cp r77 identityawareness adminguide
DESCRIPTION
interestingTRANSCRIPT

26 February 2014
Administration Guide
Identity Awareness
R77
Classification: [Protected]

© 2014 Check Point Software Technologies Ltd.
All rights reserved. This product and related documentation are protected by copyright and distributed under licensing restricting their use, copying, distribution, and decompilation. No part of this product or related documentation may be reproduced in any form or by any means without prior written authorization of Check Point. While every precaution has been taken in the preparation of this book, Check Point assumes no responsibility for errors or omissions. This publication and features described herein are subject to change without notice.
RESTRICTED RIGHTS LEGEND:
Use, duplication, or disclosure by the government is subject to restrictions as set forth in subparagraph (c)(1)(ii) of the Rights in Technical Data and Computer Software clause at DFARS 252.227-7013 and FAR 52.227-19.
TRADEMARKS:
Refer to the Copyright page (http://www.checkpoint.com/copyright.html) for a list of our trademarks.
Refer to the Third Party copyright notices (http://www.checkpoint.com/3rd_party_copyright.html) for a list of relevant copyrights and third-party licenses.

Important Information Latest Software
We recommend that you install the most recent software release to stay up-to-date with the latest functional improvements, stability fixes, security enhancements and protection against new and evolving attacks.
Latest Documentation
The latest version of this document is at: (http://supportcontent.checkpoint.com/documentation_download?ID=24805)
For additional technical information, visit the Check Point Support Center.
For more about this release, see the R77 home page (https://supportcenter.checkpoint.com/supportcenter/portal?eventSubmit_doShowproductpage&productTab=overview&product=sk92965).
Revision History
Date Description
26 February 2014 Updated command syntax in Kerberos Principal Name topic. ("Mapping the User Account to a Kerberos Principal Name" on page 60)
Updated information for the asterisk character in Regular Expression Syntax (on page 99)
08 December 2013 Added troubleshooting section for Kerberos Authentication ("Troubleshooting Authentication Issues" on page 39) and links to applicable SKs.
Added pdp ad associate (on page 93) and pdp ad dissociate ("pdp ad disassociate" on page 93) commands.
26 August 2013 Initial Release
Feedback
Check Point is engaged in a continuous effort to improve its documentation.
Please help us by sending your comments (mailto:[email protected]?subject=Feedback on Identity Awareness R77 Administration Guide).

Contents
Important Information ............................................................................................................ 3 Terms ...................................................................................................................................... 7 Getting Started With Identity Awareness ............................................................................. 8
Introduction ......................................................................................................................... 8 Comparison of Acquisition Sources .............................................................................. 10 AD Query ...................................................................................................................... 11 Browser-Based Authentication ...................................................................................... 12 Identity Agents .............................................................................................................. 14
Deployment ....................................................................................................................... 15 Identity Awareness Scenarios ........................................................................................... 16
Acquiring Identities for Active Directory Users .............................................................. 16 Acquiring Identities with Browser-Based Authentication ................................................ 17 Acquiring Identities with Endpoint Identity Agents ......................................................... 19 Acquiring Identities in a Terminal Server Environment .................................................. 21 Acquiring Identities in Application Control ..................................................................... 22
SmartDashboard Toolbar .................................................................................................. 23 Configuring Identity Awareness ......................................................................................... 24
Enabling Identity Awareness on the Security Gateway ...................................................... 24 Results of the Wizard .................................................................................................... 25
Working with Access Roles ............................................................................................... 26 Automatic LDAP Group Update .................................................................................... 27
Using Identity Awareness in the Firewall Rule Base .......................................................... 28 Access Role Objects ..................................................................................................... 29 Negate and Drop .......................................................................................................... 29
Using Identity Awareness in the Application and URL Filtering Rule Base ......................... 29 Source and Destination Fields ...................................................................................... 30 Negate and Block ......................................................................................................... 30
Configuring Browser-Based Authentication in SmartDashboard ........................................ 31 Portal Network Location ................................................................................................ 31 Access Settings ............................................................................................................ 31 Authentication Settings ................................................................................................. 32 Customize Appearance ................................................................................................. 33 User Access ................................................................................................................. 33 Endpoint Identity Agent Deployment from the Portal ..................................................... 34
Configuring Endpoint Identity Agents ................................................................................. 34 Endpoint Identity Agent Types ...................................................................................... 35 Endpoint Identity Agent Deployment Methods............................................................... 36 Server Discovery and Trust ........................................................................................... 37 Configuring Endpoint Identity Agents in SmartDashboard ............................................. 38 Troubleshooting Authentication Issues ......................................................................... 39
Configuring Terminal Servers ............................................................................................ 39 Deploying the Terminal Servers Identity Awareness Solution ....................................... 40 Terminal Servers - Users Tab ....................................................................................... 41 Terminal Servers Advanced Settings ............................................................................ 42
Working with RADIUS Accounting ..................................................................................... 43 How RADIUS Accounting Works with Identity Awareness ............................................ 43 Enabling RADIUS Accounting on a Security Gateway .................................................. 43 Configuring RADIUS Accounting .................................................................................. 44
Configuring Remote Access .............................................................................................. 46 Configuring Identity Logging for a Log Server .................................................................... 46
Enabling Identity Awareness on the Log Server for Identity Logging ............................. 46

Identity Sources ................................................................................................................... 48 Choosing Identity Sources ................................................................................................. 48 Configuring Identity Awareness for a Domain Forest (Subdomains) .................................. 49 Specifying Domain Controllers per Security Gateway ........................................................ 49
Checking the Status of Domain Controllers ................................................................... 50 Working with AD Query ..................................................................................................... 50
Single User Assumption ................................................................................................ 50 Excluding Users, Computers and Networks .................................................................. 50 Using AD Query with NTLMv2 ...................................................................................... 51
Multiple Security Gateway Environments ........................................................................... 51 Non-English Language Support ......................................................................................... 52 Performance ...................................................................................................................... 52 Nested Groups .................................................................................................................. 52 Troubleshooting ................................................................................................................. 52
Connectivity Issues ....................................................................................................... 52 Use wbemtest to Verify WMI ......................................................................................... 53 Confirm that Security Event Logs are Recorded ........................................................... 54 Install Database for a Log Server .................................................................................. 54
Advanced Browser-Based Authentication Configuration .................................................... 55 Customizing Text Strings .............................................................................................. 55 Adding a New Language ............................................................................................... 55 Server Certificates ........................................................................................................ 57 Transparent Kerberos Authentication Configuration ...................................................... 59
Advanced Deployment ........................................................................................................ 64 Introduction ....................................................................................................................... 64 Deployment Options .......................................................................................................... 65 Deploying a Test Environment ........................................................................................... 65
Testing Identity Sources ............................................................................................... 65 Testing Endpoint Identity Agents .................................................................................. 66
Deployment Scenarios ...................................................................................................... 66 Perimeter Security Gateway with Identity Awareness ................................................... 66 Data Center Protection ................................................................................................. 67 Large Scale Enterprise Deployment .............................................................................. 68 Network Segregation .................................................................................................... 69 Distributed Enterprise with Branch Offices .................................................................... 70 Wireless Campus .......................................................................................................... 72 Dedicated Identity Acquisition Security Gateway .......................................................... 73
Advanced Endpoint Identity Agents Configuration ........................................................... 74 Customizing Parameters ................................................................................................... 74 Advanced Endpoint Identity Agent Options ........................................................................ 74
Kerberos SSO Compliance ........................................................................................... 74 Server Discovery and Trust ........................................................................................... 78 Creating Custom Endpoint Identity Agents .................................................................... 86
Identity Awareness Commands .......................................................................................... 89 Introduction ....................................................................................................................... 89 pdp .................................................................................................................................... 89
pdp monitor ................................................................................................................... 90 pdp connections ............................................................................................................ 91 pdp control .................................................................................................................... 91 pdp network .................................................................................................................. 91 pdp debug ..................................................................................................................... 91 pdp tracker .................................................................................................................... 92 pdp status ..................................................................................................................... 92 pdp update .................................................................................................................... 93 pdp ad associate ........................................................................................................... 93 pdp ad disassociate ...................................................................................................... 93
pep .................................................................................................................................... 94 pep show ...................................................................................................................... 94 pep debug ..................................................................................................................... 95

adlog ................................................................................................................................. 95 adlog query ................................................................................................................... 96 adlog dc ........................................................................................................................ 96 adlog statistics .............................................................................................................. 96 adlog debug .................................................................................................................. 97 adlog control ................................................................................................................. 97 adlog service_accounts ................................................................................................ 97
test_ad_connectivity .......................................................................................................... 98 Regular Expressions ........................................................................................................... 99
Regular Expression Syntax ............................................................................................... 99 Using Non-Printable Characters ...................................................................................... 100 Using Character Types .................................................................................................... 100
Index ................................................................................................................................... 101

Terms AD
Active Directory. Microsoft directory information service. Stores data about user, computer, and service identities for authentication and access.
AD Query
A clientless identity acquisition technology that gets user and device identities from the Active Directory server.
Captive Portal
Also Browser-Based Authentication. A feature where users can authenticate and log in with a special Web page that shows in a browser.
Identity Agent
A dedicated software client installed on user computers that gets identity information and sends it to the Security Gateway.
RADIUS Accounting
A client/server protocol for getting user and device information from RADIUS authentication servers.
Rule
A set of traffic parameters and other conditions that cause specified actions to be taken for a communication session.
Rule Base
The database that contains the rules in a security policy and defines the sequence in which they are enforced.
Security Gateway
A computer or appliance that inspects traffic and enforces Security Policies for connected network resources.
Security Management Server
The application that manages, stores, and distributes the security policy to Security Gateways.
Service Account
In AD, a user account created explicitly to provide a security context for services running on Microsoft® Windows® Server.
SmartDashboard
A SmartConsole client used to create and manage the security policy.

Identity Awareness Administration Guide R77 | 8
Chapter 1
Getting Started With Identity Awareness
In This Chapter Introduction 8
Deployment 15
Identity Awareness Scenarios 16
SmartDashboard Toolbar 23
Introduction Traditionally, firewalls use IP addresses to monitor traffic and are unaware of the user and computer identities behind those IP addresses. Identity Awareness removes this notion of anonymity since it maps users and computer identities. This lets you enforce access and audit data based on identity.
Identity Awareness is an easy to deploy and scalable solution. It is applicable for both Active Directory and non-Active Directory based networks as well as for employees and guest users. It is currently available on the Firewall blade and Application Control blade and will operate with other blades in the future.
Identity Awareness lets you easily configure network access and auditing based on network location and:
The identity of a user
The identity of a computer
When Identity Awareness identifies a source or destination, it shows the IP address of the user or computer with a name. For example, this lets you create firewall rules with any of these properties. You can define a firewall rule for specific users when they send traffic from specific computers or a firewall rule for a specific user regardless of which computer they send traffic from.

Getting Started With Identity Awareness
Identity Awareness Administration Guide R77 | 9
In SmartDashboard, you use Access Role objects to define users, computers and network locations as one object.
Identity Awareness also lets you see user activity in SmartView Tracker and SmartEvent based on user and computer name and not just IP addresses.
Identity Awareness gets identities from these acquisition sources:
AD Query
Browser-Based Authentication
Endpoint Identity Agent
Terminal Servers Identity Agent
Remote Access
Identity Awareness Security Gateways can share the identity information that they acquire with Identity Awareness Security Gateways. In this way, users that need to pass through many Security Gateways are only identified once. See Advanced Deployment (on page 64) for more information.

Getting Started With Identity Awareness
Identity Awareness Administration Guide R77 | 10
Comparison of Acquisition Sources
These tables show how identity sources are different in terms of usage and deployment considerations. Depending on those considerations, you can configure Identity Awareness to use one identity source or a combination of identity sources ("Choosing Identity Sources" on page 48).
Browser-Based Authentication - Captive Portal
Unidentified users log in with a user name and password in a Captive Portal. After authentication, the user clicks a link to go to the destination address.
Recommended Usage Deployment Considerations
Identity based enforcement for non-AD users (non-
Windows and guest users)
You can require deployment of Endpoint Identity
Agents
Used for identity enforcement (not intended for logging
purposes).
AD Query Gets identity data seamlessly from Active Directory (AD).
Recommended Usage Deployment Considerations
Identity based auditing and logging
Leveraging identity in Internet application control
Basic identity enforcement in the internal network
Easy configuration (requires AD administrator
credentials). For organizations that prefer not to allow
administrator users to be used as service accounts on
third party devices there is an option to configure AD
Query without AD administrator privileges, see sk43874
(http://supportcontent.checkpoint.com/solutions?id=sk438
74).
Preferred for desktop users
Only detects AD users and computers
Endpoint Identity Agent
A lightweight Endpoint Identity Agent authenticates users securely with Single Sign-On (SSO).
Recommended Usage Deployment Considerations
Identity enforcement for Data Centers
Protecting highly sensitive servers
When accuracy in detecting identity is crucial
See Choosing Identity Sources (on page 48).
Terminal Servers Endpoint Identity Agent
Identifies multiple users who connect from one IP address. A terminal Server Endpoint Identity Agent is installed on the application server, which hosts the terminal/Citrix services.
Recommended Usage Deployment Considerations
Identify users who use Terminal Servers or a Citrix
environment.
See Choosing Identity Sources (on page 48).
Browser-Based Authentication - Transparent Kerberos Authentication
The Transparent Kerberos Authentication Single-Sign On (SSO) solution transparently authenticates users already logged into AD. This means that a user authenticates to the domain one time and has access to all authorized network resources without having to enter credentials again. If Transparent Kerberos Authentication fails, the user is redirected to the Captive Portal for manual authentication.
Note -The Endpoint Identity Agent download link and the keep Alive option are ignored when Transparent Kerberos Authentication SSO is successful. This is so because the user does not see the Captive Portal.
Recommended Usage Deployment Considerations
In AD environments, when known users are already
logged in to the domain.
Used for identity enforcement only (not intended for
logging purposes)
Transparent Kerberos Authentication does not use
Endpoint Identity Agents or the Keep Alive feature.

Getting Started With Identity Awareness
Identity Awareness Administration Guide R77 | 11
RADIUS Accounting
You can configure a Security Gateway with Identity Awareness to use RADIUS Accounting to get user and computer identities directly from a RADIUS accounting client. Identity Awareness uses this information to apply access permissions to the connection.
RADIUS Accounting gets identity data from RADIUS Accounting Requests generated by the RADIUS accounting client. Identity Awareness uses the data from these requests and to get user and device group information from the LDAP server. Firewall rules apply these permissions to users, computers and networks.
Recommended Usage Deployment Considerations
In environments where authentication is handled by
a RADIUS server.
You must define the Security Gateway as a RADIUS
accounting client.
You must give the RADIUS client access permissions and
create a shared secret.
Remote Access
Users who get access using IPsec VPN Office Mode can authenticate seamlessly.
Recommended Usage Deployment Considerations
Identify and apply identity-based security Policy on
users that access the organization through VPN.
See Choosing Identity Sources (on page 48).
AD Query
AD Query is an easy to deploy, clientless identity acquisition method. It is based on Active Directory integration and it is completely transparent to the user.
The AD Query option operates when:
An identified asset (user or computer) tries to access an Intranet resource that creates an authentication request. For example, when a user logs in, unlocks a screen, shares a network drive, reads emails through Exchange, or accesses an Intranet portal.
AD Query is selected as a way to acquire identities.
The technology is based on querying the Active Directory Security Event Logs and extracting the user and computer mapping to the network address from them. It is based on Windows Management Instrumentation (WMI), a standard Microsoft protocol. The Security Gateway communicates directly with the Active Directory domain controllers and does not require a separate server.
No installation is necessary on the clients or on the Active Directory server.

Getting Started With Identity Awareness
Identity Awareness Administration Guide R77 | 12
How AD Query Works- Firewall Rule Base
Item Description
Security Gateway
Active Directory domain controller
1 The Security Gateway is configured to receive security event logs from the Active Directory domain controllers.
2 A user logs in to a computer with Active Directory credentials.
3 The Active Directory domain controller sends the security event log to the Security Gateway. The Security Gateway gets the user and IP information (user name@domain, computer name and source IP address).
4 The user opens a connection to the Internet.
5 The Security Gateway confirms the user identification and lets him access the Internet based on the policy.
Browser-Based Authentication
Browser-Based Authentication gets identities and authenticates users with one of these acquisition methods:
Captive Portal
Transparent Kerberos Authentication

Getting Started With Identity Awareness
Identity Awareness Administration Guide R77 | 13
Captive Portal is a simple method that authenticates users with a web interface. When users try to access a protected resource, they enter authentication information in a form that shows in their browser.
Transparent Kerberos Authentication authenticates users by getting authentication data from the browser without any user input. If authentication is successful, the user goes directly to the specified destination. If authentication fails, the user must enter credentials in the Captive Portal.
The Captive Portal shows when a user tries to access a web resource and all of these conditions apply:
Captive Portal is enabled.
The redirect option enabled for the applicable rule.
Firewall or Application and URL Filtering rules block access by unidentified users to resources that would be allowed if they were identified.
The Captive Portal also shows when Transparent Kerberos Authentication is enabled, but authentication fails.
From the Captive Portal, users can:
Enter their user name and password.
Enter guest user credentials (Configured in the Portal Settings).
Click a link to download an Identity Awareness agent (Configured in the Portal Settings).
How Captive Portal Works- Firewall Rule
Item Description
Security Gateway with Identity Awareness
Active Directory domain controller
1 A user wants to access the Internal Data Center.
2 Identity Awareness does not recognize him and redirects the browser to the Captive Portal.
3 The user enters regular office credentials.
The credentials can be AD or other Check Point supported authentication methods, such as LDAP, Check Point internal credentials, or RADIUS.
4 The credentials go to the Security Gateway, which finds them in the AD server.
5 The user can access the requested URL.

Getting Started With Identity Awareness
Identity Awareness Administration Guide R77 | 14
How Transparent Kerberos Authentication Works
1. A user wants to access the Internal Data Center.
2. Identity Awareness does not recognize the user and redirects the browser to the Transparent Authentication page.
3. The Transparent Authentication page asks the browser to authenticate itself.
4. The browser gets a Kerberos ticket from Active Directory and presents it to the Transparent Authentication page.
5. The Transparent Authentication page sends the ticket to the Security Gateway which authenticates the user and redirects it to the originally requested URL.
6. If Kerberos authentication fails for some reason, Identity Awareness redirects the browser to the Captive Portal.
Identity Agents
There are two types of Identity Agents:
Endpoint Identity Agents - dedicated client agents installed on users' computers that acquire and report identities to the Security Gateway.
Terminal Servers Endpoint Identity Agent - an Endpoint Identity Agent installed on an application server that hosts Citrix/Terminal services. It identifies individual users whose source is the same IP address. ("Configuring Terminal Servers" on page 39)
Using Endpoint Identity Agents gives you:
User and computer identity
Minimal user intervention - All necessary configuration steps are done by administrators and does not require user input.
Seamless connectivity - Transparent authentication using Kerberos Single Sign-On (SSO) when users are logged in to the domain. If you do not want to use SSO, users enter their credentials manually. You can let them save these credentials.
Connectivity through roaming - Users stay automatically identified when they move between networks, as the client detects the movement and reconnects.
Added security - You can use the patented packet tagging technology to prevent IP Spoofing. Endpoint Identity Agents also gives you strong (Kerberos based) user and computer authentication.
These are the types of Endpoint Identity Agents you can install:
Full – Predefined Endpoint Identity Agent includes packet tagging and computer authentication. It applies to all users of the computer that it is installed on. Administrator permissions are required to use the Full Endpoint Identity Agent type.
Light – Predefined Endpoint Identity Agent that does not include packet tagging and computer authentication. You can install this Endpoint Identity Agent individually for each user on the target computer. Administrator permissions are not required.
Terminal Servers - Predefined Endpoint Identity Agent that installs MAD services and the Multi-user host driver on Citrix and Terminal Servers. This Endpoint Identity Agent type cannot be used for endpoint computers.
Custom - Configure custom features for all computers that use this agent, such as MAD services and packet tagging.
For more information, see Creating Custom Endpoint Identity Agents (on page 86).
Users can download and install Endpoint Identity Agents from the Captive Portal or you can distribute MSI/DMG files to computers with distribution software or any other method (such as telling them where to download the client from).

Getting Started With Identity Awareness
Identity Awareness Administration Guide R77 | 15
Downloading Endpoint Identity Agent
This shows how a user downloads the Endpoint Identity Agent from the Captive Portal:
Item Description
Security Gateway with Identity Awareness
Active Directory domain controller
1 A user logs in to a computer with credentials, to access the Internal Data Center.
2 The Security Gateway with Identity Awareness does not recognize the user and redirects to the Captive Portal.
3 The user sees the Portal page, with a link to download the Endpoint Identity Agent.
4 The user downloads the Endpoint Identity Agent from the Captive Portal and installs it.
5 The Endpoint Identity Agent client connects to the Security Gateway.
If SSO with Kerberos is configured, the user is automatically connected.
6 The user is authenticated and the Security Gateway sends the connection to its destination according to the Firewall Rule Base.
Deployment Identity Awareness is commonly enabled on a perimeter Security Gateway. It is frequently used in conjunction with Application Control.
To protect internal data centers, Identity Awareness can be enabled on an internal Security Gateway in front of internal servers, such as data centers. This can be in addition to on the perimeter Security Gateway but does not require a perimeter Security Gateway.
Identity Awareness can be deployed in Bridge mode or Route mode.
In Bridge mode it can use an existing subnet with no change to the hosts' IP addresses.
In Route mode the Security Gateway acts as a router with different subnets connected to its network interfaces.
For redundancy, you can deploy a Security Cluster in Active-Standby (HA) or Active-Active (LS) modes. Identity awareness supports ClusterXL HA and LS modes.
If you deploy Identity Awareness on more than one Security Gateway, you can configure the Security Gateways to share identity information. Common scenarios include:

Getting Started With Identity Awareness
Identity Awareness Administration Guide R77 | 16
Deploy on your perimeter Security Gateway and data center Security Gateway.
Deploy on several data center Security Gateways.
Deploy on branch office Security Gateways and central Security Gateways.
You can have one or more Security Gateways acquire identities and share them with the other Security Gateways.
You can also share identities between Security Gateways managed in different Multi-Domain Servers.
Identity Awareness Scenarios This section describes scenarios in which you can use Identity Awareness to let users access network resources.
The first 3 scenarios describe different situations of acquiring identities in a Firewall Rule Base environment. The last scenario describes the use of Identity Awareness in an Application Control environment.
Acquiring Identities for Active Directory Users
Organizations that use Microsoft Active Directory can use AD Query to acquire identities.
When you set the AD Query option to get identities, you are configuring clientless employee access for all Active Directory users. To enforce access options, create rules in the Firewall Rule that contain access role objects. An access role object defines users, computers and network locations as one object.
Active Directory users that log in and are authenticated will have seamless access to resources based on Firewall rules.
Scenario: Laptop Access
John Adams is an HR partner in the ACME organization. ACME IT wants to limit access to HR servers to designated IP addresses to minimize malware infection and unauthorized access risks. Thus, the Security Gateway policy permits access only from John's desktop which is assigned a static IP address 10.0.0.19.
He received a laptop and wants to access the HR Web Server from anywhere in the organization. The IT department gave the laptop a static IP address, but that limits him to operating it only from his desk. The current Rule Base contains a rule that lets John Adams access the HR Web Server from his laptop with a static IP (10.0.0.19).
Name Source Destination VPN Service Action Track
Jadams to HR Server Jadams_PC HR_Web_Server Any Traffic Any accept Log
He wants to move around the organization and continue to have access to the HR Web Server.
To make this scenario work, the IT administrator does these steps:
1. Enables Identity Awareness on a Security Gateway, selects AD Query as one of the Identity Sources and installs the policy.
2. Checks SmartView Tracker to make sure the system identifies John Adams in the logs.
3. Adds an access role object to the Firewall Rule Base that lets John Adams access the HR Web Server from any computer and from any location.
4. Sees how the system tracks the actions of the access role in SmartView Tracker.
User Identification in the Logs
The SmartView Tracker log shows that the system recognizes John Adams as the user behind IP 10.0.0.19. This log entry shows that the system maps the source IP to the user John Adams from CORP.ACME.COM. This uses the identity acquired from AD Query.
Note - AD Query maps the users based on AD activity. This can take some time and depends on user activity. If John Adams is not identified (the IT administrator does not see the log), he should lock and unlock the computer.

Getting Started With Identity Awareness
Identity Awareness Administration Guide R77 | 17
Using Access Roles
To let John Adams access the HR Web Server from any computer, change the rule in the Rule Base. Create an access role ("Working with Access Roles" on page 26) for John Adams, from any network and any computer. In the rule, change the source object to be the access role object (for example, HR_Partner).
Name Source Destination VPN Service Action Track
HR Partner Access
HR_Partner HR_Web_Server Any Traffic
Any accept None
Install the policy. You can remove the static IP from John Adam's laptop and give it a dynamic IP. The Security Gateway John Adams, defined in the HR_Partner access role, access the HR Web server from his laptop with a dynamic IP.
Acquiring Identities with Browser-Based Authentication
Browser-Based Authentication lets you acquire identities from unidentified users such as:
Managed users connecting to the network from unknown devices such as Linux computers or iPhones.
Unmanaged, guest users such as partners or contractors.
If unidentified users try to connect to resources in the network that are restricted to identified users, they are automatically sent to the Captive Portal. If Transparent Kerberos Authentication is configured, the browser will attempt to identify users that are logged into the domain using SSO before it shows the Captive Portal.
Scenario: Recognized User from Unmanaged Device
The CEO of ACME recently bought her own personal iPad. She wants to access the internal Finance Web server from her iPad. Because the iPad is not a member of the Active Directory domain, she cannot identify seamlessly with AD Query. However, she can enter her AD credentials in the Captive Portal and then get the same access as on her office computer. Her access to resources is based on rules in the Firewall Rule Base.
Required SmartDashboard Configuration
To make this scenario work, the IT administrator must:
1. Enable Identity Awareness on a Security Gateway and select Browser-Based Authentication as one of the Identity Sources.
2. In the Portal Settings window in the User Access section, make sure that Name and password login is selected.
3. Create a new rule in the Firewall Rule Base to let Jennifer McHanry access network destinations. Select accept as the Action.
4. Right-click the Action column and select Edit Properties.
The Action Properties window opens.
5. Select the Redirect http connections to an authentication (captive) portal. Note: redirection will not occur if the source IP is already mapped to a user checkbox.
6. Click OK.
7. From the Source of the rule, right-click to create an Access Role.
a) Enter a Name for the Access Role.
b) In the Users tab, select Specific users and choose Jennifer McHanry.
c) In the Machines tab make sure that Any machine is selected.
d) Click OK.
The Access Role is added to the rule.
Name Source Destination VPN Service Action Track
CEO Access
Jennifer_McHanry Finance_Server Any Traffic
http accept (display captive portal)
Log

Getting Started With Identity Awareness
Identity Awareness Administration Guide R77 | 18
User Experience
Jennifer McHanry does these steps:
1. Browses to the Finance server from her iPad.
The Captive Portal opens because she is not identified and therefore cannot access the Finance Server.
2. She enters her usual system credentials in the Captive Portal.
A Welcome to the network window opens.
3. She can successfully browse to the Finance server.
User Identification in the Logs
The SmartView Tracker log shows how the system recognizes Jennifer McHanry from her iPad. This log entry shows that the system maps the source "Jennifer_McHanry" to the user name. This uses the identity acquired from Captive Portal.
Scenario: Guest Users from Unmanaged Device
Guests frequently come to the ACME company. While they visit, the CEO wants to let them access the Internet on their own laptops.
Amy, the IT administrator configures the Captive Portal to let unregistered guests log in to the portal to get network access. She makes a rule in the Firewall Rule Base to let unauthenticated guests access the Internet only.
When guests browse to the Internet, the Captive Portal opens. Guests enter their name, company, email address, and phone number in the portal. They then agree to the terms and conditions written in a network access agreement. Afterwards they are given access to the Internet for a specified period of time.
Required SmartDashboard Configuration
To make this scenario work, the IT administrator must:
1. Enable Identity Awareness on a Security Gateway and select Browser-Based Authentication as one of the Identity Sources.
2. In the Portal Settings window in the User Access section, make sure that Unregistered guest login is selected.
3. Click Unregistered guest login - Settings.
4. In the Unregistered Guest Login Settings window, configure:
The data guests must enter.
For how long users can access the network resources.
If a user agreement is required and its text.
5. Create two new rules in the Firewall Rule Base:
a) If it is not already there, create a rule that identified users can access the internet from the organization.
(i) From the Source of the rule, right-click to create an Access Role.
(ii) Enter a Name for the Access Role.
(iii) In the Users tab, select All identified users.
(iv) Click OK.
The Access Role is added to the rule.
b) Create a rule to let Unauthorized Guests access only the internet.
(i) From the Source of the rule, right-click to create an Access Role.
(ii) Enter a Name for the Access Role.
(iii) In the Users tab, select Specific users and choose Unauthenticated Guests.
(iv) Click OK. The Access Role is added to the rule.
(v) Select accept as the Action.

Getting Started With Identity Awareness
Identity Awareness Administration Guide R77 | 19
(vi) Right-click the Action column and select Edit Properties. The Action Properties window opens.
(vii) Select Redirect http connections to an authentication (captive) portal. Note: redirection will not occur if the source IP is already mapped to a user.
(viii) Click OK.
User Experience
From the perspective of a guest at ACME, she does these steps:
1. Browses to an internet site from her laptop.
The Captive Portal opens because she is not identified and therefore cannot access the Internet.
2. She enters her identifying data in the Captive Portal and reads through and accepts a network access agreement.
A Welcome to the network window opens.
3. She can successfully browse to the Internet for a specified period of time.
Acquiring Identities with Endpoint Identity Agents
Scenario: Endpoint Identity Agent Deployment and User Group Access
The ACME organization wants to make sure that only the Finance department can access the Finance Web server. The current Rule Base uses static IP addresses to define access for the Finance department.
Amy, the IT administrator wants to leverage the use of Endpoint Identity Agents so:
Finance users will automatically be authenticated one time with SSO when logging in (using Kerberos which is built-in into Microsoft Active Directory).
Users that roam the organization will have continuous access to the Finance Web server.
Access to the Finance Web server will be more secure by preventing IP spoofing attempts.
Amy wants Finance users to download the Endpoint Identity Agent from the Captive Portal. She needs to configure:
Endpoint Identity Agents as an identity source for Identity Awareness.
Endpoint Identity Agent deployment for the Finance department group from the Captive Portal. She needs to deploy the Full Endpoint Identity Agent so she can set the IP spoofing protection. No configuration is necessary on the client for IP spoofing protection.
A rule in the Rule Base with an access role for Finance users, from all managed computers and from all locations with IP spoofing protection enabled.
After configuration and policy install, users that browse to the Finance Web server will get the Captive Portal and can download the Endpoint Identity Agent.
User Experience
A Finance department user does this:
1. Browses to the Finance Web server.
The Captive Portal opens because the user is not identified and cannot access the server. A link to download the Endpoint Identity Agent is shown.
2. The user clicks the link to download the Endpoint Identity Agent.
The user automatically connects to the Security Gateway. A window opens asking the user to trust the server.
Note - The trust window opens because the user connects to the Security Gateway with Identity Awareness using the File name based server discovery option. See Server Discovery and Trust (on page 37) for more details on other server discovery methods that do not require user trust confirmation.
3. Click OK. The user automatically connects to the Finance Web server.
The user can successfully browse to the internet for a specified period of time.

Getting Started With Identity Awareness
Identity Awareness Administration Guide R77 | 20
Required SmartDashboard Configuration
To make this scenario work, the IT administrator must:
1. Enable Identity Awareness on a Security Gateway and select Endpoint Identity Agents and Browser-Based Authentication as Identity Sources.
2. Click the Browser-Based Authentication Settings button.
3. In the Portal Settings window in the Users Access section, select Name and password login.
4. In the Endpoint Identity Agent Deployment from the Portal, select Require users to download and select Endpoint Identity Agent - Full option.
Note - This configures Endpoint Identity Agent for all users. Alternatively, you can set Endpoint Identity Agent download for a specific group ("Configuring Endpoint Identity Agent Deployment for User Groups" on page 36).
5. Configure Kerberos SSO.
6. Create a rule in the Firewall Rule Base that lets only Finance department users access the Finance Web server and install policy:
a) From the Source of the rule, right-click to create an Access Role.
b) Enter a Name for the Access Role.
c) In the Networks tab, select Specific users and add the Active Directory Finance user group.
d) In the Users tab, select All identified users.
e) In the Machines tab, select All identified machines and select Enforce IP spoofing protection (requires Full Endpoint Identity Agent).
f) Click OK.
The Access Role is added to the rule.
7. Install policy.
What's Next
Other options that can be configured for Endpoint Identity Agents:
A method that determines how Endpoint Identity Agents connect to a Security Gateway enabled with Identity Awareness and trusts it. See Server Discovery and Trust (on page 37) for more details. In this scenario, the File Name server discovery method is used.
Access roles ("Working with Access Roles" on page 26) to leverage computer awareness.
End user interface protection so users cannot access the client settings.
Let users defer client installation for a set time and ask for user agreement confirmation. See User Access (on page 33).

Getting Started With Identity Awareness
Identity Awareness Administration Guide R77 | 21
User Identification in the Logs
The SmartView Tracker log shows how the system recognizes a guest.
This log entry shows that the system maps the source IP address with the user identity. In this case, the identity is "guest" because that is how the user is identified in the Captive Portal.
Acquiring Identities in a Terminal Server Environment
Scenario: Identifying Users Accessing the Internet through Terminal Servers
The ACME organization defined a new policy that only allows users to access the internet through Terminal Servers. The ACME organization wants to make sure that only the Sales department will be able to access Facebook. The current Rule Base uses static IP addresses to define access for Facebook, but now all connections are initiated from Terminal Server IP addresses.
Amy, the IT administrator wants to leverage the use of the Terminal Servers solution so that:
Sales users will automatically be authenticated with Identity Awareness when logging in to the Terminal Servers.
All connections to the internet will be identified and logged.
Access to Facebook will be restricted to the Sales department users.
To enable the Terminal Servers solution, Amy must:
Configure Terminal Server/Citrix Identity Agents as an identity source for Identity Awareness.
Install a Terminal Servers Identity Agent on each of the Terminal Servers.
Configure a shared secret between the Terminal Servers Identity Agents and the Identity Server.

Getting Started With Identity Awareness
Identity Awareness Administration Guide R77 | 22
After configuration and installation of the policy, users that log in to Terminal Servers and browse to the internet will be identified and only Sales department users will be able to access Facebook.
Acquiring Identities in Application Control
Identity Awareness and Application and URL Filtering can be used together to add user awareness, computer awareness, and application awareness to the Check Point Security Gateway. They work together in these procedures:
Use Identity Awareness Access Roles in Application and URL Filtering rules as the source of the rule.
You can use all the types of identity sources to acquire identities of users who try to access applications.
In SmartView Tracker logs and SmartEvent events, you can see which user and IP address accesses which applications.
Scenario: Identifying Users in Application Control Logs
The ACME organization wants to use Identity Awareness to monitor outbound application traffic and learn what their employees are doing. To do this, the IT administrator must enable Application Control and Identity Awareness. The SmartView Tracker and SmartEvent logs will then show identity information for the traffic.
Next, the IT department can add rules to block specific applications or track them differently in the Application Control policy to make it even more effective. See the R77 Application Control and URL Filtering Administration Guide (http://supportcontent.checkpoint.com/documentation_download?ID=24853).
Required SmartDashboard Configuration
To make this scenario work, the IT administrator:
1. Enable the Application Control blade on a Security Gateway.
This adds a default rule to the Application Control Rule Base that allows traffic from known applications, with the tracking set to Log.
2. Enables Identity Awareness on a Security Gateway, selects AD Query as one of the Identity Sources.
3. Installs the policy.
User Identification in the Logs
Logs related to application traffic in SmartView Tracker and SmartEvent show data for identified users.
The SmartView Tracker log entry shows that the system maps the source IP address with the user identity. It also shows Application Control data.

Getting Started With Identity Awareness
Identity Awareness Administration Guide R77 | 23
SmartDashboard Toolbar You can use the SmartDashboard toolbar to do these actions:
Icon Description
Open the SmartDashboard menu. When instructed to select menu options, click this button to show the menu.
For example, if you are instructed to select Manage > Users and Administrators, click this button to open the Manage menu and then select the Users and Administrators option.
Save current policy and all system objects.
Open a policy package, which is a collection of Policies saved together with the same name.
Refresh policy from the Security Management Server.
Open the Database Revision Control window.
Change global properties.
Verify Rule Base consistency.
Install the policy on Security Gateways or VSX Gateways.
Open SmartConsoles.

Identity Awareness Administration Guide R77 | 24
Chapter 2
Configuring Identity Awareness
In This Chapter Enabling Identity Awareness on the Security Gateway 24
Working with Access Roles 26
Using Identity Awareness in the Firewall Rule Base 28
Using Identity Awareness in the Application and URL Filtering Rule Base 29
Configuring Browser-Based Authentication in SmartDashboard 31
Configuring Endpoint Identity Agents 34
Configuring Terminal Servers 39
Working with RADIUS Accounting 43
Configuring Remote Access 46
Configuring Identity Logging for a Log Server 46
Enabling Identity Awareness on the Security Gateway When you enable Identity Awareness on a Security Gateway, a wizard opens. You can use the wizard to configure one Security Gateway that uses the AD Query, Browser-Based Authentication, and Terminal Servers for acquiring identities. You cannot use the wizard to configure a multiple Security Gateway environment or to configure Endpoint Identity Agent and Remote Access acquisition (other methods for acquiring identities).
When you complete the wizard and install a Policy, the system is ready to monitor Identity Awareness. You can use SmartView Tracker and SmartEvent to see the logs for user and computer identity.
To enable Identity Awareness:
1. Log in to SmartDashboard.
2. From the Network Objects tree, expand the Check Point branch.
3. Double-click the Security Gateway on which to enable Identity Awareness.
4. In the Software Blades section, select Identity Awareness on the Network Security tab.
The Identity Awareness Configuration wizard opens.
5. Select one or more options. These options set the methods for acquiring identities of managed and unmanaged assets.
AD Query - Lets the Security Gateway seamlessly identify Active Directory users and computers.
Browser-Based Authentication - Sends users to a Web page to acquire identities from unidentified users. If Transparent Kerberos Authentication is configured, AD users may be identified transparently.
Terminal Servers - Identify users in a Terminal Server environment (originating from one IP address).
See Choosing Identity Sources (on page 48).
Note - When you enable Browser-Based Authentication on a Security Gateway that is on an IP Series appliance, make sure to set the Voyager management application port to a port other than 443 or 80.
6. Click Next.
The Integration With Active Directory window opens.
When SmartDashboard is part of the domain, SmartDashboard suggests this domain automatically. If you select this domain, the system creates an LDAP Account Unit with all of the domain controllers in the organization's Active Directory.

Configuring Identity Awareness
Identity Awareness Administration Guide R77 | 25
Note - We highly recommend that you go to the LDAP Account Unit and make sure that only necessary domain controllers are in the list. If AD Query is not required to operate with some of the domain controllers, delete them from the LDAP Servers list.
With the Identity Awareness configuration wizard you can use existing LDAP Account units or create a new one for one AD domain. If you create a new domain, the LDAP account unit that the system creates contains only the domain controller you set manually. If it is necessary for AD Query to fetch data from other domain controllers, you must add them at a later time manually to the LDAP Servers list after you complete the wizard.
To view/edit the LDAP Account Unit object, select Servers and OPSEC in the objects tree > LDAP Account Unit.
The LDAP Account Unit name syntax is: <domain name>_ _ AD
For example, CORP.ACME.COM_ _ AD.
7. From the Select an Active Directory list, select the Active Directory to configure from the list that shows configured LDAP account units or create a new domain. If you have not set up Active Directory, you need to enter a domain name, username, password and domain controller credentials.
8. Enter the Active Directory credentials and click Connect to verify the credentials. Important - For AD Query you must enter domain administrator credentials. For Browser-Based Authentication standard credentials are sufficient.
9. If you selected Browser-Based Authentication or Terminal Servers and do not wish to configure Active Directory, select I do not wish to configure Active Directory at this time and click Next.
10. Click Next.
If you selected Browser-Based Authentication on the first page, the Browser-Based Authentication Settings page opens.
11. In the Browser-Based Authentication Settings page, select a URL for the portal, where unidentified users will be directed.
All IP addresses configured for the Security Gateway show in the list. The IP address selected by default is the Security Gateway main IP address>. The same IP address can be used for other portals with different paths. For example:
Identity Awareness Browser-Based Authentication - 143.100.75.1/connect
DLP Portal - 2.2.2.2/DLP
Mobile Access Portal - 2.2.2.2/sslvpn
12. By default, access to the portal is only through internal interfaces. To change this, click Edit. We do not recommend that you let the portal be accessed through external interfaces on a perimeter Security Gateway.
13. Click Next. The Identity Awareness is Now Active page opens with a summary of the acquisition methods.
If you selected Terminal Servers, the page includes a link to download the agent. See Terminal Servers Configuration. ("Configuring Terminal Servers" on page 39)
14. Click Finish.
15. Select Policy > Install from the SmartDashboard menu.
Results of the Wizard
These are the results of the wizard:
Depending on the acquisition methods you set, Active Directory and / or Browser-Based Authentication become active.
When you set an Active Directory domain, the system creates an LDAP Account Unit object for the Active Directory domain.
To view/edit the LDAP Account Unit object, select Servers and OPSEC in the objects tree > LDAP Account Unit.
The LDAP Account Unit name syntax is: <domain name>_ _ AD
For example, CORP.ACME.COM_ _ AD.
If you configured Terminal Servers, you need additional configuration. See Terminal Servers Configuration. ("Configuring Terminal Servers" on page 39)

Configuring Identity Awareness
Identity Awareness Administration Guide R77 | 26
Working with Access Roles After you enable Identity Awareness, you can create access role objects.
You can use Access Role objects as source and/or destination parameter in a rule. Access role objects can include one or more of these objects:
Users and user groups
Computers and computer groups
Networks
To create an access role:
1. Select Users and Administrators in the Objects Tree.
2. Right-click Access Roles > New Access Role.
The Access Role window opens.
3. Enter a Name and Comment (optional) for the access role.
4. In the Networks tab, select one of these:
Any network
Specific networks - Click the plus sign and select a network.
Your selection is shown in the Networks node in the Role Preview pane.
5. In the Users tab, select one of these:
Any user
All identified users - Includes users identified by a supported authentication method (internal users, AD users or LDAP users).
Specific users - Click the plus sign.
A window opens. You can search for Active Directory entries or select them from the list.
6. In the Machines tab, select one of these:
Any machine
All identified machines - Includes computers identified by a supported authentication method (AD).
Specific machines - Click the plus sign.
You can search for AD entries or select them from the list.
7. Optional: For computers that use Full Endpoint Identity Agents, from the Machines tab select Enforce IP Spoofing protection.
8. Click OK.
The access role is added to the Users and Administrators tree.

Configuring Identity Awareness
Identity Awareness Administration Guide R77 | 27
Automatic LDAP Group Update
Identity Awareness automatically recognizes changes to LDAP group membership and updates identity information, including access roles.
When you:
Add an LDAP group to another LDAP group
Remove an LDAP group from another LDAP group
Move an LDAP from one LDAP group to another
The system recalculates LDAP group membership for ALL users in ALL Groups. Be very careful when you deactivate user-related notifications.
LDAP Group Update is activated by default. You can manually deactivate LDAP Group Update with the CLI.
Important - Automatic LDAP group update works only with Microsoft Active Directory when AD Query is activated.
To deactivate automatic access role assignment:
1. From the Security Gateway command line, run:
adlogconfig a
The adlog status screen and menu opens.
2. Select 26 - Turn LDAP groups update on/off.
LDAP groups update notifications status changes to [ ] (not active). If you enter 26 when automatic access role assignment is not active, LDAP groups update notifications status changes to [X ] (active).
3. Enter 31 - Exit and save to save this setting and close the adlogconfig tool.
4. Install policy.
You can use adlogconfig to set the time between LDAP change notifications and to send notifications
only for user related changes.
To configure LDAP group notification options:
1. From the Security Gateway command line, run:
adlogconfig a
The adlog status screen and menu opens.
2. Enter 27 - Turn LDAP groups update on/off to set the time between LDAP change notifications.
3. Enter the time between notifications in seconds (default = 10).
4. Enter 28 - Update only user-related LDAP changes to/not to send notifications only for user related changes.
Be very careful when you deactivate user-related notifications. This can cause excessive gateway CPU load.
5. Enter 31 - Exit and save to save these settings and close the adlogconfig tool.
6. Install Policy
Automatic access role assignment does not occur immediately because Identity Awareness looks for users and groups in the LDAP cache first. The information in the cache does not contain the updated access role. By default, the cache contains 1,000 users and cached user information is updated every 15 minutes.
You must deactivate the LDAP cache to get automatic access role assignments immediately. This action can cause Identity Awareness to work slower.
To deactivate the LDAP cache:
1. In SmartDashboard, go to Policy> Global Properties > User Directory.
2. Change Timeout on cached users to 0.
3. Change Cache size to zero.
4. Install policy.

Configuring Identity Awareness
Identity Awareness Administration Guide R77 | 28
Using Identity Awareness in the Firewall Rule Base The Security Gateway examines packets and applies rules in a sequential manner. When a Security Gateway receives a packet from a connection, it examines the packet against the first rule in the Rule Base. If there is no match, it then goes on to the second rule and continues until it matches a rule.
In rules with access roles, you can add a property in the Action field to redirect traffic to the Captive Portal. If this property is added, when the source identity is unknown and traffic is HTTP, the user is redirected to the Captive Portal. If the source identity is known, the Action in the rule (Allow or Block) is enforced immediately and the user is not sent to the Captive Portal. After the system gets the credentials from the Captive Portal, it can examine the rule for the next connection.
Important - When you set the option to redirect http traffic from unidentified IP addresses to the Captive Portal, make sure to place the rule in the correct position in the Rule Base to avoid unwanted behavior.
In rules with access role objects, criteria matching works like this:
When identity data for an IP is known:
If it matches an access role, the rule is enforced and traffic is allowed or blacked based on the action.
If it does not match an access role, it goes on to examine the next rule.
When identity data for an IP is unknown and:
All rule fields match besides the source field with an access role.
The connection is http.
The action is set to redirect to the Captive Portal.
If all the conditions apply, the traffic is redirected to the Captive Portal to get credentials and see if there is a match.
If not all conditions apply, there is no match and the next rule is examined.
Note - You can only redirect http traffic to the Captive Portal.
To redirect http traffic to the Captive Portal:
In a rule that uses an access role in the Source column, right-click the Action column and select Edit Properties.
The Action Properties window opens.
1. Select the Redirect http connections to an authentication (captive) portal. Note: redirection will not occur if the source IP is already mapped to a user checkbox.
2. Click OK.
The Action column shows that a redirect to the Captive Portal occurs.
This is an example of a Firewall Rule Base that describes how matching operates:
No. Source Destination Service Action
1 Finance_Dept (Access Role)
Finance_Web_ Server
Any Accept (display Captive Portal)
2 Admin_IP Any Any Accept
3 Any Any Any Drop
Example 1 - If an unidentified Finance user tries to access the Finance Web Server with http, a redirect to the Captive Portal occurs. After the user enters credentials, the Security Gateway allows access to the Finance Web Server. Access is allowed based on rule number 1, which identifies the user through the Captive Portal as belonging to the Finance access role.
Example 2 - If an unidentified administrator tries to access the Finance Web Server with http, a redirect to the Captive Portal occurs despite rule number 2. After the administrator is identified, rule number 2 matches.

Configuring Identity Awareness
Identity Awareness Administration Guide R77 | 29
To let the administrator access the Finance Web Server without redirection to the Captive Portal, switch the order of rules 1 and 2 or add a network restriction to the access role.
Access Role Objects
You can use Access Role objects as source and/or destination parameter in a rule. For example, a rule that allows file sharing between the IT department and the Sales department access roles.
Name Source Destination VPN Service Action
IT and Sales File Sharing IT_dept Sales_dept Any Traffic ftp accept
Negate and Drop
When you negate a source or destination parameter, it means that a given rule applies to all sources/destinations of the request except for the specified source/destination object. When the object is an access role, this includes all unidentified entities as well.
When you negate an access role, it means that the rule is applied to "all except for" the access role and unidentified entities. For example, let's say that the below rule is positioned above the Any, Any, Drop rule. The rule means that everyone (including unidentified users) can access the Intranet Web Server except for temporary employees. If a temporary employee is not identified when she accesses the system, she will have access to the Intranet Web Server. Right-click the cell with the access role and select Negate Cell. The icon that represents the access role object is shown crossed out.
Source Destination VPN Service Action
Temp_employees Intranet_web_server Any Traffic http accept
To prevent access to unidentified users, add another rule that ensures that only identified employees will be allowed access and that attempts by a temporary employee will be dropped.
Source Destination VPN Service Action
Temp_employees Intranet_web_server Any Traffic http drop
Any_identified_employee Intranet_web_server Any Traffic http accept
Using Identity Awareness in the Application and URL Filtering Rule Base
The Security Gateway inspects Application and URL Filtering requests and applies rules in a sequential manner. When a Security Gateway receives a packet from a connection, it examines the packet against the first rule in the Rule Base. If there is no match, it goes on to the second rule and continues until it completes the Rule Base. If no rule matches, the packet is allowed.
In rules with access roles, you can add a property in the Action field to redirect traffic to the Captive Portal. If this property is added, when the source identity is unknown and traffic is HTTP, the user is redirected to the Captive Portal. If the source identity is known, the Action in the rule (Allow or Block) is enforced immediately and the user is not sent to the Captive Portal. After the system gets the credentials from the Captive Portal, it can examine the rule for the next connection.
In rules with access role objects, criteria matching works like this:
When identity data for an IP is known:
If it matches an access role, the rule is enforced and traffic is allowed or blocked based on the specified action.
If it does not match an access role, it goes on to examine the next rule.
When identity data for an IP is unknown and:
All rule fields match besides the source field with an access role.
The connection protocol is HTTP.

Configuring Identity Awareness
Identity Awareness Administration Guide R77 | 30
The action is set to redirect to the Captive Portal.
If all the conditions apply, the traffic is redirected to the Captive Portal to get credentials and see if there is a match.
If not all conditions apply, there is no match and the next rule is examined.
When the criteria do not match any of the rules in the Rule Base, the traffic is allowed.
To redirect HTTP traffic to the Captive Portal:
1. In a rule that uses an access role in the Source column, right-click the Action column and select Edit Properties.
The Action Properties window opens.
2. Select Redirect HTTP connections.
3. Click OK.
The Action column shows that a redirect to the Captive Portal occurs.
This is an example of an Application and URL Filtering Rule Base that shows how criteria matching operates:
No. Source Destination Service Applications/Sites Action
1 Finance_Dept (Access Role)
Internet Any Salesforce Allow (display Captive Portal)
2 Any_identified_user (Access Role)
Internet Any Remote Administration Tool (non-HTTP category)
Allow
3 Any_identified_user (Access Role)
Internet Any Any recognized Block
When browsing the Internet, different users experience different outcomes:
Example 1 - An unidentified Finance user that attempts to access Salesforce is sent to the Captive Portal. This happens because the action is set to redirect to the Captive Portal. After entering credentials and being identified, the user is granted access according to rule number 1.
Example 2 - An unidentified user that attempts to access the Remote Administration Tool matches rule 2, but not the Source column. Because the application is not HTTP, traffic cannot be redirected to the Captive Portal. Since none of the rules match, the user is granted access to the Remote Administration Tool.
Example 3 - An unidentified user that browses to Gmail does not match rules 1 and 2 because of the application. In rule 3 there is also no match because the action is not set to redirect to the Captive Portal. Since none of the rules match, the user is granted access to Gmail.
Source and Destination Fields
These issues are related to Source and Destination fields:
You can use access role objects in the Source column or the Destination column of a rule. This means you cannot have a rule that uses an access role in both the Source column and the Destination column. Furthermore, you cannot use access roles in both the Source and Destination columns in the same Rule Base.
In the Source and Destination columns, you can use a network object together with an access role object. But the condition between them is "or" and not "and".
Negate and Block
Negate and block in the Application Control Rule Base operates similarly to Negate and drop (on page 29) in the Firewall Rule Base. Unlike the Firewall Rule Base, if a connection does not match any of the rules, it is not automatically blocked. It is allowed.

Configuring Identity Awareness
Identity Awareness Administration Guide R77 | 31
Thus, when you use negate on an access role you allow all unidentified users and anyone who is not the access role access. To prevent this you must include an access role that prevents access to unidentified users. This rule makes sure that only identified users will be allowed access and attempts by unidentified users will be blocked.
This example shows rules that block temporary employees from accessing the Internet and allows access for identified employees.
Source Destination Application Action
Temp_employees Internet Any Recognized Block
Any_identified_employee Internet Any Recognized Allow
Configuring Browser-Based Authentication in SmartDashboard
In the Identity Sources section of the Identity Awareness page, select Browser-Based Authentication to send unidentified users to the Captive Portal.
If you configure Transparent Kerberos Authentication, the browser tries to identify AD users before sending them to the Captive Portal. See Transparent Kerberos Authentication Configuration (on page 59).
If you already configured the portal in the Identity Awareness Wizard or SmartDashboard, its URL shows below Browser-Based Authentication.
To configure the Browser-Based Authentication settings:
1. Select Browser-Based Authentication and click Settings.
2. From the Portal Settings window, configure:
Portal Network Location
Access Settings
Authentication Settings
Customize Appearance
Users Access
Endpoint Identity Agent Deployment from the Portal
Note - When you enable Browser-Based Authentication on a Security Gateway that is on an IP Series appliance, make sure to set the Voyager management application port to a port other than 443 or 80.
Portal Network Location
Select if the portal runs on this Security Gateway or a different Identity Awareness enabled Security Gateway. The default is that the Captive Portal is on the Security Gateway. The Security Gateway redirects unidentified users to the Captive Portal on the same Security Gateway. This is the basic configuration.
A more advanced deployment is possible where the portal runs on a different Security Gateway. See the Deployment section for more details.
Access Settings
Click Edit to open the Portal Access Settings window. In this window you can configure:
Main URL - The primary URL that users are redirected to for the Captive Portal. You might have already configured this in the Identity Awareness Wizard.
Aliases - Click the Aliases button to Add URL aliases that are redirected to the main portal URL. For example, ID.yourcompany.com can send users to the Captive Portal. To make the alias work, it must be resolved to the main URL on your DNS server.

Configuring Identity Awareness
Identity Awareness Administration Guide R77 | 32
Certificate - Click Import to import a certificate for the portal website to use. If you do not import a certificate, the portal uses a Check Point auto-generated certificate. This might cause browser warnings if the browser does not recognize Check Point as a trusted Certificate Authority. See Server Certificates (on page 57) for more details.
Accessibility - Click Edit to select from where the portal can be accessed. You might have already configured this in the Identity Awareness Wizard. The options are based on the topology configured for the Security Gateway.
Users are sent to the Captive Portal if they use networks connected to these interfaces.
Through all interfaces
Through internal interfaces
Including undefined internal interfaces
Including DMZ internal interfaces
Including VPN encrypted interfaces
According to the Firewall policy - Select this if there is a rule that states who can access the portal.
Authentication Settings
Click Settings to open the Authentication Settings window. In this window you can configure:
Browser transparent Single Sign-On - Select Automatically authenticate users from computers in the domain if Transparent Kerberos Authentication is used to identify users.
Main URL: The URL used to begin the SSO process. If transparent authentication fails, users are redirected to the configured Captive Portal.
IP Address: The IP address to which the Portal URL is resolved if DNS resolution fails.
Notes:
The Endpoint Identity Agent download link and the Keep Alive option are ignored when Transparent Kerberos Authentication SSO is successful. This is so because users do not see the Captive Portal.
The IP Address option only shows when you select Browser-based Authentication as an identity source.
Authentication Method - Select one method that known users must use to authenticate.
Defined on user record (Legacy Authentication) - Takes the authentication method from Gateway Object Properties > Other > Legacy Authentication.
User name and password - This can be configured internally or on an LDAP server.
RADIUS - A configured RADIUS server. Select the server from the list.
User Directories - Select one or more places where the Security Gateway searches to find users when they try to authenticate.
Internal users - The directory of internal users.
LDAP users - The directory of LDAP users. Either:
Any - Users from all LDAP servers.
Specific - Users from an LDAP server that you select.
External user profiles - The directory of users who have external user profiles.
The default is that all user directory options are selected. You might choose only one or two options if users are only from a specified directory or directories and you want to maximize Security Gateway performance when users authenticate. Users with identical user names must log in with domain\user.

Configuring Identity Awareness
Identity Awareness Administration Guide R77 | 33
Customize Appearance
Click Edit to open the Portal Customization window and edit the images that users see in the Captive Portal. Configure the labeled elements of the image below.
Label Number Name To do in GUI
1 Portal Title Enter the title of the portal. The default title is Network Access Login.
2 Company Logo Select Use my company logo and Browse to select a logo image for the portal.
2 Company Logo for mobiles
Select Use my company logo for mobiles and Browse to select a smaller logo image for users who access the portal from mobile devices.
User Access
Configure what users can do in the Captive Portal to become identified and access the network.
Name and password login- Users are prompted to enter an existing username and password. This will only let known users authenticate.
Unregistered guests login - Let guests who are not known by the Security Gateway access the network after they enter required data.
Name and Password Login Settings
Click Settings to configure settings for known users after they enter their usernames and passwords successfully.
Access will be granted for xxx minutes - For how long can they access network resources before they have to authenticate again.
Ask for user agreement - You can require that users sign a user agreement. Click Edit to upload an agreement. This option is not selected by default because a user agreement is not usually necessary for known users.
Adjust portal settings for specific user groups - You can add user groups and give them settings that are different from other users. Settings specified for a user group here override settings configured elsewhere in the Portal Settings. The options that you configure per user group are:
If they must accept a user agreement.
If they must download an Endpoint Identity Agent and which one.
If they can defer the Endpoint Identity Agent installation and until when.

Configuring Identity Awareness
Identity Awareness Administration Guide R77 | 34
You can only configure settings for Endpoint Identity Agent deployment if Endpoint Identity Agents is selected on the Identity Awareness page.
Unregistered Guest Login Settings
Click Settings to configure settings for guests.
Access will be granted for xxx minutes - For how long can they access network resources before they have to authenticate again.
Ask for user agreement - Makes users sign a user agreement. Click Edit to choose an agreement and the End-user Agreement Settings page opens. Select an agreement to use:
Default agreement with this company name - Select this to use the standard agreement. See the text in the Agreement preview. Replace Company Name with the name of your company. This name is used in the agreement.
Customized agreement - Paste the text of a customized agreement into the text box. You can use HTML code.
Login Fields - Edit the table shown until it contains the fields that users complete in that sequence. Select Is Mandatory for each field that guests must complete before they can get access to the network. To add a new field, enter it in the empty field and then click Add. Use the green arrows to change the sequence of the fields. The first field will show the user name in the SmartView Tracker logs.
Endpoint Identity Agent Deployment from the Portal
If Endpoint Identity Agents is selected as a method to acquire identities, You can require users to download the Endpoint Identity Agent from the Captive Portal. You can also let users install the Endpoint Identity Agent on a specified later date instead of right away.
Require users to download - Select this to make users install the Endpoint Identity Agent. Select which Endpoint Identity Agent they must install. If this option is selected and the defer option is not selected, users will only be able to access the network if they install the Endpoint Identity Agent.
Users may defer installation until - Select this if you want to give users flexibility to choose when they install the Endpoint Identity Agent. Select the date by which they must install it. Until that date a Skip Endpoint Identity Agent installation option shows in the Captive Portal.
Configuring Endpoint Identity Agents Endpoint Identity Agents are dedicated client agents installed on users computers that acquire and report identities to the Security Gateway. All necessary configuration is done by the administrator and does not require user input.
Before you configure Endpoint Identity Agents, you must think about these elements:
Endpoint Identity Agent type - Full Endpoint Identity Agent, Light Endpoint Identity Agent or Custom Endpoint Identity Agent. For the Full Endpoint Identity Agent you can enforce IP spoofing protection. For the Full Endpoint Identity Agent you can also leverage computer authentication if you define computers in access roles. The Custom Endpoint Identity Agent is a customized installation package.
Installation deployment methods- You can deploy the Endpoint Identity Agent for installation through the Captive Portal or use other means you use to deploy software in your organization.
Server discovery and trust - Before the Endpoint Identity Agent can connect to a Security Gateway with Identity Awareness, the Endpoint Identity Agent must discover and trust the server that it connects to. You can configure one of five methods.
Automatic authentication using Single Sign-On (SSO) - Endpoint Identity Agents installed on endpoint computers authenticate users automatically when they log in to the domain using SSO.
The Endpoint Identity Agent identity source uses SSO to authenticate users when they enter their login credentials (Active Directory or other authentication server). The system securely gets authentication data one time without making users authenticate manually (as is necessary with Captive Portal).
You get SSO with Kerberos, an inherent authentication and authorization protocol in Windows networks that is available by default on all Windows servers and workstations. If you do not use SSO, users enter credentials in another window.

Configuring Identity Awareness
Identity Awareness Administration Guide R77 | 35
To set up Kerberos, see Kerberos SSO Configuration ("Kerberos SSO Compliance" on page 74).
Endpoint Identity Agent Types
These are the Endpoint Identity Agent types that you can install:
Full – Predefined Endpoint Identity Agent includes packet tagging and computer authentication. It applies to all users of the computer that it is installed on. Administrator permissions are required to use the Full Endpoint Identity Agent type.
Light – Predefined Endpoint Identity Agent that does not include packet tagging and computer authentication. You can install this Endpoint Identity Agent individually for each user on the target computer. Administrator permissions are not required.
Terminal Servers - Predefined Endpoint Identity Agent that installs MAD services and the Multi-user host driver on Citrix and Terminal Servers. This Endpoint Identity Agent type cannot be used for endpoint computers.
Custom - Configure custom features for all computers that use this agent, such as MAD services and packet tagging.
For more information, see Prepackaging Endpoint Identity Agents ("Creating Custom Endpoint Identity Agents" on page 86).
User identification - Users that log in to the Active Directory domain are transparently authenticated (with SSO) and identified when using an Endpoint Identity Agent. If you do not configure SSO or you disable it, the Endpoint Identity Agent uses username and password authentication with a standard LDAP server. The system opens a window for entering credentials.
Computer identification - You get computer identification when you use the Full Endpoint Identity Agent as it requires installing a service.
IP change detection - When an endpoint IP address changes (interface roaming or DHCP assigns a new address), the Endpoint Identity Agent automatically detects the change. The Endpoint Identity Agent tells the Security Gateway and you stay connected.
Packet tagging - A technology that prevents IP spoofing is available only for the Full Endpoint Identity Agent as it requires installing a driver.
This table shows the similarities and differences of the Light and Full Endpoint Identity Agent types.
Endpoint Identity Agent Light
Endpoint Identity Agent Full
Installation Elements
Endpoint Identity Agent format
Resident application Resident application + service + driver
Installation permissions None administrator
Upgrade permissions None None
Security Features
User identification SSO SSO
Computer identification No Yes
IP change detection Yes Yes
Packet tagging No Yes
The installation file size is 7MB for both types and the installation takes less than a minute.
Packet Tagging for Anti-Spoofing
IP Spoofing happens when an unauthorized user assigns an IP address of an authenticated user to an endpoint computer. By doing so, the user bypasses identity access enforcement rules. It is also possible to poison ARP tables that let users do ARP "man-in-the-middle attacks" that keep a continuous spoofed connectivity status.

Configuring Identity Awareness
Identity Awareness Administration Guide R77 | 36
To protect packets from IP spoofing attempts, you can enable Packet Tagging. Packet Tagging is a patent pending technology that prevents spoofed connections from passing through the Security Gateway. This is done by a joint effort between the Endpoint Identity Agent and the Security Gateway that uses a unique technology that sign packets with a shared key.
The Identity Awareness view in SmartView Tracker shows Packet Tagging logs. The Success status indicates that a successful key exchange happened.
Note - Packet Tagging can only be set on computers installed with the Full Endpoint Identity Agent.
For details, see Packet Tagging.
To enable IP Spoofing protection:
1. Make sure users have the Full Endpoint Identity Agent installed.
2. Create an Access Role ("Working with Access Roles" on page 26).
3. In the Machines tab, select Enforce IP spoofing protection (requires full Endpoint Identity Agent).
4. Click OK.
Endpoint Identity Agent Deployment Methods
There are 2 Endpoint Identity Agent deployment methods:
Using Captive Portal - You can require users to download the Endpoint Identity Agent from the Captive Portal. You can also let users install the Endpoint Identity Agent on a specified later date instead of right away. During installation, the Endpoint Identity Agent automatically detects if there are administrator permissions on the computer or not and installs itself accordingly.
Note - When you deploy the Full Endpoint Identity Agent, the user that installs the client must have administrator rights on the computer. If the user does not have administrator permissions, the Light Endpoint Identity Agent is installed instead.
Note - When users authenticate with the transparent portal, the download link does not show. They must install the agent from the distribution media.
Using distribution software - you can deploy the Endpoint Identity Agent with distribution software. The msi installation files (Light and Full) can be found in the \linux\windows directory on the supplied DVD.
For more information, see Prepackaging Identity Agents ("Creating Custom Endpoint Identity Agents" on page 86).
Configuring Endpoint Identity Agent Deployment from Captive Portal
To configure Endpoint Identity Agent deployment from Captive Portal:
1. From the Identity Awareness page, select the Endpoint Identity Agents checkbox.
2. Select Browser-Based Authentication and click Settings.
3. From the Portal Settings window, select the Require users to download checkbox to make users install the Endpoint Identity Agent. Select which Endpoint Identity Agent they must install. If you select this option and you do not select the defer option, users will can only access the network if they install the Endpoint Identity Agent.
4. To give users flexibility to choose when they install the Endpoint Identity Agent, select Users may defer installation until. Select the date by which they must install it. Until that date a Skip Endpoint Identity Agent installation option shows in the Captive Portal.
5. Click OK.
Configuring Endpoint Identity Agent Deployment for User Groups
When necessary, you can configure specific groups to download the Endpoint Identity Agent. For example, if you have a group of mobile users that roam and it is necessary for them to stay connected as they move between networks.
To configure Endpoint Identity Agent deployment for user groups:
1. From the Identity Awareness page, select the Endpoint Identity Agent checkbox.

Configuring Identity Awareness
Identity Awareness Administration Guide R77 | 37
2. Select Browser-Based Authentication and click Settings.
3. Select Name and password login and click Settings.
4. Select Adjust portal settings for specific user groups - You can add user groups and give them settings that are different from other users. Settings specified for a user group here override settings configured elsewhere in the Portal Settings. The options that you configure for each user group are:
If they must accept a user agreement.
If they must download the Endpoint Identity Agent and which one.
If they can defer the Endpoint Identity Agent installation and until when.
5. Click OK.
Server Discovery and Trust
Server Discovery refers to the procedure the Endpoint Identity Agent uses to find which Security Gateway with Identity Awareness to connect to. There are several methods you can use to configure this. The most basic method is to configure one server. Another method is to deploy a domain wide Policy of connecting to a Security Gateway with Identity Awareness based on the Endpoint Identity Agent client current location.
Server Trust refers to the procedure that:
Makes sure that the Endpoint Identity Agent connects to a genuine Security Gateway with Identity Awareness.
Makes sure that the communication between the Endpoint Identity Agent and the Security Gateway with Identity Awareness is not being tampered with. For example, an attempt to launch a Man-in-the-middle attack.
Trust is verified by comparing the server fingerprint calculated during the SSL handshake with the expected fingerprint.
There are 5 server discovery and trust methods:
File name based server configuration - If no other method is configured (out of the box situation), any Endpoint Identity Agent downloaded from the Captive Portal is renamed to include the Captive Portal computer IP address in it. During installation, the Endpoint Identity Agent uses this IP for the Security Gateway with Identity Awareness. When you use this method, users will have to manually trust the server (a trust window opens).
AD based configuration – If the Endpoint Identity Agent computers are members of an Active Directory domain, you can deploy the server addresses and trust data using a dedicated "Distributed Configuration" tool.
DNS SRV record based server discovery – You can configure the Security Gateway with Identity Awareness addresses in the DNS server. Because DNS is not secure, users will have to manually trust the server (a trust window opens).
Note - This is the only server discovery method that is applicable for the MAC OS Endpoint Identity Agent.
Remote registry – All client configuration resides in the registry. This includes the Identity Server addresses and trust data. You can deploy these values before installing the client (by GPO, or any other method that lets you control the registry remotely). The Endpoint Identity Agent can then use them immediately.
Prepackaging – You can create a custom version of the Endpoint Identity Agent installation that comes with the Security Gateway with Identity Awareness.
For more details, see Server Discovery and Server Trust ("Server Discovery and Trust" on page 78).

Configuring Identity Awareness
Identity Awareness Administration Guide R77 | 38
Configuring Endpoint Identity Agents in SmartDashboard
In the Identity Sources section of the Identity Awareness page, select Endpoint Identity Agents to configure Endpoint Identity Agent settings.
To configure the Endpoint Identity Agent settings:
1. Select Endpoint Identity Agents and click Settings.
2. From the Endpoint Identity Agents Settings window, configure:
Endpoint Identity Agent Access
Authentication Settings
Session details
Endpoint Identity Agent Upgrades
Endpoint Identity Agent Access
Click Edit to select from where the Endpoint Identity Agent can be accessed. The options are based on the topology configured for the Security Gateway.
Users can communicate with the servers if they use networks connected to these interfaces.
Through all interfaces
Through internal interfaces
Including undefined internal interfaces
Including DMZ internal interfaces
Including VPN encrypted interfaces
According to the Firewall Policy - the Endpoint Identity Agent is accessible through interfaces associated with source networks that appear in access rules used in the Firewall Policy.
Authentication Settings
Click Settings to open the Authentication Settings window. In this window you can configure:
Browser transparent Single Sign-On - Select Automatically authenticate users from computers in the domain if Transparent Kerberos Authentication is used to identify users.
Main URL: The URL used to begin the SSO process. If transparent authentication fails, users are redirected to the configured Captive Portal.
IP Address: The IP address to which the Portal URL is resolved if DNS resolution fails.
Notes:
The Endpoint Identity Agent download link and the Keep Alive option are ignored when Transparent Kerberos Authentication SSO is successful. This is so because users do not see the Captive Portal.
The IP Address option only shows when you select Browser-based Authentication as an identity source.
Authentication Method - Select one method that known users must use to authenticate.
Defined on user record (Legacy Authentication) - Takes the authentication method from Gateway Object Properties > Other > Legacy Authentication.
User name and password - This can be configured internally or on an LDAP server.
RADIUS - A configured RADIUS server. Select the server from the list.
User Directories - Select one or more places where the Security Gateway searches to find users when they try to authenticate.
Internal users - The directory of internal users.
LDAP users - The directory of LDAP users. Either:
Any - Users from all LDAP servers.
Specific - Users from an LDAP server that you select.
External user profiles - The directory of users who have external user profiles.

Configuring Identity Awareness
Identity Awareness Administration Guide R77 | 39
The default is that all user directory options are selected. You might choose only one or two options if users are only from a specified directory or directories and you want to maximize Security Gateway performance when users authenticate. Users with identical user names must log in with domain\user.Session
Configure data for the logged in session using the Endpoint Identity Agent.
Agents send keepalive every X minutes - The interval at which the Endpoint Identity Agent sends a keepalive signal to the Security Gateway. The keepalive is used as the server assumes the user logged out if it is not sent. Lower values affect bandwidth and network performance.
Users should re-authenticate every XXX minutes - For how long can users access network resources before they have to authenticate again. When using SSO, this is irrelevant.
Allow user to save password - When SSO is not enabled, you can let users save the passwords they enter in the Endpoint Identity Agent login window.
Endpoint Identity Agent Upgrades
Configure data for Endpoint Identity Agent upgrades.
Check agent upgrades for - You can select all users or select specific user groups that should be checked for Endpoint Identity Agent upgrades.
Upgrade only non-compatible versions - the system will only upgrade versions that are no longer compatible.
Keep agent settings after upgrade - settings made by users before the upgrade are saved.
Upgrade agents silently (without user intervention) - the Endpoint Identity Agent is automatically updated in the background without asking the user for upgrade confirmation.
Note - When you install or upgrade the Full Endpoint Identity Agent version, the user will experience a momentary loss of connectivity.
Troubleshooting Authentication Issues
Some users cannot authenticate with the Endpoint Identity Agent
This issue can occur in Kerberos environments with a very large Domain Controller database. The authentication failure occurs when the CCC message size is larger than the default maximum size. You can increase the maximum CCC message size to prevent this error.
To increase the maximum CCC message size, use the procedure in sk66087 (http://supportcontent.checkpoint.com/solutions?id=sk66087).
Transparent Portal Authentication fails for some users
This issue can occur for users that try to authenticate with Kerberos authentication with the transparent portal. The user sees a 400 Bad Request page with this message:
Your browser sent a request that this server could not understand.
Size of a request header field exceeds server limit.
The authentication failure occurs because the HTTP request header is larger than the default maximum size. You increase the maximum HTTP request header to prevent this error.
To increase the maximum HTTP request header size, use the procedure in sk92802 (http://supportcontent.checkpoint.com/solutions?id=sk92802 ).
Configuring Terminal Servers The Identity Awareness Terminal Servers solution lets the system enforce identity aware policies on multiple users that connect from one IP address. This functionality is necessary when an administrator must control traffic created by users of application servers that host Microsoft Terminal Servers, Citrix XenApp, and Citrix XenDesktop.
The Terminal Servers solution is based on reserving a set of TCP/UDP ports for each user. Each user that is actively connected to the application server that hosts the Terminal/Citrix services is dynamically assigned

Configuring Identity Awareness
Identity Awareness Administration Guide R77 | 40
a set of port ranges. The Identity Server receives that information. Then, when a user attempts to access a resource, the packet is examined and the port information is mapped to the user.
For more information, see sk66761 (http://supportcontent.checkpoint.com/solutions?id=sk66761).
Deploying the Terminal Servers Identity Awareness Solution
To deploy Terminal Servers you must do two steps:
Install a Terminal Servers Identity Agent - You install this agent on the application server that hosts the Terminal/Citrix services after you enable the Terminal Servers identity source and install policy. Go to the link https://<gateway_IP>/_IA_MU_Agent/download/muhAgent.exe. Make sure you open the link from a location defined in the Terminal Servers Accessibility setting (Gateway Properties > Identity Awareness > Terminal Servers > Settings > Edit).
Configure a shared secret - You must configure the same password on the Terminal Servers Identity Agent and the Identity Server (the Security Gateway enabled with Identity Awareness). This password is used to secure the establish trust between them.
Installing the Terminal Servers Endpoint Identity Agent
The Terminal Servers Endpoint Identity Agent installation installs the Terminal Servers driver and features. A user with administrator rights must run the Terminal Servers installation.
You can download the Terminal Servers Endpoint Identity Agent from a link in SmartDashboard.
To download the Terminal Servers Endpoint Identity Agent:
1. On the Identity Awareness page, enable the Terminal Servers identity source.
2. Install policy.
3. Go back to the same page and click the download Endpoint Identity Agent link. Make sure you open the link from a location defined in the Accessibility setting (Terminal Servers > Settings > Edit).
4. Install the Endpoint Identity Agent on the Terminal Server.
Upgrading a Terminal Servers Endpoint Identity Agent
There is no option to upgrade the Terminal Servers Endpoint Identity Agent when you upgrade a Security Gateway to a newer version. You must manually install the new version of the Terminal Servers Endpoint Identity Agent on the Citrix or Terminal Server.
Configuring the Shared Secret
You must configure the same password as a shared secret in the Terminal Servers Endpoint Identity Agent on the application server that hosts the Terminal/Citrix services and on the Security Gateway enabled with Identity Awareness. The shared secret enables secure communication and lets the Security Gateway trust the application server with the Terminal Servers functionality.
The shared secret must contain at least 1 digit, 1 lowercase character, 1 uppercase character, no more than three consecutive digits, and must be eight characters long in length. In SmartDashboard, you can automatically generate a shared secret that matches these conditions.
To configure the shared secret on the Identity Server:
1. Log in to SmartDashboard.
2. From the Network Objects tree, right-click Check Point and select the Security Gateway enabled with Identity Awareness.
The Identity Awareness page opens.
3. In the Identity Sources section, select Terminal Servers and click Settings.
4. To automatically configure the shared secret:
a) Click Generate to automatically get a shared secret that matches the string conditions.
The generated password is shown in the Pre-shared secret field.
b) Click OK.
5. To manually configure the shared secret:

Configuring Identity Awareness
Identity Awareness Administration Guide R77 | 41
a) Enter a password that matches the conditions in the Pre-shared secret field. Note the strength of the password in the Indicator.
b) Click OK.
To configure the shared secret on the application server:
1. Open the Terminal Servers Endpoint Identity Agent.
The Check Point Endpoint Identity Agent - Terminal Servers main window opens.
2. In the Advanced section, click Terminal Servers Settings.
3. In Identity Server Shared Secret, enter the shared secret string.
4. Click Save.
Configuring Terminal Servers Accessibility
1. On the Identity Awareness page, click Terminal Servers - Settings.
2. In the Accessibility section, click Edit to select from where the Terminal Server Identity Agent can connect. The options are based on the topology configured for the gateway.
Through all interfaces
Through internal interfaces
Including undefined internal interfaces
Including DMZ internal interfaces
Including VPN encrypted interfaces
According to the Firewall policy - Select this if there is a rule that states who can access the portal.
Terminal Servers - Users Tab
The Users tab in the Terminal Servers Endpoint Identity Agent shows a table with information about all users that are actively connected to the application server that hosts the Terminal/Citrix services.
Table Field Description
ID The SID of the user.
User The user and domain name. The format used: <domain>\<user>
TCP Ports The ports allocated to the user for TCP traffic.
UDP Ports The ports allocated to the user for TCP traffic.
Authentication Status Indicates whether this user is authenticated on the Identity Server.
The ID and User field information is automatically updated from processes running on the application server. The Terminal Servers Endpoint Identity Agent assigns TCP and UDP port ranges for each connected user.
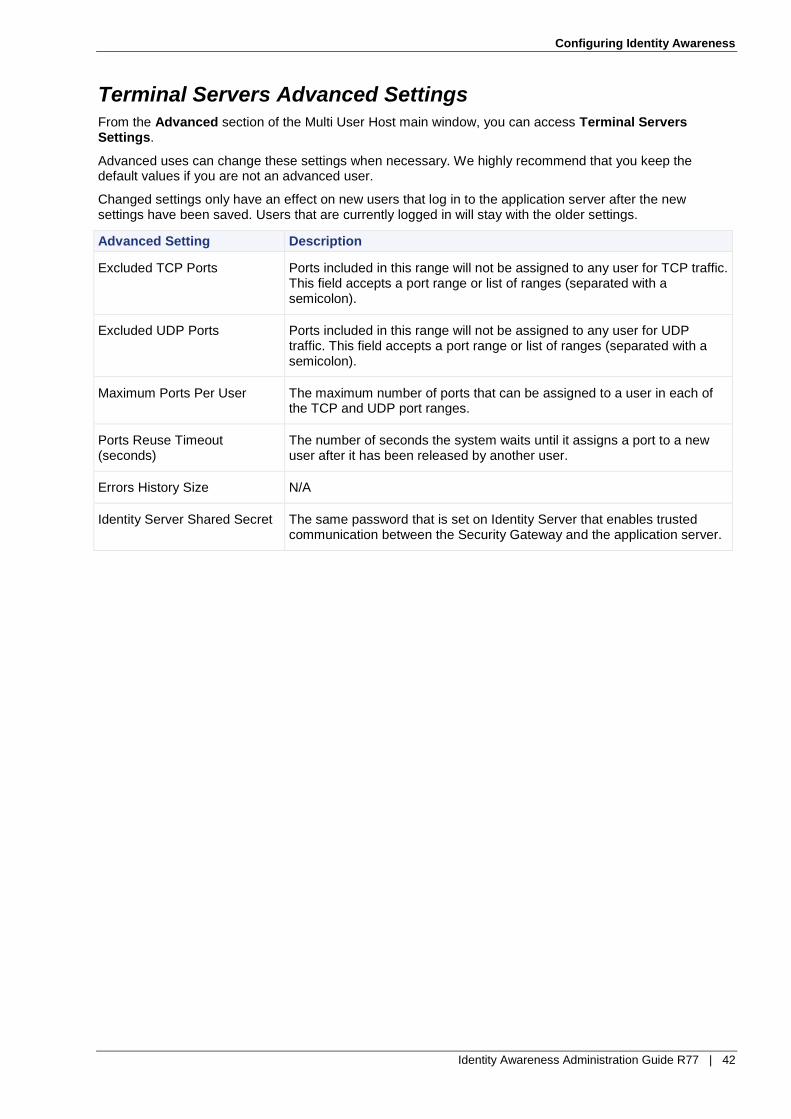
Configuring Identity Awareness
Identity Awareness Administration Guide R77 | 42
Terminal Servers Advanced Settings
From the Advanced section of the Multi User Host main window, you can access Terminal Servers Settings.
Advanced uses can change these settings when necessary. We highly recommend that you keep the default values if you are not an advanced user.
Changed settings only have an effect on new users that log in to the application server after the new settings have been saved. Users that are currently logged in will stay with the older settings.
Advanced Setting Description
Excluded TCP Ports Ports included in this range will not be assigned to any user for TCP traffic. This field accepts a port range or list of ranges (separated with a semicolon).
Excluded UDP Ports Ports included in this range will not be assigned to any user for UDP traffic. This field accepts a port range or list of ranges (separated with a semicolon).
Maximum Ports Per User The maximum number of ports that can be assigned to a user in each of the TCP and UDP port ranges.
Ports Reuse Timeout (seconds)
The number of seconds the system waits until it assigns a port to a new user after it has been released by another user.
Errors History Size N/A
Identity Server Shared Secret The same password that is set on Identity Server that enables trusted communication between the Security Gateway and the application server.

Configuring Identity Awareness
Identity Awareness Administration Guide R77 | 43
Working with RADIUS Accounting You can configure a Security Gateway with Identity Awareness to use RADIUS Accounting to get user and computer identities directly from a RADIUS accounting client. Identity Awareness uses this information to apply access permissions to the connection.
How RADIUS Accounting Works with Identity Awareness
RADIUS Accounting gets identity data from RADIUS Accounting Requests generated by the RADIUS accounting client. Identity Awareness uses the data from these requests and to get user and device group information from the LDAP server. Firewall rules apply these permissions to users, computers and networks.
Item Description
1 User devices
2 Security Gateway with Identity Awareness configured as a RADIUS Accounting server
3 RADIUS authentication server with RADIUS Accounting client enabled
4 RADIUS Accounting request
5 User identity information
6 LDAP server
7 Protected resources
Enabling RADIUS Accounting on a Security Gateway
You must enable RADIUS Accounting on Security Gateways before they can work as a RADIUS Accounting server.
To enable RADIUS Accounting for a Security Gateway:
1. In the SmartDashboard Network Objects tree, open the Security Gateway.
2. On the General Properties page, make sure that the Identity Awareness Blade is enabled.
3. On the Identity Awareness page, select RADIUS Accounting.

Configuring Identity Awareness
Identity Awareness Administration Guide R77 | 44
Configuring RADIUS Accounting
Configure RADIUS Accounting in the RADIUS Accounting Settings window.
To Configure RADIUS Accounting:
1. In the Check Point Gateway window > Identity Awareness pane, click Settings (to the right of the RADIUS Accounting option).
2. In the RADIUS Accounting Settings window, configure the parameters for your environment.
RADIUS Client Access Permissions
Gateway interfaces must be authorized to accept connections from RADIUS Accounting clients.
To select gateway interfaces:
1. In the RADIUS Client Access Permissions section, click Edit.
2. Select Security Gateway interfaces that can accept connections from RADIUS Accounting clients:
a) All Interfaces - All Security Gateway interfaces can accept connections from RADIUS Accounting clients (default)
b) Internal Interfaces - Only explicitly defined internal Security Gateway interfaces can accept connections from RADIUS Accounting clients
Including undefined internal interfaces - Also accepts connections from internal interfaces without a defined IP address
Including DMZ internal interfaces - Also accepts connections from clients located in the DMZ
c) Firewall Policy - Interface connections are allowed according to the Firewall policy.
3. Enter or select the RADIUS server port (default = 1813).

Configuring Identity Awareness
Identity Awareness Administration Guide R77 | 45
Important - The All Interfaces and Internal Interface options have priority over Firewall Policy rules. If a Firewall rule is configured to block connections from RADIUS Accounting clients, connections continue to be allowed when one of these options are selected.
Authorized RADIUS Clients
An Identity Awareness Security Gateway accepts RADIUS Accounting requests only from authorized RADIUS Accounting clients. A Radius Accounting client is a host with a RADIUS client software installed.
To configure an authorized RADIUS client:
1. In the Authorized RADIUS Clients section of the RADIUS Accounting window, click the + icon and select a RADIUS Accounting Client from the list.
Click New to define a new host object for the RADIUS Accounting client. This host object is selected automatically.
Click the - icon to remove an existing RADIUS client from the list.
2. Click Generate to create a strong, shared secret for client authentication. This shared secret applies to all host objects in this list.
You can manually enter a shared secret. It is not necessary to generate a new shared secret when you add or remove clients from the list.
Message Attribute Indices
RADIUS Accounting Messages contain identity, authentication and administrative information for a connection. This information is contained in predefined attributes of the RADIUS Accounting Message packet.
The Message Attributes Indices section tells Identity Awareness which attributes in RADIUS Accounting Messages contain identity information used by Identity Awareness:
Device name - RADIUS device-name attribute
User name - RADIUS user-name attribute.
IP Address - RADIUS IP address attribute.
Select a message attribute for each of these values. The default attributes are correct for many Identity Awareness deployments.
Note - Vendor-Specific (26) is a user-defined attribute. There can be more than one Vendor-Specific attribute in a RADIUS Accounting message, each with a different value. A sub-index value is assigned to each Vendor-Specific attribute in a message. This lets Identity Awareness find and use the applicable value.
To configure message attributes:
1. Select a message attribute from the list for each index field.
2. If you use the Vendor-Specific (26) attribute, select the applicable sub-index value.
Session Timeout and LDAP Servers
You can define the user session timeout. This parameter is the maximum time that a user session stays open without receiving an Accounting Start or Interim-Update message from the RADIUS Accounting client. To define the session timeout, enter or select a value in minutes (default = 720).
You can select which LDAP account units the Security Gateway searches for user or device information when it gets a RADIUS Accounting request. LDAP account units are configured in SmartDashboard.
To define the authorized LDAP account units:
1. Click the Settings button, located below the LDAP Account Units heading.
2. In the LDAP Account Units window, select one these options:
Any - Searches all defined LDAP account units for user or device information.
Specific - Searches only the specified LDAP account units for user or device information.

Configuring Identity Awareness
Identity Awareness Administration Guide R77 | 46
Click + to add an authorized LDAP account unit.
Click - to remove an authorized LDAP account unit.
3. If you selected the Specific option, click the + icon and then select one or more LDAP account units.
Configuring Remote Access Identities are acquired for Mobile Access clients and IPSec VPN clients configured to work in Office Mode when they connect to the Security Gateway. This option is enabled by default.
To configure Remote Access:
Select or clear the Remote Access checkbox to enable it or disable it, respectively.
Important - If there is more than one Security Gateway enabled with Identity Awareness that share identities with each other and have Office Mode configured, each gateway must be configured with different office mode ranges.
Configuring Identity Logging for a Log Server When you configure identity logging for a Log Server, you are incorporating user and computer identification into Check Point logs. This is done by enabling Identity Awareness on the Log Server. Administrators can then analyze network traffic and security-related events better.
The Log Server communicates with Active Directory servers and gets user and computer names along with the source IP address information from AD event logs. The data extracted from AD is stored in an association map on the Log Server. When Security Gateways generate a Check Point log entry and send it to the Log Server, the server gets the user and computer name from the association map entry that corresponds to the source IP address. It then adds this identity aware information to the log.
Enabling Identity Awareness on the Log Server for Identity Logging
Before you enable Identity Awareness on the Log Server for identity logging:
Make sure there is network connectivity between the Log Server and the domain controller of your Active Directory environment.
Get the Active Directory administrator credentials.
To enable Identity Awareness on the Log Server for logging:
1. Log in to SmartDashboard.
2. From the Network Objects tree, right-click Check Point and select the Security Gateway with the Log Server.
3. In the Software Blades section, select Logging & Status and Identity Awareness on the Management tab.
The Identity Awareness Configuration wizard opens.
4. Click Next.
The Integration With Active Directory window opens.

Configuring Identity Awareness
Identity Awareness Administration Guide R77 | 47
When SmartDashboard is part of the domain, SmartDashboard suggests this domain automatically. If you select this domain, the system creates an LDAP Account Unit with all of the domain controllers in the organization's Active Directory.
Note - We highly recommend that you go to the LDAP Account Unit and make sure that only necessary domain controllers are in the list. If AD Query is not required to operate with some of the domain controllers, delete them from the LDAP Servers list.
With the Identity Awareness configuration wizard you can use existing LDAP Account units or create a new one for one AD domain. If you create a new domain, the LDAP account unit that the system creates contains only the domain controller you set manually. If it is necessary for AD Query to fetch data from other domain controllers, you must add them at a later time manually to the LDAP Servers list after you complete the wizard.
To view/edit the LDAP Account Unit object, select Servers and OPSEC in the objects tree > LDAP Account Unit.
The LDAP Account Unit name syntax is: <domain name>_ _ AD
For example, CORP.ACME.COM_ _ AD.
5. From the Select an Active Directory list, select the Active Directory to configure from the list that shows configured LDAP account units or create a new domain. If you have not set up Active Directory, you need to enter a domain name, username, password and domain controller credentials.
6. Enter the Active Directory credentials and click Connect to verify the credentials.
Important - For AD Query you must enter domain administrator credentials or do the steps in sk43874 (http://supportcontent.checkpoint.com/solutions?id=sk43874).
7. Click Finish.

Identity Awareness Administration Guide R77 | 48
Chapter 3
Identity Sources
In This Chapter Choosing Identity Sources 48
Configuring Identity Awareness for a Domain Forest (Subdomains) 49
Specifying Domain Controllers per Security Gateway 49
Working with AD Query 50
Multiple Security Gateway Environments 51
Non-English Language Support 52
Performance 52
Nested Groups 52
Troubleshooting 52
Advanced Browser-Based Authentication Configuration 55
Choosing Identity Sources Identity sources are different in terms of security and deployment considerations. Depending on your organization requirements, you can choose to set them separately or as combinations that supplement each other.
This section presents some examples of how to choose identity sources for different organizational requirements.
For logging and auditing with basic enforcement - enable Identity Awareness on the Security Gateway and select AD Query as the identity source.
For logging and auditing only - select the Add identity to logs received from Security Gateways without Identity Awareness (requires Active Directory Query).
For Application Control - set the AD Query and Browser-Based Authentication identity sources. The AD Query finds all AD users and computers. The Browser-Based Authentication identity source is necessary to include all non-Windows users. It also serves as a fallback option if AD Query cannot identify a user. If you configure Transparent Kerberos Authentication then the browser attempts to authenticate users transparently by getting identity information before the Captive Portal username/password page is shown to the user.
For Data Center/internal server protection - these are some identity source options:
AD Query and Browser-Based Authentication - When most users are desktop users (not remote users) and easy deployment is important.
Note - You can add Endpoint Identity Agents if you have mobile users and also have users that are not identified by AD Query. Users that are not identified encounter redirects to the Captive Portal.
Endpoint Identity Agents and Browser-Based Authentication - When a high level of security is necessary. The Captive Portal is used for distributing the Endpoint Identity Agent. IP Spoofing protection can be set to prevent packets from being IP spoofed.
For Terminal Servers and Citrix environments - Set the Terminal Servers identity source and install the Terminal Servers Endpoint Identity Agent on each Terminal Server.
For users that access the organization through VPN - Set the Remote Access identity source to identify Mobile Access and IPsec VPN clients that work in Office Mode.
For environments that use a RADIUS server for authentication, select the RADIUS Accounting identity source. Make sure that you configure the Security Gateway as a RADIUS Accounting client and give it access permissions and a shared secret.

Identity Sources
Identity Awareness Administration Guide R77 | 49
Configuring Identity Awareness for a Domain Forest (Subdomains)
You need to create a separate LDAP Account Unit for each domain in the forest (i.e. subdomain). You cannot add domain controllers from two different subdomains into the same account unit.
You can use the Identity Awareness Configuration Wizard to define one of the subdomains. This automatically creates an LDAP Account Unit, but you then must make additional changes as listed below in the LDAP Account Unit. You must manually create all other domains you want Identity Awareness to relate to from Servers and OPSEC in the Objects Tree > Servers > New > LDAP Account Unit.
When you create an LDAP Account Unit for each domain in the forest, note the instructions for these fields:
1. Make sure the username is one of these:
A Domain administrator account that is a member of the Domain Admins group in the subdomain. Enter the administrator's name as domain\user. For example, if the domain is ACME.COM and the subdomain is SUB.ACME.COM, then for the Enterprise administrator John_Doe enter in the Username field: SUB.ACME.COM\John_Doe
An Enterprise administrator account that is a member of the Enterprise Admins group in the domain. If you use an Enterprise administrator, enter the administrator's name as domain\user. For example, if the domain is ACME.COM and the subdomain is SUB.ACME.COM, then for the Enterprise administrator John_Doe enter in the Username field: ACME.COM\John_Doe
Note - In the wizard this is the Username field, in the LDAP Account Unit go to LDAP Server Properties tab > Add > Username.
2. In LDAP Server Properties tab > Add > Login DN - add the login DN.
3. In Objects Management tab > Branches in use - Edit the base DN from DC=DOMAIN_NAME,DC=DOMAIN_SUFFIX to DC=SUB_DOMAIN_NAME,DC=DOMAIN_NAME,DC=DOMAIN_SUFFIX. For example, change DC=ACME,DC=local to DC=SUB,DC=ACME,DC=local
Specifying Domain Controllers per Security Gateway An organization Active Directory can have several sites, where each site has its own domain controllers that are protected by a Security Gateway. When all of the domain controllers belong to the same Active Directory, one LDAP Account Unit is created in SmartDashboard.
When AD Query is enabled on Security Gateways, you may want to configure each Security Gateway to communicate with only some of the domain controllers.
This is configured in the User Directory page of the Gateway Properties. For each domain controller that is to be ignored, the default priority of the Account Unit must be set to a value higher than 1000.
For example, let say that the LDAP Account Unit ad.mycompany.com has 5 domain controllers.
On the Security Gateway we want to enable AD Query only for domain controllers dc2 and dc3. This means that all other domain controllers must be set to a priority higher than 1000 in the Security Gateway properties.
To specify domain controllers for each Security Gateway:
1. Log in to SmartDashboard.
2. From the Network Objects tree, right-click Check Point and select the Security Gateway.
3. From the Gateway Properties tree, select Other > User Directory.
4. Click Selected Account Units list and click Add.
5. Select your Account Unit.
6. Clear the Use default priorities checkbox and set the priority 1001 to dc1, dc4 and dc5.
7. Click OK.
8. Install policy.

Identity Sources
Identity Awareness Administration Guide R77 | 50
Checking the Status of Domain Controllers
You can make sure that the domain controllers are set properly by using the adlog CLI. You can see the domain controllers that the Security Gateway is set to communicate with as well as the domain controllers it ignores.
The CLI command is adlog a dc.
Working with AD Query AD Query extracts user and computer identity information from the Active Directory Security Event Logs. The system generates a Security Event log entry when a user or computer accesses a network resource. For example, this occurs when a user logs in, unlocks a screen, or accesses a network drive. Security Event Logs are not generated when a user logs out because Active Directory cannot detect this action.
When you work with AD Query, it is important that you understand and comply with these limitations:
User/IP association timeout - After a predefined period of network inactivity, a user session closes automatically. The user must log in again with the Captive Portal.
Many user accounts connected from the same IP address - AD Query cannot detect when a user logs out. Therefore, more than one user can have open sessions from the same IP address. When this occurs, the permissions for each account remain active until their User/IP association timeout occurs. In this scenario, there is a risk that currently connected users can access network resources for which they do not have permissions.
Single User Assumption
You can configure AD Query to allow only one active account per IP address. When user A logs out before the timeout and user B logs in, the user A session closes automatically and his permissions are canceled. User B is the only active user account and only his permissions are valid. This feature is called Single User Assumption.
Before you activate Single User Assumption, you must exclude all service accounts used by user computers.
Note - Another way to keep these issues to a minimum is to increase the DHCP lease time.
To activate single user assumption:
1. Exclude any service accounts. See Excluding Users ("Excluding Users, Computers and Networks" on page 50).
2. On the Identity Awareness page, select Settings for AD Query.
3. Select Assume that only one user is connected per computer.
4. Click OK.
To deactivate Single User Assumption, clear Assume that only one user is connected per computer.
Excluding Users, Computers and Networks
You can manually exclude service accounts, users, computers and networks from the AD Query scan. You can also configure AD Query to automatically detect and exclude suspected service accounts. Identity Awareness identifies service accounts as user accounts that are logged in to more than a specified number of computers at the same time.
To exclude objects from Active Directory queries:
1. From the Identity Awareness pane, select Settings for Active Directory Query.
2. Click Advanced.
3. In the Excluded Users / Computers section, enter the user or computer account name. You can use the * and ? wildcard characters or regular expressions (on page 99) to select more than one account.
Use this syntax for regular expressions: regexp:<regular expression>.
4. Optional: Select Automatically exclude users which are logged into more than n machines simultaneously. Enter the threshold number of computers in the related field.

Identity Sources
Identity Awareness Administration Guide R77 | 51
5. In the Excluded Networks section:
Click the plus sign (+) and select a network to add the Excluded Network list.
Select an excluded network and click the minus sign (-) to remove a network from the list.
6. Click Add.
7. Click OK
Managing the Suspected Service Account List
When automatic exclusion is enabled, Identity Awareness looks for suspected service accounts every 10 minutes. Suspected service accounts are saved to a persistent database that survives reboot. When a new service account is detected, a message shows in SmartView Tracker.
Use these commands to see and manage the suspected service account database:
To show all suspected service accounts, run adlog a control srv_accounts show.
To run the service accounts scan immediately, run adlog a control srv_accounts find. This
command is useful before you enable the Assume that only one user is connected option.
To remove an account from the service account database, run adlog a control srv_accounts
unmark <account name>.
To remove all accounts from the suspected service account database, run adlog a control
srv_accounts clear.
Important - When you use the adlog a control command, you must run adlog a control
reconf to save the configuration.
Using AD Query with NTLMv2
this release supports NTLMv2 for AD Query. Earlier releases only supported NTLM. By default, NTLMv2 support is disabled.
To enable NTLMv2 support for AD Query:
1. Enable Identity Awareness without using the wizard.
2. Install a policy.
3. From the Security Management Server command line, go to the expert mode.
4. Run adlogconfig a.
5. Select Use NTLMv2.
6. Select Exit and save.
7. Restart the Identity Awareness wizard and continue configuring Identity Awareness.
Multiple Security Gateway Environments In environments that use many Security Gateways and AD Query, we recommend that you set only one Security Gateway to acquire identities from a given Active Directory domain controller per physical site. If more than one Security Gateway gets identities from the same AD server, the AD server can become overloaded with WMI queries.
Set these options on the Identity Awareness page:
One Security Gateway to share identities with other Security Gateways. This is the Security Gateway that gets identities from a given domain controller.
All other Security Gateways to get identities from the Security Gateway that acquires identities from the given domain controller.
See the Deployment Scenarios (on page 66) section for more details.

Identity Sources
Identity Awareness Administration Guide R77 | 52
Non-English Language Support To support non-English user names on a Security Gateway enabled with Identity Awareness, you must set a parameter in the LDAP Account Unit object in SmartDashboard.
It is not necessary to set this parameter when you enable Identity Awareness on the Security Management Server or Log Server.
To set non-English language support:
1. Select Servers and OPSEC in the Objects Tree.
2. Right-click Servers > LDAP Account Unit and select the LDAP Account Unit.
3. In the General tab of the LDAP Account Unit, select Enable Unicode support.
4. Click OK.
Performance
Bandwidth between the Log server and Active Directory Domain Controllers
The amount of data transferred between the Log server and domain controllers depends on the amount of events generated. The generated events include event logs and authentication events. The amounts vary according to the applications running in the network. Programs that have many authentication requests result in a larger amount of logs. The observed bandwidth range varies between 0.1 to 0.25 Mbps per each 1000 users.
CPU Impact
When using AD Query, the impact on the domain controller CPU is less than 3%.
Nested Groups Identity Awareness supports the use of LDAP nested groups. When a group is nested in another group, users in the nested group are identified as part of the parent group. For example, if you make Group_B a member of Group_A, Group_B members will be identified by Identity Awareness as being part of Group A.
The default nesting depth is configured to 20. This feature is enabled by default. For details on working with nested groups, see sk66561 (http://supportcontent.checkpoint.com/solutions?id=sk66561).
Troubleshooting If you experience connectivity problems between your domain controllers and Security Gateway with Identity Awareness/log servers, perform the following troubleshooting steps:
In this section: Connectivity Issues 52
Use wbemtest to Verify WMI 53
Confirm that Security Event Logs are Recorded 54
Install Database for a Log Server 54
Connectivity Issues
1. Ping the domain controller from the Security Gateway with Identity Awareness/log server.
2. Ping the Security Gateway with Identity Awareness/log server from your domain controller.
3. Perform standard network diagnostics as required.
4. Check SmartView Tracker and see if there are drops between a Security Gateway defined with AD Query (Source) and the domain controller (Destination). If there are drops, see Configuring the Firewall (on page 54) and sk58881 (http://supportcontent.checkpoint.com/solutions?id=sk58881).

Identity Sources
Identity Awareness Administration Guide R77 | 53
Use wbemtest to Verify WMI
To use the Microsoft wbemtest utility to verify that WMI is functional and accessible.
1. Click Start > Run.
2. Enter wbemtest.exe in the Run window.
3. In the Windows Management Instrumentation Tester window, click Connect.
4. In the Connect window, enter the following information:
a) Domain controller in the following format: \\<IP address>\root\cimv2
b) Fully qualified AD user name. For example: ad.company.com\admin
c) Password
5. Click Connect.
6. If the Windows Management Instrumentation Tester window re-appears with its buttons enabled, WMI is fully functional.
7. If the connection fails, or you receive an error message, check for the following conditions:
a) Connectivity ("Connectivity Issues" on page 52) problems
b) Incorrect domain administrator credentials (on page 53).
c) WMI service ("Verify the WMI Service" on page 54) is not running
d) A Firewall is blocking traffic ("Configuring the Firewall" on page 54) between the Security Gateway with Identity Awareness/log server and domain controller.
Domain administrator Credentials
To verify your domain administrator credentials:
1. Click Start > Run.
2. Enter \\<domain controller IP>\c$ in the Run window. For example: \\11.22.33.44\c$.
3. In the Logon window, enter your domain administrator user name and password.
4. If the domain controller root directory appears, this indicates that your domain administrator account has sufficient privileges. An error message may indicate that:
a) If the user does not have sufficient privileges, this indicates that he is not defined as a domain administrator. Obtain a domain administrator credentials.
b) You entered the incorrect user name or password. Check and retry.
c) The domain controller IP is incorrect or you are experiencing connectivity issues.

Identity Sources
Identity Awareness Administration Guide R77 | 54
Verify the WMI Service
To verify if the WMI service is running on the domain controller:
1. Click Start > Run.
2. Enter services.msc in the Run window.
3. Locate the Windows Management Instrumentation service and verify that the service has started.
If it has not started, right-click this service and select Start from the option menu.
Configuring the Firewall
If a Security Gateway is located between the Security Gateway with Identity Awareness/log server and the Active Directory controller, configure the Firewall to allow WMI traffic.
To create Firewall rules for WMI traffic:
1. In SmartDashboard > Firewall, create a rule that allows ALL_DCE_RPC traffic:
Source = Security Gateways that run AD Query
Destination = Domain Controllers
Service = ALL_DCE_RPC
Action = Accept
2. Save the policy and install it on Security Gateways.
Note - If there are connectivity issues on DCE RPC traffic after this policy is installed, see sk37453 (http://supportcontent.checkpoint.com/solutions?id=sk37453) for a solution.
Confirm that Security Event Logs are Recorded
If you have checked connectivity ("Connectivity Issues" on page 52) but still do not see identity information in logs, make sure that the necessary event logs are being recorded to the Security Event Log.
AD Query reads these events from the Security Event log:
For Windows Server 2003 domain controllers - 672, 673, 674
For Windows Server 2008 higher domain controllers - 4624, 4769, 4768, 4770
Make sure you see the applicable events in the Event Viewer on the domain controller (My computer > Manage > Event Viewer > Security).
If the domain controller does not generate these events (by default they are generated), refer to Microsoft Active Directory documentation for instructions on how to configure these events.
Install Database for a Log Server
If you have configured Identity Awareness for a log server, but do not see identities in logs, make sure you installed the database.
To install the database:
1. Click Policy > Install Database.
The Install Database window appears.
2. Select the computers to install the database on.
3. Click OK.
The Install Database script shows.
4. Click Close when the script is done.

Identity Sources
Identity Awareness Administration Guide R77 | 55
Advanced Browser-Based Authentication Configuration
Customizing Text Strings
You can customize some aspects of the web interface. This includes changes to the text strings shown on the Captive Portal Network Login page. You can make changes to the default English language or edit files to show text strings in other languages.
You can change English text that is shown on the Captive Portal to different English text through the SmartDashboard. The changes are saved in the database and can be upgraded.
To configure other languages to show text strings in a specified language on the Captive Portal, you must configure language files. These language files are saved on the Security Gateway and cannot be upgraded. If you upgrade the Security Gateway, these files must be configured again.
To help you understand what each string ID means, you can set the Captive Portal to String ID Help Mode. This mode lets you view the string IDs used for the text captions.
Setting Captive Portal to String ID Help Mode
To set the Captive Portal to String ID Help mode:
1. On the Security Gateway, open the file:
/opt/CPNacPortal/phpincs/utils/L10N.php
2. Replace the line // return $stringID; with return $stringID;
(delete the two backslashes that you see before the text return $stringID).
3. Reload the Captive Portal in your web browser.
The Captive Portal opens showing the string IDs.
4. To revert to regular viewing mode, open the file L10N.php and put backslashes before the text
return #stringID. See the highlighted text in step number 2 above.
Changing Portal Text in SmartDashboard
To change the text that shows in SmartDashboard:
1. Go to Policy > Global Properties > SmartDashboard Customization.
2. Click Configure.
3. Go to Identity Awareness > Portal Texts.
4. Delete the word DEFAULT and type the new English text in the required field.
5. Click OK.
6. Install the policy.
Adding a New Language
You can configure the Captive Portal to show the Network Login pages in different languages. After you set the language selection list, users can choose the language they prefer to log in with from a list at the bottom of the page.
To configure a language for Captive Portal you must:
1. Edit the language array for the new language locale.
2. Use the English language file as a template to create new language files. Then translate the strings in the new language file.
3. Save the files with UTF-8 encoding and move them to the correct location.
4. Set the language selection list to show on the Network Login page.
5. Make sure the text strings are shown correctly.

Identity Sources
Identity Awareness Administration Guide R77 | 56
Editing the Language Array
The supported language file contains entries for languages that you can see in the list on the Captive Portal page.
By default, English is the only language entry in the list. It has a corresponding language file. For each new language, you must create an entry in the supported languages file and create a new language file.
To create a new language, add an entry to the supported languages file:
1. Open the file:
/opt/CPNacPortal/phpincs/conf/L10N/supportedLanguages.php
2. In the $arLanguages array, create a new locale entry with the syntax: "xx_XX" => "XName".
For example: "de_DE" => "German".
To disable a language:
Comment out the line of the specific language or delete the line.
Creating New Language Files
To create new language files, use the English language file (portal_en_US.php) as a template and refer
to it for the source language. The file contains the message strings. It is not necessary to translate all strings, but you must include all strings in the new language file.
When you translate a string, make sure that the string's length is almost the same in size as the initial English string. This is important to prevent breaks in the page layout. If this is not possible, consult with technical support.
You cannot use HTML special character sequences such as / < / > in the translated
strings.
To create a new language file:
1. Make a copy of the English language file:
/opt/CPNacPortal/phpincs/conf/L10N/portal_en_US.php
2. Rename it to the new language using the syntax portal_xx_XX.php.
For example, portal_de_DE.php
3. Translate the strings in the new language file.
4. Make sure that the read permissions for the new language file are the same as those for the original language file. Run this command to set the permissions for read and write:
chmod 666 <file name>.
Saving New Language Files
You must save the language file with UTF-8 encoding.
To save a file with UTF-8 encoding:
1. Use Notepad, Microsoft Word or a different editor to save the file with UTF-8 encoding. When using Microsoft Word, save the file as a '.txt' file with UTF-8 as the encoding method and rename it to
portal_xx_XX.php. For example: portal_de_DE.php.
2. Move the file to /opt/CPNacPortal/phpincs/conf/L10N if it is not already there.
Showing the Language Selection List
When you only use the English language, the language selection list does not show at the bottom of the Captive Portal Network Login page. When you configure additional languages, you must show the language selection list on the Network Login page. Captive Portal users can then select the language with which to log in.
To see the language list on the Network Login page:
1. On the Security Gateway, open the file:
/opt/CPNacPortal/phpincs/view/html/Authentication.php

Identity Sources
Identity Awareness Administration Guide R77 | 57
2. Back up the file (for possible future revert).
3. Find the language_selection string which is part of <label for="language_selection">.
4. Remove these lines: <?PHP /* */?>
You can find the first line a few lines above the language_selection string. You can find the second line about 20 lines below the language_selection string.
The lines to remove appear within the square:
5. Save the file.
The language selection list will show on the Network Login page.
6. To revert back to not showing the language selection list, replace the current file with the backup of the original file.
Making Sure the Strings Shows Correctly
To make sure the strings show correctly:
1. Browse to the Captive Portal and select the new language.
2. Browse from different operating systems with different locale setups.
3. Make sure that the text is shown correctly on the Captive Portal pages.
4. Browse to the Captive Portal from a different browser and use a different font size.
Server Certificates
For secure SSL communication, gateways must establish trust with endpoint computers by showing a Server Certificate. This section discusses the procedures necessary to generate and install server certificates.

Identity Sources
Identity Awareness Administration Guide R77 | 58
Check Point gateways, by default, use a certificate created by the Internal Certificate Authority on the Security Management Server as their server certificate. Browsers do not trust this certificate. When an endpoint computer tries to connect to the gateway with the default certificate, certificate warning messages open in the browser. To prevent these warnings, the administrator must install a server certificate signed by a trusted certificate authority.
All portals on the same Security Gateway IP address use the same certificate.
Obtaining and Installing a Trusted Server Certificate
To be accepted by an endpoint computer without a warning, gateways must have a server certificate signed by a known certificate authority (such as Entrust, VeriSign or Thawte). This certificate can be issued directly to the gateway, or be a chained certificate that has a certification path to a trusted root certificate authority (CA).
The next sections describe how to get a certificate for a gateway that is signed by a known Certificate Authority (CA):
Generating the Certificate Signing Request
First, generate a Certificate Signing Request (CSR). The CSR is for a server certificate, because the gateway acts as a server to the clients.
Note - This procedure creates private key files. If private key files with the same names already exist on the computer, they are overwritten without warning.
1. From the gateway command line, log in to expert mode.
2. Run:
cpopenssl req -new -out <CSR file> -keyout <private key file> -config
$CPDIR/conf/openssl.cnf
This command generates a private key. You see this output:
Generating a 2048 bit RSA private key .+++ ...+++ writing new private key to 'server1.key' Enter PEM pass phrase:
3. Enter a password and confirm.
Fill in the data.
The Common Name field is mandatory. This field must have the Fully Qualified Domain Name
(FQDN). This is the site that users access. For example: portal.example.com.
All other fields are optional.
4. Send the CSR file to a trusted certificate authority. Make sure to request a Signed Certificate in PEM
format. Keep the .key private key file.
Generating the P12 File
After you get the Signed Certificate for the gateway from the CA, generate a P12 file that has the Signed Certificate and the private key.
1. Get the Signed Certificate for the gateway from the CA.
If the signed certificate is in P12 or P7B format, convert these files to a PEM (Base64 encoded) formatted file with a CRT extension.
2. Make sure that the CRT file has the full certificate chain up to a trusted root CA.
Usually you get the certificate chain from the signing CA. Sometimes it split into separate files. If the signed certificate and the trust chain are in separate files, use a text editor to combine them into one file. Make sure the server certificate is at the top of the CRT file.
3. From the gateway command line, log in to expert mode.

Identity Sources
Identity Awareness Administration Guide R77 | 59
4. Use the *.crt file to install the certificate with the *.key file that you generated.
a) Run:
cpopenssl pkcs12 -export -out <output file> -in <signed cert chain file> -
inkey <private key file>
For example: cpopenssl pkcs12 -export -out server1.p12 -in server1.crt -inkey
server1.key
b) Enter the certificate password when prompted.
Installing the Signed Certificate
Install the Third Party signed certificate to create Trust between the Mobile Access Software Blade and the clients.
All portals on the same IP address use the same certificate. Define the IP address of the portal in the Portal Settings page for the blade/feature.
1. Import the new certificate to the gateway in SmartDashboard from a page that contains the Portal Settings for that blade/feature. For example:
Gateway Properties > Mobile Access > Portal Settings
Gateway Properties > Platform Portal
Gateway Properties > Data Loss Prevention
Gateway Properties > Identity Awareness > Browser-Based Authentication > Settings > Access Settings
In the Certificate section, click Import or Replace.
2. Install the policy on the gateway.
Note - The Repository of Certificates on the IPsec VPN page of the SmartDashboard gateway object is only for self-signed certificates. It does not affect the certificate installed manually using this procedure.
Viewing the Certificate
To see the new certificate from a Web browser:
The Security Gateway uses the certificate when you connect with a browser to the portal. To see the certificate when you connect to the portal, click the lock icon that is next to the address bar in most browsers.
The certificate that users see depends on the actual IP address that they use to access the portal- not only the IP address configured for the portal in SmartDashboard.
To see the new certificate from SmartDashboard:
From a page that contains the portal settings for that blade/feature, click View in the Certificate section.
Transparent Kerberos Authentication Configuration
The Transparent Kerberos Authentication Single-Sign On (SSO) solution transparently authenticates users already logged into AD. This means that a user authenticates to the domain one time and has access to all authorized network resources without having to enter credentials again. If Transparent Kerberos Authentication fails, the user is redirected to the Captive Portal for manual authentication.
Note -The Endpoint Identity Agent download link and the keep Alive option are ignored when Transparent Kerberos Authentication SSO is successful. This is so because the user does not see the Captive Portal.
SSO in Windows domains works with the Kerberos authentication protocol.
The Kerberos protocol is based on the concept of tickets, encrypted data packets issued by a trusted authority, Active Directory (AD). When a user logs in, the user authenticates to a domain controller that gives an initial ticket granting ticket (TGT). This ticket vouches for the user's identity.

Identity Sources
Identity Awareness Administration Guide R77 | 60
In this solution, when an unidentified user is about to be redirected to the Captive Portal for identification:
1. Captive Portal asks the browser for authentication.
2. The browser shows a Kerberos ticket to the Captive Portal.
3. Captive Portal sends the ticket to the Identity Server (the Security Gateway enabled with Identity Awareness).
4. The Identity Server decrypts the ticket, extracts the user's identity, and publishes it to all Security Gateways with Identity Awareness.
5. The authorized and identified user is redirected to the originally requested URL.
6. If transparent automatic authentication fails (steps 2-5), the user is redirected to the Captive Portal for identification.
Transparent Kerberos Authentication uses the GSS-API Negotiation Mechanism (SPNEGO) internet standard to negotiate Kerberos. This mechanism works like the mechanism that Endpoint Identity Agents use to present the Kerberos ticket ("How SSO Works" on page 75).
You can configure SSO Transparent Kerberos Authentication to work with HTTP and/or HTTPS connections. HTTP connections work transparently with SSO Transparent Kerberos Authentication at all times. HTTPS connections work transparently only if the Security Gateway has a signed .p12 certificate. If the Security Gateway does not have a certificate, the user sees, and must respond to, the certificate warning message before a connection is made.
For more about Kerberos SSO, see:
http://web.mit.edu/Kerberos/ (http://web.mit.edu/Kerberos/)
http://technet.microsoft.com/en-us/library/bb742433.aspx (http://technet.microsoft.com/en-us/library/bb742433.aspx)
Configuration Overview
Transparent Kerberos Authentication SSO configuration includes these steps. They are described in details in this section.
AD configuration - Creating a user account and mapping it to a Kerberos principal name
For HTTP connections: (HTTP/<captive portal dns name>@DOMAIN)
For HTTPS connections: (HTTPS/<captive portal dns name>@DOMAIN)
SmartDashboard configuration
Creating an LDAP Account Unit and configuring it with SSO.
Enabling Transparent Kerberos Authentication on the Security Gateway configured with Identity Awareness.
Endpoint client configuration - Configuring trusted sites in the browsers.
Where applicable, the procedures give instructions for both HTTP and HTTPS configuration.
Creating a New User Account
1. In Active Directory, open Active Directory Users and Computers (Start->Run->dsa.msc)
2. Add a new user account. You can choose any username and password. For example: a user account named ckpsso with the password 'qwe123!@#' to the domain corp.acme.com.
3. Clear User must change password at next logon and select Password Never Expires
Mapping the User Account to a Kerberos Principal Name
This procedure uses the ktpass utility to create a Kerberos principal name, which is used by the Security
Gateway and the AD. A Kerberos principal name contains a service name (for the Security Gateway that browsers connect to) and the domain name to which the service belongs.
Ktpass is a command line utility that is available for Windows Server 2000 and higher.

Identity Sources
Identity Awareness Administration Guide R77 | 61
Retrieve the correct executable
You must install the correct ktpass.exe version on the AD. Ktpass.exe is not installed by default in Windows 2003.
1. If you are using Windows 2003:
a) Retrieve the correct executable for your service pack from the Microsoft Support site (http://support.microsoft.com/) prior to installation. It is part of the Windows 2003 support tools. For example, AD 2003 SP2 requires support tools for 2003 sp2 (http://www.microsoft.com/downloads/details.aspx?familyid=96A35011-FD83-419D-939B-9A772EA2DF90&displaylang=en).
b) Download the support.cab and suptools.msi files to a new folder on your AD server.
c) Run the suptools.msi.
2. If you’re using Active Directory with Windows Server 2008 and higher, the ktpass utility is already installed on your server in the Windows\System32 folder and you can run the command line. You need to open the command prompt as an administrator by right clicking it and selecting "run as an Administrator".
To Use Ktpass:
1. Open the command line (Start > Run > cmd).
2. Run ktpass with this syntax:
For HTTP connections:
> ktpass -princ HTTP/captive_portal_dns_name@DOMAIN_NAME -mapuser
username@domain_name -pass password -out trans.keytab -ptype
KRB5_NT_PRINCIPAL -crypto RC4-HMAC-NT
For HTTPS connections:
> ktpass -princ HTTPS/captive_portal_dns_name@DOMAIN_NAME -mapuser
username@domain_name -pass password -out trans.keytab -ptype
KRB5_NT_PRINCIPAL -crypto RC4-HMAC-NT
Important - The example shown below is case sensitive. Make sure that you enter the command
exactly as shown. The captive_portal_dns_name is lower case and the DOMAIN_NAME and
KRB5_NT_PRINCIPAL are upper case.
> ktpass –princ HTTP/[email protected] –mapuser
[email protected] –pass qweQWE!@# -out trans.keytab –ptype
KRB5_NT_PRINCIPAL -crypto RC4-HMAC-NT
The AD is ready to support Kerberos authentication for the Security Gateway.
Important - If you used the ktpass utility before, with the same principal name, but with a different
account, you must:
Delete the different account.
or
Remove the association to the principal name:
Run setspn -D ckp_pdp/domain_name old_account name
Example: setspn –D pdp/corp.acme.com ckpsso.
If you do not do this, authentication will fail.
The above example shows the ktpass syntax on Windows Server 2008 and higher. For Windows
Server 2003, the ktpass syntax is different. All parameters start with a hyphen "-" instead of a forward
slash"/" character.
Configuring an Account Unit
1. Add a new host to represent the AD domain controller. Go to Network Objects tab > Nodes > Node > Host.
2. Enter a name and IP address for the AD object and click OK. For example, AD_Server.
3. Add a new LDAP Account Unit. Select Servers and OPSEC Applications in the Objects Tree. Right-click Servers > New > LDAP Account Unit.

Identity Sources
Identity Awareness Administration Guide R77 | 62
4. In the General tab of the LDAP Account Unit:
a) Enter a name.
b) In the Profile field, select Microsoft_AD.
c) In the Domain field, enter the domain name. It is highly recommended to fill this field for existing account units that you want to use for Identity Awareness. Entering a value into this field will not affect existing LDAP Account Units.
d) Select CRL retrieval and User management.
5. Click Active Directory SSO configuration and configure the values (see example):
a) Select Use Kerberos Single Sign On.
b) Enter the domain name. For example, CORP.ACME.COM
c) Enter the account username you created in Creating a New User Account (on page 60).
For example, ckpsso.
d) Enter the account password for that user (the same password you configured for the account username in AD) and confirm it.
e) Leave the default settings for Ticket encryption method.
f) Click OK.
6. In the Servers tab:
a) Click Add and enter the LDAP Server properties.
b) In the Host field, select the AD object you configured in step 4 above.
c) In the Login DN field, enter the login DN of a predefined user (added in the AD) used for LDAP operations.
d) Enter the LDAP user password and confirm it.
e) In the Check Point Gateways are allowed to section, select Read data from this server.
f) In the Encryption tab, select Use Encryption (SSL), fetch the fingerprint and click OK.
Note - LDAP over SSL is not supported by default. If you have not configured your domain controller to support LDAP over SSL, either skip step f or configure your domain controller to support LDAP over SSL.
7. In the Objects Management tab:
a) In the Manage objects on field, select the AD object you configured in step 4 above.
b) Click Fetch Branches to configure the branches in use.
c) Set the number of entries supported.
8. In the Authentication tab, select Check Point Password in the Default authentication scheme and click OK.
Enabling Transparent Kerberos Authentication
1. Log in to SmartDashboard.
2. From the Network Objects tree, expand the Check Point object.
3. Double-click the gateway enabled with Identity Awareness.
4. Select Browser-Based Authentication - Settings.
The Portal Settings window opens.
5. Select Authentication Settings - Edit.
The Authentication Settings window opens.
6. Select Automatically authenticate users from machines in the domain.
Main URL: The URL used to begin the SSO process. If transparent authentication fails, users are redirected to the configured Captive Portal.
IP Address: The IP address to which the Portal URL is resolved if DNS resolution fails.

Identity Sources
Identity Awareness Administration Guide R77 | 63
Browser Configuration
To work with Transparent Kerberos Authentication, it is necessary to configure your browser to trust Captive Portal URL. If the portal is working with HTTPS, you must also enter the URL in the Local Internet field using HTTPS.
Internet Explorer
It is not necessary to add the Captive Portal URL to Trusted Sites.
To configure Internet Explorer for Transparent Kerberos Authentication:
1. Open Internet Explorer.
2. Go to Internet Tools > Options > Security > Local intranet > Sites > Advanced.
3. Enter the Captive Portal URL in the applicable and then click Add.
Google Chrome
If you have already configured Internet Explorer for Transparent Kerberos Authentication, that configuration also works with Chrome. Use this procedure only if you did not configure Internet Explorer for Transparent Kerberos Authentication.
To configure Google Chrome for Transparent Kerberos Authentication:
1. Open Chrome.
2. Click the menu (wrench) icon and select Settings.
3. Click Show advanced settings.
4. In the Network section, click Change Proxy Settings.
5. In the Internet Properties window, go to Security > Local intranet > Sites > Advanced.
6. Enter the Captive Portal URL in the applicable field.
Firefox
For Firefox, the Negotiate authentication option is disabled by default. To use Transparent Kerberos Authentication, you must enable this option.
To configure Firefox for Transparent Kerberos Authentication:
1. Open Firefox.
2. In the URL bar, enter about:config
3. Search for the network.negotiate-auth.trusted-uris parameter.
4. Set the value to the DNS name of the Captive Portal Security Gateway. You can enter multiple URLs by separating them with a comma.

Identity Awareness Administration Guide R77 | 64
Chapter 4
Advanced Deployment
In This Chapter Introduction 64
Deployment Options 65
Deploying a Test Environment 65
Deployment Scenarios 66
Introduction You can deploy Check Point Security Gateways enabled with Identity Awareness in various scenarios that provide a maximum level of security for your network environment and corporate data. This section describes recommended deployment scenarios and options available with Identity Awareness.
Perimeter Security Gateway with Identity Awareness – This deployment scenario is the most common scenario, where you deploy the Security Gateway at the perimeter where it protects access to the DMZ and the internal network. The perimeter Security Gateway can also control and inspect outbound traffic, targeted to the Internet. In this case, you can create an identity-based Firewall security Rule Base together with Application Control.
Data Center protection – If you have a Data Center or server farm, segregated from the users' network, you can protect access to the servers with the Security Gateway. To do this, deploy the Security Gateway inline in front of the Data Center. All traffic that flows is then inspected by the Security Gateway. You can control access to resources and applications with an identity-based access policy. You can deploy the Security Gateway in transparent mode (bridge mode) to avoid significant changes in the existing network infrastructure.
Large scale enterprise deployment – In large scale enterprise networks, there is a need to deploy multiple Security Gateways at different network locations, such as the perimeter Firewall and multiple Data Centers. Identity Awareness capability is centrally managed through the Security Management Server and SmartDashboard. You can distribute the identity-based policy to all identity aware Security Gateways in the network. Identity information about all users and computers obtained by each Security Gateway is shared between all Security Gateways in the network to provide a complete Identity Awareness infrastructure.
Network segregation – The Security Gateway helps you migrate or design internal network segregation. Identity Awareness lets you control access between different segments in the network by creating an identity-based policy. You can deploy the Security Gateway close to the access network to avoid malware threats and unauthorized access to general resources in the global network.
Distributed enterprise with branch offices – The distributed enterprise consists of remote branch offices connected to the headquarters through VPN lines. You can deploy the Security Gateway at the remote branch offices to avoid malware threats and unauthorized access to the headquarters' internal network and Data Centers. When you enable Identity Awareness at the branch office Security Gateway you make sure that users are authenticated before they reach internal resources. The identity information learned from the branch office Security Gateways is shared between internal Security Gateways to avoid unnecessary authentications.
Wireless campus – Wireless networks are not considered secure for network access, however they are intensively used to provide access to wireless-enabled corporate devices and guests. You can deploy a Security Gateway enabled with Identity Awareness inline in front of the wireless switch, provide an identity aware access policy and inspect the traffic that comes from WLAN users. Identity Awareness gives guests access by authenticating guests with the web Captive Portal.

Advanced Deployment
Identity Awareness Administration Guide R77 | 65
Important - NAT between two Security Gateways with Identity Awareness that share information with each other is not supported.
Deployment Options You can deploy a Security Gateway enabled with Identity Awareness in two different network options:
IP routing mode
Transparent mode (bridge mode)
IP routing mode – This is a regular and standard method used to deploy Security Gateways. You usually use this mode when you deploy the Security Gateway at the perimeter. In this case, the Security Gateway behaves as an IP router that inspects and forwards traffic from the internal interface to the external interface and vice versa. Both interfaces should be located and configured using different network subnets and ranges.
Transparent mode – Known also as a "bridge mode". This deployment method lets you install the Security Gateway as a Layer 2 device, rather than an IP router. The benefit of this method is that it does not require any changes in the network infrastructure. It lets you deploy the Security Gateway inline in the same subnet. This deployment option is mostly suitable when you must deploy a Security Gateway for network segregation and Data Center protection purposes.
Deploying a Test Environment If you want to evaluate how Identity Awareness operates in a Security Gateway, we recommend that you deploy it in a simple environment. The recommended test setup below gives you the ability to test all identity sources and create an identity-based Policy.
The recommendation is to install 3 main components in the setup:
1. User host (Windows)
2. Check Point Security Gateway R75.20 or higher
3. Microsoft Windows server with Active Directory, DNS and IIS (Web resource)
Deploy the Security Gateway in front of the protected resource, the Windows server that runs IIS (web server). The user host computer will access the protected resource via the Security Gateway.
Testing Identity Sources
To configure the test environment:
1. Install the user host computer with Windows XP or 7 OS.
2. Install Windows Server and configure Active Directory and DNS.
3. Install IIS with a sample Web Server.
4. Deploy a Security Gateway either in routing or bridge mode.
5. Test connectivity between the host and the Windows server.
6. Add the user host computer to the Active Directory domain.
7. Enable Identity Awareness in the Security Gateway.
8. Follow the wizard and enable the AD Query and Browser-Based Authentication identity sources.
9. Create an Access Role and define access for all authenticated users or select users with the Users picker.
10. Create 3 rules in the Firewall Rule Base:
a) Any to Any Negate HTTP accept log
b) Access Role to Any HTTP accept log
c) Any to Any Drop

Advanced Deployment
Identity Awareness Administration Guide R77 | 66
11. Install policy.
12. Logout and login again from the user host computer.
13. Open SmartView Tracker > Identity Awareness section and check whether the user is authenticated using the AD Query method.
14. Use the user host computer to test connectivity to the Web Server.
15. Check logs. The user and computer names show in the connections logs.
16. From the Security Gateway CLI revoke the authenticated user by: pdp control revoke_ip IP_ADDRESS
17. On the user host computer open an Internet browser and try to connect to the web resource.
You should be redirected to the Captive Portal, use the user credentials to authenticate and access the web resource.
Testing Endpoint Identity Agents
Enable and configure Identity Agents, and configure Identity Agents self-provisioning through Captive Portal ("Configuring Endpoint Identity Agent Deployment from Captive Portal" on page 36).
1. Open a browser and connect to the web resource.
You are redirected to the Captive Portal.
2. Enter user credentials.
3. Install the client as requested by the Captive Portal.
When the client is installed wait for an authentication pop-up to enter the user credentials via the client.
4. Test connectivity.
The SSO method using Kerberos authentication can be tested too.
Deployment Scenarios
Perimeter Security Gateway with Identity Awareness
Security Challenge
The Security Gateway at the perimeter behaves as a main gate for all incoming and outgoing traffic to and from your corporate network. Users located in the internal networks access the Internet resource and applications daily. Not all Internet applications and web sites are secure and some are restricted according to corporate policy. Blocking all internal access may impact productivity of certain employees that must have access in the context of their daily work definition. Controlling access to the allowed applications is possible through the Application Control blade. However, you may require a more granular access policy that is based also on user and computer identity – i.e. access roles.
Access roles let you configure an identity aware policy together with Application Control to allow access only to specified user groups to the applications on the Internet.
In this case Identity Awareness should be enabled on the perimeter Security Gateway.
Deployment scenario
1. Deploy the Security Gateway at the perimeter in routing mode and define an external interface towards the ISP (the Internet) and an internal interface points to the internal corporate network LAN. Optional: you can define another internal interface which protects DMZ servers.
2. Make sure that NAT or Proxy devices do not exist between the Security Gateway and LAN (the recommendation is to have proxy in the DMZ network).
3. Check that the Security Gateway has connectivity to the internal AD domain controllers.
4. Make sure that users can reach the Security Gateway’s internal interface.
5. Configure the Application Control blade. See the R77 Application Control and URL Filtering Administration Guide (http://supportcontent.checkpoint.com/documentation_download?ID=24853).
6. If you have several perimeter Security Gateways leading to the Internet, we recommend that you manage these Security Gateways with one Security Management Server and SmartDashboard to deploy the relevant security policy.

Advanced Deployment
Identity Awareness Administration Guide R77 | 67
Configuration
1. Enable Identity Awareness and select the appropriate identity sources.
2. Create access roles based on users and computers. You can create multiple access roles that represent different departments, user and computer groups and their location in the network.
3. Add the access roles to the source column of the relevant Firewall and application control policies.
Data Center Protection
Security Challenge
The Data Center contains sensitive corporate resources and information that must be securely protected from unauthorized access. You must also protect it from malwares and viruses that can harm databases and steal corporate information. Access to the Data Center and particularly to certain applications must be granted only to compliant users and computers.
Deployment Scenario
1. Deploy the Security Gateway inline in front of the Date Center core switch, protecting access to the Data Center from the LAN.
2. We recommend that you deploy the Security Gateway in the bridge mode, to avoid any changes in the network. However, IP routing mode is also supported.
3. Define at least two interfaces on the Security Gateway and configure them to be internal or bridged.
4. Make sure that the Security Gateway has connectivity to the Active Directory and all relevant internal domain controllers in the network (LAN).
5. Make sure that users from the LAN can connect to the Data Center through the Security Gateway with an ANY ANY Accept policy.
6. Make sure that you do not have a proxy or NAT device between the Security Gateway and users or the LAN.
Configuration
1. Enable Identity Awareness on the Security Gateway and select identity sources.
2. Create access roles for users and apply the access roles to relevant Firewall security rules.

Advanced Deployment
Identity Awareness Administration Guide R77 | 68
Large Scale Enterprise Deployment
Security Challenge
In complex large scale enterprise networks you must control access from the local network to the Internet and to multiple Data Center resources. Access should be granted only to compliant users and computers. The Data Center contains sensitive corporate resources and information that must be securely protected from unauthorized access. You must also protect it from malwares and viruses that can harm databases and steal corporate information.
Users located in the internal networks access the Internet resource and applications daily. Not all Internet applications and web sites are secure and some are restricted according to corporate policy.
Blocking all internal access may impact productivity of certain employees that must have access in the context of their daily work definition. Controlling access to the allowed applications is possible through the Application Control blade. However, you may require a more granular access policy that is based also on user and computer identity – i.e. access roles.
Deployment Scenario
1. Deploy or use existing Security Gateways at the perimeter and in front of the Data Center.
2. Install the Security Gateway at the perimeter in routing mode, and use at least one external interface to the Internet and one to the internal network (define it as an internal interface).
3. Deploy the Security Gateway as an inline device in front of the Data Center in bridge mode to avoid network changes. This is not required, but is recommended. Nonetheless, IP routing mode is also supported.
4. Make sure that all Security Gateways in the Data Centers and perimeter can communicate directly with each other.
5. We recommend that you manage the Security Gateway from one Security Management Server and SmartDashboard.
6. Make sure that there is connectivity from each Security Gateway to the Active Directory internal domain controllers.
7. Make sure that in an "Any Any Accept" Policy, users from the LAN can connect to the desired resources.
8. Make sure that there is no NAT or proxy devices installed between the Security Gateways and LAN segment. If there are such devices, consider moving them to DMZ if possible.
Configuration
1. Enable Identity Awareness on the Security Gateway and choose the appropriate identity source method for each Security Gateway, at the perimeter and at the Data Center.
2. Create access roles for users and apply access roles to the applicable Firewall security rules.
3. Use the Application Control Policy in the perimeter Security Gateway and add access roles to the Policy.

Advanced Deployment
Identity Awareness Administration Guide R77 | 69
4. In the Gateway Properties > Identity Awareness tab, make sure to select Share local identities with other gateways.
AD Query Recommended Configuration
When you enable AD Query to obtain user and computer identity, we recommend that you enable the feature on all Security Gateways that participate in the network environment. All Security Gateways should have the Active Directory domain defined with the list of all applicable domain controllers in the internal network.
Endpoint Identity Agents Recommended Configuration
If you choose to use Endpoint Identity Agents to authenticate users and computers, you have to select the Security Gateway that will be used to maintain Endpoint Identity Agents.
For a single Data Center and perimeter Security Gateway it is recommended to define Endpoint Identity Agents that connect to a single Security Gateway. Then the identity obtained by the Security Gateway is shared with the other Security Gateways in the network. Select a high capacity / performance Security Gateway, which can also behave as an authentication server, and configure this Security Gateway’s IP / DNS on the Endpoint Identity Agents (see Endpoint Identity Agents section).
For complex multi Data Center environments where there are several Security Gateways that protect different Data Centers and the perimeter, we recommend that you balance Endpoint Identity Agents authentication using different Security Gateways. You can configure a list of Security Gateways in the Endpoint Identity Agent settings, where the Endpoint Identity Agent will connect to different Security Gateways. This provides load balancing across the Security Gateways. Identities learned from the agents are shared between all Security Gateways in the network.
Identity Sharing Advanced Settings
To define a list of Security Gateways between which identity information is shared:
1. Go to Gateway properties > Identity Awareness tab and select Get identities from other gateways.
2. Select the Security Gateways you want to obtain identities from.
Network Segregation
Security Challenge
Networks consist of different network segments and subnets where your internal users reside. Users that connect to the network can potentially spread viruses and malwares across the network that can infect other computers and servers on the network. You want to make sure that only compliant users and computers can

Advanced Deployment
Identity Awareness Administration Guide R77 | 70
pass and connect across multiple network segments, as well as authenticate users connecting to the servers and the Internet.
Deployment scenario
We recommend that you deploy Security Gateways close to access networks before the core switch.
Access between the segments is controlled by the Security Gateway.
Access between the LAN and Data Center is controlled by the Security Gateway.
Access between the LAN and the Internet is controlled by the Security Gateways either at each segment or at the perimeter Security Gateway.
We recommend that you deploy the Security Gateway in bridge mode to avoid network and routing changes.
Each Security Gateway of a particular segment authenticates users with the selected method.
Share identities learned from the segment Security Gateways with the perimeter Firewall to create an outgoing traffic Firewall policy or use an Application Control policy as well.
Configuration
1. Deploy Security Gateways in each segment in bridge mode.
2. Make sure that there is no proxy or NAT device between the Security Gateways and the LAN.
3. Make sure that the Security Gateways can communicate with the Active Directory domain controller deployed in each segment (replicated domain controllers).
If there is a general domain controller that serves all users across the segments, make sure that all Security Gateways can connect to this domain controller.
4. Enable Identity Awareness on each Security Gateway and select an appropriate identity source method.
5. In the Identity Awareness tab, clear the Share local identities with other gateways option.
If you want to share identities with one Security Gateway, for example, the perimeter Security Gateway, keep this option selected and disable Get identities from other gateways in the segment Security Gateway. Then go to the perimeter Security Gateway and select Get identities from other gateways.
6. If you want to use Endpoint Identity Agents, then define the particular Security Gateway DNS/IP in the agent Security Gateway configuration per access segment.
Distributed Enterprise with Branch Offices
Security Challenge
In distributed enterprises there is a potential risk of malware and viruses spreading from remote branch offices over VPN links to the corporate internal networks. There is also a challenge of how to provide authorized access to users that come from remote branch offices that request and want to access the Data Center and the Internet.

Advanced Deployment
Identity Awareness Administration Guide R77 | 71
Deployment Scenario
1. We recommend that you deploy Security Gateways at the remote branch offices and at headquarters in front of the Data Center and at the perimeter.
2. At remote branch offices, you can deploy low capacity Security Gateways due to a relatively low number of users.
Deploy the remote branch Security Gateways in IP routing mode and have them function as a perimeter Firewall and VPN gateway, establishing a VPN link to the corporate Security Gateways.
3. At the corporate headquarters, we recommend that you deploy Data Center Security Gateways to protect access to Data Center resources and applications, as well as a perimeter Security Gateway. You can install the Data Center Security Gateway in bridge mode to avoid changes to the existing network.
4. In this scenario, users from the branch office are identified by the local branch office Security Gateway before connecting to the corporate network over VPN.
5. The identities learned by the branch office Security Gateways are then shared with the headquarters' internal and perimeter Security Gateways. When a user from a branch office attempts to connect to the Data Center, the user is identified by the Security Gateway at the headquarters Data Center without the need for additional authentication.
Configuration
1. Select a Security Gateway according to a performance guideline for your remote branch offices.
2. Deploy the Security Gateways at the branch offices in routing mode. Define VPN site-to-site if necessary.
3. Deploy Security Gateways inline at the Data Center. We recommend using bridge mode.
4. Deploy a Security Gateway at the perimeter that protects the internal network in routing mode. The perimeter Security Gateway can serve as a VPN Security Gateway for branch offices as well.
5. If you have Active Directory domain controllers replicated across your branch offices make sure that local Security Gateways can communicate with the domain controller. In case you do not have a local domain controller, make sure that the Security Gateways can access the headquarters' internal domain controller over VPN.
6. Enable Identity Awareness and select the appropriate methods to get identity.
7. Create an access role and apply the roles in the security policy on the branch office Security Gateways, perimeter and Data Center Security Gateway.

Advanced Deployment
Identity Awareness Administration Guide R77 | 72
8. Make sure that you share identities between the branch offices with the headquarter and Data Center Security Gateways, by selecting these settings on the Identity Awareness tab:
AD Query Recommended Configuration
When you use AD Query to authenticate users from the local and branch offices, we recommend that you only configure a local domain controller list per site in the relevant Security Gateways. For example, if you have a branch office Security Gateway and a Data Center Security Gateway, enable AD Query on all Security Gateways. On the branch office Security Gateway, select the Active Directory domain controllers replications installed in the branch office only. On the Data Center Security Gateway, configure a list of domain controllers installed in the internal headquarters network.
It is not necessary to configure all domain controllers available in the network, since the identity information is shared between branch and internal Security Gateways accordingly.
Endpoint Identity Agents Recommended Configuration
When using Endpoint Identity Agents, we recommend that you configure the local branch office Security Gateway DNS/IP on the agent. The agents connect to the local Security Gateway and the user is authenticated, identities are shared with the internal headquarter Security Gateways.
Wireless Campus
Security Challenge
You use wireless networks to grant access to employees that use Wi-Fi enabled devices, guests and contractors. Guests and contractors in some cases cannot use the corporate wired network connection and must connect through WLAN. Furthermore, it is not intended for guests and contractors to install any endpoint agents on their devices.
Wireless access is also intensively used to connect mobile devices such as smart phones where agents can be installed. These devices are not part of the Active Directory domain. Wireless networks do not give a desired level of security in terms of network access.
Deployment Scenario
1. Deploy the Security Gateway in bridge mode in front of the Wireless Switch.
2. Make sure that the Security Gateway can access the Internet or any other required resource in the network.
3. Make sure that the Security Gateway can communicate with the authentication server, such as Active Directory or RADIUS.
4. Check that there is no NAT or proxy device between the Security Gateway and the WLAN network.
Configuration
1. Enable Identity Awareness on the Security Gateway.
2. Select Browser-Based Authentication as an identity source.
3. In the Gateway properties > Identity Awareness tab > Browser-Based Authentication Settings, select Unregistered guests login and in Settings, select the fields you want guests to fill when they register.
4. Select Log out users when they close the portal browser.

Advanced Deployment
Identity Awareness Administration Guide R77 | 73
Dedicated Identity Acquisition Security Gateway
Security Challenge
You have several Security Gateways that protect the Data Center or Internet access where access is based on identity acquisition. These Security Gateways run different blades and deal with heavy traffic inspection.
To avoid an impact on performance of the Security Gateways in terms of user identity acquisition and authentication, it is possible to offload this functionality to a separate Security Gateway. The dedicated Security Gateway is responsible for acquiring user identity, performing authentication and sharing learned identities with all enforcing Security Gateways in the network.
Deployment Scenario
In this deployment scenario, you have to choose an appropriate appliance to deploy as the dedicated Identity Awareness enabled Security Gateway. All users authenticate with this Security Gateway.
If you enable AD Query, the dedicated Security Gateway should communicate with all Active Directory domain controllers over WMI.
1. On the dedicated identity acquisition Security Gateway, enable the Identity Awareness feature and select the identity method.
2. Make sure to configure the Security Gateway to share identities with other Security Gateways in the network.
3. On the enforcement Security Gateways, enable Identity Awareness and select Get identities from other Security Gateways.

Identity Awareness Administration Guide R77 | 74
Chapter 5
Advanced Endpoint Identity Agents Configuration
In This Chapter Customizing Parameters 74
Advanced Endpoint Identity Agent Options 74
Customizing Parameters You can change settings for Endpoint Identity Agent parameters to control Endpoint Identity Agent behavior. You can change some of the settings in SmartDashboard and others using the Endpoint Identity Agent Configuration tool ("Creating Custom Endpoint Identity Agents" on page 86).
To change Endpoint Identity Agents parameters in SmartDashboard:
1. Go to Policy > Global Properties > SmartDashboard Customization.
2. Click Configure.
3. Go to Identity Awareness > Agent.
4. Click OK.
The Endpoint Identity Agent parameters show. This is a sample list of parameters that you can change:
Parameter Description
Nac_agent_disable_settings Whether users can right click the Endpoint Identity Agent client (umbrella icon on their desktops) and change settings.
Nac_agent_email_for_sending_logs You can add a default email address for to which to send client troubleshooting information.
Nac_agent_disable_quit Whether users can right click the Endpoint Identity Agent client (umbrella icon on their desktops) and close the agent.
Nac_agent_disable_tagging Whether to disable the packet tagging feature that prevents IP Spoofing.
Nac_agent_hide_client Whether to hide the client (the umbrella icon does not show on users' desktops).
Advanced Endpoint Identity Agent Options
Kerberos SSO Compliance
The Identity Awareness Single Sign-On (SSO) solution for Endpoint Identity Agents gives the ability to transparently authenticate users that are logged in to the domain. This means that a user authenticates to the domain one time and has access to all authorized network resources without additional authentication.
Using Endpoint Identity Agents gives you:
User and computer identity

Advanced Endpoint Identity Agents Configuration
Identity Awareness Administration Guide R77 | 75
Minimal user intervention - All necessary configuration steps are done by administrators and does not require user input.
Seamless connectivity - Transparent authentication using Kerberos Single Sign-On (SSO) when users are logged in to the domain. If you do not want to use SSO, users enter their credentials manually. You can let them save these credentials.
Connectivity through roaming - Users stay automatically identified when they move between networks, as the client detects the movement and reconnects.
Added security - You can use the patented packet tagging technology to prevent IP Spoofing. Endpoint Identity Agents also gives you strong (Kerberos based) user and computer authentication.
You get SSO in Windows domains with the Kerberos authentication protocol. Kerberos is the default authentication protocol used in Windows 2000 and above.
The Kerberos protocol is based on the idea of tickets, encrypted data packets issued by a trusted authority which in this case is the Active Directory (AD). When a user logs in, the user authenticates to a domain controller that provides an initial ticket granting ticket (TGT). This ticket vouches for the user’s identity. When the user needs to authenticate against the Security Gateway with Identity Awareness, the Endpoint Identity Agent presents this ticket to the domain controller and requests a service ticket (SR) for a specific resource (Security Gateway that Endpoint Identity Agents connect to). The Endpoint Identity Agent then presents this service ticket to the Security Gateway that grants access.
How SSO Works
Item Description
A User
B Active Directory Domain Controller
C Security Gateway that Endpoint Identity Agents connect to
D Data Center servers
1 a) A logs in to B b) B sends an initial ticket (TGT) to A
2 a) The Endpoint Identity Agent connects to C b) C asks A for user authentication

Advanced Endpoint Identity Agents Configuration
Identity Awareness Administration Guide R77 | 76
Item Description
3 a) The Endpoint Identity Agents requests a service ticket (SR) for C and presents the TGT to B b) B sends the SR (encrypting the user name with the shared secret between B and C)
4 The Endpoint Identity Agent sends the service ticket to C
5 C decrypts the ticket with the shared secret and identifies A
6 A gets access to D based on identity
References
For more about Kerberos SSO, see:
http://web.mit.edu/Kerberos/ (http://web.mit.edu/Kerberos/)
http://technet.microsoft.com/en-us/library/bb742433.aspx (http://technet.microsoft.com/en-us/library/bb742433.aspx)
SSO Configuration
SSO configuration includes two steps:
AD Configuration - Creating a user account and mapping it to a Kerberos principal name.
SmartDashboard Configuration - Creating an LDAP Account Unit and configuring it with SSO.
AD Configuration
Creating a New User Account
1. In Active Directory, open Active Directory Users and Computers (Start->Run->dsa.msc)
2. Add a new user account. You can choose any username and password. For example: a user account named ckpsso with the password 'qwe123!@#' to the domain corp.acme.com.
3. Clear User must change password at next logon and select Password Never Expires
Mapping the User Account to a Kerberos Principal Name
This step uses the ktpass utility to create a Kerberos principal name that is used by both the Security Gateway and the AD. A Kerberos principal name consists of a service name (for the Security Gateway that Endpoint Identity Agents connect to) and the domain name to which the service belongs.
Ktpass is a command-line tool available in Windows 2000 and higher.
Retrieve the correct executable
You must install the correct ktpass.exe version on the AD. Ktpass.exe is not installed by default in Windows 2003.
1. If you are using Windows 2003:
a) Retrieve the correct executable for your service pack from the Microsoft Support site (http://support.microsoft.com/) prior to installation. It is part of the Windows 2003 support tools. For example, AD 2003 SP2 requires support tools for 2003 sp2 (http://www.microsoft.com/downloads/details.aspx?familyid=96A35011-FD83-419D-939B-9A772EA2DF90&displaylang=en).
b) Download the support.cab and suptools.msi files to a new folder on your AD server.
c) Run the suptools.msi.
2. If you’re using Active Directory with Windows Server 2008 and higher, the ktpass utility is already installed on your server in the Windows\System32 folder and you can run the command line. You need to open the command prompt as an administrator by right clicking it and selecting "run as an Administrator".

Advanced Endpoint Identity Agents Configuration
Identity Awareness Administration Guide R77 | 77
Use Ktpass
1. Open a command line to run the ktpass tool (Start > Run > cmd).
2. At the command prompt, run ktpass with this syntax:
C:> ktpass -princ ckp_pdp/domain_name@DOMAIN_NAME -mapuser
username@domain_name -pass password -out unix.keytab –crypto RC4-HMAC-NT
Important - Make sure to enter the command exactly as shown. Mapping the username to the Kerberos principal name with ktpass is case-sensitive.
This is an example of running ktpass with these parameters:
Parameter Value
domain_name@DOMAIN_NAME [email protected]
username@domain_name [email protected]
password qwe123@#
The AD is ready to support Kerberos authentication for the Security Gateway.
Important - If you have used the ktpass utility before for the same principal name (ckp_pdp/domain_name@DOMAIN_NAME) but with a different account, you must either delete the different account beforehand or remove its association to the principal name (by using setspn –D ckp_pdp/domain_name old_account name – i.e. setspn –D ckp_pdp/corp.acme.com ckpsso).
Failure to do this will cause the authentication to fail.
The example above shows the ktpass syntax on Windows 2003. When using Windows Server 2008 or
higher, the ktpass syntax is slightly different. Parameters start with a forward slash "/" instead of a hyphen
"-".
Example (Windows 2008 and higher):
ktpass /princ ckp_pdp/[email protected] /mapuser [email protected]
/pass qweQWE!@# /out unix.keytab /crypto RC4-HMAC-NT
SmartDashboard Configuration
This section describes how to configure an LDAP Account Unit to support SSO.
Configuring an Account Unit
1. Add a new host to represent the AD domain controller. Go to Network Objects tab > Nodes > Node > Host.
2. Enter a name and IP address for the AD object and click OK. For example, AD_Server.
3. Add a new LDAP Account Unit. Select Servers and OPSEC Applications in the Objects Tree. Right-click Servers > New > LDAP Account Unit.
4. In the General tab of the LDAP Account Unit:
a) Enter a name.
b) In the Profile field, select Microsoft_AD.
c) In the Domain field, enter the domain name. It is highly recommended to fill this field for existing account units that you want to use for Identity Awareness. Entering a value into this field will not affect existing LDAP Account Units.
d) Select CRL retrieval and User management.
5. Click Active Directory SSO configuration and configure the values (see example):
a) Select Use Kerberos Single Sign On.

Advanced Endpoint Identity Agents Configuration
Identity Awareness Administration Guide R77 | 78
b) Enter the domain name. For example, CORP.ACME.COM
c) Enter the account username you created in Creating a New User Account (on page 60).
For example, ckpsso.
d) Enter the account password for that user (the same password you configured for the account username in AD) and confirm it.
e) Leave the default settings for Ticket encryption method.
f) Click OK.
6. In the Servers tab:
a) Click Add and enter the LDAP Server properties.
b) In the Host field, select the AD object you configured in step 4 above.
c) In the Login DN field, enter the login DN of a predefined user (added in the AD) used for LDAP operations.
d) Enter the LDAP user password and confirm it.
e) In the Check Point Gateways are allowed to section, select Read data from this server.
f) In the Encryption tab, select Use Encryption (SSL), fetch the fingerprint and click OK.
Note - LDAP over SSL is not supported by default. If you have not configured your domain controller to support LDAP over SSL, either skip step f or configure your domain controller to support LDAP over SSL.
7. In the Objects Management tab:
a) In the Manage objects on field, select the AD object you configured in step 4 above.
b) Click Fetch Branches to configure the branches in use.
c) Set the number of entries supported.
8. In the Authentication tab, select Check Point Password in the Default authentication scheme and click OK.
Server Discovery and Trust
Introduction
The Endpoint Identity Agent client needs to be connected to a Security Gateway with Identity Awareness. For this to happen, it must discover the server and trust it.

Advanced Endpoint Identity Agents Configuration
Identity Awareness Administration Guide R77 | 79
Server discovery refers to the process of deciding which server the client should connect to. We offer several methods for configuring server discovery – from a very basic method of simply configuring one server to a method of deploying a domain wide policy of connecting to a server based on your current location. This section describes these options.
Server trust refers to the process of validating that the server the end user connects to is indeed a genuine one. It also makes sure that communication between the client and the server was not tampered with by a Man In The Middle (MITM) attack.
The trust process compares the server fingerprint calculated during the SSL handshake with the expected fingerprint. If the client does not have the expected fingerprint configured, it will ask the user to verify that it is correct manually. This section describes the methods that allow the expected fingerprint to be known, without user intervention.
Discovery and Trust Options
These are the options that the client has for discovering a server and creating trust with it:
File name based server configuration – If no other method is configured (default, out-of-the-box situation), any Endpoint Identity Agent downloaded from the portal will be renamed to have the portal computer IP in it. During installation, the client uses this IP to represent the Security Gateway with Identity Awareness. Note that the user has to trust the server by himself (the trust dialog box opens).
AD based configuration – If client computers are members of an Active Directory domain, you can deploy the server addresses and trust data using a dedicated tool.
DNS SRV record based server discovery – It is possible to configure the server addresses in the DNS server. Because the DNS is not secure, we recommend that you do not configure trust this way. Users can authorize the server manually in a trust dialog box that opens. This is the only server discovery method that is applicable for the MAC OS Endpoint Identity Agent.
Remote registry – All client configuration, including the server addresses and trust data are in the registry. You can deploy the values before installing the client (by GPO, or any other system that lets you control the registry remotely). This lets you use the configuration from first run.
Custom Endpoint Identity Agents – You can create a custom version of the Endpoint Identity Agent installation package that includes the server IP and trust data.

Advanced Endpoint Identity Agents Configuration
Identity Awareness Administration Guide R77 | 80
Option Comparison
Requires AD
Manual User Trust Required?
Multi- Site
Client Remains Signed?
Allows Ongoing Changes
Level Recommended for...
File name based
No Yes No Yes No Very Simple
Single Security Gateway deployments
AD based Yes No Yes Yes Yes Simple Deployments with AD that you can modify
DNS based No Yes Partially (per DNS server)
Yes Yes Simple Deployments without AD or with an AD you cannot modify, but the DNS can be changed
Remote registry
No No Yes Yes Yes Moderate Where remote registry is used for other purposes
Pre- packaging
No No Yes No No Advanced When both DNS and AD cannot be changed, and there is more than one Security Gateway
File Name Based Server Discovery
This option is the easiest to deploy, and works out-of-the-box if the Captive Portal is also the Security Gateway with Identity Awareness. If your deployment consists of one Security Gateway with Identity Awareness and a Captive Portal running on the same Security Gateway and it is OK with you that the user needs to verify the server fingerprint and trust it once, you can use this option, which works with no configuration.

Advanced Endpoint Identity Agents Configuration
Identity Awareness Administration Guide R77 | 81
How does it work?
When a user downloads the Endpoint Identity Agent client from the Captive Portal, the address of the Security Gateway with Identity Awareness is embedded into the file name. During the installation sequence, the client checks if there is any other discovery method configured (prepackaged, AD based, DNS based or local registry). If no method is configured and the server can be reached, it will be used as the Security Gateway with Identity Awareness. You can make sure that this is the case by looking at the client settings and seeing that the server that is shown in the file name is present in the Endpoint Identity Agent dialog box.
Why can't we use this for trust data?
As the file name can be changed, we cannot be sure that the file name wasn’t modified by an attacker along the way. Therefore, we cannot trust data passed in the file name as authentic, and we need to verify the trust data by another means.
AD Based Configuration
If your endpoint computers are members of an Active Directory domain and you have administrative access to this domain, you can use the Distributed Configuration tool to configure connectivity and trust rules.
The Distributed Configuration tool has three windows:
Welcome - This window describes the tool and lets you to enter alternate credentials that are used to access the AD.
Server configuration – This window lets you configure which Security Gateway with Identity Awareness the client should use, depending on its source location.

Advanced Endpoint Identity Agents Configuration
Identity Awareness Administration Guide R77 | 82
Trusted gateways – This window lets you view and change the list of fingerprints that the Security Gateways with Identity Awareness consider secure.
Server Configuration Rules
If you use the Distributed Configuration tool and you configure ‘Automatically discover’ the server, the client fetches the rule lists and each time it needs to connect to a server, it tries to match itself against a rule, from top to bottom.
When it matches a rule, it uses the servers shown in this rule, according to the priority specified.
For example:
This configuration means:
1. If the user is coming from ‘192.168.0.1 – 192.168.0.255’, then try to connect to US-GW1. If it isn’t available, try BAK-GS2 (it will be used only if US-GW1 is not available, as its priority is higher).
2. Otherwise, if the user is connected from the Active Directory site ‘UK-SITE’, connect either to UK-GW1 or UK-GW2 (choose between them randomly, as they both have the same priority). If both of them are not available, connect to BAK-GS2.
3. Otherwise, connect to BAK-GS2 (the default rule is always matched when it is encountered).
Trusted gateways
The trusted gateways window shows the list of servers considered trusted – no popups will open when trying to connect to them.

Advanced Endpoint Identity Agents Configuration
Identity Awareness Administration Guide R77 | 83
You can add, edit or delete a server. If you have connectivity to the server, you can get the name and fingerprint by entering its address and clicking ‘Fetch Fingerprint’. Otherwise, you should enter the same name and fingerprint that is shown when connecting to that server.
Note - The entire configuration is written in a hive named ‘Check Point’ under the ‘Program Data’ Branch in the AD database that is added in the first run of the tool. Adding this hive won’t have any effect on other AD based applications or features.
DNS Based Configuration
If you configure the client to ‘Automatic Discovery’ (the default), it looks for a server by issuing a DNS SRV query for the address ‘CHECKPOINT_NAC_SERVER._tcp’ (the DNS suffix is added automatically). You can configure the address in your DNS server.
To configure the automatic discovery address on the DNS server:
1. Go to Start > All Programs > Administrative Tools > DNS.
2. Go to Forward lookup zones and select the applicable domain.
3. Right click and select Other new record.
4. Select Service Location > Create Record.
5. In the Service field, enter CHECKPOINT_NAC_SERVER.
6. Set the Port number to 443.
7. In the Protocol field, select _tcp.
8. In the Host offering this service field, enter the Security Gateway (with Identity Awareness) IP address.
9. Click OK.
Note - Security Gateway with Identity Awareness Load Sharing can be achieved by creating several SRV records with the same priority and High Availability can be achieved by creating several SRV records with different priorities.

Advanced Endpoint Identity Agents Configuration
Identity Awareness Administration Guide R77 | 84
Note - If you configure AD based and DNS based configuration, the results are combined according to the specified priority (from the lowest to highest).
Troubleshooting - Displaying SRV Record Stored in the DNS Server
Run the following commands:
C:\> nslookup > set type=srv > checkpoint_nac_server._tcp
Server: dns.company.com Address: 192.168.0.17
checkpoint_nac_server._tcp.ad.company.com SRV service location: priority = 0 weight = 0 port = 443 svr hostname = idserver.company.com
idserver.company.com internet address = 192.168.1.212
>
Remote Registry
If you have another way to deploy registry entries to your client computers (such as Active Directory GPO updates), you can deploy the Security Gateway with Identity Awareness addresses and trust parameters before installing the clients. That way, they will use the already deployed settings immediately after installation.
To use the remote registry option:
1. Install the client on one of your computers. Make sure it is installed in the same mode that will be installed on the other computers. – the ‘full agent’ installs itself to your program files directory, and saves its configuration to HKEY_LOCAL_MACHINE, while the light Endpoint Identity Agent installs itself to the users directory, and saves its configuration to HKEY_CURRENT_USER.
2. Connect manually to all of the servers that are configured, verify their fingerprints, and click ‘trust’ on the fingerprint verification dialog box.
3. Configure it manually to connect to the requested servers (Use the settings dialog box). If you need the client to choose a server based on the client location, you can click ‘Advanced’ and configure it that way. See AD Based Configuration (on page 81) to understand how these rules are interpreted.

Advanced Endpoint Identity Agents Configuration
Identity Awareness Administration Guide R77 | 85
4. Export the following registry keys (from HKEY_LOCAL_MACHINE / HKEY_CURRENT_USER, according to the client type installed):
a) SOFTWARE\CheckPoint\IA\TrustedGateways (the whole tree)
b) SOFTWARE\CheckPoint\IA\ (32 bit) or SOFTWARE > Wow6432Node > Checkpoint > IA (64 bit)
DefaultGateway
DefaultGatewayEnabled
PredefinedPDPConnRBUsed
PredefinedPDPConnectRuleBase
5. Deploy the exported keys to the workstations before installing the client on your workstations.

Advanced Endpoint Identity Agents Configuration
Identity Awareness Administration Guide R77 | 86
Creating Custom Endpoint Identity Agents
Introduction
You can use the IA Configuration Utility to create custom Endpoint Identity Agent installation packages. Endpoint Identity Agents have many advanced configuration parameters. Some of these parameters are related to the installation process, while others are related to Endpoint Identity Agent functionality. All of the configuration parameters have default values that are deployed with the product and can remain unchanged.
Full – Predefined Endpoint Identity Agent includes packet tagging and computer authentication. It applies to all users of the computer that it is installed on. Administrator permissions are required to use the Full Endpoint Identity Agent type.
Light – Predefined Endpoint Identity Agent that does not include packet tagging and computer authentication. You can install this Endpoint Identity Agent individually for each user on the target computer. Administrator permissions are not required.
Terminal Servers - Predefined Endpoint Identity Agent that installs MAD services and the Multi-user host driver on Citrix and Terminal Servers. This Endpoint Identity Agent type cannot be used for endpoint computers.
Custom - Configure custom features for all computers that use this agent, such as MAD services and packet tagging.
Installing Microsoft .NET Framework
You must install Microsoft .NET framework 4.0 or higher before you install and run the Endpoint Identity Agent Configuration Tool.
To install the .NET framework:
1. Download the installation package (http://www.microsoft.com/en-us/download/details.aspx?id=17718).
2. When prompted to start the installation immediately, click Run.
3. Do the instructions on the screen.
Working with the Endpoint Identity Agent Configuration Tool
Getting the source MSI File
To create a custom Endpoint Identity Agent installation package, you must first copy the customizable MSI file from the Security Gateway to your management computer. This is the computer on which you use the Endpoint Identity Agent Configuration Tool.
To get the customizable MSI file:
1. Copy this file from the Security Gateway to your management computer: SecurePlatform, Gaia or Linux: /opt/CPNacPortal/htdocs/nac/nacclients/customAgent.msi
2. Make a backup copy of this file on your management computer with a different name.
You must use the original copy of the MSI file when you work with the Endpoint Identity Agent Configuration Tool.
Running the Endpoint Identity Agent Configuration Tool
You must install Endpoint Identity Agent v2.0 (R77) or higher on your management client computer. This is the computer on which you use the Endpoint Identity Agent Configuration Tool. The Configuration Tool is installed in the Endpoint Identity Agent installation directory.
To install the Endpoint Identity Agent on your client computer:
1. Copy these agents from the Security Gateway to your management computer:
Full Endpoint Identity Agent - opt/CPNacPortal/htdocs/nac/nacclients/fullAgent.exe
Light Endpoint Identity Agent - opt/CPNacPortal/htdocs/nac/nacclients/lightAgent.exe
2. Run one of these executable files as applicable for your environment.

Advanced Endpoint Identity Agents Configuration
Identity Awareness Administration Guide R77 | 87
3. Do the instructions on the screen.
To run the Endpoint Identity Agent Configuration Tool:
1. Go to the Endpoint Identity Agent installation directory.
a) Click Start > All Programs > Check Point > Endpoint Identity Agent.
b) Right click the Endpoint Identity Agent shortcut and select Properties from the menu.
c) Click Open File Location (Find Target in some Windows versions).
2. Double-click IAConfigTool.exe.
The Endpoint Identity Agent Configuration Tool opens.
Configuring the Endpoint Identity Agent
You configure all features and options in the Endpoint Identity Agent Configuration Tool window.
MSI Package Path
Enter or browse to the source installation package. You must use a Check Point customizable MSI file as the source for the configuration tool.
Installation Type
Select whether the Endpoint Identity Agent applies to one user or to all users of the computer on which it is installed.
Per-User - Install the Light Endpoint Identity Agent only for the user who does the installation. Administrator permissions are not required for this installation.
Per Computer - Install any Endpoint Identity Agent type for all users on the computer. Administrator permissions are required for this installation type, even for the Light Endpoint Identity Agent type.
Installation UI
Select one of these end user interaction options:
FULL (Default) - Interactive installation where the end user sees the full installation interface and can select options.
BASIC - Non-interactive installation where the end user only sees a progress bar and a Cancel button.
Endpoint Identity Agent Type
Select the type of Endpoint Identity Agent to install:
Full – Predefined Endpoint Identity Agent includes packet tagging and computer authentication. It applies to all users of the computer that it is installed on. Administrator permissions are required to use the Full Endpoint Identity Agent type.
Light – Predefined Endpoint Identity Agent that does not include packet tagging and computer authentication. You can install this Endpoint Identity Agent individually for each user on the target computer. Administrator permissions are not required. You must select the Per-Computer installation type for this agent type.
Terminal Servers - Predefined Endpoint Identity Agent that installs MAD services and the Multi-user host driver on Citrix and Terminal Servers. This Endpoint Identity Agent type cannot be used for endpoint computers.
Custom - Configure custom features for all computers that use this agent, such as MAD services and packet tagging.
Custom Features
Select these features for the Custom Endpoint Identity Agent type:
MAD Service - Install MAD (Managed Asset Detection) services for Kerberos SSO and computer authentication.
Advanced Endpoint Identity Agents Configuration
Identity Awareness Administration Guide R77 | 88
Packet Tagging - Install the packet tagging driver to enable anti-spoofing protection. The driver signs every packet that is sent from the computer. This setting is required if you have Firewall rules that use Access Roles and IP Spoofing is enabled.
Copy configuration
Copy configuration from this computer - Copy Endpoint Identity Agent configuration settings from this computer to other computers running a custom MSI file.
Save
Click to save this configuration to a custom MSI file. Enter a name for the MSI file.
Deploying a Custom Endpoint Identity Agent with the Captive Portal
To deploy a custom Endpoint Identity Agent with the Captive Portal:
1. Upload the custom customAgent.msi to /opt/CPNacPortal/htdocs/nacclients.
2. Configure the Captive Portal to distribute the custom agent.
a) In SmartDashboard, go to the Security Gateway with Identity Awareness.
b) Go to the Identity Awareness page.
c) Click on the Browser-Based Authentication Settings button.
d) Change the Require users to download value to Identity Agent - Custom.

Identity Awareness Administration Guide R77 | 89
Chapter 6
Identity Awareness Commands
In This Chapter Introduction 89
pdp 89
pep 94
adlog 95
test_ad_connectivity 98
Introduction These terms are used in the CLI commands:
PDP - The process on the Security Gateway responsible for collecting and sharing identities.
PEP - The process on the Security Gateway responsible for enforcing network access restrictions. Decisions are made according to identity data collected from the PDP.
AD Query - AD Query is the module responsible for acquiring identities of entities (users or computers) from the AD (Active Directory). AD Query was called Identity Logging in previous versions and in some cases is also referenced as AD Log. The adlog is the command line process used to control and monitor the AD Query feature.
test_ad_connectivity - A utility that runs connectivity tests from the Security Gateway to an AD
domain controller.
The PEP and PDP processes are key components of the system. Through them, administrators control user access and network protection.
AD Query can run either on a Security Gateway that has been enabled with Identity Awareness or on a Log Server. When it runs on a Security Gateway, AD Query serves the Identity Awareness feature, and gives logging and policy enforcement. When it runs on a Log Server, AD Query gives identity logging. The command line tool helps control users’ statuses as well as troubleshoot and monitor the system.
The test_ad_connectivity utility runs over both the LDAP and WMI protocols. It is usually used by the
SmartDashboard Identity Awareness first time wizard, but you can run it manually on the Security Gateway when needed.
pdp Description These commands control and monitor the PDP process.
Syntax # pdp [command]... <parameter>
Parameter Description
<none> Display available options for this command and exit
debug Control debug messages
tracker Tracker options
connections pdp connections information

Identity Awareness Commands
Identity Awareness Administration Guide R77 | 90
Parameter Description
network pdp network information
status pdp status information
control pdp control commands
monitor Display monitoring data
update Recalculate users and computers group membership (deleted accounts will not be updated)
ad Operations related to AD Query
timers Show pdp timers information
pdp monitor
Description Lets you monitor the status of connected sessions. You may perform varied queries according to the usage below to get the output you are interested in.
Syntax # pdp monitor <parameter> <option>
Parameter Description
all Display information for all connected sessions
user <user name> Display session information for the given user name
ip <IP address> Display session information for the given IP address
machine <computer name> Display session information for the given computer name
mad Display all sessions that relate to a managed asset (i.e. all sessions that successfully performed computer authentication)
client_type
[unknown|portal|"Identi
ty Agent"|"AD Query"]
Display all sessions connecting via the given client type
Possible client types are:
Unknown - User was identified by an unknown source
Portal - User was identified by the Captive Portal
Identity Agent - User/computer was identified by an Identity Awareness Agent
AD Query - User was identified by AD Query
groups <group name> Display all sessions of users / computers that are members of the given group name
cv_ge <version> Display all sessions that are connected with a client version that is higher than (or equal to) the given version
cv_le <version> Display all sessions that are connected via a client version that is lower than (or equal to) the given version.
Example
pdp monitor ip 192.0.2.1
Shows the connected user behind the given IP address (192.0.2.1).

Identity Awareness Commands
Identity Awareness Administration Guide R77 | 91
Note - The last field "Published " indicates whether the session information was already published to the Gateway PEPs whose IP addresses are listed.
pdp connections
Description These commands assist in monitoring and synchronizing the communication between the PDP and the PEP.
Syntax pdp connections <argument>
Argument Description
pep Shows the connection status of all the PEPs that should be updated by the current PDP
ts Shows a list of terminal servers that are connected
ifmap Shows a list of the active IFMAP sessions
pdp control
Description Provides commands to control the PDP process.
Syntax # pdp control <parameter> <option>
Parameter Description
revoke_ip <IP
address> Log out the session that is related to the given IP.
revoke_pt_key
<session id.> Revoke the packet tagging key if one exists.
sync Force an initiated synchronization operation between the PDPs and the PEPs. When running this command, the PDP will inform its related PEPs the up-to-date information of all connected sessions. At the end of this operation, the PDP and the PEPs will contain the same and latest session information.
pdp network
Description Shows information about network related features.
Syntax # pdp network <parameter>
Parameter Description
info Display a list of networks known by the PDP.
registered Display the mapping of a network address to registered gateways (PEP module).
pdp debug
Description Activates and deactivates the debug logs of the PDP daemon.
Syntax # pdp debug <parameter> <option>
Parameter Description
on Turn on the debug logs (should be followed by the command "set" to determine the required filter).
off Turn off the debug logs.

Identity Awareness Commands
Identity Awareness Administration Guide R77 | 92
Parameter Description
set <topic name>
[critical|surprise| important|events| all]…
Filter the debug logs that would be written to the debug file according to the given topic and severity
For debug it is recommended to run:
pdp debug set all all
Note that you can place a number of topics and severity pairs.
For example: topicA severityA topicB severityB ...
unset <topic name>… Unset a specific topic or topics.
stat Show the status of the debug option.
reset Reset the debug options of severity and topic. The debug is still activated after running this command.
rotate Rotate the log files (increase the index of each log file) so that the current log file that will be written is the PDP log. For example, pdpd.elg becomes pdpd.elg.0 and so on.
ccc [on|off] Allows enabling or disabling writing of the CCC debug logs into the PDP log file.
Important - Activating the debug logs affects the performance of the daemon. Make sure to turn off the debug after you complete troubleshooting.
pdp tracker
Description Adds the TRACKER topic to the PDP logs (on by default). This is very useful when monitoring the PDP-PEP identity sharing and other communication on distributed environments. This can be set manually by adding the TRACKER topic to the debug logs.
Syntax # pdp tracker <parameter>
Parameter Description
on Turns on logging of TRACKER events in the PDP log.
off Turns off the logging of TRACKER events in the PDP log.
pdp status
Description Displays PDP status information such as start time or configuration time.
Syntax # pdp status <parameter>
Parameter Description
show Display PDP information.

Identity Awareness Commands
Identity Awareness Administration Guide R77 | 93
pdp update
Description Initiates a recalculation of group membership for all users and computers. Note that deleted accounts will not be updated.
Syntax # pdp update <parameter>
Parameter Description
all Recalculate group membership for all users and computers.
pdp ad associate
Description For AD Query, adds an identity to the Identity Awareness database on the Security Gateway. The group data must be in the AD.
Syntax # pdp ad associate ip <ip> u <username> d <domain> [m <machine>] [t <timeout>] [s]
Parameter Description
ip <ip> IP address for the identity.
u <username> Username for the identity.
m <machine> Computer that is defined for the identity.
d <domain> Domain of the ID server.
t <timeout> Timeout setting for the AD Query (default is 5 hours).
s Associates u <username> and m <machine> parameters sequentially. First
the <machine> is added to the database and then the <username>.
pdp ad disassociate
Description Removes the identity from the Identity Awareness database on the Security Gateway. Identity Awareness does not authenticate a user that is removed.
Syntax # pdp ad disassociate ip <ip> {u <username>|m <machine>} [r {probed|override|timeout}]
Parameter Description
ip <ip> IP address for the identity
u <username> Username for the identity
m <machine> Computer that is defined for the identity
t <timeout> Timeout setting for the AD Query (default is 5 hours)
r
{probed|override|
timeout}
Reason that is shown in the SmartView Tracker logs

Identity Awareness Commands
Identity Awareness Administration Guide R77 | 94
pep Description Provides commands to control and monitor the PEP process.
Syntax # pep [command]... <argument>
Parameter Description
tracker Tracker options.
show Display PEP information.
pep show
Description Displays information regarding pep status.
Syntax # pep show <parameter> <option>
pep show user
Description Enables monitoring the status of sessions that are known to the PEP. You can perform varied queries according to the usage below to get the output you are interested in.
Syntax # pep show user all
Parameter Description
all Display all sessions with information summary.
Query Syntax # pep show user query <parameter>
Parameter Description
usr <username> Display session information for the given user name.
mchn <computer
name> Display session information for the given computer name.
cid <IP> Display session information for the given IP.
uid <uidString> Display session information for the given session ID.
pdp <IP> Display all session information that was published from the given PDP IP.
ugrp <group> Display all sessions of users that are members of the given user group name.
mgrp <group> Display all sessions of computers that are members of the given computer group name.
Note - You can use multiple query tokens (parameters) at once to create a logical "AND" correlation between them. For example, to display all users that have a sub string of "jo" AND are part of the user group "Employees" then you can use:
# pep show user query usr jo ugrp Employees

Identity Awareness Commands
Identity Awareness Administration Guide R77 | 95
pep show pdp
Description Enables monitoring the communication channel between the PEP and the PDP. The output displays the connect time and the number of users that were shared through the connection.
Syntax # pep show pdp <parameter>
Parameter Description
all List all the PDPs that are connected to the current PEP with the relevant information.
id <IP> Display connection information of the given PDP IP.
pep show stat
Description Shows the last time the daemon was started and the last time a policy was received.
Important - Each time the daemon starts, it loads the policy and the two timers (Daemon start time and Policy fetched at) will be very close.
Syntax # pep show stat
pep show network
Description Shows network related information.
Syntax # pep show network <parameter>
Parameter Description
pdp Shows information about mapping between the network and PDPs.
registration Shows which networks this PEP is registered to.
pep debug
Description See pdp debug (on page 91).
adlog Description Provides commands to control and monitor the AD Query process.
When AD Query runs on a Security Gateway, AD Query serves the Identity Awareness feature that gives
logging and policy-enforcement. In this case the command line is: adlog a <argument> (see below for
options)
When it runs on a Log Server, AD Query gives identity logging. In this case, the command line is: adlog l
<argument>. Note: the l in adlog l is a lowercase L.
Options for adlog a and adlog l are identical.
Syntax # adlog {a|l} <command>… <argument>
Parameter Description
<none> Display available options for this command and exit.
{a|l} Set the working mode:
adlog l - if you are using a Log Server (identity logging)
adlog a - if you are using AD Query for Identity Awareness.

Identity Awareness Commands
Identity Awareness Administration Guide R77 | 96
Parameter Description
query
See sections below.
debug
dc
statistics
control
service_accounts
adlog query
Description Shows the database of identities acquired by AD Query, according to the given filter.
Usage adlog [a|l] query <argument>
Syntax
Parameter Description
ip <IP address> Filters identities relating to the given IP.
string <string> Filters identity mappings according to the given string.
user <user name> Filters identity mappings according to a specific user.
machine <computer
name> Filters identity mappings according to a specific computer.
all No filtering, shows the entire identity database.
Example
adlog a query user jo
Shows the entry that contains the string "jo" in the user name.
adlog dc
Description Shows status of connection to the AD domain controller.
Usage adlog [a|l] dc
Syntax None
adlog statistics
Description Displays statistics regarding NT Event Logs received by adlog, per IP and by total. It also shows the number of identified IPs.
Usage adlog [a|l] statistics
Syntax None

Identity Awareness Commands
Identity Awareness Administration Guide R77 | 97
adlog debug
Description Turns on/off debug flags for controlling the debug file. The debug file is located at $FWDIR/log/pdpd.elg (for Identity Awareness on a Security Gateway) or $FWDIR/log/fwd.elg (for identity logging on a log server).
Usage adlog [a|l] debug <parameter>
Syntax
Parameter Description
on Turn on debug.
off Turn off debug.
mode Show debug status (on/off).
extended Turn on debug and add extended debug topics.
adlog control
Description Sends control commands to AD Query.
Usage adlog [a|l] control <parameter>
Syntax
Parameter Description
stop Stop AD Query. New identities are not acquired via AD Query.
reconf Send a reconfiguration command to AD Query, which means it resets to policy configuration as was set in SmartDashboard.
adlog service_accounts
Description Shows accounts that are suspected to be "service accounts". Service accounts are accounts that don’t belong to actual users, rather they belong to services running on a computer. They are suspected as such if they are logged in more than a certain number of times.
Usage adlog [a|l] service_accounts
Syntax None

Identity Awareness Commands
Identity Awareness Administration Guide R77 | 98
test_ad_connectivity Description Runs connectivity tests from the Security Gateway to an AD domain controller.
Syntax $FWDIR/bin/test_ad_connectivity <parameter_1 value_1> <parameter value_2> … <parameter_n value_n>
Parameters can be set in the command line as specified below, or set in a text file located at
$FWDIR/conf/test_ad_connectivity.conf . Parameters set in the test_ad_connectivity.conf
file are overridden by ones provided in the command line.
Important - Parameters set in $FWDIR/conf/test_ad_connectivity cannot contain
whitespaces and cannot be within quotation marks.
Output of the utility is provided in a file (not to STDOUT). The path of the file is specified by the –o
parameter (see below).
Syntax
Parameter Mandatory? Description
-d <domain name> Mandatory Domain name of the AD, for example ad.checkpoint.com
-i <DC IP> Mandatory IP of the domain controller that is being tested.
-u <user name> Mandatory Administrator user name on the AD.
-o <filename> Mandatory Output filename relative to $FWDIR/tmp. For example, if you
specify -o myfile, the output will be in $FWDIR/tmp/myfile
-c <password
clear> Either this or -a should be specified
User’s password.
-a Either this or -c should be specified
For entering password via stdin.
-t <timeout> Mandatory Total timeout in milliseconds.
-D <user DN> Optional Use this for LDAP user DN override (the utility won’t try to figure out the DN automatically).
-l Optional Run LDAP connectivity test only (no WMI test).
-w Optional Run WMI connectivity test only (no LDAP test).
-s Optional SSL Parameters file path.
-L Optional Timeout for the LDAP test only. If this timeout expires and the LDAP test doesn’t finish, both tests fail.
-h Optional Show help.

Identity Awareness Administration Guide R77 | 99
Appendix A
Regular Expressions
In This Appendix Regular Expression Syntax 99
Using Non-Printable Characters 100
Using Character Types 100
Regular Expression Syntax
Metacharacter Name Description
\ Backslash escape metacharacters
non-printable characters
character types
[ ] Square Brackets character class definition
( ) Parenthesis subpattern, to use metacharacters on the enclosed string
{min[,max]} Curly Brackets min/max quantifier
{n} - exactly n occurrences
{n,m} - from n to m occurrences
{n,} - at least n occurrences
. Dot match any character
? Question Mark zero or one occurrences (equals {0,1})
* Asterisk zero or more occurrences (equals {0,})
+ Plus Sign one or more occurrences (equals {1,})
| Vertical Bar alternative
^ Circumflex anchor pattern to beginning of buffer (usually a word)
$ Dollar anchor pattern to end of buffer (usually a word)
- hyphen range in character class
Note for the asterisk:
When using regular expressions, the asterisk is a metacharacter that means zero or more instances of the preceding character.
When not using regular expressions, the asterisk is a wildcard, for any character, zero or more number of instances.

Regular Expressions
Identity Awareness Administration Guide R77 | 100
For example, to block any domain that ends with "example.com" (such as www.example.com)
For a regular expression enter: .*\.example\.com
For a wildcard enter: *.example.com
Using Non-Printable Characters To use non-printable characters in patterns, escape the reserved character set.
Character Description
\a alarm; the BEL character (hex 07)
\cx "control-x", where x is any character
\e escape (hex 1B)
\f formfeed (hex 0C)
\n newline (hex 0A)
\r carriage return (hex 0D)
\t tab (hex 09)
\ddd character with octal code ddd
\xhh character with hex code hh
Using Character Types To specify types of characters in patterns, escape the reserved character.
Character Description
\d any decimal digit [0-9]
\D any character that is not a decimal digit
\s any whitespace character
\S any character that is not whitespace
\w any word character (underscore or alphanumeric character)
\W any non-word character (not underscore or alphanumeric)

Index A
Access Role Objects • 29 Access Settings • 31 Acquiring Identities for Active Directory Users •
16 Acquiring Identities in a Terminal Server
Environment • 21 Acquiring Identities in Application Control • 22 Acquiring Identities with Browser-Based
Authentication • 17 Acquiring Identities with Endpoint Identity
Agents • 19 AD • 7 AD Based Configuration • 81 AD Configuration • 76 AD Query • 7, 11 Adding a New Language • 55 adlog • 95 adlog control • 97 adlog dc • 96 adlog debug • 97 adlog query • 96 adlog service_accounts • 97 adlog statistics • 96 Advanced Browser-Based Authentication
Configuration • 55 Advanced Deployment • 64 Advanced Endpoint Identity Agent Options • 74 Advanced Endpoint Identity Agents
Configuration • 74 Authentication Settings • 32, 38 Authorized RADIUS Clients • 45 Automatic LDAP Group Update • 27
B
Browser Configuration • 63 Browser-Based Authentication • 12
C
Captive Portal • 7 Changing Portal Text in SmartDashboard • 55 Checking the Status of Domain Controllers • 50 Choosing Identity Sources • 48 Comparison of Acquisition Sources • 10 Configuration Overview • 60 Configuring an Account Unit • 61, 77 Configuring Browser-Based Authentication in
SmartDashboard • 31 Configuring Endpoint Identity Agent
Deployment for User Groups • 36 Configuring Endpoint Identity Agent
Deployment from Captive Portal • 36 Configuring Endpoint Identity Agents • 34 Configuring Endpoint Identity Agents in
SmartDashboard • 38 Configuring Identity Awareness • 24 Configuring Identity Awareness for a Domain
Forest (Subdomains) • 49
Configuring Identity Logging for a Log Server • 46
Configuring RADIUS Accounting • 44 Configuring Remote Access • 46 Configuring Terminal Servers • 39 Configuring Terminal Servers Accessibility • 41 Configuring the Endpoint Identity Agent • 87 Configuring the Firewall • 54 Configuring the Shared Secret • 40 Confirm that Security Event Logs are Recorded
• 54 Connectivity Issues • 52 Creating a New User Account • 60, 76 Creating Custom Endpoint Identity Agents • 86 Creating New Language Files • 56 Customize Appearance • 33 Customizing Parameters • 74 Customizing Text Strings • 55
D
Data Center Protection • 67 Dedicated Identity Acquisition Security Gateway
• 73 Deploying a Custom Endpoint Identity Agent
with the Captive Portal • 88 Deploying a Test Environment • 65 Deploying the Terminal Servers Identity
Awareness Solution • 40 Deployment • 15 Deployment Options • 65 Deployment Scenarios • 66 Discovery and Trust Options • 79 Distributed Enterprise with Branch Offices • 70 DNS Based Configuration • 83 Domain administrator Credentials • 53 Downloading Endpoint Identity Agent • 15
E
Editing the Language Array • 56 Enabling Identity Awareness on the Log Server
for Identity Logging • 46 Enabling Identity Awareness on the Security
Gateway • 24 Enabling RADIUS Accounting on a Security
Gateway • 43 Enabling Transparent Kerberos Authentication •
62 Endpoint Identity Agent Access • 38 Endpoint Identity Agent Deployment from the
Portal • 34 Endpoint Identity Agent Deployment Methods •
36 Endpoint Identity Agent Types • 35 Endpoint Identity Agent Upgrades • 39 Excluding Users, Computers and Networks • 50
F
File Name Based Server Discovery • 80 Firefox • 63
G
Generating the Certificate Signing Request • 58 Generating the P12 File • 58 Getting Started With Identity Awareness • 8

Page 102
Getting the source MSI File • 86 Google Chrome • 63
H
How AD Query Works- Firewall Rule Base • 12 How Captive Portal Works- Firewall Rule • 13 How RADIUS Accounting Works with Identity
Awareness • 43 How SSO Works • 75 How Transparent Kerberos Authentication
Works • 14
I
Identity Agent • 7 Identity Agents • 14 Identity Awareness Commands • 89 Identity Awareness Scenarios • 16 Identity Sources • 48 Important Information • 3 Install Database for a Log Server • 54 Installing Microsoft .NET Framework • 86 Installing the Signed Certificate • 59 Installing the Terminal Servers Endpoint Identity
Agent • 40 Internet Explorer • 63 Introduction • 8, 64, 78, 89 Introduction • 86
K
Kerberos SSO Compliance • 74
L
Large Scale Enterprise Deployment • 68
M
Making Sure the Strings Shows Correctly • 57 Managing the Suspected Service Account List •
51 Mapping the User Account to a Kerberos
Principal Name • 60, 76 Message Attribute Indices • 45 Multiple Security Gateway Environments • 51
N
Name and Password Login Settings • 33 Negate and Block • 30 Negate and Drop • 29 Nested Groups • 52 Network Segregation • 69 Non-English Language Support • 52
O
Obtaining and Installing a Trusted Server Certificate • 58
Option Comparison • 80
P
Packet Tagging for Anti-Spoofing • 35 pdp • 89 pdp ad associate • 93 pdp ad disassociate • 93 pdp connections • 91 pdp control • 91
pdp debug • 91 pdp monitor • 90 pdp network • 91 pdp status • 92 pdp tracker • 92 pdp update • 93 pep • 94 pep debug • 95 pep show • 94 pep show network • 95 pep show pdp • 95 pep show stat • 95 pep show user • 94 Performance • 52 Perimeter Security Gateway with Identity
Awareness • 66 Portal Network Location • 31
R
RADIUS Accounting • 7 RADIUS Client Access Permissions • 44 References • 76 Regular Expression Syntax • 99 Regular Expressions • 99 Remote Registry • 84 Required SmartDashboard Configuration • 17,
18, 20, 22 Results of the Wizard • 25 Rule • 7 Rule Base • 7 Running the Endpoint Identity Agent
Configuration Tool • 86
S
Saving New Language Files • 56 Scenario
Endpoint Identity Agent Deployment and User Group Access • 19
Guest Users from Unmanaged Device • 18 Identifying Users Accessing the Internet
through Terminal Servers • 21 Identifying Users in Application Control Logs
• 22 Laptop Access • 16 Recognized User from Unmanaged Device •
17 Security Gateway • 7 Security Management Server • 7 Server Certificates • 57 Server Discovery and Trust • 37, 78 Service Account • 7 Session • 39 Session Timeout and LDAP Servers • 45 Setting Captive Portal to String ID Help Mode •
55 Showing the Language Selection List • 56 Single User Assumption • 50 SmartDashboard • 7 SmartDashboard Configuration • 77 SmartDashboard Toolbar • 23 Source and Destination Fields • 30 Specifying Domain Controllers per Security
Gateway • 49 SSO Configuration • 76

Page 103
T
Terminal Servers - Users Tab • 41 Terminal Servers Advanced Settings • 42 test_ad_connectivity • 98 Testing Endpoint Identity Agents • 66 Testing Identity Sources • 65 Transparent Kerberos Authentication
Configuration • 59 Troubleshooting • 52 Troubleshooting - Displaying SRV Record
Stored in the DNS Server • 84 Troubleshooting Authentication Issues • 39
U
Unregistered Guest Login Settings • 34 Upgrading a Terminal Servers Endpoint Identity
Agent • 40 Use wbemtest to Verify WMI • 53 User Access • 33 User Experience • 18, 19 User Experience • 19 User Identification in the Logs • 17, 18, 21, 22 Using Access Roles • 17 Using AD Query with NTLMv2 • 51 Using Character Types • 100 Using Identity Awareness in the Application and
URL Filtering Rule Base • 29 Using Identity Awareness in the Firewall Rule
Base • 28 Using Non-Printable Characters • 100
V
Verify the WMI Service • 54 Viewing the Certificate • 59
W
What's Next • 20 Wireless Campus • 72 Working with Access Roles • 26 Working with AD Query • 50 Working with RADIUS Accounting • 43 Working with the Endpoint Identity Agent
Configuration Tool • 86