cpa audit/review guide - clients.foundationsoft.com · developed in 2004, this online directory...
TRANSCRIPT

CPA AUDIT/REVIEW GUIDEA GUIDE TO FOUNDATION for Windows CPA AUDIT/REVIEW MODULE

A Note to Our CPA Friends
We Love to Compete...and We’re Here to Help You Compete, Too...Working closely with contractors since the 1980s, I’ve learned a few things.
One eye-opener is seeing that the vast majority of contractors don't use construction-specific accounting software. More importantly, an equal majority don't utilize the services of a CPA who has a focus in construction.
This is why Foundation Software works hard to meet and establish relationships with CPAs who have a strength in construction. In fact, we have created a variety of programs just for our CPA friends. Together, we can help each other reach the thousands of contractors who could benefit from our respective services.
Below, I have outlined a couple of ways we can be of assistance to your firm. We invite you to learn more about these resources by visiting www.foundationsoft.com/CPA.
• Online CPA DirectoryDeveloped in 2004, this online directory lists CPA firms with an emphasis in construction. A listing is free, and represents a great opportunity for our CPA friends to get in front of contractors who may be actively looking for a CPA.
• CPA Audit/Review Module Developed with feedback from respected industry CPAs and professionals, this add-on module was created to help facilitate the audit/review process for those using FOUNDATION® for Windows®. It saves time and eliminates costly errors and omissions.
• CPA Webcast with Free CPE CreditWe created this live, interactive webcast so that CPAs could conveniently learn more about FOUNDATION for Windows and see how it can benefit their construction clients. Eligible attendees can qualify for up to one hour of free CPE when participating.

It is our hope that you will keep Foundation Software in mind when referring accounting systems to your construction clients. We welcome the opportunity to demonstrate how FOUNDATION for Windows could benefit them. We understand that in addition to referring FOUNDATION for Windows, you may also choose to refer other construction accounting software products. We value this competition and see it as an occasion to prove the strength of our system and our company.
In closing, Foundation Software is a company that likes to compete and wishes to help you compete, too. We will continue to meet and work with CPA firms who have an emphasis in construction and hope that you will get to know us, as well!
Sincerely,
Fred OdeCEO/Chairman
P.S. We value your opinions and are always open to hear new ideas from our clients and professional partners. I invite you to email me at [email protected] or call me directly at 800-246-0800.


Limits of LiabilityThis training guide has been developed with the intent of assisting new
clients and users of FOUNDATION® for Windows® (FOUNDATION) to become familiar with the look, feel and basic operation of FOUNDATION. This guide is not intended as the sole source of training or information
about the use and operation of FOUNDATION.
In order to receive the full benefit of the rich features that are available within FOUNDATION, it is critical that a Foundation Software, Inc., Client Services Representative review the particular needs of your firm and assist with the soft customization of FOUNDATION. Although we believe that this training guide is a powerful and useful tool that will assist you
in the learning process, we recognize that no training guide can adequately convey all of the many options available.
We strongly encourage you, as a new user of FOUNDATION, to consult with a Client Services Representative prior to making any final decisions
on implementation and usage of the product. In the event that you choose to use this guide as your sole source of training and insight into
FOUNDATION, we disclaim any liability of fitness for any particular use and for any other deficiency that may be related to the decision above. Foundation Software, Inc., reiterates here its warranties and remedies
as included in your Licensing Agreement as if reprinted here.
Copyright NoticeThis documentation and the software described within are copyrighted.
Under United States copyright laws, neither this documentation, the reports within nor the software may be copied, reproduced, translated or reduced to any electronic medium or machine readable form without
first obtaining the prior written consent of Foundation Software, Inc. Copyright © 2013 Foundation Software, Inc. All rights reserved. Portions copyright © Microsoft Corporation. All rights reserved.
Trademarks and AcknowledgementsFOUNDATION is a registered trademark of Foundation Software, Inc.
Microsoft, Windows, Excel and SQL Server are either registered trademarks or trademarks of Microsoft Corporation in the United States and/or other countries. Adobe and Reader are registered trademarks of
Adobe Systems Incorporated in the United States and/or other countries. Lotus 1-2-3 is a registered trademark of IBM in the United
States and/or other countries. Crystal Reports is a registered trademark of Business Objects SA or its affiliated companies in the United States
and/or other countries. All other names mentioned herein may be trademarks of their respective owner.

FOUNDATION for Windows CPA Audit/Review Module
Executive OverviewFoundation Software's CPA Audit Review Module is a collaborative tool for contractors and their CPAs. This patent-pending, add-on module to FOUNDATION® for Windows® was designed with input and recommendations from construction-focused CPA firms as a tool to facilitate the audit/review process using FOUNDATION.
A typical audit/review requires a multitude of reports and detailed transaction records. Contractors may not know specifically what their CPA needs, or they may be unprepared to gather the required information. Likewise, CPAs often experience difficulties extracting information from their clients’ computerized systems, resulting in inefficiencies and errors.
Foundation Software has addressed these needs with its patent-pending module that features a centralized “CPA Console.” When the Console is launched, the “Reports” screen becomes visible and allows the user to select from a list of reports. Each report follows recommendations from the PPC Guides for Accounting and Auditing and was designed to show information the way most CPAs want to see it. The Console also allows the CPA to easily make corrections to the data or to re-class items, when necessary.
For example, after entering selected date ranges, auditors can instantly pull:
• Gain/Fade Reports: Similar to the contractor's over/under billing report but in a format preferred by CPAs, this report gives information on the gain or fade (profit or loss) of each job over several periods in order to give a snapshot of a contractor's bidding and billing processes.
• Job and G/L Tie-Out: This report capitalizes on the unique ability of FOUNDATION to link General Ledger activity to a specific job. It allows a view of General Ledger transactions for one or more specific jobs, and makes the task of tying out the General Ledger and job costing a breeze.

• Materiality Reports: For Accounts Payable, Accounts Receivables and General Ledger, materiality reports are available to help locate transactions of a minimum dollar amount and trace them from start to finish.
• Billing Back Log Reports: The purpose of this report is to show work remaining to be completed in the format used by most CPAs.
• Over/Under and Work in Progress: FOUNDATION’s powerful over/under billing report allows CPAs to gain a thorough understanding of where the clients’ contracts stand. It is date sensitive and offers another view into the careful tie-out between job costing and the General Ledger.
• Cut-Off Reports: For payable invoices, receivable invoices, checks, and cash receipts, these simple reports allow the CPA to see payments made or received outside the audit period for invoices dated inside the period.
• Flexible Aging Reports with Materiality: FOUNDATION’s already powerful Aging Reports have been enhanced with features like aging by transaction date and the ability to include only transactions with a minimum dollar amount.
• Multi-Period Trial Balance: The standard Trial Balance can now be run for up to five periods (weeks, months, years, etc.). As with all reports in FOUNDATION, it can quickly and easily be exported to Microsoft® Excel format for use in CPA-specific audit software.
Also available with the module is this CPA Audit/Review Guide. Co-authored and edited by construction-specific CPAs, the guide is broken into two parts. The first, “The Preliminaries,” explains the basics of working with the FOUNDATION system. The second part, “Performing Audits and Reviews,” details the reports available through the console and how to find the information necessary for an audit/review.

Table of ContentsPart 1:The Preliminaries ................................................. 1
Communicating with Foundation Software .................. 1The Foundation Software CPA Directory ............... 2Advantages of being listed in the CPA Directory .... 2Sign up for the CPA Directory .............................. 3
FOUNDATION Facts and Features .................................. 4
Working in FOUNDATION .............................................. 6Using the Menu .................................................. 6Quick Links Bar ................................................... 7Open Windows Bar ............................................. 8The FOUNDATION Menu Bar ................................... 8Changing Modes ................................................. 8Modifying Records .............................................. 9Adding Rows ...................................................... 9Verifying and Saving Records .............................10
Working with FOUNDATION Reports .............................12Running Reports ................................................12Using Standard Report Criteria Fields ..................13Using The Report Toolbar ...................................14Sorting On-Screen Reports .................................17
Exporting Data to PDF, Excel and More .....................18Accessing Data From Third-Party Software ..........19
Part 2:Performing Audits and Reviews ........................ 23
Using the CPA Console .............................................25Accessing the CPA Console .................................25Working in the CPA Console ...............................26Closing the CPA Console .....................................26
The Reports of the CPA Console ...............................27The Accounts Payable Aging Report ....................27The Accounts Payable Materiality Report .............28The Accounts Payable Invoice Cut-Off Report ......29The Check Cut-Off Report ..................................30The Accounts Receivable Aging Report ................31The Accounts Receivable Materiality Report .........32The Accounts Receivable Invoice Cut-Off Report ..33The Cash Receipt Cut-Off Report ........................34

The Job & Contact Info Report ...........................34The Gross Profit Report ......................................35The Contract Status Report ................................35The Cash Flow by Job Report .............................35The Billing Backlog Report ..................................36The Gain/Fade Report ........................................36The Over/Under Billing Report ............................36The Overhead Allocation Reports ........................38The Trial Balance Report ....................................39The GL/JC Tie-Out Report ..................................39The General Ledger Materiality Report ................40The Payroll 941 Report ......................................40
How Do I Find ... ? ..................................................42
Entering Adjustments ..............................................45Creating a New Journal ......................................45Entering an Adjustment .....................................45

Part 1The Preliminaries


Communicating with Foundation Soft-
1Communicating with Foundation Software
Foundation Software is committed to making FOUNDATION® for Windows® a powerful, yet simple-to-use tool for construction professionals and CPAs alike. We're always here to offer you more help. And we love hearing your suggestions for improvement. The CPA Audit/Review Console offers several ways to contact us for help or to make suggestions.
To contact Foundation Software:
1. Access the CPA Audit/Review Console.
2. Click the More! link near the top.
3. If you would like to send us an email requesting additional help with the Console or other areas of the system, click the [Email us for help] button. This will open an email directed to our support department. We will be in contact with you as soon as possible after we receive your email.
If you would like to offer us a suggestion regarding the Console or other areas of the system, click the [Email Suggestions] button. This will open an email directed to our support department. We will take your suggestion under consideration, and we will contact you shortly.
If you would like to phone, fax, or write us, use the contact information provided in the “Contact Us” area of the Console.
1

FOUNDATION® for Windows®
The Foundation Software CPA Directory
In the preface of the CPA Audit/Review Guide, we mentioned that we love to compete — and we want to help you compete, too. One of the many ways in which Foundation helps our professional friends is through our on-line Construction CPA Directory. Developed back in 2004, this directory lists firms across the United States with a strength in construction. We currently have over 350 firms listed and, to my knowledge, this directory is the only one of its kind.
Advantages of being listed in the CPA Directory
In our experience of working with contractors, we’ve noticed a common theme: many do not utilize the services of a construction-focused CPA firm.
In our opinion this represents a great opportunity for our professional partners to get in front of the contractors that could most benefit from their services. Additionally, a link within a relevant website can only help to improve your ranking with various search engines.
2

Communicating with Foundation Soft-
Sign up for the CPA Directory
I strongly encourage all CPAs with an emphasis in construction to take advantage of our CPA Directory, if you haven’t already done so.
Signing up is easy and there is absolutely no cost or commitment involved. The only prerequisite is that your firm have more than five construction clients.
To list your firm on the Foundation Software CPA Directory, please do the following:
• Visit the CPA Directory page of our website and click the CPA Directory form.
• Complete all of the required fields
• Read and agree to the directory consent policy
• Click the [Submit CPA Entry] button
As always, Foundation Software welcomes your comments and suggestions on how we can continue to develop better programs and products focused for the construction industry. To provide feedback, simply contact us by calling 800-246-0800 or email me at [email protected].
3

FOUNDATION® for Windows®
2FOUNDATION Facts and Features
Foundation Software offers contractors one core product – FOUNDATION® for Windows®. It’s designed around the needs of contractors, but we also strive to make it friendly toward the need of CPAs and other accounting professionals. In other words, it offers construction-specific features such as AIA billing and certified payroll reporting, but it does it all with an eye toward security, audit trails and date-sensitive reporting.
As you are working with a client who uses FOUNDATION, you should be aware of the following features of the system:
• Date Sensitivity: All transactions are saved individually with a transaction date, so all reports are date sensitive. If an invoice is entered on the 1st, adjusted on the 15th and paid on the 30th of March, a report showing that invoice will vary greatly depending on the date for which the report is run. Let’s say you run the report the following month, April. At that point, you can enter any date you choose. If you enter March 2nd, the report will show the original invoice without the adjustment or payment. If you enter March 20th, you’ll see the adjusted invoice amount, but not the payment. And so on.
• GL and JC Balance: As far as we know, FOUNDATION is the only system on the market that ties a job number to every income and expense transaction – from every module and transaction, including timecards, burden, union fringes, etc. – as it is posted to the General Ledger. This tight integration between the G/L and job costing ensures that the two balance and offers the ability to see G/L reports from the job perspective. For example, run a GL/JC Tie-Out Report to see all G/L activity for a particular job or range of jobs and see that it balances to the penny with job costing detail.
• Multiple Dates: FOUNDATION tracks several dates for each transaction. On payable invoices, for example, users can enter both an Invoice Date and Transaction Date. The Invoice Date is the date printed on the
4
FOUNDATION Facts and Features
invoice received from a vendor. The Transaction Date is the date on which the invoice is posted to the books. In addition, FOUNDATION tracks the actual system date that the user completed the data entry.
• Audit Trail: A complete audit trail is always maintained. Adjustments and reversals (for invoices, checks, etc.) are actually saved as separate transactions from the original, so they are never deleted. Historical data is linked to maintenance data (like vendors, customers and employees), so maintenance items that have history posted against them cannot be deleted. This means you’ll never see an invoice for a “mystery” vendor that’s been deleted.
• Data Integrity: FOUNDATION prevents common fraud tactics. The vendor/customer on invoices cannot be changed once an invoice is posted, even when it is adjusted or reversed. While a check can be cut to a name different than that on the invoice, an audit trail maintains that information, and the name on the check cannot be changed after the check is printed.
• Powerful Database: The system is based on a Microsoft® SQL Server database, which is well respected for maintaining data accurately and completely without risk of corruption. In addition, FOUNDATION offers extensive security measures to ensure that data is available only to those authorized to view/change it.
5

FOUNDATION® for Windows®
3Working in FOUNDATION
There are certain functions that you will perform frequently in FOUNDATION® for Windows®. These functions are used in every module in the system. For example, when you learn the steps in modifying a record, the same steps will apply in modifying Customer, Vendor and Employee Records, etc.
Using the Menu
The Main Menu, shown below, offers access to all FOUNDATION features that you have security permission to access. It includes the FOUNDATION base modules, any additional modules or project management tools that have been purchased and installed, and program tools (including the Control Files, report genies, etc.).
You can create links to frequently-used menu options by dragging any menu option to the Quick Links bar on the left side of the screen. Custom menu items can also be created.
Note:If a Control File window is open, it must be closed before other windows can be opened.
6

Working in FOUNDATION
Most of the modules contain three options. It is important to have a general understanding of these options to work in FOUNDATION efficiently. The usage of these options is consistent throughout most modules in the system.
• Daily – This option contains functions you perform regularly to produce or modify something within the system. For example, when you need to invoice a customer, go to Accounts Receivable on the Main Menu and click Daily. In the submenu that appears, click Enter Invoices.
• Maintenance – This option consists of choices allowing ongoing record maintenance. For example, when you need to add a customer or change a customer’s address, go to Accounts Receivable on the Main Menu and click Maintenance. In the submenu that appears, click Customers.
• Reports – This option lists choices for reporting your data. For example, when you want to view an A/R Aging Report, go to Accounts Receivable on the Main Menu and click Reports. In the submenu that appears, click Aging Report. Each report is listed under the module to which its data is relevant. In a few instances, a report may be listed under more than one module because it is relevant to more than one module.
Quick Links Bar
The Quick Links bar appears to the left of the Main Menu. You can create links to frequently-used Main Menu options by dragging any menu option to the Quick Links bar. You can then click the new link to go directly to that menu option. Links to menu headings (e.g., Accounts Receivable or Job Costing Reports) will appear in bold font, while links to menu items (e.g., A/P Aging Report or Customers) will appear in regular font. Custom menu items can also be added to the Quick Links bar.
Note:If the Quick Links bar does not currently appear, click the lightning bolt icon on the FOUNDATION Toolbar to display it.
7

FOUNDATION® for Windows®
To change the order of items in the Quick Links bar, drag them up or down to the desired order. To remove an item from the Quick Links bar, simply drag it back to the Main Menu. Links you create will be saved for your user login (which is always displayed above the Quick Links bar).
Open Windows Bar
The Open Windows bar appears to the left of the Main Menu. If the Quick Links bar is displayed, the Open Windows bar will appear to the right of it. By default, the Open Windows bar is not visible. To display it, click the window icon on the toolbar. Clicking the window icon again will hide it.
The Open Windows bar lists all windows that are currently open in FOUNDATION, with the currently active window highlighted and the most recently opened window listed at the bottom. Clicking any window name listed in the bar will bring the corresponding open window to the foreground.
The FOUNDATION Menu Bar
The menu bar provides another quick way to access functions used regularly in FOUNDATION. The toolbar is availablr throughout FOUNDATION, though its appearance may vary from window to window. In addition, if you have purchased and installed any optional modules, a corresponding menu option will appear for each of those modules.
To access any module, place your mouse pointer over the module name and click once. In the submenu that appears, click Daily Transactions, Maintenance or Reports. This will lead you to the corresponding area of the Main Menu, where you can navigate to the desired function.
The menu bar also provides printing and editing options, as well as options to work with the record or report currently displayed on the screen.
Changing Modes
When accessing records in FOUNDATION, you may wish to add a new record or modify an existing record. For instance, if you gain a new customer, you will want to
8

Working in FOUNDATION
add that customer information in FOUNDATION. If an existing customer moves, you will need to access that Customer’s Record and modify the address. When accessing most windows in FOUNDATION, the system will default to Add Mode. To toggle between Add Mode and Modify Mode, do one of the following:
• Click your mouse on the Mode Box in the upper left corner of the record window, or
• Press the <F2> key, or
• Click the button on the Toolbar, or
• From the Main Menu, choose Record and select Switch Mode.
Modifying Records
This function is used to access an existing record to review it or to make modifications. In order to modify a record, you need to access Modify Mode. Once you are in Modify Mode, do one of the following:
• Select the record’s number from the appropriate dropdown menu, and click [OK], or
• In the key field, enter the number/code for the record you wish to view and press <Enter>.
Once you have accessed the record, make the needed modifications. Remember to save the record if any changes are made. See “Verifying and Saving Records” on page 10.
Adding Rows
This function is used to create a row in which to perform data entry in windows where unlimited rows of fields may be added. For example, you may have multiple Workers’ Compensation classes within one trade and may need to add rows in which to enter the appropriate classes.
Note:If you have made an inadvertent change and do not wish to save it, click the [Cancel] button or press <F10> to undo any changes made to the data in the window.
9

FOUNDATION® for Windows®
To perform this function, do one of the following:
• From the Main Menu, choose Record and select Add Row, or
• Press <Ctrl + Insert>, or
• <Tab> to the last field in the last row, and press <Tab> one more time, or
• Right-click in the window where the row is to be added and select Add from the context-sensitive menu that appears.
Verifying and Saving Records
This function is used to save a record that has been newly added or to save changes made to an existing record. In most cases, records that have been added or modified must be verified and then saved. The verification process will default entries into fields based on entries you’ve made manually, and it will check that all requirements regarding the completion of fields have been met.
To perform the verify function, do one of the following:
• Press <Enter>, or
• Press <F3>, or
• Click the [OK] button in the upper right corner of the window, or
• Click the button on the Toolbar, or
• From the Main Menu, choose Tools and select Verify.
To perform the save function, do one of the following:
• Press <Enter>, or
• Click the [OK] button in the upper right corner of the window, or
• Click the button on the Toolbar, or
Note:The Insert Row option on the right-click context sensitive menu allows you to insert a row between two existing rows. To use this feature, click in the row where you want to insert a new row. Right-click that same row, and select Insert Row from the context-sensitive menu.
10

Working in FOUNDATION
• From the Main Menu, choose Record and select Save.
If you attempt to save the record without verifying it, FOUNDATION will automatically complete the verification process. You may need to complete the save process again. If you attempt to close the record without saving it, FOUNDATION will prompt you to save the changes that were made.
Note:The underlying structure of a limited number of tables in FOUNDATION requires the system to be restarted before new records can be recognized in other areas. For instance, when defining new earn codes, you may need to log out of the system and log back in before the new earn code will be available in the dropdown menu in the Union Employee window.
11

FOUNDATION® for Windows®
4Working with FOUNDATION Reports
FOUNDATION® for Windows® offers many built-in reports, as well as several report designers (“DataGenies”) that allow you to build your own custom reports. Most of the reports you will need for the audit/review process can be accessed through the CPA Console. However, if there are additional reports that you would like to access, you can access them through the Main Menu system.
Running Reports
The basic steps for running a report are the same regardless of whether it is a built-in or custom report.
To run a report:
4. Access the desired report. (You may select the report from the Main Menu, or access it from the CPA Console.)
5. Complete the appropriate fields on the “Criteria” tab. The standard types of fields that may be included are described in “Using Standard Report Criteria Fields” on page 13.
6. Click the “Report” tab to view the report. The Toolbar will change when viewing a report, as described in “Using The Report Toolbar” on page 14.
7. If you wish to modify the criteria used for the report, return to the appropriate “Criteria” tab and make changes. Then, click the “Report” tab to view the modified report. You may also perform some sorting and filtering directly on the report. For more information on this concept, see “Sorting On-Screen Reports” on page 17.
Note:For information on designing custom reports, refer to Online Help.
Note:The date and time on which the report was produced always appears in the top, left corner of reports. When you make any changes to criteria, this date will change.
12
Working with FOUNDATION Reports
8. If you wish to print a hard copy of the report, click
the button. For additional printing options, you may also choose File from the Main Menu, then Print.
Using Standard Report Criteria Fields
There are several kinds of fields that may appear on report “Criteria” tabs, including:
• Date ranges – Often, Date Range or As Of Date fields are required, but not always. The dates entered here can be current, or for any period in the past or future. FOUNDATION never deletes history, so a report can reflect any point in time. The dropdown menus on date fields will show a calendar that you can use to select dates. Use the single arrow buttons ( or ) to move forward or backward one month, and the double arrow buttons ( or ) to move forward or backward one year. You can also simply type dates in the format of “mmddyy”. FOUNDATION will insert slashes automatically.
• Sorting options – Most reports can be ordered in a multitude of fashions. A Sort field may allow you to alphabetize the report based on names or arrange the report numerically by a key field.
• Selection options – All reports allow you to narrow the selection of records that will appear on the report. For example, you can include only transactions related to a particular job (or jobs) on the Income Statement. For each option, there are two fields that can be used to indicate a range of the item. In the first field, you would enter the lowest record number that should be included; in the second field, you would enter the highest. The report will include those records plus every record in between. (For example, to include information for jobs 2, 3 and 4, enter “2” in the first field and “4” in the second.) You can also complete just the first field to indicate a range of one. (For example, to include information for only job 2, enter “2” in the first field and leave the second field blank.)
13
FOUNDATION® for Windows®
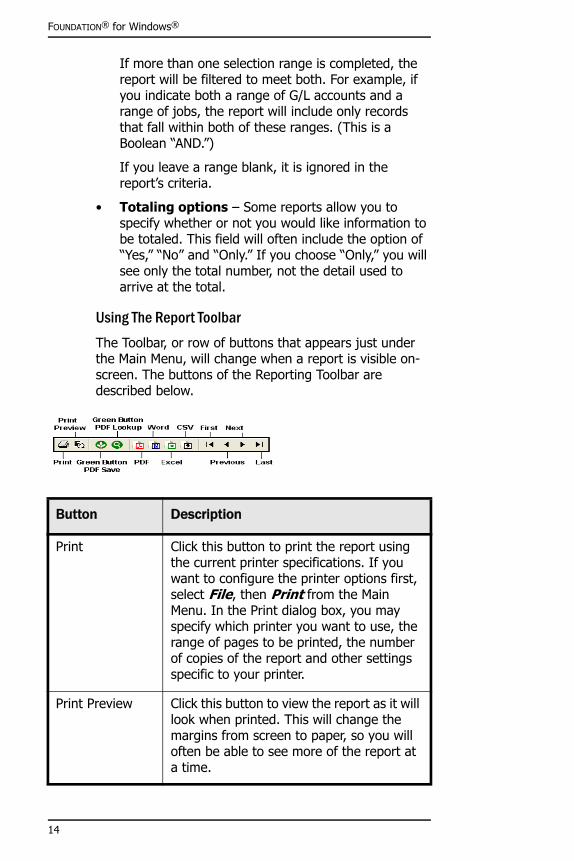
If more than one selection range is completed, the report will be filtered to meet both. For example, if you indicate both a range of G/L accounts and a range of jobs, the report will include only records that fall within both of these ranges. (This is a Boolean “AND.”)
If you leave a range blank, it is ignored in the report’s criteria.
• Totaling options – Some reports allow you to specify whether or not you would like information to be totaled. This field will often include the option of “Yes,” “No” and “Only.” If you choose “Only,” you will see only the total number, not the detail used to arrive at the total.
Using The Report Toolbar
The Toolbar, or row of buttons that appears just under the Main Menu, will change when a report is visible on-screen. The buttons of the Reporting Toolbar are described below.
Button Description
Print Click this button to print the report using the current printer specifications. If you want to configure the printer options first, select File, then Print from the Main Menu. In the Print dialog box, you may specify which printer you want to use, the range of pages to be printed, the number of copies of the report and other settings specific to your printer.
Print Preview Click this button to view the report as it will look when printed. This will change the margins from screen to paper, so you will often be able to see more of the report at a time.
14

Working with FOUNDATION Reports
Green Button PDF Save
Provided default report names and folder locations have been set-up, this button can be used to quickly and easily save reports in .PDF format . Once the defaults are set- up, click this button to save the report to the appropriate default location for the module in which you are working. The save will occur in the background without further action required on your part, allow-ing you to continue working uninterrupted.
Green Button PDF Lookup
This button can be used to quickly retrieve .PDF format reports that you have saved to your default directories provided these have been set-up. Once the defaults are set-up, click this button to look up a report by its name, the date it was saved or the time it was saved.
PDF Allows you to export the report or list to a .PDF document, which can be opened using Adobe® Reader® or a similar prod-uct. For more information, see “Exporting Data to PDF, Excel and More” on page 18.
Word Allows you to export the report or list to an .RTF document, which can be opened using Microsoft Word or a similar product. For more information, see “Exporting Data to PDF, Excel and More” on page 18.
Excel Allows you to export the report or list to an .XLS document, which can be opened using Microsoft Excel or a similar product. For more information, see “Exporting Data to PDF, Excel and More” on page 18.
CSV Allows you to export the report or list to a .CSV document, which can be opened using Microsoft Excel or a similar product. This option is only available for certain Job Related and Miscellaneous reports.For more information, see “Exporting Data to PDF, Excel and More” on page 18.
Button Description
15

FOUNDATION® for Windows®
First Use this button to navigate through the pages of the report. This button will take you to the first page. If you are in normal view, a “page” is equivalent to one view-able screen. If you are in print preview, a page is equivalent to a sheet of paper.
Previous Use this button to navigate through the pages of the report. This button will take you to the previous page. Of course, this will not work if you are currently viewing the first page. If you are in normal view, a “page” is equivalent to one viewable screen. If you are in print preview, a page is equivalent to a sheet of paper.
Next Use this button to navigate through the pages of the report. This button will take you to the next page. Of course, this will not work if you are currently viewing the last page. If you are in normal view, a “page” is equivalent to one viewable screen. If you are in print preview, a page is equivalent to a sheet of paper.
Last Use this button to navigate through the pages of the report. This button will take you to the last page. If you are in normal view, a “page” is equivalent to one view-able screen. If you are in print preview, a page is equivalent to a sheet of paper.
Post This button is only available on lists and reports that contain data that may be posted. Use this button to execute the posting process.
Calculator Click this button to expose the calculator. You will not be able to paste the results into the report, but you can use the calcu-lator to verify the accuracy of the numbers.
Button Description
16

Working with FOUNDATION Reports
Sorting On-Screen Reports
In some reports, information can be sorted on the “Report” tab according to the column headings of the report. Without returning to a “Criteria” tab, simply click a column heading to re-sort the data by the information in that column. Click the same column to toggle between ascending and descending sort orders.
Note:You’ll also notice that the time listed in the heading of the report may change to reflect the time that the report was re-configured.
17

FOUNDATION® for Windows®
5Exporting Data to PDF, Excel and More
Although the reporting mechanisms in FOUNDATION® for Windows® are extremely powerful and easily customized, you may find from time to time that you would like to manipulate a report produced by FOUNDATION in other ways. For instance, perhaps you’d like to perform a calculation on the data in the report or format it in another way.
FOUNDATION provides functionality to export all of its reports and lists into .PDF, Microsoft Word and Microsoft Excel file formats.
To export a report:
1. Run the report you wish to export.
2. While still viewing the “Report” tab of the selected report, click the appropriate export button. Choose from:
Create a .PDF version of the report that can be opened in Adobe Acrobat Reader or similar software. (For quicker, easier saving of reports in .PDF format, use FOUNDATION’s Green Buttons.)
Create an .RTF version of the report that can be opened in Microsoft Word.
Create an .XLS version of the report that can be opened in Microsoft Excel.
Create a .CSV version of the report that can be opened in Microsoft Excel or similar software.
3. When the Save As dialog box appears, navigate to the location where you want to save the report.
4. Enter a name for the exported document in the File Name field.
5. Click [Save].
6. After a moment, the selected software will be launched, and the newly created report file will be opened in it.
18

Exporting Data to PDF, Excel and More
Accessing Data From Third-Party Software
Because FOUNDATION’s data is stored in an ODBC-compliant database, its data can be accessed from any ODBC-compliant third party software, including Microsoft® Excel®, Access, or Word; Lotus 1-2-3®, Crystal Reports®, and more.
The software most commonly used by FOUNDATION users for this purpose is Microsoft Excel, which uses an “add-in” tool called Microsoft Query. In some versions of Microsoft Office, this tool is not installed by default. If that is the case, you will receive an error message when attempting to create a new database query. You will be guided to install this tool from the Microsoft Office CD, which you must have on-hand.
Directions for accessing the FOUNDATION databases through Excel and the Query wizard are shown below. However, directions for selecting specific data and setting up complex queries is beyond the scope of this manual.
To access a FOUNDATION database from Excel:
1. Launch Microsoft Excel.
2. From the Excel Main Menu, choose Data, Get External Data, New Database Query.
The Choose Data Source dialog box will appear. (If it does not, Microsoft Query may not be installed. Follow the on-screen directions to install it from the Microsoft Office CD.)
3. In the Choose Data Source dialog box, select the FOUNDATION database you wish to access.
4. Be sure the Use the Query Wizard to Create/Edit Queries checkbox is enabled.
5. Click [OK].
The SQL Server Login dialog box will appear.
6. In the SQL Server Login dialog box, enter the appropriate Login ID and Password. Be sure the Use Trusted Connection checkbox is disabled.
Note:“ODBC” stands for “Open DataBase Connectivity” and is a set of standards followed by programmers that allow files of different types to communicate.
19
FOUNDATION® for Windows®
7. Click [OK].
The Query Wizard will appear.
8. In the first step of the Query Wizard, you should select the columns you wish to include on the report. Each table in the FOUNDATION database is listed in the Available Tables and Columns area. To add a column to the report, click the column name, and then click the [>] button. To add all columns from a table, click the table name, and then click the [>] button.
9. When you have selected all of the desired columns click the [Next] button.
10. In the second step of the Query Wizard, you may filter the data that will be included on the report using any of the columns you added in the first step. To filter on a particular column, select that column from the Column to Filter list on the left. In the Only Include Rows Where area on the right, complete the fields with the criteria you wish to use. The first field allows you to specify the basis of comparison, and the second field allows you to select the data to compare against.
You may specify up to three sets of criteria for each column, using the And/Or option buttons to specify how the criteria inter-relate. To specify criteria for a different column, click its name in the Column to Filter area. Those columns that have criteria against them will appear in bold in this list.
Note:Click the plus and minus signs next to a table name to expand or collapse the list of columns in the table.
Note:You may return to a previous step at any time by clicking the [Back] button. Your changes will be saved.
Note:Use “And” to indicate that the data must meet both sets of criteria. Use “Or” to indicate that it must meet at least one, but not necessarily all.
20

Exporting Data to PDF, Excel and More
11. When you have indicated all of the desired filtering criteria, click the [Next] button.
12. In the third step of the Query Wizard, you may indicate how you would like the data to be sorted. You may sort by up to three columns, selecting from those columns indicated in the first step of the wizard.
13. When you have indicated all of the desired sorting options, click the [Next] button.
14. In the fourth and final step of the Query Wizard, you must indicate where you would like to see the data. In most cases, you should select Return the Data to Microsoft Excel.
15. Click the [Finish] button.
The Returning External Data to Microsoft Excel dialog box will appear.
16. In the Returning External Data to Microsoft Excel dialog box, indicate the cell in the Existing Worksheet (or a New Worksheet) where you want to place the starting point of the data.
17. Click [OK].
18. After a moment the data will appear. While this data is copied from the FOUNDATION database, any manipulation you do here will not affect the original data in the database. However, you may refresh the data (getting the most recent changes made to the FOUNDATION database) at any time by selecting Tools, Refresh Data from the Excel Main Menu.
21

FOUNDATION® for Windows®
22

Part 2Performing Audits and Reviews

Using the CPA Console
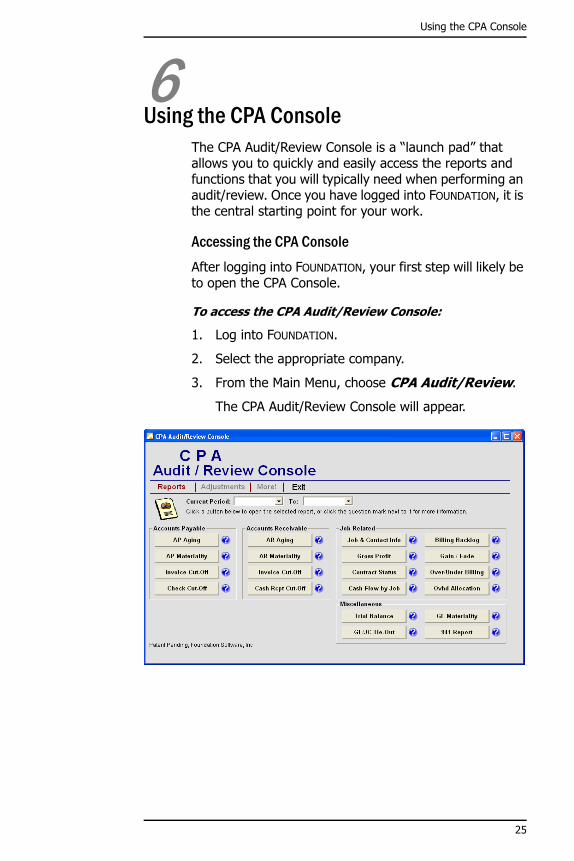
6Using the CPA Console
The CPA Audit/Review Console is a “launch pad” that allows you to quickly and easily access the reports and functions that you will typically need when performing an audit/review. Once you have logged into FOUNDATION, it is the central starting point for your work.
Accessing the CPA Console
After logging into FOUNDATION, your first step will likely be to open the CPA Console.
To access the CPA Audit/Review Console:
1. Log into FOUNDATION.
2. Select the appropriate company.
3. From the Main Menu, choose CPA Audit/Review.
The CPA Audit/Review Console will appear.
25

FOUNDATION® for Windows®
Working in the CPA Console
The CPA Audit/Review Console contains three “screens.” When you first access it, you are viewing the Reports screen. Notice that the word Reports is in orange. You may also view the Adjustments or More! screen by clicking the appropriate name. The name of the screen you are currently viewing will always appear in orange.
If desired, you may complete the Current Period and To fields with the date range of the current audit/review period. These dates will be used when running reports from the Console.
To launch a report from the Console, click the button for the report you wish to run. If you want more information on the report first, click the button next to the report button first.
Closing the CPA Console
When you run a report from the CPA Console, the report window will open on top of the Console window, but the Console will remain open. If you close the report window, the Console will re-appear. You may open as many related windows from the Console as desired.
To close the CPA Console window, click Exit.
26

The Reports of the CPA Console
7The Reports of the CPA Console
FOUNDATION® for Windows® offers many of the reports and data necessary to complete an audit or review, most of which are available through the CPA Console. Each of those reports is described below. If you find that your audit/review process requires something different, please contact us at 800-246-0800. We always welcome your suggestions!
For more information on any report, refer to Online Help.
The Accounts Payable Aging Report
As you know, the Accounts Payable Aging Report shows the progression of unpaid invoices. It is commonly used to determine which invoices will be selected for payment.
Most users want to see invoices categorized by their age in increments of 0-30 days old, 31-60 days old, 61-90 days old and 91 or more days old. These increments are defined in the Aging Cutoff fields on the “A/P 1” tab of the Accounts Payable Control File. If you would like to see different increments, you may change the setting there.
By default, the ending date of the Current Period you specified in the Console will be used as the Aging Date, and the invoices will be aged based on invoice date. Invoice date represents the date printed on the invoice received from the vendor. (Either of these settings can be changed on the “Criteria” tab.)
Note:You can access field-by-field descriptions for a particular window by opening that window in FOUNDATION, and pressing <Shift + F1>.
Note:The A/P Aging Report can also be used to select invoices to audit. In that case, you may want to enable the Minimum Dollar Amt checkbox and specify a minimum dollar amount for the invoices you want to include. For example, to include only invoices for more than $5,000, enter “5000” in the Minimum Dollar Amt field. This amount is compared against the revised invoice total (including any adjustments and payments) as of the indicated date.
27

FOUNDATION® for Windows®
The Accounts Payable Materiality Report
Materiality reports can be used to locate transactions of a certain type and minimum dollar amount. To locate Accounts Payable transactions of a minimum dollar amount, the Accounts Payable Full Invoice Report is used. It gives detailed information about payable invoices, including the amount of the invoice, the amount paid, the amount due, etc.
The amounts shown on this report will include adjustments and payments dated prior to and on the ending date of the Current Period you indicate in the CPA Console. This date-sensitive total will be used to test the materiality of an invoice.
You may test materiality in one of several ways by setting the Minimum Dollar Amount By field appropriately:
• The “Total Invoice” amount, which includes adjustments to the original invoice.
• The “Balance Due,” which includes adjustments and payments made toward the original invoice.
• The “Vendor Total” amount, which shows the total of all invoices remaining due to the vendor, including adjustments.
• The “Vendor Aged” amount, which allows you to specify a remaining total due to a vendor (including adjustments) within a selected aging increment.
28

The Reports of the CPA Console
The Accounts Payable Invoice Cut-Off Report
In FOUNDATION, users can enter both an “Invoice Date” and a “Transaction Date” on each payable invoice. The Invoice Date represents the date printed on the invoice received from the vendor. The Transaction Date indicates the date on which the invoice was posted to Accounts Payable history, the General Ledger, and Job Costing.
The Invoice Cut-Off Report is used to locate any payable invoices that were posted on a different date than the date indicated on the vendor's invoice, or more specifically were dated by the vendor inside the Current Period but posted outside it.
To set-up this report to show all invoices with different Invoice and Transaction dates, enable the Only Invoices Using Different Trx and Inv Dates checkbox. Leave the date range fields blank. The report will include invoices from any date range with different Invoice and Transaction dates.
To limit the invoices on the reports to only those relevant to the Current Period, specify both a Transaction Date Range (after the Current Period and beyond) and an Invoice Date Range (the Current Period only). This is the default setup for the criteria when this report is launched through the CPA Console.
29
FOUNDATION® for Windows®
The Check Cut-Off Report
The Check Cut-Off Report allows you to search for checks dated outside the Current Period for invoices that were dated inside it. If you completed the Current Period fields on the CPA Console, the criteria for this report will automatically be set appropriately. If not, you may want to enter the dates of the Current Period in the Invoice Date Range fields, and set the Check Date Range fields to a date range after the Current Period.
This report will also indicate the type of entry made in the system to create each check:
• “Q” will appear for “quick checks,” which are created at the same time that an invoice is entered in the system, but are printed through FOUNDATION. This is often used when a printed check is desired and no invoice has been previously entered. It saves the user several steps in selecting invoices for payment.
• “P” will appear for “preprinted” checks, which are posted at the same time that an invoice was entered. This type of check is not printed by FOUNDATION, but the check number and information is recorded in the system through the payable invoice entry window. This is often used when a check is hand-written as part of a counter sale where no invoice was previously received.
• “H” will appear for “handwritten” checks, which are posted against a previously entered invoice but are not printed through FOUNDATION. The user must go through the normal process of selecting invoice(s) for payment, and using a check number and recording check information, but the actual check is not printed. This is often used when a check is handwritten instead.
• “S” will appear for “standard” checks that were posted against a normal, payable invoice.
This report also includes the vendor name and, if applicable, the additional name entered on the check as part of a “joint check.” Note that if the vendor name shown on this report does not match the name on the
Note:FOUNDATION does not allow the user to create any sort of payable check without entering an invoice. The check and the invoice may be created and posted simultaneously, but an invoice audit trail must exist.
30

The Reports of the CPA Console
actual Vendor Record, the name may have been overridden on the printed check.
The Accounts Receivable Aging Report
As you know, the Accounts Receivable Aging Report shows the progression of unpaid receivable invoices. It is commonly used to determine which customers should be re-invoiced or to whom statements should be sent.
Most users want to see invoices categorized by their age in increments of 0-30 days old, 31-60 days old, 61-90 days old and 91 or more days old. These increments are defined in the Aging Increment fields on the “A/R 1” tab of the Accounts Receivable Control File. If you would like to see different increments, you may change the setting there. In addition, invoices may be aged based on their invoice date, due date or transaction date. This setting is controlled in the Age Based On field on the report's “Criteria” tab.
By default, the ending date of the Current Period you specified in the Console will be used as the Aging Date, and the invoices will be aged based on transaction date. Transaction date represents the date the invoice was posted to Accounts Receivable history, the General Ledger and Job Costing. (Either of these settings can be changed on the report's “Criteria” tab.)
Note:The A/R Aging Report can also be used to select invoices to audit. In that case, you may want to enable the Minimum Dollar Amt checkbox and specify a minimum dollar amount for the invoices you want to include. For example, to include only invoices for more than $5,000, enter “5000” in the Minimum Dollar Amt field. This amount is compared against the revised invoice total (including any adjustments and payments) as of the indicated date.
Note:When viewing aging information on a Customer Record’s “Inquiry Summary” tab, this information is based on the Aging Summary Based On field in the Accounts Receivable Control File. If you are comparing the Aging Report to the “Inquiry Summary” tab, be sure to use the same settings.
31

FOUNDATION® for Windows®
The Accounts Receivable Materiality Report
Materiality reports can be used to locate transactions of a certain type and minimum dollar amount. To locate Accounts Receivable transactions of a minimum dollar amount, the Accounts Receivable Full Invoice Report is used. It gives detailed information about receivable invoices, including the amount of the invoice, the amount paid, the amount due, and the job for which the invoice was posted.
The amounts shown on this report will include adjustments and payments dated prior to and on the ending date of the Current Period you indicate in the CPA Console. This date-sensitive total will be used to test the materiality of an invoice.
You may test materiality in one of several ways by setting the Minimum Dollar Amount By field appropriately:
• The “Total Invoice” amount, which includes adjustments to the original invoice.
• The “Balance Due,” which includes adjustments and payments received toward the original invoice.
• The “Customer Total” amount, which shows the total of all invoices remaining due from the customer, including adjustments.
• The “Customer Aged” amount, which allows you to specify a total remaining due (including adjustments) to a customer within a selected aging increment.
32

The Reports of the CPA Console
The Accounts Receivable Invoice Cut-Off Report
In FOUNDATION, users can enter both an “Invoice Date” and a “Transaction Date” on each receivable invoice. The Invoice Date represents the date printed on the invoice to be sent to the customer. The Transaction Date indicates the date on which the invoice was posted to Accounts Receivable history, the General Ledger, and Job Costing.
The Invoice Cut-Off Report is used to locate any receivable invoices that were posted on a different date than the date indicated on the customer's invoice, or – more specifically – were dated for the customer inside the Current Period but posted outside it.
To set-up this report to show all invoices with different Invoice and Transaction dates, enable the Only Invoices Using Different Trx and Inv Dates checkbox. Leave the date range fields blank. The report will include invoices from any date range with different Invoice and Transaction dates.
To limit the invoices on the reports to only those relevant to the Current Period, specify both a Transaction Date Range (after the Current Period and beyond) and an Invoice Date Range (the Current Period only). This is the default setup for the criteria when this report is launched through the CPA Console.
33

FOUNDATION® for Windows®
The Cash Receipt Cut-Off Report
The Cash Receipt Cut-Off Report allows you to search for cash receipts dated outside the Current Period for invoices that were dated inside it. If you completed the Current Period fields on the CPA Console, the criteria for this report will automatically be set appropriately. If not, you may want to enter the dates of the Current Period in the Invoice Date Range fields, and set the Cash Receipt Date Range and Bank Deposit Date Range fields to a date range after the Current Period.
The Job & Contact Info Report
This simple list will provide you with all the contact information you need for jobs that remain open or that were closed during the Current Period.
The customer and address information shown on the report is from data entered on the Job Record.
Note:FOUNDATION allows users to optionally post cash receipts to a “holding” account when they are received. They will post to the cash account only when the actual bank deposit is recorded. For this reason, this report allows you to filter on both the cash receipt and bank deposit dates. To determine if the user's system is configured to post to a holding account, look at the setting in the Post to Holding Account Until Bank Deposit field on the “A/R 3” tab of the Accounts Receivable Control File.
Note:FOUNDATION allows users to record cash receipts without indicating an invoice. This report will not include those types of cash receipts. To view “non-standard” cash receipts, you can use the Cash Receipt by Account Report.
Note:In order for a job to be considered “Closed,” the user must have changed the Job Status to “Closed” on the Job “General” tab and indicated a Job End Date on the Job “Addl” tab.
34

The Reports of the CPA Console
The Gross Profit Report
This simple report shows the income, current costs and gross profit of each job that remains open or that was closed during the Current Period.
The Contract Status Report
The Contract Status Report shows a detailed breakdown of the affect of change orders on the contract amount of each job. It breaks out the change orders entered by status, including “Approved,” “Pending,” “Estimated,” “Internal” and “Rejected.” It then shows the revised contract amount as the original estimate plus or minus “Approved” and “Estimate” change orders.
This report will include all jobs entered in the system that have had activity in the Current Period indicated in the Console.
The Cash Flow by Job Report
The Cash Flow by Job Report includes a great deal about the cash related activity per job. It details the contract amount, estimated costs and estimated gross profit; billings, cash collected and cash remaining to be collected; and posted costs, posted payables and payable checks. It then calculates “Net Cash Flow” (Cash Receipts – Checks) “Cash to Contract” percentage (Cash Flow / Contract Income) and “Cash to Profit” percentage (Cash Flow / Estimated Profit).
This report will include all jobs entered in the system that have had activity in the Current Period indicated in the Console.
Note:In order for a job to be considered “Closed,” the user must have changed the Job Status to “Closed” on the Job “General” tab and indicated a Job End Date on the Job “Addl” tab.
35
FOUNDATION® for Windows®
The Billing Backlog Report
The Billing Backlog Report is used to show the work remaining to be completed on a job from a billing perspective. That is calculated using the contract amount (including change orders with a status of “approved” or “estimate”) less income-to-date. The result, called “Remaining to Bill” is the backlog on the job.
This report will include all jobs entered in the system that have had activity in the Current Period indicated in the Console.
The Gain/Fade Report
This report can assist you in analyzing a contractor's bidding by looking at the profit or loss on jobs over several periods (months, years, etc.) and comparing the spread over time.
This report will include information for all currently open jobs as well as those that were closed during the Current Period.
The Over/Under Billing Report
The Over/Under Billing Report is a powerful report that helps determine if the percentage of completion on a job and the amount billed match. It should provide an accurate reflection of the profit by job for the Current Period.
In FOUNDATION, there are two methods for setting up over/under billing. In order to determine which your client is using, you should look at the setting in the Bonding Report Source field on the “General” tab of the General Ledger Control File.
If this field is set to “G/L for Costs & Billings,” all information on the report comes from the General Ledger.
If this field is set to “J/C for Costs, A/R for Billings,” the cost data will come from the Job Costing Module, and the billing data will come from the Accounts Receivable Module.
Note:In order for a job to be considered “Closed,” the user must have changed the Job Status to “Closed” on the Job “General” tab and indicated a Job End Date on the Job “Addl” tab.
36

The Reports of the CPA Console
What is the Difference Between the Methods?As you might imagine, the General Ledger Method uses information posted to G/L accounts, which are classified either “Income” or “Expense,” and categorized by user-defined categories. This method is unique among many software packages, and is only possible because FOUNDATION records the job number with each income and expense transaction posted to the General Ledger.
The Job Costing Method uses expense information posted by cost class to jobs in the Job Costing Module (either directly or through supporting modules) and income posted to jobs from the Accounts Receivable Module. Since it requires less setup, some users may have selected it. However, many accountants recommend the General Ledger Method as the most accurate.
Posting Over/Under BillingsAfter viewing this report, you can post the over/under billing information to the General Ledger automatically. Again, this feature must first be enabled and set-up. To determine if it is set-up, look at the setting in the Over/Under Billing: Enable G/L Interface checkbox on the “General” tab of the Job Costing Control File. The other fields in this groupbox will indicate the G/L accounts that will be adjusted when the over/under billing is posted.
Note:We do not recommend that you switch methods after the client has begun to run live on FOUNDATION. If you need to, however, please contact Foundation Software for assistance in accurately transferring the setup.
37

FOUNDATION® for Windows®
The Overhead Allocation Reports
FOUNDATION offers several options for prorating overhead expenses across actual jobs. These include:
• Payroll extra burden – Extra burden allocates estimated or actual overhead costs based on the hours worked by employees. It is a function of payroll and may be posted to the General Ledger and/or Job Costing Modules when timecards are posted. Burden costs are usually posted to a unique cost code (6 – Burden, by default) and to the cost code where the actual costs were incurred. They appear on standard Job Costing and General Ledger reports.
• Reporting based on G/L account – The General Ledger Overhead Allocation Report allows you to view the affects of allocating overhead and gives you the option to post the overhead. Under this method, G/L accounts are categorized to indicate if transactions posted to each account are income, actual job expense or overhead expense. The overhead expenses are then prorated across jobs either by the amount and type of expense incurred on that job or by income posted for that job. When you click the [Ovhd Allocation] button in the CPA Console, you can choose to run this report.
• Posting based on J/C Detail – Under this method of overhead allocation, actual expenses are multiplied by a user-defined rate in order to estimate overhead. (A flat dollar amount per posted labor hour may also be used.) The estimated overhead amount is then posted back to the actual jobs, using either the same Job Cost Detail as the actual costs or a phase, cost code and/or cost class that is specified. After defining the rates and Job Cost Detail you wish to use, you must generate and post overhead on a regular basis. When you click the [Ovhd Allocation] button in the CPA Console, you can choose to run this report.
Normally, you should run the report that corresponds to the type of overhead allocation your client has set-up.
38

The Reports of the CPA Console
The Trial Balance Report
The Trial Balance is a standard report showing the balance of each G/L account or a range of accounts as of the end of the Current Period.
You may choose to run the Trial Balance only for the Current Period, or you may indicate up to four additional periods to run a comparative Trial Balance. When additional periods are included, the report may need to be printed on legal-size paper.
As with all reports in the CPA Audit/Review Console, the Trial Balance can easily be exported to Microsoft Excel. In addition, it can be saved as a CSV (Comma Separated Values) file so that it can be imported into third-party audit/review software. For more information on this process, see “Exporting Data to PDF, Excel and More” on page 18.
The GL/JC Tie-Out Report
In many accounting systems, determining that the General Ledger and Job Costing tie-out can be a cumbersome challenge. FOUNDATION is unique, however, as it records the job number with every income and expense transaction to the General Ledger, and offers tight controls to ensure that these modules stay in balance.
The GL/JC Tie-Out Report is a unique report that allows you to look at General Ledger activity for the Current Period from the perspective of the job. For each job in the system, the report will show all the G/L accounts that were affected by transactions posted to that job, along with their debit/credit balance as of the end of the Current Period.
39

FOUNDATION® for Windows®
The General Ledger Materiality Report
Materiality reports can be used to locate transactions of a certain type and minimum dollar amount. The Accounts Payable and Accounts Receivable Materiality Reports allow you to find payable and receivable transactions, respectively. The General Ledger Materiality Report allows you to find transactions of any type – including A/P, A/R, payroll, equipment, inventory, etc.
Unlike the A/P and A/R Materiality Reports, the General Ledger Materiality report looks at each transaction separately. For example, materiality is tested separately against each original invoice amount, each adjusting invoice, each payment, etc. In addition, this report shows a great deal of detailed information about each transaction so that it is easy to trace that transaction from its original entry on.
The Payroll 941 Report
The 941 Report is filed weekly or quarterly by many clients. However, it can also be used to report a summary of federal tax information across any date range.
The dates you use for the report should be related to the check date, not the work-week dates. Payroll history is posted based on the check date unless the user has enabled the Update G/L and J/C Using Week-End Date checkbox on the “Reporting” tab of the Payroll Control File. So, the date range used should include any possible check dates. This is very important when the user may have issued union payoff checks, which may have been issued in a different pay period but with the same check date as normal payroll checks.
The 941 Report should balance with the Check Register for the same date range. You can compare the total 941 deposit amount for a date range to the Check Register Report for the corresponding pay period. (If there have been multiple check runs within the date range used for the 941 Deposit Report, you may need to add the totals of all Check Registers.) The following should also be true:
40

The Reports of the CPA Console
• The Total Gross Pay from the Check Register minus any non-taxable items should match the FICA Taxable amount from the 941 Report.
• The Total Taxable amount from the Check Register represents the federal taxable amount. This should equal the FICA Taxable amount from the 941 Report minus any 401K or Section 125, if applicable.
• The Employee FICA Deduction amount from the Check Register should match the Employee FICA Withheld amount from the 941 Report.
• The Employee Federal Deduction amount from the Check Register should match the FIT Withheld amount from the 941 Report.
41

FOUNDATION® for Windows®
8How Do I Find ... ?
One of the challenges many CPAs face when performing an audit or review is determining where to find the needed information. This chapter offers a checklist of the information you might need and the report you can use to find it.
The information you might want to find appears in boldface below. The report with the corresponding information is listed below it.
A list of contracts in progressThe Job & Contact Info List from the CPA Console.
Enable only the Active checkbox in the Show Job Status field.
A list of contracts closed during the Current PeriodThe Job & Contact Info List from the CPA Console.
Enable only the Closed checkbox in the Show Job Status field. Enter the dates of the Current Period in the Closed Date Range and To fields.
Contracts with significant lossThe Gross Profit Report from the CPA Console.
After running the report, click the Gross Profit column header to sort the jobs by their profit/loss.
Contracts with changesThe Contract Status Report from the CPA Console.
Payable invoices with invoice date inside Current Period but posted outside itThe AP Invoice Cut-Off Report from the CPA Console.
If you complete the Current Period fields on the CPA Console, the date ranges in this report’s criteria will be configured for you automatically.
42

How Do I Find ... ?
Receivable invoices with invoice date inside Current Period but posted outside itThe AR Invoice Cut-Off Report from the CPA Console.
If you complete the Current Period fields on the CPA Console, the date ranges in this report’s criteria will be configured for you automatically.
Checks posted after the Current Period for invoices within itThe AP Check Cut-Off Report from the CPA Console.
If you complete the Current Period fields on the CPA Console, the date ranges in this report’s criteria will be configured for you automatically.
Cash receipts posted after the Current Period for invoices within itThe AR Cash Receipt Cut-Off Report from the CPA Console.
If you complete the Current Period fields on the CPA Console, the date ranges in this report’s criteria will be configured for you automatically.
Transactions of a particular materialityEither the A/P, A/R, or G/L Materiality Reports from the CPA Console.
To test against the total due to a single vendor, or the total due to a single vendor within a particular aging increment, use the A/P Materiality Report.
To test against the total due to a single customer, or the total due to a single customer within a particular aging increment, use the A/R Materiality Report.
To test against the dollar amount of individual transactions from any module without related adjustments, use the G/L Materiality Report.
Backlog conditionsThe Billing Backlog Report from the CPA Console.
Over/under billing statusThe Over/Under Billing Report from the CPA Console.
Gain/fade trendsThe Gain/Fade Report from the CPA Console.
43

FOUNDATION® for Windows®
Relationship of financial and non-financial amountsThe GL/JC Tie-Out Report from the CPA Console.
Status of committed costsThe Committed Costs Report from the CPA Console.
Overhead costs for allocationEither the G/L or J/C Overhead Allocation Reports from the CPA Console.
Which report you use depends on the setup your client has completed.
Cash flow for each contractThe Cash Flow by Job Report from the CPA Console.
Aged payable invoicesThe AP Aging Report from the CPA Console.
Aged receivable invoicesThe AR Aging Report from the CPA Console.
Trial balance (standard or comparative)The Trial Balance Report from the CPA Console.
If you have completed the Current Period fields on the CPA Console, the report will be run as of the end of the period.
Basic financial statementsThe “canned” Balance Sheet, “canned” Income Statement” or “canned” Statement of Cash Flows from the G/L, Reports, G/L Financial menu.
In order to use these “canned” reports, the client must have accurately set-up their G/L accounts. An alternative is to use the financial statements created using the G/L DataGenie (G/L, Reports, G/L Financial, DataGenie Reports).
Detailed job cost historyThe Job History Detail Report from the J/C, Reports menu.
Run this report for the Current Period dates to see every cost that was posted to job history.
44

Entering Adjustments
9Entering Adjustments
The CPA Audit/Review Console allows you to create a journal through which to make adjustments to the General Ledger as well as to access any journal (existing or newly created) and enter the applicable adjustments.
Creating a New Journal
Before you can adjust the General Ledger, you may need to create a G/L journal through which you will make the adjustment.
To create a new journal:
1. Access the CPA Audit/Review Console.
2. Click the Adjustments link near the top.
3. Click the [Create New G/L Journal] button.
The Journal window will appear.
4. Complete the fields of the Journal “General” tab.
5. Click the [OK] button to save the changes and create the journal.
6. Click the [Close] button to close the Journal window and return to the CPA Audit/Review Console.
Entering an Adjustment
Once you have defined G/L journal that you wish to use to enter the adjustment (or verified that the appropriate
Note:When you have found an error in a particular transaction that should be adjusted, Foundation Software, Inc. highly recommends you make that adjustment directly to the original transaction – that is, reverse the invoice, void the check, etc. A complete, date-sensitive audit trail is always maintained in FOUNDATION.
On the other hand, if you need to make adjustments directly to the General Ledger, you can use a journal entry to do so. Foundation Software, Inc. highly recommends you use a user-defined journal that is used only for those types of adjustments. Do not use the built-in A/P, A/R, P/R (etc.) journals, as reports will not indicate that the entry was made manually rather than through an invoice, check, etc.
45

FOUNDATION® for Windows®
journal has been created previously), you may enter the actual adjustment.
To make an adjustment:
1. Access the CPA Audit/Review Console.
2. Click the Adjustments link near the top.
3. Click the [Enter G/L Journal Transaction] button.
4. In the Journal Selection dialog box that appears, select the journal through which you want to enter the adjustment. Then, click [OK].
The Journal Transaction Entry window will appear.
5. Complete the fields of the Journal Transaction “General” tab.
6. Click [OK] to verify the record and have any defaults be filled in.
7. Click [OK] again to save the record.
8. From the Main Menu, choose Record, List.
The Journal Transaction List and Post window will appear.
9. Complete the appropriate fields on the Journal Transaction List and Post “Criteria” tab. Remember, the data included on the list is the only data that will be posted.
10. Click the “Report” tab to view the list.
11. Verify the information on the Journal Entry List is the correct information to be posted. If necessary, you
may print the list by clicking the button. If corrections must be made, close the list window and return to the journal entry window. Make the corrections, then repeat this process.
12. From the Main Menu, choose Tools, Post.
After posting, the Journal Entry List becomes a Journal Entry Post Log. Foundation Software, Inc. recommends you print a copy of this log for your records.
46
