cps cci guide for full privilege administrators, … cci guide for full privilege administrators,...
TRANSCRIPT

CPS CCI Guide for Full Privilege Administrators, Release 12.0.0First Published: 2017-03-03
Last Modified: 2017-03-03
Americas HeadquartersCisco Systems, Inc.170 West Tasman DriveSan Jose, CA 95134-1706USAhttp://www.cisco.comTel: 408 526-4000 800 553-NETS (6387)Fax: 408 527-0883

THE SPECIFICATIONS AND INFORMATION REGARDING THE PRODUCTS IN THIS MANUAL ARE SUBJECT TO CHANGE WITHOUT NOTICE. ALL STATEMENTS,INFORMATION, AND RECOMMENDATIONS IN THIS MANUAL ARE BELIEVED TO BE ACCURATE BUT ARE PRESENTED WITHOUT WARRANTY OF ANY KIND,EXPRESS OR IMPLIED. USERS MUST TAKE FULL RESPONSIBILITY FOR THEIR APPLICATION OF ANY PRODUCTS.
THE SOFTWARE LICENSE AND LIMITEDWARRANTY FOR THE ACCOMPANYING PRODUCT ARE SET FORTH IN THE INFORMATION PACKET THAT SHIPPED WITHTHE PRODUCT AND ARE INCORPORATED HEREIN BY THIS REFERENCE. IF YOU ARE UNABLE TO LOCATE THE SOFTWARE LICENSE OR LIMITED WARRANTY,CONTACT YOUR CISCO REPRESENTATIVE FOR A COPY.
The Cisco implementation of TCP header compression is an adaptation of a program developed by the University of California, Berkeley (UCB) as part of UCB's public domain versionof the UNIX operating system. All rights reserved. Copyright © 1981, Regents of the University of California.
NOTWITHSTANDINGANYOTHERWARRANTYHEREIN, ALL DOCUMENT FILES AND SOFTWARE OF THESE SUPPLIERS ARE PROVIDED “AS IS"WITH ALL FAULTS.CISCO AND THE ABOVE-NAMED SUPPLIERS DISCLAIM ALL WARRANTIES, EXPRESSED OR IMPLIED, INCLUDING, WITHOUT LIMITATION, THOSE OFMERCHANTABILITY, FITNESS FORA PARTICULAR PURPOSEANDNONINFRINGEMENTORARISING FROMACOURSEOFDEALING, USAGE, OR TRADE PRACTICE.
IN NO EVENT SHALL CISCO OR ITS SUPPLIERS BE LIABLE FOR ANY INDIRECT, SPECIAL, CONSEQUENTIAL, OR INCIDENTAL DAMAGES, INCLUDING, WITHOUTLIMITATION, LOST PROFITS OR LOSS OR DAMAGE TO DATA ARISING OUT OF THE USE OR INABILITY TO USE THIS MANUAL, EVEN IF CISCO OR ITS SUPPLIERSHAVE BEEN ADVISED OF THE POSSIBILITY OF SUCH DAMAGES.
Any Internet Protocol (IP) addresses and phone numbers used in this document are not intended to be actual addresses and phone numbers. Any examples, command display output, networktopology diagrams, and other figures included in the document are shown for illustrative purposes only. Any use of actual IP addresses or phone numbers in illustrative content is unintentionaland coincidental.
Cisco and the Cisco logo are trademarks or registered trademarks of Cisco and/or its affiliates in the U.S. and other countries. To view a list of Cisco trademarks, go to this URL: http://www.cisco.com/go/trademarks. Third-party trademarks mentioned are the property of their respective owners. The use of the word partner does not imply a partnershiprelationship between Cisco and any other company. (1110R)
© 2017 Cisco Systems, Inc. All rights reserved.

C O N T E N T S
P r e f a c e Preface vii
About this guide vii
Audience vii
Additional Support vii
Conventions (all documentation) viii
Obtaining Documentation and Submitting a Service Request ix
C H A P T E R 1 Control Center Interface 1
Control Center Interface Overview 1
Control Center Interface Users And Roles 1
C H A P T E R 2 Subscriber Screens 3
Subscriber Screens Overview 3
Find a Subscriber 4
Create a Subscriber 5
Edit a Subscriber 7
Change the Credential ID of a Subscriber 8
Deactivating or Activating a Subscriber 8
Delete a Subscriber 9
Subscriber Screens Definitions 10
Overview Screen 10
Details Screens 10
General Screen 11
Credentials Screen 13
Services Screen 15
Add a Service to a Subscriber 17
Remove a Service from a Subscriber 18
CPS CCI Guide for Full Privilege Administrators, Release 12.0.0 iii

Notifications Screen 19
Subaccount Screen 21
Sessions Screen 22
Session Details Table 22
Remove a Session 23
Balance Screen 24
Balances 24
Quotas 24
Managing Quotas and Balances 25
Add a Balance Type 25
Credit or Debit an Existing Balance 26
Delete a Balance 26
Delete a Quota 26
Check the History of Balances 26
C H A P T E R 3 Session Tracing 29
View a Subscriber Session 29
Find Network Sessions 30
C H A P T E R 4 Custom Reference Data Tables 31
Custom Reference Data Tables Overview 31
Concepts for Custom Reference Data Tables 32
Steps and Procedures 32
Policy Builder: Constructing Custom Reference Data Tables 33
Set Up the System Plug-in Configuration 33
Create or Edit a Custom Reference Data Table 34
Delete Reference Data Tables 36
Last Tasks 36
Control Center: Populating a Custom Reference Data Table 37
Import Data from a Spreadsheet 37
Enter Data Manually 39
Add a Row 40
Edit a Row 40
Fix Errors in a Row 41
Delete a Single Row 41
CPS CCI Guide for Full Privilege Administrators, Release 12.0.0iv
Contents

Create a Snapshot 41
Revert a Snapshot 42
Export All 43
Import All 43
Typical Tasks for Everyday 44
Refresh the Screen 44
Navigate the Table Screens 44
Navigate in a Row 44
CPS CCI Guide for Full Privilege Administrators, Release 12.0.0 v
Contents

CPS CCI Guide for Full Privilege Administrators, Release 12.0.0vi
Contents
Preface
• About this guide, page vii
• Audience, page vii
• Additional Support, page vii
• Conventions (all documentation), page viii
• Obtaining Documentation and Submitting a Service Request, page ix
About this guideThis guide describes the functions and uses of the Control Center 3.6 for administrators with full read andwrite privileges.
AudienceThis guide is best used by these readers:
• Network administrators
• Network engineers
• Network operators
• System administrators
This document assumes a general understanding of network architecture, configuration, and operations.
Additional SupportFor further documentation and support:
• Contact your Cisco Systems, Inc. technical representative.
• Call the Cisco Systems, Inc. technical support number.
CPS CCI Guide for Full Privilege Administrators, Release 12.0.0 vii

•Write to Cisco Systems, Inc. at [email protected].
• Refer to support matrix at http://www.cisco.com/c/en/us/support/index.html and to other documentsrelated to Cisco Policy Suite.
Conventions (all documentation)This document uses the following conventions.
IndicationConventions
Commands and keywords and user-entered textappear in bold font.
bold font
Document titles, new or emphasized terms, andarguments for which you supply values are in italicfont.
italic font
Elements in square brackets are optional.[ ]
Required alternative keywords are grouped in bracesand separated by vertical bars.
{x | y | z }
Optional alternative keywords are grouped in bracketsand separated by vertical bars.
[ x | y | z ]
A nonquoted set of characters. Do not use quotationmarks around the string or the string will include thequotation marks.
string
Terminal sessions and information the system displaysappear in courier font.
courier font
Nonprinting characters such as passwords are in anglebrackets.
< >
Default responses to system prompts are in squarebrackets.
[ ]
An exclamation point (!) or a pound sign (#) at thebeginning of a line of code indicates a comment line.
!, #
Means reader take note. Notes contain helpful suggestions or references to material not covered in themanual.
Note
CPS CCI Guide for Full Privilege Administrators, Release 12.0.0viii
PrefaceConventions (all documentation)

Means reader be careful. In this situation, you might perform an action that could result in equipmentdamage or loss of data.
Caution
IMPORTANT SAFETY INSTRUCTIONS.
Means danger. You are in a situation that could cause bodily injury. Before you work on any equipment,be aware of the hazards involved with electrical circuitry and be familiar with standard practices forpreventing accidents. Use the statement number provided at the end of each warning to locate its translationin the translated safety warnings that accompanied this device.
SAVE THESE INSTRUCTIONS
Warning
Provided for additional information and to comply with regulatory and customer requirements.Warning
Obtaining Documentation and Submitting a Service RequestFor information on obtaining documentation, using the Cisco Bug Search Tool (BST), submitting a servicerequest, and gathering additional information, see What's New in Cisco Product Documentation.
To receive new and revised Cisco technical content directly to your desktop, you can subscribe to the What'sNew in Cisco Product Documentation RSS feed. RSS feeds are a free service.
CPS CCI Guide for Full Privilege Administrators, Release 12.0.0 ix
PrefaceObtaining Documentation and Submitting a Service Request

CPS CCI Guide for Full Privilege Administrators, Release 12.0.0x
PrefaceObtaining Documentation and Submitting a Service Request

C H A P T E R 1Control Center Interface
• Control Center Interface Overview, page 1
• Control Center Interface Users And Roles, page 1
Control Center Interface OverviewThe Control Center Interface enables you to manage subscribers and perform various operations to getinformation about subscribers, track subscriber sessions, to construct and populate custom reference datatables and so on.
Control Center Interface Users And RolesCPS enables users to be aware of its current privileges while accessing Control Center as described below:
• If a user has read-write privilege then "ADMIN" is displayed adjacent to user name in the GUI.
• If a user has read-only privilege then "READONLY" is displayed adjacent to user name in the GUI.
CPS CCI Guide for Full Privilege Administrators, Release 12.0.0 1

CPS CCI Guide for Full Privilege Administrators, Release 12.0.02
Control Center InterfaceControl Center Interface Users And Roles

C H A P T E R 2Subscriber Screens
• Subscriber Screens Overview, page 3
• Find a Subscriber, page 4
• Create a Subscriber, page 5
• Edit a Subscriber, page 7
• Change the Credential ID of a Subscriber, page 8
• Deactivating or Activating a Subscriber, page 8
• Delete a Subscriber, page 9
• Subscriber Screens Definitions, page 10
• Overview Screen, page 10
• Details Screens, page 10
• Sessions Screen, page 22
• Balance Screen, page 24
Subscriber Screens OverviewThis chapter provides discussion and examples for an administrator with full read and write privileges. As afull privilege admin, you are able to change, delete, and deactivate subscriber information.
After you log in, the default page of the Control Center interface displays the Subscribers tab > FindSubscriber screen.
The Subscribers tab lets you look at details for a subscriber, any subaccounts under a subscriber, and anysessions a subscriber may have.
From the menu tree on the left, you have access to session information screens at the subscriber level and thenetwork level. Read about these screens in Sessions Screen, on page 22.
CPS CCI Guide for Full Privilege Administrators, Release 12.0.0 3

Find a SubscriberFinding a subscriber is often the first step in performing other tasks for a subscriber.
To list all subscribers, leave the Credential Name field blank. The maximum number of records returnedis 1000.
Note
Enter search criteria into either the Credential or Name field. You can use any portion of a subscriber’s name,but when searching on a credential ID, you must use the full credential. No wild cards are permitted.
Step 1 Click Subscribers tab > Subscribers node > Find Subscriber item in the menu tree.Step 2 Enter your search criteria in the Credential or Name field and click Search.
Step 3 Matches to your search criteria appear in the Results table.Use the open link on the right to display more information about the subscriber
Use the delete link to delete the subscriber.
CPS CCI Guide for Full Privilege Administrators, Release 12.0.04
Subscriber ScreensFind a Subscriber

As you find and use subscriber screens, the menu tree keeps track of the most recent finds. Dismiss these itemsfrom the tree with the X icon.
Note
Create a SubscriberTo import a large number of subscribers, use your own subscriber profile repository (SPR) software.
Use these steps to create subscribers one at a time.
Step 1 Click Subscribers tab > Subscribers node > Create Subscriber item in the menu tree.
CPS CCI Guide for Full Privilege Administrators, Release 12.0.0 5
Subscriber ScreensCreate a Subscriber

Step 2 Select a Domain from the drop-down menu.Domains are created in the Policy Builder interface and are displayed here. Domains are a point of intersection betweenControl Center and Policy Builder.
Step 3 Type in a credential that specifically identifies the new subscriber.A credential is a unique identifier that subscribers and subaccount customers use to log in. Typically, a credential isdefined when you create the subscriber or subaccount. However, you can manage credentials separately from the createprocess.
The credential can be any letter or number with a length of one or more alphanumeric characters. Best practice is to notuse special characters, although apostrophe and hyphen may be part of a name.
Step 4 Enter the subscriber’s name, first and last, in the same field.Step 5 Click Save to create the subscriber with just a domain, name, and credential defined. You can return later and fill in
more details later.Click Save and Continue to provide more details of the new subscriber at this time.
The details of a subscriber are captured and displayed on the screens. To fill out the various detail screens, see thosespecific sections.
• General
• Credentials
• Services
• Notifications
• Subaccounts
The other two areas, Sessions and Balance, show you more information about the user, but there is nothing editable.
If you want to check your work, use the Find Subscriber task in the menu tree and make sure you can find the subscriberyou just created.
CPS CCI Guide for Full Privilege Administrators, Release 12.0.06
Subscriber ScreensCreate a Subscriber

Edit a Subscriber
Step 1 Find the subscriber as described at Find a Subscriber, on page 4.Step 2 Hover over the name displayed in the Results table and click Open.
The Subscriber Overview screen appears.
Step 3 From this screen, click any of the edit or manage links to change subscriber information about that topic.You can also use the menu items in the menu tree on the left to display individual screens.
For help on using any of the screens shown here, see the sections written specifically about them:
1 Overview Screen
CPS CCI Guide for Full Privilege Administrators, Release 12.0.0 7
Subscriber ScreensEdit a Subscriber

2 Details Screens
3 General Screen
4 Credentials Screen
5 Services Screen
6 Notifications Screen
7 Subaccount Screen
8 Sessions Screen
9 Balance Screen
Change the Credential ID of a Subscriber
Step 1 Click Subscribers tab > Subscribers node > Find Subscriber item in the tree.Step 2 Enter search criteria for the subscriber in the Find Subscriber screen.Step 3 Hover over the subscriber in the Results list and click the open link.Step 4 In the Credentials area, click the edit link.Step 5 Either add a new credential or edit one already present.
• To add an additional credential to the list, click the add link.
• To edit a credential already in the list, hover over the credential and click edit.
In the Credential Detail screen that appears, set the expiration date for the credential, or add or change an optionalpassword to the credential.
See also the Credentials Screen. That screen contains the fields for a secondary password for the subscriber.
Deactivating or Activating a SubscriberDeactivate a subscriber if you don’t want to completely delete them from your subscriber base. This way youcan reactivate them later.
Step 1 Click Subscribers tab > Subscribers node > Find Subscriber item in the menu tree.Find the subscriber as described on Find a Subscriber.
CPS CCI Guide for Full Privilege Administrators, Release 12.0.08
Subscriber ScreensChange the Credential ID of a Subscriber

Step 2 On the Overview screen, click the edit link in the General area.Step 3 In the Status drop-down menu, change the subscriber’s status to Suspended or Active.
Delete a SubscriberIf deleting a subscriber is too drastic, you can deactivate themwith the procedure on Deactivating or Activatinga Subscriber, on page 8.
Step 1 Click Subscribers tab > Subscribers node > Find Subscriber item in the menu tree.Find the subscriber as described on Find a Subscriber.
Step 2 Hover over the subscriber in the Results table and click Delete.Step 3 Be sure you are deleting the correct subscriber. Check the credential in the Confirm screen and make sure.
The Results table displays your matches, but without the deleted subscriber.
CPS CCI Guide for Full Privilege Administrators, Release 12.0.0 9
Subscriber ScreensDelete a Subscriber

Subscriber Screens DefinitionsThis section describes the screens used to support subscribers. After you find a subscriber you can accessthese screens.
Overview ScreenWhen you find a subscriber and open their record, the Overview screen opens.
The menu tree on the left displays the subscriber name and four submenus (Overview, Details, Sessions,Balance).
The Overview screen, with its six subsections, appears on the right.
Click the edit or manage links at the right of the sections to add, edit, or remove information for that specificaspect of the subscriber. Refer to Edit a Subscriber, on page 7 for more information.
Details ScreensThe Details item in the menu lets you view and edit five other screens that contain even more specificinformation about a subscriber or a subaccount:
• General information
• Credentials or passwords
• Services the subscriber pays for
CPS CCI Guide for Full Privilege Administrators, Release 12.0.010
Subscriber ScreensSubscriber Screens Definitions
• Notification preferences
• Subaccount users under the subscriber
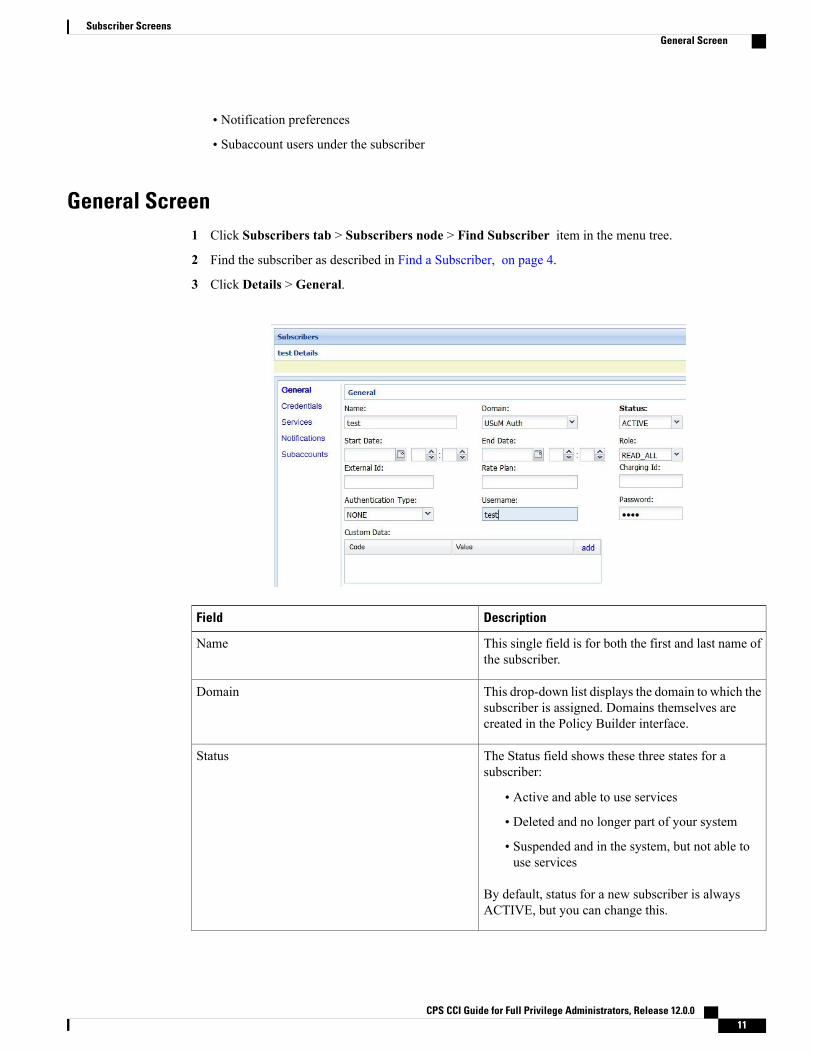
General Screen1 Click Subscribers tab > Subscribers node > Find Subscriber item in the menu tree.
2 Find the subscriber as described in Find a Subscriber, on page 4.
3 Click Details > General.
DescriptionField
This single field is for both the first and last name ofthe subscriber.
Name
This drop-down list displays the domain to which thesubscriber is assigned. Domains themselves arecreated in the Policy Builder interface.
Domain
The Status field shows these three states for asubscriber:
• Active and able to use services
• Deleted and no longer part of your system
• Suspended and in the system, but not able touse services
By default, status for a new subscriber is alwaysACTIVE, but you can change this.
Status
CPS CCI Guide for Full Privilege Administrators, Release 12.0.0 11
Subscriber ScreensGeneral Screen

DescriptionField
Use the calendar widget to specify the start and stopdate and time of service to the subscriber.
Start Date
End Date
When the subscriber logs in to your subscriber portal,this field determines how much read-write privilegeis granted to them. The primary subscriber is alwaysgranted the Write All role, permitting editing of allsubaccounts under it. You can change this role if youwish. For example, the primary subscriber might bea team leader responsible for teammember accounts.See Subaccount Screen.
If a user is not a primary subscriber, they are createdas a subaccount user under a primary subscriber.Assign roles for subaccount users in the Details >Subaccounts screen.
Be sure to assign the access privileges of a subaccountuser. When first created, they have Write allprivileges.
•Write all—can read and write all informationfor themselves and any subaccounts
• Read all—can view all portal information
•Write self—can read and write only their owninformation
• Read self—can view only their own information
Role
Occasionally, a subscriber may need to connect withor relate to an external third-party system. This fieldidentifies the subscriber to that external service.
External ID
Enter predefined rate plan codes, such as prepaid orpostpaid. Rate plans are created in Policy Builder andare obtained from that administrator.
Rate Plan
A subscriber might have a unique charging ID. Usingthis, usage by members of a subaccount, or ’children’of the subscriber can be billed to their ’parent’.
Charging ID
Not used.Authentication Type
This field is used to provision the EAP username inthe subscriber profile. This field is provided to supportthe EAP-TTLS/MSCHAPv2 call flow introduced inthe CPS 7.5 release.
Username
CPS CCI Guide for Full Privilege Administrators, Release 12.0.012
Subscriber ScreensGeneral Screen

DescriptionField
This field is used to provision the EAP password inthe subscriber profile. This field is used together withthe Username field.
Password
This area lets you use a look up list, or key-value pairsto keep track of other variables that concern yoursubscriber.
Custom Data Area
This is the key portion of a key-value pair.Code
This is the definition or value of the key-value pair.Value
Credentials ScreenThe Credentials screen lets you specify more than one credential or password for a subscriber. More than onecredential may be necessary for the subscriber to log in from different devices or locations.
The rows in this screen are populated by the Credential Detail screen shown below.
Click the add or edit link to display the Credential Detail screen.
CPS CCI Guide for Full Privilege Administrators, Release 12.0.0 13
Subscriber ScreensCredentials Screen

DescriptionField
A credential is a unique identifier that subscribers andsubaccount customers use to log in. Typically, acredential is defined when you create the subscriberor subaccount. However, you canmanage credentialsseparately from the create process.
The credential can be any letter or number with alength of one or more alphanumeric characters. Bestpractice is to not use special characters, althoughapostrophe and hyphen may be part of a name.
Credential ID
Use this field for sorting and reporting. In this field,you can indicate if the credential is for a subscriberor a subaccount, or for permanent or guest use.
Type
This field lets you provide more information aboutthis particular credential.
Description
Uses the calendar widget to set an end date to thecredential and so restrict logins.
Expiration Date
In addition to a credential ID, a subscriber can log inwith a password. A password is optional becauseMAC addresses, for example, do not have a password.
Password
Change the password already defined.New Password
This entry must match the new password.Confirm Password
CPS CCI Guide for Full Privilege Administrators, Release 12.0.014
Subscriber ScreensCredentials Screen

Services ScreenThe Services link lets you administer what services or service plans a subscriber may access.
The Services screen shows this information about the service provided to the subscriber. Recall that a subscribercan have one or more services.
Services and service plans are developed in Policy Builder and are reflected here for you to choose from.
Services are a point of intersection between Control Center and Policy Builder.
DescriptionField
Enter the name or code of the service.Service Name
If checked, this box allows the subscriber to use theservice. Unchecked, the subscriber cannot access theservice.
Enabled
This area lets you use a look up list, or key-value pairsto keep track of other variables that concern yourservice.
Custom Data
This is the key portion of a key-value pair.Code
This is the definition or value of the key.Value
CPS CCI Guide for Full Privilege Administrators, Release 12.0.0 15
Subscriber ScreensServices Screen

DescriptionField
This area lets you define specific times and recurrencefor when the service is available to the subscriber.
Click the add link to fill in the Schedule Detailwindow.
Schedule
These two fields let you limit the hours of the dayyour subscriber may access your system. The exampleshows access times from 8:00 in the morning to 5:00in the afternoon. Conversely, if you check the Turnoff service during these times check box, you preventaccess during the times specified here.
Start Time
End Time
Set dates to limit subscriber access on a wider basis.Dates
Use the calendar widget to set a specific start and enddate to service. Conversely, check the Turn off serviceduring these times check box and prevent accessduring the dates specified here.
Start Date
End Date
Select a day of the month to permit the subscriber toaccess this service. If you want, you can allow accesson the 5th, 10th, and 30th of the month by creatingthree schedules. Conversely, check the Turn offservice during these time check box to deny accessto a service on a particular day of the month.
Day of month
Select the day of the week to permit the subscriber toaccess this service. You can allow access on onlyTuesday,Wednesday, and Thursday by creating threeschedules specifying those days of the week. Foranother example, you might create two schedules,one for Saturday and one for Sunday. If you checkthe Turn off service during these times check box forboth schedules, you prevent access on weekendsspecifically.
Day of Week
CPS CCI Guide for Full Privilege Administrators, Release 12.0.016
Subscriber ScreensServices Screen

DescriptionField
Select a month that you would like to allow service,perhaps for an introductory offer. Services is grantedfor that calendar month only. To affect more than onemonth, create multiple schedules, that is, one for June,one for July, one for August and so on. Conversely,check the Turn off service during these times checkbox to deny access to a service for a particular month,perhaps during vacation period.
Month
Grant service for an entire calendar year. To affectmore than one year, create multiple schedules, thatis, one for 2014, 2015, and so on. Conversely, checkthe Turn off service during these times check box todeny access to a service for a particular year.
Year
This field interprets the Schedule detail, showing ifthe schedule has a recurring aspect.
Repeat
Select this check box to put the schedule into effect.If you are developing a schedule and don’t want toinvoke it yet, deselect this box. This selection isreflected on the Service Detail screen as a Yes or Noin the Enabled column.
Enabled
Select this check box to make the scheduled timeunavailable for login, that is, to create and excludedtime. For example, you may want to block asubscriber from logging in during school time hours.This selection is reflected on the Service Detail screenas a Yes or No in the Excl column.
Turn off service during these times
Add a Service to a Subscriber
Step 1 To add a service to a subscriber, click Subscribers tab > Find Subscriber > Open > Details (in the tree) > Services(next to the form) > add (next to the Service Code column heading).
Step 2 Choose a service from the Select Service window.
CPS CCI Guide for Full Privilege Administrators, Release 12.0.0 17
Subscriber ScreensServices Screen

Step 3 Click the Select button.Services already provisioned to a subscriber are grayed out and you cannot select them again.
Step 4 Check that the new service is listed under the Service List area on the Subscriber screen.
Remove a Service from a Subscriber
Step 1 Click Subscribers tab > Subscribers node > Find Subscriber item in the menu tree.Step 2 In the Services area of the Overview screen, click the edit link.Step 3 In the Service Code list on the left, click the remove link.
CPS CCI Guide for Full Privilege Administrators, Release 12.0.018
Subscriber ScreensServices Screen

Notifications ScreenThe Notifications screen lets you specify how to contact your subscriber for system messages or for specialpromotions, for example. You can notify subscribers by these methods.
• XML
• SMS
• Apple iPhone push
Notifications must be set up in Policy Builder prior to using this screen.Note
1 Click Subscriber tab > Subscribers tree > find a subscriber > Details > Notifications.
2 Click the add link at the top.
3 Fill in the Notification Detail screen.
CPS CCI Guide for Full Privilege Administrators, Release 12.0.0 19
Subscriber ScreensNotifications Screen

DescriptionField
Contact your subscriber with one of these methodsin the drop-down menu:
• Real time / XML
• SMS
• Apple iPhone push
Type
Specify the address for the notification.
For an XML message, provide URLs.
For an SMSmessage, provide the destination number,perhaps 555544444.
For an email notification, provide an email address.
For an Apple iPhone push, provide the servergateway, server port, and certificate and certificatepassword.
Destination
Click this check box to allow notifications to gothrough, or uncheck it if you are still developing themessage.
Enabled
This area lets you use a look up list, or key-value pairsand so keep track of other variables that concern yoursubscriber.
Custom Data Area
CPS CCI Guide for Full Privilege Administrators, Release 12.0.020
Subscriber ScreensNotifications Screen

DescriptionField
This is the key portion of a key-value pair.Code
This is the definition or value of the key.Value
Subaccount ScreenYou may be asked to create a subaccount under a primary subscriber so that the primary subscriber hasauthority over others, perhaps team members or family members. This construct forces a subaccount’s loginto count against the bill of the main subscriber.
For example, if the primary subscriber has a Charging ID of 123456, assign the subaccount users the samecharging ID.
Currently, there is nomethod to move a primary subscriber to become a subaccount of a different subscriber.You must delete and then recreate such a subscriber.
Note
1 Click Subscribers tab > Subscribers node > Find Subscriber item in the menu tree.
2 Find the primary subscriber, the person responsible for the subaccount.
3 Click Details > Subaccounts and click the add link in the corner.
The detail screen appears as when creating a primary subscriber. See these sections if you need help in fillingout those screens.
• General Screen
• Credentials Screen
• Services Screen
• Notifications Screen
CPS CCI Guide for Full Privilege Administrators, Release 12.0.0 21
Subscriber ScreensSubaccount Screen

You cannot make another subaccount under the current subaccount. You can only provision subaccountsunder a primary subscriber.
Note
Sessions ScreenThe Sessions item in the menu tree under a subscriber lets you see the sessions the subscriber has running.That is, find the subscriber first, and then check their sessions. A subscriber may have several sessions up,perhaps from different devices.
You can display a Sessions screen two ways:
• Find the subscriber and then view all their sessions:
Subscribers tab > Subscriber node > Subscriber item >Overview screen > Sessions area >manage
See Viewing a Subscriber Session.
• Find all sessions on the network and then look for a subscriber:Subscribers tab > Subscriber node > Subscriber Sessions item > Current Sessions table > open
See Finding Network Sessions.
If you would like a utility to start artificial sessions, contact your Cisco technical representative.Note
Session Details TableThe Session Detail table contains information about the session, including a Remove Session link.
An example of a Session Detail is shown below.
CPS CCI Guide for Full Privilege Administrators, Release 12.0.022
Subscriber ScreensSessions Screen

DescriptionField
At the top, a tab exists for each session the subscriberhas running. The example has one tab, the subscriberhas one session up.
Session Tabs
This check box lets you filter the session informationbelow to one or more devices.
Query Devices
This drop-down list lets you show details for only thedevices you can provide IP addresses and secrets for,and so limits the data returned by the detail table.
Network Query
The Policy Server folder has several subfolders to organize the session data.
Remove a SessionThere are several ways to find a session and then remove it.
• Subscribers tab > Subscriber node > Find a subscriber > subscriber Sessions item > Remove Sessionlink
• Subscribers tab > Subscriber node > Find a subscriber > Overview screen Sessions area > manage link> Remove Session link
• Subscribers tab > Sessions node > Find Subscriber session > open link > Remove Session link
CPS CCI Guide for Full Privilege Administrators, Release 12.0.0 23
Subscriber ScreensRemove a Session

Removing a session affects Cisco Policy Suite only, but other PEPs may be notified. Removing a sessiondrops a subscriber and force them to log in again. If a subscriber reports that they cannot log in, check to seeif there is a stuck session and remove it. If the system is experiencing performance troubles, dropping stucksessions may help.
Balance ScreenThe Balance item in the tree under a subscriber name provides a way to set balance amounts and quota amountsfor the subscriber.
A subscriber can have several balance codes in place, and under each one, the subscriber can have severalquota codes.
Balance codes and quota codes are developed and maintained in the Policy Builder interface. Control Centerreflects that configuration.
BalancesBalances are of these types:
• Recurring—recurring balances automatically replenish on a configured cycle, for example daily, weekly,monthly, or per billing cycle. Any remaining balance is not carried over when the balance is reset.
• Roll Over—a type of recurring balance. Roll over balances, which are additive, are similar torecurring balances, but any remaining balance is kept when the balance replenishes.
• One-time—one-time balances do not automatically replenish. One-time balances may be configuredwith an expiration date.
• Top Up—a type of One-time balance. Top ups add to a subscriber’s balance and may be appliedto any of the above balance types. Top ups are differentiated from the balance to which they areapplied, enabling the service provider to define the order in which top ups, and the underlyingbalance, is consumed. Top ups may be assigned an expiration date.
Balances can be configured to be automatically allocated for a subscriber during a balance reserve activity ifa balance does not already exist. The fair use balances for new subscribers is an example. Auto-provisionedbalances are created based on rules configured by the service provider, which may refer to parameters suchas subscriber class, rate plan, and so on, when provisioning the balance.
QuotasQuota may be either of two types, one-time or recurring.
One-time quotas are amounts of time use or data use that occur only one time and are not renewed. Forexample:
• If an ISP provider gives free introductory minutes
• If data bandwidth is provided on a tiered system, with the first 100 KB free, and then payment begins
• For a prepaid card use case
CPS CCI Guide for Full Privilege Administrators, Release 12.0.024
Subscriber ScreensBalance Screen

Recurring quota are those services the account subscriber signs up for and gets refreshed at some recurringperiod.
Managing Quotas and BalancesBalance codes and quota codes are developed andmaintained in the Policy Builder interface for these drop-downlists.
In the data hierarchy, Balances contain Quota. If you delete information at the balance level, all the quotasunderneath it are removed.
Step 1 In the menu, click Subscribers tab > Subscribers node > Find Subscriber.Step 2 Open a subscriber record.Step 3 Select the Balance item in the menu tree under the subscriber.Step 4 Click the plus sign by the balance code name, to open the full view to the balances.Step 5 Click a Credit link to apply more quotas or balance amounts for the subscriber.Step 6 Use the date picker and time picker fields to change the start and expiration of a credit. Originally a credit amount is
provided for you, but you can increase or decrease the amount you want to credit the balance using the date and timepicker fields.
Step 7 When the credit data are correct, click apply credit.Step 8 Wait for a screen refresh, and then review the new Balance chart. Be sure that your changes are in effect.
Add a Balance TypeA subscriber may have one or any number of balances available all at the same time. For example:
• A one-time introductory balance for a promotion
• A regular recurring balance that gets refreshed on a certain date
• A time-limited or data-limited balance that is tracked
Step 1 To add another type of quota for the subscriber’s use, click the add link located just below the Last refresh message.Step 2 Fill in the fields in the Add Balance window using the drop-down lists and calendar widgets.Step 3 Select a balance and quota code and enter the amount you want to give the subscriber.
Recall that balance codes and quota codes are developed andmaintained in the Policy Builder interface for thesedrop-down lists.
Note
CPS CCI Guide for Full Privilege Administrators, Release 12.0.0 25
Subscriber ScreensManaging Quotas and Balances

Credit or Debit an Existing BalanceSometimes a subscriber’s balance may need to be adjusted up or down.
Step 1 To adjust a balance, open the balance information with the plus sign.Step 2 Then click either credit or debit links on the right. The credit link lets you specify an amount of credit and also a start
and expiration date for when it may be used.If you select to debit a balance, you are only prompted for the amount.
Step 3 Fill in the field for debit or credit amount. The remaining quota is calculated.
Delete a BalanceIf you need to completely remove a specific balance type and all of its quota types from a subscriber, clickthe red circle/white dash icon.
This may be done during testing scenarios, but with real subscribers, another solution might be to simply debitbalance until the balance approaches zero.
Delete a QuotaA quota is a part of an overall balance. You can delete any quota that contributes to a balance, and so affectthe entire subscriber balance.
Take care about which you delete with the red circle/white dash. If you delete the Balance item on thescreen, all of the quotas within it are deleted as well.
Note
Click the red circle/white dash associated with a quota type, for example Quota1, to delete a single quota typewithin a balance type.
Check the History of BalancesOn the Balance screen, you can review the credit transactions against a quota type, but not the debit history.
Step 1 Click the history link associated with the quota.The History screen shows you the Start and Expiration dates, original amount, transacted amount and any reserved quota.
Step 2 Click on a column heading to sort that column.Step 3 Click on the down arrow in a column to change the sort or add or remove columns from the display.
CPS CCI Guide for Full Privilege Administrators, Release 12.0.026
Subscriber ScreensCredit or Debit an Existing Balance

CPS CCI Guide for Full Privilege Administrators, Release 12.0.0 27
Subscriber ScreensCheck the History of Balances
CPS CCI Guide for Full Privilege Administrators, Release 12.0.028
Subscriber ScreensCheck the History of Balances

C H A P T E R 3Session Tracing
• View a Subscriber Session, page 29
• Find Network Sessions, page 30
View a Subscriber SessionThis procedure looks at available sessions and lets you find sessions for the subscriber you specify. Contrastthis to finding a subscriber and then checking their sessions as described at Sessions Screen.
Step 1 Click the Subscribers tab > Sessions node > Find Subscriber Session.
Step 2 Click the Query Key drop-down list. The following subscriber search options is displayed:
1 User Id2 Framed IP3 IMSI4 MSISDN5 Framed IPv6 Prefix
Step 3 In Key Data, enter a valid information based on the Query Key selected in the drop down list.
CPS CCI Guide for Full Privilege Administrators, Release 12.0.0 29

Step 4 Click Search to display the general information about the found session on the right.Step 5 In the list to the right, hover over a session and double click, or click the open link to display the details about the session.
Find Network SessionsUse the Find Network Session link to look at selected session running on the network.
Step 1 Click Subscribers tab > Sessions node > Find Network Session item in the menu tree.Step 2 Fill in the Find Network Session screen.
DescriptionField
The type of data on the session you want to search for,either framed IP or User ID.
Query Key
The value of the query key, for example, part of a framedIP address.
Key Data
The type of device you want to query. Currently, only ISGis supported.
Query Device
List of all the matches for your query key and key data.Results Area
CPS CCI Guide for Full Privilege Administrators, Release 12.0.030
Session TracingFind Network Sessions

C H A P T E R 4Custom Reference Data Tables
• Custom Reference Data Tables Overview, page 31
• Concepts for Custom Reference Data Tables, page 32
• Steps and Procedures, page 32
• Policy Builder: Constructing Custom Reference Data Tables, page 33
• Control Center: Populating a Custom Reference Data Table, page 37
• Typical Tasks for Everyday, page 44
Custom Reference Data Tables OverviewIn Cisco Policy Suite, reference data is considered information that is needed to operate the policy engine,but not used for evaluating policies. For example, under the Reference Data tab in Policy Builder, are theforms used to define systems, clusters, and instances, and to set times and dates used for tariff switching. Thepolicy engine needs to refer to these data only to process policies correctly, but they do not define the policyitself.
Custom reference data is considered reference data that is specific to a service provider, perhaps the namesand characteristics of their networks or cell sites.
Such custom reference data is stored in the data structure of a table, with the columns and field attributesdefined by the service provider for their specific use. The Policy Builder interface does not provide screensfor such customized information because it would be so limiting.
Rather, in Cisco Policy Suite, custom reference data tables provide a way for service providers to create theirown data tables and to populate them.
The resulting custom reference data tables can then be used within Policy Builder as criteria to use whenescalating policy decisions.
Two interfaces are used to construct and populate custom reference data tables:
• Policy Builder 8.0.0 or greaterData table structures are managed in Policy Builder.
• Control Center 3.6 or greater, either the full admin or read only privilegesData table content is managed in Control Center.
CPS CCI Guide for Full Privilege Administrators, Release 12.0.0 31

The information in custom reference data tables handles special considerations such as these:
• Specialty area codes.
• A list of device parameters.
• Location data mapping, to map network sites and cell sites into the subscriber’s home network, roamingnetwork, or preferred roaming network.
• IMEI data tagging for smart phone, Apple, or Android device, and then use of that in policies.
Custom reference data tables allow the service provider to create their own data structures and populate themwith your own proprietary data.
The data in the tables is then used during policy evaluation.
You can construct your reference data tables yourself, or Cisco may build them for you after installation. Ifyou need any help with custom reference data tables, call your Cisco technical representative.
Concepts for Custom Reference Data Tables• The Policy Builder interface creates and edits the custom reference data table structure, defines itscolumns, and defines the data type, ranges and size of the fields.
• Control Center reflects the custom reference data tables constructed in Policy Builder.
• You provide data content to the custom reference data tables in Control Center.
• A key symbol and arrows are provided to each column in the Customer Reference Data table to enablethe user to distinguish among keys, input columns, and output columns.
◦A key symbol indicates a key column.
◦A downward arrow indicates an input column. The input columns are key columns for whichRuntime Binding option is selected.
◦An upward arrow indicates an output column. The output columns are non key columns.
• Spreadsheets can be imported into a custom reference data table structure. Log in to the Control Centerinterface to do so.
When constructing the custom reference data table in the Policy Builder, look at the spreadsheet you want toimport later and use the same column names, data types and other attributes.
Steps and Procedures• Use Custom Reference Table with Policy Builder.
These steps need only be completed once and may already be completed.
• Use Custom Reference Table with Control Center.
These steps need to be completed for every custom reference data table you want to create or edit.
CPS CCI Guide for Full Privilege Administrators, Release 12.0.032
Custom Reference Data TablesConcepts for Custom Reference Data Tables
Policy Builder: Constructing Custom Reference Data TablesThere are two tasks needed to create custom reference data tables:
• Setting Up the System Plug-in Configuration
• Creating or Editing a Custom Reference Data Table
Set Up the System Plug-in ConfigurationYou only have to do this one time for each system, cluster, or instance. Then you can create as many tablesas needed. The steps below configure an example system.
Before You Begin
Before you can create a custom reference data table, configure your system to use the Custom Reference DataTable plug-in configuration.
Step 1 Log in to Policy Builder and click Reference Data tab > Systems node > the system of your choice > PluginConfigurations.
Step 2 Click Custom Reference Data Configuration in the main pane.The tree on the left is populated with the configuration.
Step 3 Fill in the Custom Reference Data Configuration screen that appears.DescriptionField
This is the IP of the sessionMgr database.Primary Database IP
Optional, this field is the IP address of a secondary, backup,or failover sessionMgr database.
Secondary Database IP
This is the port number of the sessionMgr. It should be thesame for both the primary and secondary databases.
Port
Step 4 Go on to create data table structures as described at Create or Edit a Custom Reference Data Table, on page 34.
CPS CCI Guide for Full Privilege Administrators, Release 12.0.0 33
Custom Reference Data TablesPolicy Builder: Constructing Custom Reference Data Tables

Create or Edit a Custom Reference Data Table
Before You Begin
Before you begin, be sure that you have configured the plug-in as described in Setting Up the System Plug-inConfiguration. ClickReference Data > Systems > Plugin Configuration and make sure you see the CustomReference Data Config in the tree.
Step 1 In Policy Builder, click Reference Data > Custom Reference Data Tables node.Step 2 To create a new data table, click Summary > Custom Reference Data Tables link in the main pane.Step 3 To edit a table, click a table name in the tree.
Simply editing the name of a table results in a loss of the table. If you want to change a table name, make a copyfirst, and then change the name of the copy. No data is in the newly copied table but you have the new name.
Note
Step 4 Fill in the Data Table screen that appears.Step 5 The example shows the columns defined for a table called Countries.
DescriptionField
Here, Name is the internal name for the column.
Best practice is to name the column so that it isrecognizable as a key.
Name
This is the table name as you want it to display in ControlCenter.
Display Name
This is the data type of the column, that is:
• Date, month day and year
• Date and time. A valid date is from 1900 to 2099.
• Decimal, for decimal or currency
• Number, or integer
• Text
• True / False as Boolean
Type
CPS CCI Guide for Full Privilege Administrators, Release 12.0.034
Custom Reference Data TablesCreate or Edit a Custom Reference Data Table

DescriptionField
If checked, it specifies that each row in the table must beunique. If unchecked, when
entering data in Control Center the admin receives an errormessage.
Note that several columns can contribute to the whole key.
Best practice is to name the column so that it isrecognizable as a key.
Key
If checked, this box forces the Control Center admin toenter some value when populating data in the table.
Is Required
You must change the first row to enable fields in the restof the screen.
Columns Area
Step 6 Click on a row in the Columns definition table at the top, and access the fields on the bottom, working your way throughall of the column names listed.In the example, at the top, the row selected is the column called Continent, a key and required data. In the Valid Valuesarea, only the names of continents in the list is permitted as valid entries. In the example, some continent names havebeen omitted.
On the right side of the screen, these fields are available.
DescriptionField
Define a regular expression to define a specific data format.For example, if you define a regular expression here, youensure that a phone number is entered in a phone numberformat, or a date is entered as a date format.
Regular Expression
This is the description of what you are trying to achieveabove. In Control Center, this appears as user help or as atip to help those administrators enter data in the correctformat.
Regular Expression Description
Select this radio button if you do not have any need forBinding to CPS.
None
Control Center and Cisco Policy Server may correlate onthe basis of AVP codes. If so, specify these codes here.
Bind to Subscriber AVP Code
CPS CCI Guide for Full Privilege Administrators, Release 12.0.0 35
Custom Reference Data TablesCreate or Edit a Custom Reference Data Table

DescriptionField
Bind fields are the specific points of intersection to thepolicy engine, and are optional. Control Center may nothave any specific or defined ’hooks’ into the Cisco PolicyServer.
Click the Select button to display a list of objects that canbe used to relate Control Center with Cisco Policy Serverat specific data points.
Bind to Session/Policy State Field
Optional.
This field lets you specify a column in this table or anyother table in the tree and lets that table furnish the datafor the current table. This practice helps maintainconsistency across tables.
This example selects the table named test_table, columnaString, to use the value in that table’s column and row touse as a result in the current table.
Bind to a result column from another table
This field lets you enter a specific AVP to bind to. Doingso improves processing times.
Bind to Diameter request AVP code
Delete Reference Data TablesContact your Cisco technical representative for these delete tasks:
• Delete a custom reference data table
• Delete columns in a table
• To change the name of a table without using the copy link
Changing a table name has the same result as creating a new table. The first named table does not appear tothe admin in Control Center. The New table name has no data in it. this is because Policy Builder does notwrite to the database and change the table name.
Last TasksNow populate or edit the contents of these table columns. provide them with rows and rows of data.
See Control Center: Populating a Custom Reference Data Table, on page 37.
CPS CCI Guide for Full Privilege Administrators, Release 12.0.036
Custom Reference Data TablesDelete Reference Data Tables

Control Center: Populating a Custom Reference Data TableThe custom reference data table structures are created and edited in the Policy Builder interface. See PolicyBuilder: Constructing Custom Reference Data Tables, on page 33 for those procedures.
Import Data from a SpreadsheetIf you have a spreadsheet that already has data rows, you can import the spreadsheet into a custom referencedata tables. Of course, the data table itself must be created in Policy Builder. However, importing the dataoccurs in Control Center.
When the tables are created in Policy Builder, have your spreadsheet open to make sure you match thedata type, for example string, date, or number.
Note
Step 1 Log in to Control Center.Step 2 Configuration tab > Reference Data folder > table list.Step 3 Select the table that receives data from the spreadsheet.Step 4 Click the import link.
Figure 1:
Step 5 The table you selected under the Reference Data tree appears in the Import into Table field. You do not have to type itin. Make sure this is the table that is to receive data from the spreadsheet.
Step 6 Either name or browse for the .xls or .xlsx file you want to import, the one that populates the table.
CPS CCI Guide for Full Privilege Administrators, Release 12.0.0 37
Custom Reference Data TablesControl Center: Populating a Custom Reference Data Table

Step 7 Click the Next button in the lower corner.The Map file to Table Columns screen lets you select the columns in the spreadsheet that you want to use in the AccessTechnology table.
Step 8 Check Exclude first row if your .xls spreadsheet has headers.Step 9 Check Delete all rows if you want to completely empty the Access Technology table and bring in all new rows.Step 10 In the Select Column drop-down lists, specify what column of the Access Technology table you want to place your
spreadsheet columns in.The Select Column list shows the column names in Access Technology table as they were created in PolicyBuilder. This drop-down list does not show the column names in your spreadsheet.
Note
In our example, we want to place the device names in the Code column and the numeric values in the Description column.
CPS CCI Guide for Full Privilege Administrators, Release 12.0.038
Custom Reference Data TablesImport Data from a Spreadsheet

Step 11 In the lower right, click the Import link to proceed, or the Prev link to go back.Step 12 Notice the Import Successful screen.Step 13 Select Open AccessTechnology in the lower left to check your import, then click Done.
The newly populated table appears for you to check.
The AccessTechnology table has the new rows added, in the proper columns.
Enter Data ManuallyFor data tables that are small, or are not derived from a spreadsheet, use the Control Center interface to enterdata manually into the rows of custom reference data tables.
Step 1 Log in to Control Center.Step 2 Click Configuration tab > Configuration node and open the Reference Data folder.
The items under the Reference Data folder are the table names created in Policy Builder.If you do not see the table name that you want, go to the Policy Builder and createit.
Note
Step 3 In the tree, click a table name to open it.The table window shows the table structures and columns.
Our example uses AccessTechnology, which has several rows of data already in it.
CPS CCI Guide for Full Privilege Administrators, Release 12.0.0 39
Custom Reference Data TablesEnter Data Manually

Add to and edit rows in a table with these tips:Note
• Click on a row and it becomes editable.
• You can enter content in fields, select check boxes, use the dropdowns.
• You can build a table of values to use in another table.
• Date fields use the calender widget.
• Save or cancel the row. Save persists the rows to the database.
• Cancel lets the table data revert with no change.
• Carefully delete a row, there is no confirmation.
• Click the add link to add new blank rows.
Add a Row
Step 1 Open a table.Step 2 Click the add link in the upper right corner.Step 3 Note that the new rows is added to the bottom of the table for you to fill in. You cannot insert a row at a specific place.Step 4 Notice row count in lower right corner.
In this interface, the columns do not indicate which are Key columns or Key fields. Best practice is to name thecolumns with this attribute when creating them in Policy Builder.
Note
Any required fields display with red margins to let you know that you must enterdata.
Note
Step 5 Use any of the save methods mentioned above to save the row. However, you cannot save a row that has errors.
Edit a RowThere are several ways to save row data and so prevent data loss.
• Click the save link in the column on the far right.
• Press Enter after you have finished in a field.
• Tab over from one field to another until the row is saved.
• Finish in your field and click on another row.
CPS CCI Guide for Full Privilege Administrators, Release 12.0.040
Custom Reference Data TablesAdd a Row

There is no way to promote or demote rows.Note
• There is no way to sort on columns.
• There is no filter or search feature at this time.
Fix Errors in a RowErrors are denoted as the field margined in red. Help text displays to the far left or far right. Only the cancellink is available until you make a correction.
Delete a Single Row
Step 1 Hover over the row you want to delete.Step 2 Click the delete link to the right.
The data row is deleted immediately. No refresh needs to occur.
Create a SnapshotYou can create a snapshot of CRD tables on the system. The created snapshot will contain CRD table data,policy configuration and checksum information for all CRD tables.
Perform the following steps to create a snapshot
Step 1 Log in to Control Center.Step 2 Navigate to Configuration tab.Step 3 Click Reference Data.Step 4 Click create snapshot.
A Create a Snapshot dialog box is displayed.
Step 5 Enter snapshot details.Step 6 Click Create.
The snapshot is created displaying the following details:
• Snapshot Name
• Policy version
• Creation Date and time
CPS CCI Guide for Full Privilege Administrators, Release 12.0.0 41
Custom Reference Data TablesFix Errors in a Row

• User Comments
• Snapshot Path
• Checksum Details
To view the checksum information, click Checksum Details.
If the snapshot creation fails an error message is displayed.
Revert a SnapshotYou can revert the CRD data to a specific snapshot.
Preform the following steps to revert a snapshot:
Step 1 Log in to Control Center.Step 2 Navigate to Configuration tab.Step 3 Click Reference Data.Step 4 Click revert snapshot.
A Revert a Snapshot dialog box is displayed.
Step 5 Select a specific snapshot from the Snapshot Name drop down list.If a specific snapshot name is not selected, the latest snapshot will be populated.
If the snapshot directory is empty,No snapshot found in the systemmessage will be displayed.
Note
Step 6 Click Revert.A Confirmation Required dialog box is displayed.
Step 7 Click Yes.The specific snapshot is reverted displaying the following details:
• Snapshot Name
• Policy version
• Creation Date and time
• User Comments
• Snapshot Path
• Checksum Details
If the snapshot revert fails an error message is displayed.
CPS CCI Guide for Full Privilege Administrators, Release 12.0.042
Custom Reference Data TablesRevert a Snapshot

Export AllYou can export contents of all CRD tables to Microsoft Excel. The data is exported in CSV format in a zipfile.
Perform the following steps to export CRD table data:
Step 1 Log in to Control Center.Step 2 Navigate to the Configuration tab.Step 3 Click Reference Data.Step 4 Click Export All.
The contents of the CRD table is generated in a csv format in a zip file.
Step 5 Click Save File.Step 6 Click OK.
The zip file contains multiple CSV file containing CRD table schema and content corresponding to every CRD tableand an '.exportCrdInfo' metadata file containing the following data:
• exportDate - Date of the CRD Data when it is exported.
• exportDateMillis - Time in milli seconds when the CRD Data is exported.
• exportVersion - Exported verison of the CRD Data whose value is 1 currently.
Import AllYou can import contents of all CRD tables in bulk from Control Center. The data is imported in CSV formatin a zip file.
When Import All operation is performed the tables whose CSV files are present in the archive zip file will beupdated with the corresponding content without affecting other CRD tables existing in Control Center.
Perform the following steps to import CRD tables data in bulk:
Step 1 Log in to Control Center.Step 2 Navigate to Configuration tab.Step 3 Click Reference Data.Step 4 Click Import All.
An Import All Tables dialog box is displayed.
Step 5 Click Browse and select the file to be imported.Step 6 Click Import.
CPS CCI Guide for Full Privilege Administrators, Release 12.0.0 43
Custom Reference Data TablesExport All

Typical Tasks for EverydayThese navigation tasks and activities are specific to the custom reference data tables in Control Center.
Refresh the Screen• The refresh link in the upper right corner.
• Click the refresh link to force a refresh.
• A successful refresh message appears on the right.
• The usual refresh time is every 5 minutes, and is refreshed from the server.
• In the middle of updating, refresh is deferred.
• Upon close and reopen a table, the refreshed table is displayed.
• The refresh interval for these tables cannot be changed.
Navigate the Table Screens• Multiple tables can be open at one time.
• Icons in the tree to show the open and active focus.
• Circle with hyphen—open table
• Circle with arrows—active table focus
• Square—table not open
• Blue square—table open and in the tray at bottom
• Icons in the upper right corner of a table minimize, maximize, or close the table. When minimized, thetable heading displays at the bottom of the screen in the tray.
• To restore a table to view,
• Click the restore button of the table in the tray,
• Or
• Double click the table tab in the tray.
• Resize a table for viewing by dragging the edges.
• Narrow or widen a column by dragging the margin of the column head.
Navigate in a Row• If you have many columns, they cannot all display in the browser. You must scroll to the far right to getto the delete, edit, save, cancel links.
CPS CCI Guide for Full Privilege Administrators, Release 12.0.044
Custom Reference Data TablesTypical Tasks for Everyday

• Notice that in the bottom right corner, there is a indicator of how may rows you are viewing at themoment, and how many rows there are total in the table.
CPS CCI Guide for Full Privilege Administrators, Release 12.0.0 45
Custom Reference Data TablesNavigate the Table Screens

CPS CCI Guide for Full Privilege Administrators, Release 12.0.046
Custom Reference Data TablesNavigate the Table Screens