cps users guide win 4-20-12
TRANSCRIPT

Contents Contact Information .................................................................................................................... 4
Setting Up CPS .......................................................................................................................... 5
Overview ................................................................................................................................ 5
Purpose .................................................................................................................................. 5
Install CPS ............................................................................................................................. 6
Download Instructions ................................................................................................................ 6
CPS Receivers ....................................................................................................................... 7
CPS Student Response Pads ................................................................................................. 8
CPS IR Pad ........................................................................................................................ 8
CPS Spark and CPS Pulse Pads ........................................................................................ 8
Databases .............................................................................................................................. 9
Changing the channel number ...............................................................................................10
CPS Window Tour ....................................................................................................................11
Class Rosters in a Classpack Model .....................................................................................12
Import a .csv File ...................................................................................................................15
Quick Class ...........................................................................................................................16
Learning Management Systems ................................................................................................18
Manage a Bookstore Model Class Roster with CPSOnline ....................................................18
Manage a Bookstore Model Class Roster with Blackboard ....................................................21
Manage a Bookstore Model Class Roster with Vista (WebCT) ..............................................25
Manage a Bookstore Model Class Roster with ANGEL .........................................................28
Student Resources ................................................................................................................31
Instant Classroom Interactivity ..................................................................................................33
Overview ...............................................................................................................................33
Purpose .................................................................................................................................33
Verbal Questions ...................................................................................................................34
Chalkboard Questions........................................................................................................40
FastGrade .............................................................................................................................41
Student Paced Mode .............................................................................................................43
Student Managed Practice Mode (IR Only) ...........................................................................45
Engage Multiple Lessons ......................................................................................................46
Homework Mode ...................................................................................................................47
Creating Content in CPS ...........................................................................................................49

Overview ...............................................................................................................................49
Purpose .................................................................................................................................49
Folders and Lessons .............................................................................................................50
Lesson Builder .......................................................................................................................52
Questions ..............................................................................................................................54
Standard Mode ......................................................................................................................60
Delivery Options ....................................................................................................................62
Interactive PowerPoint Presentations ......................................................................................65
PowerPoint Options ...............................................................................................................66
CPS Software ........................................................................................................................66
CPS for PowerPoint ...............................................................................................................67
Learning Through Team Activities .............................................................................................71
Team Rosters ........................................................................................................................72
Challenge Board ....................................................................................................................73
There It Is! .............................................................................................................................76
Managing Data and Reports .....................................................................................................79
Reports ..................................................................................................................................80
Report Types .........................................................................................................................84
Class Reports ....................................................................................................................84
Individual Reports ..............................................................................................................87
Export Reports ...................................................................................................................89
Bookstore Model Instructor FAQs ..........................................................................................92
Bookstore Model Student FAQs ............................................................................................93

Contact Information In addition to this training guide and the CPS software help menu, the following are other resources available to support your implementation of CPS.
Sales Support: 866.496.4949
Technical Support: 888.333.4988 For software update downloads and online training, please visit our website: www.einstruction.com. Copyright© 2012 eInstruction Corporation. All rights reserved. eInstruction® and ExamView® are registered trademarks and Workspace™, Response, CPS™
and CPS PPT™ are trademarks of eInstruction Corporation in the United States and other countries. All other trademarks are the property of their respective owners. eInstruction® offers educators a family of software, student response systems, interactive whiteboards, mobile interactive whiteboards, data reporting, and high-quality content. These solutions have been shown to increase student engagement, while supporting student-centered collaborative learning and providing real-time assessment feedback to educators in more than 500,000 classrooms around the world. Please visit us on the web at www.einstruction.com for product and support information. No part of this document may be reproduced, transmitted, transcribed, stored in a retrieval system or translated into any language or computer language, in any form or by any means, electronic, mechanical, magnetic, optical, chemical, manual ,or otherwise, without the prior written permission of eInstruction.

Setting Up CPS
Overview This section is designed for the beginner who has never used CPS. You will be able to set up the CPS receiver and use CPS Response Pads. You will also be able to create a CPS database with class and student information to use when engaging CPS lessons and activities.
Purpose
After completing this section, you will be able to: • Install CPS.
• Navigate the buttons on the CPS clicker.
• Create, name, and save a new CPS database.
• Navigate the CPS window.
• Detect the CPS receiver.
• Create a class roster by following steps in the class wizard.
• Enter student demographic information into a class roster manually.
• Edit class and student information.
• Import a .csv file with a class list.
• Create a quick class with no personal student information (optional).
• Use CPS with CPSOnline, Blackboard, and Angel (optional).

Install CPS
Basic Installation
1. Insert the CPS Installation DVD into your DVD-ROM drive. The CPS installation wizard
will appear.
2. Click Install CPS and follow the on-screen prompts.
3. Click Finish. The Startup Wizard places a CPS icon on your desktop. For network administrators: Nothing special needs to be done when deploying CPS over the network or imaging an operating system which contains CPS. Practice standard deployment techniques with CPS.
Advanced Installation
1. With the CPS Installation DVD already in the drive, double-click the DVD-ROM icon in My Computer.
2. Double-click setup.exe. The CPS installation wizard will appear.
3. Click Install CPS and follow the on-screen prompts.
4. Click Finish. The Startup Wizard places a CPS icon on your desktop. Download Instructions Additionally, you may download the latest version of CPS by visiting: www.einstruction.com/downloads.
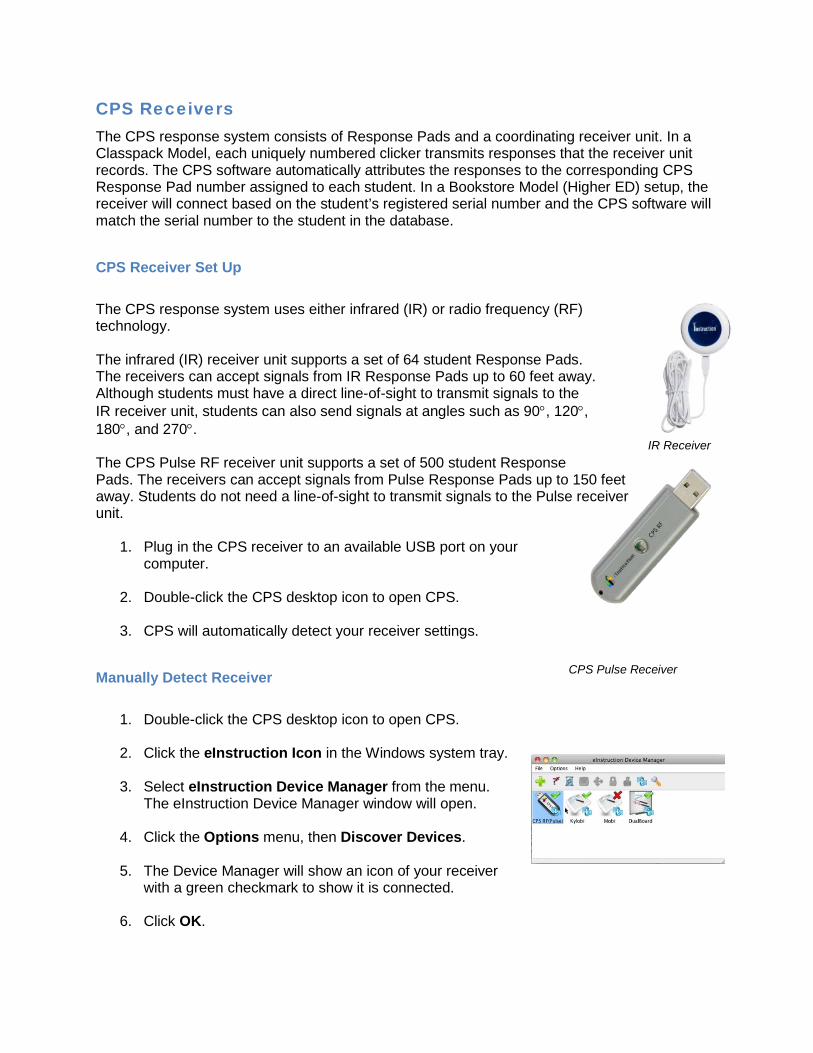
CPS Receivers The CPS response system consists of Response Pads and a coordinating receiver unit. In a Classpack Model, each uniquely numbered clicker transmits responses that the receiver unit records. The CPS software automatically attributes the responses to the corresponding CPS Response Pad number assigned to each student. In a Bookstore Model (Higher ED) setup, the receiver will connect based on the student’s registered serial number and the CPS software will match the serial number to the student in the database.
CPS Receiver Set Up The CPS response system uses either infrared (IR) or radio frequency (RF) technology. The infrared (IR) receiver unit supports a set of 64 student Response Pads. The receivers can accept signals from IR Response Pads up to 60 feet away. Although students must have a direct line-of-sight to transmit signals to the IR receiver unit, students can also send signals at angles such as 90°, 120°, 180°, and 270°. The CPS Pulse RF receiver unit supports a set of 500 student Response Pads. The receivers can accept signals from Pulse Response Pads up to 150 feet away. Students do not need a line-of-sight to transmit signals to the Pulse receiver unit.
1. Plug in the CPS receiver to an available USB port on your computer.
2. Double-click the CPS desktop icon to open CPS.
3. CPS will automatically detect your receiver settings.
Manually Detect Receiver
1. Double-click the CPS desktop icon to open CPS.
2. Click the eInstruction Icon in the Windows system tray.
3. Select eInstruction Device Manager from the menu. The eInstruction Device Manager window will open.
4. Click the Options menu, then Discover Devices.
5. The Device Manager will show an icon of your receiver
with a green checkmark to show it is connected.
6. Click OK.
IR Receiver
CPS Pulse Receiver
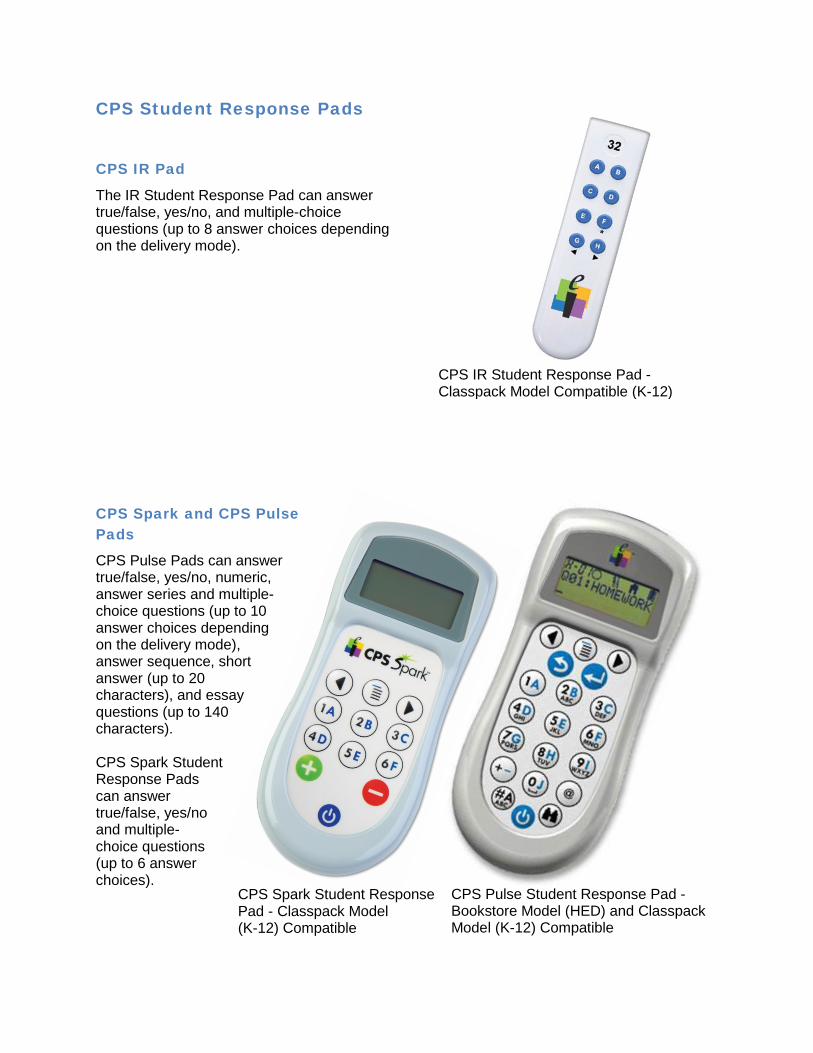
CPS Student Response Pads
CPS IR Pad
The IR Student Response Pad can answer true/false, yes/no, and multiple-choice questions (up to 8 answer choices depending on the delivery mode).
CPS Spark and CPS Pulse Pads
CPS Pulse Pads can answer true/false, yes/no, numeric, answer series and multiple-choice questions (up to 10 answer choices depending on the delivery mode), answer sequence, short answer (up to 20 characters), and essay questions (up to 140 characters). CPS Spark Student Response Pads can answer true/false, yes/no and multiple- choice questions (up to 6 answer choices).
CPS IR Student Response Pad - Classpack Model Compatible (K-12)
CPS Spark Student Response Pad - Classpack Model (K-12) Compatible
CPS Pulse Student Response Pad - Bookstore Model (HED) and Classpack Model (K-12) Compatible
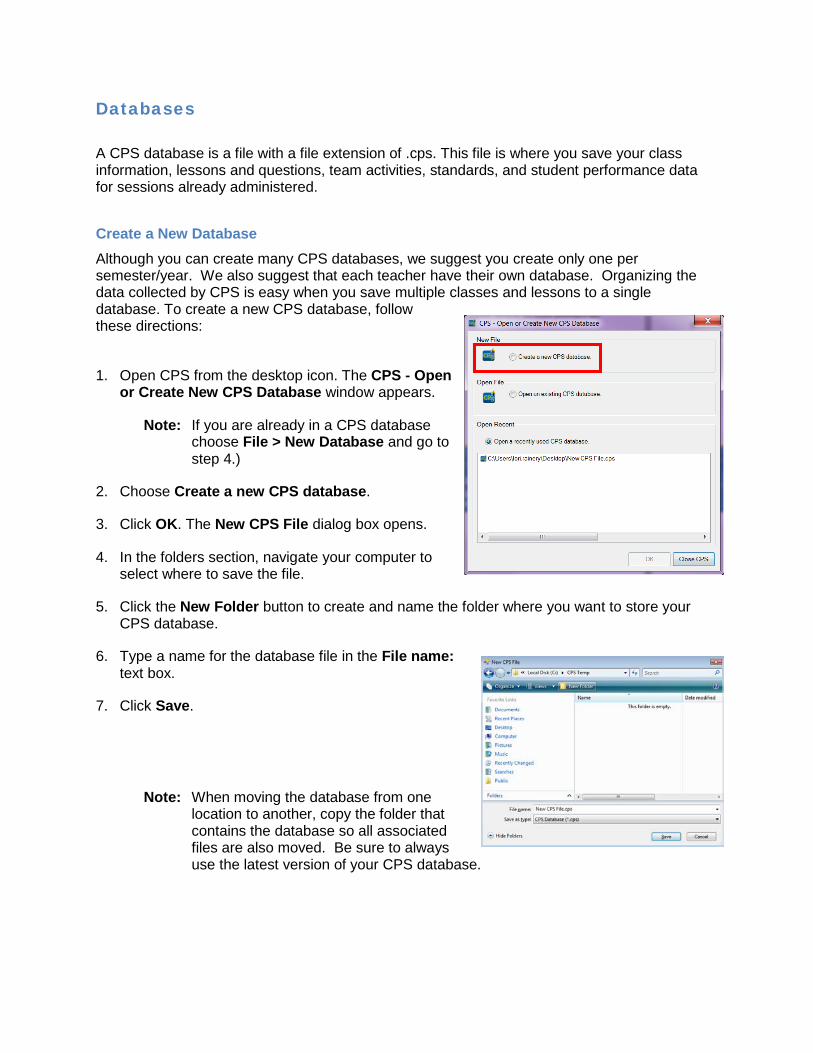
Databases
A CPS database is a file with a file extension of .cps. This file is where you save your class information, lessons and questions, team activities, standards, and student performance data for sessions already administered.
Create a New Database Although you can create many CPS databases, we suggest you create only one per semester/year. We also suggest that each teacher have their own database. Organizing the data collected by CPS is easy when you save multiple classes and lessons to a single database. To create a new CPS database, follow these directions:
1. Open CPS from the desktop icon. The CPS - Open or Create New CPS Database window appears.
Note: If you are already in a CPS database choose File > New Database and go to step 4.)
2. Choose Create a new CPS database.
3. Click OK. The New CPS File dialog box opens.
4. In the folders section, navigate your computer to select where to save the file.
5. Click the New Folder button to create and name the folder where you want to store your CPS database.
6. Type a name for the database file in the File name: text box.
7. Click Save.
Note: When moving the database from one location to another, copy the folder that contains the database so all associated files are also moved. Be sure to always use the latest version of your CPS database.
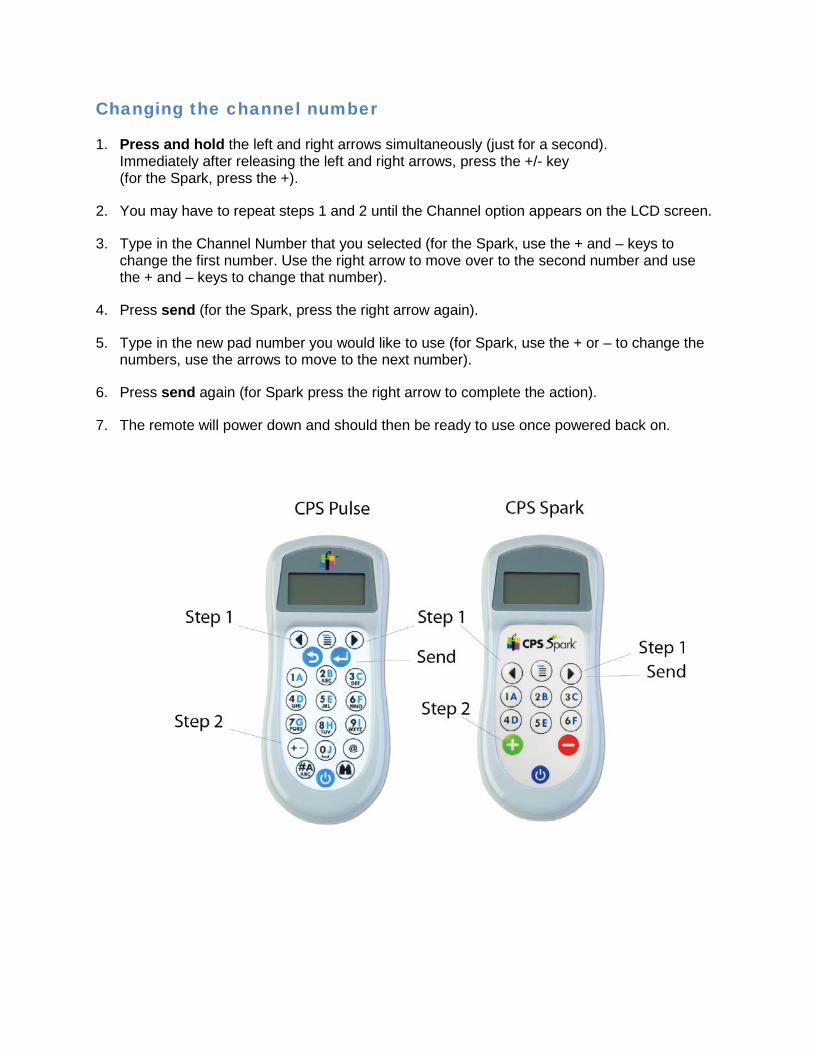
Changing the channel number
1. Press and hold the left and right arrows simultaneously (just for a second). Immediately after releasing the left and right arrows, press the +/- key (for the Spark, press the +).
2. You may have to repeat steps 1 and 2 until the Channel option appears on the LCD screen.
3. Type in the Channel Number that you selected (for the Spark, use the + and – keys to change the first number. Use the right arrow to move over to the second number and use the + and – keys to change that number).
4. Press send (for the Spark, press the right arrow again).
5. Type in the new pad number you would like to use (for Spark, use the + or – to change the numbers, use the arrows to move to the next number).
6. Press send again (for Spark press the right arrow to complete the action).
7. The remote will power down and should then be ready to use once powered back on.
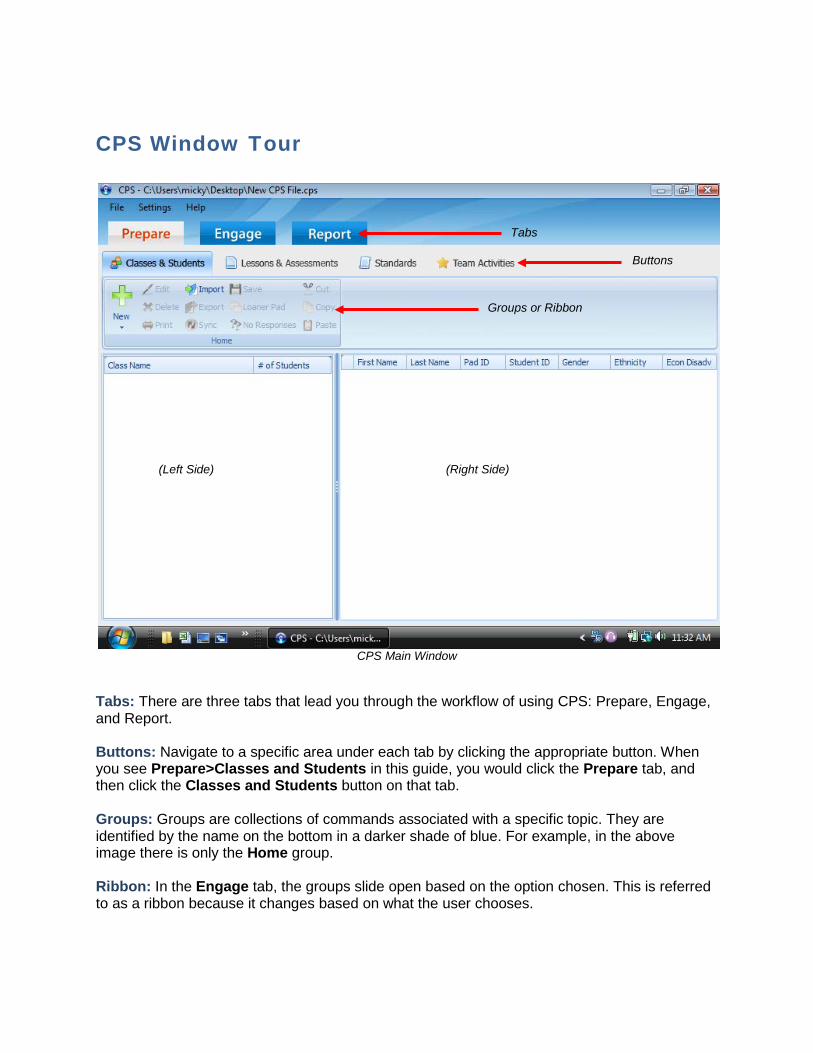
CPS Window Tour
CPS Main Window
Tabs: There are three tabs that lead you through the workflow of using CPS: Prepare, Engage, and Report. Buttons: Navigate to a specific area under each tab by clicking the appropriate button. When you see Prepare>Classes and Students in this guide, you would click the Prepare tab, and then click the Classes and Students button on that tab. Groups: Groups are collections of commands associated with a specific topic. They are identified by the name on the bottom in a darker shade of blue. For example, in the above image there is only the Home group. Ribbon: In the Engage tab, the groups slide open based on the option chosen. This is referred to as a ribbon because it changes based on what the user chooses.
Tabs
Buttons
Groups or Ribbon
(Left Side) (Right Side)
Main Window: The main window changes constantly depending on where in CPS the user is and what they are doing. It is usually divided into a left and right side.
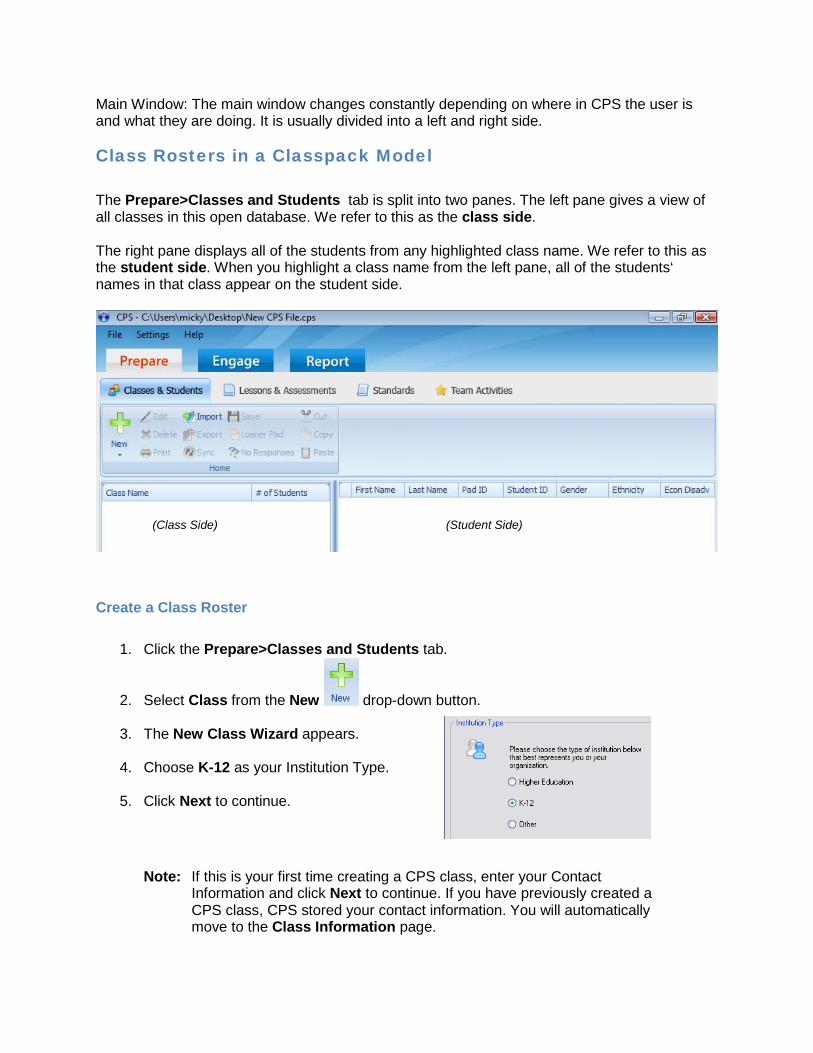
Class Rosters in a Classpack Model The Prepare>Classes and Students tab is split into two panes. The left pane gives a view of all classes in this open database. We refer to this as the class side. The right pane displays all of the students from any highlighted class name. We refer to this as the student side. When you highlight a class name from the left pane, all of the students‘ names in that class appear on the student side.
Create a Class Roster
1. Click the Prepare>Classes and Students tab.
2. Select Class from the New drop-down button. 3. The New Class Wizard appears. 4. Choose K-12 as your Institution Type.
5. Click Next to continue.
Note: If this is your first time creating a CPS class, enter your Contact Information and click Next to continue. If you have previously created a CPS class, CPS stored your contact information. You will automatically move to the Class Information page.
(Class Side) (Student Side)

6. Enter your Class Information:
• Class Name: This is
the only required information for a class. It will help you differentiate your classes, so choose a unique name.
• Course Number: Course number assigned by your school.
• Section: Section number for your class.
• Period: Period in which you hold your class.
• Semester: Semester during which you teach your class.
• Campus: Building or campus where you teach your class.
• Classroom Number: Room number for your class.
• Make this a CPSOnline class (An instructor Setup Code is required): Leave the box in front of this option blank.
• Attendance Options: This is the location where you store your attendance records in CPS. You can choose to view the attendance as a grade in the Assessments area of the Report tab or choose to view the attendance as Absent/Present in the Class Info area of the Report>Gradebook tab.
Note: By saving attendance records in the Report tab, you can easily export that data. Saving the attendance records in Report>Gradebook allows you to use the internal gradebook within the CPS software.
7. Click Next to continue.
8. Click Next to create your class or click Back to review your information.
9. Click Done to close the CPS - New Class Wizard and return to the Prepare>Classes
and Students tab, or create another class by checking the box in front of the I want to make another class option.
Opt
iona
l Fie
lds
Add Students to a ClassPack Model Class Once you have created a class in the database, you can add students to that class.
1. Click the Prepare>Classes and Students tab.
2. Click the New drop-down button and select Student. 3. CPS displays the default student information. CPS automatically saves the default
student data row.
4. Quick Tip: Quickly add personalized student information to a student data row by typing in the student‘s first name, pressing the Tab key on your keyboard, typing in the student‘s last name, and pressing Enter on your keyboard. Pressing Enter saves the student‘s information and automatically moves you to the next student data row. CPS automatically assigns the next student a Pad ID number in numeric order. You may change the student‘s Pad ID number by clicking in the Pad ID data field and entering in a new pad ID. Data fields include the following fields:
• First name (required) • Last name (required) • Pad ID (required) • Student ID (not required) • Gender (not required) • Ethnicity (not required) • Economically disadvantaged (not required)
5. Click Save when you have added all the students’ data. CPS will automatically display the student’s information on the student side.
Note: You can use any class you create in this database in conjunction with any session delivery. Click the column headers, First Name, Last Name, or Pad ID, on the student side to sort the view of the students in a class.
Edit Class Information
1. Click the Prepare>Classes and Students tab.
2. Select the class name that you want to edit.
3. Click Edit .
4. Click on the Class Information or Contact Information tab. 5. Edit any of the on-screen options.
6. Click Save to save any changes.
7. Click Done to exit and return to the Prepare>Classes and Students tab.
Edit Student Information
1. Click the Prepare>Classes and Students tab.
2. Select a class from the class side to display the students in this class on the student side.
3. On the student side, click the student data field that contains the student information you
want to edit. A cursor appears in the selected data field.
4. Edit student information in the data field that contains the cursor.
5. Click Save .
6. Repeat the above steps to edit additional student information.
Import a .csv File
You can import classes from spreadsheets or other applications as a *.csv (comma delimited or comma separated values) file.
1. Prepare the .csv file from the original software application. Make sure the following
naming conventions are used for each heading.
Data Field Required Heading in CPS First Name FIRST or FIRSTNAME Last Name LAST or LASTNAME Pad ID # PADID Student ID # STUDENTID Ethnicity ETHNICCODE Gender GENDER Economically Disadvantaged ECONDISADVANTAGED
2. Click the Prepare>Classes and Students tab.
3. Click Import .
4. Select Other Sources... The CPS - Import Class Wizard appears.
5. Choose Comma Separated Values (*.csv) from the list.
6. Click Next.
7. Click Browse. An Open dialog box appears.
8. Navigate your computer to select the .csv file you want to import.
9. Click Open.
10. Select an Instructor from the Select Instructor window.
11. Click OK.
12. CPS names the class using the name of the .csv file imported. Select that class name by clicking the check box. To select all available classes, click the box next to the Select All option.
13. Click Next. CPS imports your class roster and displays the class information on the
Student side of the screen.
14. Click Done.
Quick Class The class wizard lets you quickly create a class as you deliver a session. This on-the-fly class contains the pad ID values specific to the number of students participating in the session. The Class Wizard saves any class generated during a delivery session into the database you have open.
1. Click the Engage>Lessons and Assessments tab.
2. Click the Engage button in the Verbal group.
The Verbal Questions setup window appears.
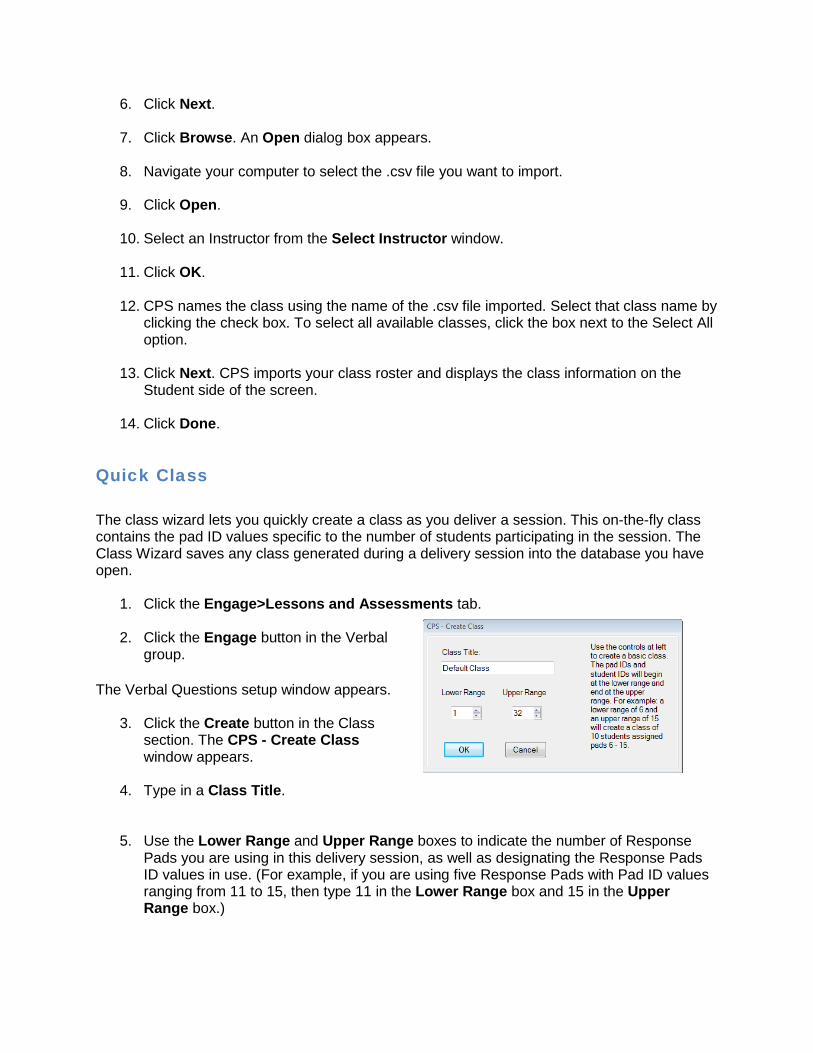
3. Click the Create button in the Class section. The CPS - Create Class window appears.
4. Type in a Class Title.
5. Use the Lower Range and Upper Range boxes to indicate the number of Response Pads you are using in this delivery session, as well as designating the Response Pads ID values in use. (For example, if you are using five Response Pads with Pad ID values ranging from 11 to 15, then type 11 in the Lower Range box and 15 in the Upper Range box.)

6. Click OK.

Learning Management Systems
A Bookstore Model (Higher Ed) class is a roster of students identified through the serial numbers of their individual response pads. Each student typically purchases a response pad from a school bookstore. After obtaining a subscription, the student enrolls the response pad’s unique serial number into the class through eInstruction’s CPSOnline, WebCT, Blackboard, or ANGEL. Use the appropriate section to learn how to utilize the relevant CPSOnline, WebCT/Vista, Blackboard, or ANGEL function. If you are not sure which system you are using to set up your CPS class roster, consult with your appropriate school or eInstruction representative.
Manage a Bookstore Model Class Roster with CPSOnline You can use CPS to create classes in CPSOnline. Use CPS in the classroom to engage your students and receive instant feedback, and then connect your class with CPSOnline so students can access information from home. The setup process is divided into two steps:
• Create your CPSOnline class in CPS*. • Sync your class with CPS.
*If you have already created a CPSOnline class, you may import it into a new database using the class import function, covered at the end of this section.
Create a CPSOnline Class A Higher Ed class is a roster of students identified through the serial numbers of their individual response pads. Students typically purchase their response pads from their school bookstore and through a subscription, enroll their response pads into the class through eInstruction’s CPSOnline. CPSOnline then sends student information to your CPS class when you sync, and CPS creates your class roster.
1. Click the Prepare > Classes and Students tab.
2. Select Class from the New drop-down
button. The CPS - Class Wizard appears.
3. Choose Higher Education and click Next.

4. If you have used CPSOnline before, choose Yes, click Next.
5. Enter your CPSOnline username and password.
6. Select your institution from the list of available schools and click Next.
7. If you have not used CPSOnline before, choose No and click Next.
8. Enter your Instructor Setup Code. You can get your Instructor Setup Code from your
eInstruction Consultant or your book representative.
Note: Instructor Setup Codes are case sensitive.
• Click Next. • Select your institution from the list of available schools and click Next. • Create a unique username and password and click Next. • Enter your instructor information and click Next.
9. Enter your class information. Please note that Class Name, Class Start Date, and
Class End Date are required fields. Click Next.
• Class Start Date: This date is the first day that students can register for the class.
• Class End Date: This is the last day of class. • Notification Date: A checkmark automatically
appears next to this option. The date next to this option indicates the first day on which you will begin to receive notification emails each time a student registers for your class. You may want to set this date the same as the class start date. If you do not want to receive notification emails, click the box next to the option so that the checkmark disappears.
10. Choose your Online Class Options.
• CPSOnline Study Guide: Choose whether to
automatically display study guides for uploaded sessions or provide a prompt to show a study guide each time you upload a session.
• Sync Options: Choose whether or not you’d like to sync your CPSOnline class roster upon starting CPS.
11. Click Next to create your class, or click Back to return to previous steps and edit your
information.
Class Information section
Online Class Options
12. Click Done to exit the CPS - Class Wizard and return to the Classes section. Your
class appears in the class side of the Classes section. Students will join the class using
the information in the Student Resources section located at the end of this module.
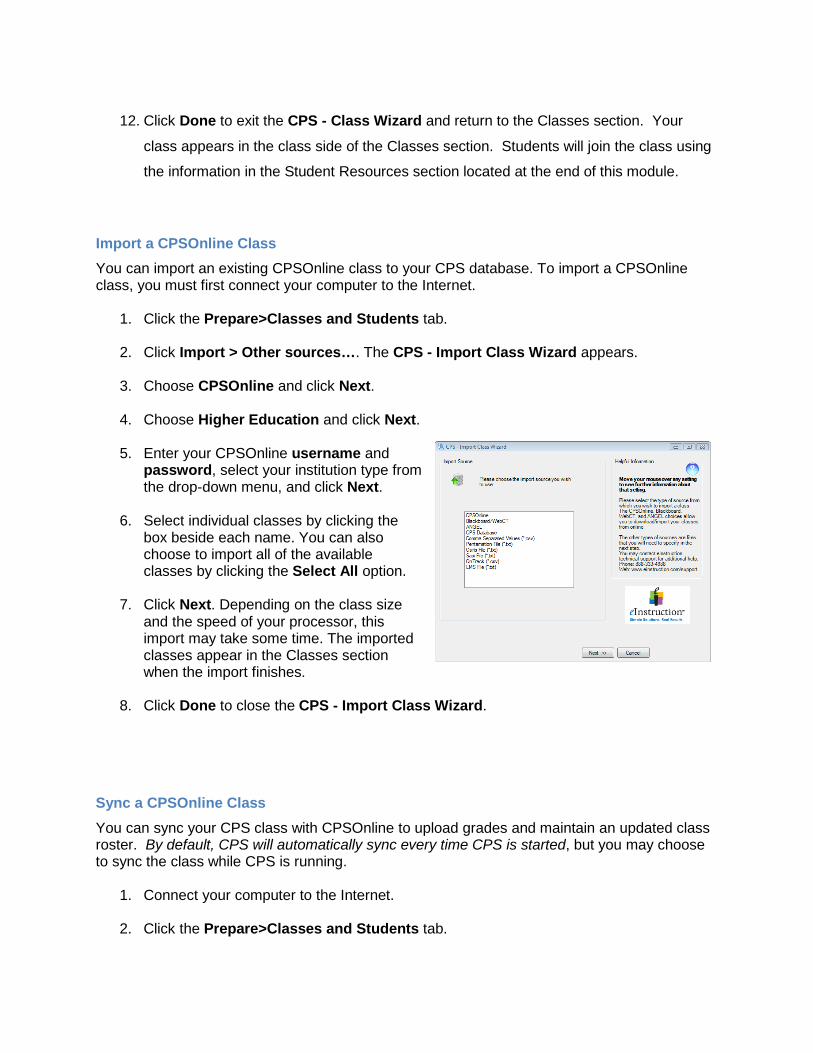
Import a CPSOnline Class You can import an existing CPSOnline class to your CPS database. To import a CPSOnline class, you must first connect your computer to the Internet.
1. Click the Prepare>Classes and Students tab.
2. Click Import > Other sources…. The CPS - Import Class Wizard appears.
3. Choose CPSOnline and click Next.
4. Choose Higher Education and click Next.
5. Enter your CPSOnline username and password, select your institution type from the drop-down menu, and click Next.
6. Select individual classes by clicking the
box beside each name. You can also choose to import all of the available classes by clicking the Select All option.
7. Click Next. Depending on the class size
and the speed of your processor, this import may take some time. The imported classes appear in the Classes section when the import finishes.
8. Click Done to close the CPS - Import Class Wizard.
Sync a CPSOnline Class You can sync your CPS class with CPSOnline to upload grades and maintain an updated class roster. By default, CPS will automatically sync every time CPS is started, but you may choose to sync the class while CPS is running.
1. Connect your computer to the Internet.
2. Click the Prepare>Classes and Students tab.
Import Class wizard
3. Highlight the class you would like to sync with CPSOnline and click the Sync button
from the menu options. The CPSOnline Connection window will appear and the class will sync.
You can use CPS with your Blackboard classes; you can also use CPS in the classroom to engage your students and receive instant feedback, and then connect your class. Blackboard students can then access information from home. Unlike a regular CPSOnline class, a Blackboard class is not created within the CPS application. It is created from within Blackboard itself and then must be imported into CPS. The setup process is divided into three steps:
• Link your Blackboard class to CPS. • Import your class to CPS. • Sync your class with CPS.
Manage a Bookstore Model Class Roster with Blackboard
You can use CPS with your Blackboard classes. Use CPS in the classroom to engage your students and receive instant feedback, and then connect your class with Blackboard so students can access information from home. Unlike a regular CPSOnline class, a Blackboard class is not created within the CPS application. It is created from within Blackboard itself and then must be imported into CPS. The setup process is divided into three steps:
• Link your Blackboard class to CPS. • Import your class to CPS. • Sync your class with CPS.
Link a Blackboard class to CPS To enable your Blackboard class to communicate with CPS, follow the steps below:
Once the class has been created in Blackboard, follow these steps to create the class in CPSOnline and link the two together:
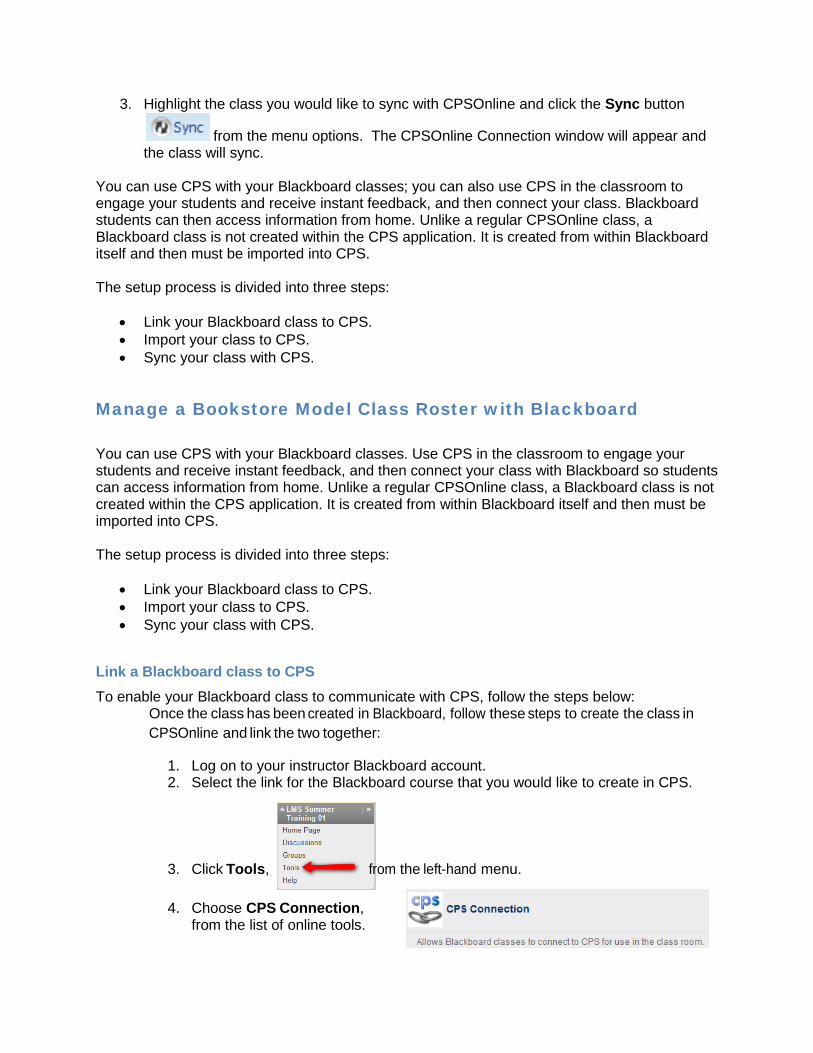
1. Log on to your instructor Blackboard account. 2. Select the link for the Blackboard course that you would like to create in CPS.
3. Click Tools, from the left-hand menu.
4. Choose CPS Connection, from the list of online tools.

5. Click the My CPS Page button or the CPS tab, located at the top of the screen.
Note: If the CPS Connection option is unavailable, please contact your IT Administrator and ask them to install the CPS Connection. They can obtain the CPS Connection Building Block by contacting eInstruction at www.einstruction.com/support.
6. Click the My CPS Page button.
7. You will now see the My Instructor Courses page. Click the Enable link to integrate your Blackboard course with CPS so students can add their response pads to the course.
CPS Connection tab
My CPS Page button

8. On the CPSOnline Account screen, fill in the required information.
• If you have used CPS before, you will enter your CPS instructor username and password.
• If you have not used CPS before, you will need to create a CPS username and password.
9. After filling out the CPSOnline Account informatiom form, click Continue.
The Enable Course for Response Pad Use screen will appear.
10. Fill out the form.
• Course Title: Will be auto-filled • Course Start Date (mm/dd/yy): Date the course will start and students will be
able to enroll in the course. • Course End Date (mm/dd/yy): Date the course will end. • Instructor Setup Code: The code can be found on the slip that came with the
demo kit. Please contact your sales representative if misplaced.
11. When you are finished entering your information, click Submit.
My Instructor Courses
CPSOnline Account screen
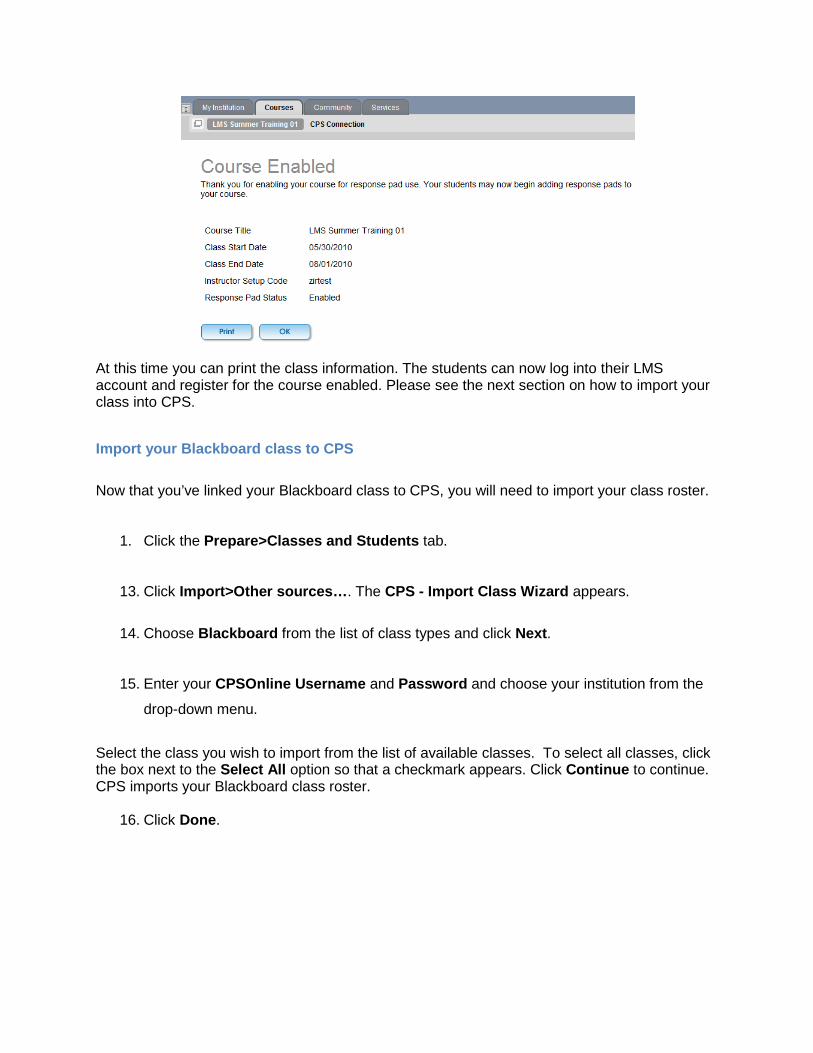
At this time you can print the class information. The students can now log into their LMS account and register for the course enabled. Please see the next section on how to import your class into CPS.
Import your Blackboard class to CPS Now that you’ve linked your Blackboard class to CPS, you will need to import your class roster.
1. Click the Prepare>Classes and Students tab.
13. Click Import>Other sources…. The CPS - Import Class Wizard appears.
14. Choose Blackboard from the list of class types and click Next.
15. Enter your CPSOnline Username and Password and choose your institution from the
drop-down menu.
Select the class you wish to import from the list of available classes. To select all classes, click the box next to the Select All option so that a checkmark appears. Click Continue to continue. CPS imports your Blackboard class roster.
16. Click Done.
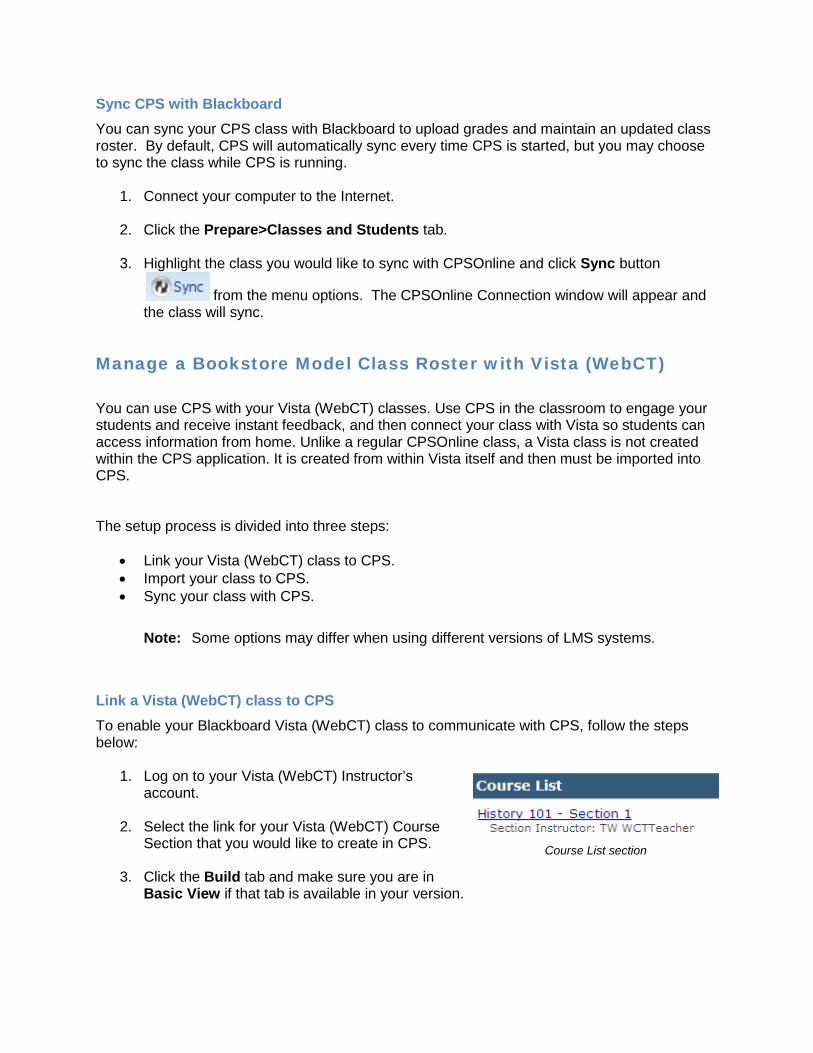
Sync CPS with Blackboard You can sync your CPS class with Blackboard to upload grades and maintain an updated class roster. By default, CPS will automatically sync every time CPS is started, but you may choose to sync the class while CPS is running.
1. Connect your computer to the Internet.
2. Click the Prepare>Classes and Students tab.
3. Highlight the class you would like to sync with CPSOnline and click Sync button
from the menu options. The CPSOnline Connection window will appear and the class will sync.
Manage a Bookstore Model Class Roster with Vista (WebCT) You can use CPS with your Vista (WebCT) classes. Use CPS in the classroom to engage your students and receive instant feedback, and then connect your class with Vista so students can access information from home. Unlike a regular CPSOnline class, a Vista class is not created within the CPS application. It is created from within Vista itself and then must be imported into CPS. The setup process is divided into three steps:
• Link your Vista (WebCT) class to CPS. • Import your class to CPS. • Sync your class with CPS.
Note: Some options may differ when using different versions of LMS systems.
Link a Vista (WebCT) class to CPS To enable your Blackboard Vista (WebCT) class to communicate with CPS, follow the steps below:
1. Log on to your Vista (WebCT) Instructor’s account.
2. Select the link for your Vista (WebCT) Course
Section that you would like to create in CPS.
3. Click the Build tab and make sure you are in Basic View if that tab is available in your version.
Course List section
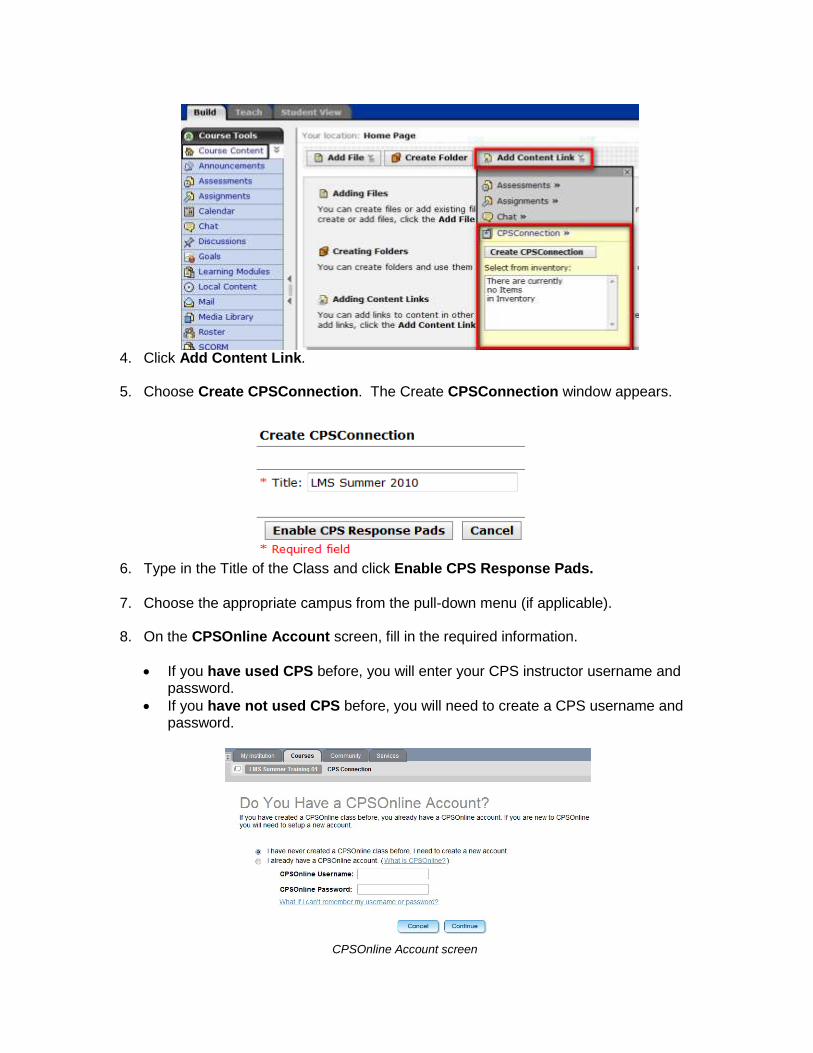
4. Click Add Content Link.
5. Choose Create CPSConnection. The Create CPSConnection window appears.
6. Type in the Title of the Class and click Enable CPS Response Pads.
7. Choose the appropriate campus from the pull-down menu (if applicable).
8. On the CPSOnline Account screen, fill in the required information.
• If you have used CPS before, you will enter your CPS instructor username and password.
• If you have not used CPS before, you will need to create a CPS username and password.
CPSOnline Account screen
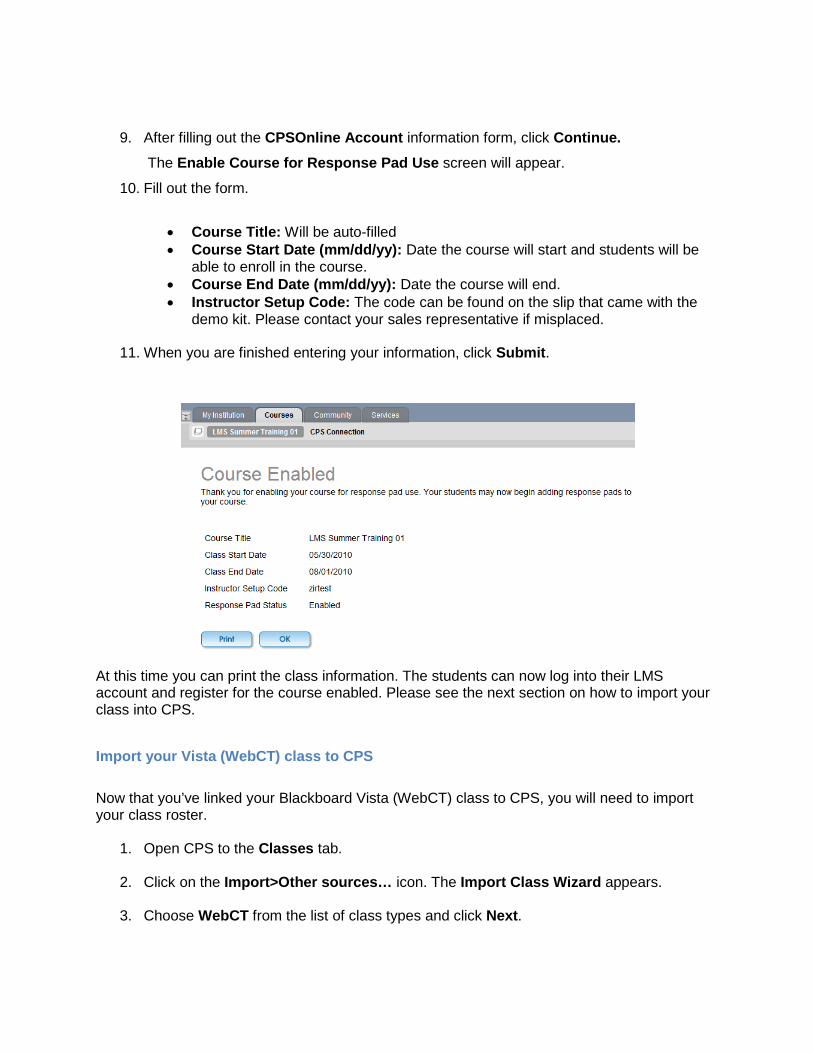
9. After filling out the CPSOnline Account information form, click Continue. The Enable Course for Response Pad Use screen will appear.
10. Fill out the form.
• Course Title: Will be auto-filled • Course Start Date (mm/dd/yy): Date the course will start and students will be
able to enroll in the course. • Course End Date (mm/dd/yy): Date the course will end. • Instructor Setup Code: The code can be found on the slip that came with the
demo kit. Please contact your sales representative if misplaced.
11. When you are finished entering your information, click Submit.
At this time you can print the class information. The students can now log into their LMS account and register for the course enabled. Please see the next section on how to import your class into CPS.
Import your Vista (WebCT) class to CPS Now that you’ve linked your Blackboard Vista (WebCT) class to CPS, you will need to import your class roster.
1. Open CPS to the Classes tab.
2. Click on the Import>Other sources… icon. The Import Class Wizard appears.
3. Choose WebCT from the list of class types and click Next.
4. Enter your CPSOnline Connection Username and Password and choose your institution from the drop-down menu.
5. Select the class you wish to import from the list of available classes. To select all classes, click box next to the Select All option so that a checkmark appears. Click Next to continue.
6. Enter your WebCT/Vista username and password as prompted.
CPS imports your Blackboard/WebCT class roster.
7. Click Done.
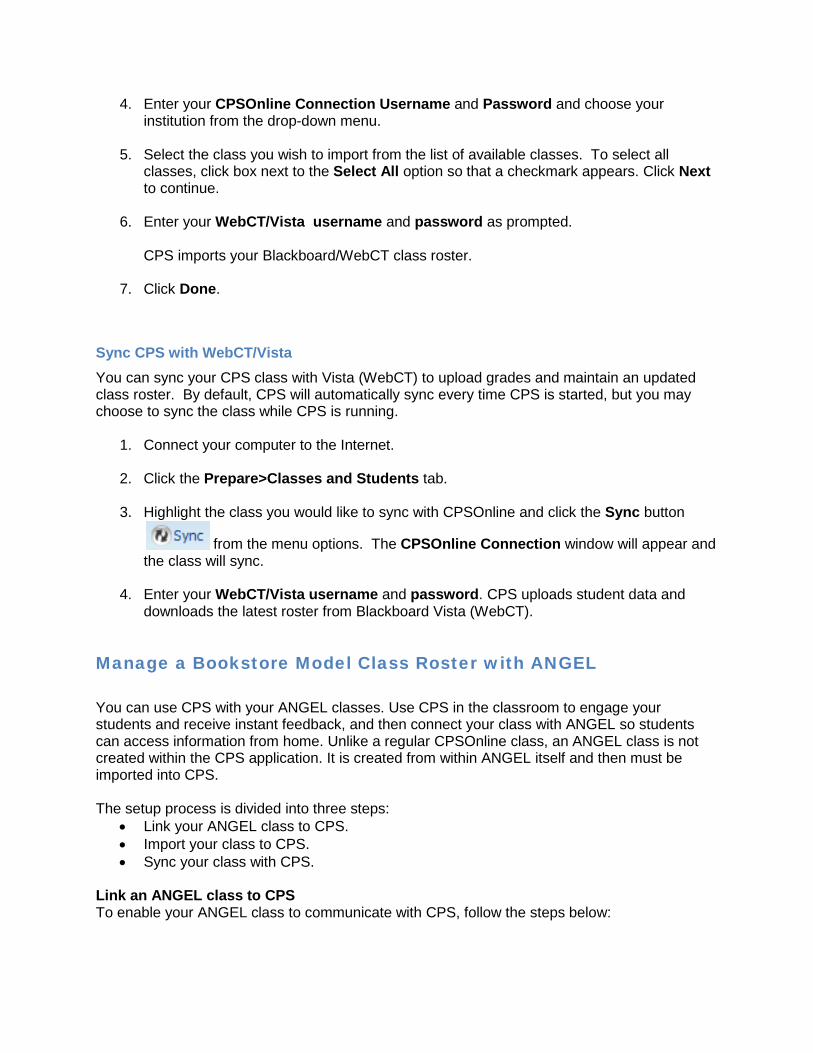
Sync CPS with WebCT/Vista You can sync your CPS class with Vista (WebCT) to upload grades and maintain an updated class roster. By default, CPS will automatically sync every time CPS is started, but you may choose to sync the class while CPS is running.
1. Connect your computer to the Internet.
2. Click the Prepare>Classes and Students tab.
3. Highlight the class you would like to sync with CPSOnline and click the Sync button
from the menu options. The CPSOnline Connection window will appear and the class will sync.
4. Enter your WebCT/Vista username and password. CPS uploads student data and
downloads the latest roster from Blackboard Vista (WebCT).
Manage a Bookstore Model Class Roster with ANGEL
You can use CPS with your ANGEL classes. Use CPS in the classroom to engage your students and receive instant feedback, and then connect your class with ANGEL so students can access information from home. Unlike a regular CPSOnline class, an ANGEL class is not created within the CPS application. It is created from within ANGEL itself and then must be imported into CPS. The setup process is divided into three steps:
• Link your ANGEL class to CPS. • Import your class to CPS. • Sync your class with CPS.
Link an ANGEL class to CPS To enable your ANGEL class to communicate with CPS, follow the steps below:
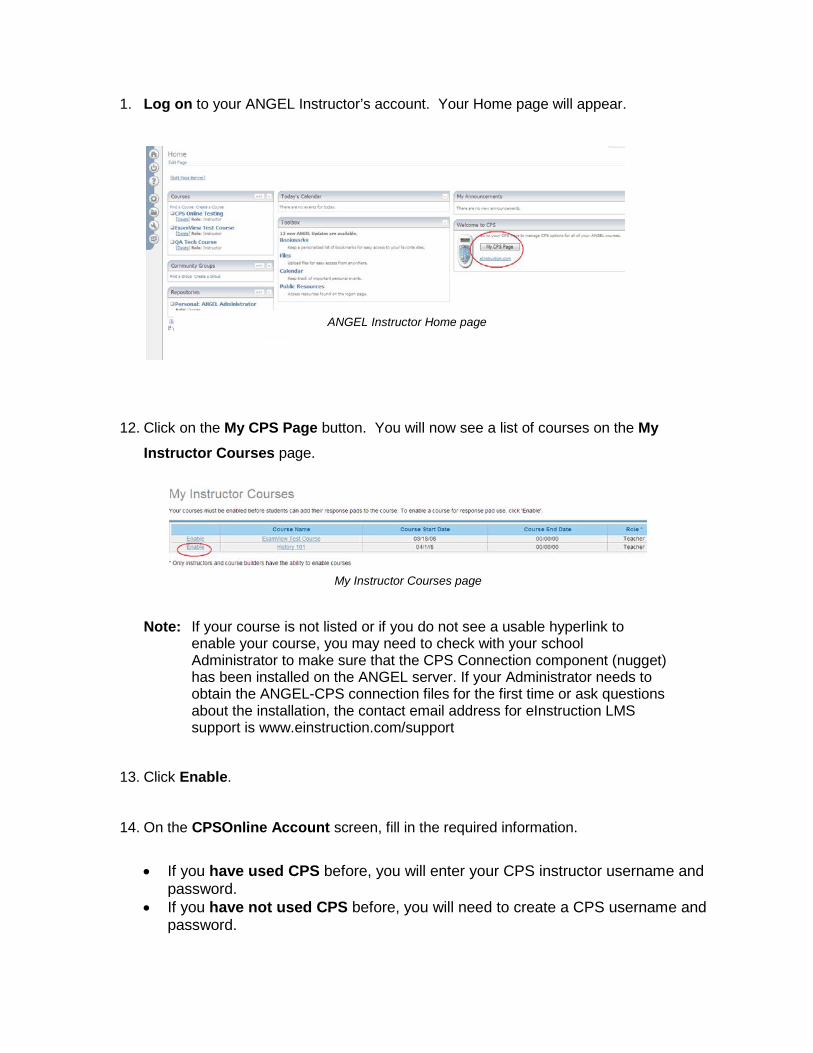
1. Log on to your ANGEL Instructor’s account. Your Home page will appear.
12. Click on the My CPS Page button. You will now see a list of courses on the My Instructor Courses page.
Note: If your course is not listed or if you do not see a usable hyperlink to enable your course, you may need to check with your school Administrator to make sure that the CPS Connection component (nugget) has been installed on the ANGEL server. If your Administrator needs to obtain the ANGEL-CPS connection files for the first time or ask questions about the installation, the contact email address for eInstruction LMS support is www.einstruction.com/support
13. Click Enable.
14. On the CPSOnline Account screen, fill in the required information.
• If you have used CPS before, you will enter your CPS instructor username and
password. • If you have not used CPS before, you will need to create a CPS username and
password.
ANGEL Instructor Home page
My Instructor Courses page

15. After filling out the form, click Continue. The Enable screen will appear.
16. Fill out the form.
• Course Title: Will be auto-filled • Course Start Date (mm/dd/yy): Date the course will start and students will be
able to enroll in the course. • Course End Date (mm/dd/yy): Date the course will end. • Instructor Setup Code: The code can be found on the slip that came with the
demo kit. Please contact your sales representative if misplaced.
When you are finished entering your information, click Submit.
Import your ANGEL class to CPS Now that you’ve linked your ANGEL class to CPS, you will need to import your class roster.
1. Open CPS to the Classes tab.
2. Click on the Import>Other sources… icon. The Import Class Wizard appears.
3. Choose ANGEL from the list of class types and click Next.
4. Enter your ANGEL Connection Username and Password and choose your institution from the drop-down menu.
5. Select the class you wish to import from the list of available classes. To select all
classes, click box next to the Select All option so that a checkmark appears. Click Next to continue.
6. Enter your ANGEL username and password as prompted. CPS imports your ANGEL
class roster.
CPSOnline Account screen

7. Click Done.
Sync CPS with ANGEL You can sync your CPS class with ANGEL to upload grades and maintain an updated class roster. By default, CPS will automatically sync every time CPS is started, but you may choose to sync the class while CPS is running.
1. Connect your computer to the Internet.
2. Click the Prepare>Classes and Students tab.
3. Highlight the class you would like to sync with CPSOnline and click Sync button
from the menu options. The CPSOnline Connection window will appear and the class will sync.
4. Enter your ANGEL username and password. CPS uploads student data and
downloads the latest roster from ANGEL.
Student Resources
Students have many resources to help them through the joining process. Because of the variety of resources available, the joining process is very smooth for most students. If a student has a question, you may direct them to one of the resources below.
CPSOnline Users This option is only for CPSOnline users. On the last page of the New Class Creation wizard, you may choose to create a document that contains the class information and student joining instructions.
1. Complete the new class creation wizard and stop before closing the last page.
2. Click Print. A document will be created using your
default word processor.
3. Print the instructions or send them as an e-mail to the students.
Response Pad Packaging The packaging that comes with the response pad directs the student to the eInstruction website so they can read instructions and view videos that apply to them.
Print instructions option
eInstruction Website Please visit us at our eInstruction website for more information on the students’ side experience.
1. Navigate to www.einstruction.com.
2. Click CPSOnline Log-In at the top of the page.
3. Click Higher Ed Students. On the Higher Ed Students page, select the appropriate enrollment instructions option on the left. The enrollment instructions will open in PDF form. Please also take a moment to view Check out our new tutorials for CPSOnline set up and product tips, located at the bottom of the higher Ed Students page.
Student Support A variety of support options are available at www.einstruction.com/support. Support options include a searchable knowledge base, online chat, e-mail support and toll-free phone support.

Instant Classroom Interactivity
Overview You will be able to use the Verbal and Chalkboard mode of delivering questions on-the-fly to bring interactivity to your lessons. The FastGrade feature will be used to grade printed assessments with a CPS answer key and engage the content in the Student Managed Assessment and Practice modes.
Purpose
After completing this section, you will be able to: • Engage a verbal or chalkboard question on-the-fly with a class.
• Change verbal mode delivery options for different instructional uses.
• Create a FastGrade lesson to grade printed homework, assignments, and assessments.
quickly with a CPS generated answer key.
• Engage a FastGrade lesson in the Student Managed Assessment and Student Managed
Practice modes.
• Generate, print, and export reports to analyze student performance data.
Verbal Questions Verbal questions are “on-the-fly” questions that you can use to engage students in a lesson. Use this feature to ask questions during a lesson in coordination with existing questions from the textbook, multimedia presentations, or any other non-CPS source.
Engage Verbal Questions
1. Click the Engage>Lessons and Assessments tab.
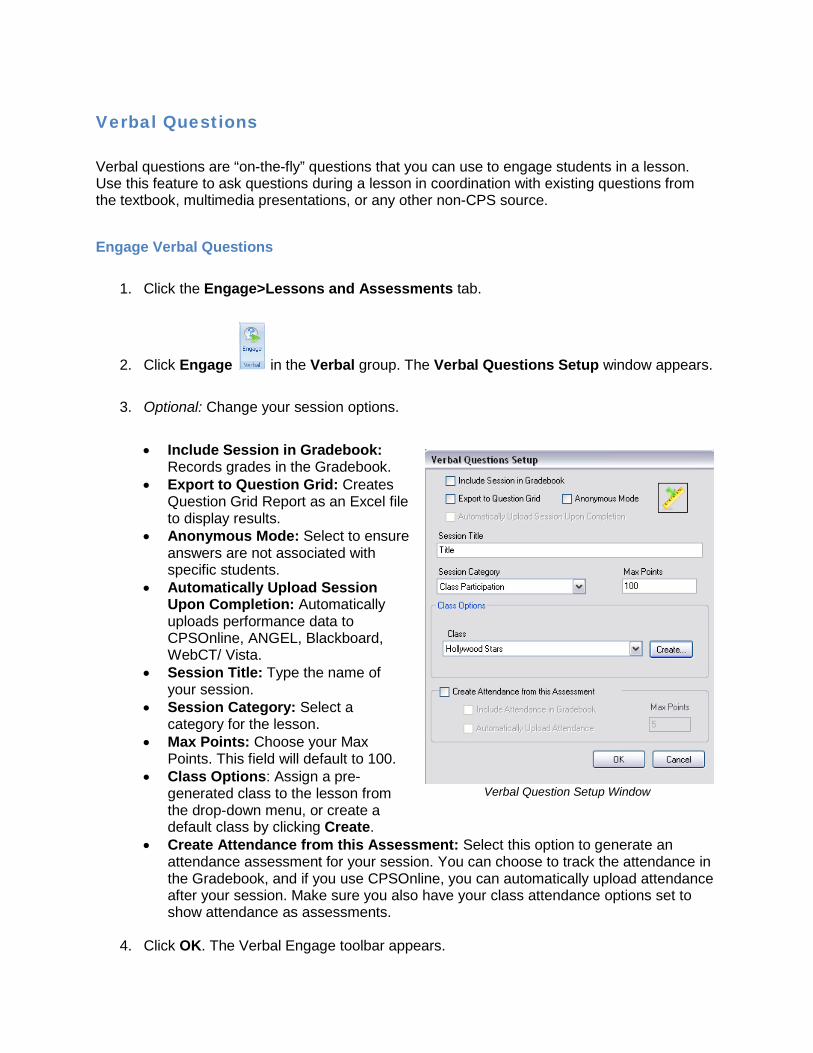
2. Click Engage in the Verbal group. The Verbal Questions Setup window appears.
3. Optional: Change your session options.
• Include Session in Gradebook:
Records grades in the Gradebook. • Export to Question Grid: Creates
Question Grid Report as an Excel file to display results.
• Anonymous Mode: Select to ensure answers are not associated with specific students.
• Automatically Upload Session Upon Completion: Automatically uploads performance data to CPSOnline, ANGEL, Blackboard, WebCT/ Vista.
• Session Title: Type the name of your session.
• Session Category: Select a category for the lesson.
• Max Points: Choose your Max Points. This field will default to 100.
• Class Options: Assign a pre-generated class to the lesson from the drop-down menu, or create a default class by clicking Create.
• Create Attendance from this Assessment: Select this option to generate an attendance assessment for your session. You can choose to track the attendance in the Gradebook, and if you use CPSOnline, you can automatically upload attendance after your session. Make sure you also have your class attendance options set to show attendance as assessments.
4. Click OK. The Verbal Engage toolbar appears.
Verbal Question Setup Window
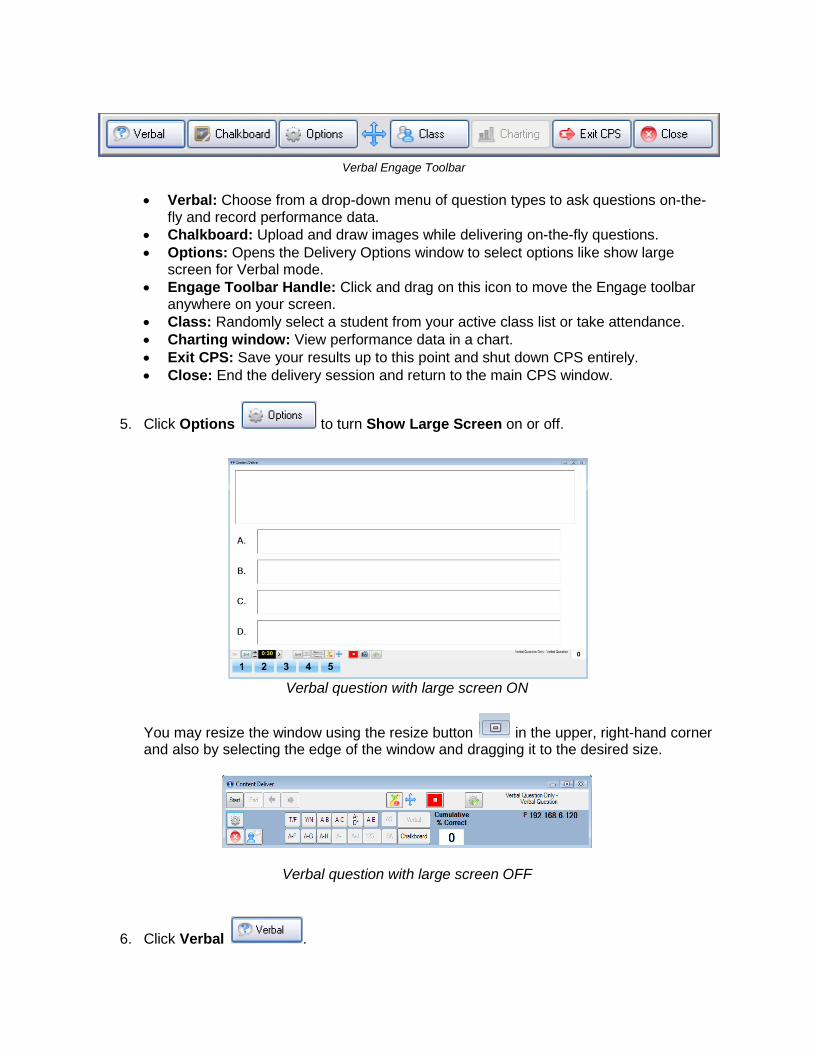
Verbal Engage Toolbar
• Verbal: Choose from a drop-down menu of question types to ask questions on-the-fly and record performance data.
• Chalkboard: Upload and draw images while delivering on-the-fly questions. • Options: Opens the Delivery Options window to select options like show large
screen for Verbal mode. • Engage Toolbar Handle: Click and drag on this icon to move the Engage toolbar
anywhere on your screen. • Class: Randomly select a student from your active class list or take attendance. • Charting window: View performance data in a chart. • Exit CPS: Save your results up to this point and shut down CPS entirely. • Close: End the delivery session and return to the main CPS window.
5. Click Options to turn Show Large Screen on or off.
Verbal question with large screen ON
You may resize the window using the resize button in the upper, right-hand corner and also by selecting the edge of the window and dragging it to the desired size.
Verbal question with large screen OFF
6. Click Verbal .
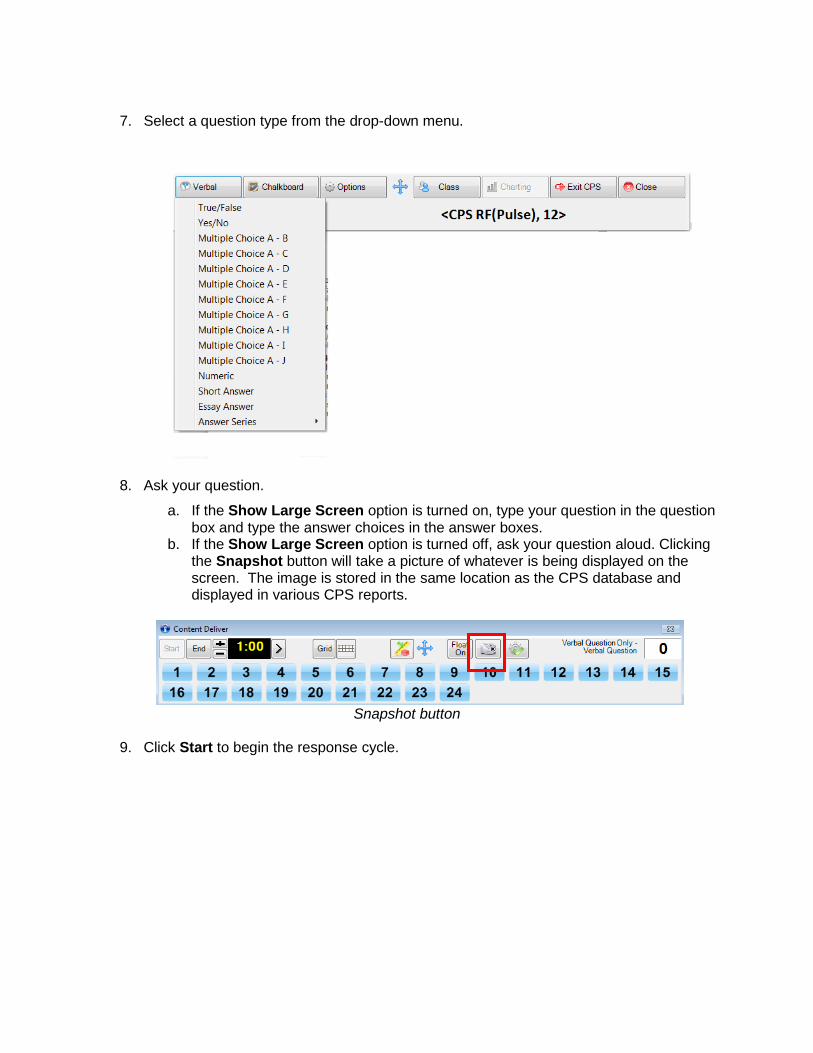
7. Select a question type from the drop-down menu.
8. Ask your question.
a. If the Show Large Screen option is turned on, type your question in the question box and type the answer choices in the answer boxes.
b. If the Show Large Screen option is turned off, ask your question aloud. Clicking the Snapshot button will take a picture of whatever is being displayed on the screen. The image is stored in the same location as the CPS database and displayed in various CPS reports.
Snapshot button
9. Click Start to begin the response cycle.
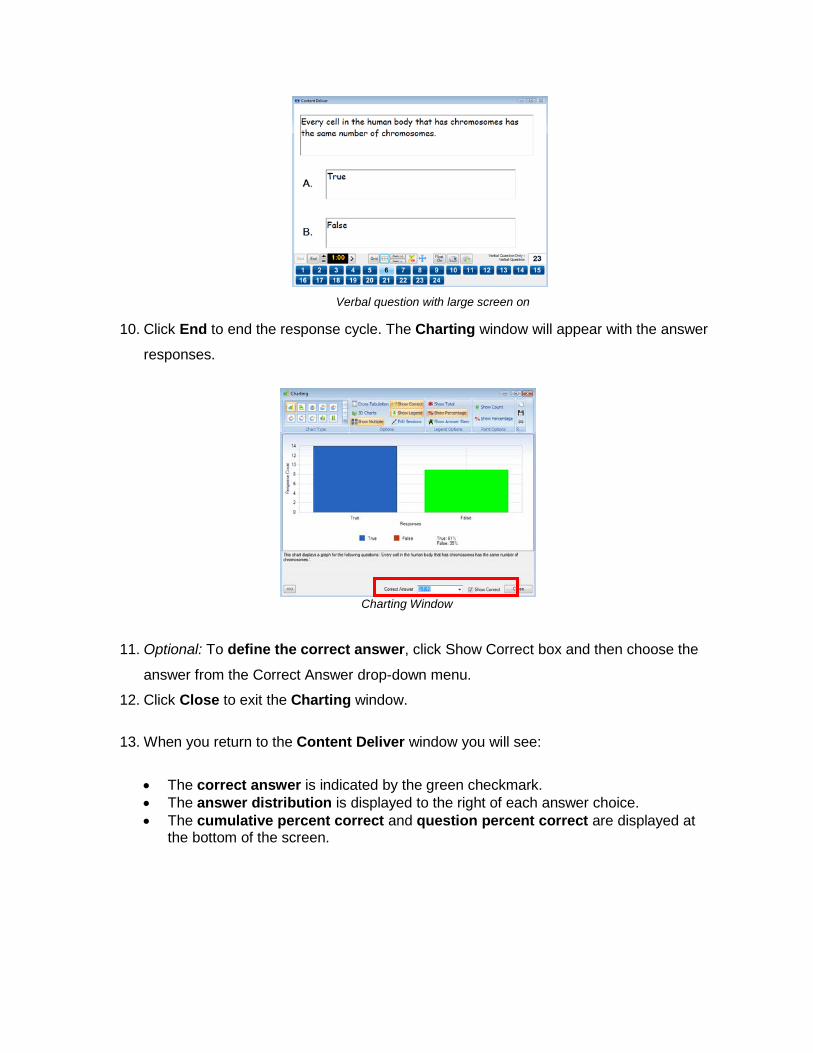
10. Click End to end the response cycle. The Charting window will appear with the answer
responses.
Charting Window
11. Optional: To define the correct answer, click Show Correct box and then choose the
answer from the Correct Answer drop-down menu.
12. Click Close to exit the Charting window.
13. When you return to the Content Deliver window you will see:
• The correct answer is indicated by the green checkmark. • The answer distribution is displayed to the right of each answer choice. • The cumulative percent correct and question percent correct are displayed at
the bottom of the screen.
Verbal question with large screen on
CPS Content Delivery Window
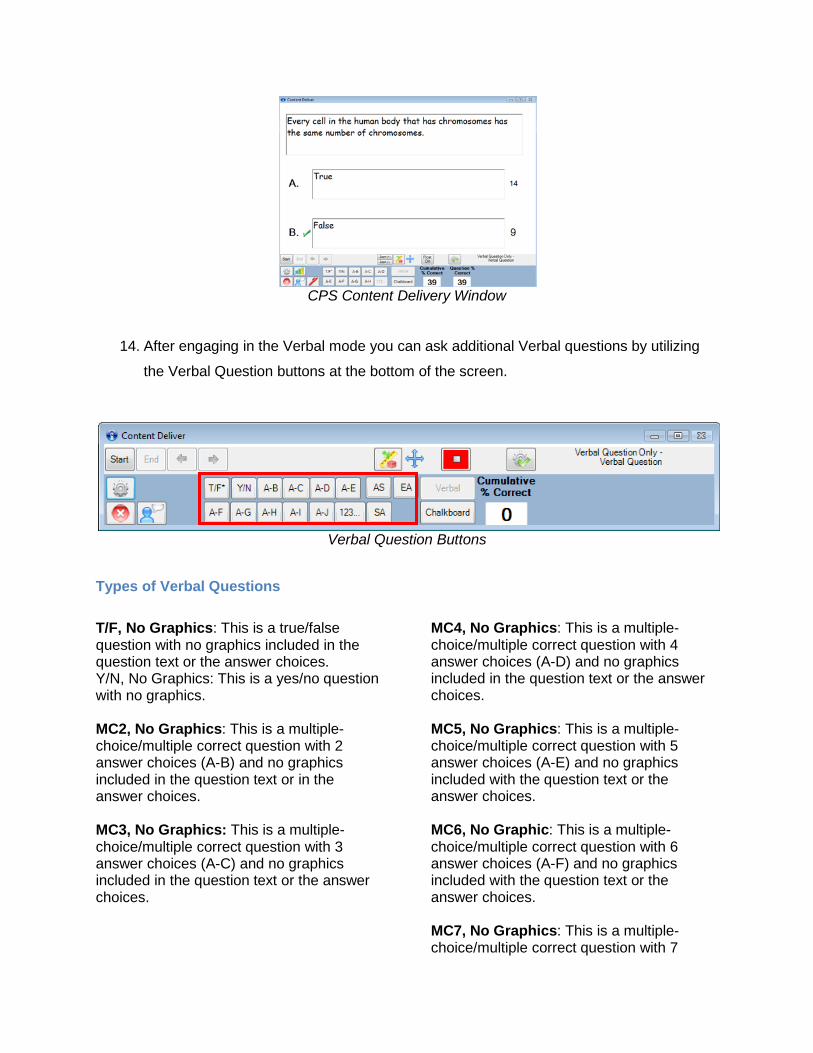
14. After engaging in the Verbal mode you can ask additional Verbal questions by utilizing
the Verbal Question buttons at the bottom of the screen.
Verbal Question Buttons
Types of Verbal Questions T/F, No Graphics: This is a true/false question with no graphics included in the question text or the answer choices. Y/N, No Graphics: This is a yes/no question with no graphics. MC2, No Graphics: This is a multiple-choice/multiple correct question with 2 answer choices (A-B) and no graphics included in the question text or in the answer choices. MC3, No Graphics: This is a multiple-choice/multiple correct question with 3 answer choices (A-C) and no graphics included in the question text or the answer choices.
MC4, No Graphics: This is a multiple-choice/multiple correct question with 4 answer choices (A-D) and no graphics included in the question text or the answer choices. MC5, No Graphics: This is a multiple-choice/multiple correct question with 5 answer choices (A-E) and no graphics included with the question text or the answer choices. MC6, No Graphic: This is a multiple-choice/multiple correct question with 6 answer choices (A-F) and no graphics included with the question text or the answer choices. MC7, No Graphics: This is a multiple-choice/multiple correct question with 7

answer choices (A-G) and no graphics included with the question text or the answer choices. MC8, No Graphics: This is a multiple-choice/multiple correct question with 8 answer choices (A-H) and no graphics included with the question text or the answer choices. MC9, No Graphics: This is a multiple-choice/multiple correct question with 9 answer choices (A-I) and no graphics included with the question text or the answer choices. MC10, No Graphics: This is a multiple-choice/multiple correct question with 10 answer choices (A-J) and no graphics included with the question text or the answer choices. Numeric, No Graphics: This is a template, for use with CPS RF that allows you to pose a question with a numeric answer as opposed to multiple choices. AS2, No Graphics: This Answer Series template enables you to create a question that requires students to put a series of 2 answers (A-B) in the correct order. S3, No Graphics: This Answer Series template enables you to create a question that requires students to put a series of 3 answers (A-C) in the correct order. AS4, No Graphics: This Answer Series template enables you to create a question that requires students to put a series of 4 answers (A-D) in the correct order. AS5, No Graphics: This Answer Series template enables you to create a question that requires students to put a series of 5 answers (A-E) in the correct order. AS6, No Graphics: This Answer Series template enables you to create a question that requires students to put a series of 6
answers (A-F) in the correct order. be engaged in all teaching modes. AS7, No Graphics: This Answer Series template enables you to create a question that requires students to put a series of 7 answers (A-G) in the correct order. AS8, No Graphics: This Answer Series template enables you to create a question that requires students to put a series of 8 answers (A-H) in the correct order. AS9, No Graphics: This Answer Series template enables you to create a question that requires students to put a series of 9 answers (A-I) in the correct order. AS10, No Graphics: This Answer Series template enables you to create a question that requires students to put a series of 10 answers (A-J) in the correct order. Short Answer: This template enables you to create a question that requires an answer of up to 20 characters. Short Answer questions can be engaged in all teaching modes. Essay: This template enables you to create a question that requires an answer of up to 140 characters. Essay questions can be engaged in all teaching modes.

Chalkboard Questions
The Chalkboard format gives you the opportunity to draw or load images into the area provided while verbally asking questions for students to answer. Use the CPS Chalkboard to engage these questions from anywhere in the room.
Engage Chalkboard Questions
1. Click the Engage>Lessons and Assessments tab.
2. Click Engage in the Verbal group. The Verbal Questions Setup window appears.
3. Optional: Change your session options.
4. Click OK. The Verbal Engage toolbar appears.
5. Click Chalkboard .
6. Use the Chalkboard toolbar to create your question and answer stems.
• Pencil: free draw • Eraser: erase a portion or all of the
drawing • Line Tool: draw straight lines • Delete: erase all of the drawing • Color: select a color • Line Width: select a line thickness • Answers: answer stems for the question
displayed • Import Image: import a saved image • Reload: reloads the most recent image file
without any drawn annotations from previous work
7. Click Start to begin the response cycle. 8. Click End to end the response cycle. The Charting window will appear with the answer
responses.
9. Optional: To define the correct answer, click the appropriate option beneath Correct Answer.
10. Click Close to close the Charting window.

_______________________________________________________ CPS™ Windows User’s Guide
41
FastGrade Use the FastGrade feature as a supplement to worksheets and other instructional materials you have in hard copy. You can create a FastGrade answer key, distribute hard copies to the students, and have them respond for a quick grade. When you create a FastGrade lesson, please have a hard copy of the course material with you, preferably one that has the correct answers indicated. You should create this FastGrade lesson before you present it to your students.
Create a FastGrade Lesson
1. Click the Prepare>Lessons and Assessments tab.
2. Select the selected database name or lesson name that you want to create a FastGrade lesson in.
3. Click New in the Home group to show a drop-down menu.
4. Select FastGrade Lesson…. The CPS - Lesson Attributes window opens.
5. Type a name for your FastGrade lesson in the Title box.
a. Optional: Type a description or unique identifier. You may also choose a delivery style to support various assessment answer options, such as ABCD / FGHI.
_______________________________________________________ CPS™ Windows User’s Guide
42
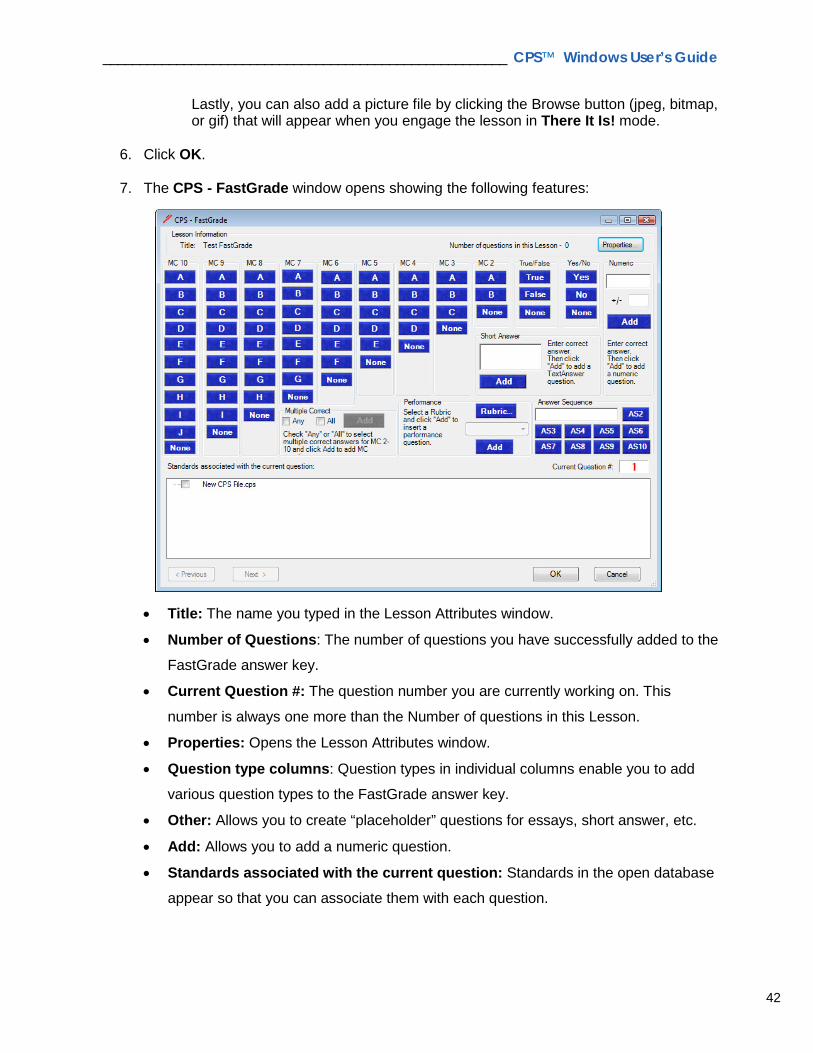
Lastly, you can also add a picture file by clicking the Browse button (jpeg, bitmap, or gif) that will appear when you engage the lesson in There It Is! mode.
6. Click OK.
7. The CPS - FastGrade window opens showing the following features:
• Title: The name you typed in the Lesson Attributes window.
• Number of Questions: The number of questions you have successfully added to the
FastGrade answer key.
• Current Question #: The question number you are currently working on. This
number is always one more than the Number of questions in this Lesson.
• Properties: Opens the Lesson Attributes window.
• Question type columns: Question types in individual columns enable you to add
various question types to the FastGrade answer key.
• Other: Allows you to create “placeholder” questions for essays, short answer, etc.
• Add: Allows you to add a numeric question.
• Standards associated with the current question: Standards in the open database
appear so that you can associate them with each question.
_______________________________________________________ CPS™ Windows User’s Guide
43
• Multiple Correct: Allows you to set up a question with an answer that has multiple
answers correct.
• Answer Sequence: Allows you to set up a question with an answer that is a
sequence.
• Previous: Moves to the previous question in your FastGrade answer key. This
action highlights the previous question‘s type and correct answer as well as displays
the position number of this question as the Current Question #.
• Next: Moves to the next question in your FastGrade answer key. This action
highlights the next question‘s type and correct answer as well as displaying the
number position of this question as the Current Question #.
• Short Answer: Allows you to ask questions where a response is a short text response up to 20 characters.
8. Click the blue answer button that corresponds with the question type and correct answer for each question. 9. Repeat step 8 until you have entered every question into the CPS FastGrade window.
10. Click OK. The Prepare>Lessons and Assessments tab appears with the FastGrade lesson name in the lesson side of the window.
Student Paced Mode The Student Paced mode lets you deliver developed lessons, FastGrade lessons, ExamView® questions, and more in an activity where each student enters their responses at their own pace. The student may change and verify their answers as many times as they wish. The last answer input is what is scored. Here’s how it works:
• Provide students with a printed copy of the lesson or assessment you want them to take. • Students can either answer the questions on paper and then input the results with their
CPS response pads or answer the questions as they go.
Note: In this mode you need a projector for the CPS IR Response Pads but do not need a projector for CPS RF Response Pads. For information on using Student Paced Mode with CPS Pulse response pads, see Student Paced Mode for CPS Pulse Only on page 44.
Engage Student Paced Mode
1. Click the Engage>Lessons and Assessments tab.
_______________________________________________________ CPS™ Windows User’s Guide
44
2. Select the lesson you want to engage by clicking in the check box before the lesson name.
3. Type a title, choose a session type, and select a class in the Engage Options group.
4. Click Assessment Setup in the Engage Options group. A list of delivery options appears.
5. Select Student Paced from the list of delivery modes.
6. Click Engage in the Assessment group. The CPS Feedback window appears.
7. Click Start to begin the response cycle.
8. Click End to end the response cycle.
9. Click Yes to save the data and end the session.
Student Paced Mode for CPS Pulse Only • If you are using a projector, please turn
off the projector before beginning the session.
• The LCD panel in each student’s response pad tells the student which question they are answering as well as their response and if it was received.
• Students can use the left and right arrow keys on their response pad to move forward and/or backward. They can also skip and return to a question.
• As students respond to questions, the boxes corresponding with the student name and question number light up with their answers.
• Click the Options button to choose color feedback with a red color indicating an incorrect answer and a green color indicating a correct answer.
Note: Individual questions show the percent correct for the entire class at the bottom of the column. This is great for grading homework quickly and finding out exactly which questions students had the most difficulty with for review.
_______________________________________________________ CPS™ Windows User’s Guide
45
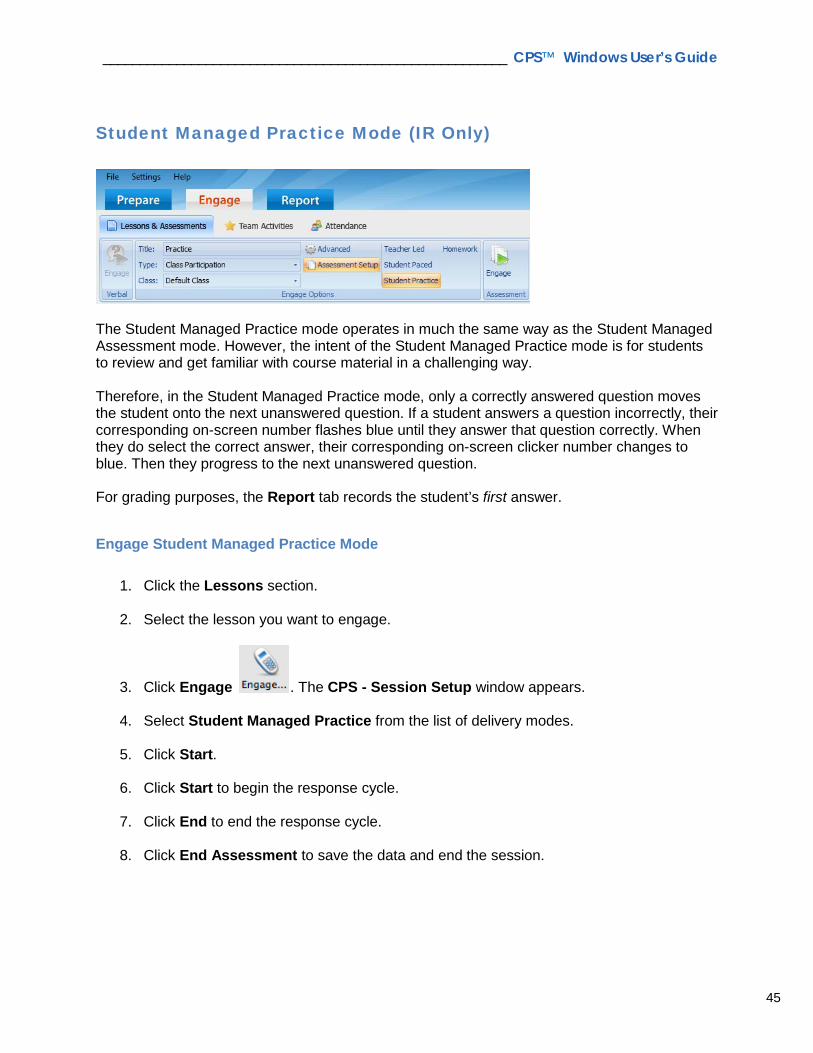
Student Managed Practice Mode (IR Only)
The Student Managed Practice mode operates in much the same way as the Student Managed Assessment mode. However, the intent of the Student Managed Practice mode is for students to review and get familiar with course material in a challenging way. Therefore, in the Student Managed Practice mode, only a correctly answered question moves the student onto the next unanswered question. If a student answers a question incorrectly, their corresponding on-screen number flashes blue until they answer that question correctly. When they do select the correct answer, their corresponding on-screen clicker number changes to blue. Then they progress to the next unanswered question. For grading purposes, the Report tab records the student’s first answer.
Engage Student Managed Practice Mode
1. Click the Lessons section.
2. Select the lesson you want to engage.
3. Click Engage . The CPS - Session Setup window appears.
4. Select Student Managed Practice from the list of delivery modes.
5. Click Start.
6. Click Start to begin the response cycle.
7. Click End to end the response cycle.
8. Click End Assessment to save the data and end the session.
_______________________________________________________ CPS™ Windows User’s Guide
46
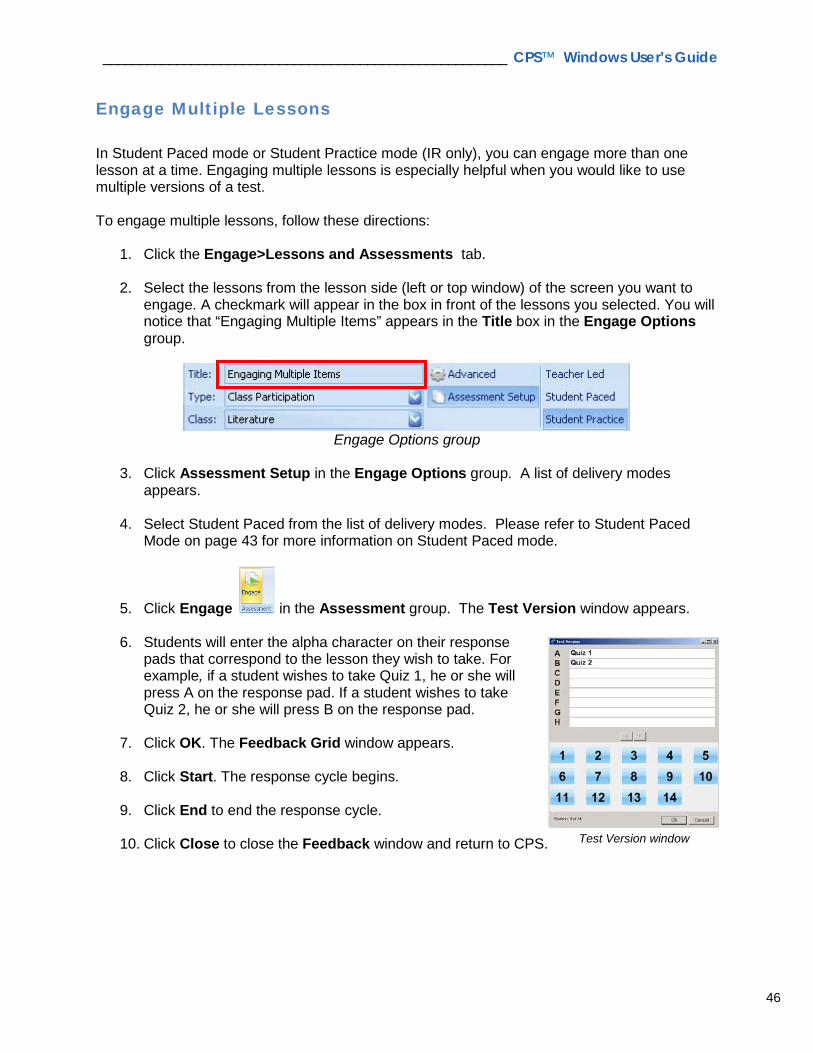
Engage Multiple Lessons In Student Paced mode or Student Practice mode (IR only), you can engage more than one lesson at a time. Engaging multiple lessons is especially helpful when you would like to use multiple versions of a test. To engage multiple lessons, follow these directions:
1. Click the Engage>Lessons and Assessments tab.
2. Select the lessons from the lesson side (left or top window) of the screen you want to engage. A checkmark will appear in the box in front of the lessons you selected. You will notice that “Engaging Multiple Items” appears in the Title box in the Engage Options group.
Engage Options group
3. Click Assessment Setup in the Engage Options group. A list of delivery modes
appears.
4. Select Student Paced from the list of delivery modes. Please refer to Student Paced Mode on page 43 for more information on Student Paced mode.
5. Click Engage in the Assessment group. The Test Version window appears.
6. Students will enter the alpha character on their response pads that correspond to the lesson they wish to take. For example, if a student wishes to take Quiz 1, he or she will press A on the response pad. If a student wishes to take Quiz 2, he or she will press B on the response pad.
7. Click OK. The Feedback Grid window appears.
8. Click Start. The response cycle begins.
9. Click End to end the response cycle.
10. Click Close to close the Feedback window and return to CPS.
Test Version window
_______________________________________________________ CPS™ Windows User’s Guide
47
Homework Mode
Homework Mode allows a student to enter responses into their clicker outside of the classroom. The instructor can then collect the responses at a later time. This functionality is useful for homework, other take-home assignments, or to ask questions during field trips.
Set Up Student Response Pads for Homework Mode (Students)
1. Press the menu button .
2. Click the right arrow button once and then Send on Homework.
3. Select location to save homework and click Send .
4. Enter a Name for the homework assignment using the keypad and click Send .
5. To edit an existing homework assignment, select Edit. To create a new homework
assignment, select New, then click Send for selection. a. If New is chosen, select Yes to clear any previously entered data in the selected
Homework location or No to return to previous screen. b. If Yes is selected enter a Test # (use 1 if teacher didn’t assign a test number)
and Send . c. If Edit is selected enter a Test # (use 1 if teacher didn’t assign a test number)
and Send .
6. The clicker will display “Q01:” to allow student to enter answers for question #1 on the Homework. To navigate through the Homework, use the navigation arrows on the
keypad. Click Send button after every answer. Answers entered while in Homework mode are stored on the clicker.
Note: The clicker input mode may have to be adjusted for each different question type. The input mode will default to Text Entry mode, but can be changed to Alpha or Numeric entry by clicking
Gather Responses from CPS Pulse Response Pads (Instructors) When you want to gather responses from the student’s Response Pads, follow these steps:
1. Open CPS.
2. Click on the Engage Tab. Select the lesson. Then select Homework mode under Assessment Setup.
3. Click the Engage button. This will open the Homework Mode toolbar.

_______________________________________________________ CPS™ Windows User’s Guide
48
4. Click the Start button to allow CPS to begin collecting responses for the homework assignment.
5. Students should now turn on their Response Pads. Once powered on, each clicker will be put automatically into Homework mode, which will allow the student to select his or her homework assignment and submit responses.
• The student will see homework choices 1, 2, 3, 4 with the corresponding name they called the homework assignment when they set it up.
6. Students must navigate to the correct assignment number and press the Send button to
transmit homework data to CPS.
Note: As homework is transmitted, CPS will keep count in the upper right corner of the Homework Mode toolbar for each student transmission received.
7. Once all homework has been submitted, the teacher presses End to end the homework
session and close the session bar. 8. All homework data will be available now in a session in the Report tab.
Homework Mode Toolbar
_______________________________________________________ CPS™ Windows User’s Guide
49
Creating Content in CPS
Overview You will create lessons and use the question-authoring templates to create your own content within CPS and deliver lessons in a Teacher Paced mode.
Purpose After completing this section, you will be able to:
• Create folders and parent and child lessons.
• Change the default font.
• Create questions using question-authoring templates.
• Add graphics to questions and answer stems.
• Add notes and media files to a question.
• Preview a question in Standard mode.
• Copy and paste questions for repeated use.
• Edit questions to make and save changes.
• Rearrange the order of questions within a lesson.
• Engage a lesson in Standard mode.
• Change delivery options to achieve different goals when displaying data.
_______________________________________________________ CPS™ Windows User’s Guide
50
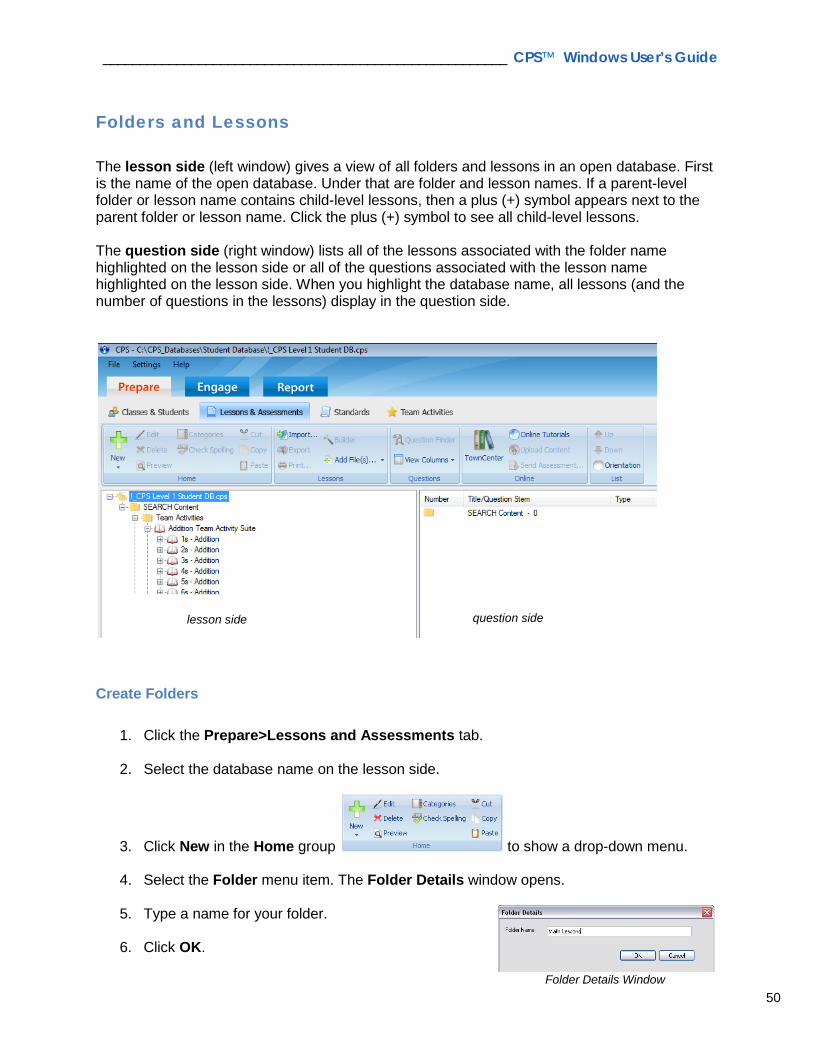
Folders and Lessons The lesson side (left window) gives a view of all folders and lessons in an open database. First is the name of the open database. Under that are folder and lesson names. If a parent-level folder or lesson name contains child-level lessons, then a plus (+) symbol appears next to the parent folder or lesson name. Click the plus (+) symbol to see all child-level lessons. The question side (right window) lists all of the lessons associated with the folder name highlighted on the lesson side or all of the questions associated with the lesson name highlighted on the lesson side. When you highlight the database name, all lessons (and the number of questions in the lessons) display in the question side.
Create Folders
1. Click the Prepare>Lessons and Assessments tab.
2. Select the database name on the lesson side.
3. Click New in the Home group to show a drop-down menu.
4. Select the Folder menu item. The Folder Details window opens.
5. Type a name for your folder.
6. Click OK.
Folder Details Window
lesson side question side
_______________________________________________________ CPS™ Windows User’s Guide
51
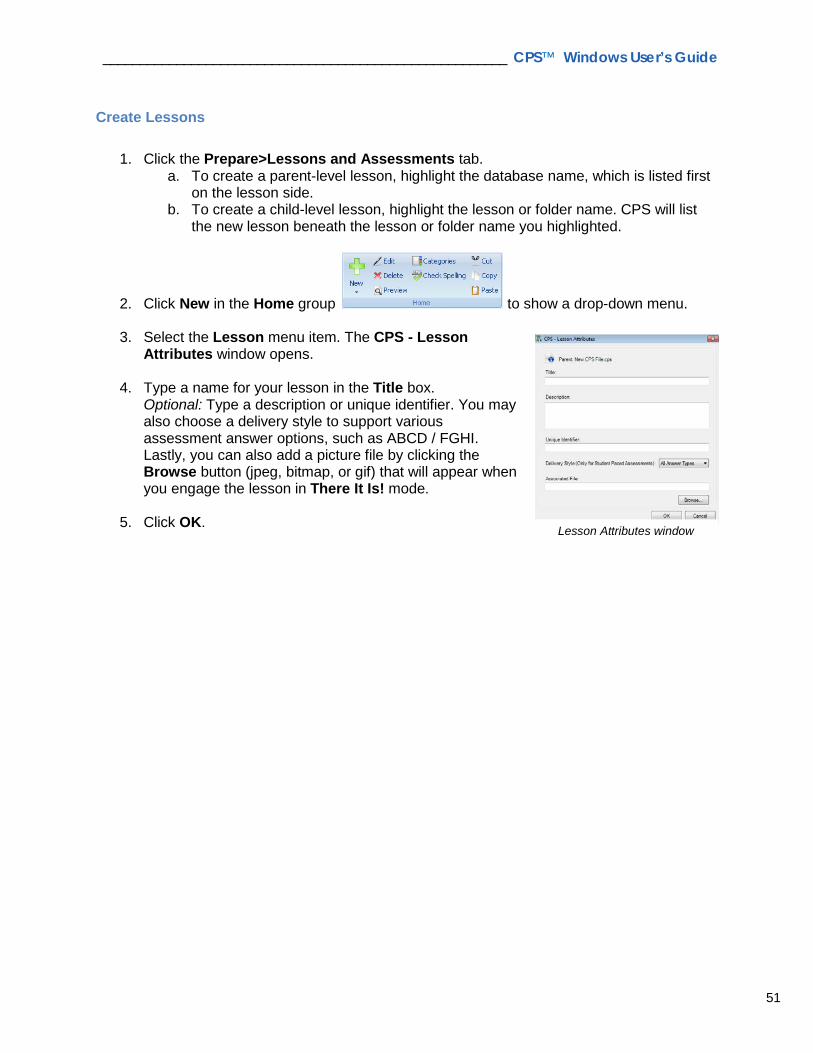
Create Lessons
1. Click the Prepare>Lessons and Assessments tab. a. To create a parent-level lesson, highlight the database name, which is listed first
on the lesson side. b. To create a child-level lesson, highlight the lesson or folder name. CPS will list
the new lesson beneath the lesson or folder name you highlighted.
2. Click New in the Home group to show a drop-down menu.
3. Select the Lesson menu item. The CPS - Lesson Attributes window opens.
4. Type a name for your lesson in the Title box.
Optional: Type a description or unique identifier. You may also choose a delivery style to support various assessment answer options, such as ABCD / FGHI. Lastly, you can also add a picture file by clicking the Browse button (jpeg, bitmap, or gif) that will appear when you engage the lesson in There It Is! mode.
5. Click OK.
Lesson Attributes window

_______________________________________________________ CPS™ Windows User’s Guide
52
Lesson Builder When you use the Lessons Builder function, you can build one lesson of questions from several pre-existing lessons. For example, if a Language Arts database has 32 lessons in it, each lesson representing a chapter from a text, you can create a mid-term exam from the first six lessons (chapters) without re-typing all the questions. You can also create a lesson from multiple databases.
1. Click the Prepare>Lessons and Assessments tab.
2. Select a lesson from the lesson side of the screen or create a new lesson.
3. Click Builder in the Lessons group . The Builder window opens showing the features listed below.
The File Menu allows you to alter the target lesson you are building from, import lessons from a different database (.cps file), and close the Builder window.
The Dragged Questions Section allows you to choose whether the questions you select for the target lesson are copied from the lesson source or linked to the lesson source.
The Bottom Right Pane is a list of questions available in the source lesson or standard selected in the bottom left pane.
The Bottom Left Pane lists the lessons available in the open database. You can also build from the standards in this open database.
The Top Pane is the target lesson to which you are adding questions.
_______________________________________________________ CPS™ Windows User’s Guide
53
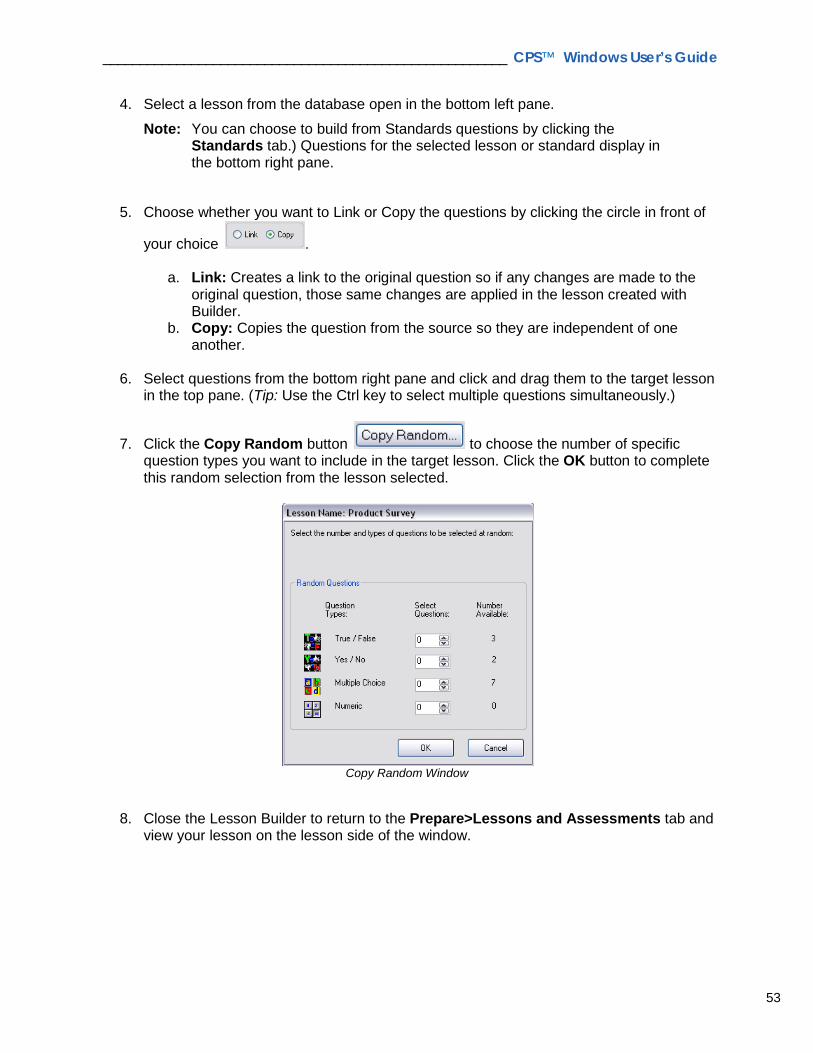
4. Select a lesson from the database open in the bottom left pane.
Note: You can choose to build from Standards questions by clicking the Standards tab.) Questions for the selected lesson or standard display in the bottom right pane.
5. Choose whether you want to Link or Copy the questions by clicking the circle in front of
your choice .
a. Link: Creates a link to the original question so if any changes are made to the original question, those same changes are applied in the lesson created with Builder.
b. Copy: Copies the question from the source so they are independent of one another.
6. Select questions from the bottom right pane and click and drag them to the target lesson
in the top pane. (Tip: Use the Ctrl key to select multiple questions simultaneously.)
7. Click the Copy Random button to choose the number of specific question types you want to include in the target lesson. Click the OK button to complete this random selection from the lesson selected.
Copy Random Window
8. Close the Lesson Builder to return to the Prepare>Lessons and Assessments tab and
view your lesson on the lesson side of the window.
_______________________________________________________ CPS™ Windows User’s Guide
54
Questions After you create a lesson or folder, you can populate the lesson or folder by adding questions. You create questions by using the CPS - Question Author window.
Default Font Before creating a question, set the default font to apply a font style and size of your choosing to current and future questions.
1. Click the Settings Menu and choose Default Font.
2. Choose the font, style, and size you want the font in your questions to appear by default.
3. Click OK.
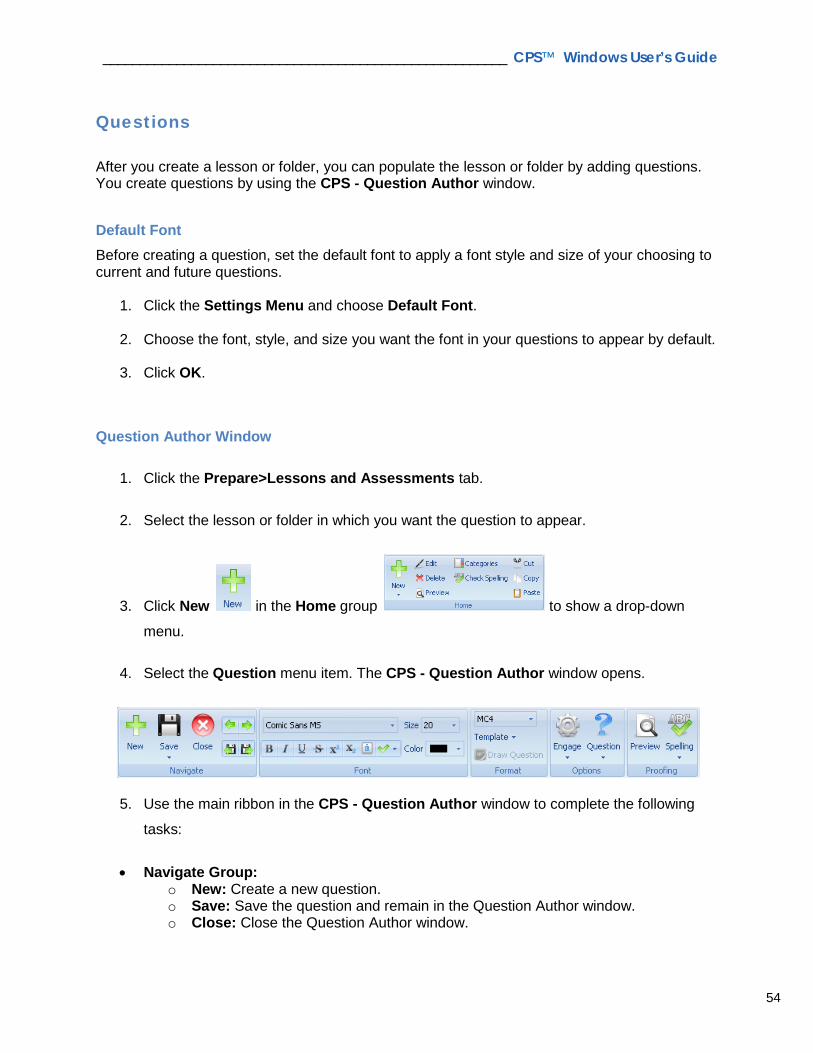
Question Author Window
1. Click the Prepare>Lessons and Assessments tab.
2. Select the lesson or folder in which you want the question to appear.
3. Click New in the Home group to show a drop-down
menu.
4. Select the Question menu item. The CPS - Question Author window opens.
5. Use the main ribbon in the CPS - Question Author window to complete the following
tasks:
• Navigate Group:
o New: Create a new question. o Save: Save the question and remain in the Question Author window. o Close: Close the Question Author window.

_______________________________________________________ CPS™ Windows User’s Guide
55
o Green Arrows: Move to the previous or next question in the lesson without saving.
o Save Arrows: Save the current question and move to the previous or next question in the lesson.
• Font Group: o Utilize the following buttons within the Font group to change the text options for a
question: Font, Font Size, Bold, Italic, Underline, Strikethrough, Superscript, Subscript, Character Map, Select Stems, and Font Color.
• Format Group: o Question Type: Select from the following question types: MC2-MC8, Numeric
(RF only), True/False, Yes/No, and Performance Questions. o Template Style: Select from the following template styles: Chalkboard, No
Graphics, and Add Graphics. • Options Group:
o Engage: Choose from the following delivery options: Show question image after response. Show image full screen. Exclude question from self-paced and practice assessments. Engage as freeform.
o Question: Choose from the following question options: Standards: Associate the question with a standard. Categories: Assign a category to a question. Notes and Media: Include notes and media with a question. Difficulty: Assign a difficulty level to the question.
• Proofing Group: o Preview: Preview the question in Standard Mode. o Spelling: Choose from the following spelling options:
Check spelling now. Check spelling upon saving the question. Select check spelling options.
Create Questions
1. Choose a Question Type in the Format group.
2. Type the question in the question box of the question template you selected.
3. Type the answers in the answer boxes of the
question template you selected.
4. Select the correct answer by clicking in the checkbox beside that answer so that a checkmark appears.
5. Click Save and Move to Next Question.
6. Repeat steps 1-5 to add additional questions to the lesson.
_______________________________________________________ CPS™ Windows User’s Guide
56
7. When you are finished adding questions, click Save and then Close in the Navigate group.
Question-Authoring Templates
Multiple Choice
You have the option of choosing from two to ten answer stems using RF and two to six using IR, in a multiple choice formatted question by using the templates named MC2-MC10 or MC2-MC6. If you are using the CPS IR pads, please note that MC6-8 cannot be used in Student Paced or Student Practice modes since those answer buttons take on different functions on the response pad. • Multiple Choice: You have the option of choosing from two to five answer stems in a
multiple choice formatted question by using the templates named MC2-MC10.
• Numeric (Pulse Only): This is a template, for use with CPS Pulse, that allows you to pose a question with a numeric answer (with or without symbols) as opposed to multiple choice.
• Answer Sequence (Pulse Only): This allows you to deliver questions with multiple correct answers in a particular order.
• Short Answer (Pulse Only): This type of question allows a text response up to 20 characters.
• Essay (Pulse only): This template allows for longer text answers, up to 140 characters.
• True/False: Type the word “True” in the T answer stem and “False” in the F answer stem.
• Yes/No: Type the word “Yes” in the Y answer stem and “No” in the N answer stem.
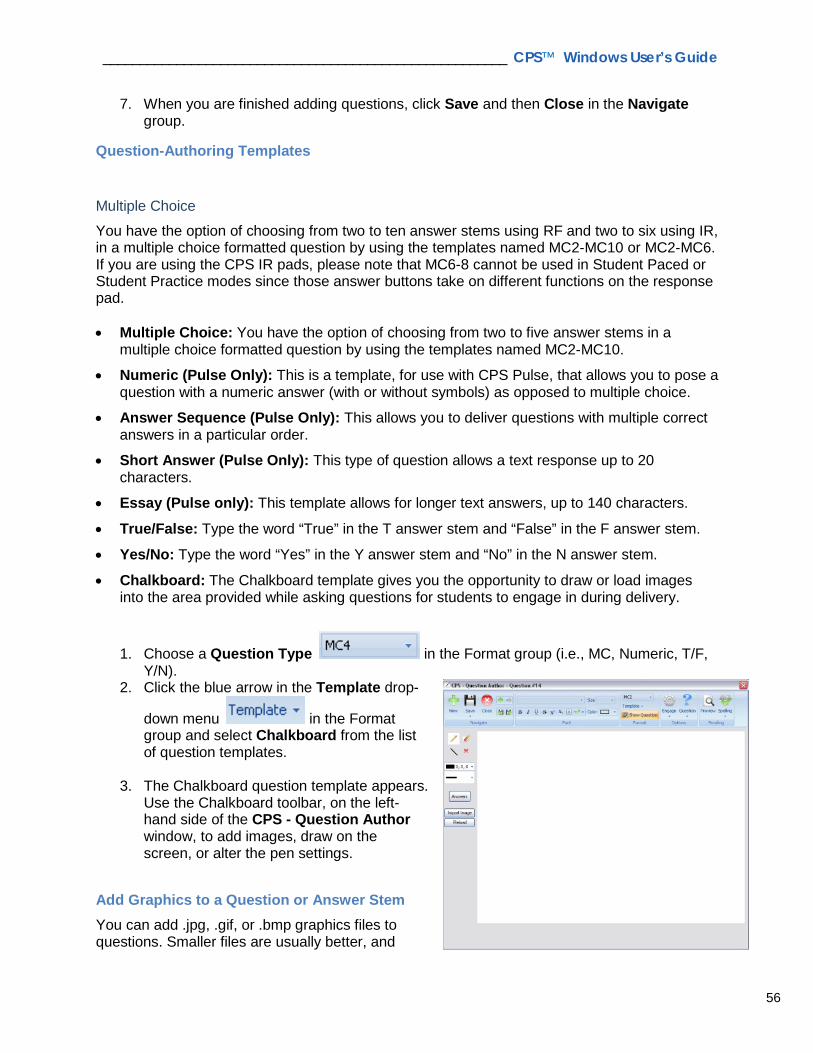
• Chalkboard: The Chalkboard template gives you the opportunity to draw or load images into the area provided while asking questions for students to engage in during delivery.
1. Choose a Question Type in the Format group (i.e., MC, Numeric, T/F, Y/N).
2. Click the blue arrow in the Template drop-
down menu in the Format group and select Chalkboard from the list of question templates.
3. The Chalkboard question template appears.
Use the Chalkboard toolbar, on the left-hand side of the CPS - Question Author window, to add images, draw on the screen, or alter the pen settings.
Add Graphics to a Question or Answer Stem You can add .jpg, .gif, or .bmp graphics files to questions. Smaller files are usually better, and

_______________________________________________________ CPS™ Windows User’s Guide
57
range from .jpg as the smallest to .bmp as the largest. All question templates with graphics include the pixel size of the graphic area. To create a question with a graphic, follow these directions:
1. Click Template in the Format group. A drop-down menu appears.
2. Click Add Graphics, and select the graphic style.
3. Click inside the graphic area. A shortcut menu appears.
4. Click the Browse command. The Set Image File window opens.
5. Navigate your computer to select the image file you want to add. The graphic appears in the graphic area of the question or answer option you selected.
6. Click Save and Close in the Navigate group.
Add Notes to a Question
1. Click Question in the Options group. A drop-down menu appears.
2. Choose Notes and Media.
3. Choose the CPS Note tab.
4. Type a note in the box and format it with the Font and Color buttons.
Note: There is a checkbox in the bottom-left corner that says, “Make note available after response.” If you check this box, your note will not be available until question delivery is complete. If you are using the Auto Move to Next Question feature, this box must be left unchecked for your note to be available.
5. Click Save and Close to return to the question-authoring window.
_______________________________________________________ CPS™ Windows User’s Guide
58
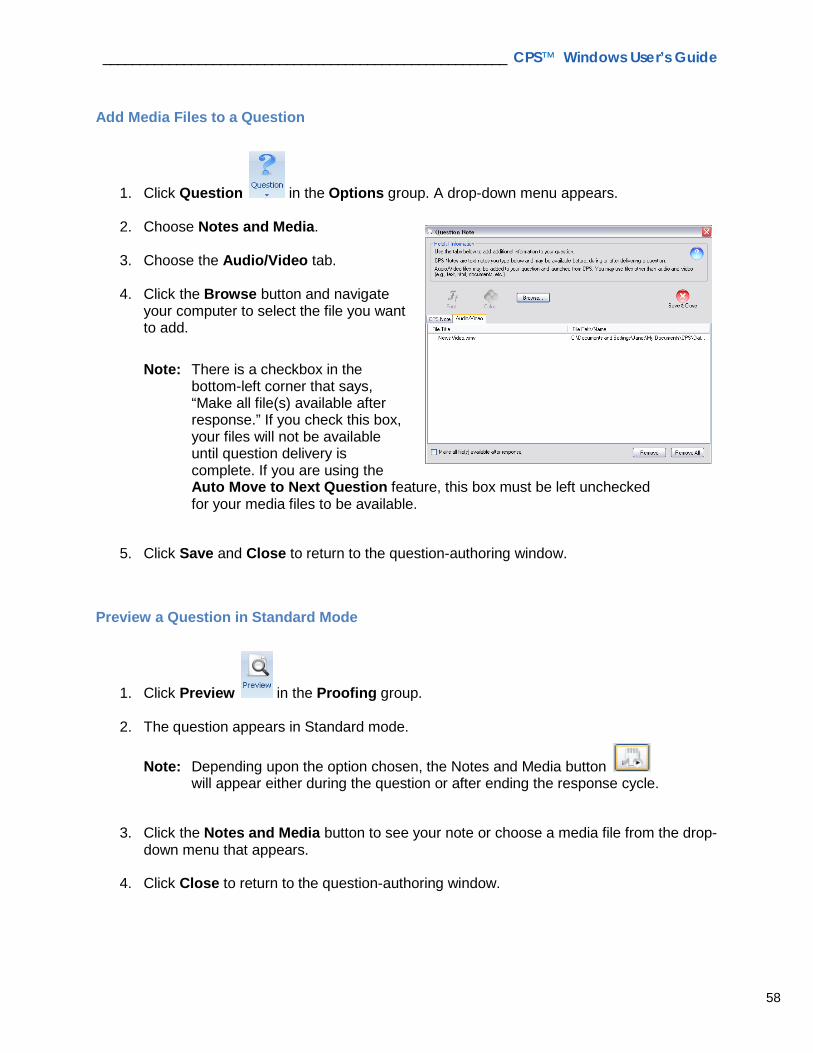
Add Media Files to a Question
1. Click Question in the Options group. A drop-down menu appears.
2. Choose Notes and Media.
3. Choose the Audio/Video tab.
4. Click the Browse button and navigate your computer to select the file you want to add.
Note: There is a checkbox in the bottom-left corner that says, “Make all file(s) available after response.” If you check this box, your files will not be available until question delivery is complete. If you are using the Auto Move to Next Question feature, this box must be left unchecked for your media files to be available.
5. Click Save and Close to return to the question-authoring window.
Preview a Question in Standard Mode
1. Click Preview in the Proofing group.
2. The question appears in Standard mode.
Note: Depending upon the option chosen, the Notes and Media button will appear either during the question or after ending the response cycle.
3. Click the Notes and Media button to see your note or choose a media file from the drop-
down menu that appears.
4. Click Close to return to the question-authoring window.
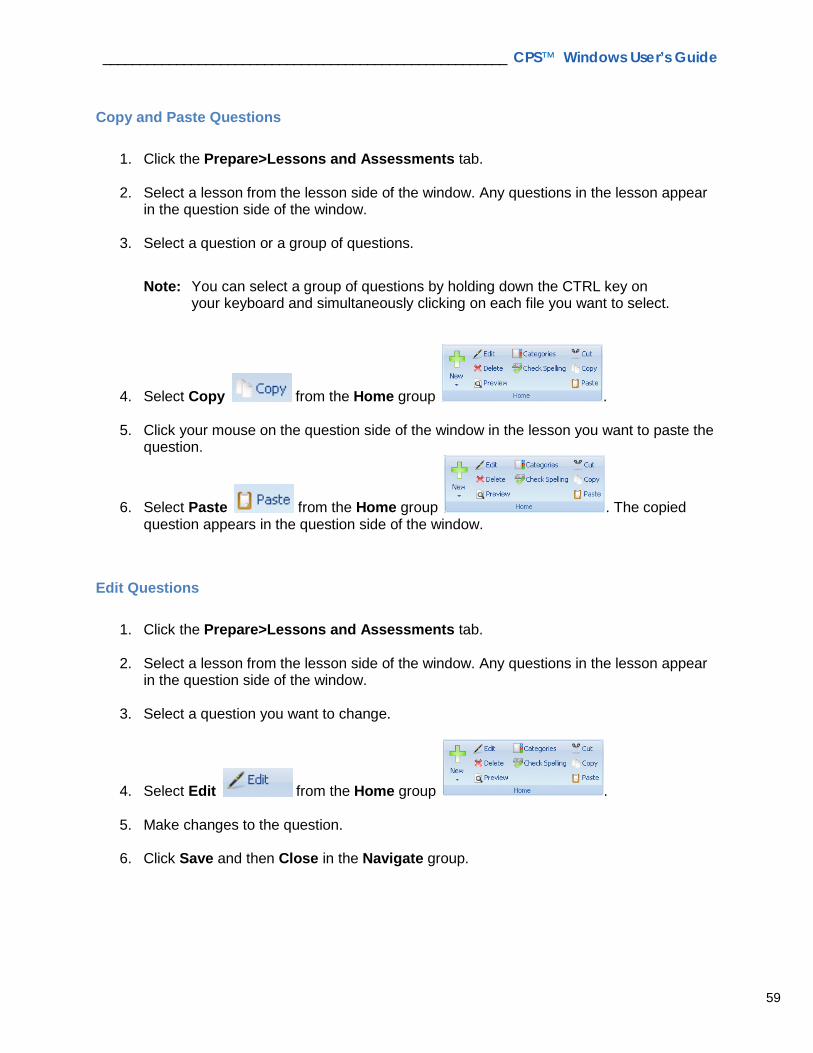
_______________________________________________________ CPS™ Windows User’s Guide
59
Copy and Paste Questions
1. Click the Prepare>Lessons and Assessments tab.
2. Select a lesson from the lesson side of the window. Any questions in the lesson appear in the question side of the window.
3. Select a question or a group of questions.
Note: You can select a group of questions by holding down the CTRL key on
your keyboard and simultaneously clicking on each file you want to select.
4. Select Copy from the Home group .
5. Click your mouse on the question side of the window in the lesson you want to paste the question.
6. Select Paste from the Home group . The copied question appears in the question side of the window.
Edit Questions
1. Click the Prepare>Lessons and Assessments tab.
2. Select a lesson from the lesson side of the window. Any questions in the lesson appear in the question side of the window.
3. Select a question you want to change.
4. Select Edit from the Home group .
5. Make changes to the question.
6. Click Save and then Close in the Navigate group.
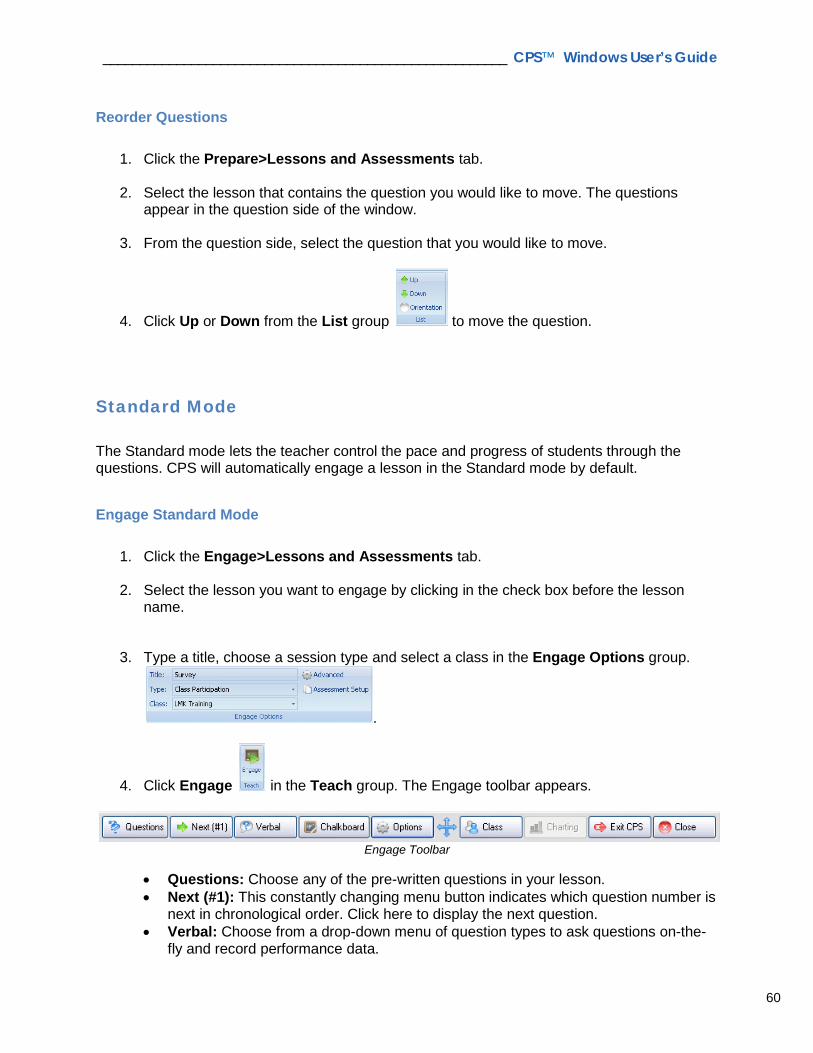
_______________________________________________________ CPS™ Windows User’s Guide
60
Reorder Questions
1. Click the Prepare>Lessons and Assessments tab.
2. Select the lesson that contains the question you would like to move. The questions appear in the question side of the window.
3. From the question side, select the question that you would like to move.
4. Click Up or Down from the List group to move the question.
Standard Mode The Standard mode lets the teacher control the pace and progress of students through the questions. CPS will automatically engage a lesson in the Standard mode by default.
Engage Standard Mode
1. Click the Engage>Lessons and Assessments tab.
2. Select the lesson you want to engage by clicking in the check box before the lesson name.
3. Type a title, choose a session type and select a class in the Engage Options group.
.
4. Click Engage in the Teach group. The Engage toolbar appears.
Engage Toolbar
• Questions: Choose any of the pre-written questions in your lesson. • Next (#1): This constantly changing menu button indicates which question number is
next in chronological order. Click here to display the next question. • Verbal: Choose from a drop-down menu of question types to ask questions on-the-
fly and record performance data.
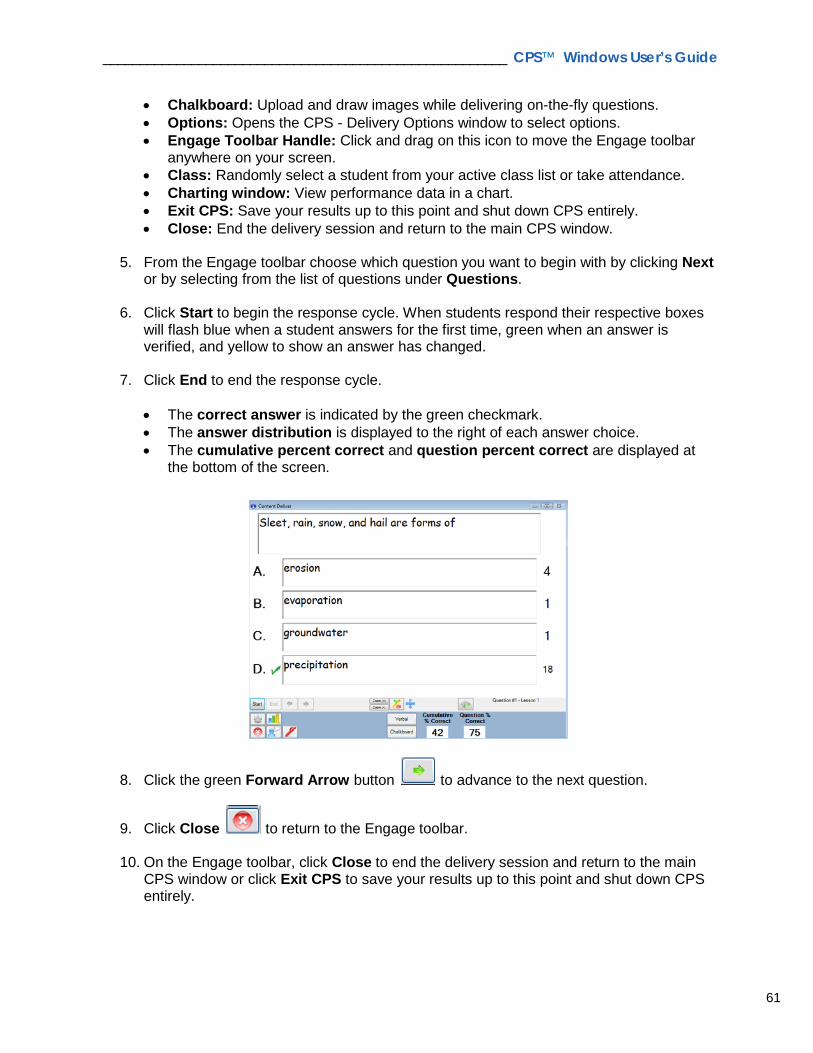
_______________________________________________________ CPS™ Windows User’s Guide
61
• Chalkboard: Upload and draw images while delivering on-the-fly questions. • Options: Opens the CPS - Delivery Options window to select options. • Engage Toolbar Handle: Click and drag on this icon to move the Engage toolbar
anywhere on your screen. • Class: Randomly select a student from your active class list or take attendance. • Charting window: View performance data in a chart. • Exit CPS: Save your results up to this point and shut down CPS entirely. • Close: End the delivery session and return to the main CPS window.
5. From the Engage toolbar choose which question you want to begin with by clicking Next
or by selecting from the list of questions under Questions.
6. Click Start to begin the response cycle. When students respond their respective boxes will flash blue when a student answers for the first time, green when an answer is verified, and yellow to show an answer has changed.
7. Click End to end the response cycle.
• The correct answer is indicated by the green checkmark. • The answer distribution is displayed to the right of each answer choice. • The cumulative percent correct and question percent correct are displayed at
the bottom of the screen.
8. Click the green Forward Arrow button to advance to the next question.
9. Click Close to return to the Engage toolbar.
10. On the Engage toolbar, click Close to end the delivery session and return to the main CPS window or click Exit CPS to save your results up to this point and shut down CPS entirely.

_______________________________________________________ CPS™ Windows User’s Guide
62
Delivery Options Each delivery mode has specific features that you can change within CPS. You can make these changes through the CPS - Delivery Options window.
Accessing Delivery Options Choose any of the following ways to access the CPS - Delivery Options window:
• In the Settings menu, select Delivery Options.
• On the Engage toolbar click Options .
• In the Standard mode engage window click the Options button .
• In the Teacher Led engage window click Options .
• In the Challenge Board engage window click the Options menu.
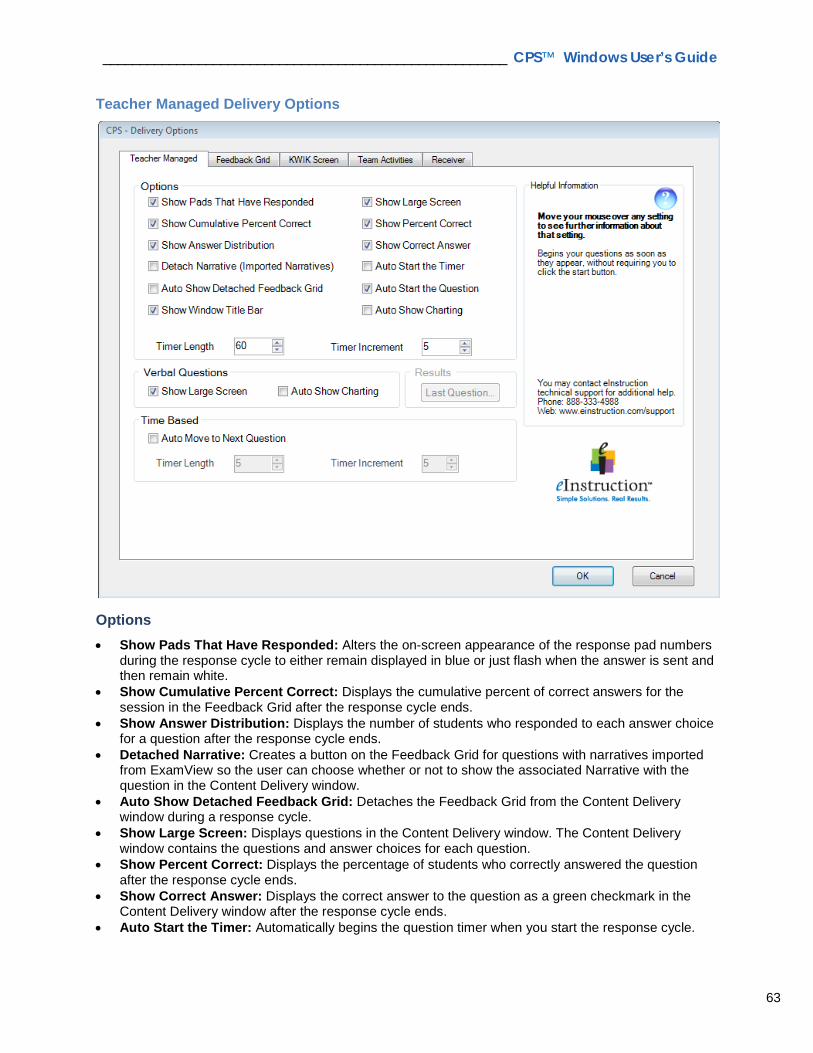
_______________________________________________________ CPS™ Windows User’s Guide
63
Teacher Managed Delivery Options
Options • Show Pads That Have Responded: Alters the on-screen appearance of the response pad numbers
during the response cycle to either remain displayed in blue or just flash when the answer is sent and then remain white.
• Show Cumulative Percent Correct: Displays the cumulative percent of correct answers for the session in the Feedback Grid after the response cycle ends.
• Show Answer Distribution: Displays the number of students who responded to each answer choice for a question after the response cycle ends.
• Detached Narrative: Creates a button on the Feedback Grid for questions with narratives imported from ExamView so the user can choose whether or not to show the associated Narrative with the question in the Content Delivery window.
• Auto Show Detached Feedback Grid: Detaches the Feedback Grid from the Content Delivery window during a response cycle.
• Show Large Screen: Displays questions in the Content Delivery window. The Content Delivery window contains the questions and answer choices for each question.
• Show Percent Correct: Displays the percentage of students who correctly answered the question after the response cycle ends.
• Show Correct Answer: Displays the correct answer to the question as a green checkmark in the Content Delivery window after the response cycle ends.
• Auto Start the Timer: Automatically begins the question timer when you start the response cycle.

_______________________________________________________ CPS™ Windows User’s Guide
64
• Auto Start the Question: Automatically starts the question, so that you do not need to press the Start button to begin the response cycle.
• Auto Show Charting: Automatically displays the Charting window after the response cycle ends. • Timer Length: Changes the default length of time displayed in the Content Delivery window during a
response cycle. • Timer Increment: Changes the default increment of time change when using the + and - sign
displayed in the Content Delivery window during a response cycle.
Verbal Questions • Show Large Screen: Displays the Content Delivery window when you engage a verbal question to
type in a question and answers so they are recorded. • Auto Show Charting: Automatically displays the Charting window after the response cycle ends.
Time Based • Auto Move to Next Question: Automatically advances to the next question after the response cycle
ends. • Timer Length: Changes the length of time a question is displayed in the Content Delivery window
during a response cycle before automatically moving to the next question. • Timer Increment: Changes the increment of time change when using the + and - sign displayed in
the Content Delivery window during an automatic advance response cycle.
_______________________________________________________ CPS™ Windows User’s Guide
65
Interactive PowerPoint Presentations
Overview You will learn how to engage questions while viewing a PowerPoint slideshow in CPS or through CPS for PowerPoint.
Purpose After completing this module, participants will be able to:
• Import PowerPoint files into CPS.
• Engage PowerPoint files in CPS Standard mode.
• Create CPS question slides for delivery with CPS for PowerPoint.
• Open a CPS database in CPS for PowerPoint.
• Engage CPS and Verbal questions during a PowerPoint presentation.
• Change delivery options to achieve different goals when displaying data – Optional.
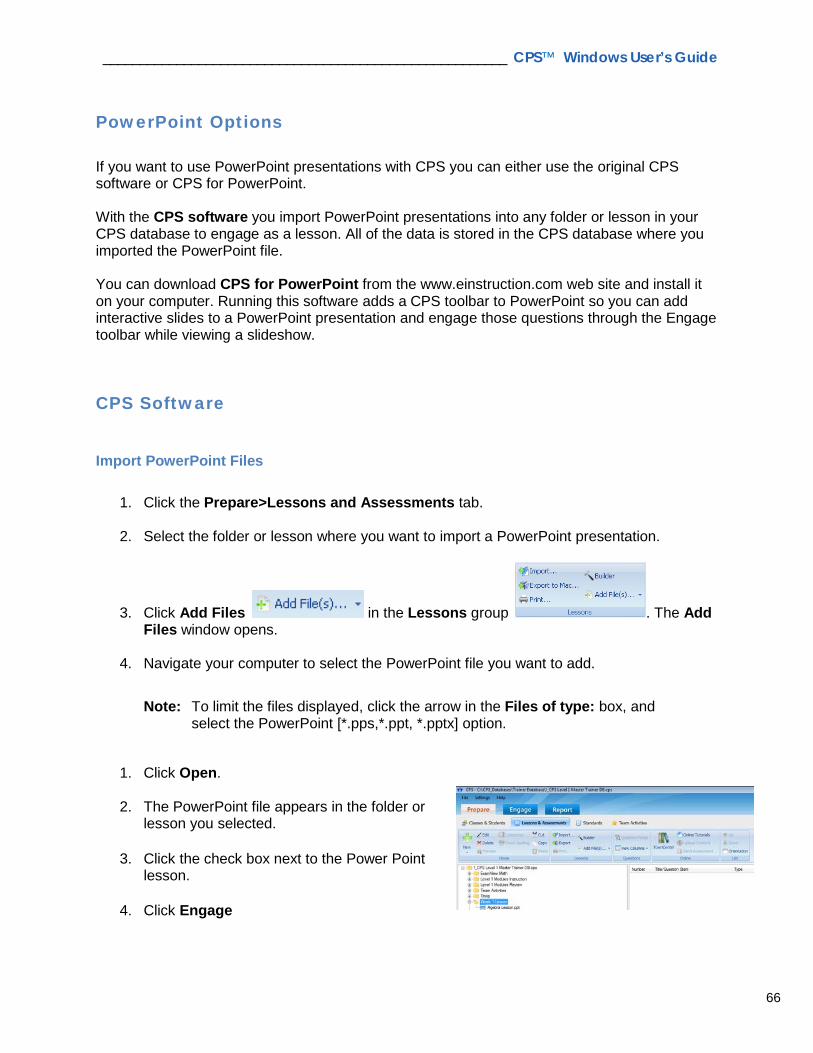
_______________________________________________________ CPS™ Windows User’s Guide
66
PowerPoint Options If you want to use PowerPoint presentations with CPS you can either use the original CPS software or CPS for PowerPoint. With the CPS software you import PowerPoint presentations into any folder or lesson in your CPS database to engage as a lesson. All of the data is stored in the CPS database where you imported the PowerPoint file. You can download CPS for PowerPoint from the www.einstruction.com web site and install it on your computer. Running this software adds a CPS toolbar to PowerPoint so you can add interactive slides to a PowerPoint presentation and engage those questions through the Engage toolbar while viewing a slideshow.
CPS Software
Import PowerPoint Files
1. Click the Prepare>Lessons and Assessments tab.
2. Select the folder or lesson where you want to import a PowerPoint presentation.
3. Click Add Files in the Lessons group . The Add Files window opens.
4. Navigate your computer to select the PowerPoint file you want to add.
Note: To limit the files displayed, click the arrow in the Files of type: box, and
select the PowerPoint [*.pps,*.ppt, *.pptx] option.
1. Click Open.
2. The PowerPoint file appears in the folder or
lesson you selected.
3. Click the check box next to the Power Point lesson.
4. Click Engage
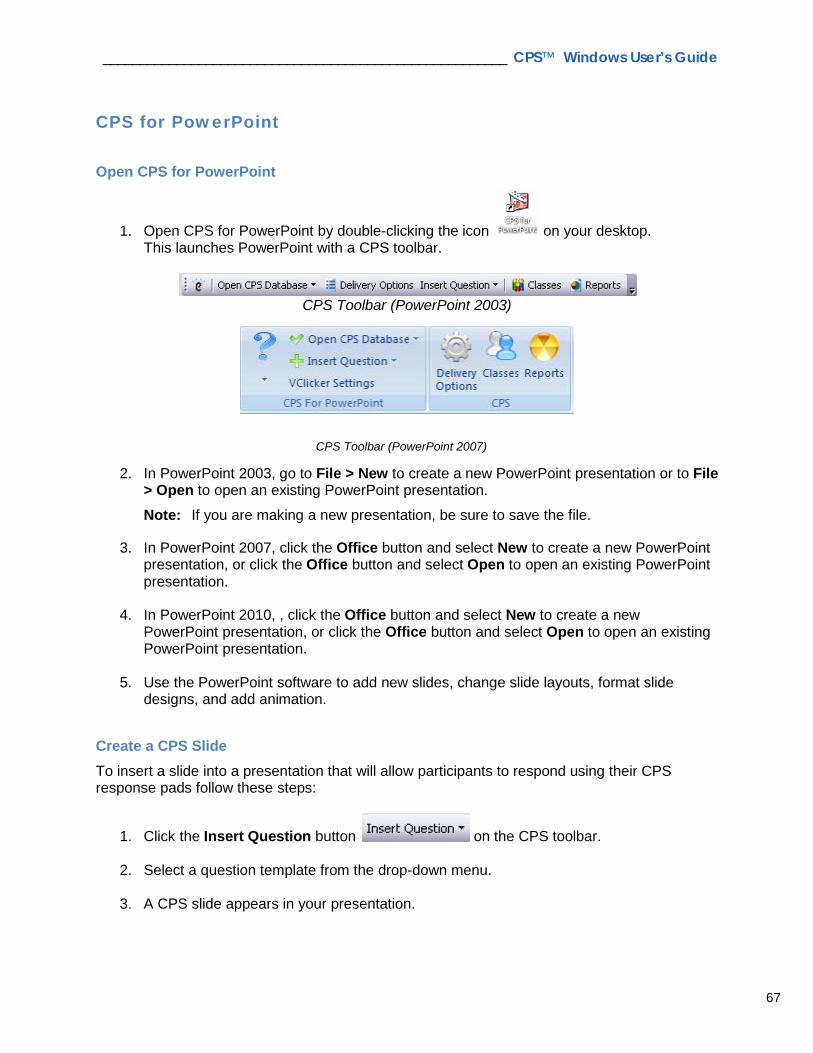
_______________________________________________________ CPS™ Windows User’s Guide
67
CPS for PowerPoint
Open CPS for PowerPoint
1. Open CPS for PowerPoint by double-clicking the icon on your desktop. This launches PowerPoint with a CPS toolbar.
CPS Toolbar (PowerPoint 2003)
2. In PowerPoint 2003, go to File > New to create a new PowerPoint presentation or to File > Open to open an existing PowerPoint presentation.
Note: If you are making a new presentation, be sure to save the file.
3. In PowerPoint 2007, click the Office button and select New to create a new PowerPoint presentation, or click the Office button and select Open to open an existing PowerPoint presentation.
4. In PowerPoint 2010, , click the Office button and select New to create a new
PowerPoint presentation, or click the Office button and select Open to open an existing PowerPoint presentation.
5. Use the PowerPoint software to add new slides, change slide layouts, format slide designs, and add animation.
Create a CPS Slide To insert a slide into a presentation that will allow participants to respond using their CPS response pads follow these steps:
1. Click the Insert Question button on the CPS toolbar.
2. Select a question template from the drop-down menu.
3. A CPS slide appears in your presentation.
CPS Toolbar (PowerPoint 2007)

_______________________________________________________ CPS™ Windows User’s Guide
68
CPS Slide
4. Type your question in the Enter question here text box.
5. Type your answer choices in the Options text boxes.
6. Click the red X symbol next to the answer choice you would like to mark as
correct, so that the symbol changes to a green check .
7. Continue creating either typical PowerPoint slides or CPS Question slides until you finish your presentation.
8. Save your changes.
Open a CPS Database A CPS database is a file with a file extension of .cps. This file is where you save your class information and student performance data for sessions already administered. You must have a CPS database open to engage CPS slides during a presentation.
1. Click the Open CPS Database button on the CPS toolbar and choose Open Database. The Open CPS File window appears.
2. Navigate your computer to select the database you created in module one from the
location where it is saved.
3. Click Open.
Engage CPS for PowerPoint
1. Go to Slide Show > View Show to engage the PowerPoint presentation.
2. In the Session Options window, set your session options (Session Title, Session Type and Class) and click OK.
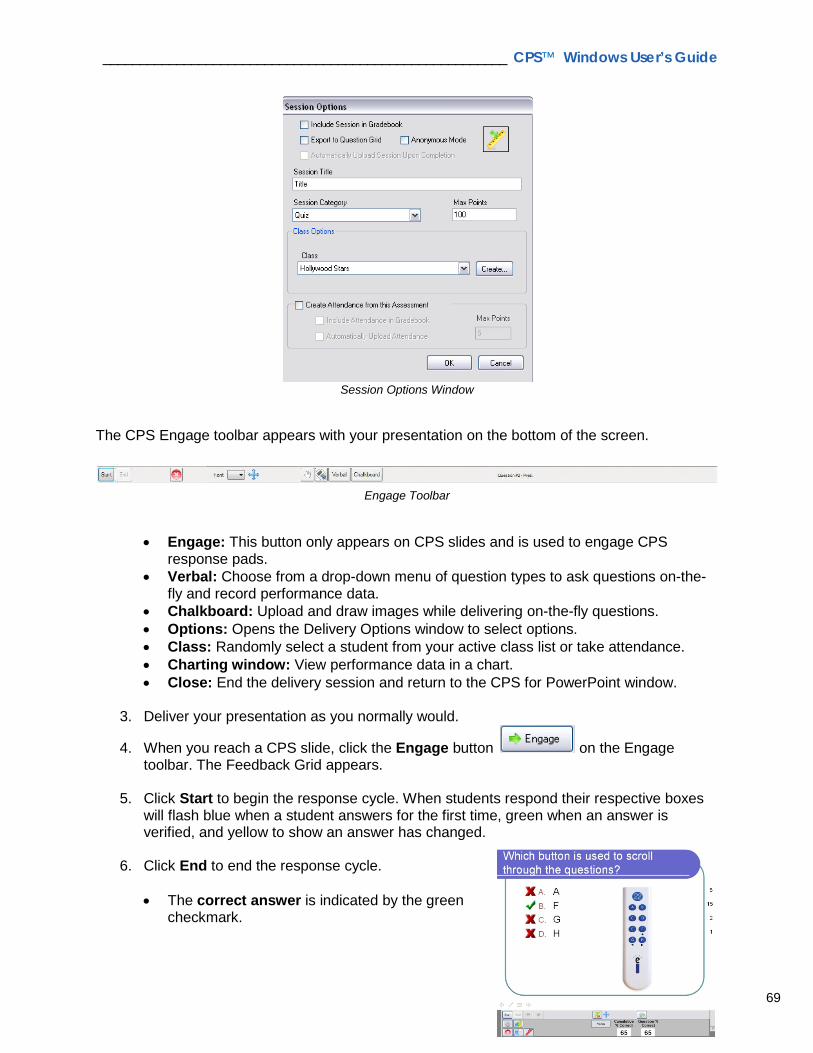
_______________________________________________________ CPS™ Windows User’s Guide
69
Session Options Window
The CPS Engage toolbar appears with your presentation on the bottom of the screen.
Engage Toolbar
• Engage: This button only appears on CPS slides and is used to engage CPS
response pads. • Verbal: Choose from a drop-down menu of question types to ask questions on-the-
fly and record performance data. • Chalkboard: Upload and draw images while delivering on-the-fly questions. • Options: Opens the Delivery Options window to select options. • Class: Randomly select a student from your active class list or take attendance. • Charting window: View performance data in a chart. • Close: End the delivery session and return to the CPS for PowerPoint window.
3. Deliver your presentation as you normally would.
4. When you reach a CPS slide, click the Engage button on the Engage toolbar. The Feedback Grid appears.
5. Click Start to begin the response cycle. When students respond their respective boxes
will flash blue when a student answers for the first time, green when an answer is verified, and yellow to show an answer has changed.
6. Click End to end the response cycle.
• The correct answer is indicated by the green
checkmark.
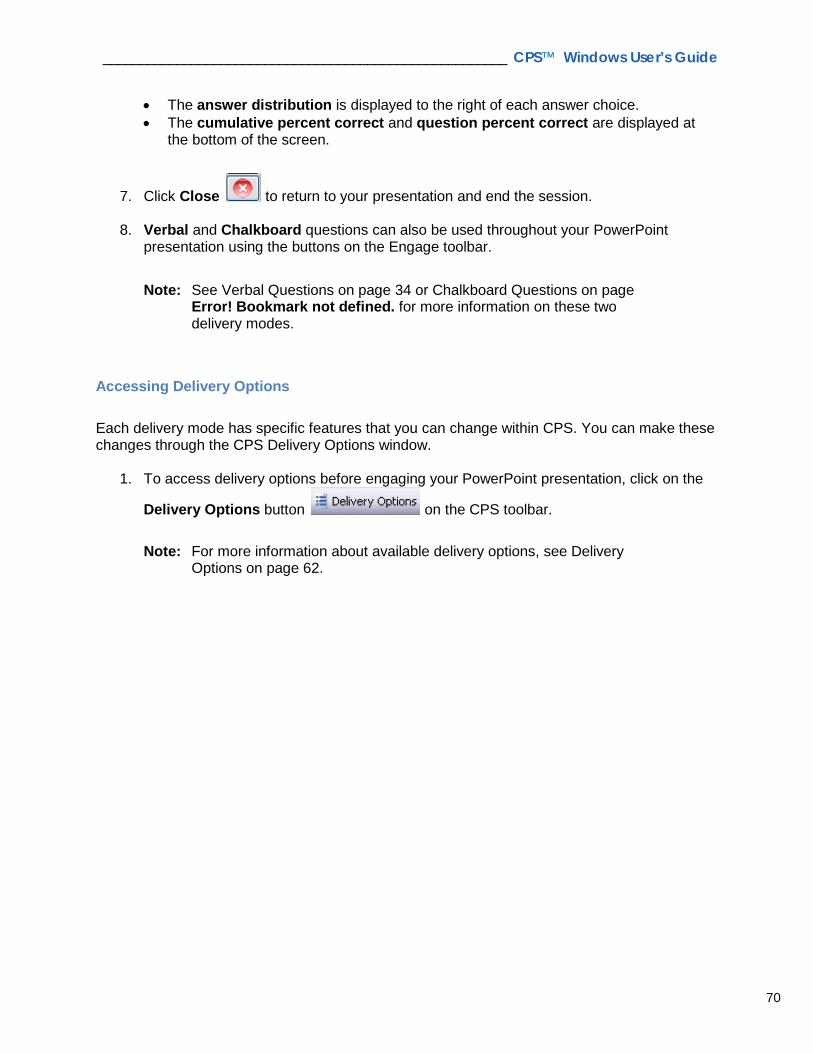
_______________________________________________________ CPS™ Windows User’s Guide
70
• The answer distribution is displayed to the right of each answer choice. • The cumulative percent correct and question percent correct are displayed at
the bottom of the screen.
7. Click Close to return to your presentation and end the session.
8. Verbal and Chalkboard questions can also be used throughout your PowerPoint presentation using the buttons on the Engage toolbar. Note: See Verbal Questions on page 34 or Chalkboard Questions on page
Error! Bookmark not defined. for more information on these two delivery modes.
Accessing Delivery Options Each delivery mode has specific features that you can change within CPS. You can make these changes through the CPS Delivery Options window.
1. To access delivery options before engaging your PowerPoint presentation, click on the
Delivery Options button on the CPS toolbar.
Note: For more information about available delivery options, see Delivery Options on page 62.
_______________________________________________________ CPS™ Windows User’s Guide
71
Learning Through Team Activities
Overview You will learn how to present content to students using the Challenge Board and There It Is! team activities.
Purpose After completing this module, participants will be able to:
• Create team rosters.
• Create and edit a Challenge Board team activity.
• Engage a Challenge Board team activity.
• Create a lesson using Lesson Builder.
• Print lessons from CPS or word processing application.
• Engage a There It Is! team activity.
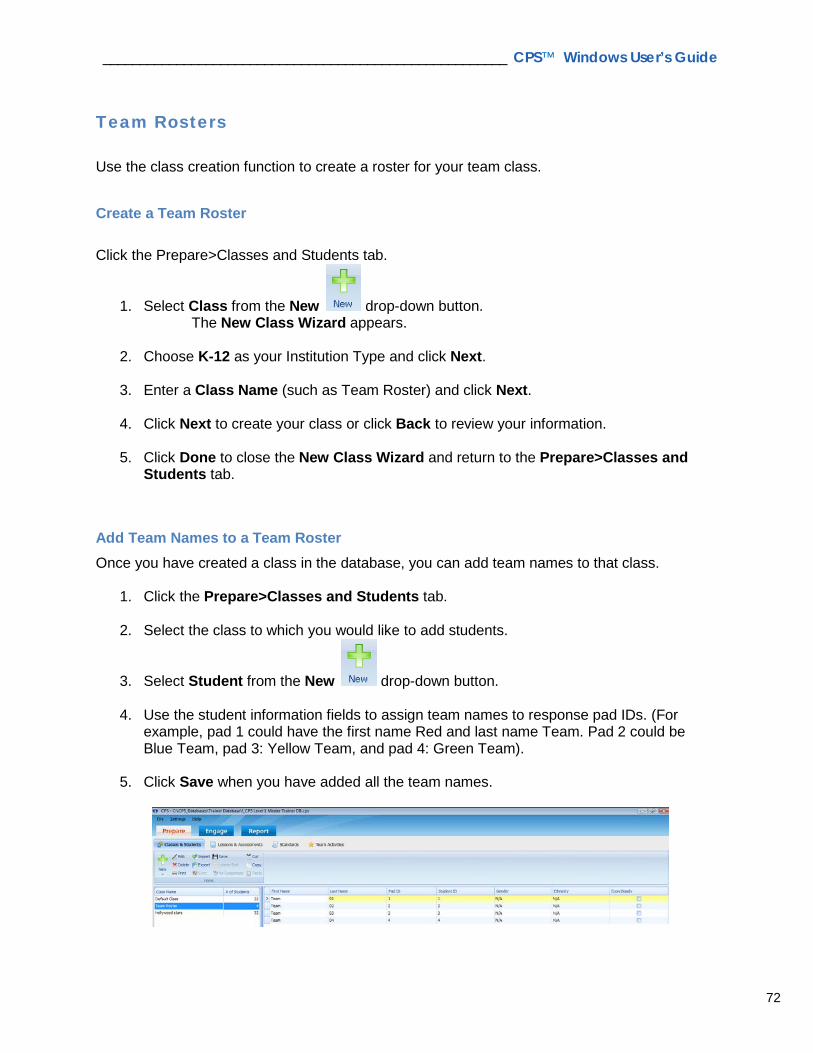
_______________________________________________________ CPS™ Windows User’s Guide
72
Team Rosters Use the class creation function to create a roster for your team class.
Create a Team Roster Click the Prepare>Classes and Students tab.
1. Select Class from the New drop-down button. The New Class Wizard appears. 2. Choose K-12 as your Institution Type and click Next.
3. Enter a Class Name (such as Team Roster) and click Next.
4. Click Next to create your class or click Back to review your information.
5. Click Done to close the New Class Wizard and return to the Prepare>Classes and
Students tab.
Add Team Names to a Team Roster Once you have created a class in the database, you can add team names to that class.
1. Click the Prepare>Classes and Students tab.
2. Select the class to which you would like to add students.
3. Select Student from the New drop-down button. 4. Use the student information fields to assign team names to response pad IDs. (For
example, pad 1 could have the first name Red and last name Team. Pad 2 could be Blue Team, pad 3: Yellow Team, and pad 4: Green Team).
5. Click Save when you have added all the team names.
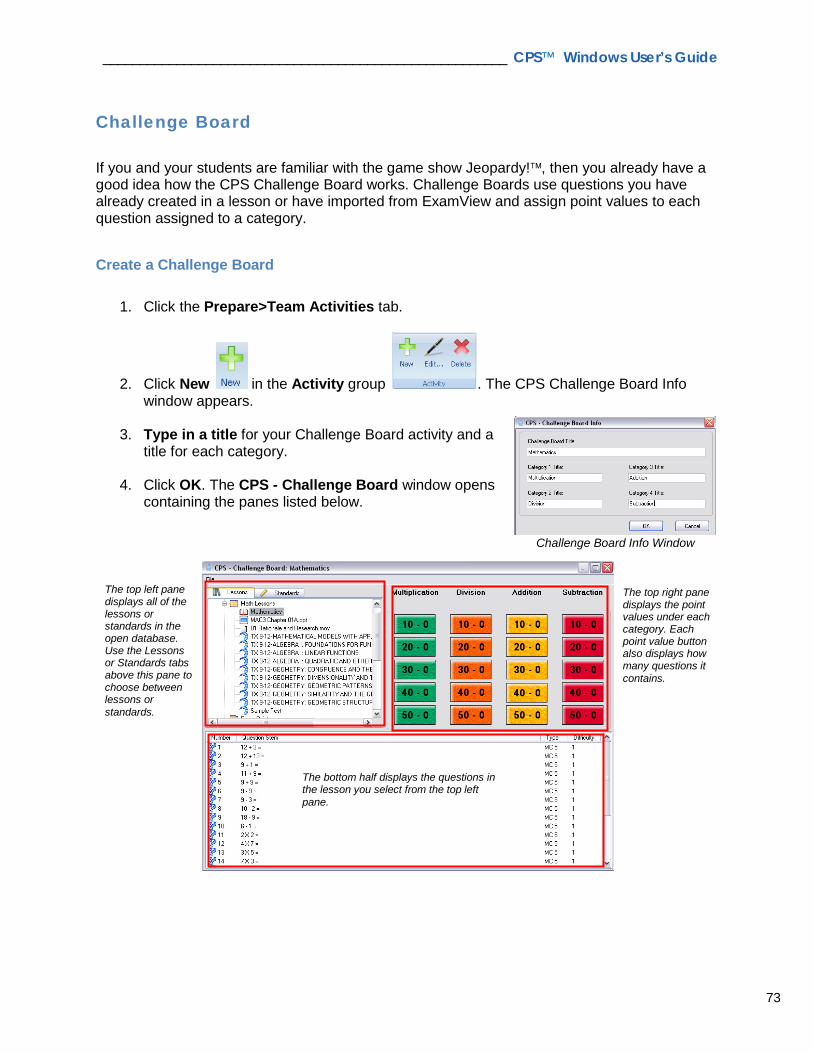
_______________________________________________________ CPS™ Windows User’s Guide
73
Challenge Board Info Window
Challenge Board If you and your students are familiar with the game show Jeopardy!, then you already have a good idea how the CPS Challenge Board works. Challenge Boards use questions you have already created in a lesson or have imported from ExamView and assign point values to each question assigned to a category.
Create a Challenge Board
1. Click the Prepare>Team Activities tab.
2. Click New in the Activity group . The CPS Challenge Board Info window appears.
3. Type in a title for your Challenge Board activity and a
title for each category.
4. Click OK. The CPS - Challenge Board window opens containing the panes listed below.
The bottom half displays the questions in the lesson you select from the top left pane.
The top left pane displays all of the lessons or standards in the open database. Use the Lessons or Standards tabs above this pane to choose between lessons or standards.
The top right pane displays the point values under each category. Each point value button also displays how many questions it contains.

_______________________________________________________ CPS™ Windows User’s Guide
74
5. Select a lesson or standard from the top left pane. The questions appear in the bottom half of the window.
6. Use one or both of the following methods to populate the category and point values with
questions:
• Populate by Questions: Click and drag a question from the bottom half of the window and drop it into a point value of a particular category.
o The point value button display changes to represent the number of questions that were dropped into the point value.
o Repeat for as many questions as you want to add to the Challenge Board.
• Populate by Lessons: Click and drag a lesson from the top left pane and drop it into a category name. This will distribute the questions from that lesson equally and randomly to all of the point values in that category.
7. Go to File > Close to exit the Challenge Board and return to the Prepare>Team
Activities tab.
Edit a Challenge Board
1. Click the Prepare>Team Activities tab.
2. Click Edit in the Activity group . The CPS - Challenge Board window appears.
3. Select File > Edit Challenge Board attributes to edit the board or category titles.
4. Add questions using the methods described in Create a Challenge Board on page 73.
5. Delete questions by double-clicking any of the colored value buttons that contain
questions to open the Category window. Click a question and then click Delete to remove the question. Click Delete All to remove all the questions. Click OK when the Confirmation dialog box appears. Click Close to exit the Category window.
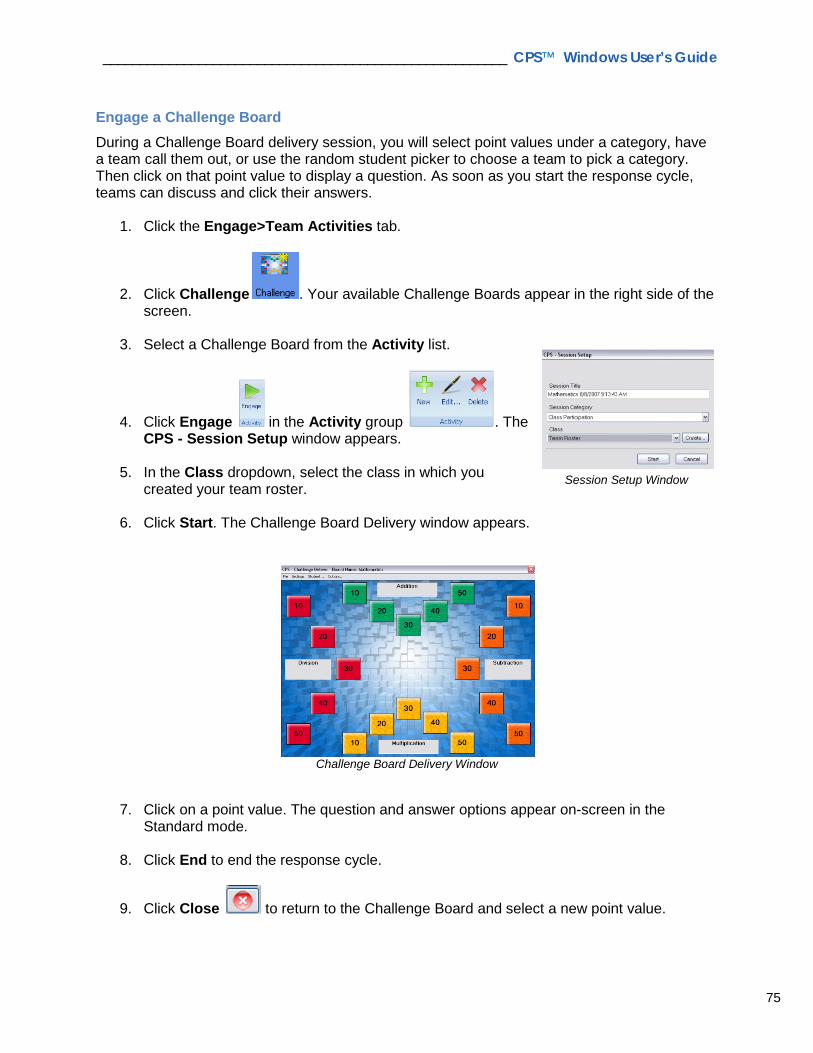
_______________________________________________________ CPS™ Windows User’s Guide
75
Engage a Challenge Board During a Challenge Board delivery session, you will select point values under a category, have a team call them out, or use the random student picker to choose a team to pick a category. Then click on that point value to display a question. As soon as you start the response cycle, teams can discuss and click their answers.
1. Click the Engage>Team Activities tab.
2. Click Challenge . Your available Challenge Boards appear in the right side of the screen.
3. Select a Challenge Board from the Activity list.
4. Click Engage in the Activity group . The CPS - Session Setup window appears.
5. In the Class dropdown, select the class in which you
created your team roster. 6. Click Start. The Challenge Board Delivery window appears.
Challenge Board Delivery Window
7. Click on a point value. The question and answer options appear on-screen in the
Standard mode.
8. Click End to end the response cycle.
9. Click Close to return to the Challenge Board and select a new point value.
Session Setup Window

_______________________________________________________ CPS™ Windows User’s Guide
76
10. To view the score for each team, select Settings > Show Score. The center of the Challenge Board displays each team name, pad ID, and cumulative points earned.
11. Select File > Close when you have completed the Challenge Board to return to the Engage>Team Activities tab.
There It Is! You can organize your class into teams of students, or let individual students compete. Each team or student answers a different question at a time, so students do not need to shout out answers.
• The first team to correctly respond to their own question receives bonus points. • Teams that answer correctly, but not first, receive the standard point value. • Teams that did not answer correctly or did not answer at all get 0 points. • The points accumulate over the session to determine a winner.
Print Lesson from CPS CPS lessons need to be printed for use with the There It Is! team activity. Lessons can be printed directly from CPS or they can be exported to a word processing application.
1. Click the Prepare>Lessons and Assessments tab.
2. Select the lesson you want to print from the lesson side of the screen.
3. Click Print... in the Lessons group . The CPS – Print Questions window appears.
4. Check the boxes in front of the questions you want to
print, or click Select All in the lower left corner to include all questions.
CPS – Print Questions Window
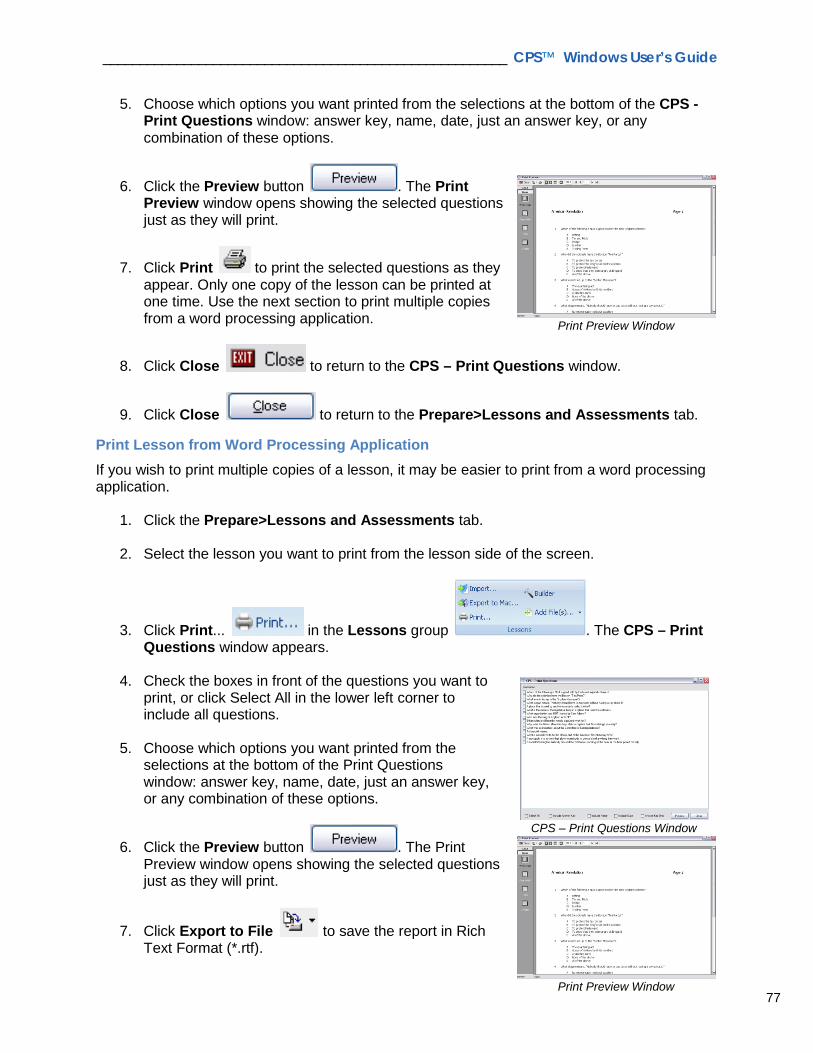
_______________________________________________________ CPS™ Windows User’s Guide
77
5. Choose which options you want printed from the selections at the bottom of the CPS - Print Questions window: answer key, name, date, just an answer key, or any combination of these options.
6. Click the Preview button . The Print Preview window opens showing the selected questions just as they will print.
7. Click Print to print the selected questions as they appear. Only one copy of the lesson can be printed at one time. Use the next section to print multiple copies from a word processing application.
8. Click Close to return to the CPS – Print Questions window.
9. Click Close to return to the Prepare>Lessons and Assessments tab.
Print Lesson from Word Processing Application If you wish to print multiple copies of a lesson, it may be easier to print from a word processing application.
1. Click the Prepare>Lessons and Assessments tab.
2. Select the lesson you want to print from the lesson side of the screen.
3. Click Print... in the Lessons group . The CPS – Print Questions window appears.
4. Check the boxes in front of the questions you want to
print, or click Select All in the lower left corner to include all questions.
5. Choose which options you want printed from the
selections at the bottom of the Print Questions window: answer key, name, date, just an answer key, or any combination of these options.
6. Click the Preview button . The Print Preview window opens showing the selected questions just as they will print.
7. Click Export to File to save the report in Rich Text Format (*.rtf).
Print Preview Window
CPS – Print Questions Window
Print Preview Window
_______________________________________________________ CPS™ Windows User’s Guide
78
8. Navigate your computer to select where to save the file in the Save in: text box.
9. Type a name for the file in the File name: text box.
10. Click Save.
11. Click OK in the RTF Export Setup screen.
12. The file will open with your default word processing application (such as Microsoft
Word). Make any necessary changes and use the program’s Print option to print.

_______________________________________________________ CPS™ Windows User’s Guide
79
Managing Data and Reports
Overview You will be able to analyze data through the reports options and learn how to edit reports to re-grade questions.
Purpose After completing this section, you will be able to:
• Upload, generate, print, and export reports to analyze student performance data.
• Re-grade questions and students to edit a session.
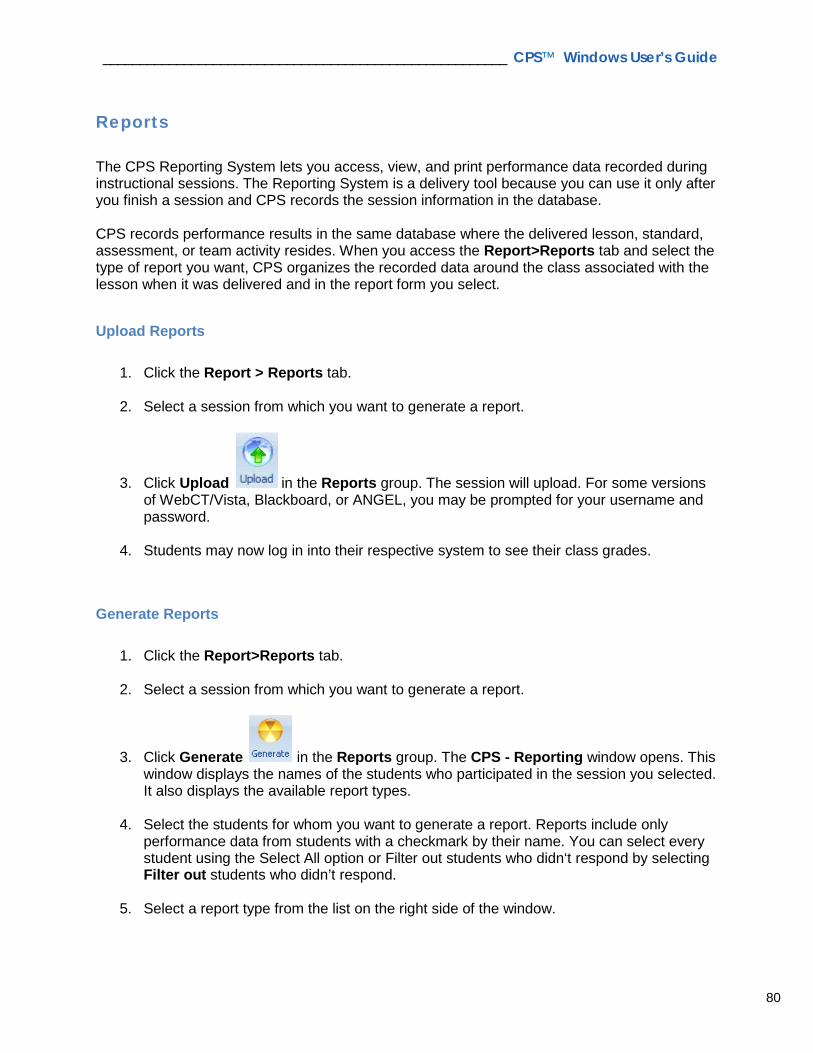
_______________________________________________________ CPS™ Windows User’s Guide
80
Reports The CPS Reporting System lets you access, view, and print performance data recorded during instructional sessions. The Reporting System is a delivery tool because you can use it only after you finish a session and CPS records the session information in the database. CPS records performance results in the same database where the delivered lesson, standard, assessment, or team activity resides. When you access the Report>Reports tab and select the type of report you want, CPS organizes the recorded data around the class associated with the lesson when it was delivered and in the report form you select.
Upload Reports
1. Click the Report > Reports tab.
2. Select a session from which you want to generate a report.
3. Click Upload in the Reports group. The session will upload. For some versions of WebCT/Vista, Blackboard, or ANGEL, you may be prompted for your username and password.
4. Students may now log in into their respective system to see their class grades.
Generate Reports
1. Click the Report>Reports tab.
2. Select a session from which you want to generate a report.
3. Click Generate in the Reports group. The CPS - Reporting window opens. This window displays the names of the students who participated in the session you selected. It also displays the available report types.
4. Select the students for whom you want to generate a report. Reports include only
performance data from students with a checkmark by their name. You can select every student using the Select All option or Filter out students who didn‘t respond by selecting Filter out students who didn’t respond.
5. Select a report type from the list on the right side of the window.

_______________________________________________________ CPS™ Windows User’s Guide
81
6. Click Preview . A Print Preview window opens and displays the report.
7. Click Views in the left column of the Print Preview window and use the four icons available to see different views of the report. These icons also appear in the toolbar.
Report Views
8. Click Export to File to save the report in any of the following file formats:
• Rich Text Format (*.rtf) • Acrobat (*.pdf) • Formatted HTML (*.html)
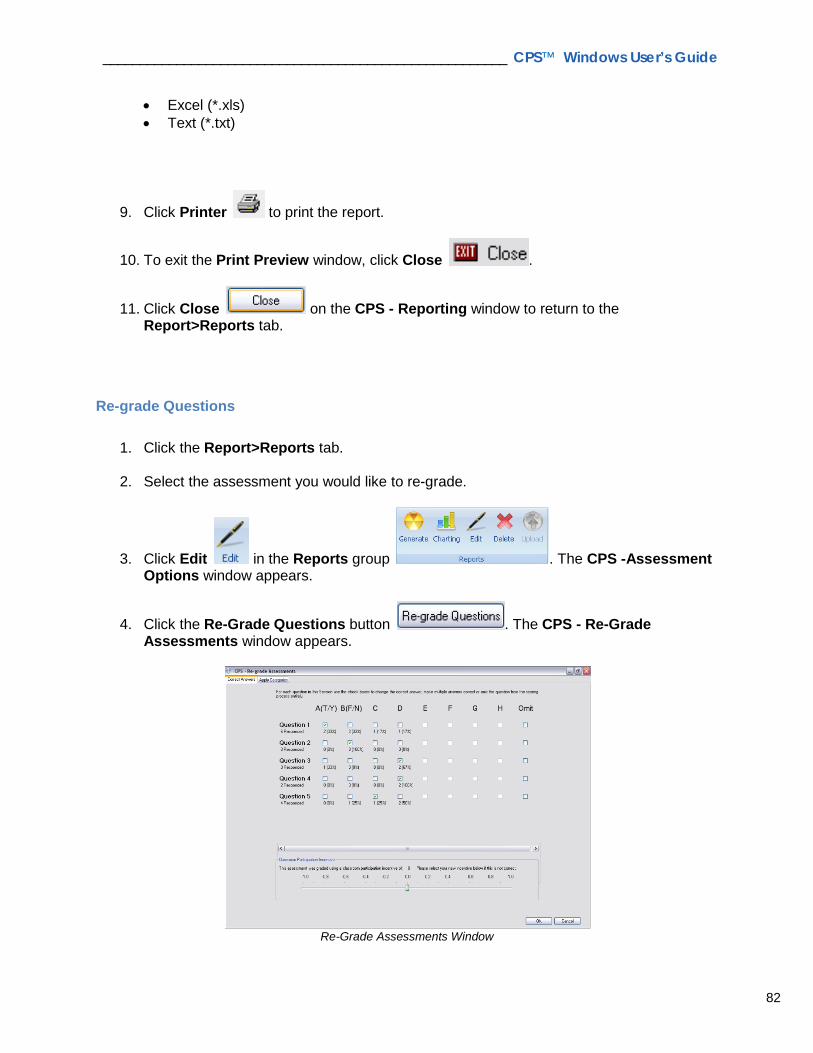
_______________________________________________________ CPS™ Windows User’s Guide
82
• Excel (*.xls) • Text (*.txt)
9. Click Printer to print the report.
10. To exit the Print Preview window, click Close .
11. Click Close on the CPS - Reporting window to return to the Report>Reports tab.
Re-grade Questions
1. Click the Report>Reports tab.
2. Select the assessment you would like to re-grade.
3. Click Edit in the Reports group . The CPS -Assessment Options window appears.
4. Click the Re-Grade Questions button . The CPS - Re-Grade Assessments window appears.
Re-Grade Assessments Window
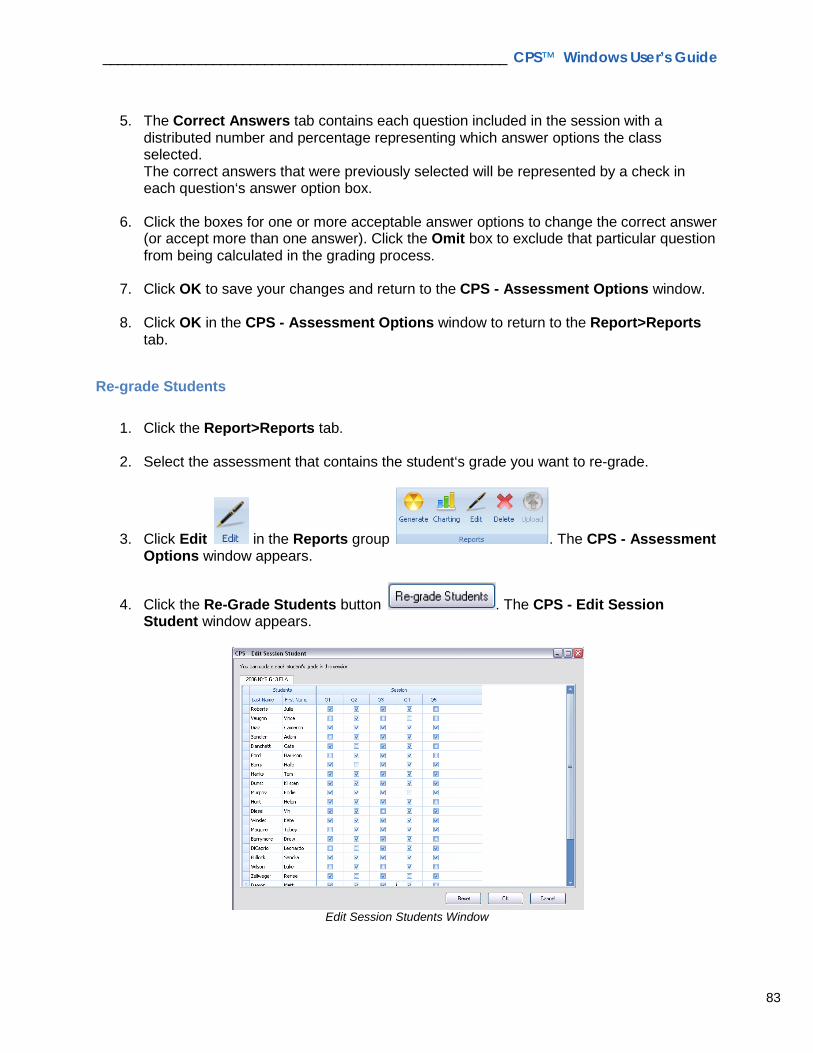
_______________________________________________________ CPS™ Windows User’s Guide
83
5. The Correct Answers tab contains each question included in the session with a
distributed number and percentage representing which answer options the class selected. The correct answers that were previously selected will be represented by a check in each question‘s answer option box.
6. Click the boxes for one or more acceptable answer options to change the correct answer
(or accept more than one answer). Click the Omit box to exclude that particular question from being calculated in the grading process.
7. Click OK to save your changes and return to the CPS - Assessment Options window.
8. Click OK in the CPS - Assessment Options window to return to the Report>Reports
tab.
Re-grade Students
1. Click the Report>Reports tab.
2. Select the assessment that contains the student‘s grade you want to re-grade.
3. Click Edit in the Reports group . The CPS - Assessment Options window appears.
4. Click the Re-Grade Students button . The CPS - Edit Session Student window appears.
Edit Session Students Window
_______________________________________________________ CPS™ Windows User’s Guide
84
5. Find the box that corresponds to the question number and student name for which you want to change the mark. If a checkmark is in the box, the question is marked correct. If there is no checkmark in the box, the question is marked incorrect.
6. Click OK to save your changes and return to the CPS - Assessment Options window.
7. Click OK in the CPS - Assessment Options window to return to the Report>Reports
tab.
Report Types CPS uses student performance data to provide you with 13 different types of reports. Reports fall into three major categories: Class Reports, Individual Reports, and Export Reports.
Class Reports
Class reports give general information about the overall class performance. While these reports may also give some information on each individual student, the overall focus of the report is on the class.
Instructor Summary Report The Instructor Summary lists the number of correct to attempted answers and the percentage of correctly answered questions for all students selected in the report.
Note: Scores are calculated using the first answer inputted for sessions
delivered using the Student Managed Practice mode.
Question Report The Question Report shows the answer distribution per question, each question and answer option, a pointing finger indicating the correct answer, the name of every respondent, the answer selected by each respondent, the percentile of respondents per answer option, and a bar graph showing answer distribution
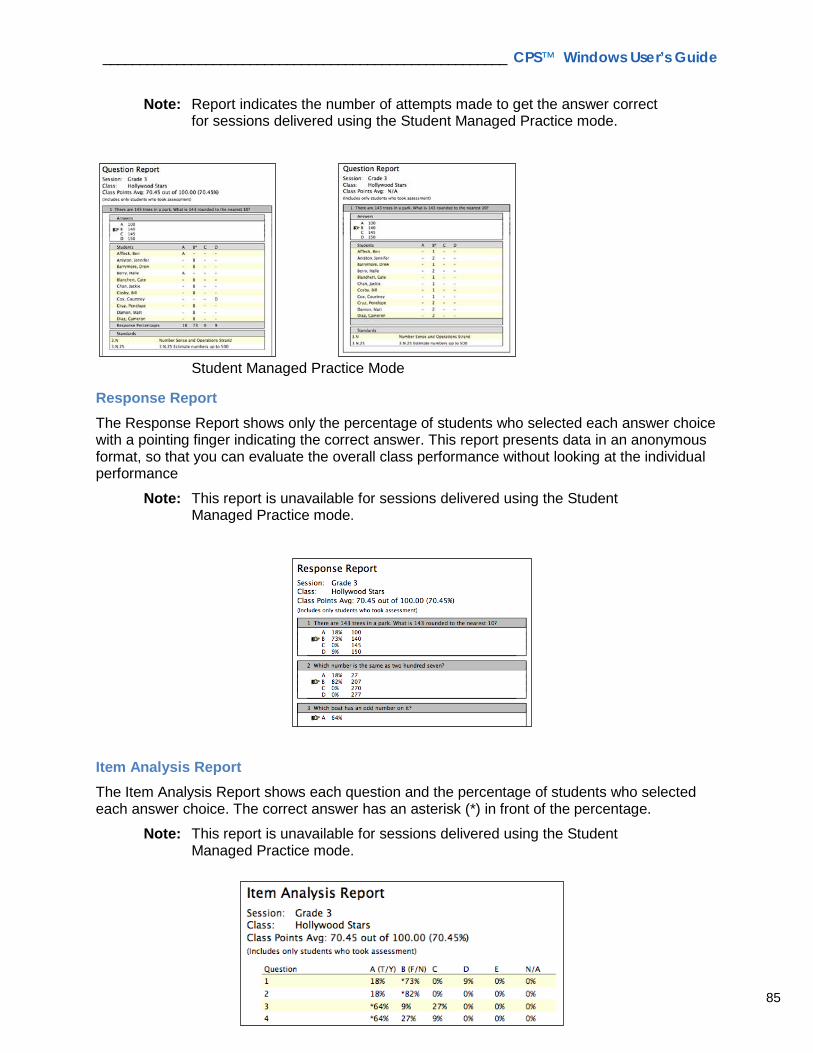
_______________________________________________________ CPS™ Windows User’s Guide
85
Note: Report indicates the number of attempts made to get the answer correct for sessions delivered using the Student Managed Practice mode.
Student Managed Practice Mode
Response Report The Response Report shows only the percentage of students who selected each answer choice with a pointing finger indicating the correct answer. This report presents data in an anonymous format, so that you can evaluate the overall class performance without looking at the individual performance
Note: This report is unavailable for sessions delivered using the Student Managed Practice mode.
Item Analysis Report The Item Analysis Report shows each question and the percentage of students who selected each answer choice. The correct answer has an asterisk (*) in front of the percentage.
Note: This report is unavailable for sessions delivered using the Student Managed Practice mode.
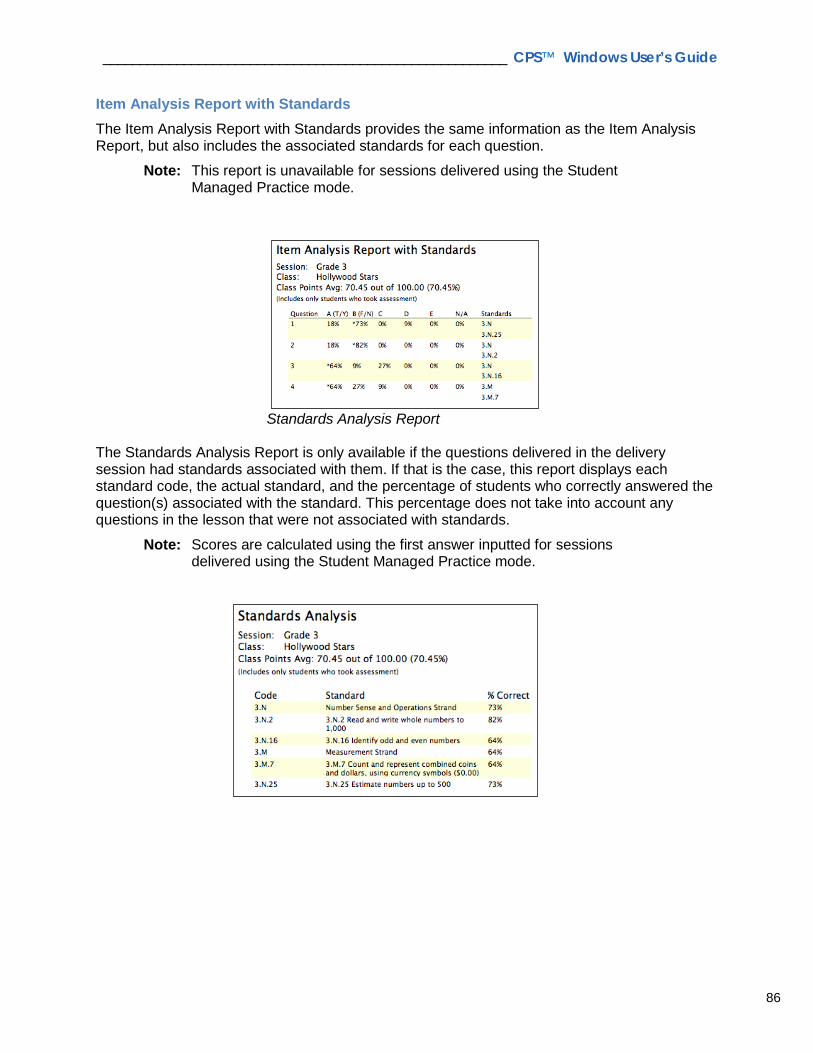
_______________________________________________________ CPS™ Windows User’s Guide
86
Item Analysis Report with Standards The Item Analysis Report with Standards provides the same information as the Item Analysis Report, but also includes the associated standards for each question.
Note: This report is unavailable for sessions delivered using the Student Managed Practice mode.
Standards Analysis Report The Standards Analysis Report is only available if the questions delivered in the delivery session had standards associated with them. If that is the case, this report displays each standard code, the actual standard, and the percentage of students who correctly answered the question(s) associated with the standard. This percentage does not take into account any questions in the lesson that were not associated with standards.
Note: Scores are calculated using the first answer inputted for sessions delivered using the Student Managed Practice mode.
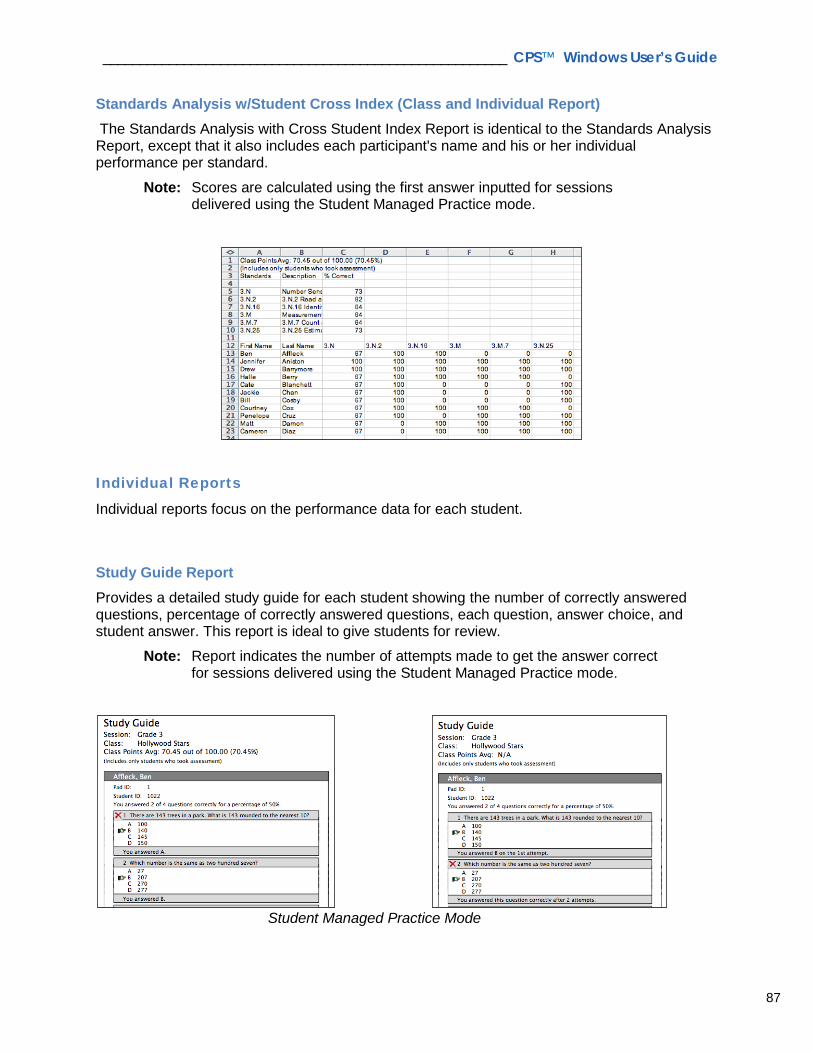
_______________________________________________________ CPS™ Windows User’s Guide
87
Standards Analysis w/Student Cross Index (Class and Individual Report) The Standards Analysis with Cross Student Index Report is identical to the Standards Analysis Report, except that it also includes each participant's name and his or her individual performance per standard.
Note: Scores are calculated using the first answer inputted for sessions delivered using the Student Managed Practice mode.
Individual Reports
Individual reports focus on the performance data for each student.
Study Guide Report Provides a detailed study guide for each student showing the number of correctly answered questions, percentage of correctly answered questions, each question, answer choice, and student answer. This report is ideal to give students for review.
Note: Report indicates the number of attempts made to get the answer correct for sessions delivered using the Student Managed Practice mode.
Student Managed Practice Mode
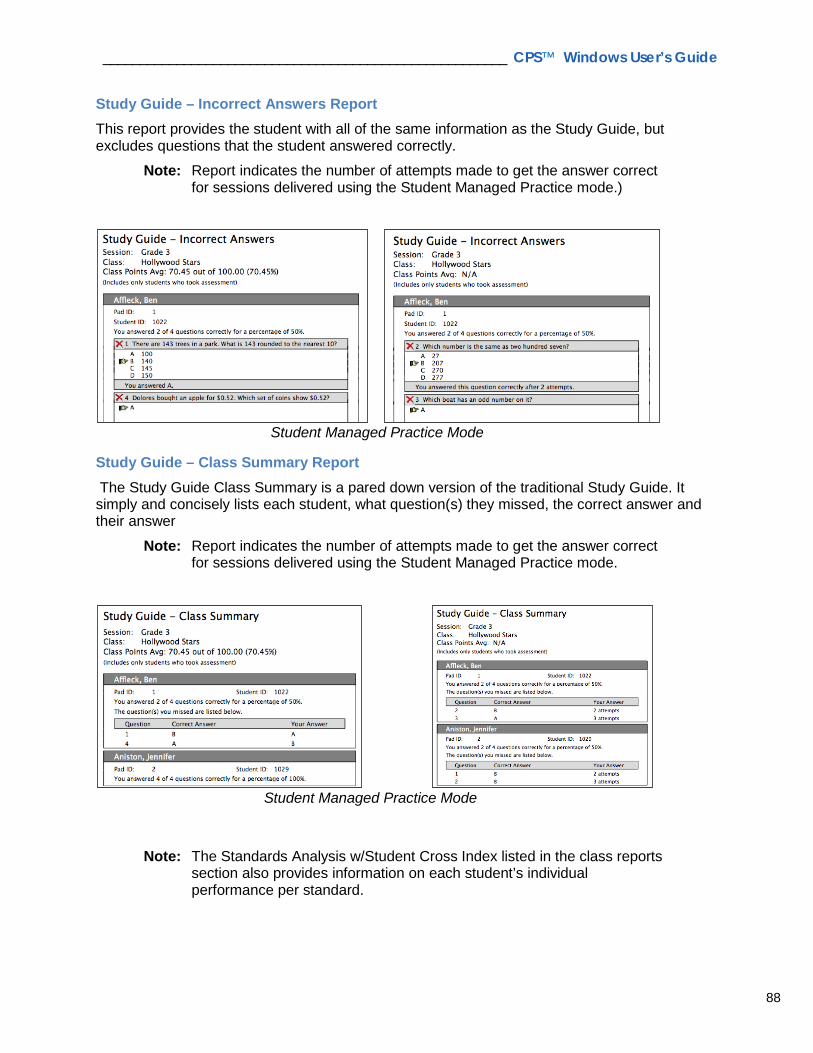
_______________________________________________________ CPS™ Windows User’s Guide
88
Study Guide – Incorrect Answers Report This report provides the student with all of the same information as the Study Guide, but excludes questions that the student answered correctly.
Note: Report indicates the number of attempts made to get the answer correct for sessions delivered using the Student Managed Practice mode.)
Student Managed Practice Mode
Study Guide – Class Summary Report The Study Guide Class Summary is a pared down version of the traditional Study Guide. It simply and concisely lists each student, what question(s) they missed, the correct answer and their answer
Note: Report indicates the number of attempts made to get the answer correct for sessions delivered using the Student Managed Practice mode.
Student Managed Practice Mode
Note: The Standards Analysis w/Student Cross Index listed in the class reports section also provides information on each student’s individual performance per standard.

_______________________________________________________ CPS™ Windows User’s Guide
89
Student Managed Practice Mode
Export Reports
Export reports are reports that you can export to third-party software applications or are automatically opened in Microsoft Excel.
Question Grid Export Report CPS displays the Question Grid report in spreadsheet format using Microsoft Excel or your system’s default spreadsheet application. When you select the Question Grid report, a Save As window opens asking where you want to save the report in .csv file format. When you select the file location, the Question Grid opens in Excel or some other default spreadsheet application. The Question Grid report lists each student in the class who was a part of the delivery session. The number of each question delivered in this session appears along the top of the report, creating a grid between the student names and question number. Below each question number, the letter that represents the correct answer appears. If a student answered a question correctly, a plus sign is in line with their name under that question number. If a student answered incorrectly, the letter that represents their answer is in line with their name under that question number. Also, this report lists the total number of correctly answered questions by all students in the class, as well as the percentage of correct answers.
Note: Report indicates the number of attempts made to get the answer correct for sessions delivered using the Student Managed Practice mode.
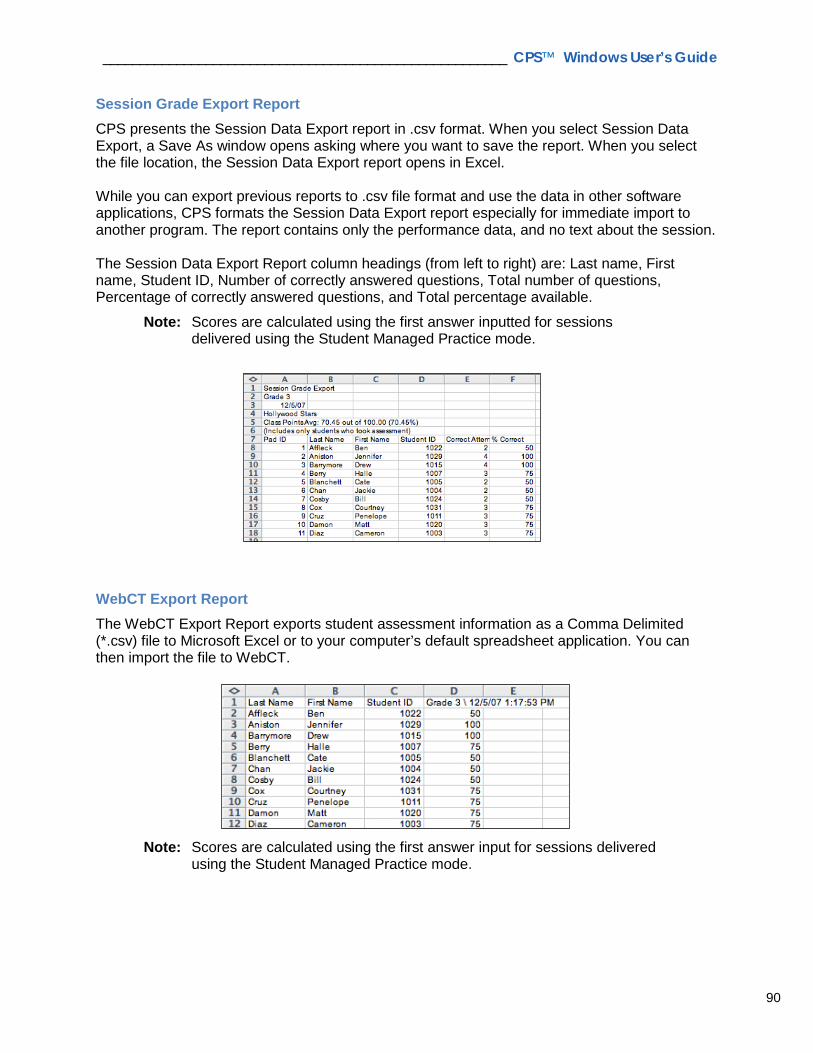
_______________________________________________________ CPS™ Windows User’s Guide
90
Session Grade Export Report CPS presents the Session Data Export report in .csv format. When you select Session Data Export, a Save As window opens asking where you want to save the report. When you select the file location, the Session Data Export report opens in Excel. While you can export previous reports to .csv file format and use the data in other software applications, CPS formats the Session Data Export report especially for immediate import to another program. The report contains only the performance data, and no text about the session. The Session Data Export Report column headings (from left to right) are: Last name, First name, Student ID, Number of correctly answered questions, Total number of questions, Percentage of correctly answered questions, and Total percentage available.
Note: Scores are calculated using the first answer inputted for sessions delivered using the Student Managed Practice mode.
WebCT Export Report The WebCT Export Report exports student assessment information as a Comma Delimited (*.csv) file to Microsoft Excel or to your computer’s default spreadsheet application. You can then import the file to WebCT.
Note: Scores are calculated using the first answer input for sessions delivered using the Student Managed Practice mode.
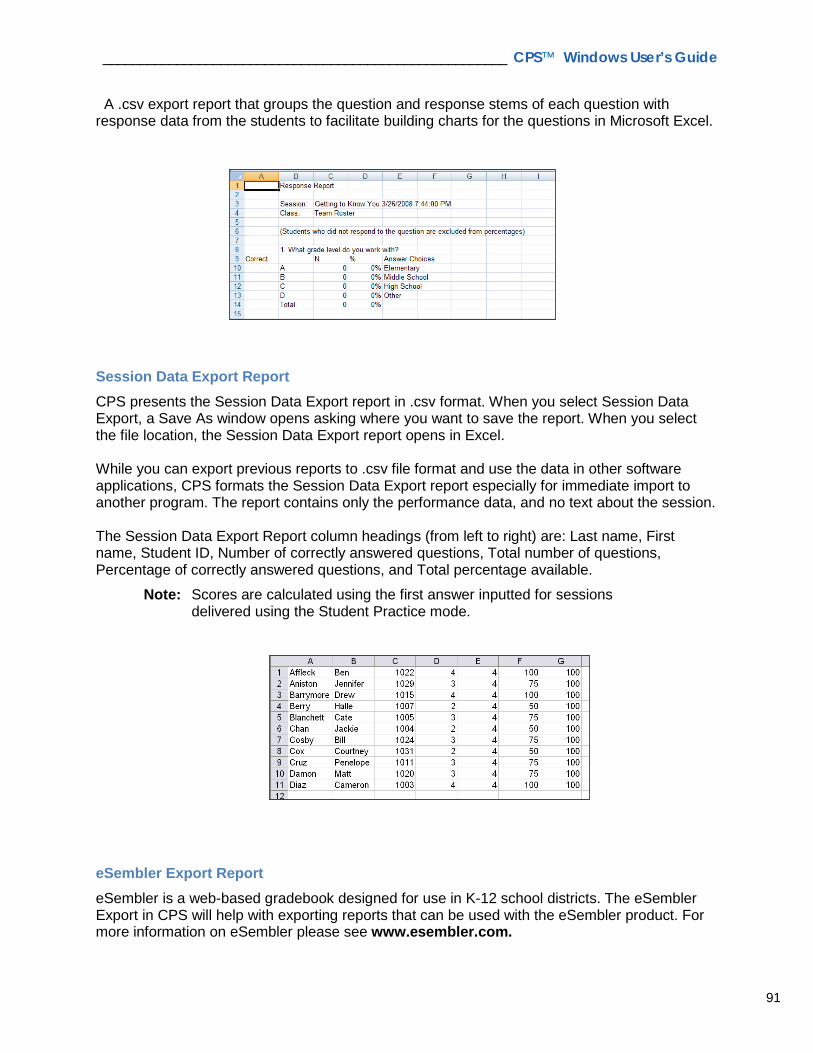
_______________________________________________________ CPS™ Windows User’s Guide
91
A .csv export report that groups the question and response stems of each question with response data from the students to facilitate building charts for the questions in Microsoft Excel.
Session Data Export Report CPS presents the Session Data Export report in .csv format. When you select Session Data Export, a Save As window opens asking where you want to save the report. When you select the file location, the Session Data Export report opens in Excel. While you can export previous reports to .csv file format and use the data in other software applications, CPS formats the Session Data Export report especially for immediate import to another program. The report contains only the performance data, and no text about the session. The Session Data Export Report column headings (from left to right) are: Last name, First name, Student ID, Number of correctly answered questions, Total number of questions, Percentage of correctly answered questions, and Total percentage available.
Note: Scores are calculated using the first answer inputted for sessions delivered using the Student Practice mode.
eSembler Export Report eSembler is a web-based gradebook designed for use in K-12 school districts. The eSembler Export in CPS will help with exporting reports that can be used with the eSembler product. For more information on eSembler please see www.esembler.com.
_______________________________________________________ CPS™ Windows User’s Guide
92
Bookstore Model Instructor FAQs What is a CPS Database file and how do I use it? The first time you launch CPS on a computer, you will be prompted to create a new CPS database file. Think of it like a spreadsheet or a word document, in that it’s simply a file that saves all of your CPS classes, lessons, grade information, and preferences. Choose a name you will remember when you create it, and save it in a location you can find. You’ll want to back it up frequently, as it contains very important data – grades! How do I create a class? (CPSOnline, Learning Management Systems) Steps for creating your higher education class will be different for CPSOnline, WebCT, BlackBoard, ANGEL, or other LMS users. See the Error! Reference source not found. section of this guide starting on page 18 for details. Can I use PowerPoint with CPS? Yes. There are two basic ways to use PowerPoint with CPS. You may use presentations you’ve already designed by adding them to CPS’s Lessons tab, which allows you to engage on-the-fly questions with automatic snapshots of the relevant slides as you present. Or you may install and use our CPS for PowerPoint software, available free to CPS users at eInstruction.com/downloads. The CPS for Powerpoint software functions like a PowerPoint add-in, letting you design fully functional CPS question slides right into your presentation for seamless-feeling integration. When creating a class the first time, CPS prompts me for an instructor setup code. How do I get that? You need an instructor setup code if this is the first time you are using CPS, and your students will be registering online to use their CPS Student Response Pads(s). Instructor Setup Codes are now printed at the bottom of the packing slip that shipped with your Instructor Starter Kit. The packing slip is in a plastic envelope on the outside of the box. If you cannot find your setup code, please contact eInstruction technical support. How can I enroll my demo pad and start learn how it works? Exact steps will vary for CPSOnline, BlackBoard, WebCT, or ANGEL customers, but the basic principle is that you need to create a class, then enroll in that class as a student with your demo pad. Your starter kit includes a lifetime demo code so that you can enroll this pad without paying, and use that same student account in future semesters for that same purpose. The process of enrolling as a student allows you to familiarize yourself with what students will see, while at the same time setting up a pad for your own use in learning CPS, testing your equipment, and potentially loaning to students when you see fit.

_______________________________________________________ CPS™ Windows User’s Guide
93
Bookstore Model Student FAQs My pad powers on, but in class, it only says “Joining…” This situation can be caused by several factors.
a. The student has not visited www.einstruction.com to enroll in the class using CPSOnline.
b. The student has enrolled through CPSOnline, but the instructor has not synchronized the roster since the student enrolled. In this case, the student should ask the instructor to synchronize the roster to incorporate the latest enrollment information. If the student’s name does not appear in the roster on the instructor’s computer, the student will not be able to join.
c. In particularly large classes, a few minutes may be required for all the pads in the class to join. If multiple students have reported this problem, and they all appear in the instructor’s roster, it may be that the instructor needs to allow more time for pads to join properly. The instructor may also need to adjust the settings in the RF Tuning Panel in the Device Manager.
d. If the student is still experiencing difficulties, the student should contact eInstruction technical support (888-333-4988) for further troubleshooting.
I am trying to register my response pad, but it says my pad is already in use. A CPS response pad can only be registered to one account at a time. This situation arises when the student is trying to register a pad that has already been attached to a different account.
a. The student may be trying to create a new account instead of using an existing account. If the student has used this pad with CPSOnline before, they need to use the account they had used previously instead of creating a new account. If they cannot remember their old account information, and they cannot retrieve the information using the username/password retrieval tool (see #3 below), they should contact eInstruction® technical support for assistance.
b. Students often get confused trying to register through an LMS system like Blackboard, WebCT, or ANGEL. If the student has used CPSOnline before, they will be prompted for their existing CPSOnline account information. They should use this information instead of asking the LMS to create a new account for them.
c. Occasionally, this situation arises because another student has already used the serial number in question. This can occur if a student types their serial number in incorrectly or if a student returns a pad that they have already registered and the bookstore immediately resells it. In this situation, the student should contact eInstruction technical support (888-333-4988) for further assistance.

_______________________________________________________ CPS™ Windows User’s Guide
94
I have forgotten my username and/or password.
a. CPSOnline has a built-in password recovery tool which can email the student’s username and password to a specified email address.
b. If the student is able to answer the security questions to get their info emailed, but they say they are not receiving the emails, they should check their spam filters and junk mail folders to be sure the emails are not being diverted. They should also check to be sure they have requested the information be sent to the correct address.
c. If, for some reason, the student is unable to retrieve the username/password using the recovery tool, they should contact eInstruction technical support (888-333-4988) for further assistance.
My enrollment code is invalid or has already been used. As with serial numbers that have already been used, this situation can have one of the following root causes.
a. If the student is getting an error saying the code is invalid, have the student check to be sure they are typing it correctly. Often, students will type the number “1” instead of the letter “L” or zero instead of the letter “O”.
b. For invalid codes, it is also important to note that if the student purchased the code at the bookstore, the code is printed on the inside of the card they purchased. It should always start with a prefix of “e0x0”, “e100” or “MHHE”. It should not be confused with the ISBN number or the UPC (bar code) number printed on the back of the card.
c. If they student is receiving an error saying the code has already been used, it may be that the student is trying to enroll in a second class using the same enrollment code. Enrollment codes can only be used once. If the code is a one-term code, the student need only use it for the first class of that semester. For subsequent classes, they should leave the code field blank. They should not be asked to pay for any additional classes in that term. If the code is a lifetime code, they will still only use it for the first class, and then for all future classes they can leave the code field blank. They should not be asked to pay again as long as they continue using the same user account.
d. If these tips do not resolve the issue, the student should contact eInstruction technical support (888-333-4988) for further assistance.
My pad won’t turn on. This situation can often be resolved by resetting the pad.
a. Try replacing the batteries. b. Reset the pad by taking out the batteries, holding down the PWR/JOIN button for 20
seconds to disperse any residual charge, and then replace the batteries with new ones. c. If resetting the pad does not alleviate the problem, the student will need to contact
eInstruction technical support (888-333-4988) for further troubleshooting.
_______________________________________________________ CPS™ Windows User’s Guide
95
37-01820-01|36-01821 Rev A
eInstruction Office EMEA Headquarters
14400 N. 87th St., Ste 250 Scottsdale, AZ 85260 Tel: 480.948.6540 Fax: 480.951.8548 www.einstruction.com
eInstruction EMEA Centre Education EMEA 26/36 rue Alfred Nobel 93600 Aulnay Sous Bois France Tel:+33 1.58.31.10.60 Support:+33 1.58.31.10.65 Fax:+33 1.58.31.10.69 www.einstruction.eu
Technical Support
www.einstruction.com/support
+1 480.443.2214 (U.S.)
+1 888.333.4988 (U.S. Toll free)
+33 1.58.31.10.65 (EMEA)
www.einstruction.com/support - www.einstruction.eu/support