crafting time: misdirection · freespiritfabric.com makeitcoats.com page 1 of 5 fs0285 technique:...
TRANSCRIPT
freespiritfabric.com
makeitcoats.com
Page 1 of 5
FS0285
Technique: Piecing & Patchwork
Brand: FreeSpirit Fabric
Crafting time: Longer Term
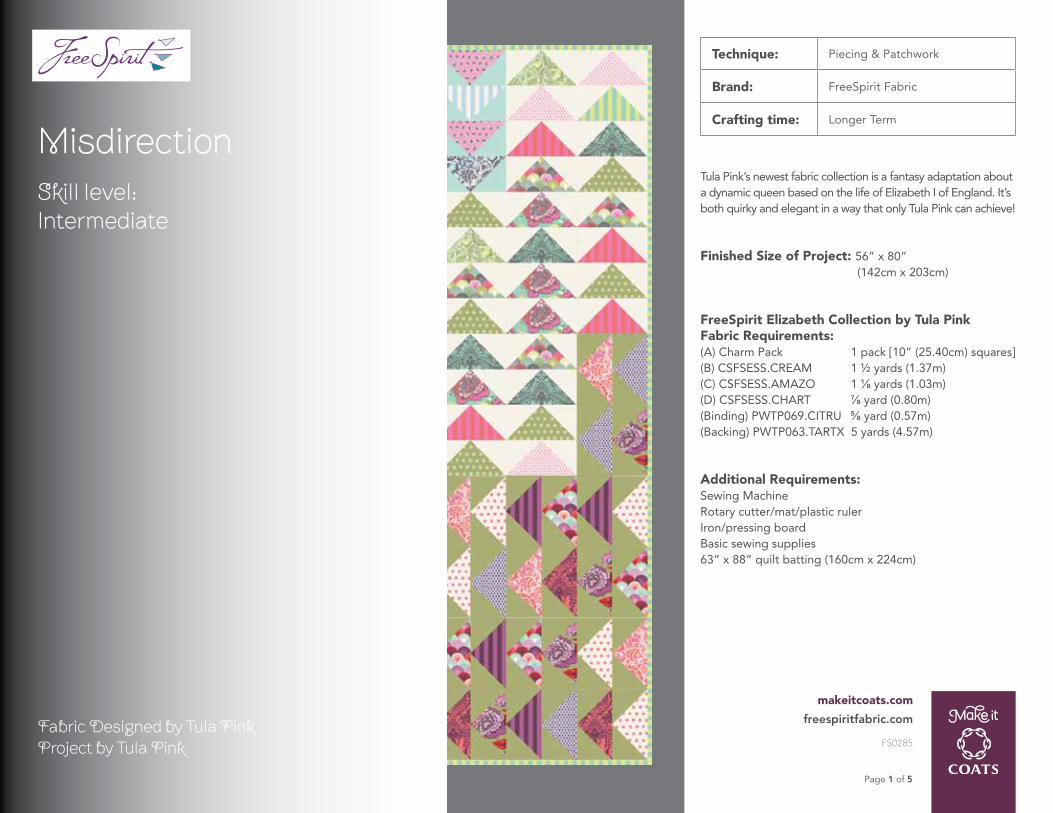
MisdirectionSkill level:Intermediate
Fabric Designed by Tula PinkProject by Tula Pink
Tula Pink’s newest fabric collection is a fantasy adaptation about a dynamic queen based on the life of Elizabeth I of England. It’s both quirky and elegant in a way that only Tula Pink can achieve!
Finished Size of Project: 56” x 80” (142cm x 203cm)
FreeSpirit Elizabeth Collection by Tula PinkFabric Requirements: (A) Charm Pack 1 pack [10” (25.40cm) squares](B) CSFSESS.CREAM 1 ½ yards (1.37m)(C) CSFSESS.AMAZO 1 ⅛ yards (1.03m)(D) CSFSESS.CHART ⅞ yard (0.80m)(Binding) PWTP069.CITRU ⅝ yard (0.57m) (Backing) PWTP063.TARTX 5 yards (4.57m)
Additional Requirements:Sewing MachineRotary cutter/mat/plastic rulerIron/pressing boardBasic sewing supplies63” x 88” quilt batting (160cm x 224cm)

Page 2 of 5
Copyright © 2014
Coats PLC freespiritfabric.com
makeitcoats.com
FS0285
Misdirection
Cutting InstructionsNote: WOF - Width of Fabric, LOF – Length of fabric
Fabric A, cut: Trim all squares to 9 ¼” (23.50cm) Note: See color chart for squares used.
Fabric B, cut: (2) 8 ½” x 12 ½” (21.59cm x 31.75cm) (44) 4 ⅞” x 4 ⅞” (12.38cm x 12.38cm) (1) 8 ½” x 20 ½” (21.59cm x 52.07cm) (2) 8 ½” x 8 ½” (21.59cm x 21.59cm)
Fabric C, cut: (1) 8 ½” x 12 ½” (21.59cm x 31.75cm) (40) 4 ⅞” x 4 ⅞” (12.38cm x 12.38cm) (2) 4 ½” x 8 ½” (11.43cm x 21.59cm)
Fabric D, cut: (36) 4 ⅞” x 4 ⅞” (12.38cm x 12.38cm)
Binding, cut: (7) 2 ½” x WOF (6.35 x WOF)
Backing Fabric, cut: (2) 88” x WOF (223.52cm x WOF)
SOLIDS: For geese + background pieces on diagramTOTAL (120) 4 ⅞” x 4 ⅞” (12.38cm x 12.38cm)Breakdown:AQUA: Cut (40) 4 ⅞” x 4 ⅞” (12.38cm x 12.38cm)CREAM: Cut (44) 4 ⅞” x 4 ⅞” (12.38cm x 12.38cm)GREEN: (36) 4 ⅞” x 4 ⅞” (12.38cm x 12.38cm)
PRINTS: Pair with AQUA Background squaresCut (1) 9 ¼” x 9 ¼” (23.50cm x 23.50cm) FROM EACH FABRIC A SWATCH for a total of (10) squares
PRINTS: Pair with CREAM BackgroundCut (1) 9 ¼” x 9 ¼” (23.50cm x 23.50cm) FROM EACH FABRIC A SWATCH for a total of (11) squares

Page 3 of 5
Copyright © 2014
Coats PLC freespiritfabric.com
makeitcoats.com
FS0285
Misdirection
Fig. 1
Fig. 2
Fig. 3
Sewing Instructions: (Note: Use a ¼” (0.64cm) seam allowance throughout, unless otherwise noted.)1. Draw a diagonal line from one corner to the opposing corner of all 4 ⅞” (12.38cm) Fabric A squares (both the prints and the background fabrics) (Fig. 1).
2. Pair all 4 ⅞” (12.38cm) squares with their coordinating 9 ¼” (23.50cm) squares, according to the fabric pairing chart.
3. Place two 4 ⅞” (12.38cm) squares on opposing corners of the 9 ¼” (23.50cm) square, right sides together, carefully lining up the outside corners of each piece and pin in place (Fig. 2).
4. Sew a scant ¼” (0.64cm) seam on either side of the drawn line across all three fabric squares (Fig. 3).
PRINTS: Pair with GREEN BackgroundCut (1) 9 ¼” x 9 ¼” (23.50cm x 23.50cm) FROM EACH FABRIC A SWATCH for a total of (9) squares

Page 4 of 5
Copyright © 2014
Coats PLC freespiritfabric.com
makeitcoats.com
FS0285
Misdirection
Fig. 4
Fig. 5
Fig. 6
Fig. 7
Fig. 8
Fig. 9
Fig. 10
5. Cut across all three fabric squares ON the drawn line to make two identical units (Fig. 4).
6. Fold the small triangles back so all fabrics are right side up and press (Fig. 5).
7. Place the third coordinating 4 ⅞” (12.38cm) on the larger triangle, right sides together, carefully lining up the top point and sides with drawn line running down the middle of the piece separating the two small triangles (Fig. 6). Pin in place.
8. Sew a scant ¼” (0.64cm) seam on either side of the drawn line (Fig. 7).
9. Cut ON the drawn line creating two identical “flying geese” units (Fig. 8).
10. Fold the small triangle back so all fabrics are right up and press (Fig. 9), creating two identical 4 ½” x 8 ½” (11.43cm x 21.59cm) Flying Geese units.
11. Repeat Steps 3-10 to create two more identical units for a total of four identical Flying Geese units (Fig. 10).
12. Repeat Steps 3-11 to make (120) assorted Flying Geese units total. Note: You will only use 119 units.
Quilt Assembly: (Follow the Quilt Photo while assembling the quilt.)13. Following the quilt layout, sew the (119) Flying Geese, (2) 8 ½” x 12 ½” (21.59cm x 31.75cm) Fabric B strips, (1) 8 ½” x 20 ½” (21.59cm x 52.07cm) Fabric B strip, (2) 8 ½” x 8 ½” (21.59cm x 21.59cm) Fabric B strip, (1) 8 ½” x 12 ½” (21.59cm x 31.75cm) Fabric C strip and (2) 4 ½” x 8 ½” (11.43cm x 21.59cm) Fabric C strip together to make the quilt top.

Page 5 of 5
Copyright © 2014
Coats PLC freespiritfabric.com
makeitcoats.com
FS0285
Misdirection
Finishing:14. Layer the backing, batting and quilt top. Quilt or tie as desired.
15. Prepare binding from seven 2 ½” x WOF (6.35cm x WOF) binding strips. Sew strips together into one long binding strip. Press strip in half lengthwise.
16. Carefully trim backing and batting even with quilt top.
17. Leaving an 8” (20.32cm) tail of binding, sew binding to top of quilt through all layers matching all raw edges. Miter corners. Stop approximately 12” (30.48cm) from where you started. Lay both loose ends of binding flat along quilt edge. Where these two loose ends meet, fold them back on themselves and press to form a crease. Using this crease as your stitching line, sew the two open ends of the binding together right sides together. Trim seam to ¼” (0.64cm) and press open. Finish sewing binding to quilt.
18. Turn binding to back of quilt and blind stitch in place.