create and attach piping - andrie designs · create and attach piping quick reference sheet #003-2...
TRANSCRIPT

CreateandAttachPiping
www.andriedesigns.com
QuickReferenceSheet#003-1
Fold fabric around cord Stitch to secure
Pin piping to panel Snip corners if needed
Stitch to attach Attach adjoining panel Re-stitch from other side
CreatePiping:
AttachtoPanel:

CreateandAttachPiping
www.andriedesigns.com
QuickReferenceSheet#003-2
Trim end of cord Fold fabric over
Tuck end into fold Pin in place Stitch to secure
AttachtoBase:
Pin around base Snip corners if needed Overlap and cut off excess
www.andriedesigns.com/tutorials1
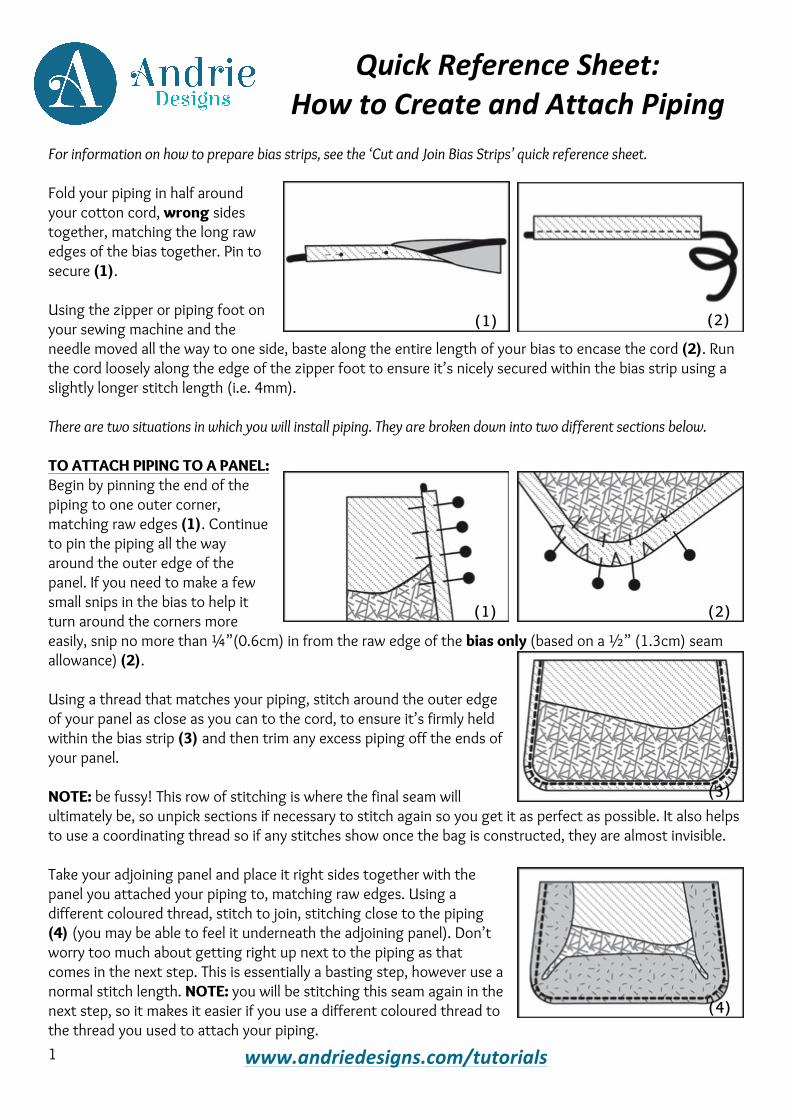
For information on how to prepare bias strips, see the ‘Cut and Join Bias Strips’ quick reference sheet.
Fold your piping in half around
your cotton cord, wrong sides
together, matching the long raw
edges of the bias together. Pin to
secure (1). Using the zipper or piping foot on
your sewing machine and the
needle moved all the way to one side, baste along the entire length of your bias to encase the cord (2). Run
the cord loosely along the edge of the zipper foot to ensure it’s nicely secured within the bias strip using a
slightly longer stitch length (i.e. 4mm).
There are two situations in which you will install piping. They are broken down into two different sections below.
TO ATTACH PIPING TO A PANEL: Begin by pinning the end of the
piping to one outer corner,
matching raw edges (1). Continue
to pin the piping all the way
around the outer edge of the
panel. If you need to make a few
small snips in the bias to help it
turn around the corners more
easily, snip no more than ¼”(0.6cm) in from the raw edge of the bias only (based on a ½” (1.3cm) seam
allowance) (2).
Using a thread that matches your piping, stitch around the outer edge
of your panel as close as you can to the cord, to ensure it’s firmly held
within the bias strip (3) and then trim any excess piping off the ends of
your panel. NOTE: be fussy! This row of stitching is where the final seam will
ultimately be, so unpick sections if necessary to stitch again so you get it as perfect as possible. It also helps
to use a coordinating thread so if any stitches show once the bag is constructed, they are almost invisible.
Take your adjoining panel and place it right sides together with the
panel you attached your piping to, matching raw edges. Using a
different coloured thread, stitch to join, stitching close to the piping
(4) (you may be able to feel it underneath the adjoining panel). Don’t
worry too much about getting right up next to the piping as that
comes in the next step. This is essentially a basting step, however use a
normal stitch length. NOTE: you will be stitching this seam again in the
next step, so it makes it easier if you use a different coloured thread to
the thread you used to attach your piping.
QuickReferenceSheet:HowtoCreateandAttachPiping
(1) (2)
(3)
(2) (1)
(4)

www.andriedesigns.com/tutorials2
Turn your panels over so you are looking at the wrong side of the panel
you attached the piping to. There’s a good chance your two rows of
stitching will NOT be overlapping – that is ok! Re-thread your machine
with your first thread colour and stitch around the outer edge again,
directly over top of the first row of stitching you made (dashed line) (5).
Your piping is now attached securely between your two panels.
TO ATTACH PIPING TO A BASE: Unpick 2½” (6.4cm) at one end
of your piping and cut 2” (5cm)
off the cord (6).
Fold the fabric over 1” (2.5cm) to
the wrong side and finger press
(7).
Pin the end of the piping along the back edge of your base, matching raw edges (8). Continue to pin the
piping all the way around the outer edge of the base. If you need to make a few small snips in the bias strip
as you go around the corners, snip no more than ¼”(0.6cm) in from the raw edge of the bias strip only (based on a ½” (1.3cm) seam allowance) (9).
When you get back to the start, overlap your piping and make a small mark on your fabric where the
beginning of the cord starts (10). Cut the excess piping off at this mark.
Open up the start of your bias strip and tuck the end you’ve cut into the fold – the two ends of the cord
should meet together (11). Re-fold the bias strip and pin to hold in place (12). Using a thread that matches
your piping, stitch all the way around to secure (13).
NOTE: be fussy! This row of stitching is where the final seam will ultimately be, so unpick sections if
necessary to stitch again so you get it as perfect as possible. It also helps to use a thread that coordinates
with the bias strip so if any stitches show once the bag is constructed, they are almost invisible.
Repeat diagrams 4 and 5 from “To Attach Piping to a Panel” to attach the base to its adjoining panels.
(7) (6)
(8) (9) (10)
(12) (13) (11)
(5)