create and use databases (access 2013) - software … 1-19-1... · create and use databases (access...
TRANSCRIPT

Create and use databases (Access 2013)
This workbook supports BSBITU301A Create and use databases in the BSB07 Business Services Training Package.
© Millbank Investments Ltd, NZ, June 2015
Software Publications writing team ISBN 978-1-922241-19-1
Disclaimer
All rights reserved. No part of this publication may be reproduced or transmitted in any form or by any means, electronic or mechanical, including photocopying, scanning, recording, or any information storage and retrieval system, without permission in writing from Millbank Investments Pty Ltd, NZ or the from the publisher, Software Publications Pty Ltd. No patent liability is assumed with respect to the use of the information contained herein. While every precaution has been taken in the preparation of this book, the publisher and authors assume no responsibility for errors or omissions. Neither is any liability assumed for damages resulting from the use of the information contained herein.
Software Publications Pty Ltd (ABN 75 078 026 150) Head Office - Sydney Unit 3 25 Gibbes Street Chatswood NSW 2067
www.SoftwarePublications.com.au
Published and printed in Australia

© Millbank Investments Ltd, 2014 Study Guide BSBITU301A i
BSBITU301A Create and use databases
Unit descriptor This unit describes the performance outcomes, skills and knowledge required to create simple two table relational databases with reports and queries, for the storage and retrieval of information.
No licensing, legislative, regulatory or certification requirements apply to this unit at the time of endorsement.
Application of the unit This unit applies to individuals employed in a range of work environments who develop and use simple databases to store and retrieve data. They may provide administrative support within an enterprise, or may be independently responsible for the storage and retrieval of data relating to their own work roles.
Employability skills This unit contains employability skills.
Prerequisites There are no prerequisites for this unit.
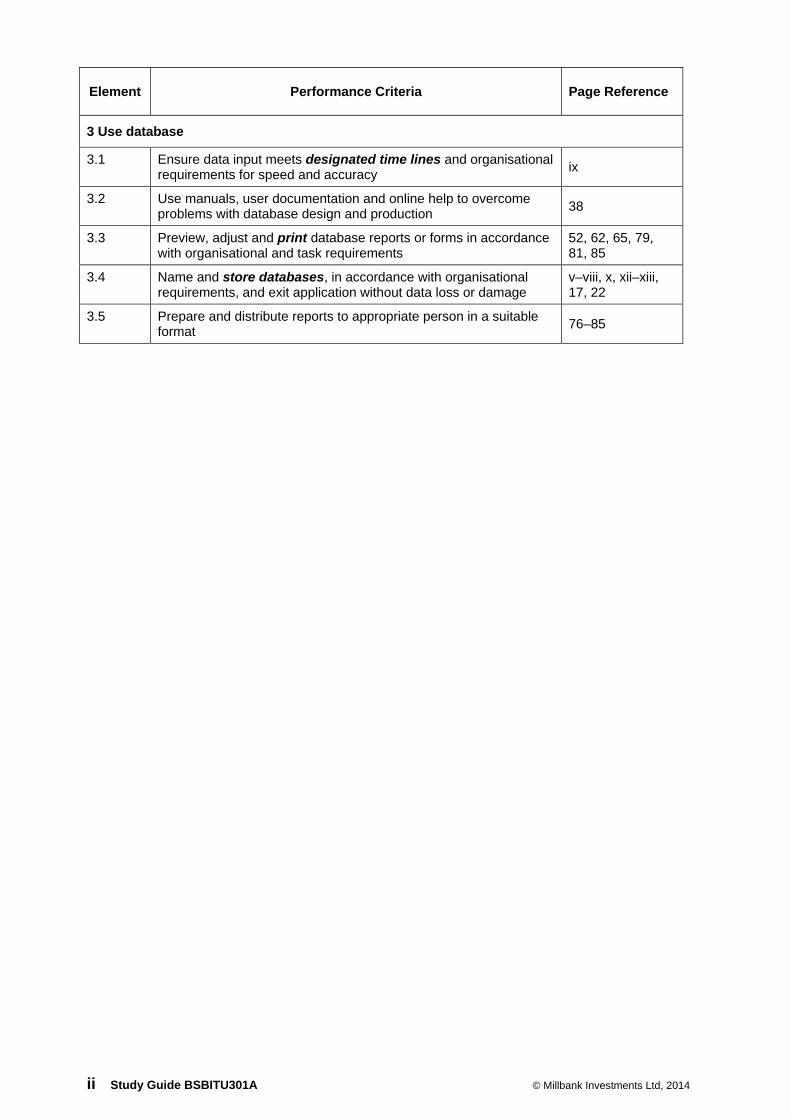
Element Performance Criteria Page Reference
1 Create a simple database
1.1 Design a simple database, with at least two tables, using a database application, basic design principles, software functions and simple formulae
Throughout workbook
1.2 Develop a table with fields and attributes according to database usage, as well as data considerations and user requirements
Throughout workbook
1.3 Create a primary key for each table 26, 31, 34, 58
1.4 Modify table layout and field attributes as required 87–89
1.5 Create a relationship between the two tables 20, 28, 37, 58
1.6 Check and amend data entered, in accordance with organisational and task requirements
13, 52, 54–56, 74
2 Create reports and queries
2.1 Determine information output, database tables to be used and report layout to meet task requirements
76–85, 93
2.2 Determine data groupings, search and sort criteria to meet task requirements
56, 62, 71, 76, 81, 85
2.3 Run reports and queries to check that results and formulae provide the required data
61–74, 77–85
2.4 Modify reports to include or exclude additional requirements 89
ii Study Guide BSBITU301A © Millbank Investments Ltd, 2014
Element Performance Criteria Page Reference
3 Use database
3.1 Ensure data input meets designated time lines and organisational requirements for speed and accuracy
ix
3.2 Use manuals, user documentation and online help to overcome problems with database design and production
38
3.3 Preview, adjust and print database reports or forms in accordance with organisational and task requirements
52, 62, 65, 79, 81, 85
3.4 Name and store databases, in accordance with organisational requirements, and exit application without data loss or damage
v–viii, x, xii–xiii, 17, 22
3.5 Prepare and distribute reports to appropriate person in a suitable format
76–85

© Millbank Investments Ltd, 2014 Study Guide BSBITU301A iii
Required Skills and Knowledge
This section describes the skills and knowledge required for this unit.
Required skills
numeracy skills to create simple queries and to use simple formulae
planning and organising skills to develop effective databases
problem-solving skills to address inconsistencies in data and issues in database, and to query structures
Required knowledge
key provisions of relevant legislation from all forms of government, standards and codes that may affect aspects of business operations, such as:
anti-discrimination legislation
ethical principles
codes of practice
privacy laws
occupational health and safety
Organisational requirements relating to data entry, storage and presentation

iv Study Guide BSBITU301A © Millbank Investments Ltd, 2014
Range Statement
The range statement relates to the unit of competency as a whole. It allows for different work environments and situations that may affect performance. Bold italicised wording, if used in the performance criteria, is detailed below. Essential operating conditions that may be present with training and assessment (depending on the work situation, needs of the candidate, accessibility of the item, and local industry and regional contexts) may also be included.
Variable Scope
Database applications may include:
commercial database application n/a
organisational specific database applications Throughout workbook
Basic design principles may include:
naming conventions 6
data layout 20–21, 31
formatting 45–49, 77–82
database use 2
required output 76–89
reporting and presentation requirements 79–82
Software functions may include:
adding, deleting, moving, re-labelling fields 47–49, 77–82, 87–89
altering field widths 13, 45
calculating using formula 68–74, 82–84
data protection n/a
field definitions and attributes 23–27, 32–36
formatting fields 24–27, 34–36
formatting text 45–49, 77–82
headers and footers 77–82
inserting and deleting blank lines and spaces n/a
repeating (if available) n/a
table, form and report wizards 41–43, 63–65, 76–77
Simple formulae may include:
average 70, 85
count 71
division 68, 71
maximum 70
minimum 70
multiplication 68
subtraction 68, 73
sum 68–71, 82, 85
combinations of above 70
Data may include: numbers Throughout workbook
text Throughout workbook
Checking and amending data may include:
accuracy of data 52, 54–56
accuracy of formulae with calculator 74
ensuring instructions with regard to content and format have been followed
Throughout workbook
outcome of sorting or filtering 13
proofreading 52
spelling, electronically and manually 52

© Millbank Investments Ltd, 2014 Study Guide BSBITU301A v
Variable Scope
Report layout may include:
alignment on page 93
columns 77–79
enhancements to format – borders, patterns and colours
83–85
enhancements to text 81–82
formatting provided through use of a wizard or other automated process
76–77
headers/footers 77–82
logical ordering of data 76, 81
tables n/a
Designated time lines may include:
time line agreed with internal or external client ix time line agreed with supervisor or requiring
database
Printing may include: forms n/a
queries 62, 65
records 52
reports 79, 81, 85
tables 52
Storing databases may include:
authorised access xii–xiii
filing locations v–viii, xiii
naming conventions n/a
organisational policy for backing up files x
organisational policy for filing hard copies of databases
xiii
security xii–xiii
storage in electronic folders and sub-folders x
storage on disk drives, CD-ROM, back-up tapes
v–viii, x

vi Study Guide BSBITU301A © Millbank Investments Ltd, 2014
Evidence Guide
The Evidence Guide identifies the critical aspects, knowledge and skills to be demonstrated to confirm competency for this unit. This is an integral part of the assessment of competency and should be read in conjunction with the Range Statement.
Critical aspects for assessment and evidence required to demonstrate competency in this unit
Evidence of the following is essential:
creating simple databases and queries
manipulating data using queries
formatting data into a final version.
Context of and specific resources for assessment
Assessment must ensure:
access to an actual workplace or simulated environment
access to office equipment and resources
access to sample data.
Method of assessment A range of assessment methods should be used to assess practical skills and knowledge. The following examples are appropriate for this unit:
direct questioning combined with review of portfolios of evidence
and third party workplace reports of on-the-job performance by
the candidate
review of authenticated documents from the workplace or training
environment
demonstration of techniques.
Guidance information for assessment
Holistic assessment with other units relevant to the industry sector, workplace and job role is recommended, for example:
administration units
other information and communications technology units.

© Millbank Investments Ltd, 2014 Study Guide BSBITU301A vii
Employability Skills Mapping Employability Skills for BSB30110: Certificate III in Business
Employability Skill
Industry/enterprise requirements for this qualification include
How this Employability Skill is covered
Communication communicating verbally with
others in negotiation, training
and questioning
writing a range of simple
documentation and
communications
n/a
Teamwork completing individual tasks to
support team goals
conveying workplace
procedures and work
instructions to team members
n/a
Problem solving resolving issues and conflicts
with team members
using manuals and other
documentation to overcome
problems with information
technology or other office
equipment
Pages xi and 38
Initiative and enterprise
demonstrating individual
responsibility for completing
tasks
suggesting improvements to
support the development of
improved work practices and
team effectiveness
All tasks in this book are completed by the individual, demonstrating the ability to create a database single-handedly.
Planning and organising
contributing to planning
processes with team members
to meet expected outcomes
gathering, organising and
applying workplace information
for the organisation's work
processes and information
systems
n/a
Self management identifying development needs
and seeking training to fill
needs
monitoring and recording the
performance of own work area
n/a

viii Study Guide BSBITU301A © Millbank Investments Ltd, 2014
Employability Skill
Industry/enterprise requirements for this qualification include
How this Employability Skill is covered
Learning developing a comprehensive
knowledge and understanding
of products and services
identifying priorities and
pursuing personal work goals
in accordance with
organisational objectives
By working through this book the learner will develop comprehensive knowledge on how to create basic databases in a business environment.
Page ix covers organising and prioritising work.
Time limits can be applied to the practice assessment tasks.
Technology using information
communication technology to
communicate with team
members or clients
using word processing
packages, spreadsheets
and/or databases to produce
written correspondence and
reports
The whole book requires the learner to operate a PC running Windows 8.1 and the Microsoft Access 2013 application.

2 SECTION 1 © Millbank Investments Ltd, 2014
What is a Database?
A database is a structured collection of data, organised so that required information can be extracted
quickly and easily. There are countless examples of databases in use today. Some examples are
described below:
Library database Contains information on all items held in the library, along with
information about members. When a library member gets out a book the
database will be updated to record who the book is issued to.
Doctor’s office
database
Contains information about patients including contact details and a full
medical record. A doctor will also have access to databases containing
information on drugs, medical procedures, etc.
Customer database Contains a list of products being held in a warehouse or storeroom along
with such information as the number of items, cost, supplier details, etc.
Why use a Database
A database allows information to be entered and organised in an efficient manner. The data can
then be analysed and the results displayed as meaningful information. Reports can be printed as
required. Specific data can be searched for or all data can be viewed. Databases are designed to
handle large amounts of data, making manual systems redundant.
Microsoft Access
This workbook uses Microsoft Access 2013. Microsoft Access is a database management system
(DBMS); a program used to create and maintain databases.
Starting Access 2013
Exercise 1
1 Ensure the Windows 8.1 Start screen is displayed. If the Start screen is not displayed, press
the Windows key .
2 If you have an Access 2013 icon on your desktop, click on it once to launch Access.
Alternatively type: access. The Search pane will display at the right of the screen.

© Millbank Investments Ltd, 2014 SECTION 1 3
3 Select from the list of located applications/files.
The Windows Desktop will display and Access will open.
Access Startup Screen
When you first start Microsoft Access you will be presented with the Startup screen. The Startup
screen displays a list of recently accessed database files at the left along with a range of templates
which you can choose from when creating a new database.
Signing into Microsoft Office
Signing into Microsoft Office allows you to access an online storage area called the SkyDrive.
Files saved to the SkyDrive can be accessed from different computers or other digital devices such
as a tablet.
When you are working at home you will sign in with a personal Microsoft account. If you are at a
training organisation or workplace you will sign in with an organisational account.
If you are signed in to Windows 8.1, you will probably be automatically signed into Office. If you
are signed in, your name will be shown in the top right corner of the Access screen.
Database templates Recent databases Sign in name
4 SECTION 1 © Millbank Investments Ltd, 2014
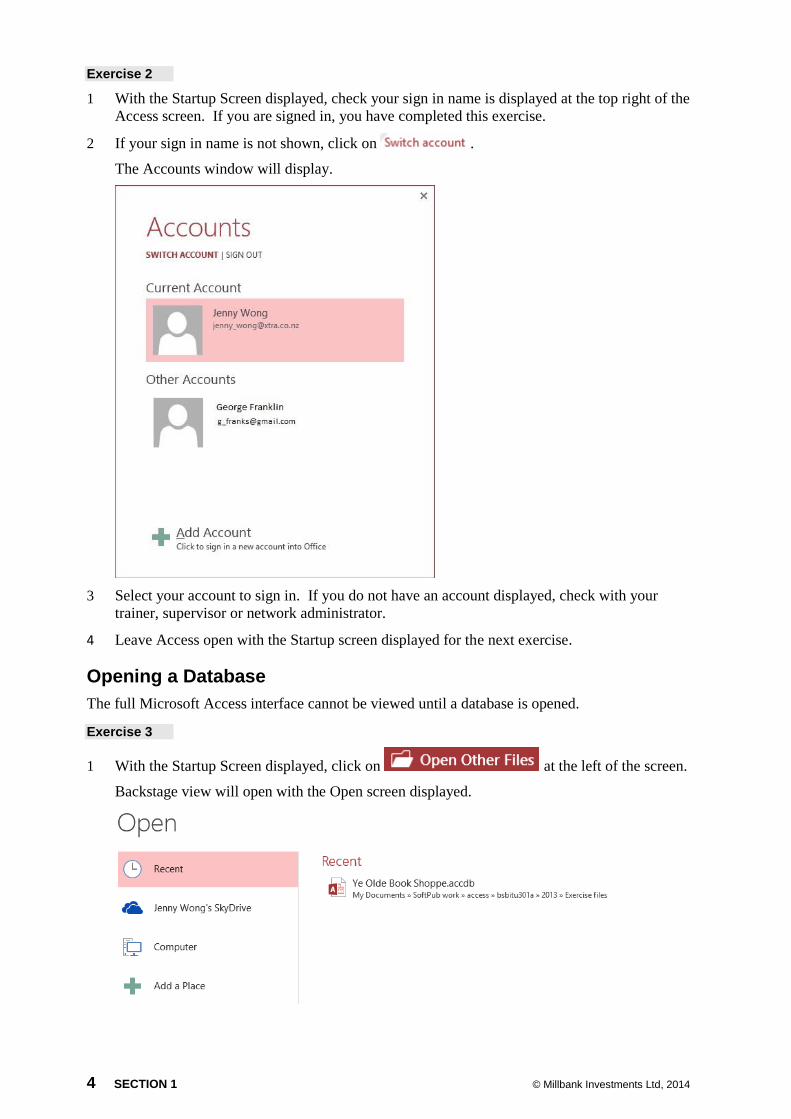
Exercise 2
1 With the Startup Screen displayed, check your sign in name is displayed at the top right of the
Access screen. If you are signed in, you have completed this exercise.
2 If your sign in name is not shown, click on .
The Accounts window will display.
3 Select your account to sign in. If you do not have an account displayed, check with your
trainer, supervisor or network administrator.
4 Leave Access open with the Startup screen displayed for the next exercise.
Opening a Database
The full Microsoft Access interface cannot be viewed until a database is opened.
Exercise 3
1 With the Startup Screen displayed, click on at the left of the screen.
Backstage view will open with the Open screen displayed.

© Millbank Investments Ltd, 2014 SECTION 1 5
2 Select the Computer option . Any storage locations on your computer or
network which have been accessed recently will be listed.
3 Click on the Browse button . The Open dialog box will display.
4 Navigate to the folder containing the exercise files.
5 Click on Stock Database.
6 Click on .
7 Leave the database open for the next exercise.
© Millbank Investments Ltd, 2014 SECTION 3 45
Editing a Form
Forms can be edited in Design View.
Exercise 33
1 With the Customer Database open, double click on the frmCompany form in the Navigation
Pane.
2 Click on the of the View button and select Design View.
3 Leave the frmCompany form open in Design View for the next exercise.
Controls
Objects called controls are contained in a form. There are two basic types of controls: bound and
unbound.
Bound Controls
A bound control is connected to a field in a table or query. The data in the field is displayed by the
control. The data can be changed in Form View or in Datasheet View.
Unbound Controls
An unbound control is not attached to any table or query. Lines, labels and shapes are all examples
of unbound controls. They are called unbound because they will always appear the same and will
not change when data is updated.
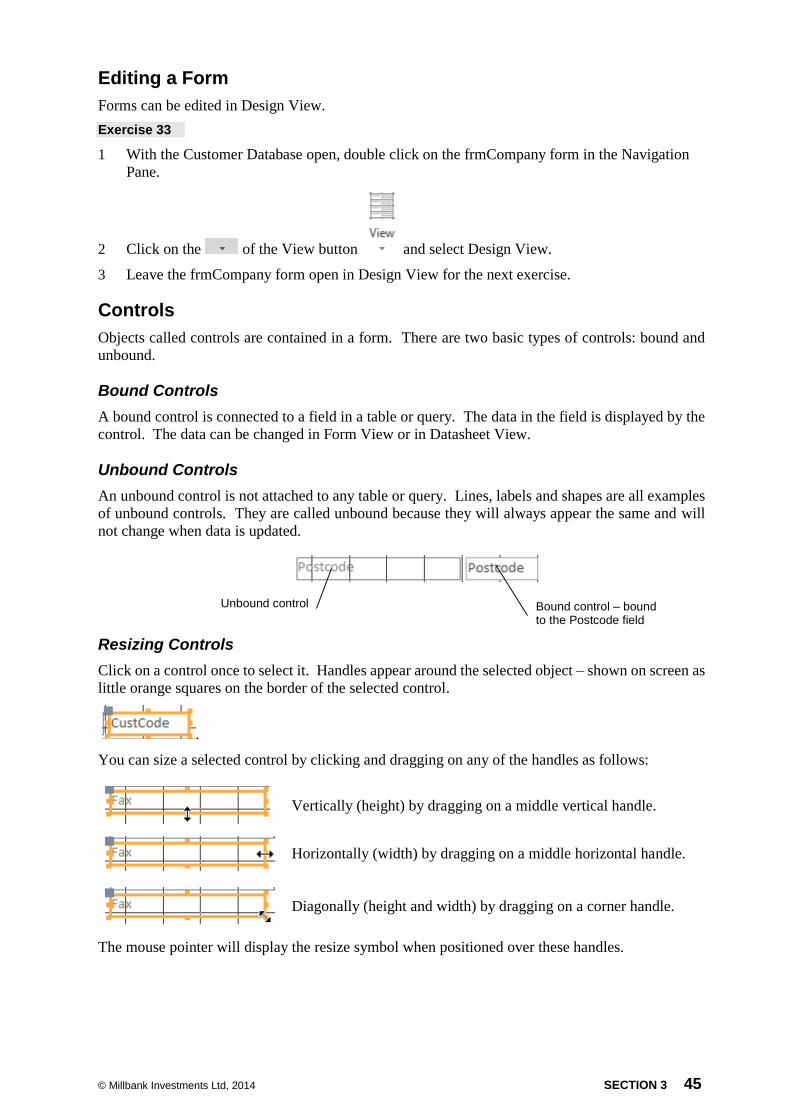
Resizing Controls
Click on a control once to select it. Handles appear around the selected object – shown on screen as
little orange squares on the border of the selected control.
.
You can size a selected control by clicking and dragging on any of the handles as follows:
Vertically (height) by dragging on a middle vertical handle.
Horizontally (width) by dragging on a middle horizontal handle.
Diagonally (height and width) by dragging on a corner handle.
The mouse pointer will display the resize symbol when positioned over these handles.
Unbound control Bound control – bound to the Postcode field

46 SECTION 3 © Millbank Investments Ltd, 2014
Exercise 34
1 Check the Customer Database is open with the frmCompany form open in Design View.
2 From within the form header, click once on the current header text. Orange handles will
appear around the object.
3 Double click inside the Control to select the text frmCompany.
4 Type: Customer Details
5 Display the Form Design Tools Format Ribbon.
6 From the Font Group, select 36 from the Font Size box .
7 Select the font style Bernard MT Condensed (or another similar font – see example below).
8 Position the mouse pointer on the right middle handle of the selected control. The mouse
pointer will display as an arrow.
9 Click and drag the handle to expand the text box so that the text displays in one line.
10 Click on the of the Font Color button and select Automatic.
11 Save the form.
12 Display the Home Ribbon.
13 Click on of the View button and select Layout View.
14 Leave the frmCompany form open in Layout View for the next exercise.
Resizing in Layout View
The width of the controls has been determined by the field size you applied to the database tables.
In some cases the controls are too wide. Although this can be remedied in Design View, in the
following exercise you will make the changes in Layout View.
Exercise 35
1 With the frmCompany form open in Layout View, click on the Company Name bound
control.
Note that the actual data is shown in this view.

© Millbank Investments Ltd, 2014 SECTION 3 47
Even though the handles do not display as squares in this view, they are still in the same
places on each control.
2 Click and drag the right middle handle to the left to reduce the width of the control until it
matches the width of the Street control.
3 Increase the width of the Customer Code, State and Postcode bound controls to match the
Phone and Fax fields.
4 Check that your controls match those shown below.
5 Switch to Design View.
6 Leave the frmCompany form open for the next exercise.
Moving Controls
The following instructions refer to moving controls within Design View. Controls can be
moved in Layout View, but it is easier to move them with precision using Design View.
To move a bound and unbound control together, position the mouse pointer on the border
of either control. Click and drag to move both controls at the same time. Release the mouse
button to complete the move.
To move either control separately, position the mouse pointer on the move handle
at the top left corner of the control (grey square). Click and drag to move just
the selected control.
Exercise 36
1 With the frmCompany form open in Design View, click on the Phone unbound control, then
hold down the Shift key and click on the Fax unbound control to select both.
2 Click on the boundary of one of the controls and drag them to the right. Position them
(temporarily) at the bottom of the main form as shown below.
Note how the bound controls follow their unbound partners. Also note that the form resizes
as required.

48 SECTION 3 © Millbank Investments Ltd, 2014
3 Click on the Street unbound control, then hold the Shift key and select the Suburb, State and
Postcode unbound controls.
4 Drag them up and to the right; position them to the right of the Customer Code and Company
name fields.
5 Select the Phone and Fax controls and move them directly beneath the Company Name
control.
6 Click to select the unbound frmContacts control to the left of the subform.
.
7 Position the mouse pointer over the grey square at the top left corner of the control.
8 Click and drag the unbound control under the Fax unbound control. Note the subform does
not move.
9 Change the frmContacts text to Contacts.
10 Click on the edge of the subform to select it.
11 Position the mouse pointer over the grey square at the top left of the subform.
12 Move the subform underneath the Contacts label.

© Millbank Investments Ltd, 2014 SECTION 3 49
13 With the subform still selected, position the mouse on the centre handle of the right border of
the subform.
14 Click and drag to the right to increase the width of the control to 21 cm on the horizontal ruler
(at the top of the main form).
15 Save the form and return to Form view.
16 Position the mouse pointer on the border between the Contact ID and Title columns in the
subform. The mouse pointer will display as a double headed arrow.
17 Double click to resize the Contact ID column to fit the column header.
18 Change the width of the Title column using the same technique.
Column widths can also be adjusted by positioning the mouse pointer on the column divider
line and dragging to the left to narrow, or the right to widen.
19 Use the subform’s scroll bar to move to the right until the Customer Code column is
displayed.
20 Position the mouse pointer on the right border of the Customer Code column.
21 Click and drag to the right until the column header can be read clearly.
22 Scroll back to view the rest of the subform.
23 Save the form.
24 Leave the frmCompany form open in Form view for the next exercise.
© Millbank Investments Ltd, 2014 SECTION 6 87
Modifying Objects for Organisational Requirements
Your supervisor at the Toy Library needs to have a report with all the members’ names and addresses.
The report is required to be sorted by Suburb. On checking the database, the supervisor found the suburb
was not a separate field. You have been asked to fix the problem.
Add a New Field to a Table
Exercise 60
1 Open the Toy Library database.
2 Open tblMembers_Details in Design View.
3 Click on the selector square to the left of the field name Postcode to select the Postcode field.
4 With the Table Tools Design Ribbon displayed, click on the Insert Rows button in
the Tools Group. This will add a new row above Postcode.
5 In the new row, type the Field Name: Suburb. Press Enter and leave the Data Type as Short
Text.
6 Using the Field Properties, change the Field Size to 20. Add an input mask to have the suburb
name display in capitals in the table: >????????????????????
7 Save the table and switch to Datasheet View.
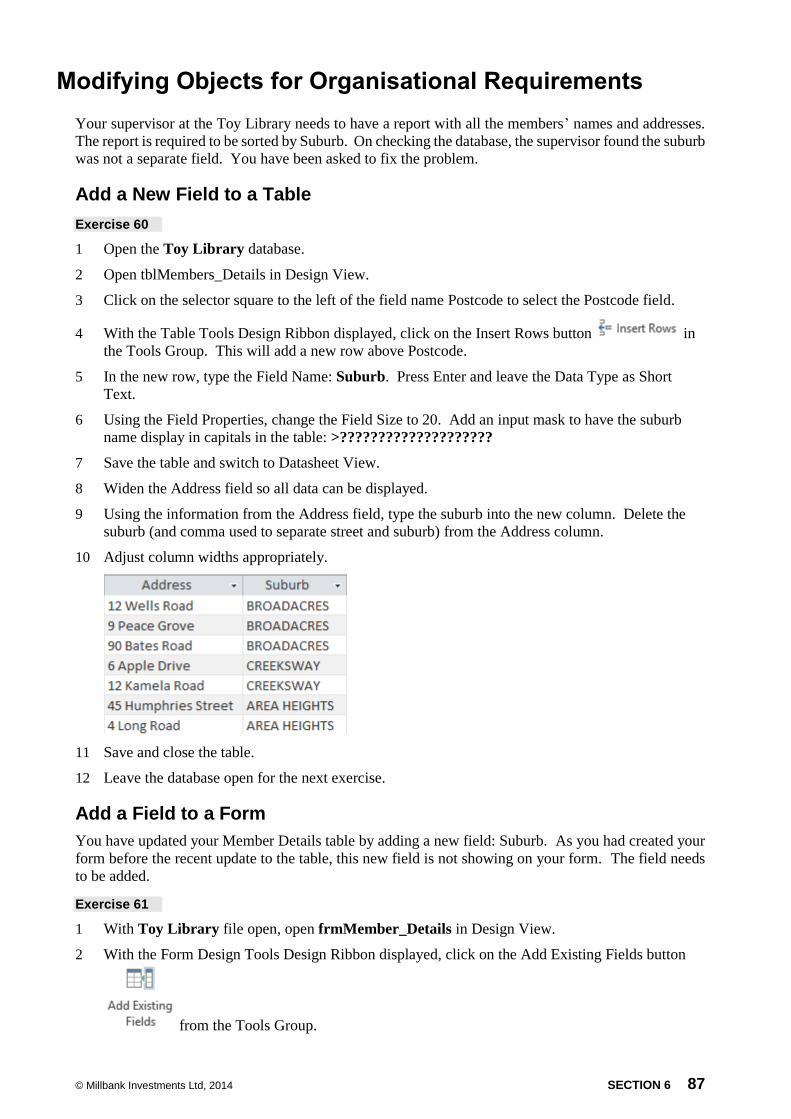
8 Widen the Address field so all data can be displayed.
9 Using the information from the Address field, type the suburb into the new column. Delete the
suburb (and comma used to separate street and suburb) from the Address column.
10 Adjust column widths appropriately.
11 Save and close the table.
12 Leave the database open for the next exercise.
Add a Field to a Form
You have updated your Member Details table by adding a new field: Suburb. As you had created your
form before the recent update to the table, this new field is not showing on your form. The field needs
to be added.
Exercise 61
1 With Toy Library file open, open frmMember_Details in Design View.
2 With the Form Design Tools Design Ribbon displayed, click on the Add Existing Fields button
from the Tools Group.

88 SECTION 6 © Millbank Investments Ltd, 2014
A Field List will appear to the display at the right of the screen.
3 Click on Suburb in the Field List. Hold down the mouse button and drag Suburb onto the Detail
section of the form. Release the mouse button to position the field onto the form. We will move
the field into the correct position later.
4 Position the mouse pointer over the bottom border of the form Detail section (on the border
between the Detail section and the Form Footer as shown below).
5 Click and drag downwards to increase the height of the Detail section.
6 Select the Postcode, Mobile Phone and Home Phone bound and unbound controls. Move them
downwards to make room for the Suburb field.
7 Move the Suburb unbound control above the Postcode unbound control. The bound control will
be too far to the left at this point.
8 Lengthen the Suburb unbound control to match the other unbound controls.
9 Resize the Suburb bound control to match the MobilePhone control.
10 Click on the Tab Order button from the Tools Group. Ensure Detail is selected from the
Section list at the left .
11 Click on the Auto Order button . Check the Custom Order: list is now correct and
click on OK.
12 Close the Field List.
13 View the form in Form View and ensure the suburb data displays.
14 Save and close the form.
15 Leave Toy Library open for the next exercise.
Exercise 62
The suburb problem also exists in the Staff Details table. You have been asked to update both the table
and the form.
1 Using Toy Library, open tblStaff_Details in Design View.
2 Insert a new row above the Postcode field.

© Millbank Investments Ltd, 2014 SECTION 6 89
3 Enter the field Suburb, leaving the data type as Short Text.
4 Change the Field Size to 20. Create an input mask to force the contents to be in capitals.
5 Save the changes and switch to Datasheet View.
6 Use the keyboard shortcuts for cut and paste (Ctrl X and Ctrl V) to cut and past the suburb names
from the Address column into the Suburb column. Ensure the commas are deleted from the
Address column.
7 Save and close the table.
8 Open frmStaff_Details in Design View.
9 Display the Field List.
10 Drag and drop the field Suburb from the Field List to the Detail section of the Form.
11 Move the fields as required to allow the Suburb field to be positioned above the Postcode field.
12 Resize and move fields as required.
13 Adjust the tab order.
14 Check your form in Form View.
15 Save and close the form.
16 Leave the database open for the next exercise.
Add a Field to a Report
In many cases it is easiest to delete a report and start again, rather than try adding a field to a report;
however, it can be done.
Exercise 63
1 Using Toy Library, open rptStaff Address List in Design View.
You need to make some space between the Address and Postcode fields to insert the Suburb field.
2 Reduce the width of the Title, First Name, Last Name and Address fields and move them to the
left.
3 Switch to Layout View.
4 Display the Report Design Tools Design Ribbon.
5 Click on .
6 Double click on Suburb field in the Field List. This will automatically add the field to the report;
it will be added to the left of the report covering existing fields.
7 With the suburb column still selected, click and drag the field to the right to the space created
between Address and Postcode. Widen the column to display the suburb names on one line.
8 Borders will display around the suburbs. With the fields selected, display the Report Layout
Tools Format Ribbon. Click on the Shape Outline button and select
Transparent.
9 Ensure all columns in the form display attractively.
10 Save and close the form.
11 Close the database.
100 © Millbank Investments Ltd, 2014
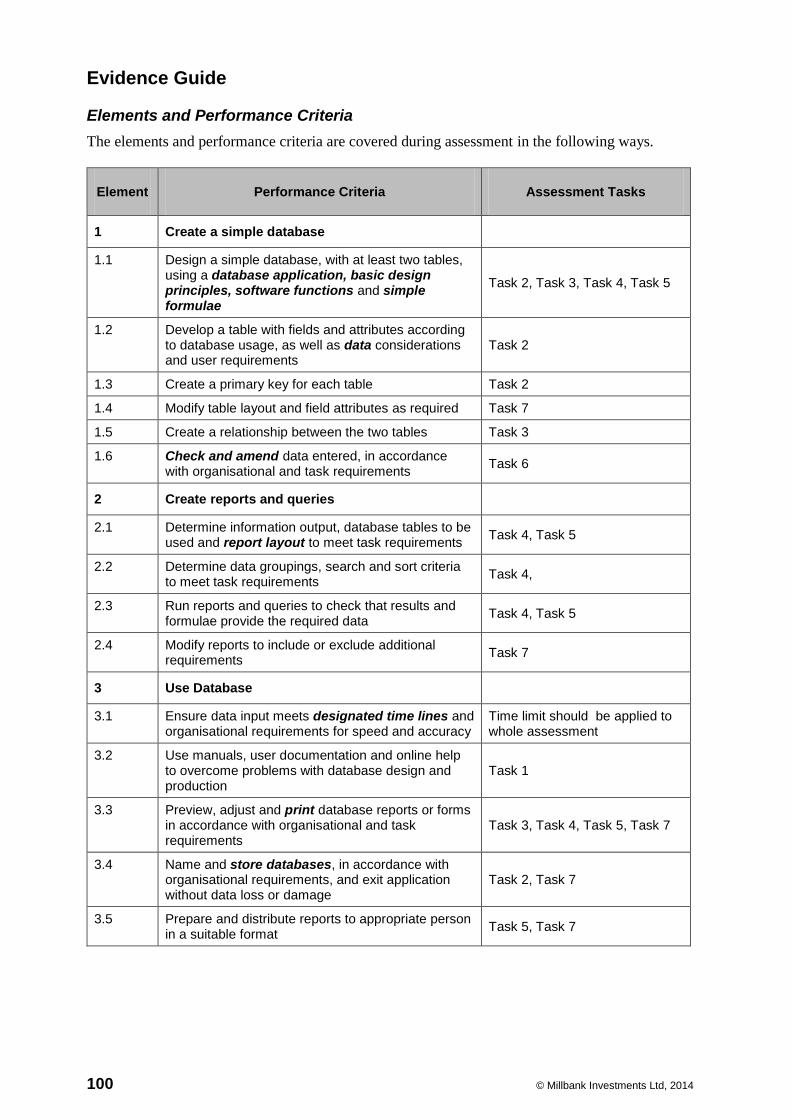
Evidence Guide
Elements and Performance Criteria
The elements and performance criteria are covered during assessment in the following ways.
Element Performance Criteria Assessment Tasks
1 Create a simple database
1.1 Design a simple database, with at least two tables, using a database application, basic design principles, software functions and simple formulae
Task 2, Task 3, Task 4, Task 5
1.2 Develop a table with fields and attributes according to database usage, as well as data considerations and user requirements
Task 2
1.3 Create a primary key for each table Task 2
1.4 Modify table layout and field attributes as required Task 7
1.5 Create a relationship between the two tables Task 3
1.6 Check and amend data entered, in accordance with organisational and task requirements
Task 6
2 Create reports and queries
2.1 Determine information output, database tables to be used and report layout to meet task requirements
Task 4, Task 5
2.2 Determine data groupings, search and sort criteria to meet task requirements
Task 4,
2.3 Run reports and queries to check that results and formulae provide the required data
Task 4, Task 5
2.4 Modify reports to include or exclude additional requirements
Task 7
3 Use Database
3.1 Ensure data input meets designated time lines and organisational requirements for speed and accuracy
Time limit should be applied to whole assessment
3.2 Use manuals, user documentation and online help to overcome problems with database design and production
Task 1
3.3 Preview, adjust and print database reports or forms in accordance with organisational and task requirements
Task 3, Task 4, Task 5, Task 7
3.4 Name and store databases, in accordance with organisational requirements, and exit application without data loss or damage
Task 2, Task 7
3.5 Prepare and distribute reports to appropriate person in a suitable format
Task 5, Task 7

© Millbank Investments Ltd, 2014 101
Required Skills and Knowledge
The skills and knowledge are covered during assessment in the following ways.
Required Skills How will Evidence be Gathered?
numeracy skills to create simple queries and to
use simple formulae
Task 4
planning and organising skills to develop
effective databases
Task 2, Task 4, Task 5, Task 7
problem-solving skills to address
inconsistencies in data and issues in database,
and to query structures
Task 1
Required Knowledge How will Evidence be Gathered?
key provisions of relevant legislation from all
forms of government, standards and codes
that may affect aspects of business operations,
such as:
anti-discrimination legislation
ethical principles
codes of practice
privacy laws
occupational health and safety
n/a
Organisational requirements relating to data
entry, storage and presentation
Task 2, Task 5

102 © Millbank Investments Ltd, 2014
Employability Skills BSB30110: Certificate III in Business
Employability skills for BSB30110 Certificate III in Business are assessed in the following
assessment tasks.
Employability Skill
Industry/Enterprise Requirements for this Qualification Include:
Task
Communication communicating verbally with others in
negotiation, training and questioning
writing a range of simple documentation and
communications
n/a
Teamwork completing individual tasks to support team
goals
conveying workplace procedures and work
instructions to team members
n/a
Problem-solving resolving issues and conflicts with team
members
using manuals and other documentation to
overcome problems with information
technology or other office equipment
Task 1
Initiative and enterprise
demonstrating individual responsibility for
completing tasks
suggesting improvements to support the
development of improved work practices and
team effectiveness
All assessment tasks are completed individually
Planning and organising
contributing to planning processes with team
members to meet expected outcomes
gathering, organising and applying workplace
information for the organisation's work
processes and information systems
n/a
Self-management identifying development needs and seeking
training to fill needs
monitoring and recording the performance of
own work area
n/a
Learning developing a comprehensive knowledge and
understanding of products and services
identifying priorities and pursuing personal
work goals in accordance with organisational
objectives
n/a

© Millbank Investments Ltd, 2014 103
Employability Skill
Industry/Enterprise Requirements for this Qualification Include:
Task
Technology using information communication technology
to communicate with team members or
clients
using word processing packages,
spreadsheets and/or databases to produce
written correspondence and reports
Database software is used throughout assessment
Assessment Material and Equipment
Make sure you have the following before you start this assessment:
Your own copy of this workbook
Pen/pencil
Access to a computer with:
Windows 8.1
Microsoft Access 2013
access to a printer

© Millbank Investments Ltd, 2014 121
BSB Business Services Training Package
Supplement
This workbook can be used by learners completing a qualification in the BSB Business Services Training Package.

122 © Millbank Investments Ltd, 2014
BSBITU301 Create and use databases Application This unit describes the skills and knowledge required to create simple two-table relational databases with reports and queries, for storage and retrieval of information.
It applies to individuals that may provide administrative support within an enterprise, or may be independently responsible for storage and retrieval of data relating to their own work roles.
No licensing, legislative or certification requirements apply to this unit at the time of publication. Elements and Performance Criteria
Element Elements describe the essential outcomes.
Performance Criteria Performance criteria describe the performance needed to demonstrate achievement of the element.
Workbook page reference
Assessment Tasks
1. Create a simple database
1.1 Design a simple database, with at least two tables, using a database application, basic design principles, software functions and simple formulae
Throughout workbook
Task 2, Task 3, Task 4, Task 5
1.2 Develop a table with fields and attributes according to database usage, as well as data considerations and user requirements
Throughout workbook
Task 2
1.3 Create a primary key for each table 26, 31, 34, 58 Task 2
1.4 Modify table layout and field attributes as required
87–89 Task 7
1.5 Create a relationship between the two tables
20, 28, 37, 58 Task 3
1.6 Check and amend data entered, in accordance with organisational and task requirements
13, 52, 54–56, 74
Task 6
2. Create reports and queries
2.1 Determine information output, database tables to be used and report layout to meet task requirements
76–85, 93 Task 4, Task 5
2.2 Determine data groupings, search and sort criteria to meet task requirements
56, 62, 71, 76, 81, 85
Task 4,
2.3 Run reports and queries to check results and formulae provide the required data
61–74, 77–85 Task 4, Task 5
2.4 Modify reports to include or exclude additional requirements
89 Task 7

© Millbank Investments Ltd, 2014 123
Element Elements describe the essential outcomes.
Performance Criteria Performance criteria describe the performance needed to demonstrate achievement of the element.
Workbook page reference
Assessment Tasks
3. Use database 3.1 Ensure data input meets designated timelines and organisational requirements for speed and accuracy
ix Time limit should be applied to whole assessment
3.2 Use manuals, user documentation and online help to overcome problems with database design and production
38 Task 1
3.3 Preview, adjust and print database reports or forms in accordance with organisational and task requirements
52, 62, 65, 79, 81, 85
Task 3, Task 4, Task 5, Task 7
3.4 Name and store databases, in accordance with organisational requirements, and exit application without data loss or damage
v–viii, x, xii–xiii, 17, 22
Task 2, Task 7
3.5 Prepare and distribute reports to appropriate person in a suitable format
76–85 Task 5, Task 7
Foundation Skills This section describes language, literacy, numeracy and employment skills incorporated in the performance criteria that are required for competent performance.
Skill Performance Criteria
Description Workbook page reference
Reading 1.1-1.6, 2.1-2.4, 3.1-3.5
Recognises and interprets textual and numerical information to determine and confirm tasks are completed as per requirements
Throughout workbook
Writing 1.1-1.6, 2.1-2.4, 3.1-3.4
Inputs numerical and key reporting information when creating and querying databases, and uses standard naming conventions and format to organise data
Throughout workbook
Numeracy 1.1, 1.2, 1.6, 2.1-2.4
Uses mathematical equations to create simple database queries and formulae
68–74
Navigate the world of work
1.2, 1.4, 1.6, 2.1-2.3, 3.1, 3.3, 3.4
Recognises and follows explicit and implicit protocols and meets expectations associated with own role
Throughout workbook, Software Publications WHS
Get the work done
1.1-1.6, 2.1-2.4, 3.1-3.5
Plans, organises and competes tasks to meet organisational requirements
Throughout workbook
Utilises a broad range of features within applications in performing routine and complex tasks
Throughout workbook