creating custom menu
DESCRIPTION
Custom Menu in ExeTRANSCRIPT
Custom MenuProduct/Project: Doc.No: Issued By: Date: Page::
IFS India A1 Ravi Vemana 21-May-2009 1(31)Title:
Create Custom Menus (RMB)
1 INTRODUCTION 2
2 DEFINITIONS 3
3 CUSTOM MENU: SCREEN TO SCREEN 5
4 CUSTOM MENU: SCREEN TO SCREEN – PASSING A PARAMETER 6
5 CUSTOM MENU: SCREEN TO REPORT 9
6 CUSTOM MENU: SCREEN TO REPORT – PASSING A PARAMETER 12
7 CUSTOM MENU: FUNCTION CALL 17
8 CUSTOM MENU: SCREEN TO DIALOG BOX 19
9 CUSTOM MENU: SCREEN TO TABLE WINDOW 21
10 CUSTOM MENU: SCREEN TO EXTERNAL APPLICATION 24
11 CUSTOM MENU: SCREEN TO EXTERNAL FOLDER 26
12 CUSTOM MENU: SCREEN TO SQL PLUS WITH AUTOMATIC LOG-IN 28
13 CUSTOM MENU: SCREEN TO INTERNET EXPLORER 30
14 CUSTOM MENU: USING ‘ENABLED WHEN’ 32
1 Introduction
This document describes the process for IT to create Custom Menus of different types.
The IFS Admin Executable is required to carry out this process.
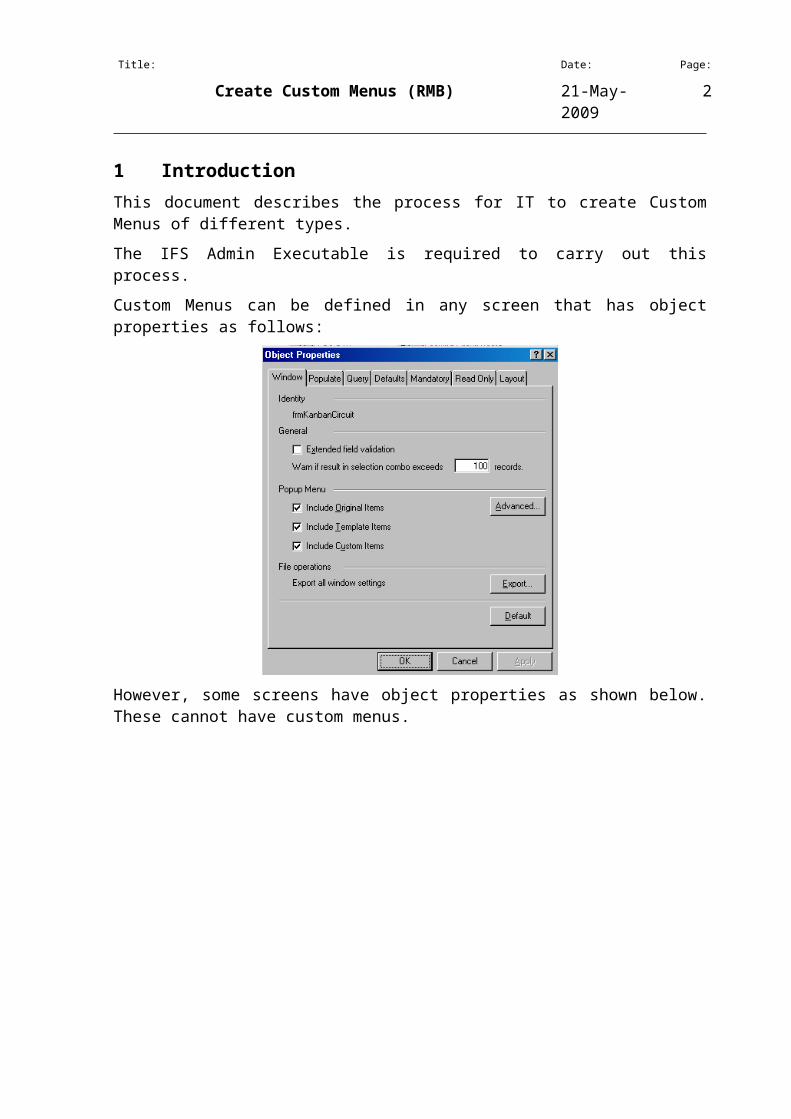
Custom Menus can be defined in any screen that has object properties as follows:
Title: Date: Page:
Create Custom Menus (RMB) 21-May-2009 2
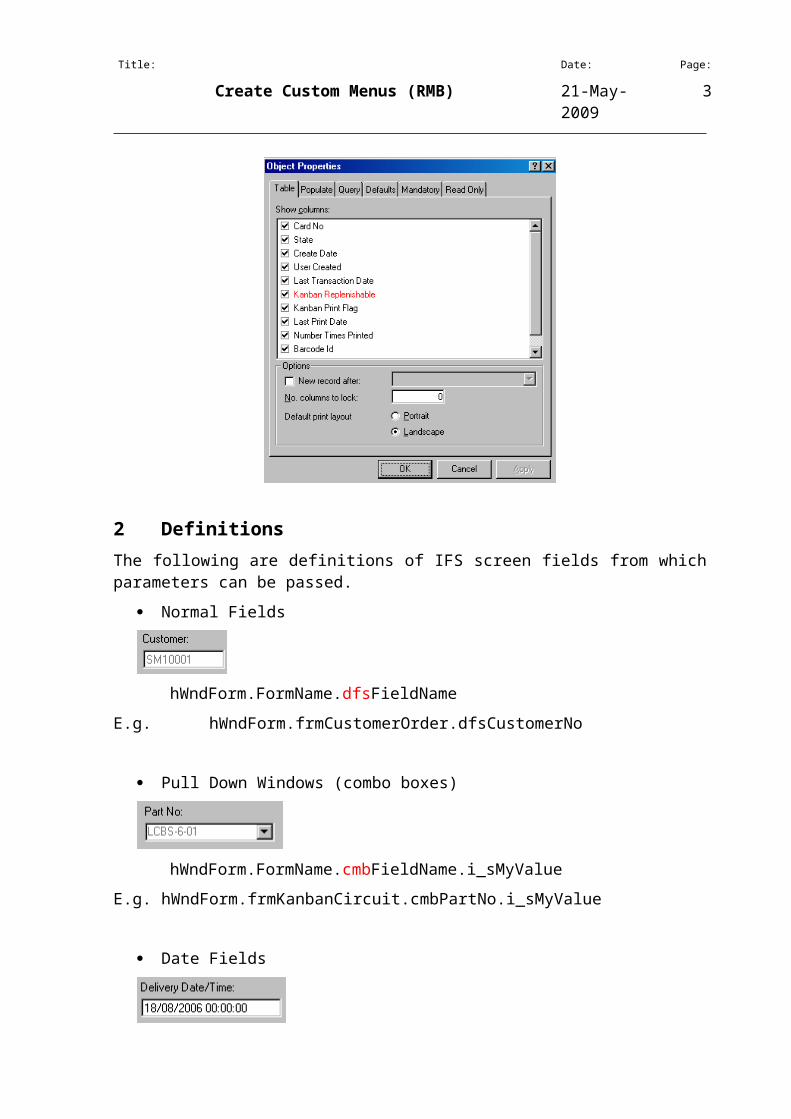
However, some screens have object properties as shown below. These cannot have custom menus.
2 Definitions
The following are definitions of IFS screen fields from which parameters can be passed.
Normal Fields
hWndForm.FormName.dfsFieldName
Title: Date: Page:
Create Custom Menus (RMB) 21-May-2009 3
E.g. hWndForm.frmCustomerOrder.dfsCustomerNo
Pull Down Windows (combo boxes)
hWndForm.FormName.cmbFieldName.i_sMyValue
E.g. hWndForm.frmKanbanCircuit.cmbPartNo.i_sMyValue
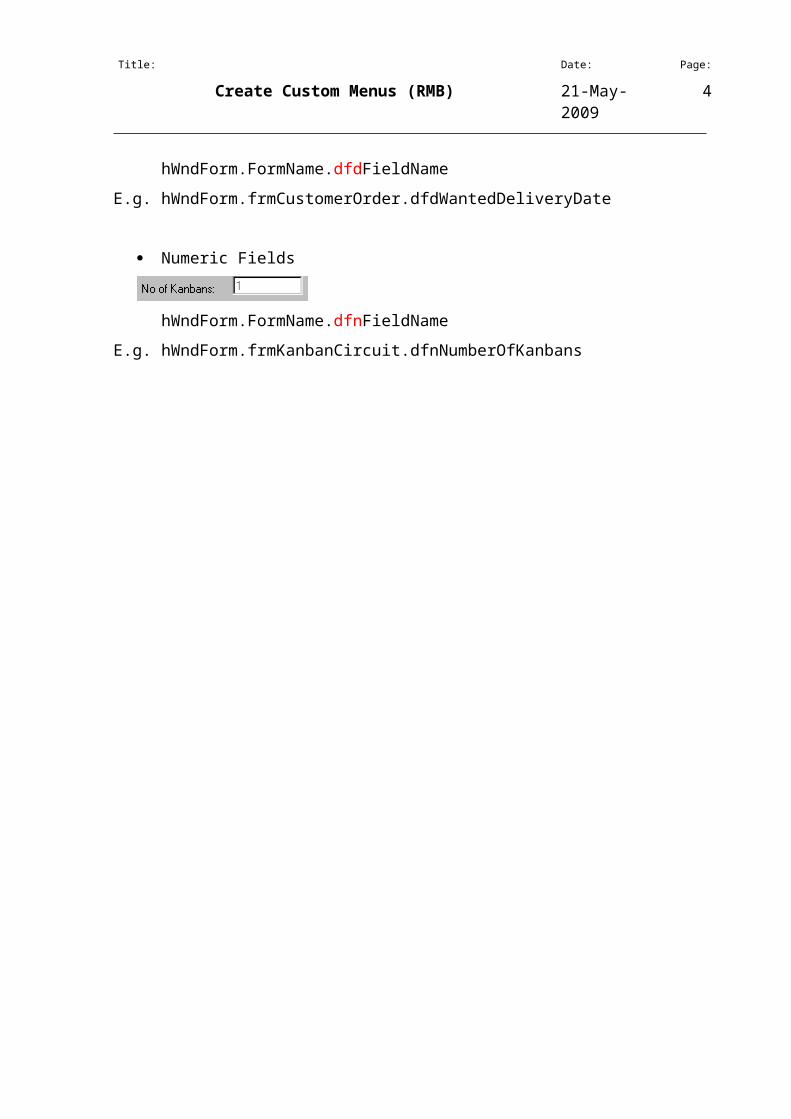
Date Fields
hWndForm.FormName.dfdFieldName
E.g. hWndForm.frmCustomerOrder.dfdWantedDeliveryDate
Numeric Fields
hWndForm.FormName.dfnFieldName
E.g. hWndForm.frmKanbanCircuit.dfnNumberOfKanbans
Title: Date: Page:
Create Custom Menus (RMB) 21-May-2009 4
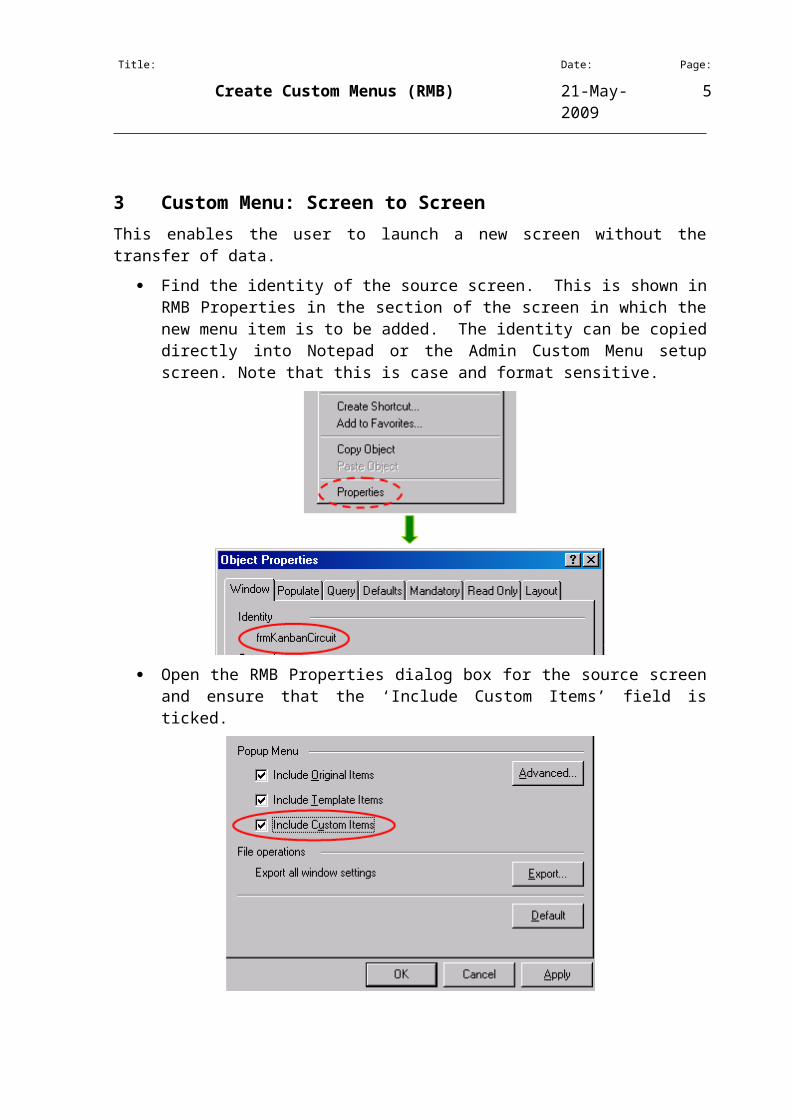
3 Custom Menu: Screen to Screen
This enables the user to launch a new screen without the transfer of data.
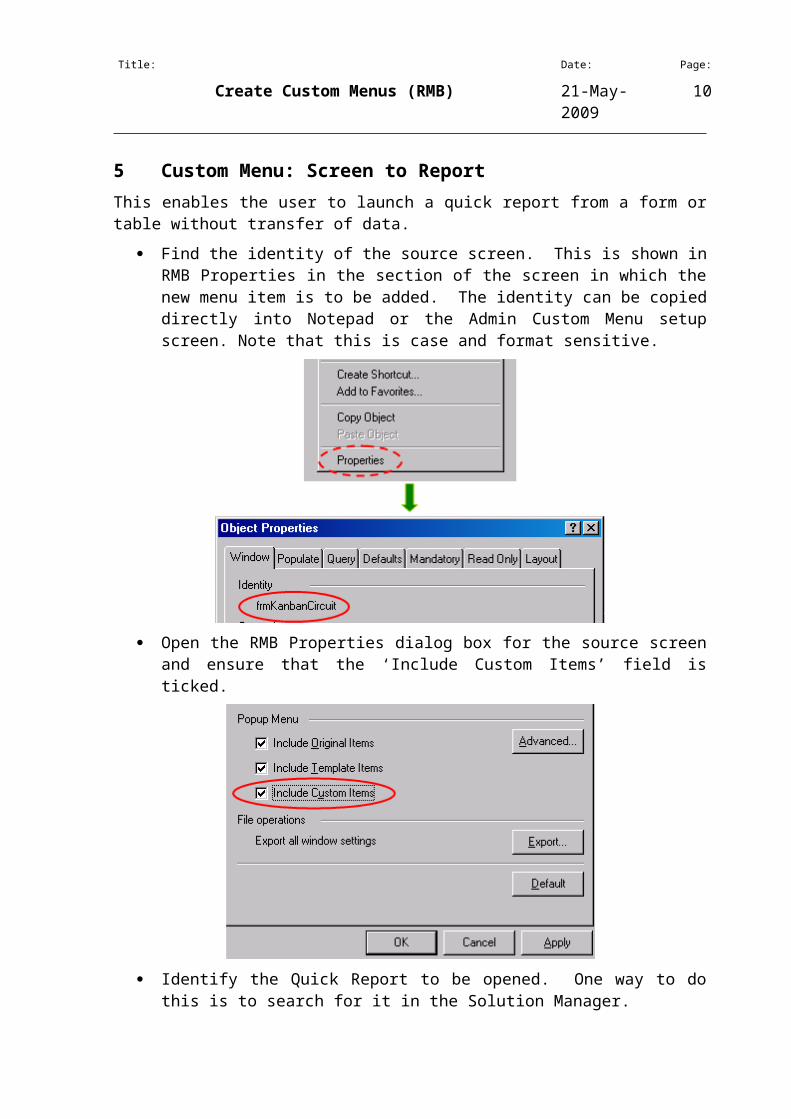
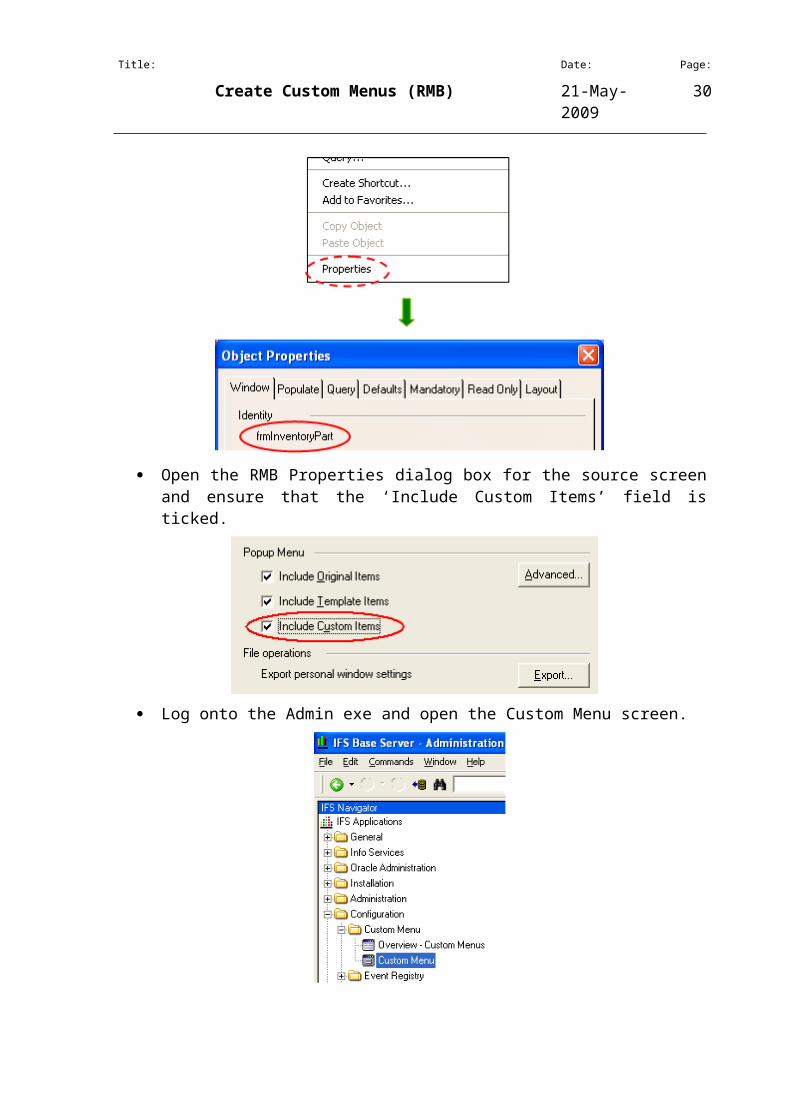
Find the identity of the source screen. This is shown in RMB Properties in the section of the screen in which the new menu item is to be added. The identity can be copied directly into Notepad or the Admin Custom Menu setup screen. Note that this is case and format sensitive.
Open the RMB Properties dialog box for the source screen and ensure that the ‘Include Custom Items’ field is ticked.
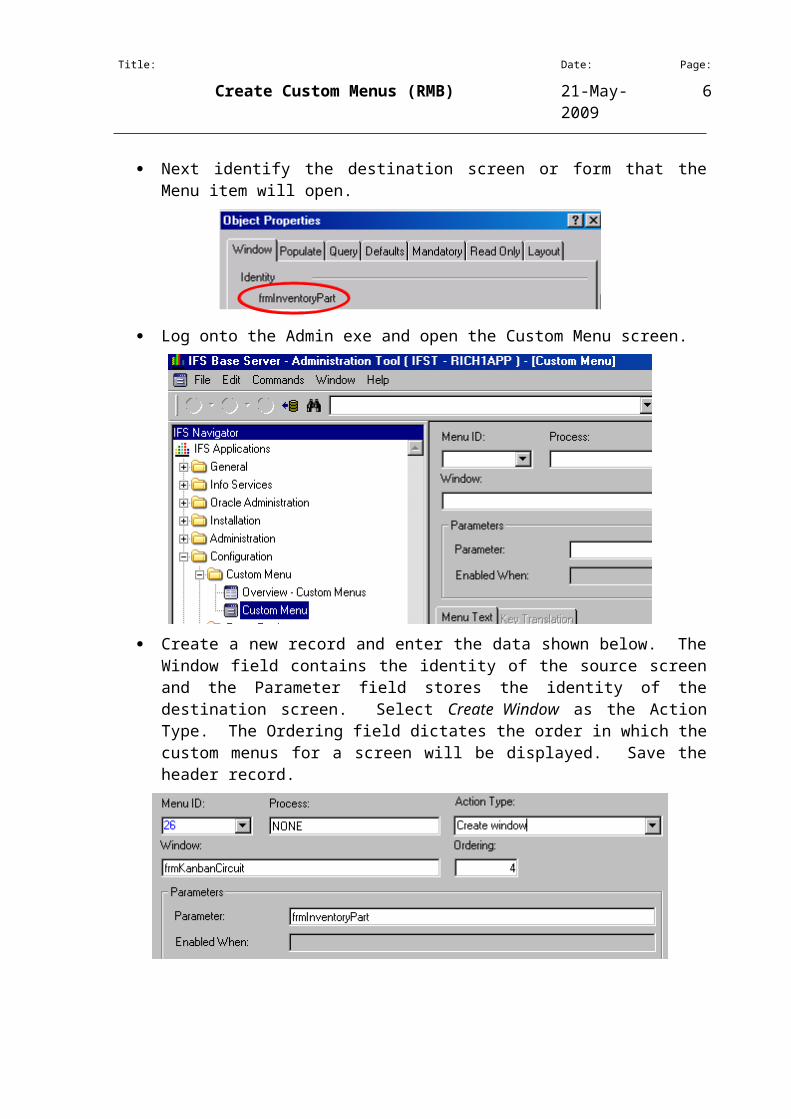
Next identify the destination screen or form that the Menu item will open.
Title: Date: Page:
Create Custom Menus (RMB) 21-May-2009 5
Log onto the Admin exe and open the Custom Menu screen.
Create a new record and enter the data shown below. The Window field contains the identity of the source screen and the Parameter field stores the identity of the destination screen. Select Create Window as the Action Type. The Ordering field dictates the order in which the custom menus for a screen will be displayed. Save the header record.
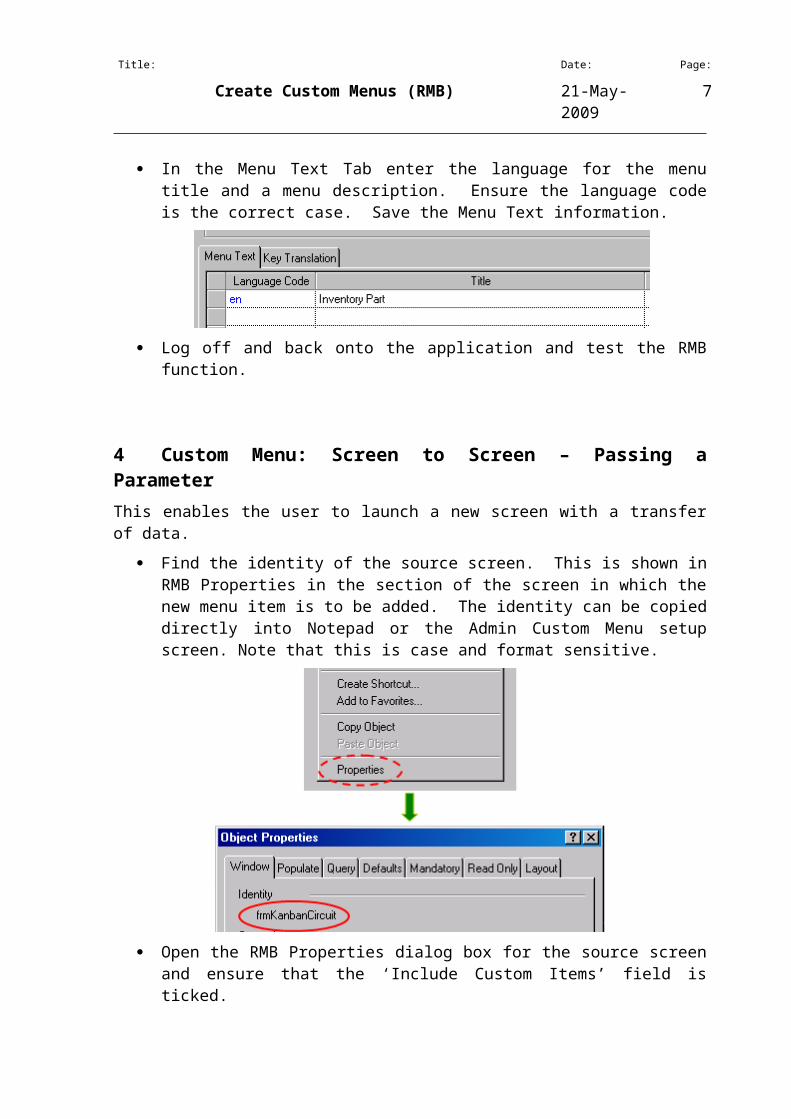
In the Menu Text Tab enter the language for the menu title and a menu description. Ensure the language code is the correct case. Save the Menu Text information.
Log off and back onto the application and test the RMB function.
4 Custom Menu: Screen to Screen – Passing a Parameter
This enables the user to launch a new screen with a transfer of data.
Title: Date: Page:
Create Custom Menus (RMB) 21-May-2009 6
Find the identity of the source screen. This is shown in RMB Properties in the section of the screen in which the new menu item is to be added. The identity can be copied directly into Notepad or the Admin Custom Menu setup screen. Note that this is case and format sensitive.
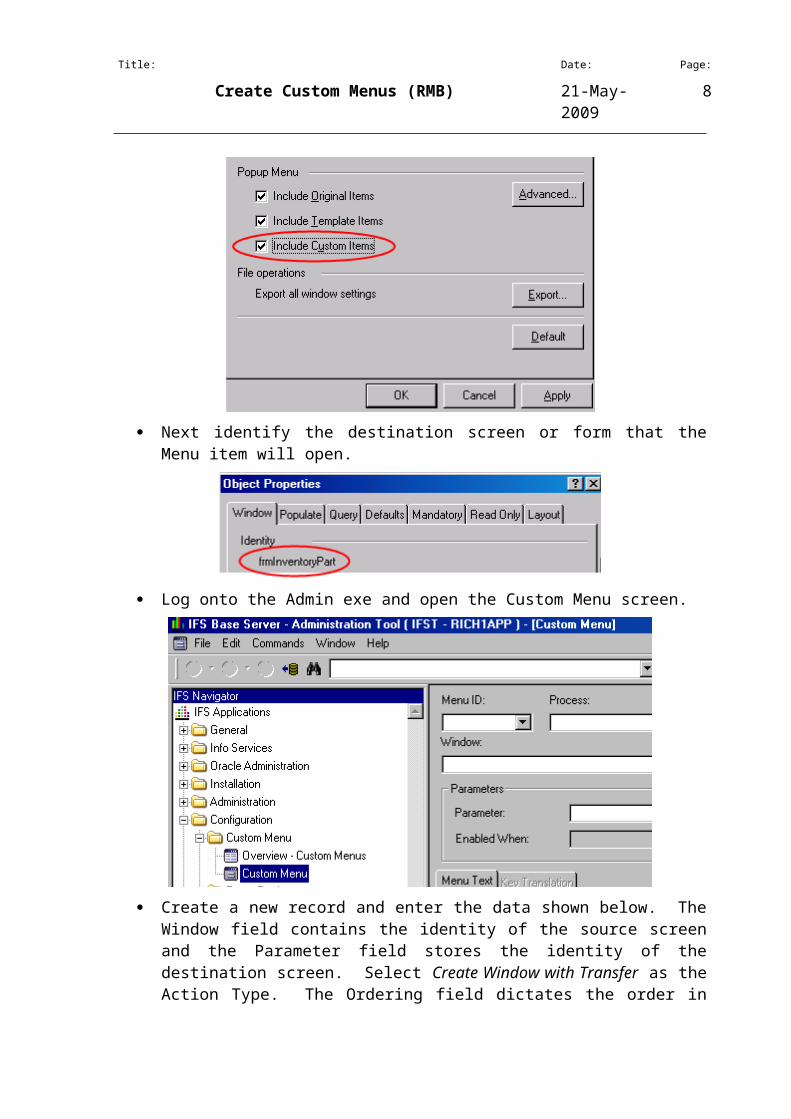
Open the RMB Properties dialog box for the source screen and ensure that the ‘Include Custom Items’ field is ticked.
Next identify the destination screen or form that the Menu item will open.
Log onto the Admin exe and open the Custom Menu screen.
Title: Date: Page:
Create Custom Menus (RMB) 21-May-2009 7
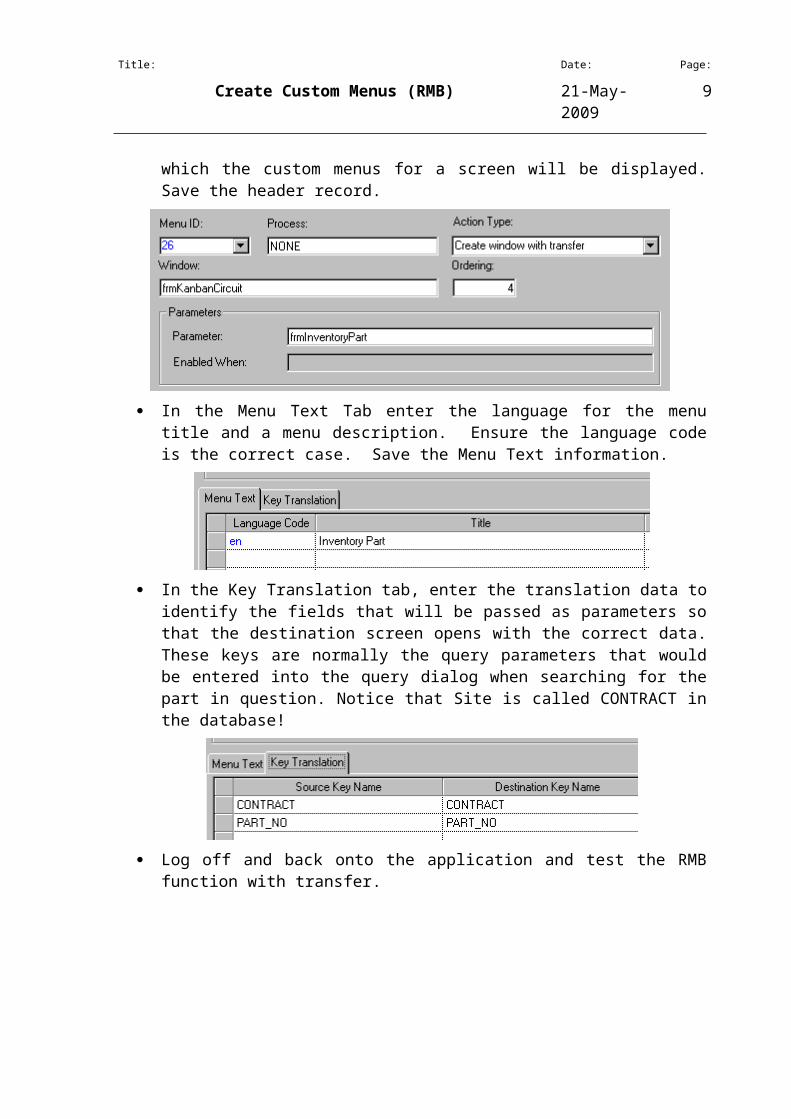
Create a new record and enter the data shown below. The Window field contains the identity of the source screen and the Parameter field stores the identity of the destination screen. Select Create Window with Transfer as the Action Type. The Ordering field dictates the order in which the custom menus for a screen will be displayed. Save the header record.
In the Menu Text Tab enter the language for the menu title and a menu description. Ensure the language code is the correct case. Save the Menu Text information.
In the Key Translation tab, enter the translation data to identify the fields that will be passed as parameters so that the destination screen opens with the correct data. These keys are normally the query parameters that would be entered into the query dialog when searching for the part in question. Notice that Site is called CONTRACT in the database!
Title: Date: Page:
Create Custom Menus (RMB) 21-May-2009 8
Log off and back onto the application and test the RMB function with transfer.
5 Custom Menu: Screen to Report
This enables the user to launch a quick report from a form or table without transfer of data.
Find the identity of the source screen. This is shown in RMB Properties in the section of the screen in which the new menu item is to be added. The identity can be copied directly into Notepad or the Admin Custom Menu setup screen. Note that this is case and format sensitive.
Open the RMB Properties dialog box for the source screen and ensure that the ‘Include Custom Items’ field is ticked.
Title: Date: Page:
Create Custom Menus (RMB) 21-May-2009 9
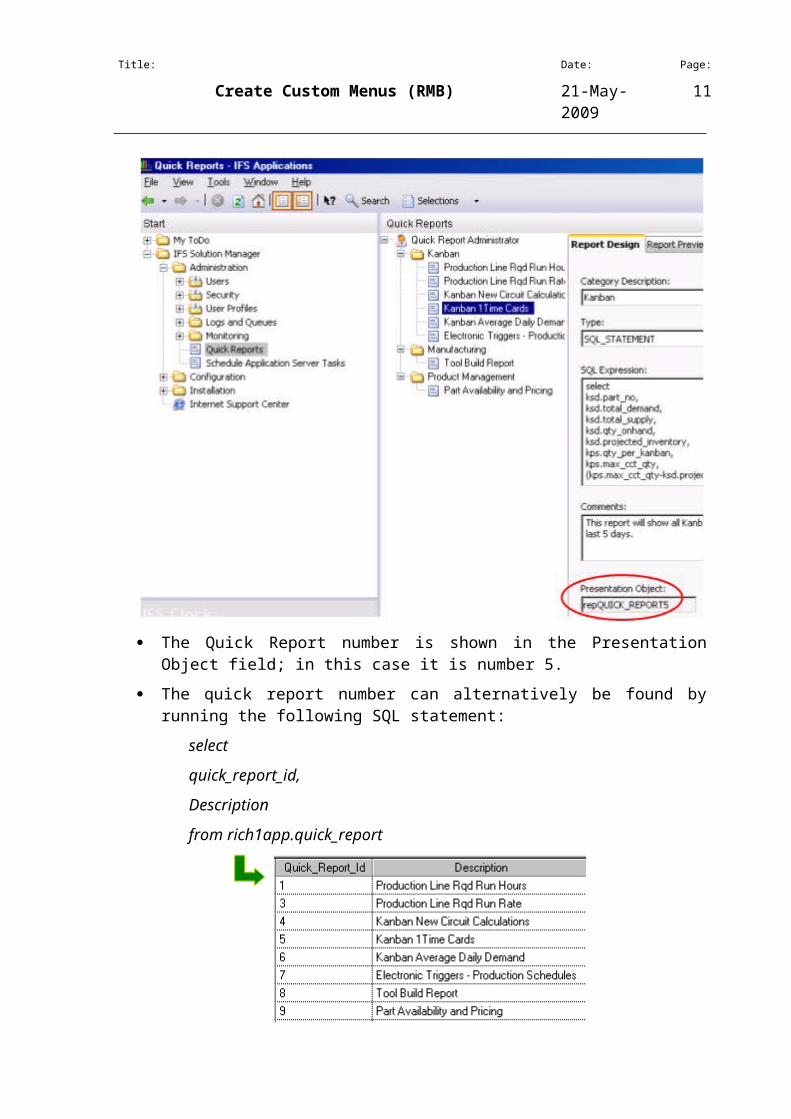
Identify the Quick Report to be opened. One way to do this is to search for it in the Solution Manager.
The Quick Report number is shown in the Presentation Object field; in this case it is number 5.
The quick report number can alternatively be found by running the following SQL statement:
select
Title: Date: Page:
Create Custom Menus (RMB) 21-May-2009 10
quick_report_id,
Description
from rich1app.quick_report
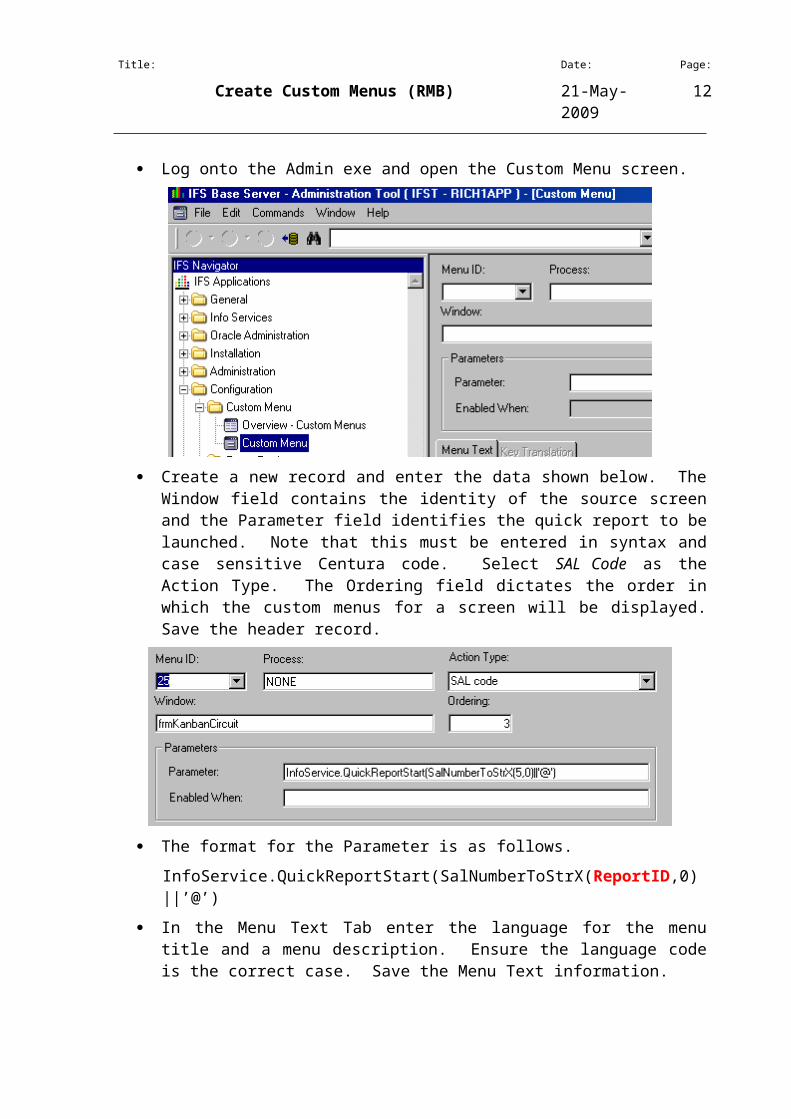
Log onto the Admin exe and open the Custom Menu screen.
Create a new record and enter the data shown below. The Window field contains the identity of the source screen and the Parameter field identifies the quick report to be launched. Note that this must be entered in syntax and case sensitive Centura code. Select SAL Code as the Action Type. The Ordering field dictates the order in which the custom menus for a screen will be displayed. Save the header record.
The format for the Parameter is as follows.
InfoService.QuickReportStart(SalNumberToStrX(ReportID,0)||’@’)
Title: Date: Page:
Create Custom Menus (RMB) 21-May-2009 11
In the Menu Text Tab enter the language for the menu title and a menu description. Ensure the language code is the correct case. Save the Menu Text information.
Log off and back onto the application and test the RMB function to launch the quick report.
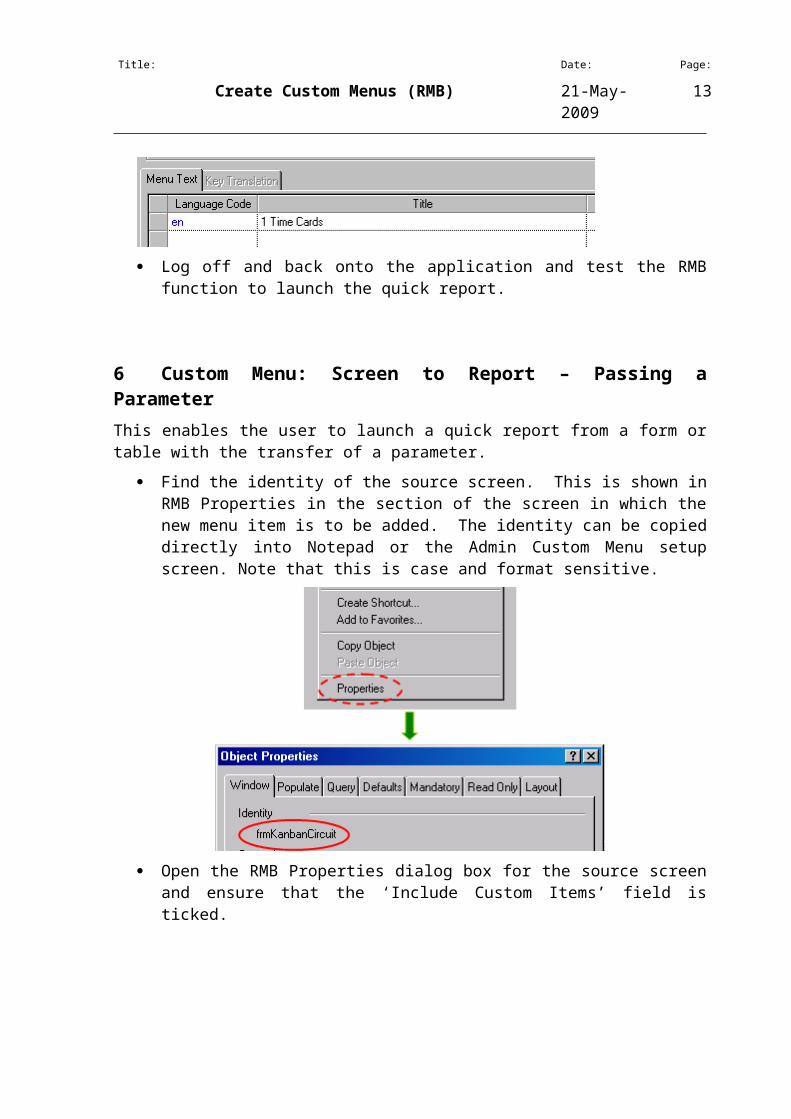
6 Custom Menu: Screen to Report – Passing a Parameter
This enables the user to launch a quick report from a form or table with the transfer of a parameter.
Find the identity of the source screen. This is shown in RMB Properties in the section of the screen in which the new menu item is to be added. The identity can be copied directly into Notepad or the Admin Custom Menu setup screen. Note that this is case and format sensitive.
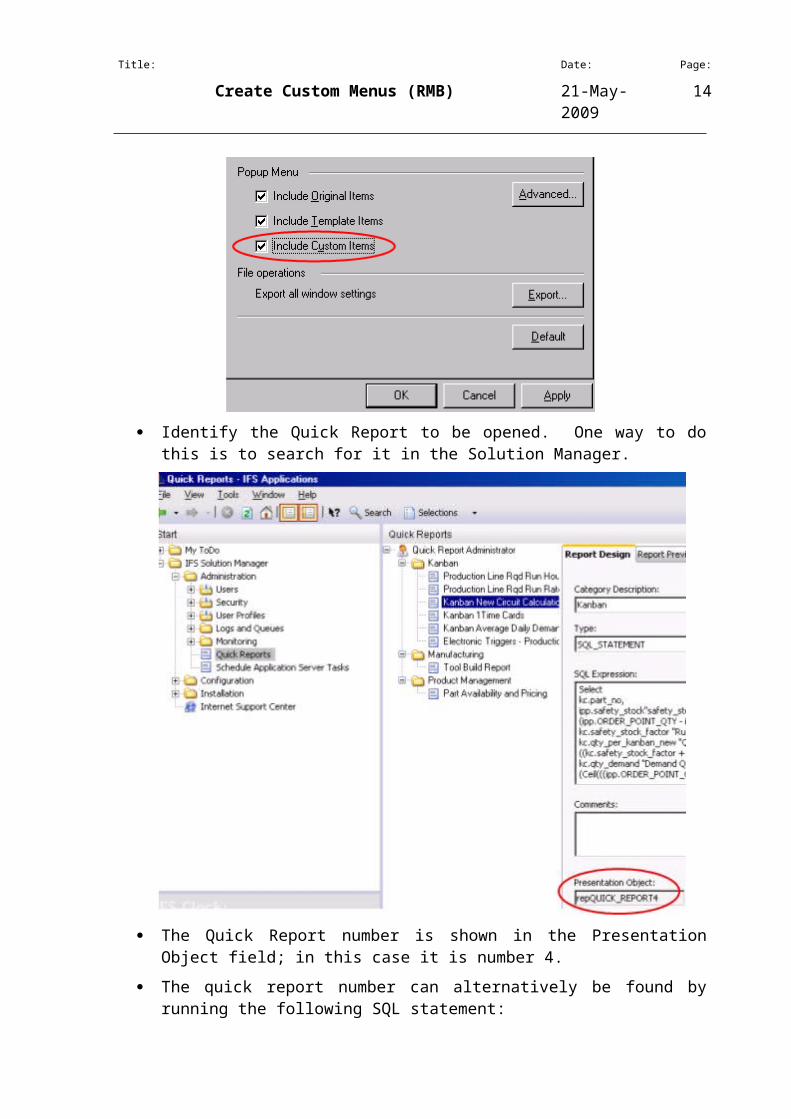
Open the RMB Properties dialog box for the source screen and ensure that the ‘Include Custom Items’ field is ticked.
Title: Date: Page:
Create Custom Menus (RMB) 21-May-2009 12
Identify the Quick Report to be opened. One way to do this is to search for it in the Solution Manager.
The Quick Report number is shown in the Presentation Object field; in this case it is number 4.
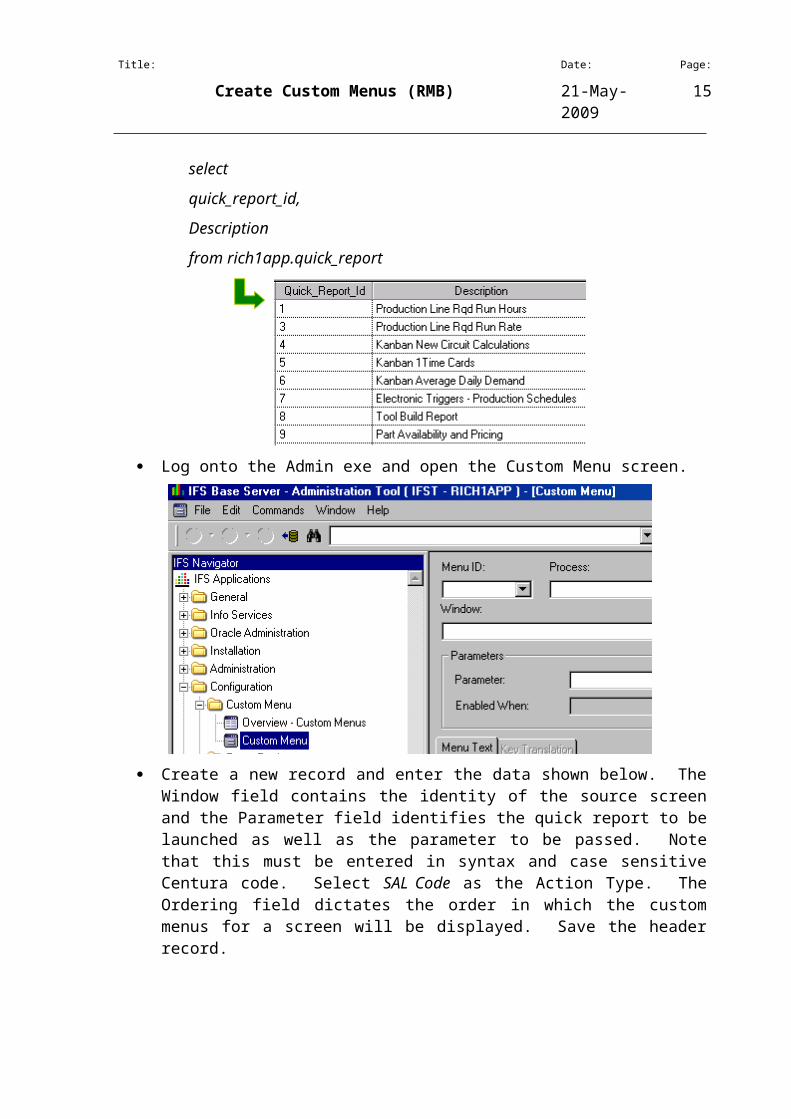
The quick report number can alternatively be found by running the following SQL statement:
select
quick_report_id,
Title: Date: Page:
Create Custom Menus (RMB) 21-May-2009 13
Description
from rich1app.quick_report
Log onto the Admin exe and open the Custom Menu screen.
Create a new record and enter the data shown below. The Window field contains the identity of the source screen and the Parameter field identifies the quick report to be launched as well as the parameter to be passed. Note that this must be entered in syntax and case sensitive Centura code. Select SAL Code as the Action Type. The Ordering field dictates the order in which the custom menus for a screen will be displayed. Save the header record.
The format for the Parameter is as follows:
InfoService.QuickReportStart(SalNumberToStrX(ReportID,0)||'@ReportParam='|| hWndForm.FieldName.i_sMyValue||'^')
Title: Date: Page:
Create Custom Menus (RMB) 21-May-2009 14
Replace ReportID with the Quick Report Number found earlier.
Replace ReportParam with the name of the parameter in the quick report, missing out the ‘&’.
hWndForm. should be included if a dynamic value is to be passed i.e. it is not required if a default value is to be used (see below).
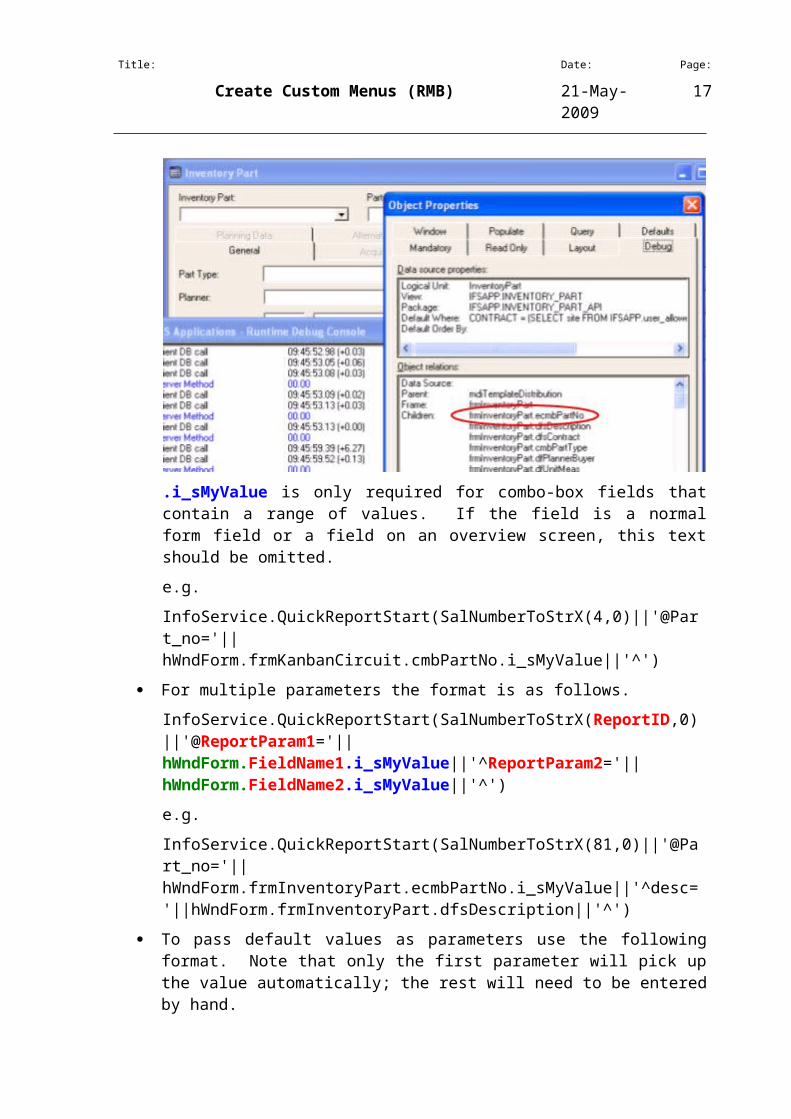
Replace FieldName with the full Centura name of the field from which the parameter is to be taken. To find this, open the source screen, turn on the debug console, open the RMB Properties window, go to the Debug tab and look for the appropriate field. This must be copied exactly as shown in the window (see below).
.i_sMyValue is only required for combo-box fields that contain a range of values. If the field is a normal form field or a field on an overview screen, this text should be omitted.
e.g.
InfoService.QuickReportStart(SalNumberToStrX(4,0)||'@Part_no='||hWndForm.frmKanbanCircuit.cmbPartNo.i_sMyValue||'^')
For multiple parameters the format is as follows.
InfoService.QuickReportStart(SalNumberToStrX(ReportID,0)||'@ReportParam1='||hWndForm.FieldName1.i_sMyValue||'^ReportParam2='||hWndForm.FieldName2.i_sMyValue||'^')
e.g.
InfoService.QuickReportStart(SalNumberToStrX(81,0)||'@Part_no='||hWndForm.frmInventoryPart.ecmbPartNo.i_sMyValue||'^desc='||hWndForm.frmInventoryPart.dfsDescription||'^')
To pass default values as parameters use the following format. Note that only the first parameter will pick up the value automatically; the rest will need to be entered by hand.
Title: Date: Page:
Create Custom Menus (RMB) 21-May-2009 15
InfoService.QuickReportStart(SalNumberToStrX(ReportID,0)||'@ReportParam1=Default^ReportParam2='||hWndForm.FieldName.i_sMyValue||'^')
e.g.
InfoService.QuickReportStart(SalNumberToStrX(81,0)||'@Part_no=JK1^@desc='||hWndForm.frmInventoryPart.dfsDescription||'^')
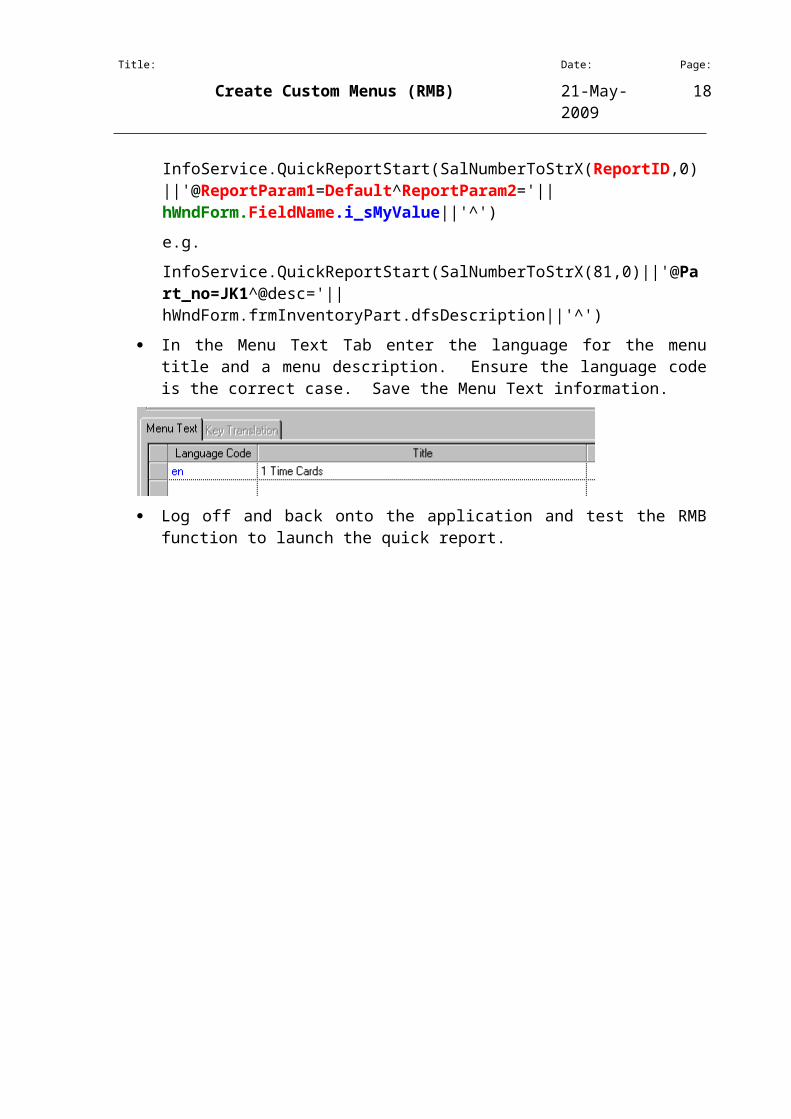
In the Menu Text Tab enter the language for the menu title and a menu description. Ensure the language code is the correct case. Save the Menu Text information.
Log off and back onto the application and test the RMB function to launch the quick report.

Title: Date: Page:
Create Custom Menus (RMB) 21-May-2009 16
7 Custom Menu: Function Call
This enables the user to run a function.
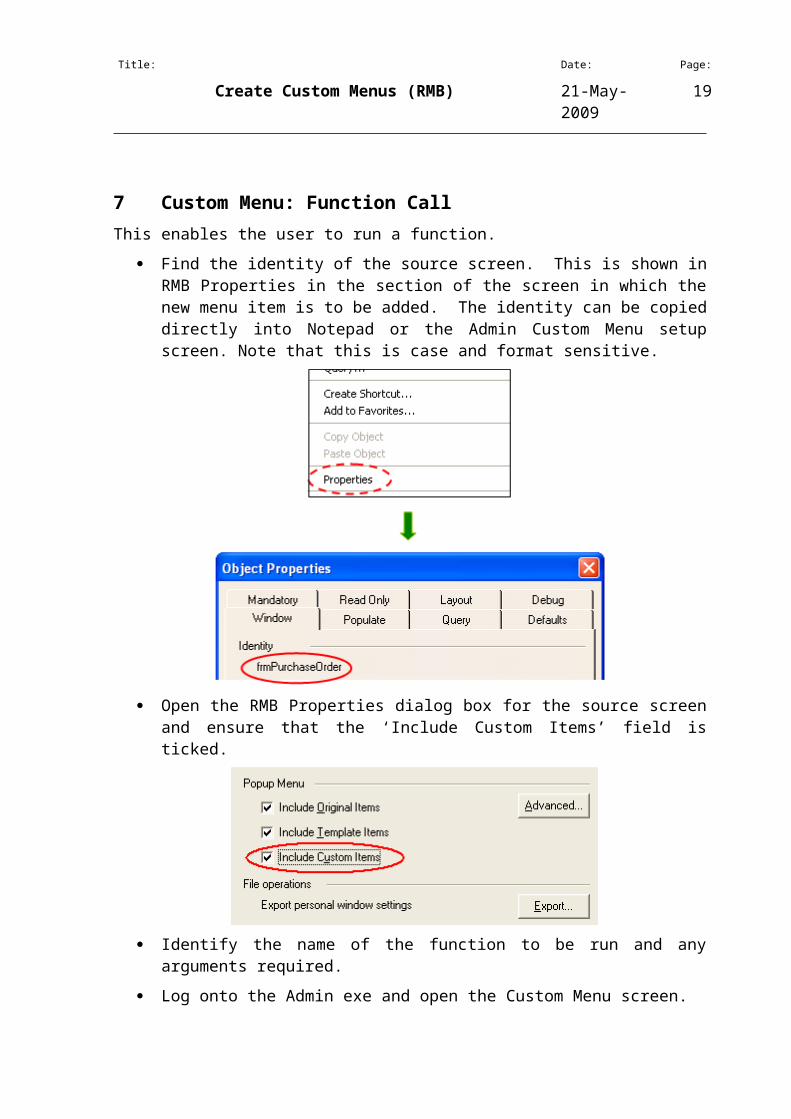
Find the identity of the source screen. This is shown in RMB Properties in the section of the screen in which the new menu item is to be added. The identity can be copied directly into Notepad or the Admin Custom Menu setup screen. Note that this is case and format sensitive.
Open the RMB Properties dialog box for the source screen and ensure that the ‘Include Custom Items’ field is ticked.
Identify the name of the function to be run and any arguments required.
Log onto the Admin exe and open the Custom Menu screen.
Title: Date: Page:
Create Custom Menus (RMB) 21-May-2009 17
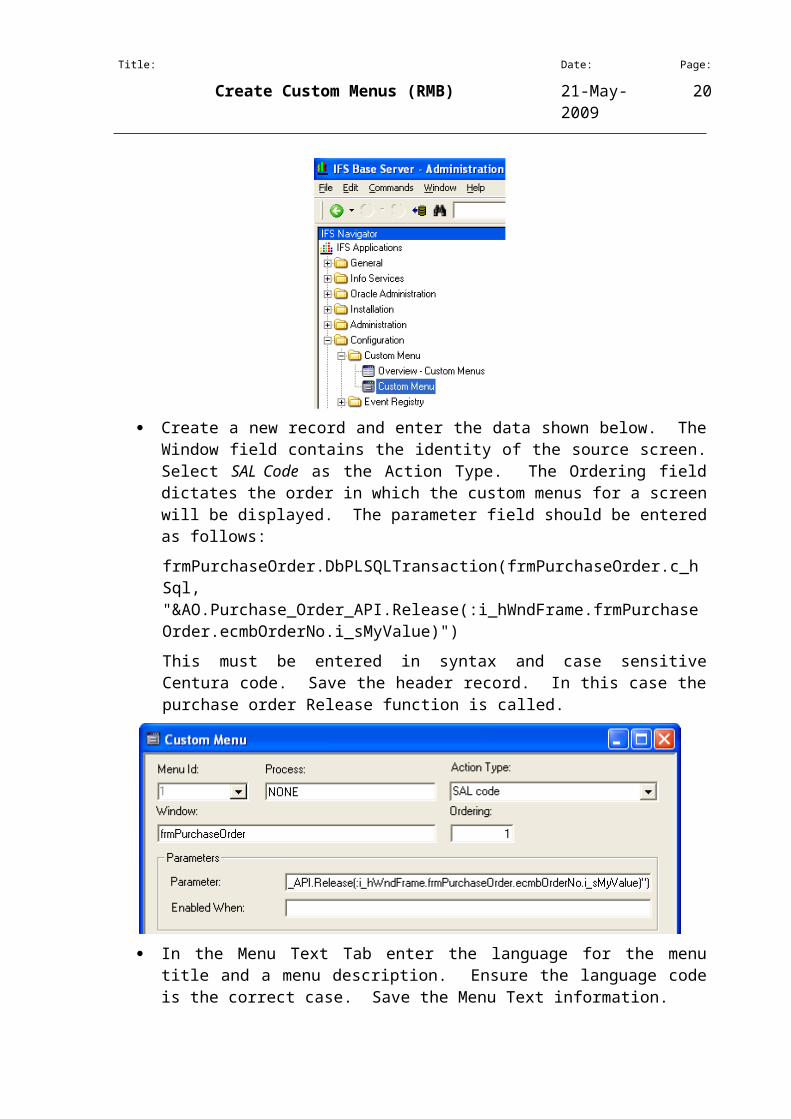
Create a new record and enter the data shown below. The Window field contains the identity of the source screen. Select SAL Code as the Action Type. The Ordering field dictates the order in which the custom menus for a screen will be displayed. The parameter field should be entered as follows:
frmPurchaseOrder.DbPLSQLTransaction(frmPurchaseOrder.c_hSql, "&AO.Purchase_Order_API.Release(:i_hWndFrame.frmPurchaseOrder.ecmbOrderNo.i_sMyValue)")
This must be entered in syntax and case sensitive Centura code. Save the header record. In this case the purchase order Release function is called.
In the Menu Text Tab enter the language for the menu title and a menu description. Ensure the language code is the correct case. Save the Menu Text information.
Log off and back onto the application and test the RMB function.
Title: Date: Page:
Create Custom Menus (RMB) 21-May-2009 18
8 Custom Menu: Screen to Dialog Box
This enables the user to launch a dialog box from within IFS. This only works from a screen within the same executable.
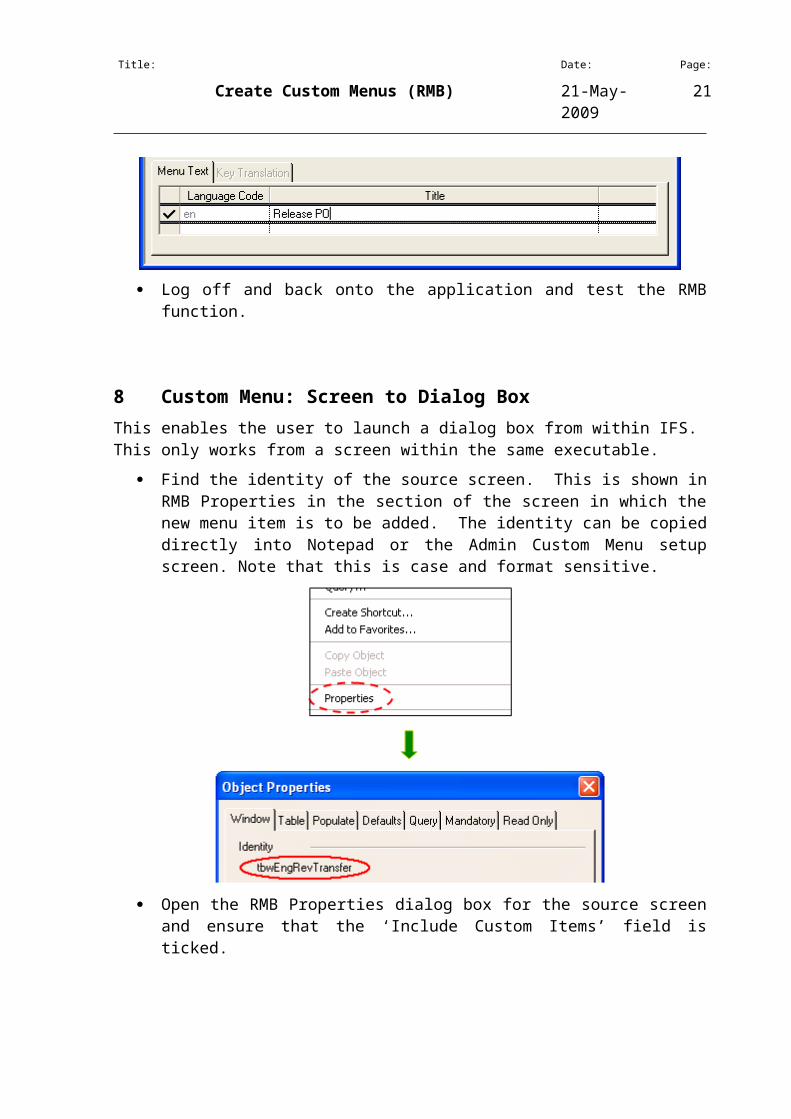
Find the identity of the source screen. This is shown in RMB Properties in the section of the screen in which the new menu item is to be added. The identity can be copied directly into Notepad or the Admin Custom Menu setup screen. Note that this is case and format sensitive.
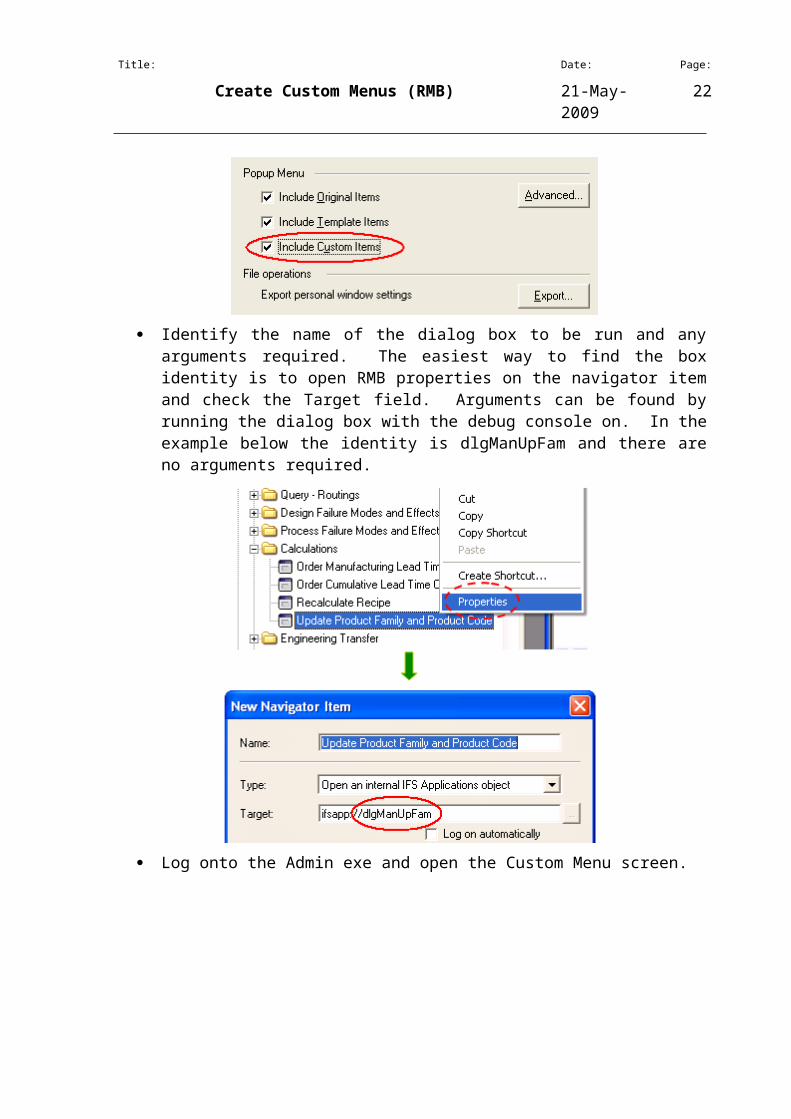
Open the RMB Properties dialog box for the source screen and ensure that the ‘Include Custom Items’ field is ticked.
Identify the name of the dialog box to be run and any arguments required. The easiest way to find the box identity is to open RMB properties on the navigator item and check the Target field. Arguments can be found by running the dialog box with the debug console on. In the example below the identity is dlgManUpFam and there are no arguments required.
Title: Date: Page:
Create Custom Menus (RMB) 21-May-2009 19
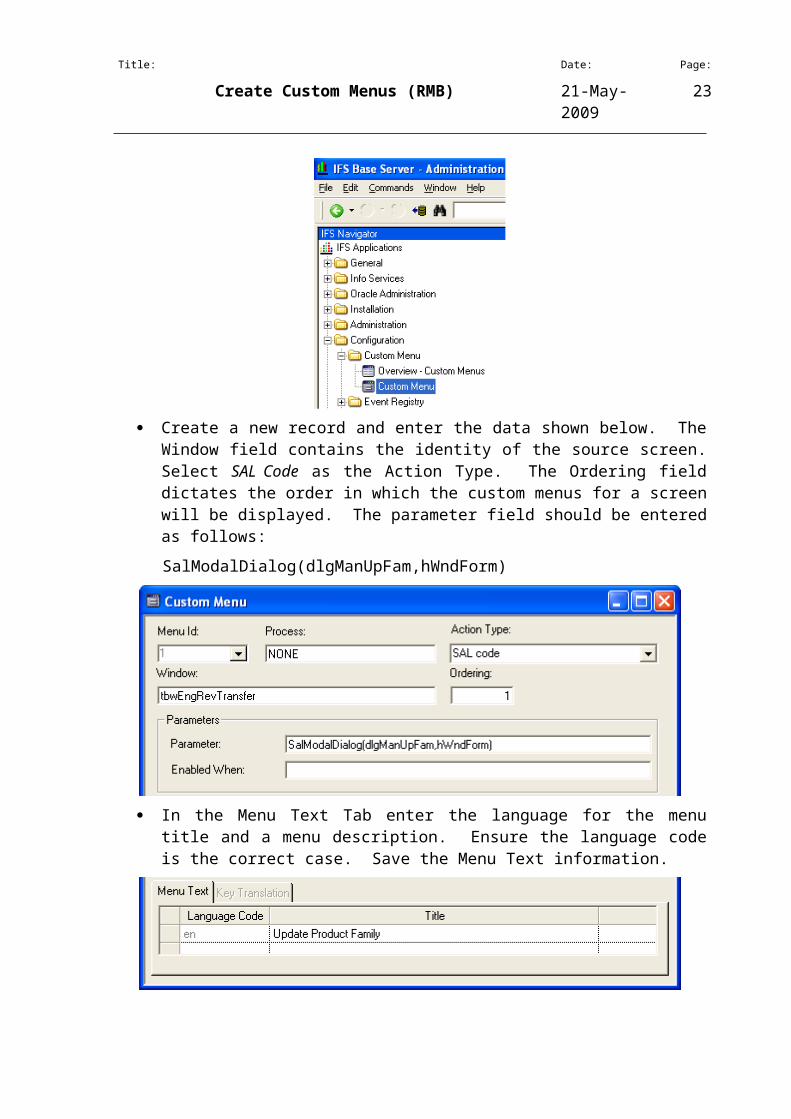
Log onto the Admin exe and open the Custom Menu screen.
Create a new record and enter the data shown below. The Window field contains the identity of the source screen. Select SAL Code as the Action Type. The Ordering field dictates the order in which the custom menus for a screen will be displayed. The parameter field should be entered as follows:
SalModalDialog(dlgManUpFam,hWndForm)
Title: Date: Page:
Create Custom Menus (RMB) 21-May-2009 20
In the Menu Text Tab enter the language for the menu title and a menu description. Ensure the language code is the correct case. Save the Menu Text information.
Log off and back onto the application and test the RMB function.
9 Custom Menu: Screen to Table Window
This enables the user to open an overview table window.
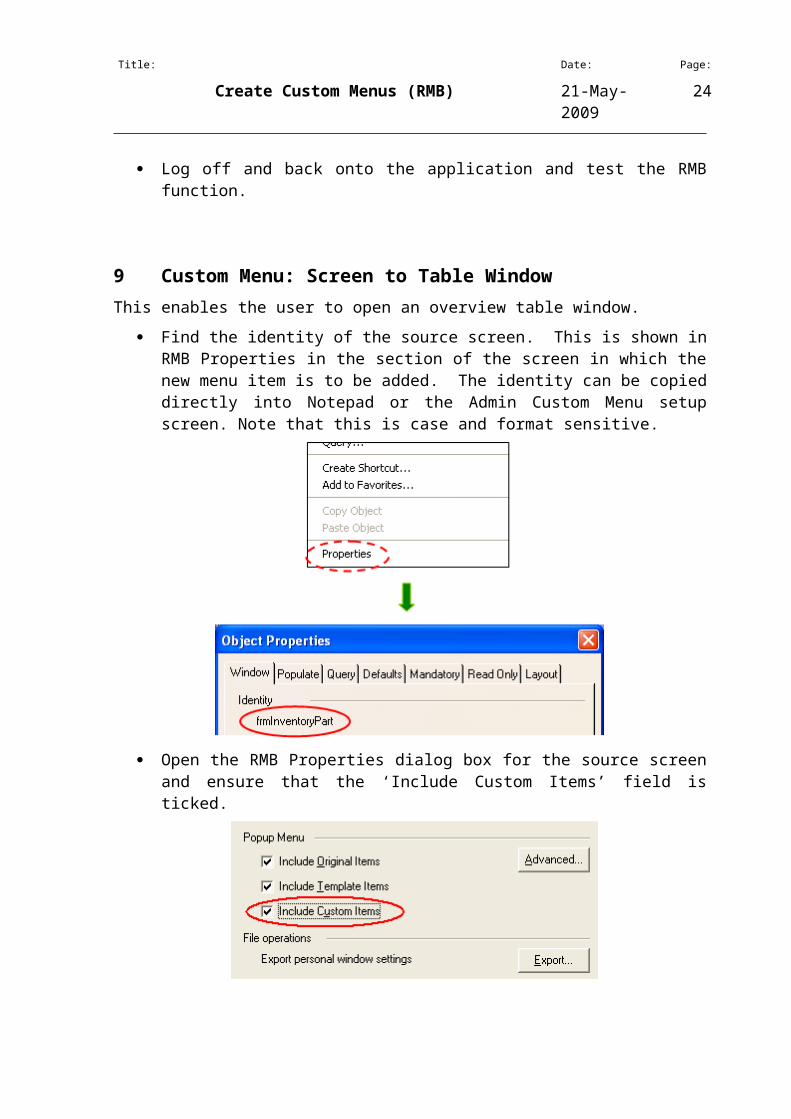
Find the identity of the source screen. This is shown in RMB Properties in the section of the screen in which the new menu item is to be added. The identity can be copied directly into Notepad or the Admin Custom Menu setup screen. Note that this is case and format sensitive.
Title: Date: Page:
Create Custom Menus (RMB) 21-May-2009 21
Open the RMB Properties dialog box for the source screen and ensure that the ‘Include Custom Items’ field is ticked.
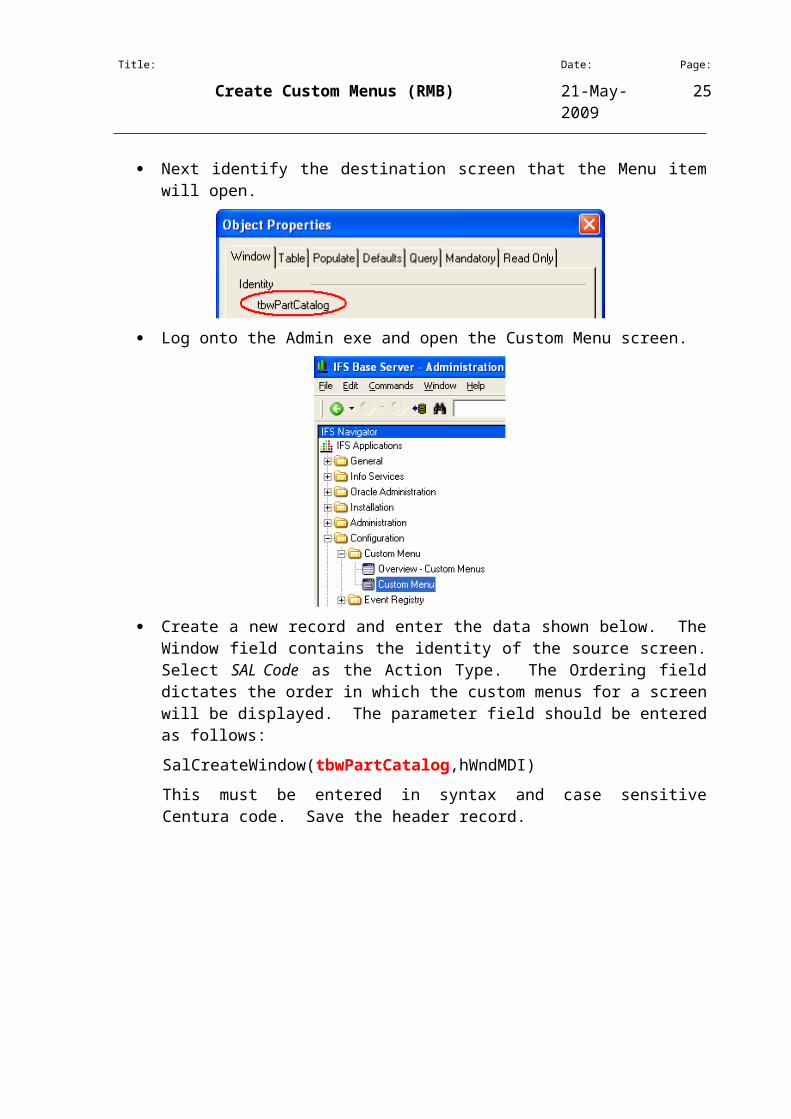
Next identify the destination screen that the Menu item will open.
Log onto the Admin exe and open the Custom Menu screen.
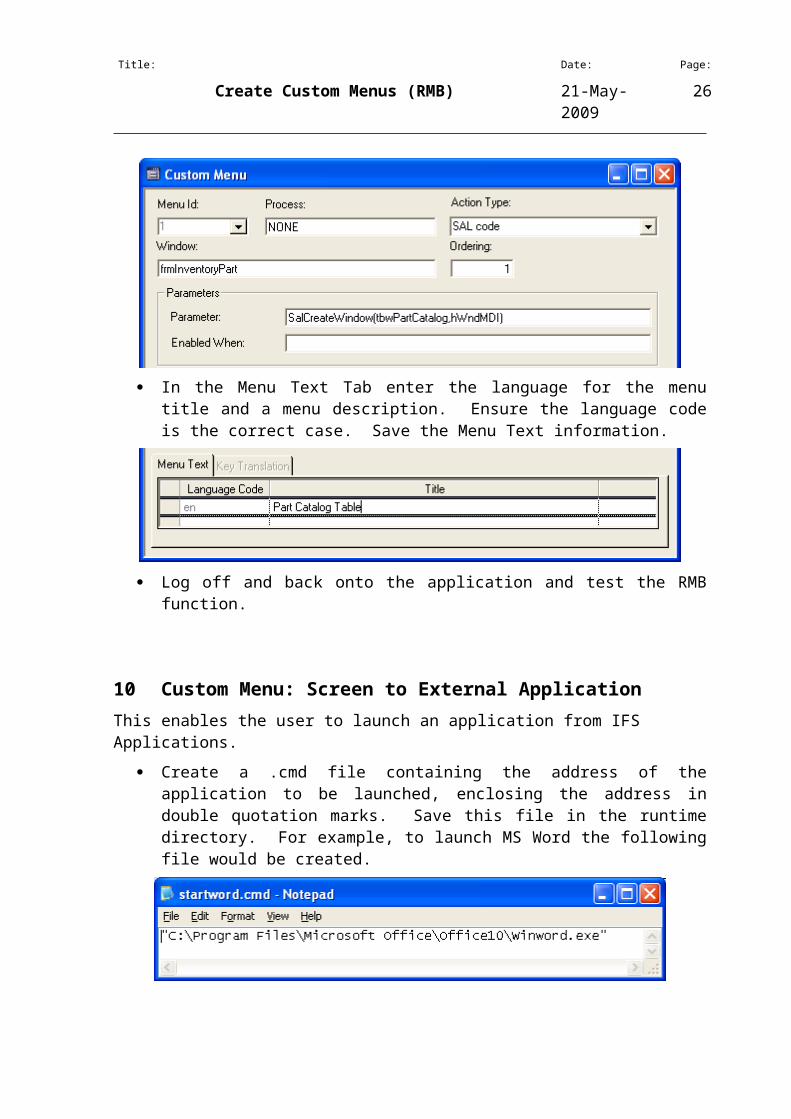
Create a new record and enter the data shown below. The Window field contains the identity of the source screen. Select SAL Code as the Action Type. The Ordering field dictates the order in which the custom menus for a screen will be displayed. The parameter field should be entered as follows:
SalCreateWindow(tbwPartCatalog,hWndMDI)
This must be entered in syntax and case sensitive Centura code. Save the header record.
Title: Date: Page:
Create Custom Menus (RMB) 21-May-2009 22
In the Menu Text Tab enter the language for the menu title and a menu description. Ensure the language code is the correct case. Save the Menu Text information.
Log off and back onto the application and test the RMB function.
10 Custom Menu: Screen to External Application
This enables the user to launch an application from IFS Applications.
Create a .cmd file containing the address of the application to be launched, enclosing the address in double quotation marks. Save this file in the runtime directory. For example, to launch MS Word the following file would be created.
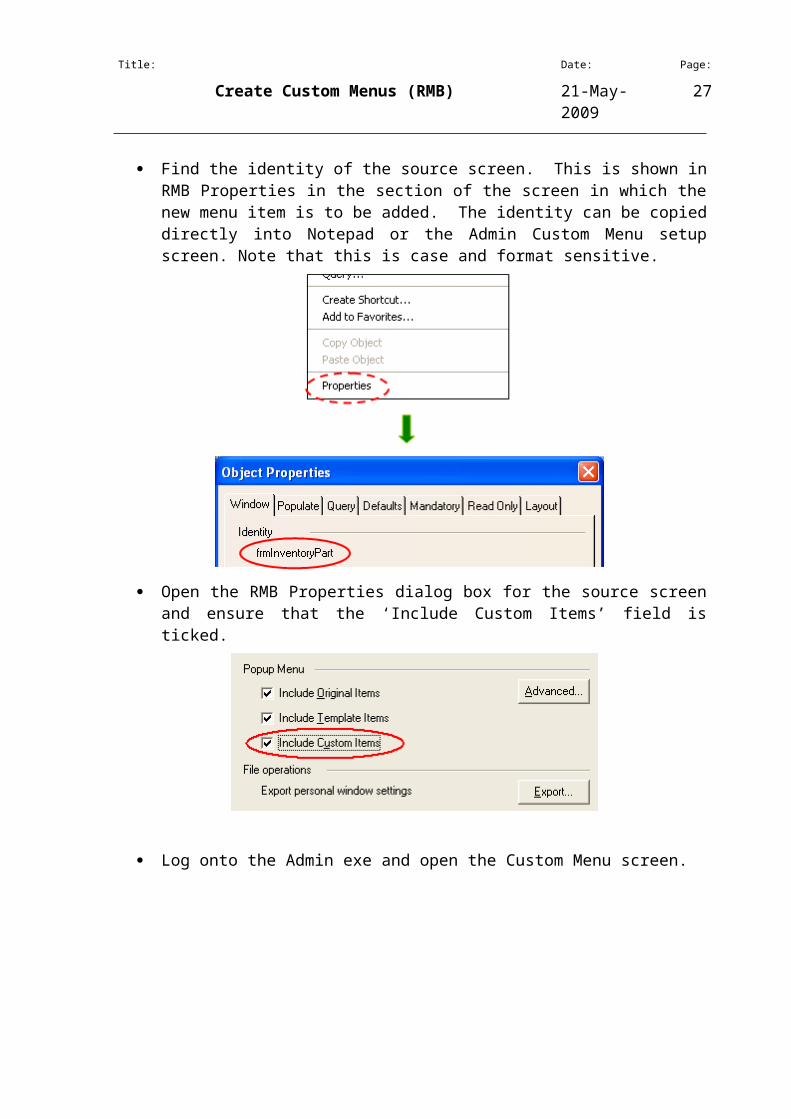
Find the identity of the source screen. This is shown in RMB Properties in the section of the screen in which the new menu item is to be added. The identity can be copied directly into Notepad or the Admin Custom Menu setup screen. Note that this is case and format sensitive.
Title: Date: Page:
Create Custom Menus (RMB) 21-May-2009 23
Open the RMB Properties dialog box for the source screen and ensure that the ‘Include Custom Items’ field is ticked.
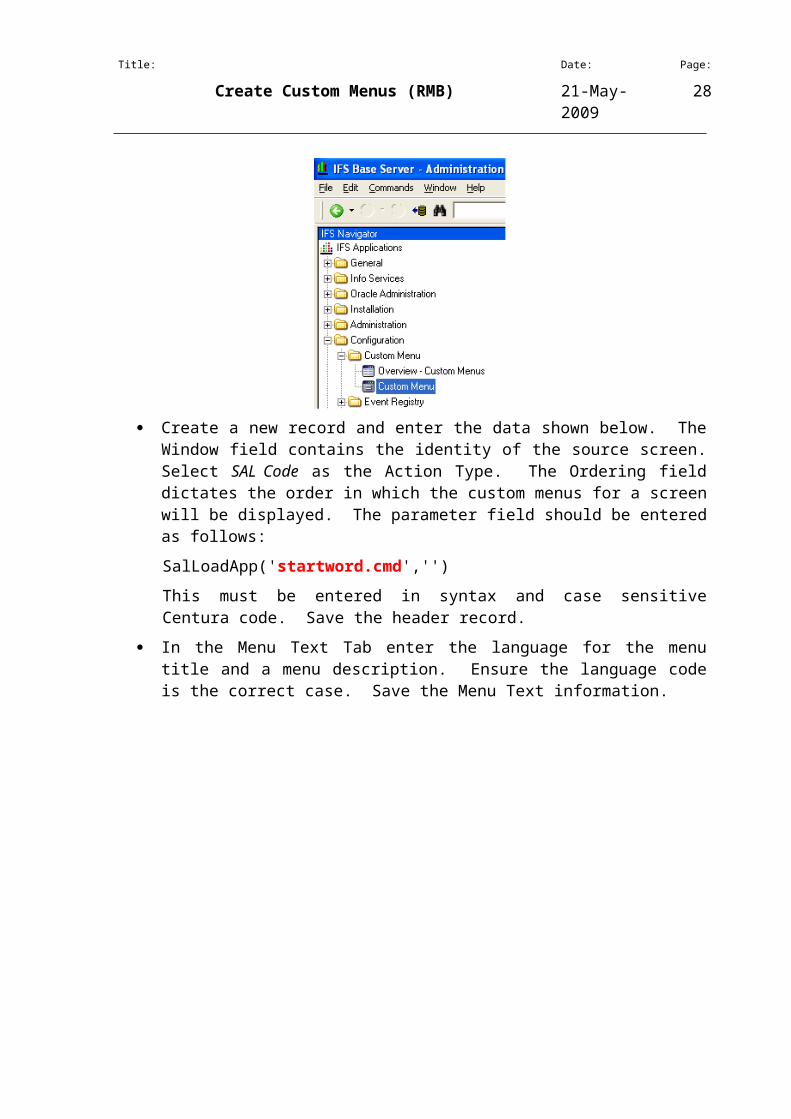
Log onto the Admin exe and open the Custom Menu screen.
Create a new record and enter the data shown below. The Window field contains the identity of the source screen. Select SAL Code as the Action Type. The Ordering
Title: Date: Page:
Create Custom Menus (RMB) 21-May-2009 24
field dictates the order in which the custom menus for a screen will be displayed. The parameter field should be entered as follows:
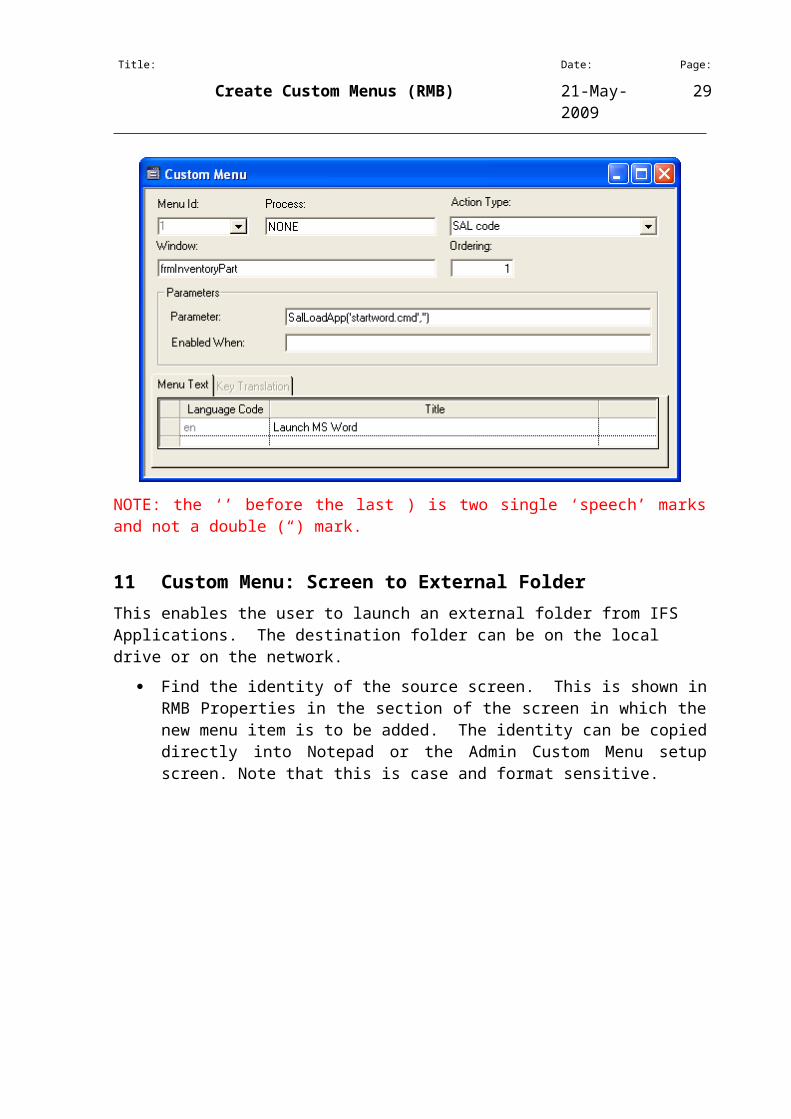
SalLoadApp('startword.cmd','')
This must be entered in syntax and case sensitive Centura code. Save the header record.
In the Menu Text Tab enter the language for the menu title and a menu description. Ensure the language code is the correct case. Save the Menu Text information.
NOTE: the ‘’ before the last ) is two single ‘speech’ marks and not a double (“) mark.
11 Custom Menu: Screen to External Folder
This enables the user to launch an external folder from IFS Applications. The destination folder can be on the local drive or on the network.
Find the identity of the source screen. This is shown in RMB Properties in the section of the screen in which the new menu item is to be added. The identity can be copied directly into Notepad or the Admin Custom Menu setup screen. Note that this is case and format sensitive.
Title: Date: Page:
Create Custom Menus (RMB) 21-May-2009 25
Open the RMB Properties dialog box for the source screen and ensure that the ‘Include Custom Items’ field is ticked.
Log onto the Admin exe and open the Custom Menu screen.
Create a new record and enter the data shown below. The Window field contains the identity of the source screen. Select SAL Code as the Action Type. The Ordering field dictates the order in which the custom menus for a screen will be displayed. The parameter field should be entered as follows:
Title: Date: Page:
Create Custom Menus (RMB) 21-May-2009 26
ShellExecuteA(hWndMDI,"Explore","C:\\GIS\\111","","",SW_SHOWNORMAL)
where C:\\GIS\\111 is the path of the folder to be opened (note the need for double backslashes). This must be entered in syntax and case sensitive Centura code. If a network drive is to be launched, the drive should be mapped with a letter on the Pc being used. Save the header record.
In the Menu Text Tab enter the language for the menu title and a menu description. Ensure the language code is the correct case. Save the Menu Text information.
12 Custom Menu: Screen to SQL Plus with automatic Log-in
This enables the user to log directly into SQL Plus from IFS. It is only possible if the alias of the database identified in the Sql.ini file is the same as the database name used when logging onto SQL Plus. If the database log-in for SQL Plus is ldnpdo2_d79, this must also be used as the alias in Sql.ini, as opposed to e.g. PD279G.
Find the identity of the source screen. This is shown in RMB Properties in the section of the screen in which the new menu item is to be added. The identity can be copied directly into Notepad or the Admin Custom Menu setup screen. Note that this is case and format sensitive.
Title: Date: Page:
Create Custom Menus (RMB) 21-May-2009 27
Open the RMB Properties dialog box for the source screen and ensure that the ‘Include Custom Items’ field is ticked.
Identify the program name of the version of SQL Plus running on the computer; this will be along the lines of SQLPlusW.exe or Plus80W.exe.
Log onto the Admin exe and open the Custom Menu screen.
Create a new record with the data shown below. The Window field contains the identity of the source screen. Select SAL Code as the Action Type. The Ordering
Title: Date: Page:
Create Custom Menus (RMB) 21-May-2009 28
field dictates the order in which the custom menus for a screen will be displayed. The parameter field should be entered as follows:
SalLoadApp('SQLPLUSW.EXE',SqlUser||'/'||SqlPassword||'@'||SqlDatabase)
where SQLPLUSW.EXE is the program name for SQL Plus. This must be entered in syntax and case sensitive Centura code. Save the header record.
In the Menu Text Tab enter the language for the menu title and a menu description. Ensure the language code is the correct case. Save the Menu Text information.
Log off and back onto the application and test the RMB function.
13 Custom Menu: Screen to Internet Explorer
This enables the user to launch a web page from IFS.
Find the identity of the source screen. This is shown in RMB Properties in the section of the screen in which the new menu item is to be added. The identity can be copied directly into Notepad or the Admin Custom Menu setup screen. Note that this is case and format sensitive.
Title: Date: Page:
Create Custom Menus (RMB) 21-May-2009 29
Open the RMB Properties dialog box for the source screen and ensure that the ‘Include Custom Items’ field is ticked.
Log onto the Admin exe and open the Custom Menu screen.
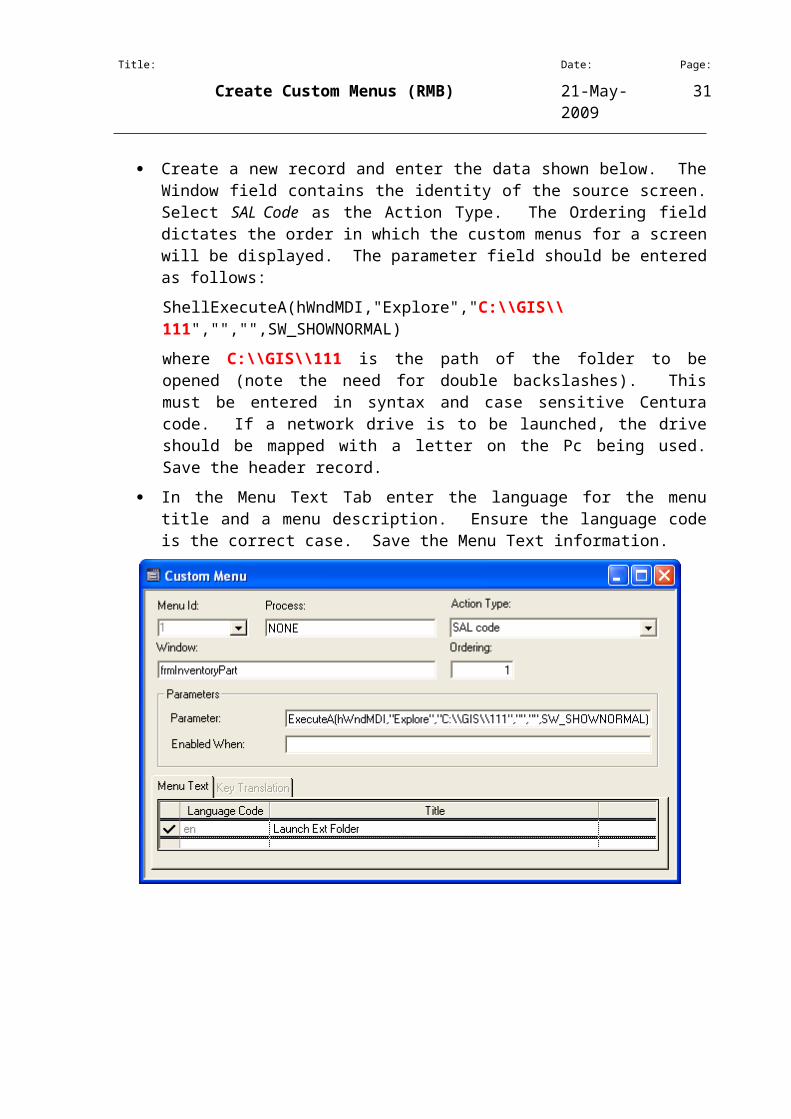
Create a new record and enter the data shown below. The Window field contains the identity of the source screen. Select SAL Code as the Action Type. The Ordering field dictates the order in which the custom menus for a screen will be displayed. The parameter field should be entered as follows:
Title: Date: Page:
Create Custom Menus (RMB) 21-May-2009 30
BrowsePage('http://www.google.com')
This must be entered in syntax and case sensitive Centura code. Save the header record.
In the Menu Text Tab enter the language for the menu title and a menu description. Ensure the language code is the correct case. Save the Menu Text information.
Log off and back onto the application and test the RMB function.
14 Custom Menu: Using ‘Enabled When’
This functionality enables the custom menu option to be conditionally displayed. If any text is entered in this box, the custom menu will only be available when all conditions are met.
Title: Date: Page:
Create Custom Menus (RMB) 21-May-2009 31
In the above example, the custom menu item is designed to launch a quick report by passing a parameter. The following text is entered into the Enabled When field:
hWndForm.frmInventoryPart.dfsDescription!=''
This means that the custom menu will only be available when the description field is not null. In order to apply multiple conditions the standard ‘and’ and ‘or’ operators are available:
hWndForm.frmInventoryPart.ecmbPartNo.i_sMyValue!='' and
hWndForm.frmInventoryPart.cmbPartType.i_sMyValue='Purchased'