creating custom portal using webcenter framework: how-to tutorial
TRANSCRIPT

An Oracle Tutorial
April 2012
Creating Custom Portal using WebCenter Framework: How-To Tutorial

Creating Custom Portal using WebCenter Framework: How-To Tutorial
Disclaimer
The following is intended to outline our general product direction. It is intended for information purposes
only, and may not be incorporated into any contract. It is not a commitment to deliver any material, code, or
functionality, and should not be relied upon in making purchasing decisions. The development, release, and
timing of any features or functionality described for Oracle’s products remains at the sole discretion of
Oracle.

Creating Custom Portal using WebCenter Framework: How-To Tutorial
Table of Contents
Executive Overview ........................................................................... 2
Introduction ....................................................................................... 2
Custom Portal Development .............................................................. 3
Framework Bundle Installation ....................................................... 3
Creating Custom Portal ................................................................. 5
Testing the Custom Application ..................................................... 7
WebCenter Environment Information ................................................. 9
Creating Custom WebCenter Managed Server ................................ 10
"Oracle WebCenter Custom Portal" template .............................. 10
Backup of WebCenter Domain .................................................... 10
Creating Schemas for “WebCenter Custom Portal” ..................... 11
Importing Managed Server Template ........................................... 12
Starting and Stopping Custom Portal Managed Server ................ 16
Deploying Application to Custom Portal Managed Server ................ 17
Adding Managed Server as Connection ...................................... 17
Custom Application Deployment .................................................. 18
Testing Custom Application in Standalone Managed Server ....... 20
Configuring an External LDAP for WebCenter ............................. 20
Registering WSRP Portlets .......................................................... 20
Creating Pages in Custom Portal ................................................. 23
Adding EnterpriseOne Portlets to a Page .................................... 24
References ...................................................................................... 27

Creating Custom Portal using WebCenter Framework: How-To Tutorial
2
Executive Overview
Oracle JD Edwards EnterpriseOne provides various platforms for creating Enterprise class
portal solutions. The platforms available today are Oracle WebCenter Framework, Oracle
WebCenter Spaces and IBM WebSphere Portal. This paper provides an overview on how to
leverage Oracle WebCenter Framework and create Custom Portal for customers trying to
implement Oracle JD Edwards EnterpriseOne Self Service Portlets.
Introduction
Oracle WebCenter Portal: Framework is a modern portal framework that speeds delivery of portals and websites and extends the capabilities of traditional enterprise portals. The Framework enables both developers and business users to collaboratively build out the exact portal solution required for internet, extranet, intranet, or social computing applications. A rich array of features and services enable you to:
Build and consume standards-based portlets
Integrate content from many different content stores through standard interfaces and the Content Presenter task flow.
Build pages that are consistent in structure, layout, and look and feel.
Build navigation components to facilitate enterprise-wide reuse as well as deliver dynamic query and content-based navigation.
Apply themes and skins to change the application's appearance without changing the portal pages themselves.
Apply delegated security policies to a hierarchy of portal pages and other navigable elements, like portlets and content.
Make the application customizable at runtime, empowering end users to edit application pages using Composer in WebCenter Portal.
Personalize portal pages with Personalization for WebCenter Portal.
Add social networking and personal productivity services to your portal with WebCenter Portal Services.
Leverage productivity tools to perform rapid, iterative development of portal components.

Creating Custom Portal using WebCenter Framework: How-To Tutorial
3
Custom Portal Development
Custom portal development requires JDeveloper, please download and install the same for implementing the EnterpriseOne WebCenter Custom Portal solution. You will also require WebCenter Framework bundle (oracle.webcenter.framework_bundle.zip) which can be downloaded separately.
Framework Bundle Installation
To install the framework bundle, open JDeveloper and go to Help -> Check for Updates and
Import the zip file from the source screen. After importing the required extension, you may check artifacts deployed by going to Help > About > Extensions > Identifier. Sort by name and check for oracle.webcenter.* to check all the WebCenter related extensions that are deployed. Figure 1 below shows some of the extensions that are deployed.
Figure 1.Sample of WebCenter Extensions that are required for created Custom Portal using JDeveloper

Creating Custom Portal using WebCenter Framework: How-To Tutorial
4
Make sure that the version of JDeveloper and WebCenter Framework Bundle is same as the WebCenter Server
Installation you will be performing or already have in your environment. In this example we are using 11.1.1.4
JDeveloper version and extension bundle associated for the same version. You can find the JDeveloper version by
opening JDeveloper and going to Help > About
Figure 2.Version of JDeveloper used for Creating Custom Portal
When downloading the framework bundle version, make sure to download the bundle for the number after GENERIC,
which in this case is 101227.1736.5923
If you have already installed your WebCenter Server, easiest way to find the version is by executing the command
below using SQLPLUS.
Figure 3.Command to check the version of WebCenter Server Installed
If the versions do not match, then the deployment process will have errors. Hence it is very important to match the
versions of your development machine with the server you will be deploying this to. If you want to associate your
development environment with versioning tool, Refer to Oracle Fusion Middleware “Developer’s Guide for Oracle
WebCenter “.
SELECT "VERSION", "LABEL" FROM "DEV_WEBCENTER"."WC_REPOSITORY_VERSION"
11.1.1.4.0 WORKPLACE_11.1.1.5.0_GENERIC_110415.0606

Creating Custom Portal using WebCenter Framework: How-To Tutorial
5
Creating Custom Portal
Follow the steps below to create a Custom Portal with Default Template that is provided. You can do additional steps to create custom Page Template and Skins to change the look and feel of your portal.
1. Open JDeveloper, if it is not open
2. Click New Application
3. Change the Application Name from the default value provided, for example “E1PortalApplication”
4. Provide an Application Package Prefix, for example oracle.eone
5. From the Templates below select, WebCenter Portal – Framework Application
Figure 4.WebCenter Portal Application Template available after installing required extensions
6. We will be taking defaults for Step 2 through 5, Go ahead and Click Finish
7. Your newly created application should open in the Application Navigator Window. Browse
through to get a feel for the application.
8. Right Click on the Application Name (E1PortalApplication) and click on Application Properties

Creating Custom Portal using WebCenter Framework: How-To Tutorial
6
9. Click Run and Change Deployment Timeout from 0 to 300.
10. Click the + Sign next to Run, Click MDS
a. If you want to test by making any application changes which you want to be preserved when the
application is stopped and re-started, click on “Preserve customizations across application runs”
11. Click OK
12. Click Save All Button to save the changes that have been made
13. In the E1PortalApplication, Under Projects highlight Portal and Right Click the same
14. Select Project Properties, This opens the properties window for the Portal as shown below
Figure 5.Jave EE Application Context Root for Portal Application
15. Change the Java EE Web Context Root from “E1PortalApplication-Portal-context-root” to
“E1Portal”
16. Click OK.
17. Click Save All Button to save the changes that have been made

Creating Custom Portal using WebCenter Framework: How-To Tutorial
7
Testing the Custom Application
The custom portal that was created above can be tested with integrated WebLogic Server
configured with JDeveloper.
1. Right click on index.html shown below and Click Run
Figure 6.Default page for the WebCenter Custom Portal
2. Configure Default Domain window might open if the integrated server is not configured.
3. Provide password and Confirm password, password provided for the example is “weblogic1”
4. Select “localhost” from the list for Listen Address
Figure 7.Integrated WebLogic Server Domain Configuration
5. Click OK

Creating Custom Portal using WebCenter Framework: How-To Tutorial
8
6. This should create the domain and start the services for Portal Application and Open your New Application in your default browser
Figure 8.Integrated WebLogic Server starting and creating Default Domain
7. The target URL for the application is shown below
Figure 9.Target URL for Custom Portal created using JDeveloper
8. The default application that opens is shown below
Figure 10.Custom Portal Main Page
9. Sign in with User/Password provided in Step 4 and browse around to get a feel for the
application. The link you can browse is “Administration”. This should give you reference to Resources, Services, Security and Configuration.
a. Refer to Oracle Fusion Middleware : Administration Guide for Oracle WebCenter, if
you would like to know each section in detail

Creating Custom Portal using WebCenter Framework: How-To Tutorial
9
WebCenter Environment Information
The environment installation directory listing for the WebCenter Server is shown below. Database:
Service Name: orcl User: sys/welcome1 as sysdba
Important Directories: JDK: C:\Software\Java\jrockit-jdk1.6.0_24-R28.1.3-4.0.1 DATABASE: C:\Software\Oracle\product\11.2.0\dbhome_1 MIDDLEWARE: C:\Software\Middleware ORACLE_COMMON: C:\Software\Middleware\oracle_common WEBLOGIC: C:\Software\Middleware\wlserver_10.3 WEBCENTER: C:\Software\Middleware\Oracle_WC1 BASE_DOMAIN: C:\Software\Middleware\user_projects\domains\base_domain When these directories are used in the document going forward, they will be referred as for example %ORACLE_COMMON%
Figure 11.Single Node WebCenter Installation with standard out of the box Managed Servers
If you haven’t performed the installation, you can refer to Oracle Fusion Middleware Installation Guide for Oracle WebCenter Portal for detailed instructions or refer to support Note 1316942.1

Creating Custom Portal using WebCenter Framework: How-To Tutorial
10
Creating Custom WebCenter Managed Server
Before deploying Custom WebCenter Portal Applications you must create a WebLogic Managed Server. Depending on the type of application that you are deploying you can choose between different templates when creating the Managed Server. In the section below we will be discussing about Oracle WebCenter Custom Portal template which is used to create a Custom Portal Managed Server and the process involved. If you want to also use Custom Services, you can follow similar process and create that Managed Server by using the template for that Server creation process.
"Oracle WebCenter Custom Portal" template
This template contains all the required Libraries for deploying Custom WebCenter Portal applications. Custom WebCenter Portal applications are created in JDeveloper using the "WebCenter Portal Application" template. A template can only be applied once to a domain. If you want to create multiple custom Managed Servers, you must clone the existing custom Managed Server with the cloneWebCenterManagedServer WLST command. Oracle WebCenter Custom Portal server need an MDS schema targeted to them. Multiple Custom Portal WebCenter applications can share the same MDS schema. This means that multiple deployed applications can use the same MDS schema, each having its own partition defined in MDS. Multiple Custom Portal WebCenter applications cannot share the same WEBCENTER schema. This means that multiple deployed applications need their own WEBCENTER schema. So if you need to deploy more than one Custom WebCenter Portal application you need to create a set of schemas for each application using RCU. Then you can clone the existing custom Managed Server with the cloneWebCenterManagedServer WLST command and associate the new schemas to the cloned managed server or associate the new schemas to an existing custom Managed Server. Deployment of Custom WebCenter applications to the pre-configured Managed Servers created during the installation of WebCenter or the domain Administration Server is not supported.
Backup of WebCenter Domain
Before starting to configure Custom Portal, Backup your existing WebCenter domain. Make an offline backup of your existing WebCenter Domain with all the managed servers down. An offline backup means that you must shut down the environment before backing up the files. When you perform an offline backup, the Administration Server, all Managed Servers in the domain all system components in the Oracle domain should be shutdown. Also make sure to do a cold database backup of all the databases associated with the Domain.

Creating Custom Portal using WebCenter Framework: How-To Tutorial
11
Creating Schemas for “WebCenter Custom Portal”
The steps below walk you through to create the schemas required for WebCenter Custom Portal
managed Server.
1. Start RCU utility by going to bin directory in your RCU_HOME
2. Click Next to skip the Welcome Screen
3. Select “Create” to Load component schemas into the database and Click “Next”
4. Provide the connection details for the database as shown below and Click “Next”
Figure 12.Database Connection details for creating WebCenter Schemas using RCU
5. In the select components screen, Select “Create a new Prefix”. For Example: CUSTPTL and
Check WEBCENTER and ACTIVITIES under WebCenter Suite. This will automatically select Metadata Services. These are the schemas that will be associated with the Custom Portal Managed Server. Click “Next”

Creating Custom Portal using WebCenter Framework: How-To Tutorial
12
Figure 13.WEBCENTER, ACTIVIES and MDS Schemas required for Custom Portal
6. Provide password for all schemas, Click “Next”
7. Click Next on the Custom Variables
8. Accept defaults for all Tablespaces and Click Next.
9. Click Ok to create all Tablespaces
10. Click “Create” in the Summary screen
11. Click “Close” when completed. Now we have created all the required schemas that we need to
associate out Managed Server with.
Importing Managed Server Template
1. Connect to the WebCenter Server using the login you used to install the WebCenter Server.
2. Stop all Managed Servers, Admin Server and Node manager on the domain you will be extending
3. Run the Configuration Wizard(%ORACLE_COMMON%\bin\config.exe) to extend the
domain
4. In the welcome Screen, Select Extend an existing WebLogic domain and Click “Next”
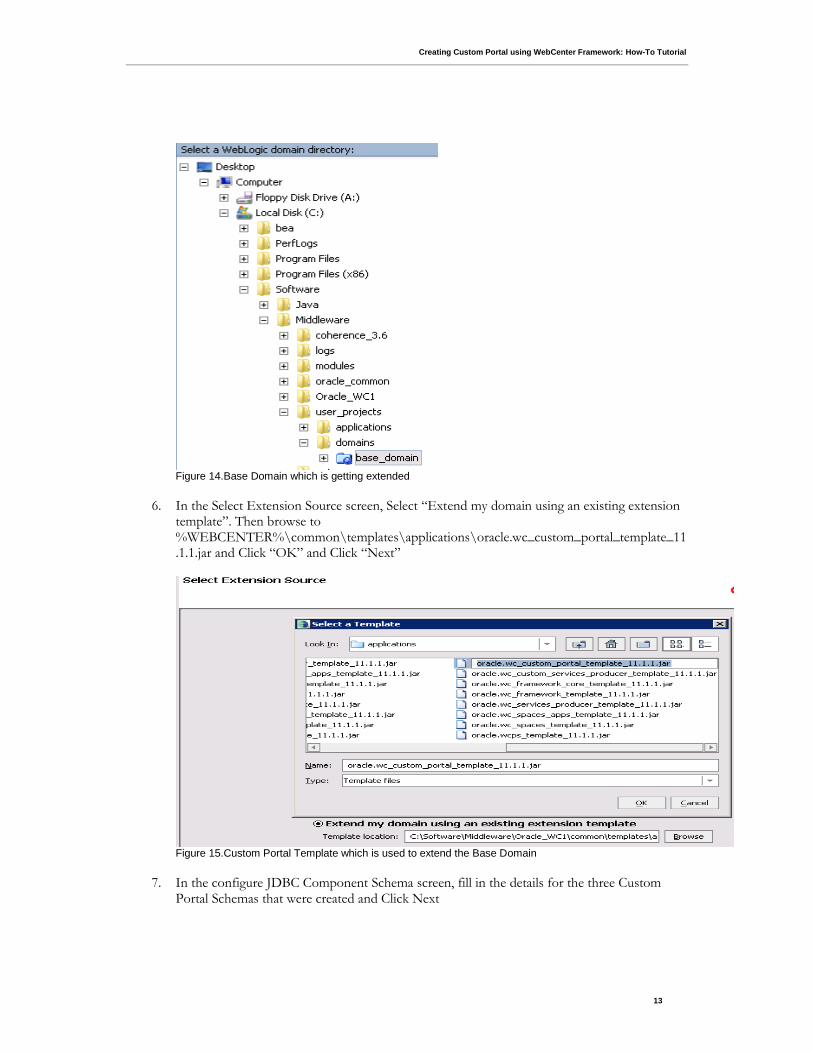
5. In the Select a WebLogic domain directory screen, choose %BASE_DOMAIN% directory and Click “Next”
Creating Custom Portal using WebCenter Framework: How-To Tutorial
13
Figure 14.Base Domain which is getting extended
6. In the Select Extension Source screen, Select “Extend my domain using an existing extension
template”. Then browse to %WEBCENTER%\common\templates\applications\oracle.wc_custom_portal_template_11.1.1.jar and Click “OK” and Click “Next”
Figure 15.Custom Portal Template which is used to extend the Base Domain
7. In the configure JDBC Component Schema screen, fill in the details for the three Custom
Portal Schemas that were created and Click Next

Creating Custom Portal using WebCenter Framework: How-To Tutorial
14
Figure 16.Custom Schemas attached to Custom Portal Managed Server
8. In the Test JDBC Component Screen, you should see three green check marks next to the
schemas which were just attached to the Managed Server. If any of them fails, correct the same by going to the Click “Previous”. If there are no errors then you can proceed using Click “Next”
9. In the Select Optional Configuration, Select “Managed Servers, Clusters and Machines” and
Click “Next”
10. In the Configure Managed Servers screen, you can change the Listen Port if you want to configure a different port from the standard port which is 8892 for Custom Portal. Click “Next”

Creating Custom Portal using WebCenter Framework: How-To Tutorial
15
Figure 17.Custom Portal Managed Server with default port configuration
11. Click “Next” on the Configure Clusters Screen
12. Configure Machines screen should come up with the node manager related details if it is
already configured, if not you can add the same at this time and Click “Next”
13. In the Assign Servers to Machines, Select the WC_CustomPortal on the left and use the arrow to transfer to the Machine on the right panel. Once you see the Managed Server under the Machine, Click “Next”
Figure 18.Custom Portal managed server attached to Node Manager Machine
14. Click “Extend” in the Configuration Summary Screen.
15. Click “Done” when Completed and this should close the Configuration Wizard.

Creating Custom Portal using WebCenter Framework: How-To Tutorial
16
After importing the template and Custom Portal Managed Server creation, your environment should look like what is shown below, but going forward we will not be using any of the other servers. We will be using Admin Server and Custom Portal Server.
Figure 19.WebCenter Server Environment after adding Custom Portal Server, But we will just be using
WC_CustomPortal and AdminServer
Starting and Stopping Custom Portal Managed Server
The server can be started and stopped using the WebLogic Administration Console or
startManagedWebLogic command in %BASE_DOMAIN%\bin. Also by default this server comes with minimum and maximum heap parameters of 128 and 512, this is good for development environment. But in production these must be adjusted based on your user.

Creating Custom Portal using WebCenter Framework: How-To Tutorial
17
Deploying Application to Custom Portal Managed Server
Now we have a sample portal application which was tested with the Integrated WebLogic Server and we have the managed server (WC_CustomPortal) created for deploying the custom portal application. There are several different ways to do packaging the application and deploying it to the Sever, what is documented below is one of the way to do accomplish the task. You may refer to Oracle Fusion Middleware Developer Guide for Oracle WebCenter for other options. In order to directly deploy to the Managed Server a connection must be created to the Server from JDeveloper. The steps below show how to attach the managed server as one of the connection.
Adding Managed Server as Connection
1. Open you JDeveloper and Open your Application
2. In the Menu bar, go to View > Application Server Navigator
3. Right Click on Application Servers and Select “New Application Server”
4. Select “Standalone Server” and Click Next
5. Assign a Connection Name, for example: denptw29. Click “Next”
6. Enter username/password and Click “Next”
7. Enter the server connection details: Hostname, Port and Domain. Example configuration is shown in the screenshot below
Figure 20.Application Server Connection Details for Administrative Server in your Domain
Creating Custom Portal using WebCenter Framework: How-To Tutorial
18
8. Once you enter the details, you can go ahead and test the connection. There should be 8
status messages and they all should end with success. Click “Next”
9. Click Finish and now you should see your newly added connection under your Application Servers.
Custom Application Deployment
The application (E1PortalApplication) that was created can be deployed to the Managed Server that was added in the previous step.
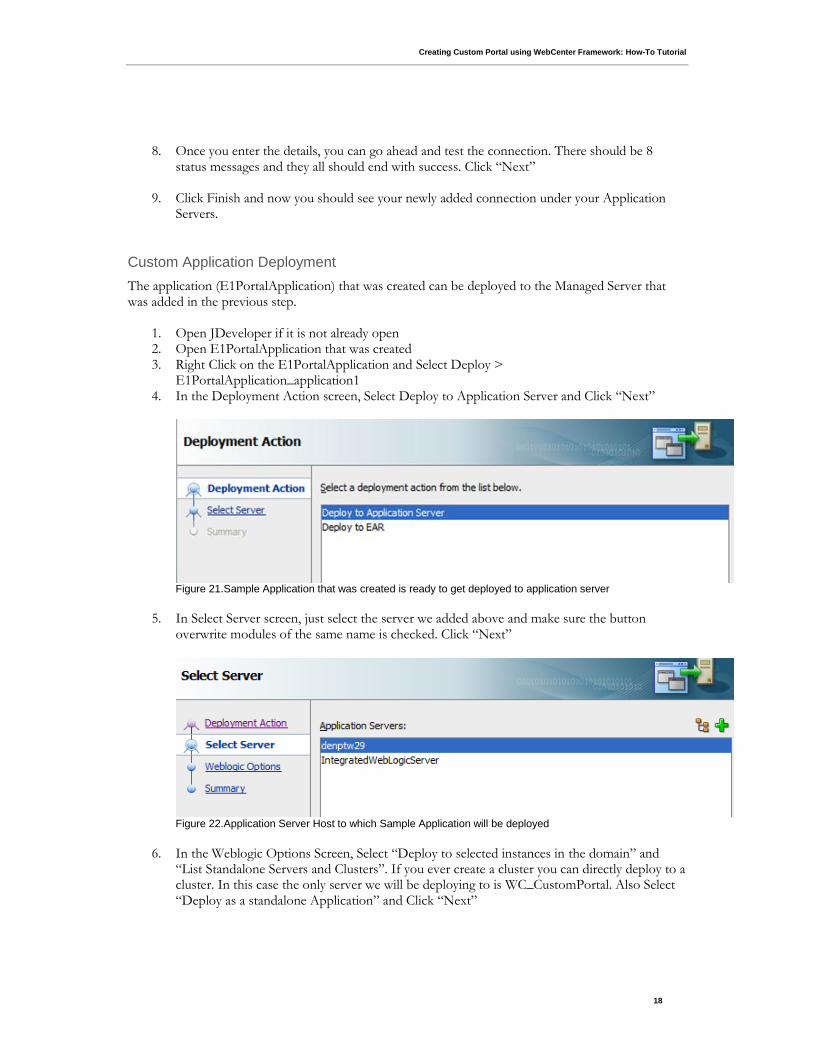
1. Open JDeveloper if it is not already open 2. Open E1PortalApplication that was created 3. Right Click on the E1PortalApplication and Select Deploy >
E1PortalApplication_application1 4. In the Deployment Action screen, Select Deploy to Application Server and Click “Next”
Figure 21.Sample Application that was created is ready to get deployed to application server
5. In Select Server screen, just select the server we added above and make sure the button
overwrite modules of the same name is checked. Click “Next”
Figure 22.Application Server Host to which Sample Application will be deployed
6. In the Weblogic Options Screen, Select “Deploy to selected instances in the domain” and
“List Standalone Servers and Clusters”. If you ever create a cluster you can directly deploy to a cluster. In this case the only server we will be deploying to is WC_CustomPortal. Also Select “Deploy as a standalone Application” and Click “Next”

Creating Custom Portal using WebCenter Framework: How-To Tutorial
19
Figure 23.Managed Server to which Sample Application will be deployed
7. In the Summary window if everything looks good, Go ahead and Click “Finish”.
8. You should see an option to associate the Repository Name with a Partition for the
Application, which will store all the application customizations. Accept the defaults and Click “Deploy”
Figure 24.Repository and Partition in which the Runtime Customizations will be stored
9. You can check the status of deployment in the Log Viewer at the bottom of JDeveloper. The
screen shot of the same is shown below.

Creating Custom Portal using WebCenter Framework: How-To Tutorial
20
Figure 21.Deployment status of the Sample Application
Testing Custom Application in Standalone Managed Server
Now that the application is deployed to the Standalone WC_CustomPortal Managed Server
we should be able to check if we can do the same testing we accomplished when testing in a integrated environment using JDeveloper.
1. Start your WC_CustomPortal Managed Server if it is not running
2. Open a browser and enter http://<host>:<port>/E1Portal , in my example it is http://denptw29.mlab.jdedwards.com:8892/E1Portal . This should open the main page to your custom portal application.
Configuring an External LDAP for WebCenter
The process for configuring an external LDAP is similar whether it is a custom Portal or we are using WebCenter Spaces. The process is documented at http://www.oracle.com/webfolder/technetwork/tutorials/jdedwards/WebCenterLDAP/01_configuring_an_external_ldap_for_webcenter_viewlet_swf.html . If you have your OID Server or any other LDAP server go ahead and configure the same before proceeding further.
Registering WSRP Portlets
EnterpriseOne WSRP Portlets can be registered using WebCenter Custom Portal or Enterprise Manager. The steps below show how to register.
Registering using Enterprise Manager
1. Log into Enterprise Manager (http://<host>:7001/em) using admin user and password
2. Expand Farm_base_domain > Application Deployments
3. Click E1PortalApplication_application1(V2.0)(WC_CustomPortal)
4. On the Right Pane Click on Down Arrow next to Application Deployment
Creating Custom Portal using WebCenter Framework: How-To Tutorial
21
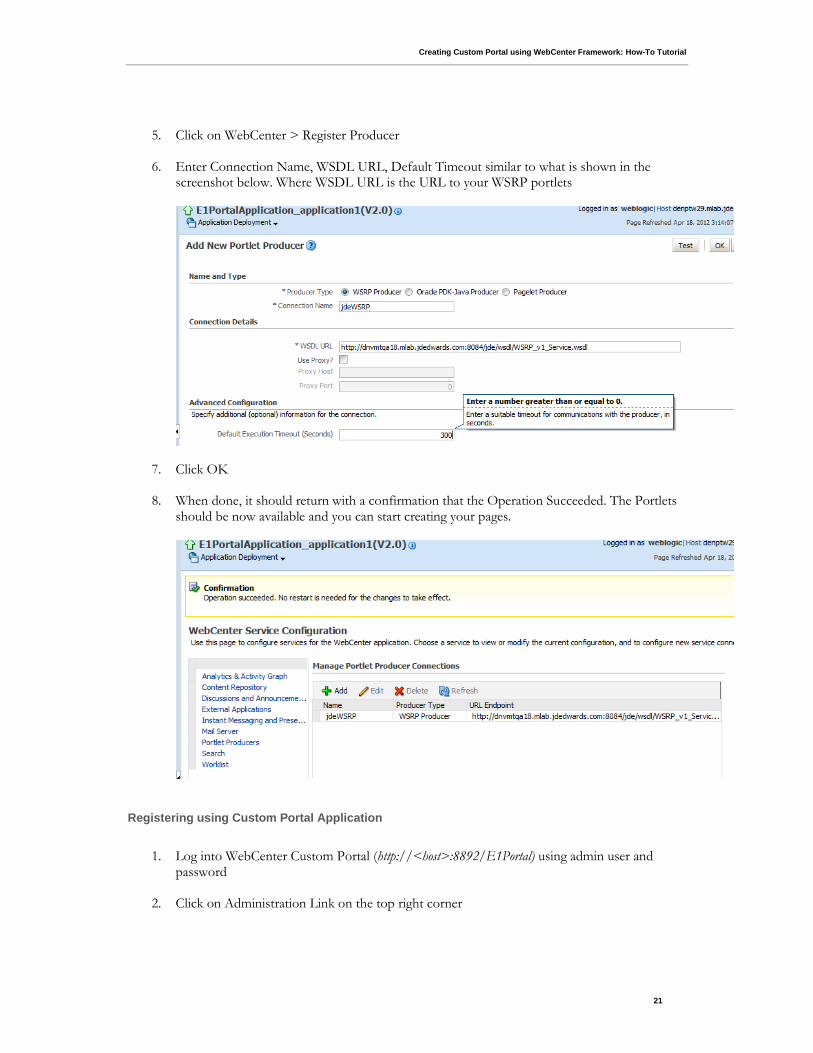
5. Click on WebCenter > Register Producer
6. Enter Connection Name, WSDL URL, Default Timeout similar to what is shown in the screenshot below. Where WSDL URL is the URL to your WSRP portlets
7. Click OK
8. When done, it should return with a confirmation that the Operation Succeeded. The Portlets should be now available and you can start creating your pages.
Registering using Custom Portal Application
1. Log into WebCenter Custom Portal (http://<host>:8892/E1Portal) using admin user and
password
2. Click on Administration Link on the top right corner

Creating Custom Portal using WebCenter Framework: How-To Tutorial
22
3. Click on Services > Portlet Producers >
4. Enter Producer Name, WSDL URL and Timeout similar to what is shown below. Where WSDL URL is the URL to your WSRP portlets
5. Click OK
6. Once registered you should see the Portlets available as shown in the screen shot below

Creating Custom Portal using WebCenter Framework: How-To Tutorial
23
Creating Pages in Custom Portal
1. Log into WebCenter Custom Portal (http://<host>:8892/E1Portal) using admin user and
password
2. Click on Administration Link on the top right corner
3. You should be directed to Resources > Structure > Pages
4. Click “Create Page”
5. Enter a value for Page Name, Associate a template and pick a page style and Click “Create”
6. If you want the page created to be displayed to everyone, Click on the box below “Show Page”

Creating Custom Portal using WebCenter Framework: How-To Tutorial
24
Adding EnterpriseOne Portlets to a Page
In the previous section we created a Page called Menu, we will be adding E1Menu Portlet to that page.
1. Log into WebCenter Custom Portal (http://<host>:8892/E1Portal) using admin user and password
2. Click on Administration Link on the top right corner
3. You should be directed to Resources > Structure > Pages
4. For the Line with Menu, Click on Actions ( ) , Click on Edit Page
5. Click Add Content
6. The resource catalog available should open, Click Portlets

Creating Custom Portal using WebCenter Framework: How-To Tutorial
25
7. You will see Administration, which contains the required administration Portlets and jdeWSRP. jdeWSRP is the WSDL we registered earlier. This will contain all the EnterpriseOne Portlets that are available in this Custom Portal. Click “jdeWSRP”
8. You can either browse for E1Menu or use the search in the top right corner and Click Add when you find the portlet
9. Click Edit button ( ) for the portlet
10. Click Display options tab and Change Render Portlet in IFrame from “auto” to “true”

Creating Custom Portal using WebCenter Framework: How-To Tutorial
26
11. Click “Apply”
12. Click “OK”
13. Click “Close” to exit the edit page mode.
14. To test the page, logout and login with a valid EnterpriseOne User and check the Menu page. You may similarly create more pages and drop EnterpriseOne Portlets to those pages.

Creating Custom Portal using WebCenter Framework: How-To Tutorial
27
References
Please go over these guides, which will give more details that you might require to install, administer, and develop WebCenter Portal
Oracle Fusion Middleware Developer’s Guide for Oracle WebCenter Portal
Oracle Fusion Middleware Tutorial for Oracle WebCenter Portal Developers
Oracle Fusion Middleware Installation Planning Guide
Oracle Fusion Middleware Installation Guide for WebCenter Portal
Oracle Fusion Middleware Administrator Guide for Oracle WebCenter Portal

Creating Custom Portal using WebCenter
Framework: How-To Tutorial
April 2012
Author: Hari Karnati
Contributing Authors:
Oracle Corporation
World Headquarters
500 Oracle Parkway
Redwood Shores, CA 94065
U.S.A.
Worldwide Inquiries:
Phone: +1.650.506.7000
Fax: +1.650.506.7200
oracle.com
Copyright © 2012, Oracle and/or its affiliates. All rights reserved. This document is provided for information purposes only and the
contents hereof are subject to change without notice. This document is not warranted to be error-free, nor subject to any other
warranties or conditions, whether expressed orally or implied in law, including implied warranties and conditions of merchantability or
fitness for a particular purpose. We specifically disclaim any liability with respect to this document and no contractual obligations are
formed either directly or indirectly by this document. This document may not be reproduced or transmitted in any form or by any
means, electronic or mechanical, for any purpose, without our prior written permission.
Oracle and Java are registered trademarks of Oracle and/or its affiliates. Other names may be trademarks of their respective owners.
Intel and Intel Xeon are trademarks or registered trademarks of Intel Corporation. All SPARC trademarks are used under license and
are trademarks or registered trademarks of SPARC International, Inc. AMD, Opteron, the AMD logo, and the AMD Opteron logo are
trademarks or registered trademarks of Advanced Micro Devices. UNIX is a registered trademark licensed through X/Open
Company, Ltd. 0112