creative gazebo how to build an octagonal deck · pdf filecreative gazebo how to build an...
TRANSCRIPT
Creative Gazebo
How to Build an Octagonal Deck
i
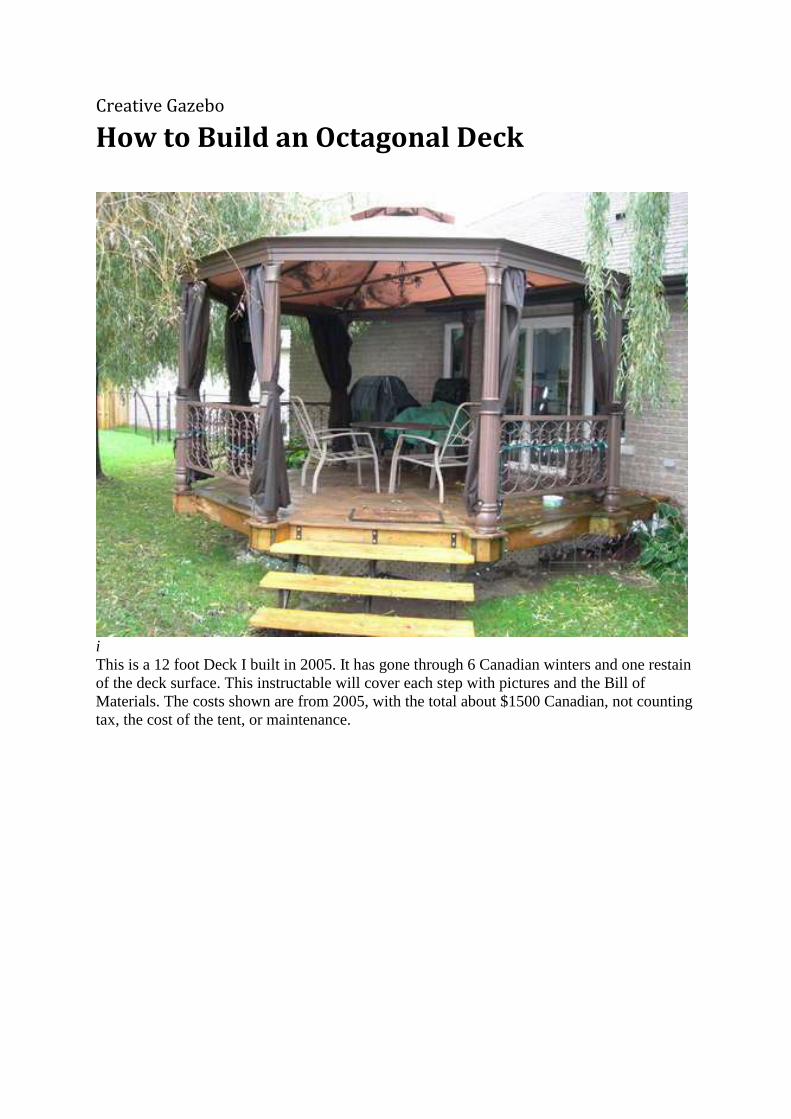
This is a 12 foot Deck I built in 2005. It has gone through 6 Canadian winters and one restain
of the deck surface. This instructable will cover each step with pictures and the Bill of
Materials. The costs shown are from 2005, with the total about $1500 Canadian, not counting
tax, the cost of the tent, or maintenance.
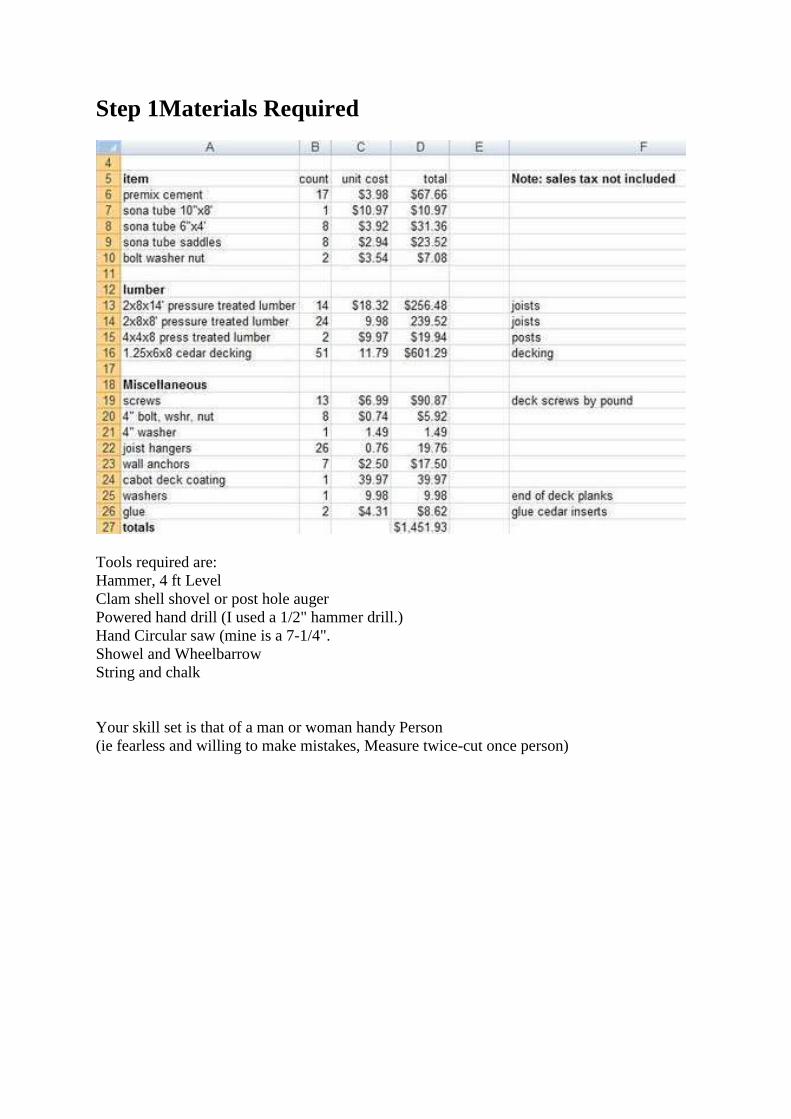
Step 1Materials Required
Tools required are:
Hammer, 4 ft Level
Clam shell shovel or post hole auger
Powered hand drill (I used a 1/2" hammer drill.)
Hand Circular saw (mine is a 7-1/4".
Showel and Wheelbarrow
String and chalk
Your skill set is that of a man or woman handy Person
(ie fearless and willing to make mistakes, Measure twice-cut once person)
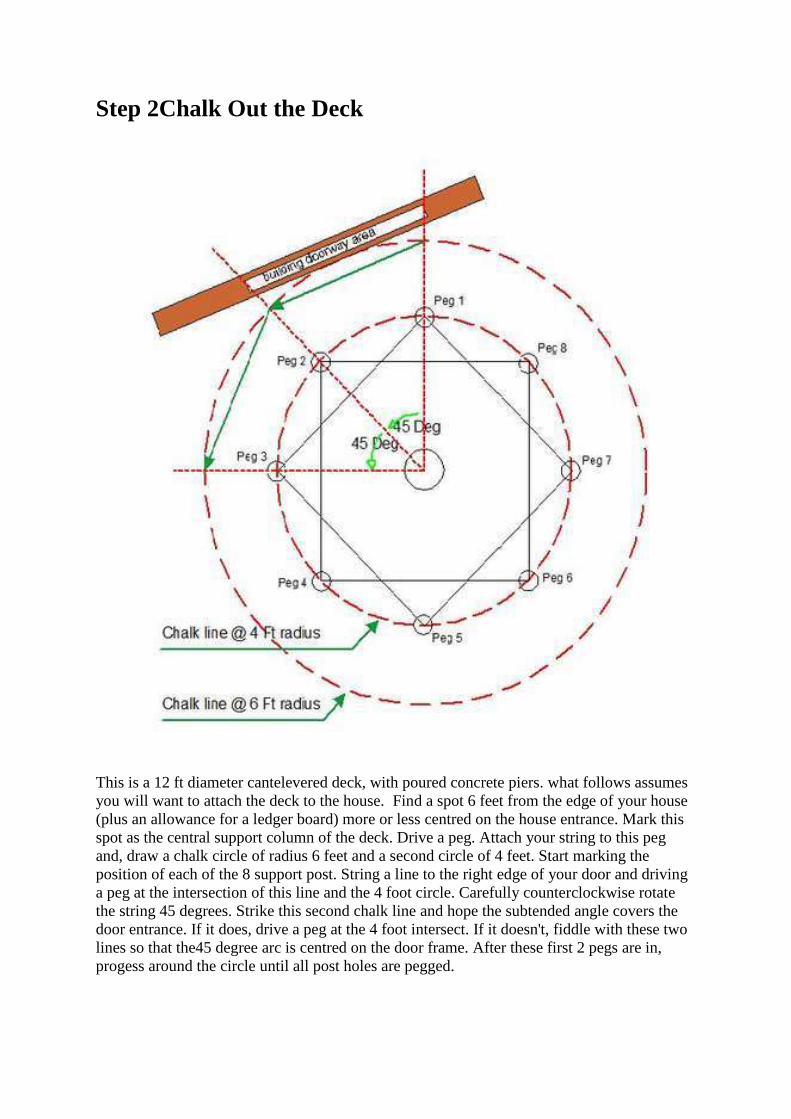
Step 2Chalk Out the Deck
This is a 12 ft diameter cantelevered deck, with poured concrete piers. what follows assumes
you will want to attach the deck to the house. Find a spot 6 feet from the edge of your house
(plus an allowance for a ledger board) more or less centred on the house entrance. Mark this
spot as the central support column of the deck. Drive a peg. Attach your string to this peg
and, draw a chalk circle of radius 6 feet and a second circle of 4 feet. Start marking the
position of each of the 8 support post. String a line to the right edge of your door and driving
a peg at the intersection of this line and the 4 foot circle. Carefully counterclockwise rotate
the string 45 degrees. Strike this second chalk line and hope the subtended angle covers the
door entrance. If it does, drive a peg at the 4 foot intersect. If it doesn't, fiddle with these two
lines so that the45 degree arc is centred on the door frame. After these first 2 pegs are in,
progess around the circle until all post holes are pegged.
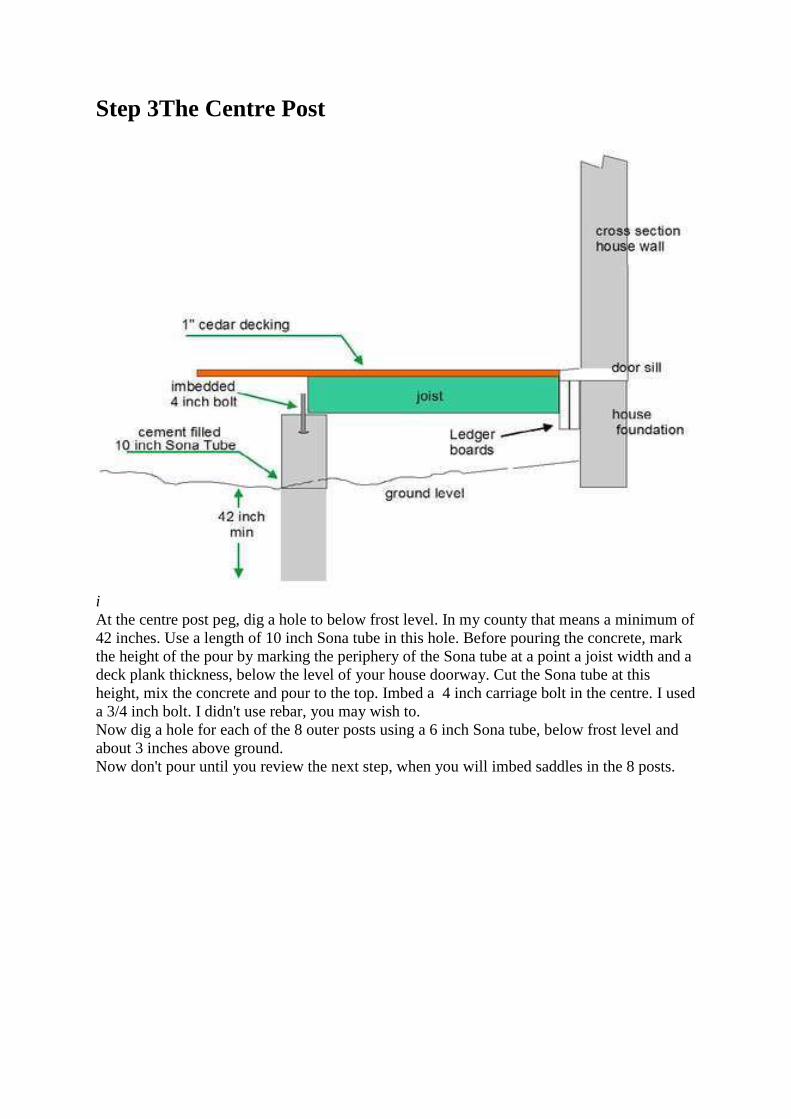
Step 3The Centre Post
i
At the centre post peg, dig a hole to below frost level. In my county that means a minimum of
42 inches. Use a length of 10 inch Sona tube in this hole. Before pouring the concrete, mark
the height of the pour by marking the periphery of the Sona tube at a point a joist width and a
deck plank thickness, below the level of your house doorway. Cut the Sona tube at this
height, mix the concrete and pour to the top. Imbed a 4 inch carriage bolt in the centre. I used
a 3/4 inch bolt. I didn't use rebar, you may wish to.
Now dig a hole for each of the 8 outer posts using a 6 inch Sona tube, below frost level and
about 3 inches above ground.
Now don't pour until you review the next step, when you will imbed saddles in the 8 posts.
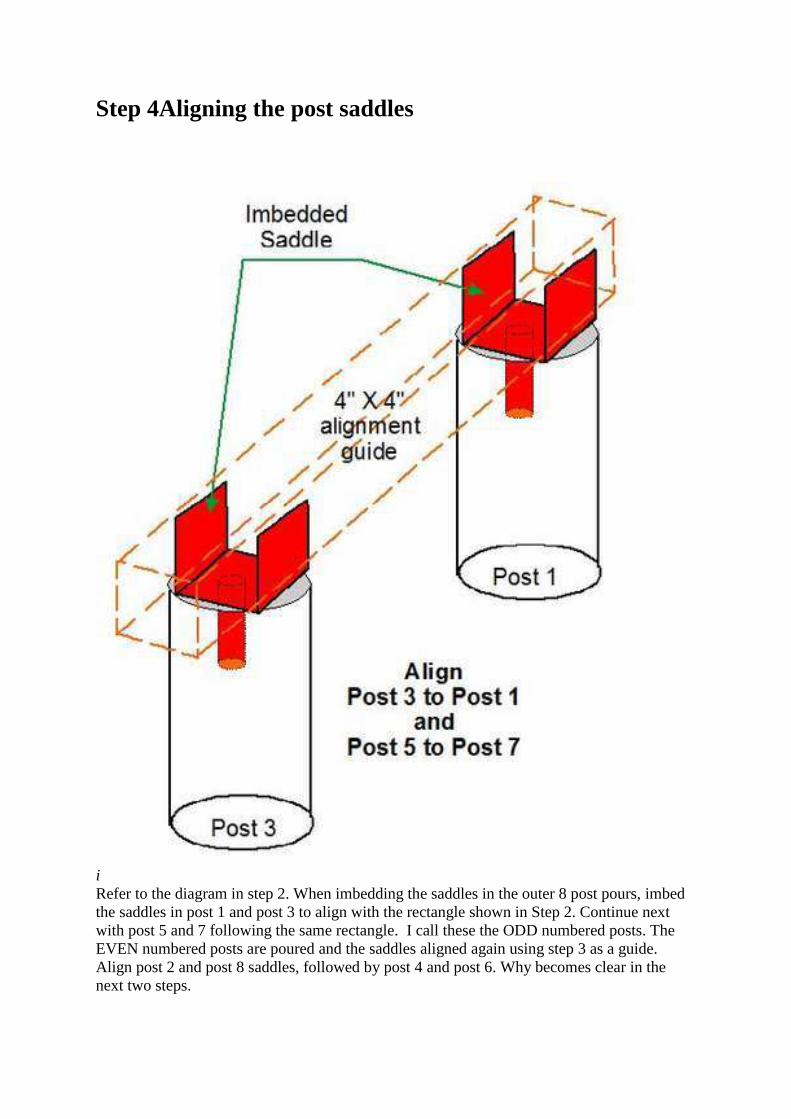
Step 4Aligning the post saddles
i
Refer to the diagram in step 2. When imbedding the saddles in the outer 8 post pours, imbed
the saddles in post 1 and post 3 to align with the rectangle shown in Step 2. Continue next
with post 5 and 7 following the same rectangle. I call these the ODD numbered posts. The
EVEN numbered posts are poured and the saddles aligned again using step 3 as a guide.
Align post 2 and post 8 saddles, followed by post 4 and post 6. Why becomes clear in the
next two steps.
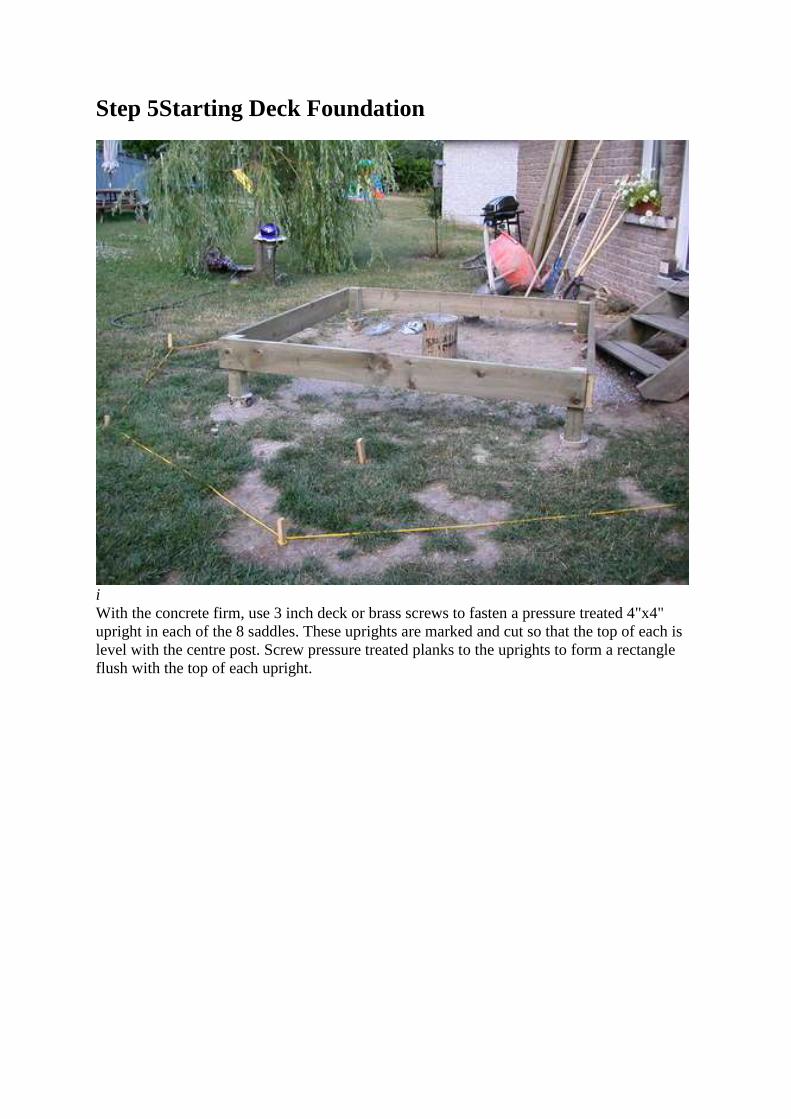
Step 5Starting Deck Foundation
i
With the concrete firm, use 3 inch deck or brass screws to fasten a pressure treated 4"x4"
upright in each of the 8 saddles. These uprights are marked and cut so that the top of each is
level with the centre post. Screw pressure treated planks to the uprights to form a rectangle
flush with the top of each upright.
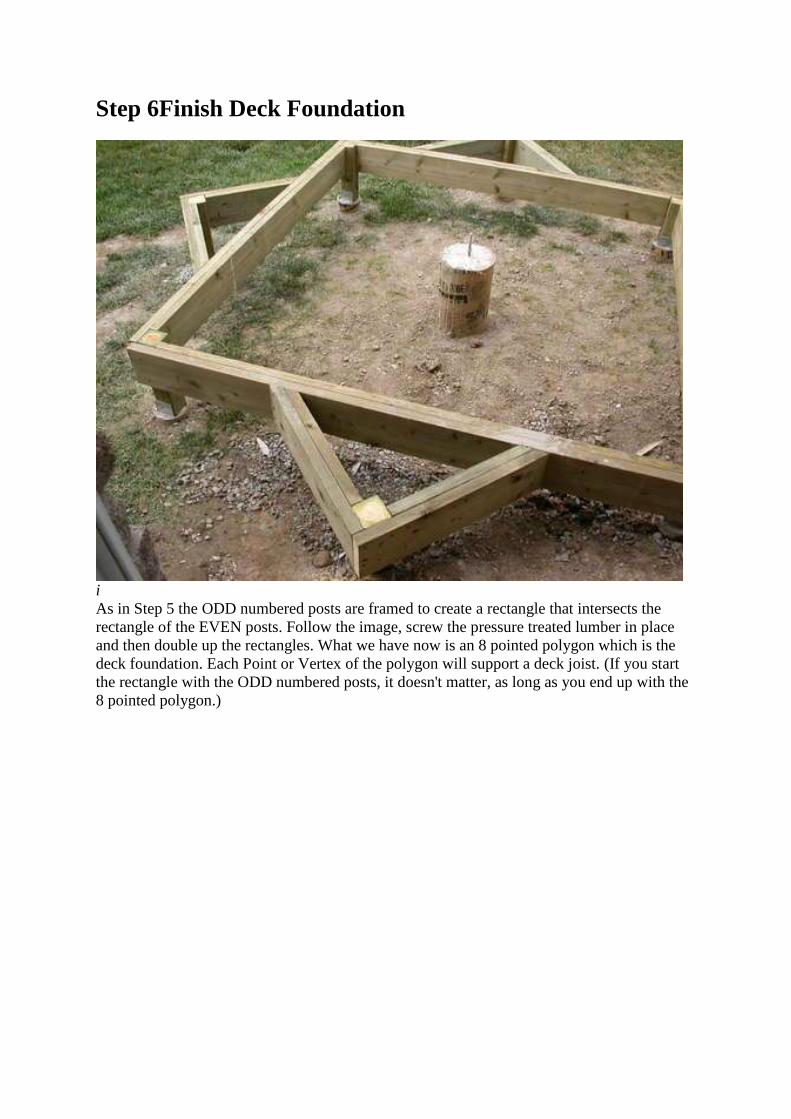
Step 6Finish Deck Foundation
i
As in Step 5 the ODD numbered posts are framed to create a rectangle that intersects the
rectangle of the EVEN posts. Follow the image, screw the pressure treated lumber in place
and then double up the rectangles. What we have now is an 8 pointed polygon which is the
deck foundation. Each Point or Vertex of the polygon will support a deck joist. (If you start
the rectangle with the ODD numbered posts, it doesn't matter, as long as you end up with the
8 pointed polygon.)
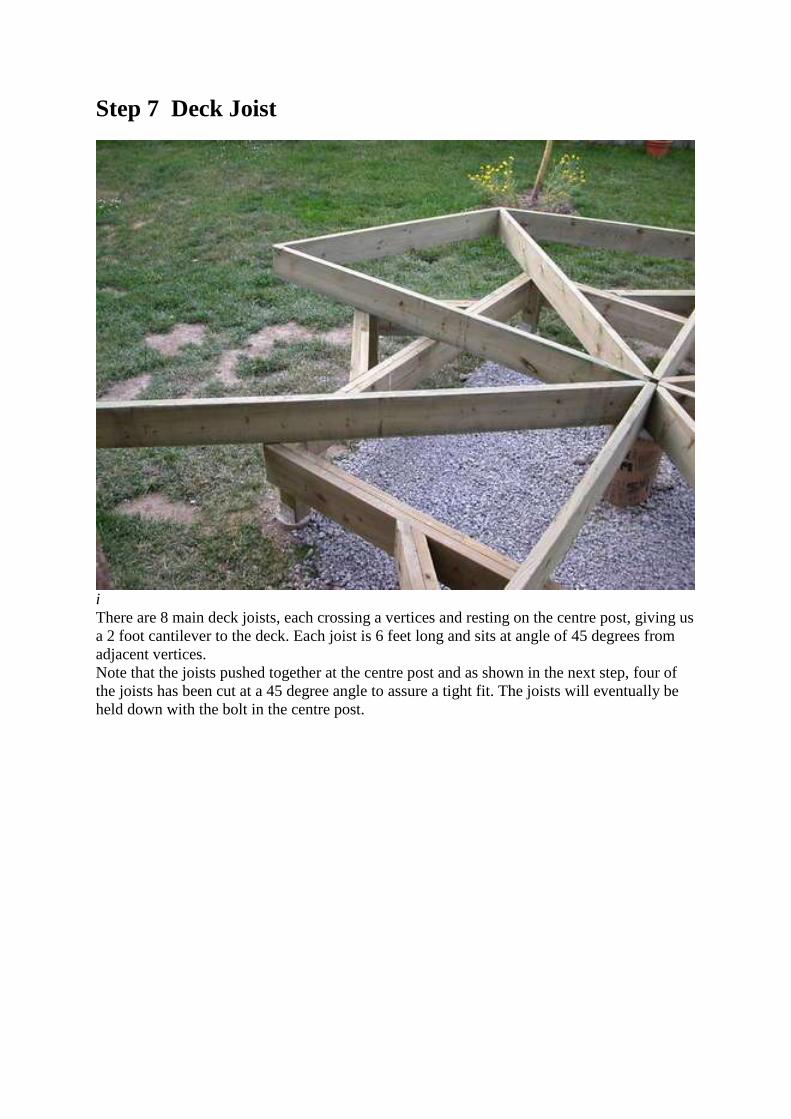
Step 7 Deck Joist
i
There are 8 main deck joists, each crossing a vertices and resting on the centre post, giving us
a 2 foot cantilever to the deck. Each joist is 6 feet long and sits at angle of 45 degrees from
adjacent vertices.
Note that the joists pushed together at the centre post and as shown in the next step, four of
the joists has been cut at a 45 degree angle to assure a tight fit. The joists will eventually be
held down with the bolt in the centre post.

Step 8 Detail of Joists on Centre Post
i
This is a detail to show the joists mounted on the centre post. They should be pushed
together, as we proceed
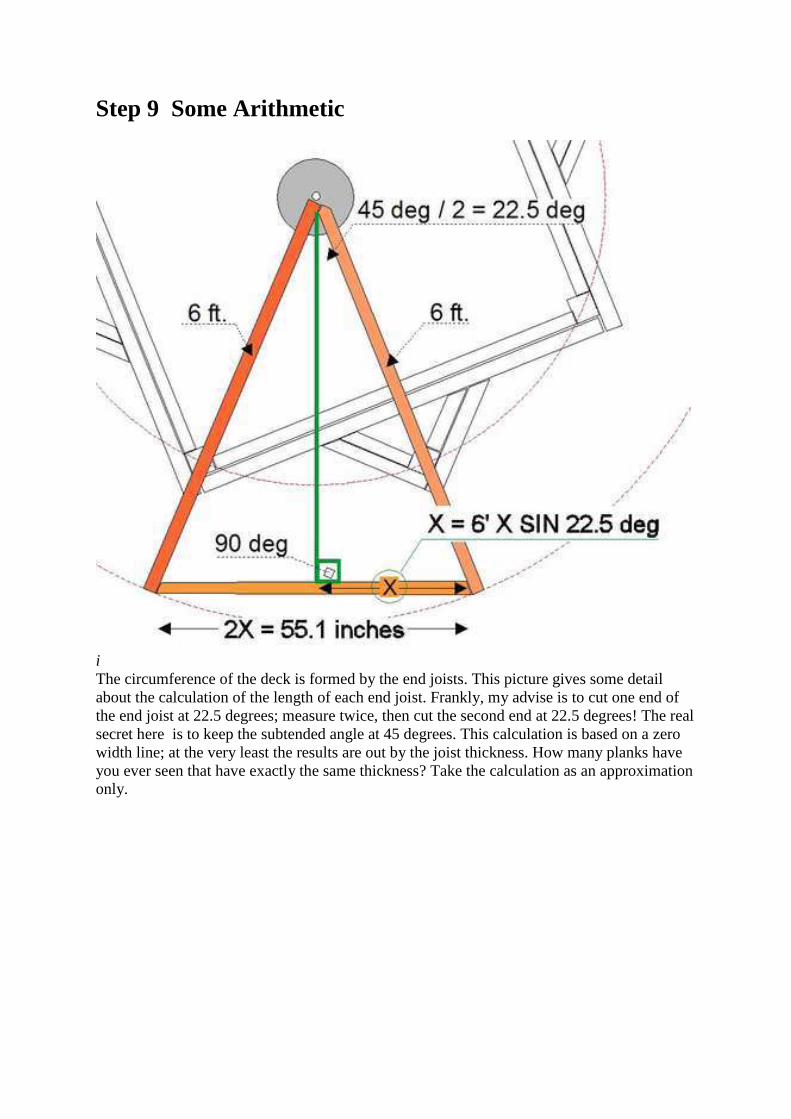
Step 9 Some Arithmetic
i
The circumference of the deck is formed by the end joists. This picture gives some detail
about the calculation of the length of each end joist. Frankly, my advise is to cut one end of
the end joist at 22.5 degrees; measure twice, then cut the second end at 22.5 degrees! The real
secret here is to keep the subtended angle at 45 degrees. This calculation is based on a zero
width line; at the very least the results are out by the joist thickness. How many planks have
you ever seen that have exactly the same thickness? Take the calculation as an approximation
only.
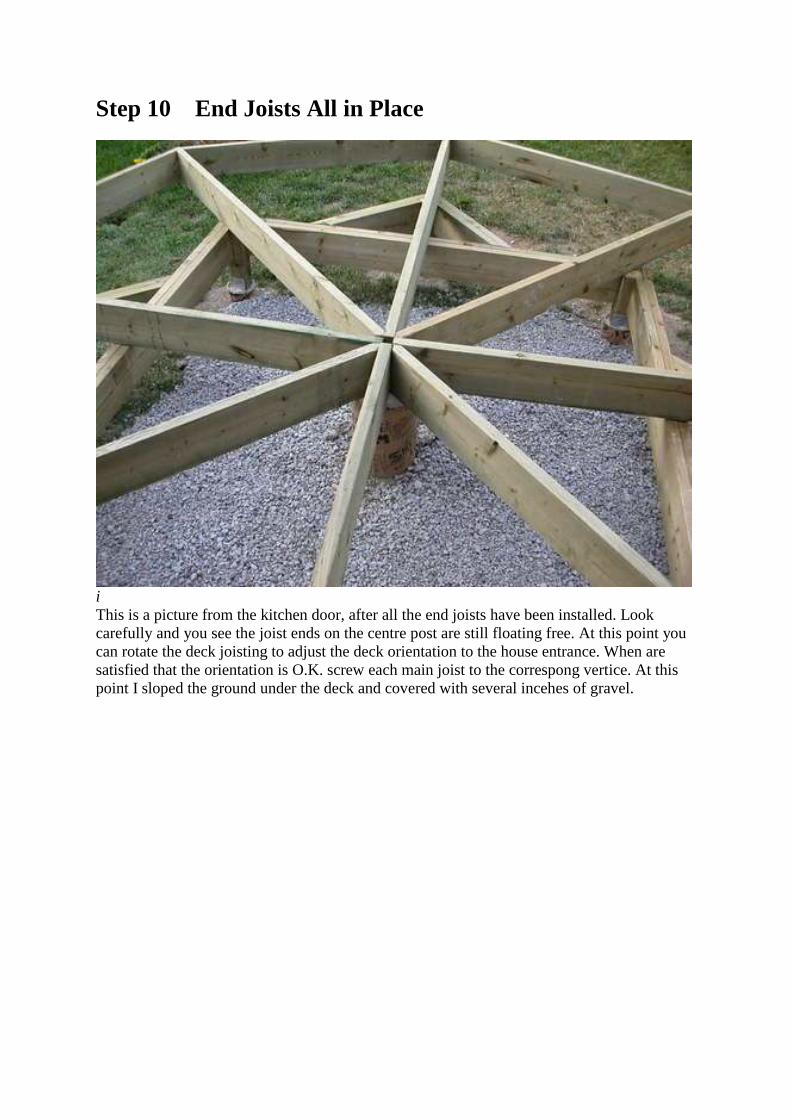
Step 10 End Joists All in Place
i
This is a picture from the kitchen door, after all the end joists have been installed. Look
carefully and you see the joist ends on the centre post are still floating free. At this point you
can rotate the deck joisting to adjust the deck orientation to the house entrance. When are
satisfied that the orientation is O.K. screw each main joist to the correspong vertice. At this
point I sloped the ground under the deck and covered with several incehes of gravel.
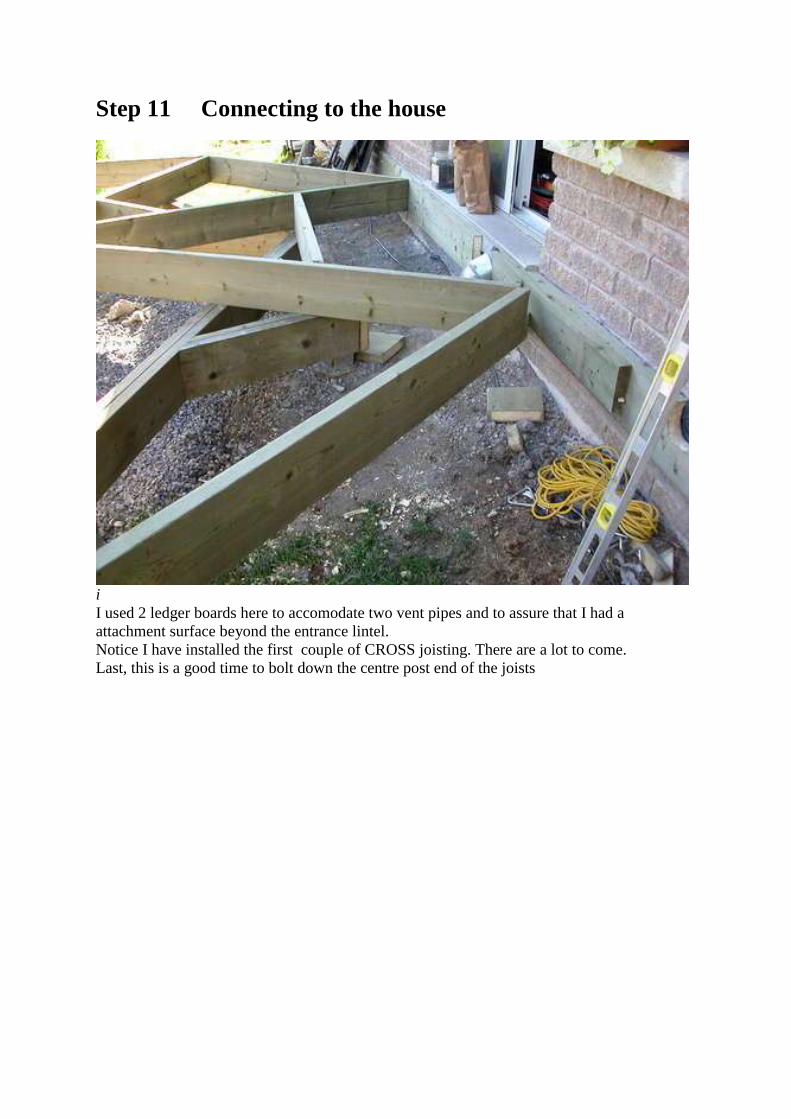
Step 11 Connecting to the house
i
I used 2 ledger boards here to accomodate two vent pipes and to assure that I had a
attachment surface beyond the entrance lintel.
Notice I have installed the first couple of CROSS joisting. There are a lot to come.
Last, this is a good time to bolt down the centre post end of the joists
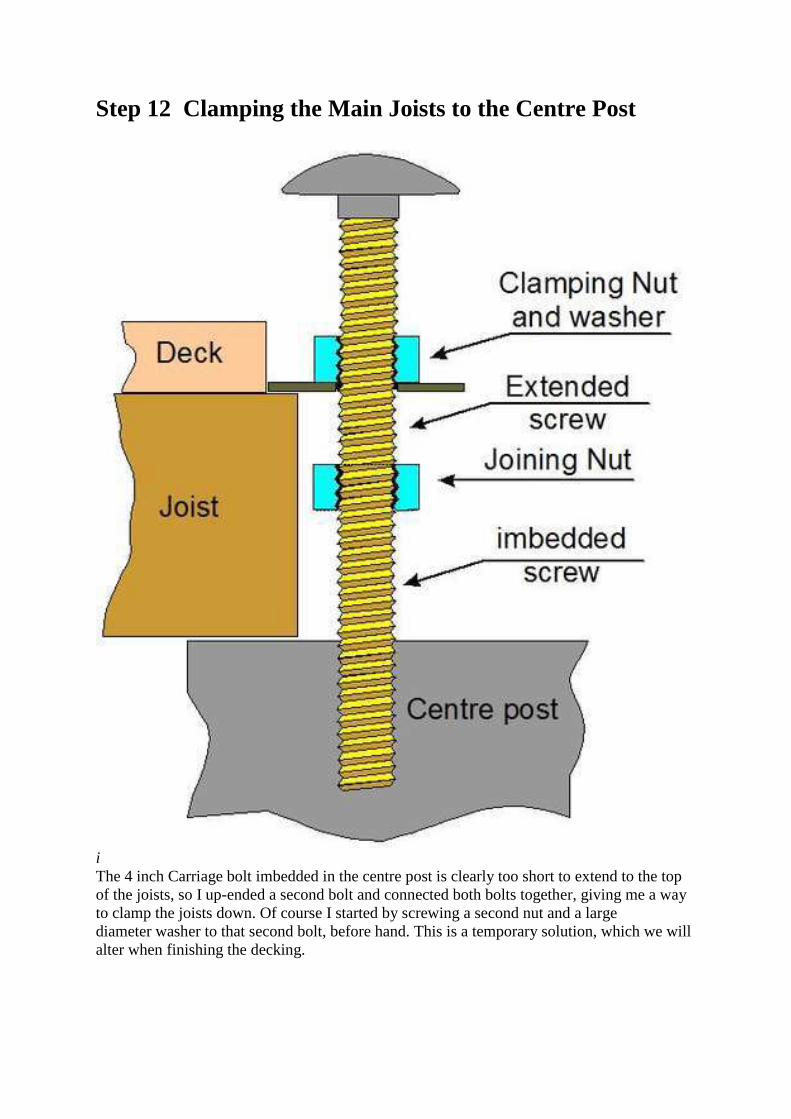
Step 12 Clamping the Main Joists to the Centre Post
i
The 4 inch Carriage bolt imbedded in the centre post is clearly too short to extend to the top
of the joists, so I up-ended a second bolt and connected both bolts together, giving me a way
to clamp the joists down. Of course I started by screwing a second nut and a large
diameter washer to that second bolt, before hand. This is a temporary solution, which we will
alter when finishing the decking.
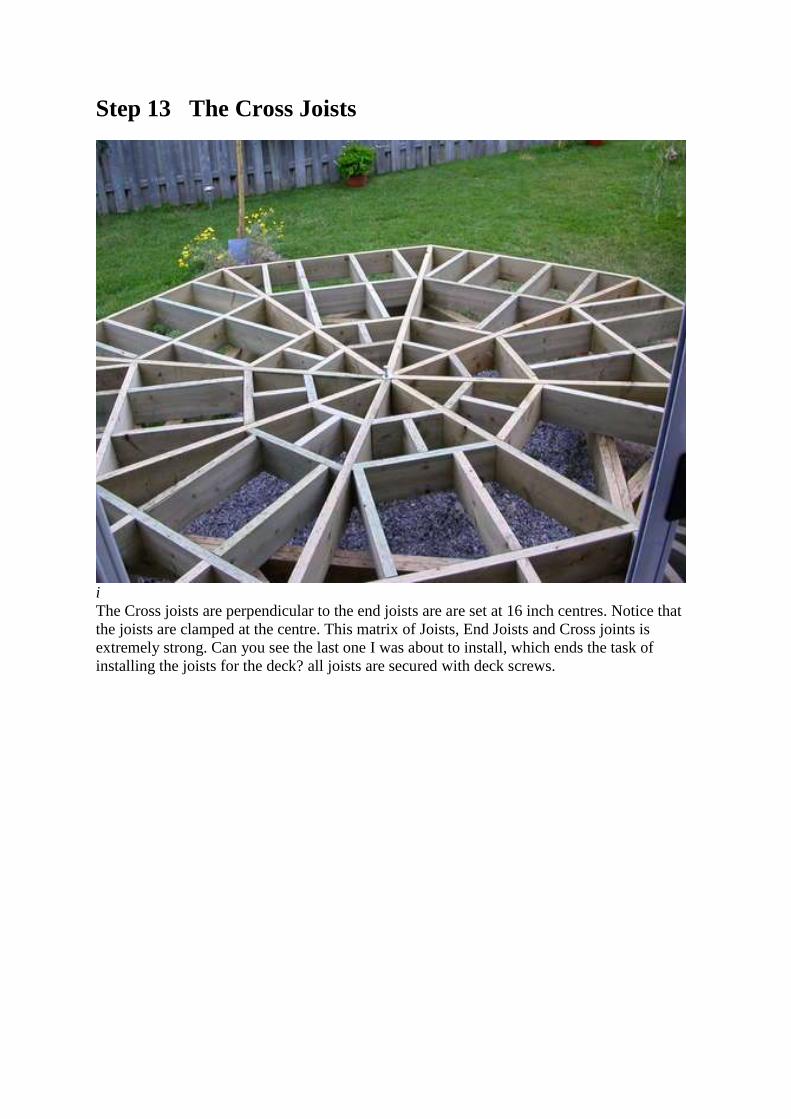
Step 13 The Cross Joists
i
The Cross joists are perpendicular to the end joists are are set at 16 inch centres. Notice that
the joists are clamped at the centre. This matrix of Joists, End Joists and Cross joints is
extremely strong. Can you see the last one I was about to install, which ends the task of
installing the joists for the deck? all joists are secured with deck screws.
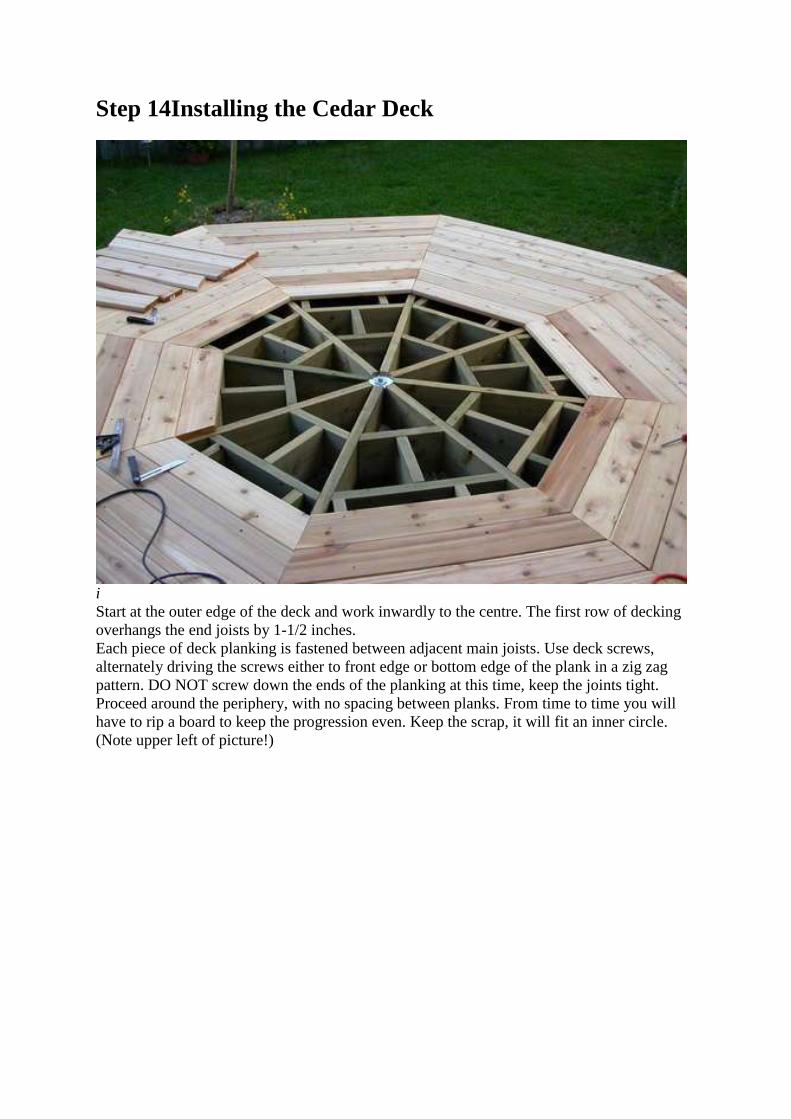
Step 14Installing the Cedar Deck
i
Start at the outer edge of the deck and work inwardly to the centre. The first row of decking
overhangs the end joists by 1-1/2 inches.
Each piece of deck planking is fastened between adjacent main joists. Use deck screws,
alternately driving the screws either to front edge or bottom edge of the plank in a zig zag
pattern. DO NOT screw down the ends of the planking at this time, keep the joints tight.
Proceed around the periphery, with no spacing between planks. From time to time you will
have to rip a board to keep the progression even. Keep the scrap, it will fit an inner circle.
(Note upper left of picture!)
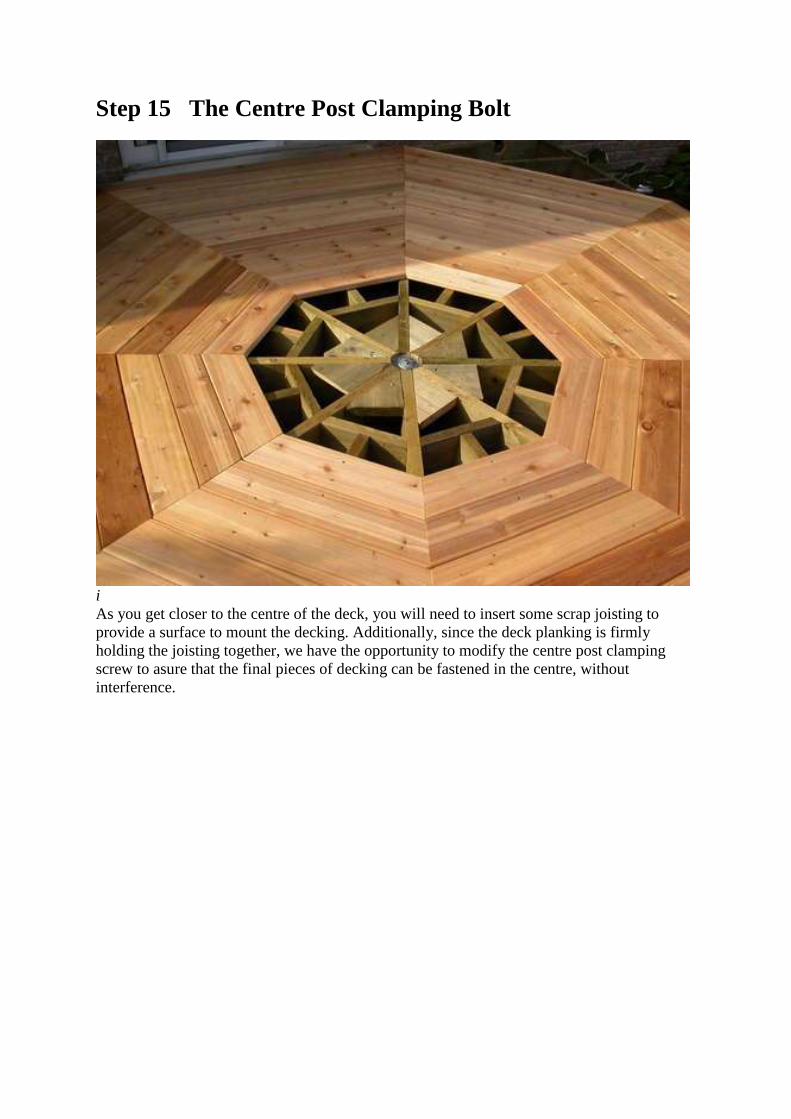
Step 15 The Centre Post Clamping Bolt
i
As you get closer to the centre of the deck, you will need to insert some scrap joisting to
provide a surface to mount the decking. Additionally, since the deck planking is firmly
holding the joisting together, we have the opportunity to modify the centre post clamping
screw to asure that the final pieces of decking can be fastened in the centre, without
interference.
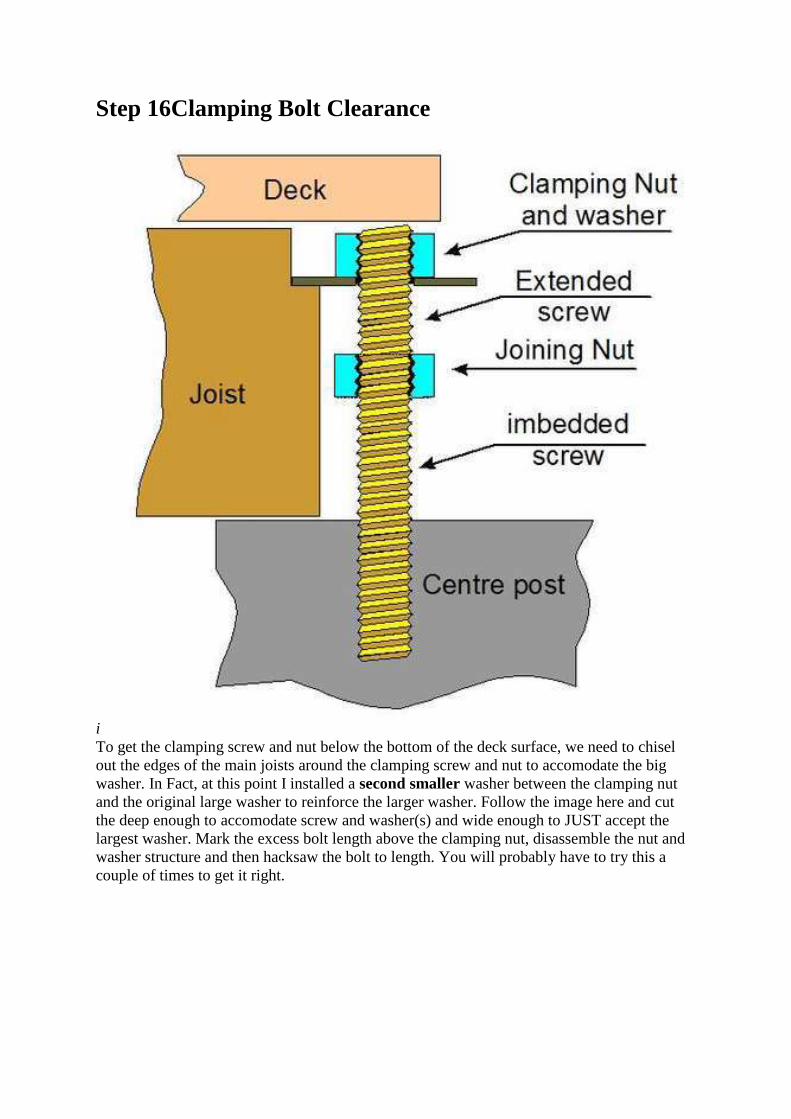
Step 16Clamping Bolt Clearance
i
To get the clamping screw and nut below the bottom of the deck surface, we need to chisel
out the edges of the main joists around the clamping screw and nut to accomodate the big
washer. In Fact, at this point I installed a second smaller washer between the clamping nut
and the original large washer to reinforce the larger washer. Follow the image here and cut
the deep enough to accomodate screw and washer(s) and wide enough to JUST accept the
largest washer. Mark the excess bolt length above the clamping nut, disassemble the nut and
washer structure and then hacksaw the bolt to length. You will probably have to try this a
couple of times to get it right.
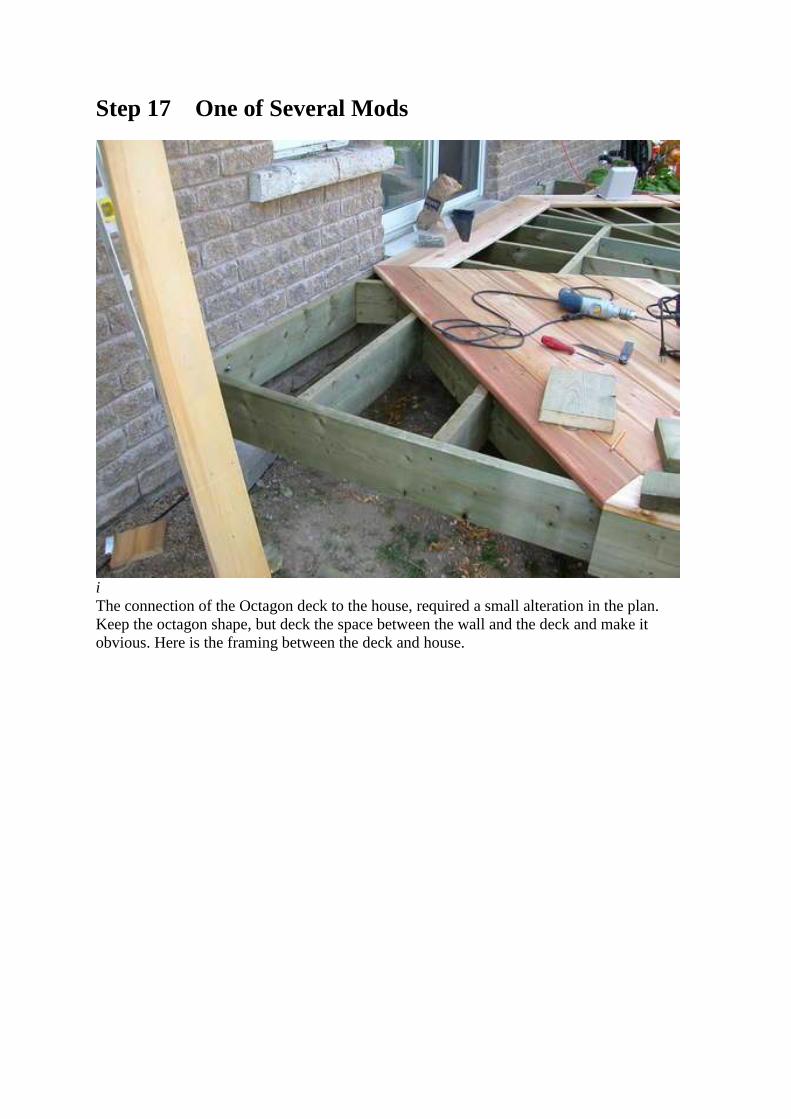
Step 17 One of Several Mods
i
The connection of the Octagon deck to the house, required a small alteration in the plan.
Keep the octagon shape, but deck the space between the wall and the deck and make it
obvious. Here is the framing between the deck and house.
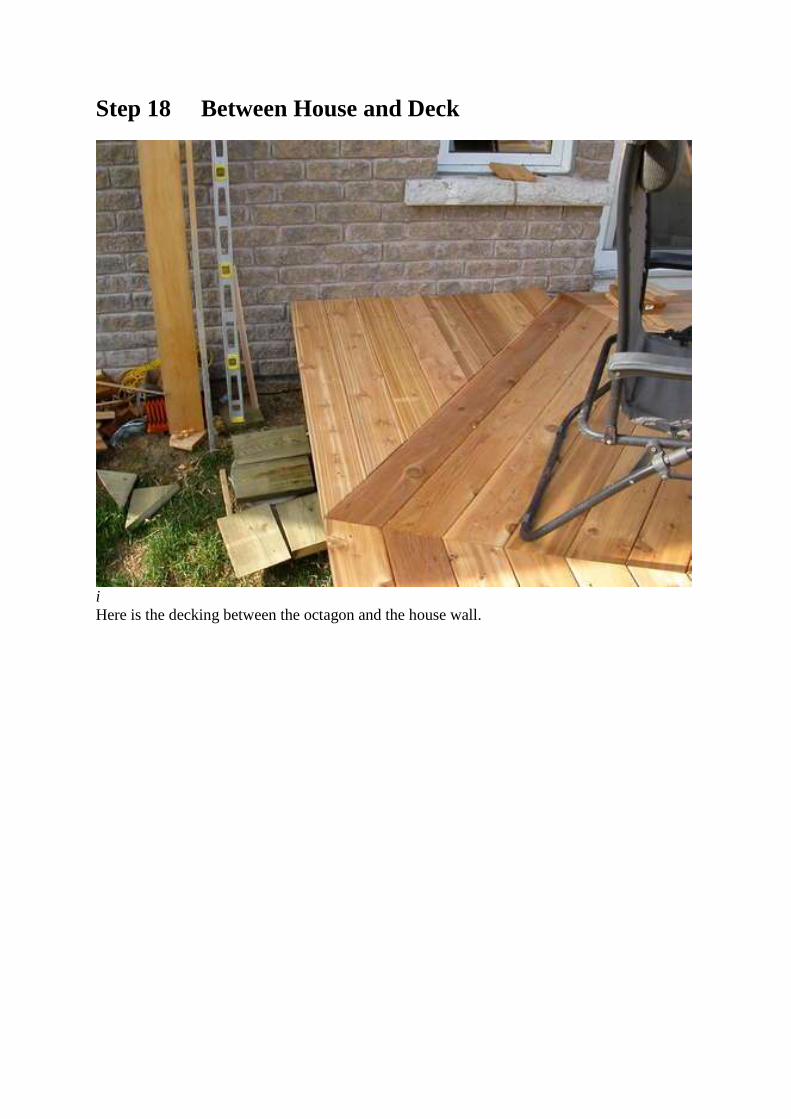
Step 18 Between House and Deck
i
Here is the decking between the octagon and the house wall.
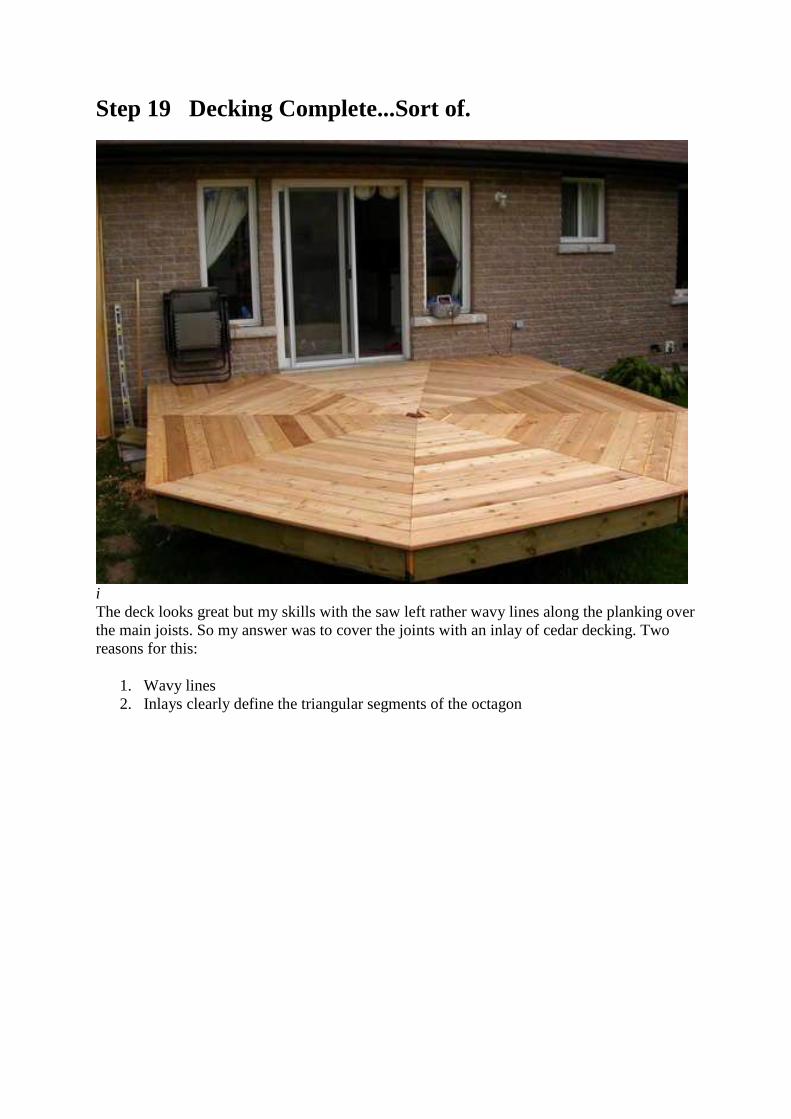
Step 19 Decking Complete...Sort of.
i
The deck looks great but my skills with the saw left rather wavy lines along the planking over
the main joists. So my answer was to cover the joints with an inlay of cedar decking. Two
reasons for this:
1. Wavy lines
2. Inlays clearly define the triangular segments of the octagon
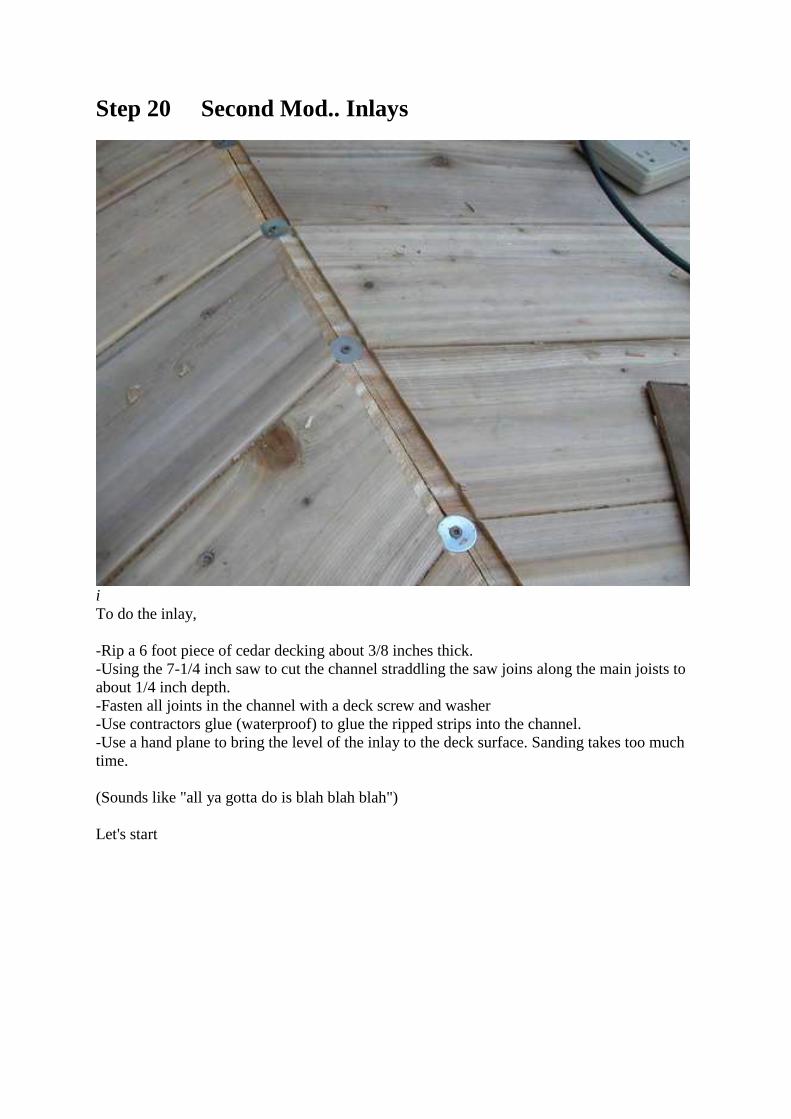
Step 20 Second Mod.. Inlays
i
To do the inlay,
-Rip a 6 foot piece of cedar decking about 3/8 inches thick.
-Using the 7-1/4 inch saw to cut the channel straddling the saw joins along the main joists to
about 1/4 inch depth.
-Fasten all joints in the channel with a deck screw and washer
-Use contractors glue (waterproof) to glue the ripped strips into the channel.
-Use a hand plane to bring the level of the inlay to the deck surface. Sanding takes too much
time.
(Sounds like "all ya gotta do is blah blah blah")
Let's start
Step 21 The Power Saw as a Router
i
Using the ripped piece of decking mentioned above, straddle the saw join with the cedar strip
so that it is centred above the join. Draw a line along the right edge of the strip. See red
dotted line in the diagram.
Measure your power saw edge guide. What is the measurement to the saw tooth closest to the
edge guide? It should typically be about 1-1/4 inch. See yellow rectangle in the diagram.
Use a piece of scrap wood no thicker than 1/4 inch and tack the scrap wood onto the deck to
the right of the drawn line a distance equal to the measurement of the guide to saw blade, and
parallel to that line. See the brown rectangle in the diagram.
Make a cut from the vertice of the join to the centre of the deck. That's 1/8". put the cedar
strip between the scrap wood guide and the saw. Make another cut. That's a total of 1/2"
channel. You got it! proceed until you get close to the line on the left of the saw join. Insert
the strip, or make another cut. BE CAREFULL. MEASURE TWICE, CUT ONCE. PLEASE
TRY ON A SCRAP OF WOOD BEFORE DOING THIS! When finished, clean out the uncut
pieces with a wood chisel.
Step 22 Inlays Completed
i
This shows four inlays in place.
It doesn't require a genius to see the improvement of the design with the inlays. The lines at
the main joists are dead straight, the triangular features of the octagon pop right out.
Be sure to review this whole procedure. You don't want to glue a strip down before screwing
the joints down. In this picture (aside from my wife's geraniums) notice that I had not decided
how to finish the centre. I enventually decided on a one piece cedar octagon.
Step 23 The Tent Mod
i
In our county, a hard roof on a gazebo or any deck changes all the rules. The setbacks for
a deck move from 4 feet to 23 feet the minute your designs include a hard roof. The result is
that I had to design for a tent roof. This design started with the intention of cedar rails and a
semi-permanant roof. Aside from the cost the local engineering department said NO!
As it happens, my wife found a really great buy on an octagonal garden tent (about $575
Cdn.) The problem was that the outfit selling the tent had little or no documentation and were
not sure of the size. They guessed 14 feet. Does that mean 7 foot edge to edge or 7 foot
radius? We bought it and found that the radius is about 13 feet 6 inches. They must include
the diameter of the support poles in the 14 feet. Regardless here is where the last design mod
is described.
I couldn't increase the current radius, but I could put in extensions to the vertices to support
the tent poles.
Each post support is constructed of 4 pieces of wood.
Two sides at 8 inches, cutting both ends at 22.5 degrees, and
two centre pieces at 4", again with 22.5 degree cut both ends.
Assemble as shown here, glue and screw and mount at each vetrice below deck level. Fasten
deck planks following the pattern of the deck with a 1-1/2 inch overhang.
Step 24 The End
i
That's it guys. I am not going to talk about the stairs, we all have been there.
Any comments good or bad are appreciated. Suggestions are also welcome but I don't plan on
another octagonal deck.
This is my first instructable and it has been interesting.
A couple of things;
-I sanded and refinished the deck in 2009. I probably will do it again in 2012.
-The reason for pushing the deck planks tight together came from my local lumber yard
person who noted that shrinkage will occur regardless, but less with cedar than PT. His
opinion has been vidicated since very little shrinkage has ocurred. My fence pressure treated
fenceplanks have shrunk about 1/2 inch in width in the last 6 years.
-The deck has been very sturdy, even when a full band with instruments has been playing on
it, no shaking or bouncing. (good lattice.)
