creativestudio 5.0.0 complete manual
TRANSCRIPT

CreativeStudio Version 5.0 User Manual

CreativeStudio 5.0
User Manual
November 2013
All rights reserved. No parts of this work may be reproduced in any form or by any means - graphic, electronic, ormechanical, including photocopying, recording, taping, or information storage and retrieval systems - without the writtenpermission of the publisher.
Products that are referred to in this document may be either trademarks and/or registered trademarks of the respectiveowners. The publisher and the author make no claim to these trademarks.
While every precaution has been taken in the preparation of this document, the publisher and the author assume noresponsibility for errors or omissions, or for damages resulting from the use of information contained in this document orfrom the use of programs and source code that may accompany it. In no event shall the publisher and the author be liablefor any loss of profit or any other commercial damage caused or alleged to have been caused directly or indirectly by thisdocument.
CreativeStudio™ is a registered trademark of Gammill, Inc.AutoSketch™ is a registered trademark of Autodesk
November 2013
CreativeStudio Version 5.0 User Manual
Copyright © 2013 Gammill, Inc. | All Rights Reserved
PublisherSpecial thanks to:
Gammill, Inc. is fortunate to have had a host of experiencedprofessionals assist us with the development of CreativeStudio™.The combined efforts of these individuals have produced anamazing piece of software which is truly feature rich.
Gammill wishes to thank Patricia Barry of By Design Quilting forher exceptional contributions to the manual, as well as the entireStatler Stitcher development team who have contributed countlesshours towards the development of CreativeStudio™.
We also wish to thank the following individuals who have digitizedpatterns included in this manual.
Anita Shackelford, Thimbleworks www.anitashackelford.com Anne Bright, Simply Continuous, www.annebright.com Debra Geissler, Designs by Deb, www.debrageissler.comKim Diamond, Sweet Dreams Quilt Studio,www.sweetdreamsquiltstudio.com Todd Brown, Legacy Quilting, www.legacyquilting.comTammy Finkler, TKQuilting, www.tkquilting.com
Managing Editor
Technical Editor
Cover Designer
Gammill Inc.
Betsey Langford
Karen Farnsworth
Rhonda Price
Production
Justin Walmuth
Team Coordinator
Matt Sherman
Dave Kapka
Paul Statler
5Contents
5
© 2013 Gammill Inc.
Table of Contents
Foreword 9
Part I Technology Basics 12
................................................................................................................................... 121 Equipment
.......................................................................................................................................................... 13Optional Equipment
................................................................................................................................... 142 Terminology
................................................................................................................................... 163 Navigating
.......................................................................................................................................................... 16The Touchscreen
.......................................................................................................................................................... 17The Mouse
.......................................................................................................................................................... 19The Keyboard
......................................................................................................................................................... 20Feature Specific Shortcuts
.......................................................................................................................................................... 21The Keypad
................................................................................................................................... 214 File Management
.......................................................................................................................................................... 21Explore Folders
......................................................................................................................................................... 23Looking at Folders
......................................................................................................................................................... 24Searching Folders and Files
......................................................................................................................................................... 25Creating a New Folder
.......................................................................................................................................................... 27Explore Files
......................................................................................................................................................... 28Copying Files
......................................................................................................................................................... 29Rename Files
......................................................................................................................................................... 29Managing Recorded Files
......................................................................................................................................................... 29Buying Pattern Files
......................................................................................................................................................... 30Moving Files
......................................................................................................................................................... 30Downloading New Version of CS
Part II Main Screen Layout 34
................................................................................................................................... 341 Title Bar
................................................................................................................................... 352 Command Bar
.......................................................................................................................................................... 35File Command
.......................................................................................................................................................... 36Edit Command
.......................................................................................................................................................... 36View Command
.......................................................................................................................................................... 37Draw Command
.......................................................................................................................................................... 39Tools Command
.......................................................................................................................................................... 41Help Command
................................................................................................................................... 433 Function Keys
................................................................................................................................... 444 Tool Bar
................................................................................................................................... 515 Right Tool Bar
................................................................................................................................... 526 Work Area
.......................................................................................................................................................... 53Project Information
.......................................................................................................................................................... 54Property Window
......................................................................................................................................................... 55Project Details - Yellow Frame
......................................................................................................................................................... 57Pattern Details - Cyan Frame
......................................................................................................................................................... 58Selected Pattern Details - Magenta Frame
......................................................................................................................................................... 59Process Details - Gray Frame
......................................................................................................................................................... 65Inheriting Settings
CreativeStudio Manual v5.06
© 2013 Gammill Inc.
.......................................................................................................................................................... 66Design Board (CAD Screen)
................................................................................................................................... 677 Keypad Window
................................................................................................................................... 688 Status Bar
................................................................................................................................... 699 Task Bar
Part III Planning the Quilting 72
................................................................................................................................... 721 Quilt Projects
.......................................................................................................................................................... 73Origin Point
.......................................................................................................................................................... 73Project Names
................................................................................................................................... 742 Quilt Groups
.......................................................................................................................................................... 75Creating a Quilt Group
.......................................................................................................................................................... 76Removing a Quilt Group
.......................................................................................................................................................... 77Renaming a Quilt Group
................................................................................................................................... 773 Quilt Patterns
.......................................................................................................................................................... 78Single Block Patterns
.......................................................................................................................................................... 79Continuous Patterns
.......................................................................................................................................................... 80Point To Point Patterns
................................................................................................................................... 814 Quilt Pattern Setup and Edit
.......................................................................................................................................................... 83Single Blocks
......................................................................................................................................................... 83Step 1: Choose Pattern
......................................................................................................................................................... 86Step 2: Define Boudary
......................................................................................................................................................... 88Step 3: Pattern to Boundary
......................................................................................................................................................... 90Step 4: Adjust Pattern
......................................................................................................................................................... 95General Pattern Settings
.......................................................................................................................................................... 99Repeat Patterns
......................................................................................................................................................... 99Step 1: Choose Pattern
......................................................................................................................................................... 100Step 2: Measure
......................................................................................................................................................... 102Step 3: Pattern Details
......................................................................................................................................................... 103Step 4: Repeat Details
......................................................................................................................................................... 106Step 5: Adjusting and Quilt
................................................................................................................................... 1075 Quilt Pattern Creation
.......................................................................................................................................................... 108Design Board Grid
......................................................................................................................................................... 108View Grid
......................................................................................................................................................... 109Grid Size
......................................................................................................................................................... 109Crosshair
.......................................................................................................................................................... 110Extra Edit Options
......................................................................................................................................................... 110Right Click Patterns
......................................................................................................................................... 111Reposition Patterns
......................................................................................................................................... 112Sewn or Unsewn
......................................................................................................................................... 113Rubber Stamp
......................................................................................................................................... 114Circular Array
......................................................................................................................................... 116Combine Group
......................................................................................................................................... 117Divide Pattern
......................................................................................................................................... 118Reverse Start/End
......................................................................................................................................... 119Export Pattern
......................................................................................................................................... 120Relocate Patterns
......................................................................................................................................... 126Echo Pattern
......................................................................................................................................... 128Convert
......................................................................................................................................... 132Fill Patterns
......................................................................................................................................... 134Options (for Patterns)
......................................................................................................................................................... 135Right Click Design Board
7Contents
7
© 2013 Gammill Inc.
......................................................................................................................................... 135Text Property
......................................................................................................................................... 136E2E Settings
......................................................................................................................................... 137Renaming Quilt Groups
......................................................................................................................................... 137Convert
......................................................................................................................................... 137Virtual Stitch Out
................................................................................................................................... 1396 Draw Options
.......................................................................................................................................................... 139Pattern Anchor
.......................................................................................................................................................... 140Set Sew Order
.......................................................................................................................................................... 142Draw Boundary
......................................................................................................................................................... 144Gridpoint Snaps
......................................................................................................................................................... 145Endpoint Snaps
.......................................................................................................................................................... 145Draw Trim
.......................................................................................................................................................... 147Draw Sewable
......................................................................................................................................................... 148Draw Arc
......................................................................................................................................................... 149Draw Curve
......................................................................................................................................................... 150Draw P2P Line
......................................................................................................................................................... 151Draw P2P Pattern
.......................................................................................................................................................... 152Draw Measure
.......................................................................................................................................................... 153Record Options
Part IV Quilting the Quilt - Which CS Feature To use 158
................................................................................................................................... 1581 Set Stitching Defaults
................................................................................................................................... 1612 Phase 1 - Basting
.......................................................................................................................................................... 161Securing the Quilt using Baste
.......................................................................................................................................................... 164Securing the Quilt using Regulated Quilting
.......................................................................................................................................................... 167Stitch in the Ditch using Point_to_Point-Line
................................................................................................................................... 1703 Phase 2 - Blocks
.......................................................................................................................................................... 170Define the Block using Boundary
.......................................................................................................................................................... 172Stitch a Single Pattern using Pattern_To_Boundary
.......................................................................................................................................................... 174Stitch Multiple Patterns using Repeat_Patterns
.......................................................................................................................................................... 179Stitch Partial Patterns using Trim-Outside
.......................................................................................................................................................... 183Stitch a Composite Pattern
................................................................................................................................... 1854 Phase 3 - Borders
.......................................................................................................................................................... 187Border Planning
.......................................................................................................................................................... 192Corners using Border Corner
.......................................................................................................................................................... 194Borders - Butted
.......................................................................................................................................................... 197Borders - Mitered
.......................................................................................................................................................... 200Borders with Corner Squares
.......................................................................................................................................................... 203Borders with Custom Corners
.......................................................................................................................................................... 207Side Borders
.......................................................................................................................................................... 208Sashings using Point_To_Point - Pattern
................................................................................................................................... 2125 Phase 4 - Backgrounds
.......................................................................................................................................................... 213Background Fillers using Trim - Inside
.......................................................................................................................................................... 216Background Fillers using Fill
.......................................................................................................................................................... 219Pantographs using Repeat Pattern
......................................................................................................................................................... 222Pantographs using Edge to Edge
.......................................................................................................................................................... 233E2E Alternating Patterns
.......................................................................................................................................................... 237E2E Concatenating Patterns
................................................................................................................................... 2416 Restart
.......................................................................................................................................................... 241Thread Break Restarts
.......................................................................................................................................................... 243Manual Stops and Restarts
CreativeStudio Manual v5.08
© 2013 Gammill Inc.
................................................................................................................................... 2467 Utility Functions
.......................................................................................................................................................... 246Set Defaults
.......................................................................................................................................................... 250Set Origin
.......................................................................................................................................................... 251Oil Stitcher Routine
.......................................................................................................................................................... 251Calibrate Stitcher Motor
.......................................................................................................................................................... 252Power Assist
.......................................................................................................................................................... 252Calibrate Power Assist
.......................................................................................................................................................... 254Add New Text Fonts
Part V Quick Reference Sheets 258
................................................................................................................................... 2581 Quick Ref Icons Shortcuts
................................................................................................................................... 2612 Quick Ref Regulated
................................................................................................................................... 2633 Quick Ref Single Block
................................................................................................................................... 2654 Quick Ref Borders and Corners
................................................................................................................................... 2675 Quick Ref Panto using Repeats
................................................................................................................................... 2696 Quick Ref Panto using E2E
................................................................................................................................... 2737 Quick Ref P2P Line
................................................................................................................................... 2748 Quick Ref P2P Pattern
................................................................................................................................... 2769 Quick Ref Trim Inside
................................................................................................................................... 27710 Quick Ref Trim Outside
................................................................................................................................... 27811 Quick Ref Extra Edit Options
................................................................................................................................... 28312 Quick Ref Draw Options
................................................................................................................................... 28713 Quick Ref Record Patterns
................................................................................................................................... 28814 Quick Ref Text Patterns Feature: Creating Text Patterns
................................................................................................................................... 28915 Quick Ref Restart
Index 291
Thank you for choosing the Statler Stitcher Systemfeaturing CreativeStudio
A complete ‘Help’ system has been created to support the Statler Stitcher®CreativeStudio™ software meaning the ‘help’ information is accessible in electronicformat as well as a printed users manual. The electronic format is sometimes referred toas ‘online’ help but at no time is this help system connected to the internet.
The electronic format is a database of information that has been linked into theCreativeStudio™ software and is accessible at any time during quilting. The help systemcan be accessed by selecting the Question Mark Icon and then selecting another icon toaccess information in the user manual about that topic. Use the Help menu in the toptoolbar to search the help topics or press the F1 key and another window will open thatpresents the information.
The CreativeStudio™ help system was written for quilters by professional quilters andexplains each feature in a quilting context. The first section covers some computer skillsthat quilters may need to review. The second section describes the main screen. Thethird section discusses planning a quilt and explains how CreativeStudio™ can collect andsave all of the planned details together for future reference. Section four details how toexecute the planned quilt using the CS features. Section five contains Quick Referencecards which can be printed and kept close to the Statler Stitcher if needed.
The key features of CreativeStudio™ are presented in the same way they might beexecuted (Baste, Blocks, Borders, Backgrounds). Utility features (Restart, Defaults, etc)are toward the end of the manual. An extensive index was created to help people searchfor topics of interest.
Links have been used in the Help system, and are denoted by keywords displayed incyan and underlined. If using the electronic format, clicking on one of the links will takeyou directly to that place in the electronic format that explains the keyword in more detail.If using the printed format, a document icon is printed just following the link. This iconcontains a number which is the page number containing the keyword explanation.
Color has been used to differentiate certain details that apply to different patterns andprocesses. It is highly recommended that this manual be printed in color, to take fulladvantage of the instruction. Suggestions for enhancements to the software and the UserManual can be sent to [email protected]
Again, thank you for choosing CreativeStudio™ a part of the Statler Stitcher® System,by Gammill, Inc.
9Foreword
© 2013 Gammill Inc.

CreativeStudio v5.0
Part
I
CreativeStudio Manual v5.012
© 2013 Gammill Inc.
1 Technology Basics
This manual was written for people who are comfortable using acomputer (with a mouse, keyboard and touch screen) that is runningMicrosoft Windows. CreativeStudio 5.0 operates on a Windows 7or Windows 8 operating system, so these systems are referenced in thismanual. As a refresher, we have listed some of the basic conceptsused.
The Statler Stitcher CreativeStudio™ manual assumes that the quilterhas been exposed to computer systems and is familiar with basiccomputer skills and terms. However, since many computer systems aresimilar (but different) a brief overview of those computer skills is included here.
One of the most powerful virtues of a computer is its flexibility.Unfortunately, that can also be a detriment because there are severalways to do the same thing, and that can cause confusion. The methodsused in this text are NOT the only way to perform certain tasks. Thereare faster methods, so if anyone is using a different technique but getsthe same results, that is just fine.
1.1 Equipment
The Statler Stitcher system comes with the following computer equipment:
Computer CPU is the main processing unit. This is included with themonitor for the All-In-One computer system. With other computersystems, this looks like a black box. CreativeStudio and supportmaterials come preloaded on it. Do not add any other software to thiscomputer, especially any internet access or firewall software. Thesoftware has been loaded for optimal performance and any othersoftware packages will inhibit the responsiveness.
There is a special 'key' that is required by the Statler Stitchersystem, called a Red Key. If the Red Key is not attached to thecomputer CPU, the software will not operate the stitcher.
Controller (also called a MOD) controls the motors. This box containsthe technology to translate the computer software instructions intocommands that move the sewing head. There are different versions ofthese controllers, and each is marked with a letter or number. THIS ISIMPORTANT. Although this may only be referred to this whendownloading software, it is important to know the controller version. On
Technology Basics 13
© 2013 Gammill Inc.
newer models, there is a small switch box with two switches (red andgreen) that controls the power supply to the stitcher and the controller.
Monitor (or screen) displays the instructions. The All-In-One computersystem features a touchscreen monitor. Other computer systemscome with a separate monitor that do not have touch capabilities. Some monitors have the speakers attached, and some do not. All of theStatler Stitcher instructions will be displayed on this screen. Responsesto the instructions can be given using the mouse, the keyboard, thekeypad on the sewing head or by touching the screen with the All-In-Onecomputer system.
Desktop is a the name for the first computer screen that appears onthe monitor after the computer is turned on. It shows a collection oficons, each of which has a specific purpose. The icons have names and double clicking or double tapping an icon will initiate that purpose, taskor program.
A 6-button keypad is on the Statler Stitcher sewing head. Like the mouse,keyboard, and touchscreen, these keys are also programmed to respond to(or interact with) the instructions on the monitor. Using the keypad eliminates the need to move from the quilt to the computer every time instructions areexecuted.
Cables are required for all the parts to work together. This makes thesystem look complicated but the engineers have designed the cables sothey are unique (one cable only fits into one connection) or color coded(like the mouse & keyboard cables) or they are very well labeled (X, Y, Zconnections).
Mouse and Keyboard are used to respond to (or interact with) theinstructions on the monitor.
1.1.1 Optional Equipment
Optional items that support the Statler Stitcher System:
Below is a list of items to consider adding to your Statler Systemfor additional support or ease of use.
Surge Protectors are highly recommended for the computer andcontroller.
Universal Power Supply (UPS) is a good idea for people who
67
CreativeStudio Manual v5.014
© 2013 Gammill Inc.
experience frequent power outages and want to protect their computer.The UPS is like a backup battery that prevents damage to a computercomponent when the electricity fluctuates significantly. The controllershould not be plugged into a UPS due to the power usage of the controller.The controller will quickly drain the UPS. A UPS rated 500 VA or higher isrecommended.
Flash Drive (also called Jump Stick, Thumb Drive or Removable Media) isa form of removable media. It is a disk drive, used when transferringfiles from a home computer to the Statler computer. Files are copied from the source (home) computer to the flash drive, and then from the flashdrive to the destination (Statler) computer.
Statler Touch Tools is a kit available from Gammill containing a wirelessmouse, wireless keyboard, network system and tablet. These tools offermore freedom in operating the Statler System and provides a touchscreeninterface. The network system and tablet work together to mirror theStatler computer offering remote access and use of the touchscreenfeatures.
Wireless Keyboard is a keyboard that is not tethered to the computer witha cord. This allows the user to move the keyboard to the quilt top or otherlocations for easy access. If adding a wireless device to your system, it isrecommended to select a device with a battery indicator.
Wireless Mouse is a mouse that is not tethered to the computer with acord. This allows the user to use the mouse on the quilt top or otherlocations preferred for easy access. If adding a wireless device to yoursystem, it is recommended to select a device with a battery indicator.
1.2 Terminology
Terminology - It is important to understand the following terms andconcepts because they are used throughout the manual.
CS is short for CreativeStudio.
Power up means to turn on the controller, stitcher and then turn on thecomputer. Be sure the monitor and the speakers are on also. It takes aminute, but the desktop screen will appear on the monitor.
Power down means to turn everything off. Do not just turn off the
Technology Basics 15
© 2013 Gammill Inc.
power. Exit gracefully by saving all work (save the project), exiting CS(click on the exit X), turning off the computer (click on the Start button,choose Turn Off Computer) and then turning off the power to themonitor, speakers, controller and stitcher.
A dialog box (also called window) contains instructions,questions or descriptive information about something. CS usesdialog boxes to group information that belong together, like thedimensions of a pattern.
A dropdown box is a dialog box that appears when a command isselected and there are choices associated with the command. Thechoices appear in a box which is usually just below the command so theassociation is clear.
A popup box is a dialog box that appears when the system needs toask a question or give instructions. This box usually appears in thelower right corner of the screen.
Properties (also called details) are descriptive pieces of information.
Object is a general term for anything that can be described, usuallyreferring to the main item selected.
Tool tips are little boxes that pop-up and give the name or a shortdescription of something. To look for tool tips, hold the cursor over anicon for a couple seconds and see if the tip appears. Not all objects have tool tips, but most icons do.
CAD Screen also called the design board, is the big, white, open areawhere the images of the patterns appear and are manipulated.
Quilt Group is a term used to describe an area of the quilt top to be quilted. Quilt groups contain all the information (boundaries, referencepoints, sizing, positioning) needed to stitch a particular area of the quilt.It has its own design board so the patterns can be checked before being stitched. Some quilts have only one quilt group and others have dozens;it depends on the quilt.
Project is technically a computer file but figuratively is more like a filefolder that contains all the patterns, quilt groups, design board and notesneeded to complete a whole quilt.
Encrypted Patterns are pattern files that have been coded with amachine controller serial number, so they will run only on that machine.
74 74
72
83 83
CreativeStudio Manual v5.016
© 2013 Gammill Inc.
Encryption protects pattern designers by ensuring that people who havepurchased one pattern can not make copies and distribute it to others.Encrypted patterns are protected in CS by using special project filetypes and using special exported pattern file types.
Removable Media is a device that holds computer files and can bemoved from one computer to another. It makes transferring files fromone computer to another very easy. Flash Drive is another name forremovable media.
UR is an abbreviation for Upper Right. Similarly, UL is upper left, LL is
lower left, LR is lower right. These abbreviations are used often whendefining boundaries.
Tip: These are tips that explain how to use the software to
resolve real life quilting issues. After all, this is about quilting!
Design It Yourself - These are tips for experienced CS
quilters who appreciate keyboard shortcuts and want to do their own pattern designing using the extensive CreativeStudiocapabilities.
1.3 Navigating
Navigating can be done with the mouse, keyboard, touchscreen orkeypad (on the sewing head).
1.3.1 The Touchscreen
Tap (same as click) refers to tapping the touchscreen with a finger orstylus. Tapping the touchscreen activates the item tapped and is used toexecute tasks much like clicking the mouse.
Double Tap (same as double click)
Touch & Hold (same as right click)A right click on a touch screenmonitor is accomplished by touching and holding an object for 1-2seconds before releasing. A right click can also be achieved by tappingthe blue right-facing arrow icon on the tool ribbon and then tapping thedesired object. The blue arrow makes the next left click (or tap) a rightclick.
73 73
27
Technology Basics 17
© 2013 Gammill Inc.
Dragging with the touch screen means placing your finger on the screenand pulling it along the surface of the screen before releasing. This isused in creating selection (or marquee) boxes, moving patterns, or usingthe pan, zoom or freehand draw features of CS.
Panning can be accomplished with touch screen monitors by tapping the“Pan” icon and then dragging your finger on the screen.
Swipe by moving a finger on the screen in a fluid motion.
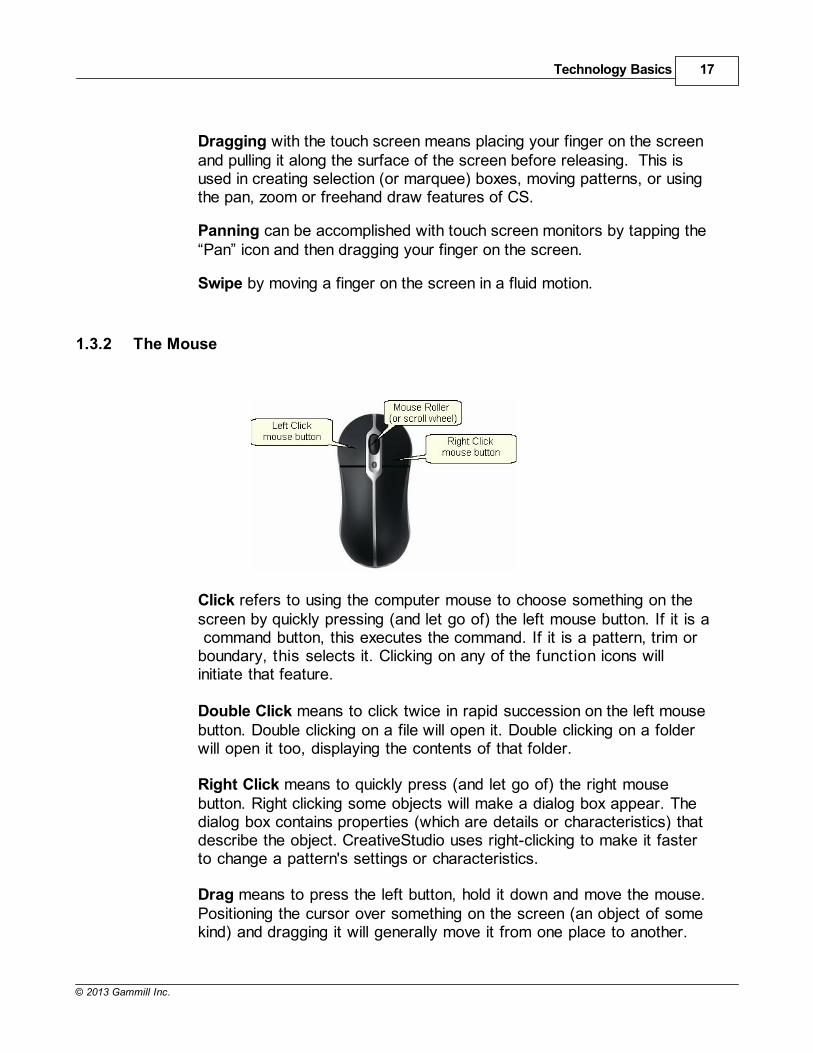
1.3.2 The Mouse
Click refers to using the computer mouse to choose something on thescreen by quickly pressing (and let go of) the left mouse button. If it is a command button, this executes the command. If it is a pattern, trim orboundary, this selects it. Clicking on any of the function icons willinitiate that feature.
Double Click means to click twice in rapid succession on the left mousebutton. Double clicking on a file will open it. Double clicking on a folderwill open it too, displaying the contents of that folder.
Right Click means to quickly press (and let go of) the right mousebutton. Right clicking some objects will make a dialog box appear. Thedialog box contains properties (which are details or characteristics) thatdescribe the object. CreativeStudio uses right-clicking to make it fasterto change a pattern's settings or characteristics.
Drag means to press the left button, hold it down and move the mouse.Positioning the cursor over something on the screen (an object of somekind) and dragging it will generally move it from one place to another.
CreativeStudio Manual v5.018
© 2013 Gammill Inc.
Scroll generally applies to text rather than an image (but not always). Itmeans to move the text on the screen so you can see what is before orafter the current lines of text. CreativeStudio uses scrolling to navigatedialog boxes. Or, if Scroll bars appear on the right edge of the screenor dialog box, you can move up by clicking on the up arrow, and downby clicking on the down arrow. There is a bar between these two arrowswhich shows your relative position in the dialog box.
Scrolling can often be done using the mouse instead of commands. Toscroll up, roll forward on the mouse roller (away from you). To scrolldown, roll backwards (toward you).
Zoom means to change the size of an object on the screen by gettingcloser (zoom in) or farther away (zoom out). Zooming generally appliesto images instead of text (not always).
Zooming can often be done using the mouse roller instead of commands.Roll it forward to zoom in, and backward to zoom out. Zooming is used inthe design board.
Panning generally applies to the screen images instead of text. It meansto move the image on the screen in any direction without changing the size,scale or proportion. Press and hold the mouse roller wheel and move themouse. The cursor shape becomes a hand. Panning will be used inCreativeStudio in the design board.
Hovering means to hold the cursor over an icon or other object for acouple seconds, and see if a little box appears (called a tool tip) that givesthe name or a short description of that object.
Selecting Files means to choose. Usually this will also highlight the object.When working with files, a single click or tap will select a file. A doubleclick or tap will open the file.
To select more than one file at a time, use the control key (Ctrl). Click ortap on the first file, then press and hold the Ctrl key while clicking ortapping on the rest of the files that need to be selected. If you choose thewrong file, click or tap it again and it will be deselected. When done,release the Ctrl key and all the files will be highlighted and can be copied,moved or deleted together.
To select a group of files that are all contiguous, use the Shift key (Shift).Click or tap on the first file, then press and hold the Shift key while clickingor tapping on the last file. When done, release the Shift key and all the files between the first and last will be highlighted and can be copied, moved ordeleted together.
Technology Basics 19
© 2013 Gammill Inc.
Drill Down means to open folders starting from the top level, workingdown one level at a time. This can be done using double clicks, taps orby clicking once on a special "+" icon that appears in front of the foldername.
1.3.3 The Keyboard
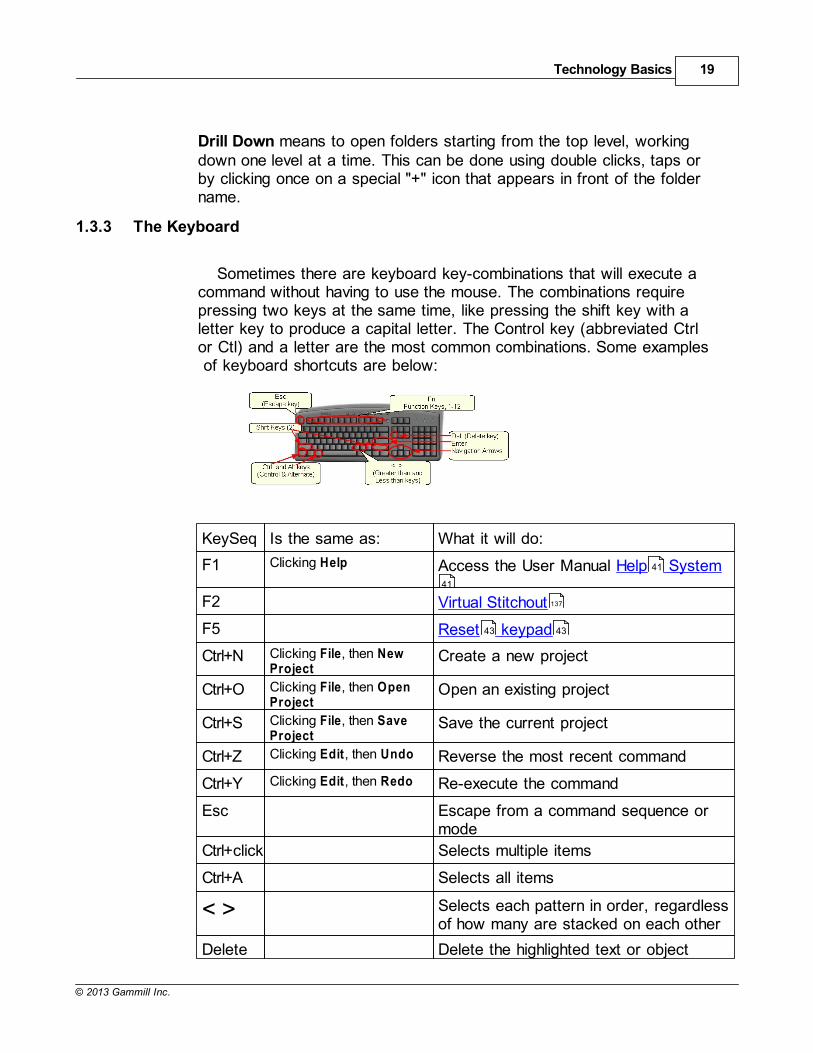
Sometimes there are keyboard key-combinations that will execute acommand without having to use the mouse. The combinations requirepressing two keys at the same time, like pressing the shift key with aletter key to produce a capital letter. The Control key (abbreviated Ctrlor Ctl) and a letter are the most common combinations. Some examples of keyboard shortcuts are below:
KeySeq Is the same as: What it will do:
F1 Clicking Help Access the User Manual Help System
F2 Virtual Stitchout
F5 Reset keypad
Ctrl+N Clicking File, then NewProject
Create a new project
Ctrl+O Clicking File, then OpenProject
Open an existing project
Ctrl+S Clicking File, then SaveProject
Save the current project
Ctrl+Z Clicking Edit, then Undo Reverse the most recent command
Ctrl+Y Clicking Edit, then Redo Re-execute the command
Esc Escape from a command sequence ormode
Ctrl+click Selects multiple items
Ctrl+A Selects all items
< > Selects each pattern in order, regardlessof how many are stacked on each other
Delete Delete the highlighted text or object
41
41
137
43 43
CreativeStudio Manual v5.020
© 2013 Gammill Inc.
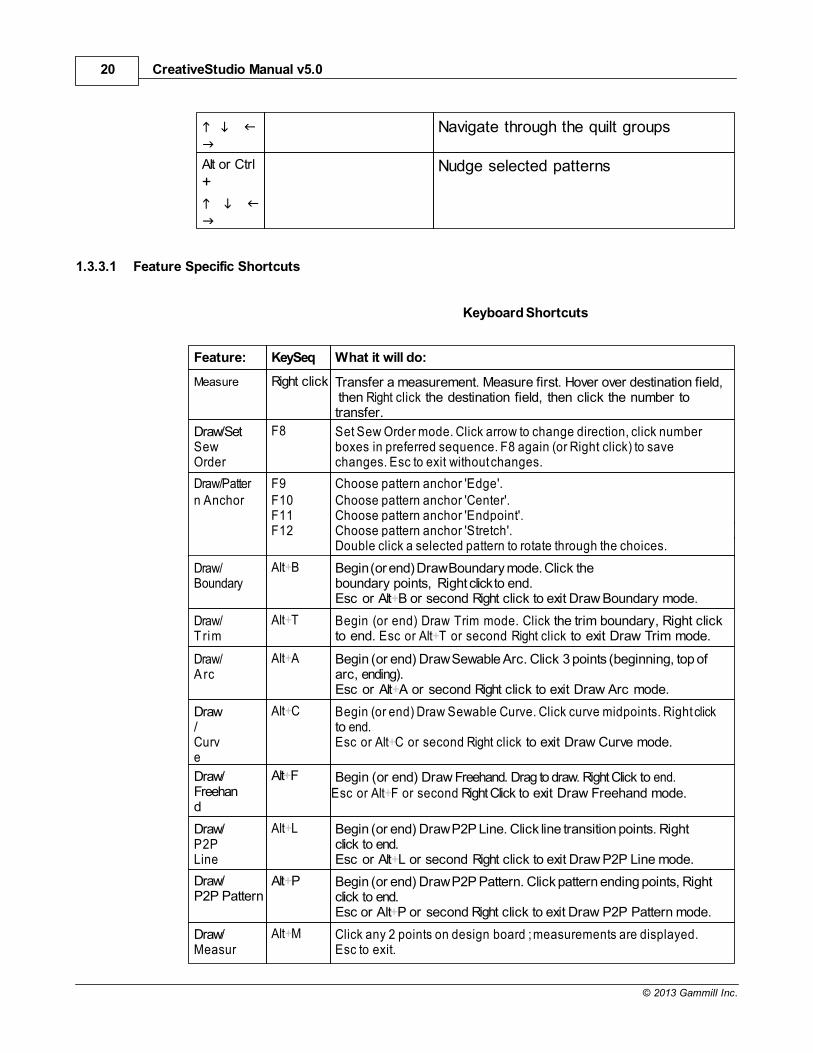
Navigate through the quilt groups
Alt or Ctrl
+
Nudge selected patterns
1.3.3.1 Feature Specific Shortcuts
Keyboard Shortcuts
Feature: KeySeq What it will do:
Measure Right click Transfer a measurement. Measure first. Hover over destination field, then Right click the destination field, then click the number totransfer.
Draw/SetSewOrder
F8 Set Sew Order mode. Click arrow to change direction, click numberboxes in preferred sequence. F8 again (or Right click) to savechanges. Esc to exit without changes.
Draw/Patter F9 Choose pattern anchor 'Edge'.n Anchor F10 Choose pattern anchor 'Center'.
F11 Choose pattern anchor 'Endpoint'.F12 Choose pattern anchor 'Stretch'.
Double click a selected pattern to rotate through the choices.
Draw/Boundary
Alt+B Begin (or end) Draw Boundary mode. Click theboundary points, Right click to end.Esc or Alt+B or second Right click to exit Draw Boundary mode.
Draw/Trim
Alt+T Begin (or end) Draw Trim mode. Click the trim boundary, Right clickto end. Esc or Alt+T or second Right click to exit Draw Trim mode.
Draw/A rc
Alt+A Begin (or end) Draw Sewable Arc. Click 3 points (beginning, top ofarc, ending).Esc or Alt+A or second Right click to exit Draw Arc mode.
Draw/Curve
Alt+C Begin (or end) Draw Sewable Curve. Click curve midpoints. Right clickto end.Esc or Alt+C or second Right click to exit Draw Curve mode.
Draw/Freehand
Alt+F Begin (or end) Draw Freehand. Drag to draw. Right Click to end.Esc or Alt+F or second Right Click to exit Draw Freehand mode.
Draw/P2PLine
Alt+L Begin (or end) Draw P2P Line. Click line transition points. Rightclick to end.Esc or Alt+L or second Right click to exit Draw P2P Line mode.
Draw/P2P Pattern
Alt+P Begin (or end) Draw P2P Pattern. Click pattern ending points, Rightclick to end.Esc or Alt+P or second Right click to exit Draw P2P Pattern mode.
Draw/Measur
Alt+M Click any 2 points on design board ; measurements are displayed.Esc to exit.
Technology Basics 21
© 2013 Gammill Inc.
e
GridpointSnap
G Turn on (or off) the Gridpoint Snap when working in Draw mode.
EndpointSnap
E Turn on (or off) the Endpoint Snap when working in Draw mode.
1.3.4 The Keypad
Navigating can also be done using the 6-button keypad on the StatlerStitcher. There is a keypad in the front and in the back of the machine, and they both function in the same manner.
Using the keypad on the machine eliminates the need to return to thekeyboard/mouse repeatedly. Just press the Mode button to movesequentially through the icons. To backup, press and hold the Stopbutton, and press Mode.
Press refers to pressing a button on the keypad located on the sewinghead. Each keypad button corresponds to a command to be executed. Sometimes the terms ‘press,' 'tap,' and click are used interchangeablysince the user can select the preferred method.
1.4 File Management
1.4.1 Explore Folders
Folders and files are stored on a computer much the same as theywould be stored in an office. By arranging them in a hierarchicalstructure, folders and files can be stored and retrieved easily. The termPath is used to describe how to find them.Example: C: \All Stat ler Pat terns\Pat terns Precis ionSt it ch\Alpha_old-z.qli
(1.) Your computer is like the office(2.) C: Disk Drive is one of the file cabinets

CreativeStudio Manual v5.022
© 2013 Gammill Inc.
(3.) Patterns Precision Stitch is one of the drawers in thecabinet
(4.) Stick Alphabet is a folder in the drawer(5.) Alpha_old-z is a file in the folder(6.) .qli is the file type
1. Your Computer holds all the files needed to run the Statler Stitcher.
2. Disk drive C: is like the file cabinet. It is a physical space thatholds folders and files.Disk Drives use letters to differentiate them.
A: is usually a floppy disk driveC: is usually the computer's fixed hard disk drive D: is usually the computer's CD driveE, F, G, H, etc. are used as needed. They might refer to a network diskdrive, a thumb drive, a digital cameracard drive or other removable diskdrive.
3. The file drawer contains file folders that are similar in nature.(Patterns Precision Stitch)
4. The file folder(s) group items that go together. (Alphabets)
5. The filename is (hopefully) a descriptive name.For example: alpha_old-z is (hopefully) a pattern of the letter Z.There are no rules regarding assigning names to files but keepingthem simple and clear is a good idea. Filenames are usually listed inalphabetical order so if there are two files that go together, it is wiseto name them so they will be sorted together. Example: daisy_block.qli, daisy_border.qli, daisy_panto.qli, daisy_triangle.qli
6. File Extension indicate which programs can read them. Most word processing software can read a file extension of .txt (short fortext) or .rtf (short for rich text format) or .doc (short for document). Word processors can't read a file extension of . qli (short for quiltlanguage), .jpg (short for a picture file), .skf (short for sketch file)or .dxf (short for CAD drawing file) or .pat (short for pattern file).
Statler Stitchers recognize file extensions for pattern files (.qli, .csq, .csqx, .dxf, .pat, . patx) and projects (.proj, .projx) and very little else.
Tip: Statler allows us to create new, original patterns. It
Technology Basics 23
© 2013 Gammill Inc.
also includes hundreds of pre-tested quilting patterns, with thefile extension of .qli. In addition to this, Statler has provided uswith multiple versions of these existing files so we can makechanges to them if needed (using the Autosketch or othersoftware). The following folders contain the additional versions:
C:\Patterns PrecisionStitch DXFC:\Patterns PrecisionStitch JPG C:\Patterns PrecisionStitch SKF
1.4.1.1 Looking at Folders
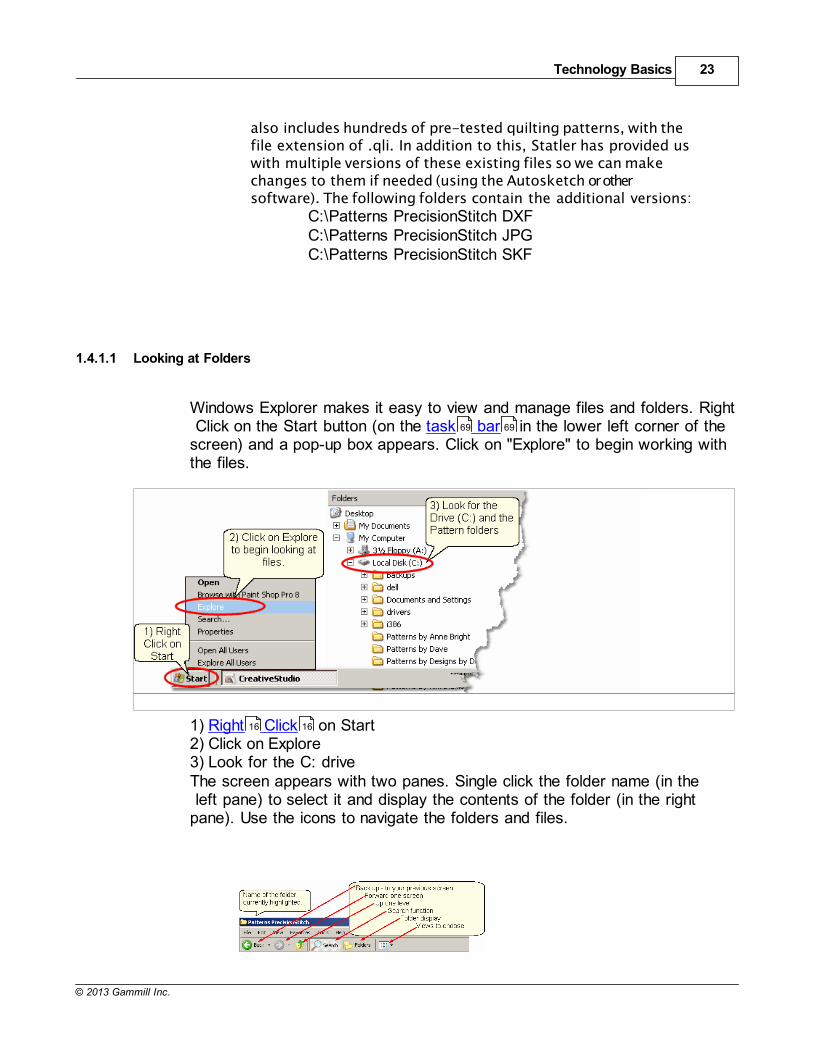
Windows Explorer makes it easy to view and manage files and folders. Right Click on the Start button (on the task bar in the lower left corner of thescreen) and a pop-up box appears. Click on "Explore" to begin working withthe files.
1) Right Click on Start2) Click on Explore3) Look for the C: driveThe screen appears with two panes. Single click the folder name (in the left pane) to select it and display the contents of the folder (in the rightpane). Use the icons to navigate the folders and files.
69 69
16 16
CreativeStudio Manual v5.024
© 2013 Gammill Inc.
Drill down and back up using clicks and the icons. The drill-down path
is shown on the left (how to get to the selected folder, Stick Alphabet). Thelowest detail level is listed on the right (what is inside the selected StickAlphabet folder).
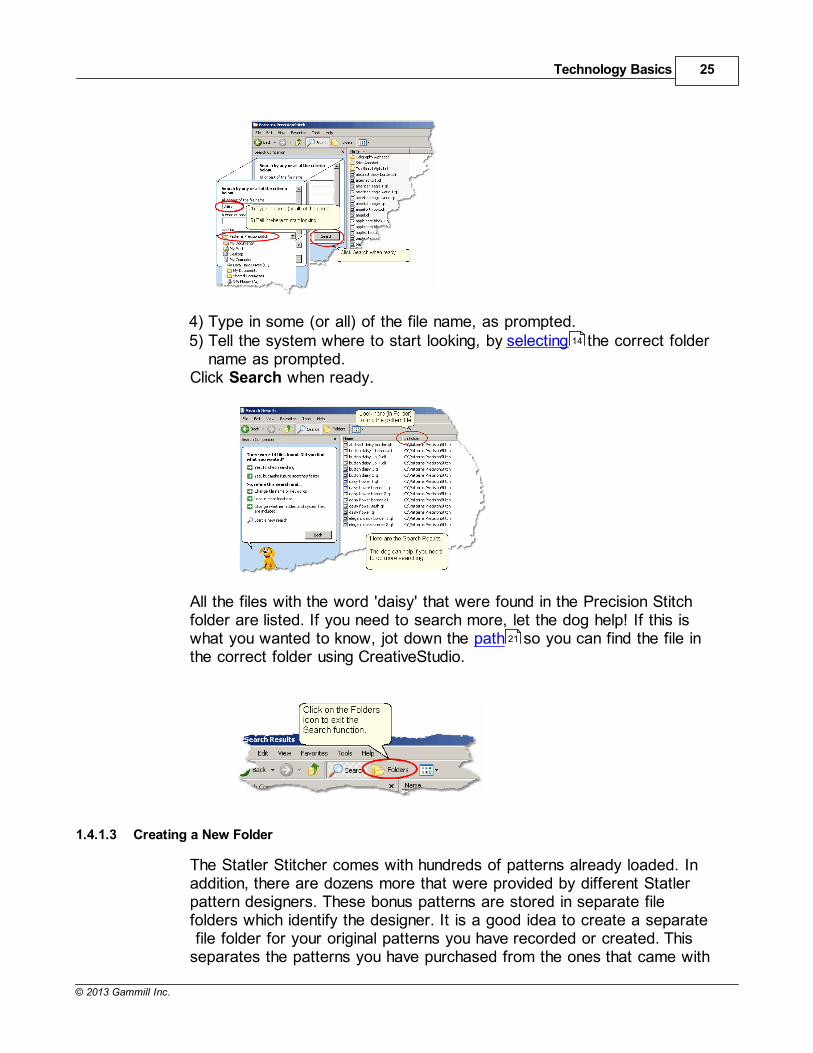
1.4.1.2 Searching Folders and Files
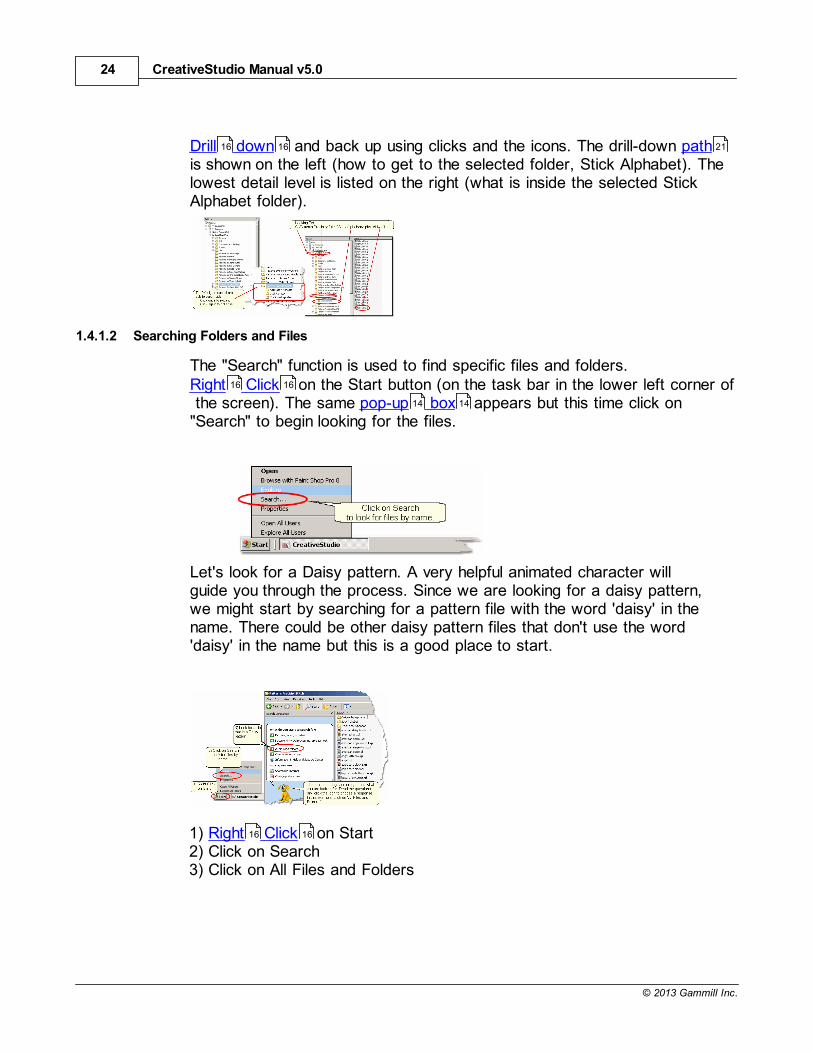
The "Search" function is used to find specific files and folders.Right Click on the Start button (on the task bar in the lower left corner of the screen). The same pop-up box appears but this time click on"Search" to begin looking for the files.
Let's look for a Daisy pattern. A very helpful animated character willguide you through the process. Since we are looking for a daisy pattern,we might start by searching for a pattern file with the word 'daisy' in thename. There could be other daisy pattern files that don't use the word'daisy' in the name but this is a good place to start.
1) Right Click on Start 2) Click on Search3) Click on All Files and Folders
16 16 21
16 16
14 14
16 16
Technology Basics 25
© 2013 Gammill Inc.
4) Type in some (or all) of the file name, as prompted.5) Tell the system where to start looking, by selecting the correct folder
name as prompted.Click Search when ready.
All the files with the word 'daisy' that were found in the Precision Stitchfolder are listed. If you need to search more, let the dog help! If this iswhat you wanted to know, jot down the path so you can find the file inthe correct folder using CreativeStudio.
1.4.1.3 Creating a New Folder
The Statler Stitcher comes with hundreds of patterns already loaded. Inaddition, there are dozens more that were provided by different Statlerpattern designers. These bonus patterns are stored in separate filefolders which identify the designer. It is a good idea to create a separate file folder for your original patterns you have recorded or created. Thisseparates the patterns you have purchased from the ones that came with
14
21
CreativeStudio Manual v5.026
© 2013 Gammill Inc.
your system.
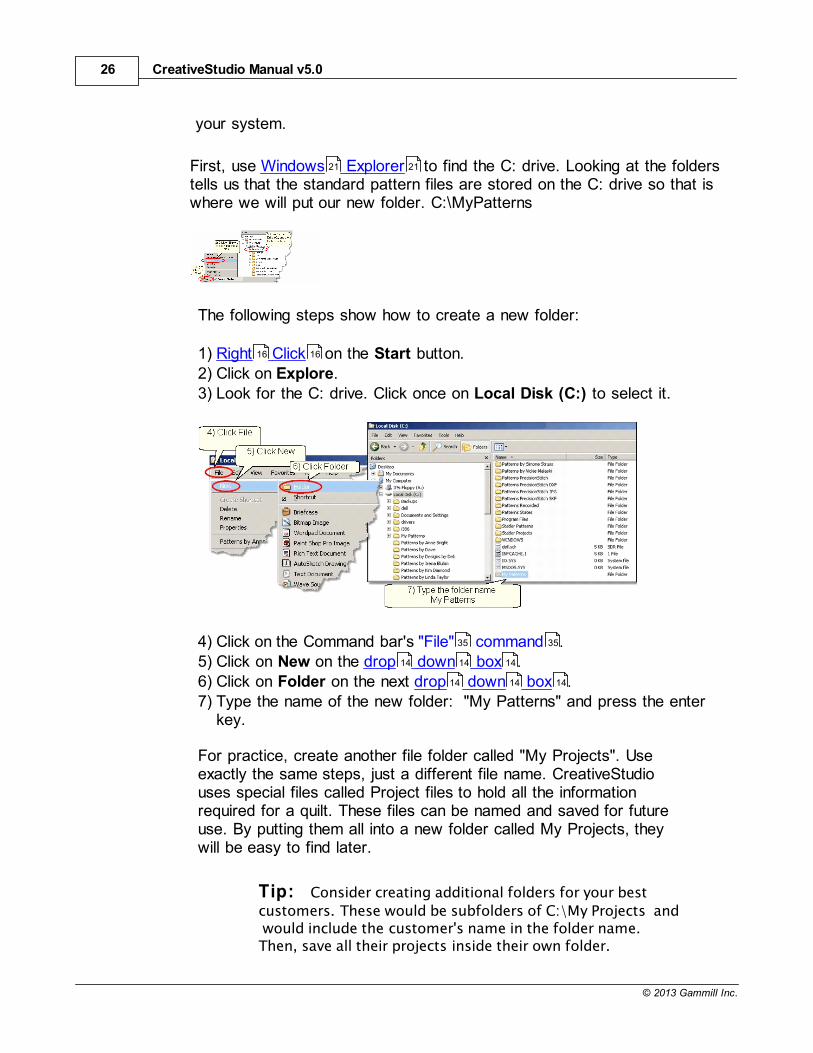
First, use Windows Explorer to find the C: drive. Looking at the folderstells us that the standard pattern files are stored on the C: drive so that iswhere we will put our new folder. C:\MyPatterns
The following steps show how to create a new folder:
1) Right Click on the Start button.2) Click on Explore.3) Look for the C: drive. Click once on Local Disk (C:) to select it.
4) Click on the Command bar's "File" command .5) Click on New on the drop down box .6) Click on Folder on the next drop down box .7) Type the name of the new folder: "My Patterns" and press the enter
key.
For practice, create another file folder called "My Projects". Useexactly the same steps, just a different file name. CreativeStudiouses special files called Project files to hold all the informationrequired for a quilt. These files can be named and saved for futureuse. By putting them all into a new folder called My Projects, theywill be easy to find later.
Tip: Consider creating additional folders for your best
customers. These would be subfolders of C:\My Projects and would include the customer's name in the folder name.Then, save all their projects inside their own folder.
21 21
16 16
35 35
14 14 14
14 14 14
Technology Basics 27
© 2013 Gammill Inc.
1.4.2 Explore Files
The Statler Stitcher computer comes pre-loaded with all the softwareand files in place, but at some time we all need to add, copy, moveor delete some of our files. There are several right ways to managefiles. Windows Explorer 19 is used here because it is easy to use.
As described earlier, files have a path (the disk drive, folder andsubfolders), a filename (hopefully it is descriptive) and a type called a fileextension .
CreativeStudio can read the following types of files:.qli is the Quilting Language format that the stitcher recognizes as apattern file..pat is an encrypted Pattern File..csq is another Quilting Language format used for derivative
patterns that you created in CS (by modifying an existingpattern) and exported, giving it a new name.
.csqx is the encrypted version of a .csq file.
.dxf is a CAD format used by CAD systems and recognized by theStatler.
A special file type that the CreativeStudio recognizes is a project file
(file extension is .proj or .projx). Project files contain all the patterns, sizesand other descriptive information needed to complete a quilt. Projects aredescribed in depth later.
At some time, additional patterns will be purchased and will need to bemoved to the folder containing your personal files; C:\My Patterns. Thenew files will exist on some type of removable media (like a flash drive
) and Windows Explorer can help copy them to their new folder.
First, insert the flash drive (removable media generally need a USB port) and open up Windows Explorer . Search the folder structure and findthe removable media.
Tip: Scan the thumb drive with up-to-date Antivirus software
before you move it to your Statler. It is wise to do this EVERYtime you move media between computers. This protects yourinvestment in your Statler Stitcher.
In this example, the thumb drive has been given the letter F but each
21 21
21
21
21
73 73
13
13
13 13
21 21 24

CreativeStudio Manual v5.028
© 2013 Gammill Inc.
computer can be different so it might be E, F, G, H, or some other letter. The example shows the flash drive has two folders that will be used for copying files to/from the home computer (Laptop) and the Statler. Thesefolders are named: CopyLaptopToStatler and CopyStatlerToLaptop. Using descriptive names for files and folders will make this process mucheasier.
1.4.2.1 Copying Files
We know where the files are (source is F:\CopyLaptopToStatler) andwhere they need to be placed (destination is C:\My Patterns). WindowsExplorer is used here too.
1) Click on the source folder, and the content will be displayed inthe right window pane.
2) Select the files to be copied.3) Right click the selected (highlighted) files.4) Click Copy.
5) Click on the destination folder.6) Right click the highlighted destination folder.7) Click Paste. Now click on the destination folder and the files should
appear in the right window pane.
16
16 16
Technology Basics 29
© 2013 Gammill Inc.
Tip: Copying or moving can also be done by dragging the
group of files to the destination. If the source and destinationare in the same path, the files are moved. If they are indifferent paths, they are copied.
1.4.2.2 Rename Files
The new files in this example have names that are more like productcodes than pattern file names, so change them to somethingrecognizable. Again, Windows Explorer makes this easy.
1.4.2.3 Managing Recorded Files
One of the outstanding features of CreativeStudio is the ability to use the stitcher to create an original design by recording the motions forstitching that design and save them so it can be used repeatedly. CS will automatically name the pattern file and save it to a folder on yourcomputer. The path is:C:\Patterns Recorded\RecordedQLI_yyyyMondd_hhmmss.qliThis looks scary but it is really very logical. The new pattern file needs aname that is unique, andthe current date and time make it unique. Apattern recorded on New Years Day, shortly after noon might be namedC:\Patterns Recorded\RecordedQLI_2009Jan01_120345.qliIt can be found in the folder C:\Recorded Patterns.
When a recorded patterns is sure to be used again, it is a good idea toExport the file, giving it a descriptive name, putting it in your 'My Patterns'folder and saving it as a .csq file. The .csq format is preferred because it issaved as arcs, not polylines. That is a techy reason but it means the file issaved more efficiently.
1.4.2.4 Buying Pattern Files
Finding the perfect motif for a quilt is fun and stitching it out is verysatisfying. So, building a stash of patterns is bound to happen. Eachdesigner has a style of their own, so try patterns from multiple designers. When ready to place an order, here is what to do:
1. Log on to the pattern designer's website and view their catalog.Most catalogs have shopping cart functions, so you can add patternsto your shopping cart as you find them. When you are done shopping,
153
27

CreativeStudio Manual v5.030
© 2013 Gammill Inc.
follow the instructions for checking out and paying for the patterns.Each designer does this a little differently so follow their directionscarefully. One of the steps is to give your name, address and emailaddress. The designer will either email the patterns to you or tell youhow to download them yourself.
2. When you get your patterns save them to your home computer first.(This assumes that your home computer has internet access, a firewall and virus security software.) All new files should be received by (andsaved on) your home computer so it can check them for viruses. TheStatler Stitcher should never be connected to the internet.
3. Frequently the patterns will arrive in a zipped file folder, whichmeans it has been compressed so it takes less space and can besent to you faster. It is easy to unzip a folder. Right click the zipped folder and follow the instructions. There is a wizard that will helpexplain the process.
4. Now copy the files to your Statler Stitcher computer.
1.4.2.5 Moving Files
Many people use the terms copy and move interchangeably becausethey are so similar. When files are copied from one place (source) toanother (destination), the original files on the source remain. Whenfiles are moved from one place (source) to another (destination) theoriginal files are deleted.
The previous section described how to copy files from a RemovableMedia to a folder on the Statler computer. Copying files from thehome computer to the Statler computer works exactly the same, but it takes two steps. The first step is to copy or move files from thehome computer to the removable media, and the second is to copy or move the files from the removable media to the Statler computer.
1.4.2.6 Downloading New Version of CS
The Statler Stitcher is a stand-alone system which means it shouldNOT be connected to the internet or have any other graphics software loaded on the computer. This guarantees that the CS software canrun at peak performance and anti-virus software is not needed.Screen Savers should NOT be used either.
The first time CreativeStudio is installed, it must be done from a CDbecause it is big (see the Installation Guide section). After the initialinstallation however, you can download new files from the Gammill /

Technology Basics 31
© 2013 Gammill Inc.
Statler website. Use a different computer (your home computer) toaccess the internet when downloading files. All software upgrades areannounced on the Gammill website at the GQ Statler Talk Forum:www.gammill.com/forum.
If you prefer, order a CD direct from Gammill by calling the orderdepartment or send your order to [email protected]


CreativeStudio v5.0
Part
II
CreativeStudio Manual v5.034
© 2013 Gammill Inc.
2 Main Screen Layout
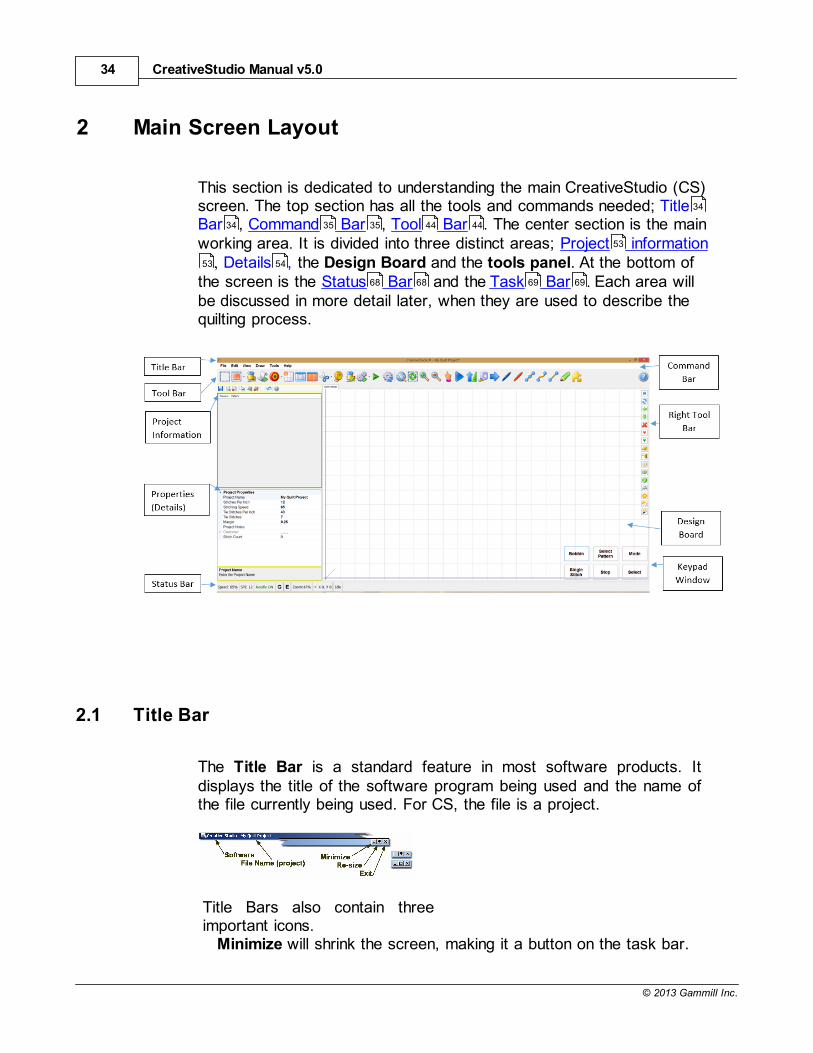
This section is dedicated to understanding the main CreativeStudio (CS)screen. The top section has all the tools and commands needed; TitleBar , Command Bar , Tool Bar . The center section is the mainworking area. It is divided into three distinct areas; Project information
, Details , the Design Board and the tools panel. At the bottom ofthe screen is the Status Bar and the Task Bar . Each area willbe discussed in more detail later, when they are used to describe thequilting process.
2.1 Title Bar
The Title Bar is a standard feature in most software products. Itdisplays the title of the software program being used and the name ofthe file currently being used. For CS, the file is a project.
Title Bars also contain threeimportant icons.
Minimize will shrink the screen, making it a button on the task bar.
34
34 35 35 44 44
53
53 54
68 68 69 69
Main Screen Layout 35
© 2013 Gammill Inc.
Re-size will change the screen size (full screen or partial screen).Exit is a fast way to close the software. Remember this closes CS
completely.
2.2 Command Bar
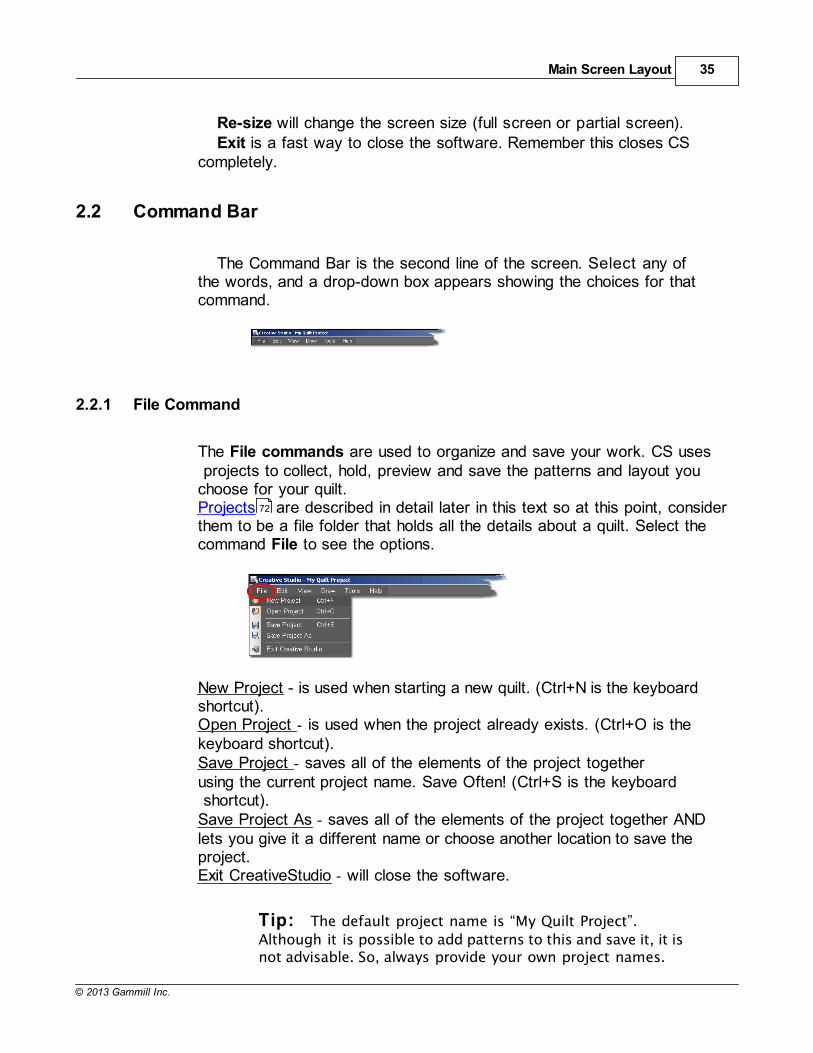
The Command Bar is the second line of the screen. Select any ofthe words, and a drop-down box appears showing the choices for thatcommand.
2.2.1 File Command
The File commands are used to organize and save your work. CS uses projects to collect, hold, preview and save the patterns and layout youchoose for your quilt.Projects are described in detail later in this text so at this point, considerthem to be a file folder that holds all the details about a quilt. Select thecommand File to see the options.
New Project - is used when starting a new quilt. (Ctrl+N is the keyboardshortcut). Open Project - is used when the project already exists. (Ctrl+O is thekeyboard shortcut).Save Project - saves all of the elements of the project togetherusing the current project name. Save Often! (Ctrl+S is the keyboard shortcut).Save Project As - saves all of the elements of the project together ANDlets you give it a different name or choose another location to save theproject.Exit CreativeStudio - will close the software.
Tip: The default project name is “My Quilt Project”.
Although it is possible to add patterns to this and save it, it isnot advisable. So, always provide your own project names.
72

CreativeStudio Manual v5.036
© 2013 Gammill Inc.
Consider using a naming convention that somehow identifiesthe quilt; perhaps by customer, date, style, event or some othercombination of methods.
2.2.2 Edit Command
CS provides the ability to undo (or redo) the previous command, so if acommand step is made by mistake, it can be immediately corrected.This does not apply to numeric measurement changes, just adjustmentson the Design Board. CS remembers the recent commands (called the stack) performed in the current quilt group, so if you backup too far,Redo will “Undo the Undo” or go forward again.
Store Undo will store the current state. Undo will reverse the previous command.Redo will re-execute the previous command.
2.2.3 View Command
CS can display or hide certain windows which contain details orsettings.
View Project Explorer shows all the patterns chosen for the currentproject. This is the pattern list at the left of the CS screen.
View Property Window displays the project properties window or awindow displaying the properties (details like size, SPI, etc.) of thepattern currently selected. The property window appears below thepattern list on the left side of the screen.
View Keypad Window displays an image of the stitcher keypad at thebottom right of the CS screen.
Main Screen Layout 37
© 2013 Gammill Inc.
View Grid - Choosing to display a grid will change the look of the designboard. It can look like graph paper with very fine lines and it is helpfulwhen drawing and planning pattern positioning.
Grid Size - Choose the distance between the grid lines that helps youplan the designs effectively. If precise pattern placement is important, thegrid size might be set to a quarter inch (0.25) but if the pattern is verylarge scale, the grid size might be better at one inch.
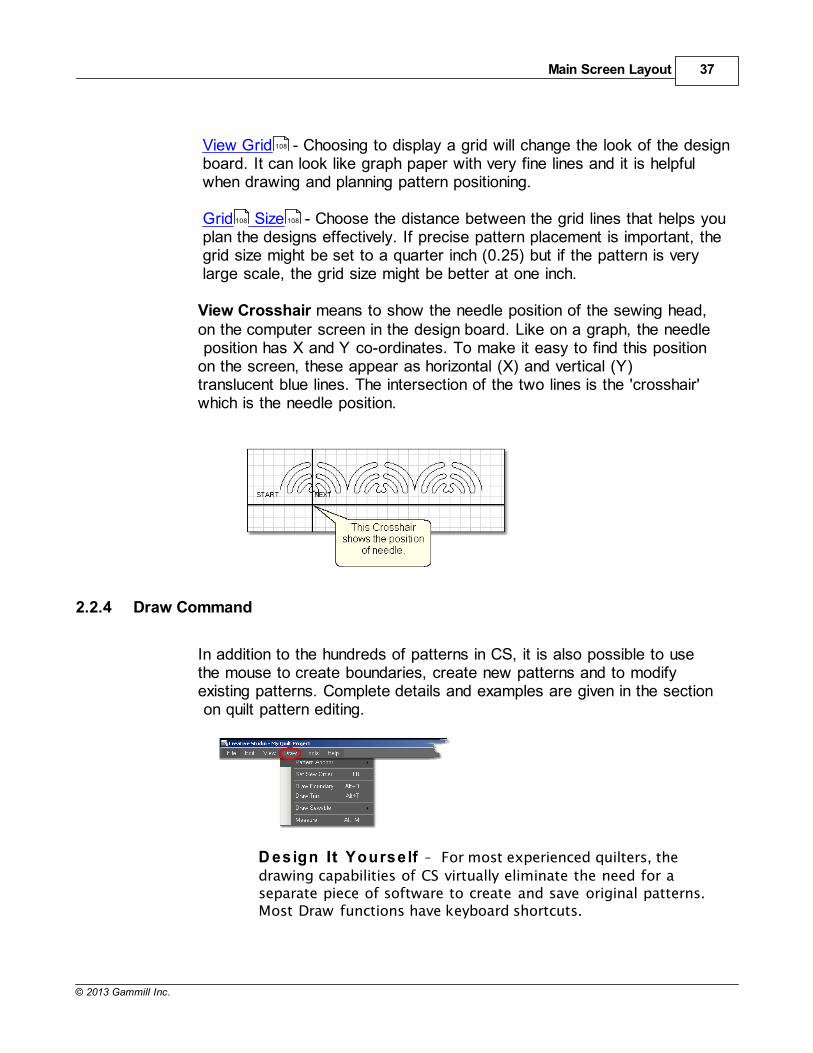
View Crosshair means to show the needle position of the sewing head,on the computer screen in the design board. Like on a graph, the needle position has X and Y co-ordinates. To make it easy to find this positionon the screen, these appear as horizontal (X) and vertical (Y)translucent blue lines. The intersection of the two lines is the 'crosshair'which is the needle position.
2.2.4 Draw Command
In addition to the hundreds of patterns in CS, it is also possible to usethe mouse to create boundaries, create new patterns and to modifyexisting patterns. Complete details and examples are given in the section on quilt pattern editing.
D esign It Yourse lf - For most experienced quilters, the
drawing capabilities of CS virtually eliminate the need for aseparate piece of software to create and save original patterns.Most Draw functions have keyboard shortcuts.
108
108 108
CreativeStudio Manual v5.038
© 2013 Gammill Inc.
Pattern Anchor - There are four different pattern anchor modes used toadjust patterns . Select a pattern to see the adjustment handles. Double click or tap the pattern to change to the next pattern anchor mode.Each mode has its own color of handles and each responds differentlyto resizing because they are anchored at different points.* Edge (F9) - Move any resizing handle (purple) and the opposite edge is
anchored.* Center (F10) - Move any resizing handle (orange) and the center is
anchored.* Endpoint (F11) - Move one of the resizing handles (blue squares that
appear only at the start or end of the pattern) and the other isanchored.
* Stretch (F12) - Move any resizing handle (gray) and the oppositehandle is anchored. Stretch is the only resizing method that allows aresizing handle to change both height and width at the same time. This allows the pattern to be stretched or skewed, which is very usefulwhen fitting a pattern into a not-so-perfect quilt block.
Set Sew Order (F8) - By default, CS will stitch patterns in the sameorder that they are moved on to the (screen). This command allowschanges to be made to the sewing order. It also allows the stitchingdirection to be reversed.
Draw Boundary (Alt+B) - Boundaries are created for visual referenceand for receiving and resizing patterns. This command draws boundaries on the screen using the mouse or finger. Drawing boundaries on the quiltusing the stitcher head is accomplished using the Create BoundaryIcon .
Draw Trim (Alt+T) - This is a special type of boundary that removes or trims away some part of the pattern(s) showing on the screen. Thiscommand draws trims on the screen using the mouse or finger. Definingtrims in the quilt using the stitcher head is accomplished using the Trim Icon.The Trim icon displays the choices: Trim Inside or Trim Outside
which determines what part of the pattern will be concealed and notquilted. Trims are a temporary change to the copy of the patterns on thescreen. It does not permanently affect the originals, it just prevents thetrimmed portion of the pattern from stitching out.
Draw Sewable - Sewable drawings are created using the mouse orfinger instead of the sewing head. The sewable drawing choices are: arcs
(Alt+A), curves (Alt+C), lines (Alt+L), patterns (Alt+P) andfreehand (Alt+F).
Draw Measure (Alt+M) - Allows images on the screen (boundaries,patterns, etc) to be measured using the mouse. This gives a good
139 139
88
139 139 139
139
44
139 139
44 44 213 213 179
179
139 139
139 139 139 139
139 139
Main Screen Layout 39
© 2013 Gammill Inc.
approximation of the true size.
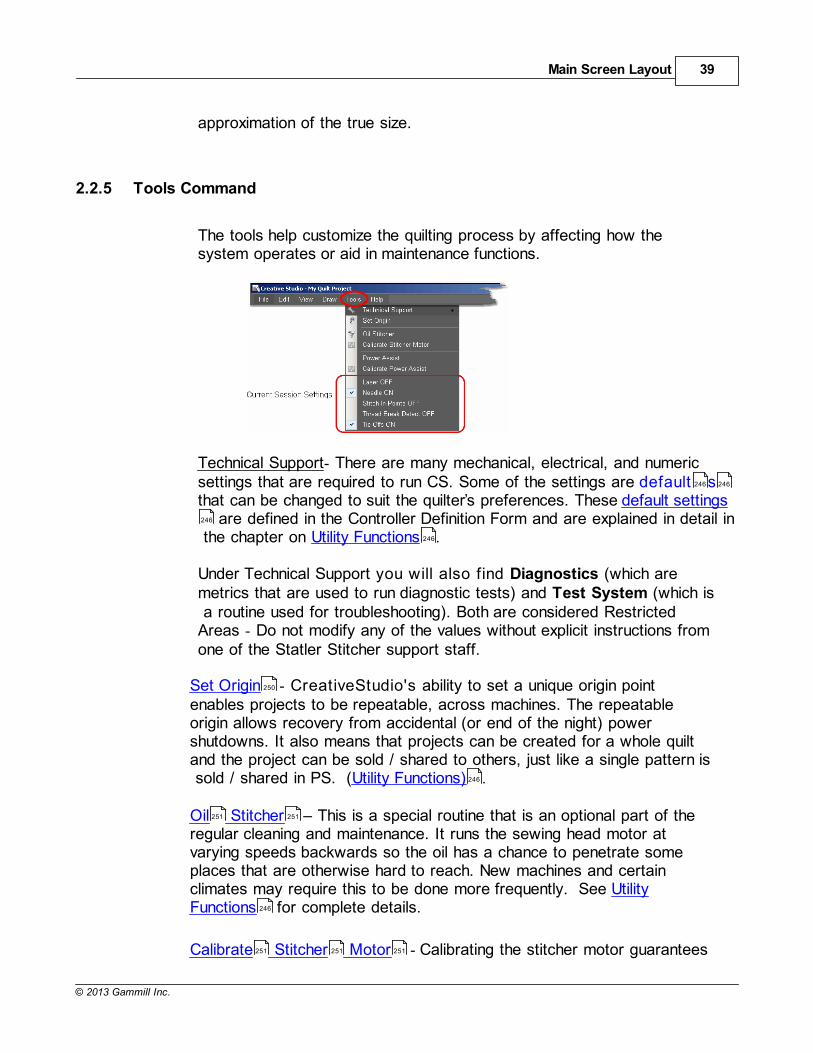
2.2.5 Tools Command
The tools help customize the quilting process by affecting how thesystem operates or aid in maintenance functions.
Technical Support- There are many mechanical, electrical, and numericsettings that are required to run CS. Some of the settings are default sthat can be changed to suit the quilter’s preferences. These default settings
are defined in the Controller Definition Form and are explained in detail in the chapter on Utility Functions .
Under Technical Support you will also find Diagnostics (which aremetrics that are used to run diagnostic tests) and Test System (which is a routine used for troubleshooting). Both are considered RestrictedAreas - Do not modify any of the values without explicit instructions fromone of the Statler Stitcher support staff.
Set Origin - CreativeStudio's ability to set a unique origin pointenables projects to be repeatable, across machines. The repeatableorigin allows recovery from accidental (or end of the night) powershutdowns. It also means that projects can be created for a whole quiltand the project can be sold / shared to others, just like a single pattern is sold / shared in PS. (Utility Functions) .
Oil Stitcher This is a special routine that is an optional part of theregular cleaning and maintenance. It runs the sewing head motor atvarying speeds backwards so the oil has a chance to penetrate someplaces that are otherwise hard to reach. New machines and certainclimates may require this to be done more frequently. See UtilityFunctions for complete details.
Calibrate Stitcher Motor - Calibrating the stitcher motor guarantees
246 246
246
246
250
246
251 251
246
251 251 251
CreativeStudio Manual v5.040
© 2013 Gammill Inc.
stitching accuracy. This does not need to be done often but can beperformed as needed such as after signficant technical maintenance.Starting with CS5, a stitcher motor calibration is done automatically afterinstalling new CS software. (see Utility Functions )
Power Assist - This feature enables the machine head to move moreeasily by adding a little 'motor power'. This compensates for the weight ofthe machine and is adjustable to suit each individual.
Calibrate Power Assist - This routine allows the quilter to adjust thePower Assist to suit their own personal 'touch'. There is an automaticcalibration routine, followed by the ability to adjust the settings until themachine movement 'feels' right. See Utility Functions for completedetails.
Current Session Settings: The following settings are inherited from thedefault settings. Changes made here apply only to the current session:
Laser OFF (or ON) - The laser light is automatically turned on duringcertain functions, but it can be turned on (or off) manually. If CS needsthe laser light on, it will turn it on automatically.
Needle OFF (or ON) - The needle can be turned OFF when a pattern isbeing checked for proper positioning. By turning the needle off and thelaser light on, CS can move through the pattern and the light shows where the stitch line would appear. This is like a rehearsal. Once the path iscorrect, turn the needle ON and use the Restart function to repeat themotions, and stitch it out.
Stitch in Points OFF (or ON) - When the Stitch in Points is set ON, thesewing head will take an extra stitch in every point it encounters. Thisenhances some patterns by making the point more precise.
Thread Break Detect OFF (or ON) - When the Thread Break detector isON, the thread break sensor on the sewing head is enabled. This sensoris usually a cylinder that is included in the thread path and it rotates whenstitching. If it stops rotating when stitching, CS assumes that the topthread has broken and CS will stop stitching and show a Thread Breakmessage.
Tieoffs OFF (or ON) - Tieoffs are the tiny stitches that are made at thebeginning and the end of a pattern or a line of stitching. They serve to knotthe threads so the stitches will not easily come out.
Tip: Any changes you make to these settings will affect the
246 246
252 252
252 252 252
246 246
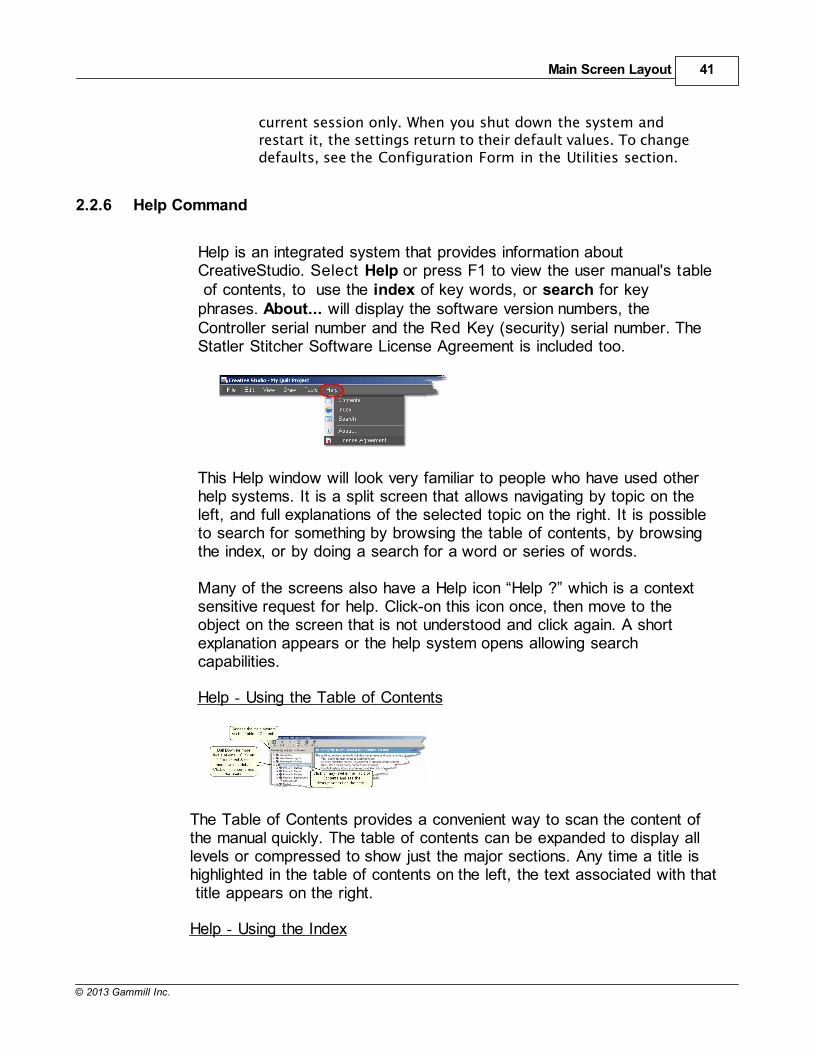
Main Screen Layout 41
© 2013 Gammill Inc.
current session only. When you shut down the system andrestart it, the settings return to their default values. To changedefaults, see the Configuration Form in the Utilities section.
2.2.6 Help Command
Help is an integrated system that provides information aboutCreativeStudio. Select Help or press F1 to view the user manual's table of contents, to use the index of key words, or search for keyphrases. About... will display the software version numbers, theController serial number and the Red Key (security) serial number. TheStatler Stitcher Software License Agreement is included too.
This Help window will look very familiar to people who have used otherhelp systems. It is a split screen that allows navigating by topic on theleft, and full explanations of the selected topic on the right. It is possibleto search for something by browsing the table of contents, by browsingthe index, or by doing a search for a word or series of words.
Many of the screens also have a Help icon “Help ?” which is a contextsensitive request for help. Click-on this icon once, then move to theobject on the screen that is not understood and click again. A shortexplanation appears or the help system opens allowing searchcapabilities.
Help - Using the Table of Contents
The Table of Contents provides a convenient way to scan the content ofthe manual quickly. The table of contents can be expanded to display alllevels or compressed to show just the major sections. Any time a title ishighlighted in the table of contents on the left, the text associated with that title appears on the right.
Help - Using the Index
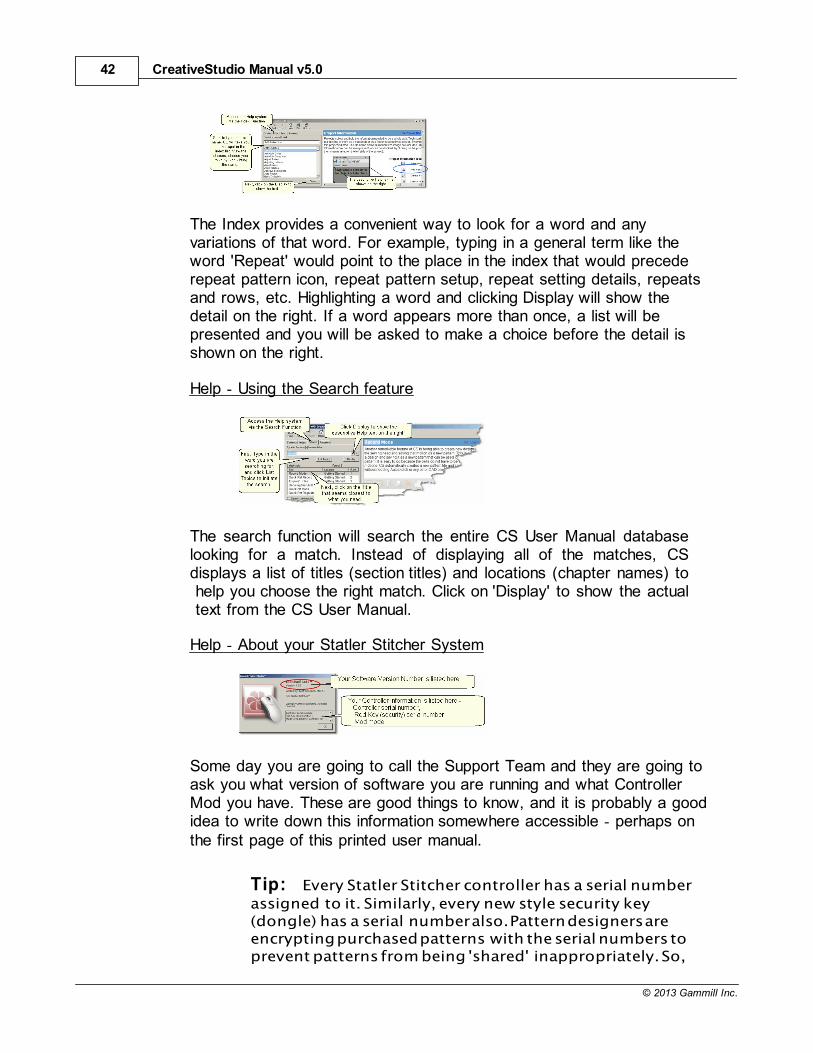
CreativeStudio Manual v5.042
© 2013 Gammill Inc.
The Index provides a convenient way to look for a word and anyvariations of that word. For example, typing in a general term like theword 'Repeat' would point to the place in the index that would precederepeat pattern icon, repeat pattern setup, repeat setting details, repeatsand rows, etc. Highlighting a word and clicking Display will show thedetail on the right. If a word appears more than once, a list will bepresented and you will be asked to make a choice before the detail isshown on the right.
Help - Using the Search feature
The search function will search the entire CS User Manual databaselooking for a match. Instead of displaying all of the matches, CSdisplays a list of titles (section titles) and locations (chapter names) to help you choose the right match. Click on 'Display' to show the actual text from the CS User Manual.
Help - About your Statler Stitcher System
Some day you are going to call the Support Team and they are going toask you what version of software you are running and what ControllerMod you have. These are good things to know, and it is probably a goodidea to write down this information somewhere accessible - perhaps onthe first page of this printed user manual.
Tip: Every Statler Stitcher controller has a serial number
assigned to it. Similarly, every new style security key(dongle) has a serial number also. Pattern designers areencrypting purchased patterns with the serial numbers toprevent patterns from being 'shared' inappropriately. So,
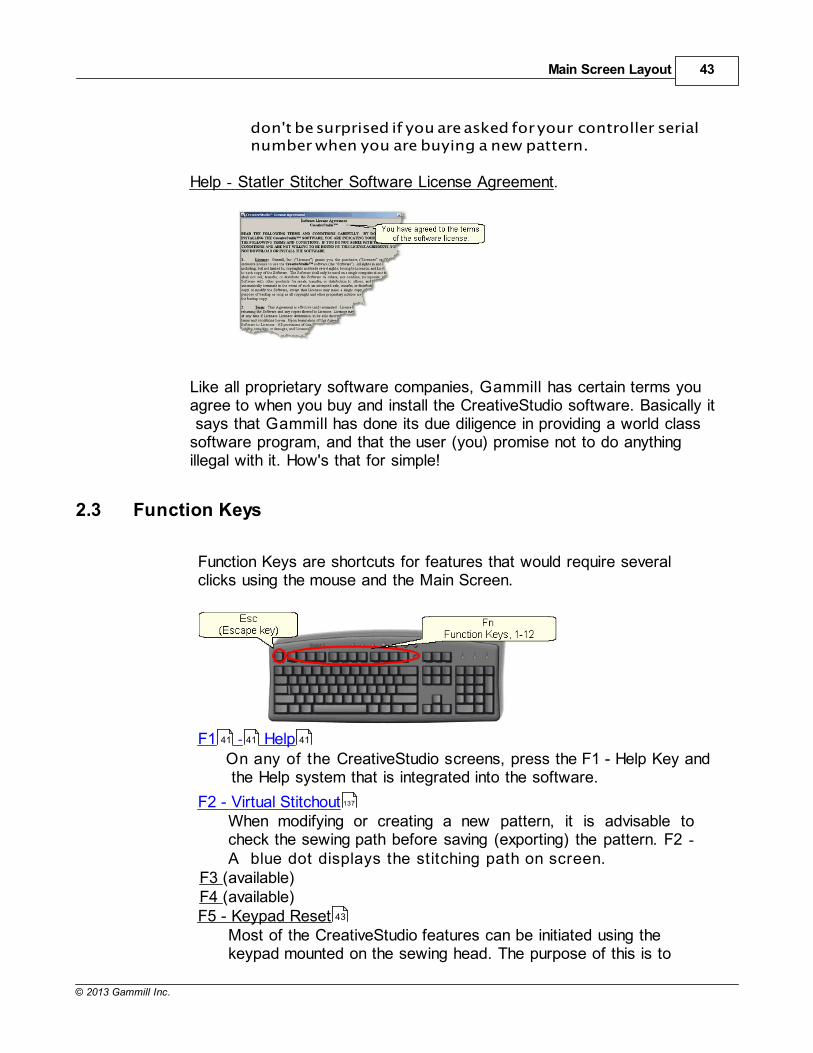
Main Screen Layout 43
© 2013 Gammill Inc.
don't be surprised if you are asked for your controller serialnumber when you are buying a new pattern.
Help - Statler Stitcher Software License Agreement.
Like all proprietary software companies, Gammill has certain terms youagree to when you buy and install the CreativeStudio software. Basically it says that Gammill has done its due diligence in providing a world classsoftware program, and that the user (you) promise not to do anythingillegal with it. How's that for simple!
2.3 Function Keys
Function Keys are shortcuts for features that would require severalclicks using the mouse and the Main Screen.
F1 - HelpOn any of the CreativeStudio screens, press the F1 - Help Key and the Help system that is integrated into the software.
F2 - Virtual StitchoutWhen modifying or creating a new pattern, it is advisable tocheck the sewing path before saving (exporting) the pattern. F2 -A blue dot displays the stitching path on screen.
F3 (available) F4 (available)F5 - Keypad Reset
Most of the CreativeStudio features can be initiated using thekeypad mounted on the sewing head. The purpose of this is to
41 41 41
137
43
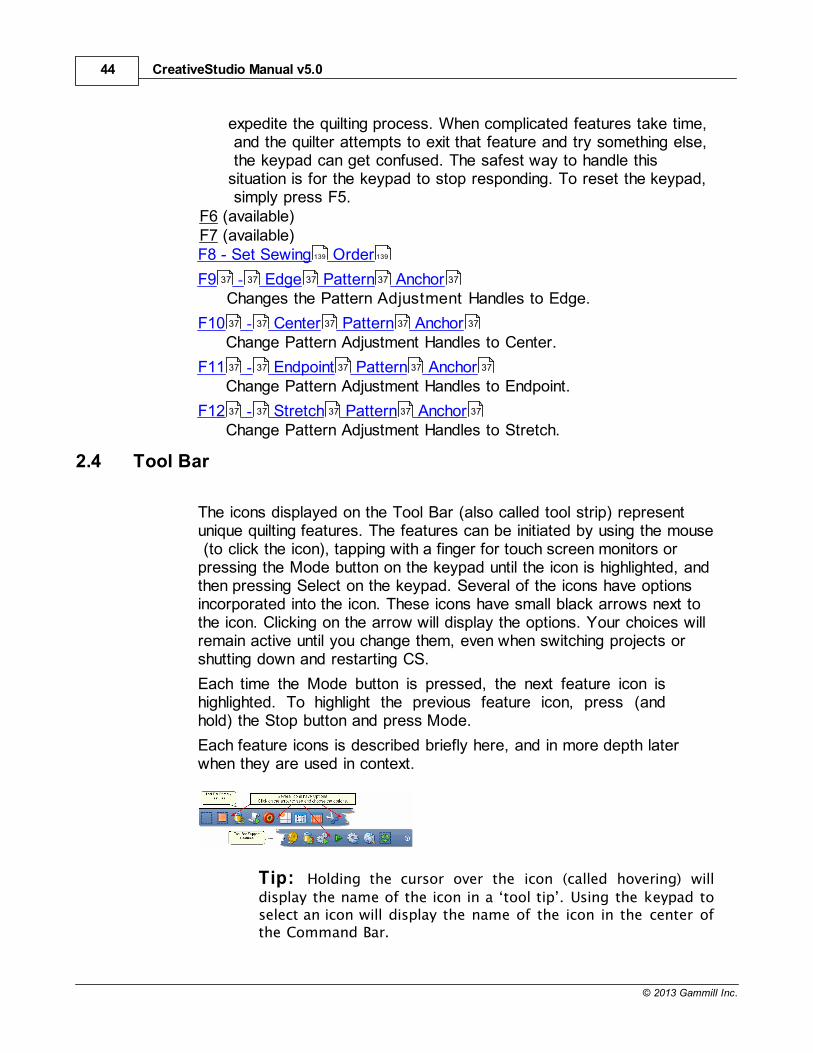
CreativeStudio Manual v5.044
© 2013 Gammill Inc.
expedite the quilting process. When complicated features take time, and the quilter attempts to exit that feature and try something else, the keypad can get confused. The safest way to handle thissituation is for the keypad to stop responding. To reset the keypad, simply press F5.
F6 (available) F7 (available)F8 - Set Sewing Order
F9 - Edge Pattern AnchorChanges the Pattern Adjustment Handles to Edge.
F10 - Center Pattern AnchorChange Pattern Adjustment Handles to Center.
F11 - Endpoint Pattern AnchorChange Pattern Adjustment Handles to Endpoint.
F12 - Stretch Pattern AnchorChange Pattern Adjustment Handles to Stretch.
2.4 Tool Bar
The icons displayed on the Tool Bar (also called tool strip) representunique quilting features. The features can be initiated by using the mouse (to click the icon), tapping with a finger for touch screen monitors orpressing the Mode button on the keypad until the icon is highlighted, andthen pressing Select on the keypad. Several of the icons have optionsincorporated into the icon. These icons have small black arrows next tothe icon. Clicking on the arrow will display the options. Your choices willremain active until you change them, even when switching projects orshutting down and restarting CS.
Each time the Mode button is pressed, the next feature icon ishighlighted. To highlight the previous feature icon, press (andhold) the Stop button and press Mode.
Each feature icons is described briefly here, and in more depth laterwhen they are used in context.
Tip: Holding the cursor over the icon (called hovering) will
display the name of the icon in a ‘tool tip’. Using the keypad toselect an icon will display the name of the icon in the center ofthe Command Bar.
139 139
37 37 37 37 37
37 37 37 37 37
37 37 37 37 37
37 37 37 37 37
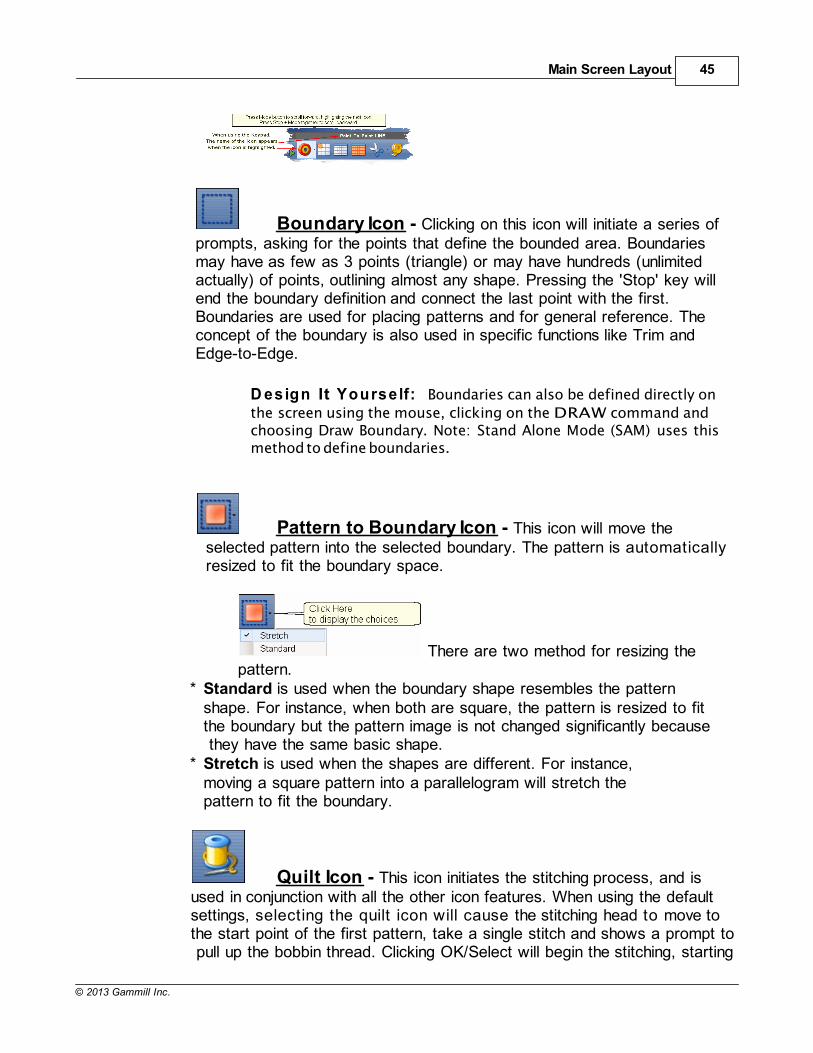
Main Screen Layout 45
© 2013 Gammill Inc.
Boundary Icon - Clicking on this icon will initiate a series ofprompts, asking for the points that define the bounded area. Boundariesmay have as few as 3 points (triangle) or may have hundreds (unlimitedactually) of points, outlining almost any shape. Pressing the 'Stop' key willend the boundary definition and connect the last point with the first.Boundaries are used for placing patterns and for general reference. Theconcept of the boundary is also used in specific functions like Trim andEdge-to-Edge.
D esign It Yourse lf: Boundaries can also be defined directly on
the screen using the mouse, clicking on the DRAW command andchoosing Draw Boundary. Note: Stand Alone Mode (SAM) uses thismethod to define boundaries.
Pattern to Boundary Icon - This icon will move theselected pattern into the selected boundary. The pattern is automaticallyresized to fit the boundary space.
There are two method for resizing thepattern.
* Standard is used when the boundary shape resembles the patternshape. For instance, when both are square, the pattern is resized to fitthe boundary but the pattern image is not changed significantly because they have the same basic shape.
* Stretch is used when the shapes are different. For instance,moving a square pattern into a parallelogram will stretch thepattern to fit the boundary.
Quilt Icon - This icon initiates the stitching process, and isused in conjunction with all the other icon features. When using the defaultsettings, selecting the quilt icon will cause the stitching head to move tothe start point of the first pattern, take a single stitch and shows a prompt to pull up the bobbin thread. Clicking OK/Select will begin the stitching, starting
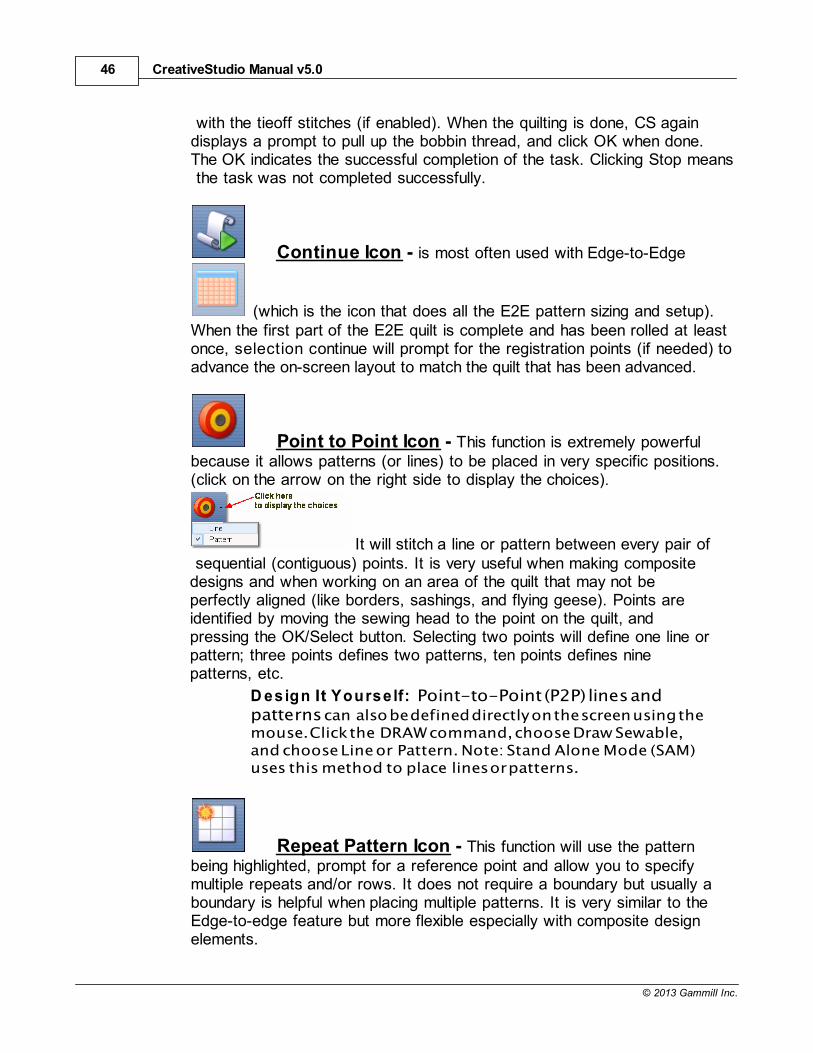
CreativeStudio Manual v5.046
© 2013 Gammill Inc.
with the tieoff stitches (if enabled). When the quilting is done, CS againdisplays a prompt to pull up the bobbin thread, and click OK when done.The OK indicates the successful completion of the task. Clicking Stop means the task was not completed successfully.
Continue Icon - is most often used with Edge-to-Edge
(which is the icon that does all the E2E pattern sizing and setup).When the first part of the E2E quilt is complete and has been rolled at leastonce, selection continue will prompt for the registration points (if needed) toadvance the on-screen layout to match the quilt that has been advanced.
Point to Point Icon - This function is extremely powerfulbecause it allows patterns (or lines) to be placed in very specific positions.(click on the arrow on the right side to display the choices).
It will stitch a line or pattern between every pair of sequential (contiguous) points. It is very useful when making compositedesigns and when working on an area of the quilt that may not beperfectly aligned (like borders, sashings, and flying geese). Points areidentified by moving the sewing head to the point on the quilt, andpressing the OK/Select button. Selecting two points will define one line orpattern; three points defines two patterns, ten points defines ninepatterns, etc.
D esign It Yourse lf: Point-to-Point (P2P) lines andpatterns can also be defined directly on the screen using themouse. Click the DRAW command, choose Draw Sewable,and choose Line or Pattern. Note: Stand Alone Mode (SAM)uses this method to place lines or patterns.
Repeat Pattern Icon - This function will use the patternbeing highlighted, prompt for a reference point and allow you to specifymultiple repeats and/or rows. It does not require a boundary but usually aboundary is helpful when placing multiple patterns. It is very similar to theEdge-to-edge feature but more flexible especially with composite designelements.
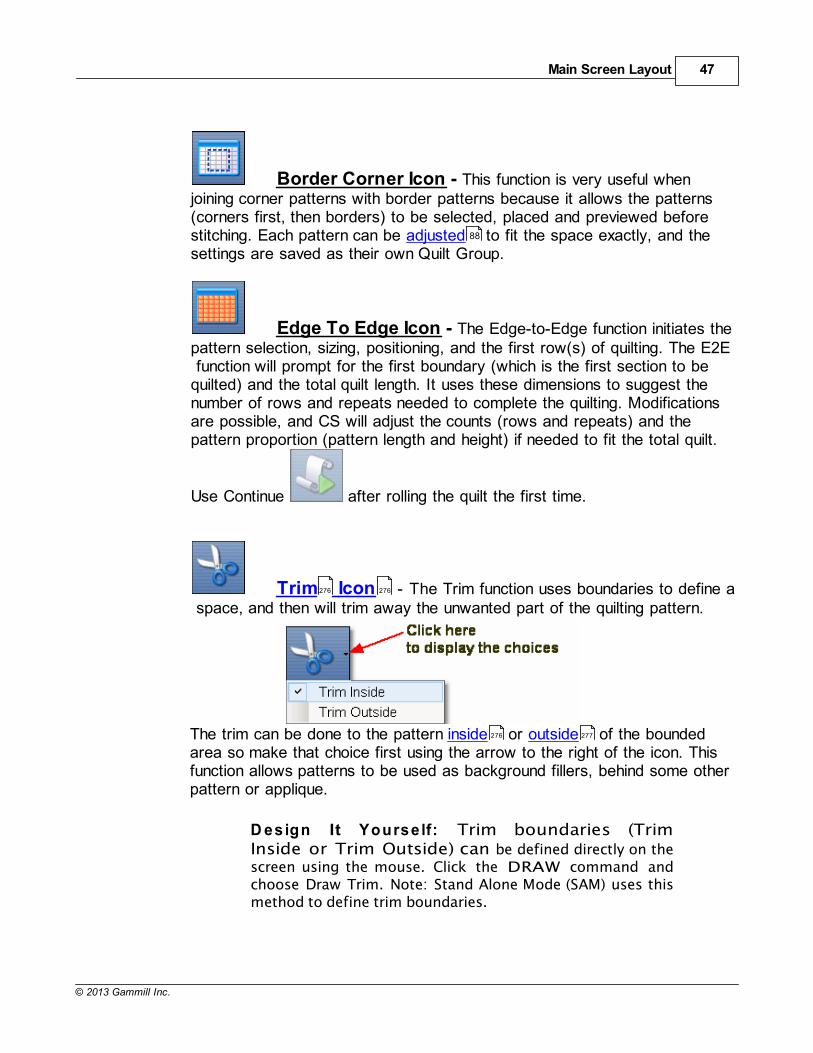
Main Screen Layout 47
© 2013 Gammill Inc.
Border Corner Icon - This function is very useful whenjoining corner patterns with border patterns because it allows the patterns(corners first, then borders) to be selected, placed and previewed beforestitching. Each pattern can be adjusted to fit the space exactly, and thesettings are saved as their own Quilt Group.
Edge To Edge Icon - The Edge-to-Edge function initiates thepattern selection, sizing, positioning, and the first row(s) of quilting. The E2E function will prompt for the first boundary (which is the first section to bequilted) and the total quilt length. It uses these dimensions to suggest thenumber of rows and repeats needed to complete the quilting. Modificationsare possible, and CS will adjust the counts (rows and repeats) and thepattern proportion (pattern length and height) if needed to fit the total quilt.
Use Continue after rolling the quilt the first time.
Trim Icon - The Trim function uses boundaries to define a space, and then will trim away the unwanted part of the quilting pattern.
The trim can be done to the pattern inside or outside of the boundedarea so make that choice first using the arrow to the right of the icon. Thisfunction allows patterns to be used as background fillers, behind some otherpattern or applique.
D esign It Yourse lf: Trim boundaries (TrimInside or Trim Outside) can be defined directly on thescreen using the mouse. Click the DRAW command andchoose Draw Trim. Note: Stand Alone Mode (SAM) uses thismethod to define trim boundaries.
88
276 276
276 277

CreativeStudio Manual v5.048
© 2013 Gammill Inc.
Measure Icon - The measure function will help obtain exactmeasurements for the area you choose. It prompts for the beginning andending point of a line, and then displays the measurement of the absoluteheight, absolute width, the actual length (which is the diagonal) and it givesthe angle (number of degrees of rotation) of the defined line. This utility willallow multiple measurements to be taken consecutively, so press Cancel toexit the measure function.
D esign It Yourse lf: Measurements can be made directly
on the screen using the mouse. Click the DRAW command andchoose Measure. This method gives good estimates, butmeasuring the quilt using the Measure icon and the sewinghead is more accurate. Note: Stand Alone Mode (SAM) usesthis method to measure.
Restart Quilting Icon - The Restart function is usedwhenever the machine stops by itself (thread break) or the Stop button ispressed. The process can begin stitching at exactly the spot where thestitching stopped (great if you needed to press the Stop button) or it can beadjusted to restart at any other point (great if the bobbin ran out and thethread break sensor didn’t detect a break immediately). It is possible todefine the restart point using the sewing head & the quilt top, or the mouseand the computer screen.
Regulated Quilting Icon - There are several choices forstitching with the stitch regulator (Original, Plus, Smooth). Recordingpatterns while using the stitch regulator is possible with any of the choices.To choose a mode, click on the arrow to the right of the icon and a drop-down box appears with the following:
* Original refers to the original stitch regulator action, which did notkeep the needle running around the corner.
* Plus is designed to keep the needle running at points or corners. This
Main Screen Layout 49
© 2013 Gammill Inc.
guarantees a sharp point, like the Gammill Plus machine.* Smooth has a different power curve (needle up/down speed) forpeople who dont pause at points, but do slow down going into the point and coming out of it.
Constant Speed Icon - When constant sewing isstarted, the needle starts stitching, and it is up to the quilter to movethe sewing head smoothly and consistently. The quilter s motiondetermines the stitch length, not the sewing head. This function ispreferred by some when doing micro-stipple backgrounds in customquilting. Most of the rest of us use constant sewing only when we arewinding bobbins using the on-board bobbin winder.
Baste Icon - is special because it is designed forstitching slowly and it will not push / stretch the fabric. It is essentiallyindividual long single stitches done continuously.
View All Icon - is a fast way to zoom out far enough tosee all the boundaries and patterns in the current quilt group. This is also used by quilters who like to see the grid background behind allboundaries and patterns.
Select All Patterns Icon - is a fast way to treat allpatterns as one entity. This is useful when trying to adjust the positioning of all patterns in a boundary. Also very useful when rotating or flippingthe group of patterns.
Zoom In Icon - Select the Zoom In Icon and thenswipe the design board to zoom in. The more you swipe the moreyou zoom in.
Zoom Out Icon - Select the Zoom Out Icon and thenswipe the design board to zoom out. The more you swipe the moreyou zoom out.
CreativeStudio Manual v5.050
© 2013 Gammill Inc.
Pan Patterns Icon - Select the Pan Patterns Iconthen swipe the design board to pan.
Cycle Pattern Anchor Icon - Select to cyclethrough the pattern anchors.
Set Sew Order Icon - Select to set sew order.
Measure With Mouse Icon - Select to measure onthe design board with the mouse or finger.
Left Click / Right Click Icon - Select to make thenext left click of the mouse a right click.
Draw Boundary Icon - Select to draw a boundaryby mouse or touch on the design board.
Draw Trim Icon - Select to draw a trim by mouse ortouch on the design board.
Draw Arc Icon - Select to draw an arc line bymouse or touch on the design board.
Draw Curve Icon - Select to draw a curve line bymouse or touch on the design board.
Draw Line Icon - Select to draw a line by mouse or
Main Screen Layout 51
© 2013 Gammill Inc.
touch on the design board.
Draw Freehand Icon - Select to draw freehand bymouse or touch on the design board.
Draw P2P Pattern Icon - Select to draw P2PPatterns by mouse or touch on the design board.
Help ? Icon - is context sensitive help. Just in case youhave forgotten the purpose of some icon, you can click on the Help?, the cursor turns into a question mark, which can be moved to the icon inquestion. By clicking again, the integrated user manual opens todisplay information about that icon.
2.5 Right Tool Bar
Virtual Stitch Out Icon - Select to launch a virtual stitch out of anunsewn pattern on the design board.
Rotate Pattern Icon - Select to rotate an active pattern on thedesign board.
Flip Pattern Horizontally Icon - Select to flip an active patternhorizontally on the design board.
Flip Pattern Vertically Icon - Select to flip an active patternvertically on the design board.
Delete Icon - Select to delete an active pattern on the design board.
Toggle Sewn Icon - Select to toggle an active pattern to the sewnstate on the design board.
Toggle Unsewn Icon - Select to flip an active pattern to theunsewn state on the design board.
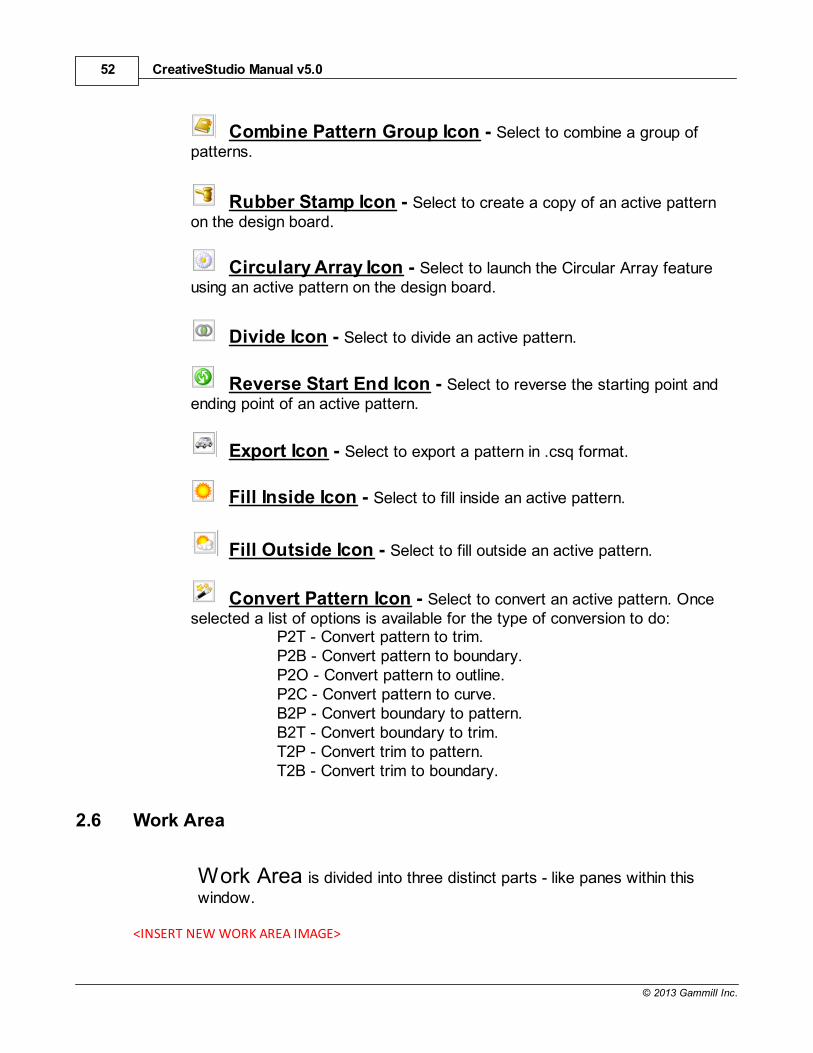
CreativeStudio Manual v5.052
© 2013 Gammill Inc.
Combine Pattern Group Icon - Select to combine a group ofpatterns.
Rubber Stamp Icon - Select to create a copy of an active patternon the design board.
Circulary Array Icon - Select to launch the Circular Array featureusing an active pattern on the design board.
Divide Icon - Select to divide an active pattern.
Reverse Start End Icon - Select to reverse the starting point andending point of an active pattern.
Export Icon - Select to export a pattern in .csq format.
Fill Inside Icon - Select to fill inside an active pattern.
Fill Outside Icon - Select to fill outside an active pattern.
Convert Pattern Icon - Select to convert an active pattern. Onceselected a list of options is available for the type of conversion to do:
P2T - Convert pattern to trim.P2B - Convert pattern to boundary.P2O - Convert pattern to outline.P2C - Convert pattern to curve.B2P - Convert boundary to pattern.B2T - Convert boundary to trim.T2P - Convert trim to pattern.T2B - Convert trim to boundary.
2.6 Work Area
Work Area is divided into three distinct parts - like panes within thiswindow.
<INSERT NEW WORK AREA IMAGE>
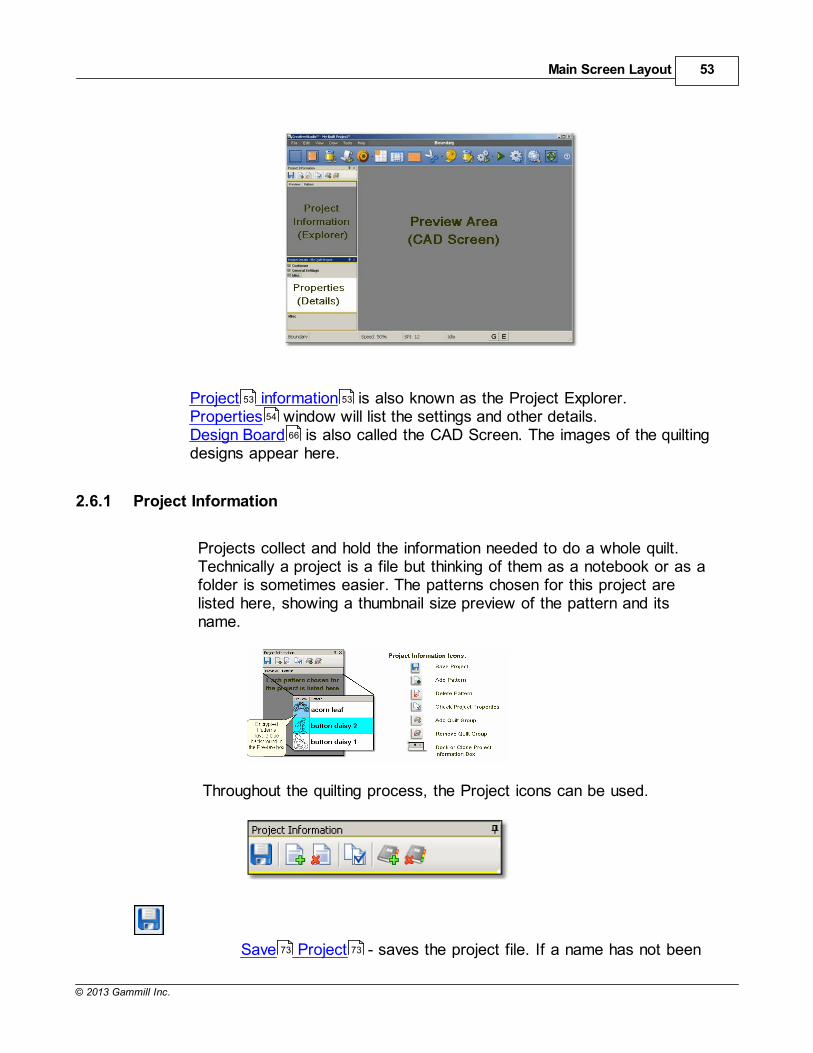
Main Screen Layout 53
© 2013 Gammill Inc.
Project information is also known as the Project Explorer.Properties window will list the settings and other details.Design Board is also called the CAD Screen. The images of the quiltingdesigns appear here.
2.6.1 Project Information
Projects collect and hold the information needed to do a whole quilt.Technically a project is a file but thinking of them as a notebook or as afolder is sometimes easier. The patterns chosen for this project arelisted here, showing a thumbnail size preview of the pattern and itsname.
Throughout the quilting process, the Project icons can be used.
Save Project - saves the project file. If a name has not been
53 53
54
66
73 73
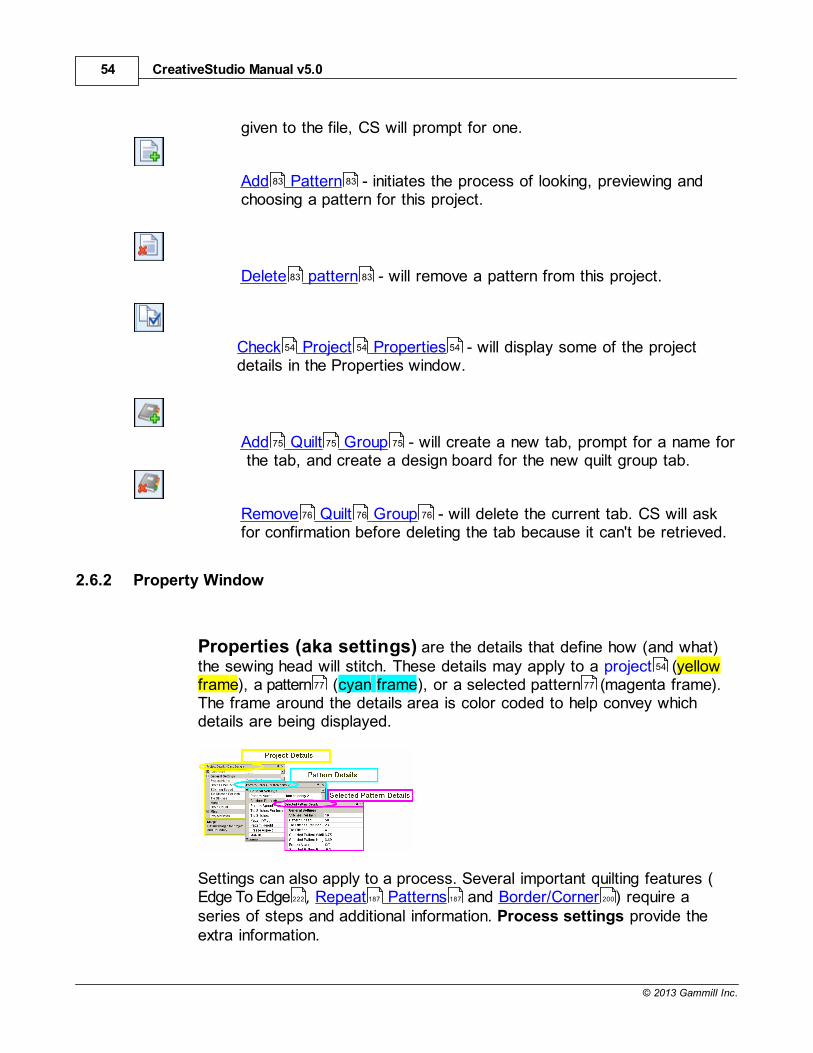
CreativeStudio Manual v5.054
© 2013 Gammill Inc.
given to the file, CS will prompt for one.
Add Pattern - initiates the process of looking, previewing andchoosing a pattern for this project.
Delete pattern - will remove a pattern from this project.
Check Project Properties - will display some of the projectdetails in the Properties window.
Add Quilt Group - will create a new tab, prompt for a name for the tab, and create a design board for the new quilt group tab.
Remove Quilt Group - will delete the current tab. CS will askfor confirmation before deleting the tab because it can't be retrieved.
2.6.2 Property Window
Properties (aka settings) are the details that define how (and what)the sewing head will stitch. These details may apply to a project (yellowframe), a pattern (cyan frame), or a selected pattern (magenta frame). The frame around the details area is color coded to help convey whichdetails are being displayed.
Settings can also apply to a process. Several important quilting features (Edge To Edge , Repeat Patterns and Border/Corner ) require aseries of steps and additional information. Process settings provide theextra information.
83 83
83 83
54 54 54
75 75 75
76 76 76
54
77 77
222 187 187 200
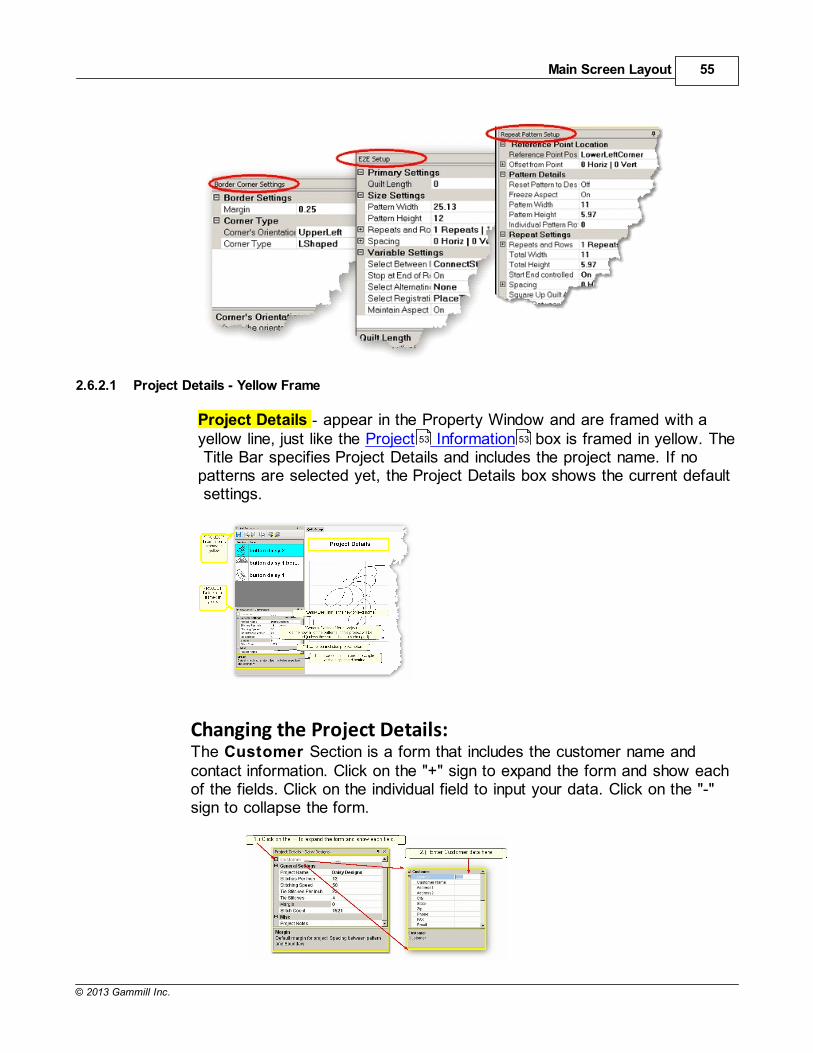
Main Screen Layout 55
© 2013 Gammill Inc.
2.6.2.1 Project Details - Yellow Frame
Project Details - appear in the Property Window and are framed with ayellow line, just like the Project Information box is framed in yellow. The Title Bar specifies Project Details and includes the project name. If nopatterns are selected yet, the Project Details box shows the current default settings.
Changing the Project Details:The Customer Section is a form that includes the customer name andcontact information. Click on the "+" sign to expand the form and show eachof the fields. Click on the individual field to input your data. Click on the "-"sign to collapse the form.
53 53
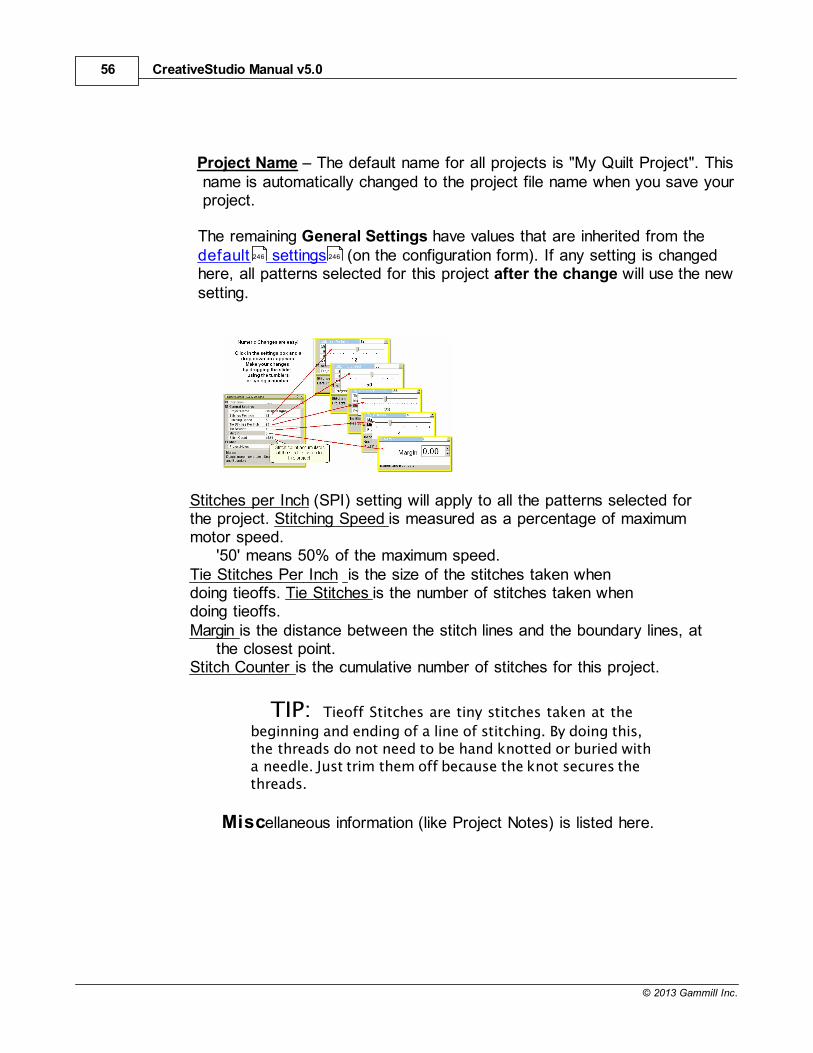
CreativeStudio Manual v5.056
© 2013 Gammill Inc.
Project Name The default name for all projects is "My Quilt Project". This name is automatically changed to the project file name when you save your project.
The remaining General Settings have values that are inherited from thedefault settings (on the configuration form). If any setting is changedhere, all patterns selected for this project after the change will use the newsetting.
Stitches per Inch (SPI) setting will apply to all the patterns selected forthe project. Stitching Speed is measured as a percentage of maximummotor speed.
'50' means 50% of the maximum speed.Tie Stitches Per Inch is the size of the stitches taken whendoing tieoffs. Tie Stitches is the number of stitches taken whendoing tieoffs.Margin is the distance between the stitch lines and the boundary lines, at
the closest point.Stitch Counter is the cumulative number of stitches for this project.
TIP: Tieoff Stitches are tiny stitches taken at the
beginning and ending of a line of stitching. By doing this,the threads do not need to be hand knotted or buried witha needle. Just trim them off because the knot secures thethreads.
Miscellaneous information (like Project Notes) is listed here.
246 246
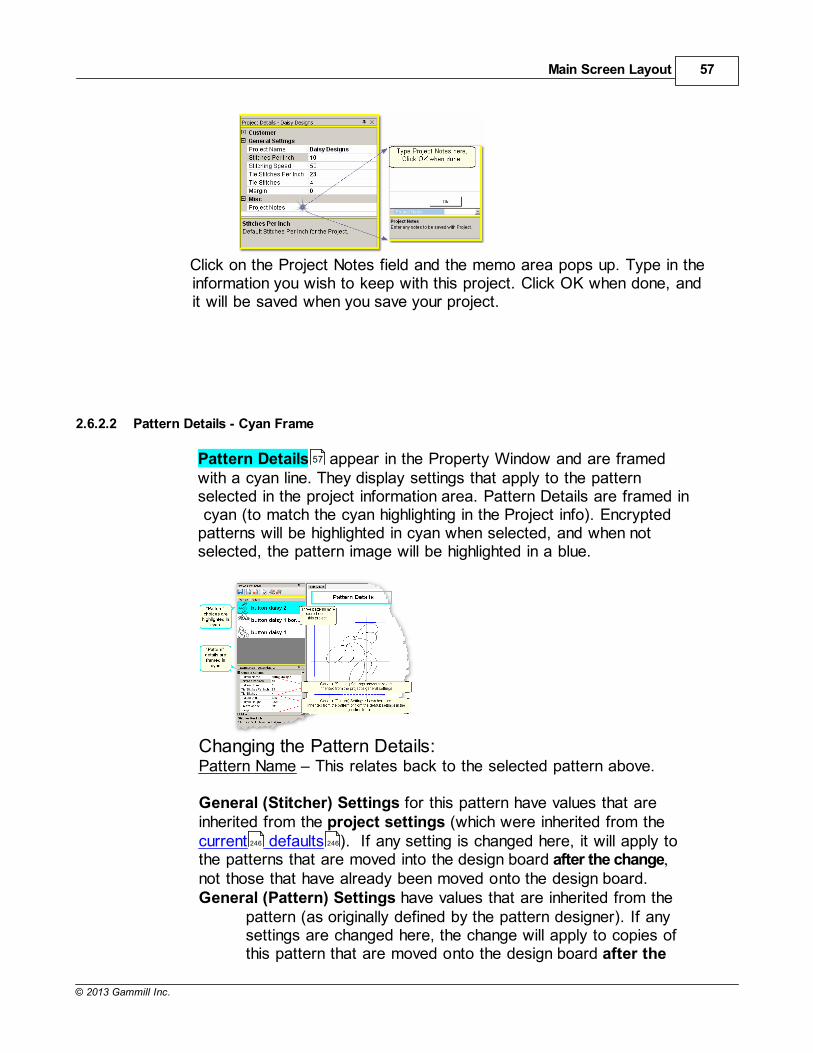
Main Screen Layout 57
© 2013 Gammill Inc.
Click on the Project Notes field and the memo area pops up. Type in theinformation you wish to keep with this project. Click OK when done, andit will be saved when you save your project.
2.6.2.2 Pattern Details - Cyan Frame
Pattern Details appear in the Property Window and are framedwith a cyan line. They display settings that apply to the patternselected in the project information area. Pattern Details are framed in cyan (to match the cyan highlighting in the Project info). Encryptedpatterns will be highlighted in cyan when selected, and when notselected, the pattern image will be highlighted in a blue.
Changing the Pattern Details:Pattern Name This relates back to the selected pattern above.
General (Stitcher) Settings for this pattern have values that areinherited from the project settings (which were inherited from thecurrent defaults ). If any setting is changed here, it will apply tothe patterns that are moved into the design board after the change,not those that have already been moved onto the design board.General (Pattern) Settings have values that are inherited from the
pattern (as originally defined by the pattern designer). If anysettings are changed here, the change will apply to copies ofthis pattern that are moved onto the design board after the
57
246 246
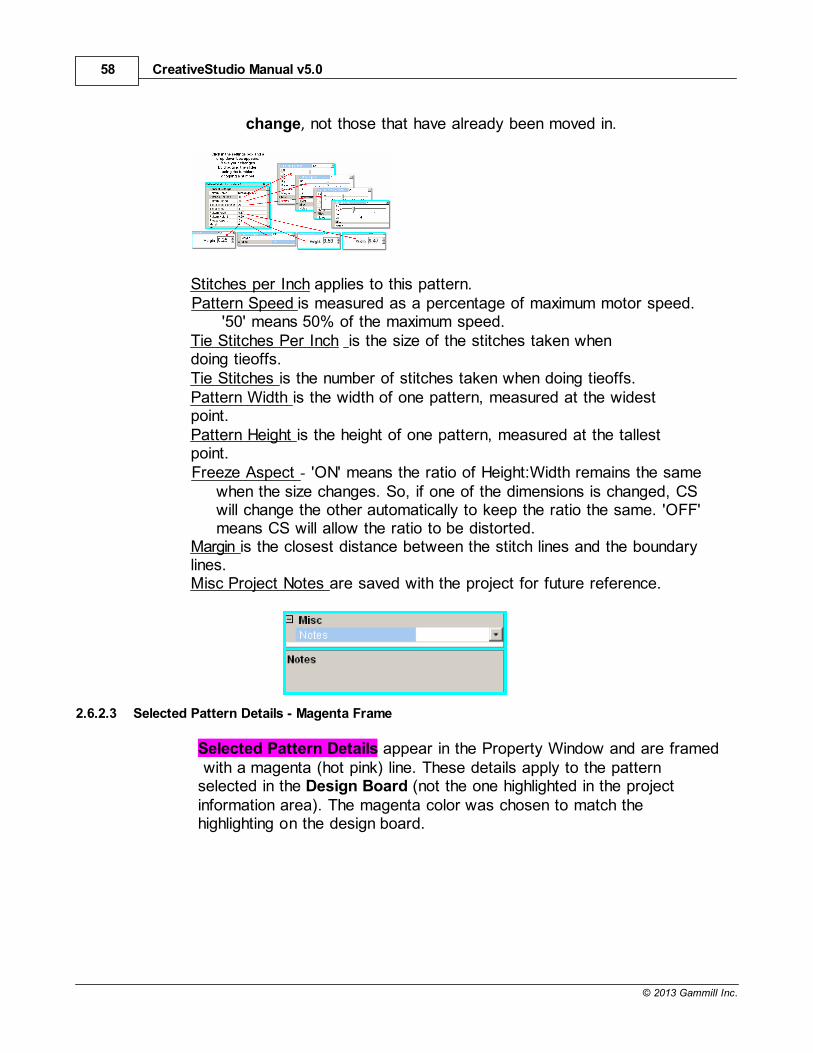
CreativeStudio Manual v5.058
© 2013 Gammill Inc.
change, not those that have already been moved in.
Stitches per Inch applies to this pattern.Pattern Speed is measured as a percentage of maximum motor speed.
'50' means 50% of the maximum speed.Tie Stitches Per Inch is the size of the stitches taken whendoing tieoffs. Tie Stitches is the number of stitches taken when doing tieoffs.Pattern Width is the width of one pattern, measured at the widestpoint. Pattern Height is the height of one pattern, measured at the tallestpoint.Freeze Aspect - 'ON' means the ratio of Height:Width remains the same
when the size changes. So, if one of the dimensions is changed, CSwill change the other automatically to keep the ratio the same. 'OFF'means CS will allow the ratio to be distorted.
Margin is the closest distance between the stitch lines and the boundarylines.Misc Project Notes are saved with the project for future reference.
2.6.2.3 Selected Pattern Details - Magenta Frame
Selected Pattern Details appear in the Property Window and are framed with a magenta (hot pink) line. These details apply to the patternselected in the Design Board (not the one highlighted in the projectinformation area). The magenta color was chosen to match thehighlighting on the design board.
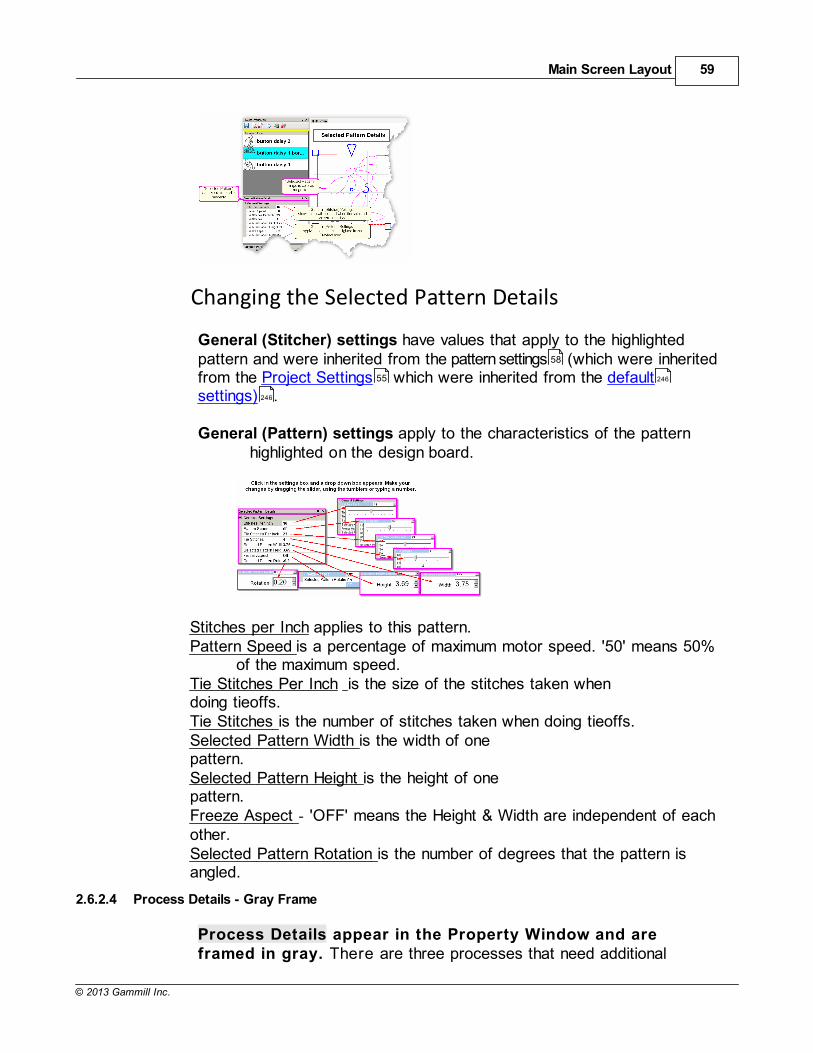
Main Screen Layout 59
© 2013 Gammill Inc.
Changing the Selected Pattern Details
General (Stitcher) settings have values that apply to the highlightedpattern and were inherited from the pattern settings (which were inheritedfrom the Project Settings which were inherited from the defaultsettings) .
General (Pattern) settings apply to the characteristics of the pattern highlighted on the design board.
Stitches per Inch applies to this pattern.Pattern Speed is a percentage of maximum motor speed. '50' means 50%
of the maximum speed.Tie Stitches Per Inch is the size of the stitches taken whendoing tieoffs. Tie Stitches is the number of stitches taken when doing tieoffs.Selected Pattern Width is the width of onepattern. Selected Pattern Height is the height of onepattern.Freeze Aspect - 'OFF' means the Height & Width are independent of eachother. Selected Pattern Rotation is the number of degrees that the pattern isangled.
2.6.2.4 Process Details - Gray Frame
Process Details appear in the Property Window and areframed in gray. There are three processes that need additional
58
55 246
246
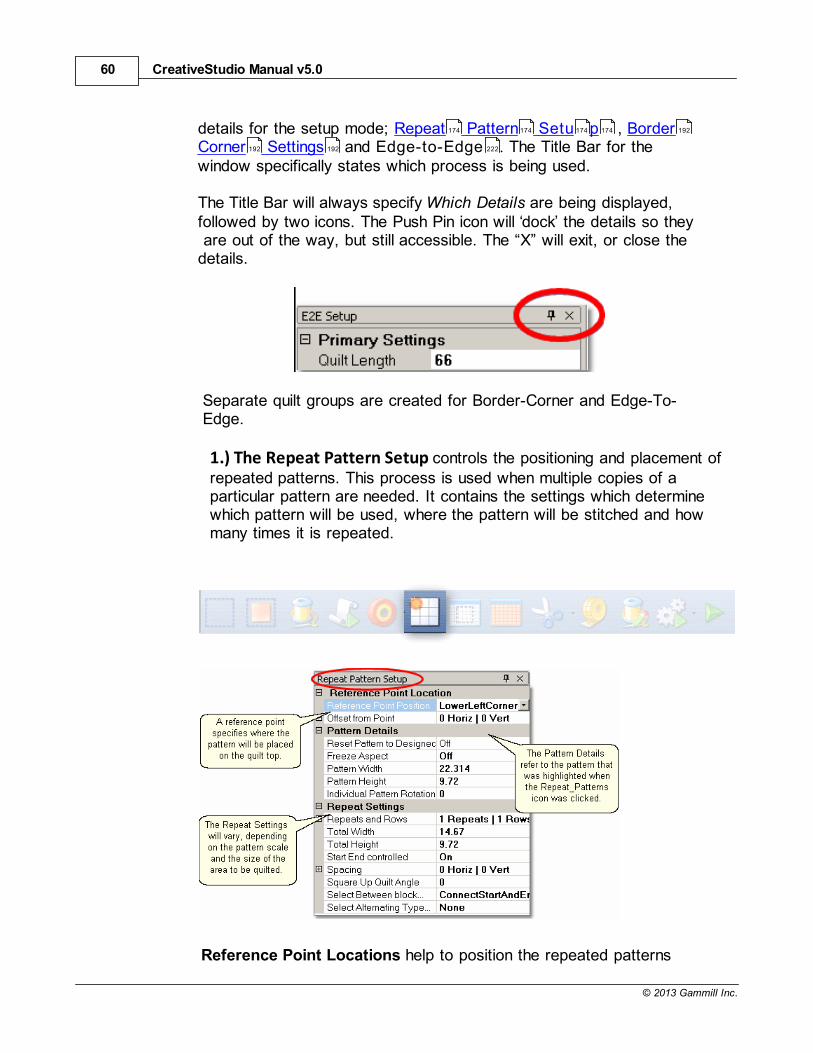
CreativeStudio Manual v5.060
© 2013 Gammill Inc.
details for the setup mode; Repeat Pattern Setu p , BorderCorner Settings and Edge-to-Edge . The Title Bar for thewindow specifically states which process is being used.
The Title Bar will always specify Which Details are being displayed,followed by two icons. The Push Pin icon will dock the details so they are out of the way, but still accessible. The “X” will exit, or close thedetails.
Separate quilt groups are created for Border-Corner and Edge-To-Edge.
1.) The Repeat Pattern Setup controls the positioning and placement ofrepeated patterns. This process is used when multiple copies of aparticular pattern are needed. It contains the settings which determinewhich pattern will be used, where the pattern will be stitched and howmany times it is repeated.
Reference Point Locations help to position the repeated patterns
174 174 174 174 192
192 192 222
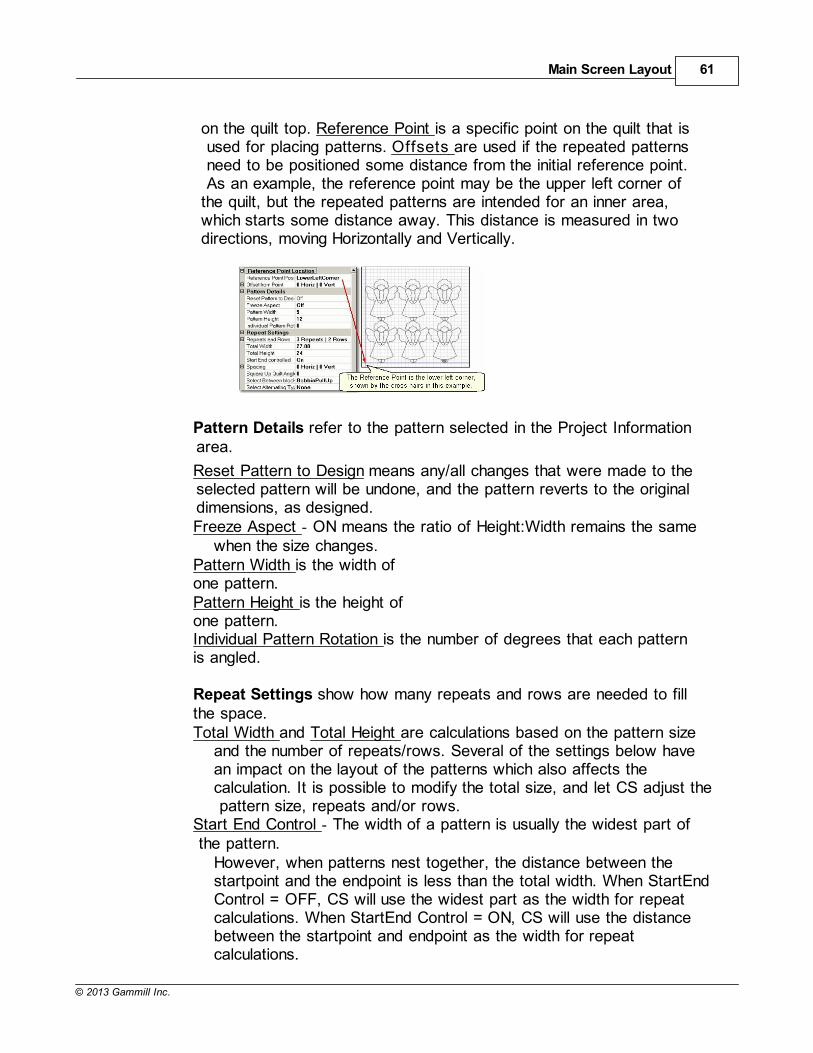
Main Screen Layout 61
© 2013 Gammill Inc.
on the quilt top. Reference Point is a specific point on the quilt that is used for placing patterns. Offsets are used if the repeated patterns need to be positioned some distance from the initial reference point. As an example, the reference point may be the upper left corner ofthe quilt, but the repeated patterns are intended for an inner area,which starts some distance away. This distance is measured in twodirections, moving Horizontally and Vertically.
Pattern Details refer to the pattern selected in the Project Information area.
Reset Pattern to Design means any/all changes that were made to the selected pattern will be undone, and the pattern reverts to the original dimensions, as designed.Freeze Aspect - ON means the ratio of Height:Width remains the same
when the size changes.Pattern Width is the width ofone pattern. Pattern Height is the height ofone pattern.Individual Pattern Rotation is the number of degrees that each patternis angled.
Repeat Settings show how many repeats and rows are needed to fillthe space.Total Width and Total Height are calculations based on the pattern size
and the number of repeats/rows. Several of the settings below havean impact on the layout of the patterns which also affects thecalculation. It is possible to modify the total size, and let CS adjust the pattern size, repeats and/or rows.
Start End Control - The width of a pattern is usually the widest part of the pattern.
However, when patterns nest together, the distance between thestartpoint and the endpoint is less than the total width. When StartEndControl = OFF, CS will use the widest part as the width for repeatcalculations. When StartEnd Control = ON, CS will use the distancebetween the startpoint and endpoint as the width for repeatcalculations.
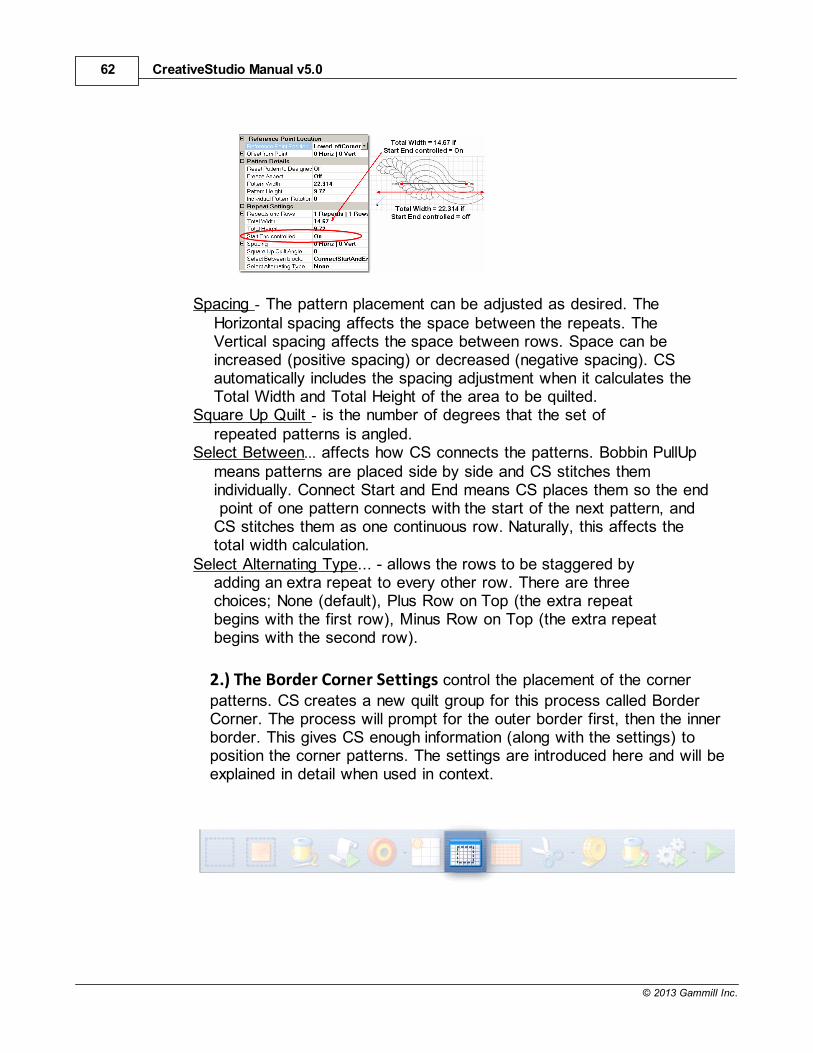
CreativeStudio Manual v5.062
© 2013 Gammill Inc.
Spacing - The pattern placement can be adjusted as desired. TheHorizontal spacing affects the space between the repeats. TheVertical spacing affects the space between rows. Space can beincreased (positive spacing) or decreased (negative spacing). CSautomatically includes the spacing adjustment when it calculates theTotal Width and Total Height of the area to be quilted.
Square Up Quilt - is the number of degrees that the set ofrepeated patterns is angled.
Select Between... affects how CS connects the patterns. Bobbin PullUpmeans patterns are placed side by side and CS stitches themindividually. Connect Start and End means CS places them so the end point of one pattern connects with the start of the next pattern, andCS stitches them as one continuous row. Naturally, this affects thetotal width calculation.
Select Alternating Type... - allows the rows to be staggered byadding an extra repeat to every other row. There are threechoices; None (default), Plus Row on Top (the extra repeatbegins with the first row), Minus Row on Top (the extra repeatbegins with the second row).
2.) The Border Corner Settings control the placement of the corner
patterns. CS creates a new quilt group for this process called BorderCorner. The process will prompt for the outer border first, then the innerborder. This gives CS enough information (along with the settings) toposition the corner patterns. The settings are introduced here and will beexplained in detail when used in context.
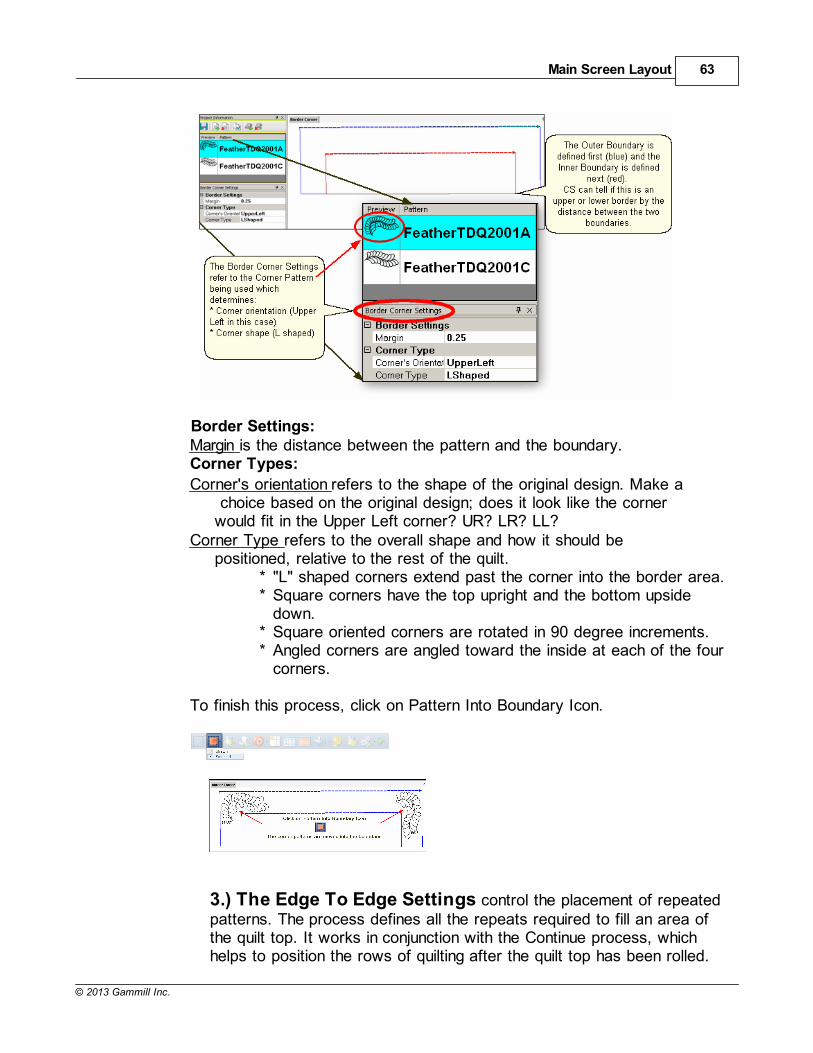
Main Screen Layout 63
© 2013 Gammill Inc.
Border Settings:Margin is the distance between the pattern and the boundary.Corner Types:
Corner's orientation refers to the shape of the original design. Make a choice based on the original design; does it look like the cornerwould fit in the Upper Left corner? UR? LR? LL?
Corner Type refers to the overall shape and how it should bepositioned, relative to the rest of the quilt.
* "L" shaped corners extend past the corner into the border area.* Square corners have the top upright and the bottom upside
down.* Square oriented corners are rotated in 90 degree increments.* Angled corners are angled toward the inside at each of the four
corners.
To finish this process, click on Pattern Into Boundary Icon.
3.) The Edge To Edge Settings control the placement of repeatedpatterns. The process defines all the repeats required to fill an area ofthe quilt top. It works in conjunction with the Continue process, whichhelps to position the rows of quilting after the quilt top has been rolled.

CreativeStudio Manual v5.064
© 2013 Gammill Inc.
The settings are introduced here and will be explained in detail when used in context.
Primary Settings refer to the quilting space.Quilt Length is to the total length of the space to be quilted. Measure
the space and then subtract the margin amount twice (top & bottom).
Size Settings refer to the quilt pattern chosen (highlighted in the ProjectInformation box).
Pattern Width is the width of onepattern. Pattern Height is the height of onepattern.Repeats and Rows will be calculated by CS based on the pattern size
and the quilt space (Length and width). Changes to the number ofrepeats and rows will adjust the pattern size to fit the quilt space.
Spacing allows the rows and columns to be nested if needed. Thespacing measurements are positive if extra space is needed betweenrows or repeats. Spacing measurements are negative if space isremoved between the rows or repeats.
Variable Settings refer to the quilting process and the stitchingpreferences.
Select Between Blocks tells CS what to do between patterns. Thepatterns can be connected (no stop between them) or individual (CSstops, does tieoffs and bobbin pullups).
Main Screen Layout 65
© 2013 Gammill Inc.
Stop at End of Row tells CS to stop and tieoff at the end of each row.Select Alternating Type describes the pattern positioning. 'No' alternating
means the patterns are placed like a spreadsheet, creating rows andcolumns. The other choices allow every other row to be staggered,making the repeats less noticeable.
Select Registration describes what CS should use as the registrationpoints so the rows don't get out of alignment when the quilt top isrolled.
Maintain Aspect - is similar to Freeze Aspect for a pattern. 'ON' meansCS will avoid distorting the pattern proportions if at all possible. Someminor distortion may be necessary to completely fill the quilt space.
2.6.2.5 Inheriting Settings
A word about settings and the level of inheritance of settings.
Level 0: Tech support controls all settings. They do allow some of thesettings to be modified by the users, as follows:
Level 1: Default settings (that the users can modify) are shown in the configuration form. A change to the configuration form ispermanent going forward (until you change it again). These changesare not retroactive.
Level 2: Settings can be changed for the current session (Tools on command bar).A change at this level applies to all new activity for the rest of the session. Changes are not retroactive. Nor are theypermanent.
Level 3: Settings can be changed for a single project. Achange at this level applies to all new activity for that projectduring the current session. Changes are not retroactive orpermanent but they are saved with the project so the next timethe project is opened, the settings will apply.
Level 4: Settings can be changed for a singlepattern within a project.
A change at this level applies to all new activity for thatpattern in that project during the current session.Changes are not retroactive and do not affect otherprojects but they can be saved with the project.
246 246
39
39
CreativeStudio Manual v5.066
© 2013 Gammill Inc.
Level 5: Settings can be changed for a patternthat has been selected and is visible on the designboard. These changes are not retroactive and haveno effect on any other patterns in the project. Thesechanges will not affect the same pattern if it is usedagain in this project in the future . This is the bottomof the hierarchy.
Settings always cascade forward and down, neverbackward or up.
2.6.3 Design Board (CAD Screen)
The Design Board - (also called the CAD screen) is the big, whitearea where the images of the patterns and boundaries appear. Eachquilt group (tab) gets its own design board, where the images can beadjusted. Images that are displayed in the design board will be exactlywhat will be quilted.
Every quilt has at least one quilt group, and custom quilts will havemany. Some of the CS features need a quilt group of their own, so they are created automatically. Quilt groups can also be adde d ordeleted using the icons in the Project Information area. They can be renamed too, by right clicking an open spot on the design board, andchoosing Rename Quilt Group .
39
74
75 75
76 53
77 77 77
Main Screen Layout 67
© 2013 Gammill Inc.
Tip: Use the first tab (called Quilt Group) to preview your
patterns together. This is a fast and easy way to auditionpatterns and determine the right pattern scale. When thepatterns are chosen and previewed, change the name of this tabto 'Preview' or something similar, so you remember that youpreviewed your patterns. Then save the project (with adescriptive file name) so all the details are readily available when it is time to complete this quilt.
2.7 Keypad Window
The Keypad Window shows an image of the six buttons on the sewinghead keypad. Using the keypad reduces the number of times you mustwalk to the computer to select an option. To view the keypad image,click on View, then click on Keypad Window and the image will appear in the CAD screen. To hide the window, click the "X" on the title bar. It ispossible to display or hide the keypad window all the time - see thedefault settings in the configuration form.
Keypad Buttons can be used instead of the mouse in certain situations. Each button can have multiple meanings, depending on the taskbeing performed. The following defaults are the most common:
Bobbin - will initiate the bobbin pull-up sequence.Select pattern - will scroll through the selected patterns in the patternlist. Mode - will highlight each icon on the Tool Bar, moving forwardsequentially. To go backwards, press and hold the Stop button, andthen press the Mode button.Select - initiates the feature represented by the icon that iscurrently highlighted.
CreativeStudio Manual v5.068
© 2013 Gammill Inc.
Stop - terminates the feature currently running.Single Stitch - will complete one stitch when pressed. Holding downthe button will result in a series of single stitches which is usefulwhen basting or doing your own tieoffs.
Tip: The buttons in the handles of the machine head are
hard-wired to two of the controls on the keypad. The left handleis connected to the lower left keypad button and the right handleis connected to the lower middle keypad button.
When the sewing head is stitching, the keypad button controlschange.
Stitcher Control Window shows the choices when the machineis sewing. Inc Speed - will increase the motor speed by 5% every time it is pressed. Dec Speed - will decrease the motor speed by 5% every time it is pressed.Quick Pause - will freeze the stitcher head by holding all motors (X,Y
and Z). This button is replaced by Quick Start which restarts thestitching exactly where it stopped.
Stop - will stop the sewing head immediately, and terminate the current process. Use the Restart feature to continue the line of stitching
2.8 Status Bar
The Status Bar displays the current status of the operation beingperformed.
Beginning at the left section, some current settings are shown.* Speed is expressed as a percent of the maximum motor speed.* SPI refers to the stitches per inch, for the pattern being stitched.* Needle Off/On allows you to toggle between needle off and needle on with
a tap or click.* The buttons labeled 'G' and 'E' refer to Gridpoint or Endpoint Snaps.139 139
Main Screen Layout 69
© 2013 Gammill Inc.
When manipulating patterns, these Snap buttons assure accuratealignment.
* Zoom percent describes how large the designs are on the Design Board,compared to what they will be when stitched.
* Idle is the machine's current status.* Repeat Patterns is the name of the current (or most recent) operation.*X and Y co-ordinates define the position of the sewing head.
T ip: Click on the Z o o m : % section of the Status bar
and CS will change the zoom to 100% or actual size. Screenresolutions differ so make sure yours displays a true 100%by setting your grid size to one inch then tap the tiny buttonnext to Zoom %
2.9 Task Bar
The last line of the screen display shows the Task Bar which containsbuttons that relate back to the computer programs currently open. It ispossible to have several programs open simultaneously. The computer will layer (or stack) the screen images from each program. Clicking one ofthe buttons will bring the screen for that program to the top of the stack.

CreativeStudio v5.0
Part
III

CreativeStudio Manual v5.072
© 2013 Gammill Inc.
3 Planning the Quilting
A key strength of the Statler Stitcher CreativeStudio software is the abilityto:
* See it Choose, Modify, Position and Preview quilting patternsbefore stitching them.
* Stitch it What You See Is What You Quilt! (WYSIWYQ)
* Save it Save all the patterns, positioning, & settings in a Project forfuture use.
Planning the quilting is easy because the quilter can select, combine andpreview quilting patterns, and see (or show the customer) what theylook like together. Completely new patterns can be created and savedtoo. The entire project can be saved for future reference or repeateduse.
3.1 Quilt Projects
Quilt Projects are used by CreativeStudio as a way to collect andorganize the details for a quilt. A project is like a notebook that containsall the information used for a quilt. The notebook has general projectinformation and it has tabbed sections that contain the details relatingto specific areas of the quilt. Projects files can be saved and re-used ata future date, with minimal adjustments.
Save your project often!
53
53
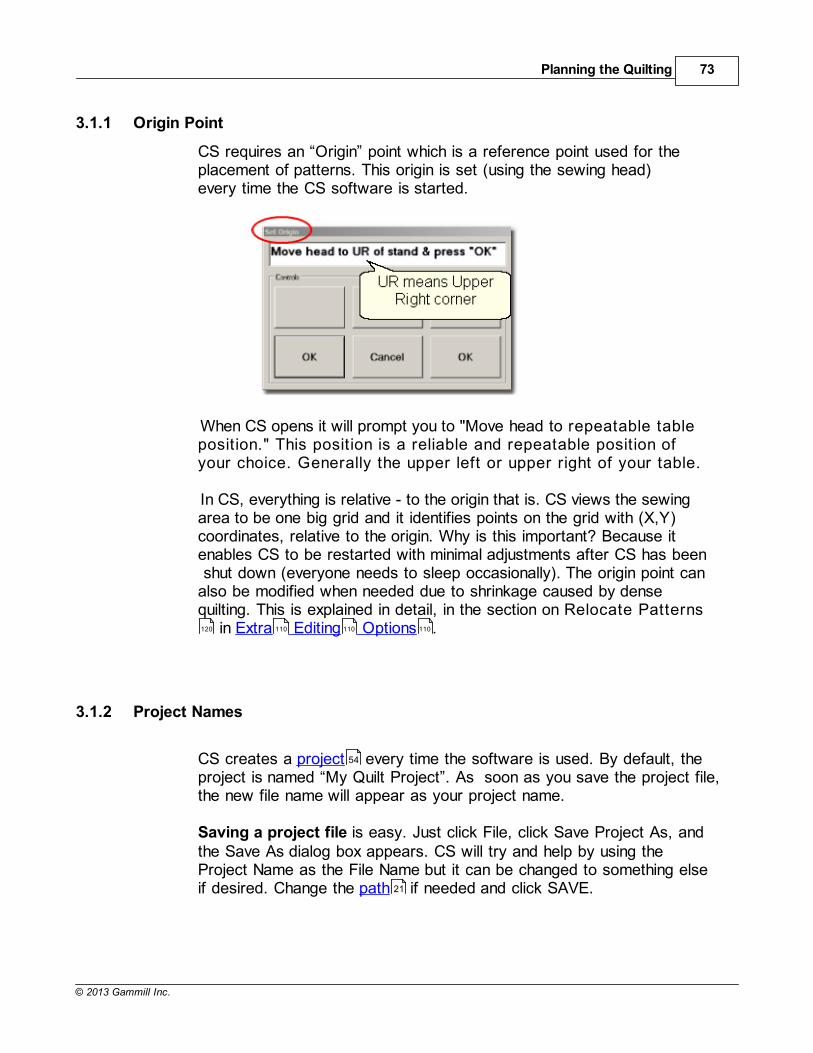
Planning the Quilting 73
© 2013 Gammill Inc.
3.1.1 Origin Point
CS requires an “Origin” point which is a reference point used for theplacement of patterns. This origin is set (using the sewing head)every time the CS software is started.
When CS opens it will prompt you to "Move head to repeatable tableposition." This position is a reliable and repeatable position ofyour choice. Generally the upper left or upper right of your table.
In CS, everything is relative - to the origin that is. CS views the sewingarea to be one big grid and it identifies points on the grid with (X,Y)coordinates, relative to the origin. Why is this important? Because itenables CS to be restarted with minimal adjustments after CS has been shut down (everyone needs to sleep occasionally). The origin point canalso be modified when needed due to shrinkage caused by densequilting. This is explained in detail, in the section on Relocate Patterns
in Extra Editing Options .
3.1.2 Project Names
CS creates a project every time the software is used. By default, theproject is named “My Quilt Project”. As soon as you save the project file,the new file name will appear as your project name.
Saving a project file is easy. Just click File, click Save Project As, andthe Save As dialog box appears. CS will try and help by using theProject Name as the File Name but it can be changed to something elseif desired. Change the path if needed and click SAVE.
120 110 110 110
54
21
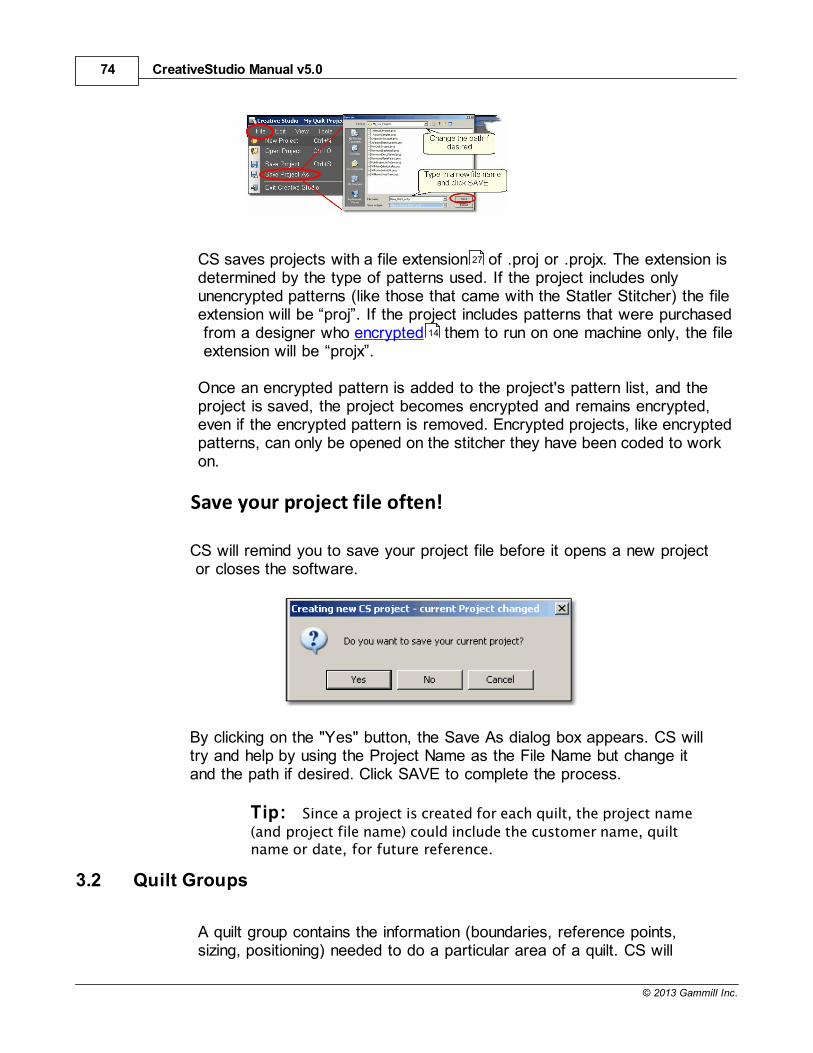
CreativeStudio Manual v5.074
© 2013 Gammill Inc.
CS saves projects with a file extension of .proj or .projx. The extension isdetermined by the type of patterns used. If the project includes onlyunencrypted patterns (like those that came with the Statler Stitcher) the fileextension will be “proj”. If the project includes patterns that were purchased from a designer who encrypted them to run on one machine only, the file extension will be “projx”.
Once an encrypted pattern is added to the project's pattern list, and theproject is saved, the project becomes encrypted and remains encrypted,even if the encrypted pattern is removed. Encrypted projects, like encryptedpatterns, can only be opened on the stitcher they have been coded to workon.
Save your project file often!
CS will remind you to save your project file before it opens a new project or closes the software.
By clicking on the "Yes" button, the Save As dialog box appears. CS willtry and help by using the Project Name as the File Name but change itand the path if desired. Click SAVE to complete the process.
Tip: Since a project is created for each quilt, the project name
(and project file name) could include the customer name, quiltname or date, for future reference.
3.2 Quilt Groups
A quilt group contains the information (boundaries, reference points,sizing, positioning) needed to do a particular area of a quilt. CS will
27
14
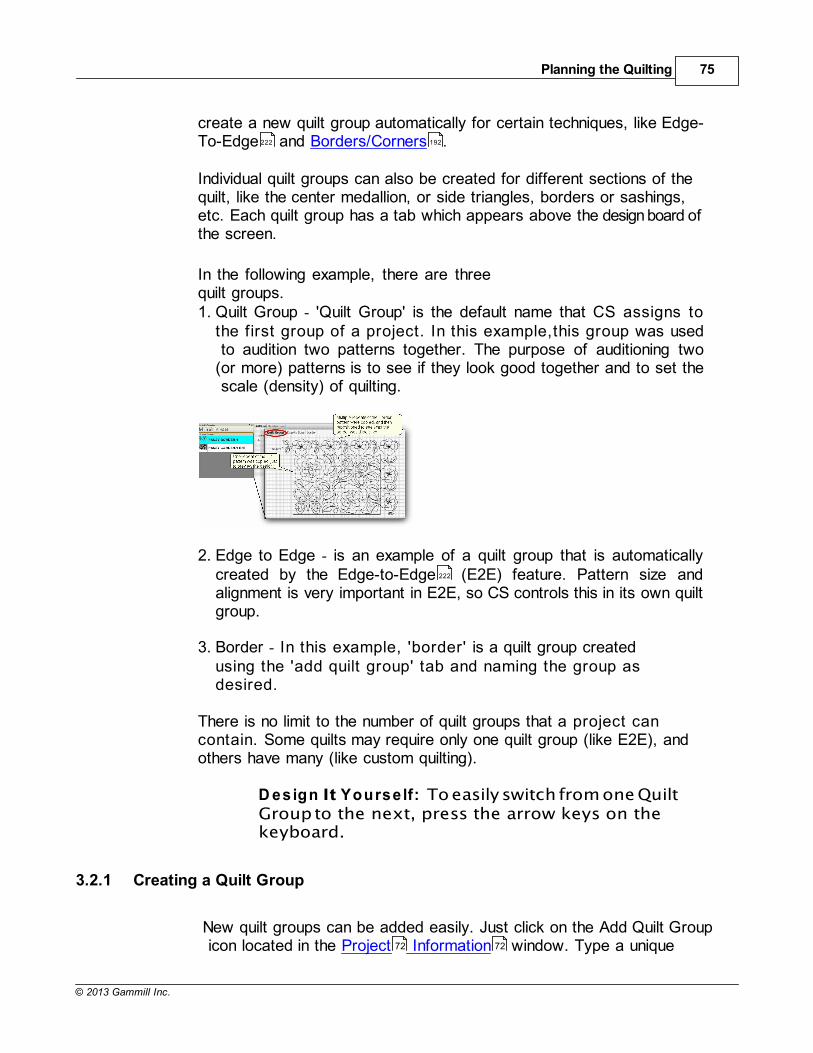
Planning the Quilting 75
© 2013 Gammill Inc.
create a new quilt group automatically for certain techniques, like Edge-To-Edge and Borders/Corners .
Individual quilt groups can also be created for different sections of thequilt, like the center medallion, or side triangles, borders or sashings,etc. Each quilt group has a tab which appears above the design board ofthe screen.
In the following example, there are threequilt groups.1. Quilt Group - 'Quilt Group' is the default name that CS assigns to
the first group of a project. In this example,this group was used to audition two patterns together. The purpose of auditioning two(or more) patterns is to see if they look good together and to set the scale (density) of quilting.
2. Edge to Edge - is an example of a quilt group that is automaticallycreated by the Edge-to-Edge (E2E) feature. Pattern size andalignment is very important in E2E, so CS controls this in its own quiltgroup.
3. Border - In this example, 'border' is a quilt group createdusing the 'add quilt group' tab and naming the group asdesired.
There is no limit to the number of quilt groups that a project cancontain. Some quilts may require only one quilt group (like E2E), andothers have many (like custom quilting).
D esign It Yourse lf: To easily switch from one QuiltGroup to the next, press the arrow keys on thekeyboard.
3.2.1 Creating a Quilt Group
New quilt groups can be added easily. Just click on the Add Quilt Group icon located in the Project Information window. Type a unique
222 192
222
72 72
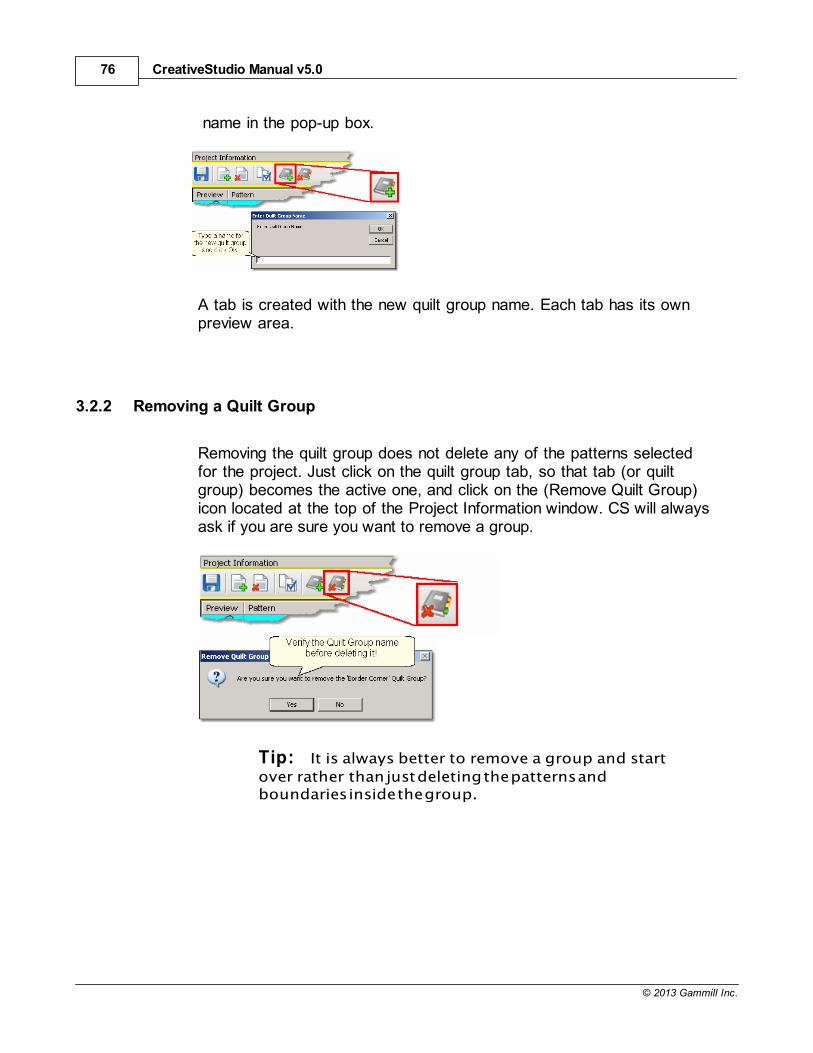
CreativeStudio Manual v5.076
© 2013 Gammill Inc.
name in the pop-up box.
A tab is created with the new quilt group name. Each tab has its ownpreview area.
3.2.2 Removing a Quilt Group
Removing the quilt group does not delete any of the patterns selectedfor the project. Just click on the quilt group tab, so that tab (or quiltgroup) becomes the active one, and click on the (Remove Quilt Group)icon located at the top of the Project Information window. CS will alwaysask if you are sure you want to remove a group.
Tip: It is always better to remove a group and start
over rather than just deleting the patterns andboundaries inside the group.
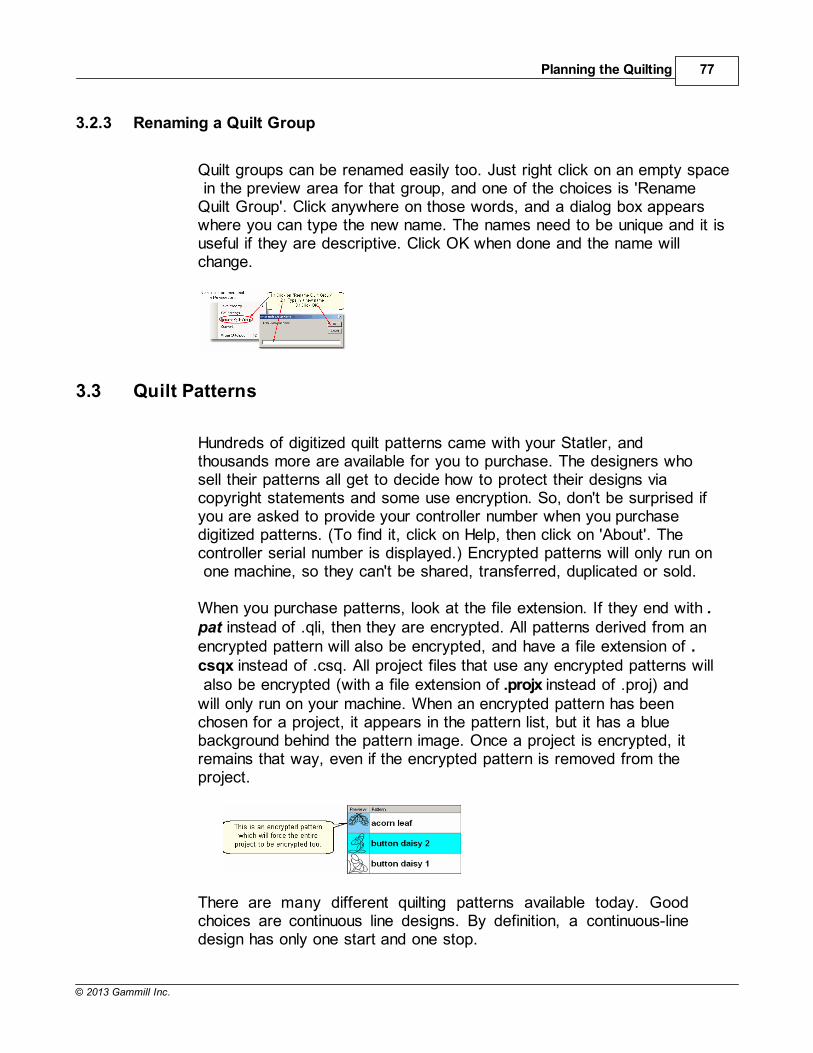
Planning the Quilting 77
© 2013 Gammill Inc.
3.2.3 Renaming a Quilt Group
Quilt groups can be renamed easily too. Just right click on an empty space in the preview area for that group, and one of the choices is 'RenameQuilt Group'. Click anywhere on those words, and a dialog box appearswhere you can type the new name. The names need to be unique and it isuseful if they are descriptive. Click OK when done and the name willchange.
3.3 Quilt Patterns
Hundreds of digitized quilt patterns came with your Statler, andthousands more are available for you to purchase. The designers whosell their patterns all get to decide how to protect their designs viacopyright statements and some use encryption. So, don't be surprised ifyou are asked to provide your controller number when you purchasedigitized patterns. (To find it, click on Help, then click on 'About'. Thecontroller serial number is displayed.) Encrypted patterns will only run on one machine, so they can't be shared, transferred, duplicated or sold.
When you purchase patterns, look at the file extension. If they end with .pat instead of .qli, then they are encrypted. All patterns derived from anencrypted pattern will also be encrypted, and have a file extension of .csqx instead of .csq. All project files that use any encrypted patterns will also be encrypted (with a file extension of .projx instead of .proj) andwill only run on your machine. When an encrypted pattern has beenchosen for a project, it appears in the pattern list, but it has a bluebackground behind the pattern image. Once a project is encrypted, itremains that way, even if the encrypted pattern is removed from theproject.
There are many different quilting patterns available today. Goodchoices are continuous line designs. By definition, a continuous-linedesign has only one start and one stop.
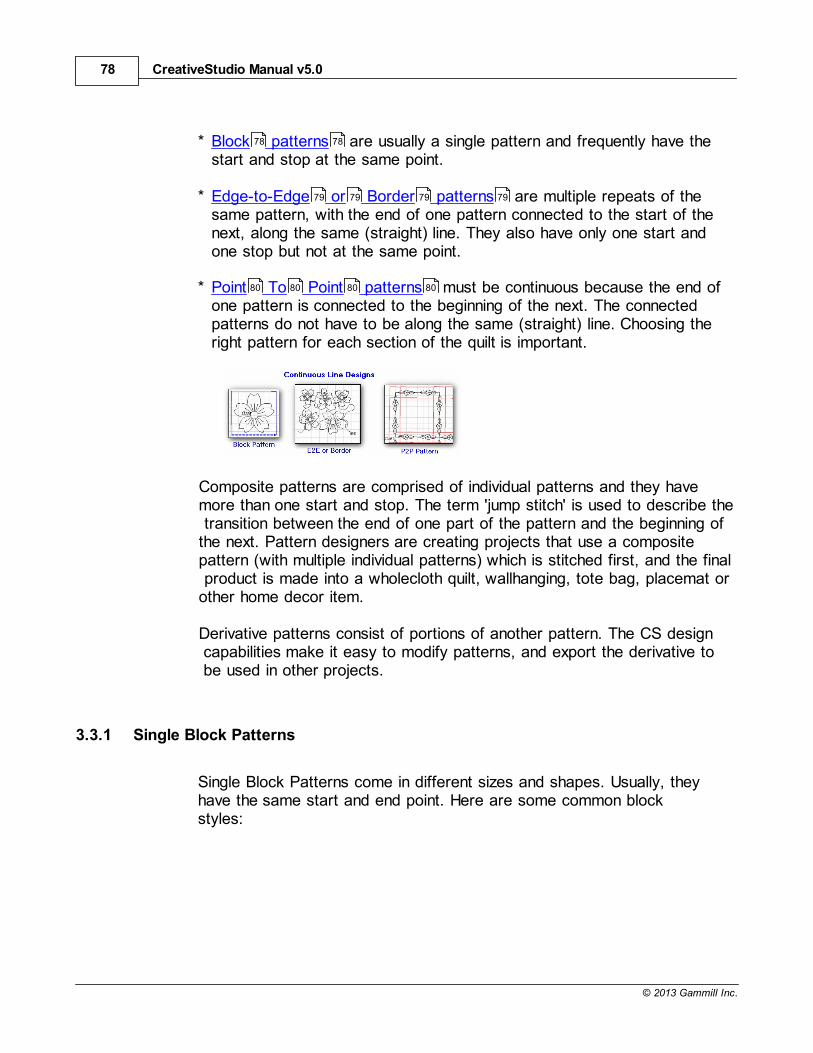
CreativeStudio Manual v5.078
© 2013 Gammill Inc.
* Block patterns are usually a single pattern and frequently have thestart and stop at the same point.
* Edge-to-Edge or Border patterns are multiple repeats of thesame pattern, with the end of one pattern connected to the start of thenext, along the same (straight) line. They also have only one start andone stop but not at the same point.
* Point To Point patterns must be continuous because the end ofone pattern is connected to the beginning of the next. The connectedpatterns do not have to be along the same (straight) line. Choosing theright pattern for each section of the quilt is important.
Composite patterns are comprised of individual patterns and they havemore than one start and stop. The term 'jump stitch' is used to describe the transition between the end of one part of the pattern and the beginning ofthe next. Pattern designers are creating projects that use a compositepattern (with multiple individual patterns) which is stitched first, and the final product is made into a wholecloth quilt, wallhanging, tote bag, placemat orother home decor item.
Derivative patterns consist of portions of another pattern. The CS design capabilities make it easy to modify patterns, and export the derivative to be used in other projects.
3.3.1 Single Block Patterns
Single Block Patterns come in different sizes and shapes. Usually, theyhave the same start and end point. Here are some common blockstyles:
78 78
79 79 79 79
80 80 80 80
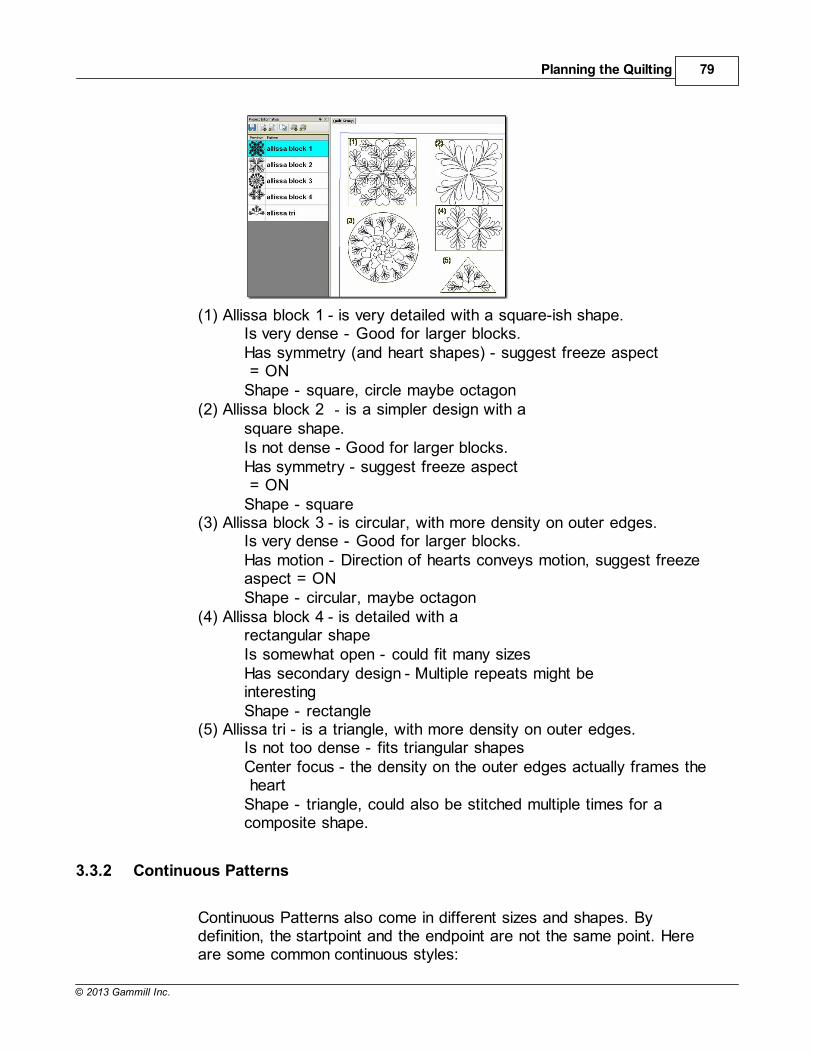
Planning the Quilting 79
© 2013 Gammill Inc.
(1) Allissa block 1 - is very detailed with a square-ish shape.Is very dense - Good for larger blocks.Has symmetry (and heart shapes) - suggest freeze aspect = ON Shape - square, circle maybe octagon
(2) Allissa block 2 - is a simpler design with asquare shape. Is not dense - Good for larger blocks.Has symmetry - suggest freeze aspect = ON Shape - square
(3) Allissa block 3 - is circular, with more density on outer edges.Is very dense - Good for larger blocks.Has motion - Direction of hearts conveys motion, suggest freezeaspect = ON Shape - circular, maybe octagon
(4) Allissa block 4 - is detailed with arectangular shape Is somewhat open - could fit many sizesHas secondary design - Multiple repeats might beinterestingShape - rectangle
(5) Allissa tri - is a triangle, with more density on outer edges.Is not too dense - fits triangular shapesCenter focus - the density on the outer edges actually frames the heart Shape - triangle, could also be stitched multiple times for acomposite shape.
3.3.2 Continuous Patterns
Continuous Patterns also come in different sizes and shapes. Bydefinition, the startpoint and the endpoint are not the same point. Hereare some common continuous styles:
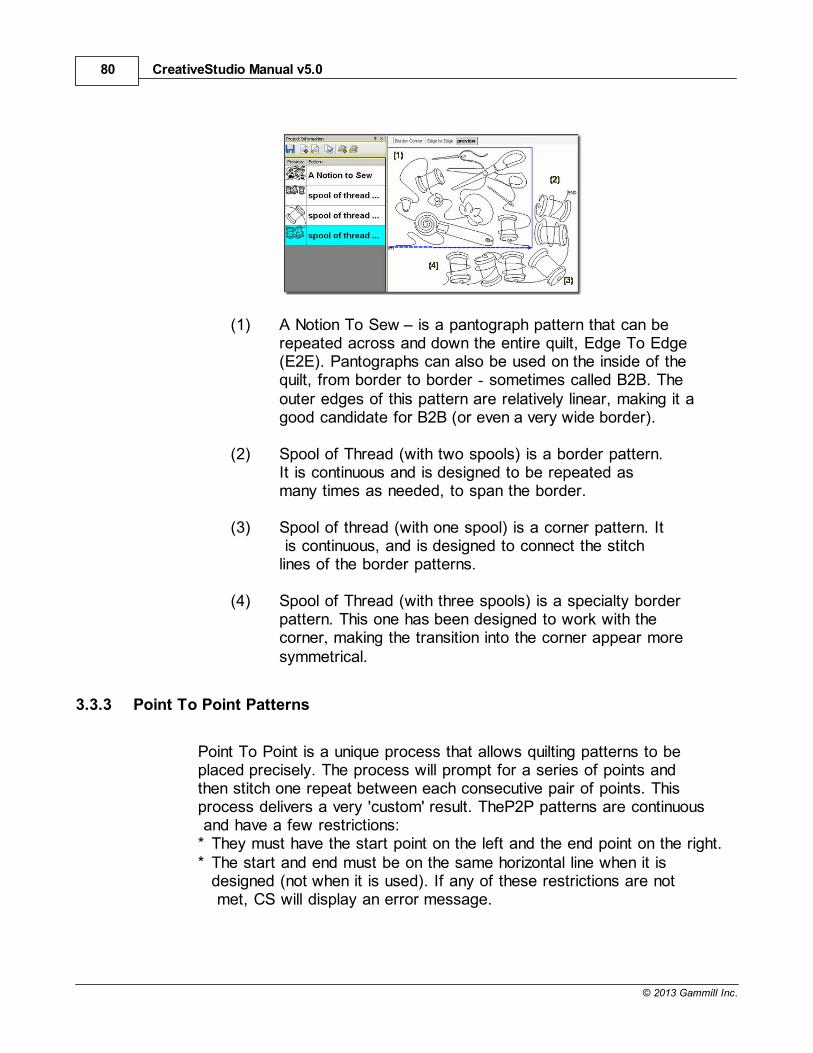
CreativeStudio Manual v5.080
© 2013 Gammill Inc.
(1) A Notion To Sew is a pantograph pattern that can berepeated across and down the entire quilt, Edge To Edge(E2E). Pantographs can also be used on the inside of thequilt, from border to border - sometimes called B2B. Theouter edges of this pattern are relatively linear, making it agood candidate for B2B (or even a very wide border).
(2) Spool of Thread (with two spools) is a border pattern.It is continuous and is designed to be repeated asmany times as needed, to span the border.
(3) Spool of thread (with one spool) is a corner pattern. It is continuous, and is designed to connect the stitchlines of the border patterns.
(4) Spool of Thread (with three spools) is a specialty borderpattern. This one has been designed to work with thecorner, making the transition into the corner appear moresymmetrical.
3.3.3 Point To Point Patterns
Point To Point is a unique process that allows quilting patterns to beplaced precisely. The process will prompt for a series of points andthen stitch one repeat between each consecutive pair of points. Thisprocess delivers a very 'custom' result. TheP2P patterns are continuous and have a few restrictions:* They must have the start point on the left and the end point on the right.* The start and end must be on the same horizontal line when it is
designed (not when it is used). If any of these restrictions are not met, CS will display an error message.
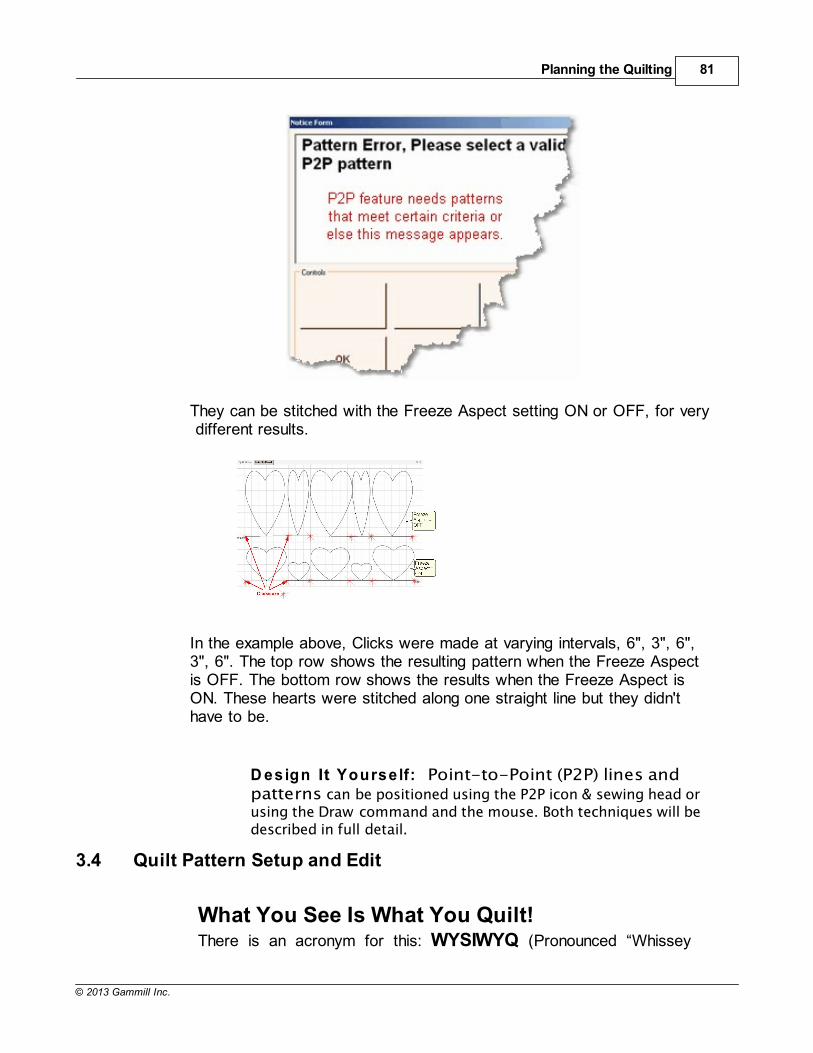
Planning the Quilting 81
© 2013 Gammill Inc.
They can be stitched with the Freeze Aspect setting ON or OFF, for very different results.
In the example above, Clicks were made at varying intervals, 6", 3", 6",3", 6". The top row shows the resulting pattern when the Freeze Aspectis OFF. The bottom row shows the results when the Freeze Aspect isON. These hearts were stitched along one straight line but they didn'thave to be.
D esign It Yourse lf: Point-to-Point (P2P) lines andpatterns can be positioned using the P2P icon & sewing head orusing the Draw command and the mouse. Both techniques will bedescribed in full detail.
3.4 Quilt Pattern Setup and Edit
What You See Is What You Quilt! There is an acronym for this: WYSIWYQ (Pronounced “Whissey
CreativeStudio Manual v5.082
© 2013 Gammill Inc.
Wick”). Being able to see what is about to be quilted is extremelyvaluable because it eliminates many surprises.
There are two modes involved when choosing, positioning andpreviewing quilting patterns:1. Setup Mode enables the quilter to change the settings that
define how the patterns should stitch for this project.2. Edit Mode enables the quilter to see an image of what is going to be
stitched, and fine tune the details if needed.
It is important that the Setup changes be done first, and the Editchanges done last. Flipping between the two modes can undo Editmode changes.
Color coding is used to distinguish between the two modes. Setup steps are highlighted in cyan throughout the user manual and the QuickReference Cards. Edit steps are highlighted in magenta. The choice ofhighlight colors is not accidental. The colors cyan and magenta werechosen because they relate back to color coding of the details’ in theProperty Window.
Cyan is used for Pattern Details settings which is done in SetupMode. Magenta is used for Selected Pattern details which is done in
Edit Mode.
To facilitate pattern setup and edit, it is strongly suggested that you usethe grid on the CAD screen, and use the Crosshair to show the currentposition of the sewing head. These were mentioned earlier, but it isworth more detail now.
The Setup and Edit steps are described in detail here, in the samesequence that would be typical for starting a new project. Todemonstrate how these modes work together we will show the steps for doing a single block and repeated blocks. The purpose of this is tofamiliarize you with some of the basic functions and explain the processand how to navigate through it. This is just a simple example.
D esign It Yourse lf: Throughout the manual there will be
DIY tips that look like this. These are intended forexperienced CS quilters who want to use keyboardshortcuts and commands to control pattern design. Youcan ignore the DIY tips without losing any functionality.
All of the quilting features will be described in full detail and in context inthe next sections The Quilting Process. Each feature will include thefeature name, any assumptions and the steps to follow. If the step
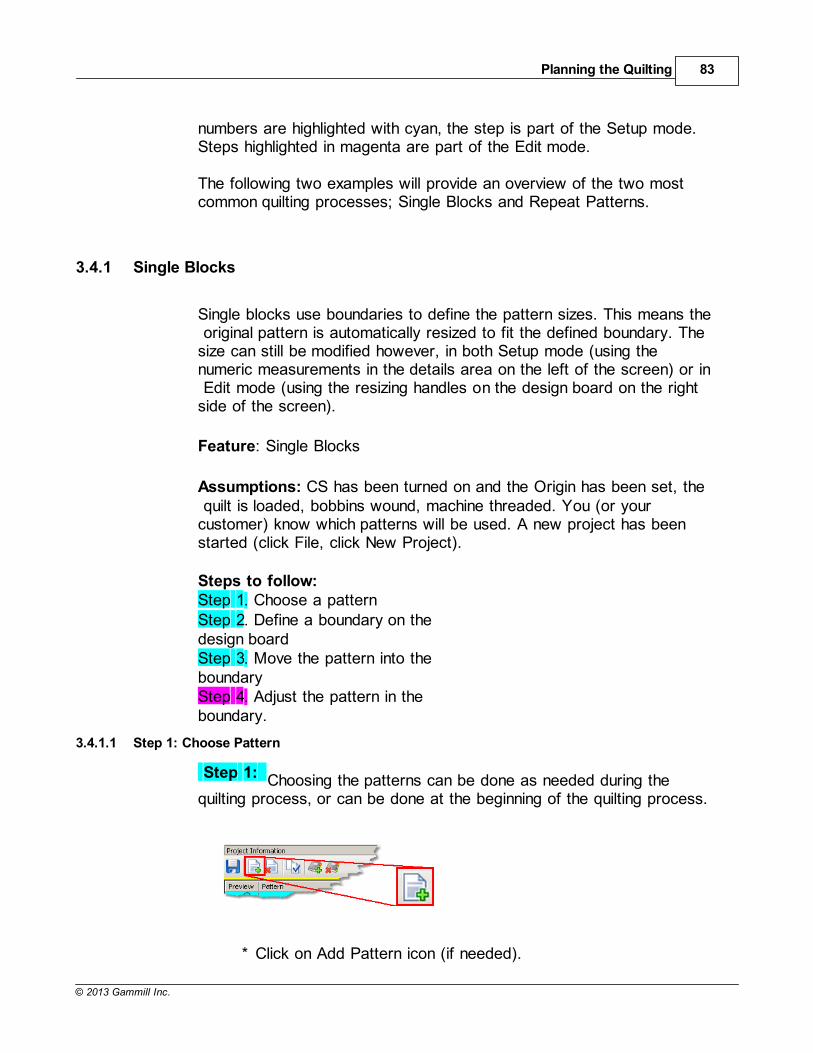
Planning the Quilting 83
© 2013 Gammill Inc.
numbers are highlighted with cyan, the step is part of the Setup mode.Steps highlighted in magenta are part of the Edit mode.
The following two examples will provide an overview of the two mostcommon quilting processes; Single Blocks and Repeat Patterns.
3.4.1 Single Blocks
Single blocks use boundaries to define the pattern sizes. This means the original pattern is automatically resized to fit the defined boundary. Thesize can still be modified however, in both Setup mode (using thenumeric measurements in the details area on the left of the screen) or in Edit mode (using the resizing handles on the design board on the rightside of the screen).
Feature: Single Blocks
Assumptions: CS has been turned on and the Origin has been set, the quilt is loaded, bobbins wound, machine threaded. You (or yourcustomer) know which patterns will be used. A new project has beenstarted (click File, click New Project).
Steps to follow:Step 1. Choose a patternStep 2. Define a boundary on thedesign boardStep 3. Move the pattern into theboundary Step 4. Adjust the pattern in theboundary.
3.4.1.1 Step 1: Choose Pattern
Step 1: Choosing the patterns can be done as needed during thequilting process, or can be done at the beginning of the quilting process.
* Click on Add Pattern icon (if needed).
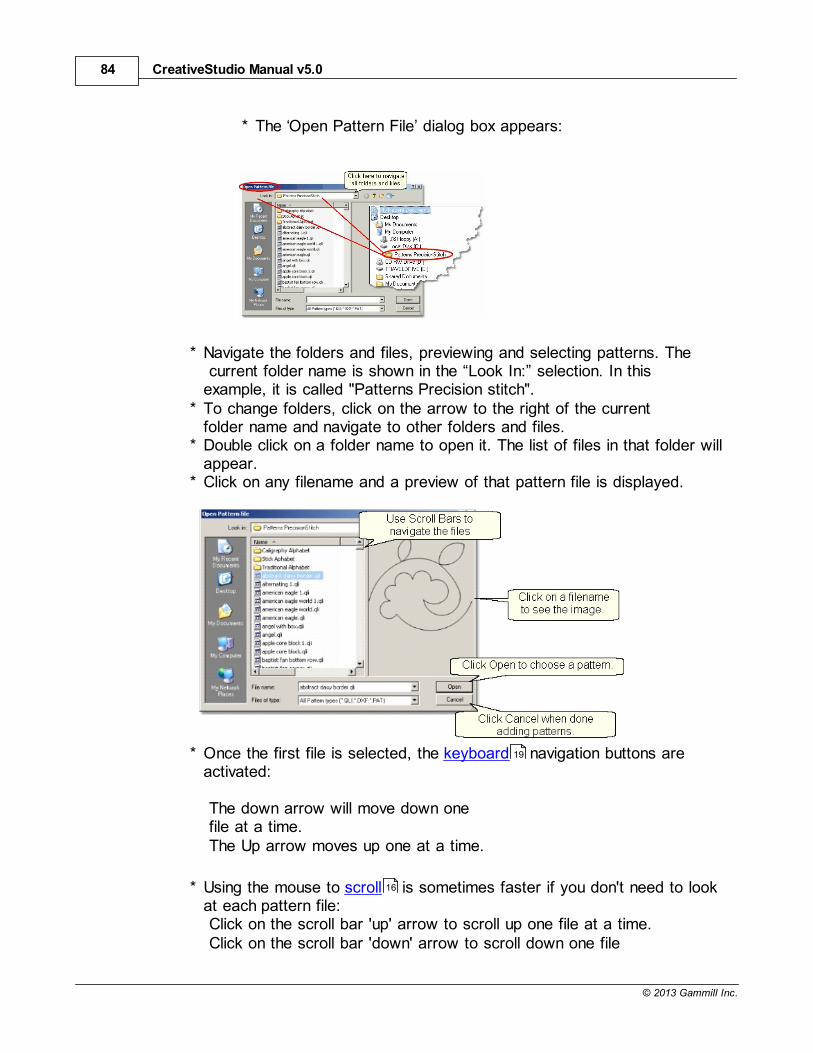
CreativeStudio Manual v5.084
© 2013 Gammill Inc.
* The Open Pattern File’ dialog box appears:
* Navigate the folders and files, previewing and selecting patterns. The current folder name is shown in the “Look In:” selection. In thisexample, it is called "Patterns Precision stitch".
* To change folders, click on the arrow to the right of the currentfolder name and navigate to other folders and files.
* Double click on a folder name to open it. The list of files in that folder willappear.
* Click on any filename and a preview of that pattern file is displayed.
* Once the first file is selected, the keyboard navigation buttons areactivated:
The down arrow will move down onefile at a time. The Up arrow moves up one at a time.
* Using the mouse to scroll is sometimes faster if you don't need to lookat each pattern file:Click on the scroll bar 'up' arrow to scroll up one file at a time.Click on the scroll bar 'down' arrow to scroll down one file
19
16
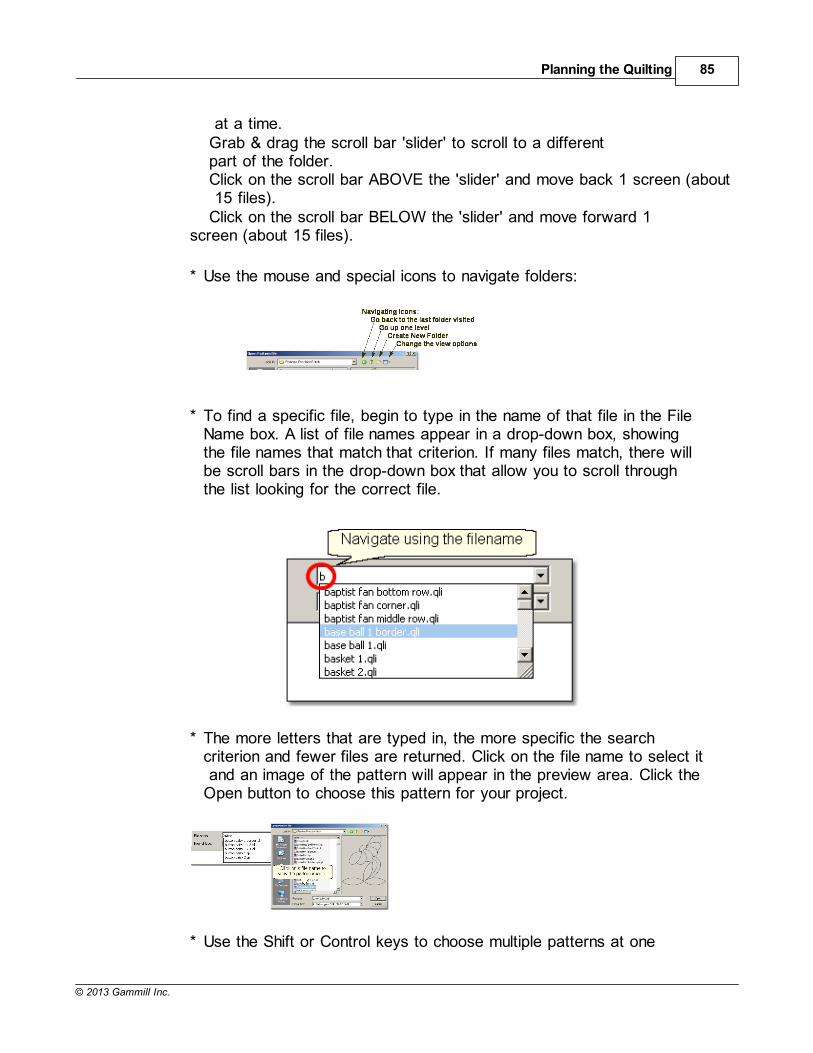
Planning the Quilting 85
© 2013 Gammill Inc.
at a time. Grab & drag the scroll bar 'slider' to scroll to a differentpart of the folder.Click on the scroll bar ABOVE the 'slider' and move back 1 screen (about 15 files).Click on the scroll bar BELOW the 'slider' and move forward 1
screen (about 15 files).
* Use the mouse and special icons to navigate folders:
* To find a specific file, begin to type in the name of that file in the FileName box. A list of file names appear in a drop-down box, showingthe file names that match that criterion. If many files match, there willbe scroll bars in the drop-down box that allow you to scroll throughthe list looking for the correct file.
* The more letters that are typed in, the more specific the searchcriterion and fewer files are returned. Click on the file name to select it and an image of the pattern will appear in the preview area. Click theOpen button to choose this pattern for your project.
* Use the Shift or Control keys to choose multiple patterns at one
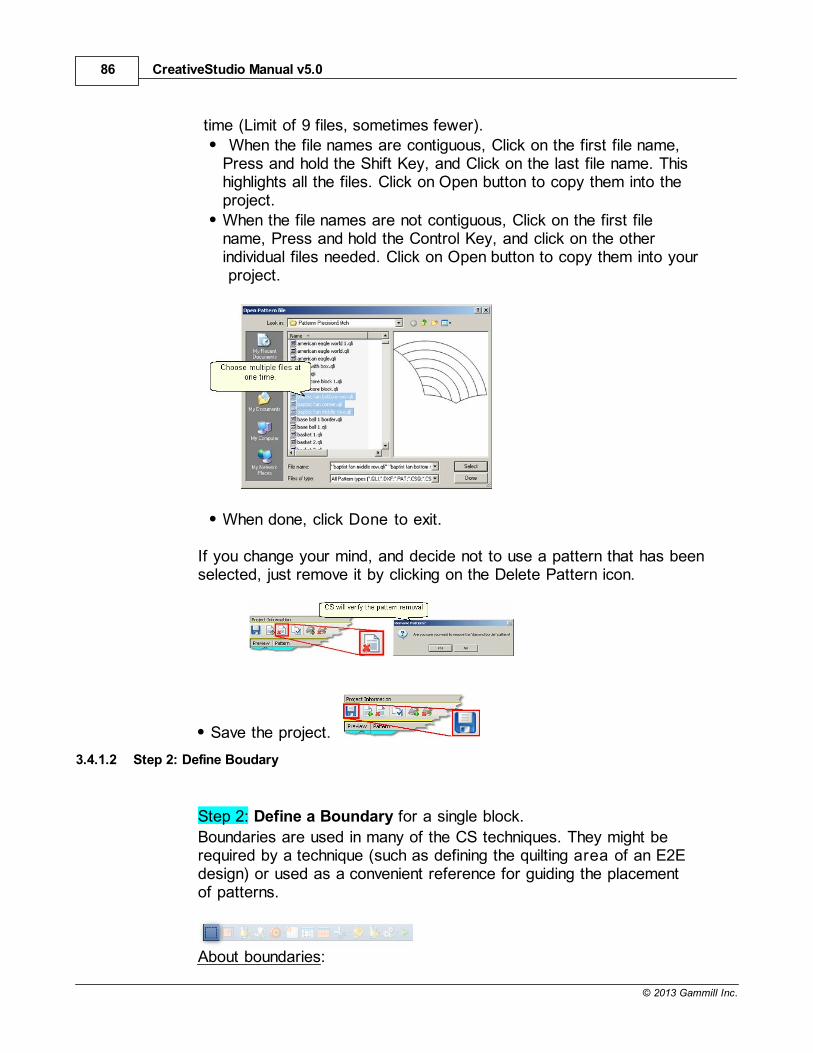
CreativeStudio Manual v5.086
© 2013 Gammill Inc.
time (Limit of 9 files, sometimes fewer).When the file names are contiguous, Click on the first file name,
Press and hold the Shift Key, and Click on the last file name. Thishighlights all the files. Click on Open button to copy them into theproject.When the file names are not contiguous, Click on the first filename, Press and hold the Control Key, and click on the otherindividual files needed. Click on Open button to copy them into your project.
When done, click Done to exit.
If you change your mind, and decide not to use a pattern that has beenselected, just remove it by clicking on the Delete Pattern icon.
Save the project.
3.4.1.2 Step 2: Define Boudary
Step 2: Define a Boundary for a single block.
Boundaries are used in many of the CS techniques. They might berequired by a technique (such as defining the quilting area of an E2Edesign) or used as a convenient reference for guiding the placementof patterns.
About boundaries:
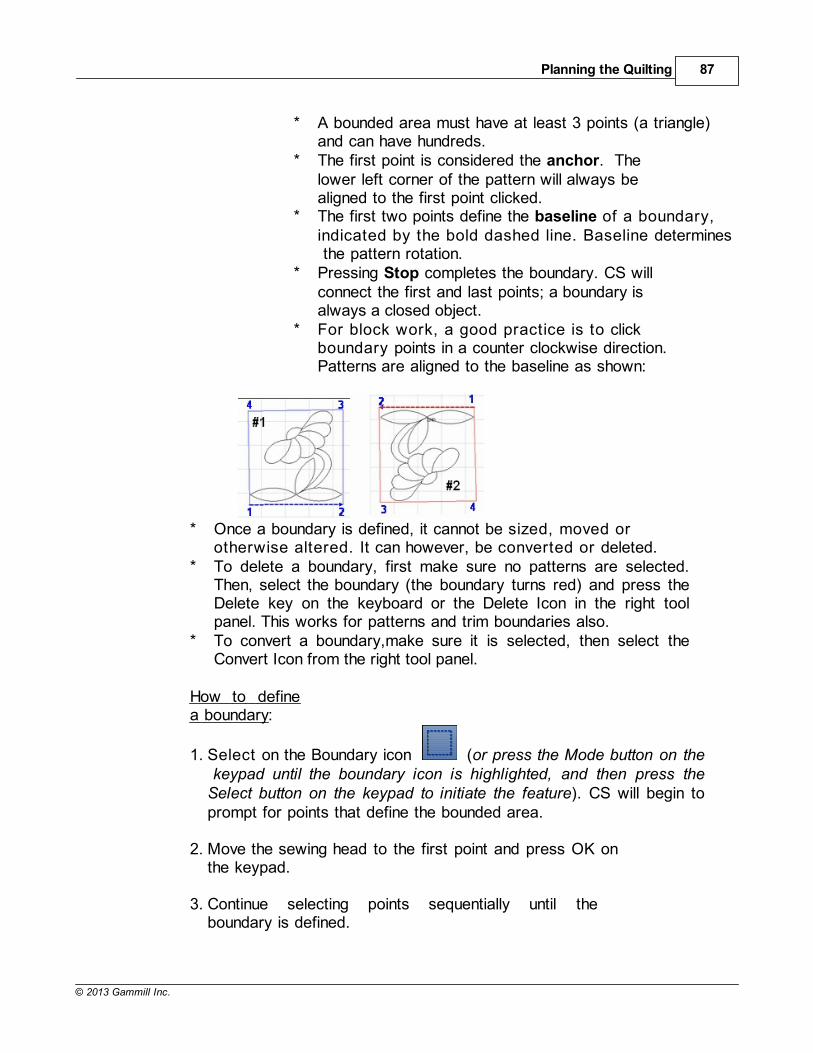
Planning the Quilting 87
© 2013 Gammill Inc.
* A bounded area must have at least 3 points (a triangle)and can have hundreds.
* The first point is considered the anchor. Thelower left corner of the pattern will always bealigned to the first point clicked.
* The first two points define the baseline of a boundary,indicated by the bold dashed line. Baseline determines the pattern rotation.
* Pressing Stop completes the boundary. CS willconnect the first and last points; a boundary isalways a closed object.
* For block work, a good practice is to clickboundary points in a counter clockwise direction.Patterns are aligned to the baseline as shown:
* Once a boundary is defined, it cannot be sized, moved orotherwise altered. It can however, be converted or deleted.
* To delete a boundary, first make sure no patterns are selected.Then, select the boundary (the boundary turns red) and press theDelete key on the keyboard or the Delete Icon in the right toolpanel. This works for patterns and trim boundaries also.
* To convert a boundary,make sure it is selected, then select theConvert Icon from the right tool panel.
How to definea boundary:
1. Select on the Boundary icon (or press the Mode button on the keypad until the boundary icon is highlighted, and then press theSelect button on the keypad to initiate the feature). CS will begin toprompt for points that define the bounded area.
2. Move the sewing head to the first point and press OK onthe keypad.
3. Continue selecting points sequentially until theboundary is defined.

CreativeStudio Manual v5.088
© 2013 Gammill Inc.
4. Press Stop on the keypad when done and CS will join the lastselected point with the first, enclosing the area.
D esign It Yourse lf: An alternative method of creating a
boundary is to use the mouse and define the boundary on thescreen, without using any specific points on the quilt top. This isexplained in detail in the Draw Options , Draw Boundary
section.
Save the project
3.4.1.3 Step 3: Pattern to Boundary
Step 3: Move Patterns into Boundary
* Click on a boundary to select it. (It turns red).* Click on a pattern (in the Project Information box) to select it. (It turns
cyan).* Click on the drop-down box next to the Pattern to Boundaryicon.
* Choose: Standard or Stretch.* Click on the Pattern To Boundary icon to move the pattern in.
139 139 139 139
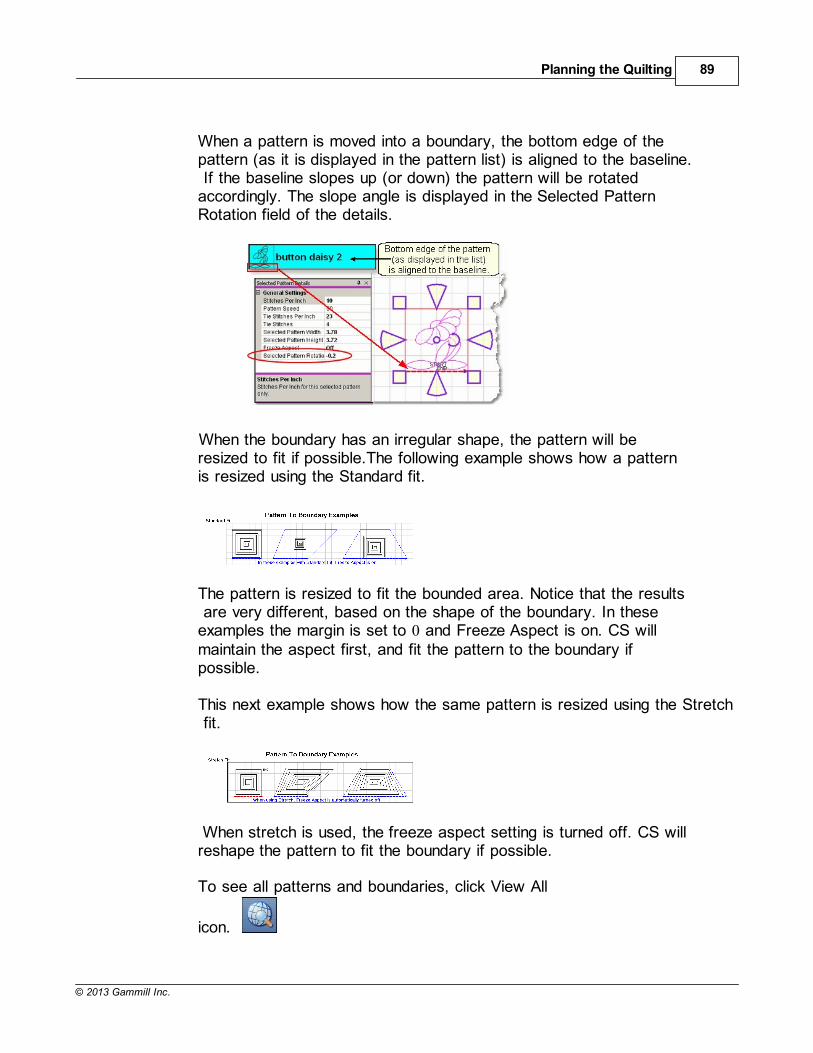
Planning the Quilting 89
© 2013 Gammill Inc.
When a pattern is moved into a boundary, the bottom edge of thepattern (as it is displayed in the pattern list) is aligned to the baseline. If the baseline slopes up (or down) the pattern will be rotatedaccordingly. The slope angle is displayed in the Selected PatternRotation field of the details.
When the boundary has an irregular shape, the pattern will beresized to fit if possible.The following example shows how a patternis resized using the Standard fit.
The pattern is resized to fit the bounded area. Notice that the results are very different, based on the shape of the boundary. In theseexamples the margin is set to 0 and Freeze Aspect is on. CS willmaintain the aspect first, and fit the pattern to the boundary ifpossible.
This next example shows how the same pattern is resized using the Stretch fit.
When stretch is used, the freeze aspect setting is turned off. CS willreshape the pattern to fit the boundary if possible.
To see all patterns and boundaries, click View All
icon.

CreativeStudio Manual v5.090
© 2013 Gammill Inc.
Save the project.
3.4.1.4 Step 4: Adjust Pattern
Step 4: Adjusting (resizing) Patterns.* Click on the pattern within the design board and adjustment handles
appear surrounding the pattern. The size and rotation of this pattern is now displayed in the Selected Pattern Details area (framed inmagenta). If more changes are made to the original pattern details(framed in cyan), they would not affect the pattern already movedinto the design board (framed in magenta). They will only affectpatterns moved into the design board from that point forward, neverretroactive.
When a pattern is highlighted on the design board, the shape can bechanged by using the adjustment handles. The handles have differentcolors and shapes, depending on the Pattern Anchor . The default is'edge' anchor. Double click the pattern to step through all of the choices.
When Pattern Anchor is 'Edge' - the re-sizing handles are purple.When any handle is moved, the opposite handle is anchored inplace.
When Pattern Anchor is 'Center' - the re-sizing handles are orange.When any of the handles are moved, the center of the pattern isanchored in place.
When Pattern Anchor is 'Endpoint' - the handles are blue boxes, at theStart and End points. Endpoint Anchor is not a choice for a block pattern
when the start and end points are the same.
When Pattern Anchor is 'Stretch' - the re-sizing handles are gray.When any handle is moved, the opposite handle is anchored in place.
57
139 139
78
78
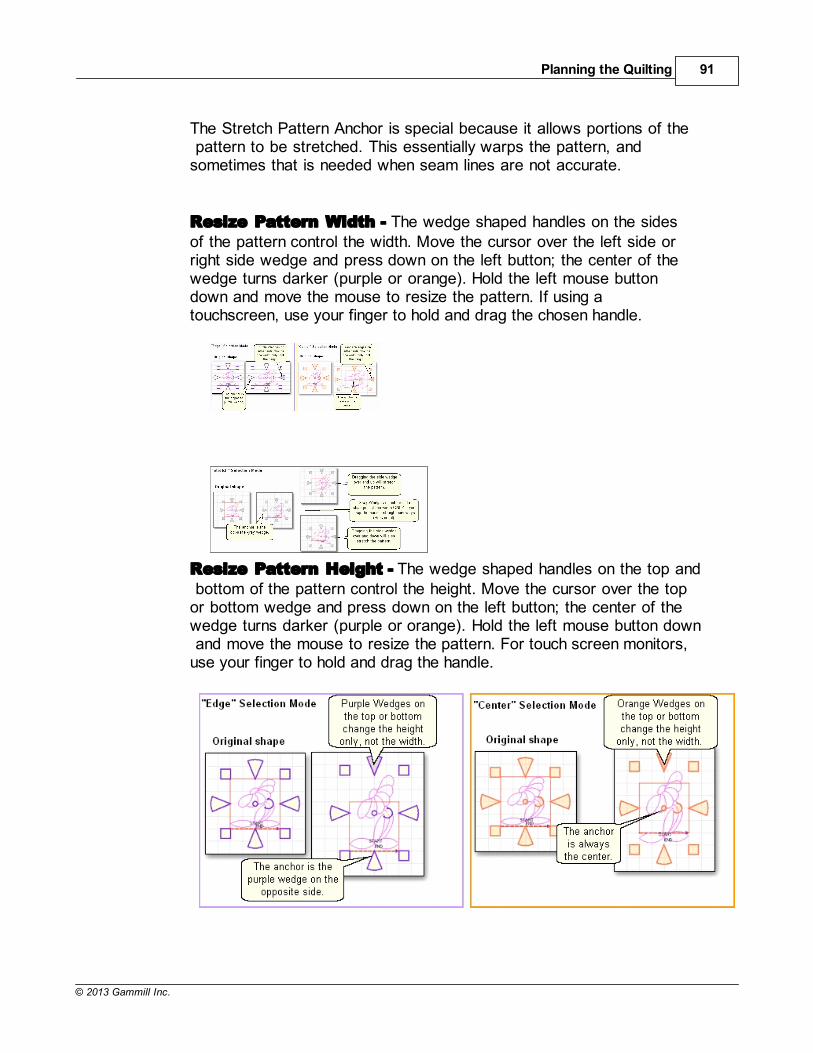
Planning the Quilting 91
© 2013 Gammill Inc.
The Stretch Pattern Anchor is special because it allows portions of the pattern to be stretched. This essentially warps the pattern, andsometimes that is needed when seam lines are not accurate.
Resize Pattern Width - The wedge shaped handles on the sidesof the pattern control the width. Move the cursor over the left side orright side wedge and press down on the left button; the center of thewedge turns darker (purple or orange). Hold the left mouse buttondown and move the mouse to resize the pattern. If using atouchscreen, use your finger to hold and drag the chosen handle.
Resize Pattern Height - The wedge shaped handles on the top and bottom of the pattern control the height. Move the cursor over the topor bottom wedge and press down on the left button; the center of thewedge turns darker (purple or orange). Hold the left mouse button down and move the mouse to resize the pattern. For touch screen monitors,use your finger to hold and drag the handle.
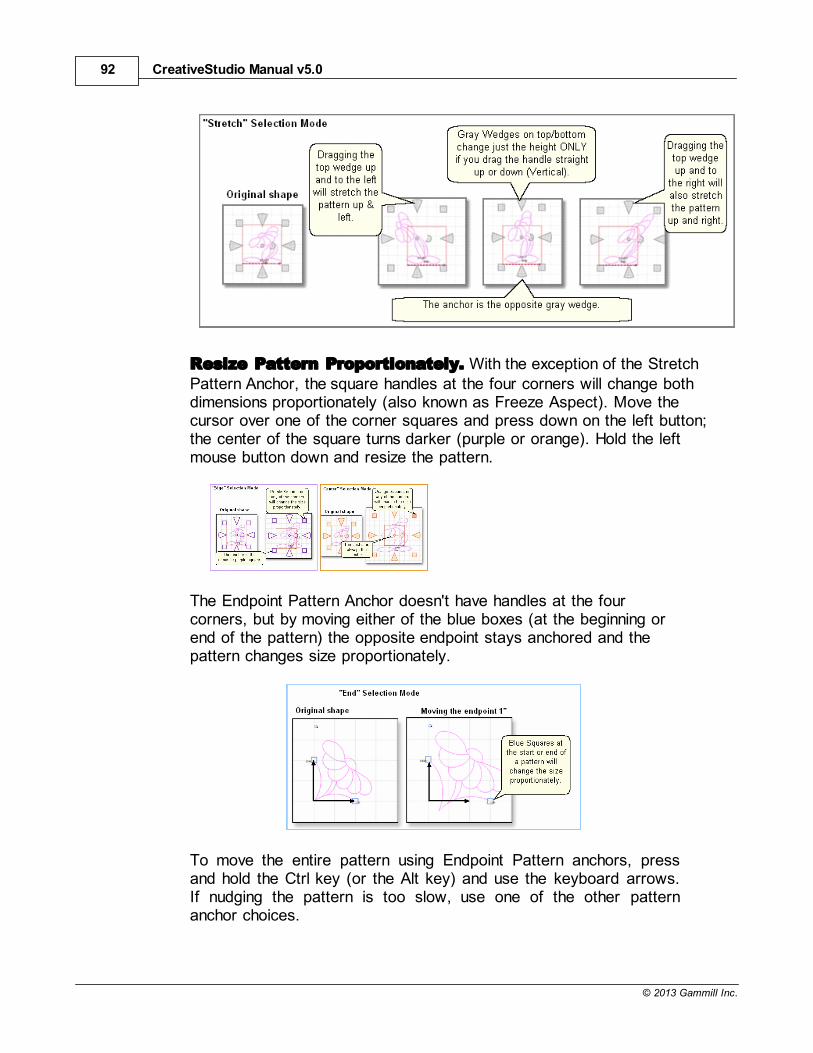
CreativeStudio Manual v5.092
© 2013 Gammill Inc.
Resize Pattern Proportionately. With the exception of the StretchPattern Anchor, the square handles at the four corners will change bothdimensions proportionately (also known as Freeze Aspect). Move thecursor over one of the corner squares and press down on the left button;the center of the square turns darker (purple or orange). Hold the leftmouse button down and resize the pattern.
The Endpoint Pattern Anchor doesn't have handles at the fourcorners, but by moving either of the blue boxes (at the beginning orend of the pattern) the opposite endpoint stays anchored and thepattern changes size proportionately.
To move the entire pattern using Endpoint Pattern anchors, pressand hold the Ctrl key (or the Alt key) and use the keyboard arrows.If nudging the pattern is too slow, use one of the other patternanchor choices.
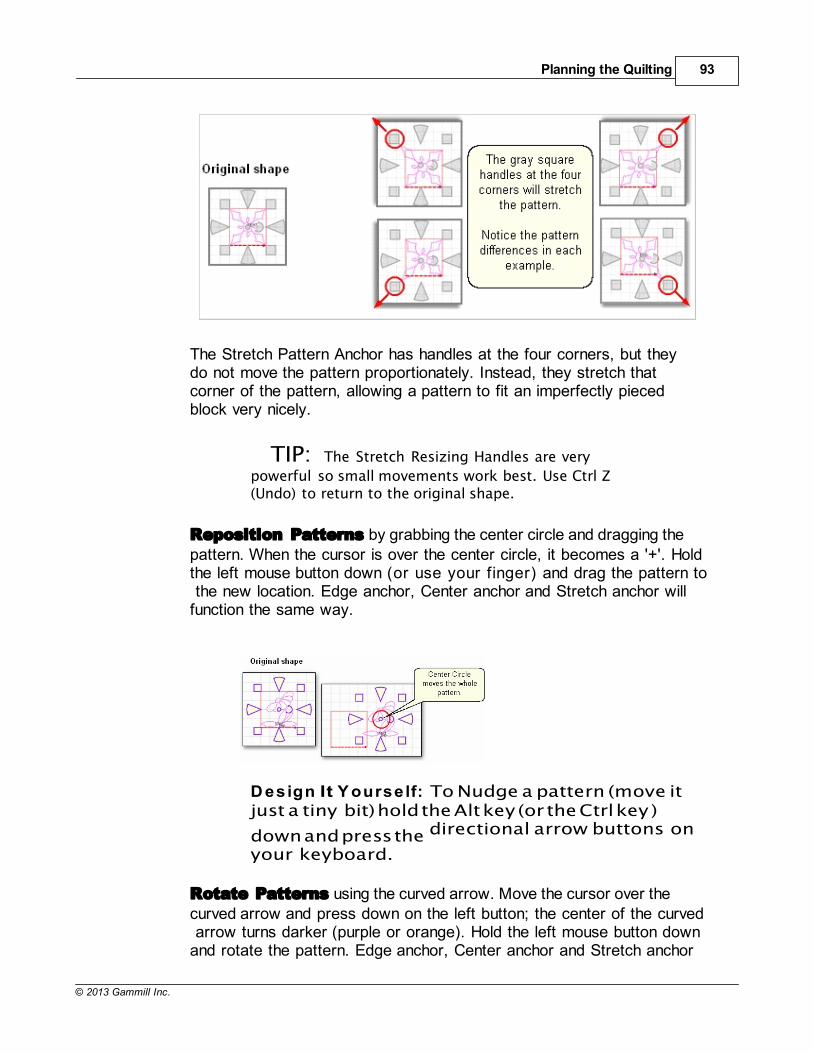
Planning the Quilting 93
© 2013 Gammill Inc.
The Stretch Pattern Anchor has handles at the four corners, but theydo not move the pattern proportionately. Instead, they stretch thatcorner of the pattern, allowing a pattern to fit an imperfectly piecedblock very nicely.
TIP: The Stretch Resizing Handles are very
powerful so small movements work best. Use Ctrl Z(Undo) to return to the original shape.
Reposition Patterns by grabbing the center circle and dragging thepattern. When the cursor is over the center circle, it becomes a '+'. Holdthe left mouse button down (or use your finger) and drag the pattern to the new location. Edge anchor, Center anchor and Stretch anchor willfunction the same way.
D esign It Y ourself: To Nudge a pattern (move itjust a tiny bit) hold the Alt key (or the Ctrl key )
down and press the directional arrow buttons on
your keyboard.
Rotate Patterns using the curved arrow. Move the cursor over thecurved arrow and press down on the left button; the center of the curved arrow turns darker (purple or orange). Hold the left mouse button downand rotate the pattern. Edge anchor, Center anchor and Stretch anchor
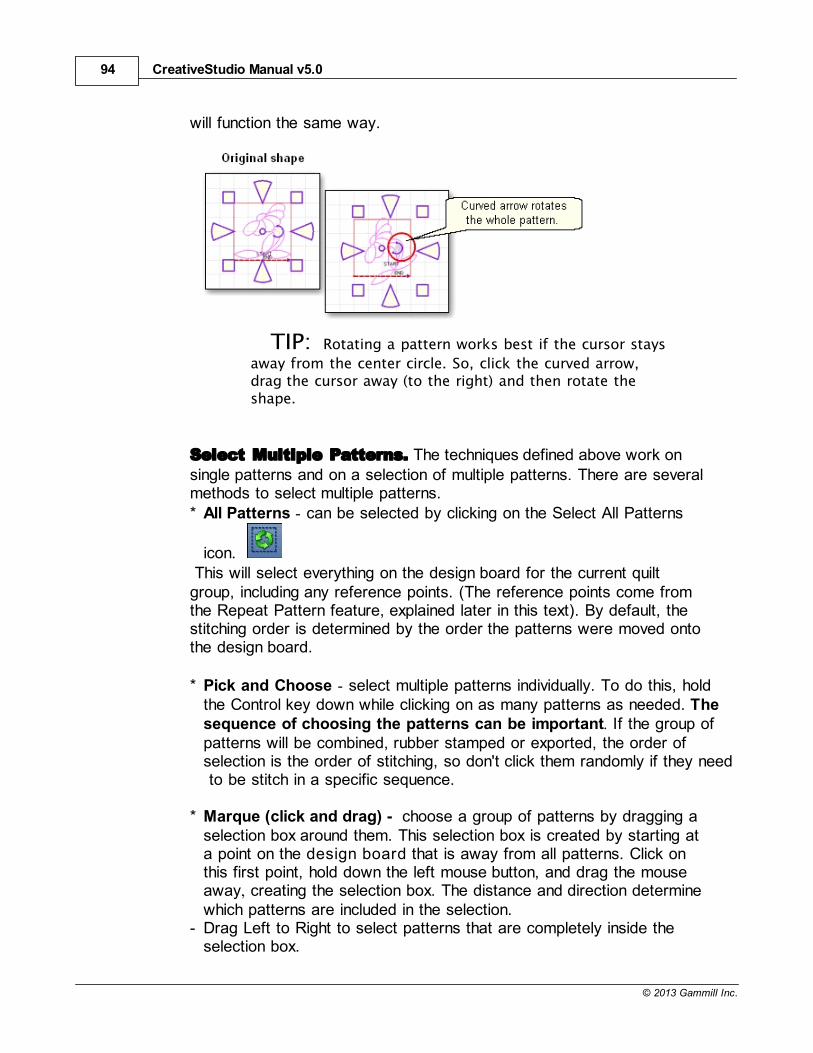
CreativeStudio Manual v5.094
© 2013 Gammill Inc.
will function the same way.
TIP: Rotating a pattern works best if the cursor stays
away from the center circle. So, click the curved arrow,drag the cursor away (to the right) and then rotate theshape.
Select Multiple Patterns. The techniques defined above work onsingle patterns and on a selection of multiple patterns. There are severalmethods to select multiple patterns.* All Patterns - can be selected by clicking on the Select All Patterns
icon. This will select everything on the design board for the current quiltgroup, including any reference points. (The reference points come fromthe Repeat Pattern feature, explained later in this text). By default, thestitching order is determined by the order the patterns were moved ontothe design board.
* Pick and Choose - select multiple patterns individually. To do this, holdthe Control key down while clicking on as many patterns as needed. Thesequence of choosing the patterns can be important. If the group ofpatterns will be combined, rubber stamped or exported, the order ofselection is the order of stitching, so don't click them randomly if they need to be stitch in a specific sequence.
* Marque (click and drag) - choose a group of patterns by dragging aselection box around them. This selection box is created by starting ata point on the design board that is away from all patterns. Click onthis first point, hold down the left mouse button, and drag the mouseaway, creating the selection box. The distance and direction determinewhich patterns are included in the selection.
- Drag Left to Right to select patterns that are completely inside theselection box.
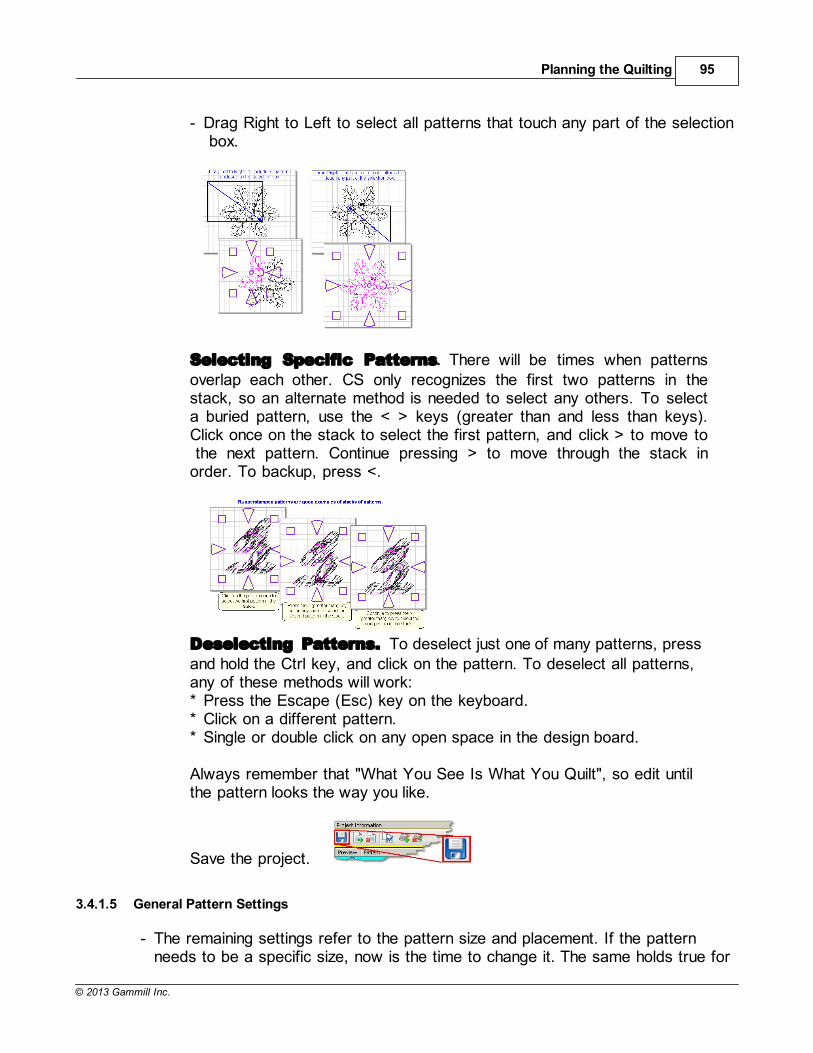
Planning the Quilting 95
© 2013 Gammill Inc.
- Drag Right to Left to select all patterns that touch any part of the selection box.
Selecting Specific Patterns. There will be times when patternsoverlap each other. CS only recognizes the first two patterns in thestack, so an alternate method is needed to select any others. To selecta buried pattern, use the < > keys (greater than and less than keys).Click once on the stack to select the first pattern, and click > to move to the next pattern. Continue pressing > to move through the stack inorder. To backup, press <.
Deselecting Patterns. To deselect just one of many patterns, pressand hold the Ctrl key, and click on the pattern. To deselect all patterns,any of these methods will work:* Press the Escape (Esc) key on the keyboard.* Click on a different pattern.* Single or double click on any open space in the design board.
Always remember that "What You See Is What You Quilt", so edit untilthe pattern looks the way you like.
Save the project.
3.4.1.5 General Pattern Settings
- The remaining settings refer to the pattern size and placement. If the patternneeds to be a specific size, now is the time to change it. The same holds true for

CreativeStudio Manual v5.096
© 2013 Gammill Inc.
the Freeze Aspect setting and the Selected pattern Rotation.Pattern Width is the width of one pattern, measured at thewidest point. Pattern Height is the height of one pattern, measured at thetallest point.Freeze Aspect - 'ON' means the ratio of Height:Width remains the same
when the size changes. So, if one of the dimensions is changed, CS will change the other automatically to keep the ratio the same.'OFF' means CS will allow the ratio to be distorted.
Margin is not recognized in Repeat Patterns or in E2E. It is intended only for the Pattern To Boundary function.
Note: Below the General Settings area there is a context sensitive help’area.
Clicking on any of the General Settings will provide a brief definition of that setting.
Save the project .
Step 4: Click on Repeat Patterns icon. CS asks for a reference point,and it displays a box on the left which contains the settings for quiltingrepeat patterns. You can either decide for yourself how many repeats androws you need, or you can provide the measurements of the total size, and CS will do the calculations for you.
Reference Point Locations are used to position the repeated patterns on the quilt top.
Reference Point is a specific point on the quilt that is used for placingpatterns. Offsets are used if the repeated patterns need to bepositioned some distance from the initial reference point. As anexample, the reference point may be the upper left corner of the quilt, but the repeated patterns are intended for an inner area, which starts some distance away. This distance is measured in two directions,moving Horizontally and Vertically.
73 73 73
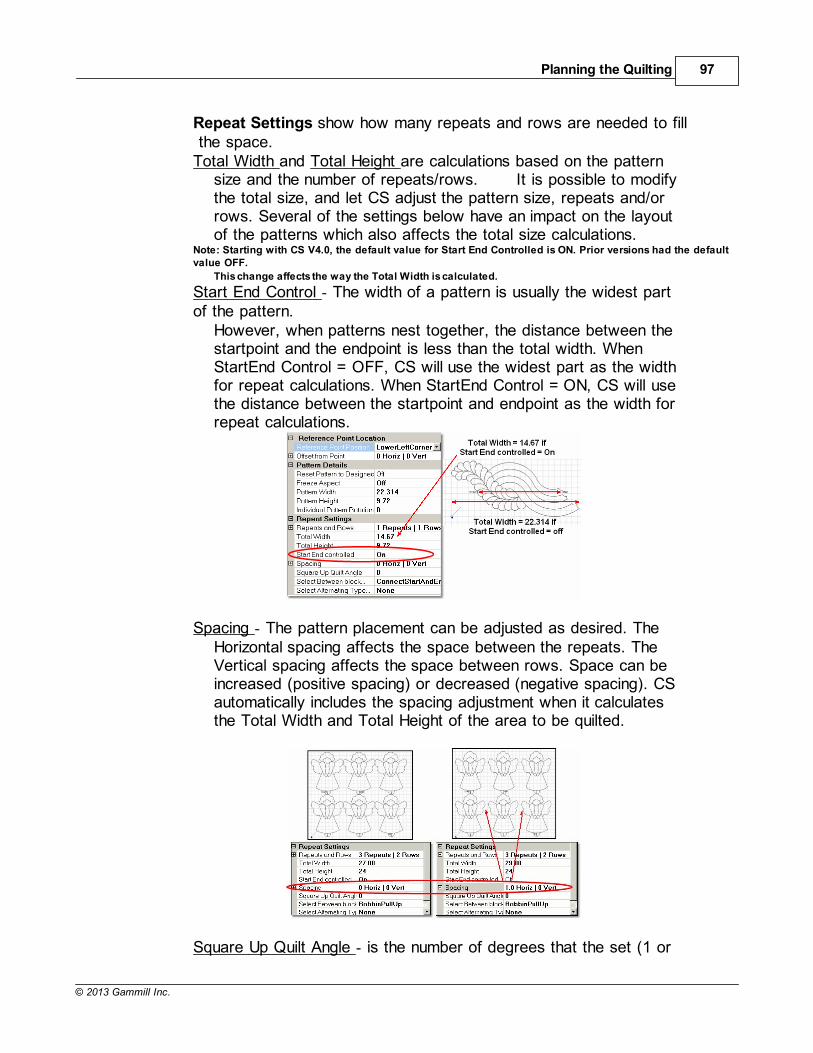
Planning the Quilting 97
© 2013 Gammill Inc.
Repeat Settings show how many repeats and rows are needed to fill the space.Total Width and Total Height are calculations based on the pattern
size and the number of repeats/rows. It is possible to modifythe total size, and let CS adjust the pattern size, repeats and/orrows. Several of the settings below have an impact on the layoutof the patterns which also affects the total size calculations.
Note: Starting with CS V4.0, the default value for Start End Controlled is ON. Prior versions had the defaultvalue OFF.
This change affects the way the Total Width is calculated.
Start End Control - The width of a pattern is usually the widest partof the pattern.
However, when patterns nest together, the distance between thestartpoint and the endpoint is less than the total width. WhenStartEnd Control = OFF, CS will use the widest part as the widthfor repeat calculations. When StartEnd Control = ON, CS will usethe distance between the startpoint and endpoint as the width forrepeat calculations.
Spacing - The pattern placement can be adjusted as desired. TheHorizontal spacing affects the space between the repeats. TheVertical spacing affects the space between rows. Space can beincreased (positive spacing) or decreased (negative spacing). CSautomatically includes the spacing adjustment when it calculatesthe Total Width and Total Height of the area to be quilted.
Square Up Quilt Angle - is the number of degrees that the set (1 or
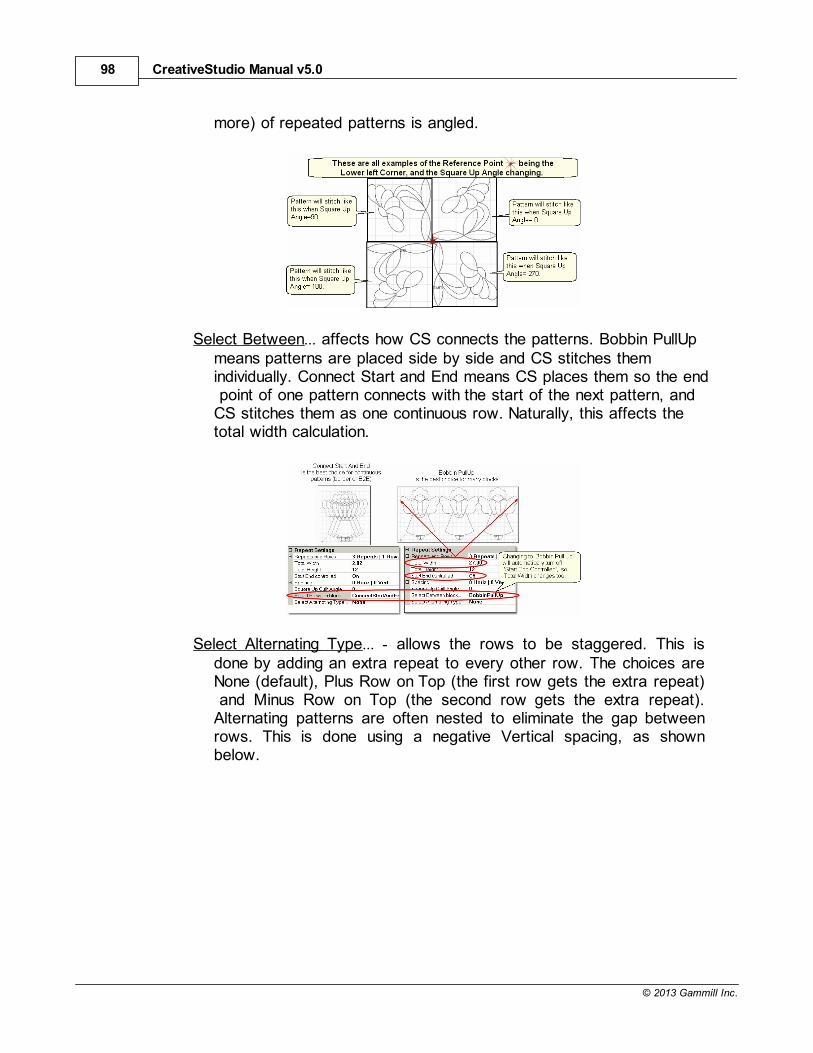
CreativeStudio Manual v5.098
© 2013 Gammill Inc.
more) of repeated patterns is angled.
Select Between... affects how CS connects the patterns. Bobbin PullUpmeans patterns are placed side by side and CS stitches themindividually. Connect Start and End means CS places them so the end point of one pattern connects with the start of the next pattern, andCS stitches them as one continuous row. Naturally, this affects thetotal width calculation.
Select Alternating Type... - allows the rows to be staggered. This isdone by adding an extra repeat to every other row. The choices areNone (default), Plus Row on Top (the first row gets the extra repeat) and Minus Row on Top (the second row gets the extra repeat).Alternating patterns are often nested to eliminate the gap betweenrows. This is done using a negative Vertical spacing, as shownbelow.
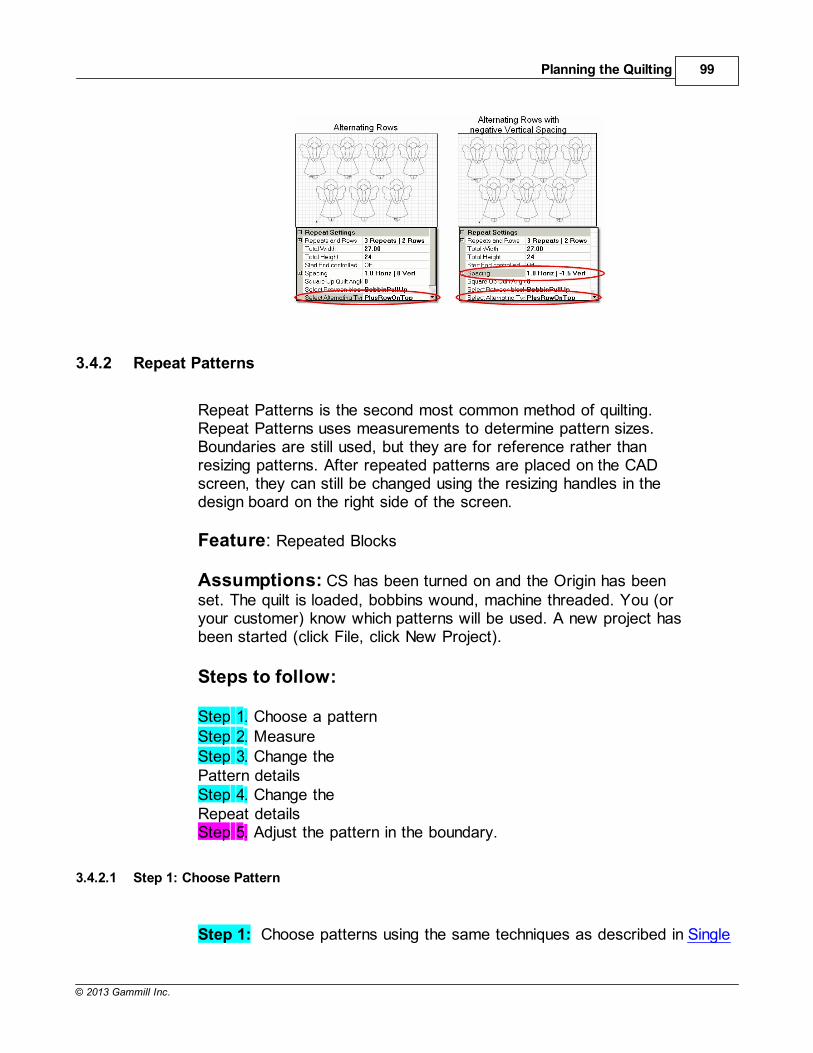
Planning the Quilting 99
© 2013 Gammill Inc.
3.4.2 Repeat Patterns
Repeat Patterns is the second most common method of quilting.Repeat Patterns uses measurements to determine pattern sizes.Boundaries are still used, but they are for reference rather thanresizing patterns. After repeated patterns are placed on the CADscreen, they can still be changed using the resizing handles in thedesign board on the right side of the screen.
Feature: Repeated Blocks
Assumptions: CS has been turned on and the Origin has beenset. The quilt is loaded, bobbins wound, machine threaded. You (oryour customer) know which patterns will be used. A new project hasbeen started (click File, click New Project).
Steps to follow:
Step 1. Choose a pattern Step 2. MeasureStep 3. Change thePattern details Step 4. Change theRepeat detailsStep 5. Adjust the pattern in the boundary.
3.4.2.1 Step 1: Choose Pattern
Step 1: Choose patterns using the same techniques as described in Single
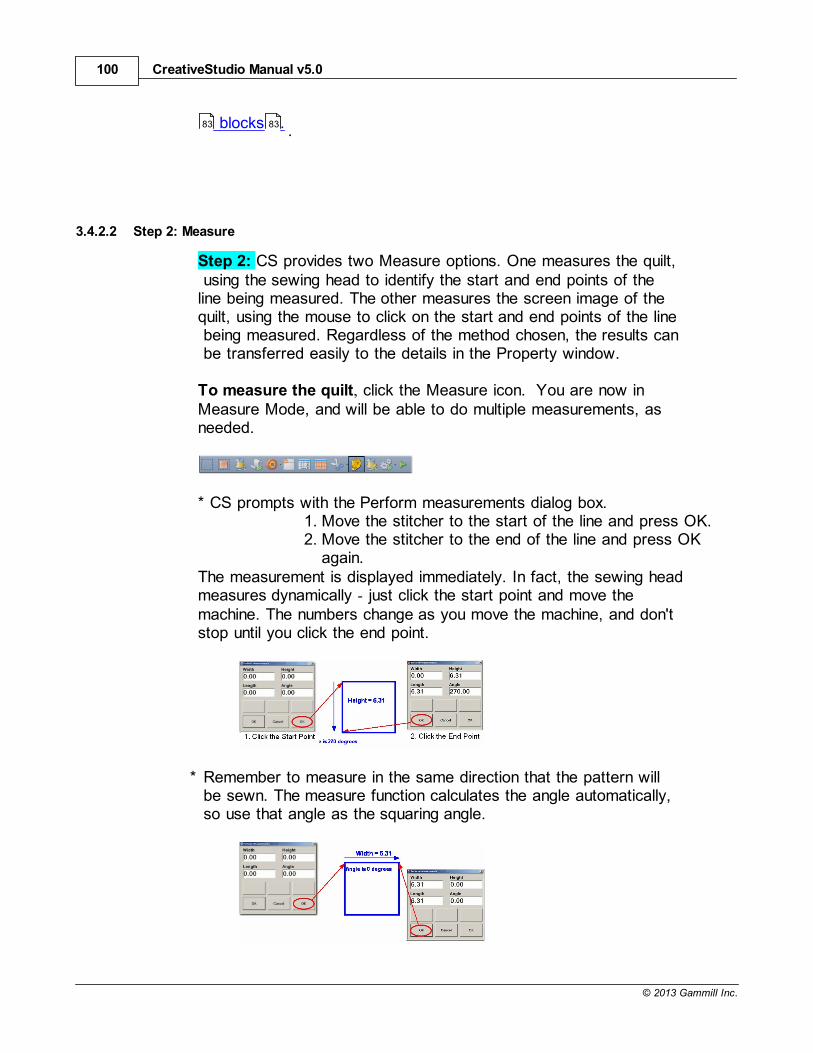
CreativeStudio Manual v5.0100
© 2013 Gammill Inc.
blocks . .
3.4.2.2 Step 2: Measure
Step 2: CS provides two Measure options. One measures the quilt, using the sewing head to identify the start and end points of theline being measured. The other measures the screen image of thequilt, using the mouse to click on the start and end points of the line being measured. Regardless of the method chosen, the results can be transferred easily to the details in the Property window.
To measure the quilt, click the Measure icon. You are now inMeasure Mode, and will be able to do multiple measurements, asneeded.
* CS prompts with the Perform measurements dialog box.1. Move the stitcher to the start of the line and press OK.2. Move the stitcher to the end of the line and press OK
again.The measurement is displayed immediately. In fact, the sewing headmeasures dynamically - just click the start point and move themachine. The numbers change as you move the machine, and don'tstop until you click the end point.
* Remember to measure in the same direction that the pattern willbe sewn. The measure function calculates the angle automatically,so use that angle as the squaring angle.
83 83
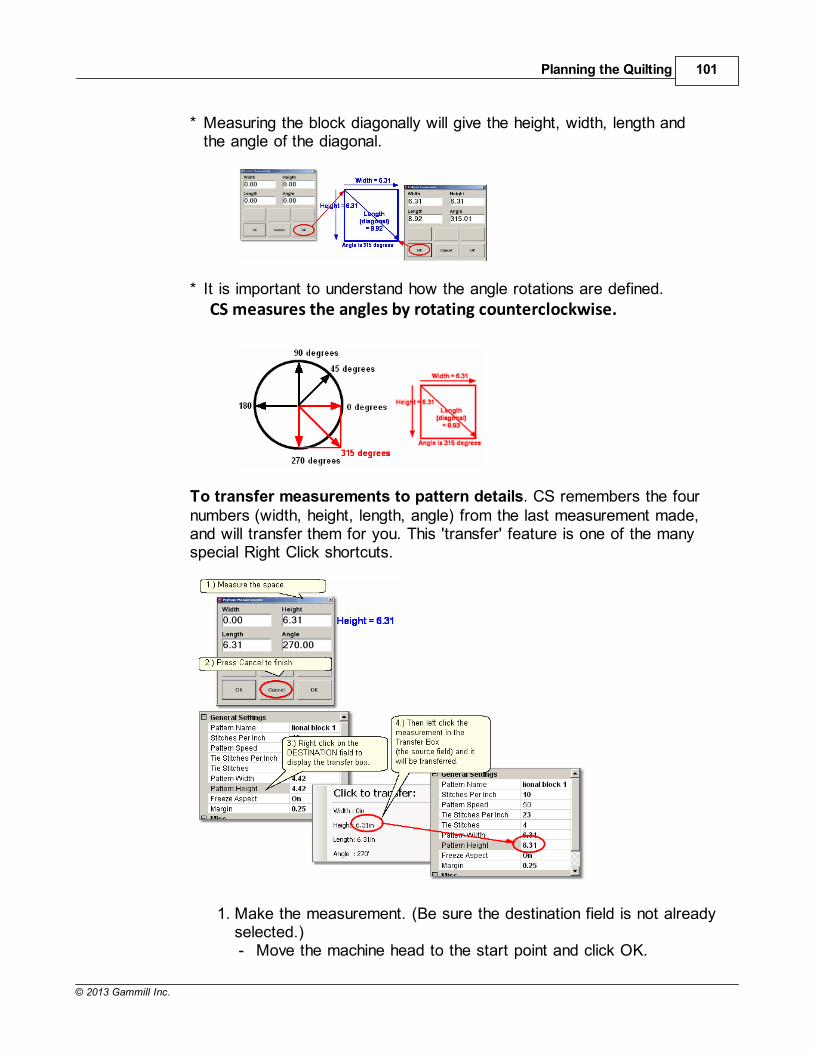
Planning the Quilting 101
© 2013 Gammill Inc.
* Measuring the block diagonally will give the height, width, length andthe angle of the diagonal.
* It is important to understand how the angle rotations are defined.
CS measures the angles by rotating counterclockwise.
To transfer measurements to pattern details. CS remembers the fournumbers (width, height, length, angle) from the last measurement made,and will transfer them for you. This 'transfer' feature is one of the manyspecial Right Click shortcuts.
1. Make the measurement. (Be sure the destination field is not alreadyselected.)- Move the machine head to the start point and click OK.
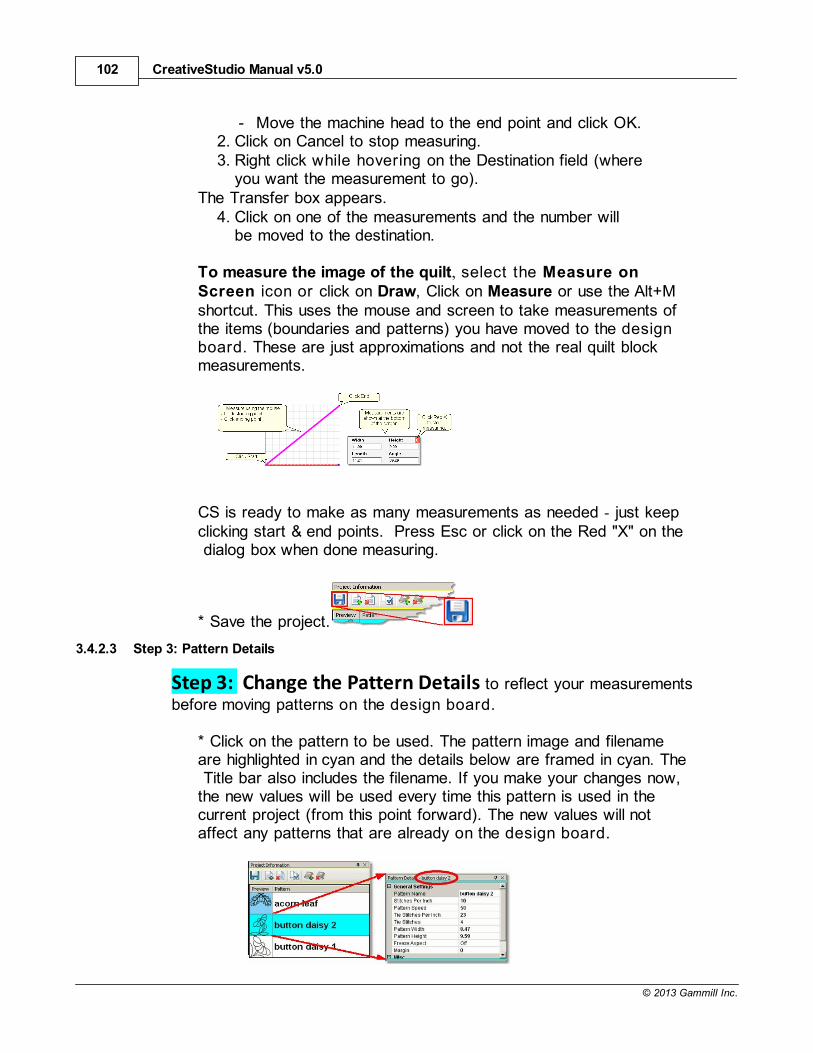
CreativeStudio Manual v5.0102
© 2013 Gammill Inc.
- Move the machine head to the end point and click OK.2. Click on Cancel to stop measuring.3. Right click while hovering on the Destination field (where
you want the measurement to go). The Transfer box appears.
4. Click on one of the measurements and the number willbe moved to the destination.
To measure the image of the quilt, select the Measure onScreen icon or click on Draw, Click on Measure or use the Alt+Mshortcut. This uses the mouse and screen to take measurements ofthe items (boundaries and patterns) you have moved to the designboard. These are just approximations and not the real quilt blockmeasurements.
CS is ready to make as many measurements as needed - just keepclicking start & end points. Press Esc or click on the Red "X" on the dialog box when done measuring.
* Save the project.
3.4.2.3 Step 3: Pattern Details
Step 3: Change the Pattern Details to reflect your measurements
before moving patterns on the design board.
* Click on the pattern to be used. The pattern image and filenameare highlighted in cyan and the details below are framed in cyan. The Title bar also includes the filename. If you make your changes now,the new values will be used every time this pattern is used in thecurrent project (from this point forward). The new values will notaffect any patterns that are already on the design board.
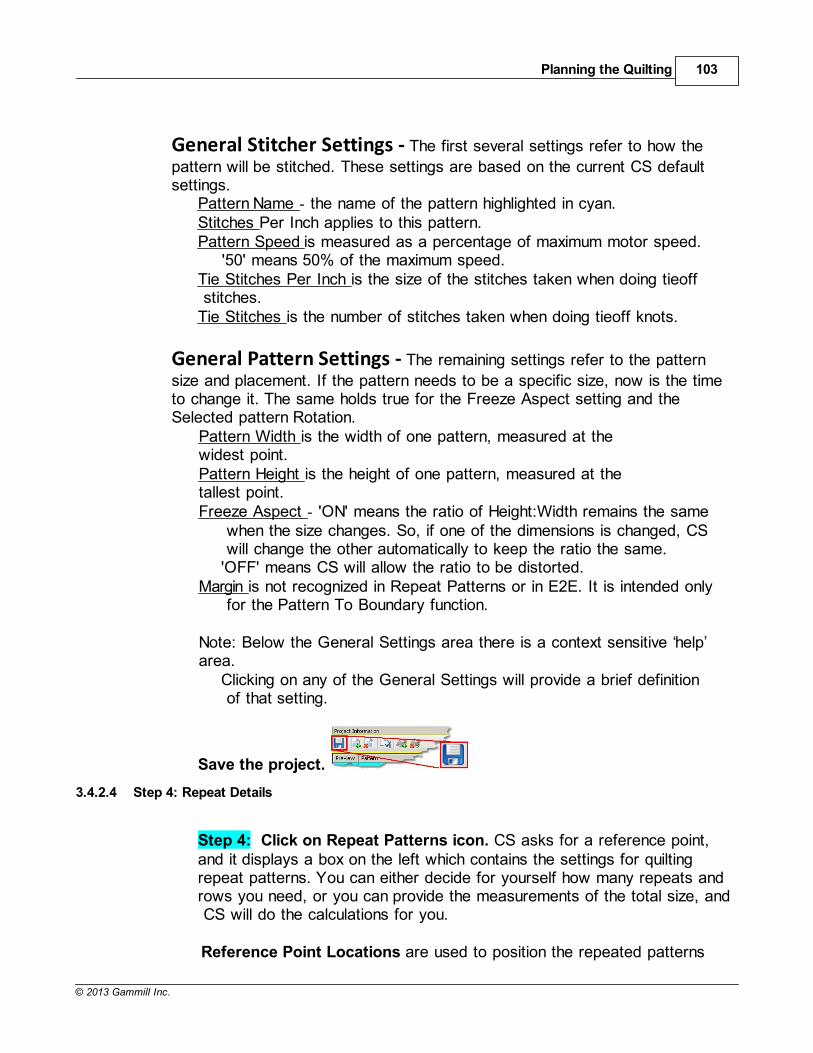
Planning the Quilting 103
© 2013 Gammill Inc.
General Stitcher Settings - The first several settings refer to how the
pattern will be stitched. These settings are based on the current CS defaultsettings.
Pattern Name - the name of the pattern highlighted in cyan.Stitches Per Inch applies to this pattern.Pattern Speed is measured as a percentage of maximum motor speed.
'50' means 50% of the maximum speed.Tie Stitches Per Inch is the size of the stitches taken when doing tieoff stitches. Tie Stitches is the number of stitches taken when doing tieoff knots.
General Pattern Settings - The remaining settings refer to the pattern
size and placement. If the pattern needs to be a specific size, now is the timeto change it. The same holds true for the Freeze Aspect setting and theSelected pattern Rotation.
Pattern Width is the width of one pattern, measured at thewidest point. Pattern Height is the height of one pattern, measured at thetallest point.Freeze Aspect - 'ON' means the ratio of Height:Width remains the same
when the size changes. So, if one of the dimensions is changed, CS will change the other automatically to keep the ratio the same.'OFF' means CS will allow the ratio to be distorted.
Margin is not recognized in Repeat Patterns or in E2E. It is intended only for the Pattern To Boundary function.
Note: Below the General Settings area there is a context sensitive help’area.
Clicking on any of the General Settings will provide a brief definition of that setting.
Save the project.
3.4.2.4 Step 4: Repeat Details
Step 4: Click on Repeat Patterns icon. CS asks for a reference point,and it displays a box on the left which contains the settings for quiltingrepeat patterns. You can either decide for yourself how many repeats androws you need, or you can provide the measurements of the total size, and CS will do the calculations for you.
Reference Point Locations are used to position the repeated patterns
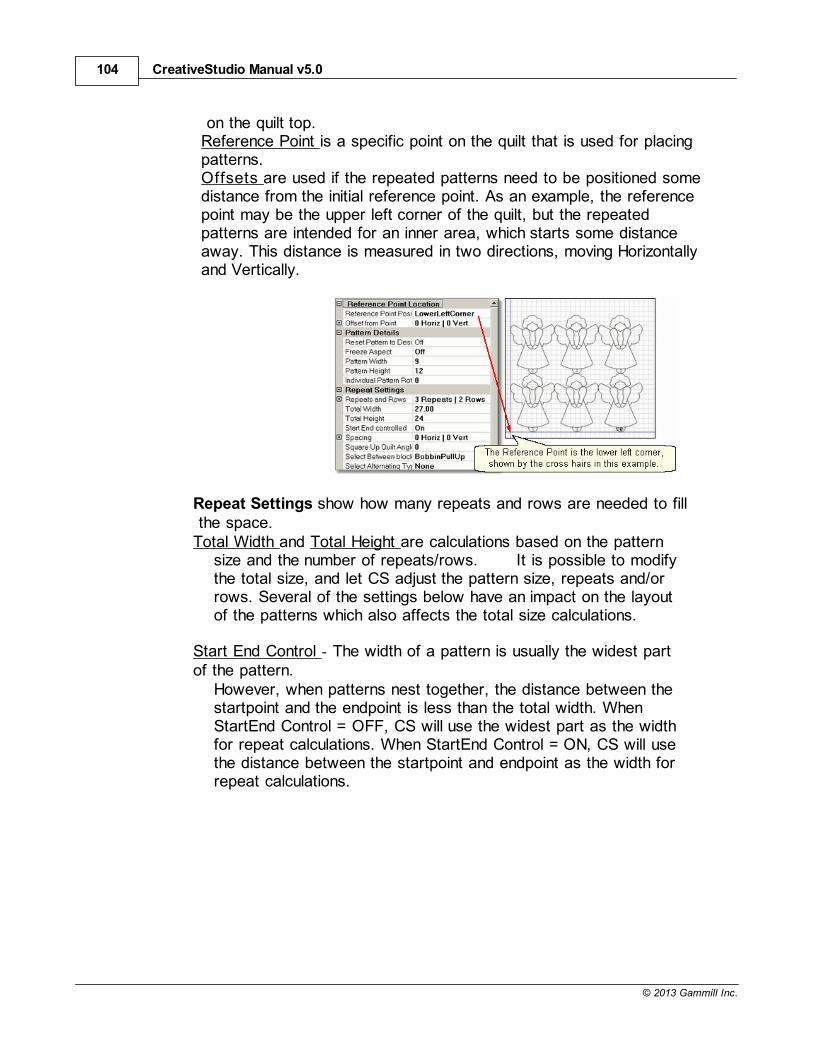
CreativeStudio Manual v5.0104
© 2013 Gammill Inc.
on the quilt top.Reference Point is a specific point on the quilt that is used for placingpatterns. Offsets are used if the repeated patterns need to be positioned somedistance from the initial reference point. As an example, the referencepoint may be the upper left corner of the quilt, but the repeatedpatterns are intended for an inner area, which starts some distanceaway. This distance is measured in two directions, moving Horizontallyand Vertically.
Repeat Settings show how many repeats and rows are needed to fill the space.Total Width and Total Height are calculations based on the pattern
size and the number of repeats/rows. It is possible to modifythe total size, and let CS adjust the pattern size, repeats and/orrows. Several of the settings below have an impact on the layoutof the patterns which also affects the total size calculations.
Start End Control - The width of a pattern is usually the widest partof the pattern.
However, when patterns nest together, the distance between thestartpoint and the endpoint is less than the total width. WhenStartEnd Control = OFF, CS will use the widest part as the widthfor repeat calculations. When StartEnd Control = ON, CS will usethe distance between the startpoint and endpoint as the width forrepeat calculations.
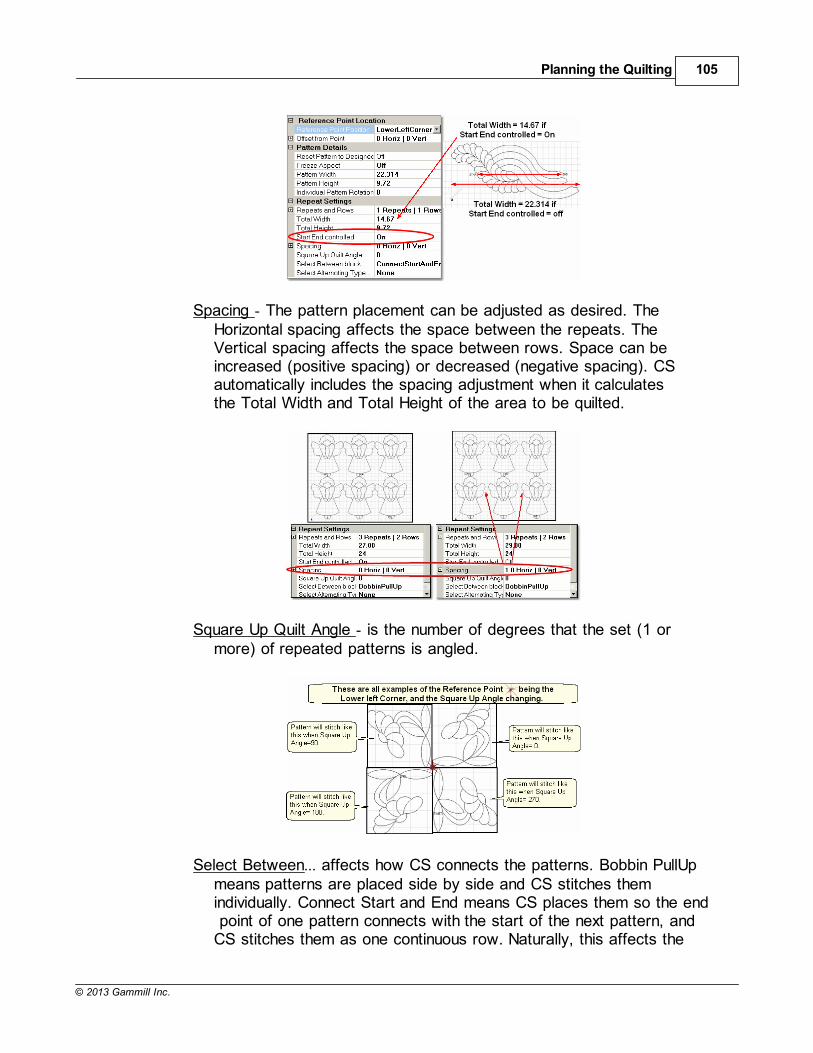
Planning the Quilting 105
© 2013 Gammill Inc.
Spacing - The pattern placement can be adjusted as desired. TheHorizontal spacing affects the space between the repeats. TheVertical spacing affects the space between rows. Space can beincreased (positive spacing) or decreased (negative spacing). CSautomatically includes the spacing adjustment when it calculatesthe Total Width and Total Height of the area to be quilted.
Square Up Quilt Angle - is the number of degrees that the set (1 ormore) of repeated patterns is angled.
Select Between... affects how CS connects the patterns. Bobbin PullUpmeans patterns are placed side by side and CS stitches themindividually. Connect Start and End means CS places them so the end point of one pattern connects with the start of the next pattern, andCS stitches them as one continuous row. Naturally, this affects the
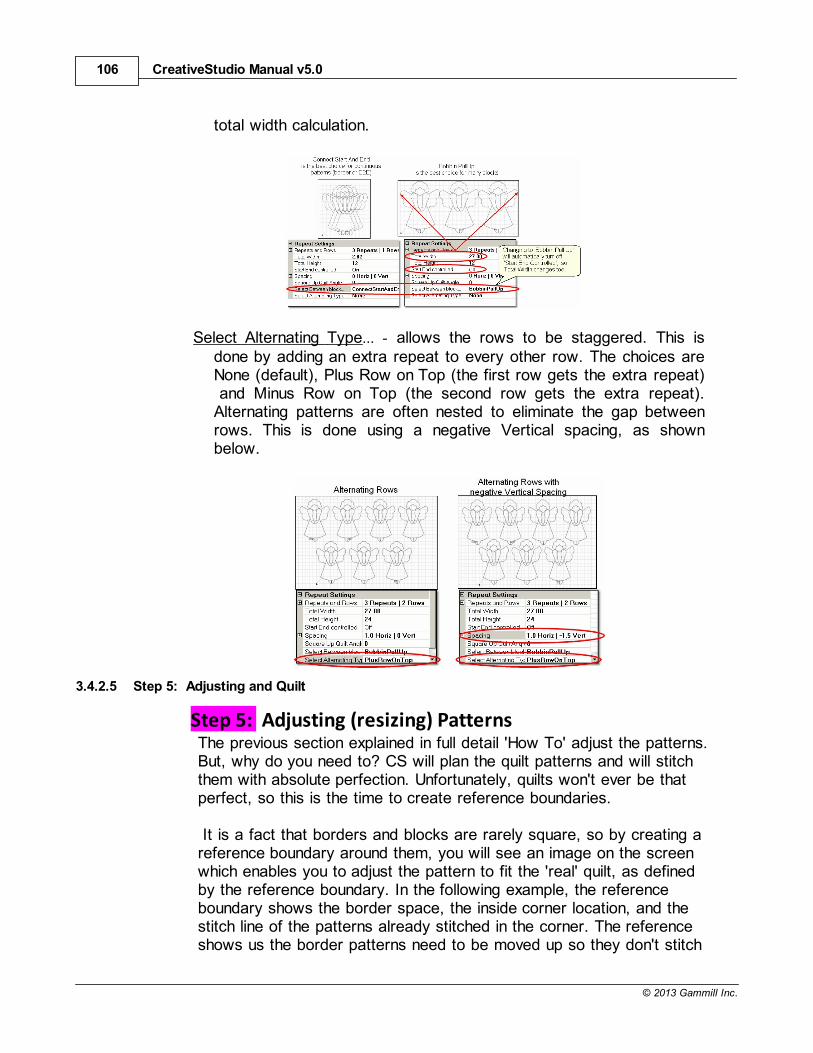
CreativeStudio Manual v5.0106
© 2013 Gammill Inc.
total width calculation.
Select Alternating Type... - allows the rows to be staggered. This isdone by adding an extra repeat to every other row. The choices areNone (default), Plus Row on Top (the first row gets the extra repeat) and Minus Row on Top (the second row gets the extra repeat).Alternating patterns are often nested to eliminate the gap betweenrows. This is done using a negative Vertical spacing, as shownbelow.
3.4.2.5 Step 5: Adjusting and Quilt
Step 5: Adjusting (resizing) PatternsThe previous section explained in full detail 'How To' adjust the patterns.But, why do you need to? CS will plan the quilt patterns and will stitchthem with absolute perfection. Unfortunately, quilts won't ever be thatperfect, so this is the time to create reference boundaries.
It is a fact that borders and blocks are rarely square, so by creating areference boundary around them, you will see an image on the screenwhich enables you to adjust the pattern to fit the 'real' quilt, as definedby the reference boundary. In the following example, the referenceboundary shows the border space, the inside corner location, and thestitch line of the patterns already stitched in the corner. The referenceshows us the border patterns need to be moved up so they don't stitch
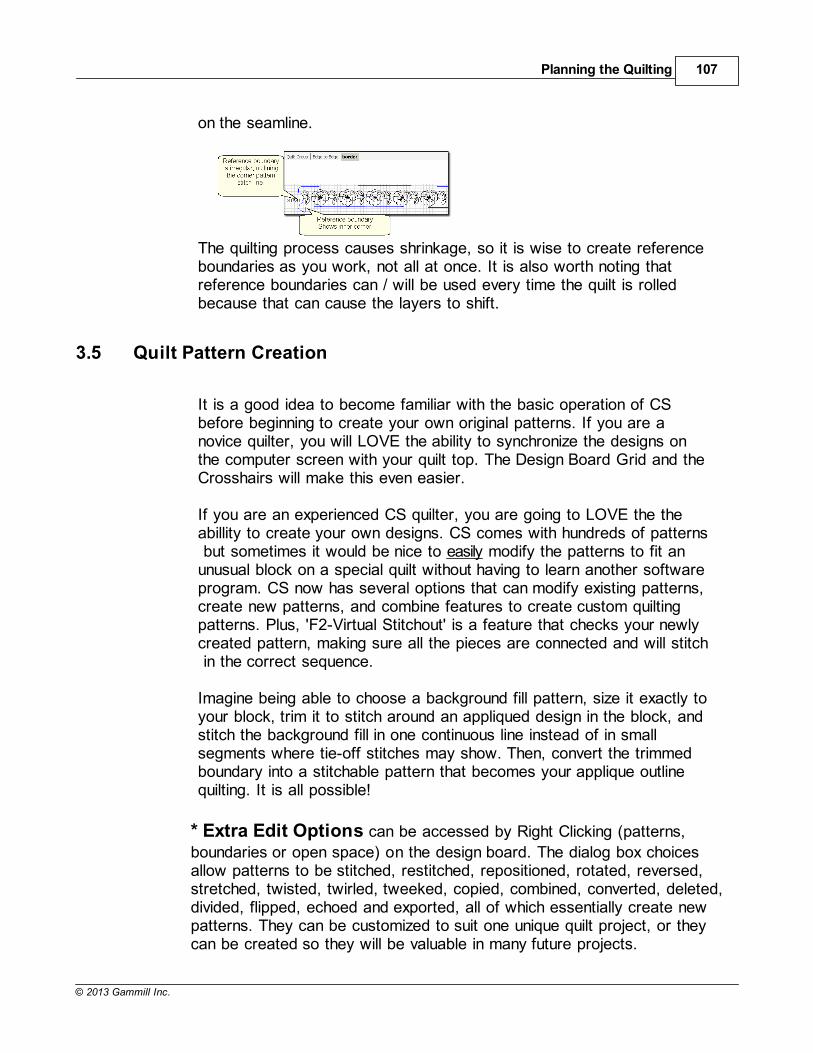
Planning the Quilting 107
© 2013 Gammill Inc.
on the seamline.
The quilting process causes shrinkage, so it is wise to create referenceboundaries as you work, not all at once. It is also worth noting thatreference boundaries can / will be used every time the quilt is rolledbecause that can cause the layers to shift.
3.5 Quilt Pattern Creation
It is a good idea to become familiar with the basic operation of CSbefore beginning to create your own original patterns. If you are anovice quilter, you will LOVE the ability to synchronize the designs onthe computer screen with your quilt top. The Design Board Grid and theCrosshairs will make this even easier.
If you are an experienced CS quilter, you are going to LOVE the theabillity to create your own designs. CS comes with hundreds of patterns but sometimes it would be nice to easily modify the patterns to fit anunusual block on a special quilt without having to learn another softwareprogram. CS now has several options that can modify existing patterns,create new patterns, and combine features to create custom quiltingpatterns. Plus, 'F2-Virtual Stitchout' is a feature that checks your newlycreated pattern, making sure all the pieces are connected and will stitch in the correct sequence.
Imagine being able to choose a background fill pattern, size it exactly toyour block, trim it to stitch around an appliqued design in the block, andstitch the background fill in one continuous line instead of in smallsegments where tie-off stitches may show. Then, convert the trimmedboundary into a stitchable pattern that becomes your applique outlinequilting. It is all possible!
* Extra Edit Options can be accessed by Right Clicking (patterns,
boundaries or open space) on the design board. The dialog box choicesallow patterns to be stitched, restitched, repositioned, rotated, reversed,stretched, twisted, twirled, tweeked, copied, combined, converted, deleted,divided, flipped, echoed and exported, all of which essentially create newpatterns. They can be customized to suit one unique quilt project, or theycan be created so they will be valuable in many future projects.
CreativeStudio Manual v5.0108
© 2013 Gammill Inc.
* Draw Options allow patterns to be created from scratch or from otherexisting patterns, using the mouse. Start with a clean screen or start with an existing pattern, and modify it to suit the quilt. Draw capabilities include theability to create boundaries, and measure them. Reverse the start and endpoints of patterns so they stitch backwards - which is great for using mirrorimages. Define your own geometric designs using arcs, curves and lines.You can draw them on the screen using a background grid for accuracy, and stitch them out. Even P2P patterns can be drawn on the screen, previewedto see if the results are appealing. Check your newly created patterns usingVirtual Stitchout, which identifies breaks in the stitching path that wouldresult in jump stitches.
* Record Options allow the quilter to create a pattern by recording themotions of the sewing head. Not only will it record free motion quilting, but itcan be used to trace things - like designs in the fabrics used to make thequilt. Imagine being able to create a completely new quilting design thatmimics the fabric design. Now, that is custom!
* Text Options allow standard Windows fonts to be used as templatesfor creating new patterns. Now it is possible to easily personalize a quilt witha monogram, a date, an occasion or a name. Each line of text is anindividual pattern instead of each letter, which makes quilting soooo mucheasier.
* Add Text Fonts (described in Utility Functions) explains how to installnew fonts. The internet has hundreds of free fonts, many of which havethemes, decorations, designs, figures, etc. and although they won't all stitch out smoothly, it is worth a try! There seems to be no limit to the number of free fonts available on the internet, even the simple pictures included in theWingdings font will work.
3.5.1 Design Board Grid
The design board is like a drawing pad, allowing the selection,positioning and resizing of patterns. Having a grid helps with thepositioning of the quilting patterns. Having a crosshair to show where the sewing head is currently placed helps to synchronize those images withthe actual quilt.
3.5.1.1 View Grid
View Grid - Choosing to show a grid will change the look of the designboard. It will look like graph paper with very fine lines and it is helpfulwhen planning pattern positioning. Some of the Draw features usingGridpoint Snaps will automatically display the grid.
Having a grid really helps when comparing or aligning patterns.
139 139
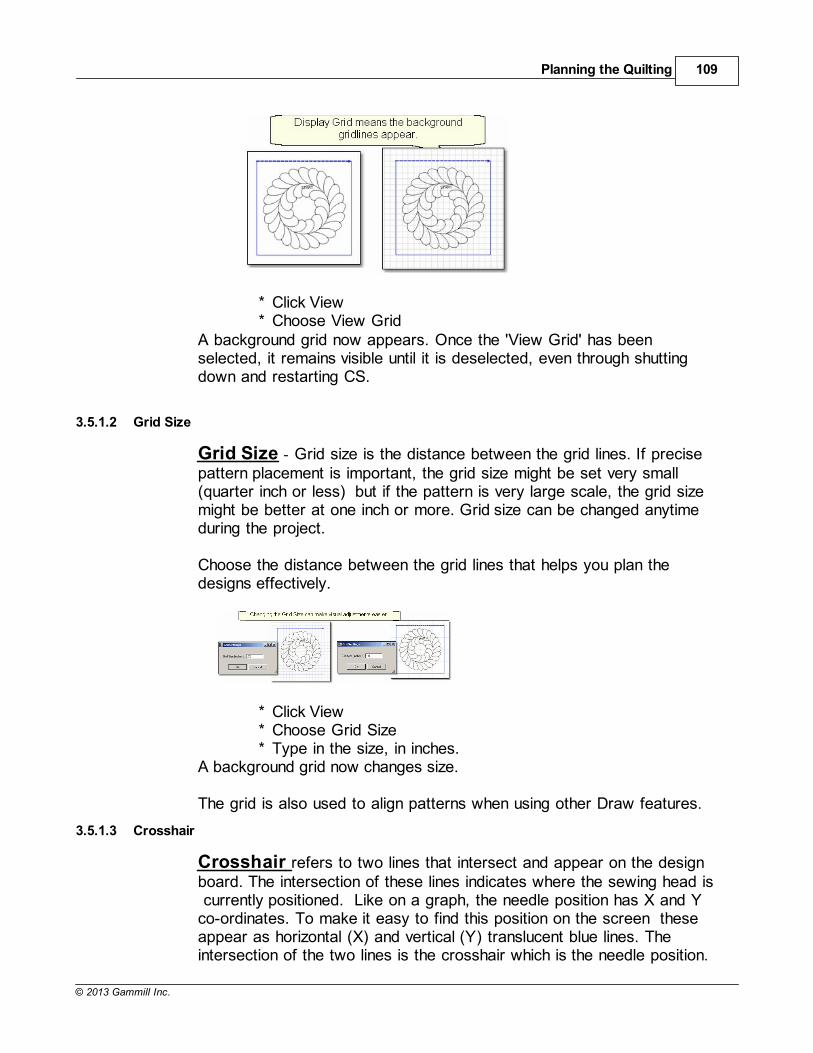
Planning the Quilting 109
© 2013 Gammill Inc.
* Click View* Choose View Grid
A background grid now appears. Once the 'View Grid' has beenselected, it remains visible until it is deselected, even through shuttingdown and restarting CS.
3.5.1.2 Grid Size
Grid Size - Grid size is the distance between the grid lines. If precisepattern placement is important, the grid size might be set very small(quarter inch or less) but if the pattern is very large scale, the grid sizemight be better at one inch or more. Grid size can be changed anytimeduring the project.
Choose the distance between the grid lines that helps you plan thedesigns effectively.
* Click View* Choose Grid Size* Type in the size, in inches.
A background grid now changes size.
The grid is also used to align patterns when using other Draw features.
3.5.1.3 Crosshair
Crosshair refers to two lines that intersect and appear on the designboard. The intersection of these lines indicates where the sewing head is currently positioned. Like on a graph, the needle position has X and Yco-ordinates. To make it easy to find this position on the screen theseappear as horizontal (X) and vertical (Y) translucent blue lines. Theintersection of the two lines is the crosshair which is the needle position.

CreativeStudio Manual v5.0110
© 2013 Gammill Inc.
The crosshair is very useful, especially when checking the alignment ofthe patterns on the screen, with the patterns stitched on the quilt. It will be mentioned frequently. Once the 'Crosshair' has been selected, itremains visible until it is deselected, even through shutting down andrestarting CS.
3.5.2 Extra Edit Options
Extra Edit Options can be found by Right-Clicking somewhere
on the design board. This could mean clicking on an individual patternthat has been moved to the design board or a group of patterns. Itcould also apply to clicking on a boundary that has been defined, oran open area where nothing has been defined. Right clicking on anyof these areas will display an Options Dialog box that lists thepossible choices. The choices will vary, depending on what wasselected. Most of the extra edit options (right click functions)are also available as icons in the shortcut tool strip at the rightside of the design board. Using this tool strip is much fasterthan right clicking to make a selection. Hover over each icon tosee a tool tip label of that icon's function. Until familiar witheach icon, right click to get the Extra Edit Options and seewhat each icon represents.
3.5.2.1 Right Click Patterns
Right clicking a pattern or group of patterns displays a list ofchoices for changing the pattern(s). Note: you can right click anywhere inside the resizing handles with the possible exception of the Echo option. When initiating anEcho of the inside of a pattern, the right click cursor position MUST be placed in theinside of the selected pattern..
The Options Dialog box appears showing choices for repositioningpatterns, repeat stitching status and creating new variations of thepattern. The choices in the dialog box will vary depending on thesewing status and/or number of patterns selected. If the right-click
126
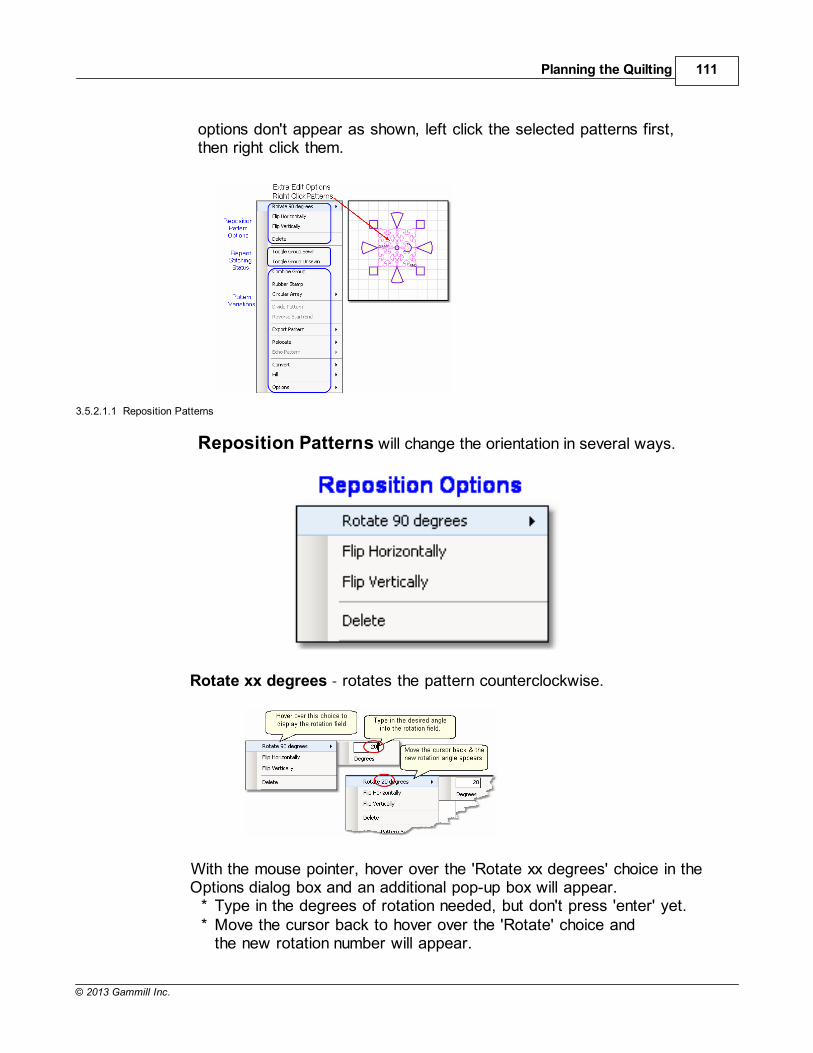
Planning the Quilting 111
© 2013 Gammill Inc.
options don't appear as shown, left click the selected patterns first,then right click them.
3.5.2.1.1 Reposition Patterns
Reposition Patterns will change the orientation in several ways.
Rotate xx degrees - rotates the pattern counterclockwise.
With the mouse pointer, hover over the 'Rotate xx degrees' choice in theOptions dialog box and an additional pop-up box will appear.
* Type in the degrees of rotation needed, but don't press 'enter' yet.* Move the cursor back to hover over the 'Rotate' choice and
the new rotation number will appear.

CreativeStudio Manual v5.0112
© 2013 Gammill Inc.
* Click the 'Rotate' choice and the pattern will be rotated.* The Options dialog box remains active so click the 'Rotate' choice
as many times as needed.* When done, click on an open area to release and close the Options
dialog box.
TIP: To rotate the pattern clockwise, enter a
negative rotation angle. To nudge the angle rotation justa bit, enter a tiny number, like +/- .05 and click Rotate.
Flip Horizontally - creates a mirror image, as if the mirror is held at theright or left side of the selected pattern(s).Flip Vertically - creates a mirror image, as if the mirror is held at the top or bottom of the selected pattern(s).Delete removes that pattern from the design board.
3.5.2.1.2 Sewn or Unsewn
Sewn or Unsewn - It is possible to re-cycle the patterns on the
design board. When a pattern is moved onto the design board, CStags it as being 'unsewn' and it is black. After it has been sewn, it istagged as 'sewn', and it turns red. CS will re-stitch the pattern if thestatus is changed back to 'unsewn'. Moving or resizing an individualpattern will change the Sewn Status automatically to 'Unsewn'. Thisdoes not happen with groups of patterns however.
TIP: Moving or resizing an individual
pattern will change the sewn status automatically
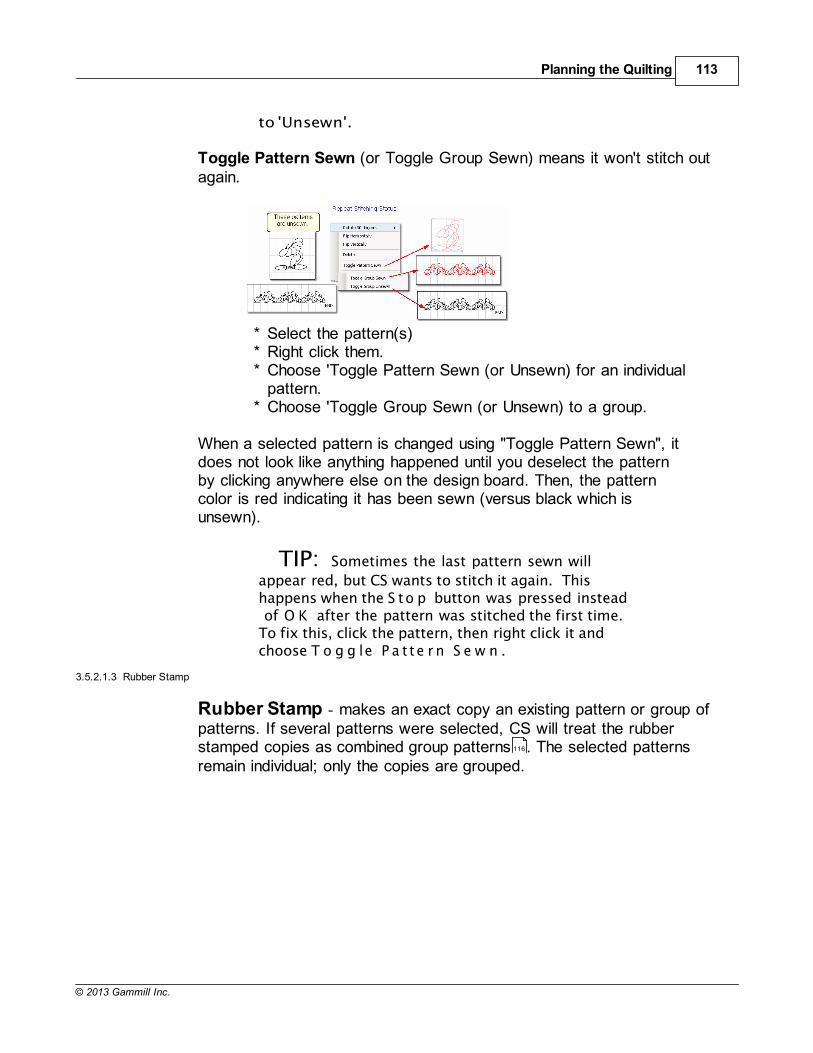
Planning the Quilting 113
© 2013 Gammill Inc.
to 'Unsewn'.
Toggle Pattern Sewn (or Toggle Group Sewn) means it won't stitch outagain.
* Select the pattern(s)* Right click them.* Choose 'Toggle Pattern Sewn (or Unsewn) for an individual
pattern.* Choose 'Toggle Group Sewn (or Unsewn) to a group.
When a selected pattern is changed using "Toggle Pattern Sewn", itdoes not look like anything happened until you deselect the patternby clicking anywhere else on the design board. Then, the patterncolor is red indicating it has been sewn (versus black which isunsewn).
TIP: Sometimes the last pattern sewn will
appear red, but CS wants to stitch it again. Thishappens when the S to p button was pressed instead of O K after the pattern was stitched the first time.To fix this, click the pattern, then right click it andchoose T o g g le P a t t e r n S e w n .
3.5.2.1.3 Rubber Stamp
Rubber Stamp - makes an exact copy an existing pattern or group ofpatterns. If several patterns were selected, CS will treat the rubberstamped copies as combined group patterns . The selected patternsremain individual; only the copies are grouped.
116
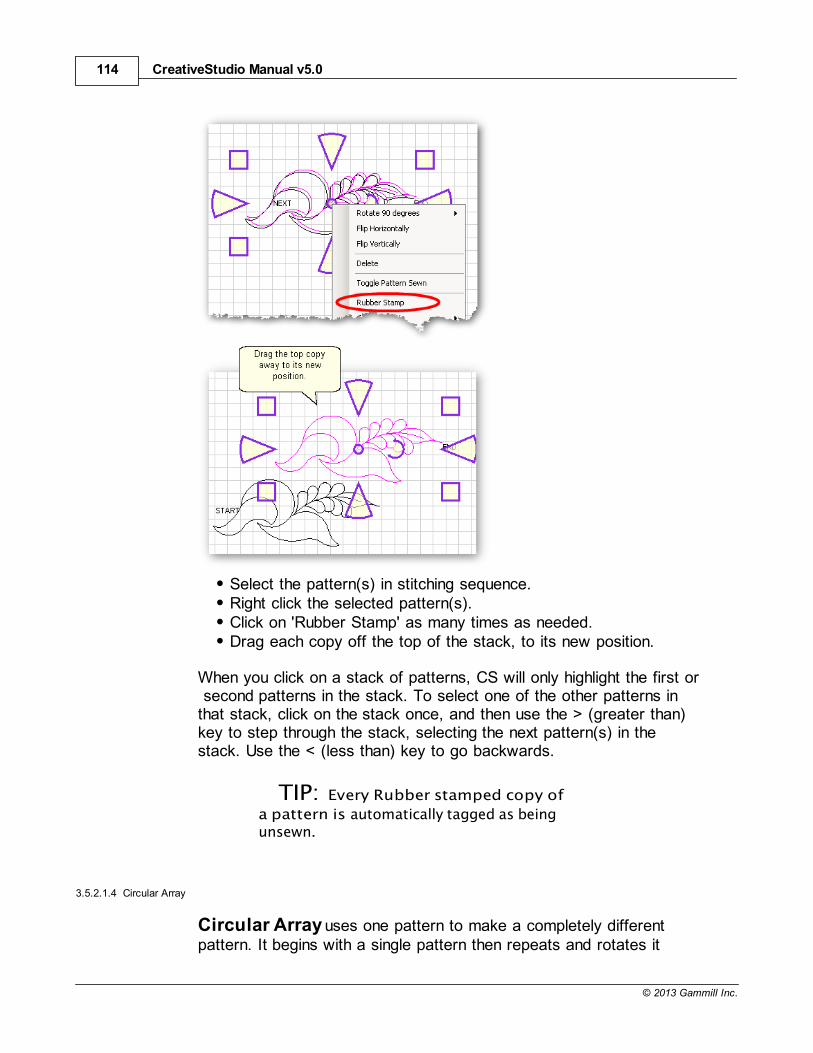
CreativeStudio Manual v5.0114
© 2013 Gammill Inc.
Select the pattern(s) in stitching sequence.Right click the selected pattern(s).Click on 'Rubber Stamp' as many times as needed.Drag each copy off the top of the stack, to its new position.
When you click on a stack of patterns, CS will only highlight the first or second patterns in the stack. To select one of the other patterns inthat stack, click on the stack once, and then use the > (greater than)key to step through the stack, selecting the next pattern(s) in thestack. Use the < (less than) key to go backwards.
TIP: Every Rubber stamped copy of
a pattern is automatically tagged as beingunsewn.
3.5.2.1.4 Circular Array
Circular Array uses one pattern to make a completely differentpattern. It begins with a single pattern then repeats and rotates it
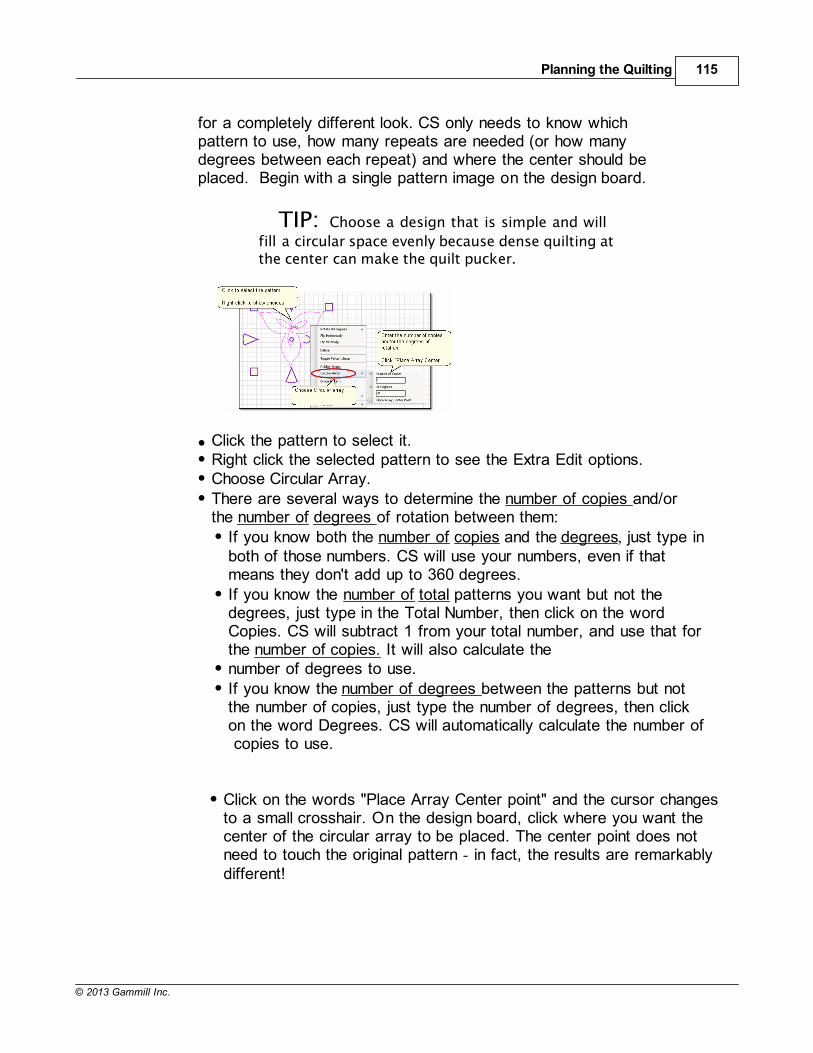
Planning the Quilting 115
© 2013 Gammill Inc.
for a completely different look. CS only needs to know whichpattern to use, how many repeats are needed (or how manydegrees between each repeat) and where the center should beplaced. Begin with a single pattern image on the design board.
TIP: Choose a design that is simple and will
fill a circular space evenly because dense quilting atthe center can make the quilt pucker.
Click the pattern to select it.Right click the selected pattern to see the Extra Edit options.Choose Circular Array.There are several ways to determine the number of copies and/orthe number of degrees of rotation between them:
If you know both the number of copies and the degrees, just type inboth of those numbers. CS will use your numbers, even if thatmeans they don't add up to 360 degrees.If you know the number of total patterns you want but not thedegrees, just type in the Total Number, then click on the wordCopies. CS will subtract 1 from your total number, and use that forthe number of copies. It will also calculate thenumber of degrees to use.If you know the number of degrees between the patterns but notthe number of copies, just type the number of degrees, then clickon the word Degrees. CS will automatically calculate the number of copies to use.
Click on the words "Place Array Center point" and the cursor changesto a small crosshair. On the design board, click where you want thecenter of the circular array to be placed. The center point does notneed to touch the original pattern - in fact, the results are remarkablydifferent!
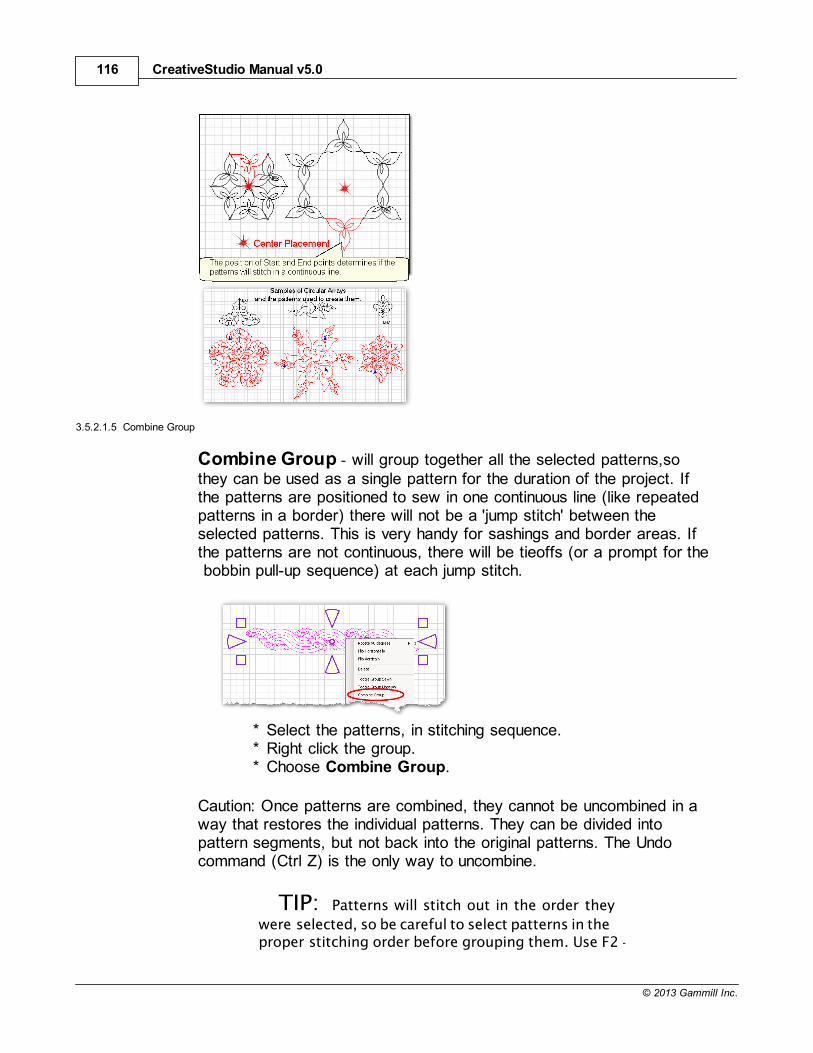
CreativeStudio Manual v5.0116
© 2013 Gammill Inc.
3.5.2.1.5 Combine Group
Combine Group - will group together all the selected patterns,sothey can be used as a single pattern for the duration of the project. Ifthe patterns are positioned to sew in one continuous line (like repeatedpatterns in a border) there will not be a 'jump stitch' between theselected patterns. This is very handy for sashings and border areas. Ifthe patterns are not continuous, there will be tieoffs (or a prompt for the bobbin pull-up sequence) at each jump stitch.
* Select the patterns, in stitching sequence.* Right click the group.* Choose Combine Group.
Caution: Once patterns are combined, they cannot be uncombined in away that restores the individual patterns. They can be divided intopattern segments, but not back into the original patterns. The Undocommand (Ctrl Z) is the only way to uncombine.
TIP: Patterns will stitch out in the order they
were selected, so be careful to select patterns in theproper stitching order before grouping them. Use F2 -
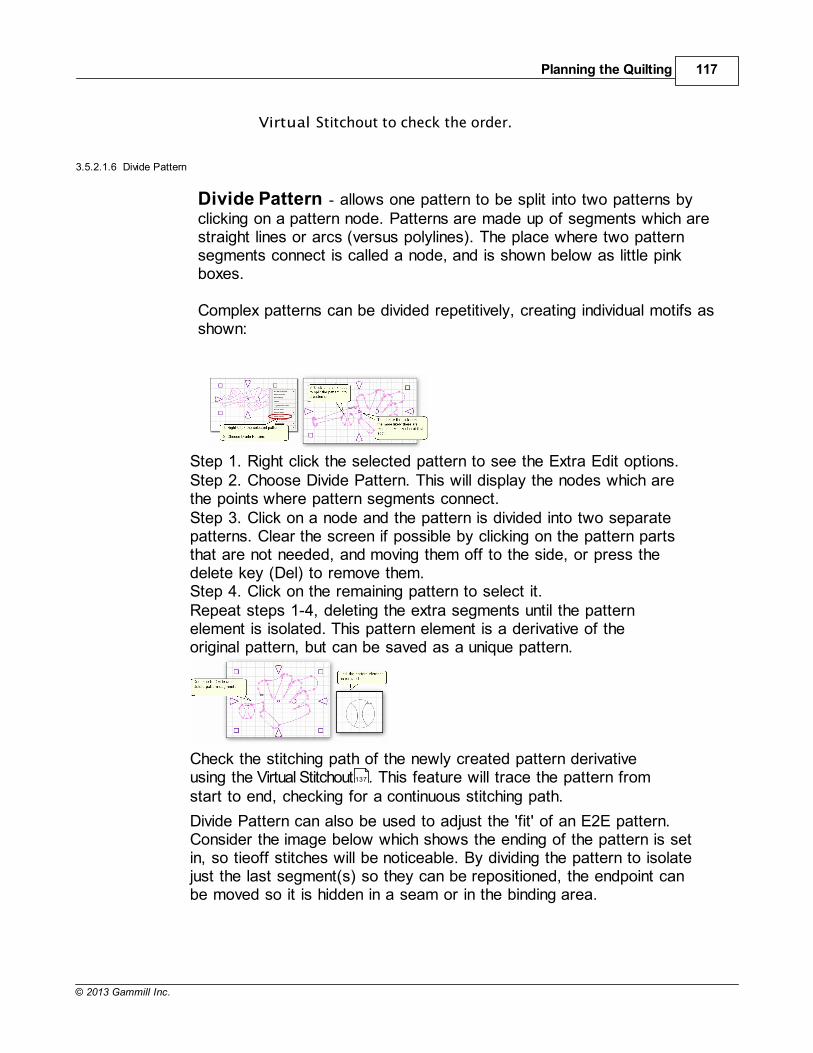
Planning the Quilting 117
© 2013 Gammill Inc.
Virtual Stitchout to check the order.
3.5.2.1.6 Divide Pattern
Divide Pattern - allows one pattern to be split into two patterns byclicking on a pattern node. Patterns are made up of segments which arestraight lines or arcs (versus polylines). The place where two patternsegments connect is called a node, and is shown below as little pinkboxes.
Complex patterns can be divided repetitively, creating individual motifs asshown:
Step 1. Right click the selected pattern to see the Extra Edit options.Step 2. Choose Divide Pattern. This will display the nodes which arethe points where pattern segments connect.Step 3. Click on a node and the pattern is divided into two separatepatterns. Clear the screen if possible by clicking on the pattern partsthat are not needed, and moving them off to the side, or press thedelete key (Del) to remove them.Step 4. Click on the remaining pattern to select it.Repeat steps 1-4, deleting the extra segments until the patternelement is isolated. This pattern element is a derivative of theoriginal pattern, but can be saved as a unique pattern.
Check the stitching path of the newly created pattern derivativeusing the Virtual Stitchout . This feature will trace the pattern fromstart to end, checking for a continuous stitching path.
Divide Pattern can also be used to adjust the 'fit' of an E2E pattern.Consider the image below which shows the ending of the pattern is setin, so tieoff stitches will be noticeable. By dividing the pattern to isolatejust the last segment(s) so they can be repositioned, the endpoint canbe moved so it is hidden in a seam or in the binding area.
137
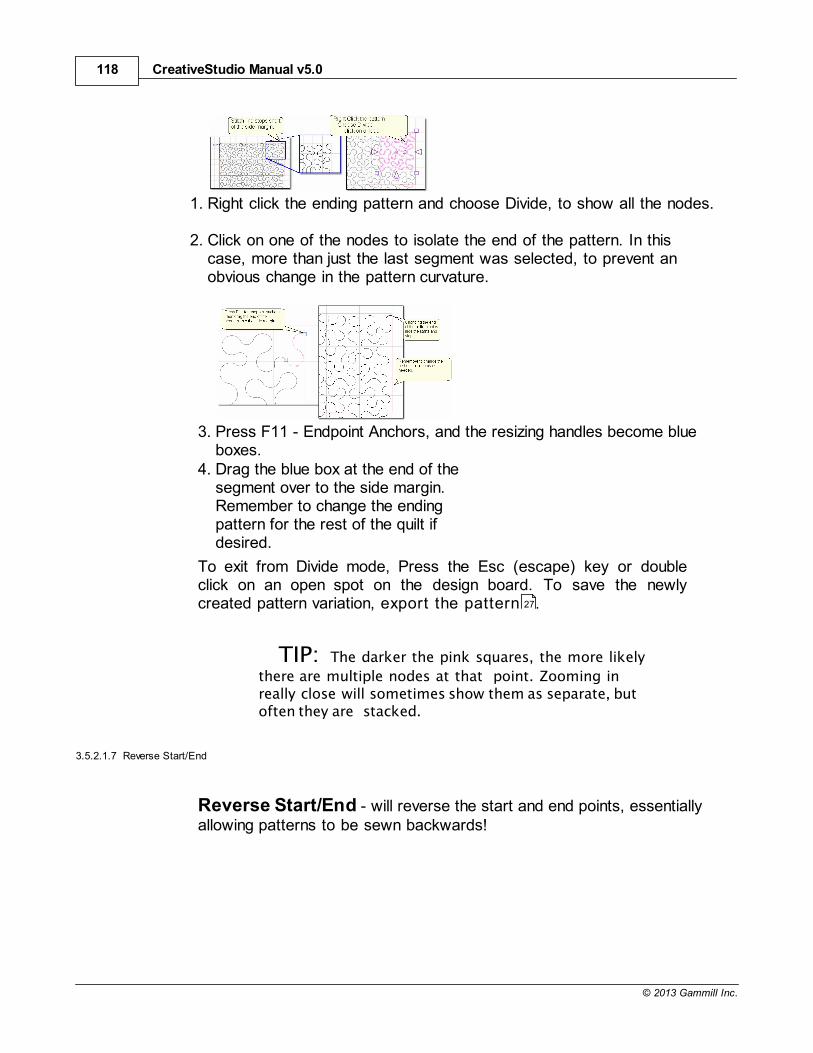
CreativeStudio Manual v5.0118
© 2013 Gammill Inc.
1. Right click the ending pattern and choose Divide, to show all the nodes.
2. Click on one of the nodes to isolate the end of the pattern. In thiscase, more than just the last segment was selected, to prevent anobvious change in the pattern curvature.
3. Press F11 - Endpoint Anchors, and the resizing handles become blueboxes.
4. Drag the blue box at the end of thesegment over to the side margin.Remember to change the endingpattern for the rest of the quilt ifdesired.
To exit from Divide mode, Press the Esc (escape) key or doubleclick on an open spot on the design board. To save the newlycreated pattern variation, export the pattern .
TIP: The darker the pink squares, the more likely
there are multiple nodes at that point. Zooming inreally close will sometimes show them as separate, butoften they are stacked.
3.5.2.1.7 Reverse Start/End
Reverse Start/End - will reverse the start and end points, essentiallyallowing patterns to be sewn backwards!
27
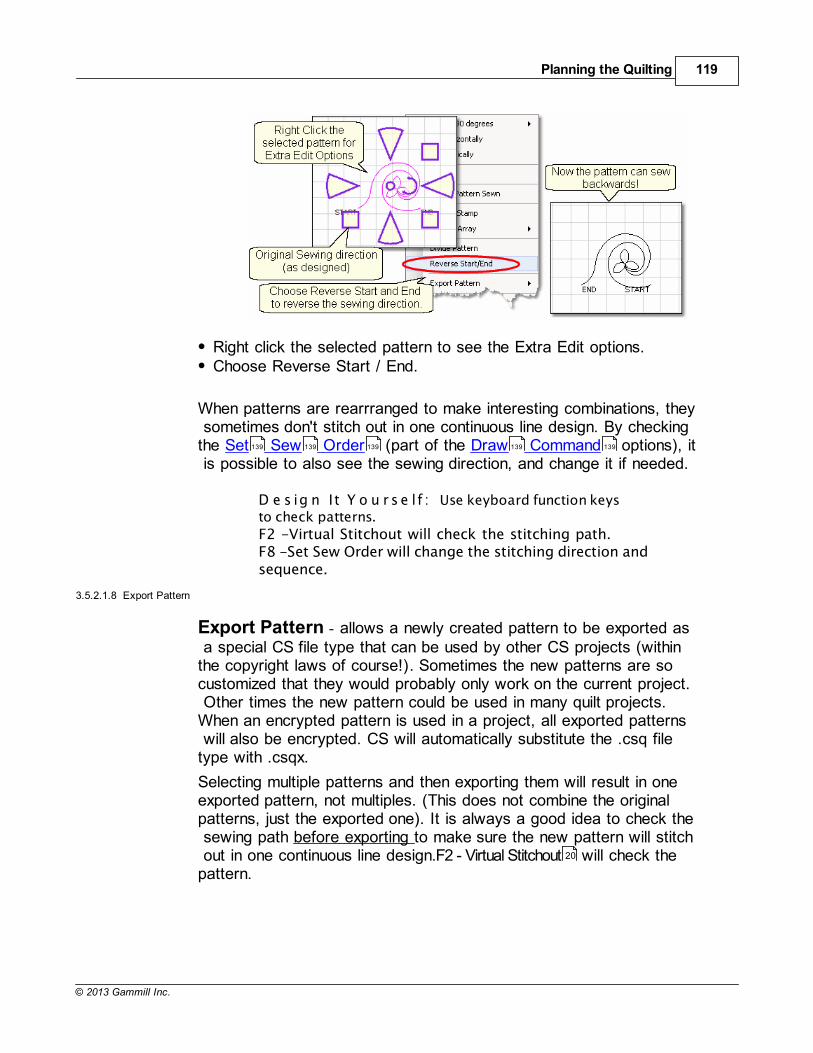
Planning the Quilting 119
© 2013 Gammill Inc.
Right click the selected pattern to see the Extra Edit options.Choose Reverse Start / End.
When patterns are rearrranged to make interesting combinations, they sometimes don't stitch out in one continuous line design. By checkingthe Set Sew Order (part of the Draw Command options), it is possible to also see the sewing direction, and change it if needed.
D e s ig n I t Y o u r s e l f : Use keyboard function keysto check patterns.
F2 -Virtual Stitchout will check the stitching path.F8 -Set Sew Order will change the stitching direction andsequence.
3.5.2.1.8 Export Pattern
Export Pattern - allows a newly created pattern to be exported as a special CS file type that can be used by other CS projects (withinthe copyright laws of course!). Sometimes the new patterns are socustomized that they would probably only work on the current project. Other times the new pattern could be used in many quilt projects.When an encrypted pattern is used in a project, all exported patterns will also be encrypted. CS will automatically substitute the .csq filetype with .csqx.
Selecting multiple patterns and then exporting them will result in oneexported pattern, not multiples. (This does not combine the originalpatterns, just the exported one). It is always a good idea to check the sewing path before exporting to make sure the new pattern will stitch out in one continuous line design.F2 - Virtual Stitchout will check thepattern.
139 139 139 139 139
20
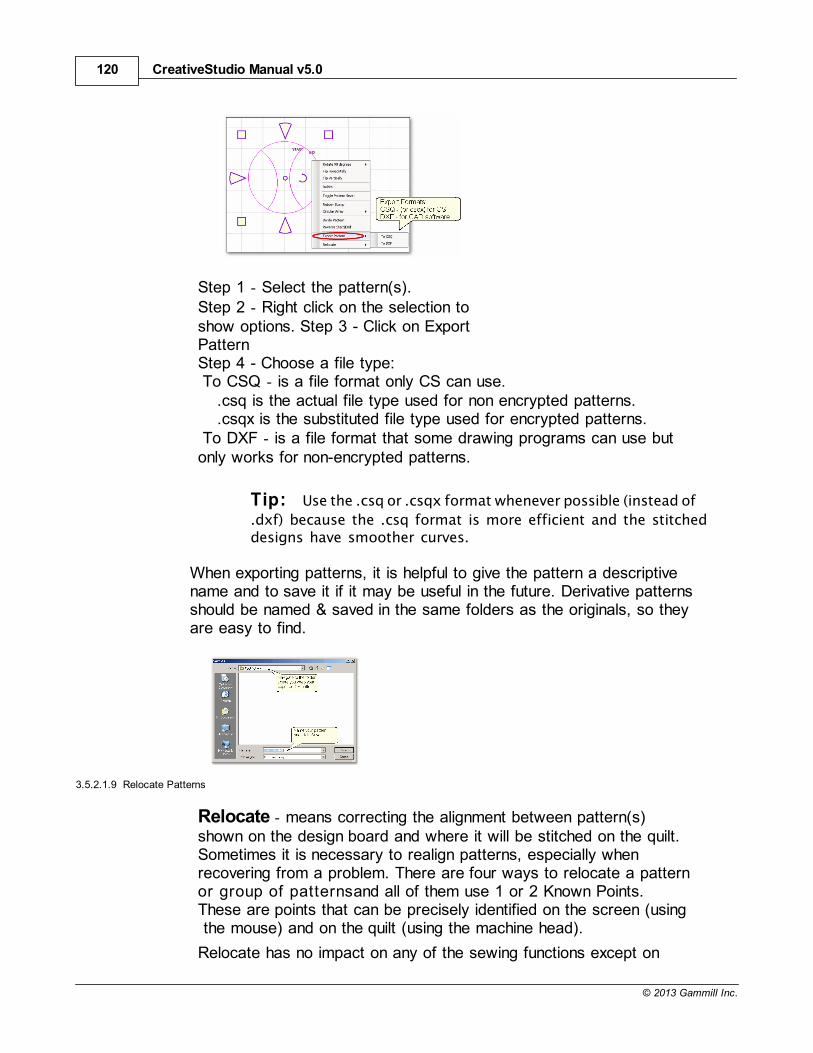
CreativeStudio Manual v5.0120
© 2013 Gammill Inc.
Step 1 - Select the pattern(s).Step 2 - Right click on the selection toshow options. Step 3 - Click on ExportPatternStep 4 - Choose a file type:To CSQ - is a file format only CS can use.
.csq is the actual file type used for non encrypted patterns.
.csqx is the substituted file type used for encrypted patterns.To DXF - is a file format that some drawing programs can use but
only works for non-encrypted patterns.
Tip: Use the .csq or .csqx format whenever possible (instead of
.dxf) because the .csq format is more efficient and the stitcheddesigns have smoother curves.
When exporting patterns, it is helpful to give the pattern a descriptivename and to save it if it may be useful in the future. Derivative patternsshould be named & saved in the same folders as the originals, so theyare easy to find.
3.5.2.1.9 Relocate Patterns
Relocate - means correcting the alignment between pattern(s)shown on the design board and where it will be stitched on the quilt.Sometimes it is necessary to realign patterns, especially whenrecovering from a problem. There are four ways to relocate a patternor group of patternsand all of them use 1 or 2 Known Points.These are points that can be precisely identified on the screen (using the mouse) and on the quilt (using the machine head).
Relocate has no impact on any of the sewing functions except on
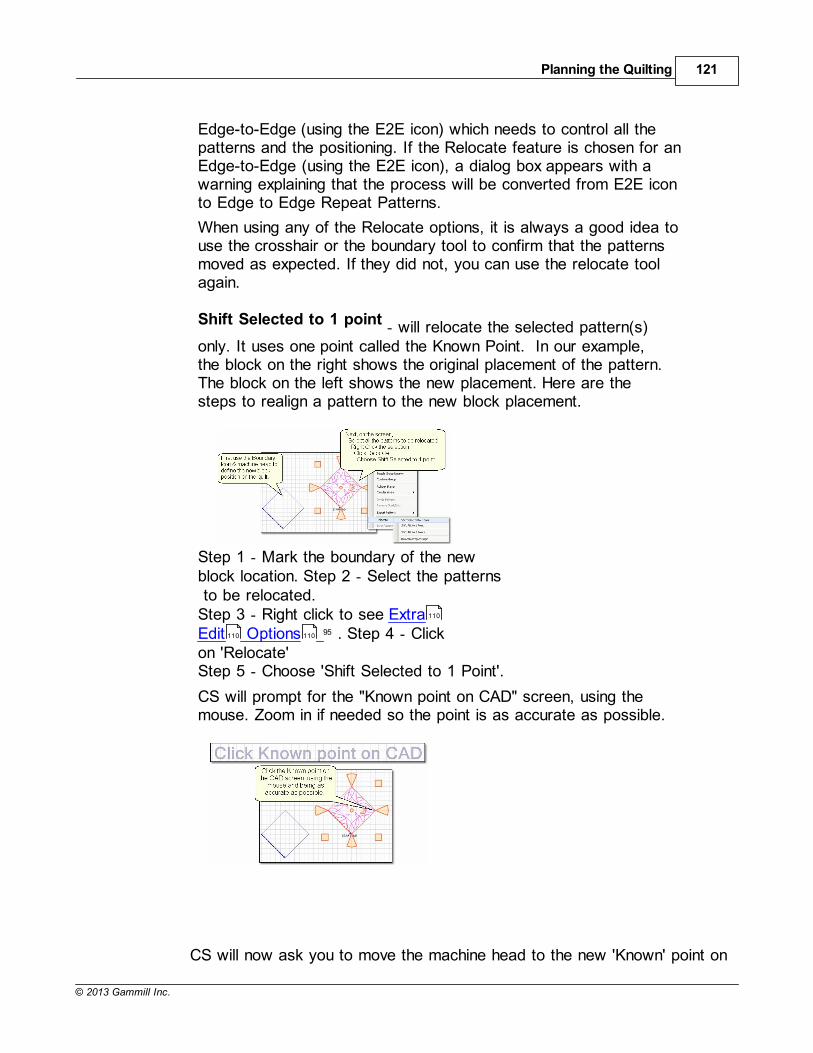
Planning the Quilting 121
© 2013 Gammill Inc.
Edge-to-Edge (using the E2E icon) which needs to control all thepatterns and the positioning. If the Relocate feature is chosen for anEdge-to-Edge (using the E2E icon), a dialog box appears with awarning explaining that the process will be converted from E2E iconto Edge to Edge Repeat Patterns.
When using any of the Relocate options, it is always a good idea touse the crosshair or the boundary tool to confirm that the patternsmoved as expected. If they did not, you can use the relocate toolagain.
Shift Selected to 1 point - will relocate the selected pattern(s)only. It uses one point called the Known Point. In our example,the block on the right shows the original placement of the pattern.The block on the left shows the new placement. Here are thesteps to realign a pattern to the new block placement.
Step 1 - Mark the boundary of the newblock location. Step 2 - Select the patterns to be relocated.Step 3 - Right click to see ExtraEdit Options 95 . Step 4 - Clickon 'Relocate'Step 5 - Choose 'Shift Selected to 1 Point'.
CS will prompt for the "Known point on CAD" screen, using themouse. Zoom in if needed so the point is as accurate as possible.
CS will now ask you to move the machine head to the new 'Known' point on
110
110 110
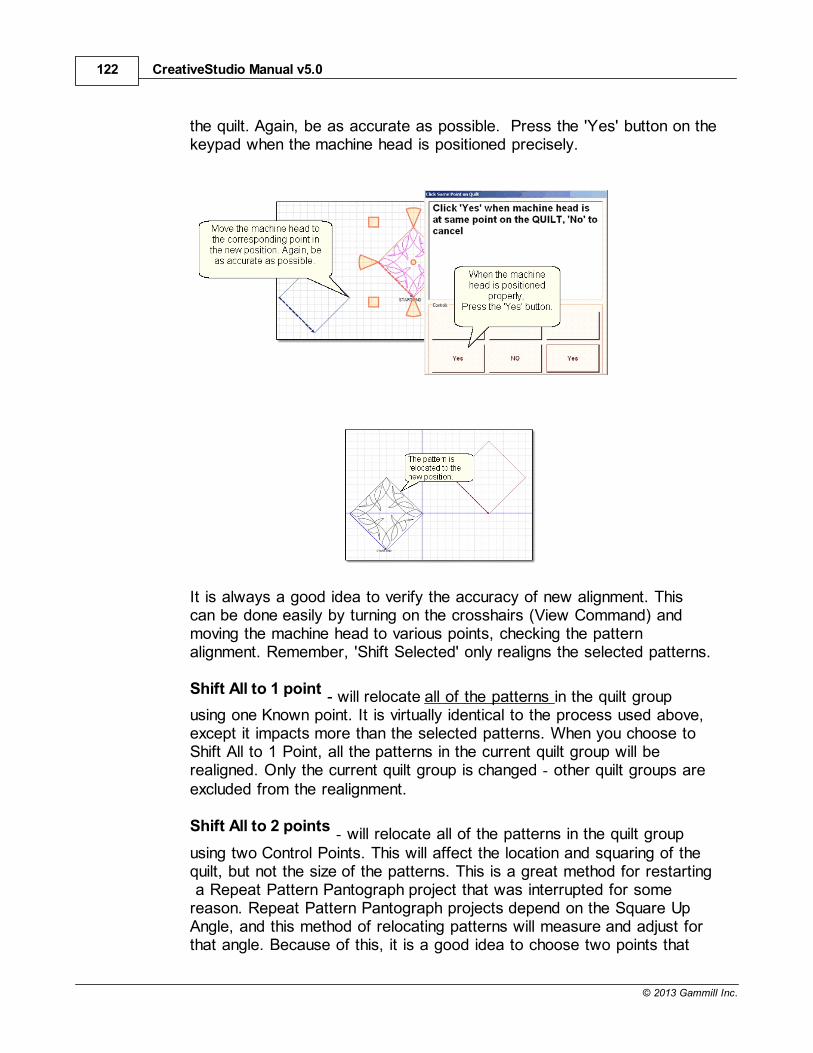
CreativeStudio Manual v5.0122
© 2013 Gammill Inc.
the quilt. Again, be as accurate as possible. Press the 'Yes' button on thekeypad when the machine head is positioned precisely.
It is always a good idea to verify the accuracy of new alignment. Thiscan be done easily by turning on the crosshairs (View Command) andmoving the machine head to various points, checking the patternalignment. Remember, 'Shift Selected' only realigns the selected patterns.
Shift All to 1 point - will relocate all of the patterns in the quilt groupusing one Known point. It is virtually identical to the process used above,except it impacts more than the selected patterns. When you choose toShift All to 1 Point, all the patterns in the current quilt group will berealigned. Only the current quilt group is changed - other quilt groups areexcluded from the realignment.
Shift All to 2 points - will relocate all of the patterns in the quilt groupusing two Control Points. This will affect the location and squaring of thequilt, but not the size of the patterns. This is a great method for restarting a Repeat Pattern Pantograph project that was interrupted for somereason. Repeat Pattern Pantograph projects depend on the Square UpAngle, and this method of relocating patterns will measure and adjust forthat angle. Because of this, it is a good idea to choose two points that
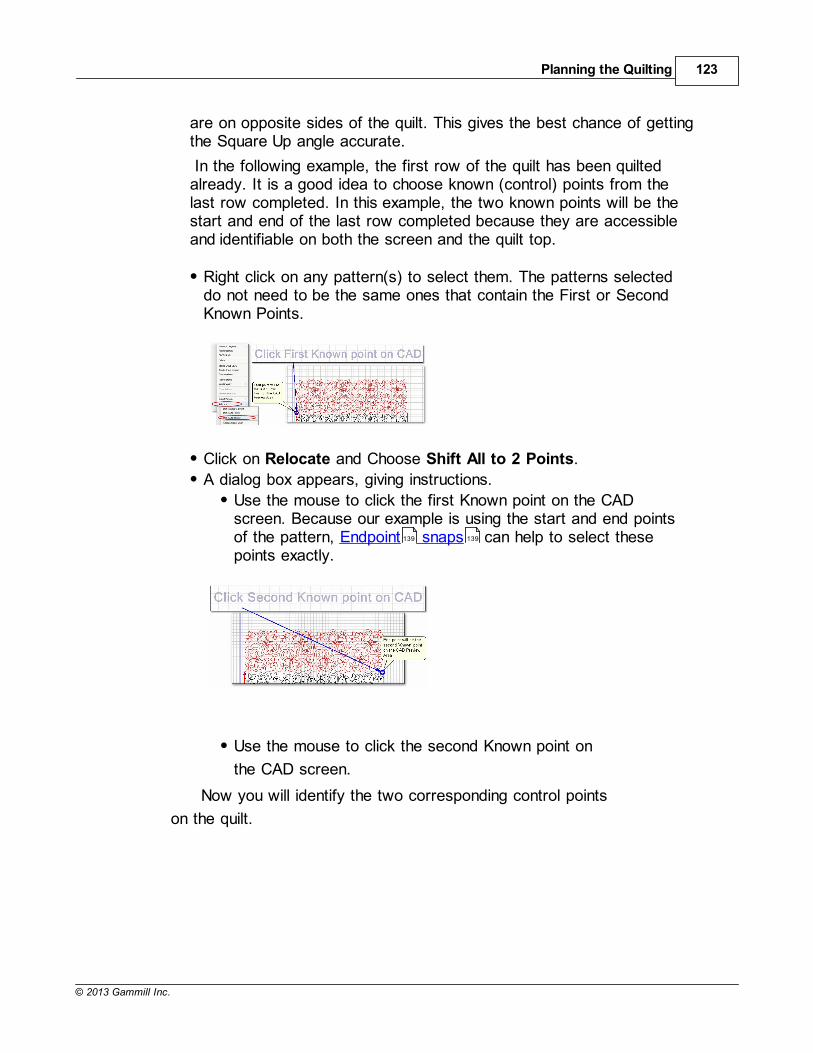
Planning the Quilting 123
© 2013 Gammill Inc.
are on opposite sides of the quilt. This gives the best chance of gettingthe Square Up angle accurate.
In the following example, the first row of the quilt has been quiltedalready. It is a good idea to choose known (control) points from thelast row completed. In this example, the two known points will be thestart and end of the last row completed because they are accessibleand identifiable on both the screen and the quilt top.
Right click on any pattern(s) to select them. The patterns selecteddo not need to be the same ones that contain the First or SecondKnown Points.
Click on Relocate and Choose Shift All to 2 Points.
A dialog box appears, giving instructions.
Use the mouse to click the first Known point on the CADscreen. Because our example is using the start and end pointsof the pattern, Endpoint snaps can help to select thesepoints exactly.
Use the mouse to click the second Known point on
the CAD screen.
Now you will identify the two corresponding control points
on the quilt.
139 139
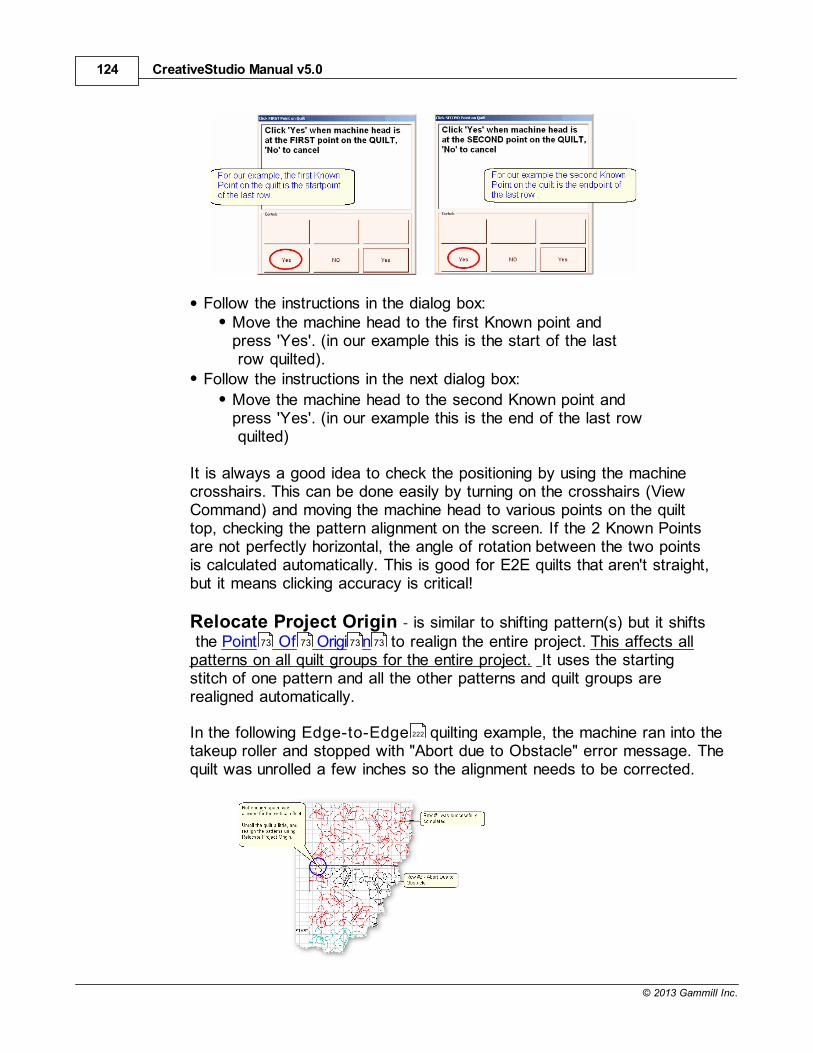
CreativeStudio Manual v5.0124
© 2013 Gammill Inc.
Follow the instructions in the dialog box:Move the machine head to the first Known point andpress 'Yes'. (in our example this is the start of the last row quilted).
Follow the instructions in the next dialog box:
Move the machine head to the second Known point andpress 'Yes'. (in our example this is the end of the last row quilted)
It is always a good idea to check the positioning by using the machinecrosshairs. This can be done easily by turning on the crosshairs (ViewCommand) and moving the machine head to various points on the quilttop, checking the pattern alignment on the screen. If the 2 Known Pointsare not perfectly horizontal, the angle of rotation between the two pointsis calculated automatically. This is good for E2E quilts that aren't straight,but it means clicking accuracy is critical!
Relocate Project Origin - is similar to shifting pattern(s) but it shifts the Point Of Origi n to realign the entire project. This affects allpatterns on all quilt groups for the entire project. It uses the startingstitch of one pattern and all the other patterns and quilt groups arerealigned automatically.
In the following Edge-to-Edge quilting example, the machine ran into thetakeup roller and stopped with "Abort due to Obstacle" error message. Thequilt was unrolled a few inches so the alignment needs to be corrected.
73 73 73 73
222
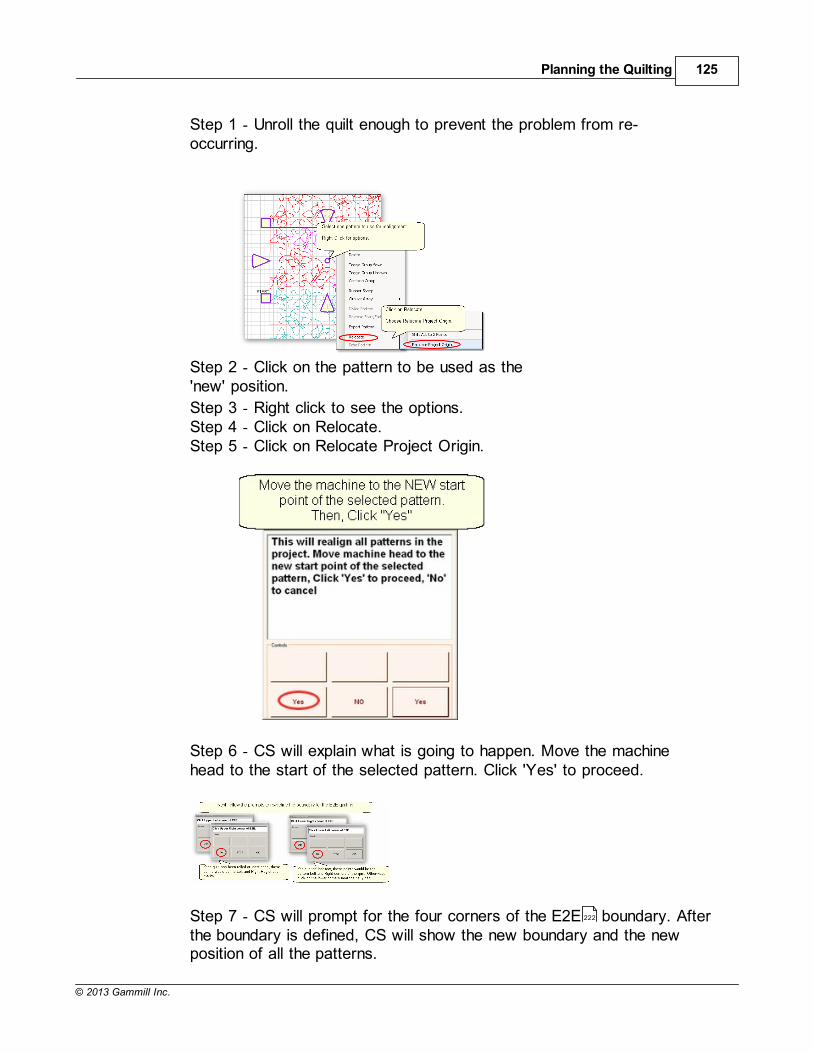
Planning the Quilting 125
© 2013 Gammill Inc.
Step 1 - Unroll the quilt enough to prevent the problem from re-occurring.
Step 2 - Click on the pattern to be used as the'new' position.
Step 3 - Right click to see the options.Step 4 - Click on Relocate.Step 5 - Click on Relocate Project Origin.
Step 6 - CS will explain what is going to happen. Move the machinehead to the start of the selected pattern. Click 'Yes' to proceed.
Step 7 - CS will prompt for the four corners of the E2E boundary. Afterthe boundary is defined, CS will show the new boundary and the newposition of all the patterns.
222
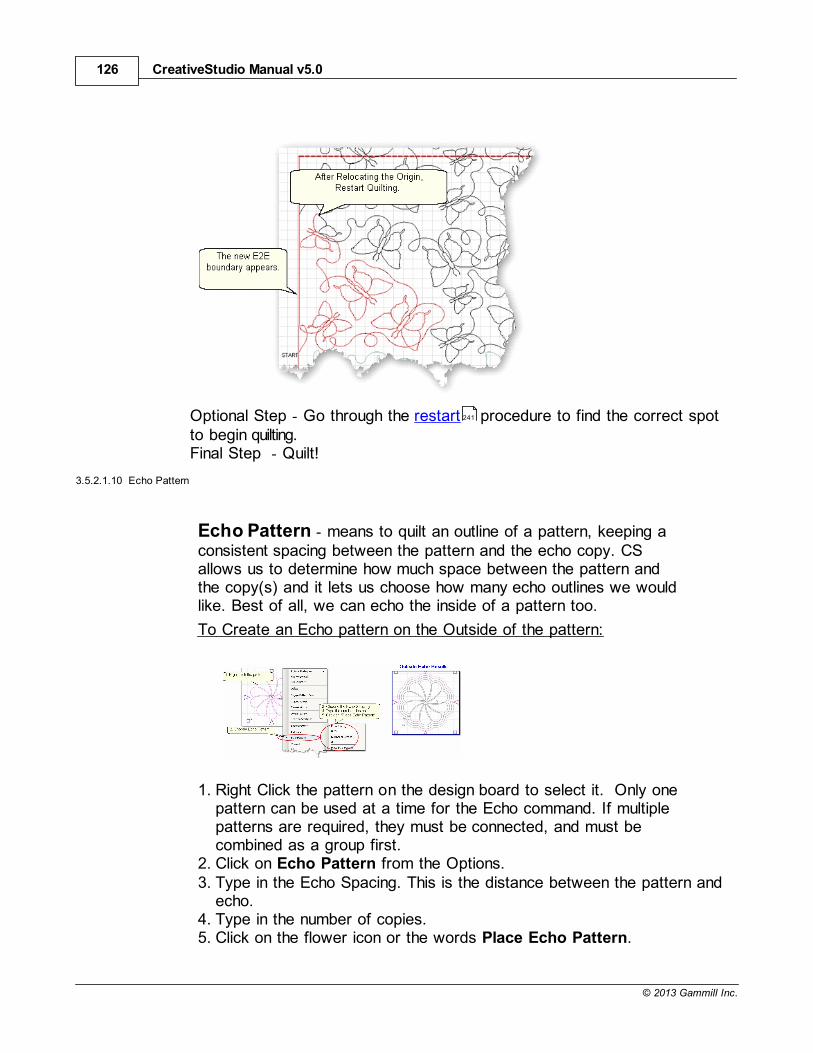
CreativeStudio Manual v5.0126
© 2013 Gammill Inc.
Optional Step - Go through the restart procedure to find the correct spotto begin quilting.Final Step - Quilt!
3.5.2.1.10 Echo Pattern
Echo Pattern - means to quilt an outline of a pattern, keeping aconsistent spacing between the pattern and the echo copy. CSallows us to determine how much space between the pattern andthe copy(s) and it lets us choose how many echo outlines we wouldlike. Best of all, we can echo the inside of a pattern too.
To Create an Echo pattern on the Outside of the pattern:
1. Right Click the pattern on the design board to select it. Only onepattern can be used at a time for the Echo command. If multiplepatterns are required, they must be connected, and must becombined as a group first.
2. Click on Echo Pattern from the Options.3. Type in the Echo Spacing. This is the distance between the pattern and
echo.4. Type in the number of copies.5. Click on the flower icon or the words Place Echo Pattern.
241
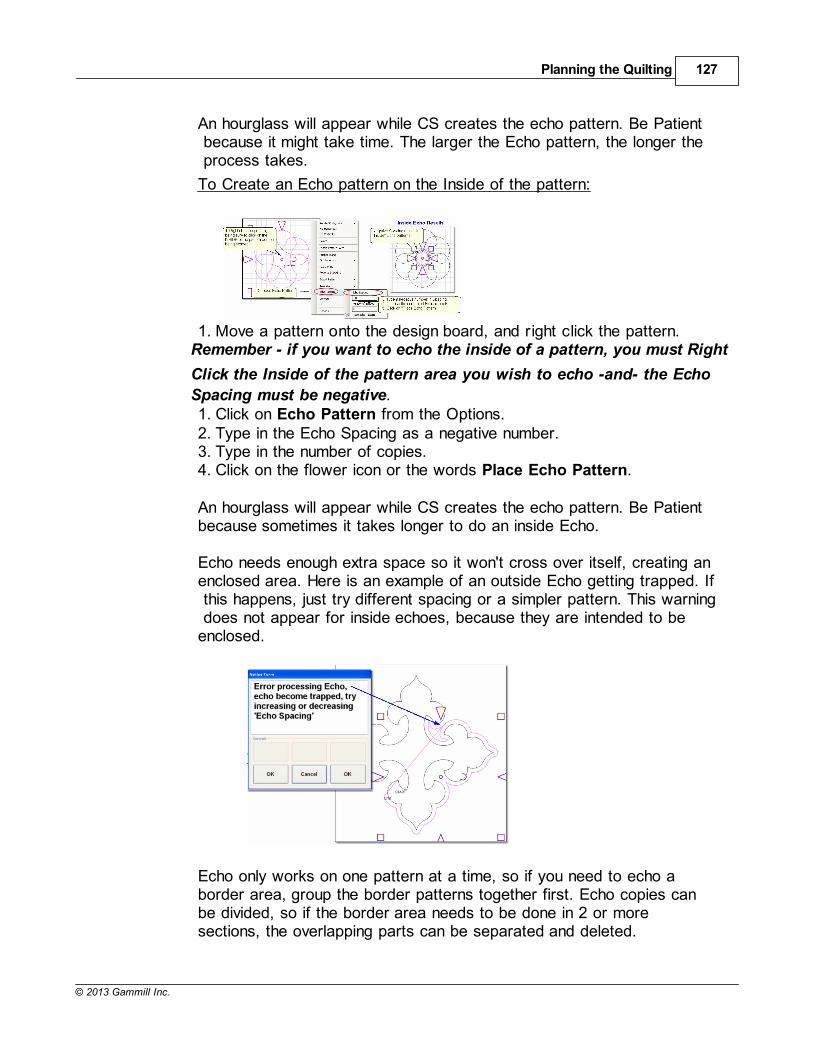
Planning the Quilting 127
© 2013 Gammill Inc.
An hourglass will appear while CS creates the echo pattern. Be Patient because it might take time. The larger the Echo pattern, the longer the process takes.
To Create an Echo pattern on the Inside of the pattern:
1. Move a pattern onto the design board, and right click the pattern.Remember - if you want to echo the inside of a pattern, you must Right
Click the Inside of the pattern area you wish to echo -and- the Echo
Spacing must be negative.1. Click on Echo Pattern from the Options.2. Type in the Echo Spacing as a negative number.3. Type in the number of copies.4. Click on the flower icon or the words Place Echo Pattern.
An hourglass will appear while CS creates the echo pattern. Be Patientbecause sometimes it takes longer to do an inside Echo.
Echo needs enough extra space so it won't cross over itself, creating anenclosed area. Here is an example of an outside Echo getting trapped. If this happens, just try different spacing or a simpler pattern. This warning does not appear for inside echoes, because they are intended to beenclosed.
Echo only works on one pattern at a time, so if you need to echo aborder area, group the border patterns together first. Echo copies canbe divided, so if the border area needs to be done in 2 or moresections, the overlapping parts can be separated and deleted.
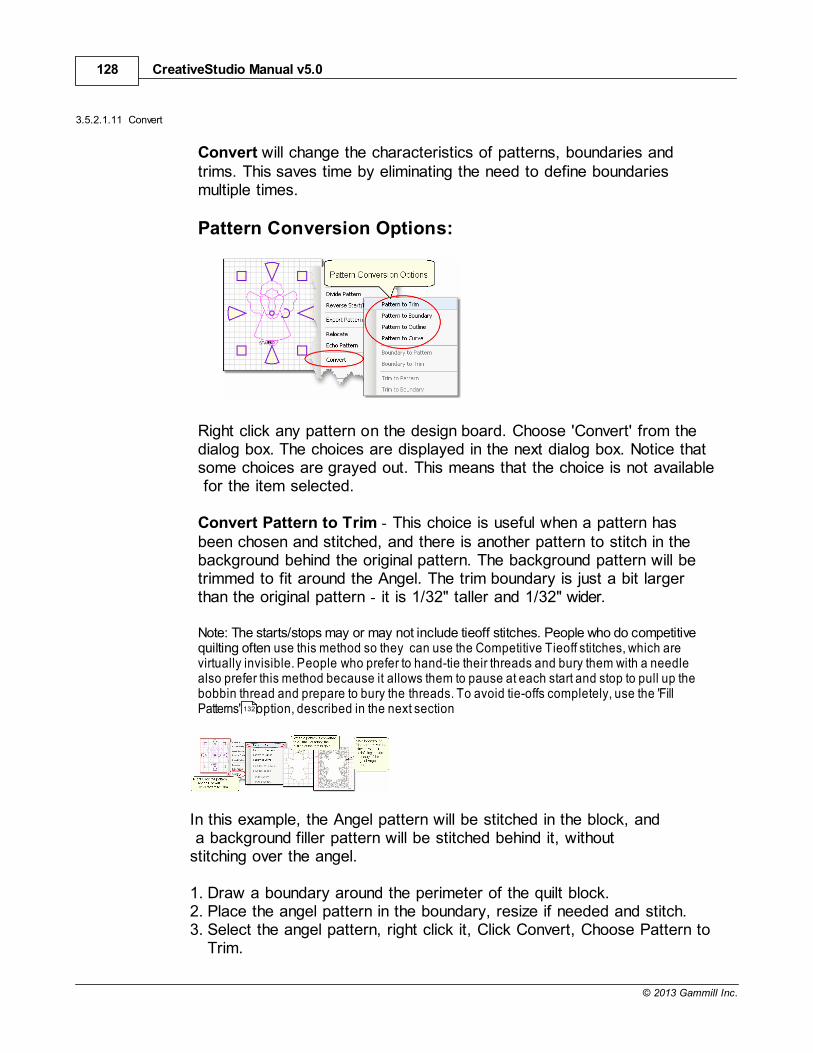
CreativeStudio Manual v5.0128
© 2013 Gammill Inc.
3.5.2.1.11 Convert
Convert will change the characteristics of patterns, boundaries andtrims. This saves time by eliminating the need to define boundariesmultiple times.
Pattern Conversion Options:
Right click any pattern on the design board. Choose 'Convert' from thedialog box. The choices are displayed in the next dialog box. Notice thatsome choices are grayed out. This means that the choice is not available for the item selected.
Convert Pattern to Trim - This choice is useful when a pattern hasbeen chosen and stitched, and there is another pattern to stitch in thebackground behind the original pattern. The background pattern will betrimmed to fit around the Angel. The trim boundary is just a bit largerthan the original pattern - it is 1/32" taller and 1/32" wider.
Note: The starts/stops may or may not include tieoff stitches. People who do competitivequilting often use this method so they can use the Competitive Tieoff stitches, which arevirtually invisible. People who prefer to hand-tie their threads and bury them with a needlealso prefer this method because it allows them to pause at each start and stop to pull up thebobbin thread and prepare to bury the threads. To avoid tie-offs completely, use the 'FillPatterns' option, described in the next section
In this example, the Angel pattern will be stitched in the block, and a background filler pattern will be stitched behind it, withoutstitching over the angel.
1. Draw a boundary around the perimeter of the quilt block.2. Place the angel pattern in the boundary, resize if needed and stitch.3. Select the angel pattern, right click it, Click Convert, Choose Pattern to
Trim.
132
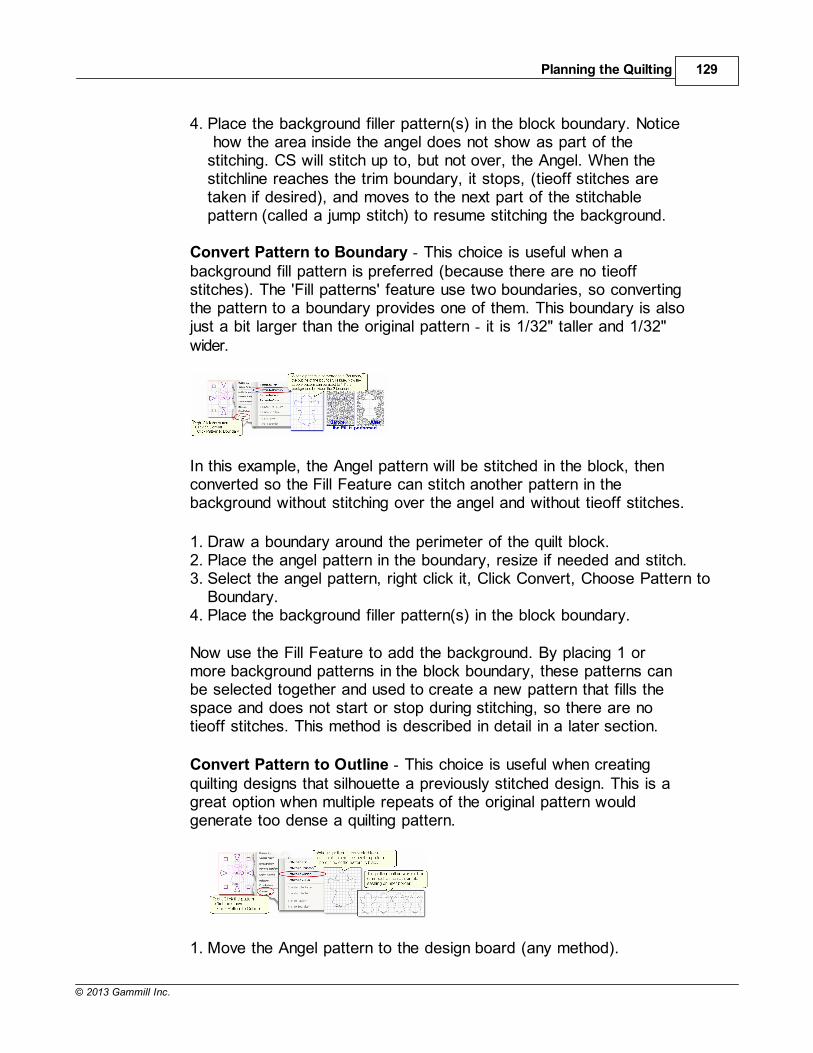
Planning the Quilting 129
© 2013 Gammill Inc.
4. Place the background filler pattern(s) in the block boundary. Notice how the area inside the angel does not show as part of thestitching. CS will stitch up to, but not over, the Angel. When thestitchline reaches the trim boundary, it stops, (tieoff stitches aretaken if desired), and moves to the next part of the stitchablepattern (called a jump stitch) to resume stitching the background.
Convert Pattern to Boundary - This choice is useful when abackground fill pattern is preferred (because there are no tieoffstitches). The 'Fill patterns' feature use two boundaries, so convertingthe pattern to a boundary provides one of them. This boundary is alsojust a bit larger than the original pattern - it is 1/32" taller and 1/32"wider.
In this example, the Angel pattern will be stitched in the block, thenconverted so the Fill Feature can stitch another pattern in thebackground without stitching over the angel and without tieoff stitches.
1. Draw a boundary around the perimeter of the quilt block.2. Place the angel pattern in the boundary, resize if needed and stitch.3. Select the angel pattern, right click it, Click Convert, Choose Pattern to
Boundary.4. Place the background filler pattern(s) in the block boundary.
Now use the Fill Feature to add the background. By placing 1 ormore background patterns in the block boundary, these patterns canbe selected together and used to create a new pattern that fills thespace and does not start or stop during stitching, so there are notieoff stitches. This method is described in detail in a later section.
Convert Pattern to Outline - This choice is useful when creatingquilting designs that silhouette a previously stitched design. This is agreat option when multiple repeats of the original pattern wouldgenerate too dense a quilting pattern.
1. Move the Angel pattern to the design board (any method).
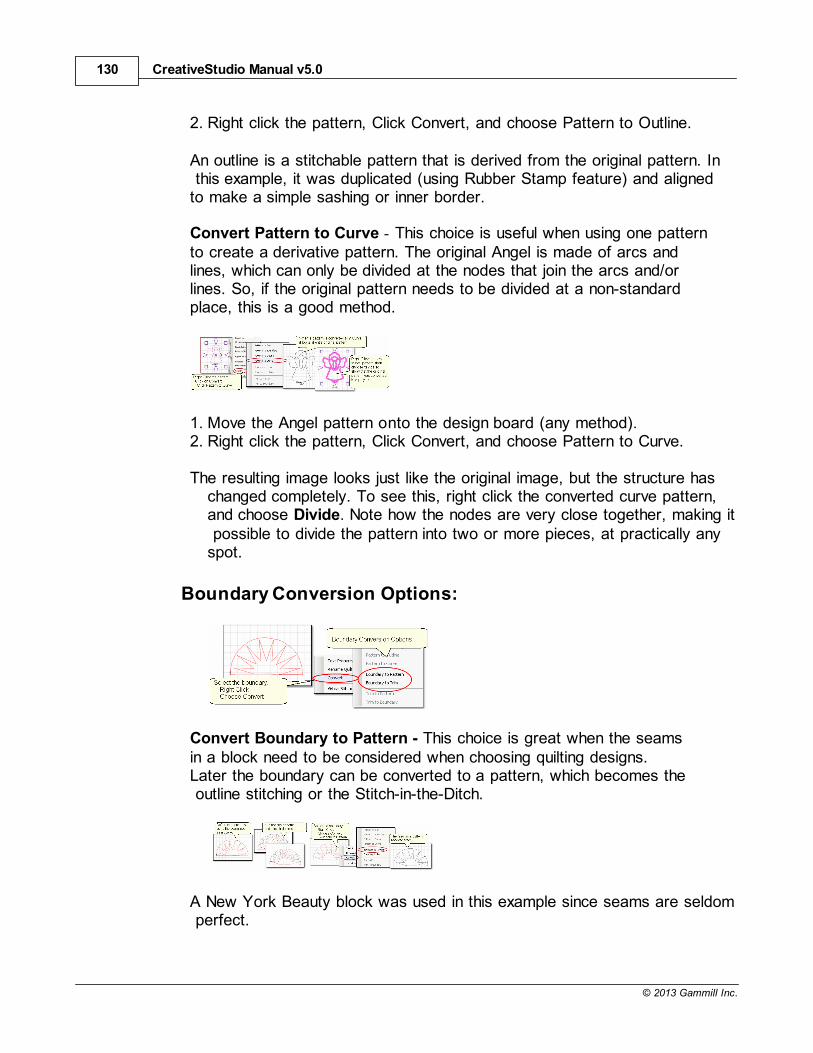
CreativeStudio Manual v5.0130
© 2013 Gammill Inc.
2. Right click the pattern, Click Convert, and choose Pattern to Outline.
An outline is a stitchable pattern that is derived from the original pattern. In this example, it was duplicated (using Rubber Stamp feature) and alignedto make a simple sashing or inner border.
Convert Pattern to Curve - This choice is useful when using one patternto create a derivative pattern. The original Angel is made of arcs andlines, which can only be divided at the nodes that join the arcs and/orlines. So, if the original pattern needs to be divided at a non-standardplace, this is a good method.
1. Move the Angel pattern onto the design board (any method).2. Right click the pattern, Click Convert, and choose Pattern to Curve.
The resulting image looks just like the original image, but the structure haschanged completely. To see this, right click the converted curve pattern,and choose Divide. Note how the nodes are very close together, making it possible to divide the pattern into two or more pieces, at practically anyspot.
Boundary Conversion Options:
Convert Boundary to Pattern - This choice is great when the seamsin a block need to be considered when choosing quilting designs.Later the boundary can be converted to a pattern, which becomes the outline stitching or the Stitch-in-the-Ditch.
A New York Beauty block was used in this example since seams are seldom perfect.
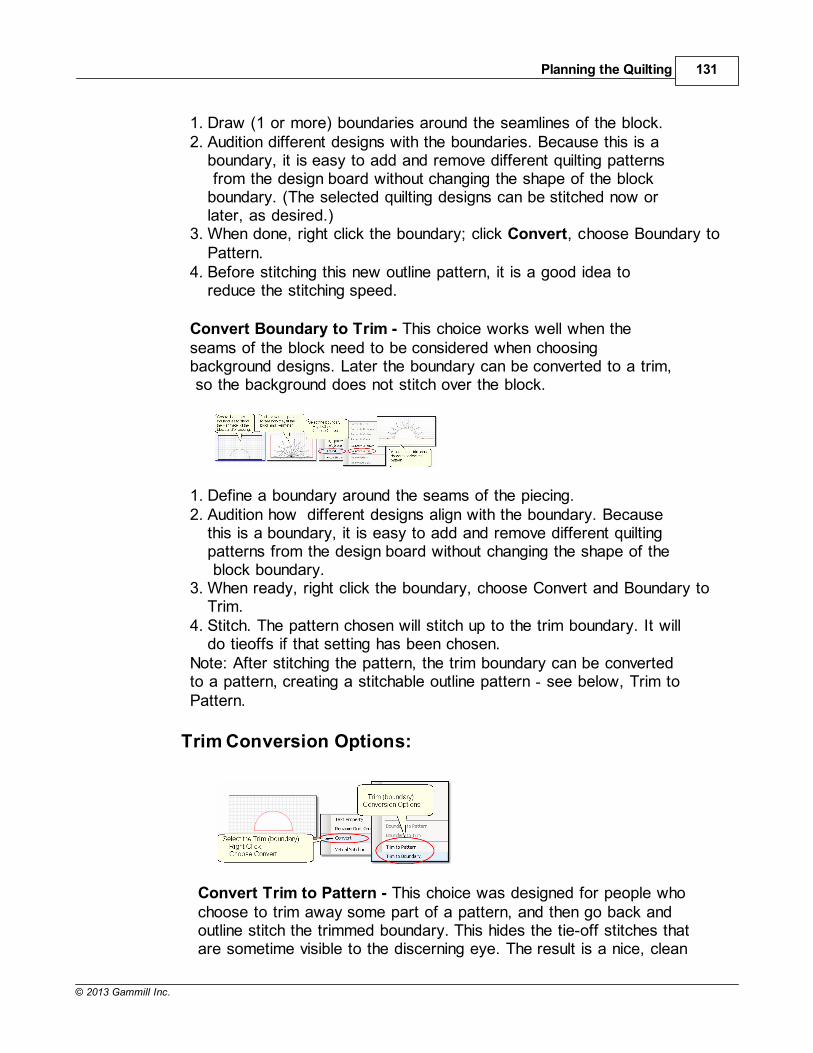
Planning the Quilting 131
© 2013 Gammill Inc.
1. Draw (1 or more) boundaries around the seamlines of the block.2. Audition different designs with the boundaries. Because this is a
boundary, it is easy to add and remove different quilting patterns from the design board without changing the shape of the blockboundary. (The selected quilting designs can be stitched now orlater, as desired.)
3. When done, right click the boundary; click Convert, choose Boundary toPattern.
4. Before stitching this new outline pattern, it is a good idea toreduce the stitching speed.
Convert Boundary to Trim - This choice works well when theseams of the block need to be considered when choosingbackground designs. Later the boundary can be converted to a trim, so the background does not stitch over the block.
1. Define a boundary around the seams of the piecing.2. Audition how different designs align with the boundary. Because
this is a boundary, it is easy to add and remove different quiltingpatterns from the design board without changing the shape of the block boundary.
3. When ready, right click the boundary, choose Convert and Boundary toTrim.
4. Stitch. The pattern chosen will stitch up to the trim boundary. It willdo tieoffs if that setting has been chosen.
Note: After stitching the pattern, the trim boundary can be convertedto a pattern, creating a stitchable outline pattern - see below, Trim toPattern.
Trim Conversion Options:
Convert Trim to Pattern - This choice was designed for people whochoose to trim away some part of a pattern, and then go back andoutline stitch the trimmed boundary. This hides the tie-off stitches thatare sometime visible to the discerning eye. The result is a nice, clean
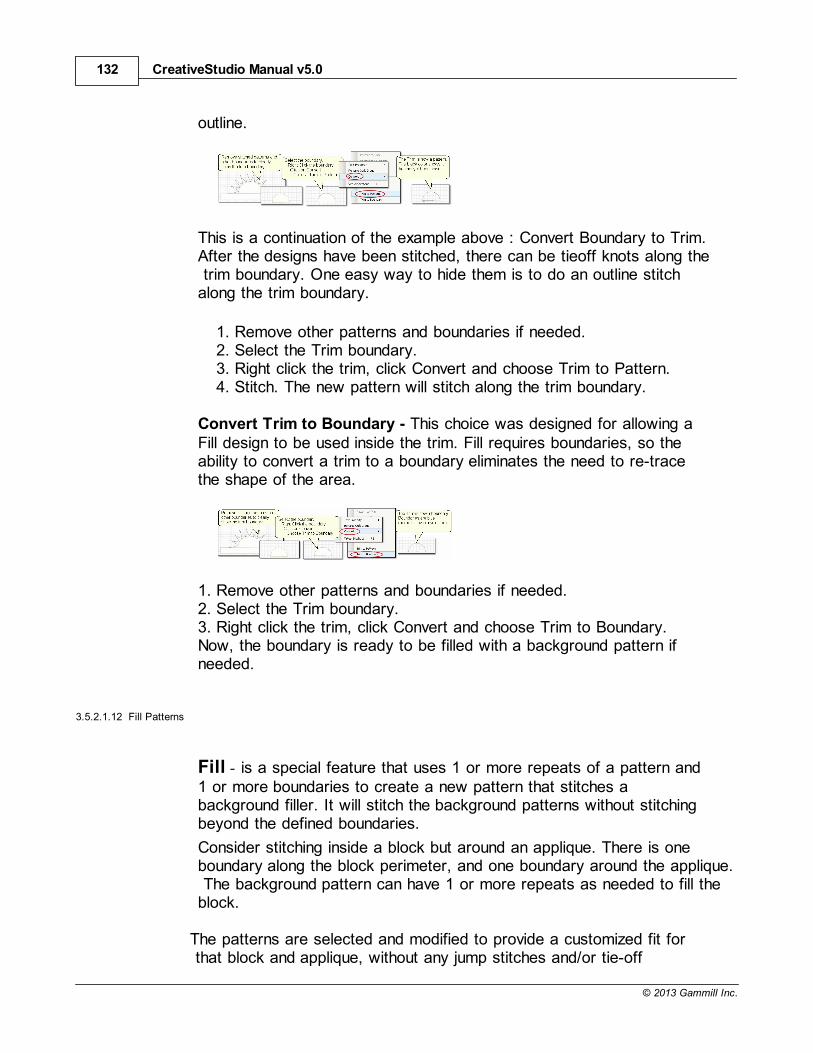
CreativeStudio Manual v5.0132
© 2013 Gammill Inc.
outline.
This is a continuation of the example above : Convert Boundary to Trim.After the designs have been stitched, there can be tieoff knots along the trim boundary. One easy way to hide them is to do an outline stitchalong the trim boundary.
1. Remove other patterns and boundaries if needed.2. Select the Trim boundary.3. Right click the trim, click Convert and choose Trim to Pattern.4. Stitch. The new pattern will stitch along the trim boundary.
Convert Trim to Boundary - This choice was designed for allowing aFill design to be used inside the trim. Fill requires boundaries, so theability to convert a trim to a boundary eliminates the need to re-tracethe shape of the area.
1. Remove other patterns and boundaries if needed.2. Select the Trim boundary.3. Right click the trim, click Convert and choose Trim to Boundary.Now, the boundary is ready to be filled with a background pattern ifneeded.
3.5.2.1.12 Fill Patterns
Fill - is a special feature that uses 1 or more repeats of a pattern and1 or more boundaries to create a new pattern that stitches abackground filler. It will stitch the background patterns without stitchingbeyond the defined boundaries.
Consider stitching inside a block but around an applique. There is oneboundary along the block perimeter, and one boundary around the applique. The background pattern can have 1 or more repeats as needed to fill theblock.
The patterns are selected and modified to provide a customized fit for that block and applique, without any jump stitches and/or tie-off
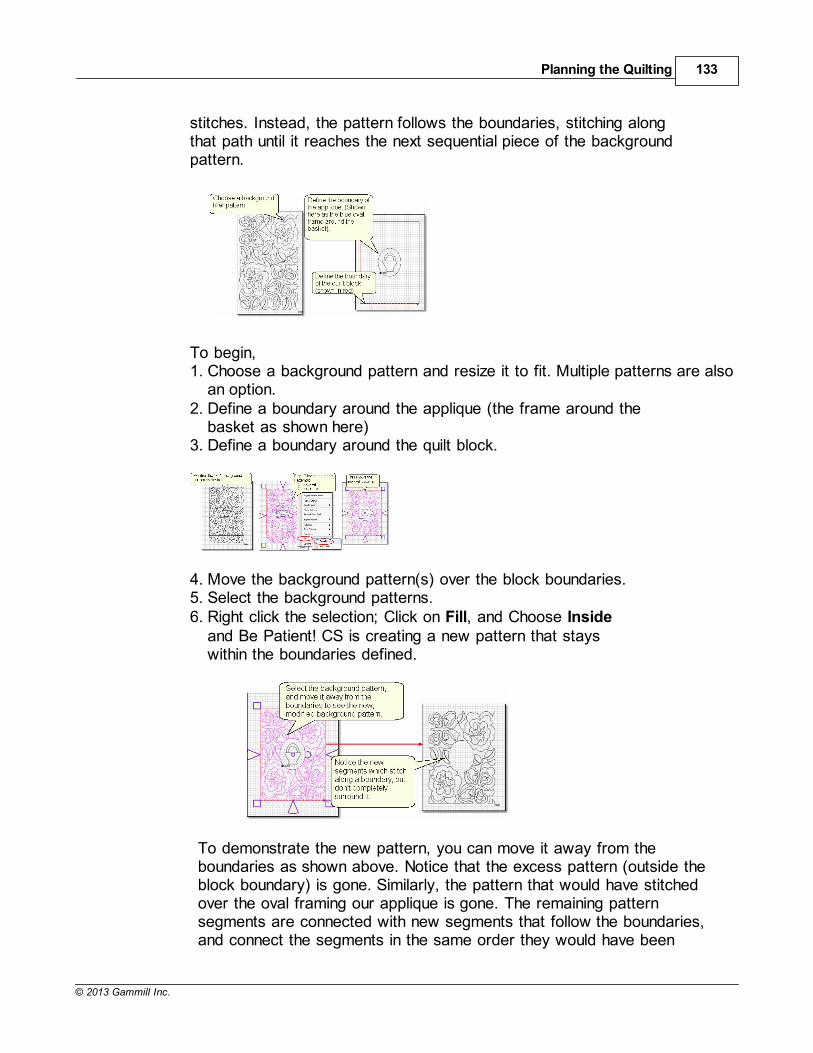
Planning the Quilting 133
© 2013 Gammill Inc.
stitches. Instead, the pattern follows the boundaries, stitching alongthat path until it reaches the next sequential piece of the backgroundpattern.
To begin,1. Choose a background pattern and resize it to fit. Multiple patterns are also
an option.2. Define a boundary around the applique (the frame around the
basket as shown here)3. Define a boundary around the quilt block.
4. Move the background pattern(s) over the block boundaries.5. Select the background patterns.6. Right click the selection; Click on Fill, and Choose Inside
and Be Patient! CS is creating a new pattern that stayswithin the boundaries defined.
To demonstrate the new pattern, you can move it away from theboundaries as shown above. Notice that the excess pattern (outside theblock boundary) is gone. Similarly, the pattern that would have stitchedover the oval framing our applique is gone. The remaining patternsegments are connected with new segments that follow the boundaries,and connect the segments in the same order they would have been
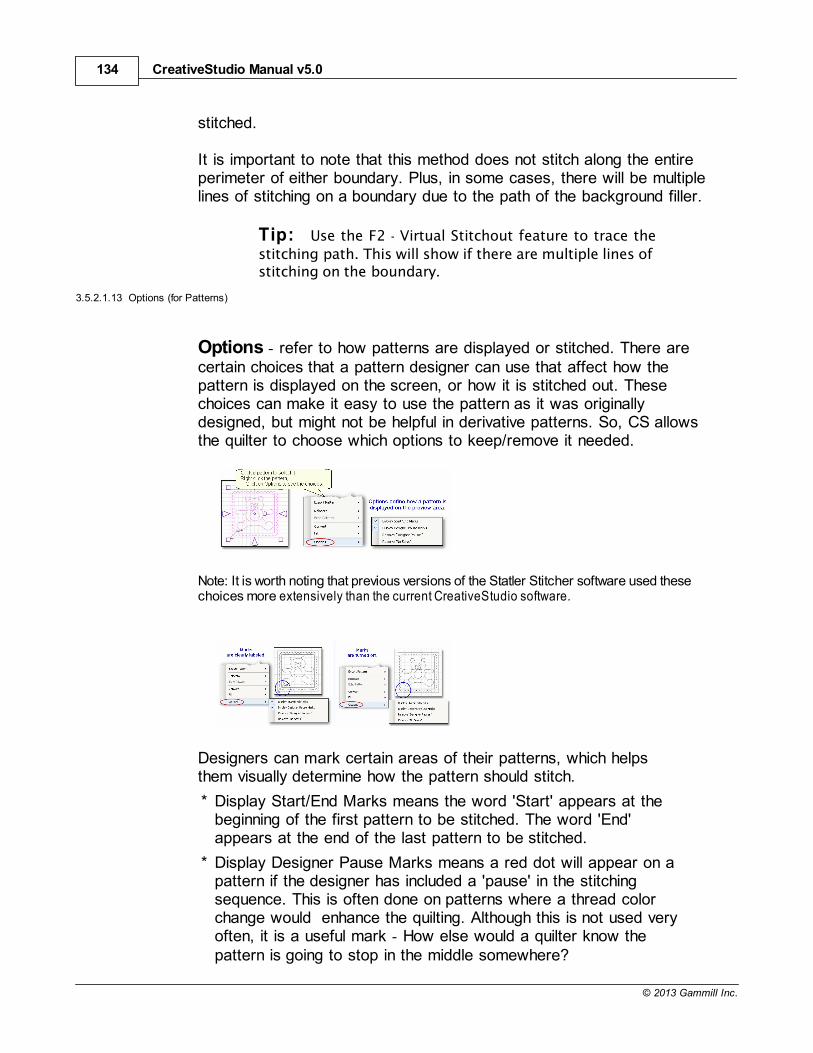
CreativeStudio Manual v5.0134
© 2013 Gammill Inc.
stitched.
It is important to note that this method does not stitch along the entireperimeter of either boundary. Plus, in some cases, there will be multiplelines of stitching on a boundary due to the path of the background filler.
Tip: Use the F2 - Virtual Stitchout feature to trace the
stitching path. This will show if there are multiple lines ofstitching on the boundary.
3.5.2.1.13 Options (for Patterns)
Options - refer to how patterns are displayed or stitched. There arecertain choices that a pattern designer can use that affect how thepattern is displayed on the screen, or how it is stitched out. Thesechoices can make it easy to use the pattern as it was originallydesigned, but might not be helpful in derivative patterns. So, CS allowsthe quilter to choose which options to keep/remove it needed.
Note: It is worth noting that previous versions of the Statler Stitcher software used thesechoices more extensively than the current CreativeStudio software.
Designers can mark certain areas of their patterns, which helpsthem visually determine how the pattern should stitch.
* Display Start/End Marks means the word 'Start' appears at thebeginning of the first pattern to be stitched. The word 'End'appears at the end of the last pattern to be stitched.
* Display Designer Pause Marks means a red dot will appear on apattern if the designer has included a 'pause' in the stitchingsequence. This is often done on patterns where a thread colorchange would enhance the quilting. Although this is not used veryoften, it is a useful mark - How else would a quilter know thepattern is going to stop in the middle somewhere?

Planning the Quilting 135
© 2013 Gammill Inc.
* Remove "Designer Pauses" means the pattern will not stop so thethread color can be changed (or any other reason). The red dotdisappears from the image of the pattern on the screen, and thestitching continues past the original pause position.
* Remove "No Sew" lines means CS will ignore these lines. In aprevious software system, designers would include a 'No Sew'frame around a pattern so it would fit the block better. CS is soflexible now, these are no longer needed.
3.5.2.2 Right Click Design Board
Right clicking the design area in an open area displays a list ofchoices.
Not all of the choices shown above will appear every time. Some CSchoices (like E2E Settings) appear only if CS is performing thatfunction (Edge-to-edge).
3.5.2.2.1 Text Property
Text Patterns can be made using standard Windows fonts. Textpatterns let you personalize your quilts with logos, dates, names orgreetings.The text can be typed, placed, sized and stitched. Thisfeature is done on the design board in an open space, not on anexisting pattern.
Steps to follow:1. Right Click on an open area of the design board. It is a good
idea to have defined a reference boundary so you can size the text to fit the space on the quilt. In our example, weare using the top border.
2. Click on Text Property in the dialog box that appears.
3. Click in the text box and type your message. The text box lookssmall, but will handle long phrases. CS will treat each phrase as apattern. If your phrase needs two (or more) lines, you could createone pattern and divide it, but it is easier to create 2 (or more)separate text patterns.
83 83 83 83
CreativeStudio Manual v5.0136
© 2013 Gammill Inc.
4. Click on Place Text when done, and the Font dialog box appears.
5. Choose the font style you like. By scrolling through the choices, youcan see what the style looks like in the sample box. For variations,preview the font using italics, bold and bold italics styles. Choose anyfont size because you will need to modify it to fit your boundaryanyway.
6. Click OK when ready and the pattern is moved onto the designboard. Resize as needed.
7. Save the Project.
8. Click on Start_Quilting and the sewing head will move to the Start of the first pattern. CS will prompt for pulling up the bobbinthread and choosing OK when ready to quilt. At the end of thequilting sequence, you will be prompted to pull up the bobbin thread. It doesn't matter how the bobbin thread is pulled up, secured ortrimmed. Just be sure to click OK because it completes thisprocess.
3.5.2.2.2 E2E Settings
E2E Settings can be recalled during your project. When setting up anEdge-to-edge quilting pattern, CS takes care of most of the measurementsand adjustments automatically. The E2E Process Details dialog box
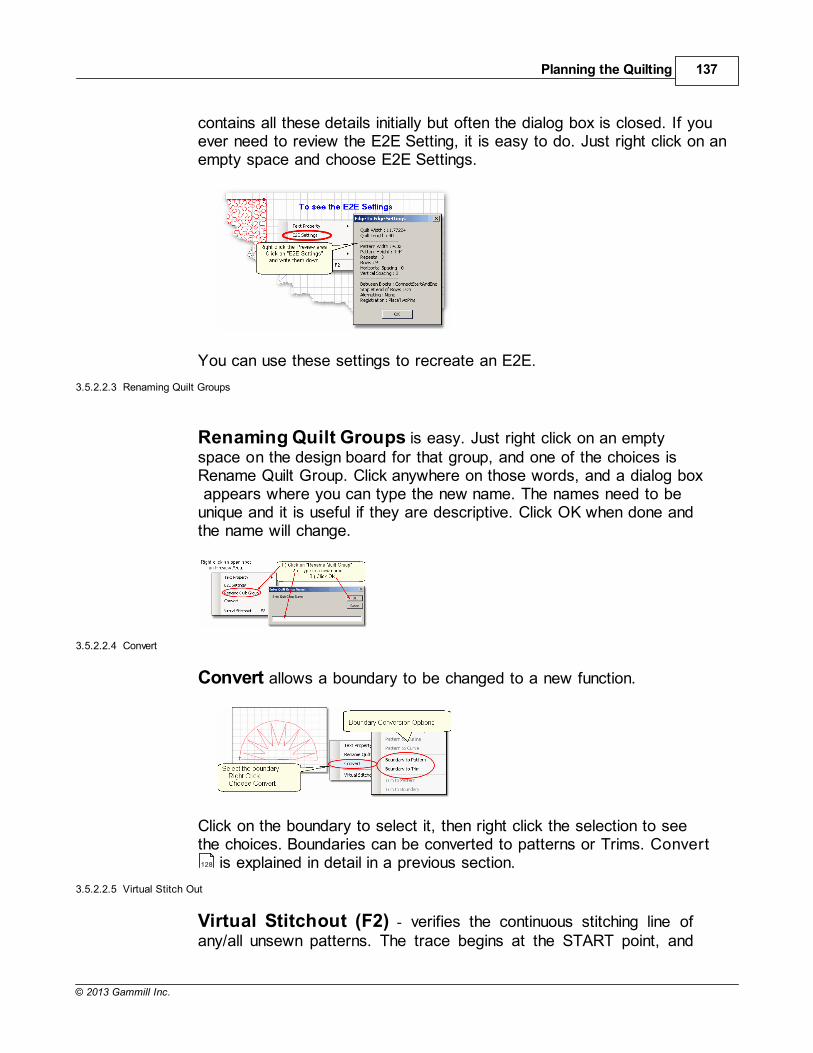
Planning the Quilting 137
© 2013 Gammill Inc.
contains all these details initially but often the dialog box is closed. If youever need to review the E2E Setting, it is easy to do. Just right click on anempty space and choose E2E Settings.
You can use these settings to recreate an E2E.
3.5.2.2.3 Renaming Quilt Groups
Renaming Quilt Groups is easy. Just right click on an emptyspace on the design board for that group, and one of the choices isRename Quilt Group. Click anywhere on those words, and a dialog box appears where you can type the new name. The names need to beunique and it is useful if they are descriptive. Click OK when done andthe name will change.
3.5.2.2.4 Convert
Convert allows a boundary to be changed to a new function.
Click on the boundary to select it, then right click the selection to seethe choices. Boundaries can be converted to patterns or Trims. Convert
is explained in detail in a previous section.
3.5.2.2.5 Virtual Stitch Out
Virtual Stitchout (F2) - verifies the continuous stitching line ofany/all unsewn patterns. The trace begins at the START point, and
128
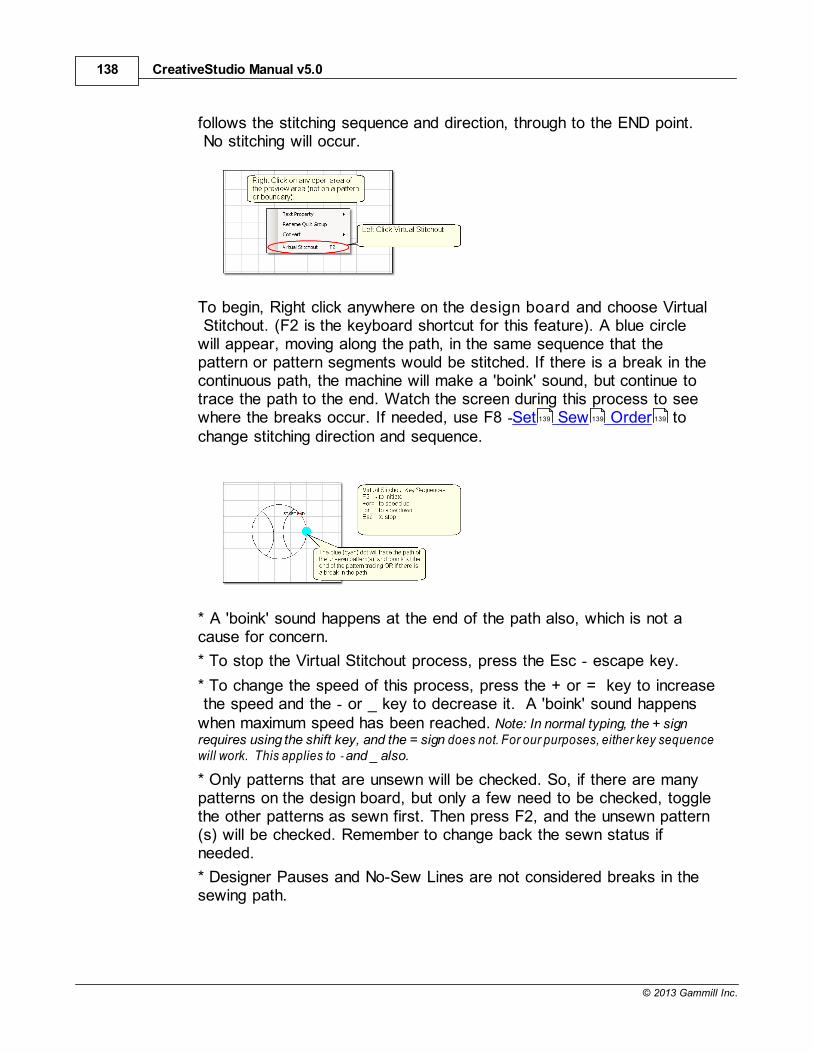
CreativeStudio Manual v5.0138
© 2013 Gammill Inc.
follows the stitching sequence and direction, through to the END point. No stitching will occur.
To begin, Right click anywhere on the design board and choose Virtual Stitchout. (F2 is the keyboard shortcut for this feature). A blue circlewill appear, moving along the path, in the same sequence that thepattern or pattern segments would be stitched. If there is a break in thecontinuous path, the machine will make a 'boink' sound, but continue totrace the path to the end. Watch the screen during this process to seewhere the breaks occur. If needed, use F8 -Set Sew Order tochange stitching direction and sequence.
* A 'boink' sound happens at the end of the path also, which is not acause for concern.
* To stop the Virtual Stitchout process, press the Esc - escape key.
* To change the speed of this process, press the + or = key to increase the speed and the - or _ key to decrease it. A 'boink' sound happenswhen maximum speed has been reached. Note: In normal typing, the + signrequires using the shift key, and the = sign does not. For our purposes, either key sequencewill work. This applies to - and _ also.
* Only patterns that are unsewn will be checked. So, if there are manypatterns on the design board, but only a few need to be checked, togglethe other patterns as sewn first. Then press F2, and the unsewn pattern(s) will be checked. Remember to change back the sewn status ifneeded.
* Designer Pauses and No-Sew Lines are not considered breaks in thesewing path.
139 139 139
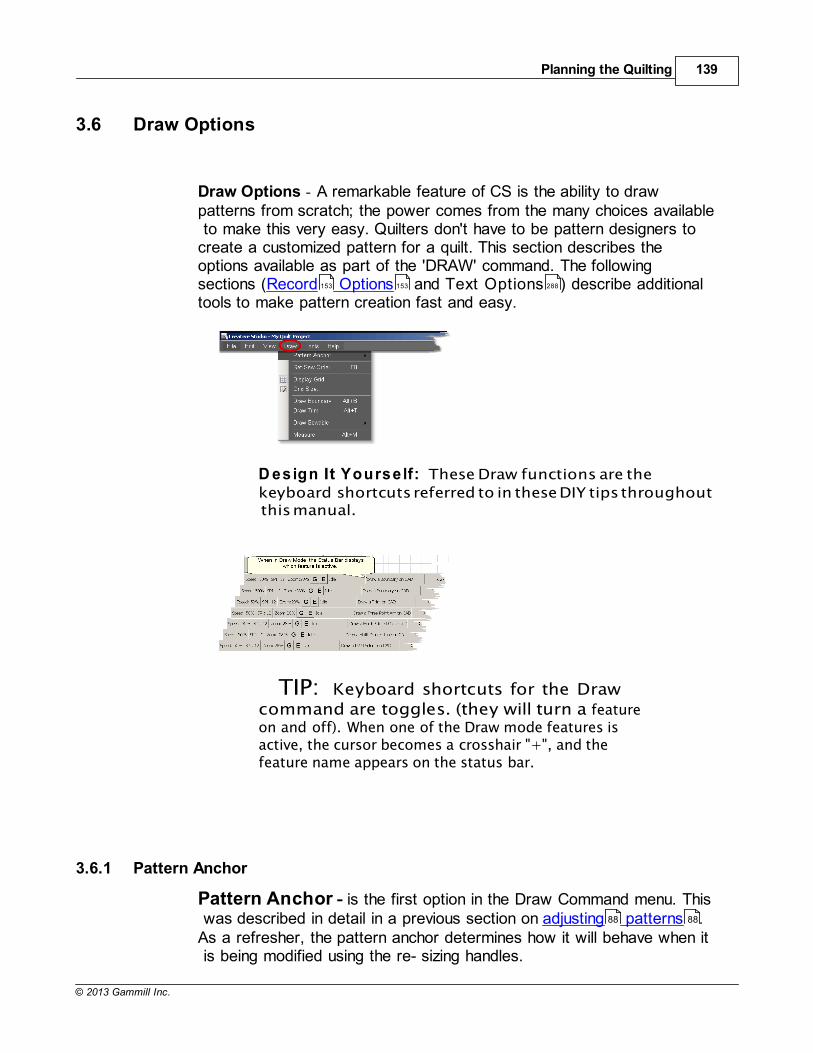
Planning the Quilting 139
© 2013 Gammill Inc.
3.6 Draw Options
Draw Options - A remarkable feature of CS is the ability to draw
patterns from scratch; the power comes from the many choices available to make this very easy. Quilters don't have to be pattern designers tocreate a customized pattern for a quilt. This section describes theoptions available as part of the 'DRAW' command. The followingsections (Record Options and Text Options ) describe additionaltools to make pattern creation fast and easy.
D esign It Yourse lf: These Draw functions are the
keyboard shortcuts referred to in these DIY tips throughout this manual.
TIP: Keyboard shortcuts for the Drawcommand are toggles. (they will turn a featureon and off). When one of the Draw mode features isactive, the cursor becomes a crosshair "+", and thefeature name appears on the status bar.
3.6.1 Pattern Anchor
Pattern Anchor - is the first option in the Draw Command menu. This was described in detail in a previous section on adjusting patterns .As a refresher, the pattern anchor determines how it will behave when it is being modified using the re- sizing handles.
153 153 288
88 88
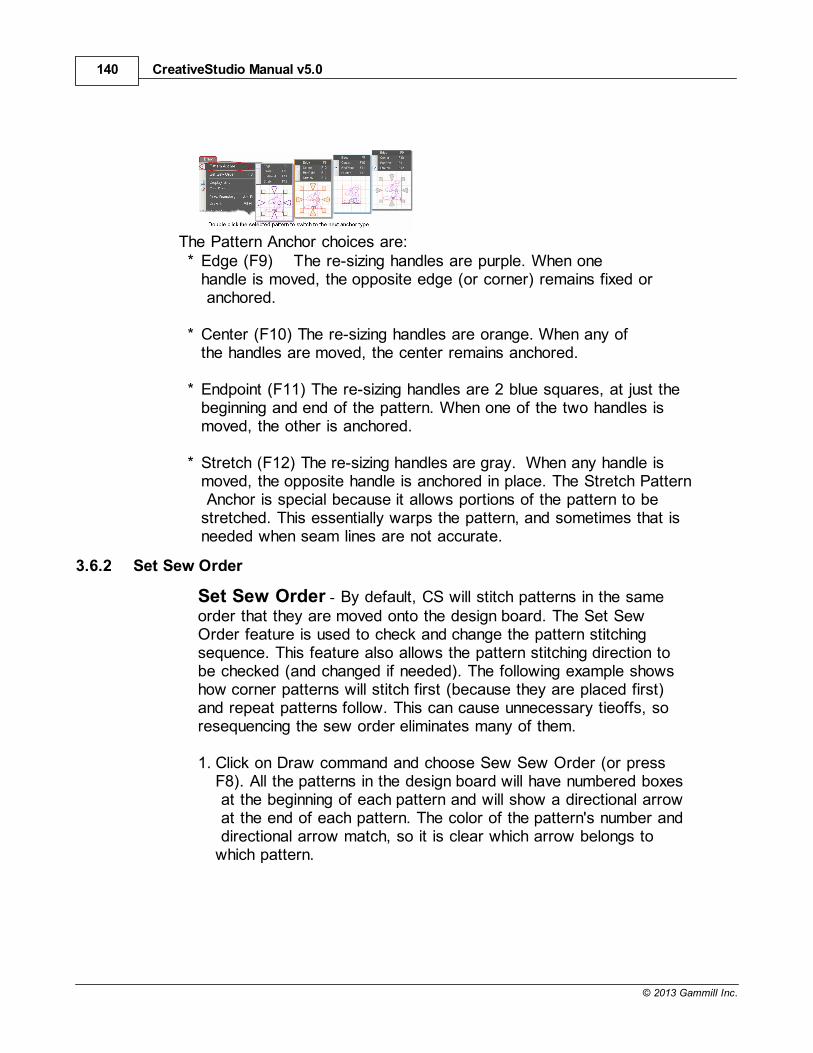
CreativeStudio Manual v5.0140
© 2013 Gammill Inc.
The Pattern Anchor choices are:* Edge (F9) The re-sizing handles are purple. When one
handle is moved, the opposite edge (or corner) remains fixed or anchored.
* Center (F10) The re-sizing handles are orange. When any ofthe handles are moved, the center remains anchored.
* Endpoint (F11) The re-sizing handles are 2 blue squares, at just thebeginning and end of the pattern. When one of the two handles ismoved, the other is anchored.
* Stretch (F12) The re-sizing handles are gray. When any handle ismoved, the opposite handle is anchored in place. The Stretch Pattern Anchor is special because it allows portions of the pattern to bestretched. This essentially warps the pattern, and sometimes that isneeded when seam lines are not accurate.
3.6.2 Set Sew Order
Set Sew Order - By default, CS will stitch patterns in the sameorder that they are moved onto the design board. The Set SewOrder feature is used to check and change the pattern stitchingsequence. This feature also allows the pattern stitching direction tobe checked (and changed if needed). The following example showshow corner patterns will stitch first (because they are placed first)and repeat patterns follow. This can cause unnecessary tieoffs, soresequencing the sew order eliminates many of them.
1. Click on Draw command and choose Sew Sew Order (or pressF8). All the patterns in the design board will have numbered boxes at the beginning of each pattern and will show a directional arrow at the end of each pattern. The color of the pattern's number and directional arrow match, so it is clear which arrow belongs towhich pattern.
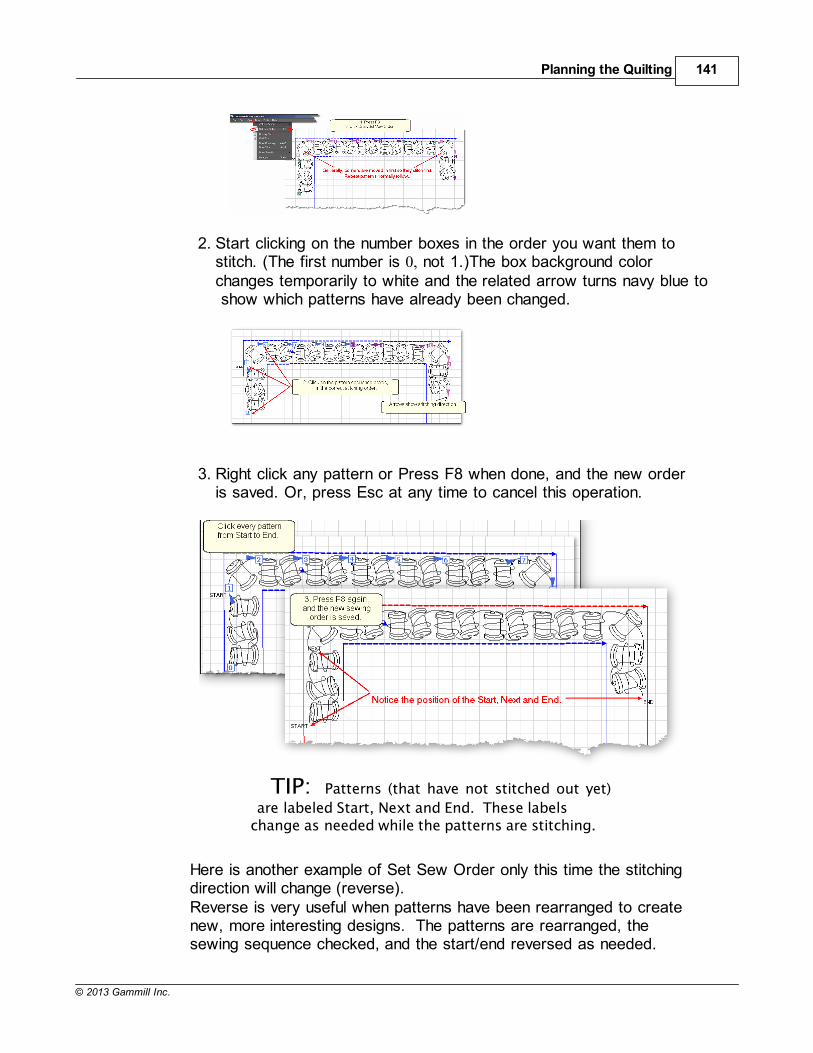
Planning the Quilting 141
© 2013 Gammill Inc.
2. Start clicking on the number boxes in the order you want them tostitch. (The first number is 0, not 1.)The box background colorchanges temporarily to white and the related arrow turns navy blue to show which patterns have already been changed.
3. Right click any pattern or Press F8 when done, and the new orderis saved. Or, press Esc at any time to cancel this operation.
TIP: Patterns (that have not stitched out yet)
are labeled Start, Next and End. These labelschange as needed while the patterns are stitching.
Here is another example of Set Sew Order only this time the stitchingdirection will change (reverse).Reverse is very useful when patterns have been rearranged to createnew, more interesting designs. The patterns are rearranged, thesewing sequence checked, and the start/end reversed as needed.
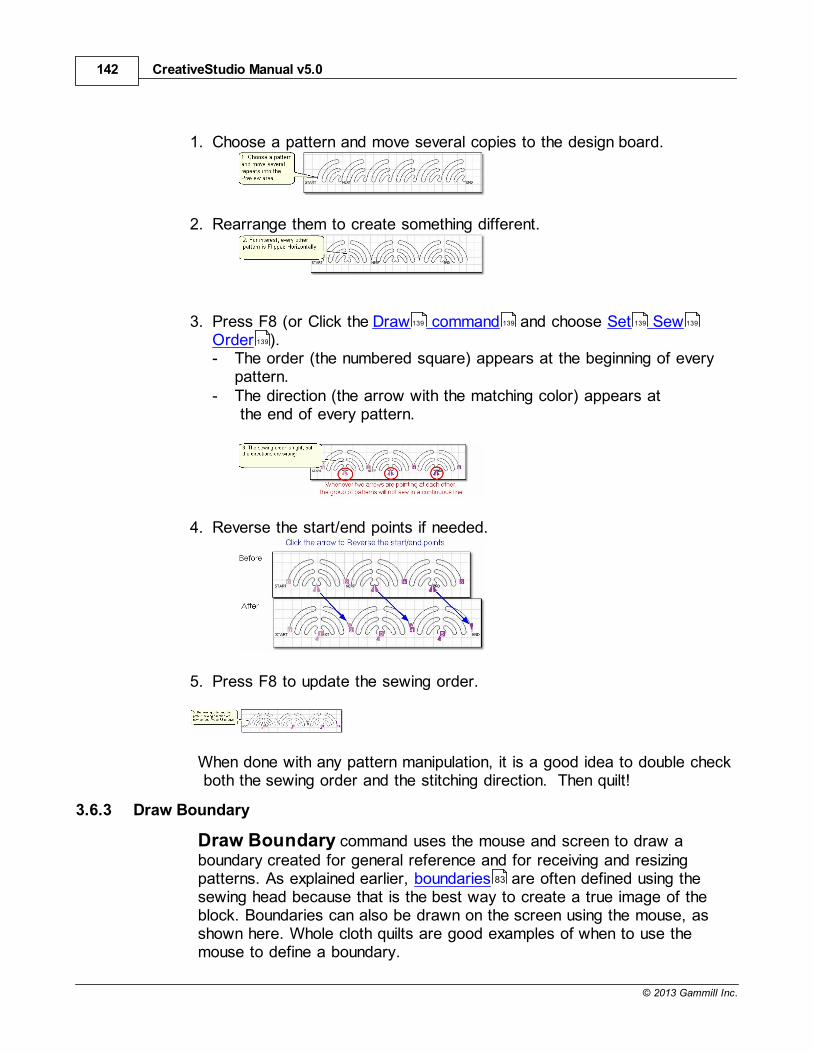
CreativeStudio Manual v5.0142
© 2013 Gammill Inc.
1. Choose a pattern and move several copies to the design board.
2. Rearrange them to create something different.
3. Press F8 (or Click the Draw command and choose Set SewOrder ).- The order (the numbered square) appears at the beginning of every
pattern.- The direction (the arrow with the matching color) appears at
the end of every pattern.
4. Reverse the start/end points if needed.
5. Press F8 to update the sewing order.
When done with any pattern manipulation, it is a good idea to double check both the sewing order and the stitching direction. Then quilt!
3.6.3 Draw Boundary
Draw Boundary command uses the mouse and screen to draw aboundary created for general reference and for receiving and resizingpatterns. As explained earlier, boundaries are often defined using thesewing head because that is the best way to create a true image of theblock. Boundaries can also be drawn on the screen using the mouse, asshown here. Whole cloth quilts are good examples of when to use themouse to define a boundary.
139 139 139 139
139
83
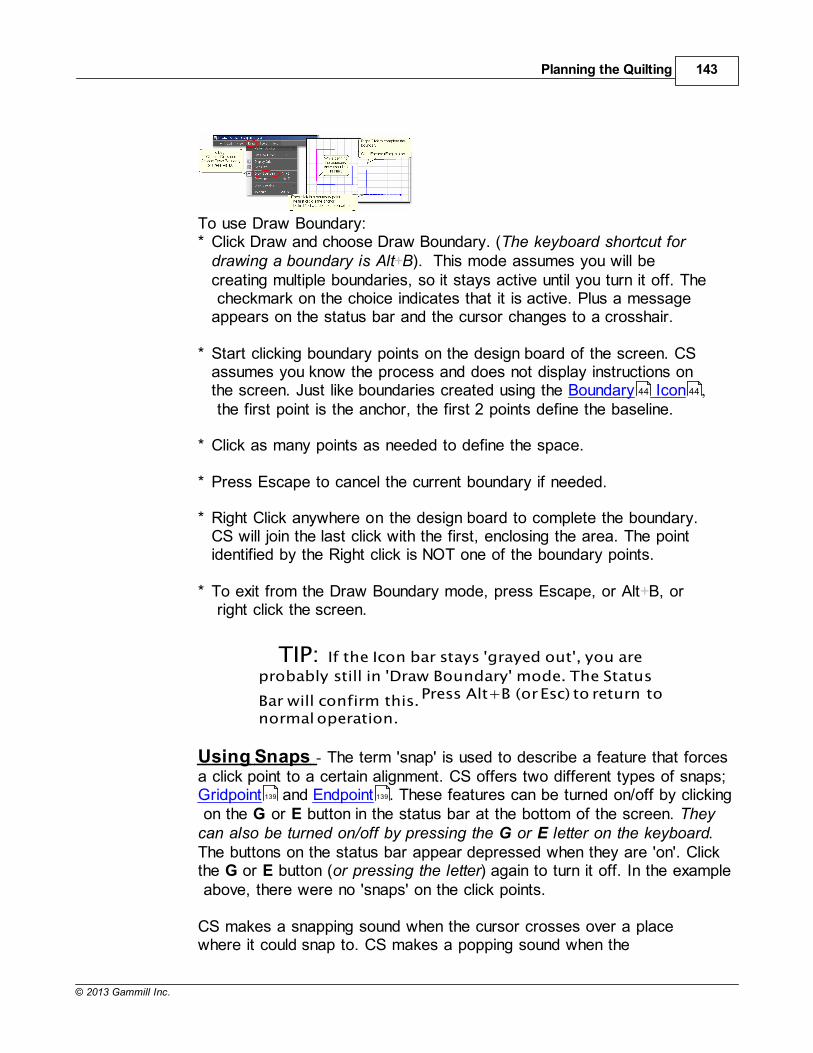
Planning the Quilting 143
© 2013 Gammill Inc.
To use Draw Boundary:* Click Draw and choose Draw Boundary. (The keyboard shortcut for
drawing a boundary is Alt+B). This mode assumes you will becreating multiple boundaries, so it stays active until you turn it off. The checkmark on the choice indicates that it is active. Plus a messageappears on the status bar and the cursor changes to a crosshair.
* Start clicking boundary points on the design board of the screen. CSassumes you know the process and does not display instructions onthe screen. Just like boundaries created using the Boundary Icon , the first point is the anchor, the first 2 points define the baseline.
* Click as many points as needed to define the space.
* Press Escape to cancel the current boundary if needed.
* Right Click anywhere on the design board to complete the boundary.CS will join the last click with the first, enclosing the area. The pointidentified by the Right click is NOT one of the boundary points.
* To exit from the Draw Boundary mode, press Escape, or Alt+B, or right click the screen.
TIP: If the Icon bar stays 'grayed out', you are
probably still in 'Draw Boundary' mode. The Status
Bar will confirm this. Press Alt+B (or Esc) to return to
normal operation.
Using Snaps - The term 'snap' is used to describe a feature that forcesa click point to a certain alignment. CS offers two different types of snaps;Gridpoint and Endpoint . These features can be turned on/off by clicking on the G or E button in the status bar at the bottom of the screen. Theycan also be turned on/off by pressing the G or E letter on the keyboard.The buttons on the status bar appear depressed when they are 'on'. Clickthe G or E button (or pressing the letter) again to turn it off. In the example above, there were no 'snaps' on the click points.
CS makes a snapping sound when the cursor crosses over a placewhere it could snap to. CS makes a popping sound when the
44 44
139 139
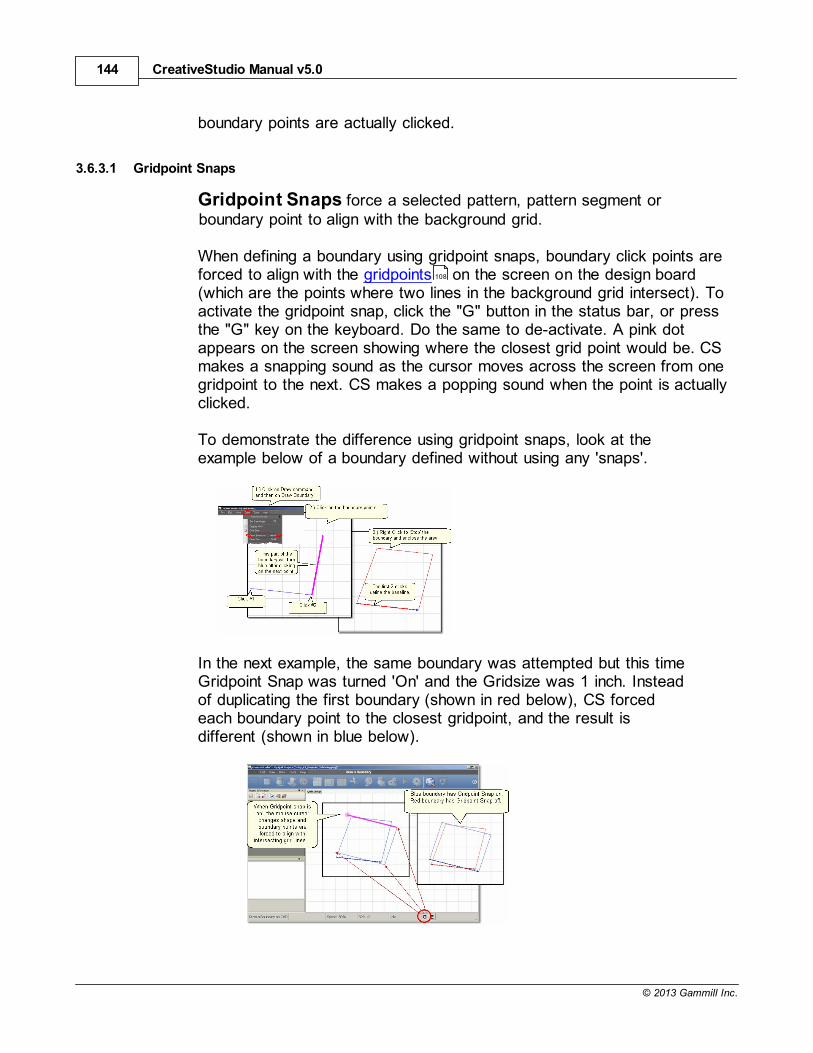
CreativeStudio Manual v5.0144
© 2013 Gammill Inc.
boundary points are actually clicked.
3.6.3.1 Gridpoint Snaps
Gridpoint Snaps force a selected pattern, pattern segment orboundary point to align with the background grid.
When defining a boundary using gridpoint snaps, boundary click points areforced to align with the gridpoints on the screen on the design board(which are the points where two lines in the background grid intersect). Toactivate the gridpoint snap, click the "G" button in the status bar, or pressthe "G" key on the keyboard. Do the same to de-activate. A pink dotappears on the screen showing where the closest grid point would be. CSmakes a snapping sound as the cursor moves across the screen from onegridpoint to the next. CS makes a popping sound when the point is actuallyclicked.
To demonstrate the difference using gridpoint snaps, look at theexample below of a boundary defined without using any 'snaps'.
In the next example, the same boundary was attempted but this timeGridpoint Snap was turned 'On' and the Gridsize was 1 inch. Insteadof duplicating the first boundary (shown in red below), CS forcedeach boundary point to the closest gridpoint, and the result isdifferent (shown in blue below).
108
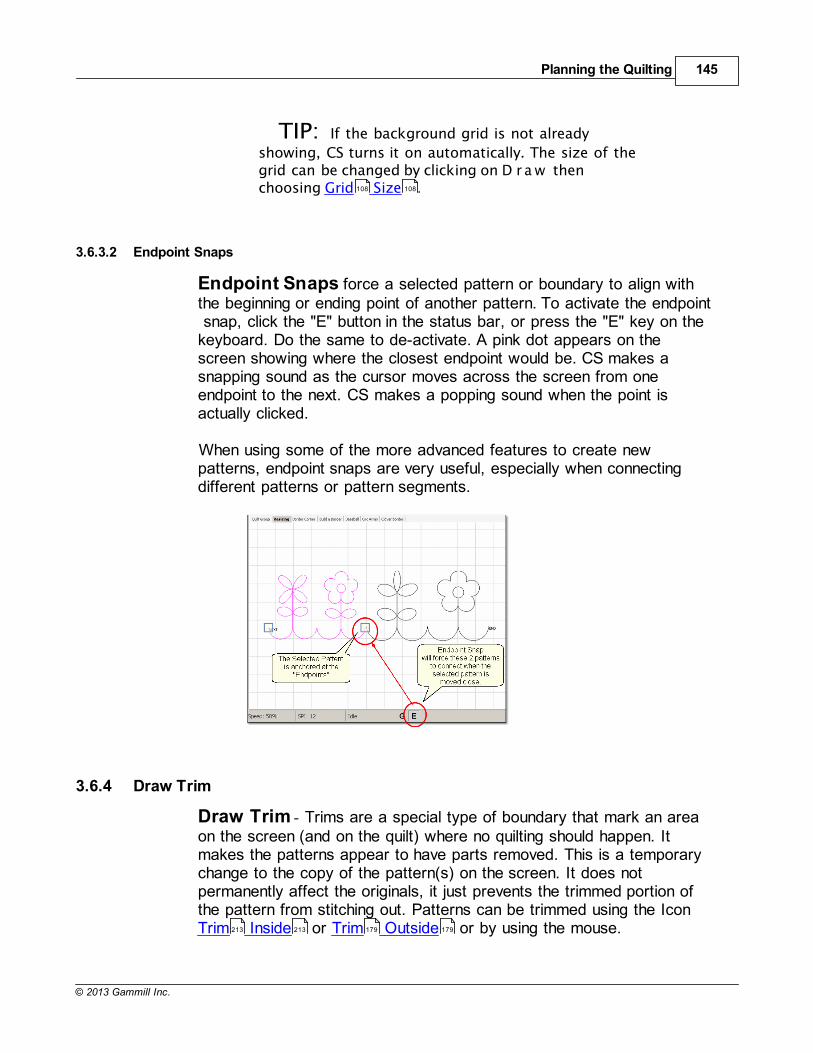
Planning the Quilting 145
© 2013 Gammill Inc.
TIP: If the background grid is not already
showing, CS turns it on automatically. The size of thegrid can be changed by clicking on D r a w thenchoosing Grid Size .
3.6.3.2 Endpoint Snaps
Endpoint Snaps force a selected pattern or boundary to align withthe beginning or ending point of another pattern. To activate the endpoint snap, click the "E" button in the status bar, or press the "E" key on thekeyboard. Do the same to de-activate. A pink dot appears on thescreen showing where the closest endpoint would be. CS makes asnapping sound as the cursor moves across the screen from oneendpoint to the next. CS makes a popping sound when the point isactually clicked.
When using some of the more advanced features to create newpatterns, endpoint snaps are very useful, especially when connectingdifferent patterns or pattern segments.
3.6.4 Draw Trim
Draw Trim - Trims are a special type of boundary that mark an areaon the screen (and on the quilt) where no quilting should happen. Itmakes the patterns appear to have parts removed. This is a temporarychange to the copy of the pattern(s) on the screen. It does notpermanently affect the originals, it just prevents the trimmed portion ofthe pattern from stitching out. Patterns can be trimmed using the IconTrim Inside or Trim Outside or by using the mouse.
108 108
213 213 179 179
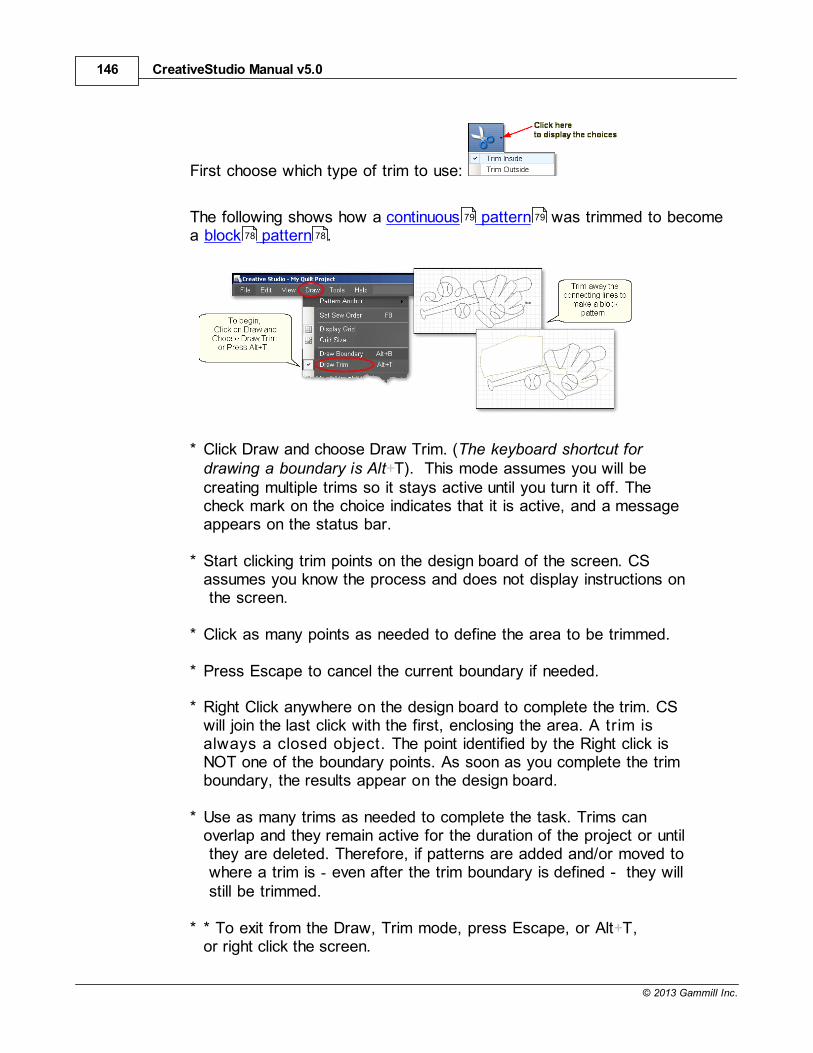
CreativeStudio Manual v5.0146
© 2013 Gammill Inc.
First choose which type of trim to use:
The following shows how a continuous pattern was trimmed to becomea block pattern .
* Click Draw and choose Draw Trim. (The keyboard shortcut fordrawing a boundary is Alt+T). This mode assumes you will becreating multiple trims so it stays active until you turn it off. Thecheck mark on the choice indicates that it is active, and a messageappears on the status bar.
* Start clicking trim points on the design board of the screen. CSassumes you know the process and does not display instructions on the screen.
* Click as many points as needed to define the area to be trimmed.
* Press Escape to cancel the current boundary if needed.
* Right Click anywhere on the design board to complete the trim. CSwill join the last click with the first, enclosing the area. A trim isalways a closed object. The point identified by the Right click isNOT one of the boundary points. As soon as you complete the trimboundary, the results appear on the design board.
* Use as many trims as needed to complete the task. Trims canoverlap and they remain active for the duration of the project or until they are deleted. Therefore, if patterns are added and/or moved to where a trim is - even after the trim boundary is defined - they will still be trimmed.
* * To exit from the Draw, Trim mode, press Escape, or Alt+T,or right click the screen.
79 79
78 78
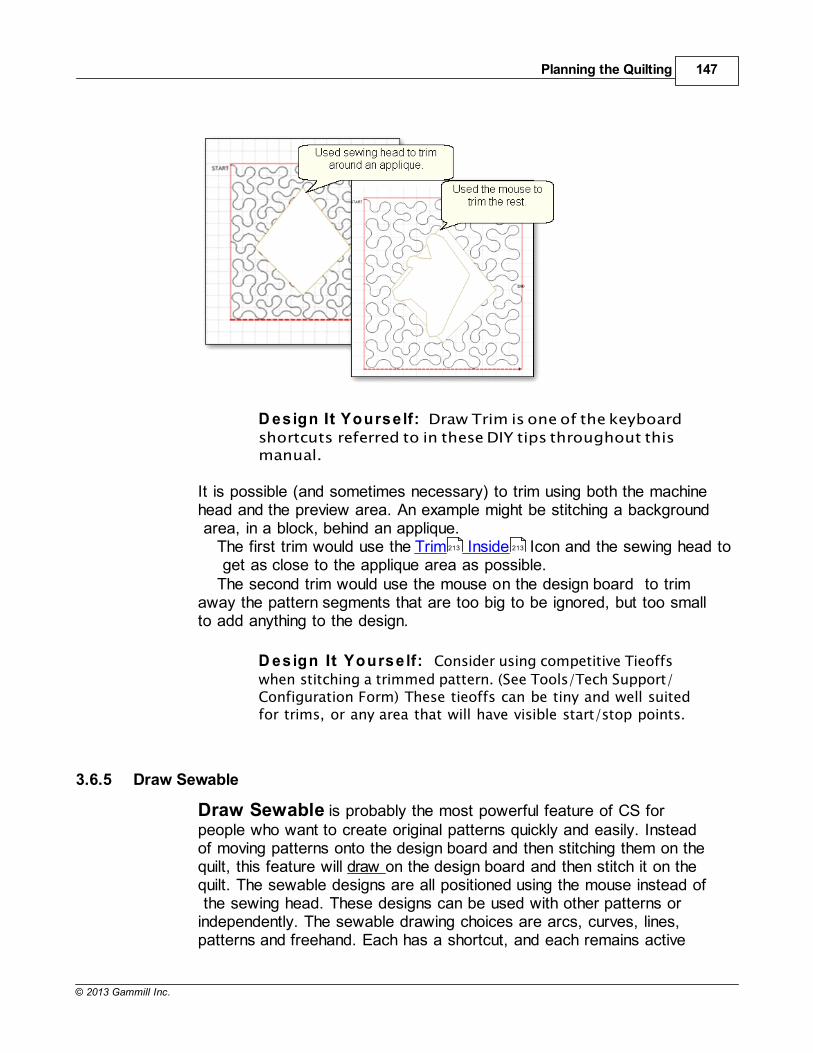
Planning the Quilting 147
© 2013 Gammill Inc.
D esign It Yourse lf: Draw Trim is one of the keyboard
shortcuts referred to in these DIY tips throughout thismanual.
It is possible (and sometimes necessary) to trim using both the machinehead and the preview area. An example might be stitching a background area, in a block, behind an applique.
The first trim would use the Trim Inside Icon and the sewing head to get as close to the applique area as possible. The second trim would use the mouse on the design board to trim
away the pattern segments that are too big to be ignored, but too smallto add anything to the design.
D esign It Yourse lf: Consider using competitive Tieoffs
when stitching a trimmed pattern. (See Tools/Tech Support/Configuration Form) These tieoffs can be tiny and well suitedfor trims, or any area that will have visible start/stop points.
3.6.5 Draw Sewable
Draw Sewable is probably the most powerful feature of CS forpeople who want to create original patterns quickly and easily. Insteadof moving patterns onto the design board and then stitching them on thequilt, this feature will draw on the design board and then stitch it on thequilt. The sewable designs are all positioned using the mouse instead of the sewing head. These designs can be used with other patterns orindependently. The sewable drawing choices are arcs, curves, lines,patterns and freehand. Each has a shortcut, and each remains active
213 213
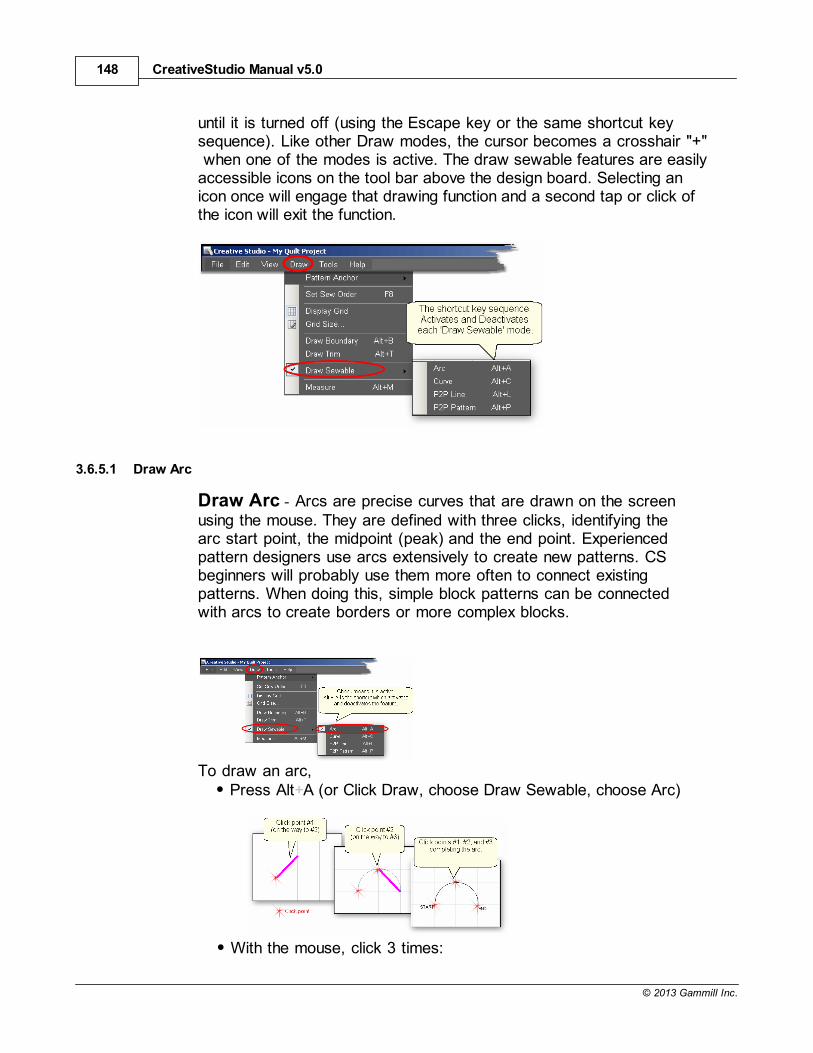
CreativeStudio Manual v5.0148
© 2013 Gammill Inc.
until it is turned off (using the Escape key or the same shortcut keysequence). Like other Draw modes, the cursor becomes a crosshair "+" when one of the modes is active. The draw sewable features are easilyaccessible icons on the tool bar above the design board. Selecting anicon once will engage that drawing function and a second tap or click ofthe icon will exit the function.
3.6.5.1 Draw Arc
Draw Arc - Arcs are precise curves that are drawn on the screenusing the mouse. They are defined with three clicks, identifying thearc start point, the midpoint (peak) and the end point. Experiencedpattern designers use arcs extensively to create new patterns. CSbeginners will probably use them more often to connect existingpatterns. When doing this, simple block patterns can be connectedwith arcs to create borders or more complex blocks.
To draw an arc,Press Alt+A (or Click Draw, choose Draw Sewable, choose Arc)
With the mouse, click 3 times:
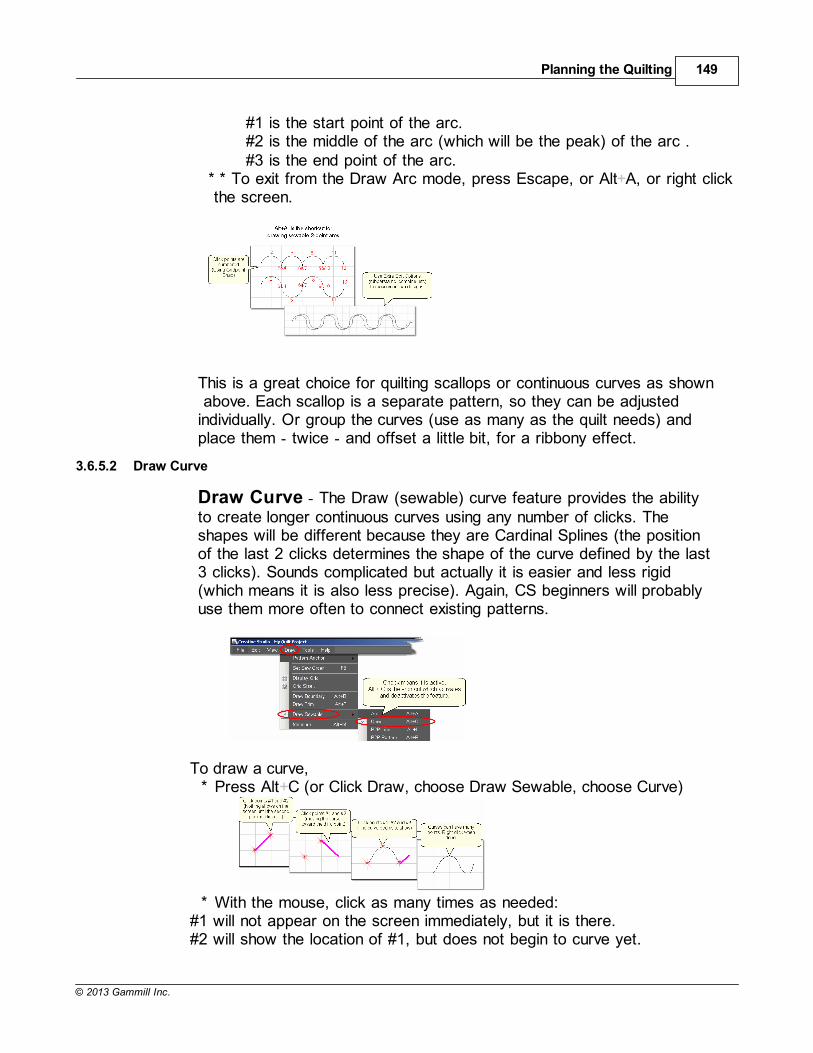
Planning the Quilting 149
© 2013 Gammill Inc.
#1 is the start point of the arc.#2 is the middle of the arc (which will be the peak) of the arc .#3 is the end point of the arc.
* * To exit from the Draw Arc mode, press Escape, or Alt+A, or right click the screen.
This is a great choice for quilting scallops or continuous curves as shown above. Each scallop is a separate pattern, so they can be adjustedindividually. Or group the curves (use as many as the quilt needs) andplace them - twice - and offset a little bit, for a ribbony effect.
3.6.5.2 Draw Curve
Draw Curve - The Draw (sewable) curve feature provides the abilityto create longer continuous curves using any number of clicks. Theshapes will be different because they are Cardinal Splines (the positionof the last 2 clicks determines the shape of the curve defined by the last3 clicks). Sounds complicated but actually it is easier and less rigid(which means it is also less precise). Again, CS beginners will probablyuse them more often to connect existing patterns.
To draw a curve,* Press Alt+C (or Click Draw, choose Draw Sewable, choose Curve)
* With the mouse, click as many times as needed:#1 will not appear on the screen immediately, but it is there.#2 will show the location of #1, but does not begin to curve yet.
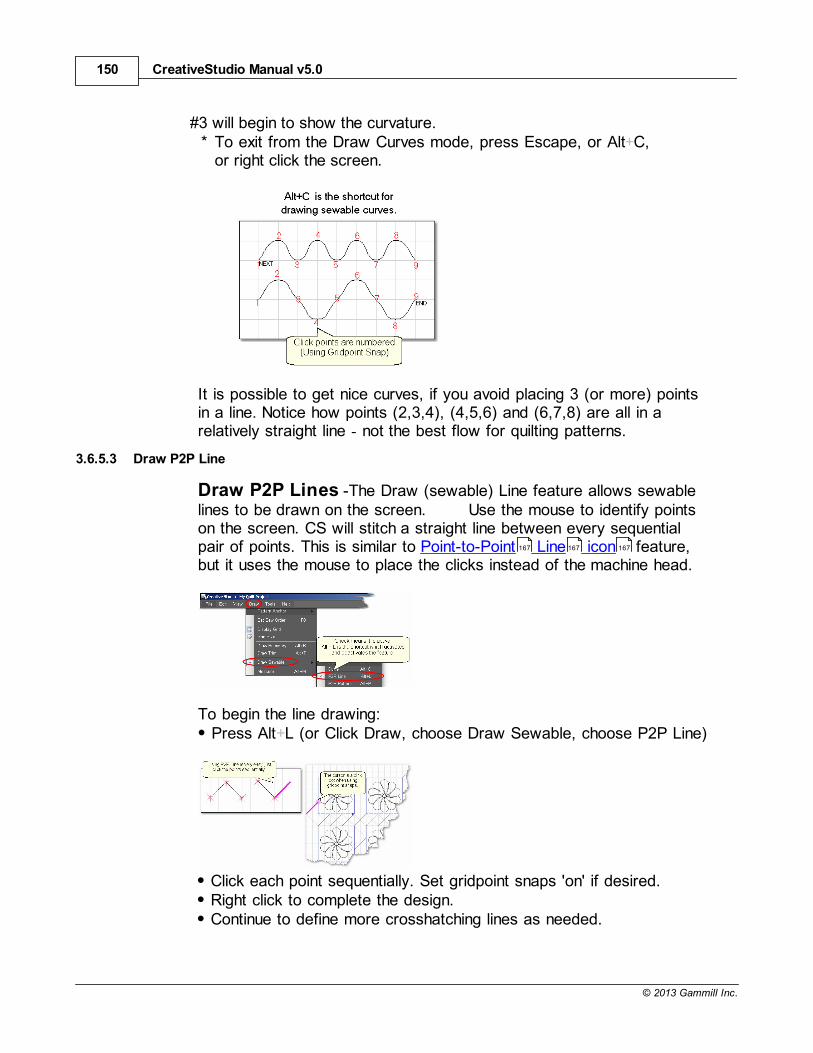
CreativeStudio Manual v5.0150
© 2013 Gammill Inc.
#3 will begin to show the curvature.* To exit from the Draw Curves mode, press Escape, or Alt+C,
or right click the screen.
It is possible to get nice curves, if you avoid placing 3 (or more) pointsin a line. Notice how points (2,3,4), (4,5,6) and (6,7,8) are all in arelatively straight line - not the best flow for quilting patterns.
3.6.5.3 Draw P2P Line
Draw P2P Lines -The Draw (sewable) Line feature allows sewablelines to be drawn on the screen. Use the mouse to identify pointson the screen. CS will stitch a straight line between every sequentialpair of points. This is similar to Point-to-Point Line icon feature,but it uses the mouse to place the clicks instead of the machine head.
To begin the line drawing:Press Alt+L (or Click Draw, choose Draw Sewable, choose P2P Line)
Click each point sequentially. Set gridpoint snaps 'on' if desired.Right click to complete the design.Continue to define more crosshatching lines as needed.
167 167 167
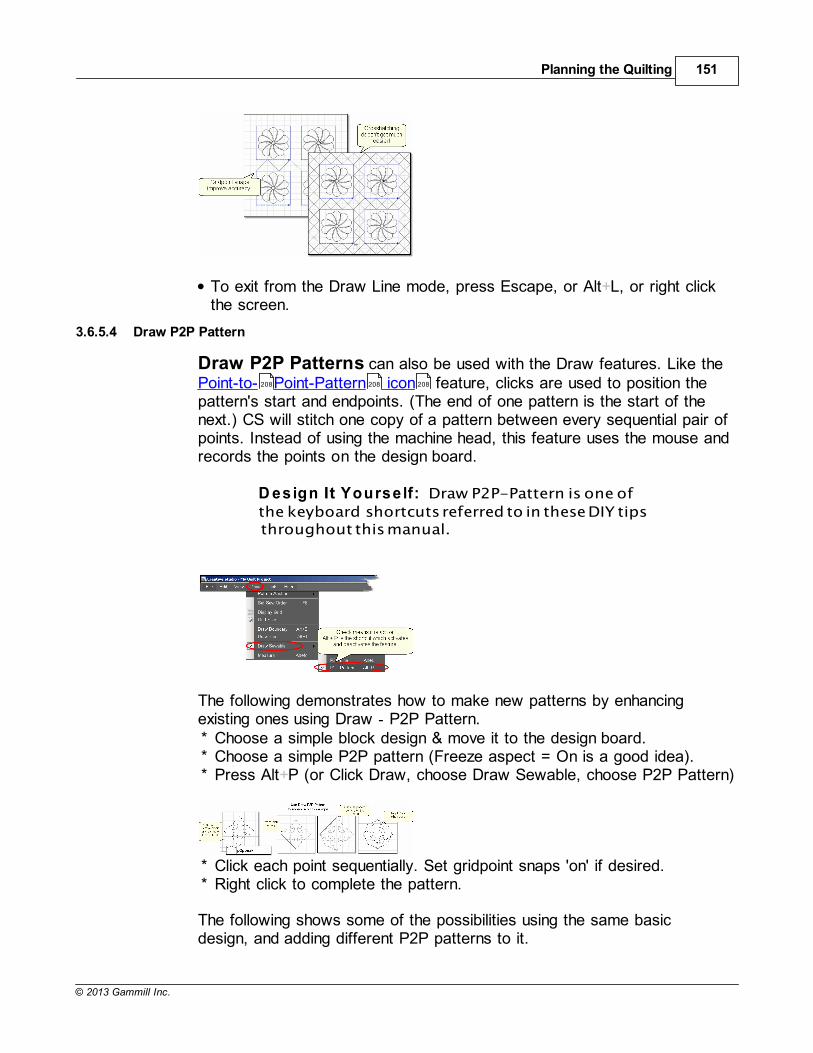
Planning the Quilting 151
© 2013 Gammill Inc.
To exit from the Draw Line mode, press Escape, or Alt+L, or right clickthe screen.
3.6.5.4 Draw P2P Pattern
Draw P2P Patterns can also be used with the Draw features. Like thePoint-to- Point-Pattern icon feature, clicks are used to position the pattern's start and endpoints. (The end of one pattern is the start of thenext.) CS will stitch one copy of a pattern between every sequential pair ofpoints. Instead of using the machine head, this feature uses the mouse andrecords the points on the design board.
D esign It Yourse lf: Draw P2P-Pattern is one of
the keyboard shortcuts referred to in these DIY tips throughout this manual.
The following demonstrates how to make new patterns by enhancingexisting ones using Draw - P2P Pattern.* Choose a simple block design & move it to the design board.* Choose a simple P2P pattern (Freeze aspect = On is a good idea).* Press Alt+P (or Click Draw, choose Draw Sewable, choose P2P Pattern)
* Click each point sequentially. Set gridpoint snaps 'on' if desired.* Right click to complete the pattern.
The following shows some of the possibilities using the same basicdesign, and adding different P2P patterns to it.
208 208 208
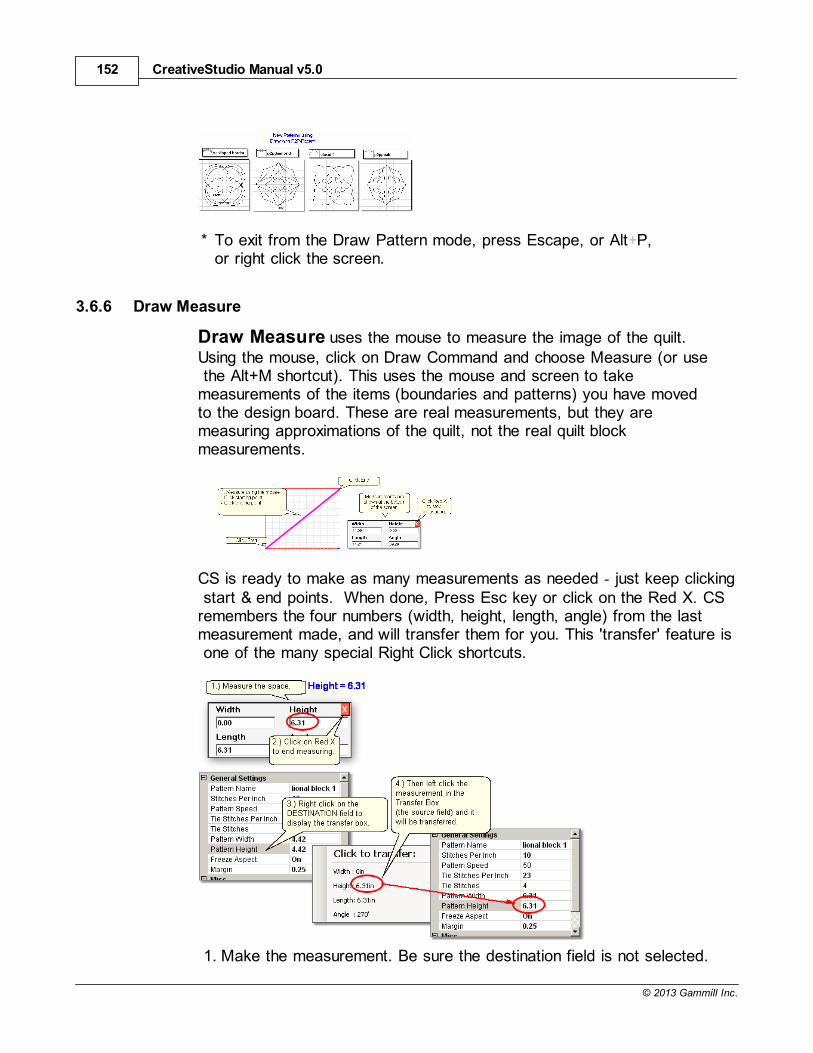
CreativeStudio Manual v5.0152
© 2013 Gammill Inc.
* To exit from the Draw Pattern mode, press Escape, or Alt+P,or right click the screen.
3.6.6 Draw Measure
Draw Measure uses the mouse to measure the image of the quilt.Using the mouse, click on Draw Command and choose Measure (or use the Alt+M shortcut). This uses the mouse and screen to takemeasurements of the items (boundaries and patterns) you have movedto the design board. These are real measurements, but they aremeasuring approximations of the quilt, not the real quilt blockmeasurements.
CS is ready to make as many measurements as needed - just keep clicking start & end points. When done, Press Esc key or click on the Red X. CSremembers the four numbers (width, height, length, angle) from the lastmeasurement made, and will transfer them for you. This 'transfer' feature is one of the many special Right Click shortcuts.
1. Make the measurement. Be sure the destination field is not selected.

Planning the Quilting 153
© 2013 Gammill Inc.
2. Right click on the destination field (where you want the measurement togo). The transfer box appears.
3. Click on any of the measurements and the number will be movedto the destination.
3.6.7 Record Options
Record is another remarkable feature of CS. It is easy to create newdesigns by moving the sewing head and saving that motion as a newpattern. This is similar to tracing a design and saving it as a new pattern. It is easy to do because the belts do not have to be engaged to recordthe motions. CS automatically creates a new pattern file and saves it for repeated use, without needing Autosketch or any other CAD program.
The Record Mode is a subset of the Regulated Sewing feature.
Tip: Record mode can be used without the belts being
engaged. The belts need to be engaged when stitching thenewly recorded pattern however.
Steps to follow:
1. Choose a style of Regulated QuiltingClick on the small black arrow to the right of the Regulated Sewing iconto see the choices. Original, Plus and Smooth vary only in the speed ofthe needle moving up & down.
2. Click on the Regulated Sewing
icon.
A Dialog box shows settings andbuttons:
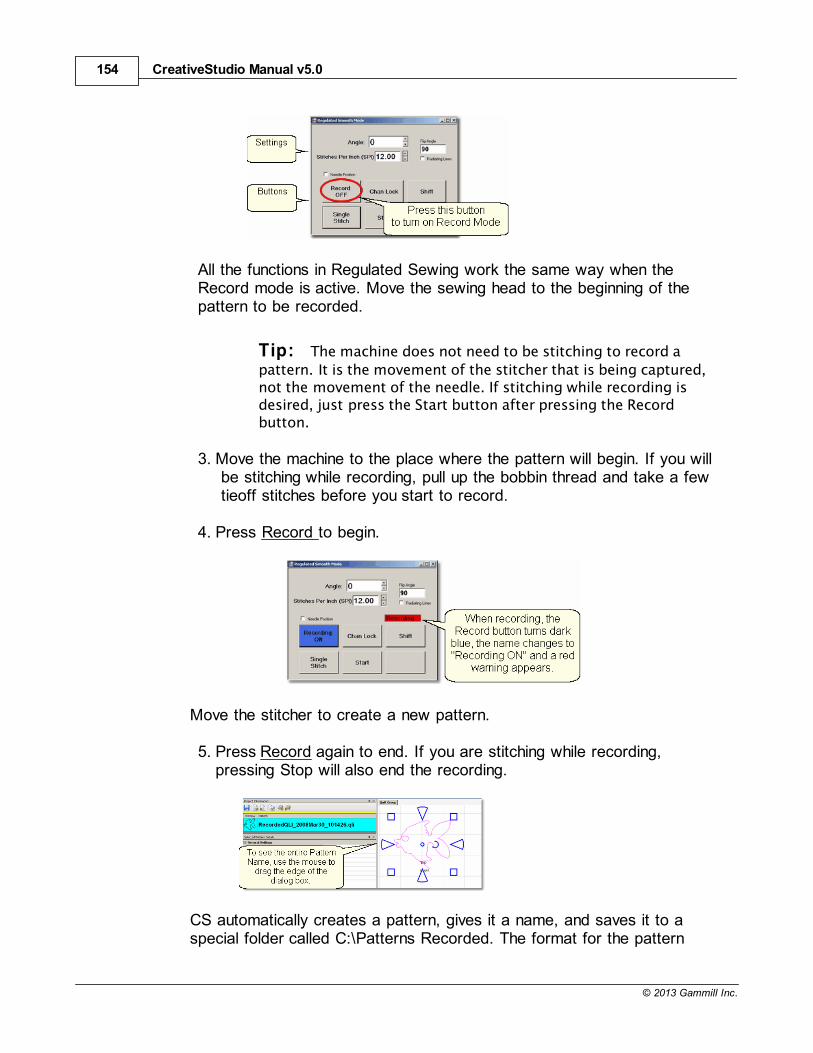
CreativeStudio Manual v5.0154
© 2013 Gammill Inc.
All the functions in Regulated Sewing work the same way when theRecord mode is active. Move the sewing head to the beginning of thepattern to be recorded.
Tip: The machine does not need to be stitching to record a
pattern. It is the movement of the stitcher that is being captured,not the movement of the needle. If stitching while recording isdesired, just press the Start button after pressing the Recordbutton.
3. Move the machine to the place where the pattern will begin. If you will be stitching while recording, pull up the bobbin thread and take a few tieoff stitches before you start to record.
4. Press Record to begin.
Move the stitcher to create a new pattern.
5. Press Record again to end. If you are stitching while recording,pressing Stop will also end the recording.
CS automatically creates a pattern, gives it a name, and saves it to aspecial folder called C:\Patterns Recorded. The format for the pattern
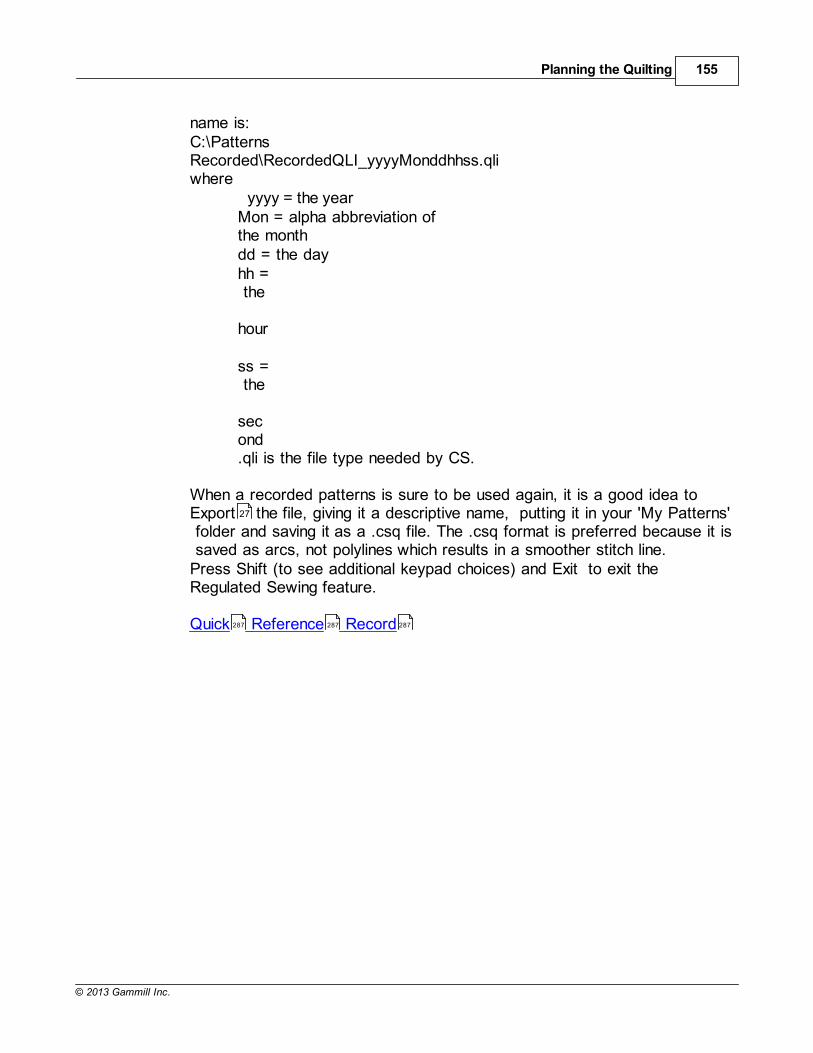
Planning the Quilting 155
© 2013 Gammill Inc.
name is:C:\PatternsRecorded\RecordedQLI_yyyyMonddhhss.qliwhere
yyyy = the yearMon = alpha abbreviation ofthe month dd = the dayhh = the hour ss = the second.qli is the file type needed by CS.
When a recorded patterns is sure to be used again, it is a good idea toExport the file, giving it a descriptive name, putting it in your 'My Patterns' folder and saving it as a .csq file. The .csq format is preferred because it is saved as arcs, not polylines which results in a smoother stitch line.Press Shift (to see additional keypad choices) and Exit to exit theRegulated Sewing feature.
Quick Reference Record
27
287 287 287


CreativeStudio v5.0
Part
IV
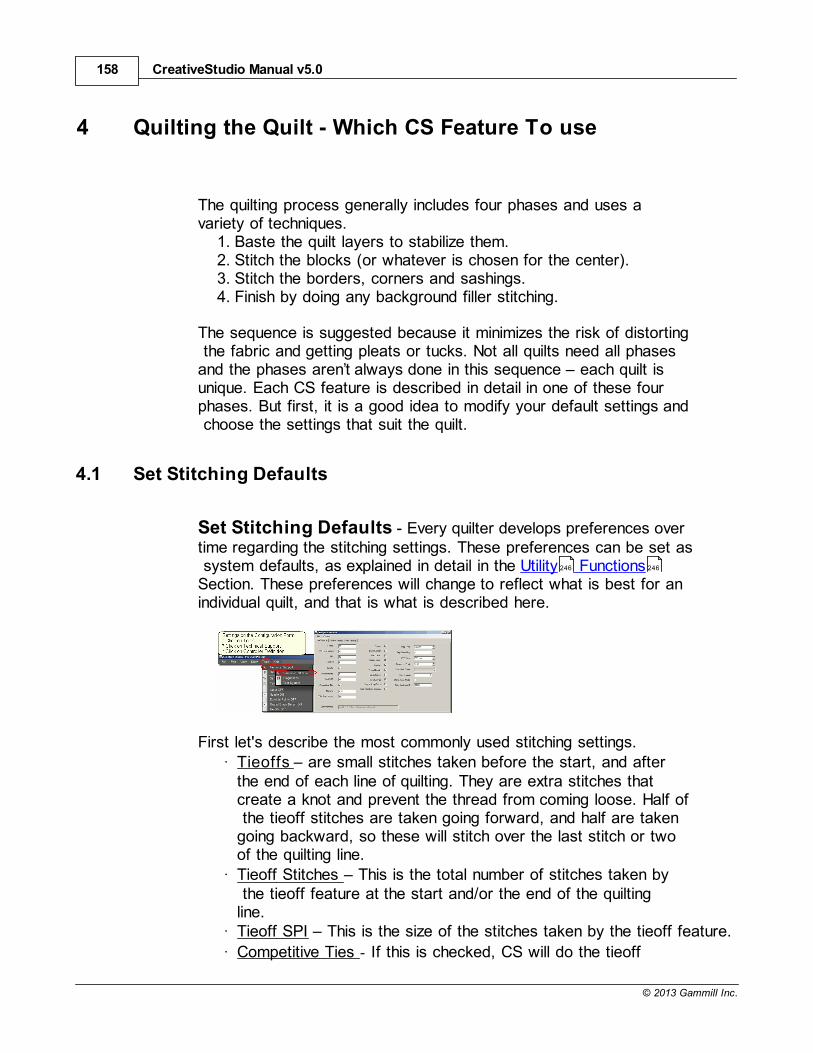
CreativeStudio Manual v5.0158
© 2013 Gammill Inc.
4 Quilting the Quilt - Which CS Feature To use
The quilting process generally includes four phases and uses avariety of techniques.
1. Baste the quilt layers to stabilize them.2. Stitch the blocks (or whatever is chosen for the center).3. Stitch the borders, corners and sashings.4. Finish by doing any background filler stitching.
The sequence is suggested because it minimizes the risk of distorting the fabric and getting pleats or tucks. Not all quilts need all phasesand the phases arent always done in this sequence – each quilt isunique. Each CS feature is described in detail in one of these fourphases. But first, it is a good idea to modify your default settings and choose the settings that suit the quilt.
4.1 Set Stitching Defaults
Set Stitching Defaults - Every quilter develops preferences overtime regarding the stitching settings. These preferences can be set as system defaults, as explained in detail in the Utility FunctionsSection. These preferences will change to reflect what is best for anindividual quilt, and that is what is described here.
First let's describe the most commonly used stitching settings.· Tieoffs are small stitches taken before the start, and after
the end of each line of quilting. They are extra stitches thatcreate a knot and prevent the thread from coming loose. Half of the tieoff stitches are taken going forward, and half are takengoing backward, so these will stitch over the last stitch or twoof the quilting line.
· Tieoff Stitches This is the total number of stitches taken by the tieoff feature at the start and/or the end of the quiltingline.
· Tieoff SPI This is the size of the stitches taken by the tieoff feature.
· Competitive Ties - If this is checked, CS will do the tieoff
246 246
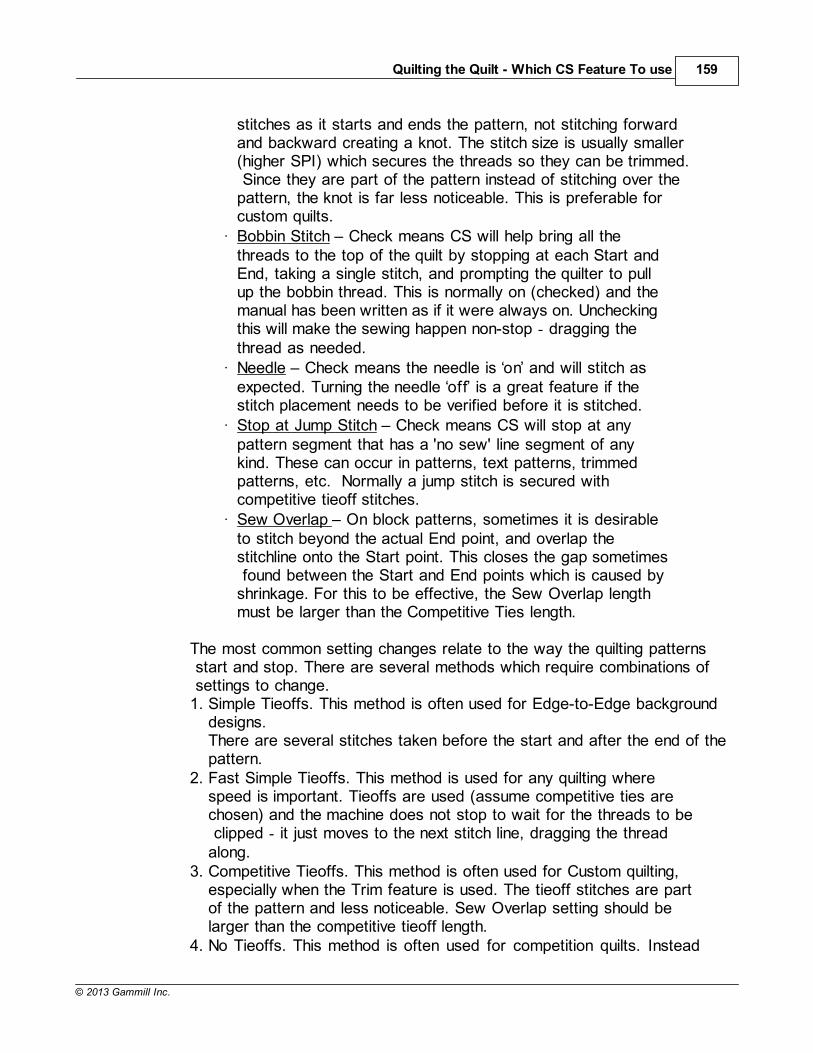
Quilting the Quilt - Which CS Feature To use 159
© 2013 Gammill Inc.
stitches as it starts and ends the pattern, not stitching forwardand backward creating a knot. The stitch size is usually smaller(higher SPI) which secures the threads so they can be trimmed. Since they are part of the pattern instead of stitching over thepattern, the knot is far less noticeable. This is preferable forcustom quilts.
· Bobbin Stitch Check means CS will help bring all thethreads to the top of the quilt by stopping at each Start andEnd, taking a single stitch, and prompting the quilter to pullup the bobbin thread. This is normally on (checked) and themanual has been written as if it were always on. Uncheckingthis will make the sewing happen non-stop - dragging thethread as needed.
· Needle Check means the needle is on and will stitch asexpected. Turning the needle off is a great feature if thestitch placement needs to be verified before it is stitched.
· Stop at Jump Stitch Check means CS will stop at anypattern segment that has a 'no sew' line segment of anykind. These can occur in patterns, text patterns, trimmedpatterns, etc. Normally a jump stitch is secured withcompetitive tieoff stitches.
· Sew Overlap On block patterns, sometimes it is desirableto stitch beyond the actual End point, and overlap thestitchline onto the Start point. This closes the gap sometimes found between the Start and End points which is caused byshrinkage. For this to be effective, the Sew Overlap lengthmust be larger than the Competitive Ties length.
The most common setting changes relate to the way the quilting patterns start and stop. There are several methods which require combinations of settings to change.1. Simple Tieoffs. This method is often used for Edge-to-Edge background
designs.There are several stitches taken before the start and after the end of thepattern.
2. Fast Simple Tieoffs. This method is used for any quilting wherespeed is important. Tieoffs are used (assume competitive ties arechosen) and the machine does not stop to wait for the threads to be clipped - it just moves to the next stitch line, dragging the threadalong.
3. Competitive Tieoffs. This method is often used for Custom quilting,especially when the Trim feature is used. The tieoff stitches are partof the pattern and less noticeable. Sew Overlap setting should belarger than the competitive tieoff length.
4. No Tieoffs. This method is often used for competition quilts. Instead
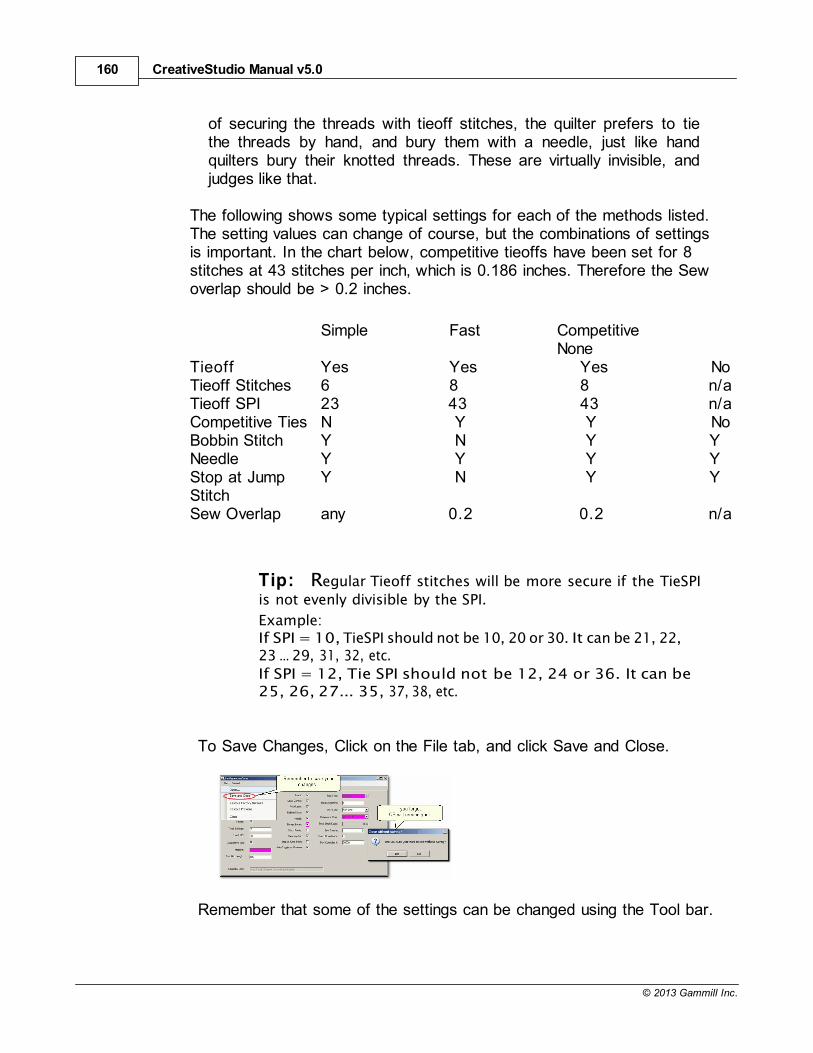
CreativeStudio Manual v5.0160
© 2013 Gammill Inc.
of securing the threads with tieoff stitches, the quilter prefers to tiethe threads by hand, and bury them with a needle, just like handquilters bury their knotted threads. These are virtually invisible, andjudges like that.
The following shows some typical settings for each of the methods listed.The setting values can change of course, but the combinations of settingsis important. In the chart below, competitive tieoffs have been set for 8stitches at 43 stitches per inch, which is 0.186 inches. Therefore the Sewoverlap should be > 0.2 inches.
Simple Fast CompetitiveNone
Tieoff Yes Yes Yes NoTieoff Stitches 6 8 8 n/aTieoff SPI 23 43 43 n/aCompetitive Ties N Y Y NoBobbin Stitch Y N Y YNeedle Y Y Y YStop at JumpStitch
Y N Y Y
Sew Overlap any 0.2 0.2 n/a
Tip: Regular Tieoff stitches will be more secure if the TieSPI
is not evenly divisible by the SPI.
Example:If SPI = 10, TieSPI should not be 10, 20 or 30. It can be 21, 22,23 ... 29, 31, 32, etc.
If SPI = 12, Tie SPI should not be 12, 24 or 36. It can be25, 26, 27... 35, 37, 38, etc.
To Save Changes, Click on the File tab, and click Save and Close.
Remember that some of the settings can be changed using the Tool bar.
Quilting the Quilt - Which CS Feature To use 161
© 2013 Gammill Inc.
Now that the preferences are set, let's quilt!
4.2 Phase 1 - Basting
Basting is a fundamental process that is used during the initial loadingof a quilt and throughout the quilting process as the quilt is stitched androlled. There are several methods for basting. Each method is usefulunder different circumstances.
Simple quilts may only need to have the three layers secured on theouter edges only, and basting is adequate. Complex quilts may need tohave many areas of the quilt stitched together to prevent the fabrics(especially the backing) from shifting and pulling. Taking the time tostabilize the quilt will result in a flatter, straighter quilt. Stitch in the ditch(SID) is commonly used in complex quilts because it secures the fabrics, and can disappear into the seams.
4.2.1 Securing the Quilt using Baste
For quilts that only need to be secured on the outer edges, basting isadequate.
Feature: Baste Stitch
The basting stitch is a long stitch and is often temporary. It is commonlyused around the outer edges of a quilt. It might be viewed as being aseries of single stitches rather than continuous stitches. The difference isthe amount of pressure the hopping foot exerts on the fabric. The benefitis that less fabric gets 'pushed' forward in the direction of the sewing.This is very valuable when trying to prevent stretching and/or ease inextra fullness.
Assumptions: The quilt is loaded, bobbin is full, machine is threadedand the belts are (probably) detached. Free motion quilting is usuallydone without the belts that control the sewing head which allows thesewing head to move freely in all directions.
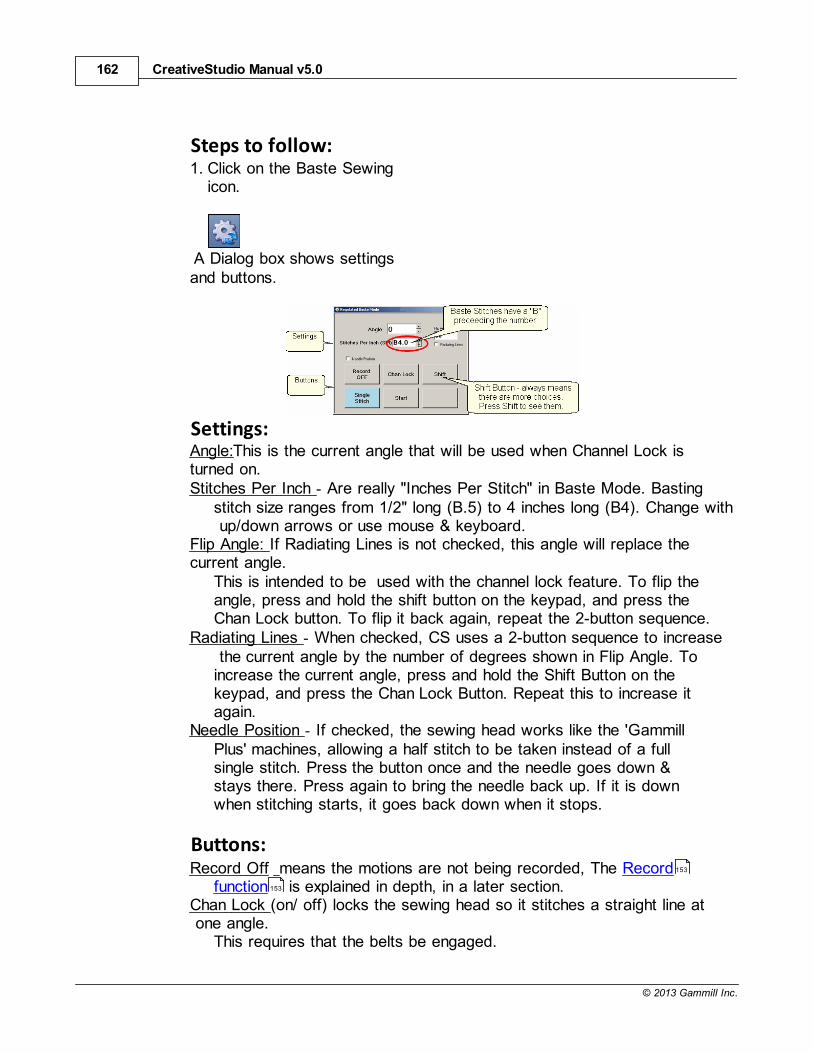
CreativeStudio Manual v5.0162
© 2013 Gammill Inc.
Steps to follow:1. Click on the Baste Sewing
icon.
A Dialog box shows settingsand buttons.
Settings:Angle:This is the current angle that will be used when Channel Lock isturned on.Stitches Per Inch - Are really "Inches Per Stitch" in Baste Mode. Basting
stitch size ranges from 1/2" long (B.5) to 4 inches long (B4). Change with up/down arrows or use mouse & keyboard.
Flip Angle: If Radiating Lines is not checked, this angle will replace thecurrent angle.
This is intended to be used with the channel lock feature. To flip theangle, press and hold the shift button on the keypad, and press theChan Lock button. To flip it back again, repeat the 2-button sequence.
Radiating Lines - When checked, CS uses a 2-button sequence to increase the current angle by the number of degrees shown in Flip Angle. Toincrease the current angle, press and hold the Shift Button on thekeypad, and press the Chan Lock Button. Repeat this to increase itagain.
Needle Position - If checked, the sewing head works like the 'GammillPlus' machines, allowing a half stitch to be taken instead of a fullsingle stitch. Press the button once and the needle goes down &stays there. Press again to bring the needle back up. If it is downwhen stitching starts, it goes back down when it stops.
Buttons:Record Off means the motions are not being recorded, The Record
function is explained in depth, in a later section.Chan Lock (on/ off) locks the sewing head so it stitches a straight line at one angle.
This requires that the belts be engaged.
153
153
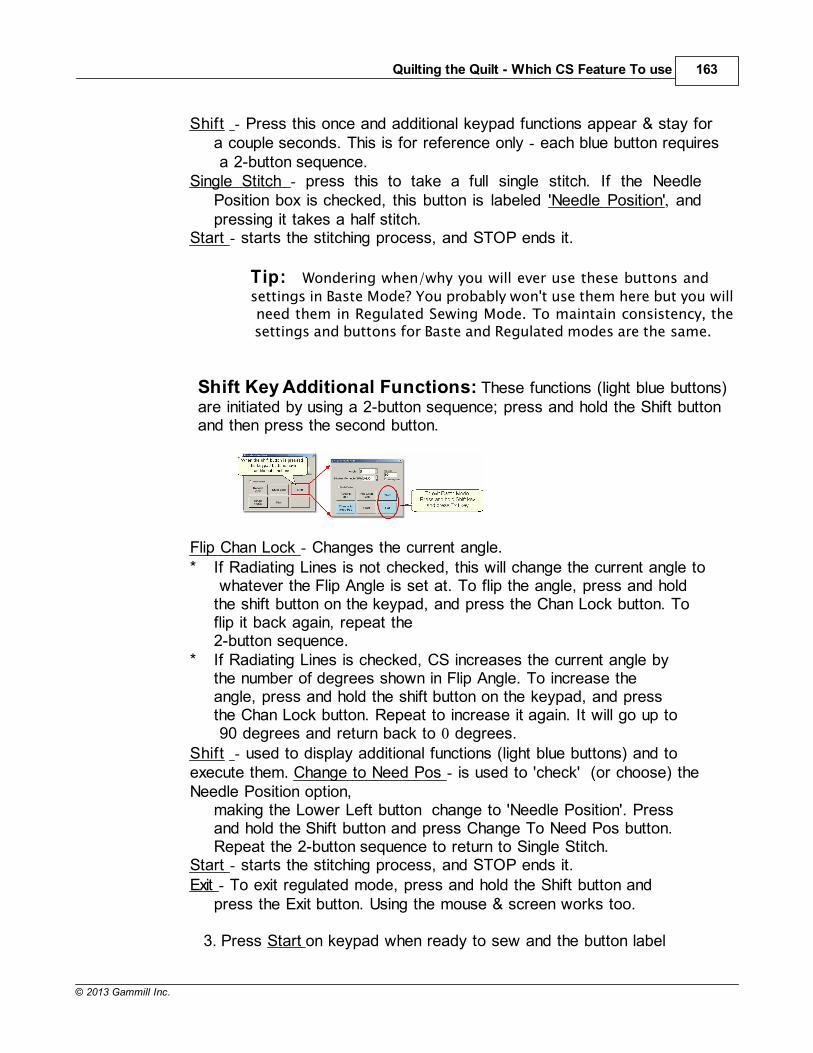
Quilting the Quilt - Which CS Feature To use 163
© 2013 Gammill Inc.
Shift - Press this once and additional keypad functions appear & stay fora couple seconds. This is for reference only - each blue button requires a 2-button sequence.
Single Stitch - press this to take a full single stitch. If the NeedlePosition box is checked, this button is labeled 'Needle Position', andpressing it takes a half stitch.
Start - starts the stitching process, and STOP ends it.
Tip: Wondering when/why you will ever use these buttons and
settings in Baste Mode? You probably won't use them here but you will need them in Regulated Sewing Mode. To maintain consistency, the settings and buttons for Baste and Regulated modes are the same.
Shift Key Additional Functions: These functions (light blue buttons)are initiated by using a 2-button sequence; press and hold the Shift buttonand then press the second button.
Flip Chan Lock - Changes the current angle.* If Radiating Lines is not checked, this will change the current angle to
whatever the Flip Angle is set at. To flip the angle, press and holdthe shift button on the keypad, and press the Chan Lock button. Toflip it back again, repeat the2-button sequence.
* If Radiating Lines is checked, CS increases the current angle bythe number of degrees shown in Flip Angle. To increase theangle, press and hold the shift button on the keypad, and pressthe Chan Lock button. Repeat to increase it again. It will go up to 90 degrees and return back to 0 degrees.
Shift - used to display additional functions (light blue buttons) and toexecute them. Change to Need Pos - is used to 'check' (or choose) theNeedle Position option,
making the Lower Left button change to 'Needle Position'. Pressand hold the Shift button and press Change To Need Pos button.Repeat the 2-button sequence to return to Single Stitch.
Start - starts the stitching process, and STOP ends it.Exit - To exit regulated mode, press and hold the Shift button and
press the Exit button. Using the mouse & screen works too.
3. Press Start on keypad when ready to sew and the button label
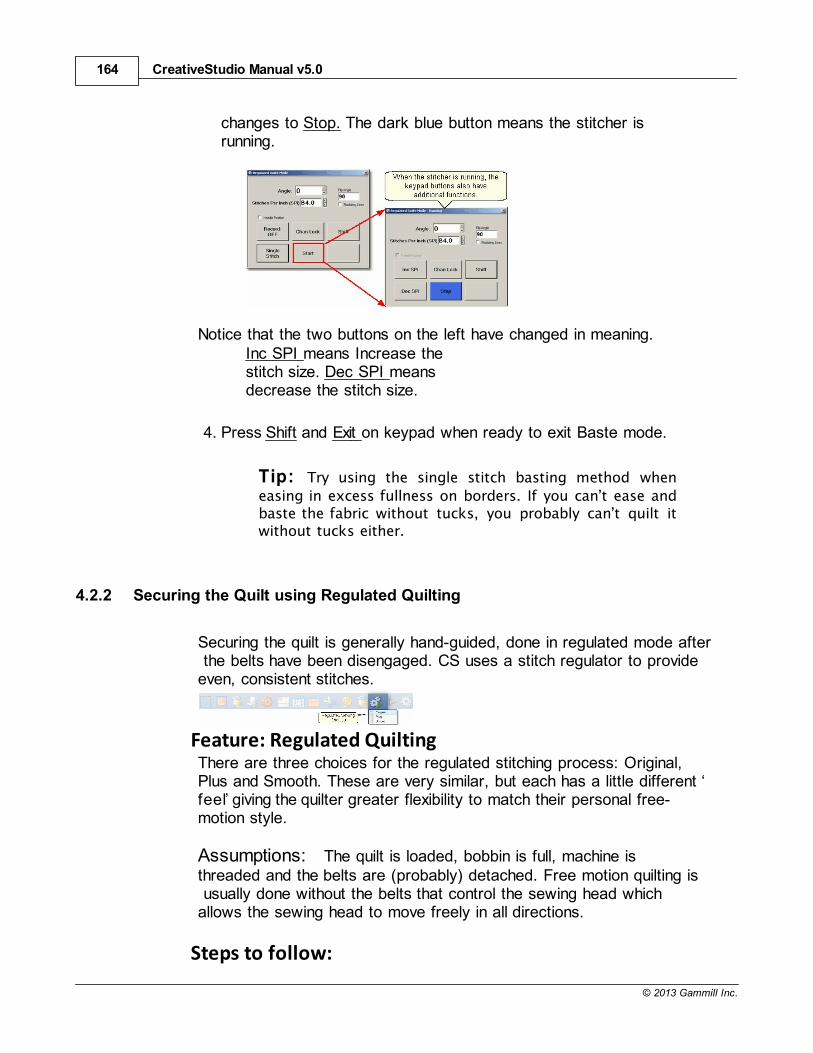
CreativeStudio Manual v5.0164
© 2013 Gammill Inc.
changes to Stop. The dark blue button means the stitcher isrunning.
Notice that the two buttons on the left have changed in meaning.Inc SPI means Increase thestitch size. Dec SPI meansdecrease the stitch size.
4. Press Shift and Exit on keypad when ready to exit Baste mode.
Tip: Try using the single stitch basting method when
easing in excess fullness on borders. If you can’t ease andbaste the fabric without tucks, you probably can’t quilt itwithout tucks either.
4.2.2 Securing the Quilt using Regulated Quilting
Securing the quilt is generally hand-guided, done in regulated mode after the belts have been disengaged. CS uses a stitch regulator to provideeven, consistent stitches.
Feature: Regulated QuiltingThere are three choices for the regulated stitching process: Original,Plus and Smooth. These are very similar, but each has a little different feel giving the quilter greater flexibility to match their personal free-motion style.
Assumptions: The quilt is loaded, bobbin is full, machine isthreaded and the belts are (probably) detached. Free motion quilting is usually done without the belts that control the sewing head whichallows the sewing head to move freely in all directions.
Steps to follow:
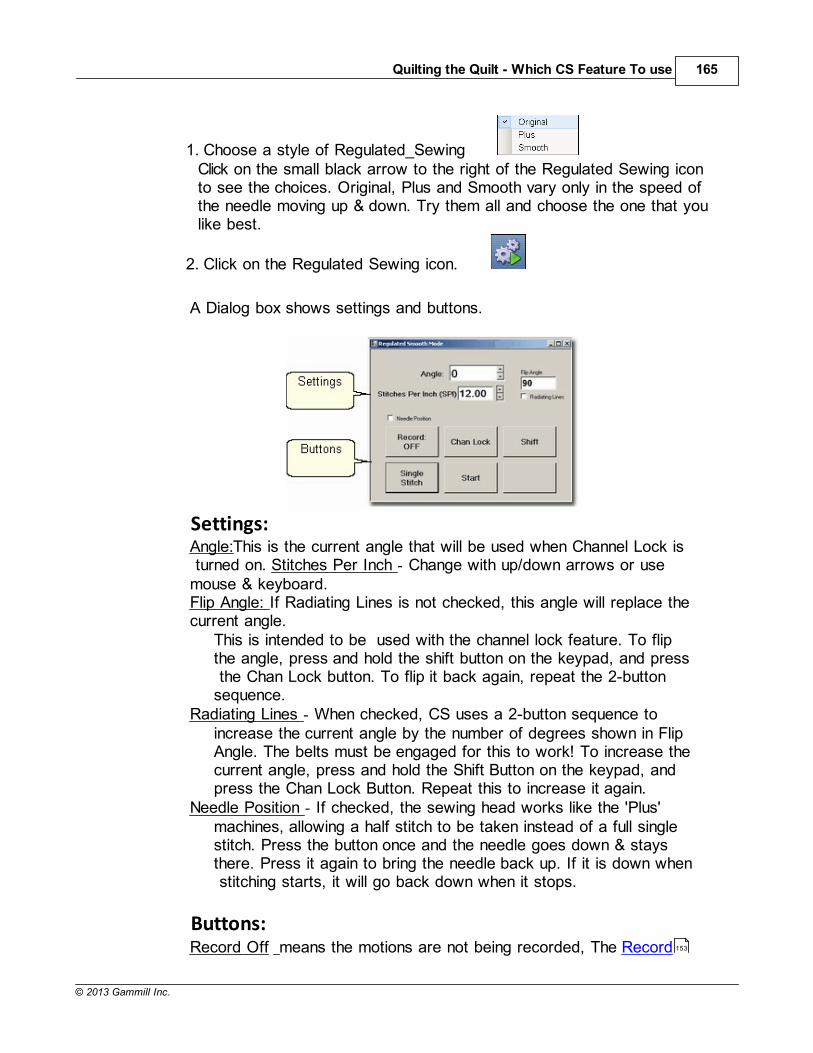
Quilting the Quilt - Which CS Feature To use 165
© 2013 Gammill Inc.
1. Choose a style of Regulated_SewingClick on the small black arrow to the right of the Regulated Sewing iconto see the choices. Original, Plus and Smooth vary only in the speed ofthe needle moving up & down. Try them all and choose the one that youlike best.
2. Click on the Regulated Sewing icon.
A Dialog box shows settings and buttons.
Settings:Angle:This is the current angle that will be used when Channel Lock is turned on. Stitches Per Inch - Change with up/down arrows or usemouse & keyboard.Flip Angle: If Radiating Lines is not checked, this angle will replace thecurrent angle.
This is intended to be used with the channel lock feature. To flipthe angle, press and hold the shift button on the keypad, and press the Chan Lock button. To flip it back again, repeat the 2-buttonsequence.
Radiating Lines - When checked, CS uses a 2-button sequence toincrease the current angle by the number of degrees shown in FlipAngle. The belts must be engaged for this to work! To increase thecurrent angle, press and hold the Shift Button on the keypad, andpress the Chan Lock Button. Repeat this to increase it again.
Needle Position - If checked, the sewing head works like the 'Plus'machines, allowing a half stitch to be taken instead of a full singlestitch. Press the button once and the needle goes down & staysthere. Press it again to bring the needle back up. If it is down when stitching starts, it will go back down when it stops.
Buttons:Record Off means the motions are not being recorded, The Record 153
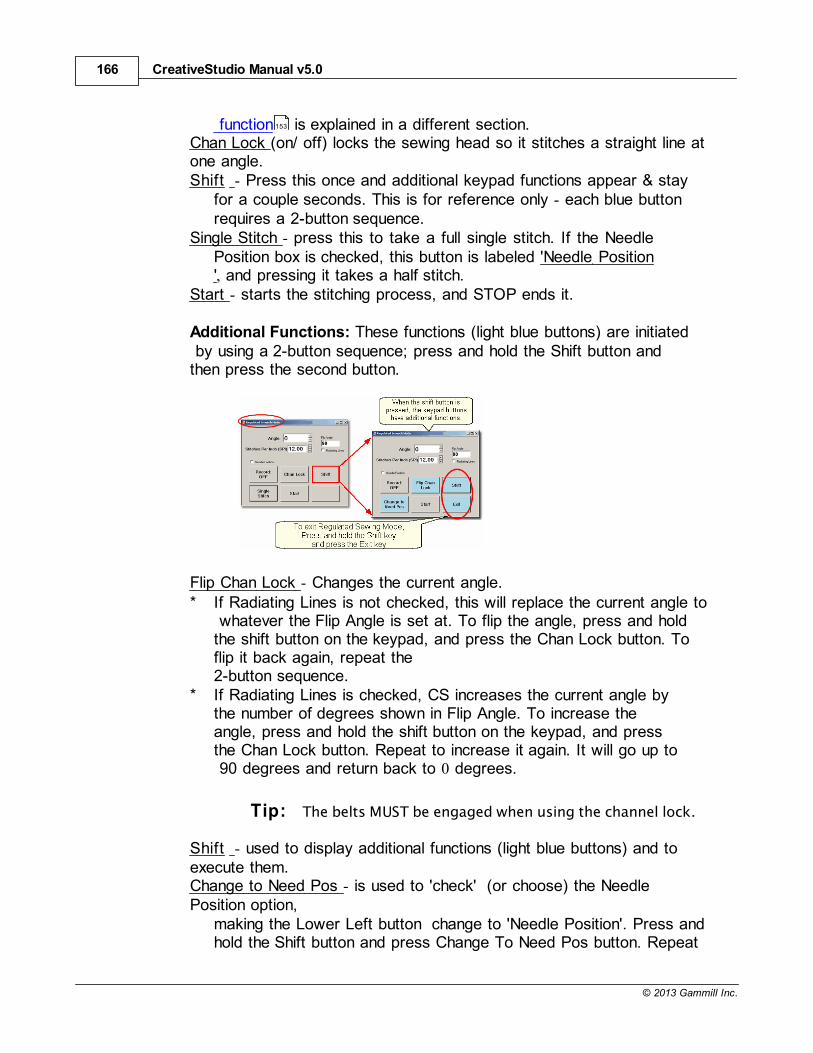
CreativeStudio Manual v5.0166
© 2013 Gammill Inc.
function is explained in a different section.Chan Lock (on/ off) locks the sewing head so it stitches a straight line atone angle.Shift - Press this once and additional keypad functions appear & stay
for a couple seconds. This is for reference only - each blue buttonrequires a 2-button sequence.
Single Stitch - press this to take a full single stitch. If the NeedlePosition box is checked, this button is labeled 'Needle Position', and pressing it takes a half stitch.
Start - starts the stitching process, and STOP ends it.
Additional Functions: These functions (light blue buttons) are initiated by using a 2-button sequence; press and hold the Shift button andthen press the second button.
Flip Chan Lock - Changes the current angle.* If Radiating Lines is not checked, this will replace the current angle to
whatever the Flip Angle is set at. To flip the angle, press and holdthe shift button on the keypad, and press the Chan Lock button. Toflip it back again, repeat the2-button sequence.
* If Radiating Lines is checked, CS increases the current angle bythe number of degrees shown in Flip Angle. To increase theangle, press and hold the shift button on the keypad, and pressthe Chan Lock button. Repeat to increase it again. It will go up to 90 degrees and return back to 0 degrees.
Tip: The belts MUST be engaged when using the channel lock.
Shift - used to display additional functions (light blue buttons) and toexecute them. Change to Need Pos - is used to 'check' (or choose) the NeedlePosition option,
making the Lower Left button change to 'Needle Position'. Press andhold the Shift button and press Change To Need Pos button. Repeat
153
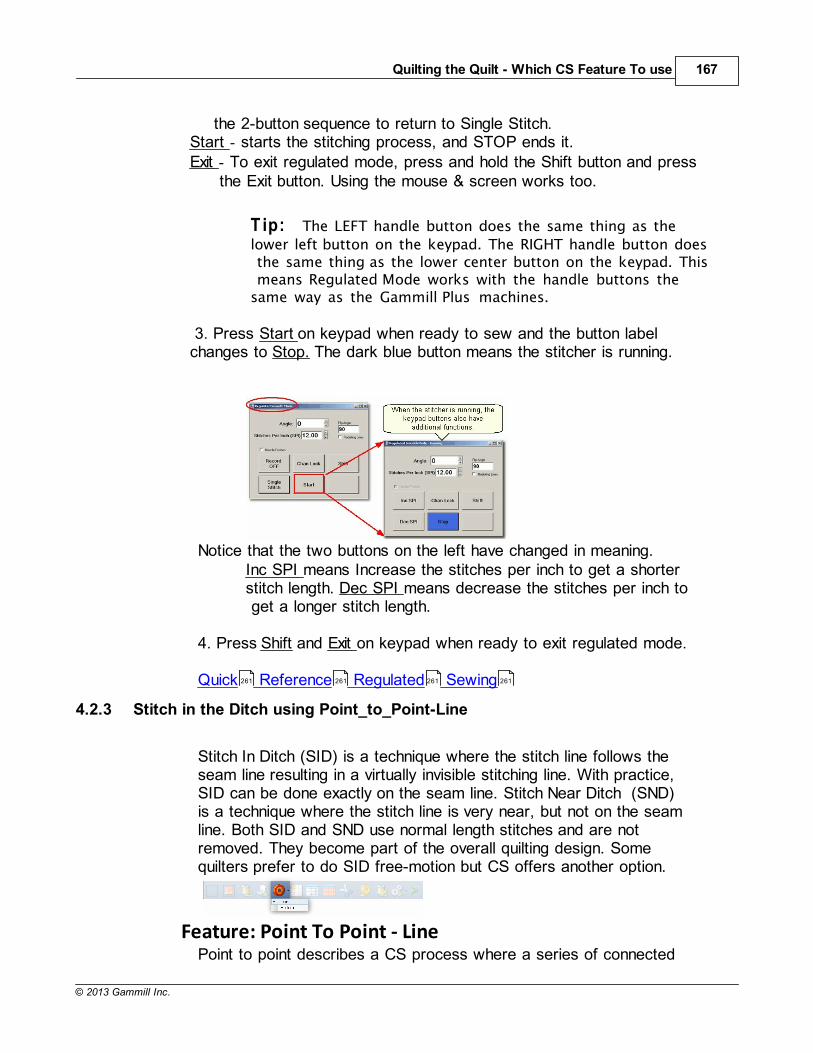
Quilting the Quilt - Which CS Feature To use 167
© 2013 Gammill Inc.
the 2-button sequence to return to Single Stitch.Start - starts the stitching process, and STOP ends it.Exit - To exit regulated mode, press and hold the Shift button and press
the Exit button. Using the mouse & screen works too.
T ip: The LEFT handle button does the same thing as the
lower left button on the keypad. The RIGHT handle button does the same thing as the lower center button on the keypad. This means Regulated Mode works with the handle buttons thesame way as the Gammill Plus machines.
3. Press Start on keypad when ready to sew and the button labelchanges to Stop. The dark blue button means the stitcher is running.
Notice that the two buttons on the left have changed in meaning.Inc SPI means Increase the stitches per inch to get a shorterstitch length. Dec SPI means decrease the stitches per inch to get a longer stitch length.
4. Press Shift and Exit on keypad when ready to exit regulated mode.
Quick Reference Regulated Sewing
4.2.3 Stitch in the Ditch using Point_to_Point-Line
Stitch In Ditch (SID) is a technique where the stitch line follows theseam line resulting in a virtually invisible stitching line. With practice,SID can be done exactly on the seam line. Stitch Near Ditch (SND)is a technique where the stitch line is very near, but not on the seamline. Both SID and SND use normal length stitches and are notremoved. They become part of the overall quilting design. Somequilters prefer to do SID free-motion but CS offers another option.
Feature: Point To Point - LinePoint to point describes a CS process where a series of connected
261 261 261 261
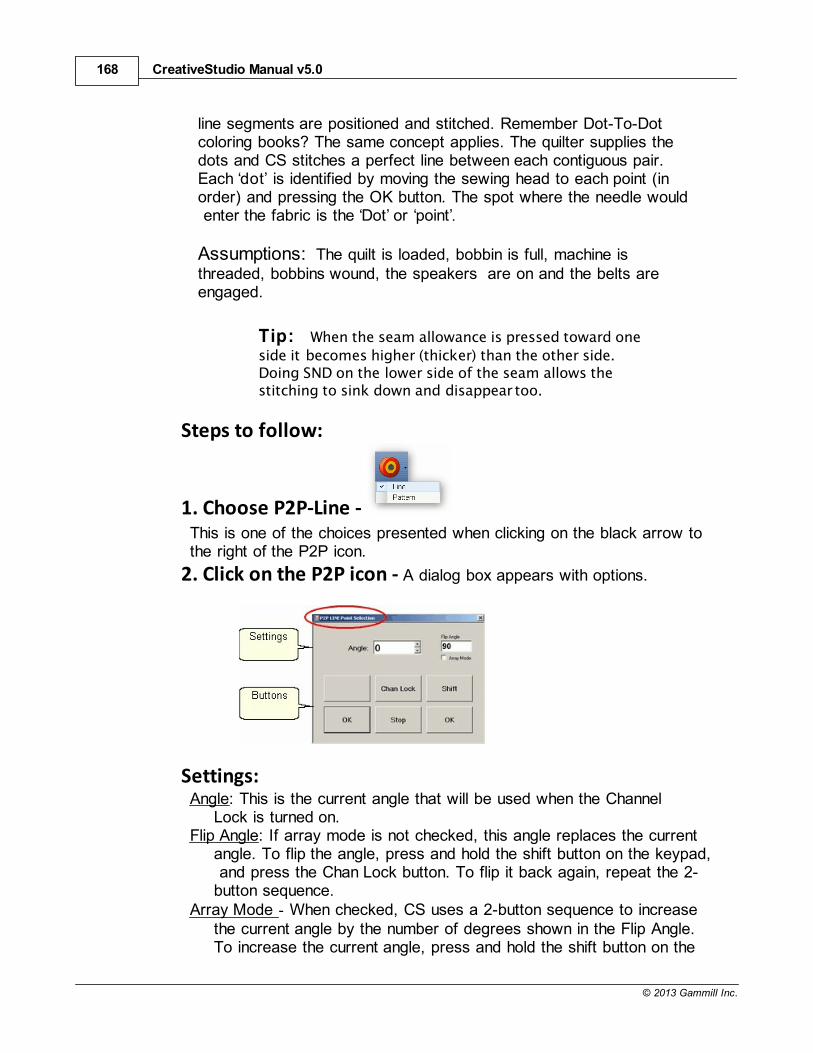
CreativeStudio Manual v5.0168
© 2013 Gammill Inc.
line segments are positioned and stitched. Remember Dot-To-Dotcoloring books? The same concept applies. The quilter supplies thedots and CS stitches a perfect line between each contiguous pair.Each dot’ is identified by moving the sewing head to each point (inorder) and pressing the OK button. The spot where the needle would enter the fabric is the Dot’ or point .
Assumptions: The quilt is loaded, bobbin is full, machine isthreaded, bobbins wound, the speakers are on and the belts areengaged.
Tip: When the seam allowance is pressed toward one
side it becomes higher (thicker) than the other side.Doing SND on the lower side of the seam allows thestitching to sink down and disappear too.
Steps to follow:
1. Choose P2P-Line - This is one of the choices presented when clicking on the black arrow tothe right of the P2P icon.
2. Click on the P2P icon - A dialog box appears with options.
Settings:Angle: This is the current angle that will be used when the Channel
Lock is turned on.Flip Angle: If array mode is not checked, this angle replaces the current
angle. To flip the angle, press and hold the shift button on the keypad, and press the Chan Lock button. To flip it back again, repeat the 2-button sequence.
Array Mode - When checked, CS uses a 2-button sequence to increasethe current angle by the number of degrees shown in the Flip Angle.To increase the current angle, press and hold the shift button on the
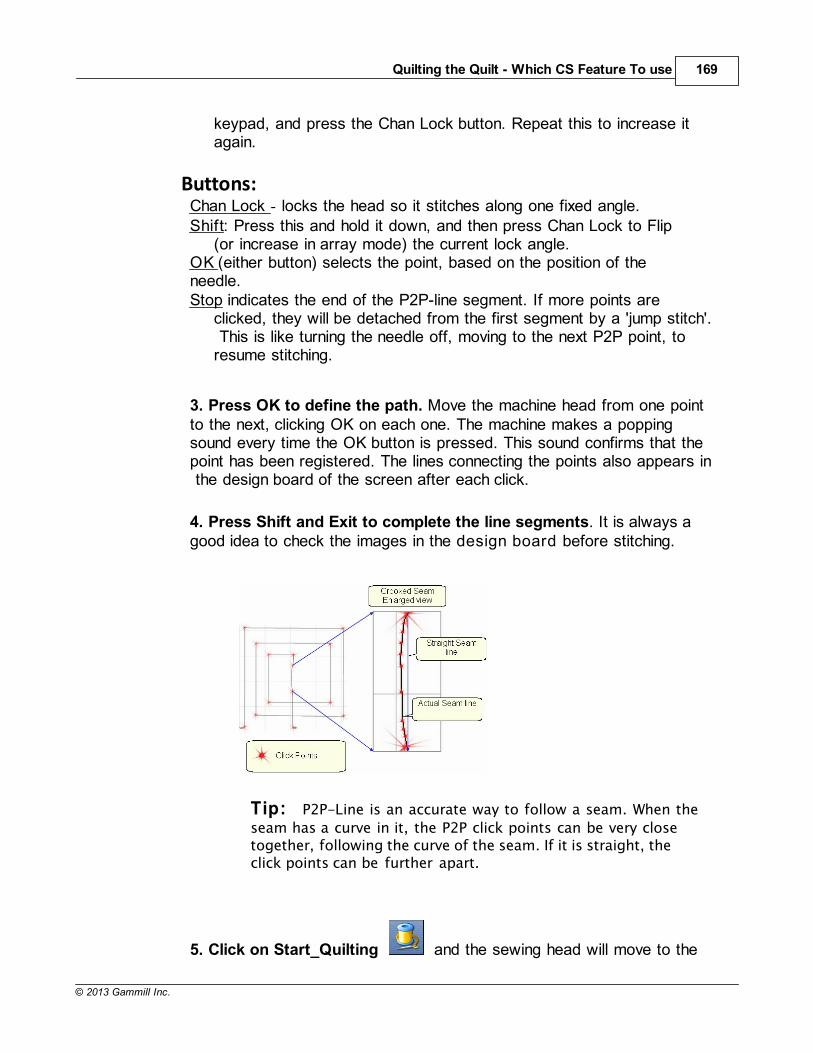
Quilting the Quilt - Which CS Feature To use 169
© 2013 Gammill Inc.
keypad, and press the Chan Lock button. Repeat this to increase itagain.
Buttons: Chan Lock - locks the head so it stitches along one fixed angle.Shift: Press this and hold it down, and then press Chan Lock to Flip
(or increase in array mode) the current lock angle.OK (either button) selects the point, based on the position of theneedle.Stop indicates the end of the P2P-line segment. If more points are
clicked, they will be detached from the first segment by a 'jump stitch'. This is like turning the needle off, moving to the next P2P point, toresume stitching.
3. Press OK to define the path. Move the machine head from one pointto the next, clicking OK on each one. The machine makes a poppingsound every time the OK button is pressed. This sound confirms that thepoint has been registered. The lines connecting the points also appears in the design board of the screen after each click.
4. Press Shift and Exit to complete the line segments. It is always agood idea to check the images in the design board before stitching.
Tip: P2P-Line is an accurate way to follow a seam. When the
seam has a curve in it, the P2P click points can be very closetogether, following the curve of the seam. If it is straight, theclick points can be further apart.
5. Click on Start_Quilting and the sewing head will move to the
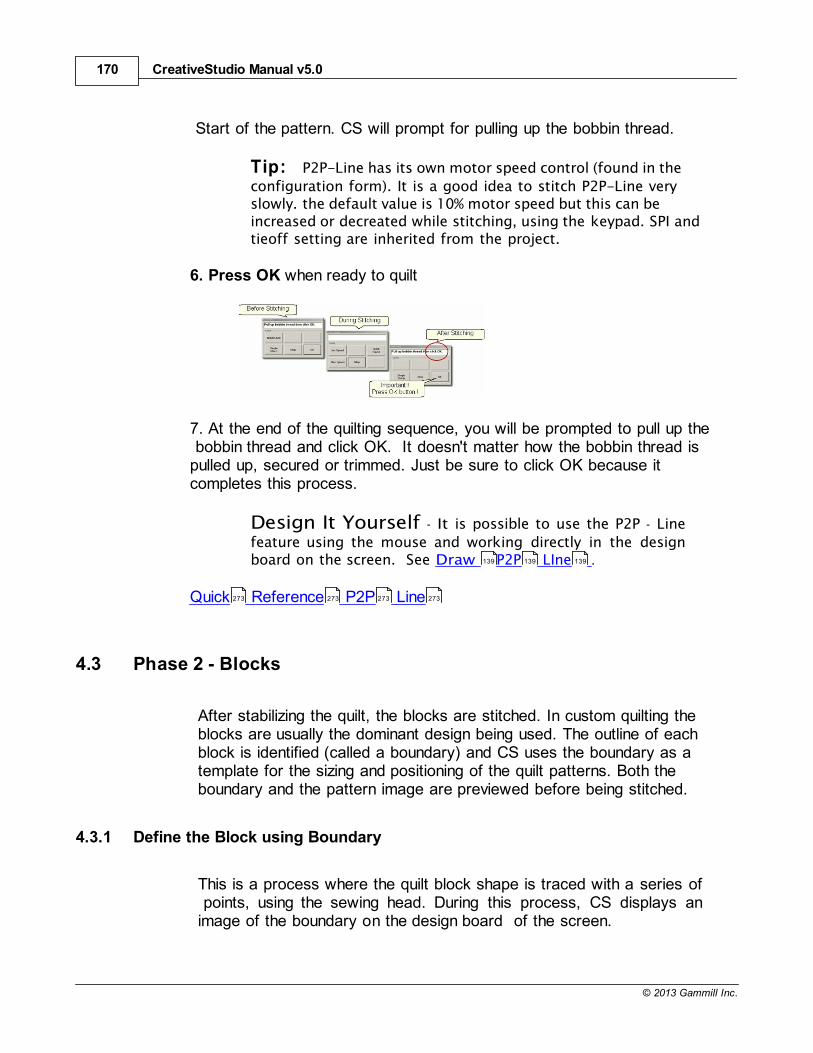
CreativeStudio Manual v5.0170
© 2013 Gammill Inc.
Start of the pattern. CS will prompt for pulling up the bobbin thread.
Tip: P2P-Line has its own motor speed control (found in the
configuration form). It is a good idea to stitch P2P-Line veryslowly. the default value is 10% motor speed but this can beincreased or decreated while stitching, using the keypad. SPI andtieoff setting are inherited from the project.
6. Press OK when ready to quilt
7. At the end of the quilting sequence, you will be prompted to pull up the bobbin thread and click OK. It doesn't matter how the bobbin thread ispulled up, secured or trimmed. Just be sure to click OK because itcompletes this process.
Design It Yourself - It is possible to use the P2P - Line
feature using the mouse and working directly in the designboard on the screen. See Draw P2P LIne .
Quick Reference P2P Line
4.3 Phase 2 - Blocks
After stabilizing the quilt, the blocks are stitched. In custom quilting theblocks are usually the dominant design being used. The outline of eachblock is identified (called a boundary) and CS uses the boundary as atemplate for the sizing and positioning of the quilt patterns. Both theboundary and the pattern image are previewed before being stitched.
4.3.1 Define the Block using Boundary
This is a process where the quilt block shape is traced with a series of points, using the sewing head. During this process, CS displays animage of the boundary on the design board of the screen.
139 139 139
273 273 273 273
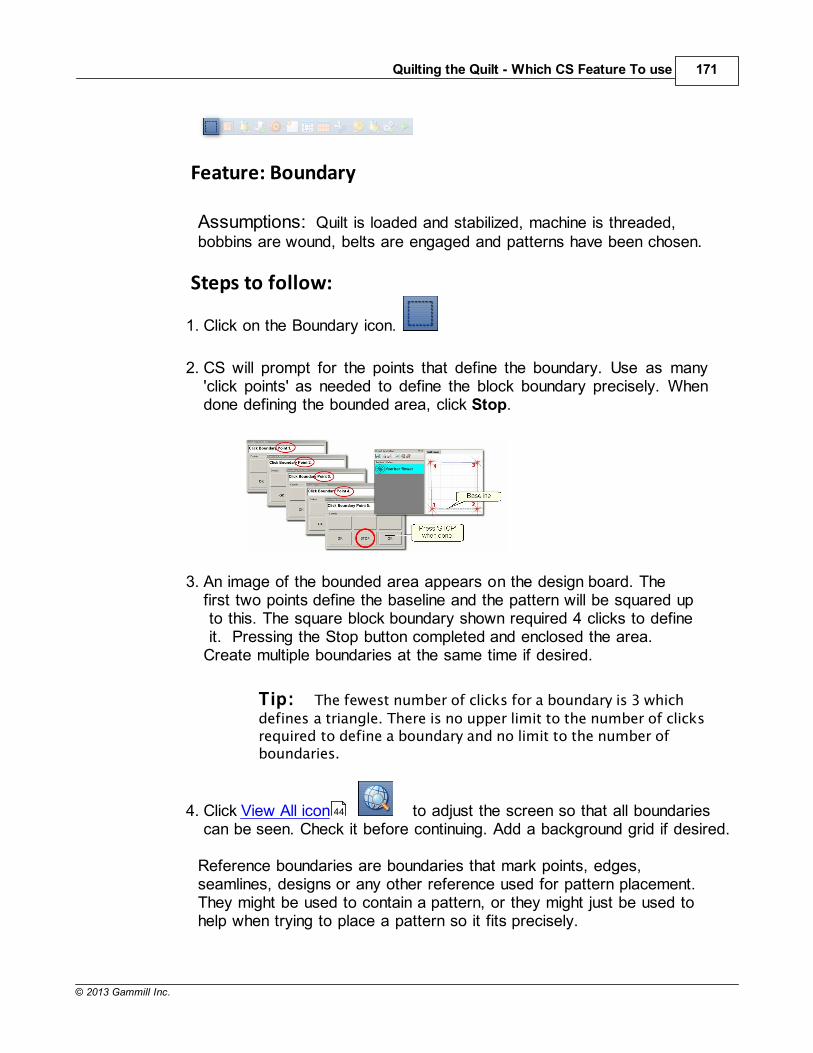
Quilting the Quilt - Which CS Feature To use 171
© 2013 Gammill Inc.
Feature: Boundary
Assumptions: Quilt is loaded and stabilized, machine is threaded,bobbins are wound, belts are engaged and patterns have been chosen.
Steps to follow:
1. Click on the Boundary icon.
2. CS will prompt for the points that define the boundary. Use as many'click points' as needed to define the block boundary precisely. Whendone defining the bounded area, click Stop.
3. An image of the bounded area appears on the design board. Thefirst two points define the baseline and the pattern will be squared up to this. The square block boundary shown required 4 clicks to define it. Pressing the Stop button completed and enclosed the area.Create multiple boundaries at the same time if desired.
Tip: The fewest number of clicks for a boundary is 3 which
defines a triangle. There is no upper limit to the number of clicksrequired to define a boundary and no limit to the number ofboundaries.
4. Click View All icon to adjust the screen so that all boundariescan be seen. Check it before continuing. Add a background grid if desired.
Reference boundaries are boundaries that mark points, edges,seamlines, designs or any other reference used for pattern placement.They might be used to contain a pattern, or they might just be used tohelp when trying to place a pattern so it fits precisely.
44
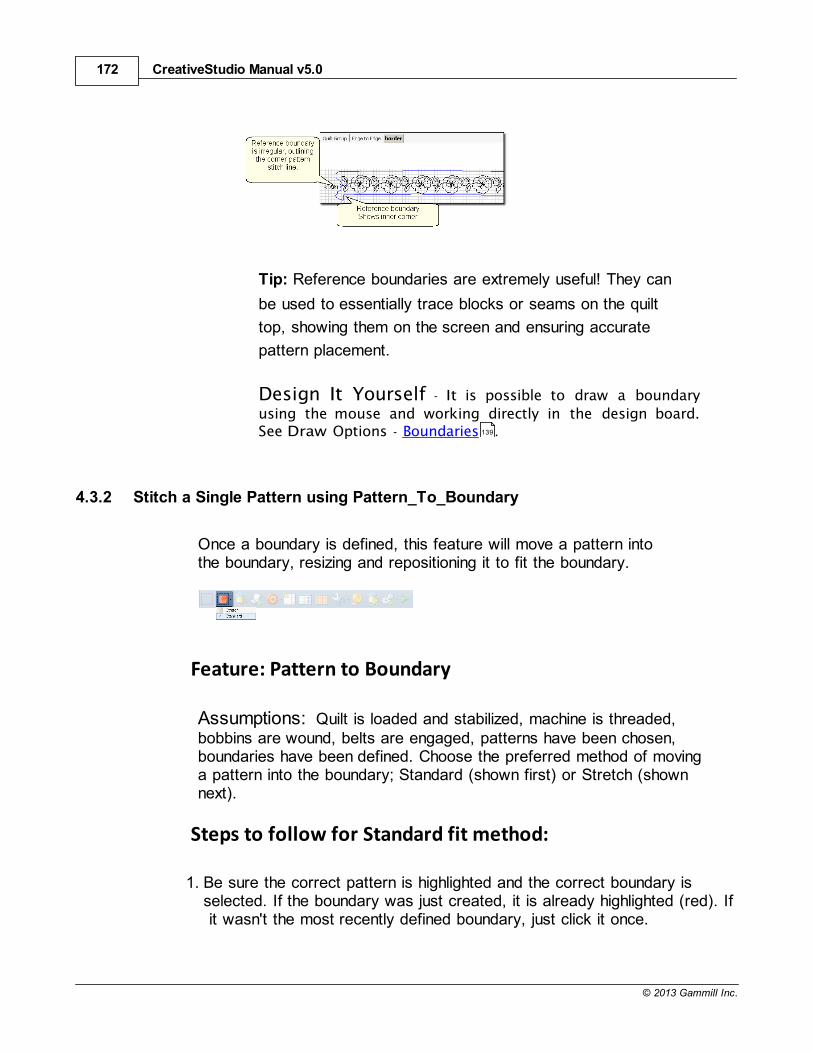
CreativeStudio Manual v5.0172
© 2013 Gammill Inc.
Tip: Reference boundaries are extremely useful! They can
be used to essentially trace blocks or seams on the quilt
top, showing them on the screen and ensuring accurate
pattern placement.
Design It Yourself - It is possible to draw a boundary
using the mouse and working directly in the design board.See Draw Options - Boundaries .
4.3.2 Stitch a Single Pattern using Pattern_To_Boundary
Once a boundary is defined, this feature will move a pattern intothe boundary, resizing and repositioning it to fit the boundary.
Feature: Pattern to Boundary
Assumptions: Quilt is loaded and stabilized, machine is threaded,bobbins are wound, belts are engaged, patterns have been chosen,boundaries have been defined. Choose the preferred method of movinga pattern into the boundary; Standard (shown first) or Stretch (shownnext).
Steps to follow for Standard fit method:
1. Be sure the correct pattern is highlighted and the correct boundary isselected. If the boundary was just created, it is already highlighted (red). If it wasn't the most recently defined boundary, just click it once.
139
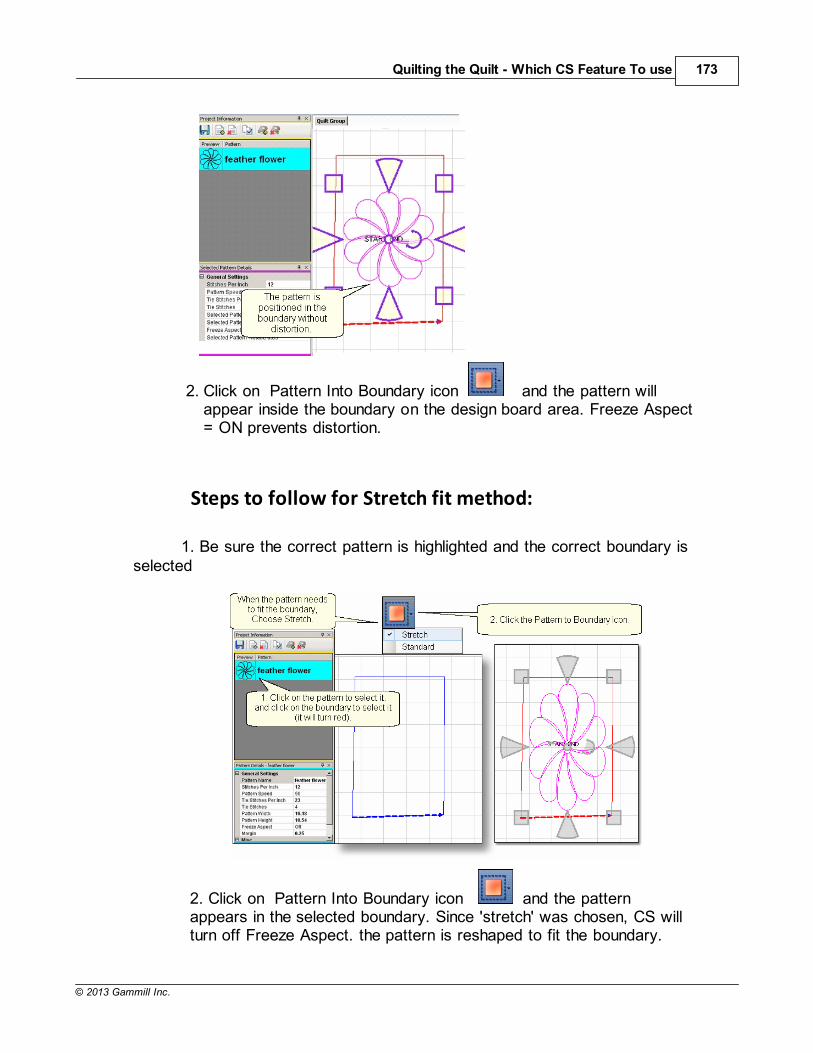
Quilting the Quilt - Which CS Feature To use 173
© 2013 Gammill Inc.
2. Click on Pattern Into Boundary icon and the pattern willappear inside the boundary on the design board area. Freeze Aspect= ON prevents distortion.
Steps to follow for Stretch fit method:
1. Be sure the correct pattern is highlighted and the correct boundary isselected
2. Click on Pattern Into Boundary icon and the patternappears in the selected boundary. Since 'stretch' was chosen, CS willturn off Freeze Aspect. the pattern is reshaped to fit the boundary.
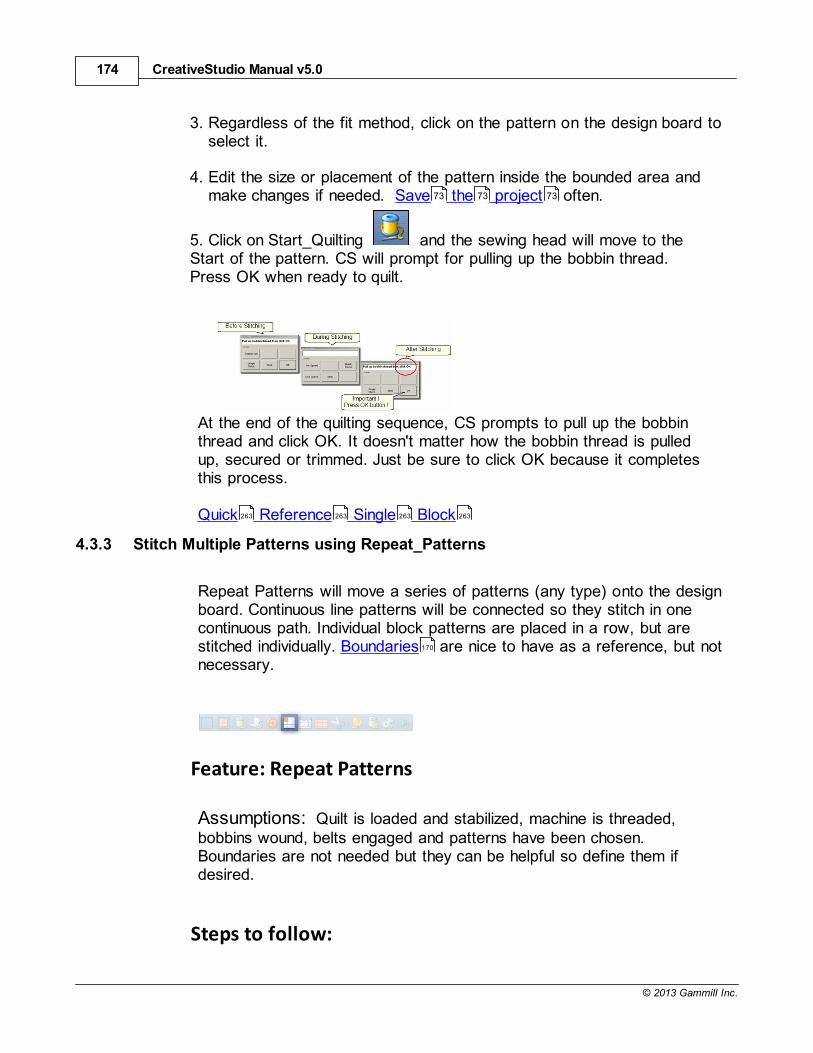
CreativeStudio Manual v5.0174
© 2013 Gammill Inc.
3. Regardless of the fit method, click on the pattern on the design board toselect it.
4. Edit the size or placement of the pattern inside the bounded area andmake changes if needed. Save the project often.
5. Click on Start_Quilting and the sewing head will move to theStart of the pattern. CS will prompt for pulling up the bobbin thread.Press OK when ready to quilt.
At the end of the quilting sequence, CS prompts to pull up the bobbinthread and click OK. It doesn't matter how the bobbin thread is pulledup, secured or trimmed. Just be sure to click OK because it completesthis process.
Quick Reference Single Block
4.3.3 Stitch Multiple Patterns using Repeat_Patterns
Repeat Patterns will move a series of patterns (any type) onto the designboard. Continuous line patterns will be connected so they stitch in onecontinuous path. Individual block patterns are placed in a row, but arestitched individually. Boundaries are nice to have as a reference, but notnecessary.
Feature: Repeat Patterns
Assumptions: Quilt is loaded and stabilized, machine is threaded,bobbins wound, belts engaged and patterns have been chosen.Boundaries are not needed but they can be helpful so define them ifdesired.
Steps to follow:
73 73 73
263 263 263 263
170
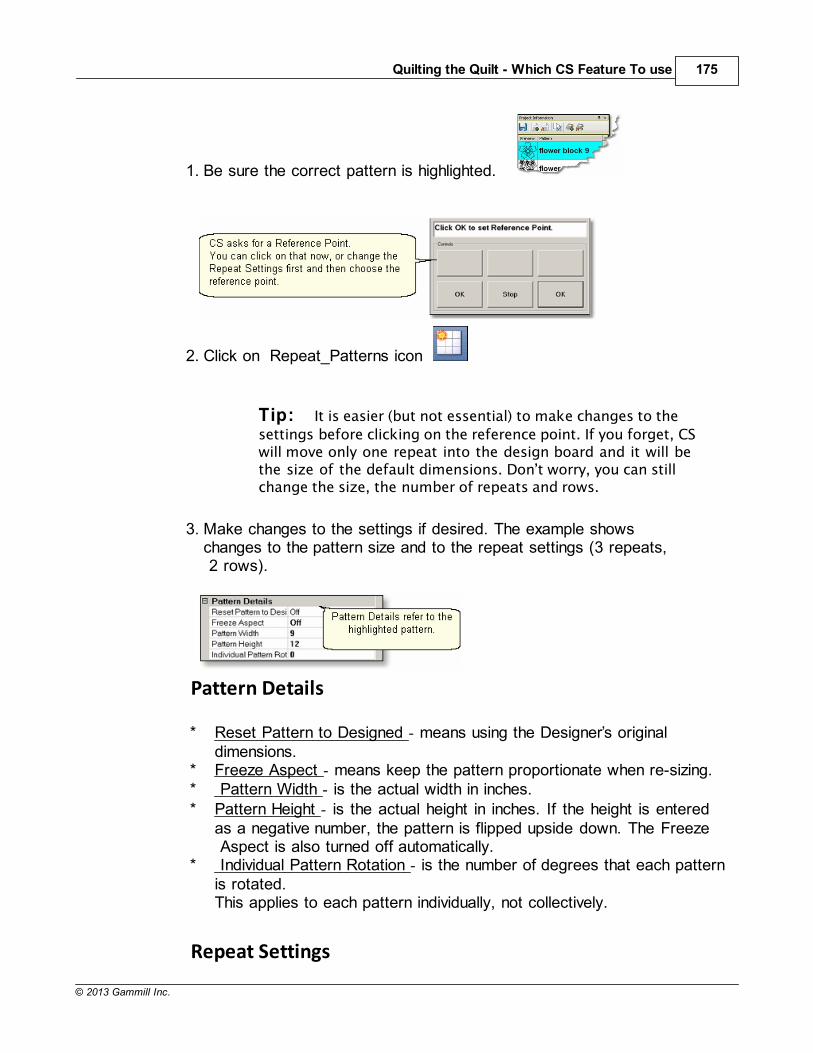
Quilting the Quilt - Which CS Feature To use 175
© 2013 Gammill Inc.
1. Be sure the correct pattern is highlighted.
2. Click on Repeat_Patterns icon
Tip: It is easier (but not essential) to make changes to the
settings before clicking on the reference point. If you forget, CSwill move only one repeat into the design board and it will bethe size of the default dimensions. Don’t worry, you can stillchange the size, the number of repeats and rows.
3. Make changes to the settings if desired. The example showschanges to the pattern size and to the repeat settings (3 repeats, 2 rows).
Pattern Details
* Reset Pattern to Designed - means using the Designer’s originaldimensions.
* Freeze Aspect - means keep the pattern proportionate when re-sizing.* Pattern Width - is the actual width in inches.* Pattern Height - is the actual height in inches. If the height is entered
as a negative number, the pattern is flipped upside down. The Freeze Aspect is also turned off automatically.
* Individual Pattern Rotation - is the number of degrees that each patternis rotated.This applies to each pattern individually, not collectively.
Repeat Settings
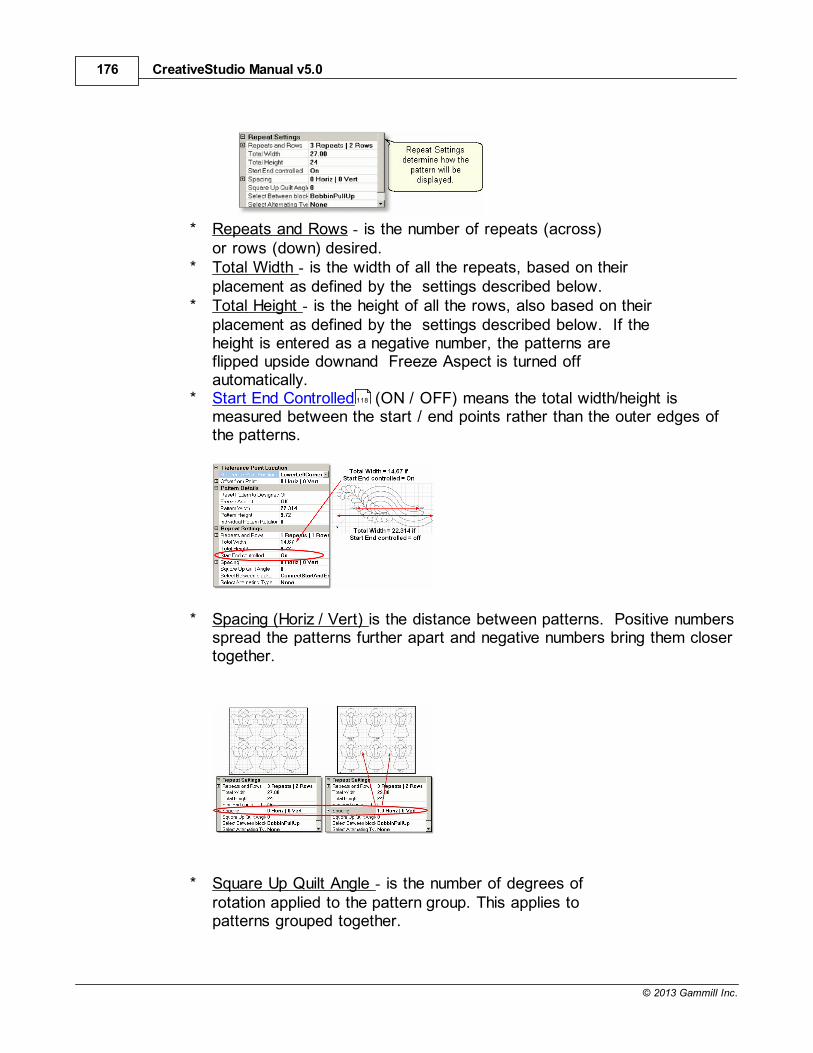
CreativeStudio Manual v5.0176
© 2013 Gammill Inc.
* Repeats and Rows - is the number of repeats (across) or rows (down) desired.
* Total Width - is the width of all the repeats, based on theirplacement as defined by the settings described below.
* Total Height - is the height of all the rows, also based on theirplacement as defined by the settings described below. If theheight is entered as a negative number, the patterns areflipped upside downand Freeze Aspect is turned offautomatically.
* Start End Controlled (ON / OFF) means the total width/height ismeasured between the start / end points rather than the outer edges ofthe patterns.
* Spacing (Horiz / Vert) is the distance between patterns. Positive numbersspread the patterns further apart and negative numbers bring them closertogether.
* Square Up Quilt Angle - is the number of degrees ofrotation applied to the pattern group. This applies topatterns grouped together.
118
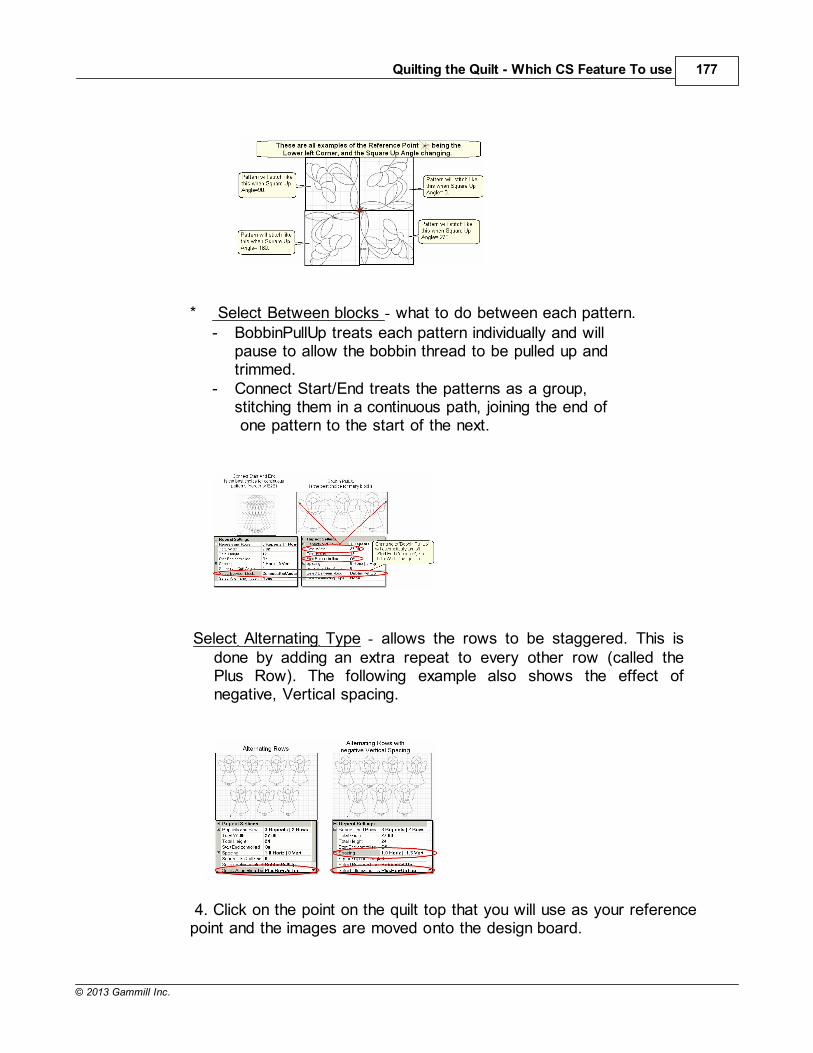
Quilting the Quilt - Which CS Feature To use 177
© 2013 Gammill Inc.
* Select Between blocks - what to do between each pattern.- BobbinPullUp treats each pattern individually and will
pause to allow the bobbin thread to be pulled up andtrimmed.
- Connect Start/End treats the patterns as a group,stitching them in a continuous path, joining the end of one pattern to the start of the next.
Select Alternating Type - allows the rows to be staggered. This isdone by adding an extra repeat to every other row (called thePlus Row). The following example also shows the effect ofnegative, Vertical spacing.
4. Click on the point on the quilt top that you will use as your referencepoint and the images are moved onto the design board.
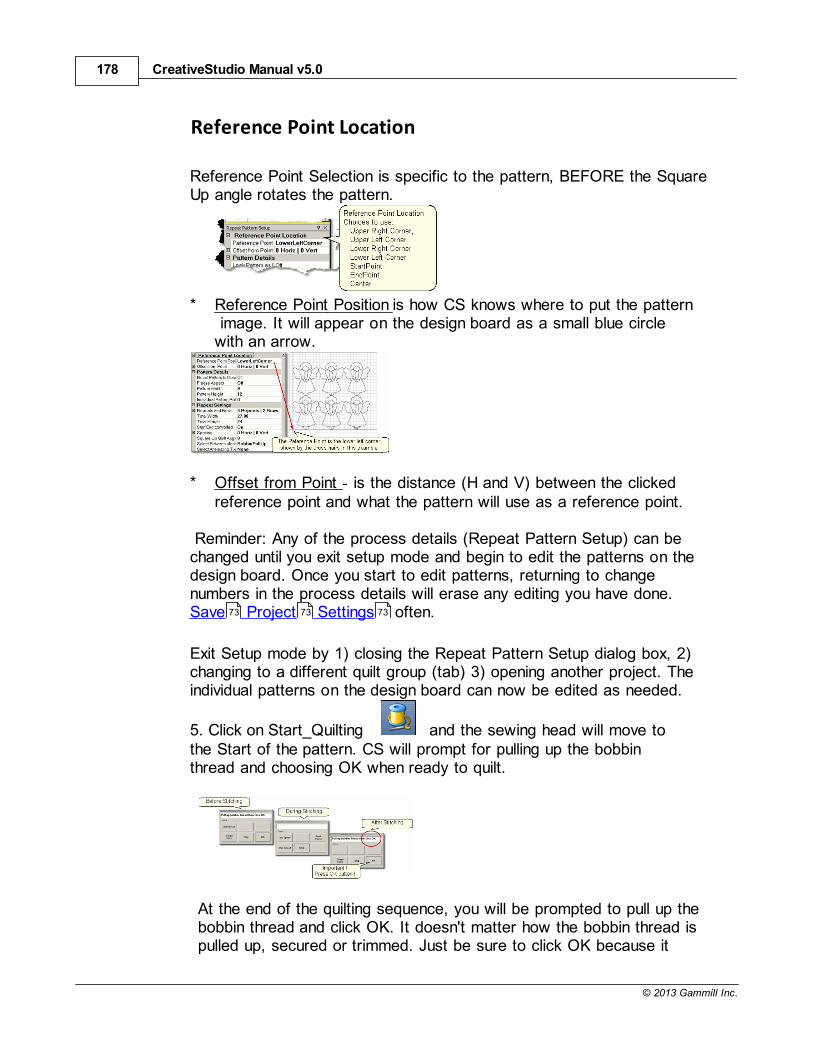
CreativeStudio Manual v5.0178
© 2013 Gammill Inc.
Reference Point Location
Reference Point Selection is specific to the pattern, BEFORE the SquareUp angle rotates the pattern.
* Reference Point Position is how CS knows where to put the pattern image. It will appear on the design board as a small blue circlewith an arrow.
* Offset from Point - is the distance (H and V) between the clickedreference point and what the pattern will use as a reference point.
Reminder: Any of the process details (Repeat Pattern Setup) can bechanged until you exit setup mode and begin to edit the patterns on thedesign board. Once you start to edit patterns, returning to changenumbers in the process details will erase any editing you have done. Save Project Settings often.
Exit Setup mode by 1) closing the Repeat Pattern Setup dialog box, 2)changing to a different quilt group (tab) 3) opening another project. Theindividual patterns on the design board can now be edited as needed.
5. Click on Start_Quilting and the sewing head will move tothe Start of the pattern. CS will prompt for pulling up the bobbinthread and choosing OK when ready to quilt.
At the end of the quilting sequence, you will be prompted to pull up thebobbin thread and click OK. It doesn't matter how the bobbin thread ispulled up, secured or trimmed. Just be sure to click OK because it
73 73 73
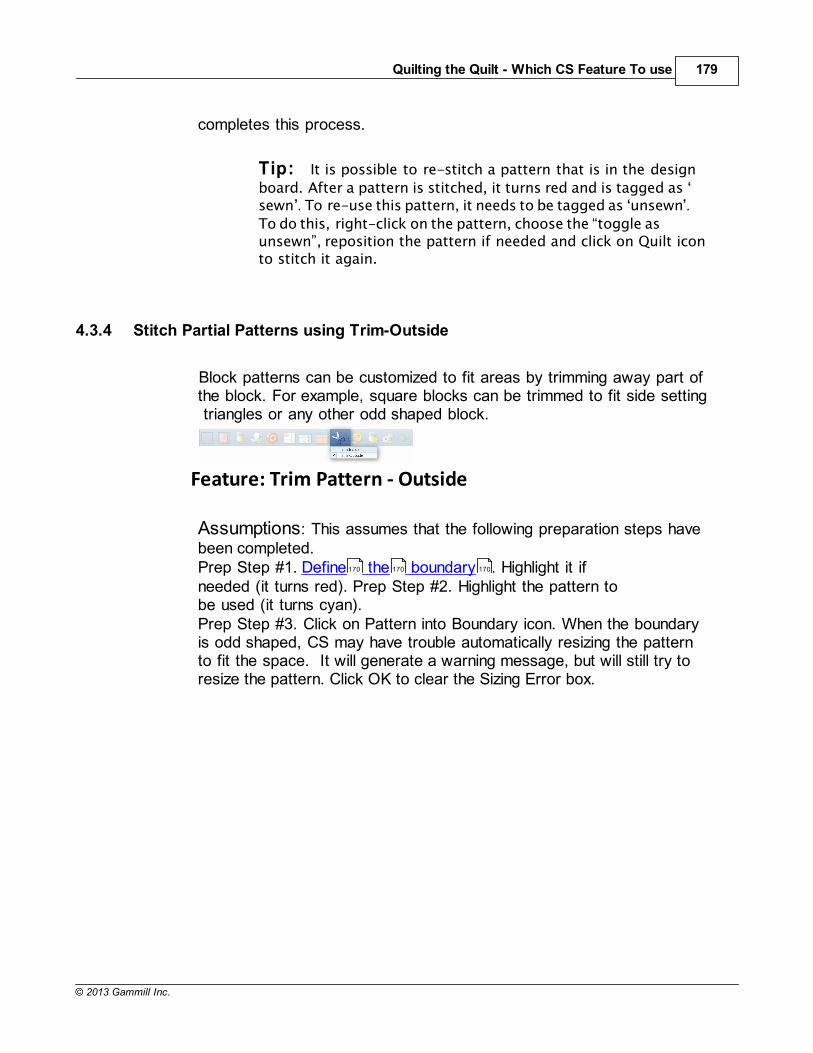
Quilting the Quilt - Which CS Feature To use 179
© 2013 Gammill Inc.
completes this process.
Tip: It is possible to re-stitch a pattern that is in the design
board. After a pattern is stitched, it turns red and is tagged as sewn . To re-use this pattern, it needs to be tagged as unsewn’.
To do this, right-click on the pattern, choose the “toggle asunsewn”, reposition the pattern if needed and click on Quilt iconto stitch it again.
4.3.4 Stitch Partial Patterns using Trim-Outside
Block patterns can be customized to fit areas by trimming away part ofthe block. For example, square blocks can be trimmed to fit side setting triangles or any other odd shaped block.
Feature: Trim Pattern - Outside
Assumptions: This assumes that the following preparation steps havebeen completed.Prep Step #1. Define the boundary . Highlight it ifneeded (it turns red). Prep Step #2. Highlight the pattern tobe used (it turns cyan).Prep Step #3. Click on Pattern into Boundary icon. When the boundaryis odd shaped, CS may have trouble automatically resizing the patternto fit the space. It will generate a warning message, but will still try toresize the pattern. Click OK to clear the Sizing Error box.
170 170 170

CreativeStudio Manual v5.0180
© 2013 Gammill Inc.
Prep Step #4. Click on the pattern and resize using the handles untilsatisfied.
Steps to follow:
1. Specify Trim Outside. This is one of the choices presented when clicking on the black arrow tothe right of the Trim icon.
2. Click on the Trim icon. CS will prompt for a Trim boundary.
Quilting the Quilt - Which CS Feature To use 181
© 2013 Gammill Inc.
3. Click Stop when done and CS will erase everything outside the boundary.
Design It Yourself - Steps 2 & 3 above could have been done
using the Draw command, Draw Trim choice. These DrawOptions don't include step-by-step prompts, but perform the
same function.
4. Reposition the pattern image. Click on the pattern(s) to select ifneeded. Use the resizing handles to re-size, rotate and reposition thepattern so it aligns to the Trim boundary. Save the project .
Tip: CS hasn't really deleted any of the pattern. It just won't
sew outside of your boundary. Therefore, you can click insideyour boundary to select the pattern and reposition it or resizeit until it fits perfectly.
139 139
139 139
73 73 73
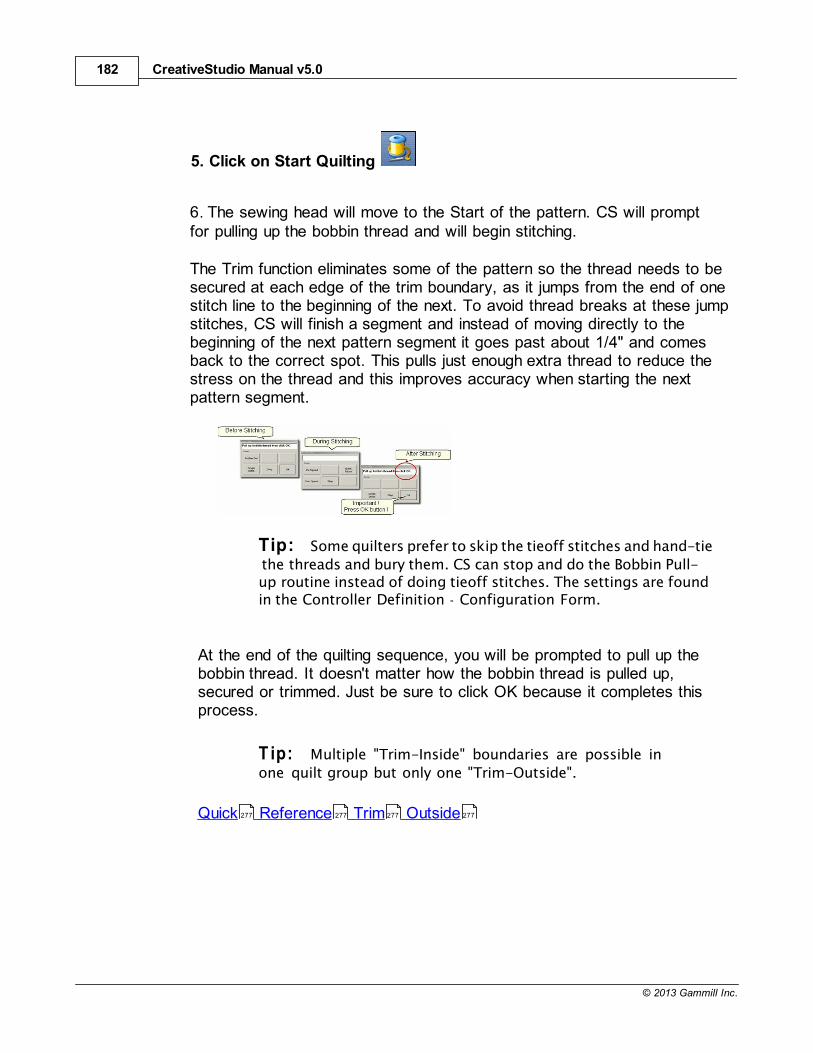
CreativeStudio Manual v5.0182
© 2013 Gammill Inc.
5. Click on Start Quilting
6. The sewing head will move to the Start of the pattern. CS will promptfor pulling up the bobbin thread and will begin stitching.
The Trim function eliminates some of the pattern so the thread needs to besecured at each edge of the trim boundary, as it jumps from the end of onestitch line to the beginning of the next. To avoid thread breaks at these jumpstitches, CS will finish a segment and instead of moving directly to thebeginning of the next pattern segment it goes past about 1/4" and comesback to the correct spot. This pulls just enough extra thread to reduce thestress on the thread and this improves accuracy when starting the nextpattern segment.
Tip: Some quilters prefer to skip the tieoff stitches and hand-tie
the threads and bury them. CS can stop and do the Bobbin Pull-up routine instead of doing tieoff stitches. The settings are foundin the Controller Definition - Configuration Form.
At the end of the quilting sequence, you will be prompted to pull up thebobbin thread. It doesn't matter how the bobbin thread is pulled up,secured or trimmed. Just be sure to click OK because it completes thisprocess.
T ip: Multiple "Trim-Inside" boundaries are possible in
one quilt group but only one "Trim-Outside".
Quick Reference Trim Outside277 277 277 277
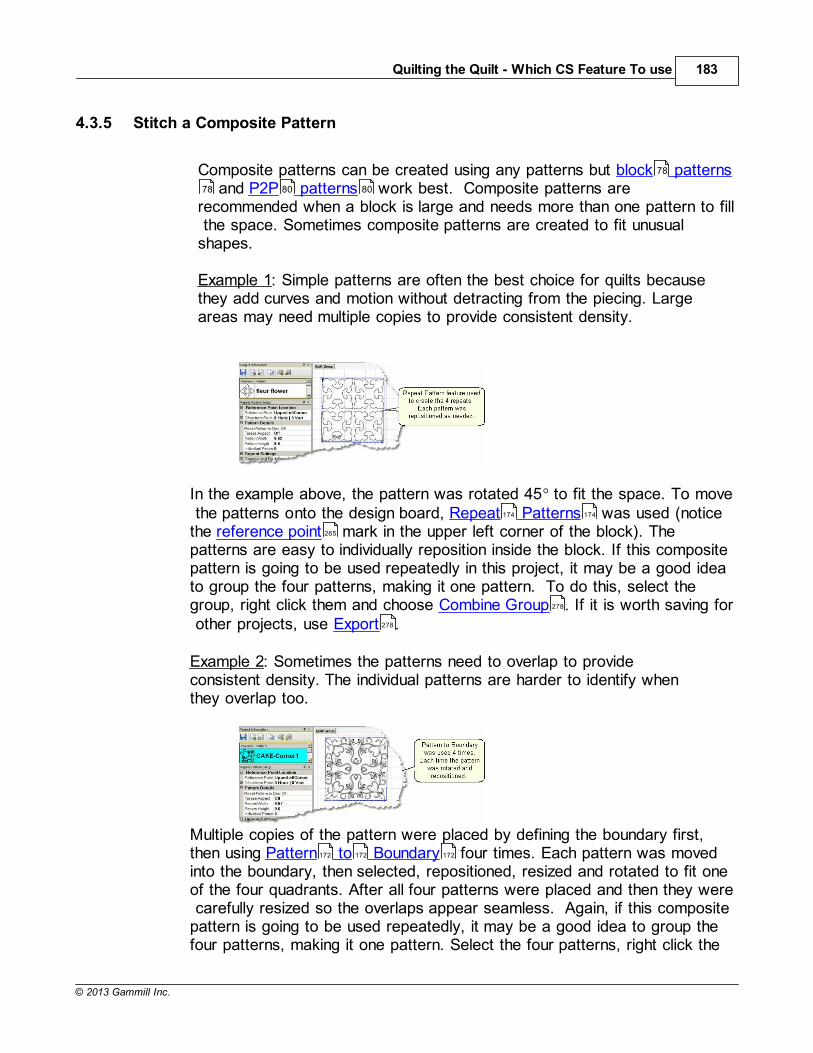
Quilting the Quilt - Which CS Feature To use 183
© 2013 Gammill Inc.
4.3.5 Stitch a Composite Pattern
Composite patterns can be created using any patterns but block patterns and P2P patterns work best. Composite patterns are
recommended when a block is large and needs more than one pattern to fill the space. Sometimes composite patterns are created to fit unusualshapes.
Example 1: Simple patterns are often the best choice for quilts becausethey add curves and motion without detracting from the piecing. Largeareas may need multiple copies to provide consistent density.
In the example above, the pattern was rotated 45° to fit the space. To move the patterns onto the design board, Repeat Patterns was used (noticethe reference point mark in the upper left corner of the block). Thepatterns are easy to individually reposition inside the block. If this compositepattern is going to be used repeatedly in this project, it may be a good ideato group the four patterns, making it one pattern. To do this, select thegroup, right click them and choose Combine Group . If it is worth saving for other projects, use Export .
Example 2: Sometimes the patterns need to overlap to provideconsistent density. The individual patterns are harder to identify whenthey overlap too.
Multiple copies of the pattern were placed by defining the boundary first,then using Pattern to Boundary four times. Each pattern was movedinto the boundary, then selected, repositioned, resized and rotated to fit oneof the four quadrants. After all four patterns were placed and then they were carefully resized so the overlaps appear seamless. Again, if this compositepattern is going to be used repeatedly, it may be a good idea to group thefour patterns, making it one pattern. Select the four patterns, right click the
78
78 80 80
174 174
265
278
278
172 172 172
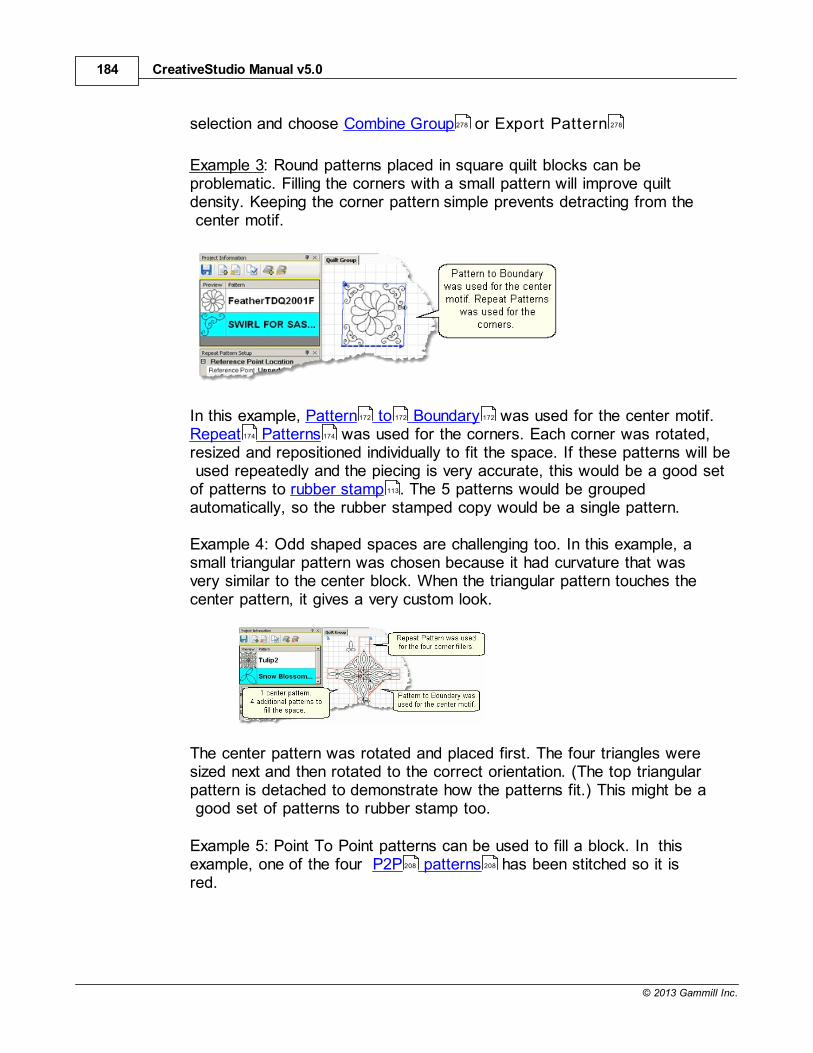
CreativeStudio Manual v5.0184
© 2013 Gammill Inc.
selection and choose Combine Group or Export Pattern
Example 3: Round patterns placed in square quilt blocks can beproblematic. Filling the corners with a small pattern will improve quiltdensity. Keeping the corner pattern simple prevents detracting from the center motif.
In this example, Pattern to Boundary was used for the center motif.Repeat Patterns was used for the corners. Each corner was rotated, resized and repositioned individually to fit the space. If these patterns will be used repeatedly and the piecing is very accurate, this would be a good setof patterns to rubber stamp . The 5 patterns would be groupedautomatically, so the rubber stamped copy would be a single pattern.
Example 4: Odd shaped spaces are challenging too. In this example, asmall triangular pattern was chosen because it had curvature that wasvery similar to the center block. When the triangular pattern touches thecenter pattern, it gives a very custom look.
The center pattern was rotated and placed first. The four triangles weresized next and then rotated to the correct orientation. (The top triangularpattern is detached to demonstrate how the patterns fit.) This might be a good set of patterns to rubber stamp too.
Example 5: Point To Point patterns can be used to fill a block. In thisexample, one of the four P2P patterns has been stitched so it isred.
278 278
172 172 172
174 174
113
208 208
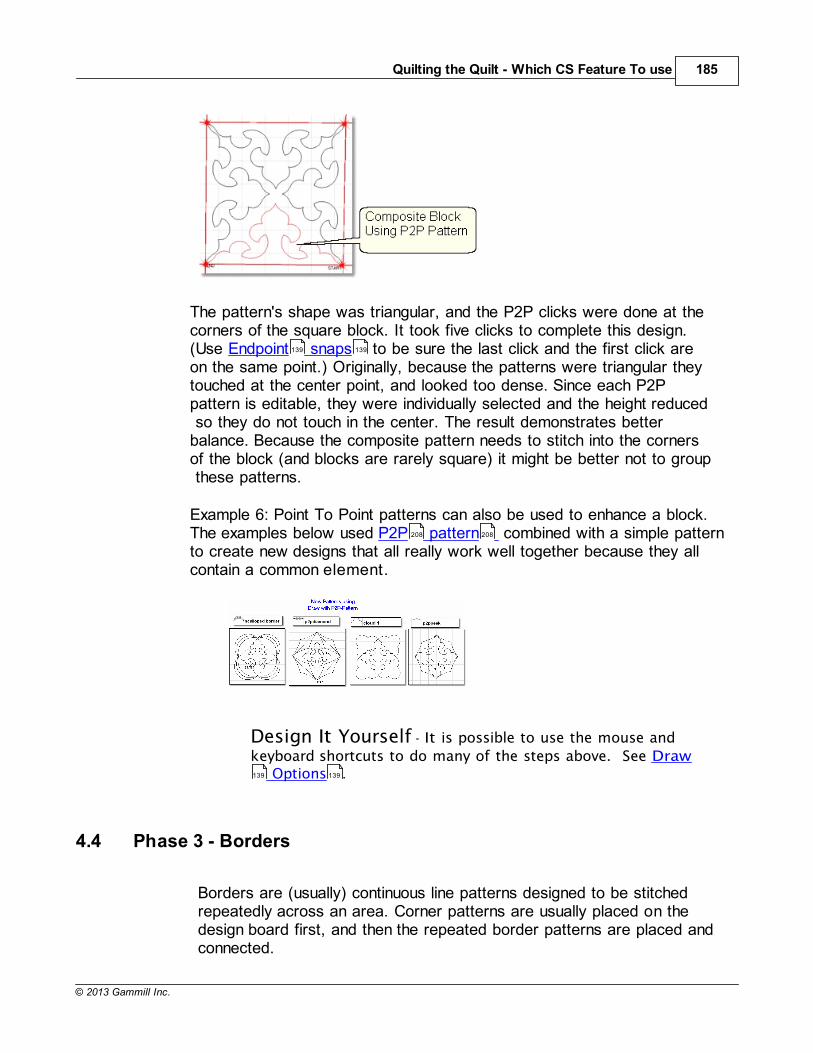
Quilting the Quilt - Which CS Feature To use 185
© 2013 Gammill Inc.
The pattern's shape was triangular, and the P2P clicks were done at thecorners of the square block. It took five clicks to complete this design.(Use Endpoint snaps to be sure the last click and the first click areon the same point.) Originally, because the patterns were triangular theytouched at the center point, and looked too dense. Since each P2Ppattern is editable, they were individually selected and the height reduced so they do not touch in the center. The result demonstrates betterbalance. Because the composite pattern needs to stitch into the cornersof the block (and blocks are rarely square) it might be better not to group these patterns.
Example 6: Point To Point patterns can also be used to enhance a block.The examples below used P2P pattern combined with a simple patternto create new designs that all really work well together because they allcontain a common element.
Design It Yourself - It is possible to use the mouse and
keyboard shortcuts to do many of the steps above. See Draw Options .
4.4 Phase 3 - Borders
Borders are (usually) continuous line patterns designed to be stitchedrepeatedly across an area. Corner patterns are usually placed on thedesign board first, and then the repeated border patterns are placed andconnected.
139 139
208 208
139 139
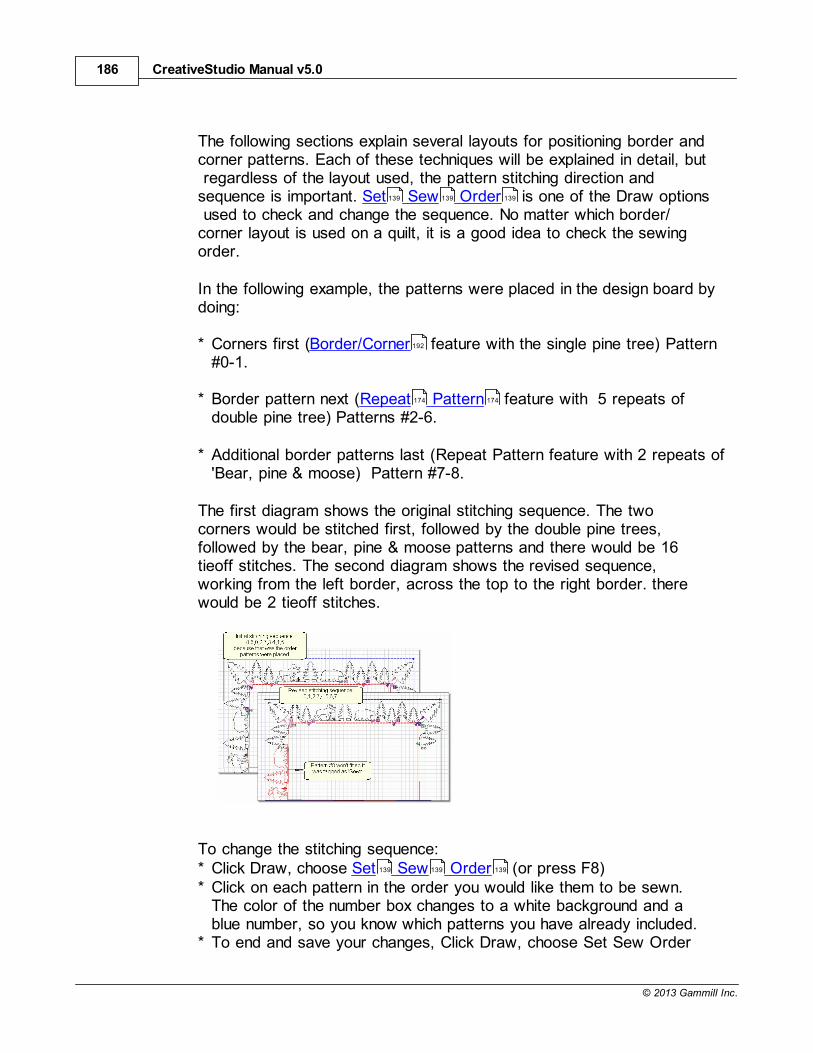
CreativeStudio Manual v5.0186
© 2013 Gammill Inc.
The following sections explain several layouts for positioning border andcorner patterns. Each of these techniques will be explained in detail, but regardless of the layout used, the pattern stitching direction andsequence is important. Set Sew Order is one of the Draw options used to check and change the sequence. No matter which border/corner layout is used on a quilt, it is a good idea to check the sewingorder.
In the following example, the patterns were placed in the design board bydoing:
* Corners first (Border/Corner feature with the single pine tree) Pattern#0-1.
* Border pattern next (Repeat Pattern feature with 5 repeats ofdouble pine tree) Patterns #2-6.
* Additional border patterns last (Repeat Pattern feature with 2 repeats of'Bear, pine & moose) Pattern #7-8.
The first diagram shows the original stitching sequence. The twocorners would be stitched first, followed by the double pine trees,followed by the bear, pine & moose patterns and there would be 16tieoff stitches. The second diagram shows the revised sequence,working from the left border, across the top to the right border. therewould be 2 tieoff stitches.
To change the stitching sequence:* Click Draw, choose Set Sew Order (or press F8)* Click on each pattern in the order you would like them to be sewn.
The color of the number box changes to a white background and ablue number, so you know which patterns you have already included.
* To end and save your changes, Click Draw, choose Set Sew Order
139 139 139
192
174 174
139 139 139
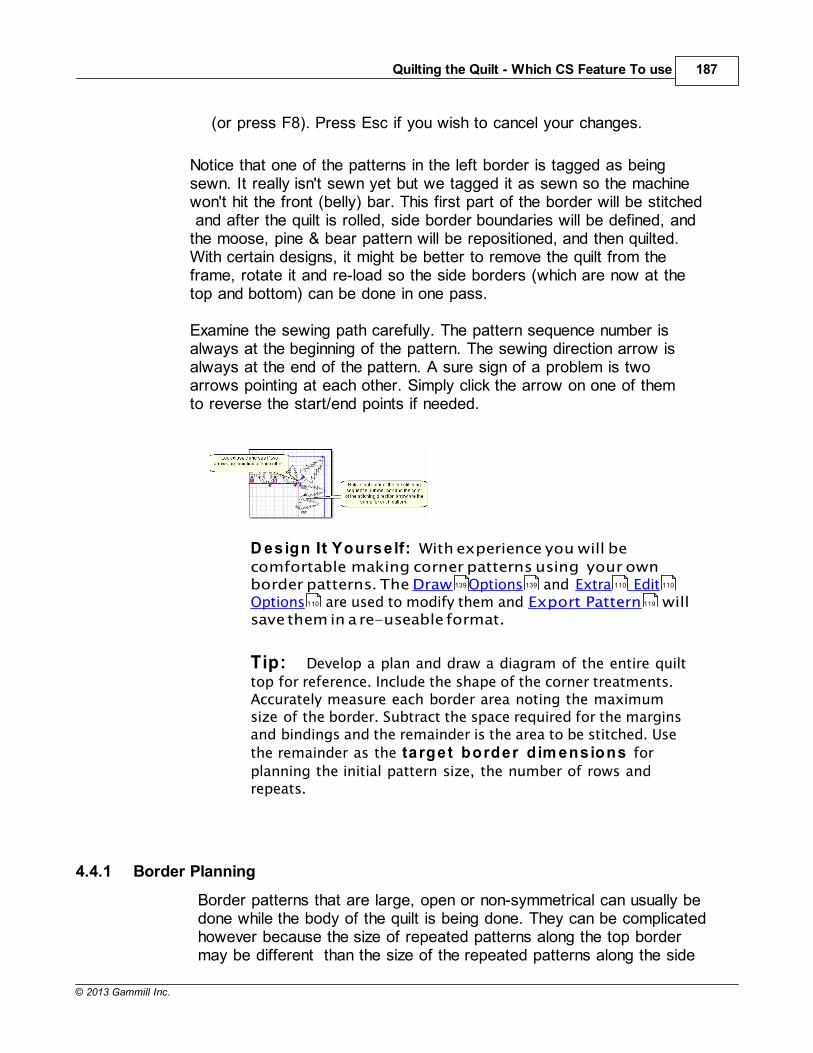
Quilting the Quilt - Which CS Feature To use 187
© 2013 Gammill Inc.
(or press F8). Press Esc if you wish to cancel your changes.
Notice that one of the patterns in the left border is tagged as beingsewn. It really isn't sewn yet but we tagged it as sewn so the machinewon't hit the front (belly) bar. This first part of the border will be stitched and after the quilt is rolled, side border boundaries will be defined, andthe moose, pine & bear pattern will be repositioned, and then quilted.With certain designs, it might be better to remove the quilt from theframe, rotate it and re-load so the side borders (which are now at thetop and bottom) can be done in one pass.
Examine the sewing path carefully. The pattern sequence number isalways at the beginning of the pattern. The sewing direction arrow isalways at the end of the pattern. A sure sign of a problem is twoarrows pointing at each other. Simply click the arrow on one of themto reverse the start/end points if needed.
D esign It Yourse lf: With experience you will be
comfortable making corner patterns using your ownborder patterns. The Draw Options and Extra EditOptions are used to modify them and Export Pattern willsave them in a re-useable format.
Tip: Develop a plan and draw a diagram of the entire quilt
top for reference. Include the shape of the corner treatments.Accurately measure each border area noting the maximumsize of the border. Subtract the space required for the marginsand bindings and the remainder is the area to be stitched. Use
the remainder as the target border d im ensions for
planning the initial pattern size, the number of rows andrepeats.
4.4.1 Border Planning
Border patterns that are large, open or non-symmetrical can usually bedone while the body of the quilt is being done. They can be complicatedhowever because the size of repeated patterns along the top bordermay be different than the size of the repeated patterns along the side
139 139 110 110
110 119
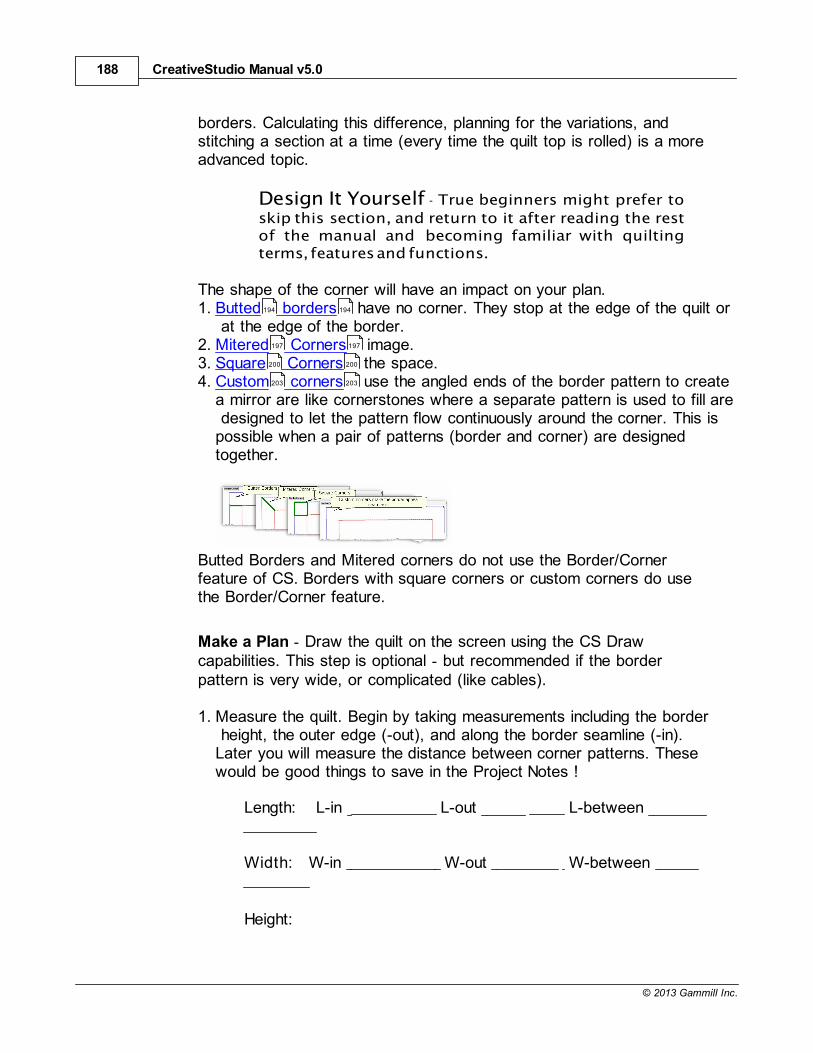
CreativeStudio Manual v5.0188
© 2013 Gammill Inc.
borders. Calculating this difference, planning for the variations, andstitching a section at a time (every time the quilt top is rolled) is a moreadvanced topic.
Design It Yourself - True beginners might prefer to
skip this section, and return to it after reading the restof the manual and becoming familiar with quiltingterms, features and functions.
The shape of the corner will have an impact on your plan.1. Butted borders have no corner. They stop at the edge of the quilt or
at the edge of the border.2. Mitered Corners image.3. Square Corners the space.4. Custom corners use the angled ends of the border pattern to create
a mirror are like cornerstones where a separate pattern is used to fill are designed to let the pattern flow continuously around the corner. This ispossible when a pair of patterns (border and corner) are designedtogether.
Butted Borders and Mitered corners do not use the Border/Cornerfeature of CS. Borders with square corners or custom corners do usethe Border/Corner feature.
Make a Plan - Draw the quilt on the screen using the CS Drawcapabilities. This step is optional - but recommended if the borderpattern is very wide, or complicated (like cables).
1. Measure the quilt. Begin by taking measurements including the border height, the outer edge (-out), and along the border seamline (-in).Later you will measure the distance between corner patterns. Thesewould be good things to save in the Project Notes !
Length: L-in L-out L-between
Width: W-in W-out W-between
Height:
194 194
197 197
200 200
203 203
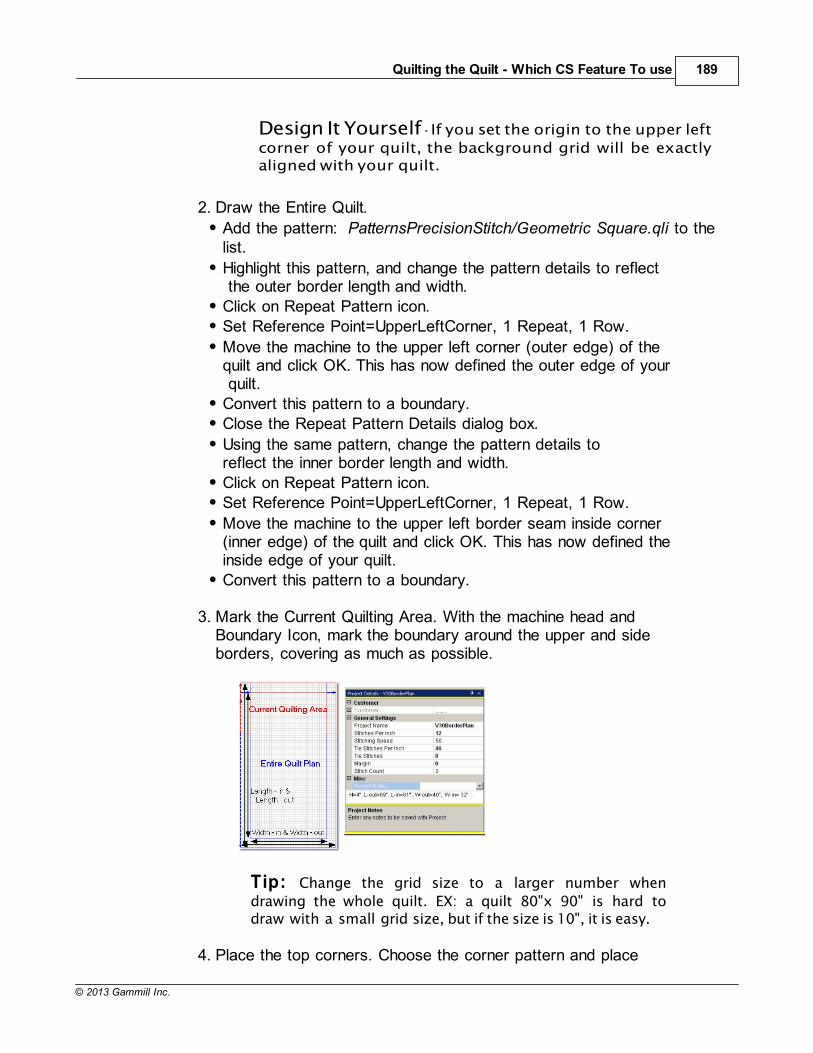
Quilting the Quilt - Which CS Feature To use 189
© 2013 Gammill Inc.
Design It Yourself - If you set the origin to the upper left
corner of your quilt, the background grid will be exactlyaligned with your quilt.
2. Draw the Entire Quilt.
Add the pattern: PatternsPrecisionStitch/Geometric Square.qli to thelist.
Highlight this pattern, and change the pattern details to reflect the outer border length and width.Click on Repeat Pattern icon.Set Reference Point=UpperLeftCorner, 1 Repeat, 1 Row.
Move the machine to the upper left corner (outer edge) of thequilt and click OK. This has now defined the outer edge of your quilt.Convert this pattern to a boundary.Close the Repeat Pattern Details dialog box.
Using the same pattern, change the pattern details toreflect the inner border length and width.Click on Repeat Pattern icon.Set Reference Point=UpperLeftCorner, 1 Repeat, 1 Row.
Move the machine to the upper left border seam inside corner(inner edge) of the quilt and click OK. This has now defined theinside edge of your quilt.Convert this pattern to a boundary.
3. Mark the Current Quilting Area. With the machine head andBoundary Icon, mark the boundary around the upper and sideborders, covering as much as possible.
Tip: Change the grid size to a larger number when
drawing the whole quilt. EX: a quilt 80"x 90" is hard todraw with a small grid size, but if the size is 10", it is easy.
4. Place the top corners. Choose the corner pattern and place
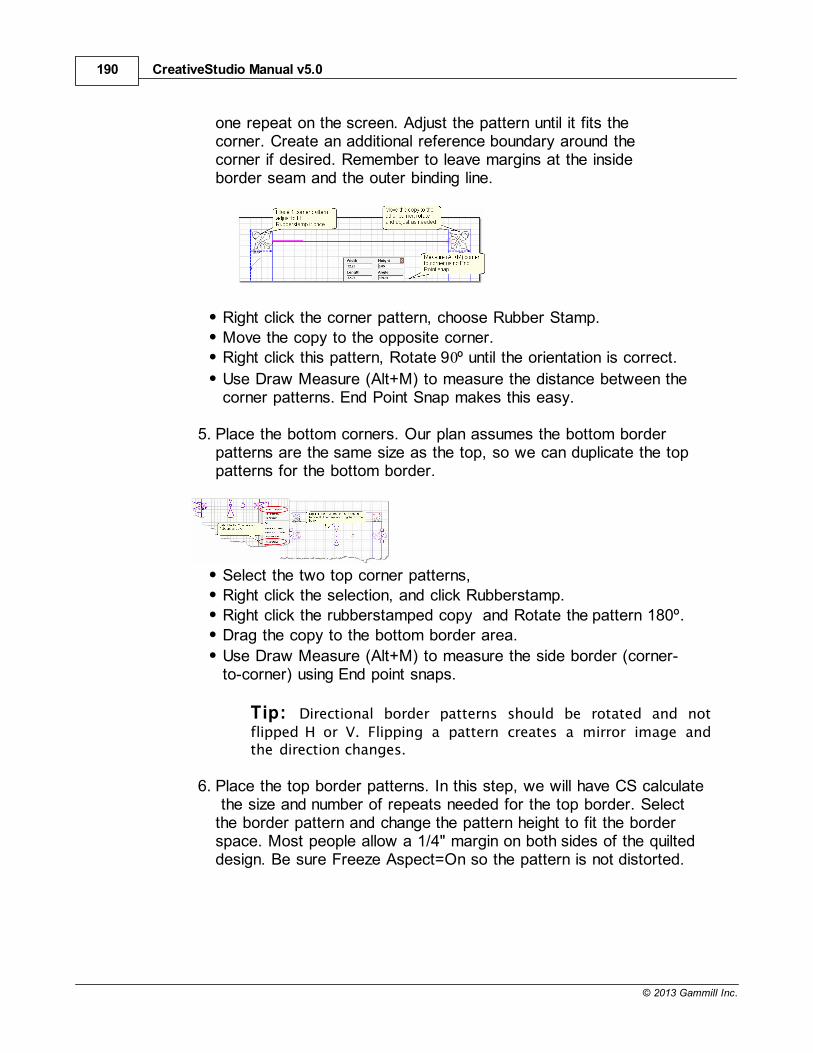
CreativeStudio Manual v5.0190
© 2013 Gammill Inc.
one repeat on the screen. Adjust the pattern until it fits thecorner. Create an additional reference boundary around thecorner if desired. Remember to leave margins at the insideborder seam and the outer binding line.
Right click the corner pattern, choose Rubber Stamp.Move the copy to the opposite corner.Right click this pattern, Rotate 90º until the orientation is correct.
Use Draw Measure (Alt+M) to measure the distance between thecorner patterns. End Point Snap makes this easy.
5. Place the bottom corners. Our plan assumes the bottom borderpatterns are the same size as the top, so we can duplicate the toppatterns for the bottom border.
Select the two top corner patterns,Right click the selection, and click Rubberstamp.Right click the rubberstamped copy and Rotate the pattern 180º.Drag the copy to the bottom border area.
Use Draw Measure (Alt+M) to measure the side border (corner-to-corner) using End point snaps.
Tip: Directional border patterns should be rotated and not
flipped H or V. Flipping a pattern creates a mirror image andthe direction changes.
6. Place the top border patterns. In this step, we will have CS calculate the size and number of repeats needed for the top border. Selectthe border pattern and change the pattern height to fit the borderspace. Most people allow a 1/4" margin on both sides of the quilteddesign. Be sure Freeze Aspect=On so the pattern is not distorted.
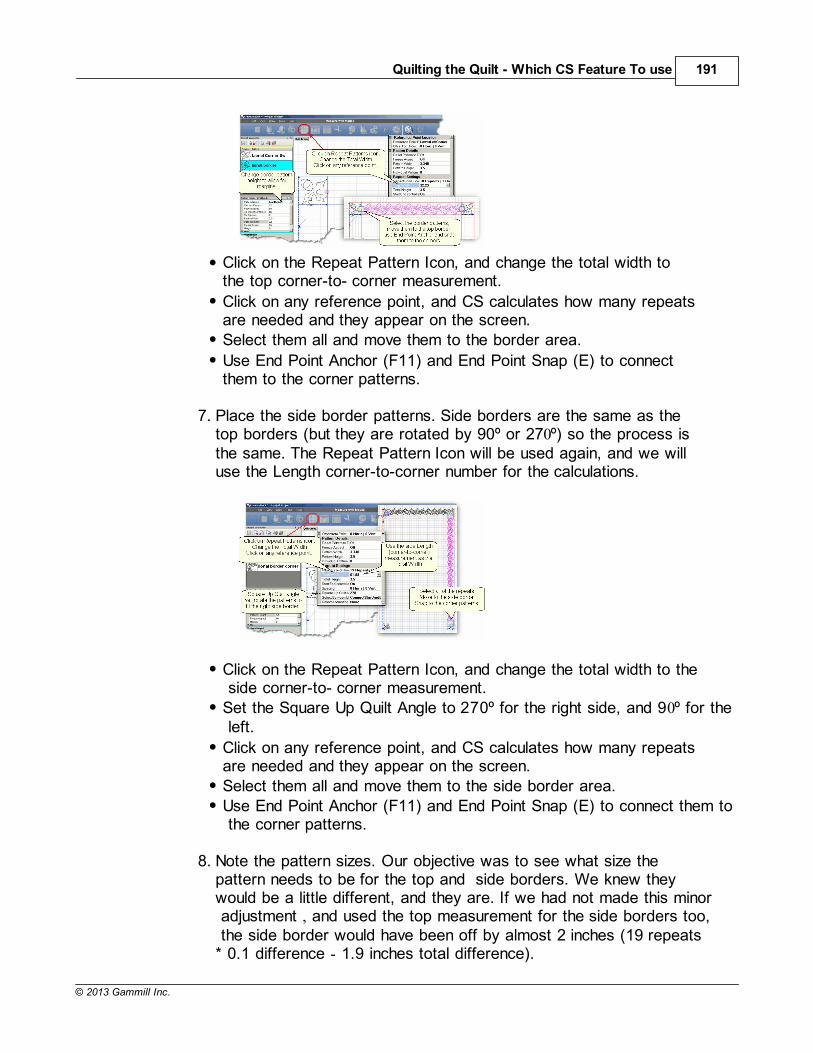
Quilting the Quilt - Which CS Feature To use 191
© 2013 Gammill Inc.
Click on the Repeat Pattern Icon, and change the total width tothe top corner-to- corner measurement.
Click on any reference point, and CS calculates how many repeatsare needed and they appear on the screen.Select them all and move them to the border area.
Use End Point Anchor (F11) and End Point Snap (E) to connectthem to the corner patterns.
7. Place the side border patterns. Side borders are the same as thetop borders (but they are rotated by 90º or 270º) so the process isthe same. The Repeat Pattern Icon will be used again, and we willuse the Length corner-to-corner number for the calculations.
Click on the Repeat Pattern Icon, and change the total width to the side corner-to- corner measurement.Set the Square Up Quilt Angle to 270º for the right side, and 90º for the left.
Click on any reference point, and CS calculates how many repeatsare needed and they appear on the screen.Select them all and move them to the side border area.Use End Point Anchor (F11) and End Point Snap (E) to connect them to the corner patterns.
8. Note the pattern sizes. Our objective was to see what size thepattern needs to be for the top and side borders. We knew theywould be a little different, and they are. If we had not made this minor adjustment , and used the top measurement for the side borders too, the side border would have been off by almost 2 inches (19 repeats* 0.1 difference - 1.9 inches total difference).
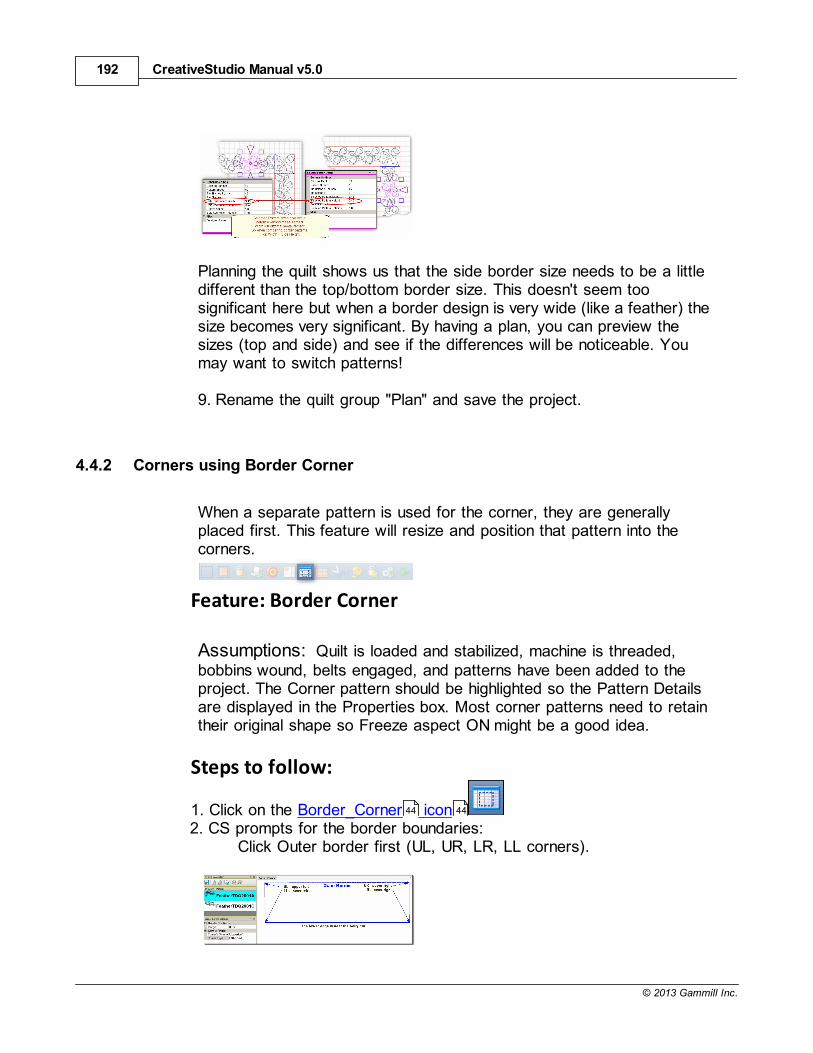
CreativeStudio Manual v5.0192
© 2013 Gammill Inc.
Planning the quilt shows us that the side border size needs to be a littledifferent than the top/bottom border size. This doesn't seem toosignificant here but when a border design is very wide (like a feather) thesize becomes very significant. By having a plan, you can preview thesizes (top and side) and see if the differences will be noticeable. Youmay want to switch patterns!
9. Rename the quilt group "Plan" and save the project.
4.4.2 Corners using Border Corner
When a separate pattern is used for the corner, they are generallyplaced first. This feature will resize and position that pattern into thecorners.
Feature: Border Corner
Assumptions: Quilt is loaded and stabilized, machine is threaded, bobbins wound, belts engaged, and patterns have been added to theproject. The Corner pattern should be highlighted so the Pattern Detailsare displayed in the Properties box. Most corner patterns need to retaintheir original shape so Freeze aspect ON might be a good idea.
Steps to follow:
1. Click on the Border_Corner icon2. CS prompts for the border boundaries:
Click Outer border first (UL, UR, LR, LL corners).
44 44
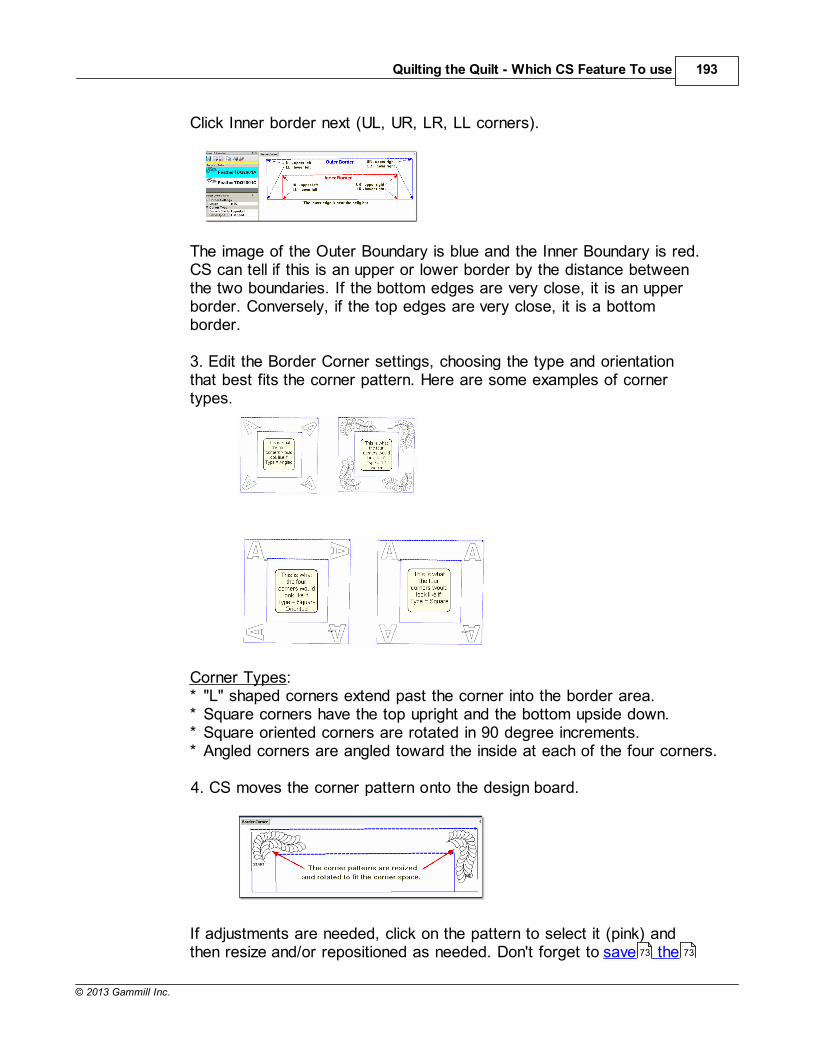
Quilting the Quilt - Which CS Feature To use 193
© 2013 Gammill Inc.
Click Inner border next (UL, UR, LR, LL corners).
The image of the Outer Boundary is blue and the Inner Boundary is red.CS can tell if this is an upper or lower border by the distance betweenthe two boundaries. If the bottom edges are very close, it is an upperborder. Conversely, if the top edges are very close, it is a bottomborder.
3. Edit the Border Corner settings, choosing the type and orientationthat best fits the corner pattern. Here are some examples of cornertypes.
Corner Types:* "L" shaped corners extend past the corner into the border area.* Square corners have the top upright and the bottom upside down.* Square oriented corners are rotated in 90 degree increments.* Angled corners are angled toward the inside at each of the four corners.
4. CS moves the corner pattern onto the design board.
If adjustments are needed, click on the pattern to select it (pink) andthen resize and/or repositioned as needed. Don't forget to save the73 73
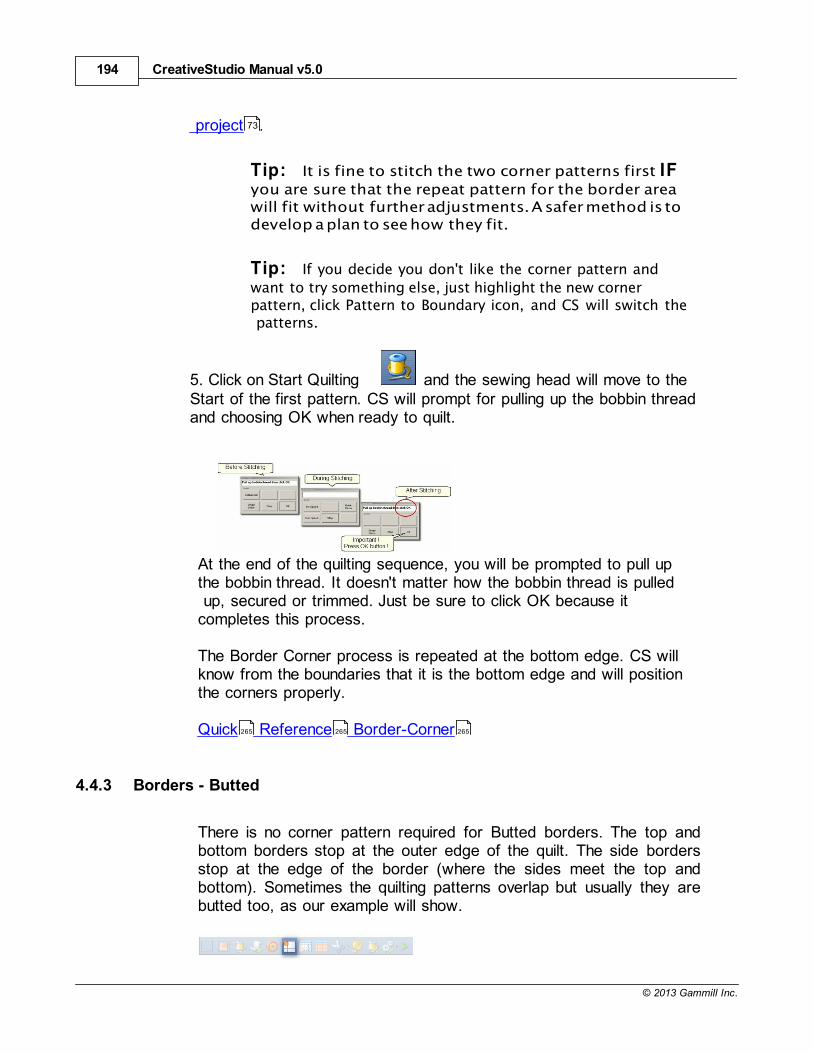
CreativeStudio Manual v5.0194
© 2013 Gammill Inc.
project .
Tip: It is fine to stitch the two corner patterns first IFyou are sure that the repeat pattern for the border areawill fit without further adjustments. A safer method is todevelop a plan to see how they fit.
Tip: If you decide you don't like the corner pattern and
want to try something else, just highlight the new cornerpattern, click Pattern to Boundary icon, and CS will switch the patterns.
5. Click on Start Quilting and the sewing head will move to theStart of the first pattern. CS will prompt for pulling up the bobbin threadand choosing OK when ready to quilt.
At the end of the quilting sequence, you will be prompted to pull upthe bobbin thread. It doesn't matter how the bobbin thread is pulled up, secured or trimmed. Just be sure to click OK because itcompletes this process.
The Border Corner process is repeated at the bottom edge. CS willknow from the boundaries that it is the bottom edge and will positionthe corners properly.
Quick Reference Border-Corner
4.4.3 Borders - Butted
There is no corner pattern required for Butted borders. The top andbottom borders stop at the outer edge of the quilt. The side bordersstop at the edge of the border (where the sides meet the top andbottom). Sometimes the quilting patterns overlap but usually they arebutted too, as our example will show.
73
265 265 265
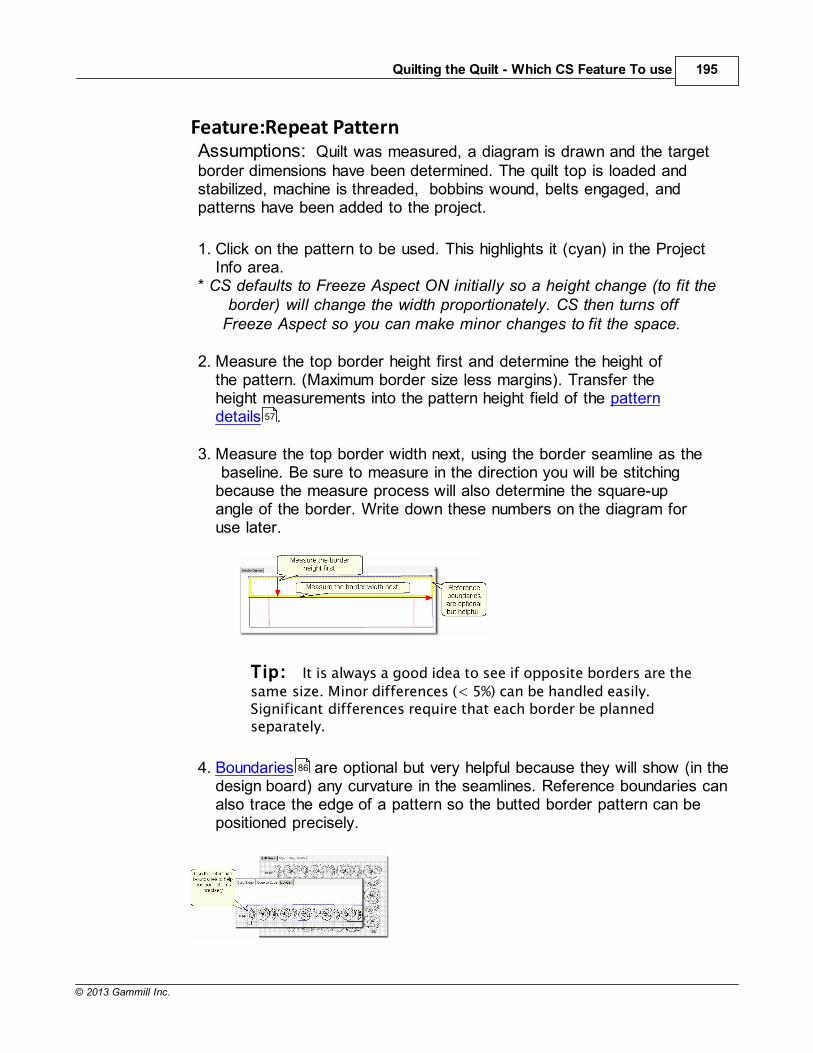
Quilting the Quilt - Which CS Feature To use 195
© 2013 Gammill Inc.
Feature:Repeat PatternAssumptions: Quilt was measured, a diagram is drawn and the targetborder dimensions have been determined. The quilt top is loaded andstabilized, machine is threaded, bobbins wound, belts engaged, andpatterns have been added to the project.
1. Click on the pattern to be used. This highlights it (cyan) in the ProjectInfo area.
* CS defaults to Freeze Aspect ON initially so a height change (to fit the border) will change the width proportionately. CS then turns offFreeze Aspect so you can make minor changes to fit the space.
2. Measure the top border height first and determine the height ofthe pattern. (Maximum border size less margins). Transfer theheight measurements into the pattern height field of the patterndetails .
3. Measure the top border width next, using the border seamline as the baseline. Be sure to measure in the direction you will be stitchingbecause the measure process will also determine the square-upangle of the border. Write down these numbers on the diagram foruse later.
Tip: It is always a good idea to see if opposite borders are the
same size. Minor differences (< 5%) can be handled easily.Significant differences require that each border be plannedseparately.
4. Boundaries are optional but very helpful because they will show (in thedesign board) any curvature in the seamlines. Reference boundaries canalso trace the edge of a pattern so the butted border pattern can bepositioned precisely.
57
86
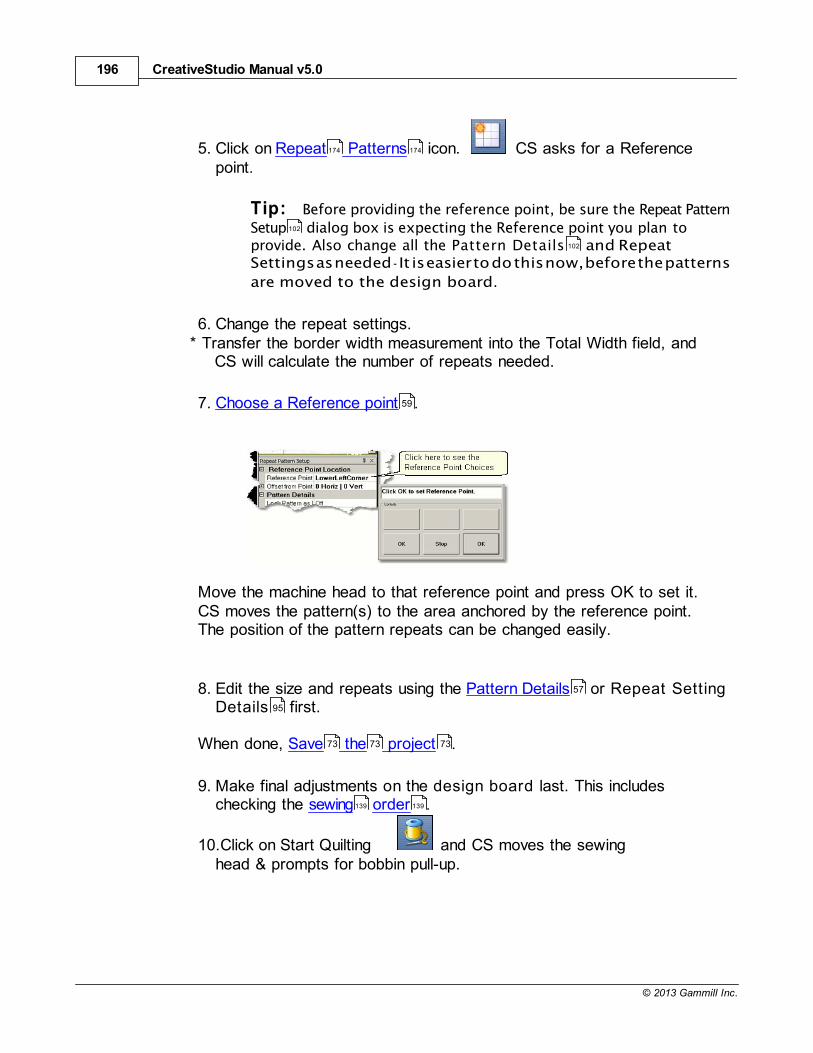
CreativeStudio Manual v5.0196
© 2013 Gammill Inc.
5. Click on Repeat Patterns icon. CS asks for a Referencepoint.
Tip: Before providing the reference point, be sure the Repeat Pattern
Setup dialog box is expecting the Reference point you plan toprovide. Also change all the Pattern Details and RepeatSettings as needed - It is easier to do this now, before the patterns
are moved to the design board.
6. Change the repeat settings.* Transfer the border width measurement into the Total Width field, and
CS will calculate the number of repeats needed.
7. Choose a Reference point .
Move the machine head to that reference point and press OK to set it.CS moves the pattern(s) to the area anchored by the reference point.The position of the pattern repeats can be changed easily.
8. Edit the size and repeats using the Pattern Details or Repeat SettingDetails first.
When done, Save the project .
9. Make final adjustments on the design board last. This includeschecking the sewing order .
10.Click on Start Quilting and CS moves the sewinghead & prompts for bobbin pull-up.
174 174
102
102
59
57
95
73 73 73
139 139
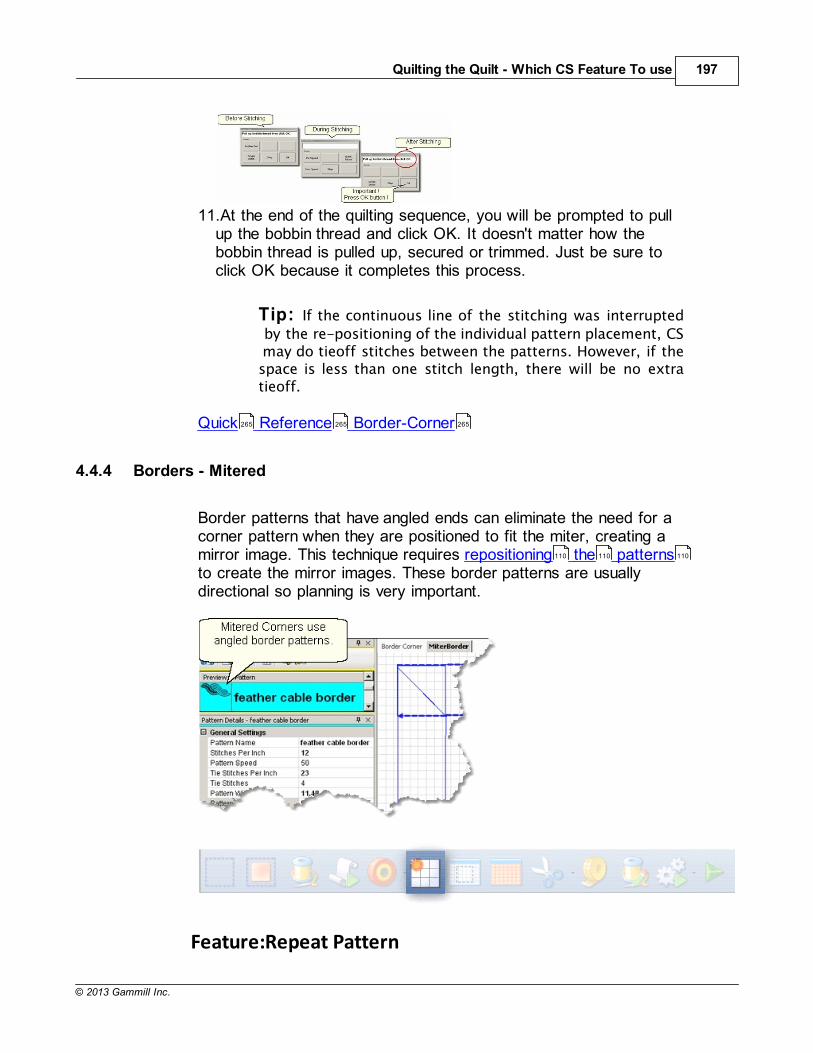
Quilting the Quilt - Which CS Feature To use 197
© 2013 Gammill Inc.
11.At the end of the quilting sequence, you will be prompted to pullup the bobbin thread and click OK. It doesn't matter how thebobbin thread is pulled up, secured or trimmed. Just be sure toclick OK because it completes this process.
Tip: If the continuous line of the stitching was interrupted
by the re-positioning of the individual pattern placement, CS may do tieoff stitches between the patterns. However, if thespace is less than one stitch length, there will be no extratieoff.
Quick Reference Border-Corner
4.4.4 Borders - Mitered
Border patterns that have angled ends can eliminate the need for acorner pattern when they are positioned to fit the miter, creating amirror image. This technique requires repositioning the patternsto create the mirror images. These border patterns are usuallydirectional so planning is very important.
Feature:Repeat Pattern
265 265 265
110 110 110
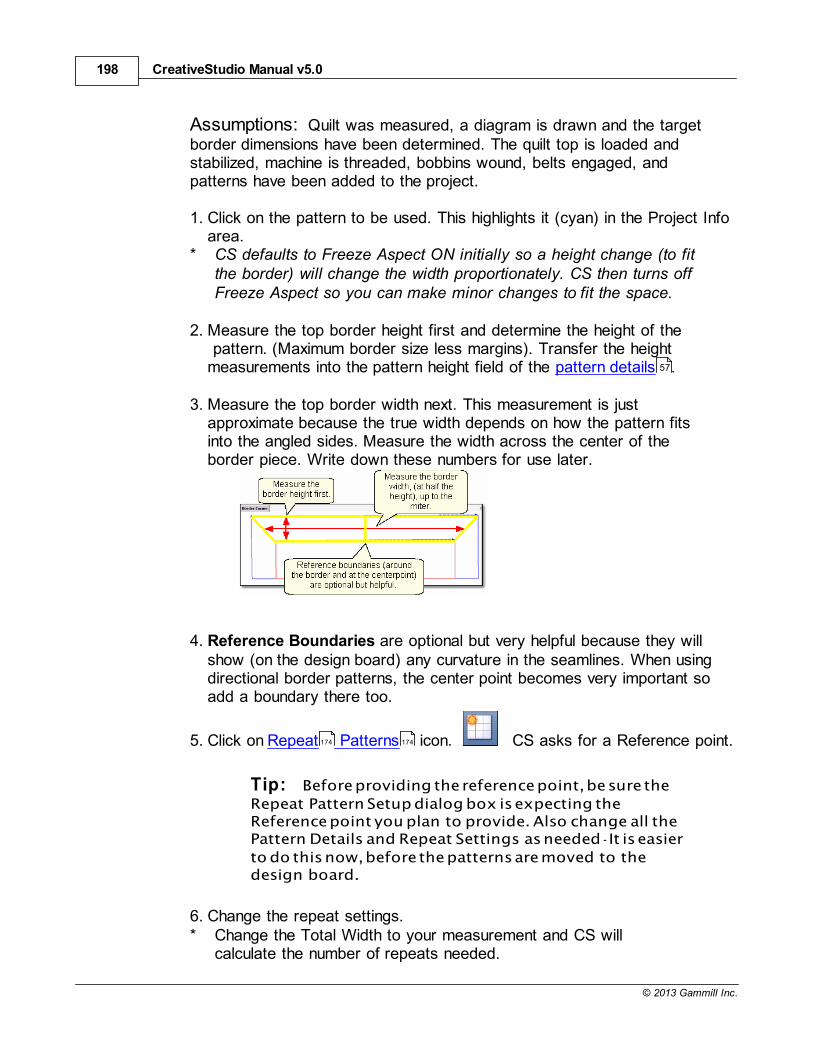
CreativeStudio Manual v5.0198
© 2013 Gammill Inc.
Assumptions: Quilt was measured, a diagram is drawn and the targetborder dimensions have been determined. The quilt top is loaded andstabilized, machine is threaded, bobbins wound, belts engaged, andpatterns have been added to the project.
1. Click on the pattern to be used. This highlights it (cyan) in the Project Infoarea.
* CS defaults to Freeze Aspect ON initially so a height change (to fitthe border) will change the width proportionately. CS then turns offFreeze Aspect so you can make minor changes to fit the space.
2. Measure the top border height first and determine the height of the pattern. (Maximum border size less margins). Transfer the heightmeasurements into the pattern height field of the pattern details .
3. Measure the top border width next. This measurement is justapproximate because the true width depends on how the pattern fitsinto the angled sides. Measure the width across the center of theborder piece. Write down these numbers for use later.
4. Reference Boundaries are optional but very helpful because they willshow (on the design board) any curvature in the seamlines. When usingdirectional border patterns, the center point becomes very important soadd a boundary there too.
5. Click on Repeat Patterns icon. CS asks for a Reference point.
Tip: Before providing the reference point, be sure the
Repeat Pattern Setup dialog box is expecting theReference point you plan to provide. Also change all thePattern Details and Repeat Settings as needed - It is easier
to do this now, before the patterns are moved to thedesign board.
6. Change the repeat settings.* Change the Total Width to your measurement and CS will
calculate the number of repeats needed.
57
174 174
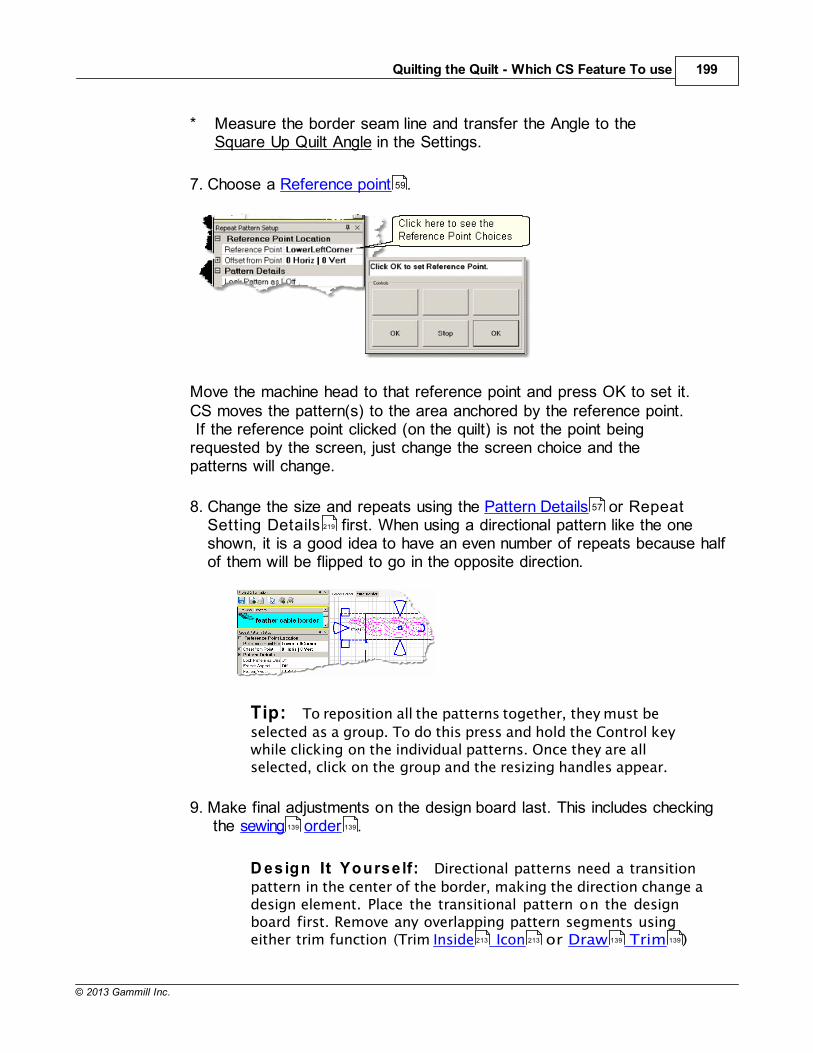
Quilting the Quilt - Which CS Feature To use 199
© 2013 Gammill Inc.
* Measure the border seam line and transfer the Angle to theSquare Up Quilt Angle in the Settings.
7. Choose a Reference point .
Move the machine head to that reference point and press OK to set it.CS moves the pattern(s) to the area anchored by the reference point. If the reference point clicked (on the quilt) is not the point beingrequested by the screen, just change the screen choice and thepatterns will change.
8. Change the size and repeats using the Pattern Details or RepeatSetting Details first. When using a directional pattern like the oneshown, it is a good idea to have an even number of repeats because halfof them will be flipped to go in the opposite direction.
Tip: To reposition all the patterns together, they must be
selected as a group. To do this press and hold the Control keywhile clicking on the individual patterns. Once they are allselected, click on the group and the resizing handles appear.
9. Make final adjustments on the design board last. This includes checking the sewing order .
D esign It Yourse lf: Directional patterns need a transition
pattern in the center of the border, making the direction change adesign element. Place the transitional pattern on the designboard first. Remove any overlapping pattern segments usingeither trim function (Trim Inside Icon or Draw Trim )
59
57
219
139 139
213 213 139 139
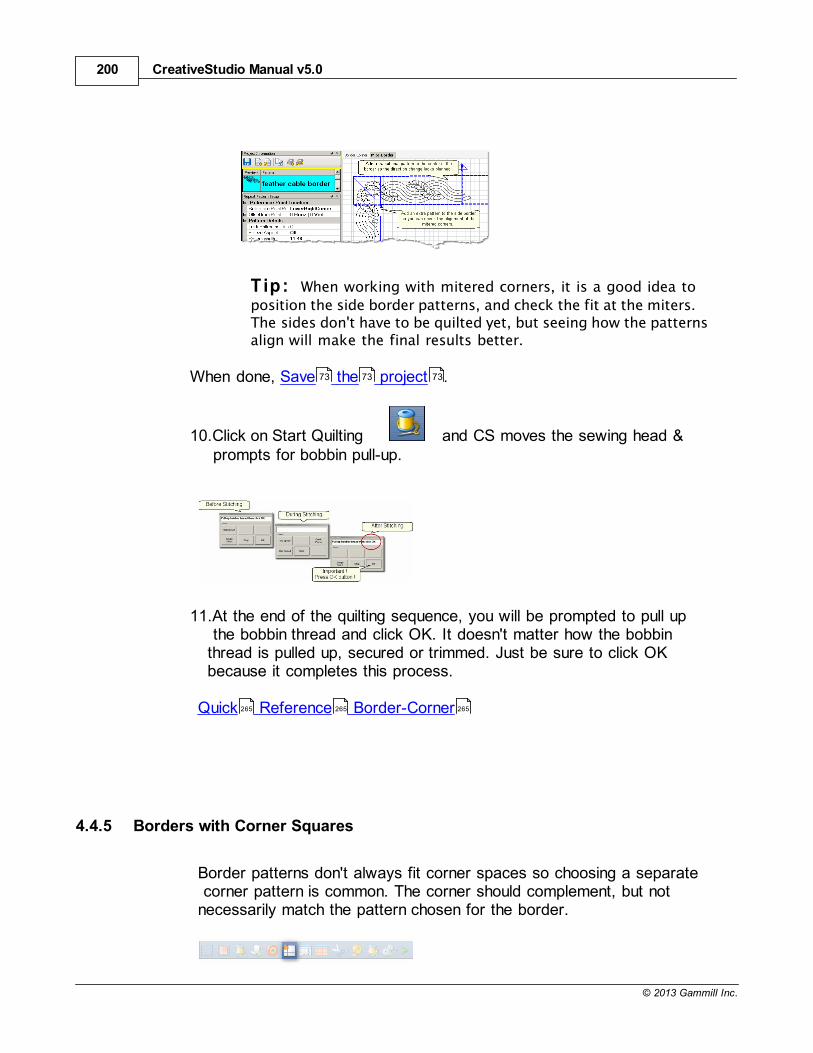
CreativeStudio Manual v5.0200
© 2013 Gammill Inc.
Tip: When working with mitered corners, it is a good idea to
position the side border patterns, and check the fit at the miters.The sides don't have to be quilted yet, but seeing how the patternsalign will make the final results better.
When done, Save the project .
10.Click on Start Quilting and CS moves the sewing head & prompts for bobbin pull-up.
11.At the end of the quilting sequence, you will be prompted to pull up the bobbin thread and click OK. It doesn't matter how the bobbinthread is pulled up, secured or trimmed. Just be sure to click OKbecause it completes this process.
Quick Reference Border-Corner
4.4.5 Borders with Corner Squares
Border patterns don't always fit corner spaces so choosing a separate corner pattern is common. The corner should complement, but notnecessarily match the pattern chosen for the border.
73 73 73
265 265 265
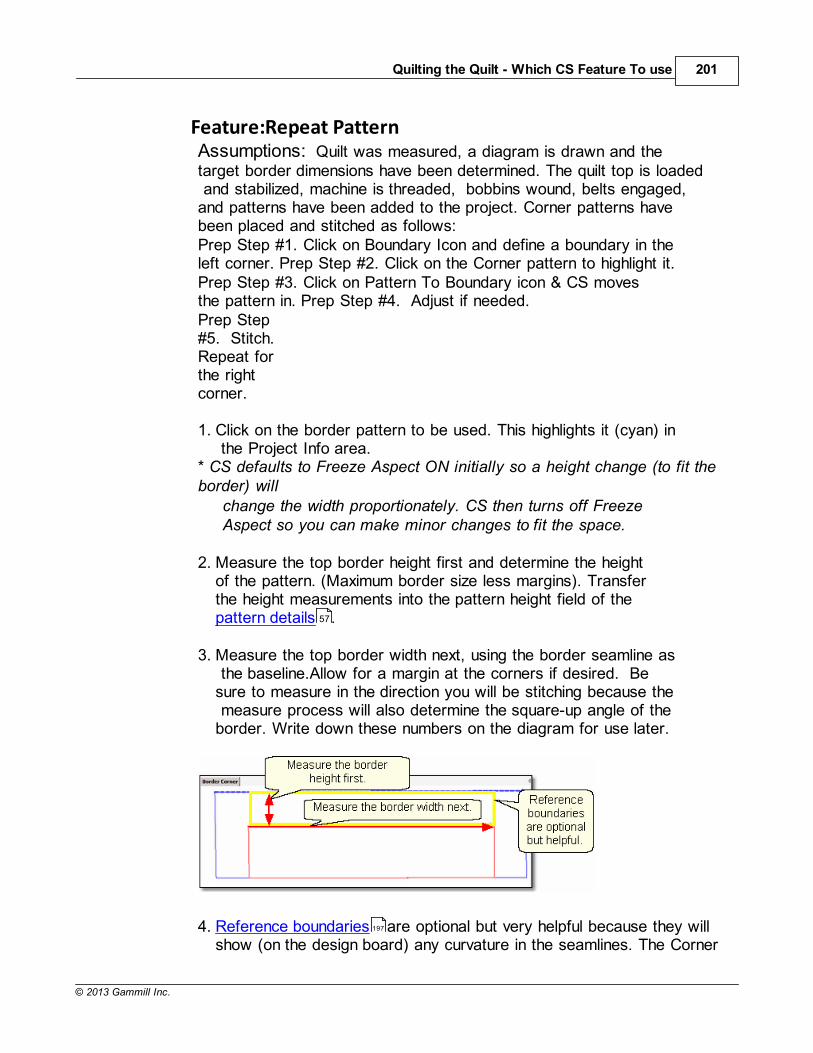
Quilting the Quilt - Which CS Feature To use 201
© 2013 Gammill Inc.
Feature:Repeat PatternAssumptions: Quilt was measured, a diagram is drawn and thetarget border dimensions have been determined. The quilt top is loaded and stabilized, machine is threaded, bobbins wound, belts engaged,and patterns have been added to the project. Corner patterns havebeen placed and stitched as follows:Prep Step #1. Click on Boundary Icon and define a boundary in theleft corner. Prep Step #2. Click on the Corner pattern to highlight it.Prep Step #3. Click on Pattern To Boundary icon & CS movesthe pattern in. Prep Step #4. Adjust if needed.Prep Step#5. Stitch.Repeat forthe rightcorner.
1. Click on the border pattern to be used. This highlights it (cyan) in the Project Info area.
* CS defaults to Freeze Aspect ON initially so a height change (to fit theborder) will
change the width proportionately. CS then turns off FreezeAspect so you can make minor changes to fit the space.
2. Measure the top border height first and determine the heightof the pattern. (Maximum border size less margins). Transferthe height measurements into the pattern height field of thepattern details .
3. Measure the top border width next, using the border seamline as the baseline.Allow for a margin at the corners if desired. Besure to measure in the direction you will be stitching because the measure process will also determine the square-up angle of theborder. Write down these numbers on the diagram for use later.
4. Reference boundaries are optional but very helpful because they willshow (on the design board) any curvature in the seamlines. The Corner
57
197
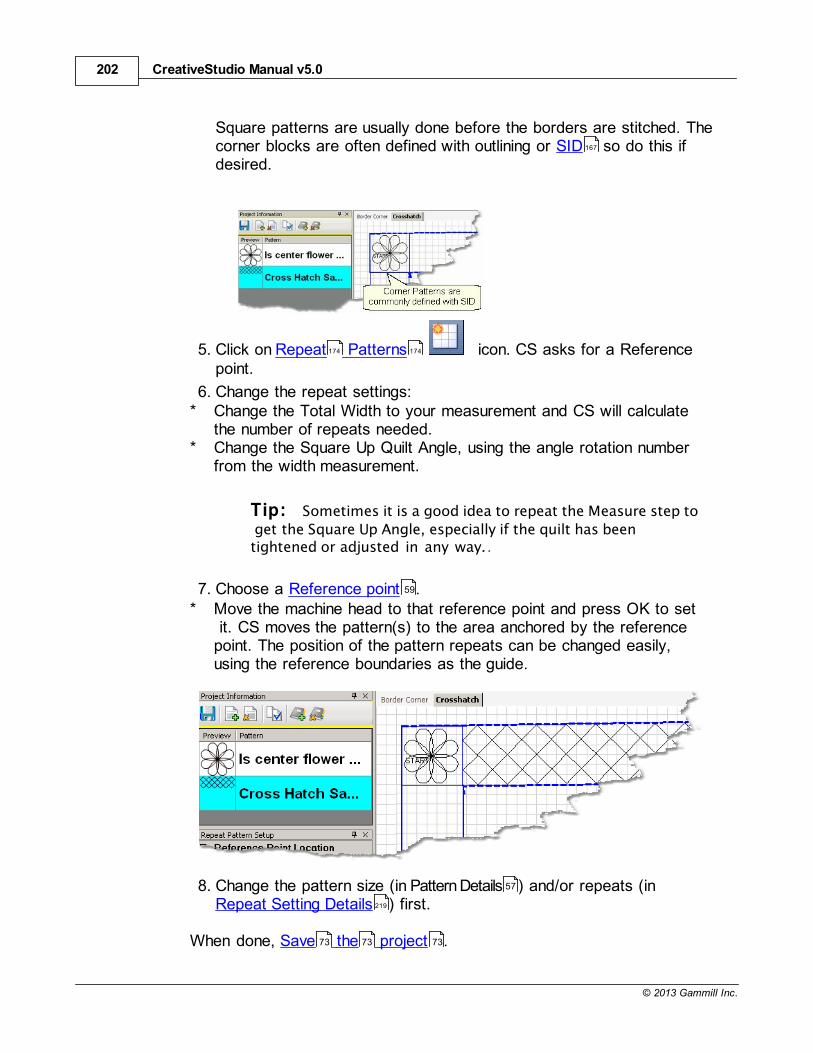
CreativeStudio Manual v5.0202
© 2013 Gammill Inc.
Square patterns are usually done before the borders are stitched. Thecorner blocks are often defined with outlining or SID so do this ifdesired.
5. Click on Repeat Patterns icon. CS asks for a Referencepoint.
6. Change the repeat settings:* Change the Total Width to your measurement and CS will calculate
the number of repeats needed.* Change the Square Up Quilt Angle, using the angle rotation number
from the width measurement.
Tip: Sometimes it is a good idea to repeat the Measure step to
get the Square Up Angle, especially if the quilt has beentightened or adjusted in any way. .
7. Choose a Reference point .* Move the machine head to that reference point and press OK to set
it. CS moves the pattern(s) to the area anchored by the referencepoint. The position of the pattern repeats can be changed easily,using the reference boundaries as the guide.
8. Change the pattern size (in Pattern Details ) and/or repeats (inRepeat Setting Details ) first.
When done, Save the project .
167
174 174
59
57
219
73 73 73
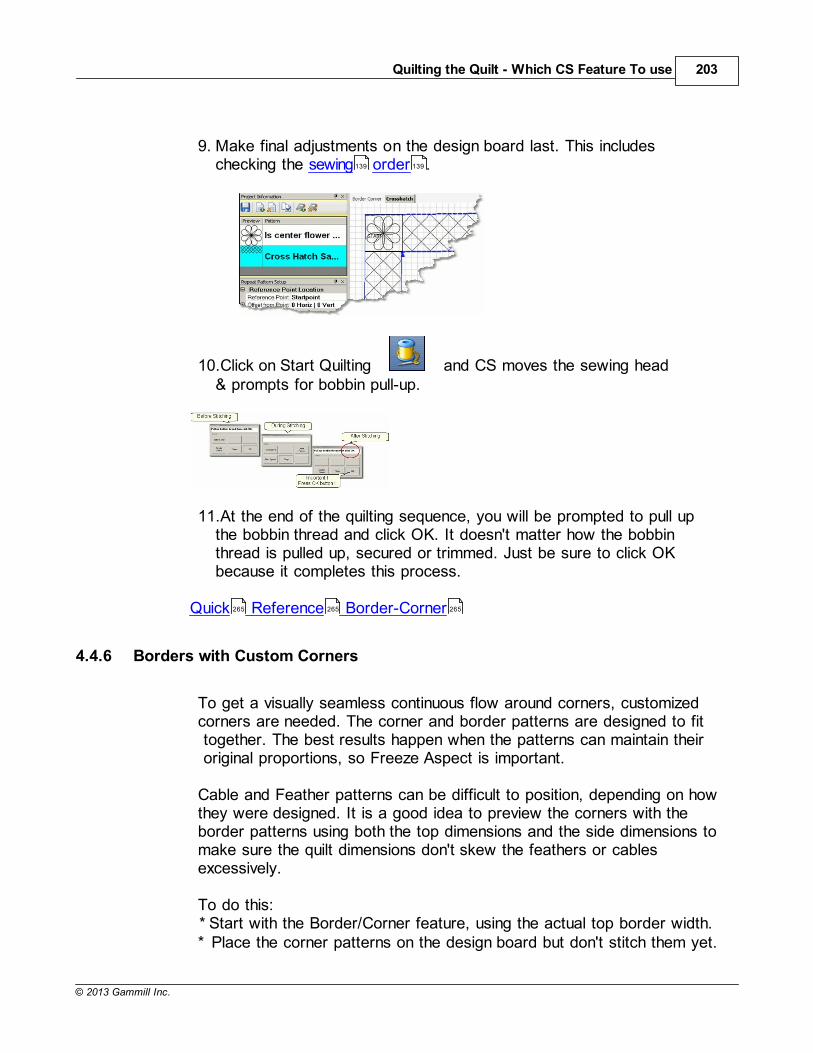
Quilting the Quilt - Which CS Feature To use 203
© 2013 Gammill Inc.
9. Make final adjustments on the design board last. This includeschecking the sewing order .
10.Click on Start Quilting and CS moves the sewing head& prompts for bobbin pull-up.
11.At the end of the quilting sequence, you will be prompted to pull upthe bobbin thread and click OK. It doesn't matter how the bobbinthread is pulled up, secured or trimmed. Just be sure to click OKbecause it completes this process.
Quick Reference Border-Corner
4.4.6 Borders with Custom Corners
To get a visually seamless continuous flow around corners, customizedcorners are needed. The corner and border patterns are designed to fit together. The best results happen when the patterns can maintain their original proportions, so Freeze Aspect is important.
Cable and Feather patterns can be difficult to position, depending on howthey were designed. It is a good idea to preview the corners with theborder patterns using both the top dimensions and the side dimensions tomake sure the quilt dimensions don't skew the feathers or cablesexcessively.
To do this:* Start with the Border/Corner feature, using the actual top border width.* Place the corner patterns on the design board but don't stitch them yet.
139 139
265 265 265
CreativeStudio Manual v5.0204
© 2013 Gammill Inc.
* Continue with the Repeat Pattern feature also using the top border width.* Place the border patterns on the design board but don't stitch them yet.* Look carefully at the preview area. Do the patterns still look good
together?* If the patterns look good, draw a sketch and make notes of the
measurements.
Tip: Sometimes border patterns that are much wider than
they are tall, will have to stretch or shrink to fit the actualborder area. This will distort the shape of the feather (or cable)so they don't visually match the corners. Beginners might bebetter off choosing a different pattern.
Repeat the process using the actual side border dimensions instead ofthe top border dimensions. When you use the Border Corner feature asecond time, you will be prompted for a new quilt group name - make itdescriptive like 'Check Side Borders'. By repeating the process usingthe side border dimensions, you can check that the side patterns willlook like the top patterns.
D esign It Yourse lf: With experience you will be
comfortable making corner patterns using your ownborder patterns. The Draw Options and Extra EditOptions are used to modify them and Export Pattern willsave them in a re-useable format.
* Extend the sketch to include the side border placement. Be sure theborder pattern fits the side borders as well as the top/bottomborders.
* SAVE the project!
Feature: Repeat PatternAssumptions: Quilt was measured, a diagram is drawn and the target border dimensions have been determined. The quilt top is loaded andstabilized, machine is threaded, bobbins wound, belts engaged, andpatterns have been added to the project. Patterns have been previewed, and the sizes noted. Place the custom corners using Border/Corneras follows:
Prep Step #1. Click on Border Corner Icon:Prep Step #2. Click the Outer Border boundary asprompted. Prep Step #3. Click the Inner Border boundary as
139 139 110 110
110 81
192
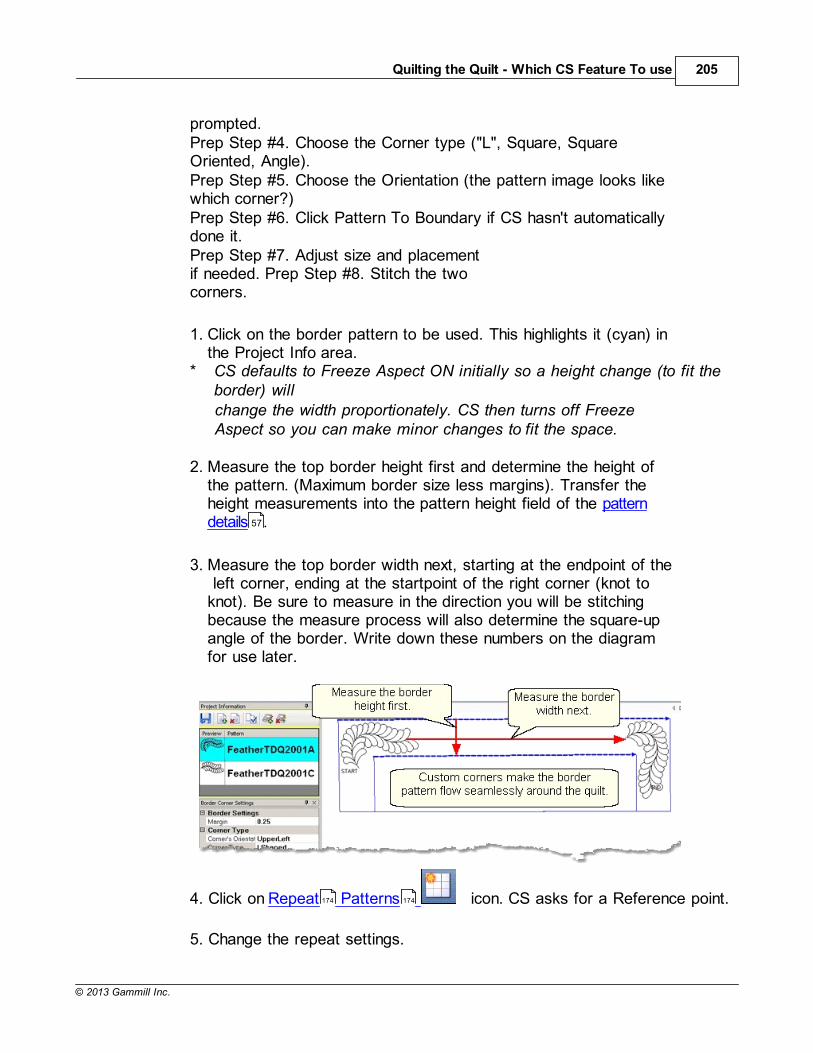
Quilting the Quilt - Which CS Feature To use 205
© 2013 Gammill Inc.
prompted.Prep Step #4. Choose the Corner type ("L", Square, SquareOriented, Angle). Prep Step #5. Choose the Orientation (the pattern image looks likewhich corner?) Prep Step #6. Click Pattern To Boundary if CS hasn't automaticallydone it.Prep Step #7. Adjust size and placementif needed. Prep Step #8. Stitch the twocorners.
1. Click on the border pattern to be used. This highlights it (cyan) inthe Project Info area.
* CS defaults to Freeze Aspect ON initially so a height change (to fit theborder) willchange the width proportionately. CS then turns off FreezeAspect so you can make minor changes to fit the space.
2. Measure the top border height first and determine the height ofthe pattern. (Maximum border size less margins). Transfer theheight measurements into the pattern height field of the patterndetails .
3. Measure the top border width next, starting at the endpoint of the left corner, ending at the startpoint of the right corner (knot toknot). Be sure to measure in the direction you will be stitchingbecause the measure process will also determine the square-upangle of the border. Write down these numbers on the diagramfor use later.
4. Click on Repeat Patterns icon. CS asks for a Reference point.
5. Change the repeat settings.
57
174 174
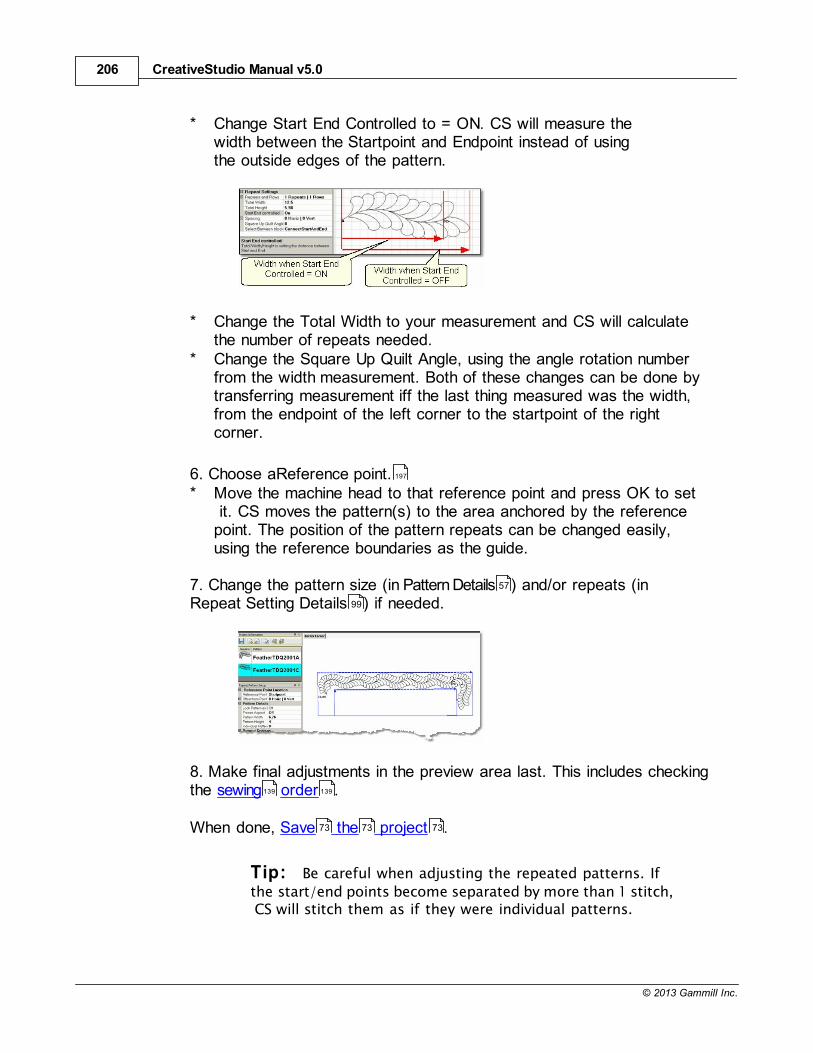
CreativeStudio Manual v5.0206
© 2013 Gammill Inc.
* Change Start End Controlled to = ON. CS will measure thewidth between the Startpoint and Endpoint instead of usingthe outside edges of the pattern.
* Change the Total Width to your measurement and CS will calculatethe number of repeats needed.
* Change the Square Up Quilt Angle, using the angle rotation numberfrom the width measurement. Both of these changes can be done bytransferring measurement iff the last thing measured was the width,from the endpoint of the left corner to the startpoint of the rightcorner.
6. Choose aReference point.* Move the machine head to that reference point and press OK to set
it. CS moves the pattern(s) to the area anchored by the referencepoint. The position of the pattern repeats can be changed easily,using the reference boundaries as the guide.
7. Change the pattern size (in Pattern Details ) and/or repeats (inRepeat Setting Details ) if needed.
8. Make final adjustments in the preview area last. This includes checkingthe sewing order .
When done, Save the project .
Tip: Be careful when adjusting the repeated patterns. If
the start/end points become separated by more than 1 stitch, CS will stitch them as if they were individual patterns.
197
57
99
139 139
73 73 73
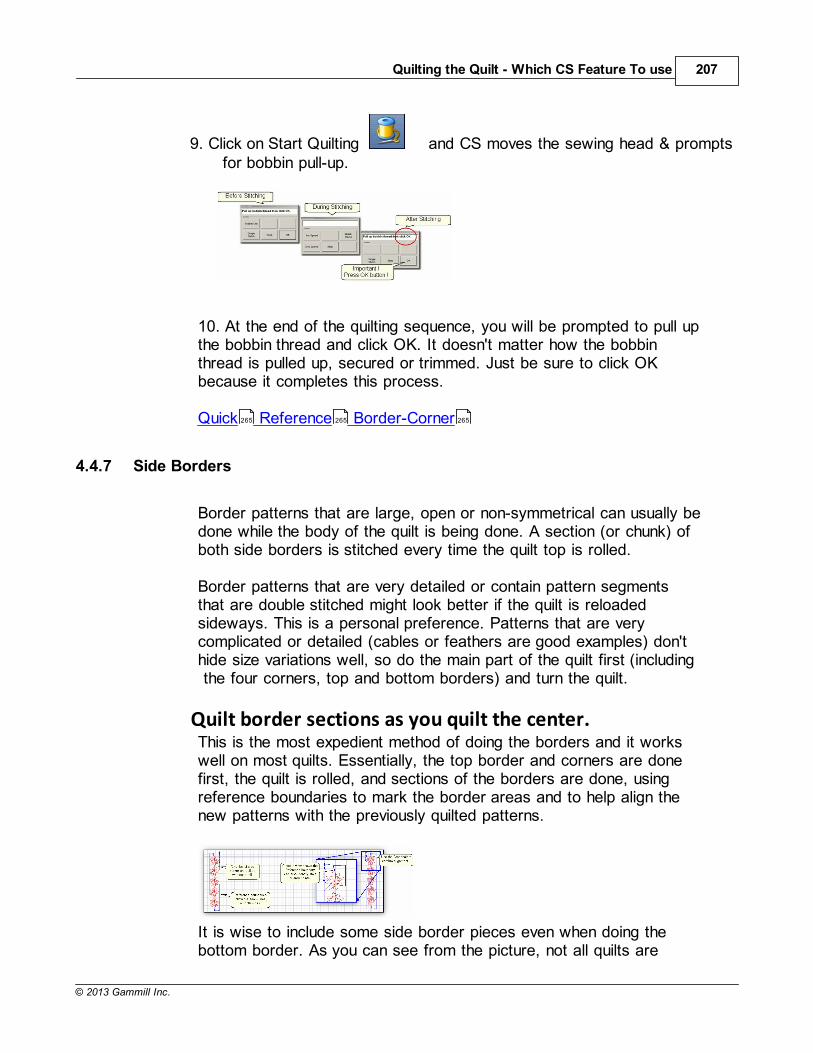
Quilting the Quilt - Which CS Feature To use 207
© 2013 Gammill Inc.
9. Click on Start Quilting and CS moves the sewing head & prompts for bobbin pull-up.
10. At the end of the quilting sequence, you will be prompted to pull upthe bobbin thread and click OK. It doesn't matter how the bobbinthread is pulled up, secured or trimmed. Just be sure to click OKbecause it completes this process.
Quick Reference Border-Corner
4.4.7 Side Borders
Border patterns that are large, open or non-symmetrical can usually bedone while the body of the quilt is being done. A section (or chunk) ofboth side borders is stitched every time the quilt top is rolled.
Border patterns that are very detailed or contain pattern segmentsthat are double stitched might look better if the quilt is reloadedsideways. This is a personal preference. Patterns that are verycomplicated or detailed (cables or feathers are good examples) don'thide size variations well, so do the main part of the quilt first (including the four corners, top and bottom borders) and turn the quilt.
Quilt border sections as you quilt the center.This is the most expedient method of doing the borders and it workswell on most quilts. Essentially, the top border and corners are donefirst, the quilt is rolled, and sections of the borders are done, usingreference boundaries to mark the border areas and to help align thenew patterns with the previously quilted patterns.
It is wise to include some side border pieces even when doing thebottom border. As you can see from the picture, not all quilts are
265 265 265
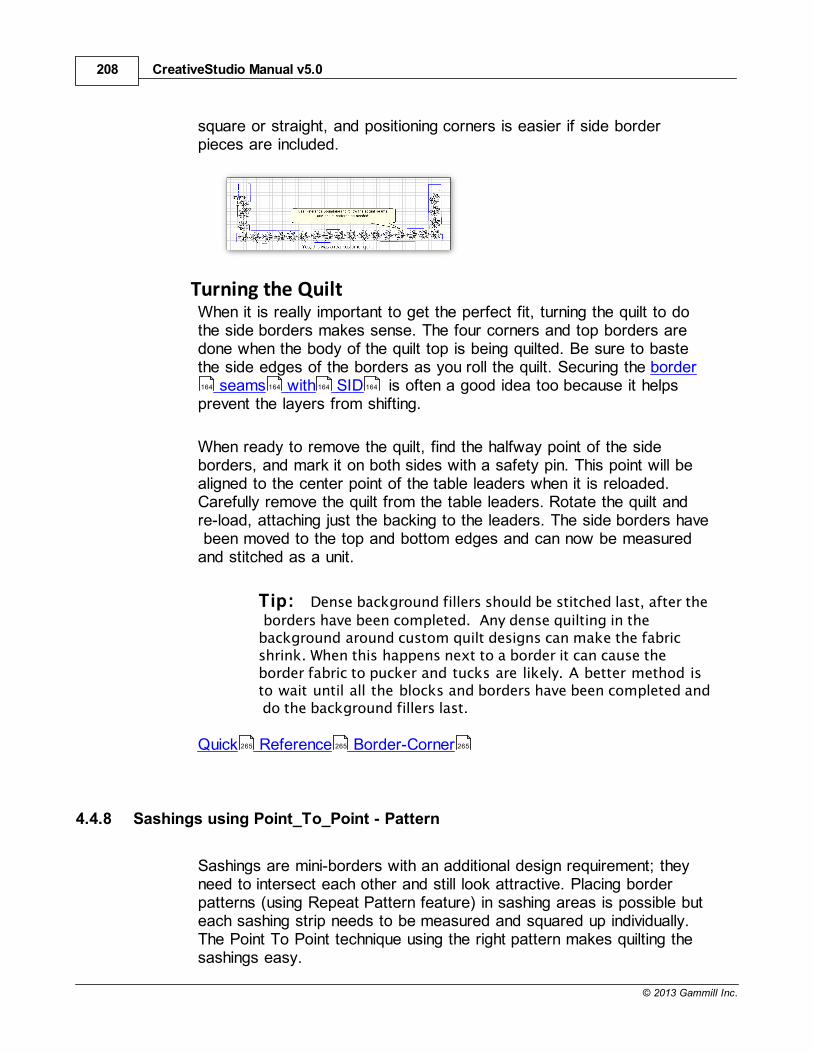
CreativeStudio Manual v5.0208
© 2013 Gammill Inc.
square or straight, and positioning corners is easier if side borderpieces are included.
Turning the QuiltWhen it is really important to get the perfect fit, turning the quilt to dothe side borders makes sense. The four corners and top borders aredone when the body of the quilt top is being quilted. Be sure to bastethe side edges of the borders as you roll the quilt. Securing the border
seams with SID is often a good idea too because it helpsprevent the layers from shifting.
When ready to remove the quilt, find the halfway point of the sideborders, and mark it on both sides with a safety pin. This point will bealigned to the center point of the table leaders when it is reloaded.Carefully remove the quilt from the table leaders. Rotate the quilt andre-load, attaching just the backing to the leaders. The side borders have been moved to the top and bottom edges and can now be measuredand stitched as a unit.
Tip: Dense background fillers should be stitched last, after the
borders have been completed. Any dense quilting in thebackground around custom quilt designs can make the fabricshrink. When this happens next to a border it can cause theborder fabric to pucker and tucks are likely. A better method isto wait until all the blocks and borders have been completed and do the background fillers last.
Quick Reference Border-Corner
4.4.8 Sashings using Point_To_Point - Pattern
Sashings are mini-borders with an additional design requirement; theyneed to intersect each other and still look attractive. Placing borderpatterns (using Repeat Pattern feature) in sashing areas is possible buteach sashing strip needs to be measured and squared up individually.The Point To Point technique using the right pattern makes quilting thesashings easy.
164 164 164 164
265 265 265
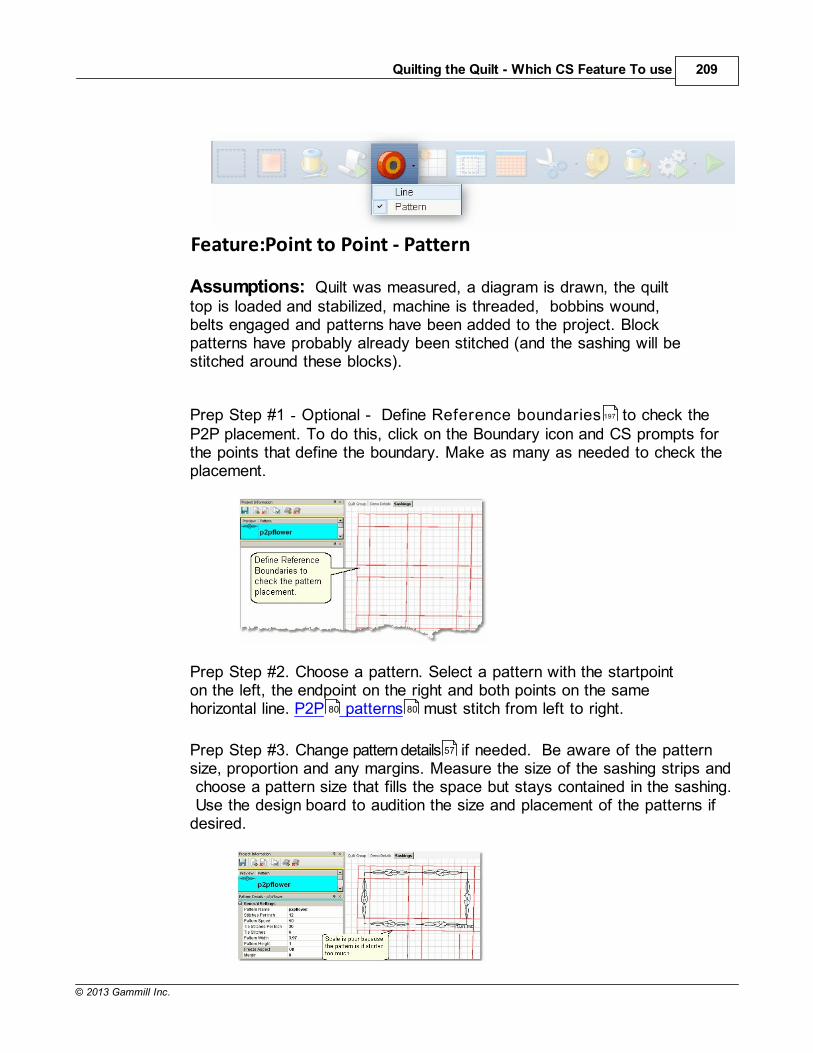
Quilting the Quilt - Which CS Feature To use 209
© 2013 Gammill Inc.
Feature:Point to Point - Pattern
Assumptions: Quilt was measured, a diagram is drawn, the quilttop is loaded and stabilized, machine is threaded, bobbins wound,belts engaged and patterns have been added to the project. Blockpatterns have probably already been stitched (and the sashing will bestitched around these blocks).
Prep Step #1 - Optional - Define Reference boundaries to check theP2P placement. To do this, click on the Boundary icon and CS prompts forthe points that define the boundary. Make as many as needed to check theplacement.
Prep Step #2. Choose a pattern. Select a pattern with the startpointon the left, the endpoint on the right and both points on the samehorizontal line. P2P patterns must stitch from left to right.
Prep Step #3. Change pattern details if needed. Be aware of the patternsize, proportion and any margins. Measure the size of the sashing strips and choose a pattern size that fills the space but stays contained in the sashing. Use the design board to audition the size and placement of the patterns ifdesired.
197
80 80
57
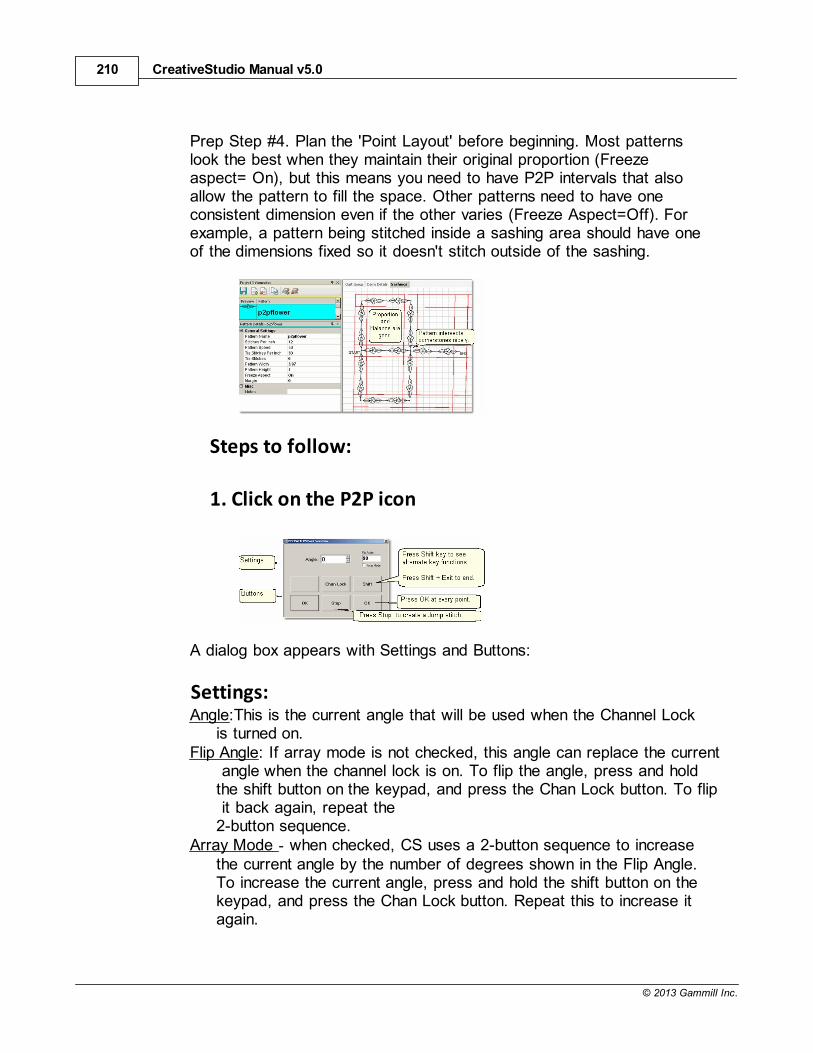
CreativeStudio Manual v5.0210
© 2013 Gammill Inc.
Prep Step #4. Plan the 'Point Layout' before beginning. Most patternslook the best when they maintain their original proportion (Freezeaspect= On), but this means you need to have P2P intervals that alsoallow the pattern to fill the space. Other patterns need to have oneconsistent dimension even if the other varies (Freeze Aspect=Off). Forexample, a pattern being stitched inside a sashing area should have oneof the dimensions fixed so it doesn't stitch outside of the sashing.
Steps to follow:
1. Click on the P2P icon
A dialog box appears with Settings and Buttons:
Settings:Angle:This is the current angle that will be used when the Channel Lock
is turned on.Flip Angle: If array mode is not checked, this angle can replace the current
angle when the channel lock is on. To flip the angle, press and holdthe shift button on the keypad, and press the Chan Lock button. To flip it back again, repeat the2-button sequence.
Array Mode - when checked, CS uses a 2-button sequence to increasethe current angle by the number of degrees shown in the Flip Angle.To increase the current angle, press and hold the shift button on thekeypad, and press the Chan Lock button. Repeat this to increase itagain.
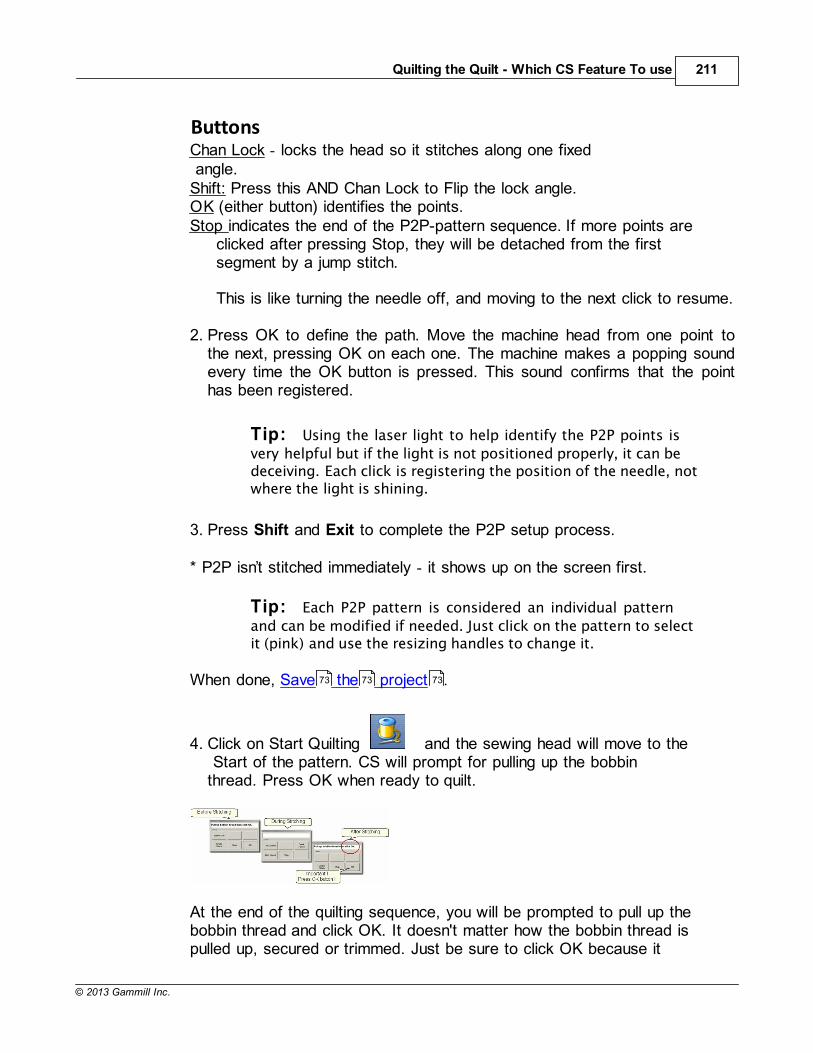
Quilting the Quilt - Which CS Feature To use 211
© 2013 Gammill Inc.
ButtonsChan Lock - locks the head so it stitches along one fixed angle. Shift: Press this AND Chan Lock to Flip the lock angle.OK (either button) identifies the points.Stop indicates the end of the P2P-pattern sequence. If more points are
clicked after pressing Stop, they will be detached from the firstsegment by a jump stitch.
This is like turning the needle off, and moving to the next click to resume.
2. Press OK to define the path. Move the machine head from one point tothe next, pressing OK on each one. The machine makes a popping soundevery time the OK button is pressed. This sound confirms that the pointhas been registered.
Tip: Using the laser light to help identify the P2P points is
very helpful but if the light is not positioned properly, it can bedeceiving. Each click is registering the position of the needle, notwhere the light is shining.
3. Press Shift and Exit to complete the P2P setup process.
* P2P isn’t stitched immediately - it shows up on the screen first.
Tip: Each P2P pattern is considered an individual pattern
and can be modified if needed. Just click on the pattern to selectit (pink) and use the resizing handles to change it.
When done, Save the project .
4. Click on Start Quilting and the sewing head will move to the Start of the pattern. CS will prompt for pulling up the bobbinthread. Press OK when ready to quilt.
At the end of the quilting sequence, you will be prompted to pull up thebobbin thread and click OK. It doesn't matter how the bobbin thread ispulled up, secured or trimmed. Just be sure to click OK because it
73 73 73

CreativeStudio Manual v5.0212
© 2013 Gammill Inc.
completes this process.
When the patterns are all stitched, the screen will display them with redlines instead of black. This is a visual reminder that they are tagged ashaving been sewn already.
Design It Yourself - It is possible to use the P2P - Pattern
feature using the mouse and working directly in the previewarea on the screen. See Draw P2P Pattern .
Quick Reference P2P Pattern
4.5 Phase 4 - Backgrounds
A Pantograph pattern is a very simple form of background quilting. Thepattern is stitched both across (multiple repeats) and down (multiplerows) the area. For custom quilting, background fillers are frequentlyused. This is dense quilting around an applique or quilted motif. The filler compresses the background allowing the applique or motif to be framed and highlighted.
CS has two methods for for doing pantographs;* Edge-to-Edge is a simple method for pantographs. CS maintains
control during most of this process.* Repeat Patterns is a different method for pantographs, which allows
other design options to be performed simultaneously. The quiltermaintains control during this process.
CS has two methods for doing background fillers;* Trim (inside or outside) uses special boundaries that are excluded
from the background filler. The pattern will stitch up to the trimboundary and stop, do a Jump stitch over the trim boundary, andresume stitching once past the trim boundary. At every Jump Stitch,there are either tie-off stitches, or the quilter hand ties the threads and buries them with a needle. This method might be the best choice forquilts that will not get much use/abuse.
* Fill (inside or outside) uses standard boundaries to define the space.The background patterns are actually modified to stitch up to theboundary, and stitch along the edge of the boundary until it canreconnect with the background pattern and then resumes stitching.The Fill method produces a stronger stitch line because it does nothave jump stitches, so it does not start and stop, and does not do tie-off stitches.
139 139 139
274 274 274 274
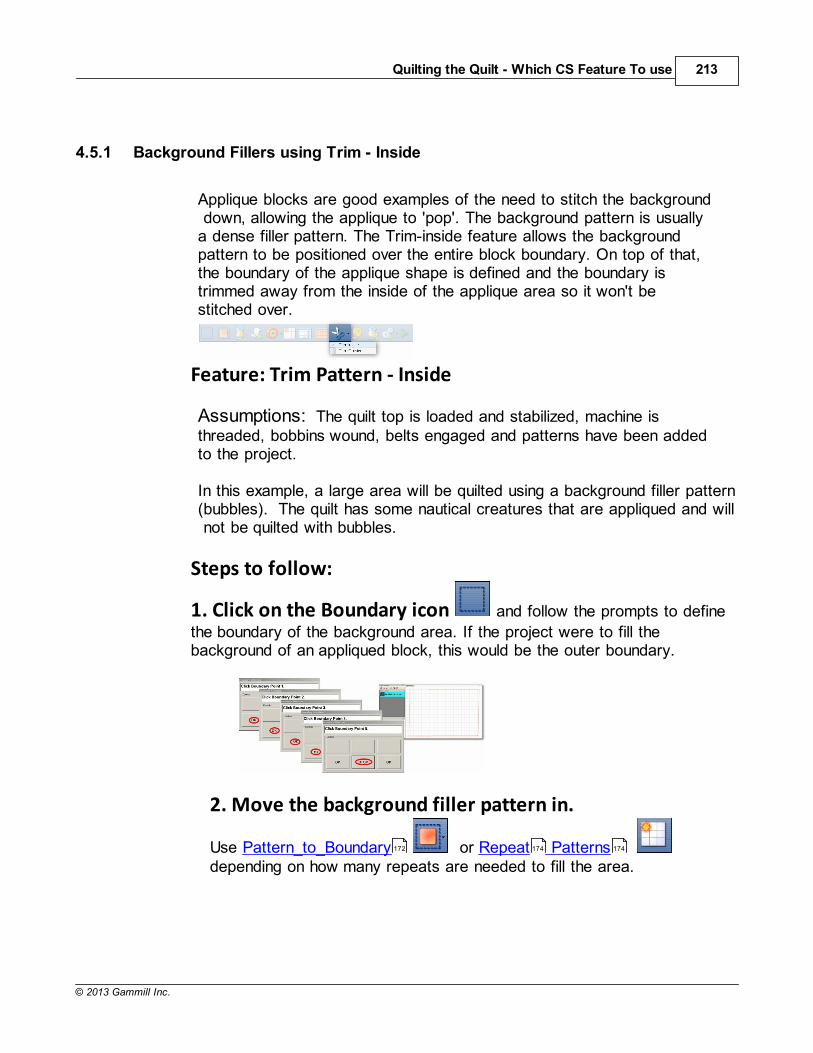
Quilting the Quilt - Which CS Feature To use 213
© 2013 Gammill Inc.
4.5.1 Background Fillers using Trim - Inside
Applique blocks are good examples of the need to stitch the background down, allowing the applique to 'pop'. The background pattern is usuallya dense filler pattern. The Trim-inside feature allows the backgroundpattern to be positioned over the entire block boundary. On top of that,the boundary of the applique shape is defined and the boundary istrimmed away from the inside of the applique area so it won't bestitched over.
Feature: Trim Pattern - Inside
Assumptions: The quilt top is loaded and stabilized, machine isthreaded, bobbins wound, belts engaged and patterns have been addedto the project.
In this example, a large area will be quilted using a background filler pattern(bubbles). The quilt has some nautical creatures that are appliqued and will not be quilted with bubbles.
Steps to follow:
1. Click on the Boundary icon and follow the prompts to define
the boundary of the background area. If the project were to fill thebackground of an appliqued block, this would be the outer boundary.
2. Move the background filler pattern in.
Use Pattern_to_Boundary or Repeat Patterns depending on how many repeats are needed to fill the area.
172 174 174
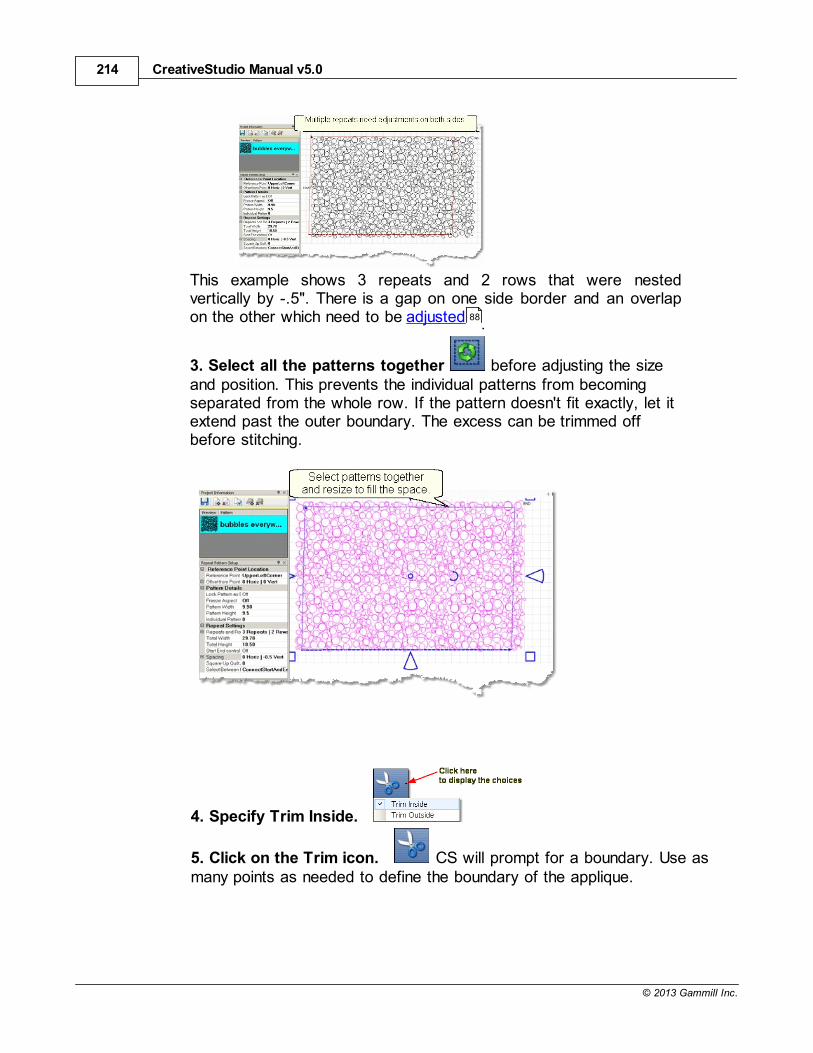
CreativeStudio Manual v5.0214
© 2013 Gammill Inc.
This example shows 3 repeats and 2 rows that were nestedvertically by -.5". There is a gap on one side border and an overlapon the other which need to be adjusted .
3. Select all the patterns together before adjusting the sizeand position. This prevents the individual patterns from becomingseparated from the whole row. If the pattern doesn't fit exactly, let itextend past the outer boundary. The excess can be trimmed offbefore stitching.
4. Specify Trim Inside.
5. Click on the Trim icon. CS will prompt for a boundary. Use asmany points as needed to define the boundary of the applique.
88
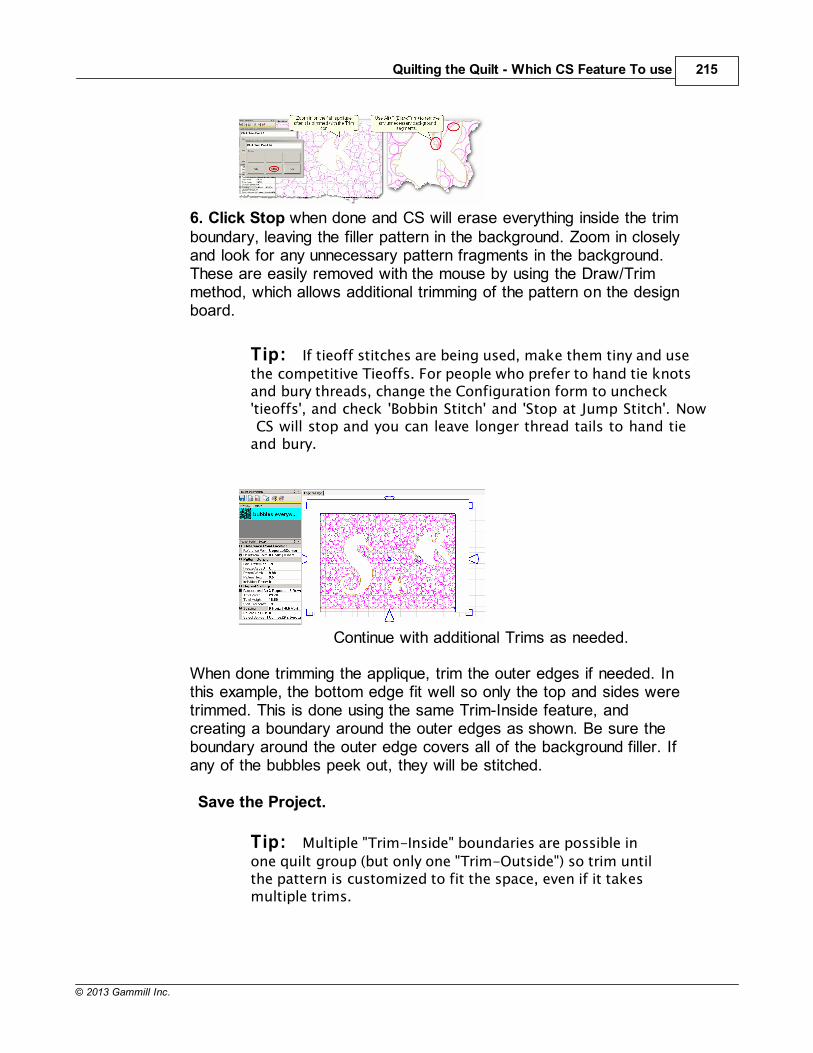
Quilting the Quilt - Which CS Feature To use 215
© 2013 Gammill Inc.
6. Click Stop when done and CS will erase everything inside the trimboundary, leaving the filler pattern in the background. Zoom in closelyand look for any unnecessary pattern fragments in the background.These are easily removed with the mouse by using the Draw/Trimmethod, which allows additional trimming of the pattern on the designboard.
Tip: If tieoff stitches are being used, make them tiny and use
the competitive Tieoffs. For people who prefer to hand tie knotsand bury threads, change the Configuration form to uncheck'tieoffs', and check 'Bobbin Stitch' and 'Stop at Jump Stitch'. Now CS will stop and you can leave longer thread tails to hand tieand bury.
Continue with additional Trims as needed.
When done trimming the applique, trim the outer edges if needed. Inthis example, the bottom edge fit well so only the top and sides weretrimmed. This is done using the same Trim-Inside feature, andcreating a boundary around the outer edges as shown. Be sure theboundary around the outer edge covers all of the background filler. Ifany of the bubbles peek out, they will be stitched.
Save the Project.
Tip: Multiple "Trim-Inside" boundaries are possible in
one quilt group (but only one "Trim-Outside") so trim untilthe pattern is customized to fit the space, even if it takesmultiple trims.
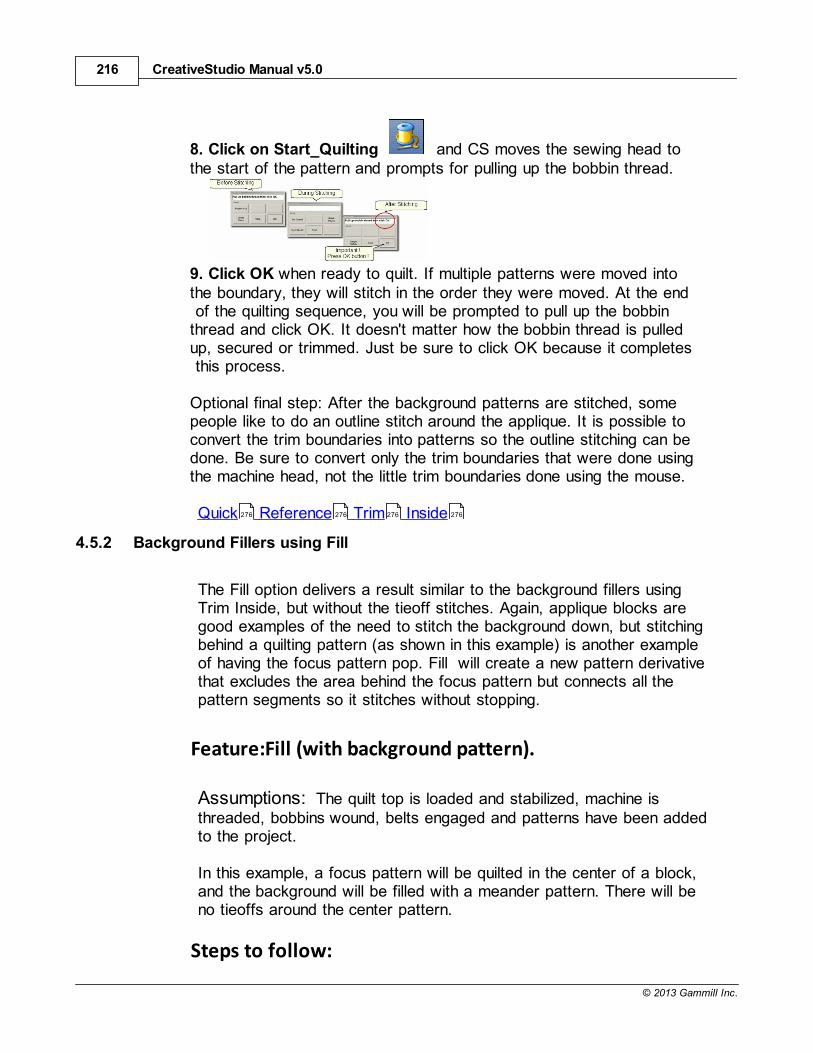
CreativeStudio Manual v5.0216
© 2013 Gammill Inc.
8. Click on Start_Quilting and CS moves the sewing head tothe start of the pattern and prompts for pulling up the bobbin thread.
9. Click OK when ready to quilt. If multiple patterns were moved intothe boundary, they will stitch in the order they were moved. At the end of the quilting sequence, you will be prompted to pull up the bobbinthread and click OK. It doesn't matter how the bobbin thread is pulledup, secured or trimmed. Just be sure to click OK because it completes this process.
Optional final step: After the background patterns are stitched, somepeople like to do an outline stitch around the applique. It is possible toconvert the trim boundaries into patterns so the outline stitching can bedone. Be sure to convert only the trim boundaries that were done usingthe machine head, not the little trim boundaries done using the mouse.
Quick Reference Trim Inside
4.5.2 Background Fillers using Fill
The Fill option delivers a result similar to the background fillers usingTrim Inside, but without the tieoff stitches. Again, applique blocks aregood examples of the need to stitch the background down, but stitchingbehind a quilting pattern (as shown in this example) is another exampleof having the focus pattern pop. Fill will create a new pattern derivativethat excludes the area behind the focus pattern but connects all thepattern segments so it stitches without stopping.
Feature:Fill (with background pattern).
Assumptions: The quilt top is loaded and stabilized, machine isthreaded, bobbins wound, belts engaged and patterns have been addedto the project.
In this example, a focus pattern will be quilted in the center of a block,and the background will be filled with a meander pattern. There will beno tieoffs around the center pattern.
Steps to follow:
276 276 276 276
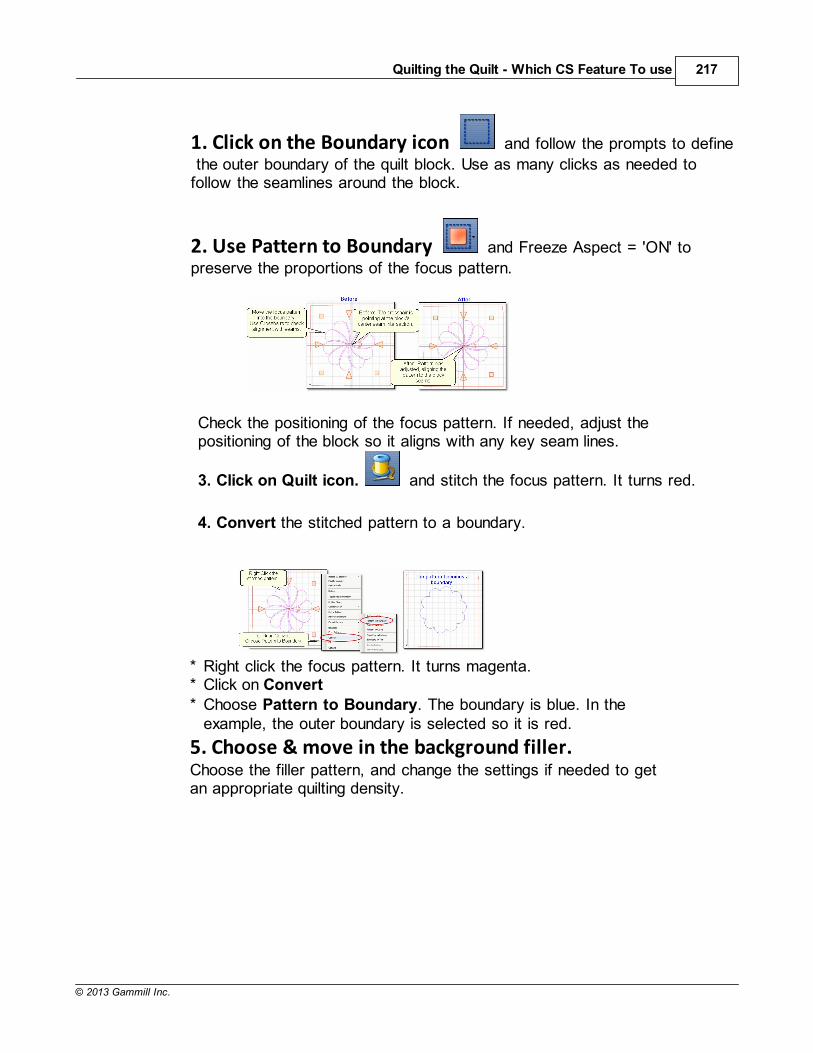
Quilting the Quilt - Which CS Feature To use 217
© 2013 Gammill Inc.
1. Click on the Boundary icon and follow the prompts to define
the outer boundary of the quilt block. Use as many clicks as needed tofollow the seamlines around the block.
2. Use Pattern to Boundary and Freeze Aspect = 'ON' to
preserve the proportions of the focus pattern.
Check the positioning of the focus pattern. If needed, adjust thepositioning of the block so it aligns with any key seam lines.
3. Click on Quilt icon. and stitch the focus pattern. It turns red.
4. Convert the stitched pattern to a boundary.
* Right click the focus pattern. It turns magenta.* Click on Convert* Choose Pattern to Boundary. The boundary is blue. In the
example, the outer boundary is selected so it is red.
5. Choose & move in the background filler.Choose the filler pattern, and change the settings if needed to getan appropriate quilting density.
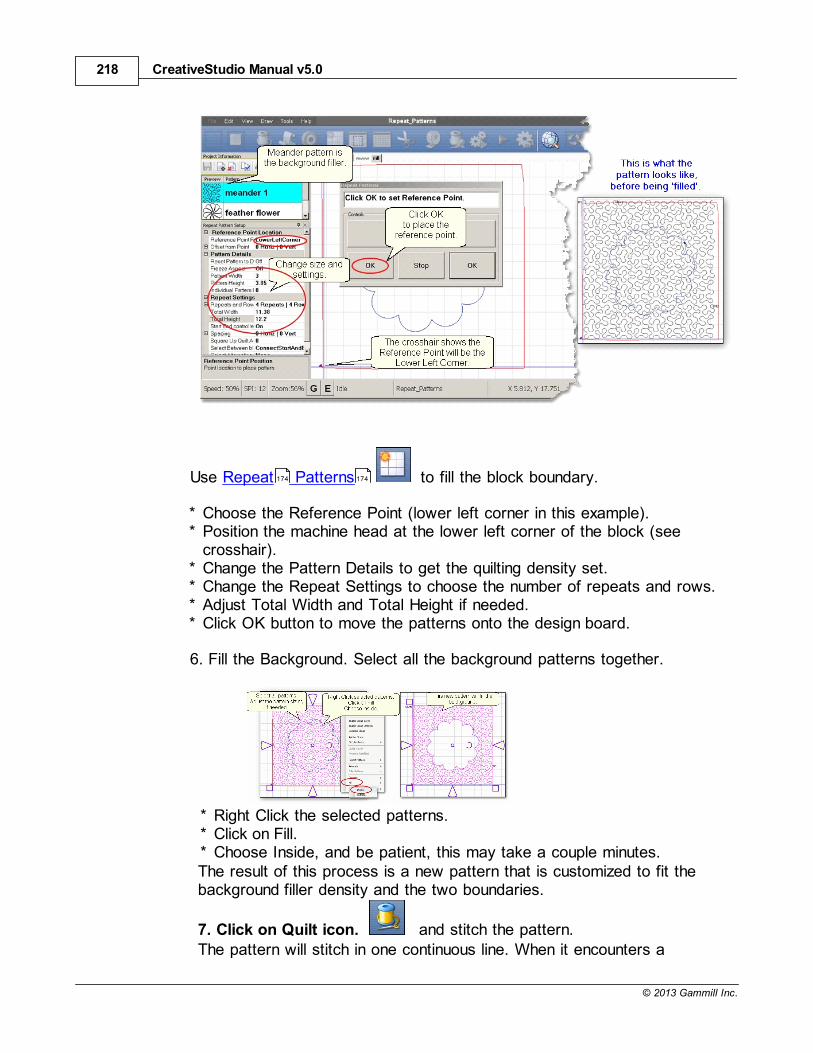
CreativeStudio Manual v5.0218
© 2013 Gammill Inc.
Use Repeat Patterns to fill the block boundary.
* Choose the Reference Point (lower left corner in this example).* Position the machine head at the lower left corner of the block (see
crosshair).* Change the Pattern Details to get the quilting density set.* Change the Repeat Settings to choose the number of repeats and rows.* Adjust Total Width and Total Height if needed.* Click OK button to move the patterns onto the design board.
6. Fill the Background. Select all the background patterns together.
* Right Click the selected patterns.* Click on Fill.* Choose Inside, and be patient, this may take a couple minutes.The result of this process is a new pattern that is customized to fit thebackground filler density and the two boundaries.
7. Click on Quilt icon. and stitch the pattern.The pattern will stitch in one continuous line. When it encounters a
174 174

Quilting the Quilt - Which CS Feature To use 219
© 2013 Gammill Inc.
boundary, instead of doing tieoff stitches, it will stitch along theboundary until it reaches the next portion of the pattern to be stitched.
As shown above, after the new fill pattern has been stitched, it mightbe a good idea to convert the two boundaries to patterrns, and stitchthem out also. It will look more like outline quilting.
8. Save the Project.
4.5.3 Pantographs using Repeat Pattern
Background patterns (pantographs) can be stitched using the RepeatPattern features. The benefit is that Repeat Pattern is a more flexible feature, allowing additional boundaries and patterns to be placed inthe quilt group along with the background pattern. The nice featureabout E2E is the way CS controls the sizing and repositioning of thepatterns automatically when the quilt is rolled. With Repeat Patterns,you do this yourself using Relocate (Extra Edit Option).
Feature: Repeat_Patterns for PantographsAssumptions: The machine is threaded, bobbins wound, beltsengaged and patterns have been added to the project.Prep Step #1.) Measure the quilt length and width accurately before loading the quilt.If you are leaving a margin at the top and bottom, be sure to reduceyour total quilt length by this amount. Also it is a good idea to reducethe length a little to accommodate shrinkage caused by the quilting.This could be from 1% to 5%, depending on the fabrics, batting andquilting density.Prep Step #2) Load the quilt and baste the outer edges.Prep Step #3) Choose a pattern and think about the scale. Large scale,open quilting results in a more supple quilt and small scale, dense quilting is a bit stiffer.Prep Step #4) Change the pattern details (height and width) to reflect the
120
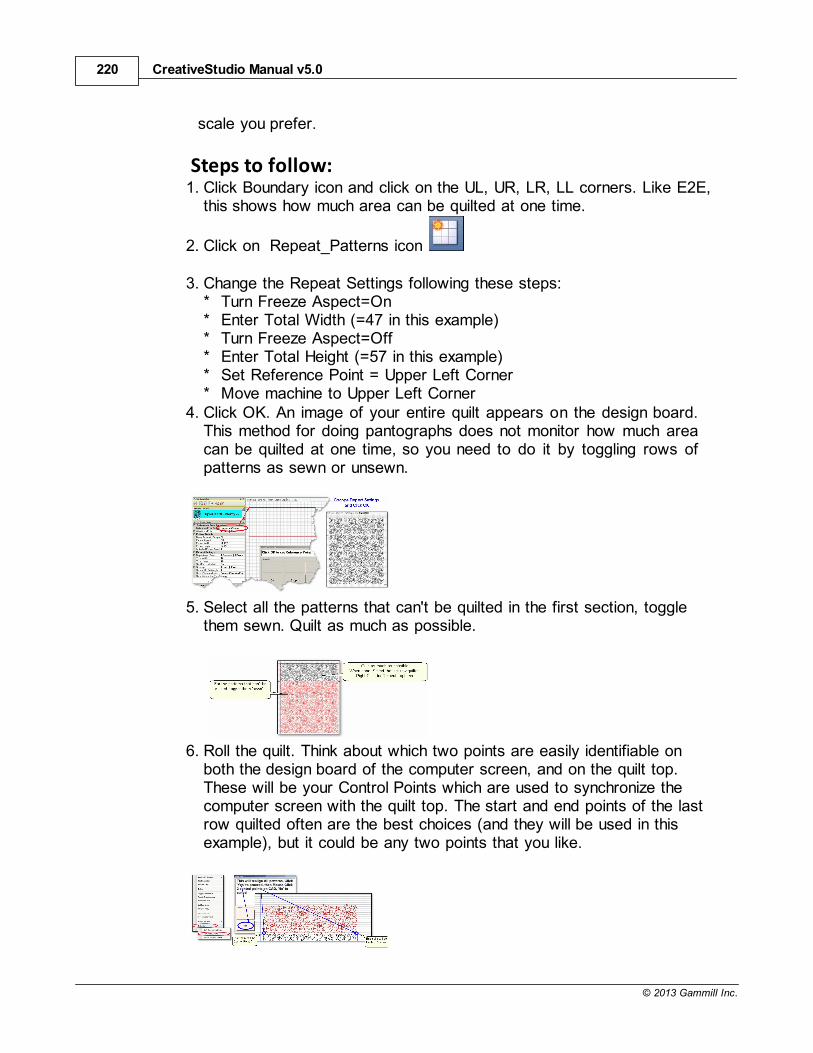
CreativeStudio Manual v5.0220
© 2013 Gammill Inc.
scale you prefer.
Steps to follow:1. Click Boundary icon and click on the UL, UR, LR, LL corners. Like E2E,
this shows how much area can be quilted at one time.
2. Click on Repeat_Patterns icon
3. Change the Repeat Settings following these steps:* Turn Freeze Aspect=On* Enter Total Width (=47 in this example)* Turn Freeze Aspect=Off* Enter Total Height (=57 in this example)* Set Reference Point = Upper Left Corner* Move machine to Upper Left Corner
4. Click OK. An image of your entire quilt appears on the design board.This method for doing pantographs does not monitor how much areacan be quilted at one time, so you need to do it by toggling rows ofpatterns as sewn or unsewn.
5. Select all the patterns that can't be quilted in the first section, togglethem sewn. Quilt as much as possible.
6. Roll the quilt. Think about which two points are easily identifiable onboth the design board of the computer screen, and on the quilt top.These will be your Control Points which are used to synchronize thecomputer screen with the quilt top. The start and end points of the lastrow quilted often are the best choices (and they will be used in thisexample), but it could be any two points that you like.
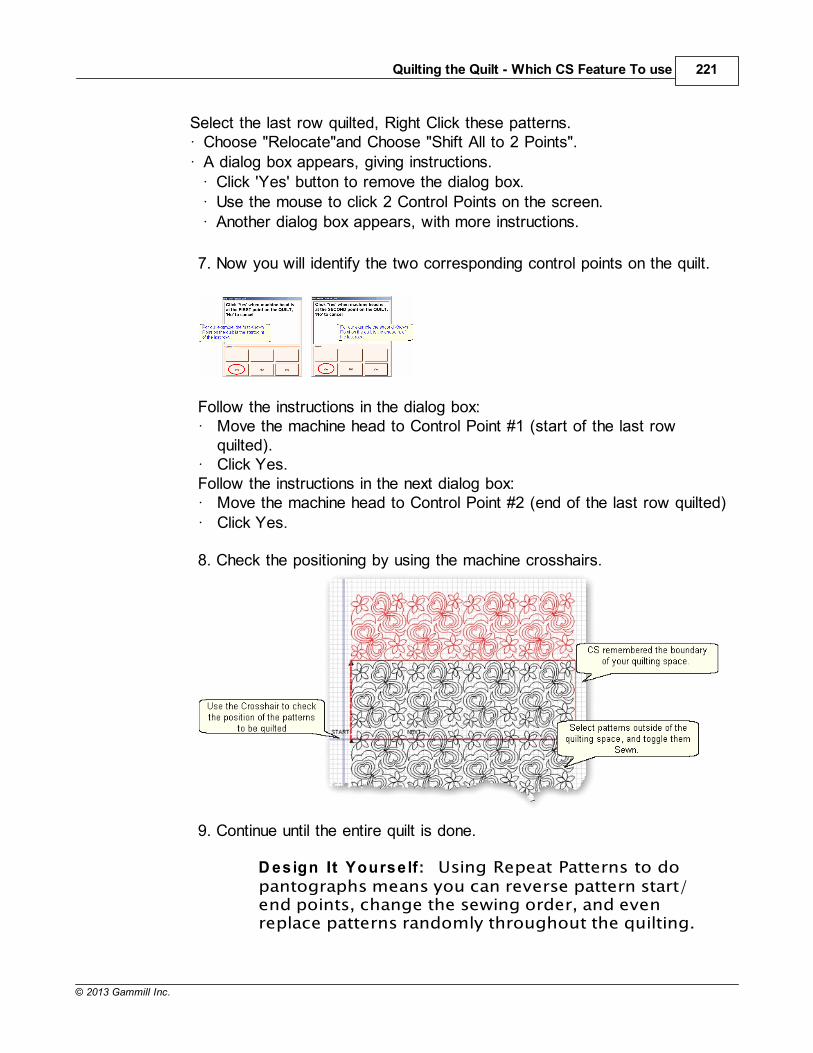
Quilting the Quilt - Which CS Feature To use 221
© 2013 Gammill Inc.
Select the last row quilted, Right Click these patterns.· Choose "Relocate"and Choose "Shift All to 2 Points".· A dialog box appears, giving instructions.
· Click 'Yes' button to remove the dialog box.· Use the mouse to click 2 Control Points on the screen.· Another dialog box appears, with more instructions.
7. Now you will identify the two corresponding control points on the quilt.
Follow the instructions in the dialog box:· Move the machine head to Control Point #1 (start of the last row
quilted).· Click Yes.Follow the instructions in the next dialog box:· Move the machine head to Control Point #2 (end of the last row quilted)· Click Yes.
8. Check the positioning by using the machine crosshairs.
9. Continue until the entire quilt is done.
D esign It Yourse lf: Using Repeat Patterns to dopantographs means you can reverse pattern start/end points, change the sewing order, and evenreplace patterns randomly throughout the quilting.
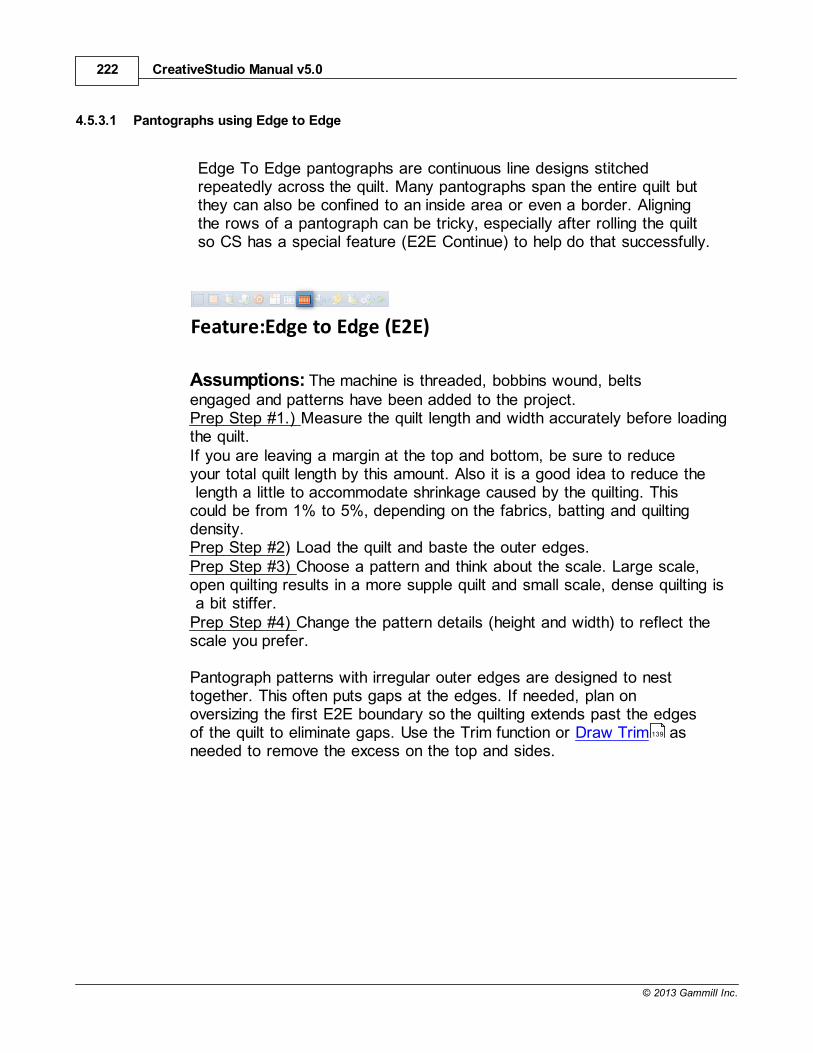
CreativeStudio Manual v5.0222
© 2013 Gammill Inc.
4.5.3.1 Pantographs using Edge to Edge
Edge To Edge pantographs are continuous line designs stitchedrepeatedly across the quilt. Many pantographs span the entire quilt butthey can also be confined to an inside area or even a border. Aligningthe rows of a pantograph can be tricky, especially after rolling the quiltso CS has a special feature (E2E Continue) to help do that successfully.
Feature:Edge to Edge (E2E)
Assumptions: The machine is threaded, bobbins wound, beltsengaged and patterns have been added to the project.Prep Step #1.) Measure the quilt length and width accurately before loadingthe quilt.If you are leaving a margin at the top and bottom, be sure to reduceyour total quilt length by this amount. Also it is a good idea to reduce the length a little to accommodate shrinkage caused by the quilting. Thiscould be from 1% to 5%, depending on the fabrics, batting and quiltingdensity.Prep Step #2) Load the quilt and baste the outer edges.Prep Step #3) Choose a pattern and think about the scale. Large scale,open quilting results in a more supple quilt and small scale, dense quilting is a bit stiffer.Prep Step #4) Change the pattern details (height and width) to reflect thescale you prefer.
Pantograph patterns with irregular outer edges are designed to nesttogether. This often puts gaps at the edges. If needed, plan onoversizing the first E2E boundary so the quilting extends past the edgesof the quilt to eliminate gaps. Use the Trim function or Draw Trim asneeded to remove the excess on the top and sides.
139
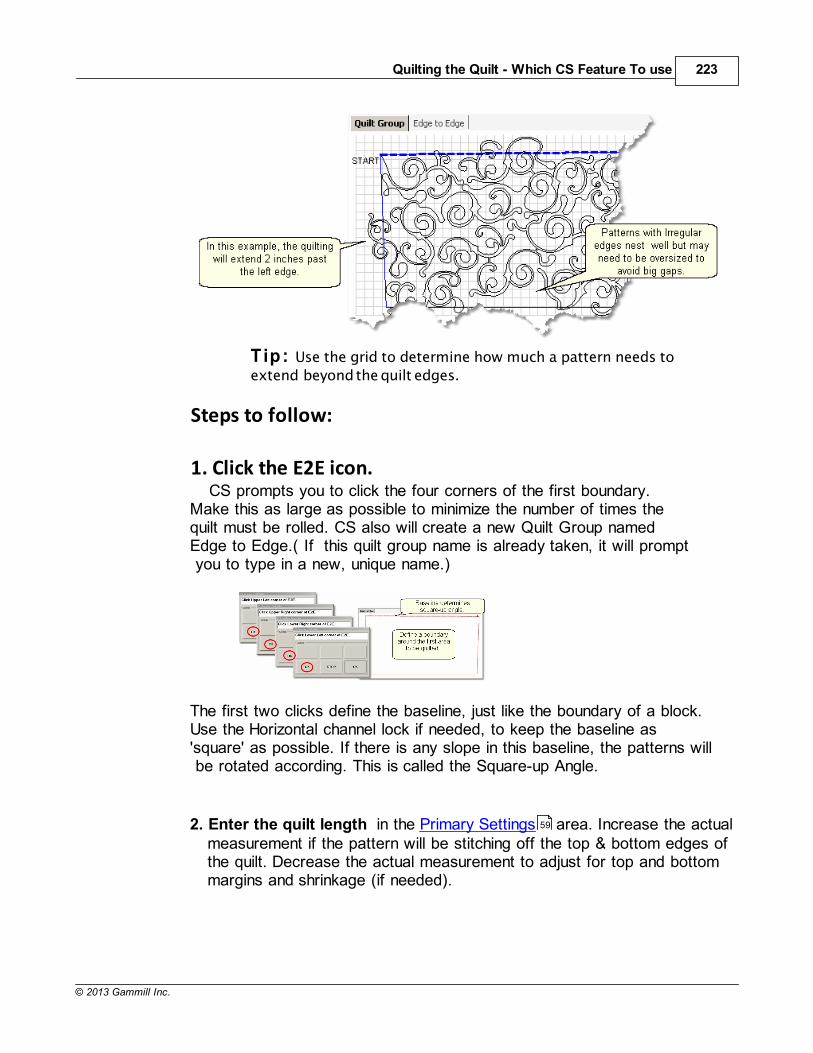
Quilting the Quilt - Which CS Feature To use 223
© 2013 Gammill Inc.
Tip: Use the grid to determine how much a pattern needs to
extend beyond the quilt edges.
Steps to follow:
1. Click the E2E icon.CS prompts you to click the four corners of the first boundary.
Make this as large as possible to minimize the number of times thequilt must be rolled. CS also will create a new Quilt Group namedEdge to Edge.( If this quilt group name is already taken, it will prompt you to type in a new, unique name.)
The first two clicks define the baseline, just like the boundary of a block.Use the Horizontal channel lock if needed, to keep the baseline as'square' as possible. If there is any slope in this baseline, the patterns will be rotated according. This is called the Square-up Angle.
2. Enter the quilt length in the Primary Settings area. Increase the actualmeasurement if the pattern will be stitching off the top & bottom edges ofthe quilt. Decrease the actual measurement to adjust for top and bottommargins and shrinkage (if needed).
59
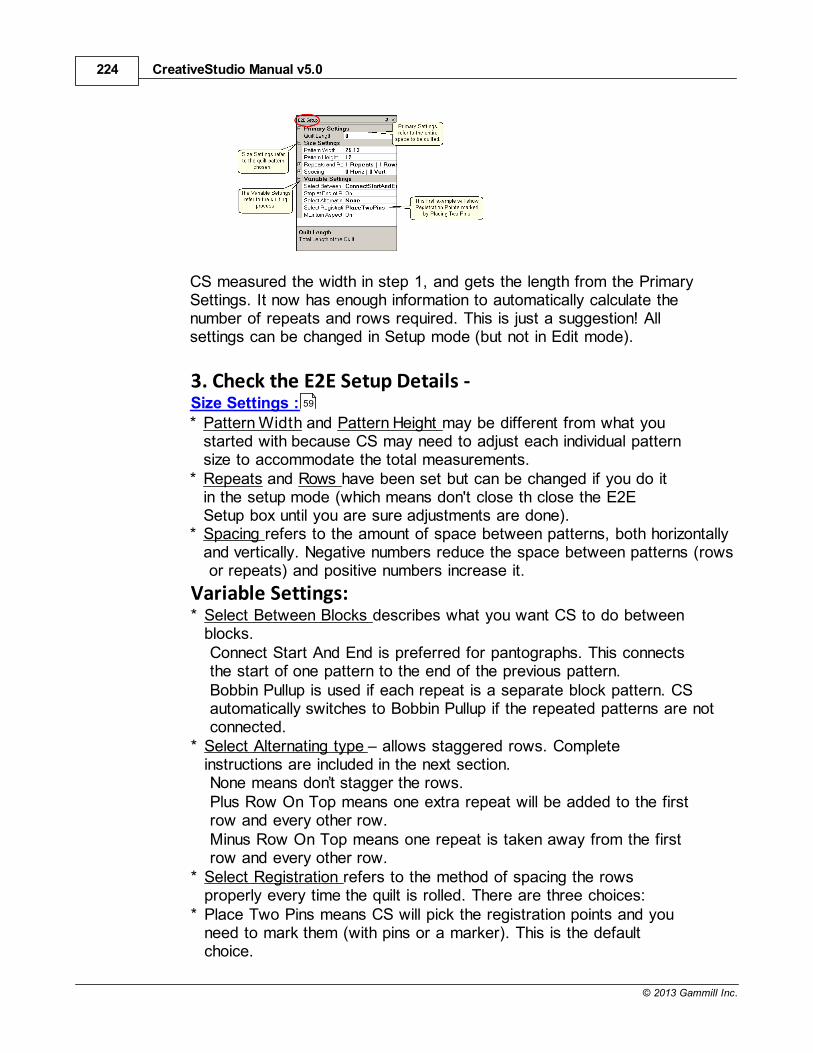
CreativeStudio Manual v5.0224
© 2013 Gammill Inc.
CS measured the width in step 1, and gets the length from the PrimarySettings. It now has enough information to automatically calculate thenumber of repeats and rows required. This is just a suggestion! Allsettings can be changed in Setup mode (but not in Edit mode).
3. Check the E2E Setup Details - Size Settings :* Pattern Width and Pattern Height may be different from what you
started with because CS may need to adjust each individual patternsize to accommodate the total measurements.
* Repeats and Rows have been set but can be changed if you do itin the setup mode (which means don't close th close the E2ESetup box until you are sure adjustments are done).
* Spacing refers to the amount of space between patterns, both horizontallyand vertically. Negative numbers reduce the space between patterns (rows or repeats) and positive numbers increase it.
Variable Settings:* Select Between Blocks describes what you want CS to do between
blocks.Connect Start And End is preferred for pantographs. This connectsthe start of one pattern to the end of the previous pattern.Bobbin Pullup is used if each repeat is a separate block pattern. CSautomatically switches to Bobbin Pullup if the repeated patterns are notconnected.
* Select Alternating type allows staggered rows. Completeinstructions are included in the next section.None means don’t stagger the rows.Plus Row On Top means one extra repeat will be added to the firstrow and every other row.Minus Row On Top means one repeat is taken away from the firstrow and every other row.
* Select Registration refers to the method of spacing the rowsproperly every time the quilt is rolled. There are three choices:
* Place Two Pins means CS will pick the registration points and youneed to mark them (with pins or a marker). This is the defaultchoice.
59
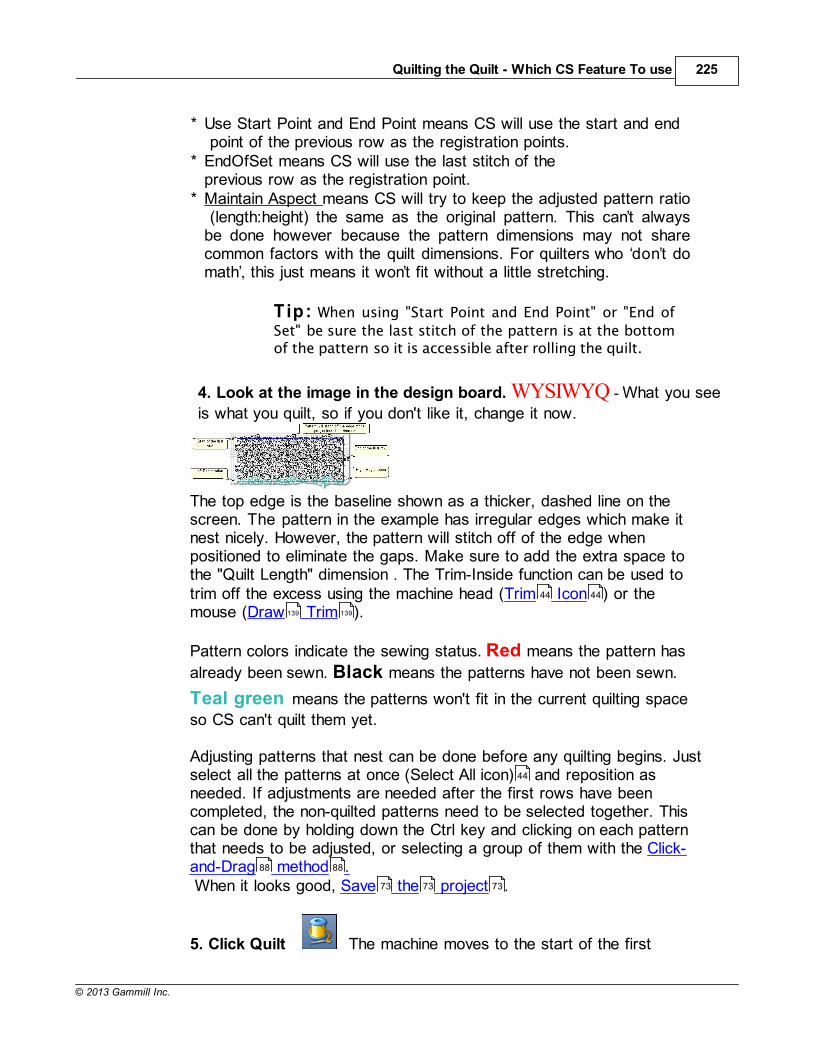
Quilting the Quilt - Which CS Feature To use 225
© 2013 Gammill Inc.
* Use Start Point and End Point means CS will use the start and end point of the previous row as the registration points.
* EndOfSet means CS will use the last stitch of theprevious row as the registration point.
* Maintain Aspect means CS will try to keep the adjusted pattern ratio (length:height) the same as the original pattern. This can’t alwaysbe done however because the pattern dimensions may not sharecommon factors with the quilt dimensions. For quilters who dont domath , this just means it won’t fit without a little stretching.
Tip: When using "Start Point and End Point" or "End of
Set" be sure the last stitch of the pattern is at the bottomof the pattern so it is accessible after rolling the quilt.
4. Look at the image in the design board. WYSIWYQ - What you see
is what you quilt, so if you don't like it, change it now.
The top edge is the baseline shown as a thicker, dashed line on thescreen. The pattern in the example has irregular edges which make itnest nicely. However, the pattern will stitch off of the edge whenpositioned to eliminate the gaps. Make sure to add the extra space tothe "Quilt Length" dimension . The Trim-Inside function can be used totrim off the excess using the machine head (Trim Icon ) or themouse (Draw Trim ).
Pattern colors indicate the sewing status. Red means the pattern has
already been sewn. Black means the patterns have not been sewn.
Teal green means the patterns won't fit in the current quilting space
so CS can't quilt them yet.
Adjusting patterns that nest can be done before any quilting begins. Justselect all the patterns at once (Select All icon) and reposition asneeded. If adjustments are needed after the first rows have beencompleted, the non-quilted patterns need to be selected together. Thiscan be done by holding down the Ctrl key and clicking on each patternthat needs to be adjusted, or selecting a group of them with the Click-and-Drag method .When it looks good, Save the project .
5. Click Quilt The machine moves to the start of the first
44 44
139 139
44
88 88
73 73 73
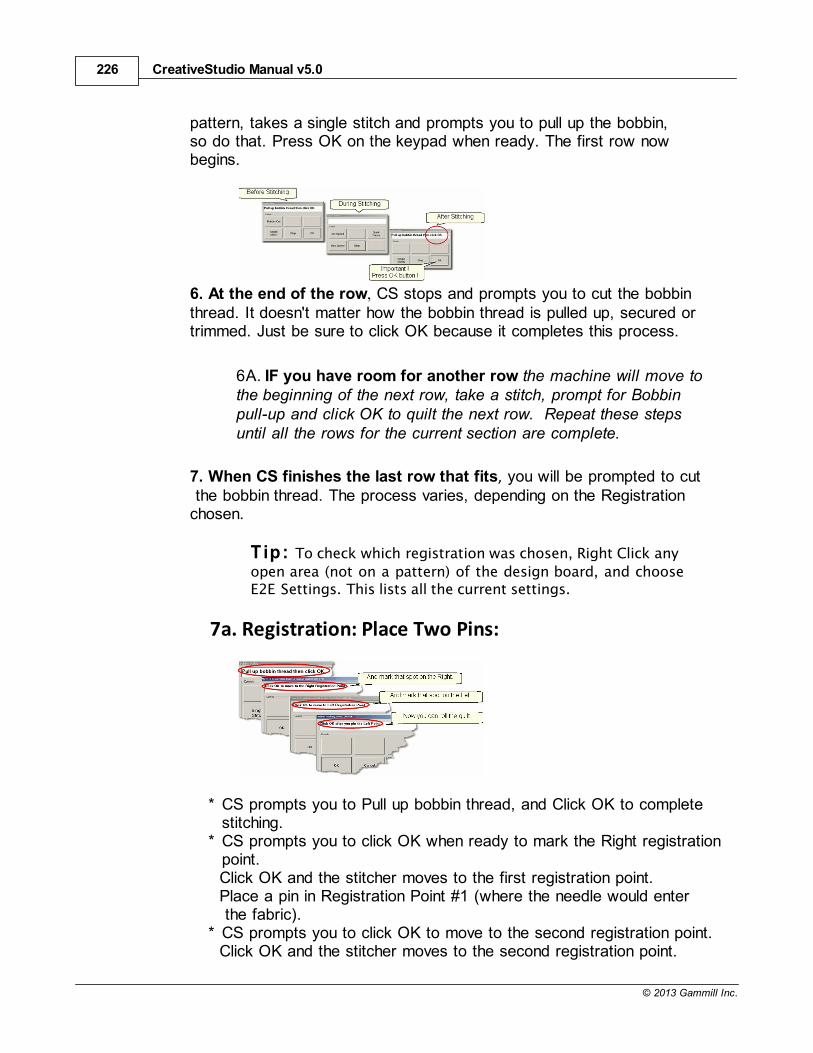
CreativeStudio Manual v5.0226
© 2013 Gammill Inc.
pattern, takes a single stitch and prompts you to pull up the bobbin,so do that. Press OK on the keypad when ready. The first row nowbegins.
6. At the end of the row, CS stops and prompts you to cut the bobbinthread. It doesn't matter how the bobbin thread is pulled up, secured ortrimmed. Just be sure to click OK because it completes this process.
6A. IF you have room for another row the machine will move tothe beginning of the next row, take a stitch, prompt for Bobbinpull-up and click OK to quilt the next row. Repeat these stepsuntil all the rows for the current section are complete.
7. When CS finishes the last row that fits, you will be prompted to cut the bobbin thread. The process varies, depending on the Registrationchosen.
Tip: To check which registration was chosen, Right Click any
open area (not on a pattern) of the design board, and chooseE2E Settings. This lists all the current settings.
7a. Registration: Place Two Pins:
* CS prompts you to Pull up bobbin thread, and Click OK to completestitching.
* CS prompts you to click OK when ready to mark the Right registrationpoint.Click OK and the stitcher moves to the first registration point.Place a pin in Registration Point #1 (where the needle would enter the fabric).
* CS prompts you to click OK to move to the second registration point.Click OK and the stitcher moves to the second registration point.
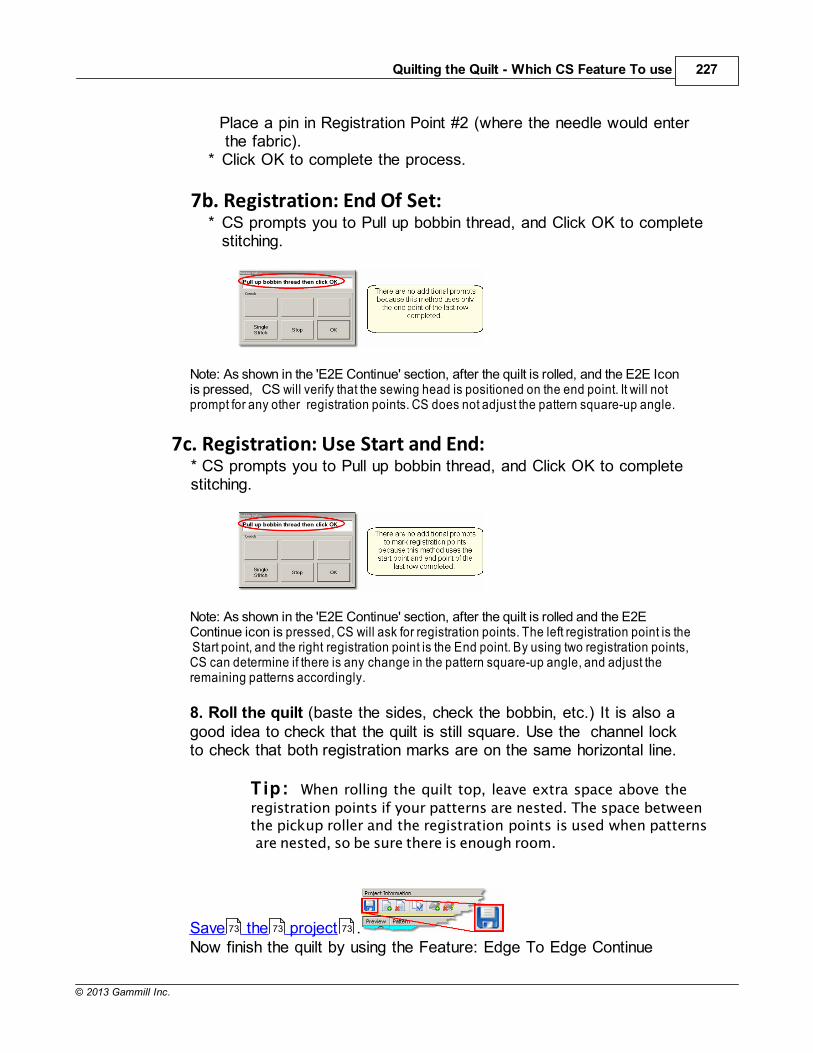
Quilting the Quilt - Which CS Feature To use 227
© 2013 Gammill Inc.
Place a pin in Registration Point #2 (where the needle would enter the fabric).
* Click OK to complete the process.
7b. Registration: End Of Set:* CS prompts you to Pull up bobbin thread, and Click OK to complete
stitching.
Note: As shown in the 'E2E Continue' section, after the quilt is rolled, and the E2E Iconis pressed, CS will verify that the sewing head is positioned on the end point. It will notprompt for any other registration points. CS does not adjust the pattern square-up angle.
7c. Registration: Use Start and End:* CS prompts you to Pull up bobbin thread, and Click OK to completestitching.
Note: As shown in the 'E2E Continue' section, after the quilt is rolled and the E2EContinue icon is pressed, CS will ask for registration points. The left registration point is the Start point, and the right registration point is the End point. By using two registration points,CS can determine if there is any change in the pattern square-up angle, and adjust theremaining patterns accordingly.
8. Roll the quilt (baste the sides, check the bobbin, etc.) It is also agood idea to check that the quilt is still square. Use the channel lockto check that both registration marks are on the same horizontal line.
Tip: When rolling the quilt top, leave extra space above the
registration points if your patterns are nested. The space betweenthe pickup roller and the registration points is used when patterns are nested, so be sure there is enough room.
Save the project .Now finish the quilt by using the Feature: Edge To Edge Continue
73 73 73
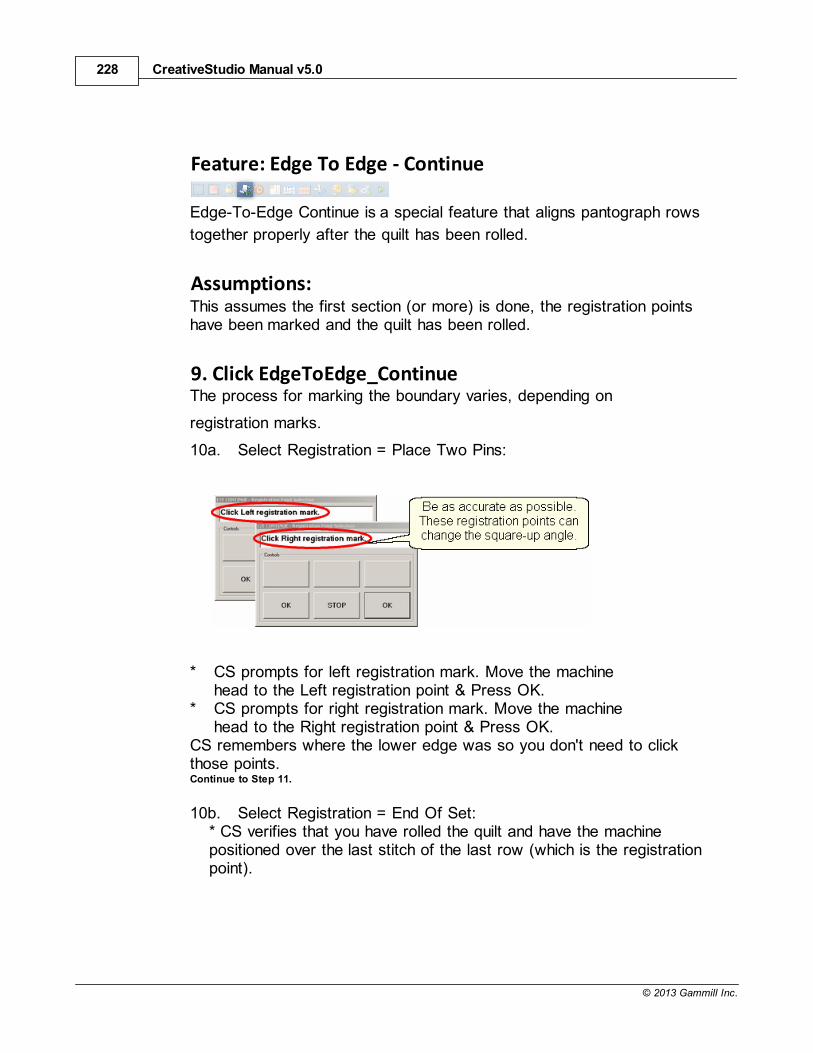
CreativeStudio Manual v5.0228
© 2013 Gammill Inc.
Feature: Edge To Edge - Continue
Edge-To-Edge Continue is a special feature that aligns pantograph rows
together properly after the quilt has been rolled.
Assumptions:This assumes the first section (or more) is done, the registration pointshave been marked and the quilt has been rolled.
9. Click EdgeToEdge_ContinueThe process for marking the boundary varies, depending on
registration marks.
10a. Select Registration = Place Two Pins:
* CS prompts for left registration mark. Move the machinehead to the Left registration point & Press OK.
* CS prompts for right registration mark. Move the machinehead to the Right registration point & Press OK.
CS remembers where the lower edge was so you don't need to clickthose points.Continue to Step 11.
10b. Select Registration = End Of Set:* CS verifies that you have rolled the quilt and have the machinepositioned over the last stitch of the last row (which is the registrationpoint).
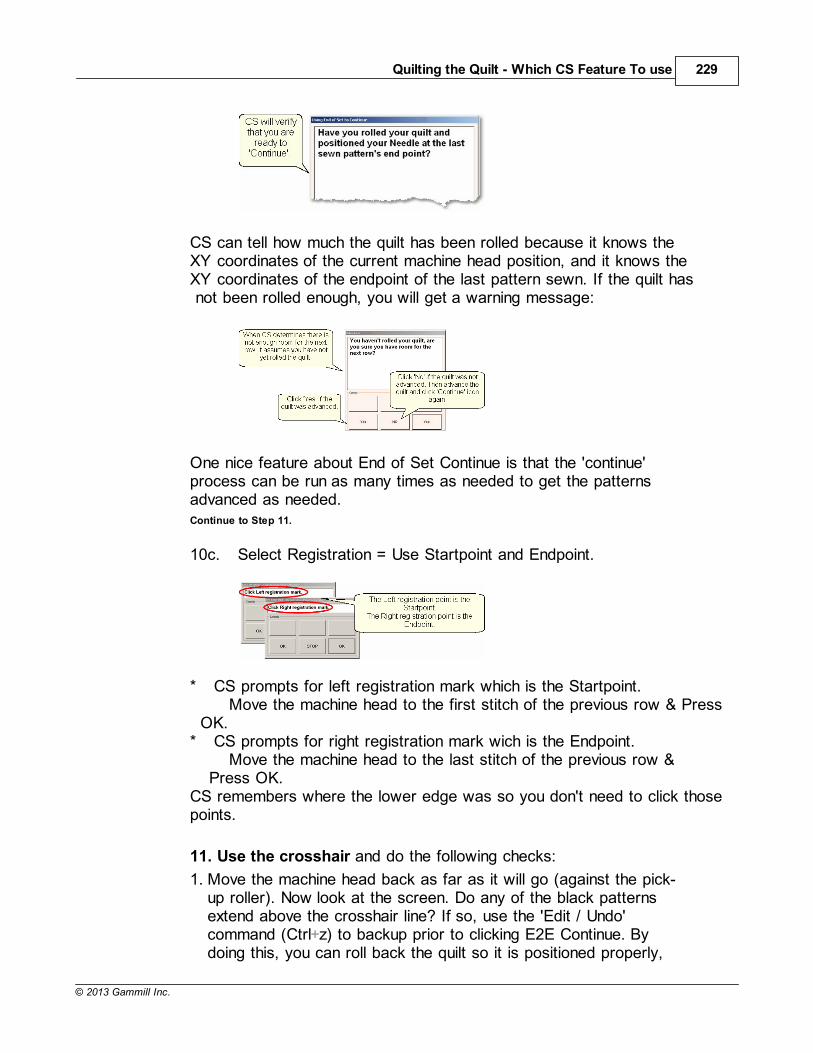
Quilting the Quilt - Which CS Feature To use 229
© 2013 Gammill Inc.
CS can tell how much the quilt has been rolled because it knows theXY coordinates of the current machine head position, and it knows theXY coordinates of the endpoint of the last pattern sewn. If the quilt has not been rolled enough, you will get a warning message:
One nice feature about End of Set Continue is that the 'continue'process can be run as many times as needed to get the patternsadvanced as needed.Continue to Step 11.
10c. Select Registration = Use Startpoint and Endpoint.
* CS prompts for left registration mark which is the Startpoint.Move the machine head to the first stitch of the previous row & Press
OK.* CS prompts for right registration mark wich is the Endpoint.
Move the machine head to the last stitch of the previous row &Press OK.
CS remembers where the lower edge was so you don't need to click thosepoints.
11. Use the crosshair and do the following checks:
1. Move the machine head back as far as it will go (against the pick-up roller). Now look at the screen. Do any of the black patternsextend above the crosshair line? If so, use the 'Edit / Undo'command (Ctrl+z) to backup prior to clicking E2E Continue. Bydoing this, you can roll back the quilt so it is positioned properly,
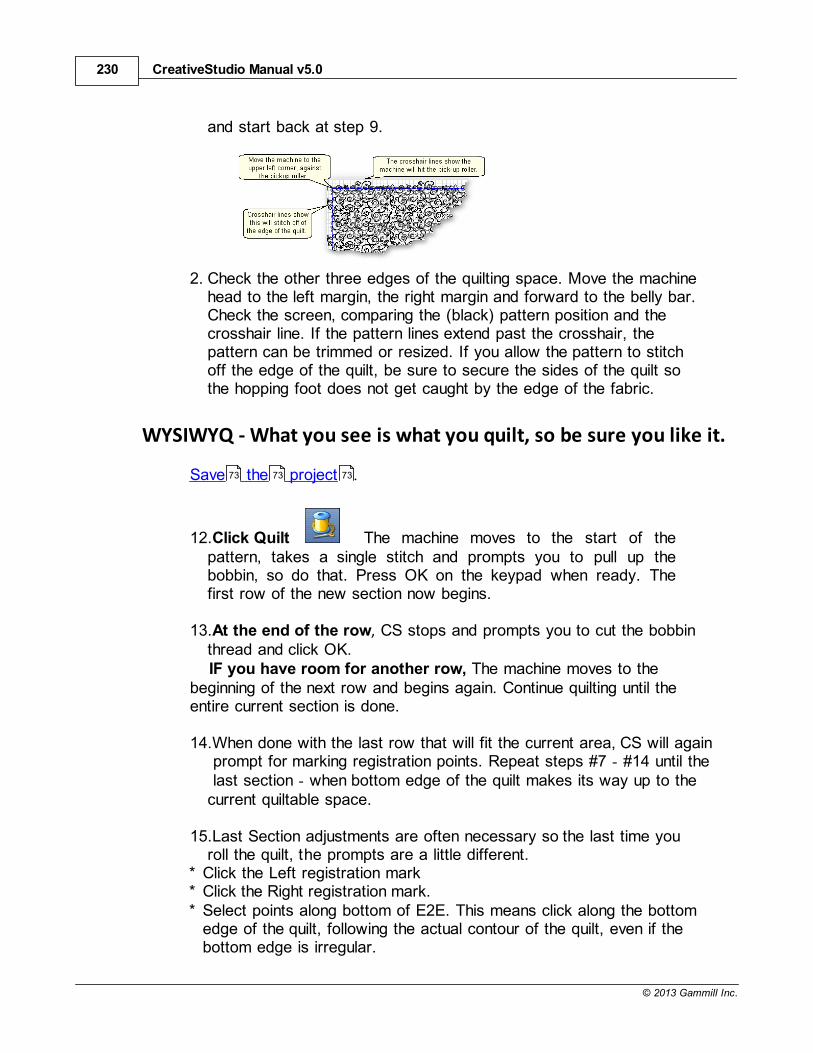
CreativeStudio Manual v5.0230
© 2013 Gammill Inc.
and start back at step 9.
2. Check the other three edges of the quilting space. Move the machinehead to the left margin, the right margin and forward to the belly bar.Check the screen, comparing the (black) pattern position and thecrosshair line. If the pattern lines extend past the crosshair, thepattern can be trimmed or resized. If you allow the pattern to stitchoff the edge of the quilt, be sure to secure the sides of the quilt sothe hopping foot does not get caught by the edge of the fabric.
WYSIWYQ - What you see is what you quilt, so be sure you like it.
Save the project .
12.Click Quilt The machine moves to the start of thepattern, takes a single stitch and prompts you to pull up thebobbin, so do that. Press OK on the keypad when ready. Thefirst row of the new section now begins.
13.At the end of the row, CS stops and prompts you to cut the bobbinthread and click OK.IF you have room for another row, The machine moves to the
beginning of the next row and begins again. Continue quilting until theentire current section is done.
14.When done with the last row that will fit the current area, CS will again prompt for marking registration points. Repeat steps #7 - #14 until the last section - when bottom edge of the quilt makes its way up to thecurrent quiltable space.
15.Last Section adjustments are often necessary so the last time youroll the quilt, the prompts are a little different.
* Click the Left registration mark* Click the Right registration mark.* Select points along bottom of E2E. This means click along the bottom
edge of the quilt, following the actual contour of the quilt, even if thebottom edge is irregular.
73 73 73
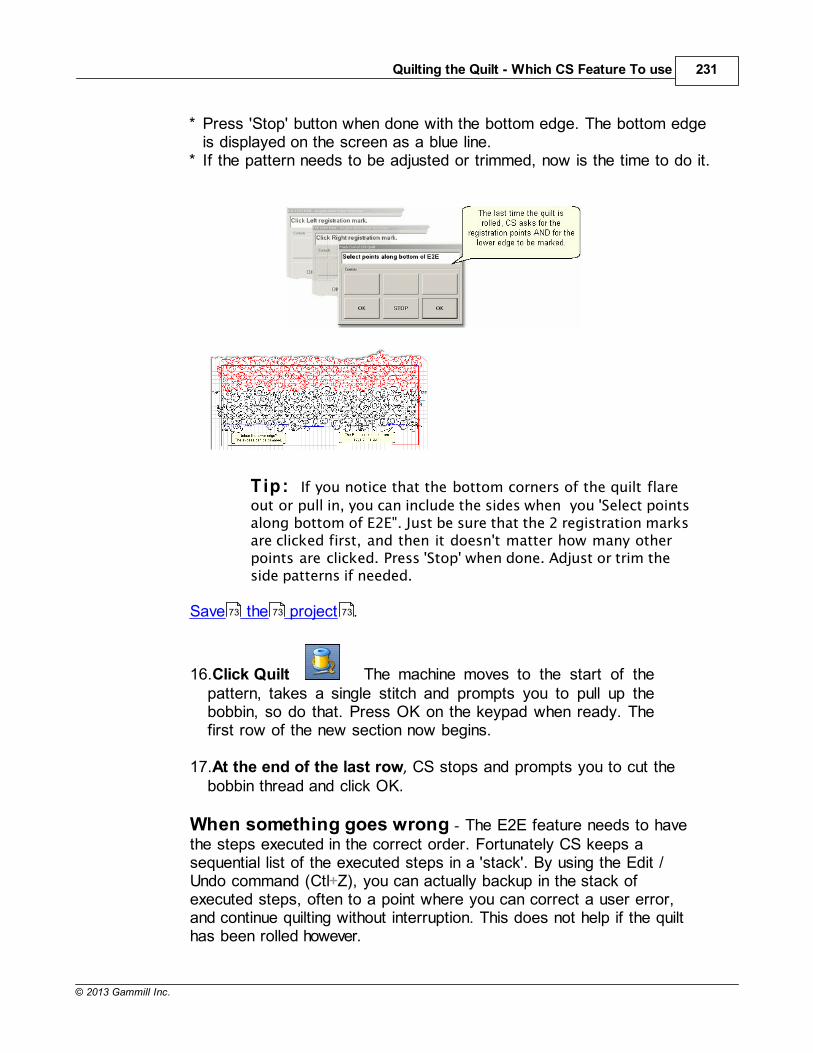
Quilting the Quilt - Which CS Feature To use 231
© 2013 Gammill Inc.
* Press 'Stop' button when done with the bottom edge. The bottom edgeis displayed on the screen as a blue line.
* If the pattern needs to be adjusted or trimmed, now is the time to do it.
Tip: If you notice that the bottom corners of the quilt flare
out or pull in, you can include the sides when you 'Select pointsalong bottom of E2E". Just be sure that the 2 registration marksare clicked first, and then it doesn't matter how many otherpoints are clicked. Press 'Stop' when done. Adjust or trim theside patterns if needed.
Save the project .
16.Click Quilt The machine moves to the start of thepattern, takes a single stitch and prompts you to pull up thebobbin, so do that. Press OK on the keypad when ready. Thefirst row of the new section now begins.
17.At the end of the last row, CS stops and prompts you to cut thebobbin thread and click OK.
When something goes wrong - The E2E feature needs to havethe steps executed in the correct order. Fortunately CS keeps asequential list of the executed steps in a 'stack'. By using the Edit /Undo command (Ctl+Z), you can actually backup in the stack ofexecuted steps, often to a point where you can correct a user error,and continue quilting without interruption. This does not help if the quilthas been rolled however.
73 73 73
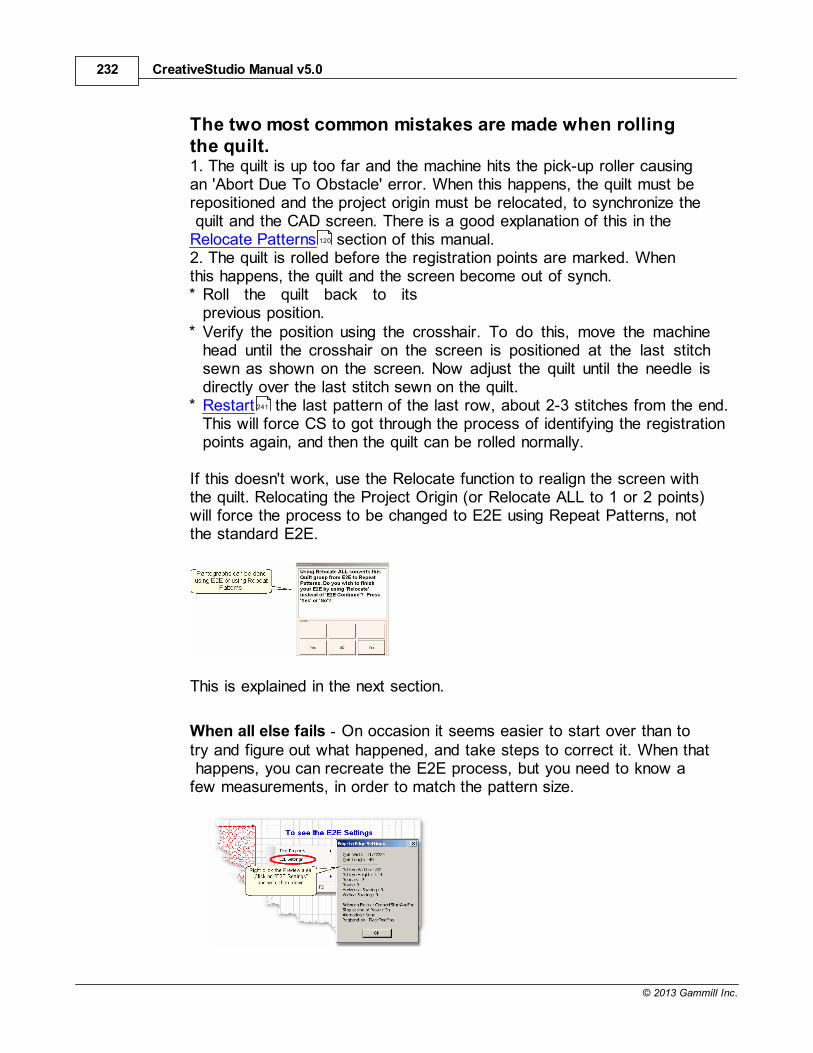
CreativeStudio Manual v5.0232
© 2013 Gammill Inc.
The two most common mistakes are made when rollingthe quilt.1. The quilt is up too far and the machine hits the pick-up roller causingan 'Abort Due To Obstacle' error. When this happens, the quilt must berepositioned and the project origin must be relocated, to synchronize the quilt and the CAD screen. There is a good explanation of this in theRelocate Patterns section of this manual.2. The quilt is rolled before the registration points are marked. Whenthis happens, the quilt and the screen become out of synch.* Roll the quilt back to its
previous position.* Verify the position using the crosshair. To do this, move the machine
head until the crosshair on the screen is positioned at the last stitchsewn as shown on the screen. Now adjust the quilt until the needle isdirectly over the last stitch sewn on the quilt.
* Restart the last pattern of the last row, about 2-3 stitches from the end.This will force CS to got through the process of identifying the registrationpoints again, and then the quilt can be rolled normally.
If this doesn't work, use the Relocate function to realign the screen withthe quilt. Relocating the Project Origin (or Relocate ALL to 1 or 2 points)will force the process to be changed to E2E using Repeat Patterns, notthe standard E2E.
This is explained in the next section.
When all else fails - On occasion it seems easier to start over than totry and figure out what happened, and take steps to correct it. When that happens, you can recreate the E2E process, but you need to know afew measurements, in order to match the pattern size.
120
241
Quilting the Quilt - Which CS Feature To use 233
© 2013 Gammill Inc.
Now you have enough information to start a new E2E Quilt group. Somepeople prefer to begin back at the first row, and others prefer to begin inthe middle, pretending that a middle row is actually the top of the quilt. Ifyou choose to do this, be sure adjust the quilt length accordingly. Also besure to verify the pattern placement by using the Crosshairs. This willenable you to move the machine to various positions on the quilt top, andthen see if the crosshair on the screen is at the same spot.
Quick Reference E2E
4.5.4 E2E Alternating Patterns
Edge To Edge pantographs look less structured when alternatingpattern is used. Not all patterns look good using the Alternating Patternoption, but CS makes it easy to audition them. The Alternating optionwill always have sides that are irregular but CS will automatically Trimthe sides to fit the quilt.
Feature:Edge to Edge - Alternating
Assumptions: The machine is threaded, bobbins wound, beltsengaged and patterns have been added to the project. The Prep Steps here are the same as a standard E2E.Prep Step #1.) Measure the quilt length and width accurately beforeloading the quilt. If you are leaving a margin at the top and bottom, besure to reduce your total quilt length by this amount. Also it is a good ideato reduce the length a little to accommodate shrinkage caused by thequilting. This could be from 1% to 5%, depending on the fabrics, battingand quilting density.Prep Step #2) Load the quilt and baste the outer edges.Prep Step #3) Choose a pattern and think about the scale. Large scale,open quilting results in a more supple quilt and small scale, dense quiltingis a bit stiffer.Prep Step #4) Change the pattern details (height and width) to reflect thescale you prefer.
Steps to follow:
1. Click the E2E icon.CS prompts you to click the four corners of the first boundary. Make
269 269 269
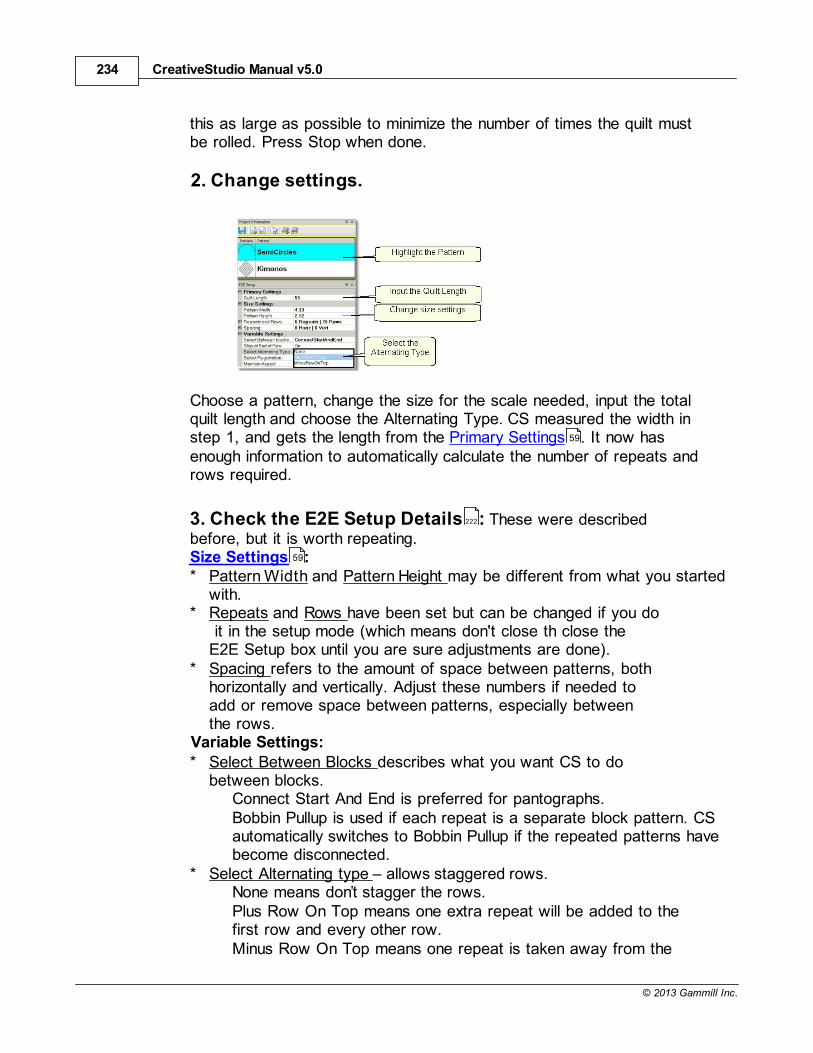
CreativeStudio Manual v5.0234
© 2013 Gammill Inc.
this as large as possible to minimize the number of times the quilt mustbe rolled. Press Stop when done.
2. Change settings.
Choose a pattern, change the size for the scale needed, input the totalquilt length and choose the Alternating Type. CS measured the width instep 1, and gets the length from the Primary Settings . It now hasenough information to automatically calculate the number of repeats androws required.
3. Check the E2E Setup Details : These were describedbefore, but it is worth repeating.Size Settings :* Pattern Width and Pattern Height may be different from what you started
with.* Repeats and Rows have been set but can be changed if you do
it in the setup mode (which means don't close th close theE2E Setup box until you are sure adjustments are done).
* Spacing refers to the amount of space between patterns, bothhorizontally and vertically. Adjust these numbers if needed toadd or remove space between patterns, especially betweenthe rows.
Variable Settings:* Select Between Blocks describes what you want CS to do
between blocks.Connect Start And End is preferred for pantographs.Bobbin Pullup is used if each repeat is a separate block pattern. CSautomatically switches to Bobbin Pullup if the repeated patterns havebecome disconnected.
* Select Alternating type – allows staggered rows.None means don’t stagger the rows.Plus Row On Top means one extra repeat will be added to thefirst row and every other row.Minus Row On Top means one repeat is taken away from the
59
222
59
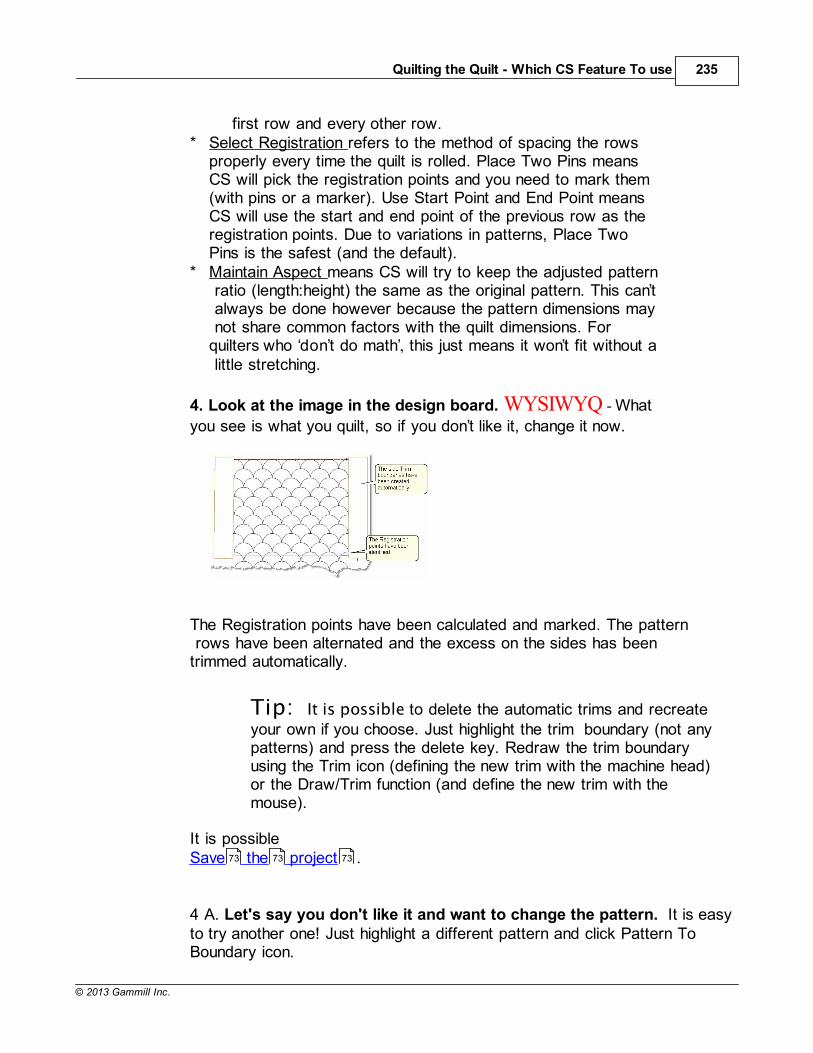
Quilting the Quilt - Which CS Feature To use 235
© 2013 Gammill Inc.
first row and every other row.* Select Registration refers to the method of spacing the rows
properly every time the quilt is rolled. Place Two Pins meansCS will pick the registration points and you need to mark them(with pins or a marker). Use Start Point and End Point meansCS will use the start and end point of the previous row as theregistration points. Due to variations in patterns, Place TwoPins is the safest (and the default).
* Maintain Aspect means CS will try to keep the adjusted pattern ratio (length:height) the same as the original pattern. This can’t always be done however because the pattern dimensions may not share common factors with the quilt dimensions. Forquilters who dont do math , this just means it won’t fit without a little stretching.
4. Look at the image in the design board. WYSIWYQ - What
you see is what you quilt, so if you dont like it, change it now.
The Registration points have been calculated and marked. The pattern rows have been alternated and the excess on the sides has beentrimmed automatically.
Tip: It is possible to delete the automatic trims and recreateyour own if you choose. Just highlight the trim boundary (not anypatterns) and press the delete key. Redraw the trim boundaryusing the Trim icon (defining the new trim with the machine head)or the Draw/Trim function (and define the new trim with themouse).
It is possibleSave the project .
4 A. Let's say you don't like it and want to change the pattern. It is easyto try another one! Just highlight a different pattern and click Pattern ToBoundary icon.
73 73 73
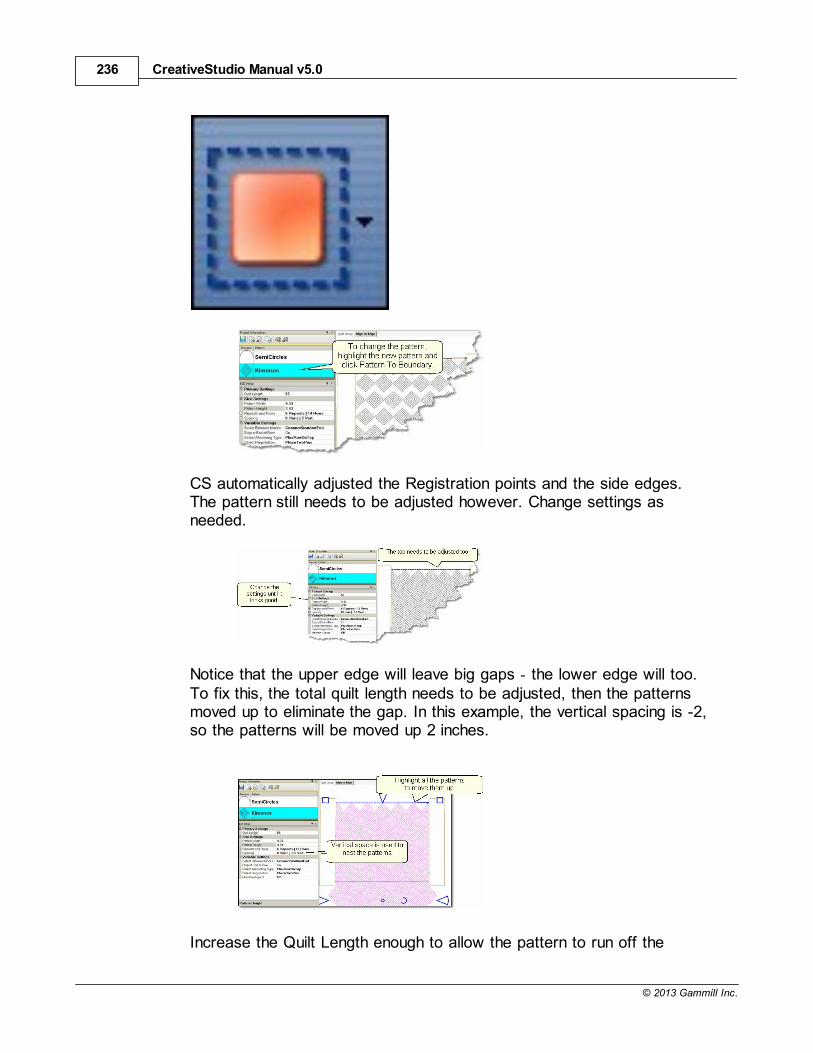
CreativeStudio Manual v5.0236
© 2013 Gammill Inc.
CS automatically adjusted the Registration points and the side edges.The pattern still needs to be adjusted however. Change settings asneeded.
Notice that the upper edge will leave big gaps - the lower edge will too.To fix this, the total quilt length needs to be adjusted, then the patternsmoved up to eliminate the gap. In this example, the vertical spacing is -2,so the patterns will be moved up 2 inches.
Increase the Quilt Length enough to allow the pattern to run off the

Quilting the Quilt - Which CS Feature To use 237
© 2013 Gammill Inc.
edges at the top and bottom. Don't worry about the overlap becauseyou can trim that off before quilting. Select All the patterns together
using the Select All icon Then move the group up to closethe gap. CS may change the settings, so watch them.
Tip: Shifting the patterns up a little is not a problem but
when the pattern needs to be moved up a lot, it might changethe number of rows that can be quilted in the first section.To avoid this, start a new E2E quilt group and define theUpper Left and Upper Right corners as being above the upperedge of the quilt. Increase the quilt length to accommodate this space.
Before quilting, be sure to define another Trim-Inside boundary at the topof the quilt. Use Draw Trim if you want to trim the excess using themouse.
When it looks good, Save the project .
5. Click Quilt The machine moves to the start of the firstpattern, takes a single stitch and prompts you to pull up thebobbin, so do that. Press OK on the keypad when ready. The firstrow now begins.
Repeat the steps listed in the previous section to complete the quilt. Besure to trim the bottom edge to fit.
Quick Reference E2E
4.5.5 E2E Concatenating Patterns
Edge To Edge patterns can be concatenated giving a very customlook. These patterns must have been designed with identical structures
44
213
139 139
73 73 73
269 269 269
CreativeStudio Manual v5.0238
© 2013 Gammill Inc.
- the same start point, end point, size, proportion and nesting shape -for them to work together.
Feature:Edge to Edge - Concatenating
Assumptions: The machine is threaded, bobbins wound, the beltsengaged, and you have patterns that are designed to work together.The Prep Steps here are a little different than a standard E2E, but thestitching steps will be the same.
Prep Step #1.) Measure the quilt length and width accurately beforeloading the quilt. If you are leaving a margin at the top and bottom, besure to reduce your total quilt length by this amount. Also it is a goodidea to reduce the length a little to accommodate shrinkage caused bythe quilting. This could be from 1% to 5%, depending on the fabrics,batting and quilting density.Prep Step #2) Load the quilt and baste the outer edges.
Steps to follow:
1. Add the patterns. Using the Add Pattern icon,
find and select the patterns, adding them to the project. If any patternneeds to appear more than once in the quilting sequence, it needs to beadded more than once.
2. Select the patterns in order by holding the control key down, andthen clicking on each pattern, in the sequence they are to appear.You will be able to scroll up and down the list of patterns withoutbreaking the sequence. This sequence is very important as you willsee.
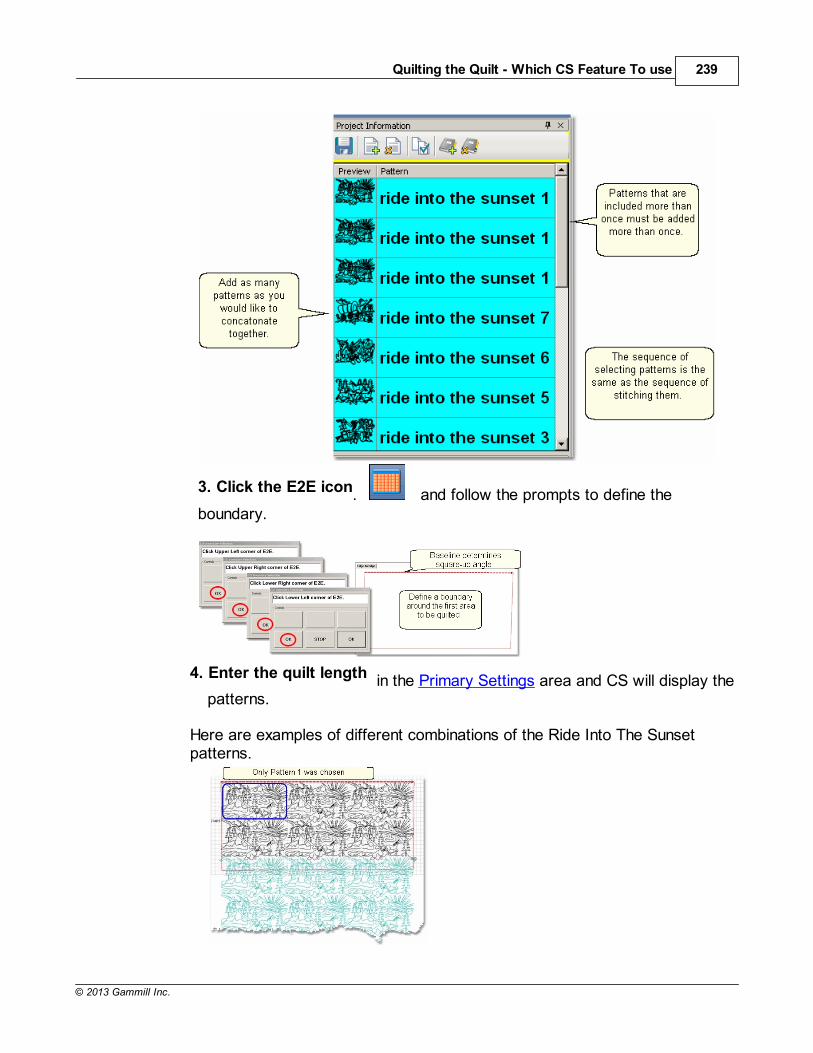
Quilting the Quilt - Which CS Feature To use 239
© 2013 Gammill Inc.
3. Click the E2E icon. and follow the prompts to define theboundary.
4. Enter the quilt length in the Primary Settings area and CS will display thepatterns.
Here are examples of different combinations of the Ride Into The Sunsetpatterns.
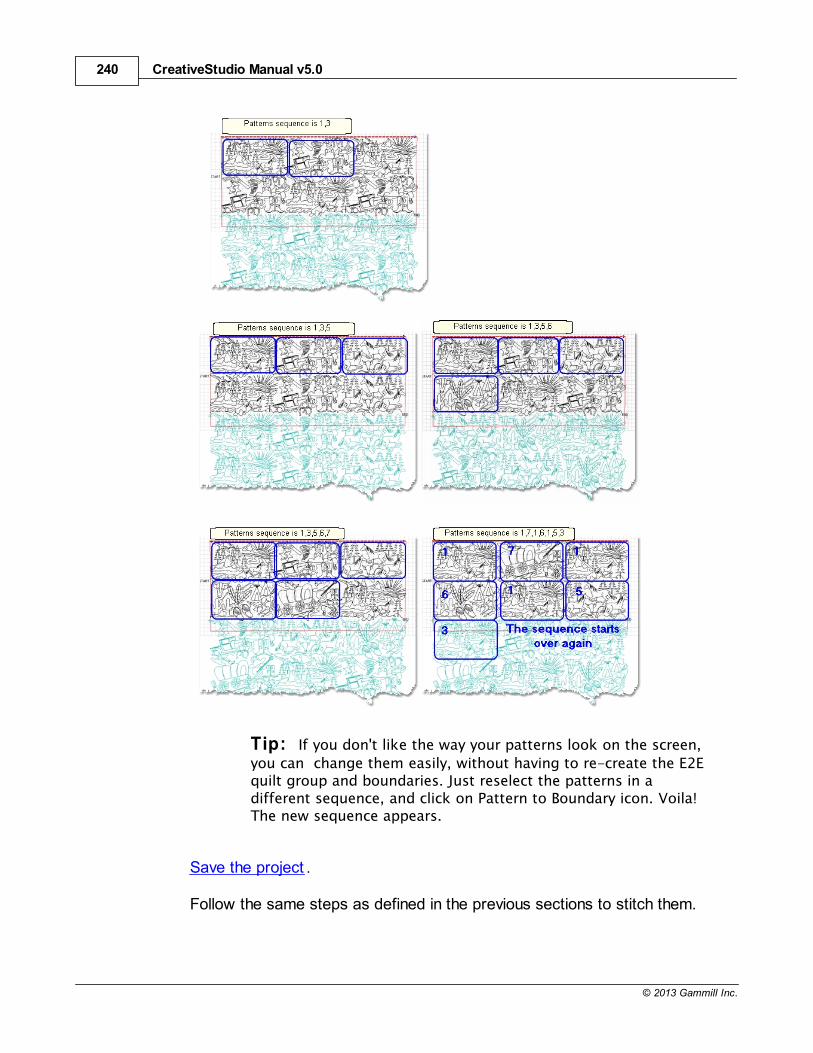
CreativeStudio Manual v5.0240
© 2013 Gammill Inc.
Tip: If you don't like the way your patterns look on the screen,
you can change them easily, without having to re-create the E2Equilt group and boundaries. Just reselect the patterns in adifferent sequence, and click on Pattern to Boundary icon. Voila! The new sequence appears.
Save the project .
Follow the same steps as defined in the previous sections to stitch them.
Quilting the Quilt - Which CS Feature To use 241
© 2013 Gammill Inc.
Begin at Step 5 of Pantographs using Edge-To-Edge. This will guide you
through the steps of quilting each row (and advancing the quilt) until done.
4.6 Restart
Restarts are needed for a variety of reasons:* The thread break sensor stops the machine.* The quilter presses the Stop button.* The machine stops because it hit an
obstacle. Whatever the reason, thisfeature makes restarting easy.
4.6.1 Thread Break Restarts
Feature: Restart (when a thread break has been detected)
Assumptions: The machine stopped and the thread break was fixed.
Steps to follow :1. To continue quilting, choose the "Auto Restart" option.
Pressing this button moves the machine back to where the break wasdetected.
2. CS asks if you want to confirm or move the Restart Point.
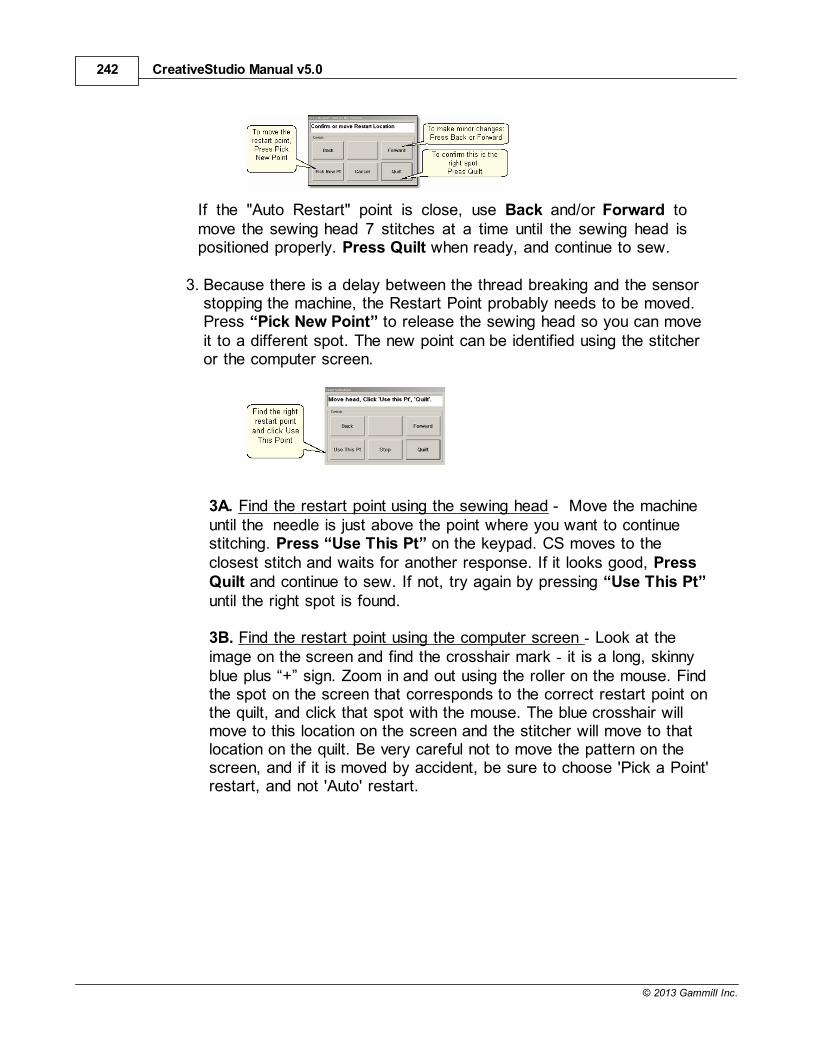
CreativeStudio Manual v5.0242
© 2013 Gammill Inc.
If the "Auto Restart" point is close, use Back and/or Forward tomove the sewing head 7 stitches at a time until the sewing head ispositioned properly. Press Quilt when ready, and continue to sew.
3. Because there is a delay between the thread breaking and the sensorstopping the machine, the Restart Point probably needs to be moved.Press “Pick New Point” to release the sewing head so you can moveit to a different spot. The new point can be identified using the stitcheror the computer screen.
3A. Find the restart point using the sewing head - Move the machineuntil the needle is just above the point where you want to continuestitching. Press “Use This Pt” on the keypad. CS moves to theclosest stitch and waits for another response. If it looks good, PressQuilt and continue to sew. If not, try again by pressing “Use This Pt”until the right spot is found.
3B. Find the restart point using the computer screen - Look at theimage on the screen and find the crosshair mark - it is a long, skinnyblue plus “+” sign. Zoom in and out using the roller on the mouse. Findthe spot on the screen that corresponds to the correct restart point onthe quilt, and click that spot with the mouse. The blue crosshair willmove to this location on the screen and the stitcher will move to thatlocation on the quilt. Be very careful not to move the pattern on thescreen, and if it is moved by accident, be sure to choose 'Pick a Point'restart, and not 'Auto' restart.
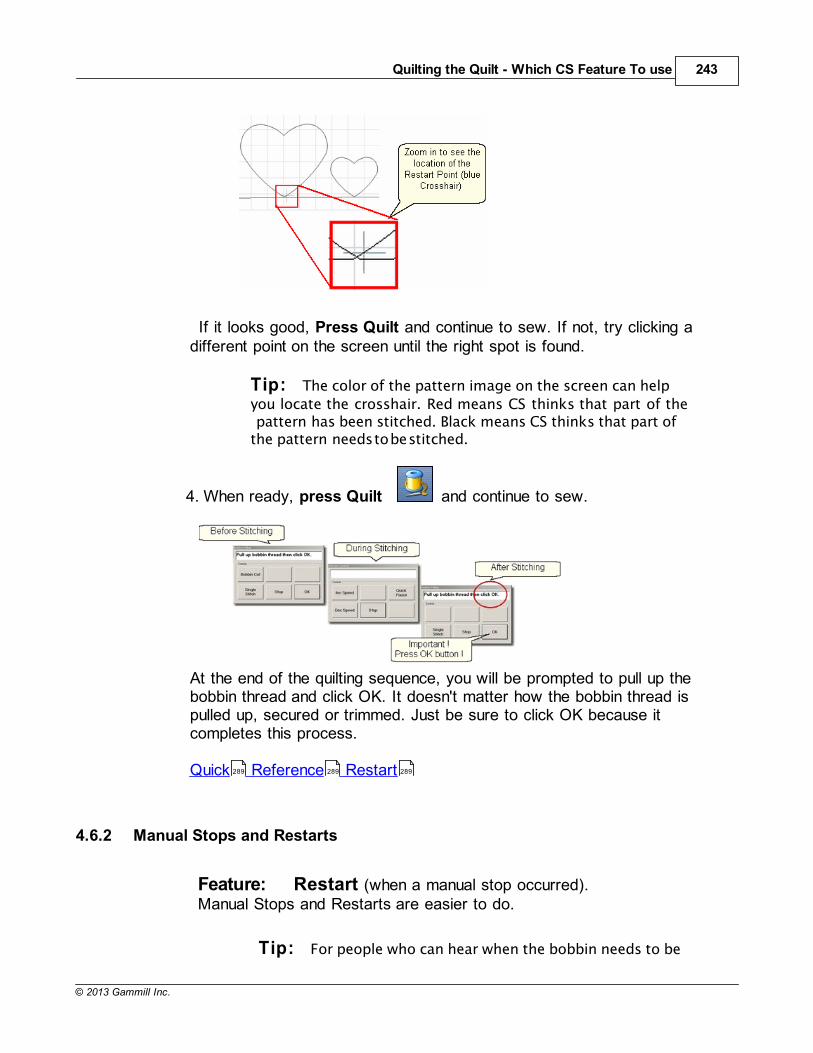
Quilting the Quilt - Which CS Feature To use 243
© 2013 Gammill Inc.
If it looks good, Press Quilt and continue to sew. If not, try clicking adifferent point on the screen until the right spot is found.
Tip: The color of the pattern image on the screen can help
you locate the crosshair. Red means CS thinks that part of the pattern has been stitched. Black means CS thinks that part ofthe pattern needs to be stitched.
4. When ready, press Quilt and continue to sew.
At the end of the quilting sequence, you will be prompted to pull up thebobbin thread and click OK. It doesn't matter how the bobbin thread ispulled up, secured or trimmed. Just be sure to click OK because itcompletes this process.
Quick Reference Restart
4.6.2 Manual Stops and Restarts
Feature: Restart (when a manual stop occurred). Manual Stops and Restarts are easier to do.
Tip: For people who can hear when the bobbin needs to be
289 289 289

CreativeStudio Manual v5.0244
© 2013 Gammill Inc.
changed, this is very useful. When it sounds like it is time tochange the bobbin, watch the stitching until it gets to a placewhere knots will be hidden, and press Stop. The machine stopsinstantly, and the sewing head can be moved to the side of thequilt and the bobbin can be changed. Restart remembers where it stopped and returns to that spot accurately.
Assumptions: The machine stopped and the reason is resolved.
Steps to follow :1. Press Stop and the Stitcher Control dialog box appears.
Press Stop again to end the stitching completely if needed and use thestitcher to secure the threads.
2. Click Restart_Quilting when ready to resume quilting. Thesewing head goes back to the spot where it detected the Stop’command and the "Pick a Restart Point" box appears.
3. Since this is usually the correct spot, chances are good that you can pressQuilt and continue on.
* If this is not true, but it is close, use Back and/or Forward to movethe sewing head 7 stitches at a time until the sewing head ispositioned properly. Press Quilt when ready, and continue to sew.
* If it isnt close, Press “PickNewPoint” to release the sewing headso you can move it to a different spot. The "Point Selection" dialogbox appears.
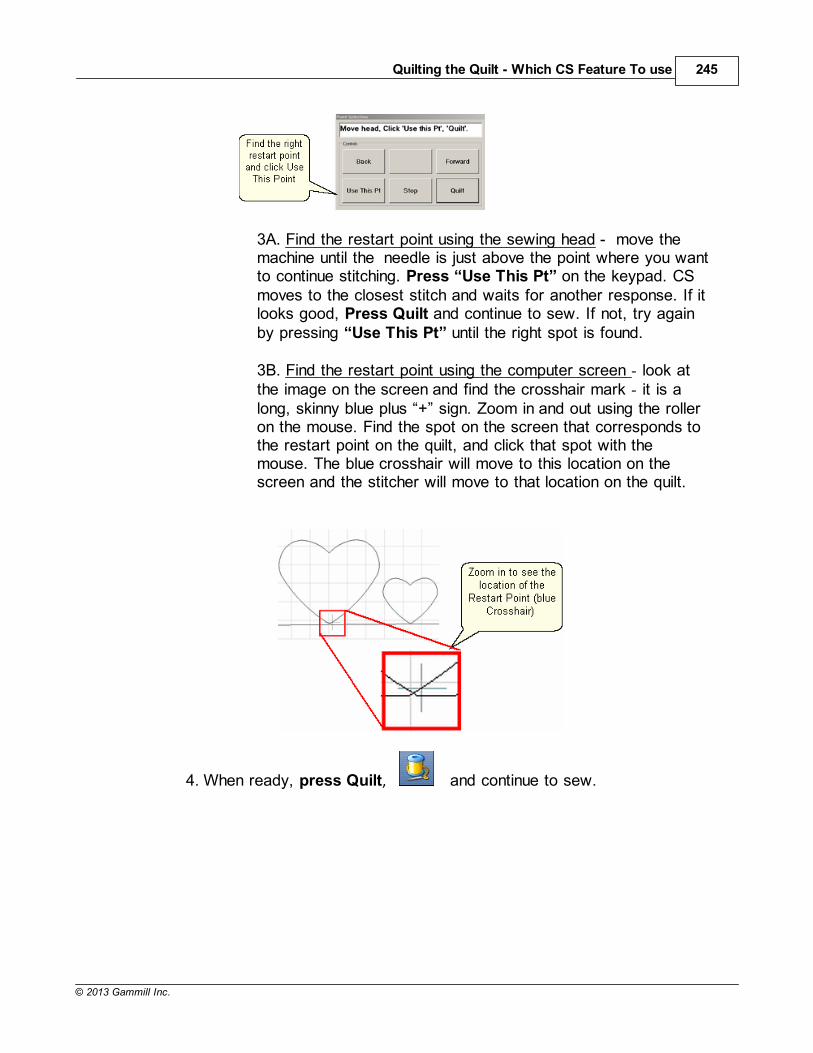
Quilting the Quilt - Which CS Feature To use 245
© 2013 Gammill Inc.
3A. Find the restart point using the sewing head - move themachine until the needle is just above the point where you wantto continue stitching. Press “Use This Pt” on the keypad. CSmoves to the closest stitch and waits for another response. If itlooks good, Press Quilt and continue to sew. If not, try againby pressing “Use This Pt” until the right spot is found.
3B. Find the restart point using the computer screen - look atthe image on the screen and find the crosshair mark - it is along, skinny blue plus “+” sign. Zoom in and out using the rolleron the mouse. Find the spot on the screen that corresponds tothe restart point on the quilt, and click that spot with themouse. The blue crosshair will move to this location on thescreen and the stitcher will move to that location on the quilt.
4. When ready, press Quilt, and continue to sew.
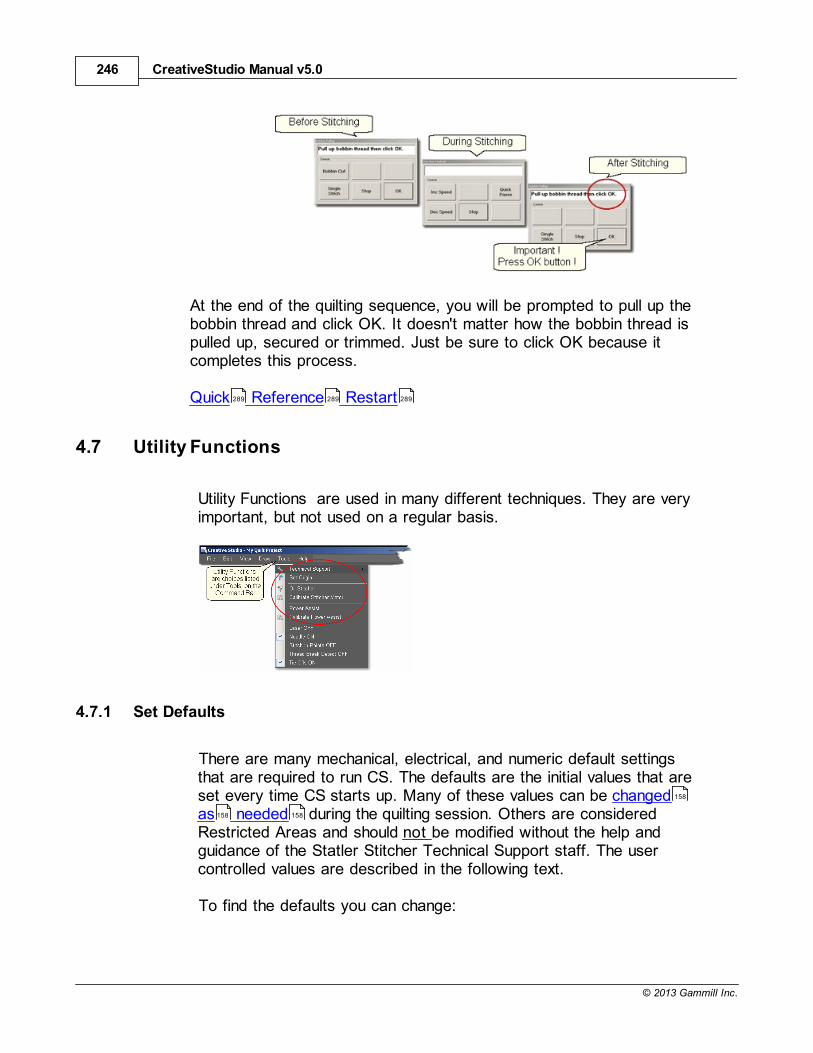
CreativeStudio Manual v5.0246
© 2013 Gammill Inc.
At the end of the quilting sequence, you will be prompted to pull up thebobbin thread and click OK. It doesn't matter how the bobbin thread ispulled up, secured or trimmed. Just be sure to click OK because itcompletes this process.
Quick Reference Restart
4.7 Utility Functions
Utility Functions are used in many different techniques. They are veryimportant, but not used on a regular basis.
4.7.1 Set Defaults
There are many mechanical, electrical, and numeric default settingsthat are required to run CS. The defaults are the initial values that areset every time CS starts up. Many of these values can be changedas needed during the quilting session. Others are consideredRestricted Areas and should not be modified without the help andguidance of the Statler Stitcher Technical Support staff. The usercontrolled values are described in the following text.
To find the defaults you can change:
289 289 289
158
158 158
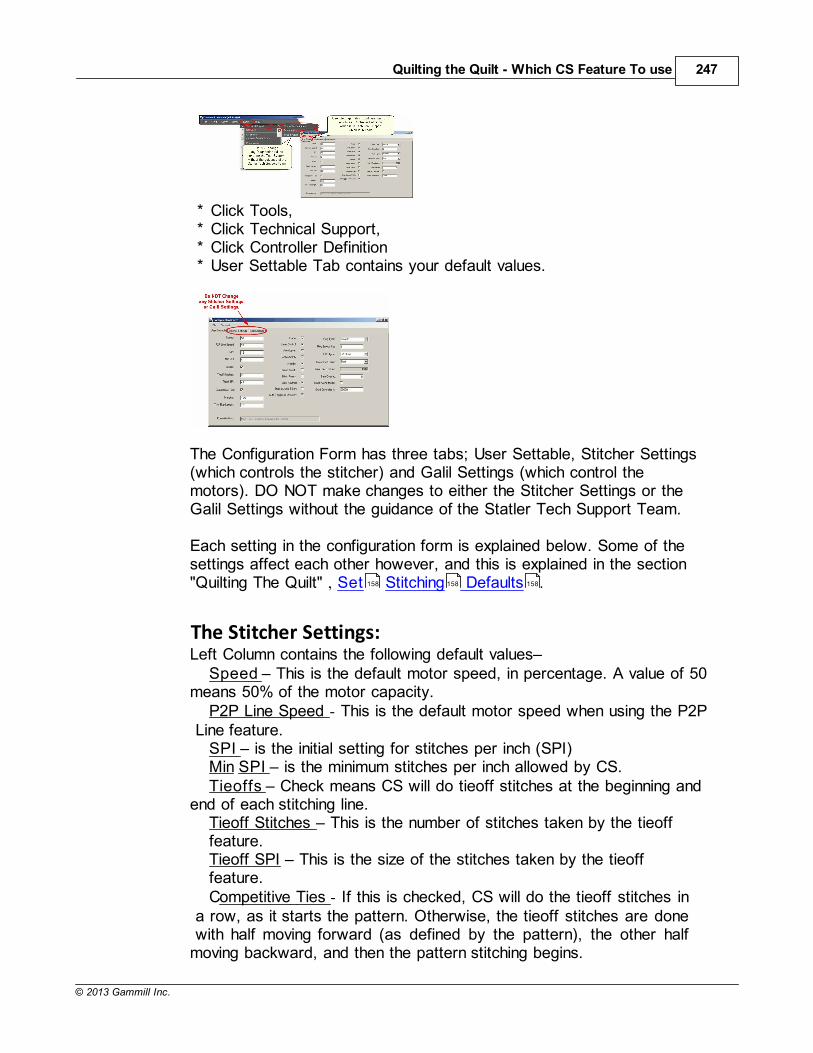
Quilting the Quilt - Which CS Feature To use 247
© 2013 Gammill Inc.
* Click Tools,* Click Technical Support,* Click Controller Definition* User Settable Tab contains your default values.
The Configuration Form has three tabs; User Settable, Stitcher Settings(which controls the stitcher) and Galil Settings (which control themotors). DO NOT make changes to either the Stitcher Settings or theGalil Settings without the guidance of the Statler Tech Support Team.
Each setting in the configuration form is explained below. Some of thesettings affect each other however, and this is explained in the section"Quilting The Quilt" , Set Stitching Defaults .
The Stitcher Settings:Left Column contains the following default values–
Speed This is the default motor speed, in percentage. A value of 50means 50% of the motor capacity.
P2P Line Speed - This is the default motor speed when using the P2P Line feature.
SPI is the initial setting for stitches per inch (SPI)Min SPI is the minimum stitches per inch allowed by CS.Tieoffs Check means CS will do tieoff stitches at the beginning and
end of each stitching line.Tieoff Stitches This is the number of stitches taken by the tieofffeature. Tieoff SPI This is the size of the stitches taken by the tieofffeature.Competitive Ties - If this is checked, CS will do the tieoff stitches in
a row, as it starts the pattern. Otherwise, the tieoff stitches are done with half moving forward (as defined by the pattern), the other halfmoving backward, and then the pattern stitching begins.
158 158 158
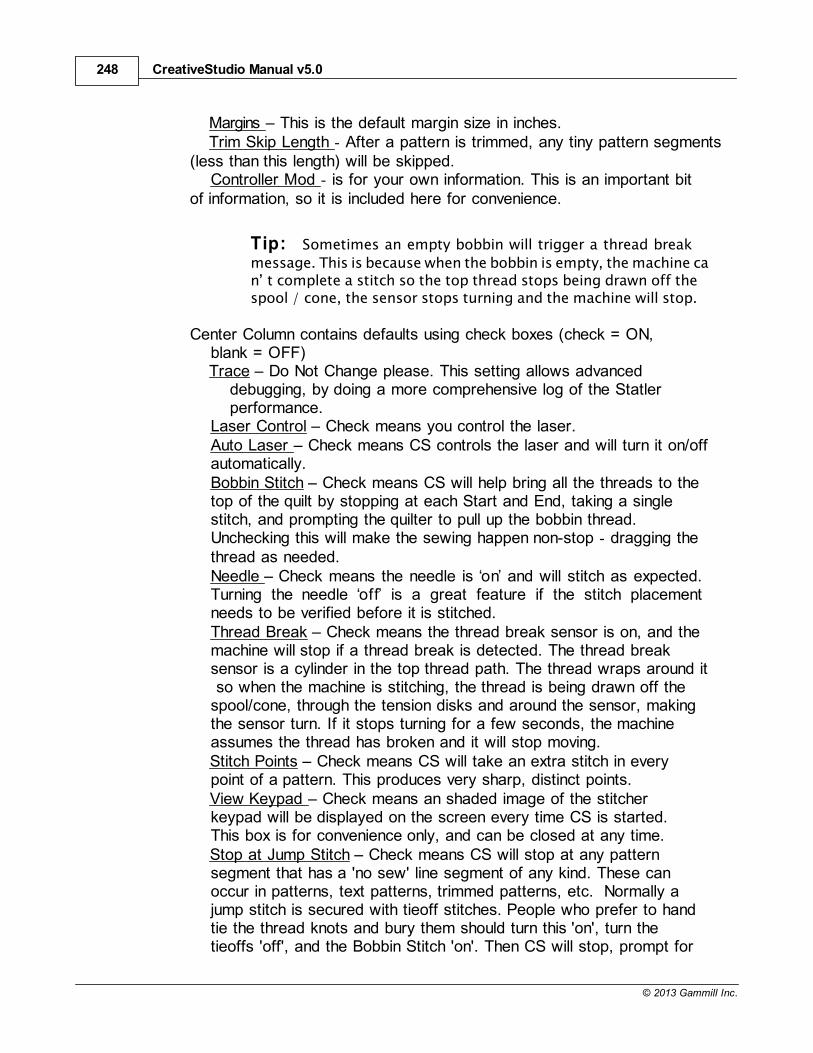
CreativeStudio Manual v5.0248
© 2013 Gammill Inc.
Margins This is the default margin size in inches.Trim Skip Length - After a pattern is trimmed, any tiny pattern segments
(less than this length) will be skipped.Controller Mod - is for your own information. This is an important bit
of information, so it is included here for convenience.
Tip: Sometimes an empty bobbin will trigger a thread break
message. This is because when the bobbin is empty, the machine can t complete a stitch so the top thread stops being drawn off thespool / cone, the sensor stops turning and the machine will stop.
Center Column contains defaults using check boxes (check = ON,blank = OFF) Trace Do Not Change please. This setting allows advanced
debugging, by doing a more comprehensive log of the Statlerperformance.
Laser Control Check means you control the laser.Auto Laser Check means CS controls the laser and will turn it on/offautomatically.Bobbin Stitch Check means CS will help bring all the threads to thetop of the quilt by stopping at each Start and End, taking a singlestitch, and prompting the quilter to pull up the bobbin thread. Unchecking this will make the sewing happen non-stop - dragging thethread as needed.Needle Check means the needle is on and will stitch as expected.Turning the needle off is a great feature if the stitch placementneeds to be verified before it is stitched.Thread Break Check means the thread break sensor is on, and themachine will stop if a thread break is detected. The thread breaksensor is a cylinder in the top thread path. The thread wraps around it so when the machine is stitching, the thread is being drawn off thespool/cone, through the tension disks and around the sensor, makingthe sensor turn. If it stops turning for a few seconds, the machineassumes the thread has broken and it will stop moving.Stitch Points Check means CS will take an extra stitch in everypoint of a pattern. This produces very sharp, distinct points.View Keypad Check means an shaded image of the stitcherkeypad will be displayed on the screen every time CS is started.This box is for convenience only, and can be closed at any time.Stop at Jump Stitch Check means CS will stop at any patternsegment that has a 'no sew' line segment of any kind. These canoccur in patterns, text patterns, trimmed patterns, etc. Normally ajump stitch is secured with tieoff stitches. People who prefer to handtie the thread knots and bury them should turn this 'on', turn thetieoffs 'off', and the Bobbin Stitch 'on'. Then CS will stop, prompt for
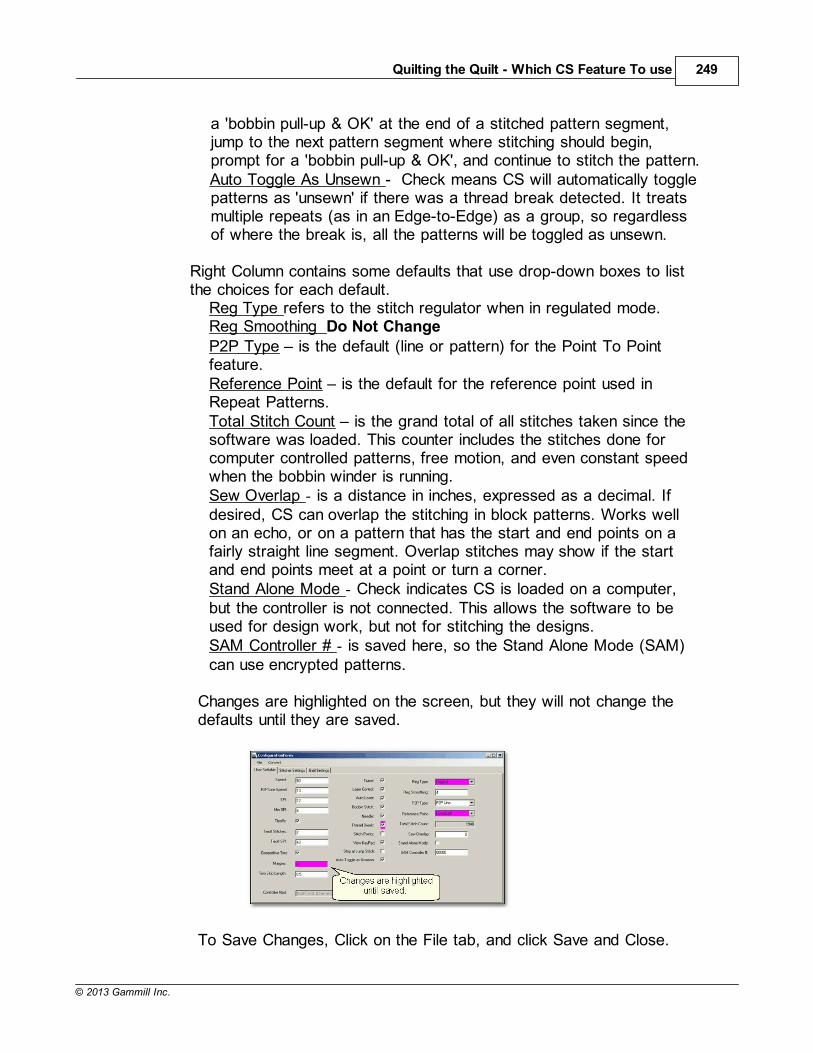
Quilting the Quilt - Which CS Feature To use 249
© 2013 Gammill Inc.
a 'bobbin pull-up & OK' at the end of a stitched pattern segment,jump to the next pattern segment where stitching should begin,prompt for a 'bobbin pull-up & OK', and continue to stitch the pattern.Auto Toggle As Unsewn - Check means CS will automatically togglepatterns as 'unsewn' if there was a thread break detected. It treatsmultiple repeats (as in an Edge-to-Edge) as a group, so regardlessof where the break is, all the patterns will be toggled as unsewn.
Right Column contains some defaults that use drop-down boxes to listthe choices for each default.
Reg Type refers to the stitch regulator when in regulated mode.Reg Smoothing Do Not ChangeP2P Type is the default (line or pattern) for the Point To Pointfeature. Reference Point is the default for the reference point used inRepeat Patterns. Total Stitch Count is the grand total of all stitches taken since thesoftware was loaded. This counter includes the stitches done forcomputer controlled patterns, free motion, and even constant speedwhen the bobbin winder is running.Sew Overlap - is a distance in inches, expressed as a decimal. Ifdesired, CS can overlap the stitching in block patterns. Works wellon an echo, or on a pattern that has the start and end points on afairly straight line segment. Overlap stitches may show if the startand end points meet at a point or turn a corner.Stand Alone Mode - Check indicates CS is loaded on a computer,but the controller is not connected. This allows the software to beused for design work, but not for stitching the designs.SAM Controller # - is saved here, so the Stand Alone Mode (SAM)can use encrypted patterns.
Changes are highlighted on the screen, but they will not change thedefaults until they are saved.
To Save Changes, Click on the File tab, and click Save and Close.
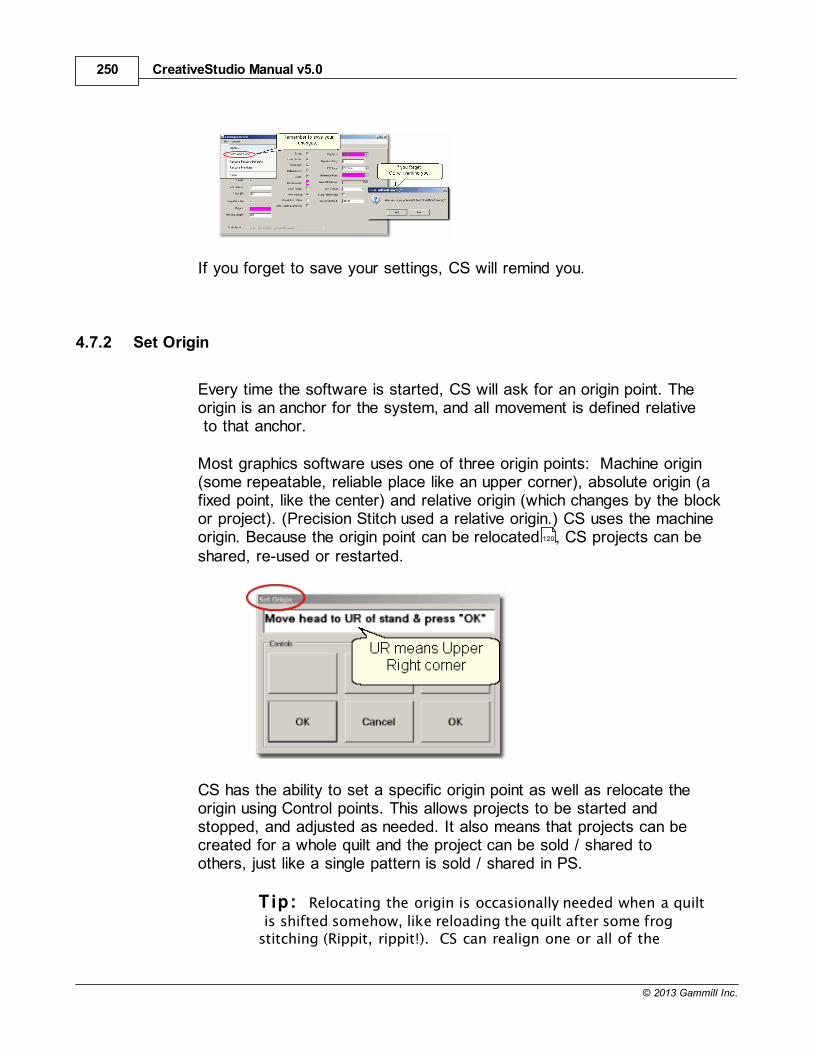
CreativeStudio Manual v5.0250
© 2013 Gammill Inc.
If you forget to save your settings, CS will remind you.
4.7.2 Set Origin
Every time the software is started, CS will ask for an origin point. Theorigin is an anchor for the system, and all movement is defined relative to that anchor.
Most graphics software uses one of three origin points: Machine origin(some repeatable, reliable place like an upper corner), absolute origin (afixed point, like the center) and relative origin (which changes by the blockor project). (Precision Stitch used a relative origin.) CS uses the machineorigin. Because the origin point can be relocated , CS projects can beshared, re-used or restarted.
CS has the ability to set a specific origin point as well as relocate theorigin using Control points. This allows projects to be started andstopped, and adjusted as needed. It also means that projects can becreated for a whole quilt and the project can be sold / shared toothers, just like a single pattern is sold / shared in PS.
Tip: Relocating the origin is occasionally needed when a quilt
is shifted somehow, like reloading the quilt after some frogstitching (Rippit, rippit!). CS can realign one or all of the
120

Quilting the Quilt - Which CS Feature To use 251
© 2013 Gammill Inc.
patterns on the screen - your choice of course. See Extra Edit
Options for more details on Relocating patterns and the originpoint.
4.7.3 Oil Stitcher Routine
This is a special routine that can be part of the weekly cleaning andmaintenance. It runs the sewing head motor at varying speedsbackwards so the oil has a chance to penetrate some places that areotherwise hard to reach. New machines and certain climates mayrequire this to be done more frequently.
The process will take about 7 minutes to complete.
4.7.4 Calibrate Stitcher Motor
Calibrating the stitcher motors guarantees stitching accuracy. This doesn t need to be done often but can be performed as needed. It shouldalways be done after loading new software versions or performing anysignificant maintenance.
1. Click on Tools
2. Click on Calibrate Stitcher Motor
3. Move the machine head off of the quilt, remove thread and bobbin
120
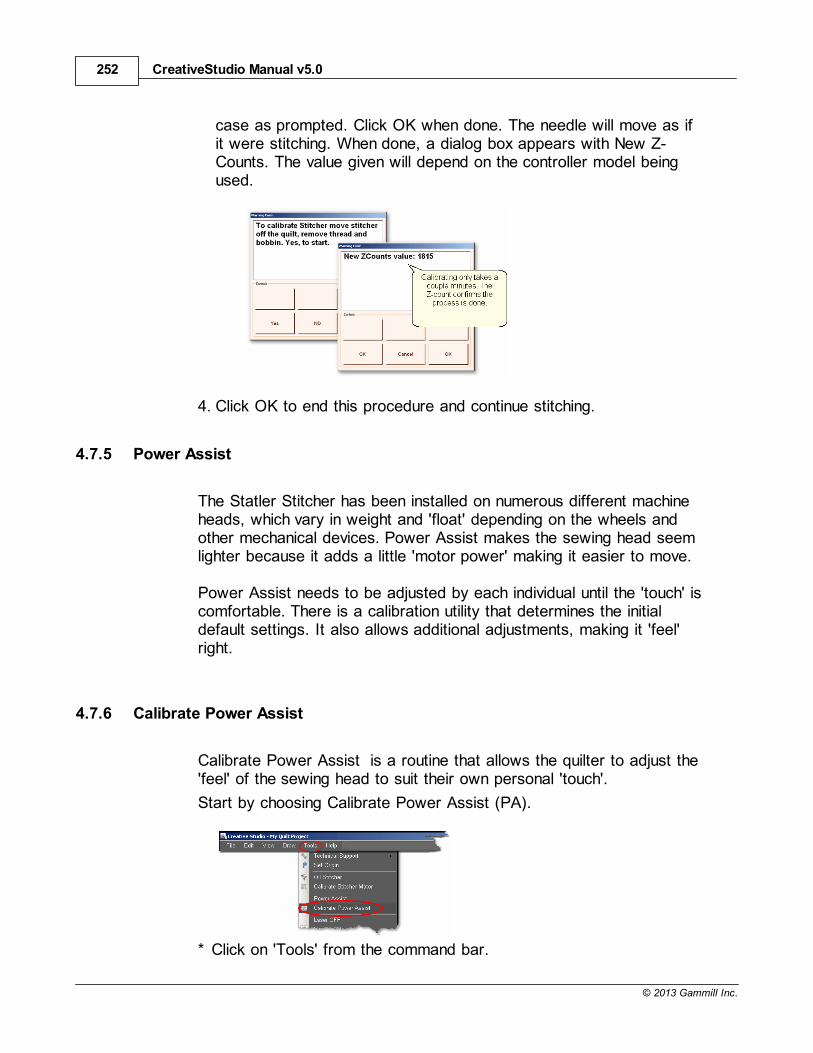
CreativeStudio Manual v5.0252
© 2013 Gammill Inc.
case as prompted. Click OK when done. The needle will move as ifit were stitching. When done, a dialog box appears with New Z-Counts. The value given will depend on the controller model beingused.
4. Click OK to end this procedure and continue stitching.
4.7.5 Power Assist
The Statler Stitcher has been installed on numerous different machineheads, which vary in weight and 'float' depending on the wheels andother mechanical devices. Power Assist makes the sewing head seemlighter because it adds a little 'motor power' making it easier to move.
Power Assist needs to be adjusted by each individual until the 'touch' iscomfortable. There is a calibration utility that determines the initialdefault settings. It also allows additional adjustments, making it 'feel'right.
4.7.6 Calibrate Power Assist
Calibrate Power Assist is a routine that allows the quilter to adjust the'feel' of the sewing head to suit their own personal 'touch'.
Start by choosing Calibrate Power Assist (PA).
* Click on 'Tools' from the command bar.
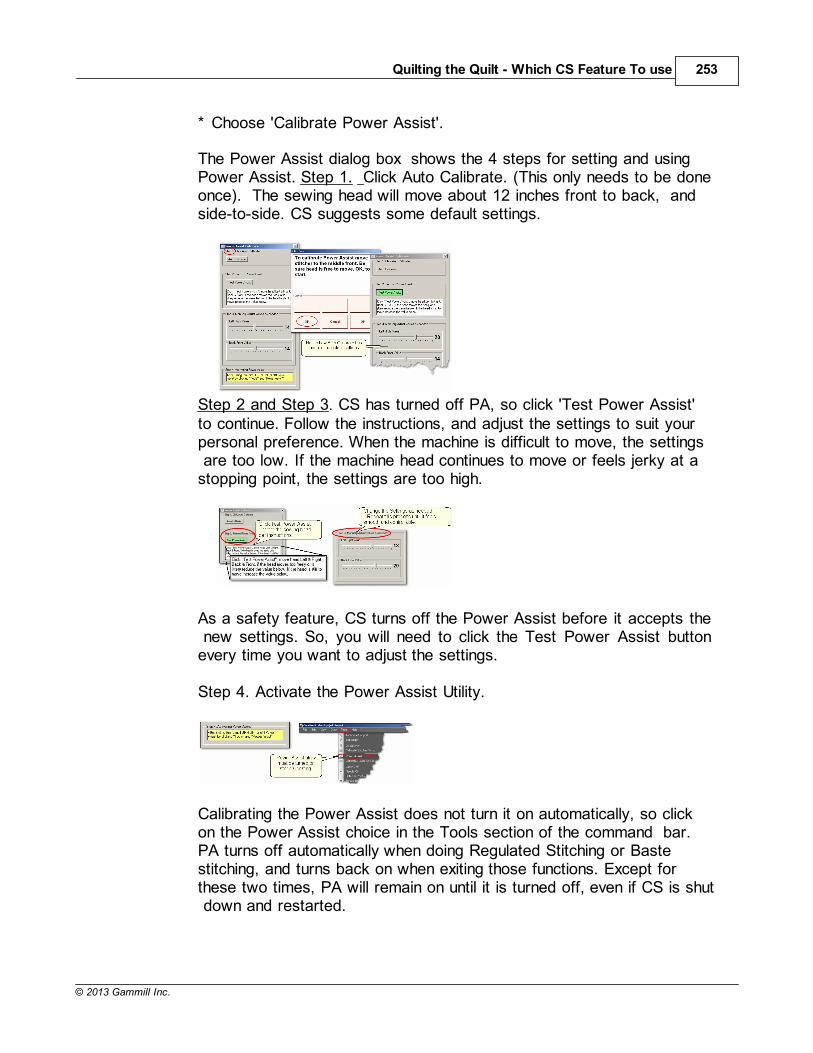
Quilting the Quilt - Which CS Feature To use 253
© 2013 Gammill Inc.
* Choose 'Calibrate Power Assist'.
The Power Assist dialog box shows the 4 steps for setting and usingPower Assist. Step 1. Click Auto Calibrate. (This only needs to be doneonce). The sewing head will move about 12 inches front to back, andside-to-side. CS suggests some default settings.
Step 2 and Step 3. CS has turned off PA, so click 'Test Power Assist'to continue. Follow the instructions, and adjust the settings to suit yourpersonal preference. When the machine is difficult to move, the settings are too low. If the machine head continues to move or feels jerky at astopping point, the settings are too high.
As a safety feature, CS turns off the Power Assist before it accepts the new settings. So, you will need to click the Test Power Assist buttonevery time you want to adjust the settings.
Step 4. Activate the Power Assist Utility.
Calibrating the Power Assist does not turn it on automatically, so clickon the Power Assist choice in the Tools section of the command bar.PA turns off automatically when doing Regulated Stitching or Bastestitching, and turns back on when exiting those functions. Except forthese two times, PA will remain on until it is turned off, even if CS is shut down and restarted.
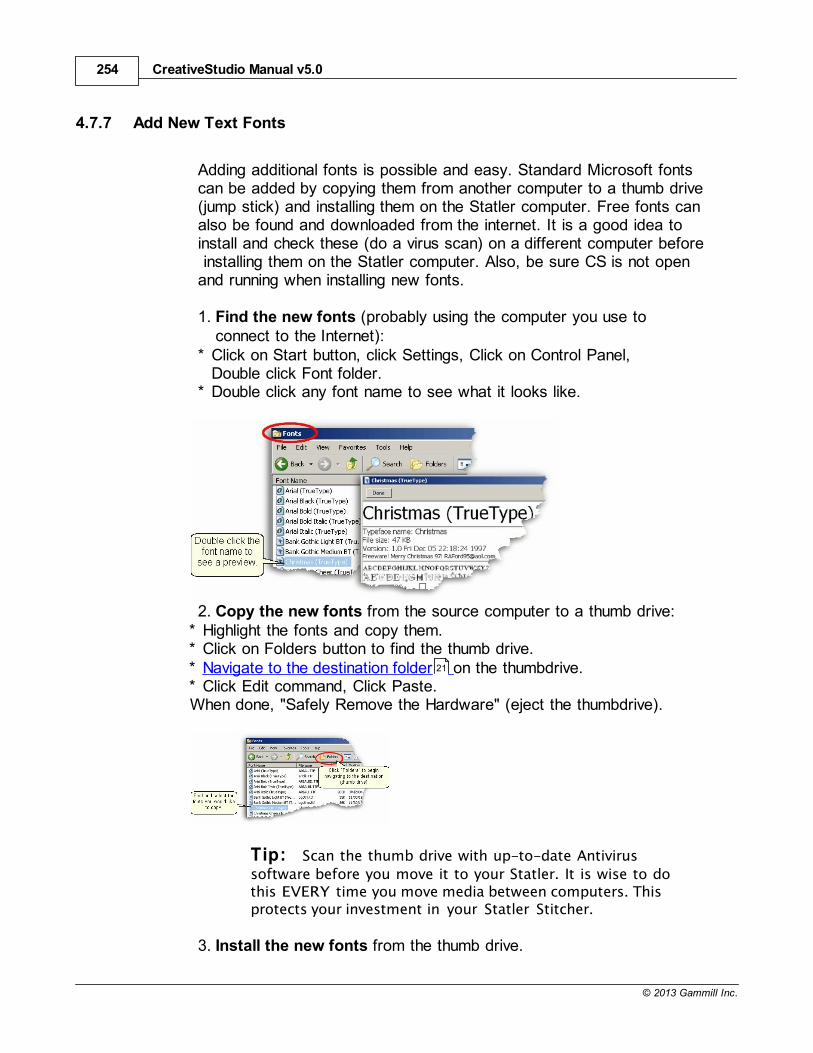
CreativeStudio Manual v5.0254
© 2013 Gammill Inc.
4.7.7 Add New Text Fonts
Adding additional fonts is possible and easy. Standard Microsoft fontscan be added by copying them from another computer to a thumb drive(jump stick) and installing them on the Statler computer. Free fonts canalso be found and downloaded from the internet. It is a good idea toinstall and check these (do a virus scan) on a different computer before installing them on the Statler computer. Also, be sure CS is not openand running when installing new fonts.
1. Find the new fonts (probably using the computer you use toconnect to the Internet):
* Click on Start button, click Settings, Click on Control Panel,Double click Font folder.
* Double click any font name to see what it looks like.
2. Copy the new fonts from the source computer to a thumb drive:* Highlight the fonts and copy them.* Click on Folders button to find the thumb drive.* Navigate to the destination folder on the thumbdrive.* Click Edit command, Click Paste.When done, "Safely Remove the Hardware" (eject the thumbdrive).
Tip: Scan the thumb drive with up-to-date Antivirus
software before you move it to your Statler. It is wise to dothis EVERY time you move media between computers. Thisprotects your investment in your Statler Stitcher.
3. Install the new fonts from the thumb drive.
21
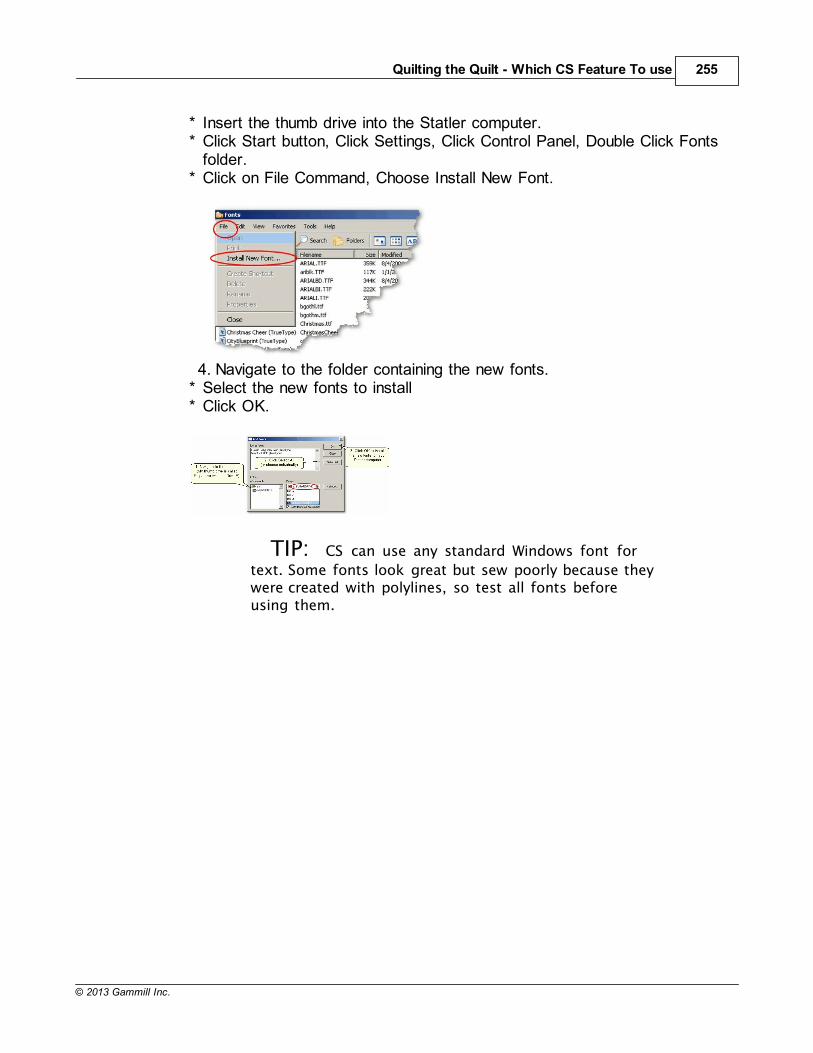
Quilting the Quilt - Which CS Feature To use 255
© 2013 Gammill Inc.
* Insert the thumb drive into the Statler computer.* Click Start button, Click Settings, Click Control Panel, Double Click Fonts
folder.* Click on File Command, Choose Install New Font.
4. Navigate to the folder containing the new fonts.* Select the new fonts to install* Click OK.
TIP: CS can use any standard Windows font for
text. Some fonts look great but sew poorly because theywere created with polylines, so test all fonts beforeusing them.

CreativeStudio v5.0
Part
V
CreativeStudio Manual v5.0258
© 2013 Gammill Inc.
5 Quick Reference Sheets
5.1 Quick Ref Icons Shortcuts
CreativeStudio Quick Start Icons andShortcuts Toolbar Icons:
Icon Icon Name - description & shortcut keystrokes included.
Tip - Created for the documentation only
DIY - Design It Yourself - Tips on pattern design and shortcuts.-
Boundary - Begins the process to define a bounded area.Alt+B starts a boundary, Right click will end it, Esc to cancel.
Pattern_To_Boundary (Standard or Stretch) - Moves the selectedpattern into the selected boundary,using either Standard mode or Stretch mode.
Start_Quilting - Begins the quilting process
Edge_To_Edge_Continue - Continues the Edge_To_Edge quiltingsequence after the quilt is rolled
Point_To_Point - (Line or Pattern) - Begins the P2P quilting processfor lines or patternsSh+Channel Lock = will change or Increment the channel lock angle. Sh+Exitwill Exit.
Repeat_Patterns - Begins the process for moving multiple copies of aselected pattern to the design board
Border_Corner - Begins the process of moving the corner patterns intothe border boundary.
Edge_To_Edge - Begins the setup process for doing E2E quilting.
Trim - (Inside or Outside) - Begins the Trim process for Inside orOutside trims.Alt+T starts a trim, Right click will end it, Esc to cancel.
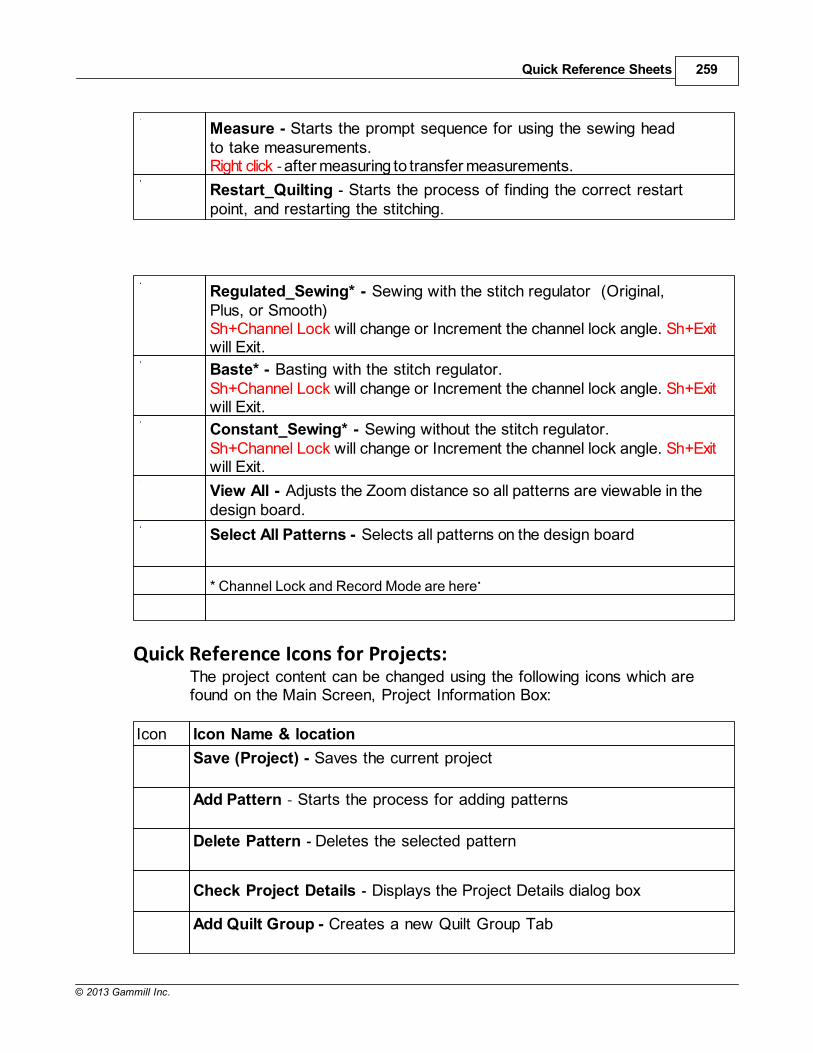
Quick Reference Sheets 259
© 2013 Gammill Inc.
Measure - Starts the prompt sequence for using the sewing headto take measurements.Right click - after measuring to transfer measurements.
Restart_Quilting - Starts the process of finding the correct restartpoint, and restarting the stitching.
Regulated_Sewing* - Sewing with the stitch regulator (Original,Plus, or Smooth)Sh+Channel Lock will change or Increment the channel lock angle. Sh+Exitwill Exit.
Baste* - Basting with the stitch regulator.Sh+Channel Lock will change or Increment the channel lock angle. Sh+Exitwill Exit.
Constant_Sewing* - Sewing without the stitch regulator.Sh+Channel Lock will change or Increment the channel lock angle. Sh+Exitwill Exit.
View All - Adjusts the Zoom distance so all patterns are viewable in thedesign board.
Select All Patterns - Selects all patterns on the design board
* Channel Lock and Record Mode are here.
Quick Reference Icons for Projects:The project content can be changed using the following icons which arefound on the Main Screen, Project Information Box:
Icon Icon Name & location
Save (Project) - Saves the current project
Add Pattern - Starts the process for adding patterns
Delete Pattern - Deletes the selected pattern
Check Project Details - Displays the Project Details dialog box
Add Quilt Group - Creates a new Quilt Group Tab
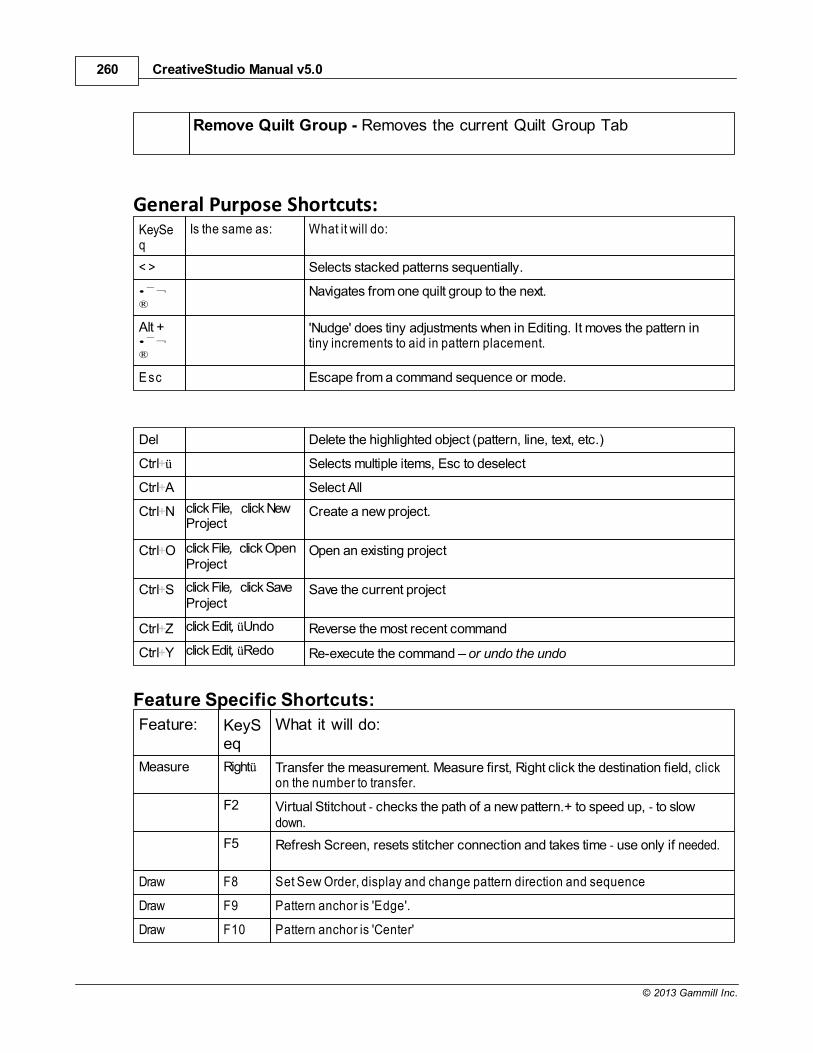
CreativeStudio Manual v5.0260
© 2013 Gammill Inc.
Remove Quilt Group - Removes the current Quilt Group Tab
General Purpose Shortcuts:KeySeq
Is the same as: What it will do:
< > Selects stacked patterns sequentially.
¨
Navigates from one quilt group to the next.
Alt + ¬
®
'Nudge' does tiny adjustments when in Editing. It moves the pattern intiny increments to aid in pattern placement.
E sc Escape from a command sequence or mode.
Del Delete the highlighted object (pattern, line, text, etc.)
Ctrl+ü Selects multiple items, Esc to deselect
Ctrl+A Select All
Ctrl+N click File, click NewProject
Create a new project.
Ctrl+O click File, click OpenProject
Open an existing project
Ctrl+S click File, click SaveProject
Save the current project
Ctrl+Z click Edit, üUndo Reverse the most recent command
Ctrl+Y click Edit, üRedo Re-execute the command or undo the undo
Feature Specific Shortcuts:
Feature: KeySeq
What it will do:
Measure Rightü Transfer the measurement. Measure first, Right click the destination field, clickon the number to transfer.
F2 Virtual Stitchout - checks the path of a new pattern.+ to speed up, - to slowdown.
F5 Refresh Screen, resets stitcher connection and takes time - use only if needed.
Draw F8 Set Sew Order, display and change pattern direction and sequence
Draw F9 Pattern anchor is 'Edge'.
Draw F10 Pattern anchor is 'Center'
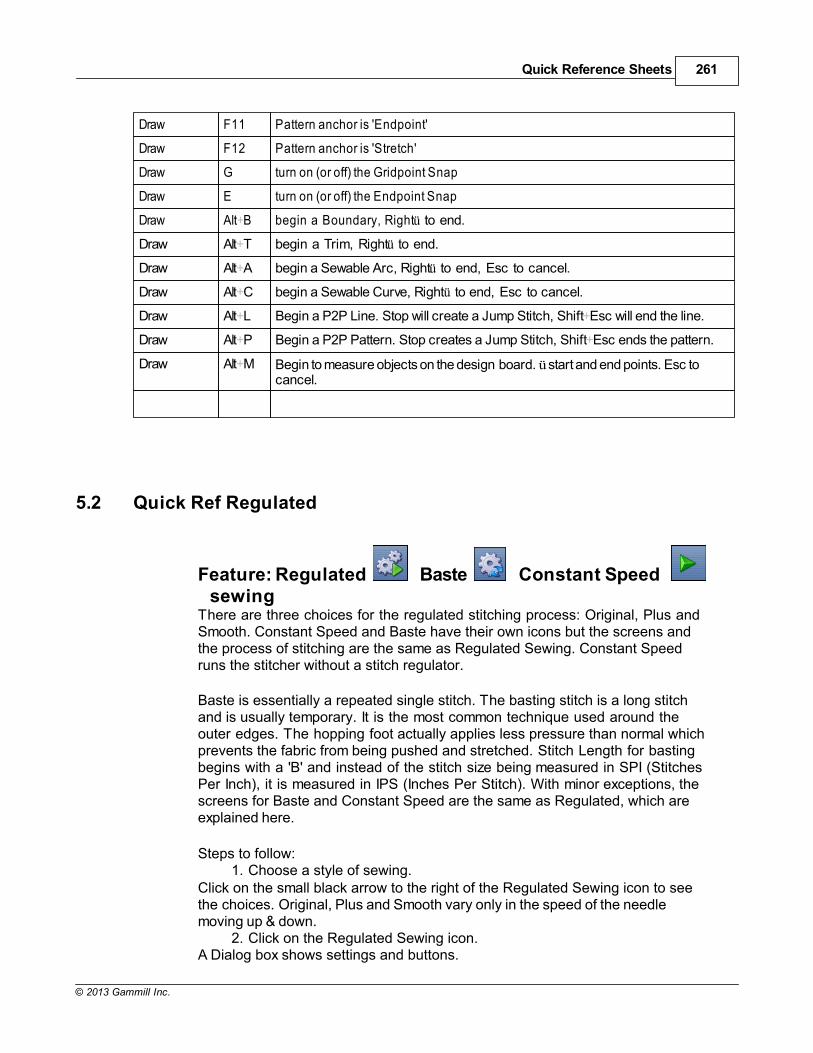
Quick Reference Sheets 261
© 2013 Gammill Inc.
Draw F11 Pattern anchor is 'Endpoint'
Draw F12 Pattern anchor is 'Stretch'
Draw G turn on (or off) the Gridpoint Snap
Draw E turn on (or off) the Endpoint Snap
Draw Alt+B begin a Boundary, Rightü to end.
Draw Alt+T begin a Trim, Rightü to end.
Draw Alt+A begin a Sewable Arc, Rightü to end, Esc to cancel.
Draw Alt+C begin a Sewable Curve, Rightü to end, Esc to cancel.
Draw Alt+L Begin a P2P Line. Stop will create a Jump Stitch, Shift+Esc will end the line.
Draw Alt+P Begin a P2P Pattern. Stop creates a Jump Stitch, Shift+Esc ends the pattern.
Draw Alt+M Begin to measure objects on the design board. ü start and end points. Esc tocancel.
5.2 Quick Ref Regulated
Feature: Regulated Baste Constant Speed sewing There are three choices for the regulated stitching process: Original, Plus andSmooth. Constant Speed and Baste have their own icons but the screens andthe process of stitching are the same as Regulated Sewing. Constant Speedruns the stitcher without a stitch regulator.
Baste is essentially a repeated single stitch. The basting stitch is a long stitchand is usually temporary. It is the most common technique used around theouter edges. The hopping foot actually applies less pressure than normal whichprevents the fabric from being pushed and stretched. Stitch Length for bastingbegins with a 'B' and instead of the stitch size being measured in SPI (StitchesPer Inch), it is measured in IPS (Inches Per Stitch). With minor exceptions, thescreens for Baste and Constant Speed are the same as Regulated, which areexplained here.
Steps to follow:1. Choose a style of sewing.
Click on the small black arrow to the right of the Regulated Sewing icon to seethe choices. Original, Plus and Smooth vary only in the speed of the needlemoving up & down.
2. Click on the Regulated Sewing icon.A Dialog box shows settings and buttons.
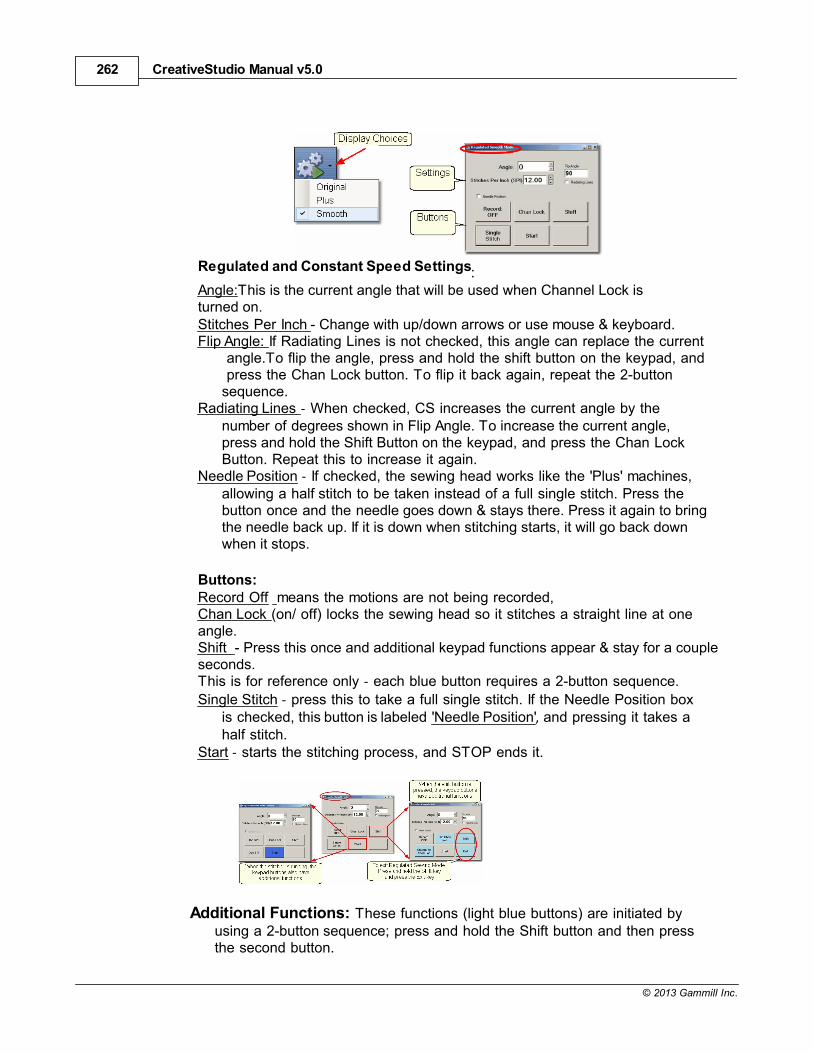
CreativeStudio Manual v5.0262
© 2013 Gammill Inc.
Regulated and Constant Speed Settings:Angle:This is the current angle that will be used when Channel Lock isturned on. Stitches Per Inch - Change with up/down arrows or use mouse & keyboard.Flip Angle: If Radiating Lines is not checked, this angle can replace the current
angle.To flip the angle, press and hold the shift button on the keypad, and press the Chan Lock button. To flip it back again, repeat the 2-buttonsequence.
Radiating Lines - When checked, CS increases the current angle by thenumber of degrees shown in Flip Angle. To increase the current angle,press and hold the Shift Button on the keypad, and press the Chan LockButton. Repeat this to increase it again.
Needle Position - If checked, the sewing head works like the 'Plus' machines,allowing a half stitch to be taken instead of a full single stitch. Press thebutton once and the needle goes down & stays there. Press it again to bringthe needle back up. If it is down when stitching starts, it will go back downwhen it stops.
Buttons:Record Off means the motions are not being recorded,Chan Lock (on/ off) locks the sewing head so it stitches a straight line at oneangle.Shift - Press this once and additional keypad functions appear & stay for a coupleseconds.This is for reference only - each blue button requires a 2-button sequence.
Single Stitch - press this to take a full single stitch. If the Needle Position boxis checked, this button is labeled 'Needle Position', and pressing it takes ahalf stitch.
Start - starts the stitching process, and STOP ends it.
Additional Functions: These functions (light blue buttons) are initiated byusing a 2-button sequence; press and hold the Shift button and then pressthe second button.
Quick Reference Sheets 263
© 2013 Gammill Inc.
Flip Chan Lock - Changes the current angle.
* If Radiating Lines is not checked, this will change the current angle towhatever the Flip Angle is set at. To flip the angle, press and hold theshift button on the keypad, and press the Chan Lock button. To flip itback again, repeat the 2-button sequence.
* If Radiating Lines is checked, CS increases the current angle by thenumber of degrees shown in Flip Angle. To increase the angle, press andhold the shift button on the keypad, and press the Chan Lock button. Repeatto increase it again. It will go up to 90 degrees and return back to 0 degrees.
Shift - used to display additional functions (light blue buttons) and toexecute them.Change to Need Pos - is used to 'check' (or choose) the Needle Position option,
making the Lower Left button change to 'Needle Position'. Press and holdthe Shift button and press Change To Need Pos button. Repeat the 2-button sequence to return to Single Stitch.
Start - starts the stitching process, and STOP ends it.Exit - To exit regulated mode, press and hold the Shift button and press the Exitbutton.Using the mouse & screen works too.
3. Press Start on keypad when ready to sew and Stop on keypad to stop.Dark blue buttons mean the stitcher is running. Notice that the twobuttons on the left have changed in meaning.
Inc SPI means Increase theStitches per Inch. Dec SPI is decrease stitches perinch.
4. Press Shift and Exit on keypad when ready to exit regulated mode.
5.3 Quick Ref Single Block
Feature: Single Block
(using Boundary and Pattern_to_Boundary/Standard mode features)
Step 1: Define the BoundaryBoundaries are used in many of the CS techniques. They might be required bya technique (such as defining the quilting surface of an E2E design) or usedas a convenient reference for guiding the placement of patterns. Either way,they synchronize the quilt top with the screen image.* Click on the Boundary icon to begin defining the boundary. CS will prompt
for points that define the area.
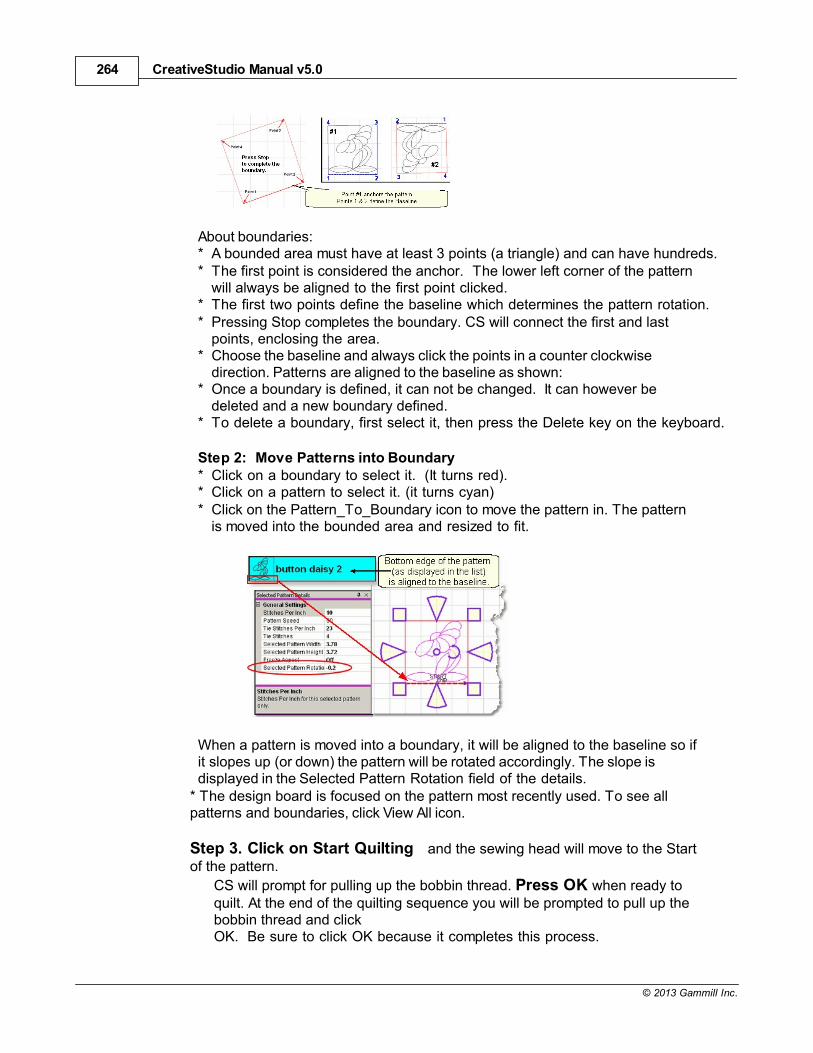
CreativeStudio Manual v5.0264
© 2013 Gammill Inc.
About boundaries:* A bounded area must have at least 3 points (a triangle) and can have hundreds.* The first point is considered the anchor. The lower left corner of the pattern
will always be aligned to the first point clicked.* The first two points define the baseline which determines the pattern rotation.* Pressing Stop completes the boundary. CS will connect the first and last
points, enclosing the area.* Choose the baseline and always click the points in a counter clockwise
direction. Patterns are aligned to the baseline as shown:* Once a boundary is defined, it can not be changed. It can however be
deleted and a new boundary defined.* To delete a boundary, first select it, then press the Delete key on the keyboard.
Step 2: Move Patterns into Boundary* Click on a boundary to select it. (It turns red).* Click on a pattern to select it. (it turns cyan)* Click on the Pattern_To_Boundary icon to move the pattern in. The pattern
is moved into the bounded area and resized to fit.
When a pattern is moved into a boundary, it will be aligned to the baseline so ifit slopes up (or down) the pattern will be rotated accordingly. The slope isdisplayed in the Selected Pattern Rotation field of the details.
* The design board is focused on the pattern most recently used. To see allpatterns and boundaries, click View All icon.
Step 3. Click on Start Quilting and the sewing head will move to the Startof the pattern.
CS will prompt for pulling up the bobbin thread. Press OK when ready toquilt. At the end of the quilting sequence you will be prompted to pull up thebobbin thread and clickOK. Be sure to click OK because it completes this process.
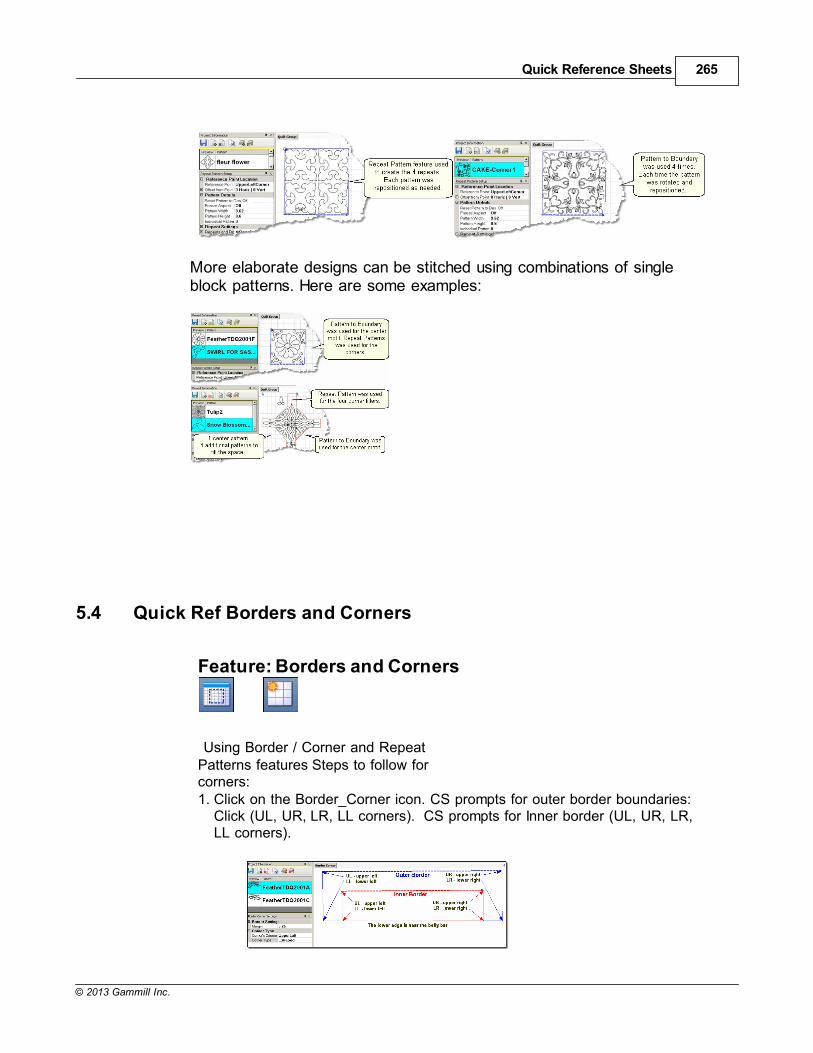
Quick Reference Sheets 265
© 2013 Gammill Inc.
More elaborate designs can be stitched using combinations of singleblock patterns. Here are some examples:
5.4 Quick Ref Borders and Corners
Feature: Borders and Corners
Using Border / Corner and RepeatPatterns features Steps to follow forcorners:1. Click on the Border_Corner icon. CS prompts for outer border boundaries:
Click (UL, UR, LR, LL corners). CS prompts for Inner border (UL, UR, LR,LL corners).
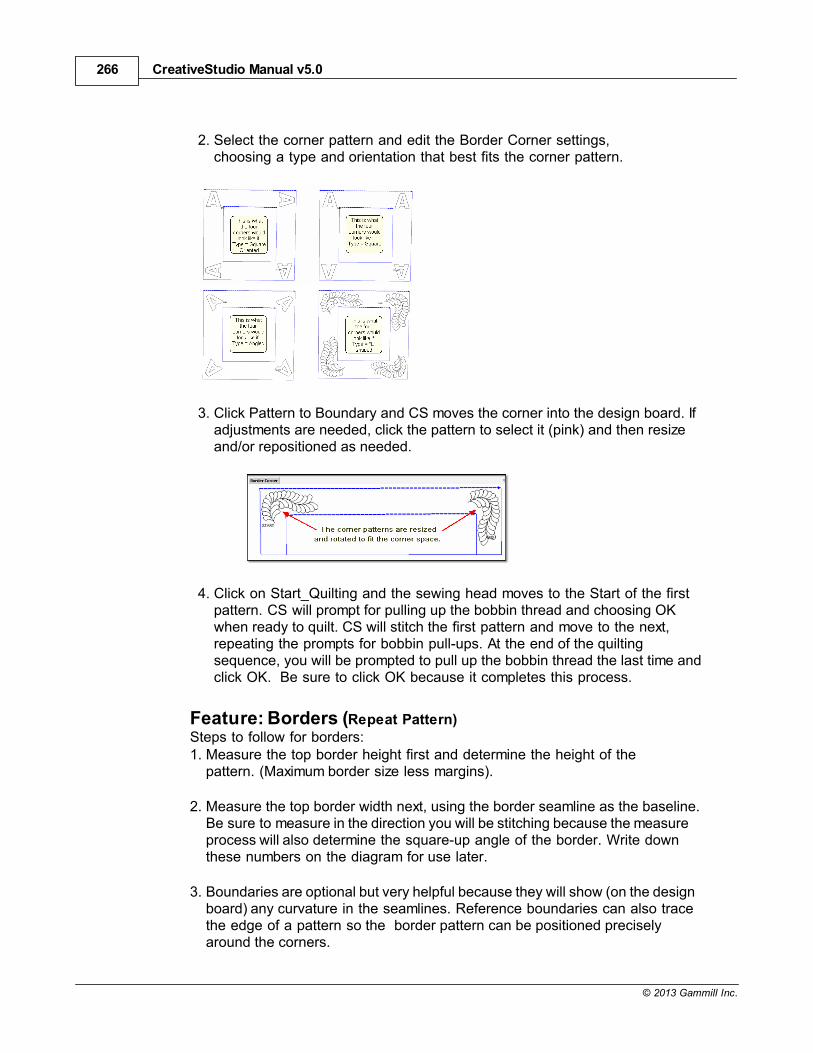
CreativeStudio Manual v5.0266
© 2013 Gammill Inc.
2. Select the corner pattern and edit the Border Corner settings,choosing a type and orientation that best fits the corner pattern.
3. Click Pattern to Boundary and CS moves the corner into the design board. Ifadjustments are needed, click the pattern to select it (pink) and then resizeand/or repositioned as needed.
4. Click on Start_Quilting and the sewing head moves to the Start of the firstpattern. CS will prompt for pulling up the bobbin thread and choosing OKwhen ready to quilt. CS will stitch the first pattern and move to the next,repeating the prompts for bobbin pull-ups. At the end of the quiltingsequence, you will be prompted to pull up the bobbin thread the last time andclick OK. Be sure to click OK because it completes this process.
Feature: Borders (Repeat Pattern)Steps to follow for borders:1. Measure the top border height first and determine the height of the
pattern. (Maximum border size less margins).
2. Measure the top border width next, using the border seamline as the baseline.Be sure to measure in the direction you will be stitching because the measureprocess will also determine the square-up angle of the border. Write downthese numbers on the diagram for use later.
3. Boundaries are optional but very helpful because they will show (on the designboard) any curvature in the seamlines. Reference boundaries can also tracethe edge of a pattern so the border pattern can be positioned preciselyaround the corners.
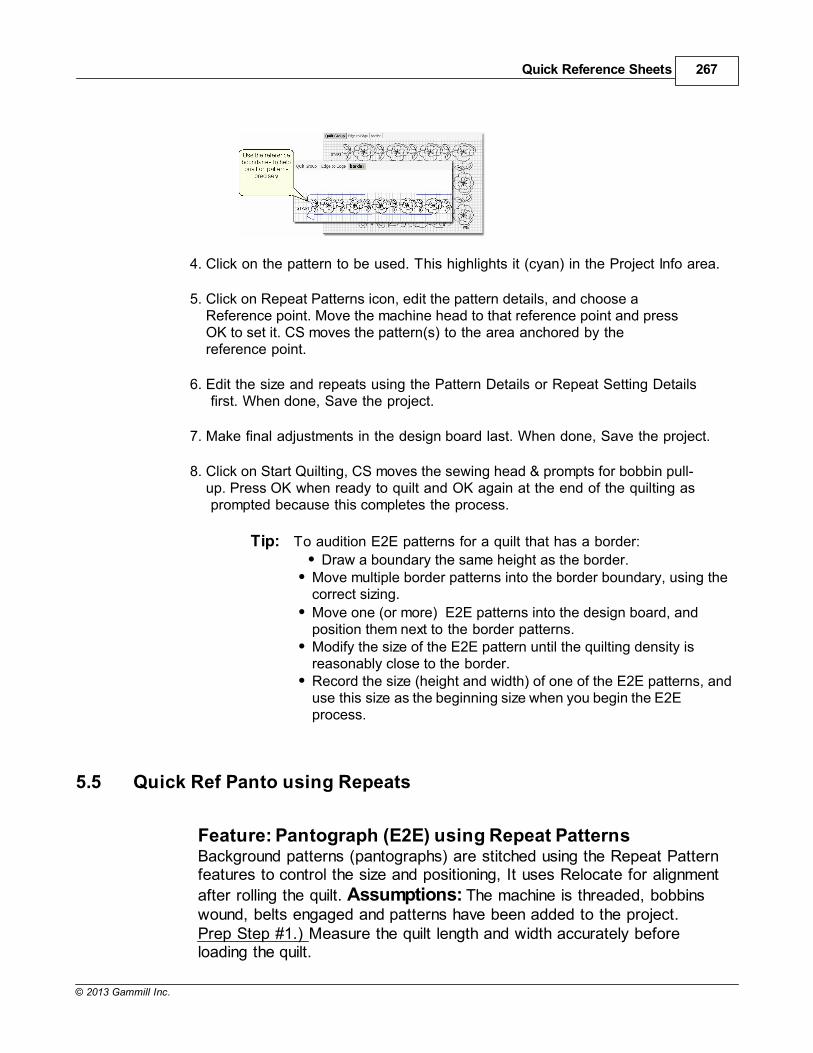
Quick Reference Sheets 267
© 2013 Gammill Inc.
4. Click on the pattern to be used. This highlights it (cyan) in the Project Info area.
5. Click on Repeat Patterns icon, edit the pattern details, and choose aReference point. Move the machine head to that reference point and pressOK to set it. CS moves the pattern(s) to the area anchored by thereference point.
6. Edit the size and repeats using the Pattern Details or Repeat Setting Details first. When done, Save the project.
7. Make final adjustments in the design board last. When done, Save the project.
8. Click on Start Quilting, CS moves the sewing head & prompts for bobbin pull-up. Press OK when ready to quilt and OK again at the end of the quilting as prompted because this completes the process.
Tip: To audition E2E patterns for a quilt that has a border:
Draw a boundary the same height as the border.Move multiple border patterns into the border boundary, using thecorrect sizing.
Move one (or more) E2E patterns into the design board, andposition them next to the border patterns.Modify the size of the E2E pattern until the quilting density isreasonably close to the border.Record the size (height and width) of one of the E2E patterns, anduse this size as the beginning size when you begin the E2Eprocess.
5.5 Quick Ref Panto using Repeats
Feature: Pantograph (E2E) using Repeat PatternsBackground patterns (pantographs) are stitched using the Repeat Patternfeatures to control the size and positioning, It uses Relocate for alignment
after rolling the quilt. Assumptions: The machine is threaded, bobbinswound, belts engaged and patterns have been added to the project.Prep Step #1.) Measure the quilt length and width accurately beforeloading the quilt.
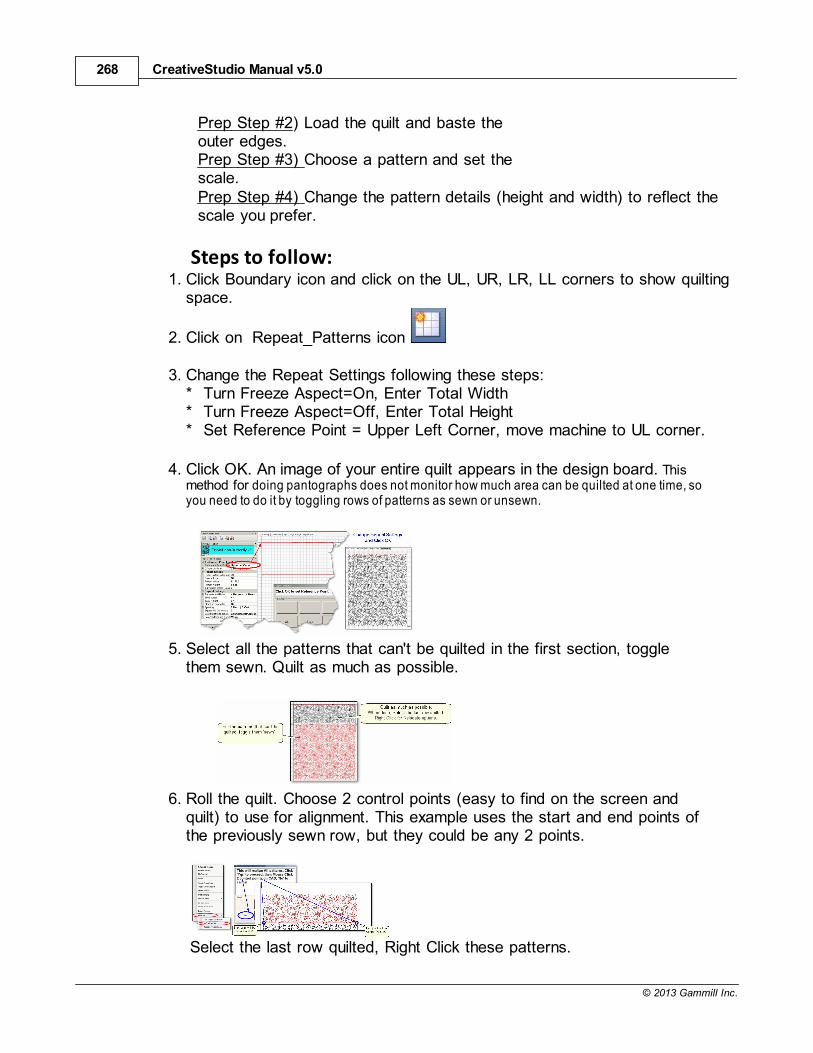
CreativeStudio Manual v5.0268
© 2013 Gammill Inc.
Prep Step #2) Load the quilt and baste theouter edges. Prep Step #3) Choose a pattern and set thescale.Prep Step #4) Change the pattern details (height and width) to reflect thescale you prefer.
Steps to follow:1. Click Boundary icon and click on the UL, UR, LR, LL corners to show quilting
space.
2. Click on Repeat_Patterns icon
3. Change the Repeat Settings following these steps:* Turn Freeze Aspect=On, Enter Total Width* Turn Freeze Aspect=Off, Enter Total Height* Set Reference Point = Upper Left Corner, move machine to UL corner.
4. Click OK. An image of your entire quilt appears in the design board. Thismethod for doing pantographs does not monitor how much area can be quilted at one time, soyou need to do it by toggling rows of patterns as sewn or unsewn.
5. Select all the patterns that can't be quilted in the first section, togglethem sewn. Quilt as much as possible.
6. Roll the quilt. Choose 2 control points (easy to find on the screen andquilt) to use for alignment. This example uses the start and end points ofthe previously sewn row, but they could be any 2 points.
Select the last row quilted, Right Click these patterns.
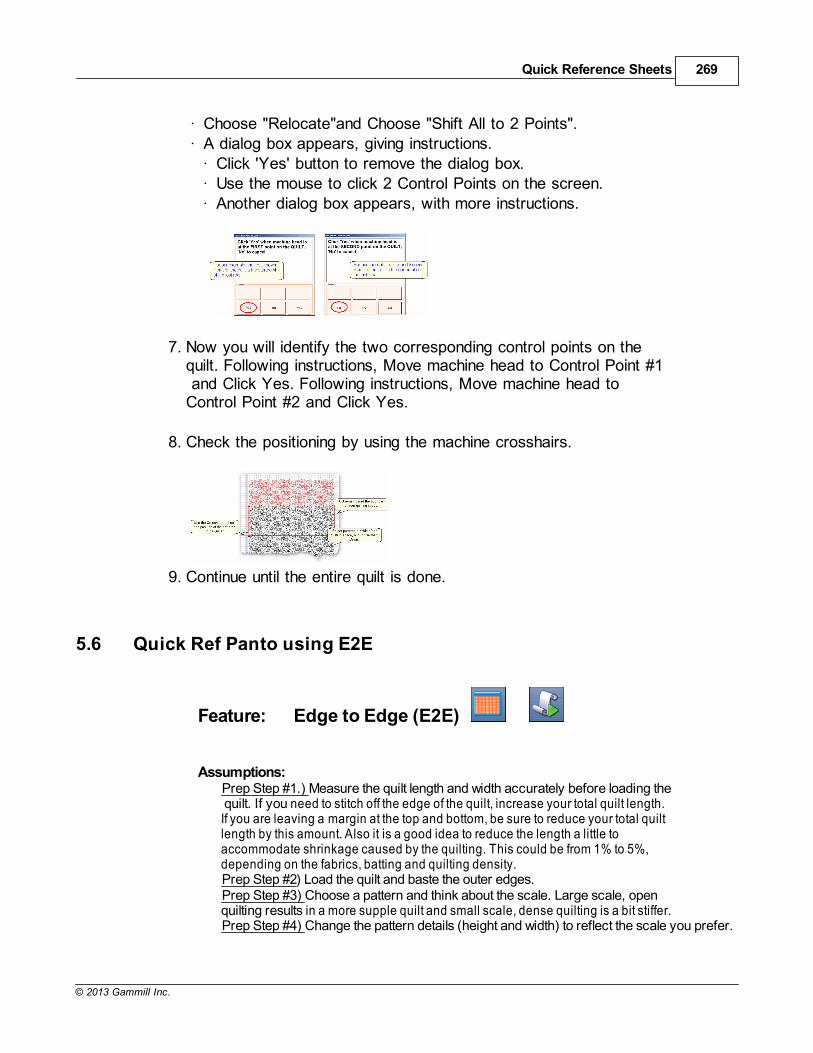
Quick Reference Sheets 269
© 2013 Gammill Inc.
· Choose "Relocate"and Choose "Shift All to 2 Points".· A dialog box appears, giving instructions.
· Click 'Yes' button to remove the dialog box.· Use the mouse to click 2 Control Points on the screen.· Another dialog box appears, with more instructions.
7. Now you will identify the two corresponding control points on thequilt. Following instructions, Move machine head to Control Point #1 and Click Yes. Following instructions, Move machine head toControl Point #2 and Click Yes.
8. Check the positioning by using the machine crosshairs.
9. Continue until the entire quilt is done.
5.6 Quick Ref Panto using E2E
Feature: Edge to Edge (E2E)
Assumptions:Prep Step #1.) Measure the quilt length and width accurately before loading the quilt. If you need to stitch off the edge of the quilt, increase your total quilt length.If you are leaving a margin at the top and bottom, be sure to reduce your total quiltlength by this amount. Also it is a good idea to reduce the length a little toaccommodate shrinkage caused by the quilting. This could be from 1% to 5%,depending on the fabrics, batting and quilting density.Prep Step #2) Load the quilt and baste the outer edges.Prep Step #3) Choose a pattern and think about the scale. Large scale, openquilting results in a more supple quilt and small scale, dense quilting is a bit stiffer.Prep Step #4) Change the pattern details (height and width) to reflect the scale you prefer.
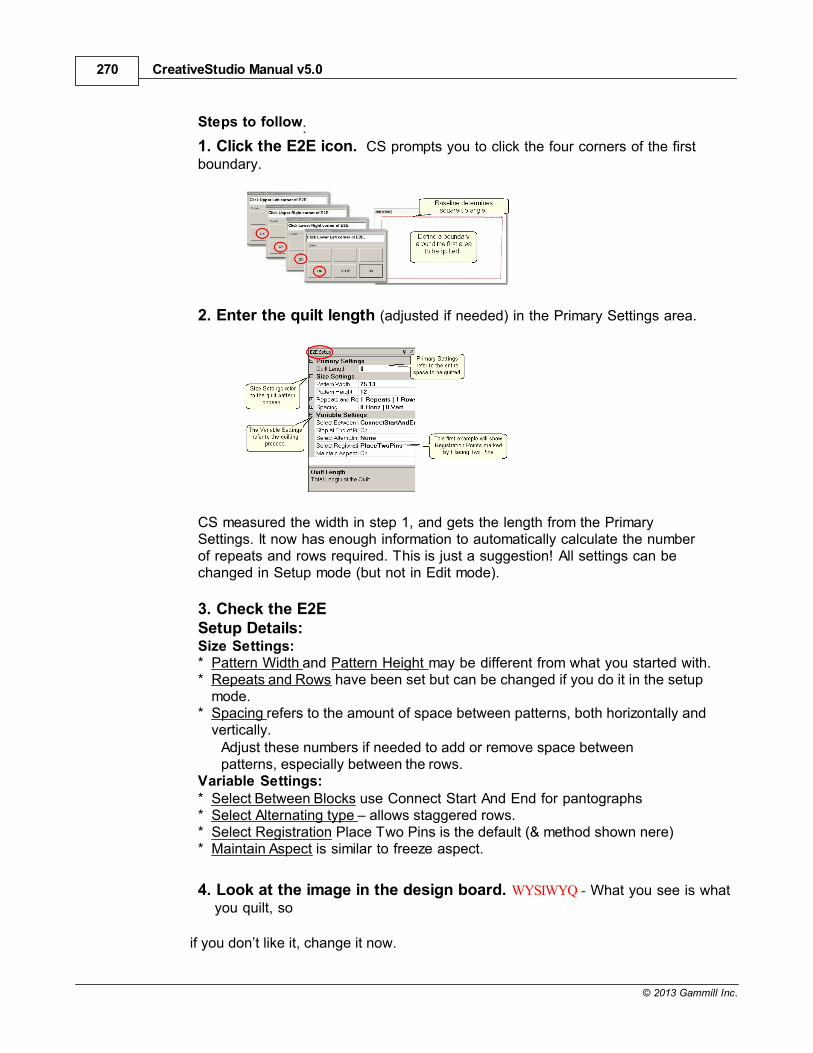
CreativeStudio Manual v5.0270
© 2013 Gammill Inc.
Steps to follow:
1. Click the E2E icon. CS prompts you to click the four corners of the firstboundary.
2. Enter the quilt length (adjusted if needed) in the Primary Settings area.
CS measured the width in step 1, and gets the length from the PrimarySettings. It now has enough information to automatically calculate the numberof repeats and rows required. This is just a suggestion! All settings can bechanged in Setup mode (but not in Edit mode).
3. Check the E2ESetup Details: Size Settings:* Pattern Width and Pattern Height may be different from what you started with.* Repeats and Rows have been set but can be changed if you do it in the setup
mode.* Spacing refers to the amount of space between patterns, both horizontally and
vertically.Adjust these numbers if needed to add or remove space betweenpatterns, especially between the rows.
Variable Settings:* Select Between Blocks use Connect Start And End for pantographs* Select Alternating type – allows staggered rows.* Select Registration Place Two Pins is the default (& method shown nere)* Maintain Aspect is similar to freeze aspect.
4. Look at the image in the design board. WYSIWYQ - What you see is whatyou quilt, so
if you don’t like it, change it now.
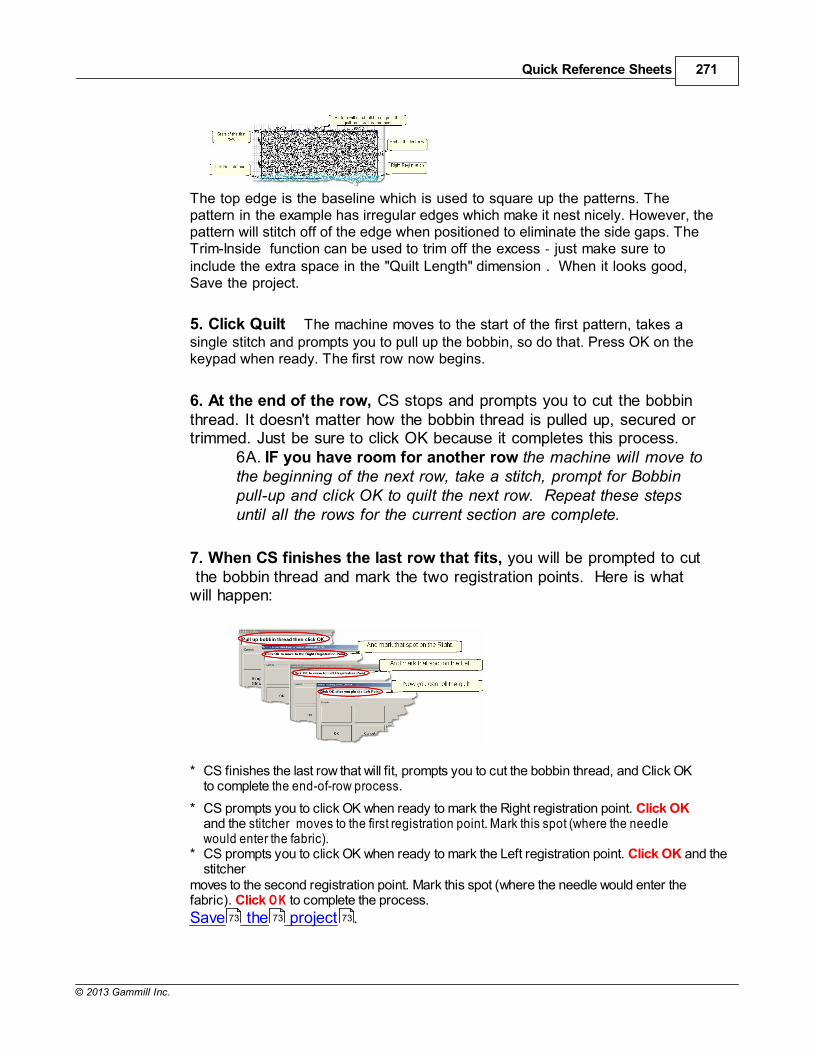
Quick Reference Sheets 271
© 2013 Gammill Inc.
The top edge is the baseline which is used to square up the patterns. Thepattern in the example has irregular edges which make it nest nicely. However, thepattern will stitch off of the edge when positioned to eliminate the side gaps. TheTrim-Inside function can be used to trim off the excess - just make sure toinclude the extra space in the "Quilt Length" dimension . When it looks good,Save the project.
5. Click Quilt The machine moves to the start of the first pattern, takes asingle stitch and prompts you to pull up the bobbin, so do that. Press OK on thekeypad when ready. The first row now begins.
6. At the end of the row, CS stops and prompts you to cut the bobbinthread. It doesn't matter how the bobbin thread is pulled up, secured ortrimmed. Just be sure to click OK because it completes this process.
6A. IF you have room for another row the machine will move tothe beginning of the next row, take a stitch, prompt for Bobbinpull-up and click OK to quilt the next row. Repeat these stepsuntil all the rows for the current section are complete.
7. When CS finishes the last row that fits, you will be prompted to cut the bobbin thread and mark the two registration points. Here is whatwill happen:
* CS finishes the last row that will fit, prompts you to cut the bobbin thread, and Click OKto complete the end-of-row process.
* CS prompts you to click OK when ready to mark the Right registration point. Click OKand the stitcher moves to the first registration point. Mark this spot (where the needlewould enter the fabric).
* CS prompts you to click OK when ready to mark the Left registration point. Click OK and thestitcher
moves to the second registration point. Mark this spot (where the needle would enter thefabric). Click O K to complete the process.
Save the project .73 73 73
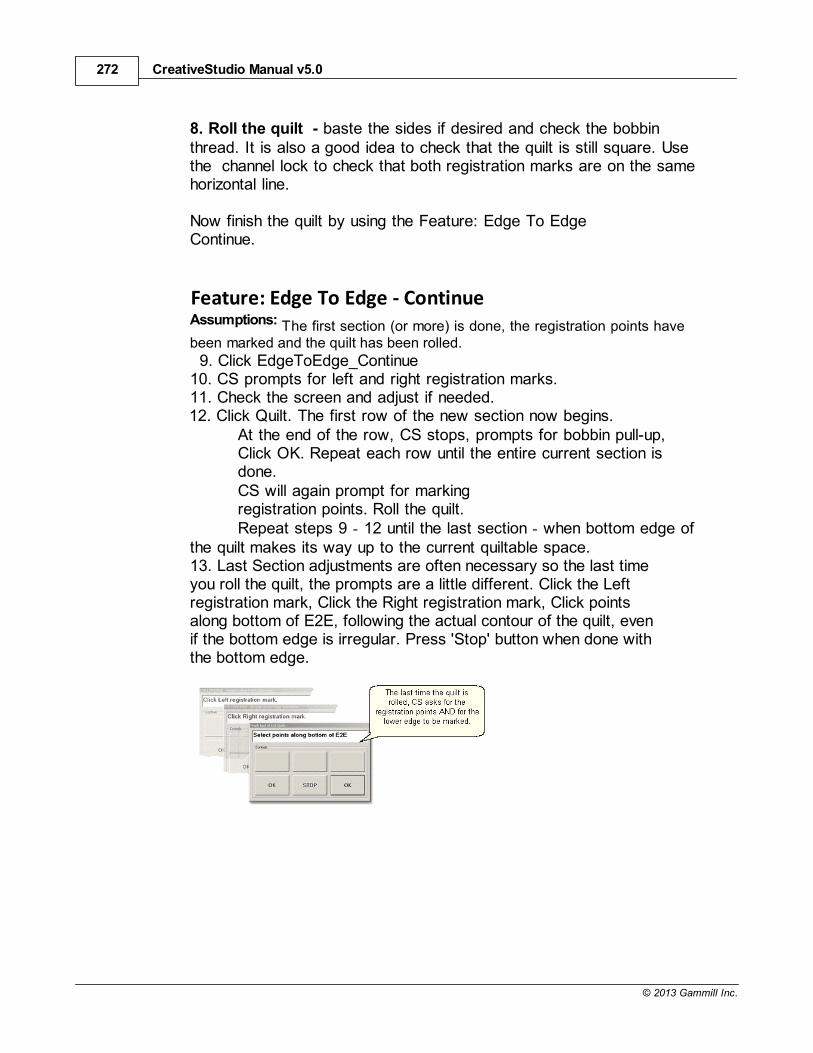
CreativeStudio Manual v5.0272
© 2013 Gammill Inc.
8. Roll the quilt - baste the sides if desired and check the bobbinthread. It is also a good idea to check that the quilt is still square. Usethe channel lock to check that both registration marks are on the samehorizontal line.
Now finish the quilt by using the Feature: Edge To EdgeContinue.
Feature: Edge To Edge - ContinueAssumptions: The first section (or more) is done, the registration points havebeen marked and the quilt has been rolled.
9. Click EdgeToEdge_Continue10. CS prompts for left and right registration marks.11. Check the screen and adjust if needed.12. Click Quilt. The first row of the new section now begins.
At the end of the row, CS stops, prompts for bobbin pull-up,Click OK. Repeat each row until the entire current section isdone.CS will again prompt for markingregistration points. Roll the quilt.Repeat steps 9 - 12 until the last section - when bottom edge of
the quilt makes its way up to the current quiltable space.13. Last Section adjustments are often necessary so the last timeyou roll the quilt, the prompts are a little different. Click the Leftregistration mark, Click the Right registration mark, Click pointsalong bottom of E2E, following the actual contour of the quilt, evenif the bottom edge is irregular. Press 'Stop' button when done withthe bottom edge.
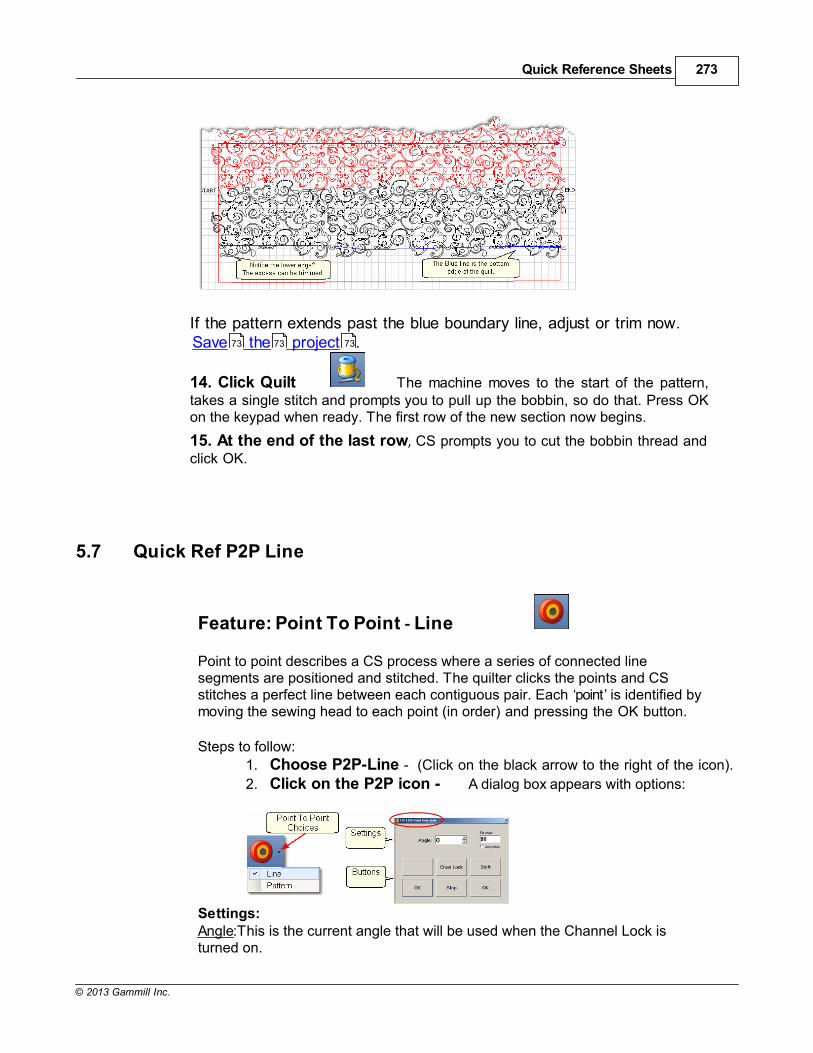
Quick Reference Sheets 273
© 2013 Gammill Inc.
If the pattern extends past the blue boundary line, adjust or trim now.Save the project .
14. Click Quilt The machine moves to the start of the pattern,takes a single stitch and prompts you to pull up the bobbin, so do that. Press OKon the keypad when ready. The first row of the new section now begins.
15. At the end of the last row, CS prompts you to cut the bobbin thread andclick OK.
5.7 Quick Ref P2P Line
Feature: Point To Point - Line
Point to point describes a CS process where a series of connected linesegments are positioned and stitched. The quilter clicks the points and CSstitches a perfect line between each contiguous pair. Each ‘point is identified bymoving the sewing head to each point (in order) and pressing the OK button.
Steps to follow:
1. Choose P2P-Line - (Click on the black arrow to the right of the icon).
2. Click on the P2P icon - A dialog box appears with options:
Settings:Angle:This is the current angle that will be used when the Channel Lock isturned on.
73 73 73
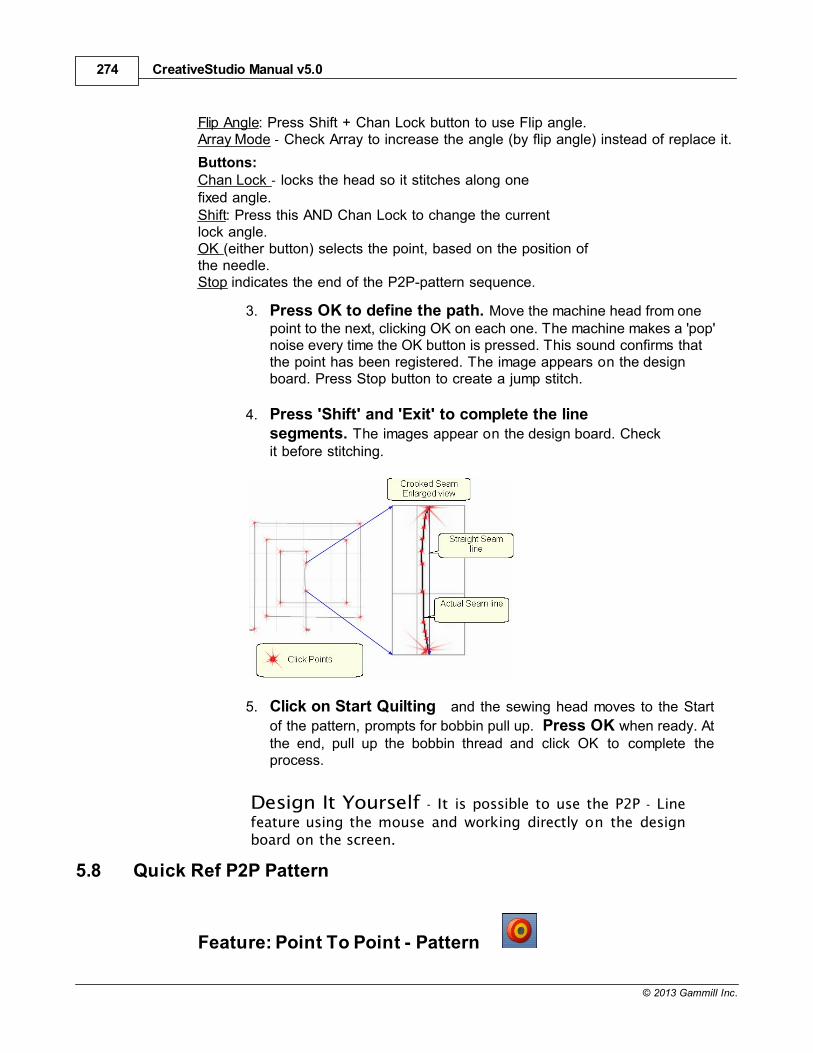
CreativeStudio Manual v5.0274
© 2013 Gammill Inc.
Flip Angle: Press Shift + Chan Lock button to use Flip angle.Array Mode - Check Array to increase the angle (by flip angle) instead of replace it.
Buttons:Chan Lock - locks the head so it stitches along onefixed angle. Shift: Press this AND Chan Lock to change the currentlock angle.OK (either button) selects the point, based on the position ofthe needle. Stop indicates the end of the P2P-pattern sequence.
3. Press OK to define the path. Move the machine head from onepoint to the next, clicking OK on each one. The machine makes a 'pop'noise every time the OK button is pressed. This sound confirms thatthe point has been registered. The image appears on the designboard. Press Stop button to create a jump stitch.
4. Press 'Shift' and 'Exit' to complete the linesegments. The images appear on the design board. Checkit before stitching.
5. Click on Start Quilting and the sewing head moves to the Start
of the pattern, prompts for bobbin pull up. Press OK when ready. Atthe end, pull up the bobbin thread and click OK to complete theprocess.
Design It Yourself - It is possible to use the P2P - Line
feature using the mouse and working directly on the designboard on the screen.
5.8 Quick Ref P2P Pattern
Feature: Point To Point - Pattern
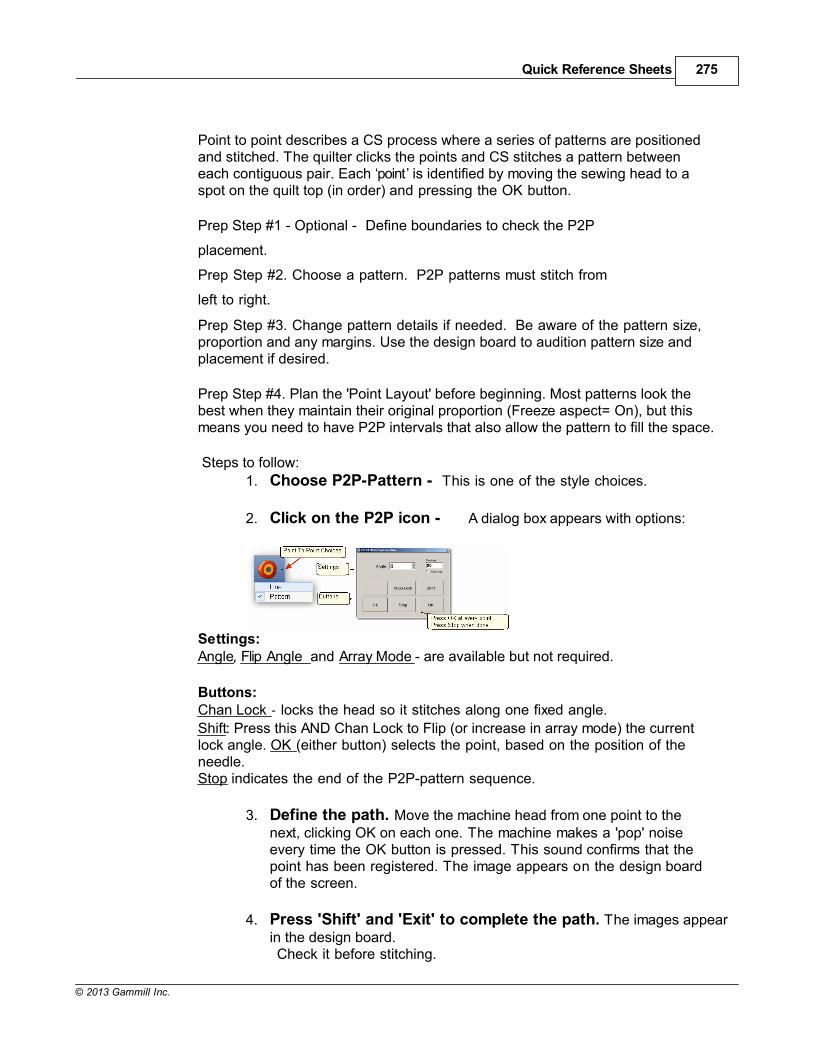
Quick Reference Sheets 275
© 2013 Gammill Inc.
Point to point describes a CS process where a series of patterns are positionedand stitched. The quilter clicks the points and CS stitches a pattern betweeneach contiguous pair. Each ‘point is identified by moving the sewing head to aspot on the quilt top (in order) and pressing the OK button.
Prep Step #1 - Optional - Define boundaries to check the P2P
placement.
Prep Step #2. Choose a pattern. P2P patterns must stitch from
left to right.
Prep Step #3. Change pattern details if needed. Be aware of the pattern size,proportion and any margins. Use the design board to audition pattern size andplacement if desired.
Prep Step #4. Plan the 'Point Layout' before beginning. Most patterns look thebest when they maintain their original proportion (Freeze aspect= On), but thismeans you need to have P2P intervals that also allow the pattern to fill the space.
Steps to follow:
1. Choose P2P-Pattern - This is one of the style choices.
2. Click on the P2P icon - A dialog box appears with options:
Settings:Angle, Flip Angle and Array Mode - are available but not required.
Buttons:Chan Lock - locks the head so it stitches along one fixed angle.
Shift: Press this AND Chan Lock to Flip (or increase in array mode) the currentlock angle. OK (either button) selects the point, based on the position of theneedle.Stop indicates the end of the P2P-pattern sequence.
3. Define the path. Move the machine head from one point to thenext, clicking OK on each one. The machine makes a 'pop' noiseevery time the OK button is pressed. This sound confirms that thepoint has been registered. The image appears on the design boardof the screen.
4. Press 'Shift' and 'Exit' to complete the path. The images appearin the design board.Check it before stitching.
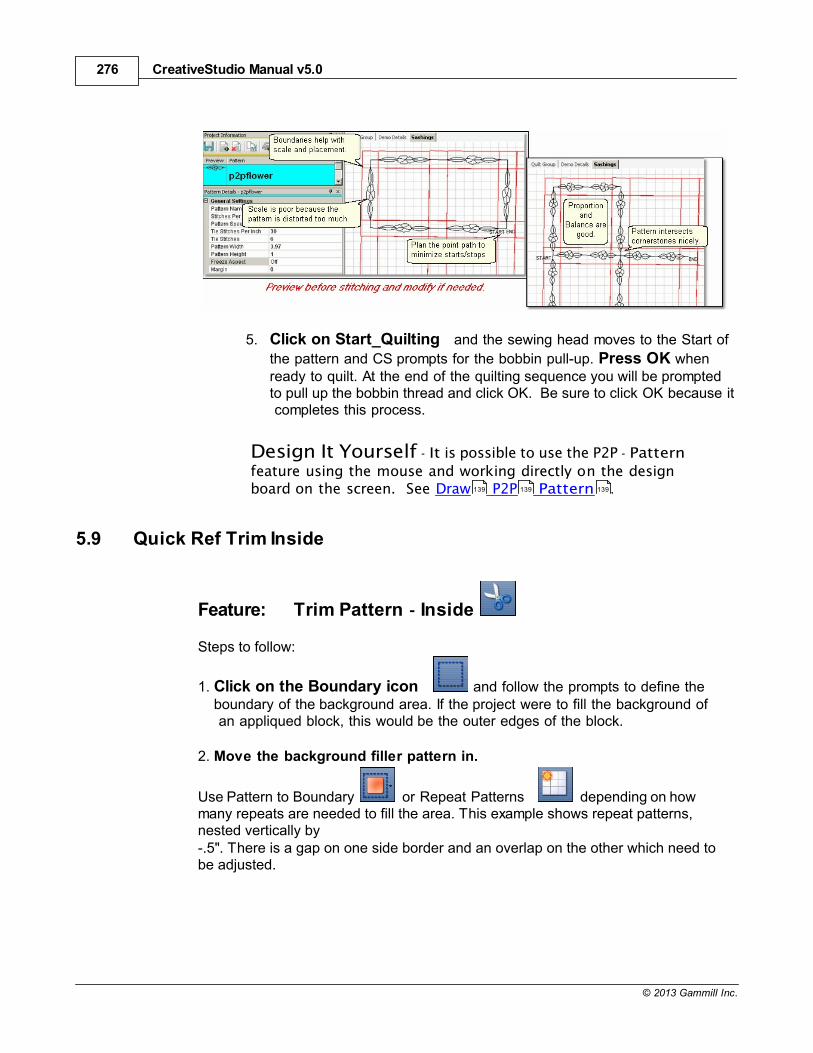
CreativeStudio Manual v5.0276
© 2013 Gammill Inc.
5. Click on Start_Quilting and the sewing head moves to the Start of
the pattern and CS prompts for the bobbin pull-up. Press OK whenready to quilt. At the end of the quilting sequence you will be promptedto pull up the bobbin thread and click OK. Be sure to click OK because it completes this process.
Design It Yourself - It is possible to use the P2P - Pattern
feature using the mouse and working directly on the designboard on the screen. See Draw P2P Pattern .
5.9 Quick Ref Trim Inside
Feature: Trim Pattern - Inside
Steps to follow:
1. Click on the Boundary icon and follow the prompts to define theboundary of the background area. If the project were to fill the background of an appliqued block, this would be the outer edges of the block.
2. Move the background filler pattern in.
Use Pattern to Boundary or Repeat Patterns depending on howmany repeats are needed to fill the area. This example shows repeat patterns,nested vertically by-.5". There is a gap on one side border and an overlap on the other which need tobe adjusted.
139 139 139
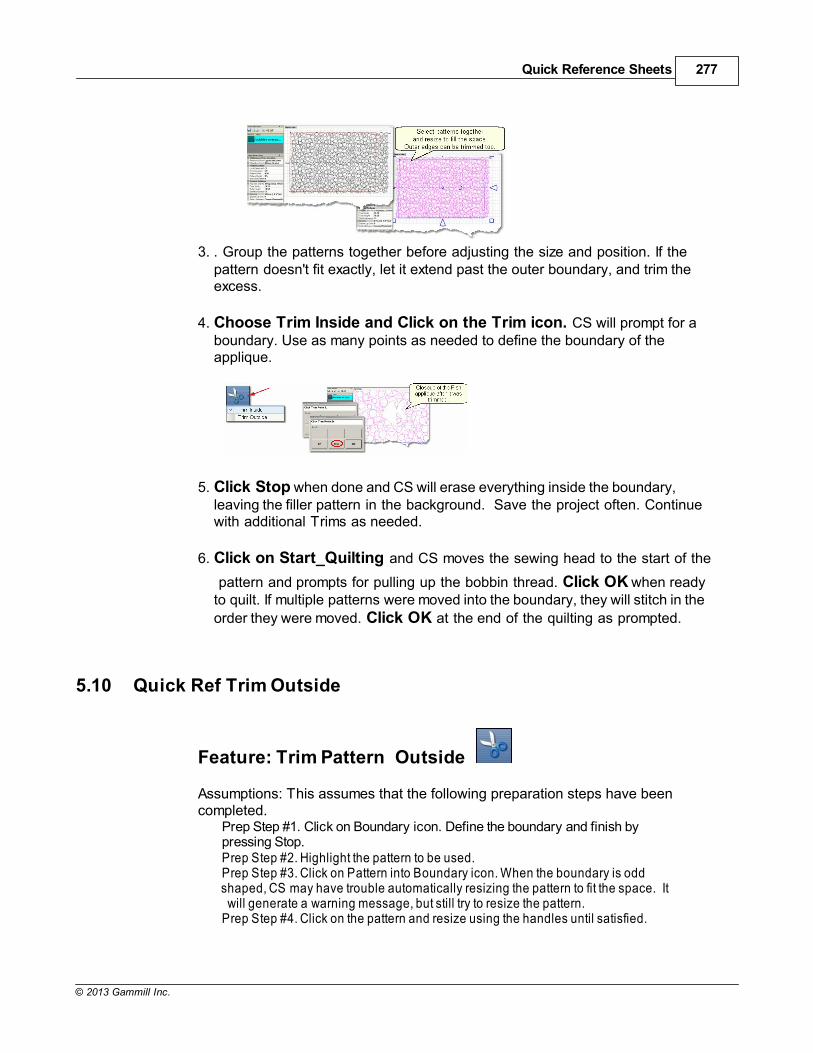
Quick Reference Sheets 277
© 2013 Gammill Inc.
3. . Group the patterns together before adjusting the size and position. If thepattern doesn't fit exactly, let it extend past the outer boundary, and trim theexcess.
4. Choose Trim Inside and Click on the Trim icon. CS will prompt for aboundary. Use as many points as needed to define the boundary of theapplique.
5. Click Stop when done and CS will erase everything inside the boundary,leaving the filler pattern in the background. Save the project often. Continuewith additional Trims as needed.
6. Click on Start_Quilting and CS moves the sewing head to the start of the
pattern and prompts for pulling up the bobbin thread. Click OK when readyto quilt. If multiple patterns were moved into the boundary, they will stitch in the
order they were moved. Click OK at the end of the quilting as prompted.
5.10 Quick Ref Trim Outside
Feature: Trim Pattern Outside
Assumptions: This assumes that the following preparation steps have beencompleted.
Prep Step #1. Click on Boundary icon. Define the boundary and finish bypressing Stop. Prep Step #2. Highlight the pattern to be used.Prep Step #3. Click on Pattern into Boundary icon. When the boundary is oddshaped, CS may have trouble automatically resizing the pattern to fit the space. It will generate a warning message, but still try to resize the pattern.Prep Step #4. Click on the pattern and resize using the handles until satisfied.
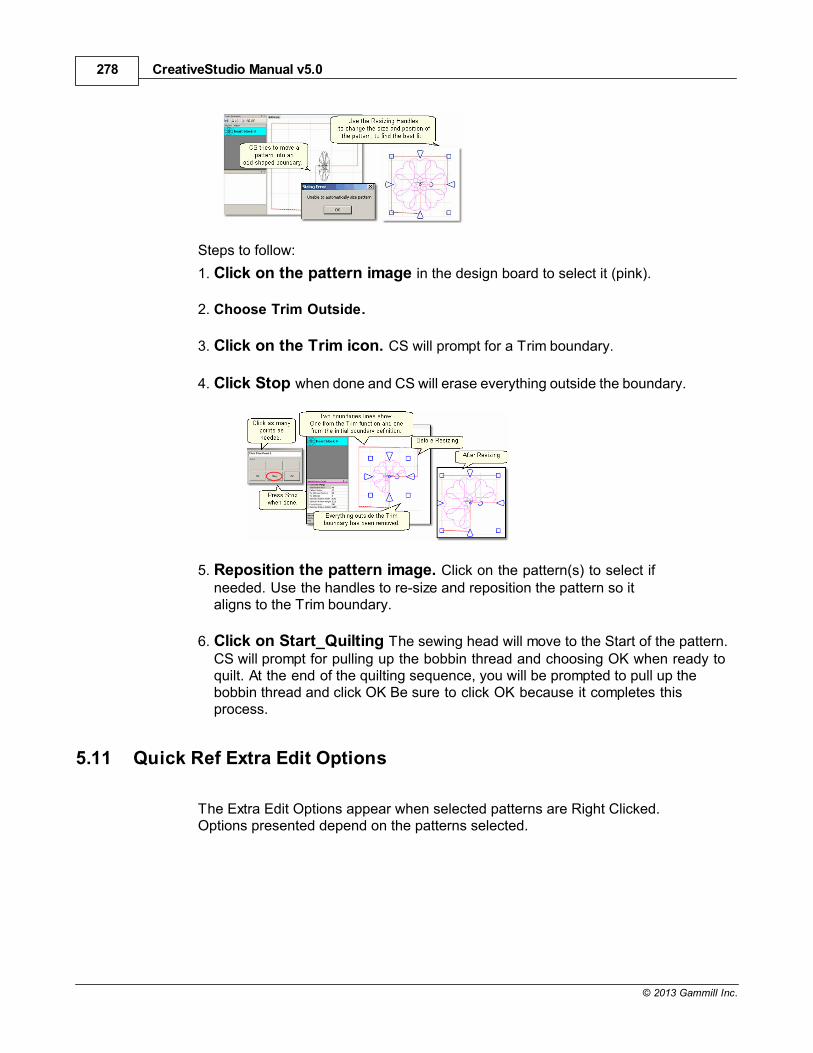
CreativeStudio Manual v5.0278
© 2013 Gammill Inc.
Steps to follow:
1. Click on the pattern image in the design board to select it (pink).
2. Choose Trim Outside.
3. Click on the Trim icon. CS will prompt for a Trim boundary.
4. Click Stop when done and CS will erase everything outside the boundary.
5. Reposition the pattern image. Click on the pattern(s) to select ifneeded. Use the handles to re-size and reposition the pattern so italigns to the Trim boundary.
6. Click on Start_Quilting The sewing head will move to the Start of the pattern.CS will prompt for pulling up the bobbin thread and choosing OK when ready toquilt. At the end of the quilting sequence, you will be prompted to pull up thebobbin thread and click OK Be sure to click OK because it completes thisprocess.
5.11 Quick Ref Extra Edit Options
The Extra Edit Options appear when selected patterns are Right Clicked.Options presented depend on the patterns selected.
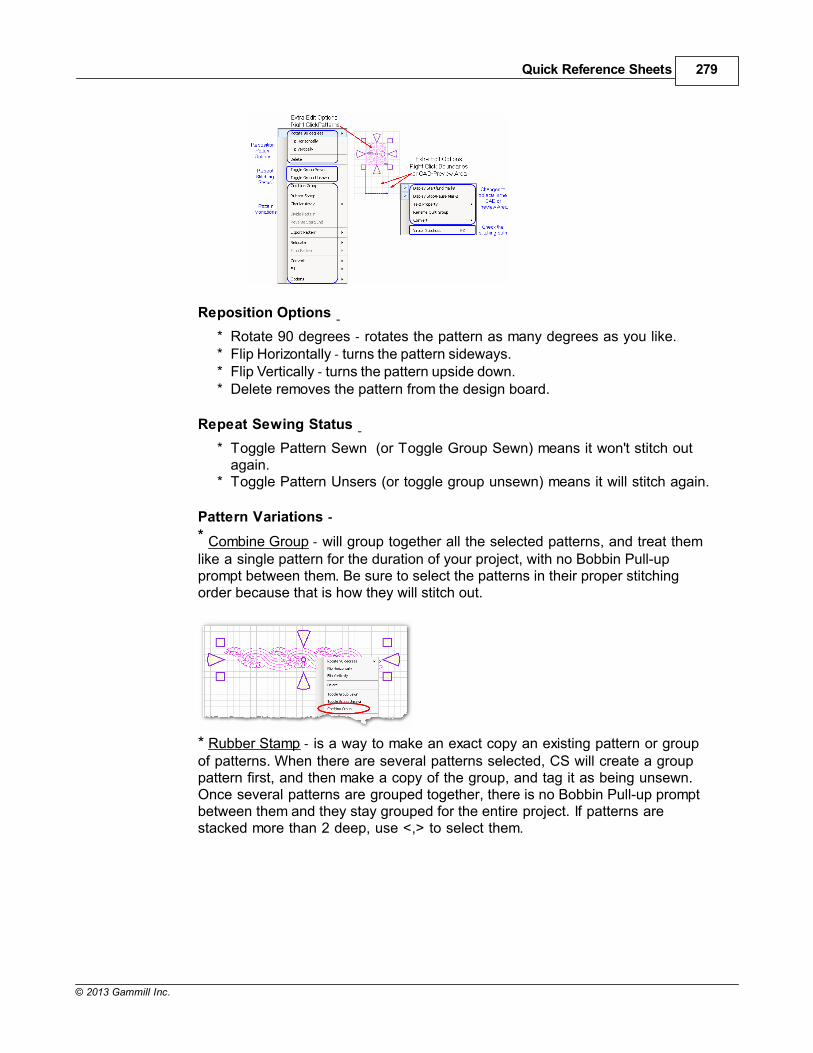
Quick Reference Sheets 279
© 2013 Gammill Inc.
Reposition Options -* Rotate 90 degrees - rotates the pattern as many degrees as you like.* Flip Horizontally - turns the pattern sideways.* Flip Vertically - turns the pattern upside down.* Delete removes the pattern from the design board.
Repeat Sewing Status -* Toggle Pattern Sewn (or Toggle Group Sewn) means it won't stitch out
again.* Toggle Pattern Unsers (or toggle group unsewn) means it will stitch again.
Pattern Variations -
* Combine Group - will group together all the selected patterns, and treat themlike a single pattern for the duration of your project, with no Bobbin Pull-upprompt between them. Be sure to select the patterns in their proper stitchingorder because that is how they will stitch out.
* Rubber Stamp - is a way to make an exact copy an existing pattern or groupof patterns. When there are several patterns selected, CS will create a grouppattern first, and then make a copy of the group, and tag it as being unsewn.Once several patterns are grouped together, there is no Bobbin Pull-up promptbetween them and they stay grouped for the entire project. If patterns arestacked more than 2 deep, use <,> to select them.
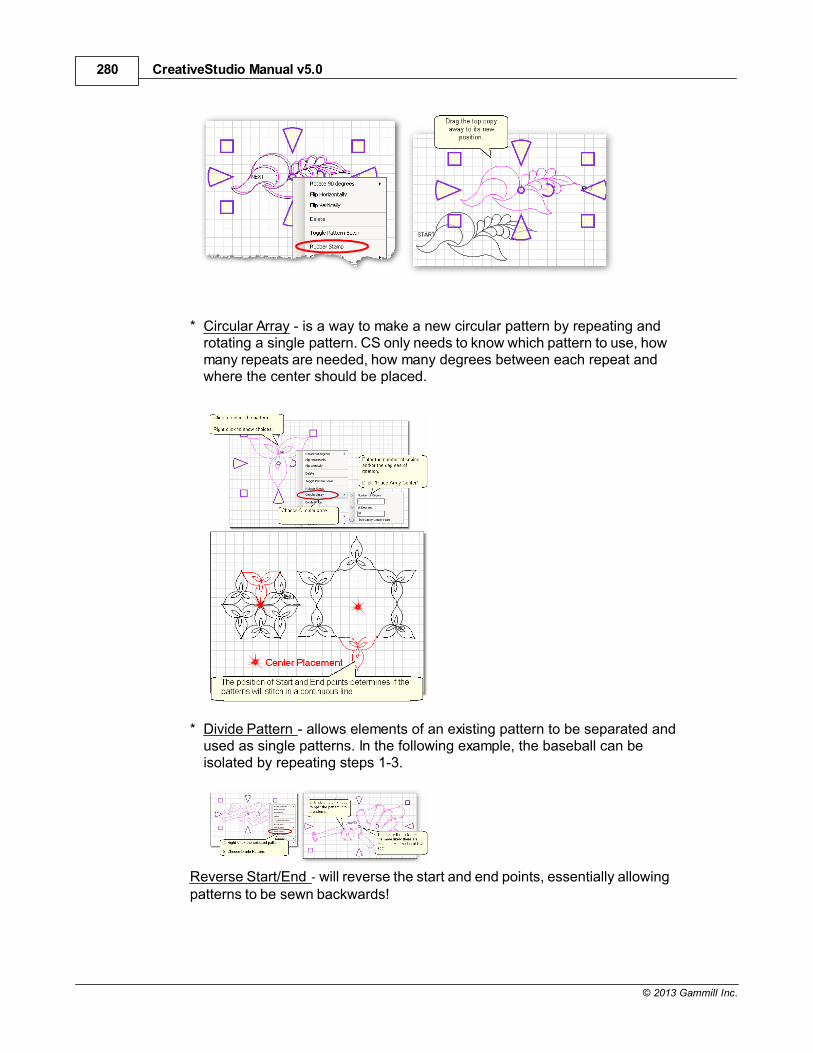
CreativeStudio Manual v5.0280
© 2013 Gammill Inc.
* Circular Array - is a way to make a new circular pattern by repeating androtating a single pattern. CS only needs to know which pattern to use, howmany repeats are needed, how many degrees between each repeat andwhere the center should be placed.
* Divide Pattern - allows elements of an existing pattern to be separated andused as single patterns. In the following example, the baseball can beisolated by repeating steps 1-3.
Reverse Start/End - will reverse the start and end points, essentially allowingpatterns to be sewn backwards!
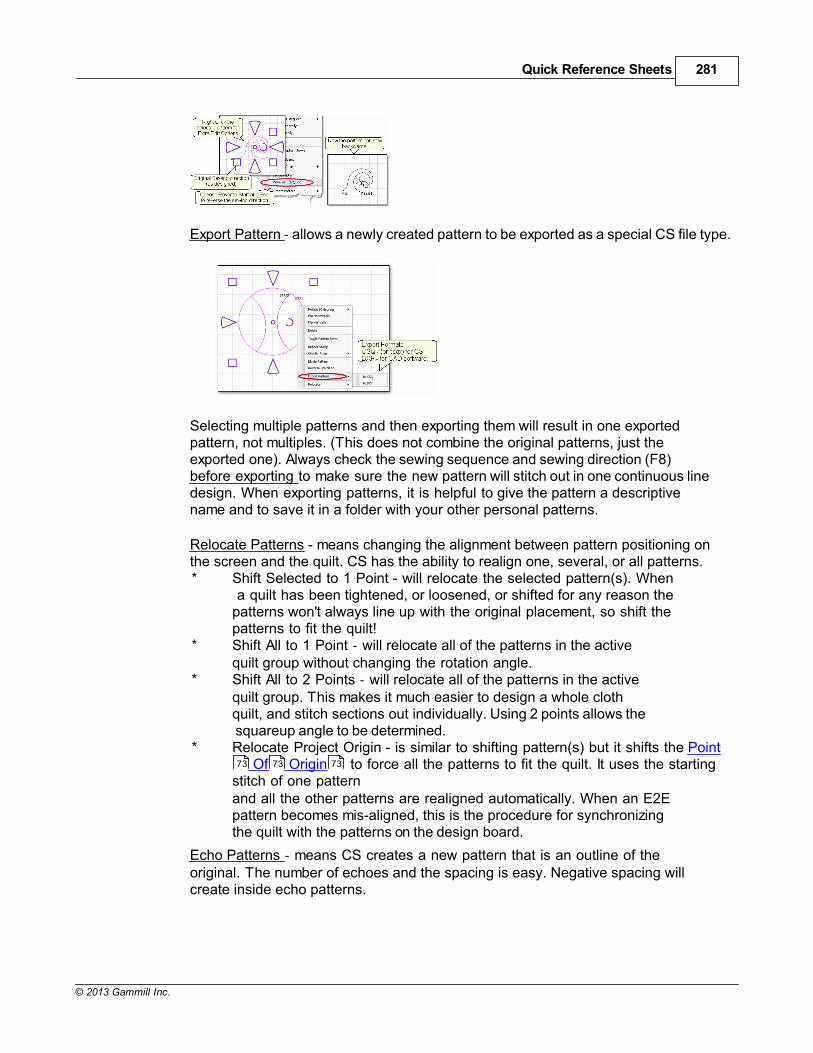
Quick Reference Sheets 281
© 2013 Gammill Inc.
Export Pattern - allows a newly created pattern to be exported as a special CS file type.
Selecting multiple patterns and then exporting them will result in one exportedpattern, not multiples. (This does not combine the original patterns, just theexported one). Always check the sewing sequence and sewing direction (F8)before exporting to make sure the new pattern will stitch out in one continuous linedesign. When exporting patterns, it is helpful to give the pattern a descriptivename and to save it in a folder with your other personal patterns.
Relocate Patterns - means changing the alignment between pattern positioning onthe screen and the quilt. CS has the ability to realign one, several, or all patterns.* Shift Selected to 1 Point - will relocate the selected pattern(s). When
a quilt has been tightened, or loosened, or shifted for any reason thepatterns won't always line up with the original placement, so shift thepatterns to fit the quilt!
* Shift All to 1 Point - will relocate all of the patterns in the activequilt group without changing the rotation angle.
* Shift All to 2 Points - will relocate all of the patterns in the activequilt group. This makes it much easier to design a whole clothquilt, and stitch sections out individually. Using 2 points allows the squareup angle to be determined.
* Relocate Project Origin - is similar to shifting pattern(s) but it shifts the Point Of Origin to force all the patterns to fit the quilt. It uses the starting
stitch of one patternand all the other patterns are realigned automatically. When an E2Epattern becomes mis-aligned, this is the procedure for synchronizingthe quilt with the patterns on the design board.
Echo Patterns - means CS creates a new pattern that is an outline of theoriginal. The number of echoes and the spacing is easy. Negative spacing willcreate inside echo patterns.
73 73 73
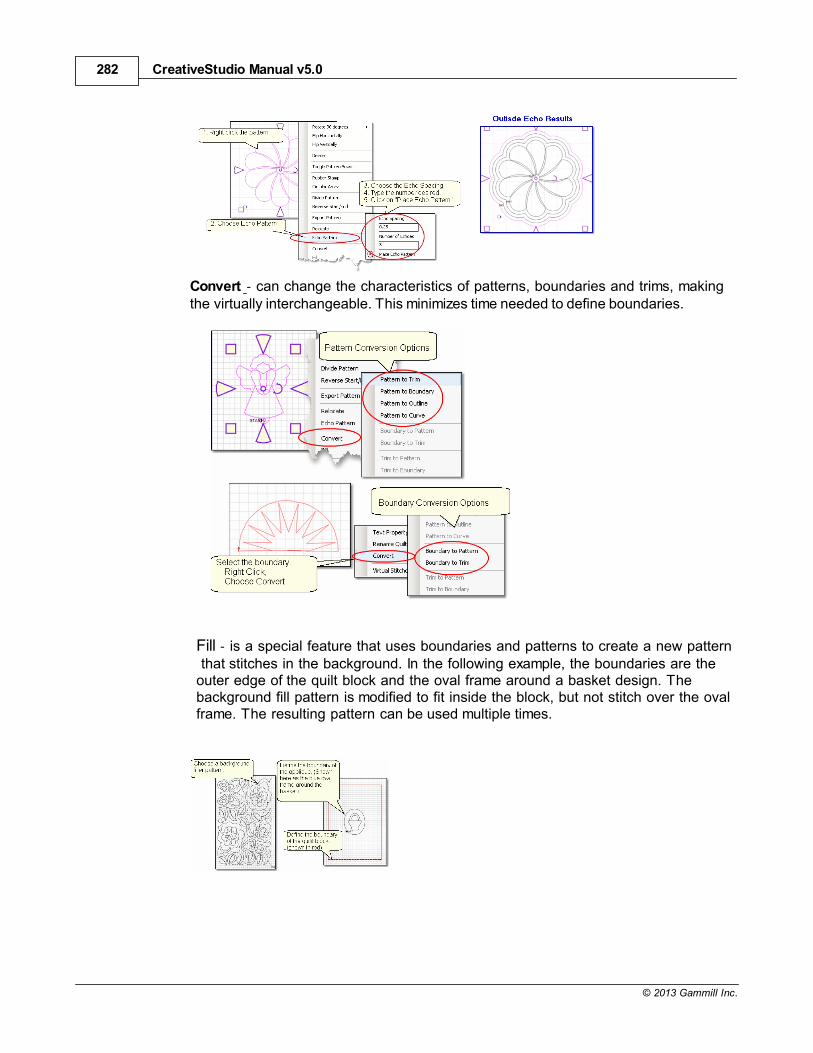
CreativeStudio Manual v5.0282
© 2013 Gammill Inc.
Convert - can change the characteristics of patterns, boundaries and trims, makingthe virtually interchangeable. This minimizes time needed to define boundaries.
Fill - is a special feature that uses boundaries and patterns to create a new pattern that stitches in the background. In the following example, the boundaries are theouter edge of the quilt block and the oval frame around a basket design. Thebackground fill pattern is modified to fit inside the block, but not stitch over the ovalframe. The resulting pattern can be used multiple times.
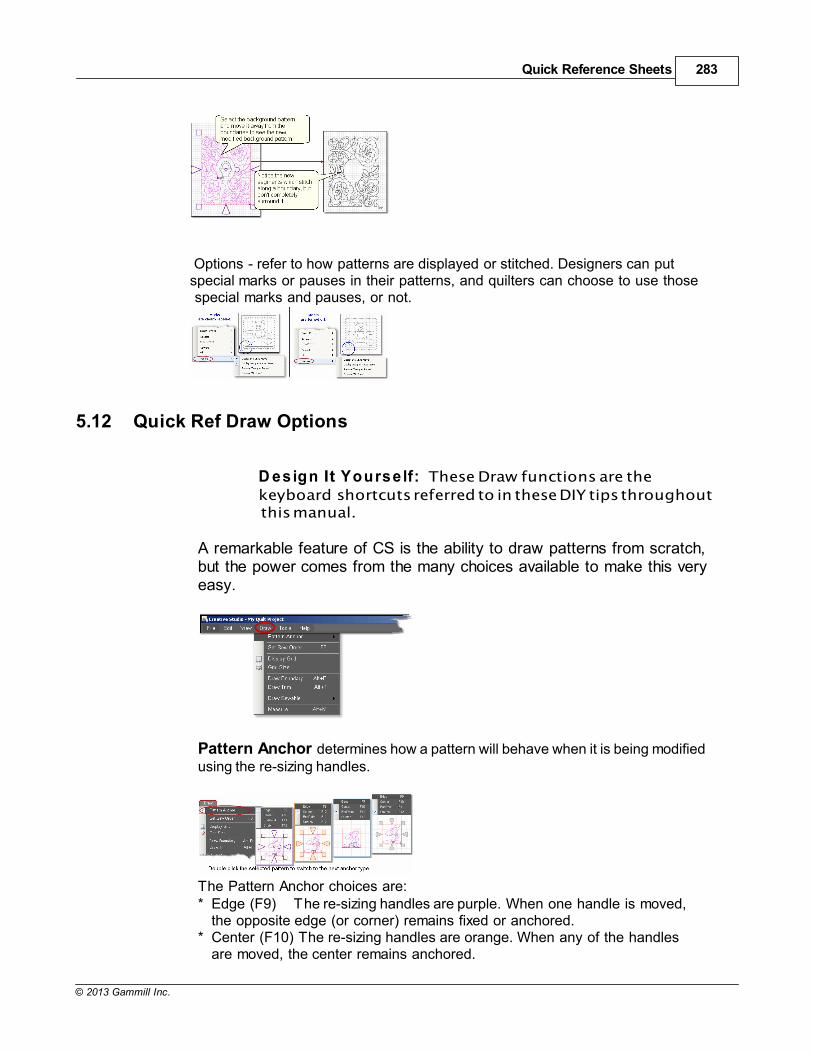
Quick Reference Sheets 283
© 2013 Gammill Inc.
Options - refer to how patterns are displayed or stitched. Designers can putspecial marks or pauses in their patterns, and quilters can choose to use those special marks and pauses, or not.
5.12 Quick Ref Draw Options
D esign It Yourse lf: These Draw functions are the
keyboard shortcuts referred to in these DIY tips throughout this manual.
A remarkable feature of CS is the ability to draw patterns from scratch,but the power comes from the many choices available to make this veryeasy.
Pattern Anchor determines how a pattern will behave when it is being modifiedusing the re-sizing handles.
The Pattern Anchor choices are:* Edge (F9) The re-sizing handles are purple. When one handle is moved,
the opposite edge (or corner) remains fixed or anchored.* Center (F10) The re-sizing handles are orange. When any of the handles
are moved, the center remains anchored.
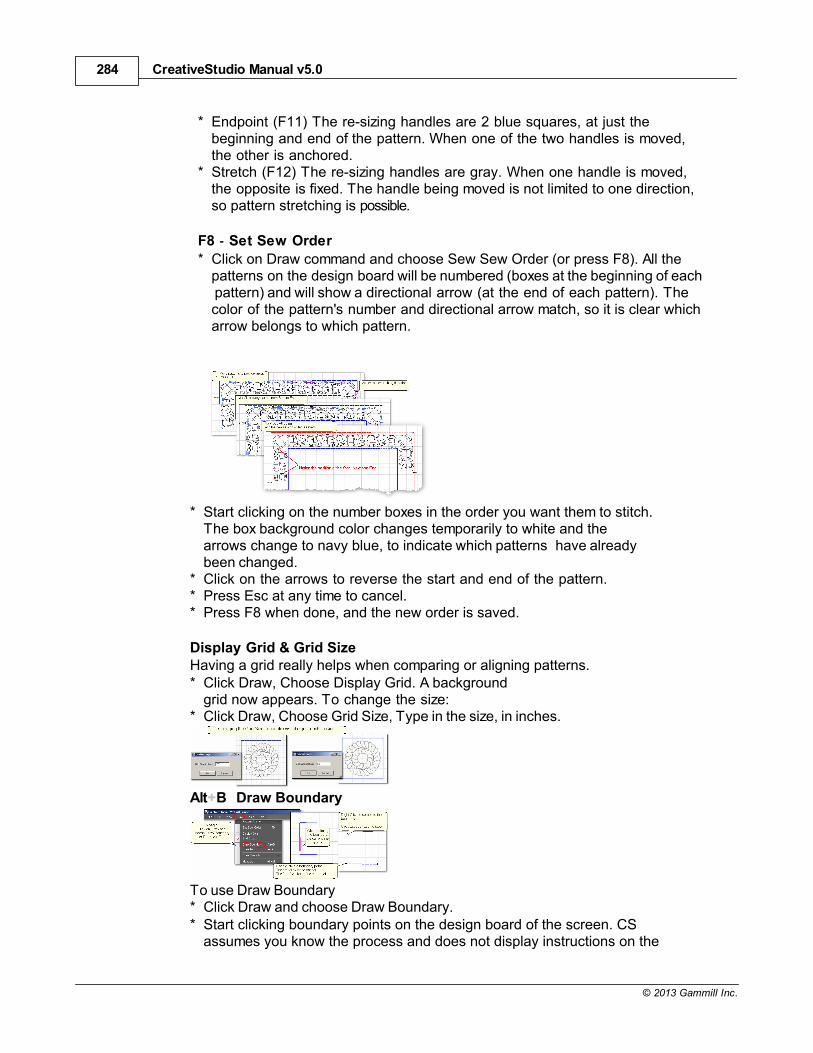
CreativeStudio Manual v5.0284
© 2013 Gammill Inc.
* Endpoint (F11) The re-sizing handles are 2 blue squares, at just thebeginning and end of the pattern. When one of the two handles is moved,the other is anchored.
* Stretch (F12) The re-sizing handles are gray. When one handle is moved,the opposite is fixed. The handle being moved is not limited to one direction,so pattern stretching is possible.
F8 - Set Sew Order
* Click on Draw command and choose Sew Sew Order (or press F8). All thepatterns on the design board will be numbered (boxes at the beginning of each pattern) and will show a directional arrow (at the end of each pattern). Thecolor of the pattern's number and directional arrow match, so it is clear whicharrow belongs to which pattern.
* Start clicking on the number boxes in the order you want them to stitch.The box background color changes temporarily to white and thearrows change to navy blue, to indicate which patterns have alreadybeen changed.
* Click on the arrows to reverse the start and end of the pattern.* Press Esc at any time to cancel.* Press F8 when done, and the new order is saved.
Display Grid & Grid SizeHaving a grid really helps when comparing or aligning patterns.* Click Draw, Choose Display Grid. A background
grid now appears. To change the size:* Click Draw, Choose Grid Size, Type in the size, in inches.
Alt+B Draw Boundary
To use Draw Boundary* Click Draw and choose Draw Boundary.* Start clicking boundary points on the design board of the screen. CS
assumes you know the process and does not display instructions on the
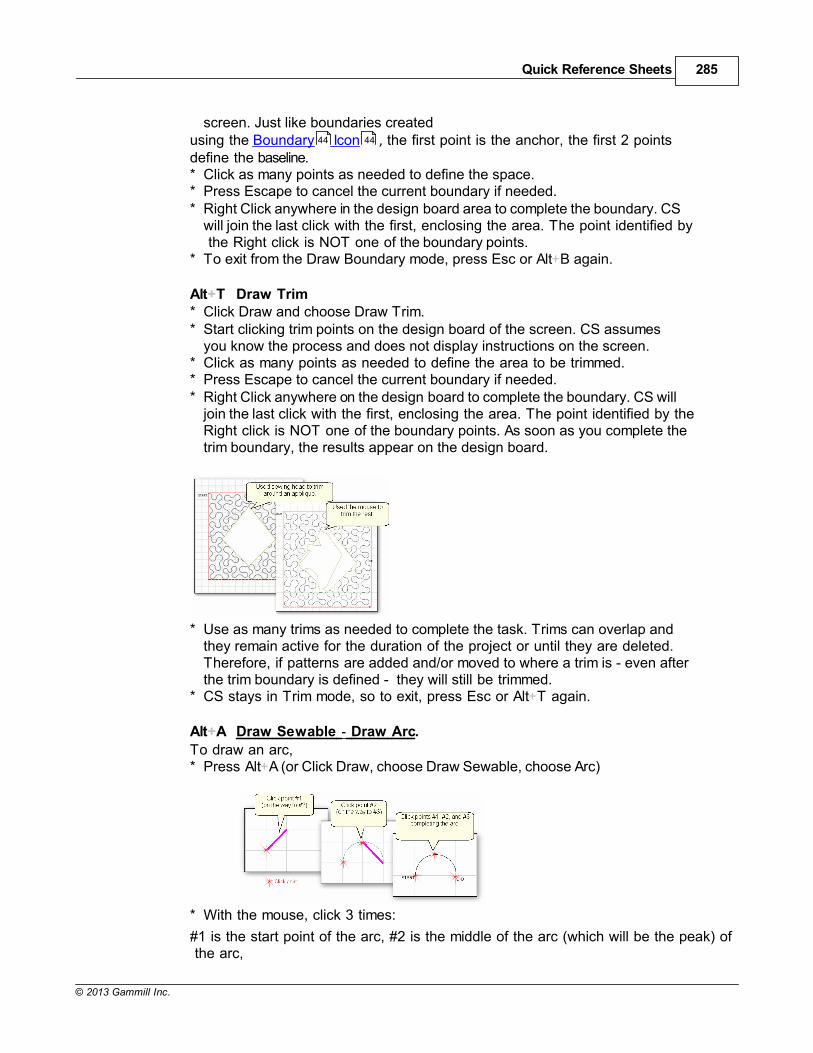
Quick Reference Sheets 285
© 2013 Gammill Inc.
screen. Just like boundaries createdusing the Boundary Icon , the first point is the anchor, the first 2 pointsdefine the baseline.* Click as many points as needed to define the space.* Press Escape to cancel the current boundary if needed.* Right Click anywhere in the design board area to complete the boundary. CS
will join the last click with the first, enclosing the area. The point identified by the Right click is NOT one of the boundary points.
* To exit from the Draw Boundary mode, press Esc or Alt+B again.
Alt+T Draw Trim* Click Draw and choose Draw Trim.* Start clicking trim points on the design board of the screen. CS assumes
you know the process and does not display instructions on the screen.* Click as many points as needed to define the area to be trimmed.* Press Escape to cancel the current boundary if needed.* Right Click anywhere on the design board to complete the boundary. CS will
join the last click with the first, enclosing the area. The point identified by theRight click is NOT one of the boundary points. As soon as you complete thetrim boundary, the results appear on the design board.
* Use as many trims as needed to complete the task. Trims can overlap andthey remain active for the duration of the project or until they are deleted.Therefore, if patterns are added and/or moved to where a trim is - even afterthe trim boundary is defined - they will still be trimmed.
* CS stays in Trim mode, so to exit, press Esc or Alt+T again.
Alt+A Draw Sewable - Draw Arc.
To draw an arc,* Press Alt+A (or Click Draw, choose Draw Sewable, choose Arc)
* With the mouse, click 3 times:
#1 is the start point of the arc, #2 is the middle of the arc (which will be the peak) of the arc,
44 44
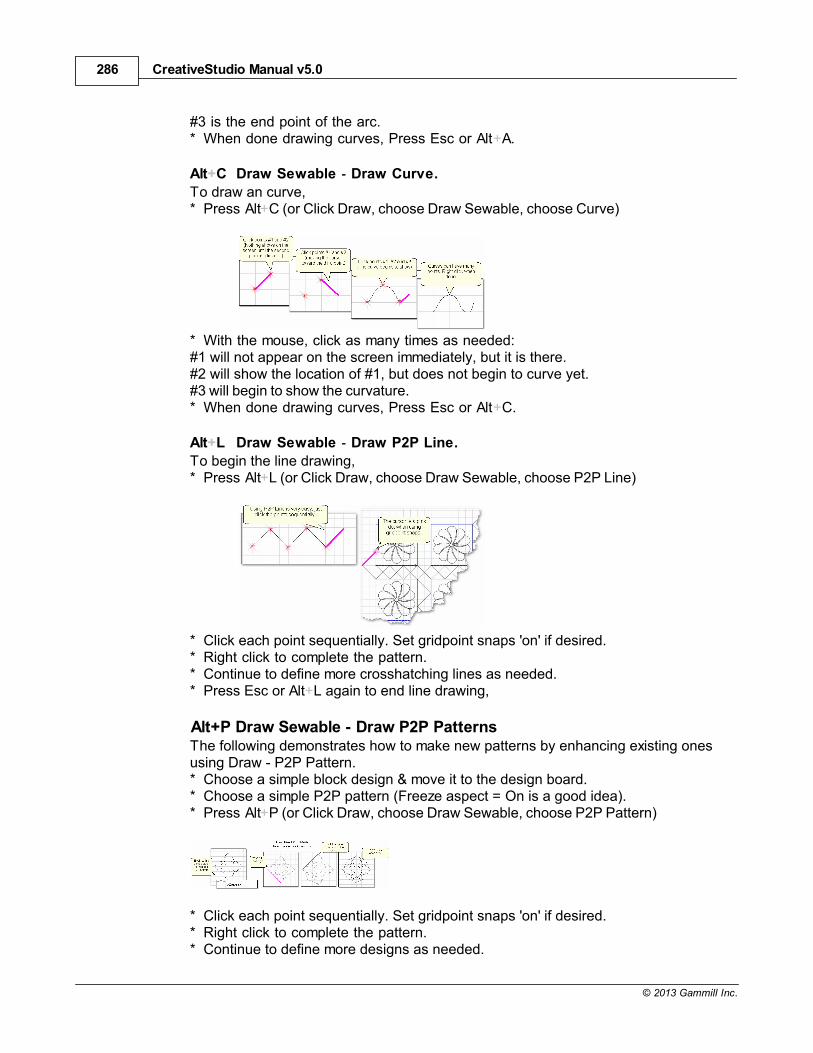
CreativeStudio Manual v5.0286
© 2013 Gammill Inc.
#3 is the end point of the arc.* When done drawing curves, Press Esc or Alt+A.
Alt+C Draw Sewable - Draw Curve.
To draw an curve,* Press Alt+C (or Click Draw, choose Draw Sewable, choose Curve)
* With the mouse, click as many times as needed:#1 will not appear on the screen immediately, but it is there.#2 will show the location of #1, but does not begin to curve yet.#3 will begin to show the curvature.* When done drawing curves, Press Esc or Alt+C.
Alt+L Draw Sewable - Draw P2P Line.
To begin the line drawing,* Press Alt+L (or Click Draw, choose Draw Sewable, choose P2P Line)
* Click each point sequentially. Set gridpoint snaps 'on' if desired.* Right click to complete the pattern.* Continue to define more crosshatching lines as needed.* Press Esc or Alt+L again to end line drawing,
Alt+P Draw Sewable - Draw P2P PatternsThe following demonstrates how to make new patterns by enhancing existing onesusing Draw - P2P Pattern.* Choose a simple block design & move it to the design board.* Choose a simple P2P pattern (Freeze aspect = On is a good idea).* Press Alt+P (or Click Draw, choose Draw Sewable, choose P2P Pattern)
* Click each point sequentially. Set gridpoint snaps 'on' if desired.* Right click to complete the pattern.* Continue to define more designs as needed.
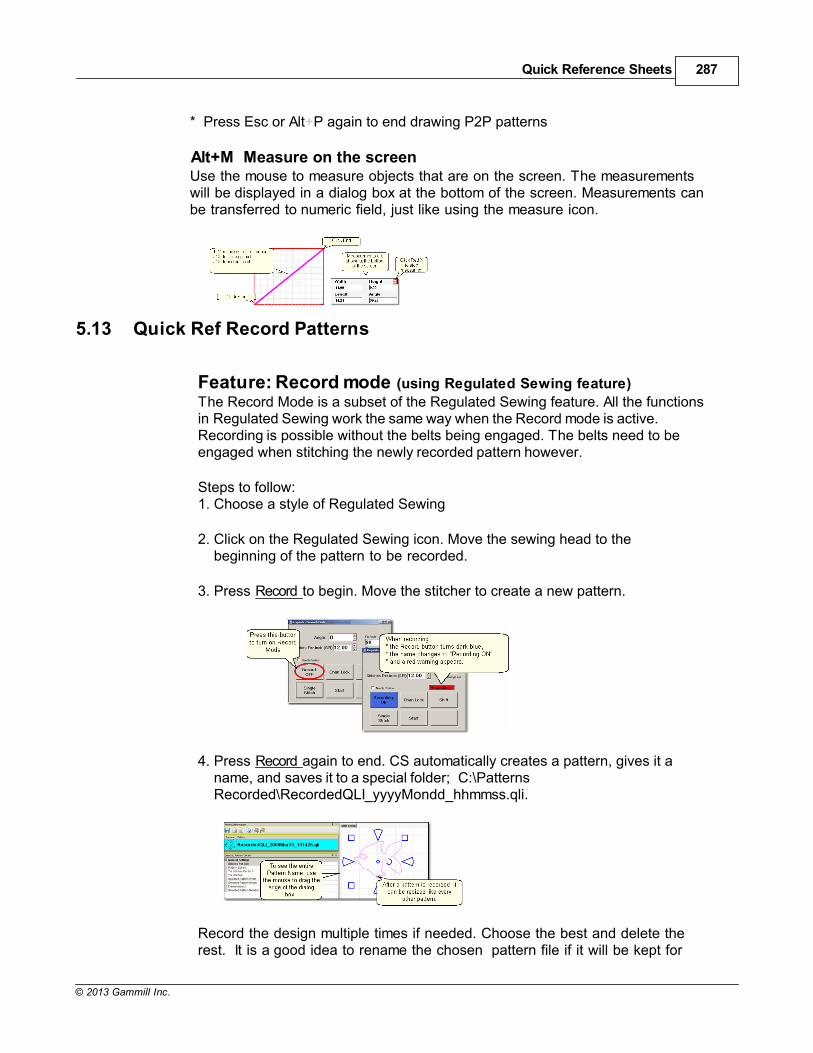
Quick Reference Sheets 287
© 2013 Gammill Inc.
* Press Esc or Alt+P again to end drawing P2P patterns
Alt+M Measure on the screenUse the mouse to measure objects that are on the screen. The measurementswill be displayed in a dialog box at the bottom of the screen. Measurements canbe transferred to numeric field, just like using the measure icon.
5.13 Quick Ref Record Patterns
Feature: Record mode (using Regulated Sewing feature)
The Record Mode is a subset of the Regulated Sewing feature. All the functionsin Regulated Sewing work the same way when the Record mode is active.Recording is possible without the belts being engaged. The belts need to beengaged when stitching the newly recorded pattern however.
Steps to follow:1. Choose a style of Regulated Sewing
2. Click on the Regulated Sewing icon. Move the sewing head to thebeginning of the pattern to be recorded.
3. Press Record to begin. Move the stitcher to create a new pattern.
4. Press Record again to end. CS automatically creates a pattern, gives it aname, and saves it to a special folder; C:\PatternsRecorded\RecordedQLI_yyyyMondd_hhmmss.qli.
Record the design multiple times if needed. Choose the best and delete therest. It is a good idea to rename the chosen pattern file if it will be kept for

CreativeStudio Manual v5.0288
© 2013 Gammill Inc.
future use.
Press Shift (to see additional keypad choices) and Exit to exit theRegulated Sewing feature.
5.14 Quick Ref Text Patterns Feature: Creating Text Patterns
Feature: Creating Text Patterns
Steps to follow:1. Right Click on an open area of the design board.2. Click on 'Text Property' in the dialog box that appears.3. Click in the text box and type your message. Each message is a pattern
that does NOT do word-wrap, but the text patterns can be divided tosimulate word wrap.
4. Click on 'Place Text' when done, and the Font dialog box appears.5. Choose the font style you like. See the 'Sample' box for a preview.6. Click 'OK', the text pattern is positioned. Resize as needed.
Tip: Each letter in a text block is stitched individually. If you
want to hand-tie all threads and bury them yourself instead ofusing tieoff stitches, change the settings in the configuration form to de- select 'tieoffs', select 'Stop at Jump Stitch' and select'Bobbin Stitch'. Now CS will stop and prompt for a bobbin pull-upinstead of doing tieoff stitches.
Save the Project.
1. Click on Start_Quilting and the sewing head will move to the Startof the first letter. CS stitches all letters continuously, dragging the threadbetween them, and only stops for the bobbin pull-up at the end of the phrase pattern. Remember to click OK because it completes this process.
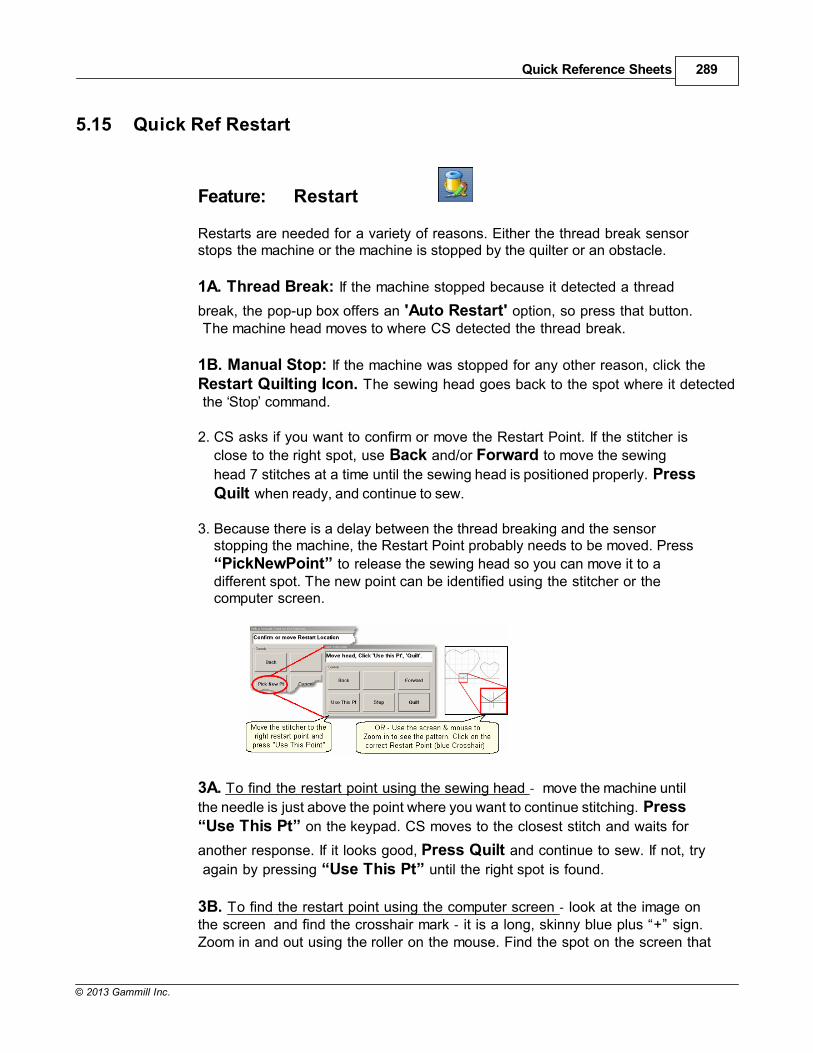
Quick Reference Sheets 289
© 2013 Gammill Inc.
5.15 Quick Ref Restart
Feature: Restart
Restarts are needed for a variety of reasons. Either the thread break sensorstops the machine or the machine is stopped by the quilter or an obstacle.
1A. Thread Break: If the machine stopped because it detected a thread
break, the pop-up box offers an 'Auto Restart' option, so press that button. The machine head moves to where CS detected the thread break.
1B. Manual Stop: If the machine was stopped for any other reason, click the
Restart Quilting Icon. The sewing head goes back to the spot where it detected the Stop’ command.
2. CS asks if you want to confirm or move the Restart Point. If the stitcher is
close to the right spot, use Back and/or Forward to move the sewing
head 7 stitches at a time until the sewing head is positioned properly. PressQuilt when ready, and continue to sew.
3. Because there is a delay between the thread breaking and the sensorstopping the machine, the Restart Point probably needs to be moved. Press
“PickNewPoint” to release the sewing head so you can move it to adifferent spot. The new point can be identified using the stitcher or thecomputer screen.
3A. To find the restart point using the sewing head - move the machine until
the needle is just above the point where you want to continue stitching. Press“Use This Pt” on the keypad. CS moves to the closest stitch and waits for
another response. If it looks good, Press Quilt and continue to sew. If not, try
again by pressing “Use This Pt” until the right spot is found.
3B. To find the restart point using the computer screen - look at the image onthe screen and find the crosshair mark - it is a long, skinny blue plus “+” sign.Zoom in and out using the roller on the mouse. Find the spot on the screen that

CreativeStudio Manual v5.0290
© 2013 Gammill Inc.
corresponds to the restart point on the quilt, and click that spot with the mouse.The blue crosshair will move to this location on the screen and the stitcher willmove to that location on the quilt.
4. When ready, press Quilt, and continue to sew.
Index 291
© 2013 Gammill Inc.
Index- A -anchor 86
- B -baseline 86
- C -Cables 12
CAD Screen 14
Click 14, 17
Combine Group 116
Computer 12
Controller 12
Convert 278
CPU 12
CS 14
Current Session Settings: 39
- D -Design Board 34, 58
Desktop 12
details 14
Diagnostics 39
dialog box 14
Double Click 17
Double Tap 16
Drag 17
Dragging 16
Drill Down 17
dropdown box 14
- E -Exit 34
- F -File commands 35
File Extension 21
filename 21
Flash Drive 13
- H -Highlight 14
Hovering 17
- I -index 41
- K -Keyboard 12
keypad 12
Keypad Window 36
- M -Minimize 34
MOD 12
Monitor 12
Mouse 12
- O -Original 44
- P -Panning 16, 17
Path 21
Pattern Details 57
Pattern To Boundary 88
Plus 44
Power down 14
Power up 14
Press 14
Preview Area 14
Process settings 54
Project Details 55
Project Explorer 36
Project Name 55
project settings 57
CreativeStudio Manual v5.0292
© 2013 Gammill Inc.
Properties 14
Property Window 36
- R -Red Key 12
Reference Boundaries 197
Repeat Settings 59
Re-size 34
Right Click 17
- S -Save the project 63 . 102
screen 12
Scroll 17
Scrolling 17
search 41
Select 14
Selected Pattern Details 58, 90
Selecting Files 17
Smooth 44
Surge Protectors 13
Swipe 16
- T -Tap 14
Terminology 14
Test System 39
Title Bar 34
Tool tips 14
tools panel 34
Touch & Hold 16
Touch Tools 13
- U -Universal Power Supply 13
- V -View Crosshair 36
Virtual Stitchout 107
- W -window 14
Wireless Keyboard 13
Wireless Mouse 13
- Z -Zoom 17
Zooming 17

Endnotes 2... (after index)
293
© 2013 Gammill Inc.