credit card processing with vantiv payment services cards... · card numbers and pass accounts ......
TRANSCRIPT

i
Credit Card Processing with Vantiv Payment Services Release 9.0.4

Table of Contents
ii
Disclaimer This document is for informational purposes only and is subject to change without notice. This document and its contents, including the viewpoints, dates and functional content expressed herein are believed to be accurate as of its date of publication. However, Epicor Software Corporation makes no guarantee, representations or warranties with regard to the enclosed information and specifically disclaims any applicable implied warranties, such as fitness for a particular purpose, merchantability, satisfactory quality or reasonable skill and care. As each user of Epicor software is likely to be unique in their requirements in the use of such software and their business processes, users of this document are always advised to discuss the content of this document with their Epicor account manager. All information contained herein is subject to change without notice and changes to this document since printing and other important information about the software product are made or published in release notes, and you are urged to obtain the current release notes for the software product. We welcome user comments and reserve the right to revise this publication and/or make improvements or changes to the products or programs described in this publication at any time, without notice. The usage of any Epicor software shall be pursuant to an Epicor end user license agreement and the performance of any consulting services by Epicor personnel shall be pursuant to Epicor's standard services terms and conditions. Usage of the solution(s) described in this document with other Epicor software or third party products may require the purchase of licenses for such other products. Where any software is expressed to be compliant with local laws or requirements in this document, such compliance is not a warranty and is based solely on Epicor's current understanding of such laws and requirements. All laws and requirements are subject to varying interpretations as well as to change and accordingly Epicor cannot guarantee that the software will be compliant and up to date with such changes. All statements of platform and product compatibility in this document shall be considered individually in relation to the products referred to in the relevant statement, i.e., where any Epicor software is stated to be compatible with one product and also stated to be compatible with another product, it should not be interpreted that such Epicor software is compatible with both of the products running at the same time on the same platform or environment. Additionally platform or product compatibility may require the application of Epicor or third-party updates, patches and/or service packs and Epicor has no responsibility for compatibility issues which may be caused by updates, patches and/or service packs released by third parties after the date of publication of this document. Epicor® is a registered trademark and/or trademark of Epicor Software Corporation in the United States, certain other countries and/or the EU. All other trademarks mentioned are the property of their respective owners.
Copyright © Epicor Software Corporation. All rights reserved. No part of this publication may be reproduced in any form without the prior written consent of Epicor Software Corporation. Publication Date: April 11, 2018

Credit Card Processing with Vantiv Payment Services
iii
Table of Contents Credit Card Processing with Vantiv Integrated Payments Overview ........................................................... 1
How the Integration with Vantiv Payment Services is Different .................................................................. 2
Card Numbers and PASS Accounts .......................................................................................................... 2
Hosted Web Pages for Card Number Capture .......................................................................................... 2
Swipe Devices ........................................................................................................................................... 2
Vantiv Processor Setup ............................................................................................................................. 2
Settlements ................................................................................................................................................ 2
Terminology Changes ............................................................................................................................... 3
New Control Record to Disable Authorizations (pre-auths) ..................................................................... 4
Vantiv Integrated Payments and Your Credit Card Transactions ................................................................. 5
Qualification Costs .................................................................................................................................... 5
Payment Accounts and Card Storage Costs .............................................................................................. 5
Credit Card Level 3 Processing .................................................................................................................... 7
Summary Data Sent in Vantiv Fields ........................................................................................................ 8
Line Item Detail Data Sent in Vantiv Fields ............................................................................................. 9
Credit Card Processing with Vantiv Setup Overview ................................................................................. 10
Setup Requirements for Credit Card Processing with Vantiv Integrated Payments ................................... 11
Control Maintenance Records ................................................................................................................. 11
Web Commerce Control Maintenance Records ...................................................................................... 11
Authorization Keys ................................................................................................................................. 11
Other Required Setup .............................................................................................................................. 11
Configuring the Vantiv Credit Card Processor at Your Branches .............................................................. 13
Entering URL Addresses for Vantiv Credit Card Processing ..................................................................... 15
Testing the Connection to the Vantiv Credit Card Processing Site ............................................................ 16
Assigning Credit Card Authorization Upcharges to Ship Vias ................................................................... 17
Defining Prompts for Additional Credit Card Information......................................................................... 18
Collecting Order Payments Using Credit Cards Overview ......................................................................... 19
Accepting Credit Card Payments for Orders .............................................................................................. 20
Saving Credit Cards on Orders for Future Payments .................................................................................. 24
Defining Default Customer and Contact Credit Cards ............................................................................... 26
Manually Entering Credit Card Authorization Codes ................................................................................. 29
Authorizing Credit Cards Overview (Formerly known as "pre-authorizing" credit cards) ........................ 31
Authorizing Credit Card Sales Amounts on Orders .................................................................................... 32

Table of Contents
iv
Completing Credit Card Payment Authorizations (Authorizing is formerly known as "pre-authorizing") 33
Authorized Credit Card Payment Example ................................................................................................. 35
Running the Credit Card Summary Report ................................................................................................. 36
Reviewing and Processing Failed and Declined Credit Card Charges ....................................................... 38
Reconciling Customer Credit Card Payments............................................................................................. 40
Creating Miscellaneous Cash Receipts for Credit Card Payments ......................................................... 41
Applying Credits to Credit Cards for Returns ............................................................................................ 42
Voiding Credit Card Transactions .............................................................................................................. 44
Returns at a Different Branch than Purchase Branch Guidelines ............................................................... 45
Managing Vantiv Integrated Payments Accounts Overview ...................................................................... 46
Reviewing Payments ............................................................................................................................... 46
Pass Account Utility ............................................................................................................................... 46
Overnight Routines ................................................................................................................................. 46
Viewing and Manually Deleting Vantiv Integrated Payments Accounts ................................................... 47
Scheduling Vantiv Integrated Payments Account Deletions ...................................................................... 51
Managing Temporary or Orphaned PASS Accounts .................................................................................. 52
Using the PASS Reconciliation Utility ....................................................................................................... 54
Converting to the Vantiv Integrated Payments Solution Overview ............................................................ 55
Converting Customer and Contact Data for Vantiv .................................................................................... 56
Converting Transactions for Vantiv ............................................................................................................ 57
Purging Unconverted Credit Card Data for Vantiv..................................................................................... 58
Chip & PIN Overview ................................................................................................................................ 59
Chip & PIN Installation Requirements ....................................................................................................... 61
Software Prerequisites ............................................................................................................................ 61
Hardware Prerequisites ........................................................................................................................... 61
Using the triPOS Automatic Installation .................................................................................................... 63
Setting Up Chip & PIN in Eclipse .............................................................................................................. 65
Using the Chip & PIN Interface .................................................................................................................. 66
Running the Chip & PIN Verification .................................................................................................... 66
Canceling Transactions ........................................................................................................................... 67
Who to Contact About Errors ................................................................................................................. 67
How the System Handles Transaction Receipts...................................................................................... 68
How the System Uses Branches for triPOS Processing .............................................................................. 70
Standard Branch Matching ..................................................................................................................... 70
G/L Branches .......................................................................................................................................... 71

Credit Card Processing with Vantiv Payment Services
v
Home Branch Changes ........................................................................................................................... 71
Scenario 1 ............................................................................................................................................ 71
Scenario 2 ............................................................................................................................................ 72
Maintaining triPOS Branches ..................................................................................................................... 74
Reviewing triPOS Transaction Responses .................................................................................................. 75
triPOS Eclipse Release Upgrade Procedure ................................................................................................ 76
Functionality Release Requirements ................................................................................................... 76
triPOS Configuration Process for Release 9.0.3 ................................................................................. 76
Troubleshooting Credit Cards and Vantiv .................................................................................................. 81
Transaction Not Found Message......................................................................................................... 81
Duplicate Decline Message ................................................................................................................. 81
Internet Explorer 8.0 ........................................................................................................................... 81
404 Page Not Found Errors ................................................................................................................. 82
Index ........................................................................................................................................................... 83


1
Credit Card Processing with Vantiv Integrated Payments Overview To accept payments using credit cards, Eclipse integrates with Vantiv Integrated Payments to offer you a solution that does not store customer credit card data on your Eclipse server.
The credit card payment industry has evolved from the days of stand-alone terminals and clunky carbon copy devices that exposed cardholder data to hackers. Eclipse Credit Card Processing with Vantiv is a fully integrated solution that provides highly increased security regarding your customer's credit card data.
Using the Vantiv Integrated Payments companion product, you can collect credit card payments on orders as you did before, including the following functionality:
• Accepting credit card payments at the time of sale
• Authorizing (or pre-authorizing) an amount on an order for charging at time of shipment
• Reviewing and processing failed and declined credit card charges
• Applying credits to cards for returns
• Voiding credit card transactions
Important: If you are still running the Credit Card Authorization companion product, some of your windows and procedures might vary slightly from what is described in this documentation. Click here to use the Credit Card Authorization documentation.

How the Integration with Vantiv Payment Services is Different
2
How the Integration with Vantiv Payment Services is Different As you move from the Credit Card Authorization companion product to the Vantiv Integrated Payments solution, consider the following changes to how your company collects and processes credit card payments.
Card Numbers and PASS Accounts To provide increased security, saved credit card information for customers and orders, including web orders, is now stored on the Vantiv Integrated Payments secure server in Payment Account Secure Storage (PASS) accounts, and is no longer stored in Eclipse. When you convert to the Vantiv Integrated Payments solution, your stored card information is masked in places in Eclipse such as order change logs, and PASS accounts are created for existing information where applicable. For more information about PASS accounts and how they are used, see Vantiv Payment Services and Your Credit Card Transactions.
Hosted Web Pages for Card Number Capture In addition, when you enter credit card information or swipe a card to gather and save information, the system opens a web browser window with a Vantiv page where you manually enter or swipe the credit card instead of entering it in an Eclipse window. Eterm launches your default browser, Solar embeds the browser window in a Solar Frame. Because of this process, each computer that you use to collect payments using credit cards must have a web browser installed and have internet access. For more information, see Setup Requirements for Credit Card Processing with Vantiv Payment Services.
Important: Your customers entering orders through your web site also see the Vantiv page to enter their card information and need Javascript enabled in their web browsers.
Swipe Devices Vantiv Integrated Payments requires that you upgrade to specific swipe devices that encrypt credit card information prior to sending it to the Vantiv Integrated Payments server. You must purchase your swipe devices through Epicor Software Corporation, as the devices are specifically configured with an encryption key that works with your implementation of the Credit Card Processing with Vantiv solution. The devices connect directly to your computer using a standard or mini USB connection.
Vantiv Processor Setup To route credit card information to a credit card company, such as Visa, you must set up each branch that takes credit card orders and processes them through Vantiv Integrated Payments. For more information, see Configuring the Vantiv Credit Card Processor at Each Branch.
Settlements Because you enter credit card information and send it to Vantiv Integrated Payments during the payment collection process, you no longer need to run the Credit Card End of Day Settlement Report to send transaction information through your company's processor to the credit card companies. Vantiv handles the settlement process of any authorized transactions for you.

Credit Card Processing with Vantiv Payment Services
3
If you select Vantiv as your service provider, you have online access to view all your transactions through an Vantiv web site. If you select Vantiv as a gateway service and work with another service provider, your reporting comes through your chosen service processor.
You can still use the Credit Card Summary Report to list all the approved credit card transactions and compare it to your bank statements or service provider reports for reconciliation purposes.
Terminology Changes Throughout the system, the credit card terminology has been updated to more accurately reflect the action you are taking with the card.
Was... Is now... Auth or Authorize
Sale In the Credit Card Processing with Vantiv solution, when you are accepting a payment for a credit card transaction, typically when a customer is present with their card or using a customer's saved card information, you now complete a credit card sale. When you select the Sale option in sales order entry the payment information is sent for processing. When dealing with retail customers, you typically process the credit card sale at the time you enter the order. A sale transaction is the most common type of credit card transaction.
Pre-auth or Pre-Authorize
Authorize In the Credit Card Processing with Vantiv solution, when you are collecting credit card information to charge later, such as waiting to charge the customer for an order until you ship it from your warehouse, you can authorize a credit card sale to ensure that the customer has enough credit available, but without actually charging the customer's account. These transactions are now called authorizations. The second event to actually charge the customer's card is now called an authorization completion.
In addition, Vantiv Integrated Payments uses the terms that might be new to you:
Term Definition Acceptor ID Much like a merchant number, Vantiv assigns you unique acceptor IDs to identify you as
an Vantiv customer. Depending on your business relationship with Vantiv, you might have a different acceptor ID for each branch, or you might have a single acceptor ID that encompasses more than one branch. When payment accounts are created as you save credit card information, they are assigned to the acceptor ID assigned for the branch.
Transaction ID When you create an authorization or a sale, Vantiv assigns an ID to the payment transaction. When you complete voids or returns, or are investigating disputes, Vantiv uses this transaction ID to identify the transaction in their system.
Payment Account ID
Credit Card numbers stored on the Vantiv server are termed Payment Accounts and have an ID (also known as a token) associated with them that is stored in Eclipse. The Payment Account ID is a long string of random characters and likely has little meaning to those outside of Vantiv. When you select a stored card based on the card's last 4 digits, card brand and expiration date, Eclipse uses the Payment Account ID in its communication with Vantiv to indicate which card to charge or credit.
Note: Orders placed through your web site that are paid for using a credit card send a PASS ID to Eclipse for credit card process.

How the Integration with Vantiv Payment Services is Different
4
New Control Record to Disable Authorizations (pre-auths) If your business does not initially authorize cards to hold funds and confirm available credit before charging the card at a later date, you now have the ability to disable the function from being accidentally selected by your users using the Disable Auth Only Option For Credit Card Authorizations control maintenance record.

Credit Card Processing with Vantiv Payment Services
5
Vantiv Integrated Payments and Your Credit Card Transactions How you enter and accept credit cards within Eclipse can affect charges that you incur. Credit card transaction fees can get complicated and many factors contribute to your total cost of accepting payment using credit cards
The Vantiv Integrated Payments solution is designed to offer you flexibility in how you want to implement credit card process at your company. As you are implementing processes for accepting credit card payments, consider how you want to accept and store credit cards to help alleviate any unneeded fees.
Qualification Costs Each transaction “qualifies” for an interchange rate based on such things as the card brand, card type, card presence, information sent -- your merchant service provider might detail this to you by transaction on your statements or might bucket the transactions and simplify what you see on your statements. Regardless, the timing and process of charging the card through Eclipse can affect the qualification.
As a general rule, card-present, “swipe” transactions qualify for a lower interchange fee than card not-present transactions. When processing through Vantiv Integrated Payments, the swipe must be directly captured in the Vantiv hosted page while charging the card. In this process, Eclipse has a transaction ID (a token for the specific charge) for handling voids and credits; but Eclipse cannot charge the swiped card for backorder fulfillment.
Payment Accounts and Card Storage Costs Payment Account Secure Storage (PASS) transactions, are credit card transactions that you make using credit card information that you have on file in Eclipse. Vantiv charges a fee, which you negotiate with them, and is based on the volume of payment accounts stored in their data centers each month.
For each card number stored in a customer or contact record in Eclipse, a payment account is created with Vantiv. Additionally, cards captured on sales orders (not saved to the customer record) in the CC Info screen generates a payment account with Vantiv. Saving credit card numbers gives you the flexibility to charge the card at any time during the order cycle with the customer. However, saving credit card numbers with Vantiv does not necessarily qualify you for the best interchange rate.
Note: Orders placed through your web site that are paid for using a credit card send a Payment Account ID to Eclipse for credit card process.
Consider the following examples. A customer walks up to your counter and orders two items: one is available for the customer to take with them, one is backordered. The customer presents their credit card for payment. You can do any of the following and be charged different rates:
• Scenario 1: Best rates, but two swipes - Charge the card for the one item that is available using a swipe transaction and also swipe the card again in the CC Info screen in order entry to create a payment account for charging the card when the backordered item ships.
• Scenario 2: One swipe, but not optimal rates - Capture the card in the CC Info screen in order entry to establish a payment account. Select the payment account to charge the card for the available item. This qualifies for a card-not-present interchange rate. However, the payment account is available for charging when the backordered item ships

Vantiv Integrated Payments and Your Credit Card Transactions
6
• Scenario 3: Charge the card for both items using a swipe transaction - This may or may not be permissible based on your agreement with your merchant service provider and how you document your card-charging policies to your customer.
To qualify for the best per transaction process rate, swipe or manually enter a customer's credit card for immediate payment for an order, without saving the card information.
Use the PASS Account Utility to help manage the payment accounts your operations generate with Vantiv Integrated Payments. The utility provides you the tools to minimize the volume of payment accounts to those required for your business. For more information, see Managing Vantiv Payments Accounts Overview.
Credit Card Processing with Vantiv Payment Services
7
Credit Card Level 3 Processing Credit Card Processing with Vantiv includes Level 3 credit card processing. Using Level 3 processing can result in lower qualification costs by sending more detailed transaction information for commercial and government transactions.
Level 1 data includes the merchant name, amount, and date for each transaction. Level 2 includes:
• Tax Amount
• Customer Code
• Merchant Postal Code
• Tax Identification
• Merchant Minority Code
• Merchant State Code
For each branch that is enabled for Level 3 credit card data in the Allow Sending Credit Card Level 3 Data control maintenance record, the system sends the following additional data for each credit card transaction. If necessary, you can override the branch setting at the customer level using the Allow Sending Credit Card Level 3 Data for Customer field in the Credit Control Parameters in Customer Maintenance.
• Item Product Code
• Item Description
• Item Quantity
• Item Unit of Measure
• Item Extended Amount
• Item Net/Gross Indicator
• Item Tax Amount
• Item Tax Rate
• Item Tax Identifier
• Item Discount Indicator
• Ship from Postal Code
• Freight Amount
• Duty Amount
• Destination Postal Code
• Destination Country Code
• Alternate Tax Amount

Credit Card Level 3 Processing
8
Summary Data Sent in Vantiv Fields The following summary information is sent to VantivVantiv Integrated Payments for each credit card transaction:
Vantiv Field Data Sent Eclipse File and Attribute Alternate Tax Amount
0 N/A
Customer VAT Registration Number
Ship-to customer entity tax exempt number for the state in which the ship-to customer resides
ENTITY, attribute 34 and 4
Destination Country 840
Destination Zip Code
The zip code of the ship-to address LEDGER 75, ENTITY attribute 5 if LEDGER is blank; '-' changed to ' '
Discount Amount Discount total that the SOE.CALC.DISC program calculates
N/A
Duty Amount Duty charges for those items that go through customs
If LEDGER 48, line item duty stored in attribute 78
Freight Amount The total freight for the order generation LEDGER 57, 0 if blank
Line Item Count The number of line items included on the order, excluding comments and subtotals
N/A
Merchant VAT Registration Number
Ship branch entity tax exempt number for the state in which the ship branch resides
ENTITY, attribute 34 and 4
National Tax 0 N/A
Order Date The date the order is entered LEDGER, attribute 4
ShipFrom Zip Code Branch entity's zip code ENTITY, attribute 5; "-" changed to ' '
Summary Commodity Code
Dist N/A
Unique VAT Invoice Reference Number
Sales order number with the generation information
N/A
VAT Amount Tax amount that the OE.TAX.CALC.AMTS program calculates
N/A
VAT Rate Tax rate that the OE.TAX.CAL.AMOUNTS program uses to calculate the tax
N/A
Credit Card Processing with Vantiv Payment Services
9
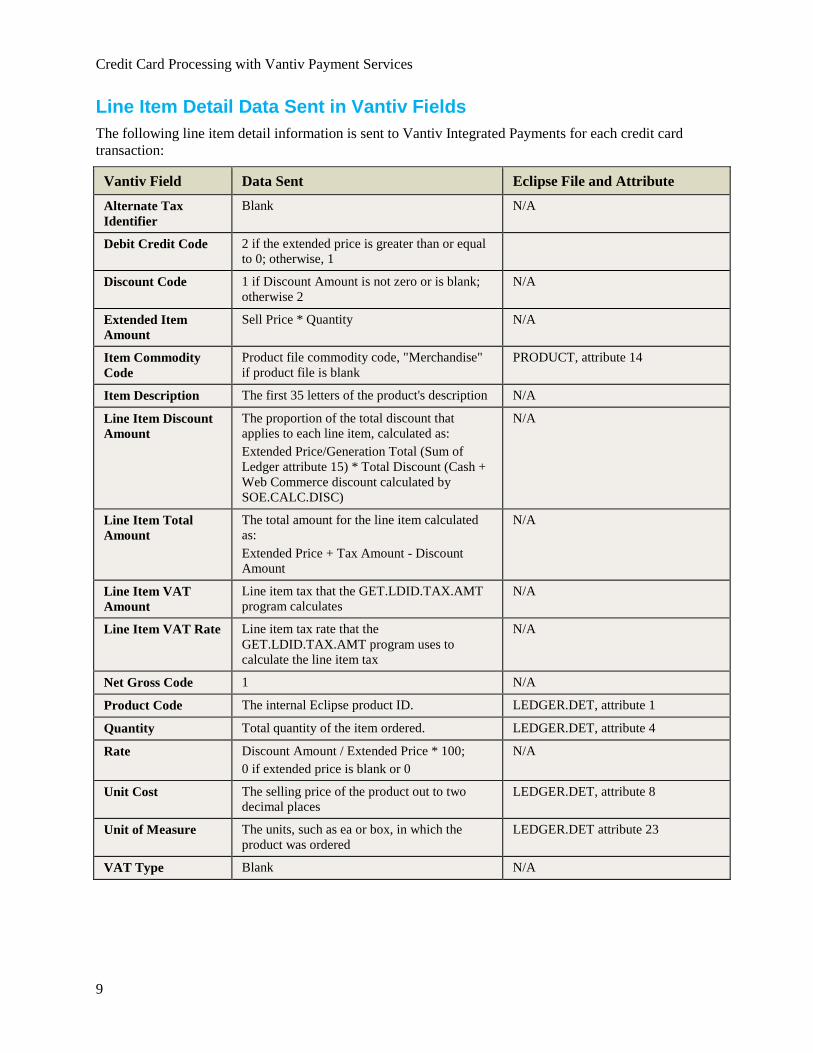
Line Item Detail Data Sent in Vantiv Fields The following line item detail information is sent to Vantiv Integrated Payments for each credit card transaction:
Vantiv Field Data Sent Eclipse File and Attribute Alternate Tax Identifier
Blank N/A
Debit Credit Code 2 if the extended price is greater than or equal to 0; otherwise, 1
Discount Code 1 if Discount Amount is not zero or is blank; otherwise 2
N/A
Extended Item Amount
Sell Price * Quantity N/A
Item Commodity Code
Product file commodity code, "Merchandise" if product file is blank
PRODUCT, attribute 14
Item Description The first 35 letters of the product's description N/A
Line Item Discount Amount
The proportion of the total discount that applies to each line item, calculated as: Extended Price/Generation Total (Sum of Ledger attribute 15) * Total Discount (Cash + Web Commerce discount calculated by SOE.CALC.DISC)
N/A
Line Item Total Amount
The total amount for the line item calculated as: Extended Price + Tax Amount - Discount Amount
N/A
Line Item VAT Amount
Line item tax that the GET.LDID.TAX.AMT program calculates
N/A
Line Item VAT Rate Line item tax rate that the GET.LDID.TAX.AMT program uses to calculate the line item tax
N/A
Net Gross Code 1 N/A
Product Code The internal Eclipse product ID. LEDGER.DET, attribute 1
Quantity Total quantity of the item ordered. LEDGER.DET, attribute 4
Rate Discount Amount / Extended Price * 100; 0 if extended price is blank or 0
N/A
Unit Cost The selling price of the product out to two decimal places
LEDGER.DET, attribute 8
Unit of Measure The units, such as ea or box, in which the product was ordered
LEDGER.DET attribute 23
VAT Type Blank N/A

Credit Card Processing with Vantiv Setup Overview
10
Credit Card Processing with Vantiv Setup Overview Prior to processing credit card transactions, complete the following setup tasks:
• Set the appropriate control maintenance records and authorization keys to configure how the credit card process works for your site and your users
• Configure the Vantiv credit card processor at each branch
• Enter the appropriate URL addresses for Vantiv t credit card processing
• Test the connection to the Vantiv Integrated Payments Site
• Define default customer and contact credit cards
• Assign credit card authorization upcharges to your shipping methods
If you use the Credit Card Authorization companion product, the weekend of your Vantiv Integrated Payments solution go live, you must run the credit card conversion utilities to prep your system for Monday morning.

Credit Card Processing with Vantiv Payment Services
11
Setup Requirements for Credit Card Processing with Vantiv Integrated Payments Following are the control maintenance records, authorization keys, and additional setup requirements for Credit Card Processing with Vantiv.
Control Maintenance Records • Allow Sending Credit Card Level 3 Data
• Credit Card: Default Reference Number
• Credit Card Administrator
• Credit Card Collection Approval Mode
• Default Auth Method For New Credit Cards
• Disable Auth Only Option For Credit Card Authorizations
• Disallow Auto Apply Of Credit Card Payments
• Notification Method When Credit Card Auth Fails
• Override Print Status On Credit Card Denial
• Require CVV ID On Keyed Element Credit Card Sales/Authorizations
• Sales Order Entry Return Setup
• User To Be Messaged With Credit Card Communication Errors
Web Commerce Control Maintenance Records • Credit Card: WOE Authorization Method
• Display The Credit Care Information Page In WOE
• Force Information To Be Entered On The WOE Credit Card Page
Authorization Keys • CREDIT.CARD.ACCT
• CREDIT.CARD.SETUP
• OVERRIDE.RETURN.PAYMENT
Users must have this authorization key assigned to select a credit card from the selection list if a card is already saved to the order.
Other Required Setup Prior to using Vantiv Integrated Payments, you need to also ensure that you have done the following:

Setup Requirements for Credit Card Processing with Vantiv Integrated Payments
12
• Worked with your Vantiv representative to determine how your account is set up. For example, are you using Vantiv as your credit card processor, or as a location to store credit card data and a as a gateway to another processor.
• Purchased swipe devices for computers at which you swipe credit cards. You must purchase your swipe devices through Epicor Eclipse, as they are configured specifically with an encryption key that works with your implementation of the Vantiv Integrated Payments solution. The devices connect directly into your computer using a standard or mini USB connection.
• If you are running Internet Explorer 8.0 on the Windows 7.0 or Windows Vista operating system, there is a known display error when launching Internet Explorer from Eclipse. To correct this problem, leave an Internet Explorer 8.0 browser window open while you are entering orders and accepting payments using credit cards in Eclipse. Or, set Mozilla Firefox as your default browser. The system uses your default browser when you swipe or manually enter card information. Using Firefox does not require that you leave a browser window open.
• Configure the Vantiv payment processor at each branch that collects credit card payments. For more information, see Configuring the Vantiv Credit Card Processor at Each Branch.

Credit Card Processing with Vantiv Payment Services
13
Configuring the Vantiv Credit Card Processor at Your Branches Eclipse is certified with Vantiv Integrated Payments (a credit card processor) that enables your company to route credit card information to a credit card company, such as Visa, when your customers place credit card orders. Set up each branch that takes credit card orders and processes them through Vantiv Integrated Payments
To edit the credit card information for a branch, you must be assigned the CREDIT.CARD.SETUP authorization key.
If you are using Vantiv Integrated Payments, test the connection to the Element processing site after you configure the card processor.
Note: If you are not using the Vantiv Integrated Payments solution, the procedure to configure the card processor at each branch differs from the one provided below. You need to enter merchant, device, and terminal ID information for your card setup, along with additional information that your processing bank provides to you.
To configure the Element credit card processor at each branch:
1. From the Maintenance > Branch menu, select Branch to display the Branch Maintenance window.
2. In the Branch field, enter the branch to display the branch record, and select Maintenance > Credit Card Branch Setup to display the Credit Card Branch Setup window.
3. In the Processor field, enter Element to indicate that you are setting up the Vantiv credit card processor.
If you are using a different processor, select that processor and enter the Merchant ID, Device ID, and Terminal ID for the branch. For information on setting up those processors, see Configuring Branch Credit Card Processors in the Entity Maintenance documentation.
4. From the Additional menu, select Additional Credit Card Information to display Additional Credit Card Information window and complete the following additional information that Vantiv Integrated Payments provides to you regarding your account.
Note: Eclipse technical support typically enters this for you when setting up your credit card functionality.
Field Description Account ID Your account identification number with Vantiv Integrated Payments.
Account Token The number used for authentication with Vantiv Integrated Payments' web sites.
Terminal ID The number the credit card processor assigns to you. This number can vary by merchant.
Acceptor ID Your merchant identification number. As an "acceptor," you are a business that is qualified to accept a credit or debit card as payment for an order.

Configuring the Vantiv Credit Card Processor at Your Branches
14
Field Description PIN Debit Enabled Activates the PIN debit acceptance for the current branch.
Note: If the Connect to triPOS when Card Present Selected option is set at the Terminal Setup level, the system ignores this field setting at the branch level.
Encrypted Key Entry Required
Activates the system requirement for encrypted key processing for credit cards.
5. Use Health Check option to verify connectivity and authentication to Element.
6. Click the Edit URLs button and enter the web site addresses that Vantiv Integrated Payments has provided you for transactions, reporting, and services. The Services URL is the Payment Account transactions. For more information, see Entering URL Addresses for Element Credit Card Processing.
The URLs are the same for all of your branches. If you have already set up a branch and entered the URLs, you do not need to do it again for a different branch.
7. Test the connection to the Vantiv processing site.
8. Save your changes and save the branch record.

Credit Card Processing with Vantiv Payment Services
15
Entering URL Addresses for Vantiv Credit Card Processing Eclipse is certified with Vantiv Integrated Payments (a credit card processor) that enables your company to route credit card information to a credit card company, such as Visa, when your customers place credit card orders. The URLs that Vantiv Integrated Payments provides you are the same for each branch.
Note: After you set up one branch for Vantiv credit card processing, each subsequent branch uses the same URLs, and you do not need to enter them again. The URLs are located at the branch level, because the system requires the branch-level information to complete the test connection (health check).
To edit the credit card information for a branch, you must be assigned the CREDIT.CARD.SETUP authorization key.
After defining the URLs, test the connection to the Element processing site.
To enter URL addresses for Element processing:
1. From the Maintenance > Branch menu, select Branch to display the Branch Maintenance window.
2. In the Branch field, enter the branch to display the branch record, and select Maintenance > Credit Card Branch Setup to display the Credit Card Branch Setup window.
3. Select the Vantiv processor in the list, and select Additional Credit Card Information from the Additional menu to display Additional Credit Card Information window.
4. Click the Edit URLs button and enter the web site addresses that Vantiv Integrated Payments has provided you for transactions, reporting, and services. The Services URL is the Payment Account transactions.
5. Test the connection to the Vantiv processing site.
6. Save your changes and save the branch record.

Testing the Connection to the Vantiv Credit Card Processing Site
16
Testing the Connection to the Vantiv Credit Card Processing Site For each branch, test the connection to Vantiv Integrated Payments to verify that the account information you entered for the branch is correct, and that you have access to the web site addresses you entered for reporting, transactions, and services. If you update the account information, or add a new branch, retest the connections to ensure that your system has access to what it needs to complete credit card processing with Vantiv.
You must set the URLs for the transaction, reporting, and service connections for a branch prior to testing the connection.
To test the connection to the Vantiv processing site:
1. From the Maintenance > Branch menu, select Branch to display the Branch Maintenance window.
2. In the Branch field, enter the branch to display the branch record, and select Maintenance > Credit Card Branch Setup to display the Credit Card Branch Setup window.
3. Select the Vantiv credit card processor, or set up a new processor for Vantiv, and click the Health Check button.
The system checks the account information you have entered, and whether you can access the web sites for transactions, reporting, and services. If the test is unsuccessful, verify that you have entered the account information and URLs for the web sites correctly, and repeat step 3.
You can also run a test from the window where you enter URLs.

Credit Card Processing with Vantiv Payment Services
17
Assigning Credit Card Authorization Upcharges to Ship Vias When you are authorizing a credit card payment for an order, you might not know what the final order total is going to be due to freight and handling charges. For each shipping method you have defined in your system, assign a default upcharge to add to the order total that you are authorizing on the customer's credit card to estimate and cover freight and handling charges. During credit card authorizations, the system adds this amount to the total order amount. This additional amount ensures that there are enough authorized funds available on the card to pay for the goods and potential shipping and handling fees.
To assign credit card authorization upcharges to a ship via:
1. From the Maintenance menu, select Ship Via to display the Ship Via Maintenance window.
2. In the Ship Via field, enter the shipping method to which you want to assign the information.
3. Click the Additional Information tab to display the Credit Card Information area.
4. In the Percent Upcharge % field, enter the percentage of the total order amount to add to the authorization amount to cover any freight or handling fees.
5. In the Minimum Upcharge field, enter the minimum upcharge to add to the total if the upcharge determined by the percent in the Percent Upcharge field is less than this amount.
6. Save your changes and exit the window.

Defining Prompts for Additional Credit Card Information
18
Defining Prompts for Additional Credit Card Information You can define a security level to customer credit card information. For example, you can have the system prompt the order writer to ask the customer for additional credit card information during order entry.
Note: If you use Vantiv Integrated Payments and a PIN pad device, those processes supersede this setup.
To define prompts for additional credit card information:
1. From the Maintenance menu, select Customer to display the Customer Maintenance window.
2. In the Customer field, type the name of a customer and press Enter.
3. From the Pricing menu, select Credit Controls to display the Credit Control Parameters window.
4. Click the Additional Info tab to display the Additional Customer Credit Data area. For more information about this area, see Entering Additional Customer Credit Data.
5. In the Credit Card Information field, select which level of credit card information is required for this customer in order entry:
• None - Requires no additional information to save the order.
• Prompt - Prompts the user to enter credit card information for the order.
• Required - Requires credit card information to save the order, unless you are assigned the CREDIT.CARD.REQD.OVR authorization key.
2. Save your changes and exit the window.

Credit Card Processing with Vantiv Payment Services
19
Collecting Order Payments Using Credit Cards Overview How you collect a credit card payment on an order is determined by the policies that your company has established.
You can accept payments on credit cards using the following methods:
• Using a new card or saved card at the time a sale is made.
• By authorizing a payment on a new or saved card, but not charging the card at the time you enter the sales order.
How you enter and accept credit cards within Eclipse can affect charges that your company incurs. For more information, see Vantiv Payment Services and Your Credit Card Transactions.

Accepting Credit Card Payments for Orders
20
Accepting Credit Card Payments for Orders The Vantiv Integrated Payments solution is designed to offer you flexibility in how your company implements its procedures for accepting credit card payments for orders. Check with your supervisor if you are unsure about whether you should save a customer's credit card information for later payment, or accept payment at the time of the order. The procedures below describe how to accept a full or partial credit card payment for an order.
Note: Vantiv contains logic that checks for duplicate charges. If two charges for the same amount are made to the same card during the batch period, the second charge is declined. The batch period is set between you and Vantiv. For more information about working around duplicate charges, see Troubleshooting Credit Cards and Vantiv.
Note: The system validates the account ID on the credit card with the account ID on the payment branch. If these do not match, the system will not complete the transaction.
To accept a credit card payment in order entry without saving card information:
1. From an open sales order, click the Totals tab to display the Totals information for the order.
2. In the Credit Card field, enter the amount of the payment the customer wants to charge to their card. The Credit Card Authorization window displays.
3. Do one of the following:
To... Do this... charge a credit card the customer has on file
Select a card from the list that displays. To display the available cards, select Transaction > List Cards. Default cards that are saved for the customer display in this list. For more information, see Defining Default Credit Cards with Vantiv Payment Services.

Credit Card Processing with Vantiv Payment Services
21
To... Do this... charge a new credit card that the customer has with them, without saving the card information
1. Select New if a list of available cards displays. The card holder, zip code, and billing street address defaults to the bill-to address on the order. If the ship-to and bill-to are different, the system prompts you to select the address to use. Update the address information for the card, if necessary.
2. From the Transaction menu, select Sale and do one of the following: • Select Swipe. The system displays the Element Process
Transaction window in your default web browser. Run the card through your card reader. The system gathers the card information, including the CCV code from the back of the card.
• Select Card Present to manually enter the card information in the fields provided in the Element Process Transaction web page, which displays using your default web browser. For example, if the card's magnetic strip is worn. If you select to manually enter the card information, you are prompted to enter CVV ID. The CVV ID is required if the Require CVV ID On Keyed Element Credit Card Sales/Authorizations control maintenance record is set to Yes.
• Card Number - The 16 digit card number from the front of the card.
• Expiration Date - The month and year in which the card expires.
• CVV - The three digit code, typically printed on the back of the card in the signature strip.
3. Click Process Transaction to submit the information and process the transaction with Vantiv.
When the request completes, Vantiv returns an authorization code for the transaction. The authorization code displays in the Authorization Code field for reference. If the returned authorization code is *Call* or something similar, you need to call the credit card company for authorization. See Manually Entering Credit Card Authorizations.
If the authorization is approved, the payment is applied to the order. If the card fails to process or is declined, the system notifies the user taking the payment by displaying an error message in the Element Credit Card window, and also sends notification to the user set in the Credit Card Administrator control maintenance record, places the transaction in the Credit Card Payment Review Queue, and changes the print status of the order based on the setting in the Override Print Status On Credit Card Denial control maintenance record. The decline is also noted in the order change log.
To accept a credit card payment in order entry and save card information:
1. From an open sales order, click the Totals tab to display the Totals information for the order.
2. In the Credit Card field, enter the amount of the payment the customer wants to charge to their card. The Credit Card Authorization window displays.
3. Enter the card information.

Accepting Credit Card Payments for Orders
22
4. Click Save Card to Order.
Important: Eclipse does not save the actual credit card number in any way. A token-application process is used. The token received to process the order is saved in Eclipse for future use on this order.
1. Click Process Transaction to submit the information and process the transaction with Vantiv.
To accept a credit card payment in close counter order without saving card information:
1. From the Orders menu, select Close Counter Order to display the Close Counter Order window. For more information, see Quickly Closing Counter Orders in the Sales Management documentation.
2. Right-click the order to which you want to apply payment, and select Collect Payment.
3. In the Payment Method field, select Credit and do one of the following:
To... Do this... charge a credit card the customer has on file
Select a card from the list that displays. To display the available cards, select Transaction > List Cards. Default cards that are saved for the customer display in this list. For more information, see Defining Default Credit Cards with Element Payment Services.

Credit Card Processing with Vantiv Payment Services
23
To... Do this... charge a new credit card that the customer has with them, without saving the card information
1. Select New if a list of available cards displays. The card holder, ZIP code, and billing street address defaults to the bill-to address on the order. If the ship-to and bill-to are different, the system prompts you to select the address to use. Update the address information for the card, if necessary. 2. From the Transaction menu, select Sale and do one of the following: • Select Swipe. The system displays the Element Process
Transaction window in your default web browser. Run the card through your card reader. The system gathers the card information, including the CCV code from the back of the card.
• Select Key Enter to manually enter the card information in the fields provided in the Element Process Transaction web page, which displays using your default web browser. For example, if the card's magnetic strip is worn. If you select to manually enter the card information, you are prompted to enter CVV ID. The CVV ID is required if the Require CVV ID On Keyed Element Credit Card Sales/Authorizations control maintenance record is set to Yes.
• Card Number - The 16 digit card number from the front of the card.
• Expiration Date - The month and year in which the card expires.
• CVV - The three digit code, typically printed on the back of the card in the signature strip.
3. Click Process Transaction to submit the information and process the transaction with Vantiv.
When the request completes, Vantiv returns an authorization code for the transaction. The authorization code displays in the Authorization Code field for reference. If the returned authorization code is *Call* or something similar, you need to call the credit card company for authorization. See Manually Entering Credit Card Authorizations.
If the authorization is approved, the payment is applied to the order. If the card fails to process or is declined, the system notifies the user taking the payment by displaying an error message in the Element Credit Card window, and also sends notification to the user set in the Credit Card Administrator control maintenance record, places the transaction in the Credit Card Payment Review Queue, and changes the print status of the order based on the setting in the Override Print Status On Credit Card Denial control maintenance record. The decline is also noted in the order change log.
4. Finalize the order by collecting a signature or printing a ship ticket. For more information, see Quickly Closing Counter Orders in the Sales Management documentation.

Saving Credit Cards on Orders for Future Payments
24
Saving Credit Cards on Orders for Future Payments Your company might decide to keep credit card information on file for an order, thus creating a payment account with Vantiv. For example, an inside salesperson enters an order that the customer would like to pay for with their credit card. However, your company does not charge the customer's card for an order until the material on the order has shipped. You can save the credit card information with the order to charge at a later date. For more information about payment accounts, see Vantiv Payment Services and Your Credit Card Transactions.
You can also accept a payment for part of an order, and store the card to charge the remaining amount at a later date. For example, your counter salesperson take an order for one hundred 1/4 inch copper fittings. You have 50 in stock that you can send with the customer today. You can charge the customer's card for the 50 they are taking with them today, and then save the card information to the order to charge the remaining total due when you ship the remaining 50 fittings. For more information about taking a credit card payment for an order, see Accepting Credit Card Payments For Orders.
To save a credit card for a customer for future use on any order a customer places, set up default credit card information at the customer level.
When the product on the order is available and ready for shipping and the ship ticket prints, or when the Credit Card Authorization Phantom runs and finds that the order has shipped, the system processes the credit card payment.
To save a credit card to an order for future payments: Note: If you are saving card information to charge for future payments on an order, you
can save the information before or after you accept a payment for the order. You can also choose to save the credit card to the order without accepting a payment on the order.
1. In the Totals tab of an order, select Save Credit Card Info from the Payment menu, and select New to display the Default Credit Card Information window.
You can also select a card on file from the displayed list if the customer wants to charge the order to a credit card they have on file with you. Selecting a saved card saves the card information to the order.
2. Swipe the card through your card reader, or enter the information for the card in the fields provided.
Field Description Card Number Enter the 16 digit card number as it appears on the front of the card.
Card Holder Enter the name exactly as it appears on the front of the credit card.
Expiration Date Enter the month and year in which the card expires.
Zip Code and Street Address
The zip code and billing street address defaults to the bill-to address on the order. If the ship-to and bill-to are different, the system prompts you to select the address to use. Update the address information for the card, if necessary. This is used when you charge the card to complete an address verification with the credit card company.

Credit Card Processing with Vantiv Payment Services
25
Field Description Card Type Select the two character code that identifies the brand name of the credit
card, such as MC for Master Card. Valid credit card types are defined in the Valid Credit Card Types control maintenance record.
Terms Override Enter the code that represents the payment terms, if any, to use when this credit card is used for payment. For example, if you give the customer discount to orders when they pay in cash, but discounts do not apply when they pay with a credit card, enter the terms code to override the discount.
Charge Tax Select this check box to apply tax to orders paid with this credit card. For example, customers could be exempt from tax if they pay with a company credit card. If you want to charge tax to payments made with such credit cards, select this option.
Reference Number Enter a reference number for this customer, such as the order number or customer ID.
If you swipe the card, you also need to enter the customer's billing address information in the fields provided.
3. Do one of the following:
• From the File menu, select File > Save to Customer to save the card to the customer record. This saves the card for use on future orders, not just this order.
• Close the window and select Yes at the prompt to save the card to the order. This saves the card information for payments on this order only.

Defining Default Customer and Contact Credit Cards
26
Defining Default Customer and Contact Credit Cards Enter a customer's or contact's default credit card so the information is available when customers place orders. The setting on the Validate Name In 'Ordered By' Field Against Customer Contact control maintenance record determines whether the contact has authorization to place a credit order for the company.
You cannot add credit card information to a customer account set up as a branch cash account or to customer records that have the Do NOT allow Credit Cards to be saved to this account check box in the Additional Info tab in the Credit Control Parameters window checked.
Important: After you save a credit card, you cannot update the expiration date on the card. If the customer or contact's card expiration information changes, create a new card and save it to the customer or contact.
To define a default credit card information:
1. If you are defining default credit card information for a customer, do the following:
• From the Maintenance menu, select Customer to display the Customer Maintenance window, and enter the customer's name in the Customer field to display the record.
• From the Pricing menu, select Credit Controls to display the Credit Control Parameters window, and enter the credit parameters as needed.
• From the Edit menu, select Default Credit Card Information, and select New, or select an existing credit card. The Default Credit Card Information window displays. The address information defaults to what is entered for the customer.
If you are defining credit card information for a contact, do the following:
• From the Maintenance menu, select Contact to display the Contact Maintenance window, and enter the contact's name in the Contact field to display the record.
• From the Information menu, select Default Credit Card Information, and select New to display the Default Credit Card Information window.
2. To enter the card information, do one of the following:
To... Do this... swipe the card to gather the card information
1. From the File menu, select Swipe to display the Element Card Information window.
2. Slide the card through your encrypted card reader.
3. Click Save Card to gather the information and return to the Default Credit Card Information window.
The system populates the last for digits of the card in the Card Number field, as well as the Card Type, and Expire Date fields with the information from the card.

Credit Card Processing with Vantiv Payment Services
27
To... Do this... enter the credit card information manually
1. From the File menu, select Manual Entry to display the Element Credit Card window.
2. In the Card Number field, enter the entire card number exactly as it appears on the card.
3. In the Expiration field, enter the month and year in which the card expires.
4. Click Save Card to return to the Default Credit Card Information window.
3. Edit the remaining credit card information in the Default Credit Card Information window for this card:
Field Description Cardholder Enter the name of the card holder, as it is printed on the credit card.
Street Address Enter the billing address for the card.
Zip Code Enter the zip code of the billing address for the card.
Authorization Method
Select one of the following authorization methods to use in order entry when the card is used for payment: • Authorize Before Shipment - Sets money aside from the credit card,
guaranteeing funds for the order total plus any freight charges, without charging the card. When the order is final, the system collects the final payment. Potential charges from your credit card processor may apply if you authorize payment from a customer.
• Authorize Before Shipment - Authorizes and charges the card for the order amount before shipping. The pick ticket is printed upon authorization.
• Reference Only - Uses information in the Credit Card Authorization window for reference only at the order level.
• Authorization After Review - Authorizes and charges the card for the order amount after the invoice is sent through batch printing and the shipping ticket is printed.
The authorization method for new cards defaults to the setting stored in the Default Auth Method for New Cards control maintenance record.
Terms Override Enter the code that represents the payment terms, if any, to use when this credit card is used for payment. For example, if you give the customer discount to orders when they pay in cash, but discounts do not apply when they pay with a credit card, enter the terms code to override the discount.
Default Reference No
Select a default reference number for this customer. Reference numbers are defined in the Credit Card: Default Reference Number control maintenance record.
If Exempt Charge Tax
Select this check box to apply tax to orders paid with this credit card. For example, customers could be exempt from tax if they pay with a company credit card. If you want to charge tax to payments made with such credit cards, select this option.
4. Save your changes, exit the window, and save the customer record.
If you swipe or manually enter a default credit card and do not save the customer record, the credit card is not saved.

Defining Default Customer and Contact Credit Cards
28
More Options when Defining Default Credit Card Information
You can also do the following when defining default credit card information for a customer:
To... Select... include additional credit payment data about the customer. This information does not directly affect any other part of the system and is displayed for informational purposes only.
File > Additional Information
delete default credit card information. For example, if a customer changes credit card companies, you can delete the credit card information from the system. The system also deletes the credit card information from Vantiv Integrated Payments. When you delete the card, the system also deletes the associated payment account in Vantiv. You cannot delete a card if there is an open order waiting for payment using the card.
File > Delete

Credit Card Processing with Vantiv Payment Services
29
Manually Entering Credit Card Authorization Codes In most circumstances, when you take a credit card payment for a sales order, the transaction with the credit card company happens behind the scenes with an automatic authorization, and you do not need to intervene in the process. However, at times, your system might be down, or there might be disputes with credit cards that require you to call the credit card companies directly and obtain an authorization code to process a payment. You can manually enter and process an authorization within order entry for an order. This process allows you to post the order payments to Eclipse, and to ensure that you receive the transaction money from the bank.
Enter credit card authorizations whenever you receive an authorization code over the phone from the card's issuing bank. If you receive an authorization code of "Call" or something similar when accepting a payment using a saved card, you need the full card number to initiate a manual authorization.
Note: You can only enter a manual credit card authorization for new cards, not cards that you have on file for a customer.
To manually enter a credit card authorization:
1. From an open sales order, click Totals to display the Totals tab for the order.
2. In the Credit Card field, enter the amount of the payment the customer wants to charge to their card. The Credit Card Authorization window displays.
3. Select New if a list of available cards displays. The zip code and billing street address defaults to the bill-to address on the order. If the ship-to and bill-to are different, the system prompts you to select the address to use. Update the address information for the card, if necessary. This is used when you charge the card to complete an address verification with the credit card company.
If the system automatically selects a card, select Transaction > List Cards and select New.
Manual authorizations must always be processed enter the card number; stored cards cannot be manually authorized.
4. From the Transaction menu, select Enter Manual/Voice Auth Code and enter the authorization number the credit card company provided you over the phone for the transaction in the Authorization Code field.
5. From the Transaction menu, select Sale, and answer Yes at the "Create A Manual Payment?" prompt, and do one of the following:
To... Do this... create a manual payment in Eclipse and to initiate the electronic payment collection process
1. Answer Yes at the "Do you want Eclipse to Settle This Charge At the End of the Day?" prompt. Answer Yes at this prompt if you have not yet received your money from the bank for this credit card payment. For example, a sale transaction returns with a "call" response, which the user performs and obtains the authorization code over the phone. Or, your system is down and you choose to obtain your voice authorization and are now going back and entering transactions into Eclipse.
2. Continue with step 6 below.

Manually Entering Credit Card Authorization Codes
30
To... Do this... create a manual payment in Eclipse without collecting money
1. Answer No at the "Do you want Eclipse to Settle This Charge At the End of the Day?" prompt. Answer No at this prompt if you are entering the authorization code to enter the payment in Eclipse, an have already received the money for the transaction from the bank. For example, if there was a dispute with the card, you might have received your money, but now need to enter the payment information in Eclipse to close out the order and balance your books.
2. If you have already received your money from the bank, answer Yes at the next prompt to continue. If you have not received your money and need to start over, answer No and start again with step 4. If you answer Yes, the system applies the payment to the order and returns to the Totals screen.
3. Continue process the order as usual.
6. If you have not received money from the card issuing bank for the transaction, do one of the following to collect the card information:
• Select Swipe to gather the card information by sliding the card through your card scanner. The system displays the Element Process Transaction window in your default web browser. Run the card through your card reader. The system gathers the card information, including the CCV code from the back of the card.
• Select Key Enter to manually enter the card information in the fields provided in the Element Process Transaction web page, which displays using your default web browser. For example, if the card's magnetic strip is worn. If you select to manually enter the card information, you are prompted to enter CVV ID. The CVV ID is required if the Require CVV ID On Keyed Element Credit Card Sales/Authorizations control maintenance record is set to Yes.
• Card Number - The 16 digit card number from the front of the card.
• Expiration Date - The month and year in which the card expires.
• CVV - The three digit code, typically printed on the back of the card in the signature strip.

Credit Card Processing with Vantiv Payment Services
31
Authorizing Credit Cards Overview (Formerly known as "pre-authorizing" credit cards) You can authorize a credit card sale to ensure that the customer has enough credit available, but without actually charging the customer's account. Use authorizations when you need to take a credit card payment for material that you plan to ship at a later date, and need the credit card sale to include the freight charge for the order, that you might not know until the order is ready to ship. The actual charge to the card occurs when you ship the order to the customer.
Note: If you are accepting a credit card payment from a customer for an account balance, you must run that transaction as a sale transaction. You cannot authorize account payments for payment later. For more information, see Receiving Payments for Accounts in the Accounts Receivable documentation.
Accepting credit card payments in this manner involves the following activities:
• Entering and processing the initial authorization to hold the funds.
The order taker can enter the initial authorization, or the Automatic Shipping Ticket Phantom initiates the authorization, depending on your setting in the Credit Card: Collection Approval Mode control maintenance record. If the authorization method is Authorize Only Before Shipment, the system invoices any orders that have a status of Ship When Avail. If a credit card is attached to the order, and has an authorization method of Sale Before Shipment, the phantom triggers the communication with Vantiv Integrated Payments to process the transaction and charge the customer's credit card. For more information, see Printing Shipping Tickets Automatically.
• Completing the authorization and actually charging the customer's card.
An order or payment taker can complete the authorization directly in order entry, or the system completes the authorization using a phantom process when the print status on the order reaches the status designated for shipment, or when the system receives a ship confirmation posting from Starship.
If the authorization method for the customer and card is set to Authorize Before Shipment, the Automatic Shipping Ticket Phantom performs the authorization and the completion is determined by the setting in the Credit Card: Collection Approval Mode control maintenance record. If the record is set to F, Freight Posting, the authorization completes when the system receives the ship confirmation from Starship. If the record is set to C, Credit Card Authorization Phantom, the authorization completes when the phantom runs and the transactions's print status matches those specified in the phantom driver screen.

Authorizing Credit Card Sales Amounts on Orders
32
Authorizing Credit Card Sales Amounts on Orders You can authorize a credit card sale to ensure that the customer has enough credit available, but without actually charging the customer's account. Use authorizations when you need to take a credit card payment for material that you plan to ship at a later date, and need the credit card sale to include the freight charge for the order, that you might not know until the order is ready to ship. The actual charge to the card occurs when you ship the order to the customer.
Note: The system uses the Vantiv credentials for the price branch to process the authorization.
For more information, see Authorizing Credit Cards Overview.
To initially authorize a credit card on an order:
1. From an open sales order, click Totals to display the Totals tab for the order.
2. In the Credit Card field, enter the amount of the payment the customer wants to charge to their card. The Credit Card Authorization window displays.
3. Select an existing credit card, or select New to enter a new card. If you select New, manually enter the card information or swipe the card, as necessary.
4. From the Transaction menu, select Authorization Only to authorize the payment amount.
The system records the authorization amount and displays it in the Authorized field on the order Totals tab . If the authorization is declined, the system sends a message to the user defined in the Credit Card Administrator control maintenance record at the payment branch, places an entry in the Credit Card Payment Review Queue, and changes the order's print status as indicated in the Override Print Status On Credit Card Denial control maintenance record.
Note: The Disable Auth Only Option For Credit Card Authorizations control maintenance record must be set to No for the Authorization Only option to be available.
5. Save and process the order.
If an authorization fails, the system sends a notification to the user identified in the Credit Card Administrator control maintenance record, using the method defined in the Notification Method When Credit Card Auth Fails.
For information about completing the authorization process, see Completing Credit Card Payment Authorizations.

Credit Card Processing with Vantiv Payment Services
33
Completing Credit Card Payment Authorizations (Authorizing is formerly known as "pre-authorizing") The authorization completion is triggered in different ways depending on the setting in the Credit Card Collection Approval Mode control maintenance record.
• Automatic Shipping Ticket Phantom - When the authorization method is Authorize Only Before Shipment, and the print phantom selects a transaction to process that has a credit card attached to the order, the phantom triggers the communication with Vantiv Integrated Payments to process the initial authorization and hold the funds against the customer's credit limit. For more information, see Printing Shipping Tickets Automatically.
Processing the order as a Pick-Up Now does not trigger the card handling event indicated by the selected authorization method.
• Credit Card Authorization Phantom - Use the Credit Card Authorization Phantom to select invoices on which to process payment. If open authorizations are found among the invoices, the phantom completes the initial authorization payment for the actual invoice amount. See the procedure below for more information.
• Starship Shipment Confirmation - When the system receives a shipment confirmation posting from Starship, the system triggers the communication with Vantiv Integrated Payments to complete the transaction for the credit card payment.
• Order Totals in Sales Order Entry - Change the payment type to Sale in the actual sales order. See the procedure below for more information.
You can also use the Credit Card Payment Review Queue to review payments, authorization, declines, and failures. However, the review queue does not contain an Approve option. Address authorizations and declines in each individual transaction.
After the transaction processes and the credit card is charged, any additional monies set aside during the authorization are released. For example, the authorization amount is $110.00, and the order total, with shipping charges, is $107.75. The Credit Card Authorization Phantom collects $107.75 and releases $2.25 back to the credit limit.
Important: The system collects the balance on the order, regardless of the original authorized amount. Depending on the final total, there are potential implications based on some credit card company operating regulations that could change your interchange rate qualification and the risk that a transaction might be subject to a charge back. For more information about avoiding this scenario, see Authorized Credit Card Payment Example.
To use the Credit Card Authorization Phantom to complete a credit card payment authorization:
1. From the A/R > Utilities menu, select Credit Card Authorization Phantom to display the Credit Card Authorization Phantom window.
2. In the Branch/Territory field, enter the branch or territory from which you want the Phantom to select invoices. To include all branches or territories, type All.
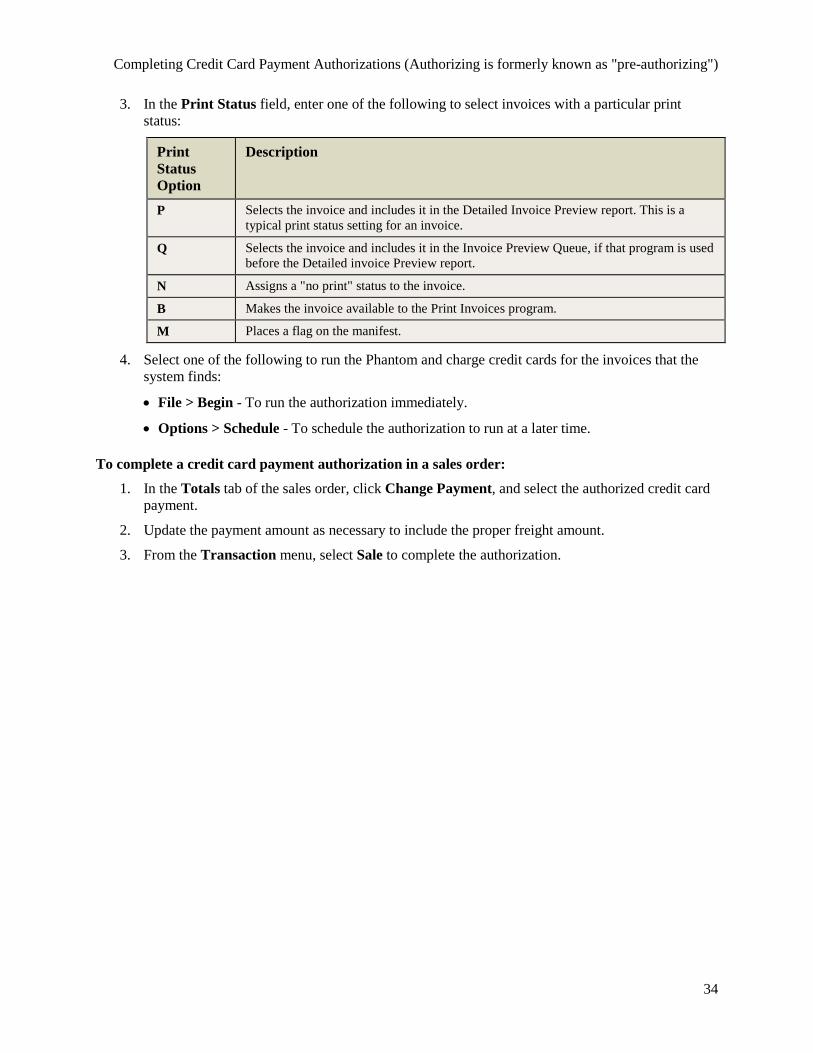
Completing Credit Card Payment Authorizations (Authorizing is formerly known as "pre-authorizing")
34
3. In the Print Status field, enter one of the following to select invoices with a particular print status:
Print Status Option
Description
P Selects the invoice and includes it in the Detailed Invoice Preview report. This is a typical print status setting for an invoice.
Q Selects the invoice and includes it in the Invoice Preview Queue, if that program is used before the Detailed invoice Preview report.
N Assigns a "no print" status to the invoice.
B Makes the invoice available to the Print Invoices program.
M Places a flag on the manifest.
4. Select one of the following to run the Phantom and charge credit cards for the invoices that the system finds:
• File > Begin - To run the authorization immediately.
• Options > Schedule - To schedule the authorization to run at a later time.
To complete a credit card payment authorization in a sales order:
1. In the Totals tab of the sales order, click Change Payment, and select the authorized credit card payment.
2. Update the payment amount as necessary to include the proper freight amount.
3. From the Transaction menu, select Sale to complete the authorization.

Credit Card Processing with Vantiv Payment Services
35
Authorized Credit Card Payment Example When the system goes to collect the money for an authorized credit card transaction, it attempts to collect the order's balance due amount, regardless of the original authorized amount. Depending on the final order total, there are potential implications that could change your interchange rate qualification and could result in you losing charge back protection if the customer disputes the charge. Consider the example below to help avoid charge backs and declines when processing credit card transactions.
The following settings and regulations apply to this example:
• The Credit Card Collection Approval Mode control maintenance record is set to Freight Posting.
• The VISA operating regulations provide a 15% tolerance in the completion amount from the initial authorization. Other credit card brands, or your merchant service provided may have differing rules for processing authorized transactions. This example deals specifically with VISA's tolerance rules.
Your counter salesperson enters an order and authorizes the customer's credit card For $100. When Starship processes the order, the freight is calculated at $30. The system attempts to collect the entire order total of $130. The $30 freight charge exceeds the VISA 15% tolerance regulation. In this case, any of the following could happen:
• The card's issuing bank might choose to decline the transaction.
• VISA re-categorizes the transaction to a higher interchange rate.
• If the customer disputes the charge, you are likely to lose the dispute because the initial authorization was not obtained for the extra $30.
There are several ways to handle this scenario:
You Can... More... Add an upcharge to the ship via in Ship Via Maintenance
Adding a percent or minimum upcharge amount to the ship via includes the additional amount in the initial order authorization. If the ship via on the order in this example had a $20 minimum upcharge amount, the initial authorization on the order would have been for $120. The completion amount of $130 would have been within the 15% tolerance, thus qualifying the transaction for optimal interchange rates and only charging the customer's card once.
Create another payment on the order for the $30 freight charge
In Sales Order Entry, prior to the ship confirmation from Starship, complete the initial authorization for $100, and create a separate payment on the order for the additional $30 to cover the freight charges. This results in two charges on the customer's credit card statement: one for the $100 for the order, one for $30 for freight.
Complete a separate sale transaction
In Sales Order Entry, complete a sale transaction for the $100 and allow the system to complete the authorization for $30 when it receives the ship confirmation from Starship. This results in two charges on the customer's credit card statement: one for the $100 for the order, one for $30 for freight.
Let the initial authorization lapse
In Sales Order Entry, complete a separate sale transaction for $130 to cover the entire amount of the order and let the initial authorization lapse. This holds the funds on the customer's card in addition to the original amount of the order.

Running the Credit Card Summary Report
36
Running the Credit Card Summary Report Run a Credit Card Summary Report to list all the approved credit card transactions for a specific date range or batch number. Both voice-authorized and system-authorized credit card transactions display in this report. Use the totals on this report and compare them to the totals on the Cash Box Journal when run for credit card types. For more information, see Cash Box Journal.
To run a Credit Card Summary Report:
1. From the A/R > Reports/Journals menu, select Credit Card Summary Report to display the Credit Card Summary Report window.
2. In the Processor field, press F10 and select the processor that you use to settle your credit card transactions. You can run the report for Vantiv, or other processors such as VITAL. The default is to run the report for all processors.
3. In the Filter Branch field, enter the branch or territory to filter the merchant numbers available for that branch. Your selection here restricts the merchant numbers available to run the report for in the Merchant Number field.
4. In the Merchant Number field, enter the ID number of the merchant to run the report for a single merchant ID. To run the report for all merchants, select All. If you are using Vantiv Integrated Payments, the merchant number is the Vantiv acceptor ID.
Your processing firm assigns you a merchant number. You might have multiple merchant numbers if you have multiple branches or use more than one processing firm.
• If you entered a branch or territory, or combination of branches and territories in the Filter Branch field you can only run the report for the merchants that are defined for the specified branches and territories.
• If you specify a merchant number and that merchant number is also used by a branch that you did not select, any orders for that merchant number at that branch are included in the report, even though you did not select that branch in the Filter Branch field.
5. In the Report Branch field, enter the branch, branches, or territories for which you want to run the report.
6. In the Start Date and End Date fields, enter the first and last date of the period you want to include in the report.
7. In the Batch Number field, enter the batch number assigned in the End of Day Settlement Report for VITAL and TSYS, or the batch number provided by Vantiv Integrated Payments.
8. In the Sort by field, select how you want to sort the contents of the report, for example, by manual or automatic authorization.
9. In the Select by Date field, if you have changed the payment date on a credit card transaction, select one of the following to determine which date to run the report by:
• Cash Box - Uses the override date.
• Authorized - Uses the original authorization date.
10. Set options, if needed, and run the report.

Credit Card Processing with Vantiv Payment Services
37
What the Report Shows
The Credit Card Summary Report provides the following information:
Column Description Order # The sales order number to which the credit card payment applies.
Br The branch where the sales order was take and the credit card transaction initiated.
Type The credit card company, such as VI for Visa and MC for Master Card.
Tran Amount The dollar amount requested for payment. Compare the total of this column with the total of the CCard column for reconciliation purposes on the Cash Box Journal Report.
Collect Amount The dollar amount the collect. The amount in this column should match the amount in the Tran Amount column, except for pre-authorizations, as pre-authorizations are not actual payments.
Auth Amount The authorization method for the transaction, for example, if ti was an automatic authorization, or a voice authorization that was entered manually.
Tran Dt The date the transaction occurred.
Collect Dt The date when funds were collected from the bank for the transaction.
Batch # The number assigned to the group of transactions in which this transaction was processed. The system assigns a batch number when you run the Credit Card End of Day Settlement Report.
Settle Dt The date when the settlement occurred. The settled date does not display if you ran the report for only the Vantiv processor. Use the Transaction ID to identify the transaction instead.
Settle Info Any information relative to the settlement of the transaction, for example, whether the card was accepted or declined. The settle information does not display if you ran the report for only the Vantiv processor. Use the Transaction ID to identify the transaction instead.
Transaction ID If you use Vantiv Integrated Payments, the report includes the Vantiv transaction ID instead of a settlement date and settlement information. The transaction ID, identifies the transaction to you within the Vantiv system.
Merchant # The merchant ID number that the processing firm assigned to you, and that the transaction was processed under. If you are using Vantiv Integrated Payments, this is your Acceptor ID.
Processor The processor used for the transaction, such as Vantiv or Vital.

Reviewing and Processing Failed and Declined Credit Card Charges
38
Reviewing and Processing Failed and Declined Credit Card Charges Use the Credit Card Payment Review Queue to view all failed, declined, and authorized credit card charges. The system places any transactions that failed due to communication-type errors or were declined due to a problem with the card in this queue for your review.
Note: The system validates the account ID on the credit card with the account ID on the payment branch. If these do not match, the system will not complete the transaction.
Use the information in this queue to help you with re-charges for failed or declined transactions, or to call the customer to get a different credit card number. For information about using the queue to process authorized orders, see Processing Credit Card Payments on Authorized Orders.
Use the information in the queue to help research why transactions failed or declined. For some declines, you might need to contact the customer for new or updated card information to reprocess the transaction.
To review and process failed and declined credit card charges:
1. From the A/R menu, select Credit Card Payment Review Queue to display the Credit Card Payment Review Queue window.
2. In the Branch field, enter the branch, branches, or territories for which you want review credit card transactions.
3. In the Status field, select Failed to review only those transactions that failed due to a communication error, or Declined to view only the transactions where payment was declined on the entered and click Update.
4. Review the information about why the transaction failed or was declined by selecting the transaction and review the Authorization Message at the bottom of the list of transactions.
For example, you might find that a transaction failed due to a communication error, or was declined because the card is expired. Having this information helps you make decisions about the actions to take regarding the transaction.
5. Do one of the following to approve or remove transactions in the queue:
To... Do this... enter new or update card information, such as updating the expiration date entered for the card
Select the transaction and select Inquiry > Edit Order to display the sales order. Go to the Totals tab and enter the updated card information. You must have the SOE.OPEN.ORDER.EDIT and the SOE.ALLOWED authorization keys assigned to edit an open sales order.
to reprocess selected transactions
Select the Approve check box for the transaction that you want to reprocess, and select Approve > Approve Item to process a single transaction or Approve > Approve All Selected Items to process all the transactions with the Approve check box selected.
approve all declined transactions
From the Approve menu, select Approve All Declined to reprocess all transactions with a status of Declined. Use this option if you have researched the declines and updated the credit card information as necessary for all the cards in the queue.
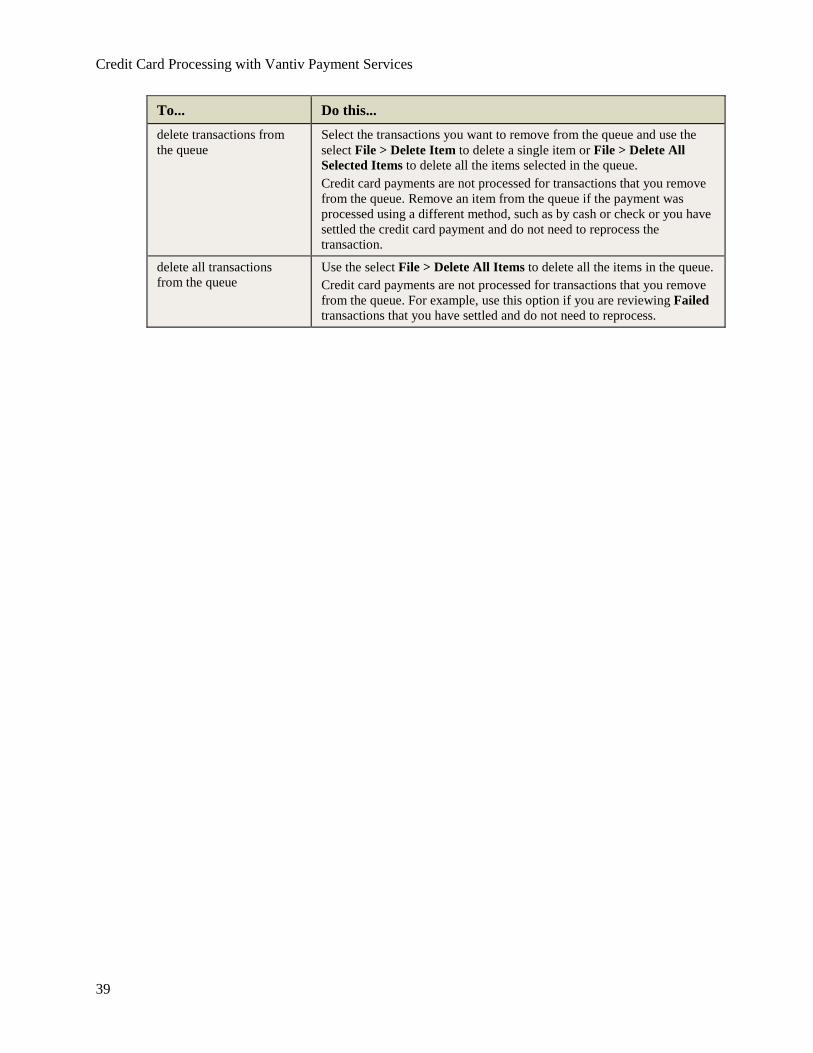
Credit Card Processing with Vantiv Payment Services
39
To... Do this... delete transactions from the queue
Select the transactions you want to remove from the queue and use the select File > Delete Item to delete a single item or File > Delete All Selected Items to delete all the items selected in the queue. Credit card payments are not processed for transactions that you remove from the queue. Remove an item from the queue if the payment was processed using a different method, such as by cash or check or you have settled the credit card payment and do not need to reprocess the transaction.
delete all transactions from the queue
Use the select File > Delete All Items to delete all the items in the queue. Credit card payments are not processed for transactions that you remove from the queue. For example, use this option if you are reviewing Failed transactions that you have settled and do not need to reprocess.

Reconciling Customer Credit Card Payments
40
Reconciling Customer Credit Card Payments Use the Credit Card Payment Reconciliation Queue to tie the credit card payments made by customers to actual bank deposits. You can reconcile the bank’s file to the credit card payments made and review when deposits have occurred by checking and changing the status and creating miscellaneous cash receipts to account for the payments.
Note: To display the Credit Card Payment Reconciliation Queue information for at all times, add a widget to your Solar Eclipse main window. For more information, see Widgets and Menu Shortcuts Overview.
To reconcile credits card payments:
1. From the A/R menu, select Credit Card Payment Reconciliation Queue to display the window.
2. Set the parameters for the queue to display the transactions you want to review and reconcile:
Field Description Branch/Tr/All Select the branch, branches, or territories for which to populate the queue.
Note: Eclipse displays the collection branch when populating the queue and creating the cash receipt.
Deposit Status Select how you want to filter the queue by credit card process status: • Processed - Indicates the payment has been received but not yet deposited
into an account. • Deposited - Indicates the payment has been received and deposited into the
appropriate account.
Credit Card Type Select which credit card you want to reconcile. You can select more than one.
Starting Date Select the date range for the payments you want to review.
Ending Date
3. Click Update to populate the queue.
The queue displays the transaction information for each of the displayed payments:
Column Description Select* Use to process transactions. Select the rows that you want to approve, reconcile, or
create a cash receipt for. See Step 4.
Order Order number with which payment is associated.
Customer Customer listed on the order.
Date Date the payment was made.
Time Time the payment was processed.
CC Type Displays which credit card was used to make the payment.
Amount The amount charged to the credit card.
Deposit Status*
Change status based on where the money currently is in the payment process. See Step 5.

Credit Card Processing with Vantiv Payment Services
41
Column Description Totals Grand total for all transactions displayed in the queue. Displays at the bottom of the
window in a green highlighted row.
* Only actionable columns. All other columns are view-only.
4. Use the Approve check box in one of the following ways to process transactions, as needed:
To... Do this: to reprocess selected transactions
One of the following: • Select the Approve check box for the transaction that you want to
reprocess. • Select Approve > Approve Item to process a single transaction • Select Approve > Approve All Selected Items to process all the
transactions with the Approve check box selected.
approve all declined transactions
From the Approve menu, select Approve All Declined to reprocess all transactions with a status of Declined. Use this option if you have researched the declines and updated the credit card information as necessary for all the cards in the queue..
5. Use the Deposit Status column for each transaction to indicate the process status for the payment: Processed, Deposit In Progress, and Deposited.
6. Create cash receipts, if needed.
7. Save your changes and exit the queue.
Creating Miscellaneous Cash Receipts for Credit Card Payments After taking credit card payments, you can tie the credit card payments to your actual bank deposits and reconcile your bank file to the credit card payments received. In this way, you can track when the payments have been deposited.
After receiving your bank statement confirming deposits, you create cash receipts to reconcile the payments that you have received. Use the Credit Card Reconciliation Queue Defaults control maintenance record to define at the branch level the parameters for cash receipts are created for credit card payments through the Credit Card Payment Reconciliation Queue.
To create cash receipts for credit card payments:
1. Display the Credit Card Reconciliation Queue and set the parameters for which you want to view credit card payments.
2. Use the Select check box to choose the orders for which you have received payment.
3. From the File menu, select Create Cash Receipt for Selected Items to create a cash receipt for all the items you have more selected. If no rows are selected, the system creates a cash receipt for row the cursor is on.
The system uses the first branch if finds with set system defaults for the comment, deposit branch, and the bank on the Miscellaneous Cash Receipts window.
4. Post the miscellaneous cash receipt for the items selected.
5. Create more cash receipts for credit card payments or exit the window.

Applying Credits to Credit Cards for Returns
42
Applying Credits to Credit Cards for Returns When a customer paid for an order using a credit card, credit any refunds or returns back to the same card. A returned product is linked to its original sales order, therefore, the original card information is used as the default credit card for the return order. However, you might encounter the following scenarios:
• If you do not have the original sales order number, create a new sales order to process the return.
• If you have the original sales order number with the credit card information, enter the return quantity on the original order, and credit the card used to pay for the original order.
The settings in the Sales Order Entry Return Setup control maintenance record determine how returns to credit cards are handled in order entry. If the Require Same Credit Card on Return option in the record is set to Yes, the amount of returned items are applied to the same credit card they were originally ordered with. If the Require Original Invoice When Adding Return Item To Order option in the record is set to Yes, you must have the original sales order number to credit the card for the return.
Note: The system uses the Vantiv credentials (acceptor ID for the branch, etc) that were used on the original order, regardless of the branch where the return is being processed. However, if the card on the original order is now expired, the system deletes that card from the return order.
To return a product in Sales Order Entry, see Returning Product from Sales Order Entry in the Sales Management documentation.
To apply a credit to the credit card for a return:
1. From the Orders menu, select Sales Order Entry to display the Sales Order Entry window and create a return order.
In the Return Goods Verification window, if you have the original order number, enter it to verify that the products were purchased. When you return to the Body of the order, the negative quantities are entered for you.
2. Click the Totals tab and enter the refund as a negative amount in the Credit Card field.
3. In the Credit Card Authorization window, do one of the following:
If... Then... You entered the return quantity on the original sales order
1. Verify that the information in the Credit Card Authorization window is correct for the card to which you want to refund the charge. The system displays the card information for the card used to purchase the items.
2. From the Transaction menu, select Sale to credit the card.

Credit Card Processing with Vantiv Payment Services
43
If... Then... You did not have the original order number, and created a new order to process the return
1. Either select New to credit a card that you do not have or select a card that the customer has on file.
2. Enter the card holder, zip code, and billing street address for the card.
3. From the Transaction menu, select Sale and do one of the following: • Select Swipe. The system displays the Element Process
Transaction window in your default web browser. Run the card through your card reader. The system gathers the card information, including the CCV code from the back of the card.
• Select Key Enter to manually enter the card information in the fields provided in the Element Process Transaction web page, which displays using your default web browser. For example, if the card's magnetic strip is worn. If you select to manually enter the card information, you are prompted to enter CVV ID. The CVV ID is required if the Require CVV ID On Keyed Element Credit Card Sales/Authorizations control maintenance record is set to Yes.
• Card Number - The 16 digit card number from the front of the card.
• Expiration Date - The month and year in which the card expires.
• CVV - The three digit code, typically printed on the back of the card in the signature strip.
4. Click Process Transaction to submit the information and process the transaction with Vantiv.
4. When the request completes, Vantiv returns an authorization code for the transaction. The authorization code displays in the Authorization Code field for reference. If the returned authorization code is *Call* or something similar, you need to call the credit card company for authorization. See Manually Entering Credit Card Authorizations.

Voiding Credit Card Transactions
44
Voiding Credit Card Transactions If a customer makes a change to an order, or for any other reason, you can void a credit card transaction. Void the original credit card transaction before attempting to accept a different payment.
Note: The system uses the Vantiv credentials for the price branch to process the void.
If the charge transaction has already been settled, you must refund the amount instead of voiding the transaction.
To void a credit card transaction:
1. In the Totals tab of the order, click Change Payment and select the payment you want to void.
2. Verify that the information in the window for the transaction is correct.
3. From the Transaction menu, select Void to void the sale.
The Void menu option is only available if the sale amount has not been settled. If it is too late to void a transaction, process a refund instead.
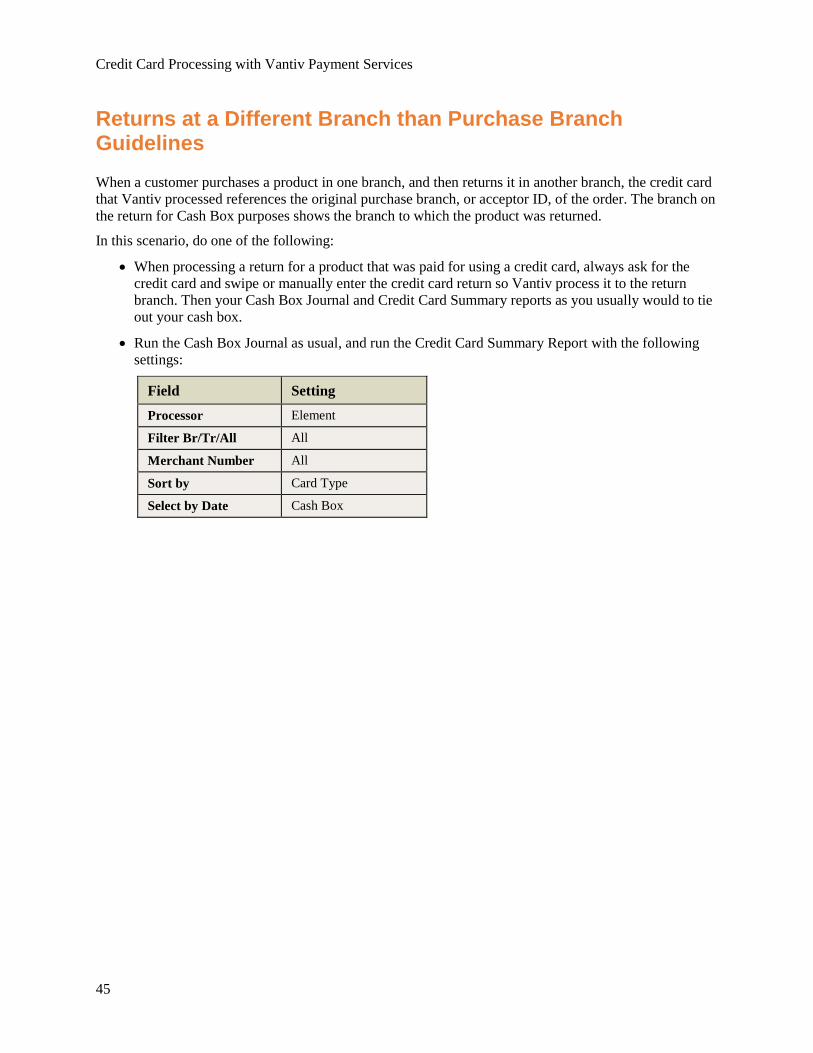
Credit Card Processing with Vantiv Payment Services
45
Returns at a Different Branch than Purchase Branch Guidelines When a customer purchases a product in one branch, and then returns it in another branch, the credit card that Vantiv processed references the original purchase branch, or acceptor ID, of the order. The branch on the return for Cash Box purposes shows the branch to which the product was returned.
In this scenario, do one of the following:
• When processing a return for a product that was paid for using a credit card, always ask for the credit card and swipe or manually enter the credit card return so Vantiv process it to the return branch. Then your Cash Box Journal and Credit Card Summary reports as you usually would to tie out your cash box.
• Run the Cash Box Journal as usual, and run the Credit Card Summary Report with the following settings:
Field Setting Processor Element
Filter Br/Tr/All All
Merchant Number All
Sort by Card Type
Select by Date Cash Box

Managing Vantiv Integrated Payments Accounts Overview
46
Managing Vantiv Integrated Payments Accounts Overview As you save credit card information either to a customer, contact, or an order, the system creates Payment Account Secure Storage (PASS) accounts, also known as payment accounts, with Vantiv Integrated Payments. Your contract terms with Vantiv indicate the charges you pay for the number of payment accounts you maintain.
Reviewing Payments To reduce your costs for storing credit card information, we recommend that you review your payment accounts once a month and delete the accounts you no longer need. For example, consider deleting payment accounts for cards that have expired, for customers or contacts who have credit card information on file but have not done business with you in six months (or less), and for credit card transactions for orders that were placed using a miscellaneous cash customer record, such as for walk-ins to your counter.
Pass Account Utility Using the PASS Account Utility and the PASS Account Reconciliation Utility, you can schedule to delete payment accounts that meet a certain set of criteria, or you can view and delete payment accounts manually. When you delete an account, the system deletes the information from Vantiv and from Eclipse. For example, if you delete a payment account for credit card information stored at the customer-level, the system deletes the payment account from Vantiv and removes the saved credit card from the customer record.
For more information, see Managing Temporary or Orphaned PASS Accounts and Using the PASS Reconciliation Utility in this documentation.
Overnight Routines As you are processing transactions or entering credit card information for a customer or contact and the power goes out, the internet goes down, or for some other reason the payment account for the information you entered is not created, there is credit card information in Eclipse that does not have a matching payment account in Vantiv, rendering it useless. In these circumstances, an overnight routine removes the credit card information from Eclipse. However, if the system finds a payment account in Vantiv that does not have matching information in Eclipse, the system creates the information in Eclipse using the saved data in Vantiv.

Credit Card Processing with Vantiv Payment Services
47
Viewing and Manually Deleting Vantiv Integrated Payments Accounts Using the PASS Account Utility, you can view and delete payment accounts manually. We recommend that you review your payment accounts at least once a month to ensure that you are being billed for only the payment accounts that you need. You can also schedule a phantom process to delete the accounts that meet your selection criteria on a regular basis. For more information about scheduling account deletions, see Scheduling Vantiv Payment Account Deletions.
Use the selection criteria in the PASS Account Utility to control the performance of the search return time. For example, limit the date range of expiration dates or search for one card type at a time.
Important: When you delete a payment account, the system deletes the information from Vantiv and from Eclipse. You must enter that credit card information again in Eclipse to use the card. The system cannot delete a payment account if there is an open order waiting to use the credit card associated with that account as payment.
For more information about why it is important to manage your Vantiv Payment Accounts, see Managing Vantiv Payments Accounts Overview.
To view and delete an Vantiv Payment Account:
1. From the System > Custom > Add On Products > Credit Card menu, select Element PASS Account Utility to display the PASS Account Utility window.
2. Select the criteria you want to use to filter your payment accounts for deletion. You must specify a card brand, an expiration date range, or both.
Field Description Acceptor ID Much like a merchant number, Vantiv assigns you unique acceptor IDs to identify
you as an Vantiv customer. Depending on your business relationship with Vantiv, you might have a different acceptor ID for each branch, or you might have a single acceptor ID that encompasses more than one branch. Enter the acceptor ID for which you want to view and delete payment accounts. To enter more than one acceptor ID, click the Multiple button next to the field.

Viewing and Manually Deleting Vantiv Integrated Payments Accounts
48
Field Description PASS Type (Optional) Select the type of payment account you want to view or delete:
• Customer - Includes payment accounts created for credit cards that you entered as default cards for a customer.
• Contact - Includes payment accounts created for credit cards that you entered s default cards for a contact.
• Open Order - Includes payment accounts for credit cards that you added and saved to an order that still has an open balance or an open generation.
• Closed Order - Includes payment accounts for credit cards that you added and saved to an order that has a balance of $0.00 no open balance or any open generations.
For example, if you want to delete all your payment accounts for a particular customer, select Customer to help narrow the list. If you want to delete payment accounts for all orders that you placed under a miscellaneous cash customer, select Closed Order.
Card Brand Select the card type, such as Visa or MasterCard, to narrow the list of payment accounts to only those associated with that card type. For example, if you decide that you are no longer going to accept American Express, select that card type to view and delete only the payment accounts associated with American Express cards. You must specify a card brand, an expiration date, or both.
Expire Begin Enter the first date in a range of dates to view only payment accounts that contain cards that expire in or after that month. The day of the month is provided here for variable dating purposes, however, the system ignores the day you enter, as credit cards expire on the last day of the month listed as the expiration date on the card. The year 2101 and 2001 both end in 01, thus they look like the same year. To get accurate results when searching for payment accounts, the expire begin date should not be prior to 1980, and the expire end date should not be after 2080. You cannot query for a date range greater than or equal to 100 years. If you leave this field blank, the system starts its search for cards expiring in January 2000.
Expire End Enter the last date in a range of dates to view only payment accounts that contain cards that expire in or before that month. The day of the month is provided here for variable dating purposes, however, the system ignores the day you enter, as credit cards expire on the last day of the month listed as the expiration date on the card. The year 2101 and 2001 both end in 01, thus they look like the same year. To get accurate results when searching for payment accounts, the expire begin date should not be prior to 1980, and the end date should not be after 2080. You cannot query for a date range greater than or equal to 100 years. If you leave this field blank, the system ends its search in December of the current year plus 11 years. For example, 2010+11 = December 2021.

Credit Card Processing with Vantiv Payment Services
49
Field Description Last Activity Over __ Days Ago
Enter a time period to view or delete only those payment accounts with cards that have been charged since that time. For example, if you want to view and delete cards that have not had activity for over three months, enter 90 in this field.
Important: If you enter a last activity date and schedule a phantom process to complete your deletions, the system deletes cards you might have entered but not yet charged.
Your search time can increase if you choose to search using a last activity date.
3. From the File menu, select View PASS Accounts to display the Element Payment Account Management window.
The window lists the view-only payment account information for the accounts that meet the criteria you entered.
Field Description PASS Type The type of transaction or entity to which the payment account is connected:
• Customer - Payment accounts created for credit cards that you entered as default cards for a customer.
• Contact - Payment accounts created for credit cards that you entered as default cards for a contact.
• Open Order - Payment accounts for credit cards that you added and saved to an order that still has an open balance or an open generation.
• Closed Order - Payment accounts for credit cards that you added and saved to an order that has no open balance or any open generations.
If this field is blank, there is credit card information in Eclipse that does not have a matching payment account in Vantiv, rendering it useless. You can choose to delete these accounts manually, or, the system deletes them the next time the overnight routines run.
Card # The last 4 digit of the credit card number. For example, use this information if you want to contact the customer about a card that has or is going to expire.
Expire The date the credit card expires.
Name The customer or contact to whom the card belongs. If the card is saved only to an order, this field displays the order number.
Last Used The date the card was last used to pay for an order. If you did not specify a last activity date in the PASS Account Utility window, the Last Used column is blank. If you do specify a last activity date, the Last Used column is blank if the card exists in the system but has not been used to process any payments.
Note: Select an account and select Detail from the File menu to display the following additional information regarding the payment account:
Field Description Reference Number A number that is assigned to the payment account to reference it in Eclipse and
tie it to the account in Element.
Card Brand The card type, such as Visa or MasterCard.

Viewing and Manually Deleting Vantiv Integrated Payments Accounts
50
Field Description PASS GUID The payment account number as generated by Vantiv. This number is provided
for troubleshooting purposes.
Note: Click Edit to display the customer, contact, or order associated with the payment account.
4. To delete a payment account, do one of the following:
To... Do this... Delete a single payment account Select the account, and then select File > Delete.
Delete all the payment accounts in the view
From the File menu, select Delete All. All payment accounts that matched your initial criteria and that are available in the view are deleted.

Credit Card Processing with Vantiv Payment Services
51
Scheduling Vantiv Integrated Payments Account Deletions Using the PASS Account Utility, you can schedule a phantom process to delete payment accounts that meet a set of criteria. We recommend that you delete unnecessary payment accounts at least once a month to ensure that you are being billed for only the payment accounts that you need. For more information about why it is important to manage your Vantiv Payment Accounts, see Managing Vantiv Payments Accounts Overview.
Important: When you delete a payment account, the system deletes the information from Vantiv and from Eclipse. You need to enter that credit card information again in Eclipse to use the card.
Using the selection criteria, you determine the payment accounts that are deleted on a scheduled basis. For example, a couple of days before Vantiv generates your bill, you might want to delete all payment accounts that were created for cards saved to orders that no longer have a balance due or any open generations. Set your search criteria to include Closed Order PASS Types and a particular card brand. You can schedule multiple phantom processes to capture deletions for each card branch. Scheduling these deletion types ensures that open orders retain their information, as you still need those payment accounts.
To schedule payment accounts to be deleted:
1. From the System > Custom > Add On Products > Credit Card menu, select Element PASS Account Utility to display the PASS Account Utility window.
2. Enter the criteria that you want to use to select the payment accounts to delete. For more information about the selection criteria, see Viewing and Deleting Vantiv Payment Accounts.
3. From the Options menu, select Schedule to display the Phantom Scheduler window.
3. Schedule the PASS account deletions, as necessary. The date fields accept variable dating. For more information about scheduling a phantom process, see Scheduling Phantom Processes in the System Maintenance documentation.
4. Save your changes and exit the window.

Managing Temporary or Orphaned PASS Accounts
52
Managing Temporary or Orphaned PASS Accounts The PASS Account Utility and PASS Account Reconciliation Utility help you clean up the PASS accounts you have in the Vantiv System. Due to your standard procedures accounts may be orphaned or be used temporarily for processing. If these do not clear from the system you can use the following procedure to clear them manually.
Important: Depending on your PASS Account set up, the following steps may need to be changed with the help of Eclipse Customer Support. If you are unsure about why or how to run this utility, please contact Eclipse Customer Support.
To clear PASS Accounts manually:
Step Description Do this... 1 Run the PASS
Utility with no options set
1. From the System > System Files > Credit Card Setup menu, select PASS Account Utility.
2. In the Acceptor ID field, select the ID you want to use.
3. From the File menu, select View Pass Accounts.
4. Leave all remaining fields blank to view all PASS account information.
Review the report for blank columns
• Card # and/or Expire Column - Indicates that this PASS account exists in Vantiv, but not in Eclipse. Run the Reconciliation Utility.
• PASS Type Column - Indicates a temporary Web Integration PASS account. Verify that it is a temporary account by using the View > Detail option and checking for a Reference Number starts with T~.
• If you do not have any blank columns, then Vantiv and Eclipse are in sync. Go straight to step 6.
Note: If you do not have temporary PASS accounts, you can skip to step 3.
2 Delete any "Temporary" PASS accounts
Sort the PASS accounts by PASS Type. Go to the first entry with a blank PASS Type and press the Delete hotkey. Repeat this step for each Temporary account.
Note: The utility prevents you from deleting accounts that are less than 24 hours old, because it may still be in use.
Important: If there are a lot of these temporary pass accounts types, we recommend revisiting your Web Integration setup with Eclipse Customer Support. For more information, see Suggested Element Credit Card Implementation in the Web Integration documentation.
3 Run the Pass Reconciliation Utitilty
See Using the PASS Reconciliation Utility. This ensures the Vantiv and Eclipse are in sync having the same list of PASS accounts. The system finds PASS accounts that exist only in Vantiv and creates a corresponding PASS account data in Eclipse. A reconciled PASS account should contain the required data for a deletion.
4 Wait 24 hours Vantiv caches the data on a Vantiv server. We recommend waiting a full 24 hours to ensure that you retrieve accurate data for updated and reconciled PASS accounts.

Credit Card Processing with Vantiv Payment Services
53
Step Description Do this... 5 Run the PASS
Utility 1. From the System > System Files > Credit Card Setup menu, select PASS
Account Utility.
2. In the Acceptor ID field, select the ID you want to use.
3. From the File menu, select View Pass Accounts.
4. Use the selection criteria by which you want to find records to delete.
Displays all the PASS accounts recognized by Eclipse. After running the Pass Reconciliation Utility, the list should match Vantiv's list and you can then delete accounts, as needed.
6 Delete PASS Accounts
Use the File > Delete option to remove the account.
7 Wait 24 hours Vantiv caches the data on a Vantiv server. We recommend waiting a full 24 hours to ensure that you retrieve accurate data for updated and reconciled PASS accounts.
8 Run the PASS Utility
(Optional) Run the utility again to ensure that the deleted accounts have been removed.

Using the PASS Reconciliation Utility
54
Using the PASS Reconciliation Utility The PASS Reconciliation utility searches Vantiv's system to obtain all the tokens Vantiv Integrated Payments has on file. For performance reasons, Vantiv provides data back to the Eclipse from a separate data source that is not accurately real-time.
As of Release 8.7.2, Vantiv updates the secondary data source four times per day, so any deletion activity performed in Eclipse recently may be caught and reported by the Reconciliation Utility with an error. For example: PASS Account number entered was linked to ABC Electrical in Vantiv. The card does not exist in Eclipse. Could not add customer information.
Vantiv does include all tokens added in the live environment since the last refresh of the secondary source. However, Vantiv does not remove any tokens that have been deleted. In addition, Eclipse runs a real-time double check against the live system before adding or purging any token that is not in the sync.
Important: Ultimately, this utility should have to be run rarely, but assists in finding and fixing these types of discrepancies. The reconciliation can be done to synchronize Vantiv and Eclipse systems before running the PASS reconciliation utility itself which purges unwanted tokens before Vantiv’s billing at month end.
Depending on your PASS Account set up, the following steps may need to be changed with the help of Eclipse Customer Support. If you are unsure about why or how to run this utility, please contact Eclipse Customer Support.
To run the PASS Reconciliation Utility:
1. From the System > Custom > Add On Products > Credit Card Authorization menu, select Element PASS Reconciliation Utility.
2. Set any options and run the report.

Credit Card Processing with Vantiv Payment Services
55
Converting to the Vantiv Integrated Payments Solution Overview Prior to processing credit card payments using the Vantiv Integrated Payments solution, complete the following conversion activities so your data is set up correctly:
1. Upgrade to Release 8.6.8 or later of the Eclipse software.
2. Establish your agreement with Vantiv and receive your credentials with them.
3. The night prior to your specified Vantiv conversion date, which you have coordinated with Epicor Eclipse and Vantiv, complete the following:
• Complete all your in-process transactions in Eclipse and settle transactions with your old credit card solution. This includes any transaction that is a "pre-authorized" state.
If you do not complete the sales for pre-authorized transactions and run the conversion, you need to let the authorization expire and enter the credit card transaction again. "Pre-authorized" transactions that are not complete are not included in the conversion.
• Run the contact and customer conversion utility to convert your Eclipse customer and contact credit card information into tokens and to create the appropriate payment accounts in the Vantiv database. For more information, see Running the Credit Card Data Conversion.
• Run the transaction conversion utility to convert credit card information on orders into tokens and to create the appropriate accounts in the Vantiv database.
• Run the Element Credit Card Purge Utility to strip all but the last for digits of any card number that was not converted to a an Vantiv account. This includes card numbers in log and activity files.
4. Replace your old swipe devices with the new encrypted swipe devices.
5. Verify your credit card control maintenance record settings.
6. Verify that your processor and range are setup for use with Vantiv.
7. Inform Eclipse Support that you are no longer using the Eclipse-TSYS solution to begin the discontinuation process.

Converting Customer and Contact Data for Vantiv
56
Converting Customer and Contact Data for Vantiv The weekend of your specified conversion date, you must run the contact and customer conversion utility to convert the historic credit card data in your customer and contact records system to create tokens and to create any necessary payment accounts for stored cards.
When you run the conversion, the system creates a payment account in the Vantiv database for each credit card it finds in a contact or customer record. We strongly recommend that you review the created accounts using the PASS Account Utility to verify that all the created accounts are required prior to your first Vantiv billing cycle. Because the system is converting all saved cards, you might find that you have payment accounts for customer and contacts you no longer do business with, or expired cards that are no longer valid.
You can run the customer and contact conversion more than once if you receive errors during the first run. If a PASS account has been created for a card, it does not get created a second time.
Note: The conversion process does not convert any credit card information that exists within your Hold file entries. To delete this information, delete the file and regenerate it after the conversion.
To run the convert customer and contact data for Vantiv:
1. Ensure that you have completed the necessary steps listed in Converting to the Vantiv Integrated Payments Solution Overview.
2. Log in to the character-based system. The conversion utility is run only at the time you are converting from your old credit card system to Vantiv, and exists only in the character-based interface.
3. From the System > System Files > Custom > Credit Card Setup menu, select Element Contact and Customer Conversion to display the Convert CC to Element screen.
4. Select one of the following to convert your credit card information:
• Begin - Use this hot key to start the conversion process immediately.
• Schedule - Use this hot key to schedule your conversion process to run at a later time.
5. View the report that the system places in your Hold file to verify the results of the conversion.

Credit Card Processing with Vantiv Payment Services
57
Converting Transactions for Vantiv The weekend of your specified conversion date, you must run the transaction conversion utility to convert the credit card data in your transactions system to create tokens and to create any necessary payment accounts for stored cards.
When you run the conversion, the system creates a payment account in the Vantiv database for each credit card that is stored on an order in the CC Info window. We strongly recommend that you review the created accounts using the PASS Account Utility to verify that all the created accounts are required prior to your first Vantiv billing cycle. Because the system is converting all saved cards, you might find that you have payment accounts for expired cards that are no longer valid.
Note: The conversion process does not convert any credit card information that exists within your Hold file entries. To delete this information, delete the file and regenerate it after the conversion.
You can run the transaction conversion more than once if you receive errors during the first run.
Important: Run the transaction conversion after hours after you have run the customer and contact conversion. After the conversion is complete, and credit card listed in the CC Info window can only be processed using Vantiv.
To convert transactions for Vantiv:
1. Ensure that you have completed the necessary steps listed in Converting to the Element Payment Services Solution Overview.
2. Log in to the character-based system. The conversion utility is run only at the time you are converting from your old credit card system to Vantiv, and exists only in the character-based interface.
3. From the System > System Files > Custom > Credit Card Setup menu, select Vantiv Transaction Conversion to display the Convert Transactions to Element screen.
4. In the Convert order closed ____ days in the past field, enter the number days in the past the system should convert orders.
The transaction conversion converts any closed order that has been settled in the last number of days that you enter here. Use this field to help manage credits for orders that are still within your return order policy. If a card is not converted to Vantiv for a closed order, you have to gather the credit card information from the customer again to manually create a new Vantiv payment account to issue a credit for the return.
5. Select one of the following to convert your credit card information:
• Begin - Use this hot key to start the conversion process immediately.
• Schedule - Use this hot key to schedule your conversion process to run at a run at a later time.
6. View the report that the system places in your Hold file to verify the results of the conversion.
Fix any errors that might have occurred, for example, invalid card numbers, and run the conversion again.

Purging Unconverted Credit Card Data for Vantiv
58
Purging Unconverted Credit Card Data for Vantiv After you run the customer and contact conversion and the transaction conversion, there may be credit cards that were not converted to Vantiv PASS accounts. To be compliant with the credit card rules, all credit card numbers left over in the system, for example in change logs and customer, contact, or orders cards that did not get converted, only the last four digits of the card number can be visible or stored in the system.
Use the Vantiv Credit Card Purge utility to trim all credit card numbers that remain in the system to display and store only the last 4 digits of the card's number.
Note: The purge process does not convert any credit card information that exists within your Hold file entries. To delete this information, delete the file and regenerate it after the conversion.
Important: Run the purge utility after you have completed all other Vantiv conversion activities.
To purge any unconverted credit card data for Vantiv:
1. Ensure that you have completed the necessary steps listed in Converting to the Vantiv Payment Services Solution Overview.
2. Log out and back into the character-based system after completing the transaction conversion.
3. From the System > System Files > Custom > Credit Card Setup menu, select Element Credit Card Purge to display the Convert CC to Element screen.
4. Select one of the following to purge your credit card information:
• Begin - Use this hot key to start the purge process immediately.
• Schedule - Use this hot key to schedule the purge process to run at a run at a later time.

Credit Card Processing with Vantiv Payment Services
59
Chip & PIN Overview Epicor and Vantiv Integrated Payments have collaborated on a solution that supports both the Chip & PIN credit card processing and the devices connected through the Vantiv Express platform. A chip & PIN credit card contains a microchip for processing in addition to the magnetic strip. The solution uses a special triPOS application and device to interface between the Eclipse application and the Vantiv Integrated Payments platform. The triPOS device is designed to process the Chip & PIN transactions and supports processing of debit and credit transactions through the Vantiv Integrated Payments Express platform.
Note: The system uses Common Alerting Protocol (CAPS) when displaying warning message about payments.
The triPOS payment processing application accepts requests from business management software suites for processing end-to-end financial transactions through the Express platform:
The following sequence details the interactions that take place between the different components during a typical payment transaction with triPOS :
1. Eclipse sends a payment request to the triPOS payment processing application: a service running on the local PC at the counter.
2. triPOS interfaces with the PINpad to obtain the card information, manages cardholder selection of options and verification, then retrieves the EMV tags or tokens required to complete the transaction.
3. If necessary, triPOS sends the transaction to the Express platform to be forwarded to the card-issuing bank for approval.
4. After receiving a response from the Express platform, triPOS proceeds with final validation of the transaction with the PINpad.
5. triPOS generates the merchant and cardholder receipts. triPOS then returns a complete response to Eclipse, including the receipts.
6. Eclipse creates a payment in the Totals tab and prints the receipts on the Ship Ticket and Invoices form returned by triPOS .
Note: If you use Eclipse Forms, the system prints the receipt received by triPOS on your form in the standard receipt location.

Chip & PIN Overview
60
Use the Chip & PIN Installation and Configuration to set up your system to interface to the Express platform using the triPOS payment processing application in order to support card present and Chip & PIN (EMV) transactions. triPOS uses the local TCP/IP socket connection to process payments. triPOS accepts an XML-formatted request message and returns an XML-formatted response. The XML format of a triPOS message is similar to that of the Express platform.
The system handles credit card and debit card transactions equally. The only requirements are the credentials passed by Vantiv Integrated Payments and the application identifiers.
For information about how the Eclipse system interfaces with the Chip & PIN device, see Using the Chip & PIN Interface.
Note: Content within the Chip & PIN documentation used with permission from Vantiv Integrated Payments, Inc.
Credit Card Processing with Vantiv Payment Services
61
Chip & PIN Installation Requirements The triPOS payment processing application consists of binary files, configuration files, and supporting files hosted in a dedicated directory structure. In addition, two separate directories receive runtime log files and transaction receipts are required. Each site that runs the Chip and PIN program needs to install the software independently.
Note: We recommend a system administrator complete the tasks outlined in this section to ensure the safe and accurate installation.
This topic addresses the following information:
• Software Prerequisites
• Hardware Prerequisites
Software Prerequisites Eclipse and the triPOS payment processing application reside on the same physical machine to which a PIN pad is attached using a serial connection.
From this deployed installation, the triPOS payment processing application communicates with the Express platform through a secured Internet connection. triPOS accepts communication only from software running on the lcoal PC, therefore Solar is the only supported interface for Chip & PIN.
Note: Eclipse server calls to triPOS are not supported, therefore the Eterm interface is unable to operate with triPOS , nor can triPOS be run on any terminal server because it only accepts calls from the local PC.
In Eclipse, you must have administrator privileges on the workstation on which you are setting up the device. Additionally, you should create a specific Terminal ID in Solar for the device.
Hardware Prerequisites As of Release 9.0.2, Eclipse requires the following to process chip and PIN payments properly:
• Ingencio iSC250

Chip & PIN Installation Requirements
62
• Powered USB cable included with the device.
Note: If you do not have a powered USB cable, the device may not function properly. Contact Vantiv Integrated Payments for a replacement.
• AC Adapter model:
For more information about configurations, see Chip & PIN Configurations.

Credit Card Processing with Vantiv Payment Services
63
Using the triPOS Automatic Installation In order to ease the triPOS installation, Eclipse provides a triPOS Setup Wizard. This wizard runs an installer that installs both the required driver for your chip & PIN devices and the triPOS software needed to accept payment transactions using the chip-enabled credit cards.
Note: You must be logged in to Solar as an administrator. Right-click on the Solar icon and select Run as Administrator when you launch Solar.
Important: For users on Eclipse Release 9.0.1.1.8, you should contact Eclipse Support for additional configuration. This Eclipse Release does not have the check marks for Test Mode or EMV. You will need assistance setting these up manually. For users on Eclipse Release 9.0.2 and above, review the triPOS 9.0.2 Upgrade Procedure before running this procedure.
To run the triPOS installation:
1. If not already on, power up your Ingencio device and wait for the triPOS splash screen to display:
2. If not already open, right-click on the Solar icon and select Run as Administrator and log in.
Note: You must have the SUPERUSER and CREDIT.CARD.SETUP authorization keys assigned to complete this setup successfully.
3. From the System > System Files > Credit Card Setup menu, select triPOS Install to display the installation wizard.
4. In the Configuration Information window, enter the following for which you are installing:
• Company name - The company name for which you are installing. This name displays on the PIN pad device's welcome screen.
• Branch - The branch to determine from where the system should gather the Additional Credit Card information, such as the acceptor ID, account ID, and account token. Eclipse populates this information for you.

Using the triPOS Automatic Installation
64
• Server Listener Port - The port number populated by Eclipse according to available ports on the network. We do NOT recommend changing this number.
• Test Mode - Select this check box for running in Test/Certification mode. Leave deselected for Production mode.
• EMV Supported - Select this check box to Enable EMV cards (also called Chip Cards, Smart, or IC Cards).
5. Click Next.
6. In the Default Lane Setting and Serial/USB Information window, click Next to accept the defaults:
• Terminal ID - The terminal ID setup for this workstation as defined in Eclipse Branch Maintenance (not from Eclipse Terminal Maintenance).
• Lane - View only. Populated from Eclipse based on network settings.
• Manual Entry Allowed - Select to allow users to manually enter account numbers on the PIN pad.
• Device - Populated with the Ingencio device information. As of Release 9.0.2, this is the only device with which Eclipse is compatible.
• COM Port Number - The available port on the network.
7. In the Ready to Install triPOS window, click Install.
A progress window displays the percentage complete as the installation continues. Do not close this window once the installation process has started.
8. At the triPOS Installation Complete prompt click OK.
9. Click Finish.
10. At the confirmation prompt, click Yes.
The device restarts automatically to apply the settings with updated drivers.

Credit Card Processing with Vantiv Payment Services
65
Setting Up Chip & PIN in Eclipse Before using the chip & PIN interface, you must activate it for each terminal. branch in the system. The terminal ID for the workstation running the device must be unique to that workstation. Sharing terminal IDs may cause unexpected results on other workstations when attempting to take credit card payments. We highly recommend keeping a separate ID for each workstation.
Note: If you receive a "Device Not Found" error and you have confirmed the device is installed, you may need to retry the transaction to ensure connectivity.
To activate the chip & PIN interface for the terminal:
1. From System > System Files menu, select Terminal Setup.
2. From the File menu, select Credit Card.
3. Select Connect to triPOS when Card Present Selected.
Note: When this option is enabled, the system ignores the PIN Debit Enabled option set in Additional Credit Card Information from Branch Maintenance.
Note: You can select both Connect to TriPOS when Card Present Selected for the credit card and Connect to triPOS for Signature Capture Only for the rest of the payment's type in this window.
4. Click OK and close Terminal Setup.
The Account ID, Account Token, Terminal ID and Acceptor ID (also referred to as MID or Merchant ID) are values provided by Vantiv Integrated Payments that need to be populated in the screen for successful PASS and key-entered transactions that are performed directly with the Vantiv Express platform. For more information, see the Vantiv Integrated Payments documentation.

Using the Chip & PIN Interface
66
Using the Chip & PIN Interface Epicor and Vantiv Integrated Payments have collaborated on a solution that supports both the Chip & PIN credit card processing and the devices connected through the Vantiv Express platform.
The Eclipse system behavior for Credit Card Processing with Vantiv has been modified at the branch level. These modifications help Eclipse communicate with the triPOS application that runs locally on the PC that the Verifone device is connected. The communication occurs when the Sales Order Entry user selects Sale and chooses Card Present as the capture form for a new card. Then, the triPOS application takes over and communicates with the device leading the user through prompts to process the Chip & PIN credit or Interac Debit transaction. After the transaction is complete or canceled, the device communicates the result back to Eclipse for payment creation or error or decline recording.
Important: The Sales Order Entry change log captures canceled transactions, declined credit card transactions, Force Stop actions and any triPOS response messages for easy tracking and review.
Note: The triPOS application is not used when PASS information is selected for the Sale transaction in Customer Maintenance.
Running the Chip & PIN Verification The triPOS service on the counter computer runs as a local web service. The XML configuration file specifies which port on the PC handles communication between Eclipse and triPOS device. The Eclipse programs are configured so a port is specified and ensures communication with the device.
Note: If you are using the Starship companion product in conjunction with the Chip & PIN device, you cannot use the authorization phantom and must handle authorization outside the Chip & PIN device.
When the user selects Sale in the Solar Charge Credit Card screen and selects the Card Present option, a successful communication with triPOS application displays:
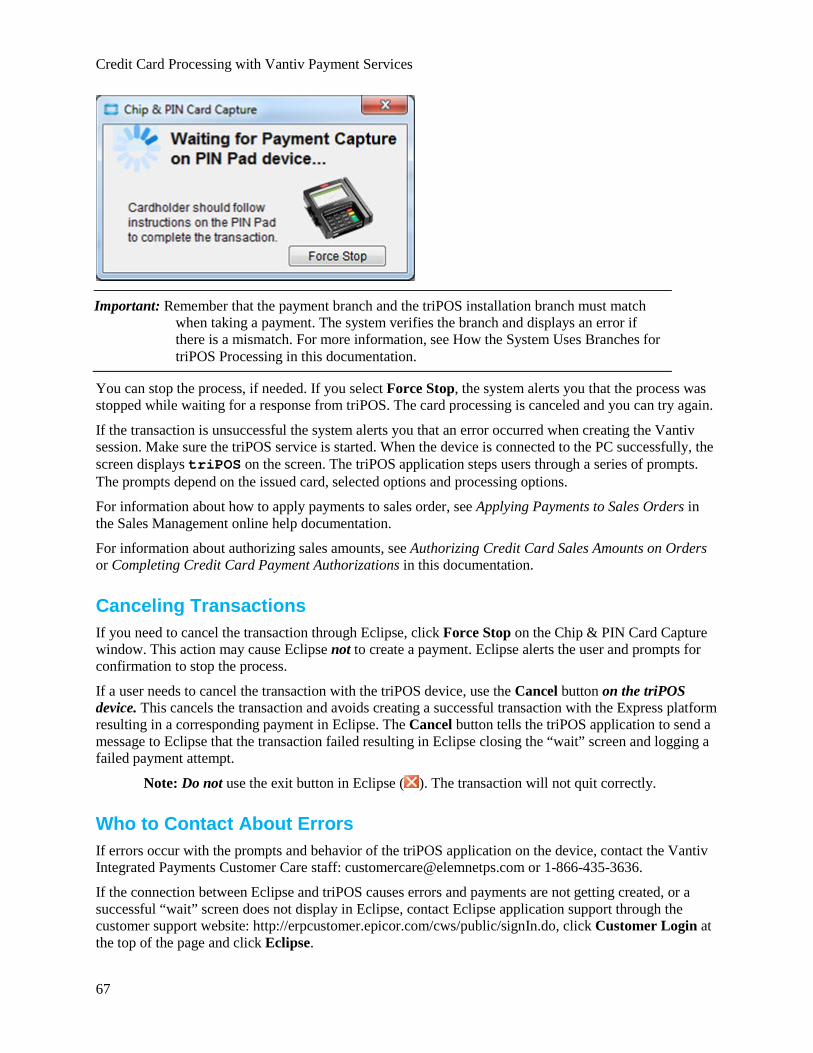
Credit Card Processing with Vantiv Payment Services
67
Important: Remember that the payment branch and the triPOS installation branch must match when taking a payment. The system verifies the branch and displays an error if there is a mismatch. For more information, see How the System Uses Branches for triPOS Processing in this documentation.
You can stop the process, if needed. If you select Force Stop, the system alerts you that the process was stopped while waiting for a response from triPOS. The card processing is canceled and you can try again.
If the transaction is unsuccessful the system alerts you that an error occurred when creating the Vantiv session. Make sure the triPOS service is started. When the device is connected to the PC successfully, the screen displays triPOS on the screen. The triPOS application steps users through a series of prompts. The prompts depend on the issued card, selected options and processing options.
For information about how to apply payments to sales order, see Applying Payments to Sales Orders in the Sales Management online help documentation.
For information about authorizing sales amounts, see Authorizing Credit Card Sales Amounts on Orders or Completing Credit Card Payment Authorizations in this documentation.
Canceling Transactions If you need to cancel the transaction through Eclipse, click Force Stop on the Chip & PIN Card Capture window. This action may cause Eclipse not to create a payment. Eclipse alerts the user and prompts for confirmation to stop the process.
If a user needs to cancel the transaction with the triPOS device, use the Cancel button on the triPOS device. This cancels the transaction and avoids creating a successful transaction with the Express platform resulting in a corresponding payment in Eclipse. The Cancel button tells the triPOS application to send a message to Eclipse that the transaction failed resulting in Eclipse closing the “wait” screen and logging a failed payment attempt.
Note: Do not use the exit button in Eclipse ( ). The transaction will not quit correctly.
Who to Contact About Errors If errors occur with the prompts and behavior of the triPOS application on the device, contact the Vantiv Integrated Payments Customer Care staff: [email protected] or 1-866-435-3636.
If the connection between Eclipse and triPOS causes errors and payments are not getting created, or a successful “wait” screen does not display in Eclipse, contact Eclipse application support through the customer support website: http://erpcustomer.epicor.com/cws/public/signIn.do, click Customer Login at the top of the page and click Eclipse.

Using the Chip & PIN Interface
68
How the System Handles Transaction Receipts In addition to data elements returned by the Vantiv Integrated Payments platform, a typical triPOS XML response also contains compliant receipts in an HTML format that the can use for printing. If you are using Eclipse Forms, the system replaces the normal receipt area with a transaction receipt from the triPOS system.
If you are using Eclipse Forms, the credit card verification displays within the Description field to ensure that the appropriate receipt is provided:
• Online PIN Card
• PIN Card

Credit Card Processing with Vantiv Payment Services
69
• No CVM Card
• No PIN Card

How the System Uses Branches for triPOS Processing
70
How the System Uses Branches for triPOS Processing For triPOS payment processing, Eclipse requires that the payment branch and the triPOS installation branch must match. The system verifies the branch and displays an error if there is a mismatch: Branch mismatch. The branch information does not match the triPOS configuration setup.
To manage the triPOS valid branches, see Maintaining triPOS Branches in this documentation.
Standard Branch Matching Following are examples for when the system uses checks to verify the branches:
Home Branch
G/L Branch
Payment Branch
Credit Card Branch
Home Branch Equals Payment Branch
Select... triPOS Message Expected Result
1 1 1 1 Yes Bill to Customer CC
Payment is processed. Payment processed.
1 1 3 1 No *** Failed *** This credit card cannot be used for payment.
Payment not processed.
1 3 1 1 Yes Payment is processed. Payment processed.
1 3 3 1 No *** Failed *** This credit card cannot be used for payment.
Payment not processed.

Credit Card Processing with Vantiv Payment Services
71
G/L Branches For G/L branch matching, the situation may be as follows:
Home Branch
G/L Branch
Payment Branch
Credit Card Branch
G/L Branch Matching
Scenario triPOS Message
Expected Result
1 3 3 1 G/L Branch Account ID equals branch account ID. Home branch Account ID does not equal payment branch account ID.
1. Select 'Bill to Customer' CC
2. Close the CC Payment Screen
3. Open CC Payment Screen
4. You will see an automatically Loaded Card, it is the 'Bill to Customer' CC but it has been saved to an Order Level Card, but will use the Bill-To Customer's home branch,so if we process the payment it fails.
*** Failed *** This credit card cannot be used for payment.
Payment not processed.
Home Branch Changes The following examples take into account matching the home branch Account ID to the payment branch ID. If a user changes his/her home branch, one of the two following scenarios can occur:
Scenario 1 A user changes the home branch with credit card information already saved. The credit card information was saved after an update (fix installed). Then, the following happens:
Home Branch
G/L Branch
Payment Branch
Credit Card Branch
Home Branch Account ID
Scenario triPOS Message Expected Result
3 1 1 1 Credit Card was created with a
Bill to Customer
Payment is processed. Payment processes.

How the System Uses Branches for triPOS Processing
72
Home Branch
G/L Branch
Payment Branch
Credit Card Branch
Home Branch Account ID
Scenario triPOS Message Expected Result
3 1 3 1 Home Branch Acct ID that matches Payment Branch Acct ID, but it now the system compares the current Home Branch Acct ID which does not match the Payment Branch Acct ID.
CC ***Failed***
This credit card cannot be used for payment
Payment is not processes
3 3 1 1 Payment is processed. Payment processes.
3 3 3 1 ***Failed***
This credit card cannot be used for payment
Payment is not processes
Scenario 2 A user changes the home branch with credit card information already saved. The credit card information was saved before an update (fix installed). Then, the following happens:
Home Branch
G/L Branch
Payment Branch
Credit Card Branch
Home Branch Account ID
Select... triPOS Message Expected Result
3 1 1 1 Credit Card was created with a Home Branch Acct ID that matches Payment Branch Acct ID, but it now the system compares the current Home Branch Acct ID which does not match the Payment Branch Acct ID.
Bill to Customer CC
*** Failed *** This credit card cannot be used for payment.
Payment not processed.
3 1 3 1 *** Failed *** Payment Account Not Found
3 3 1 1 *** Failed *** This credit card cannot be used for payment.
3 3 3 1 *** Failed *** Payment Account Not Found
If you use different branches with the same account ID, then payments will process:
2 2 2 2 Home branch equals payment branch.
Bill to Customer CC
Payment processed. Payment processed. 2 3 3 2
2 3 2 2
2 2 3 2
Home branch and payment branch differ due to create date

Credit Card Processing with Vantiv Payment Services
73
Home Branch
G/L Branch
Payment Branch
Credit Card Branch
Home Branch Account ID
Select... triPOS Message Expected Result
2 2 2 2 Current home branch account ID equals payment account ID. Home branch account ID did not equal payment account ID when it was created.
Bill to Customer CC
*** Failed *** Payment Account Not Found
Payment not processed.
2 3 3 2 *** Failed *** This credit card cannot be used for payment.
2 3 2 2 *** Failed *** Payment Account Not Found
2 2 3 2 *** Failed *** This credit card cannot be used for payment.

Maintaining triPOS Branches
74
Maintaining triPOS Branches Use triPOS Maintenance to review and manage the branches you allow to accept credit card payments using the triPOS device. The payment branches and the acceptance branch, or where the payment is actually taken, must match. This means that those branches must be enabled and recognized by the triPOS devices. The triPOS Maintenance window displays all computers where triPOS is installed and their associated branches.
To review and manage a triPOS branch:
1. From the System > System Files > Credit Card Setup menu, select triPOS Maintenance.
The triPOS Maintenance window displays all computers where triPOS is installed and their associated branches. The first row indicates the computer/PC where the Solar application runs.
Important: If this window displays as view-only, then triPOS has not been installed on the computer on which you are working.
Column Description Computer Name The physical name assigned to the computer.
Computer IP Address The internet protocol (IP) location for the computer.
Branch The branch currently assigned to the computer.
Acceptor ID Much like a merchant number, Vantiv assigns you unique acceptor IDs to identify you as an Vantiv customer. For more information about these IDs, see How the Integration with Vantiv Payment Services is Different in this documentation.
3. For new users with triPOS already installed, verify that their computer and branch display in this window.
4. Do one of the following:
To... Do this: adjust a branch 1. Locate the line for which you want to change a branch.
2. In the Branch field, press F10 and select the branch you want to use.
add a branch 1. From the File menu, select Add Branch or tab to a new row. 2. Complete the fields, as needed, including the branch needed.
5. Click Save and exit the window.

Credit Card Processing with Vantiv Payment Services
75
Reviewing triPOS Transaction Responses Use the API Activity Logs and API Activity Log Configure to log and monitor triPOS transaction responses in Eclipse. For example, you can monitory the sales and authorizations processes or PASS Transactions. Use this in addition to the PASS Reconciliation Utility to monitor transactions.
To enable triPOS activity logging:
1. From the System > System Programming > API Maintenance menu, select API Activity Log Configure.
2. In the Transaction column, search for >>>
3. In the corresponding State column, select On.
4. Use the Count and Day columns to limit the number of logs you want to maintain.
For more information about logging, see Configuring API Calls in System Maintenance online help documentation.
To review triPOS transaction responses:
1. From the System > System Programming > API Maintenance menu, select API Activity Logs to display the API Activity Logs window.
2. Set the header fields to display the logs you want to review.
3. Review the information as needed for triPOS responses.
Note: If a credit card has failed to process, use the Error Info tab to review the error information. The system indicates the reason for the fail and how long the system waited for a response, if available.

triPOS Eclipse Release Upgrade Procedure
76
triPOS Eclipse Release Upgrade Procedure Address the following for the triPOS application that is connected to the Vantiv Credit Card Payment Process application (formerly Element):
Functionality Release Requirements The following releases are required for the corresponding functionality:
• Release 9.0.3 - triPOS 5.10 and new installer. We recommend this release as the minimum as it includes the updated triPOS version. If you are running Ingenico Driver 2.20, we recommend uninstalling that version and installing the latest, version 2.6 or higher.
• Release 9.0.2.1.3 - Supports secondary non-credit card signature devices. We recommend this release for sites that use Innovo for non-credit card signatures.
• Release 9.0.2.0.6 - Supports non-credit card signatures. We recommend this as a minimum version. This version accepts both CC and non-credit card signatures on the triPOS device.
• Release 9.0.1.1.8 - This release is GA for triPOS, but does not support non-credit card signatures. The installer does not include certain options, and therefore requires some manual configuration of triPOS config file. We no longer recommend this version and encourage an upgrade.
triPOS Configuration Process for Release 9.0.3 If you already have triPOS on your computer, you must stop the triPOS service. Then, you must uninstall the old version and install the newer triPOS application. Lastly, check your terminal ID setup in Solar. This process ensures the newest version of the triPOS system is running for Release 9.0.3.
To stop triPOS:
1. From your Start menu, search for and select Administrative Tools.
2. Double-click Services.
3. Right-click on triPOS.NET and select Stop.

Credit Card Processing with Vantiv Payment Services
77
Uninstall triPOS:
1. From your Start menu, select Control Panel.
2. Double-click Programs and Features.
3. Right-click triPOS and select Uninstall.

triPOS Eclipse Release Upgrade Procedure
78
Install new triPOS:
1. Launch the Solar application.
2. From the System > System Files > Credit Card Setup menu, select triPOS Install.
3. In the triPOS setup window, use the Company Name and Branch fields to indicate where you
setting up triPOS.

Credit Card Processing with Vantiv Payment Services
79
Important: For a live/Production account leave the first check box deselected.
4. To accept chip-enable credit cards (EMV cards), select the second check box.
5. Click Next.
The system populates the Default Lane Setting and Serial/USB Information screen.
6. Complete the following field information based on how you want users to take payments using the triPOS devices:
Note: Click Next at the bottom of the window to accept the default settings.
Field Description Terminal ID (View Only) Displays the Eclipse Terminal ID assigned to the device.
Lane (View Only) Populated from Eclipse based on the network settings.
Mobile Payments Allowed
Select this check box to allow users to take credit card payments on a mobile device, such as an iPad.
Manual Entry Allowed Select this check box to allow users to manually enter credit card numbers on the device when taking payments.
Require CVV ID for Manual Entry
Select this check box to force users to enter the security code from the back of the credit card when manually entering a credit card on the device.
Device The device model or number, such as Ingenico iSC250.
Com Port Number If the field displays In Use, select an available com port to use.
Note: If you know your device has already been plugged in and is assigned a com port, then you need to unplug your device, exit the installer and start over. This releases the com port and makes it available to select.
7. Click Next.
8. Click Install.
The system displays a progress window indicating the download status.
9. When complete, a triPOS Installation Complete window displays. Click OK and then Finish.
10. Click Yes at the confirmation window to exit the setup.
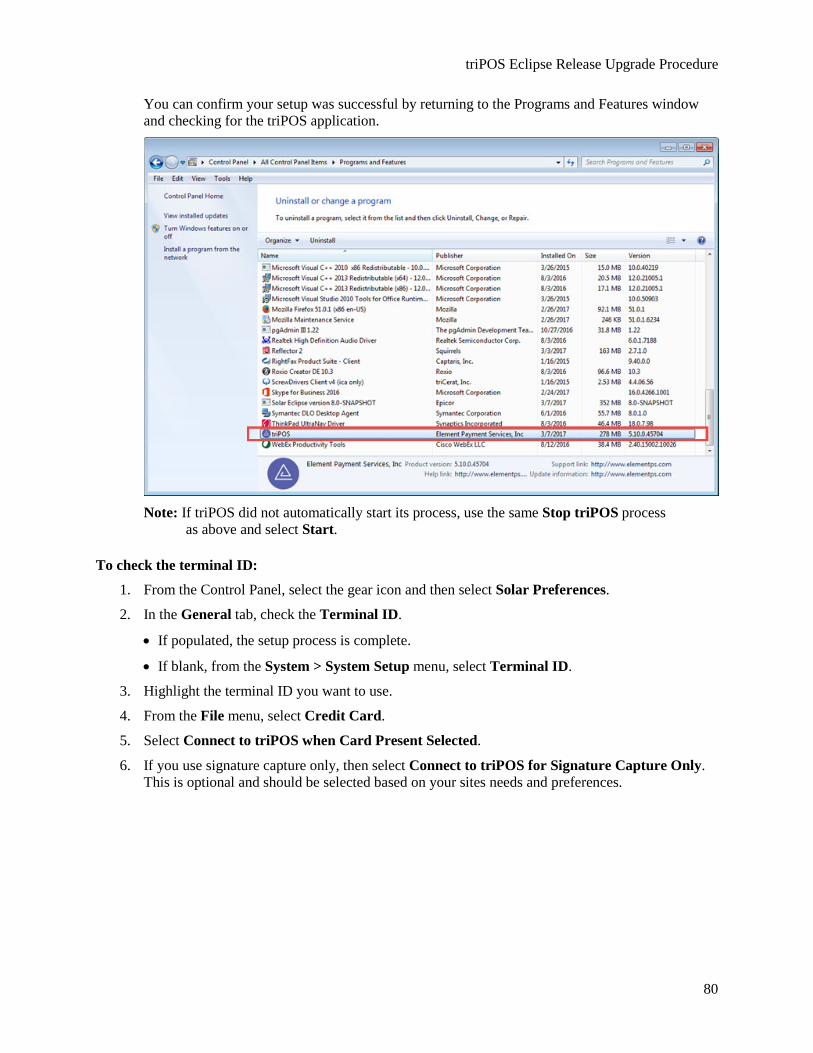
triPOS Eclipse Release Upgrade Procedure
80
You can confirm your setup was successful by returning to the Programs and Features window and checking for the triPOS application.
Note: If triPOS did not automatically start its process, use the same Stop triPOS process
as above and select Start.
To check the terminal ID:
1. From the Control Panel, select the gear icon and then select Solar Preferences.
2. In the General tab, check the Terminal ID.
• If populated, the setup process is complete.
• If blank, from the System > System Setup menu, select Terminal ID.
3. Highlight the terminal ID you want to use.
4. From the File menu, select Credit Card.
5. Select Connect to triPOS when Card Present Selected.
6. If you use signature capture only, then select Connect to triPOS for Signature Capture Only. This is optional and should be selected based on your sites needs and preferences.

Credit Card Processing with Vantiv Payment Services
81
Troubleshooting Credit Cards and Vantiv Use the following sections to help troubleshoot issues when processing payments using credit cards.
Transaction Not Found Message If you are manually entering or swiping a card in the Element Process Transaction window in a sales order, and you click Cancel Transaction without completing the transaction, the system displays a Transaction Not Found message when you return to sales order entry. This message indicates that the system was not able to retrieve a response for the transaction from Vantiv because you clicked Cancel Transaction, and a similar message displays in the order's change log. If you receive this message, attempt using a different card or accepting a different payment type.
Duplicate Decline Message Vantiv contains logic that checks for duplicate charges. If two charges for the same amount are made to the same card during the same batch period, the second charge is declined. You receive an error message that indicates a duplicate decline. You might also receive this message if a charge was sent to Vantiv, and you lost internet connectivity before Eclipse received a response, and you attempt to charge the card again.
Research transactions that come back with a duplicate decline message to ensure they are legitimate business transactions. If they are legitimate and you would like to charge the card, do one of the following:
• Change the price for the product on the order by one cent ($.01) so the order total is different, and charge the card for the new amount.
• Hold the order until the following day, or until after your batch with Vantiv processes, and process the order again to charge the card.
If Vantiv received a transaction but Eclipse did not receive a response, Vantiv has the information it needs to charge the card. However, because there is no indication in Eclipse that the order has been paid, you might attempt to charge the card again and receive the duplicate decline error. In this case, manually enter the payment information on the order to capture the charged payment so the order continues to process through the system.
Internet Explorer 8.0 If you are experiencing problems running Internet Explorer 8.0, refer to the fixes in the Microsoft Support Knowledge base article located at http://support.microsoft.com/kb/929867, or the steps below to fix the problem on each computer that you use to enter credit card payment information.
Important: If you are running Internet Explorer 8.0 on Windows 7.0 or Windows Vista, the troubleshooting steps provided below do not apply. To correct the problem, leave an Internet Explorer 8.0 browser window open while you are entering orders and accepting payments using credit cards in Eclipse. Or, set Mozilla Firefox as your default browser. Running Firefox does not require that you leave a browser window open.
1. Double-click My Computer or display your Windows Explorer.
2. From the Tools menu, select Options.
3. Click the File Types tab.

Troubleshooting Credit Cards and Vantiv
82
4. Scroll down to and highlight (NONE) URL: HyperText Transfer Protocol
5. Click Advanced.
6. Highlight the open action (should be the only on you have) and click Edit.
7. Click OK to close the window.
8. Click OK again to close the next window and then click Close to close the last window.
It may seem like nothing has changed by doing these steps since you did not actually change anything. However, you should now find that Internet Explorer 8 launches correctly from Eterm. If these steps do not resolve your Internet Explorer issues, you can follow all the steps in the article which double checks the information in the necessary fields.
404 Page Not Found Errors If you receive a 404 Page Note Found error when trying to enter a credit card payment on an order, your system has lost the internet connection with Vantiv. Verify that your internet connection is still online.

83
Index A
authorizations, credit cards
about 31
authorizing amounts 32
completing 33
ship via upcharges for freight 17
B
branches
credit card processor 13
C
chip and PIN
branch maintenance 74
branch matching 70
canceling transactions 66
downloading triPOS 61
errors 66
installation 61, 63
logging transactions 75
overview 59
receipts 66
reviewing triPOS responses 75
running verifications 66
setting up 65
sofware prerequisites 61
UNIX and LINUX considerations 61
Windows considerations 61
Credit Card Payment Review Queue 38
credit card services
conversion
purging card numbers 58
Credit Card Summary Report 36
credit cards
about 1, 2
accepting as payment 20
authorization codes, entering 29
authorizations
about 31
authorizing amounts 32
completing 33
ship via upcharges for freight 17
branch setup 13
chip and PIN
branch maintenance 74
branch matching 70
canceling transactions 66
downloading triPOS 61
errors 66
installation 61, 63
logging transactions 75
overview 59
receipts 66
reviewing triPOS responses 75
running verifications 66
setting up 65
software prerequisites 61
UNIX and LINUX considerations 61
Windows considerations 61
customer
default 26
deleting 26
declined charges 38
Element conversion
about 55
customer and contact 56

Index
84
transactions 57
failed charges 38
Level 3 data 7
PASS reconciliation 54
payment accounts
deleting 47
viewing 47
payment accounts (PASS accounts)
about 5, 46
deleting, scheduling 51
payment example 35
payment review queue 38
qualification costs 5
returns 42
sales 20
saving cards on orders 24
setting up
about 10
authorization keys 11
browser considerations 11
control maintenance records 11
test connection 16
URL addresses 15
ship via upcharges 17
storage costs 5
troubleshooting 81
voiding transactions 44
credit cards, reconciling charges to your cash box 36
credit cards, summary report 36
customer records
credit cards 26
E
Element Payment Services
about 1, 2
authorization codes, entering 29
authorizations
about 31
authorizing amounts 32
completing 33
branch setup 13
control maintenance records 11
converting to
about 55
customer and contact conversion 56
purging credit card data 58
transaction conversions 57
credit card payment example 35
Credit Card Payment Review Queue 38
declined charges 38
default cards, customer
defining 26
deleting 26
failed charges 38
Level 3 data 7
payment accounts (PASS accounts)
about 5, 46
deleting 47
deleting, scheduling 51
viewing 47
qualification costs 5
reconciling charges to your cash box 36
returns 20, 42
saving cards on orders 24
setting up
about 10
authorization keys 11
browser considerations 11
test connection 16
URL addresses 15
Credit Card Processing with Vantiv Payment Services
85
ship via upcharges for credti cards 17
storage costs 5
summary report 36
troubleshooting 81
voiding transactions 44
L
Level 3 credit card data 7
O
orders
sales
saving credit card information on 24
P
PASS reconciliation 54
payment accounts (PASS accounts), credit cards
about 46
deleting 47
scheduling deletes 51
viewing 47
payment terms
defining credit card parameters 26
payments
credit cards 20
saving credit cards on orders 24
R
reports, credit card 36
returns
credit card orders 42
S
sales tax
setting up credit cards 26
ship vias
freight upcharges for credit cards 17
T
triPOS
auto install instructions 76
branch maintenance 74
branch matching 70
canceling transactions 66
Com Port Number 76
default settings 76
errors 66
installation 63
lane setting 76
logging transactions 75
manual entry check box 76
mobile payments allowed 76
overview 59
receipts 66
reviewing triPOS responses 75
running verifications 66
terminal ID 76
U
URL addresses, credit card setup 15