criteria investigation of sand jacks investigation of sand jacks . full scale load testing of sand...
TRANSCRIPT

Load Capacity, Failure Mode and Design Criteria Investigation of Sand Jacks Full Scale Load Testing of Sand Jacks Final Report
Report CA06-0633 December 2008
Division of Research & Innovation

Load Capacity, Failure Mode and Design Criteria Investigation of Sand Jacks
Full Scale Load Testing of Sand Jacks
Final Report
Report No. CA06-0633
December 2008
Prepared By:
Department of Structural Engineering
University of California, San Diego La Jolla, CA 92093
Prepared For:
California Department of Transportation Engineering Services Center
1801 30th Street Sacramento, CA 95816
California Department of Transportation Division of Research and Innovation, MS-83
1227 O Street Sacramento, CA 95814

DISCLAIMER STATEMENT
This document is disseminated in the interest of information exchange. The contents of this report reflect the views of the authors who are responsible for the facts and accuracy of the data presented herein. The contents do not necessarily reflect the official views or policies of the State of California or the Federal Highway Administration. This publication does not constitute a standard, specification or regulation. This report does not constitute an endorsement by the Department of any product described herein.

STATE OF CALIFORNIA DEPARTMENT OF TRANSPORTATION TECHNICAL REPORT DOCUMENTATION PAGE TR0003 (REV. 10/98)
1. REPORT NUMBER
CA06-0633
2. GOVERNMENT ASSOCIATION NUMBER
3. RECIPIENT’S CATALOG NUMBER
4. TITLE AND SUBTITLE Load Capacity, Failure Mode and Design Criteria Investigation of Sand Jacks: Full Scale Load Testing of Sand Jacks
5. REPORT DATE
December, 2008 6. PERFORMING ORGANIZATION CODE
7. AUTHOR(S) Paul Travis Sanders, Scott A. Ashford
8. PERFORMING ORGANIZATION REPORT NO.
SSRP-05/06
9. PERFORMING ORGANIZATION NAME AND ADDRESS
Department of Structural Engineering University of California, San Diego La Jolla, CA 92093-0085
10. WORK UNIT NUMBER
11. CONTRACT OR GRANT NUMBER
DRI Research Task No. 0633 Contract No. 59A0446
12. SPONSORING AGENCY AND ADDRESS
California Department of Transportation Engineering Services Center 1801 30th Street Sacramento, CA 95816 California Department of Transportation Division of Research and Innovation, MS-83 1227 O Street Sacramento, CA 95814
13. TYPE OF REPORT AND PERIOD COVERED
Final Report
14. SPONSORING AGENCY CODE
913
15. SUPPLEMENTAL NOTES
This report may also be referenced as report SSRP-05/06 published by the UCSD.
16. ABSTRACT
A sand-jack is a sand filled container used as a component of cast-in-place bridge false-work. The sand filler facilitates the removal of the false-work by allowing slow and controlled lowering of the bracing that has become wedged beneath the new bridge structure. A circular sand-jack made of steel was tested to isolate the response of the two different sand fillers and the effects of the gap between the sides of the sand-jack and the application of the load. It was shown that the finer sand and a larger plunger both caused a stiffer response in the steel cylinder. Several configurations of wood sand-jacks were also tested in a second phase. In a range of vertical displacement of less than 1-inch, the number of bands, the spacing of the base nails, location of the banding, and the number of crimp connections on each band had little or no effect on the response. In that range of displacement it was shown that a sand-jack with no banding had a stiffness of half that of a sand-jack with banding. Additionally, test results demonstrated no benefit to lining the sand-jack with plastic. The use of a 12-inch wide corbel under a 15-inch wide sand-jack resulted in no adverse effects. The ultimate capacity was found to be significantly affected by the number of steel bands and the spacing of the base nails.
17. KEY WORDS
Sand Jack, falsework, false footing
18. DISTRIBUTION STATEMENT No restrictions. This document is available to the public through the National Technical Information Service, Springfield, VA 22161
19. SECURITY CLASSIFICATION (of this report)
Unclassified
20. NUMBER OF PAGES 66 Pages
21. PRICE
Reproduction of completed page authorized

STRUCTURAL SYSTEMS
RESEARCH PROJECT
Report No.
SSRP–05/06
FULL SCALE LOAD TESTING OF SAND-JACKS
by
PAUL TRAVIS SANDERS
SCOTT A. ASHFORD
Final Report Submitted to the California Department of Transportation (Caltrans) under Contract No. 59A0446
June 2006
Department of Structural Engineering University of California, San Diego La Jolla, California 92093-0085

University of California, San Diego
Department of Structural Engineering
Structural Systems Research Project
Report No. SSRP–05/06
Full Scale Load Testing of Sand-Jacks
by
Paul Travis Sanders
Graduate Student Researcher
Scott A. Ashford
Professor of Structural Engineering
Final Report Submitted to the California Department of Transportation (Caltrans) under Contract No. 59A0446
Department of Structural Engineering
University of California, San Diego
La Jolla, California 92093-0085
June 2006

Technical Report Documentation Page 1. Report No.
SSRP-05/06
2. Government Accession No.
3. Recipient’s Catalog No.
4. Title and Subtitle
FULL SCALE TESTING OF SAND-JACKS
5. Report Date
6. Performing Organization Code
7. Author(s)
Paul Travis Sanders Scott A Ashford
8. Performing Organization Report No.
UCSD / SSRP-05/06
9. Performing Organization Name and Address
Department of Structural Engineering School of Engineering
10. Work Unit No. (TRAIS)
University of California, San Diego La Jolla, California 92093-0085
11. Contract or Grant No.
59A0446 12. Sponsoring Agency Name and Address
California Department of Transportation
13. Type of Report and Period Covered
Final Report – 01/01/05 to 12/31/05
Engineering Service Center 1801 30th St., West Building MS-9
Sacramento, California 95807
14. Sponsoring Agency Code
15. Supplementary Notes
Prepared in cooperation with the State of California Department of Transportation.
16. Abstract
A sand-jack is a sand filled container used as a component of cast-in-place bridge false-work. The sand filler facilitates the removal of the false-work by allowing slow and controlled lowering of the bracing that has become wedged beneath the new bridge structure. A circular sand-jack made of steel was tested to isolate the response of the two different sand fillers and the effects of the gap between the sides of the sand-jack and the application of the load. It was shown that the finer sand and a larger plunger both caused a stiffer response in the steel cylinder. Several configurations of wood sand-jacks were also tested in a second phase. In a range of vertical displacement of less than 1-inch, the number of bands, the spacing of the base nails, location of the banding, and the number of crimp connections on each band had little or no effect on the response. In that range of displacement it was shown that a sand-jack with no banding had a stiffness of half that of a sand-jack with banding. Additionally, test results demonstrated no benefit to lining the sand-jack with plastic. The use of a 12-inch wide corbel under a 15-inch wide sand-jack resulted in no adverse effects. The ultimate capacity was found to be significantly affected by the number of steel bands and the spacing of the base nails.
17. Key Words
Sand-jack, false-work, false footing
18. Distribution Statement
Unlimited
19. Security Classification (of this report)
Unclassified
20. Security Classification (of this page)
Unclassified
21. No. of Pages
~69
22. Price
Form DOT F 1700.7 (8-72) Reproduction of completed page authorized

DISCLAIMER
The opinions, recommendations and conclusions contained within this report are
solely those of the authors, and do not necessarily reflect the views of the California
Department of Transportation or other project sponsors.
ii

ACKNOWLEDGEMENTS
Funding for the research detailed in this report was provided by the California
Department of Transportation (Caltrans). The specimens were built and tested at the Powel
Structural Systems Laboratories at the University of California, San Diego. Without the
assistance and guidance of the technical staff and the help of the undergraduate students, the
project would not have been such a success.
iii

ABSTRACT
A sand-jack is a sand filled container used as a component of cast-in-place bridge
false-work. The sand filler facilitates the removal of the false-work by allowing slow and
controlled lowering of the bracing that has become wedged beneath the new bridge structure.
A circular sand-jack made of steel was tested to isolate the response of the two different sand
fillers and the effects of the gap between the sides of the sand-jack and the application of the
load. It was shown that the finer sand and a larger plunger both caused a stiffer response in
the steel cylinder. Several configurations of wood sand-jacks were also tested in a second
phase. In a range of vertical displacement of less than 1-inch, the number of bands, the
spacing of the base nails, location of the banding, and the number of crimp connections on
each band had little or no effect on the response. In that range of displacement it was shown
that a sand-jack with no banding had a stiffness of half that of a sand-jack with banding.
Additionally, test results demonstrated no benefit to lining the sand-jack with plastic. The
use of a 12-inch wide corbel under a 15-inch wide sand-jack resulted in no adverse effects.
The ultimate capacity was found to be significantly affected by the number of steel bands and
the spacing of the base nails.
iv

TABLE OF CONTENTS
DISCLAIMER .......................................................................................................................... ii
ACKNOWLEDGEMENTS..................................................................................................... iii
ABSTRACT............................................................................................................................. iv
TABLE OF CONTENTS.......................................................................................................... v
TABLE OF FIGURES............................................................................................................. vi
TABLE OF TABLES .............................................................................................................. ix
LIST OF SYMBOLS ................................................................................................................ x
1. Introduction....................................................................................................................... 1
2. Background....................................................................................................................... 3
2.1 Previous Studies........................................................................................................ 3 2.2 Load Path .................................................................................................................. 5 2.3 Resistance ................................................................................................................. 6
3. Test Program................................................................................................................... 10
3.1 Phase One................................................................................................................ 10 3.2 Phase Two............................................................................................................... 13
4. Results............................................................................................................................. 20
4.1 Phase One................................................................................................................ 20 4.2 Phase Two............................................................................................................... 27
5. Conclusions..................................................................................................................... 45
Appendix: Example Construction Specification………………………………….………….47 References............................................................................................................................... 47
v

TABLE OF FIGURES
Figure 1.1: Sand-Jacks in use...........................................................................................................1
Figure 1.2: Close up of Sand-Jack in use.........................................................................................2
Figure 2.1: Load vs. crosshead displacement for sand-box tests with slag filler (USDOT, 1982)..4
Figure 2.2: Depiction of yield modes for single shear dowel connections......................................8
Figure 3.1: Particle-size distribution for the sand fillers................................................................12
Figure 3.2: Strain gage locations on steel cylinder. .......................................................................13
Figure 3.3: Sand-Jack with no banding and a plastic liner ............................................................13
Figure 3.4: Typical specimen design. ............................................................................................14
Figure 3.5: The four basic specimen variations; a) No bands, b) One centered band, c) Two
bands, d) Three bands. .............................................................................................................15
Figure 3.6: Sand-Jack with liner in place.......................................................................................16
Figure 3.7: Section of sand-jack positioned on the corbel.............................................................16
Figure 3.8: Single band placed in lower third of side a) Single crimp connector; b) Double crimp
connectors. ...............................................................................................................................17
Figure 4.1: Load displacement of both filler materials under two different plunger diameters. ...20
Figure 4.2: Load displacement for the 30 mesh sand under five different plunger diameters. .....21
Figure 4.3: Comparison of stiffness for the 30 mesh sand under a 19.125 inch and an 18.0 inch
diameter plunger. .....................................................................................................................22
Figure 4.4: Load displacement of the #16 sand under three different plunger diameters. ............23
Figure 4.5: Comparison of the load displacement curves for three tests of the 30 mesh sand under
an 18-inch diameter plunger. ...................................................................................................24
Figure 4.6: Comparison of three tests run on the #16 sand under an 18-inch diameter plunger. ..24
vi

Figure 4.7: Normalized strains in the steel cylinder at three depths. .............................................25
Figure 4.8 Comparison of the measured and predicted ratio of horizontal stress to vertical
pressure at the center of the plunger at depth = 0. ...................................................................26
Figure 4.9 Comparison of response for boxes with and without a liner or corbel........................27
Figure 4.10: Base nail spacing (S). ................................................................................................29
Figure 4.11 Load displacement for 7-inch base nail spacing........................................................29
Figure 4.12: Load displacement for 5-inch base nail spacing. ......................................................30
Figure 4.13: Load displacement for 4-inch base nail spacing. ......................................................30
Figure 4.14: Comparison of idealized load displacement curves for different base nail spacing. 31
Figure 4.15: Load displacement for specimens with a single band centered and a single crimp
connection. ...............................................................................................................................32
Figure 4.16: Load displacement for specimens with a single band in the lower third of the sides
and a single crimp connection..................................................................................................33
Figure 4.17: Load displacement for specimens with double crimp connectors on the single band
in the lower third......................................................................................................................33
Figure 4.18: Comparison of single bands centered and lowered with single or double crimps. ...34
Figure 4.19: Comparison of single bands centered and lowered with single or double crimps
limited to a displacement of 1-inch..........................................................................................35
Figure 4.20: Load displacement data for sand-jacks with no bands. .............................................36
Figure 4.21: Load displacement data for sand-jacks with a single centered band.........................36
Figure 4.22: Load displacement data for sand-jacks with two bands. ...........................................37
Figure 4.23: Load displacement data for sand-jacks with three bands. .........................................37
Figure 4.24: The filler material has developed a significant soil fabric. .......................................40
vii

Figure 4.25: Load displacement for the steel banding...............................................................41
Figure 4.26: Comparison of banding with a single or double crimp connection...........................41
Figure 4.27: Comparison of zero, one, two, and three bands. .......................................................44
Figure 4.28: Closer look at zero, one, two, and three bands..........................................................44
viii

TABLE OF TABLES
Table 3.1: Phase One test matrix. ........................................................................................... 11
Table 3.2: Phase Two test matrix............................................................................................ 18
ix

LIST OF SYMBOLS
A Area of plunger B Short dimension of the plunger D Nail diameter, in. d Depth of filler material F Lateral force Fem Main member dowel bearing strength, psi. Fes Side member dowel bearing strength, psi. Fyb Dowel bending yield strength, psi. G Specific gravity Ka Active earth pressure coefficient Ko At rest earth pressure coefficient L Length of sand-jack side L Long dimension of the plunger lm Main member dowel bearing length, in. ls Side member dowel bearing length, in. M B/z N L/z P Applied load r Radius Rd Reduction term: 2.2 for D < 0.17 in. Re Fem/Fes
t Thickness V M2 + N2 +1 V1 (MN)2
W Nominal withdrawal design value, lbs. Z Nominal lateral design value for a single fastener, lbs. z Depth σ' Friction angle, deg. μ Poisson's ratio σ H Lateral pressure σ m Maximum horizontal stress σ r Radial pressure σ T Tangential stress σ v Vertical pressure σ zo P/A
x

1. INTRODUCTION
In the erection of cast-in-place concrete bridges, sand-jacks are used to relieve the
stress on false-work for removal. A sand-jack is a small container filled with sand.
Typically a “plunger” made of plywood rests directly on the sand and wedges are placed
between the plunger and a horizontal element of the false-work. Figure 1.1 shows sand-jacks
in use. The plastic seen at the top of the sand-jack is placed above the filler material to keep
the filler dry.
Figure 1.1: Sand-Jacks in use.
Figure 1.2 is a closer view of a sand-jack with two steel bands. The right and left
sides show visible distress. The left side has split and is noticeably deformed.
1

Figure 1.2: Close up of Sand-Jack in use.
Once the concrete for the bridge is placed above, the temporary supports become
wedged between the newly placed concrete and the ground. For disassembly, a side of the
sand-jack can be removed allowing the sand to escape resulting in the lowering of the false-
work.
There are currently no standards of design or capacity for the use of sand-jacks,
resulting in significant variance in practice. Construction accidents have brought attention to
the design and use of sand-jacks in bridge construction. Such an accident occurred at the
Riley Road Interchange Ramp, East Chicago, Indiana, in 1982 that resulted in the death of
sixteen people (USDOT, 1982). At the behest of the California Department of
Transportation (Caltrans), full scale testing was undertaken at the Powel Structural
Laboratories at the University of California, San Diego in an effort to provide design
recommendations, failure mode definitions, and capacity information.
2

2. BACKGROUND
2.1 Previous Studies
Very little research has been done specifically related to sand-jacks. Two previous
studies were located that provided some test results on sand-jacks. Both of the previous
studies were focused on specific specimens that were either scheduled for, or already in use.
Neither study fully addressed the design variables that may or may not have significant
impact on performance of the sand-jack.
Howard Thurston (Thurston, 2000) at the Oregon Institute of Technology tested a
rectangular sand-jack, approximately 7.5-inch by 36-inch, made of steel. The test was
designed to verify the performance of the container without intermediate stiffeners and a
smaller plunger than specified by the designers. The single specimen was loaded to 90 kips
where the test was terminated with no failure of the specimen. The investigators also
conducted a finite element study that suggested that due to the shallow confined nature of the
soil filler, the sand could be treated as a linear elastic material.
The Occupational Safety and Health Administration (OSHA) and the U.S.
Department of Transportation performed an investigation into the 1982 accident at the Riley
Road interchange (USDOT, 1982). The investigation involved the National Bureau of
Standards (NBS) testing ten sand-jacks recovered from the accident. The goals of the testing
performed by NBS were very similar to those of the UCSD project. The sand-jacks being
used on the Riley Road project were constructed of 2 by 4 inch (nominal) sides with plan
dimensions of approximately 18 inches square. The boxes had aluminum sheet metal
bottoms and a single steel band. The filler used was boiler slag. The report contained load-
deflection curves for different filler materials placed loose or hand compacted. Figure 2.1 is
reproduced from the USDOT report (USDOT, 1982). The plot clearly shows a difference in
stiffness between the loose and compacted fillers. Also, one can see that the loose fillers
have a displacement of approximately 1-inch at a load of 100 kips.
3

Figure 2.1: Load vs. crosshead displacement for sand-box tests with slag filler (USDOT, 1982).
From these previous investigations it can be seen that in order to determine failure modes and ultimate capacities, the test set-up must be capable of generating very large vertical loads.
4
2.2 Load Path
Following the assumption that the confining capacity of the sand-jack will control
over the crushing capacity of the filler material and the base of the box, the lateral load
transmitted by the filler becomes central to the investigation. Above, it was suggested that
the filler material could be treated as a linear elastic material and the lateral pressure
calculated by application of Poisson’s ratio. For a steel sand-jack treating the filler as elastic
provides reasonably accurate results. However, in the case of the wood sand-jacks, the sides
dilate significantly more and the assumption of elastic behavior no longer holds.
Alternately, the load applied to the sand-jack could be thought of as a surcharge load
at the top of a retaining wall. The lateral load transmitted by the sand filler can be estimated
be applying Rankine theory. Equation 1 calculates the at rest lateral earth pressure
coefficient, that is the percentage of the vertical pressure that acts laterally on a stationary
retaining wall. Equation 2 is similar to Equation 1, except that it is for a retaining wall that
moves away from the backfill. The vertical sides of the sand-jack and the level sand inside
are appropriate for the assumptions made in Rankine theory. The dilation of the steel
cylinder was small enough to be considered stationary. The sides of the wood boxes displace
laterally significantly and thus fall under the active earth pressure case. Rankine theory
neglects friction between the soil backfill and the wall.
Once testing commenced, it was clear to the author that there is friction between the
filler material and the sides of the sand-jacks. Coulomb theory is very similar to Rankine
theory but also accounts for wall friction. Therefore, it may also be appropriate to use
Coulomb theory for estimating the lateral pressure.
'sin1 φ−=oK (1)
⎟⎠⎞
⎜⎝⎛ −=
2'45tan 2 φ
aK (2)
where
=oK at rest earth pressure coefficient
=aK active earth pressure coefficient
=′φ friction angle, deg.
5

The relationship between the at-rest earth pressure coefficient and Poisson’s ratio is
shown by Equation 3. Therefore, both retaining wall theory and Poisson’s ratio produce
similar results for estimating the lateral pressure generated inside a sand-jack when the walls
move only a small amount.
μ
μ−
=1oK (3)
The Boussinesq method (Bowels, 1996) allows one to estimate the vertical pressures
more accurately than simply assuming a uniform stress distribution. The Boussinesq method
attempts to accounts for load spreading. Application of the Boussinesq equation will account
for the distance between the plunger edge and the side of the sand-jack as well as the depth.
2.3 Resistance
Once the lateral load demand on the box is determined, to estimate the capacity of the
sand-jack we need a resistance with which to compare. The resistance to lateral pressure
supplied by a sand-jack constructed of wood is derived from two sources. The first source is
the steel strapping; the second is the nail connections.
The corners of the sand-jack and the base-to-sides are nailed connections. The
corners are primarily loaded in withdrawal from end-grain. Load parallel to the nail shank
that would tend to pull the nail back out is termed ‘withdrawal’. The structure of wood
resembles that of a bundle of parallel drinking straws (US Dept. of Agriculture, 1999). This
structure is referred to as the grain. Nails are then driven parallel or perpendicular to the
grain. When a nail is parallel to the grain and loaded in withdrawal there is a much lower
capacity than when the nail shank if perpendicular to the grain. Nails can offer some
resistance to withdrawal as calculated by Equation 4; however when loaded in withdrawal
from end-grain the resistance is reduced by up to 50% (AF&PA 1997).
DGW 25
1380= (4)
where
6

=W nominal withdrawal design value in pounds.
=G specific gravity of the wood
=D nail diameter, in.
The connection of the base to the sides is a two member connection loaded in shear.
The capacity is calculated from six doweled connection yield mode equations originally
adopted from a European yield theory (Aune, 1986). Each yield mode is designated by a
roman numeral and a subscript to describe the mode as being in the main member or the side
member. The main member is defined as the member that holds the point of the nail. The
side member is defined as the member that the nail passes all the way through. Figure 2.2
depicts the yield modes. An angle of the dowel represents a plastic hinge and the shading
around the dowel depicts crushing in the members.
The first three modes, Im, Is and II involve bearing failure of the wood members
without bending of the fastener. These modes are more applicable to bolted connections and
have not been observed in nailed connections due to the relatively low bending capacities of
nails. Modes IIIm (Equation 5), IIIs (Equation 6), and IV (Equation 7) combine plastic
hinging of the fastener with crushing of the wood members around the dowel (Breyer, 2003).
7

Figure 2.2: Depiction of yield modes for single shear dowel connections.
( ) de
emm
RRFDlk
Z21
2
+= (5)
where ( ) ( )2
2
2 3
212121
sem
eybe lF
DRFRk
++++−=
( ) de
ems
RRFDlk
Z+
=2
3 (6)
8

where ( ) ( )
2
2
3 3
22121
sem
eyb
e
e
lF
DRFR
Rk
++
++−=
( )e
ybem
d RFF
RDZ
+=
1322
(7)
where
Z = nominal lateral design value for a single fastener, lbs.
D = diameter of dowel fastener, in.
Fyb = dowel bending yield strength, psi.
Rd = reduction term: = 2.2 for D ≤ 0.17 in.
es
eme F
FR =
lm = main member dowel bearing length, in.
ls = side member dowel bearing length, in.
Fem = main member dowel bearing strength, psi.
Fes = side member dowel bearing strength, psi.
All the modes estimate the capacity of the connection by incorporating the connection
geometry and dowel bearing strength of the wood species being connected. End fixity of the
fastener, tension in the fastener and friction between the wood members is neglected
(AF&PA, 1999). The values of dowel bearing strength (Fe) given in the National Design
Specification for Wood Construction (NDS) are allowable level stresses. The commentary to
the NDS states that the nominal design values provided though application of the yield mode
equations is twenty percent of the average ultimate loads (AF&PA, 1997). The capacities
estimated by the yield mode equations are unadjusted. Appropriate adjustments must then be
made for load duration, moisture content, edge distance, etc.
Yield mode IIIs is directly dependant on the length of bearing of the dowel on the side
member (ls) (Equation 6). This dependency makes overdriven nails a concern. Nails over
driven by more than 1/8-inch can significantly reduce the shear capacity of the connection
(APA, 2002; Andreason, 1994). Nail head pull-through is also dependant on the same length
and could likewise be reduced (APA, 2002). To maintain the integrity of the nail
connections, overdriven nails should be avoided.
9

3. TEST PROGRAM
The testing consisted of two phases. The first phase was designed to isolate the
behavior of the sand filler and the affects of plunger size. The second phase tested wood
sand-jacks that closely simulated current field practice.
3.1 Phase One
Phase One tests were performed on a 0.25-inch thick steel, cylindrical sand-jack with
a 19-¼ inch inside diameter. Table 1 summarizes the tests performed on the steel cylinder.
The cylinder was placed on a ½-inch thick sheet of plywood to provide a smooth base and to
facilitate sand clean-up after the test. The sand filler was placed by simply pouring the sand
from a five gallon bucket and leveling by hand. This method was used to simulate field
conditions where it was assumed in most cases minimal time and effort would be used to
place the filler material. The sand was poured from a height equal to the top edge of the
sand-jack to maintain and equal measure of compaction between separate tests.
10

Table 3.1: Phase One test matrix. Test # Filler Plunger diameter (in)
1* 30 19-1/8 2 30 19-1/8 3 30 16 4 30 10-5/8 5 30 18 6 16 18 7 16 10-5/8 8 16 19-1/8
9* 30 15-3/8 10 30 18 11 30 18 12 16 18 13 16 18 14 30 15-3/8 * Test did not yield useable data.
Caltrans polled contractors who routinely use sand jacks to find the standard of
practice. The filler was the variable with the least amount of consistency. For this project
two different sands were used as filler material, a 30 mesh and a #16 silica sand-blasting
sand. A sieve analysis was performed on each filler material. Figure 3.1 is the particle-size
distribution curves for both materials. Both materials are uniformly graded. The grain size
of the 30 mesh corresponds to the number 30 sieve or 0.0236-inch (0.6 mm). The #16 sand
has mostly a grain size of 0.0465-inch (1.18 mm) which corresponds to the number 16 sieve.
11

Particle Size (in) -- log scale
Perc
ent P
assi
ng
Particle-Size Distribution Curvefor Both Filler Materials
0.0020.010.10.20
20
40
60
80
100
30 mesh#16
Figure 3.1: Particle-size distribution for the sand fillers.
Plungers of several different sizes were used. The largest diameter was selected to be
as large as possible and not come in contact with the sides of the cylinder. The smaller sizes
were chosen to provide a range of data but were constrained by test setup and material
availability. The load was applied by an 18-inch diameter steel plate. To achieve a
displacement range of up to 3-inch without the steel plate interacting with the specimen or
the filler the smaller plungers needed to be 3-inch thick. To accomplish this, plungers were
cast of Hydrostone in available molds. Hydrostone is a cementatious product similar to
Plaster of Paris but has a much higher strength. The plunger diameter is directly related to
the annular gap criteria for the wood sand-jacks discussed in Phase Two.
Strains were measured at two locations along the inside circumference of the
cylinder: one inch from the top, in the middle, and one inch from the bottom (Figures 6).
Vertical load and displacement were also measured.
12

Figure 3.2: Strain gage locations on steel cylinder.
3.2 Phase Two
For Phase Two, wood sand-jacks that represent the common practice in bridge
construction in California were tested to failure. Load was applied to the specimen by a steel
plate attached to a hydraulic jack. Once again a spacer was required to keep the loading plate
from interfering with the specimen. The spacer was a 3.25-inch thick piece of hardwood.
Common practice is to use hardwood wedges to level the element directly above the sand-
jack. Therefore the spacer was a close approximation to actual field conditions. Figure 3.3
shows a sand-jack with the hardwood spacer in place under the hydraulic jack and steel plate.
Figure 3.3: Sand-Jack with no banding and a plastic liner with hardwood spacer in place under load applicator.
13

Caltrans provided a general configuration and dimensions for the sand-jacks. The
general design was a representation of common practices gathered by surveying bridge
contractors using sand-jacks on projects in California.
The general configuration is shown in
Figure 3.4. Each side has one end overlapped by the adjacent side and is connected
with three nails. Early in the project it was decided for simplicity the corners and base would
be nailed with 16d nails, the most common in the field. Each sand-jack was constructed of
2”x6” (nominal) sides and a ½” CDX plywood bottom. The lumber for the sides was green,
Douglas Fir-Larch, number 2 or better. Through the duration of the project the lumber was
stored outside and uncovered subjecting the wood to temperature changes, morning dew,
direct sun, and some rain. These elements affected the characteristics of the material,
specifically the moisture content. More splitting occurred when nailing pieces that had been
in the elements longer.
Figure 3.4: Typical specimen design.
The goal of the second phase was to accurately simulate field conditions while
determining a recommended configuration. Further, it was desired that capacity and the
corresponding displacement for four variations be compiled for use by contractors and
falsework designers.
14

The four variations were zero, one, two or three bands (Figure 3.5). Single band
specimens had the band placed around the sides at mid-height. Specimens with two or three
bands had the bands wrapped around the sides spaced evenly between the top and bottom.
The strapping was 0.75-inch by 0.025-inch with approximate yield strength of 2000 lbs.
a) b)
c) d)
Figure 3.5: The four basic specimen variations; a) No bands, b) One centered band, c) Two bands, d) Three bands.
In determining a recommendation for design specifications, several variables were
explored that affect the performance. Through discussions with Caltrans engineers, the
author attempted to include the design variables that are commonly varied in practice or
variables thought to have the largest impact on performance.
First, the impact of lining the box with plastic was examined. The liner used was 4
mil polyethylene, construction grade plastic. A Square section was cut and presses into the
box by hand. The plastic was folded over itself to fit into the corners of the box as best as
possible but there were still voids left between the plastic and the box. Figure 3.6 is a sand-
jack with the liner in place prior to placement of the filler.
15

Figure 3.6: Sand-Jack with liner in place.
Second to be investigated was the effect of placing the sand-jack on a corbel, or beam that
reduces the bearing area under the jack (Figure 3.7). A one inch thick by 22-inch by 12-inch
steel plate was used as the corbel. The one inch thickness provided enough clearance such
that the floor beneath the corbel did not contact the base of the sand-jack at any time during
the test.
Figure 3.7: Section of sand-jack positioned on the corbel.
The third variable was the number and spacing of the nails used to attach the plywood
base. Nine sand-jacks were constructed with the only variable being the spacing of the base
nails. All the base nails for these nine specimens were 3.5-inch by 0.162-inch (16d). Three
16

had spacing of 4-inch maximum, three had spacing of 5-inch maximum, and three had 7-inch
maximum spacing. These nine boxes all had three bands and were tested with the 30 mesh
filler, on the corbel, unlined, and the annular gap was limited to ¼-inch.
Tests were run to scrutinize the effect of moving a single band from the middle of the
sides down into the lower third (Figure 3.8a). Last results were compared for placing one or
two crimp connections on a single band placed in the lower third of the sides (Figure 3.8b).
a) b)
Figure 3.8: Single band placed in lower third of side a) Single crimp connector; b) Double crimp connectors.
Once the variables were narrowed down, further tests were run to provide capacity
data. The test matrix below (Table 2) shows the variations between each specimen.
17

Table 3.2: Phase Two test matrix.
Wood Sand-Jack Test Matrix
Box No.
No. of Bands
# of Crimps/
Band Band
Location Filler Annular
Gap Corbel LinedCorner Nails
Base Nails
Max Spacing
1* 0 - - 30 mesh 1/2" NO NO 12d box 8d box 5
2 0 - - 30 mesh 1/2" YES YES 16d
common 8d box 5
3 0 - - 30 mesh 1/2" YES YES 12d box 8d box 5
4 2 1 Evenly Spaced 30 mesh 1/2" YES YES 12d box 8d box 5
5 1 1 Centered 30 mesh 1/2" YES YES 12d box 12d box 5
6 1 1 Centered 30 mesh 1/2" NO NO 12d box 12d box 5
7 1 1 Centered 30 mesh 1/2" YES YES 12d box 8d box 5
8 2 1 Evenly Spaced 30 mesh 1/2" YES YES 12d box 8d box 5
9 2 1 Evenly Spaced 30 mesh 1/2" YES YES 12d box 8d box 5
10 3 1 Evenly Spaced 30 mesh 1/2" NO NO 12d box 8d box 5
11 3 1 Evenly Spaced 30 mesh 1/2" YES YES 12d box 8d box 5
12 3 1 Evenly Spaced 30 mesh 1/2" YES YES 12d box 8d box 5
13* 3 1 Evenly Spaced 30 mesh 1/4" YES NO
16d common
16d common 4"
13a 3 1 Evenly Spaced 30 mesh 1/4" YES NO
16d common
16d common 4"
14 3 1 Evenly Spaced 30 mesh 1/4" YES NO
16d common
16d common 4"
15 3 1 Evenly Spaced 30 mesh 1/4" YES NO
16d common
16d common 4"
16 3 1 Evenly Spaced 30 mesh 1/4" YES NO
16d common
16d common 4"
17 3 1 Evenly Spaced 30 mesh 1/4" YES NO
16d common
16d common 7"
18 3 1 Evenly Spaced 30 mesh 1/4" YES NO
16d common
16d common 5"
19 3 1 Evenly Spaced 30 mesh 1/4" YES NO
16d common
16d common 7"
20 3 1 Evenly Spaced 30 mesh 1/4" YES NO
16d common
16d common 5"
21 3 1 Evenly Spaced 30 mesh 1/4" YES NO
16d common
16d common 5"
22 3 1 Evenly Spaced 30 mesh 1/4" YES NO
16d common
16d common 7"
23 0 - - 30 mesh 1/4" YES NO 16d
common 16d
common 7"
24 0 - - 30 mesh 1/4" YES NO 16d
common 16d
common 7"
25 0 - - 30 mesh 1/4" YES NO 16d
common 16d
common 7"
26 1 1 Centered 30 mesh 1/4" YES NO 16d
common 16d
common 7"
27 1 1 Centered 30 mesh 1/4" YES NO 16d
common 16d
common 7"
28 1 1 Centered 30 mesh 1/4" YES NO 16d
common 16d
common 7"
29 2 1 Evenly Spaced 30 mesh 1/4" YES NO
16d common
16d common 7"
18

Box No.
No. of Bands
# of Crimps/Band
Band Location Filler
Annular Gap Corbel Lined
Corner Nails
Base Nails
Max Spacing
30 2 1 Evenly Spaced 30 mesh 1/4" YES NO
16d common
16d common 7"
31 2 1 Evenly Spaced 30 mesh 1/4" YES NO
16d common
16d common 7"
32 1 2 Lower 1/3 30 mesh 1/4" YES NO 16d
common 16d
common 7"
33 1 2 Lower 1/3 30 mesh 1/4" YES NO 16d
common 16d
common 7"
34 1 2 Lower 1/3 30 mesh 1/4" YES NO 16d
common 16d
common 7"
35 1 1 Lower 1/3 30 mesh 1/4" YES NO 16d
common 16d
common 7"
36 1 1 Lower 1/3 30 mesh 1/4" YES NO 16d
common 16d
common 7"
37 1 1 Lower 1/3 30 mesh 1/4" YES NO 16d
common 16d
common 7"
38 2 1 Evenly Spaced 30 mesh 1/4" YES NO
16d common
16d common 7"
39 2 1 Evenly Spaced 30 mesh 1/4" YES NO
16d common
16d common 7"
40 2 1 Evenly Spaced 30 mesh 1/4" YES NO
16d common
16d common 7"
41 2 1 Evenly Spaced 30 mesh 1/4" YES NO
16d common
16d common 7"
42 3 1 Evenly Spaced 30 mesh 1/4" YES NO
16d common
16d common 7"
43 3 1 Evenly Spaced 30 mesh 1/4" YES NO
16d common
16d common 7"
44 3 1 Evenly Spaced 30 mesh 1/4" YES NO
16d common
16d common 7"
45 3 1 Evenly Spaced 30 mesh 1/4" YES NO
16d common
16d common 7"
* Test did not yield useable data.
As in Phase One, vertical load and displacements were measured. Additionally,
horizontal displacements were measured near the top and bottom of each corner of the sand-
jack. Strain gages were applied to the bands.
19

4. RESULTS
4.1 Phase One
Phase One provided the following results in regards to the sand filler, plunger
diameter, and stress distribution at the walls of the sand-jack.
Figure 4.1 displays the difference in stiffness for the two filler materials for two
different plunger diameters. The finer sand consistently showed a stiffer response. There are
two possible explanations for the difference in stiffness. First, the larger sand displayed
evidence of grain crushing. Later crushing was also detected in the finer sand but at higher
load. Second, the finer filler material likely developed a higher relative density when poured
into cylinder resulting in less consolidation under load.
Overall displacements of falsework systems must be constrained. Therefore, it was
judged that the stiffer response was more desirable. Taking this into consideration, the finer
sand filler was used in the Phase Two tests.
Displacement (in)
Load
(kip
s)
Load vs. Displacement forTwo Different Sand Fillers
0 0.1 0.2 0.3 0.4 0.5 0.6 0.7 0.8 0.9 10
50
100
150
200
250
300
350Plunger Diameter / Filler
19-1/8" / 30 Mesh19-1/8" / #1618" / 30 Mesh18.0" / #16
Figure 4.1: Load displacement of both filler materials under two different plunger
diameters.
20

The second goal of Phase One was to examine the impact of plunger size. Figure 4.2
shows the load displacement curves for Tests #2, 3, 4, 5, and 14. Each of these tests used the
30 mesh filler with a different diameter plunger.
The hydraulic jack used to apply the load does not rest freely on the specimen and
any unevenness of the sand results in the relatively large increase in displacement at low
load. Once this initial compliance is taken up, the diameter of the plunger begins to affect
the slope of the response.
Vertical Displacement (in)
Vert
ical
Loa
d (k
ips)
Load vs. Vertical Displacement for Differing PlungerDiameter 30 Mesh Silica Blast Sand
0 0.2 0.4 0.6 0.8 1 1.20
50
100
150
200
250
300
350
Plunger Diameter19-1/8 "18 "16 "15-3/8 "10-5/8 "
Figure 4.2: Load displacement for the 30 mesh sand under five different plunger
diameters.
The two largest plungers, 19-⅛-inch and 18- inch diameter, have very similar slopes.
Figure 4.3 shows just the 19-⅛-inch and 18- inch diameters with the 18.0 inch diameter curve
shifted back to make the initial compliance in the two tests more equal and show a direct
comparison of the slopes.
21

Displacement (in)
Load
(kip
s)
Load vs. Vertical Displacement for Differing PlungerDiameter 30 Mesh Silica Blast Sand
0 0.2 0.4 0.6 0.8 1 1.20
50
100
150
200
250
300
350
Plunger Diameter19.125 "18.0 "
Figure 4.3: Comparison of stiffness for the 30 mesh sand under a 19.125 inch and an
18.0 inch diameter plunger.
When the diameter is reduced to 16-inch the curve begins to flatten out just slightly.
An additional reduction to 15-⅜-inch caused significant reduction in stiffness. The smallest
plunger, 10-⅝-inches simply punched into the sand filler in a bearing failure manner. Sand
could be seen bulging upward at the edges of the plunger.
Similar tests were completed using the #16 sand filler (Figure 4.4). The two largest
plunger diameters had a slightly larger difference in slope than was observed in the 30 mesh
sand. The 10.625 inch diameter again punched into the filler material causing the sand to
heave up at the perimeter of the plunger.
22

Displacement (in)
Load
(kip
s)
Load vs. Vertical Displacement for Different PlungerDiameters #16 Dry Silica Blast Sand
0 0.2 0.4 0.6 0.8 1 1.20
50
100
150
200
250
300
350Plunger Diameter
19-1/8"18"10-5/8"
Figure 4.4: Load displacement of the #16 sand under three different plunger diameters.
For both filler materials, the larger plunger produced a stiffer response. Once again,
it was expectation that sand-jack design would be constrained by deflection limits most of the
time. Additionally, Section 9-1.03C of the Caltrans Falsework Manual (State of California,
2001) currently recommends an annular gap of ¼” maximum. Maintaining the ¼” gap limit
minimizes the displacement.
The tests for the 18-inch diameter plunger were repeated three times on the 30 mesh
and the #16 sand fillers (tests 5, 10 and 11 and 6, 12 and 13; see Figure 4.5 and Figure 4.6).
Figure 4.5 and Figure 4.6 show the results from these tests with the initial compliance
adjusted to be equal. The maximum load shown in Figure 4.5 and Figure 4.6 is simply where
the loading was reversed it does not represent a failure of any kind. The vertical portion of
the curve is the load being removed and some relaxation of the sand and plywood plunger
can be seen at the end. There was some difference in the initial compliance, however when
that is removed the shape of the load displacement curves are nearly identical.
23

Displacement (in)
Load
(kip
s)
Load vs. Displacement for an 18-inchDiameter Plunger on 30 Mesh Sand
0 0.2 0.4 0.6 0.8 1 1.20
50
100
150
200
250
300
350
Test 5Test 10Test 11
Figure 4.5: Comparison of the load displacement curves for three tests of the 30 mesh
sand under an 18-inch diameter plunger.
Displacement (in)
Load
(kip
s)
Load vs. Displacement for an 18-inchDiameter Plunger on #16 Sand
0 0.2 0.4 0.6 0.8 1 1.2 1.40
50
100
150
200
250
300
350
Test 6Test 12Test 13
Figure 4.6: Comparison of three tests run on the #16 sand under an 18-inch diameter
plunger.
24

The strain gages placed on the cylinder wall provided information about the transfer
of load to the sides of a sand-jack. Figure 4.7 illustrates the distribution of strain in the wall
of the cylinder at three locations for Test #5. This type of distribution is typical. As
mentioned before, the location called Top is one inch below the top edge of the cylinder and
the location called Bottom is one inch above the bottom edge (Figure 3.2).
Load (kips)
Nor
mal
ized
Str
ain
Comparison of Strain at VerticalLocations on the Cylinder Wall,
Normalized with Respect to the Maximum Strain
0 40 80 120 160 200 240 280 3200
0.1
0.2
0.3
0.4
0.5
0.6
0.7
0.8
0.9
1
TopMiddleBottom
Figure 4.7: Normalized strains in the steel cylinder at three depths.
The strains measured in the cylinder increase with depth as shown in Figure 4.7.
Hooke’s law can be used to convert the strain data into tangential stress in the wall of the
cylinder. Equation 8 is the relation between the radial pressure inside a cylinder and the
tangential stress in the cylinder wall (Gere 2001).
( )rt
Tr σσ = (8)
where
25

σr = radial pressure on the wall of the cylinder, psi.
σT = tangential stress in the wall of the cylinder, psi.
t = wall thickness, in.
r = radius of the cylinder, in.
Applying the hoop stress equation (Equation 4) from thin walled pressure vessel
mechanics we are able to back calculate the radial pressure. The radial pressure can be
directly compared with the results from Rankine theory for the lateral pressures generated in
the sand filler. Figure 4.8 is a comparison between the stress derived from strain data from
Test #5 and the stress predicted by theory. The Boussinesq method for vertical stress at any
point below a uniformly loaded circular area after Ahlvin and Ulerey was used to estimate
the vertical pressure (Das 2002). Rankine’s theory for at rest earth pressure was used to
estimate the ratio of the vertical pressure was transmitted laterally (Das 2002). The measured
horizontal stress was consistently 20% larger than predicted at the bottom of the cylinder.
σH/σzo
Dep
th /
Rad
ius
Comparison of Measured and Predicted Ratioof Horizontal Stress to Vertical Pressure Under the Center
of the Plunger at Depth = 0, for the Steel Cylinder
0 0.1 0.2 0.3 0.4 0.5-0.5
-0.4
-0.3
-0.2
-0.1
0
PredictedMeasured
Figure 4.8 Comparison of the measured and predicted ratio of horizontal stress to
vertical pressure at the center of the plunger at depth = 0.
26
Boussinesq theory was developed for an infinite half space. Here our steel cylinder
creates boundary conditions that interfere with the load spreading. Also the rigidity of the
cylinder wall does not allow the top to be independent of the middle region of the cylinder.
These two factors affect the accuracy of the predictions. The relatively small dilation of the
cylinder is analogous to the at rest scenario for retaining walls. For the sand-jacks
constructed of wood the lateral stiffness and dilation are such that they match the active earth
pressure case.
4.2 Phase Two
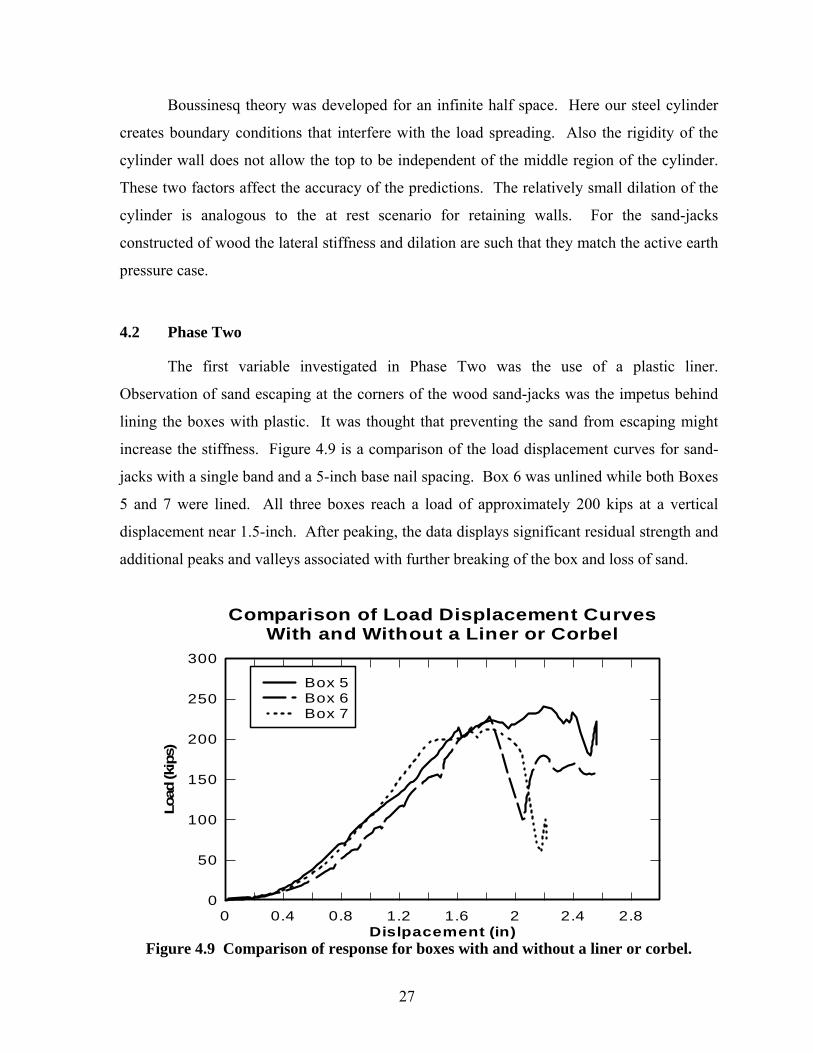
The first variable investigated in Phase Two was the use of a plastic liner.
Observation of sand escaping at the corners of the wood sand-jacks was the impetus behind
lining the boxes with plastic. It was thought that preventing the sand from escaping might
increase the stiffness. Figure 4.9 is a comparison of the load displacement curves for sand-
jacks with a single band and a 5-inch base nail spacing. Box 6 was unlined while both Boxes
5 and 7 were lined. All three boxes reach a load of approximately 200 kips at a vertical
displacement near 1.5-inch. After peaking, the data displays significant residual strength and
additional peaks and valleys associated with further breaking of the box and loss of sand.
Dislpacement (in)
Load
(kip
s)
Comparison of Load Displacement CurvesWith and Without a Liner or Corbel
0 0.4 0.8 1.2 1.6 2 2.4 2.80
50
100
150
200
250
300
Box 5Box 6Box 7
Figure 4.9 Comparison of response for boxes with and without a liner or corbel.
27

Figure 4.9 shows the presence of the plastic liner to have no noticeable impact on the
capacity or stiffness of wood sand-jacks. The liner did delay the sand leaking, but eventually
the liner would begin to tear and sand would leak. The delay in the leak did not result in a
stiffer response. Voids were created between the liner and the box when the flat sheet of
plastic was shaped to fit the three dimensional box (Figure 3.6). These voids provided the
same relief for the sand and resulted in similar stiffness.
The liner did have an impact on the mode of failure. The friction between the plastic
liner and the wood was significantly less than that of the sand and wood. An unlined box
would dilate horizontally tearing the base nails out of the plywood base. The sides of a box
with a liner were observed to dilate, and then slide up as the sand filled liner bulged out
between the sides and the base.
Box 6 was also placed on a 12” corbel (Figure 4.9). The long dimension of the sand-
jack remained fully supported. Placing the sand-jacks on a twelve inch corbel also had no
detrimental effect on their performance. It should be noted that the inside dimension of the
specimens was also twelve inches such that the filler was still fully supported and only the
sides were not supported (Figure 3.7). While the performance of the sand-jack was not
changed significantly the deformation of the corbel will be effected by a reduced bearing
area. Additionally, if the bearing area were further reduced to where the filler under vertical
pressure is no longer fully supported there could well be large differences in failure mode,
capacity, and stiffness.
As mentioned in the discussion of the liner, the base nails were observed to be torn
out of the base prior to failure. To determine how the spacing of those nails affected the
response, nine sand-jacks (Box #14, 15, 16, 17, 18, 19, 20, 21, 22) were tested that differed
only in the nailing pattern that attached the base to the sides (Figure 4.10). Figure 4.11 is the
load displacement data for a 7-inch maximum spacing. 7-inch spacing can be achieved by
using two nails per side. The capacities ranged from 200 to 269 kips with an average of 229
kips at an average displacement of 1.66-inch. All three boxes display very similar stiffness.
Figure 4.12 is the data from a 5-inch maximum spacing, which is equivalent to two nails on
each of the shorter sides and three along each of the longer sides. The capacities ranged from
365 to 390 kips with an average of 377 kips at an average displacement of 1.24-inch. Figure
4.13 is the data from a 4-inch maximum spacing which is equivalent to three nails on each of
28

the shorter sides and four nails along each of the longer sides. The capacities ranged from
374 to 411 kips with an average of 395 kips at an average displacement of 1.28-inch. The
straight line is a linear approximation of the response used for comparison in Figure 4.14.
Figure 4.10: Base nail spacing (S).
Displacement (in)
Load
(kip
s)
Load vs Displacement for 7-inch Base Nail Spacing
0 0.5 1 1.5 2 2.5 30
50
100
150
200
250
300
350
400
450
Box 17Box 19Box 22Box 42Box 43Box 44Box 45Idealized Curve
Figure 4.11 Load displacement for 7-inch base nail spacing.
29

Displacement (in)
Load
(kip
s)Load vs Displacement for 5-inch Base Nail Spacing
0 0.5 1 1.5 2 2.5 30
50
100
150
200
250
300
350
400
450Box 18Box 20Box 21Idealized Curve
Figure 4.12: Load displacement for 5-inch base nail spacing.
Displacement (in)
Load
(kip
s)
Load vs Displacement for 4-inch Base Nail Spacing
0 0.5 1 1.5 2 2.5 30
50
100
150
200
250
300
350
400
450
Box 14Box 15Box 16Idealized Curve
Figure 4.13: Load displacement for 4-inch base nail spacing.
30

Figure 4.14 is a comparison of the different base nail spacing. The ultimate capacity
and displacement represent the mean of the data.
Displacement (in)
Load
(kip
s)
Idealized Load vs Displcement as aFunction of Different Base Nail Spacing
0 0.5 1 1.5 2 2.5 30
50
100
150
200
250
300
350
400
450
4" max 5" max
7" max
377 k
253 k
380 k
Figure 4.14: Comparison of idealized load displacement curves for different base nail
spacing.
Space between and number of base nails had an interesting impact on the sand-jack
performance. The 4-inch maximum spacing yielded the largest capacity as expected.
Increasing the spacing reduced the capacity but had relatively little effect on the stiffness.
An increase to 5-inch maximum spacing reduced the capacity by less than 1%. Using two
less nails in the base increases the spacing to 7-inch maximum and reduces the capacity by an
additional 46%.
The initial compliance is accounted for by starting the curves (Figure 4.14) at a
displacement of 0.1-inch. Assumed on information from Caltrans, a practical limit to
displacement will be about 1-inch or less. This suggests that the benefit of using a tighter
spacing for the base nails may be very small and possibly not worth the effort.
31

The second major source of resistance in the wood sand-jacks is the steel banding. In
addition to the four main banding configurations, tests were performed to assess the impact
of moving a single band into the lower third of the side. Information was also desired on the
impact of using additional crimp connectors. For the boxes with the band in the lower third
of the side, three had a single crimp connection, and three were constructed with two crimp
connections (Table 3.2). Figure 4.15 shows the load displacement data for a single centered
band with a single crimp. The average capacity was 126 kips at an average displacement of
1.0-inch. Data for the band in the lower third of the side with a single crimp is shown in
Figure 4.16. Data for two crimp connections is shown in Figure 4.17.
Displacement (in)
Load
(kip
s)
Load Displacement for Sand-Jacks withOne Band Centered, Single Crimp Connection
0 0.5 1 1.5 2 2.50
50
100
150
200
250
300
350
400
450
500Box 26Box 27Box 28
Figure 4.15: Load displacement for specimens with a single band centered and a single
crimp connection.
32

Displacement (in)
Load
(kip
s)
Data from a Single Band Placed in the LowerThird with a Single Crimp Connection
0 0.5 1 1.5 2 2.5 30
50
100
150
200
250
300
350
400
450
500
Box 35Box 36Box 37
Figure 4.16: Load displacement for specimens with a single band in the lower third of
the sides and a single crimp connection.
Data for a Single Band Placed in the Lower Third with Two Crimp Connections
0 0.5 1 1.5 2 2.5 30
50
100
150
200
250
300
350
400
450
500
Box 32Box 33Box 34
Figure 4.17: Load displacement for specimens with double crimp connectors on the
single band in the lower third.
33

Examination of Figure 4.14 and Figure 4.16 finds that simply lowering the band has
little impact on capacity or stiffness. Lowering the band did impact the failure mode. The
sides displaced more at the top than at the bottom which is the opposite of all the other tests.
The specimens with double crimp connectors on the single band in the lower third of the
sides did not fail the band connections. The sides of the box rotated out at the top and split.
Figure 4.18 shows a comparison of the nine tests completed to examine the placement
of a single band and placing a second crimp on the band. One can see that placing a second
crimp connector on the band roughly triples the ultimate capacity. However, Figure 4.19 is
an enlarged view of Figure 4.18, and one can see that in the a range of displacement less than
1-inch there is little benefit to lowering the band or using a second crimp.
Displacement (in)
Load
(kip
s)
Comparison of a Single Band Centered or in the LowerThird and with One or Two Crimp Connectors
0 0.5 1 1.5 2 2.5 30
50
100
150
200
250
300
350
400
450
500Position / Number of Crimps
Centered / SingleLow / DoubleLow / Single
Figure 4.18: Comparison of single bands centered and lowered with single or double
crimps.
34

Displacement (in)
Load
(kip
s)
Comparison of a Single Band Centered or in the LowerThird and with One or Two Crimp Connectors
0 0.5 10
50
100
150Position / Number of Crimps
Centered / SingleLow / DoubleLow / Single
Figure 4.19: Comparison of single bands centered and lowered with single or double
crimps limited to a displacement of 1-inch. The final step of Phase Two was to compile capacity data for the four main
configurations with the following details:
• Single crimp connection on the bands (if present).
• 7” maximum spacing for the base nails.
• No liner.
• Supported on 12” Corbel.
• Single bands: Centered.
The data is presented in Figures 4.20, 4.21, 4.22, and 4.23. Again, the darkened line
represents a linear average of the data for comparison.
Ultimate capacity was defined as the significant reduction in load as seen in the data. In
most cases the reduction of load corresponded to the failure of the band connection.
However, when no banding was used or when the band did not fail, a loss of capacity could
also be seen in the data and generally corresponded to a loss of confinement of the filler
material.
35

Displacement (in)
Load
(kip
s)
Load Displacement for Sand-Jackswith No Bands
0 0.5 1 1.5 2 2.50
50
100
150
200
250
300
350Box 23Box 24Box 25Idealized Curve
Figure 4.20: Load displacement data for sand-jacks with no bands.
Dispalcement (in)
Load
(kip
s)
Load Displacement for Sand-Jacks withOne Band Centered, Single Connection
0 0.5 1 1.5 2 2.50
50
100
150
200
250
300
350Box 26Box 27Box 28Idealized Curve
Figure 4.21: Load displacement data for sand-jacks with a single centered band.
36

Displacement (in)
Load
(kip
s)
Load Displacement for Sand-Jacks with Two Bands
0 0.5 1 1.5 2 2.50
50
100
150
200
250
300
350Box 29Box 30Box 31Box 38Box 39Box 40Box 41Idealized Curve
Figure 4.22: Load displacement data for sand-jacks with two bands.
Displacement (in)
Load
(kip
s)
Load vs Displacement for Sand-Jacks with Three Bands
0 0.25 0.5 0.75 1 1.25 1.5 1.75 2 2.25 2.50
50
100
150
200
250
300
350Box 17Box 19Box 22Box 42Box 43Box 44Box 45Idealized Curve
Figure 4.23: Load displacement data for sand-jacks with three bands.
37

The use of steel bands increases the capacity. Sand-jacks with no steel bands failed
by pulling the nails out of the ends of the main member and tearing out of the nails
connecting the base.
When one band is applied, the nail withdrawal at the corners was reduced. Once the
base nails began tearing out of the base, the sides experienced bending stress across the grain
and began to split. Usually the bottom of the side would displace further that the top. The
side would appear to be rotating about the band. The rotation of the side allowed load and
displacement to increase while not increasing the stress on the band. In only one case was
enough stress developed in the band to fail the crimp connection. The use of only a single
band made the failure mode less predictable. The characteristics of the wood played a much
larger role than in the case of two or three bands.
It is worth noting that the curves for loose filler published by the U.S. Department of
Transportation regarding the construction failure of the Riley Road Interchange Ramp, East
Chicago, Indiana (USDOT, 1982) show similar results (Figure 3) to those obtained at UCSD
for sand-jacks with a single band. The configuration of the sand-jacks tested in the
investigation also had only a single band but had 2x4 sides and a sheet metal base. The
similarity in the results suggests that the banding has the largest influence on the response of
a sand-jack.
Two bands further increased the capacity of the sand-jacks. Several times the
bending stress in the sides would cause the sides to split between the bands. Here the wood
is still influencing the response, but less than the single band case. The placement of the
bands evenly spaced up the sides provided two points of support to reduce cross grain
bending and splitting in the sides. Failure was defined consistently by slipping of the crimp
connections of the lower band. In this case, the placement of the lower band offered more
resistance to the rotation of the side.
Three bands provided additional load carrying capacity. The three bands were again
spaced evenly up the sides. The two lower bands were able to share the lateral load
generated near the bottom of the sand-jack. Again failure was defined by slipping of the
crimp connections of the lower band. Splitting still occurred in the sides but not as severely
as in the single or double band case. Most splits did not propagate through the entire
38

thickness or along the entire length of a side. Observation indicated that characteristics and
imperfections of the wood had little effect on the capacity or stiffness of the specimen.
The most common failure mode observed consisted of three main components. First
the sand-jack would dilate. The sides would bend outward and the corners would begin to
separate. Often this was accompanied with sand leaking from the corners. Second would be
a tearing out of the nails attaching the base plate to the sides leading to sand hemorrhaging
along the bottom of the sides. Once the sides were no longer connected to the base the lateral
load was supported by the steel bands alone. When the stress in the bands exceeded the
capacity of the crimp connection, the connection would slip completely. At the point where
the band connections failed the sand-jack would have a sharp loss of load carrying capacity
but not a total loss. The compressed sand in the middle third of the box would still support
load and after some significant increase in displacement the load carrying capacity would
begin to increase again. At this point, the load was essentially being applied to a pile of sand
with little or no confinement. After the test, the sand in the middle third of the box footprint
was significantly more compacted than the sand at the edges. The sand developed quite a
soil fabric. It resembled soft sand stone. Figure 4.24 was taken after Test 3 and one can see
the fissures in the sand around the scoop. This fabric formation was observed in all of the
two and three band specimens and a few of the other specimens that achieved high capacity.
The development of this soil fabric may contribute to the residual strength seen in many of
the specimens. The residual strength of the sand-jack after losing the banding was beyond
the scope of this project and thus not investigated further.
39

Figure 4.24: The filler material has developed a significant soil fabric.
The capacity of a sand-jack can be predicted with a reasonable level of accuracy. The
capacity of the nailed connections can be determined with classic wood mechanics. By
adding in the reaction of the band we arrive at the lateral resistance. Then by using the
Boussinesq and Rankine methods as previously discussed, we are able to back calculate the
vertical force that would create a lateral load equivalent to the lateral resistance. The vertical
load derived in this manner can then be compared to the average ultimate capacities
measured in the testing.
The yield mode equations give base nails ultimate capacities of about 470 pounds
each, using recommended bearing strengths for plywood (APA, 2002). The ultimate
capacity was about 710 pounds for each end nail loaded in shear. The opposite corner nails
loaded in withdrawal from end grain resists about 280 pounds each. The total resistance of
the nails comes to almost 4 kips.
To determine the contribution of the steel bands, simple tension tests were conducted
on the banding and connections. As shown below the banding itself had a yield stress of just
over 2 kips (Figure 4.25). A single connector had a lower capacity of about one kip (Figure
40

4.26). Adding a second crimp effectively doubled the capacity to near two kips (Figure
4.26).
Displacement (in)
Load
(kip
s)Load vs. Displacement for a Steel Band Only
0 0.1 0.2 0.3 0.4 0.5 0.6 0.70
0.5
1
1.5
2
2.5
3
Figure 4.25: Load displacement for the steel banding.
Displacement (in)
Load
(kip
s)
Comparison of Banding with a Singleor Double Crimp Connection
0 0.1 0.2 0.3 0.4 0.50
0.5
1
1.5
2
2.5
3
Single Crimp(1)Single Crimp(2)Single Crimp(3)Double Crimp(1)Double Crimp(2)Double Crimp(3)
Figure 4.26: Comparison of banding with a single or double crimp connection.
41

Therefore, for a single crimp, each band can be considered as a one kip reaction at each
corner.
In the vertical direction the stress can be assumed to increase linearly with depth as
shown in Figure 4.8. However, in the horizontal directions, the stress distribution is curved
between the corner and the midpoint of the length where the stress is maximum. A linear
variation underestimates the stresses. Since the maximum horizontal pressure is consistently
underestimated by 20% and the curved distribution can be averaged at roughly 80% of the
maximum, we can simply use the maximum predicted lateral pressure when calculating the
lateral force. Equation 9 can be used to calculate the lateral load that acts on the side of the
sand-jack, and the vertical pressure is predicted combining Boussinesq and Rankine theory
an in Equation 10 (Bowels, 1996).
( dLP mσ21
= ) (9)
where
=P lateral force, lbs.
σm = maximum horizontal stress, psi.
d = depth of the filler material, in.
L = length of the side, in.
⎥⎥⎦
⎤
⎢⎢⎣
⎡⎟⎟⎠
⎞⎜⎜⎝
⎛
−+
++
= −
VVVMN
VV
VVVMNK zoav
2tan1221 1
1πσσ (10)
where
Ka = the active earth pressure coefficient.
σzo = P/A
A = the area of the plunger, in2.
P = the applied load lbs.
M = B/z
N = L/z
V = M2 + N2 +1
V1 = (MN)2
42

B = the short dimension of the plunger, in.
L = the long dimension of the plunger, in.
z = the depth, in.
For a sand-jack with no bands the capacity was just over 103 kips. Boussinesq and
Rankine predict a maximum lateral pressure on the sides of 0.076 ksi at the bottom of the
side at mid span. The sides were 5-5/8-inch deep. The length of the long sides was 18-inch.
Equation 10 then predicts 3.9 kips of force on the long side of the box compared to the 4 kips
of resistance derived from the nails.
This method predicts that sand-jacks with no bands will have an ultimate capacity of
105 kips; one band – 157 kips; two bands – 210 kips; three bands 262 kips.
The average measured values for ultimate capacity are shown in Figure 4.27. For the
case of no banding the predicted value is very accurate. Likewise, the capacity prediction for
a sand-jack with three bands is also accurate to within 5%. For the case of one or two bands
the prediction is less accurate. Recall that the ultimate capacity of a single band sand-jack
was often not associated with failure of the band. With two bands there was splitting of the
side between the bands. The splitting of the side prevents any load sharing between the
bands. In the case of one or two bands, the resistance is more heavily influenced by the
strength of the nail connections and/or the bending strength of the sides themselves.
Figure 4.27 is a comparison the idealized stiffness and ultimate capacity for the four
main sand-jack types. Here we see the relative impact of adding bands. A single band does
little for the capacity but the stiffness is significantly improved. A second band has a
relatively small effect on both capacity and stiffness. Then a third band increases the
capacity nearly 50% but again the stiffness is only slightly increased.
43

Displacement (in)
Load
(kip
s)
Load Displacement forZero, One, Two, and Three Band Sand-Jacks
0 0.5 1 1.5 2 2.50
50
100
150
200
250
300
Three Bands
Two Bands
One BandZero Bands
253 kips, 1.6 in.
126 kips, 1.0 in.
103 kips, 1.4 in.
164 kips, 1.1 in.
Figure 4.27: Comparison of zero, one, two, and three bands.
Since in practice the displacement will need to be limited, Figure 4.28 is the idealized
load displacement curves for the four main sand-jack types up to a displacement of 1-inch.
Here we see the significant capacity and stiffness benefits of a single band over no band.
Performance in the range of displacement less than 1-inch is not significantly improved by
adding additional bands. However, the addition of a second or third band does add
redundancy and some ductility when the sand-jack is subject to ultimate loads.
Displacement (in)
Load
(kip
s)
Load Displacement forZero, One, Two, and Three Band Sand-Jacks
0 0.25 0.5 0.75 10
25
50
75
100
125
150
175Three BandsTwo BandsOne BandZero Bands
Figure 4.28: Closer look at zero, one, two, and three bands.
44

5. CONCLUSIONS
Full scale load tests were performed on a circular steel sand-jack with two different
sand filler materials and several different plunger diameters. Rectangular wood sand-jacks
with zero, one, two, and three bands were also tested. The following conclusions are drawn
from the results.
1. In the range of displacements less than 1-inch, the difference in stiffness of a wood
sand-jack with one, two, or three bands is relatively small.
2. Using no banding on a wood sand-jack reduces the stiffness by 50%.
3. Ultimate capacity is significantly increased by increasing the number of bands used.
4. Increasing the number of crimp connectors used on each band does not change the
stiffness of the response, but significantly increases the ultimate capacity.
5. Placement of a single band in the middle or lower third of the sand-jack does not
significantly affect the capacity or stiffness.
6. Tighter spacing of the base nails increases the stiffness and capacity, but in the region
of displacement less than one inch the increase is negligible.
7. The use of a visqueen liner appears to have no advantage based on these test results.
8. Placing a 15-inch wide sand-jack on a 12-inch wide corbel of quality material with
corners that are not rounded such that they reduce the bearing width to less than 12-
inch, appears to have no adverse affect on the performance of the box.
9. When used in the steel cylinder, the 30 mesh sand had a stiffer response than the #16
sand.
10. A larger plunger, or smaller annular gap, resulted in less displacement in the test with
the steel cylinder.
Through the course of this project an attempt was made to investigate the variables
that have the largest impact on sand-jack performance. The authors recognizes that other
design options or field conditions could have a significant impact on the capacity or stiffness
of a sand-jack. Below are some of the other issues that fell beyond the scope of this thesis.
Duration of load has a documented effect on the allowable stress in wood members
(Breyer, 2003). Load duration and creep effects were not investigated in this project.
45

The relative density of the filler material, as placed in the sand jack, could affect the
stiffness of the sand-jack. The relative influence of the filler material on the stiffness as
compared to the nail connections, banding, and the wood sides, is a topic for future research.
There are several alternate ways of strengthening the connections. The corners could
be reinforced with additional wood or metal. The plywood base could be made thicker.
Additionally, the base could be made larger to increase the edge distance for the base nails.
To improve the stiffness of a sand-jack, blocking could be added midway along the
length of the sides to more efficiently use the confining pressure of the banding. The
blocking would produce a reaction perpendicular to the side, thus adding another point of
confinement. If this idea were taken further, the most efficient configuration may be a
circular sand-jack. A 6-inch deep steel cylinder like the one used in Phase One, could be
fitted with a permanent steel base and mechanism to allow it to be separated into two semi-
circular pieces. This would create a stiffer and stronger sand-jack that could be used
repeatedly.
These ideas leave questions open for further research and provide options for
applications that may require stiffness or strengths that exceed the capabilities of the design
considered in this thesis.
46

APPENDIX: EXAMPLE CONSTRUCTION SPECIFICATION
47

Proof Testing Specifications Contractors wishing to use sand jacks that deviate from the provided construction detail must proof test the desired configuration using the following guidelines.
1. Compressive testing of sand jacks shall be performed at the Contractor's expense, at an independent qualified testing laboratory. An independent qualified testing laboratory shall have the following:
A. Proper facilities, including a compressive testing frame capable of applying
the largest compressive force anticipated. B. Written procedures for performing the compressive testing. C. Operators who have received formal training for performing the compressive
testing. D. A record of annual calibration of compressive testing equipment performed by an independent third party that has 1) standards that are traceable to the National Institute of Standards and Technology, and 2) a formal reporting procedure, including published test forms.
2. A minimum of seven identical specimens must be tested for each configuration to be used. Results = average of seven tests
3. Test shall measure both vertical displacement of the plunger and applied load. 4. Each specimen must attain 200% of the desired load with less than 3/4 inch vertical
displacement of the plunger. 5. Specimen must be able to maintain 200% of the desired load with less than 1/16th of
an inch increase of vertical displacement over 20 minutes. 6. Test conditions must duplicate field conditions; for example if sand jack is placed on
a corbel in the field, the test must be performed on a corbel. a. Tested sand jack configuration shall be identical to the proposed sand jack
configuration: i. Material type
ii. Nailing pattern iii. Banding and crimping iv. Plunger thickness and size v. Filler material
vi. Bearing area under sand jack (i.e. 12x12 corbel; full bearing; etc.) b. For timber corbels, no crushing of the corbel shall be evident at the desired
loading. c. Test results submittal process: to be specified by governing agency (i.e.
CalTrans.)
48

REFERENCES
American Forest & Paper Association (AF&PA), (2001). National Design Specification for Wood Construction and Supplement, 2001 Ed., AF&PA, Washington, DC. American Forest & Paper Association (AF&PA), (1997). Commentary on the National Design Specification for Wood Construction and Supplement, 1997 Ed., AF&PA, Washington, DC. American Forest & Paper Association (AF&PA), (1999). Technical Report 12: General Dowel Equations for Calculating Lateral Connection Values, AF&PA, Washington, DC. Andreason, K. & Tissel, J., (1994). Effects of Overdriven Nails In Shear Walls T94-9. APA – The Engineered Wood Association, Washington. APA – The Engineered Wood Association, (2002). Recommended Bearing Strength of Wood Structural Panels to be used with Fasteners Yield Equations TT-020. APA – The Engineered Wood Association, Washington. APA – The Engineered Wood Association, (2002). Effect of Overdriven Fasteners on Shear Capacity TT-012. APA – The Engineered Wood Association, Washington. APA – The Engineered Wood Association, (2002). Nailhead Pull-Through Strength on Wood Structural Panels TT-070. APA – The Engineered Wood Association, Washington. Aune, P., Patton-Mallory, M., (1986). Lateral Load-Bearing Capacity of Nailed Joints Based on the Yield Theory: Theoretical Development Research Paper FPL 469, U.S. Department of Agriculture, Forest Service, Forest Products Laboratory, Wisconsin. Bowles, J., (1996). Foundation Analysis and Design, 5th Ed., McGraw-Hill, New York.
49

Breyer, D., Fridley, K., Pollock, D. Jr., Cobeen, K., (2003). Design of Wood Structures-ASD, 5th Ed., McGraw-Hill, New York. Das, B., (2002). Principles of Geotechnical Engineering, 5th Ed., Brooks/Cole, California. Gere, J., (2001). Mechanics of Materials, 5th Ed., Brooks/Cole, California. State of California Department of Transportation, (2001). Falsework Manual Rev. 32, Offices of Structure Construction, California. Thurston, H., (2000). Full-Scale Load Test of a Sand-Jack, Practice Periodical on Structural Design and Construction, Vol. 6, No. 3, August, 2001. 116-118. American Society of Civil Engineers, Virginia. U.S. Department of Agriculture, Forest Service, Forest Products Laboratory, (1999). Wood Handbook – Wood as an Engineering Material, General Technical Report 113, U.S. Department of Agriculture, Forest Service, Forest Products Laboratory, Wisconsin. U.S. Department of Transportation & Federal Highway Administration, (1982). Investigation of Construction Failure of the Riley Road Interchange Ramp, East Chicago, Indiana NBSIR 82-2593, U.S. Department of Transportation & Federal Highway Administration, Washington, DC.
50