crm connect - morecom · crm connect enables users to integrate call control into an approved crm...
TRANSCRIPT

CRM Connect
Application User guide
March 2015

CRM Connect - Application User Guide
Confidentiality
All information in this document is provided in confidence as per the terms and conditions of
Wholesale Hosted Centrex (WHC) and shall not be published or disclosed wholly or in part to any
other party without BT’s prior permission in writing. These obligations shall not apply to information
which is published or becomes known legitimately from some source other than BT.
Version Control
This document is controlled and issued by the BT Wholesale (BTW) Product Manager. Please
ensure that you have the latest version of this document, existing Communications Providers (CP)
can download this from the WHC Document Centre, and new customers should check with their
Account Managers.
Description of change Issue Date
Document structure created Final 1.0 16th May 2014
Updated into new style template Final 2.0 17th March 2015

3
CRM Connect – Application User Guide
www.btwholesale.com
Confidentiality .................................................................................................................... 2
Version Control .................................................................................................................. 2
Introduction ......................................................................................................................... 5
Overview .............................................................................................................................. 5
Audience .............................................................................................................................. 5
Application Description ................................................................................................... 6
Hardware & Software Description................................................................................. 8
Operating System................................................................................................................ 8
Hardware Requirements ..................................................................................................... 8
Software Requirements....................................................................................................... 8
Network and Firewall Requirements ................................................................................... 8
Provisioning & Configuration....................................................................................... 10
Download and Installation ................................................................................................. 11
Windows Installation ......................................................................................................... 11
Configuration .................................................................................................................... 13
Integration with CRM Software ......................................................................................... 14
Operating the Feature..................................................................................................... 15
Feature Interaction .......................................................................................................... 15
Start Using CRM Connect ............................................................................................. 15
Where Is It? ....................................................................................................................... 15
Tray Menu ......................................................................................................................... 16
Phone Window .................................................................................................................. 16
Preview Window ................................................................................................................ 17
Making Calls and Call Control...................................................................................... 17
Making Calls ...................................................................................................................... 17
Call Control........................................................................................................................ 20
More call control ................................................................................................................ 21
Address Books, Contacts and Call History .............................................................. 22
Creating and Searching Contacts ..................................................................................... 22
Storing contact details when on a call .............................................................................. 23
Adding contact details from the Call History window ....................................................... 23
Call History ........................................................................................................................ 23
Settings and configuration ................................................................................................ 24
Telephony settings ............................................................................................................ 24
Interface settings ............................................................................................................... 24
Dialling settings ................................................................................................................. 25

4
CRM Connect – Application User Guide
www.btwholesale.com
Events settings .................................................................................................................. 26
Integration settings ............................................................................................................ 26
Troubleshooting............................................................................................................... 28
Installation ......................................................................................................................... 28
Running CRM Connect ..................................................................................................... 28
Login Process.................................................................................................................... 28
Product Support & Fault Handling.............................................................................. 29
Application Queries ........................................................................................................... 29
Pricing................................................................................................................................. 30
5
CRM Connect – Application User Guide
www.btwholesale.com
Introduction
The following document type describes a current or recently launched WHC Site or User
application.
An application is used to control existing feature, or provide new features to Sites or Users. An
application is typically downloaded onto a local device, whether it be a PC, Smartphone or Tablet.
Applications may be inclusive of User feature packs or may be chargeable extras that enable the
User to fulfil or enhance this job role.
This User guide will cover off CP Administration, Company/Site Administration and End user
Administration.
When WHC launch new applications or even enhancements, this document type is provided to all
CP’s.
Overview
CRM Connect is an application for Windows Desktop that integrates leading CRM Applications into
the WHC service. CRM Connect works in conjunction with a User’s phone and CRM software to
provide a productivity enhancing integrated service.
The application comes with standard branding and cannot be branded like other WHC applications.
Audience
This document is intended for WHC CP and their order entry and support personnel (CP
Administrator), as it contains elements of provisioning, installation and configuration.

6
CRM Connect – Application User Guide
www.btwholesale.com
Application Description
CRM Connect enables users to integrate call control into an approved CRM system providing the
following functionality:
Automatic screen popping of customer files when inbound calls are received
Call Control from PC
Click-to-dial from CRM file
CRM Connect will work with the following systems:
Application Name Version
Act! By Sage 2008 - 2013
ConnectWise
FrontRange GoldMine 5.5 - 8.5
Lotus Notes 7 - 8.5
Maximizer 9 - 11
MS Access 2000 - 2010
MS Dynamics CRM 3 – 4, 2011
MS Dynamics CRM Online (Office 365) N/A (web based)
MS Dynamics NAV 4 - 5
MS Outlook * 2000 - 2010
NetSuite N/A (web based)
Sage 50 Accounts (Line 50) 2008 – 2010
Sage CRM N/A (web based)
Salesforce CRM Enterprise
Sugar CRM 5.0 - 6.0
SuperOffice 6.1 - 6.3
vTiger N/A (web based)
Zoho N/A (web based)

7
CRM Connect – Application User Guide
www.btwholesale.com
LinkedIn N/A (web based)

8
CRM Connect – Application User Guide
www.btwholesale.com
Hardware & Software Description
In order to successfully install and use this application, the following installation and licensing
requirements should be met:
Operating System
This application needs to be deployed on a Microsoft Windows Platform
Hardware Requirements
The hardware requirements for the Microsoft Windows platform include
1 GHz Pentium-class processor
1 GB Memory
500MB free hard drive space
Operating System:
- Windows XP Professional SP3 (Not Recommended and Unsupported)
- Windows Server 2003 and 2008 (Not Recommended and Unsupported)
- Windows Vista (Not Recommended and Unsupported)
- Windows 7 (Recommended and Supported)
- 32 bit and 64 bit versions
SVGA display
Keyboard and mouse
Network adapter connected to a TCP/IP network
IBM-PC or 100% compatible
Software Requirements
During installation of CRM Connect, as well as installing the CRM application, the following third-
party software will be installed:
Microsoft .Net 2.0
Network and Firewall Requirements
You may need to allow outbound access for the following on your firewall:

9
CRM Connect – Application User Guide
www.btwholesale.com
Protocol Destination Destination Port
HTTPS
ccusage.yourservices.co.uk 85.119.59.2
TCP 443
Proprietary
applications.yourservices.co.uk 85.119.62.3
85.119.62.4
TCP 2208
In addition to the above you may need to allow communication between the CRM Connect client
and the CRM server(s), but the communication details vary from installation to installation; ask your
system administrator for these details if you need them.

10
CRM Connect – Application User Guide
www.btwholesale.com
Provisioning & Configuration
The CRM Connect application is an Add-On that is provided to a User already on the plat form and
assigned a Functional Fixed or Mobile User license.
When creating a User in Business Zone, be sure to tick CRM Connect Add-On and then complete
the order. If this is not done on the initial Provide, then a Modify order can be placed to add this at
a later date.
Once this license pack has been ordered from the Business Zones Ordering portal, the application
download will appear in the Application section of the Business Portal as per the image below.

11
CRM Connect – Application User Guide
www.btwholesale.com
Download and Installation
Once you have provisioned the Add-On and the User has received their welcome email, they can
now download the application from the Business Portal.
Windows Installation
Log in to an administrator-level user account on the Windows workstation that CRM Connect needs
to be installed onto.
To begin installing CRM Connect, double-click the ‘CRMConnect.exe’ file and click the
Install button.

12
CRM Connect – Application User Guide
www.btwholesale.com
The installation will proceed and any third-party software that is required will also be
installed at this time; follow any onscreen instructions displayed by the third-party
software.
Once CRM Connect and any third-party software have finished installing, click the
Finish button to close the installer.

13
CRM Connect – Application User Guide
www.btwholesale.com
Configuration
The Welcome Email sent to End Users will guide them to navigate to the Business Portal to
download the application and obtain their Username. Please note this Username is t he same for all
Applications, but is different to the Business Portal credentials. The username can be seen in the
Applications tab as shown below:
The password for all applications is not sent to the User and needs to be set in the Business Portal
by navigating to My Account.
Select Password to Change box, then click on Application, enter password and then select Save.
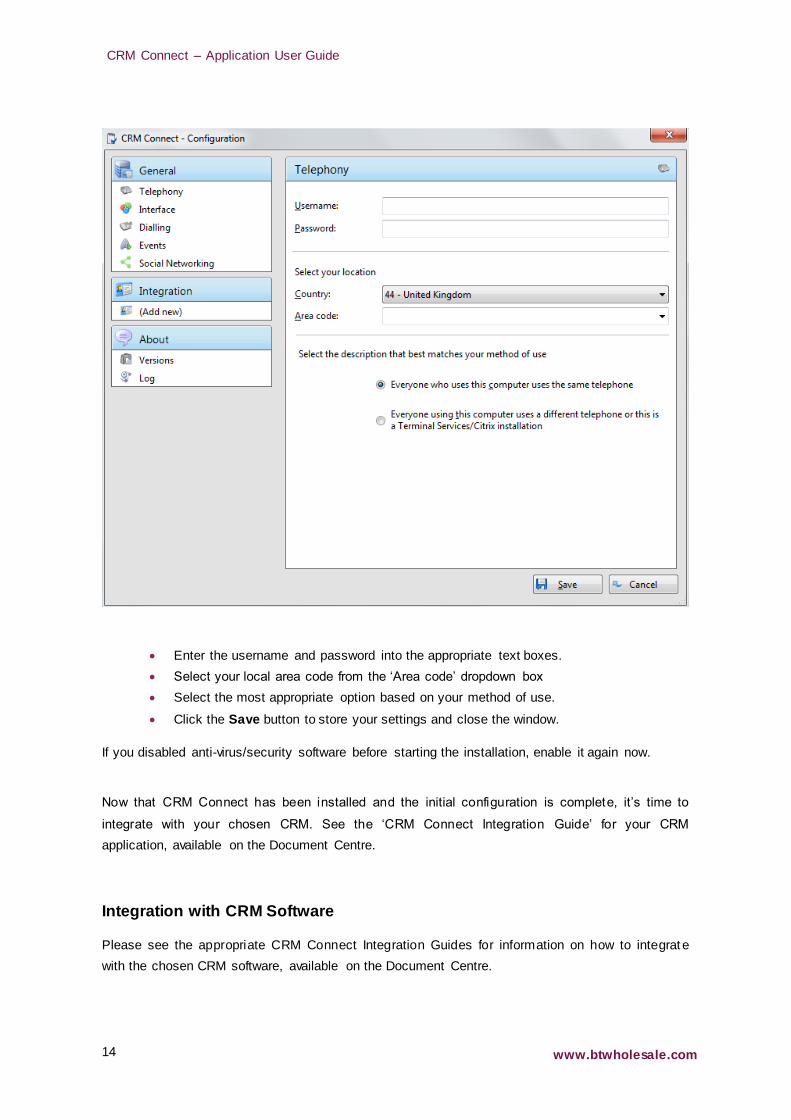
Once the installation has finished, CRM Connect presents you with the ‘Telephony’
configuration screen where you need to provide your CRM Connect user account
information.
14
CRM Connect – Application User Guide
www.btwholesale.com
Enter the username and password into the appropriate text boxes.
Select your local area code from the ‘Area code’ dropdown box
Select the most appropriate option based on your method of use.
Click the Save button to store your settings and close the window.
If you disabled anti-virus/security software before starting the installation, enable it again now.
Now that CRM Connect has been installed and the initial configuration is complete, it’s time to
integrate with your chosen CRM. See the ‘CRM Connect Integration Guide’ for your CRM
application, available on the Document Centre.
Integration with CRM Software
Please see the appropriate CRM Connect Integration Guides for information on how to integrat e
with the chosen CRM software, available on the Document Centre.

15
CRM Connect – Application User Guide
www.btwholesale.com
Operating the Feature
In addition to this guide, there are individual Quick Reference Guides for each of the CRM
applications, each of which can be downloaded from the Document Centre.
Feature Interaction
CRM Connect integrates with a whole host of calling features, all of which are covered off in the
relevant section headings below.
Start Using CRM Connect
Where Is It?
CRM Connect is designed to be discrete. Always running and providing useful information as you
need it, yet at the same time not annoying and interfering when you’re trying to work. So, most of
the time, CRM Connect sits silently in your tray menu, waiting for you to click on it or waiting for
calls to be made or received.
Note: In Windows 7, some tray icons become hidden and expressly have to be shown. These
settings are stored in the ‘Notification Area Icons’ part of the Windows Control Panel.
If you right-click on the CRM Connect icon, which is a green circle (or red if you’re on a call) and the
tray menu should appear.

16
CRM Connect – Application User Guide
www.btwholesale.com
Tray Menu
Quick dial box: Type a number here and press
Enter to make an immediate phone call
Recent menu: Quickly see recently dialled
numbers, and click to redial them
Configuration: Contains options to change your
user experience, and configure CRM packages
to integrate with
Exit: Use this to unload the software
Phone Window
The most obvious place to start is the Phone window (pictured below). Click on that option in the
tray menu, or in future you can simply double click on the tray icon and the window will be shown.
Let’s have a look at the main parts of the Phone window:
Contact information: The name
and telephone number of the
remote person.
Actions: Use these buttons to
interact with the current call and
contact.
Call information: Other
information about the current call.
At the start, you’re likely to use the Phone window if you want to control calls or show contacts.
After you’ve used the software for a while, though, you’ll probably prefer to use the Preview window
it can be more convenient and less intrusive.
17
CRM Connect – Application User Guide
www.btwholesale.com
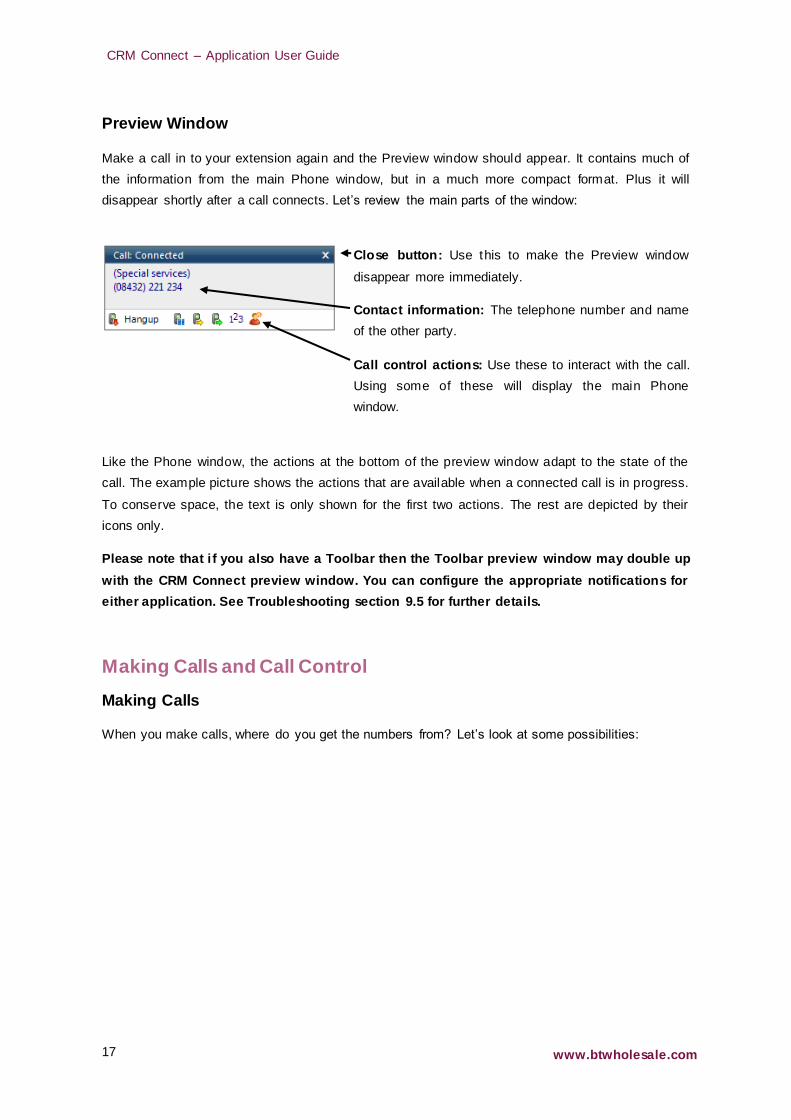
Preview Window
Make a call in to your extension again and the Preview window should appear. It contains much of
the information from the main Phone window, but in a much more compact format. Plus it will
disappear shortly after a call connects. Let’s review the main parts of the window:
Close button: Use this to make the Preview window
disappear more immediately.
Contact information: The telephone number and name
of the other party.
Call control actions: Use these to interact with the call.
Using some of these will display the main Phone
window.
Like the Phone window, the actions at the bottom of the preview window adapt to the state of the
call. The example picture shows the actions that are available when a connected call is in progress.
To conserve space, the text is only shown for the first two actions. The rest are depicted by their
icons only.
Please note that i f you also have a Toolbar then the Toolbar preview window may double up
with the CRM Connect preview window. You can configure the appropriate notifications for
either application. See Troubleshooting section 9.5 for further details.
Making Calls and Call Control
Making Calls
When you make calls, where do you get the numbers from? Let’s look at some possibilities:

18
CRM Connect – Application User Guide
www.btwholesale.com
From a piece of paper
If this is the case then you should
think about storing the person’s
name in your CRM System and then
next time, you can find them more
easily and dial the number using
CRM Connect.
Alternatively, you could right click on the
CRM Connect tray icon and then enter the
number in the text box at the top. You can
even use the backspace key if you type it
wrong.
Or, if you happen to have the Phone window open, then just start typing a
number on your keyboard. CRM Connect will understand that you want to
make a call and switch to the “Make call” screen. Press the Enter key
when you’ve finished typing to make the call.
Someone you spoke to recently
If you spoke to them using the phone that CRM Connect is connected to
then the call should be in your call history. At the main menu, press the
call history button and you will get a list of your calls in reverse date order.
If you see the caller in this list, then click on their telephone number to
make a call to them directly from this screen.
Alternatively, if the person
was one of the last ten
people that you spoke to, then they will be in your “Recent” list. You can
get to the Recent list from either the CRM Connect tray icon or from the
Make call screen.
Note: these Recent numbers are stored on your PC not on the server.

19
CRM Connect – Application User Guide
www.btwholesale.com
From a web page
You can configure CRM Connect to search your web pages (Internet
Explorer only) for telephone numbers to
dial. It won’t find all of them, unfortunately,
but it is good at phone directory searches
because it is optimized to understand this
kind of page. To turn this functionality on, you need to go to the
Configuration main menu option and then go into Dialling settings. Here
you can turn on “Web Page Dialling”. When on this will allow you to click-
to-dial recognised telephone numbers directly from Internet Explorer.
From your CRM Software
Please see the CRM Connect Integration Guide for your chosen CRM
application for how to configure and dial from your CRM system.
From another application
Clipboard dialing can be turned on in the
Configuration >> General >> Dialling settings page.
When on, CRM Connect will keep an eye on the
clipboard and if you copy something to it that looks
like a telephone number then a bubble will appear from the tray icon that
asks you if you want to call the number.
When using this method of dialling, you may want to help CRM Connect
know what a valid number is by entering a minimum and maximum length
and possibly a prefix that numbers must start with. This can be done in
the Dialling settings page.

20
CRM Connect – Application User Guide
www.btwholesale.com
Call Control
Let’s take a moment to review the items on the Call screen in the Phone window:
Contact information: The name
and telephone number of the
remote person.
Page left/right: Use these to switch
between calls when you have more
than one call in progress.
Call actions: Use these buttons to
interact with the current call.
Call information: Other information
about the current call.
As you can see, the Phone window allows you to interact with the current call in a number of ways.
One of the most common ways is to click on the New contact or Edit contact button to apply a name
to the person you are speaking to. This is covered in a later section, Address books.
It is also common to use this screen to perform a transfer of the current call to another extension or
user. To do this you must be Connected to the call (as opposed to it being on Hold or Ringing).
When you are Connected, then the Actions list looks like the above example. To transfer a call you
do NOT press the Hold button. The Hold button has a different purpose (more about his later).
Instead you either press the Consult or Transfer button. You choose the button according to
whether you want to speak to the other person (Consult) or not (Transfer).

21
CRM Connect – Application User Guide
www.btwholesale.com
You are then presented with a screen like the Make call screen, but with the word Consult or
Transfer at the top. Your call is not on hold at this stage yet, but when you are ready, type the
number to transfer to (or choose one of the dialling options) and if you are Consulting then the
original call will be put on Hold pending transfer (the pending t ransfer bit is important). If you are
transferring then the call will be put straight through.
More call control
We’ve seen what you can do with a connected call. Can you interact with other calls? Yes,
when a call is ringing, you can choose to answer the call or Deflect it (transfer it without
answering it) to another extension. Deflecting a call is done a manner similar to transferring
calls. Click the Deflect button, type a number to deflect the call to and click Deflect again.
Deflecting calls is not just used to avoid work. If you are already on the phone and someone else
phones you, then you can use Deflect productively to move the call to a colleague who can tell the
caller to wait for you to become available.
You can also put calls on hold. Depending on your telephone system configuration, this means that
the other person should hear music. When you are ready to talk to them again, use the Unhold
button. Remember, the Hold button is not for transferring calls. It is purely to pause the call. If you
want to transfer a call that is on hold, then first you will have to take the call off hold first.

22
CRM Connect – Application User Guide
www.btwholesale.com
Address Books, Contacts and Call History
Creating and Searching Contacts
The Address book window is accessed from the Address book item on the main menu or tray menu
icon. Go ahead and open it, let’s start by adding a new entry.
At the top of the window, press the New Contact button.
This will present you with a blank Contact window. Enter a
name, company and phone number in the relevant boxes.
All of the boxes from the Contact window, including the
Notes box at the bottom, can be searched. You can also
interact with some of the boxes to make a call, send an
email, etc.
You may be wondering what the Type box is for at the top of
the page. This is used to change the format of the Contact
window. Different “types” have different templates. Pick the
one that best represents the contact entry that you are
creating.
When you’re finished press the Save button and we’ll
search for your new entry.
Back at the main Address book window; enter search
criteria to find your entry. Most of the time, you can find the
results that you want by entering text in the search box and
pressing Go. However, if you get too many results back,
you may want to consider further restricting your search by
using the Advanced section. Names and telephone
numbers area searched using the original Search box, but
in the Advanced section you can filter by address fields
such as town or postal code (Where) or other fields (What)
as well.
Press the Search button and after a short delay you’ll be presented with a list of results. From this
screen you can click on the telephone number of a contact to dial them, or click on their name to
edit or view their contact details.

23
CRM Connect – Application User Guide
www.btwholesale.com
Storing contact details when on a call
If you’ve made or received an external call using the Phone window yet, you’ve probably noticed
that when CRM Connect doesn’t know who the other
party is that you’re speaking to, then it will show a town
or location name instead.
It does this in an effort to be helpful, but if you really want
to help yourself, then you’ll add a name to the contact for
future use.
How do you do this? You press the New contact button
on the right hand side of the screen.
You can then store the caller’s details for future use.
Adding contact details from the Call History window
You may find it easier to add a contact’s name and other details after the call has ended. To do this,
go into your Call History and click on where the
name would appear (it will be a location name in
brackets instead). When you do this, the Create
contact window will appear like before and you can edit and save the details.
Call History
The Call History window is accessed from the Call
History item on the Main menu or from the tray icon
menu. As well as reviewing recent activity you can
dial someone from here by clicking on their telephone
number and you can access their contact record here
by clicking on their name (we saw this in the above
section). It’s good practice to store the names of
people when you speak to them, especially if you’re
likely to speak to them again.
By default, the Call History screen returns the fi fty most recent calls. The next fifty can be accessed
by pressing the page right button in the bottom right of the window.
Also, to aid readability you can hide and show individual days from your history by pressing the
expand/collapse button to the left of the date.

24
CRM Connect – Application User Guide
www.btwholesale.com
Settings and configuration
The Settings menu contains many options
that you can change to improve your use
CRM Connect.
Let’s take a look at some of the more common
ones.
If you select the Configuration menu item from
the tray menu then you are given a page with
options on the left hand side.
Telephony settings
When you first install Connect, it takes you through an installation phase where you need to tell it
your Username and Password.
When it does this, it presents the Telephony settings page of the Configuration window, so you may
have seen these before. If your Username and/or Password change then you will need to update
the details.
Next is your area code which is used to recognize local phone numbers.
The last choice, “method of use”, is useful when several people share the same PC. Read the two
choices and select which one best fits your mode of working.
Interface settings
The Interface page allows you to change settings
relating to the look and feel of the software, including
actions that happen when calls take place.
To have the software start automatically when you log
on to Windows, put a tick in the tickbox. The setting
will take effect next time you log on to Windows.
Language packs are available for the software to
change the language of the user interface. By default,
the software will attempt to automatically select the
language to use based on the language setting of your
operating system. However, you can change the

25
CRM Connect – Application User Guide
www.btwholesale.com
language used by selecting from the Language dropdown list. If your language is not in the list,
contact your reseller to find out when it will be availabl e. Any changes you make to the language
will take effect next time you start the software.
By default, many of the software’s windows have a “skin” to make them look nice. If you find that
you don’t like the “skinned” windows, perhaps for accessibility reasons, you can turn them off by
selecting “No skin” from the Phone window dropdown. The next time you load the software, the
windows will all be standard Windows-style windows using the theme from your operating system.
The next section on the Interface page allows you to choose a sound to have your computer play
when your phone is ringing and/or you have a call waiting.
This can help you to uniquely identify that it is your phone that is ringing and not a colleague’s. You
can also tick the box to have your computer’s sound automatically muted whenever a call is in
progress, which is useful if you listen to music or Internet radio while you work, giving you a more
professional appearance.
The last section of the Interface page has buttons you can press to quickly and securely clear the
history of contact history, recent numbers (as shown in the Recent list), and which hints the
software has shown you (clearing hint history allows the software to show you the hints again).
Dialling settings
This page allows you to turn on and off dialling from all
the different types of application that the software
supports. As a review, the different methods of dialling
are: Clipboard dialling (where you copy a telephone
number to the clipboard and the software detects it),
Web page dialling (where the software automatically
scans web pages in Internet Explorer and converts
anything that looks like a telephone number into a
clickable hyperlink and adds new buttons next to
telephone number fields that you have told it about) and
Application dialling (where the software adds new Dial
buttons to applications that you have told it about).
Please note that Microsoft Word and Excel dialling via SmartTags are not available in Office
2010
The last section on this page allows you to define what telephone numbers look like, to help the
software more accurately determine whether a string of numbers it sees in a webpage or on the
clipboard is really a telephone number or not. You can tell the software the minimum and maximum
length of telephone numbers (anything outside the range will be disregarded as not a real telephone

26
CRM Connect – Application User Guide
www.btwholesale.com
number), and you can also specify that telephone numbers must begin with a certain string of
characters.
Events settings
You can make the software either show the Phone window or pop the contact when certain events
happen. Just select the relevant action from the relevant dropdown list: On ringing, On answer, or
On outbound. You can also turn on or off the unobtrusive Preview window for all calls by ticking or
clearing the box.
The software can also be configured to run
one or more custom executable on selected
events. To configure this, press the Add
button and configure the following
information: The Event list is used to select
the event on which to run the program. The
Program box allows you to select which
executable to run. This box should be left
blank to load an internet browser.
The Parameters box allows you to either
choose the “command line arguments” for
the program, or in the case of a browser, the
URL to load. When using a URL, make sure that you include the URI scheme (i.e. HTTP://). Then
you can include in the Parameters any number of values from the call. For instance, to output the
caller’s telephone number you can include %Call\CallerContact\Tel%. To use the telephone number
of the remote party (as opposed to the caller, who may be the local user), you can use the syntax
%Call\Contact\Tel%, or you can use %Call\Contact\DisplayTel% to get the formatted number.
Finally, to help testing, you can use the word Message Box in the Program entry, if you want to
show a message box with the translated Parameter output.
Integration settings
The Integration pages allow you to setup and modify the CRM
Software that you can integrate CRM Connect with. Integration
means the your CRM system will be searched when calls happen
to automatically convert telephone numbers into names; and the
database will be searchable manually from the Address Book
window; and contacts that are found in the database can be
“popped”.

27
CRM Connect – Application User Guide
www.btwholesale.com
To create a new CRM integration, click the (Add new) item, select the type of CRM Integration from
the dropdown list, and click Set (the first time you enter this screen you may have to wait a few
seconds as the software scans to find out what integrations are available).
See the ‘Integration Guide’ for your chosen CRM Application for details on how to configure
the required settings and functionality.
To modify an existing integration that you have set up, click its name in the list. You can also click
its name and then click Delete if you no longer want integration to that CRM software.
For applications like Outlook, the software attempts to find and use default settings that will “just
work” for you, so you won’t need to do anything more. For more complicated integrations, the
software will do as much as it can for you, but you may need to help it by for example entering your
password, or telling it where the CRM software files are, etc.
The Integration test area allows you to test the settings you have entered by entering a telephone
number and seeing if the software can find it. If the number is found, you can click the Show contact
button to make sure that “popping” works.
When you are done, click Save. The new integration will be available immediately.
The CRM Connect Integration Guides show you how to configure and use these integrations with
your CRM system. Obtain and follow the guide to take advantage of these features, or you may
wish to contact your System Administrator to set these up for you.

28
CRM Connect – Application User Guide
www.btwholesale.com
Troubleshooting
Installation
The Installation Wizard should report back information on anything that is stopping successful
installation, such as Administrator privileges, Anti-Virus, other open applications etc. Please ensure
that the minimum requirements are met, that the installation package is saved and run with local
Administrator privileges for successful installation. WHC cannot assist with the installation process.
If there is a critical bug preventing installation please raise a Support Ticket.
Running CRM Connect
CRM Connect should be run with local Administrator privileges. Please see the log within the
Configuration panel for information on troubleshooting any issues. WHC cannot assist with any local
issues affecting the running of the application. If there is a critical bug preventing the application
from running please raise a Support Ticket, attaching a copy of the Log and any screen shots to
assist.
Login Process
CRM Connect requires a User to enter the correct Username and Password and have a current
CRM Connect Add-On Feature Package applied. If the Username and/or Password are incorrect or
the User does not have the required Add-On then “CRM Connect: Missing” will be displayed when
hovering over the application icon in the system tray as shown below:
The icon should be green (or red when on an active call) i f the User is successfully logged in. If this
is not the case please check the Username, Password and Add -On Feature Package in the Service
Delivery Platform portals and that the Username and Password in the CRM Connect Configuration
panel under General > Telephony is correct.

29
CRM Connect – Application User Guide
www.btwholesale.com
Product Support & Fault Handling
CPs are required to undertake all 1st Line support directly from their customers. WHC will then
provide 2nd line support direct to you (our customer) and will liaise directly with our internal and
external suppliers for 3rd line support.
Application Queries
If you have a query on how this application works or need any other guidance then please contact
the WHC Support Desk by using the fault ticketing system on Business Zone.
These types of queries will be classified as Priority 4, Informational ticket and will be responded to
in less than but no more than 5 working days. Mon – Fri 08:00 – 18:00hrs (excluding UK public and
bank holidays). Where there is a fault please raise the appropriate ticket using the appropriate
Priority Level as per the following:
P1, Critical Outage – Problems severely affecting the Service, traffic, billing, and
maintenance capabilities, and which require immediate corrective action. Target response
is less than and no more than 2 hours. Target restoration time is less than 4 hours (clock
hours). Response and restoration of Severity 1 tickets will be undertaken on a 24 x 7 x 365
basis.
P2, Major Impact – Problems that cause conditions that seriously affect system operation,
maintenance, and administration, and which require immediate attention. The urgency is
less than in critical situations because of a lesser effect on system performance. Target
response time is less than and no more than 4 hours (working hours). Target resolution
time is less than and no more than 8 hours (working hours). Response and restoration of
Severity 2 tickets will be from Mon –Fri, 08:00 – 18:00hrs.
P3, Minor Impact – Problems do not significantly impair the functioning of the system and
do not significantly affect the Service. Target response time is less than and no more than
8 hours (working hours). Target restoration time is less than and no more than 24 hours
(working hours). Response and restoration of Severity 3 tickets will be from Mon –Fri,
08:00 – 18:00hrs.
P4, Information - This severity is restricted to “How To….” Questions and therefore handled
as non-service impacting. Target response time is less than but no more than 5 working
days. Mon – Fri 08:00 – 18:00hrs (excluding UK public and bank holidays).
BTW shall aim to provide a solution within the above target timeframes. For P1, Critical
Outage and P2, Major Impact issues, WHC will aim to provide a temporary solution to
temporarily fix the fault with the Service while a permanent solution is developed.

30
CRM Connect – Application User Guide
www.btwholesale.com
Pricing
CRM Connect is a chargeable Add On and is charged separately.
All pricing is available from within the WHC Pricing charge books which are provided at the point of
contract signature, and available to download from the WHC document centre. If you are unable to
locate these then please raise a P4 support ticket.

The information in this publication was correct at time of going to print. We may make minor alterations to the
specifications of products which do not affect their performance, and may vary prices and delivery charges. The telecommunications services described in this publication are subject to availability and may be modified
from time to time. Services and equipment are provided subject to British Telecommunications plc’s respective standard conditions of contract. Nothing in this publication forms part of any contract.
© British Telecommunications plc 2014. Registered office: 81 Newgate Street, London,
England EC1A 7AJ.