crm integration - cincinnati bell · express (in office, out of ... contains options to change your...
TRANSCRIPT

CRM Integration
PC User Guide
10/01/2016

CRM Integration PC User Guide Page | 1
Contents Installation ........................................................................................................................................................................ 3
Help ................................................................................................................................................................................... 3
Presence Window ............................................................................................................................................................. 3
Phone Window .................................................................................................................................................................. 5
Preview Window ............................................................................................................................................................... 6
Tray Menu ......................................................................................................................................................................... 6
Address Book Window ...................................................................................................................................................... 8
Call History Window .......................................................................................................................................................... 9
Consult and Transfer Window .......................................................................................................................................... 9
Telephony Settings ..........................................................................................................................................................10
Interface Settings ............................................................................................................................................................12
Dialing Settings................................................................................................................................................................14
Availability Settings .........................................................................................................................................................16
Call Events Settings .........................................................................................................................................................17
Custom Events Setup Guide ........................................................................................................................................18
Integration Settings .........................................................................................................................................................23
Versions Information ......................................................................................................................................................24
Log Information...............................................................................................................................................................24
Dialing .............................................................................................................................................................................25
UCAD Tool User Guide ....................................................................................................................................................26
UCAD Tool ...................................................................................................................................................................26
How to Connect ..........................................................................................................................................................27
Example 1 ................................................................................................................................................................28
Example 2 ................................................................................................................................................................29
CRM Settings Deployment ..........................................................................................................................................29
Example LDAP Settings Deployment .......................................................................................................................29
Group Policy Deployment User Guide ............................................................................................................................30
Assign 1st Party Client to a Group ...............................................................................................................................30
Deploying Additional User Settings ............................................................................................................................34
Lync (Skype for Business – S4B) Integration ...................................................................................................................34
CRM Integration – PC User Guide

CRM Integration PC User Guide Page | 2
Web Dialing Configuration ..............................................................................................................................................35
Configuring Microsoft Internet Explorer for Dialing Telephone Numbers .................................................................35
Configuring Google Chrome for Dialing Telephone Numbers ....................................................................................36
Configuring Mozilla Firefox for Dialing Telephone Numbers ......................................................................................38
Configuring Opera for Dialing Telephone Numbers ...................................................................................................40
CRM Integration PC User Guide Page | 3
Installation The Go Integrator Client software is supplied as an Internet download. It is a self-contained installer that contains the files needed to install a copy of Go Integrator Client. It can be found at https://www.cincinnatibell.com/business/support/covp-support. When you first install Go Integrator Client, it takes you through an installation phase during which you must enter
your Go Integrator login credentials. When it does this, it presents the Telephony settings page of the Configuration
window. Your login credentials are the same username and password utilized for all of your hosted VoIP services.
Help There are two ways to use the online help system built-in-to Go Integrator Client.
1. Click the Help item in the system tray menu to open the online help system at this page. The links across the
top of each page can be used to switch between the products in the Go Integrator range. The links along the
left-hand side of each page can be used to view information on each page listed there.
2. Click the context-sensitive online help buttons found in the windows in your
Go Integrator Client software to open the online help page for that window.
The links across the top and left-hand side of each help page can still be
used to view other pages as required.
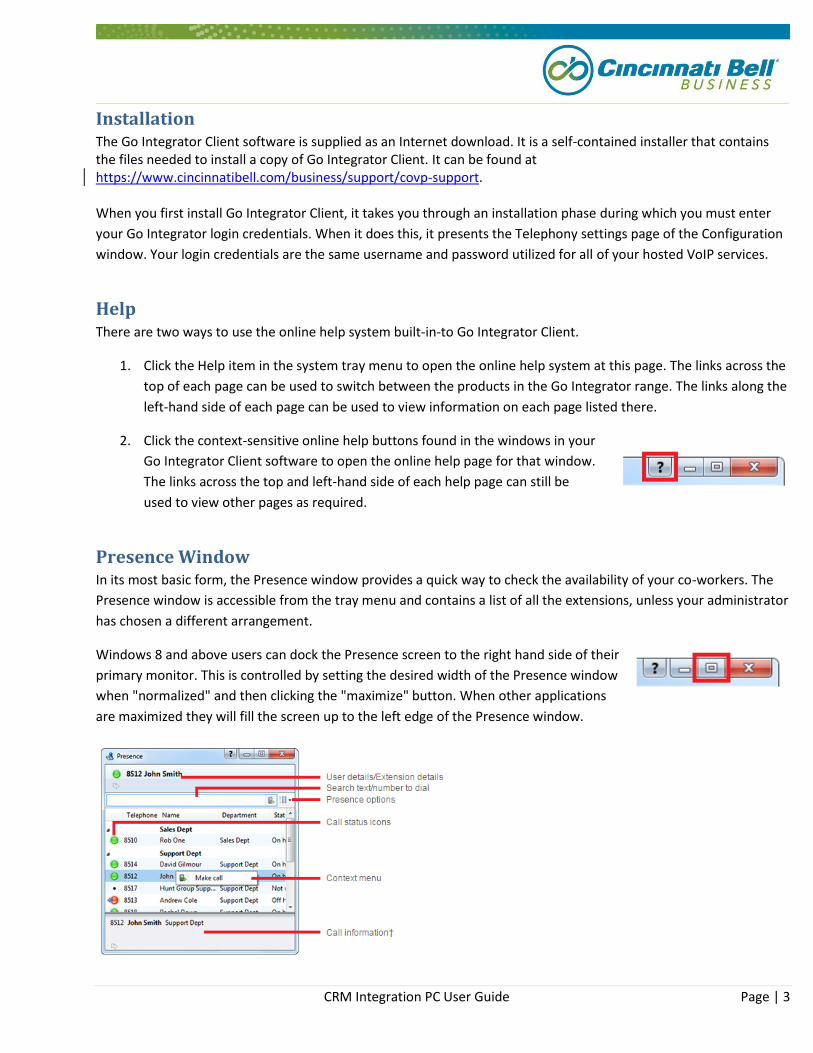
Presence Window In its most basic form, the Presence window provides a quick way to check the availability of your co-workers. The
Presence window is accessible from the tray menu and contains a list of all the extensions, unless your administrator
has chosen a different arrangement.
Windows 8 and above users can dock the Presence screen to the right hand side of their
primary monitor. This is controlled by setting the desired width of the Presence window
when "normalized" and then clicking the "maximize" button. When other applications
are maximized they will fill the screen up to the left edge of the Presence window.

CRM Integration PC User Guide Page | 4
User details/Extension details: The current call status is indicated here by the icon. Search text/number to dial: To filter the list of users/extensions, text can be typed into this box and the list will update to only show items containing that text. Call status icons: These icons indicate the current call status of each user/extension.
Go Integrator has plug and play compatibility with Busylight so everyone in the office can see whether a colleague is available for a conversation, busy on the phone, or simply does not want to be disturbed.
Presence options: If you want to personalize your Presence window to include just the contacts you need, this can be done using these options. The other style you can choose, instead of Extensions, is Custom. The user list is for hotdesk oriented sites. These are sites where staff moves around and hence the list is oriented toward who is available and where they are, rather than which extension is available. Context menu: If you right-click on one of the entries in the Presence list, a context menu should appear. Assuming you are not already on a call, the menu should contain the Make Call item. By choosing this action, you can dial the extension directly. If you had already been on a call the choices would have been Consult and Transfer rather than Make Call. This is appropriate because, if you are already on a call, then the expectation is that you are clicking on the extension to transfer the call to them. If you see an extension that is flashing red then it means the extension has a call ringing at it. Right-click on the extension and the context menu will include an option to pickup the ringing call. Call information†: Other information about the current call. Message Waiting Indication: Provides visual indication in the PC system tray when an unread voicemail message has been left on the voicemail system.

CRM Integration PC User Guide Page | 5
Phone Window
Main menu: Click here to display the main menu.
Contact information: The name and telephone number of the remote person.
Page left/right: Use these buttons to switch between calls when you have more than one call in progress.
Actions: Use these buttons to interact with the current call and contact.
Notes: Information stored in the contact's notes (local Address Book only).
Call information: Other information about the current call.
When the Phone window is open, you can simply start typing a telephone number on your keyboard. Go Integrator
Client will understand that you want to make a call and switch to the Make Call screen.
The Phone window allows you to interact with the current call in a number of ways:
Users can click any buttons showing integrated application names to open the caller's record.
When a call is ringing, you can choose to answer the call by clicking the "Answer" button or
deflecting it (transfer it without answering it) to another extension. Deflecting a call is done in a
manner similar to transferring calls. If you are already on the phone and someone else calls
you, then you can use deflect productively to move the call to a co-worker.
It is also common to use this screen to transfer the current call to another extension. To do this you must be
connected to the call (as opposed to it being on hold or ringing). To transfer a call you do NOT press the Hold
button - it has a different purpose (more about this later). Instead you press the Consult button or the
Transfer button. You choose the button according to whether you want to speak to the other person
(Consult) or not (Transfer).
You can also put calls on hold. Depending on your telephone system configuration, this means the other
person should hear music. When you are ready to talk to the caller again, use the Unhold button.
Remember, the Hold button is not for transferring calls. It is purely to pause the call. If you want to transfer
a call that is on hold, then you will have to take the call off hold first.

CRM Integration PC User Guide Page | 6
Preview Window The Preview window appears when a call is made or received. It contains much of the information from the main
Phone window but in a more compact format and it disappears shortly after a call connects.
Close button: Use this to make the Preview window disappear immediately.
Contact information: The telephone number and name of the other party.
Call control actions: Use these to interact with the call. Using some of these will display the main Phone window.
Like the Phone window, the actions at the bottom of the preview window adapt to the state of the call. The example
picture shows the actions that are available when a connected call is in progress. To conserve space, the text is only
shown for the first action. The rest are depicted by their icons only.
Tray Menu The tray menu is accessed by right-clicking on the Go Integrator Client icon which is a green circle.
(It is red if you're on a call or yellow if a call is on hold). Note: In Windows 7 and above, some tray
icons become hidden and expressly have to be shown. These settings are stored in the
"Notification Area Icons" portion of the Windows Control Panel.
Quick dial box : Type the number to dial or enter the name to find contact details.
Recent menu : Quickly see recently dialed numbers, and click to redial them.

CRM Integration PC User Guide Page | 7
Features menu : The Features menu provides you with options to control
the behaviour of your phone. The options available from this menu are
"Call settings", "Set Forward All" and "Set Do Not Disturb".
Call settings†: This allows you to configure your preferred settings for call
forwarding, Anywhere, Remote Office, DND/hide number, and CommPilot
Express (In Office, Out Of Office, Busy and Unavailable). The availability of
these options is dependent upon the features available from your Service
Provider and the services you to which you subscribe.
Set Forward All: This allows you to enter a number that will be called when someone calls your extension. Please
remember that that your phone will not ring when this is set.
Set Do Not Disturb: This allows you to set your phone so that a caller will hear the busy tone when they call your
extension.
CommPilot Express menu†: The CommPilot* option allows to quickly select your preferred CommPilot Express
profile. These can also be linked to your Microsoft Outlook calendar so that the status of your Microsoft Outlook
calendar will set your CommPilot Express profile. To link these you must set your Appointment setting in your
Microsoft Outlook integration to "(Default)". Your Microsoft Outlook calendar availability will match to your
CommPilot Express profiles as follows:
* The CommPilot state will only change for users subscribing to CommPilot Express.
Call Control / contact management : These options are used to monitor or control the creation and flow of calls.
Configuration : Contains options to change your user experience, and configure CRM packages to integrate with.
Help: Click this option to open the software's online help in your default internet
browser. Also, the software's windows have context-sensitive help buttons which will
open the appropriate online help page when clicked.
Exit : Use this to unload the software.

CRM Integration PC User Guide Page | 8
Address Book Window The Address book window is accessed from the Address book item on the main menu or tray menu icon. It provides
access to a local address book included with the client.
Search text: Enter the text for which to search within the contacts. Leave this blank to show every contact.
Search button: Click on this button to begin the search.
New contact button: Click this button to add a new contact record to the local Address Book.
Advanced options buttons: Click this button to show advanced options for further filtering of the search results.
If you get too many results back, you may want to
consider further restricting your search by using the
Advanced options. Users can filter by address fields such
as town or postal code (Where), other fields (What) and
the specific database where you think the contact might
be currently stored (Source).
Search results: Click on the telephone number of a contact to dial them.
Page: Use the arrow buttons or type the page number you want to view into the box.

CRM Integration PC User Guide Page | 9
Call History Window The Call History window is accessed from the Call History item on the main menu or from the tray icon menu. As
well as reviewing recent activity, you can dial someone from here by clicking on their telephone number.
By default, the Call History screen returns the fifty most recent calls.
View/add contact: You can add a new contact record to the Personal Phone List from your Call History by clicking on
where the name would appear (it will be a location name in brackets instead). When you do this, the Create contact
window will appear.
Consult and Transfer Window To transfer a call or consult a co-worker, you do not press the Hold button. The Hold button has a different purpose
(more about this later). Instead you either press the Consult button or the Transfer button.
You choose the button according to whether you want to speak to the other person (Consult) or not (Transfer).
You are then presented with a screen similar the Make Call screen, but with the word Consult or Transfer at the top.
Your call is not on hold at this stage yet. When you are ready, type the number to dial and click the Transfer/Consult
button according to the required action.
If you are consulting, then the original call will be put on hold pending transfer (the pending transfer detail is
important).
If you are transferring, the call will be put straight through (remember to say goodbye first).

CRM Integration PC User Guide Page | 10
When consulting and you have finished talking to the other caller, you can either click
Cancel to return to the original call or click Complete to transfer the original call to your
co-worker.
You can also transfer calls by using the Presence window.
Telephony Settings In its most basic form, the Presence window provides a quick way to check the availability of your co-workers. The
Presence window is accessible from the dock menu and contains a list of all the extensions, unless your
administrator has chosen a different arrangement.

CRM Integration PC User Guide Page | 11
Serial number: The serial number field is where you enter your serial number in order to activate the product. *
* For your convenience, nothing needs to be entered here
Method: Choose the protocol via which you want to communicate with Service Provider platform for call control.
CTI Protocol should be chosen.
Server: Enter your telephony server's URL address. **
** The XSP server address will be pre-programmed into Go Integrator Client and will not be visible.
Login details: Enter your username and password (these are your hosted telephony credentials).
Directory mode: Select the preferred directory mode which can be used to control the directory numbers you
download from the telephone system provider. This is useful to improve the performance of the Presence window if
you are part of a large organization. By default it is set to Group and your group is related to your username.
Select your location: Select your country and area code which are used to recognize local phone numbers.
Method of use: Go Integrator can be installed either locally on a user's PC or in Terminal Services / Citrix
environments where the user's Windows client session is delivered from a central server. These options control this
functionality and one of them should be selected based on the following information:
"Everyone who uses this computer uses the same telephone" is also known as "Machine mode". Machine
mode is typically used in situations where the client runs locally on the PC and all users of the PC want to
share the same settings. Important! This mode should NOT be used for Terminal Services / Citrix
environments (see below).
"Everyone using this computer uses a different telephone or this is a Terminal Services/Citrix installation" is
also known as "User mode". User mode is designed to work specifically with Terminal Services where each
user’s settings are held in their own personal settings file. It also works in the multi-agents environment,
where users move from one PC to another and expect their Go Integrator settings to follow them around.
Please note, these options are not shown in some versions of Go Integrator. In such instances it is set by default to
the second option.
The implications of changing this setting are as follows:
For multiple users sharing same PC (not terminal services)
Changing to Machine mode (option 1) for a client already
configured in User mode (option 2), will cause the Go
Integrator client to share the same settings file and hence
apply the exact same settings across all users using Go
Integrator on that PC. This will overwrite the previous user
specific settings for all users with an account on the PC.
For Terminal Services users
In Terminal Services environment, all settings are stored separately for each individual user on the host machine.
User mode (option 2) allows each user to freely, and independently from all other users, change Go Integrator client

CRM Integration PC User Guide Page | 12
settings without affecting or overwriting the other users’ setting files. For a client delivered via a Terminal Services
environment, changing to Machine mode (option 1) for a client already configured in User mode (option 2) will have
the same impact as that explained in point 1 above.
Click the Save button to store any new/edited information or click the Cancel button to discard any new/edited
information.
Interface Settings The Interface page allows you to change settings related to the look and feel of the software, including actions that
happen when calls take place.
The Interface page allows you to change settings relating to the look and feel of the software, including actions that
happen when calls take place.
License type: Displays the license type the Go Integrator Client uses.
Application load option: To have the software start automatically when you log on to your computer, put a check in
the "Application load" checkbox. The setting will take effect next time you log on to your computer.
Language selector: Language packs are available for the software to change the language of the user interface. By
default, the software will attempt to automatically select the language to use based on the language setting of your
operating system. However, you can change the language used by selecting from the Language dropdown list. If
your language is not in the list, contact your reseller to find out when it will be available. Any changes you make to
the language will take effect next time you start the software.

CRM Integration PC User Guide Page | 13
Main window skin selector: By default, many of the software's windows have a "skin" to make them look nice. Your
reseller may have added their custom branding to the skin too. If you find that you don't like the "skinned" windows,
perhaps for accessibility reasons, you can turn them off by selecting "No skin" from the Phone window dropdown.
The next time you load the software, the windows will all be standard Windows-style windows using the theme from
your operating system.
Preview window option: You can turn on or off the unobtrusive Preview window for all calls by checking or clearing
the appropriate box.
Hot keys selection: The "Hot keys" section allows you to setup keys on your keyboard and associate them with the
following actions: Call (number must be highlighted in order to dial), Answer and Hang up.
Clear cache buttons: The last section of the Interface page has buttons you can press to quickly and securely
perform certain actions: clear the history of all CRM contacts from your call history, recent numbers (as shown in the
Recent list), and which hints the software has shown you (clearing hint history allows the software to show you the
hints again).
Click the Save button to store any new/edited information or click the Cancel button to discard any new/edited
information.

CRM Integration PC User Guide Page | 14
Dialing Settings This page allows you to turn dialing on and off from all the different applications that the software supports.

CRM Integration PC User Guide Page | 15
Dialing methods: Check the appropriate boxes to turn the required dialing methods on. The different methods of
dialing are:
Clipboard dialing: Copy a telephone number to the clipboard so Go Integrator Client can dial it
automatically.
Should this really be
“interrogate”, rather than
“intergrate?”

CRM Integration PC User Guide Page | 16
Web Page Dialing: Go Integrator Client can automatically scans web pages in supported web browsers and
converts anything that looks like a telephone number into a clickable hyperlink.
Application dialing: Go Integrator Client dynamically adds new Dial buttons to applications for which you
have trained it.
TAPI Dialing: Provides a Windows TAPI Driver to allow third-party applications to dial through Go Integrator
Client.
Focus dialing: Dynamically recognize any telephone numbers in the textbox where the cursor is located and
allows that number to be dialed.
Dialing applications: Any applications or webpages to which Go Integrator Client has added Dial buttons to the
table. To add a new application or webpage to the list, click the Add button to launch the dialing wizard. You can use
the Edit and Remove buttons to correct any mistakes you have made. If you have set up some applications from
which you dial and are now changing PCs, you can use the Export button to export the dialing settings of the
applications and webpages that you have set up and save them in a single file named "dial.settings". If you have a
"dial.settings" file and want to add the settings from it to your software, you use the Import button.
Criteria: The last section on this page allows you to define what telephone numbers look like, to help the software
more accurately determine whether a string of numbers it sees on a webpage or on the clipboard is really a
telephone number. You can tell the software the minimum and maximum length of telephone numbers (anything
outside the range will be disregarded), and you can also specify that telephone numbers must begin with a certain
string of characters. The "Advanced rules" allows "regular expressions" to more accurately control whether a
number should be considered as a valid telephone number.
Click the Save button to store any new/edited information or click the Cancel button to discard any new/edited
information.
Availability Settings

CRM Integration PC User Guide Page | 17
Update Skype for Business: If you use Microsoft Skype for Business, Go Integrator Client can automatically update
the Skype for Business state accordingly. Check this option to enable the feature.
Busylight: Go Integrator has plug and play compatibility with Busylight so everyone in the office can see whether a
colleague is available for a conversation, busy on the phone, or simply does not want to be disturbed.
Call Events Settings
Default actions: You can make the software either show the Phone window or pop the contact when certain events
happen. Just select the relevant action from the relevant dropdown list: On ringing, On answer, or On outbound.
Sound selection button: The next section allows you to choose a sound to have your computer play when your
phone is ringing and/or you have a call waiting. This can help you to uniquely identify that it is your phone that is
ringing and not a co-worker's. Please note that only audio files in WAV format are supported. You can also check the
box to have your computer's sound automatically muted
whenever a call is in progress, which is useful if you listen to
music or Internet radio while you work, giving you a more
professional persona.
External programs†: The software can also be configured to
run one or more custom executable on selected events. To
configure this, press the Add button and configure the
following information: The Event list is used to select the
event on which to run the program/application. The Direction
list is used to select when it is either an incoming or an

CRM Integration PC User Guide Page | 18
outgoing call. The Calls lists can be used to restrict events for internal/external or both.
The Program box allows you to select which executable to run. This box should be left blank to load an internet
browser.
The Parameters box allows you to either choose the "command line arguments" for the program, or in the case of a
browser, the URL to load. When using a URL, make sure that you include the URI scheme (e.g. http://). Then you can
include in the Parameters any number of values from the call. For instance, to output the caller's telephone number
you can include %Call\CallerContact\Tel%. To use the telephone number of the remote party (as opposed to the
caller, who may be the local user), you can use the syntax %Call\Contact\Tel%, or you can use
%Call\Contact\DisplayTel% to get the formatted number.
To help testing, you can use the words Message Box in the Program entry, if you want to show a message box with
the translated Parameter output. Finally, a "custom" button can be added to the preview window allowing a user to
control application popping in the same way as for standard integrated applications.
Click the Save button to store any new/edited information or click the Cancel button to discard any information.
Custom Events Setup Guide
Custom events and buttons can be used to pass call information from Go Integrator Client to other software using
command line parameters under conditions specified by you.
For example, your custom event could create a new call record in a database that automatically includes the
telephone number when a call is connected.
Information You'll Need
Windows account username and password
Command Line Parameter Primer
For those who aren't sure what a "command line parameter" is, let's break it down with a brief run-through.
"Command line" refers to the "Command Line Interface" (CLI) which is a method of giving instructions to your
computer by typing commands one line at a time to perform specific tasks like starting an application.
In very basic terms, a "parameter" is simply a definition of something. For example, name = Joe or telephone =
6329603210.
A "command line parameter" is just a parameter that is specified and used when a program is started by adding it to
the end of the command line instruction that starts the program.
Another type of command line parameter called a "switch" can be used to start the associated program in a certain
mode or affect it in some other way. For example, '–editmode' or '/AddNewContact'.
Let's take a look at an example of a typical command line instruction you would type manually and how it is made:

CRM Integration PC User Guide Page | 19
When the above example is run, it would open YourCRM which would then immediately create a new contact
record by itself and enter "6329603210" into the "Phone" field.
When you set up your custom event parameters in Go Integrator Client, what you are effectively doing is using your
chosen app's normal syntax except you substitute real call information with the name of the call information as in
the example below. You can find the call information names and descriptions in the "Passable Call Information"
section below.
Then, when Go Integrator Client runs your custom event, it inserts the current call information into the parameters
where you have specified.
Please note that command line instructions and parameters are usually entered manually using the "Run" window
but you won't be doing that. Once your custom event has been set up, Go Integrator Client takes care of everything.
We will get to setting up your own custom event shortly. Also note that the structure of a command line instruction
(also called "the syntax") can vary a lot from app-to-app. For example, some apps' parameters start with a hyphen
character (-) like "-Phone" but other apps use a forward slash (/) instead like "/Phone" etc. Whatever syntax your
app uses, the principle is generally the same.
Passable Call Information
The call information that can be passed to other software is listed below (note that some are quite similar):

CRM Integration PC User Guide Page | 20
Remember, the call information name must always be enclosed in '%' signs to properly identify it, otherwise the
information will not be passed correctly. When Go Integrator Client runs your custom event, it inserts the call
information into the parameter in place of the call info name e.g. if the other person's phone number is
"6329603210", telephone = %Call\Contact\Tel% becomes telephone = 6329603210.
Chosen Application Parameters
Unfortunately, we can't help out that much with the parameters supported by your chosen app as you could be
passing the call info to more or less any piece of software and each will have differing capabilities in this area. We
suggest starting out with any help files or support documentation supplied with the software to find out what can be
done using command line parameters. You could also search online using your chosen app's name and "command
line parameters" as keywords.
Planning
Before we get started with the actual configuration, it's important to know exactly what you want the custom event
or button to do and under what conditions it should do it. If you haven't already done so, we recommend that you
sit down with the relevant colleagues and decide exactly what you need.
There are four areas for consideration:
When to trigger the event – There are two options here:
. 1. Choose a series of combinations between one of four events, one of the two call directions and one of
the two types of calls triggers which automatically initiate your custom event at a particular point during a
call.
2. Create a custom button that is clicked at the appropriate moment during a call to trigger the custom
event manually. The automatic triggers are:
o When the call is:
Ringing
Connected
Completed
Missed
o When the call direction is:
In
Out
o When the call is:
CRM Integration PC User Guide Page | 21
Internal
External
The program that gets triggered – This could be a CRM app or any other software. Please note that the
passing of information between Go Integrator Client and your chosen app will only work if the app is capable
of receiving command line parameters.
The information that will be passed – There are several different pieces of information that can be passed
from Go Integrator Client. These are listed in the "Passable Call Information" section along with further
guidance on their use. This info can be passed to the triggered software along with any other parameters
that are supported.
What is done with the passed information – You may only be able to achieve a limited number of actions
depending on the command line functionality of your chosen app so you should be aware of its limitations.
The quickest way to confusion during the actual configuration stage is by going into it without sufficiently thinking
through these four areas.
Software Configuration
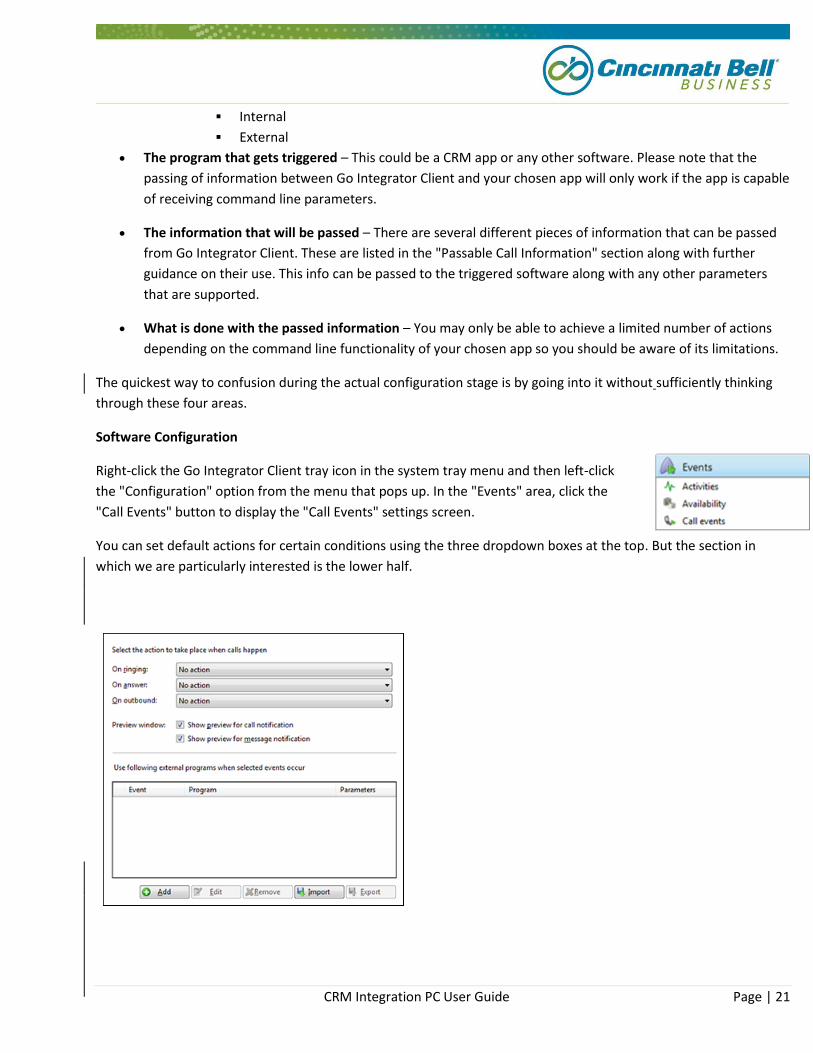
Right-click the Go Integrator Client tray icon in the system tray menu and then left-click
the "Configuration" option from the menu that pops up. In the "Events" area, click the
"Call Events" button to display the "Call Events" settings screen.
You can set default actions for certain conditions using the three dropdown boxes at the top. But the section in
which we are particularly interested is the lower half.

CRM Integration PC User Guide Page | 22
To begin with, the box containing custom events and buttons is empty but we can remedy this by
clicking the "Add" button. The event details screen will be displayed.
Select the required event trigger from the "Event", "Direction" and "Calls" dropdown boxes.
If you need to use a button rather than a trigger, you can select the "Custom: Button" option from the "Event"
dropdown box instead. An extra textbox labelled "Text" appears between "Calls" and "Program". Enter the text you
want to appear on the button.
The command line instruction that you will use to start your chosen app is broken into two parts: the program and
the parameters.
The full file path to the program you are triggering (including the executable name) needs to go in the "Program"
textbox. If you know the path, you can type it directly into the textbox or you can click the "…" button to navigate to
and select the program. Do not enter any of the command line parameters into this textbox. If you were entering
our example from before, you would just enter:
If you need to launch a web page instead of a specific piece of software, leave the "Program" textbox empty. All of
the Internet browser-related work is done in the "Parameters" textbox.
The "Parameter" textbox is where most of the magic happens, as it is here that you will enter the required program
parameters and call information to be passed to the triggered program. Any text that makes up the parameters
other than the call information names will be passed to the triggered program "as is". If you were entering our
example from before, you would enter:

CRM Integration PC User Guide Page | 23
If you are launching a web page, enter the full URL and any required parameters, remembering to include the
"http://" before the "www".
Once all of your custom event details have been entered, click the "OK" button to add your event to the list.
You can add as many custom events as you like but remember to click "Save" to store and apply them.
Integration Settings
The Integration pages allow you to see and modify the databases with which you have set up integration.
Integration means the database will be searched when calls happen to convert telephone numbers into names; and
the database will be searchable manually from the Address Book window; and contacts that are found in the
database can be "popped".
To create new integration, click the (Add new) item and select the database from the dropdown list. The first time
you enter this screen you may have to wait a few seconds as the software scans to find out what integrations are
available.
To modify an existing database that you have set up, click its name in the list. You can also click its name and then
click Delete if you no longer want integration with that database.
For applications like Outlook, the software attempts to find and use default settings that will "just work" for you, so
you won't need to do anything. For more complicated databases, the software will do as much as it can for you, but
you may need to help it by for example entering your password, or telling it where the database files are, etc.

CRM Integration PC User Guide Page | 24
The Integration test area allows you to test the settings you have entered by entering a telephone number and
seeing if the software can find it. If the number is found, you can click the Show contact button to ensure "popping"
works.
Click the Save button to store any new/edited information or click the Cancel button to discard any new/edited
information.
Please contact your Reseller to get a detailed configuration integration guide for standard applications supported by
Go Integrator Client.
Versions Information
Most software these days consists of several small programs and libraries that form a whole and Go Integrator is no
different. The Versions page lists the version used for each component part that makes up Go Integrator. This
information can be used to track down any rogue element that perhaps hasn't updated correctly or to provide clues
to a problem's cause. Should something like that happen, you could click the Copy to clipboard button and then
paste the info straight into a document or email.
Log Information

CRM Integration PC User Guide Page | 25
The Log page performs a similar function to the Versions screen in that it displays information that is useful in the
event of a problem.
The Devices list shows the devices that are being used; this could include hardware and any apps that you have
integrated with Go Integrator.
The panel below shows the Log entries. The log keeps a record of what Go Integrator attempts to do and whether it
was successful. This information can be very useful when troubleshooting an issue; click the Copy to clipboard
button and paste the info into a document.
Dialing The dialing wizard is used to configure Go Integrator to dial from webpages that use text boxes and within
applications from which the software doesn't already know how to dial.
In the Configuration screen, on the Dialing page, press the Add button to load the dialing wizard and then follow the
appropriate set of instructions below.

CRM Integration PC User Guide Page | 26
UCAD Tool User Guide This Go Integrator UCAD tool is made available to anyone wishing to use it. This program is distributed in the aim that it will be
useful, but WITHOUT ANY WARRANTY expressed or implied, including the implied warranties of FUNCTION,
MERCHANTABILITY or FITNESS FOR A PARTICULAR PURPOSE.
IN NO EVENT SHALL Go Integrator OR ANY OF ITS PARTNER COMPANIES BE LIABLE FOR ANY DIRECT, INDIRECT,
INCIDENTAL, SPECIAL, EXEMPLARY, OR CONSEQUENTIAL DAMAGES (INCLUDING, BUT NOT LIMITED TO,
PROCUREMENT OF SUBSTITUTE GOODS OR SERVICES; LOSS OF USE, DATA, OR PROFITS; OR BUSINESS
INTERRUPTION) HOWEVER CAUSED AND ON ANY THEORY OF LIABILITY,WHETHER IN CONTRACT, STRICT LIABILITY,
OR TORT (INCLUDING NEGLIGENCE OR OTHERWISE) ARISING IN ANY WAY OUT OF THE USE OF THIS SOFTWARE,
EVEN IF ADVISED OF THE POSSIBILITY OF SUCH DAMAGE.
UCAD Tool
UCADTool uses Ldifde command line program to connect and modify the data on the Active Directory.

CRM Integration PC User Guide Page | 27
IMPORTANT: It is recommended (but not required) that the UCAD Tool run on the Domain Controller or at least on
the Windows Server machine with Ldifde and is a member of the domain where you would like to apply changes to
the client software.
You will need two files: UCADTool.exe and ucsettings.ldf.
How to Connect
1. Run the UCADTool.exe program (make sure that ucsettings.ldf is in the same directory).
2. In the top menu bar enter your domain name, username and password. Please make sure the user logging in
has enough rights to access and modify the records on the Active Directory.
3. After the credentials have been accepted you will be prompted with the screen, below. Click on "Yes" to
continue (or "No" to abort). This will extend the Active Directory schema to enable you to store UC settings
information.
4. WARNING: Extending your Active Directory schema is an irreversible process!
5. The software will launch a Command Prompt window, where you will see the process of connecting and,
logging in, as well as importing the directory from ucsettings.ldf file to your domain. Once the process has
finished you will be prompted by the window, below. Click "OK" to restart the application.
6. Now you have to re-enter the login credentials (see point 2).

CRM Integration PC User Guide Page | 28
7. By default the software will download all users and display their information in two columns, "Name" and
"Windows username". Now you can select and edit settings for each individual user. To edit the user
settings you will first need to add a new column in the "New Column:" textbox.
8. To add a new column you will need to use the same format as seen in the PC client XML settings file
(Settings.xml). This usually resides in "C:\Windows\ProgramData\[ClientSoftwareName]\Settings.xml" or
"C:\Users\Username\AppData\Roaming\[ClientSoftwareName]\Settings.xml". Depending on the data or
settings under consideration for change, please refer to the following examples.
Example 1
The following "Machine.Devices.MainDevice.User" path would create a column which allows you to change an
individual user's login credentials directly from the UCAD Tool. Note: The XML format/structure is exactly the same
across all clients.

CRM Integration PC User Guide Page | 29
Example 2
In like manner turning on or off dialing options would require you to build a path for those settings. For example the
"Web page Dialing" would require you to add a column with a path of "User.Dialing.InternetOn" and then enter the
boolean value "1" or "0" to turn this feature on and off.
This way you can change nearly any settings in the client software without the need of accessing the end user's PC.
CRM Settings Deployment
The above process can be used to deliver CRM configuration also. This method however has some slightly special
features that the client software also recognizes. To publish a CRM integration please follow these steps:
Example LDAP Settings Deployment
1. Configure a CRM as you require it on a client PC.
2. Go to C:\ProgramData\Go Integrator\Settings.xml directory.
3. Open the settings file as above, and locate the node that contains the required integration. The exact node
will be called CRM1, CRM2, etc. Here is an example of such a node:

CRM Integration PC User Guide Page | 30
4. Copy the entire XML settings content from between the "<CRM1>...</CRM1>" nodes.
5. Create a column in the UCAD tool (as in the above examples) called Machine.Devices.LockedCRMx, where x
can be any value, i.e. Machine.Devices.LockedCrm1.
6. Paste it the XML setting into a newly created Machine.Devices.LockedCrm1 column and hit the Save button.
7. Important! Before saving any settings, always remember to check if you need to make any changes to the
user's XML settings as these may vary from user to user, e.g. Username or Password. Note: Settings which
are editable are marked in red.
8. Important! These settings will make the CRM integration appear in the client software, and will not allow
the end user to edit them, only view the settings. If changes are required, the system administrator will have
to carry them out using the UCAD Tool.
Group Policy Deployment User Guide This document will guide you through assigning or publishing our client software to specific users or computers by
using Group Policy in Windows Server 2008. It is expected that you have already created and populated a user group
containing the users or computers requiring access to the software.
Assign 1st Party Client to a Group
Start by using a file compression tool such as 7zip or WinRAR to extract the following 2 files from the latest released
version of the client.exe installation file:
1. UCClient.msi
2. Resource2.lib

CRM Integration PC User Guide Page | 31
Place them in a folder on a server. Make sure the folder is accessible to the appropriate users and/or computers by applying suitable sharing permissions to it. Make a note of the folder's "Network Path" as you'll need it later. It will be something like \\server_name\shared_folder.
Log in as the domain administrator using one of the Windows Server computers connected to the domain and start the "Group Policy Management Console".
Note: instructions and screenshots are based in Windows Server 2008.
You can start it from the Windows "Start" menu (Start > All Programs > Administrative Tools > Group Policy Management) or via the Windows Control Panel (Control Panel > Administrative Tools > Group Policy Management).
In the console tree, navigate to the correct
domain, right-click on the "Group Policy
Objects" option and click "New". Enter a name
for your new object, leave "(none)" selected in
the "Source Starter GPO" dropdown and click
"OK". Your new object will appear in the "Group
Policy Objects" section of the console tree. Click
the "+" icon to expand the section if you cannot
see your new object.
You need to link your new group policy object to the right domain. In the
console tree, right-click on the appropriate domain in the "Domains" section
and then left-click on the "Link an Existing GPO…" option in the pop up menu.
The "Select GPO" window will open and list the group policy objects it
finds within the domain. You should be able to see the new group policy
object you created, so select it and click "OK".

CRM Integration PC User Guide Page | 32
Right-click on your policy object in the console tree and click "Edit…" to open the
"Group Policy Management Editor".
In the console tree's "User Configuration" section, expand "Policies"
and then "Software Settings". Right-click on "Software installation",
left-click "New" and then "Package…".
You need to type the full Universal Naming Convention (UNC)
path of the client software installer package folder into the
"Open" dialog box. This is where the "Network Path" you noted
down earlier gets used. Do not use the "Browse" button to
navigate to the folder. If you do, the wrong naming convention
will be used. Once you have typed the UNC in, you should see
the UCClient.msi file listed. Select it and click "Open".
The next screen has three options for how to deploy the client.
Selecting "Advanced" gives you the most control over the software's deployment
so we suggest you use this one. The most commonly used options are found on
the "Deployment" tab.

CRM Integration PC User Guide Page | 33
You can choose between a published deployment and an assigned deployment
in the "Deployment type" group.
Selecting "Published" gives the user a choice of whether to install the software or not.
Selecting "Assigned" ensures the software is automatically installed, i.e. the user does not have a choice.
It is also important that the "Install the application at logon" option is selected.
You may wish to alter some of the others settings under the "Deployment options" group. Click "Apply" to accept
your advanced settings.
Click "OK" to continue once you have made your
choice.
When you create a new group policy, it is
automatically applied to the "Authenticated
Users" group so you need to remove this group.
In the "Security Filtering" section, select
"Authenticated Users" and click "Remove".
Once removed, click the "Add" button (next to
"Remove"). This will open the "Select User,
Computer, or Group" window.
In the "Enter the object name to select (examples)"
text area, start to type the name of the group to
which you want to assign the group policy. Once you
have typed a few characters, click the "Check Names"
button to display a list of objects that contain the
characters you have typed. Find and select the object
you require and then click "OK".

CRM Integration PC User Guide Page | 34
Depending on your Windows configuration, you may need to
"enforce" your group policy. Enforcing it ensures that it is not
overruled by another group policy, so it is recommended that you
apply it to your policy if you can. To do this, find your group policy in
the appropriate domain's section of the console tree, right-click it and
select "Enforced" from the pop up menu. Please note that your group
policy is listed twice, once in the root folder of your domain and again
in the "Group Policy Objects" subfolder. You need to right-click the listing that is in the root folder, not the "Group
Policy Objects" folder.
That's the end of the setup process on the server. However, each user in the group will need to perform two further
actions when they next log in to force the group policy into action. Otherwise the group policy may not be initiated
immediately by Windows but at randomized intervals to balance server load.
Once a user has logged in, they need to open the "Run" window (Windows key + R) and enter the following
command:
When gpupdate has completed its task, users should reboot their computers.
The client software will now be available to install or use immediately when
the computer restarts.
Deploying Additional User Settings
Once the client software has been deployed to the relevant machines then it is possible to deploy any relevant user
settings from UCADTool. Please refer to the separate UCADTool guide for how to complete this. Important! When
selecting TAPI dialing the client must have been run as an Administrator on each machine and TAPI dialing will not
be activated until the machine has been rebooted.
Lync (Skype for Business – S4B) Integration When Go Integrator is installed it will modify the Lync / Skype for
Business menu to include the option "Call using desk phone". When
clicked, this option will integrate the Lync / Skype for Business Contact
Card (last option in Lync / Skype for Business) and display the numbers
held in it. Click one of the numbers to make your handset go off hook
and dial the number.
CRM Integration PC User Guide Page | 35
Web Dialing Configuration This content will guide you through the process of configuring web page dialing for Microsoft Internet Explorer,
Google Chrome, Mozilla Firefox and Opera web browsers.
Configuring Microsoft Internet Explorer for Dialing Telephone Numbers
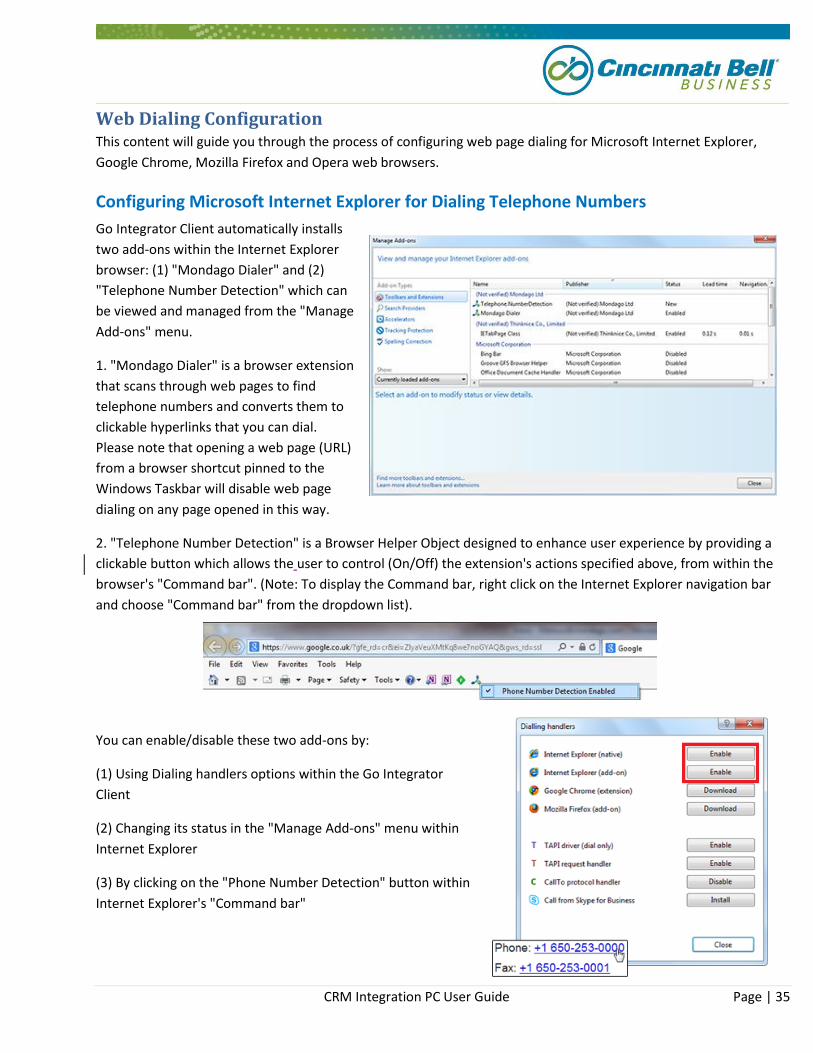
Go Integrator Client automatically installs
two add-ons within the Internet Explorer
browser: (1) "Mondago Dialer" and (2)
"Telephone Number Detection" which can
be viewed and managed from the "Manage
Add-ons" menu.
1. "Mondago Dialer" is a browser extension
that scans through web pages to find
telephone numbers and converts them to
clickable hyperlinks that you can dial.
Please note that opening a web page (URL)
from a browser shortcut pinned to the
Windows Taskbar will disable web page
dialing on any page opened in this way.
2. "Telephone Number Detection" is a Browser Helper Object designed to enhance user experience by providing a
clickable button which allows the user to control (On/Off) the extension's actions specified above, from within the
browser's "Command bar". (Note: To display the Command bar, right click on the Internet Explorer navigation bar
and choose "Command bar" from the dropdown list).
You can enable/disable these two add-ons by:
(1) Using Dialing handlers options within the Go Integrator
Client
(2) Changing its status in the "Manage Add-ons" menu within
Internet Explorer
(3) By clicking on the "Phone Number Detection" button within
Internet Explorer's "Command bar"

CRM Integration PC User Guide Page | 36
Configuring Google Chrome for Dialing Telephone Numbers
Dialing handlers provides option to download
'Telephone Number Detection' extension for
Google Chrome. This extension turns valid
telephone numbers into dialable hyperlinks.
Installing the extension via the Chrome Web
Store will cause the extension to automatically
update whenever a new version is published
(unless Chrome browser is configured
differently).
To download this extension, simply click on
"Download" button and Google Chrome will
open Chrome Web Store to provide you with
the option to add "Telephone Number Detection" extension to your browser. Click on "ADD TO CHROME" button.
You will then be prompted with the confirmation message if
you definitely want to have this extension in your browser. Click
on "Add".
Once the extension has been added, a small blue telephone
icon will be added to the Chrome toolbar.
After installing and enabling this extension you will be able to
control it by the "On/Off" (green/red) telephone button

CRM Integration PC User Guide Page | 37
Chrome will now be able to identify numbers
and convert them into hyperlinks that you can
click and dial. The first time you use web page
dialing in Chrome, a window may pop up with a
message about external protocols. Click the
"Remember my choice for all links of this type"
check box to prevent the message from
reappearing and then click "Launch
Application" to dial the number.
An options screen can be accessed by right-clicking on the small blue telephone
icon and then clicking on the "Options" menu item.
Protocol Selection: Select the telephony protocol for the
extension to use.
Protocol Replacement: If conflicts occur, you can check
the "Enable Protocol Replacement" option to replace
existing protocols with the one selected in the "Protocol
Selection" box. The individual protocols to replace can
be selected by checking the appropriate boxes in the
"Replace" section.
Valid Telephone Number Length: Enter the minimum
and maximum for the amount of numbers a telephone
number can contain in order to be recognized as a
telephone number by the extension.
Click the "Save" button to store any changes or click
"Defaults" to restore the settings to their default values.
Well done! That is the end of the Chrome configuration
process.
CRM Integration PC User Guide Page | 38
Configuring Mozilla Firefox for Dialing Telephone Numbers
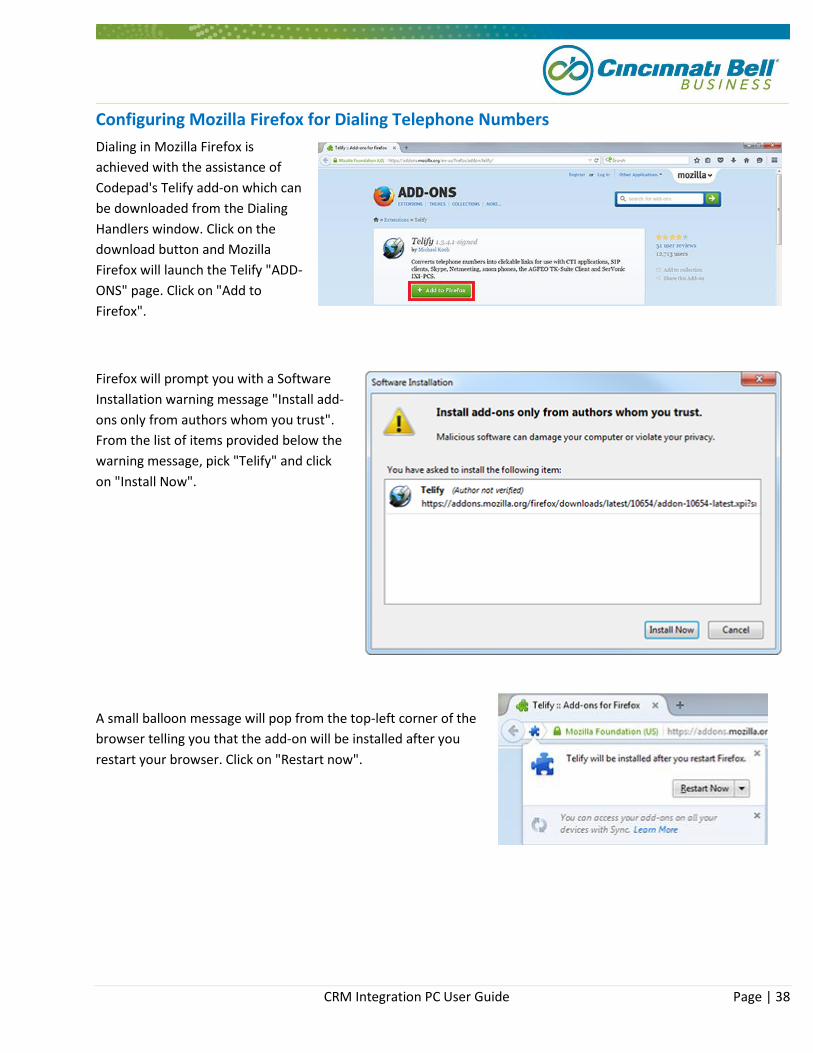
Dialing in Mozilla Firefox is
achieved with the assistance of
Codepad's Telify add-on which can
be downloaded from the Dialing
Handlers window. Click on the
download button and Mozilla
Firefox will launch the Telify "ADD-
ONS" page. Click on "Add to
Firefox".
Firefox will prompt you with a Software
Installation warning message "Install add-
ons only from authors whom you trust".
From the list of items provided below the
warning message, pick "Telify" and click
on "Install Now".
A small balloon message will pop from the top-left corner of the
browser telling you that the add-on will be installed after you
restart your browser. Click on "Restart now".

CRM Integration PC User Guide Page | 39
Once the browser has been reloaded, click on the button in the top-right corner to reveal the main menu, then
select the "Add-ons" option. A new tab will be opened that gives you access to the various extensions and plugins
that have been installed. The files that make up a modified version of Codepad's Telify dialing add-on are already
installed in the correct location so you don't need to install it but it may need enabling (which is what we are
checking now). Click the "Extensions" option in the menu on the left-hand side of the "Add-on Manager" tab to
display the list where Telify resides. Telify should be enabled by default. If the add-on's row is greyed out with an
"Enable" button, then it is disabled. Just click
the "Enable" button and then the "Restart
now" button when prompted. Firefox will
restart and dialing is almost ready to go.
Once enabled, you can modify Telify's behavior and the
appearance of the converted numbers by clicking the
"Options" button which appears on Telify's entry on the
"Add-on Manager" tab. Make sure that "callto:" is selected in
the "User protocol" dropdown box.
The first time you use dialing in Firefox, a message window will
pop up informing you that the link you have clicked needs to be
opened with an application.
Click the "PhoneHelper" option in the "Send to" box and make
sure the "Remember my choice for CallTo links" check box is
checked as in the picture opposite. This is to prevent the message
window appearing in future. Click the "OK" button to save the
settings and dial the first number.
Congratulations! You've completed the Firefox configuration.
CRM Integration PC User Guide Page | 40
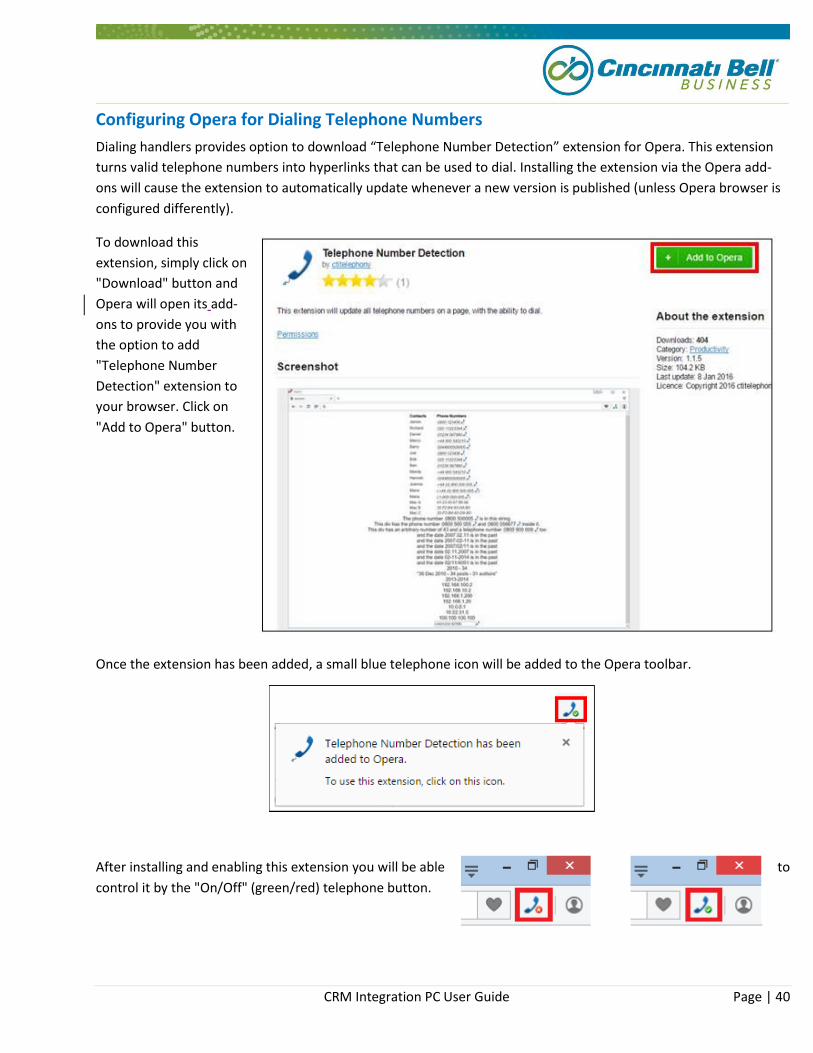
Configuring Opera for Dialing Telephone Numbers
Dialing handlers provides option to download “Telephone Number Detection” extension for Opera. This extension
turns valid telephone numbers into hyperlinks that can be used to dial. Installing the extension via the Opera add-
ons will cause the extension to automatically update whenever a new version is published (unless Opera browser is
configured differently).
To download this
extension, simply click on
"Download" button and
Opera will open its add-
ons to provide you with
the option to add
"Telephone Number
Detection" extension to
your browser. Click on
"Add to Opera" button.
Once the extension has been added, a small blue telephone icon will be added to the Opera toolbar.
After installing and enabling this extension you will be able to
control it by the "On/Off" (green/red) telephone button.