crommelins™ star picket drivers
TRANSCRIPT

CROMMELINS™ STAR PICKET DRIVERS
Thank you for your selection of a CROMMELINS™ Star Picket Driver. This Operation Manual explains its use, installation, checking and maintenance. We
highly recommend that you retain this manual for ready reference regarding proper handling of the CROMMELINS™ Star Picket Driver.
Spare Parts & Service Phone: 1300 554 524
Freecall Fax: 1800 636 281 [email protected]
www.crommelins.com.au
WA Metro 9350 5588 National 1300 650 659
OPERATION & INSTRUCTION MANUAL

2
Congratulations on purchasing a CROMMELINS™ STAR PICKET DRIVER. This manual covers operation and maintenance of the CROMMELINS™ STAR PICKET DRIVER. This CROMMELINS™ STAR PICKET DRIVER can be used by fencing contractors, landscaping, farmers, shires and councils, hire industries and general use.
Please take a moment to familiarise yourself with the proper operation and maintenance procedures in order to maximise the safe and efficient use of this product.
Keep this owner’s manual at hand, so that you can refer to it at any time.
Due to constant efforts to improve our products, certain procedures and specifications are subject to change without notice.
When ordering spare parts please have handy your products model number and serial number. Record these numbers in the boxes below for future reference.
Please fill in the following blanks after checking the production number and serial number on your product. (The location of these numbers, vary depending on product).
SERIAL NO.
MODEL NO.

3
1. GENERAL DESCRIPTION 4
2. SAFETY INSTRUCTIONS AND PROCEDURES 4 2.1 Responsibility ……………………………………………………………………. 4 2.2 Underground Utilities ……………………………………………………….. 5 2.3 Gasoline and Exhaust ………………………………………………………. 5 2.4 Personal Protective Equipment (PPE) ………………………………. 5 2.5 Vibration Hazard Warning ………………………………………………… 6 2.6 Maintenance Warning ………………………………………………………. 6
3. OPERATIONAL INSTRUCTION & SAFETY 7 3.1 Introduction and Understanding your Post Driver ………………. 7 3.2 Actions before starting ……………………………………………………… 7 3.3 Safe starting your Driver ……………………………………………..……… 8 3.4 Re-starting a hot engine ………………………………………………….. 8 3.5 Re-fuelling your Post Driver ……………………………………………… 8 3.6 Driving a picket or post into the ground ……..…………………….. 9 3.7 Potential dry-fire or miss-fire of post …………….…………………. 9
4. MAINTENANCE & SERVICE 10 4.1 Each Use ……………………………………………………………………………. 10 4.2 First 10 hours use ………………………………………………………………. 10 4.3 Every 3 months or 25 hours use ………………………………………… 11 4.4 Every 4 months or 50 hours use ………………………………………... 11 4.5 Every 12 months or 250 hours use ……………………………………… 12
5. SERVICING HAMMER AND ANVIL (RE-BUILD) 13 5.1 Bottom driver body …………………………………………………………… 13 5.2 Top driver body …………………………………………………………………. 13
6. RE-ASSEMBLY OF POST DRIVER 15
7. STANDARD FEATURES AND SPECIFICATIONS 17 7.1 Standard Features ……………………………………………………………. 17 7.2 Specifications ………………………………………………………………….. 17
8. TROUBLESHOOTING 18
9. WARRANTY 19

4
1. GENERAL DESCRIPTION
The Star Picket Driver is powered by a 4-Stroke engine. Its purpose is to assist you indriving posts or rods into the ground. Your Star Picket Driver comes with a one yearwarranty on the unit.
2. SAFETY INSTRUCTIONS AND PROCEDURES
The aim of this section is to provide you with knowledge about how to use yourCROMMELINS™ STAR PICKET DRIVER in an efficient and safe way. Take safety seriously;you must read and fully understand all of the safety warnings before using the machinefor the first time.
2.1 Responsibility
• The CROMMELINS™ STAR PICKET DRIVER may only be operated by persons overeighteen years of age, who are familiar with the safety rules and the operationmanual. First and foremost, users must be able to stop the machine immediately.
• Never let your post driver run unattended. When not in use, shut it off to preventunauthorized persons from using it.
• Users are responsible for all damage caused to a third party.• The CROMMELINS™ STAR PICKET DRIVER is only to be used for the purpose of
driving posts or rods into the ground. Misuse may result in serious injury toyourself or others, as well as causing damage to your driver or othersurrounding property.
• If the machine is used for any other purpose than described, the warranty andthe responsibility of both the manufacturer and distributor will be null andvoid.
• The warranty will also be invalidated in the case of unauthorized intervention onthe machine and whenever the safety instructions, as described in the followingenclosures, are not followed.
• The user should be aware of the rules and regulations concerning theenvironment and noise levels. When using the CROMMELINS™ STAR PICKETDRIVER it is necessary for the user to wear personal protective equipmentagainst noise (ear protection).
• In case of professional use of the CROMMELINS™ STAR PICKET DRIVER, theinstructor must provide the user of the driver with sufficient (written) instructionsto guarantee safe use.

5
2.2 Underground Utilities
Prior to driving any object into the ground, always have the location of underground utilities identified by a certified locating service. Driving posts or rods into an underground utility line can be extremely dangerous. Severe / or life threatening personal and property damage can occur, be absolutely certain you know where the underground utilities are located. Underground utilities that may be present include, but are not limited to: Electric, Gas, Telephone, Water, Sewer, TV cable, Lawn Sprinkler, etc. REMEMBER: DIAL 1100 BEFORE YOU DIG
2.3 Gasoline & Exhaust
Gasoline is highly flammable & explosive. You can be seriously injured when not handling and storing gasoline properly. Always use the approved petrol storage container for your fuel. Never attempt to add gasoline to your CROMMELINS™ STAR PICKET DRIVER while the engine is hot or running, as there is a chance of fumes igniting and causing severe personal damage, as well as damage to your machine. Never use the CROMMELINS™ STAR PICKET DRIVER inside of a building or un-ventilated area. The engine exhaust contains poisonous carbon monoxide gas that can build up to dangerous levels in closed areas. These fumes can cause unconsciousness or death.
2.4 Personal Protective Equipment (PPE)
Always use approved protective equipment. Operators and all other persons in the immediate working area must wear protective equipment as well. Noise emitted from the machine while working can reach above 100db which can also harm others nearby, please consider this while operating. Personal protective equipment that is recommended, but not limited to is: • Hearing protection with minimum class 4 Greater than 22db attenuation • Impact resistant eye protection with side guards • Protective gloves • Protective boots

6
2.5 Vibration Hazard Warning
Prolonged use of a power tool exposes the operator to vibrations which may cause white finger disease or carpal tunnel syndrome. These conditions reduce the hand’s ability to feel and regulate normal temperature, produce numbness & burning sensations and may even cause nerve & circulation damage. If numbness, tingling, pain, clumsiness, weakened grip, whitening of the skin, or any other symptoms occur at any time when operating the machine, or when not operating the machine; immediately discontinue use of the machine and seek medical attention. Continued use of the machine after the occurrence of any such symptom may increase the risk of symptoms becoming more severe and/or permanent.
• The CROMMELINS™ STAR PICKET DRIVER is designed with internal spring
dampened handles to reduce the amount of vibration transmitted to the operator.
• Wear gloves for comfort & grip. Keep hands warm while operating. • Check the machine for loose connectors / components, as these could lead to
increased levels of vibration. • Always keep a firm grip on the handles, however do not excessively squeeze the
handles.
2.6 Maintenance Warning
If the warning labels on your post driver are not able to be clearly read, replace them immediately. Call CROMMELINS MACHINERY spare parts for new warning labels. Regular maintenance is a prerequisite for keeping the machine safe & effective. Carefully follow all the operating instructions. Any damage or malfunction caused by unauthorized use, parts, or modifications to the machine will not be covered by warranty or carry any significance for any type of product liability.
• Do not use the equipment if wear or damage is evident. Replace damaged parts
immediately. • Comply with occupational health and safety regulations when servicing the
equipment, and make sure you have adequate ventilation when using cleaning fluids.
• Engine maintenance is to be carried out according to the engine manual. The operator needs to take careful note of all warnings and dangers also outlined in the engine manual.
• For major service / repairs to the machine, contact CROMMELINS directly.

7
3. OPERATION INSTRUCTIONS & SAFETY
3.1 Introduction & Understanding your Post Driver Your post driver is designed to be as effective and efficient as possible, whilst being extremely powerful and light weight. It is very important to understand that your post driver is a powerful machine. With proper use and maintenance, your post driver will provide you with many years of service. To reduce the risk of serious injury or death to yourself or others; you must read and understand the safety & operating instructions in this operator’s manual. Every new person who uses this machine must be educated and fully understand the operator’s manual. Never allow an un-informed person to use your post driver.
• The petrol powered post driver is 100 percent self-contained; no other sources
of power such as hydraulics or air compressors are required. • Custom centre bored reducer sleeves are available for grounding rods, rebar &
other types of stakes. • Be sure to read and understand the starting instructions for the 4-Stroke
engine. • The 4-Stroke engine is “inclinable” which means it is designed operate at any
angle. • For optimum performance, the machine is designed to be used with low
viscosity NLG “0” specification grease. Any other type of grease will be detrimental to the function of the machine.
3.2 Actions before starting Follow these guidelines every time you use your machine!
• Ensure Driver is configured for post being driven (use sleeve if required). • Check engine oil
NOTE - Oil must be filled into engine before starting the engine. Refer to 4- Stroke engine manual for oil levels, type. Use oil specified in manual. NOTE - Do not overfill, always hold driver in upright position to check oil level! Proper oil level is essential for the correct operation of the post driver. Overfilling the oil will result in loss of power and could cause permanent damage to your engine.
• Check the fuel level, use unleaded fuel only. • Visually check the hammer and the barrel; look up into the barrel for excessive
debris or foreign objects. • Check all fasteners and tighten as may be necessary. • Do not use your CROMMELINS™ STAR PICKET DRIVER if there is any damage or
wear to any of the controls or safety devices. • Be sure to use all the recommended personal protective equipment.

8
3.3 Safe starting of your Driver Place the machine on a secure solid surface out in an open area. Maintain a good safe posture and balance. DO NOT start the driver anywhere except in an open and well-ventilated area. It is recommended to never use your machine inside an enclosed building.
NOTE – Use only the Recoil Start to pull the starter rope, do not allow Recoil Start to snap back, let the starter rope return gradually. Do not extend the starter rope to its full length. Failure to follow this procedure may result in serious injury to hand or fingers, or may damage the starting mechanism.
• Slide red thumb switch on the throttle to the “ON” position (if the engine iscold; close the choke).
• Press the priming bulb until fuel can be seen inside the fuel return line.• Pull on the starter grip to start the engine, and gently return the starter grip to
normal position.
3.4 Restarting a hot engine If the engine is operated at a high ambient temperature for a good amount of time, and then turned off to sit for a short time to cool off, it may not restart on the first pull.
NOTE - Use the following procedure; failure to do so may result in personal injury!
• Turn the engine switch to “OFF” position; this will prevent the engine fromrunning at max speed.
• Move the choke lever to the “OPEN” position.• Hold the throttle in max speed position.• Pull the starter grip 3 to 5 times.• Follow the “safe starting” procedures listed above and start the engine with the
choke in the “OPEN” position.
3.5 Refueling your post driver • Always switch the engine “OFF” and allow adequate time to cool down before
refueling. Use unleaded fuel only.NOTE - Never refuel your driver with the engine hot or running. • Fill the tank on level ground and avoid spilling the fuel on the motor. Always
allow any spilt fuel to evaporate before restarting the engine.• Ensure the fuel cap is adequately tightened before restarting the engine.NOTE - Fuel vapors are extremely flammable and can cause severe injury or deathif ignited by a spark or excessive heat from a hot engine.

9
3.6 Driving a picket or post into the ground • Start engine safely as outlined above. • Put on personal protective equipment as outlined above • Take a firm stance with weight evenly distributed on both feet. Keep both feet
securely planted at a minimum of shoulder width apart. NOTE - Always maintain a solid balance while driving post. Lift the post driver
onto the post and ensure the driver is sitting level and the post is centered up in the barrel of the driver.
NOTE - If not aligned properly, you could cause damage to the machine or your post! (See figure 1.)
Correct In-correct
Figure 1: Post driver level example • Apply downward force on the machine handles to provide 4 – 5 kilograms of
down pressure to ensure that the hammering action is correct. Once you are confident that the machine is being held level and the post is centered; gradually open the throttle until the machine starts driving.
• When you are sure the post is moving down into the ground correctly, open the throttle fully and keep driving until the top of the post is at the required height.
NOTE - Always keep both hands on the driver and maintain the 4 – 5 kilograms of pressure whilst driving the post into the ground. • Take care that the barrel of the driver does not come into contact with the
ground; this will take the down pressure off the machine and may cause unnecessary damage to your driver.
• When the post is at the required height, close the throttle and gently slide the machine off the post, move to the next post and repeat the above procedure.
NOTE - Always fully close the throttle to stop the hammer action prior to removing from the post. • You can leave the engine idling, there is no need to repeatedly turn the engine
off and on.
3.7 Potential dry-fire or mis-fire of post For optimum performance and to prevent the potential for dry-fire or mis-fire of a post, please follow these guidelines:

10
Always apply downward force on the machine to provide 4 – 5 kilograms of pressure 1. Keep driver level on the post at all times 2. Do not allow the barrel of the driver to come into contact with the ground 3. Do not open the throttle unless driver is loaded on post 4. In the event of dry-fire or mis-fire you will need to re-engage your hammer by
lifting the driver up and setting it back down on the post with some pressure applied.
5. Continual dry-fire or mis-fire will cause damage to your driver which will not be covered under the terms of the warranty.
4. MAINTENANCE & SERVICE
The CROMMELINS™ STAR PICKET DRIVER has been manufactured and designed to give you years of trouble-free use. Always refer to the engine manual for service and maintenance guidelines on your engine. The following maintenance guidelines will keep your machine in top performance condition. Always take care to properly store your CROMMELINS™ STAR PICKET DRIVER. DO NOT lay the machine horizontally on the driver side or resting on the engine. The recommended method of storing is in an upright position, however if this is not possible, place on a flat surface with the barrel and brush guard supporting the machine at an angle, so that the top handle is the highest point. If you are experiencing an issue with the Engine, please contact your local dealer for service and/or parts.
4.1 Each Use: • Check engine oil level by holding the machine in an upright position. Lying
machine down to check will give you a false reading. Use recommended oil to top off oil if necessary.
• Check the engine air cleaner, if overly soiled; clean or replace. • Check all post driver fasteners and retighten if necessary. If you choose to re-
install any bolts with new Loctite; you must clean the bolt and the area of the bolt hole with parts cleaner to remove any grease residue, or the Loctite will not be effective if grease is present.
• Visually check the inside of the barrel and the hammer for any debris or foreign objects.
4.2 First 10 hours use: • Change engine oil following the guidelines in your engine manual. Dispose of
discarded oil in accordance with all your local, state, and federal regulations. NOTE - Do not overfill; always check the oil level by holding the machine in an upright position! • Check all engine and post driver fasteners and retighten if necessary. If you
choose to replace or reinstall any bolts with new Loctite, follow the above listed guidelines pertaining to Loctite.
11
4.3 Every 3 months or 25 hours of use: • Change engine oil following the guidelines in your engine manual. Dispose of
discarded oil in accordance with all your local, state, and federal regulations. Do not overfill!
• Replace air cleaner elements. This should be performed more often if your post driver is operated in dusty conditions.
• Check all engine and post driver fasteners and retighten if necessary. If you replace or reinstall any bolts with new Loctite, follow guidelines pertaining to Loctite bottle.
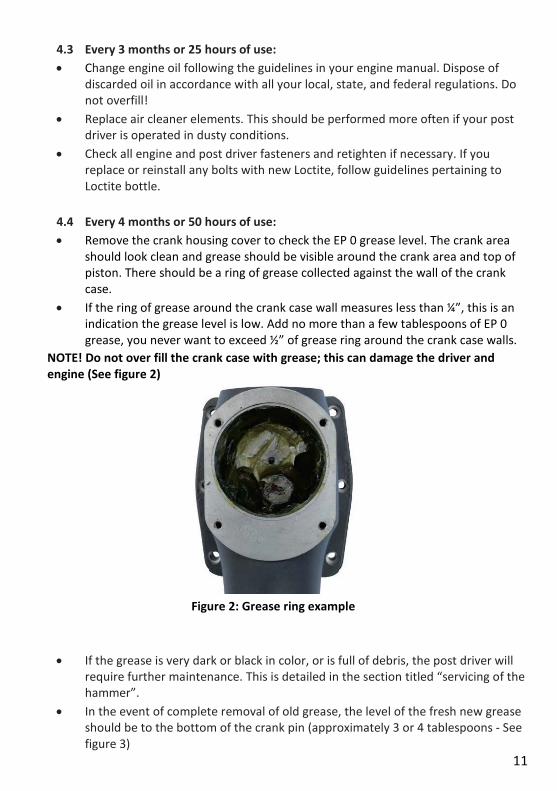
4.4 Every 4 months or 50 hours of use: • Remove the crank housing cover to check the EP 0 grease level. The crank area
should look clean and grease should be visible around the crank area and top of piston. There should be a ring of grease collected against the wall of the crank case.
• If the ring of grease around the crank case wall measures less than ¼”, this is an indication the grease level is low. Add no more than a few tablespoons of EP 0 grease, you never want to exceed ½” of grease ring around the crank case walls.
NOTE! Do not over fill the crank case with grease; this can damage the driver and engine (See figure 2)
Figure 2: Grease ring example
• If the grease is very dark or black in color, or is full of debris, the post driver will require further maintenance. This is detailed in the section titled “servicing of the hammer”.
• In the event of complete removal of old grease, the level of the fresh new grease should be to the bottom of the crank pin (approximately 3 or 4 tablespoons - See figure 3)

12
Figure 3 new grease example
(before any single use)
4.5 Every 12 months or 250 hours of use: • Follow the above regular scheduled maintenance guidelines for every 3 months
or 25 hours of use. • Follow the above regular scheduled maintenance guidelines for every 4 months
or 50 hours of use. • Remove and service the hammer and anvil according to the guidelines in section
titled “servicing of hammer” • Replace all O-rings and housing seals. Contact CROMMELINS for spare parts.
NOTE - The amount and type of grease used in your CROMMELINS™ STAR PICKET DRIVER is critical for the performance and service life of your post driver. Not enough grease will cause failure, and too much grease will over-burden the piston and affect the hammering power of the machine. Use only approved EP0 grease. NOTE - Always re-assemble your driver fasteners using loctite blue 243. Remember to clean the fastener and the holes with a parts cleaner to remove all grease residue, or the loctite will not be effective!
If you are unsure of anything in this manual, please contact your Local Service agent or CROMMELINS Machinery
If you are experiencing performance issues with your post driver, please refer to the troubleshooting section in this manual for possible solutions or contact CROMMELINS.

13
5. SERVICING OF HAMMER & ANVIL (RE-BUILD)
5.1 Bottom driver body • Remove the 6 bolts of the bottom half of the lower driver body. Be aware the
handle tubes have anti-vibration springs which are installed under tension. The damper assembly washer will sometimes be removed with the lower driver body, or it may remain in place in the upper driver body.
• Remove the damper section and inspect the rubber O-rings and steel components for wear or debris.
NOTE - Take notice of the orientation of the damper assembly parts, as they must be oriented the same way when re-installed. • Remove bottom striker (hammer that hits the post) and locate the Viton O-ring
and replace it. The bottom striker is made of high quality hardened tool steel and should not show any signs of wear. Thoroughly clean the bottom striker (See figure 4 and figure 5).
Figure 4: View when lower driver body is removed
Figure 5: damper assembly, top & bottom hammer
5.2 Top driver body • To remove the top hammer, gently tap the main cast housing vertically down on
a soft bench top and it should slide out of the barrel. Locate the Viton O-ring and replace it. The top hammer is made of high quality hardened tool steel and should not show any signs of wear. Thoroughly clean the top hammer.
• To remove the piston and connecting rod, you will need to remove the LEFT HAND THREAD crank pin from the crank and gently push the piston through the bottom of the housing. To access the crank pin, see guidelines listed above in section titled “service crank case”.

14
NOTE - Use caution when holding the connecting rod and crankshaft to not damage these components.
• Clean and inspect the piston and connecting rod. Insert the crank pin into thebearing on the connecting rod to check for fit; if there is excessive play or side toside movement, it is possible you may need to replace the crank pin. Check themovement in the bearing in the piston side, if there is excessive play theconnecting rod should be replaced. Locate the Viton O-ring on the piston andreplace it at this time (See figure 6 and figure 7)
Figure 6 location of LEFT HAND crank pin
Figure 7 piston with connecting rod in place
• Clean and inspect the cylinder and crank case for any damage or excessivewear. Replace any damaged parts you may identify.
• Remove the inner springs of the handle to clean and lubricate each one. Checkall handle cups for any excessive wear. Clean and lubricate the upper andlower cups.
15
6. RE-ASSEMBLY OF POST DRIVER After thoroughly cleaning and drying the hammer components and the cylinder, the re-assembly can be done.
1. Apply a wipe of EP0 grease around O-ring and outside of piston and gently push back into the housing using a soft dolly.
2. Add a small amount of EP 0 grease to the crank pin and re-assemble remembering IT IS A LEFT HAND THREAD! – Torque the crank pin to 228inch/pounds – DO NOT over-tighten this pin!
3. Add a wipe of EP 0 grease to the outside of top hammer and gently push into the housing with the O-ring towards the top.
4. For the bottom hammer section, add a wipe of EP 0 grease to the bottom hammer (striker) and push the bottom hammer into the guide tube.
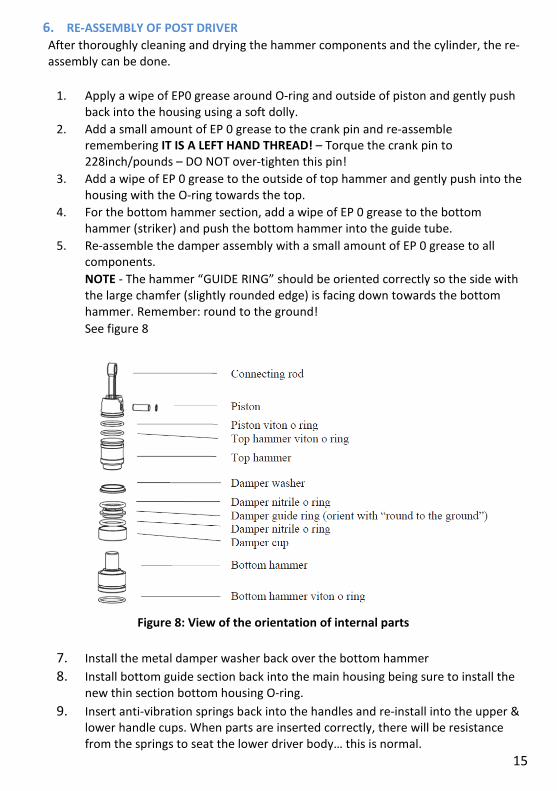
5. Re-assemble the damper assembly with a small amount of EP 0 grease to all components. NOTE - The hammer “GUIDE RING” should be oriented correctly so the side with the large chamfer (slightly rounded edge) is facing down towards the bottom hammer. Remember: round to the ground! See figure 8
Figure 8: View of the orientation of internal parts
7. Install the metal damper washer back over the bottom hammer 8. Install bottom guide section back into the main housing being sure to install the
new thin section bottom housing O-ring. 9. Insert anti-vibration springs back into the handles and re-install into the upper &
lower handle cups. When parts are inserted correctly, there will be resistance from the springs to seat the lower driver body… this is normal.

16
10. Re-install the bottom housing bolts with new Loctite; you must clean the bolt and the area of the bolt hole with parts cleaner to remove any grease residue, or the Loctite will not be effective if grease is present. Torque these bolts to 132 inch/pounds.
11. Add approximately 4 tablespoons of new EP 0 grease to the crank area and re-install the crank cover bolts with new Loctite; you must clean the bolt and the area of the bolt hole with parts cleaner to remove any grease residue, or the Loctite will not be effective if grease is present. NOTE! All screws should be correctly tightened in an alternate pattern as machine damage will occur from loose or lost bolts due to improper installation.
Please contact CROMMELINS Spare Parts directly if you have any questions or need parts.

17
7. STANDARD FEATURES & SPECIFICATIONS
7.1 Standard Features • 4-Stroke engine, Petrol powered• Large impact force provides efficient driving• Anti-vibration handles• Compact and easily transportable• Size reduction sleeves available for both models
7.2 Specifications
Model No. SP52 SP82 Picket Capacity 50.8mm (Up to 2”) 82mm (Up to 3¼”) Blow 1720/min 1720/min Impact Force 1100kg 1600kg Engine Honda or Subaru 4-Stroke engine Engine Features Air cooled Fuel type Petrol DB at 7m 69db at 7m Weight 16kg 19.5kg Dimensions 590x340x200mm
Model No. SP52 Model No. SP82

18
8. TROUBLESHOOTING• If your driver sounds like it is running fine, however the striker is not hammering as
it should; make sure your striker is fully engaged. There is a safety which willdisengage the striker if it is dry fired or misfired. To re-engage the striker, simplypick the driver up off the post and then place it back down on the post with a bit offorce to hit the striker against the post. AVOID REPEATED DRY FIRE by maintaining4 to 5 kilograms of down pressure!
• Check the type of grease in the crank; ONLY use the EP 0 grease which werecommend! EP 0 is a low viscosity grease for machinery with rapid moving partsthat produce friction. If you use a different type of grease, you will inhibit theperformance of your driver and possibly cause damage to your driver or yourengine. If you have greased your driver with the wrong grease, you will need tofollow the instructions in the maintenance section for replacing grease in the crankhousing area.
• Check the amount of grease in the crank case. If you driver is over-greased it willcause a reduced performance of the machine and put undue stress on the engineand the operations of the gears/piston in the machine. There should beapproximately 4 to 5 tablespoons of grease visible in the crank housing with roomfor freedom of movement for the parts.
• If the Driver is low on grease it will cause a reduced performance of the machine.Open the crank housing cover to visually check the amount of grease in your driver.You should always see a bit of grease residue moving throughout the machine. Youmay even see grease left on the posts, this is a good thing; it means your machine isself-lubricating.
• If you feel that the striker or hammer of the machine is not moving as freely as itshould, you can spray WD-40 up into the barrel to lubricate and cleanse this area.Occasionally you will get bits of debris which chip off the posts and then make theirway up into the striker area.
• If a driven post flares and becomes lodged within the barrel, follow these steps:1. Remove the six lower body bolts to separate the lower driver body from the
upper driver body.2. Slide the lower driver body down the post to expose the flared top of the
post. With a proper cutting tool for the type of post, cut the post off justbelow the flared top.
3. Once the flared top is removed, slide the lower driver body off the post andre-assemble it to the upper driver body. Follow the bolt tightening andLoctite guidelines explained in the “servicing” section.

19
9. WARRANTY
Consult the CROMMELINS Machinery warranty leaflet (supplied with your newproduct) for full details and a list of service dealers for this product, also availableonline at www.crommelins.com.au

20
Spare Parts & Service Phone: 1300 554 524
Freecall Fax: 1800 636 281 [email protected]
www.crommelins.com.au
WA Metro 9350 5588 National 1300 650 659