crypto-map user guideportal.cryptocard.com/documentation/mas/crypto-map_guide-eou.… · crypto-map...
TRANSCRIPT
CRYPTO-MAP User Guide Page 1
CRYPTO-MAP User Guide
End User Edition
Version: 1.0 April 26, 2007
CRYPTO-MAP Guide – End User Edition
CRYPTO-MAP User Guide Page 2
Table of Contents
1.Introduction......................................................................................................................................... 3
2.Definitions............................................................................................................................................ 3
3.Accessing MAP ..................................................................................................................................... 4
4.User Management ................................................................................................................................ 5 4.1. Adding New Users ............................................................................................................. 5 4.2. Deleting Users .................................................................................................................. 6 4.3. Editing User Information .................................................................................................... 7 4.4. Moving Users between Groups ............................................................................................ 7 4.5. Importing Users into an Organization................................................................................... 8 4.6. Designating a User as an “Administrator” ............................................................................. 9
5.Token Management ............................................................................................................................ 10 5.1. Assigning a Token to a User.............................................................................................. 10 5.2. De-Assigning a token from a User ..................................................................................... 12 5.3. Editing a Token............................................................................................................... 13
5.3.1. Editing a Software Token ..................................................................................... 13 5.3.2. Editing a Hardware Token .................................................................................... 15
5.4. Testing if a Token is Synchronized with the Server .............................................................. 17 5.5. Re-synchronizing Tokens.................................................................................................. 18
5.5.1. Re-synchronizing Software Tokens........................................................................ 18 5.5.2. Re-synchronizing KT tokens ................................................................................. 21 5.5.3. Re-synchronizing RB tokens ................................................................................. 23
5.6. Unlocking Tokens ............................................................................................................ 25 5.7. Disabling Tokens ............................................................................................................. 26 5.8. Enabling Tokens.............................................................................................................. 26
6.Group Management ............................................................................................................................ 27 6.1. Adding Groups ................................................................................................................ 27 6.2. Deleting Groups .............................................................................................................. 28 6.3. Editing Groups ................................................................................................................ 28
7.Company Management ....................................................................................................................... 29
8.Report Generation.............................................................................................................................. 30 8.1. Generating a Token Usage Report ..................................................................................... 30 8.2. Generating a Token Reconciliation Report........................................................................... 30
9.Trademarks ........................................................................................................................................ 31
10.Publication History ........................................................................................................................... 31
CRYPTO-MAP Guide – End User Edition
CRYPTO-MAP User Guide Page 3
1. Introduction
The purpose of this document is to familiarize a CRYPTO-MAP Administrator with the use of the CRYPTOCard Managed Authentication Portal (MAP).
CRYPTOCard Managed Authentication Service (CRYPTO-MAS) is a two factor authentication system that allows User within an organization to authenticate through a CRYPTOCard managed server without having to maintain an in-house authentication system.
Although the CRYPTO-MAS network is managed by CRYPTOCard, MAP allows customers to manage their Tokens and Users remotely using the CRYPTO-MAP tool. MAP is easily accessible via a web browser, and very user friendly, thus enabling end user organizations to address changes and troubles locally.
2. Definitions
2FA Two Factor Authentication. The requirement to use a User ID combined with a One-Time Password from a CRYPTOCard token
Administrators Users with a special designation in MAS/MAP who have additional functional capabilities enabling them to manage Users and Tokens within their Organization Structure.
Only Administrators have the ability to access MAP, and to troubleshoot and escalate trouble calls.
Administrators can only be created by other Administrators.
End-User Organization Units (EOU)
An Organization that has subscribed to CRYPTO-MAS for End-User 2FA and is not a Reseller.
Also referred to as a Customer or Tier 2 Organization.
Integrator / Service Provider
(ISP)
An Organization that provides provisions MAS service to EOU’s and provides Administration support via the MAP. This includes the capability to manage (create/delete/modify/troubleshoot) the EOU’s Organization, Users and Tokens.
The ISP also provisions and provides customer support services to the EOU.
MAP Managed Authentication Portal. The web based tool used by EOU and ISP Administrators to manage CRYPTO-MAS Organizations, Users and tokens.
Organization Typically a “company” with any number of Users that appears as either an ISP or EOU in MAP.
Group A sub-section of Users within an Organization that have common characteristics.
Token Pool Tokens in the MAS system that have been purchased by and allocated to a specific Organization, and have not yet been assigned to a User.
User A person within an Organization registered in MAP for CRYPTO-MAS 2FA.
CRYPTO-MAP Guide – End User Edition
CRYPTO-MAP User Guide Page 4
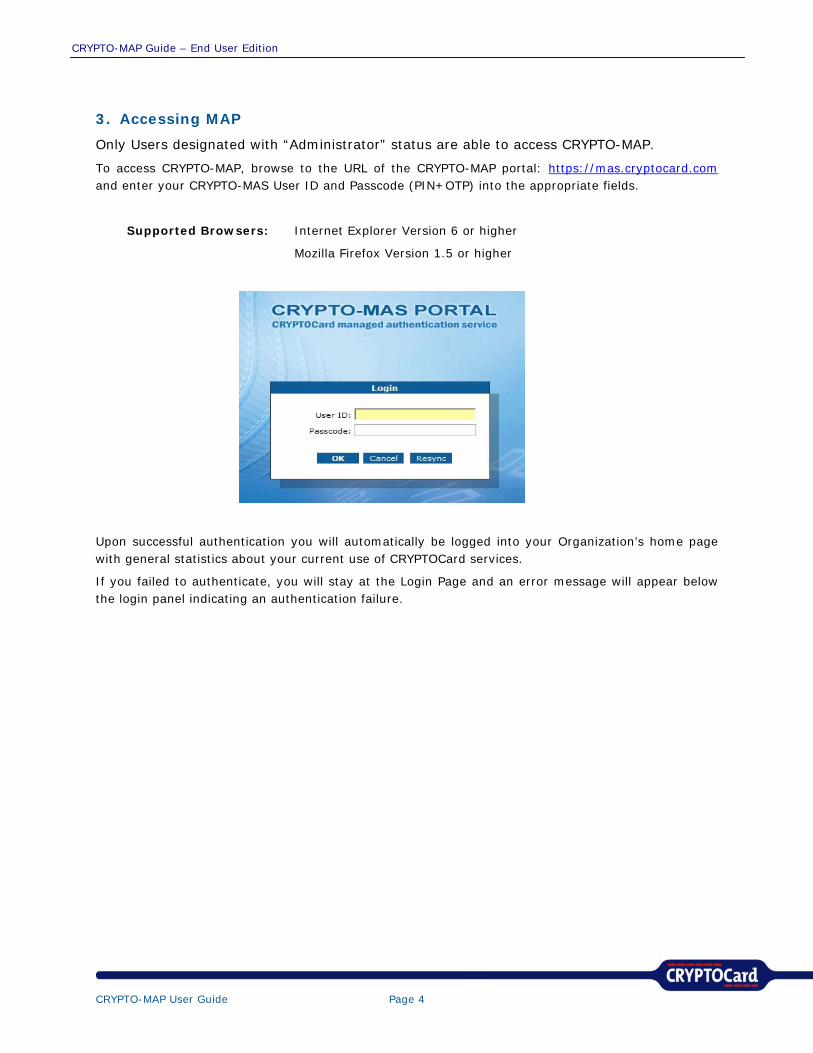
3. Accessing MAP
Only Users designated with “Administrator” status are able to access CRYPTO-MAP.
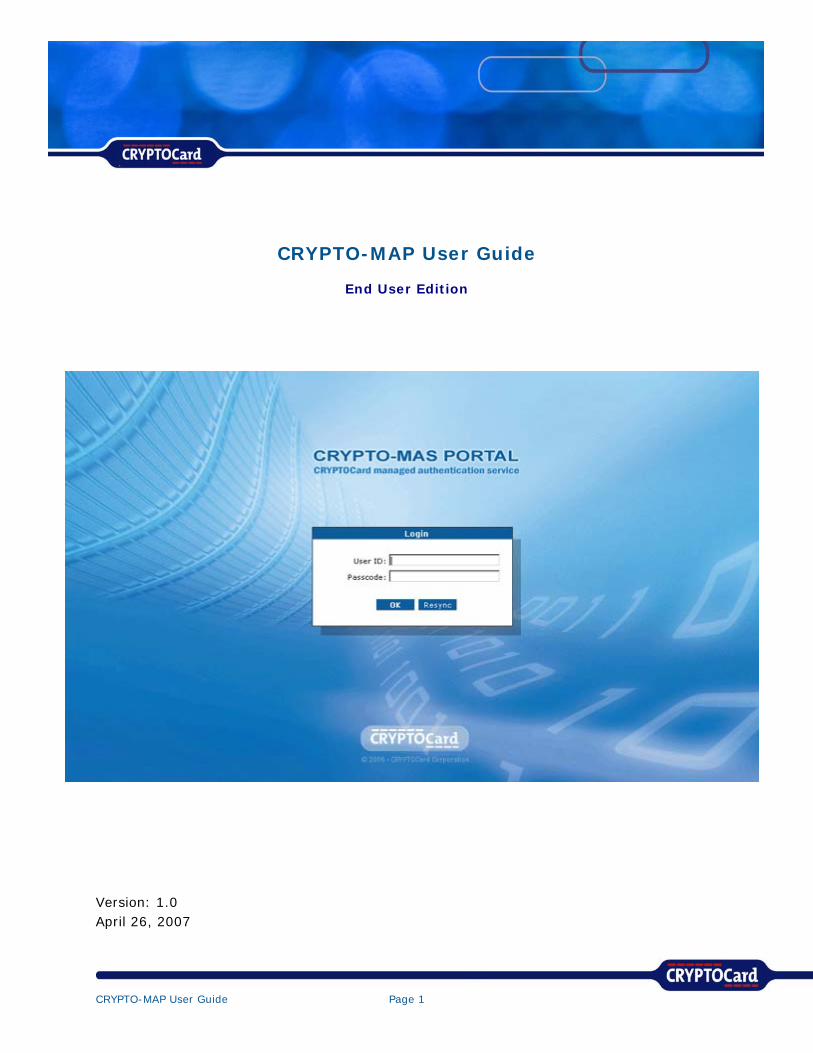
To access CRYPTO-MAP, browse to the URL of the CRYPTO-MAP portal: https://mas.cryptocard.com and enter your CRYPTO-MAS User ID and Passcode (PIN+OTP) into the appropriate fields.
Supported Browsers: Internet Explorer Version 6 or higher
Mozilla Firefox Version 1.5 or higher
Upon successful authentication you will automatically be logged into your Organization’s home page with general statistics about your current use of CRYPTOCard services.
If you failed to authenticate, you will stay at the Login Page and an error message will appear below the login panel indicating an authentication failure.
CRYPTO-MAP Guide – End User Edition
CRYPTO-MAP User Guide Page 5
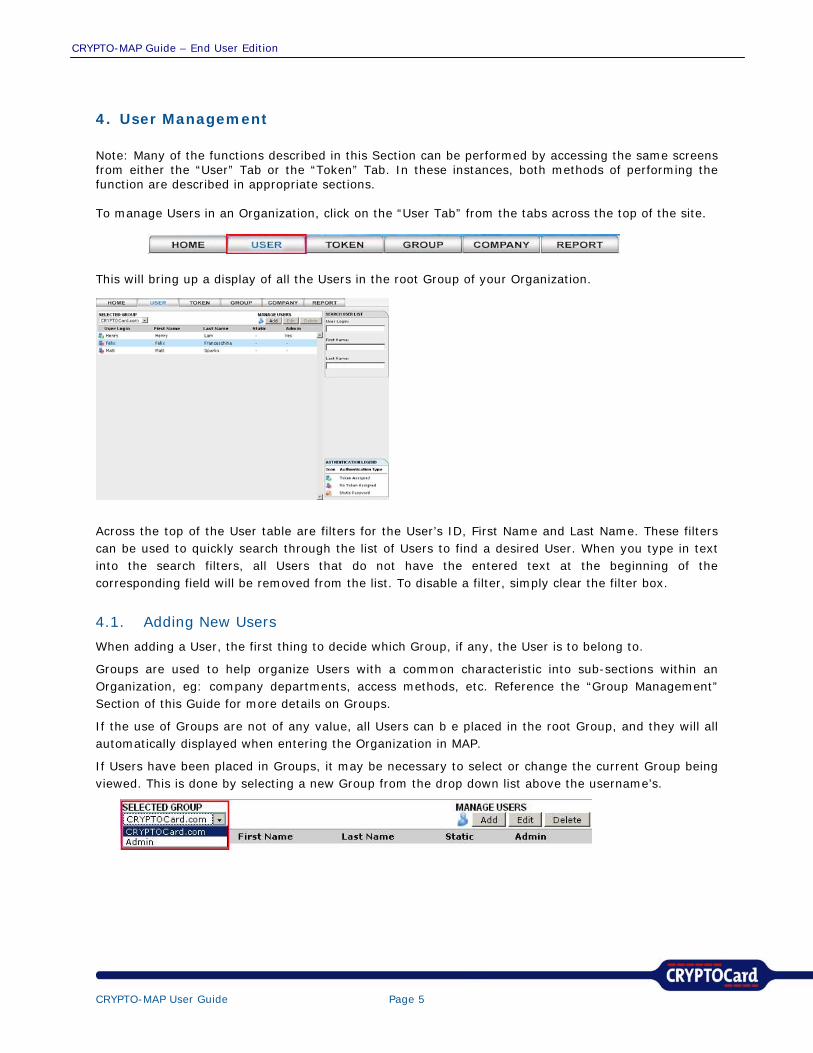
4. User Management Note: Many of the functions described in this Section can be performed by accessing the same screens from either the “User” Tab or the “Token” Tab. In these instances, both methods of performing the function are described in appropriate sections. To manage Users in an Organization, click on the “User Tab” from the tabs across the top of the site.
This will bring up a display of all the Users in the root Group of your Organization.
Across the top of the User table are filters for the User’s ID, First Name and Last Name. These filters can be used to quickly search through the list of Users to find a desired User. When you type in text into the search filters, all Users that do not have the entered text at the beginning of the corresponding field will be removed from the list. To disable a filter, simply clear the filter box.
4.1. Adding New Users
When adding a User, the first thing to decide which Group, if any, the User is to belong to.
Groups are used to help organize Users with a common characteristic into sub-sections within an Organization, eg: company departments, access methods, etc. Reference the “Group Management” Section of this Guide for more details on Groups.
If the use of Groups are not of any value, all Users can b e placed in the root Group, and they will all automatically displayed when entering the Organization in MAP.
If Users have been placed in Groups, it may be necessary to select or change the current Group being viewed. This is done by selecting a new Group from the drop down list above the username’s.
CRYPTO-MAP Guide – End User Edition
CRYPTO-MAP User Guide Page 6
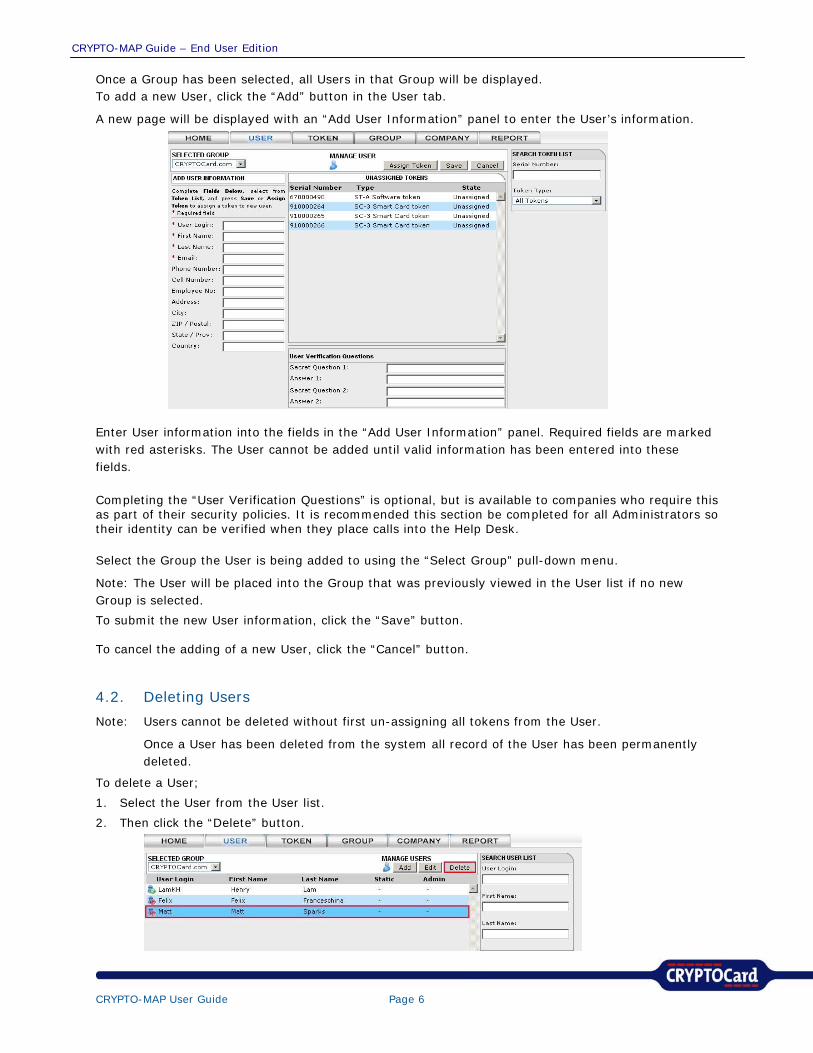
Once a Group has been selected, all Users in that Group will be displayed. To add a new User, click the “Add” button in the User tab.
A new page will be displayed with an “Add User Information” panel to enter the User’s information.
Enter User information into the fields in the “Add User Information” panel. Required fields are marked with red asterisks. The User cannot be added until valid information has been entered into these fields.
Completing the “User Verification Questions” is optional, but is available to companies who require this as part of their security policies. It is recommended this section be completed for all Administrators so their identity can be verified when they place calls into the Help Desk. Select the Group the User is being added to using the “Select Group” pull-down menu.
Note: The User will be placed into the Group that was previously viewed in the User list if no new Group is selected.
To submit the new User information, click the “Save” button. To cancel the adding of a new User, click the “Cancel” button.
4.2. Deleting Users
Note: Users cannot be deleted without first un-assigning all tokens from the User.
Once a User has been deleted from the system all record of the User has been permanently deleted.
To delete a User;
1. Select the User from the User list.
2. Then click the “Delete” button.
CRYPTO-MAP Guide – End User Edition
CRYPTO-MAP User Guide Page 7
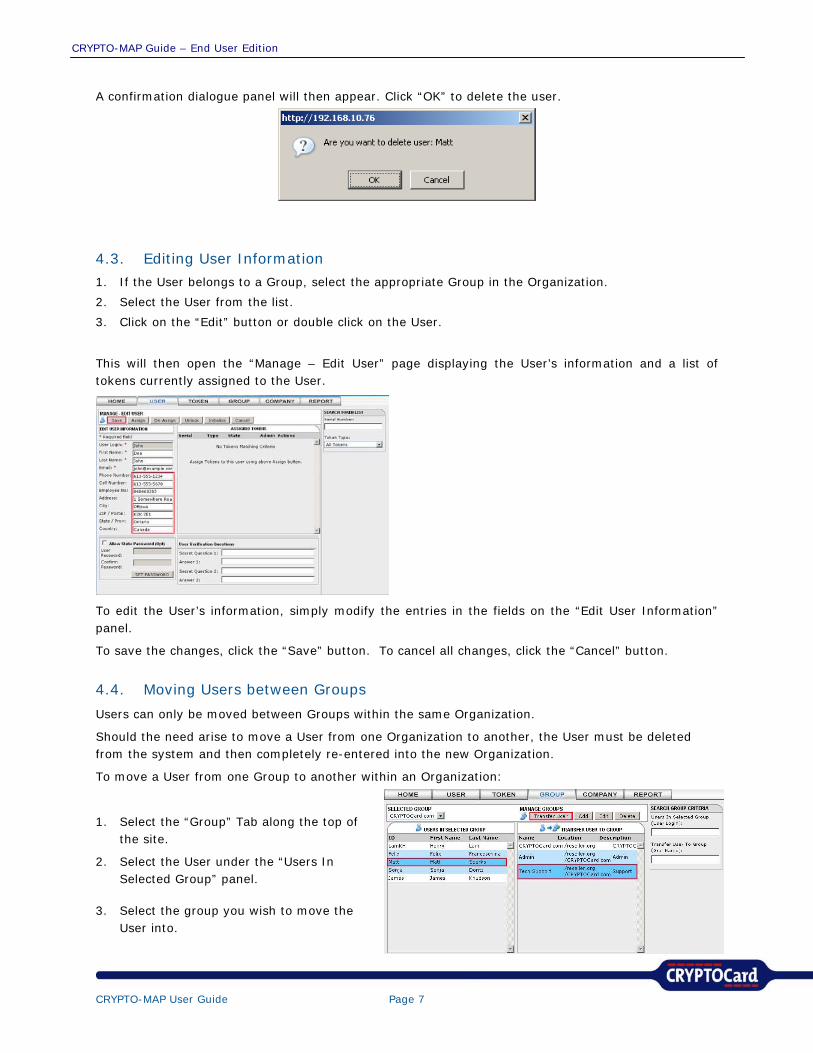
A confirmation dialogue panel will then appear. Click “OK” to delete the user.
4.3. Editing User Information
1. If the User belongs to a Group, select the appropriate Group in the Organization.
2. Select the User from the list.
3. Click on the “Edit” button or double click on the User.
This will then open the “Manage – Edit User” page displaying the User’s information and a list of tokens currently assigned to the User.
To edit the User’s information, simply modify the entries in the fields on the “Edit User Information” panel.
To save the changes, click the “Save” button. To cancel all changes, click the “Cancel” button.
4.4. Moving Users between Groups
Users can only be moved between Groups within the same Organization.
Should the need arise to move a User from one Organization to another, the User must be deleted from the system and then completely re-entered into the new Organization.
To move a User from one Group to another within an Organization:
1. Select the “Group” Tab along the top of the site.
2. Select the User under the “Users In Selected Group” panel.
3. Select the group you wish to move the User into.

CRYPTO-MAP Guide – End User Edition
CRYPTO-MAP User Guide Page 8
4. Click the “Transfer User” button under the “Manage Group” heading.
To confirm the User has been moved, click the dropdown box on the top left under “Selected Group” title and select the Group the User was moved to. This will display all Users in the Group.
4.5. Importing Users into an Organization
The import function works with any comma-delimited (.csv) file and will import six fields as follows:
field1, field2, field3, field4, field5, field6
Where:
• Field1: is the first name of the user (e.g. John)
• Field2: is the surname of the user (e.g. Smith)
• Field3: is the userid or logon id (e.g. JSmith)
• Field4: is the user’s e-mail address (e.g. [email protected])
• Field5: is the user’s phone number
• Field6 is the user’s cell phone number
To import Users into a Group;
1. Select the Destination Group on the right side of the page.
2. Click on the “Browse” button in the “Import Multiple Users Into Group (optional)” section to browse to a local file for import.
3. Click the “Import” button to Import the Users.
CRYPTO-MAP Guide – End User Edition
CRYPTO-MAP User Guide Page 9
4.6. Designating a User as an “Administrator”
General Notes about Administrators:
1- Only existing Administrators in the EOU or in the Service Provider Organization are able to designate Users as Administrators.
2- Administrators are contractually responsible for addressing User support calls and manage tokens on behalf of their Organization.
3- Only Administrators are able to access the MAP.
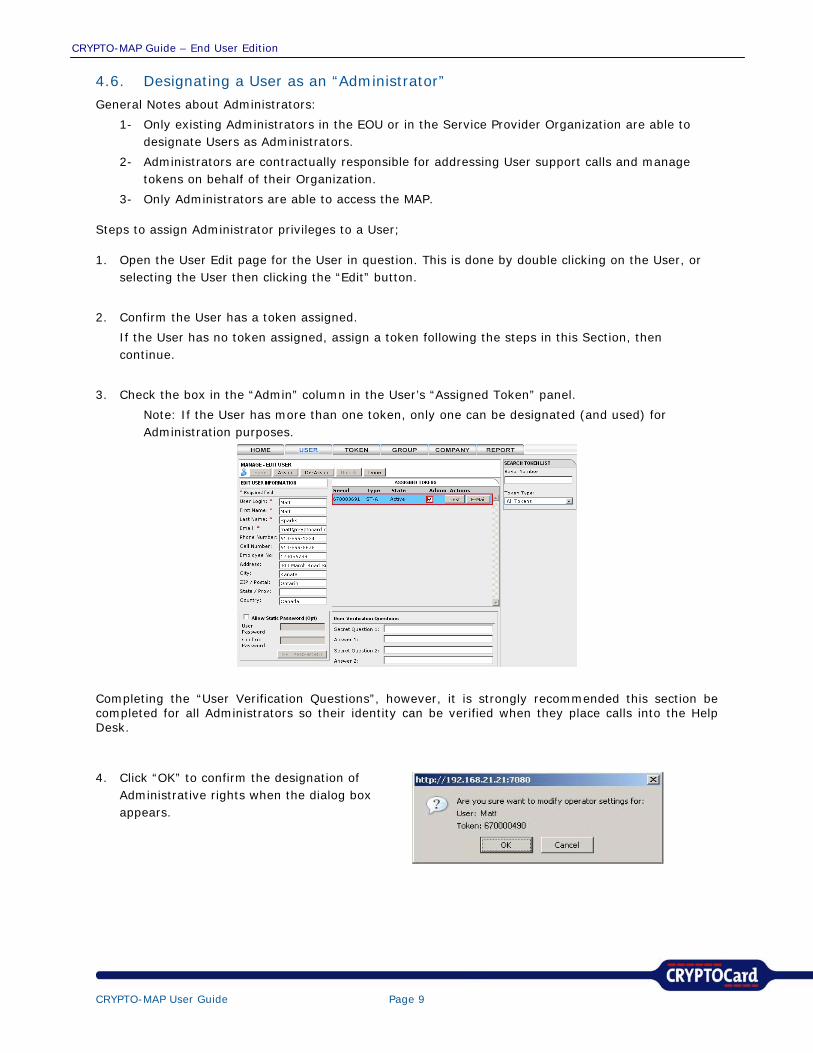
Steps to assign Administrator privileges to a User;
1. Open the User Edit page for the User in question. This is done by double clicking on the User, or selecting the User then clicking the “Edit” button.
2. Confirm the User has a token assigned.
If the User has no token assigned, assign a token following the steps in this Section, then continue.
3. Check the box in the “Admin” column in the User’s “Assigned Token” panel.
Note: If the User has more than one token, only one can be designated (and used) for Administration purposes.
Completing the “User Verification Questions”, however, it is strongly recommended this section be completed for all Administrators so their identity can be verified when they place calls into the Help Desk.
4. Click “OK” to confirm the designation of Administrative rights when the dialog box appears.
CRYPTO-MAP Guide – End User Edition
CRYPTO-MAP User Guide Page 10
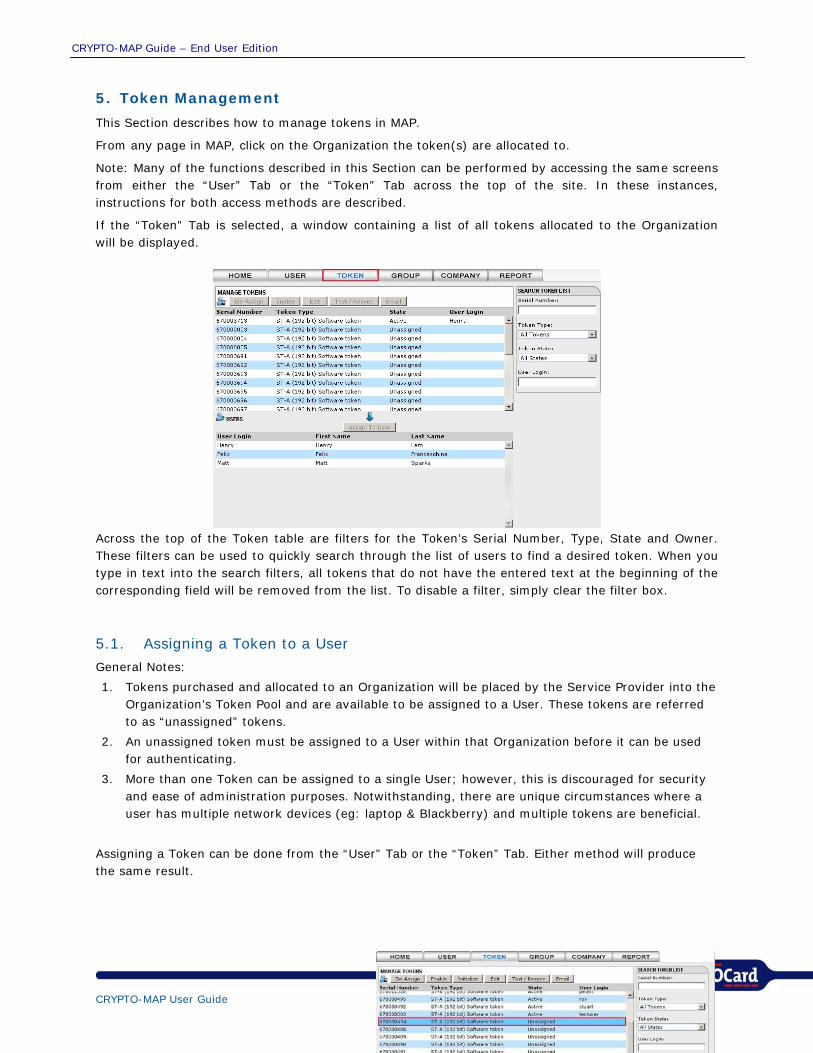
5. Token Management
This Section describes how to manage tokens in MAP.
From any page in MAP, click on the Organization the token(s) are allocated to.
Note: Many of the functions described in this Section can be performed by accessing the same screens from either the “User” Tab or the “Token” Tab across the top of the site. In these instances, instructions for both access methods are described.
If the “Token” Tab is selected, a window containing a list of all tokens allocated to the Organization will be displayed.
Across the top of the Token table are filters for the Token’s Serial Number, Type, State and Owner. These filters can be used to quickly search through the list of users to find a desired token. When you type in text into the search filters, all tokens that do not have the entered text at the beginning of the corresponding field will be removed from the list. To disable a filter, simply clear the filter box.
5.1. Assigning a Token to a User
General Notes:
1. Tokens purchased and allocated to an Organization will be placed by the Service Provider into the Organization’s Token Pool and are available to be assigned to a User. These tokens are referred to as “unassigned” tokens.
2. An unassigned token must be assigned to a User within that Organization before it can be used for authenticating.
3. More than one Token can be assigned to a single User; however, this is discouraged for security and ease of administration purposes. Notwithstanding, there are unique circumstances where a user has multiple network devices (eg: laptop & Blackberry) and multiple tokens are beneficial.
Assigning a Token can be done from the “User” Tab or the “Token” Tab. Either method will produce the same result.
CRYPTO-MAP Guide – End User Edition
CRYPTO-MAP User Guide Page 11
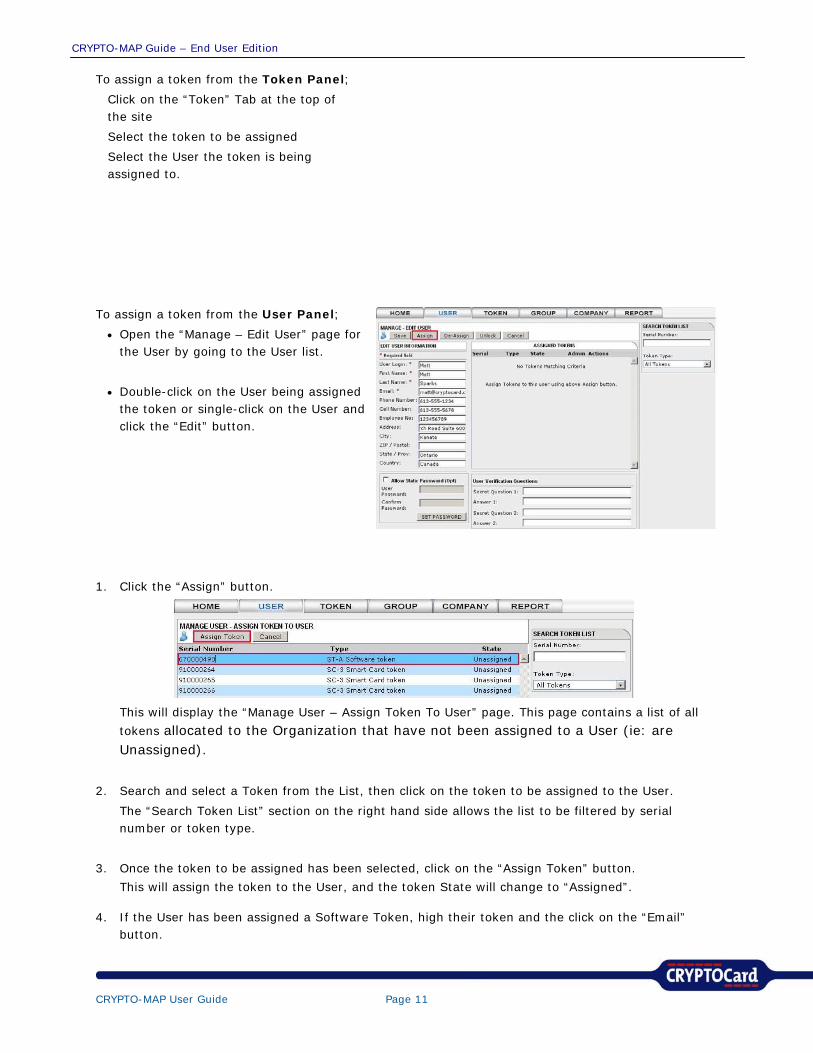
To assign a token from the Token Panel;
Click on the “Token” Tab at the top of the site
Select the token to be assigned
Select the User the token is being assigned to.
To assign a token from the User Panel;
• Open the “Manage – Edit User” page for the User by going to the User list.
• Double-click on the User being assigned the token or single-click on the User and click the “Edit” button.
1. Click the “Assign” button.
This will display the “Manage User – Assign Token To User” page. This page contains a list of all
tokens allocated to the Organization that have not been assigned to a User (ie: are Unassigned).
2. Search and select a Token from the List, then click on the token to be assigned to the User.
The “Search Token List” section on the right hand side allows the list to be filtered by serial number or token type.
3. Once the token to be assigned has been selected, click on the “Assign Token” button.
This will assign the token to the User, and the token State will change to “Assigned”. 4. If the User has been assigned a Software Token, high their token and the click on the “Email”
button.
CRYPTO-MAP Guide – End User Edition
CRYPTO-MAP User Guide Page 12
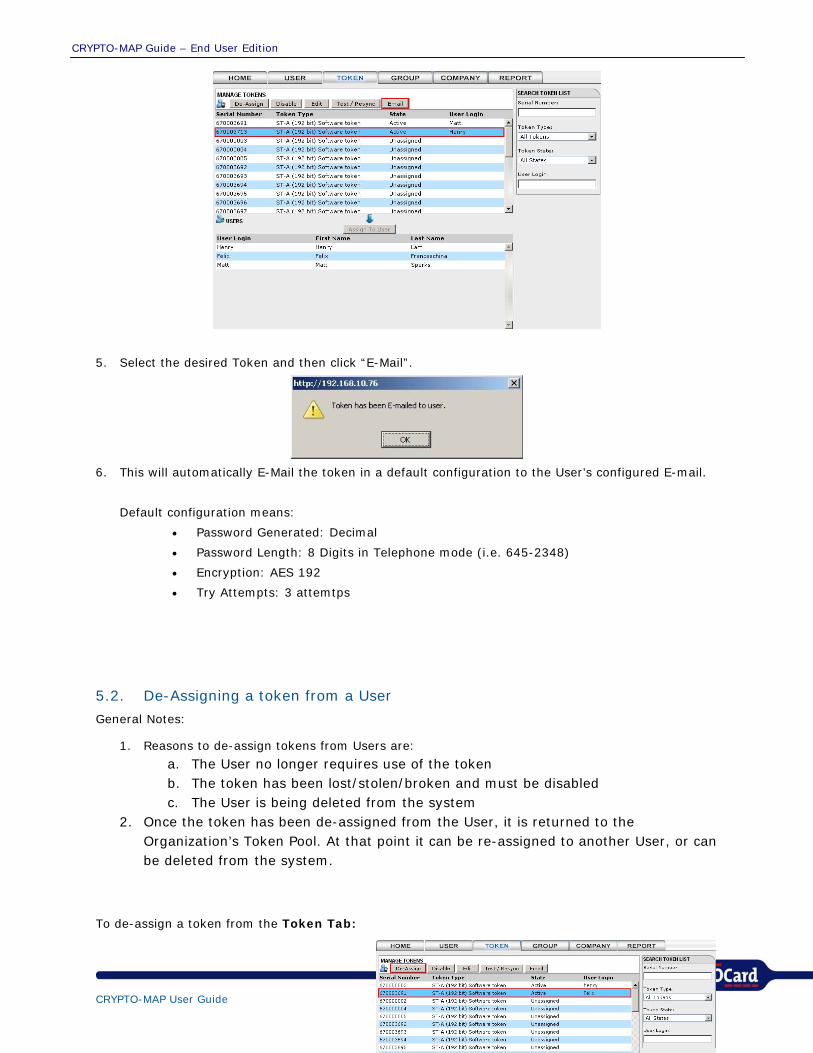
5. Select the desired Token and then click “E-Mail”.
6. This will automatically E-Mail the token in a default configuration to the User’s configured E-mail.
Default configuration means:
• Password Generated: Decimal
• Password Length: 8 Digits in Telephone mode (i.e. 645-2348)
• Encryption: AES 192
• Try Attempts: 3 attemtps
5.2. De-Assigning a token from a User
General Notes:
1. Reasons to de-assign tokens from Users are:
a. The User no longer requires use of the token b. The token has been lost/stolen/broken and must be disabled c. The User is being deleted from the system
2. Once the token has been de-assigned from the User, it is returned to the Organization’s Token Pool. At that point it can be re-assigned to another User, or can be deleted from the system.
To de-assign a token from the Token Tab:
CRYPTO-MAP Guide – End User Edition
CRYPTO-MAP User Guide Page 13
Highlight the token that you wish to de-assign from the user.
Click the De-assign button.
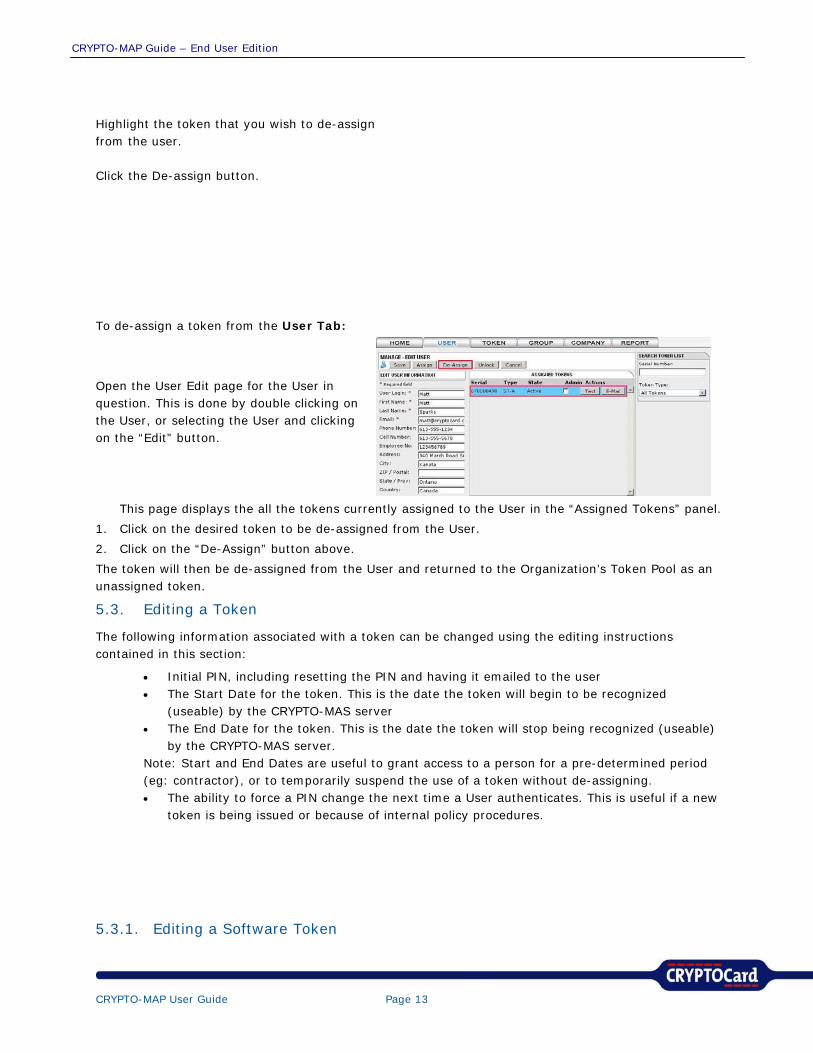
To de-assign a token from the User Tab:
Open the User Edit page for the User in question. This is done by double clicking on the User, or selecting the User and clicking on the “Edit” button.
This page displays the all the tokens currently assigned to the User in the “Assigned Tokens” panel.
1. Click on the desired token to be de-assigned from the User.
2. Click on the “De-Assign” button above.
The token will then be de-assigned from the User and returned to the Organization’s Token Pool as an unassigned token.
5.3. Editing a Token
The following information associated with a token can be changed using the editing instructions contained in this section:
• Initial PIN, including resetting the PIN and having it emailed to the user • The Start Date for the token. This is the date the token will begin to be recognized
(useable) by the CRYPTO-MAS server • The End Date for the token. This is the date the token will stop being recognized (useable)
by the CRYPTO-MAS server. Note: Start and End Dates are useful to grant access to a person for a pre-determined period (eg: contractor), or to temporarily suspend the use of a token without de-assigning. • The ability to force a PIN change the next time a User authenticates. This is useful if a new
token is being issued or because of internal policy procedures.
5.3.1. Editing a Software Token
CRYPTO-MAP Guide – End User Edition
CRYPTO-MAP User Guide Page 14
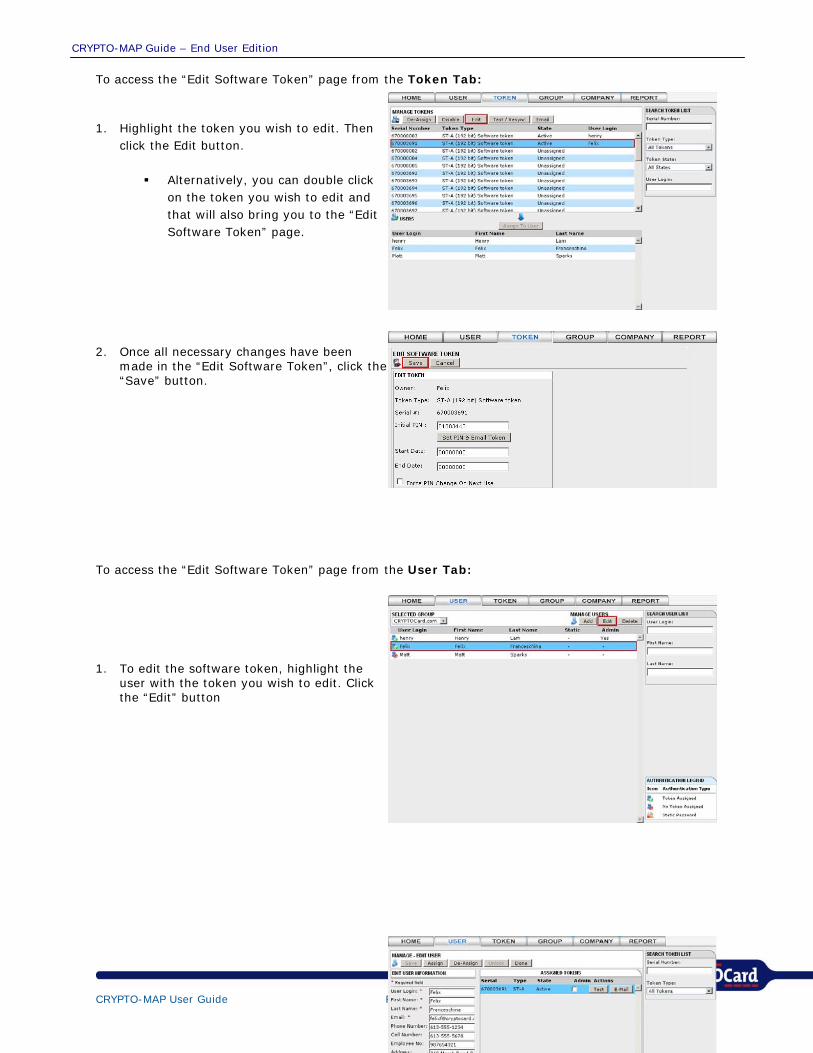
To access the “Edit Software Token” page from the Token Tab:
1. Highlight the token you wish to edit. Then
click the Edit button.
Alternatively, you can double click
on the token you wish to edit and that will also bring you to the “Edit Software Token” page.
2. Once all necessary changes have been
made in the “Edit Software Token”, click the “Save” button.
To access the “Edit Software Token” page from the User Tab:
1. To edit the software token, highlight the user with the token you wish to edit. Click the “Edit” button
CRYPTO-MAP Guide – End User Edition
CRYPTO-MAP User Guide Page 15
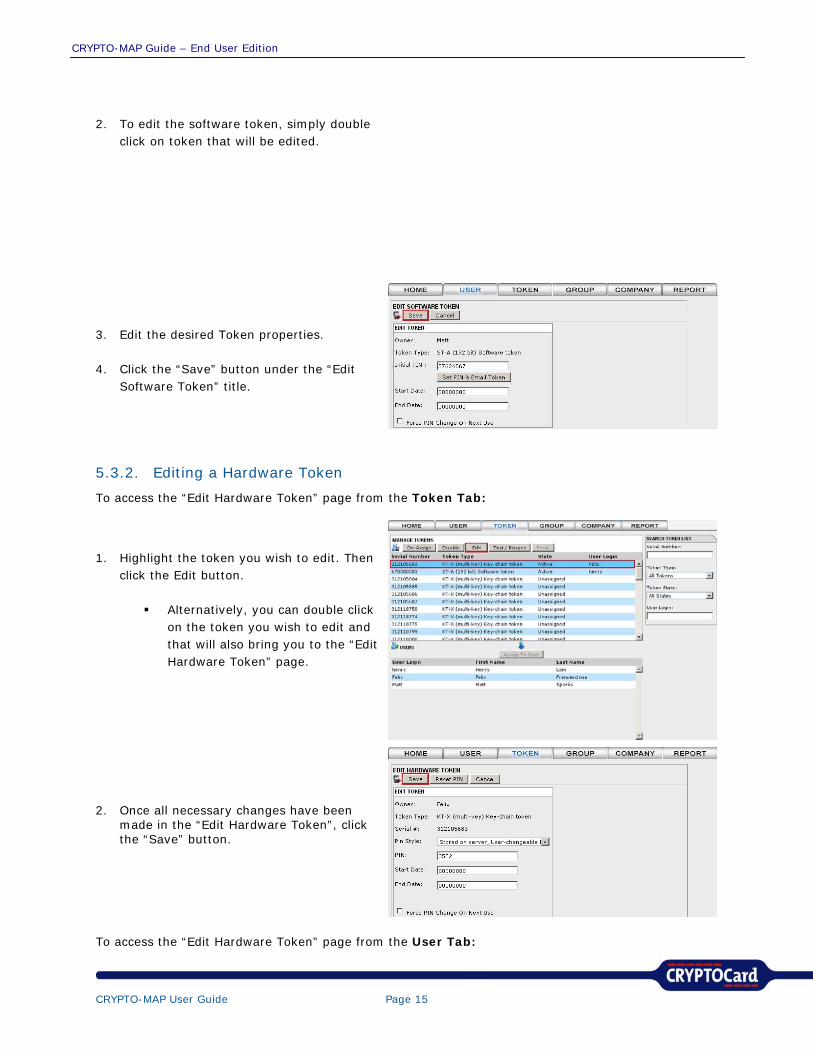
2. To edit the software token, simply double
click on token that will be edited.
3. Edit the desired Token properties.
4. Click the “Save” button under the “Edit
Software Token” title.
5.3.2. Editing a Hardware Token
To access the “Edit Hardware Token” page from the Token Tab:
1. Highlight the token you wish to edit. Then click the Edit button.
Alternatively, you can double click
on the token you wish to edit and that will also bring you to the “Edit Hardware Token” page.
2. Once all necessary changes have been
made in the “Edit Hardware Token”, click the “Save” button.
To access the “Edit Hardware Token” page from the User Tab:
CRYPTO-MAP Guide – End User Edition
CRYPTO-MAP User Guide Page 16
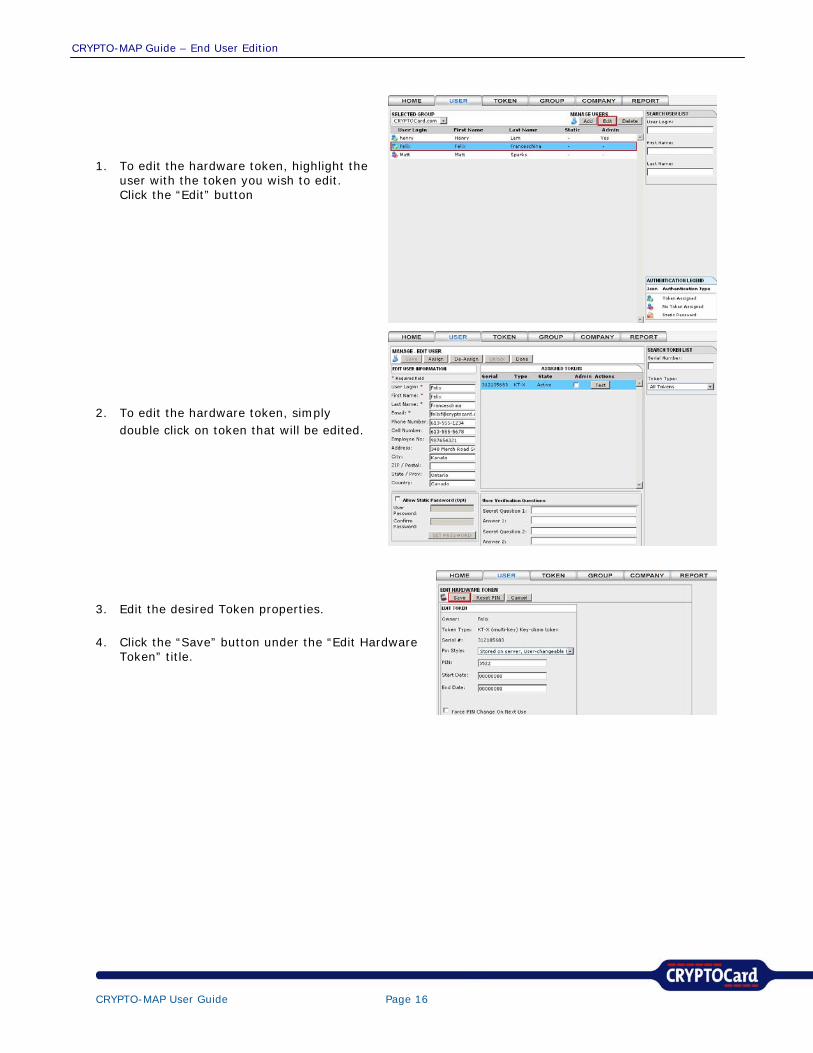
1. To edit the hardware token, highlight the
user with the token you wish to edit. Click the “Edit” button
2. To edit the hardware token, simply
double click on token that will be edited.
3. Edit the desired Token properties.
4. Click the “Save” button under the “Edit Hardware
Token” title.
CRYPTO-MAP Guide – End User Edition
CRYPTO-MAP User Guide Page 17
5.4. Testing if a Token is Synchronized with the Server
General Notes about the synchronization of tokens:
If too many OTP’s have been generated by a token since the last time the server received an OTP from the token, the server will not recognize the OTP and the token and server are said to be “out of sync”.
This is a common reason why Users cannot authenticate, and are calling for Administrator support.
The steps below will determine if a token is synchronized with the CRYPTOCard – Managed Authentication Server (CRYPTO-MAS).
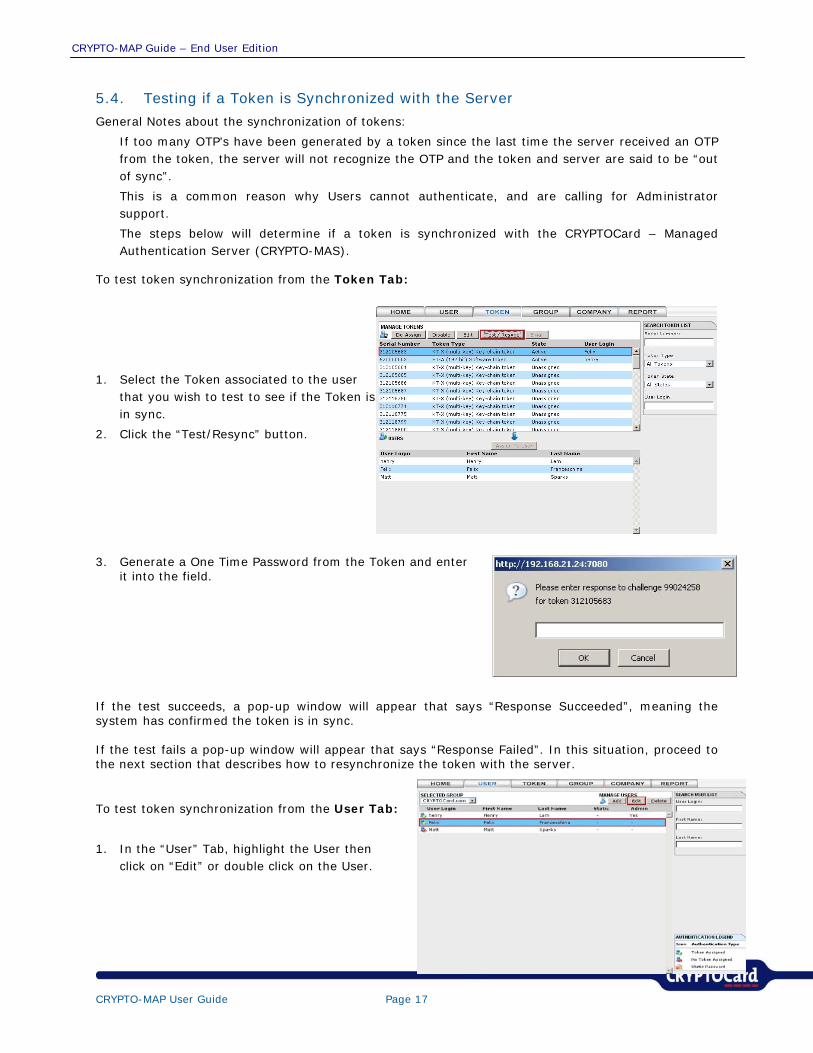
To test token synchronization from the Token Tab:
1. Select the Token associated to the user that you wish to test to see if the Token is in sync.
2. Click the “Test/Resync” button.
3. Generate a One Time Password from the Token and enter
it into the field. If the test succeeds, a pop-up window will appear that says “Response Succeeded”, meaning the system has confirmed the token is in sync. If the test fails a pop-up window will appear that says “Response Failed”. In this situation, proceed to the next section that describes how to resynchronize the token with the server. To test token synchronization from the User Tab:
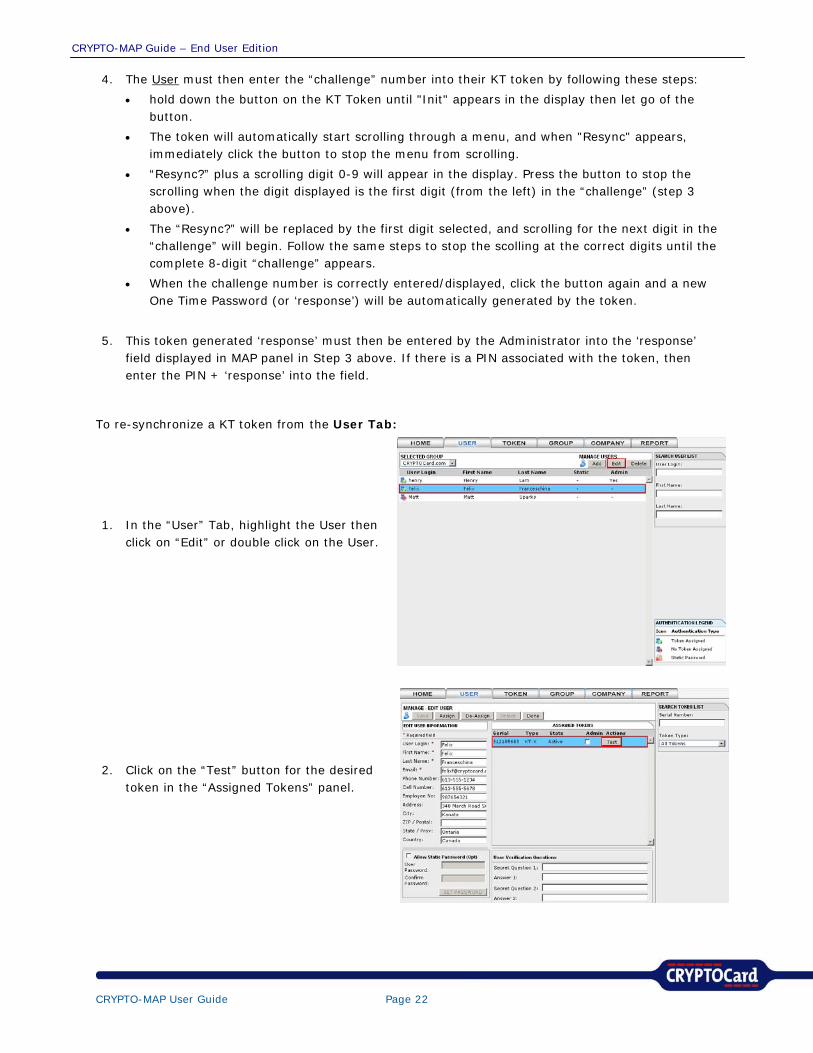
1. In the “User” Tab, highlight the User then click on “Edit” or double click on the User.
CRYPTO-MAP Guide – End User Edition
CRYPTO-MAP User Guide Page 18
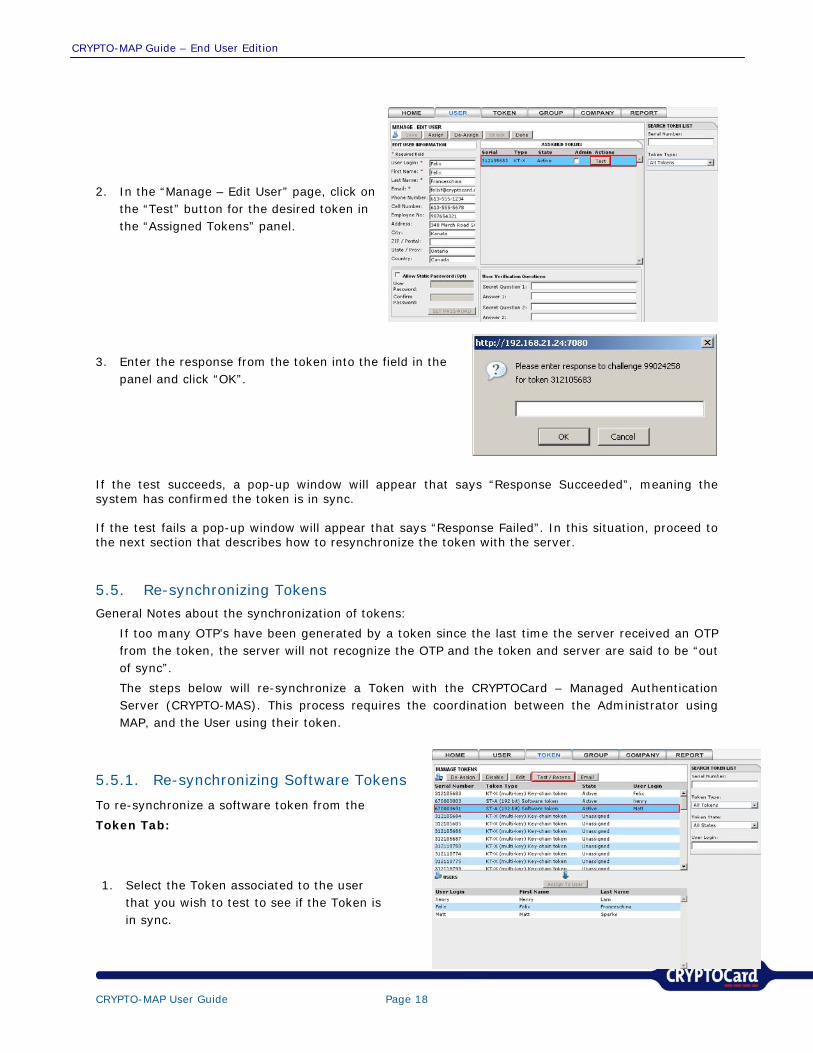
2. In the “Manage – Edit User” page, click on
the “Test” button for the desired token in the “Assigned Tokens” panel.
3. Enter the response from the token into the field in the
panel and click “OK”.
If the test succeeds, a pop-up window will appear that says “Response Succeeded”, meaning the system has confirmed the token is in sync. If the test fails a pop-up window will appear that says “Response Failed”. In this situation, proceed to the next section that describes how to resynchronize the token with the server.
5.5. Re-synchronizing Tokens
General Notes about the synchronization of tokens:
If too many OTP’s have been generated by a token since the last time the server received an OTP from the token, the server will not recognize the OTP and the token and server are said to be “out of sync”.
The steps below will re-synchronize a Token with the CRYPTOCard – Managed Authentication Server (CRYPTO-MAS). This process requires the coordination between the Administrator using MAP, and the User using their token.
5.5.1. Re-synchronizing Software Tokens
To re-synchronize a software token from the
Token Tab:
1. Select the Token associated to the user that you wish to test to see if the Token is in sync.
CRYPTO-MAP Guide – End User Edition
CRYPTO-MAP User Guide Page 19
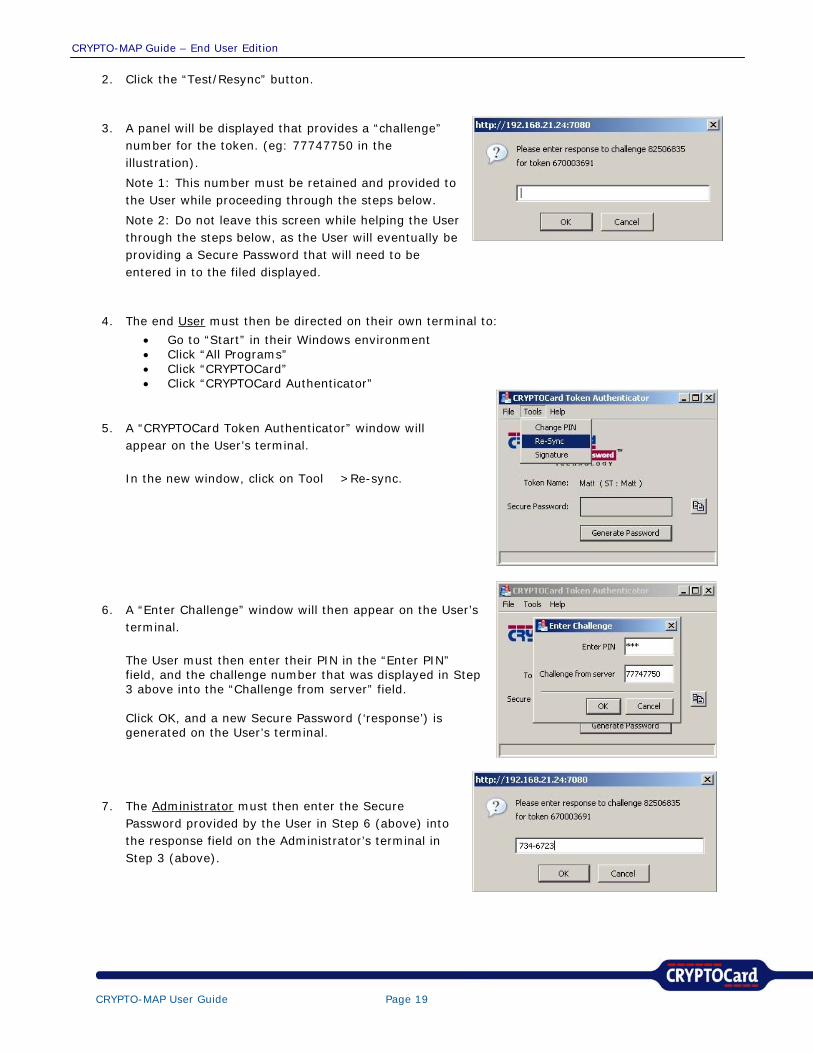
2. Click the “Test/Resync” button.
3. A panel will be displayed that provides a “challenge”
number for the token. (eg: 77747750 in the illustration).
Note 1: This number must be retained and provided to the User while proceeding through the steps below.
Note 2: Do not leave this screen while helping the User through the steps below, as the User will eventually be providing a Secure Password that will need to be entered in to the filed displayed.
4. The end User must then be directed on their own terminal to:
• Go to “Start” in their Windows environment • Click “All Programs” • Click “CRYPTOCard” • Click “CRYPTOCard Authenticator”
5. A “CRYPTOCard Token Authenticator” window will
appear on the User’s terminal.
In the new window, click on Tool >Re-sync.
6. A “Enter Challenge” window will then appear on the User’s
terminal.
The User must then enter their PIN in the “Enter PIN” field, and the challenge number that was displayed in Step 3 above into the “Challenge from server” field. Click OK, and a new Secure Password (‘response’) is generated on the User’s terminal.
7. The Administrator must then enter the Secure
Password provided by the User in Step 6 (above) into the response field on the Administrator’s terminal in Step 3 (above).
CRYPTO-MAP Guide – End User Edition
CRYPTO-MAP User Guide Page 20
To re-synchronize a software token from the User Tab:
1. In the “User” Tab, highlight the User then click on “Edit” or double click on the User.
2. Click on the “Test” button for the desired
token in the “Assigned Tokens” panel.
3. A panel will be displayed that provides a “challenge”
number for the token. (eg: 77747750 in the illustration).
Note 1: This number must be retained and provided to the User while proceeding through the steps below.
Note 2: Do not leave this screen while helping the User through the steps below, as the User will eventually be providing a Secure Password that will need to be entered in to the filed displayed.
4. The end User must then be directed on their own terminal to:
• Go to “Start” in their Windows environment • Click “All Programs” • Click “CRYPTOCard” • Click “CRYPTOCard Authenticator”
5. A “CRYPTOCard Token Authenticator” window will
appear on the User’s terminal.
In the new window, click on Tool >Re-sync.
CRYPTO-MAP Guide – End User Edition
CRYPTO-MAP User Guide Page 21
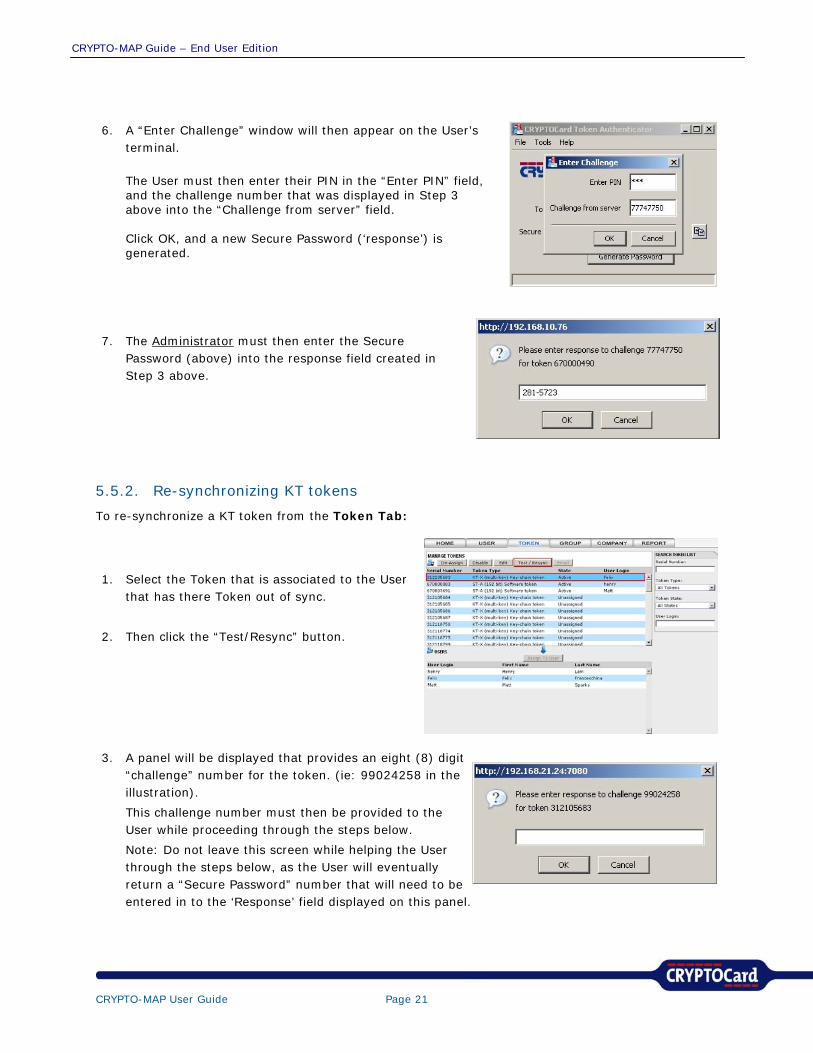
6. A “Enter Challenge” window will then appear on the User’s terminal.
The User must then enter their PIN in the “Enter PIN” field, and the challenge number that was displayed in Step 3 above into the “Challenge from server” field. Click OK, and a new Secure Password (‘response’) is generated.
7. The Administrator must then enter the Secure
Password (above) into the response field created in Step 3 above.
5.5.2. Re-synchronizing KT tokens
To re-synchronize a KT token from the Token Tab:
1. Select the Token that is associated to the User
that has there Token out of sync.
2. Then click the “Test/Resync” button.
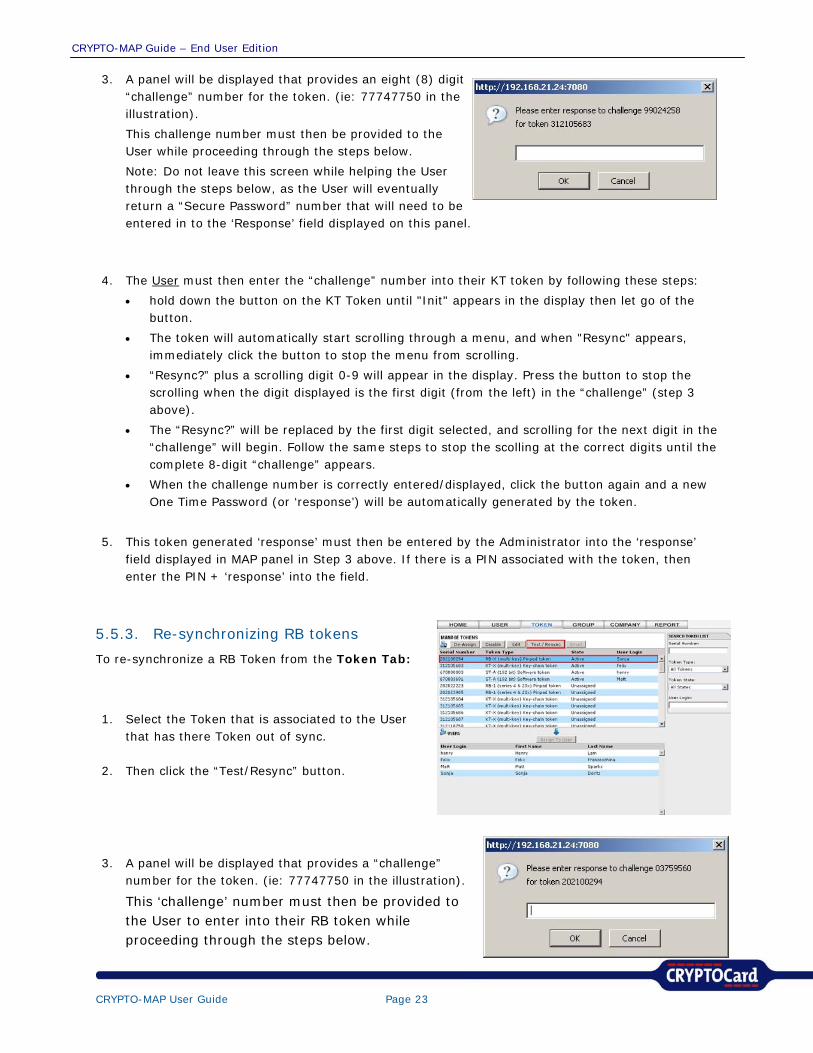
3. A panel will be displayed that provides an eight (8) digit
“challenge” number for the token. (ie: 99024258 in the illustration).
This challenge number must then be provided to the User while proceeding through the steps below.
Note: Do not leave this screen while helping the User through the steps below, as the User will eventually return a “Secure Password” number that will need to be entered in to the ‘Response’ field displayed on this panel.
CRYPTO-MAP Guide – End User Edition
CRYPTO-MAP User Guide Page 22
4. The User must then enter the “challenge” number into their KT token by following these steps:
• hold down the button on the KT Token until "Init" appears in the display then let go of the button.
• The token will automatically start scrolling through a menu, and when "Resync" appears, immediately click the button to stop the menu from scrolling.
• “Resync?” plus a scrolling digit 0-9 will appear in the display. Press the button to stop the scrolling when the digit displayed is the first digit (from the left) in the “challenge” (step 3 above).
• The “Resync?” will be replaced by the first digit selected, and scrolling for the next digit in the “challenge” will begin. Follow the same steps to stop the scolling at the correct digits until the complete 8-digit “challenge” appears.
• When the challenge number is correctly entered/displayed, click the button again and a new One Time Password (or ‘response’) will be automatically generated by the token.
5. This token generated ‘response’ must then be entered by the Administrator into the ‘response’ field displayed in MAP panel in Step 3 above. If there is a PIN associated with the token, then enter the PIN + ‘response’ into the field.
To re-synchronize a KT token from the User Tab:
1. In the “User” Tab, highlight the User then click on “Edit” or double click on the User.
2. Click on the “Test” button for the desired
token in the “Assigned Tokens” panel.
CRYPTO-MAP Guide – End User Edition
CRYPTO-MAP User Guide Page 23
3. A panel will be displayed that provides an eight (8) digit “challenge” number for the token. (ie: 77747750 in the illustration).
This challenge number must then be provided to the User while proceeding through the steps below.
Note: Do not leave this screen while helping the User through the steps below, as the User will eventually return a “Secure Password” number that will need to be entered in to the ‘Response’ field displayed on this panel.
4. The User must then enter the “challenge” number into their KT token by following these steps:
• hold down the button on the KT Token until "Init" appears in the display then let go of the button.
• The token will automatically start scrolling through a menu, and when "Resync" appears, immediately click the button to stop the menu from scrolling.
• “Resync?” plus a scrolling digit 0-9 will appear in the display. Press the button to stop the scrolling when the digit displayed is the first digit (from the left) in the “challenge” (step 3 above).
• The “Resync?” will be replaced by the first digit selected, and scrolling for the next digit in the “challenge” will begin. Follow the same steps to stop the scolling at the correct digits until the complete 8-digit “challenge” appears.
• When the challenge number is correctly entered/displayed, click the button again and a new One Time Password (or ‘response’) will be automatically generated by the token.
5. This token generated ‘response’ must then be entered by the Administrator into the ‘response’ field displayed in MAP panel in Step 3 above. If there is a PIN associated with the token, then enter the PIN + ‘response’ into the field.
5.5.3. Re-synchronizing RB tokens
To re-synchronize a RB Token from the Token Tab:
1. Select the Token that is associated to the User that has there Token out of sync.
2. Then click the “Test/Resync” button.
3. A panel will be displayed that provides a “challenge”
number for the token. (ie: 77747750 in the illustration).
This ‘challenge’ number must then be provided to the User to enter into their RB token while proceeding through the steps below.
CRYPTO-MAP Guide – End User Edition
CRYPTO-MAP User Guide Page 24
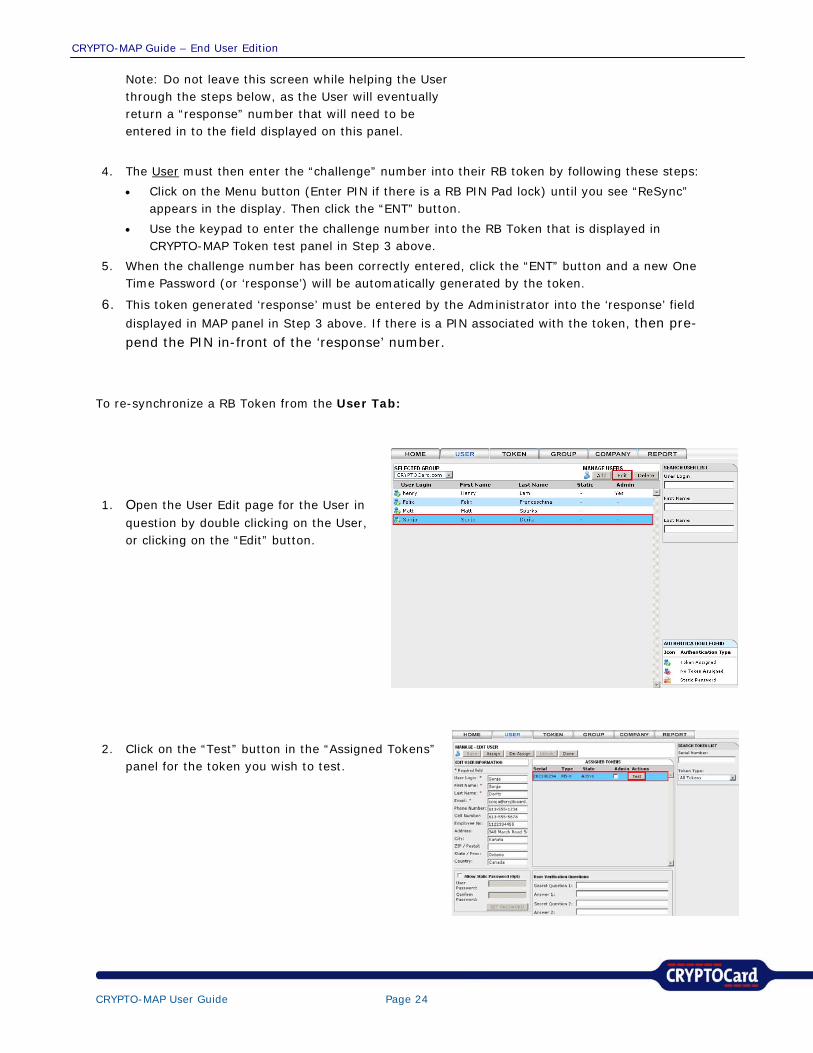
Note: Do not leave this screen while helping the User through the steps below, as the User will eventually return a “response” number that will need to be entered in to the field displayed on this panel.
4. The User must then enter the “challenge” number into their RB token by following these steps:
• Click on the Menu button (Enter PIN if there is a RB PIN Pad lock) until you see “ReSync” appears in the display. Then click the “ENT” button.
• Use the keypad to enter the challenge number into the RB Token that is displayed in CRYPTO-MAP Token test panel in Step 3 above.
5. When the challenge number has been correctly entered, click the “ENT” button and a new One Time Password (or ‘response’) will be automatically generated by the token.
6. This token generated ‘response’ must be entered by the Administrator into the ‘response’ field
displayed in MAP panel in Step 3 above. If there is a PIN associated with the token, then pre-pend the PIN in-front of the ‘response’ number.
To re-synchronize a RB Token from the User Tab:
1. Open the User Edit page for the User in question by double clicking on the User, or clicking on the “Edit” button.
2. Click on the “Test” button in the “Assigned Tokens” panel for the token you wish to test.
CRYPTO-MAP Guide – End User Edition
CRYPTO-MAP User Guide Page 25
3. A panel will be displayed that provides a “challenge” number for the token. (ie: 77747750 in the illustration).
This ‘challenge’ number must then be provided to the User to enter into their RB token while proceeding through the steps below.
Note: Do not leave this screen while helping the User through the steps below, as the User will eventually return a “response” number that will need to be entered in to the field displayed on this panel.
4. The User must then enter the “challenge” number into their RB token by following these steps:
• Click on the Menu button (Enter PIN if there is a RB PIN Pad lock) until you see “ReSync” appears in the display. Then click the “ENT” button.
• Use the keypad to enter the challenge number into the RB Token that is displayed in CRYPTO-MAP Token test panel in Step 3 above.
5. When the challenge number has been correctly entered, click the “ENT” button and a new One Time Password (or ‘response’) will be automatically generated by the token.
6. This token generated ‘response’ must be entered by the Administrator into the ‘response’ field
displayed in MAP panel in Step 3 above. If there is a PIN associated with the token, then pre-pend the PIN in-front of the ‘response’ number.
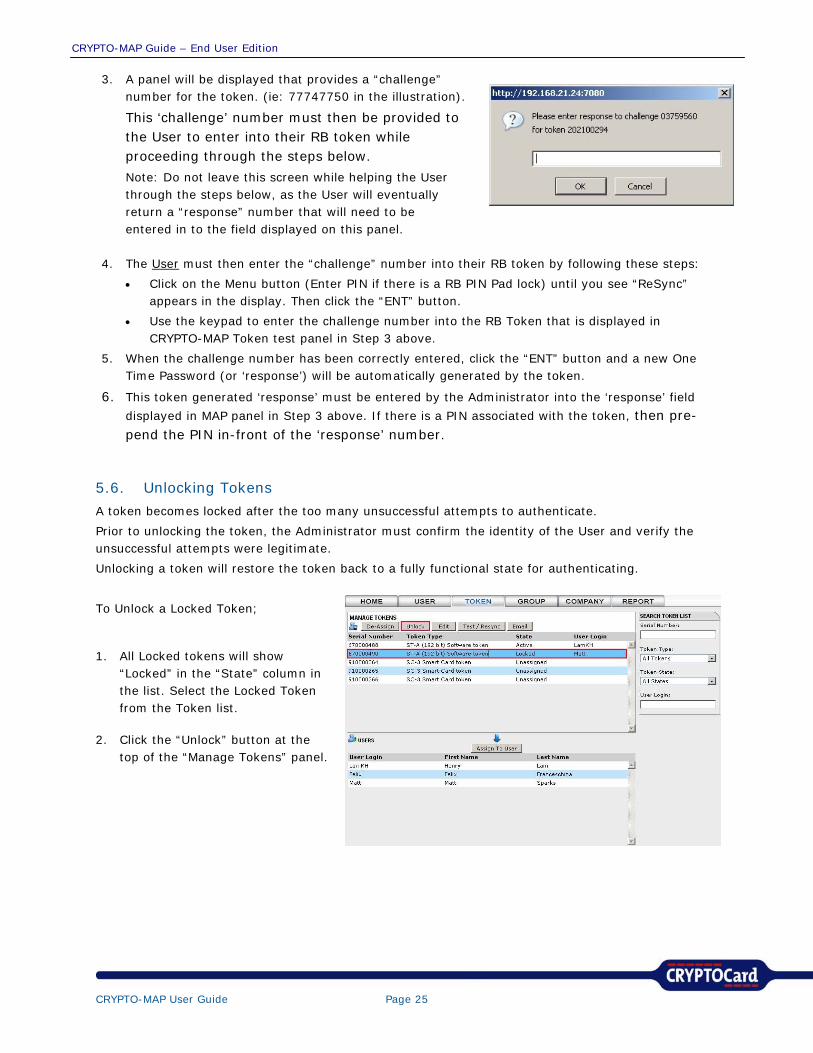
5.6. Unlocking Tokens
A token becomes locked after the too many unsuccessful attempts to authenticate.
Prior to unlocking the token, the Administrator must confirm the identity of the User and verify the unsuccessful attempts were legitimate.
Unlocking a token will restore the token back to a fully functional state for authenticating.
To Unlock a Locked Token;
1. All Locked tokens will show
“Locked” in the “State” column in the list. Select the Locked Token from the Token list.
2. Click the “Unlock” button at the
top of the “Manage Tokens” panel.
CRYPTO-MAP Guide – End User Edition
CRYPTO-MAP User Guide Page 26
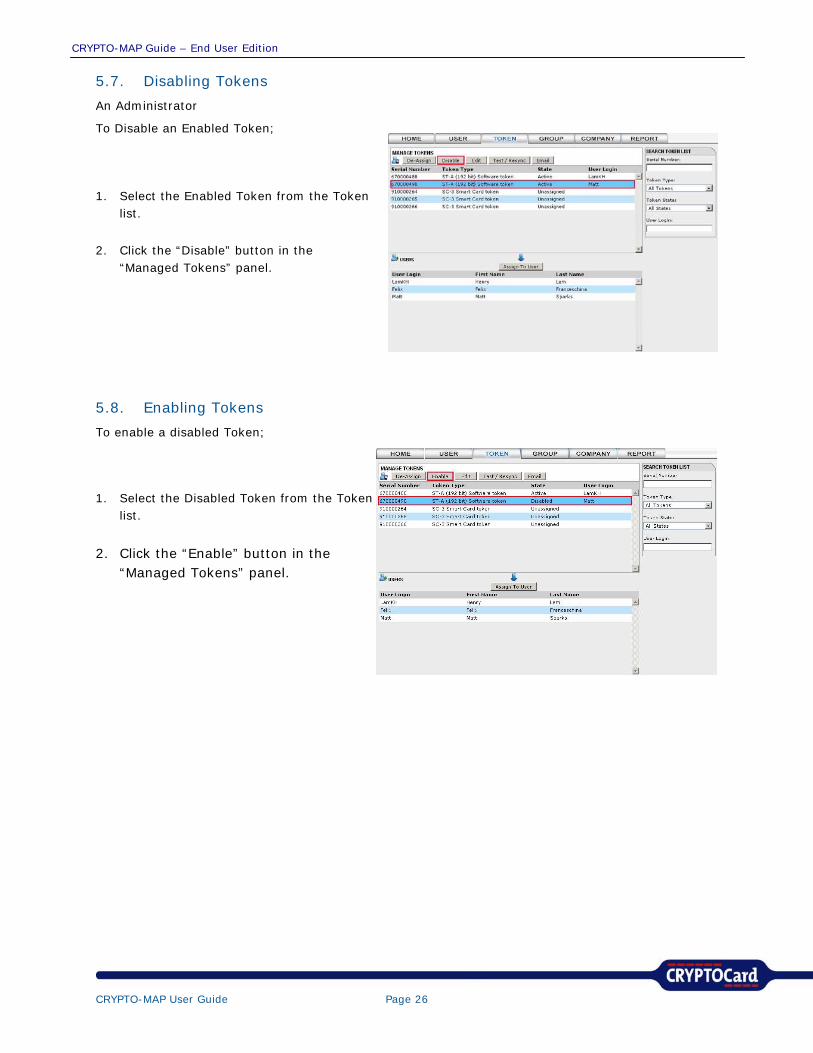
5.7. Disabling Tokens
An Administrator
To Disable an Enabled Token;
1. Select the Enabled Token from the Token list.
2. Click the “Disable” button in the
“Managed Tokens” panel.
5.8. Enabling Tokens
To enable a disabled Token;
1. Select the Disabled Token from the Token
list.
2. Click the “Enable” button in the “Managed Tokens” panel.
CRYPTO-MAP Guide – End User Edition
CRYPTO-MAP User Guide Page 27
6. Group Management
Groups are used to organize Users with a common characteristic into sub-sections within an Organization. For example: departments within a Company or network access methods, terminal types, etc.
If the use of Groups are deemed to be of little value, all Users can b e placed in the root Group by not creating any Groups, and they all Users will automatically displayed when entering the Organization in MAP.
The default root Group is identified by “yourcompanyname.com”.
If Users have been placed in Groups, it may be necessary to select or change the current Group being viewed. This is done by selecting a new Group from the drop down list above the username’s.
Once a Group has been selected, all Users in that Group will be displayed. Click on the “Group” from across the top of the page. This will bring you to the Group Page.
6.1. Adding Groups
To Add a Group;
1. Select a parent group in the “Selected
Group” table on the right side of the page.
2. Click the “Add” Button at the top of the
page above the word “Transfer User”.
CRYPTO-MAP Guide – End User Edition
CRYPTO-MAP User Guide Page 28
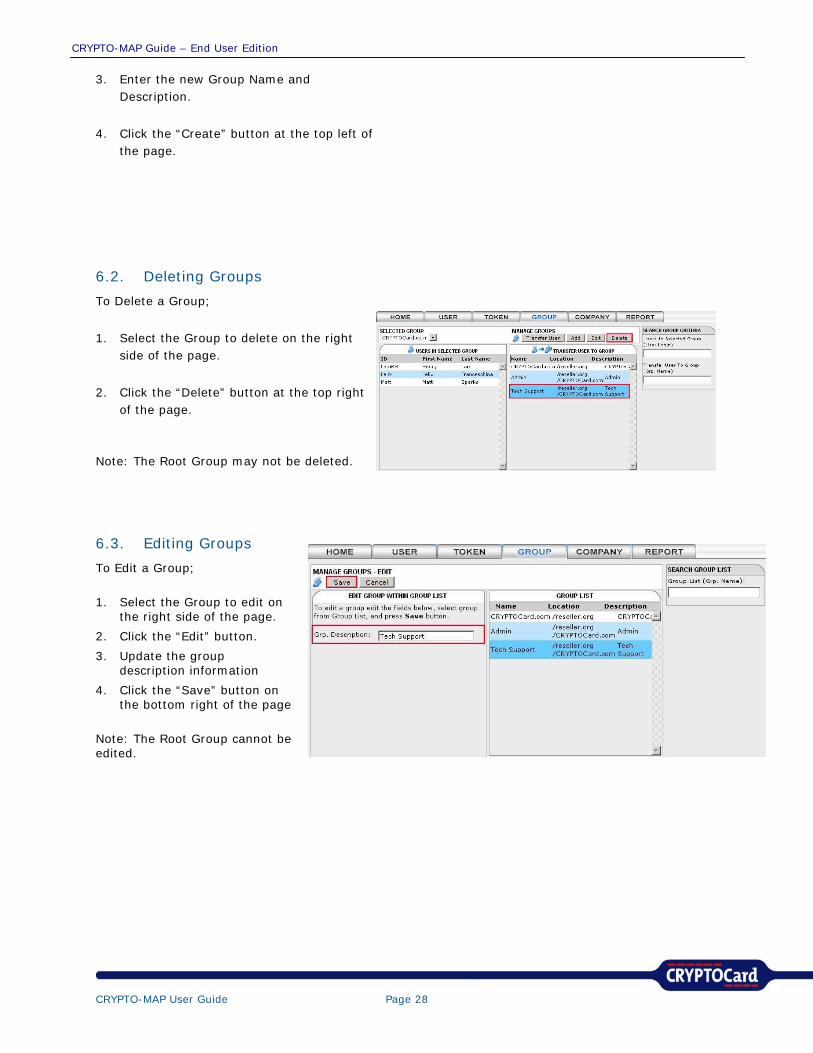
3. Enter the new Group Name and Description.
4. Click the “Create” button at the top left of
the page.
6.2. Deleting Groups
To Delete a Group;
1. Select the Group to delete on the right
side of the page.
2. Click the “Delete” button at the top right
of the page.
Note: The Root Group may not be deleted.
6.3. Editing Groups
To Edit a Group; 1. Select the Group to edit on
the right side of the page.
2. Click the “Edit” button.
3. Update the group description information
4. Click the “Save” button on the bottom right of the page
Note: The Root Group cannot be edited.
CRYPTO-MAP Guide – End User Edition
CRYPTO-MAP User Guide Page 29
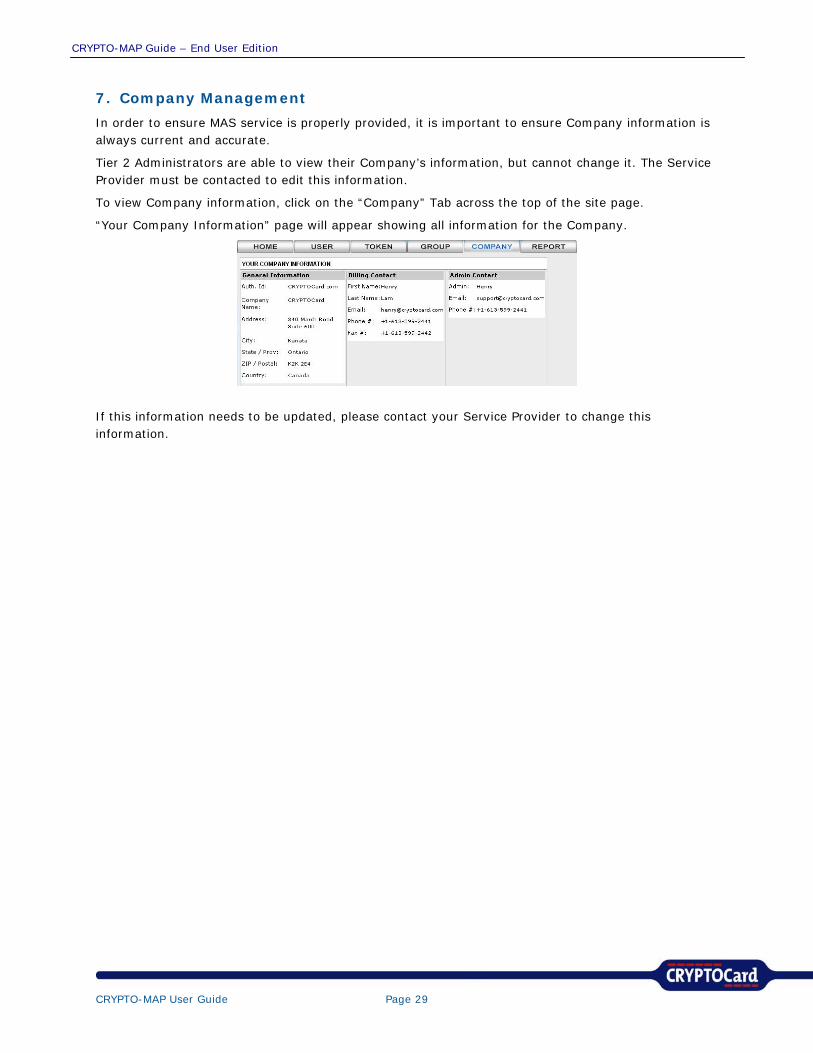
7. Company Management
In order to ensure MAS service is properly provided, it is important to ensure Company information is always current and accurate.
Tier 2 Administrators are able to view their Company’s information, but cannot change it. The Service Provider must be contacted to edit this information.
To view Company information, click on the “Company” Tab across the top of the site page.
“Your Company Information” page will appear showing all information for the Company.
If this information needs to be updated, please contact your Service Provider to change this information.
CRYPTO-MAP Guide – End User Edition
CRYPTO-MAP User Guide Page 30
8. Report Generation
To generate Reports, click on the “Report” Tab across the top of site pages.
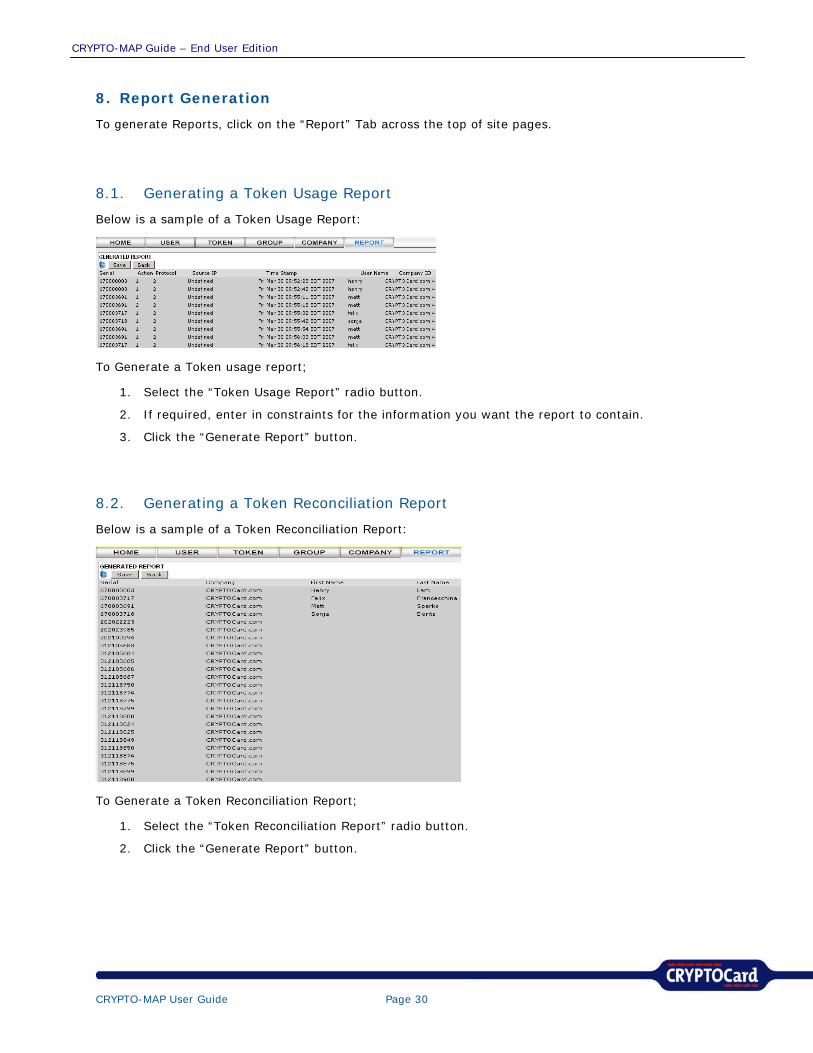
8.1. Generating a Token Usage Report
Below is a sample of a Token Usage Report:
To Generate a Token usage report;
1. Select the “Token Usage Report” radio button.
2. If required, enter in constraints for the information you want the report to contain.
3. Click the “Generate Report” button.
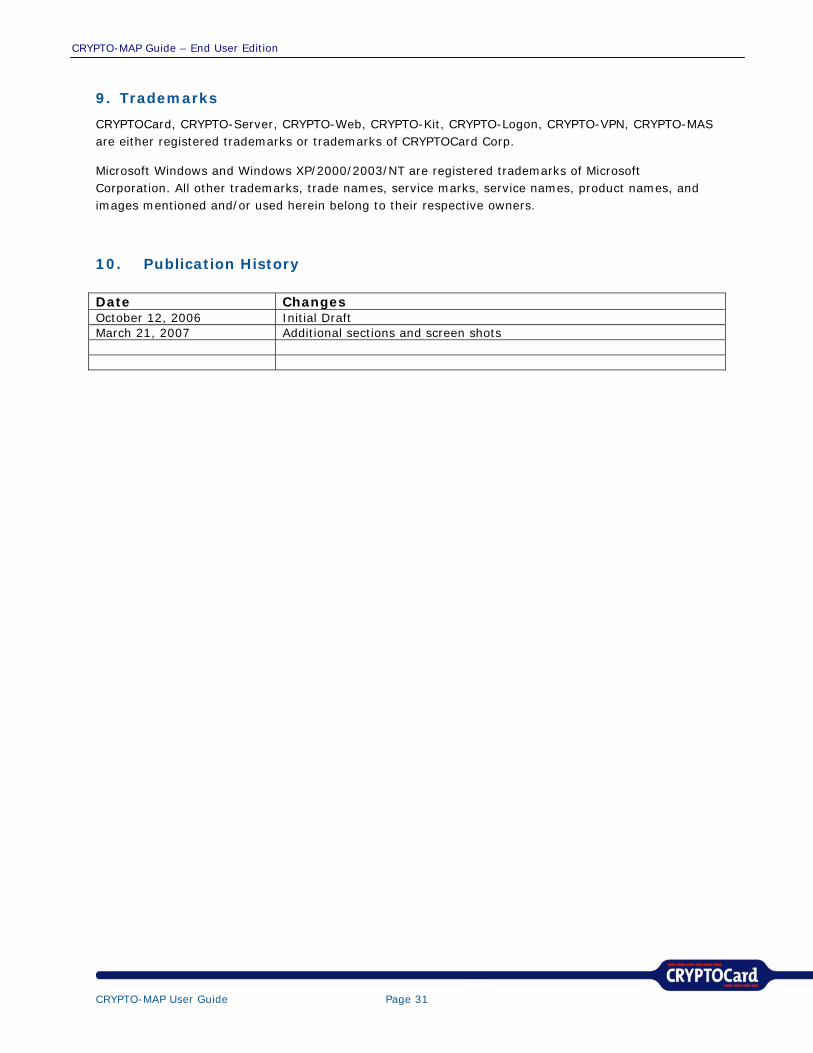
8.2. Generating a Token Reconciliation Report
Below is a sample of a Token Reconciliation Report:
To Generate a Token Reconciliation Report;
1. Select the “Token Reconciliation Report” radio button.
2. Click the “Generate Report” button.
CRYPTO-MAP Guide – End User Edition
CRYPTO-MAP User Guide Page 31
9. Trademarks
CRYPTOCard, CRYPTO-Server, CRYPTO-Web, CRYPTO-Kit, CRYPTO-Logon, CRYPTO-VPN, CRYPTO-MAS are either registered trademarks or trademarks of CRYPTOCard Corp.
Microsoft Windows and Windows XP/2000/2003/NT are registered trademarks of Microsoft Corporation. All other trademarks, trade names, service marks, service names, product names, and images mentioned and/or used herein belong to their respective owners.
10. Publication History Date Changes October 12, 2006 Initial Draft March 21, 2007 Additional sections and screen shots