ct-cs centec frameless sliding door installation guidecentec frameless sliding door installation...
TRANSCRIPT

CT-CS Centec Frameless sliding Door Installation Guide

Door trackWall jambsTrack guideRubber bumpersGlass door HeaderPlastic wall anchors
Part Name Qty1
765432
#
61
61
12
2
9 Tower bar kit 28 1-1/4” wall mount screws 6
2
7
7
5
5
48
2
1
6
3
9
Detailed diagram of CT-CS components

WARNINGS**Before starting, please read instructions carefully and thoroughly; then proceed step by step.**Please wear safety glasses and safety gloves whenever drilling or cutting tile or handling metal/glass parts.**When drilling through tile, carefully break through glazed surface only with sharp tool and then drill slowly.**Wall uprights must be installed level and plumb. Do not follow grout lines.**To insure complete customer satisfaction Century Bathworks recommends installation by a professional.**Risk of injury or product damage. Two people should perform this installation.**Do not cut the top and bottom track the same length for this installation.**Please carefully unpack all parts for your unit as listed on previous page and also check that you have all the tools as listed above.**If any parts are missing or damaged,please contact Century Bathworks or your dealer for replacements.
Safety glasses
Caulking gunPencil/MarkerFlat head and Phillips head Screwdriver
Drill
Level Hacksaw
Tools required
Tape Measure Drill bits (2) (#32 metal bit,3/16” carbide masonry bit)
Masking tape
Rubber mallet
1 2
3 4
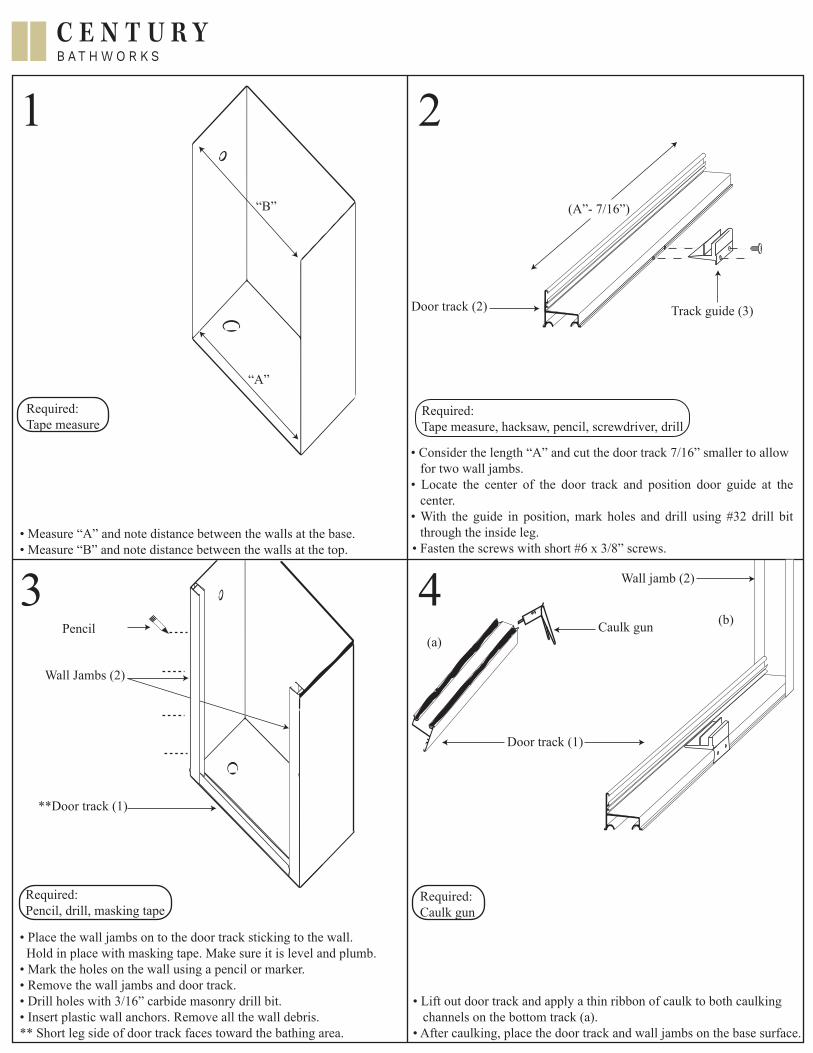
“A”
“B”
• Measure “A” and note distance between the walls at the base. • Measure “B” and note distance between the walls at the top.
Required:Tape measure
Required:Pencil, drill, masking tape
Required:Caulk gun
• Consider the length “A” and cut the door track 7/16” smaller to allowfor two wall jambs.
• Locate the center of the door track and position door guide at the center.
• With the guide in position, mark holes and drill using #32 drill bit through the inside leg.
• Fasten the screws with short #6 x 3/8” screws.
(A”- 7/16”)
Pencil
Wall Jambs (2)
**Door track (1)
• Place the wall jambs on to the door track sticking to the wall. Hold in place with masking tape. Make sure it is level and plumb.• Mark the holes on the wall using a pencil or marker.• Remove the wall jambs and door track.• Drill holes with 3/16” carbide masonry drill bit.• Insert plastic wall anchors. Remove all the wall debris.** Short leg side of door track faces toward the bathing area.
• Lift out door track and apply a thin ribbon of caulk to both caulking channels on the bottom track (a).• After caulking, place the door track and wall jambs on the base surface.
Required:Tape measure, hacksaw, pencil, screwdriver, drill
(a)
(b)Caulk gun
Door track (1)
Wall jamb (2)
Track guide (3)Door track (2)

5 6
7
Required:Caulk gun, screwdriver
Required:Hacksaw,tape measure
• Insert plastic wall anchors in the drilled wall holes. Place the wall jambs sticking to the wall.
• Fix bumpers in position with 1-1/4” screws for wall jambs. Do not over tighten.
• Caulk the inside corner where the wall jamb caps over the bottom track.
• Consider the length “B” from step 1 and cut the header 1/16“ shorter than the measurement (B” - 1/16“).
• Place the header on top of the unit as shown.
** Always lift the glass door by the side**• Label doors (H1) outside door (rollers facing outside of the unit) and (H2) inside door (rollers facing inside of the unit). Smooth side of glass is always facing inside the unit.Install the inside door first and insert the roller into the header section. • Rest rollers on the groove of the header and place the bottom of the door into the track guide.Repeat the procedure for the outside of the door. ** Be extremely careful not to hit the edge of the glass when installing.
Wall jambs (2)
Header (6)
Glass door (5)
Header (6)
Plastic wall anchors (7)
Rubber bumpers (4)
Door track (1)
1-1/4” wall mount screws (10)
Wall jambs (2)
Rollers
(H1)
(H2)
Glass door (5)

98
10
Required:Caulk gun
• On completion of assembly and installation, caulk entire inside of the unit where it meets the wall and the base and the outside of door track where it meets the walls and base to prevent water leakage.
• Wait for 24 hours before using, for silicone to dry.
Required:Screwdriver
• After the door installation is complete, turn the screw clockwise until door does not slide.
• Then, back off screw (turn counter-clockwise) two turns. Make sure the door slides freely.
• Try and lift door track. If safety screw is installed correctly, door will not come off the track.
Header (6)
Glass door (5)
Safety screw
Roller
Required:Screwdriver
• Screw the towel bar with the exact series arrangement as shown above.
Handle screwFlat
washer Flat washer Spacer