ct-lmh.019 pressing techniques
TRANSCRIPT
Educational programs of the Kentucky Cooperative Extension Service serve all people regardless of race, color, age, sex, religion, disability, or national origin.
CT-LMH.019
Pressing TechniquesPressing Techniques
for home sewingfor home sewing Pressing is an essential part of any home sewing project. Good pressing techniques help to create a professional-looking garment. Correct pressing helps to shape the fabric to your figure, flatten seams and edges, and save you time.
GENERAL TECHNIQUES
To gain skill in pressing, you need both the right equipment and the “know-how.” No amount of careful cutting, fitting and construction can make up for too much, too little or incorrect pressing. Practice the eight procedures listed here and you will soon become an expert. 1. Before pressing the garment you are
making, always test-press a scrap of the fabric first. Set the heat indicator for the type of fiber. For a blend, set the indicator for the fiber requiring the lower temperature. For example, a polyester-wool blend usually should be pressed at the temperature polyester requires. Test the fabric for the amount of moisture, if any, needed to shape it. Also check to see which type of press cloth gives the best results.
2. Thorough pressing during each construction step contributes to a precision look. It makes following each construction step easier, thus saving you time. Very little final pressing is necessary for a garment that has been properly pressed while being made.
3. True pressing calls for a lowering and lifting (up and down) motion. This flattens the seam or molds the detail without stretching the seam or distorting the grain. Never push or drag the iron over the fabric.
4. All pressing should be done with the
grain, just as in stitching. Press seams from the wide to the narrow part of the garment--from the hem to the waist of the skirt, from the neck to the sleeves at the shoulder, toward the point of a dart, etc.
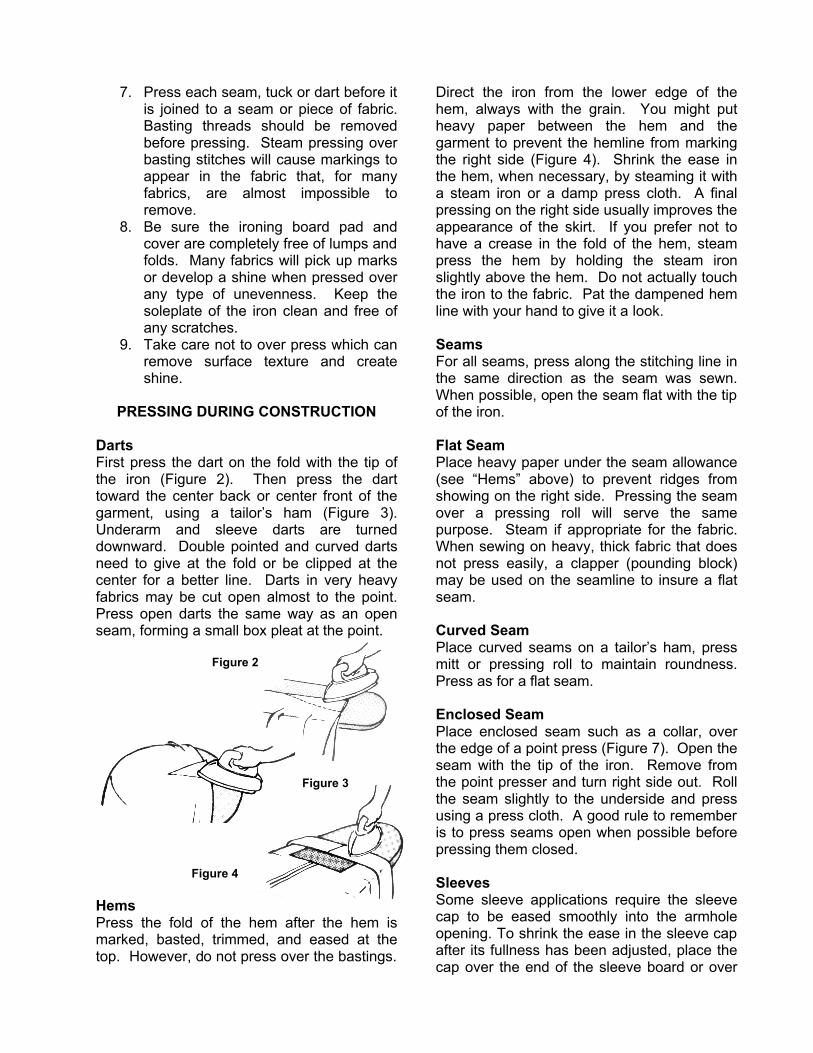
5. Press curved seams and shaped areas over a pressing ham, roll or cushion (Figure1). This helps mold the garment to the figure. It also helps the garment hold its shape.
6. Generally speaking, most pressing is done on the wrong side of the garment when possible. If moisture is needed, use a steam iron or a damp cloth. For best results, dampen the cloth with a sponge. When pressing on the right side of the garment, protect the fabric with a cloth.
Figure 1 – Two types of cushions used to press shaped areas such as darts, collars, sleeves, and curved seam
7. Press each seam, tuck or dart before it is joined to a seam or piece of fabric. Basting threads should be removed before pressing. Steam pressing over basting stitches will cause markings to appear in the fabric that, for many fabrics, are almost impossible to remove.
8. Be sure the ironing board pad and cover are completely free of lumps and folds. Many fabrics will pick up marks or develop a shine when pressed over any type of unevenness. Keep the soleplate of the iron clean and free of any scratches.
9. Take care not to over press which can remove surface texture and create shine.
PRESSING DURING CONSTRUCTION
Darts First press the dart on the fold with the tip of the iron (Figure 2). Then press the dart toward the center back or center front of the garment, using a tailor’s ham (Figure 3). Underarm and sleeve darts are turned downward. Double pointed and curved darts need to give at the fold or be clipped at the center for a better line. Darts in very heavy fabrics may be cut open almost to the point. Press open darts the same way as an open seam, forming a small box pleat at the point. Figure 2 Figure 3 Figure 4 Hems Press the fold of the hem after the hem is marked, basted, trimmed, and eased at the top. However, do not press over the bastings.
Direct the iron from the lower edge of the hem, always with the grain. You might put heavy paper between the hem and the garment to prevent the hemline from marking the right side (Figure 4). Shrink the ease in the hem, when necessary, by steaming it with a steam iron or a damp press cloth. A final pressing on the right side usually improves the appearance of the skirt. If you prefer not to have a crease in the fold of the hem, steam press the hem by holding the steam iron slightly above the hem. Do not actually touch the iron to the fabric. Pat the dampened hem line with your hand to give it a look. Seams For all seams, press along the stitching line in the same direction as the seam was sewn. When possible, open the seam flat with the tip of the iron. Flat Seam Place heavy paper under the seam allowance (see “Hems” above) to prevent ridges from showing on the right side. Pressing the seam over a pressing roll will serve the same purpose. Steam if appropriate for the fabric. When sewing on heavy, thick fabric that does not press easily, a clapper (pounding block) may be used on the seamline to insure a flat seam. Curved Seam Place curved seams on a tailor’s ham, press mitt or pressing roll to maintain roundness. Press as for a flat seam. Enclosed Seam Place enclosed seam such as a collar, over the edge of a point press (Figure 7). Open the seam with the tip of the iron. Remove from the point presser and turn right side out. Roll the seam slightly to the underside and press using a press cloth. A good rule to remember is to press seams open when possible before pressing them closed. Sleeves Some sleeve applications require the sleeve cap to be eased smoothly into the armhole opening. To shrink the ease in the sleeve cap after its fullness has been adjusted, place the cap over the end of the sleeve board or over
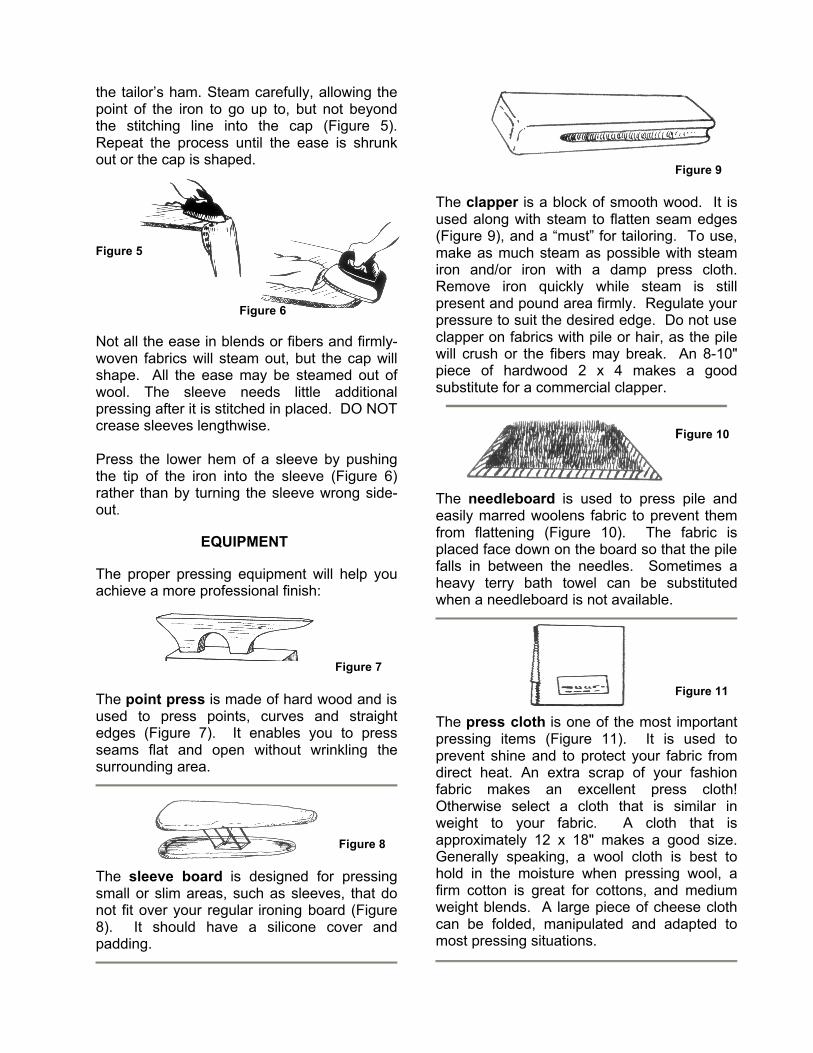
the tailor’s ham. Steam carefully, allowing the point of the iron to go up to, but not beyond the stitching line into the cap (Figure 5). Repeat the process until the ease is shrunk out or the cap is shaped. Figure 5 Figure 6 Not all the ease in blends or fibers and firmly-woven fabrics will steam out, but the cap will shape. All the ease may be steamed out of wool. The sleeve needs little additional pressing after it is stitched in placed. DO NOT crease sleeves lengthwise. Press the lower hem of a sleeve by pushing the tip of the iron into the sleeve (Figure 6) rather than by turning the sleeve wrong side-out. EQUIPMENT The proper pressing equipment will help you achieve a more professional finish: Figure 7 The point press is made of hard wood and is used to press points, curves and straight edges (Figure 7). It enables you to press seams flat and open without wrinkling the surrounding area.
Figure 8 The sleeve board is designed for pressing small or slim areas, such as sleeves, that do not fit over your regular ironing board (Figure 8). It should have a silicone cover and padding.
Figure 9 The clapper is a block of smooth wood. It is used along with steam to flatten seam edges (Figure 9), and a “must” for tailoring. To use, make as much steam as possible with steam iron and/or iron with a damp press cloth. Remove iron quickly while steam is still present and pound area firmly. Regulate your pressure to suit the desired edge. Do not use clapper on fabrics with pile or hair, as the pile will crush or the fibers may break. An 8-10" piece of hardwood 2 x 4 makes a good substitute for a commercial clapper.
Figure 10 The needleboard is used to press pile and easily marred woolens fabric to prevent them from flattening (Figure 10). The fabric is placed face down on the board so that the pile falls in between the needles. Sometimes a heavy terry bath towel can be substituted when a needleboard is not available.
Figure 11 The press cloth is one of the most important pressing items (Figure 11). It is used to prevent shine and to protect your fabric from direct heat. An extra scrap of your fashion fabric makes an excellent press cloth! Otherwise select a cloth that is similar in weight to your fabric. A cloth that is approximately 12 x 18" makes a good size. Generally speaking, a wool cloth is best to hold in the moisture when pressing wool, a firm cotton is great for cottons, and medium weight blends. A large piece of cheese cloth can be folded, manipulated and adapted to most pressing situations.
PRESSING METHODS for DIFFERENT FIBER CONTENTS For best results, adapt the amount of heat, moisture, and pressure you use to the fiber content of the fabric. If you don’t know the fiber content, test the fabric cautiously and begin with a low temperature. Linen requires high temperature and much moisture. Press on the wrong side to prevent shine, or use a cloth for right-side pressing. Press until the fabric is completely dry. Cotton requires a fairly high temperature and some moisture. Easy-care finishes require less heat and moisture. Heavy or very firmly-woven cottons may need more moisture than a steam iron supplies. Press cottons on the right side for a smooth or shiny finish; on the wrong side for a dull finish. Press fabric until completely dry. Wool requires a moderate temperature and always needs some moisture. Do NOT press completely dry. For right-side pressing, protect the fabric with a wool press cloth. Avoid heavy pressure on most woolens. Silk requires moderate temperature and little, if any, moisture. Press on the wrong side. Prevent water spotting by using a dry cloth next to the fabric and a damp cloth on top, or use a steam iron and a dry cloth. Rayon takes a moderate temperature. Test for the amount of moisture to use. Press on the wrong side, or use a press cloth for right-side pressing to prevent a shine. Lyocell (Tencel™) can be pressed on a rayon setting—moderate temperature. Depending on the texture of the fabric, it may be acceptable to press on the right side. If in doubt, press on the right side using a press cloth. Acetate requires a low temperature and little moisture. It will melt or glaze under a hot iron. Press the fabric on the wrong side or use a cloth for any necessary right-side pressing to prevent a shine. Never press completely dry.
Nylon and acrylic require low temperatures and little pressure. Protect the fabric with a press cloth. A steam iron can be used for most of these fabrics. Follow the pressing directions given on the label or the tag. Polyester requires from low to medium temperature and slight pressure. It is best to press from the wrong side; protect the right side with a press cloth to prevent shining. Steam can be used on most fabrics. Follow the manufacturer’s recommendation. Modacrylic requires a VERY LOW temperature. Press only if necessary. Protect the fabric with a dry press cloth. Do not use a steam iron--moisture lowers the melting point of modacrylic. Other manufactured fiber fabrics should have the same general precautions taken as recommended for those above–low heat and the protection of a press cloth are safeguards against heat damage. The important point to keep in mind is that these fibers are heat sensitive–some to a high degree, some less so. Any damage done to such fabrics caused by heat cannot be undone. Always follow the directions on the label or hangtag. Blends should usually be pressed at the lowest temperature required by any one of the fibers in the blend. Some blends are difficult to press well when the fibers in the blend call for widely-differing temperatures. To simplify information in this publication, trade names of some products are used. No endorsement is intended nor criticism implied of similar products not named. *Prepared by Rachel Wallace, former staff member. Revised by Bette Jo Dedic, retired Extension Clothing Specialist, and Marsha Herndon, former Extension Clothing Specialist. Revised by Linda Heaton, Ph.D. Extension Professor for Textiles & Clothing 6/96, 1/02
Pressing.doc