cti manual - voice communications inc. cti manual part 2.pdf · 1-2 section 1: introduction aspire...
TRANSCRIPT
CTI Manual991083-51.1
1. Introduction
3. Configuring Telephony NT Server
4. Configuring Telephony 2000 Server
2. Aspire TSP Install
5. Configuring Telephony Server 2003
6. TAPI Clients
7. Troubleshooting

This manual has been developed by NEC Infrontia LTD It is intended for the use of its customers and servicepersonnel, and should be read in its entirety before attempting to install or program the system. Any comments orsuggestions for improving this manual would be appreciated. Forward your remarks to:
NEC Infrontia LTD75 Swingbridge Road, Loughborough Leicestershire.
www.necinfrontia.co.uk
Nothing contained in this manual shall be deemed to be, and this manual does not constitute, a warranty of, orrepresentation with respect to, any of the equipment covered. This manual is subject to change without notice andNEC Infrontia has no obligation to provide any updates or corrections to this manual. Further, NEC Infrontia alsoreserves the right, without prior notice, to make changes in equipment design or components as it deemsappropriate. No representation is made that this manual is complete or accurate in all respects and NEC Infrontiashall not be liable for any errors or omissions. In no event shall NEC Infrontia be liable for any incidental orconsequential damages in connection with the use of this manual. This document contains proprietary informationthat is protected by copyright. All rights are reserved. No part of this document may be photocopied or reproducedwithout prior written consent of NEC Infrontia
©2003 by NEC Infrontia LTD

Document History
Revision 1.0 October 2003First Release
Revision 1.1 October 2004Minor RevisionsWindows 98/ME Clients removedTroubleshooting section added
Aspire CTI Manual - 3
Aspire Documents Available.All documents are available on the Aspire Technical CD (991098-5) and the Aspire ftp site (http://workgroup.xdrive.com).
Code Title991020-5 System Telephone Quick Reference Guide
991021-5 Basic Telephone Quick Reference Guide
991022-5 Single Line Telephone Quick Reference Guide
991023-5 Aspire Hardware Manual
991024-5 Aspire Features Manual
991025-5 Message Manager Installer Manual
991026-5 Aspire Message Manager User Guide
991078-5 DXE to Aspire Conversion List
991079-5 Message Manager System Manager Guide
991080-5 Aspire IP Manual
991081-5 Aspire DECT Manual
991082-5 AspireNet Manual
991083-5 Aspire CTI Manual
991084-5 Aspire MyPhone Manual
991092-5 PCPro/WebPro Installation Manual
991093-5 Aspire Upgrade Procedure
991104-5 Aspire MySystem Manual
991177-5 Aspire Feature Handbook
991198-5 ACD Manual
Aspire CTI Manual - 4

CTI Manual
Installing the DECT EquipmentSection 1: Installing the DECT Equipment
Section 1:
Introduction
Aspire CTI Manual Section 1: Introduction 1-1

Section 1: Introduction
General Description
The NEC Infrontia Aspire has capability to use Computer Telephony Integration (CTI). It uses the Telephony Application Programming Interface (TAPI) 2.1 protocol. To allow CTI an Ethernet inter-face is present on the NTCPU.
TAPI 2.1 based CTI realises third party call control features such as ACD, Predictive Dialing, and Call Routing.
1-2 Section 1: Introduction Aspire CTI Manual
Section 1: Introduction
1Requirements
Following are the minimum specifications required to use CTI (TAPI2.1) interface feature.
Telephone System
IP1E-NTCPU
CTI Server
Note: The above are the specification for TAPI set-up only. They may differ when you install an appli-cation.
A dedicated PC Server is recommened for Aspire CTI Server.
The setup requires you to be logged onto the PC Server as a Local Administrator.
The server should be connected to the network via the TCP/IP Protocol (Including WINS, DNS ser-vices), and should include the appropriate number of Client Access Licenses.
An IT Administrator is normally required during the installation.
The backup procedure and virus defence is the responsibility of the customer.
CTI Client PC (Optional)
The setup requires you to be logged onto the PC Server as a Local Administrator.
The server should be connected to the network via the TCP/IP Protocol (Including WINS, DNS ser-vices), and should include the appropriate number of Client Access Licenses.
An IT Administrator is normally required during the installation.
Operating System Windows NT Server (Min SP6a)Windows 2000 Server (Min SP3) Microsoft
Windows Server 2003
CPU Pentium 500MHz or higher recommended
Memory 256MB or more
Drives Free Space 10GB or over
CD-Rom Drive
Operating System Windows MEWindows 2000 Professional (Min SP3) Windows XP Professional (Min SP1)
CPU Pentium 500MHz or higher recommended
Memory 256MB or more
Aspire CTI Manual Section 1: Introduction 1-3

Section 1: Introduction
Requirements
The Ethernet interface is located on the NTCPU. This is a 10/100MB RJ45 Ethernet connection.
The following basic commands must be set.
10-12 : NTCPU Network Settings
Assign a TCP/IP Address, Subnet Mask and Default Gateway to the NTCPU.
10-20 : External Equipment LAN Settings
Assign the TCP port and Keep alive timer.
10-12-01IP Address
Aspire IP Address = 0-255.0-255.0-255.0-255
10-12-02Subnet Mask
Aspire Subnet Mask = 0-255.0-255.0-255.0-255
10-12-03Default Gateway
Aspire Default Gateway = 0-255.0-255.0-255.0-255
TCP Port No 0-65535 (8181 Recommended)
Keep Alive Timer 0-255 seconds (Default 30 Seconds)
C T I I / F
1-4 Section 1: Introduction Aspire CTI Manual

Aspire TSP Install
Installing the DECT EquipmentSection 1: Installing the DECT Equipment
Section 2:
Aspire TSPInstall
Aspire CTI Manual Section 2: Aspire TSP Install 2-1

Section 2: Aspire TSP Install
Installation Procedure1) Double click on the Setup.exe file. Click NEXT when you see the following Welcome Screen.
2) At the Aspire Telephony Service Provider Setup screen select Server and click Next
3) Choose Destination Location screen appears allowing you to choose the destination folder where you install the TAPI driver. Click Next to accept the default target folder. If necessary, click Browse to choose a different drive or folder.
2-2 Section 2: Aspire TSP Install Aspire CTI Manual
Section 2: Aspire TSP Install
24) The Setup Address screen appears. Enter the IP address of the computer, the IP address for NTCPU in the Aspire system, and the TCP port No. Use dot “.” between numbers. The PBX IP and TCP Port numbers must match the entry within the Aspire programming (Commands 10-12 and 10-20). (e.g. TAPI: 192.168.1.76, PBX IP: 192.168.1.75, TCP Port: 8181) When you enter the informa-tion, click Next.
Note: This address should be given to you by the network administrator.
5) A setup of communication timeout value. The time the TSP will wait for a response from the Aspire before deciding it will not respond. This value should be left at the default value (10 Seconds).
6) The register for Service setup screen appears. Select Register and click Next to begin the installa-tion.
Aspire CTI Manual Section 2: Aspire TSP Install 2-3
Section 2: Aspire TSP Install
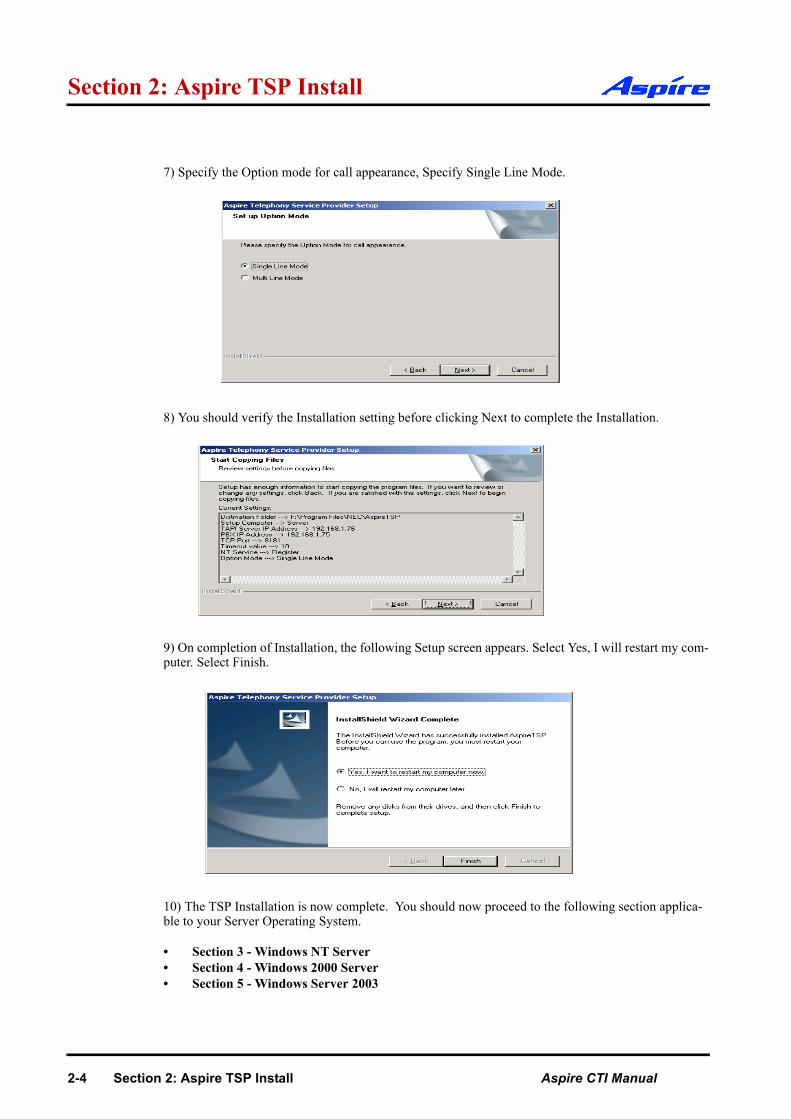
7) Specify the Option mode for call appearance, Specify Single Line Mode.
8) You should verify the Installation setting before clicking Next to complete the Installation.
9) On completion of Installation, the following Setup screen appears. Select Yes, I will restart my com-puter. Select Finish.
10) The TSP Installation is now complete. You should now proceed to the following section applica-ble to your Server Operating System.
• Section 3 - Windows NT Server• Section 4 - Windows 2000 Server• Section 5 - Windows Server 2003
2-4 Section 2: Aspire TSP Install Aspire CTI Manual

Section 2: Aspire TSP Install
2
Aspire CTI Manual Section 2: Aspire TSP Install 2-5
Section 2: Aspire TSP Install
2-6 Section 2: Aspire TSP Install Aspire CTI Manual

Configuring Telephony - NT Server
Installing the DECT EquipmentSection 1: Installing the DECT Equipment
Section 3:
Configuring Telephony Windows NT Server
Aspire CTI Manual Section 3: Configuring Telephony - NT Server 3-1

Section 3: Configuring Telephony - NT Server
General DescriptionThe following section assumes you have installed the Aspire TSP. This section contains further infor-mation on configuring TAPI2.1 on Windows NT Server.
The following information is provided:
• Aspire TSP Configuration• Enabling TAPI Server• TAPI Server User Administration
3-2 Section 3: Configuring Telephony - NT Server Aspire CTI Manual

Section 3: Configuring Telephony - NT Server
3Configuration
1) To verify that the Aspire TSP installed correctly and is using the proper settings double-click the Telephony icon from within the Control Panel (Start/Settings/Control Panel).
2) Click on the Telephony Drivers tab to see that the Aspire TSP is installed.
3) Click on the Aspire TSP and select the Configure button to see the configuration of the Aspire TSP. On the Configuration tab, you can see the Server/PBX IP addresses, TCP Port No and Display Call Status Dialog option set during installation. If necessary, change data.
4) Click on the Device tab to confirm the system extension ports’ status. You can not change any data on this screen.
Aspire CTI Manual Section 3: Configuring Telephony - NT Server 3-3

Section 3: Configuring Telephony - NT Server
5) By selecting a Device and clicking Detail the Call Mode can be set.Auto Speaker Mode (Default)
If selected Answer call requests to the selected device via TAPI will be answered using the Speaker
Auto Headset Mode
If selected Answer call requests to the selected device via TAPI will be answered using a Headset (If connected)
Note: To allow configuration of Call mode the device should be not be in use by any TAPI application (i.e Arc ScreenPop)
6) To exit,click CANCEL then click OK until you have exited to the Control Panel. Double-click in the upper left hand corner of the Control Panel to close the window.
3-4 Section 3: Configuring Telephony - NT Server Aspire CTI Manual
Section 3: Configuring Telephony - NT Server
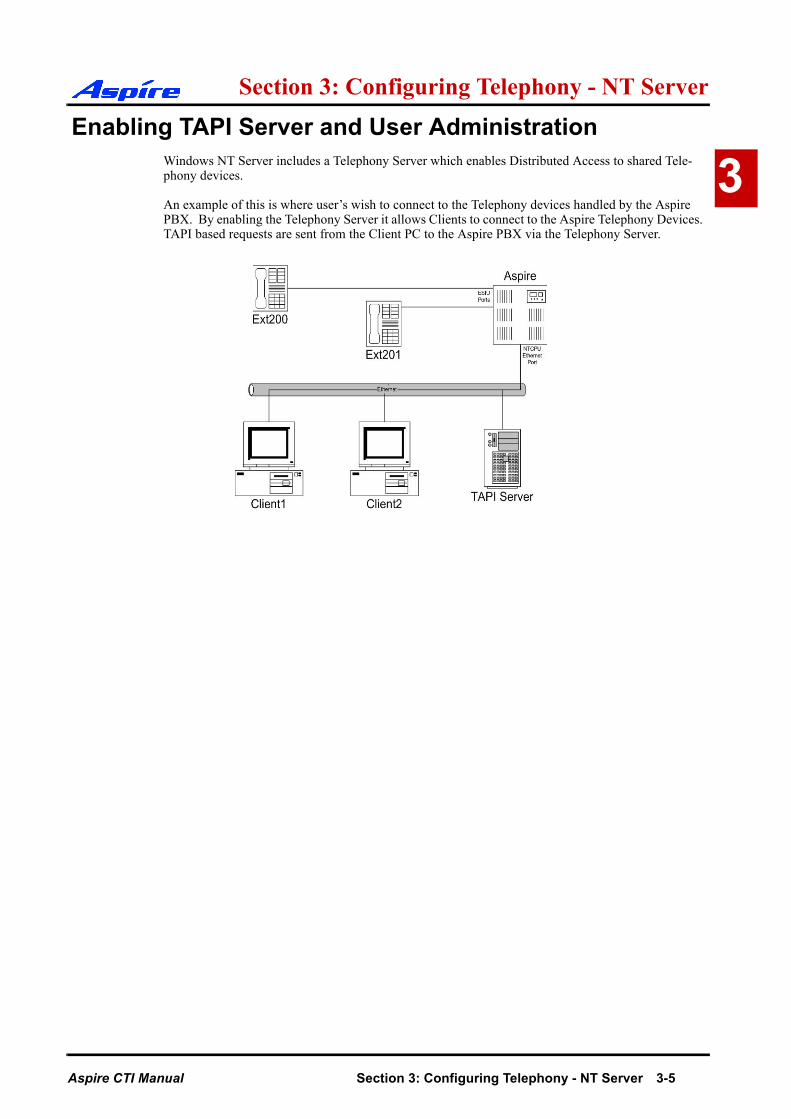
3Enabling TAPI Server and User Administration
Windows NT Server includes a Telephony Server which enables Distributed Access to shared Tele-phony devices.
An example of this is where user’s wish to connect to the Telephony devices handled by the Aspire PBX. By enabling the Telephony Server it allows Clients to connect to the Aspire Telephony Devices. TAPI based requests are sent from the Client PC to the Aspire PBX via the Telephony Server.
Aspire CTI Manual Section 3: Configuring Telephony - NT Server 3-5
Section 3: Configuring Telephony - NT Server
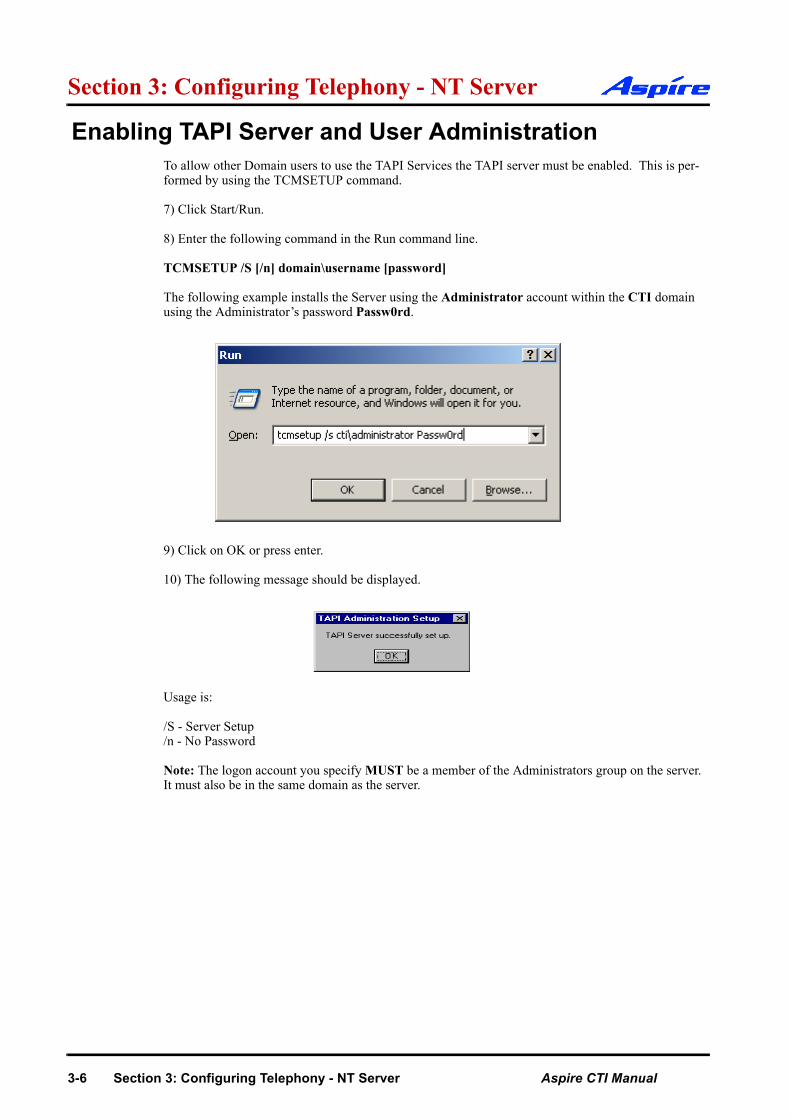
Enabling TAPI Server and User AdministrationTo allow other Domain users to use the TAPI Services the TAPI server must be enabled. This is per-formed by using the TCMSETUP command.
7) Click Start/Run.
8) Enter the following command in the Run command line.
TCMSETUP /S [/n] domain\username [password]
The following example installs the Server using the Administrator account within the CTI domain using the Administrator’s password Passw0rd.
9) Click on OK or press enter.
10) The following message should be displayed.
Usage is:
/S - Server Setup/n - No Password
Note: The logon account you specify MUST be a member of the Administrators group on the server. It must also be in the same domain as the server.
3-6 Section 3: Configuring Telephony - NT Server Aspire CTI Manual
Section 3: Configuring Telephony - NT Server
3By default Client computer’s will not be able to access any extensions. By enabling the TAPI Server you are able to permit Domain user’s to access their Telephone extension(s). Extensions available to the TAPI Server are authenticated using Windows NT access permissions.
Client computer’s will be allocated Telephone extension’s based on their Domain Logon account. The only exception to this is where by a Client Computer is logged on using a Domain Administrator account, which has permissions to access all Telephone extension(s).
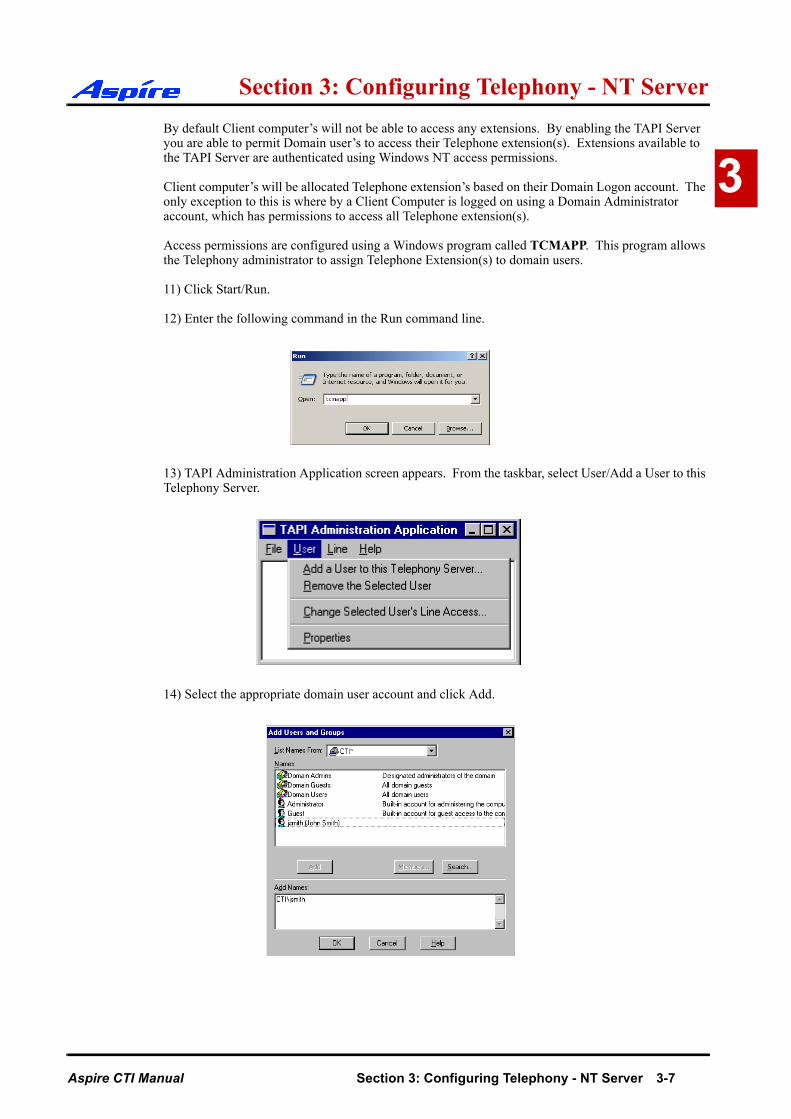
Access permissions are configured using a Windows program called TCMAPP. This program allows the Telephony administrator to assign Telephone Extension(s) to domain users.
11) Click Start/Run.
12) Enter the following command in the Run command line.
13) TAPI Administration Application screen appears. From the taskbar, select User/Add a User to this Telephony Server.
14) Select the appropriate domain user account and click Add.
Aspire CTI Manual Section 3: Configuring Telephony - NT Server 3-7

Section 3: Configuring Telephony - NT Server
15) Click OK. The Administration Application will then display the selected user(s).16) You should now assign the user with Telephone Extension(s), as required. Select User/Change Selected User’s Line Access. Select the appropriate Telephone Extension(s) which the user should have access to and click OK.
17) The Administration application will then update the User account with devices which he/she has access to.
18) Repeat this process to add/change domain User(s) access permissions.
19) On completion, select File/Exit. When the following message appears, click Yes and save changes.
3-8 Section 3: Configuring Telephony - NT Server Aspire CTI Manual
Section 3: Configuring Telephony - NT Server
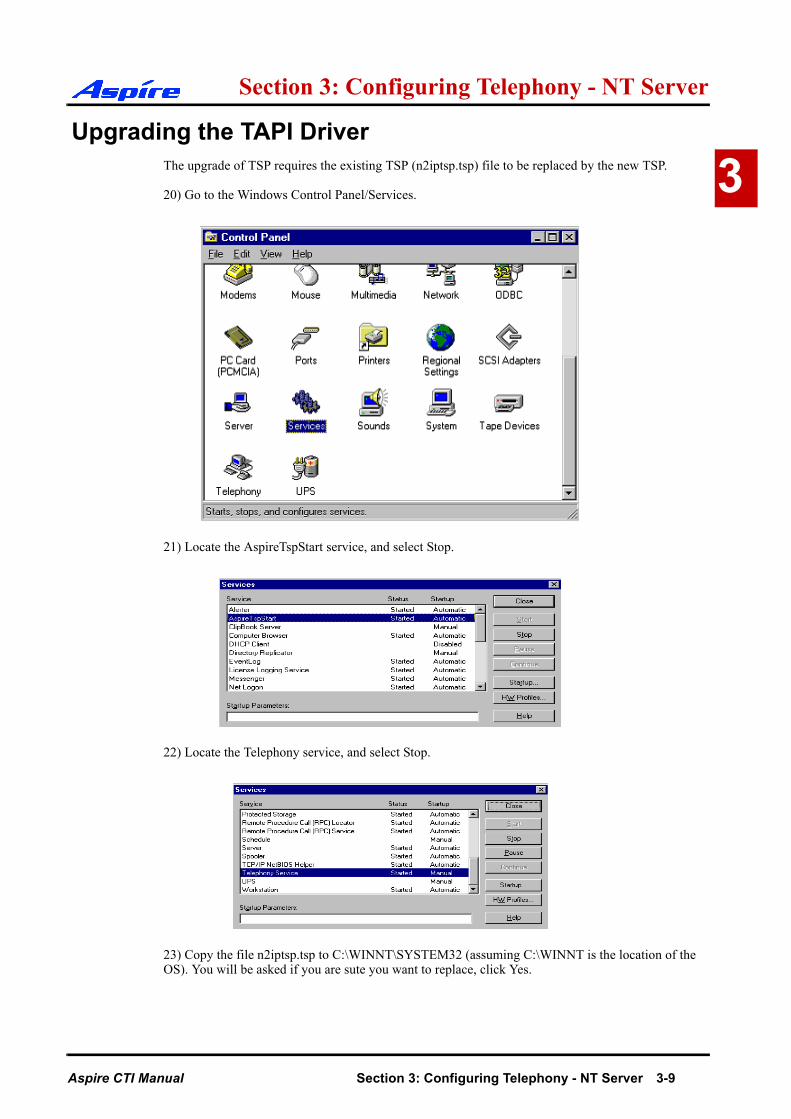
3Upgrading the TAPI Driver
The upgrade of TSP requires the existing TSP (n2iptsp.tsp) file to be replaced by the new TSP.
20) Go to the Windows Control Panel/Services.
21) Locate the AspireTspStart service, and select Stop.
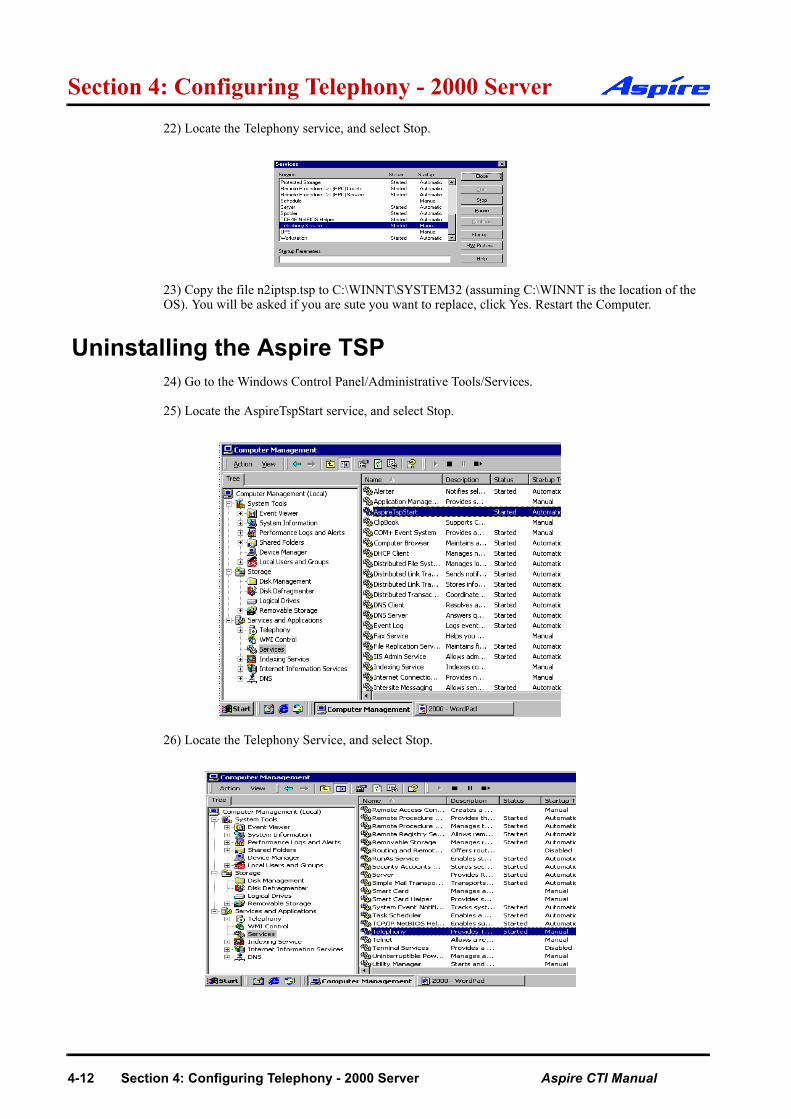
22) Locate the Telephony service, and select Stop.
23) Copy the file n2iptsp.tsp to C:\WINNT\SYSTEM32 (assuming C:\WINNT is the location of the OS). You will be asked if you are sute you want to replace, click Yes.
Aspire CTI Manual Section 3: Configuring Telephony - NT Server 3-9
Section 3: Configuring Telephony - NT Server
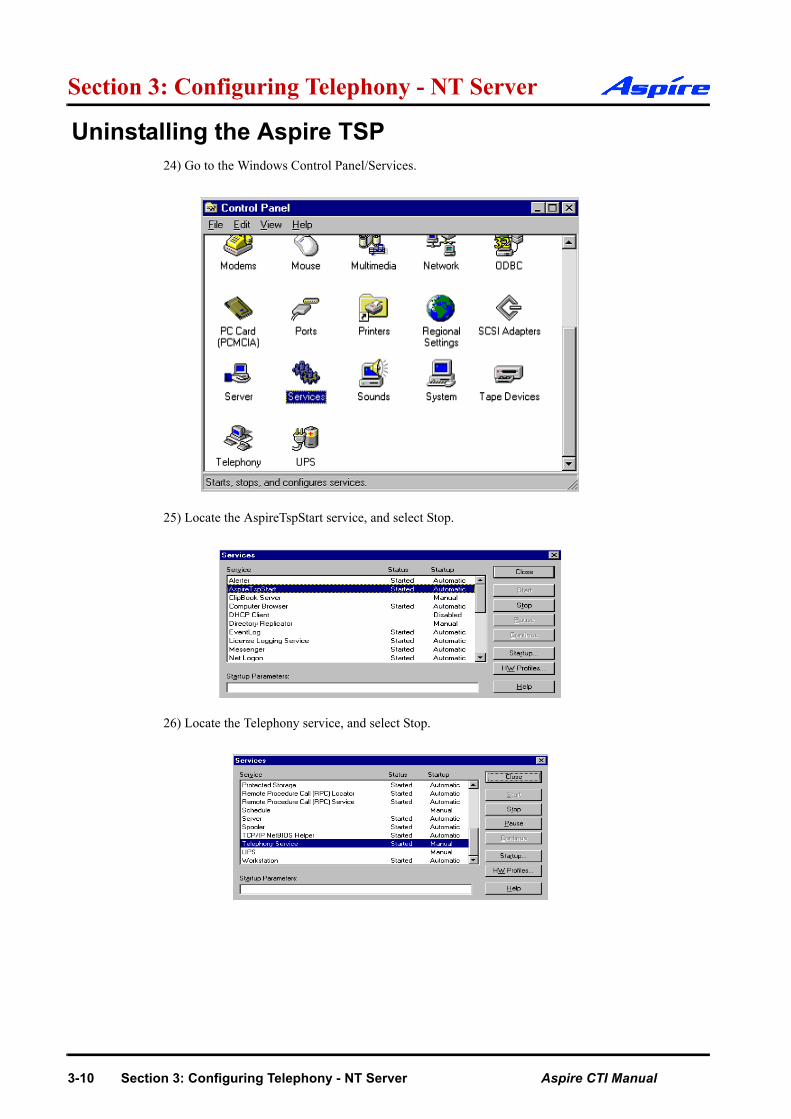
Uninstalling the Aspire TSP24) Go to the Windows Control Panel/Services.
25) Locate the AspireTspStart service, and select Stop.
26) Locate the Telephony service, and select Stop.
3-10 Section 3: Configuring Telephony - NT Server Aspire CTI Manual
Section 3: Configuring Telephony - NT Server
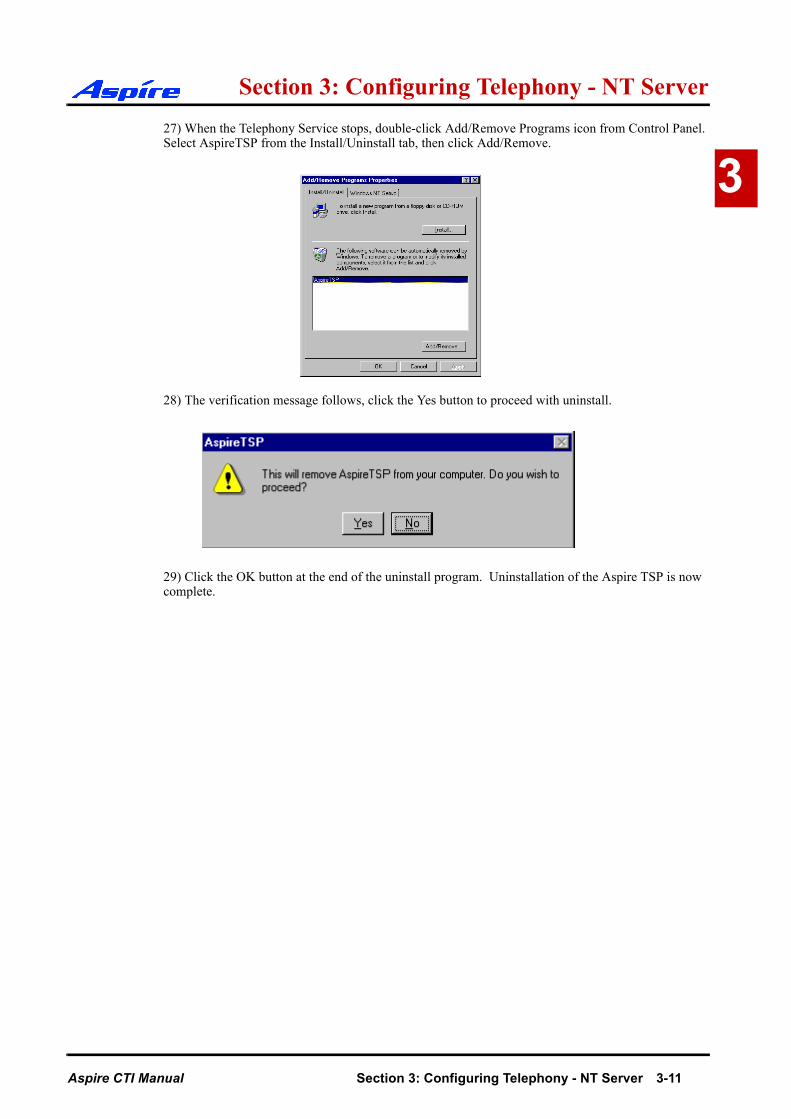
327) When the Telephony Service stops, double-click Add/Remove Programs icon from Control Panel. Select AspireTSP from the Install/Uninstall tab, then click Add/Remove.
28) The verification message follows, click the Yes button to proceed with uninstall.
29) Click the OK button at the end of the uninstall program. Uninstallation of the Aspire TSP is now complete.
Aspire CTI Manual Section 3: Configuring Telephony - NT Server 3-11
Section 3: Configuring Telephony - NT Server
3-12 Section 3: Configuring Telephony - NT Server Aspire CTI Manual
Configuring Telephony - 2000 Server
Installing the DECT EquipmentSection 1: Installing the DECT Equipment
Section 4:
Configuring Telephony Windows 2000 Server
Aspire CTI Manual Section 3: Configuring Telephony - 2000 Server 4-1

Section 4: Configuring Telephony - 2000 Server
General DescriptionThe following section assumes you have installed the Aspire TSP. This section contains further infor-mation on configuring TAPI2.1 on Windows 2000 Server.
The following information is provided:
• Aspire TSP Configuration• Enabling TAPI Server• TAPI Server User Administration
4-2 Section 4: Configuring Telephony - 2000 Server Aspire CTI Manual
Section 3: Configuring Telephony - 2000 Server
4Configuration
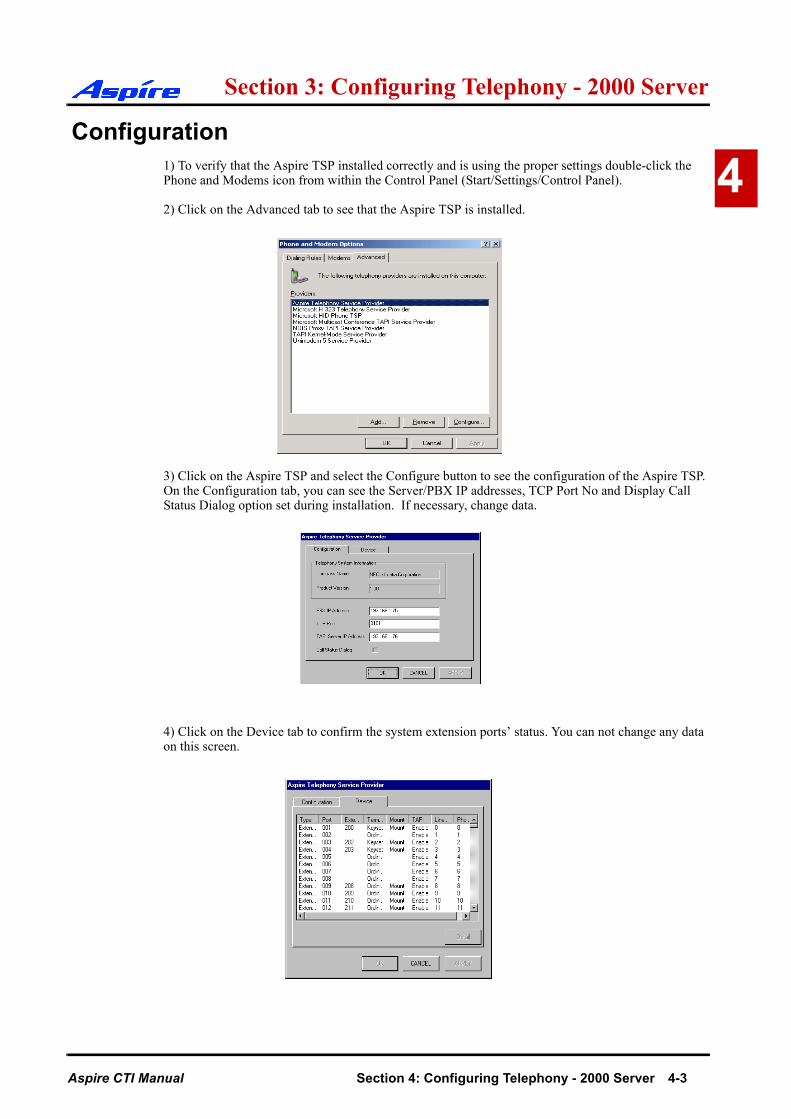
1) To verify that the Aspire TSP installed correctly and is using the proper settings double-click the Phone and Modems icon from within the Control Panel (Start/Settings/Control Panel).
2) Click on the Advanced tab to see that the Aspire TSP is installed.
3) Click on the Aspire TSP and select the Configure button to see the configuration of the Aspire TSP. On the Configuration tab, you can see the Server/PBX IP addresses, TCP Port No and Display Call Status Dialog option set during installation. If necessary, change data.
4) Click on the Device tab to confirm the system extension ports’ status. You can not change any data on this screen.
Aspire CTI Manual Section 4: Configuring Telephony - 2000 Server 4-3
Section 4: Configuring Telephony - 2000 Server
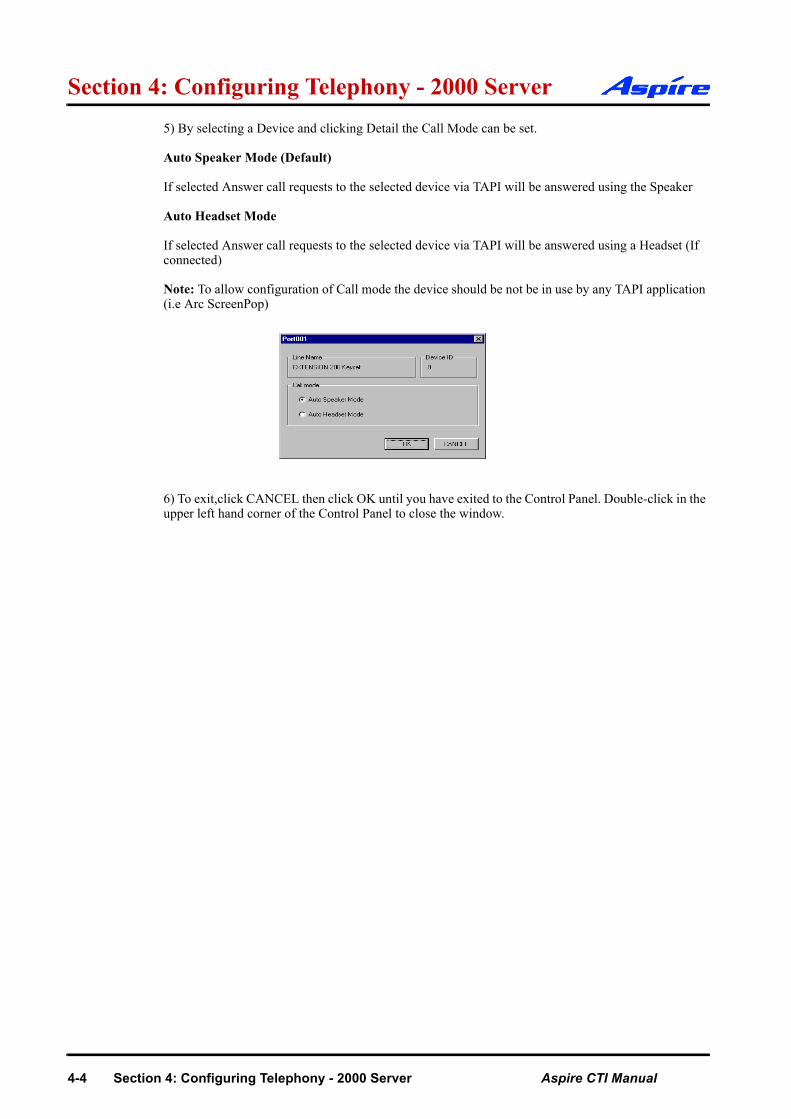
5) By selecting a Device and clicking Detail the Call Mode can be set.Auto Speaker Mode (Default)
If selected Answer call requests to the selected device via TAPI will be answered using the Speaker
Auto Headset Mode
If selected Answer call requests to the selected device via TAPI will be answered using a Headset (If connected)
Note: To allow configuration of Call mode the device should be not be in use by any TAPI application (i.e Arc ScreenPop)
6) To exit,click CANCEL then click OK until you have exited to the Control Panel. Double-click in the upper left hand corner of the Control Panel to close the window.
4-4 Section 4: Configuring Telephony - 2000 Server Aspire CTI Manual
Section 3: Configuring Telephony - 2000 Server
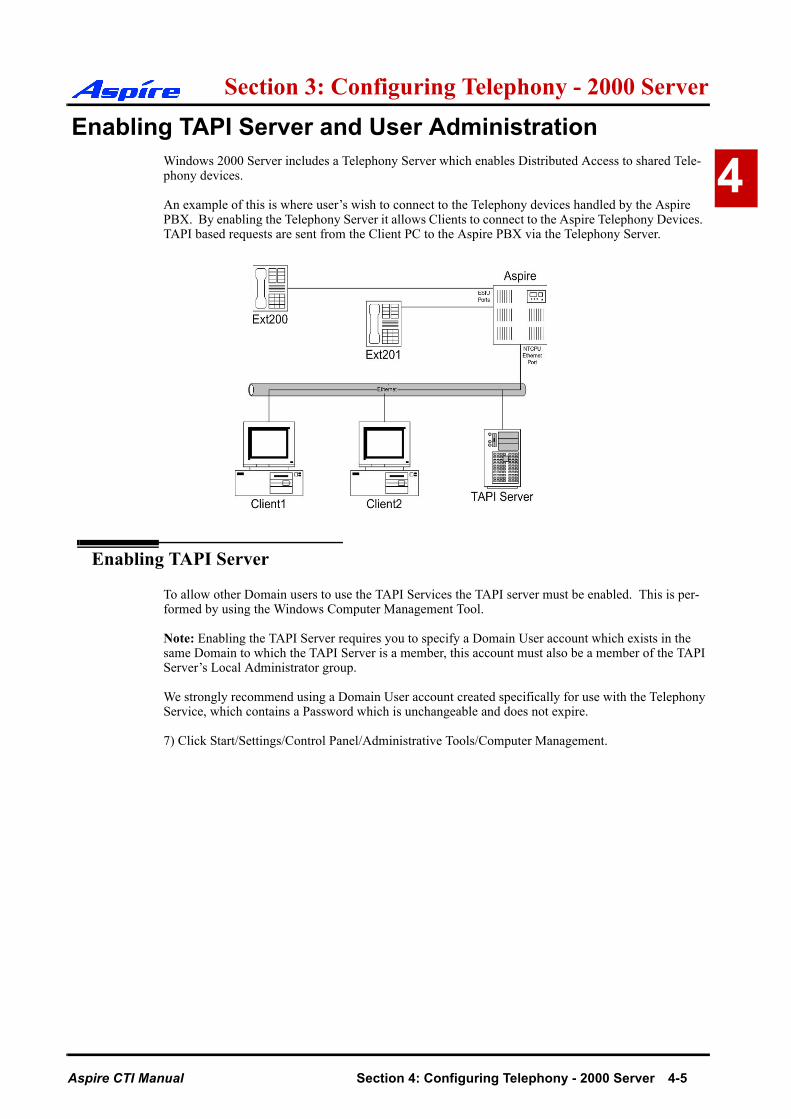
4Enabling TAPI Server and User Administration
Windows 2000 Server includes a Telephony Server which enables Distributed Access to shared Tele-phony devices.
An example of this is where user’s wish to connect to the Telephony devices handled by the Aspire PBX. By enabling the Telephony Server it allows Clients to connect to the Aspire Telephony Devices. TAPI based requests are sent from the Client PC to the Aspire PBX via the Telephony Server.
Enabling TAPI Server
To allow other Domain users to use the TAPI Services the TAPI server must be enabled. This is per-formed by using the Windows Computer Management Tool.
Note: Enabling the TAPI Server requires you to specify a Domain User account which exists in the same Domain to which the TAPI Server is a member, this account must also be a member of the TAPI Server’s Local Administrator group.
We strongly recommend using a Domain User account created specifically for use with the Telephony Service, which contains a Password which is unchangeable and does not expire.
7) Click Start/Settings/Control Panel/Administrative Tools/Computer Management.
Aspire CTI Manual Section 4: Configuring Telephony - 2000 Server 4-5

Section 4: Configuring Telephony - 2000 Server
8) Go to System Tools/Local Users and Groups/Groups, Double click the Administrators Group.9) Select Add, and specify the appropriate Domain in the Look in drop down list.
10) Specify the appropriate Domain User account and click Add. Click OK to accept the account.
4-6 Section 4: Configuring Telephony - 2000 Server Aspire CTI Manual
Section 3: Configuring Telephony - 2000 Server
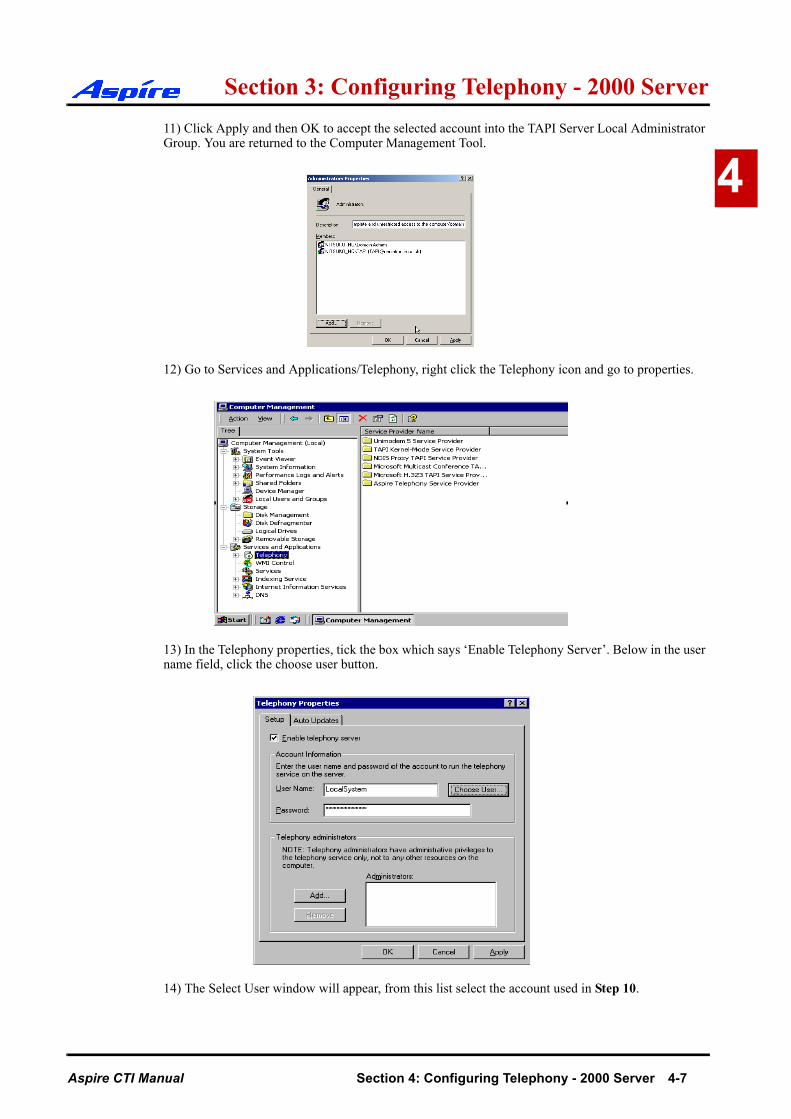
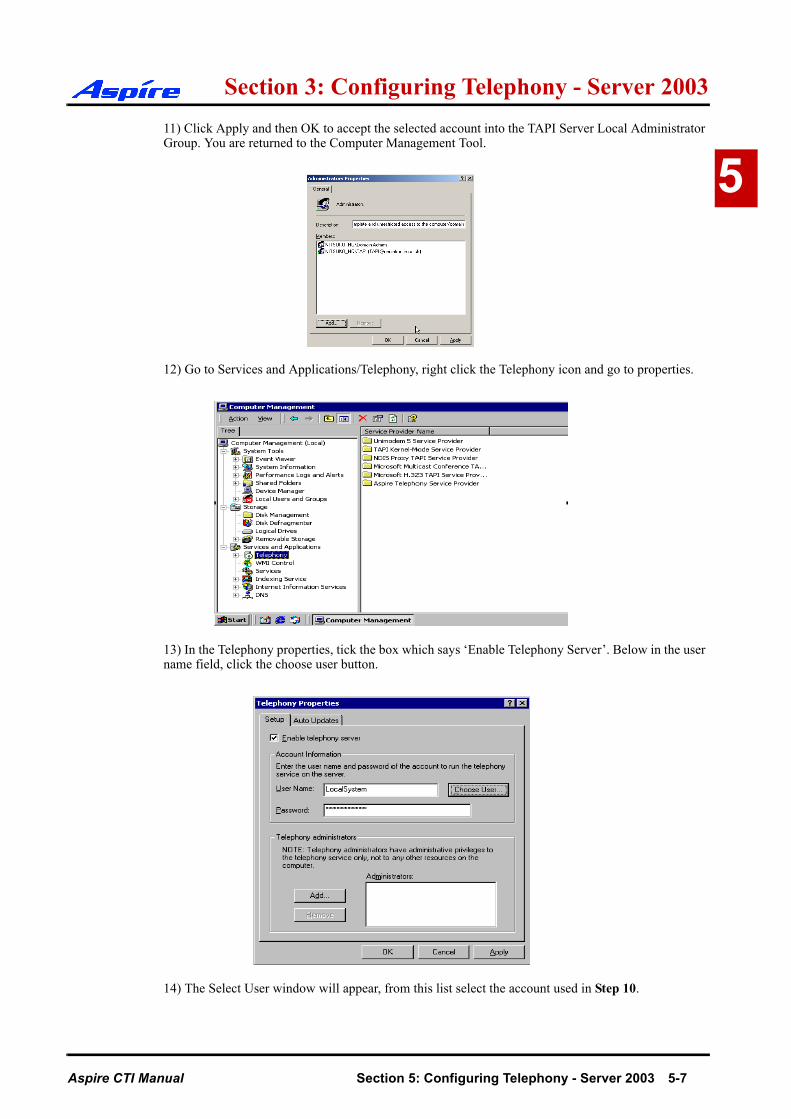
411) Click Apply and then OK to accept the selected account into the TAPI Server Local Administrator Group. You are returned to the Computer Management Tool.
12) Go to Services and Applications/Telephony, right click the Telephony icon and go to properties.
13) In the Telephony properties, tick the box which says ‘Enable Telephony Server’. Below in the user name field, click the choose user button.
14) The Select User window will appear, from this list select the account used in Step 10.
Aspire CTI Manual Section 4: Configuring Telephony - 2000 Server 4-7
Section 4: Configuring Telephony - 2000 Server
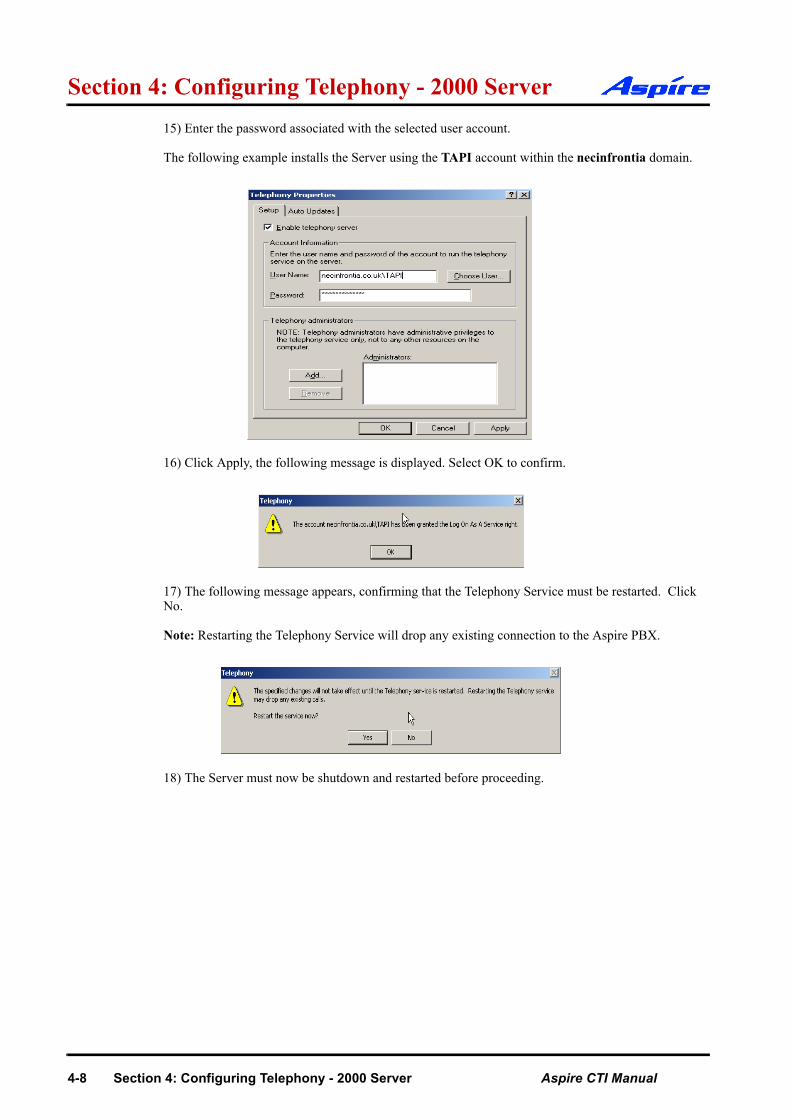
15) Enter the password associated with the selected user account.The following example installs the Server using the TAPI account within the necinfrontia domain.
16) Click Apply, the following message is displayed. Select OK to confirm.
17) The following message appears, confirming that the Telephony Service must be restarted. Click No.
Note: Restarting the Telephony Service will drop any existing connection to the Aspire PBX.
18) The Server must now be shutdown and restarted before proceeding.
4-8 Section 4: Configuring Telephony - 2000 Server Aspire CTI Manual

Section 3: Configuring Telephony - 2000 Server
4User Administration
By default Client computer’s will not be able to access any extensions. By enabling the TAPI Server you are able to permit Domain user’s to access their Telephone extension(s). Extensions available to the TAPI Server are authenticated using Windows 2000 access permissions.
Client computer’s will be allocated Telephone extension’s based on their Domain Logon account. The only exception to this is where by a Client Computer is logged on using a Domain Administrator account, which has permissions to access all Telephone extension(s).
Access permissions are configured using the Telephony snap-in within Windows Computer Manage-ment. This allows the Telephony administrator to assign Telephone Extension(s) to domain users.
11) Click Start/Settings/Control Panel/Administrative Tools/Computer Management.
12) Go to Services and Applications/Telephony/Aspire Telephony Service Provider. You should see a list of all connected Aspire Telephone Extensions.
Aspire CTI Manual Section 4: Configuring Telephony - 2000 Server 4-9

Section 4: Configuring Telephony - 2000 Server
13) Double click onto an available extension, the Edit Users screen appears. Click Add.14) Click Add, the Select Users screen appears. Specify the appropriate domain user account and click OK to accept.
15) The Edit Users screen reappears with confirmation of selected users, click OK to accept.
16) The selected user should now be associated with the Extension you assigned.
4-10 Section 4: Configuring Telephony - 2000 Server Aspire CTI Manual
Section 3: Configuring Telephony - 2000 Server
418) Repeat this process to add/change domain User(s) access permissions.
19) On completion, close Computer Management
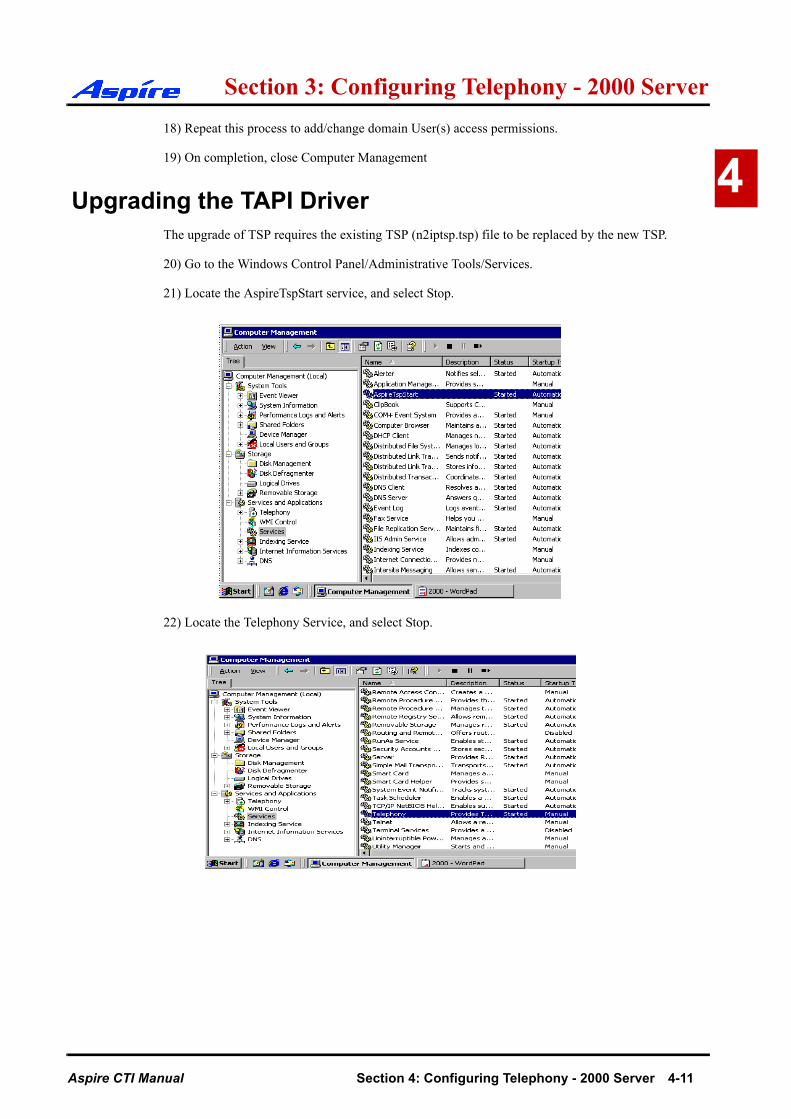
Upgrading the TAPI DriverThe upgrade of TSP requires the existing TSP (n2iptsp.tsp) file to be replaced by the new TSP.
20) Go to the Windows Control Panel/Administrative Tools/Services.
21) Locate the AspireTspStart service, and select Stop.
22) Locate the Telephony Service, and select Stop.
Aspire CTI Manual Section 4: Configuring Telephony - 2000 Server 4-11
Section 4: Configuring Telephony - 2000 Server
22) Locate the Telephony service, and select Stop.23) Copy the file n2iptsp.tsp to C:\WINNT\SYSTEM32 (assuming C:\WINNT is the location of the OS). You will be asked if you are sute you want to replace, click Yes. Restart the Computer.
Uninstalling the Aspire TSP24) Go to the Windows Control Panel/Administrative Tools/Services.
25) Locate the AspireTspStart service, and select Stop.
26) Locate the Telephony Service, and select Stop.
4-12 Section 4: Configuring Telephony - 2000 Server Aspire CTI Manual
Section 3: Configuring Telephony - 2000 Server
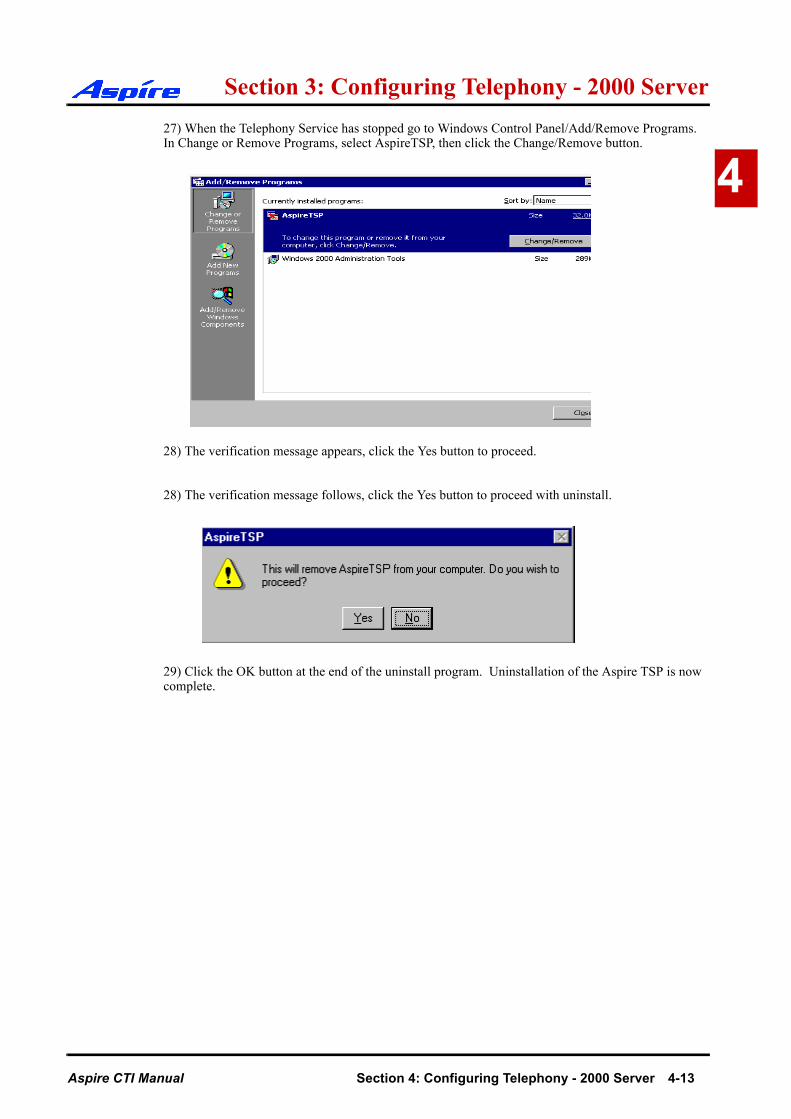
427) When the Telephony Service has stopped go to Windows Control Panel/Add/Remove Programs. In Change or Remove Programs, select AspireTSP, then click the Change/Remove button.
28) The verification message appears, click the Yes button to proceed.
28) The verification message follows, click the Yes button to proceed with uninstall.
29) Click the OK button at the end of the uninstall program. Uninstallation of the Aspire TSP is now complete.
Aspire CTI Manual Section 4: Configuring Telephony - 2000 Server 4-13
Section 4: Configuring Telephony - 2000 Server
4-14 Section 4: Configuring Telephony - 2000 Server Aspire CTI Manual
Configuring Telephony - Server 2003
Installing the DECT EquipmentSection 1: Installing the DECT Equipment
Section 5:
Configuring Telephony Windows Server 2003
Aspire CTI Manual Section 4: Configuring Telephony - Server 2003 5-1
Section 5: Configuring Telephony - Server 2003
General DescriptionThe following section assumes you have installed the Aspire TSP. This section contains further infor-mation on configuring TAPI2.1 on Windows 2000 Server.
The following information is provided:
• Aspire TSP Configuration• Enabling TAPI Server• TAPI Server User Administration
5-2 Section 5: Configuring Telephony - Server 2003 Aspire CTI Manual

Section 3: Configuring Telephony - Server 2003
5Configuration
1) To verify that the Aspire TSP installed correctly and is using the proper settings double-click the Phone and Modems icon from within the Control Panel (Start/Settings/Control Panel).
2) Click on the Advanced tab to see that the Aspire TSP is installed.
3) Click on the Aspire TSP and select the Configure button to see the configuration of the Aspire TSP. On the Configuration tab, you can see the Server/PBX IP addresses, TCP Port No and Display Call Status Dialog option set during installation. If necessary, change data.
4) Click on the Device tab to confirm the system extension ports’ status. You can not change any data on this screen.
Aspire CTI Manual Section 5: Configuring Telephony - Server 2003 5-3

Section 5: Configuring Telephony - Server 2003
5) By selecting a Device and clicking Detail the Call Mode can be set.Auto Speaker Mode (Default)
If selected Answer call requests to the selected device via TAPI will be answered using the Speaker
Auto Headset Mode
If selected Answer call requests to the selected device via TAPI will be answered using a Headset (If connected)
Note: To allow configuration of Call mode the device should be not be in use by any TAPI application (i.e Arc ScreenPop)
6) To exit,click CANCEL then click OK until you have exited to the Control Panel. Double-click in the upper left hand corner of the Control Panel to close the window.
5-4 Section 5: Configuring Telephony - Server 2003 Aspire CTI Manual

Section 3: Configuring Telephony - Server 2003
5Enabling TAPI Server and User Administration
Windows Server 2003 includes a Telephony Server which enables Distributed Access to shared Tele-phony devices.
An example of this is where user’s wish to connect to the Telephony devices handled by the Aspire PBX. By enabling the Telephony Server it allows Clients to connect to the Aspire Telephony Devices. TAPI based requests are sent from the Client PC to the Aspire PBX via the Telephony Server.
Enabling TAPI Server
To allow other Domain users to use the TAPI Services the TAPI server must be enabled. This is per-formed by using the Windows Computer Management Tool.
Note: Enabling the TAPI Server requires you to specify a Domain User account which exists in the same Domain to which the TAPI Server is a member, this account must also be a member of the TAPI Server’s Local Administrator group.
We strongly recommend using a Domain User account created specifically for use with the Telephony Service, which contains a Password which is unchangeable and does not expire.
7) Click Start/Settings/Control Panel/Administrative Tools/Computer Management.
Aspire CTI Manual Section 5: Configuring Telephony - Server 2003 5-5

Section 5: Configuring Telephony - Server 2003
8) Go to System Tools/Local Users and Groups/Groups, Double click the Administrators Group.9) Select Add, and specify the appropriate Location (i.e Entire Directory).
10) Specify the appropriate User account and click Check Names to confirm. Click OK to accept the account.
5-6 Section 5: Configuring Telephony - Server 2003 Aspire CTI Manual
Section 3: Configuring Telephony - Server 2003
511) Click Apply and then OK to accept the selected account into the TAPI Server Local Administrator Group. You are returned to the Computer Management Tool.
12) Go to Services and Applications/Telephony, right click the Telephony icon and go to properties.
13) In the Telephony properties, tick the box which says ‘Enable Telephony Server’. Below in the user name field, click the choose user button.
14) The Select User window will appear, from this list select the account used in Step 10.
Aspire CTI Manual Section 5: Configuring Telephony - Server 2003 5-7
Section 5: Configuring Telephony - Server 2003
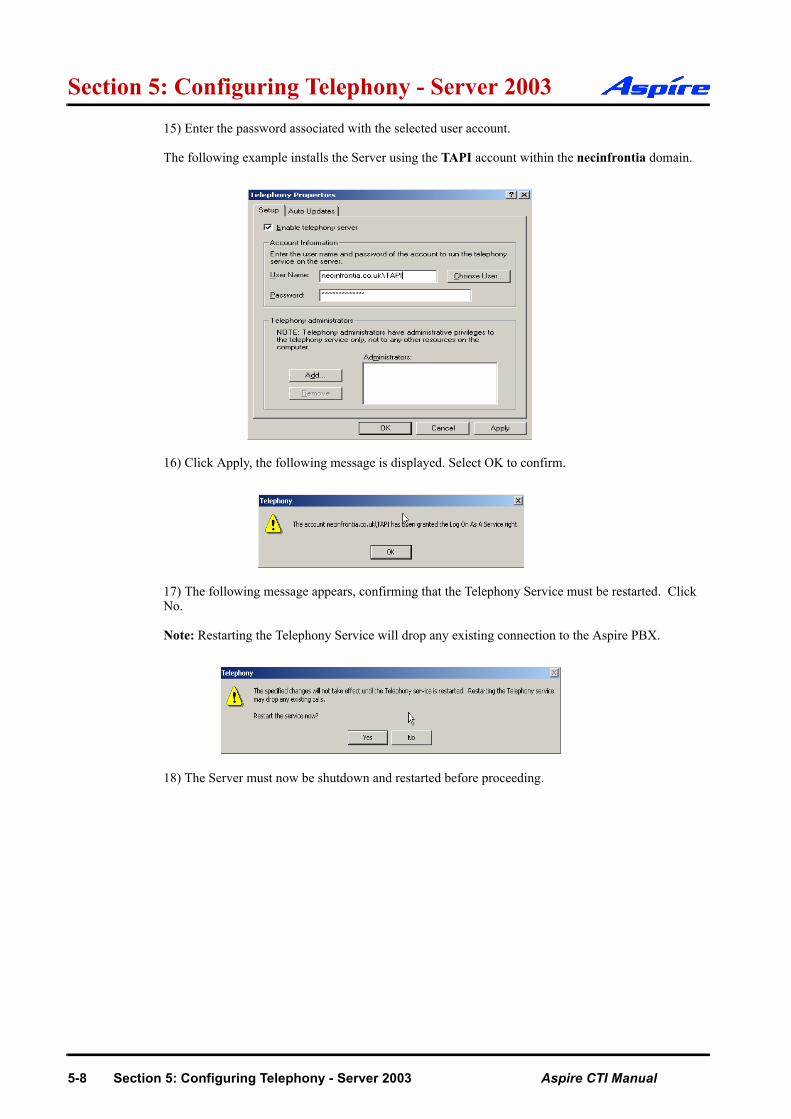
15) Enter the password associated with the selected user account.The following example installs the Server using the TAPI account within the necinfrontia domain.
16) Click Apply, the following message is displayed. Select OK to confirm.
17) The following message appears, confirming that the Telephony Service must be restarted. Click No.
Note: Restarting the Telephony Service will drop any existing connection to the Aspire PBX.
18) The Server must now be shutdown and restarted before proceeding.
5-8 Section 5: Configuring Telephony - Server 2003 Aspire CTI Manual

Section 3: Configuring Telephony - Server 2003
5User Administration
By default Client computer’s will not be able to access any extensions. By enabling the TAPI Server you are able to permit Domain user’s to access their Telephone extension(s). Extensions available to the TAPI Server are authenticated using Windows 2000 access permissions.
Client computer’s will be allocated Telephone extension’s based on their Domain Logon account. The only exception to this is where by a Client Computer is logged on using a Domain Administrator account, which has permissions to access all Telephone extension(s).
Access permissions are configured using the Telephony snap-in within Windows Computer Manage-ment. This allows the Telephony administrator to assign Telephone Extension(s) to domain users.
11) Click Start/Settings/Control Panel/Administrative Tools/Computer Management.
12) Go to Services and Applications/Telephony/Aspire Telephony Service Provider. You should see a list of all connected Aspire Telephone Extensions.
Aspire CTI Manual Section 5: Configuring Telephony - Server 2003 5-9

Section 5: Configuring Telephony - Server 2003
13) Double click onto an available extension, the Edit Users screen appears.14) Select Add, and specify the appropriate Location (i.e Entire Directory).
15) Specify the appropriate User account and click Check Names to confirm. Click OK to accept the account.
16) The Edit Users screen reappears with confirmation of selected users, click OK to accept.
17) The selected user should now be associated with the Extension you assigned.
18) Repeat this process to add/change domain User(s) access permissions.
19) On completion, close Computer Management
5-10 Section 5: Configuring Telephony - Server 2003 Aspire CTI Manual
Section 3: Configuring Telephony - Server 2003
5Upgrading the TAPI Driver
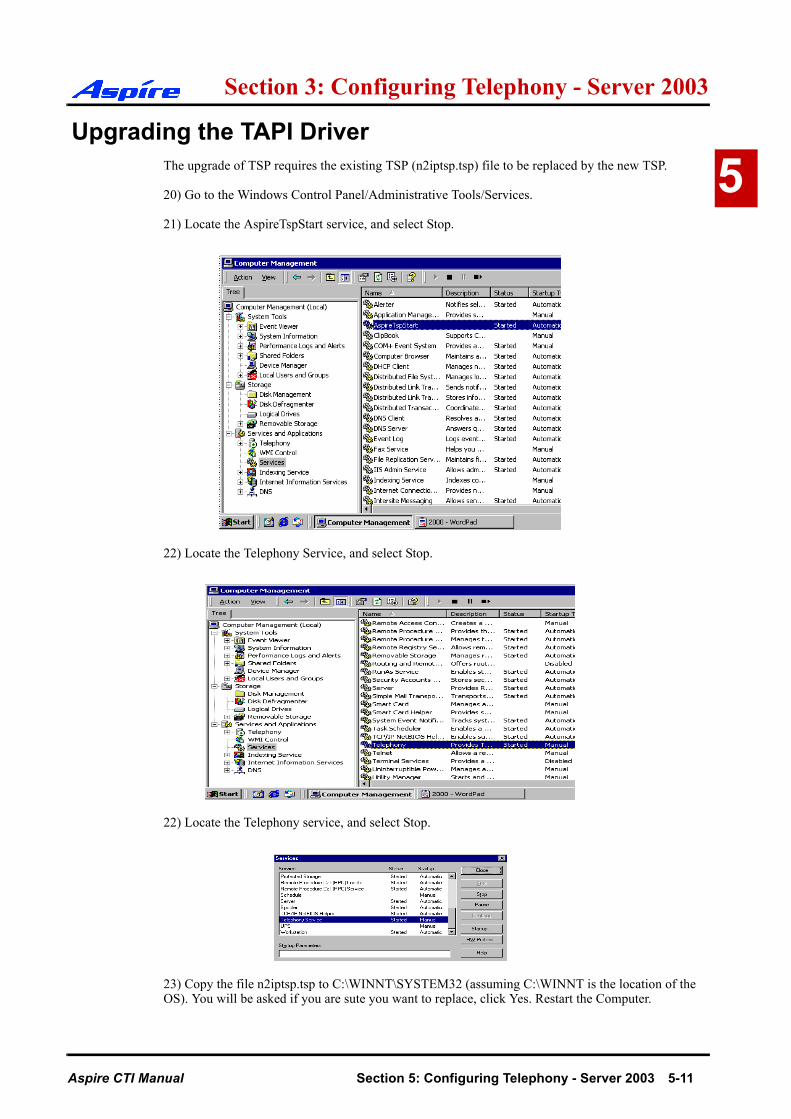
The upgrade of TSP requires the existing TSP (n2iptsp.tsp) file to be replaced by the new TSP.
20) Go to the Windows Control Panel/Administrative Tools/Services.
21) Locate the AspireTspStart service, and select Stop.
22) Locate the Telephony Service, and select Stop.
22) Locate the Telephony service, and select Stop.
23) Copy the file n2iptsp.tsp to C:\WINNT\SYSTEM32 (assuming C:\WINNT is the location of the OS). You will be asked if you are sute you want to replace, click Yes. Restart the Computer.
Aspire CTI Manual Section 5: Configuring Telephony - Server 2003 5-11
Section 5: Configuring Telephony - Server 2003
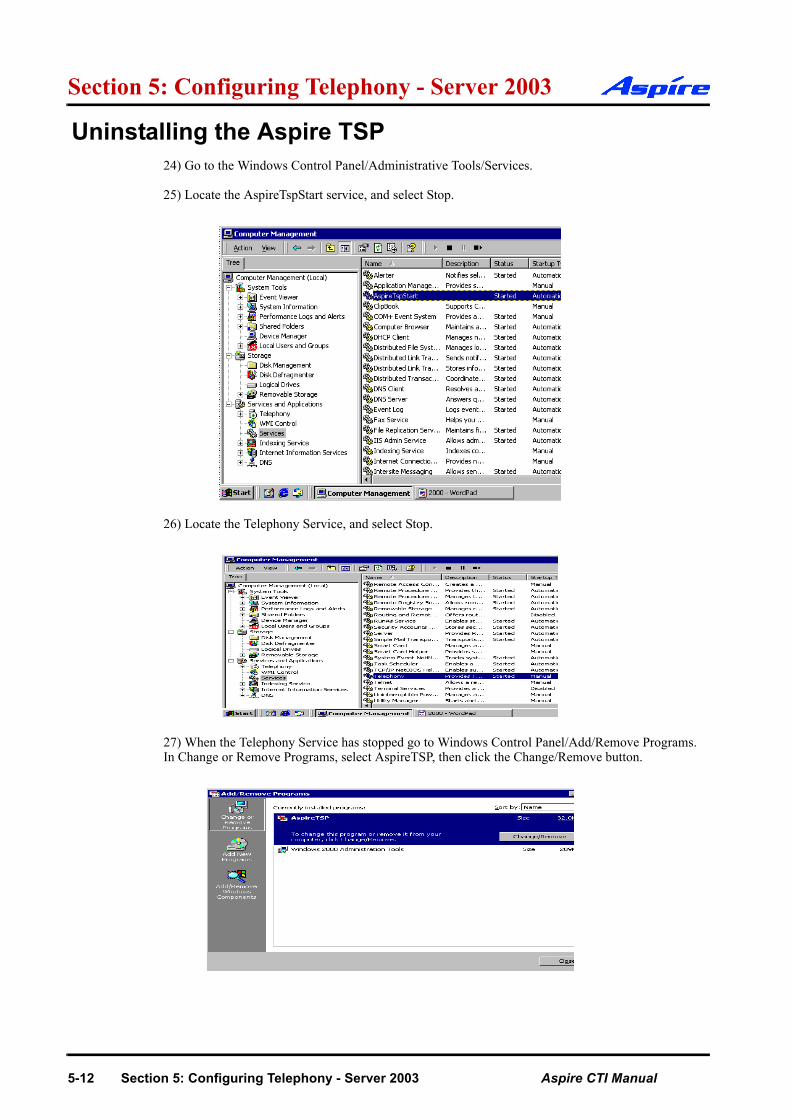
Uninstalling the Aspire TSP24) Go to the Windows Control Panel/Administrative Tools/Services.
25) Locate the AspireTspStart service, and select Stop.
26) Locate the Telephony Service, and select Stop.
27) When the Telephony Service has stopped go to Windows Control Panel/Add/Remove Programs. In Change or Remove Programs, select AspireTSP, then click the Change/Remove button.
5-12 Section 5: Configuring Telephony - Server 2003 Aspire CTI Manual

Section 3: Configuring Telephony - Server 2003
528) The verification message appears, click the Yes button to proceed.
29) Click the OK button at the end of the uninstall program. Uninstallation of the Aspire TSP is now complete.
Aspire CTI Manual Section 5: Configuring Telephony - Server 2003 5-13
Section 5: Configuring Telephony - Server 2003
5-14 Section 5: Configuring Telephony - Server 2003 Aspire CTI Manual

Installing TAPI Clients
Installing the DECT EquipmentSection 1: Installing the DECT Equipment
Section 6:
Installing TAPI Clients
Aspire CTI Manual Section 6: Installing TAPI Clients 6-1

Section 6: Installing TAPI Clients
Enabling TAPI Clients - NT/2000/XPThe conditions for installing the TAPI 2.1 Client on Windows NT/2000/XP are as follows:
The Client PC should be connected to the Network via TCP/IP and all associated services (i.e. DNS/WINS) should be configured.
The Client PC must logon to the same Windows Domain as the TAPI Server.
To issue the TCMSETUP command you must be logged on as a Local Administrator.
1) Enter the following command in the Run command line.
TCMSETUP /C SERVERNAME
Where SERVERNAME is the name of your TAPI Server
2) By executing the command, the following should be received.
6-2 Section 6: Installing TAPI Clients Aspire CTI Manual
Section 6: Installing TAPI Clients
6Disabling TAPI Clients
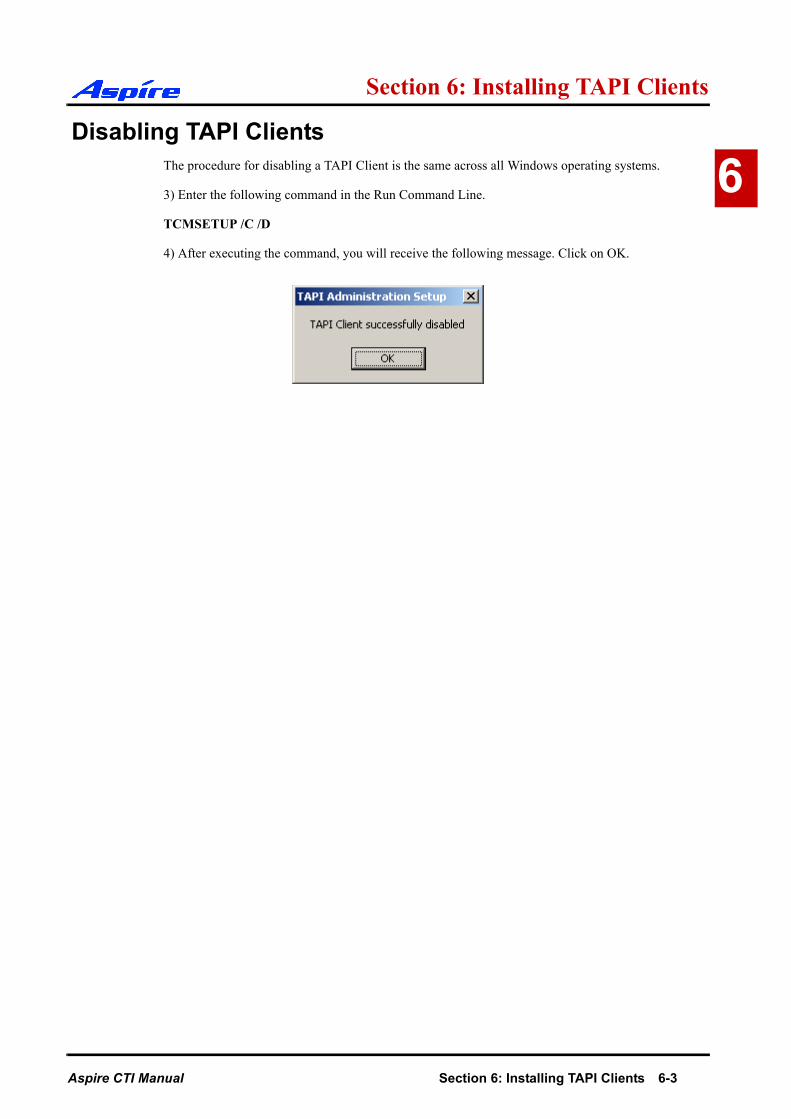
The procedure for disabling a TAPI Client is the same across all Windows operating systems.
3) Enter the following command in the Run Command Line.
TCMSETUP /C /D
4) After executing the command, you will receive the following message. Click on OK.
Aspire CTI Manual Section 6: Installing TAPI Clients 6-3

Section 6: Installing TAPI Clients
6-4 Section 6: Installing TAPI Clients Aspire CTI Manual


Aspire CTI Manual991083-5
NEC Infrontia Limited75 Swingbridge Road, Loughborough, Leicestershire,
LE11 5JB, United KingdomTel: +44 1509 643100 Fax: +44 1509 610206
www.necinfrontia.co.uk