customer tips for establishing a wireless...
TRANSCRIPT
Customer Tips For Establishing A Wireless Connection With Windows CE.NET 5.0
Confidential – Proprietary Intellectual Property of Lexicon Technologies Inc. 1
In order to establish a wireless connection with your Windows CE.NET 5.0 device the following steps will be required; view all steps below.
NOTE: In order to obtain a strong wireless connection it is of the up most importance to be within range of your access point on initial configuration of your device.
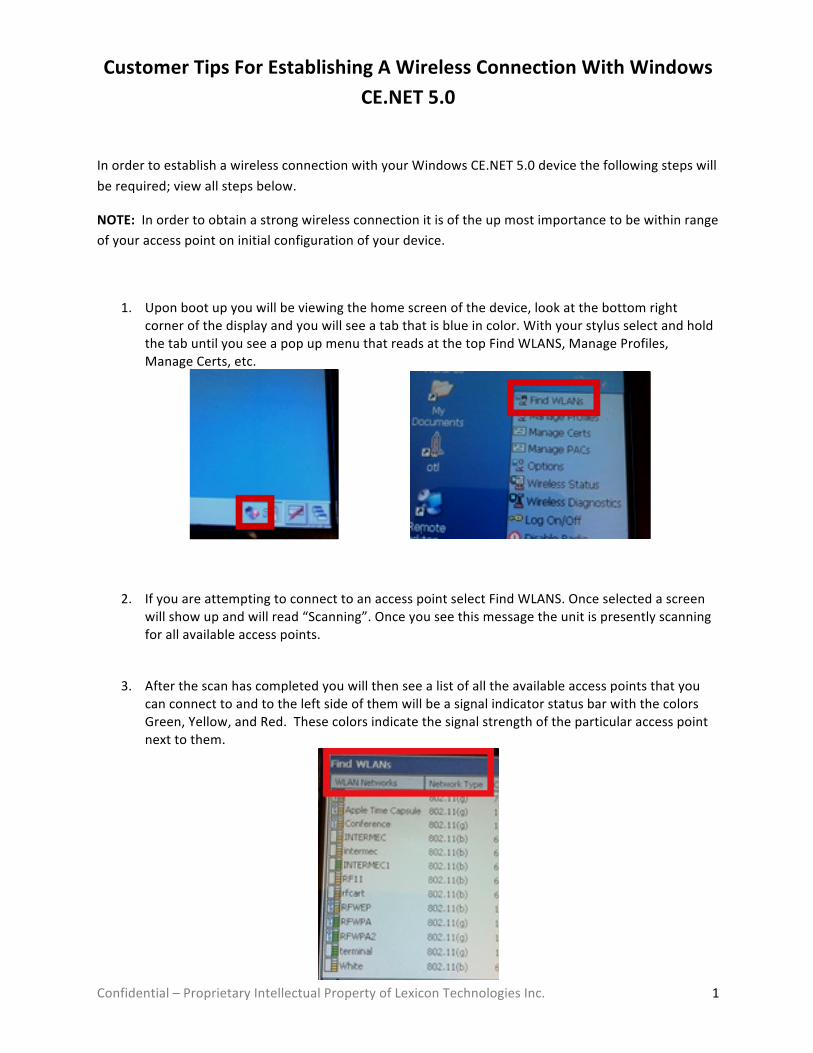
1. Upon boot up you will be viewing the home screen of the device, look at the bottom right corner of the display and you will see a tab that is blue in color. With your stylus select and hold the tab until you see a pop up menu that reads at the top Find WLANS, Manage Profiles, Manage Certs, etc.
2. If you are attempting to connect to an access point select Find WLANS. Once selected a screen will show up and will read “Scanning”. Once you see this message the unit is presently scanning for all available access points.
3. After the scan has completed you will then see a list of all the available access points that you can connect to and to the left side of them will be a signal indicator status bar with the colors Green, Yellow, and Red. These colors indicate the signal strength of the particular access point next to them.
Customer Tips For Establishing A Wireless Connection With Windows CE.NET 5.0
Confidential – Proprietary Intellectual Property of Lexicon Technologies Inc. 2
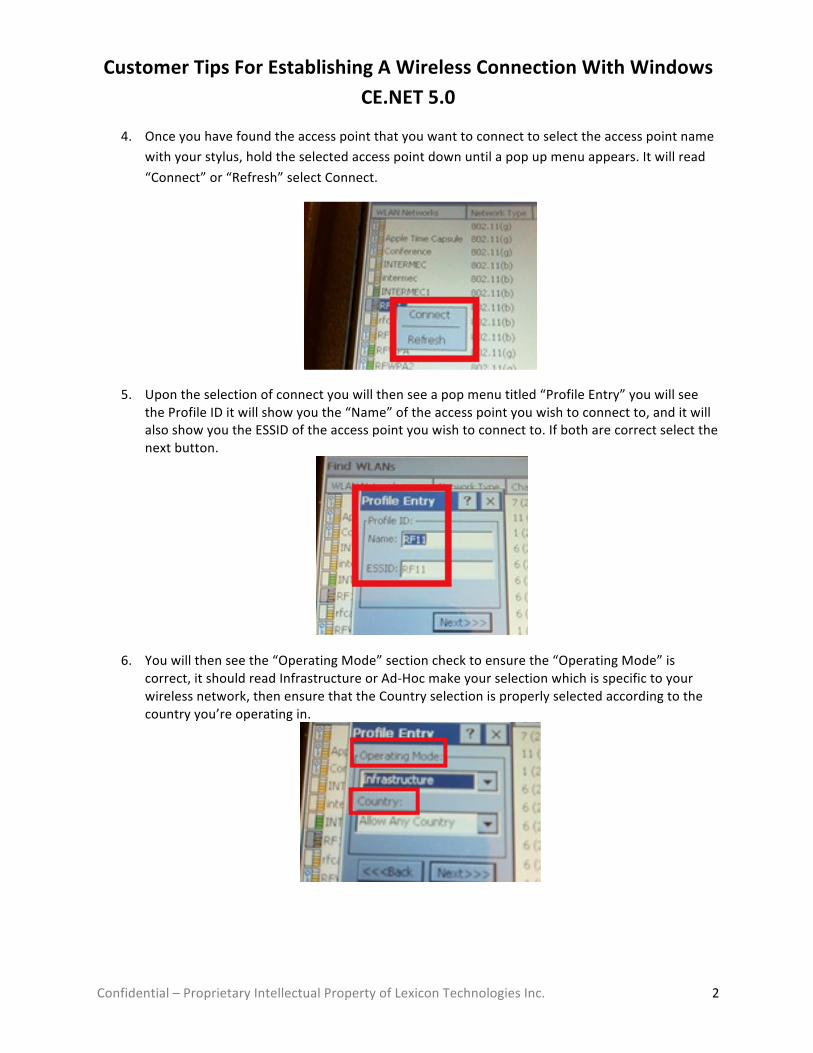
4. Once you have found the access point that you want to connect to select the access point name with your stylus, hold the selected access point down until a pop up menu appears. It will read “Connect” or “Refresh” select Connect.
5. Upon the selection of connect you will then see a pop menu titled “Profile Entry” you will see the Profile ID it will show you the “Name” of the access point you wish to connect to, and it will also show you the ESSID of the access point you wish to connect to. If both are correct select the next button.
6. You will then see the “Operating Mode” section check to ensure the “Operating Mode” is correct, it should read Infrastructure or Ad-‐Hoc make your selection which is specific to your wireless network, then ensure that the Country selection is properly selected according to the country you’re operating in.
Customer Tips For Establishing A Wireless Connection With Windows CE.NET 5.0
Confidential – Proprietary Intellectual Property of Lexicon Technologies Inc. 3
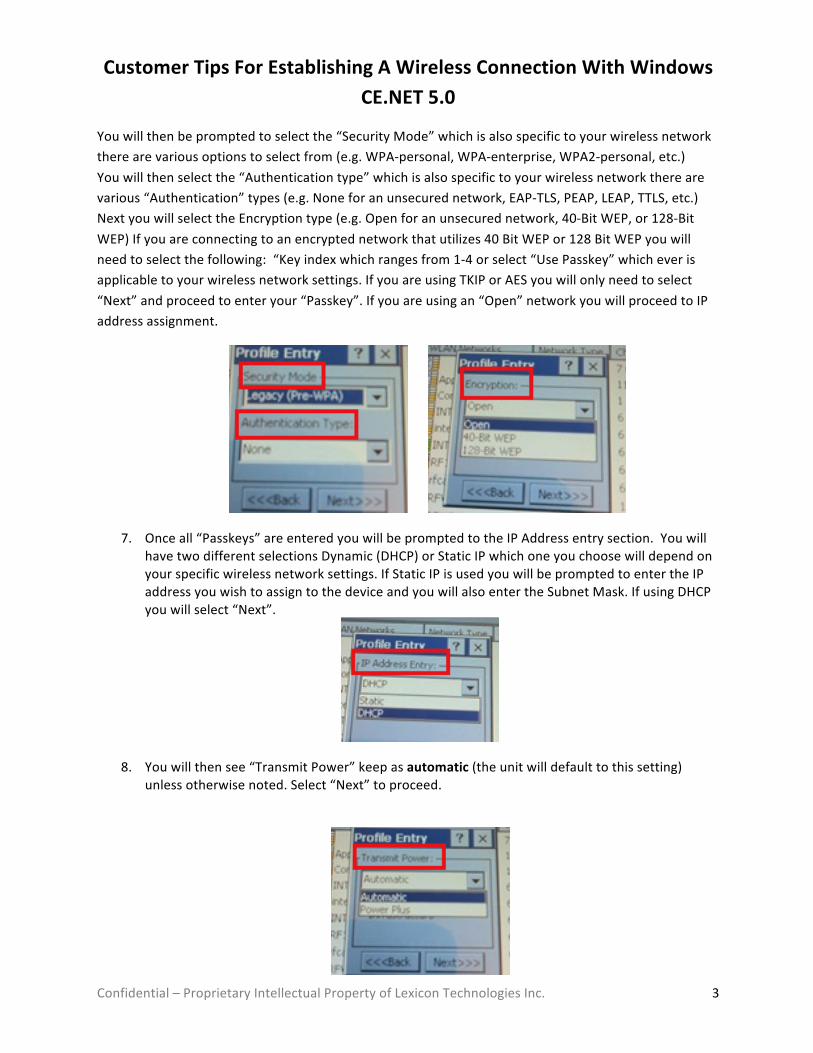
You will then be prompted to select the “Security Mode” which is also specific to your wireless network there are various options to select from (e.g. WPA-‐personal, WPA-‐enterprise, WPA2-‐personal, etc.) You will then select the “Authentication type” which is also specific to your wireless network there are various “Authentication” types (e.g. None for an unsecured network, EAP-‐TLS, PEAP, LEAP, TTLS, etc.) Next you will select the Encryption type (e.g. Open for an unsecured network, 40-‐Bit WEP, or 128-‐Bit WEP) If you are connecting to an encrypted network that utilizes 40 Bit WEP or 128 Bit WEP you will need to select the following: “Key index which ranges from 1-‐4 or select “Use Passkey” which ever is applicable to your wireless network settings. If you are using TKIP or AES you will only need to select “Next” and proceed to enter your “Passkey”. If you are using an “Open” network you will proceed to IP address assignment.
7. Once all “Passkeys” are entered you will be prompted to the IP Address entry section. You will have two different selections Dynamic (DHCP) or Static IP which one you choose will depend on your specific wireless network settings. If Static IP is used you will be prompted to enter the IP address you wish to assign to the device and you will also enter the Subnet Mask. If using DHCP you will select “Next”.
8. You will then see “Transmit Power” keep as automatic (the unit will default to this setting) unless otherwise noted. Select “Next” to proceed.
Customer Tips For Establishing A Wireless Connection With Windows CE.NET 5.0
Confidential – Proprietary Intellectual Property of Lexicon Technologies Inc. 4
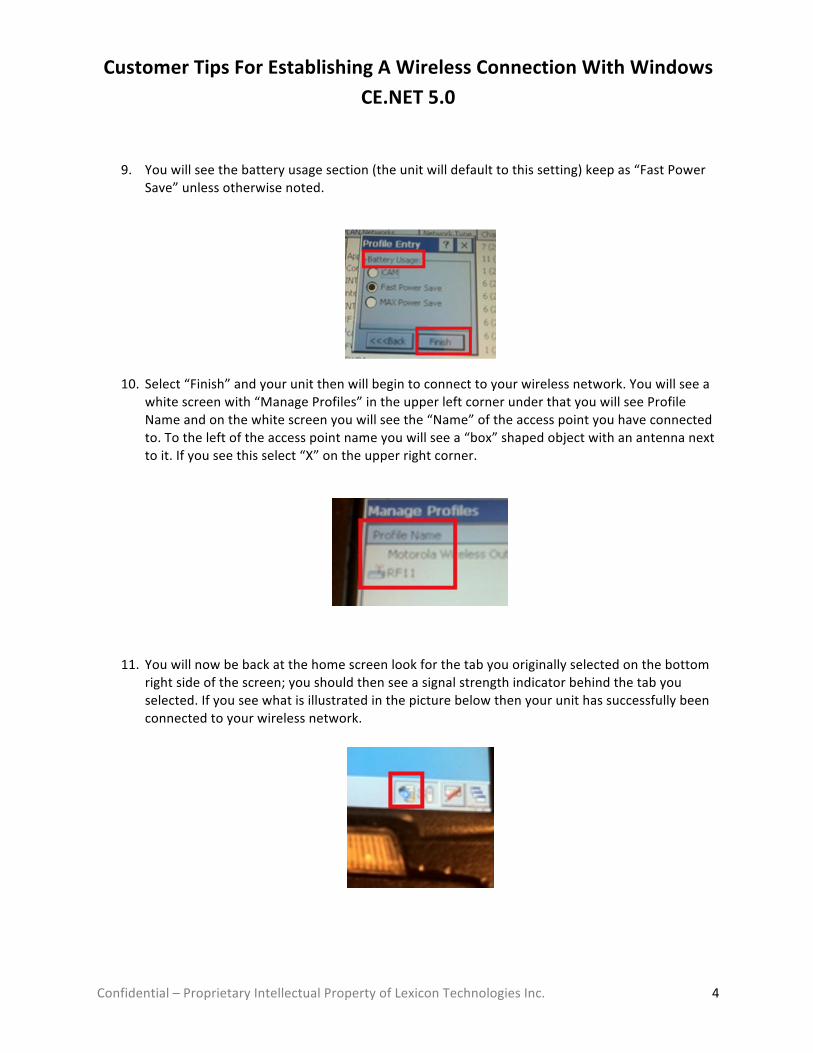
9. You will see the battery usage section (the unit will default to this setting) keep as “Fast Power Save” unless otherwise noted.
10. Select “Finish” and your unit then will begin to connect to your wireless network. You will see a white screen with “Manage Profiles” in the upper left corner under that you will see Profile Name and on the white screen you will see the “Name” of the access point you have connected to. To the left of the access point name you will see a “box” shaped object with an antenna next to it. If you see this select “X” on the upper right corner.
11. You will now be back at the home screen look for the tab you originally selected on the bottom right side of the screen; you should then see a signal strength indicator behind the tab you selected. If you see what is illustrated in the picture below then your unit has successfully been connected to your wireless network.