customizing the livecycle workspace es4 user … customizations ... configure mozilla firefox to...
TRANSCRIPT

bbc
Customizing the Flex-Based LiveCycle Workspace ES4 User Interface
Adobe® LiveCycle® ES4March 2013

Legal Notices
For legal notices, see http://helpx.adobe.com/legal/legal-notices.html.

3
Contents
1. About This DocumentWho should read this document? . . . . . . . . . . . . . . . . . . . . . . . . . . . . . . . . . . . . . . . . . . . . . . . . . . . . . . . . . . . . . . . . . . . . . . . . . . . . . . . . . . . . . . . . . . . . . . . . . . . . . . . . . . . . . . 6
Before you begin . . . . . . . . . . . . . . . . . . . . . . . . . . . . . . . . . . . . . . . . . . . . . . . . . . . . . . . . . . . . . . . . . . . . . . . . . . . . . . . . . . . . . . . . . . . . . . . . . . . . . . . . . . . . . . . . . . . . . . . . . . . . . . 6
Additional information . . . . . . . . . . . . . . . . . . . . . . . . . . . . . . . . . . . . . . . . . . . . . . . . . . . . . . . . . . . . . . . . . . . . . . . . . . . . . . . . . . . . . . . . . . . . . . . . . . . . . . . . . . . . . . . . . . . . . . . . 7
2. IntroductionUnderstanding the types of Workspace ES4 customizations . . . . . . . . . . . . . . . . . . . . . . . . . . . . . . . . . . . . . . . . . . . . . . . . . . . . . . . . . . . . . . . . . . . . . . . . . . . . . . . . . . . . 8
Localization customizations . . . . . . . . . . . . . . . . . . . . . . . . . . . . . . . . . . . . . . . . . . . . . . . . . . . . . . . . . . . . . . . . . . . . . . . . . . . . . . . . . . . . . . . . . . . . . . . . . . . . . . . . . . . . . . . . 9
Considerations for localization customization . . . . . . . . . . . . . . . . . . . . . . . . . . . . . . . . . . . . . . . . . . . . . . . . . . . . . . . . . . . . . . . . . . . . . . . . . . . . . . . . . . . . . . . . . . . 9
Theme customizations . . . . . . . . . . . . . . . . . . . . . . . . . . . . . . . . . . . . . . . . . . . . . . . . . . . . . . . . . . . . . . . . . . . . . . . . . . . . . . . . . . . . . . . . . . . . . . . . . . . . . . . . . . . . . . . . . . . .10
Considerations for theme customizations . . . . . . . . . . . . . . . . . . . . . . . . . . . . . . . . . . . . . . . . . . . . . . . . . . . . . . . . . . . . . . . . . . . . . . . . . . . . . . . . . . . . . . . . . . . . . .10
Layout customizations . . . . . . . . . . . . . . . . . . . . . . . . . . . . . . . . . . . . . . . . . . . . . . . . . . . . . . . . . . . . . . . . . . . . . . . . . . . . . . . . . . . . . . . . . . . . . . . . . . . . . . . . . . . . . . . . . . . .11
User interface redesign customizations . . . . . . . . . . . . . . . . . . . . . . . . . . . . . . . . . . . . . . . . . . . . . . . . . . . . . . . . . . . . . . . . . . . . . . . . . . . . . . . . . . . . . . . . . . . . . . . . . . . .11
Workspace ES4 customization support . . . . . . . . . . . . . . . . . . . . . . . . . . . . . . . . . . . . . . . . . . . . . . . . . . . . . . . . . . . . . . . . . . . . . . . . . . . . . . . . . . . . . . . . . . . . . . . . . . . .11
Understanding the Workspace API architecture . . . . . . . . . . . . . . . . . . . . . . . . . . . . . . . . . . . . . . . . . . . . . . . . . . . . . . . . . . . . . . . . . . . . . . . . . . . . . . . . . . . . . . . . . . . . . . .11
Layers in the Workspace API architecture . . . . . . . . . . . . . . . . . . . . . . . . . . . . . . . . . . . . . . . . . . . . . . . . . . . . . . . . . . . . . . . . . . . . . . . . . . . . . . . . . . . . . . . . . . . . . . . . . .12
Authenticated sessions . . . . . . . . . . . . . . . . . . . . . . . . . . . . . . . . . . . . . . . . . . . . . . . . . . . . . . . . . . . . . . . . . . . . . . . . . . . . . . . . . . . . . . . . . . . . . . . . . . . . . . . . . . . . . . . . . . .14
Singleton access . . . . . . . . . . . . . . . . . . . . . . . . . . . . . . . . . . . . . . . . . . . . . . . . . . . . . . . . . . . . . . . . . . . . . . . . . . . . . . . . . . . . . . . . . . . . . . . . . . . . . . . . . . . . . . . . . . . . . .15
Visual components . . . . . . . . . . . . . . . . . . . . . . . . . . . . . . . . . . . . . . . . . . . . . . . . . . . . . . . . . . . . . . . . . . . . . . . . . . . . . . . . . . . . . . . . . . . . . . . . . . . . . . . . . . . . . . . . . . . . . . .15
Workspace API SWC files . . . . . . . . . . . . . . . . . . . . . . . . . . . . . . . . . . . . . . . . . . . . . . . . . . . . . . . . . . . . . . . . . . . . . . . . . . . . . . . . . . . . . . . . . . . . . . . . . . . . . . . . . . . . . . . . . .16
Understanding the areas to customize in the Workspace ES4 user interface . . . . . . . . . . . . . . . . . . . . . . . . . . . . . . . . . . . . . . . . . . . . . . . . . . . . . . . . . . . . . . . . . . . .16
About creating a custom version of Workspace ES4 . . . . . . . . . . . . . . . . . . . . . . . . . . . . . . . . . . . . . . . . . . . . . . . . . . . . . . . . . . . . . . . . . . . . . . . . . . . . . . . . . . . . . . . .17
About creating a custom Queue Sharing Form . . . . . . . . . . . . . . . . . . . . . . . . . . . . . . . . . . . . . . . . . . . . . . . . . . . . . . . . . . . . . . . . . . . . . . . . . . . . . . . . . . . . . . . . . . . . .18
About creating a custom Approval Container (deprecated) . . . . . . . . . . . . . . . . . . . . . . . . . . . . . . . . . . . . . . . . . . . . . . . . . . . . . . . . . . . . . . . . . . . . . . . . . . . . . . . .18
Upgrade considerations . . . . . . . . . . . . . . . . . . . . . . . . . . . . . . . . . . . . . . . . . . . . . . . . . . . . . . . . . . . . . . . . . . . . . . . . . . . . . . . . . . . . . . . . . . . . . . . . . . . . . . . . . . . . . . . . . . . . . .19
3. Configuring Your Development Environment for LiveCycle ES4Install the LiveCycle ES4 version of the Flex SDK . . . . . . . . . . . . . . . . . . . . . . . . . . . . . . . . . . . . . . . . . . . . . . . . . . . . . . . . . . . . . . . . . . . . . . . . . . . . . . . . . . . . . . . . . . . . . . .20
Configure Flex Builder to use the LiveCycle ES4 version of the Flex SDK . . . . . . . . . . . . . . . . . . . . . . . . . . . . . . . . . . . . . . . . . . . . . . . . . . . . . . . . . . . . . . . . . . . . . . . .21
Configure the Flex compiler for 64-bit operating systems . . . . . . . . . . . . . . . . . . . . . . . . . . . . . . . . . . . . . . . . . . . . . . . . . . . . . . . . . . . . . . . . . . . . . . . . . . . . . . . . . .22
Install Ant to Flex Builder . . . . . . . . . . . . . . . . . . . . . . . . . . . . . . . . . . . . . . . . . . . . . . . . . . . . . . . . . . . . . . . . . . . . . . . . . . . . . . . . . . . . . . . . . . . . . . . . . . . . . . . . . . . . . . . . . . . . .22
Install the Ant plug-in to Flex Builder . . . . . . . . . . . . . . . . . . . . . . . . . . . . . . . . . . . . . . . . . . . . . . . . . . . . . . . . . . . . . . . . . . . . . . . . . . . . . . . . . . . . . . . . . . . . . . . . . . . . . .23
Install the Ant-contrib 1.0b2 library . . . . . . . . . . . . . . . . . . . . . . . . . . . . . . . . . . . . . . . . . . . . . . . . . . . . . . . . . . . . . . . . . . . . . . . . . . . . . . . . . . . . . . . . . . . . . . . . . . . . . . .23
4. Importing and configuring the Flex projectsRetrieve the most recent files for customization . . . . . . . . . . . . . . . . . . . . . . . . . . . . . . . . . . . . . . . . . . . . . . . . . . . . . . . . . . . . . . . . . . . . . . . . . . . . . . . . . . . . . . . . . . . . . . .24
Import the Flex projects . . . . . . . . . . . . . . . . . . . . . . . . . . . . . . . . . . . . . . . . . . . . . . . . . . . . . . . . . . . . . . . . . . . . . . . . . . . . . . . . . . . . . . . . . . . . . . . . . . . . . . . . . . . . . . . . . . . . . .25
About the Flex projects used for customizing the Workspace ES4 user interface . . . . . . . . . . . . . . . . . . . . . . . . . . . . . . . . . . . . . . . . . . . . . . . . . . . . . . . . . . . .25
Configure the workspace-ui project . . . . . . . . . . . . . . . . . . . . . . . . . . . . . . . . . . . . . . . . . . . . . . . . . . . . . . . . . . . . . . . . . . . . . . . . . . . . . . . . . . . . . . . . . . . . . . . . . . . . . . . . . .26
Modify the build.xml file . . . . . . . . . . . . . . . . . . . . . . . . . . . . . . . . . . . . . . . . . . . . . . . . . . . . . . . . . . . . . . . . . . . . . . . . . . . . . . . . . . . . . . . . . . . . . . . . . . . . . . . . . . . . . . . . . .27
Settings in the build.xml file . . . . . . . . . . . . . . . . . . . . . . . . . . . . . . . . . . . . . . . . . . . . . . . . . . . . . . . . . . . . . . . . . . . . . . . . . . . . . . . . . . . . . . . . . . . . . . . . . . . . . . . . . . .27

4
Create an Ant builder for building the workspace-ui project . . . . . . . . . . . . . . . . . . . . . . . . . . . . . . . . . . . . . . . . . . . . . . . . . . . . . . . . . . . . . . . . . . . . . . . . . . . . . . . .27
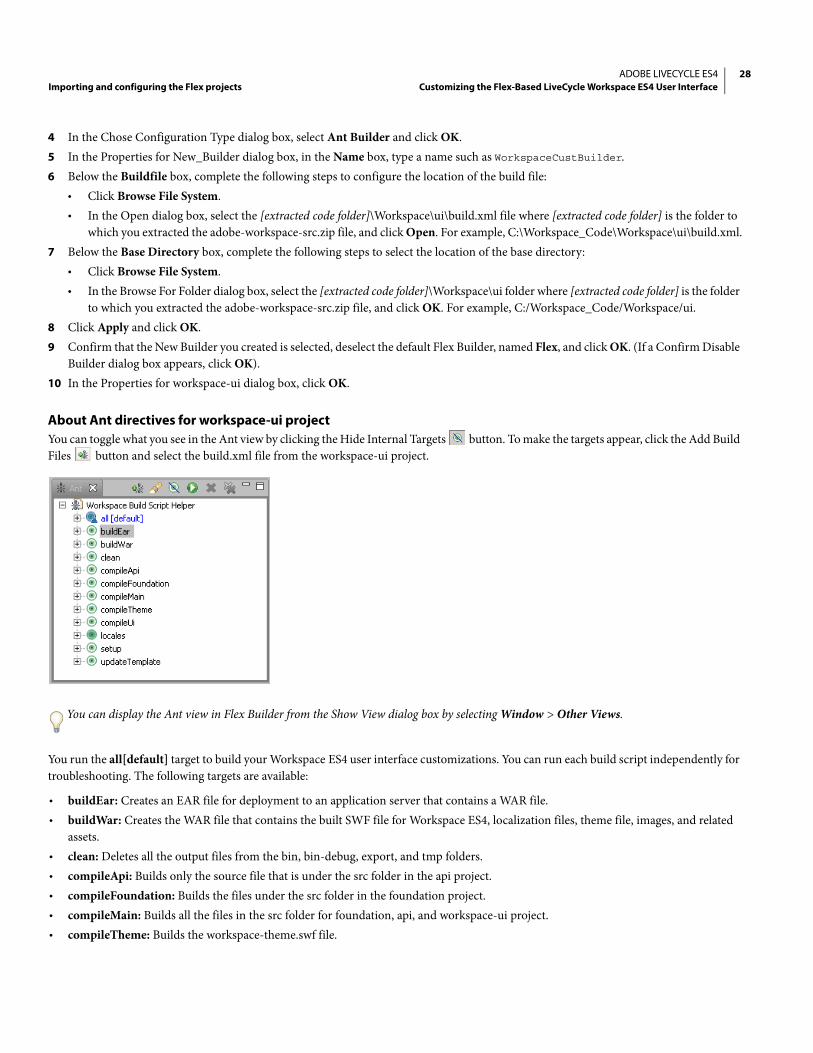
About Ant directives for workspace-ui project . . . . . . . . . . . . . . . . . . . . . . . . . . . . . . . . . . . . . . . . . . . . . . . . . . . . . . . . . . . . . . . . . . . . . . . . . . . . . . . . . . . . . . . . .28
Configure advanced deployment settings . . . . . . . . . . . . . . . . . . . . . . . . . . . . . . . . . . . . . . . . . . . . . . . . . . . . . . . . . . . . . . . . . . . . . . . . . . . . . . . . . . . . . . . . . . . . . . . . .29
Configure the queue-sharing project . . . . . . . . . . . . . . . . . . . . . . . . . . . . . . . . . . . . . . . . . . . . . . . . . . . . . . . . . . . . . . . . . . . . . . . . . . . . . . . . . . . . . . . . . . . . . . . . . . . . . . . . .30
Configure the approval-container (deprecated) project . . . . . . . . . . . . . . . . . . . . . . . . . . . . . . . . . . . . . . . . . . . . . . . . . . . . . . . . . . . . . . . . . . . . . . . . . . . . . . . . . . . . . . .30
Configure Flex projects for debugging . . . . . . . . . . . . . . . . . . . . . . . . . . . . . . . . . . . . . . . . . . . . . . . . . . . . . . . . . . . . . . . . . . . . . . . . . . . . . . . . . . . . . . . . . . . . . . . . . . . . . . . .31
5. Building, Deploying, and Testing Workspace ES4 user interface customizationsBuild, deploy, and test a custom version of Workspace ES4 . . . . . . . . . . . . . . . . . . . . . . . . . . . . . . . . . . . . . . . . . . . . . . . . . . . . . . . . . . . . . . . . . . . . . . . . . . . . . . . . . . . .34
Build a custom version of Workspace ES4 . . . . . . . . . . . . . . . . . . . . . . . . . . . . . . . . . . . . . . . . . . . . . . . . . . . . . . . . . . . . . . . . . . . . . . . . . . . . . . . . . . . . . . . . . . . . . . . . . .34
Deploy a custom version of Workspace ES4 . . . . . . . . . . . . . . . . . . . . . . . . . . . . . . . . . . . . . . . . . . . . . . . . . . . . . . . . . . . . . . . . . . . . . . . . . . . . . . . . . . . . . . . . . . . . . . . .34
Test a custom version of Workspace ES4 . . . . . . . . . . . . . . . . . . . . . . . . . . . . . . . . . . . . . . . . . . . . . . . . . . . . . . . . . . . . . . . . . . . . . . . . . . . . . . . . . . . . . . . . . . . . . . . . . . .36
Build, deploy, and test a custom Queue Sharing Form . . . . . . . . . . . . . . . . . . . . . . . . . . . . . . . . . . . . . . . . . . . . . . . . . . . . . . . . . . . . . . . . . . . . . . . . . . . . . . . . . . . . . . . . .36
Build the custom Queue Sharing Form . . . . . . . . . . . . . . . . . . . . . . . . . . . . . . . . . . . . . . . . . . . . . . . . . . . . . . . . . . . . . . . . . . . . . . . . . . . . . . . . . . . . . . . . . . . . . . . . . . . .36
Deploy the custom Queue Sharing Form . . . . . . . . . . . . . . . . . . . . . . . . . . . . . . . . . . . . . . . . . . . . . . . . . . . . . . . . . . . . . . . . . . . . . . . . . . . . . . . . . . . . . . . . . . . . . . . . . .36
Test a custom QueueSharingForm.swf file . . . . . . . . . . . . . . . . . . . . . . . . . . . . . . . . . . . . . . . . . . . . . . . . . . . . . . . . . . . . . . . . . . . . . . . . . . . . . . . . . . . . . . . . . . . . . . . . .37
Build, deploy, and test a custom Approval Container (deprecated) . . . . . . . . . . . . . . . . . . . . . . . . . . . . . . . . . . . . . . . . . . . . . . . . . . . . . . . . . . . . . . . . . . . . . . . . . . . . .37
Build the custom Approval Container (deprecated) . . . . . . . . . . . . . . . . . . . . . . . . . . . . . . . . . . . . . . . . . . . . . . . . . . . . . . . . . . . . . . . . . . . . . . . . . . . . . . . . . . . . . . . .38
Deploy the custom Approval Container (deprecated) . . . . . . . . . . . . . . . . . . . . . . . . . . . . . . . . . . . . . . . . . . . . . . . . . . . . . . . . . . . . . . . . . . . . . . . . . . . . . . . . . . . . . .38
Test a custom Approval Container (deprecated) . . . . . . . . . . . . . . . . . . . . . . . . . . . . . . . . . . . . . . . . . . . . . . . . . . . . . . . . . . . . . . . . . . . . . . . . . . . . . . . . . . . . . . . . . . .38
Configure a web browser to test localization changes . . . . . . . . . . . . . . . . . . . . . . . . . . . . . . . . . . . . . . . . . . . . . . . . . . . . . . . . . . . . . . . . . . . . . . . . . . . . . . . . . . . . . . . . .39
Configure Microsoft Internet Explorer to test localization customizations . . . . . . . . . . . . . . . . . . . . . . . . . . . . . . . . . . . . . . . . . . . . . . . . . . . . . . . . . . . . . . . . . . .39
Configure Mozilla FireFox to test localization customizations . . . . . . . . . . . . . . . . . . . . . . . . . . . . . . . . . . . . . . . . . . . . . . . . . . . . . . . . . . . . . . . . . . . . . . . . . . . . . . .39
Best practices for testing customizations . . . . . . . . . . . . . . . . . . . . . . . . . . . . . . . . . . . . . . . . . . . . . . . . . . . . . . . . . . . . . . . . . . . . . . . . . . . . . . . . . . . . . . . . . . . . . . . . . . . . . .40
6. Localization Customization - Localizing to SpanishAdd a new locale folder . . . . . . . . . . . . . . . . . . . . . . . . . . . . . . . . . . . . . . . . . . . . . . . . . . . . . . . . . . . . . . . . . . . . . . . . . . . . . . . . . . . . . . . . . . . . . . . . . . . . . . . . . . . . . . . . . . . . . .42
Translate the text in the localization files . . . . . . . . . . . . . . . . . . . . . . . . . . . . . . . . . . . . . . . . . . . . . . . . . . . . . . . . . . . . . . . . . . . . . . . . . . . . . . . . . . . . . . . . . . . . . . . . . . . . . .43
Create an error file for a new locale . . . . . . . . . . . . . . . . . . . . . . . . . . . . . . . . . . . . . . . . . . . . . . . . . . . . . . . . . . . . . . . . . . . . . . . . . . . . . . . . . . . . . . . . . . . . . . . . . . . . . . . . . . .44
Localizing the LiveCycle Workspace ES4 Help . . . . . . . . . . . . . . . . . . . . . . . . . . . . . . . . . . . . . . . . . . . . . . . . . . . . . . . . . . . . . . . . . . . . . . . . . . . . . . . . . . . . . . . . . . . . . . . . .44
Configure support for the new locale . . . . . . . . . . . . . . . . . . . . . . . . . . . . . . . . . . . . . . . . . . . . . . . . . . . . . . . . . . . . . . . . . . . . . . . . . . . . . . . . . . . . . . . . . . . . . . . . . . . . . . . . .46
Localize the Queue Sharing Form . . . . . . . . . . . . . . . . . . . . . . . . . . . . . . . . . . . . . . . . . . . . . . . . . . . . . . . . . . . . . . . . . . . . . . . . . . . . . . . . . . . . . . . . . . . . . . . . . . . . . . . . . . . . .47
7. Theme Customization - Replacing ImagesReplace images in the Workspace ES4 user interface . . . . . . . . . . . . . . . . . . . . . . . . . . . . . . . . . . . . . . . . . . . . . . . . . . . . . . . . . . . . . . . . . . . . . . . . . . . . . . . . . . . . . . . . . .49
Replace images in the Queue Sharing Form . . . . . . . . . . . . . . . . . . . . . . . . . . . . . . . . . . . . . . . . . . . . . . . . . . . . . . . . . . . . . . . . . . . . . . . . . . . . . . . . . . . . . . . . . . . . . . . . . . .51
8. Theme Customization - Modifying ColorsModify colors in the Workspace ES4 user interface . . . . . . . . . . . . . . . . . . . . . . . . . . . . . . . . . . . . . . . . . . . . . . . . . . . . . . . . . . . . . . . . . . . . . . . . . . . . . . . . . . . . . . . . . . . .54
Modify the colors in Queue Sharing Form . . . . . . . . . . . . . . . . . . . . . . . . . . . . . . . . . . . . . . . . . . . . . . . . . . . . . . . . . . . . . . . . . . . . . . . . . . . . . . . . . . . . . . . . . . . . . . . . . . . . .56
Modify the colors in the Approval Container (deprecated) . . . . . . . . . . . . . . . . . . . . . . . . . . . . . . . . . . . . . . . . . . . . . . . . . . . . . . . . . . . . . . . . . . . . . . . . . . . . . . . . . . . . .56
9. Layout Customization - Simplifying the Workspace ES4 User InterfaceCreate a simplified layout for custom version Workspace ES4 . . . . . . . . . . . . . . . . . . . . . . . . . . . . . . . . . . . . . . . . . . . . . . . . . . . . . . . . . . . . . . . . . . . . . . . . . . . . . . . . . .59
5
10. Layout customization - Creating a New Login ScreenSet up the workspace-ui project to add new components . . . . . . . . . . . . . . . . . . . . . . . . . . . . . . . . . . . . . . . . . . . . . . . . . . . . . . . . . . . . . . . . . . . . . . . . . . . . . . . . . . . . .62
Create a custom login component . . . . . . . . . . . . . . . . . . . . . . . . . . . . . . . . . . . . . . . . . . . . . . . . . . . . . . . . . . . . . . . . . . . . . . . . . . . . . . . . . . . . . . . . . . . . . . . . . . . . . . . . . . . .62
Implement the model for a custom login component . . . . . . . . . . . . . . . . . . . . . . . . . . . . . . . . . . . . . . . . . . . . . . . . . . . . . . . . . . . . . . . . . . . . . . . . . . . . . . . . . . . . . . . . .62
Create the user interface for the login screen . . . . . . . . . . . . . . . . . . . . . . . . . . . . . . . . . . . . . . . . . . . . . . . . . . . . . . . . . . . . . . . . . . . . . . . . . . . . . . . . . . . . . . . . . . . . . . . . . .65
Configure the custom login screen in the custom version of Workspace ES4 . . . . . . . . . . . . . . . . . . . . . . . . . . . . . . . . . . . . . . . . . . . . . . . . . . . . . . . . . . . . . . . . . . . .68
11. Layout Customization - Creating a Custom Approval Container (deprecated)Create and configure a Flex project . . . . . . . . . . . . . . . . . . . . . . . . . . . . . . . . . . . . . . . . . . . . . . . . . . . . . . . . . . . . . . . . . . . . . . . . . . . . . . . . . . . . . . . . . . . . . . . . . . . . . . . . . . .71
Create a custom model component . . . . . . . . . . . . . . . . . . . . . . . . . . . . . . . . . . . . . . . . . . . . . . . . . . . . . . . . . . . . . . . . . . . . . . . . . . . . . . . . . . . . . . . . . . . . . . . . . . . . . . . . . .71
Add the application logic for the model component . . . . . . . . . . . . . . . . . . . . . . . . . . . . . . . . . . . . . . . . . . . . . . . . . . . . . . . . . . . . . . . . . . . . . . . . . . . . . . . . . . . . . . . . . .71
Create the view component . . . . . . . . . . . . . . . . . . . . . . . . . . . . . . . . . . . . . . . . . . . . . . . . . . . . . . . . . . . . . . . . . . . . . . . . . . . . . . . . . . . . . . . . . . . . . . . . . . . . . . . . . . . . . . . . . .73
Create the layout for a custom Approval Container (deprecated) . . . . . . . . . . . . . . . . . . . . . . . . . . . . . . . . . . . . . . . . . . . . . . . . . . . . . . . . . . . . . . . . . . . . . . . . . . . . . . .74
Enable the Approval Container (deprecated) for Workspace ES4 . . . . . . . . . . . . . . . . . . . . . . . . . . . . . . . . . . . . . . . . . . . . . . . . . . . . . . . . . . . . . . . . . . . . . . . . . . . . . . .76
12. Troubleshooting

6
1. About This Document
This document describes how to customize the Adobe® LiveCycle® Workspace ES4 user interface. Each customization is divided into subtasks with example MXML or ActionScript code. Subsequent subtasks build on the code provided in previous subtasks. Bolded courier font appears in the examples to indicate the new code that is incrementally added.
This document provides a sampling of Workspace ES4 customizations. Use this document to identify the best practices and become familiar with ways to customize the Workspace ES4 user interface. As you become more proficient, the source code provided for Workspace ES4 and LiveCycle ES4 ActionScript Language Reference are valuable resources.
Who should read this document?This document is intended for developers who are familiar with the Flex SDK, ActionScript™ 3.0, MXML, XML, and Adobe Flex® Builder™. It is also necessary that developers understand Model-View-Controller concepts.
Before you beginBefore creating Flex applications enabled for use in Workspace ES4, you must have access to the following items:
• Access to a LiveCycle ES4 server, LiveCycle Workbench ES4, and Workspace ES4 with Service Pack 1 installed. For information on how to obtain the LiveCycle ES4 Service Pack 1, refer to your Maintenance and Support welcome package or to the Customer Support portal.It is necessary that the samples are installed on the LiveCycle ES4 server to have a testing environment. You develop LiveCycle ES4 appli-cations using Adobe LiveCycle Workbench ES4 and test them using Workspace ES4.Important: You must have LiveCycle ES4 Service Pack 1 installed on your LiveCycle ES4 server and Workbench ES4 to customize Workspace ES4.
• An installation of Adobe® Flex Builder™ 3.x Standalone. When you use the Adobe® Flash Builder™ 4.x, Adobe® Flash Builder™ 4.x plug-in for Eclipse, or Adobe® Flex Builder™ 3.x plug-in for Eclipse, the steps in this document do not correspond exactly because the menu commands differ.Note: Certified testing of customization was completed with Flex Builder 3.x. Though certification testing has not been completed using Adobe Flash Builder 4, you can alternatively use Flash Builder if you do not have Flex Builder. (See http://blogs.adobe.com /livecycle/2011/02/customize-lc-workspace-ES2-ui-using-fb4-premium-on-64-bit-os.html.)
• The LiveCycle ES4 DVD to install the LiveCycle ES4 version of the Flex SDK. • The adobe-workspace-src.zip file from the LiveCycle ES4 SDK folder. The LiveCycle ES4 SDK folder is available from the LiveCycle ES4
server or from a computer where Workbench ES4 is installed. It is beneficial if you are familiar with developing human-centric processes. If you are not, consider completing the Creating Your First LiveCycle ES4 Application tutorial.

ADOBE LIVECYCLE ES4About This Document Customizing the Flex-Based LiveCycle Workspace ES4 User Interface
7
Additional informationThe resources in this table can help you learn more about LiveCycle ES4.
For information about See
An overview of LiveCycle ES4 LiveCycle ES4 Overview
The end-to-end process of creating a LiveCycle ES4 application Creating Your First LiveCycle ES4 Application
Adobe LiveCycle Workspace ES4 LiveCycle Workspace ES4 Help
ActionScript classes and properties included with LiveCycle ES4 and Flex
LiveCycle ES4 ActionScript Language Reference
Rendering and deploying Flex applications using processes created in Workbench ES4
Application Development Using LiveCycle Workbench ES4
Installing and using Flex Builder Flex Help and Support website
Patch updates, service packs, technical notes, and additional infor-mation on this product version
http://www.adobe.com/go/learn_lc_support

8
2. Introduction
LiveCycle Workspace ES4 is a Flex application that allows users to initiate and participate in automated human-centric processes. You can customize the Workspace ES4 user interface to match the requirements of your organization. To understand the different types of custom-ization, see Understanding the types of Workspace ES4 customizations.
Workspace ES4 is built with reusable MXML and ActionScript components collectively called the Workspace API. It is recommended that you spend time to understand the Workspace API architecture. Knowledge of the architecture can help you to customize the Workspace ES4 user interface more effectively. (See Understanding the Workspace API architecture.)
You can target areas of the Workspace ES4 to customize. (See Understanding the areas to customize in the Workspace ES4 user interface.)
Before you begin, complete the following tasks to configure your development environment.
• Configure your development and Adobe Flex Builder. (See “Configuring Your Development Environment for LiveCycle ES4” on page 20.)
• Import and configure the provided Flex projects for customizing Workspace ES4. (See “Importing and configuring the Flex projects” on page 24.)
• Verify that you can build, deploy, and test Workspace ES4 user interface customizations. (See “Building, Deploying, and Testing Workspace ES4 user interface customizations” on page 34.)
If you are upgrading from a previous release of Workspace ES or Workspace ES4, it is not a requirement to rebuild your application. However, consider rebuilding your custom application to leverage improvements in Workspace ES4. (See “Upgrade considerations” on page 19.)
Understanding the types of Workspace ES4 customizationsThere are four types of Workspace ES4 user interface customizations. Knowing the type of customizations you want to achieve helps you choose the appropriate task in this document.
Localization: Change the text in Workspace ES4 to display in another language. You can also complete localization customizations to change the terminology. For example, you can change all text to Spanish to localize Workspace ES4 or change one word, such as "User ID" to "User Name".
• To understand more about localization customizations, see “Localization customizations” on page 9.• To localize Workspace ES4, see “Localization Customization - Localizing to Spanish” on page 41. Theme: Change styles such as colors, images, fonts, and spacing in the Workspace ES4 user interface. For example, you can change the background color of Workspace ES4 to red or change the images to use logos from your organization.
• To understand more about theme customizations, see “Theme customizations” on page 10.• To change the images in Workspace ES4, see “Theme Customization - Replacing Images” on page 49• To modify the colors in the Workspace ES4 user interface, see “Theme Customization - Modifying Colors” on page 53 Layout: Use various Workspace API components to build a custom version of Workspace ES4 with different layouts. For example, you can create a layout that only allows users to start processes but not complete or participate in processes.
You can also create components to replace portions of the user interface. For example, you can create a custom login screen or change the user interface for users that initiate or participate in processes.
• To understand more about layout customizations, see “Layout customizations” on page 11.

ADOBE LIVECYCLE ES4Introduction Customizing the Flex-Based LiveCycle Workspace ES4 User Interface
9
• To create a simplified layout or a custom login screen, see “Layout Customization - Simplifying the Workspace ES4 User Interface” on page 58.
• To create a custom login screen for Workspace ES4, see “Layout customization - Creating a New Login Screen” on page 61.• To create a custom Approval Container (deprecated) for Workspace ES4, see “Layout Customization - Creating a Custom Approval
Container (deprecated)” on page 70.User interface redesign: Build your own Flex application that provides similar functionality to Workspace ES4. Developing a new user interface requires full scale Flex development. For more information to help you to complete user interface redesigns, see “User interface redesign customizations” on page 11.
Localization customizations Localization customizations modify the text that is displayed to a user. You can localize Workspace ES4 to languages that are displayed from left to right and from top to bottom. The locale of the text that is displayed depends on the user’s web browser settings. For example, if the user’s web browser settings are set for international Japanese, Japanese strings are displayed in Workspace ES4.
Workspace ES4 is localized for the English (United States), French, German, and Japanese languages. The LiveCycle ES4 version of the Flex SDK provides additional resource bundles, which include translated Flex SDK error messages for the following languages:
• Danish• Spanish• Finnish• Italian• Korean• Norwegian Bokmål • Dutch• Brazilian Portuguese• Swedish• Simplified Chinese• Traditional ChineseThe provided resource bundles are required for you to localize Workspace ES4 to a specific language or region specific variants of the language. For example, you can localize Workspace ES4 to different variants of Spanish, such as Chilean Spanish. (See “Localization Customization - Localizing to Spanish” on page 41.)
Localization files that store the specific strings for a language provide localization support for Workspace ES4. Each localization file is a SWF file that is named workspace_rb_[locale].swf, where [locale] is the locale code for a specific language. For example, the localization file for Japanese is named workspace_rb_ja_JP.swf. When Workspace ES4 starts, the localization files are dynamically loaded based on the order of the language settings in web browser of the user. A localization file that matches the first language setting on the user’s web browser is loaded, otherwise, the next language specified in the settings is loaded. For example, the user’s language settings are Spanish and French. Workspace ES4 loads French if a localization file for Spanish is not found.
When no localization files match the language preferences specified in the web browser, a default localization file is loaded. The default is localization is English but can be customized to load another default language. For example, if a user’s language settings in the web browser are Russian, Spanish, and Chinese, English is loaded when no localization files exist for Russian, Spanish, or Chinese.
Considerations for localization customizationIn addition to localizing the strings that are displayed in Workspace ES4, consider localizing the following items as separate activities to provide an optimal experience.
• The text in the Queue Sharing Form. (See “Localizing the LiveCycle Workspace ES4 Help” on page 44.)

ADOBE LIVECYCLE ES4Introduction Customizing the Flex-Based LiveCycle Workspace ES4 User Interface
10
• The Help files. (See “Localize the Queue Sharing Form” on page 47.)• Text in images. (See “Theme Customization - Replacing Images” on page 49.)• The message of the day. In Workspace ES4, the message of day is provided in Workspace ES4 Administration in LiveCycle Adminis-
tration Console. (See "Setting the message of the day" in the LiveCycle Administration Help.• Forms (XDP, PDF, XML) or Flex applications that are used in processes.• Change the size or type of fonts to ensure that strings are optimized. For example, translated text sometimes occupies more space, and
appear truncated. You can use a smaller font so that the text appears does not truncate.You can also use the steps for localization customizations to change terminology. For instance, you can consider changing the terminology when it helps to ease the use of Workspace ES4. For example, you can change the English string process to workflow because that is the terminology your organization uses.
Theme customizationsTheme customizations are simple modifications to change the colors, images, fonts, spacing, and so on. For example, you can customize Workspace ES4 with graphics or colors to match the graphics and colors used by your organization. (See “Theme Customization - Replacing Images” on page 49 and “Theme Customization - Modifying Colors” on page 53.)
Theme customizations generally do not require significant modification or addition of code. Theme customizations require that you build a new theme file, named workspace-theme.swf. The theme file allows Workspace ES4 to support embedding styles at run-time and allows for dynamic theme support. When the Workspace ES4 client run time starts, it searches for the workspace-theme.swf file to load.
For a majority of the customizations, a CSS file named lc.css is modified to build the workspace-theme.swf file. The lc.css file contains a list of classes and style names. Class styles refer to specific components provided in the Workspace API while style names are set using the styleName property for a Workspace API class. You can refer to the source code in the adobe-workspace-src.zip code to determine the style name for a class. Since theme customizations are completed using a CSS file, a basic understanding of CSS is required for you to achieve the results you require.
Considerations for theme customizationsWhen you make the theme customizations, consider the following practices to provide an optimal experience for users:
• For changes to images, consider the following practices:• Scale the image to the same resolution as the image you are replacing: Most images have the size embedded as part of its name.
For example, the image LC_ToDoList_150.png indicates that the image is a PNG file with a resolution of 150 DPI. Consider changing the spacing (padding properties) if you use smaller or larger images.
• Use PNG files when possible: JPG and GIF formats are acceptable but can appear distorted or incorrect.• Use the same colors as the background: Depending on the Workspace API component, consider changing the color of the
background to create a consistent appearance.• For changes to fonts or text size, consider the following practices:
• Minimize changes to font size and spacing: When you change the font size or spacing, it impacts how the component appears relative to other components. Since Workspace ES4 is built with multiple components, changes to fonts size can affect the readability and consistency with other components.
• Use fonts that are ideal for web pages: When you change fonts types, use fonts that are easy to read on a web page. For example, some fonts are script-like in nature can be difficult to read.
• For changes to color, consider the following best practices:• Use background colors to provide a consistent and seamless appearance: When you change the background colors, use colors
that are consistent with the background of images and other components.• Use color schemes that improve readability: When you change the background colors or font colors, use colors that make it easy
for users to see the text. For example, use a black background and white for the text, but not a dark blue background and black text.

ADOBE LIVECYCLE ES4Introduction Customizing the Flex-Based LiveCycle Workspace ES4 User Interface
11
Layout customizationsYou can use Workspace API components to rebuild certain parts of Workspace ES4. In most cases, you can create complete applications that to provide a subset of functions from Workspace ES4. For example, components that encapsulate major user interface and functionality, such as the lc:StartProcess component, can be used to create an application that starts processes. (See “Layout Customization - Simpli-fying the Workspace ES4 User Interface” on page 58.)
Other layout customizations allow you replace portions of the Workspace ES4 user interface. For example, you can create a custom login screen or create a custom Approval Container (deprecated) for users to start or participate in processes. (See “Layout customization - Creating a New Login Screen” on page 61 and “Layout Customization - Creating a Custom Approval Container (deprecated)” on page 70.)
User interface redesign customizationsBefore you decide to complete a user interface redesign customization, consider using layout customizations to change portions of the user interface. For example, you can replace the default login screen with a login screen that you create or provide a custom Approval Container (deprecated) that provides additional functionality.
It is recommended that you only consider building your own Flex application when the benefits are greater than the costs. There can be significant development and maintenance costs that affect your return on investment (ROI). If you must complete a user interface redesign, the following information can be useful:
• Consider using the components from the procmgmt-api.swc and foundation-runtime.swc to provide the application logic and server connectivity functions. (See “Understanding the Workspace API architecture” on page 11.)
• Understand upgrade considerations. (See “Upgrade considerations” on page 19.)• Extend existing Workspace API components or create new components that provide similar functionality in a separate package. It is
recommended that you do not modify the Workspace API source code.• Use the Workspace ES4 source code as a reference for user interface redesign. • Review the customizations in this document to understand how to design your own custom user interface and use various parts of the
Workspace API.
Workspace ES4 customization supportThe source code for Workspace API is provided as an example. The source code is used to build a custom version of Workspace ES4. Even though the source code is available, any modification of the Workspace API source code is not supported. If you are required to augment functionality, consider creating custom components that extend the Workspace API components to augment functionality.
Understanding the Workspace API architectureThe Workspace API exposes components in the foundation-runtime.swc, procmgmt-api.swc, and procmgmt-ui.swc files. Specific packages in each SWC file are part of the lc namespace. (See “Workspace API SWC files” on page 16.) The LiveCycle ES4 ActionScript Language Reference provides descriptions of the exposed Workspace API components that you can use. In Flex Builder, there are components that visible from the Workspace API that are not described in the LiveCycle ES4 ActionScript Language Reference. It is recommended that you do not use undocumented components from the Workspace API. Undocumented components are subject to change without notice in future releases.
The Workspace API consists of visual components, non-visual components, and managers. Each visual component has view and model classes that communicate with non-visual components. Non-visual components encapsulate specific functions and broker information to visual components and communicate with various managers to get information. Managers retrieve and synchronize data between the server and Workspace ES4, such as process management and server connectivity information. (See “Visual components” on page 15.)

ADOBE LIVECYCLE ES4Introduction Customizing the Flex-Based LiveCycle Workspace ES4 User Interface
12
Workspace API components are organized functionally across presentation model, domain model, and service API layers. Each layer contains classes from one or more SWC files. For more information regarding how components are organized across various layers, see “Layers in the Workspace API architecture” on page 12.)
An important concept for using Workspace API components is that you must authenticate with a LiveCycle ES4 server. To manage the authentication, you use the lc:AuthenticatingApplication component. After you create a lc:AuthenicatingApplication component, you can access various Workspace API components. (See “Authenticated sessions” on page 14.)
The following illustration shows how the presentation model layer components communicate with domain model layer components. The illustration also shows how components in the procmgmt-api.swc and foundation-runtime.swc files communicate across layers and how the lc:AuthenticatingApplication component is used to access components.
Layers in the Workspace API architectureWorkspace API components reside in one of the following layers:
Presentation model layer: The layer consists of visual components that provide the user interface for various parts of the Workspace ES4 user interface. Each visual component consists of two parts, a view component and model component. Components in this layer can be reused to provide pieces of Workspace ES4 functionality without the requirement of knowing the implementation details. For example, you can use a single component to provide the Start Process function that includes the user interface. Use presentation model layer components to create Flex applications that reuse both Workspace ES4 user interface components and functionality.

ADOBE LIVECYCLE ES4Introduction Customizing the Flex-Based LiveCycle Workspace ES4 User Interface
13
Domain model layer: The layer consists of non-visual components that encapsulate process management business concepts (tasks, endpoints, and queues), as well as, non-process management concepts that communicate with the LiveCycle ES4 server (tokens and server connectivity). The components do not usually provide user interface functions. Typically, domain model objects are bound to and provide the data to model components. Domain objects communicate with the managers in the service API layer. Use domain model layer compo-nents to use process management functions and handle connectivity with the LiveCycle ES4 server.
Service API layer: The layer consists of components that provide manager components that communicate with the LiveCycle ES4 server. Components provide functions, as LiveCycle ES4 server connectivity, session management, generic event handling, user management, and updates to information for tasks, queues, and endpoints.
Service API layer components invoke the Task Manager Service API on the LiveCycle ES4 server. (See Programming with LiveCycle ES4) The Workspace API does not directly communicate with LiveCycle ES4 SDK exposed on the LiveCycle ES4. Instead, the Adobe LiveCycle Data Services ES4 provides the communication between the Workspace API components and LiveCycle ES4 SDK. Manager components from the service API layer use Action Message Format (AMF) protocol to maintain state information with the server. AMF is a binary data protocol that facilitates binary serialization of ActionScript objects and types. The AMF protocol provides high performance functions that update state and maintain concurrency with the states stored on the LiveCycle ES4 server.
Use the service API layer components to communicate with the LiveCycle ES4 server and manage the data passed to domain model layer components.

ADOBE LIVECYCLE ES4Introduction Customizing the Flex-Based LiveCycle Workspace ES4 User Interface
14
The following illustration shows how various components communicate with each other across different layers.
Authenticated sessionsThe lc:SessionMap component represents an authenticated session. It is necessary to authenticate with the LiveCycle ES4 server to use any of the components in Workspace API and required for components to function together. The lc:SessionMap is an important component that provides the following functions:
• Stores an authenticated session required for Flex applications to communicate with LiveCycle ES4. • Provides untyped access to all Workspace API objects. Almost all visual components require that you set the session attribute to an
instance of the lc:SessionMap class.You create an authenticated session to use components to create a custom version of Workspace ES4. It is recommended that you use the lc:AuthenticatingApplication component instead of managing the lc:SessionMap object in your application. The lc:AuthenticatingApplication component provides you the following benefits:
ADOBE LIVECYCLE ES4Introduction Customizing the Flex-Based LiveCycle Workspace ES4 User Interface
15
• Dynamic loading of localization files: Allows you to add a new localization file and deploy with your Flex application. A matching locale dynamically loads based on the language setting in the web browser of the user. If no matching localization file is found, a default localization file (en_US) is loaded.
• Dynamic loading of theme files: Allows you to customize the display settings of Workspace ES4, such as colors and images. A Cascading Style Sheet (CSS) file is compiled into a theme file. After you deploy the theme file with your Flex application, the display settings are automatically loaded.
• Automatic authentication of the user: Ensures that the logic within your application is not executed until the user is authenticated. If the session expires, the user is prompted to authenticate again without the requirement to add additional code.
• Singleton access of Workspace API components: Allows you to access singleton Workspace API components. Singleton components are useful for using domain model components. (See “Singleton access” on page 15.)
If you choose not to use the lc:AuthenticatingApplication component in your custom application, create a lc:SessionManager component. In your custom application, you provide the following functions:
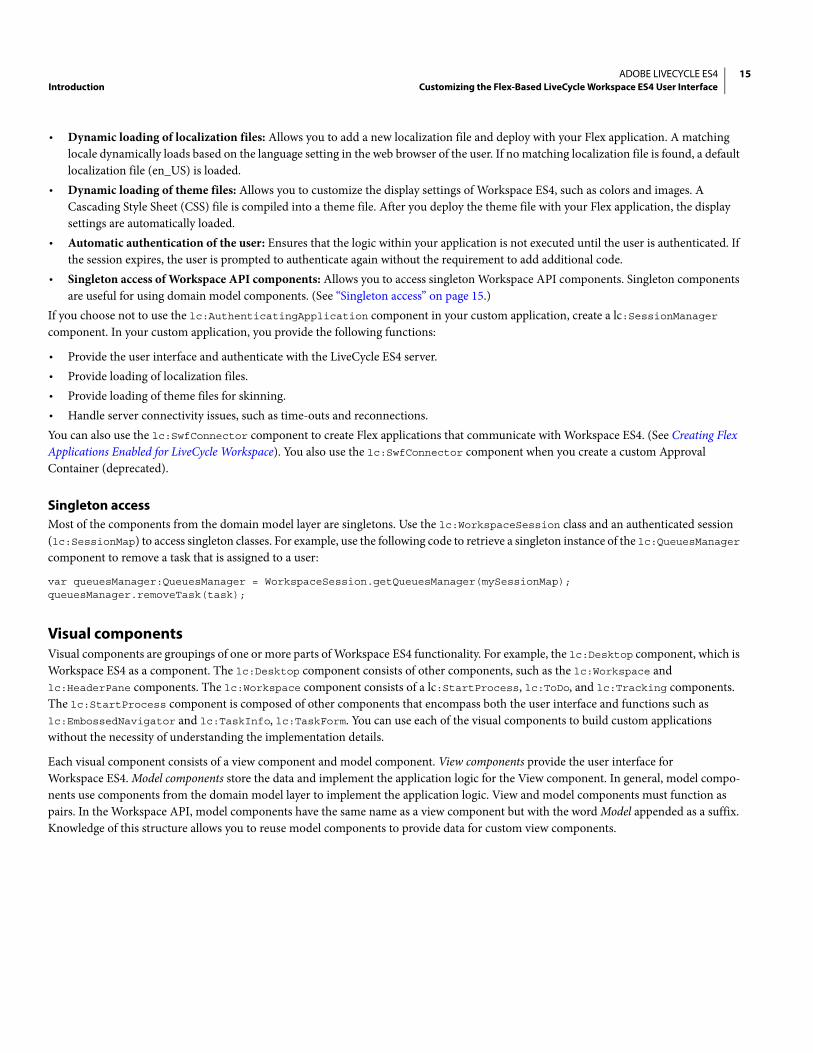
• Provide the user interface and authenticate with the LiveCycle ES4 server.• Provide loading of localization files.• Provide loading of theme files for skinning.• Handle server connectivity issues, such as time-outs and reconnections.You can also use the lc:SwfConnector component to create Flex applications that communicate with Workspace ES4. (See Creating Flex Applications Enabled for LiveCycle Workspace). You also use the lc:SwfConnector component when you create a custom Approval Container (deprecated).
Singleton access Most of the components from the domain model layer are singletons. Use the lc:WorkspaceSession class and an authenticated session (lc:SessionMap) to access singleton classes. For example, use the following code to retrieve a singleton instance of the lc:QueuesManager component to remove a task that is assigned to a user:
var queuesManager:QueuesManager = WorkspaceSession.getQueuesManager(mySessionMap); queuesManager.removeTask(task);
Visual components Visual components are groupings of one or more parts of Workspace ES4 functionality. For example, the lc:Desktop component, which is Workspace ES4 as a component. The lc:Desktop component consists of other components, such as the lc:Workspace and lc:HeaderPane components. The lc:Workspace component consists of a lc:StartProcess, lc:ToDo, and lc:Tracking components. The lc:StartProcess component is composed of other components that encompass both the user interface and functions such as lc:EmbossedNavigator and lc:TaskInfo, lc:TaskForm. You can use each of the visual components to build custom applications without the necessity of understanding the implementation details.
Each visual component consists of a view component and model component. View components provide the user interface for Workspace ES4. Model components store the data and implement the application logic for the View component. In general, model compo-nents use components from the domain model layer to implement the application logic. View and model components must function as pairs. In the Workspace API, model components have the same name as a view component but with the word Model appended as a suffix. Knowledge of this structure allows you to reuse model components to provide data for custom view components.
ADOBE LIVECYCLE ES4Introduction Customizing the Flex-Based LiveCycle Workspace ES4 User Interface
16
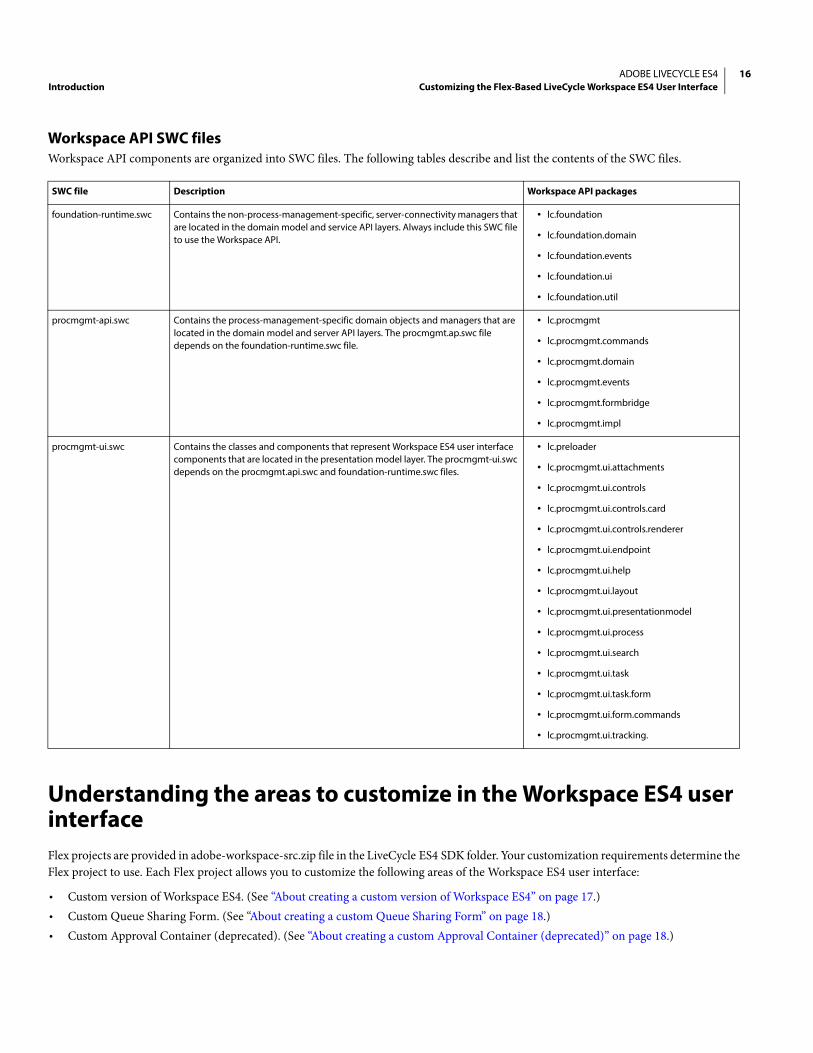
Workspace API SWC filesWorkspace API components are organized into SWC files. The following tables describe and list the contents of the SWC files.
Understanding the areas to customize in the Workspace ES4 user interface Flex projects are provided in adobe-workspace-src.zip file in the LiveCycle ES4 SDK folder. Your customization requirements determine the Flex project to use. Each Flex project allows you to customize the following areas of the Workspace ES4 user interface:
• Custom version of Workspace ES4. (See “About creating a custom version of Workspace ES4” on page 17.)• Custom Queue Sharing Form. (See “About creating a custom Queue Sharing Form” on page 18.)• Custom Approval Container (deprecated). (See “About creating a custom Approval Container (deprecated)” on page 18.)
SWC file Description Workspace API packages
foundation-runtime.swc Contains the non-process-management-specific, server-connectivity managers that are located in the domain model and service API layers. Always include this SWC file to use the Workspace API.
• lc.foundation
• lc.foundation.domain
• lc.foundation.events
• lc.foundation.ui
• lc.foundation.util
procmgmt-api.swc Contains the process-management-specific domain objects and managers that are located in the domain model and server API layers. The procmgmt.ap.swc file depends on the foundation-runtime.swc file.
• lc.procmgmt
• lc.procmgmt.commands
• lc.procmgmt.domain
• lc.procmgmt.events
• lc.procmgmt.formbridge
• lc.procmgmt.impl
procmgmt-ui.swc Contains the classes and components that represent Workspace ES4 user interface components that are located in the presentation model layer. The procmgmt-ui.swc depends on the procmgmt.api.swc and foundation-runtime.swc files.
• lc.preloader
• lc.procmgmt.ui.attachments
• lc.procmgmt.ui.controls
• lc.procmgmt.ui.controls.card
• lc.procmgmt.ui.controls.renderer
• lc.procmgmt.ui.endpoint
• lc.procmgmt.ui.help
• lc.procmgmt.ui.layout
• lc.procmgmt.ui.presentationmodel
• lc.procmgmt.ui.process
• lc.procmgmt.ui.search
• lc.procmgmt.ui.task
• lc.procmgmt.ui.task.form
• lc.procmgmt.ui.form.commands
• lc.procmgmt.ui.tracking.

ADOBE LIVECYCLE ES4Introduction Customizing the Flex-Based LiveCycle Workspace ES4 User Interface
17
About creating a custom version of Workspace ES4A Flex project builds a separate EAR file for you to deploy a custom version of Workspace ES4. The default installation of Workspace ES4 is not replaced (adobe-workspace-client.ear).
The EAR (Enterprise ARchive) file contains a WAR (Web ARchive) file. The WAR file contains files that comprise the custom version of Workspace ES4. To build more advanced customization or troubleshoot your custom version of Workspace ES4, it is necessary that you understand the files in the WAR file:
WAR Asset Description
Main.html The default HTML file that loads the SWF file containing the custom version Workspace ES4 application. The HTML file has IFrames that control the display of various forms (PDF, Acrobat, or HTML forms, and Flex applications). Modifying contents of the Main.html is not supported. The Main.html wrapper uses various JavaScript™ files to provide the following functions for web browser interac-tion:
• Determines the locale specified by the web browser for localization support
• Detects the version of Adobe Acrobat® or Adobe Reader®
• Controls the IFrames required for displaying PDF forms, HTML forms, Acrobat forms, and Flex applications
• Handles the authentication of a user and manages the time-out period.
myCustomApplication.swf The SWF file that contains a custom version of Workspace ES4. The Main.html file loads the SWF file. The SWF file determines the correct localization file and theme file to load. The name of the SWF file is determined by modifying the build.xml file. (See “Modify the build.xml file” on page 27.)
workspace-theme.swf The theme file that contains the cascading style sheets (CSS) file and images used by the custom version of Workspace ES4. A custom version of the workspace-theme.swf file is created for theme customization, such as color, images, fonts, and so on.
lc.css The Cascading Style Sheet (CSS) file that contains settings for skinning the Workspace ES4 user interface that includes images, colors, fonts, and spacing. The settings are built into a SWF file that is dynamically loaded during runtime.
LoadingCircle.swf The SWF file that indicates that an operation is in progress.
locale folder The folder that contains localization SWF files (or resource bundle files). Workspace ES4 is localized for English, French, German, and Japanese languages. Any custom localization files you create are stored in the locale folder. Localization SWF files have the naming convention of workspace_rb_[locale].swf where [locale] specifies the locale and region-specific settings. For example, en_US for U.S. English or ja_JP for Japanese.
.properties files The HTML files contain text to indicate that Adobe Flash® Player is not installed on the web browser. There is one file for each local-ized language. Add new files for each new language you provide. For example, if you are localizing Workspace ES4 to Spanish, create a file named alc_wks_client_es.properties.
js folder The folder that contains JavaScript files that the Workspace API uses to interact with PDF, HTML, and Flex applications. It is recom-mended that you do not modify files in the js folder.
images folder The folder of images that Workspace ES4 uses. Any images that you add are placed in this folder.

ADOBE LIVECYCLE ES4Introduction Customizing the Flex-Based LiveCycle Workspace ES4 User Interface
18
About creating a custom Queue Sharing FormThe Queue Sharing Form is a SWF file that is deployed as part of the Process Management (system)/Queue Sharing process. The form displays a request from another user to access a user’s queue. A Flex project allows you to build a custom version of the Queue Sharing Form. Typically, the Queue Sharing Form is customized for localization customizations. The following illustration shows the default Queue Sharing Form in Workspace ES4:
About creating a custom Approval Container (deprecated)The default Approval Container (deprecated) is a SWF file that displays PDF forms, HTML forms, or Flex applications (Flex forms). The default Approval Container (deprecated) allows users to add comments, lock, forward tasks as well as initiate and participate in processes. You can create a custom Approval Container (deprecated) that provides custom function for users. The SWF file provides a mechanism to control and customize the Workspace ES4 user interface without the requirement to build a custom version of Workspace ES4.
A Flex project contains the source code for the default Approval Container (deprecated). You can modify or use the source code as a reference to create a custom Approval Container (deprecated). The following illustration shows the default Approval Container (deprecated) boxed in red:

ADOBE LIVECYCLE ES4Introduction Customizing the Flex-Based LiveCycle Workspace ES4 User Interface
19
Upgrade considerationsPatches or upgrades to the LiveCycle ES4 server do not affect your custom version of Workspace ES4 because it is deployed to separate EAR file. Binary compatibility is assured when you upgrade as you are not required to recreate or rebuild your custom version of Workspace ES or Workspace ES4.
To include fixes from service pack or patch or leverage features from an upgrade, you rebuild your custom version of Workspace ES4. If you are upgrading from a previous version of LiveCycle, refactor your code to rebuild a custom version of Workspace ES4. For example, refactor your code when upgrading from LiveCycle ES to LiveCycle ES4 to use the new features in Workspace ES4.
It is a recommended practice to always rebuild using the most recent files from the LiveCycle ES4 SDK, such as the Flex projects from the adobe-workspace-src.zip file, JAR, and SWC files. All files in the LiveCycle ES4 SDK folder are updated when you apply a patch or service pack to the LiveCycle ES4 server. Previous versions of all updated files are available in backup folders created each time a patch or service pack is installed. For example, on the LiveCycle ES4 server where Service Pack 1 was installed, navigate to [installerdir]\Adobe\Adobe LiveCycle ES4\patch\SP1\backup_SP1\LiveCycle_ES_SDK\misc\Process_Management\Workspace, where [installdir] represents where LiveCycle ES4 is installed on a server.

20
3.Configuring Your Development Environment for LiveCycle ES4
Before you can configure your development environment, ensure that you have access to the LiveCycle ES4 DVD and a LiveCycle ES4 server. Also ensure that Flex Builder is installed on your computer and you have JAVA_HOME as an environment variable.
Complete the following tasks to configure your development environment for customizing the LiveCycle Workspace ES4 user interface:
• Install the LiveCycle ES4 version of the Flex SDK on your development computer. (See “Install the LiveCycle ES4 version of the Flex SDK” on page 20.)
• Configure Flex Builder or the Flex project to compile with the LiveCycle ES4 version of the Flex SDK. (See “Configure Flex Builder to use the LiveCycle ES4 version of the Flex SDK” on page 21.)
• Install the Ant plug-in to Flex Builder. (See “Install Ant to Flex Builder” on page 22.)Note: Certified testing of customization was completed with Flex Builder 3.x. Though certification testing has not been completed using Adobe Flash Builder 4, you can alternatively use Flash Builder if you do not have Flex Builder. (See http://blogs.adobe.com /livecycle/2011/02/customize-lc-workspace-ES2-ui-using-fb4-premium-on-64-bit-os.html.)
Install the LiveCycle ES4 version of the Flex SDKIt is necessary that you install the LiveCycle ES4 version of the Flex SDK to customize Workspace ES4. The LiveCycle ES4 version of the Flex SDK is available on the LiveCycle ES4 DVD and includes the following resources:
• Localization SWC files for proper localization support.• Enhancements that ensure Flex applications function properly within a LiveCycle ES4 environment.1 Exit Flex Builder if you have it open.2 On the LiveCycle ES4 DVD, navigate to the additional\flex_sdk folder and copy the flex_sdk_3.zip to your computer.3 Navigate to the sdks folder located in the root folder of your installation of Flex Builder 3. For example, navigate to the C:\Program
Files\Adobe\Flex Builder 3\sdks folder.4 Create a folder, such as 3.4.1.lc. 5 Using an archival and extraction tool, extract the flex_sdk_3.zip file to the folder created in the previous step.

ADOBE LIVECYCLE ES4Configuring Your Development Environment for LiveCycle ES4 Customizing the Flex-Based LiveCycle Workspace ES4 User Interface
21
After you complete the steps, the folder looks similar to the following illustration:
Configure Flex Builder to use the LiveCycle ES4 version of the Flex SDKTo develop Flex applications for LiveCycle ES4, set the LiveCycle ES4 version of the Flex SDK as the default Flex compiler. When the Flex SDK version is set for individual projects, LiveCycle ES4 specific contents in the html-template folder are incorrectly replaced. Incorrect content in the html-template folder causes issues when you deploy customizations to the LiveCycle ES4 server.
1 In Flex Builder, select Window > Preferences.2 In the Preferences dialog box, select Flex > Installed Flex SDKs and click Add.3 In the Add Flex SDK dialog box, complete the following steps:
• Click Browse. • In the Browse For Folder dialog box, select the folder you created in step 4 of the task, “Install the LiveCycle ES4 version of the Flex
SDK” on page 20, and click OK. For example, C:\Program Files\Adobe\Flex Builder 3\sdks\3.4.1.lc.• In the Flex SDK name box, type a name to identify the LiveCycle ES4 version of the Flex SDK. For example, Flex 3.4.1 - LCES4.• Click OK.
4 Select the check box beside the Flex SDK version that you added in the previous step, click Apply, and OK.

ADOBE LIVECYCLE ES4Configuring Your Development Environment for LiveCycle ES4 Customizing the Flex-Based LiveCycle Workspace ES4 User Interface
22
After you complete the steps, your Installed Flex SDKs list looks like the following illustration.
Configure the Flex compiler for 64-bit operating systemsWhen you use a 64-bit operating system, it is necessary to configure the Flex compiler to use the 32-bit JRE. Complete the following steps when you are using a 64-bit operating system.
1 Navigate to the location that you copied the Flex SDK for LiveCycle on your computer.2 Navigate to the bin folder. For example, C:\Program Files (x86)\Adobe\Flex Builder 3\sdks\3.4.1.lc\bin.3 Edit the jvm.config file and set the java.home variable to the location of the 32-bit JRE. For example, set the variable to the location of
the JRE that is installed with Flex Builder.java.home=C:\Program Files (86)\Adobe\Flex Builder 3\jre
4 Save the file.
Install Ant to Flex BuilderA build file is used to build a custom version of Workspace ES4 and package the required files into an EAR (Enterprise ARchive) file. The build file requires Ant and an additional Ant-Contrib library (version 1.0b2). Ant is a Java-based tool used to build software and provides packaging activities.
Note: It is not possible to use any other version of the ant-contrib library other than 1.0b2. It is recommended that you use Ant version 1.7.1 with the ant-contrib library 1.0b2. The Ant plug-in is not included in Flex Builder. Complete the following steps to install Ant and the Ant-contrib library to Flex Builder.
• Install Ant. (See Install the Ant plug-in to Flex Builder.)• Install the Ant-Contrib library. (See Install the Ant-contrib 1.0b2 library.)

ADOBE LIVECYCLE ES4Configuring Your Development Environment for LiveCycle ES4 Customizing the Flex-Based LiveCycle Workspace ES4 User Interface
23
Install the Ant plug-in to Flex BuilderIf you are using the Flex Builder 3.x or the Eclipse IDE (Flex Builder 3.x plug-in), verify whether Ant is installed before you complete the following steps. It is not necessary to complete these steps when you have the Ant plug-in installed.
1 In Flex Builder, select Help > Software Updates > Find and Install.2 In the Feature Updates dialog box, select Search for new features to install and click Next.3 In the Update Sites To Visit dialog box, in the Sites To Include In Search pane, select The Eclipse Project Updates option, deselect
Ignore features not applicable to this environment, and click Finish.Note: If you do not see The Eclipse Project Updates option, complete the following additional steps:
• Click New Remote Site, in the Name box, type The Eclipse Project Updates.• In the URL box, type http://update.eclipse.org/updates/3.3 and click OK.
4 In the Update Site Mirrors dialog box, select The Eclipse Project Updates and click OK.5 In the Search Results dialog box, select The Eclipse Project Updates > Eclipse 3.3.2 > Eclipse Java Development Tools
3.3.2.r33x_r20081029-7o7jE7_EDhYDiyVEnjb1pFD7ZGD7 and click Next.6 In the Feature License dialog box, read and accept the terms and click Next.7 In the Installation dialog box, click Finish and if the Update Verification dialog box appears, click Install.8 In the Install/Update dialog box, click Yes.
Install the Ant-contrib 1.0b2 library 1 In a web browser, type http://sourceforge.net/projects/ant-contrib/ and download the ant-contrib-1.0b2-bin.zip file.2 Extract the contents of the ant-contrib-1.0b2-bin.zip file to a folder on your computer. For example, C:/ant. 3 In Flex Builder, select Window > Preferences.4 Select Ant > Runtime.
Note: Ant is only available if you correctly installed Ant into Flex Builder.5 In the Runtime pane, on the Classpath tab, select Ant Home Entries (Default) and click Add External JARs.6 In the Open dialog box, navigate to the folder to which you extracted the ant-contrib-1.0b2-bin.zip file, select ant-contrib.jar, and click
Open. The ant-contrib.jar file is located under [ant folder]/ant-contrib/lib, where [ant folder] is the folder you extracted the ZIP file to in step 2.
7 Click Apply and OK.

24
4. Importing and configuring the Flex projects
Complete the following tasks to import and configure the Flex projects from the adobe-workspace-src.zip file:
1 Copy the most recent versions of the files required to customize the Workspace ES4 user interface. (See “Retrieve the most recent files for customization” on page 24.)
2 Import the Flex projects into Flex Builder. (See “Import the Flex projects” on page 25.)3 Configure the Flex project to build a custom version of Workspace ES4. (See “Configure the workspace-ui project” on page 26.)4 Configure the Flex project to build a custom version of the Queue Sharing Form (See “Configure the queue-sharing project” on page 30.)5 Configure the Flex project to build a custom Approval Container (deprecated). (See “Configure the approval-container (deprecated)
project” on page 30.)6 (Optional) Configure the Flex projects in debug mode. (See “Configure Flex projects for debugging” on page 31.)
Retrieve the most recent files for customizationMultiple Flex projects for customizing the Workspace ES4 user interface are provided in an archived file, adobe-workspace-src.zip. You extract the source to a separate folder on your computer to customize and deploy assets required to customize Workspace ES4. A specific folder structure is required to correctly build a custom version of Workspace ES4. Do not extract the source code to a Flex Builder workspace.
Important: Always use the most recent version of the adobe-workspace-src.zip file, JAR, and SWC files for customizing the Workspace ES4 user interface.
When a patch or service pack is installed on the LiveCycle ES4 server that contains fixes to adobe-workspace-src.zip file and Workspace API SWC files, or JAR files, files are updated in the LiveCycle ES4 SDK folder. To ensure that you have the most recent version of a file, compare the timestamps of the following files in the [lcinstalldir]\patch\SP2\files folder with the LiveCycle ES4 SDK. The value [lcinstalldir] repre-sents the location where LiveCycle ES4 is installed
• adobe-workspace-src.zip• adobe-livecycle-client.jar• adobe-usermanager-client.jar• foundation-runtime.swc• procmgmt-api.swc• procmgmt-ui.swcThe most recent version of the files is located in the patch folder on the LiveCycle ES4 server. Previous versions of all updated files are available in backup folders when a patch or service pack is installed.
1 Navigate to LiveCycle ES4 SDK folder. The LiveCycle ES4 SDK can be accessed at one of the following locations:• LiveCycle ES4 server: Navigate to the LiveCycle ES4 SDK folder in [lcinstalldir]\LiveCycle_ES_SDK\.
For example, for a JBoss turnkey installation in a Windows environment, navigate to the C:\Adobe\LiveCycle ES4\LiveCycle_ES_SDK\ folder to your computer.
• Computer where LiveCycle Workbench ES4 is installed: Navigate to the LiveCycle ES4 SDK folder in [wbinstalldir]\LiveCycle ES\Workbench ES\LiveCycle_ES_SDK\, where [wbinstalldir] represents the location Workbench ES4 is installed. It is recommended that you access the LiveCycle ES4 server to ensure that you have the most recent version of the files.

ADOBE LIVECYCLE ES4Importing and configuring the Flex projects Customizing the Flex-Based LiveCycle Workspace ES4 User Interface
25
For example, for a JBoss turnkey installation in a Windows environment, navigate to the C:\Adobe\LiveCycle ES4\LiveCycle_ES_SDK\ folder on the LiveCycle ES4 server.
2 Copy the contents of the LiveCycle ES4 SDK folder from the LiveCycle ES4 server to your computer, such as C:/Adobe/LiveCycle ES4/.3 Navigate to [LCSDK]\misc\Process Management\ Workspace, where [LCSDK] represents the location to which you copied the
LiveCycle ES4 SDK folder to in step 1.4 Extract the adobe-workspace-src.zip file to a folder on your computer. For example, C:\Workspace_Code.
Import the Flex projectsFlex projects for customizing the Workspace ES4 user interface are available from the adobe-workspace-src.zip. When you extract the ZIP file to your computer, a particular directory structure must be maintained. Do not copy the Flex projects into your Flex Builder workspace. For more information about the projects that you import to Flex Builder to customize Workspace ES4, see “About the Flex projects used for customizing the Workspace ES4 user interface” on page 25.
1 In Flex Builder, select Project > Build Automatically to disable the option (A check mark appears beside the item when it is enabled).2 Select File > Import > Other. 3 In the Import dialog box, select General > Existing Projects into Workspace and click Next.4 Click the Browse button beside the Select root directory option.5 In the Browse For Folder dialog box, navigate to and select the folder that you extracted the adobe-workspace-src.zip file to in step 5 of
the previous tasks (See “Retrieve the most recent files for customization” on page 24), and click OK.6 Ensure that the Copy projects into workspace option is deselected and click Finish.After you complete the steps, the api, approval-container (deprecated), foundation, queue-sharing, and workspace-ui projects appear in the Flex Navigator view as shown in the following illustration:
About the Flex projects used for customizing the Workspace ES4 user interfaceAfter you extract the adobe-workspace-src.zip file to your computer, you have the following three folders:

ADOBE LIVECYCLE ES4Importing and configuring the Flex projects Customizing the Flex-Based LiveCycle Workspace ES4 User Interface
26
• ApprovalContainer: A Flex project that contains the source code for the default Approval Container (deprecated) available in Workspace ES4. Modify this project or use it as a reference to create a custom Approval Container (deprecated). After you build a custom Approval Container (deprecated), configure and deploy the SWF File to a LiveCycle ES4 application using LiveCycle Workbench ES4.
• QueueSharing: A Flex project that contains the source code for the default Queue Sharing Form in Workspace ES4. Modify this project as required. After you build the custom Queue Sharing Form, configure and deploy the SWF file using Workbench ES4.
• Workspace: A collection of projects organized in three subfolders as follows:• foundation: A Flex Library project that contains the source code for components that provide communication and base function-
ality. Modifications to the source code are not supported.• api: A Flex Library project that contains the source code for components that provide specific process management and
Workspace ES4 functionality. Modifications to the source code are not supported.• ui: A Flex project that contains the necessary assets to create a custom version of the Workspace ES4 user interface. The assets
include the source code for various view and model components. You can modify the Main.html file, create new components, or extend Workspace API components. Modifications to the source code under the lc folder are not supported.Below are the descriptions for the folders and files in the ui folder:• .externalToolBuilders: A folder that contains configuration files for the build environment of the project.• bin: The default folder when using the Flex Builder compiler. This folder is not used when you build using the Ant script. • export: A folder that contains SWC file from building the view and model components.• html-template: A folder that contains the html-template files, JavaScript scripts, and resources that are required for building the
WAR and EAR files.• locale: A folder that contains a folder for each locale that is compiled. You can add additional folders to represent each locale
you want to support.• src: A folder that contains the Main.mxml file that is set as default application. In this folder, you can place custom code that
uses the Workspace API for custom applications that you build or customize Workspace ES4 user interface directly.• src/lc: A folder that contains the Workspace API view and model components.• templates: A folder that contains the templates files that are used for creating the EAR and WAR files. Modifications to the files
in this folder occur when you want to change the name of the context root of your customized version of Workspace ES4.• theme: A folder that contains an images subfolder and the CSS file that you modify to customize the images, colors, and fonts.
Any custom images that you want to use in your customization must be added to the images subfolder.• tmp: A folder that contains temporary files that are created when compiling the localization files and custom EAR file.• build.xml: The file that contains the build scripts for compiling Workspace ES4. Usually, you modify only the portion of the file
that pertains to adapting the file to the settings on your computer.• services-config.xml: The file that contains the settings such as remote services, default locale, and polling for the
Workspace ES4. This file is required for compiling applications that you build by using the Workspace API and for compiling Workspace ES4.
Configure the workspace-ui projectConfigure the workspace-ui project to use an Ant builder instead of the default builder (named Flex).
1 Modify the build.xml file to match your development settings. (See “Modify the build.xml file” on page 27.)2 Create a builder to run the build.xml file. (See “Create an Ant builder for building the workspace-ui project” on page 27)3 (Optional) Configure advanced configuration settings to build customizations that deploy to a production environment. (See
“Configure advanced deployment settings” on page 29.)

ADOBE LIVECYCLE ES4Importing and configuring the Flex projects Customizing the Flex-Based LiveCycle Workspace ES4 User Interface
27
Modify the build.xml fileThe build file, build.xml, contains the build scripts that are provided for the workspace-ui project.
The build file is used to build a custom version of the Workspace ES4. The build file does not build a custom Approval Container (depre-cated) or custom Queue Sharing Form. When you are ready to deploy to a production environment, you can modify additional settings in the build.xml. (See “Settings in the build.xml file” on page 27.)
1 In Flex Builder, in the Flex Navigator view, in the workspace-ui project and open the build.xml file.2 In the editor, locate the following block of text and modify the flex.sdk.home and lc.sdk.dir properties to correspond to your devel-
opment environment. <!-- Modify the following properties to match your setup --><property name="flex.sdk.home" location="C:/Program Files/Adobe/Flex Builder 3/sdks/3.4.0.lc" /><property name="lc.sdk.dir" location="C:/Adobe/LiveCycle ES 2/LiveCycle_ES_SDK" /><property name="application.title" value="My Custom Application"/><property name="application.name" value="myCustomApplication"/><property name="app.name" value="Main"/>
3 Select File > Save and select File > Close.
Settings in the build.xml fileYou can modify the following settings in the build.xml file:
flex.sdk.home: The folder on your computer where you installed the Flex SDK version for LiveCycle ES4, such as C:/Program Files/Adobe/Flex Builder 3/sdks/3.4.1.lc.
lc.sdk.dir: The location on your computer where to which you copied the LiveCycle ES4 SDK from the LiveCycle ES4 server.
Optionally, modify the following values in the build.xml:
application.title: The initial name that appears when Workspace ES4 is displayed in a web browser. The name is displayed until the SWF file for Workspace ES4 is loaded in the web browser.
application.name: The name of the EAR file that is built and the value of the URL to access the custom version of Workspace ES4. Do not use an existing URL, such as workspace. (See “Configure advanced deployment settings” on page 29.) After you change the value, it is also necessary to configure access to the new URL on the LiveCycle ES4 server. (See “Deploy a custom version of Workspace ES4” on page 34.)
app.name: The name of the file that is set as the Default application in your Flex project. This value usually specifies the name of the MXML file (without the MXML extension) to use as the default application. The value must correspond to the name of the file that is set as the default application in the workspace-ui project. You must also configure access to the new URL on the LiveCycle ES4 server when you change the value. (See “Deploy a custom version of Workspace ES4” on page 34.)
Create an Ant builder for building the workspace-ui projectCreate an Ant builder to use a build.xml file. The build file included with the workspace-ui project includes multiple Ant directives. For information about the build.xml directives, see About Ant directives for workspace-ui project.)
Ensure that you disable the default builder after you create the Ant builder for the workspace-ui project. The output messages using an Ant builder display in the Console view.
It is a recommended practice to deselect the Project > Build Automatically option to build when necessary.
1 In Flex Builder, in the Flex Navigator view, right click workspace-ui, and select Properties.2 Select Builders.3 In the Builders pane, click New.
ADOBE LIVECYCLE ES4Importing and configuring the Flex projects Customizing the Flex-Based LiveCycle Workspace ES4 User Interface
28
4 In the Chose Configuration Type dialog box, select Ant Builder and click OK.5 In the Properties for New_Builder dialog box, in the Name box, type a name such as WorkspaceCustBuilder.6 Below the Buildfile box, complete the following steps to configure the location of the build file:
• Click Browse File System.• In the Open dialog box, select the [extracted code folder]\Workspace\ui\build.xml file where [extracted code folder] is the folder to
which you extracted the adobe-workspace-src.zip file, and click Open. For example, C:\Workspace_Code\Workspace\ui\build.xml.7 Below the Base Directory box, complete the following steps to select the location of the base directory:
• Click Browse File System.• In the Browse For Folder dialog box, select the [extracted code folder]\Workspace\ui folder where [extracted code folder] is the folder
to which you extracted the adobe-workspace-src.zip file, and click OK. For example, C:/Workspace_Code/Workspace/ui.8 Click Apply and click OK.9 Confirm that the New Builder you created is selected, deselect the default Flex Builder, named Flex, and click OK. (If a Confirm Disable
Builder dialog box appears, click OK).10 In the Properties for workspace-ui dialog box, click OK.
About Ant directives for workspace-ui projectYou can toggle what you see in the Ant view by clicking the Hide Internal Targets button. To make the targets appear, click the Add Build Files button and select the build.xml file from the workspace-ui project.
You can display the Ant view in Flex Builder from the Show View dialog box by selecting Window > Other Views.
You run the all[default] target to build your Workspace ES4 user interface customizations. You can run each build script independently for troubleshooting. The following targets are available:
• buildEar: Creates an EAR file for deployment to an application server that contains a WAR file.• buildWar: Creates the WAR file that contains the built SWF file for Workspace ES4, localization files, theme file, images, and related
assets.• clean: Deletes all the output files from the bin, bin-debug, export, and tmp folders.• compileApi: Builds only the source file that is under the src folder in the api project.• compileFoundation: Builds the files under the src folder in the foundation project. • compileMain: Builds all the files in the src folder for foundation, api, and workspace-ui project.• compileTheme: Builds the workspace-theme.swf file.

ADOBE LIVECYCLE ES4Importing and configuring the Flex projects Customizing the Flex-Based LiveCycle Workspace ES4 User Interface
29
• compileUi: Builds the files under the src folder in the workspace-ui project.• locales: Creates the localization files. The locales that are built are based on the name of the folders beneath the locale folder in the
workspace-ui project.• setup: Extracts the necessary files to build the theme and localization files.• updateTemplates: Creates and configures the require settings in the Main.html.
Configure advanced deployment settingsFor production environments, consider replacing the default values with a more relevant value that matches your organization. For example, if you were creating a custom version of Workspace ES4 for an organization named Fin@nce Corporation, change the application.name value from myCustomApplication to financecorp.
1 In the build.xml file, modify the application.title, application.name, and app.name as necessary. For example, change the values to represent the organization, Fin@nce Corporation:<!-- Modify the following properties to match your setup --><property name="flex.sdk.home" location="C:/Program Files/Adobe/Flex Builder 3/sdks/3.4.0.lc" /><property name="lc.sdk.dir" location="C:/Adobe/LiveCycle ES 2/LiveCycle_ES_SDK" /><property name="application.title" value="Finance Corp"/><property name="application.name" value="financecorp"/><property name="app.name" value="Main"/>
2 In the web.xml file, modify the URL and display name as necessary. The web.xml file located under the templates folder in the Flex project. The following example shows changes to have the URL be financecorp:<!DOCTYPE web-app PUBLIC "-//Sun Microsystems, Inc.//DTD Web Application 2.3//EN" "http://java.sun.com/dtd/web-app_2_3.dtd"><web-app>
<display-name>Finance Corp</display-name><description>Adobe Workspace Application for Finance Corp</description><filter>
<filter-name>SecurityFilter</filter-name><filter-class>com.adobe.idp.um.auth.filter.SecurityFilter</filter-class><init-param>
<param-name>source_url</param-name><param-value>/financecorp/Main.html</param-value>
</init-param><init-param>
<param-name>login_url</param-name><param-value>/financecorp/Main.html</param-value>
</init-param><init-param>
<param-name>passive_mode</param-name><param-value>true</param-value>
</init-param></filter>
<filter-mapping>
<filter-name>SecurityFilter</filter-name><url-pattern>/Main.html/*</url-pattern>
</filter-mapping>
<filter-mapping><filter-name>SecurityFilter</filter-name><url-pattern>/login/*</url-pattern>
</filter-mapping>
<welcome-file-list>

ADOBE LIVECYCLE ES4Importing and configuring the Flex projects Customizing the Flex-Based LiveCycle Workspace ES4 User Interface
30
<welcome-file>Main.html</welcome-file><welcome-file>redirect.jsp</welcome-file>
</welcome-file-list></web-app>
3 (Optional) Complete the following steps to customize the display the name in the browser:• In Flex Builder, in the Flex Navigator view, navigate to workspace-ui > html-template folder.• Double-click alc_wks_client_html_de.properties file.• In the editor, change the value of Adobe LiveCycle Workspace ES4 to a value that meets your requirements. For example, Fin@nce
Corporation Workspace.4 Repeat step 3 for all .properties files, such as alc_wks_client_html_de.properties, alc_wks_client_html_fr.properties,
alc_wks_client_html_ja.properties. Also modify any .properties files you added when you localized Workspace ES4. (See “Create an error file for a new locale” on page 44.)
Configure the queue-sharing projectThe queue-sharing project uses the default builder provided in Flex Builder.
1 In Flex Builder, in the Flex Navigator view, right click queue-sharing and select Properties.2 In the Properties for queue-sharing dialog box, click Flex Build Path.3 Click Library Path.4 Click Add SWC Folder.5 In the Add Folder dialog box, click Browse.6 In the Browse For Folder dialog box, navigate to and select [LC_SDK]\misc\Process_Management\Workspace\libs and click OK.
[LC_SDK] is the location on your computer to which you copied the LiveCycle ES4 SDK folder. For example, C:\Adobe\LiveCycle ES4\LiveCycle_ES_SDK.
7 In the Add Folder dialog box, click OK.8 In the Properties For Queue-sharing dialog box, click OK.
Configure the approval-container (deprecated) projectThe approval-container (deprecated) project uses the default builder provided in Flex Builder. When you want to create a layout for a custom Approval Container (deprecated), consider importing the assets from the approval-container (deprecated) to a separate Flex project.
1 In Flex Builder, In the Flex Navigator view, right click approval-container (deprecated) and select Properties.2 In the Properties for approval-container (deprecated) dialog box, click Flex Build Path.3 Click Library Path.4 Click Add SWC Folder.5 In the Add Folder dialog box, click Browse.6 In the Browse For Folder dialog box, navigate to and select [LC_SDK]\misc\Process_Management\Workspace\libs and click OK.
[LC_SDK] is the location on your computer to which you copied the LiveCycle ES4 SDK folder. For example, C:\Adobe\LiveCycle ES4\LiveCycle_ES_SDK.
7 In the Add Folder dialog box, click OK.8 In the Properties For approval-container (deprecated) dialog box, click OK.

ADOBE LIVECYCLE ES4Importing and configuring the Flex projects Customizing the Flex-Based LiveCycle Workspace ES4 User Interface
31
Configure Flex projects for debuggingYou can configure the workspace-ui project, approval-container (deprecated), or queue-sharing projects to run in debug mode for the following purposes:
• Debug code that you modified.• Trace the provided source code to understand the execution and how to use the Workspace API components.In Flex Builder, the Console view displays debugging information. To use the debugger, configure breakpoints in the code and test in the web browser to trigger the breakpoint. Automatic Flash Player upgrades sometimes install a non-debug version of Flash Player. Ensure that you have a Debug version of Flash Player installed.
Consider creating separate debug configurations for each Flex project to debug separate projects.
1 In Flex Builder, complete the following steps:• Right-click the project and select Properties. For example, right-click the workspace-ui project.• In the Properties for Workspace dialog box, select Flex Build Path.• On the Source path tab, in the Main source folder box, type src. • Click OK.
2 Open the build.xml from the workspace-ui project. 3 In the editor, find the locales and compileMain build targets, change the -debug argument from false to true, and save your
changes. The following shows the lines to change:At line 118:<exec taskname="mxmlc" executable="${mxmlc-executable}" failonerror="true">
<arg value="-locale=${@{locale}}"/><arg value="-output=${basedir}/../export/workspace_rb_${@{locale}}.swf"/><arg value="-debug=true"/><arg value="-source-path"/><arg value="${basedir}/tmp/locale/${@{locale}}"/><arg value="-include-resource-bundles"/><arg value="alc_wks_client_msg"/><arg value="alc_wks_client_ui"/><arg value="charts"/>
At line 220:<target name="compileMain" depends="compileFoundation, compileApi, compileUi">
<java taskname="mxmlc" jar="${flex.sdk.home}/lib/mxmlc.jar" dir="${flex.sdk.home}/frameworks" fork="true" failonerror="true"><jvmarg value="-Xmx512m" /><arg value="-headless-server=true"/><arg value="-locale="/><arg value="-debug=true"/><arg value="-library-path+=
${basedir}/../foundation/export/foundation-runtime.swc;${basedir}/../api/export/procmgmt-api.swc;${basedir}/../ui/export/procmgmt-ui.swc"/>
<arg value="-services"/><arg value="${basedir}/../services-config.xml"/><arg value="-o"/><arg value="${basedir}/tmp/${swf}"/><arg value="--"/><arg value="${basedir}/../ui/src/${app.name}.mxml"/>
/java></target>
4 In the Flex Navigator view, right-click the project, and select Build Project. For example, workspace-ui.

ADOBE LIVECYCLE ES4Importing and configuring the Flex projects Customizing the Flex-Based LiveCycle Workspace ES4 User Interface
32
5 Deploy the output file:• In Windows Explorer, navigate to [Workspace code]\Workspace\export\. [Workspace code] is the location on your computer to which
you extracted the Flex projects. For example C:\Workspace_Code. For example, navigate to C:\Workspace_Code\Workspace\export. Caution: The export folder is not the same as the export folder you see in the workspace-ui project. (See “Deploy a custom version of Workspace ES4” on page 34.)
• In Flex Builder, for the approval-container (deprecated) and queue-sharing projects, deploy the SWF file. (See “Deploy the custom Queue Sharing Form” on page 36 and “Deploy the custom Approval Container (deprecated)” on page 38.)
6 In the Flex Navigator view, right click the project and select Debug As > Open Debug Dialog.7 In the Debug dialog box, select Flex Application.8 Click the New launch configuration button.9 On the Main tab, complete the following steps:
• In the Name box, type a name for the configuration. For example, debugWS.• Beside the Project box, click Browse.• In the Select Project dialog box, select the project, and click OK. For example, workspace-ui.• In the Application file box, set the file set as the default application. For example, src/Main.mxml.• On the URL or path to launch area, deselect Use defaults and, in the Debug, Profile, and Run boxes, type the URL to your custom
version of Workspace ES4, and add ?debug=true to the end. (See “Test a custom version of Workspace ES4” on page 36.) For example, for a JBoss turnkey installation on a server named lcserver, type http://lcserver:8080/myCustomApplication/Main.html?debug=true.

ADOBE LIVECYCLE ES4Importing and configuring the Flex projects Customizing the Flex-Based LiveCycle Workspace ES4 User Interface
33
After you complete the steps, the Debug dialog box looks like the following illustration.
10 Click Apply and click Run. If a Save a Launch dialog box appears, click OK.11 In the web browser, login to Workspace ES4. After breakpoint is hit in the Workspace ES4 source code, Flex Builder windows appears
in Flex Debug perspective. Right-click the project and select Run As > Flex application to start a new debug session. For example, workspace-ui.
12 If a Flash Player [playerversion] dialog box appears, complete one of the following steps and click Connect:• When Flex Builder and the LiveCycle ES4 server are on the same computer, select LocalHost.• When Flex Builder and the LiveCycle ES4 server are installed on separate computers, select Other Machine. In the Enter IP address
box and type the IP address of your computer.

34
5. Building, Deploying, and Testing Workspace ES4 user interface customizations
Depending on the type of user interface customization, it is sometimes necessary to build multiple projects and deploy multiple assets to customize LiveCycle Workspace ES4. For example, to localize Workspace ES4 to Spanish, it is necessary build all three provided Flex projects and deploy multiple files to complete the customization. Other customizations, such as branding, requires that you build and deploy one file.
Each project builds and deploys differently. It is necessary for you to understand the differences to verify that your customizations function correctly. The following tasks describe how to build and deploy the various files for customizing the Workspace ES4 user interface:
• Build, deploy, and test a custom version of Workspace ES4. (See “Build, deploy, and test a custom version of Workspace ES4” on page 34.)
• Build, deploy, and test a custom Approval Container (deprecated). (See “Build, deploy, and test a custom Approval Container (depre-cated)” on page 37.)
• Build, deploy, and test a custom Queue Sharing Form. (See “Build, deploy, and test a custom Queue Sharing Form” on page 36.)
Build, deploy, and test a custom version of Workspace ES4Build the workspace-ui project to create a custom version of Workspace ES4. The workspace-ui is a Flex project that also uses two Flex library projects named api and foundation. Included in each project is the source code for the components that comprise the Workspace API. Separate SWC files are built for the workspace-ui, api, and foundation projects and are located in export folder of each project.
After a successful build, you deploy the EAR file to a LiveCycle ES4 server. The name of EAR file depends on the value defined in the build.xml file.(See Modify the build.xml file.)
Complete the following tasks to build, deploy, and test a custom version of Workspace ES4:
• Build a custom version of Workspace ES4. (See “Build a custom version of Workspace ES4” on page 34.)• Deploy a custom version of Workspace ES4. (See “Deploy a custom version of Workspace ES4” on page 34.)• Test a custom version of Workspace ES4 (See “Test a custom version of Workspace ES4” on page 36.)For information to resolve issues deploying, building, testing your custom version of Workspace ES4, see “Troubleshooting” on page 79.
Build a custom version of Workspace ES4Ensure that you created Ant builder before you build a custom version of Workspace ES4. (See “Create an Ant builder for building the workspace-ui project” on page 27.)
❖ In Flex Builder, in the Flex Navigator view, right click workspace-ui, and select Build Project.
Deploy a custom version of Workspace ES4 You deploy an EAR file to a LiveCycle ES4 server to deploy a custom version of Workspace ES4. The EAR file is created after building the workspace-ui project. In addition to deploying the EAR file, you configure access to the URL for the custom version of Workspace ES4 on the LiveCycle ES4 server.

ADOBE LIVECYCLE ES4Building, Deploying, and Testing Workspace ES4 user interface customizations Customizing the Flex-Based LiveCycle Workspace ES4 User Interface
35
The provided steps use a JBoss Turnkey installation of LiveCycle ES4. There are minor variations to deploying the EAR file depending on the application server that the LiveCycle ES4 server is installed on.
1 In a web browser, type http://[servername]:[port]/adminui to use the LiveCycle Administration Console, where:• [servername] is the name of the computer where LiveCycle ES4 is installed.• [port] is the default port for accessing the web server. For example, for a JBoss turnkey installation, the default port is 8080.
2 Click Settings > User Management > Configuration > Import and export configuration files.3 Click Export and save the config.xml file to your computer. 4 Open the config.xml file using a text editor and add a unique key and a URL after the <map> element that follows the <node
name="AllowedUrls">, and save the file. For example, add the following entry to the existing elements within the <map> and </map>tags:...<node name="SSO">
<map/><node name="AllowedUrls">
<map><entry key="ws-cs" value="/myCustomApplication/Main.html"/><entry key="ws-ls" value="/workspace/Main.html"/><entry key="cs-l" value="/contentspace/faces/jsp/login.jsp"/><entry key="rm-l" value="/edc/Login.do"/><entry key="rm-o" value="/edc/Logout.do"/><entry key="pdfg-s" value="/pdfgui/secured/index.jsp"/><entry key="re-ls" value="/ReaderExtensions/Welcome"/><entry key="rm-s" value="/edc/Welcome.do"/><entry key="cs-o" value="/contentspace/n/logout"/><entry key="pdfg-o" value="/pdfgui"/><entry key="cs-s" value="/contentspace/faces/jsp/dashboards/container.jsp"/><entry key="pdfg-l" value="/pdfgui/secured/login.jsp"/>
</map>...
5 In LiveCycle Administration Console, click Browse.6 In the File Upload dialog box, navigate to and select the config.xml file that you modified in step 4, and click Open.7 Click Import and OK.8 Click Logout.9 On the LiveCycle ES4 server, navigate to the location to deploy the EAR file. For example, for JBoss turnkey installation, navigate to
[installdir]\Adobe\LiveCycle ES4\server\lc_turnkey\deploy folder.10 In an Windows Explorer window, navigate to [Workspace code]\Workspace\export\. [Workspace code] is the location on your computer
to which you extracted the Flex projects. For example, C:\Workspace_Code\Workspace\export.Caution: The export folder is not the same as the export folder you see in the workspace-ui project. (See “Deploy a custom version of Workspace ES4” on page 34.)
11 Copy the EAR file from the folder in step 11 to the deploy folder on the JBoss Application Server.The name of the EAR file depends on the value you configured for the application.name property. For example, copy myCustomAppli-cation.ear file to the [installdir]\Adobe\LiveCycle ES4\server\lc_turnkey\deploy folder on LiveCycle ES4 server. (See “Modify the build.xml file” on page 27.)
12 (Optional) Restart the application server if required. Some application servers require you to restart the application server after a new EAR file is deployed.

ADOBE LIVECYCLE ES4Building, Deploying, and Testing Workspace ES4 user interface customizations Customizing the Flex-Based LiveCycle Workspace ES4 User Interface
36
Test a custom version of Workspace ES4You can test the custom version of Workspace ES4 using a web browser. Connect to the LiveCycle ES4 server where you deployed the EAR file for your custom version of Workspace ES4. For information about best practices for testing your customizations, see “Best practices for testing customizations” on page 40.
To view your changes, it is sometimes necessary to delete the online and offline files cached by the web browser.
1 Configure the language settings in your web browser if you are testing localization customizations. (See “Configure a web browser to test localization changes” on page 39.)
2 In a web browser, type http://[servername]:[port]/[name space]/Main.html, where • [servername] is the name of the computer where LiveCycle ES4 is installed.• [port] is the default port for accessing the web server. For example, for a JBoss turnkey installation, the default port is 8080.• [name space] is the value you provided used to access the custom version of Workspace ES4. The name depends on the value you
configured for the application.name property in the build.xml file. (See “Modify the build.xml file” on page 27.)• [html page] is the HTML home page. The default value is Main.html and is configured in the templates folder.For example, if the server name is lcserver, the port is 8080, and the value of application.name is set to myCustomApplication, type http://lcserver:8080/myCustomApplication/Main.html in a web browser.
3 Type a user ID and password, click Login and verify that the custom version of Workspace ES4 and your customizations function correctly.
Build, deploy, and test a custom Queue Sharing FormA custom Queue Sharing Form is typically built for localization or theme customizations. After you build the queue-sharing project, you can configure the Queue Sharing process in Workbench ES4 to use your custom Queue Sharing Form.
Complete the followings tasks to build, deploy, and test a custom Queue Sharing Form:
• Build the Queue Sharing Form. (See “Build the custom Queue Sharing Form” on page 36.)• Configure and deploy the QueueSharingForm.swf file in Workbench ES4. (See “Deploy the custom Queue Sharing Form” on page 36.)• Test the custom Queue Sharing Form in Workspace ES4 (See “Test a custom QueueSharingForm.swf file” on page 37.)For information about how to resolve issues deploying, building, testing your custom Queue Sharing Form, see “Troubleshooting” on page 79.
Build the custom Queue Sharing Form❖ In Flex Builder, in the Flex Navigator view, right-click queue-sharing, and select Build Project.
Deploy the custom Queue Sharing FormYou must log in to LiveCycle Workbench ES4 and configure the Process Management (system) application to use the custom Queue Sharing Form.
1 In LiveCycle Workbench ES4, type a user name and password, and click Login.2 Select File > Get Application.3 In the Get Applications dialog box, select Process Management (system) > Process Management (system)/1.0 (or the most recent
version) and click OK.4 In the Applications view, right-click Process Management (system) and select New > Application Version.

ADOBE LIVECYCLE ES4Building, Deploying, and Testing Workspace ES4 user interface customizations Customizing the Flex-Based LiveCycle Workspace ES4 User Interface
37
5 In the New Application Version dialog box, in the Select the application list, select the most recent process version, select a Major Version, such as 2 and a Minor Version, such as 0, and click Finish.
6 In the Applications view, navigate to the application version you created in the previous step, and right-click the QueueSharing, and select Check Out.Note: The Queue Sharing Form is named QueueSharing, while the process is named Queue Sharing.
7 In Explorer, navigate to [Workspace code]\QueueSharing\bin\. [Workspace code] is the location on your computer to which you extracted the Flex projects. For example, C:\Workspace_Code\QueueSharing\bin.
8 In Workbench ES4, import the QueueSharing.swf file to a LiveCycle ES4 application by dragging the SWF file from Windows Explorer to the Applications view. For example, drag QueueSharing.swf to the application version that you created in step 5 in the Applications view.
9 In the Question dialog box, click Yes.10 In the Applications view, right-click QueueSharing, and select Check In.11 In the Applications view, right-click the application version created in step 5, and select Deploy. For example, right-click Process
Management (system)/2.0.
Test a custom QueueSharingForm.swf fileThe custom version of the Queue Sharing Form is available to both the custom version of Workspace ES4 or the default Workspace ES4. For information about logging in to a custom version of Workspace ES4, see “Test a custom version of Workspace ES4” on page 36. For a list of recommendations to follow for testing a custom Approval Container (deprecated), see “Best practices for testing customizations” on page 40.
1 Configure the language settings in your web browser if you are testing localization customizations. (See “Configure a web browser to test localization changes” on page 39.)
2 In a web browser, type http://[servername]:[port]/workspace to use the default version of Workspace ES4, where:• [servername] is the name of the computer where LiveCycle ES4 is installed.• [port] is the default port for accessing the web server. For example, for a JBoss turnkey installation, the default port is 8080.
3 Click Preferences and click Manage Queues.4 Select the Access another queue option.5 In the User ID box, type part of or the name of the user whose To Do list if you know it or leave it empty, and click Find.6 In the list below the User ID box, click the name of the user whose queue you want to access.7 Click Request.8 Click Logout. 9 Log in to Workspace ES4 using the user ID of the user you selected in step 6.10 On the To Do tab, click the Share Queue Request card.11 Verify that Share Queue Request Form appears as you had customized. For localization customizations, verify that any custom strings
display correctly.
Build, deploy, and test a custom Approval Container (deprecated)A custom Approval Container (deprecated) is built for localization and theme customization. You can also modify the default Approval Container (deprecated) or create a custom Approval Container (deprecated) to start or participate in processes. After you build the approval-container (deprecated) project (or your custom project), configure the human-centric process to use your custom Approval Container (deprecated).

ADOBE LIVECYCLE ES4Building, Deploying, and Testing Workspace ES4 user interface customizations Customizing the Flex-Based LiveCycle Workspace ES4 User Interface
38
Complete the followings tasks to build, deploy, and test a custom Approval Container (deprecated):
• Build the custom Approval Container (deprecated). (See “Build the custom Approval Container (deprecated)” on page 38.)• Deploy the custom Approval Container (deprecated) using Workbench ES4. (See “Deploy the custom Approval Container (depre-
cated)” on page 38.)• Test the custom Approval Container (deprecated) in Workspace ES4 (See “Test a custom Approval Container (deprecated)” on page 38.)For information to resolve issues deploying, building, testing your custom Approval Container (deprecated), see “Troubleshooting” on page 79.
Build the custom Approval Container (deprecated)❖ In the Flex Navigator view, right-click approval-container (deprecated) (or your Flex project for a custom Approval Container (depre-
cated)), and select Build Project.
Deploy the custom Approval Container (deprecated)You can use the custom Approval Container (deprecated) in a human-centric process. In LiveCycle Workbench ES4, you configure Assign Task or Assign Multiple Tasks (User 2.0) operations to use the custom Approval Container (deprecated).
For more information about User 2.0 operations and human-centric processes, see User 2.0 and Designing human-centric processes in Application Development Using LiveCycle Workbench ES4 .
1 In Workbench ES4, type a user name and password, and click Login.2 In Explorer, navigate to [Workspace code]\ApprovalContainer\bin\. [Workspace code] is the location on your computer to which you
extracted the Flex projects. For example, C:\Workspace_Code\ApprovalContainer\bin3 In Workbench ES4, import the ApprovalContainer.swf file, or your custom SWF file by dragging the SWF file from Windows Explorer
to the Applications view. The application you import to must contain a human-centric process. For example, drag ApprovalCon-tainer.swf to the application version of the process in the Applications view.
4 Check-out human-centric process that you want to use the custom Approval Container (deprecated).5 In the process diagram, select the User 2.0 operation, such as Assign Task.6 In the Process Properties view, click Workspace User Interface, and select Custom. In the ellipsis button beside Custom, select the
ApprovalContainer.swf file, or name of the SWF file you imported to your application.7 Select File > Save.8 In the Applications view, right-click the application version of the process you modified in step 5, and select Deploy. 9 In the Check In Assets dialog box, select Check in all files if it is not selected and click OK.
Test a custom Approval Container (deprecated)A custom Approval Container (deprecated) is available to both the custom version of Workspace ES4 or the default Workspace ES4. For information about logging in to a custom version of Workspace ES4, see “Test a custom version of Workspace ES4” on page 36. For a list of recommendations to follow for testing a custom Approval Container (deprecated), see “Best practices for testing customizations” on page 40.
1 In a web browser, set your languages if you are testing localization customizations. See “Configure a web browser to test localization changes” on page 39.)
2 In a web browser, type http://[servername]:[port]/workspace to use the default version of Workspace ES4, where:• [servername] is the name of the computer where LiveCycle ES4 is installed.• [port] is the default port for accessing the web server. For example, for a JBoss turnkey installation, the default port is 8080.
3 Type a user ID and password and click Login.

ADOBE LIVECYCLE ES4Building, Deploying, and Testing Workspace ES4 user interface customizations Customizing the Flex-Based LiveCycle Workspace ES4 User Interface
39
4 Participate in a human-centric process has been configured to use the custom Approval Container (deprecated). For example, click the To Do list and select the card that represents the process that uses the custom Approval Container (deprecated).
5 Verify that the custom Approval Container (deprecated) displays the customization correctly.
Configure a web browser to test localization changesIt is necessary for you to configure the language settings in your web browser to test any localization customizations. The settings you must change are based on the web browser you are using.
Configure Microsoft Internet Explorer to test localization customizations1 In Internet Explorer, select Tools > Internet Options.2 On the General tab, click Languages.3 In the Languages Preference dialog box, click Add.4 In the Add Language dialog box, select the language that corresponds to the new localized SWF file and click OK. For example, if you
are testing international Spanish, click Spanish (International Sort) [es.ES].5 In the Language area, select the new language, click Move up until the locale you selected in the previous step is at the type top of the
list, and click OK. For example, select Spanish (International Sort) [es].6 In the Internet Options dialog box, click OK.7 Restart Internet Explorer.
Configure Mozilla FireFox to test localization customizations1 Start FireFox and select Tools > Options.2 In the Options dialog box, click Advanced.3 On the General tab, click Choose.4 In the Languages dialog box, in the Select a language to add list, select the language that corresponds to the new localized SWF file, and
click Add. For example, if you created a localization file for international Spanish, select Spanish [es].5 In the Languages In Order Of Preference area, click Move Up or Move Down to the location of your preference, and click OK6 In the Options dialog box, click OK.7 Restart FireFox.

ADOBE LIVECYCLE ES4Building, Deploying, and Testing Workspace ES4 user interface customizations Customizing the Flex-Based LiveCycle Workspace ES4 User Interface
40
Best practices for testing customizationsReview these recommendations for testing and verifying that your custom version of Workspace ES4, custom Queue Sharing Form, and custom Approval Container (deprecated) correctly function. Before you begin testing, clear your web browser cache.
Customization Testing considerations
Theme Verify these behaviors:
• The images you changed appear correct and are sized appropriately in each screen.
• The appearance of colors is consistent in each screen.
• Fonts appear correctly and do not overlap or cross any boundaries in the screen.
Localization • Configure the web browser to access the new locale for Internet Explorer and Firefox. (See “Configure a web browser to test localization changes” on page 39.)
• Verify that the user interface text, message notifications, and strings in all are areas display in the proper language and are not truncated.
• Verify that the default language is correct when the browser settings do not find a matching locale.
Layout Verify these layout customizations:
• The Workspace API components interact correctly. For example, data is updated concurrently. For example, when a task is completed, components correctly display the number of tasks assigned to the user.
• You can display PDF and HTML forms, form guides, and Flex applications to start processes and complete tasks.
• Visual components are correctly displayed.

41
6. Localization Customization - Localizing to Spanish
Ensure that you have configured your development environment and imported the LiveCycle Workspace ES4 source code to Flex Builder. (See “Configuring Your Development Environment for LiveCycle ES4” on page 20 and “Importing and configuring the Flex projects” on page 24.)
You can create a custom version of LiveCycle ES4 to localize it (end-user client application) to another language. The localized strings are provided in localization (.properties) files. You can choose to localize to languages not provided by default, such as Spanish. For more infor-mation about localization customizations, see “Localization customizations” on page 9.
For example, the following illustration displays the text for the copyright, user name, and password in the Workspace ES4 login screen in Spanish.
Complete the following tasks to create a custom version of Workspace ES4, custom Approval Container (deprecated), and custom Queue Sharing Form, which are localized to Spanish:
1 Add a new locale folder in the workspace-ui project. (See “Add a new locale folder” on page 42.)2 Localize the localization file in the workspace-ui project. (See “Translate the text in the localization files” on page 43.)3 Create an HTML file in case the user does not have Flash Player installed. (See “Create an error file for a new locale” on page 44.)4 (Optional) Localize LiveCycle Workspace ES4 Help. (See “Localizing the LiveCycle Workspace ES4 Help” on page 44.)5 Add support for the new locale. (See “Configure support for the new locale” on page 46.)6 Build, deploy, and test the changes in a custom version of Workspace ES4 and a custom Approval Container (deprecated). (See “Build,
deploy, and test a custom version of Workspace ES4” on page 34 and “Build, deploy, and test a custom Approval Container (deprecated)” on page 37.)
7 Localize the Queue Sharing Form. (See “Localize the Queue Sharing Form” on page 47.)8 Build, deploy, and test the Queue Sharing Form. (See “Build, deploy, and test a custom Queue Sharing Form” on page 36.)

ADOBE LIVECYCLE ES4Localization Customization - Localizing to Spanish Customizing the Flex-Based LiveCycle Workspace ES4 User Interface
42
Add a new locale folderThe Workspace ES4 and Approval Container (deprecated) use the same resource bundles (localization files). To add support for a new locale, you create a folder beneath the locale folder in the workspace-ui project. The name of the folder requires a specific naming convention for the locale code. The locale code is formatted as [language code]_[country code] where:
• [language code] is a two-letter code that represents the language.• [country code] is a two-letter code that specifies the variant of the language. The folder name is used to create a SWF file that Workspace ES4 uses. The LiveCycle ES4 version of the Flex SDK contains resource bundles with translated Flex and Data Services ES4 messages. To ensure strings display correctly, use a language code for the folder that matches one of the following language codes (first two letters of the locale code) in the table:
1 In Flex Builder, in the Flex Navigator view, right-click one of the locale folders that you are translating from in the workspace-ui > locale folder, and select Copy. For example, if you are translating from English to Spanish, right-click en_US.
2 Right-click the workspace-ui > locale folder, and select Paste.3 In the Name Conflict dialog box, replace the text with a locale code, and click Finish. For example, type es_ES for international Spanish,
or type es_AR, for Argentinian Spanish.
Locale code Language Locale code Language
da_DK Danish Ko_KR Korean
de_DE German nb_NO Norwegian Bokmål
es_ES Spanish nl_NL Dutch
fi_FI Finnish pt_BR Brazilian Portuguese
fr_FR French sv_SE Swedish
it_IT Italian zh_CN Simplified Chinese
ja_JP Japanese zh_TW Traditional Chinese

ADOBE LIVECYCLE ES4Localization Customization - Localizing to Spanish Customizing the Flex-Based LiveCycle Workspace ES4 User Interface
43
The new folder looks similar to the following illustration:
Translate the text in the localization filesAfter you create a locale folder, translate the strings within the localization files(.properties). The following localization files are available in each locale folder in the workspace-ui project:
• alc_wks_client_msg.properties: Contains error messages that are displayed to the user. Modify the file to localize the messages. For example, the following key and string are used to display a login error message:ALC-WKS-007-001 = Invalid user name or password.
• alc_wks_client_ui.properties: Contains the text to display for the user interface, such as buttons, or tool tips, and labels. Most keys provide an indication of its purpose.
In each localization file, a list of keys appear. Each key is paired with a text string. Workspace ES4 and the Approval Container (deprecated) code use the keys to determine the string to display in the user interface. Each pair is structured in the format [key] = [string].
• [key]: An internal value that Workspace ES4 and the Workspace API use. Do not modify this value. The keys are critical for the operation of Workspace ES4.
• [string]: A string that provides the text to display to a user. Included in some strings surrounded by braces ({}) that represent token values. Tokens are zero-based representations values that are inserted during run-time. If a string contains tokens, ensure that you include them in your translated text.Use the Unicode values for special characters. Unicode values are required to display the correct accent in text. For example, when password is translated from English to Spanish, it becomes contraseña. It is necessary to represent the letter ñ with the Unicode value of \u00F1.
Use use Java’s native2ascii translation tool to translate letters to Unicode values.
1 Open the alc_wks_client_msg.properties file, translate the text string values (not the keys), and save the file. For example, to change the error message for an invalid login, change the following key and string:

ADOBE LIVECYCLE ES4Localization Customization - Localizing to Spanish Customizing the Flex-Based LiveCycle Workspace ES4 User Interface
44
ALC-WKS-007-001 = Invalid user name or password to ALC-WKS-007-001 = [Translated text, such as Spanish, for an invalid name or password message]
2 Open the alc_wks_client_ui.properties file, find the # login area, translate the strings value for each key, and save the file. For example, translate the following keys from English to Spanish:• login.build • login.legal • login.password • login.submit-label • login.username • login.version
Code for translating the strings displayed by the login screen# loginlogin.build=[Translated text, such as Spanish, for the build number label]login.legal=[Translated text, such as Spanish, for the legal information]login.password=[Translated, such as Spanish, for password label]login.submit-label=[Translated text, such as Spanish, for login label]login.username=[Translated text, such as Spanish, for user name label]login.version=[Translated text, such as Spanish,for version label]
Create an error file for a new localeCreate an HTML error message file to notify users when Flash Player is not installed on their web browsers.
1 In Flex Builder, in the Flex Navigator view, navigate to workspace-ui > html-template folder.2 Right-click one of the files that is prefixed with alc_wks_client_html and select Copy. Choose the file with the localization code that is
suitable for you to translate from. For example, if you are translating from English to Spanish, right-click and copy the alc_wks_client_html_en.properties file.
3 Right-click workspace-ui > html-template and select Paste.4 In the Name Conflict dialog box, in the box, type alc_wks_client_html_[locale].properties, where [locale] is the localization
code to which are you localizing, and click OK. For example, if you are localizing to Spanish, type es.5 Right-click the file that was created in the previous step and select Open.6 Translate the text to the right of the equal sign, except for the {0} token, to the language you are localizing to. For example, if you are
translating to Spanish, replace the following text:browser.document.title=Adobe LiveCycle Workspace ESno.flash.player=[Translated to Spanish] {0}.flash.here.linktext=[Translated to Spanish]
7 Select File > Save.
Localizing the LiveCycle Workspace ES4 HelpYou can also localize the Workspace ES4 Help. The Workspace ES4 help files are stored in a separate EAR file called workspace_help.ear. The EAR file is located on the LiveCycle ES4 server and is deployed on your application server.
You can use the existing workspace-help.ear file as template to build a new EAR file. When you have created a custom version of the Help, build a EAR file to deploy the custom version of the Help.

ADOBE LIVECYCLE ES4Localization Customization - Localizing to Spanish Customizing the Flex-Based LiveCycle Workspace ES4 User Interface
45
Caution: The search function in the Help does not function after you localize it because the search index is based on the language you translated from.1 Create a folder on your computer, such as a EarBuild, and copy the workspace_help.ear file to your computer. The workspace-help.ear
file is located on the LiveCycle ES4 in the [installdir]\deploy folder.2 Navigate to the folder that you copied the workspace-help.ear file in the previous step, and complete the following steps:
• Extract the EAR file by using an archiving utility. For example, in the command prompt, navigate to the EarBuild folder and type jar -xvf workspace_help.ear. After you enter the jar command, a META-INF folder, application.xml file, and four WAR files appears. Each WAR file represents the help files for each language
• Delete the workspace_help.ear file from the folder.3 Create another folder to store the contents from the WAR file. This folder must not be located under the folder you created in step 14 Create your own help system. You can copy the help contents using any tool provided the output is HTML and can be accessed from a
web server. The contents of the help system are bundled into a WAR file. • Navigate to the folder you created in step 2. • Using an archiving tool, extract the contents of the WAR file.
For example, in the command prompt, navigate to the folder and type the following command:jar -xvf workspace_help_en.war
After you extract the WAR File, a number of folders appear, such as JavaScript script, META_INF, and HTML files. The files are all part of the Workspace ES4 Help.
• Delete the WAR file you copied to the folder.• Delete all the extracted files except for the WEB_INF folder and META_INF folders.
5 In the folder where you removed all the files in the previous step, add your localized help system. Your help system must function on a web server as a stand-alone system and include an index.html file. It is recommended that you include any script files or images in this folder. After you localize the Help text in the HTML file, complete the following steps to edit the files:• In the WEB_INF folder, edit the web.xml file. Change all references of workspace_help_[locale] to match the localization code
to which you are localizing, and save the file. The value of [locale] is the language code from which you are localizing.For example, if you are localizing from English to Spanish, change each of the workspace_help_en entries to workspace_help_es in the web.xml file as follows:<?xml version="1.0"?>
<!DOCTYPE web-app PUBLIC "-//Sun Microsystems, Inc.//DTD Web Application 2.3//EN" "http://java.sun.com/dtd/web-app_2_3.dtd">
<web-app id="WebApp_workspace_help_es"><display-name>workspace_help_es;</display-name><welcome-file-list>
<welcome-file>index.html</welcome-file></welcome-file-list>
</web-app>
• In the WEB_INF folder, edit the ibm-web-bnd.xml file. Change all references of workspace_help_[locale] to match the local-ization code to which you are localizing, and save the file. The value [locale] is the language of the file from which you are local-izing.For example, if you are localizing to Spanish, change each of the workspace_help_en entries to workspace_help_es as shown in the following code:<?xml version="1.0" encoding="UTF-8"?><com.ibm.ejs.models.base.bindings.webappbnd:WebAppBinding
xmi:version="2.0" xmlns:xmi="http://www.omg.org/XMI" xmlns:com.ibm.ejs.models.base.bindings.webappbnd="webappbnd.xmi"

ADOBE LIVECYCLE ES4Localization Customization - Localizing to Spanish Customizing the Flex-Based LiveCycle Workspace ES4 User Interface
46
xmi:id="WebAppBinding_$GET_GLOBAL(BindingID);"><webapp href="WEB-INF/web.xml#WebApp_workspace_help_es"/>
</com.ibm.ejs.models.base.bindings.webappbnd:WebAppBinding><?xml version="1.0" encoding="UTF-8"?>
Note: The ibm-web-bnd.xml file is used only when the Workspace ES4 Help is deployed on a WebSphere Application Server.6 In the folder where you created your localized help system in step 5, create a WAR File by using an archiving utility and name the file
workspace_help_[locale].war. The value [locale] represents the localization code. For example, if you are localizing to Spanish, complete the following steps:• Name the WAR file workspace_help_es.war. • Navigate to the folder that stores the files that you modified in step 5. • In the command prompt, type the following command:
jar.exe -cvfm workspace_help_es.war META-INF\MANIFEST.MF *
7 Copy the WAR file that you created in the step 6 to the folder that you extracted the contents of the workspace_help.ear file to in step 2.8 In the same folder, delete all the WAR files, except for the one you copied in the previous step.9 Navigate to the folder that stores the contents of the workspace_help.ear file that you created in step 2, and complete the following steps:
• Edit the application.xml file located under the META-INF folder.• In the application.xml file, delete the <module> tag and delete all the subelements except for the first entry. • Modify the <web_uri> and <context-root> tags to reference the WAR file that you created in step 6. P• Provide a unique value in the context-root to extract the localized Help files on the web server.For example, to localize to Spanish, the following text is modified in the application.xml file:<!DOCTYPE application PUBLIC "-//Sun Microsystems, Inc.//DTD J2EE Application 1.3//EN" "http://java.sun.com/dtd/application_1_3.dtd"><application id="LiveCycle_Workspace_ES_Help">
<display-name>LiveCycle Workspace ES Help</display-name><module id="Workspace_ES_Help">
<web><web-uri>workspace_help_es.war</web-uri><context-root>/workspace_help_es</context-root>
</web></module>
</application>
10 In the folder where you stored the EAR contents, create an EAR file by using an archiving utility and name the file workspace_help_[uniqueid].ear where [uniqueid] is a unique identifier for the EAR file.For example, in the command prompt, type the following command:jar.exe -cvfm workspace_help_myCustom.ear META-INF\MANIFEST.MF *
11 Copy the EAR File that you created in the previous step and deploy it to the application server that runs LiveCycle ES4.For example, on a JBoss Turnkey installation of LiveCycle ES4, you can copy the workspace_help_myCustom.ear file to the JBoss deploy server at /Adobe/LiveCycle8.2/jboss/server/all/deploy.
Configure support for the new localeAdd an entry in the workspace-config.js file to add support for the new locale. The entry contains the following information:
• The name of the locale, which is the name of the folder you added for locale support. (“Add a new locale folder” on page 42.)• The name of the SWF file. (See “Translate the text in the localization files” on page 43.)

ADOBE LIVECYCLE ES4Localization Customization - Localizing to Spanish Customizing the Flex-Based LiveCycle Workspace ES4 User Interface
47
• The name of location and name of help file. (See “Localizing the LiveCycle Workspace ES4 Help” on page 44)• The name of the file if the Adobe® Flash Player Plug-in is not available in the web browser. (See “Create an error file for a new locale” on
page 44.)Optionally, configure the locale to use when the users’ locale settings are not supported. The en_US locale is used by default.
1 In Flex Builder, in the Flex Navigator view, navigate to Workspace > html-template > js folder.2 Right-click workspace-config.js and select Open.3 For your new locale, specify the locale code, the name of the resource bundle that is created, the error code file, and the name of the help
system to display. Each locale entry is delimited by a comma. For example, type the following entry for Spanish:[locale_country]: {flex: "locale/workspace_rb_es.swf", html: "alc_wks_client_html_es.properties", help:"/workspace_help_es"},
where es is the language code and country code of the language to which you are localizing.4 (Optional) Change the default locale to use when no localization file that matches the user’s web browser settings is available. The locale
you specify must exist. The default is set to English (US).var fallbackLocale = "en_US";
5 Select File > Save.
Code for configuring locale support......var enableSmallMessages = true;
var supportedLocales ={
de_DE: { flex: "locale/workspace_rb_de_DE.swf", html:"alc_wks_client_html_de.properties", help: "/workspace_help_de"},
es_ES: { flex: "locale/workspace_rb_es_ES.swf", html:"alc_wks_client_html_es.properties", help: "/workspace_help_es"},
en_US: { flex: "locale/workspace_rb_en_US.swf", html: "alc_wks_client_html_en.properties", help: "/workspace_help_en"},
fr_FR: { flex: "locale/workspace_rb_fr_FR.swf", html: "alc_wks_client_html_fr.properties", help: "/workspace_help_fr"},
ja_JP: { flex: "locale/workspace_rb_ja_JP.swf", html: "alc_wks_client_html_ja.properties", help: "/workspace_help_ja"}
};// the locale from the above list to use when none of the user locales match or partially match a supported localevar fallbackLocale = "en_US";
Localize the Queue Sharing Form1 In Flex Builder, in the Flex Navigator view, right-click the queue-sharing > locale > en_US folder and select Copy.2 Right-click queue-sharing > locale and select Paste.3 In the Name Conflict dialog box, replace the text with a new locale code. For example, when you customize to international Spanish,
type es_ES.4 Open the queue_sharing.properties file from the folder created in the previous step and translate the values for each key, and save the
file.5 Right-click queue-sharing and select Properties.6 In the Properties for queue-sharing dialog box, click Flex Compiler.7 In the Additional compiler arguments box, type the locale code you added in step 3 before the -source-path parameter. For example:

ADOBE LIVECYCLE ES4Localization Customization - Localizing to Spanish Customizing the Flex-Based LiveCycle Workspace ES4 User Interface
48
-locale en_US fr_FR de_DE ja_JP es_ES -source-path+=./../locale/{locale}
8 Click Apply and OK.
Code for translating the strings for the Queue Sharing Form#Message textdatetime.format=EEE MMM DD, YYYY L:NN:SS Aform.title=[Translated text, such as Spanish, for the title of the Queue Sharing Form.]form.bodyRequest=[Translated text, such as Spanish, for the queue request message.]form.bodyApproved=[[Translated text, such as Spanish, for the queue request approved message.]form.bodyDenied=[Translated text, such as Spanish, for the queue request denied message.]form.trailer=[Translated text, such as Spanish, additional information about managing queues.]

49
7. Theme Customization - Replacing Images
Ensure that you have configured your development environment and imported the LiveCycle Workspace ES4 source code to Flex Builder. (See “Configuring Your Development Environment for LiveCycle ES4” on page 20 and “Importing and configuring the Flex projects” on page 24.)
You can customize the images in Workspace ES4 by creating a new theme file. Most images that are displayed in Workspace ES4 can be replaced by changing the lc.css file. The following images cannot be replaced with Workspace ES4 because they are not embedded in the lc.css file.
Consider customizing the background colors or fonts in Workspace ES4 so that your image provides a uniform appearance. For more infor-mation about theme customizations, see “Theme customizations” on page 10.
For example, you can use a custom image to replace the background in the login window.
Complete the following tasks to customize images and build a custom version Workspace ES4 and a custom Queue Sharing Form:
• Modify the images for a custom version of the Workspace ES4. (See “Replace images in the Workspace ES4 user interface” on page 49.)• Modify the images for a custom Queue Sharing Form. (See “Replace images in the Queue Sharing Form” on page 51
Replace images in the Workspace ES4 user interfaceThe lc.css file contains the types of classes and style names that the visual components use. You import new images to change the images that are displayed in Workspace ES4 - do not overwrite the original image files.
Class names in the lc.css file refer to specific visual components from the Workspace API. For example, to replace the image for the lc:ToDo, modify ToDo style. To modify the login screen (which uses the .loginSplash style), change the backgroundImage property to reference a different file. Therefore, for example, to modify the login screen (which uses the .loginSplash style), change the backgroundImage property to reference a different file. By default, it references a file called login_splash.png, as shown in the following snippet from the lc.css file:

ADOBE LIVECYCLE ES4Theme Customization - Replacing Images Customizing the Flex-Based LiveCycle Workspace ES4 User Interface
50
.loginSplash {backgroundImage: Embed('images/login_splash.png');
}
Complete the following steps to determine the CSS property to modify:
• Navigate to the theme/images folder in the workspace-ui project. • View the images in a web browser, and find the name of the file that matches the image you want to replace.• In the lc.css file, use that name as a search key to find the CSS property to modify.1 In Flex Builder, import new image files to workspace-ui > theme> images folder. For example, add images for the logo named
financeCorpLogo.png and financeCorpBanner.png (a smaller version of the logo).2 In the Flex Navigator view, open the workspace-ui > theme > lc.css file.3 In the lc.css file, locate the style name or class name to modify and complete the following steps:
• Modify the backgroundImage attribute for the .login style• Modify the logo attribute in the HeaderPane class.
4 Type the name of the new image you copied to your project to replace the existing image name. The property you modify is specific to each class or style name. For example, for the .login style name, modify the backgroundImage property; however, for the HeaderPane class name, modify the logo property.
5 Select File > Save.6 Build, deploy, and test your custom version of Workspace ES4 (See “Build, deploy, and test a custom version of Workspace ES4” on
page 34.)
CSS modification for changing the image in the Workspace ES4 login screen and banner.headerLogo {
icon: Embed('images/financeCorpBanner.png');rollOverColor:#333333;selectionColor:#333333;
}
.../*
---------------------------------------------------------------------------- The following section describes the Workspace class selectors. ----------------------------------------------------------------------------*/.copyright {
color: #999988;}
.loginSplash {backgroundImage: Embed('images/financeCorpLogo.png');
}

ADOBE LIVECYCLE ES4Theme Customization - Replacing Images Customizing the Flex-Based LiveCycle Workspace ES4 User Interface
51
After you build and deploy the custom version of Workspace ES4, the Welcome screen looks like the following illustrations.
Replace images in the Queue Sharing FormTo change the images for the Queue Sharing Form, you modify the source code.
1 In Flex Builder, add the new image file to queue-sharing > images folder. For example, add the image financeCorpLogoRequest.png, financeCorpApproved.png, and financeCorpDenied.png.

ADOBE LIVECYCLE ES4Theme Customization - Replacing Images Customizing the Flex-Based LiveCycle Workspace ES4 User Interface
52
2 Open the queue-sharing > src > QueueSharing.mxml file and replace the LC_W_Add_67x72.png, LC_W_UserAdded_67x72, and LC_W_UserDenied_67x72.png with the name of your custom images.
3 Select File > Save.4 Build, deploy, and test the custom Queue Sharing Form. (See “Build, deploy, and test a custom Queue Sharing Form” on page 36.)
Code for changing the images in the Queue Sharing Form (QueueSharing.mxml file)<mx:Canvas height="253" width="650"
verticalScrollPolicy="off"horizontalScrollPolicy="off"backgroundColor="#B22222">
<mx:VBox height="253" width="650" horizontalAlign="center" verticalAlign="middle" verticalScrollPolicy="off"><mx:Box backgroundColor="0xe8e8e8" width="650" height="45" >
<mx:Text id="title" fontWeight="bold" paddingLeft="20" paddingTop="20"/></mx:Box>
<mx:HBox><mx:VBox>
<mx:Spacer height="8" /><mx:Image id="requestImage" source="@Embed('images/financeCorpLogoRequest.png')"
width="62" height="72"/><mx:Image id="approvedImage" visible="false" includeInLayout="false"
source="@Embed('images/financeCorpApproved.png')" width="62" height="72"/><mx:Image id="deniedImage" visible="false" includeInLayout="false"
source="@Embed('images/financeCorpDenied.png')" width="62" height="72"/></mx:VBox>
After you build and deploy the custom Queue Sharing Form, it looks like the following illustration:

53
8. Theme Customization - Modifying Colors
Ensure that you have configured your development environment and imported the LiveCycle Workspace ES4 source code to Flex Builder. (See “Configuring Your Development Environment for LiveCycle ES4” on page 20 and “Importing and configuring the Flex projects” on page 24.)
Workspace ES4 is built by using Workspace API components, which are often composed of several; subcomponents. Therefore, when you customize a Workspace API component it is common to change the colors of several components to achieve the appearance you require. Often, an iterative approach is required. You can customize the colors in Workspace ES4 by creating a new theme file. Most of the Workspace ES4 user interface uses a set of colors that are embedded within the theme file. For more information about theme customiza-tions, see “Theme customizations” on page 10.
For example, after you modify the background color for the lc:Welcome component, you find that subcomponents for the banner and an area below the header require customization. Then, after you modify the styles to change the colors for the subcomponents, you find that the rollover colors also require customization, and so on.
The following illustration shows when the background color of the Welcome component is changed to red. Subcomponents of the Welcome component, which are not red, require further customization to provide a consistent appearance for the Welcome component.
Depending on your customization requirements, complete one or more of the following tasks to modify the colors in the Workspace ES4 user interface:
• Modify the colors in the Workspace ES4 user interface. (See “Modify colors in the Workspace ES4 user interface” on page 54.)• Modify the colors in the Approval Container (deprecated). (See “Modify the colors in the Approval Container (deprecated)” on page 56.) • Modify the colors in the Queue Sharing Form. (See “Modify the colors in Queue Sharing Form” on page 56.)
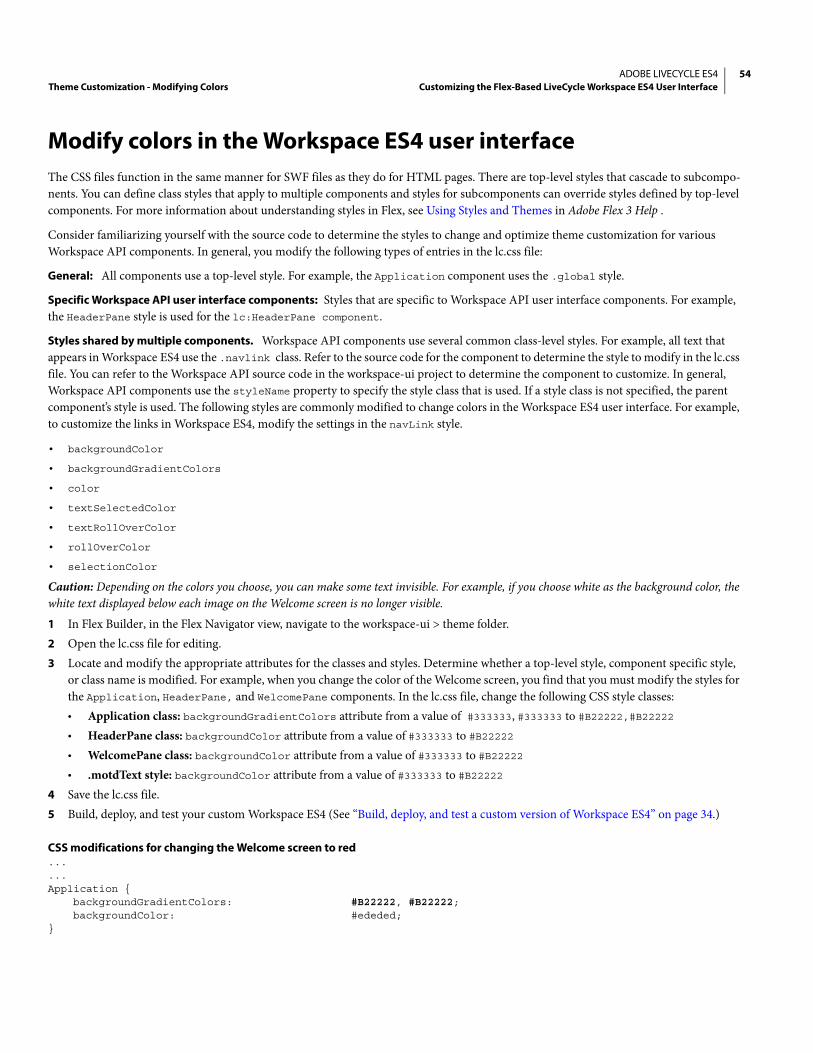
ADOBE LIVECYCLE ES4Theme Customization - Modifying Colors Customizing the Flex-Based LiveCycle Workspace ES4 User Interface
54
Modify colors in the Workspace ES4 user interfaceThe CSS files function in the same manner for SWF files as they do for HTML pages. There are top-level styles that cascade to subcompo-nents. You can define class styles that apply to multiple components and styles for subcomponents can override styles defined by top-level components. For more information about understanding styles in Flex, see Using Styles and Themes in Adobe Flex 3 Help .
Consider familiarizing yourself with the source code to determine the styles to change and optimize theme customization for various Workspace API components. In general, you modify the following types of entries in the lc.css file:
General: All components use a top-level style. For example, the Application component uses the .global style.
Specific Workspace API user interface components: Styles that are specific to Workspace API user interface components. For example, the HeaderPane style is used for the lc:HeaderPane component.
Styles shared by multiple components. Workspace API components use several common class-level styles. For example, all text that appears in Workspace ES4 use the .navlink class. Refer to the source code for the component to determine the style to modify in the lc.css file. You can refer to the Workspace API source code in the workspace-ui project to determine the component to customize. In general, Workspace API components use the styleName property to specify the style class that is used. If a style class is not specified, the parent component’s style is used. The following styles are commonly modified to change colors in the Workspace ES4 user interface. For example, to customize the links in Workspace ES4, modify the settings in the navLink style.
• backgroundColor • backgroundGradientColors • color • textSelectedColor • textRollOverColor • rollOverColor • selectionColor Caution: Depending on the colors you choose, you can make some text invisible. For example, if you choose white as the background color, the white text displayed below each image on the Welcome screen is no longer visible. 1 In Flex Builder, in the Flex Navigator view, navigate to the workspace-ui > theme folder.2 Open the lc.css file for editing.3 Locate and modify the appropriate attributes for the classes and styles. Determine whether a top-level style, component specific style,
or class name is modified. For example, when you change the color of the Welcome screen, you find that you must modify the styles for the Application, HeaderPane, and WelcomePane components. In the lc.css file, change the following CSS style classes:• Application class: backgroundGradientColors attribute from a value of #333333, #333333 to #B22222,#B22222• HeaderPane class: backgroundColor attribute from a value of #333333 to #B22222• WelcomePane class: backgroundColor attribute from a value of #333333 to #B22222• .motdText style: backgroundColor attribute from a value of #333333 to #B22222
4 Save the lc.css file.5 Build, deploy, and test your custom Workspace ES4 (See “Build, deploy, and test a custom version of Workspace ES4” on page 34.)
CSS modifications for changing the Welcome screen to red......Application {
backgroundGradientColors: #B22222, #B22222;backgroundColor: #ededed;
}
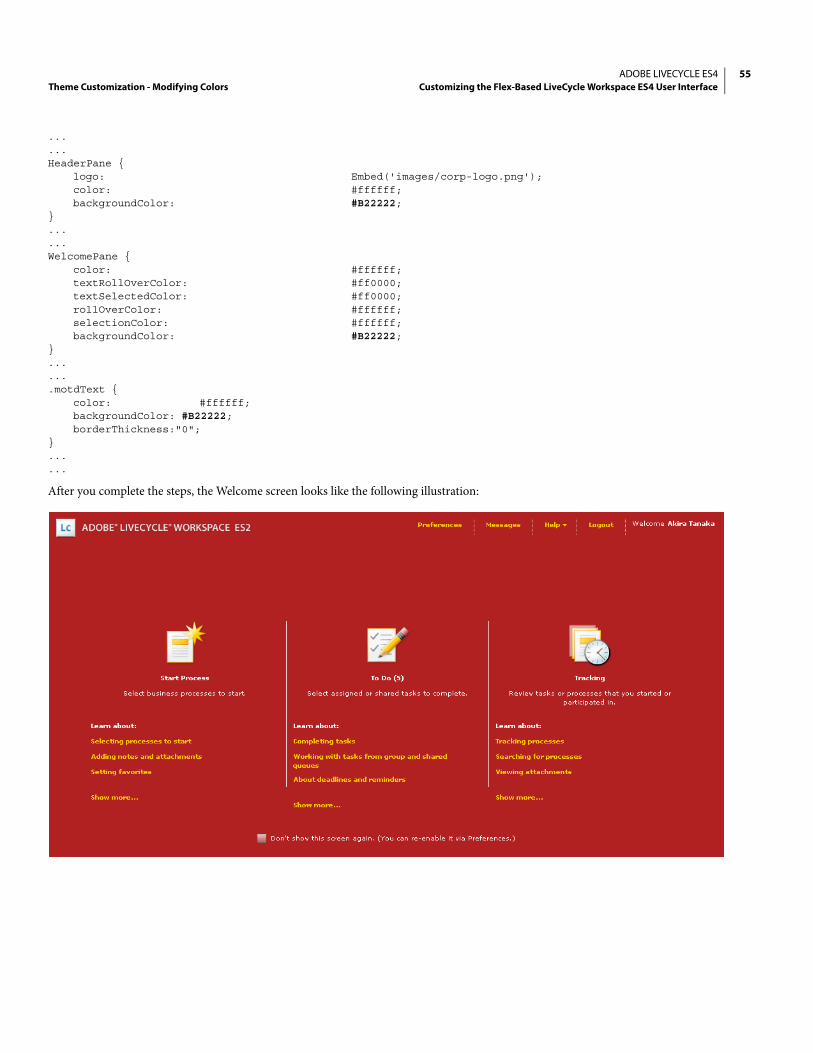
ADOBE LIVECYCLE ES4Theme Customization - Modifying Colors Customizing the Flex-Based LiveCycle Workspace ES4 User Interface
55
...
...HeaderPane {
logo: Embed('images/corp-logo.png');color: #ffffff;backgroundColor: #B22222;
}......WelcomePane {
color: #ffffff;textRollOverColor: #ff0000;textSelectedColor: #ff0000; rollOverColor: #ffffff;selectionColor: #ffffff;backgroundColor: #B22222;
}.......motdText {
color: #ffffff;backgroundColor: #B22222;borderThickness:"0";
}......
After you complete the steps, the Welcome screen looks like the following illustration:

ADOBE LIVECYCLE ES4Theme Customization - Modifying Colors Customizing the Flex-Based LiveCycle Workspace ES4 User Interface
56
Modify the colors in Queue Sharing FormThe Queue Sharing Form does not use styles defined in the lc.css file. You can modify the source code to change the colors for the Queue Sharing Form. For example, modify the background property to customize the background color used by the Queue Sharing Form.
1 In Flex Builder, in the Flex Navigator view, open the queue-sharing > src > QueueSharing.mxml file.2 Change the color of a component in the MXML file. For example, change the background property within the mx:Canvas tag from
white (#FFFFFF) to red (#B22222).3 Select File > Save.4 Build, deploy, and test the custom Queue Sharing Form. (See “Build, deploy, and test a custom Queue Sharing Form” on page 36.)
Code for changing the background color in the Queue Sharing Form (QueueSharing.mxml file)......<mx:Canvas height="253" width="650"
verticalScrollPolicy="off"horizontalScrollPolicy="off"backgroundColor="0x#B22222">
...
...
After you complete the steps, the custom Queue Sharing Form looks like the following illustration:
Modify the colors in the Approval Container (deprecated)The Approval Container (deprecated) does not use styles defined in the lc.css file. You can modify the source code to change the colors for the Approval Container (deprecated). For example, modify the background property to customize the background color used by the Approval Container (deprecated).
1 Create a copy of the approval-container (deprecated) project and modify it so that you have the original source code available as reference. Consider changing the name of the SWF file to avoid confusion with the default ApprovalContainer.swf file.
2 In Flex Builder, in the Flex Navigator view, open the approval-container (deprecated) > src > ActionBar.mxml file.

ADOBE LIVECYCLE ES4Theme Customization - Modifying Colors Customizing the Flex-Based LiveCycle Workspace ES4 User Interface
57
3 Change the background where the Document and Ownership buttons are located. For example, modify the background property in the <mx:HBox> tag from gray (#efefef) to red (#B22222).
4 Build, deploy, and test the custom Approval Container (deprecated). (See “Build, deploy, and test a custom Approval Container (depre-cated)” on page 37.).
Code for changing the background color in the Approval Container (deprecated) (ActionBar.mxml file)...<mx:HBox id="actionToggleBar"
horizontalAlign="left"backgroundColor="#B22222"verticalAlign="middle"horizontalGap="0"verticalGap="0"paddingTop="1" paddingBottom="1" paddingLeft="0" paddingRight="0"width="100%" height="100%">,
...
After you complete the steps, the Approval Container (deprecated) background for the Document and Ownership buttons is red. The Approval Container (deprecated) looks like the following illustration:

58
9. Layout Customization - Simplifying the Workspace ES4 User Interface
Ensure that you have configured your development environment and imported the LiveCycle Workspace ES4 source code to Flex Builder. (See “Configuring Your Development Environment for LiveCycle ES4” on page 20 and “Importing and configuring the Flex projects” on page 24.)
You can create a simplified presentation of the parts of the Workspace ES4 user interface to meet different user requirements. For example, users in your organization start processes but do not participate in the business processes after it starts. You can create a Flex application that uses a visual component that provides the Start Process functionality from Workspace ES4. The following illustration shows a simple Flex application that starts an approval process for a mortgage.
The Workspace API provides visual components and non-visual components. Visual components are useful to build Flex applications quickly. The common visual components are available in the lc.procmgmt.ui namespace (See LiveCycle ES4 ActionScript Language Reference)
Complete the following tasks to create a simplified layout:
1 Create a a simplified layout using Workspace API components. (See “Create a simplified layout for custom version Workspace ES4” on page 59.)
2 Build, deploy, and test your custom version of Workspace ES4 (See “Build, deploy, and test a custom version of Workspace ES4” on page 34.)

ADOBE LIVECYCLE ES4Layout Customization - Simplifying the Workspace ES4 User Interface Customizing the Flex-Based LiveCycle Workspace ES4 User Interface
59
Create a simplified layout for custom version Workspace ES4To build a simple layout that starts processes, use the following Workspace API components:
• lc:AuthenticatingApplication: Handles and store the authentication information required to communicate with the LiveCycle ES4 server. You bind subsequent Workspace API components’ session property to the lc:AuthenticatingApplication session property to pass the session information.
• lc:StartProcess component: Provides the Start Process user interface and function from Workspace ES4.For more information about the lc:AuthenticatingApplication and lc:StartProcess components, see the LiveCycle ES4 ActionScript Language Reference.
1 In Flex Builder, complete the following steps to create a backup of the Main.xml file:• In Flex Navigator view, right-click workspace-ui > src >Main.mxml and select Copy.• Right-click workspace-ui > src and select Paste.• In the Name Conflict dialog box, type a name. For example, BackupMain.mxml.
2 Open the workspace-ui > src >Main.mxml file and delete the contents of the file except for the following code:<?xml version="1.0" encoding="utf-8"?>)<lc:AuthenticatingApplication</lc:AuthenticatingApplication>
3 Set the following properties in the <lc:AuthenticatingApplication> tag:• xmlns:mx to http://www.adobe.com/2006/mxml• xmlns:lc to http://www.adobe.com/2006/livecycle• paddingBottom, paddingLeft, paddingRight, and paddingTop to 5• width and height to 100%• horizontalScrollPolicy and verticalScrollPolicy to off
4 Add a mx:VBox component and set the following properties:• width to 100%• height to 100%
5 After the <mx:VBox> tag, add a mx:Label component and set the following properties:• text to Start Your Mortgage Approval Today!• color to white• fontSize to 18• x to 10
6 After the closing <mx:Label> tag, add a lc:StartProcess component and set the following properties:• session to {session}• height and width to 100%
7 Select File > Save.
Code for a Flex application that only starts using the Workspace ES4 component
<?xml version="1.0" encoding="utf-8"?><lc:AuthenticatingApplication
xmlns:mx="http://www.adobe.com/2006/mxml" xmlns:lc="http://www.adobe.com/2006/livecycle"layout="absolute"paddingBottom="5" paddingLeft="5" paddingRight="5" paddingTop="5"horizontalAlign="center" verticalAlign="middle"

ADOBE LIVECYCLE ES4Layout Customization - Simplifying the Workspace ES4 User Interface Customizing the Flex-Based LiveCycle Workspace ES4 User Interface
60
width="100%" height="100%"horizontalScrollPolicy="off" verticalScrollPolicy="off">
<mx:VBox id= "myID" width="100%" height="100%" x="10"><mx:Label text="Start Your Mortgage Approval Today!" color="white" fontSize="18"/><lc:StartProcess session="{session}" height="100%" width="100%"/>
</mx:VBox></lc:AuthenticatingApplication>

61
10. Layout customization - Creating a New Login Screen
Ensure that you have configured your development environment and imported the LiveCycle Workspace ES4 source code to Flex Builder. (See “Configuring Your Development Environment for LiveCycle ES4” on page 20 and “Importing and configuring the Flex projects” on page 24.)
You can replace the login screen in Workspace ES4 without modifying the source code for the login component. You can create custom components that provide the following functions to replace the login screen used by Workspace ES4:
• Stores and passes login information to Workspace ES4• Defines a new layout for the login screen. For example, you can create a login screen as shown in the following diagram:
Complete the following tasks to create a custom login screen:
1 Create separate folders to organize custom components. (See “Set up the workspace-ui project to add new components” on page 62.)2 Create a custom component to handle the login process. (See “Create a custom login component” on page 62.)3 Create a custom login screen for logging in to Workspace ES4. (See “Implement the model for a custom login component” on page 62.)4 Use the custom login screen in a custom version of Workspace ES4. (See “Configure the custom login screen in the custom version of
Workspace ES4” on page 68.)5 Build, deploy, and test the new simplified Workspace ES4. (See “Build, deploy, and test a custom version of Workspace ES4” on page 34.)
Set up the workspace-ui project to add new components1 Create a backup copy of the Main.mxml file so that you can refer to it.

ADOBE LIVECYCLE ES4Layout customization - Creating a New Login Screen Customizing the Flex-Based LiveCycle Workspace ES4 User Interface
62
2 Complete the following steps to create a separate folder to organize custom components:• In Flex Builder, in the Flex Navigator view, right-click workspace-ui > src and select New > Folder.• In the New Folder dialog box, in Folder name box, type a name for the new folder. For example, custComp.• Click Finish
3 Right-click the new folder you created in step 2, and create a subfolder to store images. For example, custImages.4 Add an image to use as part of the login screen. For example, use the houseImage.png file from the Creating Your First LiveCycle ES4
Application ZIP file.
Create a custom login componentCustom login components in Workspace ES4 must implement the lc:ILogin interface. The ILogin interface passes the login information to Workspace ES4. The custom login component you create is used as a model component when you create a custom the user-interface for your custom login screen.
1 In Flex Builder, in the Navigator view, right-click the folder you created and select New > ActionScript Class. For example, right-click the workspace-ui > src > custComp.
2 In the New ActionScript Class dialog box, in the Package box, type a new name for the package or use the default name. The default name is the folder name. For example, if the folder is named custComp, the package name is custComp.
3 In the Name box, type a name for the class. For example, type CustLoginPageAdapter.4 Beside the Superclass box, click Browse.5 In the Open Type dialog box, select a user interface component to use for the custom login screen. For example, select Box -
mx.containers and click OK.6 Click Add.7 In the Open Type dialog box, select ILoginPage - lc.foundation.ui, and click OK.8 Deselect the Generate constructor from superclass option.9 Confirm that only the Generate functions inherited from interfaces option is selected and click Finish.
Implement the model for a custom login componentThe model is used to store and pass the user ID, password, the number of retries, error messages, and URL of the LiveCycle ES4 sever. It is necessary that you implement the lc:ILoginPage interface to implement the model to pass login information to Workspace ES4.
1 Below the class definition, create bindable properties to mirror the properties from the lc:ILogin interface. For example, below the public class CustLoginPageAdapter extends Box implements ILoginPage), create the following protected variables:• myErrorMessage:Message
• myPassword:String
• myRelogin:Boolean • myServerUrl:String
• myUserid:String
2 Delete all other functions except for the following setter/getter functions:• userid
• relogin
• password

ADOBE LIVECYCLE ES4Layout customization - Creating a New Login Screen Customizing the Flex-Based LiveCycle Workspace ES4 User Interface
63
• serverUrl
• errorMessage
3 For the userid property, complete the following steps:• For the getter method, return the value of the property you created to store the user ID information in step 2. Also delete the default
return null; statement.• For the setter method, assign the value that is passed to the function to the property you created to store the user ID information in
step 2.4 For the relogin property, complete the following steps:
• For the getter method, return the value of the property you created to store the error message in step 2 and delete the return false; statement.
• For the setter method, assign the value that is passed to the function to the property you created to store the error message in step 2. For example myRelogin.
5 For the password property, complete the following steps:• For the getter method, return the value of the property you created to store the password in step 2. Also delete the default return
null; statement.• For the setter method, assign the value that is passed to the function to the property you created to store the password in step 2. For
example, myPassword.6 For the serverUrl property, complete the following steps:
• For the getter method, return the value of the property you created to store the server URL information in step 2. Also delete the default return null; statement.
• For the setter method, assign the value that is passed to the function to the property to store the server URL information in step 2.7 For the errorMessage property, complete the following steps:
• For the getter method, return the value of the property you created to store the error message in step 2 and delete the return null; statement.
• For the setter method, assign the value that is passed to the function to the property you created to store the error message in step 2.8 Add a new function to dispatch an event to log in to Workspace ES4. Send the LiveCycleEvent.LOGIN event as a bubbling event that
cannot be canceled. For example, create protected function called doLogin that returns void and dispatches an instance of the LiveCycleEvent.LOGIN event in an instance of the lc:LiveCycleEvent class.protected function doLogin():void{
var myLoginEvent:LiveCycleEvent = new LiveCycleEvent(LiveCycleEvent.LOGIN, true, false, null);dispatchEvent(myLoginEvent);
}
Note: Add an import lc.foundation.events.LiveCycleEvent to your existing list of import statements the statement does not exist.9 Select File > Save.
Code for a custom ActionScript class that implements the lc:ILoginPage interfacepackage custComp{
import flash.accessibility.AccessibilityProperties;import flash.display.DisplayObject;import flash.display.DisplayObjectContainer;import flash.display.LoaderInfo;import flash.display.Sprite;import flash.display.Stage;import flash.events.Event;import flash.geom.Point;import flash.geom.Rectangle;

ADOBE LIVECYCLE ES4Layout customization - Creating a New Login Screen Customizing the Flex-Based LiveCycle Workspace ES4 User Interface
64
import flash.geom.Transform;
import lc.foundation.domain.Message;import lc.foundation.events.LiveCycleEvent;import lc.foundation.ui.ILoginPage;
import mx.containers.Box;import mx.managers.ISystemManager;
public class CustLoginPageAdapter extends Box implements ILoginPage{
[Bindable]protected var myErrorMessage:Message;[Bindable]protected var myPassword:String;[Bindable]protected var myRelogin:Boolean;[Bindable]protected var myServerUrl:String;[Bindable]protected var myUserid:String;
//Sends the authentication credentials to the server.protected function doLogin():void{
var myLoginEvent:LiveCycleEvent = new LiveCycleEvent(LiveCycleEvent.LOGIN, true, false, null);
dispatchEvent(myLoginEvent);}//The user id.public function get userid():String{
return myUserid;}//The user id.public function set userid(userid:String):void{
myUserid = userid;}//A flag that specifies whether it is another attempt to log in.public function get relogin():Boolean{
return myRelogin;}//A flag that specifies whether it is another attempt to log in.public function set relogin(relogin:Boolean):void{
myRelogin = relogin;}//The location of the server as a URL.public function get serverUrl():String{
return myServerUrl;}//The location of the server as a URL.public function set serverUrl(serverUrl:String):void{
myServerUrl = serverUrl;}

ADOBE LIVECYCLE ES4Layout customization - Creating a New Login Screen Customizing the Flex-Based LiveCycle Workspace ES4 User Interface
65
//The error message if a problem occurs while logging in.public function get errorMessage():Message{
return myErrorMessage;}//The error message if a problem occurs while logging in.public function set errorMessage(error:Message):void{
myErrorMessage = error;}//The password.public function get password():String{
return myPassword;}//The password.public function set password(password:String):void{
myPassword = password;}
}}
Create the user interface for the login screenCreate an MXML component that creates the layout for a custom login screen. Use a separate class that implements the details of the ILoginPage class. A separate class promotes reuse and separates the application logic from the presentation details of the login screen. (See “Implement the model for a custom login component” on page 62.)
The user interface for a custom login screen requires that you bind the login information and send it to Workspace ES4. The following describe the components to use for creating a login screen:
• A mx:Panel component that contains a mx:Form component for the userid and password fields.• A round button with the word Go for logging in to Workspace ES4. The button is located beside the userid and password labels.• A custom image and title that appears at the top of the login screen.• An area immediately below the password field that displays any error messages.

ADOBE LIVECYCLE ES4Layout customization - Creating a New Login Screen Customizing the Flex-Based LiveCycle Workspace ES4 User Interface
66
The resulting custom login screen looks like the following illustration:
1 In Flex Builder, in the Flex Navigator view, right-click the folder you created earlier to store custom components and select New > MXML Component. For example, custComp.
2 In the New MXML Component dialog box, in the Filename box, type a name. For example, CustLoginPage.3 In the Based on list, select CustLoginPageAdapter.4 In the Width and Height boxes, type 100%, and click Finish.5 In the CustLoginPage.mxml file, locate the cc:CustLoginPageAdapter component, and set the following properties:
• xmlns:mx to http://www.adobe.com/2006/mxml• xmlns:lc to http://www.adobe.com/2006/livecycle• verticalAlign to middle, • horizontalAlign to center• backgroundColor to "#AAAAAA"
6 After the opening <cc:CustLoginPageAdapter> tag, add a mx:Panel component and set the following properties:• paddingBottom, paddingRight, paddingLeft to 10• paddingTop to 100• width to 600• height to 500• backgroundcolor to #FFFFFF
7 After the <mx:Panel> tag, add a mx:HBox container and set the following properties:• backgroundcolor to #FFFFFF • verticalAlign to middle
8 After the opening <mx:HBox> tag, add a mx:Image component and set the following properties:• source to @Embed(source='custImages/houseImage.png')" (Or an image that you copied to the workspace-ui project)• height and width to 75.
9 After the <mx:Image> tag, add a mx:Label component and set the following properties:• text to Mortgage Approval System

ADOBE LIVECYCLE ES4Layout customization - Creating a New Login Screen Customizing the Flex-Based LiveCycle Workspace ES4 User Interface
67
• fontSize to 24• fontWeight to bold• color to #CCCCCC
10 After the closing <mx:HBox> tag, add another mx:HBox component and set the verticalAlign property to a value of middle.11 After the second opening <mx:HBox> tag that you added in the previous step, add a mx:VBox component.12 Complete the following steps to add the field for the user to type their user ID:
• After the opening <mx:VBox> tag, add a mx:Label component and set the following properties:• text to User ID• fontWeight to bold
• After the closing <mx:Label> tag, add a mx:TextInput component and set the following properties and events:• id to username• tabIndex to 1• text attribute to the property that stores the userid from the ActionScript class you are extending. For example, myUserid.• change to store the password to the user ID typed by the user. For example, myUserid = username.text.
13 Complete the following steps to add a field for the user to type a password that does not display the typed contents:• After the <mx:TextInput> tag in the previous step, add a mx:Label component and set the following properties:
• id to Password• fontWeight to bold.
• After the closing <mx:Label> tag, add a mx:TextInput component and set the following properties and events:• id to password• tabIndex to 2• displayAsPassword to true• text to the property that stores the password. For example, use the value of myPassword.• change to store the password typed by the user. For example, myPassword = password.text.
14 Complete the following steps to add an area to display the error messages:• Add <mx:Spacer/> tag after the <mx:TextInput> tag, add a mx:Text component and set the following properties:
• color attribute to a value of #000000 (black)• width to 100%• text to bind to the property that is used to retrieve the error message, For example, myErrorMessage.
15 Complete the following steps to add a Login button:• After the closing <mx:VBox> tag, add a mx:Button component, and set the following properties:
• id to loginBtn,• tabIndex to 3, • height and width to 50, • label to Go• cornerRadius to 28
16 Within the <mx:Button> tag, bind the click event to the doLogin() function you created to send login credentials to Workspace ES4. (See “Implement the model for a custom login component” on page 62.)
17 Select File > Save.
Code for the layout of a custom login screen<?xml version="1.0" encoding="utf-8"?>
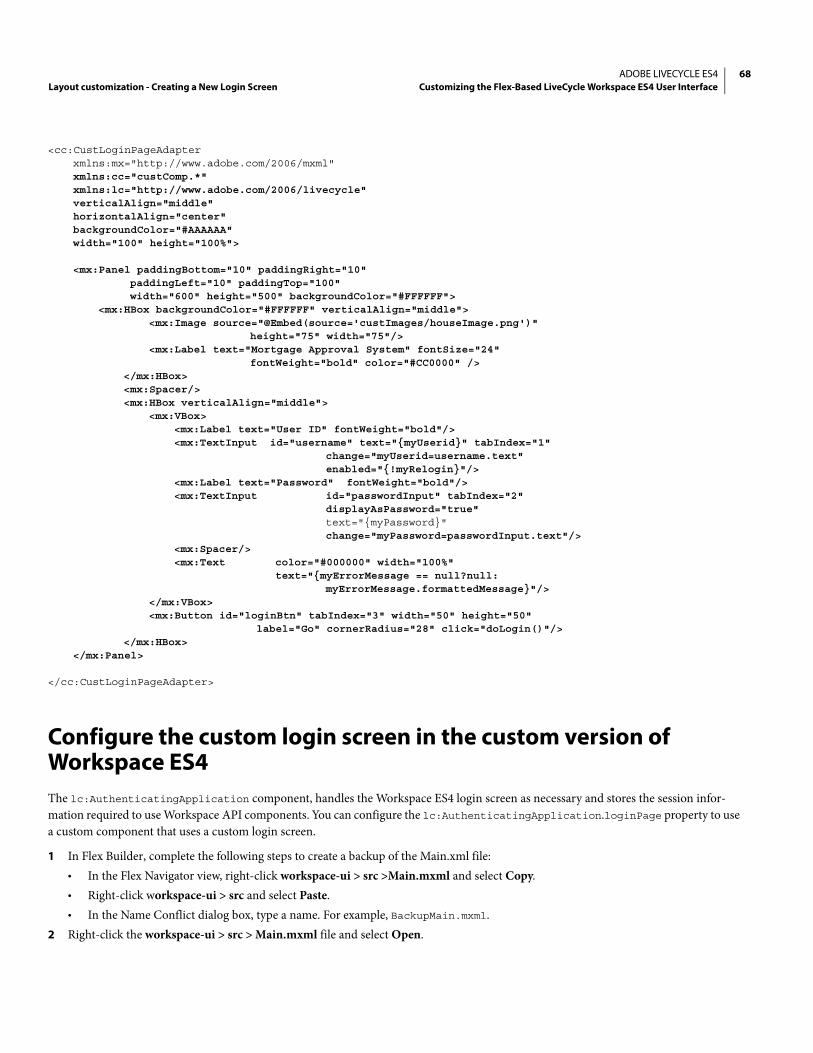
ADOBE LIVECYCLE ES4Layout customization - Creating a New Login Screen Customizing the Flex-Based LiveCycle Workspace ES4 User Interface
68
<cc:CustLoginPageAdapterxmlns:mx="http://www.adobe.com/2006/mxml"xmlns:cc="custComp.*"xmlns:lc="http://www.adobe.com/2006/livecycle"verticalAlign="middle" horizontalAlign="center"backgroundColor="#AAAAAA"width="100" height="100%">
<mx:Panel paddingBottom="10" paddingRight="10" paddingLeft="10" paddingTop="100" width="600" height="500" backgroundColor="#FFFFFF">
<mx:HBox backgroundColor="#FFFFFF" verticalAlign="middle"><mx:Image source="@Embed(source='custImages/houseImage.png')"
height="75" width="75"/><mx:Label text="Mortgage Approval System" fontSize="24"
fontWeight="bold" color="#CC0000" /></mx:HBox><mx:Spacer/><mx:HBox verticalAlign="middle">
<mx:VBox><mx:Label text="User ID" fontWeight="bold"/><mx:TextInput id="username" text="{myUserid}" tabIndex="1"
change="myUserid=username.text"enabled="{!myRelogin}"/>
<mx:Label text="Password" fontWeight="bold"/><mx:TextInput id="passwordInput" tabIndex="2"
displayAsPassword="true" text="{myPassword}"change="myPassword=passwordInput.text"/>
<mx:Spacer/><mx:Text color="#000000" width="100%"
text="{myErrorMessage == null?null:myErrorMessage.formattedMessage}"/>
</mx:VBox><mx:Button id="loginBtn" tabIndex="3" width="50" height="50"
label="Go" cornerRadius="28" click="doLogin()"/></mx:HBox>
</mx:Panel>
</cc:CustLoginPageAdapter>
Configure the custom login screen in the custom version of Workspace ES4The lc:AuthenticatingApplication component, handles the Workspace ES4 login screen as necessary and stores the session infor-mation required to use Workspace API components. You can configure the lc:AuthenticatingApplication.loginPage property to use a custom component that uses a custom login screen.
1 In Flex Builder, complete the following steps to create a backup of the Main.xml file:• In the Flex Navigator view, right-click workspace-ui > src >Main.mxml and select Copy.• Right-click workspace-ui > src and select Paste.• In the Name Conflict dialog box, type a name. For example, BackupMain.mxml.
2 Right-click the workspace-ui > src > Main.mxml file and select Open.

ADOBE LIVECYCLE ES4Layout customization - Creating a New Login Screen Customizing the Flex-Based LiveCycle Workspace ES4 User Interface
69
3 In the Main.mxml file, in the <lc:AuthenticatingApplication> tags, add a namespace property and set to reference custom compo-nents you created. For example add xmlns:cc="custComp.*" where custComp.* represents all the contents in the folder the compo-nents you created in the workspace-ui project.
4 In the lc:AuthenticatingApplication, add the loginPage property and set to the full namespace of the MXML component you created. For example, custComp.CustLoginPage. (See
5 Select File > Save.
Code for using a custom login screen component for Workspace ES4<lc:AuthenticatingApplication
xmlns:mx="http://www.adobe.com/2006/mxml"xmlns:lc="http://www.adobe.com/2006/livecycle"xmlns:cc="custComp.*"paddingBottom="5" paddingLeft="5" paddingRight="5" paddingTop="5"horizontalAlign="center" verticalAlign="middle" width="100%" height="100%"layout="absolute"preloader="lc.preloader.WorkspacePreloader"loginPage="custComp.CustLoginPage"horizontalScrollPolicy="off" verticalScrollPolicy="off"initialize="trace('initialize called on the application at ' + getTimer() + 'ms.')"creationComplete="HelpContext.helpContextRoot = parameters.helpUrl; trace('creationComplete called on the
application at ' + getTimer() + 'ms.')"applicationComplete="trace('applicationComplete called on the application at ' + getTimer() + 'ms.');
/*createComponentsFromDescriptors(true)*/">
<lc:HelpContext/>
<lc:Desktop session="{session}"/>
</lc:AuthenticatingApplication>

70
11. Layout Customization - Creating a Custom Approval Container (deprecated)
Ensure that you have configured your development environment and imported the LiveCycle Workspace ES4 source code in to Flex Builder. (See “Configuring Your Development Environment for LiveCycle ES4” on page 20 and “Importing and configuring the Flex projects” on page 24.)
When the default Approval Container (deprecated) does not meet your requirements, you can create a custom Approval Container (depre-cated). You can import a custom Approval Container (deprecated) to a LiveCycle ES4 application and configure a specific human-centric process to use it. For example, an organization requires a custom Approval Container (deprecated) that displays buttons based on available routes. In addition, a personalized greeting, and instructions must be displayed above the form. The following illustration shows the custom Approval Container (deprecated) in the To Do screen:
Complete the following tasks to create a custom Approval Container (deprecated):
1 Create a Flex project and configure project to include the Workspace API SWC files.(See “Create and configure a Flex project” on page 71)
2 Create a custom model component. (See “Create a custom model component” on page 71.)3 Provide the application logic for the model component. (See “Add the application logic for the model component” on page 71.)4 Create a view component. (See “Add the application logic for the model component” on page 71.)5 Create the layout for the custom Approval Container (deprecated). (See “Create the layout for a custom Approval Container (depre-
cated)” on page 74.)6 Enable the custom Approval Container (deprecated) for Workspace ES4. (See “Enable the Approval Container (deprecated) for
Workspace ES4” on page 76.)7 Build, deploy, and test the custom Approval Container (deprecated). (See “Build, deploy, and test a custom Approval Container (depre-
cated)” on page 37.)

ADOBE LIVECYCLE ES4Layout Customization - Creating a Custom Approval Container (deprecated) Customizing the Flex-Based LiveCycle Workspace ES4 User Interface
71
Create and configure a Flex projectCreate a separate Flex project when you want to create a custom Approval Container (deprecated).
1 In Flex Builder, select File > New > Flex project.2 In the New Flex Project dialog box, type a name for the project. For example, type custom-approvalContainer and click Next.3 In the Configure Output screen, optionally configure a different Output folder or use the default folder provided and click Next.4 In the Create a Flex project screen, click the Library Path tab.5 Click Add SWC Folder.6 In the Add Folder dialog box, click Browse.7 In the Browse For Folder dialog box, navigate to [LC_SDK]/misc/Process_Management/Workspace/libs folder and click OK. [LC_SDK]
represents the location h you copied the LiveCycle ES4 SDK to on your computer. 8 Click OK.9 In the Main application file box, type a name for your custom application and click Finish. For example, type
custApprovalContainer.mxml.
Create a custom model componentCreate a custom model component to load the form associated with the task. Extend the lc:TaskCommandBarModel to get information about the buttons to display. For information about the lc:TaskCommandBarModel component, see LiveCycle ES4 ActionScript Language Reference.
1 In the Flex Navigator view, right-click the project you created in the previous task, and select New > ActionScript Class. For example, custom-approvalContainer.
2 In the New ActionScript Class dialog box, in the Name box, type a name for the class. For example, FormAreaModel.3 Beside the Superclass box, click Browse.4 In the Open Type dialog box, select TaskCommandBarModel - lc.procmgmt.ui.task, and click OK.5 Click Finish.
Add the application logic for the model componentAdd the following application logic to the model component:
• Load the form for the task using the lc:TaskForm component.• Perform the bindings to display the buttons on the form.• Access a singleton member in the TaskRouteCommandBar class to retrieve the buttons required to complete the task.For information about lc:TaskForm and lc:TaskRouteCommandBar components, see LiveCycle ES4 ActionScript Language Reference.
1 Add the following import statements above the class definition:• lc.foundation.util.Token
• lc.procmgmt.domain.Task
• lc.procmgmt.formbridge.SwfConector
• lc.procmgmt.ui.task.form.TaskForm
• flash.external.ExternalInterface

ADOBE LIVECYCLE ES4Layout Customization - Creating a Custom Approval Container (deprecated) Customizing the Flex-Based LiveCycle Workspace ES4 User Interface
72
• mx.binding.utils.BindingUtils
2 Before the class definition, add the [Bindable] tag.3 Add a public taskForm variable of type TaskForm.4 Add an override setter method for the task property and assign the value to the task property of the parent class. For example
super.task = value.5 Add an override getter method for the task property and return the task property from the parent class. For example, return
super.task.6 Complete the following steps to create a function to bind to the lc:TaskForm member, load the form, and display it:
• Add a public method and configure the method to return void and take a parameter of type SwfConnector.• Add a conditional statement to exit the function when either the SwfConnector.task value is null, TaskForm object is null, or
the TaskForm is already loaded.• Retrieve the task object from the SwfConnector and save it to the task property.• Create and initialize a variable of type Token.• Create a variable of type Object and assign empty instance of an Object value.• Use the ExternalInterface singleton class to determine whether the container to the Flash player is available. If the container is
available, use the External.call("getAcrobatVersion") and ExternalInterface.call("getAcrobatClientType") to retrieve Acrobat version and Acrobat Client type. Assign the Acrobat client type and Acrobat version to the Object using an acrobatVersion and acrobatClientType as index values to Object value.
• If the container for Flash Player is not available, set the Object variable using an acrobatVersion and acrobatClientType as index values to ’Unknown’.
• Load the form using the TaskForm.load method and provide the acrobat version and client type and the task as parameters. Specify the form index as 0. Assign the result to the Token variable you created.
• Use the BindingUtils.bindProperty method to bind the taskForm property that is part of the taskRouteCommandBarModel object.
7 Complete the following steps to create a function to unload the form:• Add a public method and configure the method to return void.• Call the unload method from the TaskForm object.
Code for application logic for FormAreaModel componentpackage{
import flash.external.ExternalInterface;import lc.foundation.util.Token;import lc.procmgmt.domain.Task;import lc.procmgmt.formbridge.SwfConnector;import lc.procmgmt.ui.task.TaskCommandBarModel;import lc.procmgmt.ui.task.form.TaskForm;import mx.binding.utils.BindingUtils;
[Bindable]public class FormAreaModel extends TaskCommandBarModel{
public var taskForm:TaskForm;public function FormAreaModel(){
super();}//Set the task property in the parent classoverride public function set task(value:Task):void{

ADOBE LIVECYCLE ES4Layout Customization - Creating a Custom Approval Container (deprecated) Customizing the Flex-Based LiveCycle Workspace ES4 User Interface
73
super.task = value;}//Retrieve the task property from the parent classoverride public function get task():Task{
return super.task;}//Retrieve the task and load the form associated with the task.//In addition, the TaskForm object from this class to that of the domain layer //TaskCommandBarModel component for submitting the form.public function configureLoadForm(connector:SwfConnector):void{
if ( connector.task ==null || taskForm == null || taskForm.loaded) {
return}else{
var token:Token = null; var params:Object = new Object(); super.task = connector.task; if (ExternalInterface.available) { params["acrobatVersion"] = ExternalInterface.call("getAcrobatVersion"); params["acroClientType"] = ExternalInterface.call("getAcroClientType"); } else { params["acrobatVersion"] = 'Unknown'; params["acroClientType"] = 'Unknown'; } token = taskForm.load(params, super.task,0); BindingUtils.bindProperty(taskRouteCommandBarModel, "taskForm", this, "taskForm");
} }//Unload the form.public function unLoadForm():void{
taskForm.unload();}
}}
Create the view componentCreate a view component to define the layout to display a form. You use the lc:TaskForm component to display the form. The form is necessary for the user to complete a task. For more information about the lc:TaskForm component, see LiveCycle ES4 ActionScript Language Reference.
1 In the Flex Navigator view, right-click the project you created in the previous task, and select New > MXML Component.2 In the New MXML Component dialog box, in the FileName box, complete the following steps:
• In the Filename box, type a name for the component. For example, FormArea.mxml, which is the component you created in an earlier task. (See “Create a custom model component” on page 71.)

ADOBE LIVECYCLE ES4Layout Customization - Creating a Custom Approval Container (deprecated) Customizing the Flex-Based LiveCycle Workspace ES4 User Interface
74
• In the Based on list, select a component. For example, select Canvas.• Type 100% in the Width and Height boxes.• Click Finish.
3 With in the <mx:Canvas> tag, set the following properties:• xmlns:lc to http://www.adobe.com/2006/livecycle• xmlns:ac to *
4 Add the lc:TaskForm component and set the following properties:• id to approvalform• width and height to 100%
5 Add the ac:FormAreaModel and set the following properties:• id to model• taskForm bound to approvalform (the identifier for the lc:TaskForm component)
Code for View component for user interface to display form<?xml version="1.0" encoding="utf-8"?><?xml version="1.0" encoding="utf-8"?><mx:Canvas xmlns:mx="http://www.adobe.com/2006/mxml"
xmlns:lc="http://www.adobe.com/2006/livecycle"xmlns:ac="*"width="100%" height="100%"><!-- Add the model --><ac:FormAreaModel id="model" taskForm="{approvalform}"/>
<!-- For displaying the form to complete the task --><lc:TaskForm id="approvalform" width="100%" height="100%"/>
</mx:Canvas>
Create the layout for a custom Approval Container (deprecated)It is recommended that you create the layout for a custom Approval Container (deprecated) in the MXML file that is set as the default appli-cation. You can add the following items to the layout:
• mx:HBox and mx:Text: To define area to display a personalized greeting and the instructions to complete the task.• lc:CommandBar: To display the buttons to complete the task, handle the submission of a form, and close the Approval Container
(deprecated) when a user completes a task. For more information about the lc:CommandBar component, see LiveCycle ES4 ActionScript Language Reference.
1 In the <mx:Application> tag, set the following properties.• xmlns:lc to http://www.adobe.com/2006/livecycle• xmlns:ac to * (The namespace * is for the custom components you that are in the src folder.)• layout to absolute• horizontalScrollPolicy to off• backgroundColor to #FF0000
2 Add the ac:FormAreaModeland set the id property to model. You created the custom model component in an earlier task. (See “Create a custom model component” on page 71.)
3 Complete the following steps to define the layout for the Approval Container (deprecated):• Add a mx:VBox component and set the following properties:

ADOBE LIVECYCLE ES4Layout Customization - Creating a Custom Approval Container (deprecated) Customizing the Flex-Based LiveCycle Workspace ES4 User Interface
75
• width and height to 100%• paddingBottom to 2• paddingTop to 2• verticalGap to 2• backgroundColor to #EFEFEF
• Within the <mx:VBox> tags, add a mx:HBox component and set the following properties:• height to 27• width to 100%• backgroundColor to #FF3399
• Within the <mx:HBox> tags, add a mx:Text component and set the following properties:• id to fullname• height to 27• width to 100%• text to defaultname
• After the closing <mx:HBox> tag, add the ac:FormArea component and set the following properties:• id to formarea• width to 100%• height to 100%You created the ac:FormArea component in an earlier task. (See “Create the view component” on page 73.)
• After the <ac:FormArea>, add a lc:CommandBar component and set the following properties:• id to routeButtons• width to 100%• height to 27
4 Complete the following steps to create data bindings for the components you added in previous steps:• Bind the identifier custom model component, ac:FormAreaModel, to the model property of the view component, FormArea.• Bind the identifier of the TaskForm component from the view component, ac:FormArea to the taskForm property of the custom
model component, ac:FormAreaModel.• Bind the model property from the lc:CommandBar component to the custom model component,
ac:FormAreaModel.taskRouteCommandBarModel property.
Code for a layout of the Approval Container (deprecated)<?xml version="1.0" encoding="utf-8"?><mx:Application
xmlns:mx="http://www.adobe.com/2006/mxml" xmlns:lc="http://www.adobe.com/2006/livecycle"xmlns:ac="*"layout="absolute"horizontalScrollPolicy="off"paddingBottom="0"backgroundColor="#FF0000">
<!-- Create the model to bind the view component to --><ac:FormAreaModel id="model" taskForm="{formarea.approvalform}"/><mx:VBox
width="100%" height="100%" paddingBottom="2" paddingTop="2"

ADOBE LIVECYCLE ES4Layout Customization - Creating a Custom Approval Container (deprecated) Customizing the Flex-Based LiveCycle Workspace ES4 User Interface
76
verticalGap="2"backgroundColor="#EFEFEF"><!-- Greeting area. -->
<mx:HBox height="27" width="100%" backgroundColor="#FF3399"> <mx:Text id="personalMessage" height="27" width="100%" text="defaultname"/> </mx:HBox> <!-- Area to display the form for completing the task. --> <ac:FormArea id="formarea" model="{model}" borderThickness="1" width="100%" height="100%"/> <!-- Area to display the buttons for routes. -->
<lc:CommandBar id="routeButtons" width="100%" height="27" model="{model.taskRouteCommandBarModel}" />
</mx:VBox></mx:Application>
Enable the Approval Container (deprecated) for Workspace ES4To enable Flex applications for Workspace ES4, code is added to send and handle events to facilitate communication between the Flex appli-cation and Workspace ES4. This communication enables you to access data from the form, the information for the user logged in to Workspace ES4, and the task.
The Workspace API provides the lc:SwfConnector component to handle the communication.
For the purposes creating a custom Approval Container (deprecated), use the following method from the lc:SwfConnector component:
• setReady: The method notifies Workspace ES4 that the Flex application has loaded and is ready to start communication. No commu-nication occurs until the Flex application sends the FORM_READY event.
Also use the following properties to handle events that are sent to the lc:SwfConnector component:
• setWorkspaceData: Handles when Workspace ES4 sends a SET_WORKSPACE_DATA event with data. The data contains information about the task and user logged in to Workspace ES4.
• unload: Handles when Workspace ES4 sends an unload event to the Approval Container (deprecated).For more information about the SwfConnector component and the following methods, see Creating Flex Applications Enabled for LiveCycle Workspace and LiveCycle ES4 ActionScript Language Reference.
1 Add an instance of the lc:SwfConnector component, assign a name to the id property. For example, lcConnector.2 Add a mx:Script component if one does not exist.3 Complete the following steps to create an event listener function to bind to the setWorkspaceData property of the lc:SwfConnector
component:• Add a private function within the <mx:Script> tags. For example, name the function handleWorkspaceData.• Configure the function to return void and take a parameter of type SwfDataEvent.• Save the Task object from the SwfDataEvent.task property to the SwfConnector.task property.• Call the configureLoadForm method from the ac:FormAreaModel component and pass the SwfConnector component as a
parameter. • Retrieve the full name of the user logged in by using the lc:SwfConnector.getAuthenticatedUser.displayName property. • Retrieve the instructions for the task using the SwfConnector.task.instructions property.• Set the mx:Text.text property with a custom greeting to the user and the set of instructions.

ADOBE LIVECYCLE ES4Layout Customization - Creating a Custom Approval Container (deprecated) Customizing the Flex-Based LiveCycle Workspace ES4 User Interface
77
4 Complete the following steps to notify Workspace ES4 that the Approval Container (deprecated) has loaded and is ready to receive events: • Add the creationComplete property to the mx:Application component.• Bind the creationComplete property to the lc:SwfConnector.setReady() method.
5 Complete the following steps to handle the unload event in lc:SwfConnector component and close the Approval Container (depre-cated):• Within the <mx:Script> tags, add a function that returns void. For example, handleUnload.• In the function, call the ac:FormAreaModel.unLoadForm method.
Code for enabling an Approval Container (deprecated) for Workspace ES4<?xml version="1.0" encoding="utf-8"?><mx:Application
xmlns:mx="http://www.adobe.com/2006/mxml" xmlns:lc="http://www.adobe.com/2006/livecycle"xmlns:ac="*"layout="absolute"horizontalScrollPolicy="off"paddingBottom="0"backgroundColor="#FF0000"creationComplete="lcConnector.setReady()">
<mx:Script><
ADOBE LIVECYCLE ES4Layout Customization - Creating a Custom Approval Container (deprecated) Customizing the Flex-Based LiveCycle Workspace ES4 User Interface
78
}]]>
</mx:Script>
<!-- Establish communication with LiveCycle Workspace ES4 --><lc:SwfConnector id="lcConnector"
formInitialData="handleFormInitialData(event)"setWorkspaceData="returnWorkspaceSession(event)"unload="handleUnload()"/>
<!-- Create the model to bind the view component to --><ac:FormAreaModel id="model" taskForm="{formarea.approvalform}"/><mx:VBox
width="100%" height="100%" paddingBottom="2" paddingTop="2"verticalGap="2"backgroundColor="#EFEFEF"><!-- Greeting area. -->
<mx:HBox height="27" width="100%" backgroundColor="#FF3399"> <mx:Text id="personalMessage" height="27" width="100%" text="defaultname"/> </mx:HBox> <!-- Area to display the form for completing the task. --> <ac:FormArea id="formarea" model="{model}" borderThickness="1" width="100%" height="100%"/> <!-- Area to display the buttons for routes. -->
<lc:CommandBar id="routeButtons" width="100%" height="27" model="{model.taskRouteCommandBarModel}" />
</mx:VBox></mx:Application>

79
12. Troubleshooting
This section summarizes the common issues that can occur when you customize the LiveCycle Workspace ES4 user interface and proposed resolutions or reason for the issue.
Issue Proposed Solutions or Reason
The project does not build. • Verify that you are using the LiveCycle ES4 version of the Flex SDK and the most recent Flex projects, SWC files, and JAR files. The minimal version is LiveCycle ES4 with Service Pack 1.
• Verify that you use you are using the Ant to build the workspace-ui project and the Flex builder to build the approval-container (deprecated) and queue-sharing projects.
• Verify that you installed ant-contrib 1.0b2 library to Flex Builder. When you are compiling the workspace-ui project and see the "ant.contribute error", it means that the ant-contrib 1.0b2 is not available.
• Verify that the Flex compiler did not overwrite contents of the html-template folder. You can recopy the html-template contents from the respective project located in the adobe-work-space-src.zip file to fix the problem
• Verify that you imported the projects from the parent folder where the subfolder QueueSharing, ApprovalContainer, and Workspace folders reside.
• Verify that you did not select the Copy into Workspace option when you imported the project folders from the adobe-workspace-src.zip file.
• Verify that you changed the jvm.config file to point to a 32-bit JRE when you are on a 64-bit operating system.
The localization file customization does not display the correct language.
• Verify that the localization file is packaged with the EAR file you created. The localization file is in the WAR package and in the locale folder.
• Verify that locale code is set as the first language in the web browser.
• Verify that the locale extension for your localization file matches the name of the folder you created for the new locale.
• Verify that the workspace-config.js has been modified to include the new locale.
• Verify that the web browser cache is not storing pre-customization files by deleting all online and offline files that are cached.
Images that are used for Workspace ES4 components in your Flex application do not display properly.
• Verify the @embed statement is used in the lc.css for the image that does not appear.
• Verify that changes to the lc.css file have been saved.
• Verify that the image is copied into the theme > images folder in the workspace-ui project.
• Verify that the web browser cache is not storing pre-customization files by deleting all online and offline files that are cached.
Text disappeared after the colors were changed. • Verify that the background color was not changed to the same color as the text color. Look for a relevant location to modify the color property to ensure that it is different from the back-ground color.
Workspace ES4 components do not update with information • Verify that the lc:SessionMap object is updated and passed to all components in your code. Each Workspace API object requires setting the session property to a valid lc:SessionMap object.
Display of forms and functions do not seem to work properly in the web browser.
• Verify that the html-template directory provided with the default workspace-ui project was not overwritten with the default Flex html-template. Recopy the contents of the html-template folder from the respective project located in the adobe-workspace-src.zip file.