cybergame secure application delivery
TRANSCRIPT

Juuso Järviö
CYBERGAME SECURE APPLICATION
DELIVERY
Bachelor’s thesis
Information Technology
2017

Tekijä/Tekijät Tutkinto Aika
Juuso Järviö
Insinööri (AMK) Toukokuu 2017
Opinnäytetyön nimi Cybergame secure application delivery
52 sivua
Toimeksiantaja Kaakkois-Suomen ammattikorkeakoulu Ohjaaja
Lehtori Vesa Kankare Tiivistelmä Projektin tavoitteena oli luoda valmis tietoturvallinen ja optimoitu runko Cybergame-nimiselle verkkosovellukselle ottamalla käyttöön ADC-laitteen tietoturva ja optimointi ominaisuuksia. Sovellus ei ollut valmiina projektin aikana, joten toteutuksista luodun dokumentaation tuli olla kattava tulevaisuuden projekteja varten. Projektissa tutkittiin tietoturva- ja optimointi -asetusten toteuttamista Cybergame-sovellukseen, joka on pelillistetty kyberturvallisuuden opetusalusta. Projektissa hyödynnetyt ADC-ominaisuudet toteutettiin F5 BIG-IP ADC-laitteilla, jotka olivat projektin olennaisimmat verkkolaitteet. Koska Cybergame-sovellus ei ollut valmis projektin aikana, testauksia varten luotiin WordPress-sovellus. Kali GNU/Linux -jakelupakettia käytettiin sen tarjoamien penetraatiotestaustyökalujen takia. Näitä työkaluja hyödynnettiin osan toteutuksista testaamiseen. Tietoturvaominaisuudet, kuten application security policy, anomaliapohjainen DoS-suojaus, brute force -esto ja muutama pienempi ominaisuus konfiguroitiin projektissa. Optimointi-osa koostuu optimisoitujen TCP-profiilien ja TCP-multipleksoinnin, HTTP-pakkauksen ja Web Accelerationin konfiguroinnista. Projekti sisälsi myös jonkin verran ADC:n peruskonfigurointia ja työssä tarvittujen virtuaalikoneiden luomista. Tietoturvallinen ja optimoitu runko luotiin Cybergamelle, mikä tarkoittaa, että projektin tavoitteisiin päästiin. Useita ominaisuuksia käsiteltiin projektissa, mutta osaa ei voitu käsitellä läpikotaisin. Tämä jättää tilaa mahdollisille tuleville projekteille Cybergamen ADC-laitteisiin liittyen. Projektissa luotua dokumentaatiota voidaan hyödyntää, kun tulevaisuudessa ominaisuuksia käyttöönotetaan valmiiseen Cybergame-sovellukseen. Asiasanat application delivery controller, verkkosovellusten tietoturva, verkkosovellusten optimointi, kyberturvallisuus

Author (authors) Degree Time
Juuso Järviö
Bachelor of Engineering
May 2017
Thesis Title
Cybergame secure application delivery 52 pages
Commissioned by South-Eastern Finland University of Applied Sciences Supervisor Vesa Kankare, Senior Lecturer Abstract The aim of this project was to create a ready framework for a web application called Cybergame by implementing secure and optimized application delivery features. The application was not ready at the time of the project, so the implementations studied in the project were to be documented well for possible future projects. In the project, the implementation of security and optimization features for an application called Cybergame, a cyber security teaching platform that makes use of gamification, were studied. The features used in the project were provided by F5 BIG-IP application delivery controllers, which were the main web devices in the project. As the Cybergame application was not ready at the time of the project, a WordPress testing application had to be created and used. Kali GNU/Linux distribution was also utilized for the penetration testing tools to test some of the implementations. The security features such as the application security policy, the anomaly based DoS protection, the brute force block and some smaller application security features were configured. The optimization part consisted of the configuration of optimized TCP profiles and TCP multiplexing, HTTP Compression and Web Acceleration. The project also included the configuration of some basic ADC features and creation of required virtual machines The objectives for the project were accomplished as a secure and optimized framework for the Cybergame was created. Several features were covered, but most of the features could not be studied thoroughly. That leaves room for the possible future projects related to the Cybergame ADCs. The documentation created in the project can be used in future when implementing the features into the finished Cybergame application. Keywords
application delivery controller, web application security, web application optimization, cyber security

CONTENTS
1 INTRODUCTION ....................................................................................................................... 6
2 CYBERGAME ............................................................................................................................ 6
3 APPLICATION DELIVERY CONTROLLER .......................................................................... 8
3.1 ADC features ....................................................................................................................... 9
3.2 F5 Networks ......................................................................................................................10
3.3 F5 BIG-IP ...........................................................................................................................11
4 WEB APPLICATION SECURITY..........................................................................................13
4.1 Denial of Service...............................................................................................................14
4.2 Web scraping bots............................................................................................................16
4.3 Brute force .........................................................................................................................17
5 KALI GNU/LINUX ....................................................................................................................17
6 IMPLEMENTATION ................................................................................................................17
6.1 Basic configuration ...........................................................................................................18
6.2 Creating required virtual machines ................................................................................19
6.3 Configuring security..........................................................................................................20
6.3.1 Application security policy ........................................................................................20
6.3.2 Anomaly based detection.........................................................................................29
6.3.3 Web scraping .............................................................................................................32
6.3.4 Brute force ..................................................................................................................34
6.3.5 Session tracking ........................................................................................................38
6.3.6 Mitigating specific attacks ........................................................................................39
6.4 Configuring Optimization .................................................................................................41
6.4.1 TCP multiplexing .......................................................................................................41
6.4.2 HTTP compression ...................................................................................................43
6.4.3 Web Acceleration ......................................................................................................44
7 CONCLUSION .........................................................................................................................47
REFERENCES ................................................................................................................................50

ABBREVIATIONS
AAM Application Acceleration Manager
AFM Advanced Firewall Manager
ASM Application Security Manager
ADC Application Delivery Controller
AOM Always On Management
DDoS Distributed Denial of Service
DMZ Demilitarized Zone
DoS Denial of Service
EUD End User Diagnostics
HMS Host Management Subsystem
HTTP Hypertext Transfer Protocol
HTTPS Hypertext Transfer Protocol Secure
LTM Local Traffic Manager
MOS Maintenance Operating System
OSI Open Systems Interconnection
SSL Secure Sockets Layer
TCL Tool Command Language
TCP Transmission Control Protocol
TMM Traffic Management Microkernel
TMOS Traffic Management Operating System
TPS Transaction Per Second
XSS Cross-site scripting

6
1 INTRODUCTION
The objective of this project work was to study and implement the secure
application delivery features of F5 BIG-IP ADC for an application called
Cybergame, that will be explained more in detail in the next chapter. The
Cybergame application was not complete at the time of the project, but a
secure framework should be ready for the application once it is released.
Some optimization features should also be implemented to increase the
performance of the Cybergame. The features used in the project should all be
documented and tested so that they can be implemented later to the
Cybergame application.
The F5 BIG-IP devices that would provide the used features were located in
CyberLab of the South-Eastern Finland University of Applied Sciences. The
ADCs and some configurations had already been implemented into the
CyberLab in previous projects. The configurations were tested by using tools
found in Kali GNU/Linux distribution to find out the possible vulnerabilities and
mitigations. A WordPress testing site would serve as a testing application
since the Cybergame application was not available at the time of the project.
Some work related to the ADCs was already done in the CyberLab earlier.
The devices were implemented into the CyberLab and some basic settings
were configured in the thesis work of Antti Peltonen in early 2016 (Peltonen
2016). Later in 2016 Henri Kajova created a virtual laboratory, which makes
use of the virtual versions of the BIG-IP. The thesis also covers some security
configurations such as SSL offloading and DoS mitigation iRules. The virtual
lab made by Kajova was also used in this project to get to know the BIG-IP
devices. (Kajova 2016.)
2 CYBERGAME
A project called ”Cyber Security Expertise and Business Development” was
started in May of 2015 in co-operation with KyUAS, LUT and Cursor Oy. The
goal of the project was to create a hub called “CyberPros Academy” for the
development of cyber security, piloting of cyber security services and studying
of cyber threats and challenges. An innovation platform called “CyberLab” was
to be built. The operating environment of CyberPros Academy hub includes a

7
modern data center and a cyber security training class. The data center also
known as CyberLab can be used to do penetration tests and vulnerability
scans for example. (Rouhiainen & Kettunen 2015.)
The project is an innovative way to combine data center, gamification and
cyber security expertise and research. The present deficit of skilled personnel
in these areas is meant to be covered by creating a new research, knowledge,
and innovation hub, which at the same time creates entrepreneurship and jobs
in to the area. The cyber security expertise is delivered to a large crowd via a
cyber security game. (Työ- ja elinkeinoministeriö 2014.)
The Cybergame is programmed in co-operation by the programming students
of KyUAS and GoodLife Technologies company (Rouhiainen & Kettunen
2015). The game is going to be located in the CyberLab data center. It will
consist of a virtualized KVM hypervisor platform called NEST, which contains
all the virtual machines that are used in the Cybergame. Clientless remote
desktop gateway called Guacamole is used to access the virtual machines.
The back-end server will be running game features such as game logic and
databases. The NEST and the backend are running on a VMware ESXi
hypervisor. The front-end servers work as an interface into the Internet. All the
traffic into the Cybergame network goes first through the Cybergame BIG-IP
ADC. The ADC will handle web security, Denial-of-Service protection and SSL
offloading. The second levels of network security are provided by the North-
South Firewall. The basic design of the Cybergame network can be seen in
figure 1.

8
Figure 1. Cybergame network basic design.
3 APPLICATION DELIVERY CONTROLLER
Last decade the need for legacy load balancers to handle more advanced
application related requirements increased, which started making ADCs
popular. The purpose of an ADC is to increase the performance, security and
availability of the web delivered applications. (Citrix 2016.) The application
delivery controller is usually placed in the DMZ zone of a network, which
typically locates between the firewall or the router and the application servers.
An ADC helps sites to remove excess load from the servers by directing user
traffic from multiple servers. On top of Layer 4 load balancing, ADCs can
operate layer 7 for content switching and offload certain CPU-intensive tasks
from the servers. (KEMP 2016.) The latest generations of ADCs can handle a
large variety of additional functions such as rate shaping and serving as a web
application firewall (F5 2016b).

9
3.1 ADC features
ADCs usually come in redundant High Availability configurations, which
means that there are two devices of which one is an active device and another
is in a standby. In case of failure in the active device, the standby device can
become the new active device without any downtime. (KEMP 2016.)
Load balancing helps server cluster to distribute traffic to optimize utilization,
and to increase the availability and responsiveness of the servers (Citrix
2016). There are many different Layer 4 IP-based methods provided by ADCs
for distributing user traffic to servers. These Layer 4 methods can include
Round Robin and Least Connection with Weighted versions of the two,
Chained Failover with Fixed Weighting, and Server-Resource-Based load
balancing. Weighting allows administrators to have better control of the traffic
distribution. For example, if a higher performance server is added to the load
balancing it can be appointed with a higher “weight”, so a larger amount of
traffic will be allowed for it to handle. Layer 4 load balancing is sufficient for
lower volumes of Internet traffic, but sometimes a more fine-tuned approach to
the traffic distribution is needed. The fine-tuned approach can only be
accomplished with Layer 7 content switching and other higher level load
balancing methods. Content switching means the ability to load balance Layer
7 payload based user requests to the servers. For example, an URL with
images may be pointed to a graphics server and shop can point to a
transaction server. This provides more application flexibility and greater
performance tuning. (KEMP 2016.) ADCs can also perform global server load
balancing, which means the redirecting of traffic to a server cluster placed in
another data center (Citrix 2016).
Application performance can be improved by many functions on an ADC,
especially over mobile and high latency networks. ADCs can offload server
intensive tasks, perform multiplexing, compression, and caching of high used
static content. (Citrix 2016.) SSL offloading, for example, can be used to
reduce the CPU usage of the application servers. By moving the SSL
termination point to the ADC, the application servers are relieved from the
CPU-heavy tasks of encrypting and decrypting traffic and setting up secured
network connections, which greatly reduces the resources required by the
application. (A10 2016.)

10
TCP multiplexing is another good way to improve the performance of
applications. TCP multiplexing enables the device to reuse existing TCP
connections, which removes the need for servers to open and close numerous
TCP connections per second. TCP multiplexing improves the performance of
the server and increases the capacity allowing the server to open more TCP
connections for more users. (MacVittie 2008.)
HTTP compression and caching can both be used to reduce the load of the
application servers. The number of HTTP object data transferred can be
decreased with HTTP compression by utilizing GNU zip compression, which is
available in every modern browser. The network bandwidth usage can be
reduced without corruption of the content, which improves users’ overall
experience. If the task is offloaded to an ADC, it also saves the servers from
the CPU-intensive task. Caching allows ADCs to store data from the servers
in cache memory and deliver it quickly to the clients. This combined with
HTTP compression means the ability to deliver pre-compressed data form the
cache, rather than retrieving it from the servers every time. Caching can
reduce the response times and boost transaction rates while freeing the
servers to do other work. (KEMP 2016.)
Web security is an important feature of ADCs. The ADCs can recognize DDoS
attacks and implement rate limiting measures such as throttling or rejecting
the requests from a DDoS attack. They can also learn to detect malicious
requests by analyzing the traffic to determine patterns for normal behavior. As
ADCs, have converged load balancing and advanced layer 7 protection the
application firewalls can even inspect packets for suspicious or malicious
content. (Citrix 2016.) Typical network layer attacks such as flood attacks and
connections per second overloading attacks can be easily defeated with
features such as the full proxy architecture, purpose built hardware for the
mitigation of DoS. Protocol validation is also used against invalid data and
asymmetric attacks. (Holmes 2013.)
3.2 F5 Networks
F5 Networks is a US-based company headquartered in Seattle, Washington.
F5 Networks specializes in application delivery networking. Its main product is

11
the BIG-IP application delivery controller. (Crunchbase 2016.) F5 Networks
was the market share leader in application delivery controllers with a 47%
market share of the $2 billion market in 2015. Its largest competitors are Citrix,
Radware and A10 Networks. (Lerner, Skorupa & Ciscato 2016.)
3.3 F5 BIG-IP
BIG-IP is a term for the compilation of hardware and software found in the
ADC device made by F5. There is also a virtual edition available of the BIG-IP.
The primary hardware components of the BIG-IP are Traffic Management
Microkernel, Host Management Subsystem and Always On Management. The
TMM includes several traffic processing hardware components such as a
layer 2 switch module, dedicated SSL encryption or FIPS hardware and
dedicated compression hardware. The HMS is responsible for system
management and administration functions and runs a version of CentOS
Linux. The HMS and the TMM share a single CPU and RAM memory. The
AOM provides additional management of the HMS via a management
processor and supporting functions for the TMM. The primary software
components of the BIG-IP are also known as the Traffic Management
Operating System or TMOS. Even though the TMOS name suggests that it is
an operating system, it is a collection of firmware and operating systems,
which run on BIG-IP and BIG-IP Virtual Edition. The TMOS includes TMM,
HMS, AOM, MOS, EUD and feature modules like LTM. All the hardware
components have software counterparts and have the same abbreviations.
The TMM controls communications to and from the HMS. The LTM, iRules
and other similar modules run within the TMM. The HMS runs a modified
version of CentOS operating system and provides access to various
management tools and interfaces such as the GUI configuration utility and an
advanced shell. The AOM allows “lights out” power management and console
access to the HMS. The MOS which is installed in an additional boot location
is used for disk and file system maintenance. The EUD is a program that is
used to perform BIG-IP hardware tests. (Jönsson & Iveson 2014, 21-25.)
F5 BIG-IP also includes a feature called iRules, which is based on the F5’s
exclusive TMOS architecture. An iRule is a user created TCL program or
script that is assigned to a virtual server in the BIG-IP. The scripts are run or

12
triggered by a user or users doing events specified in the iRule. iRules can
contain any number of commands and they can be programmed to do almost
anything between the OSI layers 2 and 7, which leads to a great power and
control over the network. (Iveson 2013, 18.)
All BIG-IP versions come default with either a Local Traffic Manager module
or a BIG-IP DNS module, which has been known as Global Traffic Manager in
the past. They both provide core functionalities for BIG-IP. Other modules can
be activated on demand when a need for the feature is recognized, allowing
customization of the BIG-IP. There are total of 13 modules available of which
10 are advanced BIG-IP feature modules and 3 feature modules for service
providers. (F5 2016c.) There are two security modules available. Application
Security Manager that protects web applications from attacks and the
Advanced Firewall Manager, which is used to prevent network, SIP and DNS
attacks (F5 2014b). In regards of application optimization, there is one
important module, which is called Application Acceleration Manager (F5
2014a).
ASM is a web application firewall that secures web applications and protects
them against vulnerabilities. The ASM can be used to develop different levels
of security on layer 7. For example, The ASM can develop a security policy
automatically based on the traffic patterns of the site. The policy can also be
created manually or with a vulnerability assessment services. The security
policies can protect web applications against many application layer threats
such as SQL injection, buffer overflows, cross site scripting, cookie poisoning
and many more. The ASM module can even protect the web infrastructure
against layer 7 Denial-of-Service and zero-day threats. The ASM module also
uses attack signatures to protect applications. By default, the BIG-IP ASM
provides over two thousand signatures and more can be created manually.
The signatures can detect different types of attacks against commonly used
databases, applications and operating systems. (F5 2014b.) The ASM can
also be used to detect DoS attacks using transaction based detection or
latency based detection or both. The values of which the device uses to make
the calculations can be changed manually. In the transaction based method,
the average amount of requests per second to a certain URL or IP address is
used. The latency based method uses the time the server takes to respond to
the requests. If any of the intervals go beyond the selected percentage set in

13
the DoS profile the ASM considers the system to be under attack. (F5 2013.)
The IP intelligence feature of the ASM module also offers the ability to block
connections based on their IP-address’ geolocations or just their reputation
around the Internet. The Data Guard can be used to block sensitive
information such as credit card or social security numbers automatically from
being displayed in a web browser. (Wagnon 2013.)
Advanced Firewall Manager, AFM is a module for F5 BIG-IP that offers
defense against threats to network layers 3 and 4. The BIG-IP AFM module is
a high-performance, stateful, full-proxy network security solution built
especially for defeating high-capacity DDoS attacks against networks and
network devices. The AFM can automatically mitigate the attacks, alert about
an attack and adjust DDoS thresholds as traffic patterns change. The AFM
includes high-volume logging controls to log the incoming traffic during a
DDoS attack without it getting overwhelmed. IP-address blacklisting can also
be enforced by reputation feeds offered by F5 networks and third parties. SSH
and SSL connections are also controlled by the AFM. It can protect the SSH
channel against data breaches and application attacks and inspect SSL
sessions to terminate the connections of encrypted attacks. As most of the F5
feature modules the AFM can be combined with iRules to extend the ability to
mitigate attacks and increase its functionality. (F5 2016a.)
Application Acceleration Manager is the main module for optimization features
in the BIG-IP. With the native TMOS architecture, AAM makes it possible that
web performance and WAN optimization can be combined with application
delivery. The integration allows the enabling of technologies such as SSL
offloading, HTTP compression, Web Acceleration and rate shaping. As other
modules, the AAM can be combined with iRules. The AAM can also be used
to optimize multitude of protocols delivered to heaps of different devices. (F5
2014a.)
4 WEB APPLICATION SECURITY
Web application security means the process of protecting websites and
services against security threats that exploit vulnerabilities in the code of the
application. Web applications are high-priority targets for attackers, because

14
of complex source codes that increase the likelihood of vulnerabilities and
code manipulation, ”high rewards” and the ease of execution as most attacks
can be done automatically against many targets at a time. (Imperva 2017.)
Typical web application vulnerabilities include injection type attacks such as
SQL injections, cross-site scripting, remote file inclusion and cross-site
request forgery (Imperva 2017). The current trend in application security risks
can be observed from lists such as the OWASP top 10 list. The list describes
the current TOP 10 risks of application security. However, the attacks don’t
end at the top 10 and there are many more application security risks.
(OWASP 2013.)
4.1 Denial of Service
Denial of Service attacks are a powerful way to disrupt and deny availability of
web services. DoS attacks are essentially done by flooding the target of the
attack with a very large amount of legitimate traffic to render it inaccessible to
other users. DoS attacks with multiple attackers are called Distributed Denial
of Service attacks or DDoS. (Shakarian, Shakarian & Ruef 2013, 12-13.)
DoS attacks have moved up the OSI model starting from the network layer
attacks from the early 90s into session attacks and then into application layer
attacks. Network layer attacks are typically different flood type attacks.
Session and presentation layers are attacked in session attacks, which consist
of SSL and DNS attacks. Almost half of all the present attacks are done on the
application layer. The detection of attacks becomes harder as the attacks go
higher in the OSI model. (Holmes 2013.)
The network layer attacks are the traditional way of DDoS attacks. The
purpose of the network layer attacks is to consume the bandwidth of the target
and deny the service for users. These attacks include for example, ICMP
flooding, SYN flooding and UDP flooding. These kinds of attacks are easy to
mitigate nowadays and for this reason the attackers have started to move to
other types of attacks. (Balandin, Andreev & Koucheryavy 2015, 275.) Against
the most common network layer attack, the SYN flood, there are three
different types of mitigation methods. Two of them are found on the typical
15
network devices and servers and the third option, the use of SYN cookies is
the best method and is found only on BIG-IP ADCs. (Holmes 2013.)
Session layer attacks use the OSI layers 5 and 6. They include attacks
against SSL and DNS. With common firewalls, SSL attacks cannot be
mitigated and the ability to defend against DNS attacks is limited. For both
attacks the best defense is a high-performance, full-proxy functionality that
can validate every DNS and SSL connection going through. Typical Session
layer attacks against DNS servers include attacks such as DNS query floods
and DNS NXDOMAIN floods, in which the attacker sends nonexistent records
to the server and wastes the server’s resources. Against the SSL there are
SSL floods and SSL renegotiation attacks. In the SSL flood attacks the
attacker sends malicious or empty SSL connections to the server to exhaust
its resources. The SSL renegotiation attacks exploit the asymmetric
encryption ability of SSL. The SSL handshake requires 10 times more
processing power on the server side than the client side, which means that in
the worst case only one client is needed for the denial of service. (Holmes
2013.)
Application layer DDoS attacks, also known as layer 7 DDoS attacks are
denial of service attacks where the attacker targets the application OSI layer.
The attacks over use certain features and functions on a site to disturb or
disable them. The application layer attacks are different from other types of
attacks. (Kiyuna, Conyers 2015, 24.) Application layer attacks, unlike the
network layer based DDoS attacks, can focus on draining other resources
such as Sockets, CPU, memory or disk or I/O bandwidth instead of only
exhausting the bandwidth (Balandin, Andreev & Koucheryavy 2015, 275).
They can also be performed by using legitimate protocols and legitimate
connections so signature based detection systems cannot detect them. The
application DDoS attacks may also encrypt the data of the connections in the
application layer, which makes the attackers hard to detect without violating
their privacy. Anomaly-based detection is currently the best solution for the
detection and prevention of application layer attacks. Anomaly based
detection is based on typical user behavioral patterns and also allows the
detection of, zero-day attacks. HTTP protocol attacks are the most popular on
the application layer due to the popularity of the protocol and the amount of
vulnerabilities it has. (Galinina, Balandin & Koucheryavy, 2016, 327)

16
Typical application layer attacks types include attacks, such as simple or
recursive GET floods, POST floods, low bandwidth HTTP Attacks, Slow POST
attacks and HasHDoS attacks. GET floods, which are one of the most popular
application layer attacks request a static object or every object on a page that
can be requested. POST floods work the same way as GET floods, but
instead of a GET request, they send a POST that has a greater chance of
using up the resources on the target server. Low bandwidth HTTP attacks
such as the SlowLoris are hard to detect by regular means because they use
a very low amount of bandwidth. SlowLoris and similar tools first learn the
target’s inactivity timeout timer and start feeding HTTP headers to the target in
a very slow speed. A second before the timeout the SlowLoris sends a fake
header to the server to keep the connection open. When the server has too
many connections to open any new ones, the denial of service is achieved.
Slow POST attacks work the same way as the SlowLoris, but instead of
sending headers it starts an HTTP POST with the target and uploads data
very slowly. HashDoS attacks work by sending a single POST message,
which includes thousands of different variables to overwhelm the hashing
function of the server. A single HashDoS POST message can disable a server
for over an hour. (Holmes 2013.)
4.2 Web scraping bots
A Bot is an automated software program that runs tasks in the Internet.
Typical bots perform simple, repetitive tasks at very high speeds. Almost half
of all web traffic comes from bots and two thirds of the bot traffic is malicious.
One of the ways that bots can cause harm to a site or an application is web
scraping. Web scraping means the process of automatically collecting
information from the Internet. The most common type of scraping aims to steal
content from the web to use it elsewhere, which is called site scraping. The
web scraping bots typically crawl the website and access the source code,
parse it and remove the pieces they want and then post the content elsewhere
on the Internet. Another, more advanced type of web scraping is the database
scraping. It works like the site scraping bot, except it will ask the application to
retrieve data from the database. (Saeed 2016.)

17
4.3 Brute force
Password-guessing attacks, also known as brute-force attacks are a common
threat against web sites that require some kind of a user authentication. Trying
every possible combination of characters systematically, until the right
combination is called a brute force attack. A password can always be
discovered by a brute force attack, but it can take a lot of time to find it out.
The time to crack a password depends on its complexity. Brute-force attacks
can also use dictionary words or slightly modified versions of dictionary words
rather than random characters, because most people use dictionary based
passwords. Brute-force attacks put user accounts into a risk and increase the
site’s traffic with unnecessary transactions. There are many tools for the brute-
force attacks and most of them can utilize wordlists and proxy servers to try
passwords from different IP-address with advanced rulesets. (OWASP 2016).
5 KALI GNU/LINUX
Kali Linux is a GNU/Linux distribution based on the Debian GNU/Linux
distribution, which was first released in 2013. Kali focuses primarily on
penetration testing and security auditing. By default, Kali contains hundreds of
different tools for various information security tasks. Kali distribution was
developed and funded by an information security company Offensive Security.
(Offensive Security 2017b.)
The minimum system requirements for Kali are 8GB of hard disk space,
512MB of RAM memory and an Internet connection. Kali Linux can be
downloaded and installed in a few different ways. The basic ISO image is
available as 32-bit and 64-bit versions which can be installed via a CD or an
USB. There is also a VM version of Kali for Virtual usage with ready installed
VMware tools. Kali can also be running as a live CD, but it is not
recommended as nothing can be saved. (Offensive Security 2017a.)
6 IMPLEMENTATION
The implementation part includes the implementation and testing of security
and optimization features offered by the BIG-IP ADC. The implementations

18
covered in this section should all be usable with the Cybergame application
although some of the implementations need to be reconfigured or tweaked a
bit when the Cybergame application is released. Some of the implementations
were done to the test application located in www.cybergame.fi, which was at
the time not available in the public Internet. To test most of the features a
testing application with more features was required.
6.1 Basic configuration
At the start of the project, the ADCs had already been implemented into the
CyberLab and some configurations had been made in previous thesis and
project works (Kajova 2016; Peltonen 2016). The ADCs could be connected
by local IP addresses 172.18.2.25 and 172.18.2.26. The required feature
modules such as the ASM were installed and licensed. The VLANs, load
balancing pools, nodes and the virtual servers for the required servers in the
Cybergame had already been implemented so it was possible to access the
Cybergame network through the ADC. The ADCs were set to an
active/standby failover mode and the devices were in sync. The right
certificates for the Cybergame.fi domain were added to the SSL profile in the
ADC. The SSL was offloaded from the Cybergame servers into the ADC’s
HTTPS virtual server for the cybergame.fi site.
Even though the basic configuration had already been implemented into the
ADC, some changes to the base configuration needed to be made. The first
problem that appeared was that it was only possible to connect to
https://www.cybergame.fi, the non-secure http://www.cybergame.fi could not
be accessed and no automatic redirection to the HTTPS was made. This type
of implementation could cause unnecessary confusion in the future. A new
virtual server for the HTTP traffic and HTTP to HTTPS redirection had to be
created.
A new virtual server was created by going to the virtual server part of the
menu in the ADC’s web interface, which was found under the Local Traffic
module and then clicking the create new button. The settings for the virtual
server were copied from the HTTPS version of the virtual server, except of the
port number, which in this case was 80 instead of 443 and the load balancing

19
address pool, which was left blank. The BIG-IP system default iRule called
“_sys_https_redirect” was added to the new virtual server by going to the
virtual server tab and clicking the resources button on the newly created
virtual server. After implementing the iRule, traffic to the
http://www.cybergame.fi was automatically redirected to
https://www.cybergame.fi.
Another issue related to the basic configuration was that for some reason the
clock settings of the devices were not in sync and the logging was behaving
incorrectly. After a while it was noted that the Funet NTP servers used in the
whole Cybergame were not working. A new NTP server had to be configured
into the ADC. Luckily a new stratum 1 Symmetricom NTP server was just
implemented into the laboratory in project lessons. The Funet addresses were
replaced from the ADC’s NTP configuration tab with the address of the new
NTP server.
6.2 Creating the required virtual machines
After finding out the current state of the cybergame.fi site, it was seen that to
test some of the features a new testing application was to be created. For
example, there was no working login page on the current Cybergame site and
to test the brute force blocking feature of the ADC one was required.
WordPress was chosen for the application, because it is relatively easy to
implement and contains required features for the testing application. The
WordPress was installed into a Debian GNU/Linux operating system. As the
Cybergame network was at the time not connected to the Internet, the
installation of the operating system and the WordPress had to be done locally.
The Debian was installed on a local VMWare workstation and the required
LAMP package and updates were installed. The WordPress was also
downloaded into a directory, but not yet installed. The Virtual machine was
then uploaded in the Cybergame VMWare ESXi server and placed into the
frontend VLAN, where the cybergame.fi site was also located. After the server
was added to the frontend the WordPress was extracted and installed on the
server. A local IP-address from the frontend VLAN was added to the eth0
interface and a virtual server was created for the site from the ADC. After that,
an address from the “INTERNET” pool of the ADC was added for the site. The

20
INTERNET address pool includes some public addresses assigned to the
CyberLab, but as the whole CyberLab was not connected to the Internet they
could be used without harm. The site was then accessible from the address
193.167.58.249.
To test the implemented security settings a Kali Linux virtual machine was
also required. The Kali Linux was installed as a local installation. The Kali was
set to use the network card of the local computer, because it needed to
connect to the Cybergame network from the “public” side and not from the
“inside”. The updates were the only change done to the Kali at this time, as
they were required to install open-vm-tools and new security testing tools. The
address of the new testing site was confirmed accessible from the Kali, which
meant that security testing could be done.
6.3 Configuring security
The Configuring of the web security settings was the main part of this thesis.
The configuration of the security part includes the configuration of security
features that could be usable with the Cybergame application. The security
settings were configured using the template site located at www.cybergame.fi
and the WordPress test site created earlier. The Application layer security
settings used were offered by the ASM module and the basic layer 3-4
protection settings were featured by the AFM module.
6.3.1 Application security policy
The ASM application security policy offered the basic defense against the
application vulnerabilities and attacks. As the application security policy uses
signatures as one of the mitigation methods the signatures had to be up to
date. The BIG-IP system comes default with many application attack
signatures and more are coming as updates every now and then. As the
signatures could be important to application security, the signature updates
were made automatic so that the device always has the newest signatures.
The update frequency settings could be found by navigating to Security >
Options > Application Security > Attack Signatures. On top of the screen,

21
there was a selection for Scheduled or Manual update mode. The mode was
changed to Scheduled. One step below the mode selection is the update
interval menu, which could be set to daily, weekly or monthly. The update
interval was set to a daily frequency. Few steps below the interval setup was a
checkbox for auto applying new signature configurations after an update,
which was also checked. On the very bottom of the screen, the status for the
update attempts could be seen. The system would now check and apply new
updates daily. A successful update with signature details can be seen in figure
2.
Figure 2. Successful update with signature details.
Before the implementation of an application security policy, to log application
security events, a logging profile with application security logging enabled had
to be created. The logging profile was created by going to Security > Event
Logs > Logging Profiles and clicking new. All of the checkboxes, except for the
network firewall were checked. The log profile was then enabled from the
virtual server’s security policies setting menu. After the logging was enabled, a
new application security policy was created. The creation of security policy
was also required for many of the ASM application security features. By

22
navigating to Security > Application Security > Security Policies and clicking
the create button a new policy was created. The association of a policy
required a working virtual server with basic configurations such as addressing
done. The associated virtual server had also to have an HTTP profile set and
could not be associated with a Local Traffic policy. Two security policies were
done, one for the Cybergame virtual server and one for the WordPress site for
testing. However, the policies did not differ much from each other. From the
scenario selection, Existing virtual server was chosen. On the next screen a
selection for the protocol used and the virtual server could be seen. In the
case of the Cybergame server the HTTPS only protocol was chosen, as
Cybergame only works on HTTPS and for the WordPress test site the regular
HTTP was selected. On the next page, there were four choices for building the
security policy. The choices were automatic, manual or with templates, policy
for XML and web services manually and the creation of policy by using a third-
party tool. The automatic policy creation was chosen to test the application
security policy creation. It is possible to edit the policy manually after it has
been implemented. After selecting the automatic creation more policy settings
were asked. From the Application Language list, Auto detect was selected. On
the next screen, the attack signatures could be selected. There are three
different categories of signatures ready selected which are General Database,
System Independent and Various Systems. More needed signatures can and
should be added later when more about the Cybergame system is known. As
for the WordPress site, the used services were known so MySQL, Apache and
PHP signatures could be selected. The configuration of automatic policy
building was next. There were three levels of policy building to select.
Fundamental is the most basic one, Enhanced is the middle ground and
Comprehensive is the one with most policies. The learning speed of the policy
could also be adjusted from the menu. The faster the learning speed, the
bigger the chance to add false entities. The comprehensive policy type was
selected because it gives the most features. The policy builder speed was set
to the fast level. To speed up the learning of the policy, some trusted
addresses of clients were added to the settings of the security policy, as the
policy learns faster from the trusted traffic. For the future Cybergame
application a building type should be chosen, depending on the needed
elements and the extent of the policy. According to F5 the use of the default

23
policy building settings is suggested and the basic settings are sufficient for
most applications, as they also require less work. (F5 2014b).
Figure 3. Automatic Policy builder progression.
After all the settings were selected the policy builder went to the status page,
which is seen in figure 3, it shows the current learned policy elements and the
general progress of the policy creation. As the policy learns from the traffic of
the application, the progress bar will not go to the end until the policy has
collected enough traffic. The settings were saved by clicking the apply policy
from the top right corner. As the policy was associated with a virtual server, all
the web application traffic in the virtual server will be examined by the ASM
and used for the policy building (F5 2014b). The status page of the policy
builder could be found by going to Security > Application Security > Policy
Building > Status (Automatic). The learned elements that were chosen in the
policy building level selection could also be observed from the status page.
The page also shows the amount of traffic certain elements on the website
have gotten. For example, the parameters and the traffic for the WordPress
can be seen in figure 4.
Figure 4. Parameters and traffic in the security policy.

24
When the policy creation has gotten enough traffic to learn all the needed
policy elements for the application, the signatures were taken out of staging
state. In the staging mode, the signatures are applied to the application traffic,
but the blocking flag is not applied to the requests that trigger the events (F5
2014b). That was done by navigating to Security > Application Security >
Attack Signatures > Attack Signature Configuration and unchecking the
Signature Staging box. The signatures and other elements that were ready to
be enforced could also be studied and enforced at Security > Application
Security > Policy Building > Enforcement Readiness, as seen on figure 5.
Figure 5. Enforcement readiness of the policy elements.
When enough traffic was given to certain objects on the site, the system listed
all the learned parameters and URLs of the site. The page could be, for
example, viewed in a tree mode to easily see what URLs and parameters the
ASM policy had learned. The tree view of the Cybergame.fi can be seen in
figure 6.
Figure 6. ASM tree view.
The ASM policy also needed to be synced into the other device in the Sync-
Failover device group as the other configurations are. By going to Security >
Options > Application Security > Synchronization and selecting the right
failover group from the list, the system synced the ASM configurations in
similar way as it did to other configurations as shown in figure 7.

25
Figure 7. ASM sync.
When the ASM policy was set to active and started noticing violations, it would
report them to the event logs. The violations list in the policy’s “blocking”
section determined how the system would process the triggered violations.
The blocking section could be found by going to Security > Application
Security > Blocking. The enforcement mode of the Violations List could be
either set to transparent or blocking mode. In the blocking mode, the violations
would be reported to logs and blocked. In the transparent mode, the traffic
wouldn’t be blocked even if it causes violations, which is why the transparent
mode was suggested to be used when creating an application security policy.
To test the violations, the enforcement mode was set to blocking mode. The
blocking section also included a large list of different violations. There were six
different violations categories, which include RFC, Access, Length, Input,
Cookie and Negative security violations. Each violation could be configured
with three different flags. The learn flag allowed the system to log the illegal
request and create a learning suggestion of it. The alarm flag logged the
request and alarms about the request. In the blocking mode, the violation was
logged and blocked, the enforcement mode had to be set to blocking mode for
the block flag to work. The violations list gave more information about the
violations when the “i” icon next to a violation was clicked.
When the WordPress site’s policy was ready, it was tested. To test the
violations, some flags were set manually to the violations list. The violations
found by the system could be observed from Security > Application >
Requests. Both illegal and legal requests could be viewed from the logs
depending on the log configurations. Vulnerability on an application was also
needed to test ASM policy’s ability to defend against application vulnerability

26
exploits. A program called WPScan was ran from the Kali Linux virtual
machine to determine if WordPress had any vulnerabilities to exploit. The
following command was written to the Kali terminal to scan the WordPress site
for vulnerabilities.
wpscan -u 193.167.58.249
The installed version of WordPress had a few vulnerabilities including some
XSS vulnerabilities, of which one was chosen. According to Montpas, the
vulnerability is included in the WordPress’ youtube embed shortcode and it
allowed attackers to deface posts on sites and store malicious JavaScript in
them (Montpas 2017). The following code was then entered to WordPress site
as a post from an administrator user.
[embed
src=’https://youtube.com/embed/12345\x3csvgonload=alert(1)\x3
e’][/embed]
(Montpas 2017).
When the code was posted, the results could be instantly seen form the
ADC’s logs. The policy found many violations from the HTTP request, of which
one was Attack signature detected. The blocked request is shown in figure 8.
If a client is blocked by the ASM policy, the following message as in figure 9
will appear on the web browser of the client.

27
Figure 1. ASM request violation details.
Figure 2. ASM error message shown to the client.
When the detected Attack signature was looked closer, it was seen that there
are three signatures found on the XSS code posted to WordPress. The
signatures can be seen in figure 10. The violations and details of the attack
signatures could also be observed in more detail as can be seen from figure
11. From the outcome, it could be determined that the application security
policy could be used to mitigate application vulnerabilities and exploits, such
as XSS and other attacks that were listed in the OWASP top 10 automatically.

28
Figure 3. Attack signatures found.
Figure 4. Details on the signatures.
The combination of BIG-IP application security policy and the guacamole
application had also to be tested, as the Guacamole will be in an important
part in the Cybergame. Cybergame’s ESXi hypervisor contained an early
version of a Kali Linux virtual machine that could be used in the NEST. The
virtual machine was chosen for the testing. The settings of the virtual machine
were configured so that its traffic would go through the ADC’s NEST virtual
server and it would appear as a public IP address as was done in the virtual
machine creation chapter earlier. As the Guacamole uses the port 8080 by
default, an iRule that redirects traffic to the port 8080 had to be added to the
NEST’s virtual server on the ADC. The virtual machine was then available
from IP-address 193.167.58.247. To access the virtual machine using
Guacamole, “/guacamole” had to be entered after the address. After entering
to the virtual machine, the machine worked well even though it was somewhat
slow. The cause of the slowness could have been the old version of the virtual
machine or because of the traffic going through the ADC. Next was the
automatic creation of application security policy using the policy builder. It was
done the same way as earlier in this chapter. When the policy builder was set
on and traffic was sent to the Guacamole, the policy started learning
elements. The learning of the Guacamole’s elements went on well except for
the parameters section, which started showing some odd values. After a few
clicks on the Guacamole virtual machine, the parameter learning logs had
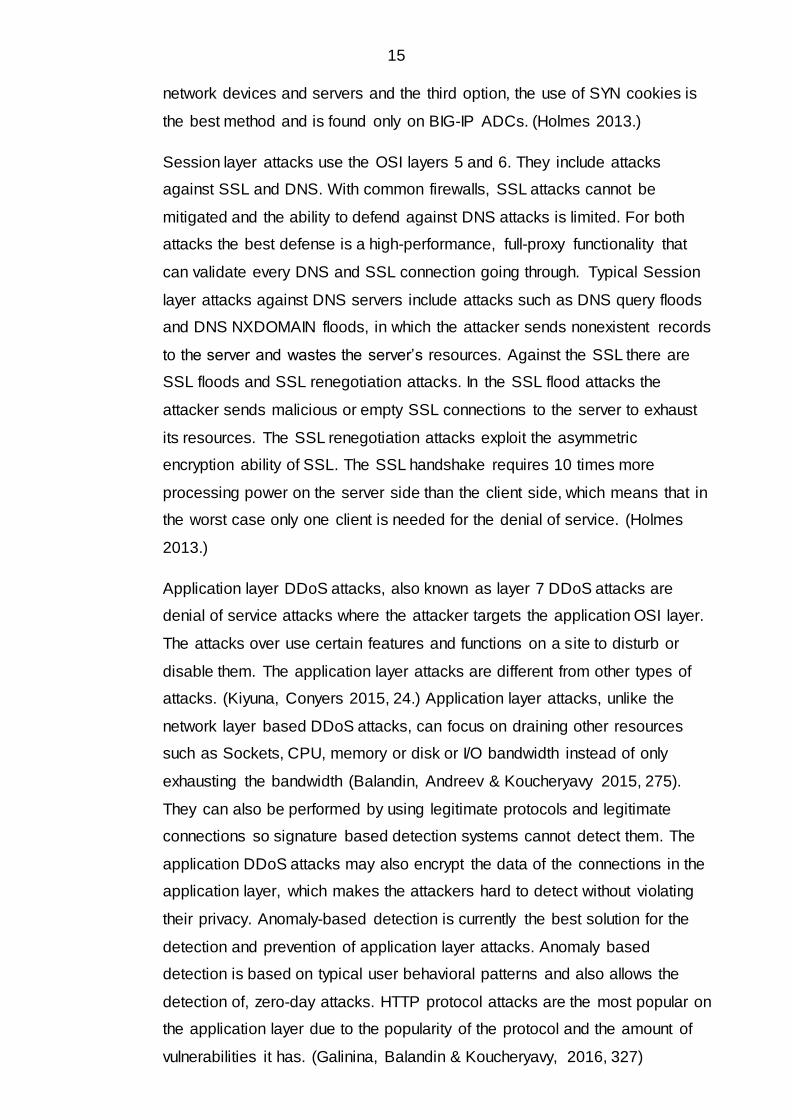
large amounts of the values. Some research had to be done, because it
29
seemed that the policy builder was not working right. The values can be seen
in figure 12.
Figure 12. Example of The Guacamole protocol values and the amounts.
After studying the Guacamole documentation, it was found that the values
were Guacamole protocol instruction messages. The messages are send from
the client to server and from server to client. (Apache s.a.a.) For example the
key values that can be seen in figure 12, are sent every time a key is pressed
or released in the Guacamole virtual machine (Apache s.a.b). At the current
state, the automatic security policy creation can’t be used with the Cybergame
Guacamole virtual machines. The combination of Guacamole and application
security policy need to be studied more.
6.3.2 Anomaly based detection
The AFM module offers automatic mitigations of layer 4 DoS attacks, however
against layer 7 DoS attacks some more advanced mitigation methods were
needed. The Anomaly based detection, which was featured by ASM could be
implemented against layer 7 attacks. The anomaly based detection is
essential against for example HTTP-GET attacks. The anomaly based
detection could be configured against TPS based anomalies and the latency
based anomalies. The TPS based anomaly was meant for the client side and
the latency based anomaly for the server side protection. The DoS protection
could be set to either transparent or blocking mode. The DoS protection
settings could be found by going to Security > DoS protection. In the DoS
protection tab, the create button was clicked and the new profile was named.

30
Next the application security check box was selected and more options
appeared. The TPS-based anomaly was set to the blocking operation mode
and all the prevention policies were checked. The TPS values and the
prevention duration were left to default. The TPS-based anomaly configuration
is shown in figure 13.
Figure 13. TPS-based anomaly configuration.
The TPS-based detection would now calculate the average TPS values and
look for anomalies. After the TPS-based detection, the latency-based
detection was to be implemented. The operation mode was again set to the
blocking mode. The detection criteria were set to default settings and all the
prevention policies were checked. The TPS criteria and the prevention
settings were again left to default. The settings for the latency-based detection
can be observed from figure 14. The latency-based detection would now look
for anomalies in URL-latency, minutely and hourly.

31
Figure 5. Latency based anomaly configuration.
In the settings there was also feature called Heavy URL Protection and under
that Automatic detection, which both were checked. Heavy URLs can also be
added to the protection list or a whitelist of the DoS profile manually when
some of them are known. Lastly the DoS profile was set to record traffic during
attacks by checking the checkbox form the end of the page. The DoS profile
was then saved by clicking the update button and was implemented into a
virtual server. The right virtual server settings were opened, then from the
security menu the policies tab was opened. Using the advanced configuration
mode, the DoS protection profile was enabled and the created profile was
associated with the virtual server. The statistics for the DoS protection profile
could be found by navigating to Security > Event Logs or Reporting > DoS >
Application. The anomaly based detection should now block and report
anomalies it notices in the network traffic to the logs.
To test the anomaly based detection, a layer 7 DoS tool was used. A tool
named slowhttptest was chosen for the process. The tool was downloaded for
the Kali Linux from the APT-repositories. The tool could be used by simply

32
typing slowhttptest to the Linux terminal and then adding parameters. The
slowhttptest tool had four different attack modes to be used, which could be
changed with lettered parameters. “-H” mode is for slow headers also known
as Slowloris, “-B” mode for slow body attack, “-R” for range attack and –X for
slow read. According to F5 the ASM anomaly detection should be able to
recognize all of the above except for the Slowloris, which will be analyzed later
in the work (Holmes 2012). The three mitigatable attacks were tested by using
command:
slowhttptest –R –c 5000 –u http://193.167.58.249
The first letter after the “slowhttptest” determines the mode, the –c defines the
amount of connections used and after the –u the tested URL should be added.
Other parameters could also be added, but they were not necessary for these
tests. After doing some testing with the command a problem was noted. The
anomaly based detection did not notice the attacks, even though the site went
down with some of the modes used. Following the testing, the TPS and the
latency values for the detection of the DoS attacks had to be taken down by a
very big margin for both the TPS and latency based detection from the
settings of the DoS profile. After modifying the profiles, the tests were done
again. The results popped instantly into the application DoS logs, which show
the starting and ending times of the attacks and the detection method used.
The results can be seen in figure 15. When the anomaly based detection is
implemented into the real Cybergame application, the profiles should be tuned
again for the profiles to correspond the traffic of the site.
Figure 15. ASM anomaly detection logs.
6.3.3 Web scraping
There were a few available features offered by the ASM module to counter
malicious bots. According to F5 the caching should be disabled when
mitigating web scraping bots, as the cached content won’t be protected from

33
the bots. The clients that use the application need also to have JavaScript
enabled and support cookies for the anomaly detection to work. (F5 2014b).
At first basic bot detection was implemented by going to Security > Application
Security > Anomaly Detection > Web Scraping. The system could be set to
alarm or alarm and block the bots in case of malicious bots appearing. The
alarm setting was chosen in all cases. When the Bot Detection was enabled,
some selections appeared at the bottom of the screen. The settings were left
to default. The bot detection setting determines if the client is a human or a
bot by limiting the page changes allowed during a certain time as seen in
figure 16.
Figure 16. Bot Detection settings.
The implementation of web scraping based on session opening was next. The
session opening anomaly detection will detect sessions or IP addresses that
open too many sessions. Attacks can also be detected when inconsistencies
and session resets reach a configured threshold. (F5 2014b.) More settings
appeared on the Session Opening tab at the bottom of the screen. Session
Opening Anomaly box was checked. From the prevention policy setting below
Client Side Integrity Defence and Rate Limiting were enabled. Drop IP
Addresses with bad reputation could not be enabled, because the IP Address
intelligence module was not licensed. The Session detection criteria were left
to default, as shown in figure 17.

34
Figure 17. Session Opening Anomaly settings.
Figure 18. Session Transaction Anomaly settings.
The last option from the top Session Transaction Anomaly looks for sessions
that request too much traffic compared to the average amount of the
application. The traffic is based on TPS. (F5 2014b.) The session transaction
anomaly settings are shown in figure 18. After the settings were set, the save
and apply policy buttons were clicked. The default criteria were left in the
settings. The detection criteria could be tuned later to decrease the chance of
false bot detections or to increase the chance of detecting bots. The web
scraping event logs could be seen by navigating to Security > Event Logs >
Application > Web Scraping Statistics. The system should now alarm in case it
detects bot activity that have not been whitelisted in the site. The web
scraping option could not be tested as the CyberLab was not connected to the
public Internet. In theory, the web scraping should work, but the percent and
transaction options should be tuned, as in other anomaly based detection
methods.
6.3.4 Brute force
The brute force attacks could also be blocked and detected on the ADC
instead of using some software blockers. To use the ASM brute force blocking
feature, a setup of a login page was required to be added to the ADC. Login

35
page could be set to the ADC by going to Security > Application Security >
Login Pages and clicking create new. To set the login page the URL of the
login page, the authentication method and some parameters needed to be
known. At least one access validation method was also mandatory. The
authentication type in the case of the WordPress test site was “HTML Form”
and the username and the password parameters, which could be found from
the site source-code were “log” for the username and “pwd” for the password.
To find some validation settings from the responses “Response Logging” had
to be activated. After it was activated a regular login and a failed login were
sent to the site. If the application security policy and the login page were set
correctly the requests should appear into the log of the application security
policy. When the response logging was enabled, the HTTP response could be
viewed and some access validation settings were deducted from the
responses as seen in figure 19, which shows a response of a successful login.
Figure 19. HTTP Response shown by ASM.
The successful login returned a 302 response and added a
“wordpress_logged_in” cookie, which were both added to the login page
settings. From the failed login the response “ERROR” could also be seen.
This was added to the string that should not appear section as shown in. After
the login page was completed, the brute force detection could be set up. The
brute force anomaly detection setting could be found from Security >
Application Security > Brute Force Attack Prevention. The login page created
earlier was selected as the login page. The login attempt parameters on both
session-based and dynamic brute force protection were set to lower to test the
protection and block durations were also decreased. The complete settings
can be observed in figure 20.

36
Figure 20. Brute Force Block settings.
To test whether the brute force block was working or not, a brute forcing tool
was needed. A tool called WPScan was found in the Kali Linux, which is a tool
exclusively for brute forcing into WordPress. The following command was
entered to terminal.
wpscan --url 193.167.58.249 –wordlist /usr/share/john/password.lst --
username root
The command would brute force the WordPress with the username “root”
using a wordlist called password.lst, which is an over 3000 word wordlist,
included with the Kali Linux. The command was run first without the brute
force blocking on and the whole list was brute forced without a notice in under
a minute. When the command was run with the blocking set on, WPScan

37
started showing errors as soon as the ADC noticed the brute force attack.
Based on the settings the attack could be discovered by the Application
security policy or the Dynamic Anomaly detection method. If the attack was
discovered by the security policy, the log could be found in the application
security event logs as shown in figure 21.
Figure 21. ASM brute force request details.
If the application security policy did not detect the brute force, the anomaly
based dynamic detection would trigger if it was set on. The anomaly detection
logs could be found from the Event Logs > Application > Brute Force Attacks
and they would display more information about the attack and how it was
discovered, as shown in figure 22.
Figure 22. Brute force block logs.

38
6.3.5 Session tracking
With the login page created in the previous chapter, a feature called session
tracking of the ASM could also be enabled. The session tracking can be used
to track, enforce and report users, sessions and IP addresses. When the
session tracking detects a violation, it will perform either logging or blocking
actions based on a user, session and IP. The session tracking could be
configured by going to Security > Application Security > Sessions and Logins
> Session tracking. From top of the menu a login page had to be selected. In
this case, the WordPress login page was used. Other settings on the top of
the page were left to default. At the bottom of the menu there were three tabs,
from which the different session tracking variations could be configured. The
different features were called block all, log all requests and delay blocking.
Only the logging setting was tested as the blocking features required other
configurations. The settings on the log all requests tab had to be re configured
as the amount of violations by default was too high. All of the violation
parameters were set to one to as seen in figure 23.
Figure 23. Session tracking log all requests.
The system should now after one violation log everything a user, session and
IP-address does during 600 seconds. After the configuration two different
WordPress users from different IP-addresses performed one violation
determined on the application security policy on the WordPress site. The
sessions should now be logged and found at Security > Reporting >
Application > Session Tracking Status. In the logs, there were two values for
usernames, sessions and IP-addresses, which confirmed the session tracking
and the login page were configured correctly. The session tracking logs can

39
be seen in figure 24. By clicking the “View Requests” button on the logs, the
requests made by the client could be tracked.
Figure 24. Session tracking logs.
6.3.6 Mitigating specific attacks
According to Holmes most of the typical DoS attack tools in layers 2 to 7 can
be blocked with the combination of ASM and AFM. However, there are some
exceptions that have to be mitigated using other methods. The exceptions are
SSL Renegotiation attack and Slowloris. (Holmes 2012.) The two attacks
listed on the article were already tested in a related project on a virtual version
of the BIG-IP so it would be interesting to see how the attacks work against
the real BIG-IP devices.
As the Cybergame will be using HTTPS the SSL renegotiation attack should
be mitigated. To test if the SSL renegotiation attacks were still a problem
against BIG-IP and SSL, “THC SSL DOS” tool had to be used. The tool was
provided by the Kali Linux and could be easily be used from the terminal. The
following command was entered to the terminal of Kali:
thc-ssl-dos 193.167.58.246 443 –accept
The program only needed the IP-address and HTTPS ports of the target and
asked in the end to confirm with –accept that the target was applicable to test
on. When the command was entered, the handshakes went on for some time
until errors started pouring in. The THC SSL tool progress can be seen in
figure 25.

40
Figure 25. THC DDoS tool.
Figure 26. SSL renegotiation in security logs.
After looking into the logs of the BIG-IP it was found that the something had
spotted DoS automatically and rate limited the attack as shown in figure 26.
According to the BIG-IP system performance logs the attack from one client
only caused the system CPU usage to go up by a few percent so other
mitigation methods were not necessary. Looking around the F5 site for a
reason why the attack was mitigated automatically, only information about the
iRule mitigation was found and nothing stating an automatic mitigation was
found. After a while a F5 white paper document was found, which states that
the SSL renegotiation was added to an automatic LTM SSL stack that
provides the mitigation by default (F5 2014c).
To test the mitigation against Slowloris, a tool called slowhttptest was used.
According to F5 the attack was mitigated automatically if an HTTP profile is
used on a virtual server. The attack sends requests, which are never meant to
complete to exhaust the connections of a server. If an HTTP profile is set to
the BIG-IP, the attack will only consume connections on the BIG-IP instead of
the application servers. When the size of the sent headers exceeds the limit
set in the BIG-IP HTTP profile, the connection will reset and the device will

41
recover TCP sockets and remove connections from the connection table,
rendering the Slowloris attack useless. (F5 2017.) When the attack was tested
on the testing site using slowhttptest tool the statistics page on the BIG-IP
showed a small increase in processor usage and an increased amount of
opened connections, but no drawbacks for the site were seen. If the attack
needs to be mitigated further for some reason, the following iRule could be
used:
when CLIENT_ACCEPTED {
setrtimer 0
after 1000 {
if { not $rtimer} {
drop
}
}
}
when HTTP_REQUEST {
setrtimer 1
}
(F5 2017).
6.4 Configuring optimization
Some traffic optimization features were also implemented to the ADC. The
optimization features are very important to reduce the load and the traffic that
goes through the ADC to the servers. If the traffic and the content were
optimized, the saved resources could be for example used to mitigate DoS
attacks or serve the application to the users. The optimization features were
featured in the AAM module.
6.4.1 TCP multiplexing
TCP multiplexing was the first optimization setting to be implemented. TCP
multiplexing feature could be found in the LTM module of the ADC by the
name of OneConnect. As stated in the F5 OneConnect tuning document, the

42
TCP profiles of the HTTP profile that are going to be implemented with
OneConnect should be changed first to the F5 default optimized profiles (F5.
s.a.). First by navigating to Local Traffic > Virtual Servers the configured virtual
server was selected.
FIGURE 27. The optimized TCP profiles implemented.
Around the TCP section of the virtual server’s settings, the client side TCP
profile was set to “tcp-wan-optimized” and the server side was set to “tcp-lan-
optimized” as shown in figure 27. Next was the implementation of
OneConnect. New OneConnect profiles could be created from Local Traffic >
Profiles > Other > OneConnect. The IP range for reused connections could be
set from the OneConnect profile settings in the source mask section.
OneConnect profile with a mask of 0.0.0.0 reuses all the connections and
could mess up the log entries. The safest mask 255.255.255.255 was chosen,
because it only reuses the same client’s TCP connections. Other OneConnect
settings were left to default.
Figure 28. Oneconnect reused TCP connections.
After implementing the OneConnect profile into the virtual server, the reused
TCP connections could be seen from the ADCs statistics page located at
Statistics > Module statistics > Local Traffic > Profiles summary >
OneConnect. After a couple of refreshes on the www.cybergame.fi site the
statistics page showed that the TCP is multiplexed correctly as shown in figure
28.

43
6.4.2 HTTP compression
HTTP compression is another good way to optimize the traffic and it can be
done on the ADC instead of the application servers. The profile could be
created by navigating to Local Traffic > Profiles > Services > HTTP
Compression and by clicking the create button. The content to be compressed
or never compressed could be added to the content lists. To test the
compression, text/, application/http, application/javascript were added to the
contents list. Other settings were left to default. The content list and other
settings can be seen in figure 29.
Figure 29. HTTP Compression settings.

44
When implementing compression into the Cybergame virtual server, the
content should be changed accordingly when more about the compressible
content of the Cybergame is known. The profile was then added to the virtual
server of the testing application by navigating to the virtual server tab,
selecting the right virtual server and scrolling to the bottom of the menu to the
HTTP compression profile selection. The traffic requested from the server was
now compressed. The statistics of the compression could be found in
Statistics > Module Statistics > Local Traffic > Profiles Summary > HTTP
Compression, which confirmed that the compression was working well on the
test site as seen in figure 30.
Figure 30. HTTP Compression statistics.
6.4.3 Web Acceleration
The last optimization feature to be implemented was the Web Acceleration,
caching of static content. Combined with the HTTP compression the caching
allows the ADC to cache compressed static content, improving the
performance. The configuration of the Web Acceleration needs some extra
tweaking to be done on the device before it can be used, if a BIG-IP ASM
policy is already implemented into the device. (F5 2015). At first a new custom
Web Acceleration profile was created, by navigating to Local Traffic > Profiles
> Services and selecting web acceleration. For the parent profile of the new
profile, “optimized-caching” was selected. Only a few settings were changed
from the default. The minimum object size, which was set to 1 byte and the
maximum object size which was set to 150000 bytes. The cache size was
changed to 100 megabytes for this implementation. To save the profile, finish
was then clicked. For the ASM and the acceleration profile to work together, a
new local traffic policy had to be made. By navigating to Local Traffic >
Policies and clicking create, a new local traffic policy was created. The new
policy was named “ASM_cache_static_content”. The strategy setting selection

45
was changed to first match. In the Requires setting option the http was moved
from available to selected and from the Controls section both, asm and
caching were moved. The changes were saved by clicking finished and the
basic settings for the policy were now in place as shown in figure 31.
Figure 31. ASM web acceleration policy general properties.
In the Rules section of the panel, the add button was clicked to create rules for
the policy. The first rule was named “Default_ASM_No_Cache”. In the Actions
section of the rule, the following settings were added:
Target: asm
Event: request
Action: enable
Value: /Common/testsite_3
The policy will enable ASM policy called testsite_3 to the virtual server it is
added. Before going any further, the policy should now be added to a virtual
server. This should also be done before building a security policy with the
policy builder or manually. Some recommended practices could also be done
to the policy at this point, like changing the file types and URLS in the policy to
wildcard and enabling blocking for certain violations. (F5 2015.) By going to
Local Traffic > Virtual Servers, selecting the configured virtual server and
clicking the resources tab the Policies section could be found. In the policies
section Manage was clicked and the recently made
“ASM_Cache_Static_Content” policy was enabled. After that the web
acceleration profile that was made first, was added to the virtual server, by
going to the settings of the virtual server. By navigating again to the policies
section and selecting the policy that was made earlier, the policy could be re-

46
edited. The “cache_disable” rule was opened again and the following was
added:
Target: cache
Event: request
Action: disable
Add was then clicked and the rule was updated. Next the rule for the caching
to be was made. By clicking add button a new rule was added to the policy.
The new rule was named “cache_enable”. The following Conditions were
added to the rule:
Operand: http-uri
Event: request
Selector: extension
Condition: equals
The case sensitive box around the equals was also cleared. In the value
setting next to the equals, some static content to be cached, should be added.
JPG, PNG and CSS were added to the value list. The same lines to enabe the
ASM policy as in the cache disable rule were added to the action section of
the cache enabled rule. The actions for enabling the caching were then added
to the actions section by adding the following values:
Target: cache
Event: request
Action: enable
On the policies list two rules could now be seen, like shown in figure 32. One
of them disables the ASM cache and the another enables the ASM cache with
the implemented file types. To determine the state of the policy the rules could
be reordered in the rules menu of the policy. If the “cache_disable” rule was
set on the top, the ASM cache wouldn’t be enabled. According to F5 the ASM
cache should not be enabled before the application security policy building is
finished and enabled on the virtual server (F5 2015). If the configuration was
done correctly, the web acceleration profile should be able to serve ASM
validated content from the cache, allowing ASM to focus on the dynamic
content.

47
Figure 32. Caching policy rules.
After the building of the application security policy was finished the cache was
set to the enable state from the policy list. Some static content such as images
were added to the WordPress test website. After a while, the Web
Acceleration profile statistics started showing hits. The statistics for the Web
Acceleration profile can be found by going to Statistics > Module Statistics >
Local Traffic and selecting Virtual Servers from the drop-down menu and
clicking “view…” button on the selected virtual server. From the statistics
page, it could be seen that the web acceleration found content from the web
page and cached the static content described in the policy created above. The
statistics page can be observed in figure 33.
Figure 33. Caching statistics.
7 CONCLUSION
The project was finished without any major failures or setbacks and can be
seen as a success. With the features used in the project, the Cybergame
application will have a secure and optimized framework waiting for the
application to be finished. Some of the implementations created in this project
can be used as they are, but it is still advised to re-configure the features
when the creation of the Cybergame application is finished. The
documentation included in this project should help with the process of
configuring the features.

48
Most of the security and optimization features that could be usable in the
Cybergame application were studied in this project. However, on some of the
configured features only the basics things were scratched. That is mostly,
because an application is required to have the configurations make any
sense. For example, it is not possible to create an application security policy
for an application that doesn’t exist or by using another application.
As a result of the thesis work, lots of new things were learned. The knowledge
of F5 ADCs went from zero to some level of expertise, because of the many
hours used to configure the device and to read the F5 documentations. The
configuration of the ADC features, taught a lot of new things about features
that were never even heard of before this project. The importance and value
of the web application security and optimization in the Cybergame and in
general was noted, as they are key factors in application delivery. With some
good planning and time management the progress of the work could have
been smoother. The F5 documentation could have been used more from the
start, since some of the implementations had to be done multiple times
because of not reading the documentations well enough.
In future projects, the features studied in this work should be implemented into
the Cybergame application, when the application is ready. Most of the
features in this project could also be studied and implemented further when
the requirements set by the Cybergame application are known. Features that
include the anomaly based detection settings in the security section can be
tuned better when the typical network traffic behavior is known. The
optimization features could also be tuned to see on which kind of a setup they
provide the most optimized traffic. The combination of application security
policy and the Guacamole virtual machines needs to be researched more to
implement application security into the Guacamole.
When implementing the features into the Cybergame application the most
important setting, the application security policy should be done first as some
of the other features require the security policy to be complete. Using the
automatic policy builder, the application should be taught to the ADC by a few
clients using the trusted addresses as explained in the application security
chapter. When the policy is finished, it will need to be monitored for possible
false entities and that it is working correctly. The violation settings of the

49
policy, mentioned in the same chapter should also be tuned to the required
settings. If the login page of the Cybergame application can be added to the
ADC, as was done in the brute force chapter, the brute force protection and
session tracking features can be used. The anomaly based DoS protection
requires some information on the traffic of the Cybergame network, which
means the application needs to be online for some time before the correct
implementation is possible. The web scraping bot protection is the least
important of the features but it could be worth to implement, if it is possible
and protection against bots is required. The F5 websites should be studied
every now and then for information and mitigation methods on new
vulnerabilities. The implemented optimization features will increase the
performance of the application. The TCP multiplexing and HTTP compression
increase the performance even on default settings. When implementing
caching with ASM set on, the application security policy should be finished
and some extra configuration is also needed as done in the web acceleration
chapter. All of the optimization features can be optimized when more about
the application and traffic is known.

50
REFERENCES
A10. 2016. SSL Offloading. Available at: https://www.a10networks.com/resources/glossary/ssl-offload [Accessed 9
December 2016].
Apache. s.a.a. Appendix B. Guacamole protocol reference
https://guacamole.incubator.apache.org/doc/gug/protocol-reference.html
[Accessed 27 April 2017].
Apache. s.a.b. Chapter 14. The Guacamole protocol. Available at: https://guacamole.incubator.apache.org/doc/gug/guacamole-protocol.html
[Accessed 27 April 2017].
Balandin, S. Andreev, S.& Koucheryavy, Y. 2015. Internet of Things, Smart
Spaces, and Next Generation Networks and Systems. Springer.
Citrix. 2016 What is an Application Delivery Controller (ADC)?. Available
at:https://www.citrix.fi/products/netscaler-adc/resources/what-is-an-adc.html
[Accessed 10 December 2016].
Crunchbase. 2016. F5 Networks. Available at: https://www.crunchbase.com/organization/f5-networks [Accessed 29
November 2016].
F5. 2013. Preventing DoS Attacks for Layer 7 traffic. Available at:
https://support.f5.com/kb/en-us/products/big-ip_asm/manuals/product/asm-
implementations-11-4-0/18.html [Accessed 1 February 2017].
F5. 2014a. BIG-IP Application Acceleration Manager. Available at: https://www.f5.com/pdf/products/big-ip-application-acceleration-manager-
datasheet.pdf [Accessed 7 April 2017].
F5. 2014b. BIG-IP Application Security Manager: Implementations. Available
at: https://support.f5.com/content/kb/en-us/products/big-ip_asm/manuals/product/asm-implementations-11-5-
0/_jcr_content/pdfAttach/download/file.res/BIG-IP_Application_Security_Manager__Implementations.pdf [Accessed 8
February 2017].
F5. 2014c. The SSL Reference Architechture. Available at:
https://f5.com/resources/white-papers/the-f5-ssl-reference-architecture
[Accessed 13 April 2017].
F5. 2015. Configuring a Web Acceleration profile for use with a BIG-IP ASM-enabled virtual server. Available at: https://support.f5.com/csp/article/K16565
[Accessed 1 February 2017].
F5. 2016a. Advanced Firewall Manager. Available at:
https://f5.com/products/big-ip/advanced-firewall-manager-afm [Accessed 9
January 2017].
F5. 2016b. Application Delivery Controller. Available at: https://f5.com/glossary/application-delivery-controller [Accessed 29 November
2016].

51
F5. 2016c. Modules. Available at: https://f5.com/products/modules [Accessed
11 December 2016].
F5. 2017. K10260: Mitigating Slowloris DoS attacks with the BIG-IP system.
Available at: https://support.f5.com/csp/article/K10260 [Accessed 22 March
2017].
F5. s.a. Tuning the OneConnect Feature on the BIG-IP Local Traffic Manager. Available at: https://www.f5.com/pdf/deployment-guides/oneconnect-tuning-
dg.pdf [Accessed 16 January 2017].
Galinina, O. Balandin, S & Koucheryavy, Y. 2016. Internet of Things, Smart
Spaces, and Next Generation Networks and Systems. Springer.
Holmes, D. 2012. Mitigating Nuclear DDoSer, R-U-Dead-Yet, Dirt Jumper,
Keep-Dead, and Tor Hammer with F5. Available at: https://devcentral.f5.com/articles/mitigating-nuclear-ddoser-r-u-dead-yet-dirt-
jumper-keep-dead-and-tor-hammer-with-f5 [Accessed 8 March 2017].
Holmes, D. 2013. Mitigating DDoS Attacks with F5 Technology. Available at:
https://f5.com/resources/white-papers/mitigating-ddos-attacks-with-f5-
technology [Accessed 3 January 2017].
Imperva 2017. Web Application Security. Available at: https://www.incapsula.com/web-application-security/application-security.html
[Accessed 21 March 2017].
Iveson, S. 2013. An Introduction to F5 Networks LTM iRules. 2nd edition. Lulu
Press, Inc.
Jönsson, P. & Iveson, S. 2014. F5 Networks Application Delivery Fundamen-
tals Study Guide. 1st edition. Self-Published.
Kajova, H. 2016. Datacenter Application Delivery Virtual Laboratory. Available at: http://theseus.fi/bitstream/handle/10024/118489/Kajova_Henri.pdf
[Accessed 24 March 2017].
KEMP. 2016. Application Delivery Controllers (ADC) and Server Load Balancing. Available at: https://kemptechnologies.com/uk/application-delivery-
controllers [Accessed 10 December 2016].
Kiyuna, A. & Conyers, L. 2015. CYBERWARFARE SOURCEBOOK. lulu.com.
Lerner, A. Skorupa, J. & Ciscato, D. 2016. Magic Quadrant for Application Delivery Controllers. Available at: https://www.gartner.com/doc/reprints?id=1-3GEK4YV&ct=160830&st=sb&aliId=170803803 [Accessed 29 November
2016].
MacVittie, L. 2008. 3 Really good reasons you should use TCP multiplexing.
Avalable at: https://devcentral.f5.com/articles/3-really-good-reasons-you-
should-use-tcp-multiplexing [Accessed 9 December 2016].
Montpas, M. 2017. Stored XSS in WordPress Core. Available at: https://blog.sucuri.net/2017/03/stored-xss-in-wordpress-core.html [Accessed
12 April 2017].

52
Offensive Security. 2017a. Kali Linux Hard Disk Install. Available at: http://docs.kali.org/installation/kali-linux-hard-disk-install [Accessed 8 March
2017].
Offensive Security. 2017b. What is Kali Linux. Available at:
http://docs.kali.org/introduction/what-is-kali-linux [Accessed 16 January 2017].
OWASP. 2013. OWASP Top 10 – 2013. Available at: https://storage.googleapis.com/google-code-archive-downloads/v2/code.google.com/owasptop10/OWASP%20Top%2010%20-
%202013.pdf [Accessed 15 March 2017].
OWASP. 2016. Blocking Brute Force Attacks. Available at https://www.owasp.org/index.php/Blocking_Brute_Force_Attacks [Accessed
21 February 2017].
Peltonen, A. 2016. Application Delivery Controller Implementation to
CyberLab Data Center. Available at: https://www.theseus.fi/bitstream/handle/10024/110229/antti_peltonen.pdf
[Accessed: 12 January 2017].
Rouhiainen, K. & Kettunen, M. 2015. Kyberturvallisuutta kehitetään joukolla. Available at: http://www2.kyamk.fi/Koskinen/052015/kyber.html [Accessed 17
December 2016].
Saeed, N. H. 2016. Good or Evil? What Web Scraping Bots Mean for Your Site. Available at: https://www.incapsula.com/blog/web-scraping-bots.html
[Accessed 14 February 2017].
Shakarian, P. Shakarian, J. & Ruef, A. 2013. Introduction to Cyber-Warfare : A
Multidisciplinary Approach. Syngress.
Työ- ja elinkeinoministeriö. 2014. Euroopan aluekehitysrahaston (EAKR)
rahoittaman hankkeen kuvaus. Available at: https://www.eura2014.fi/rrtiepa/projekti.php?projektikoodi=A70554 [Accessed
17 December 2016].
Wagnon, J. 2013. The BIG-IP Application Security Manager Part 1: What is
the ASM?. Available at: https://devcentral.f5.com/articles/the-big-ip-application-security-manager-part-1-what-is-the-asm [Accessed 24 January
2017].