d-link central wifimanager configuration guide · d-link central wifimanager configuration guide...
TRANSCRIPT

D-Link Central WiFiManager Configuration Guide

D-Link Central WiFiManager Configuration Guide
Table of Contents Introduction ..................................................................................................................................................................... 3
System Requirements .................................................................................................................................................. 3 Access Point Requirement ........................................................................................................................................... 3 Latest CWM Modules ................................................................................................................................................... 3
Scenario 1 - Basic Setup ................................................................................................................................................ 4
1.1. Install Central WiFiManager on Computer ............................................................................................................ 5 1.2. Install Access Point Module .................................................................................................................................. 8 1.3. Run the Central WifiManager Server .................................................................................................................... 9 1.4. Login to the Central WiFiManager ...................................................................................................................... 10
1.4.1. Login to the CWM from a local computer ................................................................................................... 10 1.4.2. Remote login Central WiFiManager ........................................................................................................... 10
1.5. Check and Download AP Module Online ............................................................................................................ 10 1.6. Create Site and Network, Configure SSID Settings ........................................................................................... 11 1.7. Add Access Points in CWM using the Installation Tool ....................................................................................... 14
1.7.1. Export Network Profile from CWM to your Computer ................................................................................. 14 1.7.2. Discover and Import the Profile to APs using the Installation Tool ............................................................. 15 1.7.3. Verify Access Points Managed by the CWM .............................................................................................. 18
Scenario 2 - Captive Portal and User Authentication ................................................................................................ 19
2.1. Configure Captive Portal ..................................................................................................................................... 20 2.2. Configure Local Database Authentication ........................................................................................................... 20 2.3. Configure Passcode Authentication .................................................................................................................... 21
2.3.1. Configure SSID for Passcode Authentication ............................................................................................. 21 2.3.2. Create Front Desk Account ........................................................................................................................ 22 2.3.3. Add the Front Desk Account to the Site and Network ................................................................................ 23 2.3.4. Generate Passcode to Guest ..................................................................................................................... 24
Scenario 3 - Bandwidth Optimization ......................................................................................................................... 27
3.1. Configure Bandwidth Optimization ..................................................................................................................... 28 Scenario 4 - Add Remote AP for CWM Management ................................................................................................. 29
4.1. Configure Network Device Settings .................................................................................................................... 30 4.2. Create New Site and Network for Branch Office ................................................................................................ 30 4.3. Export Network Profile then Import the Profile to the Remote AP ...................................................................... 30
2
D-Link Central WiFiManager Configuration Guide
Introduction This document provides readers with a quick guide that explains the essential operation of the Central WiFiManager (CWM). For a more detailed explanation about all the functions in the CWM, refer to the Central WiFiManager User Manual.
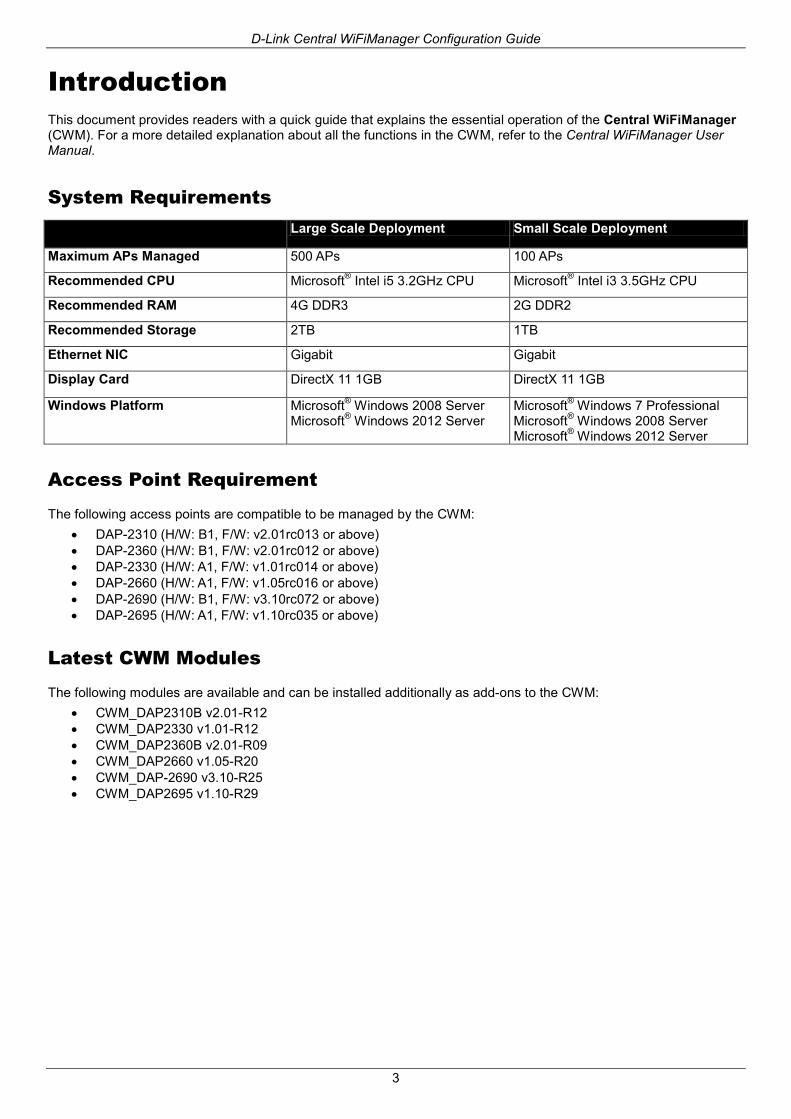
System Requirements
Large Scale Deployment Small Scale Deployment
Maximum APs Managed 500 APs 100 APs
Recommended CPU Microsoft® Intel i5 3.2GHz CPU Microsoft® Intel i3 3.5GHz CPU
Recommended RAM 4G DDR3 2G DDR2
Recommended Storage 2TB 1TB
Ethernet NIC Gigabit Gigabit
Display Card DirectX 11 1GB DirectX 11 1GB
Windows Platform Microsoft® Windows 2008 Server Microsoft® Windows 2012 Server
Microsoft® Windows 7 Professional Microsoft® Windows 2008 Server Microsoft® Windows 2012 Server
Access Point Requirement
The following access points are compatible to be managed by the CWM: • DAP-2310 (H/W: B1, F/W: v2.01rc013 or above) • DAP-2360 (H/W: B1, F/W: v2.01rc012 or above) • DAP-2330 (H/W: A1, F/W: v1.01rc014 or above) • DAP-2660 (H/W: A1, F/W: v1.05rc016 or above) • DAP-2690 (H/W: B1, F/W: v3.10rc072 or above) • DAP-2695 (H/W: A1, F/W: v1.10rc035 or above)
Latest CWM Modules
The following modules are available and can be installed additionally as add-ons to the CWM: • CWM_DAP2310B v2.01-R12 • CWM_DAP2330 v1.01-R12 • CWM_DAP2360B v2.01-R09 • CWM_DAP2660 v1.05-R20 • CWM_DAP-2690 v3.10-R25 • CWM_DAP2695 v1.10-R29
3
D-Link Central WiFiManager Configuration Guide
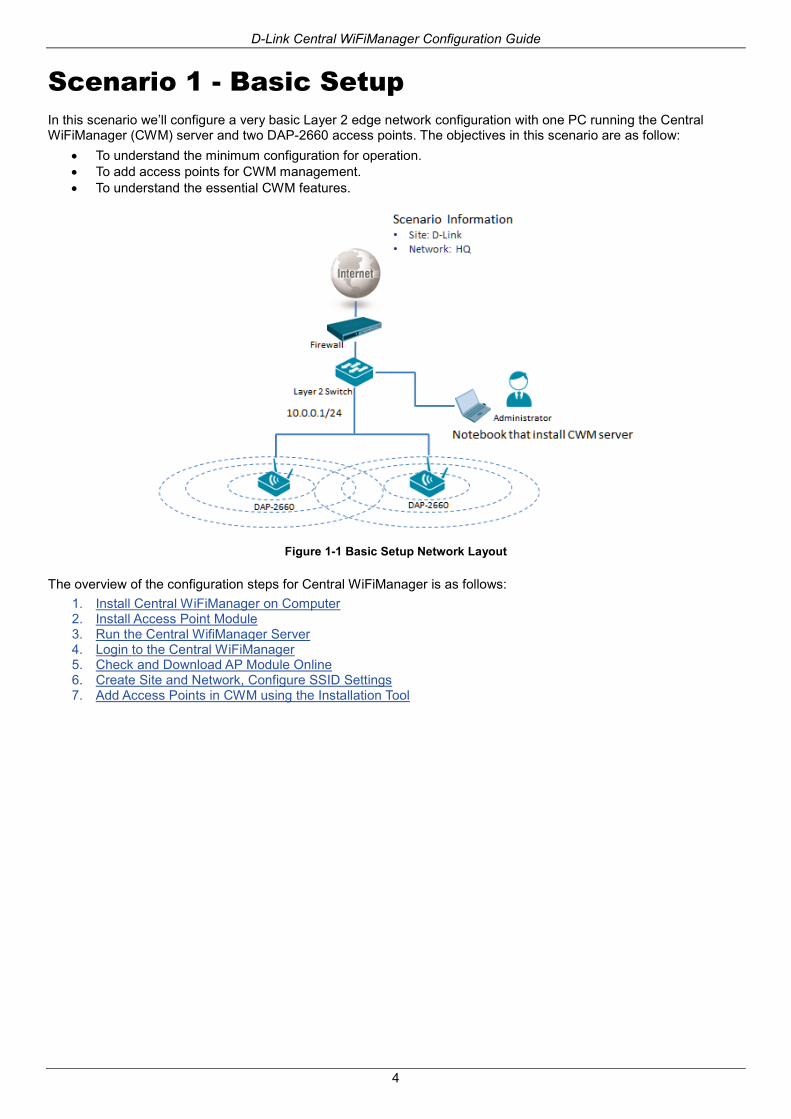
Scenario 1 - Basic Setup In this scenario we’ll configure a very basic Layer 2 edge network configuration with one PC running the Central WiFiManager (CWM) server and two DAP-2660 access points. The objectives in this scenario are as follow:
• To understand the minimum configuration for operation. • To add access points for CWM management. • To understand the essential CWM features.
Figure 1-1 Basic Setup Network Layout
The overview of the configuration steps for Central WiFiManager is as follows: 1. Install Central WiFiManager on Computer 2. Install Access Point Module 3. Run the Central WifiManager Server 4. Login to the Central WiFiManager 5. Check and Download AP Module Online 6. Create Site and Network, Configure SSID Settings 7. Add Access Points in CWM using the Installation Tool
4
D-Link Central WiFiManager Configuration Guide
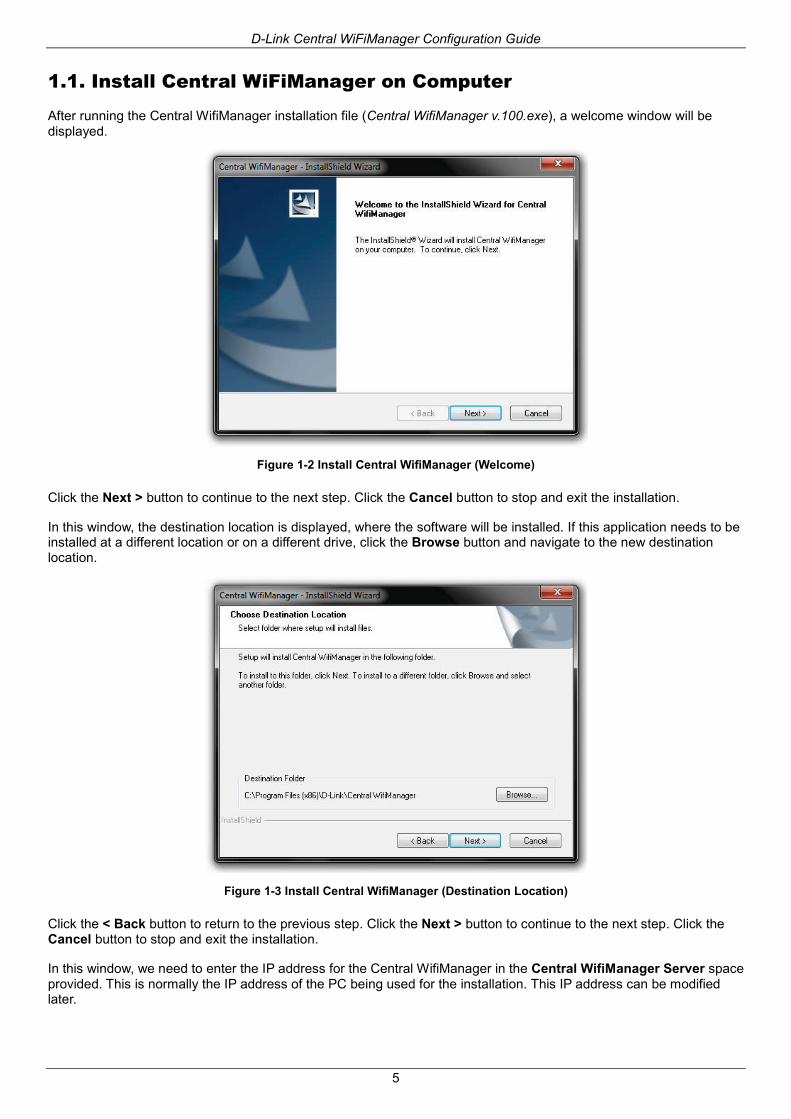
1.1. Install Central WiFiManager on Computer
After running the Central WifiManager installation file (Central WifiManager v.100.exe), a welcome window will be displayed.
Figure 1-2 Install Central WifiManager (Welcome)
Click the Next > button to continue to the next step. Click the Cancel button to stop and exit the installation.
In this window, the destination location is displayed, where the software will be installed. If this application needs to be installed at a different location or on a different drive, click the Browse button and navigate to the new destination location.
Figure 1-3 Install Central WifiManager (Destination Location)
Click the < Back button to return to the previous step. Click the Next > button to continue to the next step. Click the Cancel button to stop and exit the installation.
In this window, we need to enter the IP address for the Central WifiManager in the Central WifiManager Server space provided. This is normally the IP address of the PC being used for the installation. This IP address can be modified later.
5

D-Link Central WiFiManager Configuration Guide
Figure 1-4 Install Central WifiManager (Server IP)
Click the < Back button to return to the previous step. Click the Next > button to continue to the next step. Click the Cancel button to stop and exit the installation.
In this window we can change the Manager Port, Listen Port and Service Port numbers. These ports numbers are used for multiple access point connections and it can only be specified here and can’t be modified after the installation. Leave these port numbers on the default settings if these ports have not been used on this computer.
Figure 1-5 Install Central WifiManager (Port Settings)
Click the < Back button to return to the previous step. Click the Next > button to continue to the next step. Click the Cancel button to stop and exit the installation.
In this window, we must enter the PostgreSQL database password that will be associated with this application in the spaces provided. Enter the same password in the Password and Retype password spaces provided. This password cannot be modified after this installation.
6

D-Link Central WiFiManager Configuration Guide
Figure 1-6 Install Central WifiManager (Password)
Click the < Back button to return to the previous step. Click the Next > button to continue to the next step. Click the Cancel button to stop and exit the installation. The installation of this application requires Microsoft Visual C++ 2008 Redistributable to be installed on this computer. If not found, the option will be given to install the required redistributable. If found this step will be skipped. The Apache HTTP Server application might be blocked by the computer’s firewall. If Windows’ default firewall is used, a security alert message will be displayed. Click the Allow Access button to allow this application to communicate with the network. In this window, the user is reminded that apart from the Central WifiManager installation, each access point that will be used in this application requires a separate module to be installed. This will be discussed in the next section.
Figure 1-7 Install Central WifiManager (Finish)
Click the Finish button to complete and exit the installation wizard.
After the CWM installation, there will be two applications installed on the PC called the Central WiFiManager Server and the Central WiFiManager.
7

D-Link Central WiFiManager Configuration Guide
Figure 1-8 Central WifiManager Files
1.2. Install Access Point Module
For each access point that will be used in the D-Link Central WifiManager, we need to install an additional manager module. In this section we’ll discuss the installation of the DAP-2660AP access point’s manager module that will be used in the D-Link Central WifiManager. If the Central WifiManager Server is already running, it must be stopped and closed before that Access Point manager module can be installed.
After running the access point’s manager module, a welcome message will be displayed to inform the user that the manager module will now be installed on the computer.
Figure 1-9 Install Access Point Module (Welcome)
Click the Next > button to continue to the next step. Click the Cancel button to stop and exit the installation.
After the access point’s manager module was installed successfully, this window will appear.
Figure 1-10 Install Access Point Module (Finish)
8

D-Link Central WiFiManager Configuration Guide Click the Finish button to complete and exit the installation wizard.
1.3. Run the Central WifiManager Server
In this section, we’ll discuss the Central WifiManager Server application. After the installation was completed the following applications will be available.
Click the option to open the server application.
After running the Central WifiManager Server application, the window (on the right) will appear. This is the management console window for the server application.
In the Menu bar, there are two options available, Server and Help. Under the Server menu we can Start, Stop or Exit the application. Alternatively, right under the Server menu option, there is also start and stop icons. Under the Help menu option, there is an About option that will, after being clicked, display the name, version and copyright details of this application. In the Settings section, we can select to Automatically open configuration window when Windows start up and Automatically start server when configuration window is open. Select these options if needed. Click the icon to start the server.
Figure 1-11 CWM Management Console
When clicking the close icon ( ), on the far upper right corner, this application will close and exit. The server will not be running in the background. Click the minimize icon ( ) to close this window and allow the server application to run in the background.
When the server is up and running, the left circle icon ( ), at the far bottom right corner, will display green. When the server is not running the right circle icon ( ), at the far bottom right corner, will display red.
To view log entries about the System, FTP Connectivity, Live Access Points, Data Transmissions and Automatic Configurations, tabs at the bottom of the Message section can be selected.
9

D-Link Central WiFiManager Configuration Guide
1.4. Login to the Central WiFiManager
1.4.1. Login to the CWM from a local computer Click the option to open the client application. After the Web browser was open and connection to the server was made successfully, a login window will appear. Enter the login user name and password and click Login to enter the Central WifiManager configuration.
By default, the user name and password is admin.
Figure 1-12 CWM Server Login
1.4.2. Remote login Central WiFiManager Alternatively, from a remote computer, we can connect to the Central WifiManager Server by entering the IP address or Domain Name of the computer that has the server application installed into the web browser, thus it is not needed to install the software on the remote computer. Open the web browser on the remote computer (Internet Explorer or Google Chrome are recommend) and enter for example https://192.168.10.1 or https://domain-name.com (where 192.168.10.1 or domain-name.com is the IP address or domain name of the computer running the CWM server) in the web browser’s address bar and press ENTER to enter the CWM management interface.
1.5. Check and Download AP Module Online
After logging into the D-Link Central WifiManager Server, we can click on System, at the top, then Settings on the left, and then select the Module tab option, in the middle of the page, to access the following window.
10

D-Link Central WiFiManager Configuration Guide
Figure 1-13 Update AP Module
In the Module tab, a list of access point modules will be displayed in the Module Name section. Every different model of access point that can be managed by the Central WifiManager Server requires the administrator to install the executable module file for that specific access point’s model name.
For example, on this page we have two kinds of access point modules installed, the DAP-2330 and the DAP-2660. This means that we can have multiple DAP-2330 and DAP-2660 access points installed on the network, but only required to install two modules, one for each type of access point. The module executable files for all the access points, supported in the application, can be downloaded from the D-Link website.
To keep the installed modules and firmware versions for access points up to date, click on the Check Now button.
Click the OK button to accept the changes made.
1.6. Create Site and Network, Configure SSID Settings
To create a new Site (D-Link), select Configuration and then click the button. Multiple sites can be created for multi-tenant use.
11
D-Link Central WiFiManager Configuration Guide
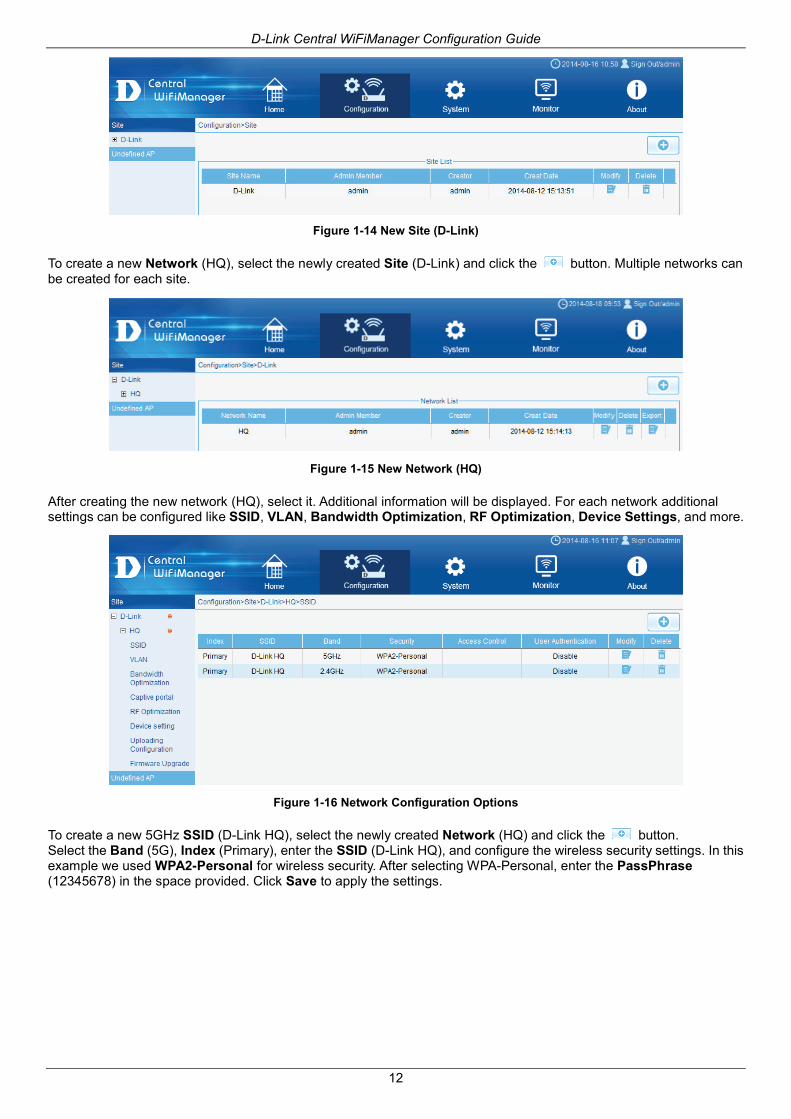
Figure 1-14 New Site (D-Link)
To create a new Network (HQ), select the newly created Site (D-Link) and click the button. Multiple networks can be created for each site.
Figure 1-15 New Network (HQ)
After creating the new network (HQ), select it. Additional information will be displayed. For each network additional settings can be configured like SSID, VLAN, Bandwidth Optimization, RF Optimization, Device Settings, and more.
Figure 1-16 Network Configuration Options
To create a new 5GHz SSID (D-Link HQ), select the newly created Network (HQ) and click the button. Select the Band (5G), Index (Primary), enter the SSID (D-Link HQ), and configure the wireless security settings. In this example we used WPA2-Personal for wireless security. After selecting WPA-Personal, enter the PassPhrase (12345678) in the space provided. Click Save to apply the settings.
12

D-Link Central WiFiManager Configuration Guide
Figure 1-17 New SSID (5G)
To create a new 2.4GHz SSID (D-Link HQ), select the newly created Network (HQ) and click the button. Select the Band (2.4G), Index (Primary), enter the SSID (D-Link HQ), and configure the wireless security settings. In this example we used WPA2-Personal for wireless security. After selecting WPA-Personal, enter the PassPhrase (12345678) in the space provided. Click Save to apply the settings.
Figure 1-18 New SSID (2.4G)
Figure 1-19 Network’s SSID List
Because this configuration wasn’t uploaded to the access points in this network, red circle icons ( ) will be displayed right next to the Network (D-Link) and Site (HQ) names. In the next section, we’ll discuss how to add new access
13

D-Link Central WiFiManager Configuration Guide points to the network. To upload the new configuration to existing access points in the network select the Uploading Configuration option, on the left, and then select the Run option, and then click the Complete button to apply the new settings to the existing access points immediately.
In the Uploading Configuration page we can decide whether we need to apply the new configuration to existing access point in the network immediately or by schedule.
Figure 1-20 Uploading Configuration
1.7. Add Access Points in CWM using the Installation Tool
1.7.1. Export Network Profile from CWM to your Computer To add new access points to the CWM, we have to export the network profile from CWM first. The exported file includes the authentication key and the IP address of the controller. Select Configuration and then click the Export ( ) icon to export the network profile to your computer.
Figure 1-21 Export Network Profile
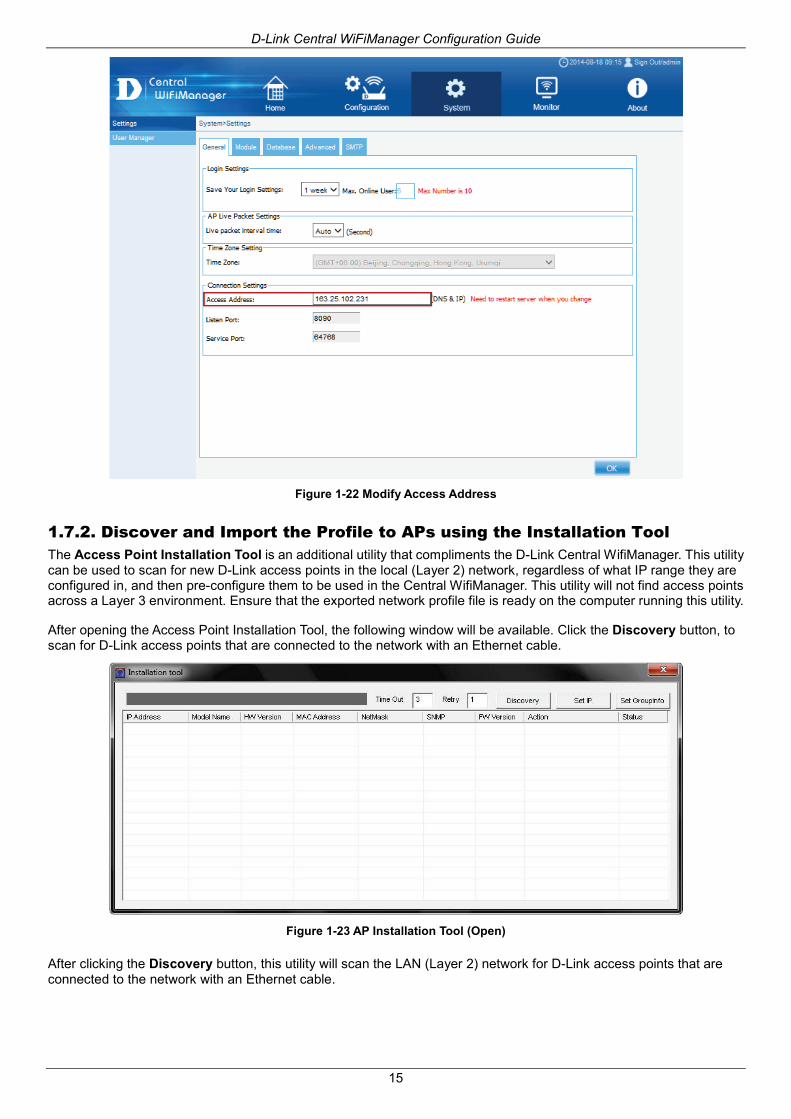
When access points are located on a public site and access to the CWM is over the Internet, ensure that the Access Address for the CWM is a public IP address or domain name and not a private IP address. To verify the Access Address navigate to System > General > Connection Settings and double check the Access Address field.
14
D-Link Central WiFiManager Configuration Guide
Figure 1-22 Modify Access Address
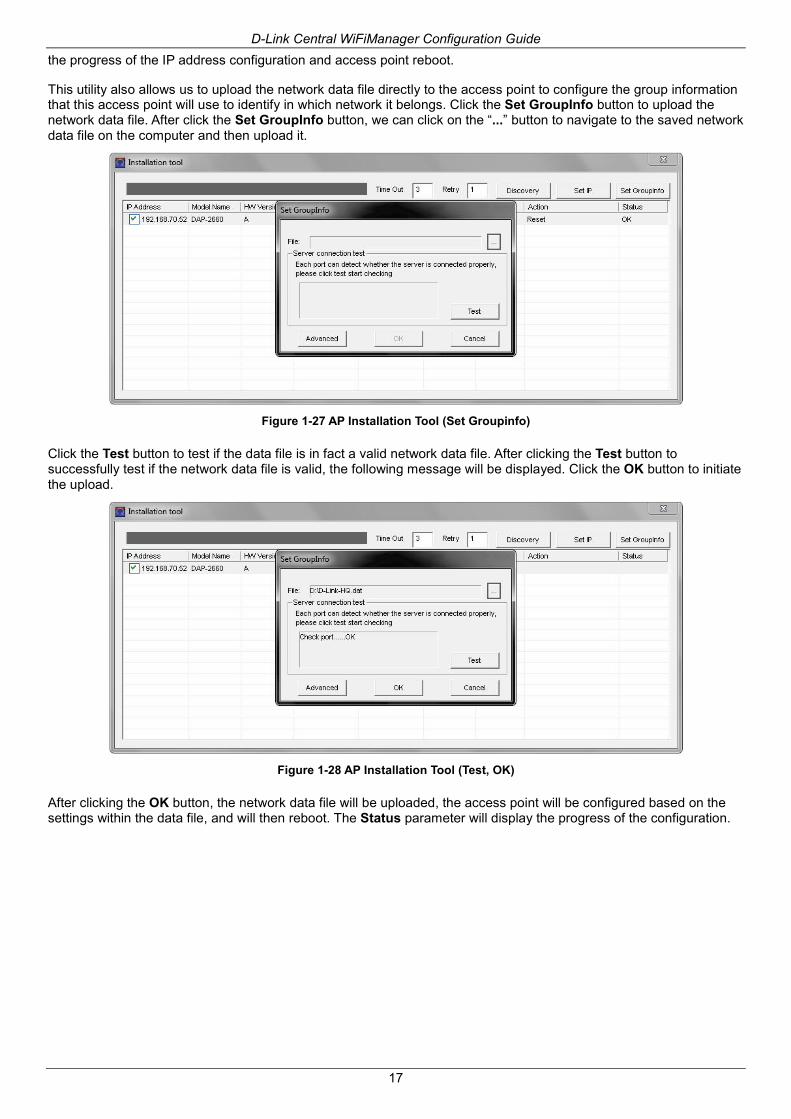
1.7.2. Discover and Import the Profile to APs using the Installation Tool The Access Point Installation Tool is an additional utility that compliments the D-Link Central WifiManager. This utility can be used to scan for new D-Link access points in the local (Layer 2) network, regardless of what IP range they are configured in, and then pre-configure them to be used in the Central WifiManager. This utility will not find access points across a Layer 3 environment. Ensure that the exported network profile file is ready on the computer running this utility.
After opening the Access Point Installation Tool, the following window will be available. Click the Discovery button, to scan for D-Link access points that are connected to the network with an Ethernet cable.
Figure 1-23 AP Installation Tool (Open)
After clicking the Discovery button, this utility will scan the LAN (Layer 2) network for D-Link access points that are connected to the network with an Ethernet cable.
15

D-Link Central WiFiManager Configuration Guide
Figure 1-24 AP Installation Tool (Discover)
After this utility found access point, they will be displayed and can be configured.
Figure 1-25 AP Installation Tool (Found)
To modify the IP address of the newly discovered access point, select it and click the Set IP button. Enter the new IP address, subnet mask, gateway address and primary DNS address in the spaces provided. Click OK to accept the changes made.
Figure 1-26 AP Installation Tool (Set IP)
After clicking the OK button to set the IP address settings, the access point will be configured and some time will be given for the access point to restart after the new IP address settings was applied. The Status parameter will display
16
D-Link Central WiFiManager Configuration Guide the progress of the IP address configuration and access point reboot.
This utility also allows us to upload the network data file directly to the access point to configure the group information that this access point will use to identify in which network it belongs. Click the Set GroupInfo button to upload the network data file. After click the Set GroupInfo button, we can click on the “...” button to navigate to the saved network data file on the computer and then upload it.
Figure 1-27 AP Installation Tool (Set Groupinfo)
Click the Test button to test if the data file is in fact a valid network data file. After clicking the Test button to successfully test if the network data file is valid, the following message will be displayed. Click the OK button to initiate the upload.
Figure 1-28 AP Installation Tool (Test, OK)
After clicking the OK button, the network data file will be uploaded, the access point will be configured based on the settings within the data file, and will then reboot. The Status parameter will display the progress of the configuration.
17

D-Link Central WiFiManager Configuration Guide
Figure 1-29 AP Installation Tool (Uploading, Reboot)
1.7.3. Verify Access Points Managed by the CWM To verify which access points are connected to which sites, navigate to Home > Network (Site) > Site (D-Link). Online access point will display a blue icon ( ) in the Status field and offline access point will display a grey icon ( ) in the Status field.
Figure 1-30 Verify Access Points
Additional information displayed for each access point on this page is the Group Name, Client, Channel, Last Check-in, Channel, IP Address, MAC Address, Model Name and firmware Version.
18

D-Link Central WiFiManager Configuration Guide
Scenario 2 - Captive Portal and User
Authentication The Captive Portal can provide wireless access to guest users. This feature is frequently used in enterprise, campus and hospital network environments. The objectives in this scenario are as follow:
• Understand how to use captive portal • Understand how to configure local data base and passcode authentication.
Figure 2-1 Captive Portal and User Authentication Network Layout
The overview of the configuration steps for Captive Portal is as follows: 1. Configure Captive Portal 2. Configure Local Database Authentication 3. Configure Passcode Authentication
19
D-Link Central WiFiManager Configuration Guide
2.1. Configure Captive Portal
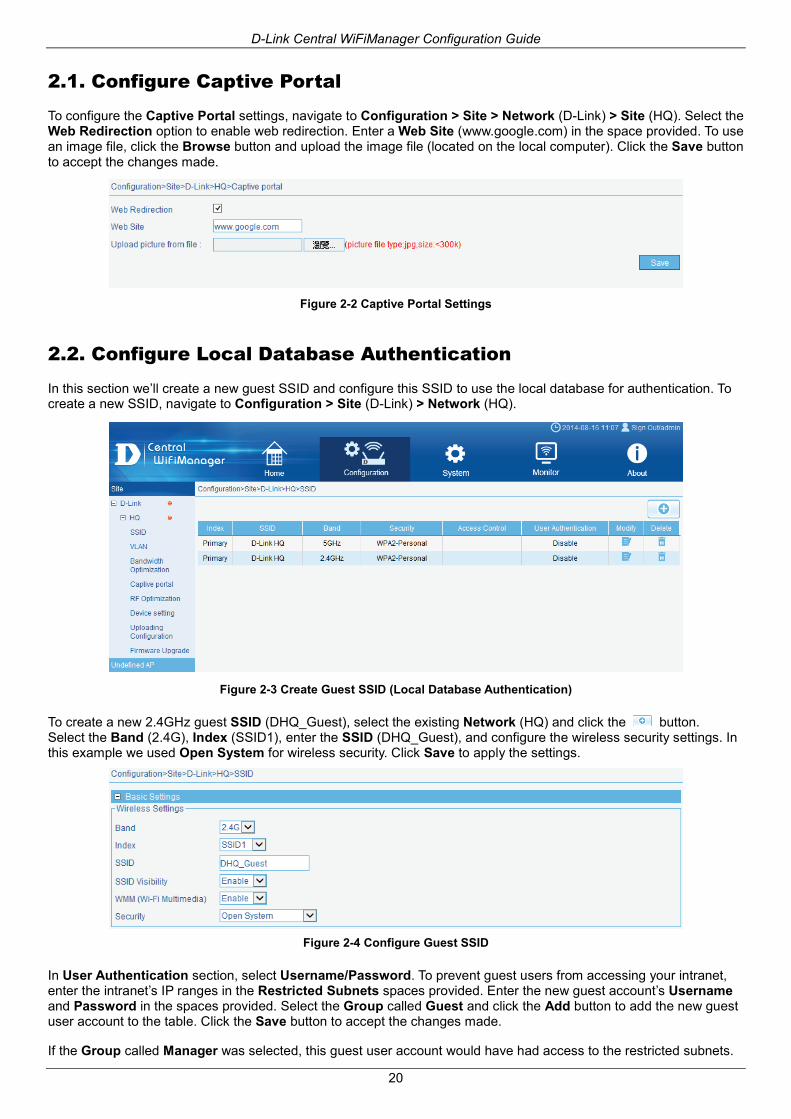
To configure the Captive Portal settings, navigate to Configuration > Site > Network (D-Link) > Site (HQ). Select the Web Redirection option to enable web redirection. Enter a Web Site (www.google.com) in the space provided. To use an image file, click the Browse button and upload the image file (located on the local computer). Click the Save button to accept the changes made.
Figure 2-2 Captive Portal Settings
2.2. Configure Local Database Authentication
In this section we’ll create a new guest SSID and configure this SSID to use the local database for authentication. To create a new SSID, navigate to Configuration > Site (D-Link) > Network (HQ).
Figure 2-3 Create Guest SSID (Local Database Authentication)
To create a new 2.4GHz guest SSID (DHQ_Guest), select the existing Network (HQ) and click the button. Select the Band (2.4G), Index (SSID1), enter the SSID (DHQ_Guest), and configure the wireless security settings. In this example we used Open System for wireless security. Click Save to apply the settings.
Figure 2-4 Configure Guest SSID
In User Authentication section, select Username/Password. To prevent guest users from accessing your intranet, enter the intranet’s IP ranges in the Restricted Subnets spaces provided. Enter the new guest account’s Username and Password in the spaces provided. Select the Group called Guest and click the Add button to add the new guest user account to the table. Click the Save button to accept the changes made.
If the Group called Manager was selected, this guest user account would have had access to the restricted subnets.
20

D-Link Central WiFiManager Configuration Guide
Figure 2-5 Configuration Guest SSID User Authentication
Navigate to Configuration > Site (D-Link) > Network (HQ) and select the Upload Configuration option in the left menu. Then select the Run option and click the Complete button to upload the modified settings to the access points associated with this network.
Figure 2-6 Uploading Configuration
2.3. Configure Passcode Authentication
2.3.1. Configure SSID for Passcode Authentication In this section we’ll create a new guest SSID and configure this SSID to use passcode authentication. To create a new SSID, navigate to Configuration > Site (D-Link) > Network (HQ).
21

D-Link Central WiFiManager Configuration Guide
Figure 2-7 Create Guest SSID (Passcode)
To create a new 2.4GHz guest SSID (DHQ_Passcode), select the existing Network (HQ) and click the button. Select the Band (2.4G), Index (SSID2), enter the SSID (DHQ_Passcode), and configure the wireless security settings. In this example we used Open System for wireless security. Click Save to apply the settings.
Figure 2-8 Configure Guest SSID (Passcode)
In User Authentication section, select Passcode. Click the Save button to accept the changes made.
Figure 2-9 User Authentication (Passcode)
2.3.2. Create Front Desk Account To create a new Front Desk User Account navigate to System > User Manager and click the button.
22

D-Link Central WiFiManager Configuration Guide
Figure 2-10 User Manager
Enter the UserName (John) and Password (1234) for this new account in the spaces provided. Select the Front Desk Staff option as the Privilege and enter the new account’s E-mail address in the space provided. Click the OK button create the new user account.
Figure 2-11 Create New Front Desk Account
2.3.3. Add the Front Desk Account to the Site and Network To add the Front Desk Account to the site and network navigate to Configuration > Site (D-Link) and click the Modify icon ( ).
Figure 2-12 Add Front Desk Account to Site (Step 1)
After clicking the modify icon ( ), select the Front Desk Account and add it to the selected table by click the >> button. Click the OK button to accept the changes made.
23
D-Link Central WiFiManager Configuration Guide
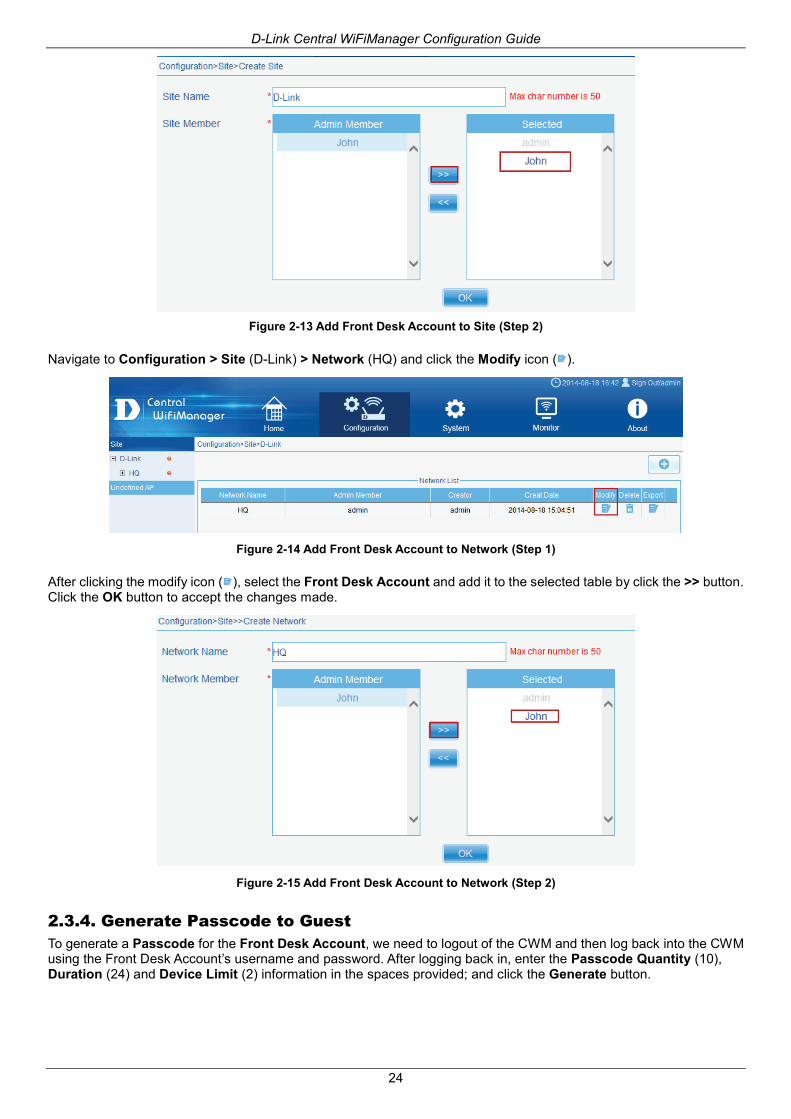
Figure 2-13 Add Front Desk Account to Site (Step 2)
Navigate to Configuration > Site (D-Link) > Network (HQ) and click the Modify icon ( ).
Figure 2-14 Add Front Desk Account to Network (Step 1)
After clicking the modify icon ( ), select the Front Desk Account and add it to the selected table by click the >> button. Click the OK button to accept the changes made.
Figure 2-15 Add Front Desk Account to Network (Step 2)
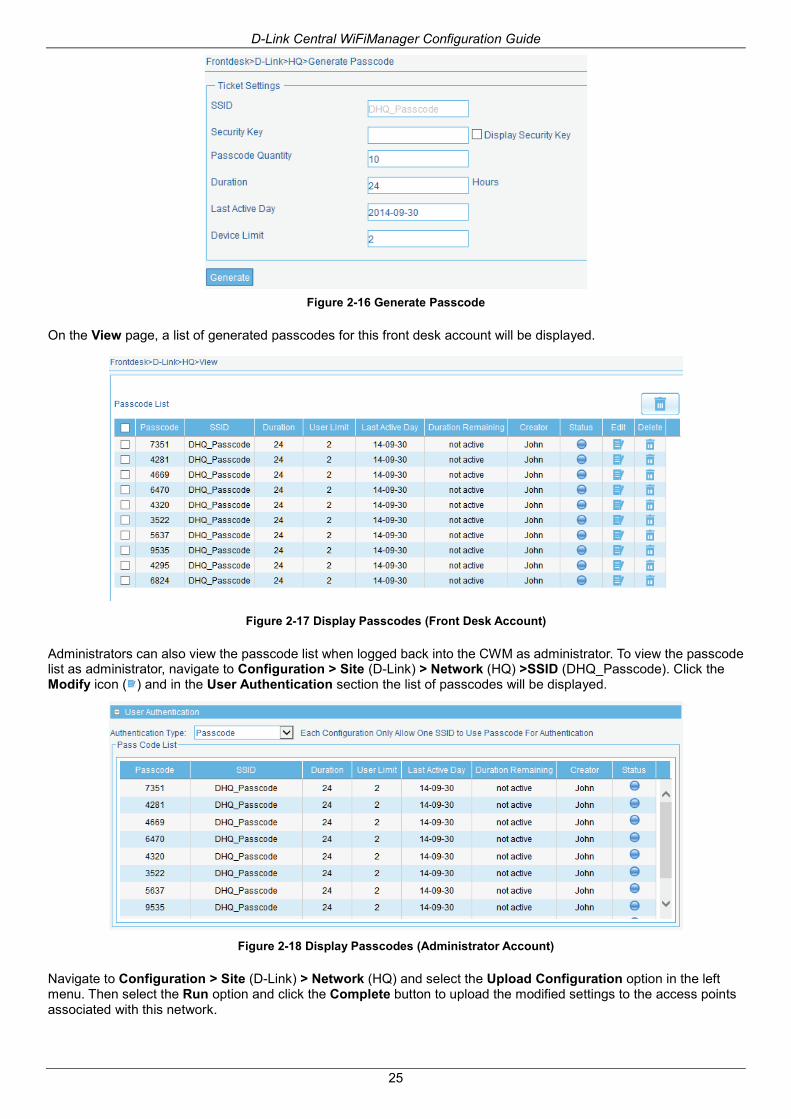
2.3.4. Generate Passcode to Guest To generate a Passcode for the Front Desk Account, we need to logout of the CWM and then log back into the CWM using the Front Desk Account’s username and password. After logging back in, enter the Passcode Quantity (10), Duration (24) and Device Limit (2) information in the spaces provided; and click the Generate button.
24
D-Link Central WiFiManager Configuration Guide
Figure 2-16 Generate Passcode
On the View page, a list of generated passcodes for this front desk account will be displayed.
Figure 2-17 Display Passcodes (Front Desk Account)
Administrators can also view the passcode list when logged back into the CWM as administrator. To view the passcode list as administrator, navigate to Configuration > Site (D-Link) > Network (HQ) >SSID (DHQ_Passcode). Click the Modify icon ( ) and in the User Authentication section the list of passcodes will be displayed.
Figure 2-18 Display Passcodes (Administrator Account)
Navigate to Configuration > Site (D-Link) > Network (HQ) and select the Upload Configuration option in the left menu. Then select the Run option and click the Complete button to upload the modified settings to the access points associated with this network.
25

D-Link Central WiFiManager Configuration Guide
Figure 2-19 Uploading Configuration
26

D-Link Central WiFiManager Configuration Guide
Scenario 3 - Bandwidth Optimization Bandwidth optimization allows administrators to control the wireless bandwidth usage. The Downlink and Uplink Bandwidth options allows for the limiting of the total bandwidth of access points. For more information about the various bandwidth optimization rules available in the CWM, refer to the Central WiFiManager User Manual.
Figure 3-1 Bandwidth Optimization Network Layout
27

D-Link Central WiFiManager Configuration Guide
3.1. Configure Bandwidth Optimization
To configure the Bandwidth Optimization settings, navigate to Configuration > Site (D-Link) > Network (HQ) > Bandwidth Optimization. At Enable Bandwidth Optimization select Enable. In the Downlink Bandwidth and Uplink Bandwidth fields enter 800Mbps. This is the bandwidth for whole AP. Select the Rule Type option called Allocate maximum BW for each station. Then select 2.4GHz as the Band, and SSID2 (DHQ_Passcode) as the SSID. In the Downlink Speed and Uplink Speed fields enter 1Mbits/sec. Click the Add button to create the new rule and then click the Save button to accept the changes made.
Figure 3-2 Bandwidth Optimization Settings
Navigate to Configuration > Site (D-Link) > Network (HQ) and select the Upload Configuration option in the left menu. Then select the Run option and click the Complete button to upload the modified settings to the access points associated with this network.
Figure 3-3 Uploading Configuration
28

D-Link Central WiFiManager Configuration Guide
Scenario 4 - Add Remote AP for CWM
Management The CWM can manage remote access points over a site-to-site VPN or behind a NAT router without a VPN connection.
Figure 4-1 Remote AP for CWM Management Network Layout
The overview of the configuration steps for this configuration is as follows: 1. Configure Network Device Settings 2. Create New Site and Network for Branch Office 3. Export Network Profile then Import the Profile to the Remote AP
29

D-Link Central WiFiManager Configuration Guide
4.1. Configure Network Device Settings
The following port numbers must be opened in the firewall at the site where the CWM server is located in order for remote access points to access the CWM server.
• UDP 161 (SNMP port) • UDP 162 (SNMP trap port) • UDP 514 (Syslog port) • UDP 8090 (Listen port) • UDP 64768 (Service port) • TCP 9000, Enable ftp-ALG (Manager port) • TCP 443 (HTTPS, Management port)
Additionally, if the CWM server uses a private IP address, the public IP address must be mapped to the private IP address on the firewall.
At remote site, the following ports also need to be opened. • UDP 161 (SNMP port) • UDP 162 (SNMP trap port) • UDP 514 (Syslog port) • UDP 8090 (Listen port) • UDP 64768 (Service port) • TCP 9000, Enable ftp-ALG (Manager port)
4.2. Create New Site and Network for Branch Office
To create a new Site (D-Link Branch), select Configuration and then click the button.
Figure 4-2 Create New Site (D-Link Branch)
To create a new Network (Branch-A), select the newly created Site (D-Link Branch) and click the button.
Figure 4-3 Create New Network (Branch-A)
4.3. Export Network Profile then Import the Profile to the Remote AP
To export the network profile select Configuration > Site (D-Link Branch) and then click the Export ( ) icon to export the network profile to your computer. Provide this exported network profile file to the remote site installer.
30

D-Link Central WiFiManager Configuration Guide
Figure 4-4 Export Network Profile to PC
At remote site, ensure that the exported network profile file is available on the computer used to configure the access point(s). Run the Access Point Installation Tool.
After opening the Access Point Installation Tool, the following window will be available. Click the Discovery button, to scan for D-Link access points that are connected to the network with an Ethernet cable.
Figure 4-5 AP Installation Tool (Open)
After clicking the Discovery button, this utility will scan the LAN (Layer 2) network for D-Link access points that are connected to the network with an Ethernet cable.
Figure 4-6 AP Installation Tool (Discover)
After this utility found access point, they will be displayed and can be configured.
31

D-Link Central WiFiManager Configuration Guide
Figure 4-7 AP Installation Tool (Found)
To modify the IP address of the newly discovered access point, select it and click the Set IP button. Enter the new IP address, subnet mask, gateway address and primary DNS address in the spaces provided. Click OK to accept the changes made.
Figure 4-8 AP Installation Tool (Set IP)
After clicking the OK button to set the IP address settings, the access point will be configured and some time will be given for the access point to restart after the new IP address settings was applied. The Status parameter will display the progress of the IP address configuration and access point reboot.
This utility also allows us to upload the network data file directly to the access point to configure the group information that this access point will use to identify in which network it belongs. Click the Set GroupInfo button to upload the network data file. After click the Set GroupInfo button, we can click on the “...” button to navigate to the saved network data file on the computer and then upload it.
32

D-Link Central WiFiManager Configuration Guide
Figure 4-9 AP Installation Tool (Set Groupinfo)
Click the Test button to test if the data file is in fact a valid network data file. After clicking the Test button to successfully test if the network data file is valid, the following message will be displayed. Click the OK button to initiate the upload.
Figure 4-10 AP Installation Tool (Test, OK)
After clicking the OK button, the network data file will be uploaded, the access point will be configured based on the settings within the data file, and will then reboot. The Status parameter will display the progress of the configuration.
Figure 4-11 AP Installation Tool (Uploading, Reboot)
33