d surround and digital performer - delmarlearning.com · q q q 41 d} surround and digital performer...
TRANSCRIPT
Q Q Q41
}D Surround and Digital Performer
Digital Performer contains many powerful tools and features for editing and mixing multi-channel (surround) formats. In addition to dedicated surround panning plug-ins, multi-channel bounce to disk,multi-channel editing, bass management, and calibration plug-ins are also provided. Incorporatethese tools with DP’s Movie window and the QuickScribe Editor, and you have a comprehensive environment for scoring and mixing sound to picture.
The following section will discuss surround-mixing formats that are supported by Digital Performerand will also provide descriptions and explanations of the various encoding schemes (for example,Dolby Digital) that are available and relationship to specific surround mixing formats (for exam-ple, 5.1 format). Setup procedures such as monitor calibration and channel assignments areexplained later in this appendix.
The Surround EnvironmentWhen working with surround projects, you should consider a number of factors. These include the following:
Q MMoonniittoorrss. One of the most basic of considerations—do you have enough speakers for the for-mat you will be working in? And are your rear speakers full range?
Q MMoonniittoorr ccaalliibbrraattiioonn. Proper speaker positioning and alignment are critical if you are planningto create surround mixes.
Q BBaassss mmaannaaggeemmeenntt. Consumer home-theatre systems usually employ some type of bass man-agement. Proper bass management in the studio allows you to simulate this process, so thatyour mixes will translate and sound better in various listening environments.
19 DPP App_D 1/10/05 2:36 PM Page 41

APPENDIX D} Surround and Digital Performer
Q Q Q42
Q EEnnccooddiinngg. Multi-channel mixing formats (for example, 5.1) are different from surround encod-ing formats (data reduction schemes) such as Dolby Digital, DTS, and SDDS, which are usedto compress, or reduce, the size of audio files so they can fit on the intended medium—whetherit is traditional film stock or DVDs. Of course, mixing formats and encoding formats arerelated; 5.1 files, for example, can be encoded to both Dolby Digital and/or DTS formats.Audio files must be properly encoded in order to play back on surround systems (of course,standard .AIFF and .WAV PCM files are supported). The encoding process is left up to themastering or authoring stages of the post-production process. DP cannot do this encoding, soyou will have to employ third-party software or dedicated hardware if you are doing theauthoring yourself.
Supported Multi-Channel Formats You can create surround projects that incorporate other surround formats besides the current industrystandard, 5.1 format. Following is a list of supported mixing formats and their related encoding formats:
Q QQUUAADD. Front L/R and rear L/R channels.
Q LLCCRRSS. Front L/R with center and mono rear channel (Dolby Surround ProLogic).
Q 55..11. Front and rear L/R channels with center and .1 subwoofer (Film, Dolby Digital, and DTS).
Q 66..11. Identical to 5.1, with center rear channel (Dolby-EX or THX Surround EX, and DTS-ES).This format is the extended version of 5.1 and is backward-compatible. Keep in mind thatthese three encoders are based on an “encoding matrix,” which basically mixes the extra rearchannel with the L/R rear channels during the encoding process and is later decoded (forexample, by the consumer home theatre) from those rear L/R channels. So technically, theseformats are not true 6.1, as they are matrix-encoded.
DTS-ES Discrete 6.1, however, is a truly discrete 6.1 format as it uses its own data stream andis not dependent on the rear L/R channels. This format is backward-compatible with DTS-ES.Regardless of which encoding format you employ, the end user’s surround receiver (decoder)must support the extended format in order for the listener to hear the extra rear channel.
Q 77..11. Identical to 5.1, but with additional L/R center channels (SDDS).
Q 1100..22. This format really consists of 14 channels: three front channels (L/C/R), two elevatedfront L/R channels, two side L/R channels, three rear channels (RL/RC/RR), elevated RL/RRchannels, and two subwoofers. Though misleading, this format maintains the name 10.2 todemonstrate its relationship with 5.1.
19 DPP App_D 1/10/05 2:36 PM Page 42
Q The Surround Environment
Q Q Q43
EncodingEncoding is really the last stage of the surround music production process. Encoding is typically per-formed in either the mastering or DVD-authoring stage. If you are an engineer who must send filesoff to be encoded, proper preparation is critical to ensure that the front left channel doesn’t get acci-dentally placed in the center, and so on. Channel assignments vary according to the encoding formatthat will be used. Regardless of the format, however, proper naming of each audio file (for example,front-left, front-right, center, rear center, and so on) can help ensure that the tracks are placed in theirproper channels.
Encoders or data reduction schemes are used for basically two reasons: to provide discrete channelsof audio for playback and to reduce the amount of bandwidth (measured in bps, or bits per second)and space that the audio consumes on the intended medium (for example, film and DVD). Make sureyou don’t confuse data compression with dynamic compression, which is a totally different beast.
There are various competing encoding formats on the market, each having its strengths and weak-nesses. A few of the major formats are discussed below.
Dolby Digital and Pro LogicDolby Digital, also known as AC-3 encoding, is the de-facto standard of the movie industry, and isflexible in that it supports “up to 5.1” channels, meaning that not all Dolby Digital soundtracks con-tain six channels. The Dolby 1.0 format consists of one mono channel, Dolby Digital 2.0 consists oftwo channels, Dolby Digital 4.0 consists of four channels, and Dolby Digital 5.0 contains five chan-nels of audio (5.1 minus the .1 subwoofer). The 5.1 format consists of five discrete channels of full-spectrum audio (L/R/C/RL/RR with a frequency range of 20Hz–20kHz) with a .1 LFE channel(subwoofer). The sub is designated as .1 because its frequency range is not full range, and is usuallybetween 30Hz–120Hz.
When film is the final medium, the AC-3 encoded file is embedded between the sprocket holes of thefilm as 78 × 78 black and white pixels. As the space is limited, Dolby Digital employs a sophisticatedperceptual encoding system to data-compress the audio data while preserving the integrity of theaudio. If you are authoring to DVD, you can control the amount of data reduction (up to 448bps),depending on the available space. For example, if you have the space, you can employ higher bitrates, resulting in less data compression and higher fidelity. Choosing AC-3 as your encoding formatcan help ensure playback capability on older consumer home-theatre systems.
19 DPP App_D 1/10/05 2:36 PM Page 43

APPENDIX D} Surround and Digital Performer
Q Q Q44
DTSThe Digital Theatre Systems (DTS) format also supports 5.1 (even true 6.1) surround, but supportshigher bit rates than Dolby Digital (up to 1536bps), which results in all those “DTS sounds better thanDolby Digital” statements and testimonials. As DTS encodes at higher bit rates, it takes up more spacethan AC-3 audio. To get around this limitation when working with film, DTS audio is actually suppliedas separate CD-ROMs that are synced to the film via an optical timecode track. This timecode track isrecorded directly on the film, between the analog soundtrack and the actual picture frame. If there isa timecode drop (which is extremely rare), the DTS system seamlessly switches to the film’s analogaudio track to prevent any playback interruptions. DTS is one of the few encoding formats that is notbased on the DVD spec.
A.PACK (AC-3 ENCODING SOFTWARE)Apple’s DVD Studio Pro (DVD authoring software) comes bundled with an application
called A.Pack (see Figure D.1). This program encodes audio files (.AIFF, SDII, .WAV,
and QuickTime soundtracks) into the AC-3 format (mono-5.1). This encoder also
includes features such as batch processing, stereo down-mixing to check the encoded
files, and the ability to decode AC-3 files to PCM files.
Q
Figure D.1The A.Pack AC-3 encoder
application comes bundled
with Apple’s DVD Studio
Pro DVD authoring
software.
19 DPP App_D 1/10/05 2:36 PM Page 44

Q The Surround Environment
Q Q Q45
When working in the DVD format, DTS audio is supplied as an optional playback format (in additionto AC-3), as it is not the standard encoding format. DTS has just received a further boost within theMAC DVD authoring environment, however, with the added support for the DTS format in Apple’sDVD Studio Pro 3 software.
SDDSSony Dynamic Digital Sound uses a format called ATRAC to reduce the data rate of the multi-channelaudio and is recorded as blue and white pixels outside the sprocket holes. To ensure reliability, bothsides of the film are recorded to; this adds a layer of redundancy.
MPEG 2MPEG 2 (MPEG 1 Layer 2) is based on the MPEG 1 format, and the files are similar to MP3s, whichare MPEG 1 Layer 3 files. Within the MPEG format, only Layer 2 files are allowed in DVD-video.MPEG 2 supports up to eight channels of audio and is similar to the AC-3 format. MPEG 2 audio isnot compatible with all NTSC DVD players, so you should employ other encoding schemes if youwant to ensure full DVD player compatibility.
DTS: PRO AUDIO ENCODERSAs of this writing, DTS has introduced a new line of pro software audio encoders for
the Mac and PC for creating DTS soundtracks for DVD-Audio, DVD-Video, and 5.1 CD
titles. The stand-alone DVD-A and DVD-V encoding solutions are capable of delivering
either 48kHz/5.1 soundtracks or 96kHz/6.1 extended surround DTS tracks, depend-
ing on the package you choose. Both stand-alone applications will accept .WAV and
.AIFF files for encoding. The 48kHz solution also provides the capability to encode
44.1kHz CDs.
On the Apple Xserve RAID front: The new “TS X Encoder” allows up to 99 multiple
users (on either Mac or PC platforms) to encode DTS surround soundtracks via an
intranet, allowing users to encode files remotely!
You can get more information on these new encoders at http://www.dts.com.
Q
APPLE’S COMPRESSORAnother encoder that comes bundled with Apple’s DVD Studio Pro application is Com-
pressor. This program is designed to data-compress audio and video to a wide range
of formats, including MPEG-2. Support for automated batch processing, variable bit
rate (VBR) encoding, format presets, and high quality filters (noise-reduction, color cor-
rection, and gamma adjustments) is included.
Q
19 DPP App_D 1/10/05 2:36 PM Page 45

APPENDIX D} Surround and Digital Performer
Q Q Q46
Surround SetupCompared to traditional two-channel mixing, multi-channel surround recording, editing, and mixing isa fairly complex process. Speaker positioning, monitor calibration, references levels, and bass man-agement are some of the details that need attending to. In this section, I’ll discuss the basic proce-dures for getting the most out of your DP surround setup; I’ll also offer DP related tips and shortcuts.Surround mixing is a complex process, however, and covering every scenario and process is beyondthe scope if this book. See Appendix E, “Additional Resources,” for a list of related Web sites orbooks that may help you to further expand your surround knowledge.
Monitor SetupIt goes without saying that you need to make sure you have the number of speakers for the surround-mixing format in which you wish to work. Each speaker will need to be connected to an output chan-nel of your audio hardware interface—six channels for 5.1, eight channels for 7.1, and 14 channelsfor 10.2.
5.1 Speaker PlacementWhen you’re working in 5.1, you must adhere to specific speaker placements as defined by the Inter-national Telecommunications Union, or ITU. The front three speakers should be arranged left, center,and right. The angle between the left (L) and center (C) speakers and between the right (R) and cen-ter (C) speakers should be 30°. Each speaker should be placed at an equal distance from the lis-tener, so the center speaker should be placed slightly further back (in an arc) in relation to the leftand right monitors. If you can’t position the center channel properly because of the way your studiois set up, you should delay the center channel to compensate.
The left rear (Ls) and right rear (Rs) surround speakers should be placed at an equal distance fromthe listener as the front speakers and should be angled at 110°. For example, if the front speakersare three feet from the listening position, the rear speakers should also be at a three-foot distance.
Standard Reference LevelsReference levels vary depending on the intended playback medium (for example, film or TV) and thespecific speakers within the surround setup.
Front and Rear SpeakersThe standard is to set the level from each speaker one at a time so that pink noise generated at–20dBFS (the SMPTE standard) on a digital system (for example, Digital Performer) reproducessound at 85db SPL. As you may have guessed, you will need an SPL meter or a Real Time Analyzer(RTA) for this. If you are using an RTA, each speaker should read 70dB SPL, which, when both leftand right channels are combined, will produce an 85dB reference level.
19 DPP App_D 1/10/05 2:36 PM Page 46

Q Surround Setup
Q Q Q47
There are two main reasons why audio levels are referenced to a certain amount: one is to provideconsistency between reels within a movie theatre, and the second is so that you have enough head-room for those loud explosions, rumbles, and so on. When setting levels for the rear channels, how-ever, there are two different approaches, depending on what you are mixing. With standard musicand television, all five channels are set to the same level, while film and cinema applications requirethe rear speakers to be set at 3db lower, or at 82 dB SPL. This concept is a by-product of the DolbySurround days, in which the left and right rear speakers reproduced the rear-mono channel. Settingthem 3db lower would reproduce a level that would be equal to one front channel.
When working strictly with music applications, these levels tend to get thrown out the window, whichis a shame, as it results in the “whose CD is louder” wars!
Subwoofer The subwoofer also requires specific care and feeding. The LFE channel is designed to have +10dB ofheadroom and also replays 10dB louder than the other speakers. Broadband SPL meters are notideal for this measurement as the subwoofer’s frequencies are restricted (30Hz–120Hz). You shoulduse an RTA meter that allows you to analyze just the lower frequency bands (for example, a thirdoctave analyzer). If you don’t have access to an RTA meter, however, you can work around it,though your results will be a little more approximated.
There are a few different approaches to setting the reference level for the LFE channel.
Q ––1100ddBB SSeettttiinngg. Set the pink noise level to –30dBFS for a measured reference level of 70dbSPL on an RTA meter (approximately 79dB SPL with an SPL meter).
Q ++1100ddBB SSeettttiinngg. Keep the pink noise level the same as for the front speakers (–20dBFS) so thatyour RTA meter reads 80dB SPL (approximate SPL meter reading should be 89db SPL).
Q ++44ddBB SSPPLL. If you do not have an RTA meter, set the pink noise to –20dBFS and filter it so thatit only has frequencies between 20 and 120Hz. Set the reference level so that the SPL meter(set to a C weighting) reads +4dB higher than the main speakers, or approximately 89dB SPL.
Q BBaassss MMaannaaggeemmeenntt. If you are using bass management (which you should be!) then you alsoneed to calibrate DP’s Bass Management plug-in by adjusting the Extend Trim knob.
Audio BundlesThe first thing you will need to do when setting up your DP system for surround is to create a multi-channel bundle for the format you wish to work in (for example, 5.1 bundle) within the Audio Bun-dles window (see the “Audio Configuration” section of Chapter 2). Once you’ve created it, assignthe outputs of your tracks to this new surround bundle and begin working. The drawback to this sim-
19 DPP App_D 1/10/05 2:36 PM Page 47

APPENDIX D} Surround and Digital Performer
Q Q Q48
ple setup is that no matter what you are mixing (for example, center channel dialog, stereo musicbed, and so on) you will always have to use a surround panner to place audio within a speaker. Assurround panners consume CPU resources, this isn’t a very efficient setup.
There is a way around this extra CPU consumption. DD-consumption DP allows you to create bundlesthat share the same outputs as other bundles. So you could, for example, create a separate monobundle for the center channel. This would let you place dialog in the center without using a CPU-hungry surround panner. Exactly how many bundle types you create is really up to you— just be sureto rename them something that’s easily recognizable. In case you’re having a problem imagining thedifferent bundles that you might need, here are a few examples to get you started in a 5.1 scenario(see Figure D.2):
Q 55..11 BBuunnddllee. Start out by creating this bundle. You’ll need this for your Master Fader and anyother sounds that you may need to place in all speakers (for example, FX, special music cues,and so on).
Q CCeenntteerr. Create a mono bundle for the dialog track.
Q SStteerreeoo. Create a normal stereo bundle for the front left (L) and right (R) speakers. This is typi-cally used for the music bed. You can, of course, also place the music in the rear channels—itreally depends on your mixing needs.
Q QQUUAADD. You could create a QUAD bundle consisting of front left/right and rear left/rightspeakers for the music bed reverb or any other elements that do not require the center andLFE channels.
Figure D.2DP allows bundles to
share the same hardware
outputs as other bundles.
19 DPP App_D 1/10/05 2:36 PM Page 48

Q Surround Setup
Q Q Q49
Basic Panning PuckOnce a multichannel bundle has been created andyour track’s outputs are assigned to a multichannelbundle, the standard stereo panning will be replacedwith the surround-panning dish (see Figure D.3).
The little ball in the Mixing Board’s circular surroundmatrix is called the “puck;” it allows you to panwithin the surround field. Simply drag the puck topan. The green indicator ring displays the panningdirection of the signal, or which speakers the signal will be occupying. The individual channels(speakers) are represented by the half circles, or “pockets.” If you would like to pan discretely to aspecific speaker, push the puck into one of the speaker pockets. To mute a channel, click on aspeaker pocket with the mouse; it will turn orange, indicating the muted state. You may have noticedthat there is no pocket for the LFE channel—you will need to open a panner plug-in for LFE control.
CHANNEL ASSIGNMENTS BY FORMAT Channel assignments are the order in which each channel should appear within your
master surround recording. Should the front left channel be assigned to output 1 or
output 3? What order should you configure your 5.1 Audio Bundles to be? Believe it
or not, there is a method to the madness, and it strictly depends on the intended sur-
round format. Below is a list of various formats and their channel assignments:
• FFiillmm ttrraacckk ssttaannddaarrdd. Left Front/Center/Right Front/Left Surround/Right
Surround/LFE
• DDoollbbyy,, SSMMPPTTEE,, aanndd IITTUU ssttaannddaarrdd. Left Front/Right Front/Center/LFE/Left
Surround/Right Surround
• DDTTSS. Left Front/Right Front/Left Surround/Right Surround/Center/LFE
• SSDDDDSS. Left Front/Left Center/Center/Right Center/Right Front/ Left
Surround/Right Surround/LFE
The Dolby configuration is the channel assignment standard. The film track standard is
seen in film studios and also in some music production situations. The DTS and the
SDDS formats must be used when encoding in their proprietary formats. If you are in
doubt, use the Dolby standard and be sure to label each audio file by its channel
name.
Q
Figure D.3The surround-panning
dish. Move the “panner
puck” into a “pocket” to
pan directly to different
speakers
19 DPP App_D 1/10/05 2:36 PM Page 49
APPENDIX D} Surround and Digital Performer
Q Q Q50
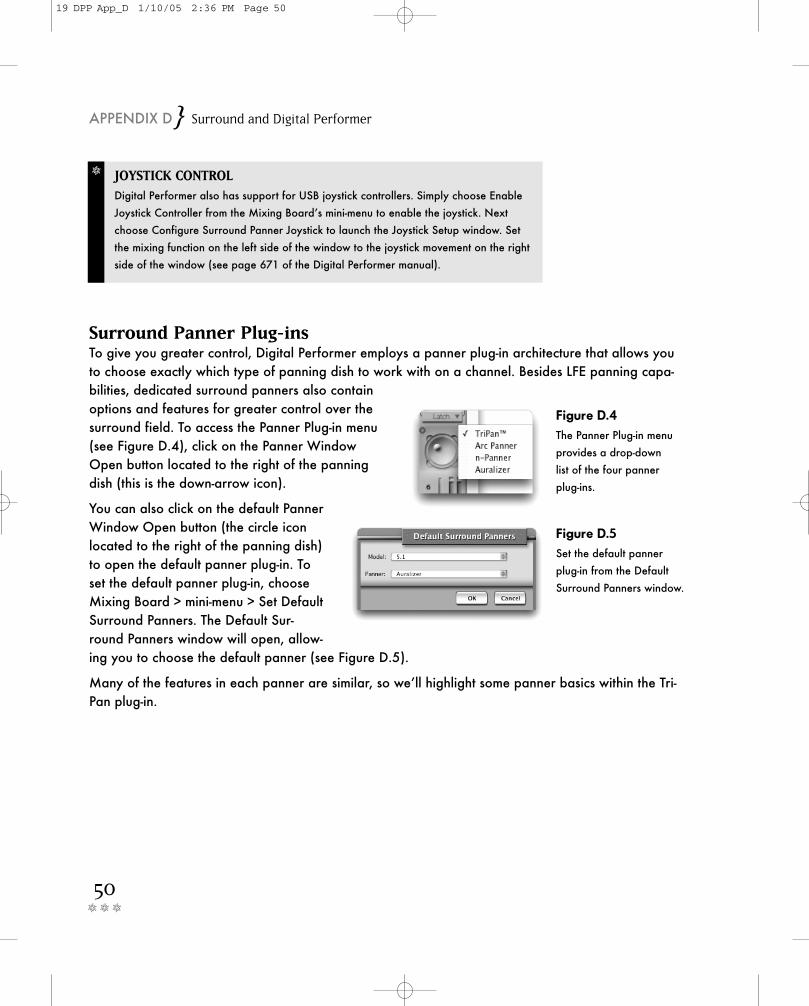
Surround Panner Plug-insTo give you greater control, Digital Performer employs a panner plug-in architecture that allows youto choose exactly which type of panning dish to work with on a channel. Besides LFE panning capa-bilities, dedicated surround panners also containoptions and features for greater control over thesurround field. To access the Panner Plug-in menu(see Figure D.4), click on the Panner WindowOpen button located to the right of the panningdish (this is the down-arrow icon).
You can also click on the default PannerWindow Open button (the circle iconlocated to the right of the panning dish)to open the default panner plug-in. Toset the default panner plug-in, chooseMixing Board > mini-menu > Set DefaultSurround Panners. The Default Sur-round Panners window will open, allow-ing you to choose the default panner (see Figure D.5).
Many of the features in each panner are similar, so we’ll highlight some panner basics within the Tri-Pan plug-in.
JOYSTICK CONTROL Digital Performer also has support for USB joystick controllers. Simply choose Enable
Joystick Controller from the Mixing Board’s mini-menu to enable the joystick. Next
choose Configure Surround Panner Joystick to launch the Joystick Setup window. Set
the mixing function on the left side of the window to the joystick movement on the right
side of the window (see page 671 of the Digital Performer manual).
Q
Figure D.4The Panner Plug-in menu
provides a drop-down
list of the four panner
plug-ins.
Figure D.5Set the default panner
plug-in from the Default
Surround Panners window.
19 DPP App_D 1/10/05 2:36 PM Page 50
Q Surround Panner Plug-ins
Q Q Q51
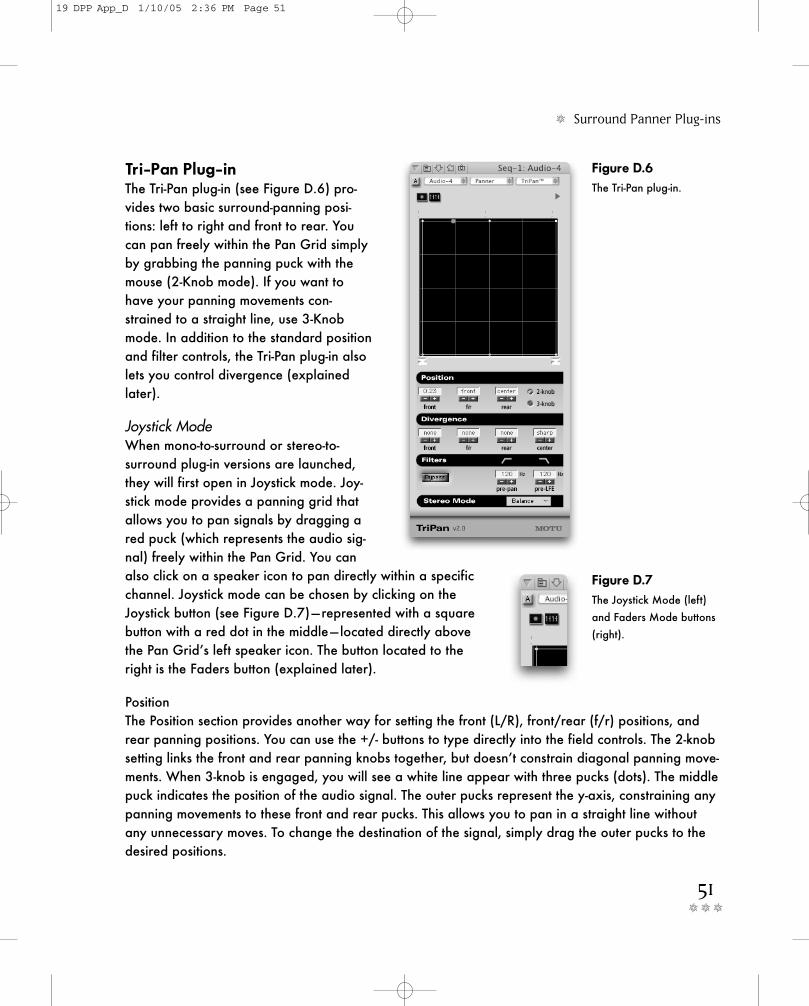
Tri-Pan Plug-inThe Tri-Pan plug-in (see Figure D.6) pro-vides two basic surround-panning posi-tions: left to right and front to rear. Youcan pan freely within the Pan Grid simplyby grabbing the panning puck with themouse (2-Knob mode). If you want tohave your panning movements con-strained to a straight line, use 3-Knobmode. In addition to the standard positionand filter controls, the Tri-Pan plug-in alsolets you control divergence (explainedlater).
Joystick ModeWhen mono-to-surround or stereo-to-surround plug-in versions are launched,they will first open in Joystick mode. Joy-stick mode provides a panning grid thatallows you to pan signals by dragging ared puck (which represents the audio sig-nal) freely within the Pan Grid. You canalso click on a speaker icon to pan directly within a specificchannel. Joystick mode can be chosen by clicking on theJoystick button (see Figure D.7)—represented with a squarebutton with a red dot in the middle— located directly abovethe Pan Grid’s left speaker icon. The button located to theright is the Faders button (explained later).
PositionThe Position section provides another way for setting the front (L/R), front/rear (f/r) positions, andrear panning positions. You can use the +/- buttons to type directly into the field controls. The 2-knobsetting links the front and rear panning knobs together, but doesn’t constrain diagonal panning move-ments. When 3-knob is engaged, you will see a white line appear with three pucks (dots). The middlepuck indicates the position of the audio signal. The outer pucks represent the y-axis, constraining anypanning movements to these front and rear pucks. This allows you to pan in a straight line withoutany unnecessary moves. To change the destination of the signal, simply drag the outer pucks to thedesired positions.
Figure D.6The Tri-Pan plug-in.
Figure D.7The Joystick Mode (left)
and Faders Mode buttons
(right).
19 DPP App_D 1/10/05 2:36 PM Page 51

APPENDIX D} Surround and Digital Performer
Q Q Q52
DivergenceDivergence controls the width of any panning. Values of None will let you pan normally and placesignals exclusively within a designated speaker. Choosing higher values will force a signal to bleedinto adjacent speakers, regardless of its panning position. Setting each control to Full, for example,would cause the signal to remain in the center, even if it was panned left or right. Divergence allowsthe mixer to adjust the width of panning depending on the size of the intended listening environment.
Within the Pan Grid, Divergence is represented with white dots connected with blue lines. Drag a dotto change the Divergence setting.
FiltersFilters are provided for signals that can be assigned to an LFE channel. The Pre-LFE setting lets youroll off frequencies (typically, anything above 120Hz) before they get to the subwoofer. If you wantto filter the LFE channel at the output stage, set this feature to 20Hz. The Pre-Pan setting allows you to filter frequencies lower than 120Hz for instances in which you are using an LFE channel.
Meters, Solos, and MutesClick the disclosure triangle (located above the front-right speaker icon) to access the hidden Meters,Solos, and Mute buttons (see Figure D.8).
Figure D.8The Meter pane can be
accessed by clicking on
the disclosure triangle
icon.Disclosure triangle
19 DPP App_D 1/10/05 2:36 PM Page 52

Q Surround Panner Plug-ins
Q Q Q53
Faders ModeClick on the Faders mode button to change from the Pan Grid to Faders view. Faders mode providesan alternative method for surround panning. Instead of maneuvering the surround puck within thePan Grid, you use faders to decide how much of a signal is sent to a certain speaker. Fader sendsare calibrated to control signals in 1/10dB increments.
Mono-to-surround panners will contain one fader for each surround channel (see Figure D.9), whilestereo-to-surround panners will have two faders for each channel (see Figure D.10). Surround-to-sur-round plug-ins, however, will only operate in Faders mode.
Figure D.9Mono-to-surround panners
contain one fader send for
each surround channel.
Figure D.10Stereo-to-surround
panners contain two fader
sends for each surround
channel.
19 DPP App_D 1/10/05 2:36 PM Page 53
APPENDIX D} Surround and Digital Performer
Q Q Q54
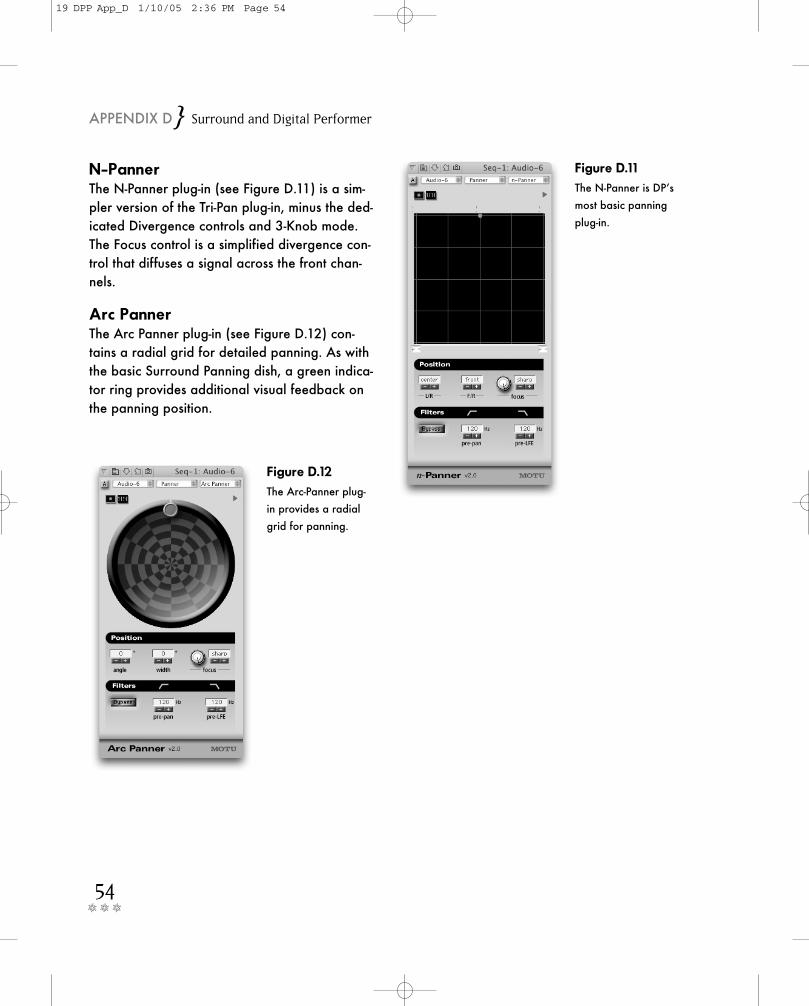
N-PannerThe N-Panner plug-in (see Figure D.11) is a sim-pler version of the Tri-Pan plug-in, minus the ded-icated Divergence controls and 3-Knob mode.The Focus control is a simplified divergence con-trol that diffuses a signal across the front chan-nels.
Arc PannerThe Arc Panner plug-in (see Figure D.12) con-tains a radial grid for detailed panning. As withthe basic Surround Panning dish, a green indica-tor ring provides additional visual feedback onthe panning position.
Figure D.11The N-Panner is DP’s
most basic panning
plug-in.
Figure D.12The Arc-Panner plug-
in provides a radial
grid for panning.
19 DPP App_D 1/10/05 2:36 PM Page 54

Q Surround Panner Plug-ins
Q Q Q55
AuralizerThe Auralizer Panner is a cross between a Surround Panner and spatial-FX plug-in (see Figure D.13).This plug-in provides a unique approach to the positioning of a signal within the surround field.Instead of using gain to send a signal to a speaker(s), you use the surround puck to position thesound within a three-dimensional space. The puck’s distance from the center is used to determine thedistance of the signal from the listening position.
This plug-in is great when you’re working with sound effects or Foley tracks within a film or videoscore. Clever features like Doppler and Head values (explained later) let you easily simulate naturalacoustic phenomena, providing the listener with a more realistic viewing experience.
PositionAngle and Distance values are used to determine the position of a signal in relationship to the listen-ing position. The Width value is measured in meters, and it controls the width of the signal. Highervalues, when used in combination with the Distance setting, allow you to give the listener the percep-tion that signals grow wider as they approach.
Figure D.13The Auralizer plug-in is
more of a spatial-FX
plug-in.
19 DPP App_D 1/10/05 2:36 PM Page 55
APPENDIX D} Surround and Digital Performer
Q Q Q56
RoomThe Room settings control the acoustic properties of the room the signal is occupying or traveling in.Size determines the average distance between walls in the virtual room, while Absorption controlsthe reflective properties of these walls. Volume is expressed in cubic meters and sets the total volumeof the room. Use the Emphasis setting to change the effects of the Position values. This may be helpfulif you are using this plug-in for signals that require a more traditional panning approach, such as amusic bed.
Psycho-Acoustic CuesThese settings are used to simulate the way the brain gathers different acoustic events to determine asound’s position relative to the listener. You can use these parameters to more control how soundtravels within an acoustic space.
Q DDoopppplleerr. Doppler shifts are inherent in the laws of physics. Sound that is approaching anobject will sound higher in pitch, while sound traveling away from a listener will sound lowerin pitch. The Doppler option allows you to simulate this acoustic phenomenon. The rate atwhich the sound approaches and travels away from the listening position determines the rateof change. You can use the Emphasis option to affect this change.
Q HHeeaadd. This parameter simulates the delay and frequency masking that occurs when a soundsource is located to the left or right side of your head. Use the Delay setting to reproduce theinherent delay that occurs when a signal is positioned to the left or right side of your head.Use Shadow to mimic the high-frequency dampening that happens when a sound is located atone side of your head. For example, if you position a sound to the right side of your head, theleft side will contain less-high frequencies.
Q DDiissttaannccee. Simulates the effects that distance has on a sound source. The further the distance,the quieter the sound source will be. Reflections controls the volume of early room reflections.Reverb will diffuse the room reverb more as the sound moves away from the listening position.Attenuation controls the volume of the actual sound source. Sounds that are further away willbecome quieter.
SIMULATING DOPPLER SHIFTSIf you are trying to simulate a realistic Doppler shift, keep in mind that sound travels
approximately 1150 feet per second. Translated into musical pitches: A sound source
approaching you at 75mph will sound 10 percent higher in pitch, or approximately a
musical one-half step higher, while sound traveling away will sound one-half step lower.
Q
19 DPP App_D 1/10/05 2:36 PM Page 56