dakota tablet clutch
TRANSCRIPT

7/23/2019 Dakota Tablet Clutch
http://slidepdf.com/reader/full/dakota-tablet-clutch 1/13
dakota Form and function unite to create a gorgeous yet practical way to carry your tablet.
The device pocket as designed measures 10” x 8”, but print at 75% to fit tablets smaller
than 7” x 5”. Dakota features a magnetic snap closure and a handle on the back.
tablet clutch
When printing, do not select “Fit to Printable Area” or enlarge/shrink in any way.
Always print at “Actual Size” or 100%.
www.swoonpatterns.com
Feel free to sell your bags made with this pattern.
Copyright 2014 Swoon Sewing Patterns
Red Dakota made by Brianne Matlage
swoon S E W I N G P A T T E R N S

7/23/2019 Dakota Tablet Clutch
http://slidepdf.com/reader/full/dakota-tablet-clutch 2/13
Where to stitch
Instructions & Pattern
Materials Needed:
• 1/2 yard exterior fabric, 44” quilting weight
• 1/2 yard lining fabric, 44” quilting weight
• 1/3 yard fusible fleece (Pellon Thermolam Plus TP971f)
• 1/3 yard 20” sew-in heavy stabilizer (Pellon Peltex 70)
• 1 yard fusible woven interfacing (Pellon Shapeflex SF101)• One magnetic snap
• Coordinating thread
1) PREPPING
Cut out all of the pieces of the pattern and tape the pieces together, butting the lines together at thematching letters. Trace all your pieces on the wrong side of the fabric and cut out. Make sure you cut on
the fold of your fabric where marked. Repeat to cut interfacing, fleece and stabilizer.
Additionally, measure and cut:• Handle - 3” x 12” - Cut 1 Exterior, Cut 1 Interfacing
• Handle Stabilizer - 3/4” x 9” - Cut 1 Stabilizer
Trim 1/2” off the top edge of each of the two fleece panels to reduce the bulk in the seams. Center the
Flap Stabilizer panel on the wrong side of the lining Flap. There should be 1/2” of fabric on each edge.
Fuse woven interfacing over top the stabilizer, taking care to fuse well around each seam allowance edgeto hold the stabilizer in place, centered on the lining Flap. Repeat this to fuse the stabilizer and woven
interfacing to the exterior Body panel. Fuse fleece to both lining Device Pocket panel and lining BodyPanel. Fuse only woven interfacing to the rest of the exterior and lining pieces except for the Body Strip
and Flap Strip.
swoon S E W I N G P AT T E R N S
Exterior Lining Wrong Side
2) DECORATIVE STRIPS (optional; skip this step if not including)
Press a long edge of the Body Strip 1/2” under towards the wrong side of the fabric. Repeat with otherlong edge. Repeat with Flap Strip panel. The only raw edges should be the short top and bottom.

7/23/2019 Dakota Tablet Clutch
http://slidepdf.com/reader/full/dakota-tablet-clutch 3/13
Press the exterior Flap in half right sides together and matching all raw edges to create a center crease.
Repeat with Flap Strip (the smaller one). Pin the Flap Strip wrong side down onto the right side of the
exterior Flap, matching the center creases. The longer raw edge of the Flap Strip should be at the top of
the Flap, like below. Edge stitch down each long (folded) edge to attach.
Repeat to attach the Body Strip to the exterior Body panel. The Body panel has stabilizer on it, so you
might want to measure and mark the centers instead of pressing - the center should be 5.5” from each
short side edge.

7/23/2019 Dakota Tablet Clutch
http://slidepdf.com/reader/full/dakota-tablet-clutch 4/13
1”
1.5”
Fold long folded edgesto center crease and press
3) HANDLE
Fold the Handle in half, matching the two long raw edges, wrong sides
together and press. Open and fold each long raw edge into the fold
crease in the center and press. Fold in half again and press. All long
raw edges should be hidden within the strap now, and the strap should
be 3/4” wide. Untuck one side and slide the Handle stabilizer in one of
the folds, centered in the Handle (1.5” from each end). Refold and edge
stitch down each long edge of the Handle.
Pin the ends of the Handle to the right side of the exterior Body panel,
matching the raw ends of the Handle with the raw side edges of the
Body panel, 1” from the top edge, as shown below. Sew a rectangestarting at the raw end, going in 1.5”, crossing over the Handle, then
back to the raw end, then across the Handle again and stopping where
you started. Repeat with the other end of the Handle on the other side
of the exterior Body panel.

7/23/2019 Dakota Tablet Clutch
http://slidepdf.com/reader/full/dakota-tablet-clutch 5/13
4) MAGNETIC SNAP
Fold the lining Flap in half right sides together matching all raw edges and mark the center on the top and
bottom of the Flap (in the seam allowance. Install the male part of the magnetic snap on the lining Flap so
that the center of the snap is 1.75” from the long edge with the curved corners (the top edge).
Press the exterior Device Pocket panel in half, right sides together and matching all raw edges, to make a
center crease. Install the female part of the magnetic snap on the exterior Device Pocket panel so that the
center of the snap is 4.75” up from the bottom edge (the side with darts).
1.75”
Male Magnetic Snap
4.75”
Female Magnetic Snap

7/23/2019 Dakota Tablet Clutch
http://slidepdf.com/reader/full/dakota-tablet-clutch 6/13
5) FLAP
Pin the lining Flap to the Exterior Flap right sides together, matching all raw edges. Sew around the entire
Flap at 1/2” seam allowance, except for the top straight edge.
Trim the seam allowance and turn right side out through the top opening. Press well and top stitch alongthe finished edge about 1/8” away. Pin the top opening closed and machine baste at 1/4” seam
allowance.

7/23/2019 Dakota Tablet Clutch
http://slidepdf.com/reader/full/dakota-tablet-clutch 7/13
6) ASSEMBLE
Fold the Exterior Device Pocket right sides together, matching up the two raw
edges of a dart on either side, and press. Sew along the raw dart edges at
1/4” seam allowance to close.
Trim the seam allowance. Repeat with the otherdart on the same panel, then the two darts on the
lining Device Pocket.
Pin the exterior Device Pocket panel to the exterior Body panel, right sides together, matching all raw
edges. Match the dart seams to the bottom corners of the Body panel. Sew around the sides and
bottom edge at 1/2”, leaving the top edge open. Trim seam allowance.
Repeat with lining Device Pocket and lining Body panel, except leave a 6” opening along one of the
side edges to turn the bag later.

7/23/2019 Dakota Tablet Clutch
http://slidepdf.com/reader/full/dakota-tablet-clutch 8/13
7) FINISH
Pin the flap, exterior side down to the right side of the exterior Body panel, matching the one raw edge
of both. Machine baste in place along the raw edge only at 1/4” seam allowance. Do not sew through
the Device Pocket.
Place the exterior, right side out, inside the lining, wrong side out. Match the top raw edges and sideseams and pin well. Make sure the flap is tucked down between the lining and exterior. Sew around
the entire top at 1/2” seam allowance. Trim seam allowance well, especially at the “V” in the front and
along the back where the Flap is. Turn the bag right side out through the opening in the lining. Fold the
edges of the opening inside 1/2” and press well. Stitch along the folds to close the opening, as closely
as you can to the folded edges so not to create too much bulk.
Press the entire bag well. Top stitch along the top of the Device Pocket. All done!

7/23/2019 Dakota Tablet Clutch
http://slidepdf.com/reader/full/dakota-tablet-clutch 9/13
FlapCut 1 Exterior (with pattern piece upside down)
Cut 1 LiningCut 2 Interfacing
swoon SEW IN G P AT T ERN S
F O L D
Male magnetic snap installed on Flap
lining 1.75” down from top edge
A

7/23/2019 Dakota Tablet Clutch
http://slidepdf.com/reader/full/dakota-tablet-clutch 10/13
FOLD
F O
L D
Body Cut 1 ExteriorCut 1 Lining
Cut 1 InterfacingCut 1 Fleece
swoon SEW IN G P AT T ERN S
B o d y S t r i p
( o p t i on al )
C ut 1 L i ni n g
s w o o n
S E WI N G P AT T E R N S
A
7/23/2019 Dakota Tablet Clutch
http://slidepdf.com/reader/full/dakota-tablet-clutch 11/13
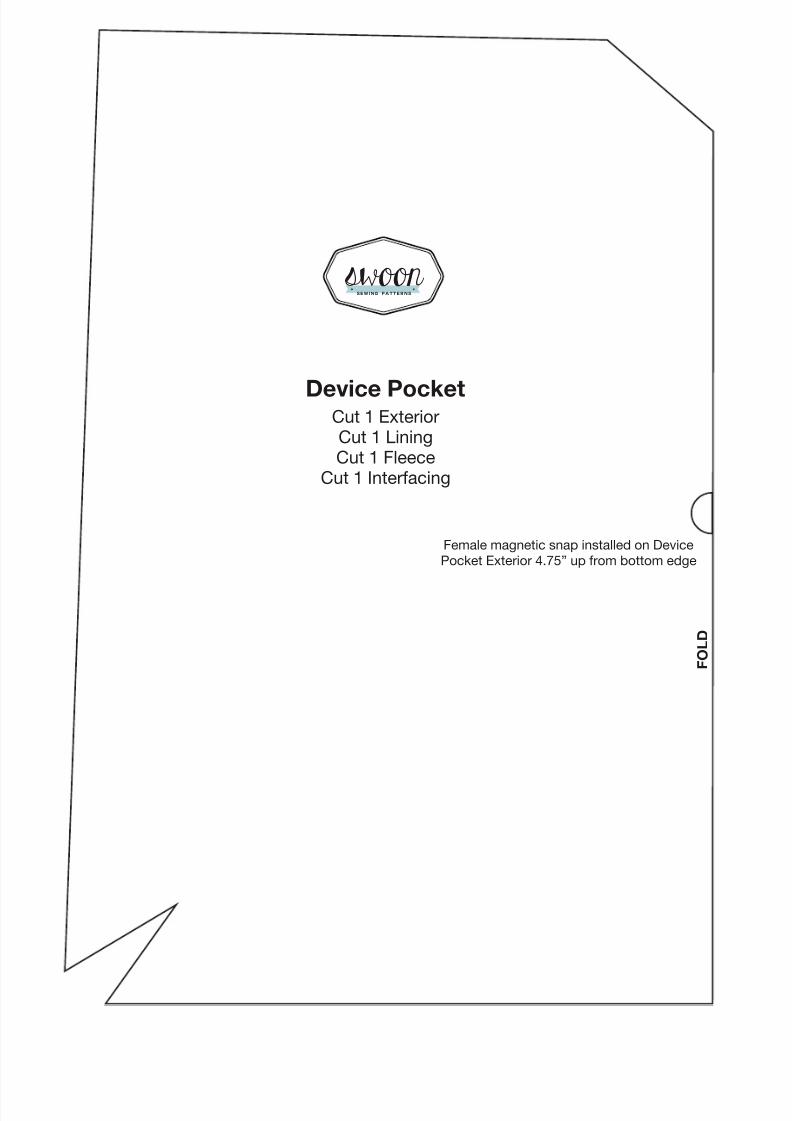
Device PocketCut 1 ExteriorCut 1 LiningCut 1 Fleece
Cut 1 Interfacing
swoon SEW IN G P AT T ERN S
F O L D
Female magnetic snap installed on Device
Pocket Exterior 4.75” up from bottom edge

7/23/2019 Dakota Tablet Clutch
http://slidepdf.com/reader/full/dakota-tablet-clutch 12/13
F l a p S t r i p
( o p t i o n a l )
C u t 1 L i n i n g
s w o o n
S E W I N G
P A T T E R N S
F l a
p S t a b i l i z e r
C
u t 1 S t a b i l i z e r
s w o o n
S E W I N G
P A T T E R N S
F O L D
FOLD

7/23/2019 Dakota Tablet Clutch
http://slidepdf.com/reader/full/dakota-tablet-clutch 13/13
Bod y StabilizerCut 1 Stabilizer
Cut size: 10” x 8”
s woon SEW IN G P AT T ER NS
F O L D
This box
should measure
1.5”If it doesn’t,your pattern
printed incorrectly