dante controller user guide · dante-my16-aud2user guide documentversion:1.0...
TRANSCRIPT
Dante-MY16-AUD2 UserGuide
Document version: 1.0
Document name: AUD-MAN-Dante-MY16-AUD2-User-Guide-v1.0
Published: Wednesday, May 25, 2016

Dante-MY16-AUD2 User Guide
Copyright © 2016 Audinate Pty Ltd. All rights reserved. -2-
Contents
European Office 5
Asia Pacific Office 5
Copyright 6
About Audinate 7
About Dante 7
Regulatory Information 8
FCC INFORMATION (U.S.A) 8
COMPLIANCE INFORMATION STATEMENT 8
CANADA 9
Package Contents 11
Getting Started: About this User Guide 12
About your Dante-MY16-AUD2 13
Specifications 14
Connectors and Indicators 15
Installing Your Card 17
Before you install 17
To Install 17
Removing your card 18
About your Audinate Software 19
What is Dante Controller? 19
What is Dante Virtual Soundcard? 20
Obtain your Dante Virtual Soundcard License ID 21
What is Dante Via? 21
Downloading Dante Controller 22
Downloading and Activating Dante Virtual Soundcard 22
Downloading Dante Via 23
Connecting to a Network 24
Before you Set Up your Network - Important Notes 24
Gigabit Ethernet Support 24
Choosing aGigabit Ethernet Switch 24
Choosing Ethernet Cabling 24
Network Configuration Options 25
Straight-through connection to your PC 25
Connection via a Gigabit Switch 25
Daisy Chain Configuration 26
Connection via a Redundant Network 26
Unsupported Dante Network Configurations 28
Connecting Primary and Secondary redundant networks to the same switch 28
Dante Audio traffic overWireless Networks 28
Dante-MY16-AUD2 User Guide
Copyright © 2016 Audinate Pty Ltd. All rights reserved. -3-
Dante-MY16-AUD2: Use of 100Mbps Network interface 28
HA Remote 29
HA Remote Chain Example 1 29
HA Remote Chain Example 2 30
Mode Selection 30
Available HA RemoteModes 31
Product / Modematrix 32
Special Considerations 32
Basic Operation 33
Pre-operation checklist 33
Using Dante Controller 33
Setting up audio routes 34
Configuring your Card 34
Identifying individual Dante-MY16-AUD2 cards 35
Dante-MY16-AUD2Device Name 36
Dante-MY16-AUD2Default Sample Rate 36
Pull-up/down 36
AES67Config 36
Advanced Configuration with Dante Controller 38
Unicast andMulticast Modes 38
AES67 Flow 39
Setting Latency 40
Configuring the Dante-MY16-AUD2clock 40
Master Clock 41
Checking clock configuration 42
Configuring your Yamaha Equipment 43
Upgrading Firmware 44
Troubleshooting 45
Introduction 45
Network Configuration – Gigabit Ethernet 45
What are the symptoms of NOT using Gigabit Ethernet? 45
How can I check whether I AM using Gigabit Ethernet? 46
Switch Configuration and Cabling 46
Computer Configuration 47
Dante Configuration: Sample Rate 47
Common configuration issues 47
Symptom: Audio only appears on every second channel @ 88.2kHz or 96kHz 48
Dante Configuration: Clock 48
How do I know if my clock is incorrectly configured? 48
How do I fix it? 48
Symptom: Orange ‘Error’ light with green ‘Sync’ light 48
Dante-MY16-AUD2 User Guide
Copyright © 2016 Audinate Pty Ltd. All rights reserved. -4-
Symptom: Red ‘Sync’ light with orange ‘Error' light 49
Dante Synchronization and Clocking 50
Dante Clock Types 50
The Dante PTP Master Clock 50
Dante Clock Settings 51
Dante Clocking and Redundancy 51
Clock Status Monitoring 51
Pull-up Clock Domains 51
How to Configure Dante Clocking 51
Automatically 51
Choose an external clock for the Dante network to use 52
Manually choose a Dante PTP Master Clock 52
Index 54

Dante-MY16-AUD2 User Guide
Copyright © 2016 Audinate Pty Ltd. All rights reserved. -5-
Contacts
Audinate Pty Ltd Level 1, 458Wattle Street
Ultimo NSW 2007
Australia
Tel. +61 2 8090 1000
Postal addressAudinate Pty Ltd
POBox 855
Broadway NSW 2007
Australia
Audinate Inc 1732 NW Quimby Street
Suite 215
Portland, OR 97209
USA
Tel: +1.503.224.2998
Fax. +1.503.360.1155
www.audinate.com
European Office Audinate Ltd
Suite 303
BrightonMedia Centre
Friese-Greene House
15-17Middle St
Brighton, BN1 1AL
United Kingdom
Tel. +44 (0) 1273 921695
Asia Pacific Office Audinate Limited
Suite 1106-08, 11/F Tai Yau Building
No 181 Johnston Road
Wanchai, Hong Kong
澳迪耐特有限公司
香港灣仔莊士敦道181號
大有大廈11樓1106-8室
Tel. +(852)-3588 0030
+(852)-3588 0031
Fax. +(852)-2975 8042
Dante-MY16-AUD2 User Guide
Copyright © 2016 Audinate Pty Ltd. All rights reserved. -6-
Copyright© 2016 Audinate Pty Ltd. All Rights Reserved.
Audinate®, the Audinate logo and Dante are trademarks of Audinate Pty Ltd.
All other trademarks are the property of their respective owners.
Audinate products are protected by one or more of US Patents 7747725, 8005939, 7978696, 8171152, andother patents pending or issued. See www.audinate.com/patents.
Legal Notice and DisclaimerAudinate retains ownership of all intellectual property in this document.
The information andmaterials presented in this document are provided as an information source only.While effort has beenmade to ensure the accuracy and completeness of the information, no guarantee isgiven nor responsibility taken by Audinate for errors or omissions in the data.
Audinate is not liable for any loss or damage that may be suffered or incurred in any way as a result ofacting on information in this document. The information is provided solely on the basis that readers will beresponsible for making their own assessment, and are advised to verify all relevant representation,statements and information with their own professional advisers.
Software Licensing NoticeAudinate distributes products which are covered by Audinate license agreements and third-party licenseagreements.
For further information and to access copies of each of these licenses, please visit our website:
www.audinate.com/software-licensing-notice

Dante-MY16-AUD2 User Guide
Copyright © 2016 Audinate Pty Ltd. All rights reserved. -7-
About AudinateAudinate revolutionizes AV systems to enable its customers to thrive in a networked world. Audinate'spatented Dantemedia networking technology has been adopted by the leadingmanufacturers in theprofessional audio/visual industry.
Dante is used extensively for live performance events, commercial installation, broadcast, recording andproduction, and communications systems.
Audinate offices are located in US, UK, Hong Kong and Australia. Visit www.audinate.com for the latestnews and information on the company.
Dante is Digital Media Networking Perfected.
About DanteAudinate’s Dante technology provides high performance digital media networking that meets the qualityand performance requirements of professional live sound, AV installations and broadcast and recordingsystems.
Designed to fully exploit the capabilities of today and tomorrow’s networking equipment, Dante providesmedia transport mechanisms that eliminatemany traditional audio network design restrictions. Dantemakes it easy to set up robust, flexible digital audio networks with virtually unrestricted performance. ADante network can be designed with mixedGigabit and 100Mbps network speeds, simultaneously supportaudio with different sample rates and bit depths, and even allow the design of network zones with differentlatencies.
Dante is built on Internet Protocols — not just Ethernet. Because it uses standard IP over Ethernet, Danteis capable of running on inexpensive off-the-shelf computer networking hardware, and with the use ofstandard QoS can share installed networks with other data and computing traffic.
Dante provides sample-accurate synchronization and can deliver the very low latency required byprofessional audio. Dante’s network-centric, audio-independent approach to synchronization allowsperfectly synchronized playout across different audio channels, devices and networks, even over multipleswitch hops.
Dantemakes networking a true plug-and-play process, allowing automatic device discovery and systemconfiguration. Dante-enabled devices will automatically setup their network configuration and advertisethemselves and their channels on the network, reducing complicated, error-prone set-up procedures.Instead of ‘magic numbers’, networked devices and their input and output signals can be named tomakesense to the user.
Dante is not restricted to allowing configuration and transmission of audio channels. Dante also providesmechanisms to send or receive control andmonitoring information across the Dante IP network, includingequipment-specific messages and control specified and developed by a particular manufacturer.
With its strong foundations and links to current and evolving network standards, Dante is able to deliver alevel of future proofing otherwise unavailable in other types of digital audio transportation. Continuedevolution of its networking technology is an integral part of the Dante roadmap.
Dante technology is available in ready-to-implement hardware and software products, reference designsand development APIs.
For more information, please visit the Audinate website at www.audinate.com.

Dante-MY16-AUD2 User Guide
Copyright © 2016 Audinate Pty Ltd. All rights reserved. -8-
Regulatory Information
FCC INFORMATION (U.S.A)IMPORTANT NOTICE: DONOTMODIFY THIS UNIT! This product, when installed as indicated in theinstructions contained in this manual, meets FCC requirements. Modifications not expressly approved byAudinatemay void your authority, granted by the FCC, to use the product.
IMPORTANT: When connecting this product to accessories and/or another product use only high qualityshielded cables. Follow all installation instructions. Failure to follow instructions could void your FCCauthorization to use this product in the USA.
NOTE: This product has been tested and found to comply with the requirements listed in FCCRegulations, Part 15 for Class 'B' digital devices. Compliance with these requirements provides areasonable level of assurance that your use of this product in a residential environment will not result inharmful interference with other electronic devices. Compliance with FCC regulations does not guaranteethat interference will not occur in all installations. If this product is found to be the source of interference,which can be determined by turning the unit 'OFF' and 'ON', please try to eliminate the problem by usingone of the followingmeasures: Relocate either this product or the device that is being affected by theinterference. Utilize power outlets that are on different branch (circuit breaker or fuse) circuits or install ACline filter/so In the case of radio or TV interference, relocate/reorient the antenna. If the antenna lead-in is300 ohm ribbon lead, change the lead-in to coaxial type cable. If these correctivemeasures do not producesatisfactory results, please contact the local retailer authorized to distribute this type of product. If youcannot locate the appropriate retailer, please contact Yamaha Corporation of America, Electronic ServiceDivision, 6600Orangethorpe Ave., Buena Park, CA 90620. The above statements apply ONLY to thoseproducts distributed by Yamaha Corporation of America or its subsidiaries.
This applies only to products distributed by YAMAHA CORPORATION OF AMERICA (Class B)
This device complies with part 15 of the FCC Rules. Operation is subject to the following two conditions:(1) This devicemay not cause harmful interference, and (2) this devicemust accept any interferencereceived, including interference that may cause undesired operation.
COMPLIANCE INFORMATION STATEMENT(DECLARATION OF CONFORMITY PROCEDURE)
Responsible Party : Yamaha Corporation of America
Address : 6600Orangethorpe Ave., Buena Park, Calif. 90620
Telephone : 714-522-9011
Type of Equipment : Dante INTERFACE CARD
Model Name : Dante-MY16-AUD
This device complies with Part 15 of the FCC Rules.
Operation is subject to the following two conditions:
1) this devicemay not cause harmful interference, and
2) this devicemust accept any interference received including interference that may cause undesiredoperation.
See user manual instructions if interference to radio reception is suspected.
This applies only to products distributed by YAMAHA CORPORATION OF AMERICA. (FCC DoC)

Dante-MY16-AUD2 User Guide
Copyright © 2016 Audinate Pty Ltd. All rights reserved. -9-
CANADAThis Class B digital apparatus complies with Canadian ICES-003.
Cet appareil numérique de la classe B est conforme à la normeNMB-003 du Canada.
This applies only to products distributed by Yamaha CanadaMusic Ltd. (class B)
Ceci ne s’applique qu’aux produits distribués par Yamaha CanadaMusique Ltée.
Dante-MY16-AUD2 User Guide
Copyright © 2016 Audinate Pty Ltd. All rights reserved. -10-
WarningTo avoid the possibility of personal physical injury or damage to the equipment, always take sensibleprecautions when using this equipment including but not limited to the following:
n Do not attempt to modify the equipment or disassemble it.
n Disconnect the power cables of audio devices before installing this equipment. Turn off any peri-pheral devices connected to the audio device and unplug all related cables.
n Handle the equipment carefully.
n Drain any static electricity from your body or clothing before handling the equipment .
n Do not drop the equipment or subject it to physical shock.
n Avoid loose screws or other extraneous metal objects coming into contact with the equipment wheninstalled and powered up.
n Do not expose the equipment to sudden temperature changes from cold to hot.
n Do not expose the equipment to rain or moisture.
n Avoid installing this equipment where foreign objects may fall onto this unit and/or this equipmentmay be exposed to liquid dripping or splashing.
Audinate cannot be held responsible for any loss or destruction of data or damage caused byimproper use of or modifications to the device.
Dante-MY16-AUD2 User Guide
Copyright © 2016 Audinate Pty Ltd. All rights reserved. -11-
Package ContentsThe following items are included with your Dante-MY16-AUD-II. Check to ensure you have everythinglisted here.
n Dante-MY16-AUD2 card in unopened anti-static bag
n Printed Getting Started Guide
n 'Download Your Software’ card

Dante-MY16-AUD2 User Guide
Copyright © 2016 Audinate Pty Ltd. All rights reserved. -12-
Getting Started: About this User GuideThis User Guide has been designed to provide you with the information you will need to install and operateyour Dante-MY16-AUD2 card in your Yamaha equipment.
To start using your Dante-MY16-AUD2 card and recording and playing back audio, follow the steps below.
n Install your Dante-MY16-AUD2 card(s)
o Refer to the section About your Dante-MY16-AUD2 for details about your card specification andinstallation instructions.
n Download and Install your Audinate software and get your Dante Virtual Soundcard License ID
o Refer to the section About your Audinate Software for details.
n Set up your Dante network
o Refer to the section Connecting to a Network for details.
n Configure your Dante-MY16-AUD2 card(s) in your Yamaha equipment
o Refer to the sections Basic Operation and Configuring your Yamaha Equipment for details.

Dante-MY16-AUD2 User Guide
Copyright © 2016 Audinate Pty Ltd. All rights reserved. -13-
About your Dante-MY16-AUD2The Dante-MY16-AUD2 card is an expansion card for use with compatible Yamaha professional audioequipment. It allows the transmission and reception of up to 32 (16x16) channels at 44.1kHz or 48kHz, or16 (8x8) channels at 88.2kHz or 96kHz of uncompressed 16, 24 or 32-bit digital audio data, usingAudinate’s Dante™ audio networking standard.
The Dante-MY16-AUD2 card has a fully compatible YamahaMini-YGDAI standard interface connectorallowing it to be installed in a range of compatible Yamaha equipment.
Gigabit Ethernet connectors ensure low latency, high-quality synchronization audio.
Dante-MY16-AUD2 User Guide
Copyright © 2016 Audinate Pty Ltd. All rights reserved. -14-
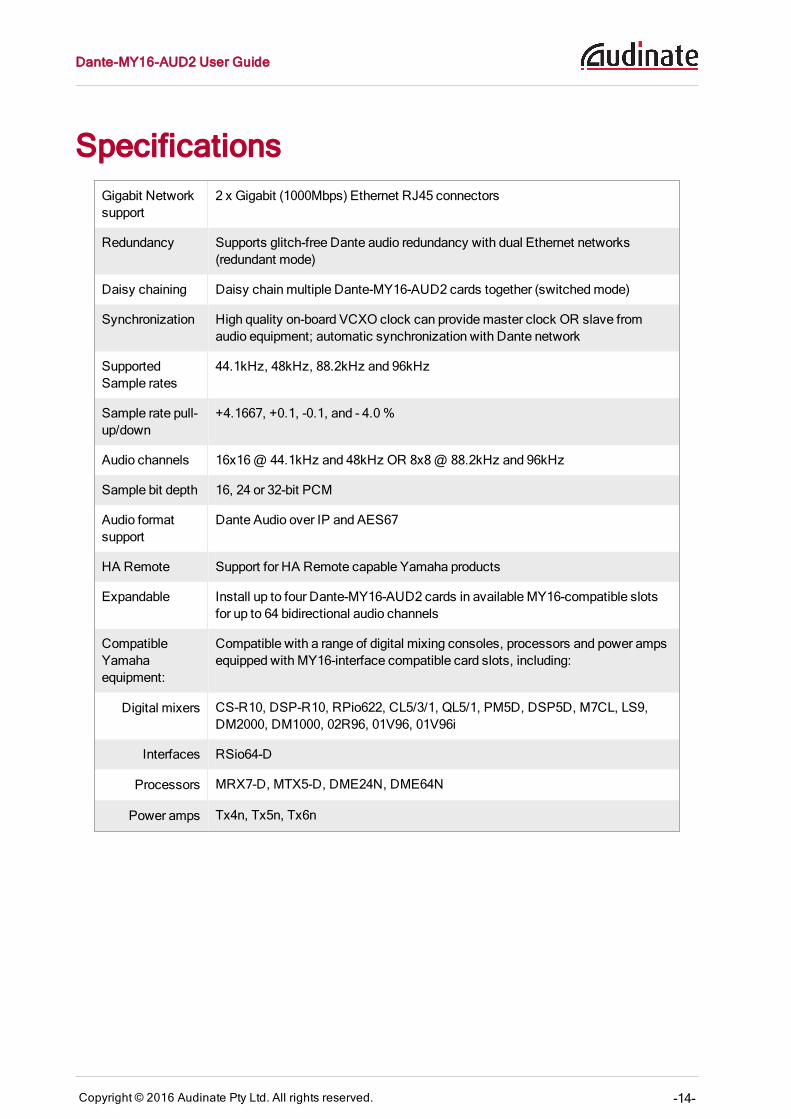
SpecificationsGigabit Networksupport
2 x Gigabit (1000Mbps) Ethernet RJ45 connectors
Redundancy Supports glitch-free Dante audio redundancy with dual Ethernet networks(redundant mode)
Daisy chaining Daisy chainmultiple Dante-MY16-AUD2 cards together (switchedmode)
Synchronization High quality on-board VCXO clock can providemaster clock OR slave fromaudio equipment; automatic synchronization with Dante network
SupportedSample rates
44.1kHz, 48kHz, 88.2kHz and 96kHz
Sample rate pull-up/down
+4.1667, +0.1, -0.1, and - 4.0%
Audio channels 16x16@ 44.1kHz and 48kHz OR 8x8@ 88.2kHz and 96kHz
Sample bit depth 16, 24 or 32-bit PCM
Audio formatsupport
Dante Audio over IP and AES67
HA Remote Support for HA Remote capable Yamaha products
Expandable Install up to four Dante-MY16-AUD2 cards in available MY16-compatible slotsfor up to 64 bidirectional audio channels
CompatibleYamahaequipment:
Compatible with a range of digital mixing consoles, processors and power ampsequipped with MY16-interface compatible card slots, including:
Digital mixers CS-R10, DSP-R10, RPio622, CL5/3/1, QL5/1, PM5D, DSP5D, M7CL, LS9,DM2000, DM1000, 02R96, 01V96, 01V96i
Interfaces RSio64-D
Processors MRX7-D, MTX5-D, DME24N, DME64N
Power amps Tx4n, Tx5n, Tx6n
Dante-MY16-AUD2 User Guide
Copyright © 2016 Audinate Pty Ltd. All rights reserved. -15-
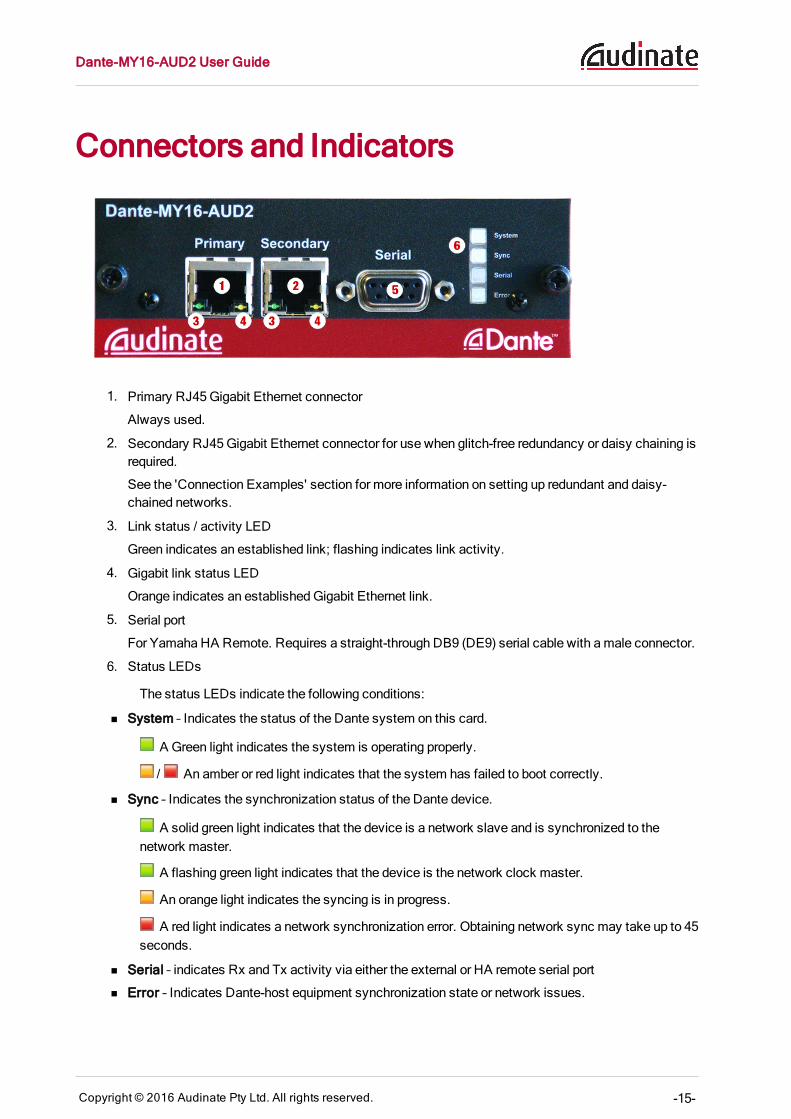
Connectors and Indicators
1. Primary RJ45Gigabit Ethernet connector
Always used.
2. Secondary RJ45Gigabit Ethernet connector for use when glitch-free redundancy or daisy chaining isrequired.
See the 'Connection Examples' section for more information on setting up redundant and daisy-chained networks.
3. Link status / activity LED
Green indicates an established link; flashing indicates link activity.
4. Gigabit link status LED
Orange indicates an establishedGigabit Ethernet link.
5. Serial port
For Yamaha HA Remote. Requires a straight-through DB9 (DE9) serial cable with amale connector.
6. Status LEDs
The status LEDs indicate the following conditions:
n System – Indicates the status of the Dante system on this card.
A Green light indicates the system is operating properly.
/ An amber or red light indicates that the system has failed to boot correctly.
n Sync – Indicates the synchronization status of the Dante device.
A solid green light indicates that the device is a network slave and is synchronized to thenetwork master.
A flashing green light indicates that the device is the network clock master.
An orange light indicates the syncing is in progress.
A red light indicates a network synchronization error. Obtaining network sync may take up to 45seconds.
n Serial – indicates Rx and Tx activity via either the external or HA remote serial port
n Error – Indicates Dante-host equipment synchronization state or network issues.
Dante-MY16-AUD2 User Guide
Copyright © 2016 Audinate Pty Ltd. All rights reserved. -16-
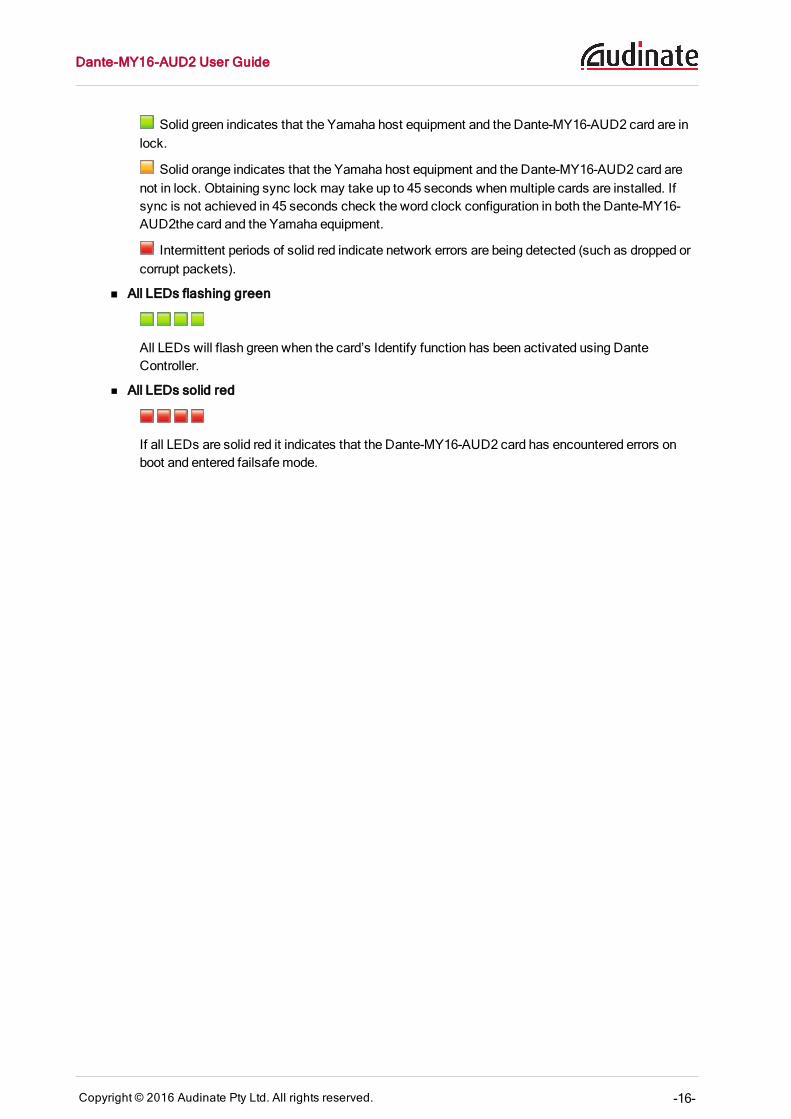
Solid green indicates that the Yamaha host equipment and the Dante-MY16-AUD2 card are inlock.
Solid orange indicates that the Yamaha host equipment and the Dante-MY16-AUD2 card arenot in lock. Obtaining sync lock may take up to 45 seconds whenmultiple cards are installed. Ifsync is not achieved in 45 seconds check the word clock configuration in both the Dante-MY16-AUD2the card and the Yamaha equipment.
Intermittent periods of solid red indicate network errors are being detected (such as dropped orcorrupt packets).
n All LEDs flashing green
All LEDs will flash green when the card’s Identify function has been activated using DanteController.
n All LEDs solid red
If all LEDs are solid red it indicates that the Dante-MY16-AUD2 card has encountered errors onboot and entered failsafemode.
Dante-MY16-AUD2 User Guide
Copyright © 2016 Audinate Pty Ltd. All rights reserved. -17-
Installing Your Card
Before you installBefore you install the Dante-MY16-AUD2 card, you should note down the last 6 characters of theMACaddress of the card.
This is printed on a label on the card itself. The last six characters of theMAC address of the card are usedin the default device name.
e.g.: Dante-MY16-AUD2 card with MAC address 00:1D:C1:03:01:C4 will show as
MY16-2-0301C4
in Dante Controller until it is given amore suitable name.
If you are installingmore than one card, this will allow you to easily identify which card you have installed inwhich slot when viewing them onDante Controller in order to configure or rename them appropriately.
To InstallTo install your Dante-MY16-AUD2 card in your chosen compatible Yamaha equipment, please carefullyfollow the instructions below. For instructions relating to specific Yamaha equipment, please refer to theManual for that equipment.
Important: Please observe normal antistatic precautions when handling sensitive electronicequipment to avoid damage.
1. Check that your Yamaha equipment has a compatible, empty MY16 slot.
2. Turn off the power to your Yamaha equipment
3. Remove the screws from the cover of the empty MY16 slot.
4. Store the blank slot cover and its screws in a safe place for later use.
5. Remove the Dante-MY16-AUD2 from its anti-static bag.
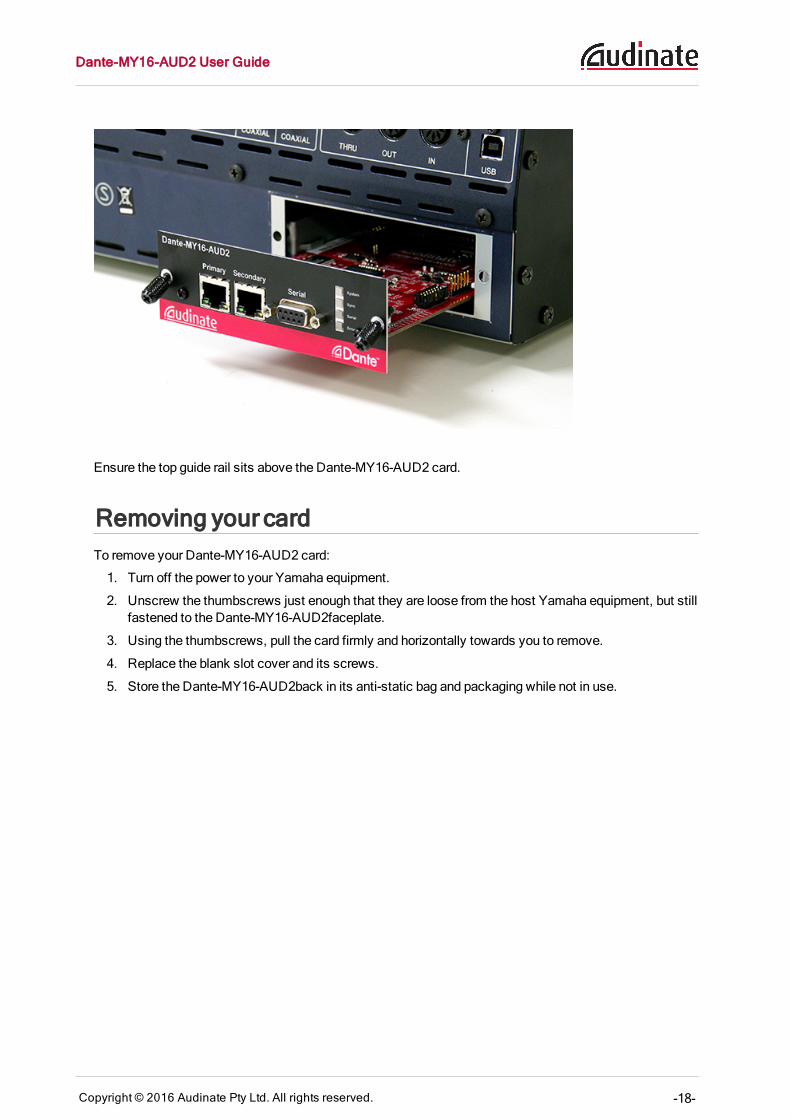
6. Carefully slide the Dante-MY16-AUD2 card into the slot, ensuring the card is sitting within the guiderails.
7. After checking the card is within the guide rails, fully install the card by pushing it firmly until the face-plate is flush with the back of the Yamaha equipment.
8. Screw the thumbscrews into place.
Dante-MY16-AUD2 User Guide
Copyright © 2016 Audinate Pty Ltd. All rights reserved. -18-
Ensure the top guide rail sits above the Dante-MY16-AUD2 card.
Removing your cardTo remove your Dante-MY16-AUD2 card:
1. Turn off the power to your Yamaha equipment.
2. Unscrew the thumbscrews just enough that they are loose from the host Yamaha equipment, but stillfastened to the Dante-MY16-AUD2faceplate.
3. Using the thumbscrews, pull the card firmly and horizontally towards you to remove.
4. Replace the blank slot cover and its screws.
5. Store the Dante-MY16-AUD2back in its anti-static bag and packaging while not in use.
Dante-MY16-AUD2 User Guide
Copyright © 2016 Audinate Pty Ltd. All rights reserved. -19-
About your Audinate SoftwareTo configure and use your Dante-enabled Yamaha equipment to route audio over a network, you need toinstall Dante Controller on a PC orMac on the Dante network.
To record and play out audio direct to your PC orMac, you need to install Dante Virtual Soundcard, orDante Via, or a Dante PCIe card.
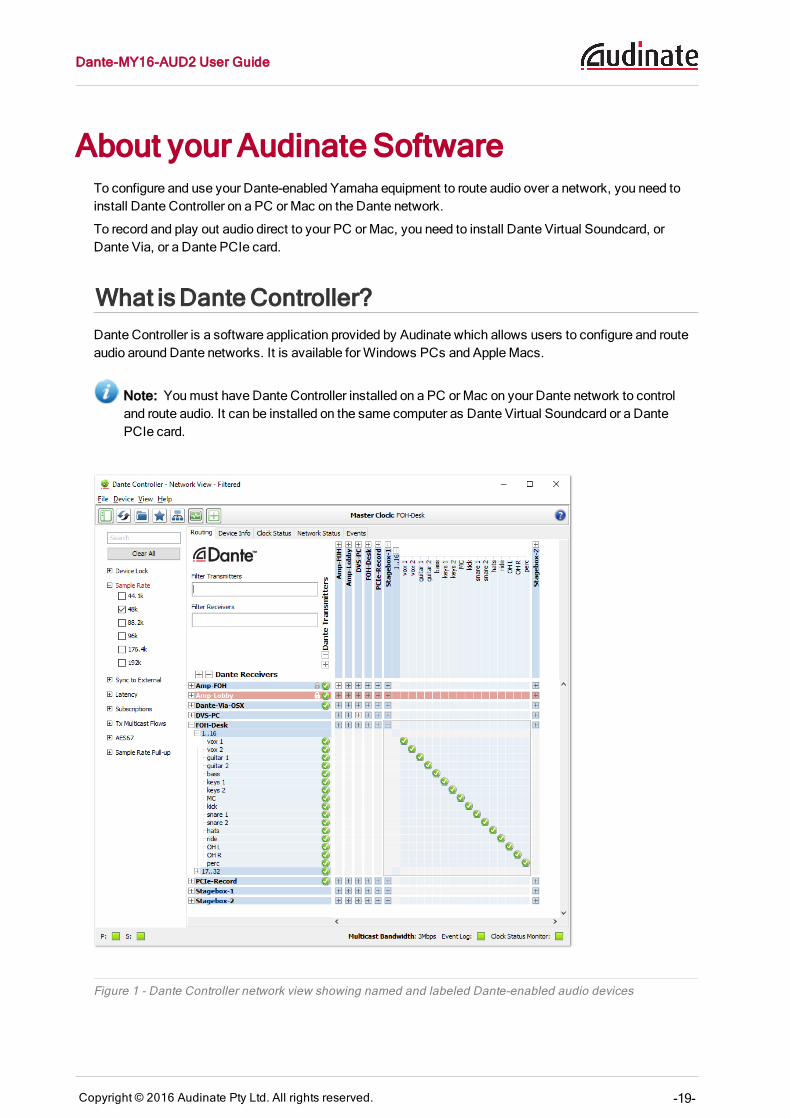
What isDante Controller?Dante Controller is a software application provided by Audinate which allows users to configure and routeaudio around Dante networks. It is available forWindows PCs and AppleMacs.
Note: Youmust have Dante Controller installed on a PC orMac on your Dante network to controland route audio. It can be installed on the same computer as Dante Virtual Soundcard or a DantePCIe card.
Figure 1 - Dante Controller network view showing named and labeled Dante-enabled audio devices
Dante-MY16-AUD2 User Guide
Copyright © 2016 Audinate Pty Ltd. All rights reserved. -20-
Once you connect Dante Controller to a Dante network, you can:
n View all Dante-enabled audio devices and their Dante audio channels
n View device clock and network settings
n Set up audio channels (subscriptions) between channels on these devices, and view the state ofexisting subscriptions
n Change the labels of transmitted audio channels from numbers to names that suit you
n Customize the device latency (latency before playout) for either individual devices or groups ofdevices
n Save and reapply audio routing presets
n Edit presets offline, and apply as configurations for new network deployments
n View device latency statistics, for supported devices (including the Dante-MY16-AUD-II)
n View clock status statistics
n View multicast bandwidth across the network, and transmit and receive bandwidth for each device
n Inspect advanced configuration options, including
o Changing the device name
o Changing sample rate and clock settings
o Viewing detailed network information
o Viewing firmware and license information
Please read the Dante Controller User Guide for information describing how to install, configure and usethe Dante Controller software.
What isDante Virtual Soundcard?Dante Virtual Soundcard is a software application that turns your PC orMac into a Dante-enabled device,allowing Dante audio traffic to be transmitted and received using the standard Ethernet port. No additionalhardware is required.
OnWindows, Dante Virtual Soundcard uses WDM or Steinberg’s ASIO audio interface, and can be usedwith any audio application that supports WDM or ASIO. OnMac OSX, Dante Virtual Soundcard uses thestandard Core Audio interface, and can be used by almost any standard audio application.
Once you install Dante Virtual Soundcard on a PC orMac and connect it to the Dante network, you can:
n View and change the current audio sample rate
n Customize the receive latency (latency a receiving device should use before playout)
n View and set your Ethernet network interface, and view network interface details
n Start and stop Dante Virtual Soundcard
OnWindows you can also:
n View and set ASIO-specific parameters
Please read the Dante Virtual Soundcard User Guide for information describing how to install, configureand use the Dante Virtual Soundcard software.
Dante-MY16-AUD2 User Guide
Copyright © 2016 Audinate Pty Ltd. All rights reserved. -21-
Obtain yourDante Virtual Soundcard License ID
Note: Please read the Dante Virtual Soundcard User Guide for detailed information about minimumsystem requirements, installation and activation
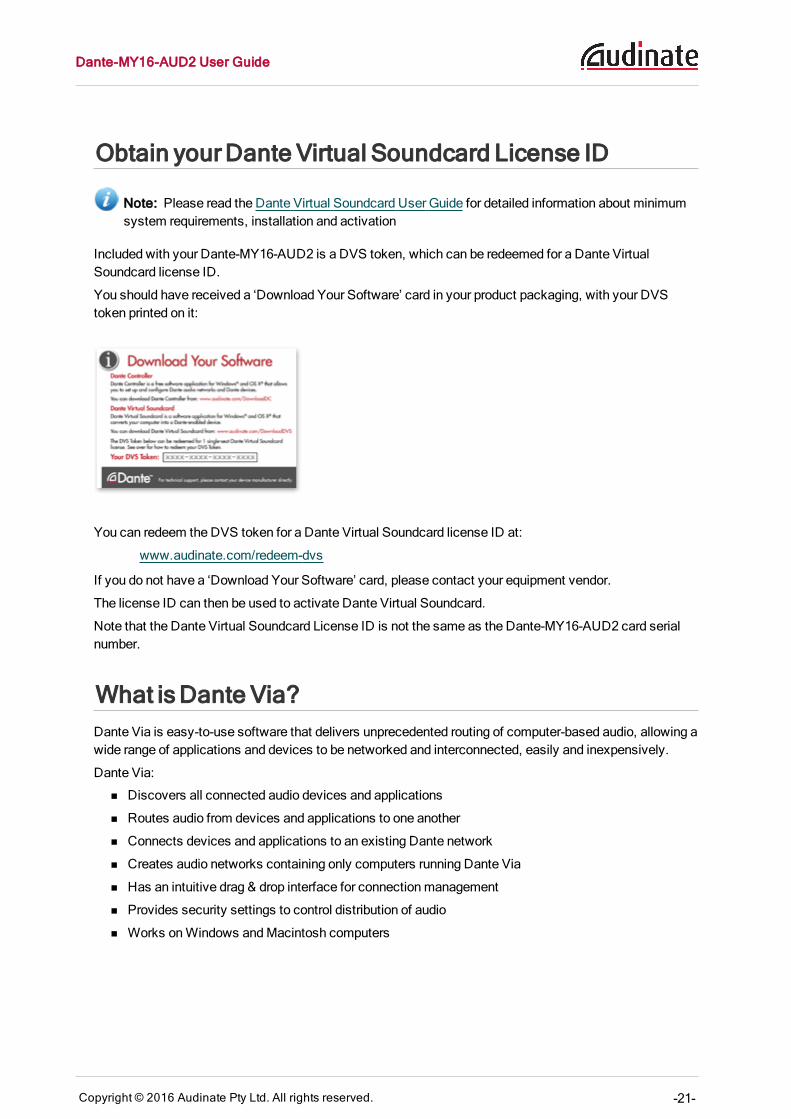
Included with your Dante-MY16-AUD2 is a DVS token, which can be redeemed for a Dante VirtualSoundcard license ID.
You should have received a ‘Download Your Software’ card in your product packaging, with your DVStoken printed on it:
You can redeem the DVS token for a Dante Virtual Soundcard license ID at:
www.audinate.com/redeem-dvs
If you do not have a ‘Download Your Software’ card, please contact your equipment vendor.
The license ID can then be used to activate Dante Virtual Soundcard.
Note that the Dante Virtual Soundcard License ID is not the same as the Dante-MY16-AUD2 card serialnumber.
What isDante Via?Dante Via is easy-to-use software that delivers unprecedented routing of computer-based audio, allowing awide range of applications and devices to be networked and interconnected, easily and inexpensively.
Dante Via:
n Discovers all connected audio devices and applications
n Routes audio from devices and applications to one another
n Connects devices and applications to an existing Dante network
n Creates audio networks containing only computers running Dante Via
n Has an intuitive drag & drop interface for connectionmanagement
n Provides security settings to control distribution of audio
n Works onWindows andMacintosh computers

Dante-MY16-AUD2 User Guide
Copyright © 2016 Audinate Pty Ltd. All rights reserved. -22-
Downloading Dante ControllerThe Dante Controller software is available for download from Audinate’s website.
To download a copy of Dante Controller:
1. Go to Audinate’s website: www.audinate.com.
2. Navigate to ‘Products’ > ‘Dante Controller’.
3. Under ‘Download’, choose your operating system.
4. Click the red button to go to the relevant release.
5. Click the hyperlink under ‘File downloads’ to download the installer.
Downloading and Activating Dante Virtual SoundcardThe Dante Virtual Soundcard is available for download from Audinate’s website.
To download a copy of the Dante Virtual Soundcard:
1. Go to Audinate’s website: www.audinate.com.
2. Navigate to ‘Products’ > ‘Dante Virtual Soundcard’.
3. Under ‘Download’, choose your operating system.
4. Click the red button to go to the relevant release.
5. Click the hyperlink under ‘File downloads’ to download the installer.

Dante-MY16-AUD2 User Guide
Copyright © 2016 Audinate Pty Ltd. All rights reserved. -23-
When you first run Dante Virtual Soundcard you will need to activate it, using a valid Dante VirtualSoundcard license ID.
Downloading Dante ViaDante Via software is available for download from Audinate’s website.
To download a copy of Dante Via :
1. Go to Audinate’s website: ww.audinate.com.
2. Navigate to ‘Products’ > ‘Dante Via’.
3. Under ‘Download and Try’, choose your operating system.
4. Click the red button to go to the relevant release.
5. Click the hyperlink under ‘File downloads’ to download the installer.
Dante-MY16-AUD2 User Guide
Copyright © 2016 Audinate Pty Ltd. All rights reserved. -24-
Connecting to a NetworkIn order to configure and use your Dante-MY16-AUD2 card, you will need to set up an Ethernet networkconnecting your card(s), your computer running Dante Controller (and optionally Dante Virtual Soundcardor Dante Via), and any other Dante-enabled audio equipment youmay have.
Before you Set Up yourNetwork - Important Notes
Gigabit Ethernet SupportYour Dante-MY16-AUD2 cards have been designed to perform with Gigabit Ethernet networks.
Note: Connecting your Dante-MY16-AUD2 card to older 100Mbit/s Ethernet switches or equipmentis not supported.
n When connecting your Dante-MY16-AUD2 card to a switch, make sure it supports Gigabit Ethernetand you are connected to a Gigabit Ethernet port.
n If you are connecting a single Dante-MY16-AUD2 card directly to a PC orMac, make sure it has aGigabit Ethernet network interface
Choosing a Gigabit Ethernet SwitchThere are a number of available and affordable standard Gigabit Ethernet switches that enable you to getthe best performance out of your Dante network.
Dante uses standard Ethernet and IP Quality of Service (QoS) to ensure its high-quality synchronization isnot affected even on loaded networks. Switch features to look for on a product datasheet include:
n DSCP-basedQoS support with four queues and strict priority queuing
n Filtering and ACL support
n If you need to run long cables, consider fiber support including SFP pluggablemodules
n Managed switches allow you tomanage the switch andmonitor network performance, and are recom-mended for installs
n EEE (Energy Efficient Ethernet) functions can interfere with real-time low latency audio traffic. Werecommend testing for correct operation of EEE-capable switches, or selecting switches where EEEcan be disabled, should it be necessary to do so.
Note: If you have chosen a switch that has been used before, youmay need to check its settings toensure it doesn’t have an incompatible configuration loaded.
For more information about choosing switches, please visit the FAQs section of the Audinate website.
Choosing Ethernet CablingDante uses completely standard Ethernet and IP, so it also uses standard Ethernet cabling, includingCat5e, Cat6 and fiber.
Dante-MY16-AUD2 User Guide
Copyright © 2016 Audinate Pty Ltd. All rights reserved. -25-
Note: Make sure your Ethernet cables are in good condition and have intact locking tabs.
Remember that Cat5e and Cat6 cabling has a limit of 100meters at speeds of 1Gbps. If you require longerdistances, you can use fiber.
NetworkConfiguration Options
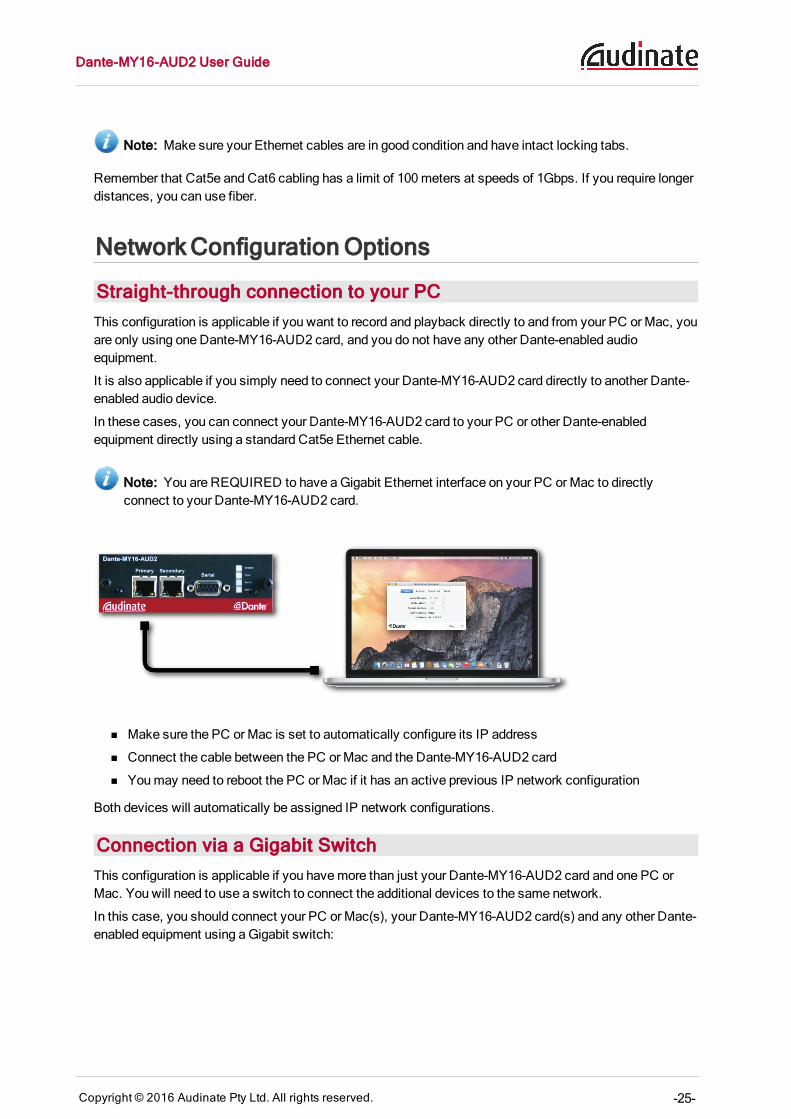
Straight-through connection to your PCThis configuration is applicable if you want to record and playback directly to and from your PC orMac, youare only using one Dante-MY16-AUD2 card, and you do not have any other Dante-enabled audioequipment.
It is also applicable if you simply need to connect your Dante-MY16-AUD2 card directly to another Dante-enabled audio device.
In these cases, you can connect your Dante-MY16-AUD2 card to your PC or other Dante-enabledequipment directly using a standard Cat5e Ethernet cable.
Note: You are REQUIRED to have aGigabit Ethernet interface on your PC orMac to directlyconnect to your Dante-MY16-AUD2 card.
n Make sure the PC orMac is set to automatically configure its IP address
n Connect the cable between the PC orMac and the Dante-MY16-AUD2 card
n Youmay need to reboot the PC orMac if it has an active previous IP network configuration
Both devices will automatically be assigned IP network configurations.
Connection via a Gigabit SwitchThis configuration is applicable if you havemore than just your Dante-MY16-AUD2 card and one PC orMac. You will need to use a switch to connect the additional devices to the same network.
In this case, you should connect your PC orMac(s), your Dante-MY16-AUD2 card(s) and any other Dante-enabled equipment using aGigabit switch:

Dante-MY16-AUD2 User Guide
Copyright © 2016 Audinate Pty Ltd. All rights reserved. -26-
If your switch has amix of Gigabit and 100Mbps ports, make you are connecting all Dante-MY16-AUD2cards, and if possible all devices, to the Gigabit ports.
Note: It is STRONGLY RECOMMENDED that the PC orMac has aGigabit Ethernet interface. Thisis REQUIRED if the PC is running Dante Virtual Soundcard with more than 32 active audio channels.
n Make sure any PCs orMacs are set to automatically configure their IP address
n Power on the switch
n Connect your Cat5e or Cat6 cables from each device to the central Gigabit switch and ports
n Youmay need to reboot the PCs orMacs if they have active previous IP network configurations
All devices will automatically be assigned IP network configurations.
Daisy Chain ConfigurationYou can connect multiple Dante-MY16-AUD2 cards to each other in a daisy chain configuration. Daisychaining requires that up-stream Dante-MY16-AUD2 cards are configured (using Dante Controller) to useSwitchedmode.
Daisy chain connections between Dante-MY16-AUD2 cards are counted as network switch hops - thereceive latency for the cards may need to be adjusted in Dante Controller (using the same guidelines as forindependent network switches) if many cards are daisy-chained together. See Setting Latency for moreinformation.
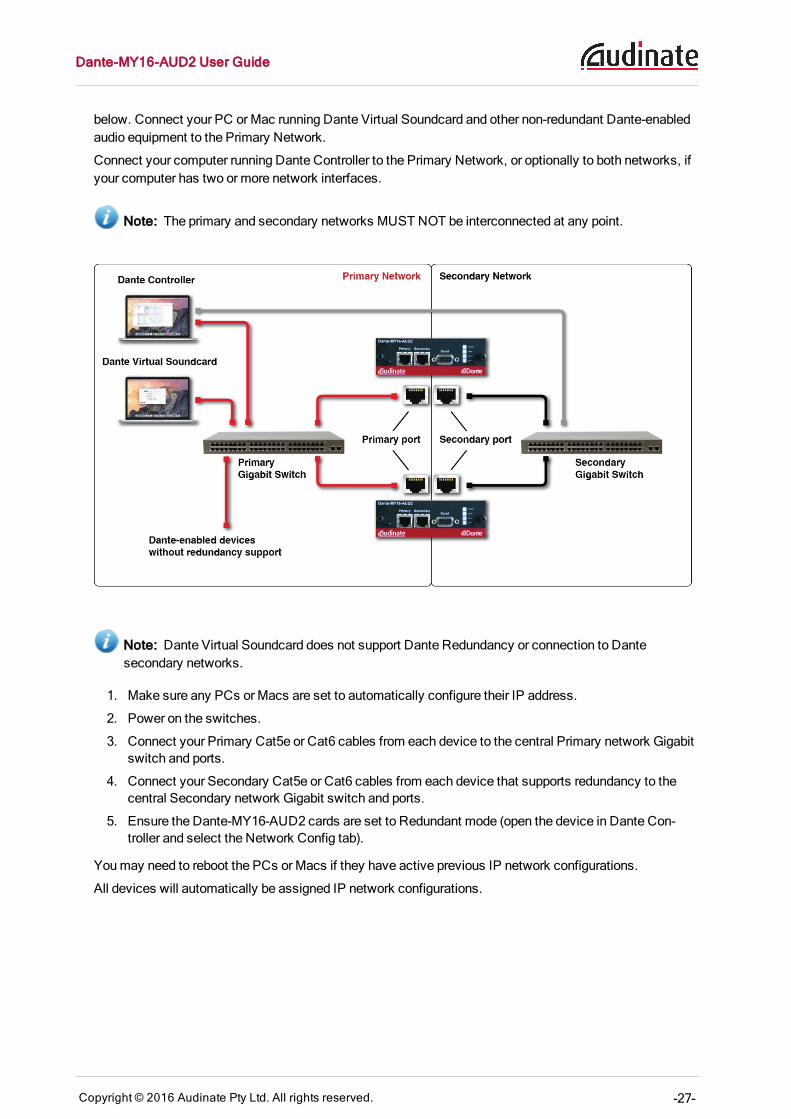
Connection via a Redundant NetworkYour Dante-MY16-AUD2 cards support glitch-free Dante Redundancy, to protect you against possiblecable disconnections or switch failures.
This configuration is applicable if you require complete glitch-free audio redundancy, for example in a livesound environment with longer cable runs, and youmight have additional Dante-enabled devices that alsosupport redundancy.
Dante redundancy works by using two completely independent and separate networks, the PrimaryNetwork and the Secondary Network.
To set up and use Dante Redundancy, connect Dante Controller, your Dante-MY16-AUD2 cards and otherredundant Dante-enabled audio equipment using duplicate Gigabit switches and Ethernet cables as shown
Dante-MY16-AUD2 User Guide
Copyright © 2016 Audinate Pty Ltd. All rights reserved. -27-
below. Connect your PC orMac running Dante Virtual Soundcard and other non-redundant Dante-enabledaudio equipment to the Primary Network.
Connect your computer running Dante Controller to the Primary Network, or optionally to both networks, ifyour computer has two or more network interfaces.
Note: The primary and secondary networks MUST NOT be interconnected at any point.
Note: Dante Virtual Soundcard does not support Dante Redundancy or connection to Dantesecondary networks.
1. Make sure any PCs orMacs are set to automatically configure their IP address.
2. Power on the switches.
3. Connect your Primary Cat5e or Cat6 cables from each device to the central Primary network Gigabitswitch and ports.
4. Connect your Secondary Cat5e or Cat6 cables from each device that supports redundancy to thecentral Secondary network Gigabit switch and ports.
5. Ensure the Dante-MY16-AUD2 cards are set to Redundant mode (open the device in Dante Con-troller and select the Network Config tab).
Youmay need to reboot the PCs orMacs if they have active previous IP network configurations.
All devices will automatically be assigned IP network configurations.
Dante-MY16-AUD2 User Guide
Copyright © 2016 Audinate Pty Ltd. All rights reserved. -28-
Unsupported Dante NetworkConfigurations
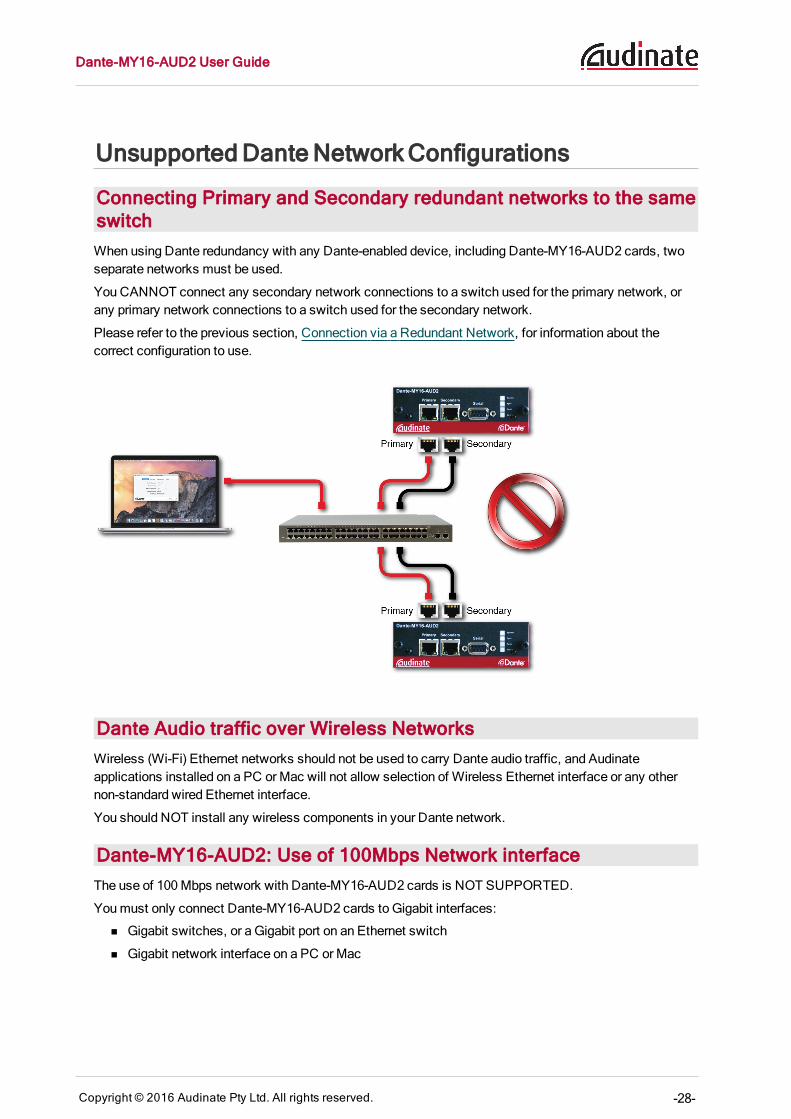
Connecting Primary and Secondary redundant networks to the sameswitchWhen using Dante redundancy with any Dante-enabled device, including Dante-MY16-AUD2 cards, twoseparate networks must be used.
You CANNOT connect any secondary network connections to a switch used for the primary network, orany primary network connections to a switch used for the secondary network.
Please refer to the previous section, Connection via a Redundant Network, for information about thecorrect configuration to use.
Dante Audio traffic over Wireless NetworksWireless (Wi-Fi) Ethernet networks should not be used to carry Dante audio traffic, and Audinateapplications installed on a PC orMac will not allow selection of Wireless Ethernet interface or any othernon-standard wired Ethernet interface.
You should NOT install any wireless components in your Dante network.
Dante-MY16-AUD2: Use of 100Mbps Network interfaceThe use of 100Mbps network with Dante-MY16-AUD2 cards is NOT SUPPORTED.
Youmust only connect Dante-MY16-AUD2 cards to Gigabit interfaces:
n Gigabit switches, or a Gigabit port on an Ethernet switch
n Gigabit network interface on a PC orMac
Dante-MY16-AUD2 User Guide
Copyright © 2016 Audinate Pty Ltd. All rights reserved. -29-
HARemoteThe Dante-MY16-AUD2 card supports HA Remote control via its DB9 serial port, and also over the Dantenetwork via its Ethernet ports.
HA Remote control data that is received via the Ethernet port can bemirrored to the serial port, and vice-versa. HA Remote data can also be bridged between the host device (via theMY slot), and either thenetwork or serial port on the Dante-MY16-AUD2 card. This means that HA Remote chains can beestablished that include amix of serial connections and Dante network connections.
Note: No configuration of the Dante-MY16-AUD2 card is required to enable HA Remote support.
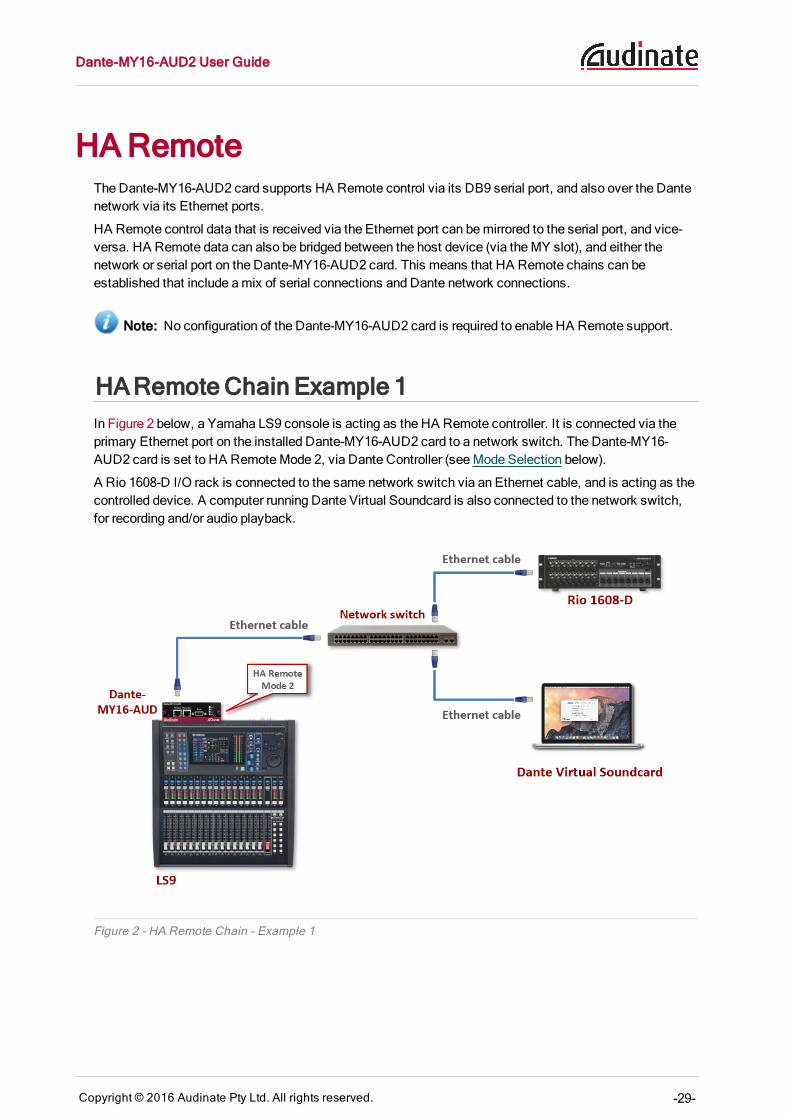
HARemote Chain Example 1In Figure 2 below, a Yamaha LS9 console is acting as the HA Remote controller. It is connected via theprimary Ethernet port on the installed Dante-MY16-AUD2 card to a network switch. The Dante-MY16-AUD2 card is set to HA RemoteMode 2, via Dante Controller (seeMode Selection below).
A Rio 1608-D I/O rack is connected to the same network switch via an Ethernet cable, and is acting as thecontrolled device. A computer running Dante Virtual Soundcard is also connected to the network switch,for recording and/or audio playback.
Figure 2 - HA Remote Chain - Example 1
Dante-MY16-AUD2 User Guide
Copyright © 2016 Audinate Pty Ltd. All rights reserved. -30-
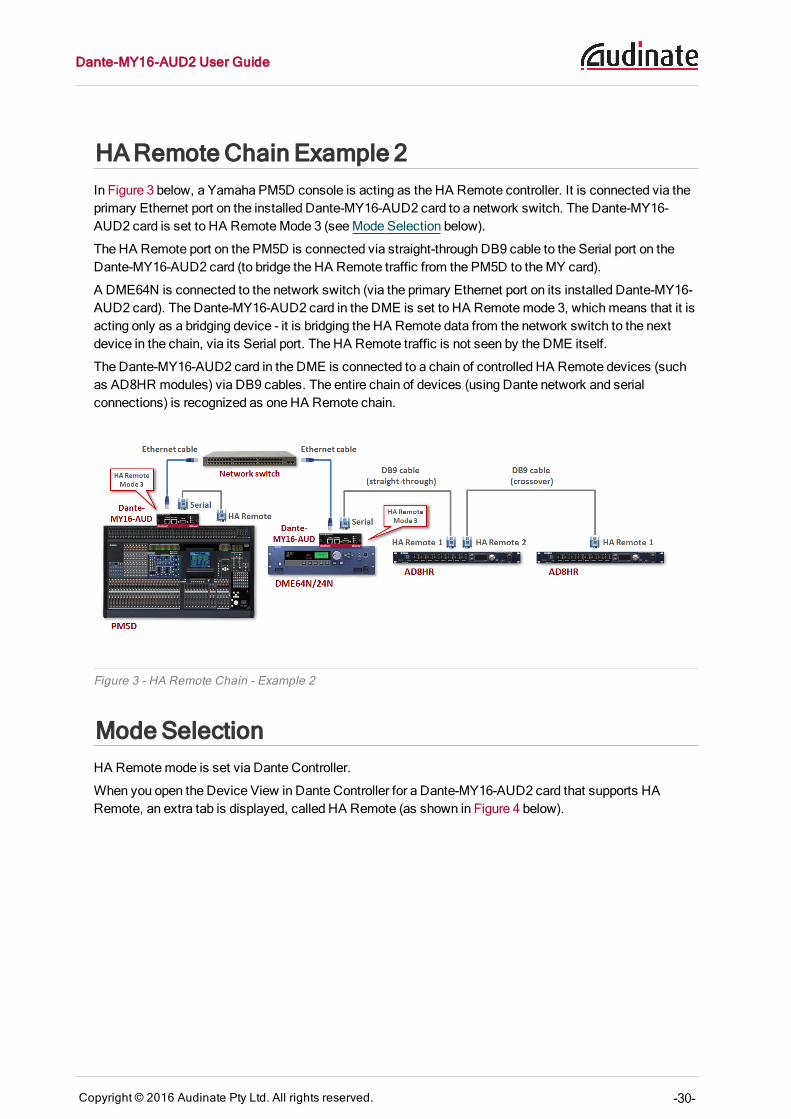
HARemote Chain Example 2In Figure 3 below, a Yamaha PM5D console is acting as the HA Remote controller. It is connected via theprimary Ethernet port on the installed Dante-MY16-AUD2 card to a network switch. The Dante-MY16-AUD2 card is set to HA RemoteMode 3 (seeMode Selection below).
The HA Remote port on the PM5D is connected via straight-through DB9 cable to the Serial port on theDante-MY16-AUD2 card (to bridge the HA Remote traffic from the PM5D to theMY card).
A DME64N is connected to the network switch (via the primary Ethernet port on its installed Dante-MY16-AUD2 card). The Dante-MY16-AUD2 card in the DME is set to HA Remotemode 3, whichmeans that it isacting only as a bridging device - it is bridging the HA Remote data from the network switch to the nextdevice in the chain, via its Serial port. The HA Remote traffic is not seen by the DME itself.
The Dante-MY16-AUD2 card in the DME is connected to a chain of controlled HA Remote devices (suchas AD8HR modules) via DB9 cables. The entire chain of devices (using Dante network and serialconnections) is recognized as one HA Remote chain.
Figure 3 - HA Remote Chain - Example 2
Mode SelectionHA Remotemode is set via Dante Controller.
When you open the Device View in Dante Controller for a Dante-MY16-AUD2 card that supports HARemote, an extra tab is displayed, called HA Remote (as shown in Figure 4 below).
Dante-MY16-AUD2 User Guide
Copyright © 2016 Audinate Pty Ltd. All rights reserved. -31-
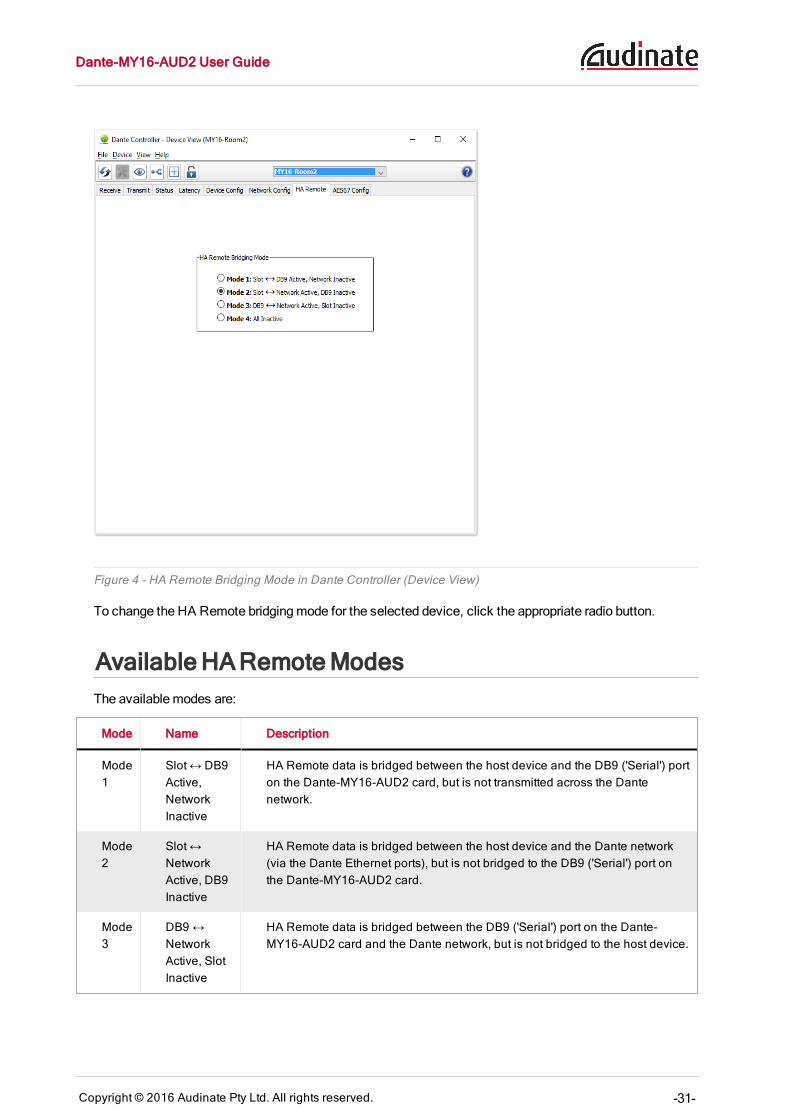
Figure 4 - HA Remote Bridging Mode in Dante Controller (Device View)
To change the HA Remote bridgingmode for the selected device, click the appropriate radio button.
Available HARemoteModesThe available modes are:
Mode Name Description
Mode1
Slot ↔ DB9Active,NetworkInactive
HA Remote data is bridged between the host device and the DB9 ('Serial') porton the Dante-MY16-AUD2 card, but is not transmitted across the Dantenetwork.
Mode2
Slot ↔NetworkActive, DB9Inactive
HA Remote data is bridged between the host device and the Dante network(via the Dante Ethernet ports), but is not bridged to the DB9 ('Serial') port onthe Dante-MY16-AUD2 card.
Mode3
DB9 ↔NetworkActive, SlotInactive
HA Remote data is bridged between the DB9 ('Serial') port on the Dante-MY16-AUD2 card and the Dante network, but is not bridged to the host device.

Dante-MY16-AUD2 User Guide
Copyright © 2016 Audinate Pty Ltd. All rights reserved. -32-
Mode Name Description
Mode4
All Inactive HA Remote data is not bridged at all. This is the default mode.
Product / Mode matrixFor information about themost suitable HA Remotemode for your device, please see the table below.
HA Remote Mode 1 2 3 4
CL1/3/5 ✓ ✓ ✗ N/A
QL1/5 ✓ ✓ ✗ N/A
M7CL-48ES ✓ ✓ ✗ N/A
LS9 ✓ ✓ ✗ N/A
PM5D ✗ ✗ ✓ N/A
M7CL-32/48 ✗ ✗ ✓ N/A
DM2000 ✗ ✗ ✓ N/A
DM1000 ✗ ✗ ✓ N/A
DME64N ✗ ✗ ✓ N/A
DME24N ✗ ✓ (as an HAdevice)
✓ (as a controller) N/A
Other MY-compatiblemodels
✗ ✗ ✓ (as anMY cardhost)
✓
Special ConsiderationsSomeYamaha devices (listed below) do not bridge HA Remote control data directly from the host deviceto an installed Dante-MY16-AUD2 card. For these devices, use a straight-throughmale-to-female DB9(DE9) cable to connect the REMOTE port on the host device to the Serial port on the Dante-MY16-AUD2card, and select HA RemoteMode 3 in Dante Controller for the Dante-MY16-AUD2 card. Then connect thedevice to the network switch using the Primary Ethernet port on the Dante-MY16-AUD2 card.
Affected devices:
n DM1000
n DM2000
n PM5D
n M7CL‐32/48
n DME24N
n DME64N
Dante-MY16-AUD2 User Guide
Copyright © 2016 Audinate Pty Ltd. All rights reserved. -33-
Basic OperationOnce you have installed Dante-MY16-AUD2 cards in your Yamaha equipment and connected them to anetwork you are in a position to start using Dante networking in earnest to set up audio routes betweendevices, including other Dante-enabled devices youmay have on the network and any computers runningDante Virtual Soundcard or Dante Via.
Pre-operation checklistTo start configuring and using your Dante-MY16-AUD2 card and Audinate software you should havecompleted the following:
n Installed your Dante-MY16-AUD2 card in your Yamaha equipment
n Redeemed your DVS Token for a Dante Virtual Soundcard License ID
n Downloaded and installed your Audinate software
n Set up a network between your PC orMac and your Dante-MY16-AUD2 card(s)
n Referred to the Dante Controller and Dante Virtual Soundcard User Guides
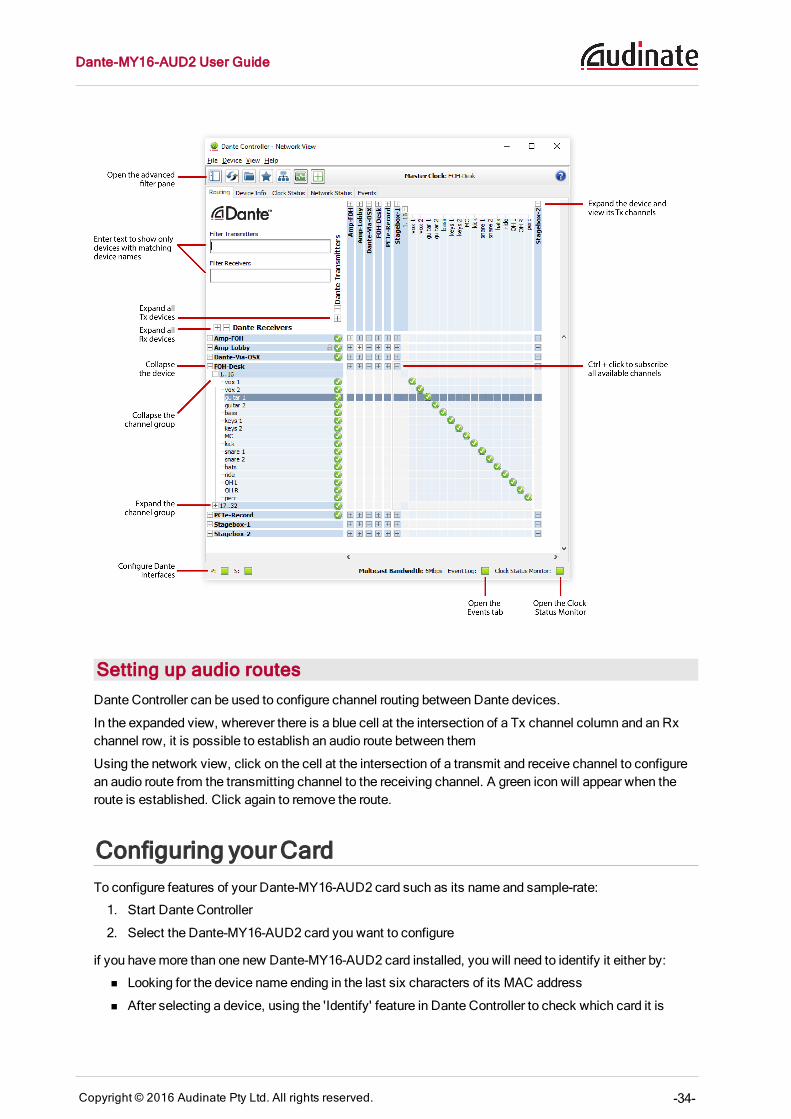
Using Dante ControllerWhen you open Dante Controller it displays a grid view, which shows all the Dante-enabled devices on thenetwork. Initially it will display devices, but not channels within devices. Devices with transmitter (Tx)channels will be displayed along the top row and devices with receiver (Rx) channels will be displayed inthe left hand columnChannels can be viewed by clicking on the + symbol next to Dante Transmitters orDante Receivers, or the + symbol next to a particular Dante device.
Note: The Dante Controller User Guide contains detailed information about all aspects of usingDante Controller. This section is only a brief overview – you will need to refer to the User Guide to beable to use all features of Dante Controller.
Dante-MY16-AUD2 User Guide
Copyright © 2016 Audinate Pty Ltd. All rights reserved. -34-
Setting up audio routesDante Controller can be used to configure channel routing between Dante devices.
In the expanded view, wherever there is a blue cell at the intersection of a Tx channel column and an Rxchannel row, it is possible to establish an audio route between them
Using the network view, click on the cell at the intersection of a transmit and receive channel to configurean audio route from the transmitting channel to the receiving channel. A green icon will appear when theroute is established. Click again to remove the route.
Configuring yourCardTo configure features of your Dante-MY16-AUD2 card such as its name and sample-rate:
1. Start Dante Controller
2. Select the Dante-MY16-AUD2 card you want to configure
if you havemore than one new Dante-MY16-AUD2 card installed, you will need to identify it either by:
n Looking for the device name ending in the last six characters of its MAC address
n After selecting a device, using the 'Identify' feature in Dante Controller to check which card it is
Dante-MY16-AUD2 User Guide
Copyright © 2016 Audinate Pty Ltd. All rights reserved. -35-
There are two ways that you can select the device. You can either:
n Click on the device name in Dante Controller network grid view. This can be done either by clickingon the entry in the transmitter row, or by clicking on the entry in the Receiver column. This opens aDevice View window for the selected device
OR
n Go to the Devices dropdown list in the Network View menu bar and select Device View (or simplytype Ctrl+D). This opens a Device View window with no device selected. Select the device to con-figure using the dropdown list of available devices in the Device View toolbar.
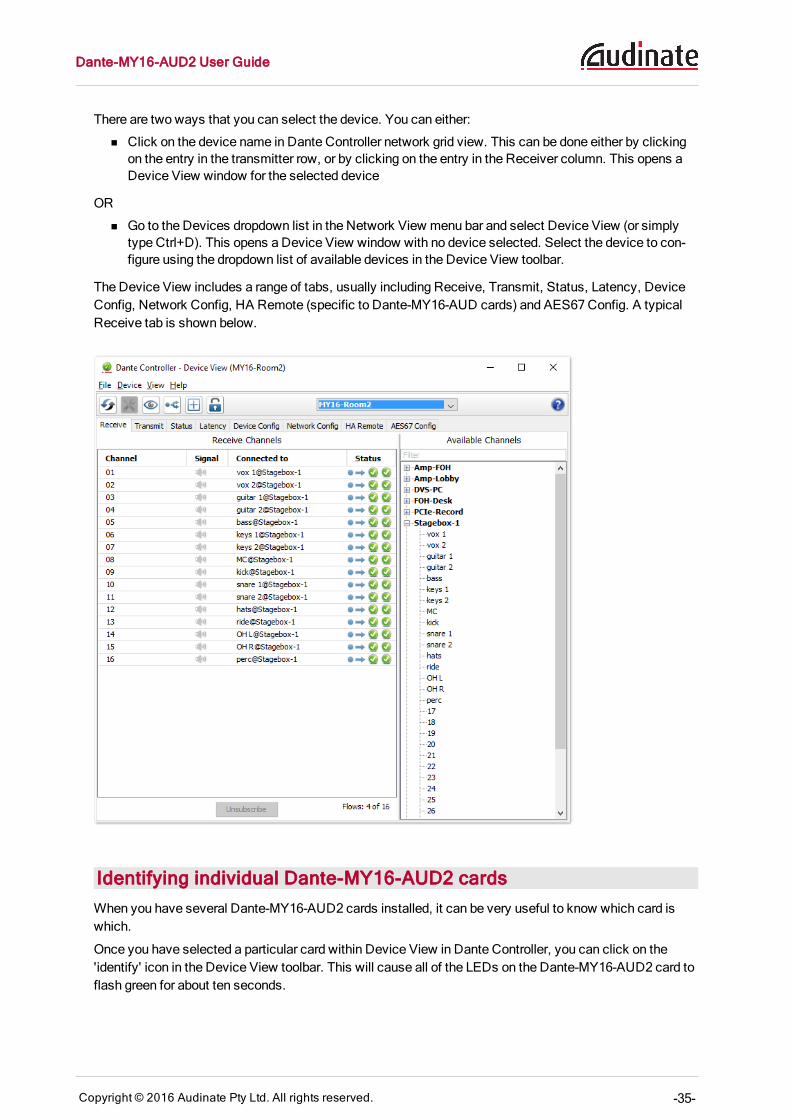
The Device View includes a range of tabs, usually including Receive, Transmit, Status, Latency, DeviceConfig, Network Config, HA Remote (specific to Dante-MY16-AUD cards) and AES67Config. A typicalReceive tab is shown below.
Identifying individual Dante-MY16-AUD2 cardsWhen you have several Dante-MY16-AUD2 cards installed, it can be very useful to know which card iswhich.
Once you have selected a particular card within Device View in Dante Controller, you can click on the'identify' icon in the Device View toolbar. This will cause all of the LEDs on the Dante-MY16-AUD2 card toflash green for about ten seconds.
Dante-MY16-AUD2 User Guide
Copyright © 2016 Audinate Pty Ltd. All rights reserved. -36-
Dante-MY16-AUD2 Device NameBy default the device name for Dante-MY16-AUD2 cards is MY16-2-nnnnnn, where nnnnnn is a uniquealphanumeric identifier consisting of the last six digits of theMAC address. This is the name the card willhave when you first use it.
It is possible to replace the Dante-MY16-AUD2 card default device namewith a custom, user-definedname. To do this open Device View in Dante Controller, select the card you wish tomodify in the DeviceView, and change the Device Name in the Device Config tab.
Note: If you rename a device, youmust re-establish any existing audio routes to and from the re-named device using its new name.
Please refer to your Dante Controller manual for more information on renaming devices.
Dante-MY16-AUD2 Default Sample RateBy default, the Dante-MY16-AUD2 card is configured to operate using a 48kHz sample rate. Audio routescan only be set up between devices that are operating at the same sample rate.
It is possible to change the sample rate to 44.1kHz, 88.2kHz or 96kHz. To do this, open Device View inDante Controller, select the card you wish tomodify in the Device View, and change the sample rate usingNew Sample Rate in the Device Config tab.
For 88.1kHz and 96kHz, youmay need to set your Yamaha equipment to 'double-speed', NOT 'double-channel'. Please refer to the section Configuring your Yamaha Equipment.
Note: If you change the sample rate of your Dante-MY16-AUD2 card youMUST power-cycle thehost Yamaha Equipment that it is installed in. Youmay also need to change your Yamahaequipment's word clock settings. Please refer to the later section Configuring your YamahaEquipment for further information.
Note: Dante-MY16-AUD2 cards installed in the same piece of Yamaha equipment MUST all be setto the same sample rate. Please refer to your Dante Controller manual for more information onchanging sample rate.
Pull-up/downYou can also apply sample rate pull-up/down. The pull-up/down setting adjusts the sample rate of thedevice to synchronize audio with video that has undergone frame rate conversion. For example, tosynchronize Dante audio with video that has been converted from 24 fps to 25 fps, set the sample rate pull-up/down for any relevant Dante audio devices to +4.1667%. Devices with pull-up/down use a dedicatedclock domain. See the Dante Controller user guide for more information.
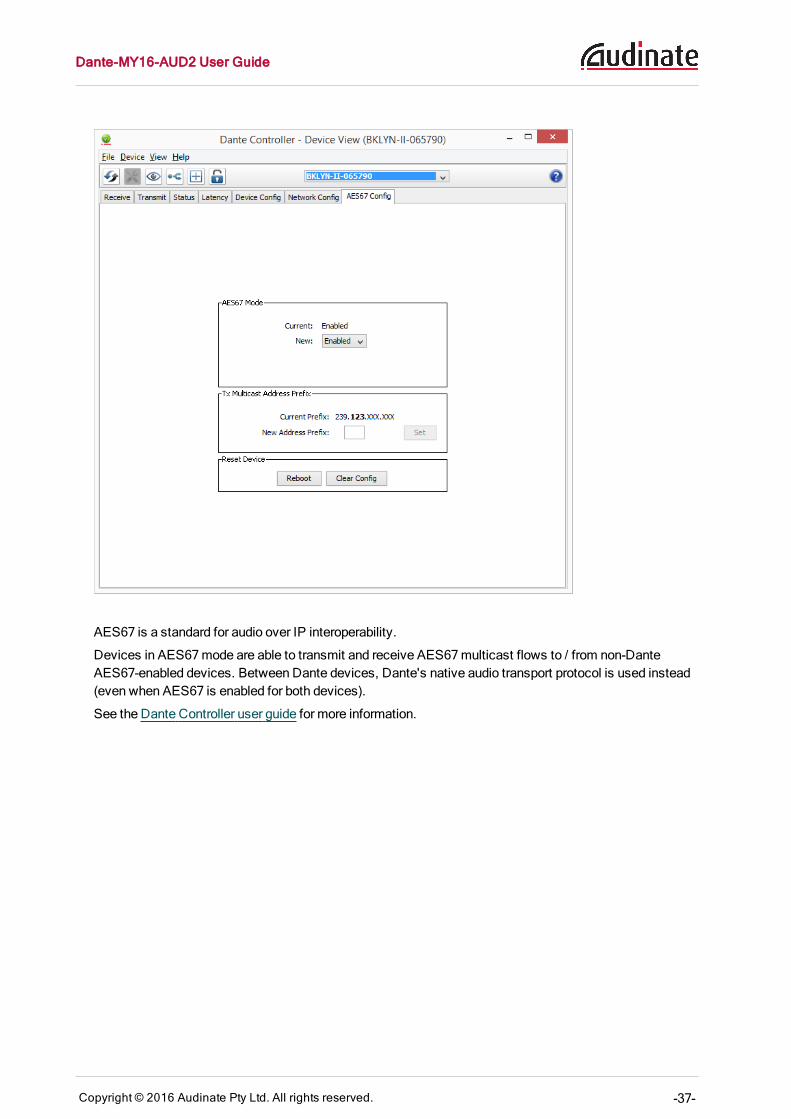
AES67ConfigFor Dante-MY16-AUD2 cards, the Device View also includes an AES67Config tab. The AES67Configtab allows the selection of AES67mode for the device.
Dante-MY16-AUD2 User Guide
Copyright © 2016 Audinate Pty Ltd. All rights reserved. -37-
AES67 is a standard for audio over IP interoperability.
Devices in AES67mode are able to transmit and receive AES67multicast flows to / from non-DanteAES67-enabled devices. Between Dante devices, Dante's native audio transport protocol is used instead(even when AES67 is enabled for both devices).
See the Dante Controller user guide for more information.

Dante-MY16-AUD2 User Guide
Copyright © 2016 Audinate Pty Ltd. All rights reserved. -38-
Advanced Configuration with DanteController
Once you have installed a Dante-MY16-AUD2 card in your Yamaha equipment and connected it to anetwork, you can configure your card using a PC orMac on the same network with Dante Controllerinstalled and running on it.
Some basic functions of Dante Controller have already been described:
n Setting up an audio route.
n Changing the device name.
n Changing sample rate.
n Identifying a specific Dante-MY16-AUD2 card.
Dante Controller can also be used to configure a number of other more advanced features, including:
n Adjusting latency settings
n Choosing between unicast andmulticast modes
n Selecting clock sources
n Specifying static IP addresses
These are described briefly below. A more complete description of the functions of Dante Controller can befound in the Dante Controller User Guide.
Unicast andMulticastModesDante audio routing creates flows. Each flow carries one or more channels of audio from a transmittingdevice to one or more receiving devices. There are two types of flow, unicast andmulticast.
Unicast routing creates flows to a single receiving device; a unicast flow typically assigns space for 4channels of audio. Unicast flows are set up when a receiver subscribes to an available audio channel, andare automatically removed when the receiver unsubscribes from all channels in that flow.
Multicast routing creates flows that can be received by multiple receivers. Multicast flows are assignedIDs enabling them to be identified in Dante Controller and to facilitate their removal. In contrast to unicastflows, multicast flows are set up on the transmitting Dante device.
Dante routing is unicast by default. This means that a separate flow is set up for each pair of transmitterand receiver. If several receivers are all subscribed to the same channels of a transmitter, it maysometimes bemore efficient to usemulticast.
Multicast sends the same set of channels to multiple receivers. In practice, this usually means that theaudio flow is flooded throughout the network. If many receivers want the same channels, usingmulticastcan reduce overall network use, especially on the transmitter since only one copy of each audio channelneeds to be sent rather thanmany. Unlike unicast routing, multicast flows consume network bandwidtheven if there are no receivers, but do not require additional bandwidth to addmore receivers.
Dante receivers will automatically prefer multicast to unicast if it is available. This means that if a newmulticast flow is created containing the channels that a receiver is currently receiving as unicast, thereceiver will switch over to receiving audio from themulticast flow and the unicast flow will be removed.
Dante Controller can be used to choose what channels are to bemulticast.

Dante-MY16-AUD2 User Guide
Copyright © 2016 Audinate Pty Ltd. All rights reserved. -39-
Click theMulticast Configuration button in the toolbar of the Device View to open the CreateMulticast Flow panel, which allows you to select individual channels to add to a new multicast flow.
The panel shows a list of the Tx channels for the device, and allows you to add them to the new multicastflow that is being created, by checking the tick box next to each channel name. Once you have selected allthe channels required, themulticast flow can be created by clicking the Create button at the bottom of thedialog box. To abandon creating a new multicast flow, click the Cancel button.
A single multicast flow can contain up to themaximum supported channels per flow for this device. This isdisplayed at the top of this window, and is 8 channels for this device. If you select more than themaximumallowed channels per flow, multiple flows will be created. Once a flow has been created, it will appear in thelist of flows in the transmit pane, along with the channels contained within that flow. Also, once a flow hasbeen created, it cannot be edited, channels cannot be added or removed. Each time the dialog is used toselect additional channels, a new multicast flow will be created.
AES67 FlowThe AES67 Flow option is only available for AES67-enabled devices (which includes the Dante-MY16-AUD-II).
When AES67 Flow is checked, the selected channels will be added to an AES67 flow. Only AES67-enabled devices can receive AES67 flows.
AES67 flows appear in blue at the far right of the Routing tab of the Network View, and at the bottom of theAvailable Channels list in the Device View receive tab. AES67 flows are identified by their transmitmulticast IP addresses, rather than device names.
For AES67 devices, each device transmit channel can simultaneously support an AES67multicast flowand a standard Dantemulticast flow.
Dante-MY16-AUD2 User Guide
Copyright © 2016 Audinate Pty Ltd. All rights reserved. -40-
Note: It is recommended that you read the Dante Controller user guide before setting upmulticastflows.
Setting LatencyTo adjust the latency setting, open a Device View for the selected device in Dante Controller, and selectthe Device Config tab. This allows several device settings to be viewed andmodified. It shows the currentreceive latency setting and allows the user to change the operating receive latency for the selected device.
The typical allowed values are:
n 0.25ms (250microseconds) - suitable for a Gigabit network containing three switches
n 0.5ms - suitable for a Gigabit network containing five switches
n 1.0ms - suitable for a Gigabit network containing ten switches
n 2.0ms - suitable for a Gigabit network with 100Mbps leaf nodes
n 5.0ms – a safe value for a network of almost any conceivable size
Note: Making latency changes temporarily suspends existing audio routes to the device, resulting insome loss of audio data.
Note: When using a daisy chain configuration, upstream Dante-MY16-AUD2 cards are counted asindependent switches.
Configuring the Dante-MY16-AUD2clockFirst, you will need to decide whether your Yamaha equipment should be the network clock master, orsync to one of the Dante-MY16-AUD2 cards.
Note: Please refer to Dante Synchronization and Clocking for a fuller discussion and diagrams ofthis subject.
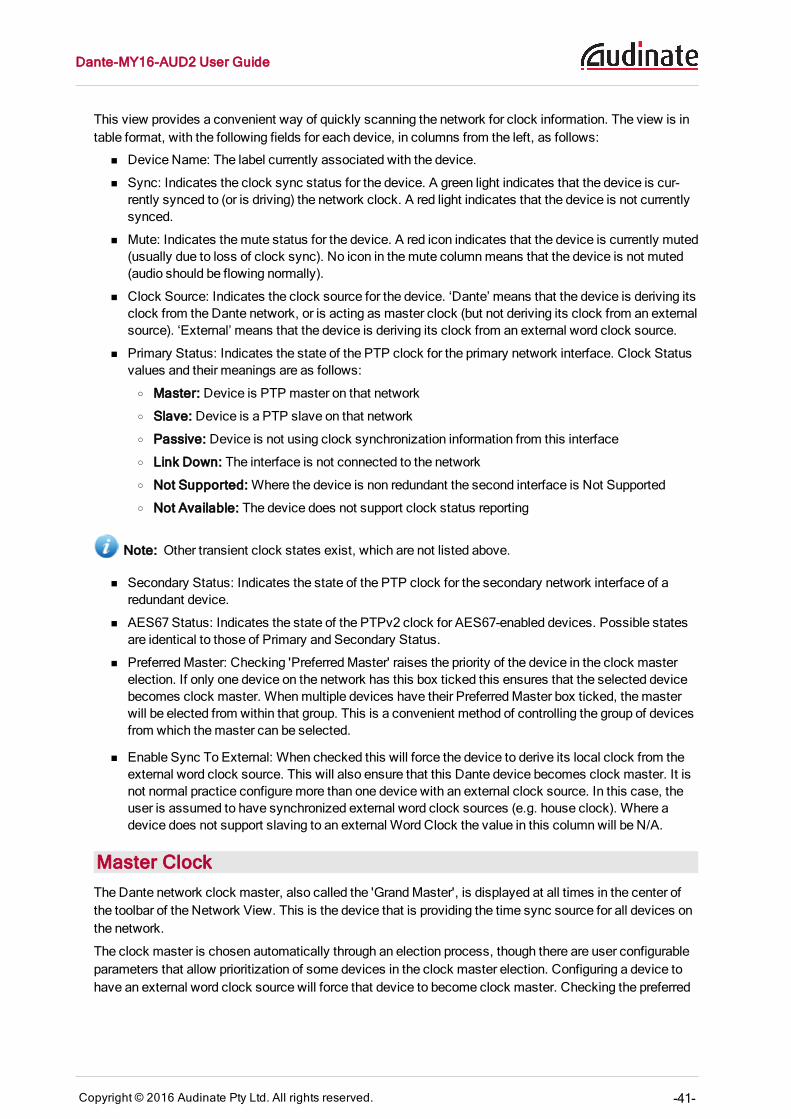
The Clock Status tab within the Network View provides a network wide overview of the clocking statewithin the network.
Dante-MY16-AUD2 User Guide
Copyright © 2016 Audinate Pty Ltd. All rights reserved. -41-
This view provides a convenient way of quickly scanning the network for clock information. The view is intable format, with the following fields for each device, in columns from the left, as follows:
n Device Name: The label currently associated with the device.
n Sync: Indicates the clock sync status for the device. A green light indicates that the device is cur-rently synced to (or is driving) the network clock. A red light indicates that the device is not currentlysynced.
n Mute: Indicates themute status for the device. A red icon indicates that the device is currently muted(usually due to loss of clock sync). No icon in themute columnmeans that the device is not muted(audio should be flowing normally).
n Clock Source: Indicates the clock source for the device. ‘Dante’ means that the device is deriving itsclock from the Dante network, or is acting as master clock (but not deriving its clock from an externalsource). ‘External’ means that the device is deriving its clock from an external word clock source.
n Primary Status: Indicates the state of the PTP clock for the primary network interface. Clock Statusvalues and their meanings are as follows:
o Master: Device is PTP master on that network
o Slave: Device is a PTP slave on that network
o Passive: Device is not using clock synchronization information from this interface
o Link Down: The interface is not connected to the network
o Not Supported: Where the device is non redundant the second interface is Not Supported
o Not Available: The device does not support clock status reporting
Note: Other transient clock states exist, which are not listed above.
n Secondary Status: Indicates the state of the PTP clock for the secondary network interface of aredundant device.
n AES67 Status: Indicates the state of the PTPv2 clock for AES67-enabled devices. Possible statesare identical to those of Primary and Secondary Status.
n PreferredMaster: Checking 'PreferredMaster' raises the priority of the device in the clock masterelection. If only one device on the network has this box ticked this ensures that the selected devicebecomes clock master. Whenmultiple devices have their PreferredMaster box ticked, themasterwill be elected from within that group. This is a convenient method of controlling the group of devicesfrom which themaster can be selected.
n Enable Sync To External: When checked this will force the device to derive its local clock from theexternal word clock source. This will also ensure that this Dante device becomes clock master. It isnot normal practice configuremore than one device with an external clock source. In this case, theuser is assumed to have synchronized external word clock sources (e.g. house clock). Where adevice does not support slaving to an external Word Clock the value in this columnwill be N/A.
Master ClockThe Dante network clock master, also called the 'GrandMaster', is displayed at all times in the center ofthe toolbar of the Network View. This is the device that is providing the time sync source for all devices onthe network.
The clock master is chosen automatically through an election process, though there are user configurableparameters that allow prioritization of some devices in the clock master election. Configuring a device tohave an external word clock source will force that device to become clock master. Checking the preferred

Dante-MY16-AUD2 User Guide
Copyright © 2016 Audinate Pty Ltd. All rights reserved. -42-
master flag will also raise the priority of a device in the clock master election. This can be done through theNetwork View > Clock Status tab.
Checking clock configurationDante Controller can be used to view the Dante clock status of all devices on the network, and to displaywho is the Dante clock master. Theremay also be some occasions where you want to force a Dantedevice to become the Dante network clock master. Please refer to the Dante Controller User Guide andother Dante documentation for further information.

Dante-MY16-AUD2 User Guide
Copyright © 2016 Audinate Pty Ltd. All rights reserved. -43-
Configuring your Yamaha EquipmentThe host Yamaha equipment in which you have installed your cards needs to be configured tomatch yourdesired clock settings and sample rate. Refer to the relevant Yamaha equipment manual for specificinstructions on configuring sample rates and word clock for that equipment.
Setting up clocking can be confusing: please refer to Dante Synchronization and Clocking for detailedinformation and diagrams on setting up system clocking.
Key configuration checks for the host Yamaha equipment for your Dante-MY16-AUD2 card:
If:
n Youwant the host Yamaha equipment to derive its clock from Dante
You will need to ensure that:
n None of your Dante-MY16-AUD2 cards are set to 'Enable Sync To External'
n Your Yamaha host equipment has its Word Clock set to one of the Dante-MY16-AUD2 card slots
If your Dante-MY16-AUD2 cards are set to 88.2kHz or 96kHz sample rate, you also need to set theYamaha host equipment to 'double-speed' for the Dante-MY16-AUD2 card slots (not double-channel).
If:
n Youwant the Dante network to derive its clock from its host Yamaha equipment
You need to ensure that:
n The Yamaha host equipment has its Word Clock set to Internal
n All installed Dante-MY16-AUD2 cards are set to the same sample rate as the Yamaha Internal clock
n Just one of the Dante-MY16-AUD2 cards has 'Enable Sync To External' set (via the Clock Statustab in Dante Controller)
Dante-MY16-AUD2 User Guide
Copyright © 2016 Audinate Pty Ltd. All rights reserved. -44-
Upgrading FirmwareThe Dante-MY16-AUD2 firmware can be upgraded using the Dante Firmware UpdateManager, which canbe downloaded from the Yamaha Commercial Audio website. Please read the associated user guidebefore updating the firmware on your device.
Dante-MY16-AUD2 User Guide
Copyright © 2016 Audinate Pty Ltd. All rights reserved. -45-
Troubleshooting
IntroductionProblems or issues related to Dante and setting up your Dante-MY16-AUD2 card tend to fall in one of threeareas:
n Network Configuration
o Standard networking issues
o PC /Mac network configuration and firewalls
o Switches and cables
n PC Application Configuration
o Install issues
o Audio application configuration confusion
n Dante Configuration
o Clock configuration
o Mismatched sample rates
NetworkConfiguration – Gigabit EthernetAll your Dante-MY16-AUD2 cards require a Gigabit Ethernet interface.
This means that they should be connected to either:
n A Gigabit Ethernet Switch
n A PC orMac with a Gigabit Ethernet interface
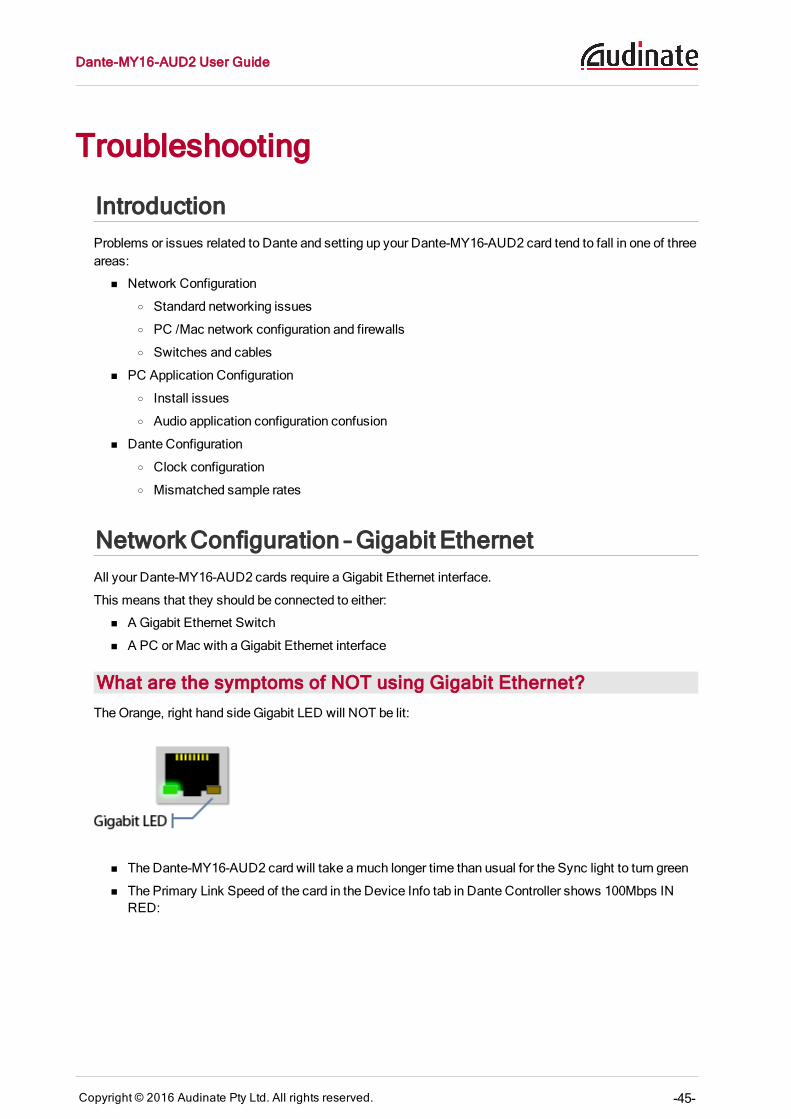
What are the symptoms of NOT using Gigabit Ethernet?TheOrange, right hand side Gigabit LED will NOT be lit:
n The Dante-MY16-AUD2 card will take amuch longer time than usual for the Sync light to turn green
n The Primary Link Speed of the card in the Device Info tab in Dante Controller shows 100Mbps INRED:

Dante-MY16-AUD2 User Guide
Copyright © 2016 Audinate Pty Ltd. All rights reserved. -46-
How can I check whether I AM using Gigabit Ethernet?n TheOrange, right hand side Gigabit LED will be lit:
n The Primary Link Speed of the card in the Device Info tab in Dante Controller shows 1Gbps:
Switch Configuration and CablingCables are themost vulnerable part of a network system, and 'home-made' manually terminated cablescan be error-prone.
If you suspect cabling issues, check for:
n Unplugged /badly connected Ethernet cables
n Incorrectly configured switches
n Dante devices removed or turned off
Symptoms of switch or cabling issues:
n You cannot see (some) devices in the Dante Controller network view
n Dante Controller shows orange ‘unsuccessful subscription’ icons which usually means a devicethat was present earlier is now missing
n Faulty cables can lead to intermittent faults, whichmay be heard as dropped samples or ‘cracks’ inthe audio
n Dante devices may appear and disappear in Dante Controller
Ethernet Switch and Cabling Checklist
n Are all the connected link/status lights on the switch lit or flashing as expected?
o Is the Ethernet switch powered on?
o Is the cable correctly plugged in at the switch and the PC or equipment?

Dante-MY16-AUD2 User Guide
Copyright © 2016 Audinate Pty Ltd. All rights reserved. -47-
n Is the switch correctly configured?
o Perhaps QoS or VLANs have been incorrectly set up
n Are you using a switch from another application with an unchecked or tested configuration?
o Consult the switchmanual and check the switch configuration
n Is your switch using EEE (Energy Efficient Ethernet)?
o Disable EEE if possible, or replace it with a switch that does not include EEE functionality
ComputerConfigurationBefore installing, a PC orMac needs to have:
n The user logged in with administrator privileges
A PC orMac for use on the Dante network should have:
n Dante Controller installed
n If using, Dante Virtual Soundcard (DVS), Dante Via or a Dante PCIe card, and an audio applicationsupporting either ASIO, WDM or Core Audio
A correct PC orMac Dante network configuration should have:
n The correct network interfaces selected
n The correct IP addresses configured
n DVS (if installed) running before starting the audio application
n An audio application correctly configured to use DVS, Dante Via or a Dante PCIe card as its audiointerface
Note: See this FAQ on the Audinate website for information about optimizingWindows PCs foraudio.
Dante Configuration: Sample Rate
Common configuration issuesn Dante-MY16-AUD2 cards and /or Yamaha consoles have been configured with different sample
rates, or different sample rate pull-up/down settings
o UseDante Controller to check Dante device sample rates
n Sample rate has been changed without a power-cycling the Yamaha equipment
o Sample rate changes require the Dante-MY16-AUD2 card and its host Yamaha console to be re-booted before the change takes effect
n If using 88.2kHz or 96kHz, the Yamaha console is using ‘double channel’ rather than ‘double speed’for the Dante-MY16-AUD2slots
o Double channel is NOT supported by the Dante-MY16-AUD2 cards
o If the card slots are set to ‘double channel’, every second audio channel will bemissing (seebelow)

Dante-MY16-AUD2 User Guide
Copyright © 2016 Audinate Pty Ltd. All rights reserved. -48-
n If the Yamaha console is providing its internal word clock to a Dante-MY16-AUD2 card, the samplerate is incorrect
o All installed Dante-MY16-AUD2 cards should be set to the same sample rate as the selectedYamaha internal clock
Symptom: Audio only appears on every second channel @ 88.2kHzor 96kHzSomeYamaha equipment supports both a ‘double channel’ and a ‘double speed’ mode when operating at88.2 kHz or 96kHz.
Dante-MY16-AUD2 cards will only operate in ‘double speed’ mode. Ensure that your Yamaha equipment isconfigured accordingly.
If ‘double channel’ mode is selected, audio from Dante-MY16-AUD2 cards will be interleaved: Forexample, Dante channels 1 and 2 will appear on channel 1 of the Yamaha device, with a sample of eachchannel played out alternately.
Dante Configuration: ClockIt is possible to incorrectly configure system word clocks and clock directions. Please refer to DanteSynchronization and Clocking for detailed information and diagrams.
How do I know if my clock is incorrectly configured?If your overall system clock is incorrectly configured:
n Youmay see console warningmessages
n The Dante-MY16-AUD2 card ‘Error’ LED may remain orange
n Youmay hear corrupt audio
How do I fix it?UseDante Controller Clock Status tab to view the clock configuration for all the Dante devices on thenetwork.
n There Can BeOnly One Primary Clock Master
n There should usually be only one clock set to ‘External’
n ‘PreferredMaster’ setting to be avoided unless advanced design and configuration is required
Next, check your Yamaha equipment clock configuration:
n If an external clock source is used to drive the Dante PTP Clock Master, ensure it is using the cor-rect sample rate and the Dante-MY16-AUD2 card is set to 'Enable Sync To External'
n Check clock signal routing to other digital networks for loops
Symptom: Orange ‘Error’ light with green ‘Sync’ lightThis indicates a clock sync issue between the host Yamaha equipment and the Dante-MY16-AUD2displaying this condition. This could either be because your clock configuration is wrong, or you haveincorrectly configured sample rates.

Dante-MY16-AUD2 User Guide
Copyright © 2016 Audinate Pty Ltd. All rights reserved. -49-
Check the clock source on both the Yamaha device and the Dante-MY16-AUD2 card(s). If a Dante-MY16-AUD2 card is selected as the clock source on the Yamaha equipment, ALL of the Dante cards in thisdevicemust have their word clock source set to ‘Internal’. Similarly if a Dante-MY16-AUD2 card has‘Enable Sync To External’ set, the Yamaha equipment must have an internal ‘Int’ clock source selected.
Symptom: Red ‘Sync’ light with orange ‘Error' lightThis indicates the card was unable to lock (or fell out of lock) with the Dante network clock. A number ofissues may cause this condition to occur.
The common issue for Dante-MY16-AUD2 cards is a 100Mbit link in the network: Dante-MY16-AUD2cards require Gigabit networking between all Dante nodes.
Dante-MY16-AUD2 User Guide
Copyright © 2016 Audinate Pty Ltd. All rights reserved. -50-
Dante Synchronization and ClockingAll Dante-enabled audio equipment on the same Ethernet network uses the IEEE1588 Precision TimeProtocol (PTP) to automatically and accurately synchronize their clocks with each other to sub-microsecond accuracy.
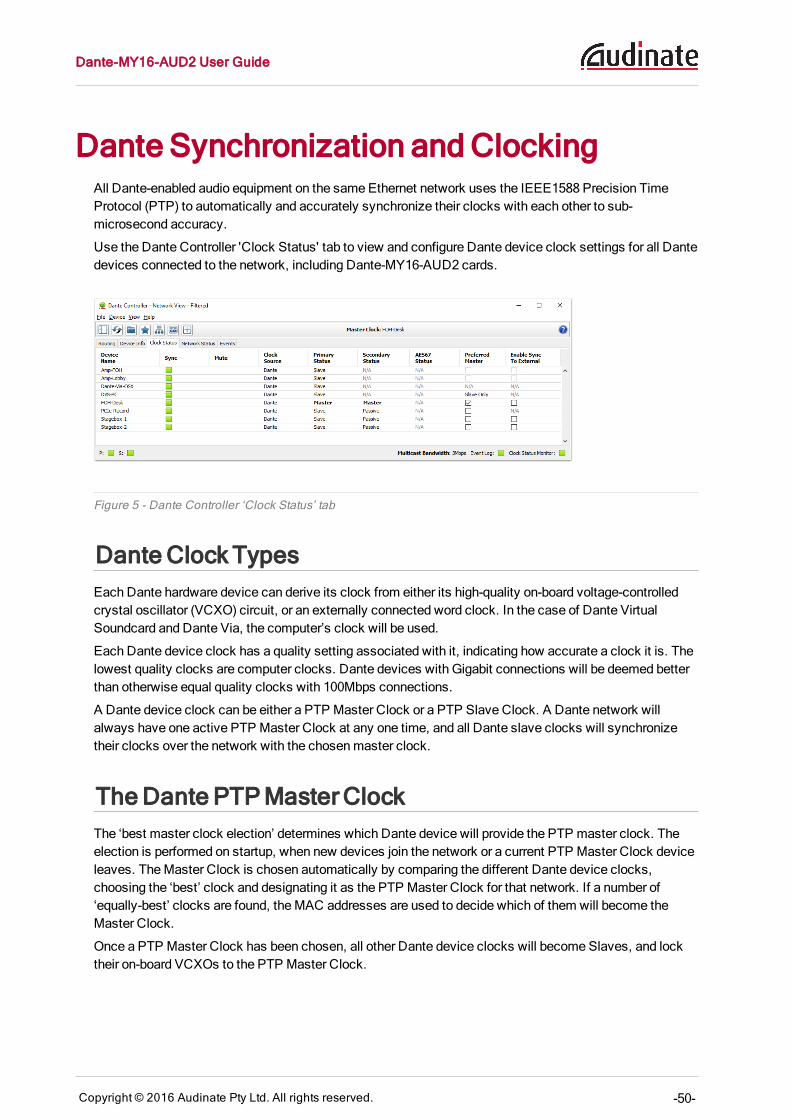
Use the Dante Controller 'Clock Status' tab to view and configure Dante device clock settings for all Dantedevices connected to the network, including Dante-MY16-AUD2 cards.
Figure 5 - Dante Controller ‘Clock Status’ tab
Dante Clock TypesEach Dante hardware device can derive its clock from either its high-quality on-board voltage-controlledcrystal oscillator (VCXO) circuit, or an externally connected word clock. In the case of Dante VirtualSoundcard and Dante Via, the computer’s clock will be used.
Each Dante device clock has a quality setting associated with it, indicating how accurate a clock it is. Thelowest quality clocks are computer clocks. Dante devices with Gigabit connections will be deemed betterthan otherwise equal quality clocks with 100Mbps connections.
A Dante device clock can be either a PTP Master Clock or a PTP Slave Clock. A Dante network willalways have one active PTP Master Clock at any one time, and all Dante slave clocks will synchronizetheir clocks over the network with the chosenmaster clock.
The Dante PTPMasterClockThe ‘best master clock election’ determines which Dante device will provide the PTP master clock. Theelection is performed on startup, when new devices join the network or a current PTP Master Clock deviceleaves. TheMaster Clock is chosen automatically by comparing the different Dante device clocks,choosing the ‘best’ clock and designating it as the PTP Master Clock for that network. If a number of‘equally-best’ clocks are found, theMAC addresses are used to decide which of them will become theMaster Clock.
Once a PTP Master Clock has been chosen, all other Dante device clocks will become Slaves, and locktheir on-board VCXOs to the PTP Master Clock.

Dante-MY16-AUD2 User Guide
Copyright © 2016 Audinate Pty Ltd. All rights reserved. -51-
Dante ClockSettingsDante hardware devices, including Dante-MY16-AUD2 cards, have two optional clock settings that can beselected.
Set ‘Enable Sync To External’ to use an external word clock (such as the Internal clock of host Yamahaequipment) to tune the on-board VCXO. When this attribute is set, the Dante device will become PTPMaster Clock unless another Dante hardware device has ‘PreferredMaster’ set.
Dante Clocking and RedundancyIf both primary and secondary Dante networks have been connected, each network will have its own PTPMaster Clock.
ClockStatusMonitoringYou can use Dante Controller to monitor the synchronization performance of Dante device clocks in realtime. See the Dante Controller user guide for more information.
Pull-up ClockDomainsDevices configured to use sample rate pull-up/down synchronize to a dedicated clock domain. See theDante Controller user guide for more information.
How to Configure Dante Clocking
AutomaticallyThe easiest way to configure clocking on your Dante network is to let the Dante network provide the clockfor all the audio equipment, and to allow the Dante devices to automatically elect a PTP Clock Master.
All Dante devices including Dante-MY16-AUD2 cards should be in their default state (’PreferredMaster’and ‘Enable Sync to External’ UN-checked), and host equipment configured to derive its word clock fromthe Dante device or a Dante-MY16-AUD2 card.
Dante-MY16-AUD2 User Guide
Copyright © 2016 Audinate Pty Ltd. All rights reserved. -52-
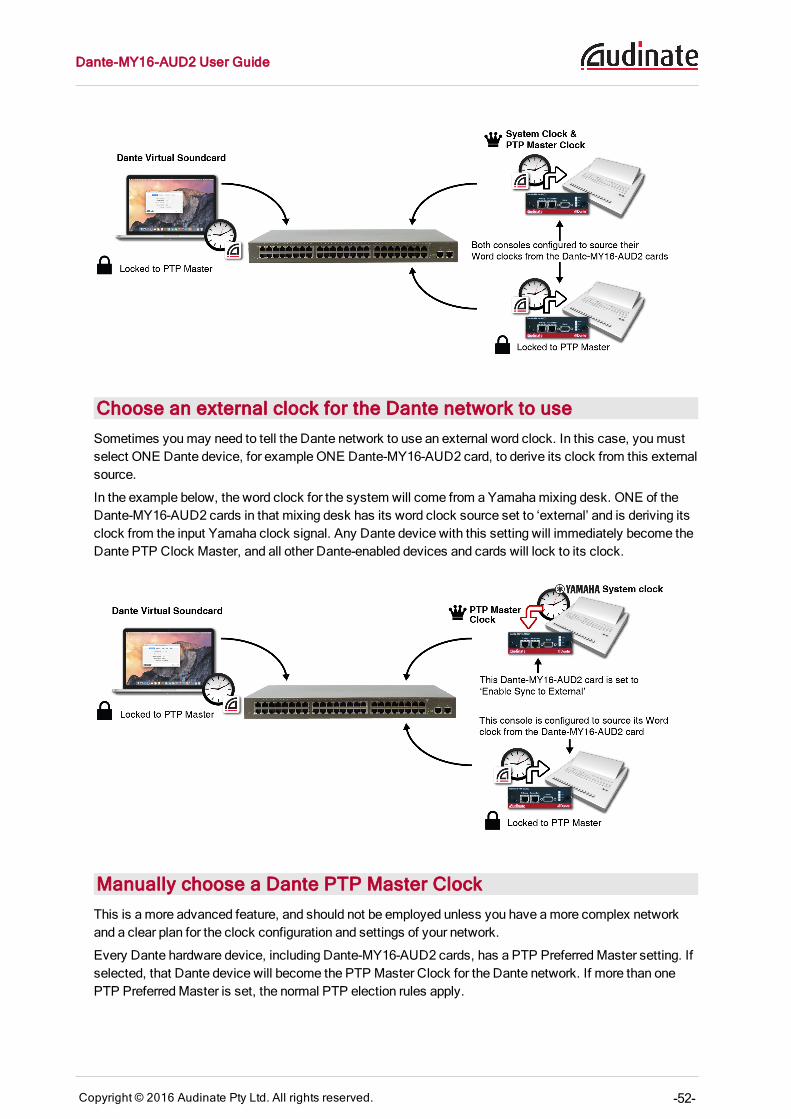
Choose an external clock for the Dante network to useSometimes youmay need to tell the Dante network to use an external word clock. In this case, youmustselect ONE Dante device, for example ONE Dante-MY16-AUD2 card, to derive its clock from this externalsource.
In the example below, the word clock for the system will come from a Yamahamixing desk. ONE of theDante-MY16-AUD2 cards in that mixing desk has its word clock source set to ‘external’ and is deriving itsclock from the input Yamaha clock signal. Any Dante device with this setting will immediately become theDante PTP Clock Master, and all other Dante-enabled devices and cards will lock to its clock.
Manually choose a Dante PTP Master ClockThis is amore advanced feature, and should not be employed unless you have amore complex networkand a clear plan for the clock configuration and settings of your network.
Every Dante hardware device, including Dante-MY16-AUD2 cards, has a PTP PreferredMaster setting. Ifselected, that Dante device will become the PTP Master Clock for the Dante network. If more than onePTP PreferredMaster is set, the normal PTP election rules apply.
Dante-MY16-AUD2 User Guide
Copyright © 2016 Audinate Pty Ltd. All rights reserved. -53-
Youmay want to set PTP PreferredMaster if you have a complex install network, and a number ofotherwise equal quality Dante clocks, and you would like to force the devicemost centrally connected tobe the Dante PTP Master Clock.

Dante-MY16-AUD2 User Guide
Copyright © 2016 Audinate Pty Ltd. All rights reserved. -54-
Index1
100Mbit/s Ethernet 24
100Mbps 28, 45
1Gbps 46
8
88.2kHz 43
9
96kHz 43
A
About 13
Activating Dante Virtual Soundcard 22
Advanced Configuration 38
AES67 14, 36
AES67Config 36
AES67 Status 41
ASIO 20, 47
Audinate Software 19
Audio channels 14
Audio format support 14
Audio routes 34
B
Basic Operation 33
C
Cabling 46
Cannot see devices in Dante Controller 46
Cat5e 26
Cat6 26
Clock 40, 48
Clock configuration 42
Clock Settings 51
Clock Source 41
Clock Status 40
Clock Status Monitoring 51
Clock Types 50
Clocking 51
Dante-MY16-AUD2 User Guide
Copyright © 2016 Audinate Pty Ltd. All rights reserved. -55-
Clocking and Redundancy 51
Compatible Yamaha equipment 14
Computer Configuration 47
Configuration 48
Configure Dante Clocking 51
Configuring 34
Configuring your Yamaha Equipment 43
Connecting to a Network 24
Connection via a Switch 25
Connectors 15
Core Audio 47
D
Daisy Chain 26
Daisy chaining 14
Dante Controller 19, 22, 33
Dante Via 21, 23
Dante Virtual Soundcard 20, 22
Dante Virtual Soundcard License ID 21
Device name 36
Device Name 41
Double channel 47
Double speed 47
Download Your Software 21
Downloading 22-23
E
EEE 24, 47
Enable Sync to External 51
Enable Sync To External 41, 43
Energy Efficient Ethernet 24, 47
Error 15
Ethernet Cabling 24
Ethernet connector 15
Ethernet Support 24
Ethernet Switch 24
External clock 52
F
Firmware 44
G
Gigabit Ethernet 24
Dante-MY16-AUD2 User Guide
Copyright © 2016 Audinate Pty Ltd. All rights reserved. -56-
Gigabit LED 45
H
HA Remote 14, 29-30
HA Remotemode 30
HA RemoteModes 31
I
Identifying 35
Indicators 15
Installation 17
Installing 17
L
Latency 40
LEDs flashing green 16
LEDs solid red 16
License ID 21
M
MAC address 34
Master Clock 41, 50, 52
Multicast 38
Mute 41
N
Network Configuration 25, 45
Network Support 14
O
Orange ‘Error’ light 48
Orange icons 46
P
PreferredMaster 41, 51
Primary Clock Master 48
Primary Network 26
Primary Status 41
Pull-up Clock Domains 51
Pull-up/down 14
Q
QoS 24, 47
Dante-MY16-AUD2 User Guide
Copyright © 2016 Audinate Pty Ltd. All rights reserved. -57-
R
Red ‘Sync’ light 49
Redeem DVS token 21
Redundancy 14, 26
Redundant Network 26
Regulatory Information 8
Removing 18
S
Sample bit depth 14
Sample Rate 36, 47
Sample Rates 14
Secondary Network 26
Secondary Status 41
Serial 15
Set up audio channels 20
Set Up your Network 24
Specifications 14
Straight-through connection 25
Switch and Cabling Checklist 46
Switch Configuration 46
Sync 15, 41
Sync light 45
Synchronization 14
Synchronization and Clocking 50
System 15
T
Troubleshooting 45
U
Unicast 38
Unsupported Network Configurations 28
Upgrading Firmware 44
V
VLANs 47
W
WDM 47
Wi-Fi 28
Wireless Networks 28
Word Clock 43
Dante-MY16-AUD2 User Guide
Copyright © 2016 Audinate Pty Ltd. All rights reserved. -58-
Y
Yamahamixing desk 52