data acquisition and reporting software for ge ifix hmi ... · data acquisition and reporting...
TRANSCRIPT
Data Acquisition and Reporting Software
For GE iFIX HMI Systems
User Manual Version 2.02
IFIXReports Web: http://www.iFIXReports.com/ Tel: 888-706-7393
IFIXReports User Manual Page 1
iFIXReports
Introduction
Welcome to iFIXReports. iFIXReports is a complete data acquisition and reporting solution used with the GE Fanuc iFIX HMI SCADA software, Microsoft Access and Microsoft SQL Server products. iFIXReports provides the tools necessary to completely configure and manage data acquisition and reporting for any SCADA system running GE Fanuc iFIX. Developed by SCADA application engineers for application engineers, iFIXReports addresses the problems faced during development, dramatically increases efficiency and organization, and provides the end user with a valuable tool to maintain their system. If you have any suggestions for the improvements of the product or documentation, please submit feedback on the http://www.icproe.com/ web site. By installing, copying, or otherwise using the IFIXReports SOFTWARE PRODUCT, you agree to be bound by the terms the END-USER LICENSE AGREEMENT FOR ICPROE SOFTWARE in the last chapter of this manual.
IFIXReports User Manual Page 2
Table of Contents
Introduction........................................................................................ 1 Table of Contents ................................................................................ 2
General ............................................................................................ 4 Requirements.................................................................................... 4
Microsoft Access .............................................................................. 4 Microsoft Excel ................................................................................ 4 Microsoft SQL Server........................................................................ 5 GE Fanuc iFIX ................................................................................. 5
Installation ....................................................................................... 5 Navigation ........................................................................................ 7 Interfaces......................................................................................... 8
IFIXReports Data Acquisition and Reporting Engine .............................. 8 Configuration/Options Dialog............................................................. 9 Messaging Dialog........................................................................... 10 Historical Data Configuration Interface.............................................. 11 Historical Data QA/QC Interface....................................................... 12 Report Configuration Interface......................................................... 13 Report Execution Interface.............................................................. 14 Login/Logout Dialog ....................................................................... 14 Import/Export/Archive Wizard ......................................................... 15
1.0 IFIXReports Configuration ............................................................. 17 1.1 Historical Database Connection .................................................... 18 1.2 Reporting Database File .............................................................. 19 1.3 iFIX Connection Properties........................................................... 22 1.4 Network/Redundancy Settings ..................................................... 23 1.5 User Specific Date and Time Settings ............................................ 24 1.6 Security Settings........................................................................ 25 1.7 General Settings ........................................................................ 26
2.0 Data Acquisition ........................................................................... 28 Historical Data Configuration Overview ............................................. 28
2.1 Data Acquisition Groups ................................................................ 29 Adding "Historical Data Acquisition Groups" ....................................... 29 Deleting "Historical Data Acquisition Groups" ..................................... 29 Adding Tags to the Data Group........................................................ 29 Removing Tags from the Data Group ................................................ 30
2.2 Data Acquisition Scheduling ......................................................... 30 Record Data During Event............................................................... 31
2.3 Data Acquisition Post Action......................................................... 32 Using Post Action........................................................................... 32
3.0 Report Creation............................................................................ 33
IFIXReports User Manual Page 3
Creating a new Report Page or Excel Data Dump................................ 33 3.1 Report Fields ............................................................................. 34
Adding Fields to the Report ............................................................. 34 3.2 Report Field Descriptions and Aggregates ...................................... 34
Detail Aggregate............................................................................ 35 Summary Aggregates (Access Reports Only) ..................................... 35 3.3 Excel Reports (Data Dump Output) ............................................. 35 3.4 Access Report Template Output.................................................. 36
4.0 Report Execution.......................................................................... 37 4.1 Report Groups ........................................................................... 38 4.2 Report Group Scheduling............................................................. 38 4.3 Report Group Output .................................................................. 39 4.4 Custom Excel Execution .............................................................. 40
General steps to executing Excel: .................................................... 40 4.5 Custom Reports Access ............................................................... 40
Passing data to Access for custom report execution ............................ 41 "Custom Report Date Range" form in the MS Access Report Database ... 41 Required objects for a custom report ................................................ 42 Simple example of creating a custom Access report ............................ 42
5.0 Backup Wizard............................................................................. 46 5.1 Import...................................................................................... 46 5.2 Export / Archive ......................................................................... 46
6.0 HMI Login ................................................................................... 46 7.0 Manual Data Acquisition ................................................................ 47
Manual Logging Approach ............................................................... 47 8.0 Creating a Configuration Output Text File ........................................ 48 Appendix A ....................................................................................... 48
Understanding the Differences Between SQL Server and Microsoft Access 48 Use Access If… .............................................................................. 48 Use SQL Server If…........................................................................ 49
Appendix B EULA ............................................................................. 50
IFIXReports User Manual Page 4
General
IFIXReports records selected real time data, at specified intervals or events, to a common historical relational database. This historical data is then reported automatically or manually at specified intervals for specified aggregates and grouping requirements using MS Excel or MS Access. IFIXReports provides exceptional flexibility and is easily customized for use in any iFIX SCADA system. The advantages of using iFIXReports are great to the engineer, developer, and final end user. iFIXReports provides clear definition, control and organization to all plant historical data and reporting configurations.
• For the engineer, IFIXReports provides a predictable and cost effective software “Use Case” operation approach to the system data acquisition and reporting requirements.
• For the developer, IFIXReports can provide a significant reduction in
development time and ease of use. iFIXReports provides a foundation for enterprise data management and sharing.
• For the end user or owner, iFIXReports provides an easy to use tool to
evaluate data acquisition configuration and access historical data via reporting or data analysis.
Requirements
Microsoft Access
Used for reporting and utilizing all the benefits of Access reporting in its ability to increase efficiency and utilization. MS Access incorporates industry standards for data collection, SQL Language, reporting, and ODBC. The use of access for data warehousing will limit the data storage to 2 Gigabyte. Although this is a significant amount of data, it is not recommended for very large systems where the number of data points recorded is large.
Microsoft Excel
This is optional, but is preferred by most developers for building custom reports.

IFIXReports User Manual Page 5 Note: MS Office Professional provides both Access and Excel in addition to MS Word and other useful applications.
Microsoft SQL Server
Used for data warehousing and to provide a base for future expansion and security. SQL Server uses industry standards for data collection, SQL Language, and ODBC. Most enterprise data analysis and IT personnel prefer SQL server as a historical database. If you do not have SQL Server, iFIXReports supplies you with the MSDE version of SQL Server 2000 on the CD for free. The best benefit of using SQL Server as the database is the unlimited amount of storage space (hard drive). Appendix A details more information on the differences between Access and SQL Server. The MSDE version of SQL Server is limited to 2 GB.
GE Fanuc iFIX
Development Software used for Supervisory Control. IFIXReports should be installed on the SCADA Server nodes when using HMI redundancy. Visit www.gefanuc.com for more information on this product. Note: You must have a default printer installed under start-> settings-> printers. Hardware requirements will be satisfied by the successful installation of the above software products.
Installation
Note: For installation in a redundant system, the application must be installed on each server requiring licensing for each. The two installations run on each server to accommodate the redundancy. If one server fails or is shutdown, historical data will continue to be logged and reported by the backup server. Before installation, you should make sure that the HMI software is ready to support the iFIXReports application. There are a few features that you need to configure in the HMI software if not done already:
• First, you must have the iFIX HMI software installed and ready to run.
IFIXReports User Manual Page 6
• Set iFIX to open iFIXReports when started.
• Under the SCU-tasks you should have iFIX start the iFIXReports application (as minimized, not background). You can use the command line switch “/m” to start the iFIXReports application as minimized.
• If you are using SQL Server for the historical database, be sure that is
running and there is a network connection to the Historical Server.
• You should also have the node names and HMI database configured and ready to go.
• If you are using a redundant SCADA server configuration, be sure to
setup the logical and local node names for the system.
• If you intend to use security in iFIXReports, you should have security enabled and configured in iFIX.
• From the IFIXReports CD, run “setup.exe”.
• Follow the installation instructions that follow.
• Once installed, reboot the computer.
• After the reboot, start iFIXReports from the start menu.
• Start iFIXReports, iFIXReports will prompt you to configure the
settings outlined in the “IFIXReports Configuration” part of this user manual. There is a READY/NOT READY indicator that will show READY when IFIXReports is set up correctly. The configuration prompt will display until IFIXReports is configured and READY (See Configuration below).
IFIXReports User Manual Page 7
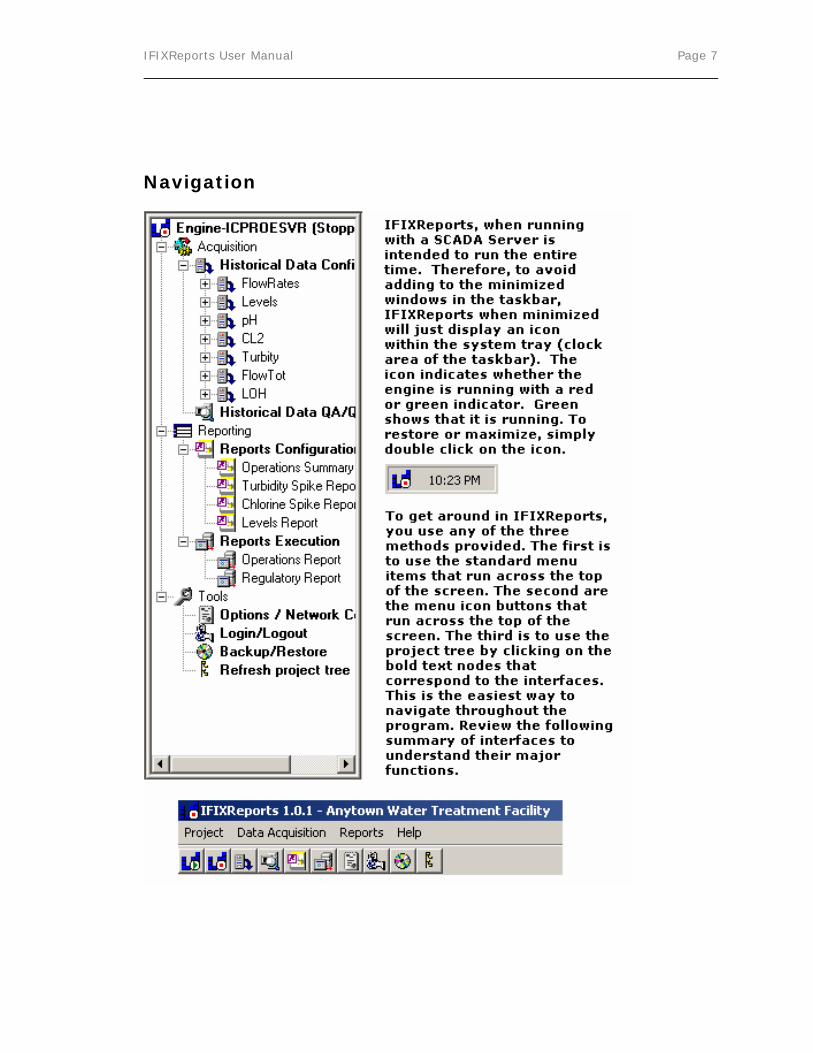
Navigation

IFIXReports User Manual Page 8
Interfaces
The following is a brief overview of each iFIXReports interface:
IFIXReports Data Acquisition and Reporting Engine
The iFIXReports Engine interface is the first screen you see when the application starts. This screen provides details of configured data acquisition groups, data acquisition scheduling properties and data acquisition logging activity in real time. The engine also displays the configured iFIXReports and custom reports scheduling properties, printing and output activity. This screen allows for manual execution of reports as well as starting and stopping the data acquisition and reporting engine. In general, this screen will allow for monitoring and control of data acquisition and reporting activity for the SCADA system.
IFIXReports User Manual Page 9
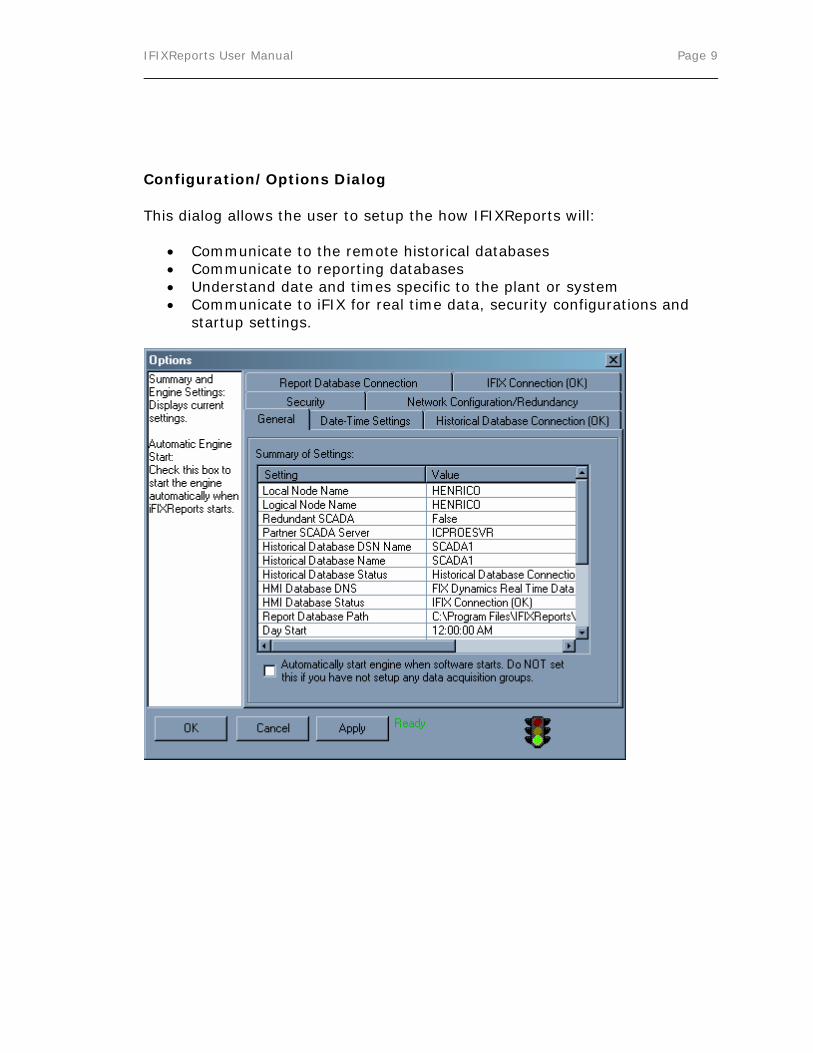
Configuration/Options Dialog
This dialog allows the user to setup the how IFIXReports will:
• Communicate to the remote historical databases • Communicate to reporting databases • Understand date and times specific to the plant or system • Communicate to iFIX for real time data, security configurations and
startup settings.
IFIXReports User Manual Page 10
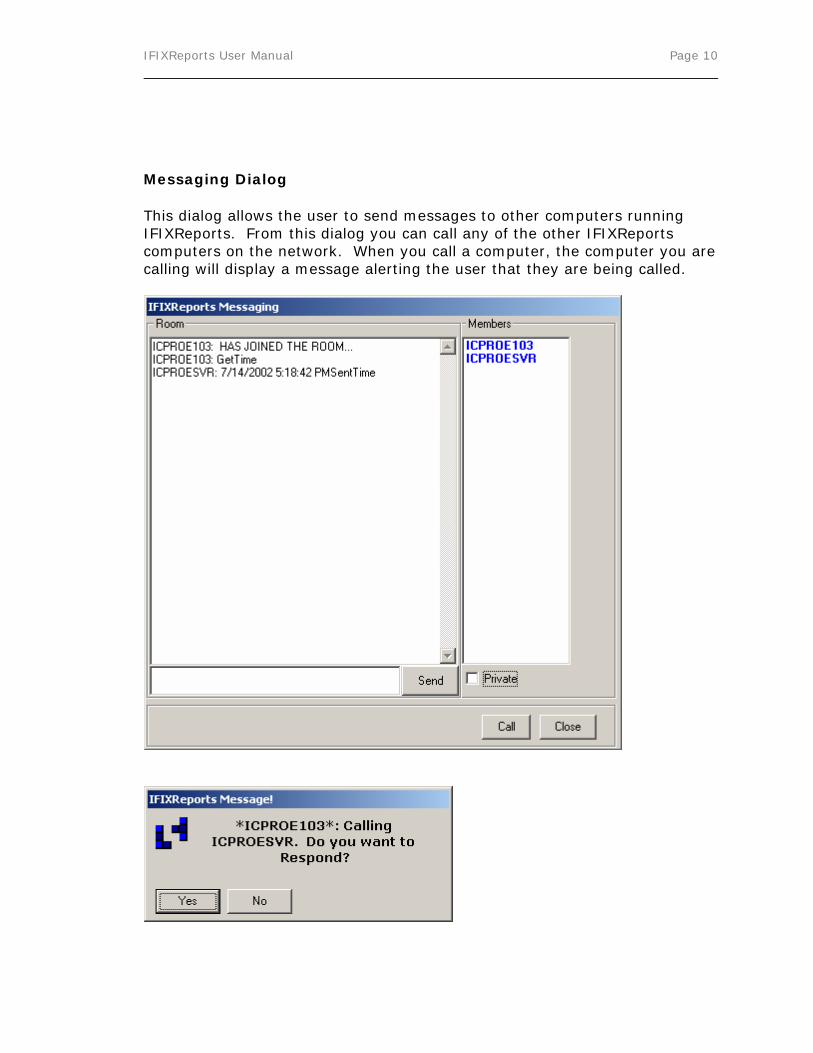
Messaging Dialog
This dialog allows the user to send messages to other computers running IFIXReports. From this dialog you can call any of the other IFIXReports computers on the network. When you call a computer, the computer you are calling will display a message alerting the user that they are being called.

IFIXReports User Manual Page 11 If the user does not answer the call within 30 seconds, the message will disappear. If the user answers the call, iFIXReports will display the Messaging Dialog over iFIX. The users can now chat publicly, or privately. The Messaging dialog also has a feature to synchronize of all computer machine dates and times (if running iFIXReports). Every time iFIXReports is launched, it will synchronize of all computer dates and times. To manually do this, send a message publicly of “GetTime” and all the computers will correct their times to match the server’s time. You will see the server’s responses following the “GetTime” Request.
Historical Data Configuration Interface
This dialog is where the user will setup historical data acquisition data groups (using the iFIX database), scheduling of the groups, and post recording activity (send reset for PLC totalizes, etc).
IFIXReports User Manual Page 12
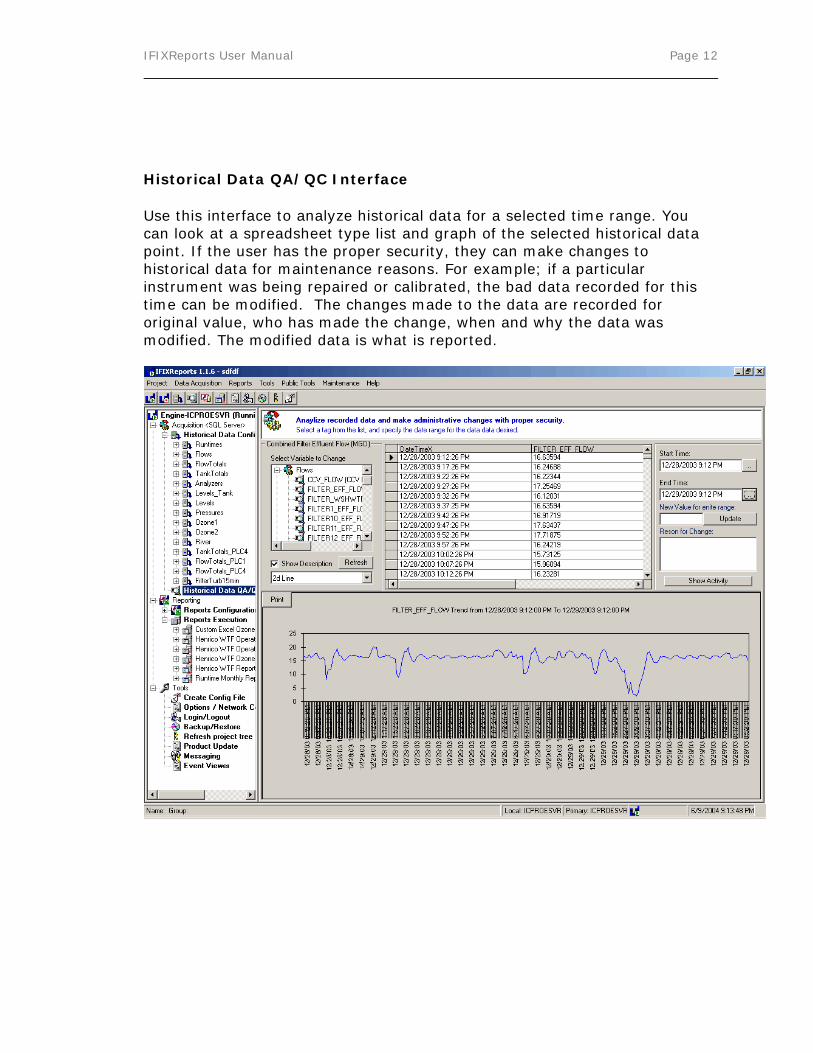
Historical Data QA/QC Interface
Use this interface to analyze historical data for a selected time range. You can look at a spreadsheet type list and graph of the selected historical data point. If the user has the proper security, they can make changes to historical data for maintenance reasons. For example; if a particular instrument was being repaired or calibrated, the bad data recorded for this time can be modified. The changes made to the data are recorded for original value, who has made the change, when and why the data was modified. The modified data is what is reported.

IFIXReports User Manual Page 13
Report Configuration Interface
This interface is where the user can configure SCADA report pages. It will simulate the look of the actual report data, field names, title, and page number. The user configures each report by adding historical data tags and setting the report properties for each. Specifying the detail summary aggregates is usually based on the field’s type of data (Volume or Rate). The report uses the database properties tag description and Engineering units from iFIX for use in the reports. You can also change the iFIX description properties from here.

IFIXReports User Manual Page 14
Report Execution Interface
This interface is where the user can create groups of report pages and schedule the execution. They can specify report group execution in any or all of daily, weekly, monthly, and yearly grouping formats. Required grouping for each value is also specified. For example, a daily report can be configured to have each record grouped by hour. The time of day to automatically print is also specified. Custom reports can be added to a group where the engine will execute the custom reports in its page position as well as pass date-time ranges for any custom Access reports.
Login/Logout Dialog
This dialog allows the user to login or Logout of iFIX security. All security features use the iFIX Security groups to allow access to secured features.

IFIXReports User Manual Page 15
Import/Export/Archive Wizard
This wizard allows the user to import, export, and archive historical and configuration data.

IFIXReports User Manual Page 16

IFIXReports User Manual Page 17
1.0 IFIXReports Configuration
Before you can use iFIXReports, you must successfully configure items (1.1 thru 1.7). If these configurations are not configured, the application will not work correctly. Each area of the configuration has specific information required for iFIXReports to perform each corresponding functions. All of the following topics are located within the Options/Configuration dialog. To open this interface, click on the “Options/Configuration” item within the project tree. When IFIXReports is not configured correctly, it will automatically open the Options/Configuration form. This dialog will remain visible until all parameters are setup correctly. There is a traffic light indicator at the bottom of the configuration interface to show when you have successfully configured the application. It will display the text “Ready” and show a green light when iFIXReports is configured correctly. If there is a part of the configuration that is not ready, it will display a message directing you to the problem area and show a red light.
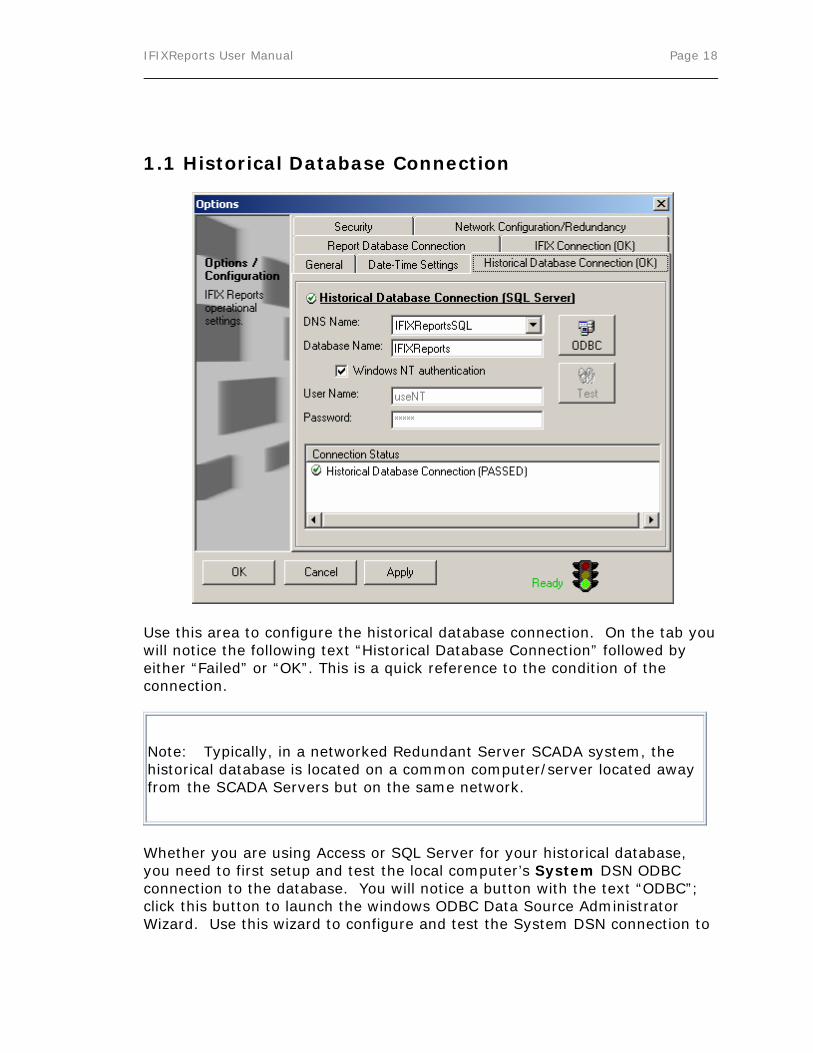
IFIXReports User Manual Page 18 1.1 Historical Database Connection
Use this area to configure the historical database connection. On the tab you will notice the following text “Historical Database Connection” followed by either “Failed” or “OK”. This is a quick reference to the condition of the connection.
Note: Typically, in a networked Redundant Server SCADA system, the historical database is located on a common computer/server located away from the SCADA Servers but on the same network.
Whether you are using Access or SQL Server for your historical database, you need to first setup and test the local computer’s System DSN ODBC connection to the database. You will notice a button with the text “ODBC”; click this button to launch the windows ODBC Data Source Administrator Wizard. Use this wizard to configure and test the System DSN connection to
IFIXReports User Manual Page 19 the historical database. To start, click the ODBC button and select the SQL Server or Access driver to begin the wizard step through process. Once you have configured the ODBC source connection, the name you assigned to the ODBC connection will appear in the DSN Name list. Select the name of the data source DSN you created. If you are using SQL Server, it is important that you type the name of the specific database in the Database Name field. For Access, use the same name as the DSN Name. That’s all there is to it, now click the apply button and the test button. You should see the results of the test as well as the tab status change to “Ok”. If the status shows “Failed”, return to the ODBC wizard to check and test the connection. The iFIXReports CD includes the Desktop version of SQL Server. To install and use as the iFIXReports Historical Database, run the command line (using Start->Run) located in the ReadMeFirst.txt file within the \MSDE_A folder on the iFIXReports CD. This command line includes the necessary switches for the installation to allow for full functionality. Once installed, setup the ODBC connection and iFIXReports as described above to use as the free MSDE SQL Server Historical Database.
1.2 Reporting Database File
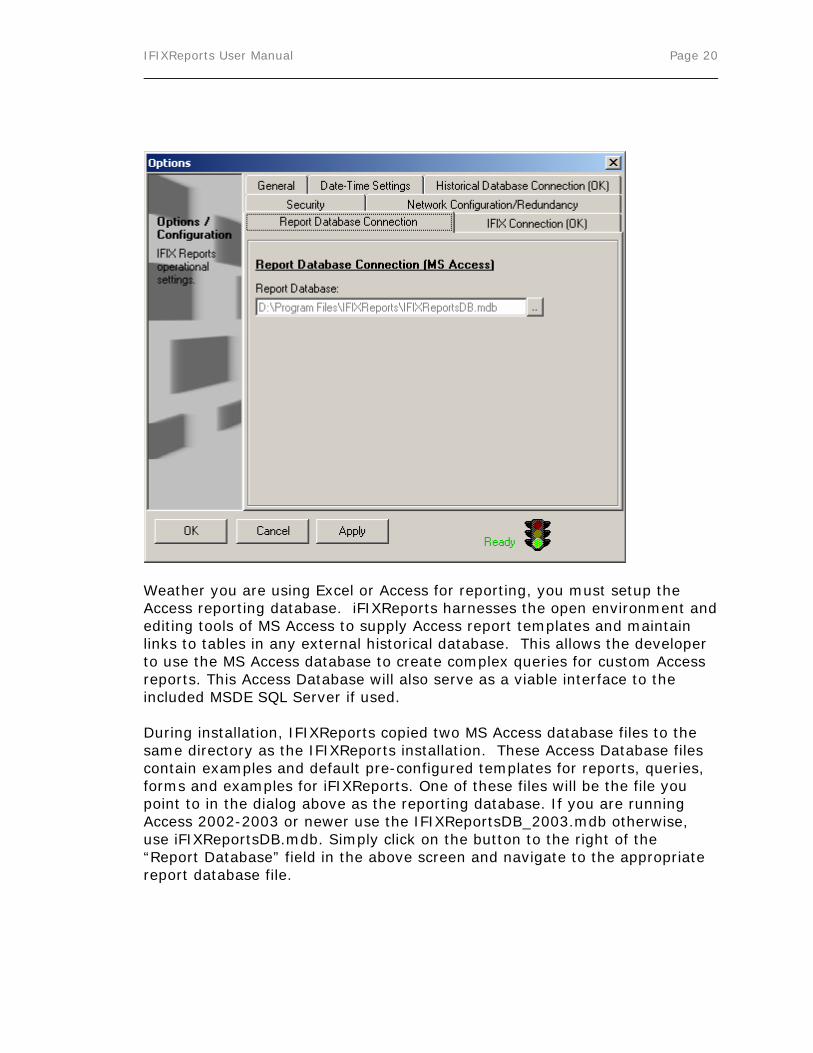
IFIXReports User Manual Page 20
Weather you are using Excel or Access for reporting, you must setup the Access reporting database. iFIXReports harnesses the open environment and editing tools of MS Access to supply Access report templates and maintain links to tables in any external historical database. This allows the developer to use the MS Access database to create complex queries for custom Access reports. This Access Database will also serve as a viable interface to the included MSDE SQL Server if used. During installation, IFIXReports copied two MS Access database files to the same directory as the IFIXReports installation. These Access Database files contain examples and default pre-configured templates for reports, queries, forms and examples for iFIXReports. One of these files will be the file you point to in the dialog above as the reporting database. If you are running Access 2002-2003 or newer use the IFIXReportsDB_2003.mdb otherwise, use iFIXReportsDB.mdb. Simply click on the button to the right of the “Report Database” field in the above screen and navigate to the appropriate report database file.

IFIXReports User Manual Page 21
Note: In redundant configurations, each IFIXReports installation should have its own reporting database file. If any modifications are made to one PC reporting Database file, you should copy it to any other PC’s on the system that are running IFIXReports.
IFIXReports User Manual Page 22
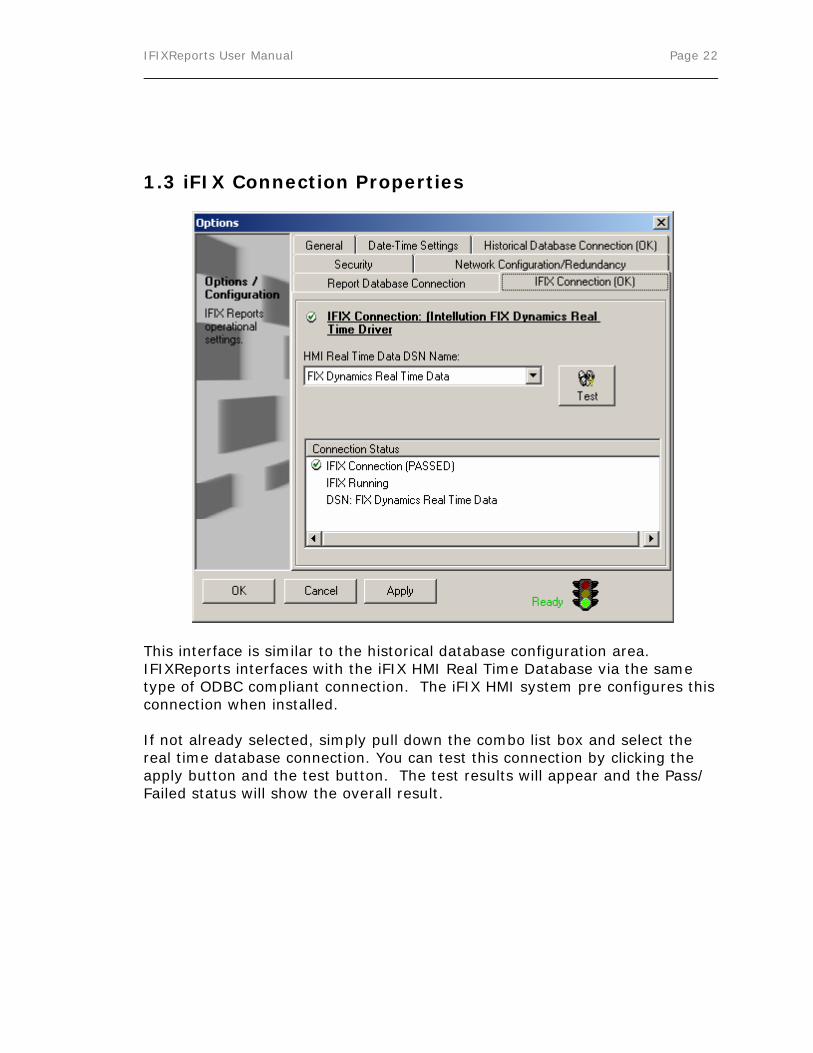
1.3 iFIX Connection Properties
This interface is similar to the historical database configuration area. IFIXReports interfaces with the iFIX HMI Real Time Database via the same type of ODBC compliant connection. The iFIX HMI system pre configures this connection when installed. If not already selected, simply pull down the combo list box and select the real time database connection. You can test this connection by clicking the apply button and the test button. The test results will appear and the Pass/ Failed status will show the overall result.
IFIXReports User Manual Page 23
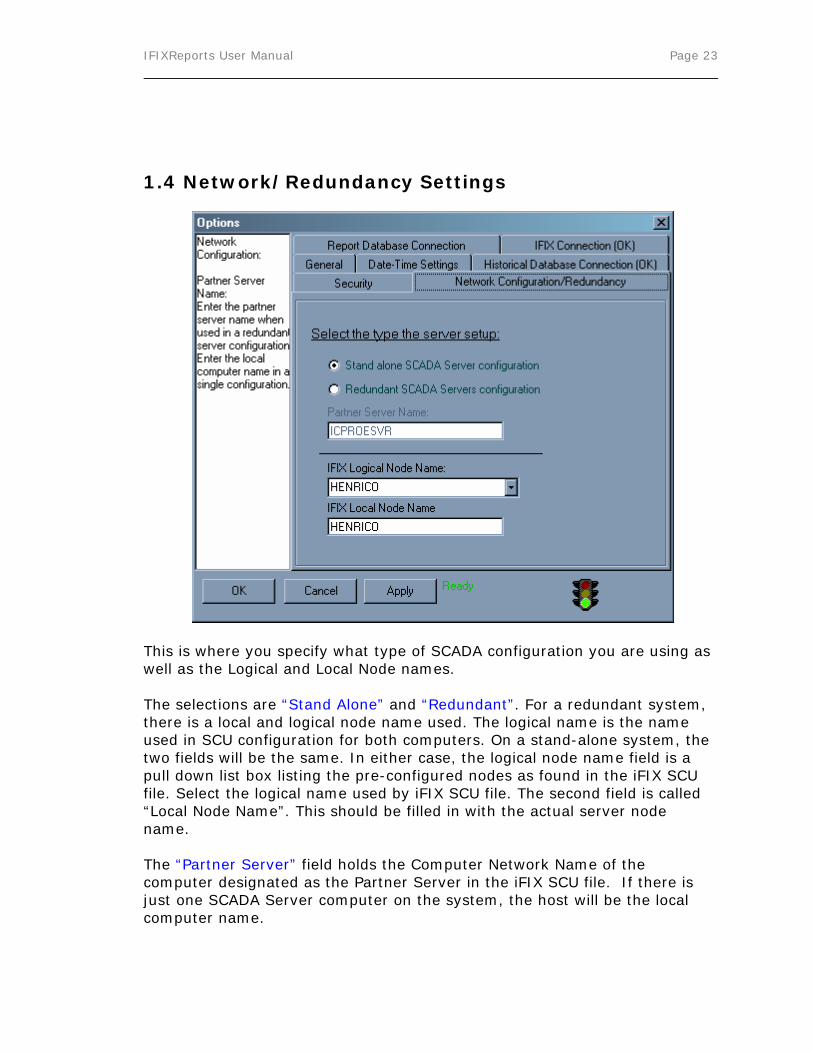
1.4 Network/Redundancy Settings
This is where you specify what type of SCADA configuration you are using as well as the Logical and Local Node names. The selections are “Stand Alone” and “Redundant”. For a redundant system, there is a local and logical node name used. The logical name is the name used in SCU configuration for both computers. On a stand-alone system, the two fields will be the same. In either case, the logical node name field is a pull down list box listing the pre-configured nodes as found in the iFIX SCU file. Select the logical name used by iFIX SCU file. The second field is called “Local Node Name”. This should be filled in with the actual server node name. The “Partner Server” field holds the Computer Network Name of the computer designated as the Partner Server in the iFIX SCU file. If there is just one SCADA Server computer on the system, the host will be the local computer name.
IFIXReports User Manual Page 24
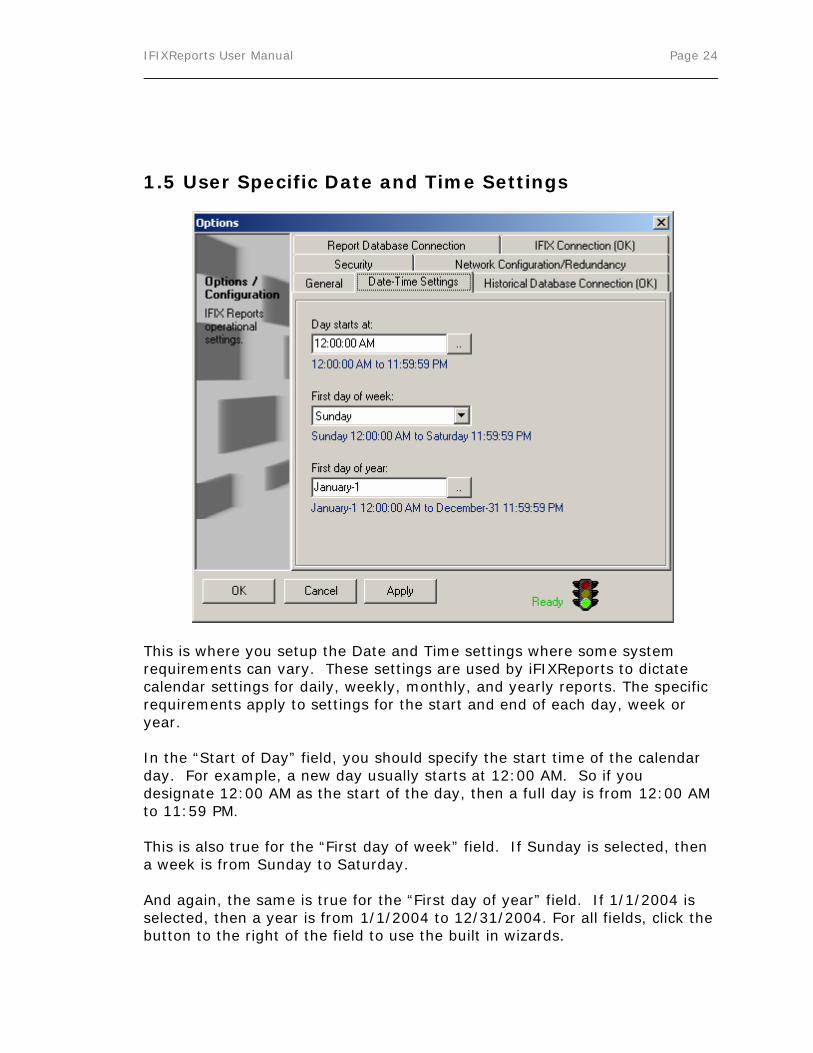
1.5 User Specific Date and Time Settings
This is where you setup the Date and Time settings where some system requirements can vary. These settings are used by iFIXReports to dictate calendar settings for daily, weekly, monthly, and yearly reports. The specific requirements apply to settings for the start and end of each day, week or year. In the “Start of Day” field, you should specify the start time of the calendar day. For example, a new day usually starts at 12:00 AM. So if you designate 12:00 AM as the start of the day, then a full day is from 12:00 AM to 11:59 PM. This is also true for the “First day of week” field. If Sunday is selected, then a week is from Sunday to Saturday. And again, the same is true for the “First day of year” field. If 1/1/2004 is selected, then a year is from 1/1/2004 to 12/31/2004. For all fields, click the button to the right of the field to use the built in wizards.

IFIXReports User Manual Page 25
1.6 Security Settings
This area is used to specify built-in security specific to iFIXReports functions. There are two areas where this applies. The first is in the development area and second in the historical data area. For example, you may only want certain security groups (configured in iFIX) who are able to modify iFIXReports configuration. This is defined as development security. Users who are part of a group specified for development security will be administrators to iFIXReports and have access to all features. Historical data Security can be set to another security group. Users in this group will be able to use all functions of iFIXReports excluding development configuration. This group is aimed towards senior maintenance personnel allowing them to change historical data; for example in the case where calibration or repair was performed.

IFIXReports User Manual Page 26 With these features enabled, all other users who are part of any other security group will have access to features that are not part of configuration or data editing. To enable these features, you must be logged in to IFIX as the specified group. So to set the development security to administrator, you must be logged in as a user part of the administrators group. To switch your login, simply use the login/logout feature in the iFIXReports project explorer.
1.7 General Settings
The “Summary of Settings” list summarizes the current configuration. The “Automatically start engine when software starts” option can specify weather the engine starts when the application starts. This should be set if
IFIXReports User Manual Page 27 you intend to have iFIXReports start when the SCADA software starts. Do not set this to start engine if you have not setup data acquisition groups.

IFIXReports User Manual Page 28
2.0 Data Acquisition
One of the primary functions of iFIXReports is to supply a complete data acquisition solution for your iFIX system. This part of the solution includes the ability to record groups of real time SCADA data tags at specified intervals to a historical database. IFIXReports streamlines this configuration by allowing you to select tags directly from the iFIX real time database. To open the "Historical Data Configuration", simply click on the node in the project tree called “Historical Data Configuration”.
Historical Data Configuration Overview
The "Data Groups" list contains a list of configured data groups. The "Data Group Tags" list contains the list of tags assigned to the group that is currently highlighted in the "Data Groups" list.

IFIXReports User Manual Page 29 To the right of the "Data Group Tags" list; the selected tag names, descriptions and engineering units are displayed. The "Data Acquisition Scheduling" and "Data Acquisition Post Action" areas contain criteria for the selected data acquisition group in the "Data Groups" list. There is an Apply button that should be used as changes are made to a group. Also at the bottom of the form is a database calculator that will display the estimated bytes per year of usage based on the current data acquisition configuration. This is a total for all groups. You can change the displayed units of measure by selecting the desired option button.
2.1 Data Acquisition Groups
It is good practice to create groups for a particular type of data. For example, you may have a requirement to record pH, Level, Flow Rate, and Flow Totals for 16 different filters. You would create four groups. A separate group should be configured for pH, level, flow rate, and flow total rather then a group for each filter. This is because each of these groups may require different frequencies for recording. For example, PH may require a recording frequency of every 5 minutes and levels may be required to be recorded every 30 minutes.
Adding "Historical Data Acquisition Groups"
To create a new group, click the “Add” button just below the "Data Groups" list box. You will be prompted for the desired group name. Enter name then click ok. Now the group you just created appears in the "Data Groups" list.
Deleting "Historical Data Acquisition Groups"
Highlight the desired group and click on the "Delete" Button just below the "Data Groups" list. If you delete a data group or tag from a data group, the historical data will also be deleted for that group or tag.
Adding Tags to the Data Group

IFIXReports User Manual Page 30 Highlight the desired group to add tags to in the "Data Groups" list. Click the add button just below the "Data Group Tags" list. A group can contain up to 250 tags. A search dialog will appear helping you to select tags from the SCADA real time database. You can add one at a time or use the Shift and Ctrl keys to select multiple tags to add to the group. Click ok to add the tags to the group’s "Data Group Tags" list.
Removing Tags from the Data Group
1. Highlight the desired tag to remove from the group. 2. Click the "Remove Button" Note: When a tag is removed, all historical data for that tag is deleted.
2.2 Data Acquisition Scheduling
Within the scheduling area of the Historical Data Configuration Interface, you will select a desired group to edit and select from four frequency types of data acquisition. One time: If this is selected, you will select a specific date and time for the recording of the selected group. Custom: Custom selection will ask you to specify an interval for the recording. You may select any number of seconds, hours, or days. Hourly: Hourly selection will ask for the minutes past the hour to record. Daily: Daily will use a specific time of day to record.

IFIXReports User Manual Page 31
Record Data During Event
There is an "Only When" feature that can be used for any data group. To use this feature, select an event expression that will dictate when the group is recorded. This enables you to set up a group to record data when this event expression is true. For example, you may what to record the turbidity of each filter every 10 seconds in addition to the normal acquisition of every 15 minutes when the combined turbidity is greater then 0.2. This data group can then be reported in a turbidity spike report in addition to the normal turbidity report. This feature may also be used in a manual data entry configuration where the user enters data on an HMI Screen and clicks a save button. The button will open a digital tag and IFIXReports will: see the event, record the data, and close (or set to 1) the tag using the post action function.
1. Check the "Only When" check box. This means that the data group will not record unless the expression is true.
2. Click on the button just to the right of the "Tag" text box and select
the tag to use for the criteria in the expression.
3. Select from the "Function" combo box to select the comparison function to use.
4. Enter the value for the comparison in the "Value" text box.
The data group will now be recorded at the specified interval only when the expression is true.
IFIXReports User Manual Page 32
2.3 Data Acquisition Post Action
Different groups may require a post action following successful recording. For example, flow totals are recorded every day at 12:00:00 AM. When this recording is complete, a totalizer reset may be needed by the system to start accumulating for the new day.
Using Post Action
Simply select to use the post action option and specify the desired tag to set when the data group has been recorded. iFIXReports sets this tag to 1 when the data group has completed its data logging for the specified interval. This is typically used to reset running total accumulators, totalizers or reset manual data entry save functions. Tip: If you needed to totalize a volume like flow in gallons per day, it is good practice to reset the totalizers once a day to avoid loss of data due to the nature of adding floating point data types. By using this function, it is not necessary to coordinate system times between the system DCS/PLC and the SCADA HMI Computers. In the DCS/PLC, the tag set by iFIXReports is reset once the totalizers are reset. No more having to coordinate the PLC and HMI times! This feature can also be used to prompt the operator to enter manual data that may be required for acquisition on some interval.
IFIXReports User Manual Page 33
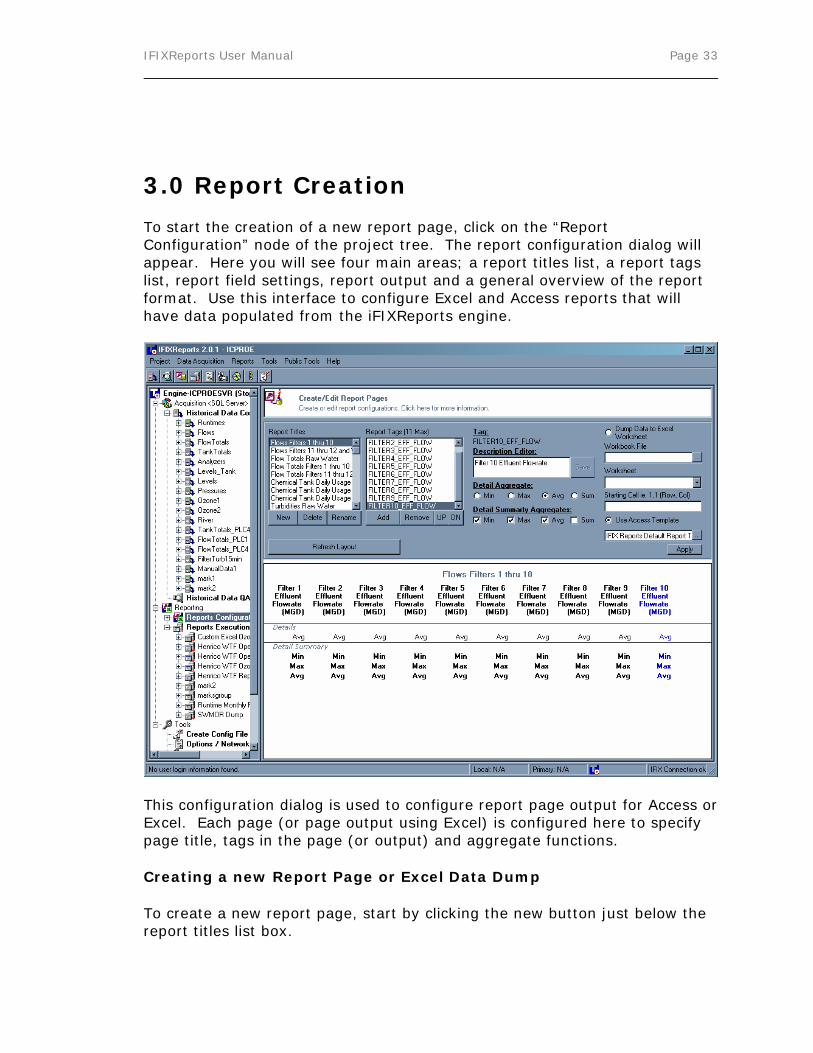
3.0 Report Creation
To start the creation of a new report page, click on the “Report Configuration” node of the project tree. The report configuration dialog will appear. Here you will see four main areas; a report titles list, a report tags list, report field settings, report output and a general overview of the report format. Use this interface to configure Excel and Access reports that will have data populated from the iFIXReports engine.
This configuration dialog is used to configure report page output for Access or Excel. Each page (or page output using Excel) is configured here to specify page title, tags in the page (or output) and aggregate functions.
Creating a new Report Page or Excel Data Dump
To create a new report page, start by clicking the new button just below the report titles list box.
IFIXReports User Manual Page 34 You will be prompted for a title for the report. Enter a title and select ok. The new report will appear in the reports titles list. This will become a single Access page within a report group or a “Excel dump” page. In this report creation, you will specify the title of the report, the fields for the report, the detail aggregate required for each field and weather to use an Access template or Excel Data Dump Output.
3.1 Report Fields
Adding Fields to the Report
1. Highlight the desired report title in the report titles to add historical tags.
2. Click on the “add tag” button just below the report’s tags list. Each
tag added will be a field in the report or data dump.
3. A dialog will appear that will allow you to select tags that have been configured for historical data acquisition. Select the desired tag(s) for the new field and click ok. You can add one at a time or use the Shift and Ctrl keys to select multiple tags to add.
4. Use the refresh button to refresh the report layout
Note: You can add a maximum of 11 tags per report output. When Using Excel, the limit is still 11 tags, however multiple pages of data can be “Dumped” to different Excel spreadsheets within the same workbook.
3.2 Report Field Descriptions and Aggregates
With the report page created and the fields added, you can now specify the required aggregates for each field. This is a very powerful option in that you have the ability to mix and match different aggregates for each field in the same report. These aggregates will be used in any grouping you specify during the execution scheduling (discussed in section 4) The field descriptions are same descriptions and engineering units defined for the tag in the iFIX tag database. If any of the tag descriptions are not
IFIXReports User Manual Page 35 desirable, you can edit and save the iFIX database description for the tag using this description editor or the iFIX tag database editor.
Detail Aggregate
Just below the description field, there are two selection areas. First is the detail aggregate selection. This is where you will specify what aggregate that will be calculated for the selected field in the detail area of the report (report records). Your selection depends on the type of data you are reporting. For example, if the filed is a variable rate you may want to report the average for the detail time grouping period. If the field is some type of analysis, you may want the minimum or maximum that occurred for the grouping time period. The grouping for this detail is defined section 4 below. If no grouping is specified, all data will be reported without aggregate grouping.
Summary Aggregates (Access Reports Only)
The summary area will have multiple aggregates calculated for the detail aggregate data. You will select the summary aggregates required to appear in the summary section for each field in the report. This only applies to Access reports. Excel reports are custom and will use the formulas of Excel to show detail summery.
3.3 Excel Reports (Data Dump Output)
When using Excel, you will use this interface to create “Excel Dumps”. In this case you are specifying a worksheet and cell range within a workbook file that IFIXReports will dump the data. This is simply an Excel file where data is inserted by iFIXReports. Data will be inserted in to a specified workbook, worksheet, and cell range just before outputting (printing or saving to file) a specified workbook file that is linked to the dumped data. You may configure as many “data dumps” as you like to any number of Excel files. This dumped data is linked to other customized worksheets in the same or other workbooks that can be configured in iFIXReports for manual or scheduled automatic printing or outputting to file. The Excel dump pages are scheduled to populate data (dump data) to a worksheet just before the execution (printing) of a customized Excel report worksheet that is linked to this data. This will fill the worksheet(s) with data for the related date range and time including formatting for specified aggregates and grouping properties.
IFIXReports User Manual Page 36 The custom report you want to print will be scheduled for execution under the reports execution (section 4). When a report is to be executed, this data dump will be scheduled just before the printing execution to load the intended printed worksheets with the desired date range data. If you are using an excel report, Select the “Use Excel option and specify the workbook, worksheet, and cell range for the “data dump”. This will be the dump that occurs just before the execution (or printing) of any other worksheets or workbooks that are linked to the dumped data.
3.4 Access Report Template Output
IFIXReports uses a pre-configured report template called "IFIXReports Default Report Template" located in the reporting database. During the report configuration, you may select this template as the template to use for execution of the configured report. Using MS Access, you can copy this template and rename it as many times as you like in the report database file. You can then select the different templates for the reports you created from the master template. IFIXReports uses these templates to execute the report while including the title, time range, page numbers and tag descriptions to the template. You can modify these report templates and add your own formatting to the report. You should not, however delete any of the objects in the report (Textboxes, Labels, etc). If you do not want to use the automatic information, like page number and title, you can set these objects to be small and out of the way and set the visible properties to false but they must remain in the report file. Note: Within the report database, the default report template name is "IFIXReports default report template". You may select this one or copy and rename it in the report database to create another template. To select, click the button just to the right of the template text box. A dialog will appear showing all reports for the project. The middle list lists the custom and template reports from the report database. You will select from the list in the middle to select a template (only option enabled). You should only select a template that is either the supplied template or a template made from copying the supplied template.
IFIXReports User Manual Page 37
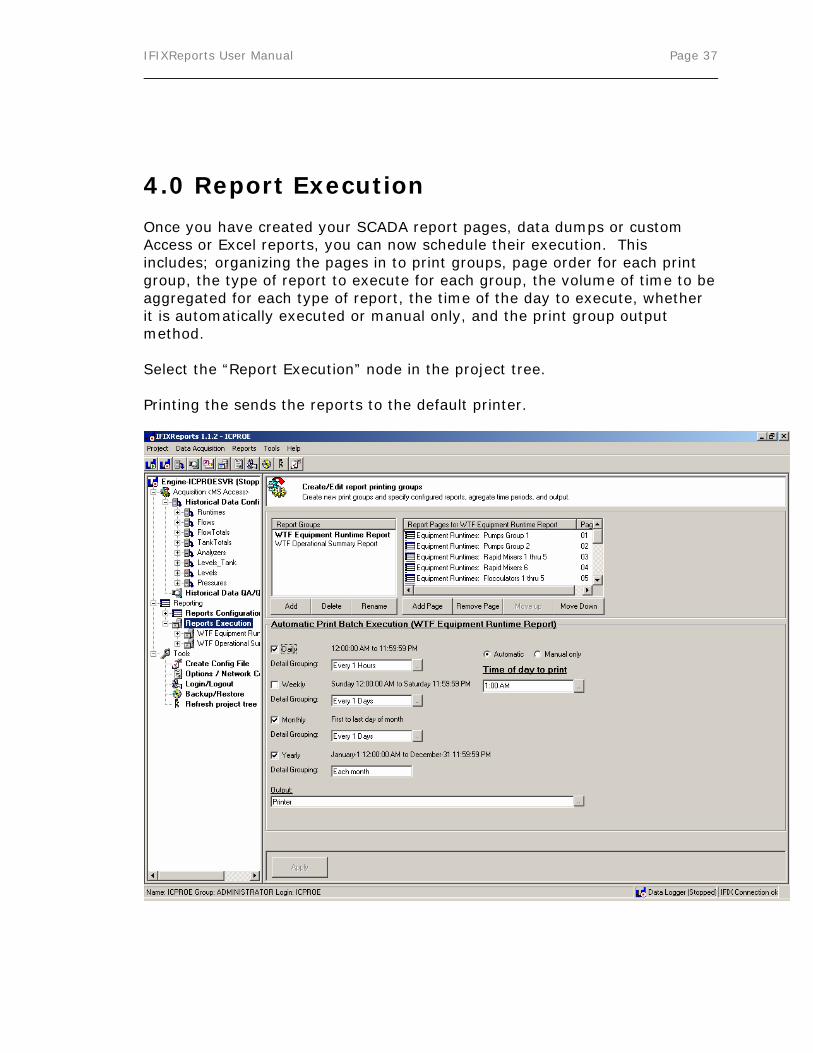
4.0 Report Execution
Once you have created your SCADA report pages, data dumps or custom Access or Excel reports, you can now schedule their execution. This includes; organizing the pages in to print groups, page order for each print group, the type of report to execute for each group, the volume of time to be aggregated for each type of report, the time of the day to execute, whether it is automatically executed or manual only, and the print group output method. Select the “Report Execution” node in the project tree. Printing the sends the reports to the default printer.

IFIXReports User Manual Page 38 4.1 Report Groups
For execution, the first thing to do is to create print groups for the reports or data dumps you created. Even if there will be just one page for the group, you must create a group for its execution. Click the add group button to add a new group to the list. To add pages, you click the button just below the report pages list. A dialog will appear that will list all the reports configured for the project. The dialog will have two list boxes to choose from. The left list box is a list of all the SCADA reports that have been configured. The middle list box will list any custom reports you have created in the report Access file. The right area is if you wish to print a particular worksheet range within a workbook file. You may select custom Excel reports that use data dump or not. Any excel file can be scheduled for execution. If data for a custom excel report comes from IFIXReports data dump, the report would be scheduled following the data dump scheduling. Select and add all the report pages desired for the report group. Do not add templates to the report group. Note: You should setup groups of similar types. IE. You should create separate groups for Excel Data Dumps and Excel Execution / Access types. Let’s say you had a daily report that is a custom Excel report using a data dump. You would create a group called “Daily Dump” and a second group for “Daily Excel Execution”. The dump group will be scheduled prior to the Excel execution group.
4.2 Report Group Scheduling
For each report group, you can select what type of report to automatically execute and how to group detail data for the for each SCADA report page. There are four types of reports you can execute. These are Daily, Weekly, Monthly, and Yearly. Selecting the type of group to execute specifies the time range used for each. For example, let's say we have a group called Flow Rates and we select daily for a group type. The report group will be executed every day at the specified time of day to print, for the previous days data. The previous day start and end times are dictated by the settings for date and time in the Options/Configuration dialog.
IFIXReports User Manual Page 39 The second part of selecting a type is specifying the detail grouping for the selected type. Continuing with the example where we selected daily, we need to select a detail-grouping interval. So, let's say we want this daily report to display grouping for each record or row to be aggregated for each hour. The page we created in the report configuration called flows is part of a group called flow rates and we specified the aggregate to be average in the page details. So this report page will print daily at the specified time of day for the previous day’s data, with 24 records each with an hourly average for each flow rate. For weekly and yearly, the same applies. The only difference is the time range for each group. For example the same report group can be scheduled for weekly execution as well. You may what the weekly to show the data for the past week aggregated for every 12 hours. Whatever the case, it will execute at the specified time of day to print directly following the end of the week. When 0 time is selected for grouping, the data will not be aggregated or grouped with data for the time range reported in actual time-stamped or raw format. Any report where data will be reported as raw must only include tags from within the same historical data group. If you would like a raw format report, you must configure a report page or data dump for each historical tag group you intend on using tags from.
4.3 Report Group Output
Report Group output will specify where IFIXReports prints the report. It can be to a file or a printer. The printer option uses the default system printer. If you want to create a file as the output, then simply specify the type of file to create and its path. For file output, you can select; rich text file (.rtf), Web Page (.html), Excel (.xls), or a text file (.txt). The file will be created when scheduled using the template file, excel or new file when using access. Each new report created as a file will have the template or report name as the new file name as well as the page number and date-time stamp as part of the file. For example, if executing an Excel file to a file, the Excel template file will be saved as the file name with identifiers shown as follows: Filename & Page number & Identifier & Month & Day & Year & file extension
IFIXReports User Manual Page 40 IE. The daily report test.xls would be saved as test_01_D080406.xls. This will save a new file for each daily, weekly, monthly and yearly report. The date in the file name will represent starting date for report data. In the above example, the file save is a daily report containing data for 08/04/06 time period.
4.4 Custom Excel Execution
You can schedule any excel file to execute to file or printer. The most common approach to this is creating an Excel dump to dump the data to a separate worksheet within the workbook. And then use the dumped data as linked cells to a custom Excel worksheet that can be scheduled for execution. For example, a user can schedule an Excel dump to always dump to sheet 2 of his workbook template file. The user will then customize sheet 1 as the report that is scheduled for execution following the data dump. The sheet 1 will have its cells linked to the dumped information. When scheduling an Excel execution (not a dump), the data grouping settings are irrelevant as IFIXReports simply prints or exports the specified workbook-worksheet-cell range at the specified time.
General steps to executing Excel:
1. Create a group called Excel Dumps 2. Add configured Excel Dump Pages to the group (see section 3) 3. Schedule Execution for the Data Dump group for a specific time 4. Create a Group for Excel Execute 5. Add an Excel file to the group by using the Custom Excel file option (add page button) to select an Excel file, worksheet and print range that that is linked to the dumped data pages. 6. Schedule this group to execute after the execute time set for the dumped group created in step 1.
4.5 Custom Reports Access
You can have IFIXReports execute custom reports you create. iFIXReports can execute these manually or automatically, passing time range and page parameters to the custom Access report queries at the time of execution.

IFIXReports User Manual Page 41 IFIXReports does this by using a provided form within reporting database file. This form is used for specifying date-time range parameters to your custom queries when developing completely custom Access Reports.
Passing data to Access for custom report execution
When the custom report is executed by iFIXReports, the custom report builds its data according to its associated custom queries. The queries date-time parameters will look to the supplied form fields for the start and end date-times instead of having the date-times coded in to the query its self.
"Custom Report Date Range" form in the MS Access Report Database
This form has been created by iFIXReports. It is used by iFIXReports to automatically open and print any custom reports that you create. You should also use this form to help in your report creation. The basic function of this form is to provide the queries for your report with the start and end date-times that the custom report will use. This will allow for reoccurring scheduled execution. When IFIXReports attempts to print any of your custom Access reports, it will first plug in the start and end date-times to objects within the "frmCustomDateRange" form before opening and printing your report. Start-Date-Time = [Forms]![frmCustomDateRange]![txtSrtDate] End Date-Time = [Forms]![frmCustomDateRange]![txtEndDate] Group By = [Forms]![frmCustomDateRange]![txtGrpBy] You should use reference to the above fields in your queries and custom reports creation instead of coded date-times.

IFIXReports User Manual Page 42 The group BY field is not used by IFIXReports at this time but this may be useful to you for debugging your own custom reports. See the "Custom Example Report" that is provided in the Report Database. Look for "GROUP BY" in the MS Access help file for more information. Within the form "frmCustomDateRange", the name for the start date-time object is txtSrtDate and the txtEndDate object for the end date-time. You will simply use a reference to the above objects in place of a SQL coded date-time in a query, by using the following text: [Forms]![frmCustomDateRange]![txtSrtDate] and [Forms]![ frmCustomDateRange]![txtEndDate]. For example, instead of a query like (use SQL view to see the statement): "SELECT * FROM tblFlows WHERE DatetimeX BETWEEN #1/1/2002 12:00:00 AM# and #1/31/2002 11:59:59 PM#;" You can use: "SELECT * FROM tblFlows WHERE DatetimeX BETWEEN [Forms]![frmCustomDateRange]![txtSrtDate] and [Forms]![frmCustomDateRange]![txtEndDate];" When testing the query, use the form fields to specify the start and end times for the query. Use the Example CustomExampleQuery and CustomExampleReport to view in design views to see how. To see this report in action, first open the "frmCustomDateRange" form and then open the report. The report calls its query and the query looks to the form for the start date-time, end date-time, and the grouping parameter.
Required objects for a custom report
In the custom report, you must create a new text box and set its Name property to txtPage. This will be the object IFIXReports uses to plug in the page number of the custom report when executing. This page number is specified by the page position within the report execution group).
Simple example of creating a custom Access report
IFIXReports User Manual Page 43
1. Open the Report Database using MS Access.
2. Go to the queries section of the database.
3. Select "Create a Query by using a wizard"
4. Select the table "CustomExampleTable" from the Tables/Queries list.
5. Select all fields from the "Available Fields List"
6. Select next and select the summary option
7. Click the "Summary Options" button
8. Select average for all; click ok, and then next
9. Select day then next (doesn't matter, we are going to the group object of the date range form.)
10. Call it "test query" and select open in design view click finish
11. It should open in design view, highlight the text in the e first column
in the first field called "field". Replace the text with the following:
12. DateTimeX: Format$([CustomExampleTable].[DateTimeX],[Forms]![frmCustomDateRange]![txtGrpBy])
13. In this case, the details of the report will aggregate the values for every hour. The txtGrpBy object equals (hh AM/PM) which specifies group by hour. If you do not replace it, it will just group by day as we set during the wizard. On the far right is the last column of the query; we are going to add a new on that tells the query to only return records for a specific time range. Otherwise, it will return all the records.
14. At the top of the new column, select DateTimeX
15. Change the text "Group By" to "Where
16. In the Criteria paste the following:
17. Between [Forms]![frmCustomDateRange]![txtSrtDate] And
[Forms]![frmCustomDateRange]![txtEndDate]

IFIXReports User Manual Page 44
18. Save and close the query
19. Open the Date-Time range form.
20. Open the query in run mode to see the results. You can change the forms fields to test the functionality of this example.
21. Go to reports section and use the report wizard to create a report
using the query. You can further condition the data with the report editing functions. Be sure to add the page object to the report for the auto execution from IFIXReports.
Tip: Try and set up the Data acquisition groups to where creating the custom queries are easier to develop.
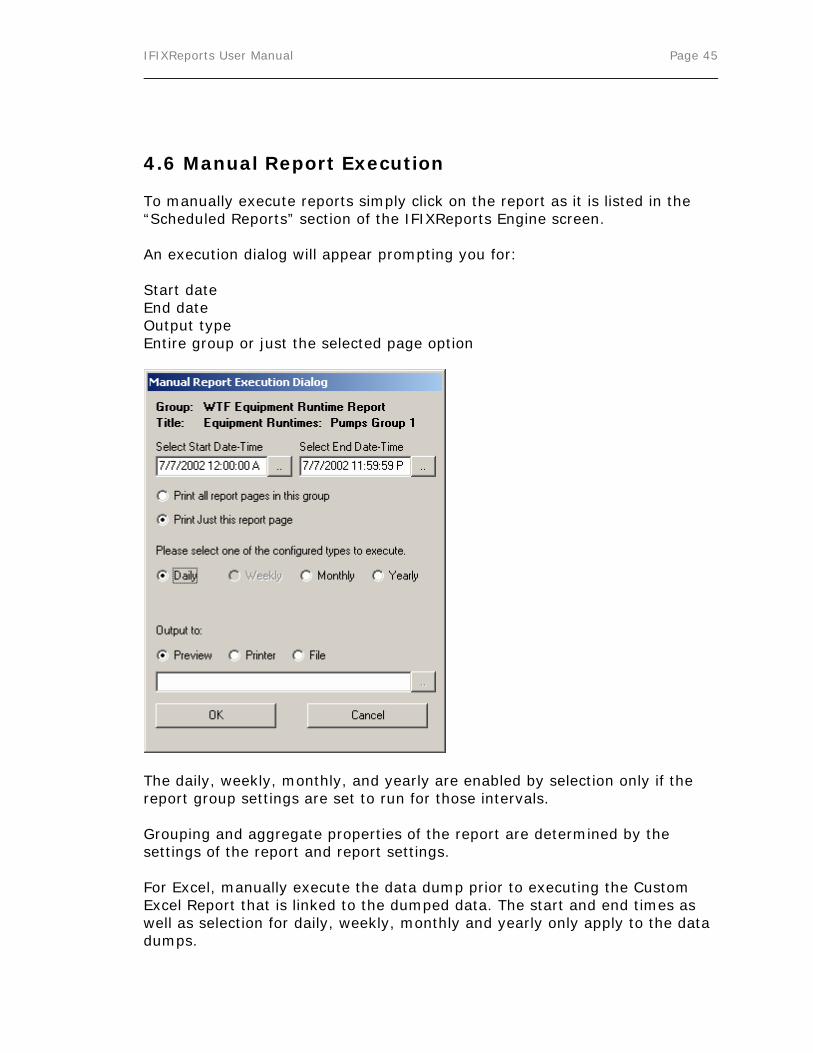
IFIXReports User Manual Page 45 4.6 Manual Report Execution To manually execute reports simply click on the report as it is listed in the “Scheduled Reports” section of the IFIXReports Engine screen. An execution dialog will appear prompting you for: Start date End date Output type Entire group or just the selected page option
The daily, weekly, monthly, and yearly are enabled by selection only if the report group settings are set to run for those intervals. Grouping and aggregate properties of the report are determined by the settings of the report and report settings. For Excel, manually execute the data dump prior to executing the Custom Excel Report that is linked to the dumped data. The start and end times as well as selection for daily, weekly, monthly and yearly only apply to the data dumps.
IFIXReports User Manual Page 46
5.0 Backup Wizard
The Backup Wizard tool allows you to import, export, and archive historical data. To launch the wizard, click on the Import/Export node in the project tree.
5.1 Import
To Import data, you must import from a CSV file. This file should be formatted for the particular group you are importing too. If the file to be imported is from an exported or archived file, no formatting is required. The export file is in the right format to start with. Use the wizard and follow the instructions. To format data not exported by iFIXReports, simply export the data group you wish to import to and modify with the data you would like to import. Save the CSV file and then run the import utility within the wizard.
5.2 Export / Archive
Export and archive are the same functions with the only difference that during an archive, the data is removed from the historical database. The export will copy data from the historical database. Simply follow the wizard instructions.
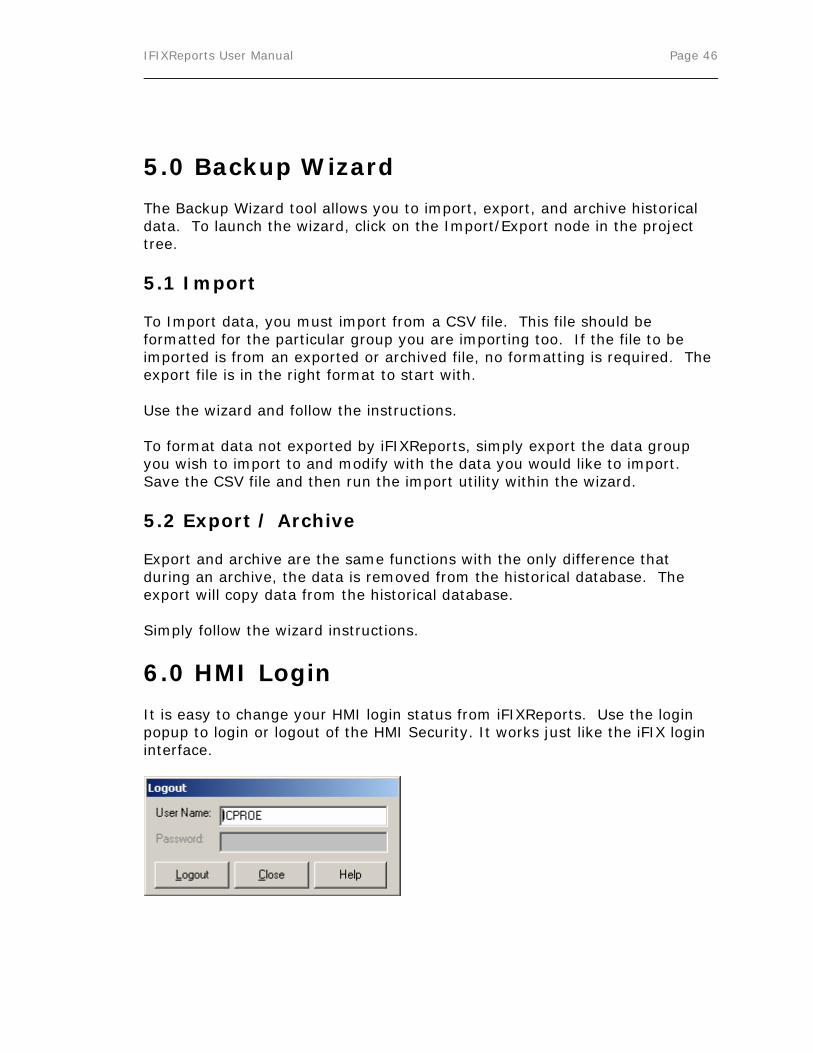
6.0 HMI Login
It is easy to change your HMI login status from iFIXReports. Use the login popup to login or logout of the HMI Security. It works just like the iFIX login interface.
IFIXReports User Manual Page 47
7.0 Manual Data Acquisition
Manual Data Acquisition is possible within the configuration of IFIXReports. It can take place from any or all of the HMI nodes using standard HMI screens without additional software. The setup of the Manual Data Acquisition should is transparent to operations. This means that operational data that is required to be manually entered occurs in the HMI application. This eliminates the need for additional software on the view nodes. By utilizing the HMI Real-Time database, you can setup tags that will hold data that is entered until IFIXReports records it. You will setup the acquisition of these tags the same as you would any other. You will create a data group(s) configured to record the tags for manual data as follows.
Manual Logging Approach
Use the Data Group “on event” feature where you have the operator enter the data in the HMI screen data entry fields. Place a save button that will set a tag to 0 (OpenDigitalPoint) Set iFIXReports to use this tag=0 event to record data for the manual data group by setting its interval to 1 second and to trigger when the tag is equal to 0. Then set up the post action feedback to set the same tag to 1 when recorded. It will record once and wait for the next save event.

IFIXReports User Manual Page 48
8.0 Creating a Configuration Output Text File
Under tools, there is a selection for “Create Configuration File”. Use this feature to create a rich text file (.rtf) that reports in detail, the configuration of the data acquisition and reporting as well as the configuration settings for the application. This is very useful when putting together a submittal that describes exactly how the system is configured. In an existing system this feature is useful for translating details related to what data is recorded and reported in your SCADA system. It is easy to understand and accurate. It will completely translate all information explaining the configuration of reporting and data acquisition for the system.
Appendix A
Understanding the Differences Between SQL Server and Microsoft Access
SQL Server is an enterprise relational database management and analysis system designed to deliver scalable e-commerce, line-of-business and data warehousing solutions. Access is the Microsoft Office desktop database management system. The current versions of these products are SQL Server 2000 and Access 2002, respectively. Many organizations combine Access with SQL Server. Access can easily serve as front end for data stored in SQL Server, thus presenting end users with a familiar and easy-to-use interface while ensuring that developers and database administrators have access to the performance and robustness of SQL Server. This is exactly what IFIXReports does for reporting. When considering the differences between SQL Server and Access, be sure to keep the following points in mind:
Use Access If…
• You want compatibility with Access 97 or earlier. • Your environment has a small number of simultaneous users. • Your data will not grow past 2 gigabytes (GB) without frequent

IFIXReports User Manual Page 49
archiving. • You place a premium on ease of use.
Use SQL Server If…
• You want to develop from a single code base for server, desktop, embedded, and mobile database solutions.
• Your application must support many users. • You need the greatest scalability. • You need the best security. • You need the greatest reliability, such as transaction logging. • Your system is online 24 hours a day, 7 days a week. • You need stored procedures and triggers. • Basically
The following table outlines major operational and design differences between SQL Server and Access.
Feature Microsoft SQL Server Microsoft Access
Database size Terabytes 2 gigabytes (GB)
Objects in database 2,147,483,647 32,768
Number of concurrent users
Unlimited 255
Failure recovery Point in time recovery; fail-over cluster support
Recoverable to the last backup
Enterprise Database Security
Integrated with Windows 2000 and Windows NT security
Based on use of workgroup information file
Analysis Services (data warehousing, data mining and OLAP)
Built-in None
Support for SMP systems
Built-in None

IFIXReports User Manual Page 50
Appendix B EULA
END-USER LICENSE AGREEMENT FOR ICPROE SOFTWARE This ICPROE End-User License Agreement ("EULA") is a legal agreement between you (either an individual or a single entity) and ICPROE Corporation for the ICPROE software product identified above, which includes computer software and associated media and printed materials, and may include "online" or electronic documentation ("SOFTWARE PRODUCT" or "SOFTWARE"). By installing, copying, or otherwise using the SOFTWARE PRODUCT, you agree to be bound by the terms of this EULA. If you do not agree to the terms of this EULA, do not install, copy, or use the SOFTWARE PRODUCT. Software Warranty: ICPROE warrants that the software will perform according to accompanying user documentation for a period of 90 (ninety) days from the date of receipt. Replacement software will be warranted for 90 (ninety) days from the date of receipt. ICPROE does not warrant that the operation will be error free or uninterrupted. Grant of License: ICPROE grants the reseller a non-exclusive and non-transferable license to use the software product and to make one copy solely for backup or archival purposes, which may include user documentation provided via on-line or other electronic form. Additional copies may not be made nor may anyone else be allowed to copy or otherwise reproduce any part of the licensed software without prior written consent of ICPROE, Inc. The reseller may transfer product and therefore license, but may not make copies or may not allow any one else to make copies unless specifically outlined in their reseller agreement or with prior written consent of ICPROE, Inc. Copyright: All trademark(s), logo(s), name(s), software, documentation and other supporting materials relating to the product are trademarked, copyrighted or owned by ICPROE as proprietary information protected by United States copyright laws and international and applicable national treaty provisions and laws. Software protection extends beyond its literal code to structure, sequence and organization; any unauthorized use or modification would constitute a misappropriation of ICPROE’s proprietary rights and a violation of the product's stated license agreement. Liabilities: ICPROE's entire liability to the purchaser's exclusive remedy shall be at ICPROE's option, either return of the price paid or repair/replacement of the product not meeting ICPROE's declared Limited Warranty. In all cases, ICPROE. Will address any claim for repairs, replacement or refund via the reseller or directly with the end-user in the event of a direct sale by ICPROE or its suppliers shall not be liable in any event to anyone for any indirect, incidental, consequential, special or exemplary damages including without limitation damages for loss of business profits, business interruptions, business information or other pecuniary loss arising out

IFIXReports User Manual Page 51 of the use of or inability to use the said product even if advised of the possibility of such damages. In any case, ICPROE's entire liability under any provision of this agreement shall be limited to the amount actually paid by the purchaser for the product. Remedy: Software Remedy. For software defects, ICPROE shall use a commercially reasonable effort to correct defects that result in material non-compliance with the user's manuals, for such software, and supply a corrected version of the software. Exclusions: The above remedies are available only if ICPROE's examination discloses to ICPROE's satisfaction that such defects actually exist and were not caused by end-user's misuse, unauthorized modifications, neglect, improper installation or testing, attempts to repair, or by accident. Disclaimer: The express warranty above is in lieu of all other warranties, express or implied, including, without limitation, the warranties of merchantability, fitness for a particular purpose or non-infringement of any third party's intellectual property rights. No representation or other affirmation of fact, including but not limited to statements regarding capacity, suitability for use or performance of Products, whether made by ICPROE employees or otherwise shall be deemed to be a warranty by ICPROE for any purpose or give rise to any liability of ICPROE whatsoever unless contained in the Sales Acknowledgment or the ICPROE Terms and Conditions of Sale. Limitations: The express obligation stated above is in lieu of all liabilities or obligations of ICPROE for damages, including but not limited to any liability due to or associated with infringement of a third party's intellectual property rights or any loss, damage, or injury, direct or consequential (including any loss of profits, use, business or the like, even if ICPROE has been advised of the possibility of same), arising out of or in connection with the delivery, use or performance of ICPROE’s products, and it is agreed that repair or replacement, in accordance with the foregoing warranty, is ICPROE’s sole liability and buyer's sole remedy for such liability, loss, damage, or injury. This limitation of ICPROE’s liability will apply regardless of the form of action, whether in contract or tort (including negligence) or based on a warranty. Any action against ICPROE must be brought within 18 months after the cause of action arises. The parties expressly agree that the products are not consumer goods.