data collection agent™ for nas - ntp software · copyright © 2011-2015 ntp software 14 prepare...
TRANSCRIPT
Copyright © 2011-2015 NTP Software 1
Data Collection Agent™ for NAS NetApp® Edition
Installation Guide
Version 7.5 - September 2015
This guide provides quick instructions for the installation of NTP Software Data Collection Agent™ for NAS, NetApp® Edition from an administrator’s perspective. Upon completion of the steps within this document, NTP Software Data Collection Agent for NAS, NetApp Edition will be installed within your enterprise community.

Copyright © 2011-2015 NTP Software 2
Table of Contents Executive Summary ............................................................................................................. 3
Before You Begin ................................................................................................................. 3
Requirements ...................................................................................................................... 4
Hardware Specification ................................................................................................... 4
Software Specification .................................................................................................... 4
Installation .......................................................................................................................... 5
Installing Data Collection Agent for NAS, NetApp Edition .............................................. 5
Enabling NTPSoftware_DCA fpolicy .............................................................................. 14
About NTP Software ......................................................................................................... 18
NTP Software Professional Services ................................................................................. 18

Copyright © 2011-2015 NTP Software 3
Executive Summary
Thank you for your interest in NTP Software Data Collection Agent™ for NAS, NetApp® Edition. NTP Software Data Collection Agent for NAS, NetApp Edition is a critical component of an overall file data management (FDM) architecture and is part of the NTP Software® integrated suite of products. Together, these products are designed to help organizations control and report on their current and ever-growing storage infrastructure.
This document is a guide to the successful installation of NTP Software Data Collection Agent for NAS, NetApp Edition. It will take you about 15 minutes to complete the installation steps provided here.
Before You Begin
The hardware required to support NTP Software Data Collection Agent for NAS, NetApp Edition should be appropriate for the services running on the machine. For more specific hardware information, review the Requirements section of this document.
NTP Software recommends using a single service account for installing NTP Software Data Collection Agent for NAS, NetApp Edition. This account requires local administrator rights on each machine where NTP Software Data Collection Agent for NAS, NetApp Edition is installed and on each Filer that the agent will scan, in addition to permission to write to the database.
Copyright © 2011-2015 NTP Software 4
Requirements
Hardware Specification
Each NTP Software Data Collection Agent for NAS, NetApp Edition server must meet the following minimum requirements prior to installation:
2.2 GHz CPU
4 GB RAM
20 MB free disk space
Each agent requires 20 MB for installation files and additional disk space for scan caching. The amount of disk space required for scan caching scales depending on the amount of disk space that the agent is configured to scan. NTP Software recommends reserving 1 GB of additional disk space for this scan caching.
Software Specification
Each agent server must be running:
Windows Server® 2003, Windows Server® 2008, Windows Server® 2008 R2, Windows Server® 2012, or Windows® XP with administrator privileges.
NetApp Filer Requirements The NetApp Filer to which NTP Software Data Collection Agent for NAS, NetApp Edition will be scanning requires the following:
Data ONTAP v. 6.5 or later (excluding versions7.1.x). If Data Collection Agent is running on Windows Server 2008 or newer, it is recommended to upgrade to ONTAP version 7.3.3 or newer.
NTP Software Data Collection Agent for NAS, NetApp Edition requires the Cluster mode NetApp Filer to run Data ONTAP version 8.2 or later.
Copyright © 2011-2015 NTP Software 5
Installation
Prior to installing NTP Software Data Collection Agent for NAS, NetApp Edition, NTP Software recommends verifying that the installation server meets the requirements listed in the Requirements section of this document.
Installing Data Collection Agent for NAS, NetApp Edition
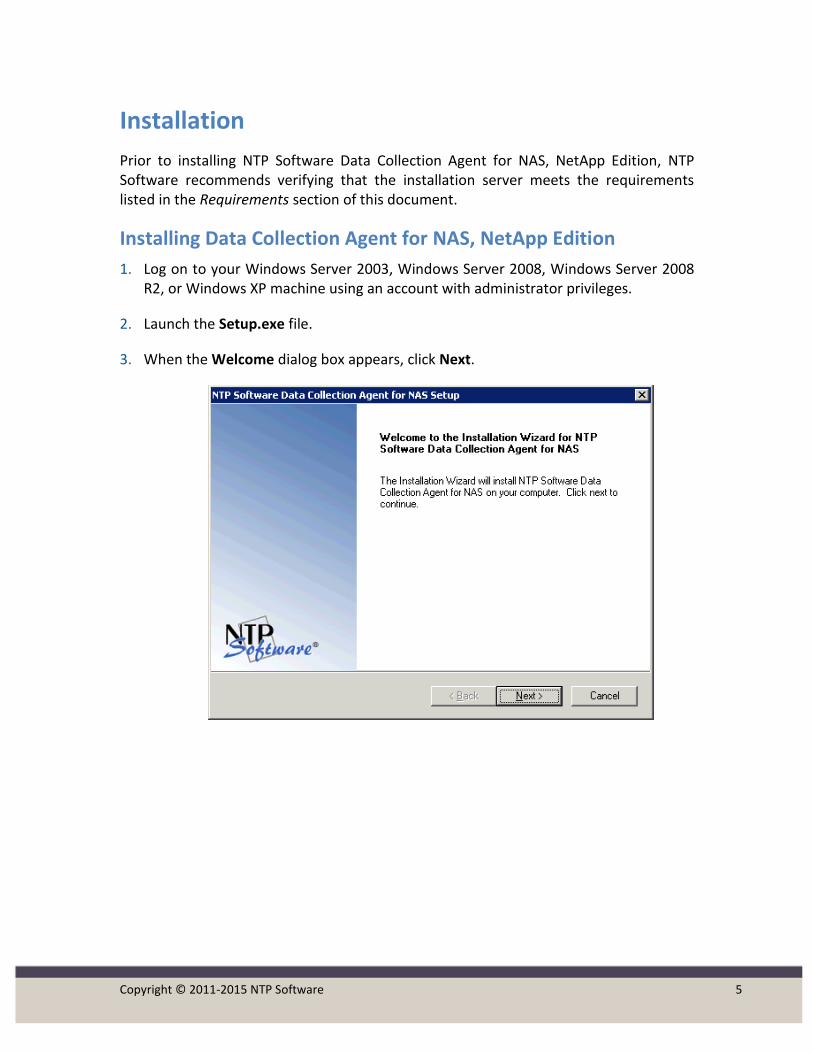
1. Log on to your Windows Server 2003, Windows Server 2008, Windows Server 2008 R2, or Windows XP machine using an account with administrator privileges.
2. Launch the Setup.exe file.
3. When the Welcome dialog box appears, click Next.
Copyright © 2011-2015 NTP Software 6
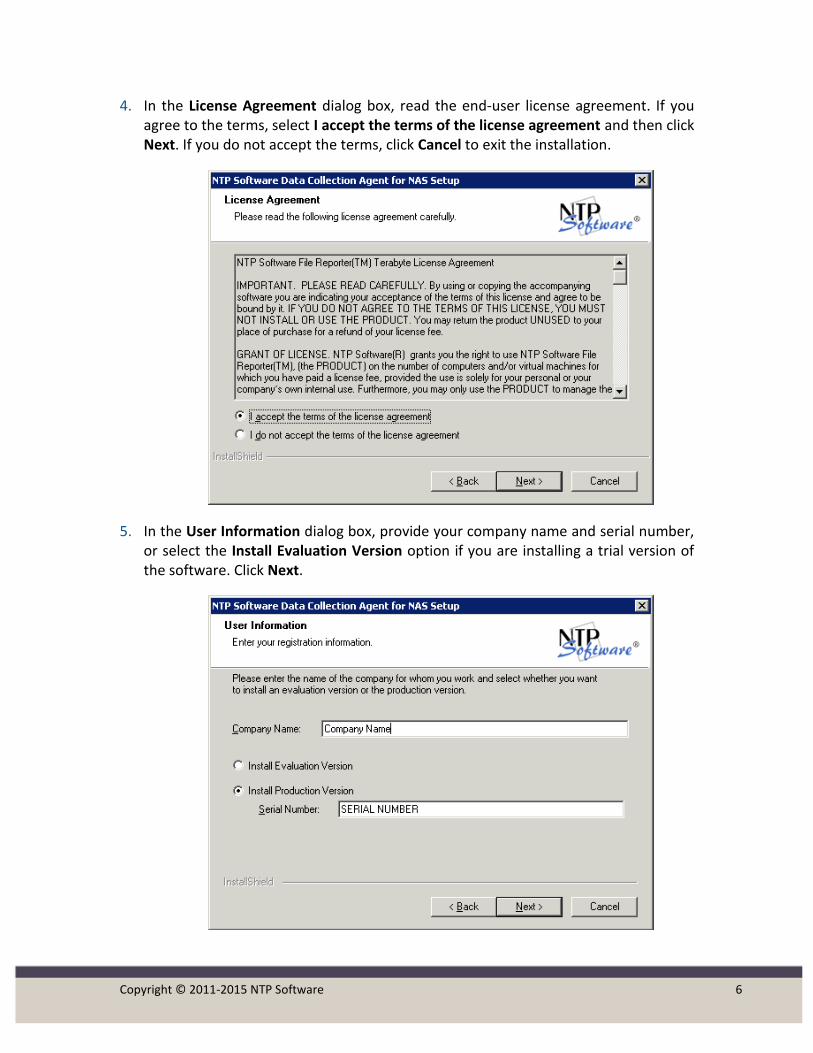
4. In the License Agreement dialog box, read the end-user license agreement. If you agree to the terms, select I accept the terms of the license agreement and then click Next. If you do not accept the terms, click Cancel to exit the installation.
5. In the User Information dialog box, provide your company name and serial number, or select the Install Evaluation Version option if you are installing a trial version of the software. Click Next.
Copyright © 2011-2015 NTP Software 7
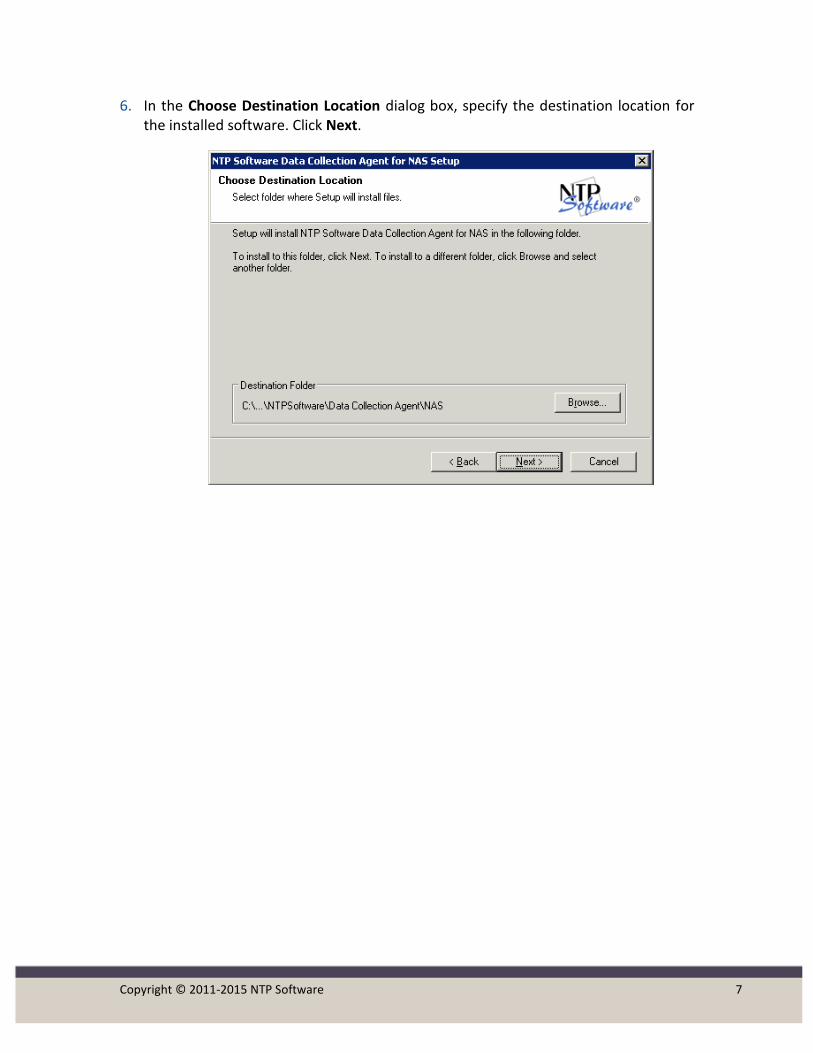
6. In the Choose Destination Location dialog box, specify the destination location for the installed software. Click Next.

Copyright © 2011-2015 NTP Software 8
7. In the Agent Configuration dialog box, you will be prompted for a Windows domain user account to run the agent. Enter the username and password for a domain user account with the following:
o Administrative rights on the Filer (for 7-Mode Filers only, not required for C-Mode Filers).
o read/write privileges for the NTP Software Data Collection Agent for NAS, NetApp Edition database.
8. Click Next.
Copyright © 2011-2015 NTP Software 9
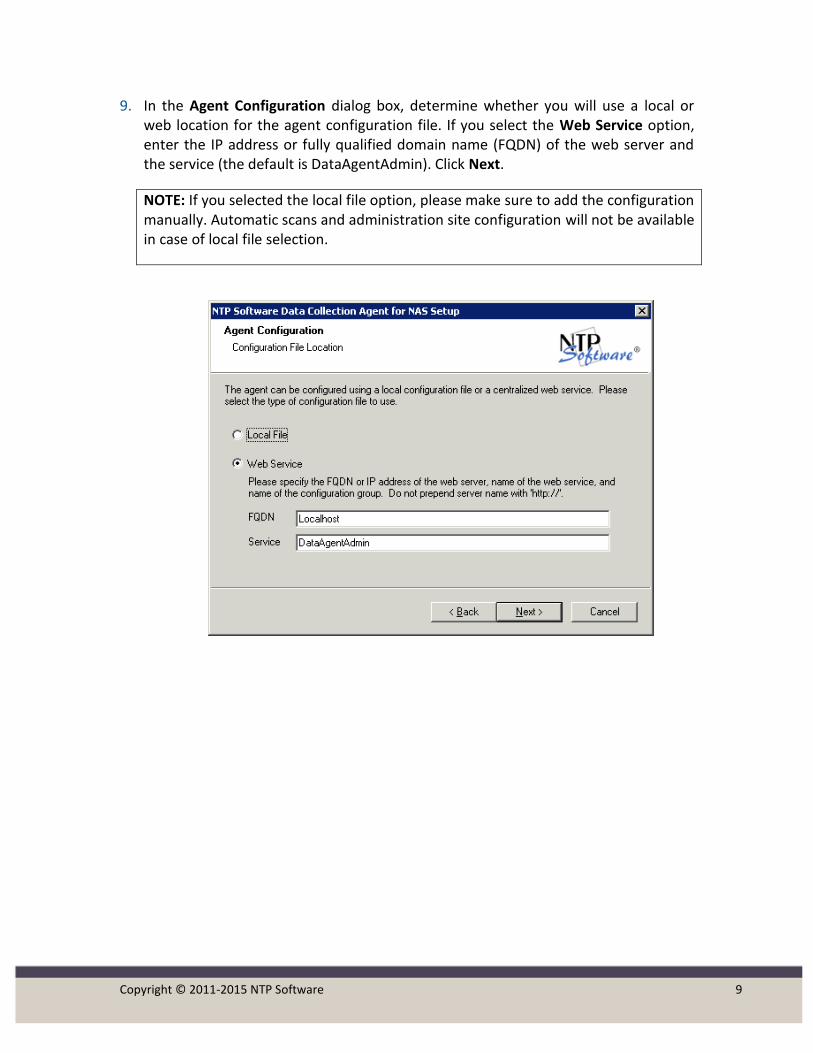
9. In the Agent Configuration dialog box, determine whether you will use a local or web location for the agent configuration file. If you select the Web Service option, enter the IP address or fully qualified domain name (FQDN) of the web server and the service (the default is DataAgentAdmin). Click Next.
NOTE: If you selected the local file option, please make sure to add the configuration manually. Automatic scans and administration site configuration will not be available in case of local file selection.
Copyright © 2011-2015 NTP Software 10
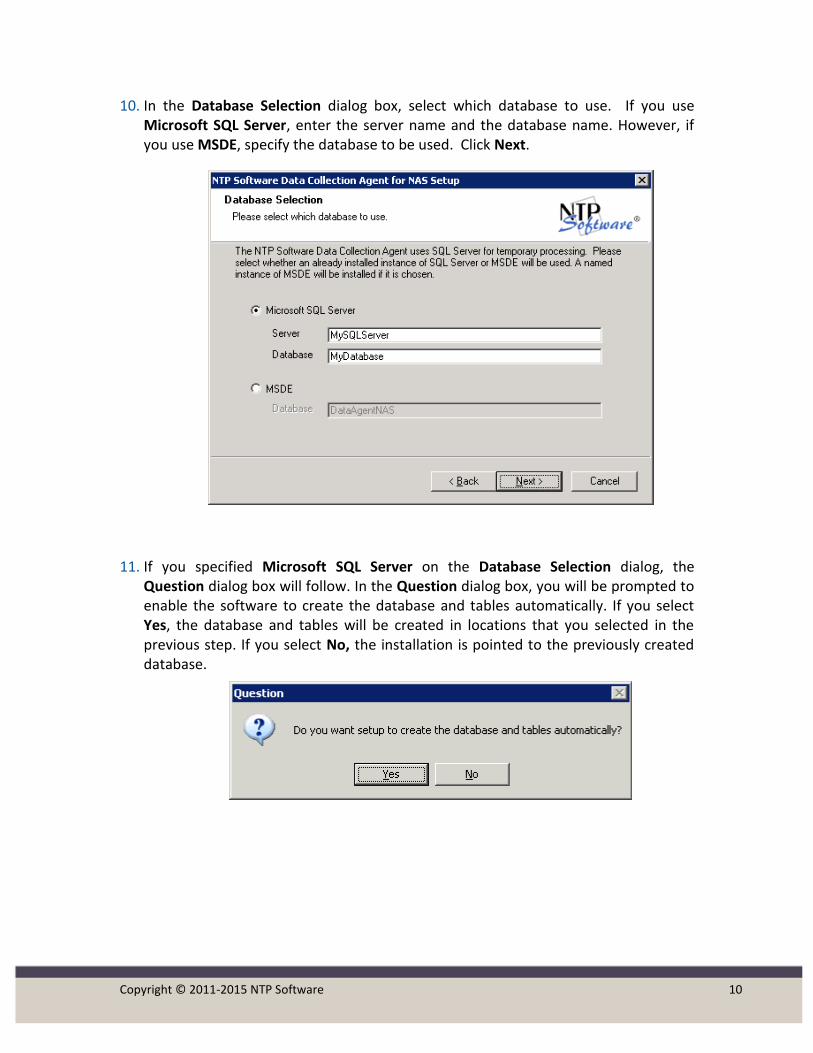
10. In the Database Selection dialog box, select which database to use. If you use Microsoft SQL Server, enter the server name and the database name. However, if you use MSDE, specify the database to be used. Click Next.
11. If you specified Microsoft SQL Server on the Database Selection dialog, the Question dialog box will follow. In the Question dialog box, you will be prompted to enable the software to create the database and tables automatically. If you select Yes, the database and tables will be created in locations that you selected in the previous step. If you select No, the installation is pointed to the previously created database.
Copyright © 2011-2015 NTP Software 11
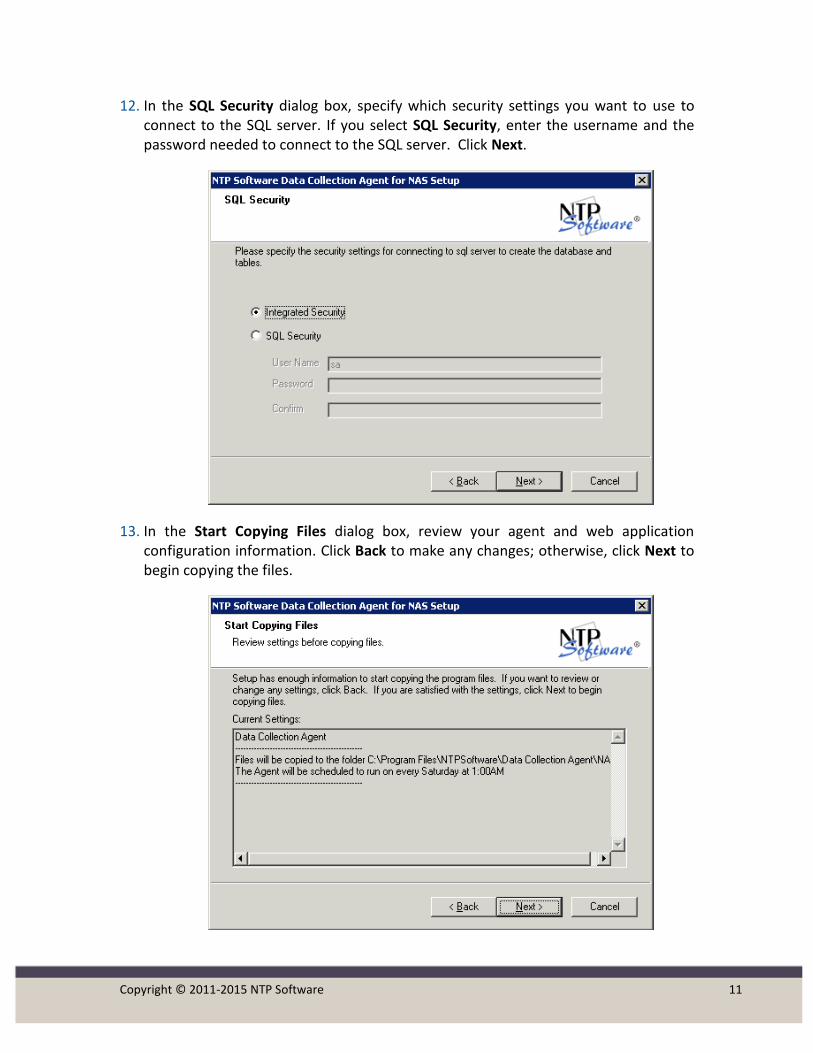
12. In the SQL Security dialog box, specify which security settings you want to use to connect to the SQL server. If you select SQL Security, enter the username and the password needed to connect to the SQL server. Click Next.
13. In the Start Copying Files dialog box, review your agent and web application configuration information. Click Back to make any changes; otherwise, click Next to begin copying the files.
Copyright © 2011-2015 NTP Software 12
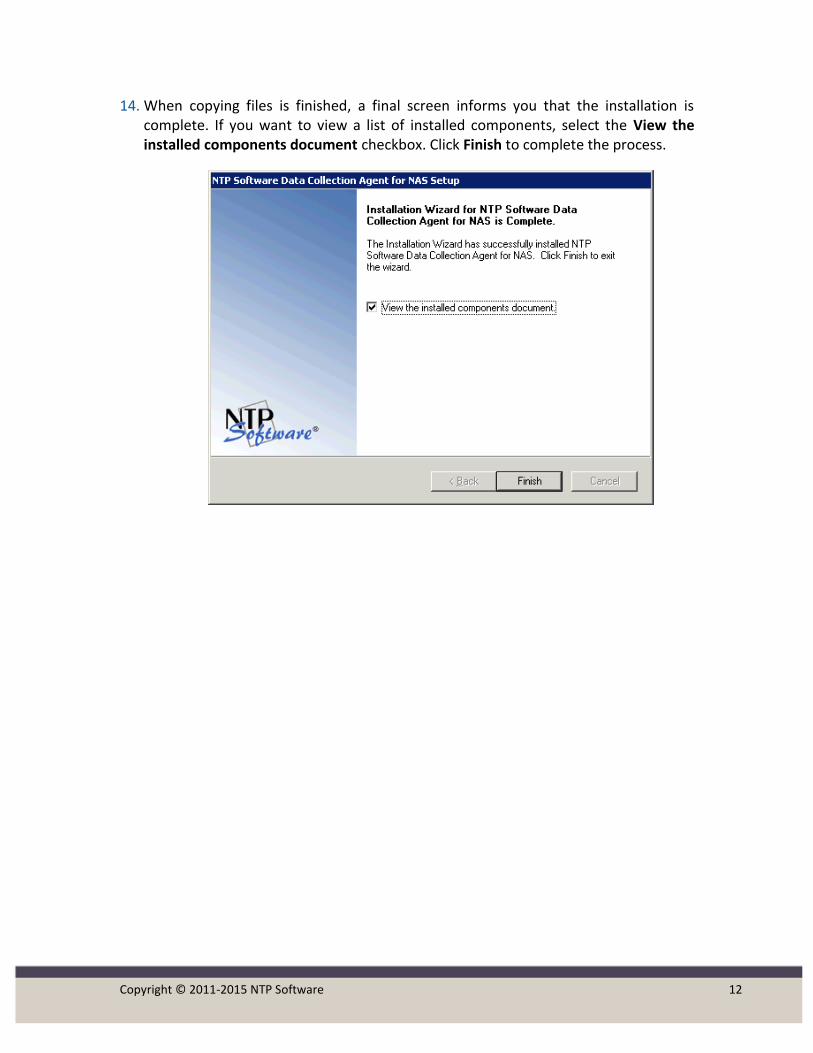
14. When copying files is finished, a final screen informs you that the installation is complete. If you want to view a list of installed components, select the View the installed components document checkbox. Click Finish to complete the process.

Copyright © 2011-2015 NTP Software 13
NOTE: Once you are done with the NTP Software Data Collection Agent for NAS, NetApp Edition installation, you will need to create a corresponding configuration for the agent. For more details, please refer to the NTP Software File Reporter™ user manual.

Copyright © 2011-2015 NTP Software 14
Prepare Netapp Filer for Data Collection Agent
Create a user for Data Collection Agent to use to scan C-Mode Filers
Create a local account on the cluster that has admin role for the ontapi application. Use the
following command to create this user: $ security login create -username ntp_user -application ontapi -authmethod password -role admin
Enabling NTPSoftware_DCA fpolicy for 7-Mode Filers
Although NTP Software Data Collection Agent For NAS, NetApp Edition does not install any components on the Filer, for Filers running ONTAP® versions lower than 7.0x, you will need to enable the NTPSoftware_DCA fpolicy management service.
For Filers running ONTAP version 7.0 or later, the NTPSoftware_DCA fpolicy will be created automatically. No further Filer administration is required.
NOTE: Data ONTAP versions 7.0.6 and 7.2.2 contain a number of fixes that address stability and memory issues related to fpolicy functionality in Data ONTAP. NetApp strongly recommends that customers using fpolicy should move to one of these Data ONTAP versions or later.
The Data ONTAP 7.1 release family is currently not supported with fpolicy.
For more information please consult NetApp Customer Support Bulletin CSB-0704-02: fpolicy Update for Data ONTAP.
To enable the MASCAN fpolicy, follow these steps:
Log on to the Filer with an account that has administrative privileges (for example, root).
1. At the prompt, type the following text and then press Enter:
fpolicy create NTPSoftware_DCA screen
NOTE: You will need this information when you add the Filer details in the Data Agent Administration website. For more details, please refer to the NTP Software File Reporter™ user manual.

Copyright © 2011-2015 NTP Software 15
2. Type the following text and then press Enter:
fpolicy enable NTPSoftware_DCA
3. To verify that CIFS file policies are now enabled, type the following text and then press Enter:
fpolicy
These steps create the configuration that allows NTP Software Data Collection Agent for NAS, NetApp Edition to register with and manage your Filer. This step must be completed before you try to configure NTP Software Data Collection Agent for NAS, NetApp Edition.

Copyright © 2011-2015 NTP Software 16
Enabling FPolicy Support for Cluster-Mode Filers
Note: NTP Software Data Collection Agent will create and enable fpolicy automatically for the managed CIFS Server on the cluster-mode Filer. However, the following section shows how to create and enable FPolicy manually.
Perform the following steps to enable the Cluster-Mode Data ONTAP fpolicy management service:
1. Log on to the NetApp server with an account that has administrative privileges.
2. At the prompt, enter the following commands:
fpolicy policy event create -vserver <vserver name> -event-name NTPSoftware_DCA_EVT_CIFS -protocol cifs
fpolicy policy external-engine create -vserver <vserver name> -engine-name NTPSoftware_DCA_ENG -primary-servers <Preferred DCA machine IP address, dedicated for communication with the filer> -port <unused dynamic port number> -extern-engine-type asynchronous -ssl-option no-auth
fpolicy policy create -vserver <vserver name> -policy-name NTPSoftware_DCA -events NTPSoftware_DCA_EVT_CIFS -engine NTPSoftware_DCA_ENG -is-mandatory false -allow-privileged-access yes -privileged-user-name <Data Collection Agent domain user account, in the format NetBiosName\UserName>
fpolicy policy scope create -vserver <vserver name> -policy-name NTPSoftware_DCA -shares-to-include "*" -volumes-to-include "*"
fpolicy enable -vserver <vserver name> -policy-name NTPSoftware_DCA -sequence-number <unused sequence number>
3. To verify that CIFS file policies are now enabled, enter the following command:
fpolicy show -vserver <vserver name>

Copyright © 2011-2015 NTP Software 17
NOTES:
Data Collection Agent will create and enable fpolicy automatically for the managed CIFS Server on the cluster-mode Filer using default sequence number 2. Since sequence number cannot duplicate.
DCA will fail to enable fpolicy on cluster-mode Filer if the sequence number is used by another fpolicy on the same VServer.
DCA will create a registry value named “<CifsServerName>_FPolicySeqNum” inside the connector registry key, with default value 2. If DCA failed to enable fpolicy due to a redundant sequence number, then the user can configure this registry value to any unused sequence number, and then restart the DCA.
Copyright © 2011-2015 NTP Software 18
About NTP Software
NTP Software puts users in charge of their file data and is the only company providing file data management solutions that deliver all of the enterprise-class features needed to understand, manage, monitor, and secure file data completely. NTP Software is a global leader and has been chosen by the majority of Fortune 1000 companies and thousands of customers in private and public sectors for providing leadership through superior solutions, professional services, experience, and trusted advice. NTP Software delivers a single solution across the entire data storage environment, from individual files and users to an entire global enterprise across thousands of systems and sites. NTP Software reduces the cost and complexity associated with the exponential growth of file data and is located on the web at www.ntpsoftware.com.
NTP Software Professional Services
NTP Software’s Professional Services offers consulting, training, and design services to help customers with their storage management challenges. We have helped hundreds of customers to implement cost-effective solutions for managing their storage environments. Our services range from a simple assessment to in-depth financial analyses.
For further assistance in creating the most cost-effective Storage Management Infrastructure, please contact your NTP Software Representative at 800-226-2755 or 603-622-4400.
Copyright © 2011-2015 NTP Software 19
The information contained in this document is believed to be accurate as of the date of publication. Because NTP Software must constantly respond to changing market conditions, what is here should not be interpreted as a commitment on the part of NTP Software, and NTP Software cannot guarantee the accuracy of any information presented after the date of publication.
This installation guide is for informational purposes only. NTP SOFTWARE MAKES NO WARRANTIES, EXPRESS OR IMPLIED, IN THIS DOCUMENT.
NTP Software and other marks are either registered trademarks or trademarks of NTP Software in the United States and/or other countries. Other product and company names mentioned herein may be the trademarks of their respective owners.
NTP Software products and technologies described in this document may be protected by United States and/or international patents.
NTP Software
20A NW Boulevard #136
Nashua, NH 03063
Toll Free: 800-226-2755
International: 1-603-622-4400
E-mail: [email protected]
Web Site: http://www.ntpsoftware.com
Copyright © 2011-2015 NTP Software. All rights reserved. All trademarks and registered trademarks are the property of their respective owners. Doc#4404EF