data entry using access - university of maine system
TRANSCRIPT

DATA ENTRY USING ACCESS
Table of Contents
Page
LESSON 1: THE ACCESS WINDOW ...............................................................................1
♦ What is Access?...........................................................................................1 ♦ Opening Access ...........................................................................................1 ♦ Parts of the Access Window........................................................................3 ♦ Terminology ................................................................................................3
LESSON 2: FORM NAVIGATION ....................................................................................6
♦ Forms...........................................................................................................6 ♦ Navigational Tools ......................................................................................8 ♦ Keyboard Shortcuts .....................................................................................9 ♦ Find............................................................................................................11 ♦ Find and Replace .......................................................................................12 ♦ Filtering .....................................................................................................13
LESSON 3: DATA ENTRY................................................................................................16
♦ Adding Data ..............................................................................................16 ♦ Modifying Records....................................................................................16 ♦ Copying Records .......................................................................................18 ♦ Deleting Records .......................................................................................19
LESSON 4: FIELD TYPES AND PROPERTIES............................................................22
♦ Data Types.................................................................................................22 ♦ Data Type Errors .......................................................................................23 ♦ AutoNumber/Number/Currency Fields .....................................................24 ♦ Primary Key Fields....................................................................................24 ♦ Required Fields.........................................................................................25 ♦ Default Values ...........................................................................................29 ♦ Field Sizes .................................................................................................29 ♦ Input Masks ...............................................................................................30 ♦ Yes/No Fields ............................................................................................30 ♦ Lookup Fields............................................................................................32 ♦ Data Validation..........................................................................................32
LESSON 5: GIVE IT A TRY! ............................................................................................35

NICE TO KNOW......................................................................................................................37
♦ Access Help Features ................................................................................37 ♦ Creating an AutoForm...............................................................................38 ♦ Mouse Pointers ..........................................................................................39 ♦ Toolbar Buttons.........................................................................................40 ♦ Keyboard Shortcuts ...................................................................................41
This workbook may be reproduced in whole or in part by an employee of the Department of Health and Human Services. All other reproduction is prohibited unless written permission is obtained from the Training Institute.
Last Updated: July 22, 2004
Data Entry Using Access Page 1
NOTES
LESSON 1: THE ACCESS WINDOW
OBJECTIVES: Define what Microsoft Access does. Identify the parts of the Microsoft Access program
window.
♦ What is Access?
OVERVIEW
Microsoft Access is a relational database application. A relational database is a collection of data organized into individual tables, each with their own purpose. These tables include connecting data that allows them to "relate" to one another. Therefore, the user is able to combine data from many tables to analyze the data and gain useful information.
♦ Opening Access
OVERVIEW
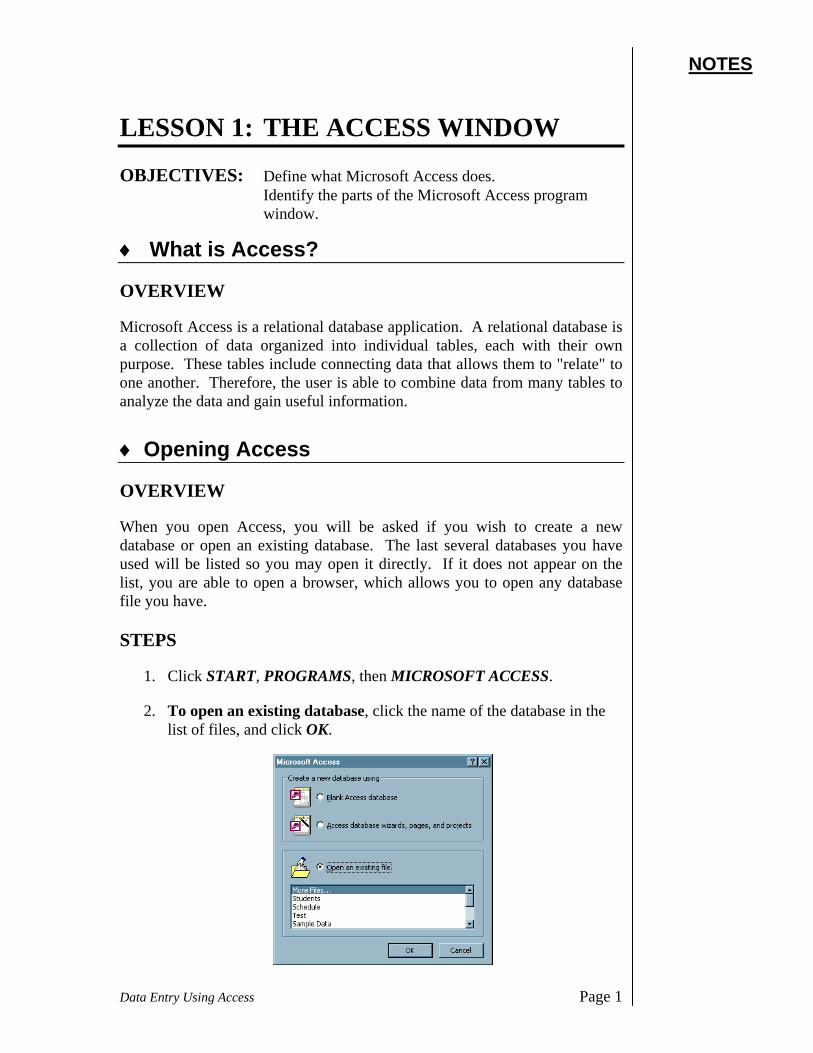
When you open Access, you will be asked if you wish to create a new database or open an existing database. The last several databases you have used will be listed so you may open it directly. If it does not appear on the list, you are able to open a browser, which allows you to open any database file you have. STEPS
1. Click START, PROGRAMS, then MICROSOFT ACCESS.
2. To open an existing database, click the name of the database in the list of files, and click OK.
Page 2 Data Entry Using Access
NOTES
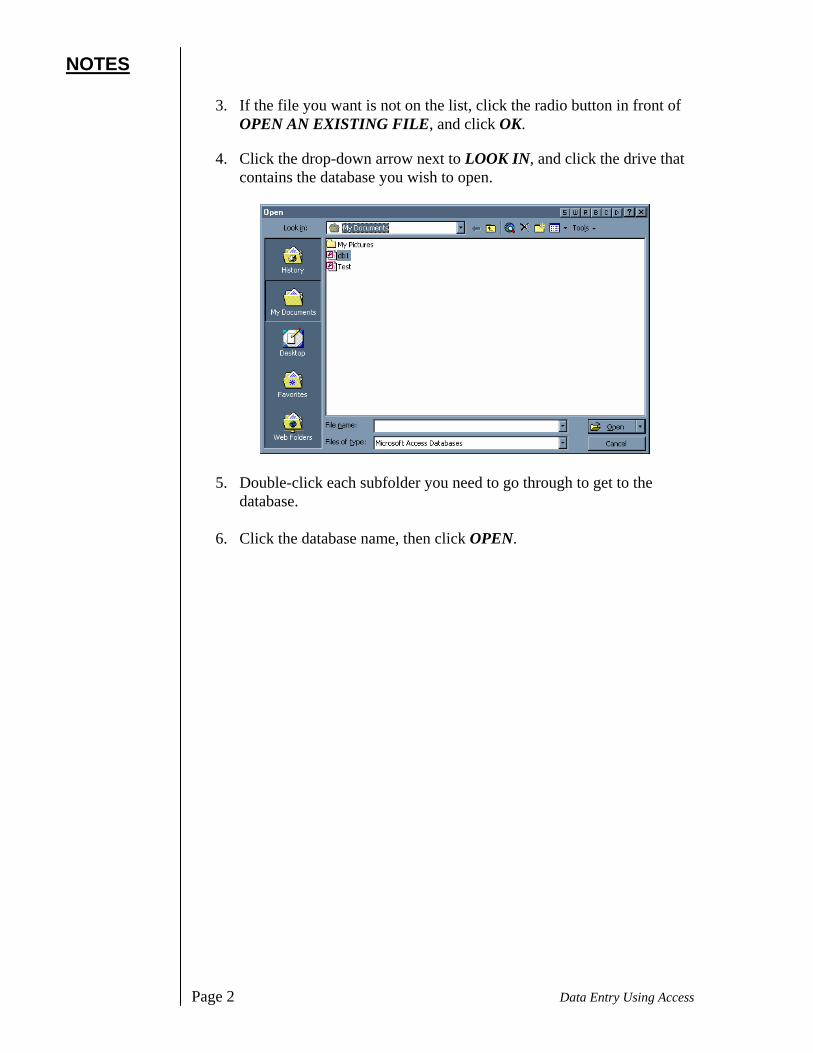
3. If the file you want is not on the list, click the radio button in front of OPEN AN EXISTING FILE, and click OK.
4. Click the drop-down arrow next to LOOK IN, and click the drive that contains the database you wish to open.
5. Double-click each subfolder you need to go through to get to the
database.
6. Click the database name, then click OPEN.

Data Entry Using Access Page 3
NOTES
♦ Parts of the Access Window
OVERVIEW
The Access window typically shows the following:
♦ Terminology
Title Bar - the blue bar at the top of the screen; it shows the program name. Minimize, Restore/Maximize, and Close Buttons - allow you to manipulate the program and workbook windows. Minimize collapses the window into the taskbar, Restore shrinks the window slightly, Maximize makes it as large as your screen, and Close will exit the workbook or program.
Title Bar
Menu Bar
Database Title
Object Toolbar
Objects Bar
Status Bar
Scrollbars
Database Window
Maximize/Restore Minimize Close
Database Toolbar
Page 4 Data Entry Using Access
NOTES
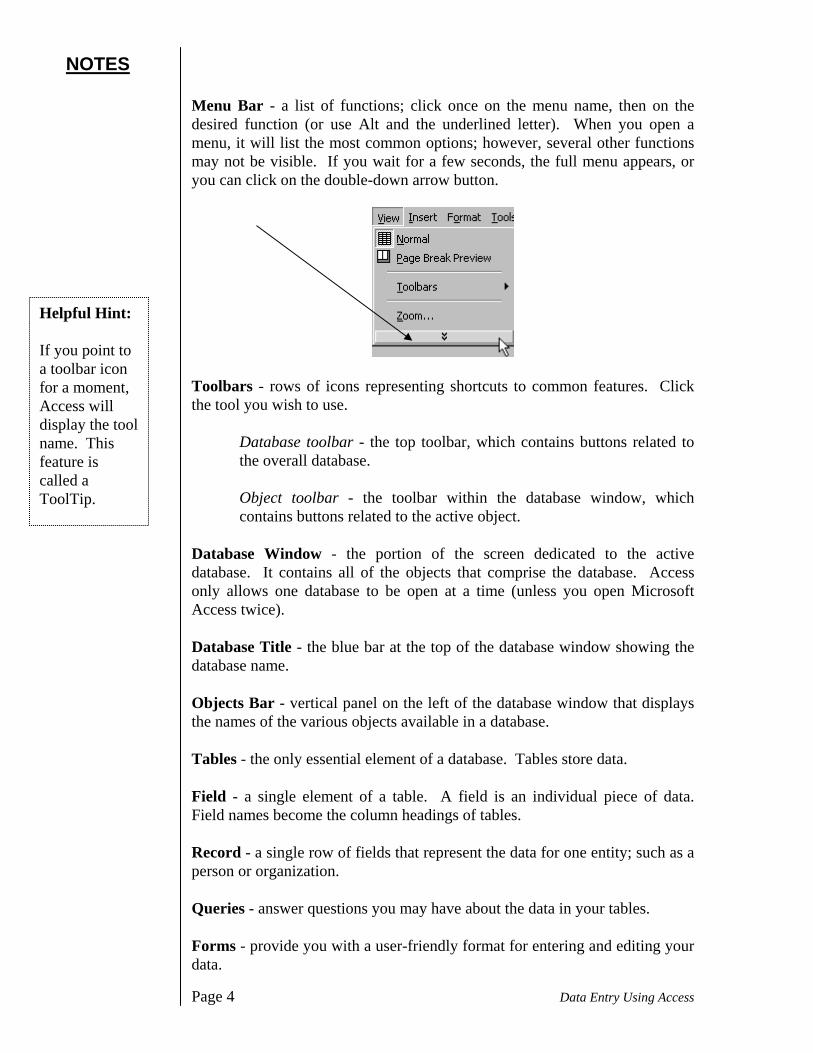
Menu Bar - a list of functions; click once on the menu name, then on the desired function (or use Alt and the underlined letter). When you open a menu, it will list the most common options; however, several other functions may not be visible. If you wait for a few seconds, the full menu appears, or you can click on the double-down arrow button.
Toolbars - rows of icons representing shortcuts to common features. Click the tool you wish to use.
Database toolbar - the top toolbar, which contains buttons related to the overall database. Object toolbar - the toolbar within the database window, which contains buttons related to the active object.
Database Window - the portion of the screen dedicated to the active database. It contains all of the objects that comprise the database. Access only allows one database to be open at a time (unless you open Microsoft Access twice). Database Title - the blue bar at the top of the database window showing the database name. Objects Bar - vertical panel on the left of the database window that displays the names of the various objects available in a database. Tables - the only essential element of a database. Tables store data. Field - a single element of a table. A field is an individual piece of data. Field names become the column headings of tables. Record - a single row of fields that represent the data for one entity; such as a person or organization. Queries - answer questions you may have about the data in your tables. Forms - provide you with a user-friendly format for entering and editing your data.
Helpful Hint: If you point to a toolbar icon for a moment, Access will display the tool name. This feature is called a ToolTip.

Data Entry Using Access Page 5
NOTES
Reports - nicely formatted, printable versions of complete or partial tables and queries. Pages - allow users to create Web versions of Access databases. Macros - perform a series of actions automatically, such as opening a form directly to a new record or printing and closing a report. Modules - a collection of Visual Basic for Application statements stored together as a unit. Status Bar - is at the very bottom of the program window. Scrollbars - appear on the right and bottom of the window, and allow you to see different areas of the worksheet.
Lesson Example
You need to open your database and become familiar with it. STEPS
1. Click START, PROGRAMS, then MICROSOFT ACCESS.
2. Click the STUDENTS database in the list of files (your Instructor will give you the location) and then click OK.
EXERCISE: 1) What are the names of the Tables in the database?
2) On Your Own: What are the names of the Forms in the database?
Page 6 Data Entry Using Access
NOTES
LESSON 2: FORM NAVIGATION
OBJECTIVES: Open and maneuver within data entry forms. Locate particular records. ♦ Forms
OVERVIEW
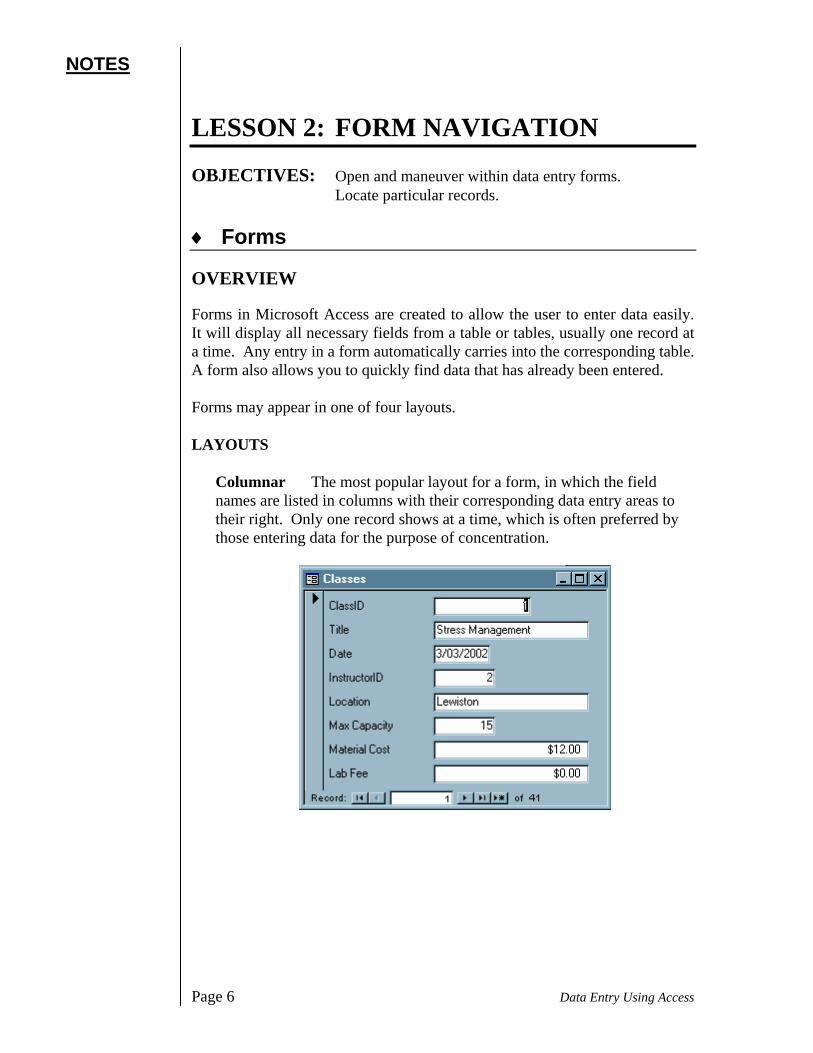
Forms in Microsoft Access are created to allow the user to enter data easily. It will display all necessary fields from a table or tables, usually one record at a time. Any entry in a form automatically carries into the corresponding table. A form also allows you to quickly find data that has already been entered. Forms may appear in one of four layouts. LAYOUTS
Columnar The most popular layout for a form, in which the field names are listed in columns with their corresponding data entry areas to their right. Only one record shows at a time, which is often preferred by those entering data for the purpose of concentration.
Data Entry Using Access Page 7
NOTES
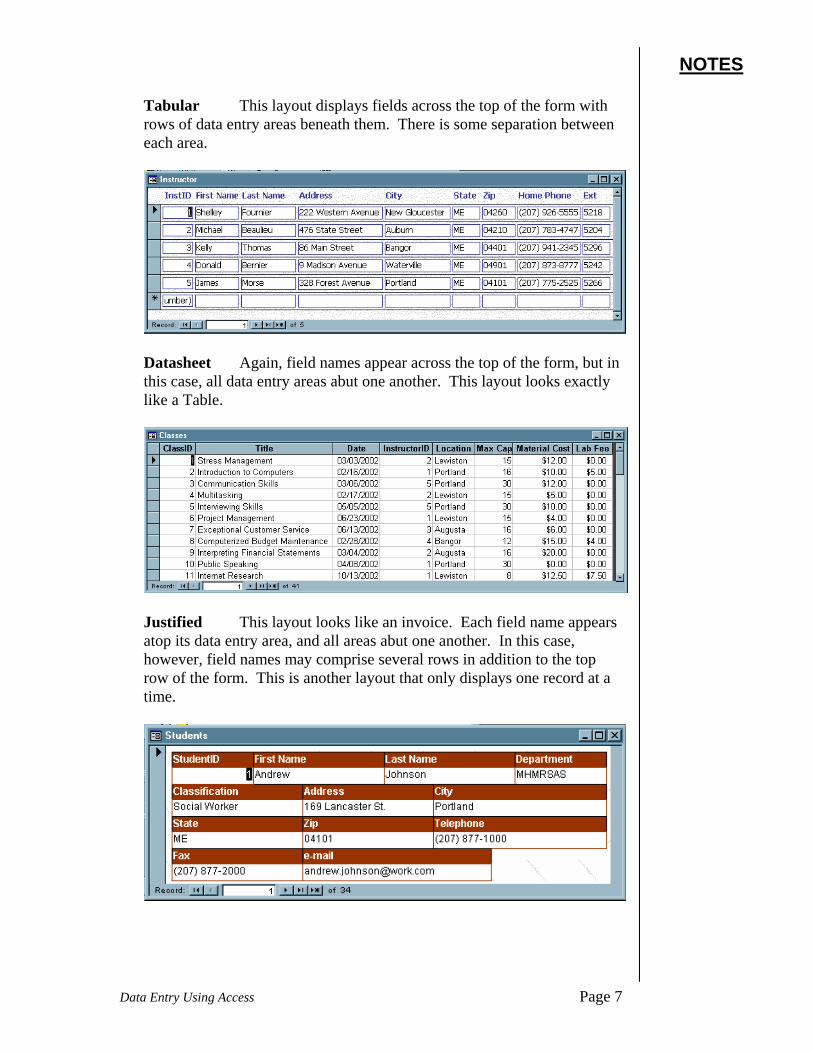
Tabular This layout displays fields across the top of the form with rows of data entry areas beneath them. There is some separation between each area.
Datasheet Again, field names appear across the top of the form, but in this case, all data entry areas abut one another. This layout looks exactly like a Table.
Justified This layout looks like an invoice. Each field name appears atop its data entry area, and all areas abut one another. In this case, however, field names may comprise several rows in addition to the top row of the form. This is another layout that only displays one record at a time.
Page 8 Data Entry Using Access
NOTES
In addition to the layout of the form, a variety of styles are available for the developer to choose from. Styles determine the font, font size, colors, and graphics that appear on the form. STEPS
1. Click the FORMS object in the OBJECTS bar.
2. Double-click the name of the form to open.
♦ Navigational Tools
OVERVIEW
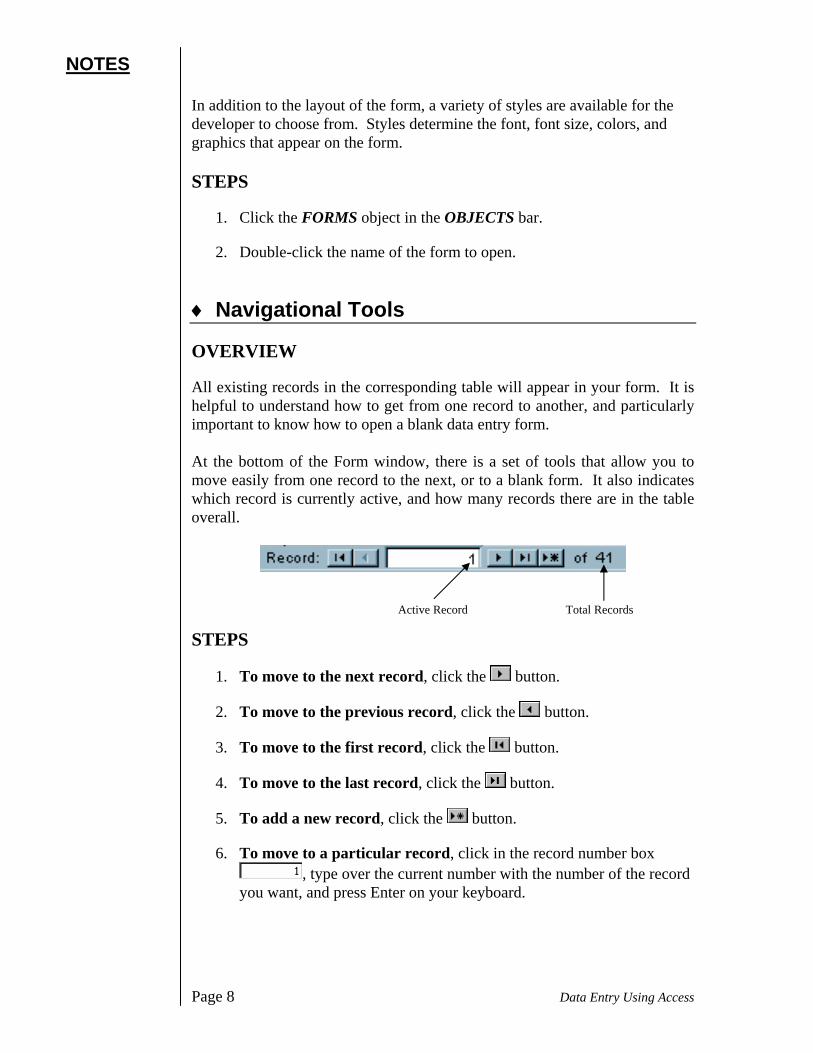
All existing records in the corresponding table will appear in your form. It is helpful to understand how to get from one record to another, and particularly important to know how to open a blank data entry form. At the bottom of the Form window, there is a set of tools that allow you to move easily from one record to the next, or to a blank form. It also indicates which record is currently active, and how many records there are in the table overall.
STEPS
1. To move to the next record, click the button.
2. To move to the previous record, click the button.
3. To move to the first record, click the button.
4. To move to the last record, click the button.
5. To add a new record, click the button.
6. To move to a particular record, click in the record number box , type over the current number with the number of the record
you want, and press Enter on your keyboard.
Active Record Total Records
Data Entry Using Access Page 9
NOTES
♦ Keyboard Shortcuts
OVERVIEW
If you prefer to use your keyboard to move from one record to another and through the fields in a record, there are several keystroke combinations that will assist you. STEPS
1. To move to the next field, press TAB or ENTER. You may also press the right or down arrow key.
2. To move to the previous field, hold down the SHIFT key and press the TAB key. You may also use the up or left arrow key.
3. To move to the first field of the first record, hold down the CTRL key and press the HOME key.
4. To move to the last field in the last record, hold down the CTRL key and press the END key.
5. To move to the first field of the current record, press HOME.
6. To move to the last field of the current record, press END.

Page 10 Data Entry Using Access
NOTES
Lesson Example
You want to look through the records in the Students Form. STEPS
1. Click the FORMS object in the OBJECTS bar.
2. Double-click the STUDENTS form.
3. In what layout was the Students form created?
EXERCISE: 1) Use your Tab key to move through all of the fields in the first
record in the Students form.
2) Go to the last record using the navigational tools at the bottom of the form.
3) Return to the first record using your keyboard.
4) On Your Own: Go to the last field in the current record using your keyboard.
5) Return to the first field in the current record using your keyboard.
6) Close the Students form.

Data Entry Using Access Page 11
NOTES
♦ Find
OVERVIEW
When your database contains a large number of records, it can be difficult to find a specific piece of information. Access has a tool that enables you to find a record if you know the data in one of its fields. STEPS
1. Click in the field by which you want to search.
2. Click the FIND button .
3. Type the entry you wish to find for the selected field in the FIND WHAT text box.
4. Click the FIND NEXT button.
5. If the record you were seeking appears, click CANCEL or the CLOSE button . If this is not the correct record, click FIND NEXT again.
6. To search by a portion of the entry, click the MATCH drop-down list, and select START OF FIELD or PART OF FIELD before clicking FIND NEXT.
7. To search the records from the bottom of the list to the top, click the MORE button, and in the SEARCH drop-down select UP. Change it back to ALL if necessary. You may click LESS to hide that portion of the dialog box if desired.
Helpful Hint: You may need to move the FIND AND REPLACE dialog box to see the record Access finds. Simply click and drag the Title Bar of the box.

Page 12 Data Entry Using Access
NOTES
♦ Find and Replace
OVERVIEW
You may also need to edit data that was previously entered. For example, a department name could change. If you wish to change a certain entry in several fields, the Find and Replace feature can allow you to change them all at once. STEPS
1. Click in the field by which you want to search.
2. Click the FIND button .
3. To replace the current entry with alternate data, click the REPLACE tab.
4. Type the text to be found in the FIND WHAT box.
5. Type the text to overwrite the entry in the REPLACE WITH box.
6. Click the FIND NEXT button.
7. If this is the field you wish to change, click REPLACE.
8. If you are certain you want to change every occurrence of this entry, click REPLACE ALL.
Helpful Hint: When using Find and Replace be certain to type the entire item to be replaced in the FIND WHAT text box no matter what the MATCH text box says.
Data Entry Using Access Page 13
NOTES
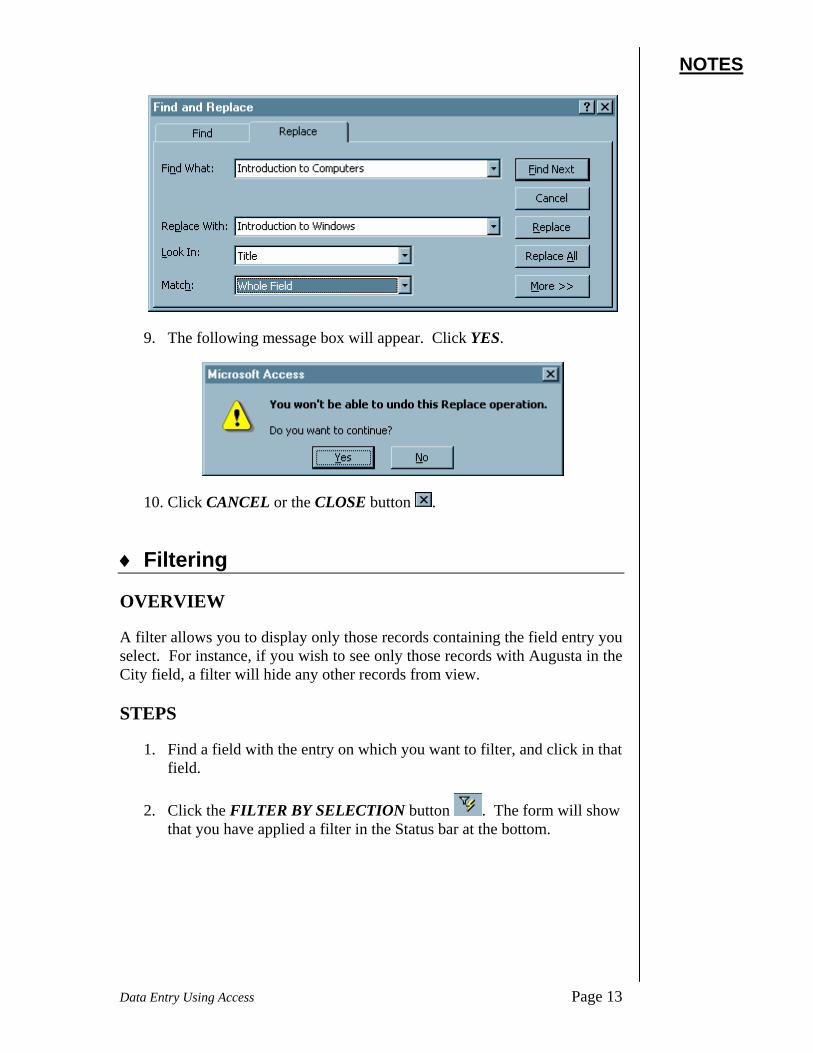
9. The following message box will appear. Click YES.
10. Click CANCEL or the CLOSE button .
♦ Filtering
OVERVIEW
A filter allows you to display only those records containing the field entry you select. For instance, if you wish to see only those records with Augusta in the City field, a filter will hide any other records from view. STEPS
1. Find a field with the entry on which you want to filter, and click in that field.
2. Click the FILTER BY SELECTION button . The form will show that you have applied a filter in the Status bar at the bottom.

Page 14 Data Entry Using Access
NOTES
3. To display all records again, click the REMOVE FILTER button
.

Data Entry Using Access Page 15
NOTES
Lesson Example
You are looking for a class entitled Public Speaking in the Classes form. STEPS
1. Double-click the CLASSES form.
2. Click in the Title field of the first record, then click the FIND button.
3. Type Public Speaking in the FIND WHAT text box.
4. Click the FIND NEXT button.
5. Click the FIND NEXT button again. Notice that this is another Public Speaking class, but with different details.
6. Click CANCEL or the CLOSE button
7. Check that your active field is still Title in the form, and click the FILTER button in the toolbar.
8. How many Public Speaking classes are there in the entire database?
9. Return to displaying the entire table by clicking the REMOVE FILTER button.
EXERCISE: 1) Use Find and Replace to change all classes entitled
Multitasking to Time Management.
2) Close the Find and Replace dialog box.
3) Filter to display only those classes to be held in Bangor.
4) Remove the filter.
5) On Your Own: A minimum Material Cost of $2.50 has been set. Change all classes with a $0.00 Material Cost to $2.50.
6) Filter to display all classes with no Lab Fee.
7) Remove the filter, and close the Classes form.
Page 16 Data Entry Using Access
NOTES
LESSON 3: DATA ENTRY
OBJECTIVE: Enter and edit data. ♦ Adding Data
OVERVIEW
An Access database can store enormous amounts of data. That data must be entered correctly in order to ensure that accurate information is extracted from the database. Microsoft Access includes several features that assist the user in entering data efficiently. The most important of these is the Save function. Each time you move from one field to another, the data entered in the previous field is saved. Therefore, as you perform data entry you will never need to save your work. STEPS
1. To add a new record, click the NEW RECORD button at the bottom of the form, and type the data in the first field. Press TAB to move to the next field, and continue entering data and pressing TAB until the record is complete.
2. To add data to any empty field, find the appropriate record and move your insertion point into the field using the methods described in Lesson 2. Then type the data.
♦ Modifying Records
OVERVIEW
Any entry in your database may be modified if the data changes for some reason. STEPS
1. Find the record needing to be changed.
2. To overwrite the entry in a field, TAB to the field needing to be changed (this will highlight the data in that field). Type the new data.

Data Entry Using Access Page 17
NOTES
3. To change only a portion of the entry in a field, click in the field to be changed. Making sure your insertion point is properly placed, type any additional data, and/or delete data to be removed.
4. To undo a change to a field, if you have not yet pressed the TAB key to move to the next field, the ESC key will return you to the original entry. If you have moved to the next field, click the UNDO button
in the toolbar.
Lesson Example
You need to enter a new student into the database. STEPS
1. Double-click the STUDENTS form.
2. Click the NEW RECORD button.
3. Type HG44 in the STUDENTID field. Press the TAB key.
4. Type the following information in the remaining fields, pressing the TAB key to move from one field to the next:
Field Entry First Name Heather Last Name Grant Department BDS Classification Clerk Typist II Address BMHI Complex City Bangor State ME Zip 04401 Telephone (207) 561-3000 Fax (207) 561-4000 e-mail [email protected]
Did You Know? The UNDO button will only allow you to reverse one action.

Page 18 Data Entry Using Access
NOTES
EXERCISE: 1) In the Students form, find the record of Sherry Pope, and
change her from a Clerk Typist II to a Clerk Typist III.
2) Change Melissa Parlin’s last name to Jones.
3) On Your Own: Enter the following new student:
Field Entry
StudentID GL42 First Name George Last Name Libby Department DHS Classification Auditor Address 11 High St. City Houlton State ME Zip 04730 Telephone (207) 733-6000 Fax (207) 733-7000 e-mail [email protected] 4) Change Lisa Evans’ Address, City, and Zip to 1 Main St.,
Presque Isle, 04769 and her Phone Number and Fax to (207) 555-4444, and (207) 555-5555.
5) Close the Students form.
♦ Copying Records
OVERVIEW
In certain circumstances, some of the data entered in the previous record will be identical to the data needed for the current record. It may also be simpler to duplicate a record and change small parts of the entry rather than typing the entire record. Access provides you with options for copying all or part of a record into another record.
Helpful Hint: One way to remember the copy function for the previous field is to think “ditto” - the ‘ key also includes the “ character, which is often used to mean ditto.

Data Entry Using Access Page 19
NOTES
STEPS
1. To copy the field entry from the previous record into the current record, hold down the CTRL key and press the ' key.
2. To copy an entire record, click the RECORD SELECTOR button to the left of the record to copy (this will highlight the entire bar
running down the left side).
3. Click the COPY button on the Standard toolbar.
4. Click the NEW RECORD button at the bottom of the form.
5. Click the RECORD SELECTOR button to the left of the new
record, and click the PASTE button on the Standard toolbar.
♦ Deleting Records
OVERVIEW
On occasion, you may need to eliminate a record altogether. You may or may not have the ability to do this in your particular database, depending on your permissions. However, if you are able, the process is very simple. STEPS
1. Find the record to be deleted.
2. Click the RECORD SELECTOR button to the left of the record.
3. Click the DELETE RECORD button in the toolbar. Or, press DELETE on your keyboard.
4. Click YES to confirm the deletion.
Page 20 Data Entry Using Access
NOTES
Lesson Example
You have been asked to enter an additional class date to the database. Since the class information is very similar to another class offered, you decide to copy the class data and make minor changes to it. STEPS
1. Double-click the CLASSES form.
2. Click in the Title field of the first record, then click the FIND button.
3. Type Interviewing Skills in the FIND WHAT text box.
4. Click the FIND NEXT button until you find the one taught by Morse on 05/05/2002.
5. Click CANCEL or the CLOSE button
6. Select the record by clicking the RECORD SELECTOR arrow on the left side of the form.
7. Click the COPY button on the Standard toolbar.
8. Click the NEW RECORD button at the bottom of the form.
9. Click the PASTE button on the Standard toolbar.
10. Change the date of the class to 06/12/2002. Keep the other information the same.
Data Entry Using Access Page 21
NOTES
EXERCISE: 1) Copy the Time Management class scheduled taught by
Thomas on 05/31/2002 and paste it to a new record.
2) Change the Date to 03/07/2005, the Location to Augusta, and the Max Capacity to 16.
3) Delete the Internet Research class taught by Fournier on 04/04/2002.
4) On Your Own: Copy the Communication Skills class taught by Beaulieu on 09/09/2002 and paste it to a new record.
5) Change the date to 04/17/2005.
6) Delete the Computerized Budget Maintenance class taught by Bernier on 02/28/2002.
7) Leave the Classes form open.
Page 22 Data Entry Using Access
NOTES
LESSON 4: FIELD TYPES AND PROPERTIES
OBJECTIVES: Properly identify Access data types. Understand error messages related to invalid data entry
and correct the entry appropriately. OVERVIEW
Microsoft Access has several methods for controlling the data entered in specific fields. When applied, these features assist in maintaining consistency throughout the database. ♦ Data Types
OVERVIEW
When establishing the fields that make up a table (and its corresponding form), the developer of the database must determine what type of data will be entered in that field. Access has several different data types from which to choose.
Text - used for all data that consists of letters, numbers, and/or characters. You are limited to 255 keystrokes in a text field. Memo - also allows for letters, numbers, and/or characters, but for larger amounts up to 65,535 keystrokes. Number - only permits the entry of digits. It is suggested that you only select the number data type if you wish to perform calculations with the data. Date/Time - used for dates and times and may be formatted to show one, the other, or a combination of both. Currency - used for money, and like the Number data type will only allow the entry of digits. AutoNumber - numbers records in the order they are entered. When AutoNumber is displayed in a field, simply TAB past it. Once data is entered in any field in that record, the next consecutive number will appear in the AutoNumber field.
Did You Know? The NUMBER and CURRENCY data types will eliminate a leading zero. For example, if a Zip Code field had a number data type, all zip codes for Maine would only display four digits.
Helpful Hint: Even if a record is deleted, once an AUTO-NUMBER is used, that number will never be reassigned.

Data Entry Using Access Page 23
NOTES
Yes/No - used to answer "yes/no" or "true/false" questions. This field will display a box, which if left empty means no or false, if checked means yes or true. OLE Object - Object Linking and Embedding - enables you to enter pictures or charts.
Hyperlink - allows the entry of a combination of text and/or numbers as an interactive link to another location, such as a Web address.
Lookup Wizard – used to create a drop-down list of choices. You are
limited to the selections on the list. See below for further information on this data type.
♦ Data Type Errors
OVERVIEW
If you attempt to enter data that is not permitted by the data type of the field, an error message will appear. STEPS
1. Type invalid data in a field, and press TAB to move to the next field.
2. Click the OK button to close the error message box.
3. The field in which the error occurred should be highlighted. Type over the invalid data with appropriate data, then continue data entry as needed.
Page 24 Data Entry Using Access
NOTES
♦ AutoNumber/Number/Currency Fields
OVERVIEW
The AutoNumber, Number and Currency data types only allow numeric digits to be entered. AutoNumber fields need no entry at all. In fact, you are unable to enter data in an AutoNumber field. Number and Currency fields work the same way, you may only enter digits; however, the Currency field will apply the dollar sign to the entry. STEPS
1. Press the TAB key to move to an AutoNumber field.
2. Type nothing in the field. Press TAB. The next consecutive number will be assigned.
3. To enter data in a Number or Currency field, TAB to the field, type the appropriate digits, and press TAB again to move to the next field.
♦ Primary Key Fields
OVERVIEW
One field in your form is likely to be a Primary Key field. This field is what Access uses to identify each record. The entry in a primary key field for one record must never duplicate an entry in that field for another record. It may not be evident to you that a field is a primary key field until you attempt to enter duplicate data in it. Fortunately, many primary key fields have a data type of AutoNumber, in which you are never responsible for doing any entry. STEPS
1. Press the TAB key to move to a Primary Key field.
2. If the field is an AutoNumber data type (it will say (AutoNumber) in the field), press the TAB key. Otherwise, type an appropriate entry in the field. Press TAB.
Data Entry Using Access Page 25
NOTES
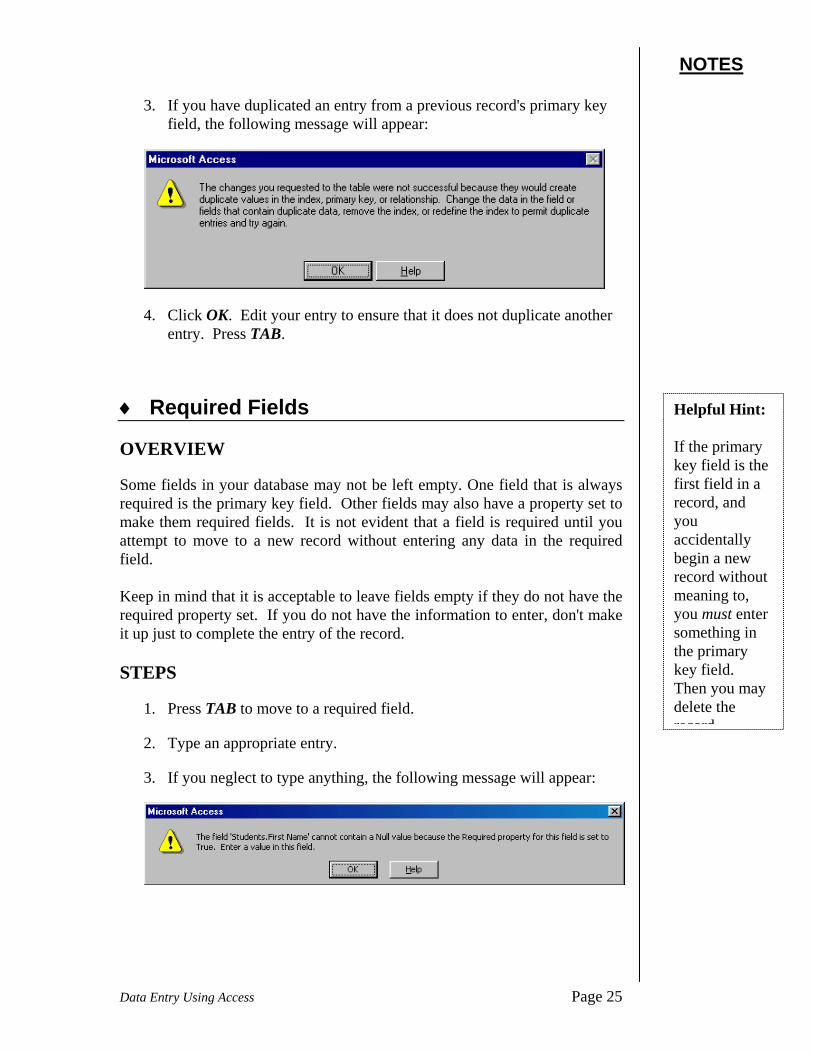
3. If you have duplicated an entry from a previous record's primary key field, the following message will appear:
4. Click OK. Edit your entry to ensure that it does not duplicate another entry. Press TAB.
♦ Required Fields
OVERVIEW
Some fields in your database may not be left empty. One field that is always required is the primary key field. Other fields may also have a property set to make them required fields. It is not evident that a field is required until you attempt to move to a new record without entering any data in the required field. Keep in mind that it is acceptable to leave fields empty if they do not have the required property set. If you do not have the information to enter, don't make it up just to complete the entry of the record. STEPS
1. Press TAB to move to a required field.
2. Type an appropriate entry.
3. If you neglect to type anything, the following message will appear:
Helpful Hint: If the primary key field is the first field in a record, and you accidentally begin a new record without meaning to, you must enter something in the primary key field. Then you may delete the record

Page 26 Data Entry Using Access
NOTES
4. Note the field mentioned in the message box.
5. Click OK, then enter appropriate data into the required field.
Lesson Example
You are attempting to perform data entry in the Classes form; however, the information you have been given is causing error messages to appear. STEPS
1. Be sure you are in the CLASSES form.
2. Click the NEW RECORD button.
3. Try to type 76 in the CLASSID field. Stop trying and press the TAB key.
4. Type Project Management for the TITLE. Press the TAB key.
5. Type 10/22/2002 for the DATE. Press the TAB key.
6. Type Morse for the INSTRUCTOR. Press the TAB key.
7. You do not know a LOCATION at this time, so TAB to the MAX CAPACITY field.
8. Type Ten, and press the TAB key. What happens?
9. Read the message that appears, then click OK.
10. Press the BACKSPACE key three times to erase the text entry, then type 10, and press the TAB key. What happens?
11. In the MATERIAL COST field, type Instructor Discretion, and press the TAB key.
12. Read the message that appears, then click OK.

Data Entry Using Access Page 27
NOTES
13. Use the BACKSPACE key to erase the text entry, then type 4, and press the TAB key.
14. Close the Classes form.

Page 28 Data Entry Using Access
NOTES
EXERCISE: 1) In the Students form, open a new record and enter the
following information, bypassing any fields not mentioned:
Field Entry
StudentID SS66 First Name Sally Department DHS Classification Data Entry Specialist Address 200 Main St. City Lewiston State ME Zip 04240 Telephone (207) 783-8000 Fax (207) 783-9000 e-mail [email protected] 2) When you attempt to Tab out of this record, a message
appears. Close the message and type Soucy in the appropriate field to fix the problem.
3) On Your Own: In the Students form, open a new record and enter the following information, bypassing any fields not mentioned:
Field Entry
First Name Robin Last Name Baldwin Department BDS Classification Mental Health Worker II Address 169 Lancaster St. City Portland State ME Zip 04101 Telephone (207) 877-1000 Fax (207) 877-2000 e-mail [email protected]
4) Make up information to resolve the problem that arises as you try to finish the record.
5) Close the Students form.
Data Entry Using Access Page 29
NOTES
♦ Default Values
OVERVIEW
If a field will often contain the same data, a default value eliminates the need to enter that data repeatedly. However, it will allow you to enter alternate data whenever necessary. Fields with default values are very evident - they already have data in them. STEPS
1. Press the TAB key to move to a default value field.
2. To keep the default data, simply press TAB to move to the next field.
3. To change the data, type over the default entry, then press TAB to move to the next field.
♦ Field Sizes
OVERVIEW
As previously discussed, text fields are limited to 255 characters and spaces of entry, and memo fields 65,535. However, it is possible to limit these fields to a particular number of characters and spaces of entry. For example, in a text field that collects State data, you may be limited to entering only the two-character abbreviation. Like other field properties, it may not be apparent that the field size is limited until you attempt to type more than allowed. STEPS
1. Press the TAB key to move to a field with a size limit.
2. Type an appropriate entry in the field, and press TAB to move to the next field.
3. If you type more than the limit, no message will appear. You will simply be unable to continue entering data in that field.
ful Hint:
e loper ed to ide you
tance, they have d riptive text ach field will appear e Status of the .
Page 30 Data Entry Using Access
NOTES
♦ Input Masks
OVERVIEW
An Input Mask may be applied to certain types of fields so you do not have to type certain characters while entering data. For instance, when typing a telephone number, you can simply type the digits rather than having to remember parentheses around the area code and a dash in the middle of the number. STEPS
1. Press the TAB key to move to a field with an input mask.
2. Type the data, ignoring the characters.
♦ Yes/No Fields
OVERVIEW
As discussed in the Data Types section, a Yes/No field answers a true/false or yes/no question. The field appears as a box that may be checked to indicate yes or true, or may be kept empty to mean no or false. STEPS
1. Press the TAB key to move to a Yes/No field. The box will look shaded, indicating that it is the active field.
2. To place a checkmark in the box, press the SPACEBAR on your keyboard. The SPACEBAR is a toggle key, so pressing it again will remove the check.
Lesson Example
You need to enter a new instructor. STEPS
1. Double-click the INSTRUCTORS form.
2. Click the NEW RECORD button.
Data Entry Using Access Page 31
NOTES
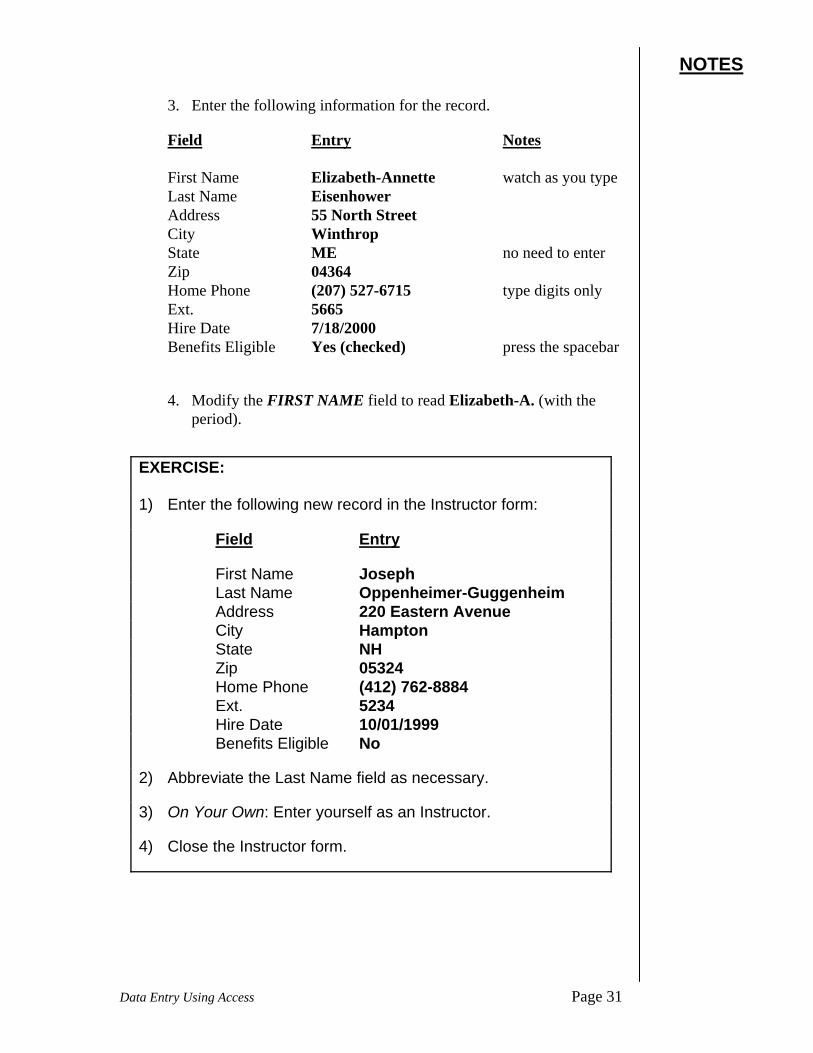
3. Enter the following information for the record.
Field Entry Notes First Name Elizabeth-Annette watch as you type Last Name Eisenhower Address 55 North Street City Winthrop State ME no need to enter Zip 04364 Home Phone (207) 527-6715 type digits only Ext. 5665 Hire Date 7/18/2000 Benefits Eligible Yes (checked) press the spacebar
4. Modify the FIRST NAME field to read Elizabeth-A. (with the period).
EXERCISE: 1) Enter the following new record in the Instructor form:
Field Entry
First Name Joseph Last Name Oppenheimer-Guggenheim Address 220 Eastern Avenue City Hampton State NH Zip 05324 Home Phone (412) 762-8884 Ext. 5234 Hire Date 10/01/1999 Benefits Eligible No
2) Abbreviate the Last Name field as necessary.
3) On Your Own: Enter yourself as an Instructor.
4) Close the Instructor form.
Page 32 Data Entry Using Access
NOTES
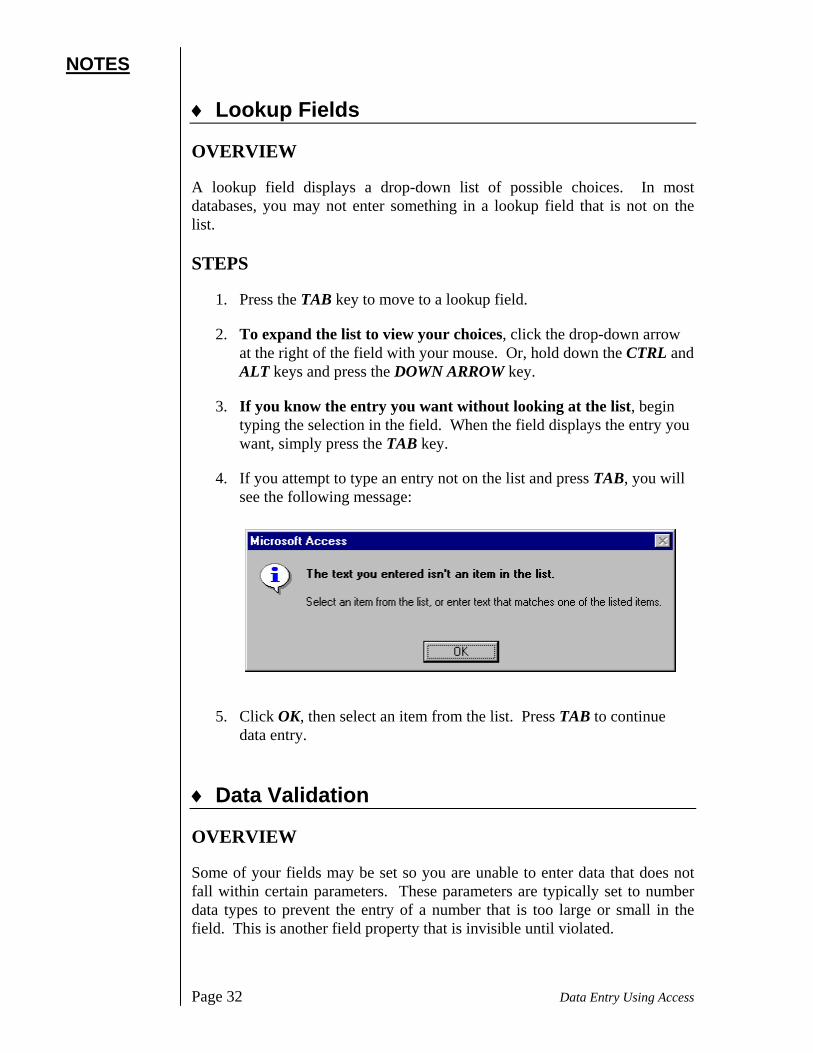
♦ Lookup Fields
OVERVIEW
A lookup field displays a drop-down list of possible choices. In most databases, you may not enter something in a lookup field that is not on the list. STEPS
1. Press the TAB key to move to a lookup field.
2. To expand the list to view your choices, click the drop-down arrow at the right of the field with your mouse. Or, hold down the CTRL and ALT keys and press the DOWN ARROW key.
3. If you know the entry you want without looking at the list, begin typing the selection in the field. When the field displays the entry you want, simply press the TAB key.
4. If you attempt to type an entry not on the list and press TAB, you will see the following message:
5. Click OK, then select an item from the list. Press TAB to continue data entry.
♦ Data Validation
OVERVIEW
Some of your fields may be set so you are unable to enter data that does not fall within certain parameters. These parameters are typically set to number data types to prevent the entry of a number that is too large or small in the field. This is another field property that is invisible until violated.

Data Entry Using Access Page 33
NOTES
STEPS
1. Press the TAB key to move to a field with data validation.
2. Enter appropriate data, and press TAB to move to the next field.
3. If the data validation rule is violated, a message box similar to one of the following will appear:
If the developer provided a helpful validation message
If the developer neglected to provide a message
4. Click OK and correct your entry to fall within the parameters set. 5. Press TAB to move to the next field and continue data entry.
Lesson Example
You have been asked to enter a new class into the Classes form. STEPS
1. Open the CLASSES form.
2. Click the NEW RECORD button.
3. Press TAB to move to the TITLE field, and enter Word Processing. Press the TAB key.
4. Enter a DATE of 7/19/2002. Press the TAB key.

Page 34 Data Entry Using Access
NOTES
5. Enter INSTRUCTOR Bernier by typing his name until it pops up in the field. Press the TAB key.
6. Click the drop-down arrow to select Portland as the LOCATION. Press the TAB key.
7. Type 50 for MAX CAPACITY, and press the TAB key. What happens?
8. Click OK and change MAX CAPACITY to 20. Press the TAB key.
9. Type 5 for the MATERIAL COST, and press the TAB key.
10. Type 12 for the LAB FEE, and press the TAB key. What happens in this case?
11. Click OK and change the LAB FEE to $10.00.
EXERCISE: 1) Add another class including the following information:
Field Entry
Title Train the Trainer Date 8/14/2002 Instructor Thomas Location Bangor Max Capacity 15 Material Cost $0.00 Lab Fee $20.00 2) Change the Lab Fee to $0.00 and the Material Cost to
$20.00.
3) On Your Own: Enter another new class making up the information.
4) Close the Classes form.

Data Entry Using Access Page 35
NOTES
LESSON 5: GIVE IT A TRY!
OBJECTIVE: Practice the lessons learned in class.
EXERCISE:
Refer to Lesson 2 for assistance
1) Open the Students form and find Kathryn Anderson.
2) Change all entries of BDS to DBDS using Find and Replace.
3) Find a Social Worker, then filter to determine how many Social Workers are in the database.
4) Close the Students form.
Refer to Lesson 3 for assistance
5) Open the Classes form.
6) Copy the Personnel Management class taught by Beaulieu on 04/19/2002 in Lewiston.
7) Change the date to 5/20/2002.
8) Delete the Internet Research class taught by Fournier on 05/25/2002 in Portland.
Refer to Lesson 3 for assistance
9) Enter the following new class:
Field Entry Title Polished Presentation Skills Date 7/7/2002 Instructor Morse Location Portland 10) Enter a Max Capacity of 40. Change your mind and type 20
instead.
11) Enter a Material Cost of $100.00. You realize you meant $10.00, so make the change.
Page 36 Data Entry Using Access
NOTES
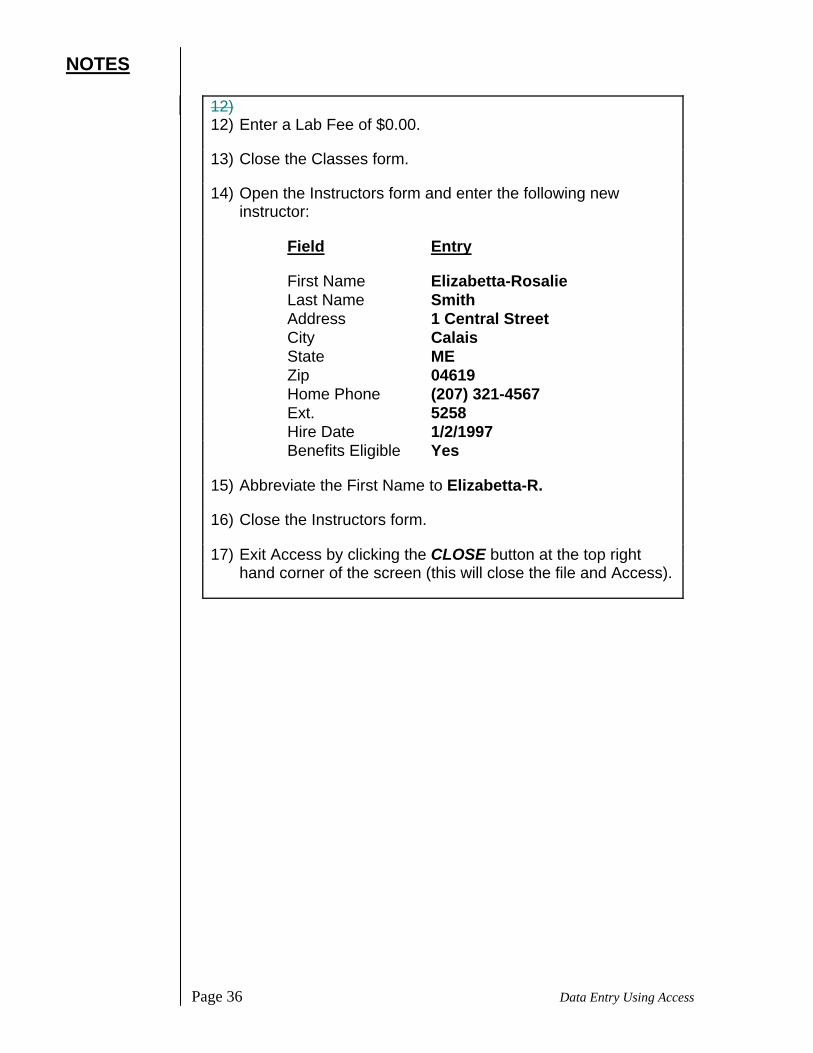
12) 12) Enter a Lab Fee of $0.00.
13) Close the Classes form.
14) Open the Instructors form and enter the following new instructor:
Field Entry
First Name Elizabetta-Rosalie Last Name Smith Address 1 Central Street City Calais State ME Zip 04619 Home Phone (207) 321-4567 Ext. 5258 Hire Date 1/2/1997 Benefits Eligible Yes
15) Abbreviate the First Name to Elizabetta-R.
16) Close the Instructors form.
17) Exit Access by clicking the CLOSE button at the top right hand corner of the screen (this will close the file and Access).
Data Entry Using Access Page 37
NICE TO KNOW ♦ Access Help Features
OVERVIEW
Microsoft Access contains several different types of help to assist you when you have difficulty with the program. The Office Assistant is an interactive help device that comes in the form of a cartoon character. It allows you to type a question or phrase related to your problem, and it will search through lists of topics for one related to your issue. However, this requires that you are very familiar with Access terminology. STEPS
1. Click the OFFICE ASSISTANT icon.
2. Type your question.
3. Either press ENTER or click SEARCH.
4. Click on one of the options available to receive additional information on that topic.
5. To look for other topics, click the SHOW button.
6. To utilize the CONTENTS tab, click the tab, then double-click a topic area. Double-click a specific topic to view the information.
7. To utilize the INDEX tab, click the tab, then type in the first several letters of the topic you want. When it appears below, double-click the topic to view the information. In the secondary list of topics, click the appropriate one to open it.
8. To close the Help Box, click the CLOSE button in the upper right corner of the Help Box.

Page 38 Data Entry Using Access
♦ Creating an AutoForm
OVERVIEW
If the developer of the database did not create data entry forms for your use, there is a very simple process that allows you to do so. AutoForm generates a data entry form based on a single table that includes a space for every field in that table. STEPS
1. Click the TABLES object in the OBJECTS bar.
2. Click once on the table for which you would like to create a form.
3. Click the NEW OBJECT: AUTOFORM button in the toolbar.
4. The new data entry form will appear. You may enter data at this time or not.
5. Close the form. Access will ask if you would like to save the form. Click YES.
6. Type an appropriate form name, or keep the suggested name, and click OK. The new form will be stored in the FORMS object.

Data Entry Using Access Page 39
♦ Mouse Pointers
Text Selector - appears while among text; click to place insertion point or click and drag to select a section of text
Field Selector - appears on the left side of a field in Datasheet View; click to select the contents of the field
Column Selector - appears when pointing at field names in Datasheet View; click to select an entire row
Row Selector - appears in the gray box to left of a record in Datasheet View; click to select the entire record
Column Resize - appears between field names in Datasheet view or on a vertical border in Design View of a Form or Report; click and drag to increase or decrease width
Row Resize - appears on a horizontal border in Design View of a Form or Report; click and drag to increase or decrease height
Normal Select - allows you to click to choose an object; also allows you to click and drag a rectangle to select a group of objects
Move - in Design View of a Form or Report, this pointer appears when you point at the middle a selected control; click and drag to move the control
Move Separately - appears when pointing at the upper left corner of a selected control; allows you to click and drag a label separately from a text box and vice versa
Horizontal Resize - appears when you point at a resizing handle (small black square) on the edge of a control; click and drag away from the object to enlarge, toward the object to make smaller
Diagonal Resize - see above
Vertical Resize - see above

Page 40 Data Entry Using Access
♦ Toolbar Buttons
Print prints the active object. Be careful if your object contains many records!
Print Preview shows you what your active object will look like on paper
Spell check will check for spelling errors
Cut removes text or an object and places it on the Clipboard, so it may be placed elsewhere
Copy places a copy of the selected text or object on the Clipboard, so it may be copied to another location
Paste takes the item from the Clipboard and places it at the location of your insertion point or selection
Format Painter allows you to copy the formatting of selected text to other text in your database
Undo will undo the last action taken
The Office Assistant provides you with interactive help regarding Access
Delete will remove the selected object from your database
Sort Ascending puts your records in alphabetical, chronological, or numeric order based on the active field
Sort Descending sorts records backwards
AutoFilter removes any record not including the selected entr.
The Filter button becomes activated when AutoFilter is used. Pushing this button will remove the current filter. When Filter by Form is used, this button will turn on the filter once criteria are established, then turn it off when you wish to see all records
Find lets you search for an entry
New Record sends you to a blank record for data entry. Some databases require a different button to be used
Delete Record will remove the active record

Data Entry Using Access Page 41
♦ Keyboard Shortcuts
Keystroke
Combination Effect
F1 Opens Access Help F6 Moves from Design Grid of Table to Properties section F9 Updates the active object F11 Brings the Database Window to the front Tab Moves you ahead one field Shift + Tab Moves you backward one field Enter Moves you ahead one field Spacebar Toggles a checkmark on and off in a Yes/No field Ctrl + Alt + down arrow Opens a drop-down list
Ctrl + Tab Moves you out of a subform to the next form field Ctrl + Home Sends you to the beginning of the first record Ctrl + End Sends you to the end of the last record Ctrl + ' Copies the previous record's entry into the current field Home Sends you to the beginning of the active record End Sends you to the end of the active record Arrow (Cursor) Keys Send you one field in the arrow's direction