data representation lab manual, chapter one
TRANSCRIPT

Lab 1-13
Data Representation Lab Manual, Chapter One
A major problem facing beginning assembly language students at the University level is the sheer volume of infor-mation that must be digested in order to learn 8088 assembly language. This is compounded by the fact that well overhalf of today’s students haven’t had any practical experience with the machine on which they’re being taught assemblylanguage. Unfortunately, before you can write and execute an assembly language program, you’ve got to be able to editit, assemble it, link it, and, possibly, debug it. Which means you’ve got to learn how to use an editor, assembler, linker,and debugger. Before you can learn how to use these programs, you’ve got to learn how to use the IBM PC and its ubiq-uitous operating system, MS-DOS. The following sections describe the basic operation of the IBM PC and the MS-DOSoperating system. After this explanation, there are some laboratory exercises for you to perform (see “MS-DOS Labora-tory Exercises” on page 21). If you’re already familiar with the PC and MS-DOS, you may want to skip on to the next sec-tion or quickly skim over this portion of the lab and go right to the exercises.
1.1 System Configurations
Most PCs in circulation today come in one of four configurations:
(1) a system unit with a single floppy disk drive, (2) a system unit with two floppy disk drives, (3) a system unit witha single floppy disk drive and a hard disk, or (4) a system unit with two floppy disk drives and a hard disk. Attempting todevelop assembly language software on a system with a single floppy disk drive is nearly impossible. Unless you areoperating under severe financial constraints, this is not an acceptable configuration. While it is possible to developassembly language software on a system with two floppy disk drives but no hard disk, this configuration is highly unde-sirable. Given the number of different programs you will need to execute, you will be constantly swapping disks in andout of your machine. However, for those on a budget, this is the minimal system acceptable for real assembly languagedevelopment. The most desirable configuration, of course, is a hard disk based system. Preferably with two 3-1/2” highdensity floppy disk drives. The first thing you should do when sitting down to use an IBM PC is determine your exactsystem configuration. The operating procedure is different for floppy based systems and hard disk based systems. Toavoid confusion later, you must determine how many floppy disk drives are in your system and if there is a hard disk.MS-DOS systems use an alphabetic character to designate the system disk drives. Most MS-DOS systems use the letters“A” and “B” for the two floppy disk drives and “C” for the hard drive. MS-DOS assigns the drive letters in the followingmanner:
Floppy drive #1 : A Floppy drive #2: B Hard disk: C
1.1.1 Booting Floppy Based Systems
If you’re attempting to make do with a floppy based system, you will need an MS-DOS system diskette. Wheneveryou apply power to the system, the PC will attempt to boot from the diskette in drive A. If it does not find a diskette indrive A, it will keep on trying to read a diskette in drive A until it finds one. If the diskette you insert isn’t an MS-DOS sys-tem diskette, the PC will complain and ask you to insert a system diskette. Once you’ve satisfied the computer by insert-ing a system diskette, MS-DOS will begin execution and you will be greeted with a little sign-on message and an “A>”prompt. Now you can begin executing MS-DOS commands. The “A>” prompt tells you that the default disk drive is the“A” drive. That is, disk drive #1 will be used for all operations unless you explicitly specify otherwise.
1.1.2 Booting a Hard Disk Based System
To boot a hard disk based system simply turn on the power to the computer. Make sure that drive A does not con-tain a floppy diskette or that the disk drive door is open. After a little while the system will boot from the hard disk andyou will be greeted with a “C>” prompt.
1.1 Which drive letter is generally associated with the first floppy drive? __________
Thi d t t d ith F M k 4 0 2

Lab Ch01
Lab 1-14
1.1.3 Using a PC Emulator
In addition to
real
PC hardware, there are several programs available for different machines which
emulate
a PCusing software. Examples include SoftPC for the Macintosh and NeXT computers, and DOS Window for Sun Worksta-tions. Other PC emulation packages undoubtedly exist for these and other machines. Most PC emulators behave like a PCwith a hard disk. Once you’ve successfully run the emulator, the remarks throughout this chapter will apply.
However, before you can emulate a PC, you must properly set up and execute your emulation software. This is nota trivial task (particularly, setting up the emulator). If your emulator doesn’t run directly from the native OS, you shouldconsult the reference manual or a local guru. Attempting to explain the options available to these different products isway beyond the scope of this manual.
1.2 Which drive letter is generally associated with the hard disk? ________
1.2 MS-DOS Commands
Whenever the system boots, it executes a special program called COMMAND.COM. This is a small program whichaccepts various commands from the IBM PC keyboard and executes those commands. Since COMMAND.COM is theonly part of MS-DOS visible to the user, we will refer to this program as MS-DOS, though, in actuality, it is not. MS-DOSsupports two types of commands. Intrinsic commands which are part of the COMMAND.COM program and extrinsiccommands which are programs found on a disk drive. Useful intrinsic commands include dir, del, md, cd, type, rename,and copy. Examples of extrinsic commands you’ll need to develop assembly language programs include ML (the 80x86assembler), LINK (the MS-DOS linker program), CODEVIEW (a symbolic debugger), and some sort of editor program(typically called PWB, EDIT or some other name). Many MS-DOS commands accept (or require) command line parame-ters. For example, the DEL command (delete a file) expects you to supply the name of the file you want deleted (erasedfrom the disk). If you want to delete the file “JUNK.TXT” from your disk drive, issue the command:
DEL JUNK.TXT
MS-DOS will remove that file from the disk.
1.3 Which type of commands are built into DOS? ____________________________
1.3 Directories, Subdirectories, and Filenames
Extrinsic commands are stored as programs on the disk drive. To access programs and data on the disk, MS-DOSmaintains a directory of all the files on the disk. The directory contains, among other things, the name of the file, whereit’s located on the disk drive, and the file’s length. You can create a listing of all the files in a directory using the MS-DOS
dir
(for directory) command. Typing “DIR” followed by œ
will display the directory of the selected disk drive. Thefilenames displayed in response to the DIR command usually take the following form:
NAME.TYP
where NAME is a one to eight character filename and the TYP is a zero to three character file type extension. Files whosenames end with “.COM” or “.EXE” are usually program names which may be executed as MS-DOS commands. (By theway, COM stands for COMmand file, while EXE stands for EXEcutable file.) Other types of files use different file typeextensions. For example, your assembly language source files will (normally) use a “.ASM” suffix; Pascal source files usea “.PAS” suffix; etc. Some files, particularly on a hard disk, may be followed by the symbol “<DIR>”. Such files are calledsubdirectories.
MS-DOS uses a hierarchical file structure. Much as the disk itself contains a directory of files, a directory may containa subdirectory which contains additional files. Likewise, subdirectories may appear inside other subdirectories, and soon. We can represent this structure graphically using a
tree
diagram:

Data Representation
Lab 1-15
Why would you need subdirectories? Mainly for organizational purposes. For example, sup-pose you were working on three different programming projects. You might keep the sourcefiles for each project in their own directory. This helps prevent confusion and error (such asworking on the wrong source file) during program development.
1.4 The DEL command will ___________ files in a directory.
1.5 The DIR command will ___________ files in a directory.
1.6 A directory is where MS-DOS keeps track of __________.
Within a single directory all filenames must be unique. For example, in the diagram aboveyou cannot have two identical filenames in the same directory (same box). For if you did, howcould MS-DOS figure out which file you want to access? You may, however, reuse a filename inanother directory. For example, the name “fileA” appears in three separate subdirectories above.However, it never appears in the same subdirectory twice.
1.7 Why do we use subdirectories? __________________________________
The MS-DOS
MD
(make directory) and
CD
(change directory) commands manipulate direc-tories on your disk. To create a new subdirectory within the current directory, execute the com-mand:
MD newdirname
where
newdirname
is the name of the subdirectory you wish to create. This must be a valid MS-DOS filename and it must be a unique filename. If these conditions exist, MS-DOS will create asubdirectory with the specified name. Note:
MKDIR
is a synonym for
MD
. If the current direc-
file1subdir1file2subdir2file3file4
\ (root directory)
Subdir1
fileAfileBSubDirA
Subdir2
fileAfileC
SubDirAfile1FileA Figure 2.1: MS-DOS Hierarchical File Structure
Answers to Questions
1.1: A

Lab Ch01
Lab 1-16
tory contains some subdirectories, you may list the contents of those subdirectories using a
DIR
command of the form:
DIR subdirectory
where
subdirectory
is the name of the subdirectory file you wish to list. If you want to change the default directory fromthe currently selected directory to a subdirectory, use the
CD
command. Its format is identical to
MD
,
CD subdirectory
where subdirectory is the name of the subdirectory file that is to become the new default directory. Note:
CHDIR
is asynonym for
CD
. The
DIR
command lists the default directory whenever it appears by itself on a DOS command line.
1.8 To set the default directory you would use the _____________________________ command.
There are two additional forms of the
CD
command. They are
CD ..
and
CD \
The first form makes the parent directory of the current directory the default. A subdirectory is a child of the direc-tory that contains it; likewise, the parent directory is the one containing the current directory. The second form of the
CD
command above makes the root directory the default directory. The root directory is the main directory on the disk. It isthe only directory which does not have a parent directory.
1.9 To remove a file from a directory you would use the ________________________ command.
If you are currently in one directory and you want to access a file in another directory, you could use the CD com-mand to switch to the other directory and process the file in that directory. There is another way, however, using MS-DOS pathnames. A pathname consists of a string of subdirectory names plus a filename, separated by backslashes (“\”).For example, if you are in the root directory and you want to access a file X which appears in subdirectory Y, and subdi-rectory Y appears in subdirectory Z, and subdirectory Z appears in the current directory, you could access file X using theMS-DOS pathname “Z\Y\X”. This cursory look at subdirectories and pathnames it not intended to be sufficient, only tomake you aware of their existence. For more details, please consult the MS-DOS reference manual. Besides accessingfiles within a subdirectory, you may need to access data on a disk other than the current default disk drive. You canaccomplish this by prefacing the pathname of the desired file with the drive letter and a colon. For example, to access file\Y\Z on the diskette in drive A, the following pathname could be used:
A:\Y\Z
1.10 To create a new directory you would use the _______________________________ command.
1.11 To specify a file which is not in the current directory requires the use of a __________name
1.4 Wildcards
Some MS-DOS commands, like
DEL
, allow you to specify several filenames by using wildcard characters* in a file-name. MS-DOS supports two wildcard characters, “*” and “?”. Anytime an asterisk appears within a filename, MS-DOSwill match any number of characters for that portion of the filename. For example, the command “
DEL *.ASM
” willdelete all files that contain the “.ASM” suffix. Likewise, “
DEL Source.*
” will delete all files that begin with “Source”regardless of the suffix. Finally, “
DEL A
*.*” will delete all files that begin with an “A”. Obviously the asterisk wildcardcharacter should be used with care with the
DEL
command. The question mark wildcard character will also match anycharacter, but it will only match a single character. For example, “
DEL W?.COM
” will delete all filenames that begin witha “W”, followed by any other character, and of type “.COM”. Not all MS-DOS commands accept wildcard characters. Forexample, the MS-DOS “TYPE” command does not allow wildcards. Be aware of this if you get an error message whenattempting to use wildcard characters in a filename.
1.12 Would it make sense for wildcards to work with the CD or MD commands? ______________
1.13 What would “DEL TEST.*” do? __________________________________________________________
1.14 What would “DIR *.ASM” do?___________________________________________________________

Data Representation
Lab 1-17
1.5 Useful MS-DOS Commands
The following subsections describe some of the more useful built-in MS-DOS commands.This list, while probably sufficient, is certainly not exhaustive. For more information about addi-tional MS-DOS commands, or about additional options for the commands described here, seeyour MS-DOS manual.
1.5.1 The Change Drive Command
On occasion, you may need to switch the default disk drive to a different drive designator.On a floppy system, you may want to change the default drive to drive B. On a hard disk systemyou may want to switch from drive C to drive A. To do this, type the drive letter followed by acolon. For example,
A:
followed by œ
will change the current default drive to drive A.
C:
œ
will switch the default system drive to the hard disk in drive C.
1.15 Which MS-DOS command lets you create a new subdirectory? ______
MS-DOS maintains a “default” directory for each drive in the system. If you set a default sub-directory with the CD command on drive C: and then switch to drive A:, MS-DOS remembersthat subdirectory. Typing “DIR C:” would list the contents of the selected subdirectory on driveC:. Likewise, changing back to drive C: with the C:
œ
command would drop you backinto the previously selected subdirectory.
1.5.2 The DIR Command
The
DIR
command lists files that appear in a directory. If typed by itself, it will list all thefiles in the current default directory. If followed by a drive letter, e.g., “
DIR A
:” it will list all thefiles in the default directory of the specified disk drive. If a subdirectory pathname follows the
DIR
command, it will list all the files in that subdirectory. Finally, if the DIR parameter is a file-name,
DIR
will list the file statistics for that file.
DIR
accepts wildcard characters in filenames.For example, “
DIR*.ASM
” will list all the files in the current subdirectory that have the “.ASM” filetype suffix.
1.16 Suppose you execute the MS-DOS commands “C:, CD \XYZ, A:” andthen you issue the command “DIR C:”. Which directory will youlist?_______________________________________________________________
1.5.3 The DEL Command
The
DEL
command deletes a file.
ERASE
is a synonym for
DEL
. The
DEL
commandrequires a filename (which may include wildcard characters) and it will remove the specifiedfile(s) from the diskette. Note:
DEL
doesn’t actually remove the data from the disk drive, it sim-ply modifies the directory and an area on the disk called the FAT (File Allocation Table) so thatMS-DOS thinks the file no longer exists. MS-DOS 6.0 and later provides an
undelete
commandwhich can restore some files you’ve accidentally deleted.
1.17 What does “DEL *.* do?_____________________________________________
___________________________________________________________________
Answers to Questions
1.2: C
1.3 intrinsic
1.4 delete
1.5 list
1.6 files
1.7 To organize files.

Lab Ch01
Lab 1-18
1.5.4 The Type Command
The
TYPE
command expects a single filename as a command line parameter. It prints this file to the screen. Forexample,
TYPE MYFILE.ASM
will print the contents of MYFILE.ASM to the video display. This command is useful for scanning through various filesand determining their content. Warning: You should only use
TYPE
on files containing ASCII characters. Attempting to
TYPE
a program file or other type of non-text file will usually result in garbage on the screen. To abort the
TYPE
com-mand press çC
.
If the file contains more than about 24 lines of text, the
TYPE
command will scroll the data off the screen and youwill probably be unable to read the lost information. By pressing çS
you can temporarily stop the display. Pressingany key while the display is frozen will restart the list operation.
1.18 If you only want to look at ten lines in the middle of a file, you can use the TYPE commandto list it, çS
to find the pertinent section, and then___________ to return to MS-DOS.
Many MS-DOS systems have a
MORE
or
LIST
command which let you selectively page through portions of a file.Some versions even let you back up if you’ve gone too far in the file. This is not available with standard MS-DOS. Checkyour local system to see if such programs are available.
1.5.5 The RENAME Command
Once in a while you will need to change the name of a file. Perhaps to shorten a program name that you use all thetime to save some typing. The
RENAME
command takes the following form:
RENAME oldfilename, newfilename
It will change the name of oldfilename to newfilename.
RENAME
does allow the use of wildcard symbols as long as the context is meaningful and the computer can figureout what you mean? For example, “RENAME test.* tested.*” will change every filename that begins with “test.” to “tested.”with the same file extension. However, you cannot use a command like “RENAME xyz.* abc.def” because this wouldforce MS-DOS to (possibly) give the same name to several different files.
Note:
REN
is a synonym for
RENAME
.
1.5.6 The COPY Command
The
COPY
command is one of the more useful built-in MS-DOS commands. Quite simply, the copy command cop-ies files. The syntax for this command is
COPY source, dest
It will copy the source file to the destination file. The copy command accepts wildcard characters and can be used tocopy several files at a time. This command is useful for making backups of your files to a floppy diskette. For example,the command “
COPY *.ASM, A:*.ASM
” will copy all the assembly language source files from the current directory ondrive C to the floppy disk in drive A. The
COPY
command is powerful and supports many features not described here.Please have a look at your MS-DOS reference manual for more details about the
COPY
command.
More often than not, you’ll probably want to work on the system’s hard disk because it’s so much faster than thefloppy drive. Once you’ve completed your work, however, you won’t want to leave your precious files on a publicmachine. Suppose you’ve created a working directory name “Randy” containing only your files.
1.19 If you wanted to create a new subdirectory named “Randy” to hold your working files, whatcommand would you use to create (__________) and switch to (__________) that directory?

Data Representation
Lab 1-19
1.20 How could you copy all the files from “Randy” to the floppy disk indrive B? _____________
1.6 Some Useful MS-DOS Extrinsic Commands
There are certain programs (extrinsic commands) supplied with the MS-DOS system diskwhich are quite valuable to an assembly language programmer. Besides the support toolsrequired by the assembler, two programs immediately come to mind. They are
and
FOR-MAT
.
1.6.1 The PRINT Command
The MS-DOS
command is a program that will print a specified file to the printer. Thisprogram operates as a background process so you can continue to use the computer while it isprinting your file. The simplest form of the
command is
PRINT filename
where
filename
is the name of the file you wish sent to the printer. The first time you execute the
command it will ask you which printer port to use. If your printer is connected to the IBMPC parallel printer port (as most are), simply hit the œ
key to default to the PRN: (printer)device. Otherwise, consult the MS-DOS reference manual for details about this command.
Note: obviously, you must have a properly functioning printer connected to your PC for the
command to work. The
command may or may not work automatically if you areusing some sort of DOS emulation software (e.g., on a Macintosh). See the emulator softwarereference manual for more details if you cannot easily print data.
If you’ve started printing a file and you want to stop the output, simply issue the command“PRINT /T”. This will stop all printing. The print program will
spool
several files at once. You donot need to wait for one file to finish before using
to print another. By issuing multipleprint commands (or by using wildcard characters in the filename) you can instruct PRINT to printout several files. Of course,
can only print a single file at a time, but it will buffer up thenames you specify and it will output the files in order.
1.21 What command prints all the files with an extension of“.ASM”?____________________________________________________________
Another way to print data from MS-DOS is to press çP
at the beginning of a com-mand line. After you press this key sequence, MS-DOS echoes all output appearing on thescreen to the printer. This is a convenient way to print directory listings. Just type çP
fol-lowed by
DIR
and , voilà, all output appears on the printer as well as the screen. MS-DOS willcontinue printing the data sent to the screen until you type çP a second time to turn offthe printer output.
1.6.2 The FORMAT Command
Before a diskette can be used it must be formatted. For this you use the FORMAT command.The simplest form of the FORMAT command is
FORMAT d:
where “d” represents a valid floppy disk drive letter (usually A or B). This command will preparethe diskette surface so that data can be written to and read from that diskette. All floppy disksmust be formatted before you can use them. If you are using 3-1/2” disk drives and you want to
Answers to Questions
1.8 CD
1.9 DEL
1.10 MD
1.11 path
1.12 No
1.13 Deletes all filesbeginning with “TEST.”
1.14 Lists all files endingwith “.ASM” in the currentdirectory.
1.15 MD
1.16 “XYZ” on drive C.
1.17 Deletes all files in thecurrent directory.

Lab Ch01
Lab 1-20
format a 720K in a 1.44Mbyte drive, use the command: “FORMAT d: /N:9 /T:80”. See an MS-DOS reference manual formore FORMAT options.
Most DOS emulation systems do not allow you to format MS-DOS compatible diskettes from inside the DOS emula-tor. They require that you format such floppies from the native OS (e.g., Mac OS, NeXTStep, or UNIX). Please consult thereference manual or a local expert if you need to format a floppy disk on one of these systems.
Warning: formatting a diskette erases all data that was previously on it. Therefore, you should exercise cautionwhen using this command. It is, however, an effective way of removing everything on a floppy diskette.
1.6.3 A Final Note About DOS Commands
It would be ludicrous to think that the discussion above is a complete guide to MS-DOS. There is no way you canuse an IBM PC (running MS-DOS) without having an MS-DOS manual laying around. The purpose of this chapter was toexpose you to the commands you’ll use most often under MS-DOS, so you can concentrate on these commands whenreading the MS-DOS manual. For those who have absolutely no other interest in MS-DOS or the IBM PC, the commandset provided here (along with an editor, assembler, linker, and debugger) should prove sufficient to get the job done.However, by studying the MS-DOS manual, you can determine more efficient ways to get the job done. This chapter hasprovided only the bare minimum. If you want to read about something that can make your life a lot easier under MS-DOS, you should read about BATCH (“.BAT”) files. Batch files can automate much of the typing required under MS-DOS.Unfortunately, they are too deep a subject to present in this text, so you’ll have to refer to the MS-DOS manual for moredetails on this neat feature.
1.7 A Note about Viruses and Other Nasty Objects on the System
One problem when tends to plague publicly available computer systems is virus infection. This is particularly true ofmachines in computing laboratories at colleges and universities. Not only do students not take any care to ensure thatthey do not spread viruses across machines, they even get a big thrill from purposefully spreading viruses from machineto machine just to torture some poor user.
Viruses have a nasty habit of striking at the worst possible moment. They can wipe out your project just before it’sdue, they can wipe out some code at your job as a deadline approaches, or they can wipe out a lot of work on yourfavorite personal project. Viruses are not to be played around with. It might seem funny to you, as you watch a virusyou’ve placed on one machine spread throughout a laboratory. But keep in mind, these things tend to come around andthat very virus you spread (either purposely or by inaction) may come back to bite you later on.
Unless everyone takes necessary precautions, viruses tend to run rampant. I, like many other instructors, institutetough rules to help keep the incidence of viruses to a minimum. I require that all students turn in a floppy disk which Iimmediately scan for viruses. If any viruses are present on the diskette, the student gets a zero on that project. This mayseem rather extreme, but shortly after announcing this policy viruses tend to disappear from the system. It seems thatonce students have a reason to ensure that the system stays virus-free, it does.
There are many commercial, public domain, and shareware solutions to the virus problem available. The most pop-ular solution is, undoubtedly, the McAfee SCAN and CLEAN programs. These programs are available free of charge fornon-commercial use (at least they were the last time I looked at them). Most universities and colleges have licensed theseproducts for use on their systems. You should never operate a publicly accessible PC system without first running theSCAN program on it. Sure, SCAN takes a little while to run. But chances are pretty good there is a virus on the system ifSCAN isn’t run on it on a regular basis.
By the way, viruses infect DOS emulation products as well. Be sure to run SCAN and CLEAN on a regular basis evenif you’re using SoftPC, DOS Window, or some other similar application.
To check to see if your system is infected with a virus, simply issue the command:
SCAN C:
(assuming, of course, your hard disk is the C: drive). You can also check out the floppy disk in drive A by typing:
SCAN A:

Data Representation
Lab 1-21
SCAN will complain if there are any viruses on the scanned media.
The McAfee antiviral system is generally distributed electronically and includes documenta-tion in the form of a text file. Please consult this manual for details on the product. In particular,if you detect a virus on your system, this manual will explain how to eradicate it.
1.8 MS-DOS Laboratory Exercises
In this laboratory exercise you will execute and observe the operation of several useful MS-DOS commands. This laboratory serves two purposes. First, for those students who are unfamil-iar with MS-DOS, it provides a basic introduction to the system and teaches enough DOS com-mands to deal with the remaining projects in this manual. For everyone, this lab provides anopportunity to see how to perform laboratory experiments. For this lab exercise only, samplepre-lab and lab reports appear in this manual. This will give you an idea of what’s expected ofyou. Of course, you should check with your instructor to see if there are any additional pieces ofinformation required in your reports.
Materials you will need for this lab:
1) At least two blank floppy diskettes as appropriate for the system you are using. Sincemost modern PCs have 3-1/2” high density floppy disk drives, you should use 1.44mbyte highdensity 3-1/2” diskettes. In any case, you should use the highest density diskettes supported bythe system. Check with your instructor or local system administrator for details on which dis-
kettes you should purchase1.
2) The diskette supplied with this lab manual (take this manual back if the diskette is miss-ing or tampered with).
3) Access to a PC or compatible system. Note: you will be formatting diskettes in this lab. Ifyou are using a PC emulation system such as SoftPC, you will need to obtain information on howto format diskettes on your system. Such procedures are beyond the scope of this manual.
1.8.1 Before Coming to the Laboratory
Obtain an MS-DOS command reference2 and look up some of the options for the followingcommands: MD, CD, FORMAT, COPY, DIR, and TYPE. While you’re at it, learn about the follow-ing DOS commands (whose descriptions do not appear in this manual up to this point): CLS,DATE, PATH, PROMPT, RD, and TIME. Finally, dig up the documentation on the McAfee SCANand CLEAN programs. In your pre-lab report, describe all of these commands and list their possi-ble options. For extra credit, you might consider looking at some additional DOS commands, aswell.
1.8.2 Laboratory Exercise
In this laboratory you will perform the following activities:
• Format at least two floppy diskettes• Create several subdirectories on those diskettes• Create a subdirectory on the hard disk • Create several files on the hard disk.• Make copies of a file on the hard disk to a floppy disk.
1. In general, you should have at least five diskettes for use with this class. You should use two diskettes to maintaintwo personal copies of your own work (in case the instructor loses the disk(s) you turn in). The remaining three disksallow you to turn in up to three projects before getting any diskettes back from your instructor.2. If you do not have immediate access to an MS-DOS manual, your library will, undoubtedly, have several.
Answers to Questions
1.18 çC
1.19 MD, CD
1.20 CD RANDY
COPY *.* B:
1.21 PRINT *.asm

Lab Ch01
Lab 1-22
• Delete the files from the hard disk• Delete the subdirectory on the hard disk.Before you can do any practical work on your own, you will need to initialize or format some floppy diskettes.
1.22 Assuming you want to format the floppy diskette in drive A:, what command would you useto accomplish this? _________________________________________________________________
❏ Exercise 1: Format two or more floppy diskettes. Describe the information displayed on the screen while for-matting the diskette. How long (approximately) does it take to format a floppy diskette? Warning: since for-matting destroys the data on a floppy diskette, you should not, under any circumstances, attempt to format thefloppy disk which came with this manual. Doing so would destroy some useful files and software which youwill need.
Note: Turn on the printer so that everything going to the screen winds up on the printer when performing these lab-oratory exercises. Turn in this print out with your lab report. Do not worry about making mistakes or typographical
errors. Everybody makes them and your instructor will expect to see several on each printout3. However, try to limit theoutput to the exercises described in this experiment. Turn on the printer after the successful execution of exercise one.You do not want a print-out of the format operation.
1.23 How do you turn on the printer to capture screen output?______________________________
In general, you will need to deal with at least two separate diskettes for each project. One diskette will contain the
current project (and nothing more!) which you will submit to your instructor4. The second diskette will contain a copy of
your work for your own personal protection5. Since instructors lose disks, and disks wear out and go bad, you want tomake sure you have more than one copy of your project in case something happens to it.
Diskettes you turn in should only contain the data for the current project. No sense in confusing your instructor with
extraneous data6. For your backup diskette (the disk(s) on which you keep copies of your work), you do not need tostick only one project per diskette. If space permits, you can place the files from several projects onto the same diskette.However, to prevent total confusion as you add more and more files to your backup diskette, it’s best to organize thefiles into subdirectories by project.
1.24 Assuming you have the current drive selected, what command would you use to switch tothe A: drive? _________________________________________________________________________
1.25 Assuming you’re currently on the A: drive, what commands would you use to create a newsubdirectory named “HYDE” on the C: hard disk?_______________________________________
❏ Exercise 2: Choose a diskette to use for your personal backup and create a subdirectory named “LAB2” on thatdiskette. Switch back to the hard disk (drive C:) and create a subdirectory using your last name as the directoryname. Switch to this subdirectory (I will use the name “HYDE” to refer to this subdirectory).
1.26 What command do you use to switch to the HYDE subdirectory you’ve created?____________
______________________________________________________________________________________
In the following exercises, you will manipulate some files. Since we’ve not yet discussed how to create new files,you’re going to have to deal with existing files. On the diskette accompanying this manual, you will find a subdirectorylabelled “LAB2”. Inside this subdirectory is a file called “LAB2.TXT”. This is a simple ASCII text file which you will use forvarious experiments throughout the rest of this lab.
3. Of course, if you do some operation which produces dozens of pages of output you may want to think twice about turning it all in. 4. Assuming, of course, your instructor collects projects on diskette.5. Indeed, you should keep at least two separate copies of your work in case one copy goes bad on you.6. Of course, don’t forget to SCAN all diskettes you turn in to your instructor. Nothing impresses an instructor less than receiving a diskette submis-sion with a virus on it.

Data Representation
Lab 1-23
❏ Exercise 3: Switch to the HYDE subdirectory on the hard drive. Copy the LAB2.TXT file from theLAB2 subdirectory of the disk accompanying this manual.
1.27 Assuming the current directory on the hard disk is “HYDE” and the currentdirectory on the floppy disk is the root directory, how can you copy theLAB2.TXT file from the LAB2 directory on the diskette to the HYDE directory onthe hard disk without using the “CD” command?_____________________________
❏ Exercise 4: Make five copies of the LAB2.TXT file on the hard disk. Name them LAB3.TXT,LAB4.TXT, etc.
❏ Exercise 5: Make another five copies of LAB2.TXT, but name them FILE1.DOC, FILE2.DOC,FILE3.DOC, FILE4.DOC and FILE5.TXT (note the different extension on this last file name).
1.28 What command would you use to display all filenames ending with“.TXT”?______________________ How about all filenames beginning with“L”?_______________________________________________________________________
❏ Exercise 6: Delete all files whose name ends with the “.DOC” suffix.❏ Exercise 7: Display the contents of the LAB2.TXT file on the screen using the TYPE command.
When you are done with a laboratory exercise, it’s very important that you copy your files from thehard disk onto your floppy disk and erase those files on the hard disk. If someone else were to come alongand find your files on the hard disk, they could copy them. When the instructor discovered two virtually
identical projects, he would probably accuse you, as well as the other person, of cheating7. Do not leaveyour data on the hard disk!
Of course, it’s equally important to copy your files from the hard disk to a floppy before leaving yourwork station. Nothing is as frustrating as to get home and realize that the two hours you spent in the com-puter lab was all for naught because you forgot to copy your data from the hard disk before leaving.
1.29 What command would you use to copy all the files from the HYDE directory onthe hard disk to the LAB2 directory on the floppy disk in drive A?___________
_________________________________________________________________________
(assume HYDE is the default directory on the hard disk but LAB2 is not thedefault on the floppy disk.)
1.30 What command would you use to delete all the files in the HYDE directory onthe hard disk?_____________________________________________________________
(assume HYDE is the default directory.)
1.31 What command(s) would you use to remove the HYDE directory from the harddisk?_____________________________________________________________________
❏ Exercise 8: Copy all the files from the hard disk to your floppy, delete the files from the hard disk,then remove the “HYDE” subdirectory from the hard disk.
❏ Exercise 9: Demonstrate the use of the following commands: CLS, DATE, TIME, and PROMPT.
If you have been operating the printer, turn it off now.
7. For this very reason, many schools do not allow students to store temporary work on the hard disk.

Lab Ch01
Lab 1-24
1.9 Sample Pre-Lab Report
First of all, the pre-lab report should include the pages from this lab manual with all the questions completed. Forobvious reasons, this sample will not include such material.
Randall L. HydeCS 13 (UC Riverside)3/15/92Laboratory #2: Pre-Lab Report
Purpose
To determine appropriate options for various MS-DOS commands, including MD, CD, FORMAT, COPY, DIR, TYPE,and RD. I also looked up the execution options for the McAfee SCAN and CLEAN programs. These are all common DOScommands that a typical assembly language programmer would use. This information will help me when I attack pro-gramming projects later on.
The CD/CHDIR Command
CD is an abbreviation for CHDIR which stands for “change directory.” It is an intrinsic DOS command, part of COM-MAND.COM. You use it primarily to switch default directories on each disk drive. This command takes many differentforms. I will attempt to list most of the forms here:
CD Without any command line parameters at all, the CD command simply displays the currentdefault directory name, on the currently selected disk drive.
CD d: Where d: represents a disk drive letter. This option displays the name of the default disk direc-tory on the specified drive.
CD \ Sets the default directory to root on the current drive.
CD d:\ Sets the default directory to root on the specified drive (d represents a disk drive letter).
CD path Sets the default directory to path on the current drive. If the pathname does not begin with thebackslash character (“\”), MS-DOS assumes that it is to start in the current subdirectory whensearching for the pathname.
CD d:path Sets the default directory on drive d without affecting the current drive (unless it is drive d).
CD .. Sets the default directory to the parent of the current directory.
Examples:
CD \book\ch1 -switches to subdirectory “ch1” inside the “book” subdirectory.
CD book\ch1 -as above, except it looks for “book” in the current directory.
The MD/MKDIR Command
MD is an abbreviation for MKDIR which stands for “make directory.” It is an intrinsic DOS command just like CD.You use this command to create new subdirectories on a disk. Basically, this command has two forms:
MD path Creates a new directory on the current drive using the specified pathname.
MD d:path Creates a new directory on drive d: with the specified pathname.

Data Representation
Lab 1-25
If the above pathname begins with a backslash (“\”) then the new directory is attached to the system begin-ning at the root directory level. If it does not begin with a backslash, then the system creates the new subdi-rectory starting with the path at the current default directory.
FORMAT Command
The format command initializes a disk surface for use on an MS-DOS system and writes an empty filesystem to the disk. The IBM DOS 3.20 manual states that the following options are available for the FOR-MAT command (the available options vary depending upon which version of MS-DOS you use):
[d:] [path] FORMAT [options]
The brackets surround optional items on the command line. The “d:” represents a drive letter which givesthe location of the drive containing the FORMAT.COM program. The “path” item denotes the path to thesubdirectory which contains the FORMAT.COM program. You will need to enter the drive and path if theFORMAT.COM program isn’t in the current directory or in the execution path specified by the MS-DOSPATH command. The options for this command include:
d: Specifies the drive containing the media to format.
/S Create a bootable disk by writing the system files to the disk after formatting it.
/1 Format a diskette for single sided use (160K) regardless of drive type.
/8 To format a 5-1/4” diskette at eight sectors per track rather than nine or 15.
/V To give the disk a volume name after formatting it.
/4 To format a double-sided diskette in a high-capacity drive (5-1/4” only).
COPY Command
The COPY command copies one or more files, perhaps from one disk to another. This is an intrinsiccommand (built into COMMAND.COM) and the basic syntax for the command is
COPY [options] file1 file2
which copies the data from file1 to file2. The COPY command takes many different forms, the followingexamples demonstrate some of the possibilities:
COPY b:file.xyz -Copies “file.xyz” to current drive & directory.
COPY b:file.xyz c: -Copies “file.xyz” to the current directory on drive c:
COPY \dir1\dir2\name name2 -Copies “name” from “\dir1\dir2” to “name2” in the current dir.
COPY *.asm \dir1 -Copies all files ending with “asm” to the “dir1” subdirectory.
COPY file1+file2 combined -Copies file1 then file2 to the “combined” file (concatenation).
COPY also supports three command line options “/A”, “/B”, and “/V”. You use the “/A” option whencopying ASCII text files which are terminated with a control-Z (an old fashioned way to mark the end of thefile). Most modern programs do not require a control-Z at the end of the file, so this option has limited util-ity these days. The “/B” is for transferring binary files. Once again, a throwback to the days of DOS 1.0.Finally, the “/V” option turns verify on (which verifies the copy made) if you’ve turned “VERIFY OFF” inDOS.
DIR Command
Answers to Questions
1.22 FORMAT A:
1.23 ç P
1.24 A:
1.25 C:
MD HYDE
1.26 CD HYDE
1.27
COPY A:LAB2\LAB2.TXT .
1.28 DIR *.TXT
DIR L*.*
1.29
COPY C:\HYDE*.* A:\LAB2
1.30 DEL C:\HYDE*.*
1.31 RD c:\HYDE

Lab Ch01
Lab 1-26
The DIR command lists the files in a directory. Used by itself, this command lists the files present in the currentdirectory. You may also specify a disk letter after the DIR command to tell it to list the current directory on some speci-fied drive. You may also provide the pathname to some directory and DIR will list that directory. The basic form of thecommand is
DIR [d:] [path]
where d: represents some drive letter and path represents an optional path name of a directory or a file (including groupsof files using DOS wildcard characters).
The DIR command supports two command line parameters “/P” and “/W”. The “/P” option (pause) instructs the DIRcommand to pause the display when the screen is full, it will display another screen full when the user presses a key. The“/W” option (wide) instructs the DIR command to display only the names of the files with several names per line on thescreen. Examples of the DIR command:
DIR Lists all the files in the current directory on the current disk.
DIR *.ASM Lists all files in the current directory ending with “.ASM”
DIR C:\DIR1\DIR2 Lists all the files in the \DIR1\DIR2 subdirectory on drive C
TYPE Command
The type command is quite simple– it displays the contents of a file on the screen. The syntax for the type commandis
TYPE filename
where filename represents the name of the file you wish to display on the screen. Note that the TYPE command does notallow wildcard characters in a filename. That is, it can only print one file at a time. This command does not support anycommand line options.
RD Command
The RD command (remove directory) is used to delete a subdirectory. Note that RMDIR is a synonym for this com-mand. The basic syntax for the command is
RD pathname
where pathname is the name of some subdirectory. The selected subdirectory must be empty or RD/RMDIR will refuseto delete the specified subdirectory. You cannot delete the current default directory (e.g., “RM .”) nor can you delete theroot directory. The RD command does not support any command line parameters.
Something for you to do: This sample pre-lab report discusses the commands presented in this manual. You shouldcome to lab with a description of the CLS, DATE, PATH, PROMPT, and TIME commands. This information appears in anyDOS reference manual or tutorial. There should be several in your local library if you do not own one. While you’re at it,describe the options for the virus detection and eradication program in use on your campus (this is usually McAfee’sSCAN and CLEAN programs). There is generally documentation available in electronic form on the system.

Data Representation
Lab 1-27
1.10 Sample Lab Report
Randall L. HydeCS 13 (UC Riverside)3/15/92Laboratory #2: Lab Report
Purpose
The purpose of this lab was to learn several important MS-DOS commands and familiarize myselfwith the basic operation of an MS-DOS machine. In this lab I learned several important operations includ-ing formatting disks and copying files between the hard disk and a floppy disk.
Exercise #1: Formatting Floppy Diskettes
For the first exercise, I formatted two 3-1/2” floppy disks using the MS-DOS FORMAT command. Asthe system I was on had a high density 3-1/2” floppy disk drive for drive A:, I issued the following com-mand to format the disk:
FORMAT A:
The first thing the FORMAT program did was ask me to insert a new diskette into drive A: and hit theenter key. As I had already put the diskette into drive A:, I just hit the enter key at that point. During theformatting operation, the format program flashed a bunch of numbers onto the screen. It said it was for-matting “cylinder” zero through 79. On each track it said it was formatting “head” zero and one.
The first disk took almost three minutes to format. Towards the end the disk drive made some terriblegrinding noises and finally finished after formatting track 79. After formatting track 79 it display the follow-ing information:
Format Complete
1457664 bytes total disk space
55296 bytes in bad sectors
1402368 bytes available on disk
Format another (Y/N)?
I replied “Y” and it asked me to place a new diskette in drive A:. I took the first diskette out andinserted the new diskette, then pressed the enter key. This format operation was similar to the first exceptit didn’t make the grinding noises and it only took about two minutes and ten seconds to perform thisoperation. The message at the end of the format operation was similar to the one above, it said:
Format Complete
1457664 bytes total disk space
1457664 bytes available on disk
Format another (Y/N)?
I replied no and the program returned me to the COMMAND.COM “>” prompt.
The T.A. told me that the first diskette had some manufacturing flaws and contained several badspots. MS-DOS tries to work around such flaws and marks certain “sectors” (sounds like something out ofStar Trek) bad. He also told me that perhaps I should consider formatting another diskette and avoid using

Lab Ch01
Lab 1-28
the first diskette. I did this by re-issuing the format command. The results for the third format operation were identical to
the second. I am taking the bad diskette back to the bookstore tomorrow to get my money back!8
Exercise #2: Creating a Subdirectory on the Floppy and Hard Disks
With the third diskette I formatted still in the drive, I created a subdirectory on that floppy diskette using the com-mands:
A:MD LAB2
I issued a “DIR” command to verify that I had actually created this new subdirectory. MS-DOS responded with a directory
listing containing the single entry “LAB2”9. I then switched to the hard drive, switched to the root directory on the harddrive, and created a new subdirectory labelled “HYDE” using the following sequence of commands:
C:CD \MD HYDE
A DIR command verified that I had properly created the new subdirectory:.
8. Okay, I admit this is a little editorializing on my part. However, I really did get some errors on the first diskette I attempted to format.
9. This would be a perfect place to use ç P or the PrtSc commands to dump a listing of the screen to the printer and enclose the print-outwith your lab report.
Here is thesubdirectoryI created.

Data Representation
Lab 1-29
Exercise #3: Copying a File from Floppy to the Hard Disk
For the next part of the lab I copied the LAB2.TXT file from the floppy disk accompanying my labmanual to the HYDE subdirectory. I did this using the following command:
COPY A:\LAB2\LAB2.TXT C:\HYDE
MS-DOS responded with a brief message telling me that it copied one file. I executed a “DIR HYDE” com-mand to verify that MS-DOS had copied the file to the HYDE subdirectory. Sure enough, the file was there.
Exercise #4: Making Additional Copies of the LAB2.TXT File
To create five copies of the LAB2.TXT file, I used the following MS-DOS commands:
COPY LAB2.TXT LAB3.TXT
COPY LAB2.TXT LAB4.TXT
COPY LAB2.TXT LAB5.TXT
COPY LAB2.TXT LAB5.TXT
COPY LAB2.TXT LAB6.TXT
Counting the original file, this produced five copies of the LAB2.TXT file on the disk with the namesshown above. A DIR command verified their existence.
Exercise #5: Making an Additional Five Copies of LAB2.TXT
Using the DOS COPY command I created another five copies of the LAB2.TXT file. However, I namedthese files FILE1.DOC, FILE2.DOC, FILE3.DOC, FILE4.DOC, AND FILE5.TXT. Note, as per instructions inthe lab manual, that the last file has an extension of “.TXT” rather than “.DOC”. A directory command ver-ified the proper execution of the COPY commands. The exact commands I used were
COPY LAB2.TXT FILE1.DOC
COPY LAB2.TXT FILE2.DOC
COPY LAB2.TXT FILE3.DOC
COPY LAB2.TXT FILE4.DOC
COPY LAB2.TXT FILE5.TXT
Exercise #6: Deleting all “.DOC” Files
For this part of the lab, I used the “DEL *.DOC” command to delete all the “.DOC” files. A DIR com-mand verified that I had deleted FILE1.DOC through FILE4.DOC. Note that FILE5.TXT remained in thedirectory since it did not end with “.DOC”.
Exercise #7: Using the TYPE Command to Display a File’s Contents to the Screen
To actually see what was in the LAB2.TXT file, I used the following TYPE command to print the file tothe display:
TYPE LAB2.TXT
The output file appears in the printout attached to this report.
Exercise #8: Copying Files from the Hard Disk to Floppy
At the completion of each laboratory exercise, I need to remove my files from the hard disk and placethem on a floppy diskette. To accomplish this, I used the command “COPY *.* A:\LAB2”. This copied all

Lab Ch01
Lab 1-30
the files from the HYDE directory on the hard disk to the LAB2 directory on my floppy disk. A directory listing of theA:\LAB2 directory verified that I had, indeed, copied the files. Again, the printout attached to this report demonstratesthe execution of these commands.
Once I had copied the files to the floppy disk, the next step was to remove my files from the hard disk. I did thisusing the following MS-DOS commands:
CD ..
DEL HYDE
RD HYDE
A DIR command afterwards verified that the “HYDE” directory no longer exists on the hard disk.
Exercise #9: Demonstration of CLS, DATE, TIME, and PROMPT
The CLS command is fairly straightforward. It accepts no parameters and it simply clears the screen. The DATE andTIME commands displayed the current date and time and stopped to allow me to enter in new values. Since the systemclock was already correct, I simply hit the enter key to accept the existing date and time.
The PROMPT command lets you set the prompt string which appears on the display when COMMAND.COM isexpecting some sort of command line. I entered the string “PROMPT HYDE$g” and this caused the system to print“HYDE>” whenever it wanted a command line parameter. There are other metacharacters, beginning with a “$”, which
the prompt command supports, see the pre-lab report for more details10.
Conclusion
The ability to successfully use MS-DOS is a very important one for this assembly language class. After all, the pro-grams we will be writing are going to be assembled and run under MS-DOS. Therefore, some familiarity with basic MS-DOS commands is very important. In this lab I experienced, first hand, several important commands which are usefulwhen using MS-DOS. This certainly isn’t the only set of commands I will ever need to know, but it does get me started.Fortunately, MS-DOS is very similar to the UNIX operating system we used in CS 10 & 12 (even if the command namesare different) so adjusting to MS-DOS wasn’t so difficult.
A printout of my session at the machine during the course of the lab follows:
a:
A>md lab2
A>c:
c:\>md hyde
c:\>cd hyde
c:\hyde>copy a:lab2\lab2.txt .a:\lab2\lab2.txt => c:\hyde\lab2.txt 1 file(s) copied
c:\hyde>dir
Volume in drive C is unlabeled Directory of c:\hyde\*.*. <DIR> 7-04-92 9:00 .. <DIR> 7-04-92 9:00 LAB2 TXT 178 7-04-92 8:58 2,048 bytes in 3 file(s) 12,564,480 bytes free
c:\hyde>copy lab2.txt lab3.txt
10. Actually, the operation of the PROMPT command is one of those commands I’ve left you to figure out.

Data Representation
Lab 1-31
c:\hyde\lab2.txt => c:\hyde\lab3.txt 1 file(s) copied
c:\hyde>copy lab2.txt lab4.txtc:\hyde\lab2.txt => c:\hyde\lab4.txt 1 file(s) copied
c:\hyde>copy lab2.txt lab5.txtc:\hyde\lab2.txt => c:\hyde\lab5.txt 1 file(s) copied
c:\hyde>copy lab2.txt lab6.txtc:\hyde\lab2.txt => c:\hyde\lab6.txt 1 file(s) copied
c:\hyde>dir
Volume in drive C is unlabeled Directory of c:\hyde\*.*. <DIR> 7-04-92 9:00 .. <DIR> 7-04-92 9:00 LAB2 TXT 178 7-04-92 8:58 LAB3 TXT 178 7-04-92 8:58 LAB4 TXT 178 7-04-92 8:58 LAB5 TXT 178 7-04-92 8:58 LAB6 TXT 178 7-04-92 8:58 10,240 bytes in 7 file(s) 12,556,288 bytes free
c:\hyde>copy lab2.txt lab7.txtc:\hyde\lab2.txt => c:\hyde\lab7.txt 1 file(s) copied
c:\hyde>dir
Volume in drive C is unlabeled Directory of c:\hyde\*.*. <DIR> 7-04-92 9:00 .. <DIR> 7-04-92 9:00 LAB2 TXT 178 7-04-92 8:58 LAB3 TXT 178 7-04-92 8:58 LAB4 TXT 178 7-04-92 8:58 LAB5 TXT 178 7-04-92 8:58 LAB6 TXT 178 7-04-92 8:58 LAB7 TXT 178 7-04-92 8:58 12,288 bytes in 8 file(s) 12,554,240 bytes free
c:\hyde>copy lab2.txt file1.docc:\hyde\lab2.txt => c:\hyde\file1.doc 1 file(s) copied
c:\hyde>copy lab2.txt file2.docc:\hyde\lab2.txt => c:\hyde\file2.doc 1 file(s) copied
c:\hyde>copy lab2.txt file3.docc:\hyde\lab2.txt => c:\hyde\file3.doc 1 file(s) copied
c:\hyde>copy lab2.txt file4.docc:\hyde\lab2.txt => c:\hyde\file4.doc 1 file(s) copied
c:\hyde>copy lab3.txt file5.txtc:\hyde\lab2.txt => c:\hyde\file5.txt 1 file(s) copied

Lab Ch01
Lab 1-32
c:\hyde>dir
Volume in drive C is unlabeled Directory of c:\hyde\*.*. <DIR> 7-04-92 9:00 .. <DIR> 7-04-92 9:00 LAB2 TXT 178 7-04-92 8:58 LAB3 TXT 178 7-04-92 8:58 LAB4 TXT 178 7-04-92 8:58 LAB5 TXT 178 7-04-92 8:58 LAB6 TXT 178 7-04-92 8:58 LAB7 TXT 178 7-04-92 8:58 FILE1 DOC 178 7-04-92 8:58 FILE2 DOC 178 7-04-92 8:58 FILE3 DOC 178 7-04-92 8:58 FILE4 DOC 178 7-04-92 8:58 FILE5 TXT 178 7-04-92 8:58 22,528 bytes in 13 file(s) 12,544,000 bytes free
c:\hyde>del *.docDeleting c:\hyde\file1.docDeleting c:\hyde\file2.docDeleting c:\hyde\file3.docDeleting c:\hyde\file4.doc
c:\hyde>dir
Volume in drive C is unlabeled Directory of c:\hyde\*.*. <DIR> 7-04-92 9:00 .. <DIR> 7-04-92 9:00 LAB2 TXT 178 7-04-92 8:58 LAB3 TXT 178 7-04-92 8:58 LAB4 TXT 178 7-04-92 8:58 LAB5 TXT 178 7-04-92 8:58 LAB6 TXT 178 7-04-92 8:58 LAB7 TXT 178 7-04-92 8:58 FILE5 TXT 178 7-04-92 8:58 14,336 bytes in 9 file(s) 12,552,192 bytes free
c:\hyde>type lab2.txtThis is a short text file used to demonstratefile copying and other operations in the laboratoryassociated with Chapter Two of “The Art of AssemblyLanguage Programming.”
c:\hyde>copy *.* a:lab2c:\hyde\lab2.txt => a:\lab2\lab2.txtc:\hyde\lab3.txt => a:\lab2\lab3.txtc:\hyde\lab4.txt => a:\lab2\lab4.txtc:\hyde\lab5.txt => a:\lab2\lab5.txtc:\hyde\lab6.txt => a:\lab2\lab6.txtc:\hyde\lab7.txt => a:\lab2\lab7.txtc:\hyde\file5.txt => a:\lab2\file5.txt 7 file(s) copied
c:\hyde>del *.*c:\hyde\*.* : Are you sure ? (Y/N) : YDeleting c:\hyde\lab2.txtDeleting c:\hyde\lab3.txtDeleting c:\hyde\lab4.txtDeleting c:\hyde\lab5.txtDeleting c:\hyde\lab6.txtDeleting c:\hyde\lab7.txtDeleting c:\hyde\file5.txt

Data Representation
Lab 1-33
c:\hyde>cd ..
c:\>rd hyde
c:\>cls
c:\>dateFri Jul 3, 1992 09:03:56New date (mm-dd-yy):
c:\>timeFri Jul 3, 1992 09:04:01New time (hh:mm:ss):
c:\>prompt rhyde
rhydeprompt rhyde$g
rhyde>
1.11 Chapter One Examples and Study Guide
Although this study guide contains most of the information necessary to answer the ques-tions it poses, by no means is it a stand alone document. This guide assumes that you’ve readChapter One in “The Art of Assembly Language Programming” prior to working through thisstudy guide. Chapter One of the textbook provides far more background and support materialthan you will find here. The instructional material appearing in this guide is to jog your memoryand support the material from the text. Please note that the organization of this chapter is a littledifferent from those that follow since this chapter includes sample prelab and laboratory reports.
The decimal numbering system is, by far, the most common numbering system employedby people. Each digit to the left of the “decimal” point represents a value in the range 0-9 timessome successive positive power of two. Likewise, each digit to the right of the decimal point rep-resents a value by a successive negative power of two.
Examples:
• 1234.567 is 1*1000 + 2*100 + 3*10 + 4 + 5*0.1 + 6 * 0.01 + 7 * 0.001. This is also
equivalent to the value 1*103 + 2 *102 + 3*101 + 4*100 + 5*10-1 + 6*10-2 + 7*10-3
• 5.23e+5 is 5*105 + 2*104 + 3*103
1.32 What is the “powers of ten” representation for 7009.001?
___________________________________________________________________
__________________________________________________________________
The binary numbering system works in a manner quite similar to the decimal numberingsystem, except it uses successive powers of two rather than powers of ten and it only allows thedigits 0-1 rather than 0-9. Examples:
• 1001 is 1 * 23 + 1*20 (decimal equivalent is nine)
• 110.11 is 1*22 + 1*21 + 1*2-1 + 1*2-2 (decimal equivalent is 6.75)
1.33 What is the “powers of two” representation for 1101101.1?
___________________________________________________________________
___________________________________________________________________
Lab Ch01
Lab 1-34
1.34 What is the decimal equivalent of 1101101.1?
___________________________________________________________________
In assembly language, binary numbers are generally grouped together in clumps of four, eight, sixteen or thirty-two“bits” (binary digits). Likewise, most of the values dealt with in assembly language are integers. This text will follow thenormal convention of numbering the bits from zero to n-1 where “n” is the total number of bits in the value. The loworder (L.O.) bit is always bit number zero, the high order (H.O.) bit is always bit number n-1 in a binary number.
1.35 In a 16-bit binary number, which bit position is the H.O. bit?___________________________
Assembly language programmers, particularly those on the 80x86, often work with bit strings four, eight, sixteen, orthirty-two bits long. Therefore, we use several special names for binary data types of these lengths. They are: nibbles,bytes, words, and double words, respectively.
1.36 What is the number of the H.O. bit in a word? _____________. In a double word?___________.
1.37 How many bits are there in a byte? ____________________________________________________
1.38 How many bytes are there in a double word? ___________________________________________
1.39 What is the number of the L.O. bit in a nibble? __________________________________________
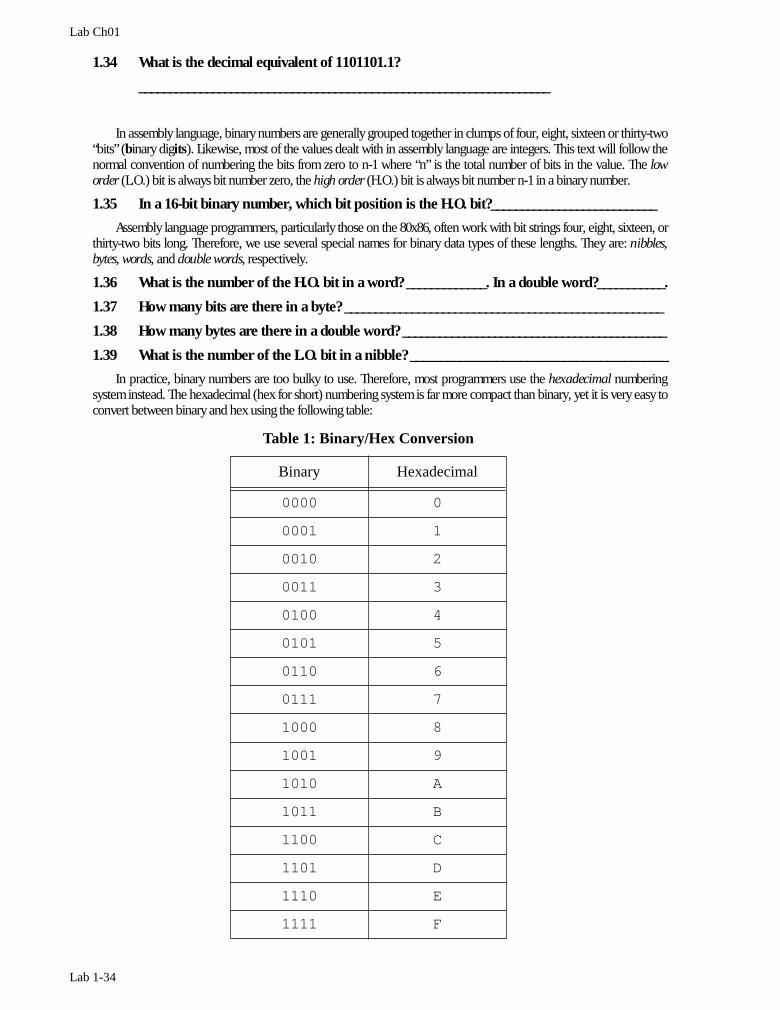
In practice, binary numbers are too bulky to use. Therefore, most programmers use the hexadecimal numberingsystem instead. The hexadecimal (hex for short) numbering system is far more compact than binary, yet it is very easy toconvert between binary and hex using the following table:
Table 1: Binary/Hex Conversion
Binary Hexadecimal
0000 0
0001 1
0010 2
0011 3
0100 4
0101 5
0110 6
0111 7
1000 8
1001 9
1010 A
1011 B
1100 C
1101 D
1110 E
1111 F

Data Representation
Lab 1-35
To convert a hexadecimal number to binary, simply replace each hexadecimal digit withthe corresponding four binary digits from the table above.
Examples:
• FACE = 1111 1010 1100 1110• 1A2B = 0001 1010 0010 1011• 4821 = 0100 1000 0010 0001
Converting binary to hexadecimal is almost as easy. First, you separate the binary numberinto groups of four bits starting with the L.O. bit and working your way to the left (adding zerosat the left end of the number if necessary):
• 11011010 = 1101 1010• 110 = 0110• 11001010010 = 0110 0101 0010• 1111100000101= 0001 1111 0000 0101
The next step is to substitute the corresponding hexadecimal digit for each group of fourbits in the binary number:
• 1101 1010 = DA• 0110 = 6• 0110 0101 0010 = 652• 0001 1111 0000 0101 = 1F05
1.40 What is the binary equivalent of FEDC? ______________________________
1.41 What is the hex equivalent of 11011010010010? ______________________
1.42 What is the hex equivalent of 100010010000101? _____________________
1.43 What is the value of the H.O. bit of the 16-bit number 7F8C? ___________
There are four major logical operation on bits11: AND, OR, XOR, and NOT. The followingtables provide the “truth tables” for these operations:
11. Actually, as any digital designer will tell you, there are 16 possible functions of two single bit variables. However,four of these functions appear in many programming languages, hence their presence in this manual.
Table 2: AND Truth Table
AND 0 1
0 0 0
1 0 1
Table 3: OR Truth Table
OR 0 1
0 0 1
1 1 1
1.32:
7*103 + 9*100 + 1*10-3
1.33:
1*26 + 1*25 + 1*23 + 1*22 +
1*20 + 1*2-1
Lab Ch01
Lab 1-36
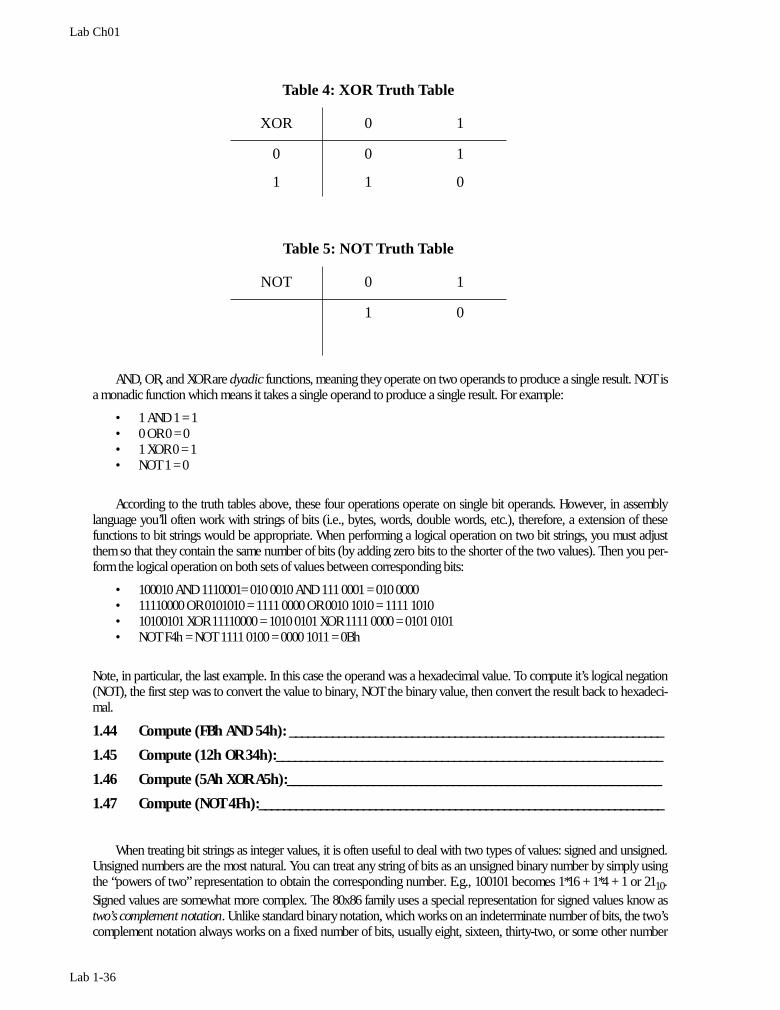
AND, OR, and XOR are dyadic functions, meaning they operate on two operands to produce a single result. NOT isa monadic function which means it takes a single operand to produce a single result. For example:
• 1 AND 1 = 1• 0 OR 0 = 0• 1 XOR 0 = 1• NOT 1 = 0
According to the truth tables above, these four operations operate on single bit operands. However, in assemblylanguage you’ll often work with strings of bits (i.e., bytes, words, double words, etc.), therefore, a extension of thesefunctions to bit strings would be appropriate. When performing a logical operation on two bit strings, you must adjustthem so that they contain the same number of bits (by adding zero bits to the shorter of the two values). Then you per-form the logical operation on both sets of values between corresponding bits:
• 100010 AND 1110001= 010 0010 AND 111 0001 = 010 0000• 11110000 OR 0101010 = 1111 0000 OR 0010 1010 = 1111 1010• 10100101 XOR 11110000 = 1010 0101 XOR 1111 0000 = 0101 0101• NOT F4h = NOT 1111 0100 = 0000 1011 = 0Bh
Note, in particular, the last example. In this case the operand was a hexadecimal value. To compute it’s logical negation(NOT), the first step was to convert the value to binary, NOT the binary value, then convert the result back to hexadeci-mal.
1.44 Compute (FBh AND 54h): _____________________________________________________________
1.45 Compute (12h OR 34h):_______________________________________________________________
1.46 Compute (5Ah XOR A5h):_____________________________________________________________
1.47 Compute (NOT 4Fh):__________________________________________________________________
When treating bit strings as integer values, it is often useful to deal with two types of values: signed and unsigned.Unsigned numbers are the most natural. You can treat any string of bits as an unsigned binary number by simply usingthe “powers of two” representation to obtain the corresponding number. E.g., 100101 becomes 1*16 + 1*4 + 1 or 2110.Signed values are somewhat more complex. The 80x86 family uses a special representation for signed values know astwo’s complement notation. Unlike standard binary notation, which works on an indeterminate number of bits, the two’scomplement notation always works on a fixed number of bits, usually eight, sixteen, thirty-two, or some other number
Table 4: XOR Truth Table
XOR 0 1
0 0 1
1 1 0
Table 5: NOT Truth Table
NOT 0 1
1 0

Data Representation
Lab 1-37
which is an even power of two12. To begin with, the two’s complement format uses the H.O. bitas the sign bit. If it contains zero, the number is positive and uses the standard binary represen-tation for positive values. If the H.O. bit is one, the number is negative and uses the two’s com-plement representation for negative numbers. You can get the two’s complement representationfor a positive value by inverting all the bits and adding one
Example: Compute the two’s complement of the 16-bit value F1Eh
1) Convert to 16-bit binary. F1Eh = 0000 1111 0001 1110b
2) Invert all the bits. NOT 0000 1111 0001 1110 = 1111 0000 1110 0001
3) Add one. 1111 0000 1110 0001 + 1 = 1111 0000 1110 0010
4 Convert back to hexadecimal. -(F1Eh) = F0E2h
Example: Compute the two’s complement of the 16-bit value F0E2h:
1) Convert to 16-bit binary: F0E2h = 1111 0000 1110 0010b
2) Invert all the bits. NOT 1111 0000 1110 0010 = 0000 1111 0001 1101
3) Add one. 0000 1111 0001 1101 + 1 = 0000 1111 0001 1110
4 Convert back to hexadecimal. 0000 1111 0001 1110b = 0F1Eh.
It is encouraging to note that -(-F1Eh) = F1Eh.
1.48 Compute -FFFFh: _____________________________________________________
1.49 Compute -(FACEh AND F0F0h): ________________________________________
Often, you’ll have a two’s complement value of one size which you need to convert toanother size. Perhaps you want to add a signed eight-bit value and a signed sixteen-bit valuetogether. Or maybe you need to store away the result of a signed sixteen bit operation into aneight bit variable. The sign extension and sign contraction operations are what you need.
Sign extension is the easiest of the two to deal with. You use the sign extension operation tomake a two’s complement number larger, e.g., take an eight-bit two’s complement number andturn it into a 16-bit two’s complement value. Sign extension is very easy, you simply take theH.O. bit of the smaller number and replicate it through all the additional bits in the larger num-ber. When going from an eight-bit number to a sixteen-bit number, you would duplicate thevalue of bit seven throughout bits eight through fifteen in the new number.
• The sign extension of the eight-bit value FCh to 16 bits is FFFCh.
• The sign extension of the eight-bit value 7Fh to 16 bits is 007Fh13
• The sign extension of the 16-bit value 8000h to 32 bits is FFFFFF80h
1.50 Sign extend the eight-bit value 5Fh to 16 bits
: ___________________________________________
1.51 Sign extend the eight-bit value 91h to 16 bits:
___________________________________________
12. The exact number of bits should be clear from context, although this text will tend to state the number of bits inuse for any given example.13. Strictly speaking, the extra zeros aren’t required here. They appear to emphasize the fact that this is a sixteen-bitvalue.
1.34: 109.5
1.35: Bit #15
1.36: Bit #15, Bit #31
1.37: 8
1.38: 4
1.39: 0
1.40: 1111 1110 1101 1100
1.41: 3692
1.42 4485
1.43: 0

Lab Ch01
Lab 1-38
Sign contraction is somewhat more difficult because it’s not always possible to sign contract a number. A numberlike -200 will fit just fine into a sixteen-bit signed integer, but it will not fit into an eight-bit number. However, many num-bers will fit just fine. For example, 67 and -32 both fit into eight bit, sixteen bit, and larger integers.
Sign contraction is only possible if the H.O. bits of a value are all zero or all one. For example, if you want to signcontract a 16-bit number to an eight bit number, the H.O. eight bits must all contain the same value as bit #7 (the H.O. bitof the result). Examples:
• FF80h sign contracts to 80h• 0045h sign contracts to 45h• FF9Fh sign contracts to 9Fh
Values outside the range of a signed byte (-128..+127) will not sign contract to an eight-bit value:
• FF00h will not sign contract to an eight-bit value.• 102h will not sign contract to an eight-bit value.
1.52 Sign extend 7Fh to 16 bits: __________________________________________________________
1.53 Sign extend the eight-bit value 81h to 32 bits: _________________________________________
1.54 Sign extend the 16-bit value 81h to 32 bits:____________________________________________
1.55 Sign extend the 16-bit result of (01FFh AND FF81h) to 32-bits: __________________________
Shift and rotate operations let you move data around in a bit string. There are three basic shifts and two basic
rotates14: shift left, shift right, arithmetic shift right, rotate left, and rotate right. These five operations move bits around ina bit string. They vary in the direction that the bits move and where bits go (and come from) at the ends of the bit string.The following diagrams best describe these operations:
Shift Left:
Shift Right:
Arithmetic Shift Right:
14. Actually, the 80x86 family supports four basic rotate operations. Right now we will deal with only two of them.
7 6 5 4 3 2 1 0
7 6 5 4 3 2 1
7 6 5 4 3 2 1 0

Data Representation
Lab 1-39
Rotate Left:
Rotate Right:
Shifting a bit string to the left one position corresponds to a multiplication by two. Shifting abit string to the right one position corresponds to an unsigned division by two. An arithmeticshift right, by one bit position, corresponds to a signed division by two. The rotate left and right
instructions do not directly correspond to a particular arithmetic operation15.
The real purpose of the shift and rotate instructions, however, is not for performing multi-plications and divisions by two but for moving bits around within another. Suppose you have adate packed into a 16-bit value as follows:
If you wanted to extract the DAYS field of this number, you could strip out the other bitsusing the logical AND operation (since AND lets you force selected bits to zero). For example,the expressions:
DATE and 0F80h
sets all the bits except the DDDDD bits to zero (why?). This, however, doesn’t produce an inte-ger in the range 0..31 (or, actually, 1..31 if it is a valid date). Instead, it produces values like 128,256, 384, 512, etc. If we want to treat this value as an unsigned integer (reasonable for a date),then the bits corresponding to the day have to be right justified in the bit string. To accomplish
this, you would need to shift the bits in this number seven positions to the right16.
Extracting a bit field from a number usually requires two operations: an AND operation to
mask out unwanted bits, and a shift operation to align the result against bit zero17.
15. Actually, the rotate left instruction does correspond to a special form of one of the 80x86’s addition instructions, butthe two are not substitutes for one another.16. Rotating the value nine bits to the left would also work, but that is two more operations to perform.17. In the DATE example above, it takes only one operation, AND, to extract the date since it is already aligned againstbit zero. Likewise, you need only shift the month field to the right 12 positions to extract the month since the shift rightoperation automatically fills the H.O. bits with zeros.
7 6 5 4 3 2 1 0
7 6 5 4 3 2 1 0
15 14 13 12 11 10 9 8 7 6 5 4 3 2 1 0
M M M M D D D D D Y Y Y Y Y Y Y
1.44: 50h
1.45 36h
1.46 0
1.47: 70h
1.48: 1
1.49 0F40h
1.50: 005Fh
1.51: 0FF91h

Lab Ch01
Lab 1-40
1.56 What are the operations required to extract the Month _______________________________,Day ____________________________________, and Year _______________________________from a DATE?
1.57 How could you extract a sign bit from a number using a rotate left and AND instruction?
_____________________________________________________________________________________
_____________________________________________________________________________________
Inserting data into a packed field is only a little more complicated than extracting it. Assuming you want to insert aDAY value into the DATE data structure, the first step is to clear out any value already appearing in the DAY field. AnAND operation (AND 0F80h) accomplishes this. Next, you take your DAY value (presumably a five-bit unsigned integer)and shift it seven positions to the left in order to align it with the DAY field of the DATE data type. Finally, you use theOR operation to merge the two values together:
Start with: DATE: 0001 10011 1011100 (1/19/92)
DAY: 0000 0000 000 11000 (24)
First, mask out the DAY field from the DATE using the AND 0F80h operation:
DATE: 0001 00000 1011100 (1/0/92)
DAY: 0000 0000 000 11000 (24)
Next, shift the DAY value to the left seven bits to align it with the DAY field in DATE:
DATE: 0001 00000 1011100 (1/0/92)
DAY: 0000 11000 0000000 (24 * 128)
Finally, logically OR the two together to form the new date:
DATE: 0001 11000 1011100 (1/24/92)
1.58 What is the bit pattern for the date 6/19/60? _________________
1.59 Which operations would you use to insert the day “20” into the above date?___________________________________________________________________________________________________________________________________________________________________________
The ASCII character set is probably the most universal code in existence today. The standard ASCII character setincludes 128 different codes for representing different types of characters. Most computers use an eight-bit byte to repre-sent ASCII characters, setting the H.O. bit to zero (since it takes only seven bits to represent any standard ASCII charac-ter). The 128 ASC II character set is easily broken down into four groups using bits five and six as follows:

Data Representation
Lab 1-41
1.60 What logical operation would you use to convert lower case to uppercase? ____________________________________________________________
To convert upper case to lower case?______________________________
To switch the case of a letter? _____________________________________
Bit 6 Bit 5 Group
0 0 Control Characters
0 1 Digits & Punctuation
1 0 Upper Case & Special
1 1 Lower Case & Special
1.52: 007Fh
1.53: 0 FFFFFF81h
1.54 00000081h
1.55 00000181h

Lab Ch01
Lab 1-42
1.12 Answers To Selected Questions
1a) 1000 0000 1b) 0001 0000 0000 0000 1c) 0001 0000 0000
1d) 0001 0000 0000 0000 0000 1e) 1111 1110
2a) 153 2b) 157 2c) 195 2d) 9 2e) 255
3a) 99 3b) 9D 3c) C3 3d) 9 3e) FF
4a) 1010 1011 1100 1101 4b) 0001 0000 0010 0100 4c) 1101 1110 1010 1101
4d) 1010 1101 1101 4f) 1000
5a) AAAA
6a)
8a) By forcing one input to the NAND function high, the output is always the inverse of the other input.
10a) 2 11a) 4 12a) 3
14a) negative 14b) positive 14c) negative 14d) positive 14e) negative
15a) FF99 15b) FF9D 15c) FFC3 15d) 9 15e) FFFF
16a) 0F00 16b) 1004 16c) 0220 16d) 2241 16e) EDCB
17a) FFF0 17b) F23F 17c) 5335 17d) 3341 17e) FFFF
18a) F0F0 18b) E23B 18c) 5115 18d) 1100 18e) 1234
19a) 5432 19b) EFDB 19c) 2152 19d) F522 19e) 4110
20a) 5433 20b) EFDC 20c) 2153 20d) F523 20e) 4111
21a) FFFF 21b) FF82 21c) 12 21d) 56 21e) FF98
22a) Cannot be sign contracted because result won’t fit into eight bits.
22c) F0 22d) 12
23a) FFFFFF00 23d) 12
24a) FE00 24b) FE24 24c) FFE0 24d) 24 24e) 100
25a) 7F80 25b) 7f89 25c) 7FF8 25d) 9 25e) 40
26a) FE01 26b) FE23 26c) FFE1 26d) 24 26e) 100
27a) 7F80 27b) 7F91 27i) 803F 27l) C07F
28a) 10DC
Table 6: NAND Truth Table
NAND 0 1
0 1 1
1 1 0

Data Representation
Lab 1-43
1.56:
Month: SHR 12
or AND F000, ROL 4
or ROL 4, AND F
Day: AND F80, SHR 7
Year: AND 7F
1.57: ROL 1, then AND 1
1.58: 69BC
1.59: Date AND F07F(remove old day), DAYSHL 7 to move it in posi-tion, DATE OR DAY tomerge the two.
1.60: AND 5Fh, OR 20h,XOR 20h

Lab Ch01
Lab 1-44