day/night noise level assessment tool user guide · the day/night noise level assessment tool is a...
TRANSCRIPT
D a y / N i g h t N o i s e L e v e l A s s e s s m e n t T o o l U s e r s G u i d e
Department of Housing and Urban Development Community Planning and Development
Office of Environment and Energy Environmental Planning Division
V2.0 August 2010

Table of Contents
Overview of the Day/Night Noise Level Assessment Tool .............. 3 Assessment Approach - Roadway .................................................. 4 Assessment Approach - Railway .................................................... 4 Assessment Process ...................................................................... 4 Roadway Assessment Procedures ................................................. 9 Railway Assessment Procedures ................................................. 13 Mitigation Options ........................................................................ 16
Barrier Performance Module .................................................. 17 Calculation Examples ................................................................... 19
Roadway Example ................................................................. 19 Railway Example ................................................................... 26
Browser Requirements ................................................................. 33 Printing and Saving ...................................................................... 33
PROVIDING FEEDBACK & CORRECTIONS
After using the DNL Assessment Tool following the directions in this User Guide, users are encouraged to provide feedback on how the DNL Assessment Tool may be improved. Users are also encouraged to send comments or corrections for the improvement of the tool.
Please send your comments or other input to [email protected]
2

Overview of the Day/Night Noise Level Assessment Tool The Day/Night Noise Level Assessment tool is a web-based application of the existing Noise Assessment Guidelines (NAG). It is a component of the Assessment Tools for Environmental Compliance (ATEC). Derivations of the basic noise equation from the noise regulation, 24 CFR Part 51 Subpart B, were applied to a new application of the NAG. The resulting calculations automate the paper process by “filling in the blanks” and negating the need for the graphed curves and charts. The data requirements are interactive. Users only supply data to active input boxes, and those boxes are activated by the answers to questions about the site conditions. If it does not apply, users are not asked. If it should apply and a box is not active, answers to previous questions should be revisited.
This version contains mitigation options and a barrier performance module. The module provides options on mitigation when the calculated site Day/Night Noise Level (DNL) result is in excess of 65 decibels. The barrier performance module provides the barrier’s effectiveness on noise reduction.
The Day/Night Noise Level Assessment tool calculates roadway and railway noise only. This update includes the ability to incorporate aircraft noise and loud impulse sounds. The DNL Calculator has been modified to accept aircraft noise data supplied by the airport and combine it with the road and railway sources for a total site exposure from all transportation sources. It can also add the compensating factor for loud impulse sounds.
3

Assessment Approach - Roadway
The computerized noise assessment process very closely mimics the paper worksheets of the NAG. The same data must be gathered. Instead of blanks on the worksheet, boxes are filled in on a screen. The traffic characteristics and relationship of the road to the Noise Assessment Location (NAL) are the inputs for the noise calculation. The 10-year projected noise of each vehicle type is combined with other vehicle types to calculate a road noise. The roadway noise calculated is combined with noise from other community sources to determine the site exposure to environmental noise as described by the current NAG.
Assessment Approach – Railway
The computerized process for quantifying railway noise similarly uses the paper worksheets of the NAG for its basic structure. The railway characteristics and relationship of the railway to the NAL are the inputs for the noise calculation. The noise of each train is combined with other trains to calculate a railway noise. The railway noise calculated is combined with other sources to determine the site exposure to environmental noise.
Assessment Process – Roadway and railway noise sources The process for using the Day/Night Noise Level Calculator is relatively simple. It is recommended that users fill out the data sheets in the NAG to organize the project information, but that is not necessary. Users can go directly to the ATEC.
1. Go to the Noise Assessment Guidelines in the Noise Guidebook. Optionally, go directly to the DNL Calculator.
1a. For either noise source (roadway or railway), fill out Worksheet A: Site Evaluation in the Noise Assessment Guidelines to organize the project information. This is also where the findings of the noise assessment can be reported.
4

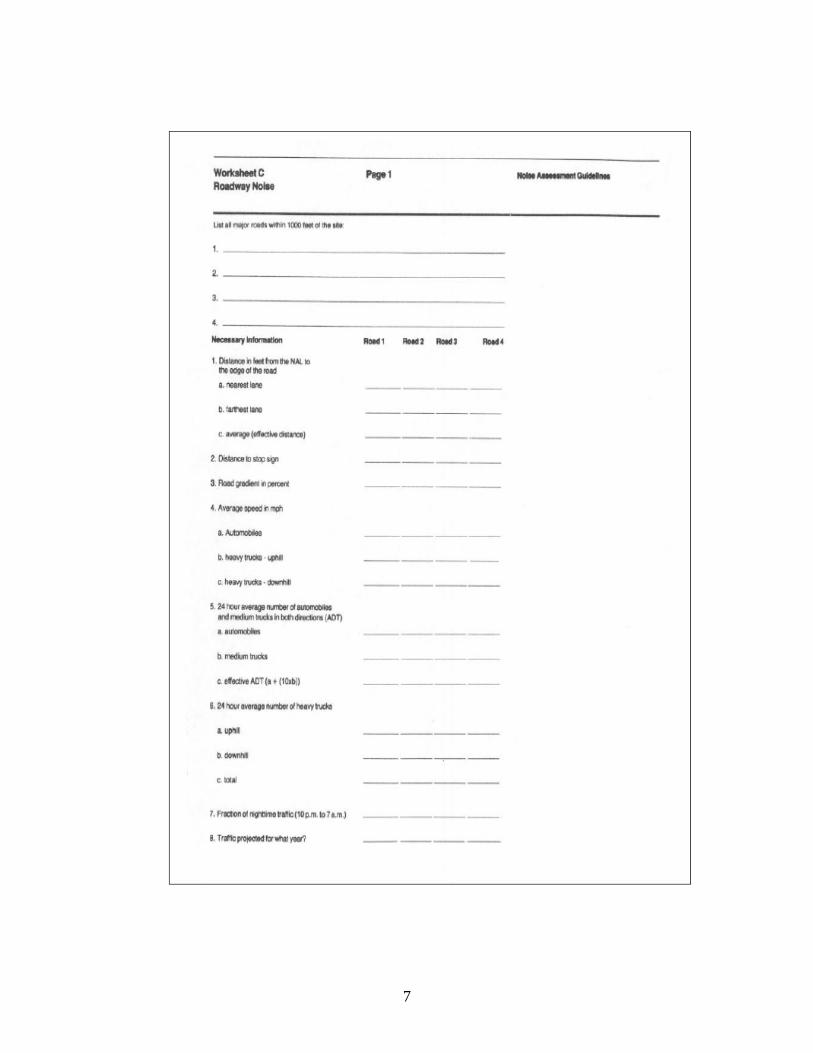
1b. Complete Worksheet C: For Roadway Noise if there is a major roadway within 1000 feet of the site.
1c. Complete Worksheet D: For Railway Noise if there is a rail line within 3000 feet of the site.
Worksheets A, C and D are the inputs for the electronic noise assessment tool
1a. Noise Assessment Guidelines 1b. Noise Assessment Guidelines Worksheet A: Site Evaluation Worksheet C: Roadway Noise
1c. Noise Assessment Guidelines Worksheet D: Railway Noise
5

For purposes of illustration, Worksheets A,(Site Evaluation), Worksheet C (Roadway Noise) and Worksheet D (Railway Noise) of the NAG, are presented full size on pages 6 through 8.
6
7

8

Site Identification data fields
DNL calculator buttons
Airport noise level entry field
Loud Impulse Sound information entry field
2. Roadway DNL Assessment Procedures
Users can access the Day/Night Noise Level Calculator by going to the following URL: http://www.hud.gov/offices/cpd/environment/dnlcalculator.cfm. This is the Welcome Screen.
2a. Enter the information (from Worksheet A) into the Site Identification Data fields for the site being assessed:
Site ID – Project Site’s unique identifier – This is a number that you choose to identify the site. It must be numeric.
Record Date – Date the assessment was created.
User’s Name – Person assessing the site noise exposure
2b. Click on the appropriate DNL Calculator button (for roadway assessments use the button labeled “Add Road Source,” for railway assessments use the “Add Rail Source” button) .
9

Roadway Identification data field
Roadway Assessment data fields
DNL Calculation result field for Road and Rail
Checkboxes to Activate Vehicle Input
DNL Calculation result field incorporating airport noise if applicable
DNL Calculation result field with or without loud impulse sound penalty
Note: You need to “add” a source as appropriate to the blank assessment to start the process. If your site is exposed to both rails and roads, pick one to begin. You will be given an opportunity to add the other source at the end of each assessment.
Sequential Steps to Complete a Noise Assessment
Below are the steps to calculate the noise from a particular Noise Assessment Location (NAL) near a road involving any combination of vehicle types (cars, medium trucks and heavy trucks). These steps should be repeated for additional NALs on a site.
Note: Definitions for each Roadway Assessment Data field could be determined by moving the cursor to the pertinent field.
Step 1. Enter the Road Name (The name of the road being assessed must be unique)
10
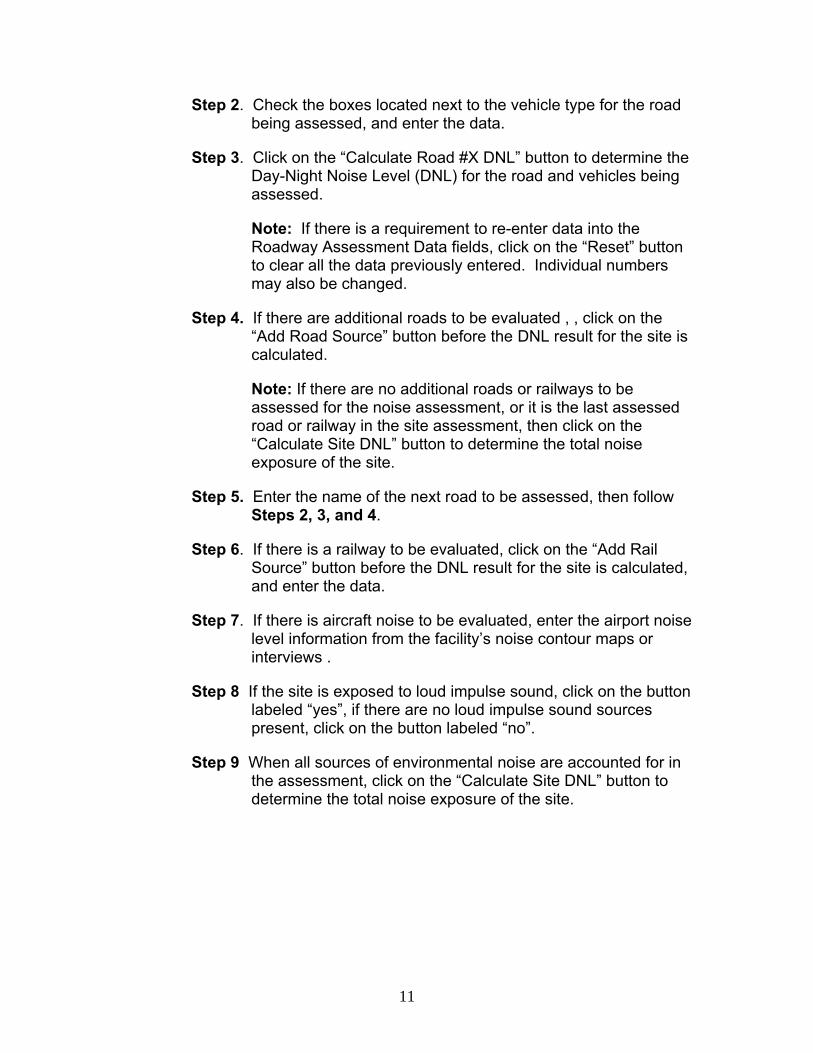
Step 2. Check the boxes located next to the vehicle type for the road being assessed, and enter the data.
Step 3. Click on the “Calculate Road #X DNL” button to determine the Day-Night Noise Level (DNL) for the road and vehicles being assessed.
Note: If there is a requirement to re-enter data into the Roadway Assessment Data fields, click on the “Reset” button to clear all the data previously entered. Individual numbers may also be changed.
Step 4. If there are additional roads to be evaluated , , click on the “Add Road Source” button before the DNL result for the site is calculated.
Note: If there are no additional roads or railways to be assessed for the noise assessment, or it is the last assessed road or railway in the site assessment, then click on the “Calculate Site DNL” button to determine the total noise exposure of the site.
Step 5. Enter the name of the next road to be assessed, then follow Steps 2, 3, and 4.
Step 6. If there is a railway to be evaluated, click on the “Add Rail Source” button before the DNL result for the site is calculated, and enter the data.
Step 7. If there is aircraft noise to be evaluated, enter the airport noise level information from the facility’s noise contour maps or interviews .
Step 8 If the site is exposed to loud impulse sound, click on the button labeled “yes”, if there are no loud impulse sound sources present, click on the button labeled “no”.
Step 9 When all sources of environmental noise are accounted for in the assessment, click on the “Calculate Site DNL” button to determine the total noise exposure of the site.
11
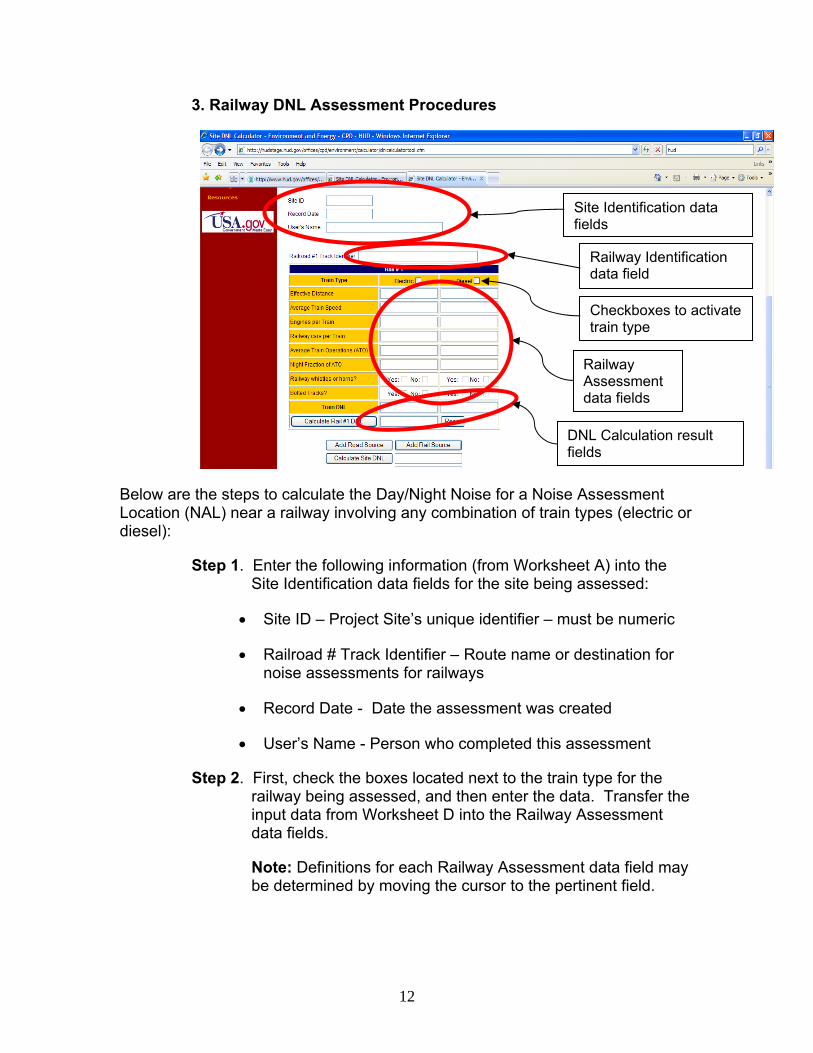
Site Identification data fields
Railway Assessment data fields
DNL Calculation result fields
Railway Identification data field
Checkboxes to activate train type
3. Railway DNL Assessment Procedures
Below are the steps to calculate the Day/Night Noise for a Noise Assessment Location (NAL) near a railway involving any combination of train types (electric or diesel):
Step 1. Enter the following information (from Worksheet A) into the Site Identification data fields for the site being assessed:
Site ID – Project Site’s unique identifier – must be numeric
Railroad # Track Identifier – Route name or destination for noise assessments for railways
Record Date - Date the assessment was created
User’s Name - Person who completed this assessment
Step 2. First, check the boxes located next to the train type for the railway being assessed, and then enter the data. Transfer the input data from Worksheet D into the Railway Assessment data fields.
Note: Definitions for each Railway Assessment data field may be determined by moving the cursor to the pertinent field.
12

Step 3. Click on the “Calculate Rail #Y DNL” button to determine the Day-Night Noise Level (DNL) for the railway and trains being assessed.
Note: If there is a need to re-enter data into the Railway Assessment data fields, click on the “Reset” button to clear all the data previously entered.
Step 4. If there are additional railways to be evaluated into the noise assessment, click on the “Add Rail Source” button.
Step 4a. Enter the name of the next railway to be assessed, then follow Steps 2, 3, and 4.
Step 5 If there is aircraft noise to be evaluated, enter the airport noise level information from the facility’s noise contour maps or interviews .
Step 8 If the site is exposed to loud impulse sound, click on the button labeled “yes,” if there are no loud impulse sound sources present, click on the button labeled “no.”
Step 9 When all sources of environmental noise are accounted for in the assessment, click on the “Calculate Site DNL” button to determine the total noise exposure of the site.
Here are some tips to help with the data entry:
Boxes that need input will be white and editable. A box next to the vehicle type involved in the noise assessment (vehicle types include cars, medium trucks and heavy trucks) must be “checked” in order for the data from Worksheet C be entered into the Vehicle assessments data fields. Boxes that report DNL calculation results are also white but they are non-editable.
To determine the Day-Night Noise Level (DNL) for the road and vehicles being assessed, click on the “Calculate Road #X DNL” button.
Any roadway or railway to be assessed must added, including the first ones. To add an additional road to the noise assessment, click on the “Add Road Source” button, or to add a railway to the noise assessment, click on the “Add Rail Source” button.
To re-start calculation procedures after a noise assessment has been completed, click the “Refresh” button located below the “Calculate Site DNL” button
13

To clear the data from the Roadway Assessment Data fields, click on the “Reset” button.
It is important to leave the “Distance to Stop Sign” box blank if there is no stop sign within 600’ of the NAL.
Note: DNL Calculator assumes roadway data is always entered.
14

4. Mitigation Options
The mitigation module is accessible from the DNL calculator welcome screen.
The mitigation module provides options to the user of the DNL calculator, if the site DNL is in excess of 65 decibels. The module provides suggested options presented as follows:
No Action Alternative: Cancel the project at the presented location
Other Reasonable Alternative: Choose an alternate site
Contact your Field or Regional Environmental Officer about mitigation options:
Increase mitigation in the building walls
Reconfigure the site plan to increase the distance between the noise source and the noise sensitive uses
Incorporate natural or man-made barriers
Construct noise barrier
15

Final Site DNL result. Result from site data input into the DNL calculator.
Barrier Input Variables
Barrier Output Variables
Roadway Input field Railway Input field
Combined New Site DNL field
4a. Barrier Performance Module
Users can get access to the Barrier Performance Module by going to the following URL: http://www.hud.gov/offices/cpd/environment/calculator/mitigation.cfm, or from the mitigation options module. This is the Welcome Screen.
To calculate the Barrier Performance of an existent barrier perform the steps as follow:
Step 1. Enter the value of the barrier’s input variables. Each variable definition could be accessed by hovering over them with the mouse.
Step 2. Click on the “Calculate Output” button. The result of the calculations is presented with the value of the barrier output variables ( the barrier performance (FS) is within these variables). The “new site dnl” output is the result of the attenuation provided from the barrier on the assessed site.
16
An additional function of the barrier performance module is the site DNL calculation by providing DNL values from roadway and railway sources.
Note: These values need not to be provided from the DNL calculator. The values could be provided from any other source.
To accomplish this calculation, perform the steps as follow:
Step 1. Enter the roadway and railway DNL values into the roadway and railway DNL input fields.
Step 2. Click the “calculate” button. The system will provide the result from the combination of the entered data and it will be displayed in the “Combined New Site DNL” field.
17

Site Identification data fields
Roadway Identification data field
5. Calculation Examples
5a. Roadway DNL Calculation Example:
Calculate Day/ Night Noise from:
A Noise Assessment Location (NAL) near two roads involving a combination of types of vehicles (cars, medium trucks and heavy trucks).
Step 1. Enter the following information (from Worksheet A) into the Site and Roadway Identification data fields:
Site ID – Project number 0001
Road #1 Name – Maury Street
Record Date – 7 January 2009
User’s Name – Forrest Gump
The screen should look as follows:
18

Roadway Assessment data fields. Note: Check the boxes next to the vehicle type for the road being assessed before entering the data
Note: These are the boxes to be checked before entering the data
Step 2. Transfer the input data from Worksheet C (effective distance, distance to stop sign, road average speed, Average Daily Trips (ADT), nightime fraction of ADT, and road gradient) into the Roadway Assessment Data fields. To enter that data, first, check the boxes located next to the vehicle for the road been assessed, and then enter the data.
The screen should look as follows:
19

Click on this button to determine the DNL for the road and vehicles being assessed
Road DNL result
Vehicle DNL results
Step 3. Click on the “Calculate Road #X DNL” button to determine the Day-Night Noise Level (DNL) for the road and vehicles being assessed
The screen should look as follows:
20
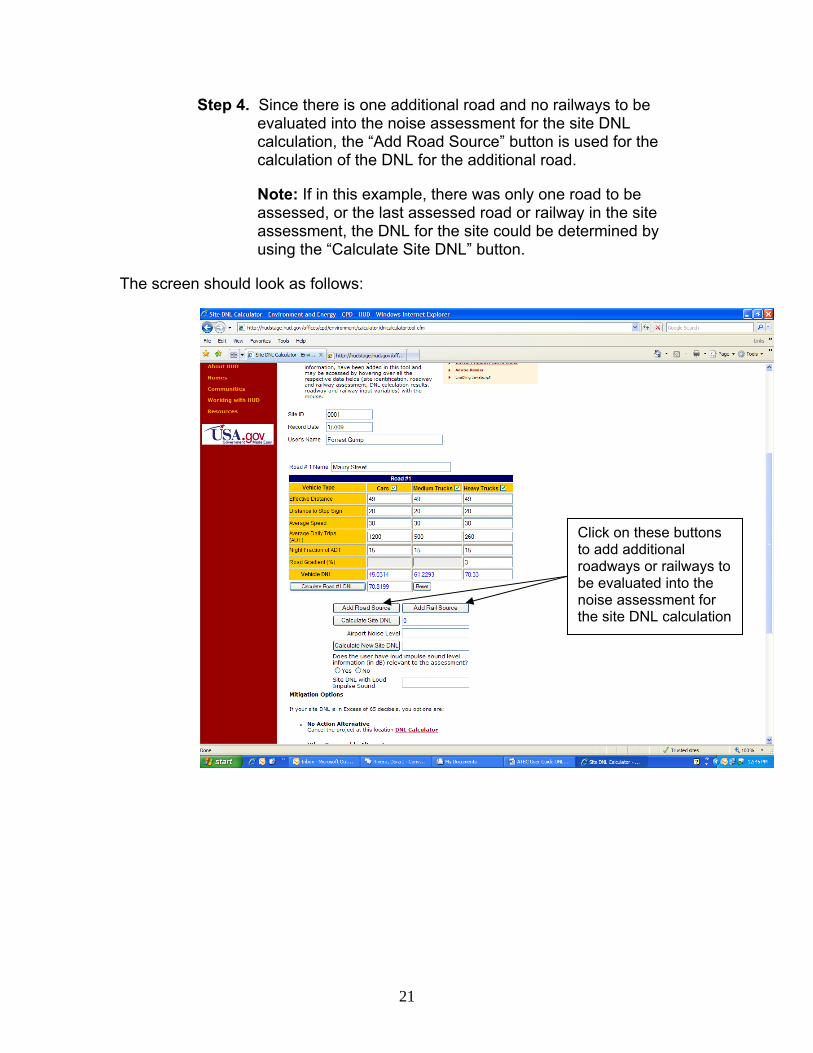
Click on these buttons to add additional roadways or railways to be evaluated into the noise assessment for the site DNL calculation
Step 4. Since there is one additional road and no railways to be evaluated into the noise assessment for the site DNL calculation, the “Add Road Source” button is used for the calculation of the DNL for the additional road.
Note: If in this example, there was only one road to be assessed, or the last assessed road or railway in the site assessment, the DNL for the site could be determined by using the “Calculate Site DNL” button.
The screen should look as follows:
21

Enter the name of the next road to be assessed
Step 2 – Enter the Roadway Assessment data into the fields
Step 3 – Click here for road and vehicle DNL results
Step 4 – Click here for Site DNL results
Step 5. Enter the name of the next road to be assessed, then follow Steps 2, 3 and 4:
The screen should look as follows:
22
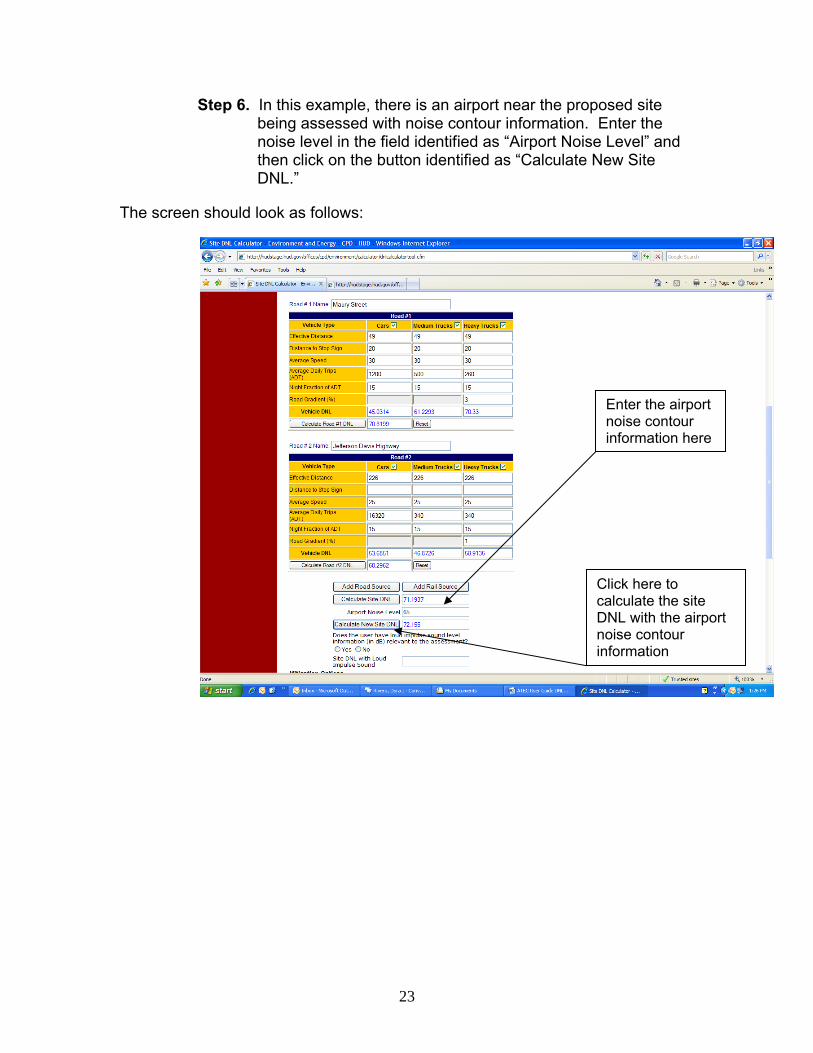
Enter the airport noise contour information here
Click here to calculate the site DNL with the airport noise contour information
Step 6. In this example, there is an airport near the proposed site being assessed with noise contour information. Enter the noise level in the field identified as “Airport Noise Level” and then click on the button identified as “Calculate New Site DNL.”
The screen should look as follows:
23

Enter the availability (yes or no) for loud impulse sound information
Final Site DNL results with loud impulse sound information
24
Step 7. In this example, there is loud impulse sound information relevant to the site being assessed. Since this information is available, click on the button identified as “Yes.” The final site DNL result will be displayed on the “Site DNL with loud Impulse sound” area. If there was no data available, then click in the button identified as “No.”
The screen should look as follows:
Site Identification Data fields
Railway Identification Data field
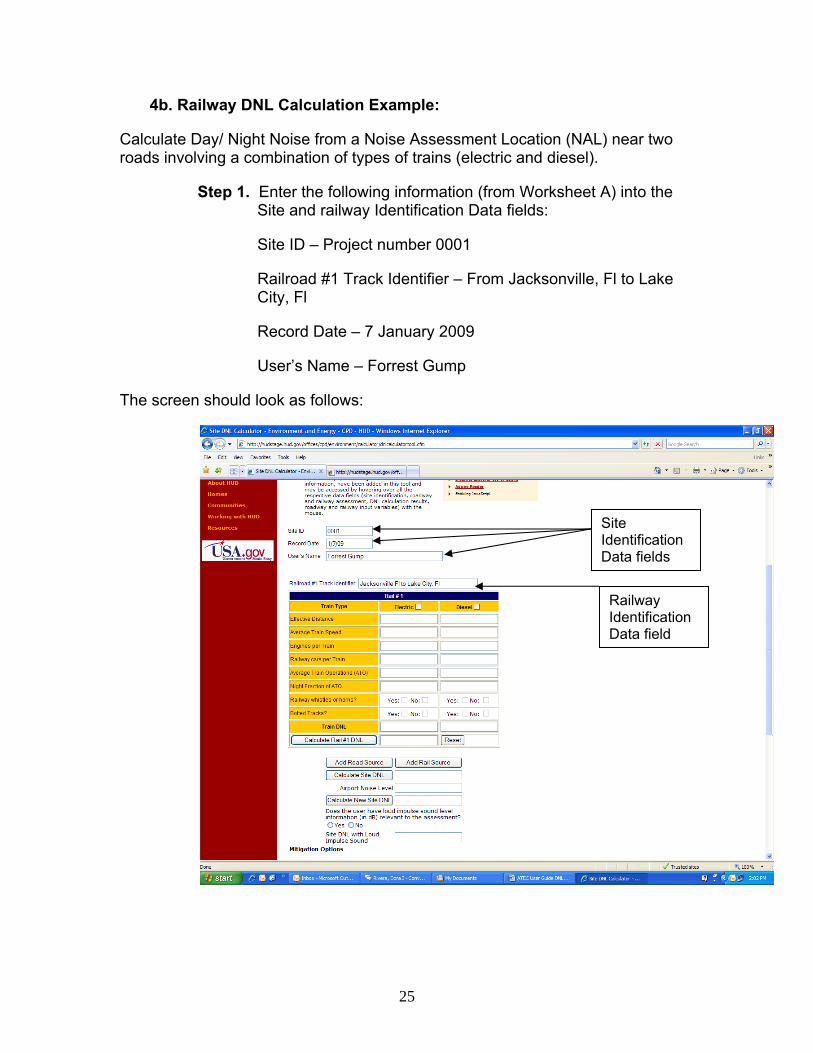
4b. Railway DNL Calculation Example:
Calculate Day/ Night Noise from a Noise Assessment Location (NAL) near two roads involving a combination of types of trains (electric and diesel).
Step 1. Enter the following information (from Worksheet A) into the Site and railway Identification Data fields:
Site ID – Project number 0001
Railroad #1 Track Identifier – From Jacksonville, Fl to Lake City, Fl
Record Date – 7 January 2009
User’s Name – Forrest Gump
The screen should look as follows:
25
Note: These are the boxes to be checked before entering the data
Railway Assessment Data fields. Note: Check the boxes next to the train type for the railway being assessed before entering the data
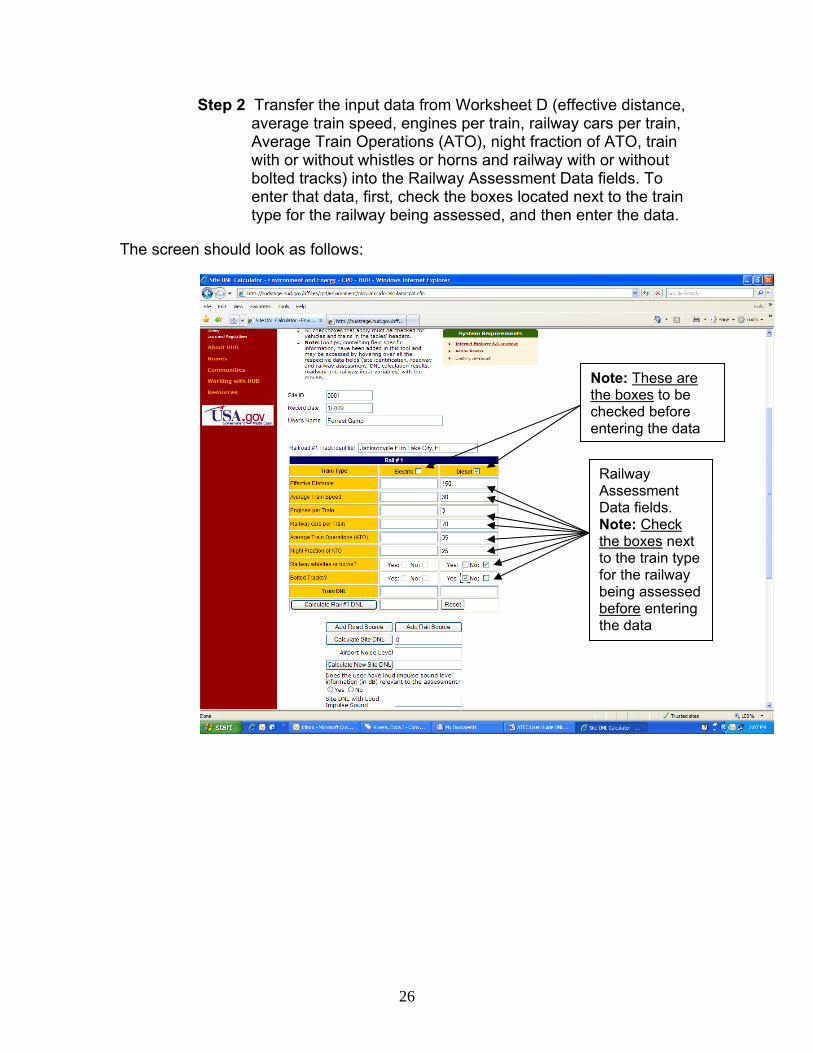
Step 2 Transfer the input data from Worksheet D (effective distance, average train speed, engines per train, railway cars per train, Average Train Operations (ATO), night fraction of ATO, train with or without whistles or horns and railway with or without bolted tracks) into the Railway Assessment Data fields. To enter that data, first, check the boxes located next to the train type for the railway being assessed, and then enter the data.
The screen should look as follows:
26

Train DNL results
Railway DNL result
Click on this button to determine the DNL for the railway and trains being assessed
Step 3. Click on the “Calculate Rail # DNL” button to determine the Day-Night Noise Level (DNL) for the railway and trains being assessed
The screen should look as follows:
27

Click on these buttons to add additional roadways or railways to be evaluated into the noise assessment for the site DNL calculation
Step 4. Since there is one additional railway and no roadways to be evaluated into the noise assessment for the site DNL calculation, the “Add Rail Source” button is used for the calculation of the DNL for the additional railway.
Note: If in this example, there was only one railway to be assessed, or the last assessed railway or roadway in the site assessment, the DNL for the site could be determined by using the “Calculate Site DNL” button.
The screen should look as follows:
28

Enter the name of the next railway to be assessed
Step 2- Enter the Railway Assessment Data into the fields
Step 3- Click here for railway and train DNL results
Step 4- Click here for Site DNL result
Step 5. Enter the name of the next railway to be assessed, then follow Steps 2, 3 and 4.
The screen should look as follows:
29

Enter the airport noise contour information here
Click here to calculate the site DNL with the airport noise contour information
Step 6. In this example, there is an airport near the proposed site being assessed with noise contour information. Enter the noise level in the field identified as “ Airport Noise Level” and then click on the button identified as “Calculate New Site DNL”.
The screen should look as follows:
30

31
Step 7. In this example, there is loud impulse sound information relevant to the site being assessed. Since this information is available, click on the button identified as “Yes”. The final site DNL result will be displayed on the “Site DNL with loud Impulse sound” area. If there was no data available, then click in the button identified as “No”.
The screen should look as follows:
Enter the availability (yes or no) for loud impulse sound information
Final Site DNL results with loud impulse sound information

Browser requirements: Microsoft Internet Explorer 6.0
Printing and Saving:
For either printing or saving the records from this tool it is required to display the Adobe PDF toolbar in the Browser. To accomplish that the following steps are required to be accomplished:
Step 1 From the menu bar click on View
Step 2 Click on Toolbars
Step 3 Click on Adobe PDF
The following is a visual representation of the procedure to display the Adobe PDF toolbar in the Browser:
32

To save as a PDF document, perform the following steps:
Step 1 Click on the Adobe PDF icon in the browser. A “Convert Web Page to Adobe PDF” window will appear.
Step 2 Choose the location and file name to save the web page in a PDF format.
Step 3 Click on Save.
The following is a visual representation of the procedure of saving a record:
33

To print as a PDF document, perform the following steps:
Step 1 Click on the arrow next to the Adobe PDF icon to see the PDF menu
Step 2 Click on “Print Web Page”
The following is a visual representation of the procedure of printing a record:
34