db2 ibm informix - oninitdb2 ® ibm informix ibm informix backup and restore guide version 10.0/8.5...
TRANSCRIPT

DB2® IBM Informix
IBM Informix Backup and Restore Guide
Version 10.0/8.5
G251-2269-00
���

DB2® IBM Informix
IBM Informix Backup and Restore Guide
Version 10.0/8.5
G251-2269-00
���
Note!
Before using this information and the product it supports, read the information in “Notices” on page F-1.
First Edition (December 2004)
This document contains proprietary information of IBM. It is provided under a license agreement and is protected by
copyright law. The information contained in this publication does not include any product warranties, and any
statements provided in this manual should not be interpreted as such.
When you send information to IBM, you grant IBM a nonexclusive right to use or distribute the information in any
way it believes appropriate without incurring any obligation to you.
© Copyright International Business Machines Corporation 1996, 2004. All rights reserved.
US Government Users Restricted Rights – Use, duplication or disclosure restricted by GSA ADP Schedule Contract
with IBM Corp.
Contents
Introduction . . . . . . . . . . . . . . . . . . . . . . . . . . . . . . . xi
About This Manual . . . . . . . . . . . . . . . . . . . . . . . . . . . . xii
Types of Users . . . . . . . . . . . . . . . . . . . . . . . . . . . . . xii
Software Dependencies . . . . . . . . . . . . . . . . . . . . . . . . . . xii
Assumptions About Your Locale . . . . . . . . . . . . . . . . . . . . . . . xiii
Demonstration Database . . . . . . . . . . . . . . . . . . . . . . . . . xiii
New Features in Dynamic Server . . . . . . . . . . . . . . . . . . . . . . . xiv
Features from Dynamic Server 10.0 . . . . . . . . . . . . . . . . . . . . . . xiv
Features from Dynamic Server 9.4 . . . . . . . . . . . . . . . . . . . . . . xv
Features from Dynamic Server 9.3 . . . . . . . . . . . . . . . . . . . . . . xvi
Features from Dynamic Server 9.21 . . . . . . . . . . . . . . . . . . . . . . xvi
New Features in Extended Parallel Server . . . . . . . . . . . . . . . . . . . . xvi
Documentation Conventions . . . . . . . . . . . . . . . . . . . . . . . . . xvi
Typographical Conventions . . . . . . . . . . . . . . . . . . . . . . . . xvii
Feature, Product, and Platform . . . . . . . . . . . . . . . . . . . . . . . xvii
Syntax Diagrams . . . . . . . . . . . . . . . . . . . . . . . . . . . xviii
Example Code Conventions . . . . . . . . . . . . . . . . . . . . . . . . xxii
Additional Documentation . . . . . . . . . . . . . . . . . . . . . . . . . xxiii
Installation Guides . . . . . . . . . . . . . . . . . . . . . . . . . . . xxiii
Online Notes . . . . . . . . . . . . . . . . . . . . . . . . . . . . . xxiii
Informix Error Messages . . . . . . . . . . . . . . . . . . . . . . . . . xxv
Manuals . . . . . . . . . . . . . . . . . . . . . . . . . . . . . . xxvi
Online Help . . . . . . . . . . . . . . . . . . . . . . . . . . . . . xxvi
Accessibility . . . . . . . . . . . . . . . . . . . . . . . . . . . . . . xxvi
IBM Informix Dynamic Server Version 10.0 and CSDK Version 2.90 Documentation Set . . . . . xxvi
Compliance with Industry Standards . . . . . . . . . . . . . . . . . . . . . . xxix
IBM Welcomes Your Comments . . . . . . . . . . . . . . . . . . . . . . . . xxx
Part 1. Introducing Backup and Restore
Chapter 1. Introducing Backup and Restore . . . . . . . . . . . . . . . . . . . 1-1
What Is a Recovery System? . . . . . . . . . . . . . . . . . . . . . . . . . 1-2
What Is a Backup? . . . . . . . . . . . . . . . . . . . . . . . . . . . 1-2
What Is a Logical-Log Backup? . . . . . . . . . . . . . . . . . . . . . . . 1-3
What Is a Restore? . . . . . . . . . . . . . . . . . . . . . . . . . . . 1-5
Comparing ON-Bar and ontape . . . . . . . . . . . . . . . . . . . . . . . . 1-9
Planning a Recovery Strategy . . . . . . . . . . . . . . . . . . . . . . . . 1-10
What Types of Data Loss Can Occur? . . . . . . . . . . . . . . . . . . . . . 1-10
How Severe is the Failure? . . . . . . . . . . . . . . . . . . . . . . . . 1-10
How Do You Use Your Data? . . . . . . . . . . . . . . . . . . . . . . . 1-11
Scheduling Backups . . . . . . . . . . . . . . . . . . . . . . . . . . 1-11
Planning a Backup System for a Production Database Server . . . . . . . . . . . . . . 1-12
Evaluating Hardware and Memory Resources . . . . . . . . . . . . . . . . . . 1-12
Evaluating Backup and Restore Time . . . . . . . . . . . . . . . . . . . . . 1-12
© Copyright IBM Corp. 1996, 2004 iii
Evaluating Logging and Transaction Activity . . . . . . . . . . . . . . . . . . 1-13
Part 2. Overview of the ON-Bar Backup and Restore System
Chapter 2. The ON-Bar Backup and Restore System . . . . . . . . . . . . . . . . 2-1
Where to Find Information on ON-Bar, ISM, and TSM . . . . . . . . . . . . . . . . 2-2
ON-Bar for Dynamic Server . . . . . . . . . . . . . . . . . . . . . . . . . 2-4
ON-Bar for Extended Parallel Server . . . . . . . . . . . . . . . . . . . . . . 2-6
Database Server and Storage-Manager Communication . . . . . . . . . . . . . . . 2-7
Backup Scheduler . . . . . . . . . . . . . . . . . . . . . . . . . . . . 2-7
ON-Bar Utilities . . . . . . . . . . . . . . . . . . . . . . . . . . . . . 2-9
IBM Informix Storage Manager . . . . . . . . . . . . . . . . . . . . . . . 2-9
IBM Tivoli Storage Manager (UNIX) . . . . . . . . . . . . . . . . . . . . . 2-10
Third-Party Storage Managers . . . . . . . . . . . . . . . . . . . . . . . 2-11
The XBSA Interface . . . . . . . . . . . . . . . . . . . . . . . . . . . 2-11
The ON-Bar Tables . . . . . . . . . . . . . . . . . . . . . . . . . . . 2-12
The Emergency Boot Files . . . . . . . . . . . . . . . . . . . . . . . . 2-12
The ON-Bar Activity Log . . . . . . . . . . . . . . . . . . . . . . . . . 2-14
Chapter 3. Configuring the Storage Manager and ON-Bar . . . . . . . . . . . . . . 3-1
Configuring a Storage Manager . . . . . . . . . . . . . . . . . . . . . . . . 3-2
Installing and Configuring a Storage Manager . . . . . . . . . . . . . . . . . . 3-2
Configuring ISM . . . . . . . . . . . . . . . . . . . . . . . . . . . . 3-2
Configuring TSM . . . . . . . . . . . . . . . . . . . . . . . . . . . . 3-3
Updating the sm_versions File . . . . . . . . . . . . . . . . . . . . . . . 3-5
Configuring Multiple Storage Managers on Coserver Nodes (XPS) . . . . . . . . . . . 3-6
Validating Your Storage Manager . . . . . . . . . . . . . . . . . . . . . . 3-7
Configuring ON-Bar . . . . . . . . . . . . . . . . . . . . . . . . . . . . 3-7
Creating the bargroup Group (UNIX) . . . . . . . . . . . . . . . . . . . . . 3-7
Updating the onbar Script . . . . . . . . . . . . . . . . . . . . . . . . . 3-8
Setting ISM Environment Variables and ONCONFIG Parameters . . . . . . . . . . . . 3-8
Setting the Informix Interface for TSM Environment Variables . . . . . . . . . . . . . 3-9
Specifying the Location of the XBSA Library . . . . . . . . . . . . . . . . . . . 3-9
Using ON-Bar Configuration Parameters . . . . . . . . . . . . . . . . . . . . . 3-11
Using ON-Bar Configuration Parameters on Dynamic Server . . . . . . . . . . . . . 3-11
Using ON-Bar Configuration Parameters on Extended Parallel Server . . . . . . . . . . 3-12
Steps to Take Before Making a Test Backup . . . . . . . . . . . . . . . . . . . . 3-18
Choosing Storage Managers and Storage Devices . . . . . . . . . . . . . . . . . . 3-19
Features That ISM Supports . . . . . . . . . . . . . . . . . . . . . . . . 3-19
Features That ISM Does Not Support . . . . . . . . . . . . . . . . . . . . . 3-19
Features That TSM Supports . . . . . . . . . . . . . . . . . . . . . . . . 3-20
Feature that TSM Does Not Support . . . . . . . . . . . . . . . . . . . . . 3-20
Storage Device Requirements . . . . . . . . . . . . . . . . . . . . . . . 3-20
Considerations for Extended Parallel Server . . . . . . . . . . . . . . . . . . 3-21
Chapter 4. Backing Up with ON-Bar . . . . . . . . . . . . . . . . . . . . . . 4-1
Syntax of ON-Bar Commands . . . . . . . . . . . . . . . . . . . . . . . . . 4-2
Preparing for a Backup . . . . . . . . . . . . . . . . . . . . . . . . . . . 4-3
What Data Does ON-Bar Back Up? . . . . . . . . . . . . . . . . . . . . . . 4-3
iv IBM Informix Backup and Restore Guide
Which Administrative Files to Back Up? . . . . . . . . . . . . . . . . . . . . 4-4
Installing and Configuring a Storage Manager . . . . . . . . . . . . . . . . . . 4-5
What Is a Whole-System Backup? (IDS) . . . . . . . . . . . . . . . . . . . . 4-5
What Is a Standard Backup? . . . . . . . . . . . . . . . . . . . . . . . . 4-5
What is an Incremental Backup? . . . . . . . . . . . . . . . . . . . . . . . 4-5
What Is a Physical Backup? (XPS) . . . . . . . . . . . . . . . . . . . . . . 4-6
Choosing a Backup Level . . . . . . . . . . . . . . . . . . . . . . . . . 4-6
Collecting Information About Your System Before a Backup . . . . . . . . . . . . . 4-7
Backing Up Storage Spaces and Logical Logs . . . . . . . . . . . . . . . . . . . 4-8
Backup Syntax . . . . . . . . . . . . . . . . . . . . . . . . . . . . . 4-8
Backing Up After Changing the Physical Schema . . . . . . . . . . . . . . . . . 4-11
Using ISM During a Backup . . . . . . . . . . . . . . . . . . . . . . . . 4-13
Using IBM Informix Server Administrator to Back Up and Verify . . . . . . . . . . . 4-13
ON-Bar Backup Examples . . . . . . . . . . . . . . . . . . . . . . . . 4-14
Backing Up Table Types . . . . . . . . . . . . . . . . . . . . . . . . . 4-19
Viewing Recent ON-Bar Activity (IDS) . . . . . . . . . . . . . . . . . . . . . 4-19
Backing Up Logical Logs . . . . . . . . . . . . . . . . . . . . . . . . . . 4-20
Backing Up Logical Logs on Dynamic Server . . . . . . . . . . . . . . . . . . 4-20
Backing Up Logical Logs on Extended Parallel Server . . . . . . . . . . . . . . . 4-25
Monitoring Logical-Log Backups . . . . . . . . . . . . . . . . . . . . . . 4-27
Salvaging Logical-Log Files . . . . . . . . . . . . . . . . . . . . . . . . 4-28
Understanding ON-Bar Backup Processes . . . . . . . . . . . . . . . . . . . . 4-29
Backup Sequence on Dynamic Server . . . . . . . . . . . . . . . . . . . . . 4-29
Backup Sequence on Extended Parallel Server . . . . . . . . . . . . . . . . . . 4-30
Chapter 5. Verifying Backups . . . . . . . . . . . . . . . . . . . . . . . . 5-1
Verifying Backups with archecker . . . . . . . . . . . . . . . . . . . . . . . 5-1
Using archecker to Verify Backups . . . . . . . . . . . . . . . . . . . . . . 5-2
Preparing to Verify Backups . . . . . . . . . . . . . . . . . . . . . . . . 5-3
Syntax . . . . . . . . . . . . . . . . . . . . . . . . . . . . . . . 5-3
Estimating the Amount of Temporary Space for archecker . . . . . . . . . . . . . . 5-5
Verification Examples . . . . . . . . . . . . . . . . . . . . . . . . . . 5-6
Interpreting Verification Messages . . . . . . . . . . . . . . . . . . . . . . 5-7
What To Do If Backup Verification Fails . . . . . . . . . . . . . . . . . . . . 5-7
Procedures for Fixing Backup Verification Problems . . . . . . . . . . . . . . . . 5-8
Chapter 6. Restoring Data with ON-Bar . . . . . . . . . . . . . . . . . . . . . 6-1
What Types of Restores Does ON-Bar Perform . . . . . . . . . . . . . . . . . . . 6-2
What Is a Warm Restore? . . . . . . . . . . . . . . . . . . . . . . . . . 6-2
What Is a Cold Restore? . . . . . . . . . . . . . . . . . . . . . . . . . 6-3
What Is a Mixed Restore? . . . . . . . . . . . . . . . . . . . . . . . . . 6-4
What Is a Parallel Restore? . . . . . . . . . . . . . . . . . . . . . . . . . 6-4
What Is a Whole-System Restore? (IDS) . . . . . . . . . . . . . . . . . . . . 6-4
What Is a Point-in-Time Restore? . . . . . . . . . . . . . . . . . . . . . . 6-4
What Is an Imported Restore? . . . . . . . . . . . . . . . . . . . . . . . 6-5
What Is a Rename Chunks Restore? (IDS) . . . . . . . . . . . . . . . . . . . . 6-5
What Is a Restartable Restore? (IDS) . . . . . . . . . . . . . . . . . . . . . 6-5
Using the Pre-Recovery Checklist . . . . . . . . . . . . . . . . . . . . . . . 6-6
Monitoring Restores . . . . . . . . . . . . . . . . . . . . . . . . . . . 6-7
Ensuring That Storage Devices Are Available . . . . . . . . . . . . . . . . . . 6-7
Contents v
Restoring Save Sets with ISM . . . . . . . . . . . . . . . . . . . . . . . . 6-8
Performing a Complete Restore . . . . . . . . . . . . . . . . . . . . . . . . 6-8
Performing a Physical-Only or Logical-Only Restore . . . . . . . . . . . . . . . . 6-12
Using IBM Informix Server Administrator to Restore Data . . . . . . . . . . . . . . 6-15
Examples of ON-Bar Restore Commands . . . . . . . . . . . . . . . . . . . 6-15
Renaming Chunks During a Restore (IDS) . . . . . . . . . . . . . . . . . . . . 6-30
Key Considerations . . . . . . . . . . . . . . . . . . . . . . . . . . . 6-30
New-Chunk Requirements . . . . . . . . . . . . . . . . . . . . . . . . 6-31
Syntax . . . . . . . . . . . . . . . . . . . . . . . . . . . . . . . 6-31
Examples of Renaming Chunks During a Restore . . . . . . . . . . . . . . . . . 6-32
Transferring Data with the Imported Restore . . . . . . . . . . . . . . . . . . . 6-34
Importing a Restore . . . . . . . . . . . . . . . . . . . . . . . . . . 6-35
Initializing High-Availability Data Replication with ON-Bar (IDS) . . . . . . . . . . . 6-37
Restoring Nonlogging Databases and Tables . . . . . . . . . . . . . . . . . . . 6-39
Restoring Table Types . . . . . . . . . . . . . . . . . . . . . . . . . . . 6-39
Using Restartable Restore to Recover Data (IDS) . . . . . . . . . . . . . . . . . . 6-41
Restartable Restore Example . . . . . . . . . . . . . . . . . . . . . . . . 6-41
Restarting a Restore . . . . . . . . . . . . . . . . . . . . . . . . . . 6-42
Resolving a Failed Restore . . . . . . . . . . . . . . . . . . . . . . . . 6-44
Understanding ON-Bar Restore Processes . . . . . . . . . . . . . . . . . . . . 6-46
Warm-Restore Sequence on Dynamic Server . . . . . . . . . . . . . . . . . . 6-46
Cold-Restore Sequence on Dynamic Server . . . . . . . . . . . . . . . . . . . 6-48
Warm-Restore Sequence on Extended Parallel Server . . . . . . . . . . . . . . . 6-49
Cold-Restore Sequence on Extended Parallel Server . . . . . . . . . . . . . . . . 6-50
Chapter 7. Performing an External Backup and Restore . . . . . . . . . . . . . . . 7-1
Recovering Data Using an External Backup and Restore . . . . . . . . . . . . . . . . 7-1
What Is Backed Up in an External Backup? . . . . . . . . . . . . . . . . . . . . 7-3
Rules for an External Backup . . . . . . . . . . . . . . . . . . . . . . . . 7-3
Performing an External Backup . . . . . . . . . . . . . . . . . . . . . . . 7-4
Preparing for an External Backup . . . . . . . . . . . . . . . . . . . . . . . 7-7
Blocking and Unblocking Dynamic Server . . . . . . . . . . . . . . . . . . . 7-7
Blocking and Unblocking Extended Parallel Server . . . . . . . . . . . . . . . . 7-8
Monitoring an External Backup . . . . . . . . . . . . . . . . . . . . . . . 7-12
Tracking an External Backup . . . . . . . . . . . . . . . . . . . . . . . . 7-12
What Is Restored in an External Restore? . . . . . . . . . . . . . . . . . . . . 7-13
Using External Restore Commands . . . . . . . . . . . . . . . . . . . . . 7-14
Rules for an External Restore . . . . . . . . . . . . . . . . . . . . . . . 7-15
Performing an External Restore . . . . . . . . . . . . . . . . . . . . . . . 7-15
Initializing HDR with an External Backup and Restore (IDS) . . . . . . . . . . . . . 7-19
Chapter 8. Using ON-Bar Utilities . . . . . . . . . . . . . . . . . . . . . . . 8-1
Customizing ON-Bar and Storage-Manager Commands . . . . . . . . . . . . . . . . 8-2
Printing the Backup Boot Files . . . . . . . . . . . . . . . . . . . . . . . 8-3
Migrating Backed-Up Logical Logs to Tape . . . . . . . . . . . . . . . . . . . 8-4
Using start_worker.sh to Start onbar_worker Processes Manually (XPS) . . . . . . . . . . . 8-5
Expiring and Synchronizing the Backup Catalogs . . . . . . . . . . . . . . . . . . 8-6
Choosing an Expiration Policy . . . . . . . . . . . . . . . . . . . . . . . 8-6
Using the onsmsync Utility . . . . . . . . . . . . . . . . . . . . . . . . 8-7
Starting and Stopping ON-Bar Sessions (XPS) . . . . . . . . . . . . . . . . . . . 8-11
vi IBM Informix Backup and Restore Guide
Using the onbar_w Utility . . . . . . . . . . . . . . . . . . . . . . . . 8-12
Monitoring the Backup Scheduler Status (XPS) . . . . . . . . . . . . . . . . . . 8-13
Using the onstat -g bus Option . . . . . . . . . . . . . . . . . . . . . . . 8-13
Using the onstat -g bus_sm Option . . . . . . . . . . . . . . . . . . . . . 8-14
Chapter 9. Setting ON-Bar Configuration Parameters . . . . . . . . . . . . . . . . 9-1
Setting archecker Configuration Parameters in AC_CONFIG . . . . . . . . . . . . . . 9-2
AC_CONFIG File . . . . . . . . . . . . . . . . . . . . . . . . . . . . 9-3
AC_MSGPATH . . . . . . . . . . . . . . . . . . . . . . . . . . . . 9-3
AC_STORAGE . . . . . . . . . . . . . . . . . . . . . . . . . . . . . 9-4
AC_TIMEOUT . . . . . . . . . . . . . . . . . . . . . . . . . . . . . 9-5
AC_VERBOSE . . . . . . . . . . . . . . . . . . . . . . . . . . . . . 9-5
Setting ON-Bar Parameters in ONCONFIG . . . . . . . . . . . . . . . . . . . . 9-5
ALARMPROGRAM . . . . . . . . . . . . . . . . . . . . . . . . . . . 9-5
ALRM_ALL_EVENTS (IDS) . . . . . . . . . . . . . . . . . . . . . . . . 9-6
BAR_ACT_LOG . . . . . . . . . . . . . . . . . . . . . . . . . . . . 9-6
BAR_BOOT_DIR (XPS) . . . . . . . . . . . . . . . . . . . . . . . . . . 9-8
BAR_BSALIB_PATH . . . . . . . . . . . . . . . . . . . . . . . . . . . 9-8
BAR_DBS_COSVR (XPS) . . . . . . . . . . . . . . . . . . . . . . . . . 9-10
BAR_DEBUG . . . . . . . . . . . . . . . . . . . . . . . . . . . . . 9-10
BAR_DEBUG_LOG . . . . . . . . . . . . . . . . . . . . . . . . . . . 9-10
BAR_HISTORY . . . . . . . . . . . . . . . . . . . . . . . . . . . . 9-11
BAR_IDLE_TIMEOUT (XPS) . . . . . . . . . . . . . . . . . . . . . . . . 9-11
BAR_LOG_COSVR (XPS) . . . . . . . . . . . . . . . . . . . . . . . . . 9-12
BAR_MAX_BACKUP (IDS) . . . . . . . . . . . . . . . . . . . . . . . . 9-12
BAR_NB_XPORT_COUNT (IDS) . . . . . . . . . . . . . . . . . . . . . . 9-13
BAR_PROGRESS_FREQ . . . . . . . . . . . . . . . . . . . . . . . . . 9-14
BAR_RETRY . . . . . . . . . . . . . . . . . . . . . . . . . . . . . 9-14
BAR_SM (XPS) . . . . . . . . . . . . . . . . . . . . . . . . . . . . 9-16
BAR_SM_NAME (XPS) . . . . . . . . . . . . . . . . . . . . . . . . . 9-16
BAR_WORKER_COSVR (XPS) . . . . . . . . . . . . . . . . . . . . . . . 9-16
BAR_WORKER_MAX (XPS) . . . . . . . . . . . . . . . . . . . . . . . . 9-17
BAR_XFER_BUF_SIZE (IDS) . . . . . . . . . . . . . . . . . . . . . . . . 9-18
BAR_XFER_BUFSIZE (XPS) . . . . . . . . . . . . . . . . . . . . . . . . 9-18
BAR_XPORT_COUNT (XPS) . . . . . . . . . . . . . . . . . . . . . . . . 9-19
ISM_DATA_POOL . . . . . . . . . . . . . . . . . . . . . . . . . . . 9-20
ISM_LOG_POOL . . . . . . . . . . . . . . . . . . . . . . . . . . . 9-20
LOG_BACKUP_MODE (XPS) . . . . . . . . . . . . . . . . . . . . . . . 9-21
LTAPEDEV (IDS) . . . . . . . . . . . . . . . . . . . . . . . . . . . 9-21
RESTARTABLE_RESTORE (IDS) . . . . . . . . . . . . . . . . . . . . . . 9-22
Files That ON-Bar, ISM, and TSM Use . . . . . . . . . . . . . . . . . . . . . 9-23
Chapter 10. ON-Bar Catalog Tables . . . . . . . . . . . . . . . . . . . . . . 10-1
The bar_action Table . . . . . . . . . . . . . . . . . . . . . . . . . . . 10-2
The bar_instance Table . . . . . . . . . . . . . . . . . . . . . . . . . . . 10-2
The bar_ixbar Table . . . . . . . . . . . . . . . . . . . . . . . . . . . . 10-4
The bar_object Table . . . . . . . . . . . . . . . . . . . . . . . . . . . 10-7
The bar_server Table . . . . . . . . . . . . . . . . . . . . . . . . . . . 10-8
The bar_syncdeltab Table . . . . . . . . . . . . . . . . . . . . . . . . . . 10-8
ON-Bar Catalog Map . . . . . . . . . . . . . . . . . . . . . . . . . . . 10-8
Contents vii
Backup Scheduler SMI Tables (XPS) . . . . . . . . . . . . . . . . . . . . . . 10-10
sysbuobject . . . . . . . . . . . . . . . . . . . . . . . . . . . . . 10-11
sysbuobjses . . . . . . . . . . . . . . . . . . . . . . . . . . . . . 10-12
sysbusession . . . . . . . . . . . . . . . . . . . . . . . . . . . . . 10-12
sysbusm . . . . . . . . . . . . . . . . . . . . . . . . . . . . . . 10-12
sysbusmdbspace . . . . . . . . . . . . . . . . . . . . . . . . . . . 10-13
sysbusmlog . . . . . . . . . . . . . . . . . . . . . . . . . . . . . 10-13
sysbusmworker . . . . . . . . . . . . . . . . . . . . . . . . . . . . 10-13
sysbuworker . . . . . . . . . . . . . . . . . . . . . . . . . . . . . 10-14
Chapter 11. ON-Bar Messages and Return Codes . . . . . . . . . . . . . . . . . 11-1
About ON-Bar Messages . . . . . . . . . . . . . . . . . . . . . . . . . . 11-1
Message Format . . . . . . . . . . . . . . . . . . . . . . . . . . . . 11-1
Message Numbers . . . . . . . . . . . . . . . . . . . . . . . . . . . 11-2
ON-Bar Usage Messages . . . . . . . . . . . . . . . . . . . . . . . . . . 11-2
ON-Bar Return Codes . . . . . . . . . . . . . . . . . . . . . . . . . . . 11-7
Part 3. The ontape Backup and Restore System (IDS)
Chapter 12. Configuring ontape . . . . . . . . . . . . . . . . . . . . . . . 12-1
Setting the ontape Configuration Parameters . . . . . . . . . . . . . . . . . . . 12-2
Setting the Tape-Device Parameters . . . . . . . . . . . . . . . . . . . . . 12-2
Specifying the Tape-Block-Size Parameters . . . . . . . . . . . . . . . . . . . 12-5
Specifying the Tape-Size Parameters . . . . . . . . . . . . . . . . . . . . . 12-5
Checking and Changing ontape Configuration Parameters . . . . . . . . . . . . . . . 12-5
Who Can Change ontape Parameters? . . . . . . . . . . . . . . . . . . . . 12-6
When Can You Change ontape Parameters? . . . . . . . . . . . . . . . . . . 12-6
Changing ontape Parameters . . . . . . . . . . . . . . . . . . . . . . . 12-7
Chapter 13. Backing Up with ontape . . . . . . . . . . . . . . . . . . . . . 13-1
Syntax of ontape . . . . . . . . . . . . . . . . . . . . . . . . . . . . . 13-2
Starting ontape . . . . . . . . . . . . . . . . . . . . . . . . . . . . 13-2
Using ontape Exit Codes . . . . . . . . . . . . . . . . . . . . . . . . . 13-3
Changing Database Logging Status . . . . . . . . . . . . . . . . . . . . . . 13-3
Creating a Backup . . . . . . . . . . . . . . . . . . . . . . . . . . . . 13-4
Choosing a Backup Level . . . . . . . . . . . . . . . . . . . . . . . . . 13-4
Backing Up After Changing the Physical Schema . . . . . . . . . . . . . . . . . 13-4
Preparing for a Backup . . . . . . . . . . . . . . . . . . . . . . . . . 13-5
Performing a Backup . . . . . . . . . . . . . . . . . . . . . . . . . . 13-8
When the Logical-Log Files Fill During a Backup . . . . . . . . . . . . . . . . 13-10
When a Backup Terminates Prematurely . . . . . . . . . . . . . . . . . . . 13-11
Monitoring Backup History Using oncheck . . . . . . . . . . . . . . . . . . 13-11
Backing Up Logical-Log Files with ontape . . . . . . . . . . . . . . . . . . . . 13-12
Before You Back Up the Logical-Log Files . . . . . . . . . . . . . . . . . . . 13-12
When Must You Back Up Logical-Log Files? . . . . . . . . . . . . . . . . . . 13-13
Starting an Automatic Logical-Log Backup . . . . . . . . . . . . . . . . . . 13-13
Starting a Continuous Logical-Log File Backup . . . . . . . . . . . . . . . . . 13-14
Ending a Continuous Logical-Log Backup . . . . . . . . . . . . . . . . . . . 13-14
What Device Must Logical-Log Backups Use? . . . . . . . . . . . . . . . . . 13-15
viii IBM Informix Backup and Restore Guide

Chapter 14. Restoring with ontape . . . . . . . . . . . . . . . . . . . . . . 14-1
Choosing the Type of Physical Restore . . . . . . . . . . . . . . . . . . . . . 14-2
A Full-System Restore . . . . . . . . . . . . . . . . . . . . . . . . . . 14-2
Restoring Selected Dbspaces, Blobspaces, and Sbspaces . . . . . . . . . . . . . . . 14-2
Choosing a Cold, Warm, or Mixed Restore . . . . . . . . . . . . . . . . . . . . 14-3
A Cold Restore . . . . . . . . . . . . . . . . . . . . . . . . . . . . 14-3
A Warm Restore . . . . . . . . . . . . . . . . . . . . . . . . . . . . 14-3
A Mixed Restore . . . . . . . . . . . . . . . . . . . . . . . . . . . . 14-4
Performing a Restore . . . . . . . . . . . . . . . . . . . . . . . . . . . 14-4
Restoring the Whole System . . . . . . . . . . . . . . . . . . . . . . . . . 14-6
Gathering the Appropriate Tapes . . . . . . . . . . . . . . . . . . . . . . 14-7
Deciding on a Complete Cold or a Mixed Restore . . . . . . . . . . . . . . . . 14-7
Verifying Your Database Server Configuration . . . . . . . . . . . . . . . . . . 14-7
Performing a Cold Restore . . . . . . . . . . . . . . . . . . . . . . . . 14-8
Restoring Selected Storage Spaces . . . . . . . . . . . . . . . . . . . . . . . 14-11
Gathering the Appropriate Tapes . . . . . . . . . . . . . . . . . . . . . . 14-11
Ensuring That Needed Device Are Available . . . . . . . . . . . . . . . . . . 14-11
Backing Up Logical-Log Files . . . . . . . . . . . . . . . . . . . . . . . 14-12
Performing a Warm Restore . . . . . . . . . . . . . . . . . . . . . . . 14-12
Restoring Raw Tables . . . . . . . . . . . . . . . . . . . . . . . . . . . 14-12
Renaming Chunks During a Restore . . . . . . . . . . . . . . . . . . . . . . 14-13
Key Considerations . . . . . . . . . . . . . . . . . . . . . . . . . . 14-13
New Chunk Requirements . . . . . . . . . . . . . . . . . . . . . . . . 14-14
Examples of Renaming Chunks During a Restore . . . . . . . . . . . . . . . . 14-14
Restoring from Standard Input . . . . . . . . . . . . . . . . . . . . . . . 14-16
Simultaneous Backup and Restore Using Standard I/O . . . . . . . . . . . . . . . 14-17
Chapter 15. Performing an External Backup and Restore Using ontape . . . . . . . . . 15-1
Recovering Data Using an External Backup and Restore . . . . . . . . . . . . . . . 15-1
What Is Backed Up in an External Backup? . . . . . . . . . . . . . . . . . . . . 15-2
Rules for an External Backup . . . . . . . . . . . . . . . . . . . . . . . 15-2
Performing an External Backup . . . . . . . . . . . . . . . . . . . . . . . 15-3
Preparing for an External Backup . . . . . . . . . . . . . . . . . . . . . . . 15-3
Blocking and Unblocking Dynamic Server . . . . . . . . . . . . . . . . . . . 15-3
Tracking an External Backup . . . . . . . . . . . . . . . . . . . . . . . . 15-4
What Is Restored in an External Restore? . . . . . . . . . . . . . . . . . . . . 15-4
Using External Restore Commands . . . . . . . . . . . . . . . . . . . . . 15-5
Rules for an External Restore . . . . . . . . . . . . . . . . . . . . . . . 15-5
Performing an External Restore . . . . . . . . . . . . . . . . . . . . . . . 15-6
Initializing HDR with an External Backup and Restore . . . . . . . . . . . . . . . 15-7
Part 4. Other Data Restore Utilities
Chapter 16. Restoring Table-level Data . . . . . . . . . . . . . . . . . . . . 16-1
Overview of archecker . . . . . . . . . . . . . . . . . . . . . . . . . . . 16-2
The archecker Configuration File . . . . . . . . . . . . . . . . . . . . . . 16-3
The archecker Schema Command File . . . . . . . . . . . . . . . . . . . . 16-3
Restoring Data . . . . . . . . . . . . . . . . . . . . . . . . . . . . . 16-4
Physical Restore . . . . . . . . . . . . . . . . . . . . . . . . . . . . 16-4
Contents ix
Logical Restore . . . . . . . . . . . . . . . . . . . . . . . . . . . . 16-5
Using the archecker Utility to Restore Data . . . . . . . . . . . . . . . . . . . . 16-6
Syntax . . . . . . . . . . . . . . . . . . . . . . . . . . . . . . . 16-6
Examples . . . . . . . . . . . . . . . . . . . . . . . . . . . . . . 16-8
The archecker Schema Reference . . . . . . . . . . . . . . . . . . . . . . . 16-10
The CREATE TABLE Statement . . . . . . . . . . . . . . . . . . . . . . 16-10
The CREATE EXTERNAL TABLE Statement . . . . . . . . . . . . . . . . . . 16-11
The DATABASE Statement . . . . . . . . . . . . . . . . . . . . . . . . 16-12
The INSERT Statement . . . . . . . . . . . . . . . . . . . . . . . . . 16-13
The RESTORE Statement . . . . . . . . . . . . . . . . . . . . . . . . 16-14
The SET Statement . . . . . . . . . . . . . . . . . . . . . . . . . . 16-15
SQL Comments . . . . . . . . . . . . . . . . . . . . . . . . . . . . 16-16
Schema Command File Examples . . . . . . . . . . . . . . . . . . . . . . 16-16
The archecker Configuration Parameter Reference . . . . . . . . . . . . . . . . . 16-19
AC_DEBUG . . . . . . . . . . . . . . . . . . . . . . . . . . . . . 16-20
AC_IXBAR . . . . . . . . . . . . . . . . . . . . . . . . . . . . . 16-20
AC_LTAPEBLOCK . . . . . . . . . . . . . . . . . . . . . . . . . . 16-20
AC_LTAPEDEV (IDS) . . . . . . . . . . . . . . . . . . . . . . . . . . 16-21
AC_MSGPATH . . . . . . . . . . . . . . . . . . . . . . . . . . . . 16-21
AC_PAGESIZE (XPS) . . . . . . . . . . . . . . . . . . . . . . . . . . 16-21
AC_SCHEMA . . . . . . . . . . . . . . . . . . . . . . . . . . . . 16-21
AC_STORAGE . . . . . . . . . . . . . . . . . . . . . . . . . . . . 16-21
AC_TAPEBLOCK . . . . . . . . . . . . . . . . . . . . . . . . . . . 16-22
AC_TAPEDEV (IDS) . . . . . . . . . . . . . . . . . . . . . . . . . . 16-22
AC_VERBOSE . . . . . . . . . . . . . . . . . . . . . . . . . . . . 16-22
Part 5. Appendixes
Appendix A. Troubleshooting . . . . . . . . . . . . . . . . . . . . . . . . A-1
Appendix B. onstat Command Reference . . . . . . . . . . . . . . . . . . . . B-1
Appendix C. Migration . . . . . . . . . . . . . . . . . . . . . . . . . . C-1
Appendix D. GLS Support . . . . . . . . . . . . . . . . . . . . . . . . . D-1
Appendix E. Accessibility . . . . . . . . . . . . . . . . . . . . . . . . . E-1
Notices . . . . . . . . . . . . . . . . . . . . . . . . . . . . . . . . F-1
Index . . . . . . . . . . . . . . . . . . . . . . . . . . . . . . . . X-1
x IBM Informix Backup and Restore Guide
Introduction
About This Manual . . . . . . . . . . . . . . . . . . . . . . . . . . . . xii
Types of Users . . . . . . . . . . . . . . . . . . . . . . . . . . . . . xii
Software Dependencies . . . . . . . . . . . . . . . . . . . . . . . . . . xii
Assumptions About Your Locale . . . . . . . . . . . . . . . . . . . . . . . xiii
Demonstration Database . . . . . . . . . . . . . . . . . . . . . . . . . xiii
New Features in Dynamic Server . . . . . . . . . . . . . . . . . . . . . . . xiv
Features from Dynamic Server 10.0 . . . . . . . . . . . . . . . . . . . . . . xiv
Features from Dynamic Server 9.4 . . . . . . . . . . . . . . . . . . . . . . xv
Features from Dynamic Server 9.3 . . . . . . . . . . . . . . . . . . . . . . xvi
Features from Dynamic Server 9.21 . . . . . . . . . . . . . . . . . . . . . . xvi
New Features in Extended Parallel Server . . . . . . . . . . . . . . . . . . . . xvi
Documentation Conventions . . . . . . . . . . . . . . . . . . . . . . . . . xvi
Typographical Conventions . . . . . . . . . . . . . . . . . . . . . . . . xvii
Feature, Product, and Platform . . . . . . . . . . . . . . . . . . . . . . . xvii
Syntax Diagrams . . . . . . . . . . . . . . . . . . . . . . . . . . . xviii
How to Read a Command-Line Syntax Diagram . . . . . . . . . . . . . . . . . xx
Keywords and Punctuation . . . . . . . . . . . . . . . . . . . . . . . xxi
Identifiers and Names . . . . . . . . . . . . . . . . . . . . . . . . . xxi
Example Code Conventions . . . . . . . . . . . . . . . . . . . . . . . . xxii
Additional Documentation . . . . . . . . . . . . . . . . . . . . . . . . . xxiii
Installation Guides . . . . . . . . . . . . . . . . . . . . . . . . . . . xxiii
Online Notes . . . . . . . . . . . . . . . . . . . . . . . . . . . . . xxiii
Locating Online Notes . . . . . . . . . . . . . . . . . . . . . . . . . xxiv
Online Notes Filenames . . . . . . . . . . . . . . . . . . . . . . . . xxv
Informix Error Messages . . . . . . . . . . . . . . . . . . . . . . . . . xxv
Manuals . . . . . . . . . . . . . . . . . . . . . . . . . . . . . . xxvi
Online Manuals . . . . . . . . . . . . . . . . . . . . . . . . . . . xxvi
Printed Manuals . . . . . . . . . . . . . . . . . . . . . . . . . . . xxvi
Online Help . . . . . . . . . . . . . . . . . . . . . . . . . . . . . xxvi
Accessibility . . . . . . . . . . . . . . . . . . . . . . . . . . . . . . xxvi
IBM Informix Dynamic Server Version 10.0 and CSDK Version 2.90 Documentation Set . . . . . xxvi
Compliance with Industry Standards . . . . . . . . . . . . . . . . . . . . . . xxix
IBM Welcomes Your Comments . . . . . . . . . . . . . . . . . . . . . . . . xxx
In This Introduction
This introduction provides an overview of the information in this manual and
describes the conventions it uses.
© Copyright IBM Corp. 1996, 2004 xi
About This Manual
This manual describes how to use the ON–Bar and ontape utilities to back up
and restore database server data. These utilities enable you to recover your
databases after data is lost or becomes corrupt due to hardware or software
failure or accident.
ON–Bar requires IBM Informix Storage Manager, Version 2.2, IBM Tivoli
Storage Manager, or a third-party storage manager to manage the storage
devices. The backup and restore processes, the ON–Bar commands, and the
ON–Bar configuration parameters are different for IBM Informix Dynamic
Server and IBM Informix Extended Parallel Server.
The ontape utility does not require a storage manager and works on Dynamic
Server only.
Types of Users
This manual is written for the following users:
v Database administrators
v System administrators
v Backup operators
v Technical support personnel
This manual is written with the assumption that you have the following
background:
v Some experience with storage managers, which are applications that
manage the storage devices and media that contain backups
v A working knowledge of your computer, your operating system, and the
utilities that your operating system provides
v Some experience working with relational databases or exposure to database
concepts
v Some experience with database server administration, operating-system
administration, or network administration
If you have limited experience with relational databases, SQL, or your
operating system, refer to the IBM Informix: Getting Started Guide for your
database server for a list of supplementary titles.
Software Dependencies
This manual is written with the assumption that you are using one of the
following database servers:
v IBM Informix Dynamic Server, Version 10.0
v IBM Informix Extended Parallel Server, Version 8.50
xii IBM Informix Backup and Restore Guide
ON–Bar works differently on Dynamic Server and on Extended Parallel
Server.
Assumptions About Your Locale
IBM Informix products can support many languages, cultures, and code sets.
All the information related to character set, collation, and representation of
numeric data, currency, date, and time is brought together in a single
environment, called a Global Language Support (GLS) locale.
The examples in this manual are written with the assumption that you are
using the default locale, en_us.8859-1. This locale supports U.S. English
format conventions for date, time, and currency. In addition, this locale
supports the ISO 8859-1 code set, which includes the ASCII code set plus
many 8-bit characters such as é, è, and ñ.
If you plan to use nondefault characters in your data or your SQL identifiers,
or if you want to conform to the nondefault collation rules of character data,
you need to specify the appropriate nondefault locale.
For instructions on how to specify a nondefault locale, additional syntax, and
other considerations related to GLS locales, see the IBM Informix: GLS User's
Guide.
Demonstration Database
The DB–Access utility, which is provided with the database server products,
includes one or more of the following demonstration databases:
v The stores_demo database illustrates a relational schema with information
about a fictitious wholesale sporting-goods distributor. Many examples in
IBM Informix manuals are based on the stores_demo database.
Extended Parallel Server
v The sales_demo database illustrates a dimensional schema for data-
warehousing applications. For conceptual information about dimensional
data modeling, see the IBM Informix: Database Design and Implementation
Guide.
End of Extended Parallel Server
Dynamic Server
v The superstores_demo database illustrates an object-relational schema. The
superstores_demo database contains examples of extended data types, type
and table inheritance, and user-defined routines.
End of Dynamic Server
Introduction xiii
For information about how to create and populate the demonstration
databases, see the IBM Informix: DB–Access User's Guide. For descriptions of
the databases and their contents, see the IBM Informix: Guide to SQL Reference.
The scripts that you use to install the demonstration databases reside in the
$INFORMIXDIR/bin directory on UNIX and in the %INFORMIXDIR%\bin
directory on Windows.
New Features in Dynamic Server
This section describes new features in Dynamic Server that affect backup and
restore.
For a description of all new features, see the IBM Informix: Getting Started
Guide.
Features from Dynamic Server 10.0
The following table provides information about the new backup and restore
features in IBM Informix Dynamic Server, Version 10.0, that this manual
covers.
xiv IBM Informix Backup and Restore Guide
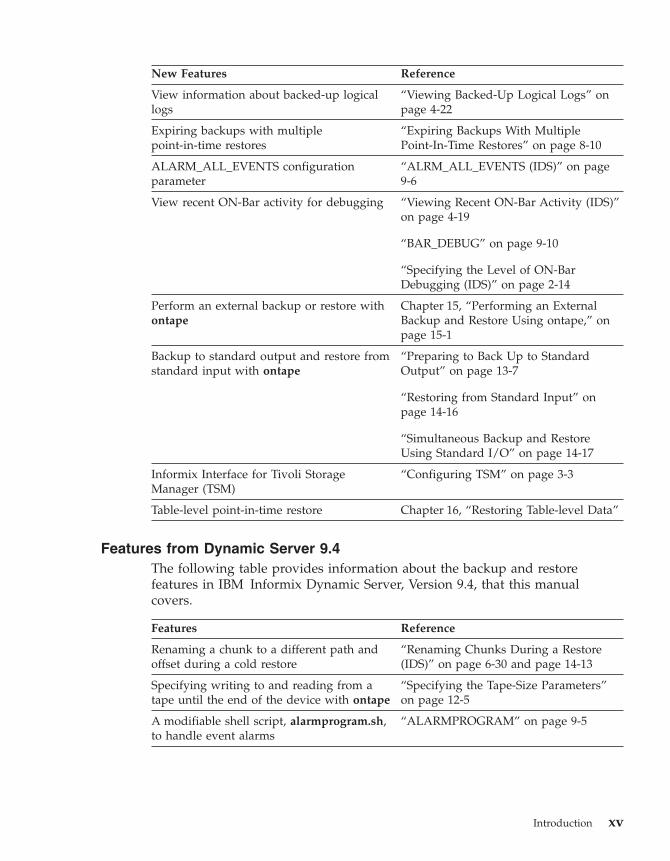
New Features Reference
View information about backed-up logical
logs
“Viewing Backed-Up Logical Logs” on
page 4-22
Expiring backups with multiple
point-in-time restores
“Expiring Backups With Multiple
Point-In-Time Restores” on page 8-10
ALARM_ALL_EVENTS configuration
parameter
“ALRM_ALL_EVENTS (IDS)” on page
9-6
View recent ON-Bar activity for debugging “Viewing Recent ON-Bar Activity (IDS)”
on page 4-19
“BAR_DEBUG” on page 9-10
“Specifying the Level of ON-Bar
Debugging (IDS)” on page 2-14
Perform an external backup or restore with
ontape
Chapter 15, “Performing an External
Backup and Restore Using ontape,” on
page 15-1
Backup to standard output and restore from
standard input with ontape
“Preparing to Back Up to Standard
Output” on page 13-7
“Restoring from Standard Input” on
page 14-16
“Simultaneous Backup and Restore
Using Standard I/O” on page 14-17
Informix Interface for Tivoli Storage
Manager (TSM)
“Configuring TSM” on page 3-3
Table-level point-in-time restore Chapter 16, “Restoring Table-level Data”
Features from Dynamic Server 9.4
The following table provides information about the backup and restore
features in IBM Informix Dynamic Server, Version 9.4, that this manual
covers.
Features Reference
Renaming a chunk to a different path and
offset during a cold restore
“Renaming Chunks During a Restore
(IDS)” on page 6-30 and page 14-13
Specifying writing to and reading from a
tape until the end of the device with ontape
“Specifying the Tape-Size Parameters”
on page 12-5
A modifiable shell script, alarmprogram.sh,
to handle event alarms
“ALARMPROGRAM” on page 9-5
Introduction xv
Features from Dynamic Server 9.3
Version 9.3 included features that make the database server easier to install,
use, and manage.
Features Reference
Dynamic addition of logical logs “Ensuring That You Have Enough
Logical-Log Space” on page 4-7
The ON–Bar option in IBM Informix Server
Administrator
ISA online help
Features from Dynamic Server 9.21
These features were introduced in IBM Informix Dynamic Server,
Version 9.21.
Features Reference
Backup and restore of nonlogging (RAW)
tables using ON–Bar or ontape
“Backing Up Table Types” on page 4-19
and page 13-10
“Restoring Table Types” on page 6-39
and page 14-12
onbar -b -l command to back up logical logs
The log_full.sh and log_full.bat scripts have
been updated with the new parameters for
continuous log backups. The onbar-l syntax
for backing up logical logs will not be
supported in the future.
“Backing Up Logical Logs” on page
4-20
New Features in Extended Parallel Server
Extended Parallel Server, Version 8.5 provides support for restoring table-level
data using the archecker utility. For more information, see Chapter 16,
“Restoring Table-level Data,” on page 16-1
For a complete list of new features in Extended Parallel Server, Version 8.5,
see the IBM Informix: Getting Started Guide manual.
Documentation Conventions
This section describes the conventions that this manual uses. These
conventions make it easier to gather information from this and other volumes
in the documentation set.
The following conventions are discussed:
xvi IBM Informix Backup and Restore Guide
v Typographical conventions
v Other conventions
v Syntax diagrams
v Command-line conventions
v Example code conventions
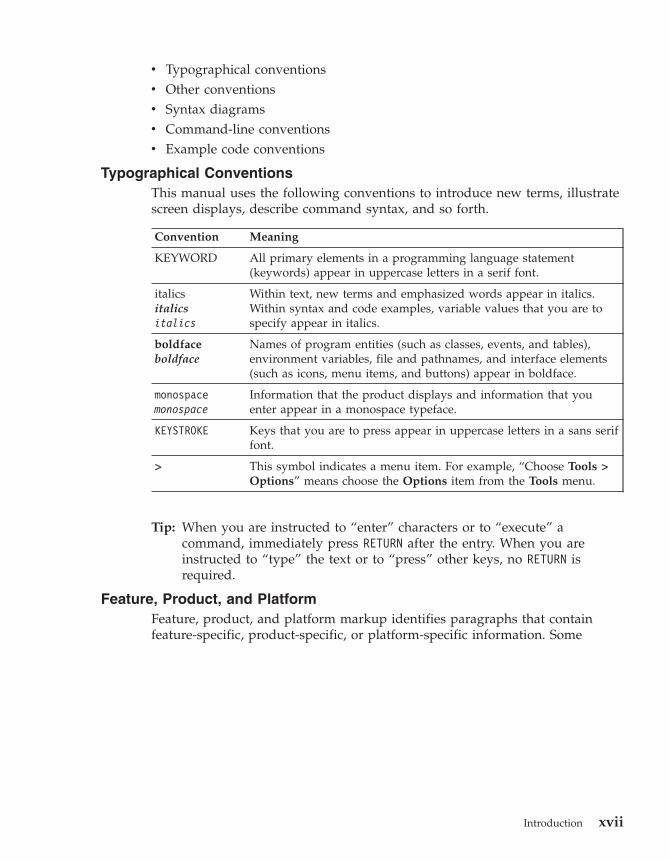
Typographical Conventions
This manual uses the following conventions to introduce new terms, illustrate
screen displays, describe command syntax, and so forth.
Convention Meaning
KEYWORD All primary elements in a programming language statement
(keywords) appear in uppercase letters in a serif font.
italics
italics
italics
Within text, new terms and emphasized words appear in italics.
Within syntax and code examples, variable values that you are to
specify appear in italics.
boldface
boldface
Names of program entities (such as classes, events, and tables),
environment variables, file and pathnames, and interface elements
(such as icons, menu items, and buttons) appear in boldface.
monospace
monospace
Information that the product displays and information that you
enter appear in a monospace typeface.
KEYSTROKE Keys that you are to press appear in uppercase letters in a sans serif
font.
> This symbol indicates a menu item. For example, “Choose Tools >
Options” means choose the Options item from the Tools menu.
Tip: When you are instructed to “enter” characters or to “execute” a
command, immediately press RETURN after the entry. When you are
instructed to “type” the text or to “press” other keys, no RETURN is
required.
Feature, Product, and Platform
Feature, product, and platform markup identifies paragraphs that contain
feature-specific, product-specific, or platform-specific information. Some
Introduction xvii
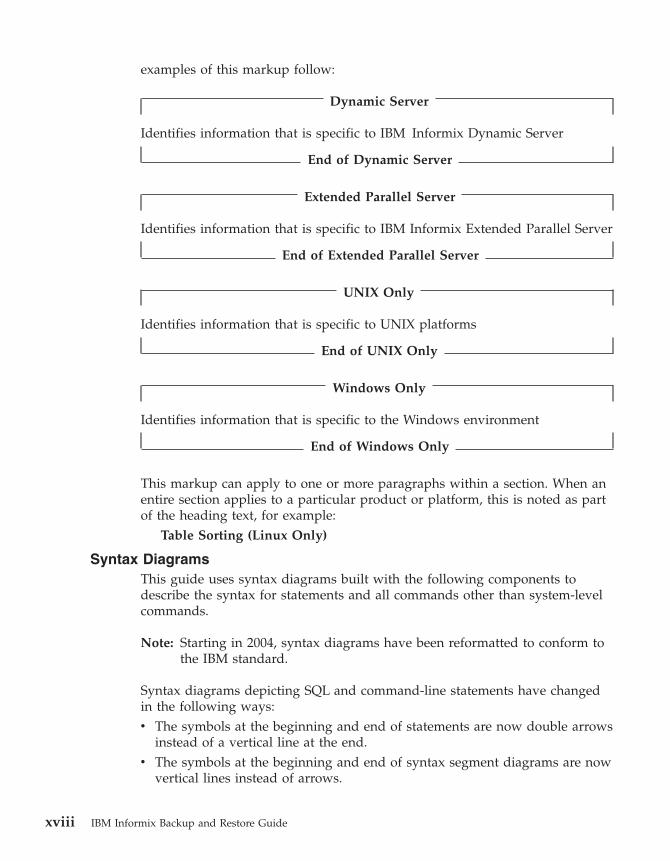
examples of this markup follow:
Dynamic Server
Identifies information that is specific to IBM Informix Dynamic Server
End of Dynamic Server
Extended Parallel Server
Identifies information that is specific to IBM Informix Extended Parallel Server
End of Extended Parallel Server
UNIX Only
Identifies information that is specific to UNIX platforms
End of UNIX Only
Windows Only
Identifies information that is specific to the Windows environment
End of Windows Only
This markup can apply to one or more paragraphs within a section. When an
entire section applies to a particular product or platform, this is noted as part
of the heading text, for example:
Table Sorting (Linux Only)
Syntax Diagrams
This guide uses syntax diagrams built with the following components to
describe the syntax for statements and all commands other than system-level
commands.
Note: Starting in 2004, syntax diagrams have been reformatted to conform to
the IBM standard.
Syntax diagrams depicting SQL and command-line statements have changed
in the following ways:
v The symbols at the beginning and end of statements are now double arrows
instead of a vertical line at the end.
v The symbols at the beginning and end of syntax segment diagrams are now
vertical lines instead of arrows.
xviii IBM Informix Backup and Restore Guide
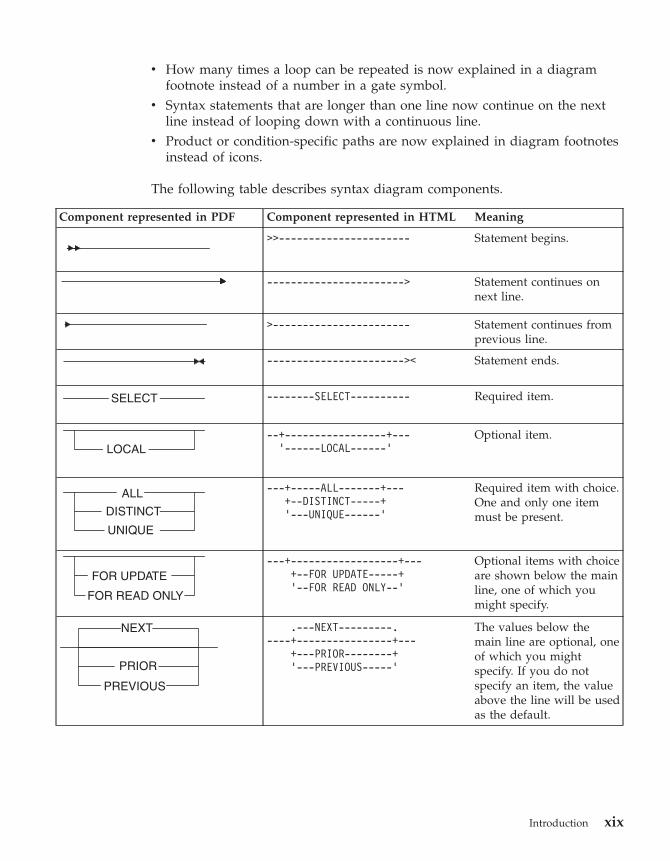
v How many times a loop can be repeated is now explained in a diagram
footnote instead of a number in a gate symbol.
v Syntax statements that are longer than one line now continue on the next
line instead of looping down with a continuous line.
v Product or condition-specific paths are now explained in diagram footnotes
instead of icons.
The following table describes syntax diagram components.
Component represented in PDF Component represented in HTML Meaning
>>---------------------- Statement begins.
-----------------------> Statement continues on
next line.
>----------------------- Statement continues from
previous line.
----------------------->< Statement ends.
--------SELECT---------- Required item.
--+-----------------+---
’------LOCAL------’
Optional item.
---+-----ALL-------+---
+--DISTINCT-----+
’---UNIQUE------’
Required item with choice.
One and only one item
must be present.
---+------------------+---
+--FOR UPDATE-----+
’--FOR READ ONLY--’
Optional items with choice
are shown below the main
line, one of which you
might specify.
.---NEXT---------.
----+----------------+---
+---PRIOR--------+
’---PREVIOUS-----’
The values below the
main line are optional, one
of which you might
specify. If you do not
specify an item, the value
above the line will be used
as the default.
Introduction xix
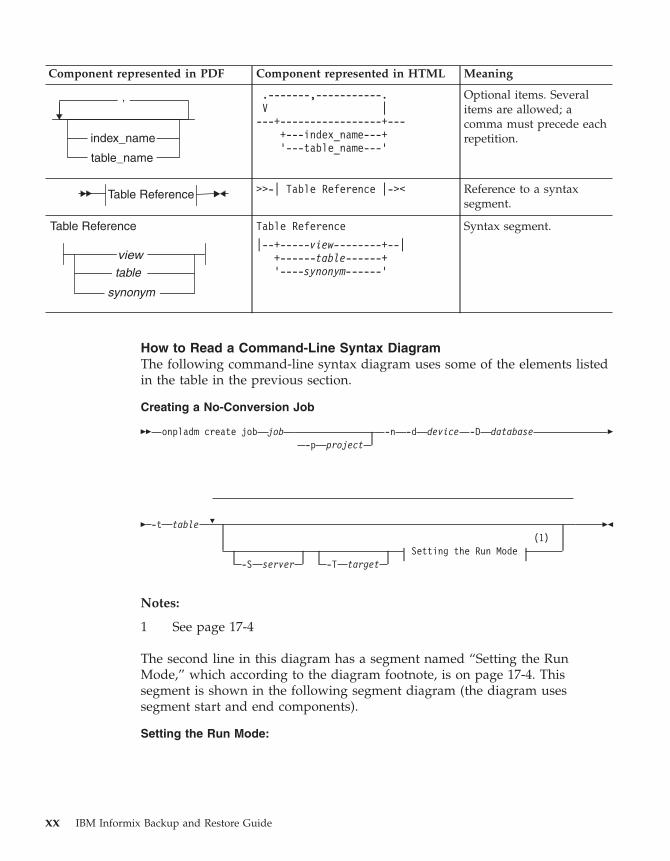
Component represented in PDF Component represented in HTML Meaning
.-------,-----------.
V |
---+-----------------+---
+---index_name---+
’---table_name---’
Optional items. Several
items are allowed; a
comma must precede each
repetition.
>>-| Table Reference |->< Reference to a syntax
segment.
Table Reference
|--+-----view--------+--|
+------table------+
’----synonym------’
Syntax segment.
How to Read a Command-Line Syntax Diagram
The following command-line syntax diagram uses some of the elements listed
in the table in the previous section.
Creating a No-Conversion Job
�� onpladm create job job
-p
project -n -d device -D database �
�
-t
table
�
(1)
Setting the Run Mode
-S
server
-T
target
��
Notes:
1 See page 17-4
The second line in this diagram has a segment named “Setting the Run
Mode,” which according to the diagram footnote, is on page 17-4. This
segment is shown in the following segment diagram (the diagram uses
segment start and end components).
Setting the Run Mode:
xx IBM Informix Backup and Restore Guide
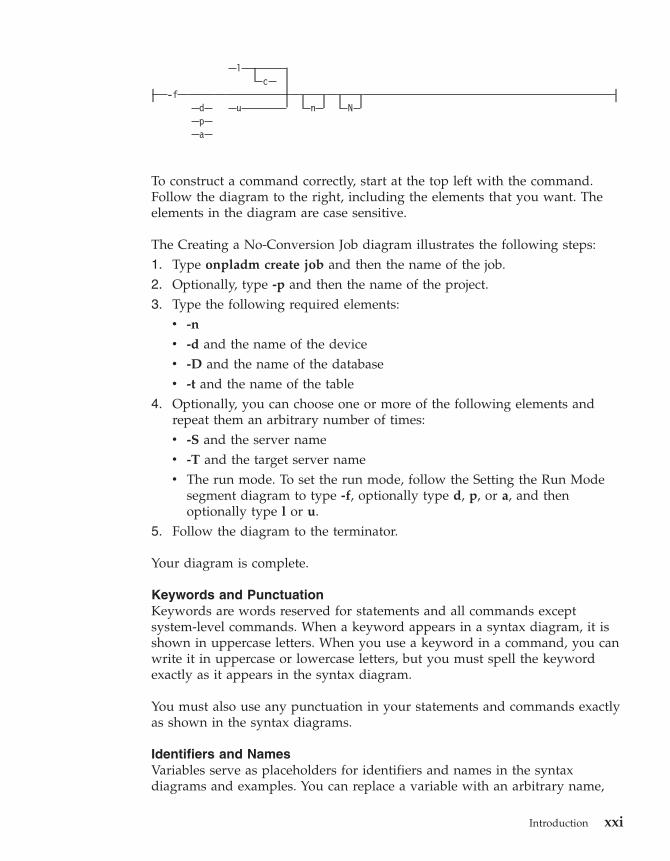
-f
d
p
a
l
c
u
n
N
To construct a command correctly, start at the top left with the command.
Follow the diagram to the right, including the elements that you want. The
elements in the diagram are case sensitive.
The Creating a No-Conversion Job diagram illustrates the following steps:
1. Type onpladm create job and then the name of the job.
2. Optionally, type -p and then the name of the project.
3. Type the following required elements:
v -n
v -d and the name of the device
v -D and the name of the database
v -t and the name of the table4. Optionally, you can choose one or more of the following elements and
repeat them an arbitrary number of times:
v -S and the server name
v -T and the target server name
v The run mode. To set the run mode, follow the Setting the Run Mode
segment diagram to type -f, optionally type d, p, or a, and then
optionally type l or u.5. Follow the diagram to the terminator.
Your diagram is complete.
Keywords and Punctuation
Keywords are words reserved for statements and all commands except
system-level commands. When a keyword appears in a syntax diagram, it is
shown in uppercase letters. When you use a keyword in a command, you can
write it in uppercase or lowercase letters, but you must spell the keyword
exactly as it appears in the syntax diagram.
You must also use any punctuation in your statements and commands exactly
as shown in the syntax diagrams.
Identifiers and Names
Variables serve as placeholders for identifiers and names in the syntax
diagrams and examples. You can replace a variable with an arbitrary name,
Introduction xxi
identifier, or literal, depending on the context. Variables are also used to
represent complex syntax elements that are expanded in additional syntax
diagrams. When a variable appears in a syntax diagram, an example, or text,
it is shown in lowercase italic.
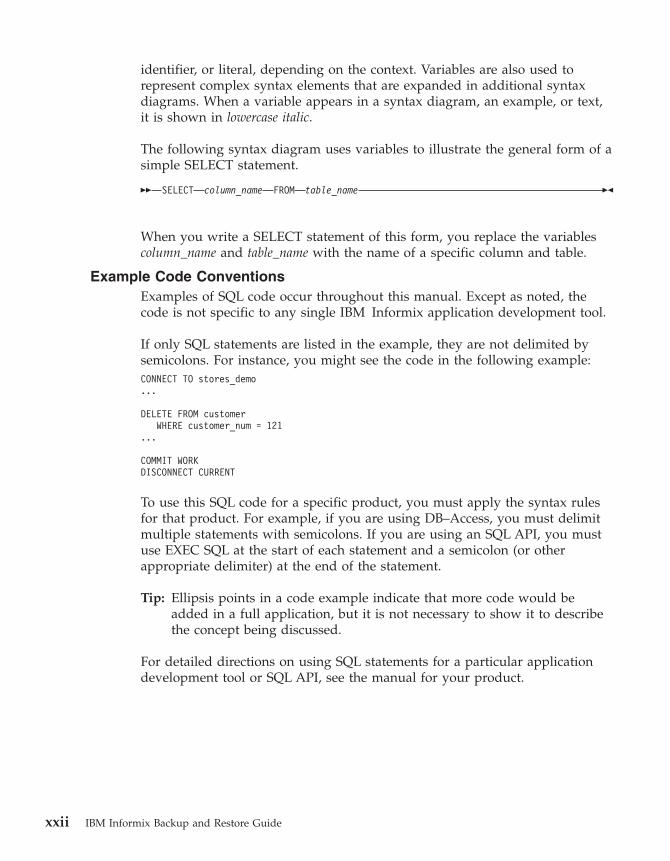
The following syntax diagram uses variables to illustrate the general form of a
simple SELECT statement.
�� SELECT column_name FROM table_name ��
When you write a SELECT statement of this form, you replace the variables
column_name and table_name with the name of a specific column and table.
Example Code Conventions
Examples of SQL code occur throughout this manual. Except as noted, the
code is not specific to any single IBM Informix application development tool.
If only SQL statements are listed in the example, they are not delimited by
semicolons. For instance, you might see the code in the following example:
CONNECT TO stores_demo
...
DELETE FROM customer
WHERE customer_num = 121
...
COMMIT WORK
DISCONNECT CURRENT
To use this SQL code for a specific product, you must apply the syntax rules
for that product. For example, if you are using DB–Access, you must delimit
multiple statements with semicolons. If you are using an SQL API, you must
use EXEC SQL at the start of each statement and a semicolon (or other
appropriate delimiter) at the end of the statement.
Tip: Ellipsis points in a code example indicate that more code would be
added in a full application, but it is not necessary to show it to describe
the concept being discussed.
For detailed directions on using SQL statements for a particular application
development tool or SQL API, see the manual for your product.
xxii IBM Informix Backup and Restore Guide
Additional Documentation
For additional information, refer to the following types of documentation:
v Installation guides
v Online notes
v Informix error messages
v Manuals
v Online help
Installation Guides
Installation guides are located in the /doc directory of the product CD or in
the /doc directory of the product‘s compressed file if you downloaded it from
the IBM Web site. Alternatively, you can obtain installation guides from the
IBM Informix Online Documentation site at
http://www.ibm.com/software/data/informix/pubs/library/.
Online Notes
The following sections describe the online files that supplement the
information in this manual. Please examine these files before you begin using
your IBM Informix product. They contain vital information about application
and performance issues.
Introduction xxiii
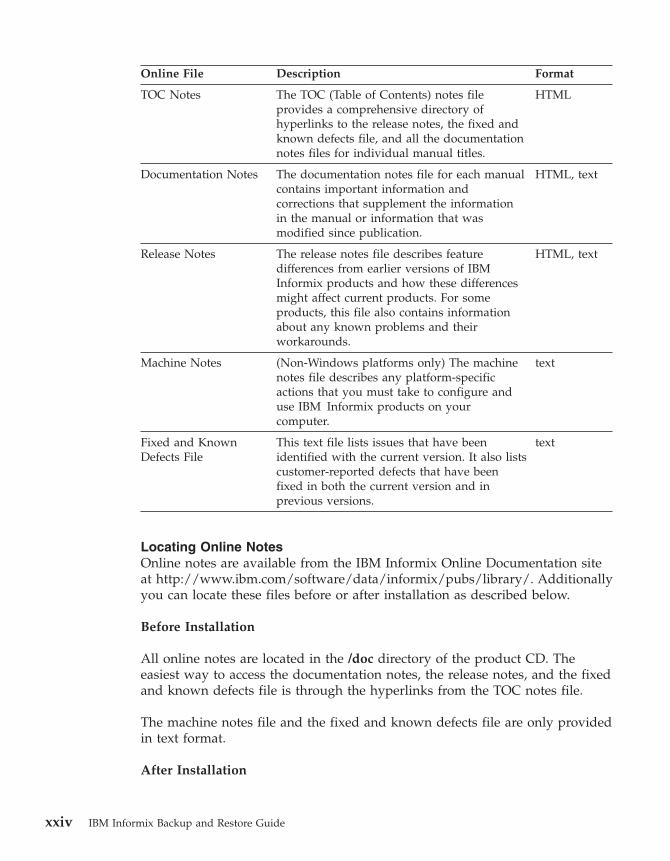
Online File Description Format
TOC Notes The TOC (Table of Contents) notes file
provides a comprehensive directory of
hyperlinks to the release notes, the fixed and
known defects file, and all the documentation
notes files for individual manual titles.
HTML
Documentation Notes The documentation notes file for each manual
contains important information and
corrections that supplement the information
in the manual or information that was
modified since publication.
HTML, text
Release Notes The release notes file describes feature
differences from earlier versions of IBM
Informix products and how these differences
might affect current products. For some
products, this file also contains information
about any known problems and their
workarounds.
HTML, text
Machine Notes (Non-Windows platforms only) The machine
notes file describes any platform-specific
actions that you must take to configure and
use IBM Informix products on your
computer.
text
Fixed and Known
Defects File
This text file lists issues that have been
identified with the current version. It also lists
customer-reported defects that have been
fixed in both the current version and in
previous versions.
text
Locating Online Notes
Online notes are available from the IBM Informix Online Documentation site
at http://www.ibm.com/software/data/informix/pubs/library/. Additionally
you can locate these files before or after installation as described below.
Before Installation
All online notes are located in the /doc directory of the product CD. The
easiest way to access the documentation notes, the release notes, and the fixed
and known defects file is through the hyperlinks from the TOC notes file.
The machine notes file and the fixed and known defects file are only provided
in text format.
After Installation
xxiv IBM Informix Backup and Restore Guide
On UNIX platforms in the default locale, the documentation notes, release
notes, and machine notes files appear under the
$INFORMIXDIR/release/en_us/0333 directory.
Dynamic Server
On Windows the documentation and release notes files appear in the
Informix folder. To display this folder, choose Start > Programs > IBM
Informix Dynamic Server version > Documentation Notes or Release Notes
from the taskbar.
Machine notes do not apply to Windows platforms.
End of Dynamic Server
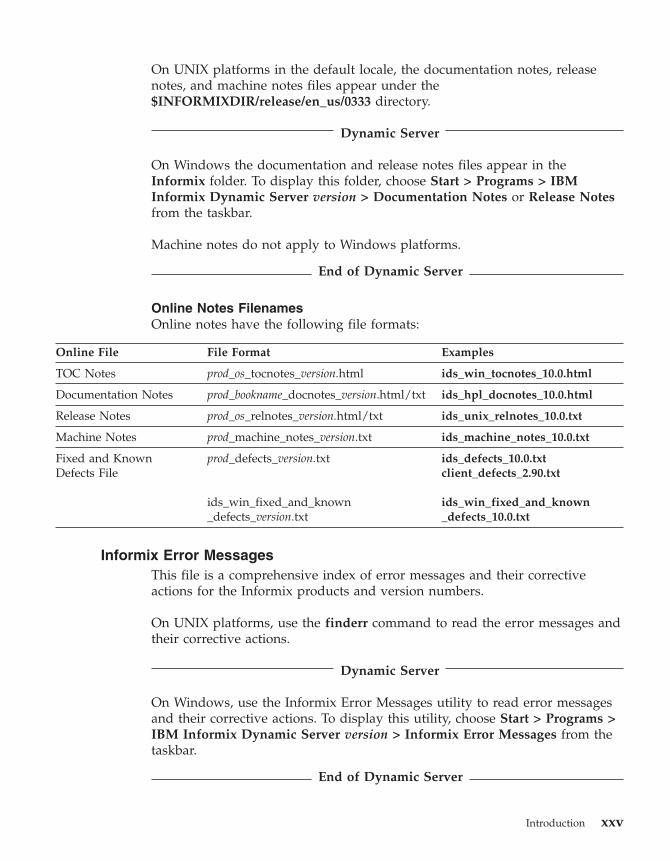
Online Notes Filenames
Online notes have the following file formats:
Online File File Format Examples
TOC Notes prod_os_tocnotes_version.html ids_win_tocnotes_10.0.html
Documentation Notes prod_bookname_docnotes_version.html/txt ids_hpl_docnotes_10.0.html
Release Notes prod_os_relnotes_version.html/txt ids_unix_relnotes_10.0.txt
Machine Notes prod_machine_notes_version.txt ids_machine_notes_10.0.txt
Fixed and Known
Defects File
prod_defects_version.txt
ids_win_fixed_and_known
_defects_version.txt
ids_defects_10.0.txt
client_defects_2.90.txt
ids_win_fixed_and_known
_defects_10.0.txt
Informix Error Messages
This file is a comprehensive index of error messages and their corrective
actions for the Informix products and version numbers.
On UNIX platforms, use the finderr command to read the error messages and
their corrective actions.
Dynamic Server
On Windows, use the Informix Error Messages utility to read error messages
and their corrective actions. To display this utility, choose Start > Programs >
IBM Informix Dynamic Server version > Informix Error Messages from the
taskbar.
End of Dynamic Server
Introduction xxv
You can also access these files from the IBM Informix Online Documentation
site at http://www.ibm.com/software/data/informix/pubs/library/.
Manuals
Online Manuals
A CD that contains your manuals in electronic format is provided with your
IBM Informix products. You can install the documentation or access it directly
from the CD. For information about how to install, read, and print online
manuals, see the installation insert that accompanies your CD. You can also
obtain the same online manuals from the IBM Informix Online Documentation
site at http://www.ibm.com/software/data/informix/pubs/library/.
Printed Manuals
To order hardcopy manuals, contact your sales representative or visit the IBM
Publications Center Web site at
http://www.ibm.com/software/howtobuy/data.html.
Online Help
IBM Informix online help, provided with each graphical user interface (GUI),
displays information about those interfaces and the functions that they
perform. Use the help facilities that each GUI provides to display the online
help.
Accessibility
IBM is committed to making our documentation accessible to persons with
disabilities. Our books are available in HTML format so that they can be
accessed with assistive technology such as screen reader software. The syntax
diagrams in our manuals are available in dotted decimal format, which is an
accessible format that is available only if you are using a screen reader. For
more information about the dotted decimal format, see the Accessibility
appendix.
IBM Informix Dynamic Server Version 10.0 and CSDK Version 2.90
Documentation Set
The following tables list the manuals that are part of the IBM Informix
Dynamic Server, Version 10.0 and the CSDK Version 2.90, documentation set.
PDF and HTML versions of these manuals are available at
http://www.ibm.com/software/data/informix/pubs/library/. You can order
hardcopy versions of these manuals from the IBM Publications Center at
http://www.ibm.com/software/howtobuy/data.html.
xxvi IBM Informix Backup and Restore Guide
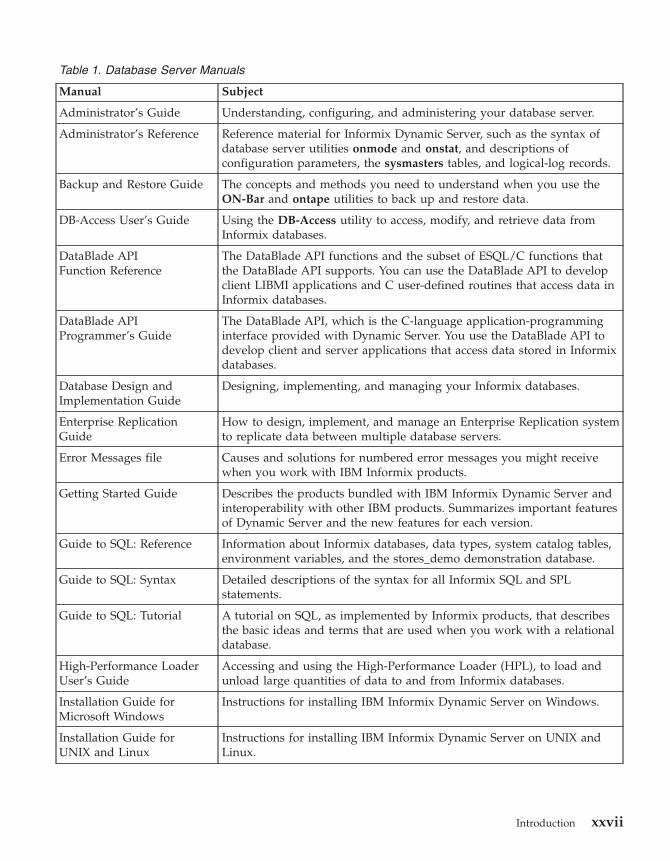
Table 1. Database Server Manuals
Manual Subject
Administrator’s Guide Understanding, configuring, and administering your database server.
Administrator’s Reference Reference material for Informix Dynamic Server, such as the syntax of
database server utilities onmode and onstat, and descriptions of
configuration parameters, the sysmasters tables, and logical-log records.
Backup and Restore Guide The concepts and methods you need to understand when you use the
ON-Bar and ontape utilities to back up and restore data.
DB-Access User’s Guide Using the DB-Access utility to access, modify, and retrieve data from
Informix databases.
DataBlade API
Function Reference
The DataBlade API functions and the subset of ESQL/C functions that
the DataBlade API supports. You can use the DataBlade API to develop
client LIBMI applications and C user-defined routines that access data in
Informix databases.
DataBlade API
Programmer’s Guide
The DataBlade API, which is the C-language application-programming
interface provided with Dynamic Server. You use the DataBlade API to
develop client and server applications that access data stored in Informix
databases.
Database Design and
Implementation Guide
Designing, implementing, and managing your Informix databases.
Enterprise Replication
Guide
How to design, implement, and manage an Enterprise Replication system
to replicate data between multiple database servers.
Error Messages file Causes and solutions for numbered error messages you might receive
when you work with IBM Informix products.
Getting Started Guide Describes the products bundled with IBM Informix Dynamic Server and
interoperability with other IBM products. Summarizes important features
of Dynamic Server and the new features for each version.
Guide to SQL: Reference Information about Informix databases, data types, system catalog tables,
environment variables, and the stores_demo demonstration database.
Guide to SQL: Syntax Detailed descriptions of the syntax for all Informix SQL and SPL
statements.
Guide to SQL: Tutorial A tutorial on SQL, as implemented by Informix products, that describes
the basic ideas and terms that are used when you work with a relational
database.
High-Performance Loader
User’s Guide
Accessing and using the High-Performance Loader (HPL), to load and
unload large quantities of data to and from Informix databases.
Installation Guide for
Microsoft Windows
Instructions for installing IBM Informix Dynamic Server on Windows.
Installation Guide for
UNIX and Linux
Instructions for installing IBM Informix Dynamic Server on UNIX and
Linux.
Introduction xxvii
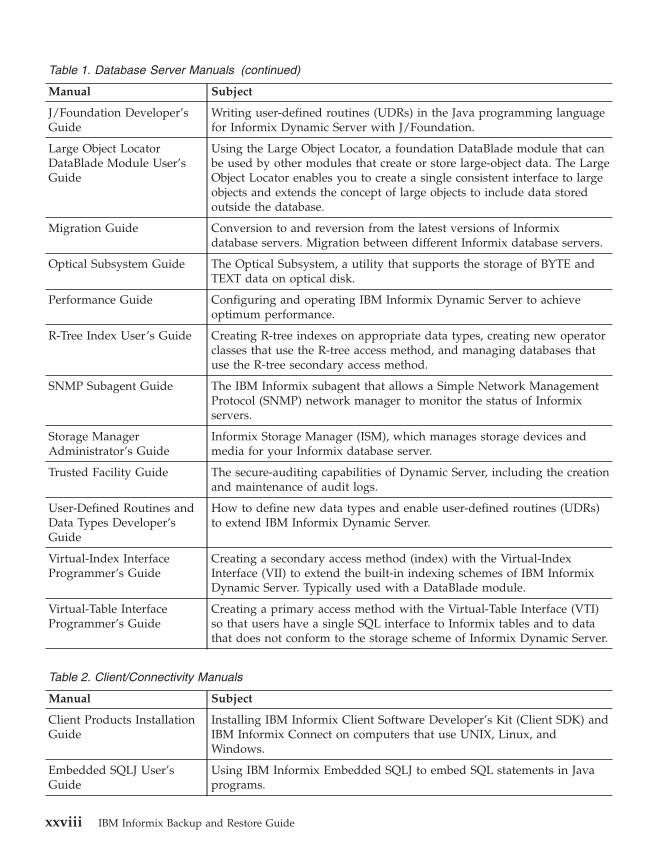
Table 1. Database Server Manuals (continued)
Manual Subject
J/Foundation Developer’s
Guide
Writing user-defined routines (UDRs) in the Java programming language
for Informix Dynamic Server with J/Foundation.
Large Object Locator
DataBlade Module User’s
Guide
Using the Large Object Locator, a foundation DataBlade module that can
be used by other modules that create or store large-object data. The Large
Object Locator enables you to create a single consistent interface to large
objects and extends the concept of large objects to include data stored
outside the database.
Migration Guide Conversion to and reversion from the latest versions of Informix
database servers. Migration between different Informix database servers.
Optical Subsystem Guide The Optical Subsystem, a utility that supports the storage of BYTE and
TEXT data on optical disk.
Performance Guide Configuring and operating IBM Informix Dynamic Server to achieve
optimum performance.
R-Tree Index User’s Guide Creating R-tree indexes on appropriate data types, creating new operator
classes that use the R-tree access method, and managing databases that
use the R-tree secondary access method.
SNMP Subagent Guide The IBM Informix subagent that allows a Simple Network Management
Protocol (SNMP) network manager to monitor the status of Informix
servers.
Storage Manager
Administrator’s Guide
Informix Storage Manager (ISM), which manages storage devices and
media for your Informix database server.
Trusted Facility Guide The secure-auditing capabilities of Dynamic Server, including the creation
and maintenance of audit logs.
User-Defined Routines and
Data Types Developer’s
Guide
How to define new data types and enable user-defined routines (UDRs)
to extend IBM Informix Dynamic Server.
Virtual-Index Interface
Programmer’s Guide
Creating a secondary access method (index) with the Virtual-Index
Interface (VII) to extend the built-in indexing schemes of IBM Informix
Dynamic Server. Typically used with a DataBlade module.
Virtual-Table Interface
Programmer’s Guide
Creating a primary access method with the Virtual-Table Interface (VTI)
so that users have a single SQL interface to Informix tables and to data
that does not conform to the storage scheme of Informix Dynamic Server.
Table 2. Client/Connectivity Manuals
Manual Subject
Client Products Installation
Guide
Installing IBM Informix Client Software Developer’s Kit (Client SDK) and
IBM Informix Connect on computers that use UNIX, Linux, and
Windows.
Embedded SQLJ User’s
Guide
Using IBM Informix Embedded SQLJ to embed SQL statements in Java
programs.
xxviii IBM Informix Backup and Restore Guide
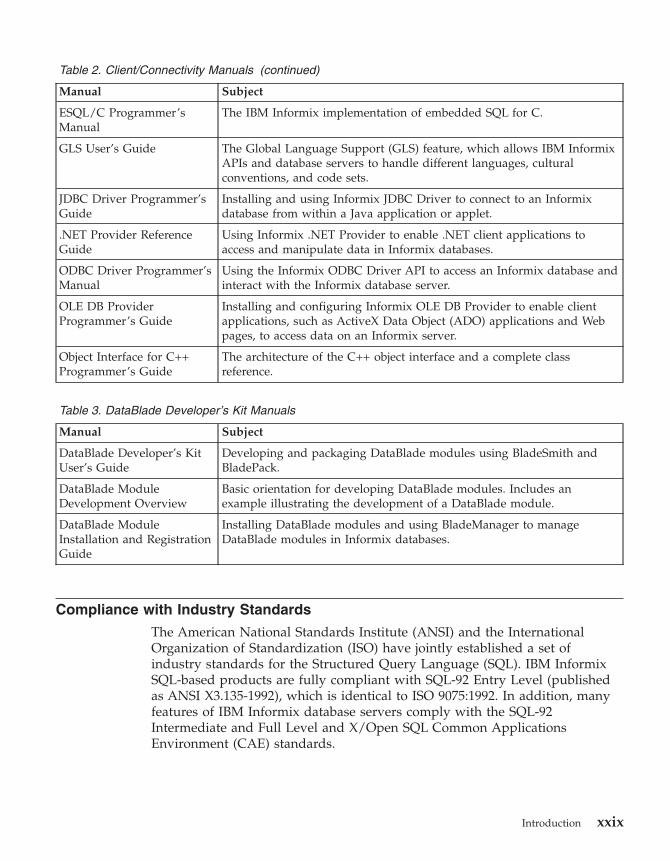
Table 2. Client/Connectivity Manuals (continued)
Manual Subject
ESQL/C Programmer’s
Manual
The IBM Informix implementation of embedded SQL for C.
GLS User’s Guide The Global Language Support (GLS) feature, which allows IBM Informix
APIs and database servers to handle different languages, cultural
conventions, and code sets.
JDBC Driver Programmer’s
Guide
Installing and using Informix JDBC Driver to connect to an Informix
database from within a Java application or applet.
.NET Provider Reference
Guide
Using Informix .NET Provider to enable .NET client applications to
access and manipulate data in Informix databases.
ODBC Driver Programmer’s
Manual
Using the Informix ODBC Driver API to access an Informix database and
interact with the Informix database server.
OLE DB Provider
Programmer’s Guide
Installing and configuring Informix OLE DB Provider to enable client
applications, such as ActiveX Data Object (ADO) applications and Web
pages, to access data on an Informix server.
Object Interface for C++
Programmer’s Guide
The architecture of the C++ object interface and a complete class
reference.
Table 3. DataBlade Developer’s Kit Manuals
Manual Subject
DataBlade Developer’s Kit
User’s Guide
Developing and packaging DataBlade modules using BladeSmith and
BladePack.
DataBlade Module
Development Overview
Basic orientation for developing DataBlade modules. Includes an
example illustrating the development of a DataBlade module.
DataBlade Module
Installation and Registration
Guide
Installing DataBlade modules and using BladeManager to manage
DataBlade modules in Informix databases.
Compliance with Industry Standards
The American National Standards Institute (ANSI) and the International
Organization of Standardization (ISO) have jointly established a set of
industry standards for the Structured Query Language (SQL). IBM Informix
SQL-based products are fully compliant with SQL-92 Entry Level (published
as ANSI X3.135-1992), which is identical to ISO 9075:1992. In addition, many
features of IBM Informix database servers comply with the SQL-92
Intermediate and Full Level and X/Open SQL Common Applications
Environment (CAE) standards.
Introduction xxix
IBM Welcomes Your Comments
We want to know about any corrections or clarifications that you would find
useful in our manuals, which will help us improve future versions. Include
the following information:
v The name and version of the manual that you are using
v Section and page number
v Your suggestions about the manual
Send your comments to us at the following email address:
This email address is reserved for reporting errors and omissions in our
documentation. For immediate help with a technical problem, contact IBM
Technical Support.
We appreciate your suggestions.
xxx IBM Informix Backup and Restore Guide
Part 1. Introducing Backup and Restore
© Copyright IBM Corp. 1996, 2004

IBM Informix Backup and Restore Guide
Chapter 1. Introducing Backup and Restore
What Is a Recovery System? . . . . . . . . . . . . . . . . . . . . . . . . . 1-2
What Is a Backup? . . . . . . . . . . . . . . . . . . . . . . . . . . . 1-2
What Is a Logical-Log Backup? . . . . . . . . . . . . . . . . . . . . . . . 1-3
When You Do Not Use Logging . . . . . . . . . . . . . . . . . . . . . . 1-3
What Are Manual and Continuous Logical-Log Backups? . . . . . . . . . . . . . 1-3
What Is a Log Salvage? . . . . . . . . . . . . . . . . . . . . . . . . . 1-4
Why You Need to Save Logical-Log Backups . . . . . . . . . . . . . . . . . 1-4
What Is a Restore? . . . . . . . . . . . . . . . . . . . . . . . . . . . 1-5
What Are Warm, Cold, and Mixed Restores? . . . . . . . . . . . . . . . . . . 1-5
What Are Physical and Logical Restores? . . . . . . . . . . . . . . . . . . . 1-7
Comparing ON-Bar and ontape . . . . . . . . . . . . . . . . . . . . . . . . 1-9
Planning a Recovery Strategy . . . . . . . . . . . . . . . . . . . . . . . . 1-10
What Types of Data Loss Can Occur? . . . . . . . . . . . . . . . . . . . . . 1-10
How Severe is the Failure? . . . . . . . . . . . . . . . . . . . . . . . . 1-10
How Do You Use Your Data? . . . . . . . . . . . . . . . . . . . . . . . 1-11
Scheduling Backups . . . . . . . . . . . . . . . . . . . . . . . . . . 1-11
Planning a Backup System for a Production Database Server . . . . . . . . . . . . . . 1-12
Evaluating Hardware and Memory Resources . . . . . . . . . . . . . . . . . . 1-12
Evaluating Backup and Restore Time . . . . . . . . . . . . . . . . . . . . . 1-12
Evaluating Logging and Transaction Activity . . . . . . . . . . . . . . . . . . 1-13
In This Chapter
Two utilities are provided for backing up and restoring database server data.
Utility Storage Manager Where Discussed
ON–Bar IBM Informix Storage
Manager (ISM)
IBM Tivoli Storage Manager
Third-party storage manager
Chapter 2 through Chapter 11
ontape None Chapter 12 through Chapter 14
This chapter explains basic backup and restore concepts for Informix database
servers and covers the following topics:
v Comparing ON–Bar and ontape
v Planning a recovery strategy
v Planning a backup system for a production database server
© Copyright IBM Corp. 1996, 2004 1-1
What Is a Recovery System?
A recovery system enables you to back up your database server data and
subsequently restore it if your current data becomes corrupt or inaccessible.
The causes of data corruption or loss can range from a program error to a
disk failure to a disaster that damages the entire facility. A recovery system
enables you to recover data that you already lost due to such mishaps.
What Is a Backup?
A backup is a copy of one or more dbspaces (also called storage spaces) and
logical logs that the database server maintains. On Dynamic Server, you can
also back up blobspaces and sbspaces. On Extended Parallel Server, you can also
back up dbslices. For a description of storage spaces, see your IBM Informix:
Administrator's Guide.
The backup copy is usually written to a secondary storage medium such as
disk, magnetic tape, or optical disk. We recommend that you store the media
offline and keep a copy off-site if possible.
Important: Database backups do not replace ordinary operating-system
backups, which back up files other than Informix database files.
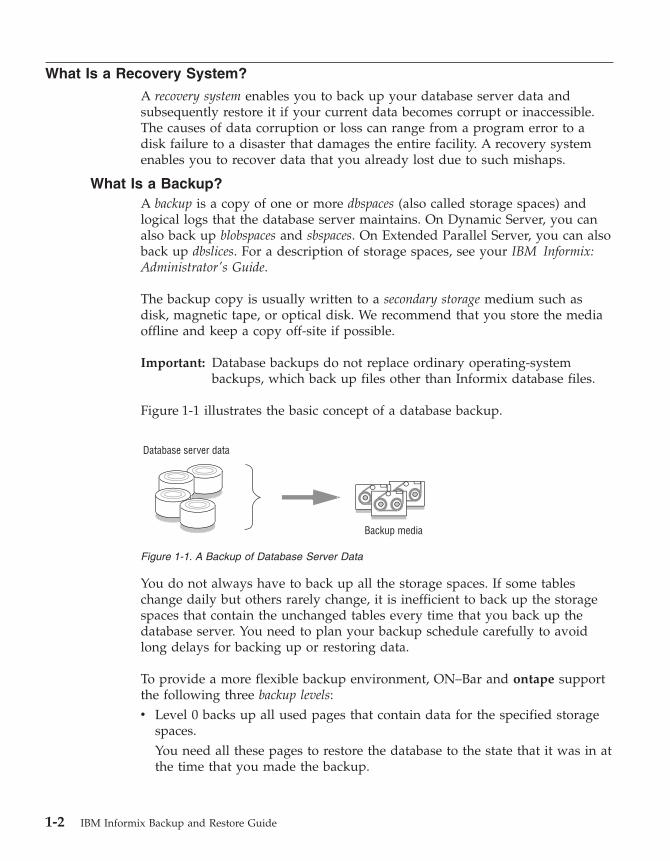
Figure 1-1 illustrates the basic concept of a database backup.
You do not always have to back up all the storage spaces. If some tables
change daily but others rarely change, it is inefficient to back up the storage
spaces that contain the unchanged tables every time that you back up the
database server. You need to plan your backup schedule carefully to avoid
long delays for backing up or restoring data.
To provide a more flexible backup environment, ON–Bar and ontape support
the following three backup levels:
v Level 0 backs up all used pages that contain data for the specified storage
spaces.
You need all these pages to restore the database to the state that it was in at
the time that you made the backup.
Database server data
Backup media
Figure 1-1. A Backup of Database Server Data
1-2 IBM Informix Backup and Restore Guide
v Level 1 backs up only data that has changed since the last level-0 backup of
the specified storage spaces.
All changed table and index pages are backed up, including those with
deleted data. The data that is copied to the backup reflects the state of the
changed data at the time that the level-1 backup began.
v Level 2 backs up only data that has changed since the last level-1 backup of
the specified storage spaces.
A level-2 backup contains a copy of every table and index page in a storage
space that has changed since the last level-1 backup.
Important: If disks and other media are completely destroyed and need to be
replaced, you need at least a level-0 backup of all storage spaces
and relevant logical logs to restore data completely on the
replacement hardware.
For details, see Chapter 4, “Backing Up with ON-Bar,” on page 4-1, and
Chapter 13, “Backing Up with ontape,” on page 13-1.
What Is a Logical-Log Backup?
A logical-log backup is a copy to disk or tape of all full logical-log files. The
logical-log files store a record of database server activity that occurs between
backups.
To free full logical-log files, back them up. The database server reuses the
freed logical-log files for recording new transactions. For a complete
description of the logical log, see your IBM Informix: Administrator's Guide.
When You Do Not Use Logging
Even if you do not specify logging for databases or tables, you need to back
up the logical logs because they contain administrative information such as
checkpoint records and additions and deletions of chunks. When you back up
these logical-log files, you can do warm restores even when you do not use
logging for any of your databases.
What Are Manual and Continuous Logical-Log Backups?
A manual logical-log backup backs up all the full logical-log files and stops at
the current logical-log file.
If you turn on continuous logical-log backup, the database server backs up each
logical log automatically when it becomes full. If you turn off continuous
logical-log backup, the logical-log files continue to fill. If all logical logs are
filled, the database server hangs until the logs are backed up.
Chapter 1. Introducing Backup and Restore 1-3
What Is a Log Salvage?
When the database server is offline (Dynamic Server) or in microkernel mode
(Extended Parallel Server), you can perform a special kind of logical-log
backup, called a log salvage. In a log salvage, the database server accesses the
log files directly from disk. The log salvage backs up any logical logs that
have not yet been backed up and are not corrupted or destroyed. The log
salvage enables you to recover all of your data up to the last available and
uncorrupted logical-log file and the last complete transaction.
Why You Need to Save Logical-Log Backups
Perform frequent logical-log backups for the following reasons:
v To free full logical-log files
v To minimize data loss if a disk that contains logical logs fails
v To ensure that restores contain consistent and the latest transactions
Save the logical-log backups from the last two level-0 backups so that you can
use them to complete a restore. If a level-0 backup is inaccessible or unusable,
you can restore data from an older backup, if you have one. If any of the
logical-log backups are also inaccessible or unusable, however, you cannot roll
forward the transactions from those logical-log files or from any subsequent
logical-log files.
Warning: You will lose transactions in logical-log files that are not backed up
or salvaged.
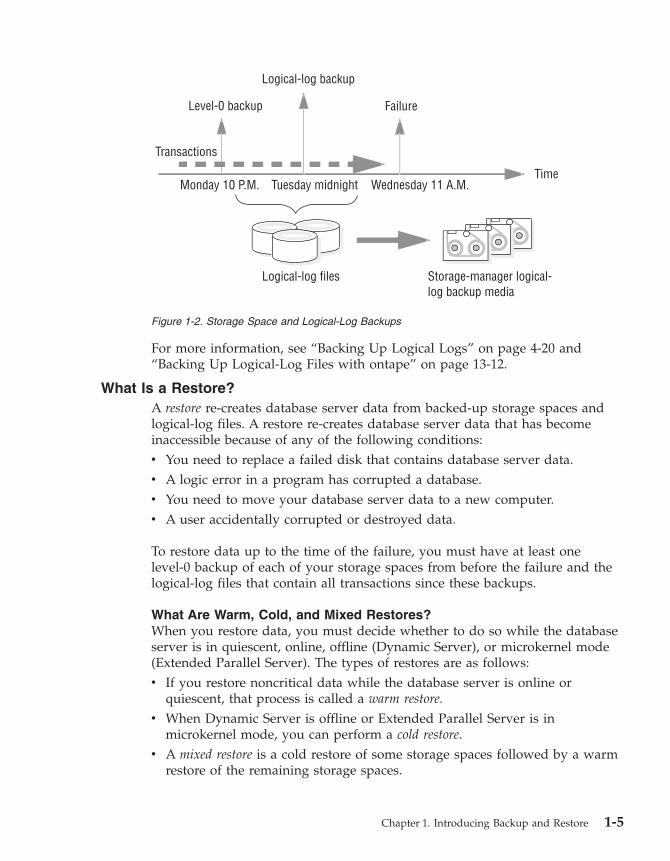
To illustrate, as Figure 1-2 shows, suppose you perform a level-0 backup on
Monday at 10:00 P.M. and then back up the logical logs on Tuesday at
midnight. On Wednesday at 11:00 A.M., you suffer a mishap that destroys
your databases. You would be unable to restore the transactions that occurred
between midnight on Tuesday and 11:00 A.M. on Wednesday unless you had
continuous logical-log backup set up.
If the disks that contain the storage spaces with the logical logs are damaged,
the transactions after midnight on Tuesday might be lost. To restore these
transactions from the last logical-log backup, try to salvage the logical logs
before you repair or replace the bad disk and then perform a cold restore.
1-4 IBM Informix Backup and Restore Guide
For more information, see “Backing Up Logical Logs” on page 4-20 and
“Backing Up Logical-Log Files with ontape” on page 13-12.
What Is a Restore?
A restore re-creates database server data from backed-up storage spaces and
logical-log files. A restore re-creates database server data that has become
inaccessible because of any of the following conditions:
v You need to replace a failed disk that contains database server data.
v A logic error in a program has corrupted a database.
v You need to move your database server data to a new computer.
v A user accidentally corrupted or destroyed data.
To restore data up to the time of the failure, you must have at least one
level-0 backup of each of your storage spaces from before the failure and the
logical-log files that contain all transactions since these backups.
What Are Warm, Cold, and Mixed Restores?
When you restore data, you must decide whether to do so while the database
server is in quiescent, online, offline (Dynamic Server), or microkernel mode
(Extended Parallel Server). The types of restores are as follows:
v If you restore noncritical data while the database server is online or
quiescent, that process is called a warm restore.
v When Dynamic Server is offline or Extended Parallel Server is in
microkernel mode, you can perform a cold restore.
v A mixed restore is a cold restore of some storage spaces followed by a warm
restore of the remaining storage spaces.
Level-0 backup
TimeMonday 10 P.M. Wednesday 11 A.M.
Storage-manager logical-log backup media
Logical-log backup
Logical-log files
Failure
Transactions
Tuesday midnight
Figure 1-2. Storage Space and Logical-Log Backups
Chapter 1. Introducing Backup and Restore 1-5
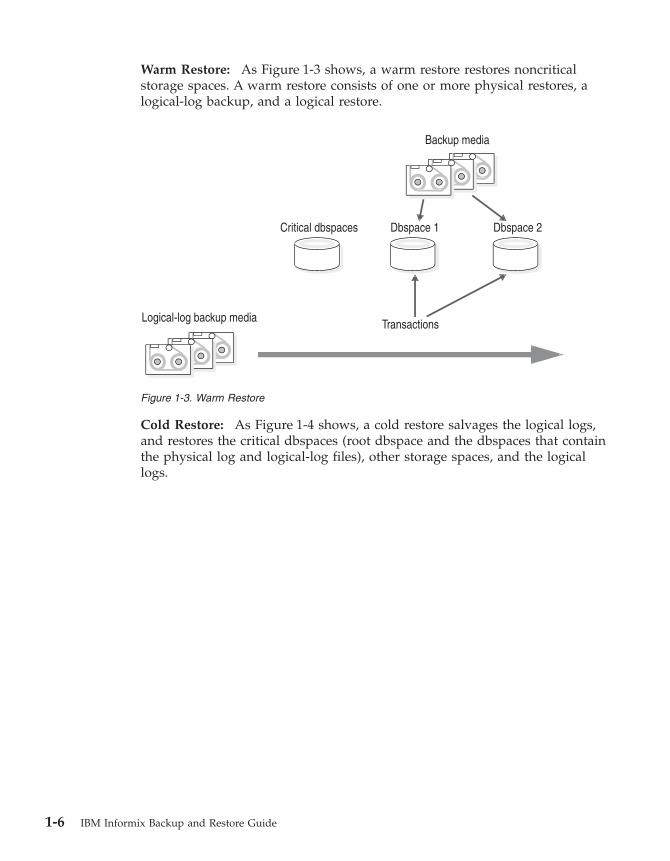
Warm Restore: As Figure 1-3 shows, a warm restore restores noncritical
storage spaces. A warm restore consists of one or more physical restores, a
logical-log backup, and a logical restore.
Cold Restore: As Figure 1-4 shows, a cold restore salvages the logical logs,
and restores the critical dbspaces (root dbspace and the dbspaces that contain
the physical log and logical-log files), other storage spaces, and the logical
logs.
Backup media
Logical-log backup media
Critical dbspaces Dbspace 1 Dbspace 2
Transactions
Figure 1-3. Warm Restore
1-6 IBM Informix Backup and Restore Guide
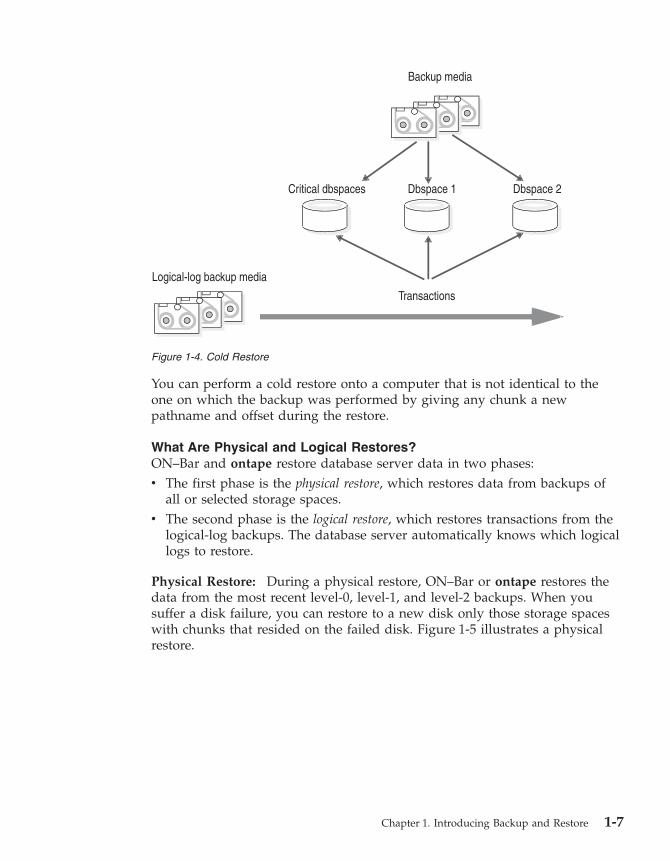
You can perform a cold restore onto a computer that is not identical to the
one on which the backup was performed by giving any chunk a new
pathname and offset during the restore.
What Are Physical and Logical Restores?
ON–Bar and ontape restore database server data in two phases:
v The first phase is the physical restore, which restores data from backups of
all or selected storage spaces.
v The second phase is the logical restore, which restores transactions from the
logical-log backups. The database server automatically knows which logical
logs to restore.
Physical Restore: During a physical restore, ON–Bar or ontape restores the
data from the most recent level-0, level-1, and level-2 backups. When you
suffer a disk failure, you can restore to a new disk only those storage spaces
with chunks that resided on the failed disk. Figure 1-5 illustrates a physical
restore.
Backup media
Logical-log backup media
Critical dbspaces Dbspace 1 Dbspace 2
Transactions
Figure 1-4. Cold Restore
Chapter 1. Introducing Backup and Restore 1-7
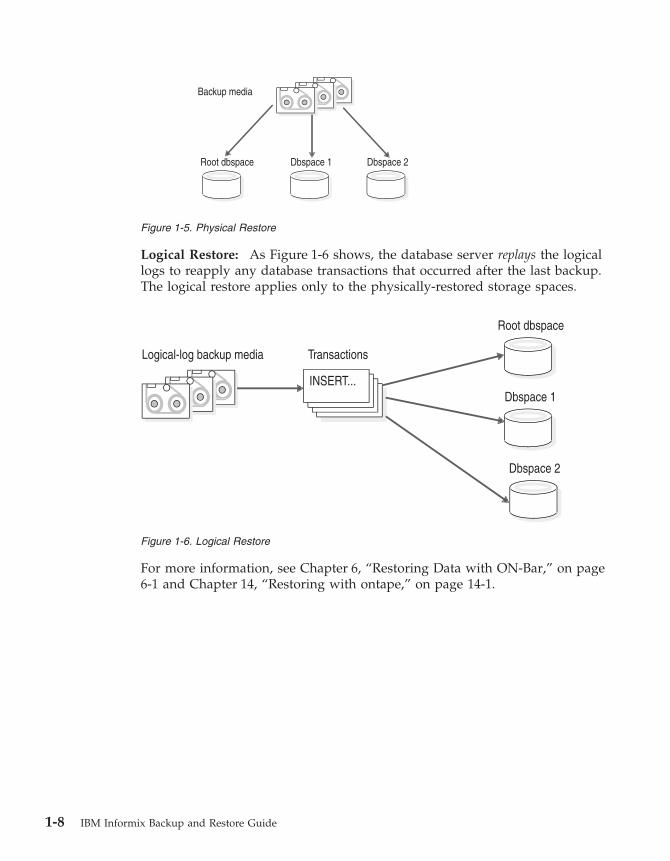
Logical Restore: As Figure 1-6 shows, the database server replays the logical
logs to reapply any database transactions that occurred after the last backup.
The logical restore applies only to the physically-restored storage spaces.
For more information, see Chapter 6, “Restoring Data with ON-Bar,” on page
6-1 and Chapter 14, “Restoring with ontape,” on page 14-1.
Backup media
Root dbspace Dbspace 1 Dbspace 2
Figure 1-5. Physical Restore
Logical-log backup media
Root dbspace
Dbspace 1
Dbspace 2
Transactions
INSERT...
Figure 1-6. Logical Restore
1-8 IBM Informix Backup and Restore Guide
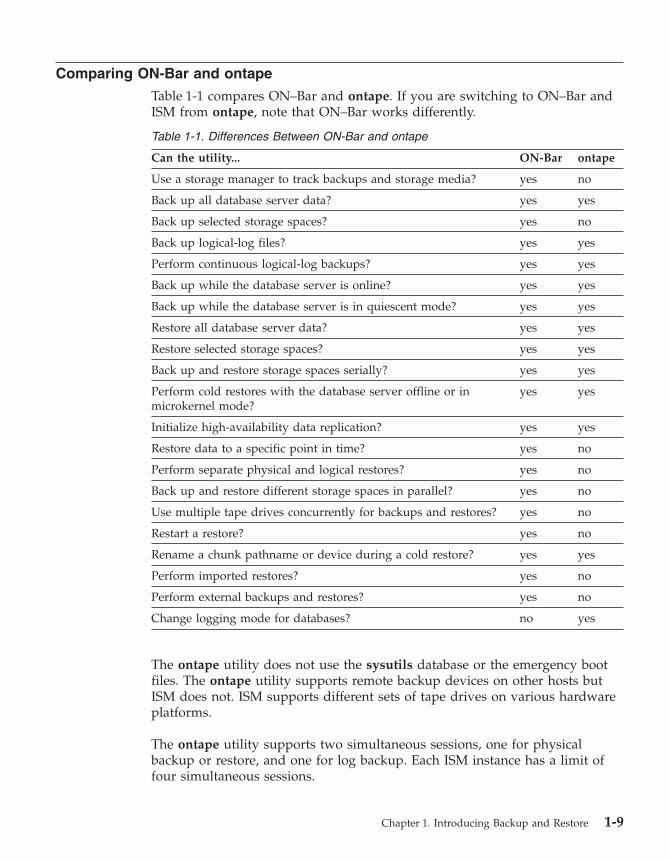
Comparing ON-Bar and ontape
Table 1-1 compares ON–Bar and ontape. If you are switching to ON–Bar and
ISM from ontape, note that ON–Bar works differently.
Table 1-1. Differences Between ON-Bar and ontape
Can the utility... ON-Bar ontape
Use a storage manager to track backups and storage media? yes no
Back up all database server data? yes yes
Back up selected storage spaces? yes no
Back up logical-log files? yes yes
Perform continuous logical-log backups? yes yes
Back up while the database server is online? yes yes
Back up while the database server is in quiescent mode? yes yes
Restore all database server data? yes yes
Restore selected storage spaces? yes yes
Back up and restore storage spaces serially? yes yes
Perform cold restores with the database server offline or in
microkernel mode?
yes yes
Initialize high-availability data replication? yes yes
Restore data to a specific point in time? yes no
Perform separate physical and logical restores? yes no
Back up and restore different storage spaces in parallel? yes no
Use multiple tape drives concurrently for backups and restores? yes no
Restart a restore? yes no
Rename a chunk pathname or device during a cold restore? yes yes
Perform imported restores? yes no
Perform external backups and restores? yes no
Change logging mode for databases? no yes
The ontape utility does not use the sysutils database or the emergency boot
files. The ontape utility supports remote backup devices on other hosts but
ISM does not. ISM supports different sets of tape drives on various hardware
platforms.
The ontape utility supports two simultaneous sessions, one for physical
backup or restore, and one for log backup. Each ISM instance has a limit of
four simultaneous sessions.
Chapter 1. Introducing Backup and Restore 1-9
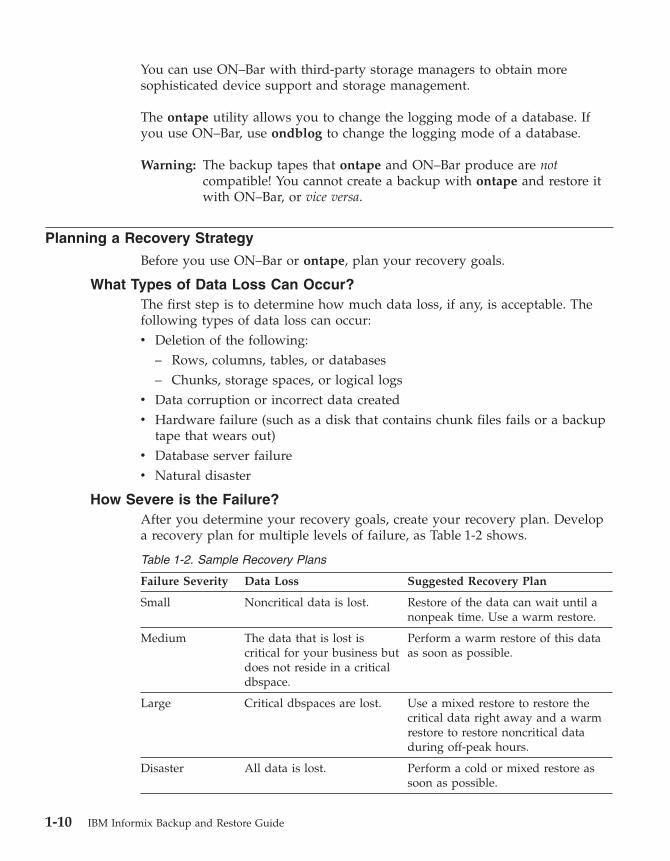
You can use ON–Bar with third-party storage managers to obtain more
sophisticated device support and storage management.
The ontape utility allows you to change the logging mode of a database. If
you use ON–Bar, use ondblog to change the logging mode of a database.
Warning: The backup tapes that ontape and ON–Bar produce are not
compatible! You cannot create a backup with ontape and restore it
with ON–Bar, or vice versa.
Planning a Recovery Strategy
Before you use ON–Bar or ontape, plan your recovery goals.
What Types of Data Loss Can Occur?
The first step is to determine how much data loss, if any, is acceptable. The
following types of data loss can occur:
v Deletion of the following:
– Rows, columns, tables, or databases
– Chunks, storage spaces, or logical logsv Data corruption or incorrect data created
v Hardware failure (such as a disk that contains chunk files fails or a backup
tape that wears out)
v Database server failure
v Natural disaster
How Severe is the Failure?
After you determine your recovery goals, create your recovery plan. Develop
a recovery plan for multiple levels of failure, as Table 1-2 shows.
Table 1-2. Sample Recovery Plans
Failure Severity Data Loss Suggested Recovery Plan
Small Noncritical data is lost. Restore of the data can wait until a
nonpeak time. Use a warm restore.
Medium The data that is lost is
critical for your business but
does not reside in a critical
dbspace.
Perform a warm restore of this data
as soon as possible.
Large Critical dbspaces are lost. Use a mixed restore to restore the
critical data right away and a warm
restore to restore noncritical data
during off-peak hours.
Disaster All data is lost. Perform a cold or mixed restore as
soon as possible.
1-10 IBM Informix Backup and Restore Guide
How Do You Use Your Data?
After you develop your recovery plan, create a backup plan. How you use the
data also determines how you plan your backup schedule, as follows:
v Data usage
How do users use the data?
– Critical dbspaces (root dbspace and dbspaces that contain the physical
log and at least one logical-log file)
– Critical business application data
– Long-term data storage for legal or record-keeping reasons
– Data sharing among groups
– Test datav Transaction Time
How much transaction time can be lost? Also, how long might it take to
re-enter lost transactions manually? For example, can you afford to re-enter
all transactions that occurred over the past three hours?
v Quantity and Distribution
How much data can you afford to lose? For example, you lost one fourth of
your customer profiles, or you lost the Midwest regional sales figures but
the West Coast figures are intact.
Ask the following questions to assist in deciding how often and when you
want to back up the data:
v Does your business have down time where the system can be restored?
v If your system is 24x7 (no down time), is there a nonpeak time where a
restore could occur?
v If a restore must occur during a peak period, how critical is the time?
v Which data can you restore with the database server online (warm restore)?
Which data must be restored offline (cold restore)?
v How many storage devices are available to back up and restore the data?
Scheduling Backups
Table 1-3 shows a sample backup plan for a small or medium-sized system.
Tailor your backup plan to the requirements of your system. The more often
the data changes and the more important it is, the more frequently you need
to back it up. For more information, see “Choosing a Backup Level” on page
4-6.
Table 1-3. Sample Backup Plan
Backup Level Backup Schedule
Complete (level-0) backup Saturday at 6 P.M.
Chapter 1. Introducing Backup and Restore 1-11
Table 1-3. Sample Backup Plan (continued)
Backup Level Backup Schedule
Incremental (level-1) backup Tuesday and Thursday at 6 P.M.
Incremental (level-2) backup Daily at 6 P.M.
Level-0 backup of storage spaces that are
updated frequently
Hourly
Important: Perform a level-0 backup after you change the physical schema,
such as adding a chunk to a storage space. (See “Collecting
Information About Your System Before a Backup” on page 4-7.)
Planning a Backup System for a Production Database Server
To plan for adequate backup protection for your data, analyze your database
server configuration and activity and the types of backup media available at
your installation. Also, consider your budget for storage media, disks,
computers and controllers, and the size of your network.
Evaluating Hardware and Memory Resources
Evaluate the following database server and hardware configuration elements
to determine which storage manager and storage devices to use:
v The number of I/O virtual processors
v The amount of memory available and the distribution of processor activity
Evaluating Backup and Restore Time
How long your backup or restore takes depends on your database server
configuration and the database size:
v The speed of disks or tape devices
The faster the storage devices, the faster the backup or restore time.
v The number of incremental backups that you want to restore if a disk or
system failure requires you to rebuild the database
Incremental backups use less storage space than full backups and also
reduce restore time.
v The size and number of storage spaces in the database
Backups: Many small storage spaces take slightly longer to back up than a
few large storage spaces of the same total size.
Restores: A restore usually takes as long to recover the largest storage space
and the logical logs.
v Whether storage spaces are mirrored
1-12 IBM Informix Backup and Restore Guide
If storage spaces are mirrored, you reduce the chance of having to restore
damaged or corrupted data. You can restore the mirror at nonpeak time
with the database server online.
v The length of time users are interrupted during backups and restores
If you perform backups and warm restores while the database server is
online, users can continue their work but might notice a slower response. If
you perform backups and warm restores with the database server in
quiescent mode, users must exit the database server. If you perform a cold
restore with the database server offline, the database server is unavailable
to users, so the faster the restore, the better. An external backup and restore
eliminates system downtime.
v The backup schedule
Not all storage spaces need to be included in each backup or restore
session. Schedule backups so that you can back up more often the storage
spaces that change rapidly than those that seldom or never change. Be sure
to back up each storage space at level-0 at least once.
v The layout of the tables across the dbspaces and the layout of dbspaces
across the disks
When you design your database server schema, organize the data so that
you can restore important information quickly. For example, you should
isolate critical and frequently used data in a small set of storage spaces on
the fastest disks. You also can fragment large tables across dbspaces to
balance I/O and maximize throughput across multiple disks. For more
information, see your IBM Informix: Performance Guide.
v The database server and system workload
The greater the workload on the database server or system, the longer the
backup or restore time.
v The values of backup and restore configuration parameters
For example, the number and size of data buffers that ON–Bar uses to
exchange data with the database server can affect performance. Use the
BAR_NB_XPORT_COUNT and BAR_XFER_BUF_SIZE (IDS) or
BAR_XPORT_COUNT and BAR_XFER_BUFSIZE (XPS) configuration
parameters to control the number and size of data buffers.
Evaluating Logging and Transaction Activity
The following database server usage requirements also affect your decisions
about the storage manager and storage devices:
v The amount and rate of transaction activity that you expect
v The number and size of logical logs
If you need to restore data from a database server with very little
transaction activity, define many small logical logs. You are less likely to
lose data because of infrequent logical-log backups.
v How fast the logical-log files fill
Chapter 1. Introducing Backup and Restore 1-13
Back up log files before they fill so that the database server does not hang
v Database and table logging modes
When you use many nonlogging databases or tables, logical-log backups
might become less frequent.
1-14 IBM Informix Backup and Restore Guide
Part 2. Overview of the ON-Bar Backup and Restore
System
© Copyright IBM Corp. 1996, 2004

IBM Informix Backup and Restore Guide
Chapter 2. The ON-Bar Backup and Restore System
Where to Find Information on ON-Bar, ISM, and TSM . . . . . . . . . . . . . . . . 2-2
ON-Bar for Dynamic Server . . . . . . . . . . . . . . . . . . . . . . . . . 2-4
ON-Bar for Extended Parallel Server . . . . . . . . . . . . . . . . . . . . . . 2-6
Database Server and Storage-Manager Communication . . . . . . . . . . . . . . . 2-7
Backup Scheduler . . . . . . . . . . . . . . . . . . . . . . . . . . . . 2-7
ON-Bar Utilities . . . . . . . . . . . . . . . . . . . . . . . . . . . . . 2-9
IBM Informix Storage Manager . . . . . . . . . . . . . . . . . . . . . . . 2-9
IBM Tivoli Storage Manager (UNIX) . . . . . . . . . . . . . . . . . . . . . 2-10
Third-Party Storage Managers . . . . . . . . . . . . . . . . . . . . . . . 2-11
The XBSA Interface . . . . . . . . . . . . . . . . . . . . . . . . . . . 2-11
The ON-Bar Tables . . . . . . . . . . . . . . . . . . . . . . . . . . . 2-12
The Emergency Boot Files . . . . . . . . . . . . . . . . . . . . . . . . 2-12
Emergency Boot File on Dynamic Server . . . . . . . . . . . . . . . . . . . 2-13
Emergency Boot Files on Extended Parallel Server . . . . . . . . . . . . . . . 2-13
The ON-Bar Activity Log . . . . . . . . . . . . . . . . . . . . . . . . . 2-14
Specifying the Location of the Activity Log . . . . . . . . . . . . . . . . . . 2-14
Specifying the Level of ON-Bar Debugging (IDS) . . . . . . . . . . . . . . . . 2-14
Specifying the Location of the Debug Log . . . . . . . . . . . . . . . . . . 2-14
Monitoring the Progress of a Backup or Restore . . . . . . . . . . . . . . . . 2-14
In This Chapter
This chapter introduces the components of ON–Bar and describes how it
works. The following topics are covered:
v Where to find information on ON–Bar, ISM, and TSM
v ON–Bar for Dynamic Server
v ON–Bar for Extended Parallel Server
v ON–Bar utilities
Table 2-1 on page 2-2 shows which database server versions support ON–Bar,
IBM Informix Storage Manager (ISM), Version 2.2, and Tivoli Storage
Manager (TSM), Version 5.1.6 and later.
© Copyright IBM Corp. 1996, 2004 2-1
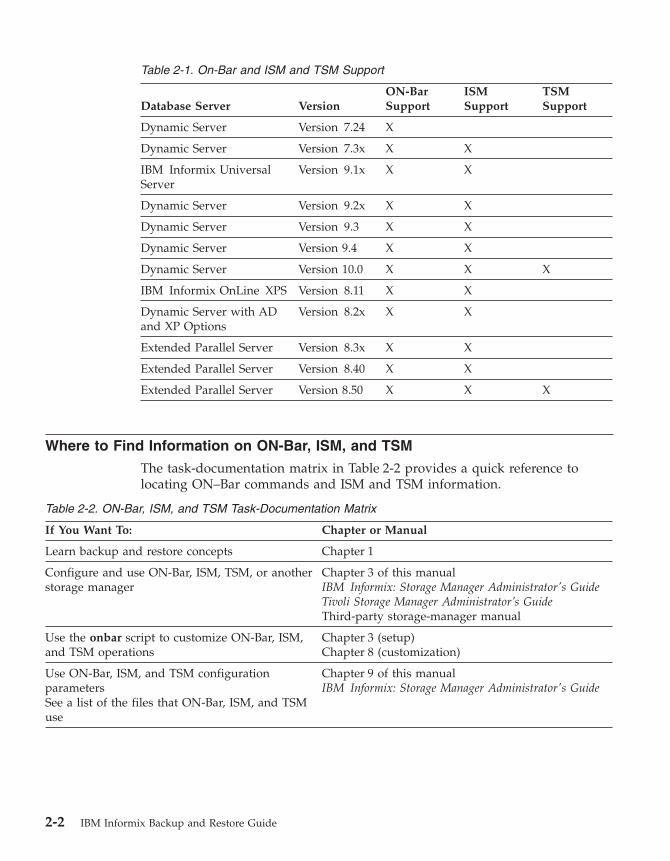
Table 2-1. On-Bar and ISM and TSM Support
Database Server Version
ON-Bar
Support
ISM
Support
TSM
Support
Dynamic Server Version 7.24 X
Dynamic Server Version 7.3x X X
IBM Informix Universal
Server
Version 9.1x X X
Dynamic Server Version 9.2x X X
Dynamic Server Version 9.3 X X
Dynamic Server Version 9.4 X X
Dynamic Server Version 10.0 X X X
IBM Informix OnLine XPS Version 8.11 X X
Dynamic Server with AD
and XP Options
Version 8.2x X X
Extended Parallel Server Version 8.3x X X
Extended Parallel Server Version 8.40 X X
Extended Parallel Server Version 8.50 X X X
Where to Find Information on ON-Bar, ISM, and TSM
The task-documentation matrix in Table 2-2 provides a quick reference to
locating ON–Bar commands and ISM and TSM information.
Table 2-2. ON-Bar, ISM, and TSM Task-Documentation Matrix
If You Want To: Chapter or Manual
Learn backup and restore concepts Chapter 1
Configure and use ON-Bar, ISM, TSM, or another
storage manager
Chapter 3 of this manual
IBM Informix: Storage Manager Administrator's Guide
Tivoli Storage Manager Administrator’s Guide
Third-party storage-manager manual
Use the onbar script to customize ON-Bar, ISM,
and TSM operations
Chapter 3 (setup)
Chapter 8 (customization)
Use ON-Bar, ISM, and TSM configuration
parameters
See a list of the files that ON-Bar, ISM, and TSM
use
Chapter 9 of this manual
IBM Informix: Storage Manager Administrator's Guide
2-2 IBM Informix Backup and Restore Guide
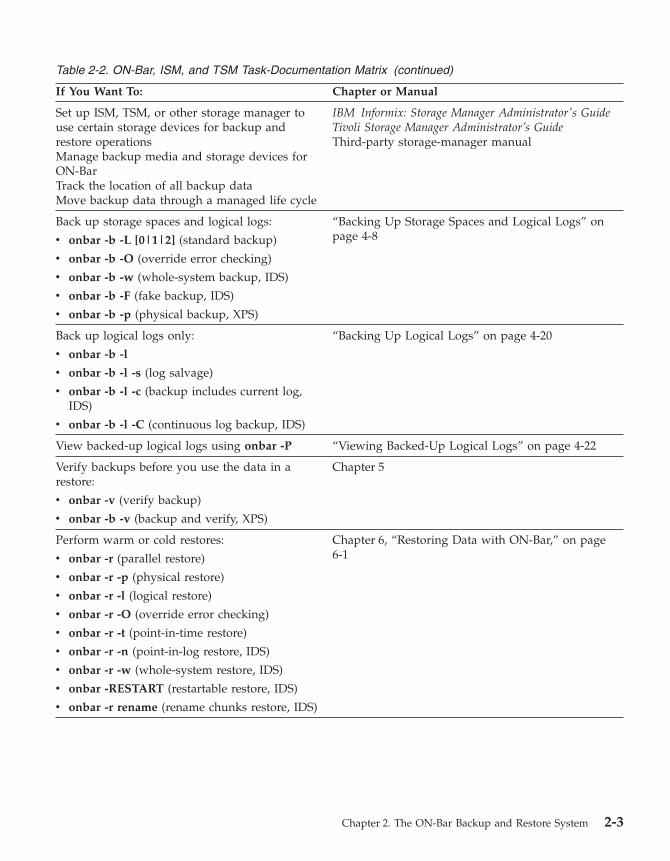
Table 2-2. ON-Bar, ISM, and TSM Task-Documentation Matrix (continued)
If You Want To: Chapter or Manual
Set up ISM, TSM, or other storage manager to
use certain storage devices for backup and
restore operations
Manage backup media and storage devices for
ON-Bar
Track the location of all backup data
Move backup data through a managed life cycle
IBM Informix: Storage Manager Administrator's Guide
Tivoli Storage Manager Administrator’s Guide
Third-party storage-manager manual
Back up storage spaces and logical logs:
v onbar -b -L [0|1|2] (standard backup)
v onbar -b -O (override error checking)
v onbar -b -w (whole-system backup, IDS)
v onbar -b -F (fake backup, IDS)
v onbar -b -p (physical backup, XPS)
“Backing Up Storage Spaces and Logical Logs” on
page 4-8
Back up logical logs only:
v onbar -b -l
v onbar -b -l -s (log salvage)
v onbar -b -l -c (backup includes current log,
IDS)
v onbar -b -l -C (continuous log backup, IDS)
“Backing Up Logical Logs” on page 4-20
View backed-up logical logs using onbar -P “Viewing Backed-Up Logical Logs” on page 4-22
Verify backups before you use the data in a
restore:
v onbar -v (verify backup)
v onbar -b -v (backup and verify, XPS)
Chapter 5
Perform warm or cold restores:
v onbar -r (parallel restore)
v onbar -r -p (physical restore)
v onbar -r -l (logical restore)
v onbar -r -O (override error checking)
v onbar -r -t (point-in-time restore)
v onbar -r -n (point-in-log restore, IDS)
v onbar -r -w (whole-system restore, IDS)
v onbar -RESTART (restartable restore, IDS)
v onbar -r rename (rename chunks restore, IDS)
Chapter 6, “Restoring Data with ON-Bar,” on page
6-1
Chapter 2. The ON-Bar Backup and Restore System 2-3

Table 2-2. ON-Bar, ISM, and TSM Task-Documentation Matrix (continued)
If You Want To: Chapter or Manual
Perform external backups and restores:
v onmode -c block|unblock (external backup,
IDS)
v onutil ebr block|unblock (external backup,
XPS)
v onbar -r -e (external restore)
Chapter 15
Use the onsmsync utility to expire old backup
objects
Chapter 8
Use the onbar_w utility or start_worker script to
start onbar-worker processes manually (XPS)
Chapter 8
Monitor Backup Scheduler status (XPS) Chapter 8
Refer to the tables in the sysutils database and
the Backup Scheduler tables in the sysmaster
database
Chapter 10
Find corrective actions to ON–Bar error messages The finderr utility on UNIX or IBM Informix Error
Messages on Windows
Find ON–Bar return codes Chapter 11
Use GLS with ON-Bar Appendix D
Create and delete storage spaces and chunks
Manage database-logging status, logical-log files,
and the physical log
Perform fast recovery
IBM Informix: Administrator's Guide for your database
server
Locate complete information on all database
server configuration parameters Use the ondblog
utility to change the logging mode
Use the onlog utility to display logical-log
records
IBM Informix: Administrator's Reference
Restoring table-level data with archecker Chapter 16, “Restoring Table-level Data,” on page
16-1
ON-Bar for Dynamic Server
Figure 2-1 on page 2-6 shows the following components of ON–Bar for
Dynamic Server:
v Storage spaces (dbspaces, blobspaces, and sbspaces) and logical logs to be
backed up or restored
v The ON–Bar catalog tables in the sysutils database
v The onbar script (onbar.sh on UNIX or onbar.bat on Windows)
v The onbar-driver (onbar_d)
2-4 IBM Informix Backup and Restore Guide
v The XBSA shared library for the storage manager on your system
Use either ISM, TSM, or a storage manager that a third-party vendor
provides.
v Backup data on storage media
v The ON–Bar activity log
v The ON–Bar emergency boot file
ON–Bar communicates with both the database server and the storage
manager. Use the onbar command to start a backup or restore. For a backup
session, ON–Bar requests the contents of storage spaces and logical logs from
the database server and passes them to the storage manager. The storage
manager stores the data on storage media. For a restore session, ON–Bar
requests the backed up data from the storage manager and restores it on the
database server.
If you specify a parallel backup or restore, the onbar-driver (onbar_d) creates
child onbar_d processes that perform backup and restore operations. Each
child processes one storage space, then returns. ON–Bar processes log files
serially. If you specify a serial backup or restore, the onbar-driver performs
the operation one object at a time.
The onbar_d processes write status and error messages to the ON–Bar activity
log and write information to the emergency boot file that is used in a cold
restore. For more details, see “Backup Sequence on Dynamic Server” on page
4-29.
Chapter 2. The ON-Bar Backup and Restore System 2-5

ON-Bar for Extended Parallel Server
Figure 2-2 on page 2-8 shows the following components of ON–Bar for
Extended Parallel Server:
v Storage spaces (dbspaces and dbslices) and logical logs to be backed up or
restored
v The ON–Bar catalog tables in the sysutils database
v The onbar script and onbar-driver (onbar_d), onbar-worker (onbar_w), and
onbar-merger (onbar_m)
v The XBSA shared library for each storage manager on your system
Emergency boot file
Backup media
Storage spaces andlogical logs
IDS
onbar_d
XBSAActivity log
Storagemanager
sysutils database
onbar commands
Figure 2-1. ON-Bar Components for Dynamic Server
2-6 IBM Informix Backup and Restore Guide
Use either ISM, TSM, or a storage manager that a third-party vendor
provides.
v Backup data on storage media
v The ON–Bar activity log
v The ON–Bar emergency boot files
Database Server and Storage-Manager Communication
For a backup session, ON–Bar requests the contents of storage spaces and
logical logs from the database server and passes them to the storage manager.
The storage manager stores the data on storage media. For a restore session,
ON–Bar requests the backed-up data from the storage manager and restores it
on the database server.
The onbar_d, onbar_w, and onbar_m processes write status and error
messages to the ON–Bar activity log. The onbar_w and onbar_m processes
write information to the emergency boot files that are used in a cold restore.
Backup Scheduler
The onbar-driver (onbar_d) communicates backup or restore requests to the
Backup Scheduler on Extended Parallel Server. The Backup Scheduler tracks all
active and scheduled backup and restore activities for all the coservers. The
Backup Scheduler creates one or more sessions, each of which contains a list
of objects to back up or restore. It starts onbar-worker processes to back up or
restore the objects and coordinates the session activity. A session is a single
backup or restore request.
For details, see “Backup Sequence on Extended Parallel Server” on page 4-30.
Chapter 2. The ON-Bar Backup and Restore System 2-7
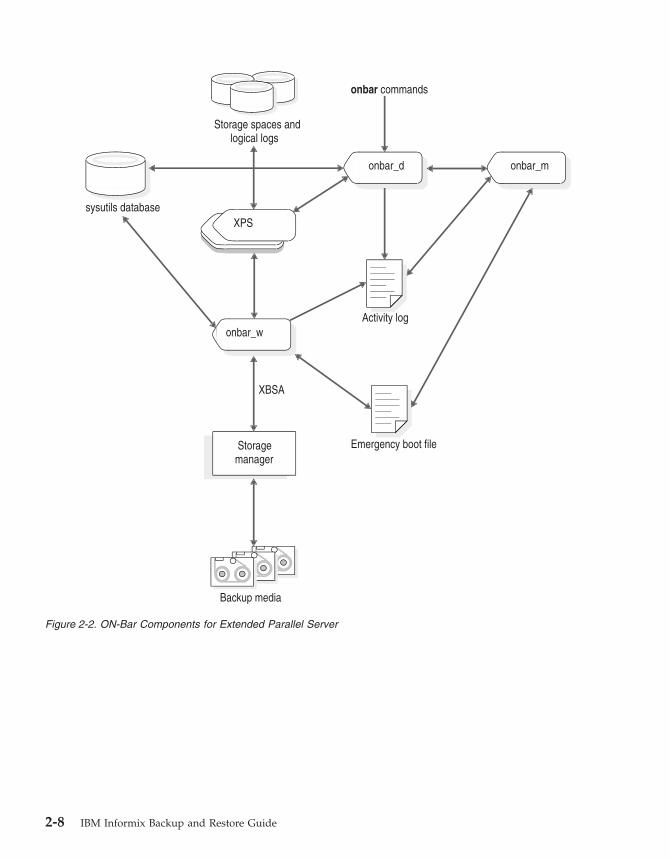
Backup media
Storage spaces andlogical logs
XPS
onbar_d onbar_m
onbar_w
XBSA
Activity log
Storagemanager
Emergency boot file
sysutils database
onbar commands
Figure 2-2. ON-Bar Components for Extended Parallel Server
2-8 IBM Informix Backup and Restore Guide
ON-Bar Utilities
ON–Bar includes the following utilities. You can call onbar from the
command line, a script, a scheduler such as cron (UNIX), or a
storage-manager process.
Utility Description IDS XPS
onbar Is an editable shell script on UNIX and a batch
file (onbar.bat) in Windows that starts the
onbar-driver. Use the onbar script or batch file
to check the storage-manager version and
customize backup and restore operations.
X X
onbar_d When you use the onbar command, it calls the
onbar_d utility that starts the onbar-driver.
The onbar-driver starts and controls backup
and restore activities.
X
onbar_d The onbar_d utility transfers data between
Dynamic Server and the storage manager.
X
onbar_w Transfers data between an Extended Parallel
Server coserver and the storage manager until
the backup or restore request is fulfilled.
X
onbar_m Collects and processes the backup emergency
boot files from each coserver and creates the
restore boot file.
X
start_worker.sh Starts onbar-worker processes manually. X
onsmsync Synchronizes the contents of the sysutils
database, the emergency boot files, and the
storage manager catalogs. Can be used to
purge backups that are no longer needed
according to user-selectable policies.
X X
ondblog Changes the database-logging mode. X X
archecker Verifies backups and restores table-level data X X
IBM Informix Storage Manager
ON–Bar is packaged with ISM. However, you can purchase a third-party
storage manager if you prefer. You must use a storage manager to perform
backups and restores with ON–Bar. The storage manager is an application that
manages the storage devices and media that contain backups. The storage
manager handles all media labeling, mount requests, and storage volumes.
The ISM server resides on the same computer as ON–Bar and the Informix
database server; your storage devices are attached to this computer as well.
ISM can store data on simple tape drives, optical disk devices, and file
systems. ISM also performs the following functions:
Chapter 2. The ON-Bar Backup and Restore System 2-9
v Configures up to four storage devices
v Adds, changes, and deletes administrative users
v Labels and mounts storage volumes on your storage devices
v Manages storage volumes
v Compresses and decompresses data
v Encrypts and decrypts data
For more information, see “Installing and Configuring a Storage Manager” on
page 3-2, “Choosing Storage Managers and Storage Devices” on page 3-19,
Chapter 9, “Setting ON-Bar Configuration Parameters,” on page 9-1, and the
IBM Informix: Storage Manager Administrator's Guide.
IBM Tivoli Storage Manager (UNIX)
IBM Tivoli Storage Manager (TSM) is a client/server program that provides
storage management solutions to customers in a multivendor computer
environment. TSM provides an automated, centrally scheduled,
policy-managed backup, archive, and space-management facility for file
servers and workstations.
TSM stores data on separate TSM servers. Your Informix database servers are
TSM clients using the library that implement XBSA functions for using TSM
with Informix database servers (Informix Interface for TSM). Informix
Interface for TSM is part of your Informix database server installation. TSM is
distributed separately.
TSM efficiently manages disk, optical, and tape library resources. TSM
provides the following functions:
v Reduces network complexity with interfaces and functions that span
network environments.
v Increases administrator productivity by automating repetitive processes,
scheduling unattended processes, and administering TSM from anywhere in
the network
v Reduces risk of data loss with scheduled routine backups
v Optimizes existing storage resources with automated movement of files
from client file systems to TSM storage
TSM provides the following services:
v Backup and restore services to generate scheduled backups and restore data
when required
v Archive and retrieve services to provide point-in-time copies of data for
long-term storage
v Server hierarchical storage management services to automate migration
from expensive storage media to less expensive storage media
2-10 IBM Informix Backup and Restore Guide
v Automation services to automate common storage administration tasks
v Administration services to support routine monitoring, administration, and
accounting, including the following functions:
– Set client and server options
– Define devices
– Format storage volumes
– Add additional clients
– Label tape volumesv Security services to control user access
v Disaster recovery management to implement a comprehensive backup and
recovery procedures
Third-Party Storage Managers
Some third-party storage managers can manage stackers, robots, and
jukeboxes as well as simple tape and disk devices. These storage managers
might perform these additional functions:
v Schedule backups
v Support networked and distributed backups and restores
Find information on the third-party storage managers that ON–Bar supports
at http://www.ibm.com/software/data/informix/support.
Make sure that the storage manager has passed the Informix validation
process. The validation process is specific to the backup and restore product
version, the operating-system version, and the Informix database server
version.
The XBSA Interface
ON–Bar and the storage manager communicate through the X/Open Backup
Services Application Programmer’s Interface (XBSA), which enables the
storage manager to manage media for the database server. By using an
open-system interface to the storage manager, ON–Bar can work with a
variety of storage managers that also use XBSA.
Each storage manager develops and distributes a unique version of the XBSA
shared library. You must use the version of the XBSA shared library provided
with the storage manager. For example, if you use ISM, use the XBSA shared
library provided with ISM. ON–Bar and the XBSA shared library must be
compiled the same (32-bit or 64-bit).
ON–Bar uses XBSA to exchange the following types of information with a
storage manager:
v Control data. ON–Bar exchanges control data with a storage manager to
verify that ON–Bar and XBSA are compatible, to ensure that objects are
Chapter 2. The ON-Bar Backup and Restore System 2-11
restored to the proper instance of the database server and in the proper
order, and to track the history of backup objects.
v Backup or restore data. During backups and restores, ON–Bar and the
storage manager use XBSA to exchange data from specified storage spaces
or logical-log files.
ON–Bar uses XBSA transactions to ensure data consistency. All operations
included in a transaction are treated as a unit. All operations within a
transaction must succeed for objects transferred to the storage manager to be
restorable.
The ON-Bar Tables
ON–Bar uses the following catalog tables in the sysutils database to track
backup and restore operations:
v The bar_server table tracks instances of the database server.
v The bar_object table tracks backup objects. A backup object is a backup of a
dbspace, blobspace, sbspace, or logical-log file.
v The bar_action table tracks all backup and restore attempts against each
backup object, except some log salvage and cold restore events.
v The bar_instance table describes each object that is backed up during a
successful backup attempt.
The onsmsync utility uses the following tables to track its operations:
v The bar_ixbar table contains history of all unexpired successful backups in
all timelines. It is maintained and used by onsmsync only.
v The bar_syncdeltab table is normally empty except when onsmsync is
running. It is maintained and used by onsmsync only.
For a description of the content of these tables, see Chapter 10, “ON-Bar
Catalog Tables,” on page 10-1.
The Emergency Boot Files
The ON–Bar emergency boot files reside in the $INFORMIXDIR/etc directory
on UNIX and in the %INFORMIXDIR%\etc directory on Windows. The
emergency boot files contain the information that you need to perform a cold
restore and are updated after every backup.
ON–Bar must be able to restore objects from a storage manager even when
the tables in the sysutils database are not available. During a cold restore, the
database server is not available to access sysutils, so ON–Bar obtains the
information it needs for the cold restore from the emergency boot file.
Warning: Do NOT modify the emergency boot file(s) in any way. Doing so
may cause ON-Bar to select the wrong backup as part of a restore,
2-12 IBM Informix Backup and Restore Guide
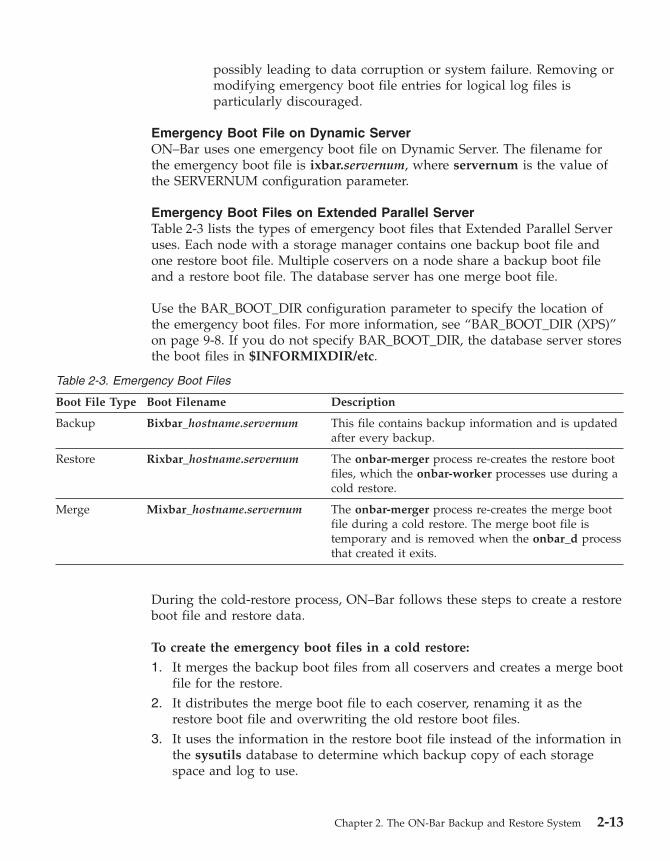
possibly leading to data corruption or system failure. Removing or
modifying emergency boot file entries for logical log files is
particularly discouraged.
Emergency Boot File on Dynamic Server
ON–Bar uses one emergency boot file on Dynamic Server. The filename for
the emergency boot file is ixbar.servernum, where servernum is the value of
the SERVERNUM configuration parameter.
Emergency Boot Files on Extended Parallel Server
Table 2-3 lists the types of emergency boot files that Extended Parallel Server
uses. Each node with a storage manager contains one backup boot file and
one restore boot file. Multiple coservers on a node share a backup boot file
and a restore boot file. The database server has one merge boot file.
Use the BAR_BOOT_DIR configuration parameter to specify the location of
the emergency boot files. For more information, see “BAR_BOOT_DIR (XPS)”
on page 9-8. If you do not specify BAR_BOOT_DIR, the database server stores
the boot files in $INFORMIXDIR/etc.
Table 2-3. Emergency Boot Files
Boot File Type Boot Filename Description
Backup Bixbar_hostname.servernum This file contains backup information and is updated
after every backup.
Restore Rixbar_hostname.servernum The onbar-merger process re-creates the restore boot
files, which the onbar-worker processes use during a
cold restore.
Merge Mixbar_hostname.servernum The onbar-merger process re-creates the merge boot
file during a cold restore. The merge boot file is
temporary and is removed when the onbar_d process
that created it exits.
During the cold-restore process, ON–Bar follows these steps to create a restore
boot file and restore data.
To create the emergency boot files in a cold restore:
1. It merges the backup boot files from all coservers and creates a merge boot
file for the restore.
2. It distributes the merge boot file to each coserver, renaming it as the
restore boot file and overwriting the old restore boot files.
3. It uses the information in the restore boot file instead of the information in
the sysutils database to determine which backup copy of each storage
space and log to use.
Chapter 2. The ON-Bar Backup and Restore System 2-13
The ON-Bar Activity Log
ON–Bar writes informational, progress, warning, error, and debugging
messages to the ON–Bar activity log. The activity log also records which
storage spaces and logical logs were backed up or restored, the progress of
the operation, and approximately how long it took. Use the information in the
activity log to determine whether a backup or restore operation succeeded.
The ondblog utility reports its errors in the activity log.
For a list of ON–Bar informational, warning, and error messages, use the
finderr or Find Error utility or view IBM Informix: Error Messages at
http://www.ibm.com/software/data/informix/pubs/library/.
Specifying the Location of the Activity Log
For information on how to change the location of the ON–Bar activity log, see
“BAR_ACT_LOG” on page 9-6.
Specifying the Level of ON-Bar Debugging (IDS)
You can set the level of debugging messages the ON-Bar utility prints in the
ON-Bar debug log with the BAR_DEBUG configuration parameter. The
ON-Bar debug log is specified by the BAR_DEBUG_LOG configuration
parameter. By default, no debugging messages are printed.
You can update the value of BAR_DEBUG by editing the ONCONFIG file.
When the updated value of BAR_DEBUG takes affect depends on your
database server:
v For Dynamic Server, the new value of BAR_DEBUG takes affect
immediately for any currently executing ON-Bar command and any
subsequent commands. Any ON-Bar command that is currently executing
when you update BAR_DEBUG reads the new value of BAR_DEBUG and
prints debug messages at the new level.
v For Extended Parallel Server, the new value of BAR_DEBUG takes affect for
ON-Bar commands executed after you update the value of BAR_DEBUG.
Specifying the Location of the Debug Log
For information on how to change the location of the ON-Bar debug log, see
“BAR_DEBUG_LOG” on page 9-10.
Monitoring the Progress of a Backup or Restore
If your backup or restore operations take a long time to complete, knowing
the progress is especially useful. Use the BAR_PROGRESS_FREQ
configuration parameter to specify, in minutes, the frequency of the progress
messages written to the ON–Bar activity log. For information on how to
change the frequency of the progress messages, see “BAR_PROGRESS_FREQ”
on page 9-14.
2-14 IBM Informix Backup and Restore Guide

Chapter 3. Configuring the Storage Manager and ON-Bar
Configuring a Storage Manager . . . . . . . . . . . . . . . . . . . . . . . . 3-2
Installing and Configuring a Storage Manager . . . . . . . . . . . . . . . . . . 3-2
Configuring ISM . . . . . . . . . . . . . . . . . . . . . . . . . . . . 3-2
Configuring TSM . . . . . . . . . . . . . . . . . . . . . . . . . . . . 3-3
Editing the TSM Client Options Files . . . . . . . . . . . . . . . . . . . . 3-3
Assigning a TSM Management Class for a Backup . . . . . . . . . . . . . . . . 3-4
Registering with the TSM Server . . . . . . . . . . . . . . . . . . . . . . 3-5
Initializing the Informix Interface for TSM Password . . . . . . . . . . . . . . . 3-5
Updating the sm_versions File . . . . . . . . . . . . . . . . . . . . . . . 3-5
Configuring Multiple Storage Managers on Coserver Nodes (XPS) . . . . . . . . . . . 3-6
Validating Your Storage Manager . . . . . . . . . . . . . . . . . . . . . . 3-7
Configuring ON-Bar . . . . . . . . . . . . . . . . . . . . . . . . . . . . 3-7
Creating the bargroup Group (UNIX) . . . . . . . . . . . . . . . . . . . . . 3-7
Updating the onbar Script . . . . . . . . . . . . . . . . . . . . . . . . . 3-8
Setting ISM Environment Variables and ONCONFIG Parameters . . . . . . . . . . . . 3-8
Setting the Informix Interface for TSM Environment Variables . . . . . . . . . . . . . 3-9
Specifying the Location of the XBSA Library . . . . . . . . . . . . . . . . . . . 3-9
Using ON-Bar Configuration Parameters . . . . . . . . . . . . . . . . . . . . . 3-11
Using ON-Bar Configuration Parameters on Dynamic Server . . . . . . . . . . . . . 3-11
Using ON-Bar Configuration Parameters on Extended Parallel Server . . . . . . . . . . 3-12
Configuring Multiple Storage Managers . . . . . . . . . . . . . . . . . . . 3-12
Global Configuration Parameters . . . . . . . . . . . . . . . . . . . . . 3-13
Storage-Manager Specific Configuration Parameters . . . . . . . . . . . . . . . 3-13
Examples of ON-Bar and Storage-Manager Configurations . . . . . . . . . . . . . 3-15
Steps to Take Before Making a Test Backup . . . . . . . . . . . . . . . . . . . . 3-18
Choosing Storage Managers and Storage Devices . . . . . . . . . . . . . . . . . . 3-19
Features That ISM Supports . . . . . . . . . . . . . . . . . . . . . . . . 3-19
Features That ISM Does Not Support . . . . . . . . . . . . . . . . . . . . . 3-19
Features That TSM Supports . . . . . . . . . . . . . . . . . . . . . . . . 3-20
Feature that TSM Does Not Support . . . . . . . . . . . . . . . . . . . . . 3-20
Storage Device Requirements . . . . . . . . . . . . . . . . . . . . . . . 3-20
Considerations for Extended Parallel Server . . . . . . . . . . . . . . . . . . 3-21
In This Chapter
This chapter provides the information that you need to plan and to set up
ON–Bar with a storage manager:
v Installing and configuring a storage manager
v Configuring ON–Bar
v Steps to take before making a test backup
v Choosing storage managers and storage devices
© Copyright IBM Corp. 1996, 2004 3-1
Configuring a Storage Manager
This section discusses installing and configuring a storage manager.
Installing and Configuring a Storage Manager
Storage managers have slightly different installation and configuration
requirements. Make sure that you follow the manufacturer’s instructions
carefully. If you have difficulty with the storage-manager installation and
configuration, please contact the manufacturer directly. For the list of certified
storage managers for your ON–Bar version, consult your sales representative.
Important: Some storage managers let you specify the kind of data to back
up to specific storage devices. Configure the storage manager to
back up logical logs to one device and storage spaces to a
different device for more efficient backups and restores.
To configure a third-party storage manager:
1. Set ON–Bar configuration parameters and environment variables.
2. Configure the storage manager so that ON–Bar can communicate correctly
with it. For information, see your storage-manager documentation.
3. Configure your storage devices.
To configure your storage devices, follow instructions in your
storage-manager documentation. The storage manager must know the
device names of the storage devices that it should use.
4. Label your storage volumes.
5. Mount the storage volumes on the storage devices.
6. Update the storage-manager definition in the sm_versions file. For more
information, see “Updating the sm_versions File” on page 3-5.
7. Verify that the BAR_BSALIB_PATH configuration parameter points to the
correct XBSA shared library for your storage manager. For more
information, see “Specifying the Location of the XBSA Library” on page
3-9.
After you configure the storage manager and storage devices and label
volumes for your database server and logical-log backups, you are ready to
initiate a backup or restore operation with ON–Bar.
Configuring ISM
For instructions on how to set up ISM to work with ON–Bar, see the
IBM Informix: Storage Manager Administrator's Guide. The ISM server is
installed with the Informix database server on UNIX or Windows. Several
database server instances can share one ISM instance.
3-2 IBM Informix Backup and Restore Guide
Warning: Install one copy of ISM on each computer to prevent possible
conflicts with the XBSA shared library. Do not run ISM and Legato
NetWorker on the same computer because they conflict with each
other.
Configuring TSM
To use Tivoli Storage Manager with Informix databases, you must install and
configure the Tivoli Storage Manager client on your database server computer
and Tivoli Storage Manager on your storage computer.
For more information about TSM, read the following manuals:
v Tivoli Storage Manager Backup-Archive Clients Installation and User’s Guide
v Tivoli Storage Manager Using the Application Program Interface
v Tivoli Storage Manager Administrator’s Guide
v Tivoli Storage Manager Administrator’s Reference
In addition, you must configure Informix Interface for TSM and perform other
TSM configuration tasks on your Informix database server computer. These
tasks are explained in the following sections.
Editing the TSM Client Options Files
The Informix Interface for TSM communicates with the TSM server using the
TSM API. By default, Informix Interface for TSM uses the client user options
file (dsm.opt) and client system options file (dsm.sys) located in the TSM API
installation directory:
v Specify the TSM server to use in the client user options file, dsm.opt.
v Identify the TSM server name, communication method, and server options
in the client system options file, dsm.sys.
Use the sample dsm.opt.smp and dsm.sys.smp files distributed with the TSM
API to help you get started quickly.
You must be the root user to perform edits to the dsm.opt and dsm.sys files.
See TSM Installing the Clients and TSM Trace Facility Guide for information
regarding options you can specify in these files.
Editing the TSM Client User Options File: The TSM client user options file,
dsm.opt, must refer to the correct TSM server stanza, as listed in the dsm.sys
file.
Set the following options in the dsm.opt file:
v SERVERNAME: to identify which TSM server stanza, as listed in the
dsm.sys file, that Informix Interface for TSM contacts for services.
Chapter 3. Configuring the Storage Manager and ON-Bar 3-3

v TRACEFILE: to send trace output information to a designated file.
v TRACEFLAG: to set specific trace flags.
Editing the TSM Client System Options File: The TSM client systems
options file, dsm.sys, must refer to the correct TSM server address and
communication method.
The following TSM options are the most important to set in the dsm.sys file:
v SERVERNAME: to specify the name you want to use to identify a server
when it is referred to in the dsm.opt file and to create a stanza that contains
options for that server
v COMMMETHOD: to identify the communication method
v TCPSERVERADDRESS: to identify the TSM server
v PASSWORDACCESS: to specify GENERATE to store the TSM password
The SERVERNAME option in the dsm.opt and dsm.sys files define server
stanza names only. The TCPSERVERADDRESS option controls which server is
actually contacted.
You can set up multiple server stanzas in the dsm.sys file. See the Tivoli
Storage Manager Backup-Archive Client Installation and User’s Guide for
information about multiple server stanzas.
Assigning a TSM Management Class for a Backup
When you back up a database, the default management class for your node is
used. You can override the default value with a different value that is specified
in the INCLUDE option. This option is placed in the include-exclude options
file. The file name of the include-exclude options file is in the client system
options file (dsm.sys). For more information, see the Tivoli Storage Manager
Backup-Archive Client Installation and User’s Guide.
Use the following naming conventions for ON-Bar files:
v A database backup:
/dbservername/dbservername/dbspacename/level
v A log backup:
/dbservername/dbservername/server_number/unique_logid
For a database backup, an example of the INCLUDE statement is as follows:
Include /dbserverA/dbserverA/dbspaceA/* InformixDbMgmt
For a logical log back up, an example of the INCLUDE statement is as
follows:
Include /dbserverA/dbserverA/55/* InformixLogMgmt
3-4 IBM Informix Backup and Restore Guide
where the number 55 is the value of the SERVERNUM parameter in the
ONCONFIG file.
Registering with the TSM Server
Before backing up to and recovering from a TSM server, you must have a
TSM registered node name and a password. The process of setting up a node
name and password is called registration. After the Informix Interface for TSM
node is registered with a TSM server, you can begin using the Informix
Interface for TSM to back up and restore your Informix storage spaces and
logical logs. If your workstation has a node name assigned to the TSM
backup-archive client, you should have a different node name for Informix
Interface for TSM. For information about performing the registration process,
see the Tivoli Storage Manager Backup-Archive Client Installation and User’s Guide.
Initializing the Informix Interface for TSM Password
To initialize the password for Informix Interface for TSM, use the txbsapswd
program. This program sets up a connection with the server stanza that you
specified in the dsm.opt file. You must run the txbsapswd program as user
root before using Informix Interface for TSM.
To initialize the password:
1. Start the txbsapswd program located in the $INFORMIXDIR/bin
directory.
2. Enter the password and press Return. To retain your current password,
press Return without a value.
Updating the sm_versions File
The storage manager must have an entry in the sm_versions file. If you are
using ISM, put ism in the sm_name field of sm_versions. To find out which
code name to use in sm_versions for third-party storage managers, see the
storage-manager documentation.
The storage-manager definition in the sm_versions file uses this format:
1|XBSA_ver|sm_name|sm_ver
XBSA_ver is the release version of the XBSA shared library for the storage
manager. sm_name is the name of the storage manager. sm_ver is the
storage-manager version. The maximum field length is 128 characters.
The following example shows the ISM definition in the sm_versions file:
1|1.0.1|ism| ISM.2.20.UC1.114|
The following example shows the TSM definition in the sm_versions file:
1|5.1.6|adsm|5
Chapter 3. Configuring the Storage Manager and ON-Bar 3-5

Before ON–Bar starts a backup or restore process, it calls the currently
installed version of the storage-manager-specific XBSA shared library to get its
version number. If this version is compatible with the current version of
ON–Bar and is defined in the sm_versions file, ON–Bar begins the requested
operation.
To update the storage-manager definition in sm_versions:
1. Copy the sm_versions.std template to a new file, sm_versions in the
$INFORMIXDIR/etc directory on UNIX or the %INFORMIXDIR%\etc
directory on Windows.
2. If you are using ISM, issue the ism_startup -init command to
automatically update sm_versions with the correct version number and
storage-manager name or manually edit sm_versions.
If you are installing an ISM patch, you must manually edit sm_versions.
Warning: The ism_startup -init command erases records of previous
backups.
3. If you are using a third-party storage manager, the vendor supplies the
definition for the sm_versions file. Create your own sm_versions file with
the correct data for the storage manager using the format in
sm_versions.std as a template.
Extended Parallel Server
4. If all coservers share the sm_versions file in the etc subdirectory, the
sm_versions file should have an entry for each storage-manager brand.
If the etc subdirectory is not shared between coserver nodes, specify one
line in the sm_versions file for the storage manager in use on that
coserver node.
End of Extended Parallel Server
5. Stop any ON–Bar processes (onbar_d, onbar_w, or onbar_m) that are
currently running and restart them for the changes to take effect.
Configuring Multiple Storage Managers on Coserver Nodes (XPS)
Extended Parallel Server allows multiple storage-manager instances, but only
one instance per node. You can configure and use different storage-manager
brands for different purposes. For best performance, run onbar-worker
processes on all nodes that have storage devices. For example, you have two
storage devices, a tape drive and a jukebox, and want to connect them on
different nodes. When an onbar-worker is on each node, the data moves
faster because it does not have to travel over the network. For complex
examples, see “Using ON-Bar Configuration Parameters on Extended Parallel
Server” on page 3-12.
3-6 IBM Informix Backup and Restore Guide
For information on how to update the sm_versions file when using multiple
storage managers, see step 4 in “To update the storage-manager definition in
sm_versions” on page 3-6.
Some third-party storage managers have a client/server architecture. For these
storage managers, one instance per node means one storage-manager client.
Important: Each hardware MPP node that contains a coserver that runs
onbar-worker processes must have a local copy of the
storage-manager version of the XBSA shared library.
Validating Your Storage Manager
When you convert or revert an Informix database server, the storage manager
that you used on the old version might not be validated for the version that
you are migrating to. Verify that the storage-manager vendor has successfully
completed the Informix validation process for the database server version and
platform. If not, you need to install a validated storage manager before you
perform backups with ON–Bar.
Configuring ON-Bar
ON–Bar is installed with your Informix database server software. To use
ON–Bar with installed storage managers, you set specific parameters in the
ONCONFIG file. The following section describes the required ON–Bar
configuration parameters.
Dynamic Server
Use the onconfig.std file as a template.
End of Dynamic Server
Extended Parallel Server
Use the onconfig.std file as a template for single coservers. Use the
onconfig.xps file as a template for multiple coservers.
End of Extended Parallel Server
Creating the bargroup Group (UNIX)
If you want users other than informix or root to execute ON–Bar commands,
you can create a bargroup group. Members of bargroup can execute ON–Bar
commands. The bargroup group on UNIX is similar to the Informix-Admin
group on Windows. For instructions on how to create a group, see your UNIX
documentation.
Chapter 3. Configuring the Storage Manager and ON-Bar 3-7
Important: For security, it is recommended that onbar commands not be run
by the root user.
Updating the onbar Script
When the installation program installs the database server files, including the
ON–Bar files, the onbar script is distributed as a shell script so that users can
add any preprocessing or postprocessing steps to the script.
To prevent the loss of user changes in the existing onbar script, the onbar
script is distributed as a file named onbar.sh (UNIX) or onbar.bat (Windows).
When the install program installs the database server files over an existing
installation, it checks whether any difference exists between the new onbar
script and the old onbar script.
v If the two scripts are the same, the installation program renames the
onbar.sh or onbar.bat file to onbar, the new onbar script overwrites the old
onbar script, and no user data is lost.
v If a difference exists between the new onbar script and the old onbar script,
the installation program renames the onbar.sh or onbar.bat file to onbar,
renames the old onbar script to the form onbar.date, and issues a message
to the user that the existing onbar script was renamed.
If you see a message that the old onbar script has been renamed by
appending a date, look at the new onbar script (filename onbar) and integrate
the contents of the old onbar script into the new onbar script. For example, if
onbar has been renamed to onbar.2000.12.15, integrate the contents of
onbar.2000.12.15 into onbar.
For information on using the onbar script, see “Customizing ON-Bar and
Storage-Manager Commands” on page 8-2. For information on installing the
database server, see your IBM Informix: Installation Guide.
Setting ISM Environment Variables and ONCONFIG Parameters
When you use ISM, you need to set certain environment variables. For
information, see the IBM Informix: Storage Manager Administrator's Guide.
Dynamic Server
You can set these environment variables in the onbar script or in your
environment.
End of Dynamic Server
Extended Parallel Server
You can set these environment variables in your environment if you start
onbar -w manually or before you start the database server, or set them in
3-8 IBM Informix Backup and Restore Guide
start_worker.sh.
End of Extended Parallel Server
If you use ISM, you can specify the volume pool names for storage spaces
and logical logs in the ISM_DATA_POOL and ISM_LOG_POOL parameters in
the ONCONFIG file. If you do not set these parameters, they default to the
volume pool names ISMData and ISMLogs, respectively.
Setting the Informix Interface for TSM Environment Variables
When you use the Informix Interface for TSM, you need to set certain
environment variables in the user’s environment. The following table
describes these environment variables.
Table 3-1. Informix Interface for TSM Environment Variables
Environment Variable Description
DSMI_CONFIG The fully qualified name for the client user
option file (dsm.opt). The default value is
dsm.opt in the TSM API installation directory.
DSMI_DIR Points to the TSM API installed path. This
environment variable needs to be defined only if
the TSM API is installed in a different path from
the default path. The DSMI_DIR environment
variable is also used to find the dsm.sys file.
DSMI_LOG Points to the directory that contains the API error
log file (dsierror.log).
For error log files, create a directory for the error
logs to be created in, then set the DSMI_LOG
environment variable to that directory. The API
error log file must have writable rights by the
user performing the backup.
The following example shows how to set up these environment variables for
Solaris 32-bit if the TSM API is installed in the /opt/Tivoli/tsm/client/api
directory:
export DSMI_CONFIG=/opt/Tivoli/tsm/client/api/bin/dsm.opt
export DSMI_DIR=/opt/Tivoli/tsm/client/api/bin
export DSMI_LOG=/home/user_a/logdir
Specifying the Location of the XBSA Library
UNIX Only
By default, ON–Bar looks for the XBSA shared library in
$INFORMIXDIR/lib/libbsa.s[ol] on UNIX. To specify a different name or
Chapter 3. Configuring the Storage Manager and ON-Bar 3-9
location of the XBSA shared library, use the BAR_BSALIB_PATH configuration
parameter. You can also make $INFORMIXDIR/lib/ibsad001.s[ol] a symbolic
link to the correct library.
For example, if you are using ISM, you can do either of the following:
v Link $INFORMIXDIR/lib/ibsad001.so to $INFORMIXDIR/lib/libbsa.so
v Set BAR_BSALIB_PATH to $INFORMIXDIR/lib/libbsa.so
For example, if you are using TSM, you can do either of the following:
v Link $INFORMIXDIR/lib/ibsad001.so to $INFORMIXDIR/lib/libtxbsa.so
v Set BAR_BSALIB_PATH to $INFORMIXDIR/lib/libtxbsa.so
End of UNIX Only
Windows Only
On Windows, because no default XBSA shared library name exists, you must
specify its name and location in the BAR_BSALIB_PATH configuration
parameter. If you are using ISM, set BAR_BSALIB_PATH to
%ISMDIR%\bin\libbsa.dll.
End of Windows Only
If you are using a third-party storage manager, ON–Bar must use the version
of the XBSA library that the storage-manager manufacturer provides. For
more information, see “BAR_BSALIB_PATH” on page 9-8 and your release
notes.
Extended Parallel Server
The XBSA library must be present on each coserver node where you are
running onbar-worker processes. Each onbar_worker needs to dynamically
link to the functions in the XBSA library. The XBSA library must be either on
a local disk or NFS-mounted disk.
To find out whether onbar_worker processes can share libraries and whether
the sharing can be done through NFS, check your storage-manager
documentation.
You can specify BAR_BSALIB_PATH in the global section of the ONCONFIG
file if you configure:
v The XBSA shared library to have the same path on all nodes
v Storage managers from more than one vendor if each shared XBSA library
has the same path on each node, which is not NFS-mounted
3-10 IBM Informix Backup and Restore Guide
If each XBSA library uses a different path, you must specify
BAR_BSALIB_PATH in each storage-manager-specific section of the
ONCONFIG file.
End of Extended Parallel Server
Important: To set the pathname of the XBSA library with the
BAR_BSALIB_PATH configuration parameter in the ONCONFIG
file, specify the absolute pathname. If you specify a relative
pathname, then the following message is written to the ON-Bar
activity log: BAR_BSALIB_PATH is ONCONFIG is not an absolute
pathname.
Using ON-Bar Configuration Parameters
Before you begin your first backup, review the default ON–Bar parameters in
the ONCONFIG file and adjust the values as needed. For more information,
see “Steps to Take Before Making a Test Backup” on page 3-18. For the
complete list of database server configuration parameters and their default
values, see the IBM Informix: Administrator's Reference.
Using ON-Bar Configuration Parameters on Dynamic Server
ON–Bar on Dynamic Server uses the following configuration parameters.
Configuration Parameter Reference Purpose
ALARMPROGRAM page 9-5 Specifies a script that handles alarms For ON–Bar, set
this script to log_full.sh to automatically back up log
files when they become full.
ALRM_ALL_EVENTS page 9-6 Causes ALARMPROGRAM to execute every time an
alarm event is invoked
BAR_ACT_LOG page 9-6 Specifies the location and name for the ON–Bar activity
log file
BAR_BSALIB_PATH page 9-8 Specifies the path of the storage-manager library on
UNIX or a dll on Windows
To determine if BAR_BSALIB_PATH is supported on
your platform, check your release notes.
BAR_DEBUG page 9-10 Specifies the level of debugging information to display
in the ON-Bar activity log file
You can dynamically update the value of BAR_DEBUG
in the ONCONFIG file during a session
BAR_DEBUG_LOG page 9-10 Specifies the location and name of the ON-Bar debug log
BAR_HISTORY page 9-11 Specifies whether the sysutils database maintains the
backup history
Chapter 3. Configuring the Storage Manager and ON-Bar 3-11

Configuration Parameter Reference Purpose
BAR_MAX_BACKUP page 9-12 Specifies the maximum number of processes per onbar
command
BAR_NB_XPORT_COUNT page 9-13 Specifies the number of shared-memory data buffers for
each onbar_d worker or child process
BAR_PROGRESS_FREQ page 9-14 Specifies in minutes how frequently the backup or
restore progress messages display in the activity log
BAR_RETRY page 9-14 Specifies how many times ON–Bar should retry a
backup, logical-log backup, or restore operation if the
first attempt fails
BAR_XFER_BUF_SIZE page 9-18 Specifies the size in pages of the buffers that the
database server uses to exchange data with each
onbar_d worker or child process
ISM_DATA_POOL page 9-20 Specifies the volume pool that you use for backing up
storage spaces (ISM)
ISM_LOG_POOL page 9-20 Specifies the volume pool that you use for backing up
logical logs (ISM)
LTAPEDEV page 9-21 For ontape, specifies the tape device where logical logs
are backed up
For ON–Bar, specifies whether to back up logs.
RESTARTABLE_RESTORE page 9-22 Turns restartable restore on or off
Using ON-Bar Configuration Parameters on Extended Parallel Server
The ONCONFIG file contains a section for global parameters and individual
sections for each storage-manager instance. You might need to specify
multiple instances of storage managers to back up and restore data to all the
coservers in Extended Parallel Server.
Configuring Multiple Storage Managers
In Extended Parallel Server, you can use more than one storage-manager
product, as follows:
v Different versions of a particular storage manager
v Storage managers from different vendors
If you use the onconfig.std template to configure a single coserver with one
storage manager, copy the section “Storage-Manager instances” from
onconfig.xps into your ONCONFIG file. Use the onconfig.xps template to
configure multiple storage managers.
Warning: Be careful not to get the shared libraries for the two products or
versions mixed up.
3-12 IBM Informix Backup and Restore Guide
Global Configuration Parameters
The global section includes parameters that apply to all storage managers.
You can include ON–Bar parameters in the global section if they are the same
for all storage-manager instances.
Put these parameters in the storage-manager section between the BAR_SM
and END pair if they are different for each storage-manager instance.
Storage-Manager Specific Configuration Parameters
You must define each storage-manager client that you install and configure in
the storage-manager section, as illustrated in “Defining a Storage Manager on
a Five-Coserver System” on page 3-15.
Configuration
Parameter Reference Purpose
Can Be
Storage-Manager
Specific
Always
Storage-Manager
Specific
Always
Global
BAR_ACT_LOG page 9-6 Specifies the location and
name for the ON–Bar
activity log file.
X
BAR_BOOT_DIR page 9-8 Specifies the directory for
the emergency boot files
X
BAR_BSALIB_PATH page 9-8 Specifies the path of the
storage-manager library
To determine if
BAR_BSALIB_PATH is
supported on your platform,
check your release notes.
Specify BAR_BSALIB_PATH
in the storage-manager
section if the libraries are not
in the same location on all
nodes.
X
BAR_DBS_COSVR page 9-10 Specifies coservers that send
backup and restore data to
the storage manager
X
BAR_HISTORY page 9-11 Specifies whether the
sysutils database maintains
a backup history
X
BAR_IDLE_TIMEOUT page 9-11 Specifies the maximum
number of minutes that an
onbar-worker process is idle
before it is shut down
X
Chapter 3. Configuring the Storage Manager and ON-Bar 3-13
Configuration
Parameter Reference Purpose
Can Be
Storage-Manager
Specific
Always
Storage-Manager
Specific
Always
Global
BAR_LOG_COSVR page 9-12 Specifies coservers that send
log backup data to the
storage manager
X
BAR_PROGRESS_FREQ page 9-14 Specifies in minutes how
frequently the backup or
restore progress messages
display in the activity log
X
BAR_RETRY page 9-14 Specifies how many times
ON–Bar should retry a
backup, logical-log backup,
or restore operation if the
first attempt fails
X
BAR_SM page 9-16 Specifies the
storage-manager number
Is required; starts the
storage-manager section.
X
BAR_SM_NAME page 9-16 Specifies the
storage-manager name
X
BAR_WORKER_COSVR page 9-16 Lists the coservers that can
access the storage manager
This parameter is required.
X
BAR_WORKER_MAX page 9-17 Specifies the maximum
number of onbar-worker
processes that the Backup
Scheduler can start for this
storage-manager instance
You can start additional
onbar-worker processes
manually.
X
BAR_XFER_BUFSIZE page 9-18 Specifies the size in pages of
the buffers used between
XPS and each onbar-worker
process
X
BAR_XPORT_COUNT page 9-19 Specifies the number of
shared-memory data buffers
for each onbar-worker
process
X
3-14 IBM Informix Backup and Restore Guide
Configuration
Parameter Reference Purpose
Can Be
Storage-Manager
Specific
Always
Storage-Manager
Specific
Always
Global
ISM_DATA_POOL page 9-20 Specifies the volume pool
that you use for backing up
storage spaces
X
ISM_LOG_POOL page 9-20 Specifies the volume pool
that you use for backing up
logical logs
X
LOG_BACKUP_MODE page 9-21 Specifies whether to back up
full logical-log files
automatically or manually
X
Examples of ON-Bar and Storage-Manager Configurations
This section shows sample storage-manager configurations for Extended
Parallel Server. For more information about each configuration parameter,
refer to Chapter 9, “Setting ON-Bar Configuration Parameters,” on page 9-1.
Creating a Storage-Manager Definition: The following configuration
example is for a storage manager that can run on coservers 1, 2, 3, 4, and 7. In
this configuration, you have to start onbar-worker processes manually on
coservers 1, 2, 3, 4, and 7, because BAR_WORKER_MAX is not set. All storage
spaces and logical logs are backed up to this storage-manager instance.
# Backup/Restore Variables
BAR_ACT_LOG /tmp/bar_act.log # Path of activity log
BAR_RETRY 2 # Number of times to retry failures
BAR_XPORT_COUNT 10 # Number of transport buffers per worker
BAR_XFER_BUFSIZE 8 # Size of each transport buffer in pages
LOG_BACKUP_MODE CONT # Backup as soon as logical log fills
BAR_IDLE_TIMEOUT 5 # How long onbar-workers wait
BAR_BSALIB_PATH /usr/lib/ibsad001.so # XBSA shared lib path
# Storage-Manager Section
BAR_SM 1
BAR_WORKER_COSVR 1-4,7
END
Defining a Storage Manager on a Five-Coserver System: The following
example is a simple storage-manager definition that automatically starts a
single onbar-worker process on coserver 1. Data on coservers 1 through 5 is
backed up or restored to the storage manager on coserver 1. If you omit the
BAR_WORKER_MAX parameter, you must start onbar-worker processes
manually. For more information, see “Using start_worker.sh to Start
onbar_worker Processes Manually (XPS)” on page 8-5.
Chapter 3. Configuring the Storage Manager and ON-Bar 3-15
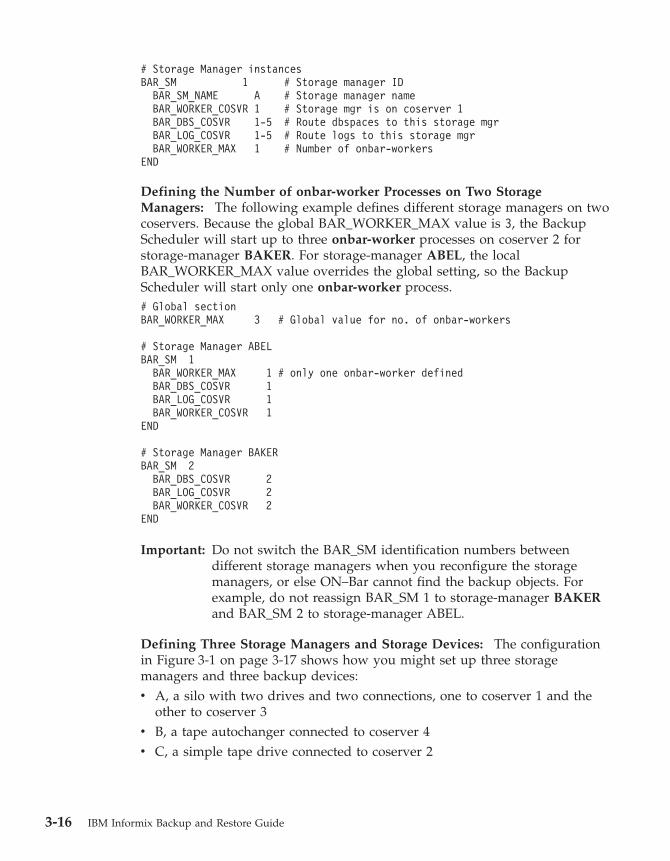
# Storage Manager instances
BAR_SM 1 # Storage manager ID
BAR_SM_NAME A # Storage manager name
BAR_WORKER_COSVR 1 # Storage mgr is on coserver 1
BAR_DBS_COSVR 1-5 # Route dbspaces to this storage mgr
BAR_LOG_COSVR 1-5 # Route logs to this storage mgr
BAR_WORKER_MAX 1 # Number of onbar-workers
END
Defining the Number of onbar-worker Processes on Two Storage
Managers: The following example defines different storage managers on two
coservers. Because the global BAR_WORKER_MAX value is 3, the Backup
Scheduler will start up to three onbar-worker processes on coserver 2 for
storage-manager BAKER. For storage-manager ABEL, the local
BAR_WORKER_MAX value overrides the global setting, so the Backup
Scheduler will start only one onbar-worker process.
# Global section
BAR_WORKER_MAX 3 # Global value for no. of onbar-workers
# Storage Manager ABEL
BAR_SM 1
BAR_WORKER_MAX 1 # only one onbar-worker defined
BAR_DBS_COSVR 1
BAR_LOG_COSVR 1
BAR_WORKER_COSVR 1
END
# Storage Manager BAKER
BAR_SM 2
BAR_DBS_COSVR 2
BAR_LOG_COSVR 2
BAR_WORKER_COSVR 2
END
Important: Do not switch the BAR_SM identification numbers between
different storage managers when you reconfigure the storage
managers, or else ON–Bar cannot find the backup objects. For
example, do not reassign BAR_SM 1 to storage-manager BAKER
and BAR_SM 2 to storage-manager ABEL.
Defining Three Storage Managers and Storage Devices: The configuration
in Figure 3-1 on page 3-17 shows how you might set up three storage
managers and three backup devices:
v A, a silo with two drives and two connections, one to coserver 1 and the
other to coserver 3
v B, a tape autochanger connected to coserver 4
v C, a simple tape drive connected to coserver 2
3-16 IBM Informix Backup and Restore Guide

Storage-manager ABEL can back up and restore storage spaces on coservers 1
and 3. Storage-manager BAKER can back up and restore storage spaces on
coservers 4 and 2. Storage-manager CHARLY can back up and restore logs on
all four coservers.
The ONCONFIG definitions for storage-managers ABEL, BAKER, and
CHARLY appear in the following example:
# Storage manager section for storage manager A
BAR_SM 1
BAR_SM_NAME ABEL
BAR_WORKER_COSVR 1,3
BAR_DBS_COSVR 1,3
BAR_LOG_COSVR 0
BAR_WORKER_MAX 2
END
# Storage manager section for storage manager B
BAR_SM 2
BAR_SM_NAME BAKER
BAR_WORKER_COSVR 4
BAR_DBS_COSVR 2,4
Backup device C
Storage manager can back up and restore storage spaces on these coservers.
XBSA shared library for storage manager is available on this coserver.
Storage manager can back up and restore logs on these coservers.
Coserver 1 Coserver 2 Coserver 3 Coserver 4
Backup device BBackup device A
Storage-manager CHARLY Storage-manager ABEL Storage-manager BAKER
Figure 3-1. Storage-Manager Configuration
Chapter 3. Configuring the Storage Manager and ON-Bar 3-17
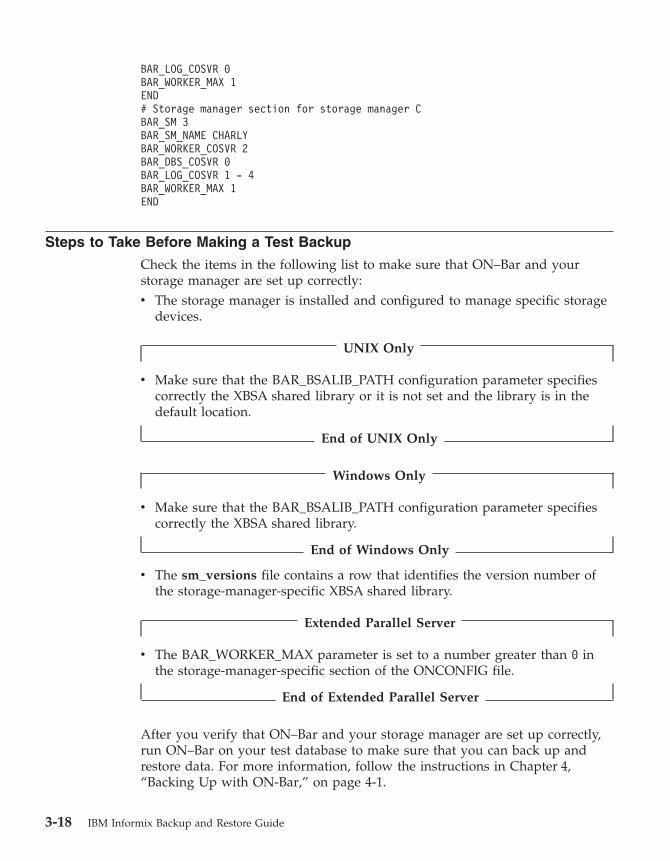
BAR_LOG_COSVR 0
BAR_WORKER_MAX 1
END
# Storage manager section for storage manager C
BAR_SM 3
BAR_SM_NAME CHARLY
BAR_WORKER_COSVR 2
BAR_DBS_COSVR 0
BAR_LOG_COSVR 1 - 4
BAR_WORKER_MAX 1
END
Steps to Take Before Making a Test Backup
Check the items in the following list to make sure that ON–Bar and your
storage manager are set up correctly:
v The storage manager is installed and configured to manage specific storage
devices.
UNIX Only
v Make sure that the BAR_BSALIB_PATH configuration parameter specifies
correctly the XBSA shared library or it is not set and the library is in the
default location.
End of UNIX Only
Windows Only
v Make sure that the BAR_BSALIB_PATH configuration parameter specifies
correctly the XBSA shared library.
End of Windows Only
v The sm_versions file contains a row that identifies the version number of
the storage-manager-specific XBSA shared library.
Extended Parallel Server
v The BAR_WORKER_MAX parameter is set to a number greater than 0 in
the storage-manager-specific section of the ONCONFIG file.
End of Extended Parallel Server
After you verify that ON–Bar and your storage manager are set up correctly,
run ON–Bar on your test database to make sure that you can back up and
restore data. For more information, follow the instructions in Chapter 4,
“Backing Up with ON-Bar,” on page 4-1.
3-18 IBM Informix Backup and Restore Guide
Choosing Storage Managers and Storage Devices
The storage manager manages the storage devices to which the backed-up
data is written. ISM is included with your database server. For information on
how to use ISM, refer to the IBM Informix: Storage Manager Administrator's
Guide.
If you choose a different storage manager, consider whether it has the features
that you need to back up your storage spaces and logical logs. When you
choose storage devices, make sure that they are compatible with the storage
manager that you choose. The storage devices should have the speed and
capacity that your backups require. The storage manager should be easy to
use and work on your operating system.
Features That ISM Supports
ISM fulfills the following storage-manager requirements:
v ISM allows you to back up logical logs and storage spaces to different
devices and to specify whether to use encryption or compression for data.
v ISM can write the output of parallel backups to a single device, medium, or
volume. Some backup devices can write data faster than the disks used to
hold storage spaces can be read.
v ISM can automatically switch from one tape device to another when the
volume in the first device fills.
v ISM allows migration of data from one backup medium to another.
For speed, you can back up logical logs or storage spaces to disk, but you
must move them later to tape or other removable media or your disk will
become full.
v ISM allows you to clone copies of backup data for on-site and off-site
storage.
v ISM uses automatic expiration of data. Once all data on a backup media
expires, you can reuse the media.
Features That ISM Does Not Support
ISM does not support the following features. Third-party storage managers
might support these features.
v Distributing a single data stream across multiple devices simultaneously,
which improves throughput if you have several slow devices
v Using different encryption or compression methods for specified storage
spaces or databases
v Scheduling backups
v Support for devices such as tape libraries, jukeboxes, silos, tape
autochangers, and stackers
v Remote host operations
Chapter 3. Configuring the Storage Manager and ON-Bar 3-19
You can install some storage managers on a different host from the
database server. However, ISM must be installed on the same host as the
database server.
Features That TSM Supports
TSM supports all the features that ISM supports and all the features listed in
the previous section that ISM does not support. TSM supports the following
additional features:
v TSM allows you to create policies to automate storage management and
enforce data management goals.
v TSM allows automated circulation of media through the storage
management process.
v TSM allows you to implement a progressive backup methodology so that
files are backed up incrementally to reduce network traffic, while recovery
media is consolidated to provide better performance.
v TSM can use the Network Data Management Protocol to back up and
restore file systems stored on a network-attached storage file server.
Feature that TSM Does Not Support
TSM for Informix databases is currently only available on UNIX platforms.
Storage Device Requirements
Ask the following interrelated questions to determine what storage devices
you need. For example, the speed and type of storage devices partly
determine the number of storage devices that you need.
v What kind of storage devices do you need?
The transaction volume and the size of your database are major factors in
determining the kind of storage devices that you need.
ISM supports simple tape devices such as QIC, 4mm, 8mm, DLT, optical
devices, and disk backups. If ISM cannot manage the storage devices that
you need, you need to purchase a different storage manager. For more
information, see the IBM Informix: Storage Manager Administrator's Guide.
v What is the availability requirement for each device?
Is it important for your storage devices to allow random as well as
sequential access? If so, you cannot use tape storage devices.
v How many storage devices do you need?
ISM supports up to four devices per host. The number of storage devices
that you need depends on the kind of storage devices you have, how much
transaction activity occurs on the database server, how fast throughput is,
how much time you can allow for backups, and other similar factors.
Extended Parallel Server
3-20 IBM Informix Backup and Restore Guide
v How many and what type of storage-manager instances should you
configure?
You can have one storage manager on each coserver node.
End of Extended Parallel Server
Considerations for Extended Parallel Server
Because backing up data on multiple coservers is much more complex, some
Extended Parallel Server users use third-party storage managers. The
following usage requirements also affect your decisions about the storage
manager and storage devices:
v The number of hardware nodes, the number of coservers on those nodes,
and how the coservers are distributed across the nodes
Balance these factors against the number of storage devices and
storage-manager instances. The architecture of some platforms limits where
you can attach devices, but the number of coservers increases processing
requirements. The storage-manager sections of the ONCONFIG file should
reflect these considerations.
Although some nodes in a massively parallel processing (MPP) system
might not be running coservers, they might be able to run part of the
storage manager.
v The kind of high-speed interconnect on the MPP system
Because disks are slower than the high-speed interconnect, they could
create a bottleneck in the interconnect. Distributing devices across multiple
nodes might reduce the amount of traffic across the interconnect and allow
more parallelism.
v If you isolate tables or databases in a single storage space or in a dbslice
across coservers, you can restore single tables or databases.
v Whether it is possible to restore data from external sources
Although Decision Support System (DSS) databases might not be mirrored,
they might be easier to re-create from the original external source than to
restore from backups if they are corrupted or damaged. For Online
Transaction Processing (OLTP) systems, regenerating data from external
sources is rarely possible.
v The size of each logical-log stream, how the transaction activity is
distributed across logical-log streams, and when it occurs
If you are running an OLTP system with many transactions evenly
distributed across coservers, your storage manager and storage-device
requirements are different from a DSS, which usually generates few
transactions.
In addition, if logstreams are the same size on each coserver but activity is
not evenly distributed, space and resources are wasted. You should adjust
them for efficiency.
Chapter 3. Configuring the Storage Manager and ON-Bar 3-21

3-22 IBM Informix Backup and Restore Guide
Chapter 4. Backing Up with ON-Bar
Syntax of ON-Bar Commands . . . . . . . . . . . . . . . . . . . . . . . . . 4-2
Preparing for a Backup . . . . . . . . . . . . . . . . . . . . . . . . . . . 4-3
What Data Does ON-Bar Back Up? . . . . . . . . . . . . . . . . . . . . . . 4-3
Which Administrative Files to Back Up? . . . . . . . . . . . . . . . . . . . . 4-4
Installing and Configuring a Storage Manager . . . . . . . . . . . . . . . . . . 4-5
What Is a Whole-System Backup? (IDS) . . . . . . . . . . . . . . . . . . . . 4-5
What Is a Standard Backup? . . . . . . . . . . . . . . . . . . . . . . . . 4-5
What is an Incremental Backup? . . . . . . . . . . . . . . . . . . . . . . . 4-5
What Is a Physical Backup? (XPS) . . . . . . . . . . . . . . . . . . . . . . 4-6
Choosing a Backup Level . . . . . . . . . . . . . . . . . . . . . . . . . 4-6
Level-0 Backups . . . . . . . . . . . . . . . . . . . . . . . . . . . 4-6
Level-1 Backups . . . . . . . . . . . . . . . . . . . . . . . . . . . 4-6
Level-2 Backups . . . . . . . . . . . . . . . . . . . . . . . . . . . 4-7
Collecting Information About Your System Before a Backup . . . . . . . . . . . . . 4-7
Ensuring That You Have Enough Logical-Log Space . . . . . . . . . . . . . . . 4-7
Copying Database Server Configuration Information . . . . . . . . . . . . . . . 4-7
Verifying Database Integrity . . . . . . . . . . . . . . . . . . . . . . . 4-8
Backing Up Storage Spaces and Logical Logs . . . . . . . . . . . . . . . . . . . 4-8
Backup Syntax . . . . . . . . . . . . . . . . . . . . . . . . . . . . . 4-8
Backing Up After Changing the Physical Schema . . . . . . . . . . . . . . . . . 4-11
When to Back Up the Root Dbspace and Modified Storage Spaces . . . . . . . . . . 4-11
When to Back Up the Modified Storage Spaces Only . . . . . . . . . . . . . . 4-12
Using ISM During a Backup . . . . . . . . . . . . . . . . . . . . . . . . 4-13
Using IBM Informix Server Administrator to Back Up and Verify . . . . . . . . . . . 4-13
ON-Bar Backup Examples . . . . . . . . . . . . . . . . . . . . . . . . 4-14
Performing a Level-0 Backup of All Storage Spaces . . . . . . . . . . . . . . . 4-14
Performing a Level-0 Backup of Specified Storage Spaces . . . . . . . . . . . . . 4-14
Performing an Incremental Backup . . . . . . . . . . . . . . . . . . . . 4-14
Backing Up a List of Storage Spaces Specified in a File . . . . . . . . . . . . . . 4-14
How to Avoid Repeatedly Archiving Read-Only Storage Spaces . . . . . . . . . . . 4-15
Backing Up Specific Tables . . . . . . . . . . . . . . . . . . . . . . . 4-16
Retrying Skipped Storage Spaces During a Backup . . . . . . . . . . . . . . . 4-16
Performing a Whole-System Backup (IDS) . . . . . . . . . . . . . . . . . . 4-17
Backing Up Smart Large Objects in Sbspaces (IDS) . . . . . . . . . . . . . . . 4-17
Using Fake Backups in a Data Warehouse (IDS) . . . . . . . . . . . . . . . . 4-17
Backing Up Blobspaces in a Logging Database (IDS) . . . . . . . . . . . . . . . 4-17
Backing Up Logical Logs When Blobspaces Are Offline (IDS) . . . . . . . . . . . . 4-18
Assigning a Name to a Backup Session (XPS) . . . . . . . . . . . . . . . . . 4-18
Performing a Physical Backup (XPS) . . . . . . . . . . . . . . . . . . . . 4-18
Backing Up a Dbslice (XPS) . . . . . . . . . . . . . . . . . . . . . . . 4-19
Backing Up Table Types . . . . . . . . . . . . . . . . . . . . . . . . . 4-19
Viewing Recent ON-Bar Activity (IDS) . . . . . . . . . . . . . . . . . . . . . 4-19
Backing Up Logical Logs . . . . . . . . . . . . . . . . . . . . . . . . . . 4-20
Backing Up Logical Logs on Dynamic Server . . . . . . . . . . . . . . . . . . 4-20
© Copyright IBM Corp. 1996, 2004 4-1
Performing a Continuous Backup of Logical Logs . . . . . . . . . . . . . . . 4-21
Performing a Manual Backup of Logical Logs . . . . . . . . . . . . . . . . . 4-22
Using ALARMPROGRAM to Set the Log Backup Mode . . . . . . . . . . . . . 4-22
Viewing Backed-Up Logical Logs . . . . . . . . . . . . . . . . . . . . . 4-22
Backing Up Logical Logs on Extended Parallel Server . . . . . . . . . . . . . . . 4-25
Performing a Manual Backup of Logical Logs . . . . . . . . . . . . . . . . . 4-26
Starting Continuous Logical-Log Backups . . . . . . . . . . . . . . . . . . 4-27
Preventing Logical-Log Backups in a Test System . . . . . . . . . . . . . . . . 4-27
Monitoring Logical-Log Backups . . . . . . . . . . . . . . . . . . . . . . 4-27
Salvaging Logical-Log Files . . . . . . . . . . . . . . . . . . . . . . . . 4-28
Understanding ON-Bar Backup Processes . . . . . . . . . . . . . . . . . . . . 4-29
Backup Sequence on Dynamic Server . . . . . . . . . . . . . . . . . . . . . 4-29
Backup Sequence on Extended Parallel Server . . . . . . . . . . . . . . . . . . 4-30
In This Chapter
This chapter explains how to use the onbar utility to back up and verify
storage spaces (dbspaces, blobspaces, and sbspaces) and logical-log files. The
onbar utility is a wrapper to onbar_d, the ON–Bar driver. Use any of the
following methods to execute ON–Bar backup and restore commands:
v Issue ON–Bar commands.
To execute ON–Bar commands, you must be user informix or a member of
the bargroup group on UNIX or a member of the Informix-Admin group
or user informix in Windows. (For more information, see “Creating the
bargroup Group (UNIX)” on page 3-7.)
v Include ON–Bar and ISM commands in a shell or batch script.
For information, see “Customizing ON-Bar and Storage-Manager
Commands” on page 8-2.
v Call ON–Bar from a job-scheduling program.
v Set event alarms that trigger a logical-log backup.
For information, see “Backing Up Logical Logs on Dynamic Server” on
page 4-20 and “Backing Up Logical Logs on Extended Parallel Server” on
page 4-25.
Syntax of ON-Bar Commands
You can use ON–Bar to back up and restore storage spaces and logical logs, to
verify a backup, and to start or stop ON–Bar sessions.
4-2 IBM Informix Backup and Restore Guide
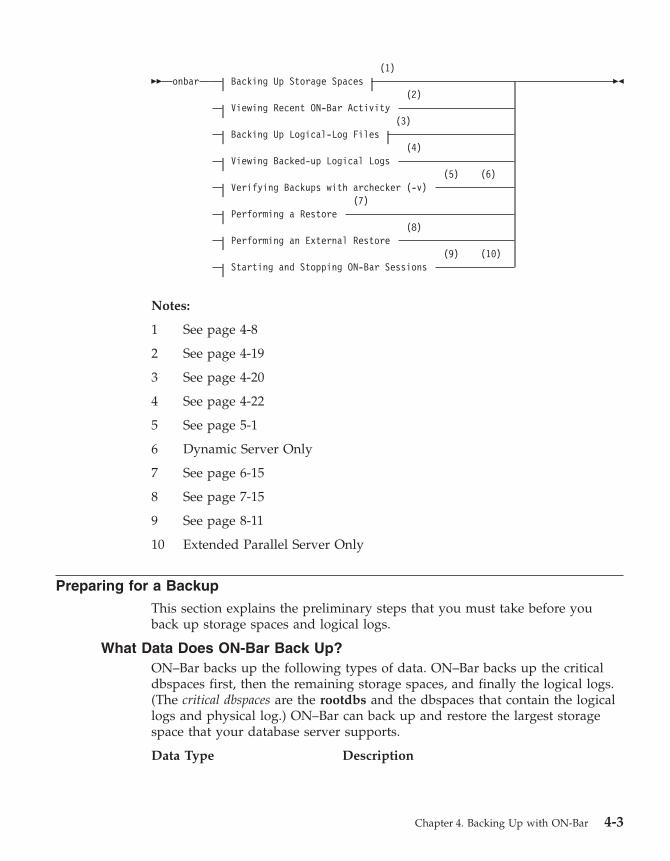
��
onbar (1)
Backing Up Storage Spaces
(2)
Viewing Recent ON-Bar Activity
(3)
Backing Up Logical-Log Files
(4)
Viewing Backed-up Logical Logs
(5)
(6)
Verifying Backups with archecker (-v)
(7)
Performing a Restore
(8)
Performing an External Restore
(9)
(10)
Starting and Stopping ON-Bar Sessions
��
Notes:
1 See page 4-8
2 See page 4-19
3 See page 4-20
4 See page 4-22
5 See page 5-1
6 Dynamic Server Only
7 See page 6-15
8 See page 7-15
9 See page 8-11
10 Extended Parallel Server Only
Preparing for a Backup
This section explains the preliminary steps that you must take before you
back up storage spaces and logical logs.
What Data Does ON-Bar Back Up?
ON–Bar backs up the following types of data. ON–Bar backs up the critical
dbspaces first, then the remaining storage spaces, and finally the logical logs.
(The critical dbspaces are the rootdbs and the dbspaces that contain the logical
logs and physical log.) ON–Bar can back up and restore the largest storage
space that your database server supports.
Data Type Description
Chapter 4. Backing Up with ON-Bar 4-3
Dbspaces that contain tables or indexes
See “Backing Up Storage Spaces and Logical
Logs” on page 4-8. ON–Bar also backs up the
reserved pages in the root dbspace.
Blobspaces (IDS) See “Backing Up Blobspaces in a Logging
Database (IDS)” on page 4-17.
ISM catalog If you use ISM, the ISM catalog is in
$INFORMIXDIR/ism on UNIX and
%ISMDIR% on Windows.
Logical-log files See “Backing Up Logical Logs” on page 4-20.
Sbspaces (IDS) See “Backing Up Smart Large Objects in
Sbspaces (IDS)” on page 4-17.
Which Administrative Files to Back Up?
ON–Bar backups safeguard your data. They do not replace normal operating-
system backups of important configuration files.
Important: For use in an emergency, you should have a backup copy of the
current version of the following administrative files. You will need
to restore these files if you need to replace disks or if you restore
to a second computer system (imported restore).
The following table lists the administrative files that you should back up.
Administrative Files IDS XPS
ONCONFIG file X X
Emergency boot files X X
sm_versions file X X
The sqlhosts file (UNIX) X X
The oncfg_servername.servernum file in the etc subdirectory X
The oncfg_servername.servernum.coserverid file from each coserver X
Storage-manager configuration and data files X X
Simple-large-object data in blobspaces that are stored on disks or optical
platters
X
The xcfg_servername.servernum file in the etc subdirectory X
Externally stored data such as external tables that a DataBlade maintains X
Although ON–Bar does not back up the following items, ON–Bar
automatically re-creates them during a restore. You do not need to make
backup copies of these files:
4-4 IBM Informix Backup and Restore Guide
v The dbspace pages that are allocated to the database server but that are not
yet allocated to a tblspace extent
v Mirror chunks, if the corresponding primary chunks are accessible
v Temporary dbspaces
ON–Bar does not back up or restore the data in temporary dbspaces. Upon
restore, the database server re-creates empty temporary dbspaces.
Installing and Configuring a Storage Manager
Before you can create a backup with ON–Bar, you must configure your
storage manager and start it. For information about configuring ISM, see the
IBM Informix: Storage Manager Administrator's Guide. For information about
configuring third-party storage managers, see Chapter 3, “Configuring the
Storage Manager and ON-Bar,” on page 3-1, and your storage-manager
manuals.
Make sure your storage manager is ready to receive data before you begin a
backup or restore. To improve performance, it is recommended that you
reserve separate storage devices for storage-space and logical-log backups.
Label and mount all volumes in the storage device. The backup or restore
might pause until you mount the requested tape or optical disk.
What Is a Whole-System Backup? (IDS)
A whole-system backup (onbar -b -w) is a serial backup of all storage spaces
and logical logs based on a single checkpoint. That time is stored with the
backup information. The advantage of using a whole-system backup is that
you can restore the storage spaces with or without the logical logs. Because
the data in all storage spaces is consistent in a whole-system backup, you do
not need to restore the logical logs to make the data consistent. For an
example, see “Performing a Whole-System Backup (IDS)” on page 4-17.
What Is a Standard Backup?
A standard backup (onbar -b) is a parallel backup of selected or all storage
spaces and the logical logs. In a standard backup, the database server
performs a checkpoint for each storage space as it is backed up. Therefore,
you must restore the logical logs from a standard backup to make the data
consistent. For an example, see “Performing a Level-0 Backup of All Storage
Spaces” on page 4-14.
What is an Incremental Backup?
An incremental backup of a storage space backs up only those pages that have
been modified since the last backup of the storage space. ON-Bar supports the
following types of backups:
v Full backups, also called level-0 backups
v Incremental backups of full backups, also called level-1 backups
v Incremental backups of incremental backups, also called level-2 backups
Chapter 4. Backing Up with ON-Bar 4-5
Use the -L option to the ON-Bar backup command to select the level of
backup. By default ON-Bar performs a level-0 backup.
Note: You cannot perform incremental backups on logical logs.
What Is a Physical Backup? (XPS)
A physical backup (onbar -b -p) backs up just the storage spaces. You can back
up specific or all storage spaces.
Choosing a Backup Level
ON–Bar supports level-0, level-1, and level-2 backups.
Tip: It is good practice to create a backup schedule that keeps level-1 and
level-2 backups small and to schedule frequent level-0 backups. With
such a backup schedule, you avoid having to restore large level-1 and
level-2 backups or many logical-log backups.
Level-0 Backups
Level-0 backups can be time-consuming because ON–Bar writes all the disk
pages to backup media. Level-1 and level-2 backups might take almost as
much time as a level-0 backup because the database server must scan all the
data to determine what has changed since the last backup. It takes less time to
restore data from level-0, level-1, and level-2 backups than from level-0
backups and a long series of logical-log backups.
Level-1 Backups
A level-1 backup takes less space and might take less time than a level-0
backup because only data that changed since the last level-0 backup is copied
to the storage manager.
If you request an incremental backup where no previous incremental backup
exists, ON–Bar automatically performs the lower-level backup. For example, if
you request a level-1 backup but no level-0 backup exists for one of the
dbspaces, ON–Bar automatically performs a level-0 backup of that dbspace
and a level-1 backup of the other storage spaces.
Dynamic Server
If you request a whole-system level-1 backup and no level-0 backup exists,
ON–Bar performs a whole-system level-0 backup. If you request a
whole-system level-2 backup but the level-1 backup does not exist, ON–Bar
performs a whole-system level-1 backup.
End of Dynamic Server
4-6 IBM Informix Backup and Restore Guide
Level-2 Backups
A level-2 backup takes less space and might take less time than a level-1
backup because only data that changed since the last level-1 backup is copied
to the storage manager.
Collecting Information About Your System Before a Backup
To ensure that you can restore the data, perform the following tasks:
v Print or keep a copy of essential database server configuration information.
v Verify data consistency.
v Keep track of the number of rows in each table (optional).
After you complete the backup, verify it with the archecker utility. For more
information, see Chapter 5, “Verifying Backups,” on page 5-1.
Ensuring That You Have Enough Logical-Log Space
ON–Bar checks for available logical-log space at the beginning of a backup. If
the logs are nearly full, ON–Bar backs up and frees the logs before attempting
to back up the storage spaces. If the logs contain ample space, ON–Bar backs
up the storage spaces, then the logical logs.
Monitor the logs so that you can back them up before they fill. If insufficient
space exists in the logical log, the database server will stop responding. If the
database server stops responding, add more logical-log files and retry the
ON–Bar command.
Extended Parallel Server
Extended Parallel Server keeps one logical log reserved for backups. That way,
enough log space exists for you to back up the logical logs to free enough log
space to back up storage spaces.
End of Extended Parallel Server
Copying Database Server Configuration Information
Copy the following database server configuration files. For more information,
see “Which Administrative Files to Back Up?” on page 4-4.
v The sqlhosts file (UNIX only)
v The oncfg files
v The emergency boot files
v The ONCONFIG file
v sm_versions file
Extended Parallel Server
Chapter 4. Backing Up with ON-Bar 4-7
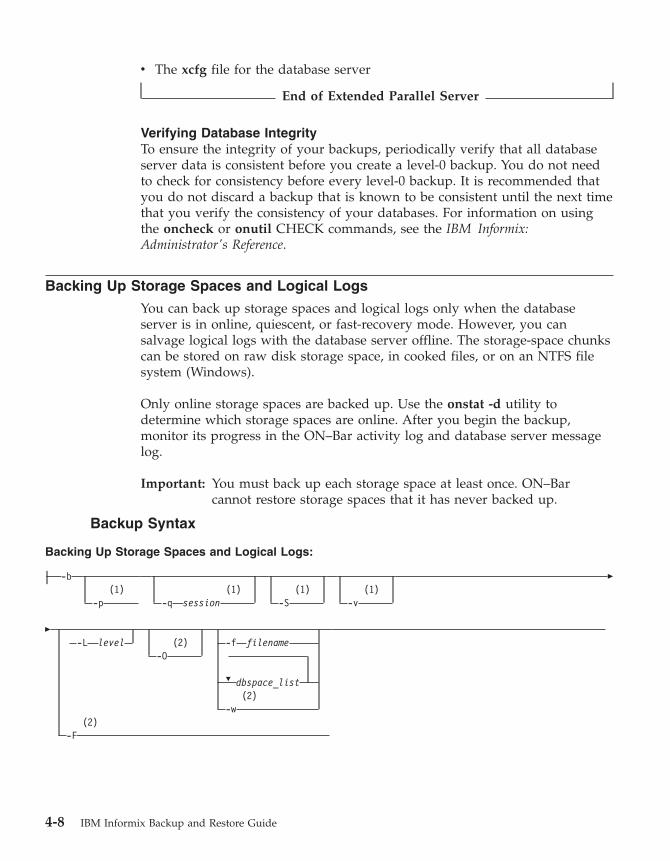
v The xcfg file for the database server
End of Extended Parallel Server
Verifying Database Integrity
To ensure the integrity of your backups, periodically verify that all database
server data is consistent before you create a level-0 backup. You do not need
to check for consistency before every level-0 backup. It is recommended that
you do not discard a backup that is known to be consistent until the next time
that you verify the consistency of your databases. For information on using
the oncheck or onutil CHECK commands, see the IBM Informix:
Administrator's Reference.
Backing Up Storage Spaces and Logical Logs
You can back up storage spaces and logical logs only when the database
server is in online, quiescent, or fast-recovery mode. However, you can
salvage logical logs with the database server offline. The storage-space chunks
can be stored on raw disk storage space, in cooked files, or on an NTFS file
system (Windows).
Only online storage spaces are backed up. Use the onstat -d utility to
determine which storage spaces are online. After you begin the backup,
monitor its progress in the ON–Bar activity log and database server message
log.
Important: You must back up each storage space at least once. ON–Bar
cannot restore storage spaces that it has never backed up.
Backup Syntax
Backing Up Storage Spaces and Logical Logs:
-b
(1)
-p
(1)
-q
session
(1)
-S
(1)
-v
�
�
�
-L
level
(2)
-f
filename
-O
dbspace_list
(2)
-w
(2)
-F
4-8 IBM Informix Backup and Restore Guide
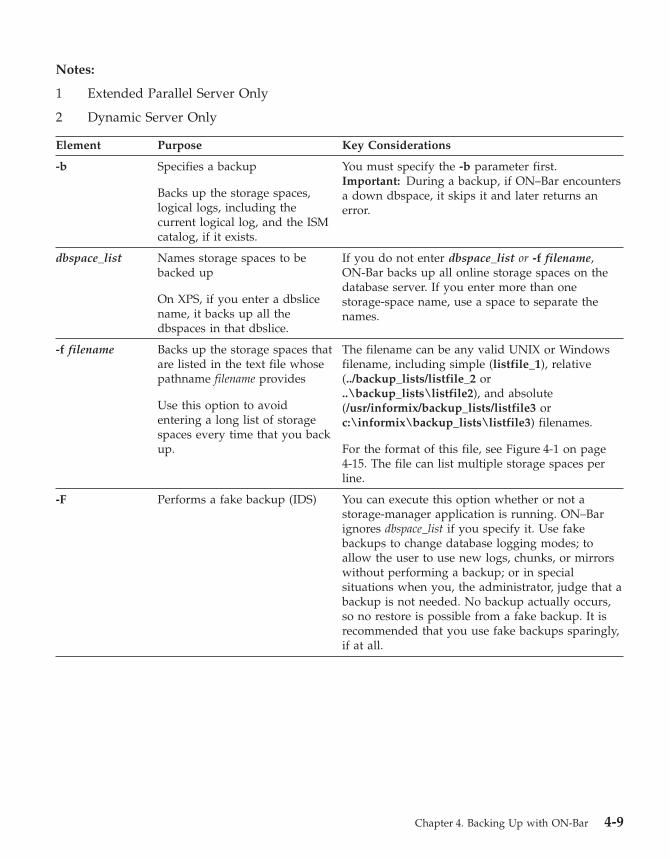
Notes:
1 Extended Parallel Server Only
2 Dynamic Server Only
Element Purpose Key Considerations
-b Specifies a backup
Backs up the storage spaces,
logical logs, including the
current logical log, and the ISM
catalog, if it exists.
You must specify the -b parameter first.
Important: During a backup, if ON–Bar encounters
a down dbspace, it skips it and later returns an
error.
dbspace_list Names storage spaces to be
backed up
On XPS, if you enter a dbslice
name, it backs up all the
dbspaces in that dbslice.
If you do not enter dbspace_list or -f filename,
ON-Bar backs up all online storage spaces on the
database server. If you enter more than one
storage-space name, use a space to separate the
names.
-f filename Backs up the storage spaces that
are listed in the text file whose
pathname filename provides
Use this option to avoid
entering a long list of storage
spaces every time that you back
up.
The filename can be any valid UNIX or Windows
filename, including simple (listfile_1), relative
(../backup_lists/listfile_2 or
..\backup_lists\listfile2), and absolute
(/usr/informix/backup_lists/listfile3 or
c:\informix\backup_lists\listfile3) filenames.
For the format of this file, see Figure 4-1 on page
4-15. The file can list multiple storage spaces per
line.
-F Performs a fake backup (IDS) You can execute this option whether or not a
storage-manager application is running. ON–Bar
ignores dbspace_list if you specify it. Use fake
backups to change database logging modes; to
allow the user to use new logs, chunks, or mirrors
without performing a backup; or in special
situations when you, the administrator, judge that a
backup is not needed. No backup actually occurs,
so no restore is possible from a fake backup. It is
recommended that you use fake backups sparingly,
if at all.
Chapter 4. Backing Up with ON-Bar 4-9
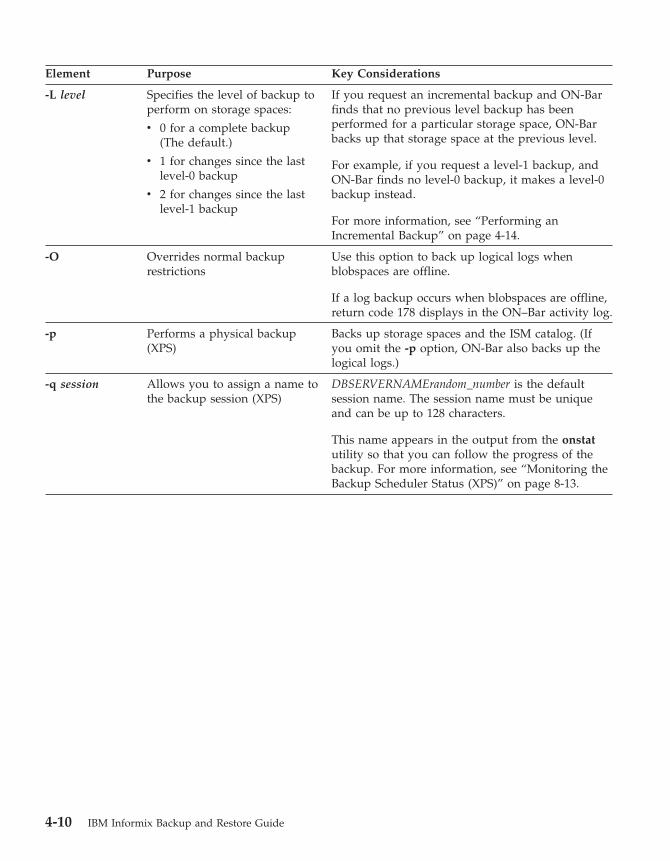
Element Purpose Key Considerations
-L level Specifies the level of backup to
perform on storage spaces:
v 0 for a complete backup
(The default.)
v 1 for changes since the last
level-0 backup
v 2 for changes since the last
level-1 backup
If you request an incremental backup and ON-Bar
finds that no previous level backup has been
performed for a particular storage space, ON-Bar
backs up that storage space at the previous level.
For example, if you request a level-1 backup, and
ON-Bar finds no level-0 backup, it makes a level-0
backup instead.
For more information, see “Performing an
Incremental Backup” on page 4-14.
-O Overrides normal backup
restrictions
Use this option to back up logical logs when
blobspaces are offline.
If a log backup occurs when blobspaces are offline,
return code 178 displays in the ON–Bar activity log.
-p Performs a physical backup
(XPS)
Backs up storage spaces and the ISM catalog. (If
you omit the -p option, ON-Bar also backs up the
logical logs.)
-q session Allows you to assign a name to
the backup session (XPS)
DBSERVERNAMErandom_number is the default
session name. The session name must be unique
and can be up to 128 characters.
This name appears in the output from the onstat
utility so that you can follow the progress of the
backup. For more information, see “Monitoring the
Backup Scheduler Status (XPS)” on page 8-13.
4-10 IBM Informix Backup and Restore Guide
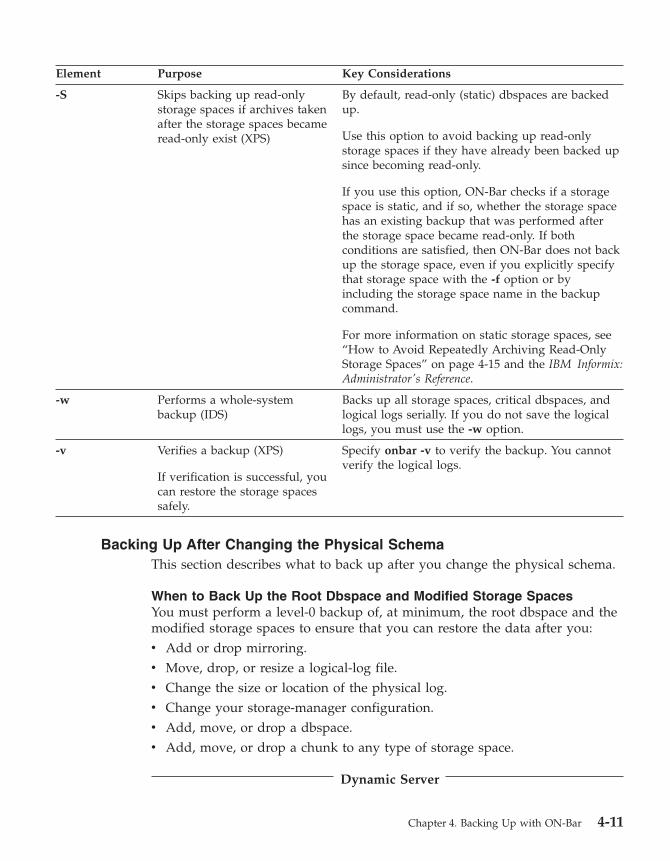
Element Purpose Key Considerations
-S Skips backing up read-only
storage spaces if archives taken
after the storage spaces became
read-only exist (XPS)
By default, read-only (static) dbspaces are backed
up.
Use this option to avoid backing up read-only
storage spaces if they have already been backed up
since becoming read-only.
If you use this option, ON-Bar checks if a storage
space is static, and if so, whether the storage space
has an existing backup that was performed after
the storage space became read-only. If both
conditions are satisfied, then ON-Bar does not back
up the storage space, even if you explicitly specify
that storage space with the -f option or by
including the storage space name in the backup
command.
For more information on static storage spaces, see
“How to Avoid Repeatedly Archiving Read-Only
Storage Spaces” on page 4-15 and the IBM Informix:
Administrator's Reference.
-w Performs a whole-system
backup (IDS)
Backs up all storage spaces, critical dbspaces, and
logical logs serially. If you do not save the logical
logs, you must use the -w option.
-v Verifies a backup (XPS)
If verification is successful, you
can restore the storage spaces
safely.
Specify onbar -v to verify the backup. You cannot
verify the logical logs.
Backing Up After Changing the Physical Schema
This section describes what to back up after you change the physical schema.
When to Back Up the Root Dbspace and Modified Storage Spaces
You must perform a level-0 backup of, at minimum, the root dbspace and the
modified storage spaces to ensure that you can restore the data after you:
v Add or drop mirroring.
v Move, drop, or resize a logical-log file.
v Change the size or location of the physical log.
v Change your storage-manager configuration.
v Add, move, or drop a dbspace.
v Add, move, or drop a chunk to any type of storage space.
Dynamic Server
Chapter 4. Backing Up with ON-Bar 4-11
v Add, move, or drop a blobspace or sbspace.
End of Dynamic Server
Extended Parallel Server
It is recommended that you perform a complete level-0 backup after changing
the physical configuration.
End of Extended Parallel Server
For example, if you add a new dbspace dbs1, you will see a warning in the
message log that asks you to perform a level-0 backup of the root dbspace
and the new dbspace. If you attempt an incremental backup of the root
dbspace or the new dbspace instead, ON–Bar automatically performs a level-0
backup of the new dbspace.
Extended Parallel Server
For Extended Parallel Server, back up the root dbspace and the new or
modified dbspace on the coserver where the change occurred.
End of Extended Parallel Server
Tip: Although you no longer need to backup immediately after adding a log
file, your next backup should be level-0 because the data structures have
changed.
Warning: If you create a new storage space with the same name as a deleted
storage space, perform a level-0 backup twice:
1. Back up the root dbspace after you drop the storage space and
before you create the new storage space with the same name.
2. After you create the new storage space, back up the root
dbspace and the new storage space.
When to Back Up the Modified Storage Spaces Only
You must perform a level-0 backup of the modified storage spaces to ensure
that you can restore the data when you:
v Convert a nonlogging database to a logging database.
v Convert a raw, static, or operational table to standard. This backup ensures
that the unlogged data is restorable before you switch to a logging table
type.
4-12 IBM Informix Backup and Restore Guide
Using ISM During a Backup
Use the ism_watch command to monitor backups and restores sent to the ISM
server. During a backup, the ISM server automatically routes storage-space
data to volumes in the ISMData volume pool and logical-log files to volumes
in the ISMLogs volume pool.
Always keep the volumes from the ISMLogs pool mounted to ensure that a
storage device is always available to accept logical-log data. If the volume is
not mounted, the backup will pause. For more information on using devices
and ISM commands, see the IBM Informix: Storage Manager Administrator's
Guide.
During the backup operation, ISM creates save sets of the backed up data and
enters information about the backed up data in the ISM catalog. You also can
use this command to back up the ISM catalog:
ism_catalog -create_bootstrap
If you use the onbar script to back up storage spaces and logical logs, it backs
up the ISM catalog automatically. If you call onbar_d directly, you must use
the ism_catalog -create_bootstrap command.
Using IBM Informix Server Administrator to Back Up and Verify
IBM Informix Server Administrator (ISA) is a browser-based tool for
performing administrative tasks such as ON–Bar and onstat commands. You
can use ISA to perform the following ON–Bar tasks:
v View messages in the ON–Bar activity log.
v Perform level-0, level-1, or level-2 backups.
– Back up storage spaces (onbar -b).
– Back up the whole system (onbar -b -w).
– Override error checks during the backup (onbar -b -O).
– Perform a fake backup (onbar -b -F).v Back up the logical logs.
– Include the current log in the log backup (onbar -b -l -c).
– Override error checks to back up logs when blobspaces are offline (onbar
-l -O).
– Start a continuous logical-log backup (onbar -b -l -C).v Verify backups.
v Edit the onbar script.
For more information, see the ISA online help.
Chapter 4. Backing Up with ON-Bar 4-13
ON-Bar Backup Examples
The following sections contain examples of ON–Bar syntax for backing up
storage spaces.
Performing a Level-0 Backup of All Storage Spaces
To perform a standard, level-0 backup of all online storage spaces and used
logical logs, use one of the following commands:
onbar -b
onbar -b -L 0
ON–Bar never backs up offline storage spaces, temporary dbspaces, or
temporary sbspaces.
Important: Save your logical logs so that you can restore from this backup.
Performing a Level-0 Backup of Specified Storage Spaces
To perform a level-0 backup of specified storage spaces and all logical logs
(for example, two dbspaces named fin_dbspace1 and fin_dbspace2), use the -b
option as the following example shows. You could also specify the -L 0
option, but it is not necessary.
onbar -b fin_dbspace1 fin_dbspace2
Performing an Incremental Backup
An incremental backup backs up all changes in the storage spaces since the
last level-0 backup and performs a level-0 backup of used logical logs. To
perform a level-1 backup, use the -L 1 option, as the following example
shows:
onbar -b -L 1
Backing Up a List of Storage Spaces Specified in a File
To back up a list of storage spaces specified in a file and the logical logs, use
the following command:
onbar -b -f /usr/informix/backup_list/listfile3
The format of the file is as follows:
v Each line can list more than one storage space, separated by spaces or a tab.
v Comments begin with a # or ; symbol and continue to the end of the
current line.
v ON–Bar ignores all comment or blank lines in the file.
v ON–Bar truncates pathnames to the word after the last directory delimiter.
Figure 4-1 shows a sample file that contains a list of storage spaces to be
backed up (blobsp2.1, my_dbspace1, blobsp2.2, dbsl.1, rootdbs.1, and
4-14 IBM Informix Backup and Restore Guide
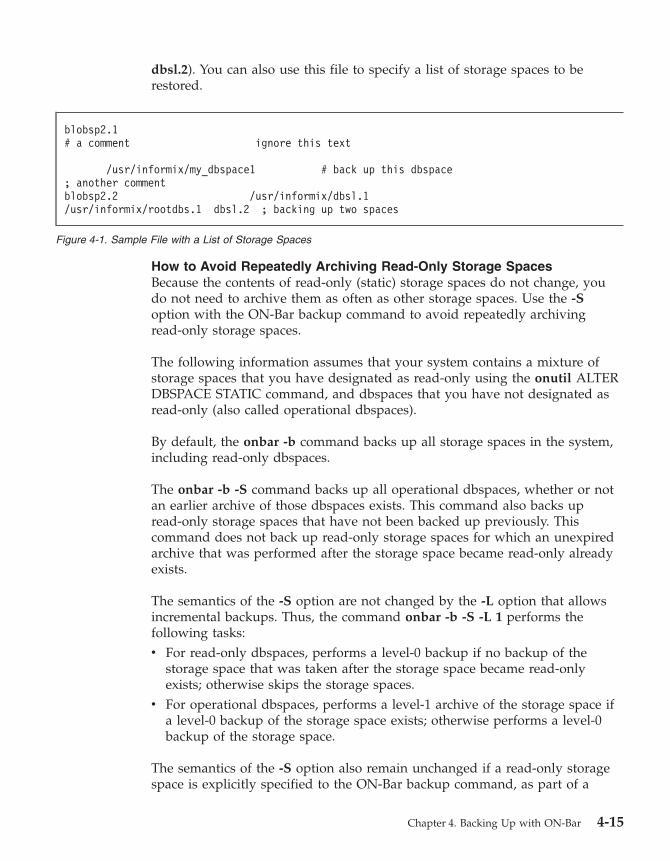
dbsl.2). You can also use this file to specify a list of storage spaces to be
restored.
How to Avoid Repeatedly Archiving Read-Only Storage Spaces
Because the contents of read-only (static) storage spaces do not change, you
do not need to archive them as often as other storage spaces. Use the -S
option with the ON-Bar backup command to avoid repeatedly archiving
read-only storage spaces.
The following information assumes that your system contains a mixture of
storage spaces that you have designated as read-only using the onutil ALTER
DBSPACE STATIC command, and dbspaces that you have not designated as
read-only (also called operational dbspaces).
By default, the onbar -b command backs up all storage spaces in the system,
including read-only dbspaces.
The onbar -b -S command backs up all operational dbspaces, whether or not
an earlier archive of those dbspaces exists. This command also backs up
read-only storage spaces that have not been backed up previously. This
command does not back up read-only storage spaces for which an unexpired
archive that was performed after the storage space became read-only already
exists.
The semantics of the -S option are not changed by the -L option that allows
incremental backups. Thus, the command onbar -b -S -L 1 performs the
following tasks:
v For read-only dbspaces, performs a level-0 backup if no backup of the
storage space that was taken after the storage space became read-only
exists; otherwise skips the storage spaces.
v For operational dbspaces, performs a level-1 archive of the storage space if
a level-0 backup of the storage space exists; otherwise performs a level-0
backup of the storage space.
The semantics of the -S option also remain unchanged if a read-only storage
space is explicitly specified to the ON-Bar backup command, as part of a
blobsp2.1
# a comment ignore this text
/usr/informix/my_dbspace1 # back up this dbspace
; another comment
blobsp2.2 /usr/informix/dbsl.1
/usr/informix/rootdbs.1 dbsl.2 ; backing up two spaces
Figure 4-1. Sample File with a List of Storage Spaces
Chapter 4. Backing Up with ON-Bar 4-15
dbspace list in the command or as part of a dbspace list in a file specified by
the -f option. For example, if the storage space dbs_static has been flagged as
read-only and has already been backed up since being flagged read-only, the
command onbar -b -S dbs_static does not back up the dbs_static storage
space again.
Although use of the -S option can greatly improve backup performance in a
system containing large amounts of static data, you should still force backups
of read-only dbspaces with some regularity by omitting the -S option.
Otherwise, you run the risk of having only a single backup of your static
data, and risk data loss if a restore is necessary but the single backup becomes
unreadable.
If you have a large number of read-only dbspaces, consider backing up a
subset of your read-only dbspaces as part of your regular backup cycles. To
do so, run the ON-Bar backup command without the -S option and specify
the subset of read-only dbspaces to back up, either in the command or with
the -f option. Cycling through different subsets of your read-only dbspaces as
part of your regular backup schedule provides you the performance
advantages of not backing up all read-only storage spaces in each backup,
while minimizing the risk of data loss in the event backup media becomes
unreadable.
Backing Up Specific Tables
To back up a specific table or set of tables in ON-Bar, store these tables in a
separate dbspace and then back up this dbspace.
Extended Parallel Server
Tip: If your tables are read-only and not modified, consider placing them in
read-only (static) dbspaces. Use the -S option to the ON-Bar backup
command to avoid repeatedly archiving read-only dbspaces.
End of Extended Parallel Server
Warning: If you need to restore only that table, you must warm restore the
entire dbspace to the current time (onbar -r). This procedure does
not allow you to recover from accidentally dropping or corrupting a
table because it would be dropped again during logical restore.
Retrying Skipped Storage Spaces During a Backup
You cannot back up storage spaces that are down or temporarily inaccessible.
If a storage space is down, ON–Bar skips it during the backup and writes a
message to the activity log. Take one of the following actions:
v Retry the backup later when the storage space is back online.
4-16 IBM Informix Backup and Restore Guide

v Restore these storage spaces from an older backup, if available. Make sure
that at least one level-0 backup of each storage space exists or else it might
not be restorable. For details, see “Restoring from an Older Backup” on
page 6-26.
Performing a Whole-System Backup (IDS)
To perform a serial, level-0 backup of all online storage spaces and logical
logs, use one of the following commands:
onbar -b -w
onbar -b -w -L 0
For more details, see “Performing a Whole-System Restore (IDS)” on page
6-20.
Backing Up Smart Large Objects in Sbspaces (IDS)
You can back up smart large objects in one or more sbspaces or include them
in a whole-system backup. In a level-0 backup, the entire sbspace is backed
up. In a level-1 or level-2 backup, the modified sbpages in the sbspace are
backed up.
The following example performs a level-0 backup of the s9sbpace sbspace:
onbar -b -L 0 s9sbspace
When you turn on logging for a smart large object, you must immediately
perform a level-0 backup to ensure that the object is fully recoverable. For
details on logging sbspaces, see the IBM Informix: Administrator's Guide.
Using Fake Backups in a Data Warehouse (IDS)
The High-Performance Loader (HPL) in Express mode loads tables in
read-only mode. A backup changes the table to update mode. Use one of the
following commands:
onbar -b # the recommended way
onbar -b -F
Warning: It is recommended that you use fake backups on test systems, not
on production systems. You cannot restore data from a fake backup.
(If you performed a fake backup, you must reload the table to be
able to restore the data.)
Backing Up Blobspaces in a Logging Database (IDS)
Follow these steps when you back up blobspaces in a database that uses
transaction logging:
1. Before you back up a new blobspace, make sure that the log file that
recorded the creation of the blobspace is no longer the current log file.
Chapter 4. Backing Up with ON-Bar 4-17

To verify the logical-log status, use the onstat -l or xctl onstat -l command.
To switch to the next log file, use the onmode -l command.
Blobspaces are not available for use until the log file is not the current log
file. For more information on verifying the logical-log status, see “onstat
-l” on page B-4. For information on switching log files, see the onmode
section in the IBM Informix: Administrator's Reference.
2. If you update or delete simple large objects in a blobspace, you must back
up all the log files, including the current log file. If the blobspace is online,
use the onbar -b -l -c command.
When users update or delete simple large objects in blobspaces, the
blobpages are not freed for reuse until the log file that contains the delete
records is freed. To free the log file, you must back it up.
3. Back up the blobspaces with the onbar -b or onbar -b -w command.
Warning: If you perform a warm restore of a blobspace without backing up
the logical logs after updating or deleting data in it, that blobspace
might not be restorable.
Backing Up Logical Logs When Blobspaces Are Offline (IDS)
To back up the logical logs when a blobspace is offline, use the onbar -b -l -O
or onbar -b -O command. If this backup is successful, ON–Bar returns 178.
To salvage the logical logs, use the onbar -b -s -O command.
Warning: If you back up logical logs that contain changes to a blobspace
while it is offline, the simple large objects in that blobspace will not
be restorable. If an offline blobspace has not changed, it will be
restorable.
Assigning a Name to a Backup Session (XPS)
To assign a name to a backup session, use the following command:
onbar -b -q session1
To monitor the backup session, use the onstat -g bus command.
Performing a Physical Backup (XPS)
Use the -p option to perform either a level-0 or incremental backup of storage
spaces only without also backing up the logical logs, as the following
command shows. In the backup command, you can list the storage spaces on
the command line or in a file.
onbar -b -p
To restore data, you must have previously backed up the logical logs. For
more information, see “Backing Up Logical Logs on Extended Parallel Server”
on page 4-25.
4-18 IBM Informix Backup and Restore Guide
Backing Up a Dbslice (XPS)
You can specify storage spaces individually or with a dbslice name. Specifying
storage spaces with a dbslice name simplifies backup commands. The dbslice
name is translated to the names of its component storage spaces. If you back
up a dbslice, ON–Bar backs up all the storage spaces in that dbslice.
To back up all dbspaces in a dbslice named fin_slice, use the following
command:
onbar -b fin_slice
Backing Up Table Types
Table 4-1 discusses backup scenarios for different table types. For more
information about the table types, see the chapter on data storage in the
IBM Informix: Administrator's Guide.
Table 4-1. Backing Up Table Types
Table Type IDS XPS Can You Back Up This Type of Table?
Standard X X Yes.
Temp X X No.
Scratch X No.
Operational X Yes. If you use pload express mode to load an operational table, you
cannot reliably restore the data unless you have done a level-0 backup
after the load. It is not enough to just back up the logical logs.
Raw X X Yes. If you update a raw table, you cannot reliably restore the data
unless you perform a level-0 backup after the update. Backing up
only the logical logs is not enough.
Static X Yes.
Important: Perform a level-0 backup before you alter a raw, static, or
operational table to type STANDARD.
Viewing Recent ON-Bar Activity (IDS)
You can view recent ON-Bar activity using the onbar -m utility. Only users
who have permission to perform backup and restore operations can use this
option.
Viewing Recent ON-Bar Activity:
-m
lines
-r
seconds
Chapter 4. Backing Up with ON-Bar 4-19
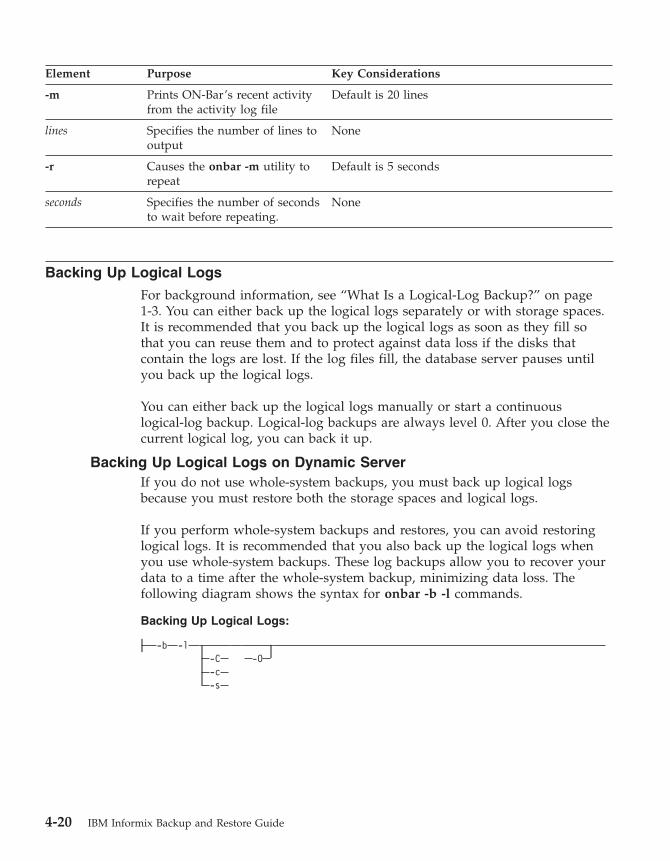
Element Purpose Key Considerations
-m Prints ON-Bar’s recent activity
from the activity log file
Default is 20 lines
lines Specifies the number of lines to
output
None
-r Causes the onbar -m utility to
repeat
Default is 5 seconds
seconds Specifies the number of seconds
to wait before repeating.
None
Backing Up Logical Logs
For background information, see “What Is a Logical-Log Backup?” on page
1-3. You can either back up the logical logs separately or with storage spaces.
It is recommended that you back up the logical logs as soon as they fill so
that you can reuse them and to protect against data loss if the disks that
contain the logs are lost. If the log files fill, the database server pauses until
you back up the logical logs.
You can either back up the logical logs manually or start a continuous
logical-log backup. Logical-log backups are always level 0. After you close the
current logical log, you can back it up.
Backing Up Logical Logs on Dynamic Server
If you do not use whole-system backups, you must back up logical logs
because you must restore both the storage spaces and logical logs.
If you perform whole-system backups and restores, you can avoid restoring
logical logs. It is recommended that you also back up the logical logs when
you use whole-system backups. These log backups allow you to recover your
data to a time after the whole-system backup, minimizing data loss. The
following diagram shows the syntax for onbar -b -l commands.
Backing Up Logical Logs:
-b -l
-C
-c
-s
-O
4-20 IBM Informix Backup and Restore Guide
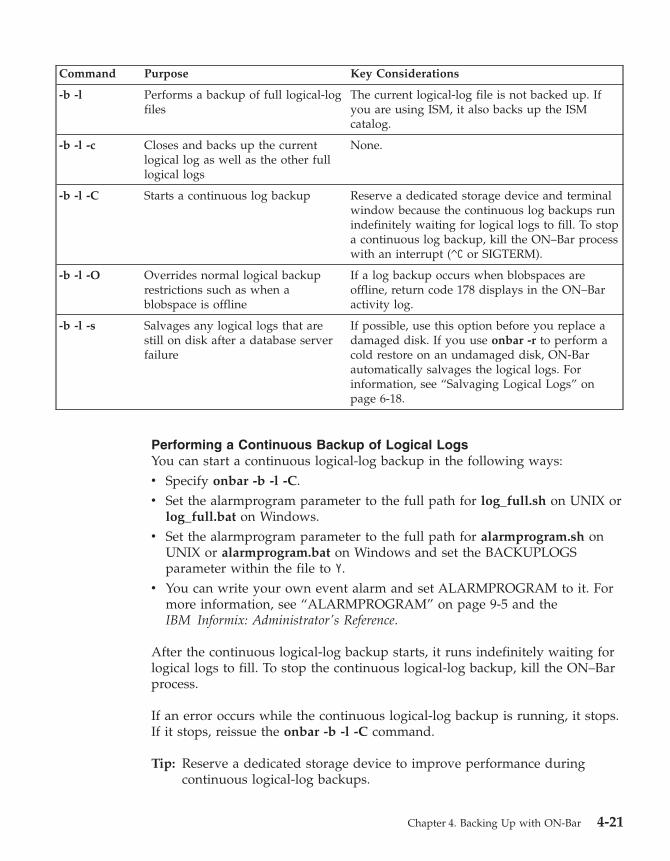
Command Purpose Key Considerations
-b -l Performs a backup of full logical-log
files
The current logical-log file is not backed up. If
you are using ISM, it also backs up the ISM
catalog.
-b -l -c Closes and backs up the current
logical log as well as the other full
logical logs
None.
-b -l -C Starts a continuous log backup Reserve a dedicated storage device and terminal
window because the continuous log backups run
indefinitely waiting for logical logs to fill. To stop
a continuous log backup, kill the ON–Bar process
with an interrupt (^C or SIGTERM).
-b -l -O Overrides normal logical backup
restrictions such as when a
blobspace is offline
If a log backup occurs when blobspaces are
offline, return code 178 displays in the ON–Bar
activity log.
-b -l -s Salvages any logical logs that are
still on disk after a database server
failure
If possible, use this option before you replace a
damaged disk. If you use onbar -r to perform a
cold restore on an undamaged disk, ON-Bar
automatically salvages the logical logs. For
information, see “Salvaging Logical Logs” on
page 6-18.
Performing a Continuous Backup of Logical Logs
You can start a continuous logical-log backup in the following ways:
v Specify onbar -b -l -C.
v Set the alarmprogram parameter to the full path for log_full.sh on UNIX or
log_full.bat on Windows.
v Set the alarmprogram parameter to the full path for alarmprogram.sh on
UNIX or alarmprogram.bat on Windows and set the BACKUPLOGS
parameter within the file to Y.
v You can write your own event alarm and set ALARMPROGRAM to it. For
more information, see “ALARMPROGRAM” on page 9-5 and the
IBM Informix: Administrator's Reference.
After the continuous logical-log backup starts, it runs indefinitely waiting for
logical logs to fill. To stop the continuous logical-log backup, kill the ON–Bar
process.
If an error occurs while the continuous logical-log backup is running, it stops.
If it stops, reissue the onbar -b -l -C command.
Tip: Reserve a dedicated storage device to improve performance during
continuous logical-log backups.
Chapter 4. Backing Up with ON-Bar 4-21
Performing a Manual Backup of Logical Logs
To start a manual logical-log backup, use the onbar -b -l command. If you set
alarmprogram to no_log.sh or no_log.bat, you must initiate a logical-log
backup manually.
To back up the current logical-log file, use the onbar -b -l -c command.
Using ALARMPROGRAM to Set the Log Backup Mode
Use the ALARMPROGRAM configuration parameter to control continuous log
backups. If ALARMPROGRAM is set to log_full.sh or log_full.bat, when a
logical-log file fills, the database server triggers event alarm 23. This event
alarm calls onbar -b -l to back up the full logical-log file. Restart the database
server after you change the value of ALARMPROGRAM.
To turn off continuous log backups, set ALARMPROGRAM to
$INFORMIXDIR/etc/no_log.sh or %INFORMIXDIR%\etc\no_log.bat.
To generate email or pager messages to a designated DBA when a specific
error level is triggered, set ALARMPROGRAM to $INFORMIXDIR/etc/
alarmprogram.sh or %INFORMIXDIR%\etc\alarmprogram.bat. Then edit
the file to turn automatic logging on, set the level of errors, and insert the
email address of the DBA.
Dynamic Server
Additionally, you can set the ALRM_ALL_EVENTS configuration parameter
to allow the ALARMPROGRAM script to execute every time any alarm event
is triggered.
End of Dynamic Server
Viewing Backed-Up Logical Logs
You can use the onbar -P to view logical logs that have been backed up using
the ON-Bar utility. In order to view the backed-up logical logs, the storage
manager must be running. This command can be used by anyone who has
permission to perform backup and restore operations.
The output of this command is displayed to stdout.
You cannot view logs that have not been backed-up which are still on the disk
or in shared memory. The contents of these logical logs can only be viewed
with the onlog utility.
Viewing Backed-Up Logical Logs:
4-22 IBM Informix Backup and Restore Guide

onbar -P -n unique_id
starting_id
-
ending_id
-l
-q
-b �
� -u
username
-t
tblspace_num
-x
transaction_num
Chapter 4. Backing Up with ON-Bar 4-23
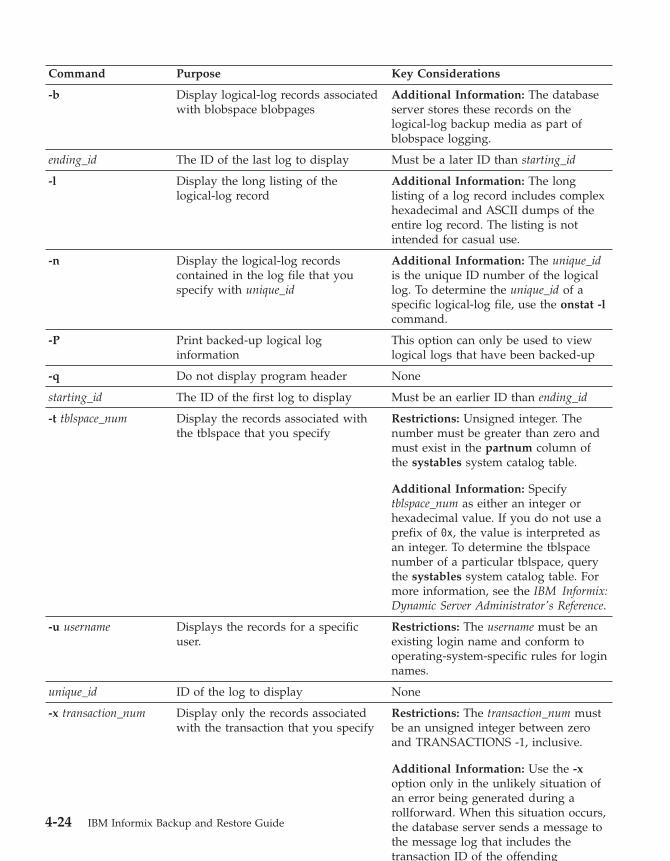
Command Purpose Key Considerations
-b Display logical-log records associated
with blobspace blobpages
Additional Information: The database
server stores these records on the
logical-log backup media as part of
blobspace logging.
ending_id The ID of the last log to display Must be a later ID than starting_id
-l Display the long listing of the
logical-log record
Additional Information: The long
listing of a log record includes complex
hexadecimal and ASCII dumps of the
entire log record. The listing is not
intended for casual use.
-n Display the logical-log records
contained in the log file that you
specify with unique_id
Additional Information: The unique_id
is the unique ID number of the logical
log. To determine the unique_id of a
specific logical-log file, use the onstat -l
command.
-P Print backed-up logical log
information
This option can only be used to view
logical logs that have been backed-up
-q Do not display program header None
starting_id The ID of the first log to display Must be an earlier ID than ending_id
-t tblspace_num Display the records associated with
the tblspace that you specify
Restrictions: Unsigned integer. The
number must be greater than zero and
must exist in the partnum column of
the systables system catalog table.
Additional Information: Specify
tblspace_num as either an integer or
hexadecimal value. If you do not use a
prefix of 0x, the value is interpreted as
an integer. To determine the tblspace
number of a particular tblspace, query
the systables system catalog table. For
more information, see the IBM Informix:
Dynamic Server Administrator's Reference.
-u username Displays the records for a specific
user.
Restrictions: The username must be an
existing login name and conform to
operating-system-specific rules for login
names.
unique_id ID of the log to display None
-x transaction_num Display only the records associated
with the transaction that you specify
Restrictions: The transaction_num must
be an unsigned integer between zero
and TRANSACTIONS -1, inclusive.
Additional Information: Use the -x
option only in the unlikely situation of
an error being generated during a
rollforward. When this situation occurs,
the database server sends a message to
the message log that includes the
transaction ID of the offending
4-24 IBM Informix Backup and Restore Guide
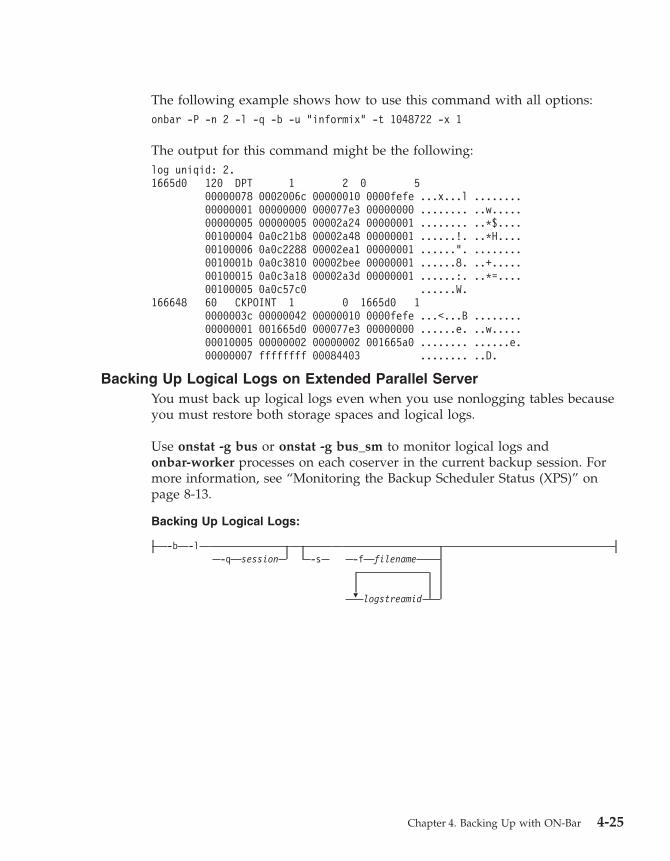
The following example shows how to use this command with all options:
onbar -P -n 2 -l -q -b -u "informix" -t 1048722 -x 1
The output for this command might be the following:
log uniqid: 2.
1665d0 120 DPT 1 2 0 5
00000078 0002006c 00000010 0000fefe ...x...l ........
00000001 00000000 000077e3 00000000 ........ ..w.....
00000005 00000005 00002a24 00000001 ........ ..*$....
00100004 0a0c21b8 00002a48 00000001 ......!. ..*H....
00100006 0a0c2288 00002ea1 00000001 ......". ........
0010001b 0a0c3810 00002bee 00000001 ......8. ..+.....
00100015 0a0c3a18 00002a3d 00000001 ......:. ..*=....
00100005 0a0c57c0 ......W.
166648 60 CKPOINT 1 0 1665d0 1
0000003c 00000042 00000010 0000fefe ...<...B ........
00000001 001665d0 000077e3 00000000 ......e. ..w.....
00010005 00000002 00000002 001665a0 ........ ......e.
00000007 ffffffff 00084403 ........ ..D.
Backing Up Logical Logs on Extended Parallel Server
You must back up logical logs even when you use nonlogging tables because
you must restore both storage spaces and logical logs.
Use onstat -g bus or onstat -g bus_sm to monitor logical logs and
onbar-worker processes on each coserver in the current backup session. For
more information, see “Monitoring the Backup Scheduler Status (XPS)” on
page 8-13.
Backing Up Logical Logs:
-b -l
-q
session
-s
�
-f
filename
logstreamid
Chapter 4. Backing Up with ON-Bar 4-25
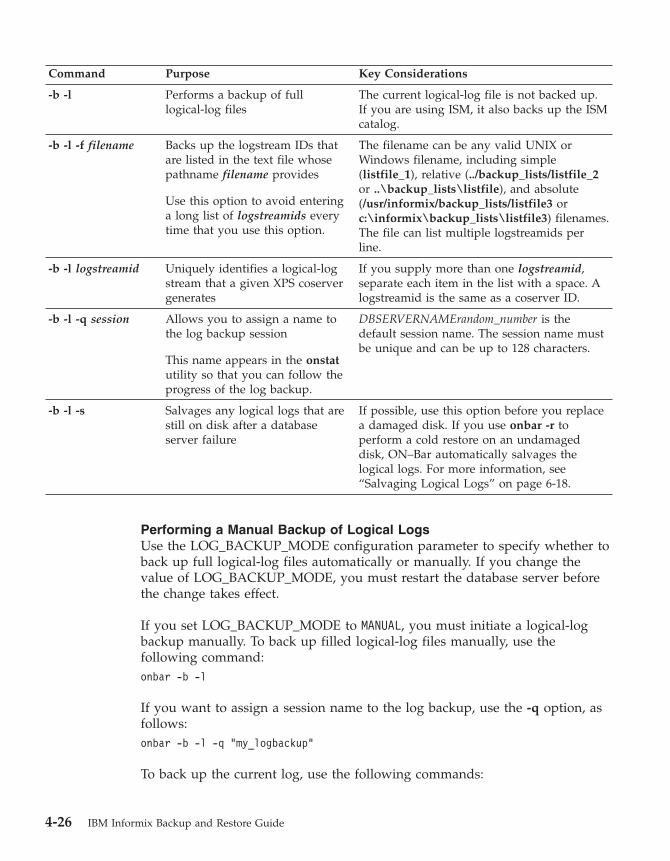
Command Purpose Key Considerations
-b -l Performs a backup of full
logical-log files
The current logical-log file is not backed up.
If you are using ISM, it also backs up the ISM
catalog.
-b -l -f filename Backs up the logstream IDs that
are listed in the text file whose
pathname filename provides
Use this option to avoid entering
a long list of logstreamids every
time that you use this option.
The filename can be any valid UNIX or
Windows filename, including simple
(listfile_1), relative (../backup_lists/listfile_2
or ..\backup_lists\listfile), and absolute
(/usr/informix/backup_lists/listfile3 or
c:\informix\backup_lists\listfile3) filenames.
The file can list multiple logstreamids per
line.
-b -l logstreamid Uniquely identifies a logical-log
stream that a given XPS coserver
generates
If you supply more than one logstreamid,
separate each item in the list with a space. A
logstreamid is the same as a coserver ID.
-b -l -q session Allows you to assign a name to
the log backup session
This name appears in the onstat
utility so that you can follow the
progress of the log backup.
DBSERVERNAMErandom_number is the
default session name. The session name must
be unique and can be up to 128 characters.
-b -l -s Salvages any logical logs that are
still on disk after a database
server failure
If possible, use this option before you replace
a damaged disk. If you use onbar -r to
perform a cold restore on an undamaged
disk, ON–Bar automatically salvages the
logical logs. For more information, see
“Salvaging Logical Logs” on page 6-18.
Performing a Manual Backup of Logical Logs
Use the LOG_BACKUP_MODE configuration parameter to specify whether to
back up full logical-log files automatically or manually. If you change the
value of LOG_BACKUP_MODE, you must restart the database server before
the change takes effect.
If you set LOG_BACKUP_MODE to MANUAL, you must initiate a logical-log
backup manually. To back up filled logical-log files manually, use the
following command:
onbar -b -l
If you want to assign a session name to the log backup, use the -q option, as
follows:
onbar -b -l -q “my_logbackup”
To back up the current log, use the following commands:
4-26 IBM Informix Backup and Restore Guide

xctl onmode -l
onbar -b -l
Starting Continuous Logical-Log Backups
On Extended Parallel Server, you can start a continuous logical-log backup by
setting the LOG_BACKUP_MODE configuration parameter to CONT. Whenever
a logical-log file fills, the Backup Scheduler automatically starts an
onbar-worker process, if one is not already active, and assigns the log backup
to it.
To stop a continuous logical-log backup, you must suspend the backup
session. For example, the following command turns off continuous logical-log
backup for the session “log backup 1” on coserver 1. In a multicoserver
environment, you might need to turn off logical-log backup on each coserver.
onbar off -q “log backup 1”
To find the logical-log backup session, use the onstat -g bus command. For
more information, see “Starting and Stopping ON-Bar Sessions (XPS)” on
page 8-11.
Preventing Logical-Log Backups in a Test System
If you set LOG_BACKUP_MODE to NONE, you cannot back up or restore
logical logs, and log salvage does not work. Although you can continue to
back up storage spaces, you cannot restore them. The only reason to set
LOG_BACKUP_MODE to NONE is to test your system. Do not use
LOG_BACKUP_MODE = NONE in a production system.
Monitoring Logical-Log Backups
To find out if a logical-log file is ready to be backed up, check the flags field
of onstat -l. After the logical-log file is marked as backed up, it can be reused.
When the flags field displays any of the following values, the logical-log file is
ready to be backed up:
U------
U-----L
The value U means that the logical-log file is used. The value L means that the
last checkpoint occurred when the indicated logical-log file was current. The
value C indicates the current log. If B appears in the third column, the
logical-log file is already backed up and can be reused.
U-B---L
The following example shows the output of onstat -l when you use it to
monitor logical logs on the database server:
Logical Logging
Buffer bufused bufsize numrecs numpages numwrits recs/pages pages/io
L-2 0 16 1 1 1 1.0 1.0
Subsystem numrecs Log Space used
Chapter 4. Backing Up with ON-Bar 4-27
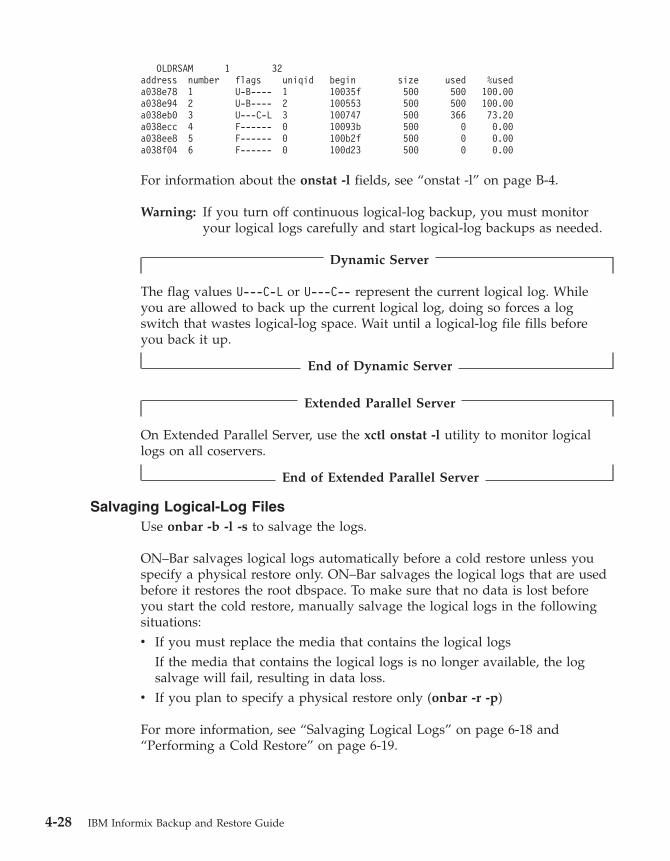
OLDRSAM 1 32
address number flags uniqid begin size used %used
a038e78 1 U-B---- 1 10035f 500 500 100.00
a038e94 2 U-B---- 2 100553 500 500 100.00
a038eb0 3 U---C-L 3 100747 500 366 73.20
a038ecc 4 F------ 0 10093b 500 0 0.00
a038ee8 5 F------ 0 100b2f 500 0 0.00
a038f04 6 F------ 0 100d23 500 0 0.00
For information about the onstat -l fields, see “onstat -l” on page B-4.
Warning: If you turn off continuous logical-log backup, you must monitor
your logical logs carefully and start logical-log backups as needed.
Dynamic Server
The flag values U---C-L or U---C-- represent the current logical log. While
you are allowed to back up the current logical log, doing so forces a log
switch that wastes logical-log space. Wait until a logical-log file fills before
you back it up.
End of Dynamic Server
Extended Parallel Server
On Extended Parallel Server, use the xctl onstat -l utility to monitor logical
logs on all coservers.
End of Extended Parallel Server
Salvaging Logical-Log Files
Use onbar -b -l -s to salvage the logs.
ON–Bar salvages logical logs automatically before a cold restore unless you
specify a physical restore only. ON–Bar salvages the logical logs that are used
before it restores the root dbspace. To make sure that no data is lost before
you start the cold restore, manually salvage the logical logs in the following
situations:
v If you must replace the media that contains the logical logs
If the media that contains the logical logs is no longer available, the log
salvage will fail, resulting in data loss.
v If you plan to specify a physical restore only (onbar -r -p)
For more information, see “Salvaging Logical Logs” on page 6-18 and
“Performing a Cold Restore” on page 6-19.
4-28 IBM Informix Backup and Restore Guide
Understanding ON-Bar Backup Processes
This section explains how ON–Bar performs backup operations on the
database server. You can perform a backup when the database server is in
online or quiescent mode. The original ON–Bar process is called the driver,
and each new ON–Bar process that it creates is called an onbar_d child
process.
Backup Sequence on Dynamic Server
Figure 4-2 on page 4-30 describes the ON–Bar backup sequence. When you
issue a backup command, the onbar-driver builds a list of storage spaces and
creates a backup session.
In a parallel backup (if BAR_MAX_BACKUP is not set to 1), the onbar-driver
starts one or more onbar_d child processes and assigns backup tasks to them.
Each onbar_d child process backs up one storage space. Each onbar_d child
disappears when the backup of its storage space is done. The onbar-driver
keeps creating new children until all the storage spaces are backed up. Then
the onbar-driver backs up the logical logs.
If you specify a whole-system backup or set BAR_MAX_BACKUP to 1, the
onbar_driver backs up the storage spaces and logical logs serially. No
onbar_d child processes are created.
When the backup is complete, the onbar-driver determines whether an error
occurred and returns a status in the ON–Bar activity log. After each object is
backed up, information about it is added to the emergency boot file on the
database server and to the sysutils database.
Chapter 4. Backing Up with ON-Bar 4-29
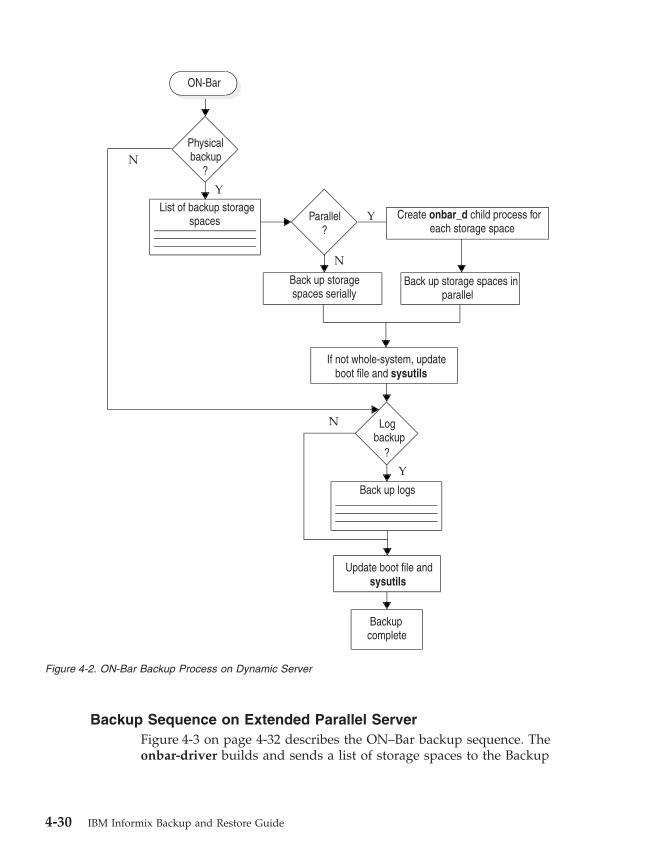
Backup Sequence on Extended Parallel Server
Figure 4-3 on page 4-32 describes the ON–Bar backup sequence. The
onbar-driver builds and sends a list of storage spaces to the Backup
Y
ON-Bar
Physicalbackup
?
List of backup storagespaces
Back up logs
Backupcomplete
N
N
Parallel?
Create _ child process foreach storage spaceonbar d
Back up storage spaces inparallel
Back up storagespaces serially
N
Y
Update boot file andsysutils
If not whole-system, updateboot file and sysutils
Logbackup
?
Y
Figure 4-2. ON-Bar Backup Process on Dynamic Server
4-30 IBM Informix Backup and Restore Guide
Scheduler. The Backup Scheduler creates a backup session. It might start one
or more onbar-worker processes. It then assigns backup tasks to the
onbar-worker processes.
Once all the storage spaces are backed up, the onbar-driver sends a list of
logstreams (logical-log data) to the Backup Scheduler that assigns the tasks to
onbar-worker processes. Each onbar-worker process is associated with a
coserver and a storage-manager instance. Once an onbar-worker process
starts, it might be active after the backup or restore session is completed. An
onbar-worker can process parts of several backup or restore sessions in its
lifetime.
Each onbar-worker transfers data between the database server and the storage
manager until the backup request is fulfilled. When an onbar-worker
completes its task, it waits for the next task from the Backup Scheduler. If no
new task is assigned in a user-specified amount of time, the onbar-worker
shuts down. You can set the number of minutes that the onbar-worker
processes wait in BAR_IDLE_TIMEOUT in the ONCONFIG file.
If the Backup Scheduler has new tasks to assign and not enough
onbar-worker processes are running to complete the task, it calls the
start_worker script to start one or more new onbar-worker processes.
It is recommended that you start onbar-worker processes automatically, but if
you want to start them manually, see “Using start_worker.sh to Start
onbar_worker Processes Manually (XPS)” on page 8-5. If you have set
BAR_WORKER_MAX = 0, you must start a new onbar-worker manually.
After each object is backed up, ON–Bar updates the emergency backup boot
file on the coserver that is local to the onbar-worker and the sysutils
database. The emergency backup boot file is on the coserver of the
onbar-worker that backed it up.
To monitor the status of backups, restores, and onbar-worker activities, use
the onstat -g bus or onstat -g bus_sm options or check the Backup Scheduler
tables in the sysmaster database. For more information, see “Monitoring the
Backup Scheduler Status (XPS)” on page 8-13 and “Backup Scheduler SMI
Tables (XPS)” on page 10-10.
Chapter 4. Backing Up with ON-Bar 4-31
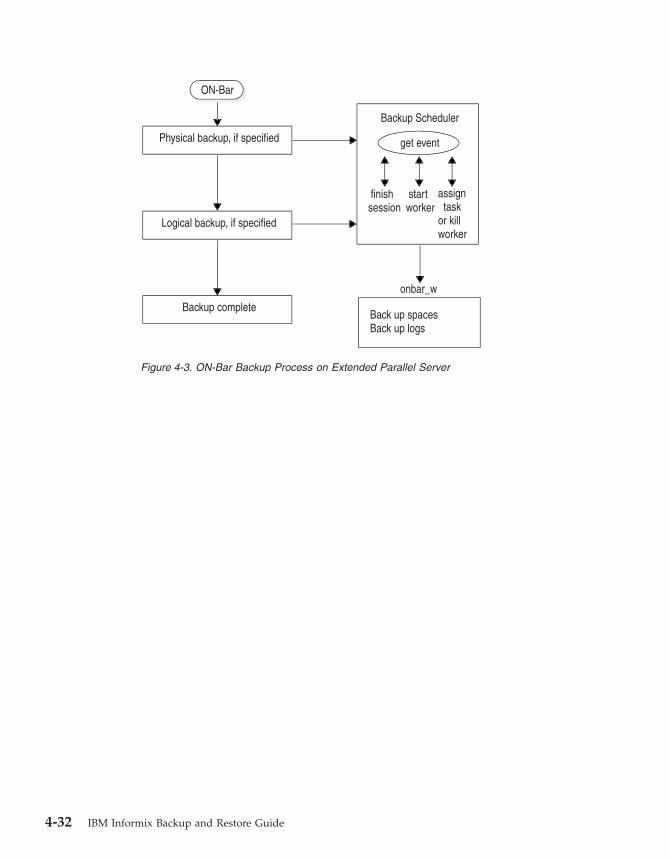
onbar_w
Backup Scheduler
get event
finishsession
startworker
assigntask
or killworker
Back up spacesBack up logs
Physical backup, if specified
Logical backup, if specified
Backup complete
ON-Bar
Figure 4-3. ON-Bar Backup Process on Extended Parallel Server
4-32 IBM Informix Backup and Restore Guide
Chapter 5. Verifying Backups
Verifying Backups with archecker . . . . . . . . . . . . . . . . . . . . . . . 5-1
Using archecker to Verify Backups . . . . . . . . . . . . . . . . . . . . . . 5-2
Preparing to Verify Backups . . . . . . . . . . . . . . . . . . . . . . . . 5-3
Syntax . . . . . . . . . . . . . . . . . . . . . . . . . . . . . . . 5-3
Estimating the Amount of Temporary Space for archecker . . . . . . . . . . . . . . 5-5
Verification Examples . . . . . . . . . . . . . . . . . . . . . . . . . . 5-6
Performing Verification Only . . . . . . . . . . . . . . . . . . . . . . . 5-6
Performing a Point-in-Time Verification . . . . . . . . . . . . . . . . . . . 5-6
Verifying a Whole-System Backup (IDS) . . . . . . . . . . . . . . . . . . . 5-6
Verifying Blobspaces (IDS) . . . . . . . . . . . . . . . . . . . . . . . . 5-6
Verifying Sbspaces (IDS) . . . . . . . . . . . . . . . . . . . . . . . . 5-7
Interpreting Verification Messages . . . . . . . . . . . . . . . . . . . . . . 5-7
Sample Verification Message in the ON-Bar Activity Log . . . . . . . . . . . . . . 5-7
Sample Verification Message in the archecker Message Log . . . . . . . . . . . . . 5-7
What To Do If Backup Verification Fails . . . . . . . . . . . . . . . . . . . . 5-7
Backups with Corrupt Pages . . . . . . . . . . . . . . . . . . . . . . . 5-8
Backups with Corrupt Control Information . . . . . . . . . . . . . . . . . . 5-8
Backups with Missing Data . . . . . . . . . . . . . . . . . . . . . . . 5-8
Backups of Inconsistent Database Server Data . . . . . . . . . . . . . . . . . 5-8
Procedures for Fixing Backup Verification Problems . . . . . . . . . . . . . . . . 5-8
In This Chapter
This chapter describes the archecker utility for checking the validity and
completeness of backups. To ensure that you can restore a backup safely, issue
the onbar -v command, which calls the archecker utility.
Verifying Backups with archecker
You access the archecker utility when you use the onbar -v command. You
can use archecker with the database server in any mode. The archecker utility
verifies that all pages required to restore a backup exist on the media in the
correct form. After you successfully verify a backup, you can restore it safely.
If archecker shows problems with the backup, contact Technical Support.
The archecker utility verifies standard and whole-system backups. The
archecker utility cannot verify logical-log backups. The archecker utility does
not perform a restore.
© Copyright IBM Corp. 1996, 2004 5-1

Figure 5-1 shows how ON–Bar and archecker verify a backup. The archecker
utility verifies level-0 backups on all database servers. The following steps
correspond to the circled numbers in Figure 5-1.
Using archecker to Verify Backups
When the user issues an onbar -v command, the following sequence of
actions occurs:
1. ON–Bar uses the emergency boot file if the database server is offline or in
microkernel mode or the sysutils database if the database server is online
or quiescent to determine which backup to verify.
2. ON–Bar requests and retrieves the backup data from the storage manager.
3. ON–Bar forwards the backup data to archecker.
4. The archecker utility scans the backup data and creates a bitmap of the
pages. During the scan phase, archecker verifies the following types of
problems:
v Backups with corrupt pages
v Backups with corrupt control information
v Backups with missing pages that have been added since the last level-0
backup
v Retrieval of the wrong backup objects
An example of retrieving the wrong backup object is if ON–Bar requests
the rootdbs backup from last Wednesday but the storage manager
retrieves the rootdbs backup from last Tuesday.5. After it completes the scan, archecker uses this bitmap to verify the
backup and records the status in the archecker message log. ON–Bar also
records this status in the ON–Bar activity log.
Storagemanager
Emergency boot file orsysutils
Bitmap of backup
1
onbar -v
archecker
2
3
4
5
Figure 5-1. How ON-Bar Verifies a Backup
5-2 IBM Informix Backup and Restore Guide
6. When a backup is verified, ON–Bar inserts a row into the emergency boot
file with the backup copy ID and the verification date, and updates the
ins_verify and ins_verify_date rows of the bar_instance table in the
sysutils database. For more information, see “The bar_instance Table” on
page 10-2.
During the verification phase, archecker verifies that all the pages for each
table are present and checks the partition pages, the reserved pages, the
chunk-free list, blobspaces, sbspaces, and extents. The archecker utility also
checks the free and used counts, verifies that the page stamps match and that
no overlap exists in the extents.
Archecker writes temporary files in the directory that the AC_STORAGE
parameter specifies. For information, see “AC_STORAGE” on page 9-4.
Preparing to Verify Backups
This section describes preparing to verify backups.
To prepare to verify backups:
1. Review the ac_config.std file that contains default archecker configuration
parameters to see if you want to change the location of the directories for
the archecker message log and temporary files.
2. Set the AC_CONFIG environment variable to specify the path for the
archecker configuration file (either ac_config.std or user defined).
For more information on setting the path, see “Setting archecker
Configuration Parameters in AC_CONFIG” on page 9-2.
3. Estimate the amount of temporary space needed for storing the archecker
temporary files.
For more information, see “Estimating the Amount of Temporary Space for
archecker” on page 5-5.
4. Use the onbar -v option to verify that an existing backup will restore
properly.
For examples, see “Verification Examples” on page 5-6.
5. To see whether archecker verified the backup successfully, check the
archecker return code in the ON–Bar activity log and the messages in the
archecker message log.
Syntax
This diagram shows the onbar -v syntax.
Verifying Backups with archecker:
Chapter 5. Verifying Backups 5-3
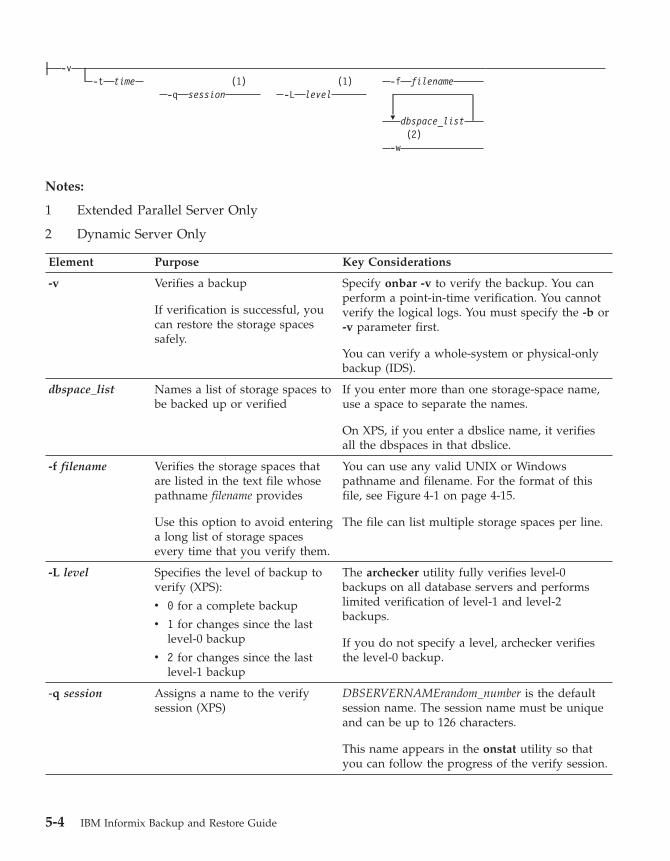
-v
�
-t
time
(1)
(1)
-f
filename
-q
session
-L
level
dbspace_list
(2)
-w
Notes:
1 Extended Parallel Server Only
2 Dynamic Server Only
Element Purpose Key Considerations
-v Verifies a backup
If verification is successful, you
can restore the storage spaces
safely.
Specify onbar -v to verify the backup. You can
perform a point-in-time verification. You cannot
verify the logical logs. You must specify the -b or
-v parameter first.
You can verify a whole-system or physical-only
backup (IDS).
dbspace_list Names a list of storage spaces to
be backed up or verified
If you enter more than one storage-space name,
use a space to separate the names.
On XPS, if you enter a dbslice name, it verifies
all the dbspaces in that dbslice.
-f filename Verifies the storage spaces that
are listed in the text file whose
pathname filename provides
Use this option to avoid entering
a long list of storage spaces
every time that you verify them.
You can use any valid UNIX or Windows
pathname and filename. For the format of this
file, see Figure 4-1 on page 4-15.
The file can list multiple storage spaces per line.
-L level Specifies the level of backup to
verify (XPS):
v 0 for a complete backup
v 1 for changes since the last
level-0 backup
v 2 for changes since the last
level-1 backup
The archecker utility fully verifies level-0
backups on all database servers and performs
limited verification of level-1 and level-2
backups.
If you do not specify a level, archecker verifies
the level-0 backup.
-q session Assigns a name to the verify
session (XPS)
DBSERVERNAMErandom_number is the default
session name. The session name must be unique
and can be up to 126 characters.
This name appears in the onstat utility so that
you can follow the progress of the verify session.
5-4 IBM Informix Backup and Restore Guide
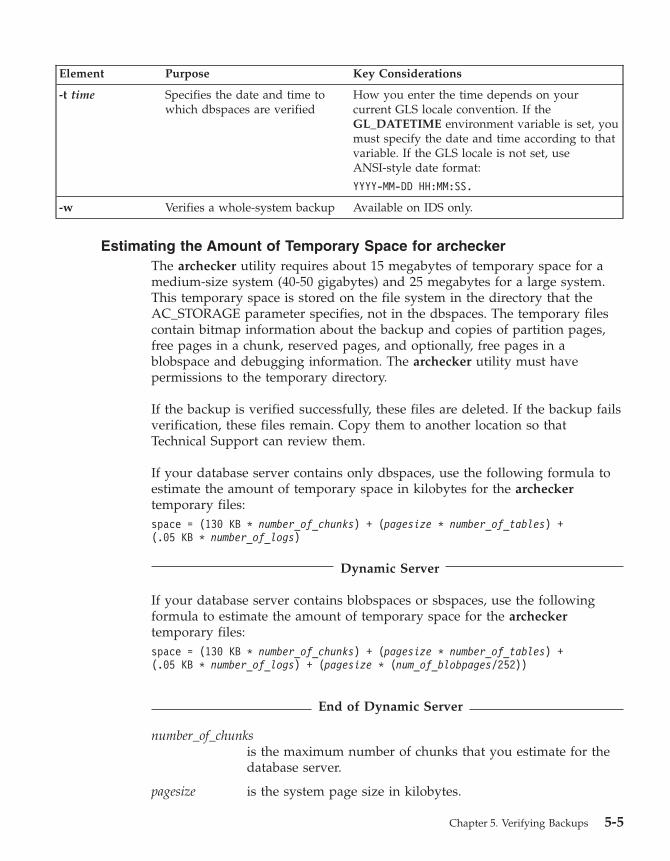
Element Purpose Key Considerations
-t time Specifies the date and time to
which dbspaces are verified
How you enter the time depends on your
current GLS locale convention. If the
GL_DATETIME environment variable is set, you
must specify the date and time according to that
variable. If the GLS locale is not set, use
ANSI-style date format:
YYYY-MM-DD HH:MM:SS.
-w Verifies a whole-system backup Available on IDS only.
Estimating the Amount of Temporary Space for archecker
The archecker utility requires about 15 megabytes of temporary space for a
medium-size system (40-50 gigabytes) and 25 megabytes for a large system.
This temporary space is stored on the file system in the directory that the
AC_STORAGE parameter specifies, not in the dbspaces. The temporary files
contain bitmap information about the backup and copies of partition pages,
free pages in a chunk, reserved pages, and optionally, free pages in a
blobspace and debugging information. The archecker utility must have
permissions to the temporary directory.
If the backup is verified successfully, these files are deleted. If the backup fails
verification, these files remain. Copy them to another location so that
Technical Support can review them.
If your database server contains only dbspaces, use the following formula to
estimate the amount of temporary space in kilobytes for the archecker
temporary files:
space = (130 KB * number_of_chunks) + (pagesize * number_of_tables) +
(.05 KB * number_of_logs)
Dynamic Server
If your database server contains blobspaces or sbspaces, use the following
formula to estimate the amount of temporary space for the archecker
temporary files:
space = (130 KB * number_of_chunks) + (pagesize * number_of_tables) +
(.05 KB * number_of_logs) + (pagesize * (num_of_blobpages/252))
End of Dynamic Server
number_of_chunks
is the maximum number of chunks that you estimate for the
database server.
pagesize is the system page size in kilobytes.
Chapter 5. Verifying Backups 5-5
number_of_tables
is the maximum number of tables that you estimate for the
database server.
number_of_logs is the number of logical logs on the database server.
num_of_blobpages
is the number of blobpages in the blobspaces or the number
of sbspaces. (If your database server contains sbspaces,
substitute num_of_blobpages with the number of sbspaces.)
(IDS only)
For example, you would need 12.9 megabytes of temporary disk space on a
50-gigabyte system with a page size of 2 kilobytes. This system does not
contain any blobspaces, as the following statement shows:
13,252 KB = (130 KB * 25 chunks) + (2 KB * 5000 tables) +
(.05 KB * 50 logs) + (2 KB * 0)
To convert kilobytes to megabytes, divide the result by 1024:
12.9 MB = 13,252/1024
Verification Examples
The following examples show how to verify an existing backup and how to
verify immediately after backing up.
Performing Verification Only
To verify a backup of all storage spaces, use the onbar -v command. The
logical logs are not verified.
To verify the backed-up storage spaces listed in the file bkup1, use the
following command:
onbar -v -f /usr/backups/bkup1
Performing a Point-in-Time Verification
To perform a point-in-time verification of a backup, use the following
command with the datetime value in quotes:
onbar -v -t "2001-12-10 10:20:50"
Verifying a Whole-System Backup (IDS)
To verify a whole-system backup, use the following command:
onbar -v -w
Verifying Blobspaces (IDS)
The onbar -v command cannot verify the links between data rows and simple
large objects in a blobspace. Use the oncheck -cD command instead to verify
the links in a blobspace. For information on oncheck, see the IBM Informix:
Administrator's Reference.
5-6 IBM Informix Backup and Restore Guide
Verifying Sbspaces (IDS)
The onbar -v command verifies only the smart-large-object extents in an
sbspace. For a complete check, use the oncheck -cS command. For
information on oncheck, see the IBM Informix: Administrator's Reference.
Interpreting Verification Messages
When you verify a backup, ON–Bar writes summary messages to the
bar_act.log that report which storage spaces were verified and whether the
verification succeeded or failed. The archecker utility writes detailed messages
to the ac_msg.log. Technical Support uses the ac_msg.log to diagnose
problems with backups and restores.
Sample Verification Message in the ON-Bar Activity Log
The level-0 backup of dbspace dbs2.2 passed verification, as follows:
Begin backup verification of level0 for dbs2.2 (Storage Manager Copy ID:##)
Completed level-0 backup verification successfully.
The level-0 backup of rootdbs failed verification, as follows:
Begin backup verification of level0 for rootdbs (Storage Manager Copy ID:##).
ERROR: Unable to close the physical check: error_message.
Sample Verification Message in the archecker Message Log
More detailed information is available in the archecker message log, as
follows:
STATUS: Scan PASSED
STATUS: Control page checks PASSED
STATUS: Starting checks of dbspace dbs2.2.
STATUS: Checking dbs2.2:TBLSpace
.
.
STATUS: Tables/Fragments Validated: 1
Archive Validation Passed
What To Do If Backup Verification Fails
If a backup fails verification, do not attempt to restore it. The results are
unpredictable and range from corruption of the database server to a failed
restore because ON–Bar cannot find the backup object on the storage
manager. In fact, the restore might appear to be successful but it hides the real
problem with the data or media.
The three different types of corrupt backups are as follows:
v Backups with corrupt pages
v Backups with corrupt control information
v Backups with missing data
Chapter 5. Verifying Backups 5-7
Backups with Corrupt Pages
If the pages are corrupt, the problem is with the databases rather than with
the backup or the media. Run oncheck -cd on any tables that produce errors
and then redo the backup and validation. To check extents and reserved
pages, run oncheck -ce and oncheck -cr.
Backups with Corrupt Control Information
In this case, all the data is correct, but some of the backup control information
is incorrect, which could cause problems with the restore. Ask Technical
Support for assistance.
Backups with Missing Data
When a backup is missing data, it might not be recoverable. After a data loss,
try to restore from an older backup. Then restore the current logical logs.
Backups of Inconsistent Database Server Data
There are cases where archecker returns “success” to ON–Bar but shows
“failure” in the archecker message logs. This situation occurs when archecker
verifies that ON–Bar backed up the data correctly, but the database server
data was invalid or inconsistent when it was backed up.
Procedures for Fixing Backup Verification Problems
Follow these steps when a backup fails verification. The first procedure
diagnoses why a backup failed verification; the second procedure verifies an
expired backup; and the third procedure verifies a backup with missing data.
To diagnose why a backup failed verification:
1. Verify that the AC_CONFIG environment variable and the contents of the
archecker configuration file are set correctly. If these variables are set
incorrectly, the ON–Bar activity log displays a message.
2. Immediately redo the backup onto different media.
Do not reuse the original backup media because it might be bad.
3. Do not use any backups based on this backup. If the level-0 backup is bad,
do not use the corresponding level-1 and level-2 backups.
4. Verify this new backup. If verification succeeds, you will be able to restore
the storage spaces with confidence.
5. Use your storage manager to expire the backup that failed verification and
then run the onsmsync utility without arguments to remove the bad
backup from the sysutils and emergency boot files.
For more information on expiring data from the storage manager, see your
storage-manager documentation or the IBM Informix: Storage Manager
Administrator's Guide. For more information, see “Using the onsmsync
Utility” on page 8-7.
5-8 IBM Informix Backup and Restore Guide

6. If verification fails again, call Technical Support and provide them with the
following information:
v Your backup tool name (ON–Bar)
v The database server online.log
v The archecker message log
v The AC_STORAGE directory that contains the bitmap of the backup and
copies of important backed-up pages
If only part of the backup is corrupt, Technical Support can help you
determine which portion of the backup can be restored in an emergency.
7. Technical Support might advise you to run oncheck options against a set
of tables. (See “Backups with Corrupt Pages” on page 5-8.)
To verify an expired backup:
1. Check the status of the backup save set on the storage manager. If the
storage manager has expired the backup save set, the archecker utility
cannot verify it.
2. Use the storage-manager commands for activating the expired backup save
set. See your storage-manager documentation or the IBM Informix: Storage
Manager Administrator's Guide.
3. Retry the backup verification: onbar -v.
To restore when a backup is missing data:
1. Choose the date and time of an older backup than the one that just failed.
To perform a point-in-time verification, use the following command:
onbar -v -t datetime dbspace1
2. If the older backup passes verification, perform a point-in-time physical
restore using the same datetime value, then perform a log restore, as
follows:
onbar -r -p -t datetime dbspace1
onbar -r -l
3. To prevent ON-Bar from using a backup that failed verification as part of a
restore, expire the bad backup at your storage manager and then run the
onsmsync utility without arguments. The onsmsync utility removes
backups that are no longer held by the storage manager from the
emergency boot file and the sysutils database, thereby preventing ON-Bar
from attempting to use such backups.
Chapter 5. Verifying Backups 5-9

5-10 IBM Informix Backup and Restore Guide
Chapter 6. Restoring Data with ON-Bar
What Types of Restores Does ON-Bar Perform . . . . . . . . . . . . . . . . . . . 6-2
What Is a Warm Restore? . . . . . . . . . . . . . . . . . . . . . . . . . 6-2
What Is a Cold Restore? . . . . . . . . . . . . . . . . . . . . . . . . . 6-3
What Is a Mixed Restore? . . . . . . . . . . . . . . . . . . . . . . . . . 6-4
What Is a Parallel Restore? . . . . . . . . . . . . . . . . . . . . . . . . . 6-4
What Is a Whole-System Restore? (IDS) . . . . . . . . . . . . . . . . . . . . 6-4
What Is a Point-in-Time Restore? . . . . . . . . . . . . . . . . . . . . . . 6-4
What Is an Imported Restore? . . . . . . . . . . . . . . . . . . . . . . . 6-5
What Is a Rename Chunks Restore? (IDS) . . . . . . . . . . . . . . . . . . . . 6-5
What Is a Restartable Restore? (IDS) . . . . . . . . . . . . . . . . . . . . . 6-5
Using the Pre-Recovery Checklist . . . . . . . . . . . . . . . . . . . . . . . 6-6
Monitoring Restores . . . . . . . . . . . . . . . . . . . . . . . . . . . 6-7
Ensuring That Storage Devices Are Available . . . . . . . . . . . . . . . . . . 6-7
Restoring Save Sets with ISM . . . . . . . . . . . . . . . . . . . . . . . . 6-8
Performing a Complete Restore . . . . . . . . . . . . . . . . . . . . . . . . 6-8
Performing a Physical-Only or Logical-Only Restore . . . . . . . . . . . . . . . . 6-12
Using IBM Informix Server Administrator to Restore Data . . . . . . . . . . . . . . 6-15
Examples of ON-Bar Restore Commands . . . . . . . . . . . . . . . . . . . 6-15
Performing a Restore . . . . . . . . . . . . . . . . . . . . . . . . . 6-15
Restoring Specific Storage Spaces . . . . . . . . . . . . . . . . . . . . . 6-16
Performing a Logical Restore . . . . . . . . . . . . . . . . . . . . . . 6-16
Skipping Logical Replay (XPS) . . . . . . . . . . . . . . . . . . . . . . 6-17
Restoring Data on Extended Parallel Server . . . . . . . . . . . . . . . . . . 6-17
Performing a Physical Restore Followed By a Logical Restore . . . . . . . . . . . . 6-18
Salvaging Logical Logs . . . . . . . . . . . . . . . . . . . . . . . . 6-18
Performing a Cold Restore . . . . . . . . . . . . . . . . . . . . . . . 6-19
Performing a Whole-System Restore (IDS) . . . . . . . . . . . . . . . . . . 6-20
Restoring Data Using a Mixed Restore . . . . . . . . . . . . . . . . . . . 6-21
Restoring Data to a Point in Time . . . . . . . . . . . . . . . . . . . . . 6-24
Restoring from an Older Backup . . . . . . . . . . . . . . . . . . . . . 6-26
Performing a Point-in-Log Restore (IDS) . . . . . . . . . . . . . . . . . . . 6-26
Restoring Online Storage Spaces . . . . . . . . . . . . . . . . . . . . . 6-26
Re-Creating Chunk Files During a Restore . . . . . . . . . . . . . . . . . . 6-27
Restoring a Dropped Storage Space . . . . . . . . . . . . . . . . . . . . 6-28
Deferring Index Rebuild After Logical Restore (XPS) . . . . . . . . . . . . . . . 6-28
Restoring Data when Reinitializing the Database Server . . . . . . . . . . . . . 6-29
Renaming Chunks During a Restore (IDS) . . . . . . . . . . . . . . . . . . . . 6-30
Key Considerations . . . . . . . . . . . . . . . . . . . . . . . . . . . 6-30
New-Chunk Requirements . . . . . . . . . . . . . . . . . . . . . . . . 6-31
Syntax . . . . . . . . . . . . . . . . . . . . . . . . . . . . . . . 6-31
Examples of Renaming Chunks During a Restore . . . . . . . . . . . . . . . . . 6-32
Renaming Chunks with Command Line Options . . . . . . . . . . . . . . . . 6-33
Renaming Chunks with a File . . . . . . . . . . . . . . . . . . . . . . 6-33
Renaming Chunks While Specifying Other Options . . . . . . . . . . . . . . . 6-33
© Copyright IBM Corp. 1996, 2004 6-1
Renaming a Chunk to a Nonexistent Device . . . . . . . . . . . . . . . . . 6-33
Transferring Data with the Imported Restore . . . . . . . . . . . . . . . . . . . 6-34
Importing a Restore . . . . . . . . . . . . . . . . . . . . . . . . . . 6-35
Initializing High-Availability Data Replication with ON-Bar (IDS) . . . . . . . . . . . 6-37
Restoring Nonlogging Databases and Tables . . . . . . . . . . . . . . . . . . . 6-39
Restoring Table Types . . . . . . . . . . . . . . . . . . . . . . . . . . . 6-39
Using Restartable Restore to Recover Data (IDS) . . . . . . . . . . . . . . . . . . 6-41
Restartable Restore Example . . . . . . . . . . . . . . . . . . . . . . . . 6-41
Restarting a Restore . . . . . . . . . . . . . . . . . . . . . . . . . . 6-42
Interaction Between Restartable Restore and BAR_RETRY Value . . . . . . . . . . . 6-42
Restarting a Logical Restore . . . . . . . . . . . . . . . . . . . . . . . 6-43
Resolving a Failed Restore . . . . . . . . . . . . . . . . . . . . . . . . 6-44
Understanding ON-Bar Restore Processes . . . . . . . . . . . . . . . . . . . . 6-46
Warm-Restore Sequence on Dynamic Server . . . . . . . . . . . . . . . . . . 6-46
Cold-Restore Sequence on Dynamic Server . . . . . . . . . . . . . . . . . . . 6-48
Warm-Restore Sequence on Extended Parallel Server . . . . . . . . . . . . . . . 6-49
Cold-Restore Sequence on Extended Parallel Server . . . . . . . . . . . . . . . . 6-50
In This Chapter
This chapter describes the different types of restores that ON–Bar performs.
What Types of Restores Does ON-Bar Perform
You can restore storage spaces stored in both raw and cooked files. If your
system contains primary and mirror storage spaces, ON–Bar writes to both
the primary and mirror chunks at the same time during the restore, except for
an external restore. Mirroring is a strategy that pairs a primary chunk of one
storage space with an equal-sized mirror chunk.
Important: You cannot specify temporary dbspaces in a warm or cold restore.
When you restore the critical dbspaces (for example, the root
dbspace), the database server re-creates the temporary dbspaces,
but they are empty.
What Is a Warm Restore?
The database server is in online, quiescent, or fast-recovery mode in a warm
restore. Unless your database server has failed, you can restore noncritical
storage spaces in a warm restore in the following circumstances:
v The storage space is online, but one of its chunks is offline, recovering, or
inconsistent.
v The storage space is offline or down.
If the database server goes offline but the critical dbspaces are all right, bring
the database server online and perform a warm restore. If the database server
goes offline and a critical dbspace is down, perform a cold restore. For details,
see “What Is a Cold Restore?” on page 6-3.
6-2 IBM Informix Backup and Restore Guide
Dynamic Server
A warm restore can be performed after a dbspace has been renamed and a
level 0 archive of the rootdbs and renamed dbspace is taken.
End of Dynamic Server
What Is a Cold Restore?
If a critical dbspace is damaged because of a disk failure or corrupted data,
the database server goes offline automatically. If a critical dbspace goes down,
you must perform a cold restore of all critical dbspaces.
The database server must be offline on Dynamic Server or in microkernel
mode on Extended Parallel Server for a cold restore. You can perform a cold
restore of all storage spaces regardless of whether they were online or offline
when the database server went down.
Perform a cold restore when the database server fails or you need to perform
one of the following tasks:
v Point in time restore
v Point in log restore
v Whole system restore (IDS only)
v Imported restore
v Renaming chunks (IDS only)
A cold restore starts by physically restoring all critical storage spaces, then the
noncritical storage spaces, and finally the logical logs. The database server
goes into recovery mode after the reserved pages of the root dbspace are
restored. When the logical restore is complete, the database server goes into
quiescent mode. Use the onmode command to bring the database server
online. For more information, see “Performing a Cold Restore” on page 6-19.
Tip: If you mirror the critical dbspaces, you are less likely to have to perform
a cold restore after a disk failure because the database server can use the
mirrored storage space. If you mirror the logical-log spaces, you are
more likely to be able to salvage logical-log data if one or more disks
fail.
Dynamic Server
A cold restore can be performed after a dbspace has been renamed and a
level-0 backup of the rootdbs and renamed dbspace is performed.
End of Dynamic Server
Chapter 6. Restoring Data with ON-Bar 6-3
What Is a Mixed Restore?
A mixed restore is a cold restore of an initial group of storage spaces followed
by one or more warm restores of the remaining storage spaces. The initial set
of storage spaces you restore in the cold restore must include all critical
storage spaces in the server. To the extent that you do not restore all storage
spaces during the initial cold restore and avoid the time necessary to restore
them, you can bring the server online faster than if you were to perform a
cold restore of the entire server. You can then restore the remaining storage
spaces in one or more warm restores.
The storage spaces that you do not restore during the cold restore are not
available until after you restore them during a warm restore, although they
might not have been damaged by the failure. While a mixed restore makes the
critical data available sooner, the complete restore takes longer because the
logical logs are restored and replayed several times, once for the initial cold
restore and once for each subsequent warm restore.
What Is a Parallel Restore?
If you perform a restore using the onbar -r command, ON–Bar restores the
storage spaces in parallel and replays the logical logs once.
Dynamic Server
If BAR_MAX_BACKUP is set to 1, ON–Bar restores the storage spaces serially.
If you did not perform a whole-system backup, you must use the onbar -r
command to restore the data.
End of Dynamic Server
Extended Parallel Server
If BAR_WORKER_MAX is set to 1, ON–Bar restores the storage spaces
serially.
End of Extended Parallel Server
What Is a Whole-System Restore? (IDS)
Whole-system restores are always serial. If you backed up the whole system
(onbar -b -w), you can restore the whole system (onbar -r -w or onbar -r -p
-w) with or without restoring the logical logs. Choose a whole-system restore
for small systems or when you do not need to restore logs. You can perform a
whole-system point-in-time restore.
What Is a Point-in-Time Restore?
A point-in-time restore is a cold restore that you can use to undo mistakes
that might otherwise not be fixable. An example of such a mistake is dropping
6-4 IBM Informix Backup and Restore Guide
a table by mistake. A full restore restores the table during the physical restore
but drops it again during the logical restore. A point-in-time restore lets you
restore the data to the moment just before the table was dropped.
When you restore the database server to a specific time, any transactions that
were uncommitted at the specified point in time are lost. Also, all transactions
after the point-in-time restore are lost. For information on how to restore to a
specific time, see “Restoring Data to a Point in Time” on page 6-24.
What Is an Imported Restore?
ON–Bar allows you to restore objects to a different database server instance
than the one from which the data was backed up. This type of restore is
called an imported restore.
You can perform imported restores using whole-system, serial, or parallel
backups. You must use compatible versions of XBSA and storage managers for
both operations. If you perform a parallel imported restore, it must include all
storage spaces, logical logs, and administrative files from the source database
server to synchronize the instance. For more information, see “Transferring
Data with the Imported Restore” on page 6-34.
You cannot use a backup from one database server version to restore on a
different version.
What Is a Rename Chunks Restore? (IDS)
ON–Bar allows you to rename chunks by specifying new chunks paths and
offsets during a cold restore. This option is useful if you need to restore
storage spaces to a different disk from the one on which the backup was
made. You can rename any type of chunk, including critical chunks and
mirror chunks.
The ON-Bar rename chunk restore only works for cold restores. The critical
dbspaces (the rootdbs and any dbspace containing logical or physical logs)
must be restored during a cold restore. If you do not specify the list of
dbspaces to be restored, then the server will restore the critical dbspaces and
all the other dbspaces. But if you specify the list of dbspaces to be restored,
then the critical dbspaces must be included in the list.
For more information, see “Renaming Chunks During a Restore (IDS)” on
page 6-30.
What Is a Restartable Restore? (IDS)
If a failure occurs with the database server, media, or ON–Bar during a
restore, you can restart the restore from the place that it failed. You do not
have to restart the restore from the beginning. The RESTARTABLE_RESTORE
parameter controls whether ON–Bar is able to keep track of the storage spaces
and logical logs that were restored successfully.
Chapter 6. Restoring Data with ON-Bar 6-5
You can restart the following types of restores:
v Whole system
v Point in time
v Storage spaces
v Logical part of a cold restore
For more details, see “Using Restartable Restore to Recover Data (IDS)” on
page 6-41 and “RESTARTABLE_RESTORE (IDS)” on page 9-22.
Using the Pre-Recovery Checklist
Use this checklist before you decide if a restore is required:
v Has data been lost or corrupted?
v Does a committed transaction error need to be undone?
v Is the database server down or has a disk failed?
v Is a storage space or chunk down or inconsistent?
v Review the following files and outputs to obtain information about your
system:
– The onstat -d and onstat -l outputs
– The database server message log
– The ON–Bar activity log
– The storage-manager logs
– The oncheck output (Dynamic Server) or onutil CHECK output
(Extended Parallel Server)
– The oncfg files
– The physical data layout (disks)
– The database schema (dbschema command)
– The af* files (assertion failures), if any
– The core dump files, if any
Extended Parallel Server
– The xcfg file
End of Extended Parallel Server
– The ism_chk.pl report
The ism_chk.pl report is useful when you investigate backup or restore
problems. For details, see the IBM Informix: Storage Manager Administrator's
Guide.
v Estimate how long the restore will take.
6-6 IBM Informix Backup and Restore Guide

v Determine whether a warm or cold restore is needed. If you need to take
the database server offline for the restore, ask your client users to log off
the system.
v If you suspect a problem with the storage manager or the XBSA connection,
the operating system, or the storage media, contact your vendor.
Monitoring Restores
To determine the state of each storage space and its chunks, or the status of
the restore, examine the output of the onstat -d utility. The onstat -d utility
works only with the database server online. For more information on onstat
-d, see “onstat -d” on page B-1. The following table describes the information
in the second position of the flags column in the first (storage spaces) and
second (chunks) sections of the onstat -d output and the actions required to
solve the problems.
Extended Parallel Server
On Extended Parallel Server, you can use the xctl onstat -d utility to check the
storage spaces on all coservers.
End of Extended Parallel Server
onstat -d Flag Storage Space or Chunk State Action Required
(No flag) Storage space no longer exists. Perform a point-in-time cold restore to a
time before the storage space was
dropped.
D Chunk is down or storage space is
disabled.
Perform a warm restore of the affected
storage space.
I Chunk has been physically restored, but
needs a logical restore.
Perform a logical restore.
L Storage space is being logically restored. Retry the logical restore.
N Chunk is renamed and either down or
inconsistent. (IDS)
Perform a warm restore of the chunk
when the physical device is available.
O Chunk is online. No action required.
P Storage space is physically restored. Perform a logical restore, if one is not
already in progress.
R Storage space is being restored. Perform a physical or logical restore.
X Storage space or chunk is newly
mirrored.
No action required.
Ensuring That Storage Devices Are Available
Verify that storage devices and files are available before you begin a restore.
For example, when you drop a dbspace or mirroring for a dbspace after your
Chapter 6. Restoring Data with ON-Bar 6-7
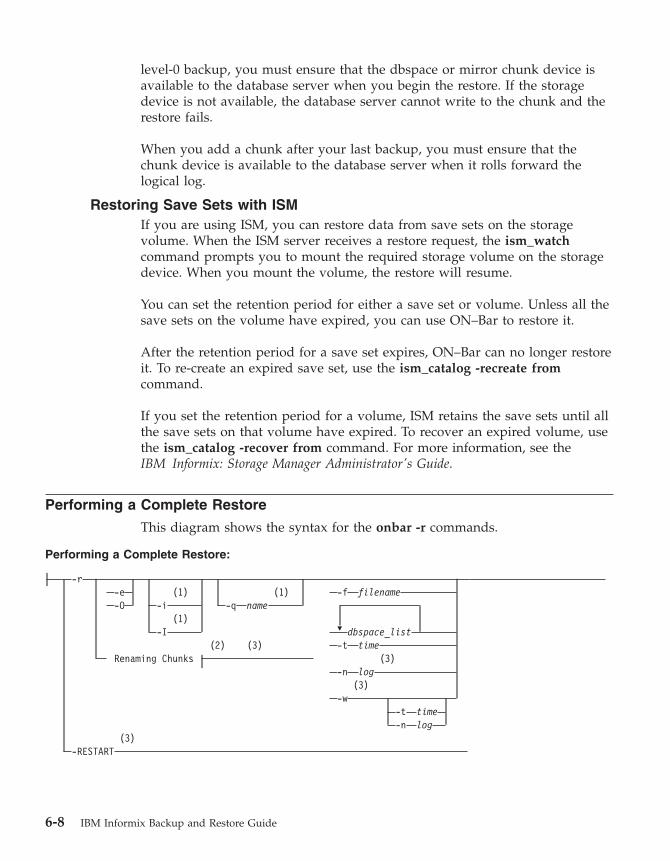
level-0 backup, you must ensure that the dbspace or mirror chunk device is
available to the database server when you begin the restore. If the storage
device is not available, the database server cannot write to the chunk and the
restore fails.
When you add a chunk after your last backup, you must ensure that the
chunk device is available to the database server when it rolls forward the
logical log.
Restoring Save Sets with ISM
If you are using ISM, you can restore data from save sets on the storage
volume. When the ISM server receives a restore request, the ism_watch
command prompts you to mount the required storage volume on the storage
device. When you mount the volume, the restore will resume.
You can set the retention period for either a save set or volume. Unless all the
save sets on the volume have expired, you can use ON–Bar to restore it.
After the retention period for a save set expires, ON–Bar can no longer restore
it. To re-create an expired save set, use the ism_catalog -recreate from
command.
If you set the retention period for a volume, ISM retains the save sets until all
the save sets on that volume have expired. To recover an expired volume, use
the ism_catalog -recover from command. For more information, see the
IBM Informix: Storage Manager Administrator's Guide.
Performing a Complete Restore
This diagram shows the syntax for the onbar -r commands.
Performing a Complete Restore:
�
-r
-e
(1)
(1)
-f
filename
-O
-i
-q
name
(1)
-I
dbspace_list
(2)
(3)
-t
time
Renaming Chunks
(3)
-n
log
(3)
-w
-t
time
-n
log
(3)
-RESTART
6-8 IBM Informix Backup and Restore Guide
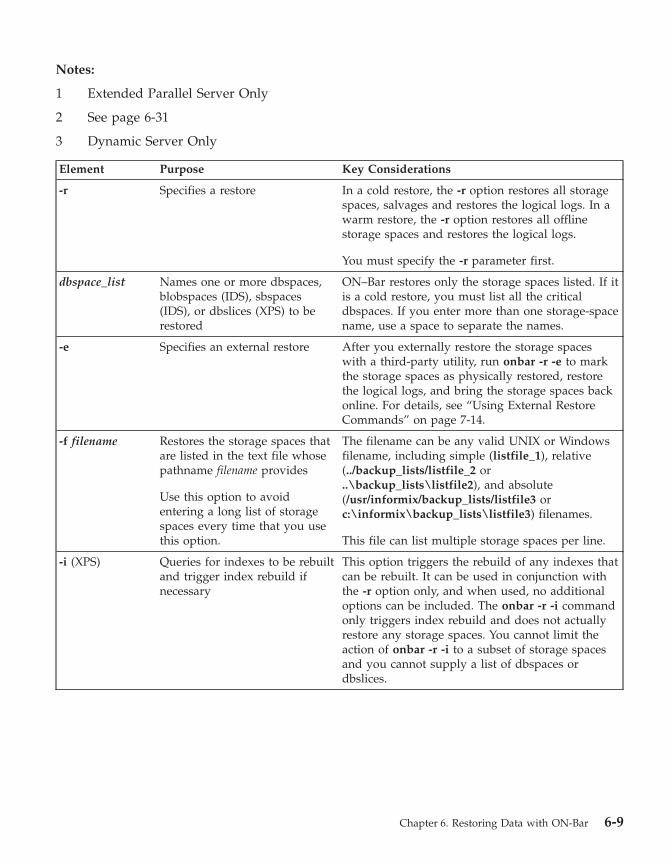
Notes:
1 Extended Parallel Server Only
2 See page 6-31
3 Dynamic Server Only
Element Purpose Key Considerations
-r Specifies a restore In a cold restore, the -r option restores all storage
spaces, salvages and restores the logical logs. In a
warm restore, the -r option restores all offline
storage spaces and restores the logical logs.
You must specify the -r parameter first.
dbspace_list Names one or more dbspaces,
blobspaces (IDS), sbspaces
(IDS), or dbslices (XPS) to be
restored
ON–Bar restores only the storage spaces listed. If it
is a cold restore, you must list all the critical
dbspaces. If you enter more than one storage-space
name, use a space to separate the names.
-e Specifies an external restore After you externally restore the storage spaces
with a third-party utility, run onbar -r -e to mark
the storage spaces as physically restored, restore
the logical logs, and bring the storage spaces back
online. For details, see “Using External Restore
Commands” on page 7-14.
-f filename Restores the storage spaces that
are listed in the text file whose
pathname filename provides
Use this option to avoid
entering a long list of storage
spaces every time that you use
this option.
The filename can be any valid UNIX or Windows
filename, including simple (listfile_1), relative
(../backup_lists/listfile_2 or
..\backup_lists\listfile2), and absolute
(/usr/informix/backup_lists/listfile3 or
c:\informix\backup_lists\listfile3) filenames.
This file can list multiple storage spaces per line.
-i (XPS) Queries for indexes to be rebuilt
and trigger index rebuild if
necessary
This option triggers the rebuild of any indexes that
can be rebuilt. It can be used in conjunction with
the -r option only, and when used, no additional
options can be included. The onbar -r -i command
only triggers index rebuild and does not actually
restore any storage spaces. You cannot limit the
action of onbar -r -i to a subset of storage spaces
and you cannot supply a list of dbspaces or
dbslices.
Chapter 6. Restoring Data with ON-Bar 6-9
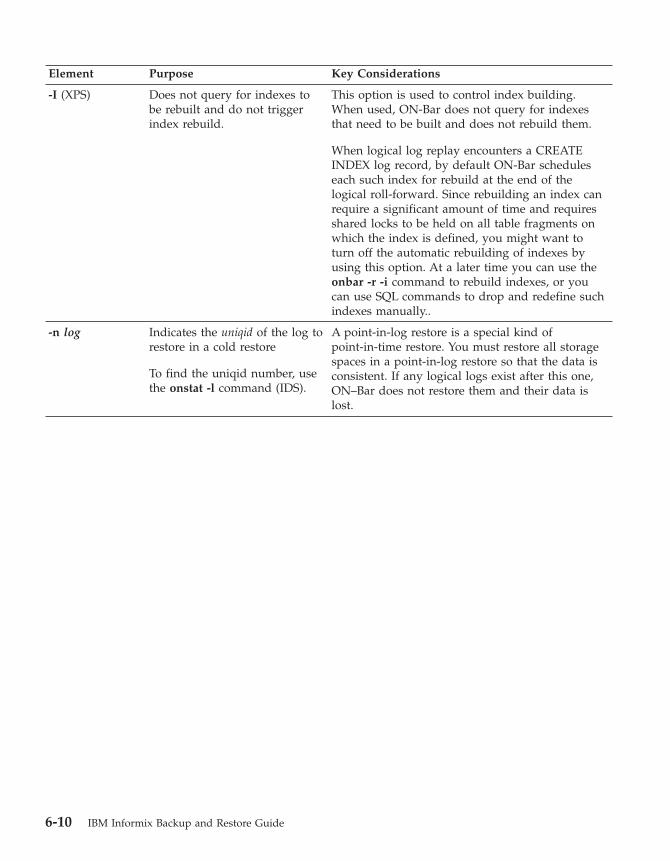
Element Purpose Key Considerations
-I (XPS) Does not query for indexes to
be rebuilt and do not trigger
index rebuild.
This option is used to control index building.
When used, ON-Bar does not query for indexes
that need to be built and does not rebuild them.
When logical log replay encounters a CREATE
INDEX log record, by default ON-Bar schedules
each such index for rebuild at the end of the
logical roll-forward. Since rebuilding an index can
require a significant amount of time and requires
shared locks to be held on all table fragments on
which the index is defined, you might want to
turn off the automatic rebuilding of indexes by
using this option. At a later time you can use the
onbar -r -i command to rebuild indexes, or you
can use SQL commands to drop and redefine such
indexes manually..
-n log Indicates the uniqid of the log to
restore in a cold restore
To find the uniqid number, use
the onstat -l command (IDS).
A point-in-log restore is a special kind of
point-in-time restore. You must restore all storage
spaces in a point-in-log restore so that the data is
consistent. If any logical logs exist after this one,
ON–Bar does not restore them and their data is
lost.
6-10 IBM Informix Backup and Restore Guide
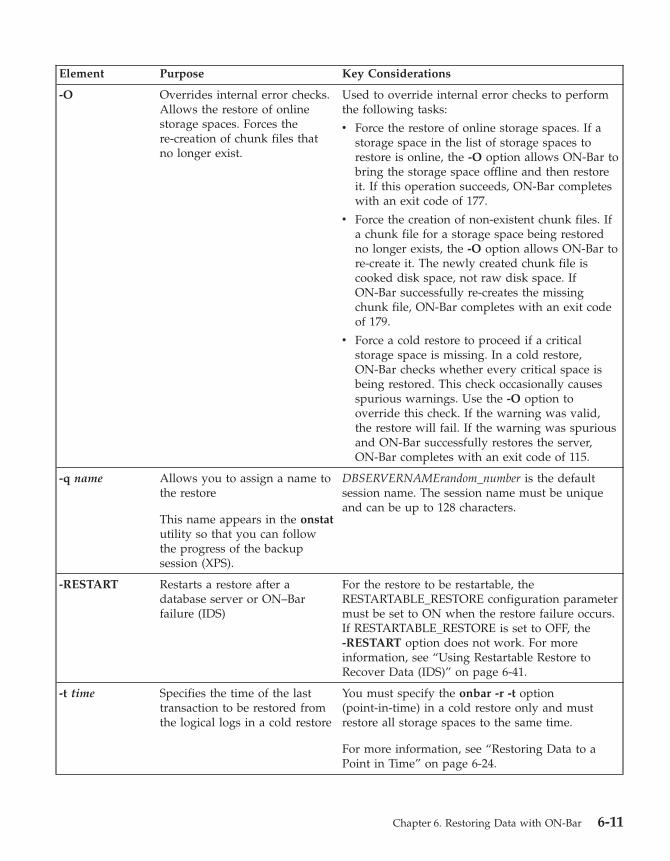
Element Purpose Key Considerations
-O Overrides internal error checks.
Allows the restore of online
storage spaces. Forces the
re-creation of chunk files that
no longer exist.
Used to override internal error checks to perform
the following tasks:
v Force the restore of online storage spaces. If a
storage space in the list of storage spaces to
restore is online, the -O option allows ON-Bar to
bring the storage space offline and then restore
it. If this operation succeeds, ON-Bar completes
with an exit code of 177.
v Force the creation of non-existent chunk files. If
a chunk file for a storage space being restored
no longer exists, the -O option allows ON-Bar to
re-create it. The newly created chunk file is
cooked disk space, not raw disk space. If
ON-Bar successfully re-creates the missing
chunk file, ON-Bar completes with an exit code
of 179.
v Force a cold restore to proceed if a critical
storage space is missing. In a cold restore,
ON-Bar checks whether every critical space is
being restored. This check occasionally causes
spurious warnings. Use the -O option to
override this check. If the warning was valid,
the restore will fail. If the warning was spurious
and ON-Bar successfully restores the server,
ON-Bar completes with an exit code of 115.
-q name Allows you to assign a name to
the restore
This name appears in the onstat
utility so that you can follow
the progress of the backup
session (XPS).
DBSERVERNAMErandom_number is the default
session name. The session name must be unique
and can be up to 128 characters.
-RESTART Restarts a restore after a
database server or ON–Bar
failure (IDS)
For the restore to be restartable, the
RESTARTABLE_RESTORE configuration parameter
must be set to ON when the restore failure occurs.
If RESTARTABLE_RESTORE is set to OFF, the
-RESTART option does not work. For more
information, see “Using Restartable Restore to
Recover Data (IDS)” on page 6-41.
-t time Specifies the time of the last
transaction to be restored from
the logical logs in a cold restore
You must specify the onbar -r -t option
(point-in-time) in a cold restore only and must
restore all storage spaces to the same time.
For more information, see “Restoring Data to a
Point in Time” on page 6-24.
Chapter 6. Restoring Data with ON-Bar 6-11
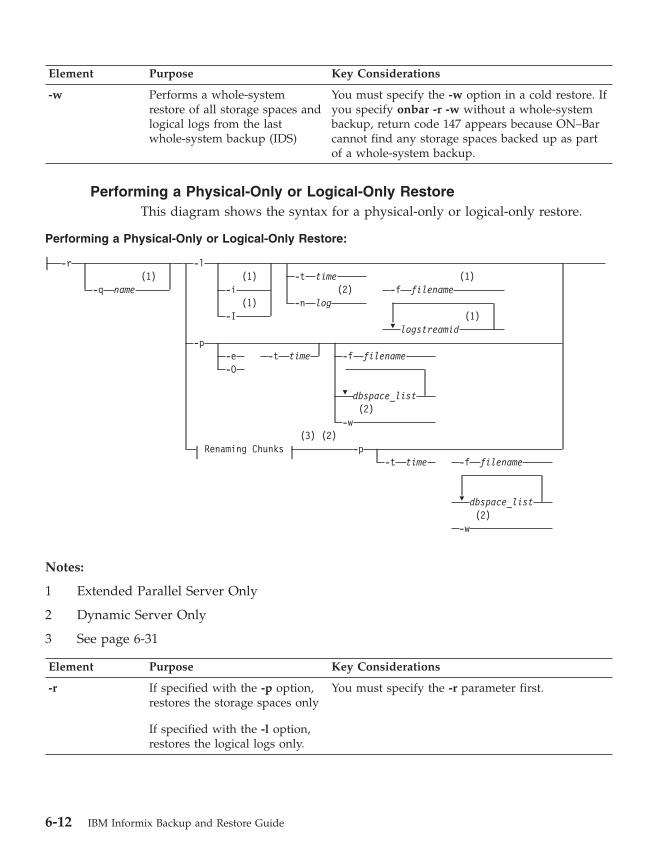
Element Purpose Key Considerations
-w Performs a whole-system
restore of all storage spaces and
logical logs from the last
whole-system backup (IDS)
You must specify the -w option in a cold restore. If
you specify onbar -r -w without a whole-system
backup, return code 147 appears because ON–Bar
cannot find any storage spaces backed up as part
of a whole-system backup.
Performing a Physical-Only or Logical-Only Restore
This diagram shows the syntax for a physical-only or logical-only restore.
Performing a Physical-Only or Logical-Only Restore:
-r
(1)
-q
name
�
�
�
-l
(1)
-t
time
(1)
-i
(2)
-f
filename
(1)
-n
log
-I
(1)
logstreamid
-p
-e
-t
time
-f
filename
-O
dbspace_list
(2)
-w
(3)
(2)
Renaming Chunks
-p
-t
time
-f
filename
dbspace_list
(2)
-w
Notes:
1 Extended Parallel Server Only
2 Dynamic Server Only
3 See page 6-31
Element Purpose Key Considerations
-r If specified with the -p option,
restores the storage spaces only
If specified with the -l option,
restores the logical logs only.
You must specify the -r parameter first.
6-12 IBM Informix Backup and Restore Guide
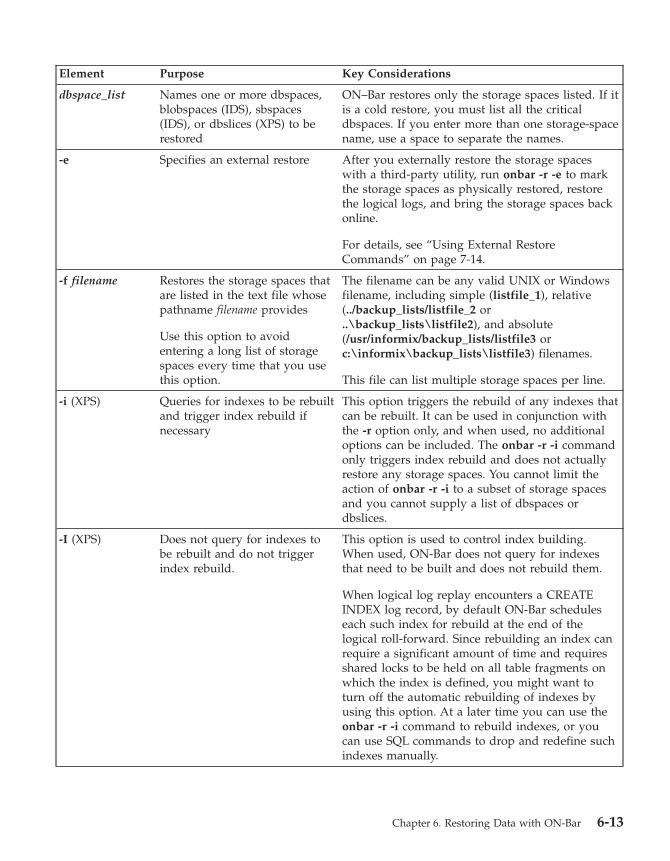
Element Purpose Key Considerations
dbspace_list Names one or more dbspaces,
blobspaces (IDS), sbspaces
(IDS), or dbslices (XPS) to be
restored
ON–Bar restores only the storage spaces listed. If it
is a cold restore, you must list all the critical
dbspaces. If you enter more than one storage-space
name, use a space to separate the names.
-e Specifies an external restore After you externally restore the storage spaces
with a third-party utility, run onbar -r -e to mark
the storage spaces as physically restored, restore
the logical logs, and bring the storage spaces back
online.
For details, see “Using External Restore
Commands” on page 7-14.
-f filename Restores the storage spaces that
are listed in the text file whose
pathname filename provides
Use this option to avoid
entering a long list of storage
spaces every time that you use
this option.
The filename can be any valid UNIX or Windows
filename, including simple (listfile_1), relative
(../backup_lists/listfile_2 or
..\backup_lists\listfile2), and absolute
(/usr/informix/backup_lists/listfile3 or
c:\informix\backup_lists\listfile3) filenames.
This file can list multiple storage spaces per line.
-i (XPS) Queries for indexes to be rebuilt
and trigger index rebuild if
necessary
This option triggers the rebuild of any indexes that
can be rebuilt. It can be used in conjunction with
the -r option only, and when used, no additional
options can be included. The onbar -r -i command
only triggers index rebuild and does not actually
restore any storage spaces. You cannot limit the
action of onbar -r -i to a subset of storage spaces
and you cannot supply a list of dbspaces or
dbslices.
-I (XPS) Does not query for indexes to
be rebuilt and do not trigger
index rebuild.
This option is used to control index building.
When used, ON-Bar does not query for indexes
that need to be built and does not rebuild them.
When logical log replay encounters a CREATE
INDEX log record, by default ON-Bar schedules
each such index for rebuild at the end of the
logical roll-forward. Since rebuilding an index can
require a significant amount of time and requires
shared locks to be held on all table fragments on
which the index is defined, you might want to
turn off the automatic rebuilding of indexes by
using this option. At a later time you can use the
onbar -r -i command to rebuild indexes, or you
can use SQL commands to drop and redefine such
indexes manually.
Chapter 6. Restoring Data with ON-Bar 6-13
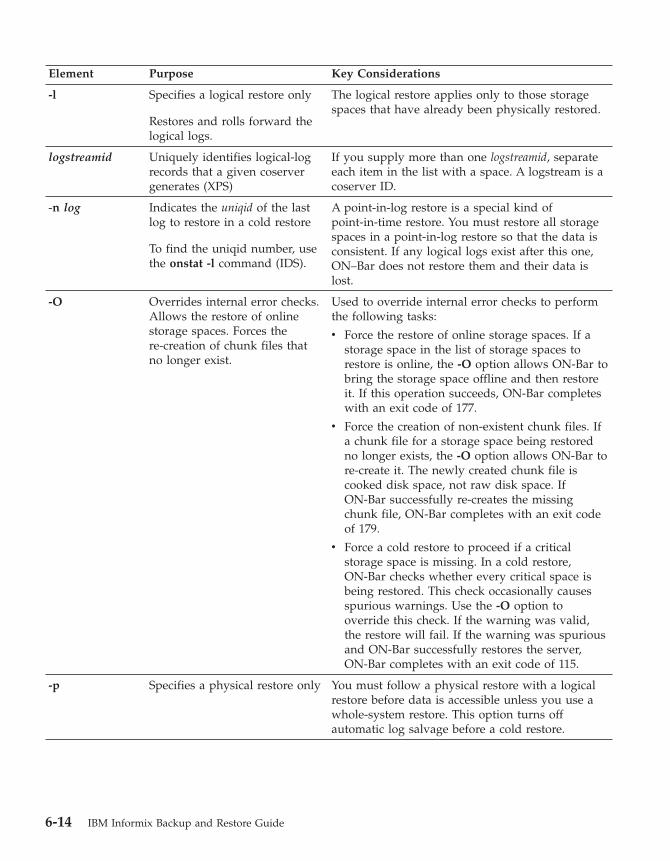
Element Purpose Key Considerations
-l Specifies a logical restore only
Restores and rolls forward the
logical logs.
The logical restore applies only to those storage
spaces that have already been physically restored.
logstreamid Uniquely identifies logical-log
records that a given coserver
generates (XPS)
If you supply more than one logstreamid, separate
each item in the list with a space. A logstream is a
coserver ID.
-n log Indicates the uniqid of the last
log to restore in a cold restore
To find the uniqid number, use
the onstat -l command (IDS).
A point-in-log restore is a special kind of
point-in-time restore. You must restore all storage
spaces in a point-in-log restore so that the data is
consistent. If any logical logs exist after this one,
ON–Bar does not restore them and their data is
lost.
-O Overrides internal error checks.
Allows the restore of online
storage spaces. Forces the
re-creation of chunk files that
no longer exist.
Used to override internal error checks to perform
the following tasks:
v Force the restore of online storage spaces. If a
storage space in the list of storage spaces to
restore is online, the -O option allows ON-Bar to
bring the storage space offline and then restore
it. If this operation succeeds, ON-Bar completes
with an exit code of 177.
v Force the creation of non-existent chunk files. If
a chunk file for a storage space being restored
no longer exists, the -O option allows ON-Bar to
re-create it. The newly created chunk file is
cooked disk space, not raw disk space. If
ON-Bar successfully re-creates the missing
chunk file, ON-Bar completes with an exit code
of 179.
v Force a cold restore to proceed if a critical
storage space is missing. In a cold restore,
ON-Bar checks whether every critical space is
being restored. This check occasionally causes
spurious warnings. Use the -O option to
override this check. If the warning was valid,
the restore will fail. If the warning was spurious
and ON-Bar successfully restores the server,
ON-Bar completes with an exit code of 115.
-p Specifies a physical restore only You must follow a physical restore with a logical
restore before data is accessible unless you use a
whole-system restore. This option turns off
automatic log salvage before a cold restore.
6-14 IBM Informix Backup and Restore Guide
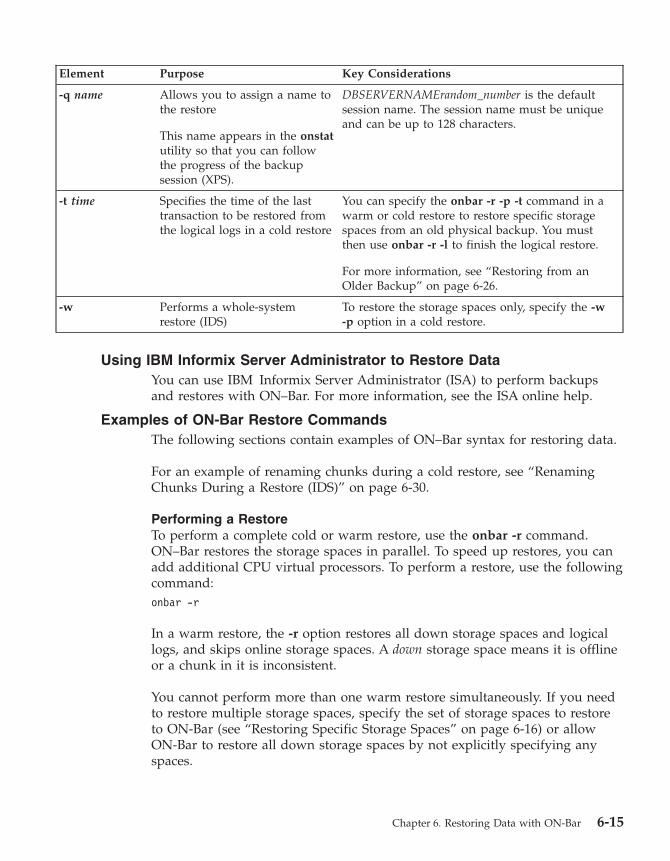
Element Purpose Key Considerations
-q name Allows you to assign a name to
the restore
This name appears in the onstat
utility so that you can follow
the progress of the backup
session (XPS).
DBSERVERNAMErandom_number is the default
session name. The session name must be unique
and can be up to 128 characters.
-t time Specifies the time of the last
transaction to be restored from
the logical logs in a cold restore
You can specify the onbar -r -p -t command in a
warm or cold restore to restore specific storage
spaces from an old physical backup. You must
then use onbar -r -l to finish the logical restore.
For more information, see “Restoring from an
Older Backup” on page 6-26.
-w Performs a whole-system
restore (IDS)
To restore the storage spaces only, specify the -w
-p option in a cold restore.
Using IBM Informix Server Administrator to Restore Data
You can use IBM Informix Server Administrator (ISA) to perform backups
and restores with ON–Bar. For more information, see the ISA online help.
Examples of ON-Bar Restore Commands
The following sections contain examples of ON–Bar syntax for restoring data.
For an example of renaming chunks during a cold restore, see “Renaming
Chunks During a Restore (IDS)” on page 6-30.
Performing a Restore
To perform a complete cold or warm restore, use the onbar -r command.
ON–Bar restores the storage spaces in parallel. To speed up restores, you can
add additional CPU virtual processors. To perform a restore, use the following
command:
onbar -r
In a warm restore, the -r option restores all down storage spaces and logical
logs, and skips online storage spaces. A down storage space means it is offline
or a chunk in it is inconsistent.
You cannot perform more than one warm restore simultaneously. If you need
to restore multiple storage spaces, specify the set of storage spaces to restore
to ON-Bar (see “Restoring Specific Storage Spaces” on page 6-16) or allow
ON-Bar to restore all down storage spaces by not explicitly specifying any
spaces.
Chapter 6. Restoring Data with ON-Bar 6-15
In a cold restore, the -r option automatically salvages the logical logs, and
restores all storage spaces and appropriate logical logs.
Tip: For faster performance in a restore, assign separate storage devices for
backing up storage spaces and logical logs. If physical and logical
backups are mixed together on the storage media, it takes longer to scan
the media during a restore.
Restoring Specific Storage Spaces
To restore particular storage spaces (for example, a dbspaces named
fin_dbspace1 and fin_dbspace2), use the -r option, as the following example
shows:
onbar -r fin_dbspace1 fin_dbspace2
You can also specify the storage spaces to restore by listing them in a text file
and passing the pathname of the file to ON-Bar with the -f option.
If any of the dbspaces that you request to restore are online, they are skipped
in the restore. ON–Bar writes a message to the activity log about the skipped
dbspaces.
Performing a Logical Restore
To perform a logical restore, use the following command:
onbar -r -l
Warning: Because the logical-log files are replayed using temporary space
during a warm restore, make sure that you have enough temporary
space for the logical restore.
The minimum amount of temporary space that the database server needs is
equal to:
Dynamic Server
v The total logical-log space for the database server instance, or the number
of log files to be replayed, whichever is smaller.
Tip: To improve performance, replay logical-log transactions in parallel
during a warm restore. Use the ON_RECVRY_THREADS
configuration parameter to set the number of parallel threads. To
replay logical-log transactions in parallel during a cold restore, use the
OFF_RECVRY_THREADS configuration parameter. For more
information, see your IBM Informix: Performance Guide.
6-16 IBM Informix Backup and Restore Guide

End of Dynamic Server
Extended Parallel Server
v The total logical-log space for the coservers on which storage spaces are
being restored, or the number of log files to be replayed, whichever is
smaller. Each coserver must have enough temporary space for all its
temporary log files.
End of Extended Parallel Server
Skipping Logical Replay (XPS)
The database server automatically skips logical replay when it is not necessary
during a warm restore. For example, if you lose a dbspace that contains a
large table that has not changed since its last backup, you can quickly restore
it without replaying the logical logs. If all dbspaces being restored on a
coserver meet the following criteria, logical replay is skipped for the warm
restore:
v A backup or set of incremental backups exists for the dbspaces.
v No logging activity has occurred for the dbspaces since the last backup.
Read-only (static) dbspaces will always satisfy this condition, unless they
were changed to read-only after the last backup was taken.
If dbspaces are being restored on multiple coservers, logical replay is skipped
on those coservers where no dbspaces need it and performed on those
coservers where at least one dbspace needs it.
In the following onstat -d example, the S flag shows that dbspace dbnoreplay
is a candidate for skipping logical replay. This S flag disappears the first time
that a logging operation occurs in that dbspace.
Dbspaces
address number flags fchunk nchunks flags owner name
a66c140 1 1 1 1 N informix rootdbs
a68bea8 2 20001 2 1 N S informix dbnoreplay
The database server always replays the logical logs during a cold restore.
Restoring Data on Extended Parallel Server
To restore all dbspaces in a dbslice named fin_slice, use the following
command:
onbar -r fin_slice
If you have a mixture of dbspaces to restore, some that require logical replay
and some that do not, follow these steps:
Chapter 6. Restoring Data with ON-Bar 6-17

1. Restore the dbspaces that do not require logical replay first.
2. Restore the dbspaces that require logical replay.
You can use the dbspaces restored in the first pass sooner but the total restore
time might be longer. This method enables you to quickly restore tables in a
data warehouse. For more information, see “Skipping Logical Replay (XPS)”
on page 6-17.
Performing a Physical Restore Followed By a Logical Restore
In certain situations, you might want to perform a restore in stages. If
multiple devices are available for the restore, you can restore multiple storage
spaces separately or concurrently, and then perform a single logical restore.
To perform a warm restore in stages:
1. Perform a physical restore:
onbar -r -p
2. Back up the logical logs:
onbar -b -l
3. Perform a logical restore:
onbar -r -l
To perform a cold restore in stages:
1. Optionally, salvage the logical logs manually:
onbar -b -l -s
To perform a cold restore without salvaging the logical logs, skip this step.
2. Perform a physical restore:
onbar -r -p
3. Perform a logical restore:
onbar -r -l
4. Synchronize the sysutils database and emergency boot files:
onsmsync
You must run onsmsync (without arguments) after performing a cold
restore that salvages logs.
For information on what actions to take when an error occurs during a
physical or logical restore, see “Resolving a Failed Restore” on page 6-44.
Salvaging Logical Logs
Decide whether you want to salvage the logical logs before you perform a
cold restore. If not, the data in the logical logs that has not been backed up is
6-18 IBM Informix Backup and Restore Guide
lost. If a disk is damaged, salvage the logs if they are still accessible before
you replace the disk. For more information, see “Performing a Cold Restore”
on page 6-19.
The onbar -r command automatically salvages the logical logs. Use the onbar
-r -p and onbar -r -l commands if you want to skip log salvage.
Dynamic Server
If you set the LTAPEDEV configuration parameter to /dev/null on UNIX or to
NUL or \dev\nul on Windows, the logical logs are not salvaged in any
ON–Bar restore (onbar -r or onbar -r -w, for example).
End of Dynamic Server
Avoid salvaging the logical logs in the following situations:
v When you perform an imported restore
Salvage the logical logs on the source database server but not on the target
database server. For more information, see “Transferring Data with the
Imported Restore” on page 6-34.
v If you reinitialize the database server (oninit -i) before you perform a cold
restore
Reinitialization creates new logical logs that do not contain the data that
you want to restore.
v If you install a new disk for the dbspace that contains the logical logs
Salvage the logs from the old disk, but not from the new disk.
Performing a Cold Restore
If a critical storage space is damaged because of a disk failure or corrupted
data, you must perform a cold restore. If a disk fails, you need to replace it
before you can perform a cold restore to recover data.
Extended Parallel Server
On Extended Parallel Server, if a critical dbspace on any of the coservers goes
down, you must perform a cold restore on all coservers.
End of Extended Parallel Server
Warning: Back up all storage spaces before you perform a cold restore. If you
do not and you try to perform a cold restore, data in the storage
spaces that were not backed up will be lost. The storage space is
marked as offline after the cold restore. Drop the storage space so
that you can reuse its disk space.
Chapter 6. Restoring Data with ON-Bar 6-19
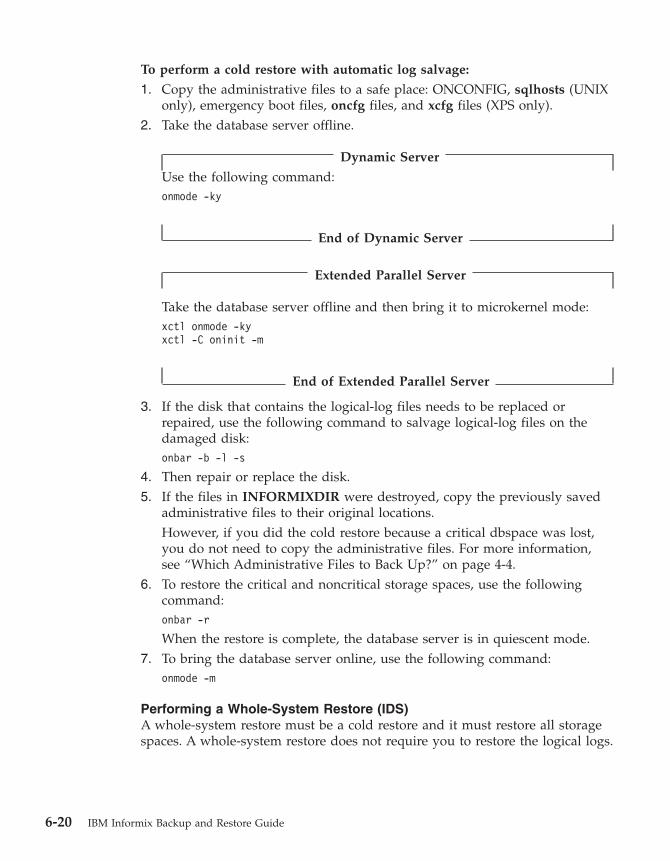
To perform a cold restore with automatic log salvage:
1. Copy the administrative files to a safe place: ONCONFIG, sqlhosts (UNIX
only), emergency boot files, oncfg files, and xcfg files (XPS only).
2. Take the database server offline.
Dynamic Server
Use the following command:
onmode -ky
End of Dynamic Server
Extended Parallel Server
Take the database server offline and then bring it to microkernel mode:
xctl onmode -ky
xctl -C oninit -m
End of Extended Parallel Server
3. If the disk that contains the logical-log files needs to be replaced or
repaired, use the following command to salvage logical-log files on the
damaged disk:
onbar -b -l -s
4. Then repair or replace the disk.
5. If the files in INFORMIXDIR were destroyed, copy the previously saved
administrative files to their original locations.
However, if you did the cold restore because a critical dbspace was lost,
you do not need to copy the administrative files. For more information,
see “Which Administrative Files to Back Up?” on page 4-4.
6. To restore the critical and noncritical storage spaces, use the following
command:
onbar -r
When the restore is complete, the database server is in quiescent mode.
7. To bring the database server online, use the following command:
onmode -m
Performing a Whole-System Restore (IDS)
A whole-system restore must be a cold restore and it must restore all storage
spaces. A whole-system restore does not require you to restore the logical logs.
6-20 IBM Informix Backup and Restore Guide
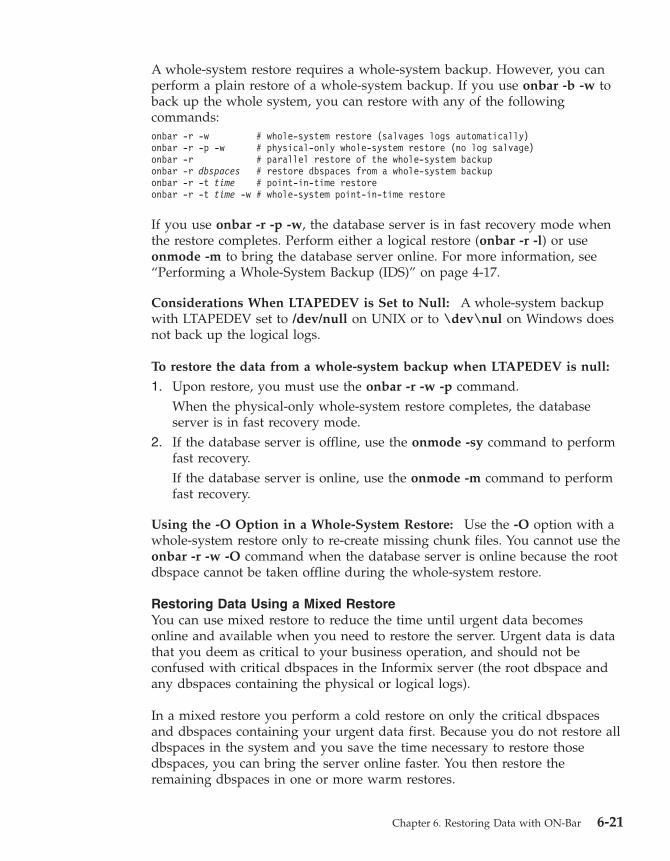
A whole-system restore requires a whole-system backup. However, you can
perform a plain restore of a whole-system backup. If you use onbar -b -w to
back up the whole system, you can restore with any of the following
commands:
onbar -r -w # whole-system restore (salvages logs automatically)
onbar -r -p -w # physical-only whole-system restore (no log salvage)
onbar -r # parallel restore of the whole-system backup
onbar -r dbspaces # restore dbspaces from a whole-system backup
onbar -r -t time # point-in-time restore
onbar -r -t time -w # whole-system point-in-time restore
If you use onbar -r -p -w, the database server is in fast recovery mode when
the restore completes. Perform either a logical restore (onbar -r -l) or use
onmode -m to bring the database server online. For more information, see
“Performing a Whole-System Backup (IDS)” on page 4-17.
Considerations When LTAPEDEV is Set to Null: A whole-system backup
with LTAPEDEV set to /dev/null on UNIX or to \dev\nul on Windows does
not back up the logical logs.
To restore the data from a whole-system backup when LTAPEDEV is null:
1. Upon restore, you must use the onbar -r -w -p command.
When the physical-only whole-system restore completes, the database
server is in fast recovery mode.
2. If the database server is offline, use the onmode -sy command to perform
fast recovery.
If the database server is online, use the onmode -m command to perform
fast recovery.
Using the -O Option in a Whole-System Restore: Use the -O option with a
whole-system restore only to re-create missing chunk files. You cannot use the
onbar -r -w -O command when the database server is online because the root
dbspace cannot be taken offline during the whole-system restore.
Restoring Data Using a Mixed Restore
You can use mixed restore to reduce the time until urgent data becomes
online and available when you need to restore the server. Urgent data is data
that you deem as critical to your business operation, and should not be
confused with critical dbspaces in the Informix server (the root dbspace and
any dbspaces containing the physical or logical logs).
In a mixed restore you perform a cold restore on only the critical dbspaces
and dbspaces containing your urgent data first. Because you do not restore all
dbspaces in the system and you save the time necessary to restore those
dbspaces, you can bring the server online faster. You then restore the
remaining dbspaces in one or more warm restores.
Chapter 6. Restoring Data with ON-Bar 6-21
Important: You should run the onsmsync utility, without arguments, after the
initial cold restore but before any warm restores.
For example, consider a database server with four dbspaces in addition to the
root dbspace: logdbs, dbs_1, dbs_2, and dbs_3. Suppose the logical logs are
stored in logdbs and the physical log is in the root dbspace. The critical
dbspaces that must be restored during the initial cold restore are rootdbs and
logdbs:
onbar -r rootdbs logdbs dbs_1
When the cold restore completes, you can bring the server online and any
data stored in rootdbs, logdbs, and dbs_1 becomes accessible.
Next, run the onsmsync utility without arguments:
onsmsync
You can then perform a warm restore of dbs_2:
onbar -r dbs_2
Finally, you can perform a warm restore of all remaining dbspaces (for this
example, only dbs_3):
onbar -r
Instead of performing two warm restores, you could have issued the onbar -r
command, without specifying a list of dbspaces, immediately after the initial
cold restore. This command would have restored all dbspaces remaining to be
restored: dbs_2 and dbs_3. Conversely, in a larger system with dozens of
dbspaces, you could divide the warm restore portion of the mixed restore into
several warm restores, each restoring only a small subset of the dbspaces
remaining to be restored in the system.
Tip: If you do not run onsmsync after the cold part of the mixed restore,
ON-Bar automatically runs onsmsync. You should run onsmsync as a
separate step so that you can address any errors that might occur. If you
allow ON-Bar to run onsmsync and onsmsync fails, the restore proceeds
but might fail.
Tip: You can perform both the initial cold restore and each subsequent warm
restore in stages, as described in the section “Performing a Physical
Restore Followed By a Logical Restore” on page 6-18.
Strategies for Using Mixed Restore: To successfully implement a
mixed-restore strategy, you should carefully select the set of dbspaces in
which you place your databases and database objects at the time you create
them. ON-Bar backs up and restores physical, not logical, entities. Thus,
6-22 IBM Informix Backup and Restore Guide
ON-Bar cannot restore a particular database or a particular set of tables.
Instead, ON-Bar restores a particular set of storage spaces. It is up to you to
track what is stored in those storage spaces.
For example, consider a database with the catalogs in the dbspace cat_dbs:
create database mydb in cat_dbs with log;
A table in this database is fragmented among the dbspaces tab_dbs_1 and
tab_dbs_2:
create table mytab (i integer, c char(20))
fragment by round robin in tab_dbs_1, tab_dbs_2;
An index for the table is stored in the dbspace idx_dbs:
create index myidx on mytab(i) in idx_dbs;
If you need to restore the server, you cannot access all of the data in the
example database until you have restored the dbspaces containing the
database catalogs, table data, and index: in this case, the dbspaces cat_dbsp,
tab_dbs_1, tab_dbs_2, and idx_dbsp.
To simplify the management and tracking of your data, it is recommended
that you divide your set of dbspaces into subsets in which you store data of a
particular urgency. When you create your database objects, place them in
dbspaces appropriate to their urgency. For example, if you have data with
three levels of urgency, you might want to place all the objects (database
catalogs, tables, and indexes) associated with your most urgent data in a
particular set of dbspaces or dbslices: for example, urgent_dbs_1,
urgent_dbs_2, ....urgent_dbs_n. You would place all the objects associated
with less urgent data in a different set of dbspaces (or dbslices): for example,
less_urgent_dbs_1, less_urgent_dbs_2, ...., less_urgent_dbs_k. Lastly, you
would place your remaining data in a different set of dbspaces (or dbslices):
for example, non_urgent_dbs_1, non_urgent_dbs_2, .... non_urgent_dbs_r.
If you need to restore the server, you would first perform a cold restore of all
critical dbspaces and dbspaces containing urgent data, urgent_dbs_1 through
urgent_dbs_n. For example, assume logical logs are distributed among two
dbspaces, logdbsp_1 and logdbsp_2, and the physical log is in rootdbs. The
critical dbspaces are therefore rootdbs, logdbsp_1, and logdbsp_2.
You would perform the initial cold restore by issuing the following ON-Bar
command:
onbar -r rootdbs logdbsp_1 logdbsp_2 urgent_dbs_1 ... urgent_dbs_2
At this point you can bring the server online and all business-urgent data is
available.
Chapter 6. Restoring Data with ON-Bar 6-23
Next, perform a warm restore for the less-urgent data:
onsmsync
onbar -r less_urgent_dbs_1 less_urgent_dbs_2 ..... less_urgent_dbs_k
Finally, you can perform a warm restore for the rest of the server by issuing
the following command:
onbar -r non_urgent_dbs_1 non_urgent_dbs_2 ... non_urgent_dbs_r
Alternatively, you can use the following command to restore all storage
spaces:
onbar -r
Restoring Data to a Point in Time
A point-in-time restore enables you to restore the database server to the state
it was in at a particular point in time. A point-in-time restore is typically used
to recover from a mistake. For example, if you accidentally dropped a
database, you can restore the server to a point in time just before you
dropped the database.
A point-in-time restore is specified by including the -t option in the ON-Bar
command; for example, onbar -r -t time. If you use the onbar -r -t time
command, you must restore all storage spaces to the same point in time.
Extended Parallel Server
Tip: In a multiple coserver configuration, a point-in-time restore automatically
restores all coservers to the same point in time. You cannot restore
individual coservers.
End of Extended Parallel Server
Important: To determine the appropriate date and time for the point-in-time
restore, use the onlog utility that the IBM Informix: Administrator's
Reference describes. The onlog output displays the date and time
of the committed transactions in the logical log. All data
transactions that occur after time or last_log are lost.
Performing a Cold Point-in-Time Restore:
To restore database server data to its state at a specific date and time, enter a
command using the date and time format for your GLS locale, as this example
shows:
onbar -r -t “2004-05-10 11:35:57”
6-24 IBM Informix Backup and Restore Guide
In this example, the restore replays transactions that committed on or before
the specified time, including any transactions with a commit time of 11:35:57.
Transactions in progress but not committed by 11:35:57 are rolled back.
Quotation marks are recommended around the date and time. The format for
the English locale is yyyy-mm-dd hh:mm:ss. If the GL_DATETIME
environment variable is set, you must specify the date and time according to
that variable. For an example of using a point-in-time restore in a non-English
locale, see “Point-in-Time Restore Example” on page D-2.
Dynamic Server
You can also perform a whole-system, point-in-time restore.
End of Dynamic Server
Performing a Point-in-Time Cold Restore in Stages: You can perform a
point-in-time cold restore in stages, similar to an ordinary restore in stages as
described in the section “Performing a Physical Restore Followed By a Logical
Restore” on page 6-18. Use the -t time option for both the physical and logical
restore steps:
onbar -r -p -t "2004-05-10 11:35:57"
onbar -r -l -t "2004-05-10 11:35:57"
Important: The point-in-time values for the -t option must be identical for
both the physical and logical restore.
Performing a Point-in-Time Mixed Restore: You can perform a point-in-time
mixed restore. Supply a point-in-time value to the initial cold restore by using
the -t time option, then restore the remaining storage spaces in one or more
warm restores. Do not include the -t time option in the warm restores.
The following example performs a cold restore for a subset of the storage
spaces (including all critical dbspaces) in the initial cold restore, and then
performs a warm restore for dbspace_2 and dbspace_3, followed by a warm
restore of dbspace_4 and dbspace_5, and finally performs a warm restore of
all remaining storage spaces:
onbar -r -t "2004-05-10 11:35:57" rootdbs logspace_1 dbspace_1
onsmsync
onbar -r dbspace_2 dbspace_3
onbar -r dbspace_4 dbspace_5
onbar -r
Tip: You can perform the cold part of the mixed restore in stages, as
described in the section “Performing a Point-in-Time Cold Restore in
Stages.” Supply a list of dbspaces or dbslices to the physical restore. For
example:
Chapter 6. Restoring Data with ON-Bar 6-25
onbar -r -p -t "2004-05-10 11:35:57" rootdbs_1 dbslice_1
onbar -r -l "2004-05-10 11:35:57"
Performing a Point-In-Time Restore with Multiple Timelines: When you
perform more than one point-in-time restore, you create multiple timelines.
You can specify any time in any timeline with the onbar -r -t time command.
Performing a Point-in-Time Warm Restore: You cannot perform a
point-in-time warm restore. A warm restore of a dbspace will always
roll-forward the dbspace to the latest time available in the logical logs.
Restoring from an Older Backup
By default, ON–Bar restores the latest backup. If you do not want to restore
this backup (for example, when backup verification failed or the backup
media was lost), you can restore from an older backup.
To restore from an older backup using a physical point-in-time restore:
1. Find the time of the older backup in the message log or ON–Bar activity
log or from the storage manager.
2. To restore all or specific storage spaces, issue the following commands:
onbar -r -p -t time [dbspaces_from_older_backup]
onbar -r -p [remaining_dbspaces]
onbar -r -l
To restore from an older backup by expiring the bad backup:
1. Expire the bad backup in the storage manager.
2. Run onsmsync without arguments.
3. To restore the data, issue the following command:
onbar -r
Performing a Point-in-Log Restore (IDS)
A point-in-log restore is similar to a point-in-time restore. The point-in-log
restore stops at the time of the last committed transaction listed in the logical
log. You must use point-in-log restore in a cold restore only and you must
restore all storage spaces. To perform a point-in-log restore, use the following
command:
onbar -r -n log_id
You can specify any log ID from any timeline to restore to a specific logical
log. If the specific logical log applies to more than one timeline, then ON-Bar
uses the latest one.
Restoring Online Storage Spaces
Use the following command to force a restore of online storage spaces (except
critical dbspaces) in a warm restore:
6-26 IBM Informix Backup and Restore Guide
onbar -r -O dbsp1 dbsp2
The database server automatically shuts down each storage space before it
starts to restore it. Taking the storage space offline ensures that users do not
try to update its tables during the restore process.
Dynamic Server
For special considerations on using the -O option, see “Using the -O Option in
a Whole-System Restore” on page 6-21.
End of Dynamic Server
Re-Creating Chunk Files During a Restore
If the disk or file system fails, one or more chunk files could be missing from
the dbspace. If you use the -O option in a warm or cold restore, ON–Bar
re-creates the missing chunk files, including any necessary directories, before
restoring the dbspace as long as enough space exists on the file system. The
newly created chunk files are cooked files and are owned by group informix
on UNIX or group Informix-Admin on Windows.
To restore when using cooked chunks:
1. Install the new disk.
2. On UNIX, mount the device as a file system.
On Windows, format the disk.
3. Allocate disk space for the chunk file.
For instructions, see the chapter on managing data in the IBM Informix:
Administrator's Guide.
4. Issue the following command to re-create the chunk files and restore the
dbspace:
onbar -r -O crashedspace
Important: ON–Bar does not re-create chunk files during a logical restore if
the logical logs contain chunk-creation records.
To restore when using raw chunks:
1. Install the new disk.
UNIX Only
2. If you use symbolic links to raw devices, create new links for the down
chunks that point to the newly installed disk.
Chapter 6. Restoring Data with ON-Bar 6-27
ON–Bar restores the chunk file to where the symbolic link points.
End of UNIX Only
3. Issue the following command to restore the dbspace:
onbar -r crashedspace
Restoring a Dropped Storage Space
If you accidentally drop a storage space, you can use a point-in-time restore
or a point-in-log restore to recover it.
To restore a dropped storage space using separate physical and logical
restores:
1. In this example, the database server has dbspace1, which was dropped
accidentally, and dbspace2. Use onlog or the database server message log
to obtain a time before dbspace1 was dropped.
2. Shut down the database server.
3. Perform a physical-only restore of all storage spaces:
onbar -r -p -t time rootdbs dbspace1 dbspace2
4. To restore the dropped storage space and prevent the logical log from
replaying the drop, enter one of the following commands:
a. If you use the point-in-log command, specify the uniqid of the log
before the log that contains the drop command:
onbar -r -l -n uniqid
b. If you use the logical point-in-time command, use the same time as in
step 3:
onbar -r -l -t time
To restore a dropped storage space when the chunk files were also deleted:
1. Use the onlog utility to find the logical-log file that contains the dropped
transaction for the storage space.
2. To restore a dropped storage space when the chunk files were deleted,
enter the following command:
onbar -r -t time -O
The point-in-time restore restores the dropped storage space and
automatically re-creates the chunk files.
Warning: You must restore the data to a point in time before the storage
space was dropped in both the physical and logical restores.
Deferring Index Rebuild After Logical Restore (XPS)
When logical log replay encounters a CREATE INDEX log record, by default
ON-Bar schedules each such index for rebuild at the end of logical
roll-forward. Since rebuilding an index can require a significant amount of
6-28 IBM Informix Backup and Restore Guide
time and requires share locks to be held on all table fragments on which the
index is defined, you might want to turn off the automatic rebuilding of
indexes.
To prevent ON-Bar from rebuilding indexes at the end of logical roll-forward,
use the -I option in the restore command.
For example, the following command restores the entire system, without
rebuilding indexes:
onbar -r -I
When you use the -I option with ON-Bar, any indexes that did not already
exist at the time the backup was performed will be unavailable or might be
unusable after the restore.
You can re-create the down indexes in one of the following ways:
v Drop and re-define them manually using the DROP INDEX and CREATE
INDEX SQL commands.
v Use the onbar -r -i command. The onbar -r -i command only triggers index
rebuild among storage spaces that are already online; it does not restore
any storage spaces.
The -I and -i options are particularly useful if you have created many indexes
since your last backup and have performed a mixed restore on the system. In
this case, you might want to use the -I option in each phase of the mixed
restore. Then, after you have restored the entire system, run the onbar -r -i
command to re-create the down indexes.
Restoring Data when Reinitializing the Database Server
Any backups that you performed before reinitializing the database server are
unusable. During initialization, ON–Bar saves the emergency boot file
elsewhere and starts a new, empty emergency boot file. Do not use the copy
of the emergency boot file unless you want to restore the previous database
server instance.
To reinitialize the database server after a failure when you do not need the
old data:
1. Do not copy the old emergency boot file into the database server directory
($INFORMIXDIR/etc on UNIX or %INFORMIXDIR%\etc on Windows).
2. To perform a complete backup, use ON-Bar -b.
To reinitialize the database server and restore the old data:
1. Before you reinitialize the database server, copy the administrative files
(emergency boot, oncfg, and ONCONFIG files) to a different directory, if
possible.
Chapter 6. Restoring Data with ON-Bar 6-29
2. Reinitialize the database server.
3. Re-copy the administrative files into the database server directory because
you need the information in the old emergency boot file.
If the administrative files are unavailable, copy them from the last backup
into the database server directory.
4. Perform a restore. Do not salvage the logical logs.
5. Any changes made after reinitialization are lost.
6. Verify that you restored the correct instance of the critical and noncritical
storage spaces.
Renaming Chunks During a Restore (IDS)
You can rename chunks by specifying new chunks paths and offsets during a
cold restore with ON–Bar. This option is useful if you need to restore storage
spaces to a different disk from the one on which the backup was made. You
can rename any type of chunk, including critical chunks and mirror chunks.
Tip: If you use symbolic links to chunk names, you might not need to rename
chunks; you need only edit the symbolic name definitions. For more
information, see the IBM Informix: Administrator's Guide.
Key Considerations
During a cold restore, ON–Bar performs the following validations to rename
chunks:
1. It validates that the old chunk pathnames and offsets exist in the archive
reserved pages.
2. It validates that the new chunk pathnames and offsets do not overlap each
other or existing chunks.
3. If renaming the primary root or mirror root chunk, it updates the
ONCONFIG file parameters ROOTPATH and ROOTOFFSET, or
MIRRORPATH, and MIRROROFFSET. The old version of the ONCONFIG
file is saved as $ONCONFIG.localtime.
4. It restores the data from the old chunks to the new chunks (if the new
chunks exist).
5. It writes the rename information for each chunk to the online log.
If either of the validation steps fail, the renaming process stops and ON–Bar
writes an error message to the ON–Bar activity log.
Warning: Perform a level-0 archive after you rename chunks; otherwise you
will have to restore the renamed chunk to its original pathname
and then rename the chunk again.
6-30 IBM Informix Backup and Restore Guide
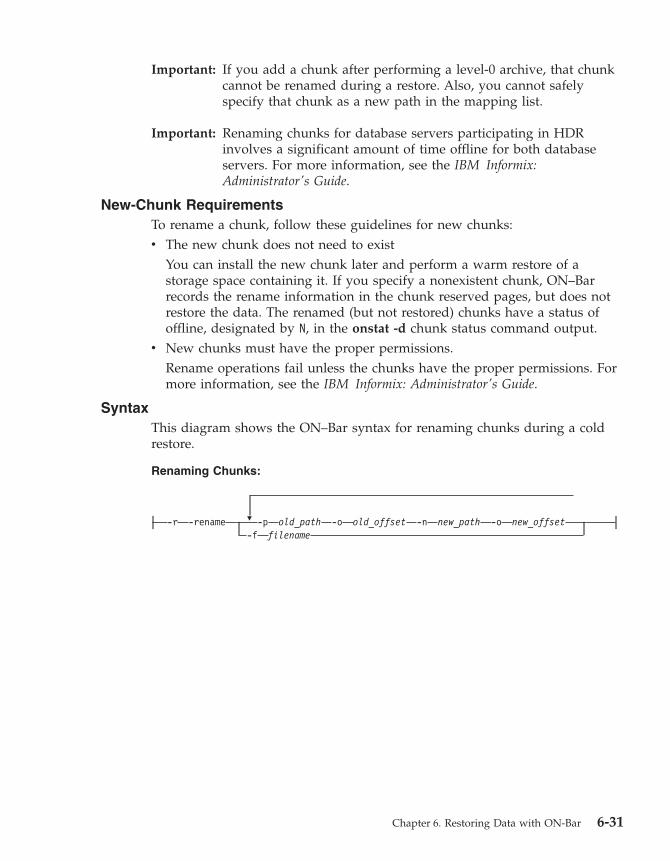
Important: If you add a chunk after performing a level-0 archive, that chunk
cannot be renamed during a restore. Also, you cannot safely
specify that chunk as a new path in the mapping list.
Important: Renaming chunks for database servers participating in HDR
involves a significant amount of time offline for both database
servers. For more information, see the IBM Informix:
Administrator's Guide.
New-Chunk Requirements
To rename a chunk, follow these guidelines for new chunks:
v The new chunk does not need to exist
You can install the new chunk later and perform a warm restore of a
storage space containing it. If you specify a nonexistent chunk, ON–Bar
records the rename information in the chunk reserved pages, but does not
restore the data. The renamed (but not restored) chunks have a status of
offline, designated by N, in the onstat -d chunk status command output.
v New chunks must have the proper permissions.
Rename operations fail unless the chunks have the proper permissions. For
more information, see the IBM Informix: Administrator's Guide.
Syntax
This diagram shows the ON–Bar syntax for renaming chunks during a cold
restore.
Renaming Chunks:
-r
-rename
�
-p
old_path
-o
old_offset
-n
new_path
-o
new_offset
-f
filename
Chapter 6. Restoring Data with ON-Bar 6-31

Element Purpose Key Considerations
-r Specifies a restore You must specify the -r parameter first.
-rename Renames one or more chunks
during a cold restore
-f filename Specifies a file containing the
names and offsets of chunks to
be renamed and their new
locations
Use to rename a large number
of chunks at one time
The filename can be any valid UNIX or Windows
filename, including simple (listfile_1), relative
(../backup_lists/listfile_2 or
..\backup_lists\listfile2), and absolute
(/usr/informix/backup_lists/listfile3 or
c:\informix\backup_lists\listfile3) filenames.
In the file, list the old chunk pathname, the old
offset, the new chunk pathname, and the new
offset. Put a blank space or a tab between each
item. Put information for each chunk on a separate
line. Blank lines are ignored. Begin comment lines
with a # symbol.
-p old_path-o old_offset-n new_path-o new_offset
Specifies the chunk to be
renamed and its new location
Use to rename one or more
chunks at one time
The variables for this element are:
v old_path is the current path and filename of the
chunk
v old_offset is the current offset of the chunk, in
kilobytes
v new_path is the new path and filename of the
chunk
v new_offset is the new offset of the chunk
You can use the following options after the -rename command:
v -f filename
v dbspace_list
v -t time
v -n log
v -w
v -p
For more information on these options, see “Performing a Complete Restore”
on page 6-8.
Examples of Renaming Chunks During a Restore
To rename a chunk, provide the old chunk location and the new chunk
location, either at the command line or in a file.
The following table lists example values for two chunks that are used in the
examples in this section.
6-32 IBM Informix Backup and Restore Guide
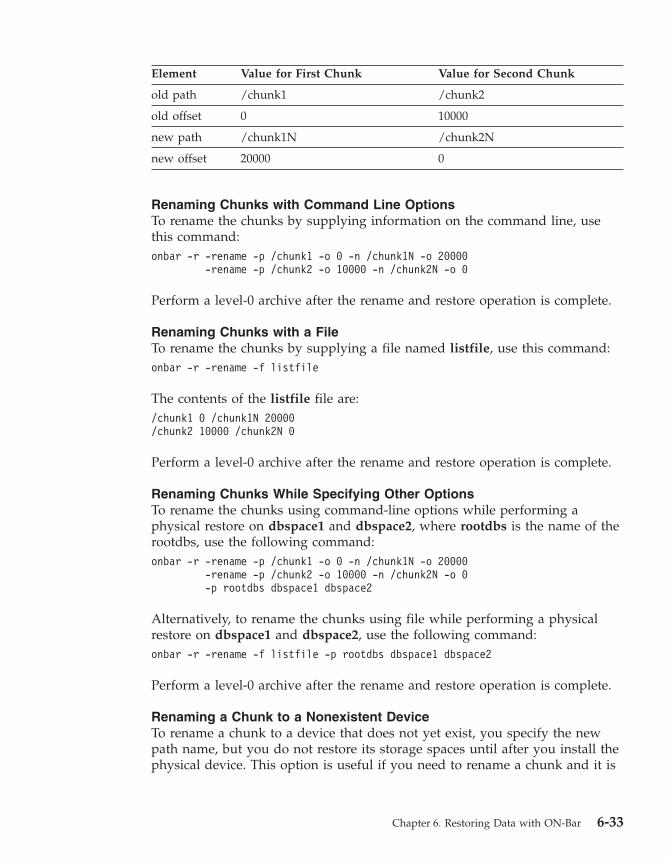
Element Value for First Chunk Value for Second Chunk
old path /chunk1 /chunk2
old offset 0 10000
new path /chunk1N /chunk2N
new offset 20000 0
Renaming Chunks with Command Line Options
To rename the chunks by supplying information on the command line, use
this command:
onbar -r -rename -p /chunk1 -o 0 -n /chunk1N -o 20000
-rename -p /chunk2 -o 10000 -n /chunk2N -o 0
Perform a level-0 archive after the rename and restore operation is complete.
Renaming Chunks with a File
To rename the chunks by supplying a file named listfile, use this command:
onbar -r -rename -f listfile
The contents of the listfile file are:
/chunk1 0 /chunk1N 20000
/chunk2 10000 /chunk2N 0
Perform a level-0 archive after the rename and restore operation is complete.
Renaming Chunks While Specifying Other Options
To rename the chunks using command-line options while performing a
physical restore on dbspace1 and dbspace2, where rootdbs is the name of the
rootdbs, use the following command:
onbar -r -rename -p /chunk1 -o 0 -n /chunk1N -o 20000
-rename -p /chunk2 -o 10000 -n /chunk2N -o 0
-p rootdbs dbspace1 dbspace2
Alternatively, to rename the chunks using file while performing a physical
restore on dbspace1 and dbspace2, use the following command:
onbar -r -rename -f listfile -p rootdbs dbspace1 dbspace2
Perform a level-0 archive after the rename and restore operation is complete.
Renaming a Chunk to a Nonexistent Device
To rename a chunk to a device that does not yet exist, you specify the new
path name, but you do not restore its storage spaces until after you install the
physical device. This option is useful if you need to rename a chunk and it is
Chapter 6. Restoring Data with ON-Bar 6-33
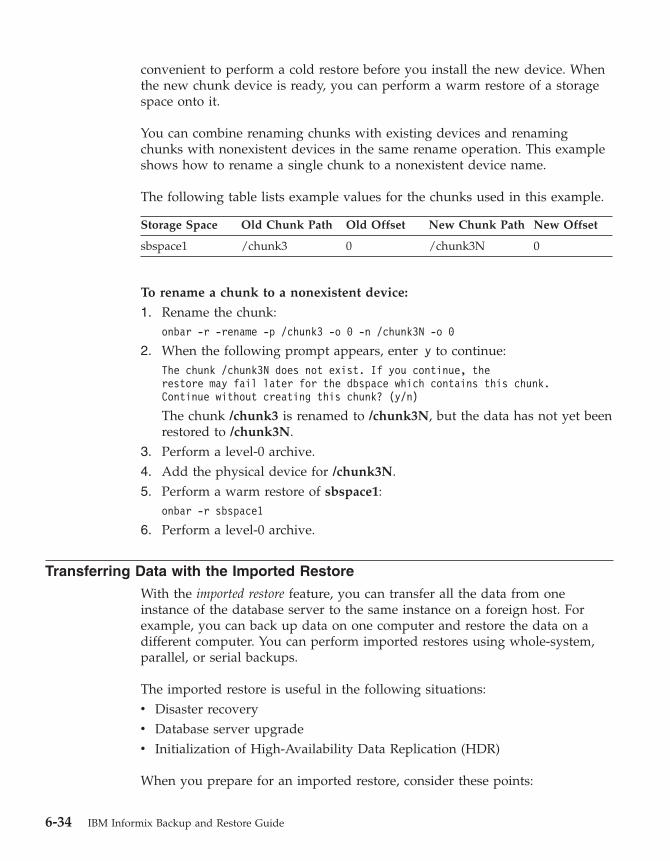
convenient to perform a cold restore before you install the new device. When
the new chunk device is ready, you can perform a warm restore of a storage
space onto it.
You can combine renaming chunks with existing devices and renaming
chunks with nonexistent devices in the same rename operation. This example
shows how to rename a single chunk to a nonexistent device name.
The following table lists example values for the chunks used in this example.
Storage Space Old Chunk Path Old Offset New Chunk Path New Offset
sbspace1 /chunk3 0 /chunk3N 0
To rename a chunk to a nonexistent device:
1. Rename the chunk:
onbar -r -rename -p /chunk3 -o 0 -n /chunk3N -o 0
2. When the following prompt appears, enter y to continue:
The chunk /chunk3N does not exist. If you continue, the
restore may fail later for the dbspace which contains this chunk.
Continue without creating this chunk? (y/n)
The chunk /chunk3 is renamed to /chunk3N, but the data has not yet been
restored to /chunk3N.
3. Perform a level-0 archive.
4. Add the physical device for /chunk3N.
5. Perform a warm restore of sbspace1:
onbar -r sbspace1
6. Perform a level-0 archive.
Transferring Data with the Imported Restore
With the imported restore feature, you can transfer all the data from one
instance of the database server to the same instance on a foreign host. For
example, you can back up data on one computer and restore the data on a
different computer. You can perform imported restores using whole-system,
parallel, or serial backups.
The imported restore is useful in the following situations:
v Disaster recovery
v Database server upgrade
v Initialization of High-Availability Data Replication (HDR)
When you prepare for an imported restore, consider these points:
6-34 IBM Informix Backup and Restore Guide
v Make sure that your storage manager supports imported restores.
v The whole-system backup must include all storage spaces; logical logs are
optional.
The parallel backup must include all storage spaces and logical logs.
v You can change the database server name in an imported restore.
Important: You cannot use a backup from one database server version to
restore on a different version.
For information on importing a restore with ISM, see the IBM Informix:
Storage Manager Administrator's Guide. For information on using HDR, see the
IBM Informix: Administrator's Guide. If you are using a third-party storage
manager, use the following procedure for an imported restore.
To set up an imported restore:
1. Install the database server and the storage manager on the target
computer. Both computers must have the following:
v Identical hardware and operating systems
v Identical database server versions
v Be on the same LAN or WAN
v Identical storage-manager versions
v Compatible XBSA libraries
The source computer (also called the primary server) contains the current
instance that you want to replicate. The target computer (also called the
secondary server) contains the computer where you want to replicate the
source instance.
2. Set up the storage manager on the target database server instance.
a. Define the same type of storage devices as on the source instance.
b. Label the storage media with the correct pool names.
c. Mount the storage devices.
d. Update the sm_versions file on the target computer with the
storage-manager version.
Importing a Restore
Before you back up the data, set the storage-manager environment variables.
To back up the data and migrate the storage-manager objects:
1. Perform a level-0 backup (ON-Bar -b or onbar -b -w) of all storage spaces
on the source database server. (Do not perform an incremental backup.)
2. If you are using ISM, follow these steps:
a. Shut down the storage manager on both computers.
Chapter 6. Restoring Data with ON-Bar 6-35

b. Create a tar file of the storage-manager directories on the source
computer.
c. Copy this tar file and unpack it on the target computer.
With other storage managers, you might be able to use backup tapes or
import the storage-manager directories over the network. For more
information, see your storage-manager documentation.
3. Mount the transferred storage volumes.
v If the backup files are on disk, copy them from the source computer to
the target computer.
v If the backup is on tape, mount the transferred volumes on the storage
devices that are attached to the target computer. Both the source and
target computers must use the same type of storage devices such as
8mm tape or disk.
v Some storage managers support remote backups to a backup server. If
the backup is on the backup server, retrieve the backup from that
backup server.4. Use storage-manager commands (such as nsradmin -c) to add the source
hostname as a client on the target computer.
To perform the imported restore:
1. Copy the following files from the source computer to the target computer:
a. Emergency boot file
Rename the emergency boot file with the target database server
number. For example, rename ixbar.51 to ixbar.52. The emergency boot
file needs only the entries from the level-0 backup on the source
computer.
On Dynamic Server, the filename is ixbar.servernum. On Extended
Parallel Server, the filename is bixbar.servernum.coservernum.
b. The oncfg files: oncfg_servername.servernum
ON–Bar needs the oncfg file to know what dbspaces to retrieve.
Rename the oncfg file with the target database server name and
number. For example, rename oncfg_bostonserver.51 to
oncfg_chicagoserver.52. The filename should match the
DBSERVERNAME and SERVERNUM on the target computer.
c. The ONCONFIG file
In the ONCONFIG file, update the DBSERVERNAME and
SERVERNUM parameters with the target database server name and
number.
d. Storage-manager configuration files, if any
The storage-manager configuration files might need updating.
6-36 IBM Informix Backup and Restore Guide
2. Use the ON-Bar -r command to restore the data.
Dynamic Server
If you are importing a whole-system backup, you can use the onbar -r -w
-p command to restore the data.
End of Dynamic Server
3. Before you expire objects on the target computer and the storage manager
using onsmsync, perform one of the following tasks:
v Manually edit the emergency boot file viz ixbar.servernum in the
$INFORMIXDIR/etc directory on the target computer to replace the
Informix server name that is used on the source computer with the
Informix server name of the target computer.
v Execute the command onsmsync -b as user informix on the target
computer to regenerate the emergency boot file from the sysutils
database only, so that the newly regenerated emergency boot file reflects
the server name of the target computer.
Otherwise, onsmsync expires the incorrect objects.
Important: Every chunk (including mirrors) must match exactly in size,
location, and offset on the source and target computers for the
imported restore to complete.
Initializing High-Availability Data Replication with ON-Bar (IDS)
Follow the steps for the imported restore first and then start HDR and
perform a physical-only restore on the target computer. Also see “Initializing
HDR with an External Backup and Restore (IDS)” on page 7-19.
Important: If you use ON–Bar to perform the backup and restore, ontape is
required on both database servers. You cannot remove ontape
from database servers participating in HDR.
To perform the imported restore:
1. Follow the steps in on page 6-35.
2. On the source computer, add entries into your sqlhosts file or registry to
recognize the target instance.
Verify that the source and target database servers can communicate over
the network. For more information on sqlhosts, see the IBM Informix:
Administrator's Guide.
3. Follow the steps in on page 6-35.
4. Copy the emergency boot files, oncfg files, ONCONFIG file, and
storage-manager files from the source computer to the target computer.
Chapter 6. Restoring Data with ON-Bar 6-37
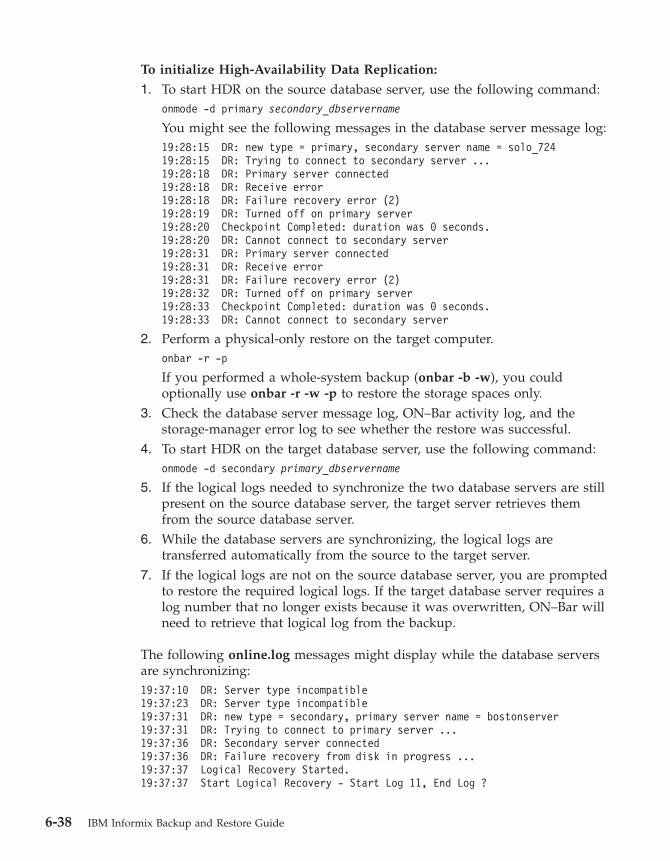
To initialize High-Availability Data Replication:
1. To start HDR on the source database server, use the following command:
onmode -d primary secondary_dbservername
You might see the following messages in the database server message log:
19:28:15 DR: new type = primary, secondary server name = solo_724
19:28:15 DR: Trying to connect to secondary server ...
19:28:18 DR: Primary server connected
19:28:18 DR: Receive error
19:28:18 DR: Failure recovery error (2)
19:28:19 DR: Turned off on primary server
19:28:20 Checkpoint Completed: duration was 0 seconds.
19:28:20 DR: Cannot connect to secondary server
19:28:31 DR: Primary server connected
19:28:31 DR: Receive error
19:28:31 DR: Failure recovery error (2)
19:28:32 DR: Turned off on primary server
19:28:33 Checkpoint Completed: duration was 0 seconds.
19:28:33 DR: Cannot connect to secondary server
2. Perform a physical-only restore on the target computer.
onbar -r -p
If you performed a whole-system backup (onbar -b -w), you could
optionally use onbar -r -w -p to restore the storage spaces only.
3. Check the database server message log, ON–Bar activity log, and the
storage-manager error log to see whether the restore was successful.
4. To start HDR on the target database server, use the following command:
onmode -d secondary primary_dbservername
5. If the logical logs needed to synchronize the two database servers are still
present on the source database server, the target server retrieves them
from the source database server.
6. While the database servers are synchronizing, the logical logs are
transferred automatically from the source to the target server.
7. If the logical logs are not on the source database server, you are prompted
to restore the required logical logs. If the target database server requires a
log number that no longer exists because it was overwritten, ON–Bar will
need to retrieve that logical log from the backup.
The following online.log messages might display while the database servers
are synchronizing:
19:37:10 DR: Server type incompatible
19:37:23 DR: Server type incompatible
19:37:31 DR: new type = secondary, primary server name = bostonserver
19:37:31 DR: Trying to connect to primary server ...
19:37:36 DR: Secondary server connected
19:37:36 DR: Failure recovery from disk in progress ...
19:37:37 Logical Recovery Started.
19:37:37 Start Logical Recovery - Start Log 11, End Log ?
6-38 IBM Informix Backup and Restore Guide
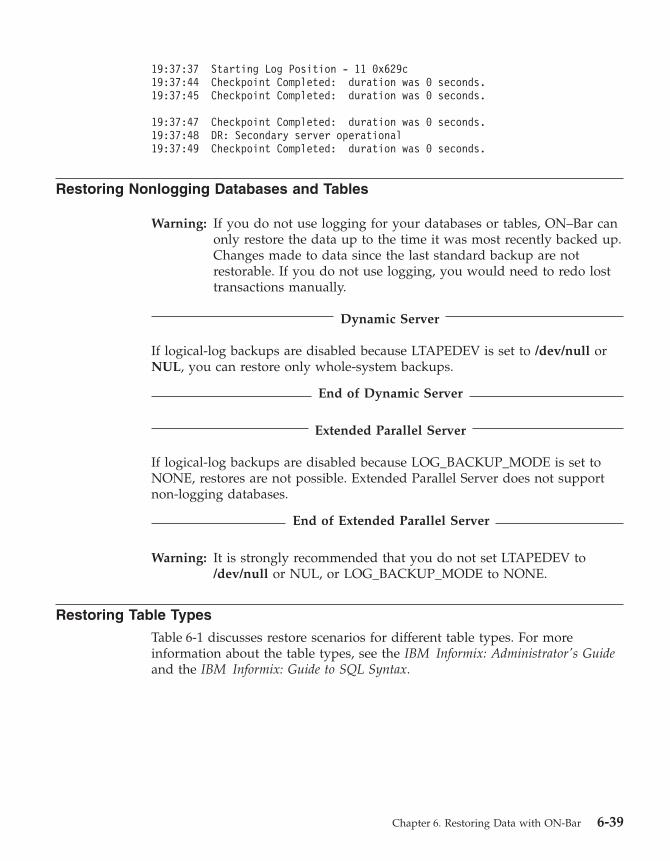
19:37:37 Starting Log Position - 11 0x629c
19:37:44 Checkpoint Completed: duration was 0 seconds.
19:37:45 Checkpoint Completed: duration was 0 seconds.
19:37:47 Checkpoint Completed: duration was 0 seconds.
19:37:48 DR: Secondary server operational
19:37:49 Checkpoint Completed: duration was 0 seconds.
Restoring Nonlogging Databases and Tables
Warning: If you do not use logging for your databases or tables, ON–Bar can
only restore the data up to the time it was most recently backed up.
Changes made to data since the last standard backup are not
restorable. If you do not use logging, you would need to redo lost
transactions manually.
Dynamic Server
If logical-log backups are disabled because LTAPEDEV is set to /dev/null or
NUL, you can restore only whole-system backups.
End of Dynamic Server
Extended Parallel Server
If logical-log backups are disabled because LOG_BACKUP_MODE is set to
NONE, restores are not possible. Extended Parallel Server does not support
non-logging databases.
End of Extended Parallel Server
Warning: It is strongly recommended that you do not set LTAPEDEV to
/dev/null or NUL, or LOG_BACKUP_MODE to NONE.
Restoring Table Types
Table 6-1 discusses restore scenarios for different table types. For more
information about the table types, see the IBM Informix: Administrator's Guide
and the IBM Informix: Guide to SQL Syntax.
Chapter 6. Restoring Data with ON-Bar 6-39
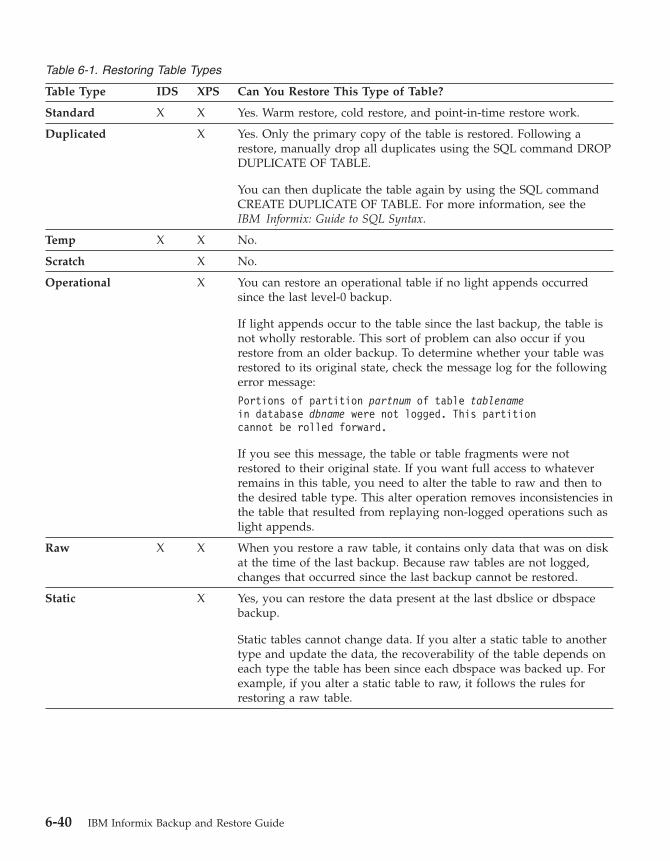
Table 6-1. Restoring Table Types
Table Type IDS XPS Can You Restore This Type of Table?
Standard X X Yes. Warm restore, cold restore, and point-in-time restore work.
Duplicated X Yes. Only the primary copy of the table is restored. Following a
restore, manually drop all duplicates using the SQL command DROP
DUPLICATE OF TABLE.
You can then duplicate the table again by using the SQL command
CREATE DUPLICATE OF TABLE. For more information, see the
IBM Informix: Guide to SQL Syntax.
Temp X X No.
Scratch X No.
Operational X You can restore an operational table if no light appends occurred
since the last level-0 backup.
If light appends occur to the table since the last backup, the table is
not wholly restorable. This sort of problem can also occur if you
restore from an older backup. To determine whether your table was
restored to its original state, check the message log for the following
error message:
Portions of partition partnum of table tablename
in database dbname were not logged. This partition
cannot be rolled forward.
If you see this message, the table or table fragments were not
restored to their original state. If you want full access to whatever
remains in this table, you need to alter the table to raw and then to
the desired table type. This alter operation removes inconsistencies in
the table that resulted from replaying non-logged operations such as
light appends.
Raw X X When you restore a raw table, it contains only data that was on disk
at the time of the last backup. Because raw tables are not logged,
changes that occurred since the last backup cannot be restored.
Static X Yes, you can restore the data present at the last dbslice or dbspace
backup.
Static tables cannot change data. If you alter a static table to another
type and update the data, the recoverability of the table depends on
each type the table has been since each dbspace was backed up. For
example, if you alter a static table to raw, it follows the rules for
restoring a raw table.
6-40 IBM Informix Backup and Restore Guide
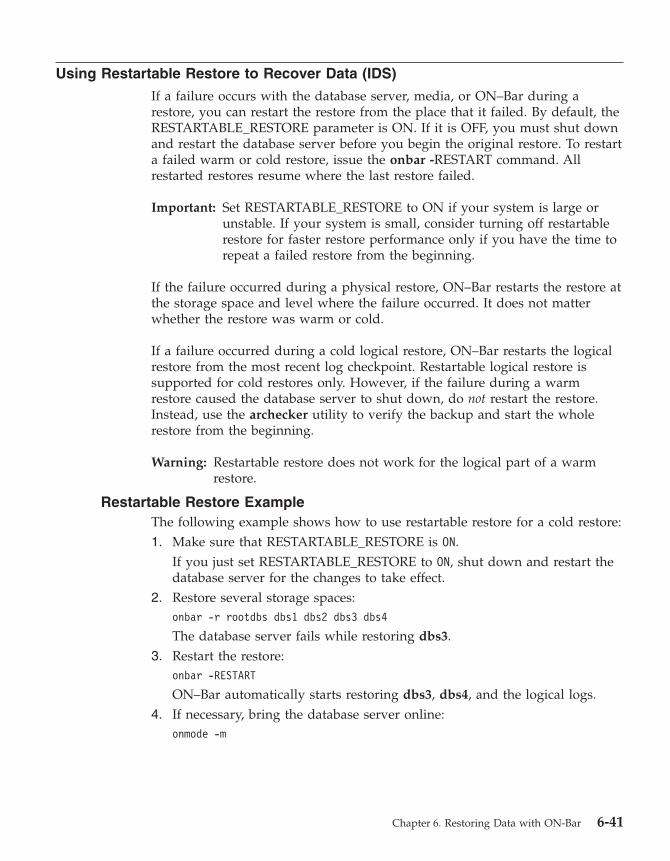
Using Restartable Restore to Recover Data (IDS)
If a failure occurs with the database server, media, or ON–Bar during a
restore, you can restart the restore from the place that it failed. By default, the
RESTARTABLE_RESTORE parameter is ON. If it is OFF, you must shut down
and restart the database server before you begin the original restore. To restart
a failed warm or cold restore, issue the onbar -RESTART command. All
restarted restores resume where the last restore failed.
Important: Set RESTARTABLE_RESTORE to ON if your system is large or
unstable. If your system is small, consider turning off restartable
restore for faster restore performance only if you have the time to
repeat a failed restore from the beginning.
If the failure occurred during a physical restore, ON–Bar restarts the restore at
the storage space and level where the failure occurred. It does not matter
whether the restore was warm or cold.
If a failure occurred during a cold logical restore, ON–Bar restarts the logical
restore from the most recent log checkpoint. Restartable logical restore is
supported for cold restores only. However, if the failure during a warm
restore caused the database server to shut down, do not restart the restore.
Instead, use the archecker utility to verify the backup and start the whole
restore from the beginning.
Warning: Restartable restore does not work for the logical part of a warm
restore.
Restartable Restore Example
The following example shows how to use restartable restore for a cold restore:
1. Make sure that RESTARTABLE_RESTORE is ON.
If you just set RESTARTABLE_RESTORE to ON, shut down and restart the
database server for the changes to take effect.
2. Restore several storage spaces:
onbar -r rootdbs dbs1 dbs2 dbs3 dbs4
The database server fails while restoring dbs3.
3. Restart the restore:
onbar -RESTART
ON–Bar automatically starts restoring dbs3, dbs4, and the logical logs.
4. If necessary, bring the database server online:
onmode -m
Chapter 6. Restoring Data with ON-Bar 6-41
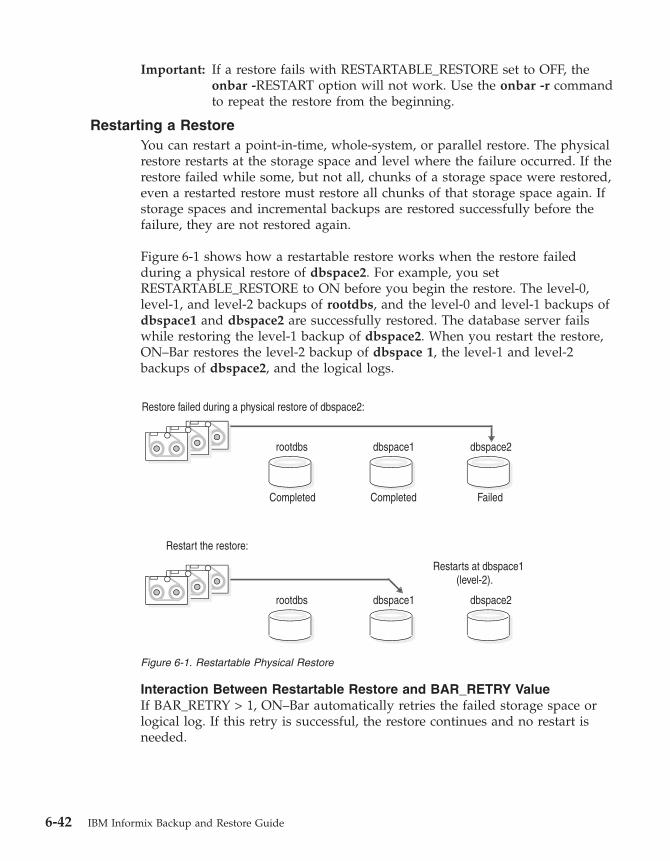
Important: If a restore fails with RESTARTABLE_RESTORE set to OFF, the
onbar -RESTART option will not work. Use the onbar -r command
to repeat the restore from the beginning.
Restarting a Restore
You can restart a point-in-time, whole-system, or parallel restore. The physical
restore restarts at the storage space and level where the failure occurred. If the
restore failed while some, but not all, chunks of a storage space were restored,
even a restarted restore must restore all chunks of that storage space again. If
storage spaces and incremental backups are restored successfully before the
failure, they are not restored again.
Figure 6-1 shows how a restartable restore works when the restore failed
during a physical restore of dbspace2. For example, you set
RESTARTABLE_RESTORE to ON before you begin the restore. The level-0,
level-1, and level-2 backups of rootdbs, and the level-0 and level-1 backups of
dbspace1 and dbspace2 are successfully restored. The database server fails
while restoring the level-1 backup of dbspace2. When you restart the restore,
ON–Bar restores the level-2 backup of dbspace 1, the level-1 and level-2
backups of dbspace2, and the logical logs.
Interaction Between Restartable Restore and BAR_RETRY Value
If BAR_RETRY > 1, ON–Bar automatically retries the failed storage space or
logical log. If this retry is successful, the restore continues and no restart is
needed.
Restart the restore:
Restore failed during a physical restore of dbspace2:
rootdbs
Completed
dbspace2
Completed Failed
dbspace1
rootdbs dbspace2dbspace1
Restarts at dbspace1(level-2).
Figure 6-1. Restartable Physical Restore
6-42 IBM Informix Backup and Restore Guide
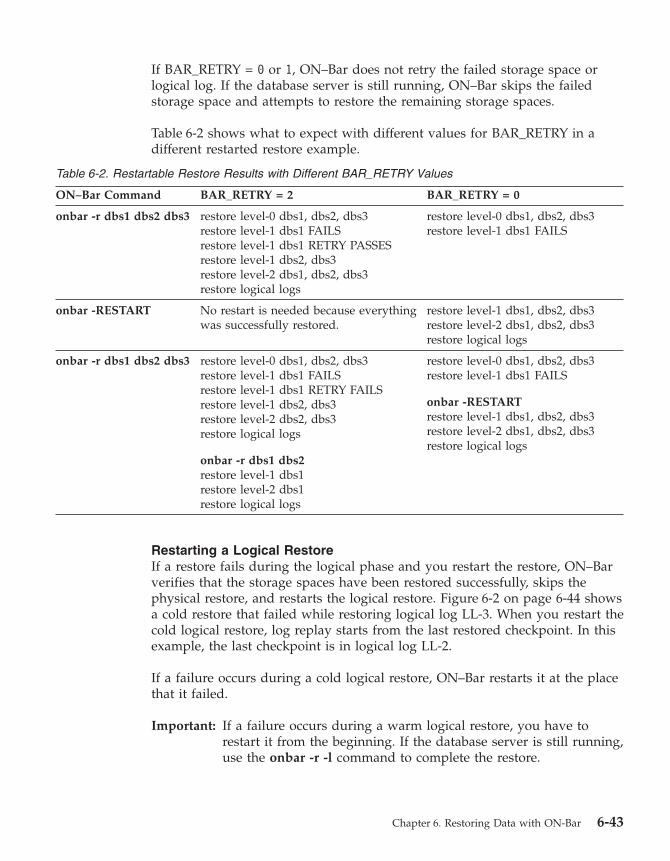
If BAR_RETRY = 0 or 1, ON–Bar does not retry the failed storage space or
logical log. If the database server is still running, ON–Bar skips the failed
storage space and attempts to restore the remaining storage spaces.
Table 6-2 shows what to expect with different values for BAR_RETRY in a
different restarted restore example.
Table 6-2. Restartable Restore Results with Different BAR_RETRY Values
ON–Bar Command BAR_RETRY = 2 BAR_RETRY = 0
onbar -r dbs1 dbs2 dbs3 restore level-0 dbs1, dbs2, dbs3
restore level-1 dbs1 FAILS
restore level-1 dbs1 RETRY PASSES
restore level-1 dbs2, dbs3
restore level-2 dbs1, dbs2, dbs3
restore logical logs
restore level-0 dbs1, dbs2, dbs3
restore level-1 dbs1 FAILS
onbar -RESTART No restart is needed because everything
was successfully restored.
restore level-1 dbs1, dbs2, dbs3
restore level-2 dbs1, dbs2, dbs3
restore logical logs
onbar -r dbs1 dbs2 dbs3 restore level-0 dbs1, dbs2, dbs3
restore level-1 dbs1 FAILS
restore level-1 dbs1 RETRY FAILS
restore level-1 dbs2, dbs3
restore level-2 dbs2, dbs3
restore logical logs
onbar -r dbs1 dbs2
restore level-1 dbs1
restore level-2 dbs1
restore logical logs
restore level-0 dbs1, dbs2, dbs3
restore level-1 dbs1 FAILS
onbar -RESTART
restore level-1 dbs1, dbs2, dbs3
restore level-2 dbs1, dbs2, dbs3
restore logical logs
Restarting a Logical Restore
If a restore fails during the logical phase and you restart the restore, ON–Bar
verifies that the storage spaces have been restored successfully, skips the
physical restore, and restarts the logical restore. Figure 6-2 on page 6-44 shows
a cold restore that failed while restoring logical log LL-3. When you restart the
cold logical restore, log replay starts from the last restored checkpoint. In this
example, the last checkpoint is in logical log LL-2.
If a failure occurs during a cold logical restore, ON–Bar restarts it at the place
that it failed.
Important: If a failure occurs during a warm logical restore, you have to
restart it from the beginning. If the database server is still running,
use the onbar -r -l command to complete the restore.
Chapter 6. Restoring Data with ON-Bar 6-43

Set the RESTARTABLE_RESTORE parameter to ON. A restartable restore makes
the logical restore run more slowly if many logical logs need to be restored,
but it saves you time if something goes wrong and you need to restart.
Restartable restore does not affect the speed of the physical restore.
Resolving a Failed Restore
What is retried, what is restartable, and what command you use to restart the
restore depends on what failed and how serious it was. You can save some
failed restores even if restartable restore is turned off. For example, if the
restore fails because of a storage-manager or storage-device error, you can fix
the tape drive or storage-manager problem, remount a tape, and then
continue the restore.
Table 6-3 shows what results to expect when physical restore fails. Assume
that BAR_RETRY > 1 in each case.
Restart the cold restore:
Cold restore failed during a logical restore of LL-3. The last checkpoint is in LL-2.
LL-1
CompletedCompleted Failed
Restarts at the last checkpoint in LL-2.
LL-2 LL-3
LL-1 LL-2 LL-3
Figure 6-2. Restartable Cold Logical Restore
6-44 IBM Informix Backup and Restore Guide
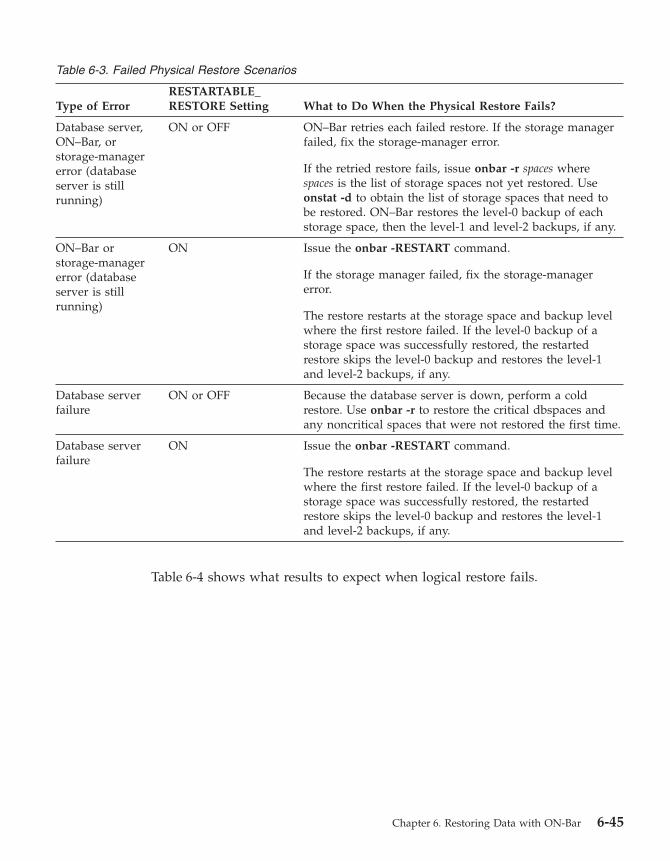
Table 6-3. Failed Physical Restore Scenarios
Type of Error
RESTARTABLE_
RESTORE Setting What to Do When the Physical Restore Fails?
Database server,
ON–Bar, or
storage-manager
error (database
server is still
running)
ON or OFF ON–Bar retries each failed restore. If the storage manager
failed, fix the storage-manager error.
If the retried restore fails, issue onbar -r spaces where
spaces is the list of storage spaces not yet restored. Use
onstat -d to obtain the list of storage spaces that need to
be restored. ON–Bar restores the level-0 backup of each
storage space, then the level-1 and level-2 backups, if any.
ON–Bar or
storage-manager
error (database
server is still
running)
ON Issue the onbar -RESTART command.
If the storage manager failed, fix the storage-manager
error.
The restore restarts at the storage space and backup level
where the first restore failed. If the level-0 backup of a
storage space was successfully restored, the restarted
restore skips the level-0 backup and restores the level-1
and level-2 backups, if any.
Database server
failure
ON or OFF Because the database server is down, perform a cold
restore. Use onbar -r to restore the critical dbspaces and
any noncritical spaces that were not restored the first time.
Database server
failure
ON Issue the onbar -RESTART command.
The restore restarts at the storage space and backup level
where the first restore failed. If the level-0 backup of a
storage space was successfully restored, the restarted
restore skips the level-0 backup and restores the level-1
and level-2 backups, if any.
Table 6-4 shows what results to expect when logical restore fails.
Chapter 6. Restoring Data with ON-Bar 6-45
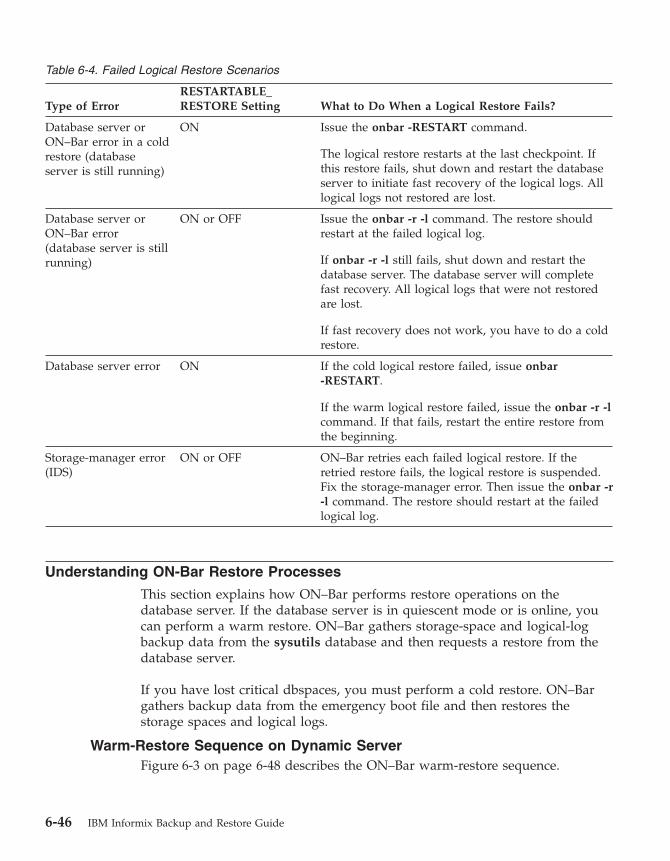
Table 6-4. Failed Logical Restore Scenarios
Type of Error
RESTARTABLE_
RESTORE Setting What to Do When a Logical Restore Fails?
Database server or
ON–Bar error in a cold
restore (database
server is still running)
ON Issue the onbar -RESTART command.
The logical restore restarts at the last checkpoint. If
this restore fails, shut down and restart the database
server to initiate fast recovery of the logical logs. All
logical logs not restored are lost.
Database server or
ON–Bar error
(database server is still
running)
ON or OFF Issue the onbar -r -l command. The restore should
restart at the failed logical log.
If onbar -r -l still fails, shut down and restart the
database server. The database server will complete
fast recovery. All logical logs that were not restored
are lost.
If fast recovery does not work, you have to do a cold
restore.
Database server error ON If the cold logical restore failed, issue onbar
-RESTART.
If the warm logical restore failed, issue the onbar -r -l
command. If that fails, restart the entire restore from
the beginning.
Storage-manager error
(IDS)
ON or OFF ON–Bar retries each failed logical restore. If the
retried restore fails, the logical restore is suspended.
Fix the storage-manager error. Then issue the onbar -r
-l command. The restore should restart at the failed
logical log.
Understanding ON-Bar Restore Processes
This section explains how ON–Bar performs restore operations on the
database server. If the database server is in quiescent mode or is online, you
can perform a warm restore. ON–Bar gathers storage-space and logical-log
backup data from the sysutils database and then requests a restore from the
database server.
If you have lost critical dbspaces, you must perform a cold restore. ON–Bar
gathers backup data from the emergency boot file and then restores the
storage spaces and logical logs.
Warm-Restore Sequence on Dynamic Server
Figure 6-3 on page 6-48 describes the ON–Bar warm-restore sequence.
6-46 IBM Informix Backup and Restore Guide
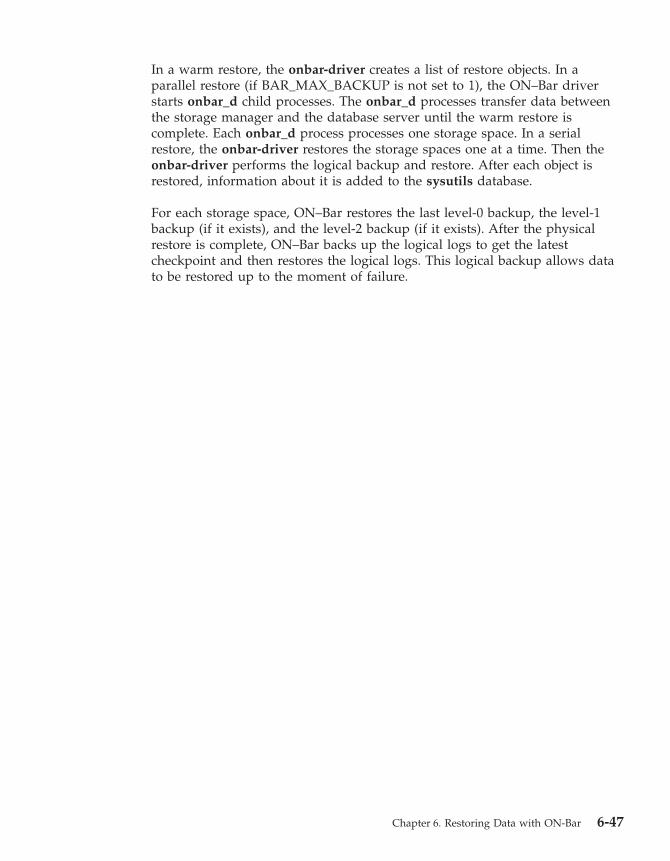
In a warm restore, the onbar-driver creates a list of restore objects. In a
parallel restore (if BAR_MAX_BACKUP is not set to 1), the ON–Bar driver
starts onbar_d child processes. The onbar_d processes transfer data between
the storage manager and the database server until the warm restore is
complete. Each onbar_d process processes one storage space. In a serial
restore, the onbar-driver restores the storage spaces one at a time. Then the
onbar-driver performs the logical backup and restore. After each object is
restored, information about it is added to the sysutils database.
For each storage space, ON–Bar restores the last level-0 backup, the level-1
backup (if it exists), and the level-2 backup (if it exists). After the physical
restore is complete, ON–Bar backs up the logical logs to get the latest
checkpoint and then restores the logical logs. This logical backup allows data
to be restored up to the moment of failure.
Chapter 6. Restoring Data with ON-Bar 6-47
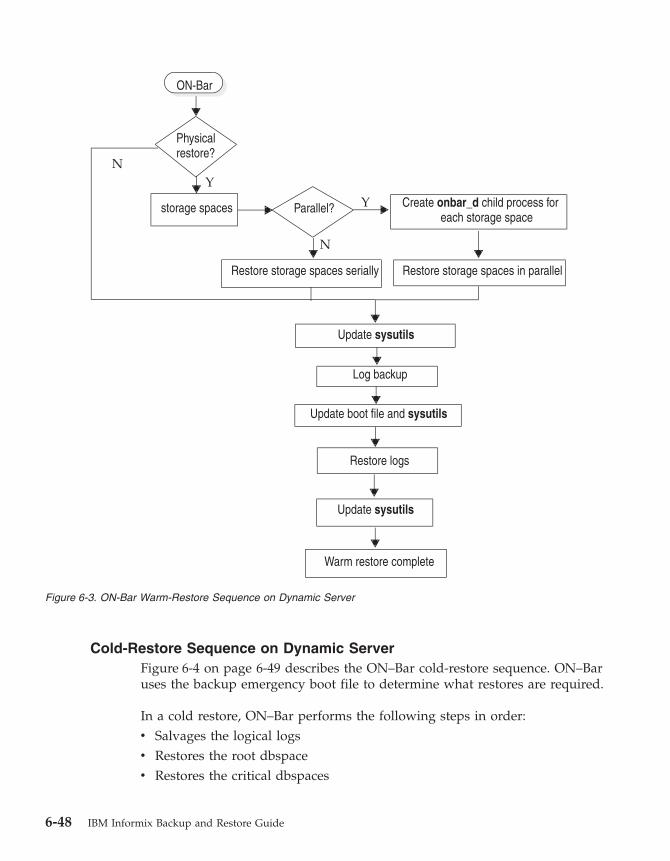
Cold-Restore Sequence on Dynamic Server
Figure 6-4 on page 6-49 describes the ON–Bar cold-restore sequence. ON–Bar
uses the backup emergency boot file to determine what restores are required.
In a cold restore, ON–Bar performs the following steps in order:
v Salvages the logical logs
v Restores the root dbspace
v Restores the critical dbspaces
Figure 6-3. ON-Bar Warm-Restore Sequence on Dynamic Server
6-48 IBM Informix Backup and Restore Guide
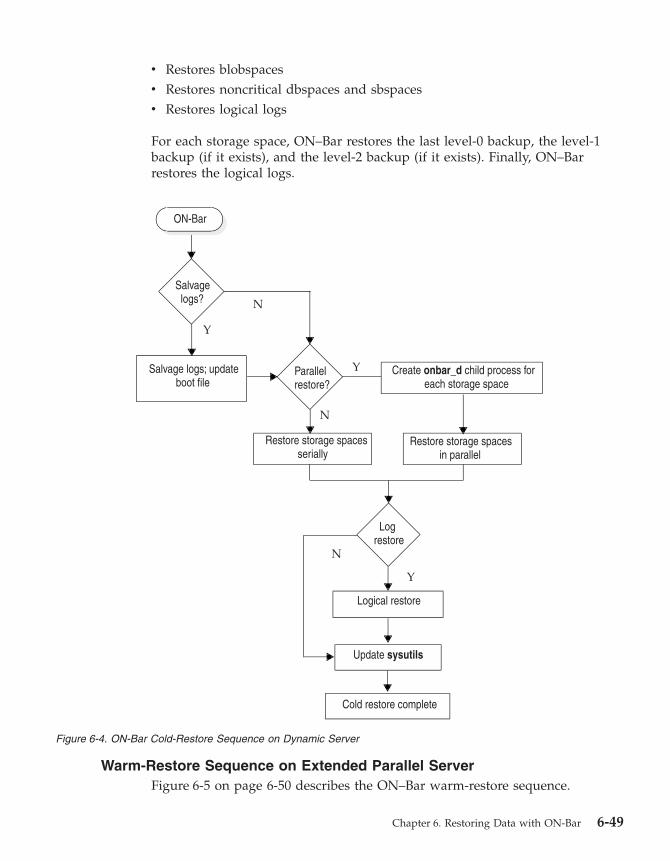
v Restores blobspaces
v Restores noncritical dbspaces and sbspaces
v Restores logical logs
For each storage space, ON–Bar restores the last level-0 backup, the level-1
backup (if it exists), and the level-2 backup (if it exists). Finally, ON–Bar
restores the logical logs.
Warm-Restore Sequence on Extended Parallel Server
Figure 6-5 on page 6-50 describes the ON–Bar warm-restore sequence.
N
Y
N
ON-Bar
Salvagelogs?
Salvage logs; updateboot file
Parallelrestore?
Create _ child process foreach storage spaceonbar d
Restore storage spacesin parallel
Y
Restore storage spacesserially
Logrestore
Logical restore
Cold restore complete
Update sysutils
N
Y
Figure 6-4. ON-Bar Cold-Restore Sequence on Dynamic Server
Chapter 6. Restoring Data with ON-Bar 6-49
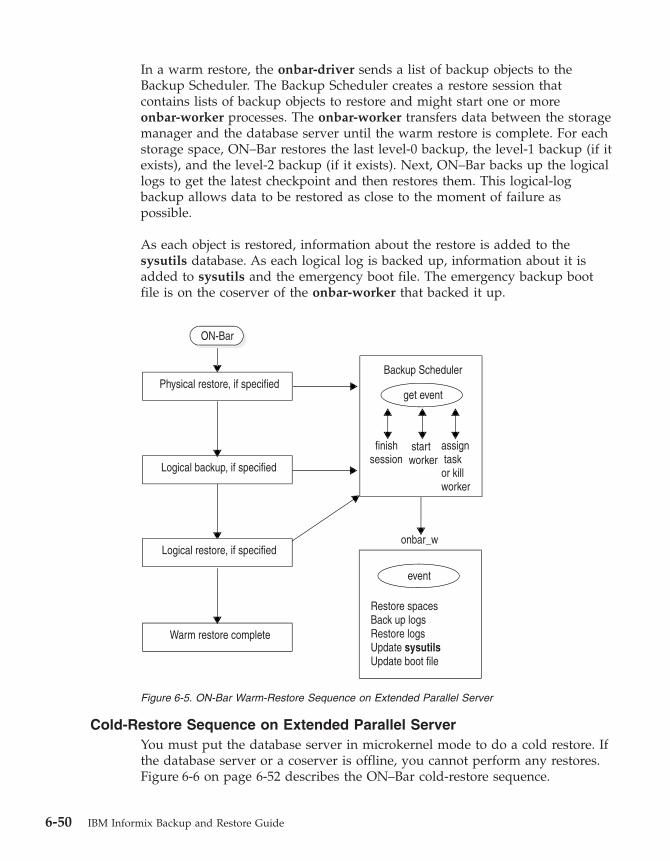
In a warm restore, the onbar-driver sends a list of backup objects to the
Backup Scheduler. The Backup Scheduler creates a restore session that
contains lists of backup objects to restore and might start one or more
onbar-worker processes. The onbar-worker transfers data between the storage
manager and the database server until the warm restore is complete. For each
storage space, ON–Bar restores the last level-0 backup, the level-1 backup (if it
exists), and the level-2 backup (if it exists). Next, ON–Bar backs up the logical
logs to get the latest checkpoint and then restores them. This logical-log
backup allows data to be restored as close to the moment of failure as
possible.
As each object is restored, information about the restore is added to the
sysutils database. As each logical log is backed up, information about it is
added to sysutils and the emergency boot file. The emergency backup boot
file is on the coserver of the onbar-worker that backed it up.
Cold-Restore Sequence on Extended Parallel Server
You must put the database server in microkernel mode to do a cold restore. If
the database server or a coserver is offline, you cannot perform any restores.
Figure 6-6 on page 6-52 describes the ON–Bar cold-restore sequence.
onbar_w
Physical restore, if specified
Logical backup, if specified
Warm restore complete
ON-Bar
Logical restore, if specified
Restore spacesBack up logsRestore logsUpdate sysutilsUpdate boot file
Backup Scheduler
get event
finishsession
startworker
assigntask
or killworker
event
Figure 6-5. ON-Bar Warm-Restore Sequence on Extended Parallel Server
6-50 IBM Informix Backup and Restore Guide
In a cold restore, ON–Bar performs the following steps in order:
v Salvages the logical logs
v Merges the boot files
v Restores the root dbspace
v Restores the critical dbspaces
v Restores the other dbspaces
v Restores logical logs
The onbar-merger utility collects and processes the backup emergency boot
files from each coserver to determine what restores are required. The
onbar-merger then creates the restore boot file and copies it to each coserver
that contains a backup emergency boot file.
You can specify in the bar_worker_coserver configuration parameter which
coservers have boot files and run onbar-worker processes. For more
information, see “BAR_WORKER_COSVR (XPS)” on page 9-16.
For each storage space, ON–Bar restores the last level-0 backup, the level-1
backup (if it exists), and the level-2 backup (if it exists). Finally, it restores the
logical logs.
Chapter 6. Restoring Data with ON-Bar 6-51
Collect backup boot filesMerge backup boot filesCreate restore boot filesSend restore boot files
ON-Bar
Start merge if Mixbarfile does not exist
Cold restore complete
Salvage logsRestore spaces and logsUpdate sysutils
onbar_w
Physical restore, if specified
Salvage logs, if specified
Logical restore, if specified
Backup Scheduler
get event
finishsession
startworker
assigntask
or killworker
Figure 6-6. ON-Bar Cold-Restore Sequence on Extended Parallel Server
6-52 IBM Informix Backup and Restore Guide
Chapter 7. Performing an External Backup and Restore
Recovering Data Using an External Backup and Restore . . . . . . . . . . . . . . . . 7-1
What Is Backed Up in an External Backup? . . . . . . . . . . . . . . . . . . . . 7-3
Rules for an External Backup . . . . . . . . . . . . . . . . . . . . . . . . 7-3
Performing an External Backup . . . . . . . . . . . . . . . . . . . . . . . 7-4
Performing an External Backup when Chunks are Mirrored by the Database Server (XPS) . . 7-6
Performing an External Backup Using Third-Party Mirroring Solutions (XPS) . . . . . . . 7-7
Preparing for an External Backup . . . . . . . . . . . . . . . . . . . . . . . 7-7
Blocking and Unblocking Dynamic Server . . . . . . . . . . . . . . . . . . . 7-7
Blocking and Unblocking Extended Parallel Server . . . . . . . . . . . . . . . . 7-8
Blocking Coservers or the Database Server . . . . . . . . . . . . . . . . . . 7-8
Blocking a Cogroup and Specifying a Session Name . . . . . . . . . . . . . . . 7-10
Blocking Coservers . . . . . . . . . . . . . . . . . . . . . . . . . . 7-10
Unblocking Coservers or the Database Server . . . . . . . . . . . . . . . . . 7-10
Unblocking All Coservers and Marking Dbspaces as Backed Up . . . . . . . . . . . 7-11
Unblocking a Cogroup and Marking Selected Dbspaces as Backed Up . . . . . . . . . 7-12
Unblocking a Specific Session and Not Marking Dbspaces as Backed Up . . . . . . . . 7-12
Monitoring an External Backup . . . . . . . . . . . . . . . . . . . . . . . 7-12
Tracking an External Backup . . . . . . . . . . . . . . . . . . . . . . . . 7-12
What Is Restored in an External Restore? . . . . . . . . . . . . . . . . . . . . 7-13
Using External Restore Commands . . . . . . . . . . . . . . . . . . . . . 7-14
Rules for an External Restore . . . . . . . . . . . . . . . . . . . . . . . 7-15
Performing an External Restore . . . . . . . . . . . . . . . . . . . . . . . 7-15
Cold External Restore Procedure . . . . . . . . . . . . . . . . . . . . . 7-15
Mixed External Restore Restriction . . . . . . . . . . . . . . . . . . . . . 7-18
Warm External Restore Procedure . . . . . . . . . . . . . . . . . . . . . 7-18
Examples of External Restore Commands . . . . . . . . . . . . . . . . . . 7-19
Initializing HDR with an External Backup and Restore (IDS) . . . . . . . . . . . . . 7-19
In This Chapter
This chapter discusses recovering data using external backup and restore.
Recovering Data Using an External Backup and Restore
An external backup and restore eliminates the downtime of systems because
the backup and restore operations are performed external to the Informix
system. ON–Bar does not move the data during the backup or physical
restore. An external backup allows you to copy disks that contain
storage-space chunks without using ON–Bar. When disks fail, replace them
and use third-party software to restore the data, then use ON–Bar for the
logical restore. For more information, see “What Is Restored in an External
Restore?” on page 7-13.
© Copyright IBM Corp. 1996, 2004 7-1
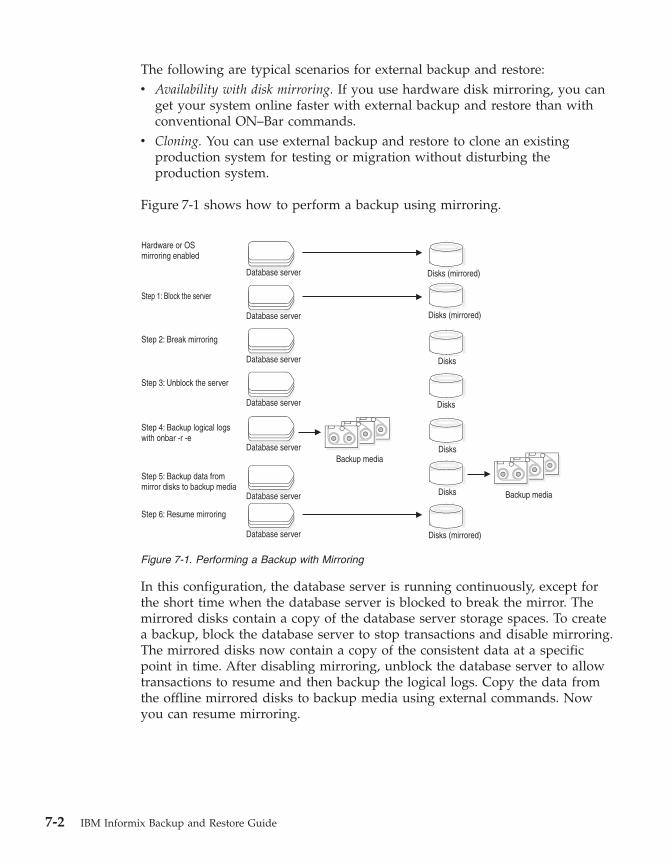
The following are typical scenarios for external backup and restore:
v Availability with disk mirroring. If you use hardware disk mirroring, you can
get your system online faster with external backup and restore than with
conventional ON–Bar commands.
v Cloning. You can use external backup and restore to clone an existing
production system for testing or migration without disturbing the
production system.
Figure 7-1 shows how to perform a backup using mirroring.
In this configuration, the database server is running continuously, except for
the short time when the database server is blocked to break the mirror. The
mirrored disks contain a copy of the database server storage spaces. To create
a backup, block the database server to stop transactions and disable mirroring.
The mirrored disks now contain a copy of the consistent data at a specific
point in time. After disabling mirroring, unblock the database server to allow
transactions to resume and then backup the logical logs. Copy the data from
the offline mirrored disks to backup media using external commands. Now
you can resume mirroring.
Figure 7-1. Performing a Backup with Mirroring
7-2 IBM Informix Backup and Restore Guide

What Is Backed Up in an External Backup?
Before you begin an external backup, block the database server or one or
more coservers. Blocking forces a checkpoint, flushes buffers to disk, and
blocks user transactions that involve temporary tables. During the blocking
operation, users can access that database server or coserver in read-only
mode. Then you can physically back up or copy the data to another set of
disks or storage media using operating-system or third-party tools. When you
complete the external backup, unblock the database server so that transactions
can resume. You should include all the chunk files in each storage space,
administrative files, such as ONCONFIG, and the emergency boot file, in an
external backup.
Important: To make tracking backups easier, it is recommended that you back
up all storage spaces in each external backup.
ON–Bar treats an external backup as equivalent to a level-0 backup. You
cannot perform an external backup and then use ON–Bar to perform a level-1
backup, or vice versa because ON–Bar does not have any record of the
external backup. For more information, see “Performing an External Backup”
on page 7-4.
Rules for an External Backup
Before you begin an external backup, keep the following rules in mind:
v The database server must be online or in quiescent mode during an
external backup.
v Use ON–Bar to back up all logical logs including the current log so that
you can restore the logical logs at the end of the external restore.
v Suspend continuous logical-log backups before you block the database
server for an external backup. After the external backup is complete,
resume the continuous logical-log backup.
Extended Parallel Server
To suspend continuous logical-log backup, use the onbar off Log backup
coserver_id command. To resume continuous logical-log backup, use the
onbar on Log backup coserver_id command. For more information, see
“Starting and Stopping ON-Bar Sessions (XPS)” on page 8-11.
End of Extended Parallel Server
Dynamic Server
To stop continuous logical-log backup, use the CTRL-C command. To resume
continuous logical-log backup, use the onbar -b -l -C command.
End of Dynamic Server
Chapter 7. Performing an External Backup and Restore 7-3
v Wait until all ON–Bar backup sessions have completed before you block the
database server. If any backup sessions are active, the block command
displays an error message.
v Any OLTP work or queries are suspended while the database server is
blocked. They resume after the database server is unblocked.
v All critical dbspaces of the database server instance must be backed up
together simultaneously within the same command bracket of onmode -c
block ... onmode -c unblock. Backups of different critical dbspaces done at
different times cannot be restored to a consistent system.
Important: Because the external backup is outside the control of ON–Bar, you
must track these backups manually. For more information, see
“Tracking an External Backup” on page 7-12.
Performing an External Backup
The database server must be online or in quiescent mode during an external
backup.
Performing an External Backup when Chunks are not Mirrored:
1. To obtain an external backup, block the database server. The system takes
a checkpoint and suspends all update transactions. Users can access the
database server in read-only mode.
Dynamic Server
On Dynamic Server, use the following command:
onmode -c block
End of Dynamic Server
Extended Parallel Server
On Extended Parallel Server, use the following command to block all the
coservers in cogroup_all:
onutil ebr block;
End of Extended Parallel Server
2. To back up the storage spaces and administrative files, use a copy
command, such as cp, dd, or tar on UNIX or copy on Windows, or a
file-backup program. You must back up all chunks in the storage spaces.
7-4 IBM Informix Backup and Restore Guide
3. To allow normal operations to resume, unblock the database server.
Dynamic Server
Use the following command:
onmode -c unblock
End of Dynamic Server
Extended Parallel Server
Use the following command to unblock all the coservers in cogroup_all
and mark all dbspaces on each coserver as having a level-0 backup:
onutil ebr unblock commit;
End of Extended Parallel Server
4. Back up all the logical logs including the current log so that checkpoint
information is available for the external restore.
Warning: Because external backup is not done through ON–Bar, you must
ensure that you have a backup of the current logical log from
the time when you execute the onutil EBR BLOCK or onmode -c
block command. Without a backup of this logical-log file, the
external backup is not restorable.
5. After you perform an external backup, back up the current log.
Dynamic Server
Use the following command to back up the current log on Dynamic
Server:
onbar -b -l -c
End of Dynamic Server
Extended Parallel Server
Use the following commands to switch to and back up the current log on
Extended Parallel Server:
onmode -l # execute on coservers with external backups
onbar -b -l # back up all used logs
End of Extended Parallel Server
Chapter 7. Performing an External Backup and Restore 7-5
If you lose a disk, coserver, or the whole system, you are now ready to
perform an external restore.
Performing an External Backup when Chunks are Mirrored by the
Database Server (XPS)
When you use the mirroring support provided by the database server, you
should create your backups by copying the data from the primary chunks to
make tracking your backups easier. Mirroring is configured using the
MIRROR configuration parameter in the ONCONFIG file. For more
information on mirroring, see the chapter on mirroring in the IBM Informix:
Administrator's Guide.
To perform an external backup when chunks are mirrored:
1. To obtain an external backup, block the database server. The system takes
a checkpoint and suspends all update transactions. Users can access the
database server in read-only mode.
On Extended Parallel Server, use the following command to block all the
coservers in cogroup_all:
onutil ebr block;
2. To back up the storage spaces and administrative files, use a copy
command, such as cp, dd, or tar on UNIX or copy on Windows, or a
file-backup program. You must back up all chunks in the primary storage
spaces. Do not backup mirror chunks.
3. To allow normal operations to resume, unblock the database server.
Use the following command to unblock all the coservers in cogroup_all
and mark all dbspaces on each coserver as having a level-0 backup:
onutil ebr unblock commit;
4. Back up all the logical logs including the current log so that checkpoint
information is available for the external restore.
Warning: Because external backup is not done through ON–Bar, you must
ensure that you have a backup of the current logical log from
the time when you execute the onutil EBR BLOCK or onmode -c
block command. Without a backup of this logical-log file, the
external backup is not restorable.
5. After you perform an external backup, back up the current log.
Use the following commands to switch to and back up the current log on
Extended Parallel Server:
onmode -l # execute on coservers with external backups
onbar -b -l # back up all used logs
7-6 IBM Informix Backup and Restore Guide
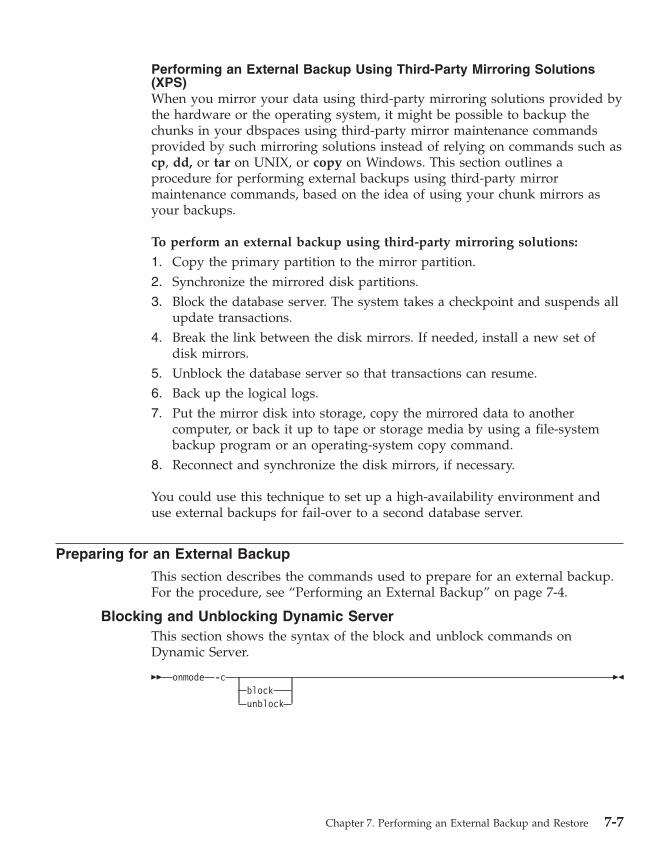
Performing an External Backup Using Third-Party Mirroring Solutions
(XPS)
When you mirror your data using third-party mirroring solutions provided by
the hardware or the operating system, it might be possible to backup the
chunks in your dbspaces using third-party mirror maintenance commands
provided by such mirroring solutions instead of relying on commands such as
cp, dd, or tar on UNIX, or copy on Windows. This section outlines a
procedure for performing external backups using third-party mirror
maintenance commands, based on the idea of using your chunk mirrors as
your backups.
To perform an external backup using third-party mirroring solutions:
1. Copy the primary partition to the mirror partition.
2. Synchronize the mirrored disk partitions.
3. Block the database server. The system takes a checkpoint and suspends all
update transactions.
4. Break the link between the disk mirrors. If needed, install a new set of
disk mirrors.
5. Unblock the database server so that transactions can resume.
6. Back up the logical logs.
7. Put the mirror disk into storage, copy the mirrored data to another
computer, or back it up to tape or storage media by using a file-system
backup program or an operating-system copy command.
8. Reconnect and synchronize the disk mirrors, if necessary.
You could use this technique to set up a high-availability environment and
use external backups for fail-over to a second database server.
Preparing for an External Backup
This section describes the commands used to prepare for an external backup.
For the procedure, see “Performing an External Backup” on page 7-4.
Blocking and Unblocking Dynamic Server
This section shows the syntax of the block and unblock commands on
Dynamic Server.
�� onmode -c
block
unblock
��
Chapter 7. Performing an External Backup and Restore 7-7
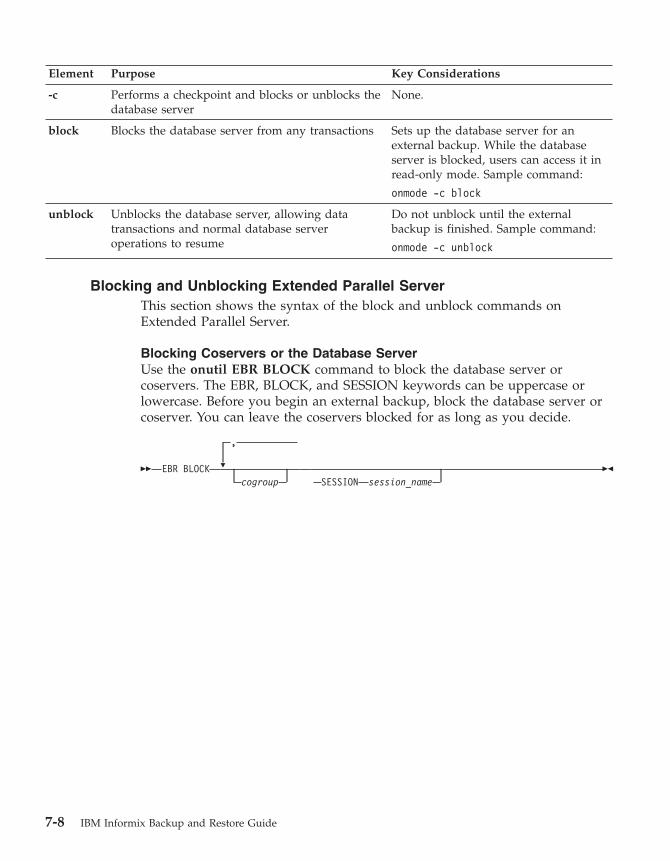
Element Purpose Key Considerations
-c Performs a checkpoint and blocks or unblocks the
database server
None.
block Blocks the database server from any transactions Sets up the database server for an
external backup. While the database
server is blocked, users can access it in
read-only mode. Sample command:
onmode -c block
unblock Unblocks the database server, allowing data
transactions and normal database server
operations to resume
Do not unblock until the external
backup is finished. Sample command:
onmode -c unblock
Blocking and Unblocking Extended Parallel Server
This section shows the syntax of the block and unblock commands on
Extended Parallel Server.
Blocking Coservers or the Database Server
Use the onutil EBR BLOCK command to block the database server or
coservers. The EBR, BLOCK, and SESSION keywords can be uppercase or
lowercase. Before you begin an external backup, block the database server or
coserver. You can leave the coservers blocked for as long as you decide.
��
EBR BLOCK
�
,
cogroup
SESSION
session_name
��
7-8 IBM Informix Backup and Restore Guide
Element Purpose Key Considerations
BLOCK Forces a checkpoint that flushes the buffers to
disk and blocks the database server or specified
coservers from any transactions
While a coserver or database server
is blocked, users can access it in
read-only mode.
cogroup Specifies the set of coservers to block
You can block one or more listed coservers or
cogroups, or cogroup_all. If you specify
coserver names, use the format:
dbservername.coserverid. If you specify a
cogroup range identifier, use the format:
dbservername.%r(first.last).
If no cogroup or coserver name is
specified, all coservers on the
database server are blocked.
EBR Specifies an external backup or restore
command
None.
SESSION
session_name
Assigns a session name to the onutil EBR
BLOCK command
Use the session name to monitor the external
backup status.
If no session name is specified,
onutil generates a session name of
the following format:
ebr_connection-coserver-id.client-sql-session-id.ebr-command-number.
When a coserver is blocked, all the data on disk is synchronized and users
can access that coserver in read-only mode. When you block a coserver, the
entire coserver is blocked. You can block a list of coservers, cogroups, or the
entire database server. You can assign a session name to the blocking
operation.
To block the entire database server (all the coservers in cogroup_all), use
either of the following commands:
onutil ebr block;
or
onutil ebr block cogroup_all;
When the block command completes, the default session ID is printed to
standard output and a message is written to online.log.
After you complete the external backup, unblock the database server. For the
syntax diagram, see “Unblocking Coservers or the Database Server” on page
7-10.
Chapter 7. Performing an External Backup and Restore 7-9
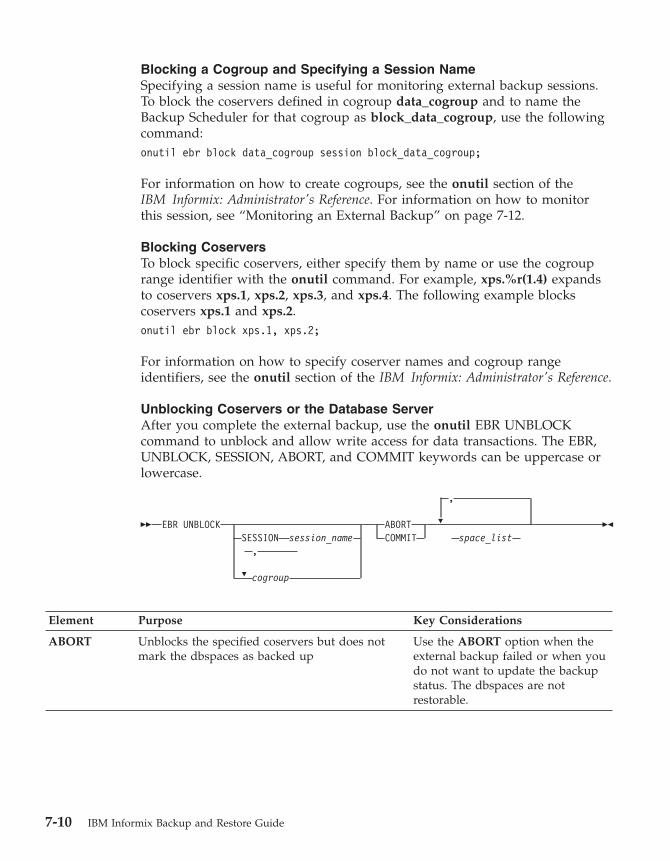
Blocking a Cogroup and Specifying a Session Name
Specifying a session name is useful for monitoring external backup sessions.
To block the coservers defined in cogroup data_cogroup and to name the
Backup Scheduler for that cogroup as block_data_cogroup, use the following
command:
onutil ebr block data_cogroup session block_data_cogroup;
For information on how to create cogroups, see the onutil section of the
IBM Informix: Administrator's Reference. For information on how to monitor
this session, see “Monitoring an External Backup” on page 7-12.
Blocking Coservers
To block specific coservers, either specify them by name or use the cogroup
range identifier with the onutil command. For example, xps.%r(1.4) expands
to coservers xps.1, xps.2, xps.3, and xps.4. The following example blocks
coservers xps.1 and xps.2.
onutil ebr block xps.1, xps.2;
For information on how to specify coserver names and cogroup range
identifiers, see the onutil section of the IBM Informix: Administrator's Reference.
Unblocking Coservers or the Database Server
After you complete the external backup, use the onutil EBR UNBLOCK
command to unblock and allow write access for data transactions. The EBR,
UNBLOCK, SESSION, ABORT, and COMMIT keywords can be uppercase or
lowercase.
��
EBR UNBLOCK
�
SESSION
session_name
,
cogroup
ABORT
COMMIT
�
,
space_list
��
Element Purpose Key Considerations
ABORT Unblocks the specified coservers but does not
mark the dbspaces as backed up
Use the ABORT option when the
external backup failed or when you
do not want to update the backup
status. The dbspaces are not
restorable.
7-10 IBM Informix Backup and Restore Guide
Element Purpose Key Considerations
cogroup Specifies a list of one or more cogroup names to
unblock the coservers
You can specify cogroup_all, cogroup names,
coserver names, or a cogroup range identifier.
All coservers in the specified
cogroups that are currently blocked
are unblocked. If you do not specify
a cogroup name, all the coservers in
the database server are unblocked.
If a specific coserver is not blocked,
an error is reported.
COMMIT Marks the listed dbspaces or dbslices as
successfully backed up while the set of coservers
were blocked
Enables newly added logical logs and dbspace
mirrors. If no logged updates have occurred
since the last backup, marks the dbspace for
skipping log replay. To verify, issue onstat -d.
If you do not specify any dbspaces
or dbslices after the COMMIT
keyword, it commits the dbspaces
and dbslices on the coservers that
were blocked.
EBR Specifies an external backup or restore None.
SESSION
session_name
Specifies a session name that can be either a
name that you specified or onutil automatically
created in the block command
The session name must be one that
was used in a previous block
command. All coservers that were
part of that session are now
unblocked.
space_list Specifies the dbspaces or dbslices that are
successfully backed up
Separate the dbspace or dbslice
names with commas.
UNBLOCK Unblocks the coservers or database server,
allowing data transactions and normal database
server operations to resume
Ends the external backup.
To unblock a list of coservers or cogroups, or the entire database server, you
can specify a session name. The list of coservers in the onutil EBR UNBLOCK
command does not have to match the list of coservers in the onutil EBR
BLOCK command.
To mark selected or all dbspaces and dbslices as backed up on each blocked
coserver, use the COMMIT option. Use the ABORT option when you do not
want to mark any dbspaces as backed up.
Tip: Be sure not to unblock coservers that another user has blocked. (For
information, see “Monitoring an External Backup” on page 7-12.)
Unblocking All Coservers and Marking Dbspaces as Backed Up
To unblock the entire database server (all the coservers in cogroup_all), use
either of the following commands. The COMMIT option marks all dbspaces
on each coserver as having a level-0 backup.
Chapter 7. Performing an External Backup and Restore 7-11
onutil ebr unblock commit;
or
onutil ebr unblock cogroup_all commit;
Unblocking a Cogroup and Marking Selected Dbspaces as Backed Up
The following example unblocks the coservers in cogroup data_group and
marks selected dbspaces or dbslices as backed up. The COMMIT option
marks dbspaces rootdbs.1, rootdbs.2, and rootdbs.3 as backed up.
onutil ebr unblock data_group commit rootdbs.%r(1..3);
Unblocking a Specific Session and Not Marking Dbspaces as Backed Up
Use the ABORT option to cancel a failed external backup and unblock the set
of coservers. You cannot externally restore these dbspaces because the backups
are incomplete.
If you use the ABORT option, the skip logical replay feature does not work,
even if that dbspace was completely backed up. In this case, use the
COMMIT option to commit those dbspaces that were backed up successfully
and use the ABORT option for the remaining dbspaces.
The following example unblocks the coservers identified in session
block_data_cogroup and does not mark any dbspaces as backed up. You must
have named the session in the previous block command. The ABORT option
means that no dbspaces are marked as backed up.
onutil ebr unblock session block_data_cogroup abort;
Monitoring an External Backup
To monitor the external backup status, use the onstat -g -bus command. To
find blocked coservers, use the xctl onstat - command. For more information,
see “Using the onstat -g bus Option” on page 8-13.
To monitor the external backup status in the sysmaster database, use the
following SQL queries. For more information, see “Backup Scheduler SMI
Tables (XPS)” on page 10-10.
# to find all blocked coservers
SELECT * FROM sysbuobject
WHERE is_block = 1 AND is_coserver = 1;
# to find all blocked coservers in my session
SELECT * FROM sysbuobjses WHERE os_ses_id = "my_session";
Tracking an External Backup
The database server and ON–Bar do not track external backups. To track the
external backup data, use a third-party storage manager or track the data
manually. Table 7-1 shows which items we recommend that you track in an
external backup. ON–Bar keeps a limited history of external restores.
7-12 IBM Informix Backup and Restore Guide
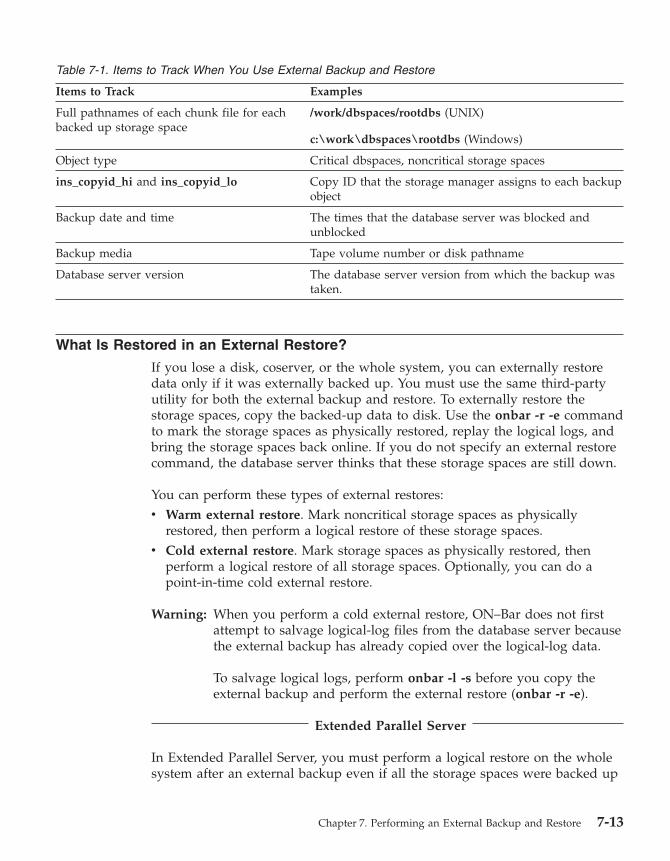
Table 7-1. Items to Track When You Use External Backup and Restore
Items to Track Examples
Full pathnames of each chunk file for each
backed up storage space
/work/dbspaces/rootdbs (UNIX)
c:\work\dbspaces\rootdbs (Windows)
Object type Critical dbspaces, noncritical storage spaces
ins_copyid_hi and ins_copyid_lo Copy ID that the storage manager assigns to each backup
object
Backup date and time The times that the database server was blocked and
unblocked
Backup media Tape volume number or disk pathname
Database server version The database server version from which the backup was
taken.
What Is Restored in an External Restore?
If you lose a disk, coserver, or the whole system, you can externally restore
data only if it was externally backed up. You must use the same third-party
utility for both the external backup and restore. To externally restore the
storage spaces, copy the backed-up data to disk. Use the onbar -r -e command
to mark the storage spaces as physically restored, replay the logical logs, and
bring the storage spaces back online. If you do not specify an external restore
command, the database server thinks that these storage spaces are still down.
You can perform these types of external restores:
v Warm external restore. Mark noncritical storage spaces as physically
restored, then perform a logical restore of these storage spaces.
v Cold external restore. Mark storage spaces as physically restored, then
perform a logical restore of all storage spaces. Optionally, you can do a
point-in-time cold external restore.
Warning: When you perform a cold external restore, ON–Bar does not first
attempt to salvage logical-log files from the database server because
the external backup has already copied over the logical-log data.
To salvage logical logs, perform onbar -l -s before you copy the
external backup and perform the external restore (onbar -r -e).
Extended Parallel Server
In Extended Parallel Server, you must perform a logical restore on the whole
system after an external backup even if all the storage spaces were backed up
Chapter 7. Performing an External Backup and Restore 7-13
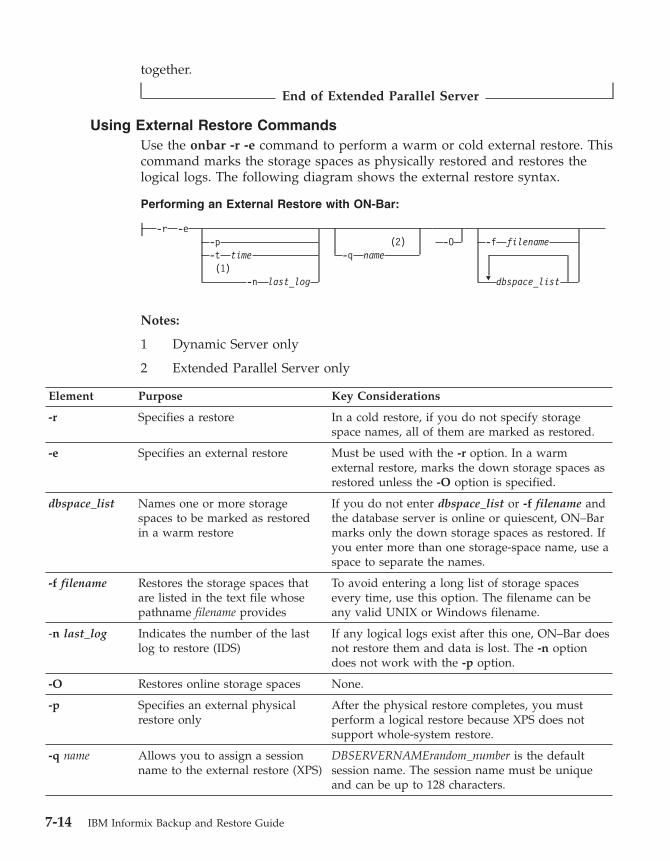
together.
End of Extended Parallel Server
Using External Restore Commands
Use the onbar -r -e command to perform a warm or cold external restore. This
command marks the storage spaces as physically restored and restores the
logical logs. The following diagram shows the external restore syntax.
Performing an External Restore with ON-Bar:
-r -e
-p
-t
time
(1)
-n
last_log
(2)
-q
name
-O
�
-f
filename
dbspace_list
Notes:
1 Dynamic Server only
2 Extended Parallel Server only
Element Purpose Key Considerations
-r Specifies a restore In a cold restore, if you do not specify storage
space names, all of them are marked as restored.
-e Specifies an external restore Must be used with the -r option. In a warm
external restore, marks the down storage spaces as
restored unless the -O option is specified.
dbspace_list Names one or more storage
spaces to be marked as restored
in a warm restore
If you do not enter dbspace_list or -f filename and
the database server is online or quiescent, ON–Bar
marks only the down storage spaces as restored. If
you enter more than one storage-space name, use a
space to separate the names.
-f filename Restores the storage spaces that
are listed in the text file whose
pathname filename provides
To avoid entering a long list of storage spaces
every time, use this option. The filename can be
any valid UNIX or Windows filename.
-n last_log Indicates the number of the last
log to restore (IDS)
If any logical logs exist after this one, ON–Bar does
not restore them and data is lost. The -n option
does not work with the -p option.
-O Restores online storage spaces None.
-p Specifies an external physical
restore only
After the physical restore completes, you must
perform a logical restore because XPS does not
support whole-system restore.
-q name Allows you to assign a session
name to the external restore (XPS)
DBSERVERNAMErandom_number is the default
session name. The session name must be unique
and can be up to 128 characters.
7-14 IBM Informix Backup and Restore Guide
Element Purpose Key Considerations
-t time Restores the last backup before
the specified point in time. If you
pick a backup made after the
point in time, the restore will fail.
You can use a point-in-time restore in a cold
restore only. You must restore all storage spaces.
How you enter the time depends on your current
GLS locale convention. If the GLS locale is not set,
use English-style date format. See “Restoring Data
to a Point in Time” on page 6-24.
Rules for an External Restore
Before you begin an external restore, keep the following rules in mind:
v You must externally restore from an external backup. Although the external
backup is treated as a level-0 backup, it might actually be a non-Informix
incremental backup.
v A warm external restore restores only noncritical storage spaces.
v You cannot externally restore temporary dbspaces.
v You cannot externally restore from regular ON–Bar backups.
v You cannot verify that you are restoring from the correct backup and that
the storage media is readable using ON–Bar.
v If the external backups are from different times, the external restore uses the
beginning logical log from the oldest backup.
These rules apply to cold external restores only:
v Salvage the logical logs (onbar -b -l -s) before you switch the disks that
contain the critical storage spaces.
v If you are restoring critical dbspaces, the database server must be offline
(Dynamic Server) or in microkernel mode (Extended Parallel Server).
v Point-in-time external restores must be cold and restore all storage spaces.
v The external backups of all critical dbspaces of the database server instance
must have been simultaneous. All critical dbspaces must have been backed
up within the same onmode -c block ... onmode -c unblock (IDS) or onutil
ebr block ...onutil ebr unblock commit (XPS) command bracket.
Performing an External Restore
This section describes procedures for performing cold and warm external
restores.
Cold External Restore Procedure
If you specify the onbar -r -e command in a cold restore, you must restore all
storage spaces. Use the onbar -r -e -p command to restore all or specific
storage spaces.
To perform a cold external restore:
Chapter 7. Performing an External Backup and Restore 7-15
1. Shut down the database server.
Dynamic Server
To shut down the database server, use the onmode -ky command.
End of Dynamic Server
Extended Parallel Server
To bring the database server to microkernel mode, use the xctl -C oninit
-m command.
End of Extended Parallel Server
2. Salvage the logical logs:
onbar -b -l -s
3. To restore the storage spaces from an external backup, use a copy
command, such as cp, dd, or tar on UNIX or a file-backup program.
You must restore the storage spaces to the same path as the original data
and include all the chunk files.
4. To perform an external restore of all storage spaces and logical logs, use
the following command:
onbar -r -e
To perform a point-in-time external restore of all storage spaces, use the
following command:
onbar -r -e -t datetime
Extended Parallel Server
To perform a physical external restore of specific storage spaces, followed
by a logical restore, use these commands:
onbar -r -e -p rootdbs
onbar -r -e -p critical_space1
onbar -r -e -p other_dbspaces
onbar -r -l
End of Extended Parallel Server
This step brings the database server to fast-recovery mode.
5. ON–Bar and the database server roll forward the logical logs and bring the
storage spaces online.
Performing an External Restore when Chunks are Mirrored by the Server:
When you mirror chunks using the mirroring support provided by the
database server, following a restore the database server assumes that you have
restored only the primary chunks from external backup and that mirror
7-16 IBM Informix Backup and Restore Guide
chunks do not contain valid data. You must recover mirror chunks manually
using the alter dbspace dbspacename online chunk chunkpath command
using the onutil utility. During recovery, the server writes the appropriate
onutil command you should use to perform the mirror recovery to the
message log. You can run these commands at a time you deem appropriate.
Because re-creating the mirror chunks consumes server resources, if your goal
is to bring the server online as soon as possible following recovery you might
want to defer mirror recovery until a scheduled maintenance period.
To restore from an external backup when you use the mirroring support
provided by the database server:
1. Shut down the database server.
Dynamic Server
To shut down the database server, use the onmode -ky command.
End of Dynamic Server
Extended Parallel Server
To bring the database server to microkernel mode, use the xctl -C oninit
-m command.
End of Extended Parallel Server
2. Salvage the logical logs:
onbar -b -l -s
3. To restore the storage spaces from an external backup, use a copy
command, such as cp, dd, or tar on UNIX, or use a file-backup program.
You must restore the storage spaces to the same path as the original data
and include all the chunk files. You need only restore data for the primary
chunks.
4. To perform an external restore of all storage spaces and logical logs, use
the following command:
onbar -r -e
To perform a point-in-time external restore of all storage spaces, use the
following command:
onbar -r -e -t datetime
Extended Parallel Server
To perform a physical external restore of specific storage spaces, followed
by a logical restore, use these commands:
Chapter 7. Performing an External Backup and Restore 7-17
onbar -r -e -p rootdbs
onbar -r -e -p critical_space1
onbar -r -e -p other_dbspaces
onbar -r -l
End of Extended Parallel Server
This step brings the database server to fast-recovery mode.
5. ON–Bar and the database server roll forward the logical logs and bring the
storage spaces online.
6. Perform mirror chunk recovery using onutil.
Mixed External Restore Restriction
ON–Bar does not support mixed external restores. For example, the following
sequence of commands might fail:
onbar -r -e rootdbs
onbar -r -e other_dbspaces
Warm External Restore Procedure
The database server is online during a warm external restore. A warm
external restore involves only noncritical storage spaces.
To perform a warm external restore:
1. To restore the storage spaces from an external backup, use a copy
command, such as cp, dd, or tar on UNIX or a file-backup program.
You must restore the storage spaces to the same path as the original data
and include all the chunk files for each restored storage space.
2. Perform a warm external restore of the noncritical storage spaces to bring
them online.
a. To restore selected storage spaces and all logical logs, use the following
command:
onbar -r -e dbspace_list
b. To restore all the down noncritical storage spaces and logical logs, use
the following command:
onbar -r -e
c. To restore all the down noncritical storage spaces and logical logs in
separate steps, use the following commands:
onbar -r -e -p
onbar -r -l
Specify the logstreams for only the coservers from where you restored
the dbspaces. For example, use the following command to restore
logstreams 1, 2, and 3:
onbar -r -l 1 2 3
7-18 IBM Informix Backup and Restore Guide
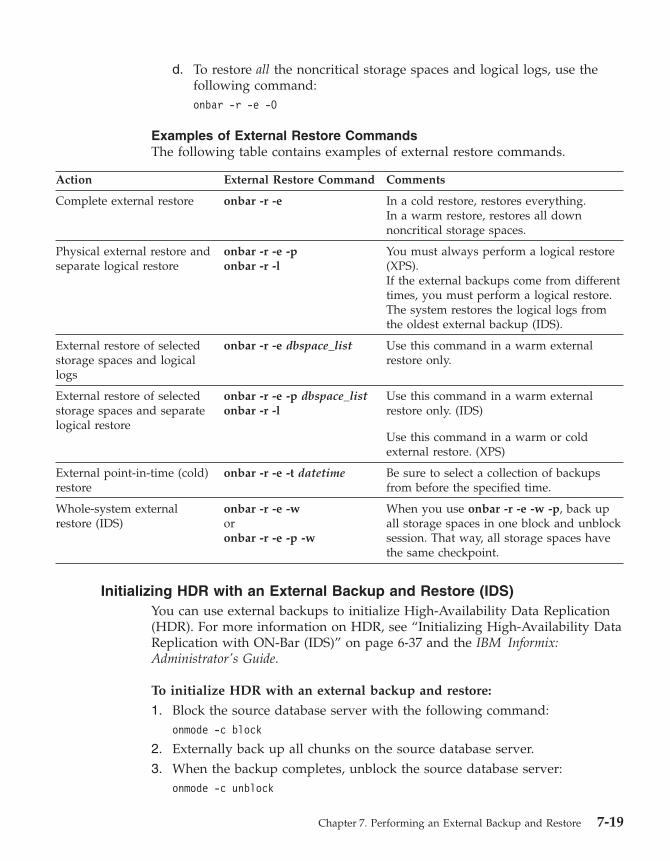
d. To restore all the noncritical storage spaces and logical logs, use the
following command:
onbar -r -e -O
Examples of External Restore Commands
The following table contains examples of external restore commands.
Action External Restore Command Comments
Complete external restore onbar -r -e In a cold restore, restores everything.
In a warm restore, restores all down
noncritical storage spaces.
Physical external restore and
separate logical restore
onbar -r -e -p
onbar -r -l
You must always perform a logical restore
(XPS).
If the external backups come from different
times, you must perform a logical restore.
The system restores the logical logs from
the oldest external backup (IDS).
External restore of selected
storage spaces and logical
logs
onbar -r -e dbspace_list Use this command in a warm external
restore only.
External restore of selected
storage spaces and separate
logical restore
onbar -r -e -p dbspace_list
onbar -r -l
Use this command in a warm external
restore only. (IDS)
Use this command in a warm or cold
external restore. (XPS)
External point-in-time (cold)
restore
onbar -r -e -t datetime Be sure to select a collection of backups
from before the specified time.
Whole-system external
restore (IDS)
onbar -r -e -wor
onbar -r -e -p -w
When you use onbar -r -e -w -p, back up
all storage spaces in one block and unblock
session. That way, all storage spaces have
the same checkpoint.
Initializing HDR with an External Backup and Restore (IDS)
You can use external backups to initialize High-Availability Data Replication
(HDR). For more information on HDR, see “Initializing High-Availability Data
Replication with ON-Bar (IDS)” on page 6-37 and the IBM Informix:
Administrator's Guide.
To initialize HDR with an external backup and restore:
1. Block the source database server with the following command:
onmode -c block
2. Externally back up all chunks on the source database server.
3. When the backup completes, unblock the source database server:
onmode -c unblock
Chapter 7. Performing an External Backup and Restore 7-19
4. Make the source database server the primary server:
onmode -d primary secondary_servername
5. On the target database server, restore the data from the external backup
with a copy or file-backup program.
6. On the target database server, restore the external backup of all chunks:
onbar -r -e -p
7. Make the target database server the secondary server:
onmode -d secondary primary_servername
8. If the logical-log records written to the primary database server since step
1 still reside on the primary database server disk, the secondary database
server reads these records to perform the logical recovery. Otherwise,
perform the logical recovery:
onbar -r -l
The database server operational messages appear in the message log on
the primary and secondary servers.
7-20 IBM Informix Backup and Restore Guide

Chapter 8. Using ON-Bar Utilities
Customizing ON-Bar and Storage-Manager Commands . . . . . . . . . . . . . . . . 8-2
Printing the Backup Boot Files . . . . . . . . . . . . . . . . . . . . . . . 8-3
Migrating Backed-Up Logical Logs to Tape . . . . . . . . . . . . . . . . . . . 8-4
Using start_worker.sh to Start onbar_worker Processes Manually (XPS) . . . . . . . . . . . 8-5
Expiring and Synchronizing the Backup Catalogs . . . . . . . . . . . . . . . . . . 8-6
Choosing an Expiration Policy . . . . . . . . . . . . . . . . . . . . . . . 8-6
Using the onsmsync Utility . . . . . . . . . . . . . . . . . . . . . . . . 8-7
Removing Expired Backups . . . . . . . . . . . . . . . . . . . . . . . 8-8
Expiring Old Backups on ISM . . . . . . . . . . . . . . . . . . . . . . 8-8
Regenerating the Emergency Boot File . . . . . . . . . . . . . . . . . . . . 8-9
Regenerating the sysutils Database . . . . . . . . . . . . . . . . . . . . . 8-9
Deleting a Bad Backup . . . . . . . . . . . . . . . . . . . . . . . . . 8-9
Expiring Backups Based on the Retention Date . . . . . . . . . . . . . . . . . 8-9
Expiring a Generation of Backups . . . . . . . . . . . . . . . . . . . . . 8-10
Expiring Backups Based on the Retention Interval . . . . . . . . . . . . . . . 8-10
Expiring Backups With Multiple Point-In-Time Restores . . . . . . . . . . . . . 8-10
Expiring All Backups . . . . . . . . . . . . . . . . . . . . . . . . . 8-11
Starting and Stopping ON-Bar Sessions (XPS) . . . . . . . . . . . . . . . . . . . 8-11
Using the onbar_w Utility . . . . . . . . . . . . . . . . . . . . . . . . 8-12
Monitoring the Backup Scheduler Status (XPS) . . . . . . . . . . . . . . . . . . 8-13
Using the onstat -g bus Option . . . . . . . . . . . . . . . . . . . . . . . 8-13
Sample onstat -g bus Output Without Any ON-Bar Activity . . . . . . . . . . . . 8-13
Sample onstat -g bus Output During a Dbspace Backup . . . . . . . . . . . . . 8-14
Using the onstat -g bus_sm Option . . . . . . . . . . . . . . . . . . . . . 8-14
Sample onstat -g bus_sm Output When ON-Bar Is Idle . . . . . . . . . . . . . . 8-14
Sample onstat -g bus_sm Output During a Dbspace Backup . . . . . . . . . . . . 8-14
In This Chapter
This chapter discusses the following topics:
v Customizing ON–Bar and storage-manager commands with the onbar
script
v Starting onbar-worker processes manually
v Expiring and synchronizing the backup history
Extended Parallel Server
v Starting and stopping ON–Bar sessions
v Monitoring the backup scheduler status
End of Extended Parallel Server
© Copyright IBM Corp. 1996, 2004 8-1
Customizing ON-Bar and Storage-Manager Commands
When you issue ON–Bar commands from the command line, the arguments
are passed to the onbar script and then to onbar_d. Use the onbar shell script
on UNIX or the onbar batch file on Windows to customize backup and restore
commands, start ISM, and back up the ISM catalog. The onbar script is
located in the $INFORMIXDIR/bin directory on UNIX and in the
%INFORMIXDIR%\bin directory on Windows.
The default onbar script assumes that the currently installed storage manager
is ISM and backs up the ISM catalogs. If you are using a different storage
manager, edit the onbar script, delete the ISM-specific lines, and optionally,
add storage-manager commands.
For background information on the onbar script or batch file, see “ON-Bar
Utilities” on page 2-9 and “Updating the onbar Script” on page 3-8.
The default onbar script contains the following sections:
v Add start-up processing here
Use this section to initialize the storage manager, if necessary, and set
environment variables.
v End start-up processing here
This section starts the onbar_d driver and checks the return code. Use this
section for onbar_d and storage-manager commands.
v Add cleanup processing here
The code in this section backs up the ISM catalogs to the ISMData volume
pool after the backup operation is complete. If you are using a third-party
storage manager, delete the ISM-specific information.
If you use a name other than ISMData for the volume pool, change it to the
name specified in the ISM_DATA_POOL configuration parameter.
Dynamic Server
The archecker temporary files are also removed.
End of Dynamic Server
v End cleanup processing here
Use this section to return onbar_d error codes.
Warning: Edit the onbar script carefully. Accidental deletions or changes
might cause undesired side effects. For example, backup verification
might leave behind temporary files if the cleanup code near the end
of the onbar script is changed.
8-2 IBM Informix Backup and Restore Guide

Printing the Backup Boot Files
Use the following examples of what to add to the onbar script to print the
emergency boot file if the backup is successful. Each time that you issue the
onbar -b command, the emergency boot file is printed.
UNIX Only
onbar_d "$@" # receives onbar arguments from command line
return_code = $? # check return code
# if backup (onbar -b) is successful, prints emergency boot file
if [$return_code -eq 0 -a "$1" = "-b"]; then
servernum=‘awk ’/^SERVERNUM/ {print $2}’ $INFORMIXDIR/etc/$ONCONFIG ’
lpr \$INFORMIXDIR/etc/ixbar.$servernum
fi
exit $return_code
End of UNIX Only
Extended Parallel Server
To print the backup boot files on all coservers, replace the line:
lpr \$INFORMIXDIR/etc/ixbar.$servernum
with:
xctl lpr \$INFORMIXDIR/etc/Bixbar_\’hostname\’.$servernum
If more coservers than hosts are on the system, this script prints the same
boot files twice.
End of Extended Parallel Server
Windows Only
@echo off
%INFORMIXDIR%\bin\onbar_d %*
set onbar_d_return=%errorlevel%
if "%onbar_d_return%" == "0" goto backupcom
goto skip
REM Check if this is a backup command
:backupcom
if "%1" == "-b" goto printboot
goto skip
REM Print the onbar boot file
:printboot
Chapter 8. Using ON-Bar Utilities 8-3
print %INFORMIXDIR%\etc\ixbar.???
REM Set the return code from onbar_d (this must be on the last line of
the script)
:skip
%INFORMIXDIR%\bin\set_error %onbar_d_return%
:end
End of Windows Only
Migrating Backed-Up Logical Logs to Tape
You can set up your storage manager to back up logical logs to disk and then
write a script to automatically migrate the logical logs from disk to tape for
off-site storage. Edit the onbar script to call this migration script after the
onbar_d process completes. The following example shows a script that calls
the migration script:
UNIX Only
onbar_d "$@" # starts the backup or restore
EXIT_CODE=$? # any errors?
PHYS_ONLY=false #if it’s physical-only, do nothing
for OPTION in $*; do
if [$OPTION = -p]; then
PHYS_ONLY = true
fi
done
if ! PHYS_ONLY; then # if logs were backed up, call another
migrate_logs # program to move them to tape
fi
End of UNIX Only
Windows Only
This example for Windows invokes the migration script:
%INFORMIXDIR%\bin\onbar_d %*
set onbar_d_return=%errorlevel%
if "%onbar_d_return%" == "0" goto backupcom
goto skip
REM Check if the command is a backup command
:backupcom
if "%1" == "-b" goto m_log
if "%1" == "-l" goto m_log
8-4 IBM Informix Backup and Restore Guide
goto skip
REM Invoke the user-defined program to migrate the logs
:m_log
migrate_log
REM Set the return code from onbar_d (this must be on the last
line of the script)
:skip
%INFORMIXDIR%\bin\set_error %onbar_d_return%
:end
End of Windows Only
Using start_worker.sh to Start onbar_worker Processes Manually (XPS)
To start onbar-worker processes manually, use the start_worker.sh script in
$INFORMIXDIR/etc or the onbar_w utility. Edit this file to specify additional
setup and cleanup tasks when the database server starts the onbar-worker
processes or to set environment variables.
The default start_worker.sh script contains only one line, which calls onbar_w
to start an onbar-worker process.
If the storage manager does not have special requirements for worker
processes that pass data to it, you do not have to change the start_worker.sh
script.
If the storage manager has special requirements, edit start_worker.sh to
include operating-system commands that set up the environment before you
start the onbar-worker process or perform other required actions after
onbar-worker processes start.
The storage-manager documentation should describe any special
requirements. If onbar-worker processes are not working correctly with a
storage manager, check if the storage manager has any special requirements. If
they are not listed in the documentation, or if they are not clearly stated so
that you can add them to start_worker, contact the storage-manager
manufacturer directly for more information.
Chapter 8. Using ON-Bar Utilities 8-5
Expiring and Synchronizing the Backup Catalogs
ON–Bar maintains a history of backup and restore operations in the sysutils
database and an extra copy of the backup history in the emergency boot file.
ON–Bar uses the sysutils database in a warm restore when only a portion of
the data is lost. ON–Bar uses the emergency boot file in a cold restore because
the sysutils database cannot be accessed. You can use the onsmsync utility to
regenerate the emergency boot file and expire old backups.
Depending on the command options you supply, the onsmsync utility can
remove the following items from the sysutils database and the emergency
boot file:
v Backups that the storage manager has expired
v Old backups based on the age of backup
v Old backups based on the number of times they have been backed up
Use onsmsync with the database server online or in quiescent mode to
synchronize both the sysutils database and the emergency boot file.
To synchronize the sysutils database:
1. Bring the database server online or to quiescent mode.
2. Run the onsmsync utility without any options.
The onsmsync utility synchronizes the sysutils database, the storage manager,
and the emergency boot file as follows:
v Adds backup history to sysutils that is in the emergency boot file but is
missing from the sysutils database.
v Removes the records of restores, whole-system restores (IDS), fake backups,
successful and failed backups from the sysutils database.
v Expires old logical logs that are no longer needed.
v Regenerates the emergency boot file from the sysutils database.
Choosing an Expiration Policy
You can choose from the following three expiration policies:
v Retention date (-t) deletes all backups before a particular date and time.
v Retention interval (-i) deletes all backups older than some period of time.
v Retention generation (-g) keeps a certain number of versions of each
backup.
ON–Bar always retains the latest level-0 backup for each storage space. It
expires all level-0 backups older than the specified time unless they are
required to restore from the oldest retained level-1 backup.
8-6 IBM Informix Backup and Restore Guide
ON–Bar expires all level-1 backups older than the specified time unless they
are required to restore from the oldest retained level-2 backup.
Dynamic Server
ON–Bar retains a whole-system backup that starts before the specified
retention time and ends after the specified retention time.
End of Dynamic Server
Using the onsmsync Utility
The order of the commands does not matter except that the storage-space
names or filename must come last.
Tip: To control whether the sysutils database maintains a history for expired
backups and restores, use the BAR_HISTORY configuration parameter.
For information, see “BAR_HISTORY” on page 9-11.
�� onsmsync
�
-g
generation
-s
-O
-f
filename
-t
time
-i
interval
dbspace_list
-b
��
Element Purpose Key Considerations
no options Synchronizes the sysutils
database and emergency
boot file with the
storage-manager catalog
None.
-b Regenerates the emergency
boot file from the sysutils
database only
Not used with the other onsmsync options. Does not
synchronize with the storage manager.
dbspace_list Lists the storage spaces to
expire
If you enter more than one storage space, use a space to
separate the names.
-f filename Specifies the pathname of
a file that contains a list of
storage spaces to expire
Use this option to avoid entering a long list of storage
spaces. The filename can be any valid UNIX or
Windows filename.
-g generation Retains a certain number
of versions of each level-0
backup
The latest generation of backups are retained and all
earlier ones are expired.
-i interval Expires all backups older
than some period of time
Retains backups younger than this interval. Backups
older than interval are not expired if they are needed to
restore from other backups after that interval. Use the
ANSI or GLS format for the interval: YYYY-MM or DD
HH:MM:SS
Chapter 8. Using ON-Bar Utilities 8-7
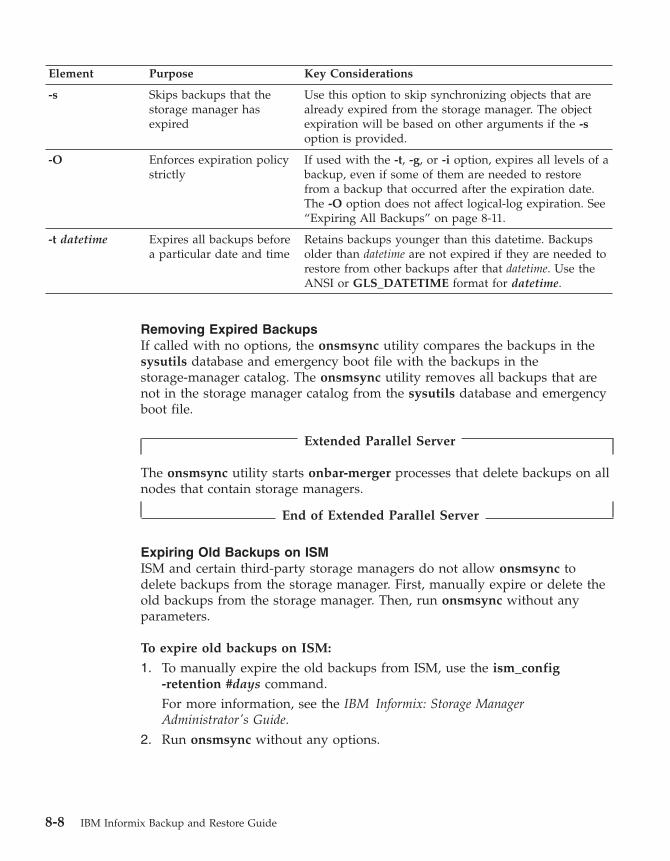
Element Purpose Key Considerations
-s Skips backups that the
storage manager has
expired
Use this option to skip synchronizing objects that are
already expired from the storage manager. The object
expiration will be based on other arguments if the -s
option is provided.
-O Enforces expiration policy
strictly
If used with the -t, -g, or -i option, expires all levels of a
backup, even if some of them are needed to restore
from a backup that occurred after the expiration date.
The -O option does not affect logical-log expiration. See
“Expiring All Backups” on page 8-11.
-t datetime Expires all backups before
a particular date and time
Retains backups younger than this datetime. Backups
older than datetime are not expired if they are needed to
restore from other backups after that datetime. Use the
ANSI or GLS_DATETIME format for datetime.
Removing Expired Backups
If called with no options, the onsmsync utility compares the backups in the
sysutils database and emergency boot file with the backups in the
storage-manager catalog. The onsmsync utility removes all backups that are
not in the storage manager catalog from the sysutils database and emergency
boot file.
Extended Parallel Server
The onsmsync utility starts onbar-merger processes that delete backups on all
nodes that contain storage managers.
End of Extended Parallel Server
Expiring Old Backups on ISM
ISM and certain third-party storage managers do not allow onsmsync to
delete backups from the storage manager. First, manually expire or delete the
old backups from the storage manager. Then, run onsmsync without any
parameters.
To expire old backups on ISM:
1. To manually expire the old backups from ISM, use the ism_config
-retention #days command.
For more information, see the IBM Informix: Storage Manager
Administrator's Guide.
2. Run onsmsync without any options.
8-8 IBM Informix Backup and Restore Guide
Regenerating the Emergency Boot File
To regenerate the emergency boot file only, use the following command:
onsmsync -b
Dynamic Server
On Dynamic Server, this command saves the old emergency boot file as
ixbar.server_number.system_time and regenerates it as ixbar.server_number.
End of Dynamic Server
Extended Parallel Server
On Extended Parallel Server, this command saves the old backup boot file on
each coserver as Bixbar_hostname_system_time.server_number and
regenerates it as Bixbar_hostname.server_number.
End of Extended Parallel Server
Regenerating the sysutils Database
If you lose the sysutils database, use the bldutil utility in
$INFORMIXDIR/etc on UNIX or %INFORMIXDIR%\etc on Windows to
re-create the sysutils database with empty tables.
Then use the onsmsync utility to re-create the backup and restore data in
sysutils.
Important: If both the sysutils database and emergency boot file are missing,
you cannot regenerate them with onsmsync. Be sure to back up
the emergency boot file with your other operating-system files.
Deleting a Bad Backup
The onsmsync utility cannot tell which backups failed verification. If the latest
backup failed verification but an earlier one was successful, you must
manually delete the failed backup records from the storage manager and then
run onsmsync with no options to synchronize ON–Bar. For more information,
see Chapter 5, “Verifying Backups,” on page 5-1.
Expiring Backups Based on the Retention Date
The following example expires backups that started before November 24, 2000
and all fake backups, failed backups, and restores:
onsmsync -t "2000-11-24 00:00"
Chapter 8. Using ON-Bar Utilities 8-9
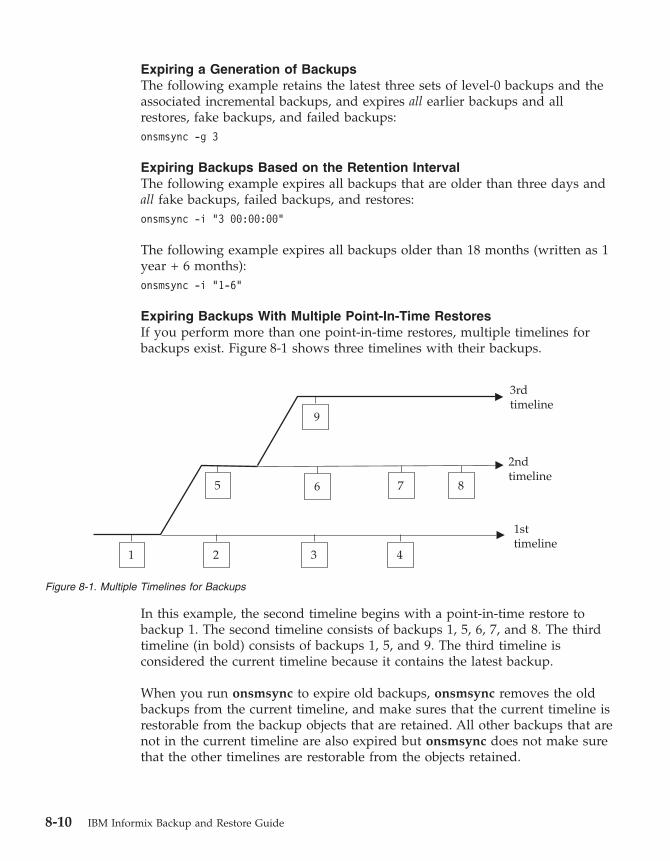
Expiring a Generation of Backups
The following example retains the latest three sets of level-0 backups and the
associated incremental backups, and expires all earlier backups and all
restores, fake backups, and failed backups:
onsmsync -g 3
Expiring Backups Based on the Retention Interval
The following example expires all backups that are older than three days and
all fake backups, failed backups, and restores:
onsmsync -i "3 00:00:00"
The following example expires all backups older than 18 months (written as 1
year + 6 months):
onsmsync -i "1-6"
Expiring Backups With Multiple Point-In-Time Restores
If you perform more than one point-in-time restores, multiple timelines for
backups exist. Figure 8-1 shows three timelines with their backups.
In this example, the second timeline begins with a point-in-time restore to
backup 1. The second timeline consists of backups 1, 5, 6, 7, and 8. The third
timeline (in bold) consists of backups 1, 5, and 9. The third timeline is
considered the current timeline because it contains the latest backup.
When you run onsmsync to expire old backups, onsmsync removes the old
backups from the current timeline, and make sures that the current timeline is
restorable from the backup objects that are retained. All other backups that are
not in the current timeline are also expired but onsmsync does not make sure
that the other timelines are restorable from the objects retained.
Figure 8-1. Multiple Timelines for Backups
8-10 IBM Informix Backup and Restore Guide
The onsmsync utility applies expiration policies in the following order to
make sure that objects from current timeline are expired according to the
specified expiration policy and that the current timeline is restorable:
v Apply the expiration policy on all sets of backup objects.
v Unexpire backup objects that belong to the current timeline.
v Apply the expiration policy on the current timeline to ensure that the
current timeline is restorable.
At the same time, the expiration policy is applied to backups in other
timelines.
For example, if you execute the onsmsync -g 2 command on the example in
Figure 8-1, backup 1 from the current timeline is expired, and backups 2, 3, 4,
6, and 7 from the first and second timelines are expired. Backups 1, 5, and 9
from the current timeline are retained. Backup 8 is retained from other
timelines.
Expiring All Backups
The onsmsync utility retains the latest level-0 backup unless you use the -O
option. If you use the -O and -t options, all backups from before the specified
time are removed even if they are needed for restore. If you use the -O and -i
options, all backups from before the specified interval are removed even if
they are needed for restore.
For example, to expire all backups, specify the following:
onsmsync -O -g 0
Warning: If you use the -O option with the -t, -i, or -g options, you might
accidentally delete critical backups, making restores impossible.
Starting and Stopping ON-Bar Sessions (XPS)
Session control commands let you stop and restart ON–Bar sessions. You
might stop and restart a session to:
v Temporarily stop continuous-log backup
v Temporarily stop some or all ON–Bar sessions while computer traffic is
heavy
Starting and Stopping ON-Bar Sessions
�� session
off
-q
on
-d
��
Chapter 8. Using ON-Bar Utilities 8-11
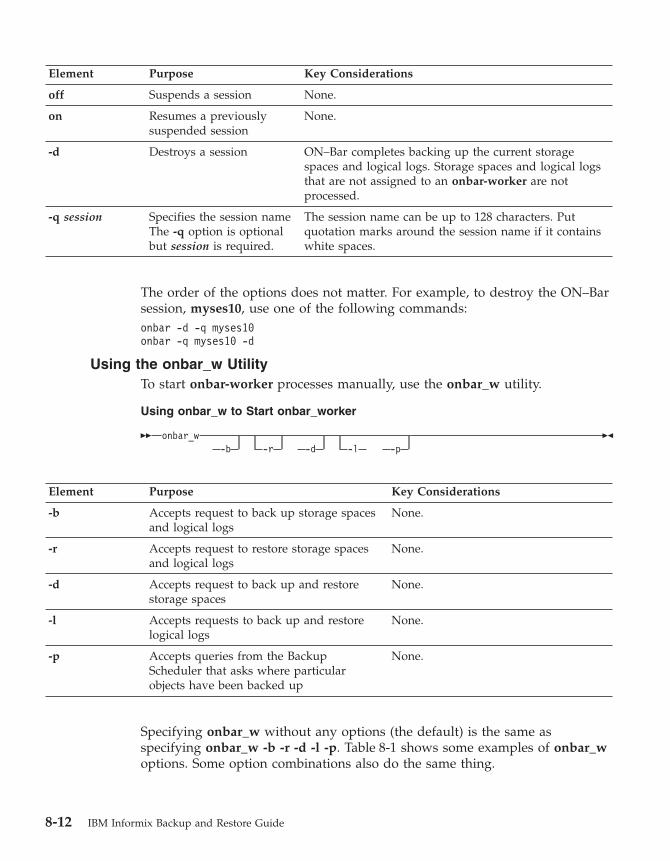
Element Purpose Key Considerations
off Suspends a session None.
on Resumes a previously
suspended session
None.
-d Destroys a session ON–Bar completes backing up the current storage
spaces and logical logs. Storage spaces and logical logs
that are not assigned to an onbar-worker are not
processed.
-q session Specifies the session name
The -q option is optional
but session is required.
The session name can be up to 128 characters. Put
quotation marks around the session name if it contains
white spaces.
The order of the options does not matter. For example, to destroy the ON–Bar
session, myses10, use one of the following commands:
onbar -d -q myses10
onbar -q myses10 -d
Using the onbar_w Utility
To start onbar-worker processes manually, use the onbar_w utility.
Using onbar_w to Start onbar_worker
�� onbar_w
-b
-r
-d
-l
-p ��
Element Purpose Key Considerations
-b Accepts request to back up storage spaces
and logical logs
None.
-r Accepts request to restore storage spaces
and logical logs
None.
-d Accepts request to back up and restore
storage spaces
None.
-l Accepts requests to back up and restore
logical logs
None.
-p Accepts queries from the Backup
Scheduler that asks where particular
objects have been backed up
None.
Specifying onbar_w without any options (the default) is the same as
specifying onbar_w -b -r -d -l -p. Table 8-1 shows some examples of onbar_w
options. Some option combinations also do the same thing.
8-12 IBM Informix Backup and Restore Guide
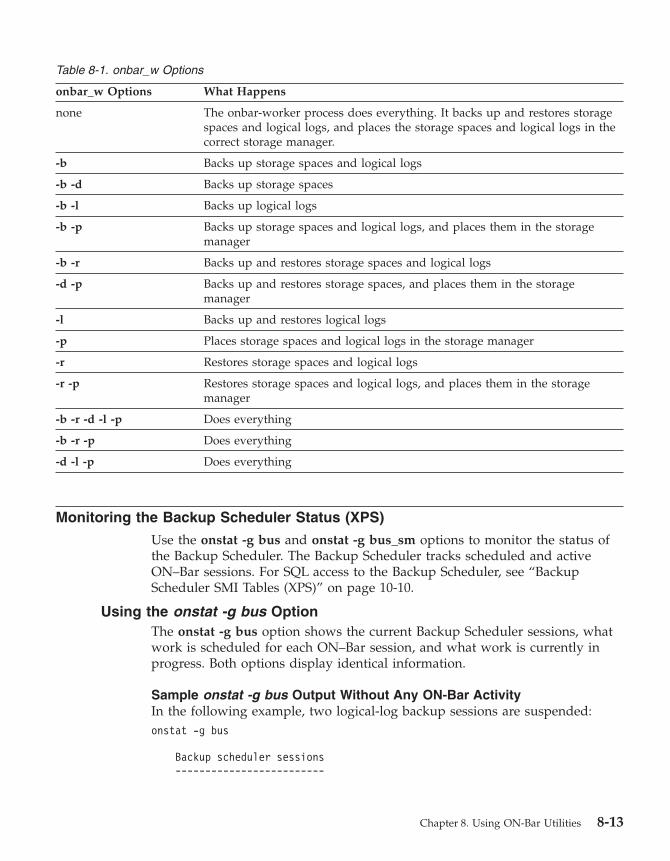
Table 8-1. onbar_w Options
onbar_w Options What Happens
none The onbar-worker process does everything. It backs up and restores storage
spaces and logical logs, and places the storage spaces and logical logs in the
correct storage manager.
-b Backs up storage spaces and logical logs
-b -d Backs up storage spaces
-b -l Backs up logical logs
-b -p Backs up storage spaces and logical logs, and places them in the storage
manager
-b -r Backs up and restores storage spaces and logical logs
-d -p Backs up and restores storage spaces, and places them in the storage
manager
-l Backs up and restores logical logs
-p Places storage spaces and logical logs in the storage manager
-r Restores storage spaces and logical logs
-r -p Restores storage spaces and logical logs, and places them in the storage
manager
-b -r -d -l -p Does everything
-b -r -p Does everything
-d -l -p Does everything
Monitoring the Backup Scheduler Status (XPS)
Use the onstat -g bus and onstat -g bus_sm options to monitor the status of
the Backup Scheduler. The Backup Scheduler tracks scheduled and active
ON–Bar sessions. For SQL access to the Backup Scheduler, see “Backup
Scheduler SMI Tables (XPS)” on page 10-10.
Using the onstat -g bus Option
The onstat -g bus option shows the current Backup Scheduler sessions, what
work is scheduled for each ON–Bar session, and what work is currently in
progress. Both options display identical information.
Sample onstat -g bus Output Without Any ON-Bar Activity
In the following example, two logical-log backup sessions are suspended:
onstat -g bus
Backup scheduler sessions
-------------------------
Chapter 8. Using ON-Bar Utilities 8-13
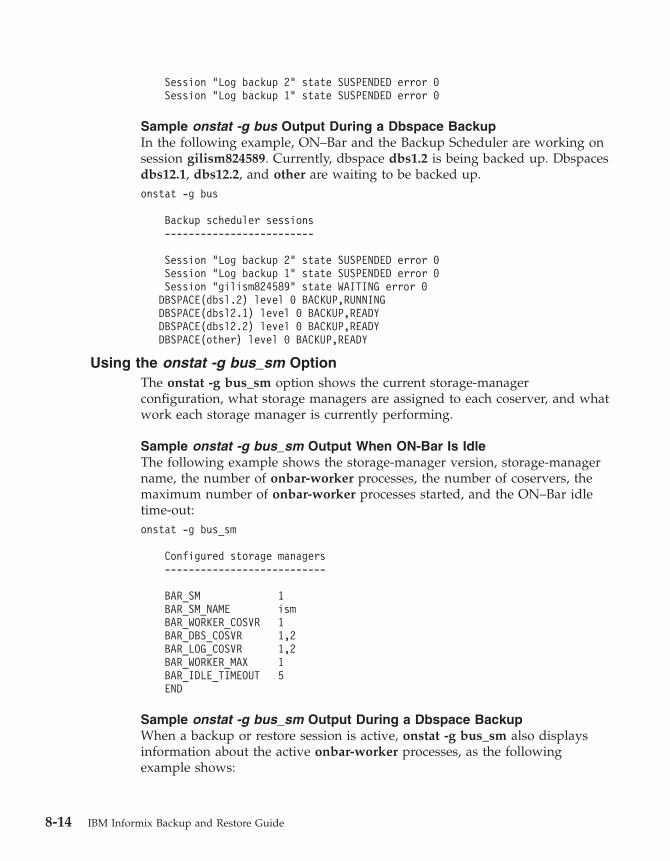
Session "Log backup 2" state SUSPENDED error 0
Session "Log backup 1" state SUSPENDED error 0
Sample onstat -g bus Output During a Dbspace Backup
In the following example, ON–Bar and the Backup Scheduler are working on
session gilism824589. Currently, dbspace dbs1.2 is being backed up. Dbspaces
dbs12.1, dbs12.2, and other are waiting to be backed up.
onstat -g bus
Backup scheduler sessions
-------------------------
Session "Log backup 2" state SUSPENDED error 0
Session "Log backup 1" state SUSPENDED error 0
Session "gilism824589" state WAITING error 0
DBSPACE(dbsl.2) level 0 BACKUP,RUNNING
DBSPACE(dbsl2.1) level 0 BACKUP,READY
DBSPACE(dbsl2.2) level 0 BACKUP,READY
DBSPACE(other) level 0 BACKUP,READY
Using the onstat -g bus_sm Option
The onstat -g bus_sm option shows the current storage-manager
configuration, what storage managers are assigned to each coserver, and what
work each storage manager is currently performing.
Sample onstat -g bus_sm Output When ON-Bar Is Idle
The following example shows the storage-manager version, storage-manager
name, the number of onbar-worker processes, the number of coservers, the
maximum number of onbar-worker processes started, and the ON–Bar idle
time-out:
onstat -g bus_sm
Configured storage managers
---------------------------
BAR_SM 1
BAR_SM_NAME ism
BAR_WORKER_COSVR 1
BAR_DBS_COSVR 1,2
BAR_LOG_COSVR 1,2
BAR_WORKER_MAX 1
BAR_IDLE_TIMEOUT 5
END
Sample onstat -g bus_sm Output During a Dbspace Backup
When a backup or restore session is active, onstat -g bus_sm also displays
information about the active onbar-worker processes, as the following
example shows:
8-14 IBM Informix Backup and Restore Guide
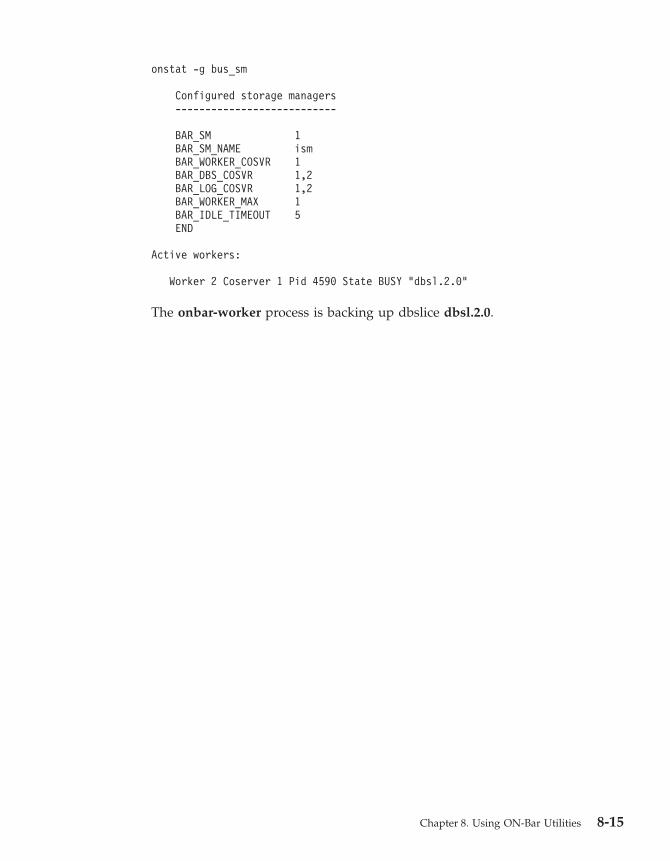
onstat -g bus_sm
Configured storage managers
---------------------------
BAR_SM 1
BAR_SM_NAME ism
BAR_WORKER_COSVR 1
BAR_DBS_COSVR 1,2
BAR_LOG_COSVR 1,2
BAR_WORKER_MAX 1
BAR_IDLE_TIMEOUT 5
END
Active workers:
Worker 2 Coserver 1 Pid 4590 State BUSY "dbsl.2.0"
The onbar-worker process is backing up dbslice dbsl.2.0.
Chapter 8. Using ON-Bar Utilities 8-15

8-16 IBM Informix Backup and Restore Guide
Chapter 9. Setting ON-Bar Configuration Parameters
Setting archecker Configuration Parameters in AC_CONFIG . . . . . . . . . . . . . . 9-2
AC_CONFIG File . . . . . . . . . . . . . . . . . . . . . . . . . . . . 9-3
AC_MSGPATH . . . . . . . . . . . . . . . . . . . . . . . . . . . . 9-3
AC_STORAGE . . . . . . . . . . . . . . . . . . . . . . . . . . . . . 9-4
AC_TIMEOUT . . . . . . . . . . . . . . . . . . . . . . . . . . . . . 9-5
AC_VERBOSE . . . . . . . . . . . . . . . . . . . . . . . . . . . . . 9-5
Setting ON-Bar Parameters in ONCONFIG . . . . . . . . . . . . . . . . . . . . 9-5
ALARMPROGRAM . . . . . . . . . . . . . . . . . . . . . . . . . . . 9-5
ALRM_ALL_EVENTS (IDS) . . . . . . . . . . . . . . . . . . . . . . . . 9-6
BAR_ACT_LOG . . . . . . . . . . . . . . . . . . . . . . . . . . . . 9-6
BAR_BOOT_DIR (XPS) . . . . . . . . . . . . . . . . . . . . . . . . . . 9-8
BAR_BSALIB_PATH . . . . . . . . . . . . . . . . . . . . . . . . . . . 9-8
BAR_DBS_COSVR (XPS) . . . . . . . . . . . . . . . . . . . . . . . . . 9-10
BAR_DEBUG . . . . . . . . . . . . . . . . . . . . . . . . . . . . . 9-10
BAR_DEBUG_LOG . . . . . . . . . . . . . . . . . . . . . . . . . . . 9-10
BAR_HISTORY . . . . . . . . . . . . . . . . . . . . . . . . . . . . 9-11
BAR_IDLE_TIMEOUT (XPS) . . . . . . . . . . . . . . . . . . . . . . . . 9-11
BAR_LOG_COSVR (XPS) . . . . . . . . . . . . . . . . . . . . . . . . . 9-12
BAR_MAX_BACKUP (IDS) . . . . . . . . . . . . . . . . . . . . . . . . 9-12
BAR_NB_XPORT_COUNT (IDS) . . . . . . . . . . . . . . . . . . . . . . 9-13
BAR_PROGRESS_FREQ . . . . . . . . . . . . . . . . . . . . . . . . . 9-14
BAR_RETRY . . . . . . . . . . . . . . . . . . . . . . . . . . . . . 9-14
BAR_SM (XPS) . . . . . . . . . . . . . . . . . . . . . . . . . . . . 9-16
BAR_SM_NAME (XPS) . . . . . . . . . . . . . . . . . . . . . . . . . 9-16
BAR_WORKER_COSVR (XPS) . . . . . . . . . . . . . . . . . . . . . . . 9-16
BAR_WORKER_MAX (XPS) . . . . . . . . . . . . . . . . . . . . . . . . 9-17
BAR_XFER_BUF_SIZE (IDS) . . . . . . . . . . . . . . . . . . . . . . . . 9-18
BAR_XFER_BUFSIZE (XPS) . . . . . . . . . . . . . . . . . . . . . . . . 9-18
BAR_XPORT_COUNT (XPS) . . . . . . . . . . . . . . . . . . . . . . . . 9-19
ISM_DATA_POOL . . . . . . . . . . . . . . . . . . . . . . . . . . . 9-20
ISM_LOG_POOL . . . . . . . . . . . . . . . . . . . . . . . . . . . 9-20
LOG_BACKUP_MODE (XPS) . . . . . . . . . . . . . . . . . . . . . . . 9-21
LTAPEDEV (IDS) . . . . . . . . . . . . . . . . . . . . . . . . . . . 9-21
RESTARTABLE_RESTORE (IDS) . . . . . . . . . . . . . . . . . . . . . . 9-22
Files That ON-Bar, ISM, and TSM Use . . . . . . . . . . . . . . . . . . . . . 9-23
In This Chapter
This chapter describes the ON–Bar configuration parameters that you can set
in the ONCONFIG file and the archecker configuration parameters that you
can set in the AC_CONFIG file.
© Copyright IBM Corp. 1996, 2004 9-1
Be sure to configure your storage manager. Depending on the storage
manager that you choose, you might set different ON–Bar configuration
parameters. Before you start ON–Bar, see “Installing and Configuring a
Storage Manager” on page 3-2.
This table describes the following attributes (if relevant) for each parameter.
Attribute Description
onconfig.std value
The default value that appears in the onconfig.std file in
Dynamic Server or the onconfig.xps file in Extended Parallel
Server
if not present The value that the database server supplies if the parameter is
missing from your ONCONFIG file
If this value is present in onconfig.std, the database server
uses the onconfig.std value. If this value is not present in
onconfig.std, the database server uses this value.
units The units in which the parameter is expressed
range of values The valid values for this parameter
takes effect The time at which a change to the value of the parameter
affects ON–Bar operation
Except where indicated, you can change the parameter value
between a backup and a restore.
refer to Cross-reference to further discussion
Setting archecker Configuration Parameters in AC_CONFIG
Because ON–Bar calls the archecker utility to verify backups, you must
configure these archecker parameters before you can use the onbar -v option.
For more information about using archecker, see Chapter 5, “Verifying
Backups,” on page 5-1. The following table shows the archecker configuration
parameters for verifying backups that you specify in the AC_CONFIG file.
9-2 IBM Informix Backup and Restore Guide
Configuration Parameter Purpose IDS XPS
AC_MSGPATH Specifies the location of the archecker
message log
X X
AC_STORAGE Specifies the location of the temporary
files that archecker builds
X X
Specifies the he timeout value for the
onbar and the archecker processes if
one of them exits prematurely
X
AC_VERBOSE Specifies either verbose or quiet mode
for archecker messages
X X
AC_CONFIG File
default value
UNIX: $INFORMIXDIR/etc/ac_config.std
Windows: %INFORMIXDIR%\etc\ac_config.std
takes effect
When ON-Bar starts
Set the AC_CONFIG environment variable to the full pathname for the
archecker configuration file (either ac_config.std or user defined). You must
specify the entire path, including the configuration filename in the
AC_CONFIG file or else the archecker utility might not work correctly. The
following are examples of valid AC_CONFIG pathnames:
v UNIX: /usr/informix/etc/ac_config.std and /usr/local/my_ac_config.std
v Windows: c:\Informix\etc\ac_config.std and
c:\Informix\etc\my_ac_config.std
If AC_CONFIG is not set, the archecker utility sets the default location for
the archecker configuration file to $INFORMIXDIR/etc/ac_config.std on
UNIX or %INFORMIXDIR%\etc\ac_config.std on Windows.
AC_MSGPATH
ac_config.std value
UNIX: /tmp/ac_msg.log
Windows: c:\temp\ac_msg.log
takes effect
When ON-Bar starts
Chapter 9. Setting ON-Bar Configuration Parameters 9-3
The AC_MSGPATH parameter in the AC_CONFIG file specifies the location of
the archecker message log (ac_msg.log). You must specify the entire path of
the message log in the AC_CONFIG file or else the archecker utility might not
work correctly.
When you verify backups with onbar -v, the archecker utility writes summary
messages to the bar_act.log and indicates whether the validation succeeded or
failed. It writes detailed messages to the ac_msg.log. If the backup fails
verification, discard the backup and retry another backup, or give the
ac_msg.log to Technical Support. For sample messages, see “Interpreting
Verification Messages” on page 5-7.
AC_STORAGE
ac_config.std value
UNIX: /tmp
Windows: c:\temp
takes effect
When ON-Bar starts
The AC_STORAGE parameter in the AC_CONFIG file specifies the location
of the directory where archecker stores its temporary files. You must specify
the entire path of the storage location in AC_CONFIG or else the archecker
utility might not work correctly.
Table 9-1 lists the directories and files that archecker builds. If verification is
successful, these files are deleted.
Table 9-1. archecker Temporary Files
Directory Files
CHUNK_BM Bitmap information for every backed up storage space.
INFO Statistical analysis and debugging information for the backup.
SAVE Partition pages in the PT.######## file.
Chunk-free pages in the FL.######## file.
Reserved pages in the RS.######## file.
Blob-free map pages in the BF.######## file (Dynamic Server only).
To calculate the amount of free space that you need, see “Estimating the
Amount of Temporary Space for archecker” on page 5-5. We recommend that
you set AC_STORAGE to a location with plenty of free space.
9-4 IBM Informix Backup and Restore Guide
AC_TIMEOUT
ac_config.std value
UNIX 300
Windows 300
units seconds
takes effect
When the onbar-v command starts
The AC_TIMEOUT parameter in the AC_CONFIG file specifies the timeout
value for the onbar and the archecker processes if one of them exits
prematurely. This parameter was introduced to avoid onbar and archecker
processes waiting for each other indefinitely if one of them exits prematurely,
thus avoiding the creation of an orphan and zombie process during data
server initialization.
AC_VERBOSE
ac_config.std value 1
range of values 1 for verbose messages in ac_msg.log0 for terse messages in ac_msg.log
takes effect When onbar starts
The AC_VERBOSE parameter in the AC_CONFIG file specifies either verbose
or terse output in the archecker message log.
Setting ON-Bar Parameters in ONCONFIG
The following section lists the ON–Bar configuration parameters and indicates
the database servers to which they apply.
Important: ON–Bar does not use the TAPEDEV, TAPEBLK, TAPESIZE,
LTAPEBLK, and LTAPESIZE configuration parameters. ON–Bar
checks if LTAPEDEV is set to /dev/null on UNIX or \dev\nul or
NUL on Windows. For more information, see “LTAPEDEV (IDS)”
on page 9-21.
ALARMPROGRAM
onconfig.std value Dynamic Server:
On UNIX: /usr/informix/etc/log_full.shOn Windows:
%INFORMIXDIR%\etc\log_full.bat
Extended Parallel Server: blank
if value not present Dynamic Server: no_log.sh or no_log.bat
Chapter 9. Setting ON-Bar Configuration Parameters 9-5
Extended Parallel Server: blank
range of values Full pathname
takes effect When the database server is shutdown and
restarted
refer to IBM Informix: Administrator's Reference
Use the ALARMPROGRAM configuration parameter to handle event alarms
and start or end automatic log backups.
Use the shell script, log_full.sh or log_full.bat, for starting automatic log
backups. Modify this script and set it to the full path of ALARMPROGRAM
in the ONCONFIG file.
To generate event alarms, set ALARMPROGRAM to $INFORMIXDIR/etc/
alarmprogram.sh or %INFORMIXDIR%\etc\alarmprogram.bat and modify
the file according. For more information, see the IBM Informix: Administrator's
Reference.
Important: When you choose automatic logical-log backups, backup media
should always be available for the backup process.
Do not use the continuous log backup command (onbar -b -l -C)
if you have automatic log backup set up through the
ALARMPROGRAM parameter, and conversely.
ALRM_ALL_EVENTS (IDS)
onconfig.std value 0
if value not present No effect
range of values 0 or 1
takes effect When the database server is initialized
refer to IBM Informix: Administrator's Reference
The ALRM_ALL_EVENTS configuration parameter is used to alter the default
behavior of the ALARMPROGRAM script. When this configuration parameter
is set to 1, ALARMPROGRAM will run for all events that are logged in the
MSGPATH and email is sent to the administrator including relevant
information about the event.
BAR_ACT_LOG
takes effect IDS: When onbar-driver starts
XPS: When onbar starts or an onbar-worker process starts
9-6 IBM Informix Backup and Restore Guide
The BAR_ACT_LOG configuration parameter specifies the full pathname of
the ON–Bar activity log. You should specify a path to an existing directory
with an appropriate amount of space available or use
$INFORMIXDIR/bar_act.log
Whenever a backup or restore activity or error occurs, ON–Bar writes a brief
description to the activity log. The format of the file resembles the format of
the database server message log. You can examine the activity log to
determine the results of ON–Bar actions.
Specifying BAR_ACT_LOG with a Filename Only
If you specify a filename only in the BAR_ACT_LOG parameter, ON–Bar
creates the ON–Bar activity log in the working directory in which you started
ON–Bar. For example, if you started ON–Bar from /usr/mydata on UNIX, the
activity log is written to that directory.
UNIX Only
If the database server launches a continuous logical-log backup, ON–Bar
writes to the ON–Bar activity log in the working directory for the database
server.
End of UNIX Only
Windows Only
If the database server launches a continuous logical-log backup, ON–Bar
writes to the activity log in the %INFORMIXDIR%\bin directory instead.
End of Windows Only
Using BAR_ACT_LOG on Extended Parallel Server
The onbar_w and onbar_m utilities also write messages to the activity log.
If you set BAR_ACT_LOG to a local pathname, each onbar-driver and
onbar-worker process writes to the ON–Bar activity log on the node where it
runs. Unless your system is configured to have shared directories, and the
ON–Bar activity log is specified to be in a shared directory, each node has its
own ON–Bar activity log.
Warning: Even if you set the path of BAR_ACT_LOG to some other directory,
check to see if the ON–Bar activity log was placed in the default
directory. When onbar-merger first starts, it writes messages to
/tmp/bar_act.log until it has a chance to read the ONCONFIG file.
Chapter 9. Setting ON-Bar Configuration Parameters 9-7
BAR_BOOT_DIR (XPS)
onconfig.std value /usr/informix/etc
if value not present blank
takes effect When the next onbar-worker process starts
The BAR_BOOT_DIR configuration parameter allows you to change the
directory path for the emergency boot files. You must specify it in the global
section of the ONCONFIG file.
Accessing the Emergency Boot Files
The onbar_w, onbar_m, and onbar_d utilities must be able to access the
directory that you select for the emergency boot files. All coservers must be
able to write to the directory for user root. The BAR_BOOT_DIR parameter is
designed to be used on a system where the INFORMIXDIR directory is
shared but the root user does not have write permissions to the
INFORMIXDIR directory. For example, you can set BAR_BOOT_DIR to the
/var/informix directory on a multinode system. Because each node has its own
/var file system, it prevents read/write permissions problems.
If you change the BAR_BOOT_DIR value while an onbar-worker process is
running, it will use the old value. Any new onbar-worker process started after
the change will pick up the new value.
Warning: After you change the BAR_BOOT_DIR value, you must kill all
onbar-worker processes on all coservers. When the processes end,
either perform a level-0 backup of all storage spaces or move the
files from the etc subdirectory to the new location.
Saving the Emergency Boot Files During Reversion
When you revert to an earlier database server version, the reversion script
saves the emergency boot files in the directory that the BAR_BOOT_DIR
parameter specifies. Otherwise, the reversion script saves the emergency boot
files to the $INFORMIXDIR/etc directory if BAR_BOOT_DIR is not set in the
ONCONFIG file or is set to an invalid directory.
BAR_BSALIB_PATH
onconfig.std value UNIX $INFORMIXDIR/lib/ibsad001.platform_
extensionwhere platform_extension is the
shared-library file extension
Windows libbsa.dll
if value not present Windows None
takes effect IDS: When onbar-driver starts
XPS: When an onbar-worker process starts
9-8 IBM Informix Backup and Restore Guide
ON–Bar and the storage manager rely on a shared library to integrate with
each other. Configure the BAR_BSALIB_PATH configuration parameter for
your storage-manager library. Support for BAR_BSALIB_PATH is
platform-specific. Check your machine notes to determine if you can use it
with your operating system. You can change the value of BAR_BSALIB_PATH
between a backup and restore.
To ensure that this integration takes place, specify the shared-library
pathname. Set one of the following options:
v Place the storage-manager library in the default directory.
UNIX Only
For example, the suffix for Solaris is so, so you specify
$INFORMIXDIR/lib/ibsad001.so on a Solaris system.
End of UNIX Only
UNIX Only
v Place the storage-manager library in any directory and create a symbolic
link from $INFORMIXDIR/lib/ibsad001.platform_extension to it.
If you use ISM, create a symbolic link to
$INFORMIXDIR/lib/libbsa.platform_extension or set BAR_BSALIB_PATH
to this absolute path value.
If you use TSM, create a symbolic link to
$INFORMIXDIR/lib/libtxbsa.platform_extension or set
BAR_BSALIB_PATH to this absolute path value.
v Set the LD_LIBRARY_PATH environment variable. For example, to use
ISM on Solaris, set LD_LIBRARY_PATH to $INFORMIXDIR/lib.
End of UNIX Only
Windows Only
v Set the pathname for the ISM shared library to
%ISMDIR%\bin\libbsa.dll.
The %ismDIR% variable includes a version or release number. For
example:
set ISMDIR=C:\program files\informix\ism\2.20. This directory is set
when the database server is installed on Windows. This pathname is
different if you use a different storage manager.
End of Windows Only
Chapter 9. Setting ON-Bar Configuration Parameters 9-9
Tip: Be sure that the shared library can access the backup data in the storage
manager in a restore. You cannot back up using one storage manager
and restore using a different storage manager.
BAR_DBS_COSVR (XPS)
onconfig.std value all coservers
range of values A list of unique positive integers greater than
or equal to one
takes effect When the database server starts
The optional BAR_DBS_COSVR configuration parameter specifies the
coservers from which the storage manager that BAR_SM specifies can be sent
storage-space backup and restore data. If BAR_DBS_COSVR is set to 0, the
storage manager is not given dbspaces from any coserver. You might specify
BAR_DBS_COSVR 0 to reserve a storage manager for logical-log backups
only.
The values are coserver numbers, separated by commas. Hyphens indicate
ranges. For example, BAR_DBS_COSVR 1-5,7,9 specifies a storage manager
that backs up dbspaces on coservers 1, 2, 3, 4, 5, 7, and 9. Do not put spaces
between coserver names.
To provide flexibility and improved performance, this list of coservers can
overlap with values listed for other storage managers.
BAR_DEBUG
onconfig.std value 0
if value not present 0
units Levels of debugging information
range of values 0 to 9
takes effect When ON-Bar starts
Set the BAR_DEBUG configuration parameter to a higher value to display
more detailed debugging information in the ON-Bar activity log. The default
value of 0 displays no debugging information. You can dynamically update
the value of BAR_DEBUG in the ONCONFIG file during a session. For more
information, see “Specifying the Level of ON-Bar Debugging (IDS)” on page
2-14.
BAR_DEBUG_LOG
onconfig.std value /usr/informix/bar_dbug.log
9-10 IBM Informix Backup and Restore Guide

if value not present On UNIX: /tmp/bar_dbug.logOn Windows: \tmp\bar_dbug.log
takes effect When ON-Bar starts
The BAR_DEBUG_LOG parameter specifies the location and name of the
ON-Bar debug log. For security reasons, you should set BAR_DEBUG_LOG to
a directory with restricted permissions, such as the $INFORMIXDIR directory.
BAR_HISTORY
onconfig.std value Not in onconfig.std
if value not present 0
range of values 0 to remove records for expired backup objects
from sysutils
1 to keep records for expired backup objects in
sysutils
takes effect When onsmsync starts
The BAR_HISTORY parameter specifies whether the sysutils database
maintains a backup history when you use onsmsync to expire old backups.
For more information, see “Using the onsmsync Utility” on page 8-7.
If you set the value to 0, onsmsync removes the bar_object, bar_action, and
bar_instance rows for the expired backup objects from the sysutils database.
If you set the value to 1, onsmsync sets the act_type value to 7 in the
bar_action row and keeps the bar_action and bar_instance rows for expired
backup objects in the sysutils database. If you do not set BAR_HISTORY to 1,
the restore history is removed.
Regardless of the value of BAR_HISTORY, onsmsync removes the line that
describes the backup object from the emergency boot file and removes the
object from the storage manager when the storage manager expires the object.
BAR_IDLE_TIMEOUT (XPS)
onconfig.std value 0
if value not present 0
units Minutes
range of values 0 to unlimited
takes effect When the database server starts
Chapter 9. Setting ON-Bar Configuration Parameters 9-11
The BAR_IDLE_TIMEOUT configuration parameter determines the maximum
amount of time in minutes that an onbar-worker process can be idle before it
is shut down.
The BAR_IDLE_TIMEOUT configuration parameter is optional. If
BAR_IDLE_TIMEOUT is set to 0, the onbar-worker processes never shut
down until you shut down the database server.
You can set this option locally for individual storage managers to override the
default or specified global setting.
BAR_LOG_COSVR (XPS)
onconfig.std value all coservers
range of values A list of unique positive integers greater than
or equal to one
takes effect When the database server starts
The BAR_LOG_COSVR configuration parameter specifies the coservers from
which the storage manager that BAR_SM specifies can be sent logical-log
backup and restore data. BAR_LOG_COSVR is optional. The default is all
coservers.
If BAR_LOG_COSVR is set to 0, the storage manager is not given logical logs
from any coserver. You might specify BAR_LOG_COSVR 0 to reserve a
storage manager for dbspace backups only.
The values are coserver numbers, separated by commas. Hyphens indicate
ranges. For example, BAR_LOG_COSVR 1-5,7,9 specifies a storage manager
that backs up logical logs on coservers 1, 2, 3, 4, 5, 7, and 9. Do not put spaces
between coserver names.
Extended Parallel Server restricts BAR_LOG_COSVR settings to guarantee
that no two storage-manager instances can back up logs for the same coserver.
BAR_MAX_BACKUP (IDS)
onconfig.std value 0
if value not present 4
units onbar processes
range of values 0 = maximum number of processes allowed
on system
1 = serial backup or restore
n = specified number of processes spawned
9-12 IBM Informix Backup and Restore Guide
takes effect When onbar starts
The BAR_MAX_BACKUP parameter specifies the maximum number of
parallel processes that are allowed for each onbar command. Both UNIX and
Windows support parallel backups. Although the database server default
value for BAR_MAX_BACKUP is 4, the onconfig.std value is 0.
Specifying Serial Backups and Restores
To perform a serial backup or restore, set BAR_MAX_BACKUP to 1.
ON–Bar ignores the BAR_MAX_BACKUP parameter for a whole-system
backup because they are always done serially.
Specifying Parallel Backups and Restores
To specify parallel backups and restores, set BAR_MAX_BACKUP to a value
other than 1. For example, if you set BAR_MAX_BACKUP to 5 and execute an
ON–Bar command, the maximum number of processes that ON–Bar will
spawn concurrently is 5. Configure BAR_MAX_BACKUP to any number up to
the maximum number of storage devices or the maximum number of streams
available for physical backups and restores.
If you set BAR_MAX_BACKUP to 0, the system creates as many ON–Bar
processes as needed. The number of ON–Bar processes is limited only by the
number of storage spaces or the amount of memory available to the database
server, whichever is less.
The amount of memory available is based on SHMTOTAL. ON–Bar performs
the following calculation where N is the maximum number of ON–Bar
processes that are allowed:
N = SHMTOTAL / (# transport buffers * size of transport buffers / 1024)
If SHMTOTAL is 0, BAR_MAX_BACKUP is reset to 1. If N is greater than
BAR_MAX_BACKUP, ON–Bar uses the BAR_MAX_BACKUP value.
Otherwise, ON–Bar starts N backup or restore processes.
BAR_NB_XPORT_COUNT (IDS)
onconfig.std value 10
if value not present 10
units Buffers
range of values 3 to unlimited
takes effect When onbar starts
The BAR_NB_XPORT_COUNT configuration parameter specifies the number
of data buffers that each onbar_d process can use to exchange data with the
Chapter 9. Setting ON-Bar Configuration Parameters 9-13
database server. The value of this parameter affects onbar performance. For
example, if you set BAR_MAX_BACKUP to 5 and BAR_NB_XPORT_COUNT
to 5 and subsequently issue 5 ON–Bar commands, the resulting 25 ON–Bar
processes will use a total of 125 buffers.
To calculate the amount of memory that each onbar_d process requires, use
the following formula. For information on the page size for your system, see
the release notes.
required_memory = (BAR_NB_XPORT_COUNT * BAR_XFER_BUF_SIZE
* page_size) + 5 MB
BAR_PROGRESS_FREQ
onconfig.std value 0
if value not present 0
units Minutes
range of values 0, then 5 to unlimited
takes effect When onbar starts
The BAR_PROGRESS_FREQ configuration parameter specifies, in minutes, the
frequency of the progress messages in the ON–Bar activity log for backup and
restore operations. For example, if you set BAR_PROGRESS_FREQ to 5,
ON–Bar reports the percentage of the object backed up or restored every five
minutes. If you set BAR_PROGRESS_FREQ to 0 or do not set it, ON–Bar does
not write any progress messages to the activity log.
Too frequent progress messages fill the activity log. So if you set
BAR_PROGRESS_FREQ to 1, 2, 3, or 4, ON–Bar automatically resets it to 5 to
prevent overflow in the ON–Bar activity log. Infrequent progress messages
might make it hard to tell if the operation is progressing satisfactorily.
If ON–Bar cannot determine the size of the backup or restore object, it reports
the number of transfer buffers sent to the database server instead of the
percentage of the object backed up or restored.
BAR_RETRY
The BAR_RETRY configuration parameter specifies how many times onbar
should retry a data backup, logical-log backup, or restore operation if the first
attempt fails.
BAR_RETRY on Dynamic Server (IDS)
onconfig.std value 1
if value not present 1
range of values BAR_ABORT(0), BAR_CONT(1), or n
9-14 IBM Informix Backup and Restore Guide
takes effect When onbar starts
The setting of the BAR_RETRY parameter determines ON–Bar behavior in the
following ways:
v If set to BAR_ABORT, ON–Bar aborts the backup or restore session when
an error occurs for a storage space or logical log, returns an error, and
quits. If ON–Bar is running in parallel, the already running processes finish
but no new ones are started.
v If set to BAR_CONT, ON–Bar aborts the backup or restore attempt for that
particular storage space, returns an error, and attempts to back up or
restore any storage spaces or logical logs that remain.
v If set to a specific number (n), ON–Bar attempts to back up or restore this
storage space or logical log the specified number of times before it gives up
and moves on to the next one.
BAR_RETRY on Extended Parallel Server
onconfig.std value 0. Does not retry
range of values 0 to 5
takes effect When the database server starts
If a backup or restore fails, ON–Bar attempts to back up or restore the object
the specified number of times before it gives up and moves on to the next
object.
The Backup Scheduler maintains two retry counts: object retries and
storage-manager retries.
Object retries is the number of times that the Backup Scheduler attempts a
backup or restore operation. If the backup or restore of a particular object gets
an error, the Backup Scheduler retries it BAR_RETRY times. If it continues to
fail, the Backup Scheduler removes the object from the backup session.
To restart the backup or restore operation:
1. Resolve the error.
2. Issue another ON–Bar command to back up or restore that object.
Storage-manager retries is the number of times that the Backup Scheduler
attempts to start an onbar-worker process before giving up. If an
onbar-worker process registers with the Backup Scheduler but exits with an
error, then the Backup Scheduler tries to start another onbar-worker process,
up to BAR_RETRY times. If the onbar-worker process fails before it registers
or if the Backup Scheduler already has tried to start an onbar-worker process
BAR_RETRY times, it does not start another onbar-worker process.
Chapter 9. Setting ON-Bar Configuration Parameters 9-15
To reset the storage-manager retry counter and restart the operation:
1. Resolve the error.
2. Start an onbar-worker process manually, either directly on the command
line or by calling start_worker.sh on UNIX or start_worker.bat on
Windows. The backup or restore operation can then resume.
You can monitor the storage-manager retry count with onstat -g bus_sm. For
more information, see “Monitoring the Backup Scheduler Status (XPS)” on
page 8-13.
BAR_SM (XPS)
onconfig.std value 1
range of values Positive integer greater than or equal to 1
takes effect When the database server starts
The required BAR_SM configuration parameter identifies a specific
storage-manager instance. Only ON–Bar and the Backup Scheduler use this
value. The storage manager does not use this value.
The system uses the BAR_SM to track the location of backups. If you change
the identification number after you use the storage manager to perform a
backup, you invalidate the backups that you have made. Perform a new
level-0 backup of all data.
BAR_SM_NAME (XPS)
onconfig.std value None
range of values Any character string that does not contain
white spaces or the pound sign (#)
takes effect When the database server starts
The BAR_SM_NAME configuration parameter is the name of the storage
manager. It can be up to 128 characters.
BAR_WORKER_COSVR (XPS)
onconfig.std value 1
if value not present an error occurs
range of values A list or range of unique positive integers
greater than or equal to one
takes effect When the database server starts
The required BAR_WORKER_COSVR configuration parameter specifies which
coservers can access the storage manager that BAR_SM identifies. If BAR_SM
9-16 IBM Informix Backup and Restore Guide
is specified, BAR_WORKER_COSVR must also be specified. Any coserver on
the list can restore data that other coservers on the list back up.
Enter the numbers of the coservers where onbar-worker processes can be
started for this storage manager. If you enter only one coserver number, use
the number of a coserver on a node with a physically attached storage device
so that the storage manager does not have to transfer data across the network.
This step improves performance.
The list must not overlap with the list of any other storage manager. The
values are coserver numbers, separated by commas. Hyphens indicate ranges.
For example, BAR_WORKER_COSVR 1-3,5,7 specifies a storage manager that
can access onbar-worker processes running on coservers 1, 2, 3, 5, and 7. Do
not put spaces between coserver names.
BAR_WORKER_MAX (XPS)
onconfig.std value 0
if value not present 0
takes effect When the database server starts
The BAR_WORKER_MAX configuration parameter determines how many
storage spaces and logical logs can be backed up or restored in parallel on
each storage manager. It also specifies the maximum number of onbar-worker
processes that the database server automatically starts for this
storage-manager instance. If the BAR_WORKER_MAX value is 0, you must
start the onbar-worker processes manually.
Specifying a Parallel Backup or Restore
For example, to start five onbar-worker processes in parallel, set
BAR_WORKER_MAX to 5. Set BAR_WORKER_MAX to the number of
storage devices available to the storage manager. If the database server has
multiple storage managers configured, the number of parallel operations is
the sum of BAR_WORKER_MAX values for all storage managers. The
maximum number of onbar-worker processes that run simultaneously
depends on the capabilities of the storage manager.
If onbar-worker processes for a specific storage manager have special start-up
requirements, such as environment variables, you can specify these by editing
the start_worker script file. For information, see “Using start_worker.sh to
Start onbar_worker Processes Manually (XPS)” on page 8-5. If storage
managers have dynamic requirements for onbar-worker processes, you might
have to start them manually.
Chapter 9. Setting ON-Bar Configuration Parameters 9-17
Specifying a Serial Backup or Restore
You can specify serial backups and restores with Extended Parallel Server in
two ways:
v Set BAR_WORKER_MAX to 0 and manually start one onbar-worker
process.
You must start the onbar-worker processes manually before you can back
up or restore data.
v Set BAR_WORKER_MAX to 1.
The database server starts one onbar-worker process and backs up or
restores the data serially for this storage-manager instance.
BAR_XFER_BUF_SIZE (IDS)
onconfig.std value 31
units page size
range of values 1 to 15 pages when the PAGESIZE is 4
kilobytes
1 to 31 when the PAGESIZE is 2 kilobytes
The maximum buffer size is 64 kilobytes, so
BAR_XFER_BUF_SIZE * pagesize <= 64
kilobytes
takes effect When onbar starts
The BAR_XFER_BUF_SIZE configuration parameter specifies the size of each
transfer buffer. The database server passes the buffer to ON–Bar and the
storage manager. To calculate the size of the transfer buffer in a storage space
or logical-log backup, use the following formula:
transfer buffers = BAR_XFER_BUF_SIZE * pagesize
Where pagesize is the largest page size used by any of the dbspaces that are
backed up.
To calculate how much memory the database server needs, use the following
formula:
memory = (BAR_XFER_BUF_SIZE * PAGESIZE) + 500
The extra 500 bytes is for overhead. For example, if BAR_XFER_BUF_SIZE is
15, the transfer buffer should be 61,940 bytes.
Important: You cannot change the buffer size between a backup and restore.
BAR_XFER_BUFSIZE (XPS)
onconfig.std value 8 pages
9-18 IBM Informix Backup and Restore Guide
if value not present 32,768 / pagesize for platform
units PAGESIZE which can be 2, 4, or 8 kilobytes
range of values 1 to 15 pages
takes effect When the onbar_w utility starts
The BAR_XFER_BUFSIZE configuration parameter specifies the size of each
transfer buffer. The actual size of a transfer buffer is BAR_XFER_BUFSIZE *
PAGESIZE + 500. The extra 500 is for overhead. For example, if
BAR_XFER_BUFSIZE is 15 and the page size is 4 kilobytes, the transfer buffer
should be 61,440 bytes.
For generally good performance, set to 8, although different storage managers
might suggest other values. The maximum value that XBSA allows is 64
kilobytes.
If you set BAR_XFER_BUFSIZE to 8 when the page size is 8 kilobytes, the
database server decrements the transfer buffer size to 7 pages so that the
maximum value would be under 64 kilobytes (7 * 8 = 56). ON–Bar displays a
warning message if the transfer buffer size is decremented.
To calculate how much memory the database server needs, use the following
formula:
kilobytes = BAR_WORKER_MAX * BAR_XFER_BUFSIZE *
BAR_XPORT_COUNT * PAGESIZE
For example, you would need at least 1600 kilobytes of memory for the
transfer buffers for five onbar-worker processes if the page size is 4 kilobytes.
1600 kilobytes = 5 workers * 8 pages* 10 buffers * 4 kilobytes
Important: You cannot change the buffer size (value of BAR_XFER_BUFSIZE)
between a backup and restore.
BAR_XPORT_COUNT (XPS)
onconfig.std value 10
if value not present 10
units Buffers
range of values 3 to unlimited
takes effect When an onbar-worker process starts
Chapter 9. Setting ON-Bar Configuration Parameters 9-19

The BAR_XPORT_COUNT configuration parameter specifies the number of
data buffers that each onbar-worker process can use to exchange data with
Extended Parallel Server. The value of this parameter affects onbar-worker
performance.
To calculate the amount of memory that each onbar_w process requires, use
the following formula:
required_memory = (BAR_XPORT_COUNT * BAR_XFER_BUFSIZE
* page_size) + 5 MB
For information on configuring the page size, see the IBM Informix:
Administrator's Guide.
ISM_DATA_POOL
onconfig.std value ISMData
takes effect When onbar starts
The ISM_DATA_POOL parameter, when listed in the ONCONFIG file for the
database server, specifies the volume pool that you use for backing up storage
spaces. The value for this parameter can be any volume pool that ISM
recognizes. If this parameter is not present, ISM uses the ISMData volume
pool. For details, see the IBM Informix: Storage Manager Administrator's Guide.
Extended Parallel Server
Insert the ISM_DATA_POOL parameter inside the BAR_SM paragraph in the
storage-manager section of the ONCONFIG file if you want it to apply to one
storage-manager instance. Insert ISM_DATA_POOL in the global section of the
ONCONFIG file if you want it to apply to all storage-manager instances.
End of Extended Parallel Server
For more information, see “Files That ON-Bar, ISM, and TSM Use” on page
9-23.
ISM_LOG_POOL
onconfig.std value ISMLogs
takes effect When onbar starts
The ISM_LOG_POOL parameter, when listed in the ONCONFIG file for the
database server, specifies the volume pool that you use for backing up logical
logs. The value for this parameter can be any volume pool that ISM
recognizes. If this parameter is not present, ISM uses the ISMLogs volume
9-20 IBM Informix Backup and Restore Guide
pool. For details, see the IBM Informix: Storage Manager Administrator's Guide.
Extended Parallel Server
Insert the ISM_LOG_POOL parameter inside the BAR_SM paragraph in the
storage-manager section of the ONCONFIG file if you want it to apply to one
storage-manager instance. Insert ISM_LOG_POOL in the global section of the
ONCONFIG file if you want it to apply to all storage-manager instances.
End of Extended Parallel Server
For more information, see “Files That ON-Bar, ISM, and TSM Use” on page
9-23.
LOG_BACKUP_MODE (XPS)
Use the LOG_BACKUP_MODE configuration parameter to determine how
logical-log files are backed up after they fill.
onconfig.std value MANUAL
range of values
CONT Continuous = an onbar-worker
process backs up each logical-log file
as soon as it fills.
MANUAL
Manual = queues the logical-log files
until you can issue an onbar -b -l
command.
NONE Use the NONE option if you do not
want to back up the logs. The
database server marks the logical logs
as backed up as soon as they are full
so that ON–Bar cannot back them up.
When the database server starts up, it
writes a message to the online.log if
LOG_BACKUP_MODE = NONE.
takes effect When the database server restarts
Warning: If you set LOG_BACKUP_MODE to NONE, you cannot back up
logs. All transactions in those logs are lost, and you will not be able
to restore them. Your physical backups also will not be restorable.
LTAPEDEV (IDS)
If you specify a tape device in the LTAPEDEV configuration parameter,
ON–Bar ignores the value. ON–Bar also ignores the value of the LTAPEBLK,
Chapter 9. Setting ON-Bar Configuration Parameters 9-21
LTAPESIZE, TAPEDEV, TAPEBLK, and TAPESIZE parameters. Consider
leaving these parameter values blank when you use ON–Bar because the
storage manager sets these values.
Warning: Set LTAPEDEV to /dev/null or leave it blank on UNIX or \dev\nul
or NUL on Windows only if you do not want to back up the logical
logs. The ON–Bar activity log will display a warning and return
code 152. Because the database server marks the logical logs as
backed up when they are no longer current, ON–Bar cannot find
logical logs to back up. All transactions in those logs are lost, and
you will not be able to restore them.
If you performed a whole-system backup with LTAPEDEV set to null, you
must use the onbar -r -w -p command during restore to notify ON–Bar that
you do not want to restore the logs. For more information, see
“Considerations When LTAPEDEV is Set to Null” on page 6-21.
RESTARTABLE_RESTORE (IDS)
Use the RESTARTABLE_RESTORE configuration parameter to enable or
disable restartable restores.
onconfig.std value ON
if value not present ON
range of values
OFF Disables restartable restore. If a restore
fails and RESTARTABLE_RESTORE is
OFF, you will not be able to restart it.
ON Enables restartable restore. Set
RESTARTABLE_RESTORE to ON before
you begin a restore. Otherwise, you
will be unable to restart the restore
after a failure.
takes effect If you need to restart a physical restore, you
do not need to restart the database server
before you can use RESTARTABLE_RESTORE.
If you need to restart a logical restore, you
must restart the database server before you
can use restartable restore.
Turning on RESTARTABLE_RESTORE slows down logical restore
performance. For more information, see “Using Restartable Restore to Recover
Data (IDS)” on page 6-41. For information on the physical log, see the
IBM Informix: Administrator's Guide.
9-22 IBM Informix Backup and Restore Guide
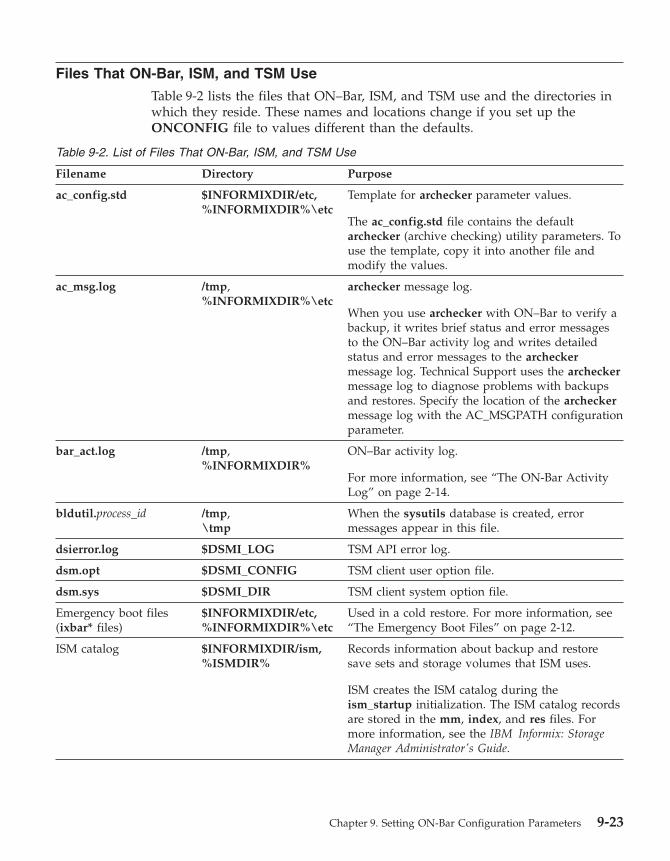
Files That ON-Bar, ISM, and TSM Use
Table 9-2 lists the files that ON–Bar, ISM, and TSM use and the directories in
which they reside. These names and locations change if you set up the
ONCONFIG file to values different than the defaults.
Table 9-2. List of Files That ON-Bar, ISM, and TSM Use
Filename Directory Purpose
ac_config.std $INFORMIXDIR/etc,
%INFORMIXDIR%\etc
Template for archecker parameter values.
The ac_config.std file contains the default
archecker (archive checking) utility parameters. To
use the template, copy it into another file and
modify the values.
ac_msg.log /tmp,
%INFORMIXDIR%\etc
archecker message log.
When you use archecker with ON–Bar to verify a
backup, it writes brief status and error messages
to the ON–Bar activity log and writes detailed
status and error messages to the archecker
message log. Technical Support uses the archecker
message log to diagnose problems with backups
and restores. Specify the location of the archecker
message log with the AC_MSGPATH configuration
parameter.
bar_act.log /tmp,
%INFORMIXDIR%
ON–Bar activity log.
For more information, see “The ON-Bar Activity
Log” on page 2-14.
bldutil.process_id /tmp,
\tmp
When the sysutils database is created, error
messages appear in this file.
dsierror.log $DSMI_LOG TSM API error log.
dsm.opt $DSMI_CONFIG TSM client user option file.
dsm.sys $DSMI_DIR TSM client system option file.
Emergency boot files
(ixbar* files)
$INFORMIXDIR/etc,
%INFORMIXDIR%\etc
Used in a cold restore. For more information, see
“The Emergency Boot Files” on page 2-12.
ISM catalog $INFORMIXDIR/ism,
%ISMDIR%
Records information about backup and restore
save sets and storage volumes that ISM uses.
ISM creates the ISM catalog during the
ism_startup initialization. The ISM catalog records
are stored in the mm, index, and res files. For
more information, see the IBM Informix: Storage
Manager Administrator's Guide.
Chapter 9. Setting ON-Bar Configuration Parameters 9-23
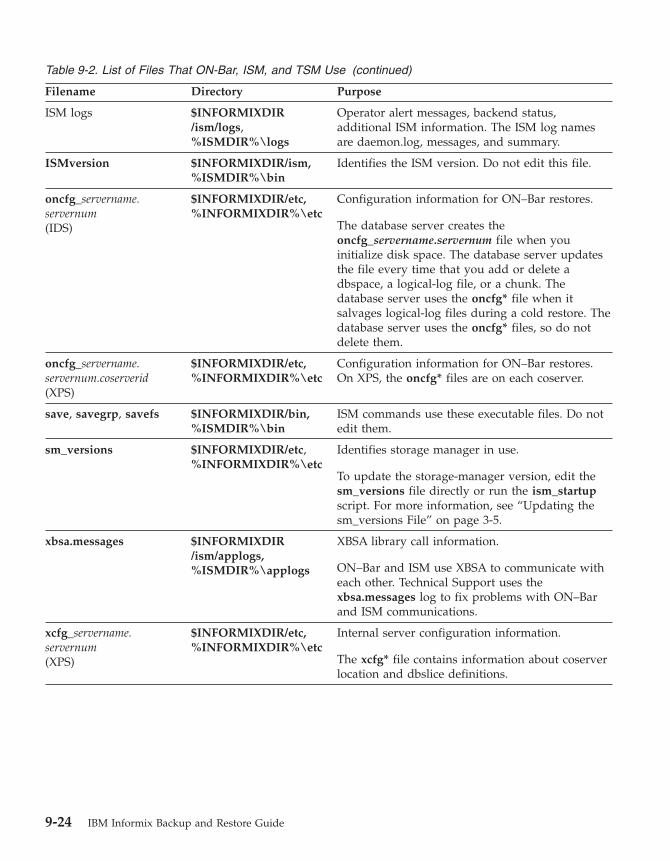
Table 9-2. List of Files That ON-Bar, ISM, and TSM Use (continued)
Filename Directory Purpose
ISM logs $INFORMIXDIR
/ism/logs,
%ISMDIR%\logs
Operator alert messages, backend status,
additional ISM information. The ISM log names
are daemon.log, messages, and summary.
ISMversion $INFORMIXDIR/ism,
%ISMDIR%\bin
Identifies the ISM version. Do not edit this file.
oncfg_servername.
servernum
(IDS)
$INFORMIXDIR/etc,
%INFORMIXDIR%\etc
Configuration information for ON–Bar restores.
The database server creates the
oncfg_servername.servernum file when you
initialize disk space. The database server updates
the file every time that you add or delete a
dbspace, a logical-log file, or a chunk. The
database server uses the oncfg* file when it
salvages logical-log files during a cold restore. The
database server uses the oncfg* files, so do not
delete them.
oncfg_servername.
servernum.coserverid
(XPS)
$INFORMIXDIR/etc,
%INFORMIXDIR%\etc
Configuration information for ON–Bar restores.
On XPS, the oncfg* files are on each coserver.
save, savegrp, savefs $INFORMIXDIR/bin,
%ISMDIR%\bin
ISM commands use these executable files. Do not
edit them.
sm_versions $INFORMIXDIR/etc,
%INFORMIXDIR%\etc
Identifies storage manager in use.
To update the storage-manager version, edit the
sm_versions file directly or run the ism_startup
script. For more information, see “Updating the
sm_versions File” on page 3-5.
xbsa.messages $INFORMIXDIR
/ism/applogs,
%ISMDIR%\applogs
XBSA library call information.
ON–Bar and ISM use XBSA to communicate with
each other. Technical Support uses the
xbsa.messages log to fix problems with ON–Bar
and ISM communications.
xcfg_servername.
servernum
(XPS)
$INFORMIXDIR/etc,
%INFORMIXDIR%\etc
Internal server configuration information.
The xcfg* file contains information about coserver
location and dbslice definitions.
9-24 IBM Informix Backup and Restore Guide
Chapter 10. ON-Bar Catalog Tables
The bar_action Table . . . . . . . . . . . . . . . . . . . . . . . . . . . 10-2
The bar_instance Table . . . . . . . . . . . . . . . . . . . . . . . . . . . 10-2
The bar_ixbar Table . . . . . . . . . . . . . . . . . . . . . . . . . . . . 10-4
The bar_object Table . . . . . . . . . . . . . . . . . . . . . . . . . . . 10-7
The bar_server Table . . . . . . . . . . . . . . . . . . . . . . . . . . . 10-8
The bar_syncdeltab Table . . . . . . . . . . . . . . . . . . . . . . . . . . 10-8
ON-Bar Catalog Map . . . . . . . . . . . . . . . . . . . . . . . . . . . 10-8
Backup Scheduler SMI Tables (XPS) . . . . . . . . . . . . . . . . . . . . . . 10-10
sysbuobject . . . . . . . . . . . . . . . . . . . . . . . . . . . . . 10-11
sysbuobjses . . . . . . . . . . . . . . . . . . . . . . . . . . . . . 10-12
sysbusession . . . . . . . . . . . . . . . . . . . . . . . . . . . . . 10-12
sysbusm . . . . . . . . . . . . . . . . . . . . . . . . . . . . . . 10-12
sysbusmdbspace . . . . . . . . . . . . . . . . . . . . . . . . . . . 10-13
sysbusmlog . . . . . . . . . . . . . . . . . . . . . . . . . . . . . 10-13
sysbusmworker . . . . . . . . . . . . . . . . . . . . . . . . . . . . 10-13
sysbuworker . . . . . . . . . . . . . . . . . . . . . . . . . . . . . 10-14
In This Chapter
This chapter describes the ON–Bar tables that are stored in the sysutils
database. ON–Bar uses these tables for tracking backups and performing
restores. You can query these tables for backup and restore data to evaluate
performance or identify object instances for a restore.
© Copyright IBM Corp. 1996, 2004 10-1
The bar_action Table
The bar_action table lists all backup and restore actions that are attempted
against an object, except during certain types of cold restores. Use the
information in this table to track backup and restore history.
Column Name Type Explanation
act_aid SERIAL Action identifier. A unique number within the
table. Can be used with act_oid to join with the
bar_instance table.
act_oid INTEGER Object identifier. Identifies the backup object
against which a backup or restore attempt is made.
Can be used with act_aid to join with
bar_instance. The act_oid column of the
bar_action table equals the obj_oid column of the
bar_object table.
act_type SMALLINT Identifies the attempted action: 1 for backup, 2 for
restore, 3 for a foreign or imported restore, 4 for a
fake backup, 5 for a whole-system backup, 6 for a
whole-system restore, 7 for expired or deleted
objects, 8 for an external restore. Fake backups,
whole-system backups, and whole-system restores
are available on IDS only.
act_status INTEGER Identifies the result of the action: 0 if successful,
otherwise an ON-Bar-specific error code. For more
information, see Chapter 11, “ON-Bar Messages
and Return Codes,” on page 11-1.
act_start DATETIME
YEAR TO
SECONDS
The date and time when the action began.
act_end DATETIME
YEAR TO
SECONDS
The date and time when the action finished.
The bar_instance Table
ON–Bar writes a record to the bar_instance table for each successful backup.
The table describes each object that is backed up. ON–Bar might later use the
information for a restore operation. For example, if you specify a level-2
backup, ON–Bar uses this table to ensure that a level-1 backup was done
previously.
10-2 IBM Informix Backup and Restore Guide
Column Name Type Explanation
ins_aid INTEGER Action identifier. Identifies the successful
action that created this instance of the backup
object. Combined with ins_oid, can be used
to join with the bar_action table.
ins_oid INTEGER Object identifier. Identifies the affected object.
Can be used to join with the bar_object table.
Combined with ins_aid, can be used to join
with the bar_action table.
ins_prevtime INTEGER Timestamp (real clock time). This value
specifies the timestamp of the previous object.
The value represents the number of seconds
after midnight, January 1, 1970 Greenwich
mean time.
ins_time INTEGER Time stamp (real clock time). The database
server uses this value when it creates the
next-level backup. Value represents the
number of seconds since midnight, January 1,
1970, Greenwich mean time.
For IDS, the ins_time value is 0.
rsam_time INTEGER The backup checkpoint time stamp. Not a
clock time. The database server uses this
value when it creates the next level backup.
ins_level SMALLINT Level of the backup action: 0 for a complete
backup, 1 for a backup of any changes to this
object since its last level-0 backup, 2 for a
backup of any changes since the last level-1
backup. This value is always 0 for logical-log
backups.
ins_copyid_hi INTEGER The high bits of the instance copy identifier.
Combined with ins_copyid_lo, it is a unique
value that the storage manager assigns to link
the ON-Bar object identifier with the
storage-manager object identifier.
ins_copyid_lo INTEGER The low bits of the instance copy identifier.
Combined with ins_copyid_hi, it is a unique
value that the storage manager assigns to link
the ON-Bar object identifier with the
storage-manager object identifier.
Chapter 10. ON-Bar Catalog Tables 10-3
Column Name Type Explanation
ins_req_aid INTEGER Stores the required action ID for a backup
object. Used in a restore to determine which
level-0 backup goes with the level-1 backup,
and which level-1 backup goes with the
level-2 backup. For a level-0 backup, the
value of ins_req_aid is the same as ins_aid in
this table. For example, if this backup is
level-1, ins_req_aid holds the action ID of the
corresponding level-0 backup of this object.
ins_logstream(XPS only)
INTEGER The coserver ID from which this object came.
ins_first_log INTEGER In a standard backup, identifies the first
logical log required to restore from this
backup.
ins_chpt_log(XPS only)
INTEGER The ID of the log that contains the rsam_time
checkpoint. Used during backup to verify that
logs needed for restore are backed up.
ins_last_log(XPS only)
INTEGER Log ID of the last log needed during logical
restore for this storage space to restore it to
the time of the backup.
ins_lbuflags
(XPS only)
INTEGER Flag field storing attributes for log backups.
ins_sm_id(XPS only)
INTEGER Storage-manager instance ID. Created from
BAR_SM in $ONCONFIG or
%ONCONFIG%.
ins_sm_name(XPS only)
VARCHAR(128, 0) Storage-manager instance name. Created from
the BAR_SM_NAME parameter in the
ONCONFIG file.
ins_verify INTEGER Value is 1 if the backup is verified. Value is 0
if the backup is not verified.
ins_verify_date DATETIME YEAR
TO SECOND
The current date is inserted when a backup is
verified. If this backup has not been not
verified, a dash represents each date and
time.
The bar_ixbar Table
The bar_ixbar table is maintained and used by onsmsync only. It keeps a
history of all unexpired successful backups in all timelines. The schema of the
bar_ixbar table is identical to the schema of the bar_syncdeltab table, with
the exception of its primary key.
10-4 IBM Informix Backup and Restore Guide
Column Name Type Explanation
ixb_sm_id INTEGER Storage-manager instance ID. Created from
BAR_SM in $ONCONFIG or %ONCONFIG%.
ixb_copyid_hi INTEGER The high bits of the instance copy identifier.
Combined with ixb_copyid_lo, it is a unique
value that the storage manager assigns to link the
ON-Bar object identifier with the
storage-manager object identifier.
ixb_copyid_lo INTEGER The low bits of the instance copy identifier.
Combined with ixb_copyid_hi, it is a unique
value that the storage manager assigns to link the
ON-Bar object identifier with the
storage-manager object identifier.
ixb_aid INTEGER Action identifier, Identifies the successful action
that created this instance of the backup object.
ixb_old INTEGER Object identifier. Identifies the affected object.
ixb_time INTEGER Time stamp (real clock time). The database server
uses this value when it creates the next-level
backup. Value represents the number of seconds
since midnight, January 1, 1970, Greenwich mean
time.
ixb_prevtime INTEGER Time stamp (real clock time). This value specifies
the time stamp of the previous object. Value
represents the number of seconds since midnight,
January 1, 1970 Greenwich mean time.
ixb_rsam_time INTEGER The backup checkpoint time stamp. Not a clock
time. The database server uses this value when it
creates the next level backup.
ixb_act_start datetime year to
second
The date and time when the action began.
ixb_act_end datetime year to
second
The date and time when the action finished.
ixb_level SMALLINT Level of the backup action: 0 for a complete
backup, 1 for a backup of any changes to this
object since its last level-0 backup, 2 for a backup
of any changes since the last level-1 backup. This
value is always 0 for logical-log backups.
Chapter 10. ON-Bar Catalog Tables 10-5
Column Name Type Explanation
ixb_req_aid INTEGER Stores the required action ID for a backup object.
Used in a restore to determine which level-0
backup Goes with the level-1 backup, and which
level-1 backup goes with the level-2 backup. For
a level-0 backup, the value of ixb_req_aidis the
same as ixb_aid in this table. For example, if this
backup is level-1, ixb_req_aid holds the action ID
of the corresponding level-0 backup of this
object.
ixb_logstream
(XPS only)
INTEGER The coserver ID from which this object came.
ixb_first_log INTEGER In a standard backup, identifies the first logical
log. Required to restore from this backup.
ixb_chpt_log INTEGER The ID of the log that contains the rsam_time
checkpoint. Used during backup to verify that
logs needed for restore are backed up.
ixb_last_log INTEGER Log ID of the last log needed during logical
restore for this storage space to restore it to the
time of the backup.
ixb_lbuflags INTEGER Flags describing log backup.
ixb_verify INTEGER Value is 1 if the backup is verified. Value is 0 if
the backup is not verified.
ixb_verify_date datetime year to
second
The current date is inserted when a backup is
verified. If this backup has not been verified, a
dash represents each date and time.
ixb_sm_name VARCHAR(128) Storage-manager instance name. Created from
the BAR_SM_NAME parameter in the
ONCONFIG file.
ixb_srv_name VARCHAR(128) The database server name. Used to ensure that
objects are restored to the correct database server.
Used when multiple database servers are on the
node to ensure that objects are restored in the
database server instance to which the object
belongs.The database server name can be up to
128 characters.
ixb_obj_name VARCHAR(128) The user name for the object. The name can be
up to 128 characters. On XPS 15:3 is the name of
log file 3 on coserver 15.
10-6 IBM Informix Backup and Restore Guide
Column Name Type Explanation
ixb_obj_type CHAR(2) Backup object type:
v CD = critical dbspace
v L = logical log
v ND = noncritical dbspace or subspace
v R = rootdbs
v B = blobspace (IDS only)
The bar_object Table
The bar_object table describes each backup object. This table is a list of all
storage spaces and logical logs from each database server for which at least
one backup attempt was made.
Column Name Type Explanation
obj_srv_name VARCHAR(128,0) The database server name. Used to ensure that
objects are restored to the correct database
server. Used when multiple database servers
are on the node to ensure that objects are
restored in the database server instance to
which the object belongs.
The database server name can be up to 128
characters.
obj_oid SERIAL The object identifier. A unique number within
the table. Can be used to join with the
bar_action and bar_instance tables.
obj_name VARCHAR(128,0) The user name for the object.
The name can be up to 128 characters.
On XPS, 15:3 is the name of log file 3 on
coserver 15.
obj_type CHAR(2) Backup object type:
CD = critical dbspace
L = logical log
ND = noncritical dbspace or sbspace
R = rootdbs
B = blobspace (Dynamic Server only)
Chapter 10. ON-Bar Catalog Tables 10-7
The bar_server Table
The bar_server table lists the database servers in an installation. This table is
used to ensure that backup objects are returned to their proper places during
a restore.
Column Name Type Explanation
srv_name VARCHAR(128,0) DBSERVERNAME value specified in the
ONCONFIG file.
Database server name can be up to 128
characters.
srv_node CHAR(256) Hostname of the computer where the database
server resides.
Hostname can be up to 256 characters.
srv_synctime INTEGER The time onsmsync was run.
The bar_syncdeltab Table
The bar_syncdeltab table is maintained and used by the onsmsync utility
only. It is normally empty except when onsmsync is running. The schema of
the bar_syncdeltabtable is identical to the schema of the bar_ixbar table, with
the exception of its primary key.
ON-Bar Catalog Map
Dynamic Server
Figure 10-1 maps the ON–Bar tables on Dynamic Server. The gray lines show
the relations between tables. The arrows show that the ins_req_aid value
must be a valid ins_aid value.
10-8 IBM Informix Backup and Restore Guide
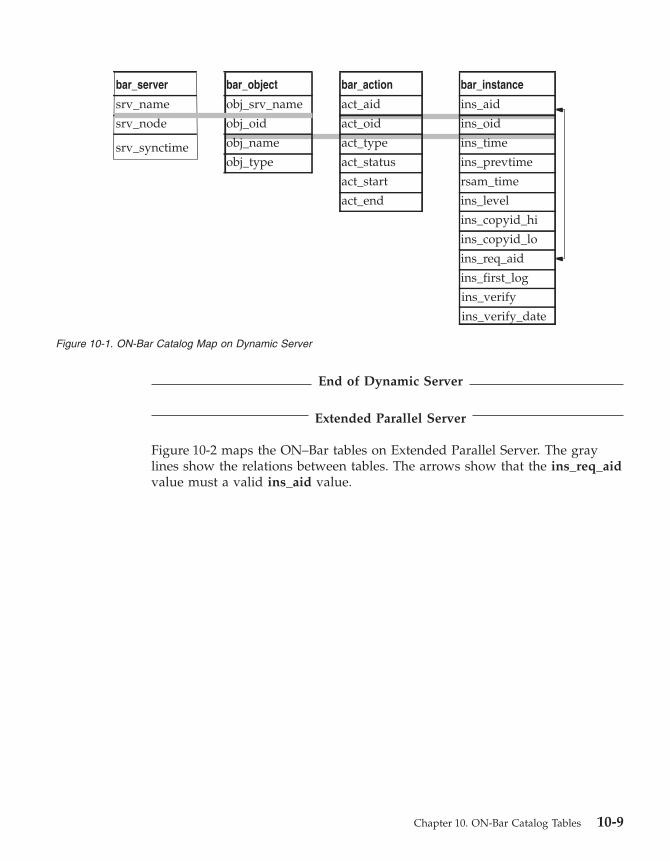
End of Dynamic Server
Extended Parallel Server
Figure 10-2 maps the ON–Bar tables on Extended Parallel Server. The gray
lines show the relations between tables. The arrows show that the ins_req_aid
value must a valid ins_aid value.
Figure 10-1. ON-Bar Catalog Map on Dynamic Server
Chapter 10. ON-Bar Catalog Tables 10-9
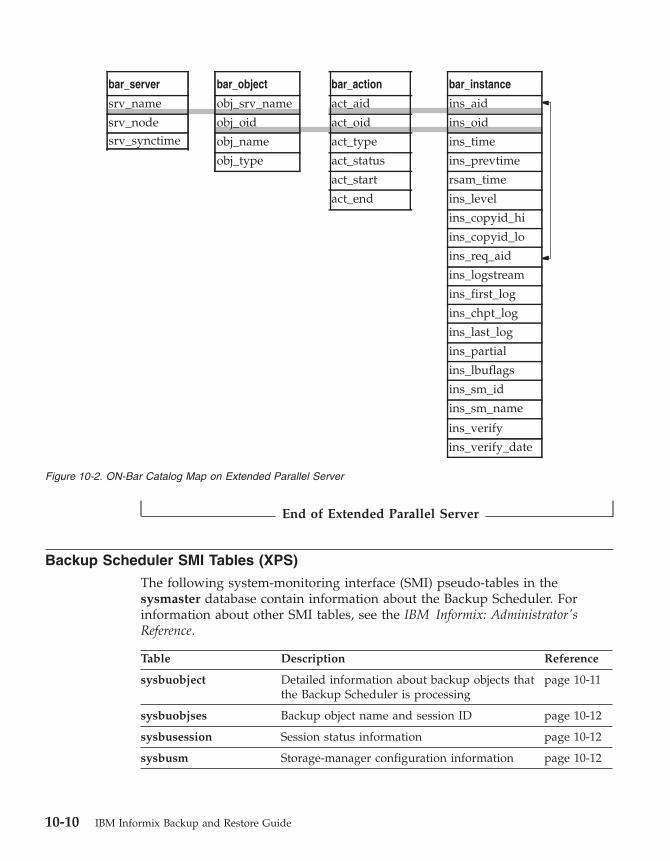
End of Extended Parallel Server
Backup Scheduler SMI Tables (XPS)
The following system-monitoring interface (SMI) pseudo-tables in the
sysmaster database contain information about the Backup Scheduler. For
information about other SMI tables, see the IBM Informix: Administrator's
Reference.
Table Description Reference
sysbuobject Detailed information about backup objects that
the Backup Scheduler is processing
page 10-11
sysbuobjses Backup object name and session ID page 10-12
sysbusession Session status information page 10-12
sysbusm Storage-manager configuration information page 10-12
Figure 10-2. ON-Bar Catalog Map on Extended Parallel Server
10-10 IBM Informix Backup and Restore Guide
Table Description Reference
sysbusmdbspace Storage manager for backing up dbspaces on a
coserver
page 10-13
sysbusmlog Storage manager for backing up logs on a
coserver
page 10-13
sysbusmworker Coservers where onbar-worker processes can
access a storage manager
page 10-13
sysbuworker Detailed onbar-worker status page 10-14
sysbuobject
The sysbuobject table provides information about the backup and restore
objects that the Backup Scheduler is processing.
Column Type Description
owner INTEGER The coserver owner of the object
priority INTEGER Priority in the Backup Scheduler queue for this session
order_hi INTEGER The high-order word of the restore order for the object
(high 32 bits of a 64-bit number)
order_lo INTEGER The low-order word of the restore order for the object
(low 32 bits of a 64-bit number)
placement INTEGER The storage-manager instance where this object is
located
retries INTEGER Number of times that the backup or restore is retried
timestamp INTEGER The global time for the object
dbsname CHAR(128) The dbspace name
level INTEGER The backup level of the dbspace
log_num INTEGER The logical-log number
is_backup INTEGER A value of 1 means this object is to be backed up.
is_restore INTEGER A value of 1 means this object is to be restored.
is_check INTEGER A value of 1 means this object is to be verified with
the archecker utility.
is_block INTEGER A value of 1 means the coserver is blocked for an
external backup.
is_external INTEGER A value of 1 means an external restore of a dbspace is
in progress.
is_dbspace INTEGER A value of 1 means this object is a dbspace.
is_log INTEGER A value of 1 means this object is a logical-log file.
Chapter 10. ON-Bar Catalog Tables 10-11
Column Type Description
is_coserver INTEGER A value of 1 means this object is a coserver (used for
external backup and restore).
is_running INTEGER A value of 1 means this object is being processed.
is_ready INTEGER A value of 1 means this object is ready to be
processed.
is_waiting INTEGER A value of 1 means this object cannot be processed
yet.
is_suspend INTEGER A value of 1 means processing of this object is
suspended.
is_cold INTEGER A value of 1 means this object is to be cold-restored.
sysbuobjses
The sysbuobjses table lists the backup object name and session ID. You can
join the sysbuobjses table with the sysbusession table on the ses_id column
to get all the backup objects in a specific session.
Column Type Description
obj_name CHAR(149) Object name
ses_id CHAR(128) Name of the backup or restore session
sysbusession
The sysbusession table shows the status of the current backup or restore
session. The information in the sysbusession table is similar to the onstat -g
bus output.
Column Type Description
id CHAR(128) Name of the backup or restore session.
count INTEGER Number of objects in the backup or restore session.
is_complete INTEGER A value of 1 means the session is complete.
is_waiting INTEGER A value of 1 means the session is waiting for work.
is_suspended INTEGER A value of 1 means the session is suspended.
error INTEGER Error value that is returned to the ON–Bar driver.
sysbusm
The sysbusm table provides information about the storage-manager
configuration, storage-manager retry status, and active onbar-worker
processes.
10-12 IBM Informix Backup and Restore Guide
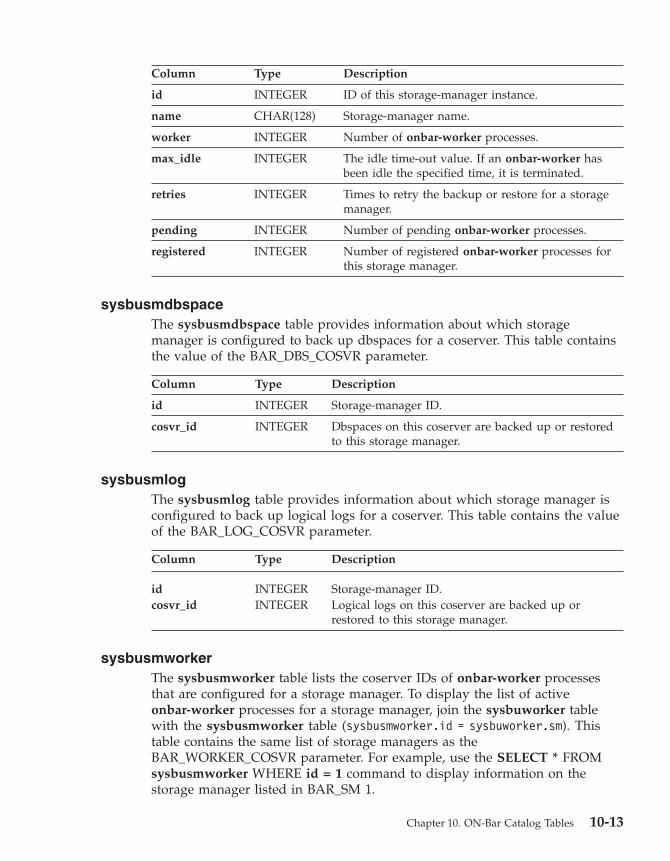
Column Type Description
id INTEGER ID of this storage-manager instance.
name CHAR(128) Storage-manager name.
worker INTEGER Number of onbar-worker processes.
max_idle INTEGER The idle time-out value. If an onbar-worker has
been idle the specified time, it is terminated.
retries INTEGER Times to retry the backup or restore for a storage
manager.
pending INTEGER Number of pending onbar-worker processes.
registered INTEGER Number of registered onbar-worker processes for
this storage manager.
sysbusmdbspace
The sysbusmdbspace table provides information about which storage
manager is configured to back up dbspaces for a coserver. This table contains
the value of the BAR_DBS_COSVR parameter.
Column Type Description
id INTEGER Storage-manager ID.
cosvr_id INTEGER Dbspaces on this coserver are backed up or restored
to this storage manager.
sysbusmlog
The sysbusmlog table provides information about which storage manager is
configured to back up logical logs for a coserver. This table contains the value
of the BAR_LOG_COSVR parameter.
Column Type Description
id INTEGER Storage-manager ID.
cosvr_id INTEGER Logical logs on this coserver are backed up or
restored to this storage manager.
sysbusmworker
The sysbusmworker table lists the coserver IDs of onbar-worker processes
that are configured for a storage manager. To display the list of active
onbar-worker processes for a storage manager, join the sysbuworker table
with the sysbusmworker table (sysbusmworker.id = sysbuworker.sm). This
table contains the same list of storage managers as the
BAR_WORKER_COSVR parameter. For example, use the SELECT * FROM
sysbusmworker WHERE id = 1 command to display information on the
storage manager listed in BAR_SM 1.
Chapter 10. ON-Bar Catalog Tables 10-13

Column Type Description
id INTEGER Storage-manager ID.
cosvr_id INTEGER Coserver on which the onbar-worker is running.
sysbuworker
The sysbuworker table provides status information about onbar-worker
processes.
Column Type Description
id INTEGER ID of the onbar-worker.
cosvr INTEGER Coserver on which the onbar-worker is running.
pid INTEGER Process ID.
sm INTEGER Storage-manager ID.
obj_name CHAR(149) Name of the current backup or restore object.
is_new INTEGER A value of 1 means this onbar-worker is initializing.
is_free INTEGER A value of 1 means this onbar-worker is free for
another job.
is_wait INTEGER A value of 1 means this onbar-worker is waiting for
its next task.
is_busy INTEGER A value of 1 means this onbar-worker is processing
an object.
is_dead INTEGER A value of 1 means this onbar-worker is dead.
event_dbu INTEGER A value of 1 means this onbar-worker can accept
dbspace backup jobs.
event_phr INTEGER A value of 1 means this onbar-worker can accept
dbspace restore jobs.
event_lbu INTEGER A value of 1 means this onbar-worker can accept
logical backup jobs.
event_lgr INTEGER A value of 1 means this onbar-worker can accept
logical restore jobs.
event_lbuplace INTEGER A value of 1 means this onbar-worker determines the
correct storage manager to handle logical backups.
event_phrplace INTEGER A value of 1 means this onbar-worker determines the
correct storage manager to handle dbspace restores.
event_dbplace INTEGER A value of 1 means this onbar-worker determines the
correct storage manager to handle dbspace backups.
event_lgrplace INTEGER A value of 1 means this onbar-worker determines the
correct storage manager to handle logical restores.
10-14 IBM Informix Backup and Restore Guide
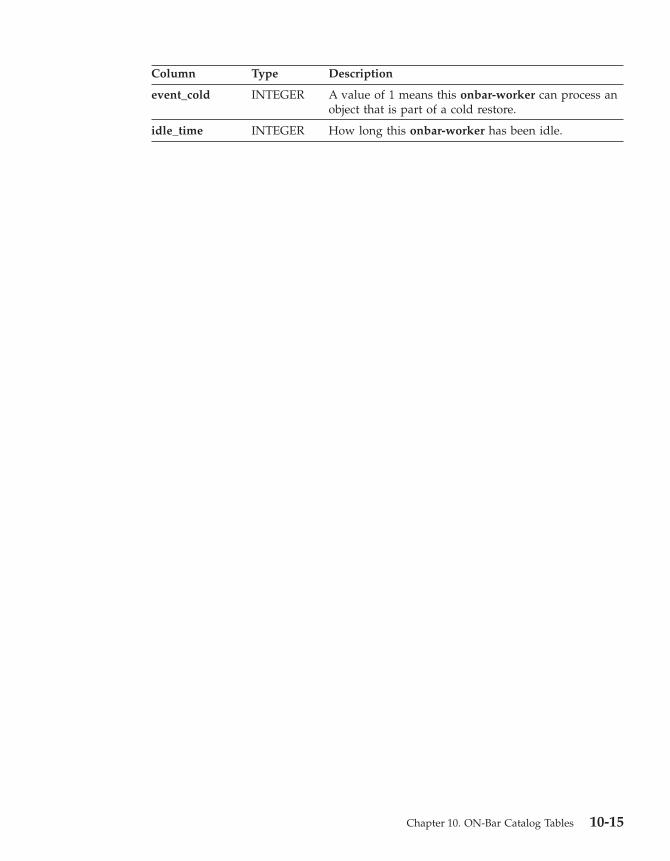
Column Type Description
event_cold INTEGER A value of 1 means this onbar-worker can process an
object that is part of a cold restore.
idle_time INTEGER How long this onbar-worker has been idle.
Chapter 10. ON-Bar Catalog Tables 10-15

10-16 IBM Informix Backup and Restore Guide
Chapter 11. ON-Bar Messages and Return Codes
About ON-Bar Messages . . . . . . . . . . . . . . . . . . . . . . . . . . 11-1
Message Format . . . . . . . . . . . . . . . . . . . . . . . . . . . . 11-1
Message Numbers . . . . . . . . . . . . . . . . . . . . . . . . . . . 11-2
ON-Bar Usage Messages . . . . . . . . . . . . . . . . . . . . . . . . . . 11-2
ON-Bar Return Codes . . . . . . . . . . . . . . . . . . . . . . . . . . . 11-7
In This Chapter
The first part of this chapter describes the ON–Bar activity log file and the
ON–Bar usage messages. Both Dynamic Server and Extended Parallel Server
share common ON–Bar messages.
The second part of this chapter describes the ON–Bar return codes.
For information on ON–Bar informational, progress, warning, and error
messages, use the finderr or Error Messages utility or view IBM Informix:
Error Messages at
http://www.ibm.com/software/data/informix/pubs/library/.
About ON-Bar Messages
This section explains how to read and interpret messages in the ON–Bar
activity log file. For more information, see “The ON-Bar Activity Log” on
page 2-14.
Message Format
A message in the ON–Bar activity log file has the following format:
timestamp process_id parent_process_id message
Table 11-1 describes each field in the message. No error message numbers
appear in the ON–Bar activity log.
Table 11-1. ON-Bar Message Format
Message Field Description
timestamp Date and time when ON-Bar writes the message.
process_id The number that the operating system uses to identify this
instance of ON-Bar.
parent_process_id The number that the operating system uses to identify the process
that executed this instance of ON-Bar.
message The ON-Bar message text.
© Copyright IBM Corp. 1996, 2004 11-1
The following example illustrates a typical entry in the ON–Bar activity log:
1999-08-18 10:09:59 773 772 Completed logical restore.
Important: If you receive an XBSA error message, consult the
storage-manager logs for more details.
Message Numbers
The ON–Bar message numbers range from -43000 to -43421. The following
table lists the ON–Bar message groups. Because message numbers do not
display in the activity log, the best way to find information about ON–Bar
messages is to search for the message text in the error messages file, which is
located in the subdirectory for your locale under the $INFORMIXDIR/msg
directory. You can search for error messages in English in IBM Informix: Error
Messages at http://www.ibm.com/software/data/informix/pubs/library/.
ON–Bar Message Type Message Numbers
ON–Bar usage -43000 to -43424
Options checking -43010 to -43034
Permission checking -43035 to -43039
Emergency boot file interface -43040 to -43059
ONCONFIG file interface -43060 to -43074
Operating system interface -43075 to -43099
Database server interface -43100 to -43229
Backup and restore status -43230 to -43239
Onbar-worker processes -43240 to -43254
XBSA interface -43255 to -43301
onsmsync -43302 to -43319
archecker -43320 to -43334
ondblog -43400 to -43424
ON-Bar Usage Messages
This section lists usage messages only. All informational, progress, warning,
and error messages appear in finderr and IBM Informix: Error Messages at
http://www.ibm.com/software/data/informix/pubs/library/.
Important: You must specify the -b, -v, -r or -m option first in the command
so that ON–Bar can determine whether it is performing a backup,
11-2 IBM Informix Backup and Restore Guide
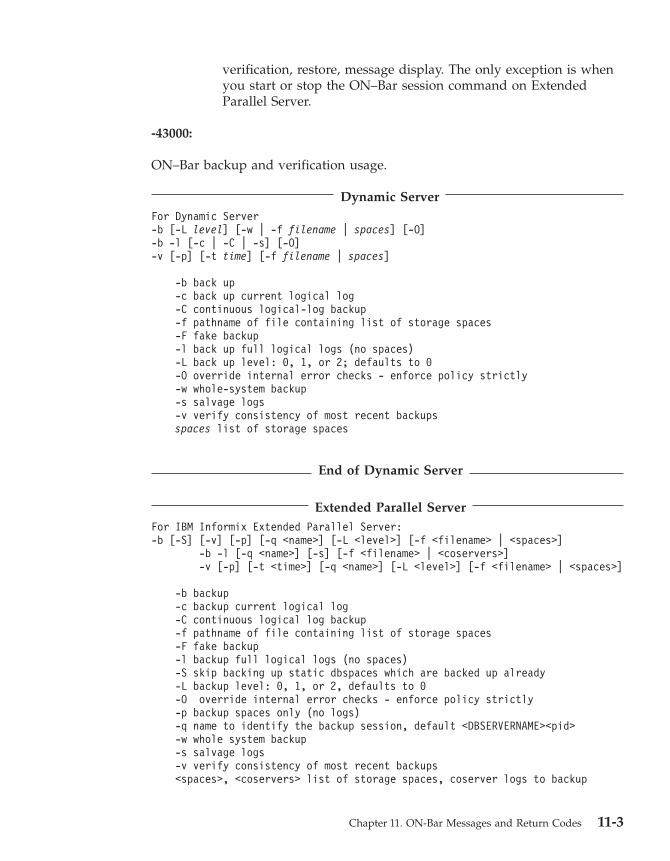
verification, restore, message display. The only exception is when
you start or stop the ON–Bar session command on Extended
Parallel Server.
-43000:
ON–Bar backup and verification usage.
Dynamic Server
For Dynamic Server
-b [-L level] [-w | -f filename | spaces] [-O]
-b -l [-c | -C | -s] [-O]
-v [-p] [-t time] [-f filename | spaces]
-b back up
-c back up current logical log
-C continuous logical-log backup
-f pathname of file containing list of storage spaces
-F fake backup
-l back up full logical logs (no spaces)
-L back up level: 0, 1, or 2; defaults to 0
-O override internal error checks - enforce policy strictly
-w whole-system backup
-s salvage logs
-v verify consistency of most recent backups
spaces list of storage spaces
End of Dynamic Server
Extended Parallel Server
For IBM Informix Extended Parallel Server:
-b [-S] [-v] [-p] [-q <name>] [-L <level>] [-f <filename> | <spaces>]
-b -l [-q <name>] [-s] [-f <filename> | <coservers>]
-v [-p] [-t <time>] [-q <name>] [-L <level>] [-f <filename> | <spaces>]
-b backup
-c backup current logical log
-C continuous logical log backup
-f pathname of file containing list of storage spaces
-F fake backup
-l backup full logical logs (no spaces)
-S skip backing up static dbspaces which are backed up already
-L backup level: 0, 1, or 2, defaults to 0
-O override internal error checks - enforce policy strictly
-p backup spaces only (no logs)
-q name to identify the backup session, default <DBSERVERNAME><pid>
-w whole system backup
-s salvage logs
-v verify consistency of most recent backups
<spaces>, <coservers> list of storage spaces, coserver logs to backup
Chapter 11. ON-Bar Messages and Return Codes 11-3
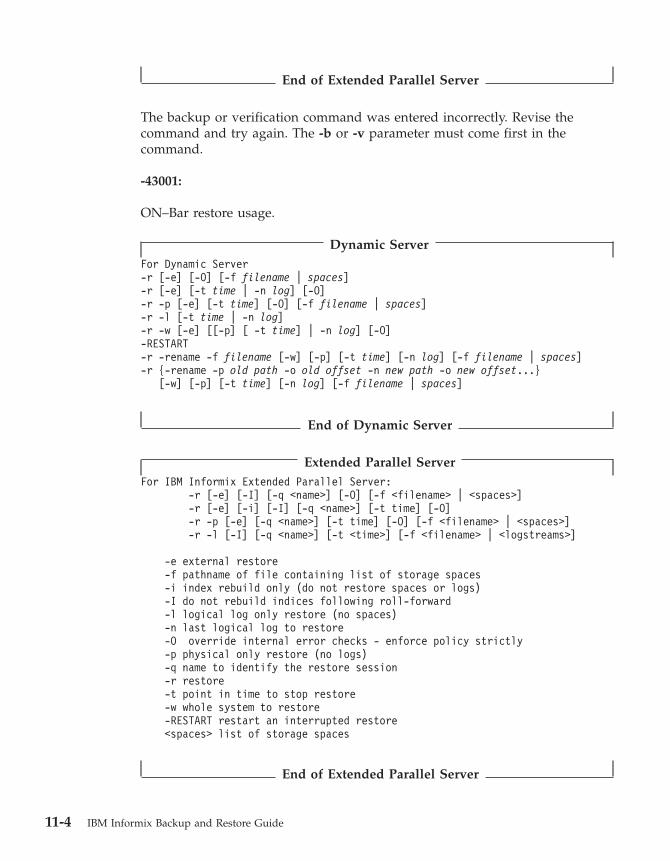
End of Extended Parallel Server
The backup or verification command was entered incorrectly. Revise the
command and try again. The -b or -v parameter must come first in the
command.
-43001:
ON–Bar restore usage.
Dynamic Server
For Dynamic Server
-r [-e] [-O] [-f filename | spaces]
-r [-e] [-t time | -n log] [-O]
-r -p [-e] [-t time] [-O] [-f filename | spaces]
-r -l [-t time | -n log]
-r -w [-e] [[-p] [ -t time] | -n log] [-O]
-RESTART
-r -rename -f filename [-w] [-p] [-t time] [-n log] [-f filename | spaces]
-r {-rename -p old path -o old offset -n new path -o new offset...}
[-w] [-p] [-t time] [-n log] [-f filename | spaces]
End of Dynamic Server
Extended Parallel Server
For IBM Informix Extended Parallel Server:
-r [-e] [-I] [-q <name>] [-O] [-f <filename> | <spaces>]
-r [-e] [-i] [-I] [-q <name>] [-t time] [-O]
-r -p [-e] [-q <name>] [-t time] [-O] [-f <filename> | <spaces>]
-r -l [-I] [-q <name>] [-t <time>] [-f <filename> | <logstreams>]
-e external restore
-f pathname of file containing list of storage spaces
-i index rebuild only (do not restore spaces or logs)
-I do not rebuild indices following roll-forward
-l logical log only restore (no spaces)
-n last logical log to restore
-O override internal error checks - enforce policy strictly
-p physical only restore (no logs)
-q name to identify the restore session
-r restore
-t point in time to stop restore
-w whole system to restore
-RESTART restart an interrupted restore
<spaces> list of storage spaces
End of Extended Parallel Server
11-4 IBM Informix Backup and Restore Guide
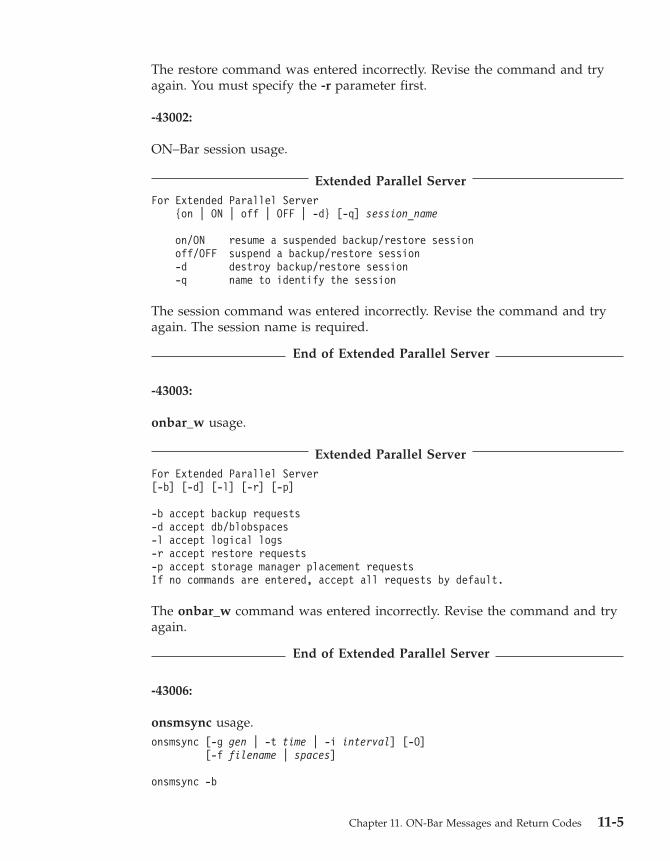
The restore command was entered incorrectly. Revise the command and try
again. You must specify the -r parameter first.
-43002:
ON–Bar session usage.
Extended Parallel Server
For Extended Parallel Server
{on | ON | off | OFF | -d} [-q] session_name
on/ON resume a suspended backup/restore session
off/OFF suspend a backup/restore session
-d destroy backup/restore session
-q name to identify the session
The session command was entered incorrectly. Revise the command and try
again. The session name is required.
End of Extended Parallel Server
-43003:
onbar_w usage.
Extended Parallel Server
For Extended Parallel Server
[-b] [-d] [-l] [-r] [-p]
-b accept backup requests
-d accept db/blobspaces
-l accept logical logs
-r accept restore requests
-p accept storage manager placement requests
If no commands are entered, accept all requests by default.
The onbar_w command was entered incorrectly. Revise the command and try
again.
End of Extended Parallel Server
-43006:
onsmsync usage.
onsmsync [-g gen | -t time | -i interval] [-O]
[-f filename | spaces]
onsmsync -b
Chapter 11. ON-Bar Messages and Return Codes 11-5
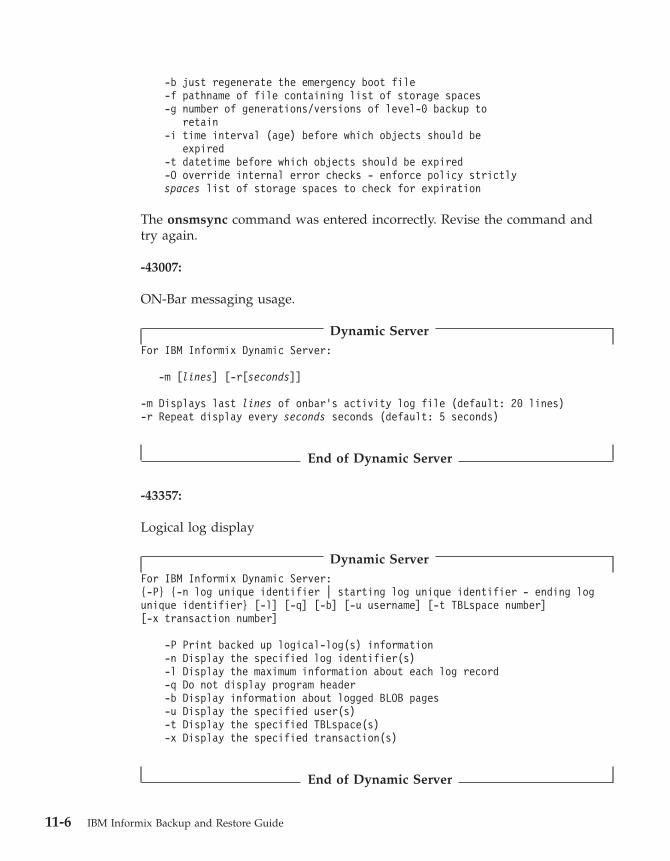
-b just regenerate the emergency boot file
-f pathname of file containing list of storage spaces
-g number of generations/versions of level-0 backup to
retain
-i time interval (age) before which objects should be
expired
-t datetime before which objects should be expired
-O override internal error checks - enforce policy strictly
spaces list of storage spaces to check for expiration
The onsmsync command was entered incorrectly. Revise the command and
try again.
-43007:
ON-Bar messaging usage.
Dynamic Server
For IBM Informix Dynamic Server:
-m [lines] [-r[seconds]]
-m Displays last lines of onbar’s activity log file (default: 20 lines)
-r Repeat display every seconds seconds (default: 5 seconds)
End of Dynamic Server
-43357:
Logical log display
Dynamic Server
For IBM Informix Dynamic Server:
{-P} {-n log unique identifier | starting log unique identifier - ending log
unique identifier} [-l] [-q] [-b] [-u username] [-t TBLspace number]
[-x transaction number]
-P Print backed up logical-log(s) information
-n Display the specified log identifier(s)
-l Display the maximum information about each log record
-q Do not display program header
-b Display information about logged BLOB pages
-u Display the specified user(s)
-t Display the specified TBLspace(s)
-x Display the specified transaction(s)
End of Dynamic Server
11-6 IBM Informix Backup and Restore Guide
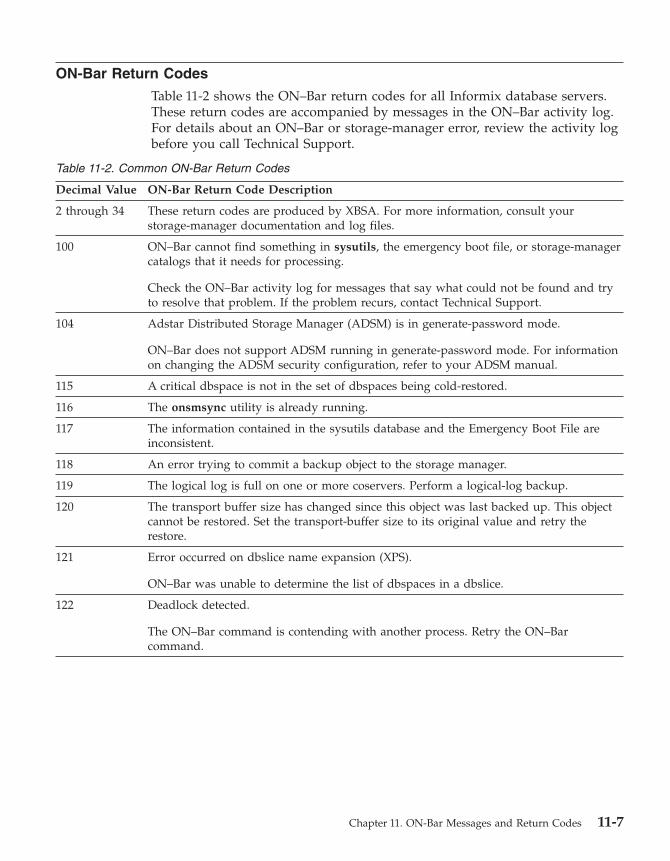
ON-Bar Return Codes
Table 11-2 shows the ON–Bar return codes for all Informix database servers.
These return codes are accompanied by messages in the ON–Bar activity log.
For details about an ON–Bar or storage-manager error, review the activity log
before you call Technical Support.
Table 11-2. Common ON-Bar Return Codes
Decimal Value ON-Bar Return Code Description
2 through 34 These return codes are produced by XBSA. For more information, consult your
storage-manager documentation and log files.
100 ON–Bar cannot find something in sysutils, the emergency boot file, or storage-manager
catalogs that it needs for processing.
Check the ON–Bar activity log for messages that say what could not be found and try
to resolve that problem. If the problem recurs, contact Technical Support.
104 Adstar Distributed Storage Manager (ADSM) is in generate-password mode.
ON–Bar does not support ADSM running in generate-password mode. For information
on changing the ADSM security configuration, refer to your ADSM manual.
115 A critical dbspace is not in the set of dbspaces being cold-restored.
116 The onsmsync utility is already running.
117 The information contained in the sysutils database and the Emergency Boot File are
inconsistent.
118 An error trying to commit a backup object to the storage manager.
119 The logical log is full on one or more coservers. Perform a logical-log backup.
120 The transport buffer size has changed since this object was last backed up. This object
cannot be restored. Set the transport-buffer size to its original value and retry the
restore.
121 Error occurred on dbslice name expansion (XPS).
ON–Bar was unable to determine the list of dbspaces in a dbslice.
122 Deadlock detected.
The ON–Bar command is contending with another process. Retry the ON–Bar
command.
Chapter 11. ON-Bar Messages and Return Codes 11-7
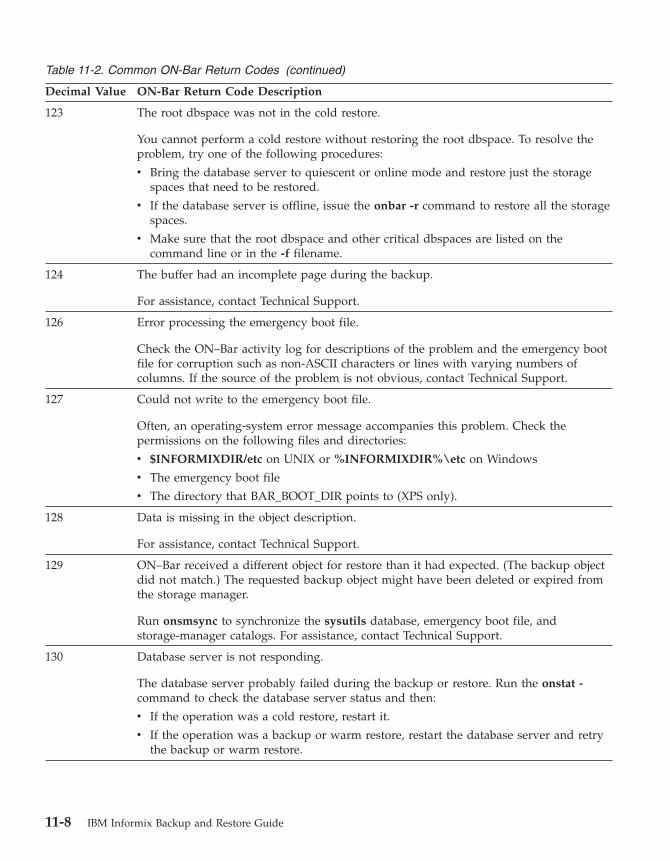
Table 11-2. Common ON-Bar Return Codes (continued)
Decimal Value ON-Bar Return Code Description
123 The root dbspace was not in the cold restore.
You cannot perform a cold restore without restoring the root dbspace. To resolve the
problem, try one of the following procedures:
v Bring the database server to quiescent or online mode and restore just the storage
spaces that need to be restored.
v If the database server is offline, issue the onbar -r command to restore all the storage
spaces.
v Make sure that the root dbspace and other critical dbspaces are listed on the
command line or in the -f filename.
124 The buffer had an incomplete page during the backup.
For assistance, contact Technical Support.
126 Error processing the emergency boot file.
Check the ON–Bar activity log for descriptions of the problem and the emergency boot
file for corruption such as non-ASCII characters or lines with varying numbers of
columns. If the source of the problem is not obvious, contact Technical Support.
127 Could not write to the emergency boot file.
Often, an operating-system error message accompanies this problem. Check the
permissions on the following files and directories:
v $INFORMIXDIR/etc on UNIX or %INFORMIXDIR%\etc on Windows
v The emergency boot file
v The directory that BAR_BOOT_DIR points to (XPS only).
128 Data is missing in the object description.
For assistance, contact Technical Support.
129 ON–Bar received a different object for restore than it had expected. (The backup object
did not match.) The requested backup object might have been deleted or expired from
the storage manager.
Run onsmsync to synchronize the sysutils database, emergency boot file, and
storage-manager catalogs. For assistance, contact Technical Support.
130 Database server is not responding.
The database server probably failed during the backup or restore. Run the onstat -
command to check the database server status and then:
v If the operation was a cold restore, restart it.
v If the operation was a backup or warm restore, restart the database server and retry
the backup or warm restore.
11-8 IBM Informix Backup and Restore Guide
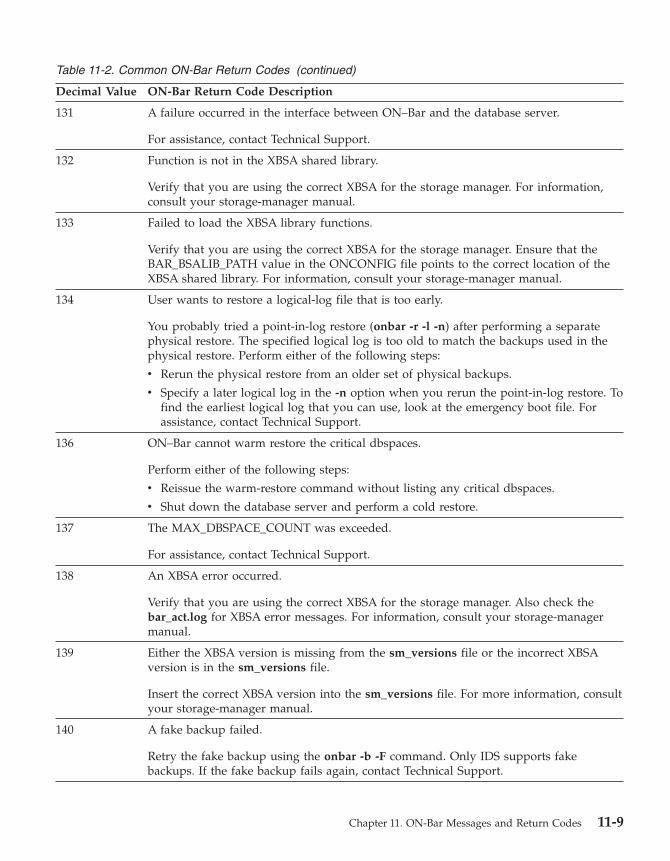
Table 11-2. Common ON-Bar Return Codes (continued)
Decimal Value ON-Bar Return Code Description
131 A failure occurred in the interface between ON–Bar and the database server.
For assistance, contact Technical Support.
132 Function is not in the XBSA shared library.
Verify that you are using the correct XBSA for the storage manager. For information,
consult your storage-manager manual.
133 Failed to load the XBSA library functions.
Verify that you are using the correct XBSA for the storage manager. Ensure that the
BAR_BSALIB_PATH value in the ONCONFIG file points to the correct location of the
XBSA shared library. For information, consult your storage-manager manual.
134 User wants to restore a logical-log file that is too early.
You probably tried a point-in-log restore (onbar -r -l -n) after performing a separate
physical restore. The specified logical log is too old to match the backups used in the
physical restore. Perform either of the following steps:
v Rerun the physical restore from an older set of physical backups.
v Specify a later logical log in the -n option when you rerun the point-in-log restore. To
find the earliest logical log that you can use, look at the emergency boot file. For
assistance, contact Technical Support.
136 ON–Bar cannot warm restore the critical dbspaces.
Perform either of the following steps:
v Reissue the warm-restore command without listing any critical dbspaces.
v Shut down the database server and perform a cold restore.
137 The MAX_DBSPACE_COUNT was exceeded.
For assistance, contact Technical Support.
138 An XBSA error occurred.
Verify that you are using the correct XBSA for the storage manager. Also check the
bar_act.log for XBSA error messages. For information, consult your storage-manager
manual.
139 Either the XBSA version is missing from the sm_versions file or the incorrect XBSA
version is in the sm_versions file.
Insert the correct XBSA version into the sm_versions file. For more information, consult
your storage-manager manual.
140 A fake backup failed.
Retry the fake backup using the onbar -b -F command. Only IDS supports fake
backups. If the fake backup fails again, contact Technical Support.
Chapter 11. ON-Bar Messages and Return Codes 11-9
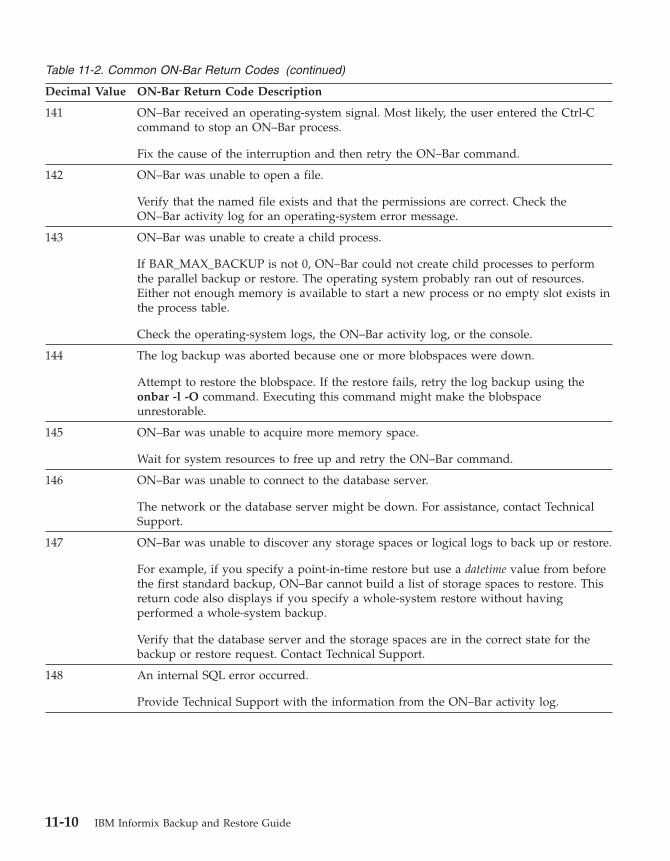
Table 11-2. Common ON-Bar Return Codes (continued)
Decimal Value ON-Bar Return Code Description
141 ON–Bar received an operating-system signal. Most likely, the user entered the Ctrl-C
command to stop an ON–Bar process.
Fix the cause of the interruption and then retry the ON–Bar command.
142 ON–Bar was unable to open a file.
Verify that the named file exists and that the permissions are correct. Check the
ON–Bar activity log for an operating-system error message.
143 ON–Bar was unable to create a child process.
If BAR_MAX_BACKUP is not 0, ON–Bar could not create child processes to perform
the parallel backup or restore. The operating system probably ran out of resources.
Either not enough memory is available to start a new process or no empty slot exists in
the process table.
Check the operating-system logs, the ON–Bar activity log, or the console.
144 The log backup was aborted because one or more blobspaces were down.
Attempt to restore the blobspace. If the restore fails, retry the log backup using the
onbar -l -O command. Executing this command might make the blobspace
unrestorable.
145 ON–Bar was unable to acquire more memory space.
Wait for system resources to free up and retry the ON–Bar command.
146 ON–Bar was unable to connect to the database server.
The network or the database server might be down. For assistance, contact Technical
Support.
147 ON–Bar was unable to discover any storage spaces or logical logs to back up or restore.
For example, if you specify a point-in-time restore but use a datetime value from before
the first standard backup, ON–Bar cannot build a list of storage spaces to restore. This
return code also displays if you specify a whole-system restore without having
performed a whole-system backup.
Verify that the database server and the storage spaces are in the correct state for the
backup or restore request. Contact Technical Support.
148 An internal SQL error occurred.
Provide Technical Support with the information from the ON–Bar activity log.
11-10 IBM Informix Backup and Restore Guide
Table 11-2. Common ON-Bar Return Codes (continued)
Decimal Value ON-Bar Return Code Description
149 Either you entered the wrong ON–Bar syntax on the command line or entered an
invalid or incorrect datetime value for your GLS environment.
Check the command that you tried against the usage message in the ON–Bar activity
log. If that does not help, then retry the command with quotes around the datetime
value. If your database locale is not English, use the GL_DATE or GL_DATETIME
environment variables to set the date and time format.
150 Error collecting data from the ONCONFIG file.
Check the permissions, format, and values in the ONCONFIG file. Check that the
ONCONFIG environment variable is set correctly.
151 The database server is in an incorrect state for this backup or restore request, or an
error occurred while determining the database server state.
Either you attempted an operation that is not compatible with the database server
mode or ON–Bar is unable to determine the database server state. For example, you
cannot do a physical backup with the database server in recovery mode.
Check the error message in the ON–Bar activity log. If an ASF error occurred, the
following message displays in the ON–Bar activity log:
Fatal error initializing ASF; asfcode = code
To determine the cause of the ASF error, refer to the ASF error code in this message
and repeat the backup or restore command. If an ASF error did not occur, change the
database server state and repeat the backup or restore command.
152 ON–Bar cannot back up the logical logs.
The logical logs are not backed up for either of the following reasons:
v If another log backup is currently running.
v If you perform a logical-log backup with the LTAPEDEV parameter set to /dev/null
(UNIX) or nul (Windows).
You receive this return code when no log backups can be done.
To enable log backups, change the LTAPEDEV parameter to a valid value.
153 ON–Bar cannot set the process group id. If BAR_MAX_BACKUP is set to any value
other than 1 and ON–Bar encounters an error setting the process group id, this value is
returned.
This message is a warning of a possible operating-system problem.
154 The ON–Bar user does not have the correct permissions.
You must be user root or informix or a member of the bargroup group on UNIX or a
member of the Informix-Admin group on Windows to execute ON–Bar commands.
Chapter 11. ON-Bar Messages and Return Codes 11-11
Table 11-2. Common ON-Bar Return Codes (continued)
Decimal Value ON-Bar Return Code Description
155 The INFORMIXSERVER environment variable is not set.
Set the INFORMIXSERVER environment variable to the correct database server name.
157 Error attempting to set the INFORMIXSHMBASE environment variable to -1.
ON–Bar could not set INFORMIXSHMBASE to -1. For assistance, contact either the
system administrator or Technical Support.
158 An internal ON–Bar error occurred.
Contact Technical Support.
159 An unexpected error occurred.
Contact Technical Support.
160 External restore failed.
To determine what went wrong with the external restore, look at the bar_act.log and
the online.log files. Ensure that you already performed the manual part of the external
restore before you retry the onbar-r -e command to complete the external restore. If that
does not work, try the external restore from a different external backup.
161 Restarted restore failed.
Verify that RESTARTABLE_RESTORE is set to ON and try the original restore again.
For more information, check the ON–Bar activity log and database server message logs
(IDS).
162 The ON-Bar log file cannot be a symbolic link.
Remove the symbolic link or change the ONCONFIG file so that the ON-Bar
parameters BAR_DEBUG_LOG or BAR_ACT_LOG point to non-symbolic linked files.
163 The ON-Bar log file must be owned by user informix.
Change the ownership of the log file to be owned by user informix or change the
BAR_ACT_LOG or BAR_DEBUG_LOG values in the ONCONFIG file to point to
different log files.
164 Unable to open file.
The file or its directory permissions prevent it from being created or opened. Verify the
permissions on the file and its directory.
177 An online dbspace was restored. This return code notifies the user that the -O option
overrode the internal checks in ON–Bar.
You do not need to take any action.
11-12 IBM Informix Backup and Restore Guide
Table 11-2. Common ON-Bar Return Codes (continued)
Decimal Value ON-Bar Return Code Description
178 The logical log was backed up while one or more blobspaces were down. This return
code notifies the user that the -O option overrode the internal checks in ON–Bar.
Examine the data in the blobspace to determine which simple large objects you need to
re-create. These blobspaces might not be restorable. For assistance, contact Technical
Support.
179 ON–Bar created the chunk needed to restore the dbspace. This return code notifies the
user that the -O option overrode the internal checks in ON–Bar.
You do not need to take any action.
180 ON–Bar could not create the chunk needed to restore the dbspace.
Create the chunk file manually. Retry the restore without the -O option.
181 ON–Bar expired an object that was needed for a backup or restore.
The onsmsync utility expired an object that might be needed for a restore. You
probably specified onsmsync with the -O option. If you used the -O option by mistake,
contact Technical Support to recover the object from the storage manager.
183 ON-Bar could not obtain the logical-log unique ID from the storage manager.
The backup of the specified logical log is missing. Query your storage manager to
determine if the backup of the specified logical-log file exists and if it is restorable.
247 Merging of emergency boot files timed out because it took too long. (XPS)
On UNIX, look in /tmp/bar_act.log and the file that the BAR_ACT_LOG parameter
points to for clues. (The onbar-merger writes to /tmp/bar_act.log until it has enough
information to read the ONCONFIG file.) Resolve the problems that the bar_act.log
describes and retry the cold restore. If the cold restore still fails, contact Technical
Support.
252 Received the wrong message from onbar_m that merges the emergency boot files.
(XPS)
For assistance, contact Technical Support.
Chapter 11. ON-Bar Messages and Return Codes 11-13

11-14 IBM Informix Backup and Restore Guide
Part 3. The ontape Backup and Restore System (IDS)
© Copyright IBM Corp. 1996, 2004

IBM Informix Backup and Restore Guide
Chapter 12. Configuring ontape
Setting the ontape Configuration Parameters . . . . . . . . . . . . . . . . . . . 12-2
Setting the Tape-Device Parameters . . . . . . . . . . . . . . . . . . . . . 12-2
Specifying Separate Devices for Storage-Space and Logical-Log Backups . . . . . . . . 12-3
Using Symbolic Links to Specify Tape Devices . . . . . . . . . . . . . . . . . 12-3
Specifying a Remote Device . . . . . . . . . . . . . . . . . . . . . . . 12-4
Using /dev/null for a Tape Device . . . . . . . . . . . . . . . . . . . . 12-4
Setting TAPEDEV to stdio . . . . . . . . . . . . . . . . . . . . . . . 12-4
Rewinding Tape Devices Before Opening and on Closing . . . . . . . . . . . . . 12-5
Specifying the Tape-Block-Size Parameters . . . . . . . . . . . . . . . . . . . 12-5
Specifying the Tape-Size Parameters . . . . . . . . . . . . . . . . . . . . . 12-5
Tape Size for Remote Devices . . . . . . . . . . . . . . . . . . . . . . 12-5
Checking and Changing ontape Configuration Parameters . . . . . . . . . . . . . . . 12-5
Who Can Change ontape Parameters? . . . . . . . . . . . . . . . . . . . . 12-6
When Can You Change ontape Parameters? . . . . . . . . . . . . . . . . . . 12-6
Changing TAPEDEV to /dev/null . . . . . . . . . . . . . . . . . . . . . 12-6
Changing LTAPEDEV to /dev/null . . . . . . . . . . . . . . . . . . . . 12-6
Verifying That the Tape Device Can Read the Specified Block Size . . . . . . . . . . 12-6
Changing ontape Parameters . . . . . . . . . . . . . . . . . . . . . . . 12-7
Changing Backup-Tape Parameters . . . . . . . . . . . . . . . . . . . . 12-7
Changing Logical-Log Backup Tape Parameters . . . . . . . . . . . . . . . . 12-7
In This Chapter
This chapter explains how to set the configuration parameters that the ontape
utility uses for backups of storage spaces and logical logs. For a description of
how ontape differs from ON–Bar, see “Comparing ON-Bar and ontape” on
page 1-9.
This chapter describes the following tasks:
v Setting the configuration parameters for ontape
v Checking configuration parameters for ontape
v Changing configuration parameters for ontape
Chapter 13, “Backing Up with ontape,” on page 13-1 describes how to use the
ontape utility to back up storage spaces and logical-log files.
© Copyright IBM Corp. 1996, 2004 12-1
Setting the ontape Configuration Parameters
The ontape utility uses six parameters in the ONCONFIG file to create
storage-space and logical-log backups. The ONCONFIG file is located in the
$INFORMIXDIR/etc directory. You specify that file in the ONCONFIG
environment variable. For a description of the ONCONFIG environment
variable and instructions on how to set it, see the IBM Informix: Guide to SQL
Reference.
The first set of ONCONFIG parameters specifies the characteristics of the tape
device and tapes for storage-space backups; the second set specifies the
characteristics of the tape device and tapes for logical-log backups.
The following list shows backup tape devices and their associated tape
parameters.
TAPEDEV is the absolute pathname of the tape device used for
storage-space backups. This is the destination where ontape
will write storage space data during an archive and the source
from which ontape will read data during a restore.
To configure ontape to use stdio, set TAPEDEV to STDIO.
TAPEBLK is the block size of the tapes used for storage-space backups,
in kilobytes.
TAPESIZE is the size of the tapes used for storage-space backups, in
kilobytes.
The following list shows the logical-log tape devices and their associated tape
parameters.
LTAPEDEV is the logical-log tape device.
LTAPEBLK is the block size of tapes used for logical-log backups, in
kilobytes.
LTAPESIZE is the size of tapes used for logical-log backups, in kilobytes.
The following sections contain information about how to set the tape-device,
tape-block-size, and tape-size parameters for both storage-space and
logical-log backups.
Setting the Tape-Device Parameters
You must consider the following points when you assign values to TAPEDEV
and LTAPEDEV:
v Use separate devices, when possible.
v Use symbolic links.
v Specify remote devices.
12-2 IBM Informix Backup and Restore Guide
v Specify /dev/null.
v Rewind tape devices.
The following sections explain each of these points.
Specifying Separate Devices for Storage-Space and Logical-Log Backups
When possible, the LTAPEDEV and TAPEDEV parameters in the ONCONFIG
file must each specify a different device. When you specify separate devices
for storage-space and logical-log backups, you can schedule these backups
independently of each other. You can create a backup on one device at the
same time you continuously back up the logical-log files on the other.
When the LTAPEDEV and TAPEDEV parameters specify the same device, the
logical log can fill and cause the database server to stop processing during a
backup. When this happens, you face limited options. You can either abort the
backup to free the tape device and back up the logical-log files or leave
normal processing suspended until the backup completes.
Precautions to Take When You Use One Tape Device: When only one tape
device exists and you want to create backups while the database server is
online, take the following precautions:
v Configure the database server with a large amount of logical-log space
through a combination of many or large logical-log files. (See your
IBM Informix: Administrator's Guide.)
v Store all explicitly created temporary tables in a dedicated dbspace and
then drop the dbspace before backing up.
v Create the backup when low database activity occurs.
v Free as many logical-log files as possible before you begin the backup.
The logical log can fill up before the backup completes. The backup
synchronizes with a checkpoint. A backup might wait for a checkpoint to
synchronize activity, but the checkpoint cannot occur until all virtual
processors exit critical sections. When database server processing suspends
because of a full logical-log file, the virtual processors cannot exit their critical
sections and a deadlock results.
Using Symbolic Links to Specify Tape Devices
You can specify the values of LTAPEDEV and TAPEDEV as symbolic links.
Using symbolic links enables you to switch to other tape or tape-compatible
devices without changing the pathname in the ONCONFIG file. For example,
you can specify the following symbolic link for tape device /dev/rst0:
ln -s /dev/rst0 /dbfiles/logtape
Chapter 12. Configuring ontape 12-3
When you set the LTAPEDEV configuration parameter, as the following
example shows, you can switch to a different device without changing the
LTAPEDEV parameter:
LTAPEDEV /dbfiles/logtape
You only need to change the symbolic link, as the following example shows:
ln -s /usr/backups /dbfiles/logtape
A user with one tape device could redirect a logical-log backup to a disk file
while using the tape device for a backup.
Specifying a Remote Device
You can perform a storage-space or logical-log backup across your network to
a remote device attached to another host computer. You should not do a
continuous backup to a remote device. To specify a tape device on another
host computer, use the following syntax:
host_machine_name:tape_device_pathname
The following example specifies a tape device on the host computer kyoto:
kyoto:/dev/rmt01
For information on the tape size for remote devices, see “Tape Size for Remote
Devices” on page 12-5.
Using /dev/null for a Tape Device
It is recommended that you do not use /dev/null as the device when backing
up. However, when you specify /dev/null as a backup tape device, you can
avoid the overhead of a level-0 backup that is required after some operations,
such as changing the logging status of a database. Obviously, you cannot
restore storage spaces from a backup to /dev/null.
You can specify /dev/null as a tape device for logical-log backups when you
decide that you do not need to recover transactions from the logical log.
When you specify the tape device as /dev/null, block size and tape size are
ignored. If you set LTAPEDEV either to or from /dev/null, you must use
ON-Monitor or restart the database server for the new setting to take effect.
Warning: When you set the ONCONFIG parameter LTAPEDEV to /dev/null,
the database server marks the logical-log files as backed up as soon
as they become full, effectively discarding logical-log information.
Setting TAPEDEV to stdio
To configure ontape to read from stdin or write to stdout, set the TAPEDEV
configuration parameter to STDIO.
12-4 IBM Informix Backup and Restore Guide
Rewinding Tape Devices Before Opening and on Closing
With ontape, you must use rewindable tape devices. Before reading from or
writing to a tape, the database server performs a series of checks that require
the rewind.
Specifying the Tape-Block-Size Parameters
Specify the block-size parameters TAPEBLK and LTAPEBLK as the largest
block size, in kilobytes, that your tape device permits.
When you set the tape parameter to /dev/null, the corresponding block size is
ignored.
The ontape utility does not check the tape device when you specify the block
size. Verify that the tape device can read the block size that you specified. If
not, you cannot restore the tape.
Specifying the Tape-Size Parameters
The number of blocks specify tape sizes. TAPESIZE and LTAPESIZE specify
the maximum amount of data that you can write to a tape.
To write or read the tape to the end of the device, set TAPESIZE and
LTAPESIZE to 0. You cannot use this option for remote devices.
When you specify the tape device as /dev/null, the corresponding tape size is
ignored.
Tape Size for Remote Devices
When you perform a continuous logical-log backup to a remote device, the
amount of data written to the tape is the smaller of LTAPESIZE and the
following formula:
(sum of space occupied by all logical-log files on disk) -
(largest logical-log file)
The I/O to the remote device completes and the database server frees the
logical-log files before a log-full condition occurs.
Note: You cannot set tape size to 0 for remote devices.
Checking and Changing ontape Configuration Parameters
To examine your ONCONFIG file (the file specified in
$INFORMIXDIR/etc/$ONCONFIG), use one of the following:
v Execute onstat -c while the database server is running.
v Use IBM Informix Server Administrator (Configuration > ONCONFIG).
Chapter 12. Configuring ontape 12-5
This section provides information on how to change configuration parameters
for ontape.
Who Can Change ontape Parameters?
When you log in as either user informix or root, you can use a text editor,
ON-Monitor, or ISA to change the value of configuration parameters for
ontape.
When Can You Change ontape Parameters?
You can change the values of parameters for ontape while the database server
is online. The change takes effect immediately.
Note: If you want to set either the TAPEDEV parameter or the LTAPEDEV
parameter to /dev/null, you must use the ON-Monitor utility to make
this change while the database server is online. If you use any other
method to alter the value of the configuration parameters to or from
/dev/null, you must restart the database server to make the change
effective.
Changing TAPEDEV to /dev/null
The ontape utility reads the value of the TAPEDEV parameter at the start of
processing. When you set TAPEDEV to /dev/null and request a backup, the
database server bypasses the backup but still updates the dbspaces with the
new backup time stamps. When you set TAPEDEV to /dev/null, you must do
it before you start ontape to request the backup. No problems exist when you
change TAPEDEV to /dev/null with ON-Monitor while the database server is
online and ontape is not running.
Changing LTAPEDEV to /dev/null
Take the database server offline before you change the value of LTAPEDEV to
/dev/null. When you make the change while the database server is either
quiescent or online, you can create a situation where you back up one or more
logical-log files but do not free them. This situation can interrupt processing
because the database server stops when it finds that the next logical-log file
(in sequence) is not free.
When you set LTAPEDEV to /dev/null, the database server frees the logical
logs without requiring that you back up those logs. The logical logs do not
get marked as free, but the database server can reuse them.
Verifying That the Tape Device Can Read the Specified Block Size
The ontape utility does not check the tape device when you specify the block
size. Verify that the tape device specified in TAPEDEV and LTAPEDEV can
read the block size you specify for their block-size parameters. If not, you
cannot restore the tape.
12-6 IBM Informix Backup and Restore Guide
Changing ontape Parameters
Before you change the parameters for ontape, perform a level-0 backup, as
explained in “Performing a Backup” on page 13-8.
Changing Backup-Tape Parameters
To change the value of TAPEDEV, TAPEBLK, and TAPESIZE from the
command line, use a text editor to edit your ONCONFIG file. Save the file.
Most change takes effect immediately. However, if you set TAPEDEV to or
from dev/null, you must restart the database server for the setting to take
effect. You also can change these parameters in ISA.
Changing Logical-Log Backup Tape Parameters
To change the value of LTAPEDEV, LTAPEBLK, and LTAPESIZE from the
command line, use a text editor to edit your ONCONFIG file. Save the file.
Most change takes effect immediately. However, if you set LTAPEDEV to or
from dev/null, you must restart the database server for the setting to take
effect.
You also can change these parameters in ISA.
Chapter 12. Configuring ontape 12-7

12-8 IBM Informix Backup and Restore Guide
Chapter 13. Backing Up with ontape
Syntax of ontape . . . . . . . . . . . . . . . . . . . . . . . . . . . . . 13-2
Starting ontape . . . . . . . . . . . . . . . . . . . . . . . . . . . . 13-2
Using ontape Exit Codes . . . . . . . . . . . . . . . . . . . . . . . . . 13-3
Changing Database Logging Status . . . . . . . . . . . . . . . . . . . . . . 13-3
Creating a Backup . . . . . . . . . . . . . . . . . . . . . . . . . . . . 13-4
Choosing a Backup Level . . . . . . . . . . . . . . . . . . . . . . . . . 13-4
Level-0 Backups . . . . . . . . . . . . . . . . . . . . . . . . . . . 13-4
Level-1 Backups . . . . . . . . . . . . . . . . . . . . . . . . . . . 13-4
Level-2 Backups . . . . . . . . . . . . . . . . . . . . . . . . . . . 13-4
Backing Up After Changing the Physical Schema . . . . . . . . . . . . . . . . . 13-4
Preparing for a Backup . . . . . . . . . . . . . . . . . . . . . . . . . 13-5
Avoid Using Temp Tables During Heavy Activity . . . . . . . . . . . . . . . . 13-5
Making Sure Enough Logical-Log Space Exists . . . . . . . . . . . . . . . . 13-5
Keeping a Copy of Your ONCONFIG File . . . . . . . . . . . . . . . . . . 13-6
Verifying Consistency Before a Level-0 Backup . . . . . . . . . . . . . . . . 13-6
Using Online and Quiescent Backups . . . . . . . . . . . . . . . . . . . . 13-6
Preparing to Backup to Tape . . . . . . . . . . . . . . . . . . . . . . . 13-7
Preparing to Back Up to Standard Output . . . . . . . . . . . . . . . . . . 13-7
Performing a Backup . . . . . . . . . . . . . . . . . . . . . . . . . . 13-8
Backing Up to Tapes . . . . . . . . . . . . . . . . . . . . . . . . . 13-9
Backing Up to Standard Output . . . . . . . . . . . . . . . . . . . . . 13-9
Backup Examples . . . . . . . . . . . . . . . . . . . . . . . . . . 13-9
Backing Up Raw Tables . . . . . . . . . . . . . . . . . . . . . . . . 13-10
When the Logical-Log Files Fill During a Backup . . . . . . . . . . . . . . . . 13-10
When You Can Use Two Tape Devices . . . . . . . . . . . . . . . . . . . 13-11
When Only One Tape Device Is Available . . . . . . . . . . . . . . . . . . 13-11
When a Backup Terminates Prematurely . . . . . . . . . . . . . . . . . . . 13-11
Monitoring Backup History Using oncheck . . . . . . . . . . . . . . . . . . 13-11
Backing Up Logical-Log Files with ontape . . . . . . . . . . . . . . . . . . . . 13-12
Before You Back Up the Logical-Log Files . . . . . . . . . . . . . . . . . . . 13-12
Using Blobspace TEXT and BYTE Data Types and Logical-Log Files . . . . . . . . . 13-12
Using /dev/null When You Do Not Need to Recover . . . . . . . . . . . . . . 13-13
When Must You Back Up Logical-Log Files? . . . . . . . . . . . . . . . . . . 13-13
Starting an Automatic Logical-Log Backup . . . . . . . . . . . . . . . . . . 13-13
Starting a Continuous Logical-Log File Backup . . . . . . . . . . . . . . . . . 13-14
Ending a Continuous Logical-Log Backup . . . . . . . . . . . . . . . . . . . 13-14
© Copyright IBM Corp. 1996, 2004 13-1
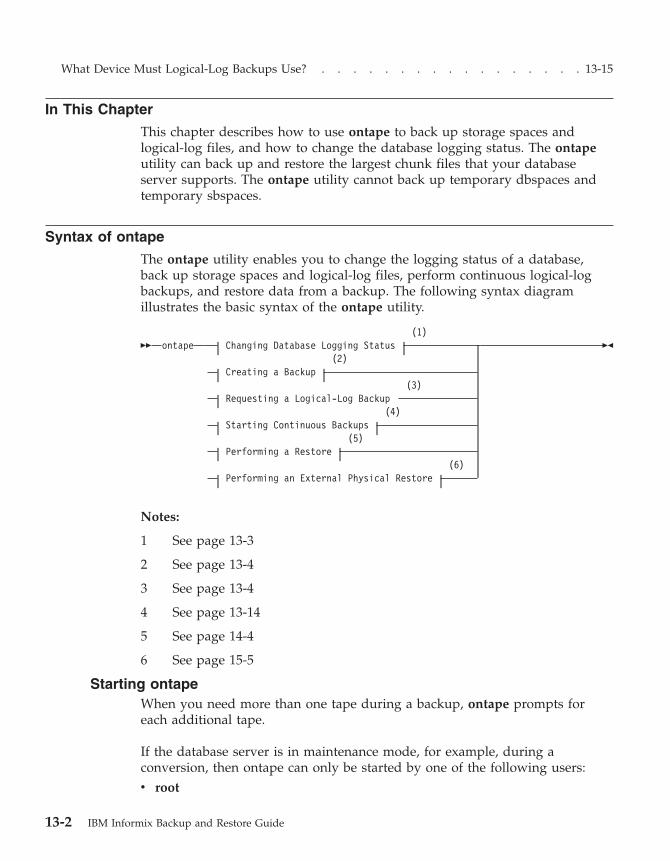
What Device Must Logical-Log Backups Use? . . . . . . . . . . . . . . . . . 13-15
In This Chapter
This chapter describes how to use ontape to back up storage spaces and
logical-log files, and how to change the database logging status. The ontape
utility can back up and restore the largest chunk files that your database
server supports. The ontape utility cannot back up temporary dbspaces and
temporary sbspaces.
Syntax of ontape
The ontape utility enables you to change the logging status of a database,
back up storage spaces and logical-log files, perform continuous logical-log
backups, and restore data from a backup. The following syntax diagram
illustrates the basic syntax of the ontape utility.
��
ontape (1)
Changing Database Logging Status
(2)
Creating a Backup
(3)
Requesting a Logical-Log Backup
(4)
Starting Continuous Backups
(5)
Performing a Restore
(6)
Performing an External Physical Restore
��
Notes:
1 See page 13-3
2 See page 13-4
3 See page 13-4
4 See page 13-14
5 See page 14-4
6 See page 15-5
Starting ontape
When you need more than one tape during a backup, ontape prompts for
each additional tape.
If the database server is in maintenance mode, for example, during a
conversion, then ontape can only be started by one of the following users:
v root
13-2 IBM Informix Backup and Restore Guide
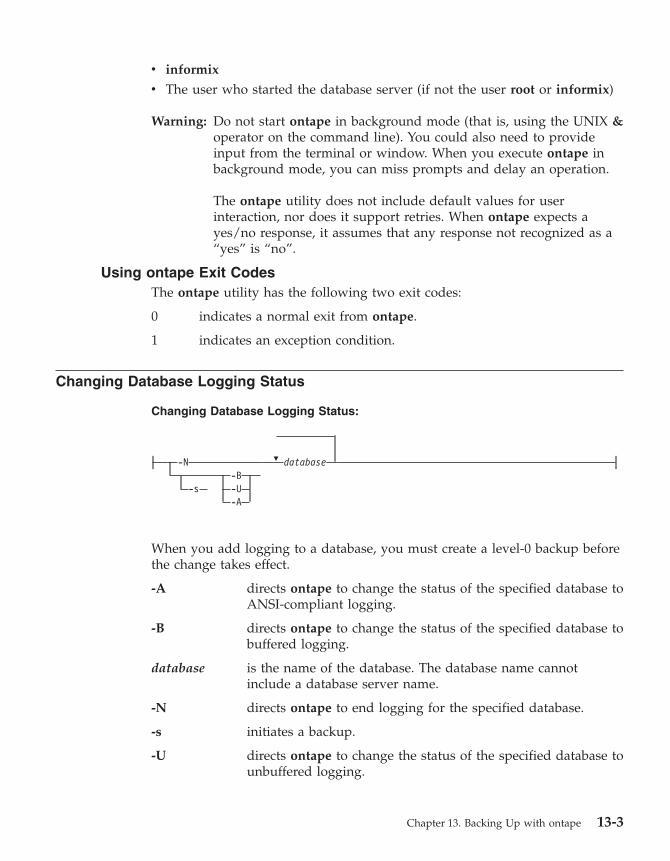
v informix
v The user who started the database server (if not the user root or informix)
Warning: Do not start ontape in background mode (that is, using the UNIX &
operator on the command line). You could also need to provide
input from the terminal or window. When you execute ontape in
background mode, you can miss prompts and delay an operation.
The ontape utility does not include default values for user
interaction, nor does it support retries. When ontape expects a
yes/no response, it assumes that any response not recognized as a
“yes” is “no”.
Using ontape Exit Codes
The ontape utility has the following two exit codes:
0 indicates a normal exit from ontape.
1 indicates an exception condition.
Changing Database Logging Status
Changing Database Logging Status:
-N
-B
-s
-U
-A
�
database
When you add logging to a database, you must create a level-0 backup before
the change takes effect.
-A directs ontape to change the status of the specified database to
ANSI-compliant logging.
-B directs ontape to change the status of the specified database to
buffered logging.
database is the name of the database. The database name cannot
include a database server name.
-N directs ontape to end logging for the specified database.
-s initiates a backup.
-U directs ontape to change the status of the specified database to
unbuffered logging.
Chapter 13. Backing Up with ontape 13-3
For considerations about changing the logging status of a database, see your
IBM Informix: Administrator's Guide.
Creating a Backup
This section explains how to plan for and create backups of your database
server data.
Choosing a Backup Level
The ontape utility supports level-0, level-1, and level-2 backups. For
information on scheduling backups, see “Planning a Recovery Strategy” on
page 1-10.
Tip: It is good practice to create a backup schedule that keeps level-1 and
level-2 backups small and to schedule frequent level-0 backups. With
such a backup schedule, you avoid having to restore large level-1 and
level-2 backups or many logical-log backups.
Level-0 Backups
When a fire or flood, for example, completely destroys a computer, you need
a level-0 backup to completely restore database server data on the
replacement computer. For online backups, the data on the backup tape
reflects the contents of the storage spaces at the time the level-0 backup
began. (The time the backup started could reflect the last checkpoint before
the backup started.)
A level-0 backup can consume lots of time because ontape must write all the
pages to tape.
Level-1 Backups
A level-1 backup usually takes less time than a level-0 backup because you
copy only part of the database server data to the backup tape.
Level-2 Backups
A level-2 backup after a level-1 backup usually takes less time than another
level-1 backup because only the changes made after the last level-1 backup
(instead of the last level-0) get copied to the backup tape.
Backing Up After Changing the Physical Schema
You must perform a level-0 backup to ensure that you can restore the data
after you make the following administrative changes. Consider waiting to
make these changes until your next regularly scheduled level-0 backup.
v Changing TAPEDEV or LTAPEDEV from /dev/null
v Adding logging to a database
v Adding a dbspace, blobspace, or sbspace before you can restore it with
anything less than a full-system restore
13-4 IBM Informix Backup and Restore Guide

v Starting mirroring for a dbspace that contains logical-log files
v Dropping a logical-log file
v Moving one or more logical-log files
v Changing the size or location of the physical log and after you reinitialize
shared memory
v Dropping a chunk before you can reuse the dbspace that contains that
chunk
v Renaming a chunk during a cold restore
Tip: Although you no longer need to backup immediately after adding a
logical-log file, your next backup should be level-0 because the data
structures have changed.
Preparing for a Backup
When you create a backup, take the following precautions:
v Avoid using temp tables during heavy activity.
v Make sure you make sufficient logical-log space to create a backup.
v Keep a copy of your ONCONFIG file.
v Verify data consistency.
v Run the database server in the appropriate mode.
v Plan for operator availability.
v Synchronize with other administrative tasks.
v Do not use background mode.
v If necessary, label tapes appropriately.
v If necessary, prepare for writing to standard output.
The following sections address each of these topics.
Avoid Using Temp Tables During Heavy Activity
When you create a temp table during a backup while using the ontape utility,
that table is placed in DBSPACETEMP. When heavy activity occurs during the
backup process, the temp table can keep growing and can eventually fill up
DBSPACETEMP. When this situation occurs, the backup aborts and your
monitor displays a NO FREE DISK error message.
Making Sure Enough Logical-Log Space Exists
When the total available space in the logical log amounts to less than half a
single logical-log file, the database server does not create a backup. You must
back up the logical-log files and attempt the backup again.
You cannot add mirroring during a backup.
Chapter 13. Backing Up with ontape 13-5
Important: When you use only one available tape device, make sure you back
up all your logical-log files before you start your backup to reduce
the likelihood of filling the logical log during the backup.
Keeping a Copy of Your ONCONFIG File
Keep a copy of the current ONCONFIG file when you create a level-0 backup.
You need this information to restore database server data from the backup
tape.
Verifying Consistency Before a Level-0 Backup
To ensure the integrity of your backups, periodically verify that all database
server data and overhead information is consistent before you create a
full-system level-0 backup. You need not check this information before every
level-0 backup, but we recommend that you keep the necessary tapes from the
most recent backup created immediately after the database server was verified
as consistent. For information on consistency checking, see your IBM Informix:
Administrator's Guide.
Using Online and Quiescent Backups
You can create a backup while the database server is online or in quiescent
mode. The terminal you use to initiate the backup command is dedicated to
the backup (displaying messages) until the backup completes. Once you start
a backup, the database server must remain in the same mode until the backup
finishes; changing the mode terminates the backup activity.
What Is an Online Backup?: You can use an online backup when you want
your database server accessible while you create the backup.
Some minor inconveniences can occur during online backups. An online
backup can slow checkpoint activity, and that can contribute to a loss in
performance. However, this decline in performance is far less costly than the
time that you lose when users were denied access to the database server
during a backup.
During an online backup, allocation of some disk pages in storage spaces can
temporarily freeze. Disk-page allocation is blocked for one chunk at a time
until you back up the used pages in the chunk.
What Is a Quiescent Backup?: You create a quiescent backup while the
database server is quiescent. Use quiescent backups when you want to
eliminate partial transactions in a backup.
Do not use quiescent backups when users need continuous access to the
databases.
13-6 IBM Informix Backup and Restore Guide
Preparing to Backup to Tape
When you back up to tape, you must ensure that an operator is available and
that you have sufficient media.
Ensuring That the Operator Is Available: Keep an operator available during
a backup to mount tapes as prompted.
A backup could take several reels of tape. When an operator is not available
to mount a new tape when one becomes full, the backup waits. During this
wait, when the backup is an online backup, the physical log space could fill
up, and that causes the database server to abort the backup. Thus, make sure
an operator is available.
Labelling Tapes Created with ontape: When you label tapes created with
ontape, the label must include the following information:
v Backup level
v Date and time
v Tape number that ontape provides
The following example shows what a label can look like:
Level 1: Wed Nov 27, 2001 20:45 Tape # 3 of 5
Each backup begins with its first tape reel numbered 1. You number each
additional tape reel consecutively thereafter. You number a five-tape backup 1
through 5. (Of course, it is possible that you could not know that it is a
five-tape backup until it is finished.)
Preparing to Back Up to Standard Output
If you choose to back up to standard output, you do not need to provide
tapes or other storage media.
What is a Backup to Standard Output?: A backup to standard output creates
an archive in the memory buffer provided by the operating system. Backing
up to standard output has the following advantages:
v There are no expensive write and read operations to disk or tape.
v You can use operating system utilities to compress or otherwise process the
data.
v You can use the archive to create a duplicate of the server by immediately
restoring the data onto another database server.
If you back up to standard output, you must also restore from standard input.
Ensuring Adequate Memory: When ontape performs a backup to standard
output, the data is written to an output file. The output file’s directory must
have enough disk space to hold the backed-up data. You can use operating
Chapter 13. Backing Up with ontape 13-7
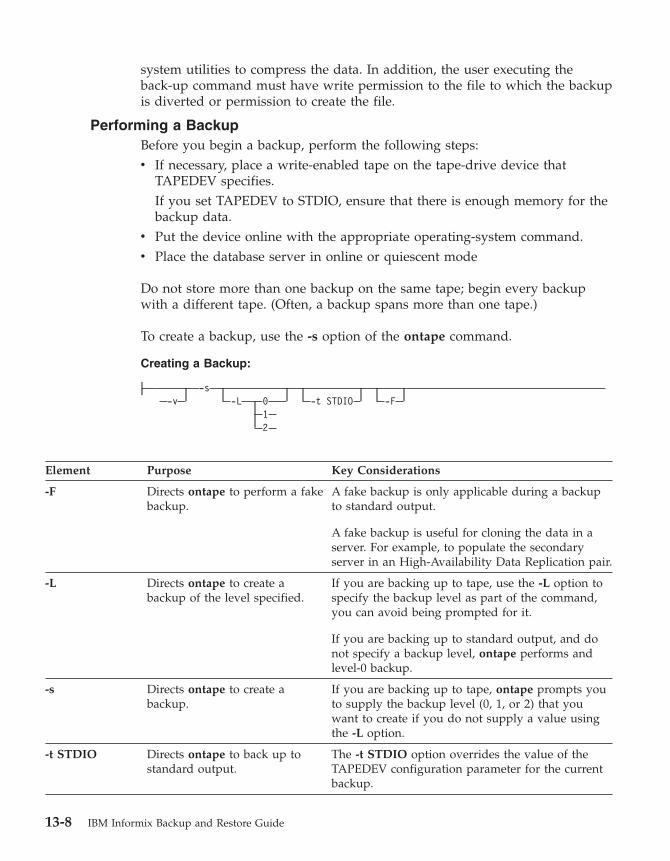
system utilities to compress the data. In addition, the user executing the
back-up command must have write permission to the file to which the backup
is diverted or permission to create the file.
Performing a Backup
Before you begin a backup, perform the following steps:
v If necessary, place a write-enabled tape on the tape-drive device that
TAPEDEV specifies.
If you set TAPEDEV to STDIO, ensure that there is enough memory for the
backup data.
v Put the device online with the appropriate operating-system command.
v Place the database server in online or quiescent mode
Do not store more than one backup on the same tape; begin every backup
with a different tape. (Often, a backup spans more than one tape.)
To create a backup, use the -s option of the ontape command.
Creating a Backup:
-s
-v
-L
0
-t STDIO
-F
1
2
Element Purpose Key Considerations
-F Directs ontape to perform a fake
backup.
A fake backup is only applicable during a backup
to standard output.
A fake backup is useful for cloning the data in a
server. For example, to populate the secondary
server in an High-Availability Data Replication pair.
-L Directs ontape to create a
backup of the level specified.
If you are backing up to tape, use the -L option to
specify the backup level as part of the command,
you can avoid being prompted for it.
If you are backing up to standard output, and do
not specify a backup level, ontape performs and
level-0 backup.
-s Directs ontape to create a
backup.
If you are backing up to tape, ontape prompts you
to supply the backup level (0, 1, or 2) that you
want to create if you do not supply a value using
the -L option.
-t STDIO Directs ontape to back up to
standard output.
The -t STDIO option overrides the value of the
TAPEDEV configuration parameter for the current
backup.
13-8 IBM Informix Backup and Restore Guide
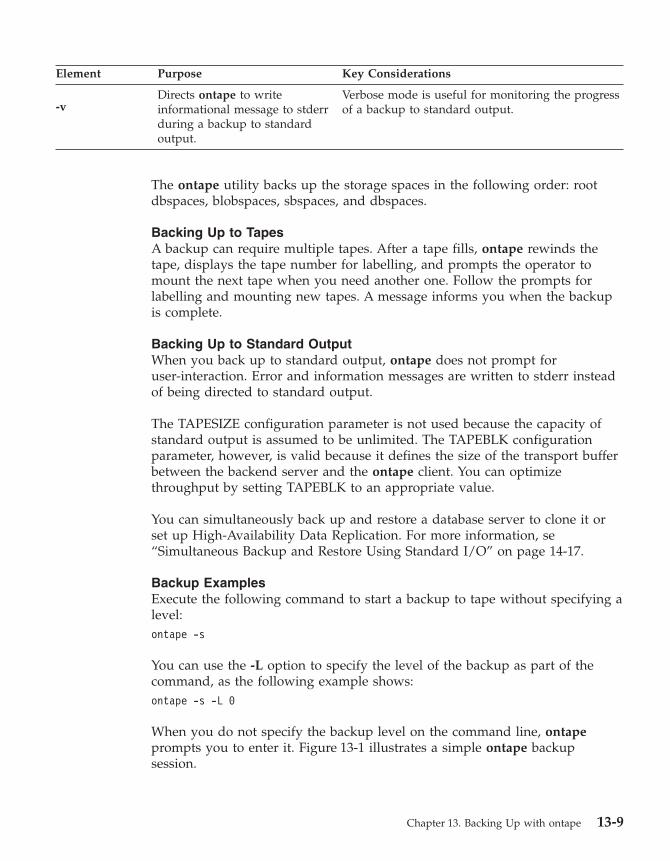
Element Purpose Key Considerations
-v
Directs ontape to write
informational message to stderr
during a backup to standard
output.
Verbose mode is useful for monitoring the progress
of a backup to standard output.
The ontape utility backs up the storage spaces in the following order: root
dbspaces, blobspaces, sbspaces, and dbspaces.
Backing Up to Tapes
A backup can require multiple tapes. After a tape fills, ontape rewinds the
tape, displays the tape number for labelling, and prompts the operator to
mount the next tape when you need another one. Follow the prompts for
labelling and mounting new tapes. A message informs you when the backup
is complete.
Backing Up to Standard Output
When you back up to standard output, ontape does not prompt for
user-interaction. Error and information messages are written to stderr instead
of being directed to standard output.
The TAPESIZE configuration parameter is not used because the capacity of
standard output is assumed to be unlimited. The TAPEBLK configuration
parameter, however, is valid because it defines the size of the transport buffer
between the backend server and the ontape client. You can optimize
throughput by setting TAPEBLK to an appropriate value.
You can simultaneously back up and restore a database server to clone it or
set up High-Availability Data Replication. For more information, se
“Simultaneous Backup and Restore Using Standard I/O” on page 14-17.
Backup Examples
Execute the following command to start a backup to tape without specifying a
level:
ontape -s
You can use the -L option to specify the level of the backup as part of the
command, as the following example shows:
ontape -s -L 0
When you do not specify the backup level on the command line, ontape
prompts you to enter it. Figure 13-1 illustrates a simple ontape backup
session.
Chapter 13. Backing Up with ontape 13-9
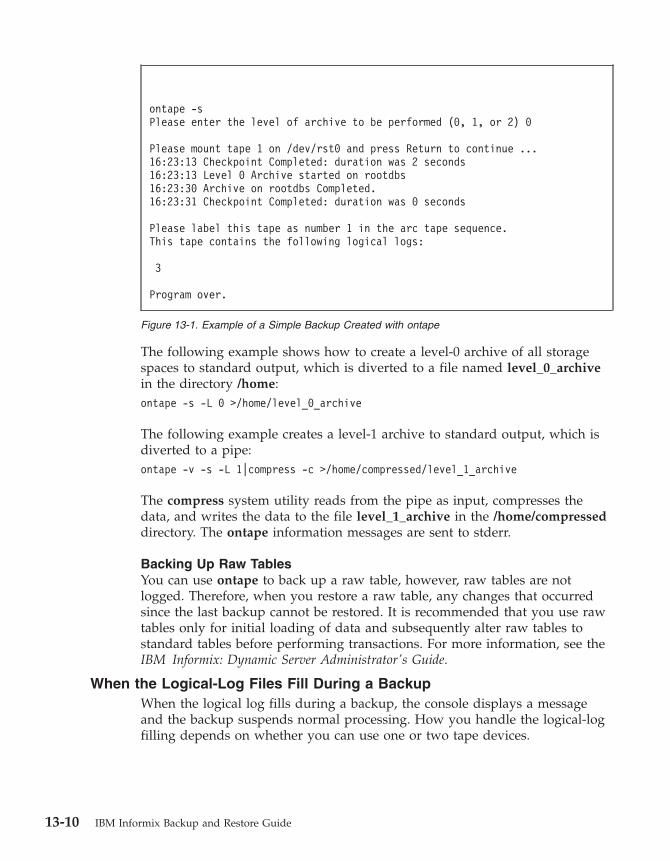
The following example shows how to create a level-0 archive of all storage
spaces to standard output, which is diverted to a file named level_0_archive
in the directory /home:
ontape -s -L 0 >/home/level_0_archive
The following example creates a level-1 archive to standard output, which is
diverted to a pipe:
ontape -v -s -L 1|compress -c >/home/compressed/level_1_archive
The compress system utility reads from the pipe as input, compresses the
data, and writes the data to the file level_1_archive in the /home/compressed
directory. The ontape information messages are sent to stderr.
Backing Up Raw Tables
You can use ontape to back up a raw table, however, raw tables are not
logged. Therefore, when you restore a raw table, any changes that occurred
since the last backup cannot be restored. It is recommended that you use raw
tables only for initial loading of data and subsequently alter raw tables to
standard tables before performing transactions. For more information, see the
IBM Informix: Dynamic Server Administrator's Guide.
When the Logical-Log Files Fill During a Backup
When the logical log fills during a backup, the console displays a message
and the backup suspends normal processing. How you handle the logical-log
filling depends on whether you can use one or two tape devices.
ontape -s
Please enter the level of archive to be performed (0, 1, or 2) 0
Please mount tape 1 on /dev/rst0 and press Return to continue ...
16:23:13 Checkpoint Completed: duration was 2 seconds
16:23:13 Level 0 Archive started on rootdbs
16:23:30 Archive on rootdbs Completed.
16:23:31 Checkpoint Completed: duration was 0 seconds
Please label this tape as number 1 in the arc tape sequence.
This tape contains the following logical logs:
3
Program over.
Figure 13-1. Example of a Simple Backup Created with ontape
13-10 IBM Informix Backup and Restore Guide
When You Can Use Two Tape Devices
When you can use two tape devices with the database server, log in as user
informix at a free terminal.
Verify that LTAPEDEV and TAPEDEV specify different pathnames that
correspond to separate tape devices. When they do, back up the logical-log
files. See “Creating a Backup” on page 13-4.
When LTAPEDEV and TAPEDEV are identical, assign a different value to the
logical-log tape device (LTAPEDEV) and initiate a logical-log-file backup.
Otherwise, your options are to either leave normal database server processing
suspended until the backup completes or cancel the backup.
When Only One Tape Device Is Available
When you create a backup with the only available tape device, you cannot
back up any logical-log files until you complete the backup. When the
logical-log files fill during the backup, normal database server processing
halts. You can either abort the backup (using ctrl-c only) to free the tape
device and back up the logical logs to continue processing, or leave normal
processing suspended until the backup completes.
You can take steps to prevent this situation. The section “Starting an
Automatic Logical-Log Backup” on page 13-13 describes these steps.
When a Backup Terminates Prematurely
When you cancel or interrupt a backup, sometimes the backup progresses to
the point where you can consider it complete. When listed in the monitoring
information, as described in “Monitoring Backup History Using oncheck” on
page 13-11, you know the backup completed.
Monitoring Backup History Using oncheck
You can monitor the history of your last full-system backup using oncheck.
Execute oncheck -pr to display reserved-page information for the root
dbspace. The last pair of reserved pages contains the following information
for the most recent backup:
v Backup level (0, 1, or 2)
v Effective date and time of the backup
v Time stamp describing when the backup began (expressed as a decimal)
v ID number of the logical log that was current when the backup began
v Physical location in the logical log of the checkpoint record (that was
written when the backup began)
Chapter 13. Backing Up with ontape 13-11
The effective date and time of the backup equals the date and time of the
checkpoint that this backup took as its starting point. This date and time
could differ markedly from the time when the backup process was started.
For example, when no one accessed the database server after Tuesday at 7
P.M., and you create a backup Wednesday morning, the effective date and
time for that backup is Tuesday night, the time of the last checkpoint. In other
words, when there has been no activity after the last checkpoint, the database
server does not perform another checkpoint at the start of the backup.
Backing Up Logical-Log Files with ontape
You must only use ontape to back up logical-log files when you use ontape to
make your backup tapes.
In addition to backing up logical-log files, you can use ontape to switch to the
next log file, move logical-log files to other dbspaces, or change the size of the
logical log. Instructions for those tasks appear in your IBM Informix:
Administrator's Guide.
Before You Back Up the Logical-Log Files
Before you back up the logical-log files, you need to understand the following
issues:
v Whether you need to back up the logical-log files
v When you need to back up the logical-log files
v Whether you want to perform an automatic or continuous backup
For more information on these issues, see “What Is a Logical-Log Backup?” on
page 1-3.
Using Blobspace TEXT and BYTE Data Types and Logical-Log Files
You must keep the following two points in mind when you use TEXT and
BYTE data types in a database that uses transaction logging:
v To ensure timely reuse of blobpages, back up logical-log files. When users
delete TEXT or BYTE values in blobspaces, the blobpages do not become
freed for reuse until you free the log file that contains the delete records. To
free the log file, you must back it up.
v When you must back up an unavailable blobspace, ontape skips it and
makes it impossible to recover the TEXT or BYTE values when it becomes
necessary. (However, blobpages from deleted TEXT or BYTE values do
become free when the blobspace becomes available even though the TEXT
or BYTE values were not backed up.)
In addition, regardless of whether the database uses transaction logging, when
you create a blobspace or add a chunk to a blobspace, the blobspace or new
13-12 IBM Informix Backup and Restore Guide
chunk is not available for use until the logical-log file that records the event is
not the current logical-log file. For information on switching logical-log files,
see your IBM Informix: Administrator's Guide.
Using /dev/null When You Do Not Need to Recover
When you decide that you do not need to recover transactions or
administrative database activities between backups, you can set the database
server configuration parameter LTAPEDEV to /dev/null.
Warning: When you set LTAPEDEV to /dev/null, it has the following
implications:
v You can only restore the data that your database server manages
up to the point of your most recent backup and any previously
backed-up logical-log files.
v When you perform a recovery, you must always perform a
full-system restore. (See “A Full-System Restore” on page 14-2.)
You cannot perform partial restores or restore when the database
server is online.
When you set LTAPEDEV to /dev/null, the database server marks a logical-log
file as backed up (status B) as soon as it becomes full. The database server can
then reuse that logical-log file without waiting for you to back it up. As a
result, the database server does not preserve any logical-log records.
Fast recovery and rolling back transactions are not impaired when you use
/dev/null as your log-file backup device. For a description of fast recovery, see
your IBM Informix: Administrator's Guide. For information about rolling back
transactions, see the ROLLBACK WORK statement in the IBM Informix: Guide
to SQL Syntax.
When Must You Back Up Logical-Log Files?
You must attempt to back up each logical-log file as soon as it fills. You can
tell when you can back up a logical-log file because it has a used status. For
more information on monitoring the status of logical-log files, see your
IBM Informix: Administrator's Guide.
Starting an Automatic Logical-Log Backup
The database server can operate online when you back up logical-log files. To
back up all full logical-log files, use the -a option of the ontape command.
Requesting a Logical-Log Backup:
-a
The -a option backs up all full logical-log files and prompts you with an
option to switch the logical-log files and back up the formerly current log.
Chapter 13. Backing Up with ontape 13-13
When the tape mounted on LTAPEDEV becomes full before the end of the
logical-log file, ontape prompts you to mount a new tape.
When you press the Interrupt key while a backup occurs, the database server
finishes the backup and then returns control to you. Any other full logical-log
files receive a used status.
To back up all full logical-log files, execute the following command:
ontape -a
Starting a Continuous Logical-Log File Backup
When you do not want to monitor the logical-log files and start backups
when the logical-log files become full, you can start a continuous backup.
When you start a continuous backup, the database server automatically backs
up each logical-log file as it becomes full. When you perform continuous
logical-log file backups, the database server protects you against ever losing
more than a partial logical-log file, even in the worst case media failure when
a chunk that contains logical-log files fails.
With continuous backups you also do not need to remember to back up the
logical-log files, but someone must always make media available for the
backup process. Also, you must dedicate the backup device and a terminal to
the backup process.
To start a continuous backup of the logical-log files, use the -c option of the
ontape command.
Starting Continuous Backups:
-c
The -c option initiates continuous backup of logical-log files. The database
server backs up each logical-log file as it becomes full. Continuous backup
does not back up the current logical-log file.
The database server can operate in online mode when you start continuous
backups. To start continuous logging, execute the following command:
ontape -c
When the tape mounted on LTAPEDEV becomes full before the end of the
logical-log file, the database server prompts the operator for a new tape.
Ending a Continuous Logical-Log Backup
To end continuous logical-log backup, press the Interrupt key (CTRL-C).
13-14 IBM Informix Backup and Restore Guide

When you press the Interrupt key while the database server backs up a
logical-log file to a local device, all logs that were completely backed up
before the interrupt are captured on the tape and are marked as backed up by
the database server.
When you press the Interrupt key while the database server waits for a
logical-log file to fill (and thus is not backing up any logical-log files), all logs
that were backed up before the interrupt reside on the tape and are marked as
backed up by the database server.
When you press the Interrupt key while the database server performs a
continuous backup to a remote device, any logical-log files that were backed
up during this operation can or cannot reside on the tape, and are not marked
as backed up by the database server (a good reason why you should not do
continuous remote backups).
After you stop continuous logging, you must start a new tape for subsequent
log backup operations.
You must explicitly request logical-log backups (using ontape -a) until you
restart continuous logging.
What Device Must Logical-Log Backups Use?
The ontape utility uses parameters defined in the ONCONFIG file to define
the tape device for logical-log backups. However, consider the following
issues when you choose a logical-log backup device:
v When the logical-log device differs from the backup device, you can plan
your backups without considering the competing needs of the backup
schedule.
v When you specify /dev/null as the logical-log backup device in the
ONCONFIG parameter LTAPEDEV, you avoid having to mount and
maintain backup tapes. However, you can only recover data up to the point
of your most recent backup tape. You cannot restore work done after the
backup. See the warning about setting LTAPEDEV to /dev/null in “Using
/dev/null When You Do Not Need to Recover” on page 13-13.
v When your tape device runs slow, the logical log could fill up faster than
you can copy it to tape. In this case, you could consider performing the
backup to disk and then copying the disk backup to tape.
Chapter 13. Backing Up with ontape 13-15

13-16 IBM Informix Backup and Restore Guide
Chapter 14. Restoring with ontape
Choosing the Type of Physical Restore . . . . . . . . . . . . . . . . . . . . . 14-2
A Full-System Restore . . . . . . . . . . . . . . . . . . . . . . . . . . 14-2
Restoring Selected Dbspaces, Blobspaces, and Sbspaces . . . . . . . . . . . . . . . 14-2
Choosing a Cold, Warm, or Mixed Restore . . . . . . . . . . . . . . . . . . . . 14-3
A Cold Restore . . . . . . . . . . . . . . . . . . . . . . . . . . . . 14-3
A Warm Restore . . . . . . . . . . . . . . . . . . . . . . . . . . . . 14-3
A Mixed Restore . . . . . . . . . . . . . . . . . . . . . . . . . . . . 14-4
Performing a Restore . . . . . . . . . . . . . . . . . . . . . . . . . . . 14-4
Restoring the Whole System . . . . . . . . . . . . . . . . . . . . . . . . . 14-6
Gathering the Appropriate Tapes . . . . . . . . . . . . . . . . . . . . . . 14-7
Backup Tapes . . . . . . . . . . . . . . . . . . . . . . . . . . . . 14-7
Logical-Log Tapes . . . . . . . . . . . . . . . . . . . . . . . . . . 14-7
Deciding on a Complete Cold or a Mixed Restore . . . . . . . . . . . . . . . . 14-7
Verifying Your Database Server Configuration . . . . . . . . . . . . . . . . . . 14-7
Setting Shared-Memory Parameters to Maximum Assigned Value . . . . . . . . . . 14-7
Setting Mirroring Configuration to Level-0 Backup State . . . . . . . . . . . . . 14-8
Ensuring That Needed Devices Are Available . . . . . . . . . . . . . . . . . 14-8
Performing a Cold Restore . . . . . . . . . . . . . . . . . . . . . . . . 14-8
Salvaging Logical-Log Files . . . . . . . . . . . . . . . . . . . . . . . 14-8
Mounting Tapes During the Restore . . . . . . . . . . . . . . . . . . . . 14-9
Restoring Logical-Log Files . . . . . . . . . . . . . . . . . . . . . . . 14-9
Bringing the Database Server Online When the Restore Is Over . . . . . . . . . . . 14-11
Restoring Selected Storage Spaces . . . . . . . . . . . . . . . . . . . . . . . 14-11
Gathering the Appropriate Tapes . . . . . . . . . . . . . . . . . . . . . . 14-11
Backup Tapes . . . . . . . . . . . . . . . . . . . . . . . . . . . 14-11
Logical-Log Tapes . . . . . . . . . . . . . . . . . . . . . . . . . . 14-11
Ensuring That Needed Device Are Available . . . . . . . . . . . . . . . . . . 14-11
Backing Up Logical-Log Files . . . . . . . . . . . . . . . . . . . . . . . 14-12
Performing a Warm Restore . . . . . . . . . . . . . . . . . . . . . . . 14-12
Restoring Raw Tables . . . . . . . . . . . . . . . . . . . . . . . . . . . 14-12
Renaming Chunks During a Restore . . . . . . . . . . . . . . . . . . . . . . 14-13
Key Considerations . . . . . . . . . . . . . . . . . . . . . . . . . . 14-13
New Chunk Requirements . . . . . . . . . . . . . . . . . . . . . . . . 14-14
Examples of Renaming Chunks During a Restore . . . . . . . . . . . . . . . . 14-14
Renaming Chunks with Command Line Options . . . . . . . . . . . . . . . 14-14
Renaming Chunks with a File . . . . . . . . . . . . . . . . . . . . . . 14-14
Renaming Chunks While Specifying Other Options . . . . . . . . . . . . . . . 14-15
Renaming a Chunk to a Nonexistent Device . . . . . . . . . . . . . . . . . 14-15
Restoring from Standard Input . . . . . . . . . . . . . . . . . . . . . . . 14-16
© Copyright IBM Corp. 1996, 2004 14-1
Simultaneous Backup and Restore Using Standard I/O . . . . . . . . . . . . . . . 14-17
In This Chapter
This section provides instructions for restoring data using ontape for the
following procedures:
v A full-system restore
v A restore of selected dbspaces, blobspaces, and sbspaces
Before you start restoring data, you must understand the concepts in “What Is
a Restore?” on page 1-5. As explained in that section, a complete recovery of
database server data generally consists of a physical restore and a logical
restore.
Choosing the Type of Physical Restore
If a failure causes the database server to go offline, you must restore all the
database server data. This type of restore is a full-system restore. When the
failure did not cause the database server to go offline, you can restore only
the storage spaces that failed. For illustrations of the restore types, see “What
Are Warm, Cold, and Mixed Restores?” on page 1-5.
A Full-System Restore
When your database server goes offline because of a disk failure or corrupted
data, it means that a critical dbspace was damaged. The following list shows
critical dbspaces:
v The root dbspace
v The dbspace that contains the physical log
v A dbspace that contains logical-log files
When you need to restore any critical dbspace, you must perform a full
system restore to restore all the data that your database server manages. You
must start a full-system restore with a cold restore. See “Choosing a Cold,
Warm, or Mixed Restore” on page 14-3.
Restoring Selected Dbspaces, Blobspaces, and Sbspaces
When your database server does not go offline because of a disk failure or
corrupted data, the damage occurred to a noncritical dbspace, blobspace, or
sbspace.
When you do not need to restore a critical dbspace, you can restore only those
storage spaces that contain a damaged chunk or chunks. When a media
failure occurs in one chunk of a storage space that spans multiple chunks, all
active transactions for that storage space must terminate before the database
server can restore it. You can start a restore operation before the database
14-2 IBM Informix Backup and Restore Guide

server finishes the transactions, but the restore becomes delayed until the
database server verifies that you finished all transactions that were active at
the time of the failure.
Choosing a Cold, Warm, or Mixed Restore
When you restore the database server data, you must decide whether you can
do it while the database server is offline or online. This decision depends in
part on the data that you intend to restore.
A Cold Restore
Perform a cold restore while the database server is offline. It consists of both a
physical restore and a logical restore. You must perform a cold restore to
restore any critical dbspaces.
The database server is offline when you begin a cold restore but it goes into
recovery mode after it restores the reserved pages. From that point on it stays
in recovery mode until either a logical restore finishes (after which it works in
quiescent mode) or you use the onmode utility to shift it to another mode.
Dynamic Server
You can rename chunks by specifying new chunks paths and offsets during a
cold restore. This option is useful if you need to restore storage spaces to a
different disk from the one on which the backup was made. You can rename
any type of chunk, including critical chunks and mirror chunks. For more
information, see “Renaming Chunks During a Restore” on page 14-13.
A cold restore can be performed after a dbspace has been renamed and a
level-0 backup or a backup of the rootdbs and renamed dbspace is performed.
End of Dynamic Server
A Warm Restore
A warm restore restores noncritical storage spaces while the database server is
in online or quiescent mode. It consists of one or more physical restore
operations (when you restore multiple storage spaces concurrently), a
logical-log backup, and a logical restore.
During a warm restore, the database server replays backed-up logical-log files
for the storage spaces that you restore. To avoid overwriting the current
logical log, the database server writes the logical-log files that you designate
for replay to temporary space. Therefore, a warm restore requires enough
temporary space to hold the logical log or the number of log files being
Chapter 14. Restoring with ontape 14-3
replayed, whichever is smaller. For information on how the database server
looks for temporary space, see the discussion of DBSPACETEMP in your
IBM Informix: Administrator's Guide.
Warning: Make sure enough temporary space exists for the logical-log portion
of the warm restore; the maximum amount of temporary space that
the database server needs equals the size of all the logical-log files.
Dynamic Server
A warm restore can be performed after a dbspace has been renamed and a
level-0 archive of the rootdbs and renamed dbspace is taken.
End of Dynamic Server
A Mixed Restore
A mixed restore is a cold restore followed by a warm restore. A mixed restore
restores some storage spaces during a cold restore (the database server is
offline) and some storage spaces during a warm restore (the database server is
online). You could do a mixed restore when you perform a full-system restore,
but you need to provide access to a particular table or set of tables as soon as
possible. In this case, perform a cold restore to restore the critical dbspaces
and the dbspaces that contain the important tables.
A cold restore takes less total time to restore all your data than a mixed
restore, even though the database server is online during part of a mixed
restore because a mixed restore requires two logical restores (one for the cold
restore and one for the warm restore). A mixed restore, however, requires the
database server to go offline for less time than a cold restore.
The dbspaces not restored during the cold restore do not become available
until after the database server restores them during a warm restore, even
though a critical dbspace possibly did not damage them.
Performing a Restore
Use the -r option to perform a full physical and logical restore of the database
server data with ontape. Use the -D option to restore selected storage spaces.
Use the -rename option to rename chunks during the restore.
14-4 IBM Informix Backup and Restore Guide
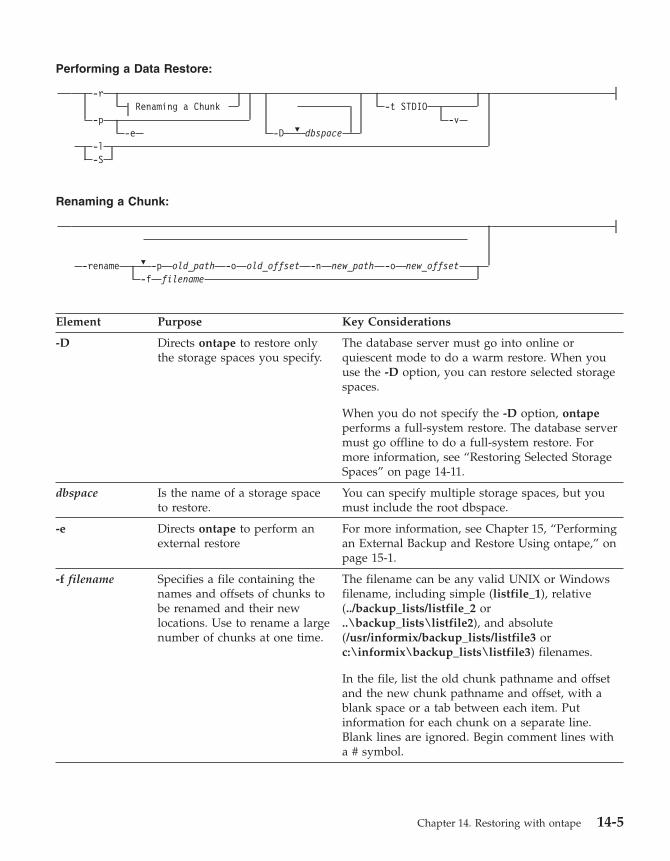
Performing a Data Restore:
�
-r
Renaming
a
Chunk
-t STDIO
-p
-v
-e
-D
dbspace
-l
-S
Renaming a Chunk:
�
-rename
-p
old_path
-o
old_offset
-n
new_path
-o
new_offset
-f
filename
Element Purpose Key Considerations
-D Directs ontape to restore only
the storage spaces you specify.
The database server must go into online or
quiescent mode to do a warm restore. When you
use the -D option, you can restore selected storage
spaces.
When you do not specify the -D option, ontape
performs a full-system restore. The database server
must go offline to do a full-system restore. For
more information, see “Restoring Selected Storage
Spaces” on page 14-11.
dbspace Is the name of a storage space
to restore.
You can specify multiple storage spaces, but you
must include the root dbspace.
-e Directs ontape to perform an
external restore
For more information, see Chapter 15, “Performing
an External Backup and Restore Using ontape,” on
page 15-1.
-f filename Specifies a file containing the
names and offsets of chunks to
be renamed and their new
locations. Use to rename a large
number of chunks at one time.
The filename can be any valid UNIX or Windows
filename, including simple (listfile_1), relative
(../backup_lists/listfile_2 or
..\backup_lists\listfile2), and absolute
(/usr/informix/backup_lists/listfile3 or
c:\informix\backup_lists\listfile3) filenames.
In the file, list the old chunk pathname and offset
and the new chunk pathname and offset, with a
blank space or a tab between each item. Put
information for each chunk on a separate line.
Blank lines are ignored. Begin comment lines with
a # symbol.
Chapter 14. Restoring with ontape 14-5
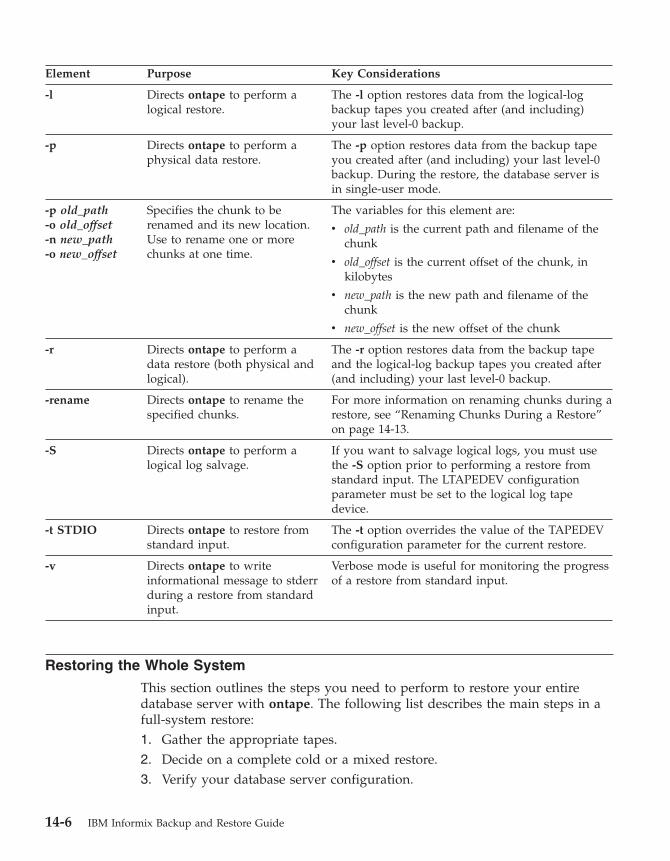
Element Purpose Key Considerations
-l Directs ontape to perform a
logical restore.
The -l option restores data from the logical-log
backup tapes you created after (and including)
your last level-0 backup.
-p Directs ontape to perform a
physical data restore.
The -p option restores data from the backup tape
you created after (and including) your last level-0
backup. During the restore, the database server is
in single-user mode.
-p old_path-o old_offset
-n new_path-o new_offset
Specifies the chunk to be
renamed and its new location.
Use to rename one or more
chunks at one time.
The variables for this element are:
v old_path is the current path and filename of the
chunk
v old_offset is the current offset of the chunk, in
kilobytes
v new_path is the new path and filename of the
chunk
v new_offset is the new offset of the chunk
-r Directs ontape to perform a
data restore (both physical and
logical).
The -r option restores data from the backup tape
and the logical-log backup tapes you created after
(and including) your last level-0 backup.
-rename Directs ontape to rename the
specified chunks.
For more information on renaming chunks during a
restore, see “Renaming Chunks During a Restore”
on page 14-13.
-S Directs ontape to perform a
logical log salvage.
If you want to salvage logical logs, you must use
the -S option prior to performing a restore from
standard input. The LTAPEDEV configuration
parameter must be set to the logical log tape
device.
-t STDIO Directs ontape to restore from
standard input.
The -t option overrides the value of the TAPEDEV
configuration parameter for the current restore.
-v Directs ontape to write
informational message to stderr
during a restore from standard
input.
Verbose mode is useful for monitoring the progress
of a restore from standard input.
Restoring the Whole System
This section outlines the steps you need to perform to restore your entire
database server with ontape. The following list describes the main steps in a
full-system restore:
1. Gather the appropriate tapes.
2. Decide on a complete cold or a mixed restore.
3. Verify your database server configuration.
14-6 IBM Informix Backup and Restore Guide
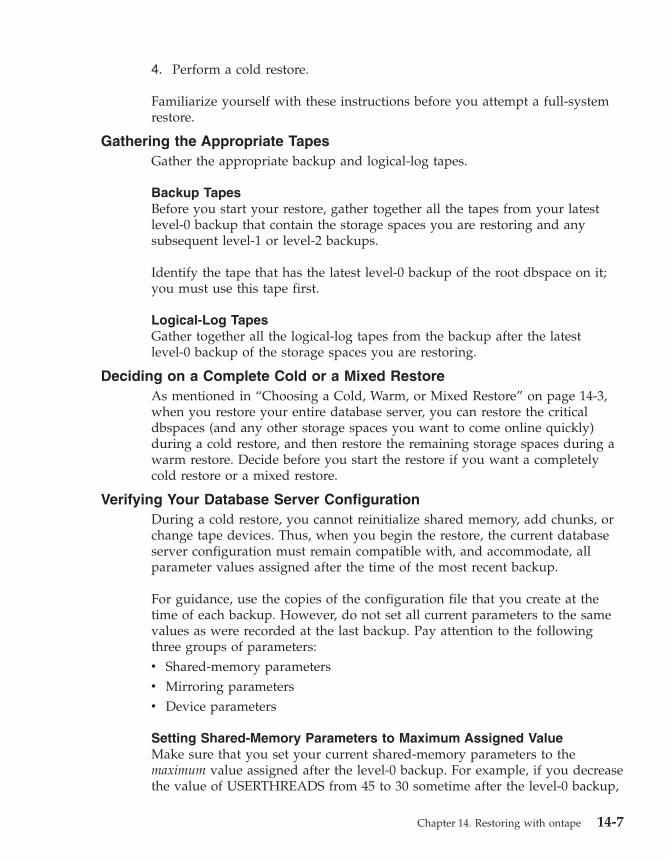
4. Perform a cold restore.
Familiarize yourself with these instructions before you attempt a full-system
restore.
Gathering the Appropriate Tapes
Gather the appropriate backup and logical-log tapes.
Backup Tapes
Before you start your restore, gather together all the tapes from your latest
level-0 backup that contain the storage spaces you are restoring and any
subsequent level-1 or level-2 backups.
Identify the tape that has the latest level-0 backup of the root dbspace on it;
you must use this tape first.
Logical-Log Tapes
Gather together all the logical-log tapes from the backup after the latest
level-0 backup of the storage spaces you are restoring.
Deciding on a Complete Cold or a Mixed Restore
As mentioned in “Choosing a Cold, Warm, or Mixed Restore” on page 14-3,
when you restore your entire database server, you can restore the critical
dbspaces (and any other storage spaces you want to come online quickly)
during a cold restore, and then restore the remaining storage spaces during a
warm restore. Decide before you start the restore if you want a completely
cold restore or a mixed restore.
Verifying Your Database Server Configuration
During a cold restore, you cannot reinitialize shared memory, add chunks, or
change tape devices. Thus, when you begin the restore, the current database
server configuration must remain compatible with, and accommodate, all
parameter values assigned after the time of the most recent backup.
For guidance, use the copies of the configuration file that you create at the
time of each backup. However, do not set all current parameters to the same
values as were recorded at the last backup. Pay attention to the following
three groups of parameters:
v Shared-memory parameters
v Mirroring parameters
v Device parameters
Setting Shared-Memory Parameters to Maximum Assigned Value
Make sure that you set your current shared-memory parameters to the
maximum value assigned after the level-0 backup. For example, if you decrease
the value of USERTHREADS from 45 to 30 sometime after the level-0 backup,
Chapter 14. Restoring with ontape 14-7
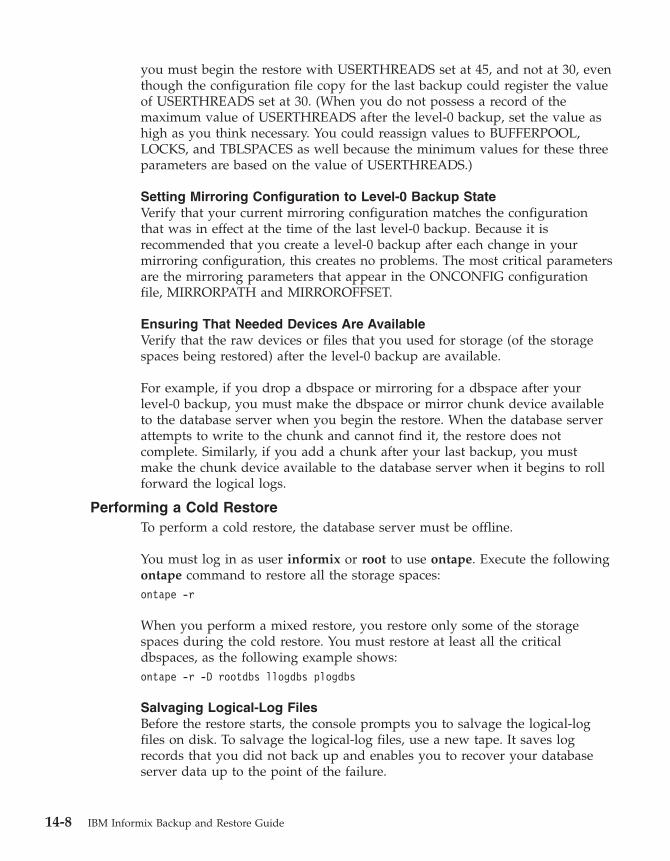
you must begin the restore with USERTHREADS set at 45, and not at 30, even
though the configuration file copy for the last backup could register the value
of USERTHREADS set at 30. (When you do not possess a record of the
maximum value of USERTHREADS after the level-0 backup, set the value as
high as you think necessary. You could reassign values to BUFFERPOOL,
LOCKS, and TBLSPACES as well because the minimum values for these three
parameters are based on the value of USERTHREADS.)
Setting Mirroring Configuration to Level-0 Backup State
Verify that your current mirroring configuration matches the configuration
that was in effect at the time of the last level-0 backup. Because it is
recommended that you create a level-0 backup after each change in your
mirroring configuration, this creates no problems. The most critical parameters
are the mirroring parameters that appear in the ONCONFIG configuration
file, MIRRORPATH and MIRROROFFSET.
Ensuring That Needed Devices Are Available
Verify that the raw devices or files that you used for storage (of the storage
spaces being restored) after the level-0 backup are available.
For example, if you drop a dbspace or mirroring for a dbspace after your
level-0 backup, you must make the dbspace or mirror chunk device available
to the database server when you begin the restore. When the database server
attempts to write to the chunk and cannot find it, the restore does not
complete. Similarly, if you add a chunk after your last backup, you must
make the chunk device available to the database server when it begins to roll
forward the logical logs.
Performing a Cold Restore
To perform a cold restore, the database server must be offline.
You must log in as user informix or root to use ontape. Execute the following
ontape command to restore all the storage spaces:
ontape -r
When you perform a mixed restore, you restore only some of the storage
spaces during the cold restore. You must restore at least all the critical
dbspaces, as the following example shows:
ontape -r -D rootdbs llogdbs plogdbs
Salvaging Logical-Log Files
Before the restore starts, the console prompts you to salvage the logical-log
files on disk. To salvage the logical-log files, use a new tape. It saves log
records that you did not back up and enables you to recover your database
server data up to the point of the failure.
14-8 IBM Informix Backup and Restore Guide
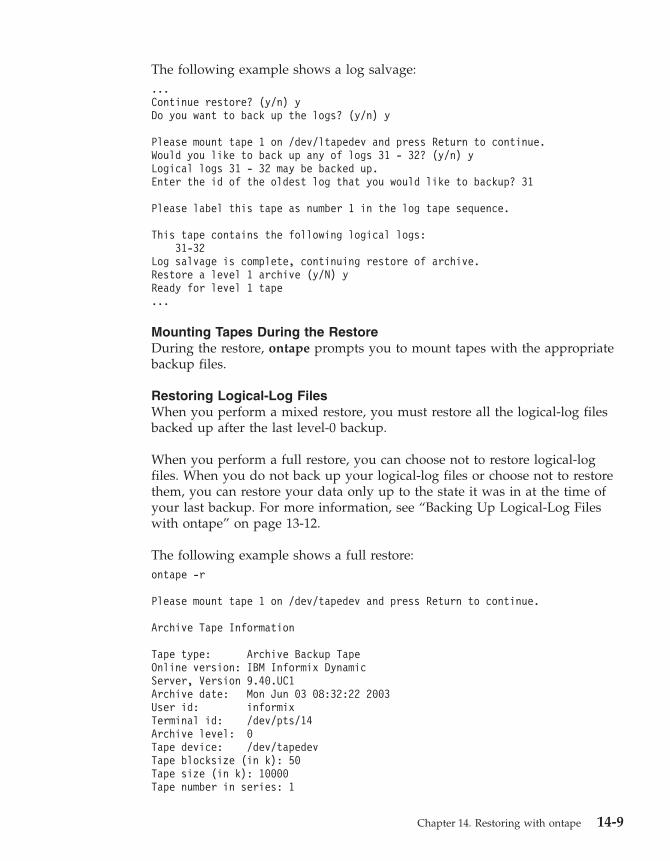
The following example shows a log salvage:
...
Continue restore? (y/n) y
Do you want to back up the logs? (y/n) y
Please mount tape 1 on /dev/ltapedev and press Return to continue.
Would you like to back up any of logs 31 - 32? (y/n) y
Logical logs 31 - 32 may be backed up.
Enter the id of the oldest log that you would like to backup? 31
Please label this tape as number 1 in the log tape sequence.
This tape contains the following logical logs:
31-32
Log salvage is complete, continuing restore of archive.
Restore a level 1 archive (y/N) y
Ready for level 1 tape
...
Mounting Tapes During the Restore
During the restore, ontape prompts you to mount tapes with the appropriate
backup files.
Restoring Logical-Log Files
When you perform a mixed restore, you must restore all the logical-log files
backed up after the last level-0 backup.
When you perform a full restore, you can choose not to restore logical-log
files. When you do not back up your logical-log files or choose not to restore
them, you can restore your data only up to the state it was in at the time of
your last backup. For more information, see “Backing Up Logical-Log Files
with ontape” on page 13-12.
The following example shows a full restore:
ontape -r
Please mount tape 1 on /dev/tapedev and press Return to continue.
Archive Tape Information
Tape type: Archive Backup Tape
Online version: IBM Informix Dynamic
Server, Version 9.40.UC1
Archive date: Mon Jun 03 08:32:22 2003
User id: informix
Terminal id: /dev/pts/14
Archive level: 0
Tape device: /dev/tapedev
Tape blocksize (in k): 50
Tape size (in k): 10000
Tape number in series: 1
Chapter 14. Restoring with ontape 14-9
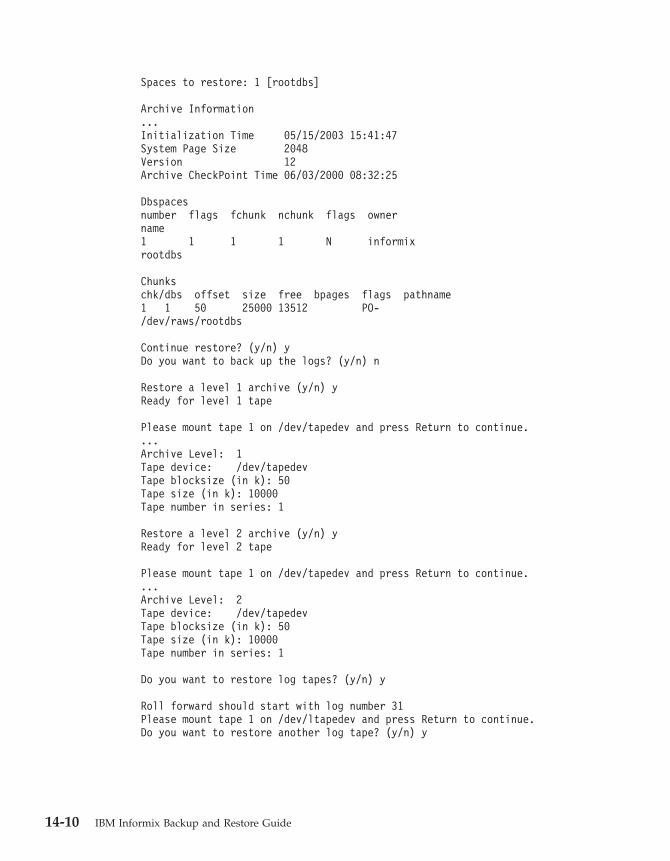
Spaces to restore: 1 [rootdbs]
Archive Information
...
Initialization Time 05/15/2003 15:41:47
System Page Size 2048
Version 12
Archive CheckPoint Time 06/03/2000 08:32:25
Dbspaces
number flags fchunk nchunk flags owner
name
1 1 1 1 N informix
rootdbs
Chunks
chk/dbs offset size free bpages flags pathname
1 1 50 25000 13512 PO-
/dev/raws/rootdbs
Continue restore? (y/n) y
Do you want to back up the logs? (y/n) n
Restore a level 1 archive (y/n) y
Ready for level 1 tape
Please mount tape 1 on /dev/tapedev and press Return to continue.
...
Archive Level: 1
Tape device: /dev/tapedev
Tape blocksize (in k): 50
Tape size (in k): 10000
Tape number in series: 1
Restore a level 2 archive (y/n) y
Ready for level 2 tape
Please mount tape 1 on /dev/tapedev and press Return to continue.
...
Archive Level: 2
Tape device: /dev/tapedev
Tape blocksize (in k): 50
Tape size (in k): 10000
Tape number in series: 1
Do you want to restore log tapes? (y/n) y
Roll forward should start with log number 31
Please mount tape 1 on /dev/ltapedev and press Return to continue.
Do you want to restore another log tape? (y/n) y
14-10 IBM Informix Backup and Restore Guide
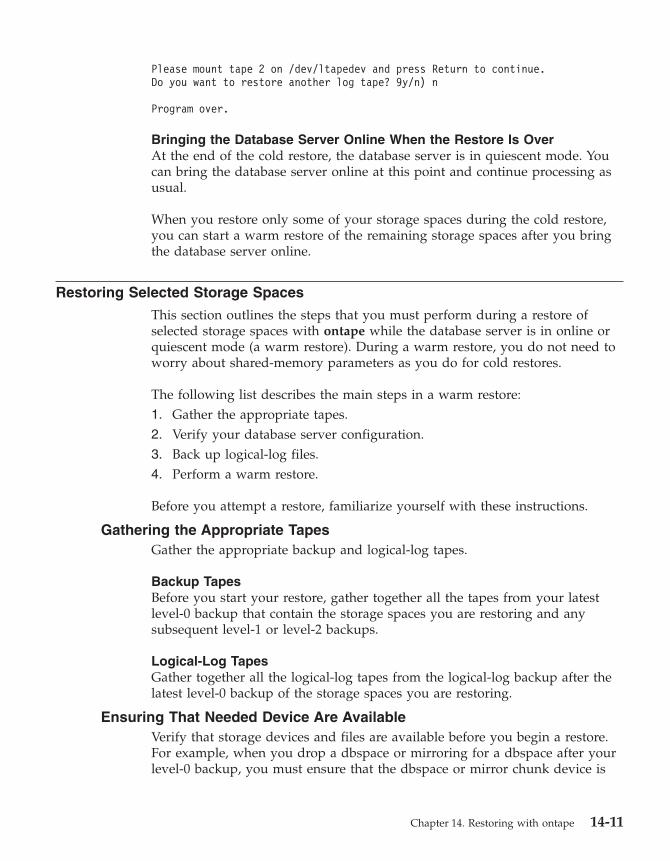
Please mount tape 2 on /dev/ltapedev and press Return to continue.
Do you want to restore another log tape? 9y/n) n
Program over.
Bringing the Database Server Online When the Restore Is Over
At the end of the cold restore, the database server is in quiescent mode. You
can bring the database server online at this point and continue processing as
usual.
When you restore only some of your storage spaces during the cold restore,
you can start a warm restore of the remaining storage spaces after you bring
the database server online.
Restoring Selected Storage Spaces
This section outlines the steps that you must perform during a restore of
selected storage spaces with ontape while the database server is in online or
quiescent mode (a warm restore). During a warm restore, you do not need to
worry about shared-memory parameters as you do for cold restores.
The following list describes the main steps in a warm restore:
1. Gather the appropriate tapes.
2. Verify your database server configuration.
3. Back up logical-log files.
4. Perform a warm restore.
Before you attempt a restore, familiarize yourself with these instructions.
Gathering the Appropriate Tapes
Gather the appropriate backup and logical-log tapes.
Backup Tapes
Before you start your restore, gather together all the tapes from your latest
level-0 backup that contain the storage spaces you are restoring and any
subsequent level-1 or level-2 backups.
Logical-Log Tapes
Gather together all the logical-log tapes from the logical-log backup after the
latest level-0 backup of the storage spaces you are restoring.
Ensuring That Needed Device Are Available
Verify that storage devices and files are available before you begin a restore.
For example, when you drop a dbspace or mirroring for a dbspace after your
level-0 backup, you must ensure that the dbspace or mirror chunk device is
Chapter 14. Restoring with ontape 14-11
available to the database server when you begin the restore. If the storage
device is not available, the database server cannot write to the chunk and the
restore fails.
When you add a chunk after your last backup, you must ensure that the
chunk device is available to the database server when it rolls forward the
logical logs.
Backing Up Logical-Log Files
Before you start a warm restore (even when you perform the warm restore as
part of a mixed restore), you must back up your logical-log files. See “Backing
Up Logical-Log Files with ontape” on page 13-12.
After the warm restore, you must roll forward your logical-log files to bring
the dbspaces that you are restoring to a state of consistency with the other
dbspaces in the system. Failure to roll forward the logical log after restoring a
selected dbspace results in the following message from ontape:
Partial system restore is incomplete.
Performing a Warm Restore
To perform a warm restore, the database server must operate in online or
quiescent mode.
You must log in as user informix or root to use ontape. To restore selected
storage spaces, execute the ontape command, with the options that the
following example shows:
ontape -r -D dbspace1 dbspace2
You cannot restore critical dbspaces during a warm restore; you must restore
them as part of a cold restore, described in “Restoring the Whole System” on
page 14-6.
During the restore, ontape prompts you to mount tapes with the appropriate
backup files.
At the end of the warm restore, the storage spaces that were down go online.
Restoring Raw Tables
When you use ontape to restore a raw table, it contains only data that existed
on disk at the time of the backup. Because raw tables are not logged, any
changes that occurred since the last backup cannot be restored. For more
information, see “Backing Up Raw Tables” on page 13-10 and the
IBM Informix: Administrator's Guide.
14-12 IBM Informix Backup and Restore Guide

Renaming Chunks During a Restore
You can rename chunks during a cold restore with ontape. This option is
useful if you need to restore storage spaces to a different disk from the one on
which the backup was made. You can rename any type of chunk, including
critical chunks and mirror chunks.
The ontape rename chunk restore only works for cold restores. The critical
dbspaces (for example, the rootdbs) must be restored during a cold restore. If
you do not specify the list of dbspaces to be restored, then the server will
restore the critical dbspaces and all the other dbspaces. But if you specify the
list of dbspaces to be restored, then the critical dbspaces must be included in
the list.
For the syntax of renaming chunks with ontape, see “Performing a Restore”
on page 14-4.
Tip: If you use symbolic links to chunk names, you might not need to rename
chunks; you need only edit the symbolic name definitions. For more
information, see the IBM Informix: Administrator's Guide.
Key Considerations
During a cold restore, ontape performs the following validations to rename
chunks:
1. It validates that the old chunk pathnames and offsets exist in the archive
reserved pages.
2. It validates that the new chunk pathnames and offsets do not overlap each
other or existing chunks.
3. If renaming the primary root or mirror root chunk, it updates the
ONCONFIG file parameters ROOTPATH and ROOTOFFSET, or
MIRRORPATH, and MIRROROFFSET. The old version of the ONCONFIG
file is saved as $ONCONFIG.localtime.
4. It restores the data from the old chunks to the new chunks (if the new
chunks exist).
5. It writes the rename information for each chunk to the online log.
If either of the validation steps fails, the renaming process stops and ontape
writes an error message to the ontape activity log.
Warning: Perform a level-0 archive after you rename chunks; otherwise your
next restore will fail.
Important: If you add a chunk after performing a level-0 archive, that chunk
cannot be renamed during a restore. Also, you cannot safely
specify that chunk as a new path in the mapping list.
Chapter 14. Restoring with ontape 14-13
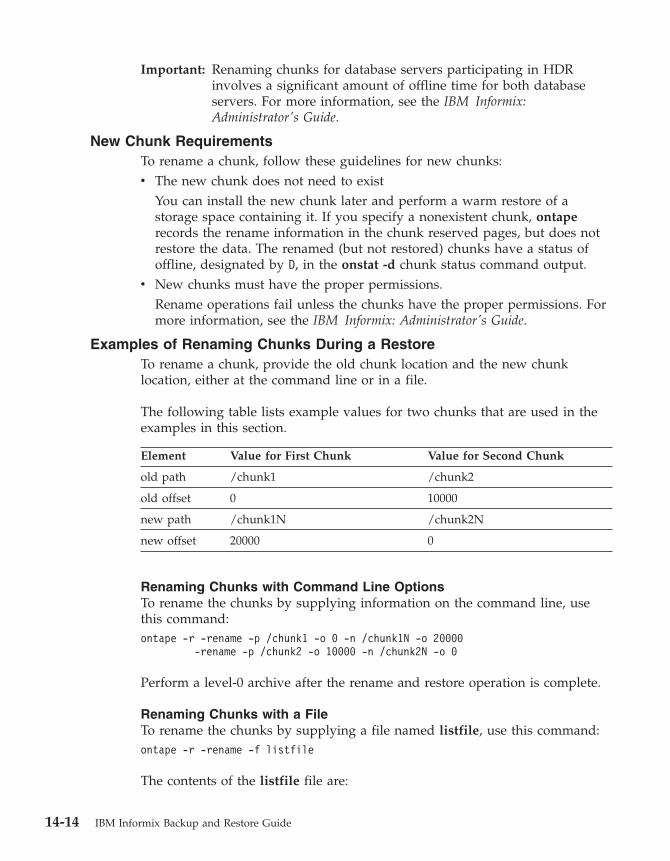
Important: Renaming chunks for database servers participating in HDR
involves a significant amount of offline time for both database
servers. For more information, see the IBM Informix:
Administrator's Guide.
New Chunk Requirements
To rename a chunk, follow these guidelines for new chunks:
v The new chunk does not need to exist
You can install the new chunk later and perform a warm restore of a
storage space containing it. If you specify a nonexistent chunk, ontape
records the rename information in the chunk reserved pages, but does not
restore the data. The renamed (but not restored) chunks have a status of
offline, designated by D, in the onstat -d chunk status command output.
v New chunks must have the proper permissions.
Rename operations fail unless the chunks have the proper permissions. For
more information, see the IBM Informix: Administrator's Guide.
Examples of Renaming Chunks During a Restore
To rename a chunk, provide the old chunk location and the new chunk
location, either at the command line or in a file.
The following table lists example values for two chunks that are used in the
examples in this section.
Element Value for First Chunk Value for Second Chunk
old path /chunk1 /chunk2
old offset 0 10000
new path /chunk1N /chunk2N
new offset 20000 0
Renaming Chunks with Command Line Options
To rename the chunks by supplying information on the command line, use
this command:
ontape -r -rename -p /chunk1 -o 0 -n /chunk1N -o 20000
-rename -p /chunk2 -o 10000 -n /chunk2N -o 0
Perform a level-0 archive after the rename and restore operation is complete.
Renaming Chunks with a File
To rename the chunks by supplying a file named listfile, use this command:
ontape -r -rename -f listfile
The contents of the listfile file are:
14-14 IBM Informix Backup and Restore Guide
/chunk1 0 /chunk1N 20000
/chunk2 10000 /chunk2N 0
Perform a level-0 archive after the rename and restore operation is complete.
Renaming Chunks While Specifying Other Options
To rename the chunks using command-line options while performing a restore
of dbspace1 and dbspace2 where the rootdbs is the rootdbs, use the following
command:
ontape -r -rename -p /chunk1 -o 0 -n /chunk1N -o 20000
-rename -p /chunk2 -o 10000 -n /chunk2N -o 0
-D rootdbs dbspace1 dbspace2
Alternatively, to rename the chunks using file while performing a restore of
dbspace1 and dbspace2, use the following command:
ontape -r -rename -f listfile -D rootdbs dbspace1 dbspace2
Perform a level-0 archive after the rename and restore operation is complete.
Renaming a Chunk to a Nonexistent Device
To rename a chunk to a device that does not yet exist, you specify the new
path name, but you do not restore its storage spaces until after you install the
physical device. This option is useful if you need to rename a chunk and it is
convenient to perform a cold restore before you install the new device. When
the new chunk device is ready, you can perform a warm restore of a storage
space onto it.
You can combine renaming chunks with existing devices and renaming
chunks with nonexistent devices in the same rename operation. This example
shows how to rename a single chunk to a nonexistent device name.
The following table lists example values for the chunks used in this example.
Storage Space Old Chunk Path Old Offset New Chunk Path New Offset
sbspace1 /chunk3 0 /chunk3N 0
To rename a chunk to a nonexistent device:
1. Rename the chunk:
ontape -r -rename -p /chunk3 -o 0 -n /chunk3N -o 0
2. When the following prompt appears, enter y to continue:
The chunk /chunk3N does not exist. If you continue, the restore
may fail later for the dbspace which contains this chunk.
Continue without creating this chunk? (y/n)
Chapter 14. Restoring with ontape 14-15
The chunk /chunk3 is renamed to /chunk3N, but the data has not yet been
restored to /chunk3N.
3. Perform a level-0 archive.
4. Add the physical device for /chunk3N.
5. Perform a warm restore of sbspace1:
ontape -r -D sbspace1
6. Perform a level-0 archive.
Restoring from Standard Input
To perform a restore from standard input, you must first have performed a
backup to standard output. For more information, see “Preparing to Back Up
to Standard Output” on page 13-7.
When you perform a restore from standard input, ontape does not prompt
you for options or information. If ontape cannot perform the operation with
the information you provided in the restore command, ontape exits with an
appropriate error. Restoring from standard input differs from restoring from
tapes in the following ways:
v No logical restore or logical log salvage occurs.
To perform a logical restore, use the ontape -l command after the physical
restore.
To salvage logical logs, use the ontape -S command prior to the physical
restore.
v You are not prompted to confirm the restore. Informational messages about
the archive are sent to stderr.
If you detect a problem, you can interrupt the restore during the 10 second
delay between the completion of the archive information and starting the
database server.
In the following example, ontape performs a physical restore from the file
level_0_archive, which contains the archive previously performed to standard
output:
cat /home/level_0_archive | ontape -p
In the following example, ontape performs a restore of a level-0 archive,
followed by a restore of a level-1 archive:
cat /home/level_0_archive /home/level_1_archive | ontape -r
When these restores are completed, the database server is left in single-user
mode.
14-16 IBM Informix Backup and Restore Guide
Simultaneous Backup and Restore Using Standard I/O
To clone a database server or quickly set up High-Availability Data
Replication (HDR), you can perform a simultaneous backup to standard
output and restore from standard input. If you perform the backup and
restore solely to duplicate a database server, use the -F option to prevent the
archive from being saved.
For example, the following command loads data into the secondary server of
an HDR pair (named secondary_host):
ontape -s -L 0 -F| rsh secondary_host "ontape -p"
This command performs a fake level-0 archive of the database server on the
local computer, pipes the data to the remote computer using the rsh system
utility, and performs a physical restore on the remote computer by reading the
data directly from the pipe.
Note: The previous example requires that the INFORMIXDIR,
INFORMIXSERVER, INFORMIXSQLHOSTS, and ONCONFIG
environment variables are set in the default environment for the user
on the remote computer on which the command is executed. The user
must be informix or root.
Chapter 14. Restoring with ontape 14-17

14-18 IBM Informix Backup and Restore Guide
Chapter 15. Performing an External Backup and Restore
Using ontape
Recovering Data Using an External Backup and Restore . . . . . . . . . . . . . . . 15-1
What Is Backed Up in an External Backup? . . . . . . . . . . . . . . . . . . . . 15-2
Rules for an External Backup . . . . . . . . . . . . . . . . . . . . . . . 15-2
Performing an External Backup . . . . . . . . . . . . . . . . . . . . . . . 15-3
Preparing for an External Backup . . . . . . . . . . . . . . . . . . . . . . . 15-3
Blocking and Unblocking Dynamic Server . . . . . . . . . . . . . . . . . . . 15-3
Tracking an External Backup . . . . . . . . . . . . . . . . . . . . . . . . 15-4
What Is Restored in an External Restore? . . . . . . . . . . . . . . . . . . . . 15-4
Using External Restore Commands . . . . . . . . . . . . . . . . . . . . . 15-5
Rules for an External Restore . . . . . . . . . . . . . . . . . . . . . . . 15-5
Performing an External Restore . . . . . . . . . . . . . . . . . . . . . . . 15-6
Cold External Restore Procedure . . . . . . . . . . . . . . . . . . . . . 15-6
Example of External Restore Commands . . . . . . . . . . . . . . . . . . . 15-6
Initializing HDR with an External Backup and Restore . . . . . . . . . . . . . . . 15-7
In This Chapter
This chapter discusses recovering data using external backup and restore
using the ontape utility.
Recovering Data Using an External Backup and Restore
An external backup and restore eliminates the downtime of systems because
the backup and restore operations are performed external to the Informix
system. The ontape utility does not move the data during the backup or
physical restore. An external backup allows you to copy disks that contain
storage-space chunks without using ontape. When disks fail, replace them and
use third-party software to restore the data, then use ontape for the logical
restore. For more information, see “What Is Restored in an External Restore?”
on page 15-4.
The following are typical scenarios for external backup and restore:
v Availability with disk mirroring. If you use hardware disk mirroring, you can
get your system online faster with external backup and restore than with
conventional ontape commands.
v Cloning. You can use external backup and restore to clone an existing
production system for testing or migration without disturbing the
production system.
© Copyright IBM Corp. 1996, 2004 15-1
What Is Backed Up in an External Backup?
Before you begin an external backup, block the database server. Blocking
forces a checkpoint, flushes buffers to disk, and blocks user transactions that
involve temporary tables. During the blocking operation, users can access that
database server in read-only mode. Then you can physically back up or copy
the data to another set of disks or storage media using operating-system or
third-party tools. When you complete the external backup, unblock the
database server so that transactions can resume. You should include all the
chunk files in each storage space and administrative files, such as
ONCONFIG, in an external backup.
Important: To make tracking backups easier, it is recommended that you back
up all storage spaces in each external backup.
The ontape utility treats an external backup as equivalent to a level-0 backup.
You cannot perform an external backup and then use ontape to perform a
level-1 backup, or vice versa because ontape does not have any record of the
external backup. For more information, see “Performing an External Restore”
on page 15-6.
Rules for an External Backup
Before you begin an external backup, keep the following rules in mind:
v The database server must be online or quiescent during an external backup.
v Use ontape to back up all logical logs including the current log so that you
can restore the logical logs at the end of the external restore.
v Suspend continuous logical-log backups before you block the database
server for an external backup. After the external backup is complete,
resume the continuous logical-log backup.
v Wait until all ontape backup sessions have completed before you block the
database server. If any backup sessions are active, the block command
displays an error message.
v Any OLTP work or queries are suspended while the database server is
blocked. They resume after the database server is unblocked.
v All critical dbspaces of the database server instance must be backed up
together simultaneously within the same command bracket of onmode -c
block ... onmode -c unblock. Backups of different critical dbspaces done at
different times cannot be restored to a consistent system.
Important: Because the external backup is outside the control of ontape, you
must track these backups manually. For more information, see
“Tracking an External Backup” on page 7-12.
15-2 IBM Informix Backup and Restore Guide
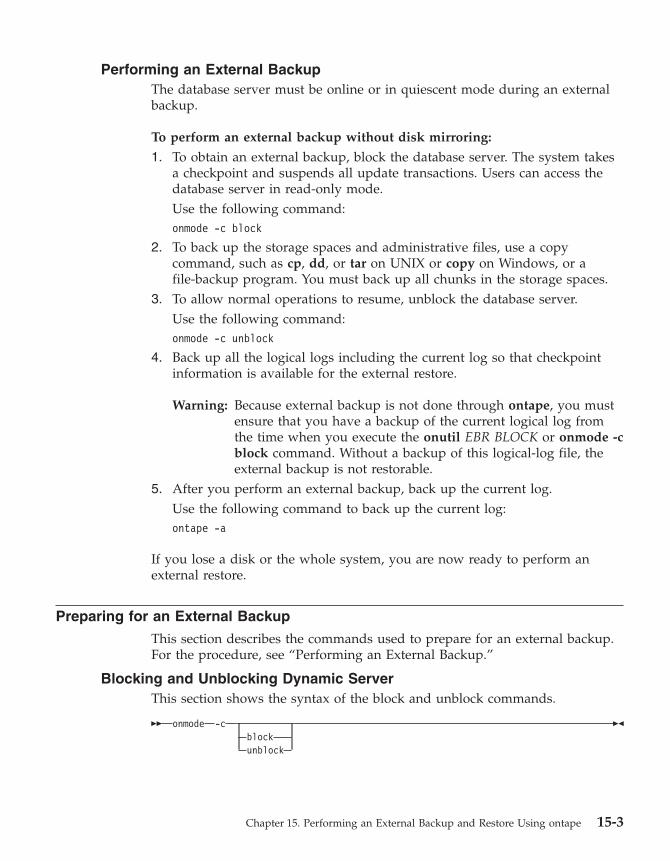
Performing an External Backup
The database server must be online or in quiescent mode during an external
backup.
To perform an external backup without disk mirroring:
1. To obtain an external backup, block the database server. The system takes
a checkpoint and suspends all update transactions. Users can access the
database server in read-only mode.
Use the following command:
onmode -c block
2. To back up the storage spaces and administrative files, use a copy
command, such as cp, dd, or tar on UNIX or copy on Windows, or a
file-backup program. You must back up all chunks in the storage spaces.
3. To allow normal operations to resume, unblock the database server.
Use the following command:
onmode -c unblock
4. Back up all the logical logs including the current log so that checkpoint
information is available for the external restore.
Warning: Because external backup is not done through ontape, you must
ensure that you have a backup of the current logical log from
the time when you execute the onutil EBR BLOCK or onmode -c
block command. Without a backup of this logical-log file, the
external backup is not restorable.
5. After you perform an external backup, back up the current log.
Use the following command to back up the current log:
ontape -a
If you lose a disk or the whole system, you are now ready to perform an
external restore.
Preparing for an External Backup
This section describes the commands used to prepare for an external backup.
For the procedure, see “Performing an External Backup.”
Blocking and Unblocking Dynamic Server
This section shows the syntax of the block and unblock commands.
�� onmode -c
block
unblock
��
Chapter 15. Performing an External Backup and Restore Using ontape 15-3
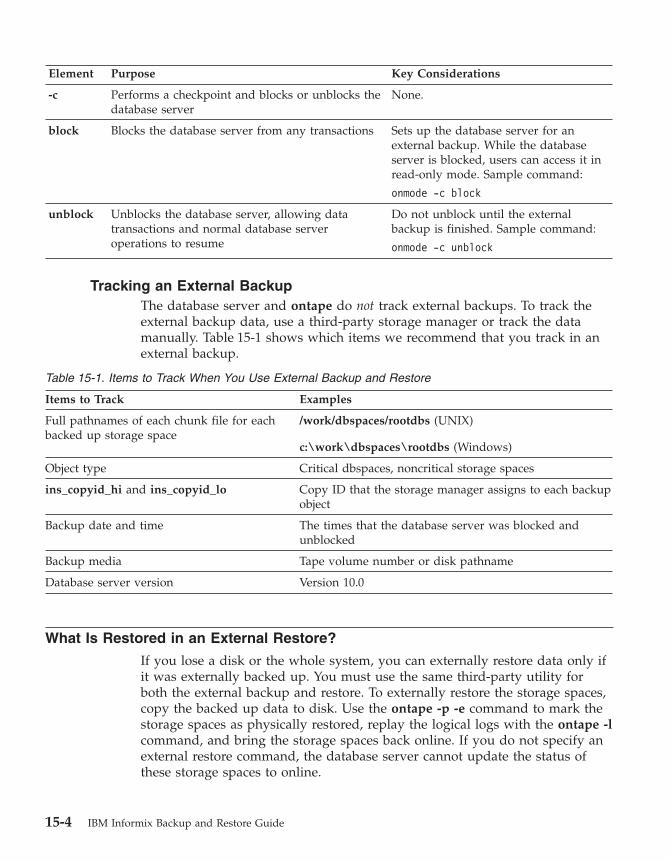
Element Purpose Key Considerations
-c Performs a checkpoint and blocks or unblocks the
database server
None.
block Blocks the database server from any transactions Sets up the database server for an
external backup. While the database
server is blocked, users can access it in
read-only mode. Sample command:
onmode -c block
unblock Unblocks the database server, allowing data
transactions and normal database server
operations to resume
Do not unblock until the external
backup is finished. Sample command:
onmode -c unblock
Tracking an External Backup
The database server and ontape do not track external backups. To track the
external backup data, use a third-party storage manager or track the data
manually. Table 15-1 shows which items we recommend that you track in an
external backup.
Table 15-1. Items to Track When You Use External Backup and Restore
Items to Track Examples
Full pathnames of each chunk file for each
backed up storage space
/work/dbspaces/rootdbs (UNIX)
c:\work\dbspaces\rootdbs (Windows)
Object type Critical dbspaces, noncritical storage spaces
ins_copyid_hi and ins_copyid_lo Copy ID that the storage manager assigns to each backup
object
Backup date and time The times that the database server was blocked and
unblocked
Backup media Tape volume number or disk pathname
Database server version Version 10.0
What Is Restored in an External Restore?
If you lose a disk or the whole system, you can externally restore data only if
it was externally backed up. You must use the same third-party utility for
both the external backup and restore. To externally restore the storage spaces,
copy the backed up data to disk. Use the ontape -p -e command to mark the
storage spaces as physically restored, replay the logical logs with the ontape -l
command, and bring the storage spaces back online. If you do not specify an
external restore command, the database server cannot update the status of
these storage spaces to online.
15-4 IBM Informix Backup and Restore Guide
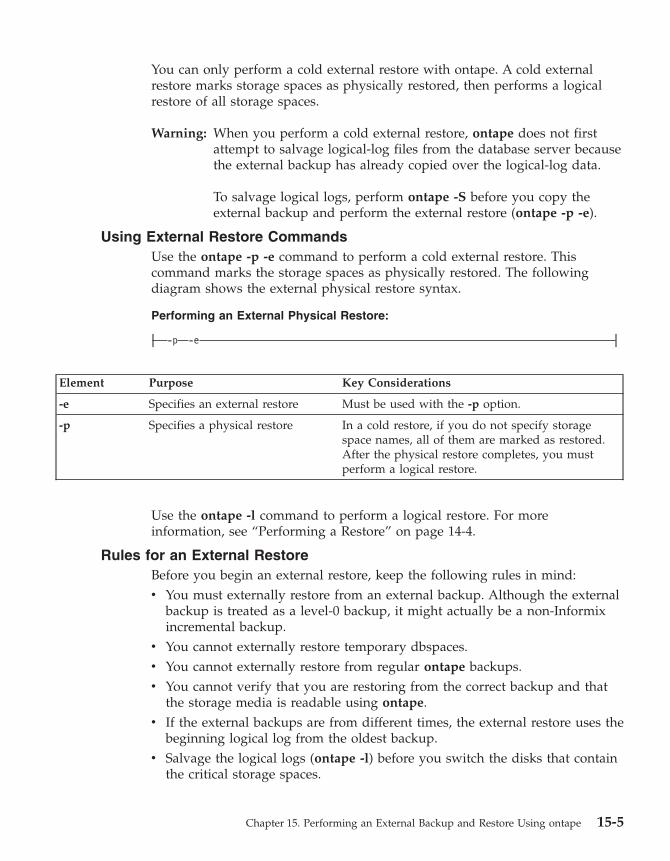
You can only perform a cold external restore with ontape. A cold external
restore marks storage spaces as physically restored, then performs a logical
restore of all storage spaces.
Warning: When you perform a cold external restore, ontape does not first
attempt to salvage logical-log files from the database server because
the external backup has already copied over the logical-log data.
To salvage logical logs, perform ontape -S before you copy the
external backup and perform the external restore (ontape -p -e).
Using External Restore Commands
Use the ontape -p -e command to perform a cold external restore. This
command marks the storage spaces as physically restored. The following
diagram shows the external physical restore syntax.
Performing an External Physical Restore:
-p -e
Element Purpose Key Considerations
-e Specifies an external restore Must be used with the -p option.
-p Specifies a physical restore In a cold restore, if you do not specify storage
space names, all of them are marked as restored.
After the physical restore completes, you must
perform a logical restore.
Use the ontape -l command to perform a logical restore. For more
information, see “Performing a Restore” on page 14-4.
Rules for an External Restore
Before you begin an external restore, keep the following rules in mind:
v You must externally restore from an external backup. Although the external
backup is treated as a level-0 backup, it might actually be a non-Informix
incremental backup.
v You cannot externally restore temporary dbspaces.
v You cannot externally restore from regular ontape backups.
v You cannot verify that you are restoring from the correct backup and that
the storage media is readable using ontape.
v If the external backups are from different times, the external restore uses the
beginning logical log from the oldest backup.
v Salvage the logical logs (ontape -l) before you switch the disks that contain
the critical storage spaces.
Chapter 15. Performing an External Backup and Restore Using ontape 15-5
v If you are restoring critical dbspaces, the database server must be offline.
v If you are restoring the rootdbs, disable mirroring during the restore.
v The external backups of all critical dbspaces of the database server instance
must have been simultaneous. All critical dbspaces must have been backed
up within the same onmode -c block ... onmode -c unblock command
bracket.
Performing an External Restore
This section describes procedures for performing cold external restores.
Cold External Restore Procedure
If you specify the ontape -p -e command in a cold restore, you must restore
all storage spaces. Use the ontape -p -e command to restore all or specific
storage spaces.
To perform a cold external restore:
1. Shut down the database server.
To shut down the database server, use the onmode -ky command.
2. To restore the storage spaces from an external backup, use a copy
command, such as cp, dd, or tar on UNIX or a file-backup program.
You must restore the storage spaces to the same path as the original data
and include all the chunk files.
3. To perform an external restore of all storage spaces followed by a logical
restore, use the following commands:
ontape -p -e
ontape -l
To perform a physical external restore of specific storage spaces, followed
by a logical restore, use these commands:
ontape -p -e rootdbs
ontape -p -e critical_space1
ontape -p -e other_dbspaces
ontape -l
This step brings the database server to fast-recovery mode. The ontape
utility and the database server roll forward the logical logs and bring the
storage spaces online.
Example of External Restore Commands
The following table contains an example of external restore commands.
Action External Restore Command Comments
Physical external restore and
logical restore
ontape -p -e
ontape -l
The system restores the logical logs from
the oldest external backup.
15-6 IBM Informix Backup and Restore Guide
Initializing HDR with an External Backup and Restore
You can use external backups to initialize High-Availability Data Replication
(HDR).
To initialize HDR with an external backup and restore:
1. Block the source database server with the following command:
onmode -c block
2. Externally back up all chunks on the source database server.
3. When the backup completes, unblock the source database server:
onmode -c unblock
4. Make the source database server the primary server:
onmode -d primary secondary_servername
5. On the target database server, restore the data from the external backup
with a copy or file-backup program.
6. On the target database server, restore the external backup of all chunks:
ontape -p -e
7. Make the target database server the secondary server:
onmode -d secondary primary_servername
8. If the logical-log records written to the primary database server since step
1 still reside on the primary database server disk, the secondary database
server reads these records to perform the logical recovery. Otherwise,
perform the logical recovery:
ontape -l
The database server operational messages appear in the message log on
the primary and secondary servers.
Chapter 15. Performing an External Backup and Restore Using ontape 15-7

15-8 IBM Informix Backup and Restore Guide

Part 4. Other Data Restore Utilities
© Copyright IBM Corp. 1996, 2004

IBM Informix Backup and Restore Guide
Chapter 16. Restoring Table-level Data
Overview of archecker . . . . . . . . . . . . . . . . . . . . . . . . . . . 16-2
The archecker Configuration File . . . . . . . . . . . . . . . . . . . . . . 16-3
The archecker Schema Command File . . . . . . . . . . . . . . . . . . . . 16-3
Restoring Data . . . . . . . . . . . . . . . . . . . . . . . . . . . . . 16-4
Physical Restore . . . . . . . . . . . . . . . . . . . . . . . . . . . . 16-4
Logical Restore . . . . . . . . . . . . . . . . . . . . . . . . . . . . 16-5
The Stager . . . . . . . . . . . . . . . . . . . . . . . . . . . . . 16-5
The Applier . . . . . . . . . . . . . . . . . . . . . . . . . . . . 16-5
Considerations . . . . . . . . . . . . . . . . . . . . . . . . . . . 16-6
Using the archecker Utility to Restore Data . . . . . . . . . . . . . . . . . . . . 16-6
Syntax . . . . . . . . . . . . . . . . . . . . . . . . . . . . . . . 16-6
Examples . . . . . . . . . . . . . . . . . . . . . . . . . . . . . . 16-8
Manually Controlling a Logical Restore . . . . . . . . . . . . . . . . . . . 16-8
Performing a Restore with Multiple Storage Managers (XPS) . . . . . . . . . . . . 16-9
Performing a Parallel Restore . . . . . . . . . . . . . . . . . . . . . . 16-9
The archecker Schema Reference . . . . . . . . . . . . . . . . . . . . . . . 16-10
The CREATE TABLE Statement . . . . . . . . . . . . . . . . . . . . . . 16-10
Syntax . . . . . . . . . . . . . . . . . . . . . . . . . . . . . . 16-10
Usage . . . . . . . . . . . . . . . . . . . . . . . . . . . . . . 16-10
Examples . . . . . . . . . . . . . . . . . . . . . . . . . . . . . 16-11
The CREATE EXTERNAL TABLE Statement . . . . . . . . . . . . . . . . . . 16-11
Syntax . . . . . . . . . . . . . . . . . . . . . . . . . . . . . . 16-11
Usage . . . . . . . . . . . . . . . . . . . . . . . . . . . . . . 16-12
The DATABASE Statement . . . . . . . . . . . . . . . . . . . . . . . . 16-12
Syntax . . . . . . . . . . . . . . . . . . . . . . . . . . . . . . 16-12
Usage . . . . . . . . . . . . . . . . . . . . . . . . . . . . . . 16-12
Examples . . . . . . . . . . . . . . . . . . . . . . . . . . . . . 16-13
The INSERT Statement . . . . . . . . . . . . . . . . . . . . . . . . . 16-13
Syntax . . . . . . . . . . . . . . . . . . . . . . . . . . . . . . 16-13
Examples . . . . . . . . . . . . . . . . . . . . . . . . . . . . . 16-14
The RESTORE Statement . . . . . . . . . . . . . . . . . . . . . . . . 16-14
Syntax . . . . . . . . . . . . . . . . . . . . . . . . . . . . . . 16-15
Usage . . . . . . . . . . . . . . . . . . . . . . . . . . . . . . 16-15
Example . . . . . . . . . . . . . . . . . . . . . . . . . . . . . 16-15
The SET Statement . . . . . . . . . . . . . . . . . . . . . . . . . . 16-15
Syntax . . . . . . . . . . . . . . . . . . . . . . . . . . . . . . 16-15
Examples . . . . . . . . . . . . . . . . . . . . . . . . . . . . . 16-16
SQL Comments . . . . . . . . . . . . . . . . . . . . . . . . . . . . 16-16
Schema Command File Examples . . . . . . . . . . . . . . . . . . . . . . 16-16
Simple Schema Command File . . . . . . . . . . . . . . . . . . . . . 16-16
Restoring a Table From a Previous Backup . . . . . . . . . . . . . . . . . 16-16
Restoring to a Different Table . . . . . . . . . . . . . . . . . . . . . . 16-17
Extracting a Subset of Columns . . . . . . . . . . . . . . . . . . . . . 16-17
Using Data Filtering . . . . . . . . . . . . . . . . . . . . . . . . . 16-17
© Copyright IBM Corp. 1996, 2004 16-1
Restoring to an External Table . . . . . . . . . . . . . . . . . . . . . . 16-18
Restoring Multiple Tables . . . . . . . . . . . . . . . . . . . . . . . 16-18
Performing a Distributed Restore . . . . . . . . . . . . . . . . . . . . . 16-18
The archecker Configuration Parameter Reference . . . . . . . . . . . . . . . . . 16-19
AC_DEBUG . . . . . . . . . . . . . . . . . . . . . . . . . . . . . 16-20
AC_IXBAR . . . . . . . . . . . . . . . . . . . . . . . . . . . . . 16-20
AC_LTAPEBLOCK . . . . . . . . . . . . . . . . . . . . . . . . . . 16-20
AC_LTAPEDEV (IDS) . . . . . . . . . . . . . . . . . . . . . . . . . . 16-21
AC_MSGPATH . . . . . . . . . . . . . . . . . . . . . . . . . . . . 16-21
AC_PAGESIZE (XPS) . . . . . . . . . . . . . . . . . . . . . . . . . . 16-21
AC_SCHEMA . . . . . . . . . . . . . . . . . . . . . . . . . . . . 16-21
AC_STORAGE . . . . . . . . . . . . . . . . . . . . . . . . . . . . 16-21
AC_TAPEBLOCK . . . . . . . . . . . . . . . . . . . . . . . . . . . 16-22
AC_TAPEDEV (IDS) . . . . . . . . . . . . . . . . . . . . . . . . . . 16-22
AC_VERBOSE . . . . . . . . . . . . . . . . . . . . . . . . . . . . 16-22
In This Chapter
This chapter describes how to use the archecker utility to perform
point-in-time table-level restores that extract tables or portion of tables from
archives and logical logs. For information on using the archecker utility to
verify backups, see Chapter 5, “Verifying Backups,” on page 5-1.
The archecker utility restores tables by specifying the source table to be
extracted, the destination table where the data is placed, and an INSERT
statement that links the two tables.
Overview of archecker
IBM Informix servers provide several utilities for recovering data from an
archive. Which utility you should use depends on the situation.
The archecker utility is useful where portions of a database, a table, a portion
of a table, or a set of tables need to be recovered. It is also useful in situations
where tables need to be moved across server versions or platforms.
Use archecker in the following situations:
v Restore data
You can use the archecker utility to restore a specific table or set of tables
that have previously been backed up with ON-Bar or ontape. These tables
can be restored to a specific point in time. This is useful, for example, to
restore a table that has accidentally been dropped.
v Copy data
The archecker utility can also be used as a method of copying data. For
example, you can move a table from the production system to another
system.
16-2 IBM Informix Backup and Restore Guide
The archecker utility is more efficient than other mechanisms for copying
data. Because archecker extracts data as text, it can copy data between
platforms or server versions.
v Migrate data
You can also use the archecker utility as a migration tool to move a table to
other IBM Informix servers.
The archecker utility is designed to recover specific tables or sets of tables;
therefore, use ON-Bar or ontape in the following data recovery scenarios:
v Full system restore
v Recovery from disk failure
To configure the behavior of the archecker utility, use the archecker
configuration file. To define the schema of the data that archecker recovers,
use the archecker schema command file. These files are described in the
following sections.
Note: You cannot use a shared memory connection when performing a
table-level restore.
The archecker Configuration File
The archecker utility uses a configuration file to set certain parameters. Set
the AC_CONFIG environment variable to the full pathname of the archecker
configuration file. By default, the AC_CONFIG environment variable is set to
$INFORMIXDIR/etc/ac_config.std. If you set AC_CONFIG to a user-defined
file, you must specify the entire path including the filename.
For information on the configuration parameters used in this file, see “The
archecker Configuration Parameter Reference” on page 16-19 later in this
chapter.
The archecker Schema Command File
The archecker utility uses a schema command file to specify the following:
v Source tables
v Destination tables
v Table schemas
v Databases
v External tables
v Point in time the table is restored to
v Other options
This file uses an SQL-like language to provide information archecker uses to
perform data recovery. For complete information on the supported statements
and syntax, see “The archecker Schema Reference” on page 16-10.
Chapter 16. Restoring Table-level Data 16-3
There are two methods to set the schema command file:
v Set the AC_SCHEMA configuration parameter in the archecker
configuration file. For more information, see “AC_SCHEMA” on page
16-21.
v Use the -f cmdname command line option. For more information, see
“Syntax” on page 16-6.
If both methods are specified, the -f command line option takes precedence.
Restoring Data
There are two types of restores that archecker performs:
v A physical restore which is based on a level-0 archive.
v A physical restore followed by a logical restore which uses both a level-0
archive and logical logs to restore data to a specific point in time.
When reading the command file, archecker determines whether to perform a
physical restore only or a physical restore followed by a logical restore. By
default, archecker performs a physical and logical restore. If you use the
WITH NO LOG clause, archecker does not perform a logical restore.
The procedures and resources that archecker uses differ between a
physical-only restore and a physical and logical restore. These procedures are
outlined in the following sections.
Physical Restore
In a physical restore, data is extracted from a level-0 archive. When
performing a physical restore, archecker performs the following tasks:
v Reads the schema command file to determine the following:
– The source tables
– The destination tables
– The schema of all tables
– The dbspace names of where tables are located
– The specific archive to extract data fromv Scans the archive for pages belonging to the tables being restored
v Processes each row from the data page and determines if the row is
complete or partial.
If the row is a partial row, then archecker determines if the remaining
portion of the row has been staged, and if not, it stages the row for later
processing.
v For a physical-only restore, applies filters to the row and rejects rows that
are not required.
16-4 IBM Informix Backup and Restore Guide
v Inserts the row into the destination table.
Logical Restore
Following the physical restore, logical recovery can further restore tables to a
user-specified point in time. To do this, the archecker utility reads backed-up
logical logs, converts them to SQL statements, and then replays these
statements to restore data. The archecker utility cannot replay transactions
from the current log. Before performing a logical recovery, ensure that all
transactions you want to restore are contained in backed-up logical logs.
When performing a logical restore, archecker uses two processes that run
simultaneously:
v Stager: assembles the logical logs and saves them in tables.
v Applier: converts the log records to SQL statements and executes the
statements.
The Stager
To collect the pertinent logical log records, the stager performs the following
steps:
1. Scans only the backed-up logical logs.
The stager reads the backed-up logical log files and assembles complete
log records.
2. Tests the logical log records
Any log record that is not applicable to the tables being restored is
rejected.
3. Inserts the logical log information into a table
If the logical log record is not rejected, it is inserted into a stage table.
The Applier
The applier reads data from the control table created by the stager. It begins
processing the required transaction and updates the control table to show that
this transaction is in process. Next, it operates on each successive log record,
row by row, until the transaction commits.
All updates to the control table occur in the same transaction as the log record
modification. This allows all work to be completed or undone as a single unit,
maintaining integrity at all times. If an error occurs, the transaction is rolled
back and the error is recorded in the control table entry for this transaction.
Note: When data is being restored and the DBA has elected to include a
logical restore, two additional work columns and an index are added to
the destination table. These columns contain the original rowid and
original part number. These columns provide a unique key which
identifies the location of the row on the original source archive. To
Chapter 16. Restoring Table-level Data 16-5
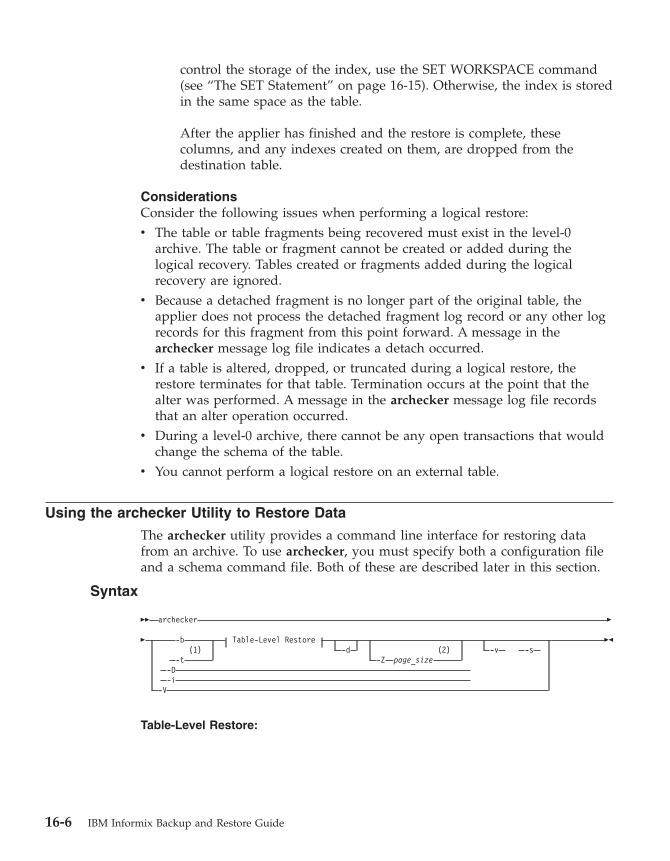
control the storage of the index, use the SET WORKSPACE command
(see “The SET Statement” on page 16-15). Otherwise, the index is stored
in the same space as the table.
After the applier has finished and the restore is complete, these
columns, and any indexes created on them, are dropped from the
destination table.
Considerations
Consider the following issues when performing a logical restore:
v The table or table fragments being recovered must exist in the level-0
archive. The table or fragment cannot be created or added during the
logical recovery. Tables created or fragments added during the logical
recovery are ignored.
v Because a detached fragment is no longer part of the original table, the
applier does not process the detached fragment log record or any other log
records for this fragment from this point forward. A message in the
archecker message log file indicates a detach occurred.
v If a table is altered, dropped, or truncated during a logical restore, the
restore terminates for that table. Termination occurs at the point that the
alter was performed. A message in the archecker message log file records
that an alter operation occurred.
v During a level-0 archive, there cannot be any open transactions that would
change the schema of the table.
v You cannot perform a logical restore on an external table.
Using the archecker Utility to Restore Data
The archecker utility provides a command line interface for restoring data
from an archive. To use archecker, you must specify both a configuration file
and a schema command file. Both of these are described later in this section.
Syntax
�� archecker �
� -b Table-Level Restore
(1)
-d
(2)
-v
-s
-t
-Z
page_size
-D
-i
-V
��
Table-Level Restore:
16-6 IBM Informix Backup and Restore Guide
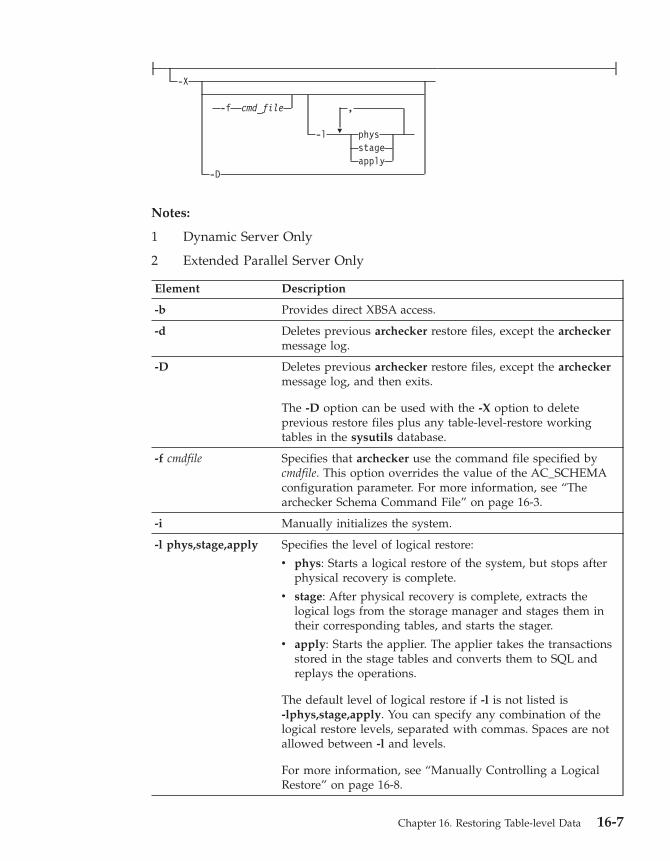
�
-X
-f
cmd_file
,
-l
phys
stage
apply
-D
Notes:
1 Dynamic Server Only
2 Extended Parallel Server Only
Element Description
-b Provides direct XBSA access.
-d Deletes previous archecker restore files, except the archecker
message log.
-D Deletes previous archecker restore files, except the archecker
message log, and then exits.
The -D option can be used with the -X option to delete
previous restore files plus any table-level-restore working
tables in the sysutils database.
-f cmdfile Specifies that archecker use the command file specified by
cmdfile. This option overrides the value of the AC_SCHEMA
configuration parameter. For more information, see “The
archecker Schema Command File” on page 16-3.
-i Manually initializes the system.
-l phys,stage,apply Specifies the level of logical restore:
v phys: Starts a logical restore of the system, but stops after
physical recovery is complete.
v stage: After physical recovery is complete, extracts the
logical logs from the storage manager and stages them in
their corresponding tables, and starts the stager.
v apply: Starts the applier. The applier takes the transactions
stored in the stage tables and converts them to SQL and
replays the operations.
The default level of logical restore if -l is not listed is
-lphys,stage,apply. You can specify any combination of the
logical restore levels, separated with commas. Spaces are not
allowed between -l and levels.
For more information, see “Manually Controlling a Logical
Restore” on page 16-8.
Chapter 16. Restoring Table-level Data 16-7

Element Description
-s Prints a status message to the screen.
-t Specifies ontape as the backup utility for Dynamic Server
only.
-v Specifies verbose mode.
-V Displays archecker version information.
-X Specifies a table-level restore.
-Z page_size Specifies the page size used by the database server: 2, 4, or 8.
This option overrides the value of the AC_PAGESIZE
configuration parameter. For more information, see
“AC_PAGESIZE (XPS)” on page 16-21.
Examples
The following sections illustrate how to use archecker commands.
Manually Controlling a Logical Restore
You can manually control the stager and applier using the -l command line
option. For Extended Parallel Server, manual control is required when you
have multiple storage managers that contain logical logs.
The following examples show how to perform a logical restore. In all
examples, the name of the schema command file is cmdfile.
The following example is a typical usage:
archecker -bvs -f cmdfile
This command is equivalent to the following command:
archecker -bvs -f cmdfile -lphys,stage,apply
After the physical restore is complete, the archecker utility starts the stager.
After the stager has started, the applier is automatically started.
In the following example, the -lphys option performs a physical-only restore:
archecker -bvs -f cmdfile -lphys
In the following example, the -lstage option starts the archecker stager. The
stager extracts the logical log records from the storage manager and saves the
applicable records to a table.
archecker -bvs -f cmdfile -lstage
The stager should only be started after physical recovery has completed.
16-8 IBM Informix Backup and Restore Guide
In the following example, the -lapply option starts the archecker applier. It
looks in the acu_control table for the transaction to recover. The applier
should only be started after the stager has been started.
archecker -bvs -f cmdfile -lapply
Performing a Restore with Multiple Storage Managers (XPS)
If you use multiple storage managers, you can perform a table level restore
with archecker by configuring archecker on every node.
To perform a table-level restore that involves multiple storage managers:
1. Create an archecker configuration file on every node.
2. Create a schema command file on every node.
3. Remove old restores by executing the following command on a single
node:
archecker -DX
4. Start the physical restore by executing the following command on each
node:
archecker -bX -lphys
Do not use the -d option.
5. After the physical restore completes, start the logical restore by executing
the following command on each node that contains logical log records:
archecker -bX -lstage
Do not use the -d option.
6. After starting all stagers, complete the restore by executing the following
command on a single node:
archecker -bX -lapply
Performing a Parallel Restore
If you have a fragmented table that resides in separate dbspaces, you can
perform a physical table-level restore in parallel by executing multiple
archecker commands with different schema command files for each dbspace.
In this example, the table is fragmented across three dbspaces. The
corresponding schema command files are named cmdfile1, cmdfile2,
cmdfile3. The following commands delete previous restores and then perform
physical restores on each dbspace in parallel:
archecker -DX
archecker -bvs -f cmdfile1 -lphys
archecker -bvs -f cmdfile2 -lphys
archecker -bvs -f cmdfile3 -lphys
You cannot perform a logical restore in parallel.
Chapter 16. Restoring Table-level Data 16-9
The archecker Schema Reference
This section provides a complete description of the command statements
supported by the archecker schema command file. Use this file to specify the
source and destination tables and to define the table schema.
For more information on specifying which command file archecker uses, see
“The archecker Schema Command File” on page 16-3.
The following are statements supported by archecker:
v CREATE TABLE
v DATABASE
v INSERT INTO
v RESTORE
v SET
The syntax of these statements is described in the following sections.
The CREATE TABLE Statement
The CREATE TABLE statement describes the schema of the source and target
tables. If the target table is external, use the CREATE EXTERNAL TABLE
statement described in the section “The CREATE EXTERNAL TABLE
Statement” on page 16-11.
Syntax
The syntax of the CREATE TABLE used in the archecker schema command
file is identical to the corresponding IBM Informix SQL statement. For a
description of this syntax, see the IBM Informix Guide to SQL: Syntax.
Usage
You must include the schema for the source table in the archecker schema
command file. This schema must be identical to the schema of the source table
at the time the archive was created.
Note: The source table’s schema is not validated by archecker. Failing to
provide an accurate schema will lead to unpredictable results.
The source table cannot be a synonym or view. The schema of the source table
only needs the column list and storage options. Other attributes such as extent
sizes, lock modes, and so on are ignored. For an ON-Bar archive, archecker
uses the list of storage spaces for the source table to create its list of objects to
retrieve from the storage manager. If the source table is fragmented, you must
list all dbspaces that contain data for the source table. The archecker utility
only extracts data from the dbspaces listed in the schema command file.
16-10 IBM Informix Backup and Restore Guide
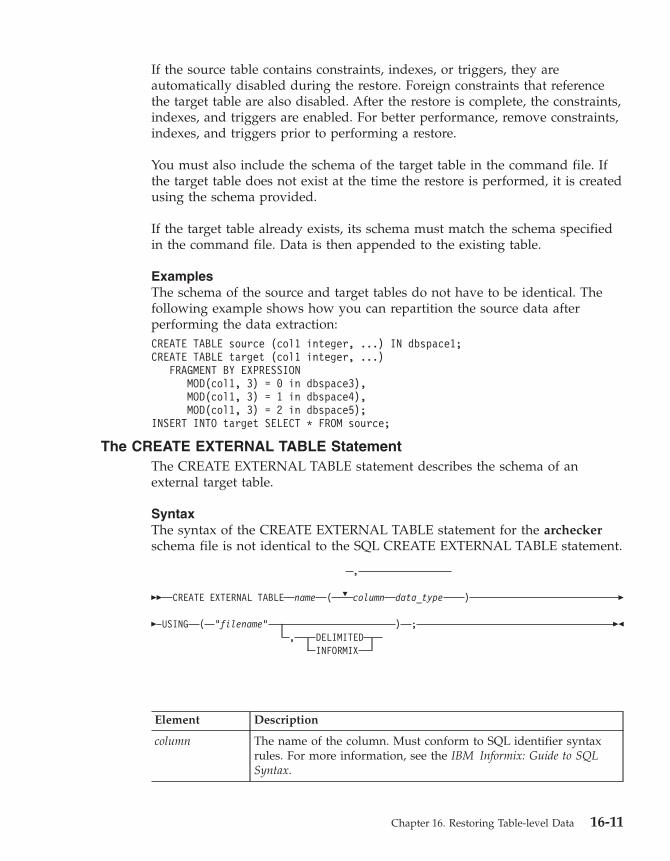
If the source table contains constraints, indexes, or triggers, they are
automatically disabled during the restore. Foreign constraints that reference
the target table are also disabled. After the restore is complete, the constraints,
indexes, and triggers are enabled. For better performance, remove constraints,
indexes, and triggers prior to performing a restore.
You must also include the schema of the target table in the command file. If
the target table does not exist at the time the restore is performed, it is created
using the schema provided.
If the target table already exists, its schema must match the schema specified
in the command file. Data is then appended to the existing table.
Examples
The schema of the source and target tables do not have to be identical. The
following example shows how you can repartition the source data after
performing the data extraction:
CREATE TABLE source (col1 integer, ...) IN dbspace1;
CREATE TABLE target (col1 integer, ...)
FRAGMENT BY EXPRESSION
MOD(col1, 3) = 0 in dbspace3),
MOD(col1, 3) = 1 in dbspace4),
MOD(col1, 3) = 2 in dbspace5);
INSERT INTO target SELECT * FROM source;
The CREATE EXTERNAL TABLE Statement
The CREATE EXTERNAL TABLE statement describes the schema of an
external target table.
Syntax
The syntax of the CREATE EXTERNAL TABLE statement for the archecker
schema file is not identical to the SQL CREATE EXTERNAL TABLE statement.
��
CREATE EXTERNAL TABLE
name
�
,
(
column
data_type
)
�
� USING ( “filename“ ) ;
,
DELIMITED
INFORMIX
��
Element Description
column The name of the column. Must conform to SQL identifier syntax
rules. For more information, see the IBM Informix: Guide to SQL
Syntax.
Chapter 16. Restoring Table-level Data 16-11
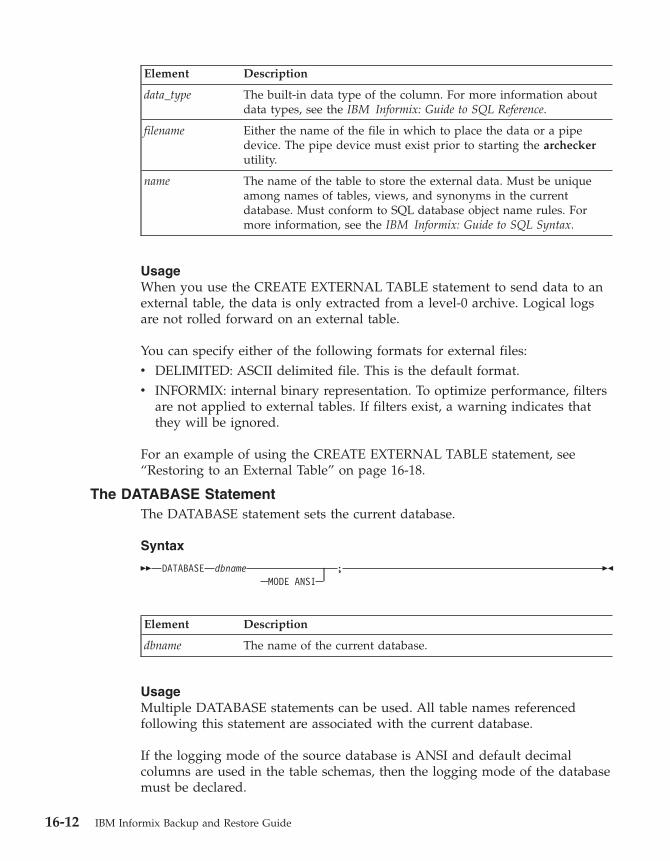
Element Description
data_type The built-in data type of the column. For more information about
data types, see the IBM Informix: Guide to SQL Reference.
filename Either the name of the file in which to place the data or a pipe
device. The pipe device must exist prior to starting the archecker
utility.
name The name of the table to store the external data. Must be unique
among names of tables, views, and synonyms in the current
database. Must conform to SQL database object name rules. For
more information, see the IBM Informix: Guide to SQL Syntax.
Usage
When you use the CREATE EXTERNAL TABLE statement to send data to an
external table, the data is only extracted from a level-0 archive. Logical logs
are not rolled forward on an external table.
You can specify either of the following formats for external files:
v DELIMITED: ASCII delimited file. This is the default format.
v INFORMIX: internal binary representation. To optimize performance, filters
are not applied to external tables. If filters exist, a warning indicates that
they will be ignored.
For an example of using the CREATE EXTERNAL TABLE statement, see
“Restoring to an External Table” on page 16-18.
The DATABASE Statement
The DATABASE statement sets the current database.
Syntax
�� DATABASE dbname ;
MODE ANSI ��
Element Description
dbname The name of the current database.
Usage
Multiple DATABASE statements can be used. All table names referenced
following this statement are associated with the current database.
If the logging mode of the source database is ANSI and default decimal
columns are used in the table schemas, then the logging mode of the database
must be declared.
16-12 IBM Informix Backup and Restore Guide

Note: If the logging mode of the source database is not declared no error will
be returned, but unexpected results and data can occur.
Examples
In the following example, both the source and target tables reside in the same
database dbs.
DATABASE dbs;
CREATE TABLE source (...);
CREATE TABLE target (...);
INSERT INTO target SELECT * from source;
You can use multiple database statements to extract a table from one database
into another database.
DATABASE dbs1;
CREATE TABLE source (...) IN dbspace1;
DATABASE dbs2;
CREATE TABLE target (...) IN dbspace2;
INSERT INTO dbs2:target SELECT * FROM dbs1:source;
The INSERT Statement
The INSERT statement tells the archecker utility what tables to extract and
where to place the extracted data.
Syntax
��
�
INSERT INTO target_table
,
(
target_column
)
�
�
�
,
SELECT
src_column
*
FROM
src_table
WHERE
filter
��
Chapter 16. Restoring Table-level Data 16-13
Element Description
filter The following filters are supported by the INSERT statement:
v =, !=, <>
v >, >=, <, <=
v [NOT] MATCH, [NOT] LIKE
v IS [NOT] NULL
v AND, OR
v TODAY, CURRENT
The following operators are not supported by the archecker utility:
v Aggregates
v Functions and procedures
v Subscripts
v Subqueries
v Views
v Joins
Filters can only be applied to physical-only restore.
src_column A list of columns to be extracted.
src_table The source table on the archive where the data is restored from.
target_column The destination column or columns where the data will be
restored.
target_table The destination table where the data will be restored.
Examples
The following example demonstrates the simplest form of the INSERT
statement. This statement extracts all rows and columns from the source to the
target table.
INSERT INTO target SELECT * FROM source;
You can also extract a subset of columns. In the following example, only two
columns from the source table are inserted into the destination table.
CREATE TABLE source (col1 integer, col2 integer, col3 integer, col4 integer);
CREATE TABLE target (col1 integer, col2 integer);
INSERT INTO target (col1, col2) SELECT (col3, col4) FROM source;
The RESTORE Statement
This is an optional command used to specify a single point in time the tables
specified in the command file should be restored to.
16-14 IBM Informix Backup and Restore Guide
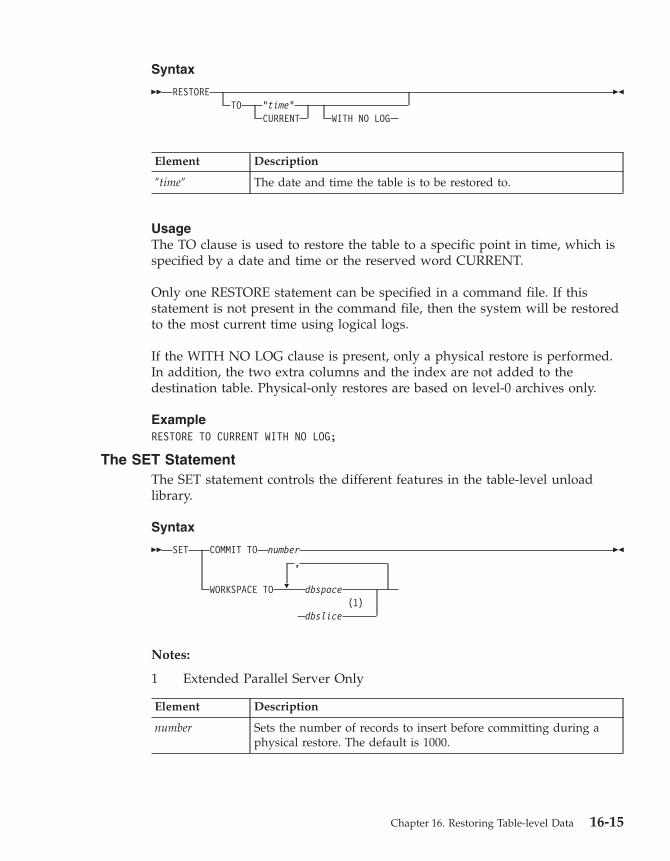
Syntax
�� RESTORE
TO
“time“
CURRENT
WITH NO LOG
��
Element Description
″time″ The date and time the table is to be restored to.
Usage
The TO clause is used to restore the table to a specific point in time, which is
specified by a date and time or the reserved word CURRENT.
Only one RESTORE statement can be specified in a command file. If this
statement is not present in the command file, then the system will be restored
to the most current time using logical logs.
If the WITH NO LOG clause is present, only a physical restore is performed.
In addition, the two extra columns and the index are not added to the
destination table. Physical-only restores are based on level-0 archives only.
Example
RESTORE TO CURRENT WITH NO LOG;
The SET Statement
The SET statement controls the different features in the table-level unload
library.
Syntax
��
�
SET COMMIT TO number
,
WORKSPACE TO
dbspace
(1)
dbslice
��
Notes:
1 Extended Parallel Server Only
Element Description
number Sets the number of records to insert before committing during a
physical restore. The default is 1000.
Chapter 16. Restoring Table-level Data 16-15
Element Description
dbspace The dbspaces to use for the working storage space. The default is
the root dbspace. You cannot use temporary dbspaces for the
working storage space.
dbslice The dbslices to use for the working storage space.
The archecker utility creates several tables for the staging of logical log
records during a logical restore. These tables are created in the sysutils
database and stored in the working storage space.
Examples
SET COMMIT TO 20000;
SET WORKSPACE to dbspace1;
SQL Comments
Standard SQL comments are allowed in the archecker utility file and are
ignored during processing.
Schema Command File Examples
The following examples show different command file syntax for different data
recovery scenarios.
Simple Schema Command File
The schema command file in this example extracts a table from the most
recent level-0 backup of dbspace1. The data is placed in the table test1:tlr and
the logs are applied to bring the table tlr to the current point in time.
database test1;
create table tlr (
a_serial serial,
b_integer integer,
c_char char,
d_decimal decimal
) in dbspace1;
insert into tlr select * from tlr;
Restoring a Table From a Previous Backup
The schema command file in this example extracts a table from the level-0
backup of dbspace1. The logical logs are used to bring the table to the time of
″2003-01-01 01:01:01″. The data is placed in the table test1:tlr.
database test1;
create table tlr (
a_serial serial,
b_integer integer,
c_char char,
16-16 IBM Informix Backup and Restore Guide
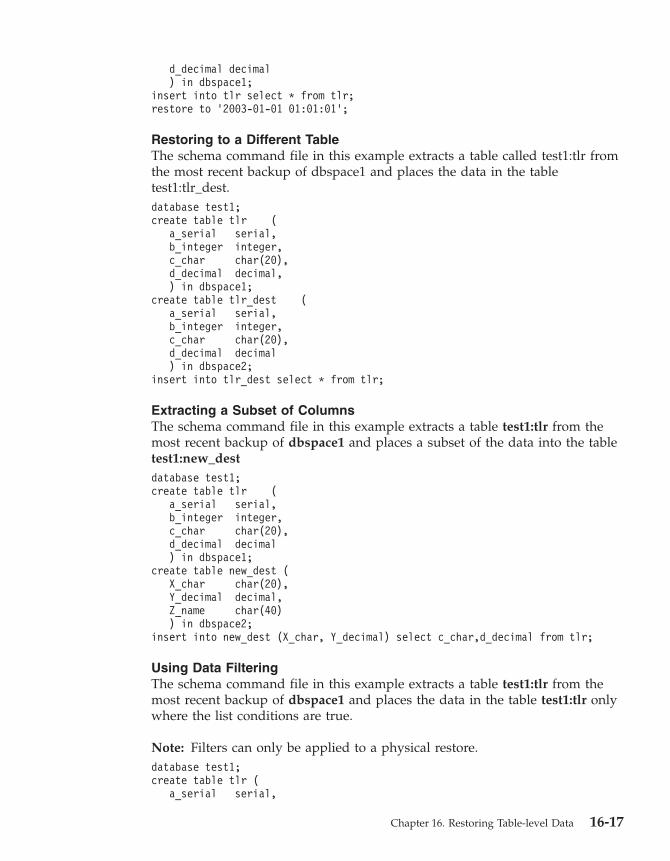
d_decimal decimal
) in dbspace1;
insert into tlr select * from tlr;
restore to ’2003-01-01 01:01:01’;
Restoring to a Different Table
The schema command file in this example extracts a table called test1:tlr from
the most recent backup of dbspace1 and places the data in the table
test1:tlr_dest.
database test1;
create table tlr (
a_serial serial,
b_integer integer,
c_char char(20),
d_decimal decimal,
) in dbspace1;
create table tlr_dest (
a_serial serial,
b_integer integer,
c_char char(20),
d_decimal decimal
) in dbspace2;
insert into tlr_dest select * from tlr;
Extracting a Subset of Columns
The schema command file in this example extracts a table test1:tlr from the
most recent backup of dbspace1 and places a subset of the data into the table
test1:new_dest
database test1;
create table tlr (
a_serial serial,
b_integer integer,
c_char char(20),
d_decimal decimal
) in dbspace1;
create table new_dest (
X_char char(20),
Y_decimal decimal,
Z_name char(40)
) in dbspace2;
insert into new_dest (X_char, Y_decimal) select c_char,d_decimal from tlr;
Using Data Filtering
The schema command file in this example extracts a table test1:tlr from the
most recent backup of dbspace1 and places the data in the table test1:tlr only
where the list conditions are true.
Note: Filters can only be applied to a physical restore.
database test1;
create table tlr (
a_serial serial,
Chapter 16. Restoring Table-level Data 16-17
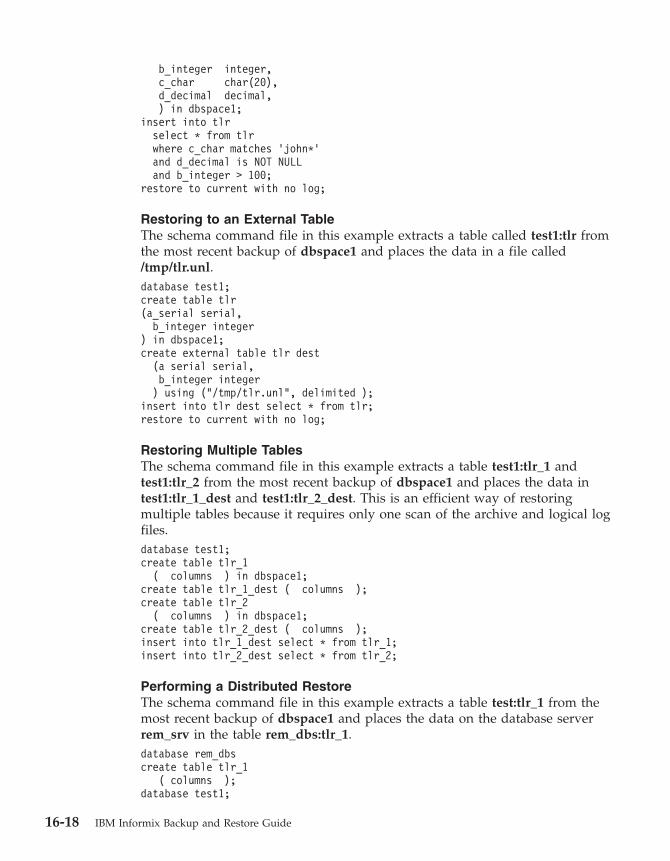
b_integer integer,
c_char char(20),
d_decimal decimal,
) in dbspace1;
insert into tlr
select * from tlr
where c_char matches ‘john*’
and d_decimal is NOT NULL
and b_integer > 100;
restore to current with no log;
Restoring to an External Table
The schema command file in this example extracts a table called test1:tlr from
the most recent backup of dbspace1 and places the data in a file called
/tmp/tlr.unl.
database test1;
create table tlr
(a_serial serial,
b_integer integer
) in dbspace1;
create external table tlr dest
(a serial serial,
b_integer integer
) using ("/tmp/tlr.unl", delimited );
insert into tlr dest select * from tlr;
restore to current with no log;
Restoring Multiple Tables
The schema command file in this example extracts a table test1:tlr_1 and
test1:tlr_2 from the most recent backup of dbspace1 and places the data in
test1:tlr_1_dest and test1:tlr_2_dest. This is an efficient way of restoring
multiple tables because it requires only one scan of the archive and logical log
files.
database test1;
create table tlr_1
( columns ) in dbspace1;
create table tlr_1_dest ( columns );
create table tlr_2
( columns ) in dbspace1;
create table tlr_2_dest ( columns );
insert into tlr_1_dest select * from tlr_1;
insert into tlr_2_dest select * from tlr_2;
Performing a Distributed Restore
The schema command file in this example extracts a table test:tlr_1 from the
most recent backup of dbspace1 and places the data on the database server
rem_srv in the table rem_dbs:tlr_1.
database rem_dbs
create table tlr_1
( columns );
database test1;
16-18 IBM Informix Backup and Restore Guide
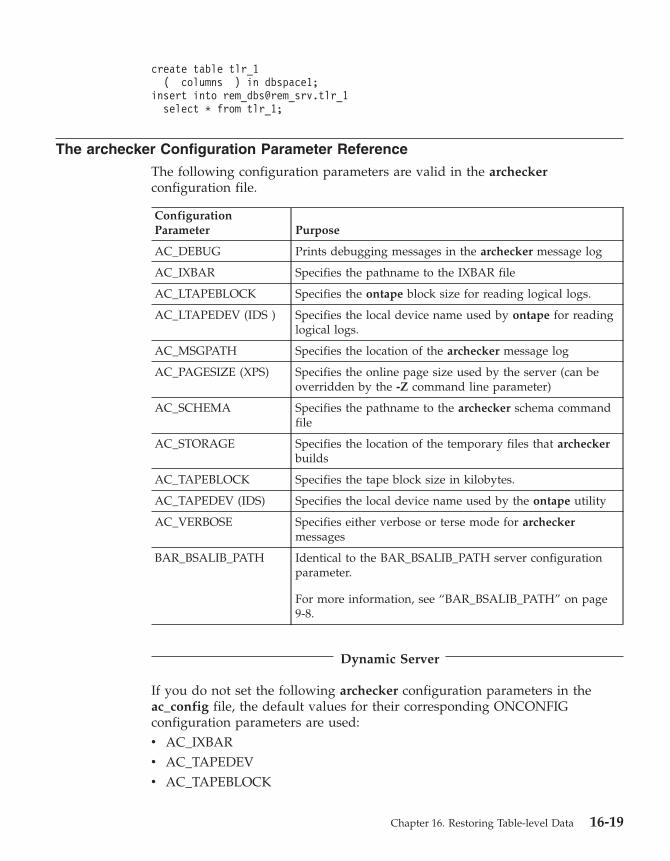
create table tlr_1
( columns ) in dbspace1;
insert into rem_dbs@rem_srv.tlr_1
select * from tlr_1;
The archecker Configuration Parameter Reference
The following configuration parameters are valid in the archecker
configuration file.
Configuration
Parameter Purpose
AC_DEBUG Prints debugging messages in the archecker message log
AC_IXBAR Specifies the pathname to the IXBAR file
AC_LTAPEBLOCK Specifies the ontape block size for reading logical logs.
AC_LTAPEDEV (IDS ) Specifies the local device name used by ontape for reading
logical logs.
AC_MSGPATH Specifies the location of the archecker message log
AC_PAGESIZE (XPS) Specifies the online page size used by the server (can be
overridden by the -Z command line parameter)
AC_SCHEMA Specifies the pathname to the archecker schema command
file
AC_STORAGE Specifies the location of the temporary files that archecker
builds
AC_TAPEBLOCK Specifies the tape block size in kilobytes.
AC_TAPEDEV (IDS) Specifies the local device name used by the ontape utility
AC_VERBOSE Specifies either verbose or terse mode for archecker
messages
BAR_BSALIB_PATH Identical to the BAR_BSALIB_PATH server configuration
parameter.
For more information, see “BAR_BSALIB_PATH” on page
9-8.
Dynamic Server
If you do not set the following archecker configuration parameters in the
ac_config file, the default values for their corresponding ONCONFIG
configuration parameters are used:
v AC_IXBAR
v AC_TAPEDEV
v AC_TAPEBLOCK
Chapter 16. Restoring Table-level Data 16-19
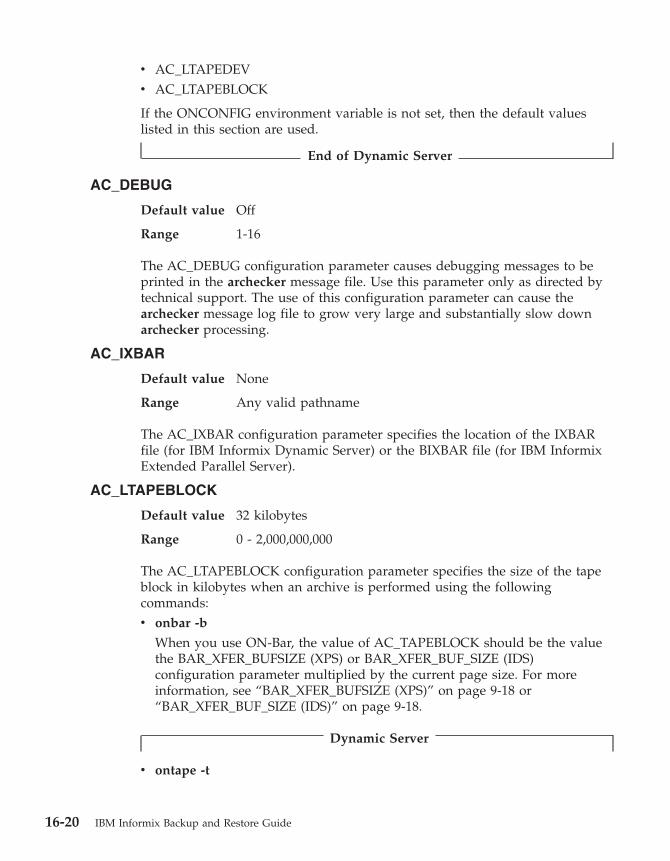
v AC_LTAPEDEV
v AC_LTAPEBLOCK
If the ONCONFIG environment variable is not set, then the default values
listed in this section are used.
End of Dynamic Server
AC_DEBUG
Default value Off
Range 1-16
The AC_DEBUG configuration parameter causes debugging messages to be
printed in the archecker message file. Use this parameter only as directed by
technical support. The use of this configuration parameter can cause the
archecker message log file to grow very large and substantially slow down
archecker processing.
AC_IXBAR
Default value None
Range Any valid pathname
The AC_IXBAR configuration parameter specifies the location of the IXBAR
file (for IBM Informix Dynamic Server) or the BIXBAR file (for IBM Informix
Extended Parallel Server).
AC_LTAPEBLOCK
Default value 32 kilobytes
Range 0 - 2,000,000,000
The AC_LTAPEBLOCK configuration parameter specifies the size of the tape
block in kilobytes when an archive is performed using the following
commands:
v onbar -b
When you use ON-Bar, the value of AC_TAPEBLOCK should be the value
the BAR_XFER_BUFSIZE (XPS) or BAR_XFER_BUF_SIZE (IDS)
configuration parameter multiplied by the current page size. For more
information, see “BAR_XFER_BUFSIZE (XPS)” on page 9-18 or
“BAR_XFER_BUF_SIZE (IDS)” on page 9-18.
Dynamic Server
v ontape -t
16-20 IBM Informix Backup and Restore Guide
When you use ontape, the value of AC_LTAPEBLOCK should be the value
that the TAPEBLK ONCONFIG configuration parameter was set to at the
time of the archive. For more information, see “Specifying the
Tape-Block-Size Parameters” on page 12-5.
End of Dynamic Server
AC_LTAPEDEV (IDS)
Default value None
Range Any valid pathname or STDIO
The AC_LTAPEDEV configuration parameter specifies the device name used
by the ontape utility. If the tape device is set to STDIO, archecker receives
input from standard input.
AC_MSGPATH
Default value /tmp/ac_msg.log
Range Any valid pathname
The AC_MSGPATH configuration parameter specifies the location of the
archecker message log (ac_msg.log). You must specify the entire path of the
message log in the AC_CONFIG file.
AC_PAGESIZE (XPS)
Default value 4
Range 2, 4, 8
The AC_PAGESIZE configuration parameter specifies the online page size
used by the server. This configuration parameter can be overridden using the
-Z command line option.
AC_SCHEMA
Default value None
Range Any valid pathname
The AC_SCHEMA configuration parameter specifies the pathname to the
archecker schema command file. This configuration parameter is overridden
by the -f cmdfile command line option.
AC_STORAGE
Default value /tmp
Range Any valid directory pathname
Chapter 16. Restoring Table-level Data 16-21
The AC_STORAGE parameter specifies the location of the directory where
archecker stores its temporary files. You must specify the entire path of the
storage directory in the AC_CONFIG file.
AC_TAPEBLOCK
Default value 32 kilobytes
Range 0 - 2,000,000,000
The AC_TAPEBLOCK configuration parameter specifies the size of the tape
block in kilobytes when an archive is performed using the following
commands:
v onbar -b
When you use ON-Bar, the value of AC_TAPEBLOCK should be the value
the BAR_XFER_BUFSIZE (XPS) or BAR_XFER_BUF_SIZE (IDS)
configuration parameter multiplied by the current page size. For more
information, see “BAR_XFER_BUFSIZE (XPS)” on page 9-18 or
“BAR_XFER_BUF_SIZE (IDS)” on page 9-18.
Dynamic Server
v ontape -t
When you use ontape, the value of AC_TAPEBLOCK should be the value
that the TAPEBLK ONCONFIG configuration parameter was set to at the
time of the archive. For more information, see “Specifying the
Tape-Block-Size Parameters” on page 12-5.
End of Dynamic Server
AC_TAPEDEV (IDS)
Default value None
Range Any valid pathname or STDIO
The AC_TAPEDEV configuration parameter specifies the device name used by
the ontape utility. If the tape device is set to STDIO, archecker receives input
from standard input.
AC_VERBOSE
Default value 1
Range
1 verbose messages
0 terse messages
16-22 IBM Informix Backup and Restore Guide

The AC_VERBOSE configuration parameter specifies either verbose or terse
output in the archecker message log and to the screen.
Chapter 16. Restoring Table-level Data 16-23

16-24 IBM Informix Backup and Restore Guide

Part 5. Appendixes
© Copyright IBM Corp. 1996, 2004

IBM Informix Backup and Restore Guide
Appendix A. Troubleshooting
This appendix lists some error messages you can receive during a backup or
restore, describes under what circumstances the errors might occur, and
provides possible solutions or work-arounds.
Corrupt Page During an Archive
The message Archive detects that page is corrupt indicates that page
validation failed.
During an archive, the database server validates every page before writing it
to the archive device. This validation checks that the elements on the page are
consistent with the expected values. When a page fails this validation, a
message similar to the following is written to the online.log file:
15:06:37 Assert Failed: Archive detects that page 0xc00021 is corrupt.
15:06:37 IBM Informix Dynamic Server Version 9.40.UC1
15:06:37 Who: Session(25, informix@cronus, 67612, 1085259772)
Thread(50, arcbackup1, 40acf758, 4)
File: rsarcbu.c Line: 2549
15:06:37 stack trace for pid 67367 written to /tmp/af.41ad7b9
15:06:37 See Also: /tmp/af.41ad7b9
The page number is printed in hexadecimal. The format for page number is
0xCCCPPPPP where CCC represents the chunk number, and PPPPP represents
the page number. For this example, the corrupted page is in chunk 0xc (12
decimal) and page 0x21 (33 decimal). The archive aborts after detecting 10
corrupt pages. The online.log file displays the full error message, including
the page address, for the first 10 errors. Subsequently, only the count of the
number of corrupt pages is put in to the online.log.
When you receive this message, identify which table the corrupt page belongs
to by examining the output of the oncheck –pe command. To determine the
extent of the corruption, execute the oncheck –cID command for that table.
A corrupt page is saved onto the backup media. During a restore, the corrupt
page is returned in its corrupt form. No errors messages are written to the
online.log when corrupt pages are restored, only when they are archived.
© Copyright IBM Corp. 1996, 2004 A-1
Log Backup Already Running
When using ON-Bar to create a backup, the message log backup is already
running in the bar_act.log file, or the message Process exited with return
code 152 in the online.log file do not indicate a problem. They can appear
under the following circumstances:
v The ALARMPROGRAM configuration parameter is set to log_full.sh.
Periodically, events cause log_full.sh to trigger the onbar -b -l command. If
a log fills while the onbar -b -l command is running, then ON-Bar backs up
that log as well. If the backup has not completed by the time of the next
event trigger, it generates a warning in the bar_act.log file. At the time of
the next event trigger, the log backup can continue.
v A level-0 archive (especially when started with the -w option) first archives
the database and then automatically start the onbar -b -l command to back
up any logical logs that are currently full and not yet backed up. There
might not be a log_full.sh message in online.log, because the onbar -b -l
command is started directly.
v When you mount a new tape after filling a previous tape, a log_full.sh
event is scheduled but not triggered. As soon as the next log fills and
generates an event trigger in the log_full.sh file, all available logs are
archived. You can force the archive by running onbar -b -l or force
log_full.sh to be triggered by running onmode -l.
No Server Connection During a Restore
During a whole system restore with ON-Bar, the error archive api error: no
server connection. might appear in the bar_act.log file. ON-Bar then
connects to the storage manager successfully, but eventually fails with the
error archive api error: not yet open.
The bar_act.log file contains information similar to the following messages:
2000-03-09 10:51:06 19304 19303 /usr/informix/bin/onbar_d -r -w
2000-03-09 10:51:09 19304 19303 ERROR: Unable to start the physical restore:
Archive API error: no server connection.
2000-03-09 10:51:09 19304 19303 Successfully connected to Storage Manager.
2000-03-09 10:51:36 19304 19303 Process 19304 received signal 3. Process will
exit after cleanup.
2000-03-09 10:59:13 19811 19810 /usr/informix/bin/onbar_d -r -w
2000-03-09 10:59:16 19811 19810 ERROR: Unable to start the physical restore:
Archive API error: no server connection.
2000-03-09 10:59:16 19811 19810 Successfully connected to Storage Manager.
2000-03-09 11:01:12 19811 19810 Begin cold level 0 restore llog1.
2000-03-09 11:01:12 19811 19810 ERROR: Unable to write restore data to the
database server: Archive API error: not yet open.
To solve this problem, check if the database server is still running. If it is, shut
down the database server and run the command again.
A-2 IBM Informix Backup and Restore Guide
Dropping a Database Before a Restore
If you perform a level-0 archive using ON-Bar and a storage manager, then
drop a database, and then perform a restore with the onbar -r command, the
database remains dropped. The restore salvages the logs and the logs contains
the DROP DATABASE statement. When the logs are salvaged, or replayed,
the database is dropped.
To prevent this situation, perform a physical restore using the onbar -r -p
command, and then a logical restore using the onbar -r -l command. This
sequence does not salvage the logs and does restore the database.
No dbspaces or blobspaces During a Backup or Restore
If the emergency boot file, ixbar.servernum, does not have the correct entries
for objects in the backup, the message There are no DB/BLOBspaces to
backup/restore appears in bar_act.log file during a restore started with the
onbar -r or onbar -r -w command.
This error can appear under the following circumstances:
v During an external restore, if the emergency boot file was not copied from
the source system.
v If the emergency boot file was re-created after the archive backup was
made. The previous file is saved in the form: ixbar.xx.xxxx.
v An attempt to execute the onbar -r -w command with a backup that is not
a full system backup.
Appendix A. Troubleshooting A-3

A-4 IBM Informix Backup and Restore Guide
Appendix B. onstat Command Reference
This appendix describes forms of the onstat command that are relevant to
ON-Bar and ontape. The onstat utility reads shared-memory structures and
provides statistics about the database server that are accurate at the instant
that the command executes. For general information about onstat, refer to the
IBM Informix: Administrator's Reference.
onstat -d
Use the -d option to display information for chunks in each storage space.
You can interpret output from this option as follows. The first section of the
display describes the storage spaces:
address Is the address of the storage space in the shared-memory
space table
number Is the unique ID number of the storage space assigned at
creation
flags Uses the following hexadecimal values to describe each
storage space:
0x00000000 Mirror not allowed and dbspace is unmirrored
0x00000001 Mirror is allowed and dbspace is unmirrored
0x00000002 Mirror is allowed and dbspace is mirrored
0x00000004 Down
0x00000008 Newly mirrored
0x00000010 Blobspace
0x00000020 Blobspace on removable media
0x00000040 Blobspace is on optical media
0x00000080 Blobspace is dropped
0x00000100 Blobspace is the optical STAGEBLOB
0x00000200 Space is being recovered
0x00000400 Space is fully recovered
0x00000800 Logical log is being recovered
0x00001000 Table in dbspace is dropped
0x00002000 Temporary dbspace
© Copyright IBM Corp. 1996, 2004 B-1

0x00004000 Blobspace is being backed up
0x00008000 Sbspace
0x0000a001 Temporary sbspace
0x00010000 Physical or logical log changed
0x00020000 Dbspace or chunk tables have changed
fchunk Is the ID number of the first chunk
nchunks Is the number of chunks in the storage space
flags Uses the following letter codes to describe each storage space:
Position 1:
M Mirrored
N Not Mirrored
Position 2:
R Being recovered
P Physically recovered, waiting for P --
logical recovery
L Being logically recovered
X Newly mirrored
D Disabled
Position 3:
B Blobspace
S Sbspace
T Temporary dbspace
Position 4:
B Has big chunks (IDS)
owner Is the owner of the storage space
name Is the name of the storage space
The line immediately following the storage-space list includes the number of
active spaces (the current number of dbspaces in the database server instance
including the rootdbs) and the number of total spaces.
Active spaces refers to the current number of storage spaces in the database
server instance including the rootdbs. Total refers to total allowable spaces for
this database server instance.
B-2 IBM Informix Backup and Restore Guide
The second section of the onstat -d output describes the chunks:
address Is the address of the chunk
chk/dbs Is the chunk number and the associated space number
offset Is the offset into the file or raw device in pages
size Is the size of the chunk in page
free Is the number of free pages in the chunk for a dbspace
For a blobspace, a tilde indicates an approximate number of
free blobpages.
For an sbspace, indicates the number of free pages of user
data space and total user data space.
bpages Is the size of the chunk in blobpages
Blobpages can be larger than disk pages; therefore, the bpages
value can be less than the size value.
For an sbspace, is the size of the chunk in sbpages
flags Provides the chunk status information as follows:
Position 1:
P Primary
M Mirror
Position 2:
O Online
D Down
X Newly mirrored
I Inconsistent
R Being recovered
N Renamed and either down or
inconsistent (IDS)
Position 3:
- Dbspace
B Blobspace
S Sbspace
Position 4:
B Big chunk (IDS)
Appendix B. onstat Command Reference B-3
pathname Is the pathname of the physical device
The line immediately following the chunk list displays the number of active
chunks (including the root chunk) and the total number of chunks.
For information on how to solve problems indicated by flags in position 2 of
both the storage space and chunk sections, see “Monitoring Restores” on page
6-7.
onstat -g bus (XPS)
Prints current backup scheduler sessions, backups in progress, and backups to
be performed. Issue from any coserver.
onstat -g bus_sm (XPS)
Prints current storage manager configuration. Issue from any coserver.
onstat -l
Use the -l option to display information about physical and logical logs. You
can interpret output from this option as follows. The first section of the
display describes the physical-log configuration:
buffer Is the number of the physical-log buffer
bufused Is the number of pages of the physical-log buffer that are used
bufsize Is the size of each physical-log buffer in pages
numpages Is the number of pages written to the physical log
numwrits Is the number of writes to disk
pages/io Is calculated as numpages/numwrits
This value indicates how effectively physical-log writes are
being buffered.
phybegin Is the physical page number of the beginning of the log
physize Is the size of the physical log in pages
phypos Is the current position in the log where the next log-record
write is to occur
phyused Is the number of pages used in the log
%used Is the percent of pages used
The second section of the onstat -l display describes the logical-log
configuration:
B-4 IBM Informix Backup and Restore Guide
buffer Is the number of the logical-log buffer
bufused Is the number of pages used in the logical-log buffer
bufsize Is the size of each logical-log buffer in pages
numrecs Is the number of records written
numpages Is the number of pages written
numwrits Is the number of writes to the logical log
recs/pages Is calculated as numrecs/numpages
You cannot affect this value. Different types of operations
generate different types (and sizes) of records.
pages/io is calculated as numpages/numwrits
You can affect this value by changing the size of the
logical-log buffer (specified as LOGBUFF in the ONCONFIG
file) or by changing the logging mode of the database (from
buffered to unbuffered, or vice versa).
The following fields are repeated for each logical-log file:
address Is the address of the log-file descriptor
number Is logid number for the logical-log file
The logid numbers might be out of sequence because either
the database server or administrator can insert a log file
in-line.
flags Provides the status of each log as follows:
A Newly added (and ready to use)
B Backed up
C Current logical-log file
D Marked for deletion
To drop the log file and free its space for reuse, you
must perform a level-0 backup of all storage spaces
F Free, available for use
L The most recent checkpoint record
U Used
uniqid Is the unique ID number of the log
begin Is the beginning page of the log file
size Is the size of the log in pages
Appendix B. onstat Command Reference B-5
used Is the number of pages used
%used Is the percent of pages used
active Is the number of active logical logs
total Is the total number of logical logs
The database server uses temporary logical logs during a warm restore because
the permanent logs are not available then. The following fields are repeated
for each temporary logical-log file:
address Is the address of the log-file descriptor
number Is logid number for the logical-log file
flags Provides the status of each log as follows:
B Backed up
C Current logical-log file
F Free, available for use
U Used
uniqid Is the unique ID number of the log
begin Is the beginning page of the log file
size Is the size of the log in pages
used Is the number of pages used
%used Is the percent of pages used
active Is the number of active temporary logical logs
B-6 IBM Informix Backup and Restore Guide
Appendix C. Migration
Using Data-Migration Tools for Recovery
If ON–Bar and ontape are not working, you can use data-migration utilities,
such as onunload, the High-Performance Loader (HPL), onpladm, or
dbexport, as a substitute for a backup. For more information on these utilities,
see the IBM Informix: Migration Guide.
Important: None of the data-migration utilities are coordinated with the
information stored in the logical-log files and, unlike backups,
they do not save a copy of system-overhead information
important to the database server.
Preparing for a Database Server or Storage-Manager Upgrade
Important: The database server conversion software automatically re-creates
the sysutils database when you upgrade to the latest version of
the database server. All backup and restore information from the
old database server version is lost. Backups that you make under
the older version of the database server are not compatible with
the newer version of the database server.
To prepare for an upgrade:
1. Use ON–Bar to perform a level-0 backup of all your data before you
upgrade your database server, ISM, or change storage-manager vendors.
2. Save these backups so that you can restore the data in case you need to
revert to the old database server version.
3. Before you upgrade, back up the administrative files.
4. After you upgrade the database server, back up all storage spaces and
logical logs.
For more information on database server migration, see the IBM Informix:
Migration Guide.
Upgrading Your Storage Manager
If you install a new version of a third-party storage manager, install it before
you bring up the database server. Update the sm_versions file with the new
storage-manager definition. If you have continuous logical-log backup set up
on the database server, ON–Bar can start backing up the logical logs soon
after the database server comes online. Also make sure that the new
storage-manager version is able to read media written with your old version.
© Copyright IBM Corp. 1996, 2004 C-1
Make sure that the storage manager can find the backup objects that ON–Bar
requests. Use the onsmsync utility to expire old backup history in the sysutils
database and emergency boot files.
Extended Parallel Server
In Extended Parallel Server only, ensure that the BAR_SM parameters in the
ONCONFIG file match the new storage-manager definition.
End of Extended Parallel Server
Changing Storage-Manager Vendors
When you switch storage-manager vendors, the transition can be difficult.
Ensure that the new data formats are identical, that a reversion utility is
provided, or that you do not use new features that change the data formats.
Differences usually occur in the following areas:
v The new storage manager might support different storage devices. If you
also upgrade a storage device, make sure the old storage device is available
until you successfully back up and restore on the new storage device.
v If you change physical connectivity, such as moving a storage device from a
local connection to a network server, make sure the storage manager can
still move the data across the network.
v If you use software compression or encryption, make sure all versions of
the compression or encryption algorithms are available for restores.
v Ensure that the storage manager can send multiple data streams to storage
devices. It also might use a different version of XBSA.
You can switch between certain storage managers more easily than others. For
details, contact Technical Support or your vendor.
Migrating from ontape to ON-Bar (IDS)
You cannot back up data with ontape and restore it using ON–Bar, or
conversely because the data storage formats and backup capabilities are
different. You can use ontape with the database server in online or quiescent
mode.
To migrate to ON-Bar:
1. Use ontape to perform a full backup.
For details, see Chapter 13, “Backing Up with ontape,” on page 13-1.
2. Take the backup media offline to prevent possible reuse or erasure.
3. Configure the storage manager to be used with ON–Bar.
For details, see Chapter 3, “Configuring the Storage Manager and
ON-Bar,” on page 3-1.
C-2 IBM Informix Backup and Restore Guide

4. Configure your ON–Bar environment:
a. Set ONCONFIG parameters.
b. Create the sm_versions file with the storage-manager definition.
For details, see Chapter 9, “Setting ON-Bar Configuration Parameters,”
on page 9-1, and “Updating the sm_versions File” on page 3-5.5. Use ON–Bar (onbar -b or onbar -b -w) to perform a full backup.
6. Verify the backup with onbar -v.
For details, see Chapter 5, “Verifying Backups,” on page 5-1.
Migrating Private ON-Bar Scripts
This section describes the procedures for migrating private ON–Bar scripts
after you upgrade the database server version.
If your script searches for ON–Bar process IDs, be aware that the relationship
between the onbar-driver and the onbar_d child processes or onbar-worker
processes is quite different for Dynamic Server and Extended Parallel Server.
Dynamic Server
If you reuse a private script for Extended Parallel Server on Dynamic Server,
remove the following ON–Bar options that Dynamic Server does not support:
v -q (session name)
v -b -p (physical-only backup)
End of Dynamic Server
Extended Parallel Server
If you reuse a private script for Dynamic Server on Extended Parallel Server,
remove the following ON–Bar options that Extended Parallel Server does not
support:
v -w (whole-system backup)
v -c (current log backup)
v -C (continuous-log backup)
v -RESTART (restartable restore)
End of Extended Parallel Server
Appendix C. Migration C-3

C-4 IBM Informix Backup and Restore Guide
Appendix D. GLS Support
Using GLS with ON-Bar
ON–Bar supports Global Language Support (GLS), which allows users to
work in their native language. The language that the client application uses is
called the client locale. The language that the database uses for its
server-specific files is called the server locale.
ON–Bar must run on the same computer as the database server. However,
you can run ON–Bar in any locale for which you have the supporting
message and localization files. For example, if the server locale is English and
the client locale is French, you can issue ON–Bar commands in French.
The following command performs a level-0 backup of the dbspaces specified
in the file, tombé:
onbar -b -L 0 -f tombé
Windows Only
On Windows, you cannot use multibyte filenames in backup or restore
commands because they are not supported.
End of Windows Only
The sysutils database, the emergency boot files, and the storage-manager boot
file are created with the en_us.8859-1 (default English) locale. The ON–Bar
catalog tables in the sysutils database are in English. Change the client and
database locales to en_us.8859-1 before you attempt to connect to the sysutils
database with DB–Access or third-party utilities.
Identifiers That Support Non-ASCII Characters
The IBM Informix: GLS User's Guide describes the SQL identifiers that support
non-ASCII characters. Non-ASCII characters include both 8-bit and multibyte
characters. You can use non-ASCII characters in the database names and
filenames with the ON–Bar, ondblog, and onutil commands, and for
filenames in the ONCONFIG file.
For example, you can specify a non-ASCII filename for the ON–Bar activity
log in BAR_ACT_LOG and a non-ASCII pathname for the storage-manager
library in BAR_BSALIB_PATH.
© Copyright IBM Corp. 1996, 2004 D-1
Identifiers That Require 7-Bit ASCII Characters
You must use 7-bit ASCII characters for the following identifiers:
v Storage-space names
v Database server names
Locale of ON-Bar Messages
All ON–Bar messages appear in the activity log in the client locale except the
messages that the database server issues. For example, the part of the message
that tells you that a database server error occurred appears in the client locale,
and the server-generated part appears in the server locale.
Using the GL_DATETIME Environment Variable with ON-Bar
The database server must know how to interpret and convert the end-user
formats when they appear in date or time data that the client application
sends. You can use the GL_DATE and GL_DATETIME environment variables
to specify alternative date and time formats. If you do not set these
environment variables, ON–Bar uses the date and time format of the client
locale.
If you perform a point-in-time restore, enter the date and time in the format
specified in the GL_DATETIME environment variable if it is set.
Point-in-Time Restore Example
For example, the default date and time format for the French locale,
fr_fr.8859-1, uses the format ″%A %.1d %B %iY %H:%M:%S.″ The ON–Bar
command for a point-in-time restore is as follows:
onbar -r -t "Lundi 9 Juin 1997 11:20:14"
You can set GL_DATETIME to a different date and time format that uses the
date, month, two-digit year, hours, minutes, and seconds.
%.1d %B %iy %H:%M:%S
The ON–Bar command for a point-in-time restore is as follows:
onbar -r -t "9 Juin 97 11:20:14"
Tip: For more information on how to use GLS and the GL_DATE and
GL_DATETIME environment variables, refer to the IBM Informix: GLS
User's Guide.
Using GLS with ontape
The ontape utility supports GLS in the same way as ON–Bar does. You can
specify the database name in the national locale.
D-2 IBM Informix Backup and Restore Guide
Appendix E. Accessibility
The syntax diagrams in the HTML version of this manual are available in
dotted decimal syntax format, which is an accessible format that is available
only if you are using a screen reader.
Dotted Decimal Syntax Diagrams
In dotted decimal format, each syntax element is written on a separate line. If
two or more syntax elements are always present together (or always absent
together), the elements can appear on the same line, because they can be
considered as a single compound syntax element.
Each line starts with a dotted decimal number; for example, 3 or 3.1 or 3.1.1.
To hear these numbers correctly, make sure that your screen reader is set to
read punctuation. All syntax elements that have the same dotted decimal
number (for example, all syntax elements that have the number 3.1) are
mutually exclusive alternatives. If you hear the lines 3.1 USERID and 3.1
SYSTEMID, your syntax can include either USERID or SYSTEMID, but not both.
The dotted decimal numbering level denotes the level of nesting. For example,
if a syntax element with dotted decimal number 3 is followed by a series of
syntax elements with dotted decimal number 3.1, all the syntax elements
numbered 3.1 are subordinate to the syntax element numbered 3.
Certain words and symbols are used next to the dotted decimal numbers to
add information about the syntax elements. Occasionally, these words and
symbols might occur at the beginning of the element itself. For ease of
identification, if the word or symbol is a part of the syntax element, the word
or symbol is preceded by the backslash (\) character. The * symbol can be
used next to a dotted decimal number to indicate that the syntax element
repeats. For example, syntax element *FILE with dotted decimal number 3 is
read as 3 \* FILE. Format 3* FILE indicates that syntax element FILE repeats.
Format 3* \* FILE indicates that syntax element * FILE repeats.
Characters such as commas, which are used to separate a string of syntax
elements, are shown in the syntax just before the items they separate. These
characters can appear on the same line as each item, or on a separate line
with the same dotted decimal number as the relevant items. The line can also
show another symbol that provides information about the syntax elements.
For example, the lines 5.1*, 5.1 LASTRUN, and 5.1 DELETE mean that if you
use more than one of the LASTRUN and DELETE syntax elements, the elements
© Copyright IBM Corp. 1996, 2004 E-1
must be separated by a comma. If no separator is given, assume that you use
a blank to separate each syntax element.
If a syntax element is preceded by the % symbol, this identifies a reference that
is defined elsewhere. The string following the % symbol is the name of a
syntax fragment rather than a literal. For example, the line 2.1 %OP1 means
that you should refer to a separate syntax fragment OP1.
The following words and symbols are used next to the dotted decimal
numbers:
? Specifies an optional syntax element. A dotted decimal number
followed by the ? symbol indicates that all the syntax elements with a
corresponding dotted decimal number, and any subordinate syntax
elements, are optional. If there is only one syntax element with a
dotted decimal number, the ? symbol is displayed on the same line as
the syntax element (for example, 5? NOTIFY). If there is more than one
syntax element with a dotted decimal number, the ? symbol is
displayed on a line by itself, followed by the syntax elements that are
optional. For example, if you hear the lines 5 ?, 5 NOTIFY, and 5
UPDATE, you know that syntax elements NOTIFY and UPDATE are
optional; that is, you can choose one or none of them. The ? symbol is
equivalent to a bypass line in a railroad diagram.
! Specifies a default syntax element. A dotted decimal number followed
by the ! symbol and a syntax element indicates that the syntax
element is the default option for all syntax elements that share the
same dotted decimal number. Only one of the syntax elements that
share the same dotted decimal number can specify a ! symbol. For
example, if you hear the lines 2? FILE, 2.1! (KEEP), and 2.1
(DELETE), you know that (KEEP) is the default option for the FILE
keyword. In this example, if you include the FILE keyword but do not
specify an option, default option KEEP is applied. A default option also
applies to the next higher dotted decimal number. In this example, if
the FILE keyword is omitted, default FILE(KEEP) is used. However, if
you hear the lines 2? FILE, 2.1, 2.1.1! (KEEP), and 2.1.1 (DELETE),
the default option KEEP only applies to the next higher dotted
decimal number, 2.1 (which does not have an associated keyword),
and does not apply to 2? FILE. Nothing is used if the keyword FILE is
omitted.
* Specifies a syntax element that can be repeated zero or more times. A
dotted decimal number followed by the * symbol indicates that this
syntax element can be used zero or more times; that is, it is optional
and can be repeated. For example, if you hear the line 5.1*
data-area, you know that you can include more than one data area or
E-2 IBM Informix Backup and Restore Guide
you can include none. If you hear the lines 3*, 3 HOST, and 3 STATE,
you know that you can include HOST, STATE, both together, or nothing.
Notes:
1. If a dotted decimal number has an asterisk (*) next to it and there
is only one item with that dotted decimal number, you can repeat
that same item more than once.
2. If a dotted decimal number has an asterisk next to it and several
items have that dotted decimal number, you can use more than
one item from the list, but you cannot use the items more than
once each. In the previous example, you could write HOST STATE,
but you could not write HOST HOST.
3. The * symbol is equivalent to a loop-back line in a railroad syntax
diagram.
+ Specifies a syntax element that must be included one or more times. A
dotted decimal number followed by the + symbol indicates that this
syntax element must be included one or more times. For example, if
you hear the line 6.1+ data-area, you must include at least one data
area. If you hear the lines 2+, 2 HOST, and 2 STATE, you know that you
must include HOST, STATE, or both. As for the * symbol, you can only
repeat a particular item if it is the only item with that dotted decimal
number. The + symbol, like the * symbol, is equivalent to a loop-back
line in a railroad syntax diagram.
Appendix E. Accessibility E-3

E-4 IBM Informix Backup and Restore Guide
Notices
IBM may not offer the products, services, or features discussed in this
document in all countries. Consult your local IBM representative for
information on the products and services currently available in your area. Any
reference to an IBM product, program, or service is not intended to state or
imply that only that IBM product, program, or service may be used. Any
functionally equivalent product, program, or service that does not infringe
any IBM intellectual property right may be used instead. However, it is the
user’s responsibility to evaluate and verify the operation of any non-IBM
product, program, or service.
IBM may have patents or pending patent applications covering subject matter
described in this document. The furnishing of this document does not give
you any license to these patents. You can send license inquiries, in writing, to:
IBM Director of Licensing
IBM Corporation
North Castle Drive
Armonk, NY 10504-1785
U.S.A.
For license inquiries regarding double-byte (DBCS) information, contact the
IBM Intellectual Property Department in your country or send inquiries, in
writing, to:
IBM World Trade Asia Corporation Licensing
2-31 Roppongi 3-chome, Minato-ku
Tokyo 106-0032, Japan
The following paragraph does not apply to the United Kingdom or any
other country where such provisions are inconsistent with local law:
INTERNATIONAL BUSINESS MACHINES CORPORATION PROVIDES THIS
PUBLICATION “AS IS” WITHOUT WARRANTY OF ANY KIND, EITHER
EXPRESS OR IMPLIED, INCLUDING, BUT NOT LIMITED TO, THE
IMPLIED WARRANTIES OF NON-INFRINGEMENT, MERCHANTABILITY
OR FITNESS FOR A PARTICULAR PURPOSE. Some states do not allow
disclaimer of express or implied warranties in certain transactions, therefore,
this statement may not apply to you.
This information could include technical inaccuracies or typographical errors.
Changes are periodically made to the information herein; these changes will
be incorporated in new editions of the publication. IBM may make
© Copyright IBM Corp. 1996, 2004 F-1
improvements and/or changes in the product(s) and/or the program(s)
described in this publication at any time without notice.
Any references in this information to non-IBM Web sites are provided for
convenience only and do not in any manner serve as an endorsement of those
Web sites. The materials at those Web sites are not part of the materials for
this IBM product and use of those Web sites is at your own risk.
IBM may use or distribute any of the information you supply in any way it
believes appropriate without incurring any obligation to you.
Licensees of this program who wish to have information about it for the
purpose of enabling: (i) the exchange of information between independently
created programs and other programs (including this one) and (ii) the mutual
use of the information which has been exchanged, should contact:
IBM Corporation
J46A/G4
555 Bailey Avenue
San Jose, CA 95141-1003
U.S.A.
Such information may be available, subject to appropriate terms and
conditions, including in some cases, payment of a fee.
The licensed program described in this information and all licensed material
available for it are provided by IBM under terms of the IBM Customer
Agreement, IBM International Program License Agreement, or any equivalent
agreement between us.
Any performance data contained herein was determined in a controlled
environment. Therefore, the results obtained in other operating environments
may vary significantly. Some measurements may have been made on
development-level systems and there is no guarantee that these measurements
will be the same on generally available systems. Furthermore, some
measurements may have been estimated through extrapolation. Actual results
may vary. Users of this document should verify the applicable data for their
specific environment.
Information concerning non-IBM products was obtained from the suppliers of
those products, their published announcements or other publicly available
sources. IBM has not tested those products and cannot confirm the accuracy
of performance, compatibility or any other claims related to non-IBM
products. Questions on the capabilities of non-IBM products should be
addressed to the suppliers of those products.
F-2 IBM Informix Backup and Restore Guide
All statements regarding IBM’s future direction or intent are subject to change
or withdrawal without notice, and represent goals and objectives only.
All IBM prices shown are IBM’s suggested retail prices, are current and are
subject to change without notice. Dealer prices may vary.
This information contains examples of data and reports used in daily business
operations. To illustrate them as completely as possible, the examples include
the names of individuals, companies, brands, and products. All of these
names are fictitious and any similarity to the names and addresses used by an
actual business enterprise is entirely coincidental.
COPYRIGHT LICENSE:
This information contains sample application programs in source language,
which illustrate programming techniques on various operating platforms. You
may copy, modify, and distribute these sample programs in any form without
payment to IBM, for the purposes of developing, using, marketing or
distributing application programs conforming to the application programming
interface for the operating platform for which the sample programs are
written. These examples have not been thoroughly tested under all conditions.
IBM, therefore, cannot guarantee or imply reliability, serviceability, or function
of these programs. You may copy, modify, and distribute these sample
programs in any form without payment to IBM for the purposes of
developing, using, marketing, or distributing application programs
conforming to IBM’s application programming interfaces.
Each copy or any portion of these sample programs or any derivative work,
must include a copyright notice as follows:
© (your company name) (year). Portions of this code are derived from IBM
Corp. Sample Programs. © Copyright IBM Corp. (enter the year or years).
All rights reserved.
If you are viewing this information softcopy, the photographs and color
illustrations may not appear.
Notices F-3
Trademarks
AIX; DB2; DB2 Universal Database; Distributed Relational Database
Architecture; NUMA-Q; OS/2, OS/390, and OS/400; IBM Informix®;
C-ISAM®; Foundation.2000™; IBM Informix
® 4GL; IBM
Informix®DataBlade®Module; Client SDK™; Cloudscape™; Cloudsync™; IBM
Informix®Connect; IBM Informix®Driver for JDBC; Dynamic Connect™; IBM
Informix®Dynamic Scalable Architecture™(DSA); IBM Informix®Dynamic
Server™; IBM Informix®Enterprise Gateway Manager (Enterprise Gateway
Manager); IBM Informix®Extended Parallel Server™; i.Financial Services™;
J/Foundation™; MaxConnect™; Object Translator™; Red Brick™; IBM
Informix® SE; IBM Informix® SQL; InformiXML™; RedBack®; SystemBuilder™;
U2™; UniData®; UniVerse®; wintegrate®are trademarks or registered
trademarks of International Business Machines Corporation.
Java and all Java-based trademarks and logos are trademarks or registered
trademarks of Sun Microsystems, Inc. in the United States and other countries.
Windows, Windows NT, and Excel are either registered trademarks or
trademarks of Microsoft Corporation in the United States and/or other
countries.
UNIX is a registered trademark in the United States and other countries
licensed exclusively through X/Open Company Limited.
Other company, product, and service names used in this publication may be
trademarks or service marks of others.
F-4 IBM Informix Backup and Restore Guide
Index
Special characters/dev/null, ontape
as a tape device 12-4
for logical–;log backup 13-15
AAC_CONFIG
setting archecker parameters 9-2
AC_CONFIG environment variable 5-3, 5-8, 9-4, 9-5
AC_CONFIG file 9-3
ac_config.std file 5-3, 9-4, 9-5
AC_DEBUG configuration parameter 16-20
AC_IXBAR configuration parameter 16-20
ac_msg.log.See archecker message log.
AC_MSGPATH configuration parameter 9-3, 9-23,
16-21
AC_PAGESIZE configuration parameter 16-21
AC_SCHEMA configuration parameter 16-21
AC_STORAGE configuration parameter 5-9, 9-3, 9-4,
16-21
AC_TAPEBLOCK configuration parameter 16-22
AC_TAPEDEV configuration parameter 16-22
AC_TIMEOUT configuration parameter 9-3, 9-5
AC_VERBOSE configuration parameter 9-3, 9-5, 16-22
Accessibility xxvi
dotted decimal format of syntax diagrams E-1
syntax diagrams, reading in a screen reader E-1
Activity log, ON-Barchecking restore status 6-38
defined 2-14
diagnosing failed verification 5-8
error messages 11-2, 11-6
finding backup time 6-26
message format 11-1
message numbers 11-2
monitoring backups 4-8
overview 2-14
return codes 11-7
skipped dbspace message 6-16
specifying location 3-13, 9-7
specifying progress messages 3-12, 3-14, 9-14
status of archecker 5-2, 5-3, 9-23
verification message 5-7
warning about /dev/null 9-22
Administrative filesbacking up 4-4
copying before cold restore 6-20, 6-29
external backup 7-3, 7-4, 7-6, 15-2, 15-3
Administrative tasksbacking up after changing schema 4-11, 13-4
using ISA 4-13
ALARM_ALL_EVENTS configuration parameter 3-11
ALARMPROGRAM configuration parameteralarmprogram.sh or alarmprogram.bat 9-6
defined 3-11, 9-5
settinglog_full.sh or log_full.bat 4-22
no_log.sh or no_log.bat 4-22
alarmprogram.sh script 4-22, 9-6
ALRM_ALL_EVENTS configuration parameter 9-6
Altering table typelight append 6-40
restoring data 4-12
Applier, manually controlling logical restore
using 16-5
archecker utilityAC_CONFIG parameters 9-4
blobspaces 5-6
configuration filevalid parameters 16-19
defined 16-1
described 16-2
estimating temporary space 5-5
fixing verification problems 5-8, 5-9
interpreting verification messages 5-7
message log 9-4
messages 5-7, 9-4
onsmsync 5-8, 5-9
point-in-time verification 5-6
preparing to verify backups 5-3
sbspaces 5-7
sbspaces and blobspaces 5-5
syntaxdiagram 5-3, 16-6
elements 16-7
table-level restore 16-9
temporary files 5-5, 9-4
uses 16-2
using 16-6
verification failure, causes of 5-7, 5-8
verifying expired backups 5-9
whole-system backup 5-6
Autochanger 3-19
Automatic backups.See Continuous log backup.
© Copyright IBM Corp. 1996, 2004 X-1
BBackup
catalogsexpiring and synchronizing 8-6
sysutils 8-6
examples 13-9
expiringon ISM 8-8
filled logical-log files 13-10
oncheckmonitoring history 13-11
ontapecreating 13-9
logical log filled 13-10
TAPEBLK configuration parameter 13-9
TAPESIZE configuration parameter 13-9
overviewlevels 1-2
planning 1-11, 1-12
schedule 1-13, 2-11
Raw tables 13-10
removingexpired backups 8-8
setting TAPEDEV to STDIO 13-8
standard output 13-9
defined 13-7
syntax 13-8
tapes 13-9
Backup Schedulerdefined 2-7
how it works 4-30
monitoring status 8-13
physical, XPS 4-6
SMI tables overview 10-10
sysbuobject table 10-11
sysbuobjses table 10-12
sysbusession table 10-12
sysbusm table 10-12
sysbusmdbspace table 10-13
sysbusmlog table 10-13
sysbusmworker table 10-13
sysbuworker table 10-14
Backup, ON-Bar-O option 2-3, 4-10, 4-18
See also Continuous log backup.
assigning a session name 4-18
automatic log backups 9-5
changing database logging 4-12
checking data consistency 4-8
complete, example of 4-14
current log 2-3, 7-5, 15-3
defined 4-8, 4-19
external 2-4, 7-3, 15-2
fake backups 2-3, 4-17
imported restore 6-34, 6-37
Backup, ON-Bar (continued)incremental, example of 4-14
ISM catalog 4-13
large chunk files 4-3
list of storage spaces 4-14
logical log 1-3, 2-3, 4-20, 4-27
monitoring progress 2-14
operational tables 4-19
physical-only 2-3, 4-10, 4-18
raw tables 4-19
salvaging logs 1-4, 4-21, 4-28
sbspaces, example of 4-17
scratch tables 4-19
sequenceDynamic Server 4-29
Extended Parallel Server 4-30
standard backup 2-3
standard tables 4-19
static tables 4-19
storage-manager installation 4-5
syntax 4-8
table types 4-12, 4-19
temp tables 4-19
verification 2-3, 5-1, 5-9
whole system 2-3
Backup, ontapebefore you create 13-5
interrupted 13-11
labelling the tape 13-7
levels 13-4
monitoring 13-11
one device 12-3
premature termination 13-11
BARdeleting bad backups 8-9
BAR_ACT_LOG configuration parameter 2-14, 3-11,
3-13, 9-7
bar_action table 10-2
BAR_BOOT_DIR configuration parameter 3-13, 9-8
BAR_BSALIB_PATH configuration parameter 3-9,
3-11, 3-13, 9-8
BAR_DBS_COSVR configuration parameter 3-13, 9-10
BAR_DEBUG configuration parameter 2-14, 3-11, 9-10
BAR_DEBUG_LOG configuration parameter 2-14,
3-11, 9-10
BAR_HISTORY configuration parameter 3-11, 3-13,
9-11
BAR_IDLE_TIMEOUT configuration parameter 3-13,
4-31, 9-11
bar_instance table 10-2
bar_ixbar table 10-4
BAR_LOG_COSVR configuration parameter 3-14, 9-12
BAR_MAX_BACKUP configuration parameter 3-12,
4-29, 9-13
X-2 IBM Informix Backup and Restore Guide
BAR_NB_XPORT_COUNT configuration
parameter 3-12, 9-13
bar_object table 10-7
BAR_PROGRESS_FREQ configuration parameter 3-12,
3-14, 9-14
BAR_RETRY configuration parameter 3-12, 3-14, 9-14
bar_server table 10-8
BAR_SM configuration parameter 3-14, 9-16
BAR_SM_NAME configuration parameter 3-14, 9-16
BAR_WORKER_COSVR configuration parameter 3-14,
9-16
BAR_WORKER_MAX configuration parameter 3-14,
3-16, 9-17
BAR_XFER_BUF_SIZE configuration parameter 3-12,
9-18
page size 9-18
BAR_XFER_BUFSIZE configuration parameterdefined 3-14, 9-19
page size 9-20
BAR_XPORT_COUNT configuration parameterdefined 3-14, 9-20
page size 9-20
bargroup group 3-7
BIXBAR file, specifying location of 16-20
Bixbar.hostname.servernum file 2-13
bldutil.process_id file 9-23
Blobspaceavailability for backing up 4-18, 13-12
backing up 1-2
backing up offline 4-18
optical platters 4-4
temp space for archecker 5-5
Block size, ontapeparameter 12-5
tape device 12-6
Blockingdatabase server 7-3, 15-2, 15-3
Boldface type xvii
CChild process, ON-Bar 4-29
Chunkcreating new chunks 14-14
filesre-creating during restore 6-27
renaming 14-14
examples using ON-Bar 6-32
examples using ontape 14-14
listfile 14-14
nonexistent device 14-15
nonexistent device, procedure 14-15
ON-Bar syntax 6-31
overview with ON-Bar 6-30
overview with ontape 14-13
specifying other options 14-15
Chunk (continued)renaming (continued)
with a file 14-14
Chunksrenaming
command line options 6-33
nonexistent device 6-33
specifying other options 6-33
with a file 6-33
Client locale D-1
Code, sample, conventions for xxii
Cold restoreSee also Restoring.
automatic log salvage 6-20
defined 1-5, 1-6, 6-3
ON-Barexample 6-19
renaming chunks during 6-30
sequence 6-48, 6-50
setting mode 6-3
ontapedefined 14-3
mixed restore 14-4
performing 14-8
renaming chunks during 14-13
procedure, in stages 6-18
Command-line conventionshow to read xx
sample diagram xx
Complete restoreonbar -r commands 6-8
procedure 6-8
Compliancewith industry standards xxix
Components, ON-BarDynamic Server 2-4
Extended Parallel Server 2-6
Configuration fileAC_CONFIG 9-4
archecker 16-3
ONCONFIG 9-5
configuration parameterAC_TIMEOUT 9-3, 9-5
ALRM_ALL_EVENTS 9-6
BAR_DEBUG 9-10
BAR_DEBUG_LOG 2-14, 3-11, 9-10
BAR_XFER_BUF_SIZE 9-18
Configuration parameterAC_MSGPATH 9-3, 9-23
AC_STORAGE 9-3, 9-4
AC_VERBOSE 9-3, 9-5
ALARM_ALL_EVENTS 3-11
ALARMPROGRAM 3-11, 4-22, 9-5
BAR_ACT_LOG 2-14, 3-11, 3-13, 9-7
BAR_BOOT_DIR 3-13, 9-8
Index X-3
Configuration parameter (continued)BAR_BSALIB_PATH 3-9, 3-11, 3-13, 9-8
BAR_DBS_COSVR 3-13, 9-10
BAR_DEBUG 2-14, 3-11
BAR_HISTORY 3-11, 3-13, 9-11
BAR_IDLE_TIMEOUT 3-13, 4-31, 9-11
BAR_LOG_COSVR 3-14, 9-12
BAR_MAX_BACKUP 3-12, 4-29, 9-13
BAR_NB_XPORT_COUNT 3-12, 9-13
BAR_PROGRESS_FREQ 3-12, 3-14, 9-14
BAR_RETRY 3-12, 3-14, 9-14
BAR_SM 3-14, 9-16
BAR_SM_NAME 3-14, 9-16
BAR_WORKER_COSVR 3-14, 9-16
BAR_WORKER_MAX 3-16, 9-17
BAR_XFER_BUF_SIZE 3-12, 9-18
BAR_XFER_BUFSIZE 3-14, 9-19, 9-20
BAR_XPORT_COUNT 3-14, 9-20
BAR-WORKER_MAX 3-14
DBSERVERNAME 6-36, 10-8
Extended Parallel Server 3-12, 3-15
multiple storage managers 3-12
global 3-13
ISM_DATA_POOL 3-9, 3-12, 3-15, 9-20
ISM_LOG_POOL 3-9, 3-12, 3-15, 9-20
LOG_BACKUP_MODE 3-15
LTAPEDEV 3-12, 9-21
OFF_RECVRY_THREADS 6-16
ON_RECVRY_THREADS 6-16
RESTARTABLE_RESTORE 3-12, 6-41, 9-22
SERVERNUM 6-36
setting, ontape 12-2
storage-manager section 3-13
ConfiguringISM 3-2
third-party storage manager 3-2
TSM 3-3
Contact information xxx
Continuous log backupexample 2-3
pausing 8-11
specifying 1-3, 4-20, 4-27
using ALARMPROGRAM 9-5
Controlling ON-Bar sessions 8-11
Conventionscommand-line xx
documentation xvi
sample-code xxii
syntax diagrams xviii
syntax notation xviii
typographical xvii
Cooked chunksbacking up 4-8
restoring 6-27
Copying data 16-2
CREATE EXTERNAL TABLE statement 16-11
syntax 16-11
CREATE TABLE statementsyntax 16-10
Critical dbspacesdefined 4-3
cron command 2-9
Current log, backup 2-3
DData
filteringexample, schema command file 16-17
migration tools C-1
recoverySee also Restoring.
defined 1-2
usage 1-11
verifying consistency 4-8
Database loggingbackups 4-12
log backups 4-20
Database logging statusontape, changing 13-3
Database serverblocking 7-3, 15-2, 15-3
evaluating 1-12, 3-21
imported restore 6-34
migration C-1
storage-manager communication 2-7
unblocking 7-8, 15-4
upgrading 6-34, C-1
versions with ON-Bar 2-1
DATABASE statementdeclaring logging mode 16-12
syntax 16-12
DBSERVERNAME configuration parameter 5-4, 10-8
DBSERVERNAME Configuration parameter 6-36
Dbslicebacking up 1-2
restoring 6-17
Dbspacebacking up 1-2
critical 4-3
renamecold restore 14-3
warm restore 14-3
restore selected, ontape 14-2
Debug log, location of 2-14
DebuggingON-Bar, levels of 2-14
Default locale xiii
Deferring index rebuildlogical restore 6-28
Dependencies, software xii
X-4 IBM Informix Backup and Restore Guide
Device, ontape/dev/null 13-15
logical–log backup 13-15
LTAPEDEV parameter 13-15
Disabilities, visualreading syntax diagrams E-1
Disaster recoveryimported restore 6-34
Distributed restoreperforming
schema command file example 16-18
Documentation conventions xvi
Documentation Notes xxiv
Documentation set of all manuals xxvi
Documentation, types of xxiii
backup and restore tasks 2-2
machine notes xxiv
online manuals xxvi
printed manuals xxvi
Dotted decimal format of syntax diagrams E-1
Dropped storage spaceonlog utility 6-28
EElement, syntax
See Syntax element.
Emergency boot file xi
backing up 4-4
how used 2-12
ixbar 2-12
regenerating 8-9
IDS 8-9
XPS 8-9
en_us.8859-1 locale xiii, D-1
Environment variableAC_CONFIG 5-3, 5-8, 9-4, 9-5
GL_DATE D-2
GL_DATETIME D-2
INFORMIXSQLHOSTS 10-8
ISM_DATA_POOL 3-8
ISM_LOG_POOL 3-8
Environment variables xvii
TSMsetting the Informix interface 3-9
setting the Informix interface, example of 3-9
Error messages xxv
Evaluatingbackup and restore time 1-12
hardware and memory usage 1-12
logging and transaction activity 1-13, 3-21
Event alarmalarmprogram.sh 4-22, 9-6
setting ALARMPROGRAM 4-22, 9-6
ex_alarm.sh script 9-6
Examples, CREATE TABLE statement 16-10
Expiration policy 8-6
retention date 8-6
retention generation 8-6
retention interval 8-6
Expiringbackups
all 8-11
generation of 8-10
multiple Point-in-Time restores 8-10
on ISM 8-8
retentioin interval 8-10
retention date 8-9
using onsmsync 8-10
External backupblocking database server 2-4, 7-7, 15-3
defined 7-1, 7-3, 15-2
mirror chunks 7-6, 7-16
mirrored support 7-17
procedure 7-4, 15-3
recovering data, procedure 7-1
third-party mirroring solutions 7-7
tracking backup objects 7-12, 15-4
unblocking database server 7-8, 15-4
External backup and restoreinitializing HDR 7-19
External restorecold restore 15-4
cold restore procedure 7-15, 15-6
examples 2-4, 7-19, 15-6
initializing HDR during 7-19, 15-7
ontape-e command 15-4
-l command 15-4
-p command 15-4
performing 15-6
restored components 15-4
rules 15-5
salvaging logical logs 7-16
syntax diagram 7-14, 15-5
warm restore procedure 7-18
External tablerestoring
example 16-18
schema command file example 16-18
FFake backups 2-3, 4-17
Features in 10.0 xiv
Fileemergency boot 2-12
logical log 1-3
temporary, built by archecker 16-21
finderr utility 2-14, 11-1
Fixed and Known Defects File xxiv
Index X-5
GGL_DATE environment variable D-2
GL_DATETIME environment variable D-2
Global Language Support xiii, D-1
GLS.See Global Language Support.
HHardware resources, evaluating 1-12
HDR.See also High-Availability Data Replication.
external backup and restore 7-19
Help xxvi
High-Availability Data Replicationimported restore 6-34
initializing 6-34, 6-38
initializing with external restore 7-19, 15-7
II/O
simultaneous backup and restore 14-17
environment variables 14-17
example 14-17
secondary host 14-17
IBM Informix Server Administratorbacking up data 4-13
restoring data 6-15
IBM Informix Storage Managerbackup requests 4-13
configuring 3-2
devices supported 3-20
ISM catalog 4-4, 4-13
overview 2-9
requirements 3-19
sm_versions file 3-5
upgrading C-1
Version 2.2 support xii
volume pool names 3-9
Imported restoreixbar.51 6-36
ixbar.52 6-36
performing 6-36
set up 6-35
Importingrestore
defined 6-5
initializing HDR 6-38
Importing a restore 6-35
Incremental backupdefined 1-12
example 4-14
level 1 4-6
level 2 4-7
Industry standards, compliance with xxix
Informix Dynamic Server documentation set xxvi
Informix-Admin group 4-2
INFORMIXDIR/bin directory xiv
INFORMIXSQLHOSTS environment variable 10-8
InitializingHigh-Availability Data Replication with
ON-Bar 6-37
INSERT statementphysical-only restores 16-14
syntax, examples 16-13
Installation Guides xxiii
ISA.See IBM Informix Server Administrator.
ISM catalogbacking up 4-13
directory path 4-4
ism_catalog command 4-13, 6-8
ism_chk.pl command 6-6
ISM_DATA_POOL configuration parameter 3-9, 3-12,
3-15, 9-20
ISM_LOG_POOL configuration parameter 3-9, 3-12,
3-15, 9-20
ism_startup command 3-6
ism_watch command 4-13, 6-8
ISM.See IBM Informix Storage Manager.
ISMData volume pool 3-8, 3-9
ISMLogs volume pool 3-8, 3-9
ISO 8859-1 code set xiii
ixbar.servernum file.See Emergency boot file.
JJukebox 3-19
KKeywords
in syntax diagrams xxi
LLarge files, backup
ON-Bar 4-3
Level-0 archive, open transactions during 16-6
Level-0 backup 1-2
Level-1 backup 1-2, 4-6
Level-2 backup 1-2, 4-7
Light appends 6-40
Localedefined xiii
using GLS with ON-Bar D-1
LOG_BACKUP_MODE configuration parameter 3-15
log_full.sh script 4-21
Logging activity, evaluating 1-13, 3-21
Logging mode, declaring in DATABASE
Statement 16-12
X-6 IBM Informix Backup and Restore Guide
Logical logbackup
-O option 4-18
current log 7-5, 15-3
defined 1-3, 4-20, 4-27
stopping 4-21
syntax, IDS 4-21
syntax, XPS 4-25
ON-Barautomatic backup 4-22, 9-5
blobspace issues 4-17
checking available space 4-7
completion messages 4-27
continuous backup 1-3, 4-20
current log backup 2-3
manual backup 4-20, 4-22, 4-26
replaying records in parallel 6-16
salvaging 2-3, 6-18
skipping replay 6-17
status of backup 4-20
when to back up 4-20
ontapeautomatic backup, starting 13-13
backed-up status 13-13
backup, changing parameters 12-7
backup, device to use 13-15
backup, if tape fills 13-10
backup, on another computer 12-4
backup, procedure 13-12
backup, separate devices 12-3
backup, to /dev/null 13-15
backup, when 13-13
blobspace blobs 13-12
continuous backup 13-14
importance of backing up 1-3
used status 13-13
overviewdefined 1-3
manual backup 1-3
salvaging 1-4
salvage, example of 14-9
Logical logs-b option 4-24
-l option 4-24
-n option 4-24
-P option 4-24
-q option 4-24
-t option 4-24
-u option 4-24
-x option 4-24
onbar -P 4-22
viewing backed-up logs 4-22
logical restoreprocedure 6-16
Logical restoreSee also Restore
See also Restoring.
altering or adding tables during 16-6
deferring index rebuild 6-28
defined 1-7, 2-3
ontapecold restore 14-3
warm restore 14-3
tables and fragments not processed by applier
during 16-6
Logical-logbacking up files
overview 14-12
filesrestoring 14-9
restoring, examples of 14-9
Logical-log backupcurrent log 15-3
logs_full.sh script 4-22, 9-6
LTAPEBLK configuration parameterontape 12-2, 12-5
LTAPEDEV configuration parameterconsiderations 6-21
ON–;Bar 3-12, 9-21
ontapechanging to /dev/null 12-6
if two tape devices 13-11
purpose 13-15
setting 12-2
LTAPESIZE configuration parameter 12-2, 12-5
MMachine notes xxiv
Manual log backupexample 4-22, 4-26
specifying 1-3, 4-20
Massively parallel-processing system 3-21
Memory resources, evaluating 1-12, 9-8
Message fileSee also Activity log, ON-Bar
See also Activity log, ON-Bar.
usage messages xi, 11-2
Message logpath 16-21
Messagesdebugging
storing 16-20
Migratingstorage-manager objects 6-35
Migrating data 16-3
Migrationdatabase server C-1
ontape to ON-Bar C-2
storage managers C-1
Index X-7
Mirroring configurationbackup state 14-8
setting 14-8
Mixbar.hostname.servernum file 2-13
Mixed restoredefined 1-5, 1-6
ON-Bar 6-4
ontape 14-4
point-in-time 6-25
restoring data 6-21
strategies for using 6-22
Moving dataSee Migrating data.
MPP system 3-21
Multiple tables, restoring 16-18
OOFF_RECVRY_THREADS configuration
parameter xiv
Offline storage spaces, restoring 6-16
ON_RECVRY_THREADS configuration
parameter 6-19
On-Barrestore
processes 6-46
ON-Bar-O option
backup 4-10, C-2
restore 4-18, 6-14, 6-26
whole-system restore 6-11
See also Configuration parameter
activity logSee Activity log.
archeckersetting configuration parameters 9-2
backup and restore time 1-12
backup sequenceDynamic Server 4-29
Extended Parallel Server 4-29
cold restore sequence 6-15, 6-50
compared to ontape 1-9, 6-48
components onDynamic Server 2-4
Extended Parallel Server 2-4
configuration parameters 3-11, 3-15, 9-5, 9-22
database servers supported 2-1, 2-2
debuggingspecifying the level of 2-14
migrating from ontape C-2
mixed restore 6-4
monitoring restoresonstat -d 6-7
operations supported 1-9
parallel restore 6-4
ON-Bar (continued)planning recovery strategy
creating backup plan 1-9
data loss 1-11
data usage 1-10
failure severity 1-11
pre-recovery checklist 6-6
progress feedback 2-14
renaming chunks 6-5
restore-e option 6-9
-f option 6-9
-i option 6-9
-I option 6-10
-n option 6-10
-O option 6-11
-q option 6-11
-r option 6-9
-t option 6-11
-w option 6-12
examples 6-15
starting and stopping sessions 8-11
types of restores 6-2
usage messages 11-2, 11-6
warm restore sequence 6-46, 6-49
where to find information 2-2
whole-system restore 6-4
XBSA interface 2-11
ON-Bar activity log.See Activity log.
ON-Bar return codes 11-7
ON-Bar tables xi
bar_action 10-2
bar_instance 10-4
bar_ixbar 10-7
bar_object 10-8
bar_server 2-12
defined 10-10
map xi, 10-9
onbar scriptdefined 8-2
usage and examples 10-2
onbar_d utilitySee also onbar-driver
purpose xi
onbar_m utilitydefined 2-9
ON-Bar diagram 2-8
purpose 4-30
onbar_w utilitydefault setting 8-12
defined 2-4, 2-9, 8-12
ON-Bar diagram 2-8
purpose 4-30
starting onbar-workers 8-5
X-8 IBM Informix Backup and Restore Guide
onbar-driverchild process 4-29
defined 2-5, 2-9
oncfg file 4-4, 4-7
ONCONFIG fileSee Configuration parameter.
oninit -m command 6-20
Online help xxvi
Online manuals xxvi
Online notes xxiii, xxiv
Online storage spaces, restoring 6-26
onmode -cblock command 7-8, 15-4
unblock command 7-8, 15-4
onmode -d command 6-38
onmode -ky command 6-20
onmode -l command 4-18, 4-26
onmode -m command 6-21, 6-41
onmode -sy command 6-21
onsmsync utilityarchecker 5-8, 5-9
defined 2-4
procedure 8-7
using 8-6
onsmsync, expiring old backups 8-10
onstat -d command 6-7, 6-17, B-1
onstat -g bus command 4-31, 8-13, B-4
onstat -g bus_sm command 4-31, 8-14, B-4
onstat -l command 4-18, 4-28, B-4
onstat command B-1, B-6
ontape-D option 14-5
-F option 13-8
-L option 13-8
-s option 13-8
-t option 13-8
-v option 13-9
ensuring adequate memory 13-7
overview 15-4
performing a restore 14-4
ontape utilitybacking up logical log 13-12
backup levels 13-4
backups and modes 13-6
changingdatabase logging status 13-3
LTAPEDEV to /dev/null 12-6
parameters 12-7
TAPEDEV to /dev/null 12-6
checking configuration parameters 12-5
compared to ON-Bar 1-9
configuration parameters 12-2
creating an archive 13-4
device name 16-3
example 16-22
ontape utility (continued)exit codes 13-10
labelling backup tapes 13-6
migrating to ON-Bar 13-6
operations supported C-2
option-D 1-9
-L 14-6
-r 13-8
-s 14-6
parameterschanging 13-8
overriding 13-8
parameters, changing 12-6
physical restore, choosing type 14-2
precautions, one tape device 14-2
premature backup termination 13-3
read to end of tape 13-13
restore, choosing mode 12-3, 14-3
restoring data 14-3
standard outputfake backup 13-8
starting continuous backup 13-12
syntaxfull backup 13-14
logical-log backup 13-2
writing to end of tape 13-13
Operational tablebacking up 4-19
restoring 6-40
Outputmessage log
verbose or terse 16-22
overriding 16-21
Overriding internal checksbackup 2-3, 4-10, 4-18
restore 2-3, 6-11, 6-14, 6-26
whole-system restore 6-21
PPage size
online 16-21
Parallel restoredefined 6-4
example 2-3
ON-Bar 6-4
performing 16-9
Parameter, configurationSee archecker configuration file.
Performingexternal backup
mirror chunks 7-16
mirrored support 7-17
Performing backup 13-8
Performing imported restore 6-36
Index X-9
Physical backup 4-6
defined 4-10
example 2-3, 4-18
Physical restoreSee also Restoring.
defined 2-3
ON-Bar, example 6-18
ON-Bar, procedure 14-2
ontape, cold restore 1-7
types xi
Physical schema, backing up 4-11
Planning a backup system 1-12
pload utility 4-19
Point-in-log restore 2-3, 6-26
Point-in-timecold restore 6-24
stages 6-25
mixed restore 6-25
Point-in-time restore-r option 6-26
-t option 6-26
creating timelines 6-26
defined 6-4
example 2-3, 6-24, D-2
expiring bad backup 6-26
restore from older backup 6-26
specifying timelines 6-26
warm restore 6-26
Printed manuals xxvi
Processes, ON-Bar 4-29, 4-30
Progress, backup or restore 2-14
RRaw chunks
backing up 4-8
restoring 6-27
Raw tablebacking up 4-19
ontape 13-10
restoring 6-40, 14-12
Recovering dataSee Restoring data.
Recoverytables or fragments added or created during 16-6
Recovery strategy planningcreating backup plan 1-11
data loss 1-10
data usage 1-11
failure severity 1-10
Recovery systemcomparing ON-Bar and ontape 1-1, 1-9
defined 1-2
invalid tools 6-18
Recreatingchunk files 6-27
Release Notes xxiv
Remote device, ontapeinterrupt key 13-15
syntax to specify 12-4
tape size 12-5
Rename chunks restore 2-3
defined 6-5, 14-3
ontape syntax 14-13
overview with ON-Bar 6-30
overview with ontape 14-13
Replaying log records 1-4, 6-16
Restartable restoreexample 2-3, 6-41
overview 6-5
using 6-41
RESTARTABLE_RESTORE configuration
parameter 3-12, 6-41, 9-22
RestoreBringing the database back online 14-11
considerations 14-13
dropped storage space 6-28
failed restore 6-44
resolving 6-44
scenarios 6-45
from an older backup 6-26
logical 16-5
manually controlling 16-8
mounting tapes 14-9
multiple storage managers 16-9
new-chunk requirements 6-31
nonlogging databases and tables 6-39
physical 16-4
point-in-timecold 6-24
rename chunk restore with cold restore 6-5
restarting 6-42
standard input 14-16
example 14-16
RESTORE statementsyntax 16-14
Restore, logicalSee Logical restore.
RestoringON-Bar
-O option 2-3, 6-14, 6-21, 6-26
cold, example 6-24
cold, setting mode 6-19
cooked chunks 6-27
dbslices 6-9
external 2-4, 7-14, 7-19
imported 6-5
logical, example 6-16
mixed 6-21
monitoring progress 2-14
offline storage spaces 6-9
X-10 IBM Informix Backup and Restore Guide

Restoring (continued)online storage spaces 6-19
operational tables 6-26
parallel 6-40
physical, example 2-3
point-in-log 2-3
point-in-time example 6-24, 6-26
raw chunks D-2
raw tables 6-27
renaming chunks 6-30, 6-40
restartable 2-3, 6-41
scratch tables 6-40
selected spaces, example 6-42
standard tables 4-19
static tables 6-40
syntax 6-12, 6-32
table types 5-3, 6-39
temp tables 6-40
using ISA 6-15, 6-40
warm 6-15
whole system 6-15
ontape-D option 14-5
-e option 14-5
-f option 14-5
-l option 14-6
-p option 14-6
-v option 14-6
full-system 2-3
selected storage spaces 14-2, 14-11
whole system, steps 14-6
overviewdefined 1-7, 14-6
logical phase 1-5, 1-7
physical phase 1-7, 1-8
Restoring data 6-30, 16-2
archecker 16-4
mixed restore 6-21
point-in-time 16-4
Return codes 11-7
Rewindable tape device 1-12, 12-5
Rixbar.hostname.servernum file 2-13
Root dbspaceonbar -r command 11-8
when to back up 2-13, 4-11
SSalvaging logs
defined 4-28
example 1-4, 2-3
skipping 6-18
Sample-code conventions xxii, 6-19
Save setrestoring 4-8
sbspacebacking up 4-17, 6-8
temp space for archecker 5-3
Scheduling backups 1-13, 4-11
Schema command fileexample 16-17
restoring to a different a table 16-16
restoring to an external table 16-17
restoring to multiple tables 16-18
simple 16-18
using data filtering 16-16
setting 16-16
Schema command file exampleextracting a subset of columns 2-11
performing a distributed restore 16-17
restoring a table from previous backup 16-18
Schema filearchecker 16-3
Scratch tablebacking up 16-3
restoring 4-19
Screen readerreading syntax diagrams E-1
Server locale D-1
SERVERNUM Configuration parameter 6-36
Session name, assigning to backup 4-26
SET statementsyntax
examples 16-15
Severity of data loss 16-15
Shared filesON-Bar, ISM, TSM 9-23
Shared libraryXBSA
default location 1-10
specifying location 3-9, 9-8
Shared-memory parameterssetting to maximum assigned value 14-7
Silos 3-9
Skippinglog salvage 1-4
logical replay 6-19
storage spaces 6-17
sm_versions filebacking up 4-7, 4-16
defining storage manager 4-4
Smart large objectbacking up 3-5
SMI tablesSee Backup Scheduler
Software dependencies xi
SQL code xxii
sqlhosts filecopying 4-4, 4-7
server name 4-7
Index X-11
Stager, manually controlling logical restore using 10-8,
16-5
Standard backupSee Backup.
Standard inputrestoring 14-16
example 14-16
single-user mode 14-16
Standard tablebacking up xi
restoring 4-19
start_worker.sh script 8-5
Static tablebacking up 6-40
restoring 4-19
Storage devicesbackups 5-2, 6-16, 6-28
continuous log backups xvi, 4-21
ISM support 4-13
ISM volume pools 3-20, 4-13
requirements 3-19
Storage manager xi
communication with ON-Bar 2-7, 3-20
configurations 2-7, 3-17
migration 3-15, C-1
onbar -Pviewing backed-up logical logs 4-22
requirements 4-5, C-1
role in ON-Bar system 3-19
sm_versions file 3-2
Storage spacebacking up a list 4-8
backing up all 4-8, 4-14
defined 2-4
offline, restoring 4-14
physical-only backup 4-18
restartable restore 6-41
restoring 1-7, 6-16, 6-41
skipping during backup 6-17
when to back up 4-16, 13-13
stores_demo database xiii
superstores_demo database xiii
Symbolic linksontape
specify tape devices 12-3
Syntax diagrambackup verification 5-3
external backupIDS 7-4
XPS 7-3
external restore 7-8, 7-14, 15-3
logical-log backup 4-2, 4-8
onbar_w 8-12
onsmsync 8-7
restore 6-12, 6-31
Syntax diagram (continued)starting and stopping sessions 8-11
storage-space backup 4-2
summary 4-2
Syntax diagramsconventions 4-10
conventions for xviii
keywords 4-2
keywords in xxi
reading in a screen reader E-1
variables in xxi
Syntax segment xx
sysbuobject table 10-10
sysbuobjses table 10-10
sysbusession table 10-10, 10-11
sysbusm table 10-10, 10-12
sysbusmdbspace table 10-11, 10-12
sysbusmlog table 10-11, 10-12
sysbusmworker table 10-11, 10-13
sysbuworker table 10-11, 10-13
System requirementsdatabase 10-13
software 10-14
sysutilsdatabase
regenerating 8-9
sysutils databaseerror messages 9-23
TTable
alteringraw 6-40
standard 9-23
altering or adding during logical restore 16-6
Table typebacking up 4-12, 4-19
operational 4-12, 6-40
raw 4-19, 6-40
restoring 6-39, 6-40
scratch 4-19, 6-40
standard 4-19, 6-40
static 4-19, 6-40
temp 4-19, 6-40
Tables and fragmentsnot processed by applier during logical
restore 16-6
Tables or fragmentsadded or created during logical recovery 16-6
Tables, restoring to user-specified point in timeSee Logical restore.
Tape autochangers 3-19
Tape block sizeON-Bar 16-5
ontape 16-20
X-12 IBM Informix Backup and Restore Guide
Tape deviceontape
before opening and on closing 12-5
block-size parameters 12-5, 16-21
gathering for cold restore 12-5
gathering for warm restore 12-5
parameters, setting 12-2
precautions with only one 12-3
reading to end 12-2
rewindable device 12-3
specifying symbolic links 12-5
using /dev/null 12-5
setting TAPEDEV to stdio 12-4
writing to end 12-3
Tape libraries 12-4
TAPEBLK configuration parameterontape 3-19, 12-5
TAPEDEV configuration parameterontape
changing to /dev/null 12-5
defined 12-2
if two tape devices 13-11
TAPESIZE configuration parameterontape 12-2, 12-7
Task-documentation matrix 2-2
Temp tablebacking up 13-5
restoring 4-19
Temporary spaces 6-40
Text editorchanging ontape parameters 12-6
Third-party mirroring solutionsexternal backup 7-7
Third-party storage managerconfiguring 3-2
functions 3-2
onbar script 3-2
Tivoli Storage ManagerSee TSM
TOC Notes xxiv
Transactionopen during level-0 archive 2-11, 16-6
Transaction activityevaluating 1-13, 3-20, 16-6
TSMAdministration services 2-11
and Network Data Management Protocol 3-20
Backup and restore services 2-10
client system optionsdsm.sys 3-4
configuring 3-3
client options files 3-3
client system options 3-4
client user options 3-3
defined 2-10, 3-3
TSM (continued)environment variables
setting the Informix interface 3-9
Informix interfaceinitializing passwords 3-5
management classassigning a backup 3-4
INCLUDE option 3-4
Managing resources 2-10
registering 3-5
sm_versions 3-5
Specifying XBSA library location 3-9
storage manager version, defining 3-5
supported features 3-20
Unsupported features 3-20
Typographical conventions xvii
UUnblocking
database server 7-7, 7-8
UNIX operating systembargroup 3-7
copying files 3-8, 3-11, 7-6
Upgradingdatabase server 7-4, C-3
Using CREATE EXTERNAL TABLE statement 16-11
Using CREATE TABLE statement 16-10
Using DATABASE statement 16-12
Using Mixed Restorestrategies 6-21
Utilityarchecker 5-1, 5-2, 6-22, C-1
onsmsync 5-8, 5-9
VVariables, in syntax diagrams xxi, 8-11
Verification, backup 5-1
Verifying raw devices 14-8
Virtual processorON-Bar 1-12
Visual disabilitiesreading syntax diagrams E-1
Volume poolsbackup locations 3-12
default names 3-9
WWarm restore
defined 1-5, 6-2
ON-Barexamples 6-18
sequence 6-15, 6-46
ontapecritical dbspaces 14-12
defined 14-3, 14-12
mixed restore 14-4
Index X-13
Warm restore (continued)ontape (continued)
part of a mixed restore 14-3
performing 14-7
steps to perform 14-4
overview 14-12
Whole-system backupdefined 4-5
specifying 4-11, 4-29
Whole-system restore-O option 6-14, 6-21
defined 6-4
example 4-11, 6-20
ON-Bar 6-4
restartable restore 6-20
syntax 6-6, 6-21
Windowscopying files 7-6, 7-7
Informix-Admin group 4-2
XXBSA interface
described 2-11
XBSA shared librarydefault location 3-9, 4-1
specifying location 2-11, 3-9
xcfg file 3-9
X-14 IBM Informix Backup and Restore Guide


����
Printed in USA
G251-2269-00

Spine information:
IBM
DB
2 IB
M In
form
ix
Vers
ion
10.0
/8.5
IBM
In
form
ix Ba
ckup
an
d Re
stor
e Gu
ide
��
�