dear customer, thank you for purchasing our product, the
TRANSCRIPT

Fingerprint Time and Attendance Terminal Manual
1
Dear Customer,
Thank you for purchasing our product, the Fingerprint Time and
Attendance Terminal!
To fully enjoy the benefits of this product,
please read and understand the important information and instructions
included in this manual.

Fingerprint Time and Attendance Terminal Manual
2
Table of Content
Chapter One Essentials ······································································3
1.1 Environmental Specifications···············································3
1.2 System Overview·································································3
1.3 Finger Placement Guide·······················································4
Chapter Two Basic Functions ···························································5
2.1 Keyboard ·············································································5
2.2 Menu ···················································································6
2.3 Interfaces ·············································································9
Chapter Three Basic Usage Instructions·······································12
3.1 Basic Usage ·······································································12
3.2 Quick Connection Guide····················································17
Chapter Four Administrator Manual············································21
4.1 Data Management ······························································22
4.1.1 User Registration ·····················································23
4.1.2 Administrator Registration ·······································26
4.1.3 Security Level Setting ··············································30
4.1.4 Delete Registration data ···········································31
4.1.5 Download to U Disk·················································32
4.1.6 View Outgoing and Incoming Record·······················32
4.1.7 View Management Record ·······································33
4.1.8 Delete All Records ···················································34
4.2 Setting ···············································································35
4.2.1 System Setting ·························································35
4.2.2 Record Setting ·························································37
4.2.3 Communication Setting ············································39
4.2.4 Brightness Adjustment ·············································43
4.3 System Information····························································43
Chapter Five Appendix ····································································45

Fingerprint Time and Attendance Terminal Manual
3
Chapter One Essentials
1.1 Environmental Specifications
Dear customer, first of all thank you for purchasing our product, the
fingerprint time and attendance machine! Before using the product, you
are expected to read carefully the information and instructions included
in this manual carefully.
1) DO NOT expose the equipment to strong rays, which will have
evidently negative effect on the collection of the fingerprint and
lead to the malfunction of the fingerprint recognition.
2) The allowable operating temperature range for the terminal of
fingerprint time and attendance system is between -5°C-60°C
(23°F to 140°F). Try not to use it outdoors in summer. Long time
exposure in outdoor environment in addition to the heat generated
by the terminal will cause negative influence on its function. If it
must be used in outdoor environment, sunshade and
heat-eliminating equipment are highly recommended.
1.2 System Overview
Fingerprint time and attendance system consists of two parts: the
fingerprint time & attendance terminal and the fingerprint time &
attendance management software.
The terminal is a stand-alone fingerprint reader, mainly responsible for
the registration of employee’s fingerprint and the daily recording of
employee’s arrival and departure times. And the software is designed to
read attendance log of the terminal, to calculate worked hours by
following the attendance rules set by the administrator, and to generate
various kind of statistical reports.
There are four modes for the communication between the terminal and
the software: RS232, RS485, TCP/IP and U disk. RS232 and RS485 are
the standard communication modes of the terminal.

Fingerprint Time and Attendance Terminal Manual
4
Correct
Too perpendicular Too deflective
Tilting Too Low
1.3 Finger Placement Guide
When installation of the terminal is completed, the fingerprints will be
registered first and then followed by the validating operation. The
fingers recommended for registration are the forefinger and middle
finger.
Correct finger placement method: Press with your finger right on the
fingerprint gathering window, with the fingerprint’s centre aligning to
the centre of the gathering window as much as possible. Finger press
method is shown as the following Figure1-1.
Figure 1-1

Fingerprint Time and Attendance Terminal Manual
5
Chapter Two Basic Functions
2.1 Keyboard
The configuration of the keyboard is demonstrated by Figure 2-1
The function is illustrated as figure 2-2.
1 2 3 ESC
4 5 6 MENU
7 8 9 ▲▲▲▲
� ESC To perform EXIT or CANCEL when operating
the menu
� MENU To access menu management
� OK To confirm the current setting item
� To switch on and off the machine
� ▲ Scroll-up button for menu operation
� ▼ Scroll-Down button for menu operation
� 0…9 To input numbers when operating or selecting
menu
Figure 2-1
Figure 2-2

Fingerprint Time and Attendance Terminal Manual
6
2.2 Menu
The terminal is convenient to operate, with function keys and numerical
keys to perform flexible menu selection, keyboard input and various
settings. The level-1 menu includes three categories: record
management, setting and system information. Each menu consists of
various subordinate level-2 and level-3 menus to perform corresponding
operations.
2.2.1 The Constitution of Menu
The constitutions of the level 1 menu are:
1> Data Management: To register and delete the fingerprints,
passwords and data on inductive card of the users or the
administrators, and to perform the functions such as examining
records, setting arithmetic, security and downloading records etc..
2> Setting: To set the system information of the terminal.
3> System Information: To examine the information recorded in the
terminal.
The structural diagram of the menu is demonstrated as follows:
Menu
Data Management
Setting
System Information
Level 1 Menu

Fingerprint Time and Attendance Terminal Manual
7
Data Management
Fingerprint and
Password
Password User
Administrator
Registration
Delete Registration
data
Security Log
Setting
View Outgoing
and Incoming
View Management
Record
Fingerprint
1: 1 Security Setting
1: N Security Setting
Delete All Records
U Disk
Download
Download Management
Record
Download All Outgoing
and Incoming Record
Download Outgoing and
Download All
Management Record
If the machine does
not have U Disk
function then this
menu will not be
available.
Level-1 Menu
Level-2 Menu
Level-3 Menu
For inductive card machine type,
“Password” is changed to
“Inductive card”
2.2.1.1 Data Management Menu
Press OK when moving the cursor on the item of Data Management in
the leve-1 menu to access the level-2 menu, which has totally eight
items/options and some of them have corresponding sub items, the
level-3 menu, as shown in the following figure:

Fingerprint Time and Attendance Terminal Manual
8
2.2.1.2 Setting Menu
Press OK when moving the cursor on the Setting item of the level-1
menu to enter the level-2 menu, which has four items
with their corresponding sub items, the
level-3 menu, as the follows:
Setting
Communication
Setting
Record Setting
System Setting
Management Record Alert
Total number of Administrators
Language
Time Setting
Lock Time-lapse
Ring Times
Auto Shutdown
IP Address
Password
Terminal Number
Repeat Confirmation Time
Outgoing and
incoming Record
Machine Number
Baud Ratio
Subnet Mask
Default Gateway
RS485 Communication
Ethernet
If there is no
TCP/IP function in
this machine, then
this menu will not
be available. But
the “Machine
Number” and
“Baud Ratio” will
be displayed on the
menu of System
Setting. Brightness
Adjustment
Level-1 Menu
Level-2 Menu Level-3 Menu

Fingerprint Time and Attendance Terminal Manual
9
2.2.1.3 System Information Menu
Press OK when placing the cursor on the item of System Information in
the level-1 menu to access the level-2 menu and three menu items will
be displayed with six items of information available. Press OK in each
menu to display another item as follows:
Note: If the cursor is placed on the item of User Registration and OK
is pressed, then the information of Administrator Registration will be
displayed. Press OK again to return to the information of User
Registration. The other two items are similar.
2.3 Interface
There are three types of interfaces for the fingerprint time and
attendance terminal: 9-pin RS232 interface, RJ45 interface and 16-pin
external extension interface.
Administrator
Fingerprint
Registration Password
Registration
User
Registration
System Information
Outgoing
and
Record
Management
For inductive type, this will be
“Inductive Card Registration”
Press OK
Press OK
Level-1 Menu
Secondary Menu Secondary Menu
Press OK

Fingerprint Time and Attendance Terminal Manual
10
e
RS232 interface provides RS232 communication, Lock or wiegand
output function; while RJ45 interface provides RS485 and TCP/IP
communication function. (Please refer to the Section 5.1.1 of Chapter
Five Interface Definition, Appendix, Chapter Five for the Details of
the definition of connectors)
Left RJ45 interface provides RS232 communication, Lock or wiegand
function; while Right RJ45 interface provides RS485 and TCP/IP
communication functions.(Please refer to the Section 5.1.2 Interface
Definition of Chapter Five Appendix for the Details of the interface
definition)
Right RJ45
Interface
Left RJ45
Interface
RS232
Interface
RJ45
Interface
Figure 2-3
Figure 2-4

Fingerprint Time and Attendance Terminal Manual
11
16-pin external extension interface provides all communication
interfaces and power supply functions. It provides interface when the
machine is embedded in a wall to conceal the connection wires. (Please
refer to the Section 5.1.3 Interface Definition of Chapter Five
Appendix for the details of the interface definition)
16-pin external
extension interface 图 2-5

Fingerprint Time and Attendance Terminal Manual
12
Chapter Three Basic Usage Instructions
3.1 Basic Usage
3.1.1 Installing Fingerprint Time and Attendance Terminal
1> Unwrap the package and take out the terminal and such
components as electrical wire, iron board and bolts etc.
2> Fasten the iron board with the bolts on an appropriate place.(The
influence of strong magnetic and electric field should be avoided
when fastening)
3> Hang the terminal on the iron board and fastening them with the
bolts or locks supplied with the machine.
4> Connect the electrical wire and turn on the terminal (Press
button).
3.1.2 Fingerprint Registration
There are three registration validation modes available for the terminal:
fingerprint, password and inductive card. Generally speaking, machine
of a certain type will have two registration modes: one is fingerprint and
password mode and the other is fingerprint and inductive card mode.
When registering the fingerprint, each person will have an exclusive ID
number, which is the corresponding number of the user information in
the time and attendance management software to the record in the
terminal. Each ID number can register 3 fingerprints and 1 password (or
inductive card) at most. When the machine is in normal function, the
interface will be as follows:
Welcome
19::::28
05/05/17 Tue

Fingerprint Time and Attendance Terminal Manual
13
3.1.1.... Fingerprint Registration
Under normal working status, press MENU to access Menu -> Record
Management ->User Registration ->Fingerprint Registration ->New
Registration -> Input ID Number ->Press with the finger for three times
->Save ->Exit. Detailed procedure is as follows:
When MENU is pressed, the following will be displayed:
Press OK to display the following:
Press OK to display the following:
Menu ▼
Data Management
Setting
System Information
Data Management ▼
User Registration
Administrator Registration
Security level Setting
User Registration ▼
Fingerprint Registration
Password Registration
Fingerprint and Password

Fingerprint Time and Attendance Terminal Manual
14
Press OK button to display the following:
Press OK to display the following
Input the corresponding ID number with the numerical keys,and then
press OK to display the following
Press a finger on the fingerprint sensor and then move the finger away.
Press it with the same finger for the second time or third time according
to the instruction on the screen. When the registration is successful, the
following will be displayed.
New Registration
Registration Number
00001
New Registration
Please press with your finger!
Fingerprint Registration
New Registration?
No ESC Yes OK
New Registration
00001-0
Invalidate ESC Save OK
Note: 00001-0
The last digit 0 represents the first
fingerprint
Note: Range of numbers 1-65535.
The ID number will be defaulted to be
00001 for the initial registration.

Fingerprint Time and Attendance Terminal Manual
15
Press OK to save it and the registration is successful, displayed as
follows:
Press OK to continue registering new users while press ESC to register
backup fingerprint. When making backups, only the same ID number is
needed to input. For password and inductive card registration,
expatiation is given in “Chapter Four Administrator Manual”.
Tip:
1> If there is no registered administrator, then any people can modify
the settings of the terminal. If there is administrator registered, then
you must be validated by the administrator before you can do any
modifications to the machine. The administrator has the supreme
authority over the machine, and he can also punch in and out like a
normal user, while the normal user can only use the time and
attendance function and can not modify any settings.
2> In the process of registering the password, when inputting the ID,
only the proportion of nonzero and those behind it are required to
input. If the employee registration number is 0050, only “50”is to
be input.
3> When registration is finished, it is recommended that you check the
validity of your enrolled fingerprint immediately. The method is to
press the finger registered on the touch sensor. If it can be verified
successfully, it means your fingerprint is clear and registered in
good quality. If it fails to be recognized, it means that the
fingerprint registered is not clear and in poor quality. It should be
registered again or with another finger.
Fingerprint Registration
New Registration?
NO ESC Yes OK

Fingerprint Time and Attendance Terminal Manual
16
3.1.2 Fingerprint Validation
When validating the fingerprint, if the validation is successful, then a
vocal instruction of success validation “Thank you” will be prompted,
displayed as follows
If it fails, a vocal message for failed validation “please press your finger
again” will be prompted and displayed as follows:
Tip::::
1> When making user validation, make sure that the fingerprint
pressed is the one registered and it should be in correct press
method.
2> When the terminal is set with a time range for checking in or out,
within that period, if the user presses his fingers for multiple times,
a voice will give instruction as “Signed in already, thank you”; the
interface of the terminal will displayed “Signed in already”; and
only the previous time and attendance record will be saved.
Fingerprint Validation
Please press your finger again!
Fingerprint Validation
Registration Number 00001
Validation Successful!

Fingerprint Time and Attendance Terminal Manual
17
3.2 Quick Connection Guide
Basic procedure for quick connection:
1> Connect the terminal to power supply.
2> Select the communication mode for the terminal RS232, RS485,
TCP/IP or U Disk. (Please refer to 3.2.1\3.2.2\3.2.3\3.2.4 for
specific connection method)
3> Turn on the terminal.
4> Install the fingerprint time and attendance management software in
PC. (Please refer to the software manual for specific installation
method)
5> Run the fingerprint time attendance management software. (Please
refer to the software manual for specific operation method)
6> Search the fingerprint time and attendance terminal (Terminal
Administration-> Equipment Setting-> Adjust relevant settings ->
Search).
3.2.1 Direct Connection through RS232
1> RS232 communication parameter setting. Press MENU to enter
Menu ->Setting ->Communication Setting ->Machine Number
Setting -> Baud Ratio Setting -> Press ESC ->Press OK -> Press
ESC to exit. The default display of the communication setting
menu is as follows:
2> Turn off the fingerprint time and attendance terminal.
Communication Setting
▼
Machine Number 1
Baud Ratio Setting
Note: For a single terminal, default setting is
recommended; for multiple terminals, the
machine number must not be repeated but
should be set to different numbers.

Fingerprint Time and Attendance Terminal Manual
18
3> Connect the terminal to a PC with RS232 communication cable
with one end connecting to the 9-pin communication serial port of
the PC and the other end to the 232 communication interface of the
terminal (Note: 9-pin serial port and RJ45 interface two types of
interface are available).
4> Restart the terminal.
3.2.2 Direct Connection through RS485 or Network Connection
1> In Communication Setting, press Scroll-down button and set
RS485 communication to “Yes” and Ethernet to “No”, displayed
as follows:
2> Turn off the terminal.
3> Connect the seventh and eight pins of the supplied RJ45 bare wire
to the 485+ and 485- of the converter respectively. (Please refer to
appendix 5.2 for the definition of wire connection)
4> Connect RS485 converter to the serial port of the PC and the other
end to the RJ45 interface of the terminal
5> Restart the terminal.
3.2.3 Network Connection through TCP/IP
1> In communication setting, press Scroll-down to set RS485
communication to “No” and set Ethernet to “Yes”, displayed as
follows:
Communication Setting ▼
Default Gateway
RS485 Communication Yes
Ethernet No
Note: Machine number, Baud Ratio and
serial port should be consistent to those
of the management software. In
addition, RS232/RS485 converter is not
included in standard configuration.

Fingerprint Time and Attendance Terminal Manual
19
2> Turn off the terminal.
3> Set the IP address, subnet mask and default gateway to those of the
LAN, displayed as follows:
4> Connect the network cable of the LAN to the RJ45 interface of the
terminal.
5> Turn on the terminal.
3.2.4 Connection through U Disk (USB Flash Drive)
1> Plug the U disk into the USB interface of the terminal
2> Press OK in U Disk Download of Data Management as follows:
Communication Setting
▼
Default Gateway
RS485 Communication No
Ethernet Yes
Note: The IP address of TCP/IP
communication should be unique.
Password is the communication code. It
should be consistent to the one in the
management software.
Communication Setting ▼
Default Gateway
RS485 Communication No
Ethernet Yes
Note: Mark means that
the record has been
downloaded when it is marked.
U Disk Download ▼
Download Outgoing and Incoming Record
Download All Outgoing and Incoming Record
Download Management Record

Fingerprint Time and Attendance Terminal Manual
20
3> Select Download Access Record, press OK to download record.
Tip:
1> The maximum communication distance of RS232 is only 15m (49
ft.).
2> RS485 communication can connect multiple terminals (e.g. 32
terminals) and the maximum communication distance can reach
1200m (3937 ft.).
3> TCP/IP communication mode belongs to Ethernet network
connection. It can connect to any terminals in the LAN and can
also use the network technology like VPN to make distant Internet
connection.
4> U Disk communication requires no wiring communication mode,
with neither limit on the numbers of the equipments nor
communication distance.

Fingerprint Time and Attendance Terminal Manual
21
Chapter Four Administrator Manual
Under normal working status, press MENU to display the following
when there is no administrator registered:
If there is any administrator registered, the following will be displayed:
If the validation for the administrator fails (Incorrect fingerprint,
password or inductive card), then the message of “Illegal Operation!”
will be displayed and followed by audible indication. The validation for
the administrator should be restarted again. And if it succeeds, then you
can access the menu interface.
Tip:
1> For the administrator registered with fingerprint, press MENU
first,and press the finger on the touch sensor. After successful
validation, the menu interface will be displayed.
2> For the administrator registered with password, press MENU first,enter the registered numbers, press OK, then enter the password
followed by pressing OK. When it is confirmed, the menu interface
will be displayed.
3> For the administrator registered with inductive card, press MENU
first, then swipe the card through the inductive area. If it matches
correctly, the menu interface will be displayed.
Menu ▼
Data Management
Setting
System Information
Administrator Confirmed
19::::28
05/05/17 Tue

Fingerprint Time and Attendance Terminal Manual
22
4.1 Data Management
Level-1 menu interface is displayed as follows:
Press the Scroll-down button in the interface to go through
corresponding menu. If the menu of Data Management is selected,
press OK to enter the level-2 menu interface as follows:
There are totally eight leve-2 menus in Data Management, namely User
registration, Administrator registration, security level setting, U disk
download, Delete registration data, View outgoing and incoming record,
view management record and delete all records.
Data Management ▼
User Registration
Administrator Registration
Security Level Setting
Menu ▼
Data Management
Setting
System Information
Data Management ▼
U Disk Download
Delete Registration data
View Outgoing and Incoming Record
Data Management ▼
View Outgoing and Incoming Record
View Management Record
Delete All Records

Fingerprint Time and Attendance Terminal Manual
23
4.1.1 Select User Registration menu and then press OK to enter the
leve-3 menu as follows:
1> Select fingerprint registration and then press OK to display the
following interface:
Press OK to access the following interface:
Enter ID number and press OK to display the following:
User Registration ▼
Fingerprint Registration
Password Registration
Fingerprint and Password
New Registration
Registration Number 00001
Exit ESC Setting OK
New Registration
Please Press with Your Finger
Fingerprint Registration
New Registration?
No ESC Yes OK
Note: The range of the numbers are
from 1-65535.
For initial registration, the ID
number is defaulted to be 00001.

Fingerprint Time and Attendance Terminal Manual
24
Press with the same finger for three times according to the instruction on
the interface. Successful registration will lead to the following:
Press OK to save it. Registration is successful and it will be displayed as
follows:
Press OK to continue registering new users while press ESC to register
backup fingerprint. When making backup, enter the same ID number
with a finger press for three times. Then save it.
2> Select password registration and press OK to display the following:
Press OK to display the following:
New Registration
Registration Number 00001
Exit ESC Setting OK
New Registration
00001-0
Invalidate ESC Save OK
Password Registration
New Registration?
NO ESC YES OK
Fingerprint Registration
New Registration?
No ESC Yes OK
Note: 00001-0
The last digit 0 represents the
first fingerprint.

Fingerprint Time and Attendance Terminal Manual
25
Enter the corresponding ID number of the person and press OK to
display the following:
Enter password and then press OK to display the following:
When finishing inputting the password, press OK to display the
following:
Press OK to save it and the registration is successful, as displayed as
follows:
Press OK to continue registering new ID number while press ESC to
exit.
Note: Four Digits in maximum
for password.
Password Registration
New Registration?
No ESC Yes OK
New Registration
00001-P
Invalidate ESC Save OK
Note: 00001-P
The letter P means that the
registration type is password
New Register
Input Password
Exit ESC Set OK
New Registration
Input Password ****
Confirm Password

Fingerprint Time and Attendance Terminal Manual
26
3> Choose inductive card number registration and press OK to display
the following:
Press OK to display the following:
Place the inductive card on the induction area and the following will be
displayed:
Press OK to finish registration. Press ESC to exit.
4.1.2 Choose Administrator Registration menu and press OK to access
the level-3 menu as follows:
Administrator Registration ▼
Fingerprint Registration
Password Registration
Fingerprint and Password
Inductive Card Number Registration
New Registration?
No ESC Yes OK
Input inductive card number
Exit ESC Set OK
Input Inductive Card Number
6549261
Exit ESC Set OK

Fingerprint Time and Attendance Terminal Manual
27
1> Select Fingerprint Registration and press OK to display the
following:
Press OK to display the following:
Enter the corresponding ID number of the person and then press OK to
display the following:
Press with the same finger for three times. If registration is successful,
the following will be displayed:
New Registration
00001-0
Invalidate ESC Save OK
Note: The range of the
number is 1-65535.
New Registration
Registration Number 00001
Exit ESC Setting OK
New Registration
Please Press with Your Finger!
Fingerprint Registration
New Registration?
No ESC Yes OK

Fingerprint Time and Attendance Terminal Manual
28
Press OK to save and the registration is successful, displayed as follows:
Press OK to continue registering new users while press ESC to register
backup fingerprint. When making backup, input the same ID number,
press with the same finger for three times and save it.
2> Select Password Registration and press OK to display the
following:
Press OK to display the following:
Enter the corresponding ID number of the person and press OK to
display the following:
Password Registration
New Registration?
No ESC Yes OK
New Registration
Registration Number 00001
Exit ESC Setting OK
Fingerprint Registration
New Registration?
No ESC Yes OK

Fingerprint Time and Attendance Terminal Manual
29
After inputting password, press OK to display the following:
When finishing inputting the password, press OK to display the
following:
Press OK to save and the registration is successful, displayed as follows:
Press OK to continue registering new ID number while press ESC to
exit.
3> Select Inductive Card Number Registration and press OK to
New Registration
00001-P
Invalidate ESC Save OK
New Register
Input Password
Exit ESC Setting OK
Password Registration
New Registration?
No ESC Yes OK
New Registration
Input Password ****
Confirm Password

Fingerprint Time and Attendance Terminal Manual
30
display the following:
Press OK to display as follows:
Place the inductive card on the induction area and the following will be
displayed:
Press OK to finish registration while press ESC to exit.
4.1.3 Select Security Level Setting menu and press OK to access the
level-3 menu as follows:
Security Level Setting ▼
1: 1 Security Setting
1: N Security Setting 1
Input Inductive Card Number
Exit ESC Set OK
Input Inductive Card Number
6549261
Exit ESC Set OK
Note: 1:1 security value is 0~50 and the suitable value is 27.
1: N security value is1~4, suitable default value is 1.
Inductive Card Number Registration
New Registration?
No ESC Yes OK

Fingerprint Time and Attendance Terminal Manual
31
The security level setting is an equilibrium value of FAR (False
Acceptance Rate) and FRR (False Rejection Rate). FAR indicates that the
machine mistakenly acknowledges the fingerprint of user A as the
identity of user B, while FRR means that the machine falsely rejects
registered fingerprint. 1:N security value is based on the security level
value of all the users while 1:1 security value is based on the security
level value of individuals who have difficulties to pass validation.
In general use, security level value based on all users can be set. (1:N is
defaulted to be 1). While for individuals who are difficult to pass
validation, 1:1 validation method (ID+fingerprint) can be adopted. If
the fingerprint of a certain user is abrased, his security level value can be
reduced to improve the validation passing rate.
4.1.4 Select Delete Registration Data menu and press OK to access
the level-3 menu as follows:
Input the registration number to be delete, e.g number 00001, and then
press OK to display the following:
Press OK to confirm as the following:
Delete Register Record
Registered Number 00001----0
Delete Registered Data
Registration Number 0000
Note: the last number of
00001-0 indicates the first
fingerprint.

Fingerprint Time and Attendance Terminal Manual
32
Press OK to delete. A sound “click” will be sent out with a prompt of
“No Registration Data!”. Then it will return to the interface of whether
continue to delete data. Press ESC to cancel and exit.
4.1.5 Select U Disk Download menu, and press OK to access the
level-3 menu as follows:
When downloading with U disk, insert a USB flash drive into the USB
interface of the machine and select Download Outgoing and Incoming
Record to display the following:
Press OK to mark the record as having been downloaded when
downloading it (like a bookmark). If it needs to be downloaded again,
only through Download All Outgoing and Incoming Record that can
it be downloaded. Successful downloading will display the message of
“Download Successful”. And Download Management Record is in the
same way.
4.1.6 Select View All Outgoing and Incoming Records menu and
Download Outgoing and
Incoming Record
Mark?
No ESC Yes OK
Delete Registration Data
Delete?
No ESC Yes YES
U Disk Download ▼
Download Outgoing and
Incoming Record
Download All Access Record
U Disk Download ▼
Download All Outgoing and
Incoming Record
Download Management Record
Note: The data recorded in the machine is in
circulation. That is, for those have been
downloaded, they will be stored in the
machine until the number reaches 50000.

Fingerprint Time and Attendance Terminal Manual
33
press OK to access the level-3 menu as follows:
Input the number to be viewed (e.g 00001) and then press OK to display
the following:
The interface can show the total times of a certain user validated with
fingerprint, as well as the detailed time, user registration number and
type of each validation.
4.1.7 Select View Management Record menu and press OK to access
the level-3 menu as follows:
When finishing input the administrator number, press OK to display the
following:
Note: C-00001: total number of access record is 1
N-00001: indicates the latest record.
05/05/20 20:45: Validation time
V_F: indicates the registration type is fingerprint
View Outgoing and Incoming Record
Registration Number 00000
View Management Record
Registration Number 00000
Check Outgoing and Incoming
Record C-00001
N-00001
05/05/20 20:45 V_F
00001
No SC Yes OK

Fingerprint Time and Attendance Terminal Manual
34
The interface can view the total times of the administrator managing the
machine, the detailed time of each management, administrator
registration number and type of management.
4.1.8 Select Delete All Records menu and press OK to access the
leve-3 menu as follows:
Press OK to delete all outgoing and incoming record while press ESC
to cancel and exit.
Tip:
1> When viewing outgoing and incoming record, the labels in the
interface are of the following meanings:
V_F: The registration type is fingerprint registration; V_P: The
registration type is password registration;
V_C: The registration type is inductive card.
2> When viewing management record, the labels in the interface are of
the following meanings:
E_U: General User Registration E_M: Administrator Registration
Delete All Records
Delete?
NO ESC Yes OK
View Management Record C-00001
N-00001
05/05/20 20:45 S_S
00002
No ESC Yes OK
Note: C-00001: Total number of management is 1
N-00001: The latest time.
05/05/20 20:45: Management Time
S_S: indicates management type
Note: When the command of Delete
all records is confirmed, all of the
records will be deleted completely.

Fingerprint Time and Attendance Terminal Manual
35
E_DF: Delete Fingerprint Registration Record
E_DP: Delete Password Registration Record
D_L: Delete All Record Data S_T: Time Setting
S_S: System Setting S_L: Record Setting
S_C: Communication Setting
4.2 Setting
In normal working status, press MENU to enter and select Setting menu.
Then press OK to access the level-2 menu with the following display:
The Setting menu consists of system setting, record setting,
communication setting and brightness adjustment.
4.2.1 System Setting
In System Setting, press OK to display the following:
There are totally seven level-3 menus in System Setting including:
Total number of administrators, language, time setting, lock time-lapse,
Ring Times and auto shutdown.
Setting ▼
System Setting
Record Setting
Communication Setting
Setting ▼
Record Setting
Communication Setting
Brightness Adjust
System Setting ▼
Total Number of Administrators 5
Language Simplified Chinese
Time Setting
System Setting ▼
Lock Time-lapse 2
Ring Times No
Auto Shutdown No
Fingerprint Time and Attendance Terminal Manual
36
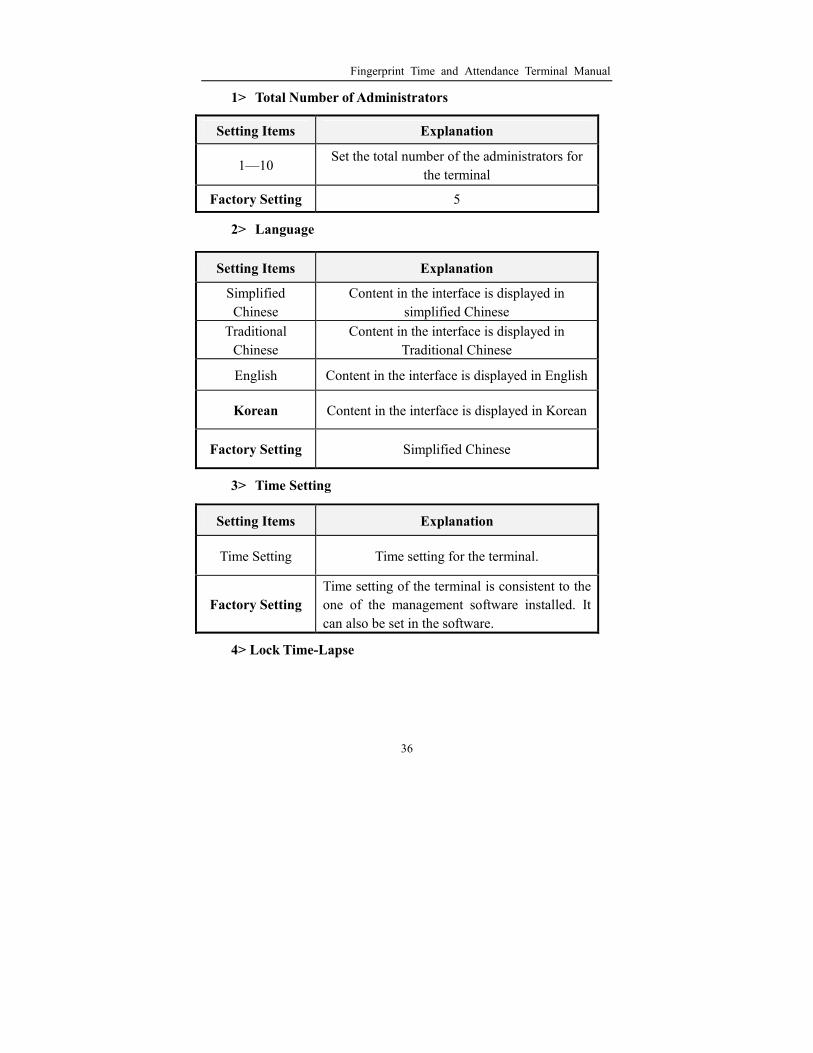
1> Total Number of Administrators
2> Language
3> Time Setting
4> Lock Time-Lapse
Setting Items Explanation
1—10 Set the total number of the administrators for
the terminal
Factory Setting 5
Setting Items Explanation
Simplified
Chinese
Content in the interface is displayed in
simplified Chinese
Traditional
Chinese
Content in the interface is displayed in
Traditional Chinese
English Content in the interface is displayed in English
Korean Content in the interface is displayed in Korean
Factory Setting Simplified Chinese
Setting Items Explanation
Time Setting Time setting for the terminal.
Factory Setting
Time setting of the terminal is consistent to the
one of the management software installed. It
can also be set in the software.

Fingerprint Time and Attendance Terminal Manual
37
5> Ring Times
6> Auto Shut-down
4.2.2 Record Setting
Select Record Setting menu, press OK to enter the level-3 menu as
follows:
Setting Items Explanation
Yes When confirmed, the control signal of the
electrical lock is output.
No When confirmed, no signal of the electrical
lock is output.
Factory Setting Yes
Setting Items Explanation
0~15 Set the total times of internal ring
Factory Setting No
Setting Items Explanation
No Disable the function of auto shut-down.
1—255
If there is no operation on the terminal and the
time for auto shut-down is set, then the function
of the machine is enabled. The unit is “Minute”.
Factory Setting No
Record Setting ▼
Management Record Alert 100
Outgoing and Incoming Record Alert 1000
Repeat Checking Time No

Fingerprint Time and Attendance Terminal Manual
38
There are three level-3 menus in Record Setting: Management Record
Alert, Outgoing and Incoming Record Alert and Repeat Checking Time.
1> Management Record Alert
Note: Users are informed by message and voice prompt that the
management record storage space is about to be full.
2> Outgoing and Incoming Record Alert
Setting Items Explanation
No
Indicates that the terminal will not give out alert
when the outgoing and incoming records are
overflowed. If the outgoing and incoming records
are overflowed, then the overflowed records can not
be stored.
1—1500
The terminal will inform that the records are
overflowed according to the value set. If the
outgoing and incoming records are overflowed, then
the terminal will be incapable to store the
overflowed records.
Setting Items Explanation
No
The terminal will not give out alert when the
records are overflowed. If the management
records are overflowed, then the terminal is
incapable to store the overflowed management
record.
1—255
The terminal will give out alert according to the
value set to inform the overflow of management
record. If the value is 100, then the alert will be
given out from the 900th record. If the
management records are overflowed, then the
terminal is incapable to store the overflowed
management record.
Factory Setting 100

Fingerprint Time and Attendance Terminal Manual
39
Factory Setting 1000
Note: Users are informed by message and voice prompt that the
management record storage space is about to be full. Once record alert is
given out, please download the record as soon as possible.
3> Repeat Checking Time
Setting Items Explanation
No Indicates that the terminal will not inspect the repeat
checks on work attendance.
1—255
Indicate the terminal will inspect the repeat checks on
work attendance according to the value set with the unit
“Minute”.
Factory Setting No
Note: This function is to inspect whether users check on work
attendance repeatedly. If the user checks on work attendance repeatedly,
no repeated record will be stored.
4.2.3 Communication Setting
Select Communication Setting menu and press OK to access the
level-3 menu displayed as follows:
Communication Setting ▼
Machine Number 1
Baud Ratio 38400
Port Number 5005
Communication Setting ▼
Password 0
IP Address
Subnet Mask
Communication Setting ▼
Subnet Mask 1
RS485 Communication Yes
Ethernet No

Fingerprint Time and Attendance Terminal Manual
40
There are nine level-3 menus available for System Setting: machine
number, baud ratio, port number, password, IP address, subnet mask,
default gateway, RS485 and Ethernet gateway.
1> Machine Number
Note: Machine number is the unique ID for the machine. If there are two
machines with the same machine number in the network, not only can
they not work properly, but also the management software will be
confused when acquiring the time attendance record. So the uniqueness
should be given attention in network use.
2> Baud Ratio
Note: The value must be set consistently to the communication ports of
the PC Administration Machine. Otherwise, no communication can be
made.
Setting Items Explanation
1—255 To set the ID number for machines.
Factory Setting 1
Setting Items Explanation
9600 The Baud Ratio of Communication Port is set to
be 9600bps
19200 The Baud Ratio of Communication Port is set to
be 19200bps
38400 The Baud Ratio of Communication Port is set to
be 38400bps
Factory Setting 38400

Fingerprint Time and Attendance Terminal Manual
41
3> Port Number
Note: The port must be consistent with the port number of the software
in the PC administration machine. Otherwise no communication can be
made.
4> Password
4> IP Address
Note: The IP address in the LAN is unique.
5> Subnet Mask
Setting Items Explanation
1—9999 To set the software port of the TCP/IP
communication of the terminal
Factory Setting 5005
Setting Items Explanation
0-999999 Set the access password of TCP/IP
communication
Factory Setting No
Setting Items Explanation
192.168.1.224 Set the IP address of the machine when access
through TCP/IP communication.
Factory Setting 192.168.1.224
Setting Items Explanation
255.255.255.0 Set the subnet mask of the LAN when using
TCP/IP communication
Factory Setting 255.255.255.0

Fingerprint Time and Attendance Terminal Manual
42
Note: Subnet mask must be consistent with the one in the LAN.
6> Default Gateway
Note: The default gateway must be consistent with the one of the LAN.
7> RS485 Communication
Note: Set RS485 communication switch for the RS485 communication
function of the machine. If the machine has TCP/IP function,it is
defaulted to be “OFF”; Otherwise it is set to be “ON”.
8> Ethernet
Note: TCP/IP communication is the switch for the TCP/IP
communication function of the machine. If the machine has TCP/IP
function,it is defaulted to be “OFF”; Otherwise it is set to be “ON”..
Setting Items Explanation
192.168.1.1 Set the default gateway of the LAN when using the TCP/IP communication
Factory Setting 192.168.1.1
Setting Items Explanation
Yes Set RS485 communication switch
Factory Setting Yes
Setting Items Explanation
Yes Set the switch of TCP/IP communication
Factory Setting Yes

Fingerprint Time and Attendance Terminal Manual
43
4.2.4 Brightness Adjustment
Select Brightness Adjust menu and press OK to display the following:
Select the menu of Brightness Adjust and press OK, the sound of
“click” will be given out twice indicating that the brightness auto match
function of the sampling instrument in the machine is finished. The
software will search for the optimal brightness value for the instrument.
4.3 System Information
Select System Information menu and press OK to access the level-3
menu as follows:
There are 6 level-3 menus in System Information, namely user
registration, administrator registration, fingerprint registration, password
registration, outgoing and incoming record and record management.
These items can be switched through the OK button.
1> User Registration: to view the total number of users registered.
2> Administrator Registration: to view the total number of
administrator registered.
3> Fingerprint Registration: to view the total number of fingerprint
registered.
Setting ▼
Record Setting
Communication Setting
Brightness Adjust
System Information ▼
User Registration 5
Fingerprint Registration 5
Outgoing and Incoming Record 10
System Information ▼
Administrator Registration 1
Password Registration 0
Record Management 7

Fingerprint Time and Attendance Terminal Manual
44
4> Password Registration: to view the total number of password
registered.
5> Outgoing and incoming Record: to view the total number of
outgoing and incoming record.
6> Record Management: to view the total number of management
record.

Fingerprint Time and Attendance Terminal Manual
45
Chapter Five Appendix
5.1. Interface Definition
Three types of interface are available in the terminal: 9-pin- RS232
interface, RJ45 interface and 16pin external extension interface.
Definition of each interface is described as follows:
5.1.1 RS232 Interface
The interface (refer to page 9 figure 2- 3) provides RS232
communication, Lock and Wiegand entrance guide function with 9 pins
in total. Definition of each pin is listed in the following table:
PIN Definition
1 Reserved
2 RS232 TX
3 RS232 RX
4 LOCK | Data1
5 GND
6 Reserved
7 Data0
8 Reserved
9 Reserved
Note: Connect with the fourth and fifth pins when using the simple
entrance guard; while connect with the fourth, fifth and seventh pin
when adopting Wiegand output.
5.1.2 RJ45 Interface
The interface provides RS485 and TCP/IP communication function。
For different terminals, some of them provide two RJ45 interfaces and
thus the definition depends on the number of RJ45 interfaces of the
terminal. And the definition is as follows:

Fingerprint Time and Attendance Terminal Manual
46
1> Definition for the machine with a single RJ45 interface(Refer to
page 10 figure2-3):
PIN Definition
1 TCP_TX+
2 TCP_TX-
3 TCP_RX+
4
5
6 TCP_RX-
7 RS485A
8 RS485B
2> Definition for the machine with two RJ45 interfaces (Refer to page
10 figure 2-4):
A> Left RJ45 interface provides Rs232 communication, Lock or
wiegand output function.
B> Right RJ45 interface provides TCP/IP and RS485 communication
function.
PIN Definition
1 TCP_TX+
2 TCP_TX-
3 TCP_RX+
4
5
PIN Definition
1 RS232 RX
2 RS232 TX
3 GND
4 RING
5 LOCK
6 Data0
7 Data1
8 GND

Fingerprint Time and Attendance Terminal Manual
47
6 TCP_RX-
7 RS485A
8 RS485B
5.1.3 16-pin External Extension Interface
Some fingerprint time attendance terminals are equipped with a 16-pin
external extension interface (Refer to Page 10 Figure 2-5) with the
following functions: RS232, RS485, TCP/IP, Lock, Wiegand, 5V or 12V
power supply, 16 pins in total and the definition of each pin is listed in
the following table:
Note: If the terminal uses 5V DC input, then the 2-pin 12V DC, IN is
valid while 1-pin 5V DC is reserved.
PIN Definition
1 +5V DC, IN/Reserved
2 +12V DC,IN/ Reserved
3 GND
4 Data0
5 Data1
6 TCP_RX-
7 TCP_RX+
8 TCP_TX-
9 TCP_TX+
10 LOCK
11 GND
12 Voc (+5V) OUT
13 RS485B
14 RS485A
15 RS232T
16 RS232R

Fingerprint Time and Attendance Terminal Manual
48
If the terminal using 220V AC input, then 1-pin 5V DC, IN is valid
while 2-pin 12V DC is reserved.
5.2 Connection Cable
The order of the supplied RJ45 connection cable is shown as follows:
Schematic diagram of RJ45 connection cable head((((The other end is bare wire))))
Orange/White1
Orange2
Green/White3
Orchid4
Orchid/White5
Green6
Brown/White7
Brown8
Sleeve Crystal Head