december 2014 - blacksmith organization of arkansas
TRANSCRIPT

VOICE
INSIDE THIS ISSUE
Safety First ................................ 2
Letter From the President ........ 3
BOA Calendar ........................... 4
Project Notes-Tongs ................. 5
Northeast Chapter .................... 8
Northwest Chapter ................... 10
Central Chapter ........................ 12
Faulkner County Museum ........ 13
Project Notes-Ornaments ......... 4
Traditions-Nail Making ............ 14
Project Notes-Nail Making ....... 19
Classifieds ................................. 20
SPECIAL POINTS OF INTEREST
Jacob Wells ............................... 5
December 2014
NAILMAKING STATION AT
COLONIAL WILLIAMSBURG
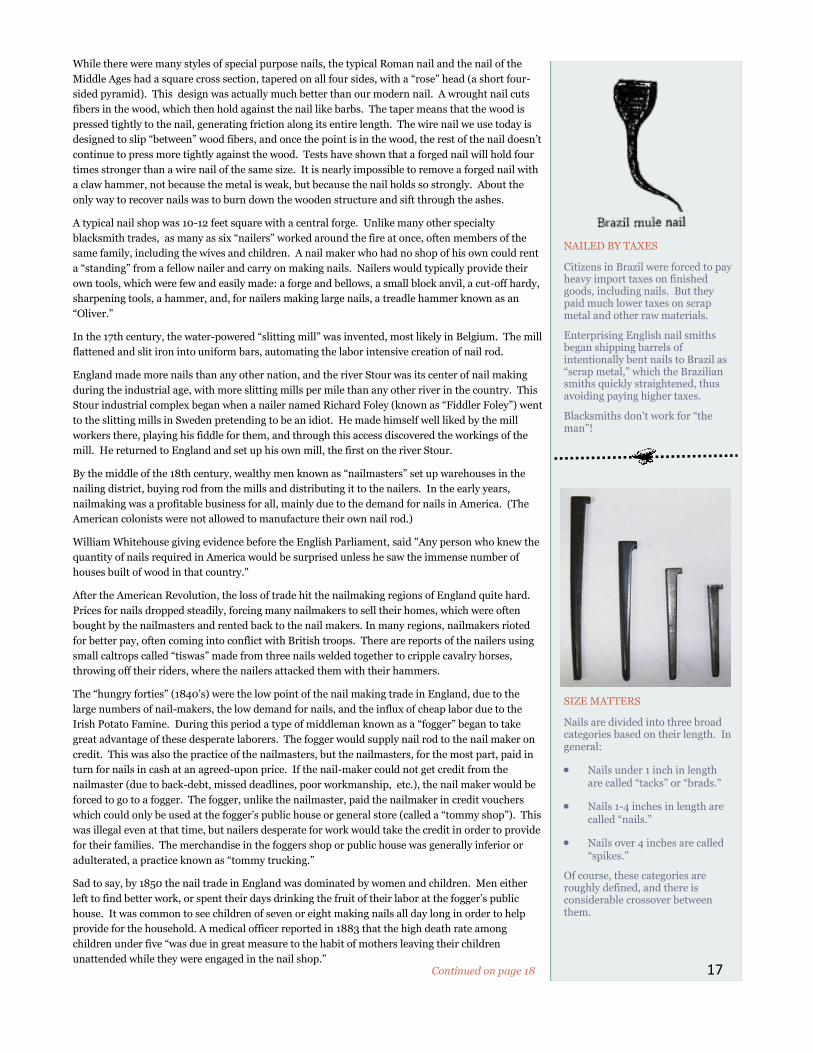
This month’s Traditions article (page 16) is on nail making, an important function of most
blacksmith shops and the primary article of trade for many smiths. The photo above is of the
nail-making station at the blacksmith shop in Colonial Williamsburg. The station features a
heading tool that takes several different die sizes, a small anvil block, a cut-off hardy, and a
trip-lever (called a “whimsy”) that can be struck to pop out the finished nail, all mounted on
an iron-bound block of wood. The Colonial Williamsburg blacksmith shop is a living history
museum focused on the importance of the blacksmith during the revolutionary period.
Although Colonial Williamsburg artifacts are historical re-creations, their historical accuracy
can be seen by comparing with the archival documentary footage below.
Photo courtesy of Jim Dunning at Moose Forge. Used with permission. Check out the Moose
Forge website for more information at http://www.mooseforge.com/Projects/nails.html.
Historical 1923 footage of a Swedish nail
maker (Spiksmide) at work on his nail-
making station. The footage also includes
blacksmiths making special shoes for draft
oxen (oxskosmide) and a waterwheel
powered sawmill. Compare this nailmaking
station to the Colonial Williamsburg
recreation above.
Click on the picture to be taken to the video.

SAFETY FIRST! QUENCHING IN OIL
Different alloys need to be quenched in different mediums. Many high-carbon steel alloys require
quenching in oil to harden them during the tempering process. Obviously, red hot metal and oil
are a dangerous combination. But you can reduce the danger by following a few simple safety
guidelines.
First, make sure there’s a fire extinguisher in your shop. Remember that spraying oil fires with
water just causes the burning oil to spread, so don’t depend on a water hose or quench tank. You
need an ABC extinguisher (things that burn to Ash, things that go Boom, and things that have
Current— for oil fires, you need the B part). A fire requires fuel, oxygen, and heat. When you
introduce hot metal to the oil and it flares up, the best thing to do is to push the hot metal under
the surface of the oil—don’t take it out and wave it around!
Second, make sure you do your quenching in a well-ventilated area away from flammable stuff
(kids and animals are flammable, by the way).
Third, make sure your quench tank is made of metal, has a sealable lid, and is welded, not
soldered. Dale told me of a story he read in the Hammer’s Blow about a group of smiths using a
metal bucket as a quench tank while reforging dies for a power hammer. When the oil became so
hot that it would flash as soon as the lid was lifted, they decided to go to lunch. While away, the
accumulated heat in the oil melted the soldered seams and released the oil. When the smiths
returned, the shop had burned to the ground.
I recommend using a military surplus ammunition can. The army surplus store in Little Rock has
a stack the size of a car selling for $14 each. They are heavy gauge steel, have a gasket to keep oil
in and debris out, and have welded seams. They have handles and the lid locks shut. Really, for
the price, you will be hard pressed to find a more perfect quench tank for your oil.
LETTER FROM THE EDITOR
When you think about the iconic image of the American
Blacksmith, odds are you think of the “village smithy,”
plying his trade beneath the big chestnut tree on the
town square. He was, in more than one sense, the
center of a community.
While a blacksmith may spend many hours working
alone, he is nonetheless always an integral part of a
larger community. The village needs the smith to make
and repair things, and the blacksmith needs the trade
that the other villagers supply.
Even today, we blacksmiths don’t forge in isolation—we are an integral part of a larger community
of people.
This is why we are all impacted by the loss suffered last month by one of our community when Ron
and Bertie Wells unexpectedly lost their son Jacob (details on page 5). This tragic loss obviously
had a profound impact on Ron’s family, but, in a very real sense, we are ALL part of that family,
and Ron is a part of ours. We feel Ron’s loss as our own.
There is nothing we can say, nothing we can do that will stop the grief, but we can let Ron know
that he is not alone. He is part of our community, our family. If there is nothing else, we can
simply stand by our friend Ron, letting him know we are here with him.
Ron, your friends at BOA have leaned on you for years. It’s time you leaned on us for a while. Let
us help carry some of the weight.
You can reach Ron at [email protected]
Robert Fox, Friend of Ron
NEWSLETTER DISCLAIMER
Blacksmithing is a very dangerous
hobby/job. All members,
demonstrators, and guests are
responsible for using eye, ear, and
respiratory protection and safe
working methods. Minors must be
accompanied by a parent or
responsible adult.
The Blacksmith Organization of
Arkansas, its officers, members,
demonstrators, guests, writers,
and the editor disclaim
responsibility for any damages,
injuries, or destruction of property
as a result of the use of any
information published in this
newsletter or demonstrated at
workshops, meetings, or
conferences.
Every effort is made to insure the
accuracy and the safety of
information provided, but the use
of any material is solely at the
user’s own risk.
Attendees at organization
functions and classes consent to
the use of their images in
publications and webpages of the
Blacksmith Organization of
Arkansas.
2
“When the smiths returned, the shop had burned to the ground.”

LETTER FROM THE PRESIDENT
December 2, 2014
I would like to thank Sonny and
Judi Sartwell for hosting the November 8th
meeting for the Northwest Chapter at their
home in Springdale. Sonny demonstrated his
power hammer and CNC controlled plasma
cutting table. I am happy to announce that
the club is moving forward with several
projects: New business cards have been
ordered with the website and the club email
address, we are back in the t-shirt business,
new sandwich boards have been ordered so
each chapter can have two, we are moving
ahead with getting signage designed and
produced for the trailer and upgraded tires
were approved for the trailer following a flat
tire that left only about half of each sidewall
and no tread. Sonny took on the tire project
and between him and Clyde Foster will see
that the trailer is at Clyde’s for the next meeting. The trade item was a forged flower, and I
must say there were several very nice ones. The next NW chapter meeting is at Clyde’s on
December 13th. The trade item is a set of tongs. The January meeting will be at Ed Osrois’
shop in Springdale on the 10th. The trade item is a door knocker.
The November meeting for the Central Chapter was at my shop in Little Rock on
the 15th. The trade item was a spring fuller. Five members came from more than an hour
away; Ross Wilkinson and his son Albert came from Greenwood, Keith Heffelfinger and his
wife Lynda drove from Timbo and Ron Wells resupplied the Central Chapter with coal.
Robert Fox presented an interesting idea for the club to sponsor a blacksmithing internship
at the University of Central Arkansas. As Robert works out the proposal to present to the
board, I’ll keep everyone updated. After the business meeting the Central Chapter got to
experience the bagging of coal that the NW Chapter does almost every meeting.
The December meeting is at Herman Ginger’s near Pine Bluff on the 20th for the
Central Chapter’s annual Christmas Party with gift exchange. Gifts are something forged by
the giver. Members of all chapters are welcome.
The meeting in January will be at Larry Lane’s shop near Sheridan. It is worth the
trip just to walk around the shop and look at all of the things that Larry has collected. The
trade item is a forged replica of something alive.
I know we were all saddened to hear of Ron Well’s tragic loss of his son Jacob. Ron
asked that instead of flowers that we give to a charity that Jacob supported. Once we have
this worked out, I will share the details with the club. Our thoughts and prayers go out to
Ron and his family.
The date for the Iron Smelt has been set for January 21st to the 24th, at the Eureka
Springs School of the Arts (ESSA). The Director is checking into lodging options. So far,
discounted hotels (it is the off season), RV parking (no word on power and water), tent
camping and being a guess at someone’s home have been discussed. Stay tuned for all of the
details.
I know the past three presidents have discussed having a statewide convention, a meeting of all three chapters. Details are still fluid but I have found a site that is centrally located to the three chapters. I think it would be a good thing for all of us to get to know each other better. If anyone has any suggestions of activities, please let me know.
Dale Custer, BOA President
BOA OFFICERS
PRESIDENT (and Board) Dale Custer (501) 416-1819 [email protected] VICE PRESIDENT (and Board) Hardy Todd (479) 665-2249 [email protected] TREASURER (and Board) Ron Wells (870) 434-5460 [email protected] EDITOR Robert Fox (501) 993-4229 [email protected] COAL MEISTER Ron Wells (870) 434-5460 [email protected] WEBMASTER Tim Huddleston (501) 545-7654 [email protected] ABANA AFFILIATE LIAISON REPRESENTATIVE Dale Custer (501) 416-1819 [email protected] NORTHWEST SECRETARY Cheryl Miskell (832) 444-1848 [email protected] NORTHEAST STEWARD (and Board) Eddie Mullins (870) 926-4218 [email protected] SECRETARY Jim Seohlman 479-652-2649 [email protected] CENTRAL STEWARD (and Board) Dale Custer 501) 416-1819 [email protected] SECRETARY Robert Fox (501) 993-4229 [email protected]
NEWSLETTER DEADLINES
Submissions for articles, meeting minutes,
announcements, events, and classified
advertising are due to the editor before
the last Saturday of the preceding month.
Members will receive an electronic edition
by email by the first Saturday of the
month. Those receiving hard copies will
be mailed the next Monday. 3
Dale Custer, Acting BOA President

4
BOA MEETINGS
UPCOMING EVENTS AND
DEMONSTRATIONS
As usual, we will have
demonstrations at the 2015
meetings in April and
September (Tired Iron) and
June and October (Rusty
Wheels).
The Faulkner County Museum
folks also want us back in
November, 2015, and we will be
demonstrating at the Harvest
Homecoming in Harrison.
Let us know of any other
planned events!
NEXT EVENT—TIRED IRON
ANTIQUE TRACTOR AND
SMALL ENGINE SHOW
April 18th, 2015
13344 Taylor Orchard Road,
Gentry, Arkansas
The members of Tired Iron of
the Ozarks have developed 17
acres in Gentry, including a
1907 log cabin , a blacksmith
shop, a clubhouse, an early
1900s sawmill, and a 60 ft x 32
ft antique home exhibit
building.
BOA members demonstrate in
the blacksmith building at the
Gentry event, which also
includes antique tractor pulls, a
tractor parade, and antique
engine demonstrations
NW AREA CENTRAL AREA NE AREA
NOVEMBER 2014 8
Sonny&Judi Sartwell’s In Springdale Forged Flower 15
At Dale Custer’s In Little Rock Spring Swage 1
At Jim Soehlman’s In Jonesboro
DECEMBER 2014 13
At Clyde Foster’s In Marble/Huntsville Tongs 20
At Herman Ginger’s In Pine Bluff Forged Gift 6
At Jim Soehlman’s In Jonesboro
JANUARY 2015 10
At Ed Osoris’ In Springdale A Door Knocker 17
At Larry Lane’s In Sheridan Plant or Animal 3
TBD
FEBRUARY 2015 14
At Richard Ross’ In Flippin TBD 21
At Tim Hutchinson’s In Bryant 7
TBD
MARCH 2014 14
At Stosh Japczyk’s In Eureka Springs TBD 21
TBD
7 TBD
APRIL 2014 18
At Tired Iron In Gentry 11
TBD
4 TBD
MAY 2014 9
TBD
16 At Thurston Fox’s In Mayflower 2
TBD
JUNE 2014 13
At Rusty Wheels In Harrison 20
TBD
6 TBD
JULY 2014 11
TBD
18 TBD
4 TBD
AUGUST 2014 8
TBD
15 TBD
1 TBD
September 2014 12
At Tired Iron In Gentry 19
TBD
5 TBD
Sidebar
Page 9
Sidebar
Page 10
Sidebar
Page 12

JACOB WELLS
The Light that Burns Twice as Bright Burns Half as
Long --Lao Tzu
Jacob was a runner. On November 1, 2014, he was
in the 19th mile of his 156th career marathon when
he collapsed and suffered cardiac arrest. Several
minutes passed before he was revived and his brain
suffered oxygen deprivation for several
minutes. He had massive brain trauma and the
Doctors gave us very little hope. Jacob died at 2:04
PM November 7, 2014.
Jacob was not an elite runner, but he was a good
runner, having run in the Boston Marathon twice.
He loved running. He had a passion for running.
Jacob was a certified public accountant. He graduated in 1991, Magna Cum Laude as the top
graduating senior of the Sam M. Walton College of Business at the University of Arkansas with
a Bachelor of Science in Accounting. He had 23 years of public accounting experience with
significant experience in the nonprofit and governmental industries.
Jacob was a volunteer. He served on the board of several Arkansas nonprofit organizations
serving as treasurer on some of them. He was a keynote speaker for many CPA functions. He
conducted workshops and seminars for the same. One of his favorite subjects was the proper
use of the English language. He claimed that the ability to communicate was as important as
numbers in the relationship with a client. He was recently awarded the 2014 Public Service
Award by the Arkansas Society of CPAs. Jacob volunteered in his running as well. He willingly
offered counsel and encouragement to runners and race committees alike. He particularly
liked to encourage new runners. He led blind runners and pushed quadriplegics to the finish
line in many races. He was Race Director of many races. Jacob was recently selected Volunteer
of the Year for 2014 and also Race Director of the Year for 2014 by the Arkansas Road Runners
Club of America.
Jacob was an organ donor. His organs would only be viable if death came within fifty minutes
from the time of extubation. Jacob finished his last race in nineteen minutes. Recipients were
already prepped and waiting in the operating rooms. By five PM the surgeries would be
finished and within a few hours the recipients would begin to feel the effects of Jacob’s last
gifts. Jacob's organ transplants were successful. A man in his late 60’s received Jacob’s right
kidney and is doing well. His left kidney was received by a lady in her early 60’s and she also is
doing well. Jacob’s liver saved the life of a man in his late 40’s.
Much has been written and said about Jacob’s selfless giving. I want to share a story of mine.
Jacob and I were alone together one day when he was around thirteen years old. It goes like
this:
“Dad, are we rich?”
“No, not really. Why do you ask?”
“Well, I just always have some money in my pocket to jingle, and whenever we need something,
you and Mom always get it for us. It just kind of seems like we are rich.”
A few seconds pass and Jacob continues:
“Dad, when I grow up I’m going to be rich. I’m going to get the best job I can. I’m going to
make the most money possible. Then I’m going to give most of it away.”
Jacob was my son.
Ron Wells, BOA Treasurer
5
DECEMBER AND NAILS
I found these pendants made
from horseshoe nails on Etsy,
and thought they would make
great Christmas tree ornaments!
The pendants sell for around $20
each. Check out the artist at the
link above, or by clicking on any
of the pictures.
Perfect for our December “Nail”
themed issue, don’t you think?
Editor’s note: Knowing many of our members would be asking for more information,
I asked Ron if he would take a moment to share some details about Jacob’s life.
Memorial donations will be used for Jacob’s last expenses and to improve facilities at the
Little Rock base of the Two Rivers Bridge in Little Rock’s River Mountain Park, Jacob’s
favorite place to start a run, and may be mailed to JPMS Cox, PLLC –Jacob Wells Memorial,
11300 Cantrell Road, Suite 301, Little Rock, AR 72212 or made online at http://
www.youcaring.com/JacobWells
John Jacob Wells 1969-2014
https://www.etsy.com/shop/brinkinkjewelry
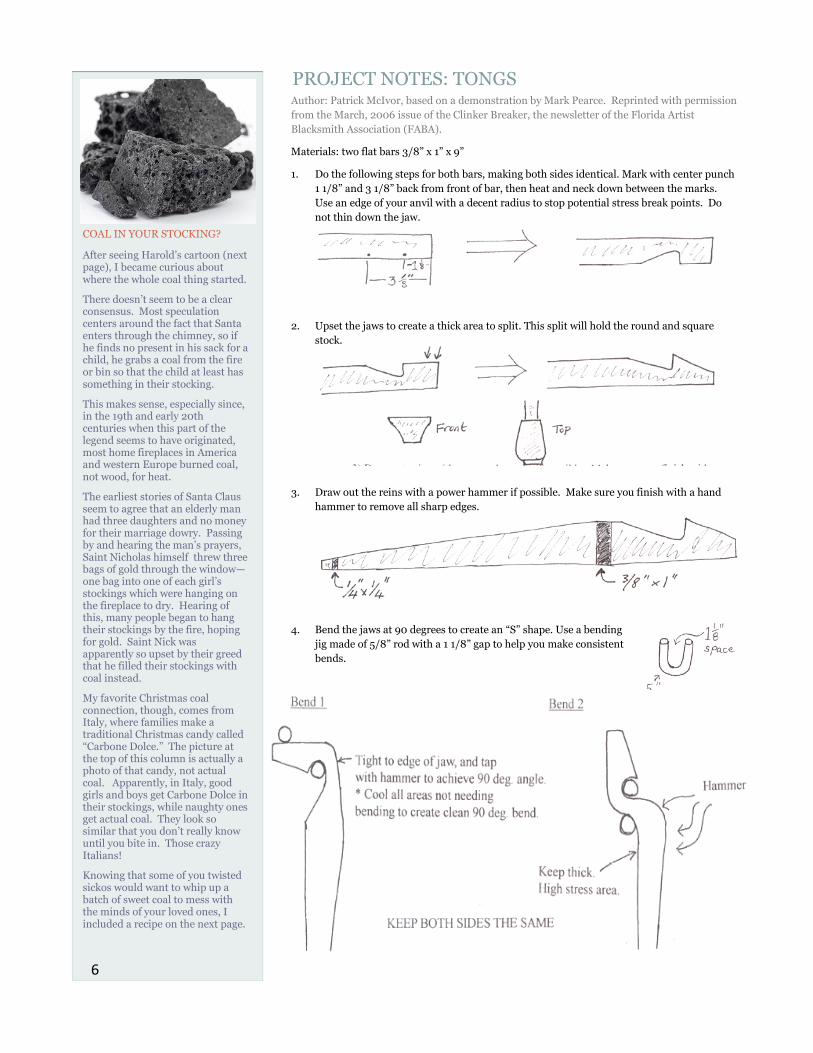
Author: Patrick McIvor, based on a demonstration by Mark Pearce. Reprinted with permission
from the March, 2006 issue of the Clinker Breaker, the newsletter of the Florida Artist
Blacksmith Association (FABA).
Materials: two flat bars 3/8” x 1” x 9”
1. Do the following steps for both bars, making both sides identical. Mark with center punch
1 1/8” and 3 1/8” back from front of bar, then heat and neck down between the marks.
Use an edge of your anvil with a decent radius to stop potential stress break points. Do
not thin down the jaw.
2. Upset the jaws to create a thick area to split. This split will hold the round and square
stock.
3. Draw out the reins with a power hammer if possible. Make sure you finish with a hand
hammer to remove all sharp edges.
4. Bend the jaws at 90 degrees to create an “S” shape. Use a bending
jig made of 5/8” rod with a 1 1/8” gap to help you make consistent
bends.
COAL IN YOUR STOCKING?
After seeing Harold’s cartoon (next page), I became curious about where the whole coal thing started.
There doesn’t seem to be a clear consensus. Most speculation centers around the fact that Santa enters through the chimney, so if he finds no present in his sack for a child, he grabs a coal from the fire or bin so that the child at least has something in their stocking.
This makes sense, especially since, in the 19th and early 20th centuries when this part of the legend seems to have originated, most home fireplaces in America and western Europe burned coal, not wood, for heat.
The earliest stories of Santa Claus seem to agree that an elderly man had three daughters and no money for their marriage dowry. Passing by and hearing the man’s prayers, Saint Nicholas himself threw three bags of gold through the window—one bag into one of each girl’s stockings which were hanging on the fireplace to dry. Hearing of this, many people began to hang their stockings by the fire, hoping for gold. Saint Nick was apparently so upset by their greed that he filled their stockings with coal instead.
My favorite Christmas coal connection, though, comes from Italy, where families make a traditional Christmas candy called “Carbone Dolce.” The picture at the top of this column is actually a photo of that candy, not actual coal. Apparently, in Italy, good girls and boys get Carbone Dolce in their stockings, while naughty ones get actual coal. They look so similar that you don’t really know until you bite in. Those crazy Italians!
Knowing that some of you twisted sickos would want to whip up a batch of sweet coal to mess with the minds of your loved ones, I included a recipe on the next page.
6
PROJECT NOTES: TONGS

7
5. Chisel open jaw shape. Make a center line
down the jaw with a cold chisel, then heat
and cut open with a hot chisel. Keep the jaws
on your vice approximately 1/4” deep to
prevent cutting to deep.
6. Open jaws
when hot in vise with a flat bar, and a hammer, tapping
from side to side to open. Keep each head and jaw side
even. Make sure the bar you use spans the length of the
cut, to open it evenly.
7. Hot punch holes to rivet the tong halves together (3/8” holes). Locate the hole position
by measuring or by eye, and center punch. After punching, drift hole to 3/8”. Flatten
reins and hole for smooth operation when together.
8. Rivet the tongs together
9. Adjust the jaws and reins for evenness and for ease of operation. Do this by heating the
jaw area and tapping the jaws so they meet in the middle. Put size of square stock in
the jaws then put in the vise and squeeze the handles to the comfortable size of your
hand. Chop the ends of the jaws and reign to make them even, if necessary. Heat and
cool in water while moving to get the even action you want.
7
CARBÓN DULCE RECIPE
adapted from Fragrante Delicia 1 egg white 3/4 cup powdered sugar, plus more if needed 5 drops lemon juice black food coloring 2 1/2 tsp almond extract 3 cups sugar 1 cup water Mix the egg white with the powdered sugar. The mixture should be thick enough that when cut with a knife, a visible cut remains, so add more powdered sugar if necessary. Then add the lemon juice, almond extract, and black food coloring (enough so the mixture is black). Measure out 1/3 cup of this egg white mixture and set aside for later; discard the rest of the mixture. (Editor’s note: that’s what the recipe said—”discard the rest”. I think it’s an Italian thing...) Spray a baking pan with nonstick spray and line with parchment paper. Set aside for now. Place the 3 cups of sugar and water in a medium saucepan. Place over medium-high heat and let it boil to 260ºF, stirring occasionally. Remove the pan from the heat. Add the reserved 1/3 cup egg white mixture to the pan and stir until it begins to foam. Then keep on stirring until it becomes thick and grainy. At this point, pour the mixture into the parchment lined pan. Let it harden and dry. Then break the candy apart. You may want to put it in a plastic bag between paper towels and use a hammer—this is indeed “hard candy.”
7

NEXT NORTHEAST MEETING
The December NEAC BOA
meeting will once again be
held at Jim Soehlman's shop.
His address is
462 Greene 731 Road
Jonesboro, AR 72401
The meeting will be held on the
second Saturday of December (the
13th).
The meeting will start at 8:00 am,
and end at 3:00 pm.
From Lake Frierson State Park
entrance (about 12 miles due north
of Jonesboro on Hwy 141),
continue north on 141 for one mile,
then turn right (east) on Greene
731, go 1/2 mile. You're there!
Jim Soehlman—NEAC BOA
NE ARKANSAS NOVEMBER 2014 MEETING
November was a busy month for most of the NEA Chapter and we only had 2 members
able to attend the meeting, myself and Dusty Elliot. Although Jim was unable to attend
he still graciously allowed the use of his shop. I would like to thank Jim for allowing the
club to use his shop for the last several months. He has a great set up that is just getting
better. The December meeting will be held on the 13th, from 8 AM to 3 PM, and will be
at Jim’s shop again. I would also like to thank Jim for the great job he has been doing
photographing and submitting the minutes from our monthly meetings..
Dusty and I made the most of the situation and spent quite a bit of time at the forge. I
have a forge at home and since several of the other members do not, I normally do not
forge at the meetings giving them the time at the anvil. Since there was not much
competition at the meeting this month I took the opportunity to forge a pair of box jaw
tongs. I have been in the bladesmithing mode of late and needed a new pair. I made
these by upsetting ½ inch square stock, a technique I hadn’t used for this application
before. Dusty also got to spend quite a bit of time forging making leaves. She is
improving each month, and I am sure will do so even more once she gets her forge set
up at home.
With Glen Owen’s recent move, the club is definitely left with big shoes to fill. Glen was
the teacher in the club and now I am trying to help in that role as best I can. Dusty fell
8
“I would like to thank Jim for allowing the club to use his shop for the last several months”

victim to this at the November meeting since she had no alternatives LOL. I did show her a
new technique for making leaves that she picked up on quickly, so perhaps I didn’t do too
badly as an instructor.
Mentioning Glen reminded me that I would like to extend a big thanks to him for his efforts
with the club, and more specifically with me. If not for his time spent helping me, I would
not be at the point I am today. Hopefully I can do the same for others new to the craft.
Since this is my first submission, I thought I would provide a quick introduction. I started
forging in March of 2013, so am still pretty new and still learning at each session at the
anvil, something I hope never stops. My first attempt forging was done with assistance of a
hair dryer in a backyard campfire and that was all it took – I was hooked. I bought a welder,
built a forge and have not looked back. I had the good fortune to meet Glen within the first
couple weeks and he gave my skill level a big jump start, and even helped me find my anvil.
I only wish I didn’t wait until I was forty to get started. My forging projects range from
jewelry to knives, from tongs to camping gear and all points between. Traditional joinery
and forge welding are a particular current interest. Since I failed to take any pictures at the
meeting, I have l include a few pictures of my recent projects, don’t be too harsh on
them : ) . Pictured are a hatchet and spoon knife along with my first carved spoon, a pair of
strikers used for flint and steel fires (thanks to Dan Davis for my primitive fire
introduction), my first attempt at a small fry pan, which still needs to have a handle added
on a grill I designed for my squirrel cooker and a couple of in process knives.
I hope everyone had a great Thanksgiving, and wish you all a Merry Christmas!
Eddie Mullins—NEACBOA Steward
9
A PORTABLE FORGE
Now that’s a portable forge! I’m
thinking maybe my old riding lawn
mower…
Then again, you have to question
the wisdom of having a coal forge
operating inches away from a
gasoline tank. And the guy in the
top photo must have a hot leg.
Notice how he’s leaning?
Still, these pictures remind us of a
time when a blacksmith was
essential to many households and
businesses, to the point where
there was money to be made
providing “house calls.” These
fellows appear to be re-pointing a
pile of pickaxes in the third picture.
These photos, originally published in
LIFE magazine, are now in the public
domain. They were unearthed by Tom
Kennedy, and reprinted with permission
from the February 2010 edition of the
Clinker Breaker, the newsletter of the
Florida Artist Blacksmith Association
(FABA).

NORTHWEST AREA BOA NOVEMBER MEETING November, 2014
The Northwest Area BOA November meeting was hosted by Sonny and Judi Sartwell. We
enjoyed a fine day of forging in the Sartwells’ nicely accoutered shop. The day started out
brisk, but was warm and sunny for most of the late morning and early afternoon. Judi and
Sonny served up a fabulous lunch of beans, rice and cornbread, with gooey, yummy gluten-
free brownies for dessert.
BOA members in attendance at this November 8 meeting included Dale Custer, Bob Lock,
Jimmy Owen, Tom Bates, Steve Low, Samuel Bollman, Ken Sartwell, Judi Sartwell, Cheryl
Miskell, Ervin Potter, Harold Enlow, Clyde Foster, and Hardy Todd.
Dale Custer called the meeting to order after lunch, first welcoming our newest member,
Samuel Bollman.
Old Business:
Dale noted that our next meeting is at Clyde
Foster’s in Marble (December 13), and the
trade item is tongs. Our January meeting
(January 10) is at Ed Osoris’ in Springdale,
and the trade item is a door knocker.
Dale reminded everyone that the Central
Chapter meeting will be next weekend
(November 15) at his home, and the trade item
is a spring fuller. The December meeting of
the Central Chapter (December 20) is at
Herman Ginger’s and the trade item is a Christmas gift. Herman has said that members can
arrive early. He has a mill, a plasma cutter, welders, a gas forge, a power hammer, and all
manner of tools to keep our members busy.
The January meeting of the Central Chapter (January 17) is at Larry Lane’s shop, between
Sheridan and Pine Bluff.
The trade item is a replica
of something living—can be
mythical.
Richard Ross will host our
February meeting on
Valentine’s Day (February
14)—bring your touch
mark.
Dale announced the date
for processing the iron ore,
December 27, the Saturday
after Christmas at his shop.
NEXT NORTHWEST MEETING
The December Northwest
Area BOA meeting will be held
on Saturday, December 13th,
from 9:00 am to 3:00 pm.
Clyde Foster
1929 Madison 2355
Huntsville, AR 72740
The trade item will a pair of
tongs.
From Huntsville, go east on 412 to
2315. Go right on 2315 to 2355
(this is a fork in the road). Go left
on 2355 to 1929, which is Clyde’s
driveway (about a mile from 412).
From Marble, go west on 412 to
2315. Go left on 2315 to 2355 (this
is a fork in the road). Go left on
2355 to 1929, which is Clyde’s
driveway (about a mile from 412).
10

The smelt will take place on January 21st
though the 24th at the Eureka Springs School of
the Arts (ESSA). The Director of ESSA is
checking on lodging options.
Our printer is up and in operation. Robert Fox
should be able to get hard copies to the post
office on the Monday following the deadline.
(Please submit items for the newsletter!)
Central Chapter did a demonstration in Conway last Saturday, November 1st. Central Chapter
“sold” some pieces to the museum director, and signed on two new members.
New Business:
T-shirts are back on track. We now have 3X, 4X and talls. Hats are available, too. If you want
a blue collared shirt with our logo, you will need to provide the shirt.
Sam Hibbs has said we can get signs on the trailer for $80. Bob Lock made a motion to get the
signs, and Tom Bates seconded. All present voted aye, so we’ll be getting the signs.
New sandwich board signs were discussed next. All present voted aye for getting additional
sandwich board signs.
Since we have almost ran out of business cards, Dale suggested that we get new ones to hand
out. He recommended that the names of officers be replaced with the permanent email address
of the president and the web site. This netted unanimous ayes.
Bob made a motion to purchase two trailer-rated tires (since there was a blow-out on the trailer
on its way to this meeting). New tires should be ten-ply, at least. Sonny and Judi volunteered
to get the tires and bring the trailer to the December meeting.
Tragically, Ron Wells’ son has passed. Bob made a motion to send a spray of flowers to the
Memorial Service in Little Rock. Dale agreed to make sure this happens.
Bob is doing a raffle on an 80# anvil, for $10 per ticket. Any profit from the raffle goes to BOA.
Hardy moved that the meeting be adjourned.
Cheryl Miskell, BOA Member
11
ORIGIN OF THE WORD “NAIL”
Etymology is the study of the
origin of words. According to the
Online Etymology Dictionary,
the origin of the word nail is the
proto-German “negel.”
What I find more interesting is
the fact that the original word
meant “fingernail”, and the
modern meaning of a spike came
much later.
Originally those proto-Germans
used the word for both human
finger and toenails and for
animal claws.
When building techniques began
to include sharpened wooden
spikes, you can imagine why they
might have been called “wooden
claws.” Actually, they were
known as “tree-nails.” In post-
and-beam construction, the large
dowels that are driven into pre-
drilled holes in the joints are still
known as “trunells.”
When these spikes finally began
to be made from metal, they were
naturally still called “nails.” Now
you know!
GOT A STORY IDEA?
Do you have a story you would like
to see in the VOICE? Would you
like to write it, or is it something you
want to read?
Let us know—send an email to
Carpenter driving in a “trunnell”

12
CENTRAL BOA NOVEMBER MEETING MINUTES
The November meeting of Central Arkansas Chapter of the Blacksmith Organization of
Arkansas (CACBOA) was held on unseasonably cold 11/15/2014 at the forge of Dale Custer in
Little Rock.
The morning demonstration was making a top set tool from a ball-peen hammer: preparing the
tool, a discussion of appropriate tongs and hammers, forging the desired shape with the
assistance of a striker, finishing and tempering. CACBOA members had the opportunity to
make their own top set tools after the demo. Tim Huddleston made a nice heavy punch.
The demonstration gave me several ideas for more top set tools I “need.” I had told my wife that
I had enough garage-sale ball peen hammers, but I think I may need to retract that statement.
As is often the case when discussing top set tools, there were passionate words exchanged on
both sides of the argument regarding whether the handles should be set in with a wedge to keep
them secure, or left un-wedged to facilitate the inevitable re-tempering. No blood was lost, but
no opinions were changed, either.
In the business meeting, Dale gave us an update on the plans for the ore smelt. It looks like all
the details are finally crystalizing. A lot of us are really looking forward to participating.
We also spent sometime talking about an interesting request we had from Lynita Langley-Ware,
the director of the Faulkner County Museum where we demonstrated November 1st (see article,
next page), and Dr. Kimberly Little, professor of History at the University of Central Arkansas
(UCA) in Conway. Dr. Little asked if we would be interested in putting together a blacksmithing
internship program for a history student next year. The program would need to involve the
student in 6-9 hours a week of work throughout the fall semester. Just attending one of our
meetings a month would be six hours, and I have a whole list of topics I would love to have a
history student researching and writing up for me that could easily fill another 12 hours a
month.
But the most interesting turn of events happened when Lynita started talking with BOA
members Scooter and Larry Lane. All three of them participate in the same historical re-
enactment group that recreate the lifestyle and events of Americans living 200 years ago. Their
time period is moving forward all the time, keeping a steady 200 years behind our own.
Through that organization Lynita knows that Larry is the demonstrating blacksmith at the Grant
County Museum in Sheridan. I overheard Lynita asking Larry when he was going to build her a
blacksmith shop for her Faulkner County Museum. When I asked about this, Lynita showed me
the location she is hoping to build the shop, and talked about how it would fit into her charter of
preserving local history for public education. Lynita is hoping to convince her board of directors
to fund the project.
Having just finished talking to Dr. Little, it occurred to me that we could ask some energetic
young college students, in addition to the tasks above, to go take measurements of the Grant
County Museum blacksmith shop, interview Larry Lane about his recommendations for
construction, safety guidelines, etc., and talk to a professional construction contractor about the
cost of building a shop in Conway. This could be put together in a grant proposal which Lynita
could take to her board.
The student would get blacksmithing experience, would get to say they were a published author,
and would have the creation of a grant proposal on their resume—and course credit to boot.
Lynita would get the draft of a grant proposal she could use for her board. BOA would get the
goodwill of the community and a great place to have meetings and demonstrations. Win, win,
win.
After hearing my passionate appeal, Dale suggested that, if this were to be done under the BOA
name, the next step would be to write up the proposal to present to the BOA board. I plan to do
just that!
After lunch, we helped Ron bag coal. If you have empty coal bags, bring them back to your next
meeting, we sure could use them.
Robert Fox, CACBOA Secretary
NEXT CAC BOA MEETING
The next central Arkansas
Chapter meeting will be at the
home of Herman and Suzanne
Ginger in Pine Bluff on
Saturday, December 20th. This
will be our second annual
CACBOA Christmas party, so,
rather than meet from 9:00 am
to 3:00 pm, we are meeting
from 3:00 pm to 9:00 pm.
3901 Divoky Rd
Pine Bluff, AR, 71603
The trade item will be a forged
gift. Wrap it up, and we will
exchange at the party!
Directions: Coming from Little
Rock, take 530 south to Pine Bluff.
From the 530 bypass, take exit 42
and go south on Hazel St to Middle
Warren Road. Follow Middle
Warren approximately 1/4 mile to
Divoky Road. Turn right and go one
mile to a dog leg left then back right.
3901 is the second driveway on the
right.
Warning, if you are using a GPS,
make sure you write down the house
number and start watching the
mailboxes when you get close. Most
GPS’s insist that Herman lives with a
neighbor about a quarter mile
further down Divoky Road.

13
FAULKNER COUNTY MUSEUM OPEN HOUSE—11/1/2014
BOA was asked by the director of the Faulkner County Museum in Conway to participate in their open house this year on November
1st. It was a beautiful day, with over 500 people dropping by. The Museum also had demonstrations of basket weaving, butter
churning, Dutch oven cooking (free samples!), and many other crafts. Many of the demonstrators were in period costume, including
some of our blacksmiths!
Tim Huddleston and Larry Lane manning the forge The Museum did not allow us to sell items, which was a good
thing because the Harrison event In October depleted our
inventory!
Some of the other nearby crafts, many manned by UCA college
students, several of whom forged with us in the afternoon
Anyone want to take a guess at how many people told us that
their grandfather was a blacksmith?

ELIZABETH BRIM AND HER
STEEL PILLOWS
Elizabeth Brim has served on the
ABANA board and demonstrated
at several ABANA conferences as
well as at other event across the
world. She is well known for
reproducing familiar items such as
hats, shoes, and purses in steel.
Her work has astounding realism.
Her work “explores the plasticity of
steel,” and she does it very well in
many creative ways.
At recent ABANA conferences, she
has demonstrated her process for
forming realistic “pillows” from
textured steel.
While neither Elizabeth or her
work are what spring first to mind
when you think “blacksmith,” she
is a talented artist and master of
her craft.
If her work is good enough for an
ABANA conference, then the
Christmas ornament project on
this page should be good enough
for the VOICE!
14
PROJECT NOTES: CHRISTMAS ORNAMENTS
By Tim Mann. Photos and Illustrations by Eden Sanders. Used with permission from the April
2008 Hot Iron News, the newsletter of the California Blacksmiths
Several years ago I was looking for a simple project to
introduce artsy iron to the students of the welding class at
Columbia College.
Remembering a demo by Dorothy Stiegler of Elizabeth Brim’s blow-up technique, I found the
perfect project. It used little material and few tools—easily made. It requires some welding and
has the thrill of doing something unexpected with really hot steel. Why not make steel
Christmas ornaments?
Materials: 6 1/2” x 5” 22 gauge mild, un-galvanized steel, and a 12” length of 1/4” steel brake
line.
Tools: 4 1/2” angle grinder, swivel pad vise-grip, oxyacetylene outfit or TIG welder, soft jaws
for vise, simple repousse tools, opener (long, round taper with a chisel tip), pitch or lead.
1. Make a half-pattern on folded paper to ensure both sides are the same. I use a 3” diameter
circle with the bottom drawn out to a point and the top curving up to an 11/16” flat edge
where the blow up tube fits and the ornament cap and hook will go.
2. Unfold your pattern and trace onto the metal. If you like the pattern and plan to use it
again, trace it onto 26-28 guage galvanized sheet metal and cut out with tin snips. The
galvanized sheet is for the stored template only—never heat galvanized metal in your forge.
Rough cut to a little beyond the line with whatever you use to cut 22 gauge stock.
3. Mark one side of each piece “in” so the the rest of the steps will be done with the two pieces
in the same orientation.
4. Stack the two pieces with the “in” sides facing each other. Align as best you can, paying
close attention to the top flats. Grip in the center with the swivel pad vise-grip. Grind
both pieces simultaneously down to the line. Split apart, and clean up the burr left from
grinding
5. On the “in” sides, draw your design, keeping 1/4” to 3/8” away from the edge to make the
weld easier. Fast and easy is a snowflake, but I have also done logos as gifts for suppliers.
Technically, this makes it repousse, but I consider this more of stamped from the inside.
6. Follow your design with repousse tools onto an appropriate backing medium. I use two
layers of sheet lead cut to fit like a
saddle over an anvil that works well
for simple designs and is available
from roofing suppliers and sheet
metal shops. For more elaborate
designs, I would use pitch
(www.nothwestpitchworks.com) ,
but that would increase cost and
time for what is supposed to be a
simple project, and deep designs are
likely to be distorted by the inflation
step.

15
DEAD AS A DOORNAIL
Ever wonder where that phrase
originated?
According to This Old House, the
traditional technique for nialing door
planks together involved using a nail
longer than the thickness of the
door, and bending the protruding bit
on the backside back around into the
door—a technique known as “clench
nailing.” This technique prevented
the nails from loosening as the door
was opened and closed, hence, a
“dead” nail, lies flat and unmoving.
The earliest known use of the phrase
was in 1350 by William Langland,
but the phrase was made popular by
none other than William
Shakespeare in Henry IV, Act 2,
spoken by Jack Cade.
“Look on me well. I have eat no meat
these five days; yet come thou and
thy five men, and if I do not leave
you all dead as a doornail, I pray God
I may never eat grass more.”
Charles Dickens also made use of the
phrase in his A Christmas Carol.
“Old Marley was as dead as a
doornail.”
7. Realign the two pieces with “in” facing “in”. The stamping process has undoubtedly
bulged out the middle, but this is OK. What you need to look for is how tight the edges
come together. Flatten by putting the “in” side on the face of the anvil and pressing on
the center with the palm of your hand, or give it a few whacks with your fist. When you
have a reasonably good fit, clamp lightly in the vice grips. Fine tune the edges by
tapping any gaps closed with a hammer.
8. The weld. If you know how to TIG weld, I don’t need to tell you how to weld this up.
For the rest of us, an oxyacetylene torch works just fine. A 000 tip in a regular torch or
a half-tip in a Henrob will do the job. Set the acetylene and oxygen pressure at 4 psi for
both types. An edge weld without a rod is one of the easier welds to make, but if you
have never done one, practice on some scrap 22 gauge first.
TIP 1: Always work from thin to thick—thin being the corners or points, thick being
the middle of the piece.
TIP 2: Keep the bead moving. Increase your speed as you push more heat ahead of the
weld. Try to keep a consistent bead size and weld depth.
TIP 3: Watch ahead of the weld pool for a developing gap. If you see a gap, stop the
weld! With material this thin, if the sides separate, you will have a very hard time
making a good weld and will most likely burn off one side or the other. Take the time
to tap the edges together before continuing to weld. (This is a tip I need tattooed on my
forehead. I get cocky and figure I can make it work. Boom! Two hours of prep work
lost to save one minute.)
Do not weld across the flat. Lightly grind any inconsistencies off the weld to smooth
the edges and fair the curves.
9. Place the ornament between soft jaws in a vise , taking care not to mash the design.
Heat the area at the top flat to a red heat and work the chisel tip of the opener between
the sides. Then drive it down to create the opening for the brake tube.
10. Weld the brake tube in place. This
weld requires welding rod. Heat
the parent metal to just where it
starts to sweat and add a drop of
rod. What you are trying to do is
plug holes, not weld for strength.
The weld does not have to be
pretty, but must be air tight. Check
to see if it is adequate by putting
air pressure into the ornament.
The side should move a little as
you squirt the air.
SAFETY NOTE: because the brake
line appears to be coated, take care not
to breathe the fumes.
11. Now comes the fun part.. Heat the entire ornament to a red heat and inflate. Setting
the compressor at low pressure gives me more control of this process and keeps me
from overinflating the shape. Lightly wire brush off the scale.
12. Leave the tube on for the next couple of steps as a handy handle. With a wire wheel in
the grinder, take off the rest of the scale. I normally reheat to a red heat and let cool to
get a consistent coat of scale. As it cools, you can highlight the design by lightly
brushing with a brass brush. Finish with a couple of coats of clear gloss finish.
13. Now remove the tube. If you make a crummy weld (desirable), you can rock the tube
out. If not, place the tube end in a vise and cut it off with a hacksaw.
14. Insert the ornament cap with a hook and enjoy!
Editor’s note: While this project skirts the very edge of the definition of “blacksmithing,” it is
seasonal, interesting, and it involves heating and shaping metal, albeit using an unusual method.
I’ll try to stick with projects that reflect more traditional blacksmithing techniques in the future,
but thought this one was worth bending the rules a little. I hope you agree.
Steel brake line and a threaded compression fitting

BLACKSMITH TRADITIONS: NAILMAKING
NAIL MAKING IN ANTIQUITY
It is unclear when the first nails might have been made. Certainly it was before the iron age—
bronze nails found in Egypt have been dated 3400 BC. But for the purpose of joining substantial
pieces of wood into large, weight-bearing structures, softer metals would not have been
practical. This is why, soon after the secrets of working with iron were discovered, smiths began
being asked to make iron nails.
The Bible provides a number of references to iron age nails in the middle east, including the
story in Judges of the woman who drives a nail into the temple of a Canaanite commander while
he is sleeping, the provision of iron for nails by King David for Solomon's Temple, and the
crucifixion of Christ.
The Romans used large quantities of
nails throughout their empire. Any
sizeable Roman fortress included a
'fabrica' or workshop where the
blacksmiths would fashion the metal
items needed by the army, including
nails. Romans soldiers even used
nails in the soles of their sandals for
traction—the original hob-nail boots!
When the Romans retreated from the
British Isles, they abandoned the
fortress of Inchtuthil in Perthshire,
Scotland, including a stockpile of 7
tons of nails in a concealed pit!
Interesting fact—the iron nails from
Inchtuthil have been extensively
examined by atomic scientists studying the corrosive effects of time on various materials used to
store nuclear waste.
Another interesting association between the Roman Empire and nails is the penny weight
system. A 16 penny nail is so called because it cost 16 pennies to buy 100 of them. It cost 20
pence to buy 100 20-penny nails. But have you ever wondered why a 16 penny nail is
abbreviated 16d? Why not 16p? Because the Roman penny was called a “denarius.” The British
used “d” to denote pence up until “Decimal Day,” February 15, 1971.
NAIL MAKING IN EUROPE
Blacksmiths in Europe through the middle ages made nails essentially the same in shape and
manufacturing technique as had the Romans. The blacksmith heated several nail “rods,” square
or round stock in three to four foot lengths, in his forge. He would take one out, taper it quickly
to the desired size, cut it almost off using a hardy,
then twist the nail completely off the rod using a
nail header, and put a head on it with a few quick
blows. A competent nail maker could make a nail in
about 30 seconds. Some nail makers were said to
produce up to four nails a minute.
16
THE HISTORY OF
BLACKSMITHING IN
ARKANSAS
The Traditions column is a
series of articles focused on
educating our members in
regard to the historical aspects
of the craft of blacksmithing, in
keeping with the mission of our
organization.
This month’s article is on a topic
that comes up again and again
in my research—nail making.
Nail making is mentioned as a
daily warm-up activity for the
professional blacksmith, as busy
-work for apprentices, and as a
full-time specialty for many
smiths. It’s difficult to read
much historical commentary on
blacksmithing without coming
across a discussion of nail
making.
I have been accumulating quite
a bit of trivia and technique
information about nail making,
and when I saw the photo of the
Colonial Williamsburg nail
making station at Moose Forge
(see cover photo, this issue), I
knew it was time to write the
article.
If there are other topics of
interest that you would like to
see covered, please drop me an
email.
Next month’s Traditions article
will be a discussion of the
apprenticeship program in
America, with particular
attention to how the American
program differed from the
European, and why. If you have
any thoughts or material, please
send it my way.
Robert Fox—BOA Editor
Nails from the horde at Inchtuthil
Roman nail from Scotland
A stamp bearing the picture of a nail from a keg found
on the Mary Rose, the flagship of King Henry VIII,
sunk in action off Portsmouth in 1545, recovered by
archaeologists in 1971. The nails were packed in tar,
which preserved them remarkably well, showing that
nails of Tudor England were identical in design to the
Roman nail.
17
While there were many styles of special purpose nails, the typical Roman nail and the nail of the
Middle Ages had a square cross section, tapered on all four sides, with a “rose” head (a short four-
sided pyramid). This design was actually much better than our modern nail. A wrought nail cuts
fibers in the wood, which then hold against the nail like barbs. The taper means that the wood is
pressed tightly to the nail, generating friction along its entire length. The wire nail we use today is
designed to slip “between” wood fibers, and once the point is in the wood, the rest of the nail doesn’t
continue to press more tightly against the wood. Tests have shown that a forged nail will hold four
times stronger than a wire nail of the same size. It is nearly impossible to remove a forged nail with
a claw hammer, not because the metal is weak, but because the nail holds so strongly. About the
only way to recover nails was to burn down the wooden structure and sift through the ashes.
A typical nail shop was 10-12 feet square with a central forge. Unlike many other specialty
blacksmith trades, as many as six “nailers” worked around the fire at once, often members of the
same family, including the wives and children. A nail maker who had no shop of his own could rent
a “standing” from a fellow nailer and carry on making nails. Nailers would typically provide their
own tools, which were few and easily made: a forge and bellows, a small block anvil, a cut-off hardy,
sharpening tools, a hammer, and, for nailers making large nails, a treadle hammer known as an
“Oliver.”
In the 17th century, the water-powered “slitting mill” was invented, most likely in Belgium. The mill
flattened and slit iron into uniform bars, automating the labor intensive creation of nail rod.
England made more nails than any other nation, and the river Stour was its center of nail making
during the industrial age, with more slitting mills per mile than any other river in the country. This
Stour industrial complex began when a nailer named Richard Foley (known as “Fiddler Foley”) went
to the slitting mills in Sweden pretending to be an idiot. He made himself well liked by the mill
workers there, playing his fiddle for them, and through this access discovered the workings of the
mill. He returned to England and set up his own mill, the first on the river Stour.
By the middle of the 18th century, wealthy men known as “nailmasters” set up warehouses in the
nailing district, buying rod from the mills and distributing it to the nailers. In the early years,
nailmaking was a profitable business for all, mainly due to the demand for nails in America. (The
American colonists were not allowed to manufacture their own nail rod.)
William Whitehouse giving evidence before the English Parliament, said "Any person who knew the
quantity of nails required in America would be surprised unless he saw the immense number of
houses built of wood in that country."
After the American Revolution, the loss of trade hit the nailmaking regions of England quite hard.
Prices for nails dropped steadily, forcing many nailmakers to sell their homes, which were often
bought by the nailmasters and rented back to the nail makers. In many regions, nailmakers rioted
for better pay, often coming into conflict with British troops. There are reports of the nailers using
small caltrops called “tiswas” made from three nails welded together to cripple cavalry horses,
throwing off their riders, where the nailers attacked them with their hammers.
The “hungry forties” (1840’s) were the low point of the nail making trade in England, due to the
large numbers of nail-makers, the low demand for nails, and the influx of cheap labor due to the
Irish Potato Famine. During this period a type of middleman known as a “fogger” began to take
great advantage of these desperate laborers. The fogger would supply nail rod to the nail maker on
credit. This was also the practice of the nailmasters, but the nailmasters, for the most part, paid in
turn for nails in cash at an agreed-upon price. If the nail-maker could not get credit from the
nailmaster (due to back-debt, missed deadlines, poor workmanship, etc.), the nail maker would be
forced to go to a fogger. The fogger, unlike the nailmaster, paid the nailmaker in credit vouchers
which could only be used at the fogger’s public house or general store (called a “tommy shop”). This
was illegal even at that time, but nailers desperate for work would take the credit in order to provide
for their families. The merchandise in the foggers shop or public house was generally inferior or
adulterated, a practice known as “tommy trucking.”
Sad to say, by 1850 the nail trade in England was dominated by women and children. Men either
left to find better work, or spent their days drinking the fruit of their labor at the fogger’s public
house. It was common to see children of seven or eight making nails all day long in order to help
provide for the household. A medical officer reported in 1883 that the high death rate among
children under five “was due in great measure to the habit of mothers leaving their children
unattended while they were engaged in the nail shop.” Continued on page 18
NAILED BY TAXES
Citizens in Brazil were forced to pay heavy import taxes on finished goods, including nails. But they paid much lower taxes on scrap metal and other raw materials.
Enterprising English nail smiths began shipping barrels of intentionally bent nails to Brazil as “scrap metal,” which the Brazilian smiths quickly straightened, thus avoiding paying higher taxes.
Blacksmiths don’t work for “the man”!
SIZE MATTERS
Nails are divided into three broad categories based on their length. In general:
Nails under 1 inch in length are called “tacks” or “brads.”
Nails 1-4 inches in length are called “nails.”
Nails over 4 inches are called “spikes.”
Of course, these categories are roughly defined, and there is considerable crossover between them.
17

A rare few were able to rise above this poverty. Elisa Tinsley was the wife of
Thomas Tinsley who died in 1851 leaving his widow little more than the
stock and tools of his trade. Rather than selling out, she took over the
business, and eventually became a nailmaster herself, known locally as “the
Black Widow.”
NAIL MAKING IN COLONIAL AMERICA
Prior to the American Revolution, nails were expensive and difficult to
obtain in America, because the nail rod had to be imported from England.
America had the raw materials and industrial capacity to make nail rod, but
England had passed the Iron Act in 1750 to prevent the development of
colonial manufacturing in competition with industry in Britain by
restricting the growth of the American iron industry to the supply of raw
metals. Americans could smelt iron ore, but they could not work it. To
meet British needs, pig iron and iron bar made in the colonies were
permitted to enter England duty free, but were not permitted to be shipped outside the British Empire. The colonies were NOT
permitted, however, to establish furnaces that could produce steel for tools, or to build rolling and slitting mills and plating forges.
Colonial nail making was permitted, but the nail rod had to be imported from England, where it was often being manufactured from
American iron! Few colonists became nail-makers before the revolution due to the high cost of these materials.
Even after the revolution, there were not enough nail makers to meet the demand. It became common for families moving westward to
intentionally burn their own perfectly good homes to the ground in order to recover the nails. This was so common, in fact, that the
original arson laws enacted in Virginia were intended, not to prevent burning down another’s property, but to prevent people from
burning down their own homes, thereby risking fire spreading to the neighborhood and the loss of real estate value.
Nails were so necessary to early American life that, after the revolution, families often had small nail manufacturing areas set up inside
their homes. During bad weather and at night, the entire family might work at making nails for their own use and for barter.
MACHINE-MADE NAILS
The production of wrought iron nails was ultimately replaced for most purposes with cut nails and, eventually, with wire nails.
Wrought nails were used only in cases where the softer cut nails were not suitable, such as horseshoe nails.
Arguably, the first machine for making nails was the Oliver, the treadle hammer which replaced the blacksmith’s hammer on larger
nails and spikes, but otherwise left the nail making process unchanged. The introduction of the slitting mill also automated what was a
manual process, the making of nail rod, but again, nails were still made one at a time.
Cut nails were invented in
America and England about
the same time. The first version of
the cut nail machine worked by slicing
thin tapers off a flat sheet of iron whose width
determined the length of the nail. Because the sheet
was flat, the cut nail only tapered on two sides. In the first
generation, the nail still had to be headed in the traditional
manner. The machine basically replaced the drawing out of the
taper and the cutting to length. The taper was formed by first
angling the stock a little to the left for one cut, then to the right
for the next cut. Because the angling and heading were done by
hand, they vary from nail to nail. This can make it difficult to
distinguish one of these cut nails from a wrought nail if the nail is
not in pristine condition. When new, you can see that the taper
of a first generation cut nail is only on two sides, and that there
is a burr on both sides where the nail was cut. In this generation
of cut-nail manufacturing, the burr would point one way on one
side, and the other way on the other side (see picture above).
The second generation of cut nail manufacturing was a marked improvement in that, rather than relying
on the operator to angle the stock, the machine flipped the stock between cuts. Also, these machines
included a mechanism to grip the nail and form the head, making them extremely uniform. These nails can
18
A factory of cut-nail machines, with bags of finished nails in the
foreground. Notice these machines were run using pulleys
connected to an overhead shaft. The noise in these factories was
deafening.

19
FOUNDING FATHER
AND NAIL MAKER
It has been reported that nail
making is the only business venture
at which Thomas Jefferson ever
made money. Jefferson wrote in a
letter, “In our private pursuits it is a
great advantage that every honest
employment is deemed honorable. I
am myself a nail maker.”
In 1794 Jefferson added a nail
making operation to his blacksmith
shop on Mulberry Row at
Monticello. He hoped it would
provide a source of cash income
while he restored the depleted soil
of his farms. Nail rod was shipped
from Philadelphia and hammered
into nails ranging in size from six-
pennies to twenty-pennies. In 1796
Jefferson acquired a nail cutting
machine, which made four-penny
brads from hoop iron.
In his Farm Book Jefferson wrote:
"Children till 10. years old to serve
as nurses. From 10. to 16. the boys
make nails, the girls spin. At 16. go
into the ground or learn trades."
Up to fourteen young male slaves,
aged ten to twenty-one, worked at
the forges of the nailery. From 1794
to 1796, when he was retired to
Monticello, Jefferson calculated the
efficiency of the nailers, each day
weighing their nail rod and the nails
they produced.
The nailery was quite profitable for
almost 30 years until it closed down
in 1823 due to management
problems and cheaper competition.
19
also be identified by the burr, which, because the stock is cut from alternating faces, faces
in the same direction on both sides of the nail.
While the cut nail dramatically improved the efficiency of the nail making process, the
metal used had to be softer, and because it only tapered on two sides, it did not hold as
strongly. Also, though the throughput per person was much higher, each cut nail machine
required a human operator, still making nails one at a time.
By the 1920’s manufacturers discovered how to cheaply make long coils of steel wire, and
machines were quickly designed to mass-produce cheap “wire nails” completely without
human intervention.
The fact that the wire nail had four times less holding power was not relevant to most uses, as
thinner timber made of softer wood were being used, and other forms of fastening were available
when stronger holding power was needed.
Today it is possible to date historical buildings by the types of nails that were used in their
construction. Those seeking historical accuracy in reproduction furniture or buildings can
determine which type of nail would be appropriate for the period. The dates above hold for
larger, established areas, but these improvements took many more years to reach the frontier.
Most professional blacksmiths today would have little interest in producing wrought nails in
commercial quantities, because the cost would necessarily be so much higher than wire nails.
However, there are still a handful of manufacturers that still produce cut nails in the traditional
manner today using machines that have not changed in 200 years.
One such company is Glasgow Steel Nail Co which can trace its business roots back to 1870. In
addition to working with these old machines, the process also involves preserving the
blacksmith's skills to form cutting and heading tools. Glasgow Steel Nail Co has been involved in
many interesting projects, including providing nails for the Globe Theatre in London and
restoration work on many castles. The nails are generally used for doors, floors, gates and other
areas where a nail will be visible, and therefore needs to be “in period.”
Robert Fox—BOA Editor
PROJECT NOTES—MAKING NAILS Author: Skeeter Prather. Reprinted with permission from the January 1997 issue of Hot Iron News, the
Newsletter of the California Blacksmiths.
1. 1/4” round or square stock
2. Square taper, working only two sides
3. Shoulder those two sides
4. Nick stock 1/4” above shoulder on both sides
5. Place in nail header and twist off
6. Flatten with 4 facets (short pyramid)
7. Quench and remove
1 2
3 4
5
6
7

CLASSIFIED ADVERTISING
COAL FOR SALE
50 pound bags.
BOA Members price $8/bag
Non-member price $10/bag
Contact Coal-Meister Ron
Wells, or see your chapter
steward.
FIREPOT AND POST DRILLS
Daniel Casey (see sidebar, page
19) has one nice firepot with
clinker breaker, and two post
drills left to sale. His phone
number is 501-858-9757
(Searcy).
COLECHESTER LATHE
Danny Rob Sr. has a fully
outfitted machine shop that he
intends to downsize over the
next several months. The first
item he is offering is a
Colechester metal lathe with a
17” swing (28 inches in gap)
with 80” between centers. It
has a 3 1/2” spindle hole and
cuts both English and metric
thread. It is in full running
condition (3 phase power), and
comes with both 3 and 4 jaw
chucks and a quick-change tool
post. Call (870) 565-3918 for
information.
HIT-AND-MISS ENGINES
Bryan Parsons sold that 350 lb
bridge anvil, but is looking for
hit-and-miss engines. If you
have a lead for him, call 479-
957-5498.
ANVIL FOR SALE
Bob Lock has an Arm and
Hammer anvil for sale. Call
him at 417-847-6708 if you’re
interested.
20
BOA T-SHIRTS ARE BACK!
BOA t-shirts are only $10 ($12 for 3x and 4x sizes). You can’t beat that with a rounding hammer!
Get the black if you are worried about coal grime, or the grey if you are worried about the heat. Or
get both for the winter, and layer up!
The silk screening process requires that we save up orders until a minimum number is reached.
Fill out the form below, but send no money. You will pay when the t-shirts arrive.
The design on the back of the shirt The right-front pocket area
Enter the quantity of each color and size below. White is also available with black ink.
With Pocket
Without Pocket
Tall Sizes (additional $2.00)
Indicate if you are interested in getting a cap. Yes No
Your Name___________________________________________________
Address______________________________________________________
City, State, Zip_________________________________________________
Phone # {in case we need to contact you}___________________________
Pay when T-shirts are delivered
BLACK GRAY WHITE
SMALL
MEDIUM
LARGE
X– LARGE
2X-LARGE
3X-LARGE
4X-LARGE

Also available online at: www.abana.org
BLACKSMITH ORGANIZATION OF ARKANSAS
MEMBERSHIP APPLICATION
21
BENEFITS OF BOA
MEMBERSHIP
BOA members continue a tradi-
tion of educating our members
and the public in the techniques
and history of blacksmithing,
the king of crafts.
In addition to our monthly
meetings, newsletter, and email
chatter, our members are active
in their communities with many
interesting events and demon-
strations.
Members also receive discount-
ed prices on coal and stylish
BOA apparel.
BOA membership is a family
membership. For one member-
ship fee, all the members of the
family are considered active,
and each may receive an elec-
tronic newsletter
MEMBERSHIP APPLICATION
BENEFITS OF ABANA
MEMBERSHIP
With your ABANA membership,
you receive a subscription to
both The Anvil's Ring and The
Hammer's Blow. As well as
discounted conference
registrations and discounts at
many web sites.
The Anvil's Ring, devoted
exclusively to the craft of
blacksmithing, is the
association's quarterly magazine
which presents articles on
topics such as architectural iron,
decorative design, hand forged
tools, historical references,
advice to beginners, etc.
The Hammer's Blow, also a
quarterly publication, is a black
and white magazine full of "how
to" tips and techniques for
professionals and beginners
alike.
Name: Email:
Address: WWW URL:
City: Phone:
State: Zip: Fax:
Type of Membership: Credit Card Information: Regular …..$55 Overseas ….....$65 Visa Mastercard
Student …..$45 Contributing ..$100 Card#
Senior …....$50 Library …….....$45 Expiration:
There is a $5 discount for 2-year memberships and renewals
The Blacksmith Organization of Arkansas (BOA) is an ABANA Chapter Affiliation
Submit check, money order (US banks only), or credit card information using this form to
Artist-Blacksmith’s Association of North America, Inc.
259 Muddy Fork Road
Jonesborough, TN 37659
Phone: 423-913-1022
Fax: 423-913-1023
Email: [email protected]
Date: _________________
Name*: (Plus Family Members)
Address:
PrimaryPhone:
Email**:
Email:
Email:
Special areas of interest:
Knife making Gunsmithing Architectural
Restoration Buck Skinning Medieval
Membership dues are $25 per year, due in January***.
Make checks payable to “BOA (Blacksmith Organization of Arkansas)”
Mail to:
Ron Wells, BOA Treasurer HCR 32 Box 141 Mount Judea, AR 72655
Or bring to the next meeting and give to the Treasurer or Steward
*BOA’s membership is a family membership. For the payment of one membership, all the mem-bers of a family would be afforded all the benefits and privileges of full membership. They would, however, have ONE vote on BOA business per family membership.
**BOA's Newsletter is available as an electronic newsletter. It is only distributed to active email addresses. Please make sure your email address and those of your family members are entered correctly above.
***Membership dues are paid with the submission of this application; thereafter, they are due each January. If the dues are paid in the last three months (October, November, or De-cember) of the year, membership is paid up for the following year. If dues are not paid with-in the first three months (January, February, or March) of the year, the member is re-moved from the membership.

THE BLACKSMITH ORGANIZATION OF ARKANSAS (BOA)
BOA is an affiliate of the Artist-Blacksmiths Association of North America (ABANA)
We are exclusively for the education of members and other interested parties in the skills, techniques, and traditions of blacksmithing. We aspire to expose the art of blacksmithing to the public, to serve as center of information about blacksmithing and its tradition, and to do so in cooperation with and as an affiliate of the Artist-Blacksmiths Association of North America.
Information on when and where we meet and how to join can be found within the pages of this, our monthly newsletter.
If you’re not already a member, we hope you will be soon!
BOA MEMBER SHOWCASE—BOB PATRICK
One of the best things
about taking a class
with Bob Patrick is
having the opportunity
to see all the amazing
bits of blacksmithing
just laying around,
propped up in odd
corners. This is one of
my favorites, just
something Bob
whipped up to hang his
shingle above his shop
door. It’s actually up
pretty high—I didn’t
even notice it until late
in the second day.
If I made something
this nice, it would
definitely be hung
where I knew everyone
would have to see it!
Nice work, Bob, as always!
PLEASE
PLACE
STAMP
HERE
The Blacksmith Organization of Arkansas
218 Trelon Circle
Little Rock, AR, 72223
VOICE