decision support system (dss) dss fy20 user’s guide software …dss)/dss_ug.pdf · dss fy20...
TRANSCRIPT

Decision Support System (DSS)
DSS FY20 User’s Guide
Software Version 3.0 Patch ECX*3.0*177
December 2019
Document Version 2.0
Department of Veterans Affairs (VA) Office of Information Technology (OI&T)

DSS FY20 User’s Guide Revision History
Patch ECX*3.0*177 ii Release: December 2019
Revision History
Date Version Description Author
12/03/2019 2.0 Document updates to reflect FY20 updated ECX*3*177 patch
Team SMS/Leidos
09/25/2019 1.0 Initial Document Release Team SMS/Leidos
DSS FY20 User’s Guide Table of Contents
Patch ECX*3.0*177 iii Release: December 2019
Table of Contents
1 Introduction .......................................................................................... 1
1.1 Purpose .......................................................................................................... 1
1.2 Document Orientation ..................................................................................... 1
1.2.1 Organization of the Guide ................................................................................................... 1 1.2.2 Assumptions ........................................................................................................................ 2 1.2.3 Coordination ........................................................................................................................ 2 1.2.4 Disclaimers .......................................................................................................................... 3
1.2.4.1 Software Disclaimer .................................................................................................. 3 1.2.4.2 Documentation Disclaimer ........................................................................................ 3
1.2.5 Documentation Conventions ............................................................................................... 3 1.2.6 References and Resources ................................................................................................ 3
1.3 National Service Desk and Organizational Contacts ...................................... 4
2 System Summary................................................................................. 5
2.1 System Configuration ..................................................................................... 5
2.2 Data Flows...................................................................................................... 5
2.3 User Access Levels ........................................................................................ 5
3 Getting Started ..................................................................................... 7
3.1 Setup Required DSS Information ................................................................... 7
3.2 Logging On - Systems Manager Menu ........................................................... 7
3.3 Accessing DSS ............................................................................................... 7
3.4 Caveats and Exceptions ................................................................................. 8
4 Using the Software ............................................................................... 9
4.1 Maintenance Menu ......................................................................................... 9
4.1.1 CBOC Activity Report........................................................................................................ 10 4.1.2 CPT/ICD Inquiry ................................................................................................................ 11
4.1.2.1 CPT Inquiry ............................................................................................................. 12 4.1.2.2 ICD Inquiry .............................................................................................................. 12
4.1.3 Enter/Edit DSS Ward ........................................................................................................ 13 4.1.4 Lab Results DSS LOINC Code Report ............................................................................. 14 4.1.5 Pharmacy .......................................................................................................................... 16
4.1.5.1 Enter/Edit IV Room Division .................................................................................... 17 4.1.5.2 Print IV Room Worksheet ........................................................................................ 17 4.1.5.3 Pharmacy NDC Lookup .......................................................................................... 18 4.1.5.4 Pharmacy Edit and Edit Log.................................................................................... 20
4.1.5.4.1 Pharmacy Volume Edit .................................................................................. 20 4.1.5.4.2 Pharmacy Volume Edit Log ........................................................................... 22
4.1.6 Print Feeder Keys ............................................................................................................. 24 4.1.7 Print Feeder Locations ...................................................................................................... 26 4.1.8 Print Stations and Divisions Report .................................................................................. 28 4.1.9 Prosthetics ........................................................................................................................ 31
4.1.9.1 Cost by PSAS HCPC Report .................................................................................. 31

DSS FY20 User’s Guide Table of Contents
Patch ECX*3.0*177 iv Release: December 2019
4.1.9.2 Prosthetics (PRO) YTD HCPCS Report ................................................................. 33 4.1.9.3 Prosthetics (PRO) YTD Laboratory Report ............................................................. 36 4.1.9.4 Prosthetics Edit and Edit Log .................................................................................. 39
4.1.9.4.1 Prosthetics Extract Edit ................................................................................. 39 4.1.9.4.2 Prosthetics Extract Edit Log .......................................................................... 41
4.1.9.5 Prosthetics Rental Report ....................................................................................... 42 4.1.9.6 Prosthetics Unit of Issue Report ............................................................................. 45
4.1.10 Setup for DSS Clinic Information ...................................................................................... 46 4.1.10.1 CHAR4 Codes List .................................................................................................. 46 4.1.10.2 Create DSS Clinic Stop Code File .......................................................................... 48
4.1.10.2.1 New Clinic Entries ......................................................................................... 49 4.1.10.2.2 Existing Clinic Entries .................................................................................... 49
4.1.10.3 Clinics and DSS Stop Codes Print .......................................................................... 50 4.1.10.4 Enter/Edit Clinic Parameters ................................................................................... 54 4.1.10.5 Approve Reviewed DSS Clinic Worksheet ............................................................. 55 4.1.10.6 Clinic and Stop Codes Validity Report .................................................................... 56 4.1.10.7 Clinic Edit Log Report ............................................................................................. 59
4.1.11 Setup for Inpatient Census Information ............................................................................ 60 4.1.11.1 Trial for Setup Extract ............................................................................................. 60 4.1.11.2 Generate the Inpatient Setup Extract ...................................................................... 62 4.1.11.3 Active MAS Wards for Fiscal Year Print ................................................................. 63 4.1.11.4 Primary Care Team Print ........................................................................................ 65
4.1.12 Test Patient List ................................................................................................................ 66 4.1.13 View G&L Corrections ....................................................................................................... 68
4.2 Pre-Extract Audit Reports ............................................................................. 69
4.2.1 Event Capture Pre-Extract Unusual Volume Report ......................................................... 69 4.2.2 Laboratory Blood Bank (LBB) Pre-Extract Audit ............................................................... 71 4.2.3 Pharmacy .......................................................................................................................... 73
4.2.3.1 Pharmacy Pre-Extract Incomplete Feeder Key Reports ......................................... 73 4.2.3.1.1 PRE Extracts Incomplete Feeder Key Report ............................................... 76 4.2.3.1.2 IVP Extracts Incomplete Feeder Key Report ................................................ 76 4.2.3.1.3 UDP Extracts Incomplete Feeder Key Report ............................................... 76
4.2.3.2 Pharmacy Pre-Extract Unusual Cost Reports ......................................................... 76 4.2.3.2.1 PRE Unusual Cost Report ............................................................................. 79 4.2.3.2.2 IVP Unusual Cost Report .............................................................................. 79 4.2.3.2.3 UDP Unusual Cost Report ............................................................................ 79
4.2.3.3 Pharmacy Pre-Extract Unusual Volume Reports .................................................... 79 4.2.3.3.1 PRE Unusual Volume Report ........................................................................ 81 4.2.3.3.2 IVP Unusual Volume Report ......................................................................... 82 4.2.3.3.3 UDP Unusual Volume Report ........................................................................ 84 4.2.3.3.4 BCM Unusual Volume Report ....................................................................... 86
4.2.3.4 IVP/UDP Source Audit Reports .............................................................................. 88 4.2.4 Prosthetic Pre-Extract Unusual Cost Report .................................................................... 90 4.2.5 Surgery .............................................................................................................................. 92
4.2.5.1 Surgery Pre-Extract Volume Report ....................................................................... 93 4.2.5.2 Surgery Pre-Extract Unusual Volume Report ......................................................... 94
4.3 Package Extracts .......................................................................................... 96

DSS FY20 User’s Guide Table of Contents
Patch ECX*3.0*177 v Release: December 2019
4.3.1 Admissions Extract (ADM) ................................................................................................ 97 4.3.2 BCMA Extract (BCM) ........................................................................................................ 97 4.3.3 Blood Bank Extract (LBB) ................................................................................................. 98 4.3.4 Clinic Extract (CLI) ............................................................................................................ 98 4.3.5 Event Capture Extract (ECS) ............................................................................................ 98 4.3.6 IV Extract (IVP) ................................................................................................................. 98 4.3.7 Lab Extract (LAB) .............................................................................................................. 98 4.3.8 Lab Results Extract (LAR) ................................................................................................ 99 4.3.9 Prescription Extract (PRE) ................................................................................................ 99 4.3.10 Prosthetics Extract (PRO) ................................................................................................. 99 4.3.11 QUASAR Extract (ECQ) ................................................................................................. 100 4.3.12 Radiology Extract (RAD) ................................................................................................. 100 4.3.13 Surgery Extract (SUR) .................................................................................................... 100 4.3.14 Transfer and Discharge Extract (MOV) ........................................................................... 100 4.3.15 Treating Specialty Change Extract (TRT) ....................................................................... 100 4.3.16 Unit Dose Extract (UDP) ................................................................................................. 100 4.3.17 Fiscal Year Logic – DSS Testing Only ............................................................................ 101
4.4 SAS Extract Audit Reports ......................................................................... 101
4.4.1 SAS Prescription Audit Report ........................................................................................ 102 4.4.2 SAS Radiology Audit Report ........................................................................................... 104 4.4.3 SAS Surgery Audit Report .............................................................................................. 106
4.5 Extract Audit Reports .................................................................................. 108
4.5.1 Admission (ADM) Extract Audit ....................................................................................... 111 4.5.2 QUASAR (ECQ) Audit..................................................................................................... 112 4.5.3 Event Capture Local (ECS) Extract Audit ....................................................................... 112 4.5.4 LAB Results DSS LOINC Code Report Extract Audit ..................................................... 114 4.5.5 Laboratory Results (LAR) Extract Audit .......................................................................... 114 4.5.6 Laboratory Blood Bank (LBB) Comparative Report ........................................................ 115 4.5.7 Physical Movement (MOV) Extract Audit ........................................................................ 116 4.5.8 Pharmacy (PHA) Extract Cost by Feeder Key ................................................................ 117 4.5.9 Prosthetics (PRO) Extract Audit ...................................................................................... 120 4.5.10 Radiology (RAD) Extract Audit ........................................................................................ 122 4.5.11 Radiology (RAD) Extract CPT Code Audit ...................................................................... 123 4.5.12 Surgery (SUR) Extract Audit ........................................................................................... 124 4.5.13 Treating Specialty Change (TRT) Extract Audit .............................................................. 125 4.5.14 Extract Stop Code Validity Report .................................................................................. 126
4.5.14.1 Clinic Extract Stop Code Audit .............................................................................. 127 4.5.14.2 Event Capture Extract Stop Code Audit ................................................................ 128 4.5.14.3 Radiology Extract Stop Code Audit ....................................................................... 128
4.6 Transmission Management ........................................................................ 129 4.6.1 Review a Particular Extract for Transmission ................................................................. 129 4.6.2 Transmit Data from Extract Files .................................................................................... 130 4.6.3 Summary Report of Extract Logs .................................................................................... 132 4.6.4 Delete Extract Files ......................................................................................................... 134 4.6.5 Purge Extract Holding Files ............................................................................................ 135 4.6.6 Recreate Extract Holding Files ....................................................................................... 137
5 Troubleshooting ............................................................................... 139

DSS FY20 User’s Guide Table of Contents
Patch ECX*3.0*177 vi Release: December 2019
5.1 Special Instructions for Error Correction ..................................................... 139
Abbreviations and Acronyms ............................................ A-1
Glossary ........................................................................... B-1
Feeder Key Encoding ....................................................... C-1
Exporting a Report to a Spreadsheet ............................... D-1
Index ......................................................................................... D-1
List of Tables
Table 1: Reference Documentation on the VDL ......................................................... 3
Table 2: Tier Support Contact Information .................................................................. 4
Table 3: ECXMGR Menu Table .................................................................................. 6
Table 4: ECXPVE Menu Table ................................................................................... 6
Table 5: ECXDSS Test Menu Table ........................................................................... 6
Table 6: New Clinic Entry Field Defaults .................................................................. 49
Table 7: Acronyms ................................................................................................. A-1
Table 8: Glossary ................................................................................................... B-1
Table 9: Feeder Key Encoding Table ..................................................................... C-1
List of Figures
Figure 1: DSS Application Data Flow Diagram ....................................................... 5
Figure 2: Systems Manager Menu for System Administrator .................................. 7
Figure 3: Extract Manager’s Options ....................................................................... 9
Figure 4: Maintenance Menu Options ..................................................................... 9
Figure 5: List of Selectable Clinic Extracts for CBOC Activity Report ................... 10
Figure 6: CBOC Activity Report ............................................................................ 11
Figure 7: Exported CBOC Activity Report ............................................................. 11
Figure 8: CPT/ICD Inquiry Options ....................................................................... 11
Figure 9: CPT Inquiry ............................................................................................ 12

DSS FY20 User’s Guide Table of Contents
Patch ECX*3.0*177 vii Release: December 2019
Figure 10: ICD Inquiry ............................................................................................. 13
Figure 11: Enter/Edit DSS Ward – Selection Screen .............................................. 14
Figure 12: Maintenance Menu Options ................................................................... 15
Figure 13: Running the Lab Results DSS LOINC Code Report .............................. 15
Figure 14: Lab Results DSS LOINC Code Report .................................................. 16
Figure 15: Exported Lab Results DSS LOINC Code Report ................................... 16
Figure 16: Pharmacy Options Menu ....................................................................... 16
Figure 17: Enter/Edit IV Room Division Menu Options ........................................... 17
Figure 18: Running the Print IV Room Worksheet .................................................. 18
Figure 19: IV Room Worksheet ............................................................................... 18
Figure 20: Exported IV Room Worksheet ............................................................... 18
Figure 21: Pharmacy NDC Lookup Feeder Key Information ................................... 19
Figure 22: Pharmacy NDC Lookup Results ............................................................ 20
Figure 23: Pharmacy Edit and Edit Log Options ..................................................... 20
Figure 24: Performing a Pharmacy Volume Edit – PRE Extract ............................. 22
Figure 25: Running the Pharmacy Volume Edit Log – PRE Extract ........................ 23
Figure 26: Pharmacy Volume Edit Log – PRE Extract ............................................ 24
Figure 27: Running the Print Feeder Keys Option .................................................. 24
Figure 28: Print Feeder Keys - PRO ....................................................................... 25
Figure 29: Exported Print Feeder Keys - PRO ........................................................ 25
Figure 30: Running the Print Feeder Locations Option ........................................... 26
Figure 31: Print Feeder Locations ........................................................................... 27
Figure 32: Exported Print Feeder Locations ........................................................... 28
Figure 33: Print Stations and Divisions Menu Options ............................................ 29
Figure 34: Print Stations and Divisions Institution File Listing ................................. 29
Figure 35: Print Stations and Divisions Institution File Listing Export...................... 30
Figure 36: Print Stations and Divisions Medical Center Division File Listing ........... 30
Figure 37: Print Stations and Divisions Medical Center Division File Listing Export30
Figure 38: Prosthetics Menu Options ...................................................................... 31
Figure 39: Running the Cost by PSAS HCPC Report ............................................. 32
Figure 40: Cost by PSAS HCPC Report ................................................................. 32
Figure 41: Exported Cost by PSAS HCPC Report .................................................. 33
Figure 42: Selecting a Primary Division for the Prosthetics YTD HCPCS Report ... 33

DSS FY20 User’s Guide Table of Contents
Patch ECX*3.0*177 viii Release: December 2019
Figure 43: Running the Prosthetics (PRO) YTD HCPCS Report ............................ 34
Figure 44: Prosthetics (PRO) YTD HCPCS Report – New ..................................... 35
Figure 45: Prosthetics (PRO) YTD HCPCS Report - Repair ................................... 35
Figure 46: Prosthetics (PRO) YTD HCPCS Report – Rental .................................. 36
Figure 47: Exported Prosthetics (PRO) YTD HCPCS Report ................................. 36
Figure 48: Selecting a Division for the Prosthetics YTD Laboratory Report ............ 37
Figure 49: Running the Prosthetics (PRO) YTD Laboratory Report ........................ 38
Figure 50: Prosthetics (PRO) YTD Laboratory Report – New ................................. 38
Figure 51: Prosthetics (PRO) YTD Laboratory Report - Repair .............................. 39
Figure 52: Exported Prosthetics (PRO) YTD Laboratory Report ............................. 39
Figure 53: Prosthetics Edit and Edit Log Options ................................................... 39
Figure 54: Performing a Prosthetics Extract Edit .................................................... 41
Figure 55: Running the Prosthetics Edit Extract Log............................................... 42
Figure 56: Prosthetics Edit Log ............................................................................... 42
Figure 57: Running the Prosthetics Rental Report .................................................. 43
Figure 58: Prosthetics Rental Report ...................................................................... 44
Figure 59: Exported Prosthetics Rental Report ....................................................... 44
Figure 60: Running the Prosthetics Unit of Issue Report ........................................ 45
Figure 61: Prosthetics Unit of Issue Report ............................................................ 45
Figure 62: Exported Prosthetics Unit of Issue Report ............................................. 46
Figure 63: DSS Clinic Information Menu Options.................................................... 46
Figure 64: Running the CHAR4 Codes List ............................................................ 47
Figure 65: CHAR4 Code List .................................................................................. 47
Figure 66: Exported CHAR4 Codes List ................................................................. 48
Figure 67: Running the Create DSS Clinic Stop Code File Option.......................... 49
Figure 68: Running the Clinics and DSS Stop Codes Print Option ......................... 51
Figure 69: Clinics and DSS Stop Codes Print - All Clinics ...................................... 51
Figure 70: Clinics and DSS Stop Codes Print – All Active Clinics ........................... 52
Figure 71: Clinics and DSS Stop Codes Print - Duplicate Clinics ........................... 52
Figure 72: Clinics and DSS Stop Codes Print – All Inactive Clinics ........................ 53
Figure 73: Clinics and DSS Stop Codes Print – Unreviewed Clinics....................... 53
Figure 74: Exported Clinics and DSS Stop Codes Print – All Clinics ...................... 54
Figure 75: Exported Clinics and DSS Stop Codes Print – Duplicate Clinics ........... 54

DSS FY20 User’s Guide Table of Contents
Patch ECX*3.0*177 ix Release: December 2019
Figure 76: Running the Enter/Edit Clinic Parameters Option .................................. 55
Figure 77: Running the Approve Reviewed DSS Clinic Worksheet Option ............. 56
Figure 78: Running the Clinic & Stop Codes Validity Report .................................. 58
Figure 79: Clinic & Stop Codes Validity Report ....................................................... 58
Figure 80: Exported Clinic and Stop Codes Validity Report .................................... 58
Figure 81: Running the Clinic Edit Log Report ........................................................ 59
Figure 82: Clinic Edit Log Report ............................................................................ 60
Figure 83: Exported Clinic Edit Log Report ............................................................. 60
Figure 84: Setup for Inpatient Census Information Menu Options .......................... 60
Figure 85: Running the Trial for Setup Extract Option ............................................ 61
Figure 86: Trial for Setup Extract ............................................................................ 62
Figure 87: Running the Generate the Inpatient Setup Extract Option ..................... 63
Figure 88: Running the Active MAS Wards for Fiscal Year Print Option ................. 64
Figure 89: Active MAS Wards for Fiscal Year Print................................................. 64
Figure 90: Exported Active MAS Wards for Fiscal Year Print ................................. 64
Figure 91: Running the Primary Care Team Print Option ....................................... 65
Figure 92: Primary Care Team Print Report ........................................................... 66
Figure 93: Exported Primary Care Team Print ........................................................ 66
Figure 94: Running the Test Patient List Option ..................................................... 67
Figure 95: Test Patient List ..................................................................................... 67
Figure 96: Exported Test Patient List ...................................................................... 67
Figure 97: Running the View G&L Corrections Option ............................................ 68
Figure 98: G&L Corrections List .............................................................................. 68
Figure 99: Pre-Extract Audit Reports Options ......................................................... 69
Figure 100: Running the Event Capture Pre-Extract Unusual Volume Report .......... 70
Figure 101: Event Capture Pre-Extract Unusual Volume Report – All DSS Units ..... 70
Figure 102: Exported ECS Extract Unusual Volume Report – All DSS Units ............ 71
Figure 103: Running the Laboratory Blood Bank (LBB) Pre-Extract Audit ................ 72
Figure 104: Laboratory Blood Bank (LBB) Pre-Extract Audit Report......................... 72
Figure 105: Exported Laboratory Blood Bank (LBB) Pre-Extract Audit Report ......... 72
Figure 106: Pharmacy Menu Options ....................................................................... 73
Figure 107: Running the Pharmacy Pre-Extract Incomplete Feeder Key Reports .... 74
Figure 108: Pharmacy Pre-Extract Incomplete Feeder Key Report – PRE ............... 75

DSS FY20 User’s Guide Table of Contents
Patch ECX*3.0*177 x Release: December 2019
Figure 109: Exported Pharmacy Pre-Extract Incomplete Feeder Key Reports ......... 76
Figure 110: Running the Pharmacy Pre-Extract Unusual Cost Report ..................... 78
Figure 111: Pharmacy Pre-Extract Unusual Cost Report – PRE .............................. 78
Figure 112: Exported Pharmacy Pre-Extract Unusual Cost Report .......................... 79
Figure 113: Running a Pharmacy Pre-Extract Unusual Volume Report .................... 80
Figure 114: Running the Unusual Volume Report - PRE .......................................... 81
Figure 115: Unusual Volume Report - PRE .............................................................. 82
Figure 116: Exported Unusual Volume Report - PRE ............................................... 82
Figure 117: Running the Unusual Volume Report – IVP ........................................... 83
Figure 118: Unusual Volume Report - IVP ................................................................ 83
Figure 119: Exported Unusual Volume Report - IVP................................................. 84
Figure 120: Running the Unusual Volume Report – UDP ......................................... 85
Figure 121: Unusual Volume Report with SIG/Order Directions - UDP ..................... 85
Figure 122: Exported Unusual Volume Report with SIG/Order Directions – UDP .... 86
Figure 123: Running the Unusual Volume Report – BCM Non-IV ............................ 87
Figure 124: Unusual Volume Report with SIG/Order Directions – BCM Non-IV ....... 87
Figure 125: Exported Unusual Volume Report with SIG/Order Directions – BCM Non-IV 88
Figure 126: Running the IVP/UDP Source Audit Report ........................................... 89
Figure 127: IVP/UDP Source Audit Report ............................................................... 89
Figure 128: Exported IVP/UDP Source Audit Report ................................................ 90
Figure 129: Running the Prosthetic Pre-Extract Unusual Cost Report...................... 91
Figure 130: Prosthetic Pre-Extract Unusual Cost Report .......................................... 92
Figure 131: Exported Prosthetic Pre-Extract Unusual Cost Report .......................... 92
Figure 132: Surgery Menu Options ........................................................................... 92
Figure 133: Running the Surgery Pre-Extract Volume Report .................................. 93
Figure 134: Surgery Pre-Extract Volume Report ...................................................... 93
Figure 135: Exported Surgery Pre-Extract Volume Report ....................................... 94
Figure 136: Running the Surgery Pre-Extract Unusual Volume Report .................... 95
Figure 137: Surgery Pre-Extract Unusual Volume Report ........................................ 95
Figure 138: Exported Surgery Pre-Extract Unusual Volume Report ......................... 96
Figure 139: Package Extracts Options ...................................................................... 96
Figure 140: Running a Package Extract ................................................................... 97
DSS FY20 User’s Guide Table of Contents
Patch ECX*3.0*177 xi Release: December 2019
Figure 141: Running the Fiscal Year Logic Option.................................................. 101
Figure 142: SAS Extract Audit Reports Menu Options ............................................ 102
Figure 143: Running the SAS Prescription Audit Report ......................................... 103
Figure 144: SAS Prescription (PRE) Audit Report .................................................. 103
Figure 145: Exported SAS Prescription Audit Report.............................................. 104
Figure 146: Running the SAS Radiology Audit Report............................................ 105
Figure 147: SAS Radiology Audit Report ................................................................ 105
Figure 148: Exported SAS Radiology Audit Report................................................. 106
Figure 149: Running the SAS Surgery Audit Report ............................................... 107
Figure 150: SAS Surgery Audit Report ................................................................... 107
Figure 151: Exported SAS Audit Report for Surgery (SUR) Extract ........................ 108
Figure 152: Extract Audit Reports Menu ................................................................. 108
Figure 153: Running an Extract Audit Report ......................................................... 110
Figure 154: Exported Extract Audit Report ............................................................. 110
Figure 155: Admission (ADM) Extract Audit Report ................................................ 111
Figure 156: Exported Admission Extract Audit Report ............................................ 111
Figure 157: QUASAR (ECQ) Extract Audit Report.................................................. 112
Figure 158: Exported QUASAR Extract Audit Report ............................................. 112
Figure 159: Event Capture (ECS) Extract Audit Report .......................................... 113
Figure 160: Exported ECS Extract Audit Report ..................................................... 113
Figure 161: Lab Results DSS LOINC Code Report Extract Audit Report ............... 114
Figure 162: Exported Laboratory Extract Audit Report ........................................... 114
Figure 163: Lab Results(LAR) Extract Audit Report................................................ 115
Figure 164: Exported Laboratory Results Extract Audit Report .............................. 115
Figure 165: LBB Extract Comparative Report ......................................................... 116
Figure 166: Exported Laboratory Blood Bank (LBB) Comparative Report .............. 116
Figure 167: Movement (MOV) Extract Audit Report................................................ 117
Figure 168: Exported Physical Movement (MOV) Extract Audit Report .................. 117
Figure 169: Extract Report Menu ............................................................................ 118
Figure 170: Pharmacy Extract Cost by Feeder Key Report Menu .......................... 118
Figure 171: Example of Pharmacy Extract Cost by Feeder Key PRE Exported Report 119

DSS FY20 User’s Guide Table of Contents
Patch ECX*3.0*177 xii Release: December 2019
Figure 172: Example of Pharmacy Extract Cost by Feeder Key IVP Exported Report 119
Figure 173: Example of Pharmacy Extract Cost by Feeder Key UDP Exported Report 119
Figure 174: Example of Pharmacy Extract Cost by Feeder Key BCM Exported Report 120
Figure 175: PRO Extract Audit Menu ...................................................................... 120
Figure 176: Prosthetics (PRO) Extract Audit Report – Summary Version ............... 121
Figure 177: Exported Prosthetics (PRO) Extract Audit Report – Summary Version121
Figure 178: Prosthetics (PRO) Extract Audit Report – Detail Version ..................... 121
Figure 179: Exported Prosthetics (PRO) Extract Audit Report – Detail Version ..... 122
Figure 180: Radiology (RAD) Extract Audit Report ................................................. 122
Figure 181: Exported Radiology (RAD) Extract Audit Report .................................. 123
Figure 182: Radiology (RAD) Extract CPT Code Audit Report ............................... 123
Figure 183: Exported Radiology (RAD) Extract CPT Code Audit Report ................ 124
Figure 184: Surgery (SUR) Extract Audit Report .................................................... 124
Figure 185: Exported Surgery (SUR) Extract Audit Report ..................................... 125
Figure 186: Treating Specialty Change (TRT) Extract Audit Report ....................... 125
Figure 187: Exported Treating Specialty Change (TRT) Extract Audit Report ........ 126
Figure 188: Running the Extract Stop Code Validity Report ................................... 127
Figure 189: Clinic Extract Stop Code Audit ............................................................. 127
Figure 190: Exported Clinic Extract Stop Code Audit.............................................. 128
Figure 191: Event Capture Extract Stop Code Audit ............................................... 128
Figure 192: Exported Event Capture Extract Stop Code Audit ............................... 128
Figure 193: Radiology Extract Stop Code Audit ...................................................... 128
Figure 194: Exported Radiology Extract Stop Code Audit ...................................... 129
Figure 195: Transmission Management Options Menu .......................................... 129
Figure 196: Review a Particular Extract for Transmission ...................................... 130
Figure 197: Transmitting Data from an Extract File................................................. 131
Figure 198: Sample Mail Message – Transmission of Extracted Data .................... 132
Figure 199: System Message When Attempting to Transmit an Empty Extract ...... 132
Figure 200: Running the Summary Report of Extract Logs Option ......................... 133
Figure 201: Summary Report of Extract Logs ......................................................... 133

DSS FY20 User’s Guide Table of Contents
Patch ECX*3.0*177 xiii Release: December 2019
Figure 202: Exported Summary Report of Extract Logs .......................................... 134
Figure 203: Running the Delete Extract Files Option .............................................. 135
Figure 204: Running the Purge Extract Holding Files Option .................................. 137
Figure 205: Running the Recreate Extract Holding File Option .............................. 138
Figure 206: Selecting an Exportable Format for a Report ....................................... D-1
Figure 207: Reflection Workspace Settings Screen ................................................ D-2
Figure 208: Changing the Characters per Row in Reflection Workspace ............... D-3
Figure 209: Reflection Workspace Logging Settings .............................................. D-3
Figure 210: Reflection Workspace File Menu > Stop Logging ................................ D-4
Figure 211: Excel Import From Text Option ............................................................ D-4
Figure 212: Import Text File Screen........................................................................ D-5
Figure 213: Text Import Wizard – Step 1 of 3 ......................................................... D-5
Figure 214: Text Import Wizard – Step 2 of 3 ......................................................... D-6
Figure 215: Text Import Wizard – Step 3 of 3 ......................................................... D-6
Figure 216: Import Data Screen .............................................................................. D-7
Figure 217: Text File Imported in Excel .................................................................. D-7
DSS FY20 User’s Guide Introduction
Patch ECX*3.0*177 1 Release: December 2019
1 Introduction
The Decision Support System (DSS) is the designated Managerial Cost Accounting (MCA) System of the
Department of Veterans Affairs (VA) as mandated in VHA Directive 1750 Veterans Health Administration
(VHA) Managerial Cost Accounting System [Decision Support System (DSS)], March 24, 2015.
DSS is a derived database built from standard VHA data sources. The Managerial Cost Accounting Office
(MCAO) uses clinical and financial data to provide state-of-the-art activity-based costing and clinical
productivity analyses.
This is a design-to-schedule project with a compulsory patch release date of no later than November 1 of
the new Fiscal Year (FY). This project enables the MCAO to accurately accommodate changes to the
primary Clinical Transaction Systems made during the preceding year, ensuring the Workload data has
been accurately captured and costed to the Product Level.
MCA Cost Data is used at all levels of the VA for important functions such as budgeting and resource
allocation. Additionally, the system contains a rich repository of clinical information used to promote a
more proactive approach to the care of high-risk (i.e., diabetes and acute coronary patients) and high-cost
patients.
1.1 Purpose The DSS FY20 User’s Guide is intended for use as an instructional guide for the DSS application
software. Users may use this manual as a supplemental guide to the DSS application Online Help
options.
1.2 Document Orientation The following sub-sections provide general information about how to use this document.
1.2.1 Organization of the Guide This document is organized into the following major sections:
Introduction – This section provides a brief description of the purpose of the guide and an orientation
into the document’s structure and use.
System Summary – This section provides a general description of the system written in non-technical
terminology, the purpose for which the system is intended, the system configuration, data flows, user
access, and continuity of operations.
Getting Started – This section provides a general walkthrough of the system from initiation through exit.
The logical arrangement of the information enables functional personnel to understand the sequence and
flow of the system.
Using the Software – This section serves as a reference to the user and covers vital aspects of this tool.
It is categorized into six components.
• Maintenance
• Pre-Extract Audit Reports

DSS FY20 User’s Guide Introduction
Patch ECX*3.0*177 2 Release: December 2019
• Package Extracts
• Statistical Analysis System (SAS) Extract Audit Reports
• Extract Audit Reports
• Transmission Management
Troubleshooting – This section provides general troubleshooting advice on commonly encountered
issues.
Appendix – The following appendices are included in this guide:
• Appendix A: Abbreviations and Acronyms
• Appendix B: Glossary
• Appendix C: Feeder Key Encoding
• Appendix D: Exporting a Report to a Spreadsheet
Index – Displays major topics of interest
1.2.2 Assumptions This guide was written with the following assumed experience/skillset of the audience:
• User has basic knowledge of the Veterans Health Information Systems and Technology Architecture (VistA) Kernel operating system. This knowledge includes logging on and off the VistA system, using commands, menu options and navigation tools.
• User has been assigned the appropriate active roles, menus, and security keys required for DSS.
• User is using DSS to perform his/her job.
• User has validated access to DSS.
• User has completed any prerequisite training.
1.2.3 Coordination The DSS application enables MCA personnel to ensure the healthcare workload is accurately captured
and costed to the product level by providing the ability to periodically run extracts and perform analyses
without intervention or assistance from other Healthcare staff.
Site teams are responsible for:
• Generating the VistA extracts in a timely manner.
• Auditing all extracts to verify that the correct data was included.
• Transmitting the extracts.
• Verifying that the transmissions were received.
• Purging the extract files once they are no longer needed.

DSS FY20 User’s Guide Introduction
Patch ECX*3.0*177 3 Release: December 2019
1.2.4 Disclaimers The following disclaimers apply to all VA user documentation.
1.2.4.1 Software Disclaimer
This software was developed at the VA by employees of the Federal Government in the course of their
official duties. Pursuant to Title 17 Section 105 of the United States Code (U.S.C.), this software is not
subject to copyright protection and is in the public domain. VA assumes no responsibility whatsoever for
its use by other parties, and makes no guarantees, expressed or implied, about its quality, reliability, or
any other characteristic. We would appreciate acknowledgement if the software is used. This software
can be redistributed and/or modified freely provided that any derivative works bear some notice that they
are derived from it, and any modified versions bear some notice that they have been modified.
1.2.4.2 Documentation Disclaimer
The appearance of external hyperlink references in this guide does not constitute endorsement by the VA
of the Web site or the information, products, or services contained therein. The VA does not exercise any
editorial control over the information found at these locations. Such links are provided and are consistent
with the stated purpose of the VA.
1.2.5 Documentation Conventions To avoid displaying sensitive information regarding our patients and staff, the examples in this guide
contain pseudonyms, scrambled data and/or data replaced with Xs. Patients and staff will be referred to
as “DSS1”, “PAT1”, “ECPATIENT, ONE”, “ECPROVIDER, ONE”, “USER, ONE” etc. Scrambled data is a
series of random letters that replace a real name like “AAADY, JWHTRE”. Likewise, actual social security
numbers (SSNs), actual addresses, and other personal identifiers are not used.
Throughout the document, many of the examples for print and export versions of reports will only include
portions of the actual output produced for the purpose of saving space and maintaining clarity.
1.2.6 References and Resources Listed below are documents that are available for reference on the DSS VA Software Document Library
(VDL) intranet site.
Table 1: Reference Documentation on the VDL
File Name Manual Name Description
DSS_DDD DSS FY20 Data Definitions Document
Provides detailed information on formatting and defines the data terminology.
DSS_DIBR DSS FY20 Distribution, Installation, Back-out, and Rollback Guide
Provides detailed information for site IT staff for distributing, installing, backing out and rolling back DSS software patches.
DSS_TM DSS FY20 Technical Manual Describes the DSS Extract technical (high- level) terminology.
DSS_UG DSS FY20 User’s Guide Provides an overview of the functionality and enhancements of the DSS Extract application.

DSS FY20 User’s Guide Introduction
Patch ECX*3.0*177 4 Release: December 2019
File Name Manual Name Description
DSS_VDD DSS FY20 Version Description Document
Provides detailed information on the DSS extracts and DSS reports modified for this Patch Release.
1.3 National Service Desk and Organizational Contacts The three tiers of support documented herein are intended to restore normal service operation as quickly
as possible and minimize the adverse impact on business operations, ensuring the best possible levels of
service quality and availability are maintained.
Table 2 lists organizational contacts needed by site users for troubleshooting purposes. Support contacts
are listed by name of service, associated tier level, organization and contact information (email and phone
number).
Table 2: Tier Support Contact Information
Name Role Org Contact Information
Local DSS Site Manager
Tier 0 Support
VHA DSS Site Manager - Site Dependent
Local MCA VISN Coordinator
Tier 0 Support
VHA Site Dependent
OI&T National Service Desk (NSD)
Tier 1 Support
OI&T [email protected]
1-855-673-4357
Health Product Support (HPS)
Tier 2 Support
1-855-673-4357
VistA Maintenance Management Systems
Tier 3 Application Support
OI&T [email protected]

DSS FY20 User’s Guide System Summary
Patch ECX*3.0*177 5 Release: December 2019
2 System Summary
DSS allows users to export data from selected VistA database modules to an MCA database located in
the VA Austin Information Technology Center (AITC).
This transfer is accomplished through a set of extract routines, intermediate files, audit reports,
transmission routines, and purge routines. Data from VistA packages is stored by the extract routines in
the intermediate files where it is temporarily available for local use and auditing. The data extract and
derivative files are then transmitted to the AITC where they are formatted and uploaded into commercial
software. After the data has been successfully uploaded into the commercial software, it is purged from
the intermediate files.
The DSS Extracts software includes the following enhancements for FY20:
• DSS Extract field additions and modifications.
• DSS menu additions, modifications and deletions.
• DSS report additions and modifications.
2.1 System Configuration Information pertaining to system configuration prior to application execution may be found in the DSS
Technical Manual. Additional DSS application setup options are also described in this document (Refer to
Section 3).
2.2 Data Flows The major paths of data flow through the DSS application supporting activities conducted by MCA
personnel are depicted in Figure 1.
Figure 1: DSS Application Data Flow Diagram
2.3 User Access Levels User access to DSS application features is controlled through the implementation of Security Keys
assigned to users. This key functionality is implemented through the Kernel Key Management functions in
VistA. Simple adjustments make it possible to assign the Extract Manager's [ECXMGR] option to a user,
enabling the viewing of all DSS reporting functionality with the assignment of a single option. The Security
Key controls only options that actually create and/or change data and should not be available to all DSS
users.

DSS FY20 User’s Guide System Summary
Patch ECX*3.0*177 6 Release: December 2019
Table 3 lists the menus to which the ECXMGR key has been assigned.
Table 3: ECXMGR Menu Table
Menu Name Description
[ECXSCLOAD] Create DSS Clinic Stop Code File
[ECXSCEDIT] Enter/Edit Clinic Parameters
[ECXSCAPPROV] Approve Reviewed DSS Clinic Worksheet
[ECX IV DIV EDIT] Enter/Edit IV Room Division
[ECX LAB RESULTS TRANS EDIT] Add/Edit Lab Results Translation Table
[ECXMENU] Package Extracts
[ECXTRANS] Transmit Data from Extract Files
[ECX WARD DSSDEPT] Enter/Edit DSS Ward
Table 4 lists the menus to which the ECXPVE key has been assigned.
Table 4: ECXPVE Menu Table
Menu Name Description
[ECX PHA VOL EDIT] Pharmacy Volume Edit
Table 5 lists the option to which the ECX DSS TEST Security Key has been assigned.
Table 5: ECXDSS Test Menu Table
Menu Name Description
[ECX FISCAL YEAR EXTRACT] Fiscal Year Logic – DSS Testing Only

DSS FY20 User’s Guide Getting Started
Patch ECX*3.0*177 7 Release: December 2019
3 Getting Started
This section provides an introduction for getting started with the DSS Extracts application.
3.1 Setup Required DSS Information Section 4 (Using the Software) of this user’s guide contains additional information regarding setup of the
required DSS information. That information can be found in Sections 4.1.9 (Setup for DSS Clinic
Information) and 4.1.10 (Setup for Inpatient Census Information).
3.2 Logging On - Systems Manager Menu Users logging on to the VistA system are presented a Systems Manager menu. The options displayed are
dependent on the user’s assigned permissions; those permissions are granted by the site’s IT staff when
setting up the user’s account. Figure 2 shows an example of the Systems Manager menu for a user
assigned Systems Administrator privileges.
Figure 2: Systems Manager Menu for System Administrator
3.3 Accessing DSS Once logged on to VistA, depending on setup and permissions, users may have a shortcut to the DSS
application options on the Extract Manager’s Options screen. If so, the VistA Kernel command ^extract
can be used to access the Extract Manager’s Options directly.
To access the Extract Manager’s Options from the Systems Manager menu:
On the Systems Manager menu, select Core Applications.

DSS FY20 User’s Guide Getting Started
Patch ECX*3.0*177 8 Release: December 2019
On the Core Applications menu, select Administrative Services menus.
On the Administrative Services menus, select Extract Manager's Options.
• The user can then view the choices in the Extract Manager’s Options and select an option.
3.4 Caveats and Exceptions There are no special actions a user must take to ensure that data is properly saved or that a function
executes properly prior to running or exiting the system.

DSS FY20 User’s Guide Using the Software
Patch ECX*3.0*177 9 Release: December 2019
4 Using the Software
The Extract Manager’s menu [ECXMGR] is the main menu for the DSS application (Figure 3). The
options listed may vary based on the user’s Security Keys settings as described in Section 2.3 above.
Each option expands to a sub-menu with detailed options for each area. The remainder of this guide is
organized according to the options shown on the menu and its sub-menus.
Figure 3: Extract Manager’s Options
4.1 Maintenance Menu Choosing the Maintenance option from the Extract Manager's menu displays various options to maintain
files and generate reports. Many of these options will also display on subsequent sub-menus and
additional options. Figure 4 shows the options available on the Maintenance menu.
Figure 4: Maintenance Menu Options

DSS FY20 User’s Guide Using the Software
Patch ECX*3.0*177 10 Release: December 2019
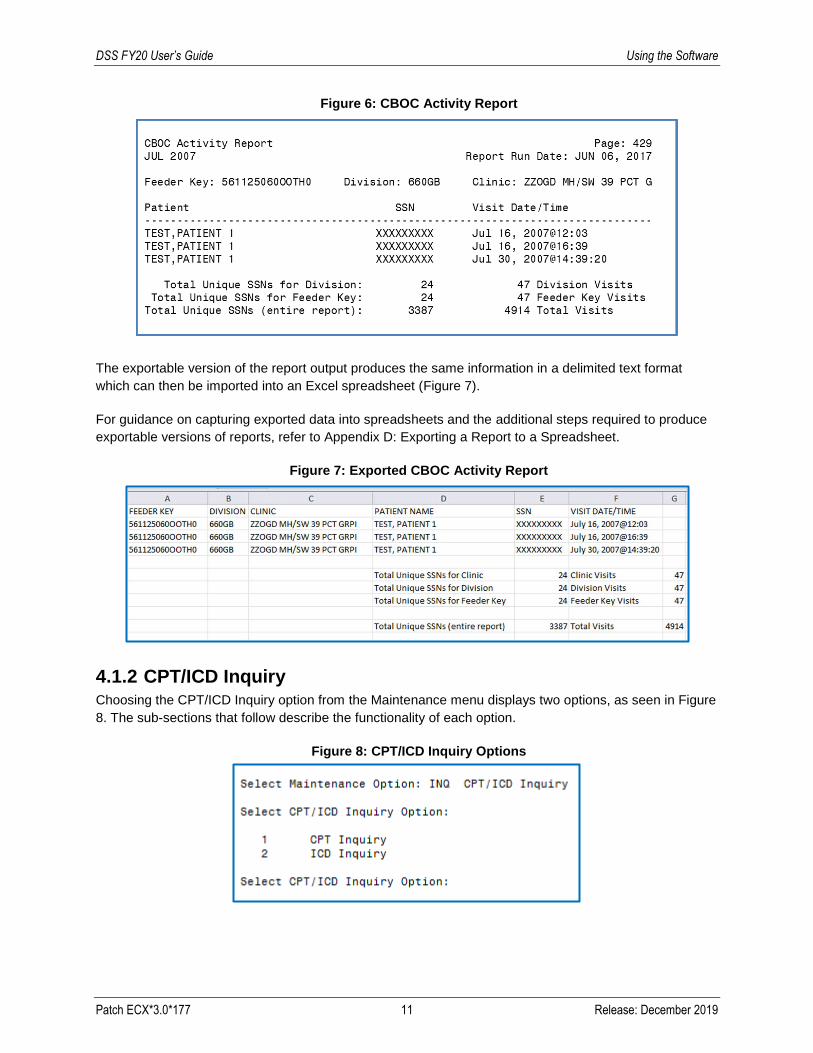
4.1.1 CBOC Activity Report This report provides information from every Clinic (CLI) extract record, by extract number, with a
Community Based Outpatient Clinic (CBOC) status of “YES”.
When purging a CLI extract, a validation check is performed to determine if the CBOC Activity Report has
been generated. If the report has not been generated, the user receives a warning message indicating
such and is prompted to confirm that the data should be purged. If the report was generated prior to the
purge, no additional prompts are displayed.
To produce the CBOC Activity Report:
Select CBO (CBOC Activity Report) from the Maintenance menu, then press <Enter>.
• A list of selectable Clinic extracts is displayed (Figure 5).
Figure 5: List of Selectable Clinic Extracts for CBOC Activity Report
Select the desired extract number to run the report, then press <Enter>.
Select whether to produce exportable output.
• At the ‘Do you want the output in exportable format? NO//’ prompt, press <Enter> to accept
‘NO’ as the default.
Select the device output format.
• For example, at the prompt, type 0;132;9999. 0 directs the output to the user’s screen, 132
defines the number of characters per line, and 9999 defines the number of rows to print.
The report output is grouped by Feeder Key, Division, and Clinic. The detail lines include the Patient
Name, SSN, and Visit Date/Time. Also displayed are the total number of unique SSNs for the Division,
Feeder Key, and the entire report, as well as the number of visits for each (Figure 6).
DSS FY20 User’s Guide Using the Software
Patch ECX*3.0*177 11 Release: December 2019
Figure 6: CBOC Activity Report
The exportable version of the report output produces the same information in a delimited text format
which can then be imported into an Excel spreadsheet (Figure 7).
For guidance on capturing exported data into spreadsheets and the additional steps required to produce
exportable versions of reports, refer to Appendix D: Exporting a Report to a Spreadsheet.
Figure 7: Exported CBOC Activity Report
4.1.2 CPT/ICD Inquiry Choosing the CPT/ICD Inquiry option from the Maintenance menu displays two options, as seen in Figure
8. The sub-sections that follow describe the functionality of each option.
Figure 8: CPT/ICD Inquiry Options

DSS FY20 User’s Guide Using the Software
Patch ECX*3.0*177 12 Release: December 2019
4.1.2.1 CPT Inquiry
This option allows the user to select a CPT code, then displays the Short Name, Category, and
Description for the selected code (Figure 9).
To perform a CPT inquiry:
From the CPT/ICD Inquiry options, select CPT Inquiry <1>, then press <Enter>.
• Information about the inquiry appears, followed by a prompt to select the CPT code.
At the prompt, type the desired CPT code, then press <Enter>.
• To display a list of selectable CPT codes, type ?? at the prompt, then press <Enter>.
Figure 9: CPT Inquiry
4.1.2.2 ICD Inquiry
This option allows the user to enter a diagnosis (2 - 245 characters in length) or a diagnosis code, then
displays the ICD code and diagnosis of the record(s) that match the entry.
To perform an ICD inquiry:
From the CPT/ICD Inquiry options, select ICD Inquiry <2>, then press <Enter>.
At the prompt, type the desired ICD diagnosis code, then press <Enter>.
• Enter a diagnosis name, a diagnosis code or code fragment, one or more keywords sufficient to
select a diagnosis name, or an accent grave character (`) followed by the Internal Entry Number
(IEN) to select a specific entry.
Select the device output format.
• For example, at the prompt, type 0;132;9999. 0 directs the output to the user’s screen, 132
defines the number of characters per line, and 9999 defines the number of rows to print.
The enumerated steps described above display on the screen as shown in Figure 10.

DSS FY20 User’s Guide Using the Software
Patch ECX*3.0*177 13 Release: December 2019
Figure 10: ICD Inquiry
4.1.3 Enter/Edit DSS Ward This option allows the user to select a ward from the DSS WARD file (#727.4), then enter or edit the DSS
Department and suffix to complete the DSS Department code (Figure 11).
Note:
• This option should only be used by the DSS Site Manager to enter or edit the DSS
Department code associated with each medical center ward.
To add or edit a DSS Ward:
Select WRD (Enter/Edit DSS Ward) from the Maintenance menu, then press <Enter>.
At the prompt, type the desired ward location name, then press <Enter>.
• If the ward selected exists in the DSS WARD file (#727.4), the DSS Department code displays
as shown in Figure 11, and the user may edit the value. The DSS Department code consists of
a minimum of 4 characters in the following format:
ABBCxxx

DSS FY20 User’s Guide Using the Software
Patch ECX*3.0*177 14 Release: December 2019
The code is derived as follows:
A = DSS CODE in the NATIONAL SERVICE file (#730)
BB = DSS PRODUCTION UNIT CODE in the DSS PRODUCTION UNIT file (#729)
C = DSS DIVISION IDENTIFIER in the DSS DIVISION IDENTIFIER file (#727.3)
xxx = A suffix of not more than three characters which must be numeric digits or
uppercase alpha characters. The first character of the string may be "-", but that is
not recommended.
Figure 11: Enter/Edit DSS Ward – Selection Screen
• If the selected ward does not exist in the DSS WARD file (#727.4), the user is prompted to enter a DSS Department for Ward and suffix to complete the DSS Department Code.
• After entering or editing the information, the new DSS Department code displays and the system prompts the user to verify its accuracy.
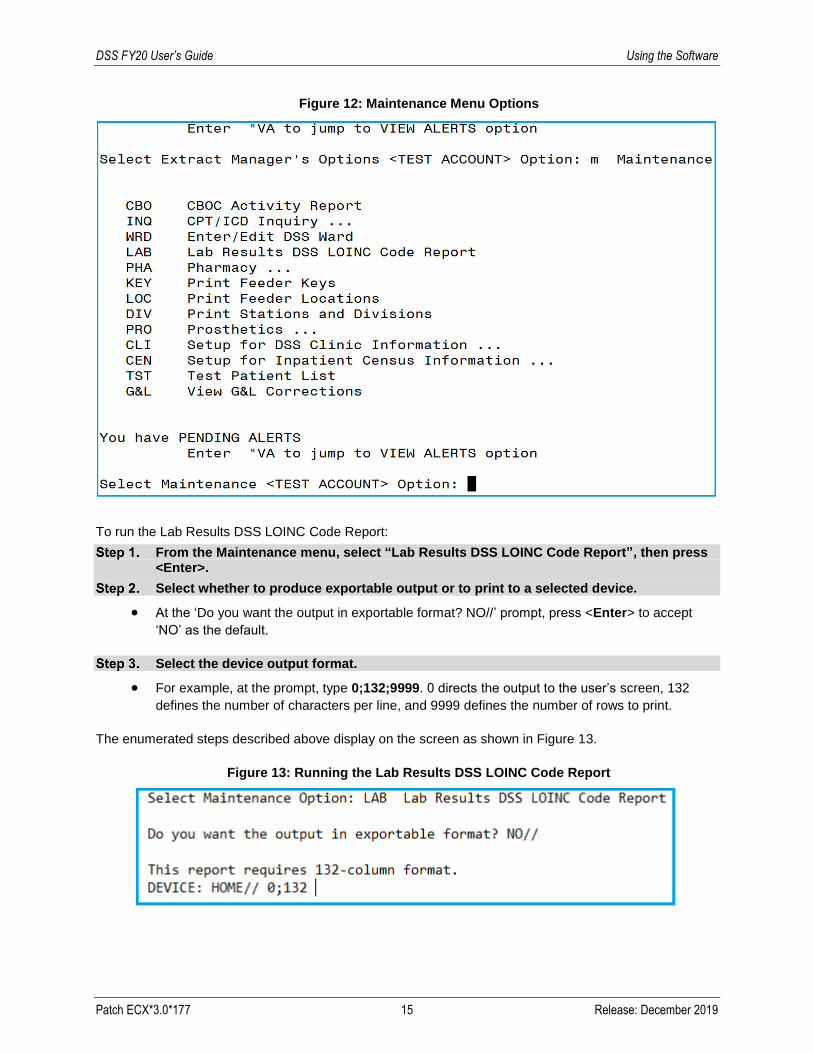
4.1.4 Lab Results DSS LOINC Code Report Selecting the Lab Results DSS LOINC Code Report option (Figure 12) from the Maintenance menu
displays the report described below.
This report generates a listing of the DSS Logical Observation Identifiers, Names, Codes (LOINC®) file (#727.29), its definitions of the LAR test numbers, and the local tests assigned to them. It also compares the LOINC code assigned by MCAO for a LAR test to the LOINC codes found in the local database. The latter is based on the linking of workload codes to LOINC codes at a particular location. Differences are marked with an asterisk following the Local LOINC Code column and must be resolved. This allows MCAO to guide the location.
The report displays all workload codes associated with the MCA-desired LOINC code. The report displays
the values in the appropriate columns of the LABORATORY TEST file (#60), even if a matching workload
code is not found. The intent of this action is to identify inexact matches and to display all workload codes
associated with an MCA-desired LOINC code.
The system attempts to find a matching LOINC code between the DSS LOINC file (#727.29) and the
WKLD CODE file (#64). If a match is not found, an asterisk (*) displays in the FLG column which indicates
“site not using LOINC code that DSS collects”. For these records, the ‘local’ fields (i.e., fields coming from
file #64) are not populated.
DSS FY20 User’s Guide Using the Software
Patch ECX*3.0*177 15 Release: December 2019
Figure 12: Maintenance Menu Options
To run the Lab Results DSS LOINC Code Report:
From the Maintenance menu, select “Lab Results DSS LOINC Code Report”, then press <Enter>.
Select whether to produce exportable output or to print to a selected device.
• At the ‘Do you want the output in exportable format? NO//’ prompt, press <Enter> to accept
‘NO’ as the default.
Select the device output format.
• For example, at the prompt, type 0;132;9999. 0 directs the output to the user’s screen, 132
defines the number of characters per line, and 9999 defines the number of rows to print.
The enumerated steps described above display on the screen as shown in Figure 13.
Figure 13: Running the Lab Results DSS LOINC Code Report

DSS FY20 User’s Guide Using the Software
Patch ECX*3.0*177 16 Release: December 2019
The report generates and includes LAR Test Number, LAR Test Name, LAR Units, LAR LOINC, Flag,
Local Test Name, Local Specimen Type, Local Workload IEN, and Local Workload Code information
(Figure 14).
Figure 14: Lab Results DSS LOINC Code Report
The exportable version of the report output produces the same information in a delimited text format that can be imported into an Excel spreadsheet (Figure 15). For guidance on capturing exported data into spreadsheets and the additional steps required to produce
exportable versions of reports, refer to Appendix D: Exporting a Report to a Spreadsheet.
Figure 15: Exported Lab Results DSS LOINC Code Report
4.1.5 Pharmacy Choosing the Pharmacy option from the Maintenance menu displays four options (Figure 16). The
following sub-sections describe the functionality of each option.
Figure 16: Pharmacy Options Menu

DSS FY20 User’s Guide Using the Software
Patch ECX*3.0*177 17 Release: December 2019
4.1.5.1 Enter/Edit IV Room Division
This option allows users to enter or edit entries in the DIVISION field (#.02) of the IV ROOM file (#59.5).
The DIVISION field allows users to tie outpatient IV data to a medical center division for MCA purposes
(Figure 17).
To enter or edit an IV room division:
From the Pharmacy menu, select “Enter/Edit IV Room Division”, then press <Enter>.
At the prompt, type the desired IV room name, then press <Enter>.
• To display a list of selectable IV rooms, type ?? at the prompt, then press <Enter>.
At the DIVISION prompt, type the desired division name, then press <Enter>.
• To display a list of selectable divisions, type ?? at the prompt, then press <Enter>.
• If a division is already assigned to the selected IV room, that division name will appear after the DIVISION: prompt (e.g., DIVISION: CHEYENNE VAMROC//).
• To delete an assigned division, type @, then press <Enter>.
Figure 17: Enter/Edit IV Room Division Menu Options
4.1.5.2 Print IV Room Worksheet
This option creates a worksheet listing of all the entries in the IV ROOM file (#59.5). MCA managers can
use this worksheet to define the division for each IV room for MCA purposes.
To print an IV Room Worksheet:
From the Pharmacy menu, select “Print IV Room Worksheet”, then press <Enter>.
• Information about the option appears, followed by a prompt.
Select whether to produce exportable output or to print to a selected device.
• At the ‘Do you want the output in exportable format? NO//’ prompt, press <Enter> to accept ‘NO’ as the default.
Select the device output format.
• For example, at the prompt, type 0;132;9999. 0 directs the output to the user’s screen, 132 defines the number of characters per line, and 9999 defines the number of rows to print.

DSS FY20 User’s Guide Using the Software
Patch ECX*3.0*177 18 Release: December 2019
The enumerated steps described above display on the screen as shown in Figure 18.
Figure 18: Running the Print IV Room Worksheet
The report output includes IV Room, Division, and Inactive Date (Figure 19).
Figure 19: IV Room Worksheet
The exportable version of the report output produces the same information in a delimited text format that
can be imported into an Excel spreadsheet (Figure 20).
For guidance on capturing exported data into spreadsheets and the additional steps required to produce
exportable versions of reports, refer to Appendix D: Exporting a Report to a Spreadsheet.
Figure 20: Exported IV Room Worksheet
4.1.5.3 Pharmacy NDC Lookup
This option allows the user to search the local DRUG file (#50) using National Drug Codes (NDC) from
DSS Pharmacy Feeder Keys that have been rejected. This occurs when a pharmacy item has not been
matched to the National Drug File (NDF). The output varies slightly, depending on the version of the NDF
running at the requestor’s site.
Refer to Appendix C: Feeder Key Encoding.
To perform a Pharmacy NDC Lookup:

DSS FY20 User’s Guide Using the Software
Patch ECX*3.0*177 19 Release: December 2019
From the Pharmacy menu, select “Pharmacy NDC Lookup”, then press <Enter>.
• Information about pharmacy feeder keys appears (Figure 21).
Figure 21: Pharmacy NDC Lookup Feeder Key Information
At the ‘Select NDC:’ prompt, type the desired 12-digit NDC or ‘LCL’ followed by 9 digits, or LCD followed by 9 digits at the prompt and then press <Enter>.
Once an NDC from a rejected feeder key is entered, the output displays the local generic name of the
drug, the NDC, the VA Classification, the Dispense Unit, and the Price per Dispense Unit for any drug
assigned the specified NDC (Figure 22).

DSS FY20 User’s Guide Using the Software
Patch ECX*3.0*177 20 Release: December 2019
Figure 22: Pharmacy NDC Lookup Results
4.1.5.4 Pharmacy Edit and Edit Log
Choosing the Pharmacy Edit and Edit Log option from the Pharmacy menu displays two options related to
editing various fields in the pharmacy files (Figure 23). The sub-sections that follow describe the
functionality of each option.
Figure 23: Pharmacy Edit and Edit Log Options
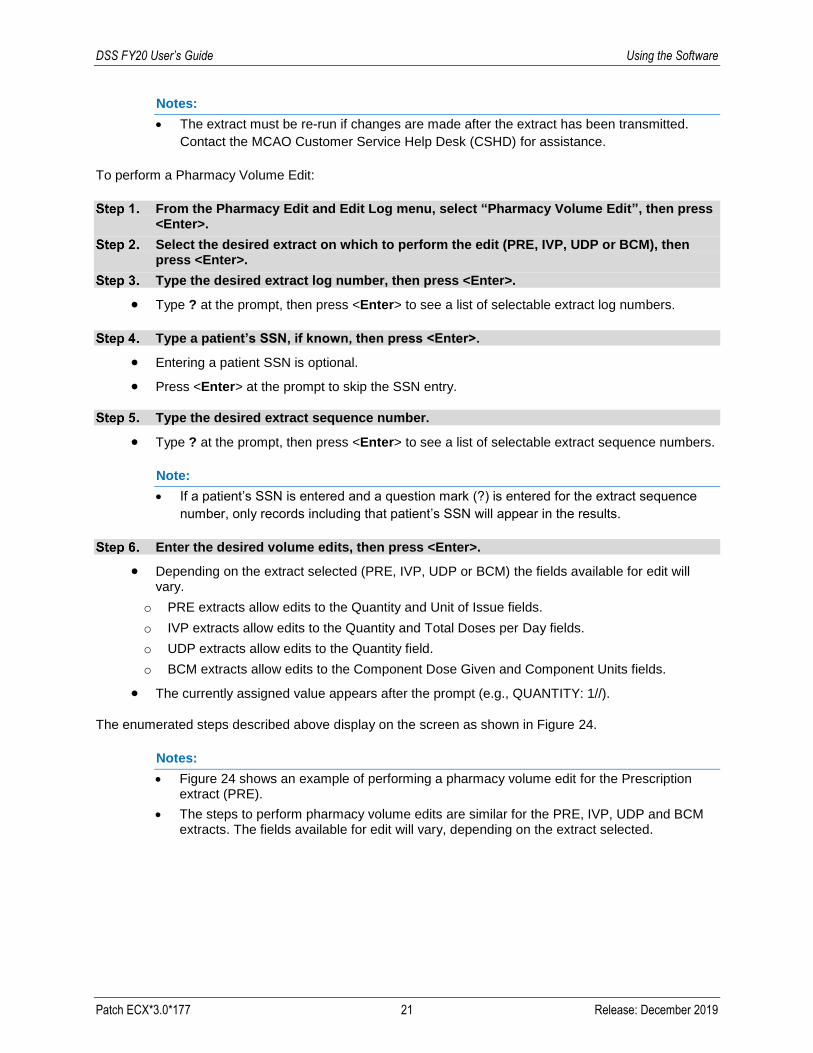
4.1.5.4.1 Pharmacy Volume Edit
This option allows authorized users (i.e., holders of the ECXPVE key) to edit the Pharmacy extracts
(PRE, IVP, UDP and BCM). Corrections may be made to the following fields:
• Quantity and Unit of Issue fields for PRE extracts.
• Quantity and Total Doses per Day fields for IVP extracts.
• Quantity field for UDP extracts.
• Component Dose Given and Component Units fields for BCM extracts.
DSS FY20 User’s Guide Using the Software
Patch ECX*3.0*177 21 Release: December 2019
Notes:
• The extract must be re-run if changes are made after the extract has been transmitted.
Contact the MCAO Customer Service Help Desk (CSHD) for assistance.
To perform a Pharmacy Volume Edit:
From the Pharmacy Edit and Edit Log menu, select “Pharmacy Volume Edit”, then press <Enter>.
Select the desired extract on which to perform the edit (PRE, IVP, UDP or BCM), then press <Enter>.
Type the desired extract log number, then press <Enter>.
• Type ? at the prompt, then press <Enter> to see a list of selectable extract log numbers.
Type a patient’s SSN, if known, then press <Enter>.
• Entering a patient SSN is optional.
• Press <Enter> at the prompt to skip the SSN entry.
Type the desired extract sequence number.
• Type ? at the prompt, then press <Enter> to see a list of selectable extract sequence numbers.
Note:
• If a patient’s SSN is entered and a question mark (?) is entered for the extract sequence
number, only records including that patient’s SSN will appear in the results.
Enter the desired volume edits, then press <Enter>.
• Depending on the extract selected (PRE, IVP, UDP or BCM) the fields available for edit will vary.
o PRE extracts allow edits to the Quantity and Unit of Issue fields.
o IVP extracts allow edits to the Quantity and Total Doses per Day fields.
o UDP extracts allow edits to the Quantity field.
o BCM extracts allow edits to the Component Dose Given and Component Units fields.
• The currently assigned value appears after the prompt (e.g., QUANTITY: 1//).
The enumerated steps described above display on the screen as shown in Figure 24.
Notes:
• Figure 24 shows an example of performing a pharmacy volume edit for the Prescription extract (PRE).
• The steps to perform pharmacy volume edits are similar for the PRE, IVP, UDP and BCM extracts. The fields available for edit will vary, depending on the extract selected.

DSS FY20 User’s Guide Using the Software
Patch ECX*3.0*177 22 Release: December 2019
Figure 24: Performing a Pharmacy Volume Edit – PRE Extract
4.1.5.4.2 Pharmacy Volume Edit Log
This allows authorized users to view changes made to the Pharmacy extracts (BCM, IVP, PRE and UDP)
through the Pharmacy Volume Edit option.
To view the Pharmacy Volume Edit Log:
From the Pharmacy Edit and Edit Log menu, select “Pharmacy Volume Edit Log”, then press <Enter>.
Select the desired extract edit log (PRE, IVP, UDP or BCM), then press <Enter>.
Select the sort order for the edit log.
• The system can sort by the name of the user that made the edit or by the date the edit was made.
DSS FY20 User’s Guide Using the Software
Patch ECX*3.0*177 23 Release: December 2019
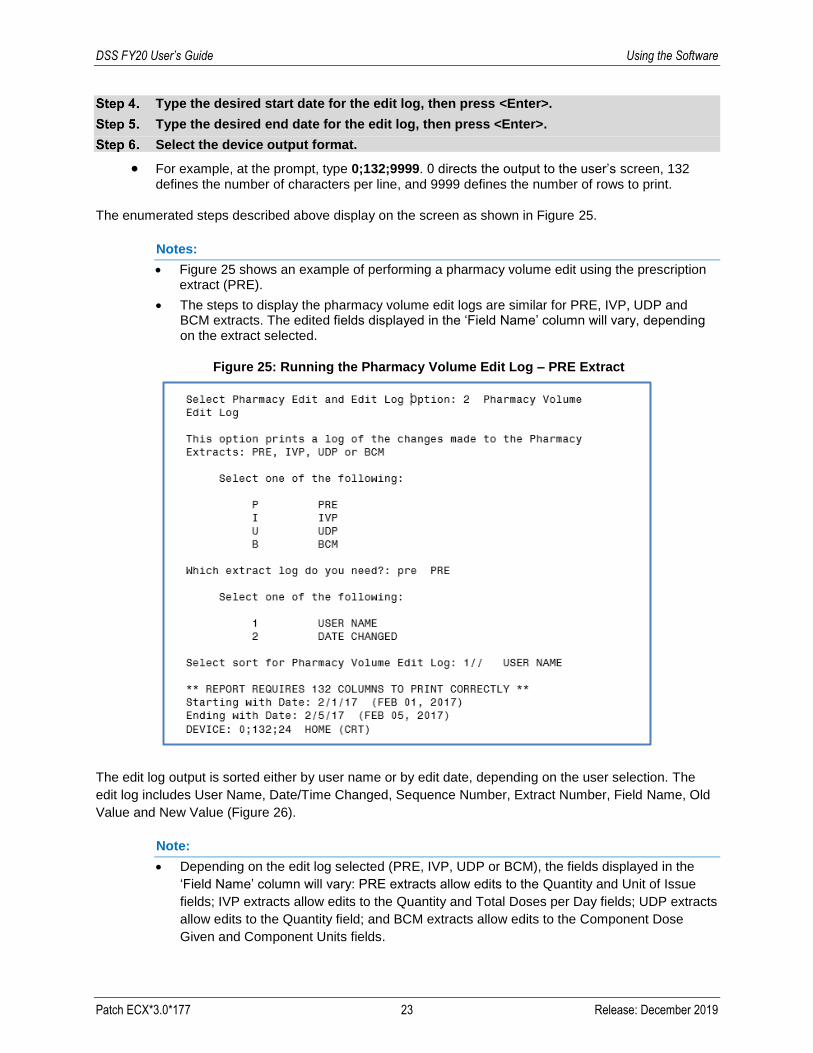
Type the desired start date for the edit log, then press <Enter>.
Type the desired end date for the edit log, then press <Enter>.
Select the device output format.
• For example, at the prompt, type 0;132;9999. 0 directs the output to the user’s screen, 132 defines the number of characters per line, and 9999 defines the number of rows to print.
The enumerated steps described above display on the screen as shown in Figure 25.
Notes:
• Figure 25 shows an example of performing a pharmacy volume edit using the prescription extract (PRE).
• The steps to display the pharmacy volume edit logs are similar for PRE, IVP, UDP and BCM extracts. The edited fields displayed in the ‘Field Name’ column will vary, depending on the extract selected.
Figure 25: Running the Pharmacy Volume Edit Log – PRE Extract
The edit log output is sorted either by user name or by edit date, depending on the user selection. The
edit log includes User Name, Date/Time Changed, Sequence Number, Extract Number, Field Name, Old
Value and New Value (Figure 26).
Note:
• Depending on the edit log selected (PRE, IVP, UDP or BCM), the fields displayed in the
‘Field Name’ column will vary: PRE extracts allow edits to the Quantity and Unit of Issue
fields; IVP extracts allow edits to the Quantity and Total Doses per Day fields; UDP extracts
allow edits to the Quantity field; and BCM extracts allow edits to the Component Dose
Given and Component Units fields.
DSS FY20 User’s Guide Using the Software
Patch ECX*3.0*177 24 Release: December 2019
Figure 26: Pharmacy Volume Edit Log – PRE Extract
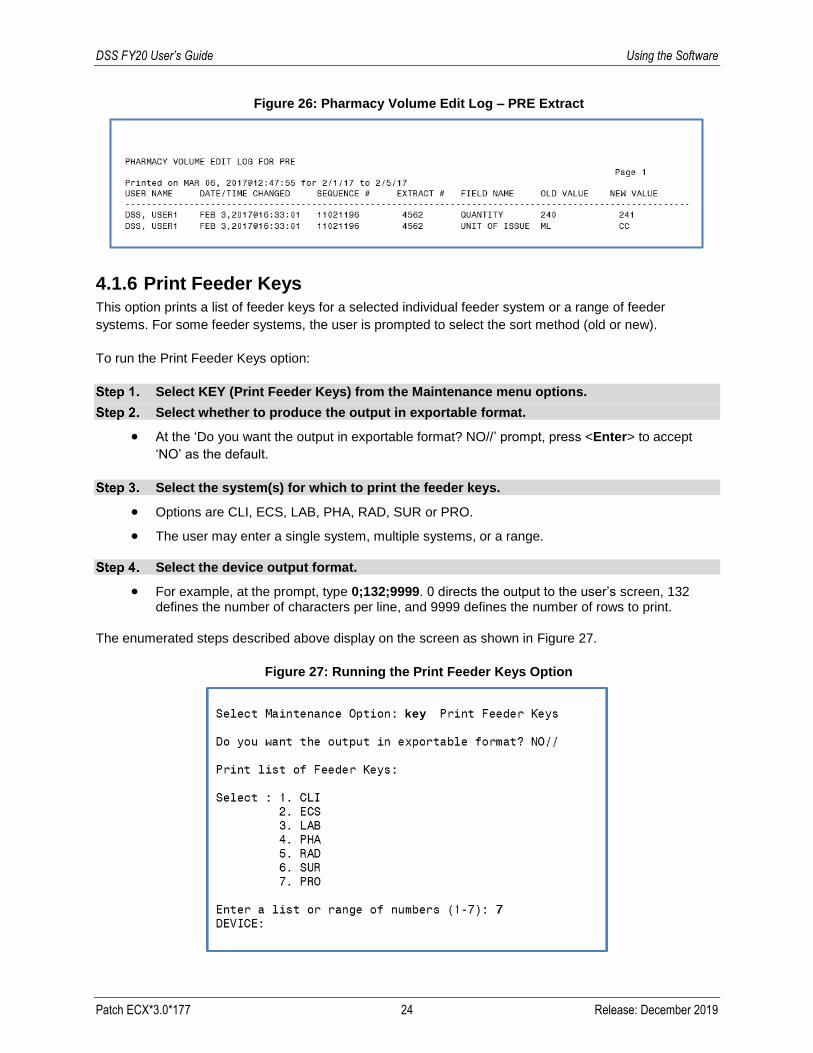
4.1.6 Print Feeder Keys This option prints a list of feeder keys for a selected individual feeder system or a range of feeder
systems. For some feeder systems, the user is prompted to select the sort method (old or new).
To run the Print Feeder Keys option:
Select KEY (Print Feeder Keys) from the Maintenance menu options.
Select whether to produce the output in exportable format.
• At the ‘Do you want the output in exportable format? NO//’ prompt, press <Enter> to accept
‘NO’ as the default.
Select the system(s) for which to print the feeder keys.
• Options are CLI, ECS, LAB, PHA, RAD, SUR or PRO.
• The user may enter a single system, multiple systems, or a range.
Select the device output format.
• For example, at the prompt, type 0;132;9999. 0 directs the output to the user’s screen, 132 defines the number of characters per line, and 9999 defines the number of rows to print.
The enumerated steps described above display on the screen as shown in Figure 27.
Figure 27: Running the Print Feeder Keys Option
DSS FY20 User’s Guide Using the Software
Patch ECX*3.0*177 25 Release: December 2019
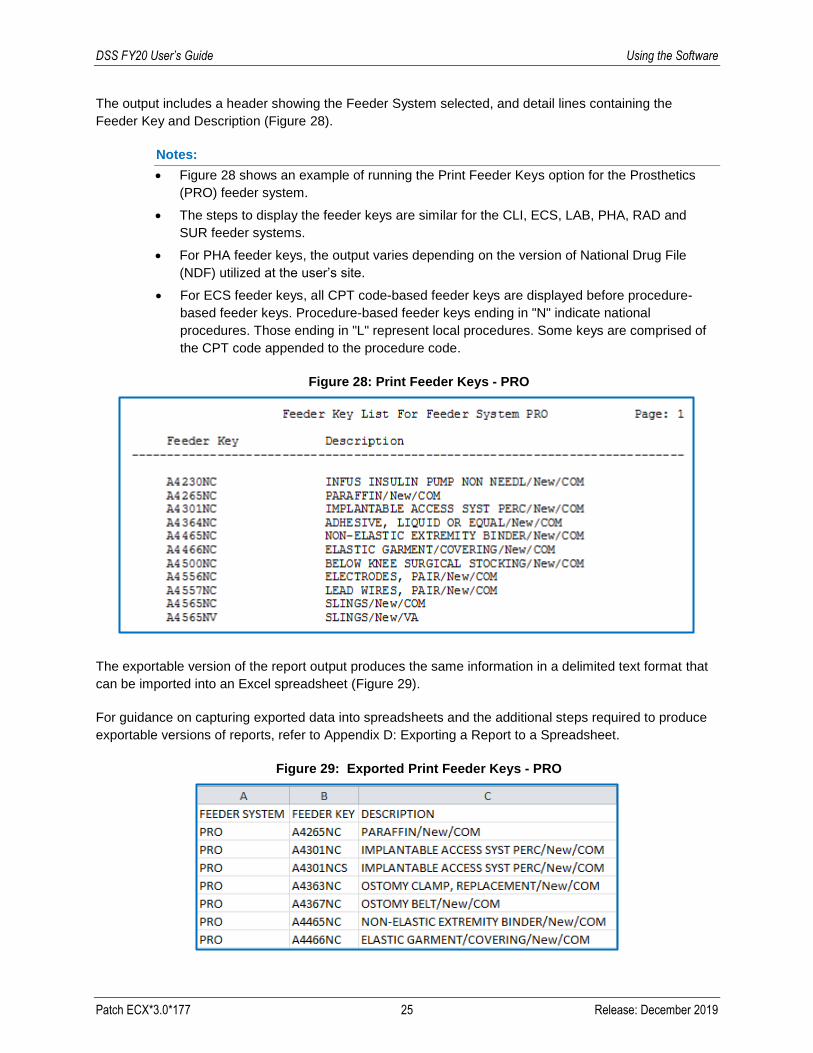
The output includes a header showing the Feeder System selected, and detail lines containing the
Feeder Key and Description (Figure 28).
Notes:
• Figure 28 shows an example of running the Print Feeder Keys option for the Prosthetics
(PRO) feeder system.
• The steps to display the feeder keys are similar for the CLI, ECS, LAB, PHA, RAD and
SUR feeder systems.
• For PHA feeder keys, the output varies depending on the version of National Drug File
(NDF) utilized at the user’s site.
• For ECS feeder keys, all CPT code-based feeder keys are displayed before procedure-
based feeder keys. Procedure-based feeder keys ending in "N" indicate national
procedures. Those ending in "L" represent local procedures. Some keys are comprised of
the CPT code appended to the procedure code.
Figure 28: Print Feeder Keys - PRO
The exportable version of the report output produces the same information in a delimited text format that
can be imported into an Excel spreadsheet (Figure 29).
For guidance on capturing exported data into spreadsheets and the additional steps required to produce
exportable versions of reports, refer to Appendix D: Exporting a Report to a Spreadsheet.
Figure 29: Exported Print Feeder Keys - PRO

DSS FY20 User’s Guide Using the Software
Patch ECX*3.0*177 26 Release: December 2019
4.1.7 Print Feeder Locations This option creates a list of feeder locations for all feeder systems and can be used to identify any rejects
that come in during processing. It allows users to identify the location where the product rejection is
generated.
Note:
• This report should be generated during non-peak hours due to its length.
To run the Print Feeder Locations option:
Select LOC (Print Feeder Locations) from the Maintenance menu.
Select one or more extract systems.
Select whether to produce exportable output.
• At the ‘Do you want the output in exportable format? NO//’ prompt, press <Enter> to accept
‘NO’ as the default.
Select the device output format.
• For example, at the prompt, type 0;132;9999. 0 directs the output to the user’s screen, 132
defines the number of characters per line, and 9999 defines the number of rows to print.
The enumerated steps described above display on the screen as shown in Figure 30.
Figure 30: Running the Print Feeder Locations Option
The output is sorted by feeder location within each feeder system; each detail line displays the Feeder
Location and Description (Figure 31).

DSS FY20 User’s Guide Using the Software
Patch ECX*3.0*177 27 Release: December 2019
Figure 31: Print Feeder Locations
The exportable version of the output produces the same information in a delimited text format that can be
imported into an Excel spreadsheet (Figure 32).
For guidance on capturing exported data into spreadsheets and the additional steps required to produce
exportable versions of reports, refer to Appendix D: Exporting a Report to a Spreadsheet.

DSS FY20 User’s Guide Using the Software
Patch ECX*3.0*177 28 Release: December 2019
Figure 32: Exported Print Feeder Locations
4.1.8 Print Stations and Divisions Report This option creates the Print Stations and Divisions Report.
To run the Print Stations and Divisions Report:
Select DIV (Print Stations and Divisions) from the Maintenance menu.
Select either the institution or medical center option.
If you choose institution, it will prompt for an institution. If you choose medical center, it will show everything in the medical center division file.
Select whether to produce exportable output.
The enumerated steps described above display on the screen as shown in Figure 33.

DSS FY20 User’s Guide Using the Software
Patch ECX*3.0*177 29 Release: December 2019
Figure 33: Print Stations and Divisions Menu Options
The output is sorted by stations and divisions; each detail line displays the institution file listing (Figure
34).
Figure 34: Print Stations and Divisions Institution File Listing
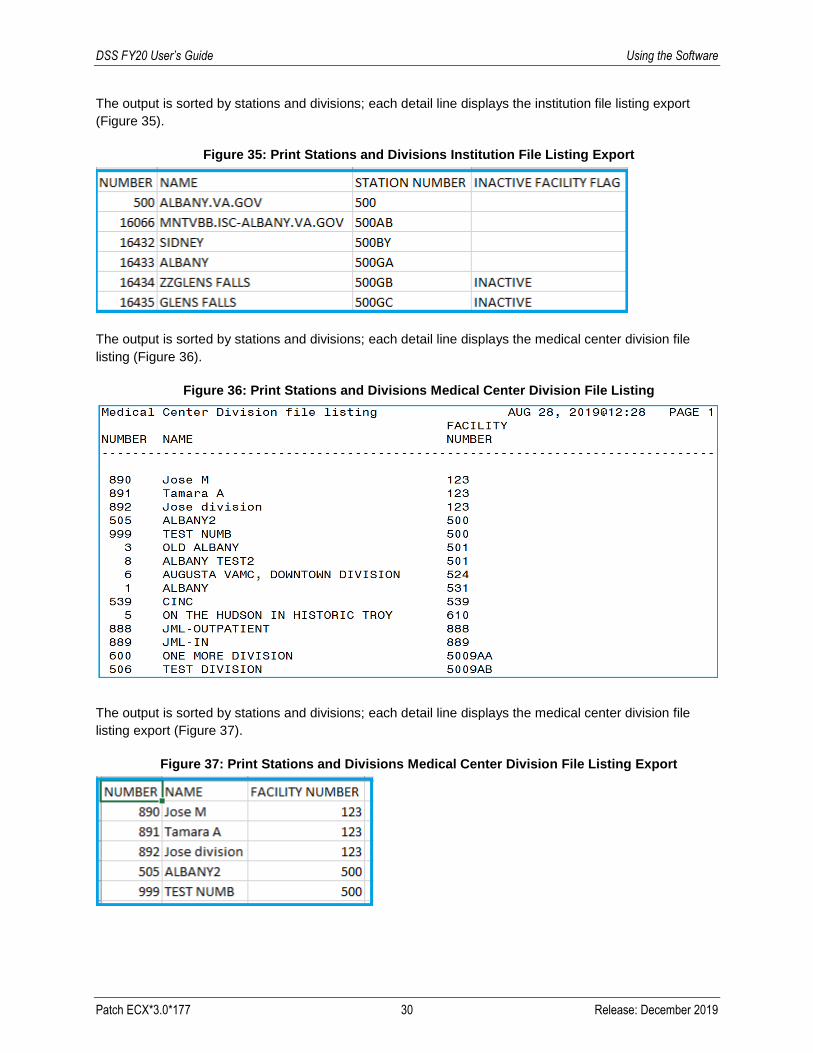
DSS FY20 User’s Guide Using the Software
Patch ECX*3.0*177 30 Release: December 2019
The output is sorted by stations and divisions; each detail line displays the institution file listing export
(Figure 35).
Figure 35: Print Stations and Divisions Institution File Listing Export
The output is sorted by stations and divisions; each detail line displays the medical center division file
listing (Figure 36).
Figure 36: Print Stations and Divisions Medical Center Division File Listing
The output is sorted by stations and divisions; each detail line displays the medical center division file
listing export (Figure 37).
Figure 37: Print Stations and Divisions Medical Center Division File Listing Export

DSS FY20 User’s Guide Using the Software
Patch ECX*3.0*177 31 Release: December 2019
4.1.9 Prosthetics Selecting the Prosthetics option from the Maintenance menu provides a list of prosthetics-related reports
(Figure 38). The following sub-sections describe the functionality of each option.
Figure 38: Prosthetics Menu Options
4.1.9.1 Cost by PSAS HCPC Report
This option creates the Cost by Prosthetic and Sensory Aids Service (PSAS) Healthcare Common
Procedure Coding (HCPC) Report. This report includes PSAS HCPC coded expenditures for a specified
time frame.
To run the Cost by PSAS HCPC Report:
From the Prosthetics menu, select “Cost by PSAS HCPC Report”, then press <Enter>.
Type the desired start date for the report.
Type the desired end date for the report.
Select whether to produce exportable output.
• At the ‘Do you want the output in exportable format? NO//’ prompt, press <Enter> to accept
‘NO’ as the default.
Select the device output format.
• For example, at the prompt, type 0;132;9999. 0 directs the output to the user’s screen, 132
defines the number of characters per line, and 9999 defines the number of rows to print.
The enumerated steps described above display on the screen as shown in Figure 39.

DSS FY20 User’s Guide Using the Software
Patch ECX*3.0*177 32 Release: December 2019
Figure 39: Running the Cost by PSAS HCPC Report
The report output includes detail lines containing the following fields: PSAS HCPC, Feeder Key,
Description, Form, Quantity, Unit of Issue, and Cost. The report also contains a Grand Total representing
the sum of all costs (Figure 40). At the bottom of each page is a key which describes the forms
represented numerically on the detail lines.
Figure 40: Cost by PSAS HCPC Report
The exportable version of the report output contains similar information in a delimited text format that can
be imported into an Excel spreadsheet. The exportable version of the report contains an additional
column called ‘Form Description’ and does not include the ‘Grand Total’ field (Figure 41).

DSS FY20 User’s Guide Using the Software
Patch ECX*3.0*177 33 Release: December 2019
For guidance on capturing exported data into spreadsheets and the additional steps required to produce
exportable versions of reports, refer to Appendix D: Exporting a Report to a Spreadsheet.
Figure 41: Exported Cost by PSAS HCPC Report
4.1.9.2 Prosthetics (PRO) YTD HCPCS Report
The Prosthetics Year-to-Date (YTD) Healthcare Common Procedure Coding System (HCPCS) Report
displays data from Prosthetics extracts from the beginning of the fiscal year to the ending date of the last
extract. Data from the current or previous fiscal year may be selected for the report.
Multi-divisional prosthetics sites must specify the primary prosthetics division for the report. Users may
choose to generate a specific report for one division or a combined report for all divisions. The report is
sorted by PSAS HCPCS Code. Non-divisional site data is reported under the facility station number.
To run the Prosthetics (PRO) YTD HCPCS Report:
From the Prosthetics menu, select “Prosthetics (PRO) YTD HCPCS Report”, then press <Enter>.
Select a primary division for the report, if prompted.
• For sites and users belonging to more than one division, a primary division must be selected for
the report (Figure 42).
Figure 42: Selecting a Primary Division for the Prosthetics YTD HCPCS Report
Select whether to run the report for the current or previous fiscal year.
• The default selection is the current fiscal year. Press <Enter> to accept the default. Otherwise,
type P, then press <Enter> to select the previous fiscal year.

DSS FY20 User’s Guide Using the Software
Patch ECX*3.0*177 34 Release: December 2019
Select whether to produce exportable output.
• At the ‘Do you want the output in exportable format? NO//’ prompt, press <Enter> to accept
‘NO’ as the default.
Select the device output format.
• For example, at the prompt, type 0;132;9999. 0 directs the output to the user’s screen, 132
defines the number of characters per line, and 9999 defines the number of rows to print.
The enumerated steps described above display on the screen as shown in Figure 43.
Figure 43: Running the Prosthetics (PRO) YTD HCPCS Report
The report is sorted by PSAS HCPCS code and is divided into three sections: New (Initial, Replacement,
or Spare); Repair, and Rental. Figure 44 is an example of the New activities, Figure 45 shows Repair
activities, and Figure 46 shows the Rental activities of the report. Each detail line displays the PSAS
HCPCS code and description followed by three sets of Quantity, Total Cost, and Average Cost values.
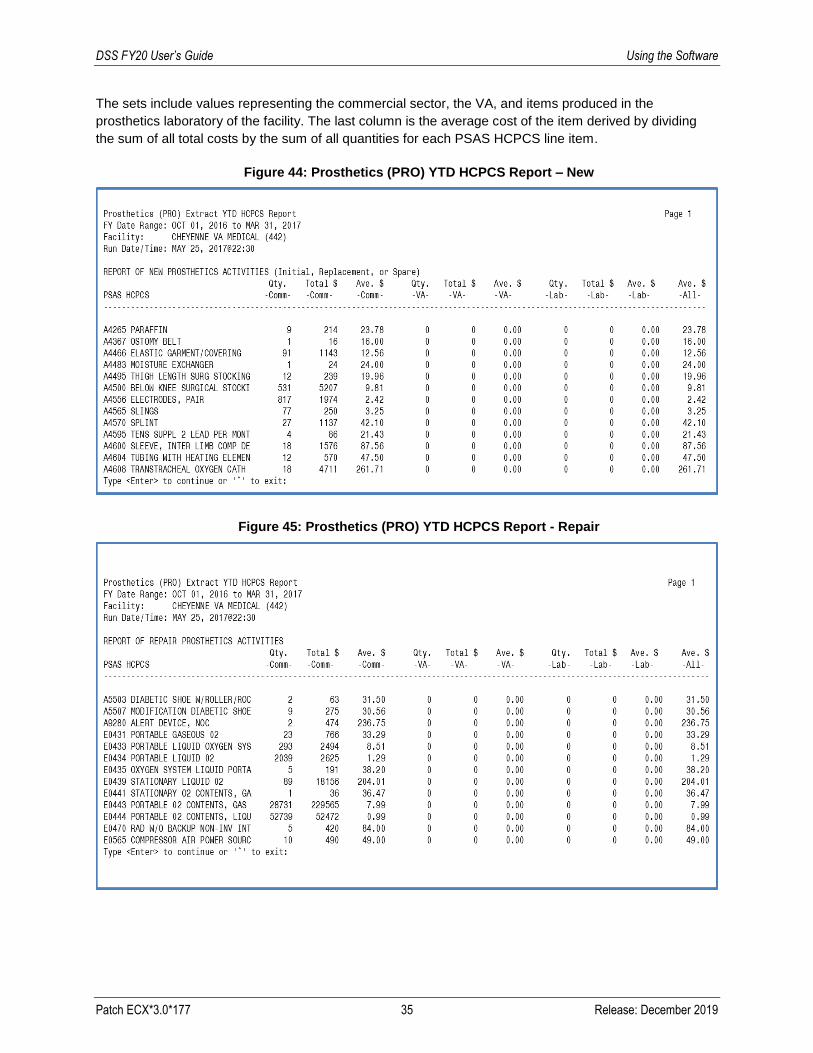
DSS FY20 User’s Guide Using the Software
Patch ECX*3.0*177 35 Release: December 2019
The sets include values representing the commercial sector, the VA, and items produced in the
prosthetics laboratory of the facility. The last column is the average cost of the item derived by dividing
the sum of all total costs by the sum of all quantities for each PSAS HCPCS line item.
Figure 44: Prosthetics (PRO) YTD HCPCS Report – New
Figure 45: Prosthetics (PRO) YTD HCPCS Report - Repair

DSS FY20 User’s Guide Using the Software
Patch ECX*3.0*177 36 Release: December 2019
Figure 46: Prosthetics (PRO) YTD HCPCS Report – Rental
The exportable version of the report output contains the same information in a delimited text format that
can be imported into an Excel spreadsheet (Figure 47).
For guidance on capturing exported data into spreadsheets and the additional steps required to produce
exportable versions of reports, refer to Appendix D: Exporting a Report to a Spreadsheet.
Figure 47: Exported Prosthetics (PRO) YTD HCPCS Report
4.1.9.3 Prosthetics (PRO) YTD Laboratory Report
This report lists prosthetics extract data by HCPCS code for items produced within the prosthetics
laboratories of the facility. It is intended for users at sites with on-site prosthetics laboratories. Data is
accumulated from all extract records for extracts dated within the beginning and end of a fiscal year. Data
from the current or previous fiscal year may be selected for the report.

DSS FY20 User’s Guide Using the Software
Patch ECX*3.0*177 37 Release: December 2019
Multi-divisional prosthetics sites must specify the primary prosthetics division for the report. Users may
choose to generate a specific report for one division or a combined report for all divisions. The report is
sorted by PSAS HCPCS Code. Non-divisional site data is reported under the facility station number.
To run the Prosthetics (PRO) YTD Laboratory Report:
From the Prosthetics menu, select “Prosthetics (PRO) YTD Laboratory Report”, then press <Enter>.
Select a primary division for the report, if prompted.
• For sites belonging to more than one division, a primary division must be selected for the report
(Figure 48).
Figure 48: Selecting a Division for the Prosthetics YTD Laboratory Report
Select whether to run the report for the current or previous fiscal year.
• The default selection is the current fiscal year. Press <Enter> to accept the default. Otherwise,
type P, then press <Enter> to select the previous fiscal year.
Type the desired end date for the report.
Select whether to produce exportable output.
• At the ‘Do you want the output in exportable format? NO//’ prompt, press <Enter> to accept
‘NO’ as the default.
Select the device output format.
• For example, at the prompt, type 0;132;9999. 0 directs the output to the user’s screen, 132
defines the number of characters per line, and 9999 defines the number of rows to print.

DSS FY20 User’s Guide Using the Software
Patch ECX*3.0*177 38 Release: December 2019
The enumerated steps described above display on the screen as shown in Figure 49.
Figure 49: Running the Prosthetics (PRO) YTD Laboratory Report
The report is sorted by PSAS HCPCS code and is divided into two sections: New (Figure 50) and Repairs
(Figure 51). Each detail line contains the PSAS HCPCS code and description, followed by two sets of
Quantity, Labor Cost, Materials Cost, and Average Cost values. The first set represents items produced
for use at the local site; the second set represents items produced for other VA stations.
Figure 50: Prosthetics (PRO) YTD Laboratory Report – New

DSS FY20 User’s Guide Using the Software
Patch ECX*3.0*177 39 Release: December 2019
Figure 51: Prosthetics (PRO) YTD Laboratory Report - Repair
The exportable version of the report output contains the same information in a delimited text format that
can be imported into an Excel spreadsheet (Figure 52).
For guidance on capturing exported data into spreadsheets and the additional steps required to produce
exportable versions of reports, refer to Appendix D: Exporting a Report to a Spreadsheet.
Figure 52: Exported Prosthetics (PRO) YTD Laboratory Report
4.1.9.4 Prosthetics Edit and Edit Log
Choosing the Prosthetics Edit and Edit Log option from the Prosthetics menu displays two options related
to editing the quantity value in the Prosthetics extract file. The sub-sections that follow describe the
functionality of each option (Figure 53).
Figure 53: Prosthetics Edit and Edit Log Options
4.1.9.4.1 Prosthetics Extract Edit
This option allows authorized users to edit the quantity field within the prosthetics extract.
Notes:
• The extract must be re-run if changes are made after the extract is transmitted. Contact the
MCAO Customer Service Help Desk (CSHD) for assistance.

DSS FY20 User’s Guide Using the Software
Patch ECX*3.0*177 40 Release: December 2019
To perform a Prosthetics Extract Edit:
From the Prosthetics Edit and Edit Log menu, select “Prosthetics Extract Edit”, then press <Enter>.
Type the desired extract log number, then press <Enter>.
• Type ?? at the prompt, then press <Enter> to see a list of selectable prosthetics extract log
numbers.
Type a patient’s SSN, if known, then press <Enter>.
• Entering a patient SSN is optional.
• Press <Enter> at the prompt to skip SSN entry.
Type the desired extract sequence number.
• Type ? at the prompt, then press <Enter> to see a list of selectable extract sequence numbers.
Note:
• If a patient’s SSN is entered and a question mark (?) is entered for the extract sequence
number, only records containing that patient’s SSN will appear in the results.
Enter the desired quantity to edit the value, then press <Enter>.
• The currently assigned value appears after the prompt (e.g., QUANTITY: 1//).
The enumerated steps described above display on the screen as shown in Figure 54.
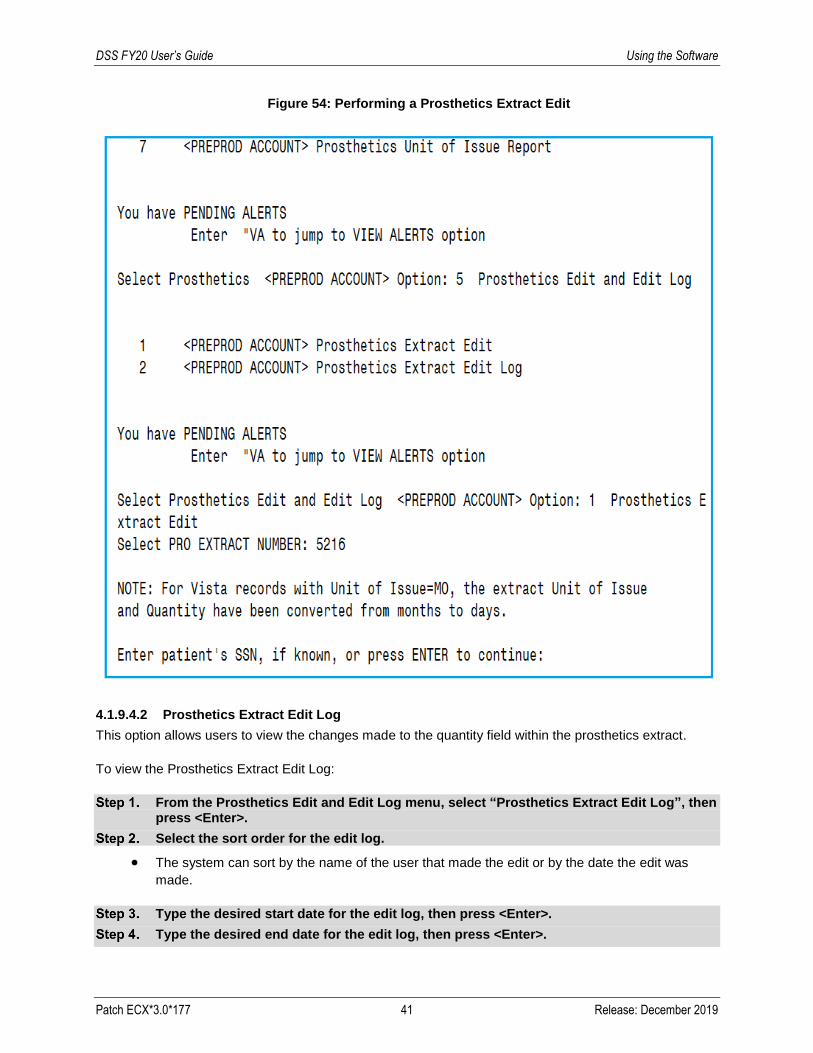
DSS FY20 User’s Guide Using the Software
Patch ECX*3.0*177 41 Release: December 2019
Figure 54: Performing a Prosthetics Extract Edit
4.1.9.4.2 Prosthetics Extract Edit Log
This option allows users to view the changes made to the quantity field within the prosthetics extract.
To view the Prosthetics Extract Edit Log:
From the Prosthetics Edit and Edit Log menu, select “Prosthetics Extract Edit Log”, then press <Enter>.
Select the sort order for the edit log.
• The system can sort by the name of the user that made the edit or by the date the edit was
made.
Type the desired start date for the edit log, then press <Enter>.
Type the desired end date for the edit log, then press <Enter>.
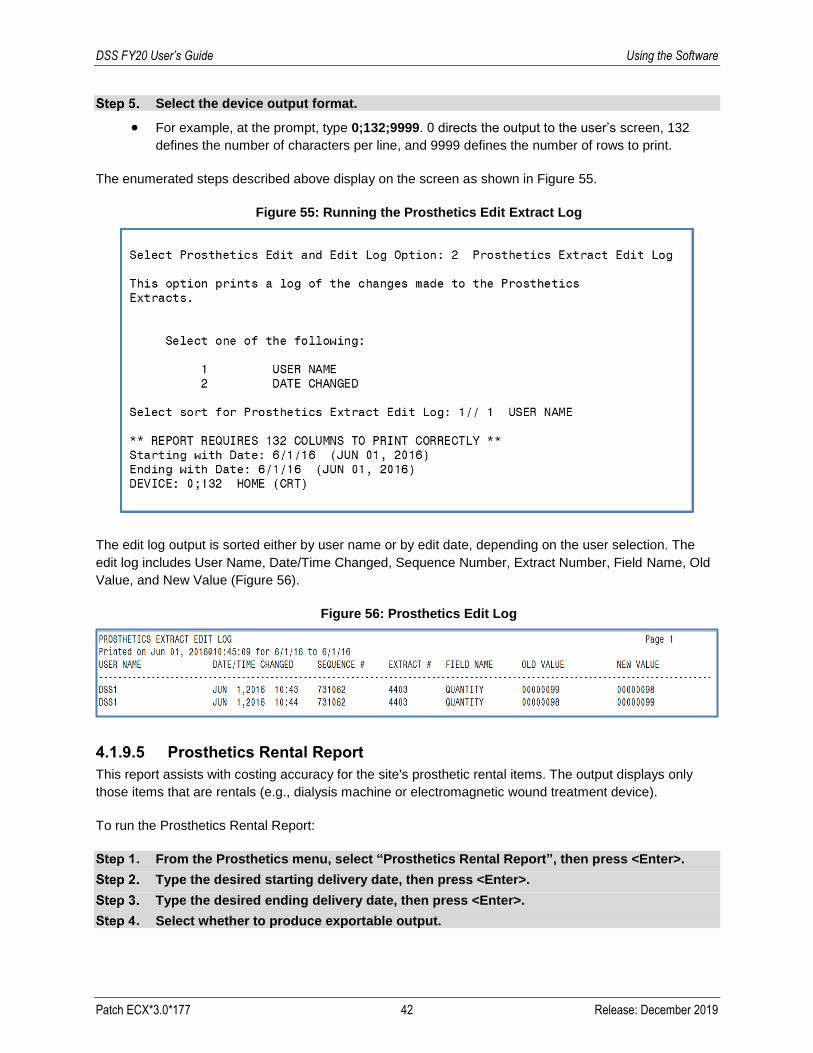
DSS FY20 User’s Guide Using the Software
Patch ECX*3.0*177 42 Release: December 2019
Select the device output format.
• For example, at the prompt, type 0;132;9999. 0 directs the output to the user’s screen, 132
defines the number of characters per line, and 9999 defines the number of rows to print.
The enumerated steps described above display on the screen as shown in Figure 55.
Figure 55: Running the Prosthetics Edit Extract Log
The edit log output is sorted either by user name or by edit date, depending on the user selection. The
edit log includes User Name, Date/Time Changed, Sequence Number, Extract Number, Field Name, Old
Value, and New Value (Figure 56).
Figure 56: Prosthetics Edit Log
4.1.9.5 Prosthetics Rental Report
This report assists with costing accuracy for the site's prosthetic rental items. The output displays only
those items that are rentals (e.g., dialysis machine or electromagnetic wound treatment device).
To run the Prosthetics Rental Report:
From the Prosthetics menu, select “Prosthetics Rental Report”, then press <Enter>.
Type the desired starting delivery date, then press <Enter>.
Type the desired ending delivery date, then press <Enter>.
Select whether to produce exportable output.

DSS FY20 User’s Guide Using the Software
Patch ECX*3.0*177 43 Release: December 2019
• At the ‘Do you want the output in exportable format? NO//’ prompt, press <Enter> to accept
‘NO’ as the default.
Select the device output format.
• For example, at the prompt, type 0;132;9999. 0 directs the output to the user’s screen, 132
defines the number of characters per line, and 9999 defines the number of rows to print.
The enumerated steps described above display on the screen as shown in Figure 57.
Figure 57: Running the Prosthetics Rental Report
The output includes Patient Name, Quantity, PSAS HCPCS, Initiator, and Item Description (Figure 58).

DSS FY20 User’s Guide Using the Software
Patch ECX*3.0*177 44 Release: December 2019
Figure 58: Prosthetics Rental Report
The exportable version of the report output contains the same information in a delimited text format that
can be imported into an Excel spreadsheet (Figure 59).
For guidance on capturing exported data into spreadsheets and the additional steps required to produce
exportable versions of reports, refer to Appendix D: Exporting a Report to a Spreadsheet.
Figure 59: Exported Prosthetics Rental Report

DSS FY20 User’s Guide Using the Software
Patch ECX*3.0*177 45 Release: December 2019
4.1.9.6 Prosthetics Unit of Issue Report
This report lists all entries in the UNIT OF ISSUE file (#420.5) that can be used within the prosthetics
package.
To run the Prosthetics Unit of Issue Report:
From the Prosthetics menu, select “Prosthetics Unit of Issue Report”, then press <Enter>.
Select whether to produce exportable output.
• At the ‘Do you want the output in exportable format? NO//’ prompt, press <Enter> to accept
‘NO’ as the default.
Select the device output format.
• For example, at the prompt, type 0;132;9999. 0 directs the output to the user’s screen, 132
defines the number of characters per line, and 9999 defines the number of rows to print.
The enumerated steps described above display on the screen as shown in Figure 60.
Figure 60: Running the Prosthetics Unit of Issue Report
The report output includes the two-character name and the full name for each unit of issue (Figure 61).
Figure 61: Prosthetics Unit of Issue Report
The exportable version of the report output contains the same information in a delimited text format that
can be imported into an Excel spreadsheet (Figure 62).
For guidance on capturing exported data into spreadsheets and the additional steps required to produce
exportable versions of reports, refer to Appendix D: Exporting a Report to a Spreadsheet.

DSS FY20 User’s Guide Using the Software
Patch ECX*3.0*177 46 Release: December 2019
Figure 62: Exported Prosthetics Unit of Issue Report
4.1.10 Setup for DSS Clinic Information Choosing the Setup for DSS Clinic Information option from the Maintenance menu displays seven options
needed to accurately define DSS clinic information (Figure 63). The sub-sections that follow describe the
functionality of each option.
Figure 63: DSS Clinic Information Menu Options
4.1.10.1 CHAR4 Codes List
This option displays a list of the CHAR4 codes with short descriptions from the NATIONAL CLINIC file
(#728.441). The output generated by this option may be used as a reference guide when using the
following options:
• Create DSS Clinic Stop Code File
• Clinics and DSS Stop Codes Print
• Enter/Edit Clinic Parameters
• Approve Reviewed DSS Clinic Worksheet
To create the CHAR4 Codes List:
From the Setup for DSS Clinic Information menu, select “CHAR4 Codes List”, then press <Enter>.
Select whether to produce exportable output.
• At the ‘Do you want the output in exportable format? NO//’ prompt, press <Enter> to accept
‘NO’ as the default.
Select the device output format.
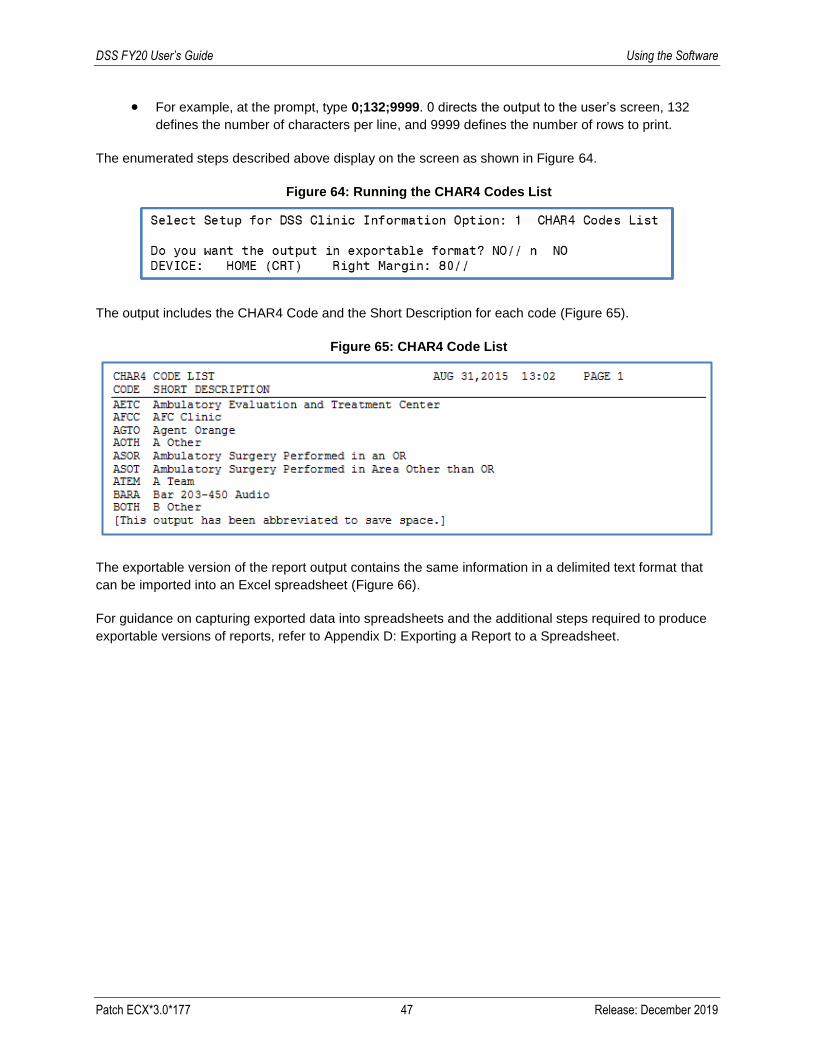
DSS FY20 User’s Guide Using the Software
Patch ECX*3.0*177 47 Release: December 2019
• For example, at the prompt, type 0;132;9999. 0 directs the output to the user’s screen, 132
defines the number of characters per line, and 9999 defines the number of rows to print.
The enumerated steps described above display on the screen as shown in Figure 64.
Figure 64: Running the CHAR4 Codes List
The output includes the CHAR4 Code and the Short Description for each code (Figure 65).
Figure 65: CHAR4 Code List
The exportable version of the report output contains the same information in a delimited text format that
can be imported into an Excel spreadsheet (Figure 66).
For guidance on capturing exported data into spreadsheets and the additional steps required to produce
exportable versions of reports, refer to Appendix D: Exporting a Report to a Spreadsheet.

DSS FY20 User’s Guide Using the Software
Patch ECX*3.0*177 48 Release: December 2019
Figure 66: Exported CHAR4 Codes List
4.1.10.2 Create DSS Clinic Stop Code File
This option allows the authorized users (i.e., holders of the ECXMGR security key) to create local entries
in the CLINICS AND STOP CODES file (#728.44) which will contain clinics, the stop codes assigned to
those clinics by MAS/HAS, and the stop codes used for those clinics by DSS.
Running this option does not affect existing data in the CLINICS AND STOP CODES file (#728.44). This
file includes the RECORD LAST SYNCHED field that identifies the last date the Create DSS Clinic Stop
Code File option was run.
Note:
• This option should be run monthly, prior to generating the Clinic extract.
To create a DSS Clinic Stop Code File:
From the Setup for DSS Clinic Information menu, select “Create DSS Clinic Stop Code File”, then press <Enter>.
Select whether to run the option now or to queue the option for a future date/time.

DSS FY20 User’s Guide Using the Software
Patch ECX*3.0*177 49 Release: December 2019
The enumerated steps described above display on the screen as shown in Figure 67.
Figure 67: Running the Create DSS Clinic Stop Code File Option
4.1.10.2.1 New Clinic Entries
The software searches the HOSPITAL LOCATION file (#44) for all clinics. It does not create entries for
clinics that are currently inactive.
New clinic entries are added to the CLINICS AND STOP CODES file (#728.44) with the field defaults
listed in Table 6.
Table 6: New Clinic Entry Field Defaults
Field # Field Name Default value
1 STOP CODE STOP CODE NUMBER field (#8) in the HOSPITAL LOCATION file (#44)
2 CREDIT STOP CODE CREDIT STOP CODE field (#2503) in the HOSPITAL LOCATION file (#44)
3 DSS STOP CODE STOP CODE NUMBER field (#8) in the HOSPITAL LOCATION file (#44)
4 DSS CREDIT STOP CODE CREDIT STOP CODE field (#2503) in the HOSPITAL LOCATION file (#44)
5 ACTION TO SEND 5: SEND STOP CODE(S) WITHOUT CHAR4 CODE
(If Clinic is not a Non-Count Clinic)
6: DO NOT SEND (If Clinic is a Non-Count Clinic)
4.1.10.2.2 Existing Clinic Entries
All preexisting clinics are checked against their counterparts in the HOSPITAL LOCATION file (#44) to
ensure the STOP CODE field (#1) in the CLINICS AND STOP CODES file (#728.44) matches the STOP
CODE NUMBER field (#8) in the HOSPITAL LOCATION file (#44). The same validation check is
performed on the CREDIT STOP CODE field (#2) to ensure it matches the CREDIT STOP CODE field
(#2503) in the HOSPITAL LOCATION file (#44).
Any preexisting clinic currently marked as inactive in the HOSPITAL LOCATION file (#44) is flagged as
inactive in the CLINICS AND STOP CODES file (#728.44). This inactive indicator is displayed as an

DSS FY20 User’s Guide Using the Software
Patch ECX*3.0*177 50 Release: December 2019
asterisk (*) beside the clinic name on the worksheet generated by the Clinics and DSS Stop Codes Print
option. Inactive clinics may still have valid historical data for DSS.
Any stop code changes to preexisting clinics delete the “Last Approved” date in the CLINICS AND STOP
CODES file (#728.44). This ensures the edited clinics print out as “Unreviewed” the next time the clinic
worksheet is generated using the Clinics and DSS Stop Codes Print option.
4.1.10.3 Clinics and DSS Stop Codes Print
This option produces a worksheet of all clinics, active clinics, duplicate clinics, inactive clinics, or
unreviewed clinics awaiting approval.
Note:
• A clinic is “Unreviewed” if it is newly established, or if there is a change to the Stop
Code/Credit Stop, Count/Non-Count clinic status or Active/Inactive clinic status.
To run the Clinics and DSS Stop Codes Print worksheet:
From the Setup for DSS Clinic Information menu, select “Clinics and DSS Stop Codes Print”, then press <Enter>.
Select the desired worksheet, then press <Enter>.
• Options include (A) All Clinics, (C) Active Clinics, (D) Duplicate Clinics, (I) Inactive Clinics, (U)
Unreviewed Clinics, or (X) Export to Text File for Spreadsheet Use.
Select the device output format.
• For example, at the prompt, type 0;132;9999. 0 directs the output to the user’s screen, 132
defines the number of characters per line, and 9999 defines the number of rows to print.
The enumerated steps described above display on the screen as shown in Figure 68.

DSS FY20 User’s Guide Using the Software
Patch ECX*3.0*177 51 Release: December 2019
Figure 68: Running the Clinics and DSS Stop Codes Print Option
The report output for the All Clinics option includes Clinic, Stop Code, Credit Stop Code, Action, CHAR4
Code, MCA Labor Code, Count/Non-Count status, DSS Product Department, and Non-OR DSS Identifier
(Figure 69).
Figure 69: Clinics and DSS Stop Codes Print - All Clinics
The report output for the All Active Clinics option includes the same fields: Clinic, Stop Code, Credit Stop
Code, Action, CHAR4 Code, MCA Labor Code, Count/Non-Count status, DSS Product Department, and
Non-OR DSS Identifier (Figure 70).

DSS FY20 User’s Guide Using the Software
Patch ECX*3.0*177 52 Release: December 2019
Figure 70: Clinics and DSS Stop Codes Print – All Active Clinics
The report output for the Duplicate Clinics option differs slightly and includes Clinic Name, Clinic IEN,
Stop Code, Credit Stop Code, CHAR4 Code, MCA Labor Code, Clinic Appointment Length, and Division
(Figure 71).
Figure 71: Clinics and DSS Stop Codes Print - Duplicate Clinics
The report output for the All Inactive Clinics option includes Clinic, Stop Code, Credit Stop Code, Action,
CHAR4 Code, MCA Labor Code, Count/Non-Count status, DSS Product Department, and Non-OR DSS
Identifier (Figure 72).

DSS FY20 User’s Guide Using the Software
Patch ECX*3.0*177 53 Release: December 2019
Figure 72: Clinics and DSS Stop Codes Print – All Inactive Clinics
The report output for the Unreviewed Clinics option includes Clinic, Stop Code, Credit Stop Code, Action,
CHAR4 Code, MCA Labor Code, Count/Non-Count status, DSS Product Department, and Non-OR DSS
Identifier (Figure 73). A clinic is reported as unreviewed if it is newly established, or if there is a change to
the Stop Code/Credit Stop, Count/Non-Count clinic status or Active/Inactive clinic status.
Note:
• For additional information regarding reviewing clinics in order to omit them from the
‘Unreviewed Clinics’ output of the Clinics and DSS Stop Codes Print report, refer to Section
4.1.9.5).
Figure 73: Clinics and DSS Stop Codes Print – Unreviewed Clinics
For each of the aforementioned options, the exportable version of the report output includes the same
information plus additional information in a delimited text format that can be imported into an Excel
spreadsheet. The additional columns included in the exported version of the report are: Clinic IEN,
Inactive Date (if the clinic was inactivated), Reactivated Date (if the clinic was inactivated and
subsequently reactivated), Clinic Type, Appointment Length (in minutes), Day, Appointment Type, Non-
Count Status (yes/no), Occasion of Service (OOS) status, OOS Calling Package, and Variable Length
Appointment (Figure 74).

DSS FY20 User’s Guide Using the Software
Patch ECX*3.0*177 54 Release: December 2019
For guidance on capturing exported data into spreadsheets and the additional steps required to produce
exportable versions of reports, refer to Appendix D: Exporting a Report to a Spreadsheet.
Note:
• The exported versions of the ‘All Clinics’, ‘All Active Clinics’, ‘All Inactive Clinics’, and
‘Unreviewed Clinics’ options contain the same columns for information. Therefore, only one
example screen shot is provided.
Figure 74: Exported Clinics and DSS Stop Codes Print – All Clinics
The exported version of the ‘Duplicate Clinics’ option differs slightly from the other exported report
versions and includes Clinic Name, Clinic IEN, Stop Code, Credit Stop Code, CHAR4 Code, MCA Labor
Code, Clinic Appointment Length, and Division (Figure 75). This information is the same as that contained
in the print version of the duplicate clinics report.
Figure 75: Exported Clinics and DSS Stop Codes Print – Duplicate Clinics
4.1.10.4 Enter/Edit Clinic Parameters
This option allows extract managers to add or edit certain parameters associated with a clinic including
the Action to Send Code, MCA Labor Code, Non-OR DSS Identifier, and the DSS Product Department.
Note:
• Modifying the DSS Product Department information for a clinic will not cause it to be placed
in an “Unreviewed” status.
To enter or edit clinic parameters:
From the Setup for DSS Clinic Information menu, select “Enter/Edit Clinic Parameters”, then press <Enter>.
Type the desired clinic name to edit, then press <Enter>.
• Existing clinic file data is displayed, followed by the current value for the Action to Send Code.
To edit the current value for the Action to Send Code, type the desired code, then press <Enter>.

DSS FY20 User’s Guide Using the Software
Patch ECX*3.0*177 55 Release: December 2019
• Type ??, then press <Enter> to see a list of selectable Action to Send Codes.
• To accept the default value, press <Enter> at the prompt without typing anything.
Type the desired MCA Labor Code, then press <Enter>.
• Type ??, then press <Enter> to see a list of selectable MCA Labor Codes.
• To accept the current value, press <Enter> at the prompt without typing anything.
Type the desired Non-OR DSS Identifier, then press <Enter>.
• To accept the current value, press <Enter> at the prompt without typing anything.
Type the desired DSS Product Department, then press <Enter>.
• To accept the current value, press <Enter> at the prompt without typing anything.
• After this field, the system prompts the user to enter the next clinic name.
The enumerated steps described above display on the screen as shown in Figure 76.
Figure 76: Running the Enter/Edit Clinic Parameters Option
4.1.10.5 Approve Reviewed DSS Clinic Worksheet
This option allows users to approve any clinics that are currently in an unreviewed status. A clinic is
reported as unreviewed if it is newly established or if there is a change to the Stop Code/Credit Stop,
Count/Non-Count clinic status or Active/Inactive clinic status.
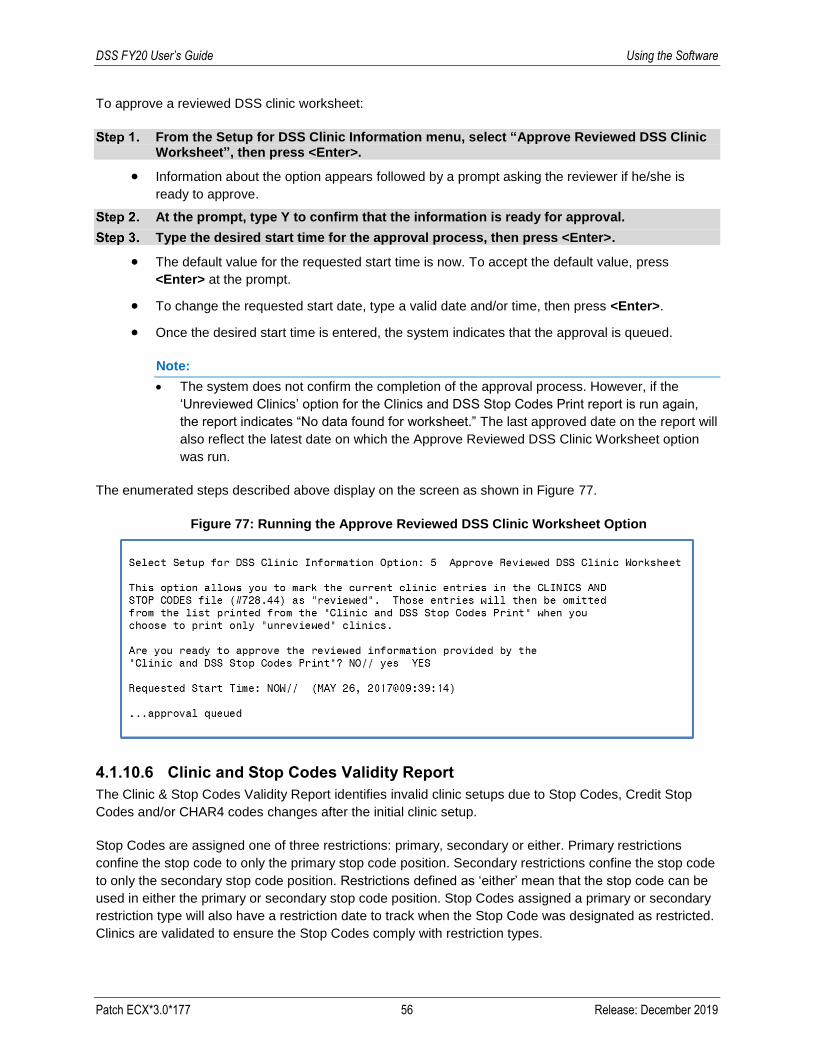
DSS FY20 User’s Guide Using the Software
Patch ECX*3.0*177 56 Release: December 2019
To approve a reviewed DSS clinic worksheet:
From the Setup for DSS Clinic Information menu, select “Approve Reviewed DSS Clinic Worksheet”, then press <Enter>.
• Information about the option appears followed by a prompt asking the reviewer if he/she is
ready to approve.
At the prompt, type Y to confirm that the information is ready for approval.
Type the desired start time for the approval process, then press <Enter>.
• The default value for the requested start time is now. To accept the default value, press
<Enter> at the prompt.
• To change the requested start date, type a valid date and/or time, then press <Enter>.
• Once the desired start time is entered, the system indicates that the approval is queued.
Note:
• The system does not confirm the completion of the approval process. However, if the
‘Unreviewed Clinics’ option for the Clinics and DSS Stop Codes Print report is run again,
the report indicates “No data found for worksheet.” The last approved date on the report will
also reflect the latest date on which the Approve Reviewed DSS Clinic Worksheet option
was run.
The enumerated steps described above display on the screen as shown in Figure 77.
Figure 77: Running the Approve Reviewed DSS Clinic Worksheet Option
4.1.10.6 Clinic and Stop Codes Validity Report
The Clinic & Stop Codes Validity Report identifies invalid clinic setups due to Stop Codes, Credit Stop
Codes and/or CHAR4 codes changes after the initial clinic setup.
Stop Codes are assigned one of three restrictions: primary, secondary or either. Primary restrictions
confine the stop code to only the primary stop code position. Secondary restrictions confine the stop code
to only the secondary stop code position. Restrictions defined as ‘either’ mean that the stop code can be
used in either the primary or secondary stop code position. Stop Codes assigned a primary or secondary
restriction type will also have a restriction date to track when the Stop Code was designated as restricted.
Clinics are validated to ensure the Stop Codes comply with restriction types.

DSS FY20 User’s Guide Using the Software
Patch ECX*3.0*177 57 Release: December 2019
The clinic’s Stop Code and Credit Stop Code must be active, valid and conform to the restriction types. If
any of the following conditions are not met, the offending clinic is listed on the report with a descriptive
message explaining what needs to be updated.
• Must be present
• Must be active
• Must not have an inactive date in the future
• Must be three numeric characters in length and valid
• Must be in the correct position for the restriction type
• Must not have identical Stop Code and Credit Stop Code values
• Must not have an inactive CHAR4 Code
Note:
• CHAR4 Codes cannot be added, deleted or modified by users.
This report lists the clinics that do not meet the criteria for validity listed above. Up to three errors and one
warning (for Stop Codes or Credit Stop Codes with a pending inactivation date) can be displayed for each
clinic.
To run the Clinic & Stop Codes Validity Report:
From the Setup for DSS Clinic Information menu, select “Clinic & Stop Codes Validity Report”, then press <Enter>.
Select whether to produce exportable output.
• At the ‘Do you want the output in exportable format? NO//’ prompt, press <Enter> to accept ‘NO’ as the default.
Select the device output format.
• For example, at the prompt, type 0;132;9999. 0 directs the output to the user’s screen, 132 defines the number of characters per line, and 9999 defines the number of rows to print.
• Any problems are listed in the report. If no problems are found, the report indicates “No problems found.”
The enumerated steps described above display on the screen as shown in Figure 78.

DSS FY20 User’s Guide Using the Software
Patch ECX*3.0*177 58 Release: December 2019
Figure 78: Running the Clinic & Stop Codes Validity Report
The report output lists any invalid clinics and includes the Clinic IEN, Clinic Name, Stop Code, Credit Stop
Code and CHAR4 Code information. A brief description of the error(s) and/or warning is also included on
the report (Figure 79).
Figure 79: Clinic & Stop Codes Validity Report
The exportable version of the report output contains the same information in a delimited text format that
can be imported into an Excel spreadsheet (Figure 80).
For guidance on capturing exported data into spreadsheets and the additional steps required to produce
exportable versions of reports, refer to Appendix D: Exporting a Report to a Spreadsheet.
Figure 80: Exported Clinic and Stop Codes Validity Report

DSS FY20 User’s Guide Using the Software
Patch ECX*3.0*177 59 Release: December 2019
4.1.10.7 Clinic Edit Log Report
The Clinic Edit Log Report generates a list of changes made to Clinic Locations for a specific time frame.
The report can be sorted either by the user name of the person that performed the edit or by the date the
change was made.
To run the Clinic Edit Log Report:
From the Setup for DSS Clinic Information menu, select “Clinic Edit Log Report”, then press <Enter>
Select the sort order for the edit log.
• The system can sort by the name of the user that made the edit or by the date the edit was
made.
Type the desired start date for the edit log, then press <Enter>.
Type the desired end date for the edit log, then press <Enter>.
Select whether to produce exportable output.
• At the ‘Do you want the output in exportable format? NO//’ prompt, press <Enter> to accept ‘NO’ as the default.
Select the device output format.
• For example, at the prompt, type 0;132;9999. 0 directs the output to the user’s screen, 132 defines the number of characters per line, and 9999 defines the number of rows to print.
The enumerated steps described above display on the screen as shown in Figure 81.
Figure 81: Running the Clinic Edit Log Report
The edit log output is sorted either by user name or by edit date, depending on the user selection. The
edit log includes User Name, Date/Time Changed, Clinic IEN, Clinic Name, Field Name, Old Value and
New Value (Figure 82).

DSS FY20 User’s Guide Using the Software
Patch ECX*3.0*177 60 Release: December 2019
Figure 82: Clinic Edit Log Report
The exportable version of the report output contains the same information in a delimited text format that
can be imported into an Excel spreadsheet (Figure 83).
For guidance on capturing exported data into spreadsheets and the additional steps required to produce
exportable versions of reports, refer to Appendix D: Exporting a Report to a Spreadsheet.
Figure 83: Exported Clinic Edit Log Report
4.1.11 Setup for Inpatient Census Information Selecting the Setup for Inpatient Census Information option from the Maintenance menu displays four
additional options needed to accurately define and create DSS inpatient census information (Figure 84).
The sub-sections that follow describe the functionality of each option.
Figure 84: Setup for Inpatient Census Information Menu Options
Note:
• These reports are resource intensive and should be run during non-peak hours.
4.1.11.1 Trial for Setup Extract
This option allows users to generate a report of the inpatient population for a specified date. The report is
sorted by inpatient ward. Within each ward, the data is sorted by patient name, SSN and admission date.
This report can be compared to MAS/HAS reports to eliminate any problems in the ADMISSION SETUP
EXTRACT file (#727.82).
To run the Trial for Setup Extract option:
From the Setup for Inpatient Census Information menu, select “Trial for Setup Extract”, then press <Enter>.

DSS FY20 User’s Guide Using the Software
Patch ECX*3.0*177 61 Release: December 2019
Type the desired date for the report, then press <Enter>.
• The default selection is the current date. To accept the default date, press <Enter>.
• To select a new date, type the desired date at the prompt, then press <Enter>.
Note:
• The report is generated for the beginning of the day selected, not the end of the day as
MAS/HAS reports do. For example, for this report, if the user selects October 1, 2017, the
report will start at midnight on October 1. For the MAS/HAS report the selected date would
need to be September 30, 2017. The MAS/HAS report begins at midnight at the end of the
day.
Select the device output format.
• For example, at the prompt, type 0;132;9999. 0 directs the output to the user’s screen, 132 defines the number of characters per line, and 9999 defines the number of rows to print.
Type the desired start time to run the report, then press <Enter>.
• The default value for the requested start time is now. To accept the default value, press <Enter> at the prompt.
• To change the requested start date, type a valid date and/or time, then press <Enter>.
• Once the desired start time is entered, the system indicates that the approval is queued.
The enumerated steps described above display on the screen as shown in Figure 85.
Figure 85: Running the Trial for Setup Extract Option
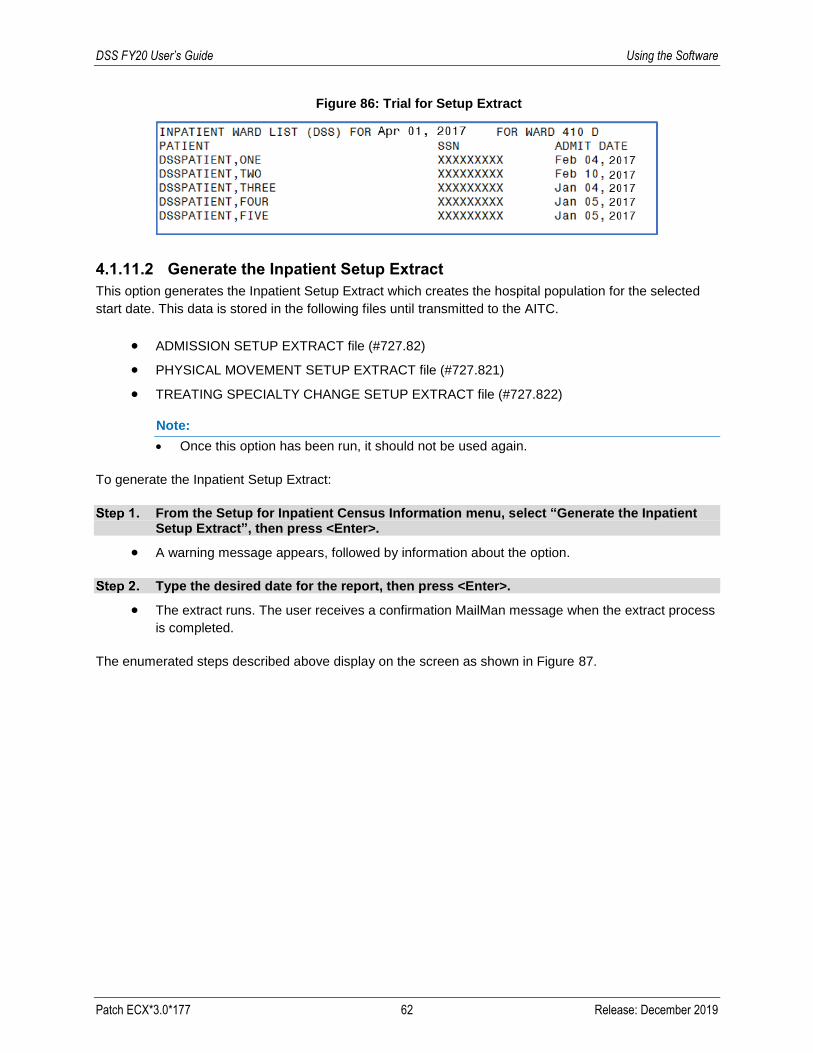
DSS FY20 User’s Guide Using the Software
Patch ECX*3.0*177 62 Release: December 2019
Figure 86: Trial for Setup Extract
4.1.11.2 Generate the Inpatient Setup Extract
This option generates the Inpatient Setup Extract which creates the hospital population for the selected
start date. This data is stored in the following files until transmitted to the AITC.
• ADMISSION SETUP EXTRACT file (#727.82)
• PHYSICAL MOVEMENT SETUP EXTRACT file (#727.821)
• TREATING SPECIALTY CHANGE SETUP EXTRACT file (#727.822)
Note:
• Once this option has been run, it should not be used again.
To generate the Inpatient Setup Extract:
From the Setup for Inpatient Census Information menu, select “Generate the Inpatient Setup Extract”, then press <Enter>.
• A warning message appears, followed by information about the option.
Type the desired date for the report, then press <Enter>.
• The extract runs. The user receives a confirmation MailMan message when the extract process
is completed.
The enumerated steps described above display on the screen as shown in Figure 87.

DSS FY20 User’s Guide Using the Software
Patch ECX*3.0*177 63 Release: December 2019
Figure 87: Running the Generate the Inpatient Setup Extract Option
4.1.11.3 Active MAS Wards for Fiscal Year Print
This option provides assistance for building wards in the commercial database at the AITC. Use this
option to generate a list of all MAS/HAS wards that were active at any time during the current fiscal year.
To generate a list of active wards for the current fiscal year:
From the Setup for Inpatient Census Information menu, select “Active MAS Wards for Fiscal Year Print”, then press <Enter>.
• Information about the option appears, followed by a prompt.
Select whether to produce exportable output.
• At the ‘Do you want the output in exportable format? NO//’ prompt, press <Enter> to accept ‘NO’ as the default.
Select the device output format.
• For example, at the prompt, type 0;132;24. 0 directs the output to the user’s screen, 132 defines the number of characters per line, and 24 defines the number of rows to print.
The enumerated steps described above display on the screen as shown in Figure 88.

DSS FY20 User’s Guide Using the Software
Patch ECX*3.0*177 64 Release: December 2019
Figure 88: Running the Active MAS Wards for Fiscal Year Print Option
The report output is sorted by medical center division and includes Ward, DSS Department, Pointer to
File #44 (HOSPTIAL LOCATION file), Ward Service and Ward Specialty (Figure 89).
Figure 89: Active MAS Wards for Fiscal Year Print
The exportable version of the report output contains the same information in a delimited text format that
can be imported into an Excel spreadsheet (Figure 90).
For guidance on capturing exported data into spreadsheets and the additional steps required to produce
exportable versions of reports, refer to Appendix D: Exporting a Report to a Spreadsheet.
Figure 90: Exported Active MAS Wards for Fiscal Year Print

DSS FY20 User’s Guide Using the Software
Patch ECX*3.0*177 65 Release: December 2019
4.1.11.4 Primary Care Team Print
This option generates a list of all primary care teams. The list is sorted alphabetically by team name and
displays the pointer to the TEAM file (#404.51). This option allows the user to build primary care teams on
the commercial DSS system.
To run the Primary Care Team Print option:
From the Setup for Inpatient Census Information menu, select “Primary Care Team Print”, then press <Enter>.
• Information about the option appears, followed by a prompt
Select whether to produce exportable output.
• At the ‘Do you want the output in exportable format? NO//’ prompt, press <Enter> to accept ‘NO’ as the default.
Select the device output format.
• For example, at the prompt, type 0;132;9999. 0 directs the output to the user’s screen, 132 defines the number of characters per line, and 9999 defines the number of rows to print.
The enumerated steps described above display on the screen as shown in Figure 91.
Figure 91: Running the Primary Care Team Print Option
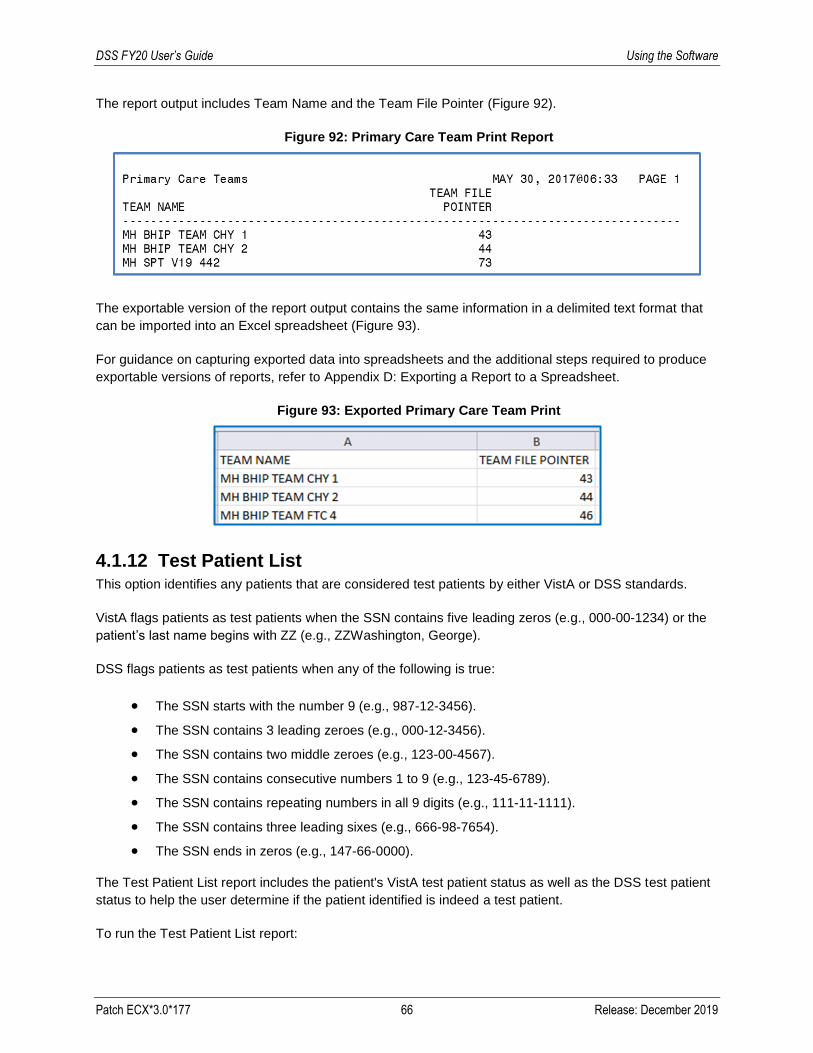
DSS FY20 User’s Guide Using the Software
Patch ECX*3.0*177 66 Release: December 2019
The report output includes Team Name and the Team File Pointer (Figure 92).
Figure 92: Primary Care Team Print Report
The exportable version of the report output contains the same information in a delimited text format that
can be imported into an Excel spreadsheet (Figure 93).
For guidance on capturing exported data into spreadsheets and the additional steps required to produce
exportable versions of reports, refer to Appendix D: Exporting a Report to a Spreadsheet.
Figure 93: Exported Primary Care Team Print
4.1.12 Test Patient List This option identifies any patients that are considered test patients by either VistA or DSS standards.
VistA flags patients as test patients when the SSN contains five leading zeros (e.g., 000-00-1234) or the
patient’s last name begins with ZZ (e.g., ZZWashington, George).
DSS flags patients as test patients when any of the following is true:
• The SSN starts with the number 9 (e.g., 987-12-3456).
• The SSN contains 3 leading zeroes (e.g., 000-12-3456).
• The SSN contains two middle zeroes (e.g., 123-00-4567).
• The SSN contains consecutive numbers 1 to 9 (e.g., 123-45-6789).
• The SSN contains repeating numbers in all 9 digits (e.g., 111-11-1111).
• The SSN contains three leading sixes (e.g., 666-98-7654).
• The SSN ends in zeros (e.g., 147-66-0000).
The Test Patient List report includes the patient's VistA test patient status as well as the DSS test patient
status to help the user determine if the patient identified is indeed a test patient.
To run the Test Patient List report:

DSS FY20 User’s Guide Using the Software
Patch ECX*3.0*177 67 Release: December 2019
Select TST (Test Patient List) from the Maintenance menu, then press <Enter>.
• A note appears indicating that the report may take a while to generate.
Select whether to produce exportable output.
• At the ‘Do you want the output in exportable format? NO//’ prompt, press <Enter> to accept ‘NO’ as the default.
Select the device output format.
• For example, at the prompt, type 0;132;9999. 0 directs the output to the user’s screen, 132 defines the number of characters per line, and 9999 defines the number of rows to print.
The enumerated steps described above display on the screen as shown in Figure 94.
Figure 94: Running the Test Patient List Option
The report output includes the Name, SSN, Test Patient Indicator (VistA), and DSS Test Patient Indicator
(Figure 95).
Figure 95: Test Patient List
The exportable version of the report output contains the same information in a delimited text format that
can be imported into an Excel spreadsheet (Figure 96).
For guidance on capturing exported data into spreadsheets and the additional steps required to produce
exportable versions of reports, refer to Appendix D: Exporting a Report to a Spreadsheet.
Figure 96: Exported Test Patient List

DSS FY20 User’s Guide Using the Software
Patch ECX*3.0*177 68 Release: December 2019
4.1.13 View G&L Corrections This option is used to view corrections to inpatient activity which have been captured by the system. To
select the correction to be viewed, the user may enter either the date of the correction or, if known, the
patient (name or SSN) for whom the correction was made.
To view G&L corrections:
Select G&L (View G&L Corrections) from the Maintenance menu, then press <Enter>.
The user is prompted “Select G&L CORRECTIONS DATE OF CHANGE:”.
• Enter the date for which changes want to be viewed, or enter the name or SSN of the patient.
• If multiple records exist, the user will be prompted to select from the list.
Select the device output format.
• For example, at the prompt, type 0;80;99. 0 directs the output to the user’s screen, 80 defines the number of characters per line, and 99 defines the number of rows to print.
• Only one record will be displayed. The length of the line can be either 80 or 132.
The enumerated steps described above display on the screen as shown in Figure 97.
Figure 97: Running the View G&L Corrections Option
The report output includes the Name, SSN, Test Patient Indicator (VistA), and DSS Test Patient Indicator
(Figure 98).
Figure 98: G&L Corrections List

DSS FY20 User’s Guide Using the Software
Patch ECX*3.0*177 69 Release: December 2019
4.2 Pre-Extract Audit Reports Selecting the Pre-Extract Audit Reports option from the Extract Manager’s menu provides a list of audit
reports that have a significant effect on facility workload as recorded in the NPCD (Figure 99). The reports
listed also require more complex review and correction by local subject matter experts (SMEs). The sub-
sections that follow describe the functionality of each option.
Figure 99: Pre-Extract Audit Reports Options
4.2.1 Event Capture Pre-Extract Unusual Volume Report This report generates a listing of unusual volumes that would be generated by the Event Capture extract
(ECS) as determined by a user-defined threshold value. This report should be run prior to the generation
of the actual ECS extract to identify and fix, as necessary, any volumes determined to be erroneous. The
default threshold value is 20 but can be changed by the user prior to running the report.
To run the Event Capture Pre-Extract Unusual Volume Report:
From the Pre-Extract Audit Reports menu, select ECS (Event Capture Pre-Extract Unusual Volume Report), the press <Enter>.
• Information about the report appears.
Press <Enter> to continue.
• The user is prompted to either accept the default threshold or change it.
• To change the default threshold, type YES at the prompt, and then enter the desired numerical threshold (0-99).
• To accept the default threshold, press <Enter> to continue.
Select the desired DSS Units for the report.
• The user can either choose to run the report for all DSS Units or select one specific DSS Unit.
Enter a Starting Date for the report.
Enter an Ending Date for the report.
Select whether to produce exportable output for the report or to print to screen.
Select the output format.
The enumerated steps described above display on the screen as shown in Figure 100.
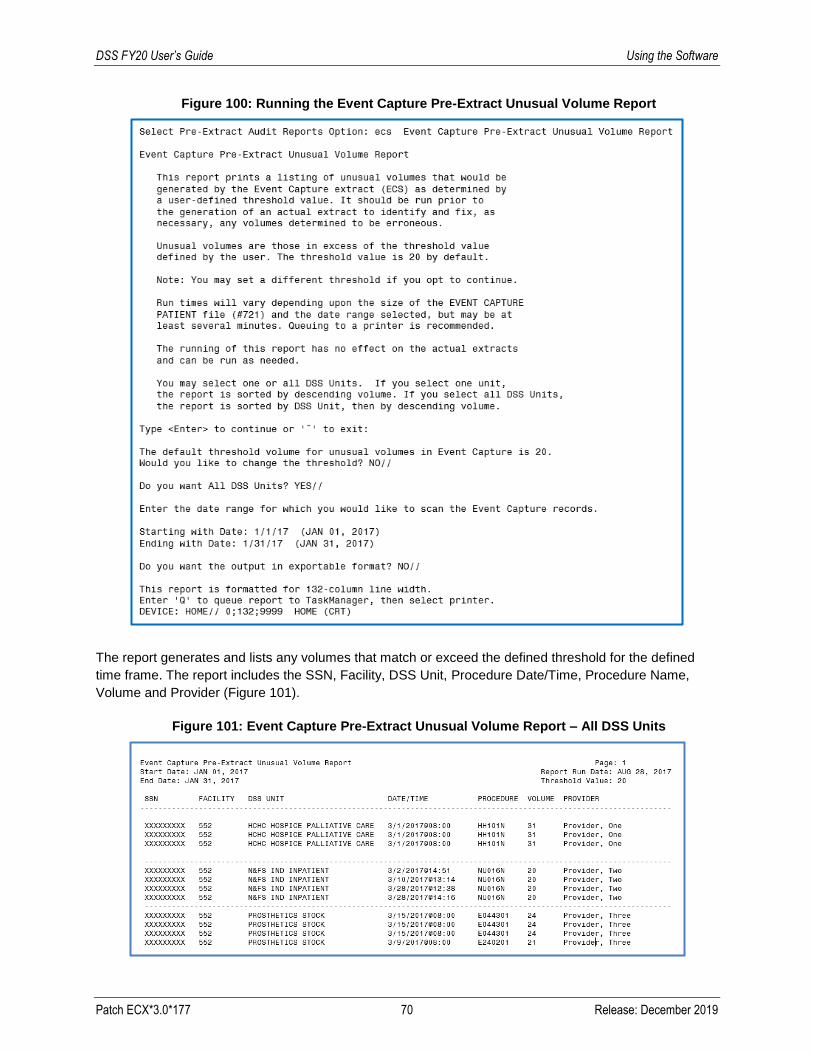
DSS FY20 User’s Guide Using the Software
Patch ECX*3.0*177 70 Release: December 2019
Figure 100: Running the Event Capture Pre-Extract Unusual Volume Report
The report generates and lists any volumes that match or exceed the defined threshold for the defined
time frame. The report includes the SSN, Facility, DSS Unit, Procedure Date/Time, Procedure Name,
Volume and Provider (Figure 101).
Figure 101: Event Capture Pre-Extract Unusual Volume Report – All DSS Units
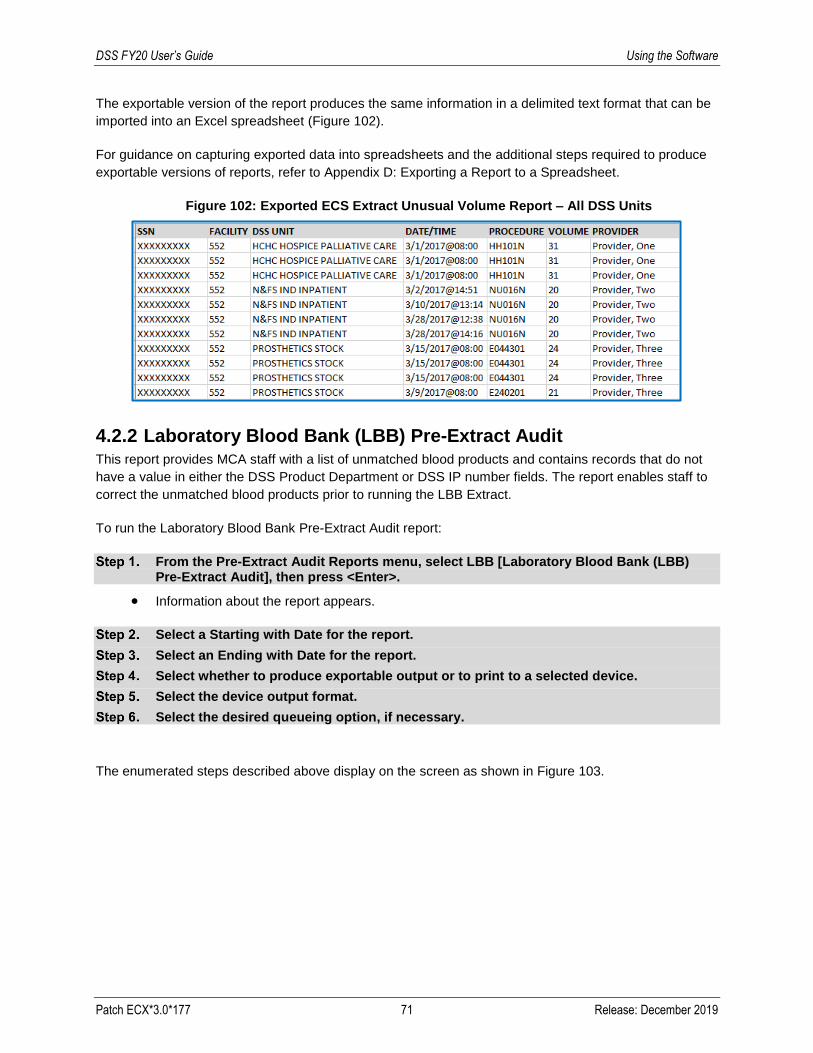
DSS FY20 User’s Guide Using the Software
Patch ECX*3.0*177 71 Release: December 2019
The exportable version of the report produces the same information in a delimited text format that can be
imported into an Excel spreadsheet (Figure 102).
For guidance on capturing exported data into spreadsheets and the additional steps required to produce
exportable versions of reports, refer to Appendix D: Exporting a Report to a Spreadsheet.
Figure 102: Exported ECS Extract Unusual Volume Report – All DSS Units
4.2.2 Laboratory Blood Bank (LBB) Pre-Extract Audit This report provides MCA staff with a list of unmatched blood products and contains records that do not
have a value in either the DSS Product Department or DSS IP number fields. The report enables staff to
correct the unmatched blood products prior to running the LBB Extract.
To run the Laboratory Blood Bank Pre-Extract Audit report:
From the Pre-Extract Audit Reports menu, select LBB [Laboratory Blood Bank (LBB) Pre-Extract Audit], then press <Enter>.
• Information about the report appears.
Select a Starting with Date for the report.
Select an Ending with Date for the report.
Select whether to produce exportable output or to print to a selected device.
Select the device output format.
Select the desired queueing option, if necessary.
The enumerated steps described above display on the screen as shown in Figure 103.

DSS FY20 User’s Guide Using the Software
Patch ECX*3.0*177 72 Release: December 2019
Figure 103: Running the Laboratory Blood Bank (LBB) Pre-Extract Audit
The report generates for the selected time frame and lists any records that do not have a value in either
the DSS Product Department or DSS IP Number fields. The report includes the first four letters of the
patient’s last name, SSN, Feeder Location, Transfusion Date, Component, and Number of Units (Figure
104).
Figure 104: Laboratory Blood Bank (LBB) Pre-Extract Audit Report
The exportable version of the report produces the same information in a delimited text format that can be
imported into an Excel spreadsheet (Figure 105).
For guidance on capturing exported data into spreadsheets and the additional steps required to produce
exportable versions of reports, refer to Appendix D: Exporting a Report to a Spreadsheet.
Figure 105: Exported Laboratory Blood Bank (LBB) Pre-Extract Audit Report
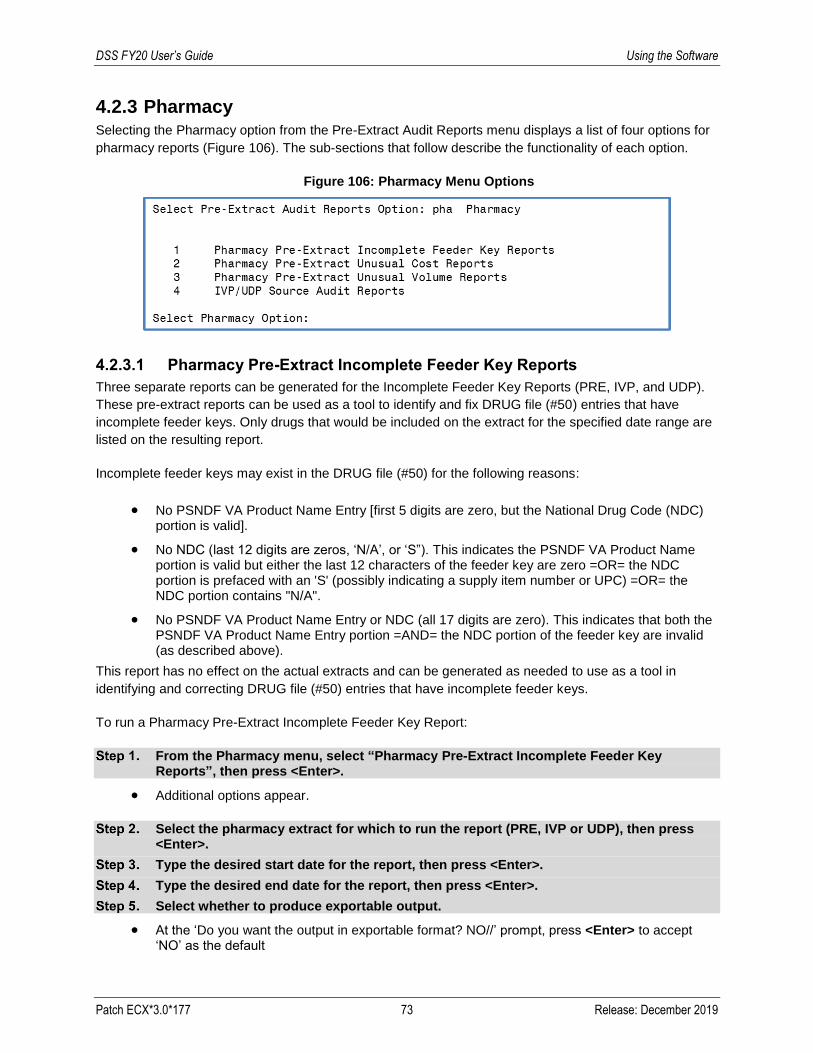
DSS FY20 User’s Guide Using the Software
Patch ECX*3.0*177 73 Release: December 2019
4.2.3 Pharmacy Selecting the Pharmacy option from the Pre-Extract Audit Reports menu displays a list of four options for
pharmacy reports (Figure 106). The sub-sections that follow describe the functionality of each option.
Figure 106: Pharmacy Menu Options
4.2.3.1 Pharmacy Pre-Extract Incomplete Feeder Key Reports
Three separate reports can be generated for the Incomplete Feeder Key Reports (PRE, IVP, and UDP).
These pre-extract reports can be used as a tool to identify and fix DRUG file (#50) entries that have
incomplete feeder keys. Only drugs that would be included on the extract for the specified date range are
listed on the resulting report.
Incomplete feeder keys may exist in the DRUG file (#50) for the following reasons:
• No PSNDF VA Product Name Entry [first 5 digits are zero, but the National Drug Code (NDC) portion is valid].
• No NDC (last 12 digits are zeros, ‘N/A’, or ‘S”). This indicates the PSNDF VA Product Name portion is valid but either the last 12 characters of the feeder key are zero =OR= the NDC portion is prefaced with an 'S' (possibly indicating a supply item number or UPC) =OR= the NDC portion contains "N/A".
• No PSNDF VA Product Name Entry or NDC (all 17 digits are zero). This indicates that both the PSNDF VA Product Name Entry portion =AND= the NDC portion of the feeder key are invalid (as described above).
This report has no effect on the actual extracts and can be generated as needed to use as a tool in
identifying and correcting DRUG file (#50) entries that have incomplete feeder keys.
To run a Pharmacy Pre-Extract Incomplete Feeder Key Report:
From the Pharmacy menu, select “Pharmacy Pre-Extract Incomplete Feeder Key Reports”, then press <Enter>.
• Additional options appear.
Select the pharmacy extract for which to run the report (PRE, IVP or UDP), then press <Enter>.
Type the desired start date for the report, then press <Enter>.
Type the desired end date for the report, then press <Enter>.
Select whether to produce exportable output.
• At the ‘Do you want the output in exportable format? NO//’ prompt, press <Enter> to accept ‘NO’ as the default
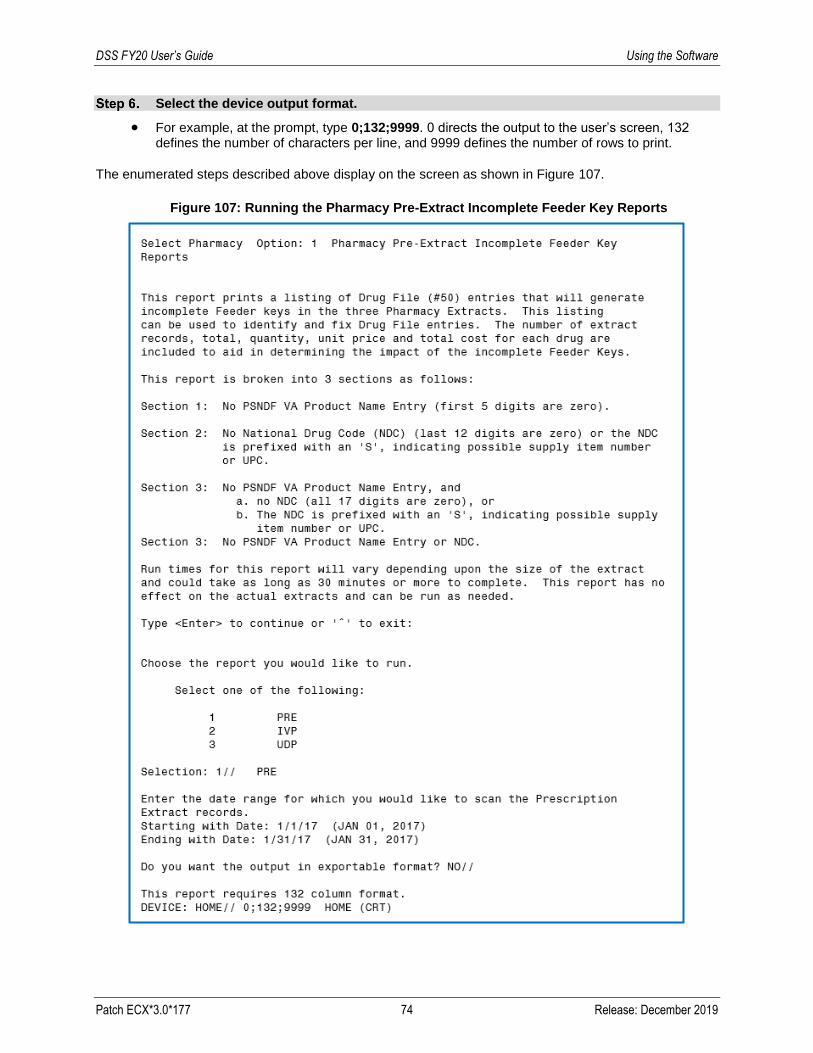
DSS FY20 User’s Guide Using the Software
Patch ECX*3.0*177 74 Release: December 2019
Select the device output format.
• For example, at the prompt, type 0;132;9999. 0 directs the output to the user’s screen, 132 defines the number of characters per line, and 9999 defines the number of rows to print.
The enumerated steps described above display on the screen as shown in Figure 107.
Figure 107: Running the Pharmacy Pre-Extract Incomplete Feeder Key Reports

DSS FY20 User’s Guide Using the Software
Patch ECX*3.0*177 75 Release: December 2019
The report generates and lists drugs with incomplete feeder keys that would be included on the specified
pharmacy extract for the specified date range. The report includes Drug Entry, Generic Name, Feeder
Key, Number of Records, Total Quantity, Unit Price and Total Cost (Figure 108).
Figure 108: Pharmacy Pre-Extract Incomplete Feeder Key Report – PRE
The exportable version of the report produces the same information in a delimited text format that can be
imported into an Excel spreadsheet (Figure 109).
For guidance on capturing exported data into spreadsheets and the additional steps required to produce
exportable versions of reports, refer to Appendix D: Exporting a Report to a Spreadsheet.

DSS FY20 User’s Guide Using the Software
Patch ECX*3.0*177 76 Release: December 2019
Figure 109: Exported Pharmacy Pre-Extract Incomplete Feeder Key Reports
Note:
• Output is similar for all three pharmacy extracts (PRE, IVP and UDP). Therefore, only one
example is provided in this user’s guide.
4.2.3.1.1 PRE Extracts Incomplete Feeder Key Report
This report contains a listing of DRUG file (#50) entries that would generate incomplete feeder keys in the
PRE extract. This listing can be used to identify and correct DRUG file entries. The number of affected
extract records, along with their unit price, total quantity and total cost, are included to aid in determining
the impact of the incomplete feeder keys.
Refer to Section 4.2.3.1 for additional information and sample output.
4.2.3.1.2 IVP Extracts Incomplete Feeder Key Report
This report contains a listing of DRUG file (#50) entries that would generate incomplete feeder keys in the
IVP extract. This listing can be used to identify and correct DRUG file entries. The number of affected
extract records, along with their unit price, total quantity and total cost, are included to aid in determining
the impact of the incomplete feeder keys.
Refer to Section 4.2.3.1 for additional information and sample output.
4.2.3.1.3 UDP Extracts Incomplete Feeder Key Report
This report contains a listing of DRUG file (#50) entries that would generate incomplete feeder keys in the
UDP extract. This listing can be used to identify and correct DRUG file entries. The number of affected
extract records, along with their unit price, total quantity and total cost, are included to aid in determining
the impact of the incomplete feeder keys.
Refer to Section 4.2.3.1 for additional information and sample output.
4.2.3.2 Pharmacy Pre-Extract Unusual Cost Reports
This option allows extract managers (i.e., users with the ECXMGR security key) to create a listing of
unusual costs that would be generated by the pharmacy extracts (PRE, IVP or UDP). The unusual cost is
determined by a user-defined threshold. This pre-extract report has no effect on the actual extracts and
can be generated as needed to use as a tool in identifying and correcting erroneous costs.
To run a Pharmacy Pre-Extract Unusual Cost Report:
From the Pharmacy menu, select “Pharmacy Pre-Extract Unusual Cost Reports”, then press <Enter>.

DSS FY20 User’s Guide Using the Software
Patch ECX*3.0*177 77 Release: December 2019
• Information about the report appears.
Press <Enter> to continue to the next prompt.
Select the pharmacy extract for which to run the report (PRE, IVP or UDP), then press <Enter>.
Select whether to accept or change the default threshold.
• At the ‘Would you like to change the threshold? NO//’ prompt, press <Enter> to accept the default.
Type the desired start date for the report, then press <Enter>.
Type the desired end date for the report, then press <Enter>.
Select whether to produce exportable output.
• At the ‘Do you want the output in exportable format? NO//’ prompt, press <Enter> to accept ‘NO’ as the default.
Select the device output format.
• For example, at the prompt, type 0;132;9999. 0 directs the output to the user’s screen, 132 defines the number of characters per line, and 9999 defines the number of rows to print.
The enumerated steps described above display on the screen as shown in Figure 110.

DSS FY20 User’s Guide Using the Software
Patch ECX*3.0*177 78 Release: December 2019
Figure 110: Running the Pharmacy Pre-Extract Unusual Cost Report
The report generates and lists costs above the defined threshold that would be included on the specified
pharmacy extract for the specified date range. The report includes Patient Name, SSN, Day, Generic
Name, Feeder Key, Quantity, Total Cost and Days Supply (Figure 111).
Figure 111: Pharmacy Pre-Extract Unusual Cost Report – PRE
The exportable version of the report produces the same information in a delimited text format that can be
imported into an Excel spreadsheet (Figure 112).

DSS FY20 User’s Guide Using the Software
Patch ECX*3.0*177 79 Release: December 2019
For guidance on capturing exported data into spreadsheets and the additional steps required to produce
exportable versions of reports, refer to Appendix D: Exporting a Report to a Spreadsheet.
Figure 112: Exported Pharmacy Pre-Extract Unusual Cost Report
Note:
• Output is similar for all three pharmacy extracts (PRE, IVP and UDP). Therefore, only one
example is provided in this user’s guide.
4.2.3.2.1 PRE Unusual Cost Report
This report generates a listing of unusual costs as defined by a user-specified threshold that would
generate in the PRE extract. This listing can be used to identify and correct erroneous costs.
Refer to Section 4.2.3.2 for additional information and sample output.
4.2.3.2.2 IVP Unusual Cost Report
This report generates a listing of unusual costs as defined by a user-specified threshold that would
generate in the IPV extract. This listing can be used to identify and correct erroneous costs.
4.2.3.2.3 UDP Unusual Cost Report
This report generates a listing of unusual costs as defined by a user-specified threshold that would
generate in the UDP extract. This listing can be used to identify and correct erroneous costs.
Refer to Section 4.2.3.2 for additional information and sample output.
Note:
• Users can choose to add the SIG/Order Directions on the second line of this report.
SIG/Order Direction information is produced by combining Prescription Unit Dose and
Schedule information. This field assists pharmacists when identifying dispensing errors for
auditing purposes.
4.2.3.3 Pharmacy Pre-Extract Unusual Volume Reports
This option allows extract managers (i.e., user with the ECXMGR security key) to create a listing of
unusual volumes that would be generated by the pharmacy extracts (PRE, IVP, UDP or BCM). The
unusual volume is determined by a user-defined threshold. This pre-extract report has no effect on the
actual extracts and can be generated as needed to use as a tool in identifying and correcting erroneous
pharmacy volumes.
Unusual volumes are defined as follows:
• PRE Extract: Quantity field is greater than the threshold value.
• IVP Extract: Total Doses Per Day field is greater than the threshold value or less than the
negative of the threshold value.

DSS FY20 User’s Guide Using the Software
Patch ECX*3.0*177 80 Release: December 2019
• UDP Extract: Quantity field is greater than the threshold value.
• BCM Extract: Component Dose Given field is greater than the threshold value.
To run a Pharmacy Pre-Extract Unusual Volume Report:
From the Pharmacy menu, select “Pharmacy Pre-Extract Unusual Volume Reports”, then press <Enter>.
• Information about the report appears.
Press <Enter> to continue to the next prompt.
Select the pharmacy extract for which to run the report (PRE, IVP, UDP or BCM), then press <Enter>.
The enumerated steps described above display on the screen as shown in Figure 113.
Figure 113: Running a Pharmacy Pre-Extract Unusual Volume Report

DSS FY20 User’s Guide Using the Software
Patch ECX*3.0*177 81 Release: December 2019
Note:
• Depending on which extract is selected, the options differ. Additional details on how to
perform each report are contained in the relevant sub-sections that follow.
4.2.3.3.1 PRE Unusual Volume Report
This report generates a listing of unusual volumes as defined by a user-specified threshold that would
generate in the PRE extract. This listing can be used to identify and correct erroneous pharmacy
volumes.
To run a Pharmacy Pre-Extract Unusual Volume Report for the PRE Extract:
From the list of report options, select the PRE option, then press <Enter>.
Select whether to accept or change the default threshold.
• At the ‘Would you like to change the threshold? NO//’ prompt, press <Enter> to accept the default.
Type the desired start date for the report, then press <Enter>.
Type the desired end date for the report, then press <Enter>.
Select whether to produce exportable output.
• At the ‘Do you want the output in exportable format? NO//’ prompt, press <Enter> to accept ‘NO’ as the default.
Select the device output format.
• For example, at the prompt, type 0;132;9999. 0 directs the output to the user’s screen, 132 defines the number of characters per line, and 9999 defines the number of rows to print.
The enumerated steps described above display on the screen as shown in Figure 114.
Figure 114: Running the Unusual Volume Report - PRE

DSS FY20 User’s Guide Using the Software
Patch ECX*3.0*177 82 Release: December 2019
The report generates and lists volumes above the defined threshold that would be included in the PRE
extract for the specified date range. The report includes Patient Name, SSN, Day, Generic Name, Feeder
Key, Quantity, Total Cost and Days Supply (Figure 115).
Figure 115: Unusual Volume Report - PRE
The exportable version of the report produces the same information in a delimited text format that can be
imported into an Excel spreadsheet (Figure 116).
For guidance on capturing exported data into spreadsheets and the additional steps required to produce
exportable versions of reports, refer to Appendix D: Exporting a Report to a Spreadsheet.
Figure 116: Exported Unusual Volume Report - PRE
4.2.3.3.2 IVP Unusual Volume Report
This report generates a listing of unusual volumes as defined by a user-specified threshold that would
generate in the IVP extract. This listing can be used to identify and correct erroneous pharmacy volumes.
To run a Pharmacy Pre-Extract Unusual Volume Report for the IVP Extract:
From the list of report options, select the IVP option, then press <Enter>.
Select whether to accept or change the default threshold.
• At the ‘Would you like to change the threshold? NO//’ prompt, press <Enter> to accept the
default.
Type the desired start date for the report, then press <Enter>.
Type the desired end date for the report, then press <Enter>.
Select whether to produce exportable output.
• At the ‘Do you want the output in exportable format? NO//’ prompt, press <Enter> to accept
‘NO’ as the default.
Select the device output format.
• For example, at the prompt, type 0;132;9999. 0 directs the output to the user’s screen, 132
defines the number of characters per line, and 9999 defines the number of rows to print.
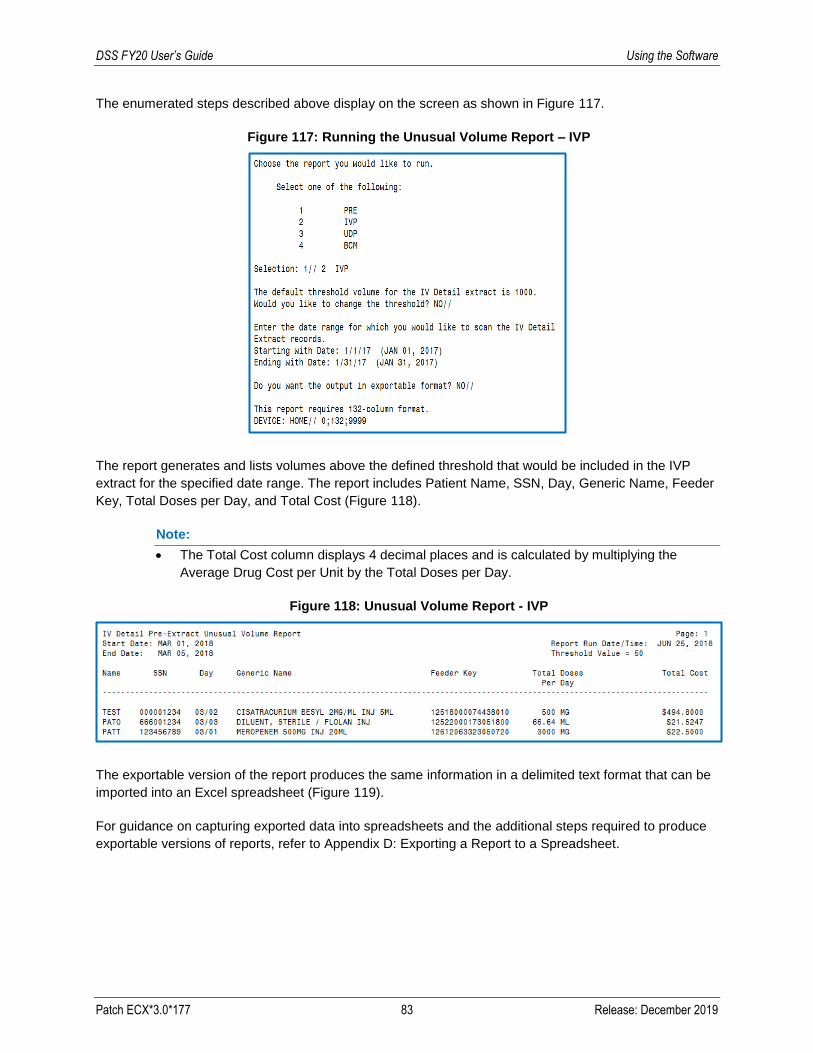
DSS FY20 User’s Guide Using the Software
Patch ECX*3.0*177 83 Release: December 2019
The enumerated steps described above display on the screen as shown in Figure 117.
Figure 117: Running the Unusual Volume Report – IVP
The report generates and lists volumes above the defined threshold that would be included in the IVP
extract for the specified date range. The report includes Patient Name, SSN, Day, Generic Name, Feeder
Key, Total Doses per Day, and Total Cost (Figure 118).
Note:
• The Total Cost column displays 4 decimal places and is calculated by multiplying the
Average Drug Cost per Unit by the Total Doses per Day.
Figure 118: Unusual Volume Report - IVP
The exportable version of the report produces the same information in a delimited text format that can be
imported into an Excel spreadsheet (Figure 119).
For guidance on capturing exported data into spreadsheets and the additional steps required to produce
exportable versions of reports, refer to Appendix D: Exporting a Report to a Spreadsheet.
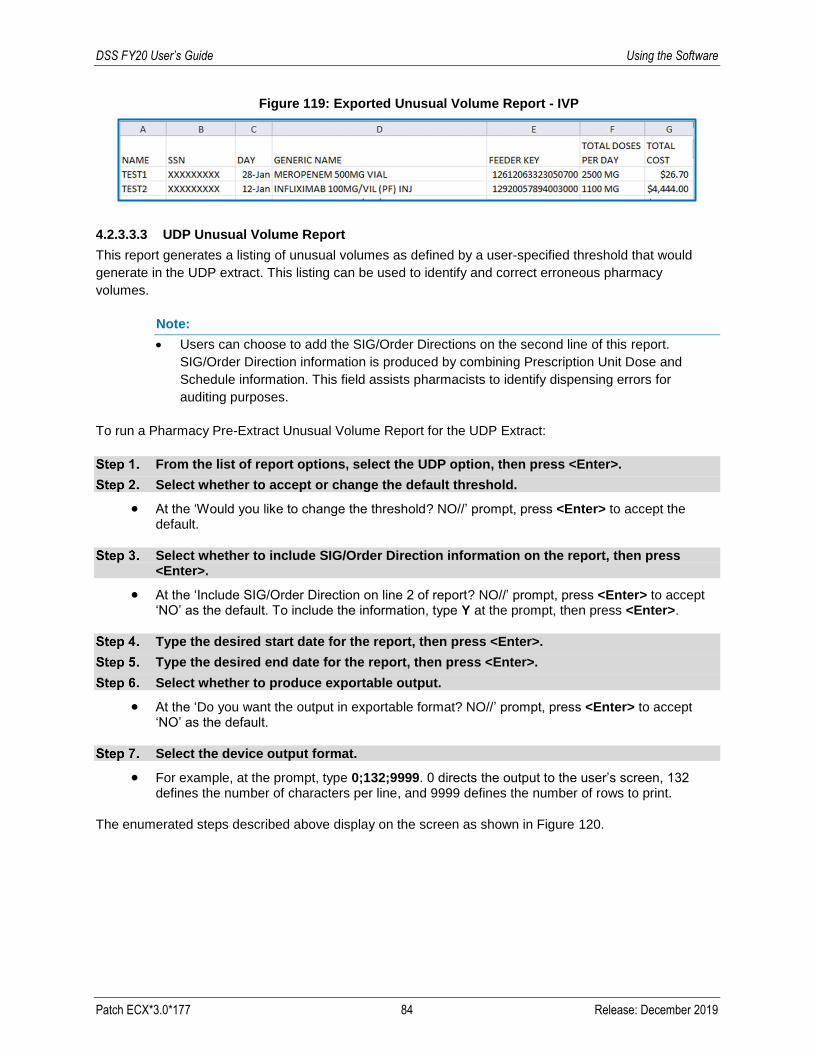
DSS FY20 User’s Guide Using the Software
Patch ECX*3.0*177 84 Release: December 2019
Figure 119: Exported Unusual Volume Report - IVP
4.2.3.3.3 UDP Unusual Volume Report
This report generates a listing of unusual volumes as defined by a user-specified threshold that would
generate in the UDP extract. This listing can be used to identify and correct erroneous pharmacy
volumes.
Note:
• Users can choose to add the SIG/Order Directions on the second line of this report.
SIG/Order Direction information is produced by combining Prescription Unit Dose and
Schedule information. This field assists pharmacists to identify dispensing errors for
auditing purposes.
To run a Pharmacy Pre-Extract Unusual Volume Report for the UDP Extract:
From the list of report options, select the UDP option, then press <Enter>.
Select whether to accept or change the default threshold.
• At the ‘Would you like to change the threshold? NO//’ prompt, press <Enter> to accept the default.
Select whether to include SIG/Order Direction information on the report, then press <Enter>.
• At the ‘Include SIG/Order Direction on line 2 of report? NO//’ prompt, press <Enter> to accept ‘NO’ as the default. To include the information, type Y at the prompt, then press <Enter>.
Type the desired start date for the report, then press <Enter>.
Type the desired end date for the report, then press <Enter>.
Select whether to produce exportable output.
• At the ‘Do you want the output in exportable format? NO//’ prompt, press <Enter> to accept ‘NO’ as the default.
Select the device output format.
• For example, at the prompt, type 0;132;9999. 0 directs the output to the user’s screen, 132 defines the number of characters per line, and 9999 defines the number of rows to print.
The enumerated steps described above display on the screen as shown in Figure 120.
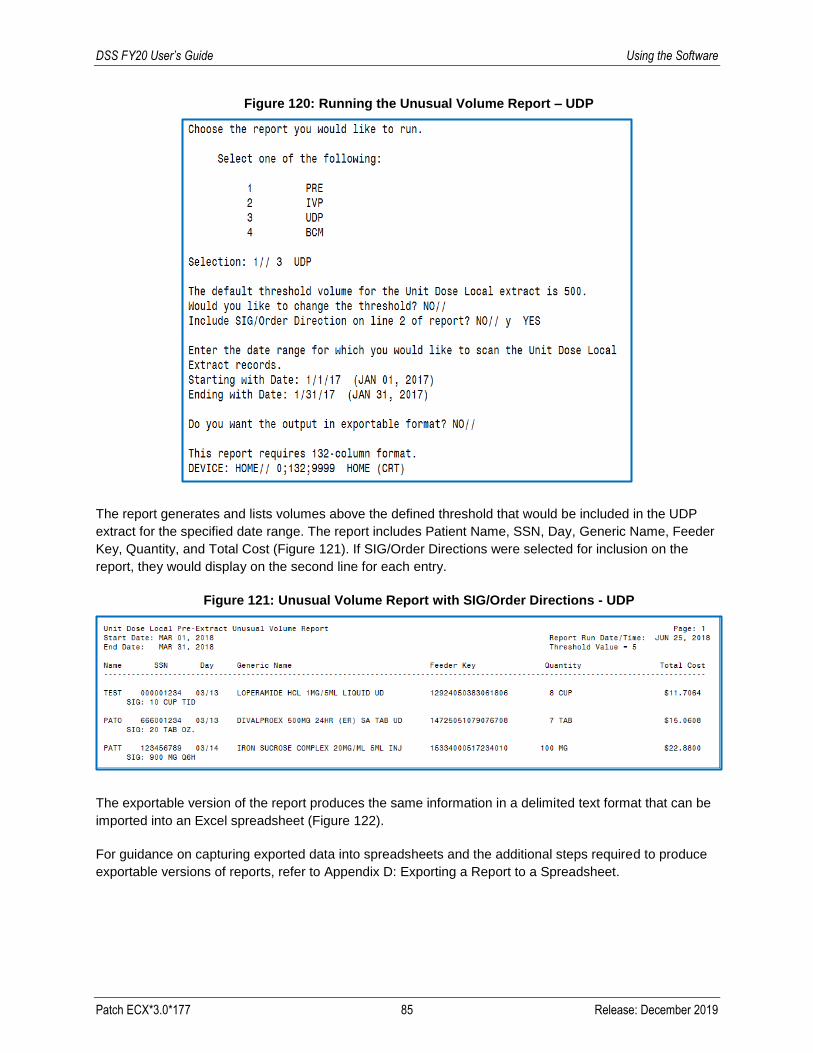
DSS FY20 User’s Guide Using the Software
Patch ECX*3.0*177 85 Release: December 2019
Figure 120: Running the Unusual Volume Report – UDP
The report generates and lists volumes above the defined threshold that would be included in the UDP
extract for the specified date range. The report includes Patient Name, SSN, Day, Generic Name, Feeder
Key, Quantity, and Total Cost (Figure 121). If SIG/Order Directions were selected for inclusion on the
report, they would display on the second line for each entry.
Figure 121: Unusual Volume Report with SIG/Order Directions - UDP
The exportable version of the report produces the same information in a delimited text format that can be
imported into an Excel spreadsheet (Figure 122).
For guidance on capturing exported data into spreadsheets and the additional steps required to produce
exportable versions of reports, refer to Appendix D: Exporting a Report to a Spreadsheet.
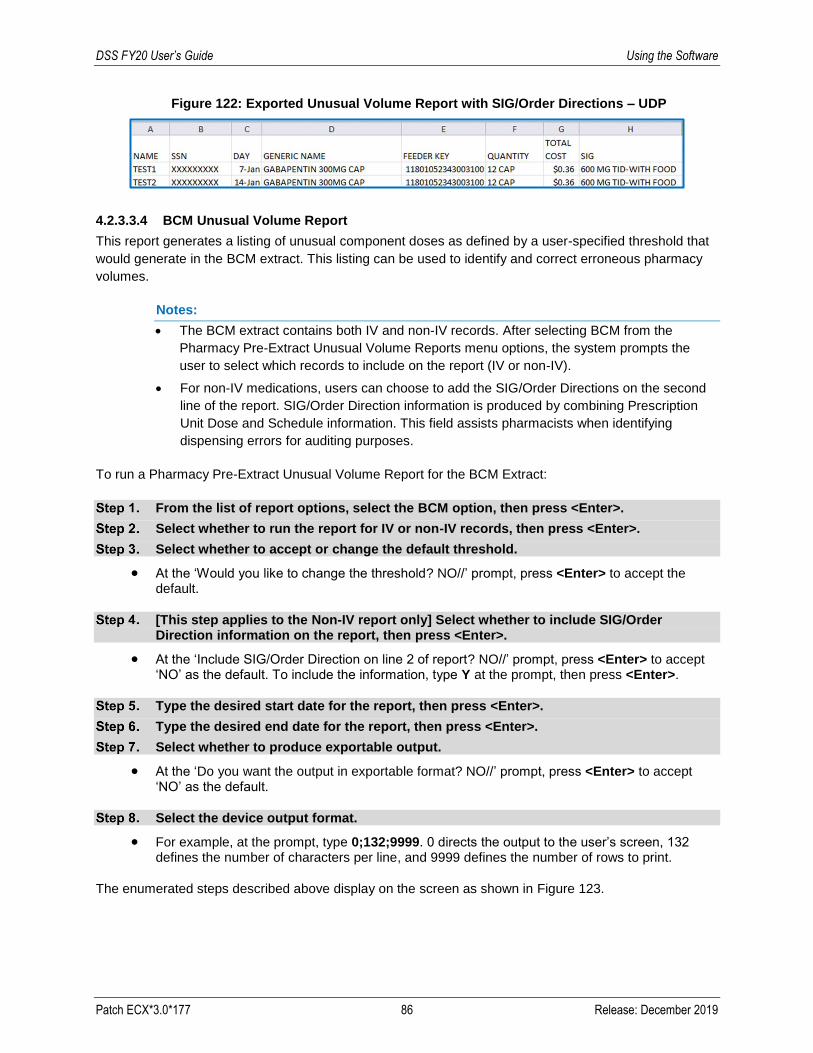
DSS FY20 User’s Guide Using the Software
Patch ECX*3.0*177 86 Release: December 2019
Figure 122: Exported Unusual Volume Report with SIG/Order Directions – UDP
4.2.3.3.4 BCM Unusual Volume Report
This report generates a listing of unusual component doses as defined by a user-specified threshold that
would generate in the BCM extract. This listing can be used to identify and correct erroneous pharmacy
volumes.
Notes:
• The BCM extract contains both IV and non-IV records. After selecting BCM from the
Pharmacy Pre-Extract Unusual Volume Reports menu options, the system prompts the
user to select which records to include on the report (IV or non-IV).
• For non-IV medications, users can choose to add the SIG/Order Directions on the second
line of the report. SIG/Order Direction information is produced by combining Prescription
Unit Dose and Schedule information. This field assists pharmacists when identifying
dispensing errors for auditing purposes.
To run a Pharmacy Pre-Extract Unusual Volume Report for the BCM Extract:
From the list of report options, select the BCM option, then press <Enter>.
Select whether to run the report for IV or non-IV records, then press <Enter>.
Select whether to accept or change the default threshold.
• At the ‘Would you like to change the threshold? NO//’ prompt, press <Enter> to accept the default.
[This step applies to the Non-IV report only] Select whether to include SIG/Order Direction information on the report, then press <Enter>.
• At the ‘Include SIG/Order Direction on line 2 of report? NO//’ prompt, press <Enter> to accept ‘NO’ as the default. To include the information, type Y at the prompt, then press <Enter>.
Type the desired start date for the report, then press <Enter>.
Type the desired end date for the report, then press <Enter>.
Select whether to produce exportable output.
• At the ‘Do you want the output in exportable format? NO//’ prompt, press <Enter> to accept ‘NO’ as the default.
Select the device output format.
• For example, at the prompt, type 0;132;9999. 0 directs the output to the user’s screen, 132 defines the number of characters per line, and 9999 defines the number of rows to print.
The enumerated steps described above display on the screen as shown in Figure 123.
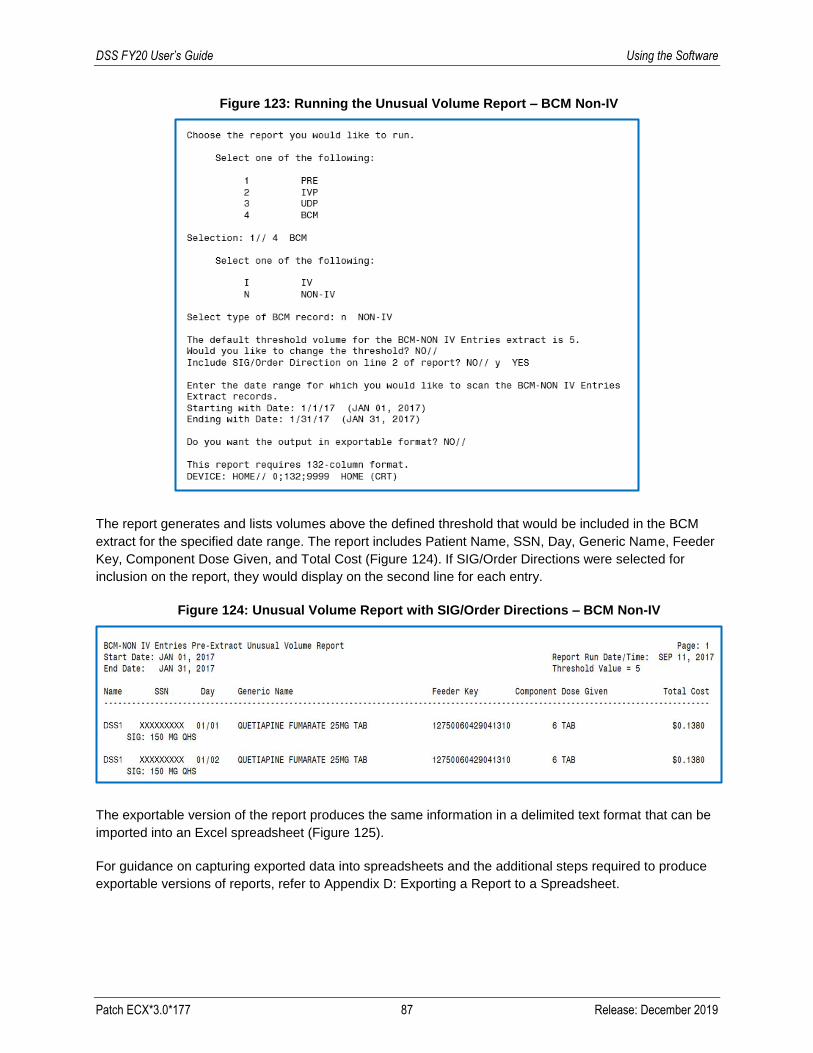
DSS FY20 User’s Guide Using the Software
Patch ECX*3.0*177 87 Release: December 2019
Figure 123: Running the Unusual Volume Report – BCM Non-IV
The report generates and lists volumes above the defined threshold that would be included in the BCM
extract for the specified date range. The report includes Patient Name, SSN, Day, Generic Name, Feeder
Key, Component Dose Given, and Total Cost (Figure 124). If SIG/Order Directions were selected for
inclusion on the report, they would display on the second line for each entry.
Figure 124: Unusual Volume Report with SIG/Order Directions – BCM Non-IV
The exportable version of the report produces the same information in a delimited text format that can be
imported into an Excel spreadsheet (Figure 125).
For guidance on capturing exported data into spreadsheets and the additional steps required to produce
exportable versions of reports, refer to Appendix D: Exporting a Report to a Spreadsheet.

DSS FY20 User’s Guide Using the Software
Patch ECX*3.0*177 88 Release: December 2019
Figure 125: Exported Unusual Volume Report with SIG/Order Directions – BCM Non-IV
4.2.3.4 IVP/UDP Source Audit Reports
The IVP/UDP Source Audit Reports provide a record count for each division for the specified date range
that would generate in either the IVP or UDP extract. The reports extract data from the IVP and UDP
intermediate source files IV EXTRACT DATA file (#728.113) and UNIT DOSE EXTRACT DATA file
(#728.904).
To run a Pharmacy IVP/UDP Source Audit Report:
From the Pharmacy menu, select “IVP/UDP Source Audit Reports”, then press <Enter>.
Select whether to run the report for IVP or UDP records, then press <Enter>.
Select which divisions to use for the report, then press <Enter>.
• The default is set to use all divisions. At the ‘Select division:’ prompt, press <Enter> to accept the default.
• To select a specific division, type the division name or number, then press <Enter>.
Type the desired start date for the report, then press <Enter>.
Type the desired end date for the report, then press <Enter>.
Select whether to produce exportable output.
• At the ‘Do you want the output in exportable format? NO//’ prompt, press <Enter> to accept ‘NO’ as the default.
Select the device output format.
• For example, at the prompt, type 0;132;9999. 0 directs the output to the user’s screen, 132 defines the number of characters per line, and 9999 defines the number of rows to print.
The enumerated steps described above display on the screen as shown in Figure 126.
Note:
• Output is similar for the IVP and UDP source audit reports. Therefore, only one example is
provided in this user’s guide. The example provided shows the IVP output.

DSS FY20 User’s Guide Using the Software
Patch ECX*3.0*177 89 Release: December 2019
Figure 126: Running the IVP/UDP Source Audit Report
The report generates and lists the record counts for the selected division(s) for the specified date range.
The report includes Division, Date, and Record Count (Figure 127).
Figure 127: IVP/UDP Source Audit Report
The exportable version of the report produces the same information in a delimited text format that can be
imported into an Excel spreadsheet (Figure 128).
For guidance on capturing exported data into spreadsheets and the additional steps required to produce
exportable versions of reports, refer to Appendix D: Exporting a Report to a Spreadsheet.
DSS FY20 User’s Guide Using the Software
Patch ECX*3.0*177 90 Release: December 2019
Figure 128: Exported IVP/UDP Source Audit Report
4.2.4 Prosthetic Pre-Extract Unusual Cost Report
This report generates a listing of unusual costs as defined by a user-specified threshold that would
generate in the prosthetics (PRO) extract. This listing can be used to identify and correct erroneous
prosthetic costs.
To run a Prosthetic Pre-Extract Unusual Cost Report:
From the Pre-Extract Audit Reports menu, select “PRO (Prosthetic Pre-Extract Unusual Cost Report”, then press <Enter>.
• Information about the report appears.
Press <Enter> to continue to the next prompt.
Select whether to accept or change the default threshold.
• At the ‘Would you like to change the threshold? NO//’ prompt, press <Enter> to accept the default.
Type the desired start date for the report, then press <Enter>.
Type the desired end date for the report, then press <Enter>.
Select whether to produce exportable output.
• At the ‘Do you want the output in exportable format? NO//’ prompt, press <Enter> to accept ‘NO’ as the default.
Select the device output format.
• For example, at the prompt, type 0;132;9999. 0 directs the output to the user’s screen, 132
defines the number of characters per line, and 9999 defines the number of rows to print.
The enumerated steps described above display on the screen as shown in Figure 129.

DSS FY20 User’s Guide Using the Software
Patch ECX*3.0*177 91 Release: December 2019
Figure 129: Running the Prosthetic Pre-Extract Unusual Cost Report
The report generates and lists costs above the defined threshold that would be included in the PRO
extract for the specified date range. The report includes Patient Name, SSN, Date of Service, Form,
PSAS HCPCS Code, Feeder Key, Quantity, Cost of Transaction and Transaction Type (Figure 130).

DSS FY20 User’s Guide Using the Software
Patch ECX*3.0*177 92 Release: December 2019
Figure 130: Prosthetic Pre-Extract Unusual Cost Report
The exportable version of the report produces the same information in a delimited text format that can be
imported into an Excel spreadsheet (Figure 131).
For guidance on capturing exported data into spreadsheets and the additional steps required to produce
exportable versions of reports, refer to Appendix D: Exporting a Report to a Spreadsheet.
Figure 131: Exported Prosthetic Pre-Extract Unusual Cost Report
4.2.5 Surgery Selecting the Surgery option from the Pre-Extract Audit Reports menu displays a list of two options for
surgery reports (Figure 132). The sub-sections that follow describe the functionality of each option.
Figure 132: Surgery Menu Options

DSS FY20 User’s Guide Using the Software
Patch ECX*3.0*177 93 Release: December 2019
4.2.5.1 Surgery Pre-Extract Volume Report
This menu option generates a report listing all surgical cases appearing on the Surgery extract for
transmission to the AITC for review.
To run the Surgery Pre-Extract Volume Report:
From the Surgery menu, select “Surgery Pre-Extract Volume Report”, then press <Enter>.
Type the desired start date for the report, then press <Enter>.
Type the desired end date for the report, then press <Enter>.
Select whether to produce exportable output.
• At the ‘Do you want the output in exportable format? NO//’ prompt, press <Enter> to accept
‘NO’ as the default.
Select the device output format.
• For example, at the prompt, type 0;132;9999. 0 directs the output to the user’s screen, 132
defines the number of characters per line, and 9999 defines the number of rows to print.
The enumerated steps described above display on the screen as shown in Figure 133.
Figure 133: Running the Surgery Pre-Extract Volume Report
The report generates and lists information for Surgery extract records for the specified date range. The
report includes Patient Name, SSN, Day, Case Number, Encounter Number, Patient Holding Time,
Anesthesia Time, Patient Time, Operation Time, PACU Time, OR Clean Time, Cancel/Abort, and
Principal Procedure (Figure 134).
Figure 134: Surgery Pre-Extract Volume Report

DSS FY20 User’s Guide Using the Software
Patch ECX*3.0*177 94 Release: December 2019
The exportable version of the report produces the same information in a delimited text format that can be
imported into an Excel spreadsheet (Figure 135).
For guidance on capturing exported data into spreadsheets and the additional steps required to produce
exportable versions of reports, refer to Appendix D: Exporting a Report to a Spreadsheet.
Figure 135: Exported Surgery Pre-Extract Volume Report
4.2.5.2 Surgery Pre-Extract Unusual Volume Report
The Surgery Extract Unusual Volume Report generates a listing of unusual time duration volumes for
surgery cases as defined by a user-specified threshold that would generate in the surgery extract. This
listing can be used to identify and correct erroneous surgery time volumes.
Notes:
• The default threshold for this report is 25 which equates to six (6) hours.
• The unusual volumes captured are defined by the Operation Time, Patient Time,
Anesthesia Time, Recovery Room Time, OR Clean Time and Patient Holding Time fields.
To run the Surgery Pre-Extract Unusual Volume Report:
From the Surgery menu, select “Surgery Pre-Extract Unusual Volume Report”, then press <Enter>.
• Information about the report appears.
Press <Enter> to continue to the next prompt.
Select whether to accept or change the default threshold.
• At the ‘Would you like to change the threshold? NO//’ prompt, press <Enter> to accept the
default.
Type the desired start date for the report, then press <Enter>.
Type the desired end date for the report, then press <Enter>.
Select whether to produce exportable output.
• At the ‘Do you want the output in exportable format? NO//’ prompt, press <Enter> to accept
‘NO’ as the default.
Select the device output format.
• For example, at the prompt, type 0;132;9999. 0 directs the output to the user’s screen, 132
defines the number of characters per line, and 9999 defines the number of rows to print.
The enumerated steps described above display on the screen as shown in Figure 136.

DSS FY20 User’s Guide Using the Software
Patch ECX*3.0*177 95 Release: December 2019
Figure 136: Running the Surgery Pre-Extract Unusual Volume Report
The report generates and lists information for Surgery extract records for the specified date range. The
report includes Patient Name, SSN, Day, Case Number, Encounter Number, Patient Holding Time,
Anesthesia Time, Patient Time, Operation Time, PACU Time, OR Clean Time, Cancel/Abort, and
Principal Procedure (Figure 137).
Figure 137: Surgery Pre-Extract Unusual Volume Report
The exportable version of the report produces the same information in a delimited text format that can be
imported into an Excel spreadsheet (Figure 138).
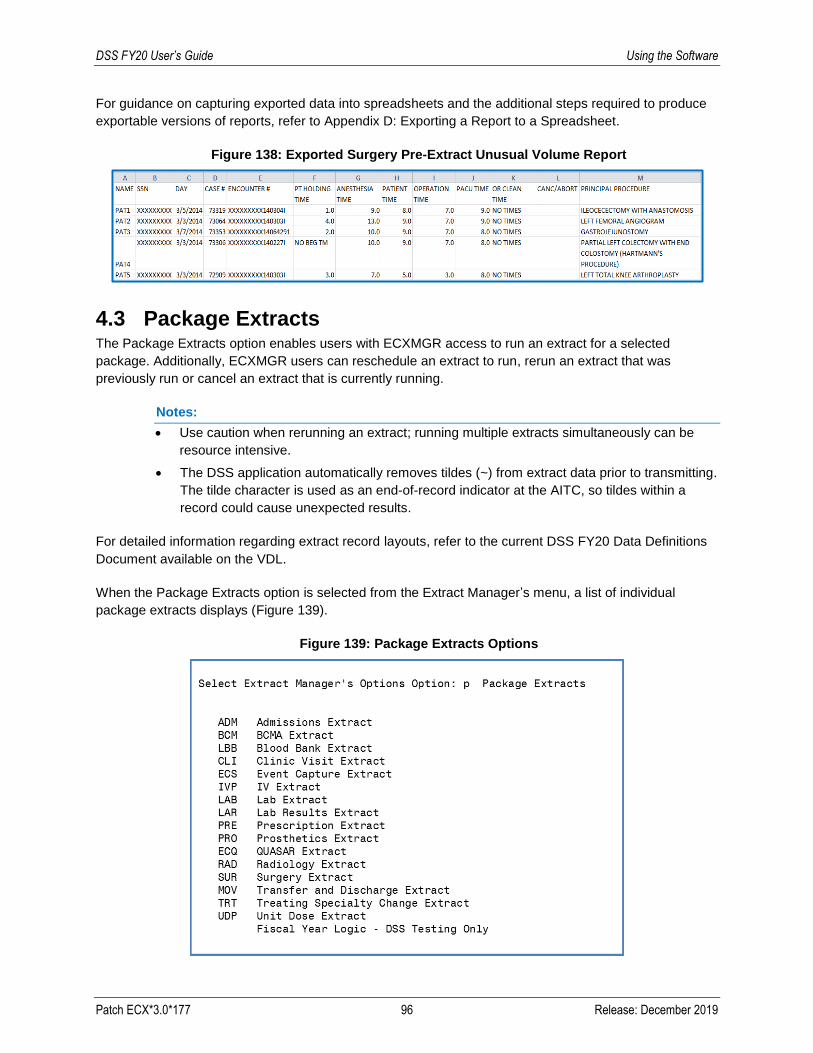
DSS FY20 User’s Guide Using the Software
Patch ECX*3.0*177 96 Release: December 2019
For guidance on capturing exported data into spreadsheets and the additional steps required to produce
exportable versions of reports, refer to Appendix D: Exporting a Report to a Spreadsheet.
Figure 138: Exported Surgery Pre-Extract Unusual Volume Report
4.3 Package Extracts The Package Extracts option enables users with ECXMGR access to run an extract for a selected
package. Additionally, ECXMGR users can reschedule an extract to run, rerun an extract that was
previously run or cancel an extract that is currently running.
Notes:
• Use caution when rerunning an extract; running multiple extracts simultaneously can be
resource intensive.
• The DSS application automatically removes tildes (~) from extract data prior to transmitting.
The tilde character is used as an end-of-record indicator at the AITC, so tildes within a
record could cause unexpected results.
For detailed information regarding extract record layouts, refer to the current DSS FY20 Data Definitions
Document available on the VDL.
When the Package Extracts option is selected from the Extract Manager’s menu, a list of individual
package extracts displays (Figure 139).
Figure 139: Package Extracts Options
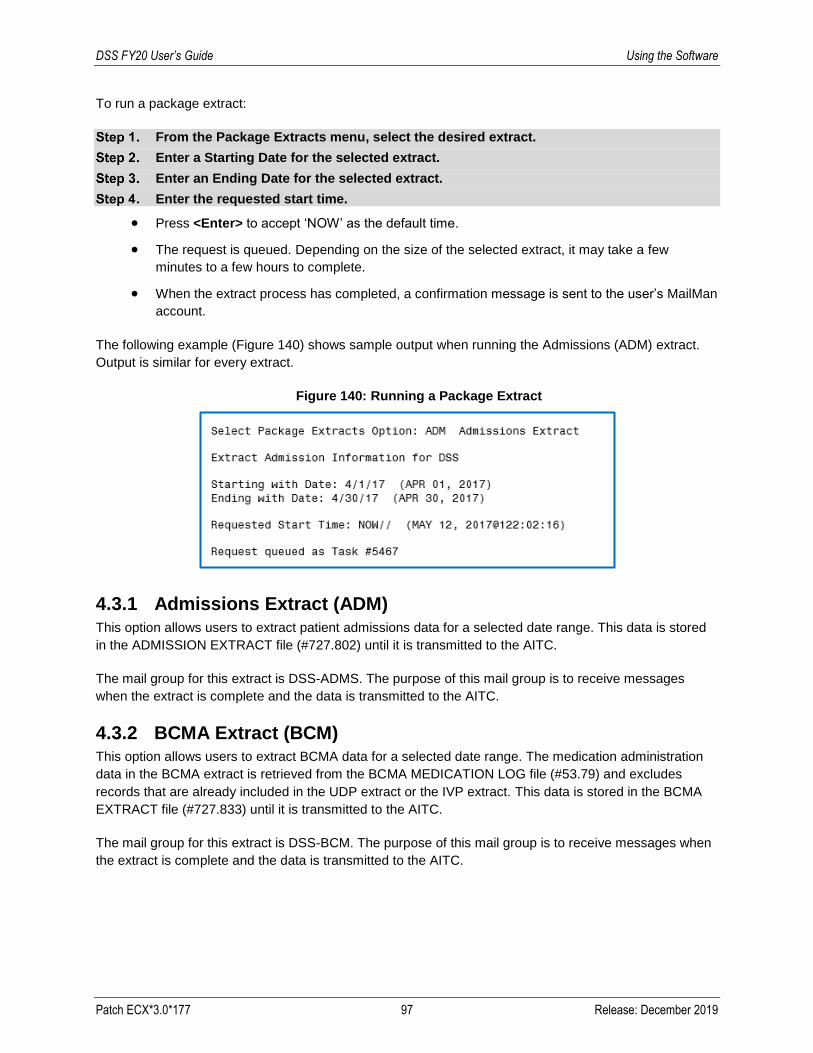
DSS FY20 User’s Guide Using the Software
Patch ECX*3.0*177 97 Release: December 2019
To run a package extract:
From the Package Extracts menu, select the desired extract.
Enter a Starting Date for the selected extract.
Enter an Ending Date for the selected extract.
Enter the requested start time.
• Press <Enter> to accept ‘NOW’ as the default time.
• The request is queued. Depending on the size of the selected extract, it may take a few
minutes to a few hours to complete.
• When the extract process has completed, a confirmation message is sent to the user’s MailMan
account.
The following example (Figure 140) shows sample output when running the Admissions (ADM) extract.
Output is similar for every extract.
Figure 140: Running a Package Extract
4.3.1 Admissions Extract (ADM) This option allows users to extract patient admissions data for a selected date range. This data is stored
in the ADMISSION EXTRACT file (#727.802) until it is transmitted to the AITC.
The mail group for this extract is DSS-ADMS. The purpose of this mail group is to receive messages
when the extract is complete and the data is transmitted to the AITC.
4.3.2 BCMA Extract (BCM) This option allows users to extract BCMA data for a selected date range. The medication administration
data in the BCMA extract is retrieved from the BCMA MEDICATION LOG file (#53.79) and excludes
records that are already included in the UDP extract or the IVP extract. This data is stored in the BCMA
EXTRACT file (#727.833) until it is transmitted to the AITC.
The mail group for this extract is DSS-BCM. The purpose of this mail group is to receive messages when
the extract is complete and the data is transmitted to the AITC.

DSS FY20 User’s Guide Using the Software
Patch ECX*3.0*177 98 Release: December 2019
4.3.3 Blood Bank Extract (LBB) This option allows users to extract Blood Bank data for a selected date range. This data is stored in the
BLOOD BANK EXTRACT file (#727.829) until the data is transmitted to the AITC. This extract enables
MCA staff to view and manage the true economic costs of blood product usage by the VHA.
The mail group for this extract is DSS-LBB. The purpose of this mail group is to receive messages when
the extract is complete and the data is transmitted to the AITC.
4.3.4 Clinic Extract (CLI) This option allows users to extract the clinic visit data for a selected date range. This data is stored in the
CLINIC EXTRACT file (#727.827) until it is transmitted to the AITC.
The following records are excluded from the Clinic extract:
• Non-Count Clinics are excluded unless specifically assigned to a DSS Action Code other than 6.
• Cancelled clinic appointments are excluded.
• Clinics with an ACTION TO SEND code of 6 in the CLINICS AND STOP CODES file (#728.44) are also excluded.
The mail group for this extract is DSS-SCX. The purpose of this mail group is to receive messages when
the extract is complete and the data is transmitted to the AITC.
4.3.5 Event Capture Extract (ECS) This option allows users to extract the Event Capture data for a selected date range. The ECS data is
retrieved from the EVENT CAPTURE PATIENT file (#721). Once extracted, the data is stored in the
EVENT CAPTURE LOCAL EXTRACT file (#727.815) until transmitted to the AITC.
The mail group for this extract is DSS-EC. The purpose of this mail group is to receive messages when
the extract is complete and the data is transmitted to the AITC.
4.3.6 IV Extract (IVP) This option allows users to extract the Pharmacy IV data for a selected date range. The data is retrieved
from the IV EXTRACT DATA file (#728.113). Once extracted, the data is stored in the IV DETAIL
EXTRACT file (#727.819) until it is transmitted to the AITC.
The mail group for this extract is DSS-IV. The purpose of this mail group is to receive messages when the
extract is complete and the data is transmitted to the AITC.
4.3.7 Lab Extract (LAB) This option allows users to extract the Laboratory data including inpatient, outpatient, referrals and
research tests for a selected date range. The data is retrieved from the PATIENT file (#2) or the
REFERRAL PATIENT file (#67). The identifying number is the SSN for in-house patients or a selected
non-SSN ID constant for referrals and research. This data is stored in the LABORATORY EXTRACT file
(#727.813) until it is transmitted to the AITC.
DSS FY20 User’s Guide Using the Software
Patch ECX*3.0*177 99 Release: December 2019
The mail group for this extract is DSS-LAB. The purpose of this mail group is to receive messages when
the extract is complete and the data is transmitted to the AITC.
4.3.8 Lab Results Extract (LAR) This option allows users to extract the Laboratory Results data for a selected date range. This data is
stored in the LAB RESULTS EXTRACT file (#727.824) until it is transmitted to the AITC.
The mail group for this extract is DSS-LAB. The purpose of this mail group is to receive messages when
the extract is complete and the data is transmitted to the AITC.
4.3.9 Prescription Extract (PRE) This option extracts the Prescription (pharmacy outpatient) data for a selected date range. This data is
stored in the PRESCRIPTION EXTRACT file (#727.81) until it is transmitted to the AITC.
The mail group for this extract is DSS-PRES. The purpose of this mail group is to receive messages when
the extract is complete and the data is transmitted to the AITC.
4.3.10 Prosthetics Extract (PRO) This option allows users to extract the Prosthetics data for a selected date range. The data is stored in
the PROSTHETICS EXTRACT file (#727.826) until transmitted to the AITC.
The following information is required to extract a Prosthetics record:
• Station
• Requesting Station
• Patient Name (in Prosthetics)
• SSN
• Receiving Station
• Name (in PATIENT file [#2])
• Type of Transaction
• Delivery Date
• Source
• HCPS
For any Prosthetics records that could not be extracted, the user will receive a Prosthetics DSS exception
message indicating the record’s IEN in the RECORD OF PROS APPLIANCE/REPAIR file (#660) and the
missing critical information. The exception message of the records identified should be reviewed to
determine necessary corrections. Once corrected, the extract should be regenerated to ensure the proper
DSS credit is received.
When extracting data for a specific division, only a primary division can be selected. The primary division
is defined in the PROSTHETICS SITE PARAMETERS file (#669.9) and the NEW PERSON file (#200).
The mail group for this extract is DSS-PRO. The purpose of this mail group is to receive messages when
the extract is complete and the data is transmitted to the AITC.

DSS FY20 User’s Guide Using the Software
Patch ECX*3.0*177 100 Release: December 2019
4.3.11 QUASAR Extract (ECQ) This option allows users to extract Audiology and Speech Pathology clinic visit data for a selected date
range. The data is retrieved from the A&SP CLINIC VISIT file (#509850.6) and is stored in the QUASAR
EXTRACT file (#727.825) until it is transmitted to the AITC.
The mail group for this extract is DSS-QSR. The purpose of this mail group is to receive messages when
the extract is complete and the data is transmitted to the AITC.
4.3.12 Radiology Extract (RAD) This option allows users to extract the Radiology data for a selected date range. This data is stored in the
RADIOLOGY EXTRACT file (#727.814) until it is transmitted to the AITC.
The mail group for this extract is DSS-RAD. The purpose of this mail group is to receive messages when
extract is complete and the data is transmitted to the AITC.
4.3.13 Surgery Extract (SUR) This option allows users to extract the Surgery data for a selected date range. This data is stored in the
SURGERY EXTRACT file (#727.811) until it is transmitted to the AITC. Secondary procedures and
prostheses are also extracted.
The mail group for this extract is DSS-SURG. The purpose of this mail group is to receive messages
when the extract is complete and the data is transmitted to the AITC.
4.3.14 Transfer and Discharge Extract (MOV) This option allows users to extract all Patient Movement (transfers and discharge) data for the selected
date range. This data is stored in the PHYSICAL MOVEMENT EXTRACT file (#727.808) until it is
transmitted to the AITC.
The mail group for this extract is DSS-MOVS. The purpose of this mail group is to receive messages
when the extract is complete and the data is transmitted to the AITC.
4.3.15 Treating Specialty Change Extract (TRT) This option extracts Treating Specialty Change data for a selected date range. This data is stored in the
TREATING SPECIALTY CHANGE EXTRACT file (#727.817) until it is transmitted to the AITC.
The mail group for this extract is DSS-TREAT. The purpose of this mail group is to receive messages
when the extract is complete and the data is transmitted to the AITC.
4.3.16 Unit Dose Extract (UDP) This option extracts all Unit Dose Orders for the selected date range. Data is extracted from the UNIT
DOSE EXTRACT DATA file (#728.904), which is populated by the Inpatient Medications package when a
pick list is filed. This data is stored in the UNIT DOSE LOCAL EXTRACT file (#727.809) until it is
transmitted to the AITC.
The mail group for this extract is DSS-UD. The purpose of this mail group is to receive messages when
the extract is complete and the data is transmitted to the AITC.

DSS FY20 User’s Guide Using the Software
Patch ECX*3.0*177 101 Release: December 2019
4.3.17 Fiscal Year Logic – DSS Testing Only The Fiscal Year Logic - DSS Testing Only option allows users to select a fiscal year that may not have the
DSS logic implemented for that year.
Note:
• Users must have the ECX DSS TEST security key assigned to view future fiscal years.
Figure 141 shows sample output when running the Fiscal Year Logic option.
Figure 141: Running the Fiscal Year Logic Option
4.4 SAS Extract Audit Reports The SAS Extracts Audit Reports menu provides the audit reports for extracts which have additional
records created by the SAS programs at the AITC (Figure 142). The following sub-sections contain a brief
description followed by sample output for each SAS Extract Audit Report option. To execute any of the
SAS Extract Audit Reports options, select SAS Extract Audit Reports from the Extract Manager’s Options,
then enter the DSS extract log number and a printer device.

DSS FY20 User’s Guide Using the Software
Patch ECX*3.0*177 102 Release: December 2019
For additional information regarding record layouts for extracted fields, refer to the DSS FY20 Data
Definitions Document.
Figure 142: SAS Extract Audit Reports Menu Options
4.4.1 SAS Prescription Audit Report This option emulates the SAS routine at the AITC which creates new records from the Prescription
(pharmacy outpatient) extract. With this option, users may print a summary report for all records sorted by
Feeder Location and Feeder Key.
Refer to Appendix C: Feeder Key Encoding.
To run the SAS Prescription Audit Report:
From the SAS Extract Audit Reports menu, select “SAS Prescription Audit Report”, then press <Enter>.
Enter the desired DSS extract log record number for the completed Prescription extract.
• Typing ?? at the prompt will list any available extract log numbers that can be used.
• Once selected, information about the selected extract will appear including the start and end
dates and the number of records in the extract.
Select whether to produce exportable output or to print to a selected device.
• At the Do you want the output in exportable format? NO// prompt, press <Enter> to accept ‘NO’
as the default
Select the device output format.
• For example, at the prompt, type 0;132;9999. 0 directs the output to the user’s screen, 132
defines the number of characters per line, and 9999 defines the number of rows to print.
The enumerated steps described above display on the screen as shown in Figure 143.

DSS FY20 User’s Guide Using the Software
Patch ECX*3.0*177 103 Release: December 2019
Figure 143: Running the SAS Prescription Audit Report
The report generates for the selected extract and includes the Feeder Location, Feeder Key, and Quantity
of records created (Figure 144).
Figure 144: SAS Prescription (PRE) Audit Report
The exportable version of the report produces the same information in a delimited text format that can be
imported into an Excel spreadsheet (Figure 145).
For guidance on capturing exported data, into spreadsheets and the additional steps required to produce
exportable versions of reports, refer to Appendix D: Exporting a Report to a Spreadsheet.
DSS FY20 User’s Guide Using the Software
Patch ECX*3.0*177 104 Release: December 2019
Figure 145: Exported SAS Prescription Audit Report
4.4.2 SAS Radiology Audit Report This option emulates the SAS routine at the AITC which creates new records from the Radiology extract.
This option generates a summary report for all records sorted by Feeder Location and Feeder Key.
Bilateral modifiers will increase volumes.
Refer to Appendix C: Feeder Key Encoding.
To run the SAS Radiology Audit Report:
From the SAS Extract Audit Reports menu, select “SAS Radiology Audit Report”, then press <Enter>.
Enter the desired DSS extract log record number for the completed Radiology extract.
Note:
• Typing ?? at the prompt and then pressing <Enter> will list any available extract log
numbers that can be used.
• Once selected, information about the selected extract will appear including the start and
end dates and the number of records in the extract.
Select whether to produce exportable output or to print to a selected device.
• At the Do you want the output in exportable format? NO// prompt, press <Enter> to accept ‘NO’
as the default.
Select the device output format, then press <Enter>.
• For example, at the prompt, type 0;132;9999. 0 directs the output to the user’s screen, 132
defines the number of characters per line, and 9999 defines the number of rows to print.
The enumerated steps described above display on the screen as shown in Figure 146.

DSS FY20 User’s Guide Using the Software
Patch ECX*3.0*177 105 Release: December 2019
Figure 146: Running the SAS Radiology Audit Report
The report generates for the selected extract and includes the Feeder Location, Feeder Key, and Quantity
of records created (Figure 147).
Figure 147: SAS Radiology Audit Report
The exportable version of the report produces the same information in a delimited text format that can be
imported into an Excel spreadsheet (Figure 148).
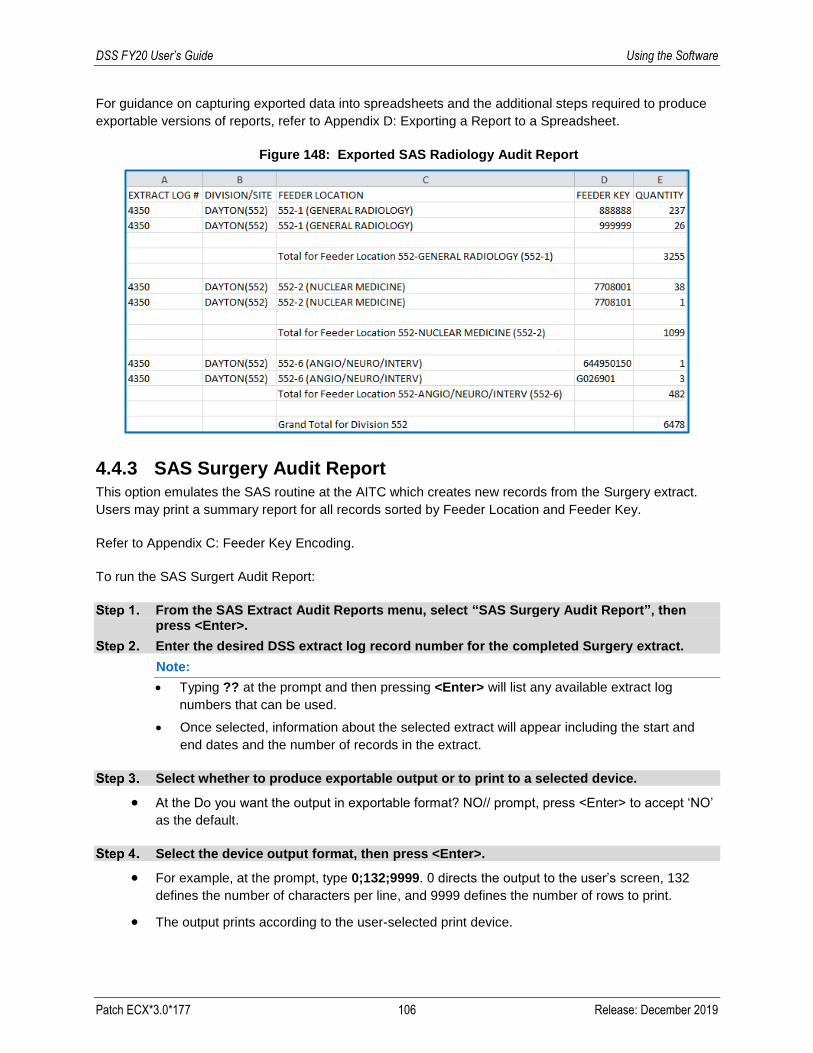
DSS FY20 User’s Guide Using the Software
Patch ECX*3.0*177 106 Release: December 2019
For guidance on capturing exported data into spreadsheets and the additional steps required to produce
exportable versions of reports, refer to Appendix D: Exporting a Report to a Spreadsheet.
Figure 148: Exported SAS Radiology Audit Report
4.4.3 SAS Surgery Audit Report This option emulates the SAS routine at the AITC which creates new records from the Surgery extract.
Users may print a summary report for all records sorted by Feeder Location and Feeder Key.
Refer to Appendix C: Feeder Key Encoding.
To run the SAS Surgert Audit Report:
From the SAS Extract Audit Reports menu, select “SAS Surgery Audit Report”, then press <Enter>.
Enter the desired DSS extract log record number for the completed Surgery extract.
Note:
• Typing ?? at the prompt and then pressing <Enter> will list any available extract log
numbers that can be used.
• Once selected, information about the selected extract will appear including the start and
end dates and the number of records in the extract.
Select whether to produce exportable output or to print to a selected device.
• At the Do you want the output in exportable format? NO// prompt, press <Enter> to accept ‘NO’
as the default.
Select the device output format, then press <Enter>.
• For example, at the prompt, type 0;132;9999. 0 directs the output to the user’s screen, 132
defines the number of characters per line, and 9999 defines the number of rows to print.
• The output prints according to the user-selected print device.
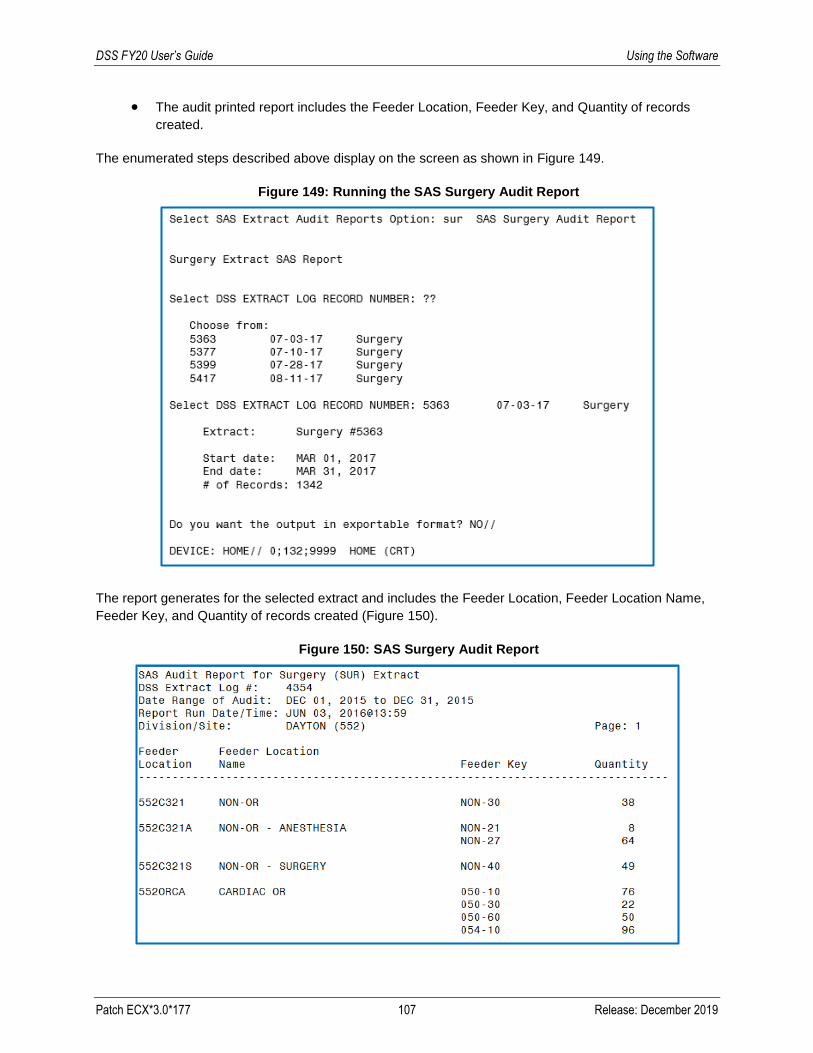
DSS FY20 User’s Guide Using the Software
Patch ECX*3.0*177 107 Release: December 2019
• The audit printed report includes the Feeder Location, Feeder Key, and Quantity of records
created.
The enumerated steps described above display on the screen as shown in Figure 149.
Figure 149: Running the SAS Surgery Audit Report
The report generates for the selected extract and includes the Feeder Location, Feeder Location Name,
Feeder Key, and Quantity of records created (Figure 150).
Figure 150: SAS Surgery Audit Report

DSS FY20 User’s Guide Using the Software
Patch ECX*3.0*177 108 Release: December 2019
The exportable version of the report produces the same information in a delimited text format that can be
imported into an Excel spreadsheet (Figure 151).
For guidance on capturing exported data into spreadsheets and the additional steps required to produce
exportable versions of reports, refer to Appendix D: Exporting a Report to a Spreadsheet.
Figure 151: Exported SAS Audit Report for Surgery (SUR) Extract
4.5 Extract Audit Reports Selecting the Extract Audit Reports option from the Extract Manager’s menu displays a list of available
extract audit reports (Figure 152). The sub-sections that follow contain a brief description followed by a
sample output for each Extract Audit Report option.
Refer to the current DSS FY20 Data Definitions Document available on the VDL for more information
about the record layout for the extracted fields.
Figure 152: Extract Audit Reports Menu
To run an Extract Audit Report:
Note:
• The steps that follow use the Admission Extract Audit as an example.
• All extract audit reports use similar steps to produce the report. Therefore, only one
example is provided.
From the Extract Audit Reports menu, select the desired extract audit report.
Enter the desired DSS extract log record number for the completed extract.

DSS FY20 User’s Guide Using the Software
Patch ECX*3.0*177 109 Release: December 2019
• Type ?? at the prompt to list any available extract log numbers that can be used.
• Once selected, information about the selected extract appears including the start and end dates and the number of records in the extract.
Enter the desired start date for the report, then press <Enter>.
• The date range for the selected extract can be narrowed, if desired. For example, if the selected extract contained records for March 1-March 31, the user has the option to narrow that range to March 1-March 15, if desired.
• If no changes to the start date are desired, press <Enter> at the prompt to accept the default date.
Enter the desired end date for the report, then press <Enter>.
• Press <Enter> to accept the extract end date as the default end date for the report.
Select whether to run the report for all divisions (ADM Extract Audit Report).
• Press <Enter> at the prompt to accept ‘NO’ as the default answer.
• Type Y at the prompt and then press <Enter> to run the report for all divisions.
If the user does not wish to run the report for all divisions, the next prompt will ask the user to ‘Select MEDICAL CENTER DIVISION NAME.’
• At the prompt, type the desired medical center division name, then press <Enter>.
• Typing ?? at the prompt will list any available medical center divisions that can be used.
Select one or many medical center divisions.
• After selecting all desired medical center divisions, pressing <Enter> at the prompt will advance the user to the next prompt.
Select whether to produce exportable output or to print to a selected device.
• At the ‘Do you want the output in exportable format? NO//’ prompt, press <Enter> to accept ‘NO’ as the default. The ‘No’ selection applies to all outputs except the Pharmacy report. The Pharmacy report is export only.
Select the device output format.
• For example, at the prompt, type 0;132;9999. 0 directs the output to the user’s screen, 132 defines the number of characters per line, and 9999 defines the number of rows to print.
The enumerated steps described above display on the screen as shown in (Figure 153).

DSS FY20 User’s Guide Using the Software
Patch ECX*3.0*177 110 Release: December 2019
Figure 153: Running an Extract Audit Report
All extract audit reports can be exported. The exported version of the report produces the same
information in a delimited text format that can be imported into an Excel spreadsheet (Figure 154).
For guidance on capturing exported data into spreadsheets and the additional steps required to produce
exportable versions of reports, refer to Appendix D: Exporting a Report to a Spreadsheet.
Figure 154: Exported Extract Audit Report

DSS FY20 User’s Guide Using the Software
Patch ECX*3.0*177 111 Release: December 2019
4.5.1 Admission (ADM) Extract Audit This option creates a summary report from the ADMISSION EXTRACT file (#727.802) that displays the
number of patient admissions by ward and ward group (Figure 155). The report also identifies missing
wards and missing treating specialties.
Figure 155: Admission (ADM) Extract Audit Report
The exportable version of the report produces the same information in a delimited text format that can be
imported into an Excel spreadsheet (Figure 156).
For guidance on capturing exported data into spreadsheets and the additional steps required to produce
exportable versions of reports, refer to Appendix D: Exporting a Report to a Spreadsheet.
Figure 156: Exported Admission Extract Audit Report
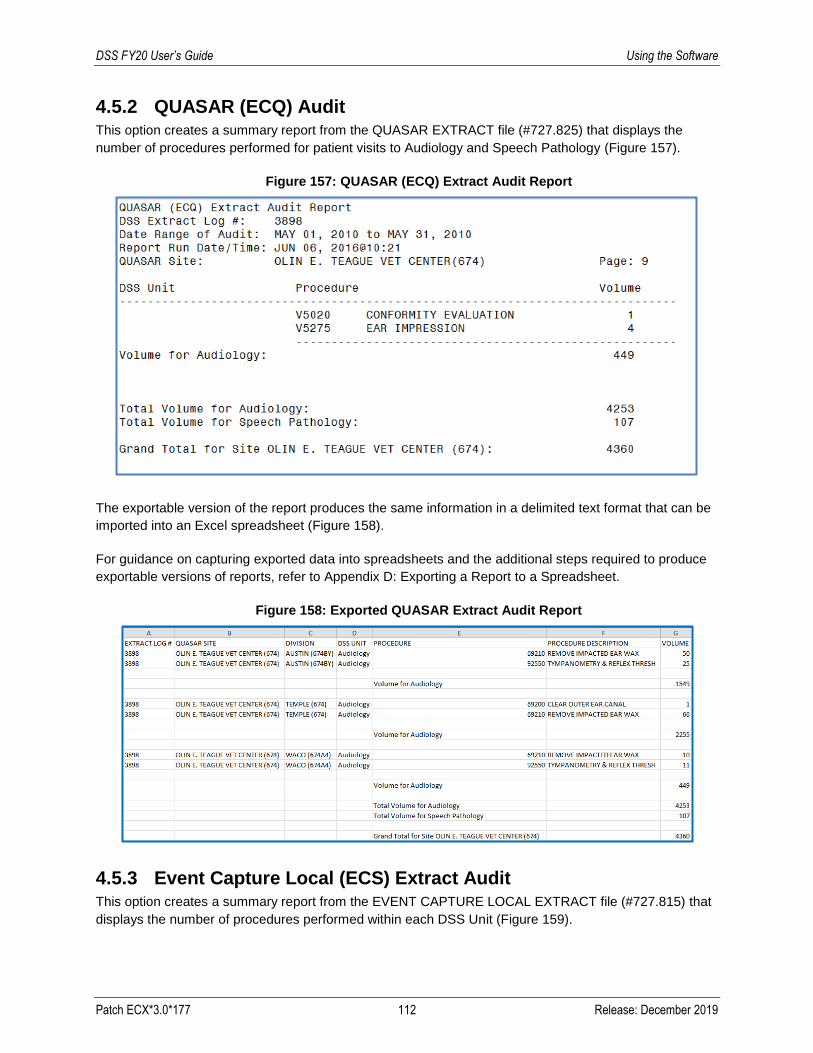
DSS FY20 User’s Guide Using the Software
Patch ECX*3.0*177 112 Release: December 2019
4.5.2 QUASAR (ECQ) Audit This option creates a summary report from the QUASAR EXTRACT file (#727.825) that displays the
number of procedures performed for patient visits to Audiology and Speech Pathology (Figure 157).
Figure 157: QUASAR (ECQ) Extract Audit Report
The exportable version of the report produces the same information in a delimited text format that can be
imported into an Excel spreadsheet (Figure 158).
For guidance on capturing exported data into spreadsheets and the additional steps required to produce
exportable versions of reports, refer to Appendix D: Exporting a Report to a Spreadsheet.
Figure 158: Exported QUASAR Extract Audit Report
4.5.3 Event Capture Local (ECS) Extract Audit This option creates a summary report from the EVENT CAPTURE LOCAL EXTRACT file (#727.815) that
displays the number of procedures performed within each DSS Unit (Figure 159).

DSS FY20 User’s Guide Using the Software
Patch ECX*3.0*177 113 Release: December 2019
Note:
• If the selected ECS extract contains any late state home spreadsheet records, the system
prompts the user to select whether to include these records in the audit report.
Figure 159: Event Capture (ECS) Extract Audit Report
The exportable version of the report produces the same information in a delimited text format that can be
imported into an Excel spreadsheet (Figure 160).
For guidance on capturing exported data into spreadsheets and the additional steps required to produce
exportable versions of reports, refer to Appendix D: Exporting a Report to a Spreadsheet.
Figure 160: Exported ECS Extract Audit Report
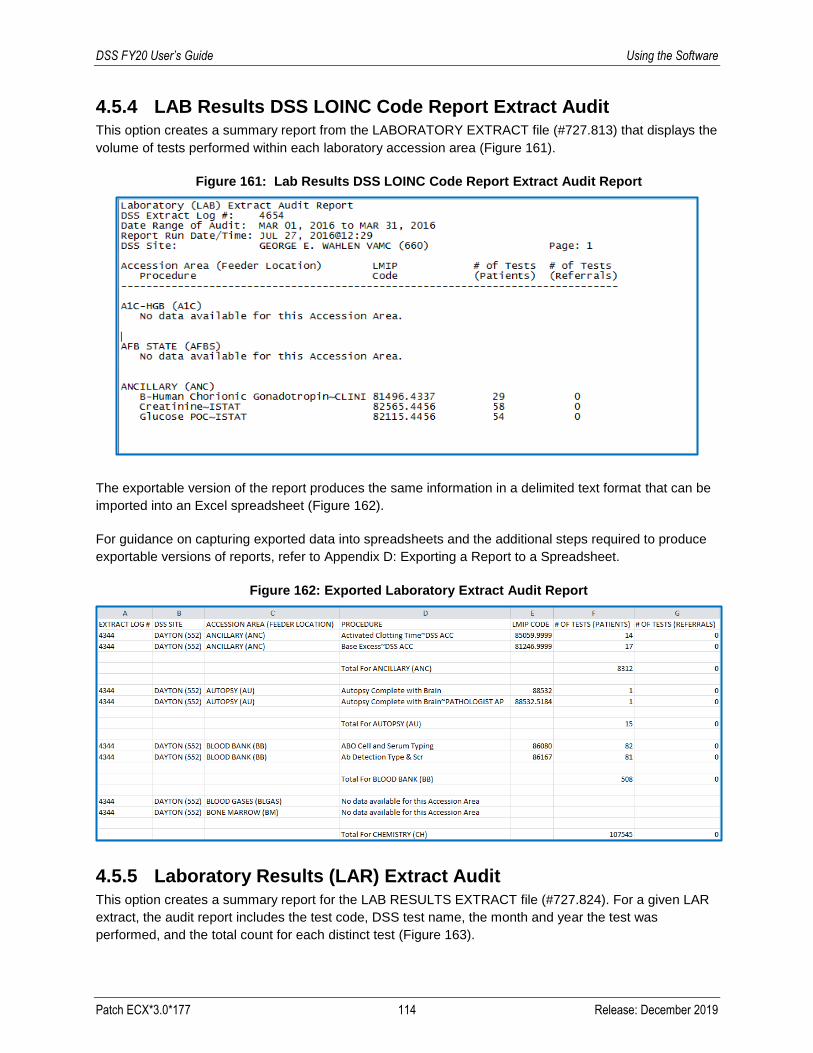
DSS FY20 User’s Guide Using the Software
Patch ECX*3.0*177 114 Release: December 2019
4.5.4 LAB Results DSS LOINC Code Report Extract Audit This option creates a summary report from the LABORATORY EXTRACT file (#727.813) that displays the
volume of tests performed within each laboratory accession area (Figure 161).
Figure 161: Lab Results DSS LOINC Code Report Extract Audit Report
The exportable version of the report produces the same information in a delimited text format that can be
imported into an Excel spreadsheet (Figure 162).
For guidance on capturing exported data into spreadsheets and the additional steps required to produce
exportable versions of reports, refer to Appendix D: Exporting a Report to a Spreadsheet.
Figure 162: Exported Laboratory Extract Audit Report
4.5.5 Laboratory Results (LAR) Extract Audit This option creates a summary report for the LAB RESULTS EXTRACT file (#727.824). For a given LAR
extract, the audit report includes the test code, DSS test name, the month and year the test was
performed, and the total count for each distinct test (Figure 163).

DSS FY20 User’s Guide Using the Software
Patch ECX*3.0*177 115 Release: December 2019
Notes:
• The number of tests will continue to increase in accordance with VistA maintenance
updates.
• For a complete list of the tests, users can run the Lab Results DSS LOINC Code report.
• If no workload exists for a DSS test, “Not in extract” displays in the Total Count column.
Figure 163: Lab Results(LAR) Extract Audit Report
The exportable version of the report produces the same information in a delimited text format that can be
imported into an Excel spreadsheet (Figure 164).
For guidance on capturing exported data into spreadsheets and the additional steps required to produce
exportable versions of reports, refer to Appendix D: Exporting a Report to a Spreadsheet.
Figure 164: Exported Laboratory Results Extract Audit Report
4.5.6 Laboratory Blood Bank (LBB) Comparative Report The Laboratory Blood Bank (LBB) Comparative Report compares the blood bank records identified in the
VistA Blood Establishment Computer Software (VBECS) DSS EXTRACT file (#6002.03), which is the
source file for blood bank activity reported to DSS to the extracted records in the BLOOD BANK
EXTRACT file (#727.829) for the selected extract log number.

DSS FY20 User’s Guide Using the Software
Patch ECX*3.0*177 116 Release: December 2019
The report shows a side-by-side comparison of the information from the source file to the information in
the extract file (Figure 165). This helps verify that the extracted data matches the source data.
Figure 165: LBB Extract Comparative Report
The exportable version of the report produces the same information in a delimited text format that can be
imported into an Excel spreadsheet (Figure 166).
For guidance on capturing exported data into spreadsheets and the additional steps required to produce
exportable versions of reports, refer to Appendix D: Exporting a Report to a Spreadsheet.
Figure 166: Exported Laboratory Blood Bank (LBB) Comparative Report
4.5.7 Physical Movement (MOV) Extract Audit This option creates a summary report from the PHYSICAL MOVEMENT EXTRACT file (#727.808) that
displays the total count of each PIMS movement type (transfers and discharges) by ward and ward group
(Figure 167).

DSS FY20 User’s Guide Using the Software
Patch ECX*3.0*177 117 Release: December 2019
Figure 167: Movement (MOV) Extract Audit Report
The exportable version of the report produces the same information in a delimited text format that can be
imported into an Excel spreadsheet (Figure 168).
For guidance on capturing exported data into spreadsheets and the additional steps required to produce
exportable versions of reports, refer to Appendix D: Exporting a Report to a Spreadsheet.
Figure 168: Exported Physical Movement (MOV) Extract Audit Report
4.5.8 Pharmacy (PHA) Extract Cost by Feeder Key This option creates the Pharmacy Extract Cost by Feeder Key Report.
To run the Pharmacy Extract Cost by Feeder Key Report:
From the Extract Report menu, select “Pharmacy Extract Cost by Feeder Key” (Figure 169), then press <Enter>.
Enter the extract type for the report you wish to run (Figure 169.
Type the DSS Extract Log Record Number.

DSS FY20 User’s Guide Using the Software
Patch ECX*3.0*177 118 Release: December 2019
The enumerated steps described above display on the screen as shown in Figure 170.
Figure 169: Extract Report Menu
The report has four options but is export only (Figure 170).
Figure 170: Pharmacy Extract Cost by Feeder Key Report Menu
Figures 171, 172, 173 and 174 show examples of reports for the four options. The report contains
information that can be imported into an Excel spreadsheet. For guidance on capturing exported data into
spreadsheets and the additional steps required to produce exportable versions of reports, refer to
Appendix D: Exporting a Report to a Spreadsheet.

DSS FY20 User’s Guide Using the Software
Patch ECX*3.0*177 119 Release: December 2019
Figure 171: Example of Pharmacy Extract Cost by Feeder Key PRE Exported Report
Figure 172: Example of Pharmacy Extract Cost by Feeder Key IVP Exported Report
Figure 173: Example of Pharmacy Extract Cost by Feeder Key UDP Exported Report

DSS FY20 User’s Guide Using the Software
Patch ECX*3.0*177 120 Release: December 2019
Figure 174: Example of Pharmacy Extract Cost by Feeder Key BCM Exported Report
4.5.9 Prosthetics (PRO) Extract Audit This option creates either a detail or summary report based on data found in the PROSTHETICS
EXTRACT file (#727.826).
Note:
• Multi-divisional prosthetics sites may choose to generate a specific report for one division
or a combined report for all divisions.
When the Prosthetics (PRO) Extract Audit option is selected from the Extract Audit Reports menu, options
to create a detailed or summary report are displayed (Figure 175).
Figure 175: PRO Extract Audit Menu
The summary report displays line items grouped by National Prosthetic Patient Database (NPPD) group.
The report includes Line Item, VA quantity, Commercial quantity, Total quantity, Total Cost and Average
Commercial Cost. Within each NPPD group, the summary data for each NPPD line item is displayed,
followed by the group totals. Summary totals are also broken down for new, rental and repair sections
(Figure 176).

DSS FY20 User’s Guide Using the Software
Patch ECX*3.0*177 121 Release: December 2019
Figure 176: Prosthetics (PRO) Extract Audit Report – Summary Version
The exportable version of the report produces the same information in a delimited text format that can be
imported into an Excel spreadsheet (Figure 177).
For guidance on capturing exported data into spreadsheets and the additional steps required to produce
exportable versions of reports, refer to Appendix D: Exporting a Report to a Spreadsheet.
Figure 177: Exported Prosthetics (PRO) Extract Audit Report – Summary Version
The detail report displays individual patient data grouped by NPPD line item. The report includes Patient
Name (first four characters of patient’s last name), SSN (last four digits of patient’s SSN), PSAS HCPCS
Code, Quantity, Type (i.e., initial or repair), Cost, Date, HCPCS description, Station Number, and the
NPPD Entry Date (Figure 178).
Figure 178: Prosthetics (PRO) Extract Audit Report – Detail Version
The exportable version of the report produces the same information in a delimited text format that can be
imported into an Excel spreadsheet (Figure 179).

DSS FY20 User’s Guide Using the Software
Patch ECX*3.0*177 122 Release: December 2019
For guidance on capturing exported data into spreadsheets and the additional steps required to produce
exportable versions of reports, refer to Appendix D: Exporting a Report to a Spreadsheet.
Figure 179: Exported Prosthetics (PRO) Extract Audit Report – Detail Version
4.5.10 Radiology (RAD) Extract Audit This option creates a summary report from the RADIOLOGY EXTRACT file (#727.814) that displays the
total count of each radiological procedure within a feeder location (Figure 180).
Figure 180: Radiology (RAD) Extract Audit Report
The exportable version of the report produces the same information in a delimited text format that can be
imported into an Excel spreadsheet (Figure 181).
For guidance on capturing exported data into spreadsheets and the additional steps required to produce
exportable versions of reports, refer to Appendix D: Exporting a Report to a Spreadsheet.
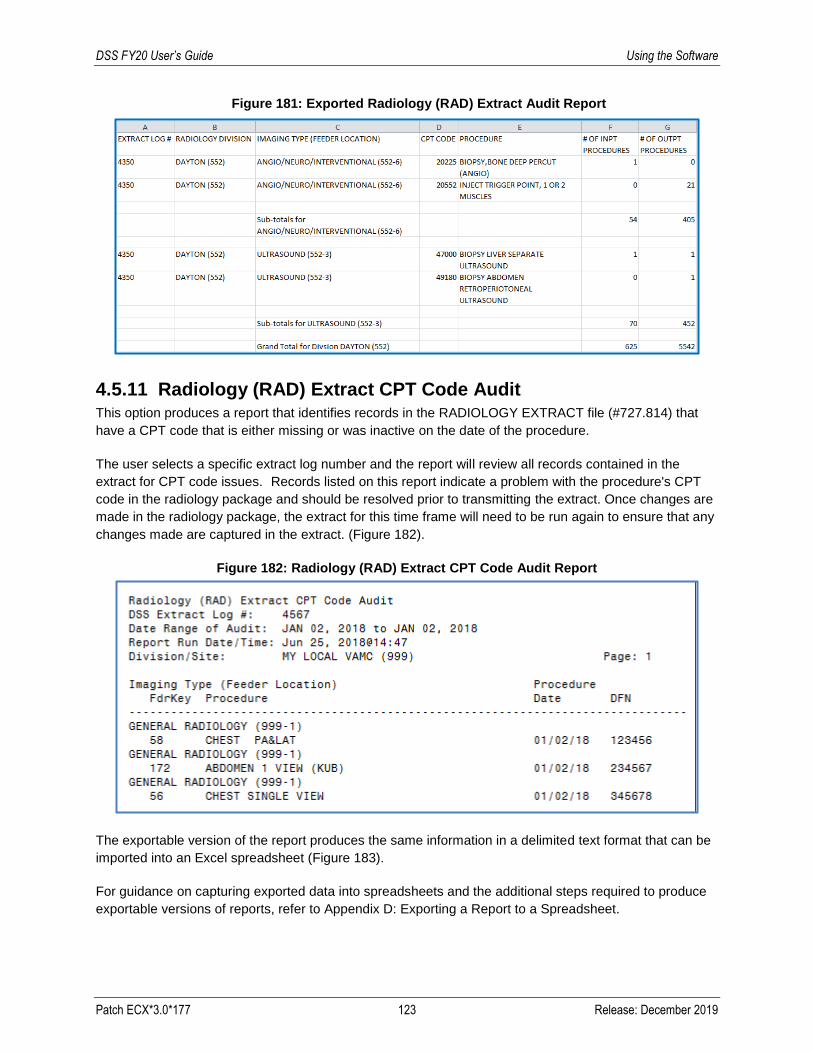
DSS FY20 User’s Guide Using the Software
Patch ECX*3.0*177 123 Release: December 2019
Figure 181: Exported Radiology (RAD) Extract Audit Report
4.5.11 Radiology (RAD) Extract CPT Code Audit This option produces a report that identifies records in the RADIOLOGY EXTRACT file (#727.814) that
have a CPT code that is either missing or was inactive on the date of the procedure.
The user selects a specific extract log number and the report will review all records contained in the
extract for CPT code issues. Records listed on this report indicate a problem with the procedure's CPT
code in the radiology package and should be resolved prior to transmitting the extract. Once changes are
made in the radiology package, the extract for this time frame will need to be run again to ensure that any
changes made are captured in the extract. (Figure 182).
Figure 182: Radiology (RAD) Extract CPT Code Audit Report
The exportable version of the report produces the same information in a delimited text format that can be
imported into an Excel spreadsheet (Figure 183).
For guidance on capturing exported data into spreadsheets and the additional steps required to produce
exportable versions of reports, refer to Appendix D: Exporting a Report to a Spreadsheet.
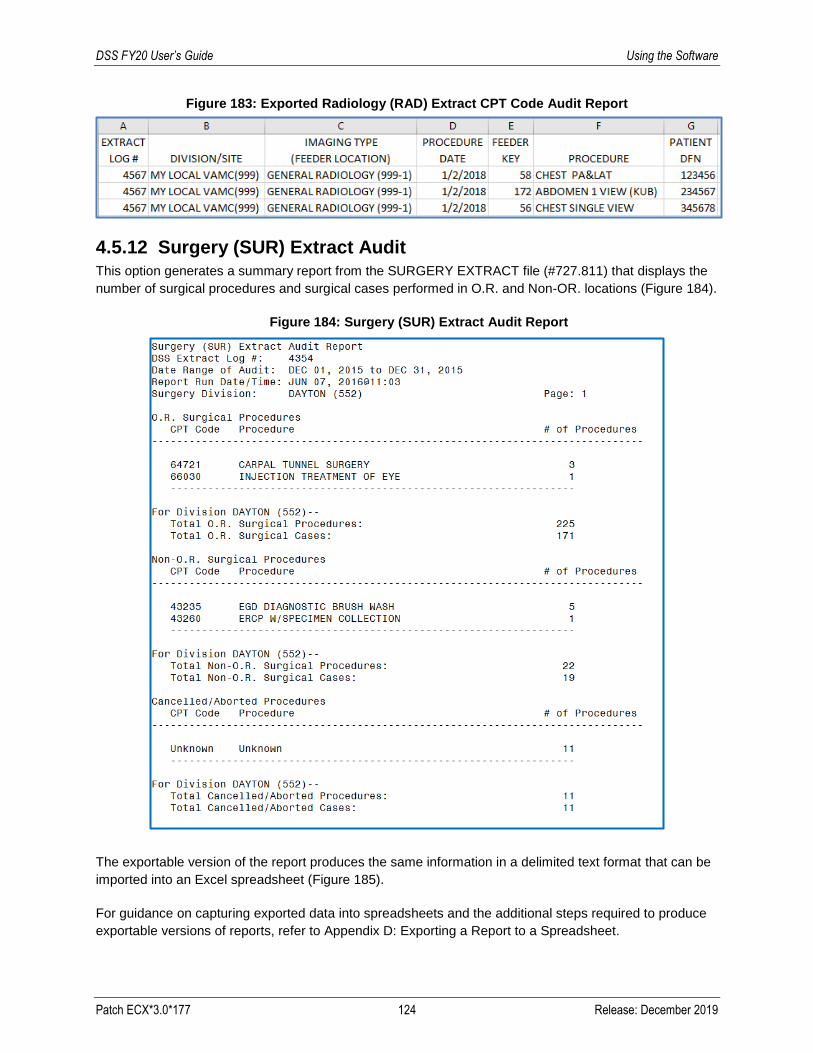
DSS FY20 User’s Guide Using the Software
Patch ECX*3.0*177 124 Release: December 2019
Figure 183: Exported Radiology (RAD) Extract CPT Code Audit Report
4.5.12 Surgery (SUR) Extract Audit This option generates a summary report from the SURGERY EXTRACT file (#727.811) that displays the
number of surgical procedures and surgical cases performed in O.R. and Non-OR. locations (Figure 184).
Figure 184: Surgery (SUR) Extract Audit Report
The exportable version of the report produces the same information in a delimited text format that can be
imported into an Excel spreadsheet (Figure 185).
For guidance on capturing exported data into spreadsheets and the additional steps required to produce
exportable versions of reports, refer to Appendix D: Exporting a Report to a Spreadsheet.

DSS FY20 User’s Guide Using the Software
Patch ECX*3.0*177 125 Release: December 2019
Figure 185: Exported Surgery (SUR) Extract Audit Report
4.5.13 Treating Specialty Change (TRT) Extract Audit This option prints a summary report from the TREATING SPECIALTY CHANGE EXTRACT file
(#727.817) that displays the total number of losses within each treating specialty of a medical center
service (Figure 186).
Figure 186: Treating Specialty Change (TRT) Extract Audit Report
The exportable version of the report produces the same information in a delimited text format that can be
imported into an Excel spreadsheet (Figure 187).

DSS FY20 User’s Guide Using the Software
Patch ECX*3.0*177 126 Release: December 2019
For guidance on capturing exported data into spreadsheets and the additional steps required to produce
exportable versions of reports, refer to Appendix D: Exporting a Report to a Spreadsheet.
Figure 187: Exported Treating Specialty Change (TRT) Extract Audit Report
4.5.14 Extract Stop Code Validity Report This report allows the user to select an extract from either the CLI, ECS, or RAD systems and will then
review the stop code associated with each record in the extract. If the stop code was inactive/invalid at
the time of service for the selected extract and record, it will be included on the report.
To run an Extract Stop Code Validity Report:
From the Extract Audit Reports menu, select “Extract Stop Code Validity Report”, then press <Enter>.
Select the extract for which to run the report (Clinic, Event Capture or Radiology), then press <Enter>.
Enter the DSS extract log record number, then press <Enter>.
• Information related to the selected extract will be displayed, including the start and end dates of data extracted and the number of records extracted.
• At the ‘Do you want the output in exportable format? NO//’ prompt, press <Enter> to accept ‘NO’ as the default.
Step 4. Select the device output format.
• For example, at the prompt, type 0;132;9999. 0 directs the output to the user’s screen, 132 defines the number of characters per line, and 9999 defines the number of rows to print.
• The message “This report requires 132 characters to display correctly.” is displayed.
The enumerated steps described above display on the screen as shown in Figure 188.

DSS FY20 User’s Guide Using the Software
Patch ECX*3.0*177 127 Release: December 2019
Figure 188: Running the Extract Stop Code Validity Report
4.5.14.1 Clinic Extract Stop Code Audit
This report reviews the stop code associated with each record in the selected CLI extract. If the stop code
was inactive or invalid at the time of service, the record will be included on the report (Figure 189).
Figure 189: Clinic Extract Stop Code Audit
The exportable version of the report produces the same information in a delimited text format that can be
imported into an Excel spreadsheet (Figure 190).
For guidance on capturing exported data into spreadsheets and the additional steps required to produce
exportable versions of reports, refer to Appendix D: Exporting a Report to a Spreadsheet.

DSS FY20 User’s Guide Using the Software
Patch ECX*3.0*177 128 Release: December 2019
Figure 190: Exported Clinic Extract Stop Code Audit
4.5.14.2 Event Capture Extract Stop Code Audit
This report reviews the stop code associated with each record in the selected ECS extract. If the stop
code was inactive or invalid at the time of service, the record will be included on the report (Figure 191).
Figure 191: Event Capture Extract Stop Code Audit
The exportable version of the report produces the same information in a delimited text format that can be
imported into an Excel spreadsheet (Figure 192).
For guidance on capturing exported data into spreadsheets and the additional steps required to produce
exportable versions of reports, refer to Appendix D: Exporting a Report to a Spreadsheet.
Figure 192: Exported Event Capture Extract Stop Code Audit
4.5.14.3 Radiology Extract Stop Code Audit
This report reviews the stop code associated with each record in the selected RAD extract. If the stop
code was inactive or invalid at the time of service, the record will be included on the report (Figure 193).
Figure 193: Radiology Extract Stop Code Audit
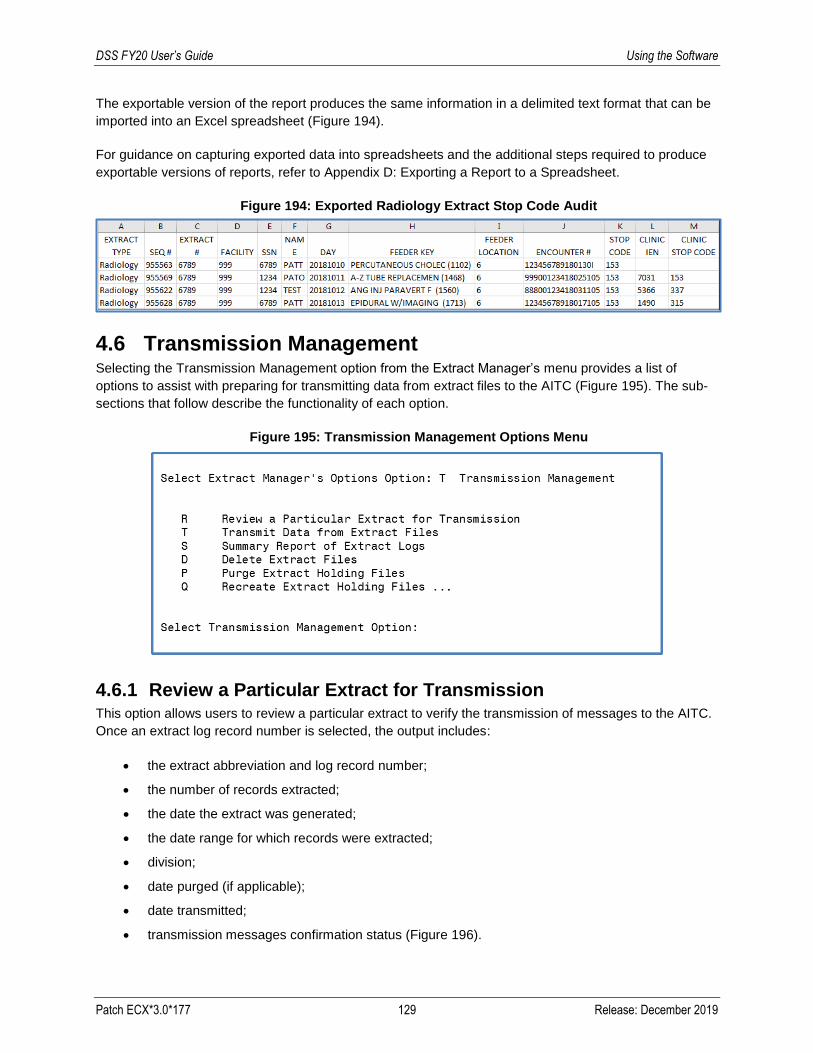
DSS FY20 User’s Guide Using the Software
Patch ECX*3.0*177 129 Release: December 2019
The exportable version of the report produces the same information in a delimited text format that can be
imported into an Excel spreadsheet (Figure 194).
For guidance on capturing exported data into spreadsheets and the additional steps required to produce
exportable versions of reports, refer to Appendix D: Exporting a Report to a Spreadsheet.
Figure 194: Exported Radiology Extract Stop Code Audit
4.6 Transmission Management Selecting the Transmission Management option from the Extract Manager’s menu provides a list of
options to assist with preparing for transmitting data from extract files to the AITC (Figure 195). The sub-
sections that follow describe the functionality of each option.
Figure 195: Transmission Management Options Menu
4.6.1 Review a Particular Extract for Transmission This option allows users to review a particular extract to verify the transmission of messages to the AITC.
Once an extract log record number is selected, the output includes:
• the extract abbreviation and log record number;
• the number of records extracted;
• the date the extract was generated;
• the date range for which records were extracted;
• division;
• date purged (if applicable);
• date transmitted;
• transmission messages confirmation status (Figure 196).

DSS FY20 User’s Guide Using the Software
Patch ECX*3.0*177 130 Release: December 2019
Figure 196: Review a Particular Extract for Transmission
4.6.2 Transmit Data from Extract Files This option allows users to transmit a series of mail messages containing data from an individual extract
to the AITC. Members of the associated mail group(s) receive confirmation messages indicating that an
extract was completed, transmitted, and received in Austin. Users can only transmit extracts for their
assigned division.
Note:
• To receive mail messages confirming transmission of extract data, the user must be
assigned to the DSS mail group associated with the extract being transmitted.
To transmit data from an extract file:
From the Transmission Management menu, select “Transmit Data from Extract Files”, then press <Enter>.
Type the desired DSS extract log record number for extract to be transmitted, then press <Enter>.
• Typing ?? at the prompt will list any available extract log numbers that can be used.
• Once selected, information about the selected extract will appear including the start and end dates, the number of records in the extract and the fiscal year logic that was used to generate the extract.

DSS FY20 User’s Guide Using the Software
Patch ECX*3.0*177 131 Release: December 2019
Type the desired start time for the transmission, then press <Enter>.
• Press <Enter> to accept ‘NOW’ as the default time.
• The request is queued. Depending on the size of the selected extract, it may take a few minutes for transmission to complete.
The enumerated steps described above display on the screen as shown in Figure 197.
Figure 197: Transmitting Data from an Extract File
When the transmission is complete, a message is sent to the user’s MailMan account (Figure 198).

DSS FY20 User’s Guide Using the Software
Patch ECX*3.0*177 132 Release: December 2019
Figure 198: Sample Mail Message – Transmission of Extracted Data
Note:
• Extracts that contain zero records cannot be transmitted.
• When attempting to transmit an extract with zero records, the system displays a message
that the extract cannot be transmitted (Figure 199).
Figure 199: System Message When Attempting to Transmit an Empty Extract
4.6.3 Summary Report of Extract Logs This option generates a summary report from the EXTRACT LOG file (#727).

DSS FY20 User’s Guide Using the Software
Patch ECX*3.0*177 133 Release: December 2019
To run a summary report of extract logs:
From the Transmission Management menu, select “Summary Report of Extract Logs”, then press <Enter>.
Type the desired start date for the report, then press <Enter>.
Type the desired end date for the report, then press <Enter>.
Select whether to produce exportable output.
• At the ‘Do you want the output in exportable format? NO//’ prompt, press <Enter> to accept ‘NO’ as the default.
Select the device output format.
• For example, at the prompt, type 0;132;9999. 0 directs the output to the user’s screen, 132 defines the number of characters per line, and 9999 defines the number of rows to print.
The enumerated steps described above display on the screen as shown in Figure 200.
Figure 200: Running the Summary Report of Extract Logs Option
The report generates and lists information for extract records within the specified date range. The report
includes the Extract Number, VistA Package name of extract, Data Set Dates, Record Count, Date
Transmitted, Date Purged, Date Extracted, Data Month, Messages Unconfirmed, and Requestor (Figure
201).
Figure 201: Summary Report of Extract Logs
The exportable version of the report produces the same information in a delimited text format that can be
imported into an Excel spreadsheet (Figure 202).
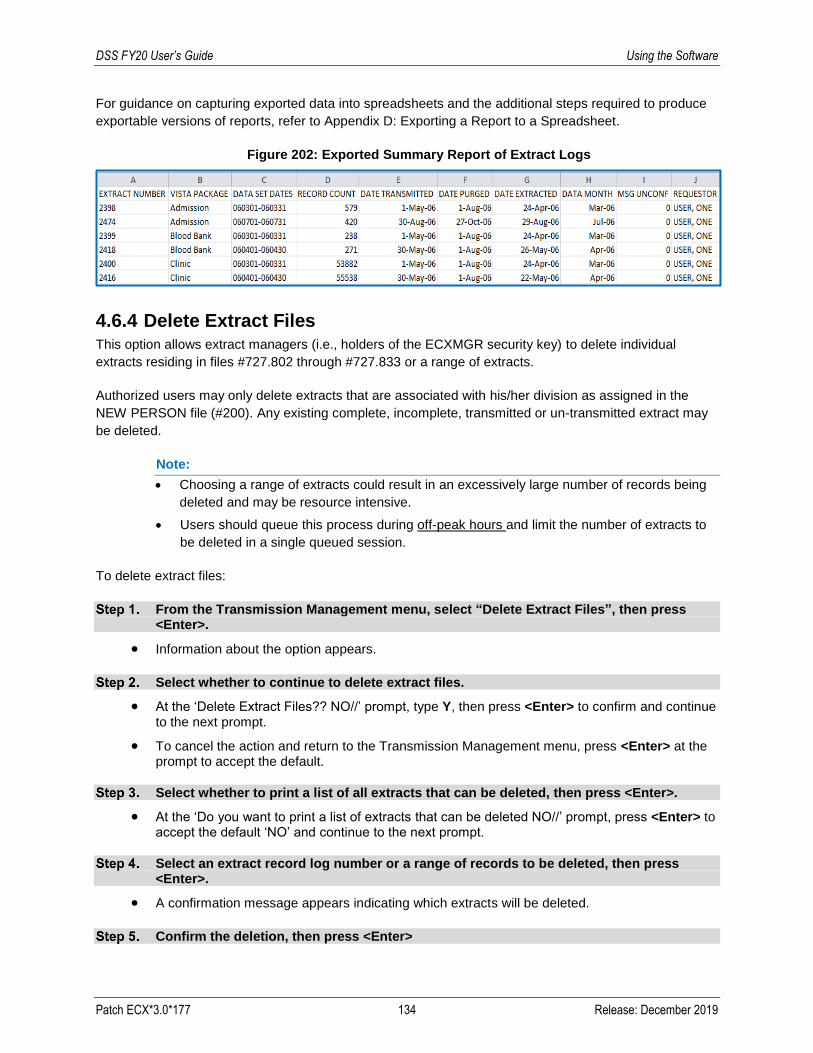
DSS FY20 User’s Guide Using the Software
Patch ECX*3.0*177 134 Release: December 2019
For guidance on capturing exported data into spreadsheets and the additional steps required to produce
exportable versions of reports, refer to Appendix D: Exporting a Report to a Spreadsheet.
Figure 202: Exported Summary Report of Extract Logs
4.6.4 Delete Extract Files
This option allows extract managers (i.e., holders of the ECXMGR security key) to delete individual
extracts residing in files #727.802 through #727.833 or a range of extracts.
Authorized users may only delete extracts that are associated with his/her division as assigned in the
NEW PERSON file (#200). Any existing complete, incomplete, transmitted or un-transmitted extract may
be deleted.
Note:
• Choosing a range of extracts could result in an excessively large number of records being
deleted and may be resource intensive.
• Users should queue this process during off-peak hours and limit the number of extracts to
be deleted in a single queued session.
To delete extract files:
From the Transmission Management menu, select “Delete Extract Files”, then press <Enter>.
• Information about the option appears.
Select whether to continue to delete extract files.
• At the ‘Delete Extract Files?? NO//’ prompt, type Y, then press <Enter> to confirm and continue to the next prompt.
• To cancel the action and return to the Transmission Management menu, press <Enter> at the prompt to accept the default.
Select whether to print a list of all extracts that can be deleted, then press <Enter>.
• At the ‘Do you want to print a list of extracts that can be deleted NO//’ prompt, press <Enter> to accept the default ‘NO’ and continue to the next prompt.
Select an extract record log number or a range of records to be deleted, then press <Enter>.
• A confirmation message appears indicating which extracts will be deleted.
Confirm the deletion, then press <Enter>

DSS FY20 User’s Guide Using the Software
Patch ECX*3.0*177 135 Release: December 2019
• At the ‘Is this OK? NO//’ prompt, type Y to confirm the deletion of the extracts as presented in the confirmation message.
• To accept the default answer of ‘NO’ and cancel the deletion, press <Enter>.
Type the desired start time for the deletion process, then press <Enter>.
• The default value for the requested start time is now. To accept the default value, press <Enter> at the prompt.
• To change the requested start date, type a valid date and/or time, then press <Enter>.
• Once the desired start time is entered, the system indicates that the approval is queued.
The enumerated steps described above display on the screen as shown in Figure 203.
Figure 203: Running the Delete Extract Files Option
4.6.5 Purge Extract Holding Files This option allows users to purge data in the holding files for the IVP or UDP extracts or VBECS.

DSS FY20 User’s Guide Using the Software
Patch ECX*3.0*177 136 Release: December 2019
The IVP, UDP and VBECS holding files are intermediate files that are populated in real-time by inpatient
pharmacy and VBECS activity. These files are then used to generate the IVP, UDP and VBECS extracts.
The IV EXTRACT DATA file (#728.113) and the UNIT DOSE EXTRACT DATA file (#728.904) can
become excessively large if purging is not performed. It is recommended that records over two years old
be purged from the IV EXTRACT DATA file (#728.113) and the UNIT DOSE EXTRACT DATA file
(#728.904).
VBECS holding files can also be purged. Once purged, these files cannot be recreated for any time
period.
Purging of any local VistA extract data or VistA source extract data (i.e., lab data, etc.) is not
recommended until the facility has successfully created extracts, transmitted them to the AITC, audited
the counts, loaded the data into DSS, and validated the results.
Note:
• Choosing a broad range of holding files could result in an excessively large number of
records being purged and may be resource intensive.
• Users should queue this process during off-peak hours and limit the number of holding files
to be purged in a single queued session.
To purge extract holding files:
From the Transmission Management menu, select “Purge Extract Holding Files”, then press <Enter>.
• Information about the option appears.
Select a holding file to purge (IVP, UDP or VBECS), then press <Enter>.
• Information for the date range of data contained in the selected holding file appears.
Type the desired start date for the purge, then press <Enter>.
Type the desired end date for the purge, then press <Enter>.
• A confirmation message appears indicating which extracts will be deleted.
Confirm the deletion, then press <Enter>
• At the ‘Is this OK? NO//’ prompt, type Y to confirm the deletion of the extracts as presented in the confirmation message.
• To accept the default answer of ‘NO’ and cancel the deletion, press <Enter>.
Type the desired start time for the purge process, then press <Enter>.
• The default value for the requested start time is now. To accept the default value, press <Enter> at the prompt.
• To change the requested start date, type a valid date and/or time, then press <Enter>.
• Once the desired start time is entered, the system indicates that the purge is queued.
• The system sends a confirmation MailMan message to the user when the extract holding file has been successfully purged.

DSS FY20 User’s Guide Using the Software
Patch ECX*3.0*177 137 Release: December 2019
The enumerated steps described above display on the screen as shown in Figure 204.
Figure 204: Running the Purge Extract Holding Files Option
4.6.6 Recreate Extract Holding Files This option allows users to recreate an IVP or UDP extract holding file that has been purged at the local
site.
To Recreate Extract Holding Files:
From the Transmission Management menu, select “Recreate Extract Holding Files”, then press <Enter>.
• Additional options appear.
Select a holding file to recreate (IVP or UDP), then press <Enter>.
• Information for the date range of data contained in the selected holding file appears.
Type the desired start date for the holding file, then press <Enter>.
Type the desired end date for the holding file, then press <Enter>.
Type the desired start time for the recreation process, then press <Enter>.
• The default value for the requested start time is now. To accept the default value, press <Enter> at the prompt.

DSS FY20 User’s Guide Using the Software
Patch ECX*3.0*177 138 Release: December 2019
• To change the requested start date, type a valid date and/or time, then press <Enter>.
• Once the desired start time is entered, the system indicates that the approval is queued.
• The system sends a confirmation MailMan message to the user when the extract holding file has been recreated.
The enumerated steps described above display on the screen as shown in Figure 205.
Figure 205: Running the Recreate Extract Holding File Option

DSS FY20 User’s Guide Troubleshooting
Patch ECX*3.0*177 139 Release: December 2019
5 Troubleshooting
The following section provides information on error handling and correction.
5.1 Special Instructions for Error Correction Users are encouraged to contact support staff when encountering errors in application performance.
There are no special utilities provided by the application for troubleshooting and error correction. Refer to
the National Service Desk and Organizational Contacts section for additional information.
DSS FY20 User’s Guide Appendix A. Abbreviations and Acronyms
Patch ECX*3.0*177 A-1 Release: December 2019
Abbreviations and Acronyms
Table 7 provides a list of abbreviations and acronyms used throughout the DSS FY20 User’s Guide.
Table 7: Acronyms
Abbreviation/Acronym Description
ADM Admissions Extract
AITC Austin Information Technology Center
BCM BCMA Extract
BCMA Bar Code Medication Administration
CBOC Community Based Outpatient Clinic
CLI Clinic Extract
CPT Current Procedural Terminology
CSHD Customer Service Help Desk
DSS Decision Support System
ECQ QUASAR Extract
ECS Event Capture Extract
FY Fiscal Year
HAS Health Administration Service (formerly MAS)
HCPC Healthcare Common Procedure Coding
HCPCS Healthcare Common Procedure Coding System
HPS Health Product Support
ICD International Classification of Diseases
IEN Internal Entry Number
IVP IV Extract
LAB Laboratory Extract
LAR Laboratory Results Extract
LBB Blood Bank Extract
LMIP Laboratory Management Index Program
LOINC Logical Observation Identifiers, Names, and Codes
MAS Medical Administration Service (now known as HAS)
MCA Managerial Cost Accounting
MCAO Managerial Cost Accounting Office
MOV Movement Extract (Transfers & Discharges)
NDC National Drug Code
NDF National Drug File
NPPD National Prosthetic Patient Database
NSD National Service Desk
OI&T Office of Information and Technology
OR Operating Room

DSS FY20 User’s Guide Appendix A. Abbreviations and Acronyms
Patch ECX*3.0*177 A-2 Release: December 2019
Abbreviation/Acronym Description
PACU Post Anesthesia Care Unit
PIMS Patient Information Management System
PRE Prescription Extract
PRO Prosthetics Extract
PSAS Prosthetic and Sensory Aids Service
QUASAR Quality: Audiology and Speech Pathology Audit & Review
RAD Radiology Extract
SAS Statistical Analysis System
SSN Social Security Number
SUR Surgery Extract
TRT Treating Specialty Change Extract
UDP Unit Dose Local Extract
U.S.C United States Code
VA Department of Veterans Affairs
VBECS VistA Blood Establishment Computer Software
VDL VA Software Document Library
VHA Veterans Health Administration
VISN Veterans Integrated Service Network
VistA Veterans Health Information Systems and Technology Architecture
YTD Year-to-Date

DSS FY20 User’s Guide Appendix B. Glossary
Patch ECX*3.0*177 B-1 Release: December 2019
Glossary
Table 8 lists terms found in this document that may aid the reader in understanding.
Table 8: Glossary
Term Definition
Action to Send Code
Indicates which, if any, code(s) should be sent to the DSS commercial software (e.g., stop code and credit stop code, with or without CHAR4 code).
Credit Stop Code
The Credit Stop Code (from the HOSPITAL LOCATION file [#44]) as determined by the Health Administration Service (HAS, formerly MAS).
DSS Credit Stop Code
The Credit Stop Code as determined by MCA.
DSS Product Department
A code associated with products or services, which assists in the categorization and costing of those products. At this time, only medical center wards are being associated with a DSS Product Department in the DSS WARD file (#727.4). The DSS Product Department consists of a minimum of 4 characters as:
ABBCxxx
A = DSS CODE in NATIONAL SERVICE file (#730)
BB = DSS PRODUCTION UNIT CODE in DSS PRODUCTION UNIT file (#729)
C = DSS DIVISION IDENTIFIER in DSS DIVISION IDENTIFIER file (#727.3)
xxx = A suffix of not more than three characters which must be numeric digits or uppercase alpha characters. The first character of the string may be "-", but that is not recommended.
DSS Division Identifier
A one-character code, either numeric (but not zero) or an uppercase alpha character. The character used in the DSS DIVISION IDENTIFIER file (#727.3) as a division identifier should exactly match the identifier associated with a medical center division in DSS/Austin.
DSS Production Unit
A two-character code which may contain both numeric and uppercase alphabetic characters. These DSS-compatible codes are based on the FMS sub-cost center scheme to categorize production unit output. The DSS PRODUCTION UNIT file (#729) holds the production unit codes approved for use by DSS.
DSS Stop Code The Stop Code as determined by MCA.
Extract Management tool used to track and account for procedures and delivered services, which are not handled in any existing VistA package.
Extract Files The files that hold the data that has been extracted via the DSS Extract software.
Feeder Key The product for workload extracted.
Feeder Location The site location of data extracted.
Provider The actual provider of care performing the procedure. This provider can be a doctor, nurse, technician or any designated team of medical professionals.
Stop Code The Stop Code (from the HOSPITAL LOCATION file [#44]) as determined by the Health Administration Service (HAS, formerly MAS).
Volume Volume is associated with the number of procedures performed or the length of time actually spent performing the procedures.

DSS FY20 User’s Guide Appendix C. Feeder Key Encoding
Patch ECX*3.0*177 C-1 Release: December 2019
Feeder Key Encoding
The feeder key for the Clinic Extract contains the stop code (SSS), credit stop code (CCC), time length of
appointment (TTT), CHAR4 code (4444), no-show code (N) and MCA Labor Code associated with the
clinic (LL) with format SSSCCCTTT4444NLL.
These characters are determined by the ACTION TO SEND code as indicated in Table 9.
Table 9: Feeder Key Encoding Table
Action to Send Code Description
4: SEND STOP CODE(S) WITH CHAR4 CODE
SSS is the Stop Code.
CCC is the Credit Stop Code. If no Credit Stop Code assigned then “000”.
TTT is the length of appointment.
4444 is the CHAR4 Code.
N if a no-show, otherwise ‘0’ (zero).
LL is the MCA labor code assigned to the clinic (blank if no labor code is assigned).
5: SEND STOP CODE(S) WITHOUT CHAR4 CODE
SSS is the Stop Code.
CCC is the Credit Stop Code.
TTT is the length of appointment.
4444 = 0000.
N if a no-show, otherwise ‘0’ (zero).
LL is the MCA labor code assigned to the clinic (blank if no labor code is assigned).
6: DO NOT SEND SSS = 000.
CCC = 000.
TTT is the length of appointment or “000” if not present.
4444=0000.
N if a no-show, otherwise ‘0’ (zero).
LL is the MCA labor code assigned to the clinic (blank if no labor code is assigned).

DSS FY20 User’s Guide Appendix D. Exporting a Report to a Spreadsheet
Patch ECX*3.0*177 D-1 Release: December 2019
Exporting a Report to a Spreadsheet
Some reports within DSS are available in an exportable format. This format creates a delimited text file
that can be imported into an Excel spreadsheet. Instructions are provided to the user for setting up the
logging feature (Figure 206). Detailed instructions are provided below.
Figure 206: Selecting an Exportable Format for a Report
Note:
• The instructions that follow were produced using Micro Focus Reflection Desktop Pro v16.0
SP1 for UNIX and OpenVMS within a Microsoft® Windows environment.
To set up the Reflection Workspace for logging an exportable format:
Margins need to be set to at least 255. You can use a pre-existing macro (if your interface has one) to do this, or you can set the margin manually by following the steps below. Go into the Reflection Workspace application and set up the margin manually by clicking appearance, expanded terminal settings (arrow in lower right corner) and set your display settings.
On the Settings screen, under Terminal Configuration, click the “Set Up Display Settings” link (Figure 207).

DSS FY20 User’s Guide Appendix D. Exporting a Report to a Spreadsheet
Patch ECX*3.0*177 D-2 Release: December 2019
Figure 207: Reflection Workspace Settings Screen
On the Display screen, scroll down to the “Dimensions” section and type 255 as the value for the “Number of characters per row” field, then click the OK button (Figure 208).
• Many of the DSS audits are available in exportable formats with character widths of 132 or 225.
To make logging format more valuable, the screen display should be adjusted to fit the
character width.
• The text displayed on the Reflection Workspace screen adjusts to the user-defined settings.

DSS FY20 User’s Guide Appendix D. Exporting a Report to a Spreadsheet
Patch ECX*3.0*177 D-3 Release: December 2019
Figure 208: Changing the Characters per Row in Reflection Workspace
If you have the classic interface, on the Reflection Workspace File menu, select “Logging…” If you have the ribbon interface, select Tools, Logging (arrow in lower right corner). Ensure the logging settings form only has ‘to disk’ selected and enter the path and filename where the output should be stored.
• The Logging Settings window appears.
On the Logging Settings window, check the “Disk” checkbox, then click the Browse button (Figure 209).
Figure 209: Reflection Workspace Logging Settings

DSS FY20 User’s Guide Appendix D. Exporting a Report to a Spreadsheet
Patch ECX*3.0*177 D-4 Release: December 2019
Select the desired location where the logging text file will be stored, type the desired file name, then click the Save button.
• The logged output that is captured within Reflection Workspace will be stored to the selected
location with the specified file name.
• Once the Save button is clicked, the user is returned to the Logging Settings window.
Click the OK button on the Logging Settings window.
• The Logging Settings window closes, and the user is returned to the Reflection Workspace.
Select Start Logging from the File menu.
At the ‘DEVICE: 0;225;99999//‘ prompt, press <Enter> to accept the default parameters.
• The report output is displayed on the user’s screen in a delimited format.
Once the report has completed, go to the Reflection Workspace File menu and select “Stop Logging” (Figure 210).
Figure 210: Reflection Workspace File Menu > Stop Logging
Open a new Excel workbook, click the Data tab, then select the “From Text” option (Figure 211).
Figure 211: Excel Import From Text Option
Select the text file that was created, then click the “Import” button (Figure 212).

DSS FY20 User’s Guide Appendix D. Exporting a Report to a Spreadsheet
Patch ECX*3.0*177 D-5 Release: December 2019
Figure 212: Import Text File Screen
Select the Delimited radio button, then, click the Next button (Figure 213).
Figure 213: Text Import Wizard – Step 1 of 3
From the list of Delimiters, uncheck the “Tab” checkbox, check the “Other” checkbox and type a caret (^) symbol as the delimiter value, then click the “Next” button (Figure 214).

DSS FY20 User’s Guide Appendix D. Exporting a Report to a Spreadsheet
Patch ECX*3.0*177 D-6 Release: December 2019
Figure 214: Text Import Wizard – Step 2 of 3
In the Data Preview section of the screen, click to highlight the columns, select “Text” as the column data format, then click the “Finish” button (Figure 215).
• To format all columns at once, hold the Shift key while clicking columns to select all columns,
then select the Text radio button.
Figure 215: Text Import Wizard – Step 3 of 3
Click the “OK” button on the Import Data screen (Figure 216).

DSS FY20 User’s Guide Appendix D. Exporting a Report to a Spreadsheet
Patch ECX*3.0*177 D-7 Release: December 2019
Figure 216: Import Data Screen
• The report will be created and displayed in an Excel spreadsheet (Figure 217).
Figure 217: Text File Imported in Excel

DSS FY20 User’s Guide Index
Patch ECX*3.0*177 I-1 Release: December 2019
Index
Accessing DSS ............................................................................................................................................. 7
Caveats and Exceptions ............................................................................................................................... 8
Data Flows .................................................................................................................................................... 5
Document Orientation ................................................................................................................................... 1
Extract Audit Reports ................................................................................................................................ 108
Getting Started .............................................................................................................................................. 7
Introduction.................................................................................................................................................... 1
Logging On - Systems Manager Menu ......................................................................................................... 7
Maintenance Menu ........................................................................................................................................ 9
National Service Desk and Organizational Contacts .................................................................................... 4
Package Extracts ........................................................................................................................................ 96
Pre-Extract Audit Reports ........................................................................................................................... 69
Purpose ......................................................................................................................................................... 1
SAS Extract Audit Reports ........................................................................................................................ 101
Setup Required DSS Information .................................................................................................................. 7
Special Instructions for Error Correction ................................................................................................... 139
System Configuration .................................................................................................................................... 5
System Summary .......................................................................................................................................... 5
Troubleshooting ........................................................................................................................................ 139
User Access Levels ....................................................................................................................................... 5
Using the Software ........................................................................................................................................ 9