dehumidifier - lowes holidaypdf.lowes.com/useandcareguides/840206120016_use.pdf · if you are not...
TRANSCRIPT

ITEM #0526013
DEHUMIDIFIERMODEL: WDH-945EL
Español p. 14
ATTACH YOUR RECEIPT HERESerial Number__________ Purchase Date__________
1
Questions, problems, missing parts? Before returning to your retailer, call our customer service department at 1-855-900-1298, Monday - Thursday, 8 a.m. - 6 p.m., EST, Friday, 8 a.m. - 5 p.m., EST.
TM

TABLE OF CONTENTS
2
PACKAGE CONTENTS
3
PART DESCRIPTION QUANTITYA Control Panel 1B Air Intake 1C Air Filter 1D Drain Bucket 1E Castors 4F Handle 2G Air Vent 1H Continuous Drain Outlet 1
A
D
E
C
B
H
GF
PACKAGE CONTENTS ……………………………………………………………………..3
SAFETY INFORMATION…………………………………………………………...............4
OPERATING INSTRUCTIONS……………………………………………………………..7
CARE AND MAINTENANCE……………………………………………..........................11
TROUBLESHOOTING……………………………………………...................................11
WARRANTY……………………………………………………………................………..12
REPLACEMENT PARTS LIST…………………………………………................…......13
TMTM

Please read and understand this entire manual before attempting to assemble, operate or installthe product.• Check available power supply and resolve any wiring problems BEFORE installation and operation of this unit. All wiring must comply with local and national electrical codes and be installed by a qualified electrician. If you have any questions regarding the following instructions, contact a qualified electrician.• This appliance draws 4.8 amps and may be used in any properly wired general purpose 15 amp household grounded receptacle.• For your safety and protection, this unit is grounded through the power cord plug when plugged into a matching wall outlet. If you are not sure whether the wall outlets in your home are properly grounded, consult a qualified electrician.
DANGER• Do not leave this unit unattended in a space where people or animals that cannot react to a failed unit are located. A failed unit can cause extreme overheating or death in such an enclosed, unattended space.
WARNING• Improper connection of the grounding plug can result in risk of fire, electric shock, and/or injury to persons associated with the appliance. Check with a qualified service representative if in doubt that the appliance is properly grounded.• DO NOT USE PLUG ADAPTERS OR EXTENSION CORDS WITH THIS UNIT. If it is necessary to use an extension cord with this unit, use an approved “air conditioner” extension cord only.
Before beginning installation of product, make sure all parts are present. Compare parts with package contents list. If any part is missing or damaged, do not attempt to installation the product.
Estimated Assembly Time: 20 minutes
Caster installation is recommended to avoid damage to floors. 1 .Remove the casters from the bucket of the dehumidifier. 2. Position the dehumidifier on its side. 3. Locate the arrow on the bottom of the dehumidifier and insert the caster according to the arrow direction. 4. Slide the caster in as far as it will go. The caster will snap into place. 5. Repeat steps 1 to 4 for the other 3 casters.
SAFETY INFORMATION SAFETY INFORMATION
4 5
SAFETY INFORMATION
CASTER INSTALLATION 20c m
1. DO NOT pull on the power cord to avoid breakage, potential danger, or injury.
2. DO NOT use insect repellent, spray oil or spray paint around the machine. These products might cause damage to plastic parts or start a fire.
3. DO NOT place the unit on uneven ground to avoid shaking, noise, and water leakage.
4. Always keep the unit 8 in. or more from the wall to dissipate heat properly.
1
2
3
4
TMTM
8 in.

6
OPERATING INSTRUCTIONS
7
SAFETY INFORMATION
5. DO NOT drop anything into the machine.
6. Close all windows to allow for the maximum possible efficiency or removal of moisture.
7. Keep the machine away from any type of heat source.
8. When moving or putting in storage, do not place the dehumidifier on its side or upside down and avoid shaking it.
5
6
7
8
Features of the Control Panel:
1) POWER Button: On / Off
2) FAN SPEED Button: High / Low
3) TIMER / HUMIDITY Set
4) TIMER: Auto turn on / Auto turn off
5)DISPLAYHUMIDITY DISPLAY:When unit is operating, it displays the current humidity. Press "+ " or "- " buttons to select humidity setting. The humidity is adjusted in increments of 5% by each press. Adjustable range is within 30% RH to 90% RH. 10 seconds after setting humidity, the display will change back to the current humidity.
TIMER SET DISPLAY: When unit is operating, it displays the current humidity. Press the TIMER button to set the machine auto turn off . Press "+ " or "- " buttons to select specifed amount of time.10 seconds after displaying the timer, the display will change back to current humidity.When unit is in stand-by, press the TIMER button to set the machine auto turn on. Press "+ " or "- " buttons to select specifed amount of time.
6) BUCKET FULL LIGHT: When water tank is full, bucket full light illuminates.
7) DEFROST LIGHT: When temperature is low, unit enters defrost mode and defrost light illuminates.
1 2 3 4
567
TMTM

OPERATING INSTRUCTIONS
8
OPERATING INSTRUCTIONS
9
START OPERATION1. Place the product in an upright position on a flat, stable, and heat-resistant surface. Make sure there is nothing flammable or heat sensitive within 39 in. Operating the product in any other position could cause a hazard.2. Insert the plug into a suitable wall socket. The dehumidifier is suitable for operating on an electricity supply having the same voltage as that shown on its rating label. 3. Make sure the water tank is correctly located. After switching onthe machine for the first time, if the “Bucket Full” light illuminates,pull out the water tank and check that the “float” lever is able tomove freely, then return the water tank to the correct position (Fig. 1).
DEFROST When the machine is operated at low temperatures (less than 64.4°F), the surface of the evaporator may accumulate a layer of frost which would reduce the efficiency of the machine.When this happens the machine will go into periodic defrost mode. The machine will operate in temperatures down to 41°F. The time taken to defrost may vary. If the machine freezes up, it should be turned off at the power supply and re-started. If the room temperature remains below 41°F the machine should be switched off.
DEHUMIDIFYINGDEHUMIDIFYING MODE SELECTION: 1) To turn the unit on, press the ON / OFF button. 2) Press the humidity button to select a desired RH operating value (30%-90%). FAN SPEED SELECTION: Select a fan speed on the keypad. The speed you select is identified bythe (illuminated) indicator light located directly above the selection mode.
BUCKET FULL LIGHT• When the water tank is full the machine will stop and the“ BucketFull” light will illuminate. • The water tank should be carefully removed from the machine bysliding it outward from the front of the unit and it should be emptied.When the empty tank is replaced properly in the machine, the unitwill start up and run normally (Fig. 2). NOTE: Please use both hands to carefully empty the water tank.
WATER FULL INDICATOR LIGHT (RED)When the water tank is full and/or incorrectly positioned inside the cabinet, the water full red lightturns on and remains on until such time that the tank is emptied and/or correctly re-positioned. This condition will result in the immediate shut down of the dehumidifying system (both compressorand fan motor operations are terminated). This is a safety feature. When the water tank is emptiedand/or correctly re-positioned, the dehumidifier will resume operation automatically.NOTE: It may take several minutes before operating conditions resume.
FACTORY DEFAULT SETTINGEach time the unit is disconnected/re-connected and/or in the event of a power failure, theelectronic circuit board automatically defaults to the following factory setting: Humidity Setting: 60% Fan Speed: Low NOTE: In the event of a power failure, the unit will default to the last program setting that was usedwhen power is restored.
WATER TANK OPERATIONProper installation of the water tank is crucial in maintaining reliable dehumidifier operation. The water tank holds accumulated condensed water and, by means of a safety switch, controls both the water level and operation of the dehumidification process. When the water tank is full and/or accidentally displaced inside the cabinet, the float switch actuator (inside the tank) breaks contact with the safety switch. This condition results in the immediate shut down of the compressor and fan motor system, preventing moisture from being condensed. NOTE: Never tamper with or attempt to defeat the water level (safety) float switch system.
Fig. 1
Fig. 2
Fig. 2
Fig. 3
AIR FILTERYour dehumidifier features a removable Air Filter.This filter is located at the front of the unit (behind the air intake grill) directly above the water tank compartment. The air filter plays an important role in helping to reduce (minimize) dust/dirt particles from the surrounding environment. A blocked / clogged air filter reduces air intake, impacting negatively on operating efficiency. To maintain maximum operating efficiency, the filter must be checked and cleaned regularly (every 2 weeks). More frequent cleaning may be required depending upon indoor air quality.IMPORTANT: Never operate the unit without the air filter in place.
AIR FILTER CLEANING STEPS:
1) Pull the air filter out gently (Fig.3).2) Clean the filter with a vacuum cleaner or wash it with clean waterand dry with a dry cloth.3) Put the clean air filter back in place and continue to operate thedehumidifier.
TMTM
OPERATING INSTRUCTIONS
10
CARE AND MAINTENANCE
TROUBLESHOOTING
11
INSTALLING PVC DRAIN HOSEWhen the water tank is full and/or incorrectly positioned inside the cabinet, the water full red lightturns on and remains on until such time that the tank is emptied and/or correctly re-positioned. This condition will result in the immediate shut down of the dehumidifying system (both compressorand fan motor operations are terminated). This is a safety feature. When the water tank is emptiedand/or correctly re-positioned, the dehumidifier will resume operation automatically.NOTE: It may take several minutes before operating conditions resume.
CLEANINGCAUTION: Before attempting to clean and/or service this unit, always disconnect the power supply cord from the electrical supply outlet.
1) DO NOT use gasoline, benzene, paint thinner, or any other chemicals to clean this unit, asthese substances will damage/deform both plastic components and luster finish. 2) Never attempt to clean the unit by pouring water directly over any of the surface areas, as thiswill cause deterioration of electrical components and wiring insulation. 3) Use only a mild dish washing detergent, lukewarm water, and a soft cloth to wipe the exteriorsurface of the unit and dry thoroughly.
STORAGE When the dehumidifier is not being used for long time periods, please follow these instructions: 1) Disconnect the power cord from the power supply.2) Empty the water tank and wipe (dry) thoroughly.3) Clean air filter thoroughly.4) Re-package the unit in the original carton. 5) Store the unit upright in a dry location.
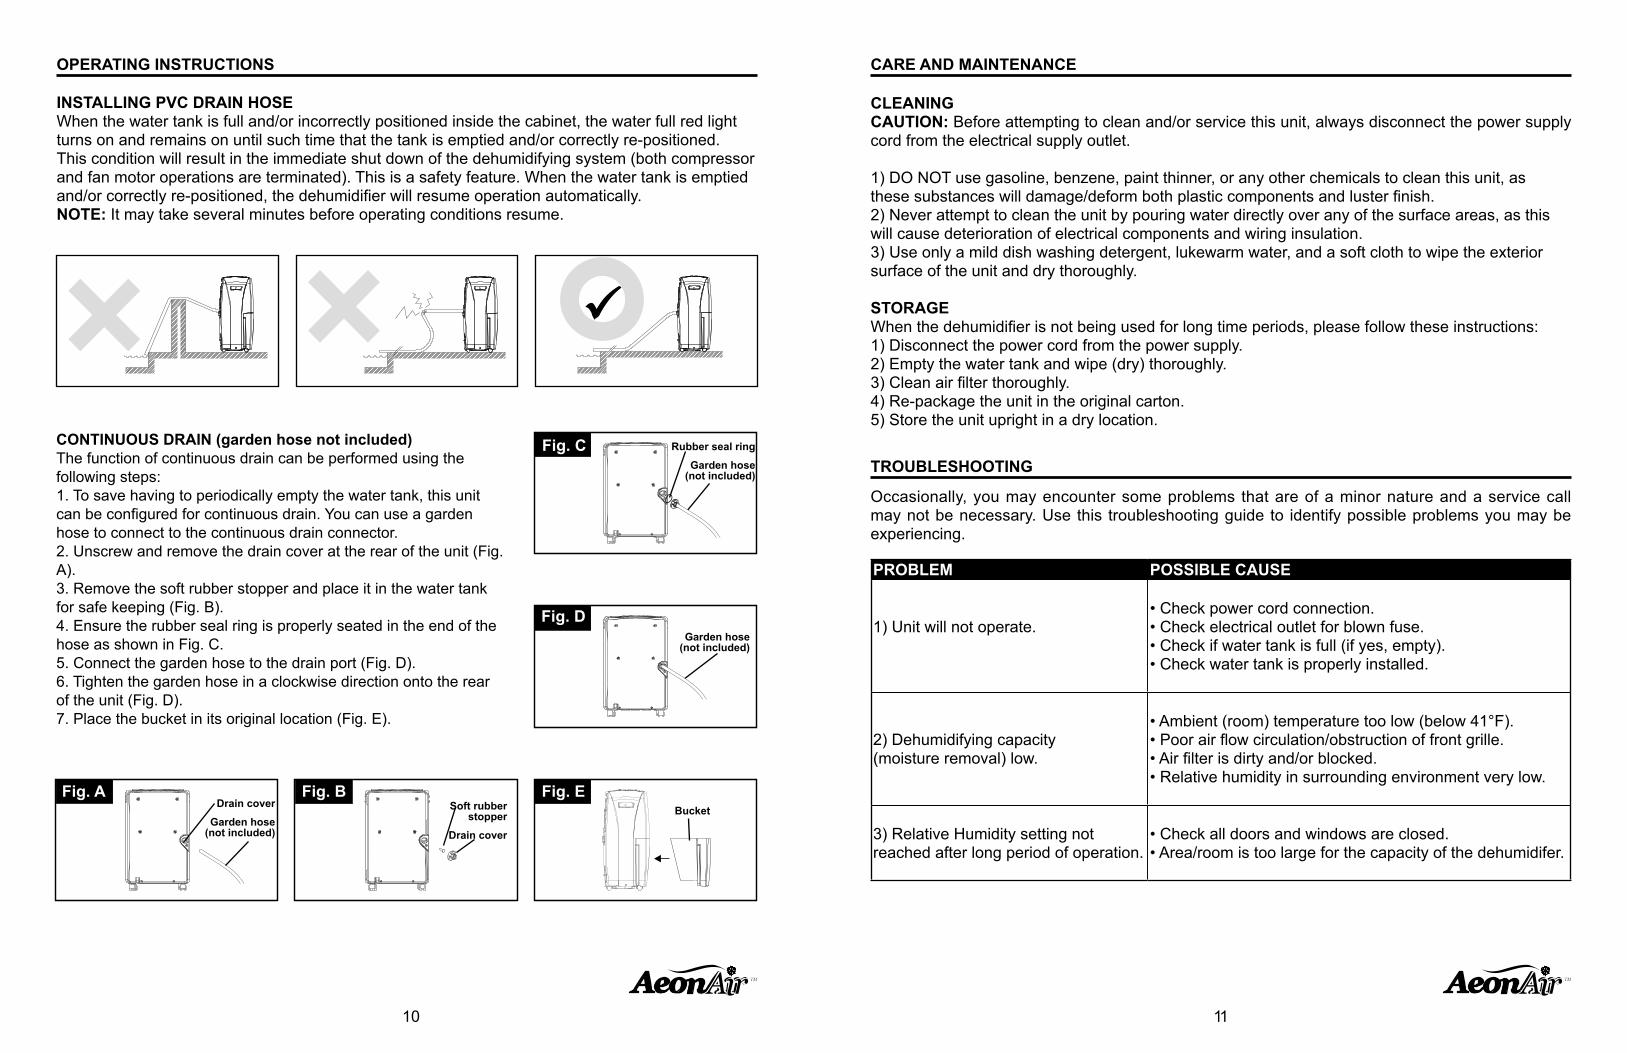
CONTINUOUS DRAIN (garden hose not included)The function of continuous drain can be performed using thefollowing steps: 1. To save having to periodically empty the water tank, this unit can be configured for continuous drain. You can use a garden hose to connect to the continuous drain connector.2. Unscrew and remove the drain cover at the rear of the unit (Fig. A).3. Remove the soft rubber stopper and place it in the water tank for safe keeping (Fig. B). 4. Ensure the rubber seal ring is properly seated in the end of the hose as shown in Fig. C. 5. Connect the garden hose to the drain port (Fig. D). 6. Tighten the garden hose in a clockwise direction onto the rear of the unit (Fig. D). 7. Place the bucket in its original location (Fig. E).
Drain cover
Garden hose(not included)
Rubber seal ring
Garden hose(not included)
Garden hose(not included)
Bucket Soft rubber stopper
Drain cover
Occasionally, you may encounter some problems that are of a minor nature and a service call may not be necessary. Use this troubleshooting guide to identify possible problems you may be experiencing.
PROBLEM POSSIBLE CAUSE
1) Unit will not operate.• Check power cord connection. • Check electrical outlet for blown fuse. • Check if water tank is full (if yes, empty). • Check water tank is properly installed.
2) Dehumidifying capacity (moisture removal) low.
• Ambient (room) temperature too low (below 41°F). • Poor air flow circulation/obstruction of front grille. • Air filter is dirty and/or blocked. • Relative humidity in surrounding environment very low.
3) Relative Humidity setting not reached after long period of operation.
• Check all doors and windows are closed. • Area/room is too large for the capacity of the dehumidifer.
TMTM
Fig. A Fig. B
Fig. C
Fig. D
Fig. E

WARRANTY
12
LIMITED APPLIANCE WARRANTYThis quality product is warranted to be free from manufacturer’s defects in material andworkmanship, provided that the unit is used under the normal operating conditions intended by themanufacturer. This warranty is available only to the person to whom the unit was originally sold bymanufacturer or by an authorized distributor of manufacturer, and is non-transferable.
TERMS OF WARRANTYPlastic parts, are warranted for thirty (30) days only from purchase date, with no extensionsprovided.
First 12 Months:During the first twelve (12) months, any functional parts of this product found to be defective, willbe repaired or replaced, at warrantor’s option, at no charge to the ORIGINAL purchaser.
To obtain service: Call 1-855-900-1298 or RETURN TO THE STORE WHERE PURCHASEFOR REPLACEMENT.
EXCLUSIONSSave as herein provided, manufacturer, there are no other warranties, conditions, representationsor guarantees, express or implied, made or intended by manufacturer or its authorized distributorsand all other warranties, conditions, representations or guarantees, including any warranties,conditions, representations or guarantees under any Sale of Goods Act or like legislation or statueis hereby expressly excluded. Save as herein provided, manufacturer shall not be responsiblefor any damages to persons or property, including the unit itself, howsoever caused or anyconsequential damages arising from the malfunction of the unit and by the purchase of the unit,the purchaser does hereby agree to indemnify and hold harmless manufacturer from any claim fordamages to persons or property caused by the unit.
As some states do not allow the limitation or exclusion of incidental or consequential damages, ordo not allow limitation on implied warranties, the above limitations and exclusions may not applyto you . This warranty gives you specific legal rights, and you may also have other rights that varyfrom state to state.
GENERAL PROVISIONSNo warranty or insurance herein contained or set out shall apply when damage or repair is causedby any of the following: 1) Power failure. 2) Damage in transit or when moving the appliance. 3) Improper power supply such as low voltage, defective house wiring or inadequate fuses. 4) Accident, alteration, abuse or misuse of the appliance such as inadequate air circulation in the room or abnormal operating conditions (extremely high or low room temperature). 5) Use for commercial or industrial purposes (ie. If the appliance is not installed in a domestic residence). 6) Fire, water damage, theft, war, riot, hostility, acts of God such as hurricanes, floods, etc. 7) Service calls resulting in customer education. 8) Improper Installation (ie. Building-in of a free standing appliance or using an appliance outdoors that is not approved for outdoor application).
Proof of purchase date will be required for warranty claims; so, please retain bills of sale.
TM
13
TM
REPLACEMENT PARTS LIST
PART DESCRIPTION PART #1 DRAIN BUCKET D5401-680-A-A52 AIR FILTER D7301-330-A-A53 TURING WHEEL D7402-1004 SOFT CAP D7324-0305 PLUG D7306-110-H-A5
For replacement parts, call our customer service department at 1-855-900-1298, 8 a.m. - 6 p.m., EST, Monday – Thursday, 8 a.m. - 5 p.m., EST, Friday.
1
23
45
Printed in China

ARTÍCULO #0526013
DESHUMIDIFICADORMODELO: WDH-945EL
ADJUNTE SU RECIBO AQUÍNúmero de serie __________ Fecha de compra__________
14
¿Preguntas, problemas, piezas faltantes? Antes de volver a la tienda, llame a nuestro Departamento de Servicio al Cliente al 1-855-900-1298, de lunes a jueves de 8 a.m. a 6 p.m., y los viernes de 8 a.m. a 5 p.m., hora estándar del Este.
TM
ÍNDICE
15
CONTENIDO DEL PAQUETE .................................................................................. 16
INFORMACIÓN DE SEGURIDAD ............................................................................ 17
INSTRUCCIONES DE FUNCIONAMIENTO ............................................................ 20
CUIDADO Y MANTENIMIENTO ............................................................................... 24
SOLUCIÓN DE PROBLEMAS .................................................................................. 24
GARANTÍA ................................................................................................................ 25
LISTA DE PIEZAS DE REPUESTO .......................................................................... 26
TM
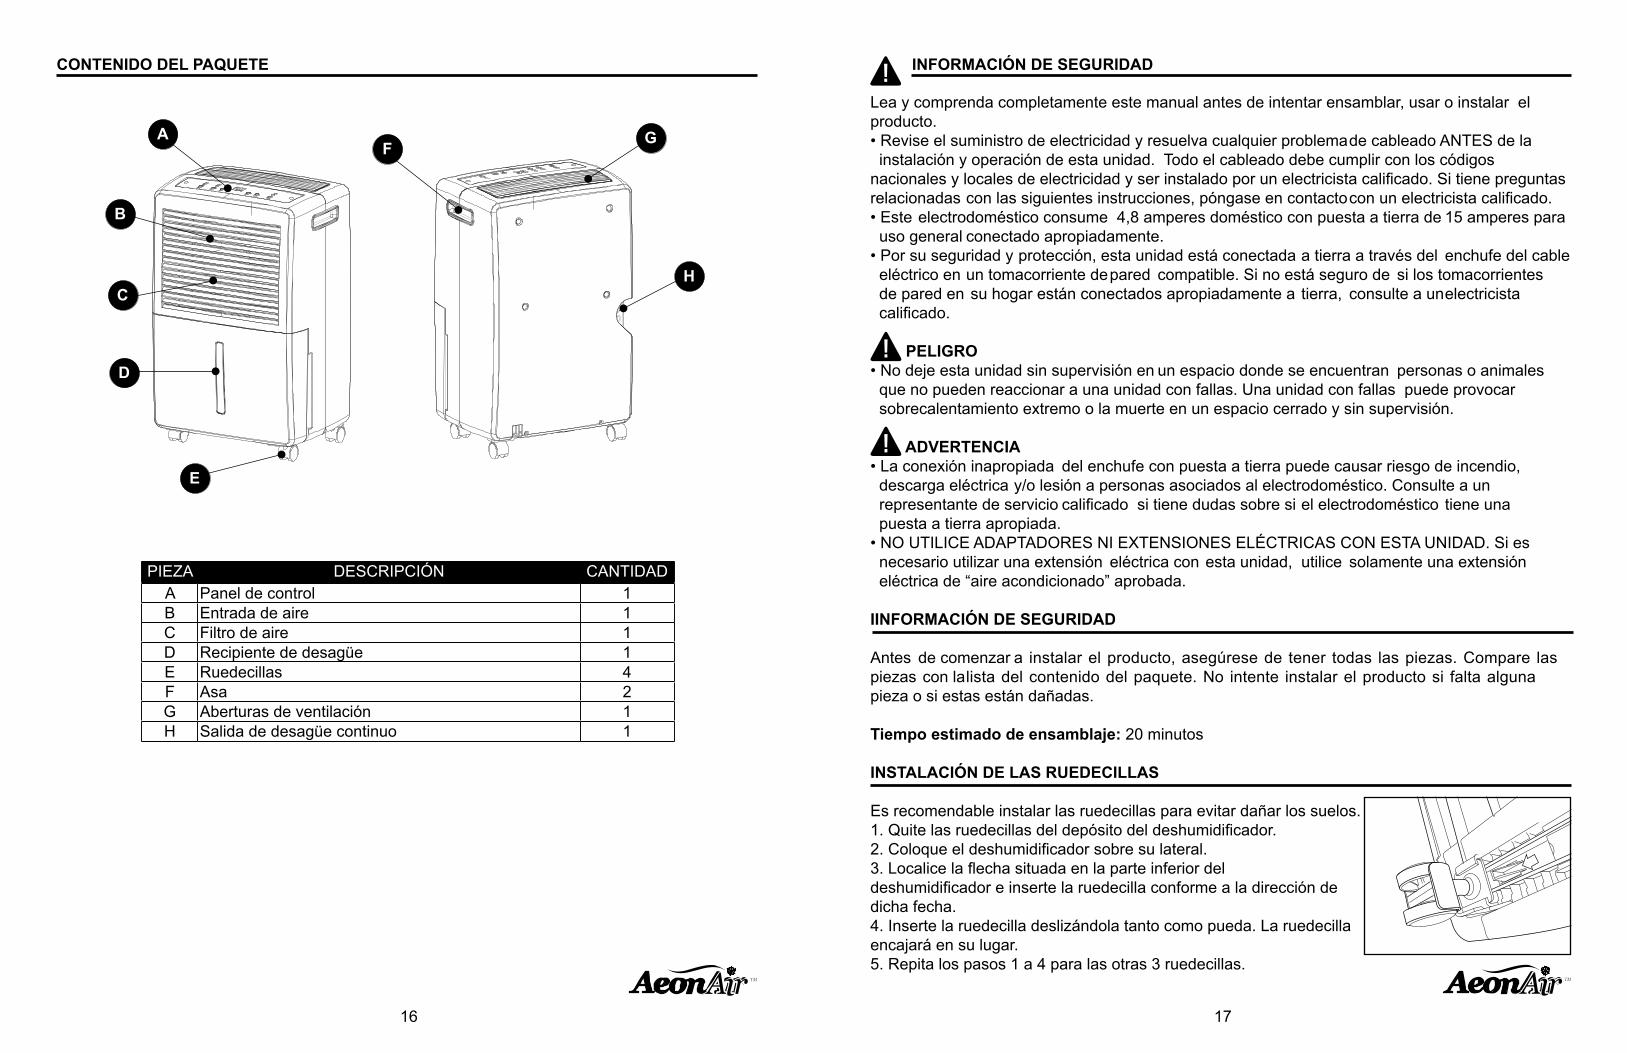
CONTENIDO DEL PAQUETE
16
PIEZA DESCRIPCIÓN CANTIDADA Panel de control 1B Entrada de aire 1C Filtro de aire 1D Recipiente de desagüe 1E Ruedecillas 4F Asa 2G Aberturas de ventilación 1H Salida de desagüe continuo 1
A
D
E
C
B
H
GF
TM
Lea y comprenda completamente este manual antes de intentar ensamblar, usar o instalar el producto.• Revise el suministro de electricidad y resuelva cualquier problema de cableado ANTES de la instalación y operación de esta unidad. Todo el cableado debe cumplir con los códigos nacionales y locales de electricidad y ser instalado por un electricista calificado. Si tiene preguntas relacionadas con las siguientes instrucciones, póngase en contacto con un electricista calificado.• Este electrodoméstico consume 4,8 amperes doméstico con puesta a tierra de 15 amperes para uso general conectado apropiadamente.• Por su seguridad y protección, esta unidad está conectada a tierra a través del enchufe del cable eléctrico en un tomacorriente de pared compatible. Si no está seguro de si los tomacorrientes de pared en su hogar están conectados apropiadamente a tierra, consulte a un electricista calificado.
PELIGRO• No deje esta unidad sin supervisión en un espacio donde se encuentran personas o animales que no pueden reaccionar a una unidad con fallas. Una unidad con fallas puede provocar sobrecalentamiento extremo o la muerte en un espacio cerrado y sin supervisión.
ADVERTENCIA• La conexión inapropiada del enchufe con puesta a tierra puede causar riesgo de incendio, descarga eléctrica y/o lesión a personas asociados al electrodoméstico. Consulte a un representante de servicio calificado si tiene dudas sobre si el electrodoméstico tiene una puesta a tierra apropiada.• NO UTILICE ADAPTADORES NI EXTENSIONES ELÉCTRICAS CON ESTA UNIDAD. Si es necesario utilizar una extensión eléctrica con esta unidad, utilice solamente una extensión eléctrica de “aire acondicionado” aprobada.
IINFORMACIÓN DE SEGURIDAD
Antes de comenzar a instalar el producto, asegúrese de tener todas las piezas. Compare las piezas con la lista del contenido del paquete. No intente instalar el producto si falta alguna pieza o si estas están dañadas.
Tiempo estimado de ensamblaje: 20 minutos
INSTALACIÓN DE LAS RUEDECILLAS
Es recomendable instalar las ruedecillas para evitar dañar los suelos.1. Quite las ruedecillas del depósito del deshumidificador.2. Coloque el deshumidificador sobre su lateral.3. Localice la flecha situada en la parte inferior del deshumidificador e inserte la ruedecilla conforme a la dirección de dicha fecha.4. Inserte la ruedecilla deslizándola tanto como pueda. La ruedecilla encajará en su lugar.5. Repita los pasos 1 a 4 para las otras 3 ruedecillas.
INFORMACIÓN DE SEGURIDAD
17
TM

INFORMACIÓN DE SEGURIDAD
18
20c m
1. NO jale del cable eléctrico para evitar roturas, peligros potenciales o lesiones.
2. NO utilice repelente para insectos, aceite en aerosol o pintura en aerosol alrededor de la máquina. Estos productos podrían dañar las piezas plásticas o iniciar un incendio.
3. NO coloque la unidad sobre suelo disparejo para evitar que se agite, el ruido y las fugas de agua.
4. Siempre mantenga la unidad a 20 cm o más de la pared, para que el calor se disipe apropiadamente.
1
2
3
4
TM
19
INFORMACIÓN DE SEGURIDAD
5. NO deje caer nada en la máquina.
6. Cier re t odas las v entanas par a obt ener la mayor eficacia o eliminación de humedad posible.
7. Mantenga la máquina alejada de fuentes de calor de cualquier tipo.
8. Cuando lo mueva o almacene, no coloque el deshumidificador de l ado o de manera invertida y evite agitarlo.
5
6
7
8
TM
INSTRUCCIONES DE FUNCIONAMIENTO
20
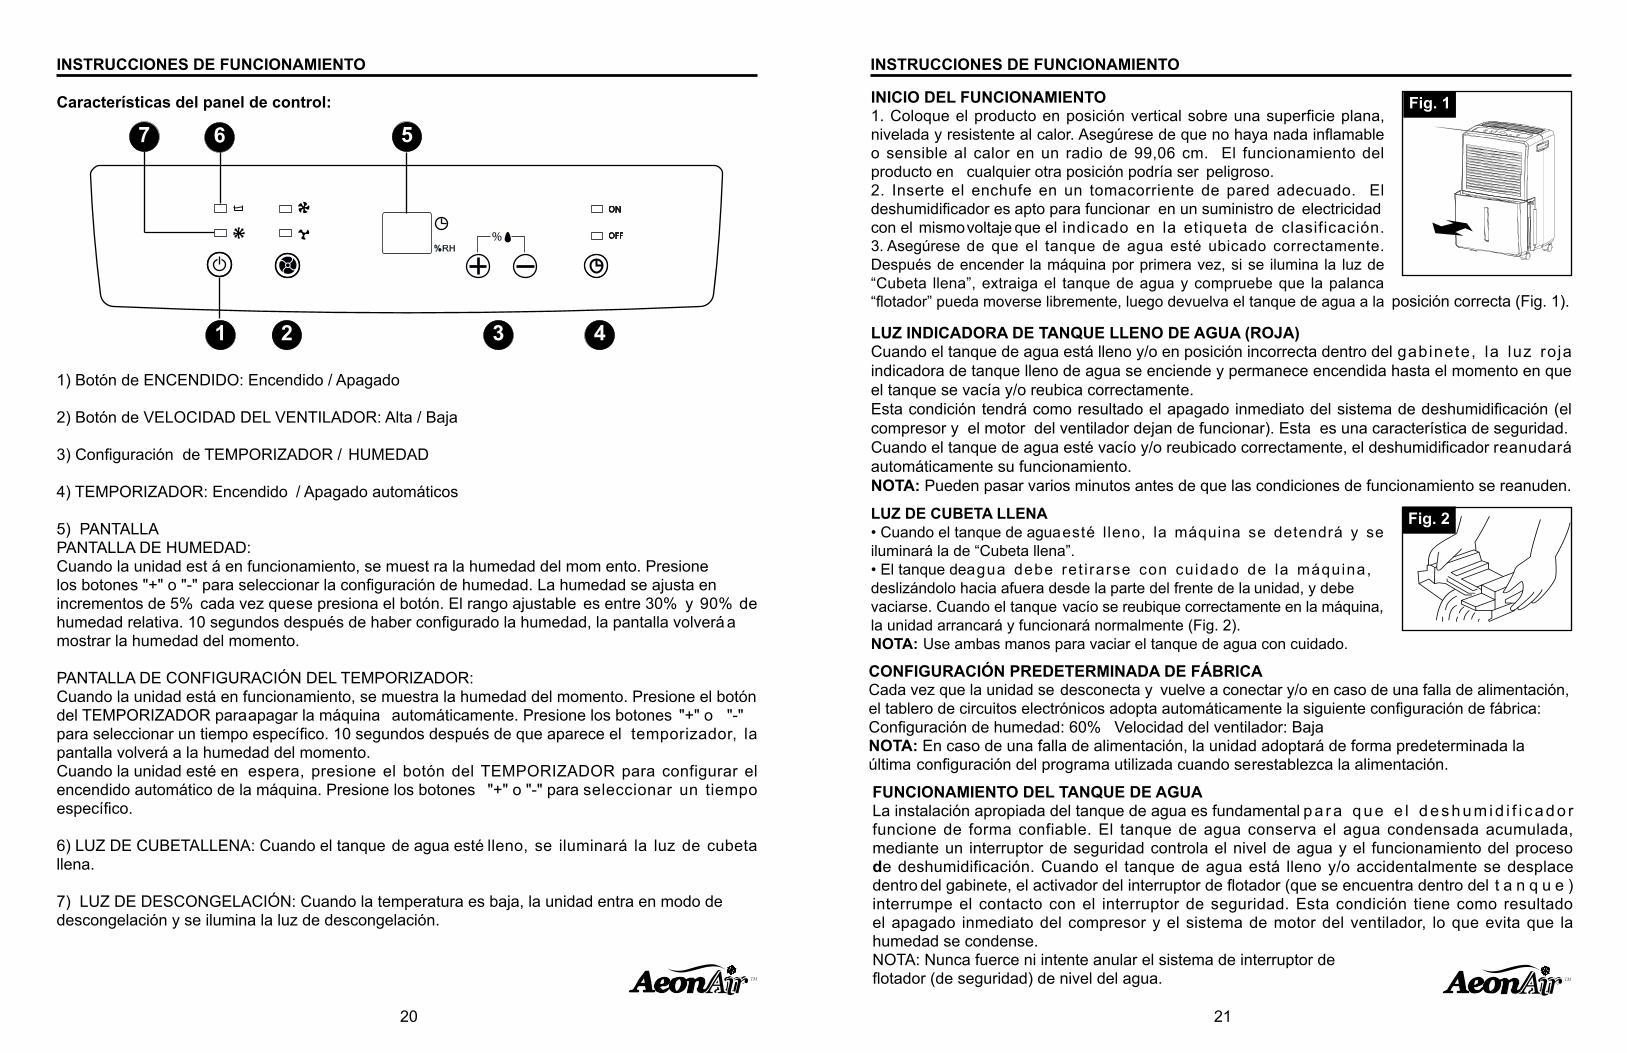
Características del panel de control:
1) Botón de ENCENDIDO: Encendido / Apagado
2) Botón de VELOCIDAD DEL VENTILADOR: Alta / Baja
3) Configuración de TEMPORIZADOR / HUMEDAD
4) TEMPORIZADOR: Encendido / Apagado automáticos
5) PANTALLAPANTALLA DE HUMEDAD:Cuando la unidad est á en funcionamiento, se muest ra la humedad del mom ento. Presione los botones "+" o "-" para seleccionar la configuración de humedad. La humedad se ajusta en incrementos de 5% cada vez que se presiona el botón. El rango ajustable es entre 30% y 90% de humedad relativa. 10 segundos después de haber configurado la humedad, la pantalla volverá a mostrar la humedad del momento.
PANTALLA DE CONFIGURACIÓN DEL TEMPORIZADOR: Cuando la unidad está en funcionamiento, se muestra la humedad del momento. Presione el botón del TEMPORIZADOR para apagar la máquina automáticamente. Presione los botones "+" o "-" para seleccionar un tiempo específico. 10 segundos después de que aparece el temporizador, la pantalla volverá a la humedad del momento.Cuando la unidad esté en espera, presione el botón del TEMPORIZADOR para configurar el encendido automático de la máquina. Presione los botones "+" o "-" para seleccionar un tiempo específico.
6) LUZ DE CUBETA LLENA: Cuando el tanque de agua esté lleno, se iluminará la luz de cubeta llena.
7) LUZ DE DESCONGELACIÓN: Cuando la temperatura es baja, la unidad entra en modo de descongelación y se ilumina la luz de descongelación.
1 2 3 4
567
TM
INSTRUCCIONES DE FUNCIONAMIENTO
21
TM
INICIO DEL FUNCIONAMIENTO1. Coloque el producto en posición vertical sobre una superficie plana, nivelada y resistente al calor. Asegúrese de que no haya nada inflamable o sensible al calor en un radio de 99,06 cm. El funcionamiento del producto en cualquier otra posición podría ser peligroso.2. Inserte el enchufe en un tomacorriente de pared adecuado. El deshumidificador es apto para funcionar en un suministro de electricidad con el mismo voltaje que el indicado en la etiqueta de clasificación.3. Asegúrese de que el tanque de agua esté ubicado correctamente. Después de encender la máquina por primera vez, si se ilumina la luz de “Cubeta llena”, extraiga el tanque de agua y compruebe que la palanca “flotador” pueda moverse libremente, luego devuelva el tanque de agua a la
LUZ DE CUBETA LLENA• Cuando el tanque de agua esté lleno, la máquina se detendrá y se iluminará la de “Cubeta llena”. • El tanque de agua debe ret i rarse con cuidado de la máquina, deslizándolo hacia afuera desde la parte del frente de la unidad, y debe vaciarse. Cuando el tanque vacío se reubique correctamente en la máquina, la unidad arrancará y funcionará normalmente (Fig. 2).NOTA: Use ambas manos para vaciar el tanque de agua con cuidado.
LUZ INDICADORA DE TANQUE LLENO DE AGUA (ROJA)Cuando el tanque de agua está lleno y/o en posición incorrecta dentro del gabinete, la luz roja indicadora de tanque lleno de agua se enciende y permanece encendida hasta el momento en que el tanque se vacía y/o reubica correctamente.Esta condición tendrá como resultado el apagado inmediato del sistema de deshumidificación (el compresor y el motor del ventilador dejan de funcionar). Esta es una característica de seguridad. Cuando el tanque de agua esté vacío y/o reubicado correctamente, el deshumidificador reanudará automáticamente su funcionamiento.NOTA: Pueden pasar varios minutos antes de que las condiciones de funcionamiento se reanuden.
FUNCIONAMIENTO DEL TANQUE DE AGUALa instalación apropiada del tanque de agua es fundamental p a r a q u e e l d e s h u m i d i f i c a d o r funcione de forma confiable. El tanque de agua conserva el agua condensada acumulada, mediante un interruptor de seguridad controla el nivel de agua y el funcionamiento del proceso de deshumidificación. Cuando el tanque de agua está lleno y/o accidentalmente se desplace dentro del gabinete, el activador del interruptor de flotador (que se encuentra dentro del t a n q u e )interrumpe el contacto con el interruptor de seguridad. Esta condición tiene como resultado el apagado inmediato del compresor y el sistema de motor del ventilador, lo que evita que la humedad se condense.NOTA: Nunca fuerce ni intente anular el sistema de interruptor de flotador (de seguridad) de nivel del agua.
CONFIGURACIÓN PREDETERMINADA DE FÁBRICACada vez que la unidad se desconecta y vuelve a conectar y/o en caso de una falla de alimentación, el tablero de circuitos electrónicos adopta automáticamente la siguiente configuración de fábrica:Configuración de humedad: 60% Velocidad del ventilador: Baja NOTA: En caso de una falla de alimentación, la unidad adoptará de forma predeterminada la última configuración del programa utilizada cuando se restablezca la alimentación.
Fig. 1
Fig. 2
posición correcta (Fig. 1).

INSTRUCCIONES DE FUNCIONAMIENTO
22
DESCONGELACIÓN Cuando la máquina funciona a temperaturas bajas (menos de 18 °C o 64,4 °F), la superficie del evaporador puede acumular una capa de escarcha que reduciría la eficacia de la máquina.Cuando esto ocurra, la máquina entrará en modo de descongelamiento periódico. La máquina funcionará en temperaturas mínimas de 5 °C (41 °F). El tiempo de descongelación puede variar. Si la máquina se congela, se debe apagarse el suministro de electricidad y reiniciarse. Si la temperatura ambiente sigue siendo inferior a 5 °C (41 °F), se debe apagar la máquina.
DESHUMIDIFICACIÓNSELECCIÓN DEL MODO DE DESHUMIDIFICACIÓN: 1) Para encender la unidad, presione el botón de ENCENDIDO / APAGADO. 2) Presione el botón de humedad para seleccionar un valor de funcionamiento de humedad relativa deseado (30% a 90%). SELECCIÓN DE VELOCIDAD DEL VENTILADOR: Seleccione la velocidad del ventilador en el teclado. La velocidad que seleccione se identifica con la luz indicadora (iluminada) que se encuentra directamente sobre el modo de selección.
Fig. 2
Fig. 3
FILTRO DEL AIREEl deshumidificador cuenta con un filtro de aire extraíble. Este filtro se encuentra situado en la parte frontal de la unidad (detrás de la rejilla de entrada de aire), justamente encima del compartimento del depósito de agua. El filtro del aire juega un papel importante en ayudar a reducir (minimizar) las partículas de polvo y suciedad del entorno. Si el filtro del aire se bloquea u obstruye, reducirá la entrada de aire, lo que afectará negativamente a la eficiencia de funcionamiento. Para mantener la eficiencia de funcionamiento máxima, el filtro se debe comprobar y limpiar regularmente (cada 2 semanas). Puede ser necesario realizar la limpieza más frecuentemente en función de la calidad del aire de entrada.IMPORTANTE: Nunca utilice la unidad sin que el filtro del aire esté colocado.
PASOS PARA LA LIMPIEZA DEL FILTRO DE AIRE:1) Extraiga con suavidad el filtro de aire (Fig.3).2) Limpie el filtro con la aspiradora o lávelo con agua caliente y séquelo con un paño seco.3) Vuelva a colocar el filtro de aire en su lugar y continúe utilizando el deshumidificador.
TM
INSTRUCCIONES DE FUNCIONAMIENTO
23
INSTALACIÓN DE LA MANGUERA DE DESAGÜE DE PVCCuando el tanque de agua está lleno y/o en posición incorrecta dentro del gabinete, la luz roja indicadora de tanque lleno de agua se enciende y permanece encendida hasta el momento en que el tanque se vacía y/o reubica correctamente.Esta condición tendrá como resultado el apagado inmediato del sistema de deshumidificación (el compresor y el motor del ventilador dejan de funcionar). Esta es una característica de seguridad. Cuando el tanque de agua esté vacío y/o reubicado correctamente, el deshumidificador reanudará automáticamente su funcionamiento.NOTA: Pueden pasar varios minutos antes de que las condiciones de funcionamiento se reanuden.
DESAGUADO CONTINUO (manguera no incluida)La función de desaguado continuo se puede realizar siguiendo los pasos que se indican a continuación:1. Para no tener que vaciar el depósito de agua periódicamente, esta unidad se puede configurar para desaguado continuo. Puede utilizar la manguera para unirla al conector de desaguado continuo (manguera no incluida).2. Desatornille la tapa de desagüe y quítela de la unidad (Fig. A).3. Quite el tope de goma mullido y colóquelo en el depósito de agua para que no se pierda (Fig. B).4. Asegúrese de que el ani l lo de sel lado de goma está correctamente asentado en el extremo de la manguera tal y como se muestra en la Fig. C.5. Conecte la manguera a la toma de desagüe (Fig. D).6. Apriete la manguera a la parte trasera de la unidad girándola en el sentido de las agujas del reloj (Fig. D).7. Coloque el depósito en su posición original (Fig. E).
Cubierta de desagüe
Manguera para jardín
(no se incluye)
Anillo sellador de goma
Manguera para jardín
(no se incluye)
Manguera para jardín
(no se incluye)
CubetaTapón de goma
suave para cubeta
Cubierta de desagüe
TM
Fig. A Fig. B
Fig. C
Fig. D
Fig. E

CUIDADO Y MANTENIMIENTO
SOLUCIÓN DE PROBLEMAS
24
LIMPIEZAPRECAUCIÓN: Antes de intentar limpiar y/o realizar mantenimiento a esta unidad, siempre desconecte el cable del suministro de electricidad del tomacorriente.
1) NO use gasolina, benceno, disolvente de pintura ni cualquier otro químico para limpiar esta unidad, ya que estas sustancias dañarán o deformarán los componentes plásticos y el brillo del acabado.2) Nunca intente limpiar la unidad vertiendo agua directamente sobre cualquiera de las superficies, ya que esto provocaría el deterioro de los componentes eléctricos y el aislamiento del cableado.3) Use solo detergent e suave para lavar plat os, agua t ibia y un paño suave para limpiar la superficie de la unidad y séquela bien.
ALMACENAJECuando no use el deshumidificador por períodos prolongados, siga estas instrucciones: 1) Desconecte el cable de alimentación del suministro de electricidad.2) Vacíe el tanque de agua y séquelo bien con un paño.3) Limpie bien el filtro de aire.4) Vuelva a guardar la unidad en su caja original. 5) Almacene la unidad en posición vertical en un lugar seco.
En ocasiones, es posible que tenga algunos problemas menores para los que no es necesario llamar a Servicio al Cliente. Use esta guía de solución de problemas para identificar los posibles problemas que pudiera estar experimentando.
PROBLEMA CAUSA POSIBLE
1) La unidad no funciona.• Revise la conexión del cable de alimentación.• Revise el tomacorriente para ver si hay un fusible fundido.• Revise si el tanque de agua está lleno (si es así, vacíelo).• Revise que el tanque de agua esté bien instalado.
2) Capacidad de deshumidificación (eliminación de humedad) baja.
• La temperatura ambiente (de la habitación) es demasiado baja (inferior a 5 °C o 41°F).• Mala circulación del aire/obstrucción de la rejilla frontal.• El filtro de aire está sucio y/o bloqueado.• La humedad relativa en el entorno es muy baja.
3) La configuración de humedad relativa no se alcanzó después de un período prolongado de funcionamiento.
• Revise que todas las ventanas y puertas estén cerradas.• El área o la habitación es demasiado grande para la capacidad del deshumidificador.
TM
25
TM
GARANTÍA
GARANTÍA LIMITADA DE ELECTRODOMÉSTICOSLa calidad de este producto está garantizada contra defectos de fabricación en los materiales y la mano de obra, siempre que la unidad se use en las condiciones de funcionamiento normales previstas por el fabricante. Esta garantía solamente está disponible para la persona a la que el fabricante, o un distribuidor autorizado por el fabricante, vendió la unidad y no es transferible.
TÉRMINOS DE GARANTÍALas piezas plásticas cuentan con garantía por un período de treinta (30) días desde la fecha de compra, sin extensiones.
Los primeros 12 meses:Durante los primeros doce (12) meses, todas las piezas funcionales de este producto que se encuentren defectuosas, serán reparadas o reemplazadas, a opción del garante, sin costo alguno para el comprador ORIGINAL.
Para obtener servicio: Llame al 1-855-900-1298 o DEVUELVA EL PRODUCTO A LA TIENDA DONDE LO COMPRÓ PARA QUE LO REEMPLACEN.
EXCLUSIONESSalvo lo aquí indicado, no existen otras garantías, condiciones, representaciones o garantías, expresas o implícitas, hechas o previstas por el fabricante o sus distribuidores autorizados y todas las demás garantías, condiciones, representaciones o garantías, incluidas las garantías, condiciones, representaciones o garantías en virtud de cualquier Ley de venta de bienes o legislación o estatuto similar quedan expresamente excluidas. Salvo lo aquí indicado, el fabricante no será responsable por ningún daño a personas o a la propiedad, incluida la unidad en sí, independientemente de su causa o los daños ocasionados por el mal funcionamiento de la unidad y por la compra de la unidad; el comprador acuerda mediante el presente indemnizar y eximir de responsabilidad al fabricante de cualquier reclamación por daños a personas o a la propiedad causados por la unidad.
Dado que algunos estados no permiten la limitación o exclusión de daños accidentales o resultantes, o no permiten limitaciones en garantías implícitas, las limitaciones y exclusiones anteriores pueden no aplicarse a usted. Esta garantía le otorga derechos legales específicos, pero podría tener también otros derechos que varían según el estado.
DISPOSICIONES GENERALESNinguna garantía o seguro de lo contenido o establecido en el presente se aplicará cuando el daño o la reparación sea causada por cualquiera de los siguientes: 1) Falla de energía. 2) Daño en el tránsito o al mover el electrodoméstico. 3) Suministro de electricidad inadecuado como bajo voltaje, cableado de la casa defectuoso o fusibles inadecuados. 4) Accidentes, alteraciones, abuso o mal uso del electrodoméstico, como circulación inadecuada de aire en la habitación o condiciones anormales de operación (temperatura ambiente demasiado alta o baja). 5) Uso con fines comerciales o industriales (es decir, si el electrodoméstico no se instala en una residencia doméstica). 6) Incendio, daños producidos por agua, robo, guerra, motín, hostilidad, desastres naturales como huracanes, inundaciones, etc. 7) Llamadas de Servicio al Cliente para educación del cliente. 8) Instalación inadecuada (es decir, construcción de un electrodoméstico independiente o utilización de un electrodoméstico al aire libre que no esté aprobado para dicho uso).
Se requerirá un comprobante de la fecha de compra para las reclamaciones de garantía, conserve los comprobantes de venta.

LISTA DE PIEZAS DE REPUESTO
26
TM
PIEZA DESCRIPCIÓN PIEZA #1 CUBETA DE DESAGÜE D5401-680-A-A52 FILTRO DE AIRE D7301-330-A-A53 RUEDA GIRATORIA D7402-1004 TAPA SUAVE D7324-0305 ENCHUFE D7306-110-H-A5
Para obtener piezas de repuesto, llame a nuestro Departamento de Servicio al Cliente al 1-855-900-1298, de lunes a jueves de 8 a.m. a 6 p.m., y los viernes de 8 a.m. a 5 p.m., hora estándar del Este.
1
23
45
Impreso en China
