dell emc vxrack system sddc upgrade guide for vmware cloud ... · from one vxrack system rcm...
TRANSCRIPT

DELL EMC VXRACK™ SYSTEM SDDC UPGRADE GUIDE FOR VMWARE CLOUD FOUNDATION
Version 2.2 Family
December 2017
ABSTRACT
This upgrade guide describes how to upgrade Dell EMC VxRack System SDDC to the
current software releases.
UPGRADE GUIDE

Copyright
2 Dell EMC VxRack System SDDC Upgrade Guide for VMware Cloud Foundation Version 2.2 Family Upgrade Guide
The information in this publication is provided as is. Dell Inc. makes no representations or warranties of any kind with respect to the information in this publication, and specifically disclaims implied warranties of merchantability or fitness for a particular purpose.
Use, copying, and distribution of any software described in this publication requires an applicable software license.
Copyright © 2017 Dell Inc. or its subsidiaries. All Rights Reserved. Dell, EMC, Dell EMC and other trademarks are trademarks of Dell Inc. or its subsidiaries. Intel, the Intel logo, the Intel Inside logo, and Xeon are trademarks of Intel Corporation in the U.S. and/or other countries. Other trademarks may be the property of their respective owners. Published in the USA 12/17 Upgrade Guide.
Dell Inc. believes the information in this document is accurate as of its publication date. The information is subject to change without notice.
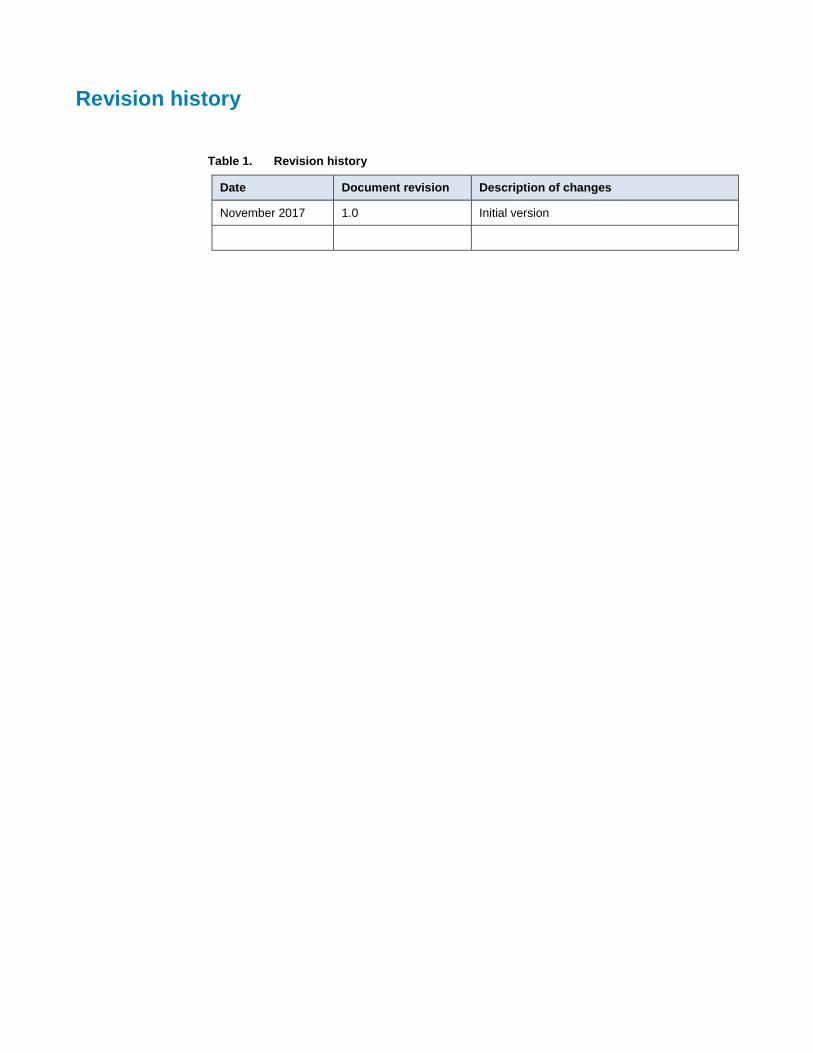
Revision history
Table 1. Revision history
Date Document revision Description of changes
November 2017 1.0 Initial version

Contents
4 Dell EMC VxRack System SDDC Upgrade Guide for VMware Cloud Foundation Version 2.2 Family Upgrade Guide
Contents
Introduction ................................................................................................................................... 5
Upgrade prerequisites .................................................................................................................. 5
Upgrade best practices and planning .......................................................................................... 6
Estimating the upgrade time ........................................................................................................ 7
VMware 2.2.0.1, 2.2.0.2, and 2.2.1 upgrade patch information ................................................... 7
System check prerequisites ......................................................................................................... 8
Prerequisites for upgrading to VMware Cloud Foundation ........................................................ 8
Upgrading firmware and BIOS on Dell servers ......................................................................... 12
Verifying NSX Manager installations ......................................................................................... 19
Upgrading the bundles ............................................................................................................... 20
Postupgrade clean-up ................................................................................................................. 26
Upgrading vRealize Operations ................................................................................................. 27
Upgrading Cisco switches .......................................................................................................... 28

Introduction
5 Dell EMC VxRack System SDDC Upgrade Guide for VMware Cloud Foundation Version 2.2 Family
Upgrade Guide
Introduction
The current Release Certification Matrix (RCM) release supports an upgrade from
VMware Cloud Foundation version 2.2 to version 2.2.0.1. You must upgrade incrementally
from one VxRack System RCM release to another.
VMware Cloud Foundation software upgrades are sequential. To upgrade to a specific
version, ensure that your environment is running one version previous to the version that
you plan to install.
These upgrade instructions apply to the VxRack System SDDC 1.0 release that is based
on VMware Cloud Foundation 2.2.0.
For more information, see:
The Dell EMC VxRack System SDDC Release 3.2.4 Certification Matrix
The Dell EMC Converged Systems Glossary
Upgrade prerequisites
To perform this upgrade, ensure that you:
Are familiar with Converged System concepts and terminology
Can troubleshoot Converged Systems
Are experienced with VMware Cloud Foundation system administration
Understand virtual machine technology and datacenter operations
Note: Ensure that you understand the entire upgrade process before you begin the Converged
System upgrade.
Before starting the upgrade, ensure that you have:
Network access to the Converged Systems and the management systems
Access to Ping, Traceroute, SSH, FTP server, TFTP server, and Telnet utilities and
tools
Before upgrading your system, complete the following tasks:
Review the VMware Cloud Foundation Release Notes for version 2.2.0.1 notes and
complete any required actions.
Ensure that the appropriate security policies are applied to the Converged Systems.
Upgrades do not modify Converged System security.
Prerequisite
skills
General system
prerequisites
Prerequisite
tasks

Upgrade best practices and planning
6 Dell EMC VxRack System SDDC Upgrade Guide for VMware Cloud Foundation Version 2.2 Family Upgrade Guide
Note: Baseline security standards for Converged Systems are available in Converged
Systems security documents.
Plan for the upgrade.
Calculate the upgrade time.
Schedule adequate downtime (if required) for system maintenance.
Ensure that all health checks have been completed.
Confirm that all components are in a ready state with no alarms.
Upgrade best practices and planning
To ensure minimum impact on the production traffic, follow these guidelines:
Before you begin the upgrade, review this entire upgrade document and each
referenced component upgrade document.
Perform the upgrade during scheduled maintenance windows or non-disruptively
when virtual machines are running. Best practice is to perform operational
verification after each component or a logical grouping of components have been
upgraded. Take this guideline into consideration during assessment and planning.
Before you begin the upgrade, confirm the overall status and software version of
each component. Verify that the component is in the ready state and is not
generating any alarms or errors.
Before you begin the upgrade, create a configuration backup file for each
Converged System component.
Because this process can take several hours to complete, schedule upgrades
outside of business hours.
Note that the Cloud Foundation Manager is available throughout the update
procedure. Dell EMC recommends that you schedule the Management Domain
update when the Cloud Foundation Manager is expected to have the least amount
of traffic.
Perform Workload Domain updates after the Management Domain updates are
successfully completed.
To minimize issues, update each Workload Domain separately.
Ensure that the Management Domain is running on the latest version of Cloud
Foundation. Workload Domains must be running on no later than three prior
versions of Cloud Foundation.
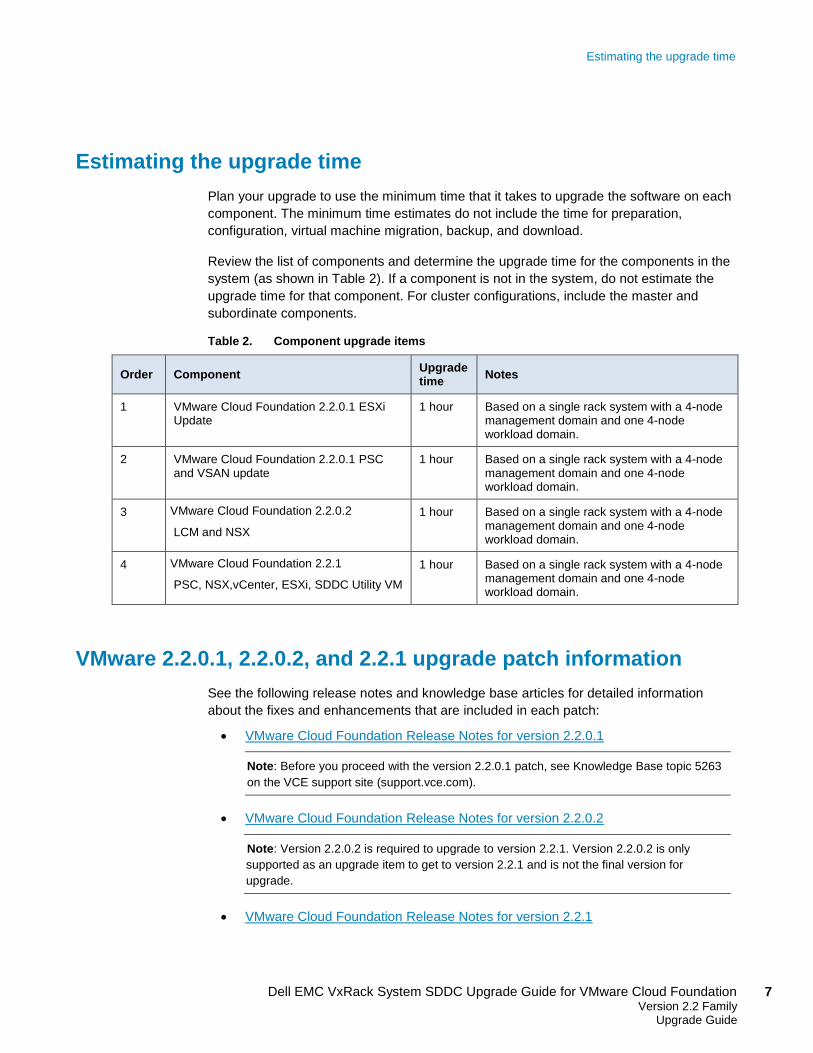
Estimating the upgrade time
7 Dell EMC VxRack System SDDC Upgrade Guide for VMware Cloud Foundation Version 2.2 Family
Upgrade Guide
Estimating the upgrade time
Plan your upgrade to use the minimum time that it takes to upgrade the software on each
component. The minimum time estimates do not include the time for preparation,
configuration, virtual machine migration, backup, and download.
Review the list of components and determine the upgrade time for the components in the
system (as shown in Table 2). If a component is not in the system, do not estimate the
upgrade time for that component. For cluster configurations, include the master and
subordinate components.
Table 2. Component upgrade items
Order Component Upgrade time
Notes
1 VMware Cloud Foundation 2.2.0.1 ESXi Update
1 hour Based on a single rack system with a 4-node management domain and one 4-node workload domain.
2 VMware Cloud Foundation 2.2.0.1 PSC and VSAN update
1 hour Based on a single rack system with a 4-node management domain and one 4-node workload domain.
3 VMware Cloud Foundation 2.2.0.2
LCM and NSX
1 hour Based on a single rack system with a 4-node management domain and one 4-node workload domain.
4 VMware Cloud Foundation 2.2.1
PSC, NSX,vCenter, ESXi, SDDC Utility VM
1 hour Based on a single rack system with a 4-node management domain and one 4-node workload domain.
VMware 2.2.0.1, 2.2.0.2, and 2.2.1 upgrade patch information
See the following release notes and knowledge base articles for detailed information
about the fixes and enhancements that are included in each patch:
VMware Cloud Foundation Release Notes for version 2.2.0.1
Note: Before you proceed with the version 2.2.0.1 patch, see Knowledge Base topic 5263
on the VCE support site (support.vce.com).
VMware Cloud Foundation Release Notes for version 2.2.0.2
Note: Version 2.2.0.2 is required to upgrade to version 2.2.1. Version 2.2.0.2 is only
supported as an upgrade item to get to version 2.2.1 and is not the final version for
upgrade.
VMware Cloud Foundation Release Notes for version 2.2.1
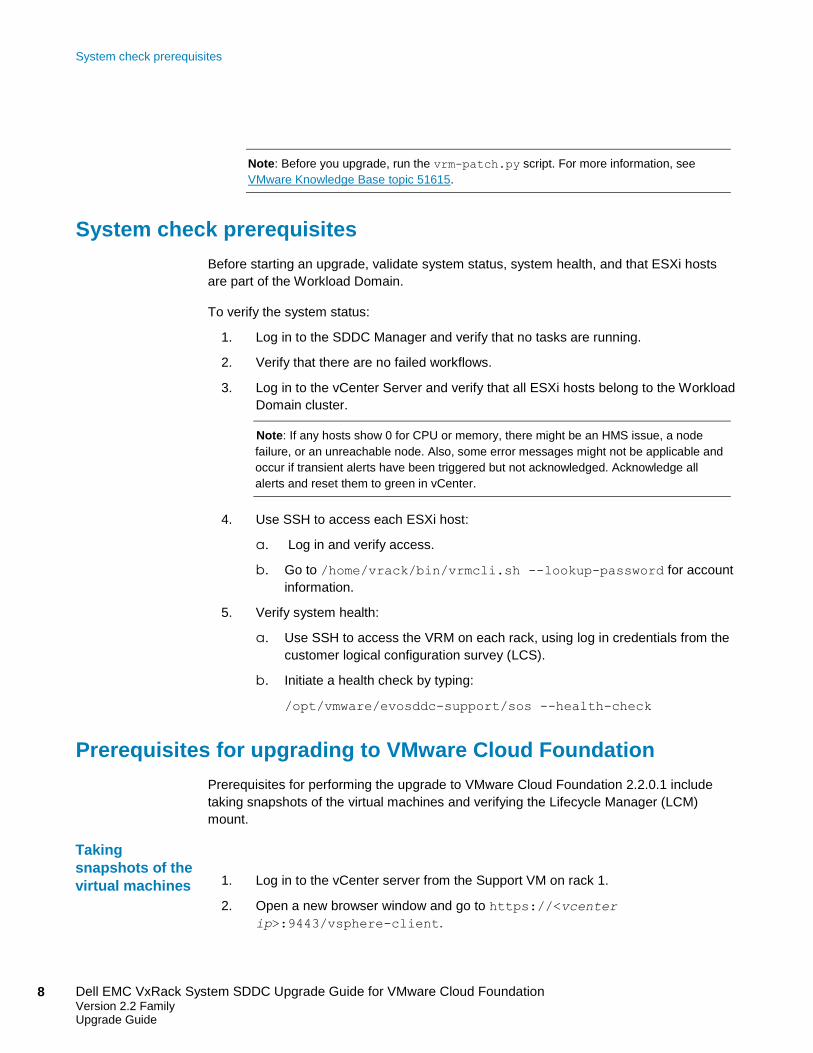
System check prerequisites
8 Dell EMC VxRack System SDDC Upgrade Guide for VMware Cloud Foundation Version 2.2 Family Upgrade Guide
Note: Before you upgrade, run the vrm-patch.py script. For more information, see
VMware Knowledge Base topic 51615.
System check prerequisites
Before starting an upgrade, validate system status, system health, and that ESXi hosts
are part of the Workload Domain.
To verify the system status:
1. Log in to the SDDC Manager and verify that no tasks are running.
2. Verify that there are no failed workflows.
3. Log in to the vCenter Server and verify that all ESXi hosts belong to the Workload
Domain cluster.
Note: If any hosts show 0 for CPU or memory, there might be an HMS issue, a node
failure, or an unreachable node. Also, some error messages might not be applicable and
occur if transient alerts have been triggered but not acknowledged. Acknowledge all
alerts and reset them to green in vCenter.
4. Use SSH to access each ESXi host:
a. Log in and verify access.
b. Go to /home/vrack/bin/vrmcli.sh --lookup-password for account
information.
5. Verify system health:
a. Use SSH to access the VRM on each rack, using log in credentials from the
customer logical configuration survey (LCS).
b. Initiate a health check by typing:
/opt/vmware/evosddc-support/sos --health-check
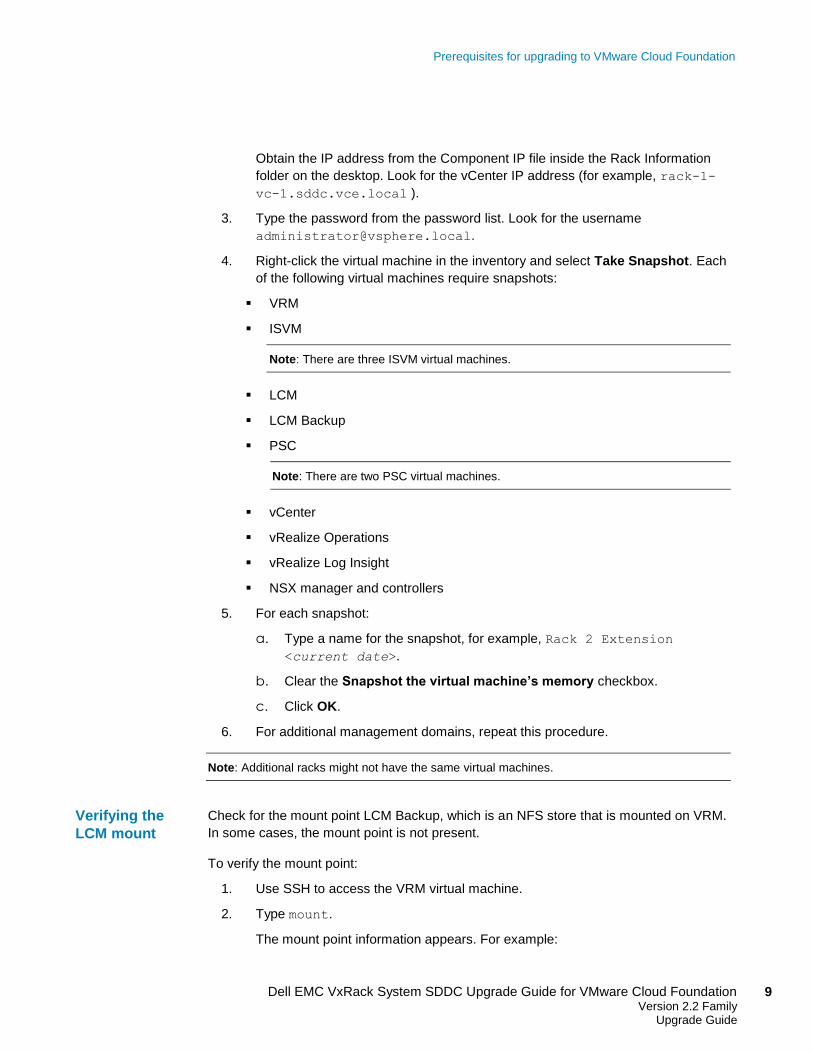
Prerequisites for upgrading to VMware Cloud Foundation
Prerequisites for performing the upgrade to VMware Cloud Foundation 2.2.0.1 include
taking snapshots of the virtual machines and verifying the Lifecycle Manager (LCM)
mount.
1. Log in to the vCenter server from the Support VM on rack 1.
2. Open a new browser window and go to https://<vcenter
ip>:9443/vsphere-client.
Taking
snapshots of the
virtual machines
Prerequisites for upgrading to VMware Cloud Foundation
9 Dell EMC VxRack System SDDC Upgrade Guide for VMware Cloud Foundation Version 2.2 Family
Upgrade Guide
Obtain the IP address from the Component IP file inside the Rack Information
folder on the desktop. Look for the vCenter IP address (for example, rack-1-
vc-1.sddc.vce.local ).
3. Type the password from the password list. Look for the username
4. Right-click the virtual machine in the inventory and select Take Snapshot. Each
of the following virtual machines require snapshots:
VRM
ISVM
Note: There are three ISVM virtual machines.
LCM
LCM Backup
PSC
Note: There are two PSC virtual machines.
vCenter
vRealize Operations
vRealize Log Insight
NSX manager and controllers
5. For each snapshot:
a. Type a name for the snapshot, for example, Rack 2 Extension
<current date>.
b. Clear the Snapshot the virtual machine’s memory checkbox.
c. Click OK.
6. For additional management domains, repeat this procedure.
Note: Additional racks might not have the same virtual machines.
Check for the mount point LCM Backup, which is an NFS store that is mounted on VRM.
In some cases, the mount point is not present.
To verify the mount point:
1. Use SSH to access the VRM virtual machine.
2. Type mount.
The mount point information appears. For example:
Verifying the
LCM mount

Prerequisites for upgrading to VMware Cloud Foundation
10 Dell EMC VxRack System SDDC Upgrade Guide for VMware Cloud Foundation Version 2.2 Family Upgrade Guide
192.168.100.46:/mnt/lcm-bundle-repo on /home/vrack/VMware/vRack/nfs-
mount/lcm/repo type nfs (rw,addr=192.168.100.46)
To run the preupgrade precheck:
1. Type cd /opt/vmware/evosddc-support.
2. Type ./sos --pre-upgrade-check.
3. Note the status for each component and the general recommendations that are
provided, and correct any issues.
Before downloading patch bundles, verify that the time is synchronized between the
support virtual machine and the VRM. Otherwise, the download requests fail.
To download bundles:
1. Log in to the SDDC Manager and click Lifecycle.
2. Download all bundles in the required order.
Note: The download time depends on the size of the patch bundle, network bandwidth, and so on.
Perform this step before the change control window opens for the update.
Before starting the upgrade, meet the ESXi prerequisites:
1. Log in to the vCenter server and verify that no ESXi host is outside of the domain
cluster.
2. Verify that all ESXi hosts in the cluster are in a healthy state. If a host is not
healthy (in maintenance mode), the upgrade fails.
3. Log in to the VRM virtual machine and type cd /opt/vmware/evosddc-
support/.
4. Log in to the SDDC Manager virtual machine and back up the ESXi configuration
by typing ./sos -- backup. The back is stored in /var/tmp.
If you are upgrading a workload domain, you might need to disable the anti-affinity rule
before you back up NSX data.
1. Log in to the domain vCenter Server as user administrator
@vsphere.local.
2. In the left navigation pane, right-click the cluster and click Edit Setting.
3. In the left navigation pane, click VMHost Rules.
Note: In a VMware 2.1.1 environment, click DRS > Rules.
4. Highlight the NSX Controllers Anti-Affinity Rule and click Edit.
5. Clear the Enable Rule checkbox.
Running the
preupgrade
precheck
Downloading
patch bundles
ESXi
prerequisites
Disabling the
anti-affinity rule

Prerequisites for upgrading to VMware Cloud Foundation
11 Dell EMC VxRack System SDDC Upgrade Guide for VMware Cloud Foundation Version 2.2 Family
Upgrade Guide
Perform this step for all NSX manager virtual machines that are deployed.
6. Click OK.
For a successful NSX upgrade, valid backup files must be available. For Cloud
Foundation to access the NSX backup files, ensure that the backups are created with the
correct setting values.
1. Use SSH to log in to the SDDC Manager virtual machine.
2. Discover the correct values for IP/hostname, username, and password settings by
typing /home/vrack/bin/vrmcli.sh --lookup-password.
3. Complete a backup for the NSX Manager for each workload domain that is
deployed. See the procedures in Backing Up NSX Manager Data, using the
discovered setting values.
a. Open a web browser and connect to the NSX Manager by typing
https://<NSX_Manager IP>. Use the username admin and the
password that is discovered in step 2.
b. Complete the settings that are shown in the procedures in Backing Up NSX
Manager Data, as described in Table 3. When you are logged in to the NSX
virtual appliance, click Change to modify the FTP Server settings
appropriately.
Table 3. NSX Manager Backup settings
Setting Value Notes
IP/Hostname <ip-address> Type the discovered IP address for the EVO- Rack_LCM_Backup_Repository-
<uuid> virtual machine that resides in the Management
Domain vCenter.
Transfer Protocol SFTP Select this value from the drop- down list.
Port 22 Type this port number.
Username <username> Type the discovered value. The default is backupuser.
Password <password> Type the discovered value. The LCM-Backup generated password is vrmcli.sh --lookup-password.
Backup Directory /backup Type this value.
Filename Prefix nsx_<type>_<domain-number> Type a name that is specific to the backup. For example, for the NSX management domain backup, specify nsx_mgmt_rack2_dmn01 , nsx_mgmt_rack2_dmn02 ,
and so on. Similarly, for VDI or VI domain backups, specify
nsx_vdi_dmn01 , nsx_vdi_dmn02 ,
nsx_vi_dmn01 , nsx_vi_dmn02, and so on.
Passphrase nsxmgr_backup Type this passphrase.
Backing up NSX
data

Upgrading firmware and BIOS on Dell servers
12 Dell EMC VxRack System SDDC Upgrade Guide for VMware Cloud Foundation Version 2.2 Family Upgrade Guide
4. Click OK.
5. Click Backup.
6. Click Start.
7. Verify the backup by logging on to the LCM-Backup virtual machine with
username root and the password that is discovered in step 2.
8. Re-enable the NSX anti-affinity rules that were disabled in the previous section.
9. Follow the procedures in Upgrading firmware and BIOS on Dell servers.
Upgrading firmware and BIOS on Dell servers
Before you perform firmware updates on the Dell servers:
Verify that the Dell firmware and Dell BIOS versions are at the correct RCM level.
Ensure that you are running the latest version of the Chrome web browser
otherwise, the update might not work correctly.
Note that after upgrading BIOS, a restart occurs automatically.
Note that all files can be loaded and installed at the same time.
1. Log in to VMware vSphere and place the node in Maintenance Mode (as shown
Figure 1).
Figure 1. Place node in Maintenance Mode
Placing nodes
into Maintenance
Mode

Upgrading firmware and BIOS on Dell servers
13 Dell EMC VxRack System SDDC Upgrade Guide for VMware Cloud Foundation Version 2.2 Family
Upgrade Guide
2. Choose whether to move powered off or suspended virtual machines to other
hosts in the cluster, and then select one of the following Virtual SAN data
migration options: Ensure Accessibility, Full Data Migration or No Data Migration
(as shown in Figure 2).
Figure 2. Select virtual machines and data migration options
3. Allow vSphere to move the virtual machines to another host (as shown in Figure
3) or perform this step manually.

Upgrading firmware and BIOS on Dell servers
14 Dell EMC VxRack System SDDC Upgrade Guide for VMware Cloud Foundation Version 2.2 Family Upgrade Guide
Figure 3. Move virtual machines
1. Log in to Dell iDRAC and note the BIOS version, NIC firmware version, Lifecycle
Controller Firmware version, and H730 (or HBA330 Mini for newer systems)
controller version (as shown in Figure 4).
Upgrading
BIOS/Firmware
on the Dell
Servers

Upgrading firmware and BIOS on Dell servers
15 Dell EMC VxRack System SDDC Upgrade Guide for VMware Cloud Foundation Version 2.2 Family
Upgrade Guide
Figure 4. Firmware inventory
2. Under iDRAC Settings on the left, select Update and Rollback (as shown in
Figure 5).
Figure 5. iDRAC Settings
3. Click Choose one file at a time, select each file, and then click Upload (as
shown in Figure 6).

Upgrading firmware and BIOS on Dell servers
16 Dell EMC VxRack System SDDC Upgrade Guide for VMware Cloud Foundation Version 2.2 Family Upgrade Guide
Figure 6. Select and upload each file
4. Expand the section and check the Current and Available firmware values for all
files. Under Contents, select the checkboxes and click Install and Reboot (as
shown in Figure 7).
Note: Figure 7 does not show the h730 firmware. In the GUI, scroll down to see the versions.
Figure 7. Update Details page
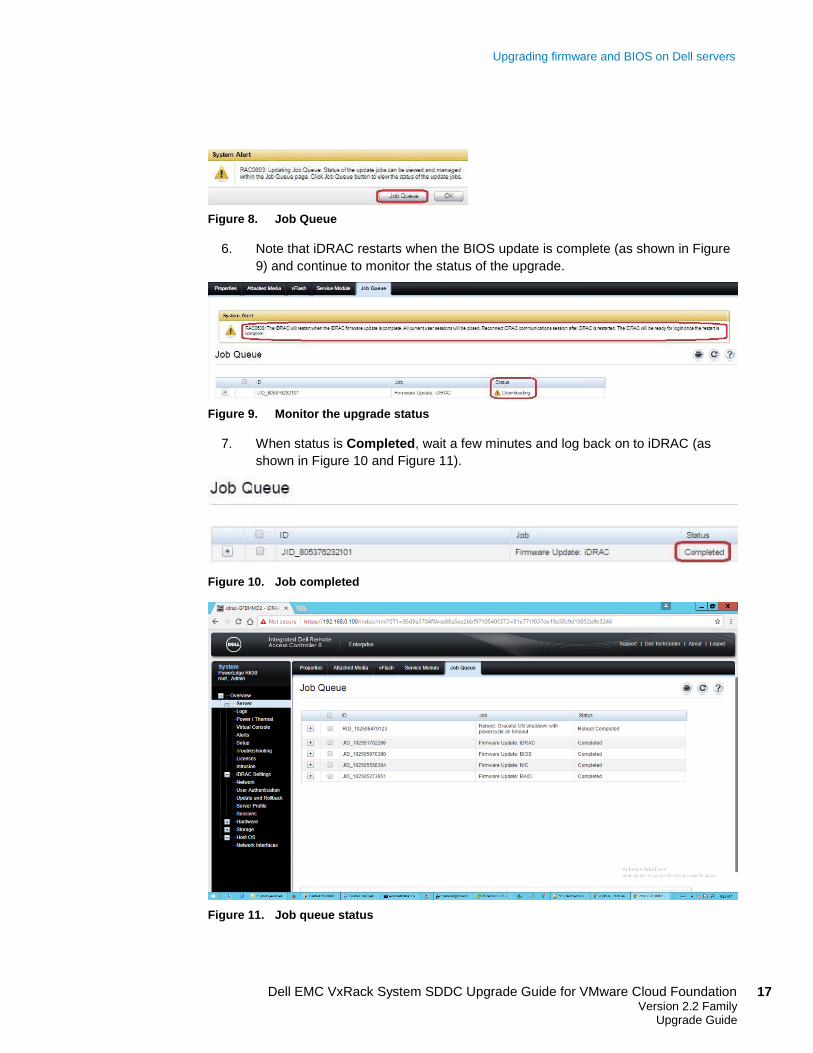
5. Click Job Queue to monitor the firmware installation (as shown in Figure 8).
Upgrading firmware and BIOS on Dell servers
17 Dell EMC VxRack System SDDC Upgrade Guide for VMware Cloud Foundation Version 2.2 Family
Upgrade Guide
Figure 8. Job Queue
6. Note that iDRAC restarts when the BIOS update is complete (as shown in Figure
9) and continue to monitor the status of the upgrade.
Figure 9. Monitor the upgrade status
7. When status is Completed, wait a few minutes and log back on to iDRAC (as
shown in Figure 10 and Figure 11).
Figure 10. Job completed
Figure 11. Job queue status

Upgrading firmware and BIOS on Dell servers
18 Dell EMC VxRack System SDDC Upgrade Guide for VMware Cloud Foundation Version 2.2 Family Upgrade Guide
8. In the Properties tab, choose System Inventory and verify the new firmware
versions (as shown in Figure 12).
Figure 12. New firmware inventory
9. Log in to vSphere and exit from Maintenance Mode (as shown in Figure 13).
Figure 13. Exit Maintenance Mode

Verifying NSX Manager installations
19 Dell EMC VxRack System SDDC Upgrade Guide for VMware Cloud Foundation Version 2.2 Family
Upgrade Guide
Verifying NSX Manager installations
Before upgrading bundles, verify that all NSX manager installations do not have errors.
1. Log in to the vCenter server vSphere Web Client at https://<vcenter
ip>:9443 on rack 1 as [email protected].
2. Select Networking and Security (as shown in Figure 14).
Figure 14. Network and Security option
3. Select Installation.
4. Select the Host Preparation tab.
5. Select the NSX Manager IP address from the NSX Manager drop-down list (as
shown in Figure 15).

Upgrading the bundles
20 Dell EMC VxRack System SDDC Upgrade Guide for VMware Cloud Foundation Version 2.2 Family Upgrade Guide
Figure 15. Select NSX Manager IP address
6. Check all instances of NSX Manager, one for each workload domain that is
configured, and verify that no errors are reported.
7. Follow the procedures in Upgrading the bundles.
Upgrading the bundles
Before you upgrade a VxRack System SDDC with VMware Cloud Foundation version 2.2
to version 2.2.0.1, you must upload and install the Patch Bundles. Ensure that you follow
the sequence for upgrading the bundles.
Note: For more information, see Administering the VMware Cloud Foundation.
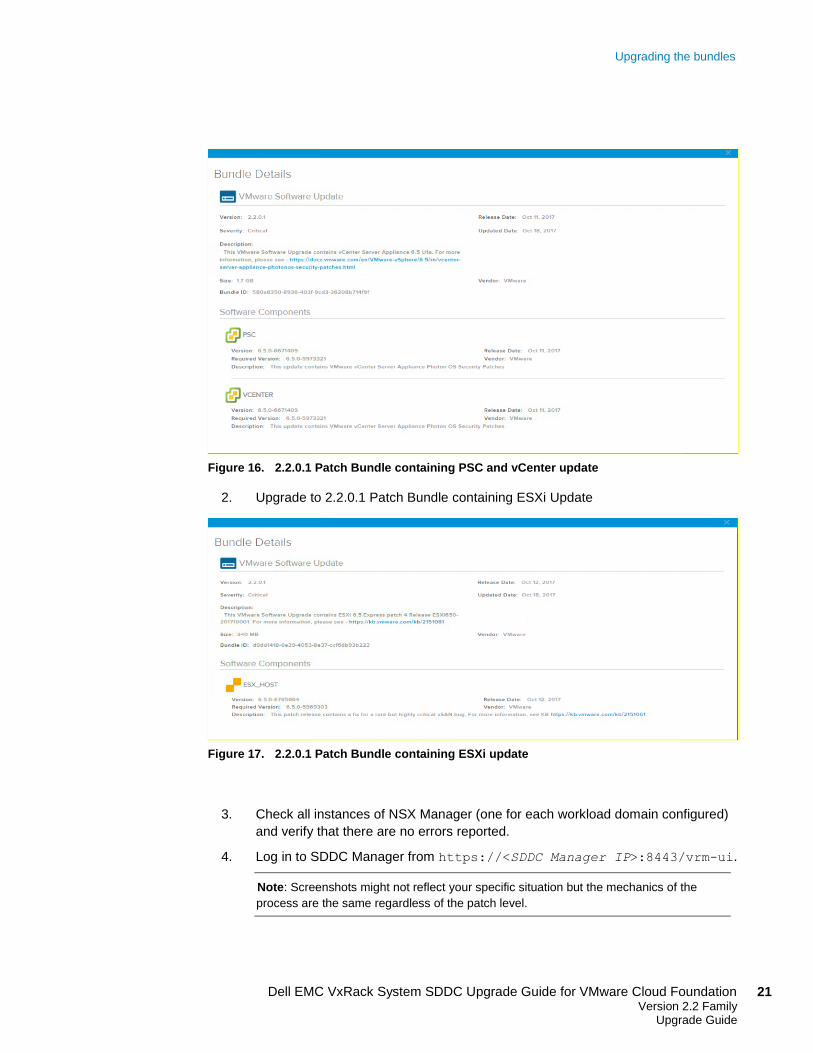
1. Upgrade to 2.2.0.1 Patch Bundle containing PSC and vCenter Update
Upgrading the bundles
21 Dell EMC VxRack System SDDC Upgrade Guide for VMware Cloud Foundation Version 2.2 Family
Upgrade Guide
Figure 16. 2.2.0.1 Patch Bundle containing PSC and vCenter update
2. Upgrade to 2.2.0.1 Patch Bundle containing ESXi Update
Figure 17. 2.2.0.1 Patch Bundle containing ESXi update
3. Check all instances of NSX Manager (one for each workload domain configured)
and verify that there are no errors reported.
4. Log in to SDDC Manager from https://<SDDC Manager IP>:8443/vrm-ui.
Note: Screenshots might not reflect your specific situation but the mechanics of the
process are the same regardless of the patch level.

Upgrading the bundles
22 Dell EMC VxRack System SDDC Upgrade Guide for VMware Cloud Foundation Version 2.2 Family Upgrade Guide
5. Click Lifecycle > Repository and verify that all the bundles that are required in
this sequence are downloaded and available (as shown in Figure 18).
Figure 18. Verify that bundles are available
6. Click Update at the top of the center pane and verify that all the available updates
that are required in this sequence are present (as shown in Figure 19). The
updates appear in sequence.
Figure 19. Verify that updates are present

Upgrading the bundles
23 Dell EMC VxRack System SDDC Upgrade Guide for VMware Cloud Foundation Version 2.2 Family
Upgrade Guide
7. Click the Update button that follows the bundle. For example, click Update next
to VMware Cloud Foundation Update 2.1.2-100182 to begin the upgrade.
8. Click Expand to review VMware Cloud Foundation software components, and the
current release versions and versions with which they are updated (as shown in
Figure 20).
Figure 20. Review software component information
9. For more information about the components and releases that are updated, click
More. Figure 21 shows additional information.

Upgrading the bundles
24 Dell EMC VxRack System SDDC Upgrade Guide for VMware Cloud Foundation Version 2.2 Family Upgrade Guide
Figure 21. Retrieve additional component information
10. Close the Bundles Details window and click Next.
11. Schedule the Date and Time of the update and click Next (as shown in Figure
22).
Figure 22. Schedule the update
12. Review the update information and click Schedule Update (as shown in Figure
23).

Upgrading the bundles
25 Dell EMC VxRack System SDDC Upgrade Guide for VMware Cloud Foundation Version 2.2 Family
Upgrade Guide
Figure 23. Review update information
The Update window shows the status of updates in progress.
13. When updates are completed, they appear under Completed Updates (as shown
in Figure 24).
Figure 24. Review completed updates
14. Verify that the updated release bundle versions are correct.

Postupgrade clean-up
26 Dell EMC VxRack System SDDC Upgrade Guide for VMware Cloud Foundation Version 2.2 Family Upgrade Guide
15. Verify the health of the NSX Manager (see Verifying NSX Manager installations).
16. Optionally, run the /opt/vmware/evosddc-support/sos --health-check
command from the VRM (see step 5 in System check prerequisites).
17. Repeat step 5 through step 16 for all the update bundles.
18. Follow the procedures in Postupgrade clean-up.
Postupgrade clean-up
After you upgrade all bundles, delete snapshots and backups, and then re-enable the
anti-infinity rule.
1. Log in to the vCenter Server from the Support VM on rack 1.
2. Open a new browser window and navigate to https://<vcenter
ip>:9443/vsphere-client.
Obtain the IP address from the Component IP file inside the Rack Information
folder on the desktop. Look for the vCenter IP address (for example, rack-1-vc-
1.sddc.vce.local ).
3. Type the password from the password list, which is produced when you run the
vrmcli.sh --lookup-password command on the VRM. Look for the
username [email protected].
4. Right-click the virtual machine in the inventory and select Manage Snapshots.
5. Delete the snapshot that was taken earlier for PSCs, vCenter, ISVMs, and VRM.
6. Delete the SOS backup that was taken earlier.
Delete only the backups that you created.
After upgrading the workload domain, enable the anti-affinity rule:
1. Log in to the vCenter Server of the domain as user administrator
@vsphere.local.
2. In the left navigation pane, right-click the cluster and click Edit Setting.
3. In the left navigation pane, click VMHost Rules.
4. Highlight the NSX Controllers Anti-Affinity Rule and click Edit.
5. Select Enable Rule for all NSX manager virtual machines that are deployed.
6. Click OK.
7. Follow the procedures in Upgrading vRealize Operations.
Deleting
snapshots and
backups
Enabling the
anti-infinity rule

Upgrading vRealize Operations
27 Dell EMC VxRack System SDDC Upgrade Guide for VMware Cloud Foundation Version 2.2 Family
Upgrade Guide
Upgrading vRealize Operations
After completing the VMware Cloud Foundation 2.1.3 upgrade, upgrade vRealize
Operations.
1. Log in to the vCenter server from the Support VM of rack 1.
2. Open a new browser window and navigate to https://<vcenter
ip>:9443/vsphere-client.
Obtain the IP address from the Component IP file inside the Rack Information folder
on the desktop. Look for the vCenter IP address (for example rack-1-vc-
1.sddc.vce.local ).
3. Type the password from the password list, which is produced when you run the
vrmcli.sh --lookup-password command on the VRM. Look for the
username [email protected].
4. Right-click the virtual machine in the inventory and select Take Snapshot. The
following virtual machines require snapshots, as indicated:
VRM
ISVMs
Note: There are three ISVM virtual machines.
LCM
LCM Backup
PSC
Note: There are two PSC virtual machines.
vCenter
vRealize Operations
vRealize Log Insight
5. For each snapshot, do the following:
a. Type a name for the snapshot. For example, Rack 2 Extension
<current date>.
b. Clear the Snapshot the virtual machine’s memory checkbox.
c. Click OK.
6. Download the vRealize Operations update PAK file for version 6.2.1 from VMware
Knowledge Base Topic 2149591 and follow the instructions to install the patch
7. Log in to vRealize Operations.

Upgrading Cisco switches
28 Dell EMC VxRack System SDDC Upgrade Guide for VMware Cloud Foundation Version 2.2 Family Upgrade Guide
8. To verify that the version is at 6.2.1.5263486, use SSH to access the vRealize
Operations virtual machine and run the following validation steps:
a. # find / -name "*struts*"
b. # find / -name "*xwork*"
The output shows the version 2.3.32 JAR file.
Upgrading Cisco switches
To upgrade Cisco switches, see:
Cisco documentation at Cisco Nexus 9000 Series Switches for information about
the Cisco Nexus 9000 series switches.
The Dell EMC VxRack System SDDC Release 3.2.3 Certification Matrix for
information about Cisco components.