dell open print driver
TRANSCRIPT

Dell Open Print Driver Version 1.20
Dell Open Print Driver
About Dell Open Print Driver MSI install command line options Installing using INF file Lockdown Policies

2
Table of Contents
Chapter 1
About Dell Open Print Driver ..............................................................................................................3
Operation Modes ...............................................................................................................................3
Dynamic Mode .......................................................................................................................................... 3
Static Mode ............................................................................................................................................... 4
Selecting the Correct Mode ................................................................................................................4
Chapter 2
MSI install command line options .......................................................................................................5
Using the DellOPD Installer from the Command Line............................................................................... 5
Installing using INF File .......................................................................................................................7
Static Instance ........................................................................................................................................... 8
Dynamic Instance .................................................................................................................................... 15
Installing an USB printer using INF File .............................................................................................. 24
Chapter 3
Lockdown Policies ............................................................................................................................ 28
Managing Printer Features Using Group Policies ................................................................................... 28
Available Policies ..................................................................................................................................... 28
Discovery Policies ................................................................................................................................ 28
Discovery Feature Control ...................................................................................................................... 29
Printer Feature Control ........................................................................................................................... 36
Paper Size Feature Control / Allowable Paper Sizes ........................................................................... 38
How to Define Policies on the Server ..................................................................................................... 39
Policies with Multiple Selection .............................................................................................................. 49
How Users See Policies ........................................................................................................................... 53
How to load and unload ‘Dell Open Print Driver’ drivers for standard user account? .......................... 55

3
Chapter 1
About Dell Open Print Driver Dell Open Print Driver (Dell OPD) is a universal print driver for PCL 5, PCL XL and PostScript printers. It provides a common user interface and functionality for all printers and reduces administration and support needs in printing environments.
Dell Open Print Driver supports Windows operating systems for clients and servers and can be deployed via MSI install, INF install and point and print. The software is Microsoft WHQL tested and certified, as well Novell yes tested and Citrix certified.
Dell Open Print Driver supports PCL and PostScript from within the same print queue. Users can manually switch between the different print formats and Dell OPD will convert all settings between the desired formats. Settings like watermarks and default print settings will be automatically preserved.
Dell Open Print Driver supports all current and a large variety of legacy Dell PCL and PS printers explicitly. Additionally Dell OPD provides a generic print profile for printing to any printers that support PCL or PostScript, regardless of manufacturer.
Dell Open Print Driver is primarily geared towards network environments, but also supports USB connections.
Operation Modes Dell Open Print Driver operates in either dynamic mode or static mode
Dynamic Mode In dynamic mode OPD provides a network discovery dialog, which allows users to find printers on the network. Users can select and change to a discovered printer and print to it as needed. When changing printers, all printing preferences are automatically transferred from the previous printer to the new one. Dell Open Print Driver automatically discovers printers through three different methods:
• SNMP via broadcast in the local IP subnet
• LDAP, if a local LDAP server is available and can be connected to
• NetBIOS, if no LDAP server is available
Additionally, printers can be manually discovered by providing an IP address, an IP address range in CLDR notation or a UNC name for either a print queue or a print server.

4
The priority of the discovery methods and advanced discovery functions can be changed through policy settings (see below)
A dynamic print queue is automatically created after an MSI install.
Static Mode In static mode a Dell OPD print queue is always connected to one printer only, and behaves like a standard print queue. No network discovery is displayed and the printing preferences are stored only for its own printer.
Static queues can be created either via the printer properties of a dynamic print queue or via an inf install or a point and print install.
Selecting the Correct Mode Small networks without print servers:
• Install Dell OPD via MSI on to the client systems. Users discover the printers via dynamic mode and may create static instances through the printer properties of the dynamic queue.
Larger networks with print servers:
• Install a dynamic instance on the server and use it to discover the network printers and to create the static print queues to be shared with the end users.
• End users create Dell OPD queues via Point-and-Print by double clicking on print queues on the print server.
Highly mobile workforces:
• Install a dynamic instance on the client pc. The end user can discover printers in virtually any environment and connect to network attached printers as well as server queues, regardless of the drivers deployed in the network.

5
Chapter 2
MSI install command line options
Using the DellOPD Installer from the Command Line Like all Windows Installer MSI packages, the Dell Open Print Driver installer (DellOPD.msi) can be run from the Windows command line. The command-line syntax is:
msiexec.exe {/i | /x | /f} DellOPD.msi [/q{n|b|r|f} [/l ‘log-file’] [properties]
where:
/i Indicates that the Dell Open Print Driver is to be installed /x Indicates that the Dell Open Print Driver is to be uninstalled /f Indicates that the Dell Open Print Driver is to be repaired /qn Indicates that the installer is to be run silently. Note that on an uninstall or a repair,
the installer will automatically restart the computer on completion /qb Indicates that the installer will run with a minimal user interface (progress bar only) /qr Indicates that the installer will run with a reduced user interface /qf Indicates that the installer will run with a full user interface (this is the default) /l Causes the installer to log its activities to the specified log file. See the Windows SDK
documentation for the full list of logging sub-options. properties Optional properties to further customize the operation of the installer
NODEFAULT=”1”
Do not set the DellOPD dynamic instance as the user’s default printer. If this property is omitted, the dynamic printer instance will be created as the default printer.
REDISTINSTALL=”1” Set the driver to install driver support for both 32-bit and 64-bit printing clients.
NETWORKS =”NW1,NW2,…”
Set multiple networks, where NW1 is Network Address. For e.g. NETWORKS =”192.168.1.100,…”
SUBNETS =”SN1,SN2,…” Set multiple subnets, where SN1 is Subnet Address. For e.g. SUBNETS =”255.255.255.0,…” Note: If the number of subnets does not match the number of networks specified, installer only includes the first N networks, where N is the count of the shorter list.
PRINTERADDRESSES = ”address,…”
Install a static printer object for the printers at each of the given addresses. The addresses of the printers to be created may be specified either as

6
PRINTERADDRESSES = “@path”
a comma-separated list of printer addresses, or as a full file system path to an ANSI text file containing a comma-separated list of addresses. A reference to a file path is marked by a leading ‘@’. The path must be an absolute path, and may be a local path (such as “@C:\printers.txt”) or a UNC path referring to a network location (such as “@\\Server\InstallFolder\printers.txt”). Each address is either an IP address (such as 192.168.1.118) or the UNC share name of a shared printer (such as \\Server\PrinterName). If the printer at a given address is a known and supported Dell printer, the static printer object will be created as the appropriate model. Otherwise, it will be created as a generic laser printer. If the specified printer is not accessible (e.g. if it is turned off or has been disconnected from the network) at the time the install is done, a static printer object will nevertheless be created for that printer. If the printer was specified with an IP address, the printer object name will be “Dell Open Print Driver on <ip-address>”; if it was specified with a UNC name, the printer object name will be “<share-name> on <server-name>”. It will be created as a generic laser printer with default printer settings. The correct model and specific printer configuration can be determined after the install is done, when the device can be successfully connected. In the context of a Windows domain (where Active Directory is present), it is recommended that server names be specified on the command line as fully-qualified domain names. That is, if the Windows domain is “company.com”, to install a server-attached printer, use \\server.company.com\printer rather than \\server\printer

7
Installing using INF File Download Dell Open Print Driver “driver only” package from http://www.Dell.com
1) Download the ‘Dell Open Print Driver Package’ zip file to your local hard drive.
2) Extract the compressed zip file to your local hard drive.

8
Static Instance An INF file in this driver package contains PCL5, PCLXL, and PS3 drivers. To create a static instance for a known printer on your network, you must install a supported PDL driver for the PDL available on that printer.
The following instructions and screen shots illustrate to install Static Instance of ‘Dell Open Print Driver’ on your system:
For this example, we used ‘Dell 7330dn’ as a TCP/IP printer:
1) Go to Printer and Devices folder; Install the driver via the Windows "Add Printer" wizard.
2) Select ‘Add a local printer’ option.

9
3) For ‘Chose a printer port’, select ‘Use an existing port:’ if the TCP/IP port already exists for the printer you want to install OR select an option ‘Create a new port:’ and ‘Standard TCP/IP Port’ from the drop-down list to create a new TCP/IP port as done for this example. Press ‘Next’.

10
4) Enter your printer’s IP address in the text box for ‘Hostname or IP address:’ and press ‘Next’
5) Select ‘Have Disk…’ option, browse the DellOPD.inf file from the Dell Open Print Driver Package and Press ‘Open’

11
6) Select the supported PDL available on the printer that you want to install. For this example, select ‘Dell Open Print Driver (PCL XL)’ from the Printer’s list and press ‘Next’.

12
7) ‘Type a printer name’ screen displays printer name ‘Dell Open Print Driver (PCL XL)’ and press ‘Next’
8) ‘Installing printer …’ process begins

13
9) Dialog displays ‘You’ve successfully added Dell Open Print Driver (PCL XL)’ and press ‘Finish’.
10) A Static Instance of the ‘Dell 7330dn’ has been created as ‘‘Dell Open Print Driver (PCL XL)’ in your Printers’ folder.

14
11) Right click on ‘Dell Open Print Driver (PCL XL)’ and select ‘Printer Properties’
12) ‘Configure’ tab displays the ‘Active model’ as ‘Dell 7330dn Mono Laser Printer’ and installed configuration for the printer, such as Duplex Unit, optional trays and output trays. Note: For printer model names not listed in ‘Active Model’ list; ‘Dell Open Print Driver’ configures that printer as ‘(Generic Laser Printer)’.

15
Dynamic Instance An INF file in this driver package contains PCL5, PCLXL, and PS3 drivers. To get the full functionality of the Dell Open Print Driver, you must install all three drivers as done by the installer/MSI file.
The following instructions and screen shots illustrate to install Dynamic Instance of ‘Dell Open Print Driver’ on your system:
1) Go to Printer and Devices folder; Install the driver via the Windows "Add Printer" wizard.
2) Select ‘Add a local printer’ option.

16
3) For ‘Chose a printer port’, select ‘Create a new port:’ and ‘Local Port’ from the drop-down list. Press ‘Next’.
4) When prompt for Port Name, type ‘Nul:’ and press ‘OK’. Press ‘Next’

17
5) Select ‘Have Disk…’ option, browse the DellOPD.inf file from the Dell Open Print Driver Package and Press ‘Open’

18
6) Select ‘Dell Open Print Driver (PCL 5)’ from the Printer’s list and press ‘Next’.
7) ‘Type a printer name’ screen displays printer name ‘Dell Open Print Driver (PCL 5)’ and press ‘Next’
8) ‘Installing printer …’ process begins

19
9) Dialog displays ‘You’ve successfully added Dell Open Print Driver (PCL 5)’ and press ‘Finish’. A Dynamic Instance of the ‘Dell Open Print Driver (PCL 5)’ has been created in your Printers’ folder.
10) To Install ‘Dell Open Print Driver (PCL XL)’ and ‘Dell Open Print Driver (PS)’; please follow these steps individually for both the drivers, perform steps 3 – 4. For step 5, in choose a printer port screen, select an option ‘Use an existing Port:’ and ‘NUL: (Local Port)’ from drop-down list. Then continue from Step 8 to 11.
20
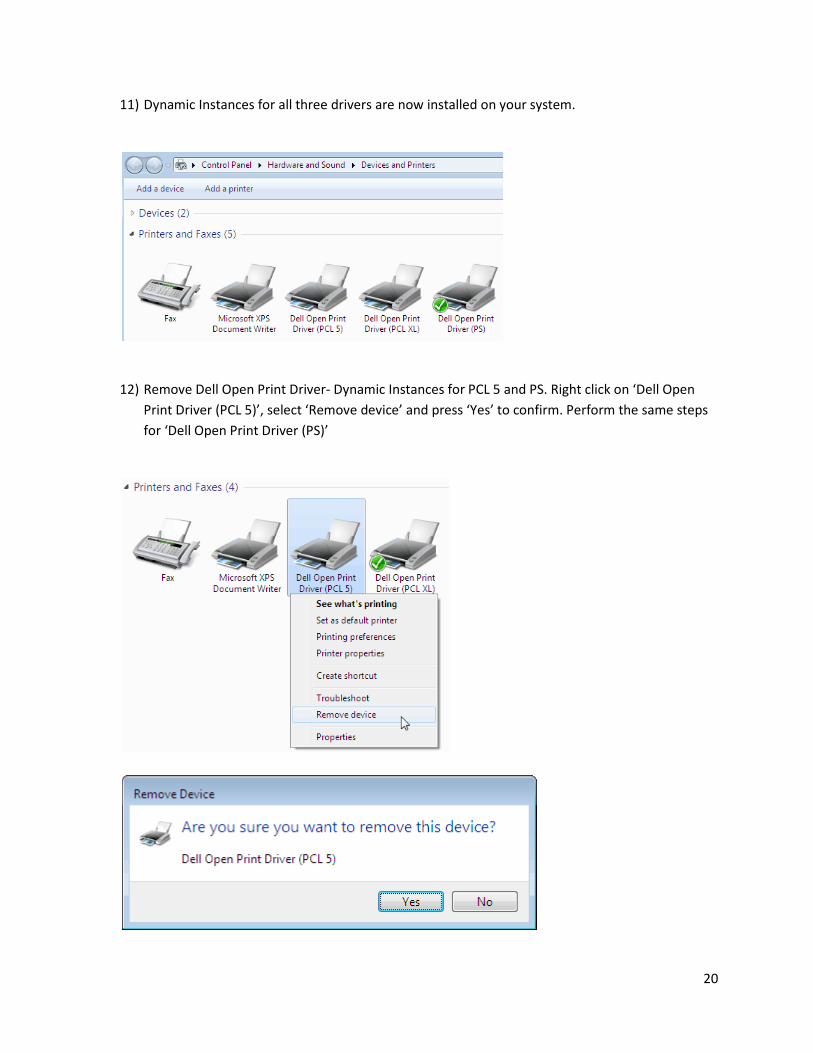
11) Dynamic Instances for all three drivers are now installed on your system.
12) Remove Dell Open Print Driver- Dynamic Instances for PCL 5 and PS. Right click on ‘Dell Open Print Driver (PCL 5)’, select ‘Remove device’ and press ‘Yes’ to confirm. Perform the same steps for ‘Dell Open Print Driver (PS)’

21
13) After PCL5 and PS driver objects have been removed, all driver packages still exist in the system.
14) Right click on ‘Dell Open Print Driver (PCL XL)’ and select ‘Printer Properties’

22
15) Change print name from ‘Dell Open Print Driver (PCL XL)’ to ‘Dell Open Print Driver’ and press ‘OK’
16) Right click on ‘Dell Open Print Driver’ and select ‘Printer Preferences’ to open the discovery.

23
17) The Discovery dialog will open to allow the user to connect a specific network printer to the Dell Open Print Driver dynamic instance.

24
Installing an USB printer using INF File
Perform steps 1 -11 from ‘Installing from INF file’ – Dynamic Instance section. Use any driver (PCL XL or PCL 5 or PS) depending on your printer supported PDLs.
The following instructions and screen shots illustrate to connect an USB printer to Dynamic Instance of your ‘Dell Open Print Driver (PCL XL)’ on your system:
1) Make sure the Dynamic Instance of the ‘Dell Open Print Driver’ exists on your system.
For this example, we used ‘Dell 2355dn’ as a USB printer:
2) Make sure the printer is turned on and an USB cable is connected to the printer. 3) Now connect USB cable marked with from the printer to the USB port on your
computer. Note: The computer must recognize the USB connection in order for installation to work.
4) ‘Devices and Printers’ folder displays ‘2355dn Laser MFP’ as unspecified device.

25
5) Right click on ‘Dell Open Print Driver’ and select ‘Printer Properties’
6) Select ‘Ports’ tab and check Port ‘USB001’ and press ‘Apply’

26
7) Select ‘Configure’ tab and change ‘Active Model’ from ‘Generic Laser Printer’ to ‘Dell 2355dn Mono Laser printer’ from drop-down list. Press ‘Apply’ Note: For printer model names not listed in ‘Active Model’ list, use ‘(Generic Laser Printer)’.

27
8) To make sure USB printer has been successfully installed, select ‘General’ tab and print test page. Press ‘OK’ to close the printer properties dialog.
9) Repeat the process to install other PDL driver for the same printer.

28
Chapter 3
Lockdown Policies
Managing Printer Features Using Group Policies The Dell Open Print Driver supports the use of Windows Group Policies to control access to printers and printer features on a per-user or per-group basis. System administrators define the policies to be observed in their organization on a Windows server on their network; these policies are “pushed out” to individual users’ computers and are enforced by the Dell Open Print Driver when users discover and manage printers and when they print jobs on printers which use the Dell Open Print Driver.
Available Policies
Discovery Policies The Dell Open Print Driver dynamically discovers printers on the network that the driver can support and the user can print to. Group policies are available which will control how wide a network the discovery process will and what kinds of printers will be made available to the user.
Model Availability Feature Control / Discoverable Printers Policy This policy limits the printers that can be presented to the user to one or more specific supported printer models. When the system administrator enables this policy, he or she is responsible for entering the exact model name of each printer model that is to be made available to the user. Note that if the model name is not entered correctly, no printer on the network will match the name and no printers of that model will be discovered.

29
The following Dell printer models are supported by the Dell Open Print Driver:
Dell 1130n Mono Laser Printer Dell 2130cn Color Laser Printer Dell 2135cn Color Laser MFP Dell 2145cn Color Laser MFP Dell 2150cdn Color Laser Printer Dell 2150cn Color Laser Printer Dell 2155cdn Color Laser MFP Dell 2155cn Color Laser MFP Dell 2230d Mono Laser Printer Dell 2330dn Mono Laser Printer Dell 2335dn Mono Laser MFP Dell 2350dn Mono Laser Printer Dell 2355dn Mono Laser Printer Dell 3115cn Color Laser MFP Dell 3130cn Color Laser Printer Dell 3330dn Mono Laser Printer
Dell 3333dn Mono Laser MFP Dell 3335dn Mono Laser MFP Dell 5100cn Color Laser Printer Dell 5110cn Color Laser Printer Dell 5130cdn Color Laser Printer Dell 5210n Mono Laser Printer Dell 5230n Mono Laser Printer Dell 5310n Mono Laser Printer Dell 5330dn Mono Laser Printer Dell 5350dn Mono Laser Printer Dell 5530dn Mono Laser Printer Dell 5535dn Mono Laser MFP Dell 7130cdn Color Laser Printer Dell 7330dn Mono Laser Printer Dell 7330n Mono Laser Printer
Discovery Feature Control
Networks to search during discovery By default, the Dell Open Print Driver will search the local subnet for supported devices. The system administrator may specify up to eight additional networks to be searched. Each network is defined by a network address and a subnet mask.
Subnet mask for search Network The complete specification of a network to search includes the network address and the subnet mask. The network address consists of the high-order bits of the IP address which are common to all devices on that network; the subnet mask specifies how many bits the network portion contains. The network address is specified by giving the common portion of the IP address, followed by zeros; the subnet mask is specified with a binary one in each bit position that belongs to the network address and a binary zero in each bit position that belongs to the device address. For example, a 256-device subnet may be specified with a network address of 192.168.1.0 and a subnet mask of 255.255.255.0. This indicates that the device addresses range from 192.168.1.0 to 192.168.1.255, and all devices on the subnet have the high-order 24 bits of the address in common.
Group policy for the Dell Open Print Driver can specify up to eight search networks. The network address for the first search network is stored as value NW1; the subnet mask for that network is stored as value SN1. Subsequent search networks are stored as values NW2/SN2, NW3/SN3, and so forth.
Discover Network Printers Only By default, the Dell Open Print Driver will search for printers which are directly attached to the network, printers that are shared using Windows File and Print Sharing, and network print queues that are defined in Windows Active Directory. The system administrator can limit this search to printers that are directly attached to the network by enabling the Network Printers Only policy.

30
Discovery Timeout The Dell Open Print Driver discovery process will time out after a certain amount of time. By default this value is 2000 milliseconds (i.e. two seconds). The system administrator may use this policy to shorten or lengthen this timeout value.
Servers to Search During Discovery By default, the Dell Open Print Driver will search for supported devices that are directly attached to the network, and for devices provided through any accessible print server or listed in Active Directory. The system administrator can limit the search to a set of one or more specific print servers, or to one or more specific Active Directory servers. To specify a print server, enter the server name in UNC form with two leading backslashes (“\\servername”); to specify an Active Directory server, enter the server’s fully-qualified domain name (“adserver.companyname.com”).
Printers shared by any of the listed print servers, and print queues published through any listed Active Directory server, will be discovered. Specifying print servers and/or Active Directory servers does not affect the discovery of network-attached printers; all printers directly attached to the network will always be found.
SNMP Options By default, the SNMP Community String is "public". The SNMP Community string represents a basic form of SNMP security and can be configured for most network printers. In order for DellOPD printer driver to discover printers that have a different community name than "public", the driver needs to know what community string is configured in the printers.
Note: This feature is also available as a standalone registry file ‘community.reg’ available in ‘Dell Open Print Driver’ .INF install package from http://www.dell.com to define the SNMP community name.
It is recommended to run the community.reg and set the community name BEFORE manually installing the ‘Dell Open Print Driver’ using an INF file.
Using ‘community.reg’ file to set community name:
1) Download the ‘Dell Open Print Driver Package’ zip file to your local hard drive. 2) Extract the compressed zip file to your local hard drive. 3) Find ‘community.reg’ in the extracted folder. 4) Right click on ‘community.reg’ and select ‘Edit’ 5) Type community name at "Community"="community_name_goes_here"
[Default is: "Community"="public"] 6) Save the ‘community.reg’ file and close. 7) Right click on ‘community.reg’ file and select "Merge" to add to the registry. 8) Select ‘Yes’ when registry editor prompts for confirmation.
The change to the Registry is effective immediately.

31
Here is an example to define SNMP community name as ‘Test’ using the registry file:
Windows Registry Editor Version 5.00
[HKEY_CURRENT_USER\Software\Policies\Dell\Printing\Dell Open Print Driver\Discovery] "Community"="Test"
The following instructions and screen shots illustrate to edit community string name for ‘Dell Open Print Driver’ in the Registry Editor on your system:
1) Click ‘Start’ on your Windows operating system
2) Type ‘regedit’ in the textbox and press ‘Enter’ or click on the ‘regedit’ displayed under program list.

32
3) If prompt for ‘User Account Control’, select ‘Yes’ to continue
4) Registry Editor opens, expand ‘HKEY_CURRENT_USER’ from the left column

33
5) Open: HKEY_CURRENT_USER\Software\Policies\Dell\Printing\Dell Open Print Driver\Discovery
6) Select ‘Discovery’ from left column

34
7) Select ‘Community’ from right column, listed under ‘Name’ list.
8) Right click on ‘Community’ and select ‘Modify…’ to edit community string name.

35
9) Type community string name in a text box under ‘Value data:’, press ‘OK’
10) Community string name has been changed.

36
Printer Feature Control
Preferred PDL For printers that support multiple PDLs, this policy defines the PDL (PCL 5, PCL XL, or PostScript) that will be used when a user selects a new printer model. This overrides the PDL that the printer itself defaults to.
Feature Policies Feature policies control which features are available to the user.
Disable Color Printing When selected, this policy prevents the user from printing in color on a color device.
Disable Copies When selected, this policy limits the user to printing a single copy of each job.
Disable Orientation When selected, this policy prevents the user from printing in landscape orientation.
Disable Output Bin When selected, this policy prevents the user from selecting an alternate output bin.
Disable Poster Printing When selected, this policy prevents the user from doing poster printing.
Disable Puncher When selected, this policy prevents the user from using a device’s installed hole puncher.
Disable Restore Defaults When selected, this policy disables the “Restore Defaults” button on the driver’s user interface.
Disable Scaling When selected, this policy prevents the user from scaling output up or down.
Disable Secure Print When selected, this policy prevents the user from storing a job on the printer for later printing, protected by a numeric PIN.
Disable Skip Blank Pages When selected, this policy prevents the user from ticking the “Skip Blank Pages” box on the driver user interface.
Disable Print Text as Black When selected, this policy prevents the user from ticking the ‘Print Text as Black’ box on the driver user interface.

37
Disable Stapler When selected, this policy prevents the user from using a device’s installed stapler.
Disable Watermarks When selected, this policy prevents the user from defining or using watermarks.
Force Duplex When selected, this policy forces the user to print either simplex, duplex long edge, or duplex short edge.
Force Input Tray When selected, this policy defines a particular input tray that the user must print from.
Force First Page Input Tray When selected, this policy defines a particular input tray that the user must print the first page of each job from.
Force NUp When selected, this policy requires the user to print multiple pages on a single sheet (2-Up, 4-Up, etc.)
Force Print Quality When selected, this policy selects a particular print quality (draft, office, or high) that the user must use for printing.

38
Paper Size Feature Control / Allowable Paper Sizes This policy allows the system administrator to limit users to printing on specific paper sizes. To use this policy, the system administrator must enter a numeric paper size ID for each paper size that is to be permitted. The defined paper size IDs are as follows:
ID Name 8 A3 9 A4
11 A5 70 A6 12 B4 (JIS) 13 B5 (JIS) 88 B6 (JIS) 17 11x17
7 Executive 14 Folio
5 Legal 1 Letter
257 Oficio 6 Statement
52 Tabloid Extra 258 Envelope A7 34 Envelope B5 30 Envelope C4 28 Envelope C5 31 Envelope C6 19 Envelope #9 20 Envelope #10 27 Envelope DL 37 Envelope Monarch 38 Envelope Personal
259 Postcard 43 Postcard Japanese
260 Postcard Small 261 SRA3

39
How to Define Policies on the Server System administrators can use the Group Policy Management Console and Group Policy Object Editor MMC snap-ins to configure group policies which will control access to printer features on a per-user or per-group basis. To do this, system administrators must:
• Decide which features are to be limited to which groups within Active Directory.
• Import the administrative template (.ADM) supplied with the Dell Open Print Driver into the GPMC snap-in.
• Configure one or more Group Policy Objects (GPOs) using the GPOE snap-in.
• Link the GPOs to the appropriate groups using the GPMC snap-in
• Registry entries for enforcing the defined policies will be pushed out to the registries on all affected systems
The following step-by-step procedure shows how to do this.

40
1. Open the Group Policy Management snap-in. Expand the tree view on the left to the desired domain, and right-click the “Group Policy Objects” folder, and select New.
2. Name the new Group Policy in the dialog that pops up, and click OK.

41
3. From the list of GPOs in the right-hand pane, select the new GPO, right-click it, and choose Edit… to bring up the GPO Editor snap-in.

42
4. Import the Dell Open Print Driver administrative template into the GPO. In the GPO Editor tree view, select User Configuration; then select Policies / Administrative Templates, right-click it, and select Add/Remove Templates.

43
5. From the Add/Remove Templates dialog, click Add and browse to the location of the Dell Open Print Driver administrative template file – lockdown.adm. Select lockdown.adm in the file selection dialog and click Open.

44
6. On the Add/Remove Templates dialog, click Close. Then in the tree view of the GPO Editor snap-in, select Printer Feature Control under User Configuration/Policies/Classic Administrative Templates (ADM). The right-hand pane of the snap-in shows the policies that have been made available by the administrative template. (All of the policies will be in the “not configured” state.)

45
7. Double-click a policy (in this example, “Force Print Quality”) to configure it. The policy Properties dialog will be shown.
46
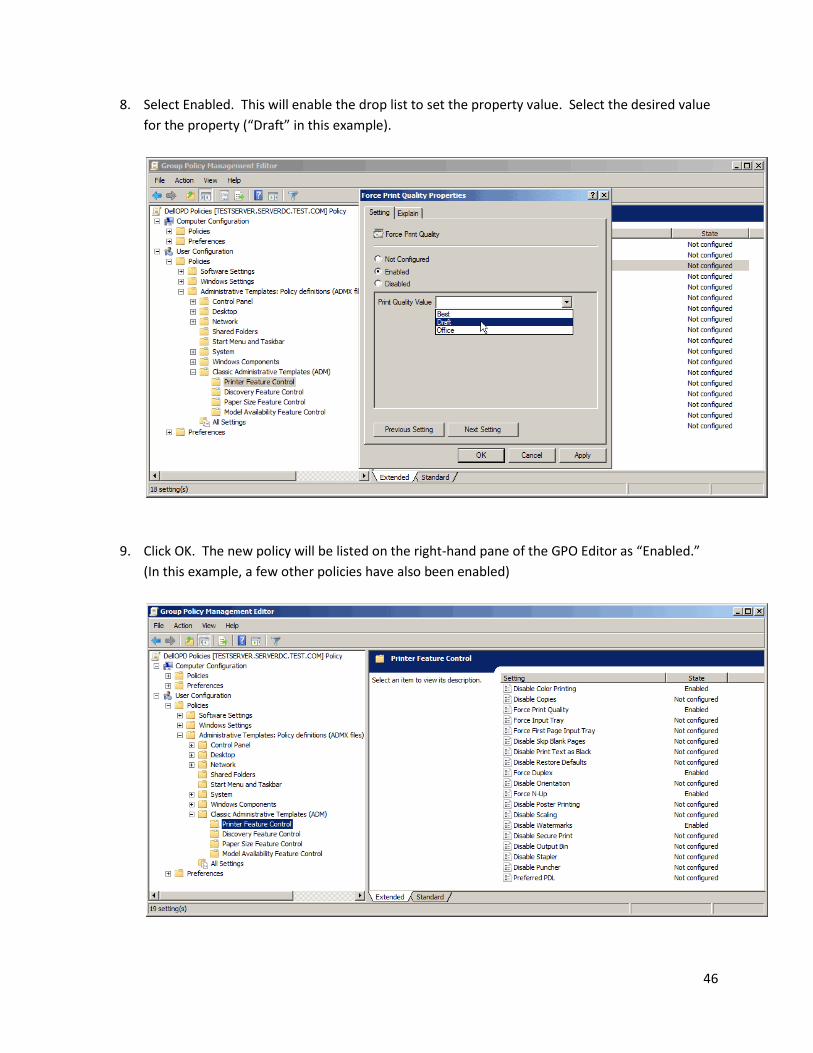
8. Select Enabled. This will enable the drop list to set the property value. Select the desired value for the property (“Draft” in this example).
9. Click OK. The new policy will be listed on the right-hand pane of the GPO Editor as “Enabled.” (In this example, a few other policies have also been enabled)

47
10. To link the new GPO to a group, return to the Group Policy Management snap-in. Right-click on the group you wish to link to (in this example, “UserGroup1”), and select “Link an Existing GPO”.
11. In the Select GPO dialog, select the GPO you have just created, and click OK.

48
12. The defined policies will be pushed out to the machines in the domain. When affected users log on, the defined policies will be reflected in their system registries. The following registry editor screen shot for a user in the Engineering group shows the registry entries resulting from the Group Policy Object created in this example:

49
Policies with Multiple Selection Providing policies that allow multiple values for a printer feature is possible, but cumbersome. The following example shows how the administrator could define a list of multiple allowable paper sizes, using the available LISTBOX keyword in the administrative template.
1. Create a group policy object and import the administrative template into it (as in steps 1 – 5 above).
2. In the GPO Editor, select Paper Size Feature Control/ Allowable Paper Sizes:

50
3. Open the Properties dialog for Allowable Paper Sizes , select Enabled, and click “Show”.
4. The GPO Editor displays the Paper Sizes list box, with no entries.

51
5. For each Paper Size to be permitted, click the Add button and enter the numeric Paper Size ID.
6. When the system administrator is finished, the list box will contain a list of all valid values for the Paper Size feature. In this example, the values 5, 7, 9 and 37 refer to Legal, Executive, A4 and Envelope Monarch.

52
7. When this policy is pushed out the users’ machines, the resulting registry entries will be:

53
How Users See Policies Group policies are defined on the server by the system administrator. Once defined, Windows propagates the policies to the operating system registry on each individual user’s computer. Each time a user logs on to Windows on his or her computer, Windows checks the policies that apply to that user, depending not only on the individual user name but also on the user groups to which he or she belongs.
The Dell Open Print Driver will read the policy values from the user’s registry whenever needed to apply the policy, such as when the Discovery dialog is to be shown or when the Printing Preferences dialog is to be shown.
The Dell Open Print Driver will tailor the Printing Preferences dialog to reflect any policies that are in effect for the current user. The dialog controls for affected features will be enabled or disabled based on whether or not the user is authorized to use those particular features; or the control will contain the specific value that a policy requires for the feature.
For example, if the system administrator has disabled color printing, the radio button for Gray Scale will be selected and the radio buttons for both Color and Gray Scale will be disabled so that the user cannot change them. Similarly, if the system administrator has set a policy for Print Quality, the Print Quality drop list will be pre-set to the quality level defined in the policy and the control will be disabled so that the user cannot change them. Both of these are illustrated in the following screen shot:

54
Note also the “padlock” icon in the lower right quadrant of the dialog. This icon appears on the printing preferences dialog whenever the features of the driver have been limited in any way by Group Policy. If the user clicks on the icon, a message box will be shown which briefly explains why some features are not available.

55
How to load and unload ‘Dell Open Print Driver’ drivers for standard user account? The following section applies to systems:
Due to limited standard user rights on the systems shown above, a standard user is unable to change the printer for ‘Dell Open Print Driver’ – Dynamic instance. The following instructions and screen shots illustrate to set the policy to load and unload device drivers for standard user account on your system:
For this example, we used Win XP 32-bit (Service Pack 3) system:
1) Log on to ‘Administrator’ Account on your system
2) Click ‘Start’ on your Windows operating system and select ‘Control Panel’
Operating System Support Operating System Min. Service Pack Architecture
Windows XP SP2 x86 – x64 Windows Server 2003 SP1 x86 – x64 Windows Server 2008 no SP x86 – x64 Windows Server 2008 R2 no SP x64

56
Note: If a user you like to grant permission to load and unload the device drivers is already a member of ‘Power Users’ group, you can skip steps 3 to 9 and follow from step 10.
3) Select ‘Administrative Tools’ and click on ‘Computer Management’
4) Select ‘Local Users and Groups’ and expand

57
5) Select ‘Users’
6) Right click on the standard user you like to grant permission to load and unload the device drivers and select ‘Properties’

58
7) Select ‘Member of’ tab and click on ‘Add…’
8) At ‘Enter the object names to select’ text box, Type ‘Power Users’ and press ‘Check Names’. Press ‘OK’ to close the dialog.

59
9) The following user is now part of the ‘Power Users’ group. Press ‘OK’ to close the dialog.
10) Select ‘Administrative Tools’ from control panel and click on ‘Local Security Policy’

60
11) Select ‘Local Policies’ and expand. Select ‘User Rights Assignment’
12) Right click on the ‘Load and unload device drivers’ policy and select ‘Properties’.

61
13) Select ‘Local Security Setting’ tab and press on ‘Add User or Group…’
14) In ‘Select Users or Groups’ screen, select ‘Object Types…’ and check box for ‘Group’. Press ‘OK’ to close the dialog.

62
15) At ‘Enter the object names to select’ text box, Type ‘Power Users’ and press ‘Check Names’. Press ‘OK’ to close the dialog.
16) The ‘Power Users’ group is now added to the ‘Load and unload device drivers’ policy. Press ‘OK’ to close the dialog.
17) Restart your system for the changes to take effect and log on to your ‘Standard Account’.