deploying an exadata db system on oracle cloud infrastructure · 2 | deploying an exadata db system...
TRANSCRIPT
Deploying an Exadata DB System on Oracle Cloud Infrastructure O R A C L E W H I T E P A P E R | A U G U S T 2 0 1 8
2 | DEPLOYING AN EXADATA DB SYSTEM ON ORACLE CLOUD INFRASTRUCTURE
Disclaimer The following is intended to outline our general product direction. It is intended for information purposes only, and may not be incorporated into any contract. It is not a commitment to deliver any material, code, or functionality, and should not be relied upon in making purchasing decisions. The development, release, and timing of any features or functionality described for Oracle’s products remains at the sole discretion of Oracle.
Revision History The following revisions have been made to this white paper since its initial publication:
Date Revision
August 31, 2018 Initial publication
You can find the most recent versions of the Oracle Cloud Infrastructure white papers at https://cloud.oracle.com/iaas/technical-resources.
3 | DEPLOYING AN EXADATA DB SYSTEM ON ORACLE CLOUD INFRASTRUCTURE
Table of Contents Introduction 4
Overview of Exadata on Oracle Cloud Infrastructure 4
Supported Database Edition and Versions 5
Access Requirements for Deploying Exadata 5
Steps to Launch an Exadata DB System on Oracle Cloud Infrastructure 5
Step 1: Create a VCN 5
Step 2: Create an Internet Gateway 7
Step 3: Create a Service Gateway 7
Step 4: Create Route Tables 8
Step 5: Create Security Lists 10
Step 6: Create DHCP Options 12
Step 7: Create Subnets 13
Step 8: Add Rules to Security Lists 17
Step 9: Launch an Exadata DB System 20
Step 10: Access the Exadata DB System from the Console 24
Step 11: Connect to the Exadata DB System 25
Summary 26
4 | DEPLOYING AN EXADATA DB SYSTEM ON ORACLE CLOUD INFRASTRUCTURE
Introduction This white paper provides step-by-step guidelines for deploying an Exadata DB system on Oracle Cloud Infrastructure. This paper outlines some best practices; it is not intended to be used as a full reference guide for implementing Exadata.
This document assumes that you have a basic understanding of various components of Oracle Cloud Infrastructure:
• Fundamentals of Oracle Cloud Infrastructure
• Oracle Cloud Infrastructure Networking, specifically virtual cloud networks (VCNs), subnets, security lists, and route tables
• Oracle Cloud Infrastructure Identity Access Management (IAM)
Overview of Exadata on Oracle Cloud Infrastructure An Exadata DB system consists of a quarter rack, half rack, or full rack of compute nodes and storage servers, tied together by a high-speed, low-latency InfiniBand network and intelligent Exadata software. You can configure automatic backups, optimize for different workloads, and scale up the system to meet increased demands.
The compute nodes are each configured with a virtual machine (VM). You have root privilege for the compute node VMs, so you can load and run additional software on them. However, you do not have administrative access to the Exadata infrastructure components, such as the physical compute node hardware, network switches, power distribution units (PDUs), integrated lights-out management (ILOM) interfaces, or the Exadata Storage Servers, which are all administered by Oracle.
You have full administrative privileges for your databases, and you can connect to your databases by using Oracle Net Services from outside Oracle Cloud Infrastructure. You are responsible for database administration tasks such as creating tablespaces and managing database users. You can also customize the default automated maintenance setup, including backups, and you have full control of the recovery process in the event of a database failure.
Oracle Cloud Infrastructure offers two versions of Exadata, X6 and X7, and each version comes with three shapes. For details about these shapes, see the System Configuration section of the Exadata DB Systems topic in the Database service documentation.
Note: Actual usable storage for the DATA disk group depends on the backup option that you choose when you launch an Exadata DB system. See the Exadata DB system documentation for details.
5 | DEPLOYING AN EXADATA DB SYSTEM ON ORACLE CLOUD INFRASTRUCTURE
Supported Database Edition and Versions Exadata DB systems require Enterprise Edition - Extreme Performance. This edition provides all the features of Oracle Database Enterprise Edition, plus all the database enterprise management packs and all the Enterprise Edition options, such as Oracle Database In-Memory and Oracle Real Application Clusters (RAC). For a list of the supported software releases, see Supported Database Edition and Versions in the Database service documentation.
Access Requirements for Deploying Exadata To launch Exadata in Oracle Cloud Infrastructure, you must be given the required access via an IAM policy. The following is a sample IAM policy that provides this access to group DBAdmins at tenancy level. To reduce the scope of access to just the database systems in a particular compartment, specify that compartment instead of the tenancy.
Allow group DBAdmins to manage database-family in tenancy
You will also require the public key that you plan to use to connect to DB system via SSH.
Steps to Launch an Exadata DB System on Oracle Cloud Infrastructure This section provides the steps to create the required networking components and launch an Exadata DB system in Oracle Cloud Infrastructure. References to the Oracle Cloud Infrastructure Networking and Database services documentation are provide for detailed steps.
Step 1: Create a VCN
1. Sign in to the Oracle Cloud Infrastructure Console.
2. Create a VCN, following the steps in To create a cloud network.
For this example, enter the following values in the Create Virtual Cloud Network dialog box:
• For Name, enter ExaVCN.
• Select Create Virtual Cloud Network Only.
6 | DEPLOYING AN EXADATA DB SYSTEM ON ORACLE CLOUD INFRASTRUCTURE
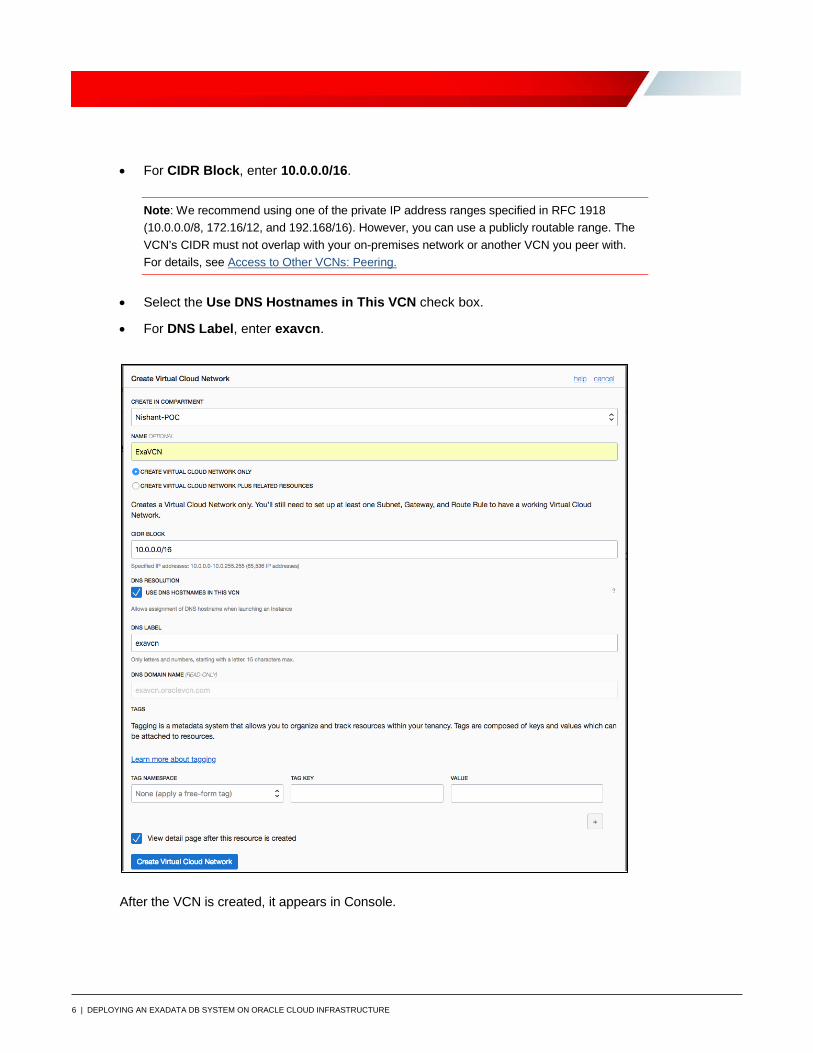
• For CIDR Block, enter 10.0.0.0/16.
Note: We recommend using one of the private IP address ranges specified in RFC 1918 (10.0.0.0/8, 172.16/12, and 192.168/16). However, you can use a publicly routable range. The VCN’s CIDR must not overlap with your on-premises network or another VCN you peer with. For details, see Access to Other VCNs: Peering.
• Select the Use DNS Hostnames in This VCN check box.
• For DNS Label, enter exavcn.
After the VCN is created, it appears in Console.
7 | DEPLOYING AN EXADATA DB SYSTEM ON ORACLE CLOUD INFRASTRUCTURE
Step 2: Create an Internet Gateway An internet gateway is a virtual router that connects the edge of the cloud network with the internet. Traffic that originates in your VCN and is destined for a public IP address outside the VCN goes through the internet gateway.
1. In the Console, click the name of the VCN that you created.
2. Create an internet gateway, following the steps in To create an internet gateway.
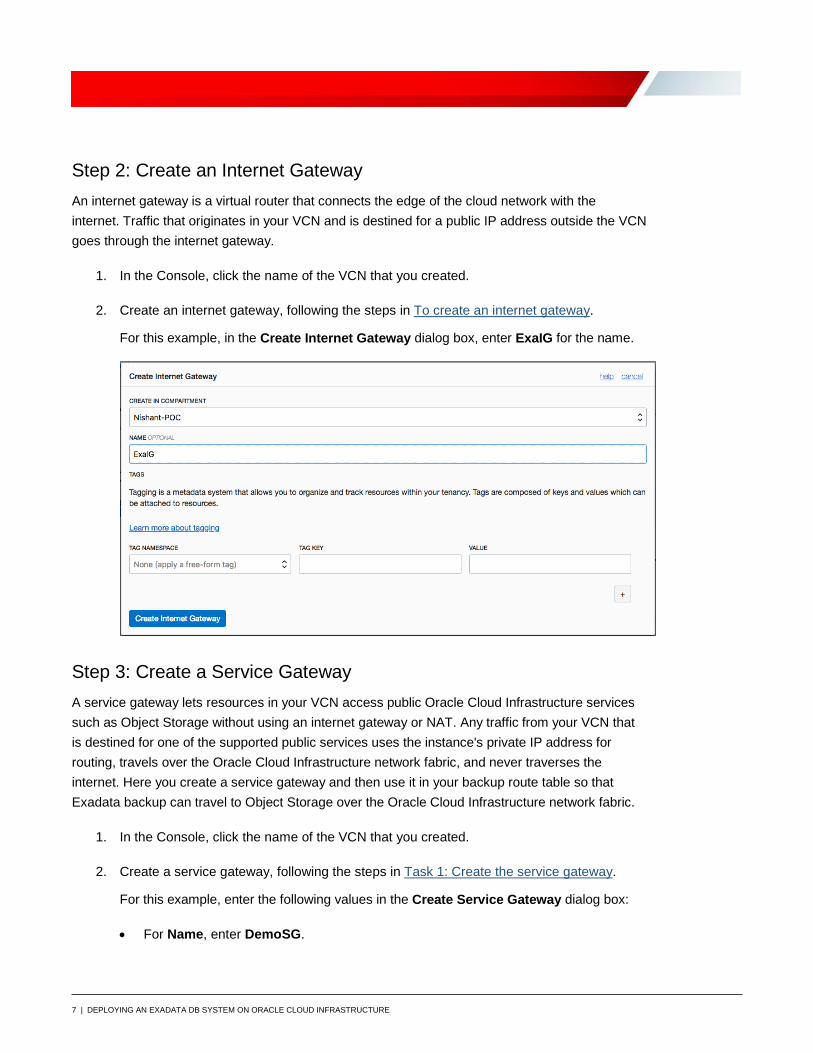
For this example, in the Create Internet Gateway dialog box, enter ExaIG for the name.
Step 3: Create a Service Gateway A service gateway lets resources in your VCN access public Oracle Cloud Infrastructure services such as Object Storage without using an internet gateway or NAT. Any traffic from your VCN that is destined for one of the supported public services uses the instance's private IP address for routing, travels over the Oracle Cloud Infrastructure network fabric, and never traverses the internet. Here you create a service gateway and then use it in your backup route table so that Exadata backup can travel to Object Storage over the Oracle Cloud Infrastructure network fabric.
1. In the Console, click the name of the VCN that you created.
2. Create a service gateway, following the steps in Task 1: Create the service gateway.
For this example, enter the following values in the Create Service Gateway dialog box:
• For Name, enter DemoSG.

8 | DEPLOYING AN EXADATA DB SYSTEM ON ORACLE CLOUD INFRASTRUCTURE
• For Services, select OCI LHR Object Storage.
Step 4: Create Route Tables Your cloud network uses virtual route tables to send traffic out of the VCN (for example, to the internet or to your on-premises network). These virtual route tables have rules that look and act like traditional network route rules that you might already be familiar with. Each rule specifies a destination CIDR block and the target (the next hop) for any traffic that matches that CIDR. For Exadata, you create two route tables, for client traffic and backup traffic.
1. In the Console, click the name of the VCN that you created.
2. Create a route table for the client traffic, following the steps in To create a route table.
For the client route table, enter the following values in the Create Route Table dialog box:
• For Name, enter Client_RT.
• In the Route Rules section:
o Target Type: Internet Gateway
o Destination CIDR Block: 0.0.0.0/0
o Compartment Name: The compartment where the internet gateway is located.
o Target Internet Gateway: The internet gateway that you created in Step 2 (in this example, ExaIG).
9 | DEPLOYING AN EXADATA DB SYSTEM ON ORACLE CLOUD INFRASTRUCTURE
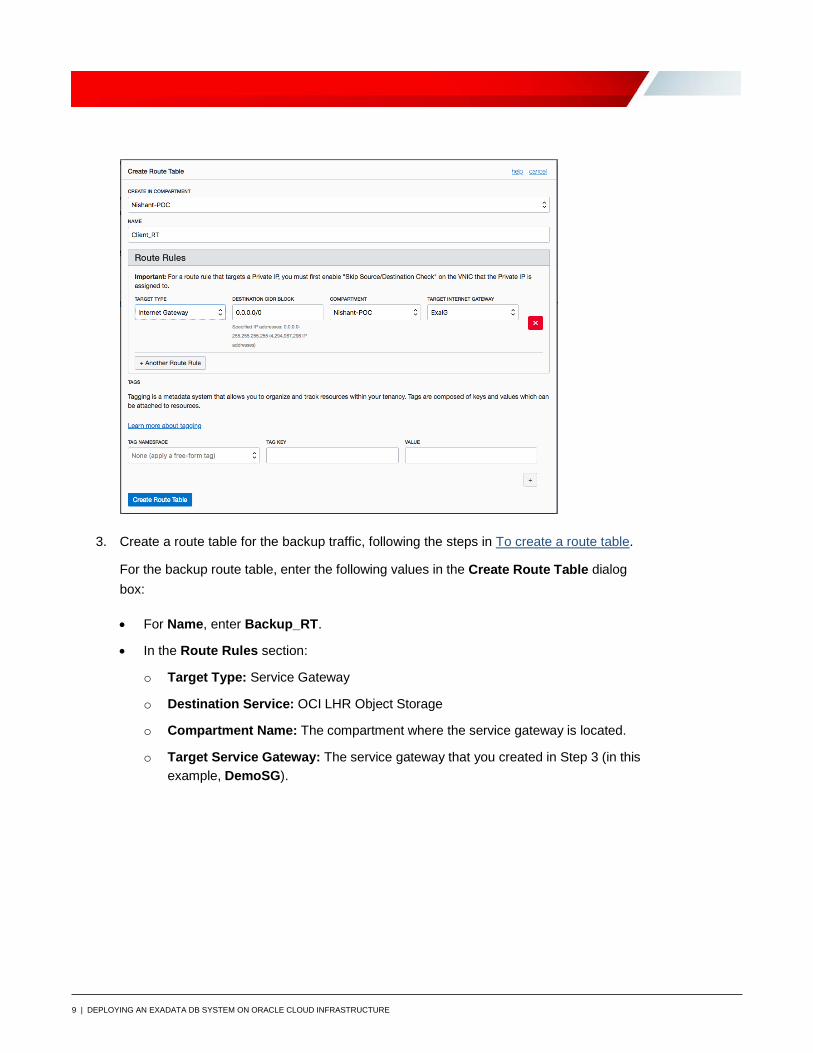
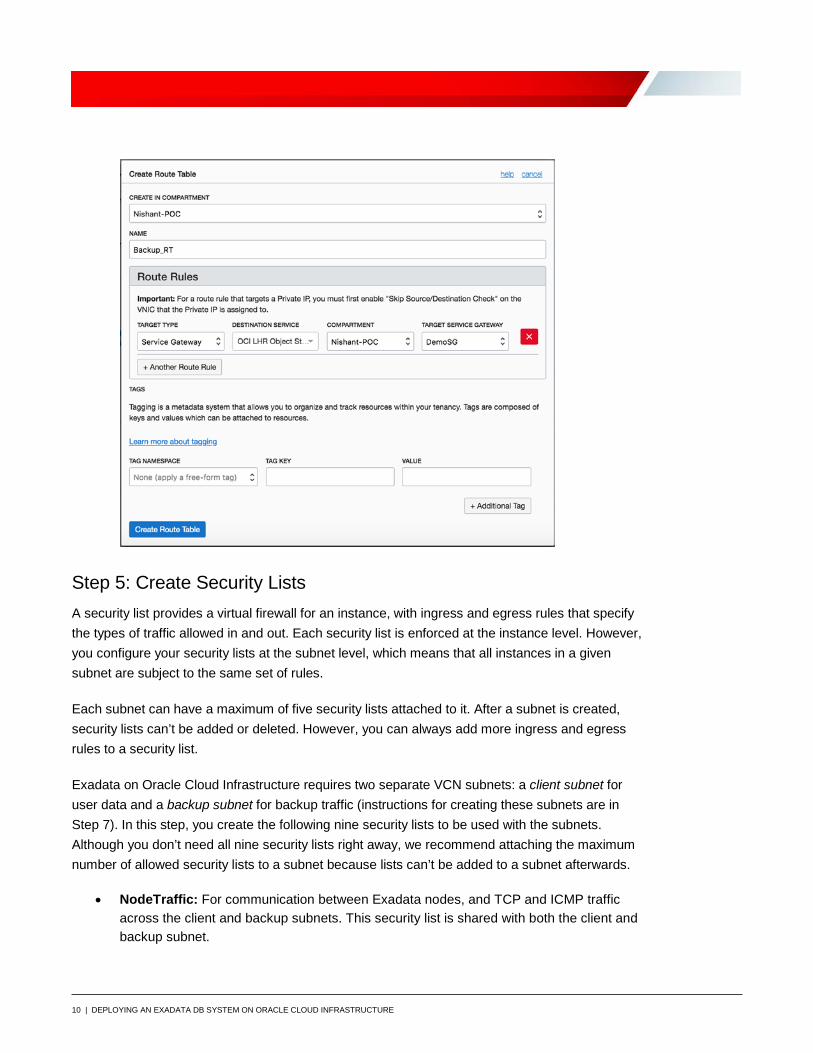
3. Create a route table for the backup traffic, following the steps in To create a route table.
For the backup route table, enter the following values in the Create Route Table dialog box:
• For Name, enter Backup_RT.
• In the Route Rules section:
o Target Type: Service Gateway
o Destination Service: OCI LHR Object Storage
o Compartment Name: The compartment where the service gateway is located.
o Target Service Gateway: The service gateway that you created in Step 3 (in this example, DemoSG).
10 | DEPLOYING AN EXADATA DB SYSTEM ON ORACLE CLOUD INFRASTRUCTURE
Step 5: Create Security Lists A security list provides a virtual firewall for an instance, with ingress and egress rules that specify the types of traffic allowed in and out. Each security list is enforced at the instance level. However, you configure your security lists at the subnet level, which means that all instances in a given subnet are subject to the same set of rules.
Each subnet can have a maximum of five security lists attached to it. After a subnet is created, security lists can’t be added or deleted. However, you can always add more ingress and egress rules to a security list.
Exadata on Oracle Cloud Infrastructure requires two separate VCN subnets: a client subnet for user data and a backup subnet for backup traffic (instructions for creating these subnets are in Step 7). In this step, you create the following nine security lists to be used with the subnets. Although you don’t need all nine security lists right away, we recommend attaching the maximum number of allowed security lists to a subnet because lists can’t be added to a subnet afterwards.
• NodeTraffic: For communication between Exadata nodes, and TCP and ICMP traffic across the client and backup subnets. This security list is shared with both the client and backup subnet.

11 | DEPLOYING AN EXADATA DB SYSTEM ON ORACLE CLOUD INFRASTRUCTURE
• SSH_Traffic: For SSH traffic.
• SQLNet: For SQL Net traffic.
• Client1: For client traffic.
• Client2: For client traffic.
• DB_Backup1: Backup traffic to Object Storage.
• DB_Backup2: Backup traffic to Object Storage.
• Flex1: Flex security list for future use.
• Flex2: Flex security list for future use.
Note: We do not recommend using the default security list that is created when you create the VCN. If you add rules to the default security list to open SQLNet traffic, these rules will be applied to every subnet to which the default security list is attached.
Create nine empty security lists, using the preceding names for the lists. In a later section, you will add the ingress and egress rules to the security lists.
1. In the Console, click the name of the VCN that you created.
2. Create nine security lists, following the steps in To create a new security list.
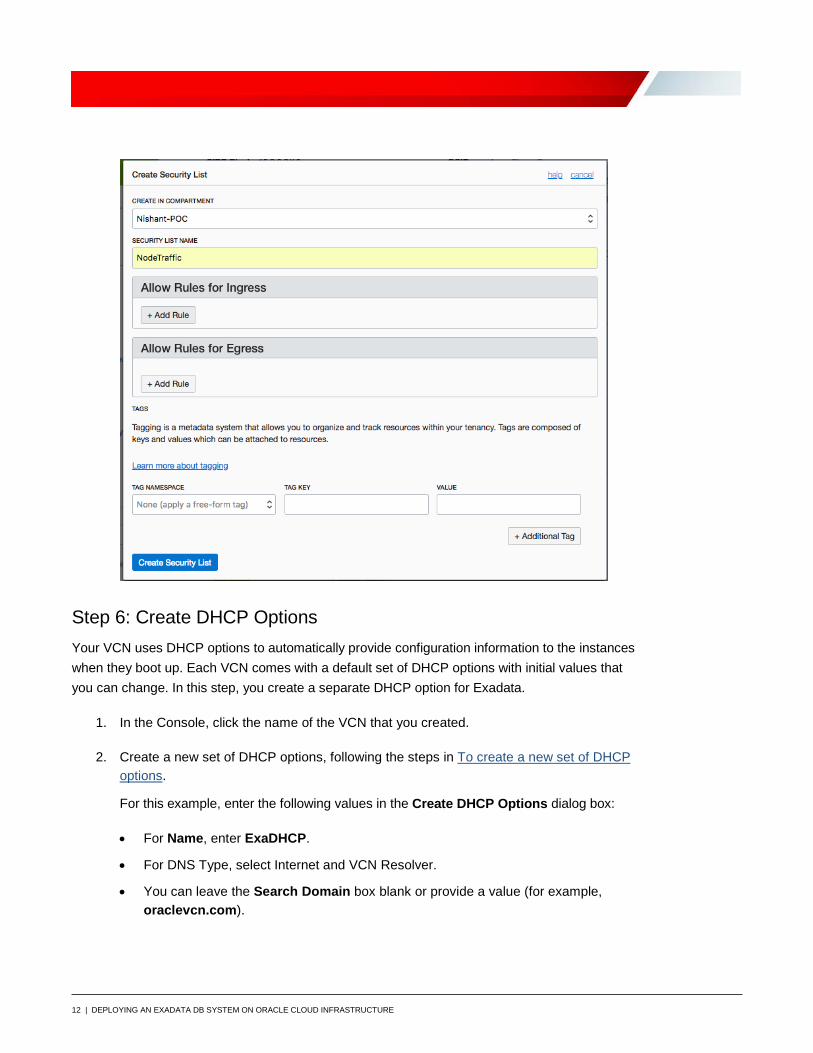
For this example, enter the following values in the Create Security List dialog box:
• Enter a name for the security list. See the preceding list for the names to use.
• Delete the default entries for the ingress and egress rules.
The following figure shows an example of the values to enter for the NodeTraffic security list.
12 | DEPLOYING AN EXADATA DB SYSTEM ON ORACLE CLOUD INFRASTRUCTURE
Step 6: Create DHCP Options Your VCN uses DHCP options to automatically provide configuration information to the instances when they boot up. Each VCN comes with a default set of DHCP options with initial values that you can change. In this step, you create a separate DHCP option for Exadata.
1. In the Console, click the name of the VCN that you created.
2. Create a new set of DHCP options, following the steps in To create a new set of DHCP options.
For this example, enter the following values in the Create DHCP Options dialog box:
• For Name, enter ExaDHCP.
• For DNS Type, select Internet and VCN Resolver.
• You can leave the Search Domain box blank or provide a value (for example, oraclevcn.com).

13 | DEPLOYING AN EXADATA DB SYSTEM ON ORACLE CLOUD INFRASTRUCTURE
Step 7: Create Subnets A subnet is a subdivision of a VCN. Each subnet in a VCN exists in a single availability domain and consists of a contiguous range of IP addresses that do not overlap with other subnets in the cloud network. For more information about VCN and subnets, see Working with VCNs and Subnets.
Follow these steps to create the client and backup subnet.
1. In the Console, click the name of the VCN that you created.
2. In the Resources section, click Subnets.
3. Click Create Subnet.
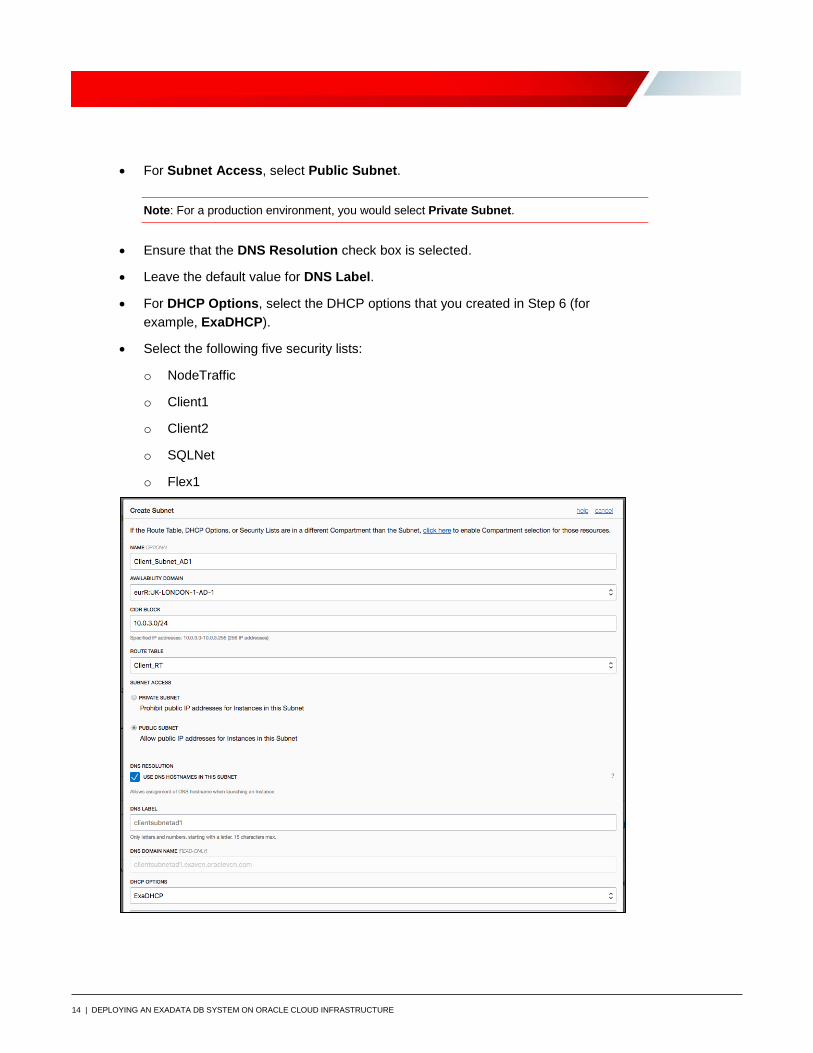
4. In the Create Subnet dialog box, enter the following values to create the client subnet:
• Enter a name for the subnet (in this example, Client_Subnet_AD1).
• Choose the availability domain where you plan to launch the Exadata DB system.
• Enter the CIDR block for the subnet (in this example, 10.0.3.0/24).
• Choose the route table that you created for the client traffic (in this example, Client_RT).
14 | DEPLOYING AN EXADATA DB SYSTEM ON ORACLE CLOUD INFRASTRUCTURE
• For Subnet Access, select Public Subnet.
Note: For a production environment, you would select Private Subnet.
• Ensure that the DNS Resolution check box is selected.
• Leave the default value for DNS Label.
• For DHCP Options, select the DHCP options that you created in Step 6 (for example, ExaDHCP).
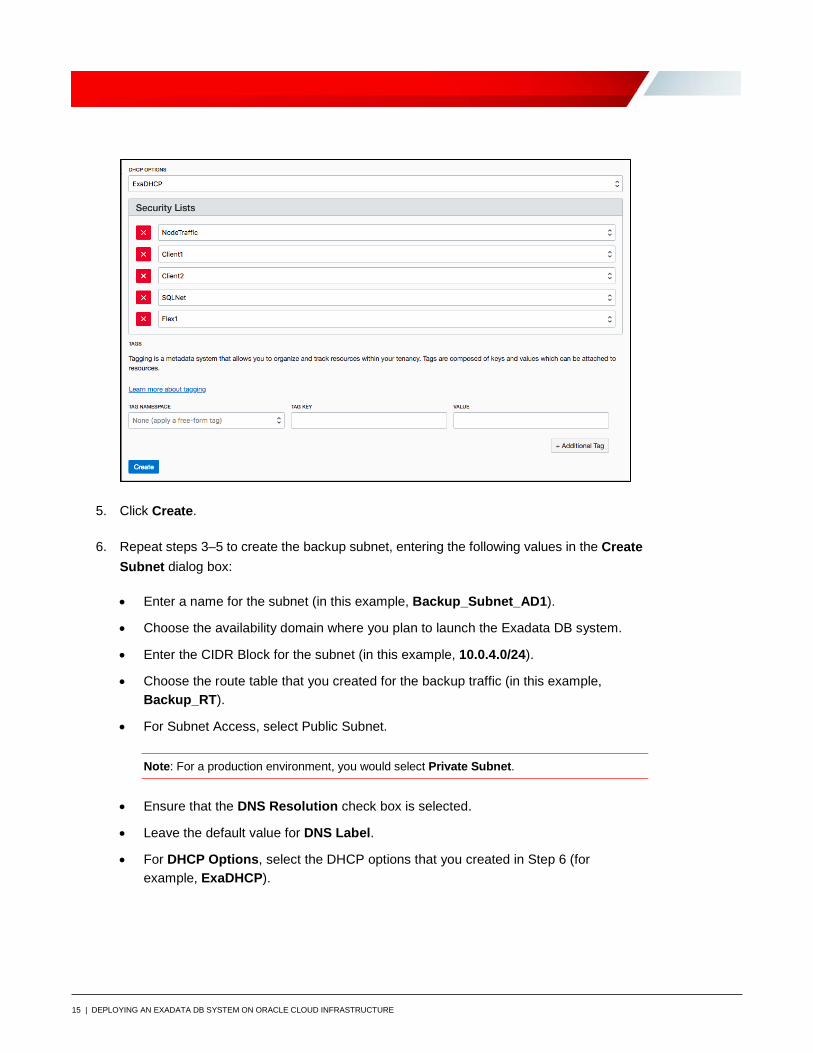
• Select the following five security lists:
o NodeTraffic
o Client1
o Client2
o SQLNet
o Flex1
15 | DEPLOYING AN EXADATA DB SYSTEM ON ORACLE CLOUD INFRASTRUCTURE
5. Click Create.
6. Repeat steps 3–5 to create the backup subnet, entering the following values in the Create Subnet dialog box:
• Enter a name for the subnet (in this example, Backup_Subnet_AD1).
• Choose the availability domain where you plan to launch the Exadata DB system.
• Enter the CIDR Block for the subnet (in this example, 10.0.4.0/24).
• Choose the route table that you created for the backup traffic (in this example, Backup_RT).
• For Subnet Access, select Public Subnet.
Note: For a production environment, you would select Private Subnet.
• Ensure that the DNS Resolution check box is selected.
• Leave the default value for DNS Label.
• For DHCP Options, select the DHCP options that you created in Step 6 (for example, ExaDHCP).
16 | DEPLOYING AN EXADATA DB SYSTEM ON ORACLE CLOUD INFRASTRUCTURE
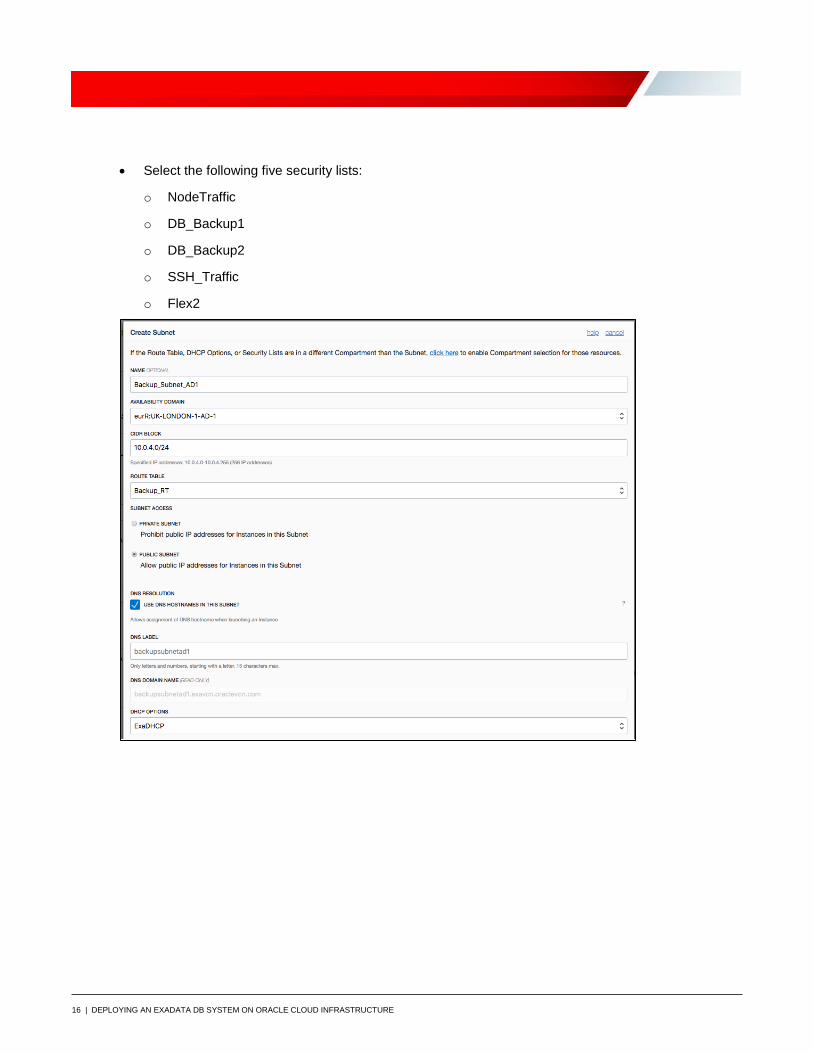
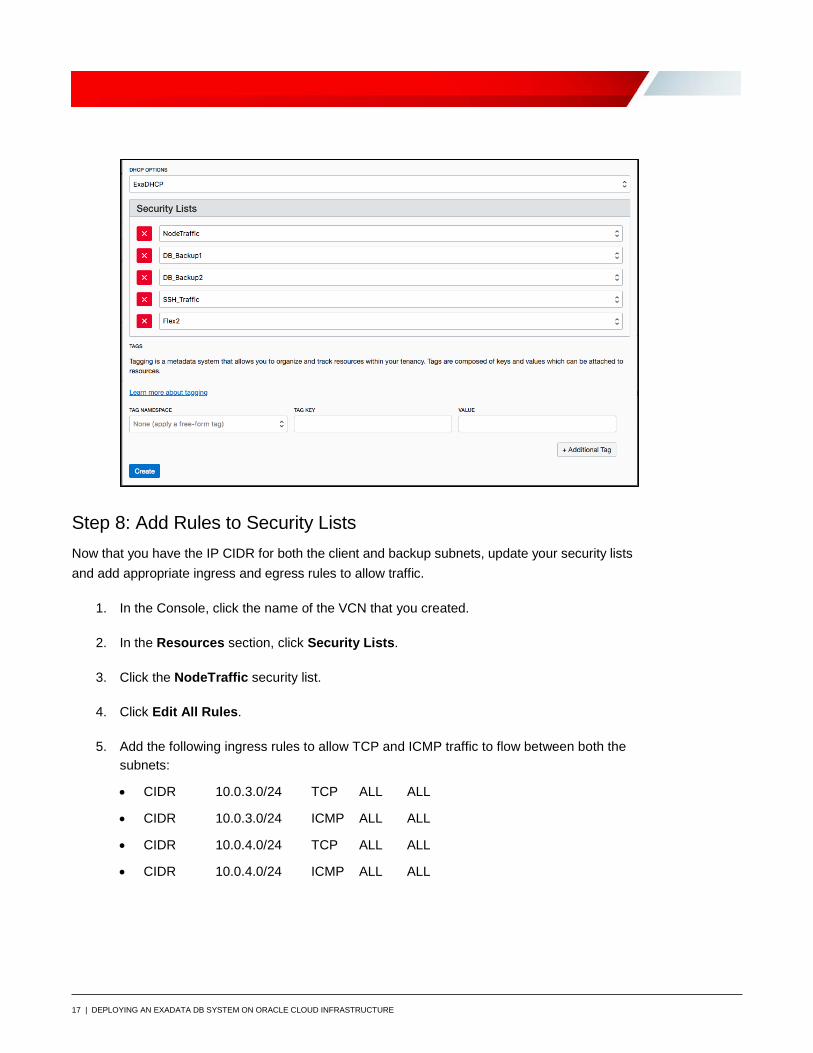
• Select the following five security lists:
o NodeTraffic
o DB_Backup1
o DB_Backup2
o SSH_Traffic
o Flex2
17 | DEPLOYING AN EXADATA DB SYSTEM ON ORACLE CLOUD INFRASTRUCTURE
Step 8: Add Rules to Security Lists Now that you have the IP CIDR for both the client and backup subnets, update your security lists and add appropriate ingress and egress rules to allow traffic.
1. In the Console, click the name of the VCN that you created.
2. In the Resources section, click Security Lists.
3. Click the NodeTraffic security list.
4. Click Edit All Rules.
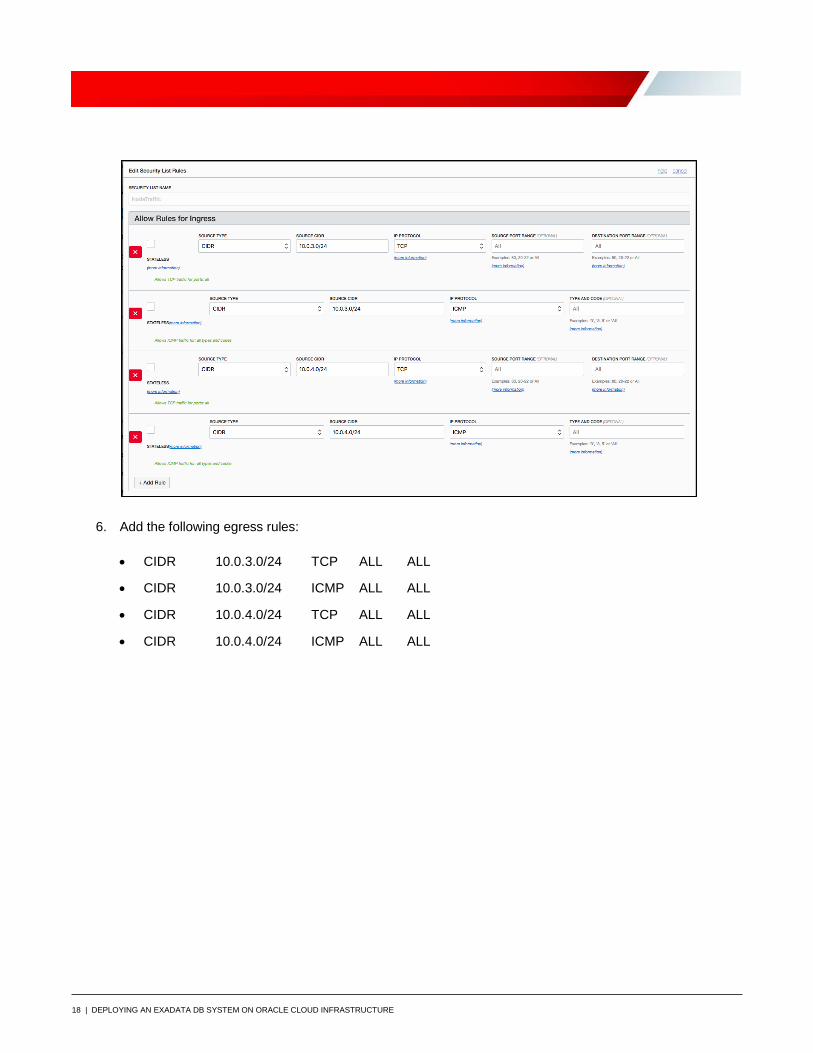
5. Add the following ingress rules to allow TCP and ICMP traffic to flow between both the subnets:
• CIDR 10.0.3.0/24 TCP ALL ALL
• CIDR 10.0.3.0/24 ICMP ALL ALL
• CIDR 10.0.4.0/24 TCP ALL ALL
• CIDR 10.0.4.0/24 ICMP ALL ALL
18 | DEPLOYING AN EXADATA DB SYSTEM ON ORACLE CLOUD INFRASTRUCTURE
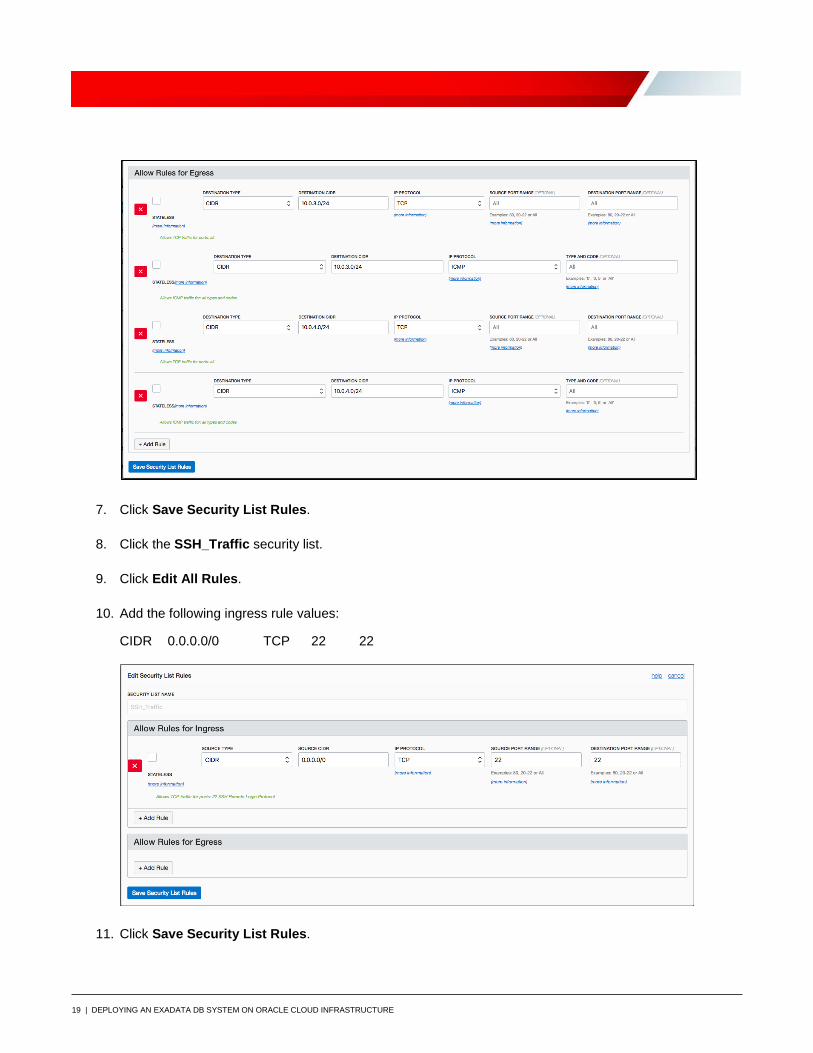
6. Add the following egress rules:
• CIDR 10.0.3.0/24 TCP ALL ALL
• CIDR 10.0.3.0/24 ICMP ALL ALL
• CIDR 10.0.4.0/24 TCP ALL ALL
• CIDR 10.0.4.0/24 ICMP ALL ALL
19 | DEPLOYING AN EXADATA DB SYSTEM ON ORACLE CLOUD INFRASTRUCTURE
7. Click Save Security List Rules.
8. Click the SSH_Traffic security list.
9. Click Edit All Rules.
10. Add the following ingress rule values:
CIDR 0.0.0.0/0 TCP 22 22
11. Click Save Security List Rules.
20 | DEPLOYING AN EXADATA DB SYSTEM ON ORACLE CLOUD INFRASTRUCTURE
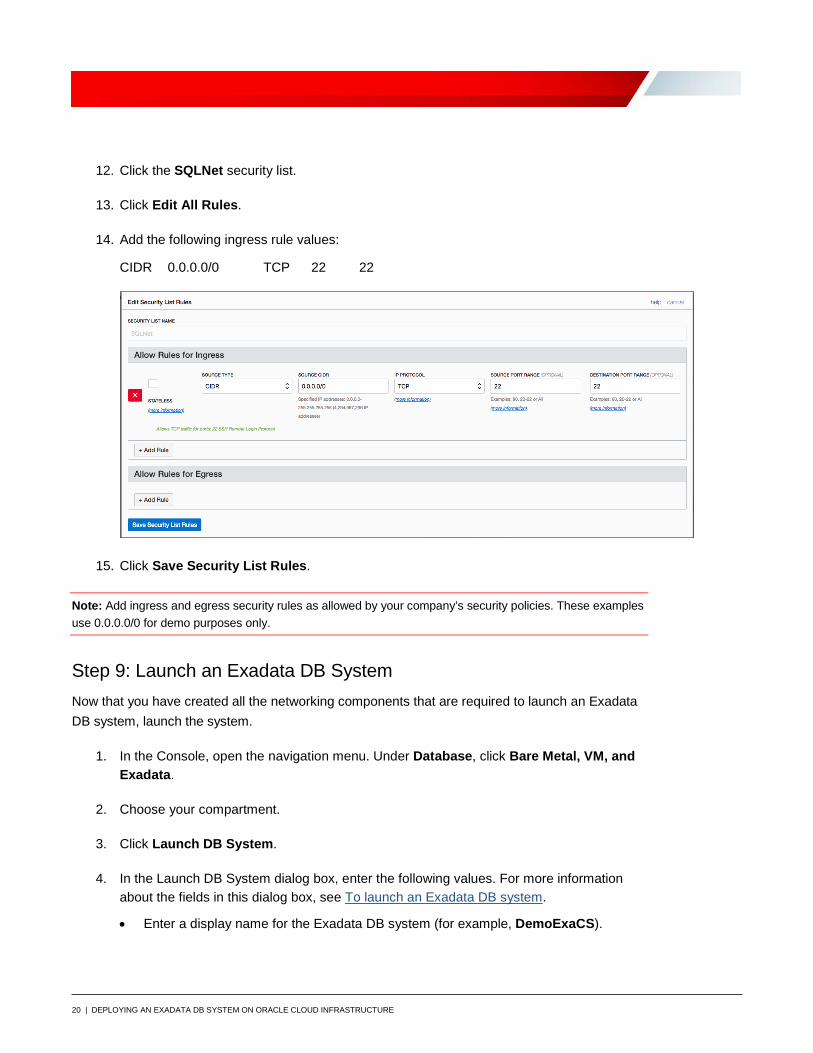
12. Click the SQLNet security list.
13. Click Edit All Rules.
14. Add the following ingress rule values:
CIDR 0.0.0.0/0 TCP 22 22
15. Click Save Security List Rules.
Note: Add ingress and egress security rules as allowed by your company’s security policies. These examples use 0.0.0.0/0 for demo purposes only.
Step 9: Launch an Exadata DB System Now that you have created all the networking components that are required to launch an Exadata DB system, launch the system.
1. In the Console, open the navigation menu. Under Database, click Bare Metal, VM, and Exadata.
2. Choose your compartment.
3. Click Launch DB System.
4. In the Launch DB System dialog box, enter the following values. For more information about the fields in this dialog box, see To launch an Exadata DB system.
• Enter a display name for the Exadata DB system (for example, DemoExaCS).
21 | DEPLOYING AN EXADATA DB SYSTEM ON ORACLE CLOUD INFRASTRUCTURE
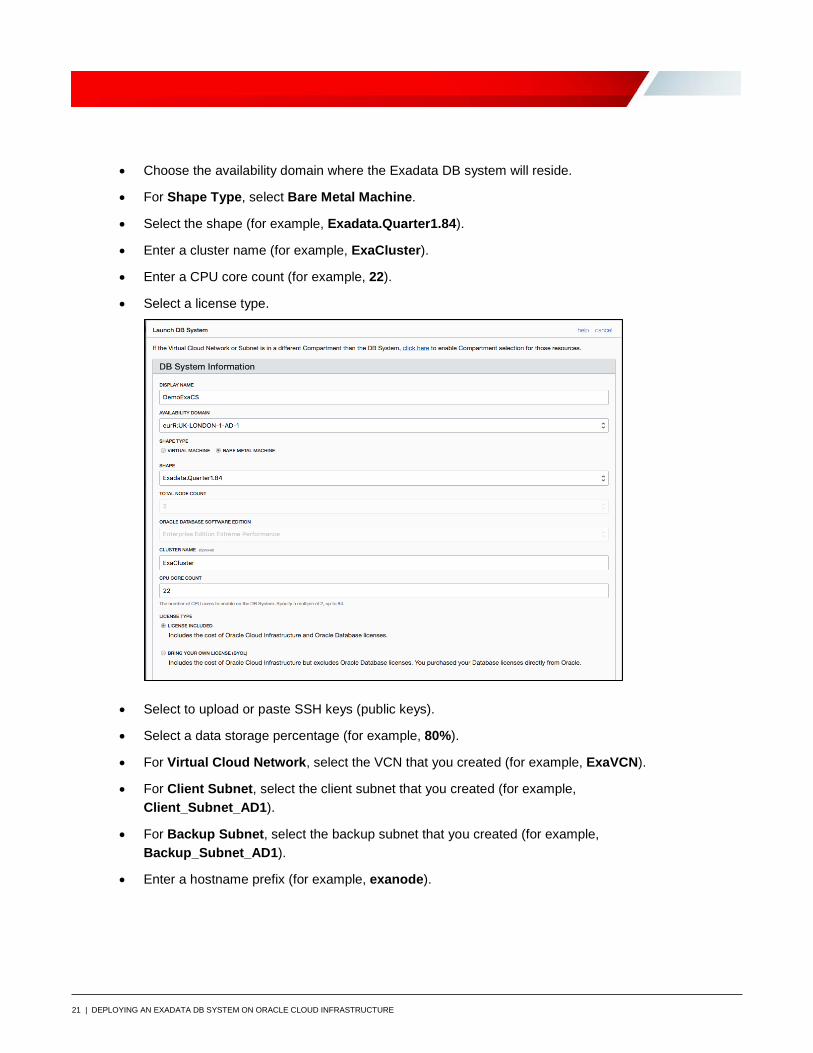
• Choose the availability domain where the Exadata DB system will reside.
• For Shape Type, select Bare Metal Machine.
• Select the shape (for example, Exadata.Quarter1.84).
• Enter a cluster name (for example, ExaCluster).
• Enter a CPU core count (for example, 22).
• Select a license type.
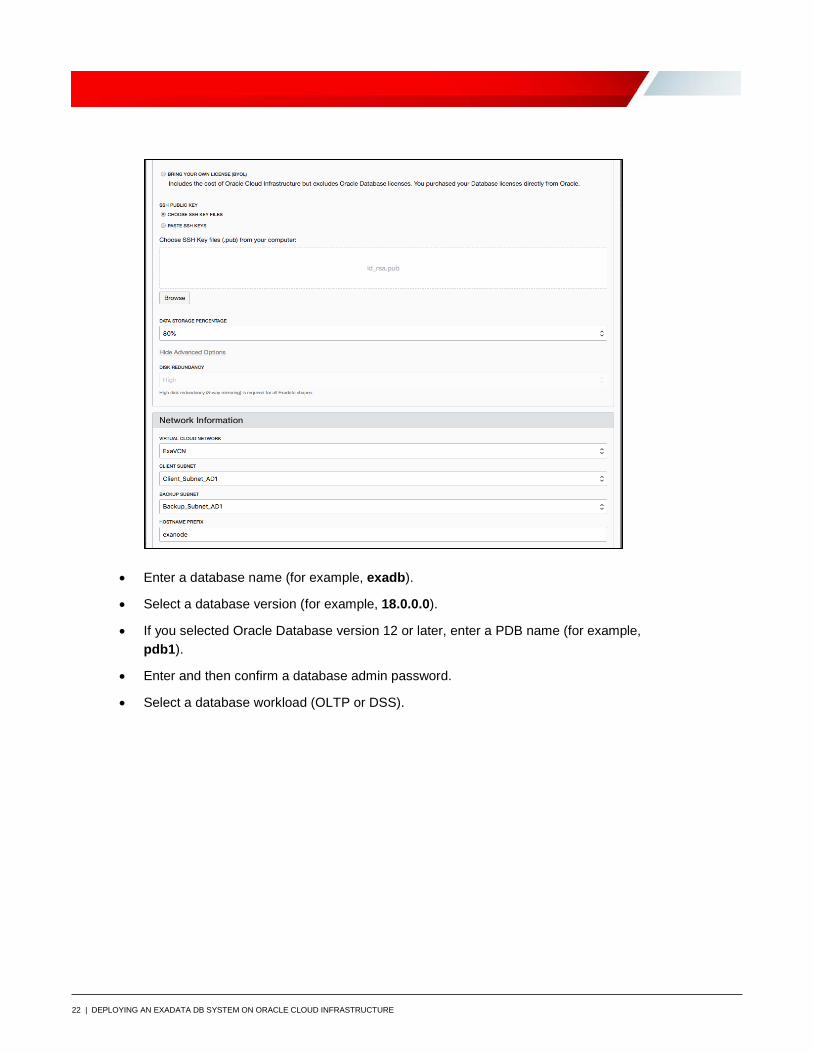
• Select to upload or paste SSH keys (public keys).
• Select a data storage percentage (for example, 80%).
• For Virtual Cloud Network, select the VCN that you created (for example, ExaVCN).
• For Client Subnet, select the client subnet that you created (for example, Client_Subnet_AD1).
• For Backup Subnet, select the backup subnet that you created (for example, Backup_Subnet_AD1).
• Enter a hostname prefix (for example, exanode).
22 | DEPLOYING AN EXADATA DB SYSTEM ON ORACLE CLOUD INFRASTRUCTURE
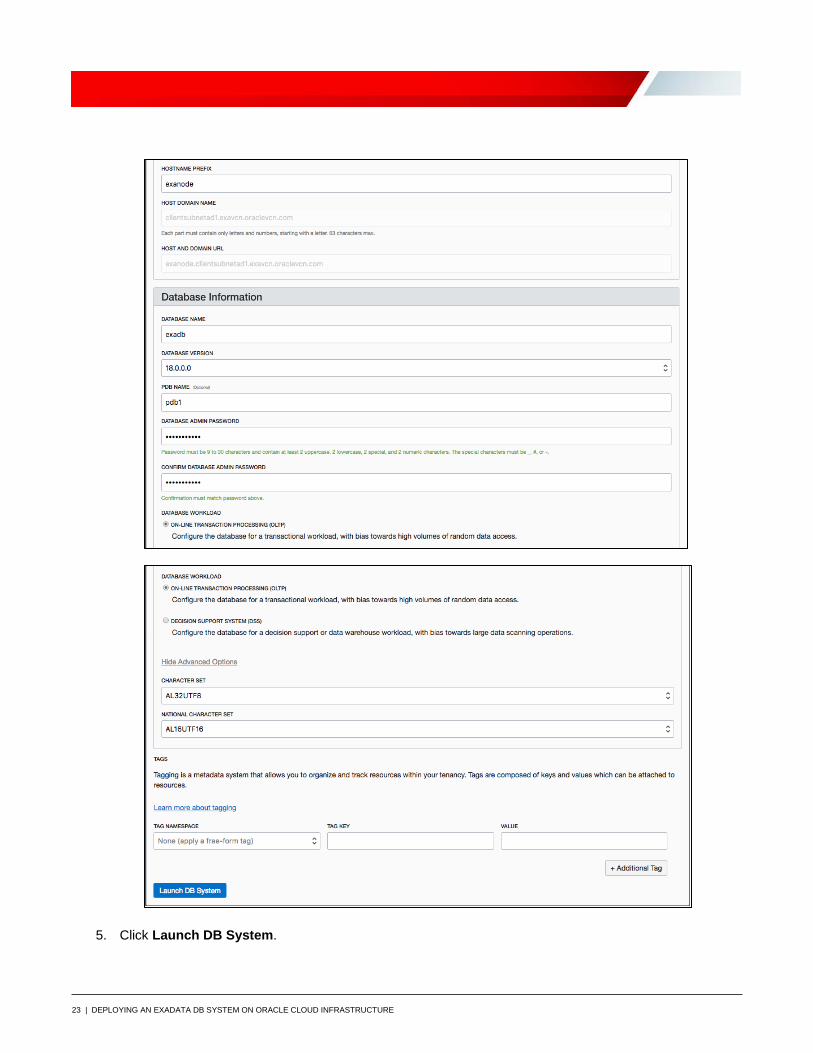
• Enter a database name (for example, exadb).
• Select a database version (for example, 18.0.0.0).
• If you selected Oracle Database version 12 or later, enter a PDB name (for example, pdb1).
• Enter and then confirm a database admin password.
• Select a database workload (OLTP or DSS).
23 | DEPLOYING AN EXADATA DB SYSTEM ON ORACLE CLOUD INFRASTRUCTURE
5. Click Launch DB System.
24 | DEPLOYING AN EXADATA DB SYSTEM ON ORACLE CLOUD INFRASTRUCTURE
Step 10: Access the Exadata DB System from the Console You can access the Exadata DB system from the Oracle Cloud Infrastructure Console and obtain the IP addresses of nodes and other information. You can create more databases, and stop and reboot nodes. For detailed information, see the Managing Exadata DB Systems.
1. In the Console, open the navigation menu. Under Database, click Bare Metal, VM, and Exadata.
2. Choose your compartment.
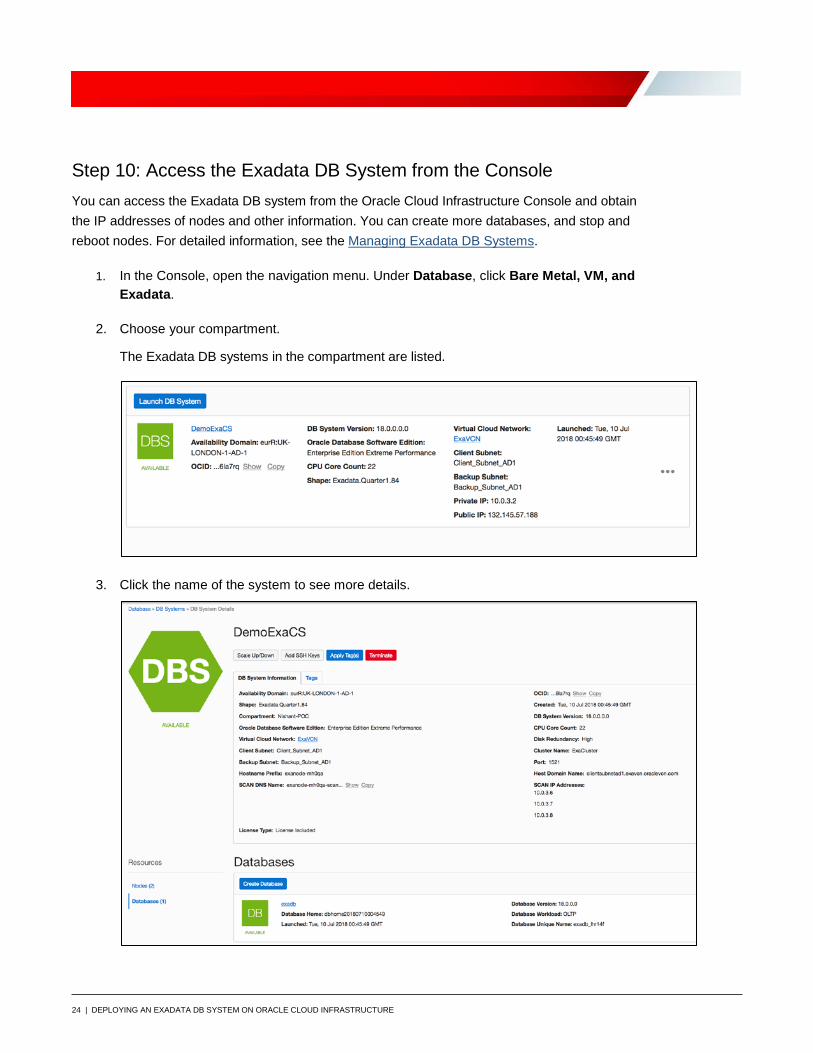
The Exadata DB systems in the compartment are listed.
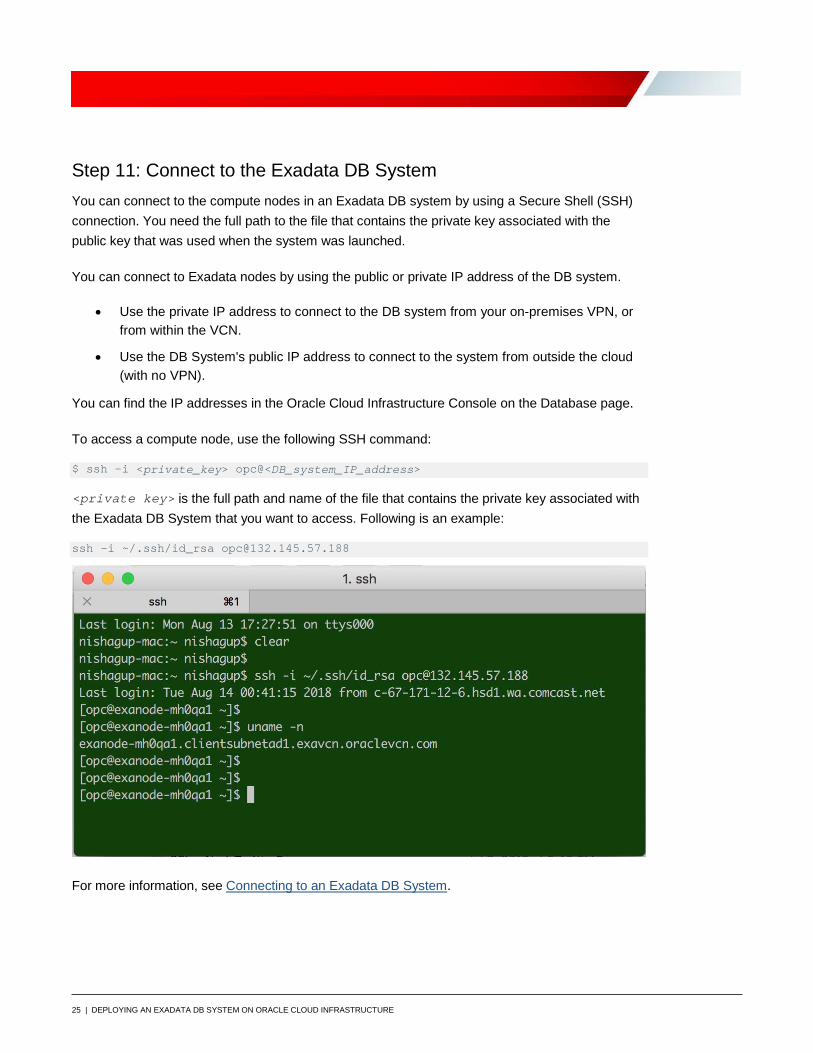
3. Click the name of the system to see more details.
25 | DEPLOYING AN EXADATA DB SYSTEM ON ORACLE CLOUD INFRASTRUCTURE
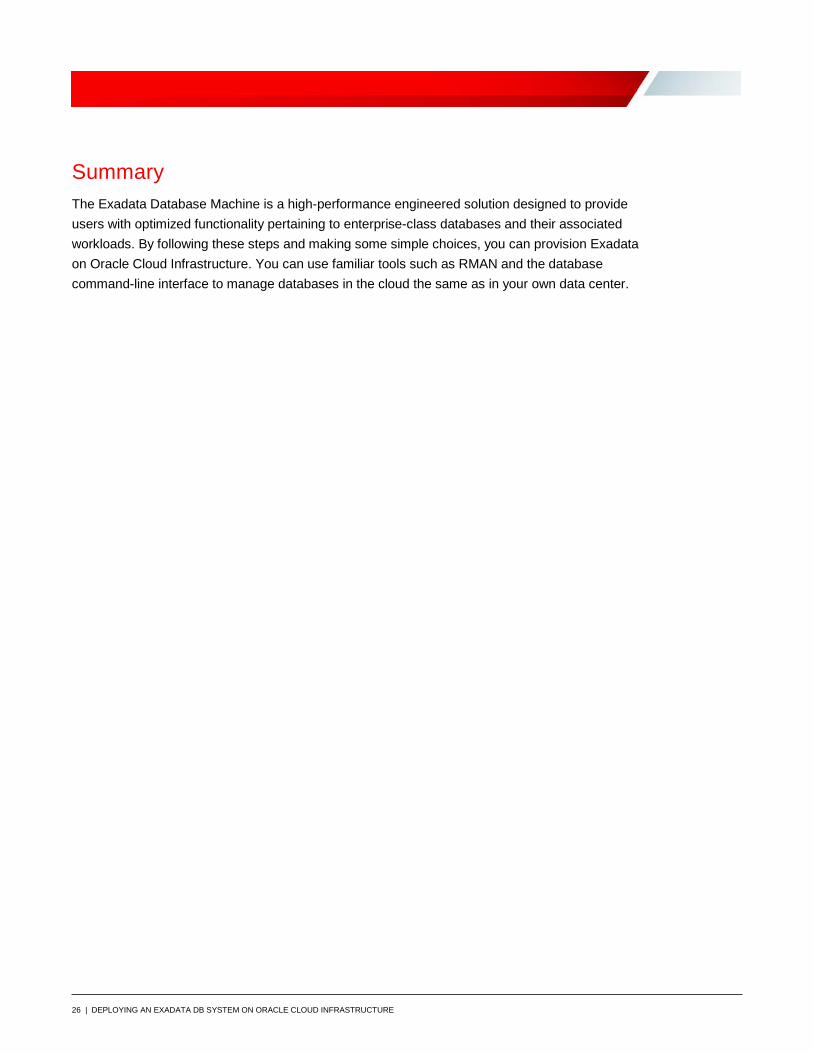
Step 11: Connect to the Exadata DB System You can connect to the compute nodes in an Exadata DB system by using a Secure Shell (SSH) connection. You need the full path to the file that contains the private key associated with the public key that was used when the system was launched.
You can connect to Exadata nodes by using the public or private IP address of the DB system.
• Use the private IP address to connect to the DB system from your on-premises VPN, or from within the VCN.
• Use the DB System's public IP address to connect to the system from outside the cloud (with no VPN).
You can find the IP addresses in the Oracle Cloud Infrastructure Console on the Database page.
To access a compute node, use the following SSH command:
$ ssh -i <private_key> opc@<DB_system_IP_address>
<private key> is the full path and name of the file that contains the private key associated with the Exadata DB System that you want to access. Following is an example:
ssh -i ~/.ssh/id_rsa [email protected]
For more information, see Connecting to an Exadata DB System.
26 | DEPLOYING AN EXADATA DB SYSTEM ON ORACLE CLOUD INFRASTRUCTURE
Summary The Exadata Database Machine is a high-performance engineered solution designed to provide users with optimized functionality pertaining to enterprise-class databases and their associated workloads. By following these steps and making some simple choices, you can provision Exadata on Oracle Cloud Infrastructure. You can use familiar tools such as RMAN and the database command-line interface to manage databases in the cloud the same as in your own data center.
Oracle Corporation, World Headquarters Worldwide Inquiries 500 Oracle Parkway Phone: +1.650.506.7000 Redwood Shores, CA 94065, USA Fax: +1.650.506.7200
Copyright © 2018, Oracle and/or its affiliates. All rights reserved. This document is provided for information purposes only, and the contents hereof are subject to change without notice. This document is not warranted to be error-free, nor subject to any other warranties or conditions, whether expressed orally or implied in law, including implied warranties and conditions of merchantability or fitness for a particular purpose. We specifically disclaim any liability with respect to this document, and no contractual obligations are formed either directly or indirectly by this document. This document may not be reproduced or transmitted in any form or by any means, electronic or mechanical, for any purpose, without our prior written permission. Oracle and Java are registered trademarks of Oracle and/or its affiliates. Other names may be trademarks of their respective owners. Intel and Intel Xeon are trademarks or registered trademarks of Intel Corporation. All SPARC trademarks are used under license and are trademarks or registered trademarks of SPARC International, Inc. AMD, Opteron, the AMD logo, and the AMD Opteron logo are trademarks or registered trademarks of Advanced Micro Devices. UNIX is a registered trademark of The Open Group. 0818 Deploying an Exadata DB System on Oracle Cloud Infrastructure August 2018 Author: Nishant Gupta
C O N N E C T W I T H U S
blogs.oracle.com/oracle
facebook.com/oracle
twitter.com/oracle
oracle.com