deploying microsoft clusters in parallels virtuozzo...
TRANSCRIPT

Parallels
Deploying Microsoft Clusters in Parallels Virtuozzo-Based Systems
Copyright © 1999-2008 Parallels, Inc.

ISBN: N/A Parallels Holdings, Ltd. c/o Parallels Software, Inc. 13755 Sunrise Valley Drive Suite 600 Herndon, VA 20171 USA Tel: +1 (703) 815 5670 Fax: +1 (703) 815 5675 Copyright © 1999-2008 Parallels Holdings, Ltd. and its affiliates. All rights reserved. Parallels, Coherence, Parallels Transporter, Parallels Compressor, Parallels Desktop, and Parallels Explorer are registered trademarks of Parallels Software International, Inc. Virtuozzo, Plesk, HSPcomplete, and corresponding logos are trademarks of Parallels Holdings, Ltd. The Parallels logo is a trademark of Parallels Holdings, Ltd. This product is based on a technology that is the subject matter of a number of patent pending applications. Virtuozzo is a patented virtualization technology protected by U.S. patents 7,099,948; 7,076,633; 6,961,868 and having patents pending in the U.S. Plesk and HSPcomplete are patented hosting technologies protected by U.S. patents 7,099,948; 7,076,633 and having patents pending in the U.S. Distribution of this work or derivative of this work in any form is prohibited unless prior written permission is obtained from the copyright holder. Apple, Bonjour, Finder, Mac, Macintosh, and Mac OS are trademarks of Apple Inc. Microsoft, Windows, Microsoft Windows, MS-DOS, Windows NT, Windows 95, Windows 98, Windows 2000, Windows XP, Windows 2003 Server,Windows Vista, Microsoft SQL Server, Microsoft Desktop Engine (MSDE),and Microsoft Management Console are trademarks or registered trademarks of Microsoft Corporation. Linux is a registered trademark of Linus Torvalds. Red Hat is a registered trademark of Red Hat Software, Inc. SUSE is a registered trademark of Novell, Inc. Solaris is a registered trademark of Sun Microsystems, Inc. X Window System is a registered trademark of X Consortium, Inc. UNIX is a registered trademark of The Open Group. IBM DB2 is a registered trademark of International Business Machines Corp. SSH and Secure Shell are trademarks of SSH Communications Security, Inc. MegaRAID is a registered trademark of American Megatrends, Inc. PowerEdge is a trademark of Dell Computer Corporation. eComStation is a trademark of Serenity Systems International. FreeBSD is a registered trademark of the FreeBSD Foundation. Intel, Pentium, Celeron, and Intel Core are trademarks or registered trademarks of Intel Corporation. OS/2 Warp is a registered trademark of International Business Machines Corporation. VMware is a registered trademark of VMware, Inc. All other marks and names mentioned herein may be trademarks of their respective owners.
3
Contents
Deploying Microsoft Clusters in Virtuozzo-Based Systems 4
Deploying MSCS Software in Virtuozzo-Based Systems 5
Deploying Virtuozzo Failover Cluster..........................................................................................................5 Designing Cluster Configuration.......................................................................................................6 Setting Up Hardware for Cluster .....................................................................................................11 Configuring Physical Servers ..........................................................................................................11 Setting Up Domain ..........................................................................................................................12 Connecting Servers to Shared Storage ............................................................................................20 Setting Up Cluster ...........................................................................................................................21 Useful Links ....................................................................................................................................32 Installing Virtuozzo Containers 4.0 on Servers Participating in MSCS Cluster..............................33
Creating Server Cluster From Containers...................................................................................................39 Setting Up SAN-Based MSCS Cluster............................................................................................39 Setting Up 'Loopback File'-Based MSCS Cluster ...........................................................................42
Setting Up NLB Cluster on Hardware Node 46
Index 50
4
Windows Server 2003 comes with two main built-in clustering technologies:
Microsoft Clustering Service (MSCS). This kind of clustering technology allows you to provide high availability for your mission-critical applications (including the Virtuozzo Containers 4.0 software itself) through the failover of resources. Running one and the same application on two or more servers in the cluster helps ensure high application availability if one of the servers fails. The clustering software controls the failover process so that the application continues running on the second server, without any loss of data and without interruption in service.
Microsoft Network Load Balancing (NLB). This kind of clustering technology allows you to provide scalability and high availability for TCP- and UDP-based services and applications (e.g. for Web servers and Terminal Services) by load balancing incoming IP traffic across several servers in the cluster.
Virtuozzo Containers 4.0 allows you to deploy both types of clustering technologies in your working environments. Detailed information on how you can do it is provided in the following sections.
C H A P T E R 1
Deploying Microsoft Clusters in Virtuozzo-Based Systems
5
The Microsoft Cluster Server (MSCS) software integrated into the Windows Server 2003 operating system is designed to provide greater availability and reliability for your applications and services. In Virtuozzo Containers 4.0, you can make use of the MSCS technology in one of the following ways:
Create a cluster of two or more Virtuozzo Hardware Nodes that will host the Virtuozzo Containers software including all its mission-critical services and Containers. If one Hardware Node fails, another Node will take its responsibilities.
Make Containers participate as full members in the MSCS cluster (like any other standalone server running Windows Server 2003) and increase the availability of your mission-critical applications.
The following subsections provide detailed information on both ways of the MSCS software usage in Virtuozzo-based systems.
In This Chapter Deploying Virtuozzo Failover Cluster .................................................................................. 5 Creating Server Cluster From Containers ............................................................................. 39
Deploying Virtuozzo Failover Cluster
Virtuozzo Containers 4.0 allows you to use the Microsoft Cluster Service (MSCS) software for creating a cluster of two or more Hardware Nodes that will host the Virtuozzo Containers software including all its mission-critical services and Containers. If one Hardware Node in the cluster fails, another Node will take its responsibilities.
To set up a Virtuozzo failover cluster, you should perform the following steps:
1 Decide on the cluster model that will best suit your needs.
2 Set up hardware for the cluster.
3 Configure all physical servers to participate in the cluster (hereinafter, we will also refer to them as cluster nodes or nodes).
4 Set up an Active Directory domain and add the cluster nodes to it.
Note: You can also add the cluster nodes to an existing Active Directory domain, if you have one.
C H A P T E R 2
Deploying MSCS Software in Virtuozzo-Based Systems
Deploying MSCS Software in Virtuozzo-Based Systems 6
5 Set up a shared storage and connect it to the cluster nodes.
6 Create an MSCS cluster and add all your nodes to this cluster.
7 Set up a Virtuozzo failover cluster.
All the aforementioned steps are described in the following subsections in detail.
Designing Cluster Configuration Before you can start deploying your Virtuozzo failover cluster, you should decide on the cluster configuration that will meet your demands best of all. You can create Virtuozzo failover clusters of one of the following types:
Active/passive. This kind of cluster includes both active and standby nodes. The standby nodes are only used if one of the active nodes fails.
Active/active. In this kind of cluster, all Hardware Nodes act as active nodes, running the Parallels Virtuozzo software and hosting a number of Containers. In the event of a failover, all Containers running on the problem node are failed over to one of the healthy active nodes.
The following subsections provide detailed information on both types of Virtuozzo failover clusters.
Active/Passive Clusters
Active/passive clusters include both active and standby nodes. An example of an active/passive cluster is a four nodes cluster where three nodes are active (i.e. running the Parallels Virtuozzo Containers software and hosting a number of Containers) and one node is in the standby state (i.e. waiting for an active node failure and ready to take the responsibility of its resources). An active/passive cluster may also consist of five active cluster nodes and two standby nodes where each of the active nodes is able to fail over to any of the two standby nodes.
The following picture shows you an example configuration of an active/passive cluster that can be used to provide high-availability for your Parallels Virtuozzo Containers installations:
Note: We will use the given configuration throughout this section to demonstrate the Virtuozzo failover cluster creation.
Deploying MSCS Software in Virtuozzo-Based Systems 7
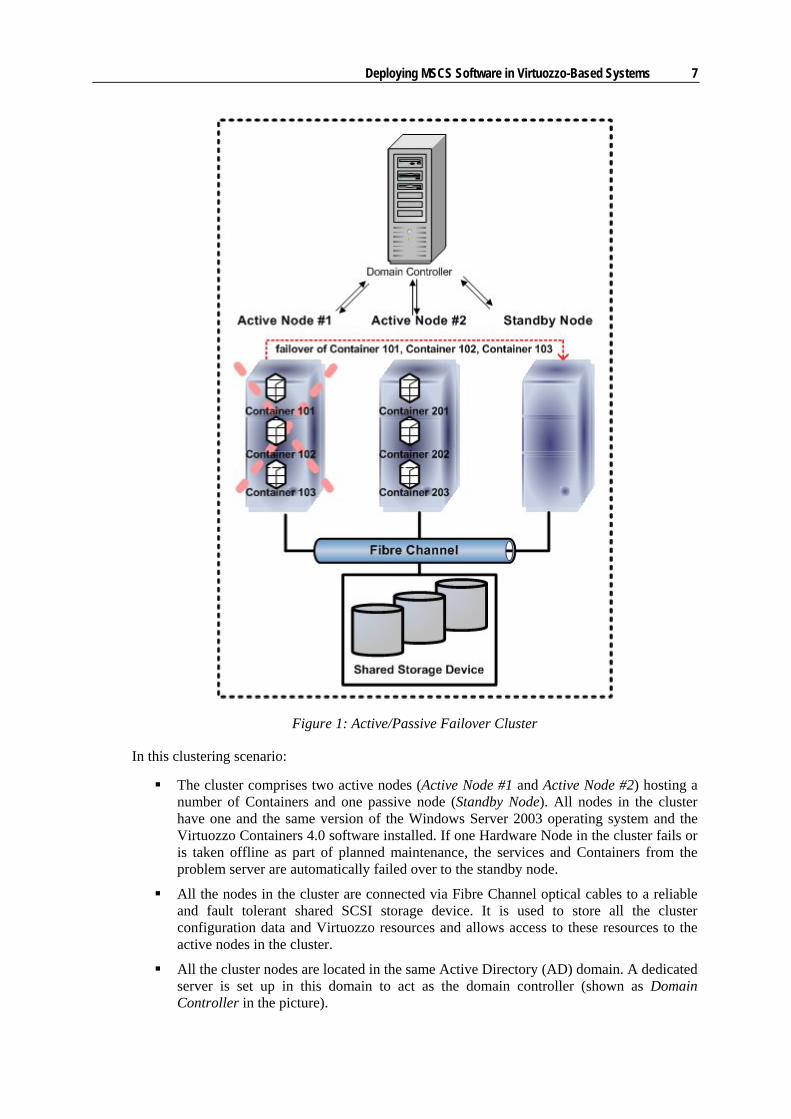
Figure 1: Active/Passive Failover Cluster
In this clustering scenario:
The cluster comprises two active nodes (Active Node #1 and Active Node #2) hosting a number of Containers and one passive node (Standby Node). All nodes in the cluster have one and the same version of the Windows Server 2003 operating system and the Virtuozzo Containers 4.0 software installed. If one Hardware Node in the cluster fails or is taken offline as part of planned maintenance, the services and Containers from the problem server are automatically failed over to the standby node.
All the nodes in the cluster are connected via Fibre Channel optical cables to a reliable and fault tolerant shared SCSI storage device. It is used to store all the cluster configuration data and Virtuozzo resources and allows access to these resources to the active nodes in the cluster.
All the cluster nodes are located in the same Active Directory (AD) domain. A dedicated server is set up in this domain to act as the domain controller (shown as Domain Controller in the picture).

Deploying MSCS Software in Virtuozzo-Based Systems 8
Note: In our example we will create an Active Directory domain from scratch. However, you can make use of an existing AD domain and include all your cluster nodes in this domain.
Active/Active Failover Cluster
Starting with the update VZU400011, Parallels Virtuozzo Containers allows you to create active/active failover clusters where all Hardware Nodes are acting as active nodes. The concept of active/active clusters is based on the ability to simultaneously run more than one group with Virtuozzo resources (i.e. with Virtuozzo-related services and Containers) on one and the same Hardware Node. In such clusters, each node is capable of taking on the additional workload - the failed over services and Containers - from a problem node along with running their own version of Parallels Virtuozzo and hosting their own Containers.
Notes: 1. You can check the number of the latest Parallels Virtuozzo update installed on your Node by opening Control Panel, double-clicking Add or Remove Programs, and navigating to the latest Virtuozzo Containers update in the Currently installed programs table. If you have update 11 installed, it will be shown as Parallels Virtuozzo Containers 4.0 update 400011. If you do not have this update installed, please refer to the Keeping Your Virtuozzo Containers System Up-to-Date chapter of the Parallels Virtuozzo Containers 4.0 User's Guide to learn how you can do it.
2. For detailed information on resource groups, refer to the Installing Virtuozzo Containers Software on Servers Participating in MSCS Cluster section (p. 33).
Deploying MSCS Software in Virtuozzo-Based Systems 9
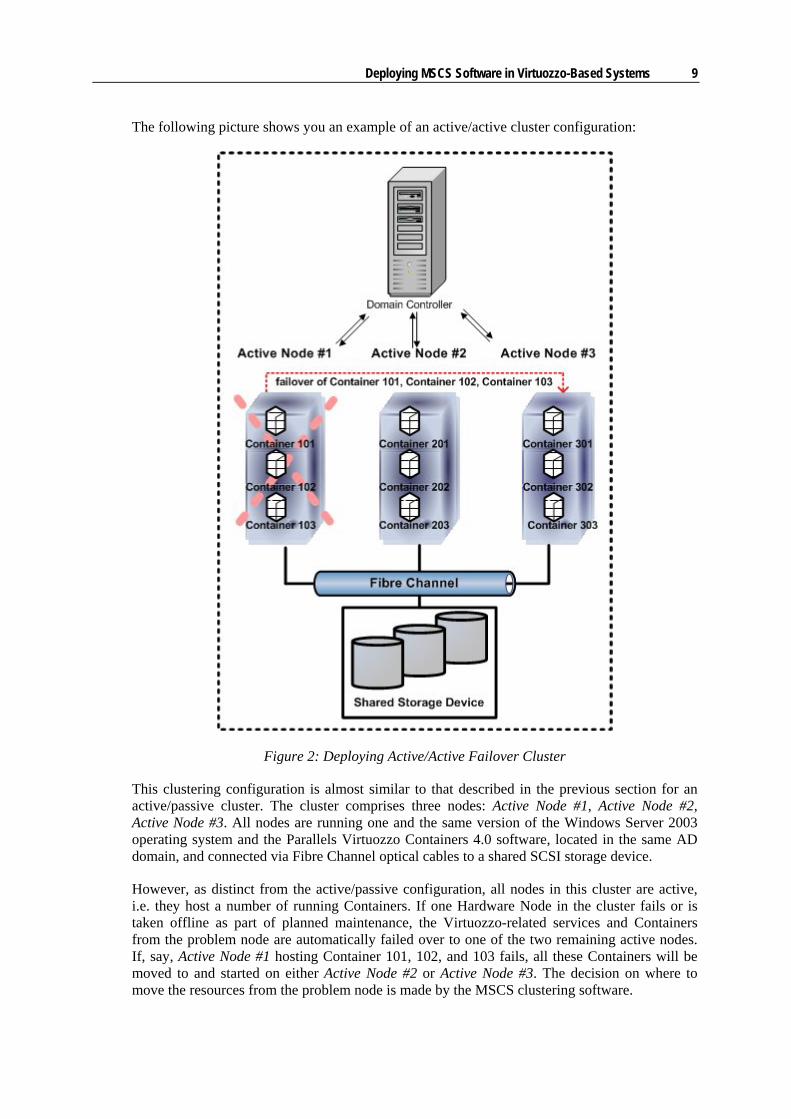
The following picture shows you an example of an active/active cluster configuration:
Figure 2: Deploying Active/Active Failover Cluster
This clustering configuration is almost similar to that described in the previous section for an active/passive cluster. The cluster comprises three nodes: Active Node #1, Active Node #2, Active Node #3. All nodes are running one and the same version of the Windows Server 2003 operating system and the Parallels Virtuozzo Containers 4.0 software, located in the same AD domain, and connected via Fibre Channel optical cables to a shared SCSI storage device.
However, as distinct from the active/passive configuration, all nodes in this cluster are active, i.e. they host a number of running Containers. If one Hardware Node in the cluster fails or is taken offline as part of planned maintenance, the Virtuozzo-related services and Containers from the problem node are automatically failed over to one of the two remaining active nodes. If, say, Active Node #1 hosting Container 101, 102, and 103 fails, all these Containers will be moved to and started on either Active Node #2 or Active Node #3. The decision on where to move the resources from the problem node is made by the MSCS clustering software.
Deploying MSCS Software in Virtuozzo-Based Systems 10
Setting Active/Active Failover Cluster to Work
The process of deploying an active/active Virtuozzo failover cluster slightly differs depending on whether you are creating your failover cluster from scratch or transforming any of your existing active/passive clusters:
If you are creating a new Virtuozzo cluster, just follow the instructions given in the following subsections to set up the cluster.
If you already have a Virtuozzo active/passive cluster and wish to transform it into an active/active one, you need to complete the following steps: Reinstall Parallels Virtuozzo 4.0 on each passive node in the cluster by deleting the
current software version and installing it again using the instructions in the Installing Virtuozzo Containers on Servers Participating in MSCS cluster section (p. 33).
Install all available Parallels Virtuozzo 4.0 updates. Refer to the Keeping Your Virtuozzo Containers System Up-to-Date chapter of the Parallels Virtuozzo Containers 4.0 User's Guide to learn how you can do it.
Important! We highly recommend that you install the same set of Parallels Virtuozzo and Windows Server 2003 updates on all nodes in the Virtuozzo failover cluster.
Active/Active Failover Cluster Restrictions
Before starting to deploy an active/active Virtuozzo failover cluster, you should have a clear understanding of all limitations imposed on your virtual infrastructure by this kind of cluster:
Virtuozzo failover clusters do not currently have a mechanism to correctly process Containers with identical IDs. So, you should always see to it that all Containers residing on all nodes in the cluster have different IDs.
Containers failed over from a problem node to a healthy one make use of the OS and application templates installed on the healthy node. So, to provide an error-free operation of your Containers, make sure that all nodes in the cluster have the same set of OS and application templates installed.
Deploying an active/active cluster requires the proper hardware configuration of all cluster nodes. As the resources from a problem node may be failed over to any of the remaining active nodes, all nodes in the active/active cluster must have enough resources (CPU, main memory, etc.) to take on the additional workload from a failed node and ensure adequate performance in the case of a failover. If, however, any of the nodes does not have sufficient resources to support this additional workload (e.g. the node's own services and Containers consume the majority of system resources), it is recommended to deploy an active/passive Virtuozzo failover cluster to avoid a degradation in your overall cluster performance.

Deploying MSCS Software in Virtuozzo-Based Systems 11
Setting Up Hardware for Cluster In the next step, you should set up hardware for your cluster. This procedure consists of the following main operations:
1 Deciding on the hardware to be included in the cluster. The amount and type of hardware may vary depending on the purpose and availability requirements of your cluster. However, the following type of hardware is always present in any cluster:
cluster nodes represented by two or more physical servers capable of running the Windows Server 2003 operating system;
shared storage device usually represented by a common disk array on a SAN and used to store all Virtuozzo-related data (Container data, templates, backups, etc.);
switches (Fibre Channel or SCSI) providing client access to the cluster and enabling the communication between each cluster node and the shared cluster storage.
2 Uniting all hardware components into one subnet and ensuring that each hardware component can access all the other components in the subnet.
For more information about installing and configuring cluster hardware, please refer to http://technet2.microsoft.com/windowsserver/en/library/32c40202-1043-4211-8dba-bb57356f46811033.mspx?mfr=true.
To deploy our cluster configuration (see the previous section), we need the following hardware:
a shared SCSI storage device; a switch; fibre optic cables; four physical servers capable of running the 32-bit version of the Windows Server 2003
operating system. Three servers will act as cluster nodes and one server will be used as a domain controller. All the physical servers in our example meet the following hardware requirements:
Pentium IV processor;
1024 Mb of memory;
60 Gb of disk space;
two network interface cards (NICs) for each cluster server and one network card for the domain controller.
Configuring Physical Servers After you have prepared the hardware, you should configure three physical servers for participating in the cluster and one physical server for converting to a domain controller. To this effect, perform the following operations:
1 Install the Windows Server 2003 (Enterprise or Datacenter Edition) operating system on each server. The process of installing Windows Server 2003 is described in detail in the documentation shipped with this operating system.
Note: All cluster nodes must be running the same version of the operating system - either Windows Server 2003 Enterprise Edition or Windows Server 2003 Datacenter Edition.
Deploying MSCS Software in Virtuozzo-Based Systems 12
2 Configure the network adapters on all physical servers:
For each cluster node:
Assign a static IP address to the first network adapter. This adapter will be used to connect the server to the private network providing communication among all nodes in the cluster.
Assign a static IP address to the second network adapter. This adapter will be used to connect the server to the public network (usually, your local area network). In comparison to the IP address assigned to the first network adapter, this IP address must belong to a different subnet.
For the domain controller:
Assign a static IP address to the network adapter. This adapter will be used to connect the domain controller to other servers in the Active Directory domain.
Setting Up Domain In the next step, you should set up an Active Directory domain and make the servers members of this domain. This procedure consists of the following steps:
1 Deploying an Active Directory domain.
2 Creating a domain administrator account.
3 Adding the cluster nodes to the domain.
All the aforementioned steps are described in the following subsections in detail.
Note: If you already have an existing Active Directory domain, you can add your cluster nodes to this domain. In this case you can skip Steps 1 and 2 and proceed directly to Step 3.
Deploying MSCS Software in Virtuozzo-Based Systems 13
Setting Up Active Directory Domain
First, you should set up an Active Directory domain. To this effect, you need a dedicated physical server capable of running the Windows Server 2003 operating system. This server will act as a domain controller and have the Active Directory service installed.
To set up an Active Directory domain, you should perform the following operations on the computer that is to serve as the domain controller:
1 Insert the Windows Server 2003 CD-ROM into the computer's CD-ROM or DVD-ROM drive.
2 Click Start --> Run and execute the dcpromo command in the Run dialog to launch the Active Directory Installation wizard.
3 In the Welcome to... window, click Next to proceed with the wizard.
4 In the Domain Controller Type window, select the Domain controller for a new domain radio button and click Next.
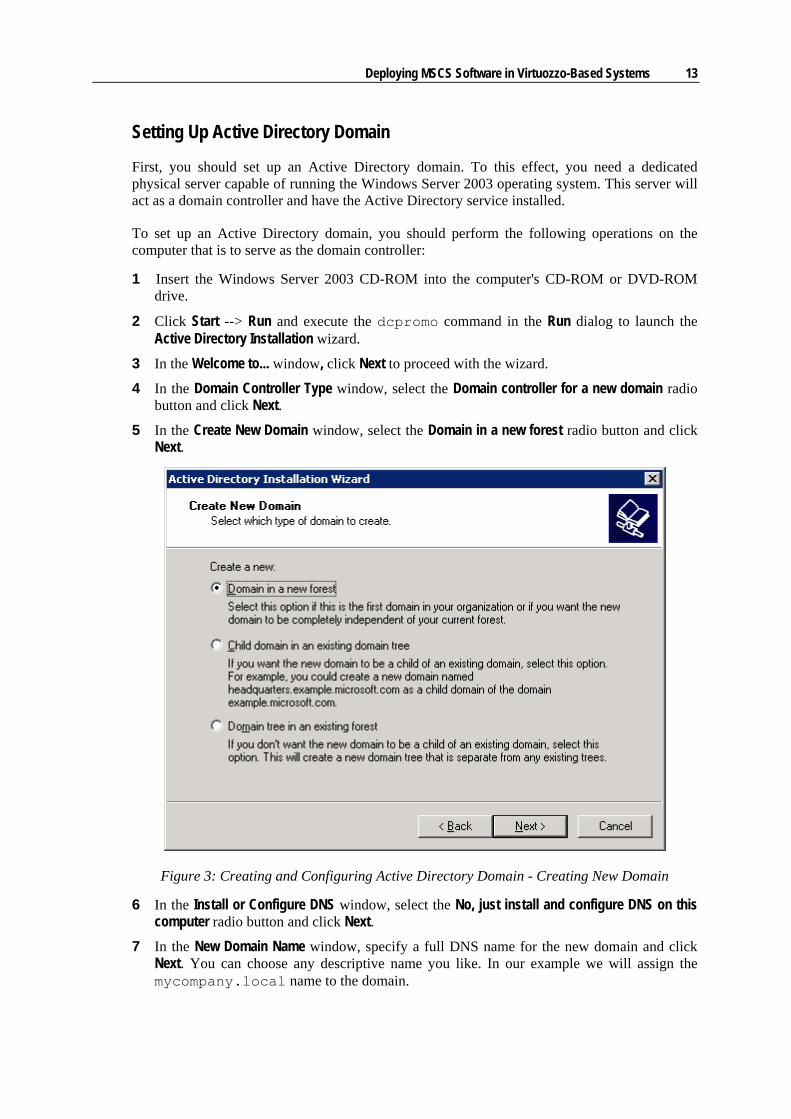
5 In the Create New Domain window, select the Domain in a new forest radio button and click Next.
Figure 3: Creating and Configuring Active Directory Domain - Creating New Domain
6 In the Install or Configure DNS window, select the No, just install and configure DNS on this computer radio button and click Next.
7 In the New Domain Name window, specify a full DNS name for the new domain and click Next. You can choose any descriptive name you like. In our example we will assign the mycompany.local name to the domain.

Deploying MSCS Software in Virtuozzo-Based Systems 14
Figure 4: Creating and Configuring Active Directory Domain - Specifying Domain Name
8 In the NetBIOS Domain Name window, accept the default domain NetBIOS name (it is set to MYCOMPANY in our case) and click Next.
9 In the Database and Log Folders window, accept the default location (C:\WINDOWS\NTDS) for the folders that will store the Active Directory database and log files; then click Next.
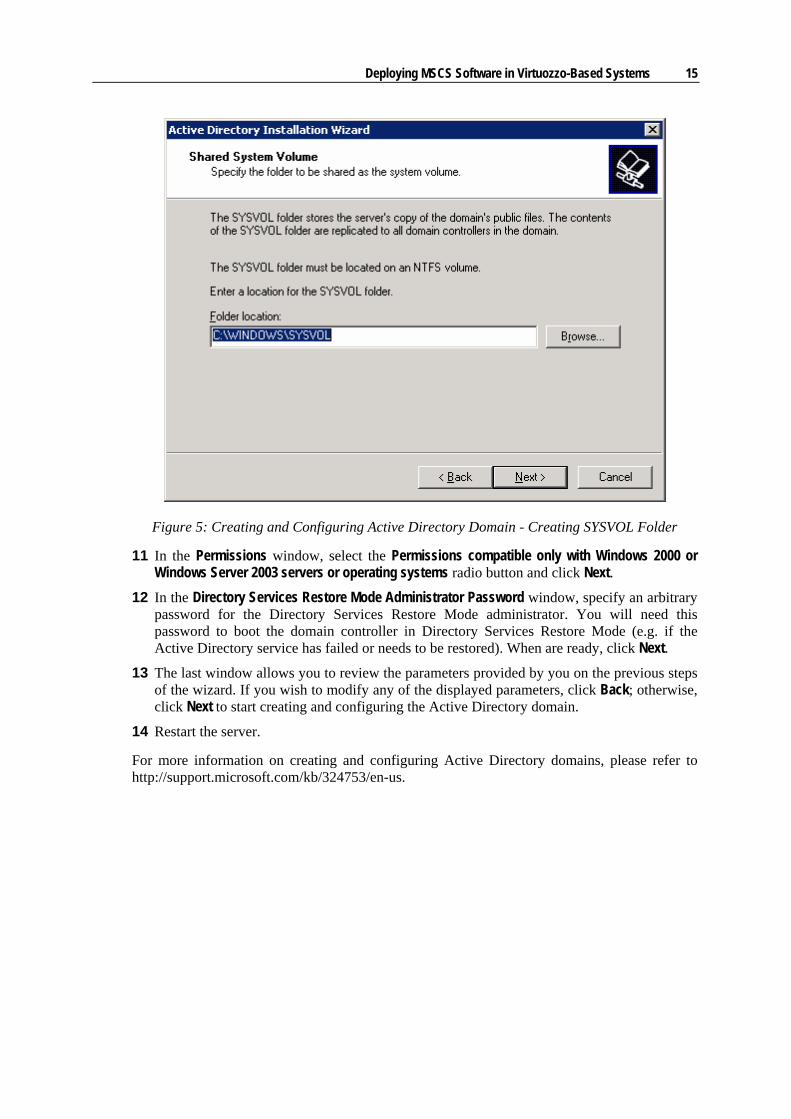
10 In the Shared System Volume window, accept the default location (C:\WINDOWS\SYSVOL) for the SYSVOL folder (this folder is used to store the server's copy of the domain's public files) and click Next.
Deploying MSCS Software in Virtuozzo-Based Systems 15
Figure 5: Creating and Configuring Active Directory Domain - Creating SYSVOL Folder
11 In the Permissions window, select the Permissions compatible only with Windows 2000 or Windows Server 2003 servers or operating systems radio button and click Next.
12 In the Directory Services Restore Mode Administrator Password window, specify an arbitrary password for the Directory Services Restore Mode administrator. You will need this password to boot the domain controller in Directory Services Restore Mode (e.g. if the Active Directory service has failed or needs to be restored). When are ready, click Next.
13 The last window allows you to review the parameters provided by you on the previous steps of the wizard. If you wish to modify any of the displayed parameters, click Back; otherwise, click Next to start creating and configuring the Active Directory domain.
14 Restart the server.
For more information on creating and configuring Active Directory domains, please refer to http://support.microsoft.com/kb/324753/en-us.
Deploying MSCS Software in Virtuozzo-Based Systems 16
Setting Up Domain Administrator Account
After you have created and configured the Active Directory domain, you should make a domain administrator account. You will need this account in the next step when adding the nodes to the domain.
To set up a domain administrator account, you should:
create a new user on the domain controller; include the newly created user in the Domain Admins group.
First, you should create a new user account on the domain controller. To this effect, complete the following tasks:
1 Log in to the domain controller.
2 Click Start, point to Administrative Tools, and click Active Directory Users and Computers.
3 In the left pane of the Active Directory Users and Computers window, expand the contents of the newly created Active Directory domain (in our case it is mycompany.local).
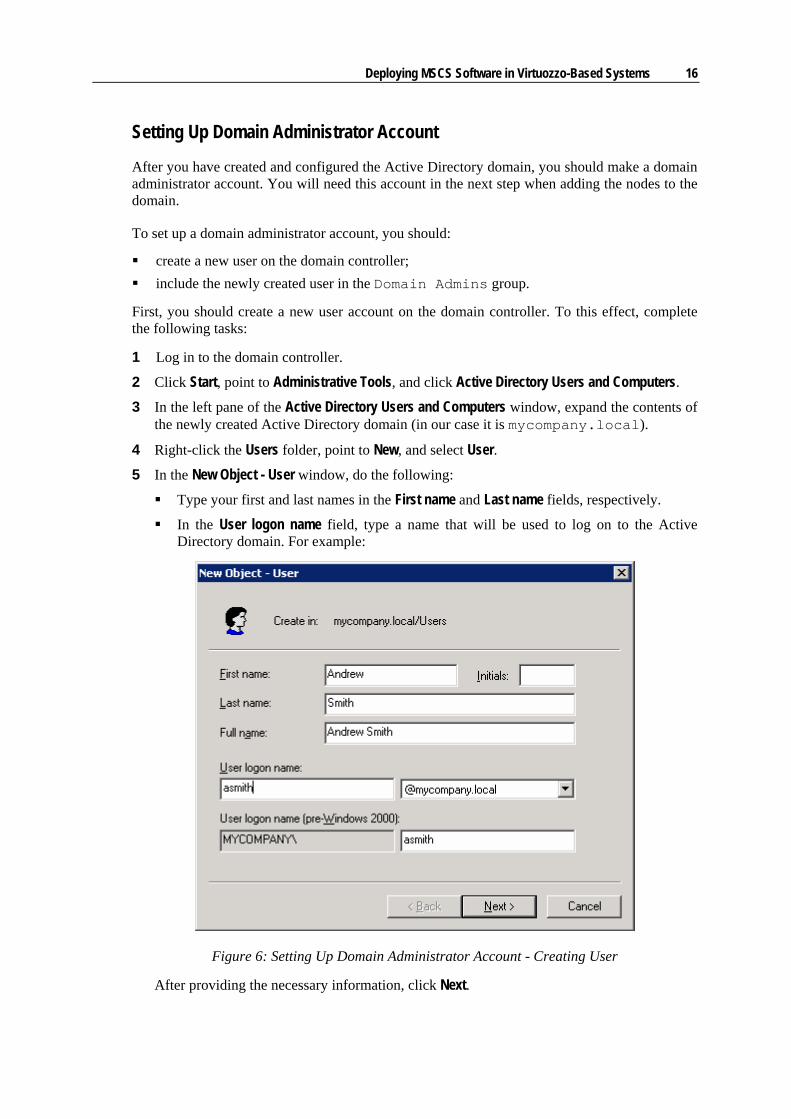
4 Right-click the Users folder, point to New, and select User. 5 In the New Object - User window, do the following:
Type your first and last names in the First name and Last name fields, respectively.
In the User logon name field, type a name that will be used to log on to the Active Directory domain. For example:
Figure 6: Setting Up Domain Administrator Account - Creating User
After providing the necessary information, click Next.
Deploying MSCS Software in Virtuozzo-Based Systems 17
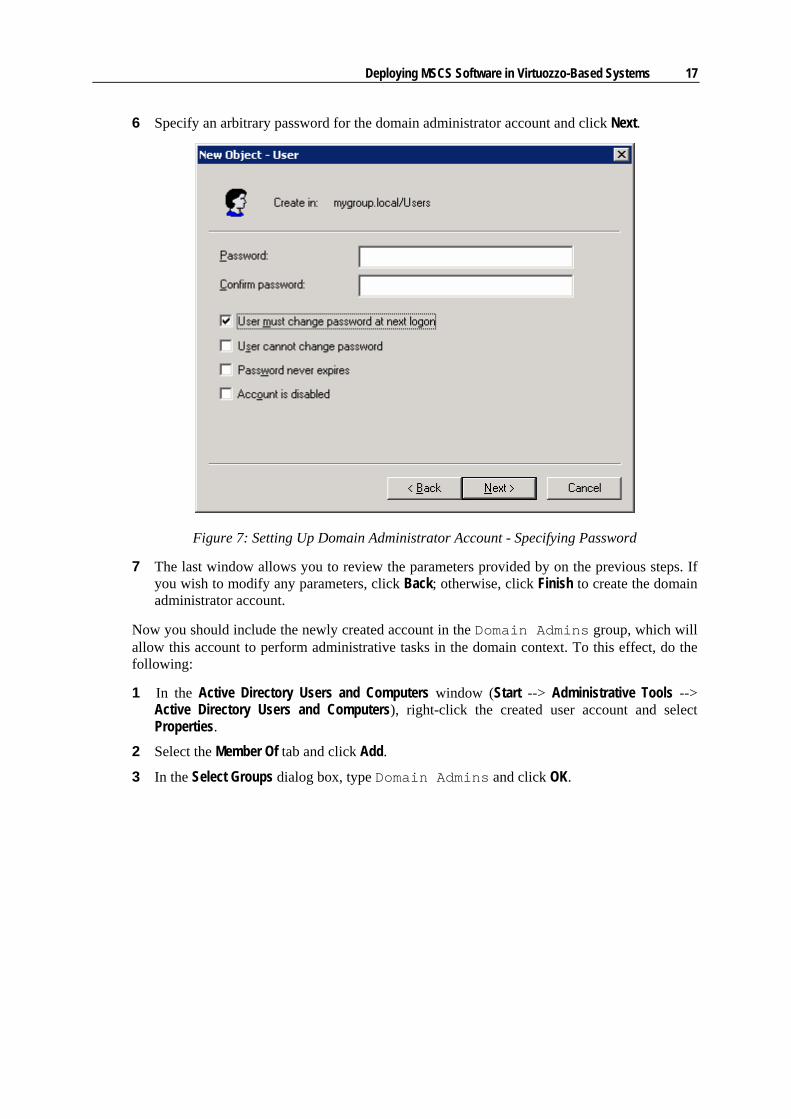
6 Specify an arbitrary password for the domain administrator account and click Next.
Figure 7: Setting Up Domain Administrator Account - Specifying Password
7 The last window allows you to review the parameters provided by on the previous steps. If you wish to modify any parameters, click Back; otherwise, click Finish to create the domain administrator account.
Now you should include the newly created account in the Domain Admins group, which will allow this account to perform administrative tasks in the domain context. To this effect, do the following:
1 In the Active Directory Users and Computers window (Start --> Administrative Tools --> Active Directory Users and Computers), right-click the created user account and select Properties.
2 Select the Member Of tab and click Add.
3 In the Select Groups dialog box, type Domain Admins and click OK.

Deploying MSCS Software in Virtuozzo-Based Systems 18
Figure 8: Setting Up Domain Administrator Account - Specifying Group
4 Click OK.
For more information on adding new users to Active Directory domains, please refer to http://support.microsoft.com/kb/324753/en-us.
Adding Nodes to Domain
After you have created the Active Directory domain and the domain administrator account, you should add all the nodes to the domain. This can be done as follows:
1 Log in to the first node you wish to add to the domain, right-click the My Computer icon, and click Properties.
2 Select the Computer Name tab and click Change.
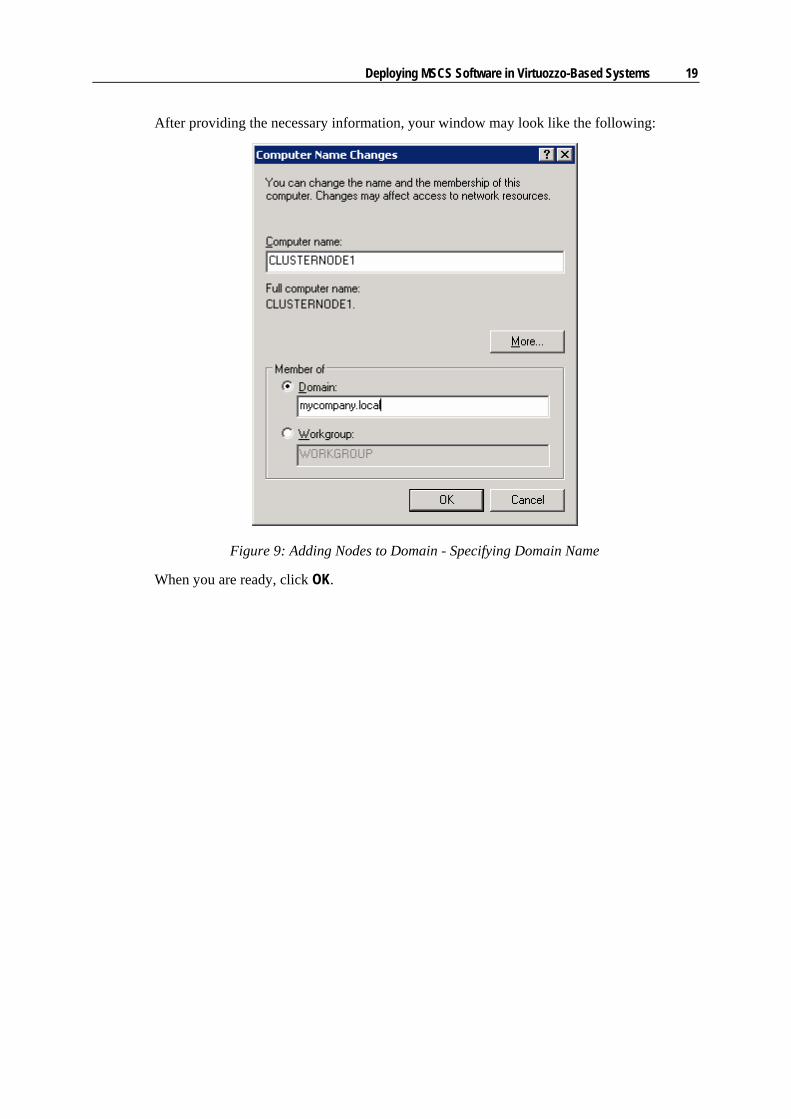
3 In the Computer Name Changes window, do the following:
In the Computer name field, specify a server hostname. This name will be used to uniquely identify the given node among other nodes in the cluster. By default, you are offered to use the hostname assigned to the node during the Windows Server 2003 installation. However, we recommend that you change this hostname to something more descriptive (e.g. CLUSTERNODE1).
Select the Domain radio button and type the domain DNS name (you specified this name during the Active Directory domain). In our example the domain DNS name should be set to mycompany.local.
Deploying MSCS Software in Virtuozzo-Based Systems 19
After providing the necessary information, your window may look like the following:
Figure 9: Adding Nodes to Domain - Specifying Domain Name
When you are ready, click OK.
Deploying MSCS Software in Virtuozzo-Based Systems 20
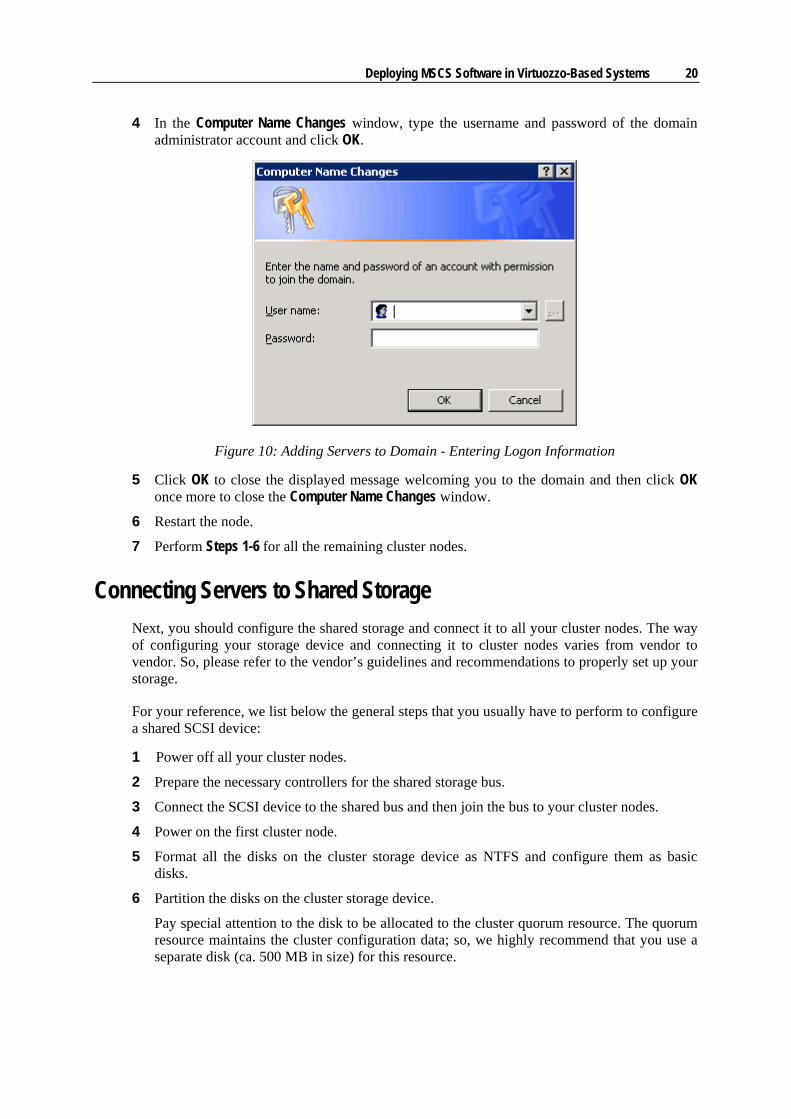
4 In the Computer Name Changes window, type the username and password of the domain administrator account and click OK.
Figure 10: Adding Servers to Domain - Entering Logon Information
5 Click OK to close the displayed message welcoming you to the domain and then click OK once more to close the Computer Name Changes window.
6 Restart the node.
7 Perform Steps 1-6 for all the remaining cluster nodes.
Connecting Servers to Shared Storage Next, you should configure the shared storage and connect it to all your cluster nodes. The way of configuring your storage device and connecting it to cluster nodes varies from vendor to vendor. So, please refer to the vendor’s guidelines and recommendations to properly set up your storage.
For your reference, we list below the general steps that you usually have to perform to configure a shared SCSI device:
1 Power off all your cluster nodes.
2 Prepare the necessary controllers for the shared storage bus.
3 Connect the SCSI device to the shared bus and then join the bus to your cluster nodes.
4 Power on the first cluster node.
5 Format all the disks on the cluster storage device as NTFS and configure them as basic disks.
6 Partition the disks on the cluster storage device.
Pay special attention to the disk to be allocated to the cluster quorum resource. The quorum resource maintains the cluster configuration data; so, we highly recommend that you use a separate disk (ca. 500 MB in size) for this resource.

Deploying MSCS Software in Virtuozzo-Based Systems 21
7 Assign drive letters to the disks on the cluster storage device.
For more information about configuring shared storage devices in cluster environments, please refer to http://technet2.microsoft.com/windowsserver/en/library/1bce08cc-2caf-417c-b53d-035f57c4e78b1033.mspx?mfr=true.
Setting Up Cluster Now you are ready to set up an MSCS cluster that will ensure the high availability of your Virtuozzo Containers 4.0 installations. The process of setting up this kind of cluster comprises the following steps:
creating the Cluster Service user account on the domain controller; creating the MSCS cluster and configuring the first cluster node; configuring all the remaining nodes in the cluster.
These steps are described in the following subsections in detail.
Creating Cluster Service User Account
Before creating an MSCS cluster, you should create a domain user account under which the Cluster service (a special service responsible for managing all cluster-related activities) will run. You will need this account later on when making the MSCS cluster and joining all your nodes to it.
To make a Cluster service account, do the following:
1 Log in to the domain controller.
2 Click Start, point to Administrative Tools, and select Active Directory Users and Computers.
3 In the left pane of the Active Directory Users and Computers window, expand the contents of the domain.
4 Right-click the Users folder, point to New and select User. 5 In the displayed window, do the following:
type arbitrary names in the First name and Last name fields (the choice of these names is not important for the account being created);

Deploying MSCS Software in Virtuozzo-Based Systems 22
in the User logon name field, type a descriptive name that will be used to log on to the cluster (e.g. ClusterService):
Figure 11: Creating Cluster Service User Account - Specifying Names
6 Next, specify a password for the domain account and click Next:
Figure 12: Creating Cluster Service User Account - Specifying Password

Deploying MSCS Software in Virtuozzo-Based Systems 23
7 The last screen allows you to review the parameters provided by you on the previous steps. If you wish to modify any settings, click Back; otherwise, click Finish to create the Cluster service account.
Creating Cluster and Configuring First Cluster Node
The processes of creating an MSCS cluster and configuring the first cluster node take place simultaneously and can be performed by doing the following:
1 Log in to any of your cluster nodes (this node will be registered as the first node in the cluster).
2 Click Start --> Run and execute the cluadmin command in the Run dialog to launch the Cluster Administrator application.
3 In the Open Connection to Cluster dialog box, select the Create new cluster item on the Action menu and click OK to launch the New Server Cluster wizard.
4 In the Welcome to ... window, click Next to proceed with the wizard.
5 In the displayed window, provide the following information:
In the Domain field, specify the name of the domain where the cluster will be located. You specified this name during the Active Directory domain creation (in our example it should be set to mycompany.local).
In the Cluster name field, indicate an arbitrary name (e.g. Cluster) that will uniquely identify the cluster in the domain:
Figure 13: Creating Cluster and Configuring First Node - Defining Cluster Name and Domain
When you are ready, click Next.

Deploying MSCS Software in Virtuozzo-Based Systems 24
6 In the Select Computer window, provide the hostname of the server that will be registered as the first node in the cluster. By default, the wizard displays the hostname of the server you are currently logged in to. Click Next to accept the default setting and start analyzing your cluster configuration:
Figure 14: Creating Cluster and Configuring First Node - Specifying Hostname
7 If the configuration is correct, the progress bar turns green and the Next button becomes available. Click Next to continue with your cluster configuration:
Deploying MSCS Software in Virtuozzo-Based Systems 25
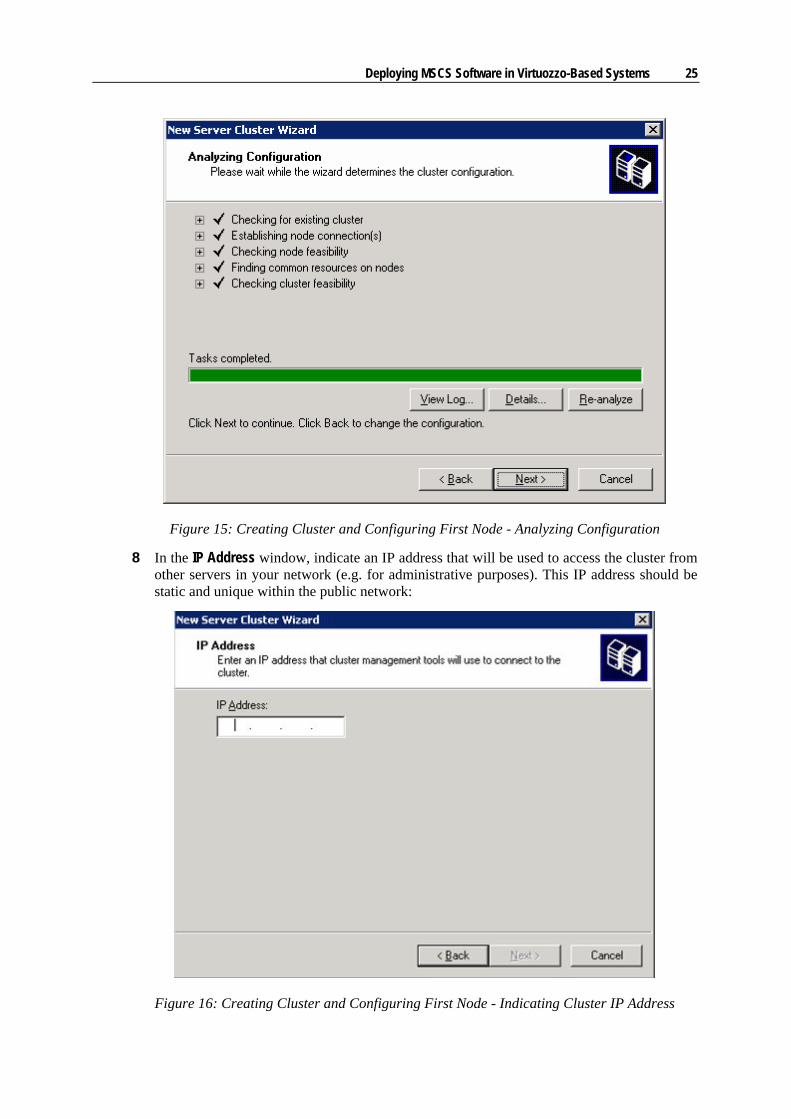
Figure 15: Creating Cluster and Configuring First Node - Analyzing Configuration
8 In the IP Address window, indicate an IP address that will be used to access the cluster from other servers in your network (e.g. for administrative purposes). This IP address should be static and unique within the public network:
Figure 16: Creating Cluster and Configuring First Node - Indicating Cluster IP Address

Deploying MSCS Software in Virtuozzo-Based Systems 26
Click Next to continue.
9 In the Cluster Service Account window, enter the user name and password of the Cluster service account created by you in the previous subsection:
Figure 17: Creating Cluster and Configuring First Node - Entering Login Information
After providing the necessary information, click Next to log the node into the domain using the specified credentials.
10 In the Proposed Cluster Configuration window, review the configuration parameters provided by you on the previous steps of the wizard. If you are satisfied with the specified parameters, click Next to create the cluster and join the first node to it. Otherwise, click Back and modify the necessary parameters.
11 Click Finish to exit the wizard and open the Cluster Administrator application with the first cluster node registered.
Adding Nodes to Cluster
The process of adding the second and all the remaining nodes to the MSCS cluster is almost identical to that of setting up the first cluster node and is described below:
1 Log in to the node you wish to register in the cluster and launch the Cluster Administrator application by clicking Start --> Run and executing the cluadmin command in the Run dialog.
2 In the Open Connection to Cluster window, do the following:
Under Action, select the Open connection to cluster item on the Action menu.

Deploying MSCS Software in Virtuozzo-Based Systems 27
Under Cluster or server name, specify the name of the cluster you created in the previous subsection. For example:
Figure 18: Configuring Nodes in Cluster - Connecting to Cluster
Click OK to connect to the cluster and display its configuration in Cluster Administrator.
3 Click File, point to New, and select Node to launch the Add Nodes wizard.
4 In the Welcome to ... window, click Next to proceed with the wizard.
5 In the Select Computers window, select the nodes to be added to the cluster:
Figure 19: Configuring Nodes in Cluster - Selecting Nodes
By default, the wizard offers to include in the cluster only the node you are currently logged in to. The hostname of this node is displayed in the Computer name field (in our case this node is assigned the hostname of CLUSTERNODE2). If you wish to add only the given node to the cluster, click Add and then click Next. If you wish to join any other nodes to the cluster, proceed as follows:

Deploying MSCS Software in Virtuozzo-Based Systems 28
click Browse to display the following window:
Figure 20: Configuring Nodes in Cluster - Choosing Nodes to Add
in the Enter the object names to select field, type the hostnames of those nodes that you wish to add to the cluster and click OK. All the selected nodes will be displayed in the Computer name field of the Select Computers window.
Click Add and then click Next. 6 The wizard starts checking the configuration of the selected nodes and the cluster itself. If
everything is OK, the progress bar turns green and the Next button becomes available:
Figure 21: Configuring Nodes in Cluster - Analyzing Configuration
Click Next to continue.

Deploying MSCS Software in Virtuozzo-Based Systems 29
7 In the Cluster Service Account window, type the password of the Cluster service account in the Password field and click Next to log the node into the domain:
Figure 22: Configuring Nodes in Cluster - Entering Login Information
8 In the Proposed Cluster Configuration window, review the parameters provided by you on the previous steps of the wizard. If you wish to modify any parameters, click Back; otherwise, click Next to start adding your nodes to the cluster. The process is displayed in the progress bar of the Adding Nodes to the Cluster window.
9 After the nodes have been successfully registered in the cluster, click Finish to exit the wizard and open the Cluster Administrator main window with all the nodes registered in the cluster.
Testing MSCS Cluster
You can use the following procedures to verify the availability of the newly created MSCS cluster:
First Procedure (viewing cluster nodes in Cluster Administrator):
1 Log in to any of your cluster nodes and launch the Cluster Administrator application by clicking Start, pointing to Administrative Tools, and selecting Cluster Administrator.
2 Connect to the newly created MSCS cluster:
In the Open Connection to Cluster window, select the Open connection to cluster item on the Action menu.
In the Cluster or server name field, type the name of the cluster and click OK.

Deploying MSCS Software in Virtuozzo-Based Systems 30
3 Verify that all nodes registered in the cluster are listed in the Cluster Administrator main window.
Second Procedure (checking the Cluster service availability):
1 On each cluster node, click Start, point to Administrative Tools, and select Services to launch the Services snap-in.
2 In the right pane of the displayed window, verify that the Cluster Service service is listed in the Services table and its status is set to Started:
Figure 23: Testing MSCS Cluster - Viewing Services
Third Procedure (testing the failover of cluster resources from one node to another):
1 Log in to any of your cluster nodes.
2 Click Start, point to Administrative Tools, and select Cluster Administrator to launch the Cluster Administrator application.
3 In the left pane of the displayed window, expand the Groups folder and select Cluster Group to view the cluster core resources. The information on these resources is presented in the following table:
Column Name Description Name The name assigned to the cluster resource. State The current state of the cluster resource. Owner The name of the cluster node currently hosting the cluster
resource. Resource Type The type of the cluster resource.
Deploying MSCS Software in Virtuozzo-Based Systems 31
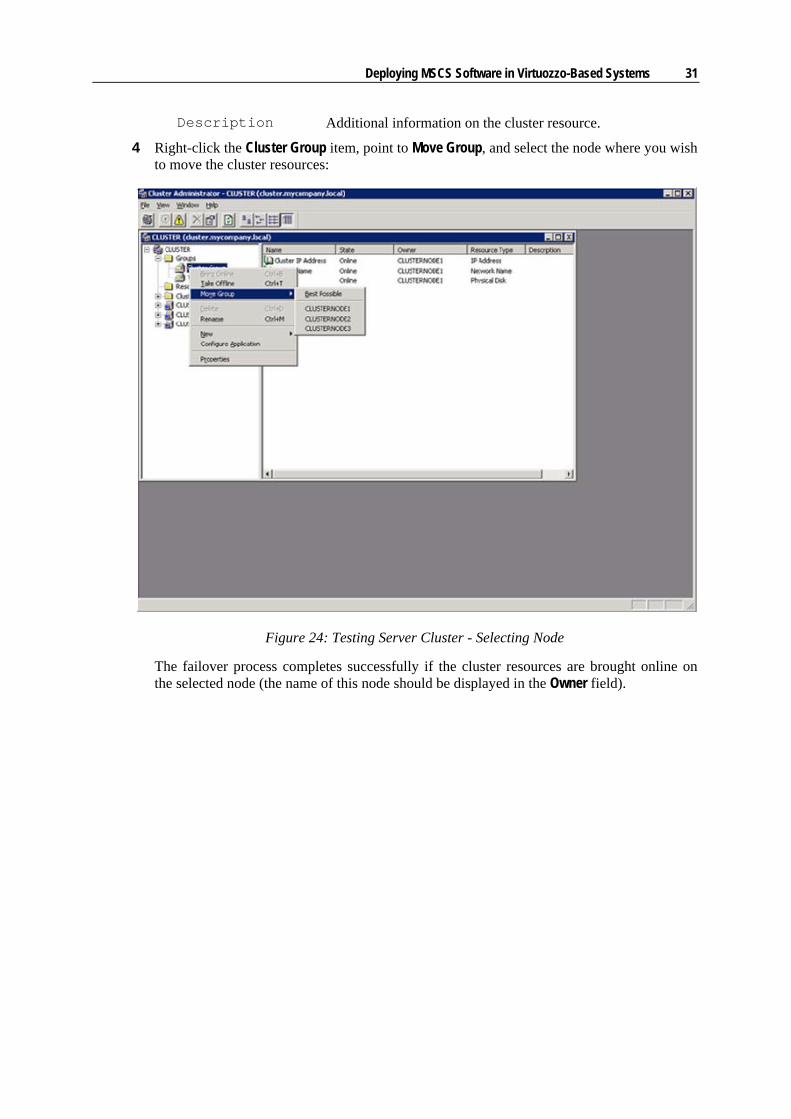
Description Additional information on the cluster resource.
4 Right-click the Cluster Group item, point to Move Group, and select the node where you wish to move the cluster resources:
Figure 24: Testing Server Cluster - Selecting Node
The failover process completes successfully if the cluster resources are brought online on the selected node (the name of this node should be displayed in the Owner field).

Deploying MSCS Software in Virtuozzo-Based Systems 32
Useful Links The following resources may be of help to you when deploying an MSCS cluster in your working environments:
For general information about deploying MSCS clusters, refer to the Designing and Deploying Server Clusters document available at http://technet2.microsoft.com/windowsserver/en/library/c14fd478-397a-47eb-ae15-0be4c5a322e01033.mspx?mfr=true.
For information about the quorum configuration, refer to the Quorum Drive Configuration Information document available at http://go.microsoft.com/fwlink/?LinkId=48240.
For information about the quorum disk designation, refer to the How to Change the Quorum Disk Designation document available at http://go.microsoft.com/fwlink/?LinkId=48244.
For information about possible network failures in Windows Server 2003 clusters, refer to the Network failure and recovery in Windows Server 2003 Clusters document available at http://www.support.microsoft.com/kb/286342/en-us.
For information about clustering in a SAN (Storage Area Network) environment, refer to the Microsoft Windows Clustering: Storage Area Networks document available at http://www.microsoft.com/windowsserver2003/techinfo/overview/san.mspx.
For information about troubleshooting clustering problems, refer to the Server Cluster Troubleshooting document available at http://technet2.microsoft.com/WindowsServer/en/library/549145e4-4f5d-4545-a9b5-53ebd86d75911033.mspx?mfr=true.
Deploying MSCS Software in Virtuozzo-Based Systems 33
Installing Virtuozzo Containers 4.0 on Servers Participating in MSCS Cluster
The procedure of installing Virtuozzo Containers 4.0 on servers (also known as nodes) participating in an MSCS cluster slightly differs from that of installing the Virtuozzo Containers software on standalone servers. Please use the guidelines below to correctly install Virtuozzo Containers 4.0 on your cluster nodes:
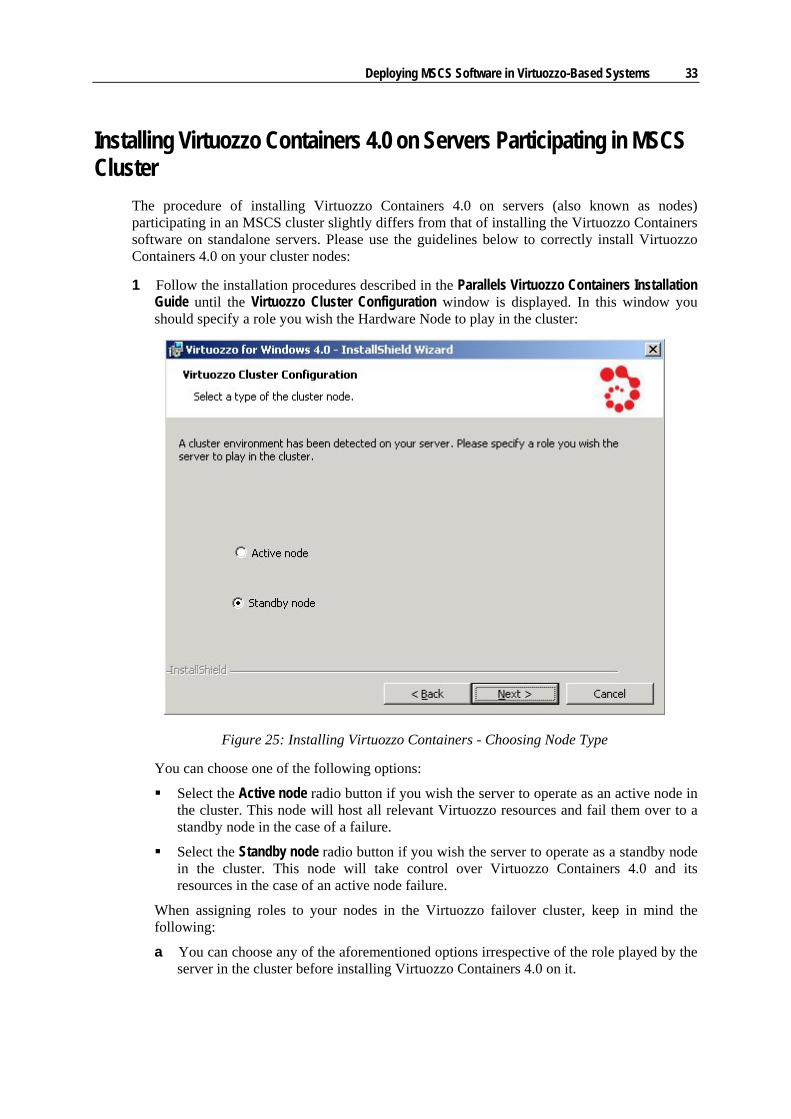
1 Follow the installation procedures described in the Parallels Virtuozzo Containers Installation Guide until the Virtuozzo Cluster Configuration window is displayed. In this window you should specify a role you wish the Hardware Node to play in the cluster:
Figure 25: Installing Virtuozzo Containers - Choosing Node Type
You can choose one of the following options:
Select the Active node radio button if you wish the server to operate as an active node in the cluster. This node will host all relevant Virtuozzo resources and fail them over to a standby node in the case of a failure.
Select the Standby node radio button if you wish the server to operate as a standby node in the cluster. This node will take control over Virtuozzo Containers 4.0 and its resources in the case of an active node failure.
When assigning roles to your nodes in the Virtuozzo failover cluster, keep in mind the following:
a You can choose any of the aforementioned options irrespective of the role played by the server in the cluster before installing Virtuozzo Containers 4.0 on it.
Deploying MSCS Software in Virtuozzo-Based Systems 34
b A role is not a permanent property of a cluster node, i.e. one and the same node can act as both active and standby in different periods of time, irrespective of the role assigned to the node during the Virtuozzo Containers installation. For example, a standby node can become active when it takes control over the group responsible for keeping Virtuozzo-specific resources in the event of an active node failure. In its turn, the failed active node automatically becomes standby when it is taken online after its failure.
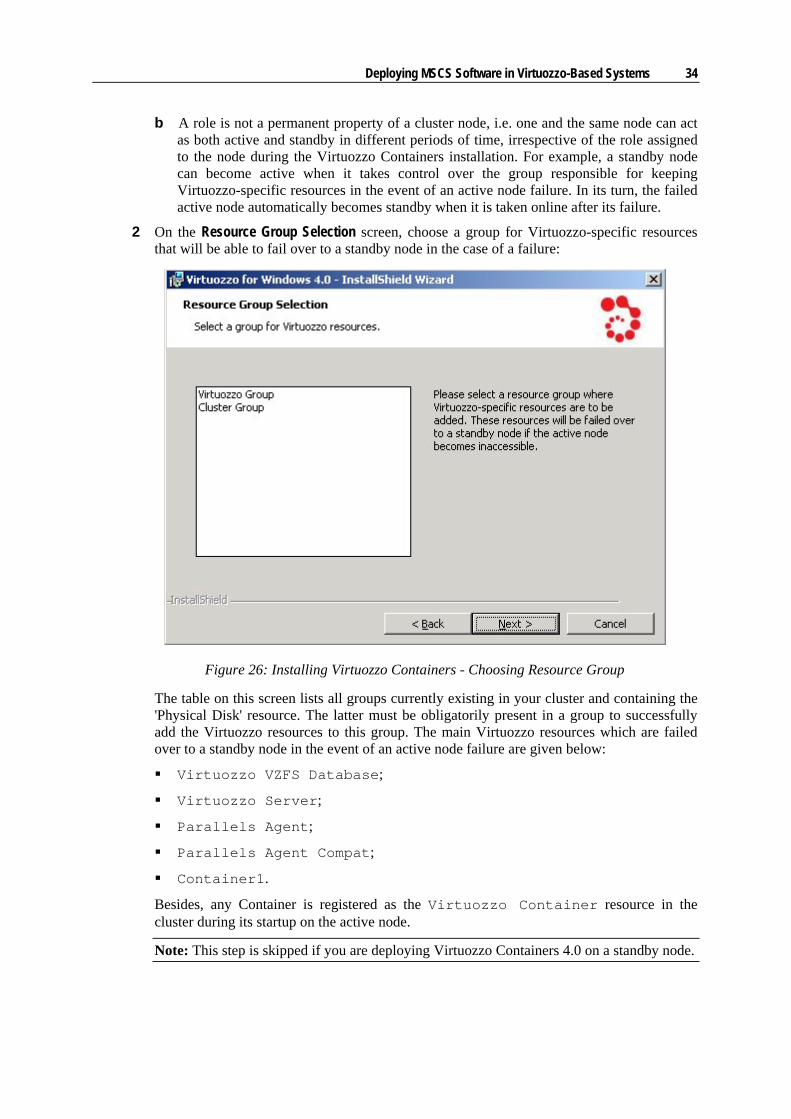
2 On the Resource Group Selection screen, choose a group for Virtuozzo-specific resources that will be able to fail over to a standby node in the case of a failure:
Figure 26: Installing Virtuozzo Containers - Choosing Resource Group
The table on this screen lists all groups currently existing in your cluster and containing the 'Physical Disk' resource. The latter must be obligatorily present in a group to successfully add the Virtuozzo resources to this group. The main Virtuozzo resources which are failed over to a standby node in the event of an active node failure are given below:
Virtuozzo VZFS Database;
Virtuozzo Server;
Parallels Agent;
Parallels Agent Compat;
Container1.
Besides, any Container is registered as the Virtuozzo Container resource in the cluster during its startup on the active node.
Note: This step is skipped if you are deploying Virtuozzo Containers 4.0 on a standby node.
Deploying MSCS Software in Virtuozzo-Based Systems 35
3 When specifying the location of Virtuozzo program files, Container data, and Virtuozzo backups on the Locations of Virtuozzo Data and Program Files screen, keep in mind the following:
All nodes in the cluster (both active and standby) must have the Virtuozzo program files installed in one and the same folder (e.g. C:\Program Files\SWsoft\Virtuozzo).
For each active node in the cluster, Virtuozzo Containers 4.0 allows you to store Container data and Virtuozzo backups only on one of those disks that are registered in the resource group you specified on the Resource Group Selection screen (see Step 2 above).
When choosing a disk for storing Container data and Virtuozzo backups, make sure that this disk has a drive letter assigned to it. Otherwise, a warning message will be displayed notifying you of this fact.
For all standby nodes in the cluster, you are not allowed to modify the location of Container data and Virtuozzo backups since these nodes make use of the corresponding folders created during the Virtuozzo Containers installation on the active node and only in the case of an active node failure.
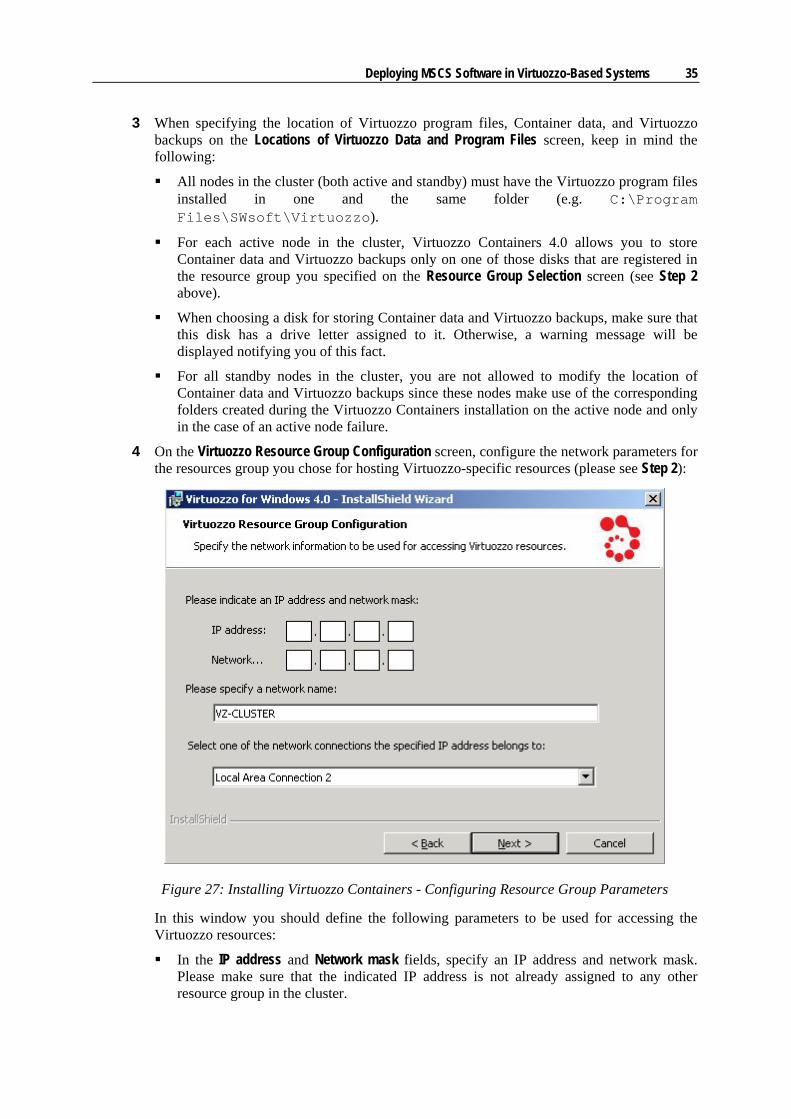
4 On the Virtuozzo Resource Group Configuration screen, configure the network parameters for the resources group you chose for hosting Virtuozzo-specific resources (please see Step 2):
Figure 27: Installing Virtuozzo Containers - Configuring Resource Group Parameters
In this window you should define the following parameters to be used for accessing the Virtuozzo resources:
In the IP address and Network mask fields, specify an IP address and network mask. Please make sure that the indicated IP address is not already assigned to any other resource group in the cluster.

Deploying MSCS Software in Virtuozzo-Based Systems 36
In the Specify a network name... field, indicate a new network name. Please make sure that this network name does not coincide with that already assigned to any other group in the cluster.
In the Select one of the network connections... field, choose a network connection the IP address specified in the IP address field belongs to.
Note: This step is skipped if you are deploying Virtuozzo Containers 4.0 on a standby node.
The other peculiarities that should be taken into account when installing Virtuozzo Containers 4.0 on cluster nodes are the following:
A number of operations which are normally performed during the Virtuozzo Containers 4.0 installation on a standalone server are skipped when installing Virtuozzo Containers 4.0 on a standby node (e.g. the step of installing Virtuozzo components and creating the Service Container). This is explained by the fact that standby nodes do not have their own Virtuozzo resources. They only can make use of the resources controlled by the corresponding active node (e.g. in the case of an active node failure or when the active node is taken offline as part of your maintenance plan).
Make sure that a valid Virtuozzo license is installed not only on the active nodes but also on all standby nodes participating in the cluster. Otherwise, your standby nodes will not be able to take control over Virtuozzo Containers 4.0 and its resources in the case of an active node failure.
Configuring Automatic Failback
By default, in the event of an active node failure, a standby node becomes active taking control over the group hosted on the active node and keeping all Virtuozzo-related resources. After the failure associated with the active node has been repaired and the node has been brought online again, this node becomes standby. You can change this behaviour by enabling the Failback feature, which allows the group to automatically fail back from a standby node to an active one when the latter is taken online anew after its failure. To turn on the Failback feature, perform the following operations:
Log in to any of your cluster nodes and open the Cluster Administrator application by clicking Start, pointing to Administrative Tools, and selecting Cluster Administrator.
In the Cluster Administrator window, select the group keeping the Virtuozzo-related resources, click the Properties icon, and select the Failback tab.
Select the Allow failback radio button and choose one of the following: select the Immediately radio button if you want the group with Virtuozzo-related
resources to immediately fail back to an originally active node when it is brought online again;
select the Failback between... radio button and set the time interval after the expiry of which the group will fail back to an originally active node.
For more information about the Failback feature, please refer to http://technet2.microsoft.com/windowsserver/en/library/1c5c3a6c-b64c-4e47-9c06-2735809b76b91033.mspx?mfr=true.
Deploying MSCS Software in Virtuozzo-Based Systems 37
Adding Nodes to Virtuozzo Failover Cluster
Sometimes, you may wish to join additional nodes to your Virtuozzo failover cluster. For example, this may be the case if you wish to increase the number of active or standby nodes participating in the cluster or need to replace a broken node with a new one. The process of adding a new node to a Virtuozzo failover cluster is identical to that of configuring any of its original nodes and includes the following main operations:
Preparing all the necessary hardware for the node; see the Setting Up Hardware for Cluster section for details (p. 10).
Configuring the node; see the Configuring Physical Servers section for details (p. 11). Adding the node to the Active Directory domain; see the Adding Nodes to Domain section
for details (p. 18). Connecting the node to your shared storage; see the Connecting Servers to Shared Storage
section for details (p. 20). Adding the node to the Virtuozzo failover cluster; see the Adding Nodes to Cluster section
for details (p. 26). Installing Virtuozzo Containers 4.0 on the newly configured cluster node; see the Installing
Virtuozzo Containers 4.0 on Servers Participating in MSCS Cluster section for details (p. 33).
Testing Virtuozzo Failover Cluster
You can check the availability of your Virtuozzo failover cluster by completing the following tasks:
1 Log in to any of your cluster nodes.
2 Click Start, point to Administrative Tools, and select Cluster Administrator to launch the Cluster Administrator application.
3 In the left pane of the Cluster Administrator window, expand the Groups folder and click the name of the group storing Virtuozzo-related resources. The information on the displayed resources is presented in the following table:
Column Name Description Name The name assigned to the resource. State The current state of the resource. Owner The name of the cluster node currently hosting the
resource. Resource Type The type of the resource. Description Additional information on the resource.
Deploying MSCS Software in Virtuozzo-Based Systems 38
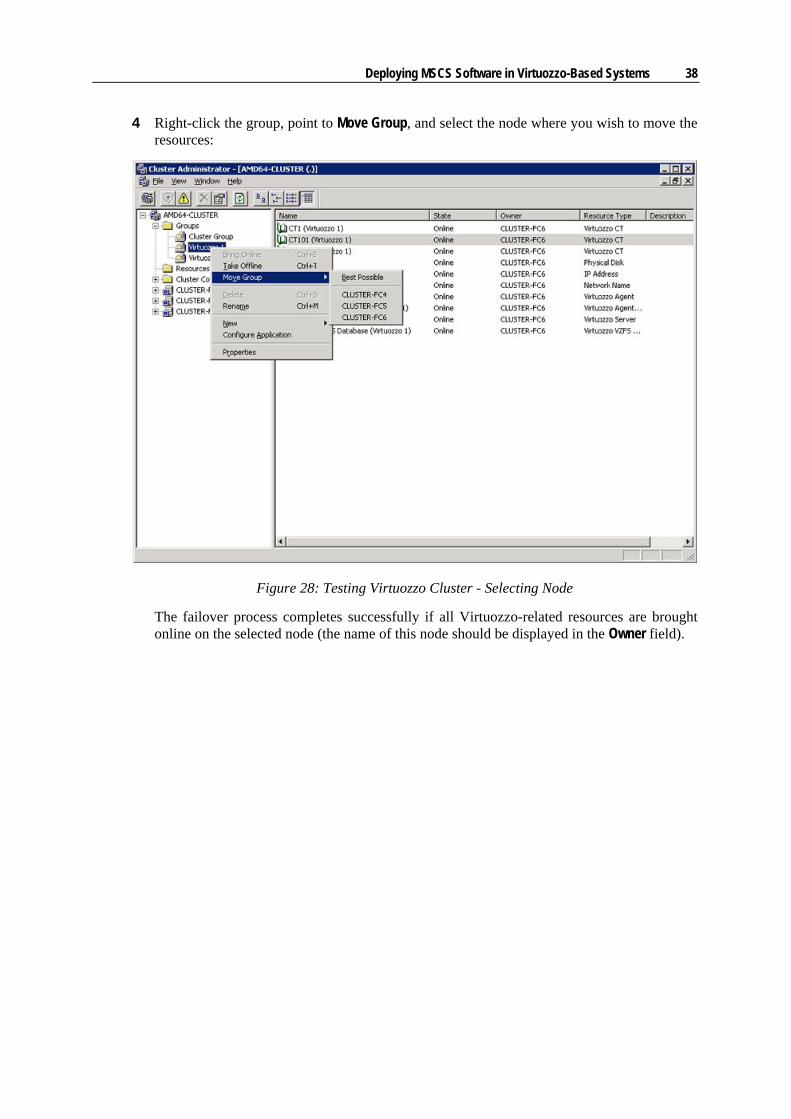
4 Right-click the group, point to Move Group, and select the node where you wish to move the resources:
Figure 28: Testing Virtuozzo Cluster - Selecting Node
The failover process completes successfully if all Virtuozzo-related resources are brought online on the selected node (the name of this node should be displayed in the Owner field).
Deploying MSCS Software in Virtuozzo-Based Systems 39
Creating Server Cluster From Containers
Parallels Virtuozzo Containers allows you to include Containers in a server cluster so that they can act as full participants (nodes) in the cluster and provide high availability for your applications and services. In Virtuozzo Containers 4.0, you can create an MSCS cluster in one of the following ways:
using a SAN (Storage Area Network)-based shared storage device and using a 'loopback file'-based shared storage device.
As is evident from their names, these ways differ from each other in the type of the shared storage device to be used in the cluster. While the first way assumes using a shared physical disk drive as a shared storage device, the second way requires the usage of a special loopback file created on the Hardware Node and emulating a shared physical disk drive in the cluster. Both ways of the MSCS cluster creation are described in the following subsections in detail.
Note: The examples used in the following subsections show only several possible cluster configurations you may wish to deploy in your working environments. You can hold to these configurations or work out your own ones and build your own cluster architecture.
Setting Up SAN-Based MSCS Cluster Parallels Virtuozzo Containers enables you to create an MSCS cluster with a SAN-based shared storage device which may include the following components:
two or more Containers one of which is to act as an active node in the cluster and all the other Containers as the standby ones. Keep in mind that all Containers participating in the cluster must reside on different Hardware Nodes since one and the same shared storage device on the Node (usually, a shared SCSI disk) can be forwarded to only one Container on this Node.
one or more Containers and any number of stand-alone servers running Windows Server 2003. For example, you can use a stand-alone physical server as an active node in the cluster and a Container as the standby one which will take control over your mission-critical applications in the case of an active node failure.
The following example demonstrates how to create an MSCS cluster which will include two Containers and use a SAN-based shared storage device (a SCSI disk drive) as a cluster storage, i.e. the place where your high-availability applications and all their data will be hosted:
1 Enable the MSCS support (which is disabled by default for all Containers on the Node) inside the Container you wish to act as the active node in the cluster. To this effect:
select the Virtuozzo Containers item under the corresponding Hardware Node name;

Deploying MSCS Software in Virtuozzo-Based Systems 40
right-click the Container to be included in the cluster and select Tasks --> Configure Support for Windows Cluster on the context menu:
Figure 29: Management Console - Enabling MSCS Support
in the displayed window, select the Enable support for MSCS software check box;
click OK;
if the Container is running, restart it for the changes to take effect.
2 Forward the shared SCSI disk to be used as a cluster storage to the Container. This can be done as follows:
select the Virtuozzo Containers item under the corresponding Hardware Node name;
right-click the Container which is to act as the active node in the cluster and select Tasks --> Configure Support for Windows Cluster on the context menu;
Deploying MSCS Software in Virtuozzo-Based Systems 41
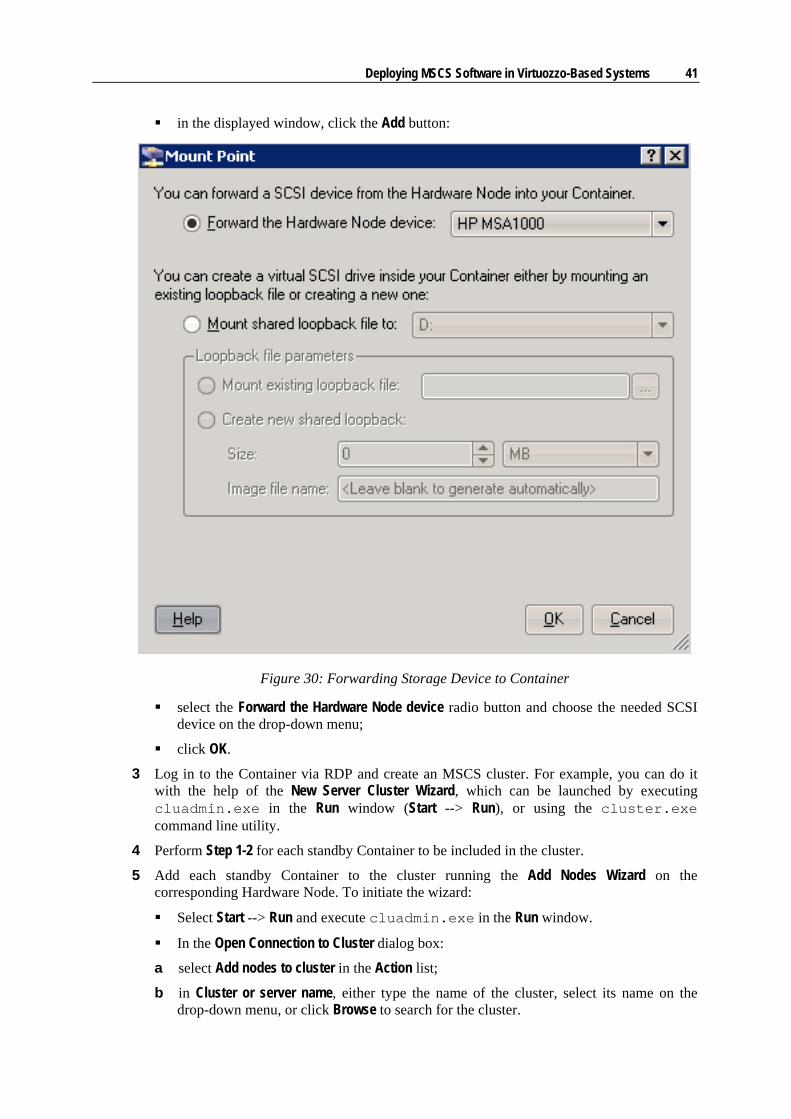
in the displayed window, click the Add button:
Figure 30: Forwarding Storage Device to Container
select the Forward the Hardware Node device radio button and choose the needed SCSI device on the drop-down menu;
click OK.
3 Log in to the Container via RDP and create an MSCS cluster. For example, you can do it with the help of the New Server Cluster Wizard, which can be launched by executing cluadmin.exe in the Run window (Start --> Run), or using the cluster.exe command line utility.
4 Perform Step 1-2 for each standby Container to be included in the cluster.
5 Add each standby Container to the cluster running the Add Nodes Wizard on the corresponding Hardware Node. To initiate the wizard:
Select Start --> Run and execute cluadmin.exe in the Run window.
In the Open Connection to Cluster dialog box:
a select Add nodes to cluster in the Action list;
b in Cluster or server name, either type the name of the cluster, select its name on the drop-down menu, or click Browse to search for the cluster.

Deploying MSCS Software in Virtuozzo-Based Systems 42
c click OK.
Follow the instructions of the Add Nodes Wizard to register the Container in the cluster.
Note: All SCSI disk drives forwarded from the Hardware Node to a Container are not kept during the Container migration.
Setting Up 'Loopback File'-Based MSCS Cluster Another way of creating MSCS clusters in Virtuozzo-based systems is to use loopback files as shared cluster storage devices. These files are mounted inside the corresponding Containers and emulate SCSI devices on a single SCSI bus inside these Containers. To create a cluster using a loopback file as a cluster storage device, you should perform the following operations:
1 Decide on the Containers to be included in the cluster. Keep in mind that all Containers to participate in the cluster must reside on one and the same Hardware Node (i.e. on the Node where the corresponding loopback file is located).
2 Enable the MSCS support (which is disabled by default for all Containers on the Node) inside the Container you wish to act as the active node in the cluster. To this effect:
select the Virtuozzo Containers item under the corresponding Hardware Node name;
right-click the Container to be included in the cluster and select Tasks --> Configure Support for Windows Cluster on the context menu:
Figure 31: Management Console - Enabling MSCS Support
in the displayed window, select the Enable support for MSCS software check box;
Deploying MSCS Software in Virtuozzo-Based Systems 43
click OK;
if the Container is running, restart it for the changes to take effect.
3 Create a loopback file to be used as the shared SCSI disk in the cluster. This can be done as follows:
select the Virtuozzo Containers item under the corresponding Hardware Node name;
right-click the Container which is to act as the active node in the cluster and select Tasks --> Configure Support for Windows Cluster on the context menu;
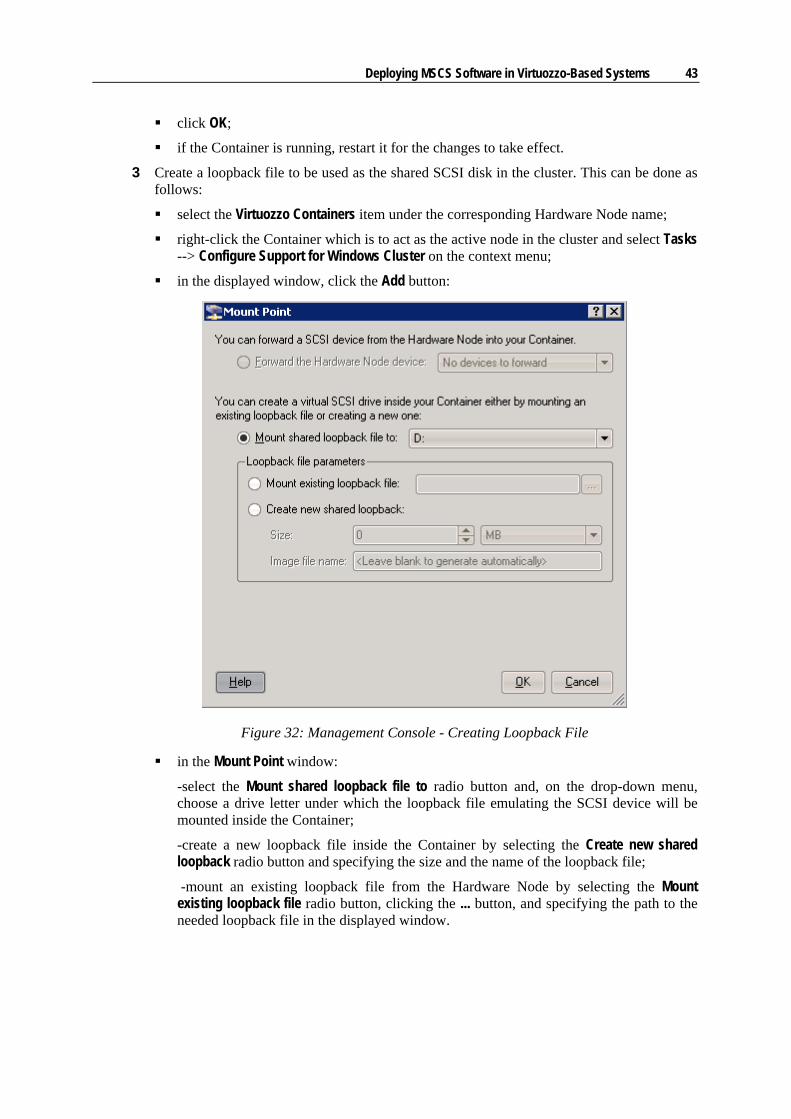
in the displayed window, click the Add button:
Figure 32: Management Console - Creating Loopback File
in the Mount Point window:
-select the Mount shared loopback file to radio button and, on the drop-down menu, choose a drive letter under which the loopback file emulating the SCSI device will be mounted inside the Container;
-create a new loopback file inside the Container by selecting the Create new shared loopback radio button and specifying the size and the name of the loopback file;
-mount an existing loopback file from the Hardware Node by selecting the Mount existing loopback file radio button, clicking the ... button, and specifying the path to the needed loopback file in the displayed window.
Deploying MSCS Software in Virtuozzo-Based Systems 44
click OK.
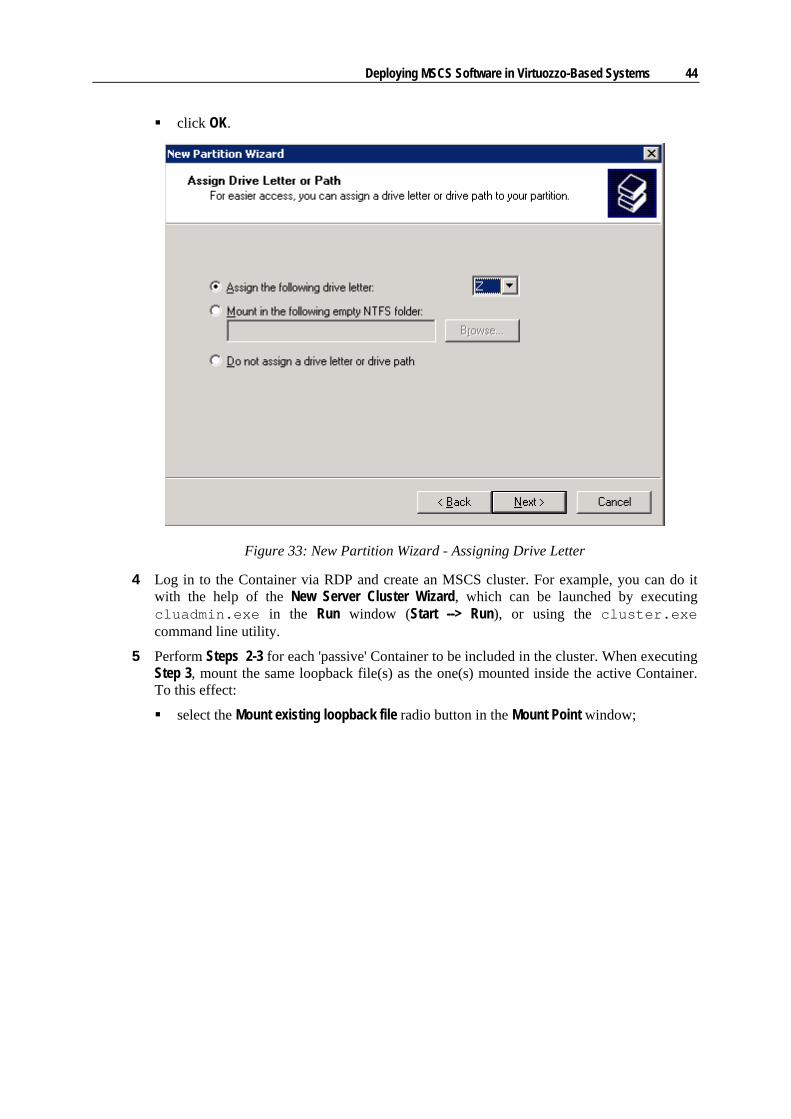
Figure 33: New Partition Wizard - Assigning Drive Letter
4 Log in to the Container via RDP and create an MSCS cluster. For example, you can do it with the help of the New Server Cluster Wizard, which can be launched by executing cluadmin.exe in the Run window (Start --> Run), or using the cluster.exe command line utility.
5 Perform Steps 2-3 for each 'passive' Container to be included in the cluster. When executing Step 3, mount the same loopback file(s) as the one(s) mounted inside the active Container. To this effect:
select the Mount existing loopback file radio button in the Mount Point window;

Deploying MSCS Software in Virtuozzo-Based Systems 45
click the ... button and, in the displayed window, specify the path to the needed loopback file, for example:
Figure 34: Management Console - Mounting Existing Loopback File
Loopback files are located in the X:\vz\private\CT_ID folder on the Hardware Node where CT_ID denotes the ID of the Container where the corresponding loopback file was created.
click Open and then click OK.
6 Add all standby Containers to the cluster using the Add Nodes Wizard. To initiate the wizard:
Select Start --> Run and execute cluadmin.exe in the Run window.
In the Open Connection to Cluster dialog box:
a select Add nodes to cluster in the Action list;
b in Cluster or server name, either type the name of the cluster, select its name on the drop-down menu, or click Browse to search for the cluster;
c click OK.
Follow the instructions of the Add Nodes Wizard to register the Container in the cluster.
Notes: 1. A Container with a shared loopback file created inside cannot be migrated.
2. If a Container has one or more shared loopback files mounted (e.g. all standby Containers in the example above), these loopback files will not be kept during the Container migration.

46
In Virtuozzo Containers 4.0, any Container can act as a full participant in an NLB cluster. This allows to deploy the following NLB cluster configurations in your network:
an NLB cluster that includes two or more Containers residing on the same Hardware Node; an NLB cluster that includes two or more Containers residing on different Hardware Nodes; an NLB cluster that includes one or more Containers and physical servers.
The NLB clusters containing a number of Containers provide you with the same functionality as the clusters uniting standalone servers only. For example, you can use the created NLB cluster to balance incoming web-based traffic by splitting its load among several Containers to improve response times and reliability, add new Containers to the cluster and remove existing ones, etc. However, the procedure of creating an NLB cluster in Virtuozzo-based systems slightly differs from that of setting up an NLB cluster containing dedicated physical hosts only and is described below.
The following example demonstrates how to create an NLB cluster containing two Containers - Container 101 and Container 102. So, if you experience the failure of, say, Container 101 in the NLB cluster, you can still serve user requests on the remaining NLB cluster member - Container 102. To create such a cluster, you should perform the following operations:
1 Make sure that Container 101 and Container 102 are operating in the bridged mode and bound to one and the same physical adapter on the Hardware Node. If they are not, please turn to the Connecting Bridged Containers to Network section of the Parallels Virtuozzo Containers User's Guide for the information on how you can do it.
Note: All participants of an NLB cluster, irrespective of whether it is a Container or a physical server, should belong to the same broadcast domain. For Containers residing on the same Hardware Node this can be done by simply configuring their network adapters to operate in the bridged mode. If Containers reside on different Nodes, you should additionally ensure that the physical adapters where the corresponding Container virtual network adapters are bridged belong to the same broadcast domain.
2 Decide on the Container operation mode in your NLB cluster. By default, all Containers are set to function in the unicast mode. To change the Container default mode to multicast, proceed as follows:
To set the multicast mode for Container 101, run the following command: C:\...\Administrator>vzctl set 101 --nlb_mode multicast
To set the multicast mode for Container 102, run the following command:
C H A P T E R 3
Setting Up NLB Cluster on Hardware Node

Setting Up NLB Cluster on Hardware Node 47
C:\...\Administrator>vzctl set 102 --nlb_mode multicast
Note: If your NLB cluster is operating in the multicast mode and client computers access it through a router, make sure that the router can map the cluster IP address to the MAC address associated with this IP address. If the router cannot, create the corresponding static ARP entry in the router. For more information about NLB clusters operating in the multicast mode, refer to the Network Load Balancing parameters: Cluster Operation Mode document available at http://technet2.microsoft.com/windowsserver/en/library/57c24429-0268-4ed8-afdf-fd4b0b6539b71033.mspx?mfr=true.
3 Assign valid IP addresses to Container 101 and Container 102, if you have not already done so before. Let Container 101 have the IP address of 192.168.1.156 and Container 102 the IP address of 192.168.1.157. For example, you can do it by completing the following operations in Parallels Management Console:
Select the Virtuozzo Containers item under the corresponding Hardware Node name.
Right-click Container 101 and select Properties on the context menu.
On the Network tab of the displayed window, select the Network Adapters item.
In the Interfaces table, select the Container virtual adapter and click the Properties button:
Go to the IP Settings tab of the Virtual Network Interface Properties window. For example:
Figure 35: Management Console - Assigning IP Address to Container
Select the Enter IP addresses manually radio button, click the Add button, and type 192.168.1.156 in the IP address field of the displayed window. You can also configure the subnet mask to be assigned to Container 101 by providing the necessary value in the Subnet mask field.
Click OK.

Setting Up NLB Cluster on Hardware Node 48
Perform the same operations for Container 102 and assign the IP address of 192.168.1.157 to it.
4 Add a 'virtual' (Cluster) IP address to Container 101 and Container 102. Let this 'virtual' IP address be 192.168.1.200:
Add the cluster IP address to Container 101: C:\...\Administrator>vzctl set 101 --cluster_ip 192.168.1.200 --save Command 'set' is successfully finished
Add the cluster IP address to Container 102: C:\...\Administrator>vzctl set 102 --cluster_ip 192.168.1.200 --save Command 'set' is successfully finished
5 Start the NLB service inside Container 101 and 102:
For Container 101, issue the following command: C:\...\Administrator>vzctl set 101 --nlb yes --save Command 'set' is successfully finished
For Container 102, execute the following command: C:\...\Administrator>vzctl set 102 --nlb yes --save Command 'set' is successfully finished
Note: If you are planning to include more than 2 Containers in your NLB cluster, you should execute Steps 2 and 4 for each Container to be joined to the cluster.

Setting Up NLB Cluster on Hardware Node 49
6 Start Container 101 and Container 102 (e.g. using Parallels Management Console or the vzctl start command).
7 Log in to Container 101 via RDP.
8 Inside Container 101, select Start --> Run and execute the nlbmgr.exe command to open the Network Load Balancing (NLB) Manager:
Figure 36: Launching NLB Manager
9 Create an NLB cluster using Network Load Balancing Manager and register two hosts (Container 101 and Container 102) in this cluster in the same way you would do it on any other standalone server.
50
A Active/Active Failover Cluster • 9 Active/Passive Clusters • 7 Adding Nodes to Cluster • 27 Adding Nodes to Domain • 19 Adding Nodes to Virtuozzo Failover Cluster •
38
C Configuring Automatic Failback • 37 Configuring Physical Servers • 12 Connecting Servers to Shared Storage • 21 Creating Cluster and Configuring First Cluster
Node • 24 Creating Cluster Service User Account • 22 Creating Server Cluster From Containers • 40
D Deploying Microsoft Clusters in Virtuozzo-
Based Systems • 4 Deploying MSCS Software in Virtuozzo-
Based Systems • 5 Deploying Virtuozzo Failover Cluster • 5 Designing Cluster Configuration • 6
I Installing Virtuozzo Containers 4.0 on Servers
Participating in MSCS Cluster • 34
S Setting Up Active Directory Domain • 14 Setting Up Cluster • 22 Setting Up Domain • 13 Setting Up Domain Administrator Account •
17 Setting Up Hardware for Cluster • 11 Setting Up 'Loopback File'-Based MSCS
Cluster • 43 Setting Up NLB Cluster on Hardware Node •
47 Setting Up SAN-Based MSCS Cluster • 40
T Testing MSCS Cluster • 30 Testing Virtuozzo Failover Cluster • 38
U Useful Links • 33
Index