deploying windows azure pack for windows server
TRANSCRIPT

Deploying Windows Azure Pack for Windows Server
Microsoft Corporation
Published date October 29 2013
Copyright
This document is provided as-is Information and views expressed in this document including
URL and other Internet website references may change without notice
Some examples depicted herein are provided for illustration only and are fictitious No real
association or connection is intended or should be inferred
This document does not provide you with any legal rights to any intellectual property in any
Microsoft product You may copy and use this document for your internal reference purposes
You may modify this document for your internal reference purposes
copy 2013 Microsoft Corporation All rights reserved
Microsoft Active Directory Internet Explorer Hyper-V Silverlight SQL Server Windows
Windows Azure and Windows PowerShell are trademarks of the Microsoft group of companies
All other trademarks are property of their respective owners
Contents
Deploy Windows Azure Pack for Windows Server 5
Windows Azure Pack components 6
Required components 6
Optional components 7
Windows Azure Pack architecture 7
Express deployment architecture 7
Basic distributed deployment architecture 8
Minimal distributed deployment architecture 9
Scaled distributed deployment architecture 10
Optional resource provider architecture 11
Windows Azure Pack installation checklist 12
Windows Azure Pack installation requirements 14
Naming conventions 14
Express deployment hardware and software prerequisites 15
Distributed deployment hardware and software prerequisites 15
Install software prerequisites 16
Install Microsoft SQL Server 17
Required firewall ports 17
Install an express deployment of Windows Azure Pack 18
Install a distributed deployment of Windows Azure Pack 22
Install the Windows Azure Pack Service Management APIs 23
Install the Windows Azure Pack management portals 26
Install the authentication sites 33
Upgrade from the Preview version of Windows Azure Pack 39
Configure Active Directory Federation Services for Windows Azure Pack 41
Best practices 41
Configure AD FS 42
Configure the management portals to trust AD FS 45
Configure the tenant authentication site to trust AD FS 47
Configure AD FS to trust the management portals 49
Reconfigure FQDNs and Ports in Windows Azure Pack 51
Re-establish trust 53
Post-installation best practices 58
Replace untrusted self-signed certificates with trusted certificates 59
Test your deployment 60
When to run BPA for Windows Azure Pack 60
How BPA for Windows Azure Pack works 61
BPA system requirements 62
Install BPA for Windows Azure Pack 62
Scan components of Windows Azure Pack 63
Next steps 63
5
Deploy Windows Azure Pack for Windows Server
Windows Azure Pack for Windows Server enables you to offer rich self-service multi-tenant
cloud services that are consistent with the public Windows Azure experience Windows Azure
Pack runs on top of the System Center 2012 R2 and is available to Microsoft customers at no
additional cost for installation in your data center
The following content provides deployment and configuration information for Windows Azure
Pack
Windows Azure Pack components
Windows Azure Pack architecture
Windows Azure Pack installation checklist
Windows Azure Pack installation requirements
Install an express deployment of Windows Azure Pack
Install a distributed deployment of Windows Azure Pack
Configure Active Directory Federation Services for Windows Azure Pack
Post-installation best practices
Next steps
Note that this deployment guide does not provide information about deploying Windows Azure
Pack Web Services System Center 2012 R2 Virtual Machine Manager Service Provider
Foundation or the Windows Azure Service Bus service For information about deploying these
products and services see the following documentation
Deploy Windows Azure Pack Web Sites
Deploying System Center 2012 ndash Virtual Machine Manager
How to Install Service Provider Foundation 2012 R2
Using SQL Server or MySQL with Windows Azure Pack
Getting Started with the Service Bus for Windows Server
For Windows Azure Pack install Service Bus 11 Preview instead of Service Bus
10 as instructed in the topic
Note
6
Windows Azure Pack components
Windows Azure Pack provides a core set of required components to support several optional
components such as Windows Azure Web Services or Windows Azure Service Bus You must
install the required components and then decide which specific service components to install
based on your hosting requirements
Required components
Service Management API The Service Management API exposes a unified interface to
manage the Windows Azure Pack services through the management portals There are three
API interfaces
The Windows Azure Pack Admin API exposes functionality to complete administrative
tasks from the management portal for administrators or through the use of Windows
PowerShell cmdlets
The Windows Azure Pack Tenant API enables users or tenants to manage and
configure cloud services that are included in the plans that they subscribe to
The Windows Azure Pack Tenant Public API enables end users to manage and configure
cloud services that are included in the plans that they subscribe to The Tenant Public
API is designed to serve all the requirements of end users that subscribe to the various
services that a hosting service provider provides
Authentication sites These sites provide authentication services for the management portal
for administrators and the management portal for tenants
Admin Authentication Site By default Windows Azure Pack uses Windows
authentication for the administration portal You also have the option to use Windows
Azure Active Directory Federation Services (AD FS) to authenticate users For more
information see Configure Active Directory Federation Services for Windows Azure
Pack
Tenant Authentication Site Windows Azure Pack uses an ASPNET Membership
provider to provide authentication for the management portal for tenants
Service management portals The management portals enable you and your tenants to
interact with Windows Azure Pack
Management portal for administrators A portal for administrators to configure and
manage resource clouds user accounts tenant plans quotas and pricing In this portal
administrators create Web Site clouds virtual machine private clouds create plans and
manage user subscriptions
Management portal for tenants A customizable self-service portal to provision monitor
and manage services such as Windows Azure Pack Web Sites Windows Azure Virtual
Machines and Windows Azure Pack Service Bus In this portal users sign up for
services and create services virtual machines and databases
7
Optional components
Web Sites A service that helps provide a high-density scalable shared web hosting platform
for ASPNET PHP and Nodejs web applications The Web Sites service includes a
customizable web application gallery of open source web applications and integration with
source control systems for custom-developed websites and applications For more
information and instructions about how to deploy the Web Sites service see Deploy
Windows Azure Pack Web Sites
Virtual Machines A service that provides infrastructure-as-a-service (IaaS) capabilities for
Windows and Linux virtual machines The Virtual Machines service includes a virtual machine
template gallery scaling options and virtual networking capabilities For more information
and instructions about how to deploy the Virtual Machines service see Provision Virtual
Machine Clouds
Service Bus A service that provides reliable messaging services between distributed
applications The Service Bus service includes queued and topic-based publishsubscribe
capabilities For more information and instructions on how to deploy the Service Bus service
see Integrate Service Bus into Windows Azure Pack
Automation and Extensibility The capability to automate and integrate additional custom
services into the services framework including a runbook editor and an execution
environment For more information and instructions about how to enable Automation see
Deploy Service Management Automation
SQL and MySQL You can provision Microsoft SQL and MySQL databases for tenant use
For more information see Using SQL Server or MySQL with Windows Azure Pack
Windows Azure Pack architecture
Windows Azure Pack for Windows Server is made up of several required and optional
components This architectural overview provides suggested machine topologies for these
components in both an express and distributed deployments
Express deployment architecture
You can use the express installation to create a proof of concept deployment In an Express
deployment all of the Windows Azure Pack required components are installed on the same
machine If you want to also install optional components you will need additional machines The
express deployment should not be used in a production environment
8
Basic distributed deployment architecture In a distributed deployment you can install the required components on up to 8 machines A
distributed deployment can be used in a production environment The following diagram shows a
basic distributed architecture of required components for a system designed to provide services
to external customers
9
Minimal distributed deployment architecture The following diagram depicts the suggested minimal architecture for a distributed deployment
10
Scaled distributed deployment architecture The following diagram shows a distributed deployment with scaling information
11
Optional resource provider architecture For sample topologies of the optional components see the following help content
Deploy Windows Azure Pack Web Sites
Integrate Service Bus into Windows Azure Pack
Provision Virtual Machine Clouds
Deploy Service Management Automation
Using SQL Server or MySQL with Windows Azure Pack
12
Windows Azure Pack installation checklist
This checklist walks you through a distributed deployment of a Windows Azure Pack It uses the
machine names that are suggested in the Naming conventions topic
Task References
Install Microsoft SQL Server for
the management databases
Install Microsoft SQL Server
Install prerequisites for the Admin
API on the AdminAPI machine
Windows Azure Pack
installation requirements
Install the Windows Azure Pack
Admin API on the WAPAdminAPI
machine
Install the Windows Azure Pack
Service Management APIs
Install prerequisites for Tenant
API on the WAPTenantAPI
machine
Windows Azure Pack
installation requirements
Install the Windows Azure Pack
Tenant API on the
WAPTenantAPI machine
Install the Windows Azure Pack
Service Management APIs
Install prerequisites for Tenant
Public API on the
WAPTenPubAPI machine
Windows Azure Pack
installation requirements
Install the Windows Azure Pack
Tenant Authentication Site on the
WAPTenantAuth machine
Install the Windows Azure Pack
Service Management APIs
Install prerequisites for the
management portal for
administrators on the WAPAdmin
machine
Windows Azure Pack
installation requirements
Install the Windows Azure Pack
Admin Site on the WAPAdmin
machine
Install the Windows Azure Pack
management portals
Install prerequisites for the
management portal for tenants
on the WAPTenant machine
Windows Azure Pack
installation requirements
Install the Windows Azure Pack
Tenant Site on the WAPTenant
Install the Windows Azure Pack
management portals
13
Task References
machine
If you do not use Active Directory
Federation Services (AD FS)
follow the next two steps
SUBSTEP Install prerequisites
for Admin Authentication Site on
the WAPAdminAuth machine
Windows Azure Pack
installation requirements
SUBSTEP Install the Windows
Azure Pack Admin
Authentication Site on the
WAPAdminAuth machine
Install the authentication sites
If you use AD FS configure the
trust settings for AD FS and the
management portals
Configure Active Directory
Federation Services for
Windows Azure Pack
If you want to add more cloud
services follow the steps below
Deploy Automation service Deploy Service Management
Automation
Deploy Windows Azure Pack
Web Services
Deploy Windows Azure Pack
Web Sites
Deploy Virtual Machine services Provision Virtual Machine
Clouds
Deploy Service Bus service Integrate Service Bus into
Windows Azure Pack
Add SQL and MySQL providers
to Windows Azure Pack
Using SQL Server or MySQL
with Windows Azure Pack
Validate the Windows Azure
Pack deployment by using the
Best Practices Analyzer for
Windows Azure Pack
Test your deployment
Create plans Administer plans and add-ons
14
Windows Azure Pack installation requirements
Windows Azure Pack can be installed in an express proof-of-concept deployment on a single
machine or in a fully distributed multi-machine production environment The hardware and
software prerequisites for each of these deployments are provided in the following topics
Naming conventions
Express deployment hardware and software prerequisites
Distributed deployment hardware and software prerequisites
Install software prerequisites
Install Microsoft SQL Server
Required firewall ports
Naming conventions
As a best practice use descriptive machine names for each machine Ensure the machine names
are not longer than 15 characters Otherwise you receive a NetBIOS error and the name is
truncated The rest of this deployment guide uses the following sample machine names
Component Sample machine name
Single Express installation machine WAPPortal
Admin API WAPAdminAPI
Tenant API WAPTenantAPI
Tenant public API WAPTenPubAPI
Admin authentication site WAPAdminAuth
Tenant authentication site WAPTenantAuth
Management portal for administrators WAPAdmin
Management portal for tenants WAPTenant
SQL server hosting the management
databases
WAPSQL
15
Express deployment hardware and software prerequisites
For a proof-of-concept or Express installation you must deploy all of the following Windows
Azure Pack required components on a single physical or virtual machine
Microsoft SQL Server prerequisite for management databases
Admin API
Tenant API
Tenant public API
Admin authentication site
Tenant authentication site
Admin site (management portal for administrators)
Tenant site (management portal for tenants)
The machine to which you deploy the Express installation requires the following
8 gigabytes (GB) of RAM Do not use dynamic memory
40 gigabytes (GB) of available hard disk space
Before you install any of the required Express components you must install the following
software as described in Install software prerequisites
Windows Serverreg 2012 or Windows Server 2012 R2
Microsoft Web Platform Installer 46
Microsoft NET Framework 35 Service Pack (SP) 1
Internet Information Services (IIS) 8 (built in component of Windows Serverreg 2012) or IIS 85
(built in component of Windows Server 2012 R2
NET Framework 45 Extended with ASPNET for Windows 8
Distributed deployment hardware and software prerequisites
In a production environment the components that Windows Azure Pack requires are intended to
run on a minimum of eight machines These machines can be physical or virtual
Install the required components in the following order
1 Microsoft SQL Server for Windows Azure Pack management databases
2 Admin API
3 Tenant API
4 Tenant public API
5 Admin authentication site
6 Tenant authentication site
16
7 Admin site (management portal for administrators)
8 Tenant site (management portal for tenants)
Each deployment machine has the following system recommendations
2 CPUs
4 gigabytes (GB) of RAM
40 gigabytes (GB) of available hard disk space
Before you install any of the required Windows Azure Pack components you must install the
following software as described in Install software prerequisites
Windows Serverreg 2012 or Windows Server 2012 R2
Microsoft Web Platform Installer 46
Microsoft NET Framework 35 Service Pack (SP) 1
Internet Information Services (IIS) 8 (built in component of Windows Serverreg 2012) or IIS 85
(built in component of Windows Server 2012 R2
NET Framework 45 Extended with ASPNET for Windows 8
Install software prerequisites
Follow these steps to install software prerequisites on machines where you want to install
Windows Azure Pack to ensure correct registration of the Microsoft NET Framework assemblies
1 Install the Windows Serverreg 2012 operating system or the Windows Server 2012 R2
operating system
2 Disable Internet Explorer Enhanced Security Configuration (ESC) for Administrators by using
Server Manager
3 Install Microsoft Web Platform Installer 46 - Web Platform Installer
4 If you are using Windows Server 2012 install the following software through Web Platform
Installer in this order
a Internet Information Services (IIS) recommended configuration
b Enable Microsoft NET Framework 35 SP 1 in Server Manager
c NET Framework 45 Extended with ASPNET for Windows 8
5 If you are using Windows Server 2012 R2 install the following software through Web
Platform Installer in this order
a Enable Microsoft NET Framework 35 SP 1 in Server Manager
b NET 45 Extended with ASPNET for Windows 8
c IIS recommended configuration
6 Install all available Windows and NET Framework updates Use Microsoft Update to ensure
that you have all available updates installed
17
Install Microsoft SQL Server
Windows Azure Pack requires an instance of Microsoft SQL Server to handle the management
databases Windows Azure Pack supports the following versions
1 SQL Server 2008 Service Pack 3
2 SQL Server 2008 R2 Service Pack 2
3 SQL Server 2012 Service Pack 1
For an express deployment you can use SQL Server Express on a machine in the Windows
Azure Pack topology For a distributed deployment in production use the full version of SQL
Server
You must enable SQL authentication on the SQL server before installing other Windows
Azure Pack components Also if you are going to use Windows authentication during
configuration you must add the current user as an administrator on the SQL server
Required firewall ports
Windows Azure Pack automatically sets the following Windows firewall ports If you use other
firewall software youll need to manually set the ports
For optimal security you should further restrict access to the specific services that require it
Windows Azure Pack services Required firewall port Scope
Admin API 30004 Any IP address
Management portal for
administrators
30091 Any IP address
Authentication site 30071 Any IP address
Configuraton site 30101 Local subnet
Monitoring 30020 Any IP address
MySQL resource provider 30012 Any IP address
SQL Server or MySQL resource
provider
30010 Any IP address
Tenant API 30005 Any IP address
Tenant public API 30006 Any IP address
Management portal for tenants 30081 Any IP address
Important
18
Windows Azure Pack services Required firewall port Scope
Usage 30022 Any IP address
WebAppGallery 30018 Any IP address
Windows authentication site 30072 Any IP address
Install an express deployment of Windows Azure Pack
You can use the Windows Azure Pack for Windows Server Express installation option that is
available in the Microsoft Web Platform Installer to install the required components of Windows
Azure Pack on a single system Use this installation option to create a proof-of-concept
deployment but not to deploy Windows Azure Pack to production
Before you install the Windows Azure Pack Express ensure that you have complied with the
Windows Azure Pack installation requirements
Use the Portal and API Express option to install the following components on one machine
Admin API
Tenant API
Tenant public API
Admin authentication site
Tenant authentication site
Admin site (management portal for administrators)
Tenant site (management portal for tenants)
1 Log on to the machine on which you want to install your proof-of-concept deployment If
you followed the recommended naming scheme log on to WAPPortal
2 Start the Web Platform Installer
3 Type Windows Azure Pack in the search box Click Add next to Windows Azure Pack
Portal and API Express and then click Install
To install the Portal and API Express option
19
4 Accept the terms and conditions on the Prerequisites page
Indicate whether you want to use Microsoft Update to keep Windows Azure Pack up to
date We recommend that you do use Microsoft Update This ensures that any fixes we
need to create are automatically installed
The installation begins
Your machine might restart during the installation
5 When the installation is completed ensure that all Internet Explorer windows are closed
and then click Continue to start the Service Management Configuration site
6 The Configuration site httpslocalhost30101 opens in Internet Explorer If the Internet
Explorer security certificate warning page is displayed click Continue to this website
20
Tip
If you need to restart Internet Explorer be sure to use the Run as administrator
option
7 On the Database Server Setup page enter the name of the database server or instance
of Microsoft SQL Server
21
8 Select the type of authentication that you want to use SQL Server Authentication or
Windows Authentication
If you select SQL Server Authentication enter the database server administrator user
name and password
9 Enter a passphrase that is to be used to encrypt and to decrypt data in the Configuration
Store Enter the passphrase again to confirm it and then click the next arrow
Important
Ensure that you write down the passphrase If you forget or lose this passphrase
there is no way to recover it
10 The features that are to be installed are listed on the Features Setup page
After the features are successfully configured click the check mark in the bottom right
corner of the Features Setup
11 To go to the management portal for administrators open an internet browser and go to
httpslocalhost30091WorkspacesWebSystemAdminExtensionquickStart
Note
You might have to log out of your system and log back on before you can access
the management portal for administrators This requirement is due to Windows
Authentication and the requirement to add the security group to your security
token
If you continue to get an Access denied error message even after you log back
22
on close all Internet Explorer windows Run Internet Explorer as an
administrator
12 To go to the management portal for tenants open an internet browser and go to
httpslocalhost 30081WorkspacesAlldashboard
13 The first time that you log on to either the management portal for administrators or the
management portal for tenants a tour of the portal is displayed Click through the pages
in the tour for an introduction to the management portal
At this point you have installed the required components of your Windows Azure Pack
Express deployment If you want to add services such as Windows Azure Pack Web
Sites or Virtual Machine Clouds to your proof-of-concept you will have to install them on
different machines For more information see Provision and configure services in
Windows Azure Pack
Install a distributed deployment of Windows Azure Pack
A production environment installation of Windows Azure Pack for Windows Server requires a
distributed deployment In such a deployment required and optional components of Windows
Azure Pack are installed on multiple machines For more information see Windows Azure Pack
architecture For information about hardware and software prerequisites see Windows Azure
Pack installation requirements
All components are installed by using the Microsoft Web Platform Installer
Follow these steps to install a distributed deployment
1 Install the Windows Azure Pack Service Management APIs
2 Install the Windows Azure Pack management portals
3 Install the authentication sites
4 Upgrade from the Preview version of Windows Azure Pack
5 OPTIONAL Configure Active Directory Federation Services for Windows Azure Pack
6 OPTIONAL Decide which services to deploy such as Windows Azure Pack Web Sites
Automation Virtual Machine Clouds SQL and MySQL For more information see Provision
and configure services in Windows Azure Pack
7 Test your deployment
8 Post-installation best practices
Next steps
23
Install the Windows Azure Pack Service Management APIs
The Windows Azure Pack for Windows Server Service Management API includes three separate
components
Windows Azure Pack Admin API
Windows Azure Pack Tenant API
Windows Azure Pack Tenant Public API
For security reasons you should install the Windows Azure Pack Admin API and the Windows
Azure Pack Tenant API on machines that are behind a firewall or that are otherwise not
accessible by the public The Windows Azure Pack Tenant Public API should not be installed
behind a firewall
API component Sample machine name Publicly accessible
Admin API WAPAdminAPI No
Tenant API WAPTenantAPI No
Tenant Public API WAPTenPubAPI Yes
For more information about suggested machine configurations see Windows Azure Pack
architecture
You must complete the following steps three times one time for each API component the Admin
API the Tenant API and the Tenant Public API
1 Ensure that the machine on which you want to install the API complies with all the
hardware and software prerequisites that are listed in the Windows Azure Pack
installation requirements
2 Log on to the machine on which you want to install the API If you followed the
recommended Naming conventions log on to WAPAdminAPI WAPTenantAPI or
WAPTenPubAPI
3 Start the Microsoft Web Platform Installer
4 Type Windows Azure Pack in the search box Click Add next to the Service Management
API component that you want to install for example Windows Azure Pack Admin API
and then click Install
To install the Admin API Tenant API and Tenant Public API
24
5 Review the software to be installed To view the privacy information for each component
click Privacy Terms
To accept the terms and conditions on the Prerequisites page click I Accept
6 On the next page scroll down and indicate whether you want to use Microsoft Update to
keep the Windows Azure Pack component up to date Then click Continue
Tip
We recommend that you do use Microsoft Update This ensures that any fixes
we need to create for the Windows Azure Pack component are automatically
installed
The installation begins
7 When the installation is completed ensure that all Internet Explorer windows are closed
and then click Continue to start the configuration site
8 The configuration site httpslocalhost30101 opens in Internet Explorer If the Internet
Explorer security certificate warning page is displayed click Continue to this website
25
Tip
If you need to restart Internet Explorer be sure to use the Run as administrator
option
9 On the Database Server Setup page enter the name of the database server
26
10 Select the type of authentication that you want to use SQL Server Authentication or
Windows Authentication
If you select SQL Server Authentication enter the database server administrator user
name (sa) and password
11 Enter a passphrase that is to be used to encrypt and to decrypt data in the Configuration
Store and then click the next arrow
Important
Ensure that you write down the passphrase Each component must use the same
passphrase If you forget or lose this passphrase there is no way to recover it
12 Indicate whether you want to participate in the Customer Experience Improvement
Program (CEIP) and then click the next arrow
Warning
If possible please participate in the CEIP We use the data collected by CEIP
(data that contains no personal information) to understand how you are using the
controller and to identify any issues that you run into
13 Review the features and then click the check mark in the bottom right corner of the
Features Setup page
14 After the features are successfully configured click the check mark in the bottom right
corner of the Features Setup page
15 In the Web Platform Installer click Finish
16 Repeat these steps for each of the Service Management APIs Admin API Tenant API
and Tenant Public API
After you installed each of the API components you should install the management portal
for administrators and management portal for tenants as described in Install the
Windows Azure Pack management portals
Install the Windows Azure Pack management portals
Before users can interact with Windows Azure Pack either as administrators or as tenants you
must install the management portal for administrators and the management portal for tenants
1 Ensure that the machine on which you want to install the management portal for
administrators complies with all the hardware and software prerequisites that are listed in
Next steps
To install the management portal for administrators
27
Windows Azure Pack installation requirements
2 Log on to the machine on which you want to install the management portal for
administrators If you followed the recommended Naming conventions log on to
WAPAdmin
3 Start the Microsoft Web Platform Installer
4 Type Windows Azure Pack in the search box Click Add next to Windows Azure Pack
Admin Site and then click Install
5 Review the software to be installed To view the privacy information for each component
click Privacy Terms
To accept the terms and conditions on the Prerequisites page click I Accept
6 On the next page scroll down and indicate whether you want to use Microsoft Update to
keep the Windows Azure Pack component up to date Then click Continue
Tip
We recommend that you do use Microsoft Update This ensures that any fixes
we need to create for the Windows Azure Pack component are automatically
installed
The installation begins
7 When the installation is completed ensure that all Internet Explorer windows are closed
and then click Continue to start the management portal
8 The configuration site httpslocalhost30101 opens in Internet Explorer If the Internet
Explorer security certificate warning page is displayed click Continue to this website
28
Tip
If you need to restart Internet Explorer be sure to use the Run as administrator
option
9 On the Database Server Setup page enter the name of the database server
29
10 Select the type of authentication that you want to use SQL Server Authentication or
Windows Authentication
If you select SQL Server Authentication enter the database server administrator user
name (sa) and password
11 Enter a passphrase to be used to encrypt and decrypt data in the Configuration Store
and then click the next arrow
Important
Ensure that you write down the passphrase Each component must use the same
passphrase If you forget or lose this passphrase there is no way to recover it
12 Indicate whether you want to participate in the Customer Experience Improvement
Program (CEIP) and then click the next arrow
Warning
If possible please participate in the CEIP We use the data collected by CEIP
(data that contains no personal information) to understand how you are using the
controller and to identify any issues that you run into
13 Review the features and then click the check mark in the bottom right corner of the
Features Setup page
14 In the Web Platform Installer click Finish
15 Open an internet browser and go to
httpslocalhost30091WorkspacesWebSystemAdminExtensionquickStart
16 If you have not yet deployed the Service Management API in the environment you get a
notification that the management portal requires the Service Management API In this
case your next step is to deploy the Service Management API
After you deploy the Service Management API return to this machine and then click Try
Again to open the management portal for administrators
Note
You might have to log out of your system and log back on before you can access
the Service management portal for administrators This step is due to Windows
Authentication and the requirement to add the security group to your security
token
If you continue to see an Access denied error even after you log back on close
all Internet Explorer windows and run Internet Explorer as an administrator
17 The first time that you log on to the management portal for administrators a tour of the
portal is displayed Click through the pages in the tour for an introduction to the portal
18 For the next step see Install the service management portal for tenants
1 Ensure that the machine on which you want to install the management portal for tenants
complies with all the hardware and software prerequisites that are listed in Windows
To install the management portal for tenants
30
Azure Pack installation requirements
2 Log on to the machine on which you want to install the management portal for tenants If
you followed the recommended Naming conventions log on to WAPTenant
3 Start the Web Platform Installer
4 Type Windows Azure Pack in the search box Click Add next to Windows Azure Pack
Tenant Site and then click Install
5 Review the software to be installed To view the privacy information for each component
click Privacy Terms
To accept the terms and conditions on the Prerequisites page click I Accept
6 On the next page scroll down and indicate whether you want to use Microsoft Update to
keep the Windows Azure Pack component up to date Then click Continue
Tip
We recommend that you do use Microsoft Update This ensures that any fixes
we need to create for the Windows Azure Pack component are automatically
installed
The installation begins
7 When the installation is completed ensure that all Internet Explorer windows are closed
and then click Continue to start the management portal
8 The configuration site httpslocalhost30101 opens in Internet Explorer If the Internet
Explorer security certificate warning page is displayed click Continue to this website
31
Tip
If you need to restart Internet Explorer be sure to use the Run as administrator
option
9 On the Database Server Setup page enter the name of the database server
32
10 Select the type of authentication that you want to use SQL Server Authentication or
Windows Authentication
If you select SQL Server Authentication enter the database server administrator user
name (sa) and password
11 Enter a passphrase that is to be used to encrypt and to decrypt data in the Configuration
Store and then click the next arrow
Important
Ensure that you write down the passphrase Each component must use the same
passphrase If you forget or lose this passphrase there is no way to recover it
12 Indicate whether you want to participate in the Customer Experience Improvement
Program (CEIP) and then click the next arrow
Warning
If possible please participate in the CEIP We use the data collected by CEIP
(data that contains no personal information) to understand how you are using the
controller and to identify any issues that you run into
13 Review the features and then click the check mark in the bottom right corner of the
Features Setup page
14 In the Web Platform Installer click Finish
15 Open an internet browser and go to httpslocalhost 30081WorkspacesAlldashboard
16 The first time that you log on to the management portal for tenants a tour of the portal is
displayed Click through the pages in the tour for an introduction to the portal
By default the management portals are configured to use only HTTPS The Webconfig
file for each portal website contains a redirect rule to route all HTTP traffic to HTTPS but
this redirect is only of use if the respective portals are bound to a valid HTTP endpoint
To accept traffic over HTTP port 80 the portal websites must be manually configured
with additional bindings Complete the following steps to enable the portal websites to
accept traffic on HTTP port 80 and enable redirection of this traffic by using the redirect
rule in the Webconfig file
a Replace the self-signed Secure Sockets Layer (SSL) certificate that is used by the
management portal websites with a certificate that is issued by a recognized trusted
root certification authority (CA)
b Add an HTTP site binding on port 80 for the management portal websites
c Modify the existing HTTPS site bindings on port 30091 for the management portal for
administrators and on port 30081 for the management portal for tenants with HTTPS
site bindings on the default port of 443
Optional Enable HTTP endpoints on the management portal for administrators and management portal for administrators for HTTP-HTTPS redirection
33
If the management portal for tenants is configured to use an untrusted certificate end
users cannot install Microsoft WebMatrix from the tenant portal and instead receive an
error message To address this issue and ensure that end users can complete a One-
click installation of WebMatrix replace the default self-signed SSL certificate that is used
by the tenant portal website with a certificate that is issued by a trusted root certification
authority
By default the management portals are configured to use only HTTPS that is bound to
port 30091 and to port 30081 respectively Ensure that the management portal websites
are bound to a TCPIP port that end users and system administrators expect such as
port 443 for HTTPS and port 80 for HTTP
After you have installed each of the management portals you should install the
administrator and tenant authentication sites as described in Install the authentication
sites
Install the authentication sites
Windows Azure Pack for Windows Server uses the following authentication services
Component Sample machine name Default authentication
service
Optional
authentication service
Management portal
for administrators
WAPAdminAuth Windows
Authentication
Active Directory
Federation Services
Management portal
for tenants
WAPTenantAuth ASPNet Membership
Provider
Active Directory
Federation Services
By default Windows Azure Pack uses Windows Authentication for the management portal for
administrators You also have the option of using Active Directory Federation Services (AD FS) to
authenticate users For more information see Configure Active Directory Federation Services for
Windows Azure Pack
1 Ensure that the machine on which you want to install the admin authentication site
Optional Configure the certificates for the management portal for tenants to ensure WebMatrix One-click installation functionality
Verify TCPIP configuration of administrator and tenant portal websites
Next steps
To install the admin authentication site
34
complies with all the hardware and software prerequisites that are listed in the Windows
Azure Pack installation requirements
2 Log on to the machine on which you want to install the admin authentication site If you
followed the recommended Naming conventions log on to WAPAdminAuth
3 Start the Microsoft Web Platform Installer
4 Type Windows Azure Pack in the search box Click Add next to Windows Azure Pack
Admin Authentication Site and then click Install
5 Review the software to be installed To view the privacy information for each component
click Privacy Terms
To accept the terms and conditions on the Prerequisites page click I Accept
6 On the next page scroll down and indicate whether you want to use Microsoft Update to
keep the Windows Azure Pack component up to date Then click Continue
Tip
We recommend that you do use Microsoft Update This ensures that any fixes
we need to create for the Windows Azure Pack component are automatically
installed
The installation begins
7 When the installation is completed ensure that all Internet Explorer windows are closed
and then click Continue to start the configuration site
8 The configuration site httpslocalhost30101 opens in Internet Explorer If the Internet
Explorer security certificate warning page is displayed click Continue to this website
35
Tip
If you need to restart Internet Explorer be sure to use the Run as administrator
option
9 On the Database Server Setup page enter the name of the database server
36
10 Select the type of authentication that you want to use SQL Server Authentication or
Windows Authentication
If you select SQL Server Authentication enter the database server administrator user
name (sa) and password
11 Enter the passphrase for the Configuration Store and then click the next arrow
Important
Ensure that you write down the passphrase Each component must use the same
passphrase If you forget or lose this passphrase there is no way to recover it
12 Indicate whether you want to participate in the Customer Experience Improvement
Program (CEIP) and then click the next arrow
Tip
If possible please participate in the CEIP We use the data collected by CEIP
(data that contains no personal information) to understand how you are using the
controller and to identify any issues that you run into
13 Review the features and then click the check mark in the bottom right corner of the
Features Setup page
14 In the Web Platform Installer click Finish
1 Ensure that the machine where you want to install the tenant authentication site complies
with all the hardware and software prerequisites listed in the Windows Azure Pack
installation requirements
2 Log on to the machine on which you want to install the tenant authentication site If you
followed the recommended Naming conventions log on to WAPTenantAuth
3 Start the Web Platform Installer
4 Type Windows Azure Pack in the search box Click Add next to Windows Azure Pack
Tenant Authentication Site and then click Install
To install the tenant authentication site
37
5 Review the software to be installed To view the privacy information for each component
click Privacy Terms
To accept the terms and conditions on the Prerequisites page click I Accept The
installation begins
6 On the next page scroll down and indicate whether you want to use Microsoft Update to
keep the Windows Azure Pack component up to date Then click Continue
Tip
We recommend that you do use Microsoft Update This ensures that any fixes
we need to create for the Windows Azure Pack component are automatically
installed
The installation begins
7 When the installation is completed ensure that all Internet Explorer windows are closed
and then click Continue to start the Configuration site
8 The Configuration site httpslocalhost30101 opens in Internet Explorer If the Internet
Explorer security certificate warning page is displayed click Continue to this website
38
Tip
If you need to restart Internet Explorer be sure to use the Run as administrator
option
9 On the Database Server Setup page enter the name of the database server
39
10 Select the type of authentication that you want to use SQL Server Authentication or
Windows Authentication
If you select SQL Server Authentication enter the database server administrator user
name (sa) and password
11 Enter the passphrase for the Configuration Store and then click the next arrow
Important
Ensure that you write down the passphrase Each component must use the same
passphrase If you forget or lose this passphrase there is no way to recover it
12 Indicate whether you want to participate in the Customer Experience Improvement
Program (CEIP) and then click the next arrow
Tip
If possible please participate in the CEIP We use the data collected by CEIP
(data that contains no personal information) to understand how you are using the
controller and to identify any issues that you run into
13 Review the features and then click the check mark in the bottom right corner of the
Features Setup page
14 In the Web Platform Installer click Finish
At this point you have installed the required components of your Windows Azure Pack
deployment If you want to add services such as Windows Azure Pack Web Services
see Provision and configure services in Windows Azure Pack
Upgrade from the Preview version of Windows Azure Pack
If you want to upgrade your express or distributed deployment from the preview version to the
new version follow these steps
1 On each machine running a Windows Azure Pack component stop all sites and IIS
services
2 To enable rollback in case of problems during the upgrade back up all sites virtual
machines and databases The upgrade process does not automatically back up the
current running versions of Windows Azure Pack components
3 If you have created a custom theme for your tenant portal follow these steps
Next steps
To upgrade from preview to Windows Server version of Windows Azure Pack
40
a Create a new folder named app_CustomTheme on the tenant machine
CinetpubMgmtSvc-TenantSiteapp_CustomTheme
b On the tenant machine copy the content folder from the custom theming kit to
CinetpubMgmtSvc-TenantSiteapp_CustomTheme
4 Locate and record the connection string information for the existing preview databases
along with the current passphrase Without this information the upgrade will install a new
installation instead of upgrading the previous version
5 Using Windows Platform Installer install the latest version of Windows Azure Pack
components
If you are upgrading an express deployment you can install the upgrade on the machine
hosting your express deployment as explained in Install an express deployment of
Windows Azure Pack During configuration be sure to use the existing preview database
and current passphrase
If you are upgrading a distributed deployment you must install the appropriate
components on each machine in your deployment Follow the instructions in Install a
distributed deployment of Windows Azure Pack During configuration be sure to use the
existing preview database and current passphrase
6 The upgrade will automatically update your deployment to the new version keeping your
user plan and account data intact with the following exceptions
All tenant passwords must be reset
The upgrade process resets IIS settings (including custom ports and host headers) of
the portal and API machines to their default values If you want to use non-default
values you must manually reset them
The upgrade process resets firewalls to default settings If you want to use non-
default firewall rules you must manually add them for tenant and API endpoints
If you have optional components of Windows Azure Pack deployed be sure to consult the
deployment guides for those services for information about upgrading to the new version
of Windows Azure Pack for Windows Server
Deploy Windows Azure Pack Web Sites
Integrate Service Bus into Windows Azure Pack
Provision Virtual Machine Clouds
Deploy Service Management Automation
Using SQL Server or MySQL with Windows Azure Pack
Next steps
41
Configure Active Directory Federation Services for Windows Azure Pack
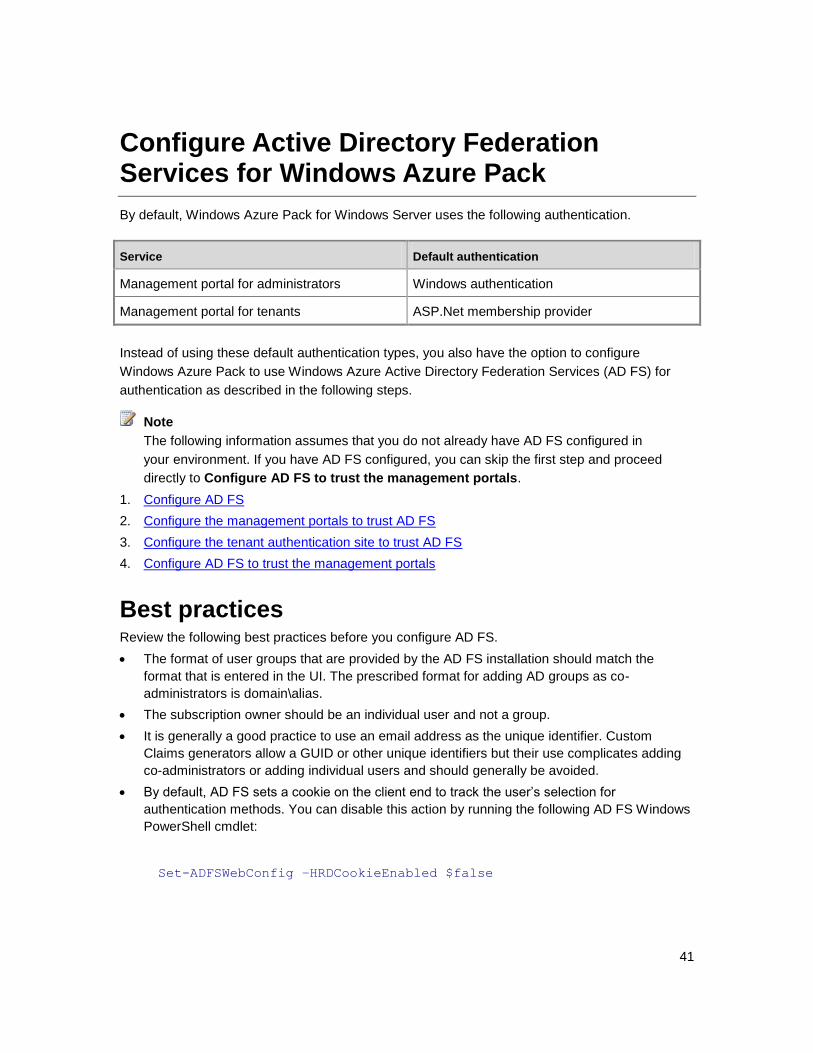
By default Windows Azure Pack for Windows Server uses the following authentication
Service Default authentication
Management portal for administrators Windows authentication
Management portal for tenants ASPNet membership provider
Instead of using these default authentication types you also have the option to configure
Windows Azure Pack to use Windows Azure Active Directory Federation Services (AD FS) for
authentication as described in the following steps
The following information assumes that you do not already have AD FS configured in
your environment If you have AD FS configured you can skip the first step and proceed
directly to Configure AD FS to trust the management portals
1 Configure AD FS
2 Configure the management portals to trust AD FS
3 Configure the tenant authentication site to trust AD FS
4 Configure AD FS to trust the management portals
Best practices Review the following best practices before you configure AD FS
The format of user groups that are provided by the AD FS installation should match the
format that is entered in the UI The prescribed format for adding AD groups as co-
administrators is domainalias
The subscription owner should be an individual user and not a group
It is generally a good practice to use an email address as the unique identifier Custom
Claims generators allow a GUID or other unique identifiers but their use complicates adding
co-administrators or adding individual users and should generally be avoided
By default AD FS sets a cookie on the client end to track the userrsquos selection for
authentication methods You can disable this action by running the following AD FS Windows
PowerShell cmdlet
Set-ADFSWebConfig ndashHRDCookieEnabled $false
Note
42
Configure AD FS
As the first step of enabling Windows Azure Active Directory Federation Services (AD FS) for
Windows Azure Pack for Windows Server you must configure AD FS as explained in the
following steps
1 If you use an existing AD FS do the following
a In AD FS use the following address to add the management portal for administrators
and management portal for tenants as relying parties
ltPortal URIgtfederationMetadata2007-06Federationmetadataxml
Replace ltPortal URIgt with the addresses of the management portal for
administrators and the management portal for tenants
For example httpswwwcontosotenantcomfederationMetadata2007-
06Federationmetadataxml
b Apply the following transformation rules to the management portal for tenants
Transform AD Groups to Groups Claims
Transform email address to UPN Claims
c Skip the remaining steps and go to Configure the management portals to trust AD
FS
2 If you are setting up a new AD FS on the machine that you want to use for AD FS
enable the AD FS role
3 Log on to the machine as the domain administrator You have two options to configure
AD FS Run the Install-AdfsFarm cmdlet or run a script
Run the Install-AdfsFarm cmdlet to configure AD FS
Install-AdfsFarm ndashCertificateThumbprint ltStringgt -
FederationServiceName ltStringgt -ServiceAccountCredential
ltPSCredentialgt -SQLConnectionString ltStringgt
You must provide the following information to run the Install-AdfsFarm cmdlet
Cmdlet parameter Information needed
ndashCertificateThumbprint Secure Socket Layer (SSL) Certificate
thumbprint The certificate should be
installed in the ltlocal_machinegtMy
store
-FederationServiceName Fully qualified domain name (FQDN) of
To configure AD FS
43
the AD FS service
-ServiceAccountCredential The domain service account to run AD
FS
-SQLConnectionString SQL connection string to an instance of
a Microsoft SQL Server to host the AD
FS databases
Or run the following script to configure AD FS
Note
You must install makecertexe before running this script Alternatively you
can use IIS to create a self-signed certificate and pass the thumbprint in this
script
Set these values
$domainName = contosocom
$adfsPrefix = AzurePack-adfs
$username = username
$password = password
$dnsName = ($adfsPrefix + + $domainName)
Generate Self Signed Certificate
Import-Module -Name PKIWebAdministration
You must install makecertexe before running this script
Alternatively use the IIS UI to create a self-signed
certificate and pass the thumbprint in this script
$item = Get-Item -Path IISSslBindings0000443 -
ErrorAction SilentlyContinue
if ($item)
MakeCertexe -n CN=$dnsName -r -pe -sky exchange -ss My -sr
LocalMachine -eku 136155731
cert = (Get-ChildItem CertLocalMachineMy | Where-Object
$_Subject -eq CN=$dnsName )[0]
44
$thumbprint = $certThumbprint
$securePassword = ConvertTo-SecureString -String $password -
Force -AsPlainText
$adfsServiceCredential = New-Object -TypeName
SystemManagementAutomationPSCredential -ArgumentList
($domainname + + $username) $securePassword
If you want to install AD FS with a database provide this
data Otherwise it will install with the Windows Internal
Database (which should be enabled
prior to configuring AD fS)
$dbServer = AzurePack-SQl
$dbUsername = sa
$dbPassword = ltSQL_passwordgt
$adfsSqlConnectionString = [string]Format(Data
Source=0Initial Catalog=masterUser ID=1Password=2
$dbServer $dbUsername $dbPassword)
Configure AD FS
Install-AdfsFarm `
-CertificateThumbprint $thumbprint `
-FederationServiceName $dnsName `
-ServiceAccountCredential $adfsServiceCredential `
-SQLConnectionString $adfsSqlConnectionString `
-OverwriteConfiguration
Configure the management portals to trust AD FS
Next steps
45
Configure the management portals to trust AD FS
After you configure Active Directory Federations Services (AD FS) you must configure
management portal for administrators and management portal for tenants to trust AD FS You
can either run the Set-MgmtSvcRelyingPartySettings cmdlet or run a Windows PowerShell script
1 Run the Set-MgmtSvcRelyingPartySettings cmdlet on each machine where the
administrator or tenant portal is installed
Before you run the Set-MgmtSvcRelyingPartySettings cmdlet ensure that the machine
that you configure can access the AD FS web service metadata endpoint To verify
access open a browser and go to the same URI that you plan to use for the ndash
MetadataEndpoint parameter If you can view the xml file you can access the federation
metadata endpoint
2 Now run the Set-MgmtSvcRelyingPartySettings cmdlet
Set-MgmtSvcRelyingPartySettings -Target Tenant -
MetadataEndpoint httpsltfqdngtFederationMetadata2007-
06FederationMetadataxml -DisableCertificateValidation -
ConnectionString Server=ltsome servergtUser Id=ltuser with
write permissions to all config
databasesgtPassword=ltpasswordgt
The following table shows required information to run the Set-
MgmtSvcRelyingPartySettings cmdlet
Cmdlet parameter Required information
-Target This parameter is used to indicate which
portal to configure Possible values Admin
Tenant
-MetadataEndpoint The AD FS web service metadata endpoint
Use a valid accessible and complete URI
in the following format httpsltAD
FSgtFederationMetadata2007-
06FederationMetadataxml In the following
cmdlets replace $fqdn with an accessible
AD FS fully qualified domain name (FQDN)
Option 1 Run the Set-MgmtSvcRelyingPartySettings cmdlet
46
-ConnectionString The connection string to the instance of
Microsoft SQL Server that hosts the
management portal configuration database
Instead of using the cmdlet you can run the following Windows PowerShell script on
each machine where the administrator or tenant portal is installed
$domainName = mydomaincom
$adfsPrefix = AzurePack-adfs
$dnsName = ($adfsPrefix + + $domainName)
Enter Sql Server details here
$dbServer = AzurePack-sql
$dbUsername = sa
$dbPassword = ltSQL_passwordgt
$connectionString = [string]Format(Data Source=0User
ID=1Password=2 $dbServer $dbUsername $dbPassword)
Note Use the DisableCertificateValidation switch only in
test environments In production environments
all SSL certificates should be valid
Set-MgmtSvcRelyingPartySettings -Target Tenant `
-MetadataEndpoint https$dnsNameFederationMetadata2007-
06FederationMetadataxml `
-DisableCertificateValidation -ConnectionString
$connectionString
If you want to add users to have access to the management portal for administrators you
must run the Add-MgmtSvcAdminUser cmdlet on the machine hosting the Admin API The
connection string should point to the Management Portal Configuration database
The following code example shows how users are added to get access
Option 2 Run a Windows PowerShell script
Add users to have access to the management portal for administrators
47
$adminuser = domainuser1mydomaincom
$dbServer = AzurePack-sql
$dbUsername = sa
$dbPassword = SQL_Password
$connectionString = [string]Format(Server= 0 Initial
Catalog=MicrosoftMgmtSvcStoreUser
Id=1Password=2$dbServer $dbUsername $dbPassword)
Add-MgmtSvcAdminUser -Principal $adminuser -ConnectionString
$connectionstring
Note
The format of the $dbuser must match the user principal name (UPN) that is sent by
AD FS
Administrator users must be individual users You cannot add AD groups as
administrator users
Configure the tenant authentication site to trust AD FS
Configure the tenant authentication site to trust AD FS
The next step is to add information about Windows Azure Active Directory Federation Services
(AD FS) to the tenant authentication sites By default the management portal for tenants uses
ASPNET Membership Provider authentication You can choose to use the same ASPNET
Membership Provider as a Claims Provider in AD FS To do this you must run the Set-
MgmtSvcIdentityProviderSettings cmdlet on any machine where the tenant authentication site is
installed
1 Ensure that the machine that you configure can access the AD FS web service metadata
endpoint To verify the access open a browser and go to the same URI that you plan to
use for the ndashMetadataEndpoint parameter If you can view the xml file you can access
the federation metadata endpoint
Next steps
Option 1 Run the Set-MgmtSvcIdentityProviderSettings cmdlet
48
2 Run the Set-MgmtSvcIdentityProviderSettings cmdlet on any machine where the
authentication site is installed
Set-MgmtSvcIdentityProviderSettings -Target Membership -
MetadataEndpoint httpslt fqdngtFederationMetadata2007-
06FederationMetadataxml -DisableCertificateValidation -
ConnectionString Server=ltsome servergtUser Id=ltuser with
write permissions to all config
databasesgtPassword=ltpasswordgt
The following table shows required information to run the Set-
MgmtSvcIdentityProviderSettings cmdlet
Cmdlet parameter Required information
-Target This parameter is used to indicate which
component to configure Possible values
Membership Windows
-MetadataEndpoint The AD FS web service metadata endpoint
Use a valid accessible and complete URI
in the following format httpsltAD
FSgtFederationMetadata2007-
06FederationMetadataxml In the following
cmdlets replace $fqdn with an accessible
AD FS fully qualified domain name (FQDN)
-ConnectionString The connection string to the instance of
Microsoft SQL Server that hosts the portal
and API database
1 Ensure that the machine that you configure can access the AD FS web service metadata
endpoint To verify the access open a browser and go to the same URI that you plan to
use for the ndashMetadataEndpoint parameter If you can view the xml file you can access
the federation metadata endpoint
2 Instead of using the cmdlet you can run the following Windows PowerShell script
$domainName = mydomaincom
$adfsPrefix = AzurePack-adfs
$dnsName = ($adfsPrefix + + $domainName)
Enter Sql Server details here
Option 2 Run a Windows PowerShell script
49
$dbServer = AzurePack-sql
$dbUsername = sa
$dbPassword = ltSQL_passwordgt
$connectionString = [string]Format(Data Source=0User
ID=1Password=2 $dbServer $dbUsername $dbPassword)
Note Use the DisableCertificateValidation switch only in
test environments In production environments all
SSL certificates should be valid
Set-MgmtSvcIdentityProviderSettings -Target Membership `
-MetadataEndpoint https$dnsNameFederationMetadata2007-
06FederationMetadataxml `
-DisableCertificateValidation `
-ConnectionString $connectionString `
Configure AD FS to trust the management portals
Configure AD FS to trust the management portals
The last step in the configuration of Windows Azure Active Directory Federation Services (AD FS)
for Windows Azure Pack is to configure AD FS to trust the management portals
1 Ensure that the machine that you configure can access the AD FS web service metadata
endpoint for the management portal for administrators To verify access open a browser
and go to httpsltAdminPortal_endpointgtFederationMetadata2007-
06FederationMetadataxml where ltAdminPortal_endpointgt is the fully qualified domain
name (FQDN) for the management portal for administrators If you can view the xml file
you can access the federation metadata endpoint
2 Ensure that the machine that you configure can access the AD FS web service metadata
endpoint for the management portal for tenants To verify access open a browser and go
to httpsltTenantPortal_endpointgtFederationMetadata2007-
06FederationMetadataxml where ltTenantPortal_endpointgt is the FQDN for the
Next steps
Configure AD FS to trust the management portals
50
management portal for tenants If you can view the xml file you can access the
federation metadata endpoint
3 OPTIONAL If you want to use the ASPNET Membership Provider as the default Claims
Provider for the management portal for tenants in AD FS ensure that the machine that
you configure can access the AD FS web service metadata endpoint for the Tenant
Authentication Site To verify access open a browser and go to
httpsltTenantAuth_endpointgtFederationMetadata2007-06FederationMetadataxml
where ltTenantAuth_endpointgt is the FQDN for the Tenant Authentication Site If you can
view the xml file you can access the federation metadata endpoint
4 Locate the configure-adfsps1 configuration script that is installed with Windows Azure
Pack in CProgram FilesManagement ServiceMgmtSvc-
PowerShellAPISamplesAuthentication
5 Run the configure-adfsps1 script on the machine where AD FS is installed
$tenantSite = tenant-AzurePackcontosocom30081
$adminSite = admin-AzurePackcontosocom30091
$authSite = auth-AzurePackcontosocom30071
Note Use the allowSelfSignCertificates switch only in
test environments In production environments all
SSL certificates should be valid
amp CProgram FilesManagement ServiceMgmtSvc-
PowerShellAPISamplesconfigure-adfsps1 `
ndashidentityProviderMetadataEndpoint
https$authSitefederationmetadata2007-
06federationmetadataxml `
-
tenantRelyingPartyMetadataEndpoint https$tenantSitefede
rationmetadata2007-06federationmetadataxml `
-adminRelyingPartyMetadataEndpoint
https$adminSitefederationmetadata2007-
06federationmetadataxml `
ndashallowSelfSignCertificates
Replace lttenantSitegt and ltadminSitegt with the locations for the management portal for
tenants and the management portal for administrators If you want to use ASPNET
Membership Provider as the default Claims Provider for the management portal for
tenants in AD FS replace ltauthSitegt with the location for the authentication site
Supply the following parameter information
51
Parameter Required information
-identityProviderMetadataEndpoint OPTIONAL Endpoint to obtain
Federation Metadata for the Tenant
Authentication Site If you do not want
to use ASPNET Membership Provider
as the default Claims Provider for the
management portal for tenants in AD
FS then delete this line
-tenantRelyingPartyMetadataEndpoint Endpoint to obtain Federation Metadata
for the management portal for tenants
-adminRelyingPartyMetadataEndpoint Endpoint to obtain Federation Metadata
for the management portal for
administrators
Reconfigure FQDNs and Ports in Windows Azure Pack
Windows Azure Pack for Windows Server uses claim-based authentication system to
authenticate and authorize users This authentication is performed by an external Identity
Provider Security Token Service (IdP-STS) The system trusts the IdP-STS to verify the identity of
users and to provide a trusted set of claims about each user A two-way trust relationship with the
IdP-STS must be established during Windows Azure Pack configuration so the endpoint changes
are properly communicated to the affected components
To establish this trust relationship the following Windows Azure Pack components expose
metadata information
Management portal for tenants
Management portal for administrators
Tenant authentication site
Admin authentication site
The exposed data includes all the necessary trust information including the endpoint information
of the different components The endpoint information is used to redirect users to the IdP-STS
and back to Windows Azure Pack
Therefore every time an endpoint configuration changes for a component the metadata
information must be updated and the trust relationship must be re-established using the updated
metadata
52
Windows Azure Pack installation and configuration provides default values for the exposed
metadata and endpoint information By default Windows Azure Pack uses the machine and
domain name as the Fully Qualified Domain Name (FQDN) of each component It also sets pre-
defined port numbers for each component
For example if your tenant machine hostname is ldquomytenantmachinerdquo and your domain is
ldquocontosocomrdquo the default configuration of the Tenant Portal will be
httpsmytenantmachinecontosocom30081
In some scenarios the default endpoint values must be changed For example
If you update a components default self-signed SSL certificate to a real certificate the
components FQDN must match the certificate FQDN
If you use a load balancer across multiple instances of a component you must use the load
balancer endpoint instead of the endpoint of each component instance
If you change the pre-defined ports you must update the Windows Azure Pack port settings
For example changing to the default HTTPS port 443 requires you to update the Windows
Azure Pack port settings
In such cases the metadata information must be updated and the trust relationship must be re-
established as explained in the following steps
1 Run the SetndashMgmtSvcFqdn cmdlet on the machine you want to update
Set-MgmtSvcFqdn ndashNamespace ltNamsepace Tokengt -
ConnectionString ltConnection Stringgt [-FQDN ltFQDNgt] [-Port
ltportgt] [-Verbose]
Parameter Requiredoptiona
l
Details
-
ConnectionStrin
g
Required This parameter defines the connection string to
the SQL Server hosting the Windows Azure Pack
configuration stores
A database name (Initial Catalog) is not required
Credentials included in the string must have write
permissions to the configuration stores
For example
$connectionString = ldquoData
Source=$serverUser
ID=$userIdPassword=$passwor
drdquo
$server ndash The address of the SQL Server hosting
the management portal configuration databases
To update the FQDN and port settings
53
$userId ndash A SQL user with write permissions to
the management portal configuration databases
$password ndash The password for the $userId
account
-FQDN Optional This parameter is used to specify the new FQDN
for the machine Replace $fqdn with the new
FQDN not including the protocol prefix For
example mynewfqdncontosocom
You can omit this parameter if you are not
changing the FQDN
-Namespace Required This parameter is used to indicate which
component to configure Possible values
AdminSite TenantSite AuthSite
WindowsAuthSite
-Port Optional This parameter is used to define the new port
Replace $port with the new port For example
443 Note Using the default HTTPS port 443 will
remove the port section from the endpoint
You can omit this parameter if you are not
changing the port
2 In Internet Information Services Manager ensure that the FQDN and port values have
been updated Also ensure that the FQDN matches the SSL certificate
3 The updated FQDN and port values will eventually propagate to the targeted
components To ensure that this happens immediately restart the website
4 Repeat steps 2 and 3 on all machines hosting the component
5 If needed set up your DNS to forward requests to the appropriate location
6 Re-establish trust between all the affected components as instructed in the next section
Re-establish trust Windows Azure Pack is a claims-aware application that uses tokens and claims to authenticate
and authorize end users Such applications dont use the identity of the token issuer as long as
the token complies with some conditions such as being signed by a trusted key For more
information see Claims-aware applications
With claims-based authentication a system trusts an STS to issue its tokens However that
doesnrsquot necessarily mean that this STS is actually performing the user authentication It is
possible that the STS delegates the user authentication request (or federation) to another STS
which is trusted by the first STS This chain of STSs trusting each other and delegating requests
54
is common and flexible There are endless possible topologies of trust relationships System
administrators must choose the most appropriate topology to meet business requirements
For example you can configure Windows Azure Pack management portals to trust AD FS to
authenticate users Depending on the AD FS configuration AD FS can then do either of the
following
AD FS can authenticate users directly using the management portal Active Directory
credentials
AD FS can federate the request to another STS
In the second case you can use Windows Azure Access Active Directory Control Service (ACS)
as the other STS for example ACS can then federate the request again to another STS such as
Windows Live In this case Windows Live actually authenticates the user using Windows Live
credentials This is one way to enable Windows Live Google or Facebook authentication in
Windows Azure Pack
Because the endpoints are used to redirect users to the next component in the trust
chain all endpoints must be configured correctly in all components to ensure the
federation is successful
If you change a management portal endpoint you must update the STS that the portal
immediately trusts
Ensure that you update the FQDN and port changes in STS for the relying party
federation metadata URL and then refresh the metadata
If you change an STS endpoint you must update all the components directly trusted by it
such as the management portals and other STSs
The system administrator should be familiar with the trust chain to understand which components
must be updated following a configuration change
1 If the STS endpoint immediately trusted by a Windows Azure Pack management portal
was changed you must update the portals with the new endpoint information You can do
this by using the Set-MgmtSvcRelyingPartySettings PowerShell cmdlet on the relevant
machines
Set-MgmtSvcRelyingPartySettings -Target ltTargetsgt ndash
MetadataEndpoint ltMetadata Endpoint Full URLgt [-
ConnectionString ltConnection Stringgt] [-
DisableCertificateValidation] [-PortalConnectionString
ltPortal Configuration Store Connection Stringgt] [-
ManagementConnectionString ltManagement Store Connection
Stringgt]
Parameter Requiredoptional Details
Important
Re-establish trust for the management portals
55
Target Required This parameter defines which set of
components to update
Permissible values for ltTargetsgt
Tenant ndash Use this to configure the management
portal for tenants the tenant API layer and the
admin API layer
Admin ndash Use this to configure the management
portal for administrators and the admin API
layer
You can provide a single target or an array of
targets
MetadataEndpoi
nt
Required This parameter defines the full URL of the
trusted IdP-STS metadata endpoint
Permissible values for ltMetadata Endpoint Full
URLgt
A valid URL for example
httpmystscontosocom12
34FederationMetadata2007-
06FederationMetadataxml
ConnectionString Required unless
PortalConnection
String and
ManagementCon
nectionString are
used
This parameter defines the connection string to
the SQL Server hosting the Windows Azure
Pack portal configuration stores and
management store
A database name (Initial Catalog) is not
required
If the portal configuration stores or management
store are hosted on different SQL Server
instances or use non-default database names
use the PortalConnectionString and
ManagementConnectionString parameters
instead
DisableCertificat
eValidation
Optional
Not
recommended
for production
environments
This parameter disables SSL certificate
validation
If you dont use this parameter the cmdlet will
fail to retrieve the metadata information if the
metadata endpoint uses a self-signed SSL
certificate
PortalConnection Optional unless
ConnectionString
Use this parameter to override the default
56
String is not provided connection string just for the configuration store
You should do this when
The portal configuration store is located
on a different SQL instance
The portal configuration store uses
different credentials
You dont want to use the default
connection string
ManagementCon
nectionString
Optional unless
ConnectionString
is not provided
Use this parameter to override the default
connection string just for the management
store
You should do this when
The WAP management store is located
on a different SQL instance
The management store uses different
credentials
You dont want to use the default
connection string
Example cmdlet
Set-MgmtSvcRelyingPartySettings ndashTarget Tenant ndash
MetadataEndpoint
lsquohttpsmystscontosocom12345FederationMetadata2007-
06FederationMetadataxmlrsquo -ConnectionString ldquoData
Source=mysqlservercontosocomUser
ID=myprivilegeduserPassword=mypasswordrdquo
Tip
This cmdlet can be used on any machine where the Windows Azure PowerShell
updates for Windows Azure Pack are installed
The updated settings will eventually propagate to all affected components For faster
propagation manually restart the affected components to immediately fetch the new
configuration values If the target is lsquoTenantrsquo you should restart all your management
portals for tenants tenant API and admin API components If the target is lsquoAdminrsquo
you should restart all your management portals for administrators and admin API
components
1 If the STS endpoint immediately trusted by a Windows Azure Pack authentication site
was changed you must update the authentication sites with the new endpoint
information You can do this by using the PowerShell cmdlet Set-
Re-establish trust for the authentication sites
57
MgmtSvcIdentityProviderSettings PowerShell cmdlet on the relevant machines
Set-MgmtSvcIdentityProviderSettings -Target ltTargetsgt ndash
MetadataEndpoint ltMetadata Endpoint Full URLgt [-
ConfigureSecondary] [-ConnectionString ltConnection Stringgt]
[-DisableCertificateValidation] [-PortalConnectionString
ltPortal Configuration Store Connection Stringgt]
Parameter Requiredoptio
nal
Details
Target Required This parameter defines which set of components to
update
Permissible values for ltTargetsgt
Membership ndash Use this to configure the tenant
(Membership) authentication site
Windows ndash Use this to configure the admin
(Windows) authentication site
You can provide a single target or an array of
targets
MetadataEndpoi
nt
Required This parameter defines the full URL of the trusted
component metadata endpoint
Permissible values for ltMetadata Endpoint Full
URLgt
A valid URL for example
httpmystscontosocom1234
FederationMetadata2007-
06FederationMetadataxml
ConfigureSecon
dary
Optional Each authentication site supports up to two trusted
relying parties
Include this parameter to configure a second
relying party instead of overwriting the default
relying party
ConnectionStrin
g
Required
unless
PortalConnect
ionString is
used
This parameter defines the connection string to the
SQL Server hosting the Windows Azure Pack
portal configuration stores
A database name (Initial Catalog) is not required
If portal configuration store uses a non-default
database name use the PortalConnectionString
parameter instead
58
DisableCertificat
eValidation
Optional
Not
recommende
d for
production
environments
This parameter disables SSL certificate validation
If you dont use this parameter the cmdlet will fail to
retrieve the metadata information if the metadata
endpoint uses a self-signed SSL certificate
PortalConnectio
nString
Optional
unless
ConnectionStr
ing is not
provided
Use this parameter to override the default
connection string just for the configuration store
You should do this when
The portal configuration store uses different
credentials
You dont want to use the default
connection string
Example cmdlet
Set-MgmtSvcIdentityProviderSettings ndashTarget Membership ndash
MetadataEndpoint
lsquohttpsmytenantportalcontosocom23456FederationMetadata
2007-06FederationMetadataxmlrsquo -ConnectionString ldquoData
Source=mysqlservercontosocomUser
ID=myprivilegeduserPassword=mypasswordrdquo
Tip
This cmdlet can be used on any machine where the Windows Azure PowerShell
updates for Windows Azure Pack are installed
The updated settings will eventually propagate to all affected components For faster
propagation manually restart the affected components to immediately fetch the new
configuration values If the target is lsquoMembershiprsquo you should restart all your tenant
(Membership) authentication sites If the target is lsquoAdminrsquo you should restart all your
admin (Windows) authentication sites
Post-installation best practices
After you install the Windows Azure Pack for Windows Server perform the following best
practices
59
Replace untrusted self-signed certificates with trusted certificates Each Windows Azure Pack component is installed on an Internet Information Services (IIS)
website that by default is configured with a self-signed certificate Because these self-signed
certificates are not issued by any of the trusted root certification authorities that your browser
loads on startup your browser displays a security warning when you attempt to connect to any of
the sites To avoid this experience we recommend that you replace the self-signed certificates
that are used by the MgmtSvc-TenantSite (management portal for tenants) and MgmtSvc-
TenantPublicAPI as publicly facing services with certificates that are issued by a trusted root
certification authority The MgmtSvc-AdminSite (management portal for administrators) can also
benefit from a replacement of the self-signed certificate
By default services that are not accessed by users such as the APIs and resource
providers ignore certificate validation errors Services are accessed via the
ServicePointManagerServerCertificateValidationCallback Property If this action presents
a security concern you can replace the untrusted self-signed certificates with a valid
certificate that is issued by a recognized certification authority and turn the validation
override off or set the value to false
The configuration settings that govern this validation override are in each websitersquos Webconfig
file as follows
For the management portal for administrators and for the management portal for tenants
MgmtSvc-AdminSite and MgmtSvc-TenantSite
ltconfigurationgt
ltappSettingsgt
ltadd
key=MicrosoftAzurePortalConfigurationAppManagementConfigurationRdfe2DisableCerti
ficateValidation value=false gt
ltappSettingsgt
ltconfigurationgt
For the Service Management API websites MgmtSvc-AdminAPI MgmtSvc-TenantAPI
and MgmtSvc-TenantPublicAPI
ltconfigurationgt
ltappSettingsgt
ltadd key=DisableSslCertValidation value=false gt
ltappSettingsgt
ltconfigurationgt
For each of these keys the default value is true It grants permission to use untrusted
certificates so when the value is set to false the use of untrusted certificates is disallowed
Note
60
The ltappSettingsgt section of the Webconfig files are encrypted by default To modify
the ltappSettingsgt section of the Webconfig files you must decrypt the file apply
changes and then re-encrypt the files To decrypt and re-encrypt the Webconfig files
run the following Windows PowerShell cmdlets on the computer where the Webconfig
file is located
To decrypt Unprotect-MgmtSvcConfiguration ndashNamespace ltnamespacegt
To re-encrypt Protect-MgmtSvcConfiguration ndashNamespace ltnamespacegt
Where ltnamespacegt is one of the following
TenantPublicAPI
TenantAPI
AdminAPI
AdminSite
TenantSite
Test your deployment
You can test your deployment using the Microsoft Best Practices Analyzer (BPA) for Windows
Azure Pack BPA is a tool that analyzes your components of Windows Azure Pack It helps you
immediately identify many configuration security and performance issues and it recommends
best practices to resolve them
A ldquobest practicerdquo is a rule or recommendation that is defined by the productrsquos experts
These rules are configurations or settings that are designed to optimize product
performance and prevent security or functionality issues
When to run BPA for Windows Azure Pack You should run BPA for Windows Azure Pack to test your installation and to confirm that it is
ready to use in a production environment Ideally you should run it at the following times
Immediately after installing and configuring Windows Azure Pack
After changing any Windows Azure Pack settings
When you believe Windows Azure Pack performance is suboptimal
Correcting the issues that you find during these tests can help reduce your total cost-of-
ownership for Windows Azure Pack by minimizing downtime and optimizing configuration
security and performance
If yoursquod like to make sure that the tool runs at automated intervals you can use Task Scheduler
For more information see Task Scheduler in the Windows Dev Center
Important
Tip
61
How BPA for Windows Azure Pack works BPA for Windows Azure Pack works within Microsoft Baseline Configuration Analyzer
(MBCA) 20 to scan the software configurations of the machine it is installed on It automatically
detects all components that are installed in Windows Azure Pack and compares their
configurations against a set of rules MBCA then lists all noncompliant issues
Although rule violations even critical ones might not always cause problems they do indicate
issues that can result in poor performance poor reliability unexpected conflicts or increased
security risks
BPA for Windows Azure Pack identifies performance and security optimization issues for
your installation of Windows Azure Pack based on a set of rules Your machines might
have additional issues that these rules do not detect
The following table describes the three possible severity levels for the rules
Severity level Description
Compliant The component satisfies the conditions of a
rule
Warning The component is compliant as it is operating
currently but it might not satisfy the conditions
of a rule if changes are not made to its
configuration or policy settings
Error The component does not satisfy the conditions
of a best practice rule and functionality issues
can be expected
BPA provides best practice recommendations in the following categories
Category name Description
Security Security rules measure a componentrsquos relative
risk for exposure to threats such as
unauthorized or malicious users or loss or theft
of confidential or proprietary data
Performance Performance rules measure a componentrsquos
ability to process requests and perform its
prescribed duties within the time periods that
are expected for the componentrsquos workload
Configuration Configuration rules identify component settings
that might require modification for the
Warning
62
Category name Description
component to perform optimally Configuration
rules can help prevent conflicts that can result
in error messages or prevent the component
from performing its prescribed duties
Operation Operation rules identify possible failures of a
component to perform its prescribed duties
BPA system requirements
Consider the following prerequisites for your servers and client computers before you install BPA
for Windows Azure Pack
Windows Azure Pack installation requirements - Describes the hardware software and
environment requirements for Windows Azure Pack
Microsoft Baseline Configuration Analyzer 20 - Download MBCA 20 from the Microsoft
Download Center
Install MBCA 20 on every machine that has one or more components of Windows Azure
Pack installed in order to analyze these local components using BPA
Install BPA for Windows Azure Pack
To scan the components of Windows Azure Pack you must install BPA for Windows Azure Pack
on every machine that has components of Windows Azure Pack installed There are two locations
where you can download and install BPA for Windows Azure Pack
Microsoft Web Platform Installer 46 (This installation requires that you first download Web
Platform Installer)
Microsoft Download Center
1 In Web Platform Installer click Products
2 In the product list find Windows Azure Pack Microsoft Best Practices Analyzer (scroll
through the list or type in the search box) and then click Add
3 Click Install and then follow the instructions in the wizard
1 On the BPA for Windows Azure Pack BPA for Windows Azure Pack page click
Important
To install by using Microsoft Web Platform Installer
To install from the Microsoft Download Center
63
Download
2 After the download completes double-click MgmtSvc-BPAmsi and then follow the
instructions in the wizard
Scan components of Windows Azure Pack
Now that you have installed MBCA 20 and BPA for Windows Azure Pack you can start
analyzing the components of Windows Azure Pack
1 Sign in to a machine with components of Windows Azure Pack installed
2 On the Start menu click Microsoft Baseline Configuration Analyzer 20
3 On the MBCA 20 Home page under Select a product click Windows Azure Pack in the
drop-down list
4 Click Start Scan BPA for Windows Azure Pack applies the appropriate rules based on
the components of Windows Azure Pack that are detected on the local machine
5 When the scan is complete click View Report to see the results
6 On the All tab you can find all the noncompliant and the compliant results Click the
Noncompliant tab to see a list of errorwarnings for rules that the machine violated You
can take the following actions to learn more about each warning
a Click the + next to the machine name to see the list of rules
b Click the rule to see details about the warning
c If you dont want to see this warning again click Exclude this Result This is not
recommended
7 For each issue you should follow the instructions that are described in Resolution
Tip
For further information about MBCA 20 click Help
Next steps
At this point you have installed the required components of your Windows Azure Pack
deployment If you want to add services such as Windows Azure Pack Web Services see
Provision and configure services in Windows Azure Pack
To scan components

Copyright
This document is provided as-is Information and views expressed in this document including
URL and other Internet website references may change without notice
Some examples depicted herein are provided for illustration only and are fictitious No real
association or connection is intended or should be inferred
This document does not provide you with any legal rights to any intellectual property in any
Microsoft product You may copy and use this document for your internal reference purposes
You may modify this document for your internal reference purposes
copy 2013 Microsoft Corporation All rights reserved
Microsoft Active Directory Internet Explorer Hyper-V Silverlight SQL Server Windows
Windows Azure and Windows PowerShell are trademarks of the Microsoft group of companies
All other trademarks are property of their respective owners
Contents
Deploy Windows Azure Pack for Windows Server 5
Windows Azure Pack components 6
Required components 6
Optional components 7
Windows Azure Pack architecture 7
Express deployment architecture 7
Basic distributed deployment architecture 8
Minimal distributed deployment architecture 9
Scaled distributed deployment architecture 10
Optional resource provider architecture 11
Windows Azure Pack installation checklist 12
Windows Azure Pack installation requirements 14
Naming conventions 14
Express deployment hardware and software prerequisites 15
Distributed deployment hardware and software prerequisites 15
Install software prerequisites 16
Install Microsoft SQL Server 17
Required firewall ports 17
Install an express deployment of Windows Azure Pack 18
Install a distributed deployment of Windows Azure Pack 22
Install the Windows Azure Pack Service Management APIs 23
Install the Windows Azure Pack management portals 26
Install the authentication sites 33
Upgrade from the Preview version of Windows Azure Pack 39
Configure Active Directory Federation Services for Windows Azure Pack 41
Best practices 41
Configure AD FS 42
Configure the management portals to trust AD FS 45
Configure the tenant authentication site to trust AD FS 47
Configure AD FS to trust the management portals 49
Reconfigure FQDNs and Ports in Windows Azure Pack 51
Re-establish trust 53
Post-installation best practices 58
Replace untrusted self-signed certificates with trusted certificates 59
Test your deployment 60
When to run BPA for Windows Azure Pack 60
How BPA for Windows Azure Pack works 61
BPA system requirements 62
Install BPA for Windows Azure Pack 62
Scan components of Windows Azure Pack 63
Next steps 63
5
Deploy Windows Azure Pack for Windows Server
Windows Azure Pack for Windows Server enables you to offer rich self-service multi-tenant
cloud services that are consistent with the public Windows Azure experience Windows Azure
Pack runs on top of the System Center 2012 R2 and is available to Microsoft customers at no
additional cost for installation in your data center
The following content provides deployment and configuration information for Windows Azure
Pack
Windows Azure Pack components
Windows Azure Pack architecture
Windows Azure Pack installation checklist
Windows Azure Pack installation requirements
Install an express deployment of Windows Azure Pack
Install a distributed deployment of Windows Azure Pack
Configure Active Directory Federation Services for Windows Azure Pack
Post-installation best practices
Next steps
Note that this deployment guide does not provide information about deploying Windows Azure
Pack Web Services System Center 2012 R2 Virtual Machine Manager Service Provider
Foundation or the Windows Azure Service Bus service For information about deploying these
products and services see the following documentation
Deploy Windows Azure Pack Web Sites
Deploying System Center 2012 ndash Virtual Machine Manager
How to Install Service Provider Foundation 2012 R2
Using SQL Server or MySQL with Windows Azure Pack
Getting Started with the Service Bus for Windows Server
For Windows Azure Pack install Service Bus 11 Preview instead of Service Bus
10 as instructed in the topic
Note
6
Windows Azure Pack components
Windows Azure Pack provides a core set of required components to support several optional
components such as Windows Azure Web Services or Windows Azure Service Bus You must
install the required components and then decide which specific service components to install
based on your hosting requirements
Required components
Service Management API The Service Management API exposes a unified interface to
manage the Windows Azure Pack services through the management portals There are three
API interfaces
The Windows Azure Pack Admin API exposes functionality to complete administrative
tasks from the management portal for administrators or through the use of Windows
PowerShell cmdlets
The Windows Azure Pack Tenant API enables users or tenants to manage and
configure cloud services that are included in the plans that they subscribe to
The Windows Azure Pack Tenant Public API enables end users to manage and configure
cloud services that are included in the plans that they subscribe to The Tenant Public
API is designed to serve all the requirements of end users that subscribe to the various
services that a hosting service provider provides
Authentication sites These sites provide authentication services for the management portal
for administrators and the management portal for tenants
Admin Authentication Site By default Windows Azure Pack uses Windows
authentication for the administration portal You also have the option to use Windows
Azure Active Directory Federation Services (AD FS) to authenticate users For more
information see Configure Active Directory Federation Services for Windows Azure
Pack
Tenant Authentication Site Windows Azure Pack uses an ASPNET Membership
provider to provide authentication for the management portal for tenants
Service management portals The management portals enable you and your tenants to
interact with Windows Azure Pack
Management portal for administrators A portal for administrators to configure and
manage resource clouds user accounts tenant plans quotas and pricing In this portal
administrators create Web Site clouds virtual machine private clouds create plans and
manage user subscriptions
Management portal for tenants A customizable self-service portal to provision monitor
and manage services such as Windows Azure Pack Web Sites Windows Azure Virtual
Machines and Windows Azure Pack Service Bus In this portal users sign up for
services and create services virtual machines and databases
7
Optional components
Web Sites A service that helps provide a high-density scalable shared web hosting platform
for ASPNET PHP and Nodejs web applications The Web Sites service includes a
customizable web application gallery of open source web applications and integration with
source control systems for custom-developed websites and applications For more
information and instructions about how to deploy the Web Sites service see Deploy
Windows Azure Pack Web Sites
Virtual Machines A service that provides infrastructure-as-a-service (IaaS) capabilities for
Windows and Linux virtual machines The Virtual Machines service includes a virtual machine
template gallery scaling options and virtual networking capabilities For more information
and instructions about how to deploy the Virtual Machines service see Provision Virtual
Machine Clouds
Service Bus A service that provides reliable messaging services between distributed
applications The Service Bus service includes queued and topic-based publishsubscribe
capabilities For more information and instructions on how to deploy the Service Bus service
see Integrate Service Bus into Windows Azure Pack
Automation and Extensibility The capability to automate and integrate additional custom
services into the services framework including a runbook editor and an execution
environment For more information and instructions about how to enable Automation see
Deploy Service Management Automation
SQL and MySQL You can provision Microsoft SQL and MySQL databases for tenant use
For more information see Using SQL Server or MySQL with Windows Azure Pack
Windows Azure Pack architecture
Windows Azure Pack for Windows Server is made up of several required and optional
components This architectural overview provides suggested machine topologies for these
components in both an express and distributed deployments
Express deployment architecture
You can use the express installation to create a proof of concept deployment In an Express
deployment all of the Windows Azure Pack required components are installed on the same
machine If you want to also install optional components you will need additional machines The
express deployment should not be used in a production environment
8
Basic distributed deployment architecture In a distributed deployment you can install the required components on up to 8 machines A
distributed deployment can be used in a production environment The following diagram shows a
basic distributed architecture of required components for a system designed to provide services
to external customers
9
Minimal distributed deployment architecture The following diagram depicts the suggested minimal architecture for a distributed deployment
10
Scaled distributed deployment architecture The following diagram shows a distributed deployment with scaling information
11
Optional resource provider architecture For sample topologies of the optional components see the following help content
Deploy Windows Azure Pack Web Sites
Integrate Service Bus into Windows Azure Pack
Provision Virtual Machine Clouds
Deploy Service Management Automation
Using SQL Server or MySQL with Windows Azure Pack
12
Windows Azure Pack installation checklist
This checklist walks you through a distributed deployment of a Windows Azure Pack It uses the
machine names that are suggested in the Naming conventions topic
Task References
Install Microsoft SQL Server for
the management databases
Install Microsoft SQL Server
Install prerequisites for the Admin
API on the AdminAPI machine
Windows Azure Pack
installation requirements
Install the Windows Azure Pack
Admin API on the WAPAdminAPI
machine
Install the Windows Azure Pack
Service Management APIs
Install prerequisites for Tenant
API on the WAPTenantAPI
machine
Windows Azure Pack
installation requirements
Install the Windows Azure Pack
Tenant API on the
WAPTenantAPI machine
Install the Windows Azure Pack
Service Management APIs
Install prerequisites for Tenant
Public API on the
WAPTenPubAPI machine
Windows Azure Pack
installation requirements
Install the Windows Azure Pack
Tenant Authentication Site on the
WAPTenantAuth machine
Install the Windows Azure Pack
Service Management APIs
Install prerequisites for the
management portal for
administrators on the WAPAdmin
machine
Windows Azure Pack
installation requirements
Install the Windows Azure Pack
Admin Site on the WAPAdmin
machine
Install the Windows Azure Pack
management portals
Install prerequisites for the
management portal for tenants
on the WAPTenant machine
Windows Azure Pack
installation requirements
Install the Windows Azure Pack
Tenant Site on the WAPTenant
Install the Windows Azure Pack
management portals
13
Task References
machine
If you do not use Active Directory
Federation Services (AD FS)
follow the next two steps
SUBSTEP Install prerequisites
for Admin Authentication Site on
the WAPAdminAuth machine
Windows Azure Pack
installation requirements
SUBSTEP Install the Windows
Azure Pack Admin
Authentication Site on the
WAPAdminAuth machine
Install the authentication sites
If you use AD FS configure the
trust settings for AD FS and the
management portals
Configure Active Directory
Federation Services for
Windows Azure Pack
If you want to add more cloud
services follow the steps below
Deploy Automation service Deploy Service Management
Automation
Deploy Windows Azure Pack
Web Services
Deploy Windows Azure Pack
Web Sites
Deploy Virtual Machine services Provision Virtual Machine
Clouds
Deploy Service Bus service Integrate Service Bus into
Windows Azure Pack
Add SQL and MySQL providers
to Windows Azure Pack
Using SQL Server or MySQL
with Windows Azure Pack
Validate the Windows Azure
Pack deployment by using the
Best Practices Analyzer for
Windows Azure Pack
Test your deployment
Create plans Administer plans and add-ons
14
Windows Azure Pack installation requirements
Windows Azure Pack can be installed in an express proof-of-concept deployment on a single
machine or in a fully distributed multi-machine production environment The hardware and
software prerequisites for each of these deployments are provided in the following topics
Naming conventions
Express deployment hardware and software prerequisites
Distributed deployment hardware and software prerequisites
Install software prerequisites
Install Microsoft SQL Server
Required firewall ports
Naming conventions
As a best practice use descriptive machine names for each machine Ensure the machine names
are not longer than 15 characters Otherwise you receive a NetBIOS error and the name is
truncated The rest of this deployment guide uses the following sample machine names
Component Sample machine name
Single Express installation machine WAPPortal
Admin API WAPAdminAPI
Tenant API WAPTenantAPI
Tenant public API WAPTenPubAPI
Admin authentication site WAPAdminAuth
Tenant authentication site WAPTenantAuth
Management portal for administrators WAPAdmin
Management portal for tenants WAPTenant
SQL server hosting the management
databases
WAPSQL
15
Express deployment hardware and software prerequisites
For a proof-of-concept or Express installation you must deploy all of the following Windows
Azure Pack required components on a single physical or virtual machine
Microsoft SQL Server prerequisite for management databases
Admin API
Tenant API
Tenant public API
Admin authentication site
Tenant authentication site
Admin site (management portal for administrators)
Tenant site (management portal for tenants)
The machine to which you deploy the Express installation requires the following
8 gigabytes (GB) of RAM Do not use dynamic memory
40 gigabytes (GB) of available hard disk space
Before you install any of the required Express components you must install the following
software as described in Install software prerequisites
Windows Serverreg 2012 or Windows Server 2012 R2
Microsoft Web Platform Installer 46
Microsoft NET Framework 35 Service Pack (SP) 1
Internet Information Services (IIS) 8 (built in component of Windows Serverreg 2012) or IIS 85
(built in component of Windows Server 2012 R2
NET Framework 45 Extended with ASPNET for Windows 8
Distributed deployment hardware and software prerequisites
In a production environment the components that Windows Azure Pack requires are intended to
run on a minimum of eight machines These machines can be physical or virtual
Install the required components in the following order
1 Microsoft SQL Server for Windows Azure Pack management databases
2 Admin API
3 Tenant API
4 Tenant public API
5 Admin authentication site
6 Tenant authentication site
16
7 Admin site (management portal for administrators)
8 Tenant site (management portal for tenants)
Each deployment machine has the following system recommendations
2 CPUs
4 gigabytes (GB) of RAM
40 gigabytes (GB) of available hard disk space
Before you install any of the required Windows Azure Pack components you must install the
following software as described in Install software prerequisites
Windows Serverreg 2012 or Windows Server 2012 R2
Microsoft Web Platform Installer 46
Microsoft NET Framework 35 Service Pack (SP) 1
Internet Information Services (IIS) 8 (built in component of Windows Serverreg 2012) or IIS 85
(built in component of Windows Server 2012 R2
NET Framework 45 Extended with ASPNET for Windows 8
Install software prerequisites
Follow these steps to install software prerequisites on machines where you want to install
Windows Azure Pack to ensure correct registration of the Microsoft NET Framework assemblies
1 Install the Windows Serverreg 2012 operating system or the Windows Server 2012 R2
operating system
2 Disable Internet Explorer Enhanced Security Configuration (ESC) for Administrators by using
Server Manager
3 Install Microsoft Web Platform Installer 46 - Web Platform Installer
4 If you are using Windows Server 2012 install the following software through Web Platform
Installer in this order
a Internet Information Services (IIS) recommended configuration
b Enable Microsoft NET Framework 35 SP 1 in Server Manager
c NET Framework 45 Extended with ASPNET for Windows 8
5 If you are using Windows Server 2012 R2 install the following software through Web
Platform Installer in this order
a Enable Microsoft NET Framework 35 SP 1 in Server Manager
b NET 45 Extended with ASPNET for Windows 8
c IIS recommended configuration
6 Install all available Windows and NET Framework updates Use Microsoft Update to ensure
that you have all available updates installed
17
Install Microsoft SQL Server
Windows Azure Pack requires an instance of Microsoft SQL Server to handle the management
databases Windows Azure Pack supports the following versions
1 SQL Server 2008 Service Pack 3
2 SQL Server 2008 R2 Service Pack 2
3 SQL Server 2012 Service Pack 1
For an express deployment you can use SQL Server Express on a machine in the Windows
Azure Pack topology For a distributed deployment in production use the full version of SQL
Server
You must enable SQL authentication on the SQL server before installing other Windows
Azure Pack components Also if you are going to use Windows authentication during
configuration you must add the current user as an administrator on the SQL server
Required firewall ports
Windows Azure Pack automatically sets the following Windows firewall ports If you use other
firewall software youll need to manually set the ports
For optimal security you should further restrict access to the specific services that require it
Windows Azure Pack services Required firewall port Scope
Admin API 30004 Any IP address
Management portal for
administrators
30091 Any IP address
Authentication site 30071 Any IP address
Configuraton site 30101 Local subnet
Monitoring 30020 Any IP address
MySQL resource provider 30012 Any IP address
SQL Server or MySQL resource
provider
30010 Any IP address
Tenant API 30005 Any IP address
Tenant public API 30006 Any IP address
Management portal for tenants 30081 Any IP address
Important
18
Windows Azure Pack services Required firewall port Scope
Usage 30022 Any IP address
WebAppGallery 30018 Any IP address
Windows authentication site 30072 Any IP address
Install an express deployment of Windows Azure Pack
You can use the Windows Azure Pack for Windows Server Express installation option that is
available in the Microsoft Web Platform Installer to install the required components of Windows
Azure Pack on a single system Use this installation option to create a proof-of-concept
deployment but not to deploy Windows Azure Pack to production
Before you install the Windows Azure Pack Express ensure that you have complied with the
Windows Azure Pack installation requirements
Use the Portal and API Express option to install the following components on one machine
Admin API
Tenant API
Tenant public API
Admin authentication site
Tenant authentication site
Admin site (management portal for administrators)
Tenant site (management portal for tenants)
1 Log on to the machine on which you want to install your proof-of-concept deployment If
you followed the recommended naming scheme log on to WAPPortal
2 Start the Web Platform Installer
3 Type Windows Azure Pack in the search box Click Add next to Windows Azure Pack
Portal and API Express and then click Install
To install the Portal and API Express option
19
4 Accept the terms and conditions on the Prerequisites page
Indicate whether you want to use Microsoft Update to keep Windows Azure Pack up to
date We recommend that you do use Microsoft Update This ensures that any fixes we
need to create are automatically installed
The installation begins
Your machine might restart during the installation
5 When the installation is completed ensure that all Internet Explorer windows are closed
and then click Continue to start the Service Management Configuration site
6 The Configuration site httpslocalhost30101 opens in Internet Explorer If the Internet
Explorer security certificate warning page is displayed click Continue to this website
20
Tip
If you need to restart Internet Explorer be sure to use the Run as administrator
option
7 On the Database Server Setup page enter the name of the database server or instance
of Microsoft SQL Server
21
8 Select the type of authentication that you want to use SQL Server Authentication or
Windows Authentication
If you select SQL Server Authentication enter the database server administrator user
name and password
9 Enter a passphrase that is to be used to encrypt and to decrypt data in the Configuration
Store Enter the passphrase again to confirm it and then click the next arrow
Important
Ensure that you write down the passphrase If you forget or lose this passphrase
there is no way to recover it
10 The features that are to be installed are listed on the Features Setup page
After the features are successfully configured click the check mark in the bottom right
corner of the Features Setup
11 To go to the management portal for administrators open an internet browser and go to
httpslocalhost30091WorkspacesWebSystemAdminExtensionquickStart
Note
You might have to log out of your system and log back on before you can access
the management portal for administrators This requirement is due to Windows
Authentication and the requirement to add the security group to your security
token
If you continue to get an Access denied error message even after you log back
22
on close all Internet Explorer windows Run Internet Explorer as an
administrator
12 To go to the management portal for tenants open an internet browser and go to
httpslocalhost 30081WorkspacesAlldashboard
13 The first time that you log on to either the management portal for administrators or the
management portal for tenants a tour of the portal is displayed Click through the pages
in the tour for an introduction to the management portal
At this point you have installed the required components of your Windows Azure Pack
Express deployment If you want to add services such as Windows Azure Pack Web
Sites or Virtual Machine Clouds to your proof-of-concept you will have to install them on
different machines For more information see Provision and configure services in
Windows Azure Pack
Install a distributed deployment of Windows Azure Pack
A production environment installation of Windows Azure Pack for Windows Server requires a
distributed deployment In such a deployment required and optional components of Windows
Azure Pack are installed on multiple machines For more information see Windows Azure Pack
architecture For information about hardware and software prerequisites see Windows Azure
Pack installation requirements
All components are installed by using the Microsoft Web Platform Installer
Follow these steps to install a distributed deployment
1 Install the Windows Azure Pack Service Management APIs
2 Install the Windows Azure Pack management portals
3 Install the authentication sites
4 Upgrade from the Preview version of Windows Azure Pack
5 OPTIONAL Configure Active Directory Federation Services for Windows Azure Pack
6 OPTIONAL Decide which services to deploy such as Windows Azure Pack Web Sites
Automation Virtual Machine Clouds SQL and MySQL For more information see Provision
and configure services in Windows Azure Pack
7 Test your deployment
8 Post-installation best practices
Next steps
23
Install the Windows Azure Pack Service Management APIs
The Windows Azure Pack for Windows Server Service Management API includes three separate
components
Windows Azure Pack Admin API
Windows Azure Pack Tenant API
Windows Azure Pack Tenant Public API
For security reasons you should install the Windows Azure Pack Admin API and the Windows
Azure Pack Tenant API on machines that are behind a firewall or that are otherwise not
accessible by the public The Windows Azure Pack Tenant Public API should not be installed
behind a firewall
API component Sample machine name Publicly accessible
Admin API WAPAdminAPI No
Tenant API WAPTenantAPI No
Tenant Public API WAPTenPubAPI Yes
For more information about suggested machine configurations see Windows Azure Pack
architecture
You must complete the following steps three times one time for each API component the Admin
API the Tenant API and the Tenant Public API
1 Ensure that the machine on which you want to install the API complies with all the
hardware and software prerequisites that are listed in the Windows Azure Pack
installation requirements
2 Log on to the machine on which you want to install the API If you followed the
recommended Naming conventions log on to WAPAdminAPI WAPTenantAPI or
WAPTenPubAPI
3 Start the Microsoft Web Platform Installer
4 Type Windows Azure Pack in the search box Click Add next to the Service Management
API component that you want to install for example Windows Azure Pack Admin API
and then click Install
To install the Admin API Tenant API and Tenant Public API
24
5 Review the software to be installed To view the privacy information for each component
click Privacy Terms
To accept the terms and conditions on the Prerequisites page click I Accept
6 On the next page scroll down and indicate whether you want to use Microsoft Update to
keep the Windows Azure Pack component up to date Then click Continue
Tip
We recommend that you do use Microsoft Update This ensures that any fixes
we need to create for the Windows Azure Pack component are automatically
installed
The installation begins
7 When the installation is completed ensure that all Internet Explorer windows are closed
and then click Continue to start the configuration site
8 The configuration site httpslocalhost30101 opens in Internet Explorer If the Internet
Explorer security certificate warning page is displayed click Continue to this website
25
Tip
If you need to restart Internet Explorer be sure to use the Run as administrator
option
9 On the Database Server Setup page enter the name of the database server
26
10 Select the type of authentication that you want to use SQL Server Authentication or
Windows Authentication
If you select SQL Server Authentication enter the database server administrator user
name (sa) and password
11 Enter a passphrase that is to be used to encrypt and to decrypt data in the Configuration
Store and then click the next arrow
Important
Ensure that you write down the passphrase Each component must use the same
passphrase If you forget or lose this passphrase there is no way to recover it
12 Indicate whether you want to participate in the Customer Experience Improvement
Program (CEIP) and then click the next arrow
Warning
If possible please participate in the CEIP We use the data collected by CEIP
(data that contains no personal information) to understand how you are using the
controller and to identify any issues that you run into
13 Review the features and then click the check mark in the bottom right corner of the
Features Setup page
14 After the features are successfully configured click the check mark in the bottom right
corner of the Features Setup page
15 In the Web Platform Installer click Finish
16 Repeat these steps for each of the Service Management APIs Admin API Tenant API
and Tenant Public API
After you installed each of the API components you should install the management portal
for administrators and management portal for tenants as described in Install the
Windows Azure Pack management portals
Install the Windows Azure Pack management portals
Before users can interact with Windows Azure Pack either as administrators or as tenants you
must install the management portal for administrators and the management portal for tenants
1 Ensure that the machine on which you want to install the management portal for
administrators complies with all the hardware and software prerequisites that are listed in
Next steps
To install the management portal for administrators
27
Windows Azure Pack installation requirements
2 Log on to the machine on which you want to install the management portal for
administrators If you followed the recommended Naming conventions log on to
WAPAdmin
3 Start the Microsoft Web Platform Installer
4 Type Windows Azure Pack in the search box Click Add next to Windows Azure Pack
Admin Site and then click Install
5 Review the software to be installed To view the privacy information for each component
click Privacy Terms
To accept the terms and conditions on the Prerequisites page click I Accept
6 On the next page scroll down and indicate whether you want to use Microsoft Update to
keep the Windows Azure Pack component up to date Then click Continue
Tip
We recommend that you do use Microsoft Update This ensures that any fixes
we need to create for the Windows Azure Pack component are automatically
installed
The installation begins
7 When the installation is completed ensure that all Internet Explorer windows are closed
and then click Continue to start the management portal
8 The configuration site httpslocalhost30101 opens in Internet Explorer If the Internet
Explorer security certificate warning page is displayed click Continue to this website
28
Tip
If you need to restart Internet Explorer be sure to use the Run as administrator
option
9 On the Database Server Setup page enter the name of the database server
29
10 Select the type of authentication that you want to use SQL Server Authentication or
Windows Authentication
If you select SQL Server Authentication enter the database server administrator user
name (sa) and password
11 Enter a passphrase to be used to encrypt and decrypt data in the Configuration Store
and then click the next arrow
Important
Ensure that you write down the passphrase Each component must use the same
passphrase If you forget or lose this passphrase there is no way to recover it
12 Indicate whether you want to participate in the Customer Experience Improvement
Program (CEIP) and then click the next arrow
Warning
If possible please participate in the CEIP We use the data collected by CEIP
(data that contains no personal information) to understand how you are using the
controller and to identify any issues that you run into
13 Review the features and then click the check mark in the bottom right corner of the
Features Setup page
14 In the Web Platform Installer click Finish
15 Open an internet browser and go to
httpslocalhost30091WorkspacesWebSystemAdminExtensionquickStart
16 If you have not yet deployed the Service Management API in the environment you get a
notification that the management portal requires the Service Management API In this
case your next step is to deploy the Service Management API
After you deploy the Service Management API return to this machine and then click Try
Again to open the management portal for administrators
Note
You might have to log out of your system and log back on before you can access
the Service management portal for administrators This step is due to Windows
Authentication and the requirement to add the security group to your security
token
If you continue to see an Access denied error even after you log back on close
all Internet Explorer windows and run Internet Explorer as an administrator
17 The first time that you log on to the management portal for administrators a tour of the
portal is displayed Click through the pages in the tour for an introduction to the portal
18 For the next step see Install the service management portal for tenants
1 Ensure that the machine on which you want to install the management portal for tenants
complies with all the hardware and software prerequisites that are listed in Windows
To install the management portal for tenants
30
Azure Pack installation requirements
2 Log on to the machine on which you want to install the management portal for tenants If
you followed the recommended Naming conventions log on to WAPTenant
3 Start the Web Platform Installer
4 Type Windows Azure Pack in the search box Click Add next to Windows Azure Pack
Tenant Site and then click Install
5 Review the software to be installed To view the privacy information for each component
click Privacy Terms
To accept the terms and conditions on the Prerequisites page click I Accept
6 On the next page scroll down and indicate whether you want to use Microsoft Update to
keep the Windows Azure Pack component up to date Then click Continue
Tip
We recommend that you do use Microsoft Update This ensures that any fixes
we need to create for the Windows Azure Pack component are automatically
installed
The installation begins
7 When the installation is completed ensure that all Internet Explorer windows are closed
and then click Continue to start the management portal
8 The configuration site httpslocalhost30101 opens in Internet Explorer If the Internet
Explorer security certificate warning page is displayed click Continue to this website
31
Tip
If you need to restart Internet Explorer be sure to use the Run as administrator
option
9 On the Database Server Setup page enter the name of the database server
32
10 Select the type of authentication that you want to use SQL Server Authentication or
Windows Authentication
If you select SQL Server Authentication enter the database server administrator user
name (sa) and password
11 Enter a passphrase that is to be used to encrypt and to decrypt data in the Configuration
Store and then click the next arrow
Important
Ensure that you write down the passphrase Each component must use the same
passphrase If you forget or lose this passphrase there is no way to recover it
12 Indicate whether you want to participate in the Customer Experience Improvement
Program (CEIP) and then click the next arrow
Warning
If possible please participate in the CEIP We use the data collected by CEIP
(data that contains no personal information) to understand how you are using the
controller and to identify any issues that you run into
13 Review the features and then click the check mark in the bottom right corner of the
Features Setup page
14 In the Web Platform Installer click Finish
15 Open an internet browser and go to httpslocalhost 30081WorkspacesAlldashboard
16 The first time that you log on to the management portal for tenants a tour of the portal is
displayed Click through the pages in the tour for an introduction to the portal
By default the management portals are configured to use only HTTPS The Webconfig
file for each portal website contains a redirect rule to route all HTTP traffic to HTTPS but
this redirect is only of use if the respective portals are bound to a valid HTTP endpoint
To accept traffic over HTTP port 80 the portal websites must be manually configured
with additional bindings Complete the following steps to enable the portal websites to
accept traffic on HTTP port 80 and enable redirection of this traffic by using the redirect
rule in the Webconfig file
a Replace the self-signed Secure Sockets Layer (SSL) certificate that is used by the
management portal websites with a certificate that is issued by a recognized trusted
root certification authority (CA)
b Add an HTTP site binding on port 80 for the management portal websites
c Modify the existing HTTPS site bindings on port 30091 for the management portal for
administrators and on port 30081 for the management portal for tenants with HTTPS
site bindings on the default port of 443
Optional Enable HTTP endpoints on the management portal for administrators and management portal for administrators for HTTP-HTTPS redirection
33
If the management portal for tenants is configured to use an untrusted certificate end
users cannot install Microsoft WebMatrix from the tenant portal and instead receive an
error message To address this issue and ensure that end users can complete a One-
click installation of WebMatrix replace the default self-signed SSL certificate that is used
by the tenant portal website with a certificate that is issued by a trusted root certification
authority
By default the management portals are configured to use only HTTPS that is bound to
port 30091 and to port 30081 respectively Ensure that the management portal websites
are bound to a TCPIP port that end users and system administrators expect such as
port 443 for HTTPS and port 80 for HTTP
After you have installed each of the management portals you should install the
administrator and tenant authentication sites as described in Install the authentication
sites
Install the authentication sites
Windows Azure Pack for Windows Server uses the following authentication services
Component Sample machine name Default authentication
service
Optional
authentication service
Management portal
for administrators
WAPAdminAuth Windows
Authentication
Active Directory
Federation Services
Management portal
for tenants
WAPTenantAuth ASPNet Membership
Provider
Active Directory
Federation Services
By default Windows Azure Pack uses Windows Authentication for the management portal for
administrators You also have the option of using Active Directory Federation Services (AD FS) to
authenticate users For more information see Configure Active Directory Federation Services for
Windows Azure Pack
1 Ensure that the machine on which you want to install the admin authentication site
Optional Configure the certificates for the management portal for tenants to ensure WebMatrix One-click installation functionality
Verify TCPIP configuration of administrator and tenant portal websites
Next steps
To install the admin authentication site
34
complies with all the hardware and software prerequisites that are listed in the Windows
Azure Pack installation requirements
2 Log on to the machine on which you want to install the admin authentication site If you
followed the recommended Naming conventions log on to WAPAdminAuth
3 Start the Microsoft Web Platform Installer
4 Type Windows Azure Pack in the search box Click Add next to Windows Azure Pack
Admin Authentication Site and then click Install
5 Review the software to be installed To view the privacy information for each component
click Privacy Terms
To accept the terms and conditions on the Prerequisites page click I Accept
6 On the next page scroll down and indicate whether you want to use Microsoft Update to
keep the Windows Azure Pack component up to date Then click Continue
Tip
We recommend that you do use Microsoft Update This ensures that any fixes
we need to create for the Windows Azure Pack component are automatically
installed
The installation begins
7 When the installation is completed ensure that all Internet Explorer windows are closed
and then click Continue to start the configuration site
8 The configuration site httpslocalhost30101 opens in Internet Explorer If the Internet
Explorer security certificate warning page is displayed click Continue to this website
35
Tip
If you need to restart Internet Explorer be sure to use the Run as administrator
option
9 On the Database Server Setup page enter the name of the database server
36
10 Select the type of authentication that you want to use SQL Server Authentication or
Windows Authentication
If you select SQL Server Authentication enter the database server administrator user
name (sa) and password
11 Enter the passphrase for the Configuration Store and then click the next arrow
Important
Ensure that you write down the passphrase Each component must use the same
passphrase If you forget or lose this passphrase there is no way to recover it
12 Indicate whether you want to participate in the Customer Experience Improvement
Program (CEIP) and then click the next arrow
Tip
If possible please participate in the CEIP We use the data collected by CEIP
(data that contains no personal information) to understand how you are using the
controller and to identify any issues that you run into
13 Review the features and then click the check mark in the bottom right corner of the
Features Setup page
14 In the Web Platform Installer click Finish
1 Ensure that the machine where you want to install the tenant authentication site complies
with all the hardware and software prerequisites listed in the Windows Azure Pack
installation requirements
2 Log on to the machine on which you want to install the tenant authentication site If you
followed the recommended Naming conventions log on to WAPTenantAuth
3 Start the Web Platform Installer
4 Type Windows Azure Pack in the search box Click Add next to Windows Azure Pack
Tenant Authentication Site and then click Install
To install the tenant authentication site
37
5 Review the software to be installed To view the privacy information for each component
click Privacy Terms
To accept the terms and conditions on the Prerequisites page click I Accept The
installation begins
6 On the next page scroll down and indicate whether you want to use Microsoft Update to
keep the Windows Azure Pack component up to date Then click Continue
Tip
We recommend that you do use Microsoft Update This ensures that any fixes
we need to create for the Windows Azure Pack component are automatically
installed
The installation begins
7 When the installation is completed ensure that all Internet Explorer windows are closed
and then click Continue to start the Configuration site
8 The Configuration site httpslocalhost30101 opens in Internet Explorer If the Internet
Explorer security certificate warning page is displayed click Continue to this website
38
Tip
If you need to restart Internet Explorer be sure to use the Run as administrator
option
9 On the Database Server Setup page enter the name of the database server
39
10 Select the type of authentication that you want to use SQL Server Authentication or
Windows Authentication
If you select SQL Server Authentication enter the database server administrator user
name (sa) and password
11 Enter the passphrase for the Configuration Store and then click the next arrow
Important
Ensure that you write down the passphrase Each component must use the same
passphrase If you forget or lose this passphrase there is no way to recover it
12 Indicate whether you want to participate in the Customer Experience Improvement
Program (CEIP) and then click the next arrow
Tip
If possible please participate in the CEIP We use the data collected by CEIP
(data that contains no personal information) to understand how you are using the
controller and to identify any issues that you run into
13 Review the features and then click the check mark in the bottom right corner of the
Features Setup page
14 In the Web Platform Installer click Finish
At this point you have installed the required components of your Windows Azure Pack
deployment If you want to add services such as Windows Azure Pack Web Services
see Provision and configure services in Windows Azure Pack
Upgrade from the Preview version of Windows Azure Pack
If you want to upgrade your express or distributed deployment from the preview version to the
new version follow these steps
1 On each machine running a Windows Azure Pack component stop all sites and IIS
services
2 To enable rollback in case of problems during the upgrade back up all sites virtual
machines and databases The upgrade process does not automatically back up the
current running versions of Windows Azure Pack components
3 If you have created a custom theme for your tenant portal follow these steps
Next steps
To upgrade from preview to Windows Server version of Windows Azure Pack
40
a Create a new folder named app_CustomTheme on the tenant machine
CinetpubMgmtSvc-TenantSiteapp_CustomTheme
b On the tenant machine copy the content folder from the custom theming kit to
CinetpubMgmtSvc-TenantSiteapp_CustomTheme
4 Locate and record the connection string information for the existing preview databases
along with the current passphrase Without this information the upgrade will install a new
installation instead of upgrading the previous version
5 Using Windows Platform Installer install the latest version of Windows Azure Pack
components
If you are upgrading an express deployment you can install the upgrade on the machine
hosting your express deployment as explained in Install an express deployment of
Windows Azure Pack During configuration be sure to use the existing preview database
and current passphrase
If you are upgrading a distributed deployment you must install the appropriate
components on each machine in your deployment Follow the instructions in Install a
distributed deployment of Windows Azure Pack During configuration be sure to use the
existing preview database and current passphrase
6 The upgrade will automatically update your deployment to the new version keeping your
user plan and account data intact with the following exceptions
All tenant passwords must be reset
The upgrade process resets IIS settings (including custom ports and host headers) of
the portal and API machines to their default values If you want to use non-default
values you must manually reset them
The upgrade process resets firewalls to default settings If you want to use non-
default firewall rules you must manually add them for tenant and API endpoints
If you have optional components of Windows Azure Pack deployed be sure to consult the
deployment guides for those services for information about upgrading to the new version
of Windows Azure Pack for Windows Server
Deploy Windows Azure Pack Web Sites
Integrate Service Bus into Windows Azure Pack
Provision Virtual Machine Clouds
Deploy Service Management Automation
Using SQL Server or MySQL with Windows Azure Pack
Next steps
41
Configure Active Directory Federation Services for Windows Azure Pack
By default Windows Azure Pack for Windows Server uses the following authentication
Service Default authentication
Management portal for administrators Windows authentication
Management portal for tenants ASPNet membership provider
Instead of using these default authentication types you also have the option to configure
Windows Azure Pack to use Windows Azure Active Directory Federation Services (AD FS) for
authentication as described in the following steps
The following information assumes that you do not already have AD FS configured in
your environment If you have AD FS configured you can skip the first step and proceed
directly to Configure AD FS to trust the management portals
1 Configure AD FS
2 Configure the management portals to trust AD FS
3 Configure the tenant authentication site to trust AD FS
4 Configure AD FS to trust the management portals
Best practices Review the following best practices before you configure AD FS
The format of user groups that are provided by the AD FS installation should match the
format that is entered in the UI The prescribed format for adding AD groups as co-
administrators is domainalias
The subscription owner should be an individual user and not a group
It is generally a good practice to use an email address as the unique identifier Custom
Claims generators allow a GUID or other unique identifiers but their use complicates adding
co-administrators or adding individual users and should generally be avoided
By default AD FS sets a cookie on the client end to track the userrsquos selection for
authentication methods You can disable this action by running the following AD FS Windows
PowerShell cmdlet
Set-ADFSWebConfig ndashHRDCookieEnabled $false
Note
42
Configure AD FS
As the first step of enabling Windows Azure Active Directory Federation Services (AD FS) for
Windows Azure Pack for Windows Server you must configure AD FS as explained in the
following steps
1 If you use an existing AD FS do the following
a In AD FS use the following address to add the management portal for administrators
and management portal for tenants as relying parties
ltPortal URIgtfederationMetadata2007-06Federationmetadataxml
Replace ltPortal URIgt with the addresses of the management portal for
administrators and the management portal for tenants
For example httpswwwcontosotenantcomfederationMetadata2007-
06Federationmetadataxml
b Apply the following transformation rules to the management portal for tenants
Transform AD Groups to Groups Claims
Transform email address to UPN Claims
c Skip the remaining steps and go to Configure the management portals to trust AD
FS
2 If you are setting up a new AD FS on the machine that you want to use for AD FS
enable the AD FS role
3 Log on to the machine as the domain administrator You have two options to configure
AD FS Run the Install-AdfsFarm cmdlet or run a script
Run the Install-AdfsFarm cmdlet to configure AD FS
Install-AdfsFarm ndashCertificateThumbprint ltStringgt -
FederationServiceName ltStringgt -ServiceAccountCredential
ltPSCredentialgt -SQLConnectionString ltStringgt
You must provide the following information to run the Install-AdfsFarm cmdlet
Cmdlet parameter Information needed
ndashCertificateThumbprint Secure Socket Layer (SSL) Certificate
thumbprint The certificate should be
installed in the ltlocal_machinegtMy
store
-FederationServiceName Fully qualified domain name (FQDN) of
To configure AD FS
43
the AD FS service
-ServiceAccountCredential The domain service account to run AD
FS
-SQLConnectionString SQL connection string to an instance of
a Microsoft SQL Server to host the AD
FS databases
Or run the following script to configure AD FS
Note
You must install makecertexe before running this script Alternatively you
can use IIS to create a self-signed certificate and pass the thumbprint in this
script
Set these values
$domainName = contosocom
$adfsPrefix = AzurePack-adfs
$username = username
$password = password
$dnsName = ($adfsPrefix + + $domainName)
Generate Self Signed Certificate
Import-Module -Name PKIWebAdministration
You must install makecertexe before running this script
Alternatively use the IIS UI to create a self-signed
certificate and pass the thumbprint in this script
$item = Get-Item -Path IISSslBindings0000443 -
ErrorAction SilentlyContinue
if ($item)
MakeCertexe -n CN=$dnsName -r -pe -sky exchange -ss My -sr
LocalMachine -eku 136155731
cert = (Get-ChildItem CertLocalMachineMy | Where-Object
$_Subject -eq CN=$dnsName )[0]
44
$thumbprint = $certThumbprint
$securePassword = ConvertTo-SecureString -String $password -
Force -AsPlainText
$adfsServiceCredential = New-Object -TypeName
SystemManagementAutomationPSCredential -ArgumentList
($domainname + + $username) $securePassword
If you want to install AD FS with a database provide this
data Otherwise it will install with the Windows Internal
Database (which should be enabled
prior to configuring AD fS)
$dbServer = AzurePack-SQl
$dbUsername = sa
$dbPassword = ltSQL_passwordgt
$adfsSqlConnectionString = [string]Format(Data
Source=0Initial Catalog=masterUser ID=1Password=2
$dbServer $dbUsername $dbPassword)
Configure AD FS
Install-AdfsFarm `
-CertificateThumbprint $thumbprint `
-FederationServiceName $dnsName `
-ServiceAccountCredential $adfsServiceCredential `
-SQLConnectionString $adfsSqlConnectionString `
-OverwriteConfiguration
Configure the management portals to trust AD FS
Next steps
45
Configure the management portals to trust AD FS
After you configure Active Directory Federations Services (AD FS) you must configure
management portal for administrators and management portal for tenants to trust AD FS You
can either run the Set-MgmtSvcRelyingPartySettings cmdlet or run a Windows PowerShell script
1 Run the Set-MgmtSvcRelyingPartySettings cmdlet on each machine where the
administrator or tenant portal is installed
Before you run the Set-MgmtSvcRelyingPartySettings cmdlet ensure that the machine
that you configure can access the AD FS web service metadata endpoint To verify
access open a browser and go to the same URI that you plan to use for the ndash
MetadataEndpoint parameter If you can view the xml file you can access the federation
metadata endpoint
2 Now run the Set-MgmtSvcRelyingPartySettings cmdlet
Set-MgmtSvcRelyingPartySettings -Target Tenant -
MetadataEndpoint httpsltfqdngtFederationMetadata2007-
06FederationMetadataxml -DisableCertificateValidation -
ConnectionString Server=ltsome servergtUser Id=ltuser with
write permissions to all config
databasesgtPassword=ltpasswordgt
The following table shows required information to run the Set-
MgmtSvcRelyingPartySettings cmdlet
Cmdlet parameter Required information
-Target This parameter is used to indicate which
portal to configure Possible values Admin
Tenant
-MetadataEndpoint The AD FS web service metadata endpoint
Use a valid accessible and complete URI
in the following format httpsltAD
FSgtFederationMetadata2007-
06FederationMetadataxml In the following
cmdlets replace $fqdn with an accessible
AD FS fully qualified domain name (FQDN)
Option 1 Run the Set-MgmtSvcRelyingPartySettings cmdlet
46
-ConnectionString The connection string to the instance of
Microsoft SQL Server that hosts the
management portal configuration database
Instead of using the cmdlet you can run the following Windows PowerShell script on
each machine where the administrator or tenant portal is installed
$domainName = mydomaincom
$adfsPrefix = AzurePack-adfs
$dnsName = ($adfsPrefix + + $domainName)
Enter Sql Server details here
$dbServer = AzurePack-sql
$dbUsername = sa
$dbPassword = ltSQL_passwordgt
$connectionString = [string]Format(Data Source=0User
ID=1Password=2 $dbServer $dbUsername $dbPassword)
Note Use the DisableCertificateValidation switch only in
test environments In production environments
all SSL certificates should be valid
Set-MgmtSvcRelyingPartySettings -Target Tenant `
-MetadataEndpoint https$dnsNameFederationMetadata2007-
06FederationMetadataxml `
-DisableCertificateValidation -ConnectionString
$connectionString
If you want to add users to have access to the management portal for administrators you
must run the Add-MgmtSvcAdminUser cmdlet on the machine hosting the Admin API The
connection string should point to the Management Portal Configuration database
The following code example shows how users are added to get access
Option 2 Run a Windows PowerShell script
Add users to have access to the management portal for administrators
47
$adminuser = domainuser1mydomaincom
$dbServer = AzurePack-sql
$dbUsername = sa
$dbPassword = SQL_Password
$connectionString = [string]Format(Server= 0 Initial
Catalog=MicrosoftMgmtSvcStoreUser
Id=1Password=2$dbServer $dbUsername $dbPassword)
Add-MgmtSvcAdminUser -Principal $adminuser -ConnectionString
$connectionstring
Note
The format of the $dbuser must match the user principal name (UPN) that is sent by
AD FS
Administrator users must be individual users You cannot add AD groups as
administrator users
Configure the tenant authentication site to trust AD FS
Configure the tenant authentication site to trust AD FS
The next step is to add information about Windows Azure Active Directory Federation Services
(AD FS) to the tenant authentication sites By default the management portal for tenants uses
ASPNET Membership Provider authentication You can choose to use the same ASPNET
Membership Provider as a Claims Provider in AD FS To do this you must run the Set-
MgmtSvcIdentityProviderSettings cmdlet on any machine where the tenant authentication site is
installed
1 Ensure that the machine that you configure can access the AD FS web service metadata
endpoint To verify the access open a browser and go to the same URI that you plan to
use for the ndashMetadataEndpoint parameter If you can view the xml file you can access
the federation metadata endpoint
Next steps
Option 1 Run the Set-MgmtSvcIdentityProviderSettings cmdlet
48
2 Run the Set-MgmtSvcIdentityProviderSettings cmdlet on any machine where the
authentication site is installed
Set-MgmtSvcIdentityProviderSettings -Target Membership -
MetadataEndpoint httpslt fqdngtFederationMetadata2007-
06FederationMetadataxml -DisableCertificateValidation -
ConnectionString Server=ltsome servergtUser Id=ltuser with
write permissions to all config
databasesgtPassword=ltpasswordgt
The following table shows required information to run the Set-
MgmtSvcIdentityProviderSettings cmdlet
Cmdlet parameter Required information
-Target This parameter is used to indicate which
component to configure Possible values
Membership Windows
-MetadataEndpoint The AD FS web service metadata endpoint
Use a valid accessible and complete URI
in the following format httpsltAD
FSgtFederationMetadata2007-
06FederationMetadataxml In the following
cmdlets replace $fqdn with an accessible
AD FS fully qualified domain name (FQDN)
-ConnectionString The connection string to the instance of
Microsoft SQL Server that hosts the portal
and API database
1 Ensure that the machine that you configure can access the AD FS web service metadata
endpoint To verify the access open a browser and go to the same URI that you plan to
use for the ndashMetadataEndpoint parameter If you can view the xml file you can access
the federation metadata endpoint
2 Instead of using the cmdlet you can run the following Windows PowerShell script
$domainName = mydomaincom
$adfsPrefix = AzurePack-adfs
$dnsName = ($adfsPrefix + + $domainName)
Enter Sql Server details here
Option 2 Run a Windows PowerShell script
49
$dbServer = AzurePack-sql
$dbUsername = sa
$dbPassword = ltSQL_passwordgt
$connectionString = [string]Format(Data Source=0User
ID=1Password=2 $dbServer $dbUsername $dbPassword)
Note Use the DisableCertificateValidation switch only in
test environments In production environments all
SSL certificates should be valid
Set-MgmtSvcIdentityProviderSettings -Target Membership `
-MetadataEndpoint https$dnsNameFederationMetadata2007-
06FederationMetadataxml `
-DisableCertificateValidation `
-ConnectionString $connectionString `
Configure AD FS to trust the management portals
Configure AD FS to trust the management portals
The last step in the configuration of Windows Azure Active Directory Federation Services (AD FS)
for Windows Azure Pack is to configure AD FS to trust the management portals
1 Ensure that the machine that you configure can access the AD FS web service metadata
endpoint for the management portal for administrators To verify access open a browser
and go to httpsltAdminPortal_endpointgtFederationMetadata2007-
06FederationMetadataxml where ltAdminPortal_endpointgt is the fully qualified domain
name (FQDN) for the management portal for administrators If you can view the xml file
you can access the federation metadata endpoint
2 Ensure that the machine that you configure can access the AD FS web service metadata
endpoint for the management portal for tenants To verify access open a browser and go
to httpsltTenantPortal_endpointgtFederationMetadata2007-
06FederationMetadataxml where ltTenantPortal_endpointgt is the FQDN for the
Next steps
Configure AD FS to trust the management portals
50
management portal for tenants If you can view the xml file you can access the
federation metadata endpoint
3 OPTIONAL If you want to use the ASPNET Membership Provider as the default Claims
Provider for the management portal for tenants in AD FS ensure that the machine that
you configure can access the AD FS web service metadata endpoint for the Tenant
Authentication Site To verify access open a browser and go to
httpsltTenantAuth_endpointgtFederationMetadata2007-06FederationMetadataxml
where ltTenantAuth_endpointgt is the FQDN for the Tenant Authentication Site If you can
view the xml file you can access the federation metadata endpoint
4 Locate the configure-adfsps1 configuration script that is installed with Windows Azure
Pack in CProgram FilesManagement ServiceMgmtSvc-
PowerShellAPISamplesAuthentication
5 Run the configure-adfsps1 script on the machine where AD FS is installed
$tenantSite = tenant-AzurePackcontosocom30081
$adminSite = admin-AzurePackcontosocom30091
$authSite = auth-AzurePackcontosocom30071
Note Use the allowSelfSignCertificates switch only in
test environments In production environments all
SSL certificates should be valid
amp CProgram FilesManagement ServiceMgmtSvc-
PowerShellAPISamplesconfigure-adfsps1 `
ndashidentityProviderMetadataEndpoint
https$authSitefederationmetadata2007-
06federationmetadataxml `
-
tenantRelyingPartyMetadataEndpoint https$tenantSitefede
rationmetadata2007-06federationmetadataxml `
-adminRelyingPartyMetadataEndpoint
https$adminSitefederationmetadata2007-
06federationmetadataxml `
ndashallowSelfSignCertificates
Replace lttenantSitegt and ltadminSitegt with the locations for the management portal for
tenants and the management portal for administrators If you want to use ASPNET
Membership Provider as the default Claims Provider for the management portal for
tenants in AD FS replace ltauthSitegt with the location for the authentication site
Supply the following parameter information
51
Parameter Required information
-identityProviderMetadataEndpoint OPTIONAL Endpoint to obtain
Federation Metadata for the Tenant
Authentication Site If you do not want
to use ASPNET Membership Provider
as the default Claims Provider for the
management portal for tenants in AD
FS then delete this line
-tenantRelyingPartyMetadataEndpoint Endpoint to obtain Federation Metadata
for the management portal for tenants
-adminRelyingPartyMetadataEndpoint Endpoint to obtain Federation Metadata
for the management portal for
administrators
Reconfigure FQDNs and Ports in Windows Azure Pack
Windows Azure Pack for Windows Server uses claim-based authentication system to
authenticate and authorize users This authentication is performed by an external Identity
Provider Security Token Service (IdP-STS) The system trusts the IdP-STS to verify the identity of
users and to provide a trusted set of claims about each user A two-way trust relationship with the
IdP-STS must be established during Windows Azure Pack configuration so the endpoint changes
are properly communicated to the affected components
To establish this trust relationship the following Windows Azure Pack components expose
metadata information
Management portal for tenants
Management portal for administrators
Tenant authentication site
Admin authentication site
The exposed data includes all the necessary trust information including the endpoint information
of the different components The endpoint information is used to redirect users to the IdP-STS
and back to Windows Azure Pack
Therefore every time an endpoint configuration changes for a component the metadata
information must be updated and the trust relationship must be re-established using the updated
metadata
52
Windows Azure Pack installation and configuration provides default values for the exposed
metadata and endpoint information By default Windows Azure Pack uses the machine and
domain name as the Fully Qualified Domain Name (FQDN) of each component It also sets pre-
defined port numbers for each component
For example if your tenant machine hostname is ldquomytenantmachinerdquo and your domain is
ldquocontosocomrdquo the default configuration of the Tenant Portal will be
httpsmytenantmachinecontosocom30081
In some scenarios the default endpoint values must be changed For example
If you update a components default self-signed SSL certificate to a real certificate the
components FQDN must match the certificate FQDN
If you use a load balancer across multiple instances of a component you must use the load
balancer endpoint instead of the endpoint of each component instance
If you change the pre-defined ports you must update the Windows Azure Pack port settings
For example changing to the default HTTPS port 443 requires you to update the Windows
Azure Pack port settings
In such cases the metadata information must be updated and the trust relationship must be re-
established as explained in the following steps
1 Run the SetndashMgmtSvcFqdn cmdlet on the machine you want to update
Set-MgmtSvcFqdn ndashNamespace ltNamsepace Tokengt -
ConnectionString ltConnection Stringgt [-FQDN ltFQDNgt] [-Port
ltportgt] [-Verbose]
Parameter Requiredoptiona
l
Details
-
ConnectionStrin
g
Required This parameter defines the connection string to
the SQL Server hosting the Windows Azure Pack
configuration stores
A database name (Initial Catalog) is not required
Credentials included in the string must have write
permissions to the configuration stores
For example
$connectionString = ldquoData
Source=$serverUser
ID=$userIdPassword=$passwor
drdquo
$server ndash The address of the SQL Server hosting
the management portal configuration databases
To update the FQDN and port settings
53
$userId ndash A SQL user with write permissions to
the management portal configuration databases
$password ndash The password for the $userId
account
-FQDN Optional This parameter is used to specify the new FQDN
for the machine Replace $fqdn with the new
FQDN not including the protocol prefix For
example mynewfqdncontosocom
You can omit this parameter if you are not
changing the FQDN
-Namespace Required This parameter is used to indicate which
component to configure Possible values
AdminSite TenantSite AuthSite
WindowsAuthSite
-Port Optional This parameter is used to define the new port
Replace $port with the new port For example
443 Note Using the default HTTPS port 443 will
remove the port section from the endpoint
You can omit this parameter if you are not
changing the port
2 In Internet Information Services Manager ensure that the FQDN and port values have
been updated Also ensure that the FQDN matches the SSL certificate
3 The updated FQDN and port values will eventually propagate to the targeted
components To ensure that this happens immediately restart the website
4 Repeat steps 2 and 3 on all machines hosting the component
5 If needed set up your DNS to forward requests to the appropriate location
6 Re-establish trust between all the affected components as instructed in the next section
Re-establish trust Windows Azure Pack is a claims-aware application that uses tokens and claims to authenticate
and authorize end users Such applications dont use the identity of the token issuer as long as
the token complies with some conditions such as being signed by a trusted key For more
information see Claims-aware applications
With claims-based authentication a system trusts an STS to issue its tokens However that
doesnrsquot necessarily mean that this STS is actually performing the user authentication It is
possible that the STS delegates the user authentication request (or federation) to another STS
which is trusted by the first STS This chain of STSs trusting each other and delegating requests
54
is common and flexible There are endless possible topologies of trust relationships System
administrators must choose the most appropriate topology to meet business requirements
For example you can configure Windows Azure Pack management portals to trust AD FS to
authenticate users Depending on the AD FS configuration AD FS can then do either of the
following
AD FS can authenticate users directly using the management portal Active Directory
credentials
AD FS can federate the request to another STS
In the second case you can use Windows Azure Access Active Directory Control Service (ACS)
as the other STS for example ACS can then federate the request again to another STS such as
Windows Live In this case Windows Live actually authenticates the user using Windows Live
credentials This is one way to enable Windows Live Google or Facebook authentication in
Windows Azure Pack
Because the endpoints are used to redirect users to the next component in the trust
chain all endpoints must be configured correctly in all components to ensure the
federation is successful
If you change a management portal endpoint you must update the STS that the portal
immediately trusts
Ensure that you update the FQDN and port changes in STS for the relying party
federation metadata URL and then refresh the metadata
If you change an STS endpoint you must update all the components directly trusted by it
such as the management portals and other STSs
The system administrator should be familiar with the trust chain to understand which components
must be updated following a configuration change
1 If the STS endpoint immediately trusted by a Windows Azure Pack management portal
was changed you must update the portals with the new endpoint information You can do
this by using the Set-MgmtSvcRelyingPartySettings PowerShell cmdlet on the relevant
machines
Set-MgmtSvcRelyingPartySettings -Target ltTargetsgt ndash
MetadataEndpoint ltMetadata Endpoint Full URLgt [-
ConnectionString ltConnection Stringgt] [-
DisableCertificateValidation] [-PortalConnectionString
ltPortal Configuration Store Connection Stringgt] [-
ManagementConnectionString ltManagement Store Connection
Stringgt]
Parameter Requiredoptional Details
Important
Re-establish trust for the management portals
55
Target Required This parameter defines which set of
components to update
Permissible values for ltTargetsgt
Tenant ndash Use this to configure the management
portal for tenants the tenant API layer and the
admin API layer
Admin ndash Use this to configure the management
portal for administrators and the admin API
layer
You can provide a single target or an array of
targets
MetadataEndpoi
nt
Required This parameter defines the full URL of the
trusted IdP-STS metadata endpoint
Permissible values for ltMetadata Endpoint Full
URLgt
A valid URL for example
httpmystscontosocom12
34FederationMetadata2007-
06FederationMetadataxml
ConnectionString Required unless
PortalConnection
String and
ManagementCon
nectionString are
used
This parameter defines the connection string to
the SQL Server hosting the Windows Azure
Pack portal configuration stores and
management store
A database name (Initial Catalog) is not
required
If the portal configuration stores or management
store are hosted on different SQL Server
instances or use non-default database names
use the PortalConnectionString and
ManagementConnectionString parameters
instead
DisableCertificat
eValidation
Optional
Not
recommended
for production
environments
This parameter disables SSL certificate
validation
If you dont use this parameter the cmdlet will
fail to retrieve the metadata information if the
metadata endpoint uses a self-signed SSL
certificate
PortalConnection Optional unless
ConnectionString
Use this parameter to override the default
56
String is not provided connection string just for the configuration store
You should do this when
The portal configuration store is located
on a different SQL instance
The portal configuration store uses
different credentials
You dont want to use the default
connection string
ManagementCon
nectionString
Optional unless
ConnectionString
is not provided
Use this parameter to override the default
connection string just for the management
store
You should do this when
The WAP management store is located
on a different SQL instance
The management store uses different
credentials
You dont want to use the default
connection string
Example cmdlet
Set-MgmtSvcRelyingPartySettings ndashTarget Tenant ndash
MetadataEndpoint
lsquohttpsmystscontosocom12345FederationMetadata2007-
06FederationMetadataxmlrsquo -ConnectionString ldquoData
Source=mysqlservercontosocomUser
ID=myprivilegeduserPassword=mypasswordrdquo
Tip
This cmdlet can be used on any machine where the Windows Azure PowerShell
updates for Windows Azure Pack are installed
The updated settings will eventually propagate to all affected components For faster
propagation manually restart the affected components to immediately fetch the new
configuration values If the target is lsquoTenantrsquo you should restart all your management
portals for tenants tenant API and admin API components If the target is lsquoAdminrsquo
you should restart all your management portals for administrators and admin API
components
1 If the STS endpoint immediately trusted by a Windows Azure Pack authentication site
was changed you must update the authentication sites with the new endpoint
information You can do this by using the PowerShell cmdlet Set-
Re-establish trust for the authentication sites
57
MgmtSvcIdentityProviderSettings PowerShell cmdlet on the relevant machines
Set-MgmtSvcIdentityProviderSettings -Target ltTargetsgt ndash
MetadataEndpoint ltMetadata Endpoint Full URLgt [-
ConfigureSecondary] [-ConnectionString ltConnection Stringgt]
[-DisableCertificateValidation] [-PortalConnectionString
ltPortal Configuration Store Connection Stringgt]
Parameter Requiredoptio
nal
Details
Target Required This parameter defines which set of components to
update
Permissible values for ltTargetsgt
Membership ndash Use this to configure the tenant
(Membership) authentication site
Windows ndash Use this to configure the admin
(Windows) authentication site
You can provide a single target or an array of
targets
MetadataEndpoi
nt
Required This parameter defines the full URL of the trusted
component metadata endpoint
Permissible values for ltMetadata Endpoint Full
URLgt
A valid URL for example
httpmystscontosocom1234
FederationMetadata2007-
06FederationMetadataxml
ConfigureSecon
dary
Optional Each authentication site supports up to two trusted
relying parties
Include this parameter to configure a second
relying party instead of overwriting the default
relying party
ConnectionStrin
g
Required
unless
PortalConnect
ionString is
used
This parameter defines the connection string to the
SQL Server hosting the Windows Azure Pack
portal configuration stores
A database name (Initial Catalog) is not required
If portal configuration store uses a non-default
database name use the PortalConnectionString
parameter instead
58
DisableCertificat
eValidation
Optional
Not
recommende
d for
production
environments
This parameter disables SSL certificate validation
If you dont use this parameter the cmdlet will fail to
retrieve the metadata information if the metadata
endpoint uses a self-signed SSL certificate
PortalConnectio
nString
Optional
unless
ConnectionStr
ing is not
provided
Use this parameter to override the default
connection string just for the configuration store
You should do this when
The portal configuration store uses different
credentials
You dont want to use the default
connection string
Example cmdlet
Set-MgmtSvcIdentityProviderSettings ndashTarget Membership ndash
MetadataEndpoint
lsquohttpsmytenantportalcontosocom23456FederationMetadata
2007-06FederationMetadataxmlrsquo -ConnectionString ldquoData
Source=mysqlservercontosocomUser
ID=myprivilegeduserPassword=mypasswordrdquo
Tip
This cmdlet can be used on any machine where the Windows Azure PowerShell
updates for Windows Azure Pack are installed
The updated settings will eventually propagate to all affected components For faster
propagation manually restart the affected components to immediately fetch the new
configuration values If the target is lsquoMembershiprsquo you should restart all your tenant
(Membership) authentication sites If the target is lsquoAdminrsquo you should restart all your
admin (Windows) authentication sites
Post-installation best practices
After you install the Windows Azure Pack for Windows Server perform the following best
practices
59
Replace untrusted self-signed certificates with trusted certificates Each Windows Azure Pack component is installed on an Internet Information Services (IIS)
website that by default is configured with a self-signed certificate Because these self-signed
certificates are not issued by any of the trusted root certification authorities that your browser
loads on startup your browser displays a security warning when you attempt to connect to any of
the sites To avoid this experience we recommend that you replace the self-signed certificates
that are used by the MgmtSvc-TenantSite (management portal for tenants) and MgmtSvc-
TenantPublicAPI as publicly facing services with certificates that are issued by a trusted root
certification authority The MgmtSvc-AdminSite (management portal for administrators) can also
benefit from a replacement of the self-signed certificate
By default services that are not accessed by users such as the APIs and resource
providers ignore certificate validation errors Services are accessed via the
ServicePointManagerServerCertificateValidationCallback Property If this action presents
a security concern you can replace the untrusted self-signed certificates with a valid
certificate that is issued by a recognized certification authority and turn the validation
override off or set the value to false
The configuration settings that govern this validation override are in each websitersquos Webconfig
file as follows
For the management portal for administrators and for the management portal for tenants
MgmtSvc-AdminSite and MgmtSvc-TenantSite
ltconfigurationgt
ltappSettingsgt
ltadd
key=MicrosoftAzurePortalConfigurationAppManagementConfigurationRdfe2DisableCerti
ficateValidation value=false gt
ltappSettingsgt
ltconfigurationgt
For the Service Management API websites MgmtSvc-AdminAPI MgmtSvc-TenantAPI
and MgmtSvc-TenantPublicAPI
ltconfigurationgt
ltappSettingsgt
ltadd key=DisableSslCertValidation value=false gt
ltappSettingsgt
ltconfigurationgt
For each of these keys the default value is true It grants permission to use untrusted
certificates so when the value is set to false the use of untrusted certificates is disallowed
Note
60
The ltappSettingsgt section of the Webconfig files are encrypted by default To modify
the ltappSettingsgt section of the Webconfig files you must decrypt the file apply
changes and then re-encrypt the files To decrypt and re-encrypt the Webconfig files
run the following Windows PowerShell cmdlets on the computer where the Webconfig
file is located
To decrypt Unprotect-MgmtSvcConfiguration ndashNamespace ltnamespacegt
To re-encrypt Protect-MgmtSvcConfiguration ndashNamespace ltnamespacegt
Where ltnamespacegt is one of the following
TenantPublicAPI
TenantAPI
AdminAPI
AdminSite
TenantSite
Test your deployment
You can test your deployment using the Microsoft Best Practices Analyzer (BPA) for Windows
Azure Pack BPA is a tool that analyzes your components of Windows Azure Pack It helps you
immediately identify many configuration security and performance issues and it recommends
best practices to resolve them
A ldquobest practicerdquo is a rule or recommendation that is defined by the productrsquos experts
These rules are configurations or settings that are designed to optimize product
performance and prevent security or functionality issues
When to run BPA for Windows Azure Pack You should run BPA for Windows Azure Pack to test your installation and to confirm that it is
ready to use in a production environment Ideally you should run it at the following times
Immediately after installing and configuring Windows Azure Pack
After changing any Windows Azure Pack settings
When you believe Windows Azure Pack performance is suboptimal
Correcting the issues that you find during these tests can help reduce your total cost-of-
ownership for Windows Azure Pack by minimizing downtime and optimizing configuration
security and performance
If yoursquod like to make sure that the tool runs at automated intervals you can use Task Scheduler
For more information see Task Scheduler in the Windows Dev Center
Important
Tip
61
How BPA for Windows Azure Pack works BPA for Windows Azure Pack works within Microsoft Baseline Configuration Analyzer
(MBCA) 20 to scan the software configurations of the machine it is installed on It automatically
detects all components that are installed in Windows Azure Pack and compares their
configurations against a set of rules MBCA then lists all noncompliant issues
Although rule violations even critical ones might not always cause problems they do indicate
issues that can result in poor performance poor reliability unexpected conflicts or increased
security risks
BPA for Windows Azure Pack identifies performance and security optimization issues for
your installation of Windows Azure Pack based on a set of rules Your machines might
have additional issues that these rules do not detect
The following table describes the three possible severity levels for the rules
Severity level Description
Compliant The component satisfies the conditions of a
rule
Warning The component is compliant as it is operating
currently but it might not satisfy the conditions
of a rule if changes are not made to its
configuration or policy settings
Error The component does not satisfy the conditions
of a best practice rule and functionality issues
can be expected
BPA provides best practice recommendations in the following categories
Category name Description
Security Security rules measure a componentrsquos relative
risk for exposure to threats such as
unauthorized or malicious users or loss or theft
of confidential or proprietary data
Performance Performance rules measure a componentrsquos
ability to process requests and perform its
prescribed duties within the time periods that
are expected for the componentrsquos workload
Configuration Configuration rules identify component settings
that might require modification for the
Warning
62
Category name Description
component to perform optimally Configuration
rules can help prevent conflicts that can result
in error messages or prevent the component
from performing its prescribed duties
Operation Operation rules identify possible failures of a
component to perform its prescribed duties
BPA system requirements
Consider the following prerequisites for your servers and client computers before you install BPA
for Windows Azure Pack
Windows Azure Pack installation requirements - Describes the hardware software and
environment requirements for Windows Azure Pack
Microsoft Baseline Configuration Analyzer 20 - Download MBCA 20 from the Microsoft
Download Center
Install MBCA 20 on every machine that has one or more components of Windows Azure
Pack installed in order to analyze these local components using BPA
Install BPA for Windows Azure Pack
To scan the components of Windows Azure Pack you must install BPA for Windows Azure Pack
on every machine that has components of Windows Azure Pack installed There are two locations
where you can download and install BPA for Windows Azure Pack
Microsoft Web Platform Installer 46 (This installation requires that you first download Web
Platform Installer)
Microsoft Download Center
1 In Web Platform Installer click Products
2 In the product list find Windows Azure Pack Microsoft Best Practices Analyzer (scroll
through the list or type in the search box) and then click Add
3 Click Install and then follow the instructions in the wizard
1 On the BPA for Windows Azure Pack BPA for Windows Azure Pack page click
Important
To install by using Microsoft Web Platform Installer
To install from the Microsoft Download Center
63
Download
2 After the download completes double-click MgmtSvc-BPAmsi and then follow the
instructions in the wizard
Scan components of Windows Azure Pack
Now that you have installed MBCA 20 and BPA for Windows Azure Pack you can start
analyzing the components of Windows Azure Pack
1 Sign in to a machine with components of Windows Azure Pack installed
2 On the Start menu click Microsoft Baseline Configuration Analyzer 20
3 On the MBCA 20 Home page under Select a product click Windows Azure Pack in the
drop-down list
4 Click Start Scan BPA for Windows Azure Pack applies the appropriate rules based on
the components of Windows Azure Pack that are detected on the local machine
5 When the scan is complete click View Report to see the results
6 On the All tab you can find all the noncompliant and the compliant results Click the
Noncompliant tab to see a list of errorwarnings for rules that the machine violated You
can take the following actions to learn more about each warning
a Click the + next to the machine name to see the list of rules
b Click the rule to see details about the warning
c If you dont want to see this warning again click Exclude this Result This is not
recommended
7 For each issue you should follow the instructions that are described in Resolution
Tip
For further information about MBCA 20 click Help
Next steps
At this point you have installed the required components of your Windows Azure Pack
deployment If you want to add services such as Windows Azure Pack Web Services see
Provision and configure services in Windows Azure Pack
To scan components
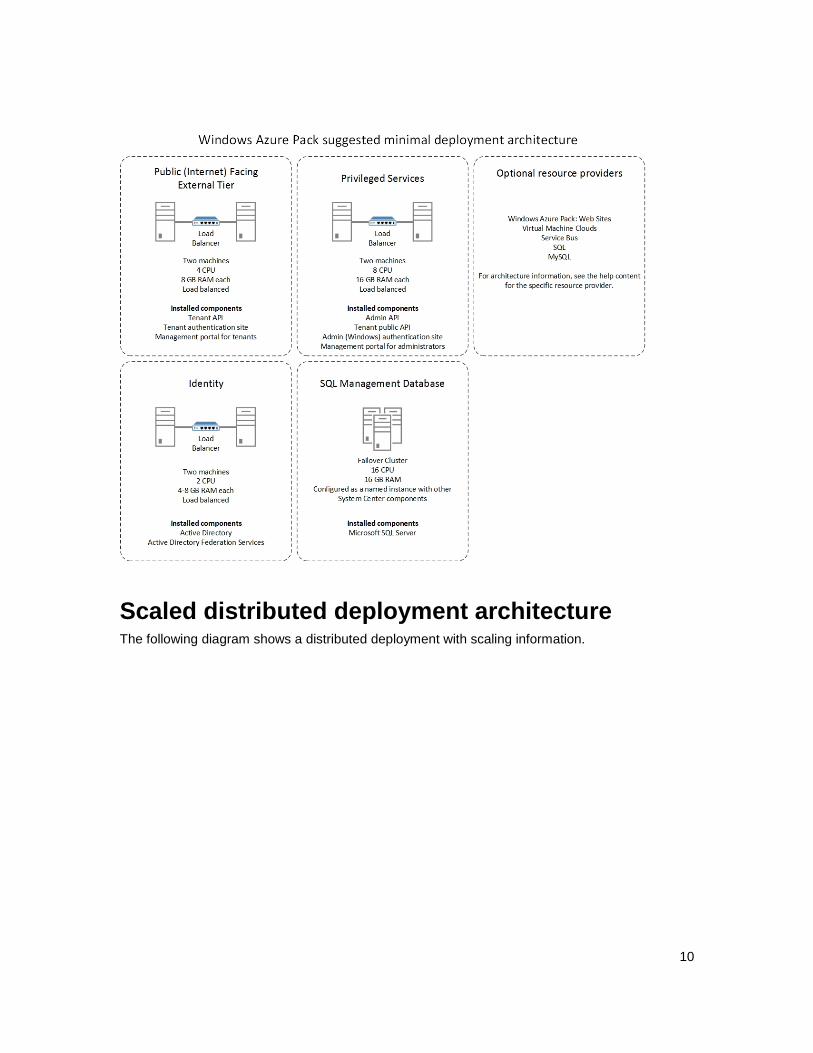