description - festo · description of the implemented profibus-dp protocol. - sercos manual:...
TRANSCRIPT

Beschneiden: Oben: 61,5 mm Unten: 61,5 mm Links: 43,5 mm Rechts: 43,5 mm
Motorcontroller CMMP�
Description Mounting and installation Type CMMP-AS-11A�
Description 557 332 en 0708NH [723 745]


Festo P-BE-CMMP-AS-…-11A 0708NH 3
Edition __________________________________________________ en 0708NH
Description _________________________________ P.BE-CMMP-AS-11A-HW-EN
Order no. ___________________________________________________ 557 332
(Festo AG & Co KG., D-73726 Esslingen, Federal Republic of Germany, 2006)
Internet: http://www.festo.com
E-Mail: [email protected]
The reproduction of this document and disclosure to third parties and the utilisation or communication of its contents without explicit authorization is prohibited. Offenders will be held liable for compensation of damages. All rights reserved, in particular the right to carry out patent, utility model or ornamental design registrations.

4 Festo P-BE-CMMP-AS-…-11A 0708NH
Index of revisions
Author:
Name of manual: Festo CMMP-AS-…-11A product manual
File name:
File saved at:
Consec. no. Description Index of revisions Date of amendment
1 24.04.08
Trade names
Microsoft and Windows are either registered trademarks or trademarks of Microsoft Corpo-ration in the United States and/or other countries.
SinCoder® ………….

Table of contents
Festo P-BE-CMMP-AS-…-11A 0708NH 5
Table of contents
1. General data ....................................................................................................... 11
1.1 Documentation .................................................................................................. 11
1.2 Scope of delivery ............................................................................................... 12
2. Safety instructions for electric drives and controllers ......................................... 13
2.1 Icons used ......................................................................................................... 13
2.2 General information ........................................................................................... 14
2.3 Danger through incorrect use ............................................................................ 15
2.4 Safety instructions ............................................................................................. 16
2.4.1 General safety information ................................................................. 16
2.4.2 Safety instructions for assembly and maintenance ............................. 18
2.4.3 Protection against touching electric components ............................... 20
2.4.4 Protection by low voltage (PELV) against electric shock ...................... 21
2.4.5 Protection from dangerous movements .............................................. 22
2.4.6 Protection against touching hot components...................................... 23
2.4.7 Protection when handling and assembling ......................................... 23
3. Product description ............................................................................................. 24
3.1 General data ...................................................................................................... 24
3.1.1 Switch-on sequence ........................................................................... 27
3.2 Power supply ..................................................................................................... 28
3.2.1 Three-phase AC supply ....................................................................... 28
3.2.2 Intermediate circuit coupling, DC power supply .................................. 28
3.2.3 Mains fuse ......................................................................................... 28
3.3 Brake chopper ................................................................................................... 29
3.4 Communication interfaces ................................................................................. 29
3.4.1 Festo profile for handling and positioning (FHPP) ............................... 30
3.4.2 RS232 interface .................................................................................. 30
3.4.3 CAN bus ............................................................................................. 31
3.4.4 PROFIBUS .......................................................................................... 31
3.4.5 DeviceNET .......................................................................................... 31
3.4.6 SERCOS .............................................................................................. 32
3.4.7 I/O functions and device control ......................................................... 32
4. Function overview ............................................................................................... 34
4.1 Motors ............................................................................................................... 34
4.1.1 Synchronous servo motors ................................................................. 34
4.1.2 Linear motors ..................................................................................... 34

Table of contents
6 Festo P-BE-CMMP-AS-…-11A 0708NH
4.2 Functions of the CMMP-AS servo positioning controller .................................... 34
4.2.1 Compatibility ...................................................................................... 34
4.2.2 Pulse width modulation (PWM) .......................................................... 35
4.2.3 Setpoint management ........................................................................ 35
4.2.4 Controlled torque mode ..................................................................... 36
4.2.5 Controlled speed mode ...................................................................... 36
4.2.6 Torque-limited speed control ............................................................. 37
4.2.7 Synchronisation to external clock sources .......................................... 37
4.2.8 Load torque compensation for vertical axes ....................................... 37
4.2.9 Positioning and position control ......................................................... 37
4.2.10 Synchronisation, electrical gearboxes ................................................ 38
4.2.11 Brake management ............................................................................ 39
4.3 Positioning control ............................................................................................ 39
4.3.1 Overview ............................................................................................ 39
4.3.2 Relative positioning............................................................................ 40
4.3.3 Absolute positioning .......................................................................... 40
4.3.4 Motion profile generator .................................................................... 40
4.3.5 Homing run ........................................................................................ 41
4.3.6 Positioning sequences ....................................................................... 41
4.3.7 Stop input in positioning mode .......................................................... 42
4.3.8 Contour control with linear interpolation (in preparation) ................... 43
4.3.9 Time-synchronised multi-axis positioning ........................................... 44
5. Functional safety engineering ............................................................................. 45
5.1 General information and intended use ............................................................... 45
5.2 Integrated "Safe standstill" function ................................................................. 47
5.2.1 General information / description of "Safe standstill" ........................ 47
5.2.2 Secure stopping brake control ............................................................ 49
5.2.3 Functional method / Timing ................................................................ 50
5.2.4 Typical applications ............................................................................ 53
6. Mechanical installation ...................................................................................... 57
6.1 Important instructions ....................................................................................... 57
6.2 Device view ....................................................................................................... 59
6.2.1 Assembly ........................................................................................... 62
7. Electrical installation .......................................................................................... 63
7.1 Connector pin assignments ................................................................................ 63
7.2 Entire CMMP-AS system ..................................................................................... 64
7.3 Connection: Power supply [X9]........................................................................... 65
7.3.1 Layout on device [X9] ......................................................................... 66
7.3.2 Counterplug [X9] ................................................................................ 66
7.3.3 Pin assignments [X9] .......................................................................... 66

Table of contents
Festo P-BE-CMMP-AS-…-11A 0708NH 7
7.4 Connection: Motor [X6] ...................................................................................... 67
7.4.1 Layout on device [X6] at the CMMP-AS................................................ 67
7.4.2 Counterplug [X6] ................................................................................ 67
7.4.3 Pin assignments [X6] .......................................................................... 67
7.5 Connection: I/O communication [X1] .................................................................. 69
7.5.1 Layout on device [X1] ......................................................................... 69
7.5.2 Counterplug [X1] ................................................................................ 69
7.5.3 Pin assignments [X1] .......................................................................... 70
7.5.4 Type and layout of cable [X1] .............................................................. 70
7.5.5 Connection notes [X1] ......................................................................... 71
7.6 Connection: Safe Standstill [X3] ......................................................................... 73
7.6.1 Layout on device [X3] ......................................................................... 73
7.6.2 Counterplug [X3] ................................................................................ 73
7.6.3 Pin assignments [X3] .......................................................................... 73
7.7 Connection: Resolver [X2A] ................................................................................ 73
7.7.1 Layout on device [X2A] ....................................................................... 73
7.7.2 Counterplug [X2A] .............................................................................. 73
7.7.3 Pin assignments [X2A] ........................................................................ 73
7.8 Connection: Encoder [X2B] ................................................................................. 74
7.8.1 Layout on device [X2B] ....................................................................... 74
7.8.2 Counterplug [X2B] .............................................................................. 74
7.9 Connection: Increment encoder input [X10] ....................................................... 75
7.9.1 Layout on device [X10] ....................................................................... 75
7.9.2 Counterplug [X10] .............................................................................. 75
7.9.3 Pin assignments [X10] ........................................................................ 75
7.9.4 Type and layout of cable [X10] ............................................................ 76
7.9.5 Connection notes [X10] ....................................................................... 76
7.10 Connection: Incremental encoder output [X11] .................................................. 76
7.10.1 Layout on device [X11] ....................................................................... 76
7.10.2 Counterplug [X11] .............................................................................. 76
7.10.3 Pin assignments [X11] ........................................................................ 76
7.11 Connection: CAN bus [X4] .................................................................................. 77
7.11.1 Layout on device [X4] ......................................................................... 77
7.11.2 Counterplug [X4] ................................................................................ 77
7.11.3 Pin assignments [X4] .......................................................................... 77
7.11.4 Connection notes [X4]......................................................................... 78
7.12 Connection: RS232/COM [X5] ............................................................................ 79
7.12.1 Layout on device [X5] ......................................................................... 79
7.12.2 Counterplug [X5] ................................................................................ 79
7.12.3 Pin assignments [X5] .......................................................................... 79
7.13 Instructions on safe and EMC-compliant installation ......................................... 79

Table of contents
8 Festo P-BE-CMMP-AS-…-11A 0708NH
7.13.1 Explanations and terms ...................................................................... 79
7.13.2 Connection instructions ...................................................................... 80
7.13.3 General information on EMC ............................................................... 80
7.13.4 EMC areas: First and second environments ......................................... 81
7.13.5 EMC-compliant wiring ......................................................................... 81
7.13.6 Operation with long motor cables ....................................................... 82
7.13.7 ESD protection ................................................................................... 83
8. Startup ................................................................................................................ 84
8.1 General connection instructions ........................................................................ 84
8.2 Tools / material ................................................................................................. 84
8.3 Connecting the motor ........................................................................................ 84
8.4 Connect the CMMP-AS servo positioning controller to the power supply ............ 85
8.5 Connecting a PC ................................................................................................. 85
8.6 Checking readiness for operation....................................................................... 85
9. Service functions and error messages ................................................................. 87
9.1 Protective and service functions ........................................................................ 87
9.1.1 Overview ............................................................................................ 87
9.1.2 Phases and mains failure recognition ................................................. 87
9.1.3 Overload current and short-circuit monitoring .................................... 87
9.1.4 Overvoltage monitoring for the intermediate circuit............................ 88
9.1.5 Temperature monitoring for the heat sink .......................................... 88
9.1.6 Motor monitoring ............................................................................... 88
9.1.7 I²t monitoring ..................................................................................... 88
9.1.8 Power monitoring for the brake chopper ............................................ 88
9.1.9 Commissioning status ........................................................................ 88
9.1.10 Quick discharge of the intermediate circuit ......................................... 89
9.2 Operating mode and error messages ................................................................. 89
9.2.1 Operating mode and error display ...................................................... 89
9.2.2 Error messages .................................................................................. 90
A. Technical specifications ...................................................................................... 99
A.1 Operation and display components ................................................................. 100
A.2 Power supply [X9] ............................................................................................ 100
A.3 Motor connection [X6] ...................................................................................... 101
A.4 Angle encoder connections [X2A] and [X2B] ..................................................... 102
A.4.1 Resolver connection [X2A] ................................................................ 102
A.4.2 Encoder connection [X2B] ................................................................. 103
A.5 Communication interfaces ............................................................................... 105
A.5.1 RS232 [X5] ....................................................................................... 105
A.5.2 CAN bus [X4]..................................................................................... 105

Festo P-BE-CMMP-AS-…-11A 0708NH 9
A.5.3 I/O interface [X1] .............................................................................. 105
A.5.4 Incremental encoder input [X10] ....................................................... 106
A.5.5 Incremental encoder output [X11]..................................................... 106
B. Glossary ............................................................................................................ 109


1. General data
Festo P-BE-CMMP-AS-…-11A 0708NH 11
1. General data
1.1 Documentation
This product manual is intended to help you safely operate the CMMP-AS-…-11A series of three-phase servo positioning controllers. It contains safety instructions which must be followed.
See the following manuals on the CMMP-AS product family for further information:
- "P-BE-CMMP-AS-..-3A Servo positioning controller product manual": Describes the technical data and device functionality and also provides information on the installa-tion and operation of the CMMP-AS-C2-3A servo positioning controller and the CMMP-AS-C5-3A for single-phase servo positioning controllers.
- CANopen manual: P.BE-CMMP-CO-SW "CMMP-AS Servo positioning controller": Description of the implemented CANopen protocol as per DSP402.
- PROFIBUS manual: P-BE-CMMP-FHPP-PB-SW "CMMP-AS servo positioning controller": Description of the implemented PROFIBUS-DP protocol.
- SERCOS manual: P-BE-CMMP-SC-SW "CMMP-AS servo positioning controller": Describes the implemented SERCOS functionality.
- Ethernet manual: P-BE-CMMP-ET-SW "Ethernet technology module": Describes the technical data and device functionality when using the Ethernet technology module.
- DeviceNet manual: P.BE-CMMP-FHPP-DN-SW Describes the implemented DeviceNet protocol.
- FHPP manual: P.BE-CMM-FHPP-SW Describes the implemented FHPP data profile.
The entire software functionality of the new CMMP-AS series of devices has been imple-mented in a stepwise development process.

1. General data
12 Festo P-BE-CMMP-AS-…-11A 0708NH
1.2 Scope of delivery
The delivery includes:
Number Delivery
1 CMMP-AS servo positioning controller
1 Inserted plug for motor connection and power
Table 1.1
Counterplugs for control or shaft encoder connections are not in-cluded in the standard scope of delivery. However, they can be ordered as accessories:
www.festo.com/catalog

2. Safety instructions for electric drives and controllers
Festo P-BE-CMMP-AS-…-11A 0708NH 13
2. Safety instructions for electric drives and con-trollers
2.1 Icons used
Information
Note
Important information and instructions.
Caution
Considerable damage to property may occur if these instructions are not observed.
Warning
Failure to comply with these instructions can result in material damage and personal injuries.
Warning
DANGER!
Considerable damage to property and injury to human beings may occur if these instructions are not observed.
Warning
Dangerous voltage
The safety instructions contain reference to dangerous voltages which may occur.
Accessories
Environment

2. Safety instructions for electric drives and controllers
14 Festo P-BE-CMMP-AS-…-11A 0708NH
2.2 General information
Festo AG & Co. KG is not liable for damage caused by failure to observe the warning instructions in these operating instructions.
Note
Before commissioning, the Safety instructions for electric drives and controllers must be read from page 13 and the chapter 7.13 "Instructions on safe and EMC-compliant installation" page 79.
If the documentation is not clearly understood in this language version, please inform the supplier.
In order for the servo drive controller to operate without problems and safely, it must be transported, stored, mounted, planned properly and correctly, taking the risks and protec-tion and emergency measures into account, as well as operated and maintained with due care.
Note
Only trained and qualified personnel should be allowed to handle the electric systems:
Trained and qualified personnel
In accordance with this product manual or the warnings on the product itself, anyone in-
volved in planning, installing, mounting, commissioning and operating the product and are sufficiently familiar with all warnings and precautionary measures in these operating instructions and who have the appropriate qualification for their work:
Training and instructions on or authorization to switch on and switch off devices/sys-tems in accordance with technical safety standards, and to earth and mark them ap-propriately in accordance with the application requirements.
Training or instructions in using and maintaining suitable safety equipment in accor-dance with technical safety standards.
Training in first aid.
The following instructions must be read before the system is commissioned for the first
time to prevent injury and/or material damage:
These safety instructions must be observed at all times.

2. Safety instructions for electric drives and controllers
Festo P-BE-CMMP-AS-…-11A 0708NH 15
Do not attempt to install or commission the servo drive control-
ler until you have read all safety instructions related to electri-cal drives and control systems in this document.
These safety instructions and all other user instructions must be read before performing any work with the servo drive controller.
If you do not have user instructions for the servo drive controller, contact your local sales representative.
Ask them to send the documents to the person responsible for safe operation of the servo drive controller immediately.
If the servo drive controller is sold, rented and/or passed on in
any other way, these safety instructions must also be passed on with it.
For safety and warranty reasons, the operator may not open the servo drive controller.
Correct planning is required for the servo drive controller to func-tion properly!
Warning
DANGER!
Incorrect use of the servo drive controller and failure to follow the warnings in this manual, as well as incorrect manipulation of safety equipment can cause material damage, injury, electric shock, and in extreme cases, even be fatal.
2.3 Danger through incorrect use
Warning
DANGER!
High electric voltage and high working current.
Danger of death or serious bodily injury due to electric shock.
Warning
DANGER!
High electric voltage due to incorrect connection!
Danger of death or bodily injury due to electric shock!
2. Safety instructions for electric drives and controllers
16 Festo P-BE-CMMP-AS-…-11A 0708NH
Warning
DANGER!
Surfaces of the device housing may be hot!
Danger of injury! Danger of burning!
Warning
DANGER!
Dangerous movements!
Danger of death, serious bodily injury or damage to property due to unintentional movement of the motors!
2.4 Safety instructions
2.4.1 General safety information
Warning
The servo drive controller conforms to protection class IP20, and contamination class 1.
Ensure that the working environment also complies with this protection/contamination class.
Warning
Use only accessories and spare parts which are approved of by the manufacturer.
Warning
In accordance with the EN standards and the VDE regulations, the servo drive controller must be connected to the grid such that they can be disconnected using appropriate isolating equipment (e.g. main switch, contactor, circuit breaker).
The servo drive controller can be fused with a 300 mA all-current sensitive fault-current circuit breaker (RCD = Residual Current pro-tective Device).
Warning
For switching the control contacts you should use gold-plated con-tacts or high-pressure contacts.

2. Safety instructions for electric drives and controllers
Festo P-BE-CMMP-AS-…-11A 0708NH 17
Precautionary measures must be taken for preventing interference to switching systems, e.g. switching protective switches and relays with RC elements or diodes.
You must observe the safety regulations and directives of the coun-try in which the device is to be used.
Warning
The environmental conditions specified in the product docu-mentation must be observed.
Safety-critical applications are not permitted if they are not explic-itly approved of by the manufacturer.
See chapter 7.13 (page 79) for instructions on EMC-compliant in-stallation.
The manufacturer of the system or machine is responsible for en-suring that the limit values requested by the national regulations are observed.
Warning
See this product manual for the specifications, connection and in-stallation conditions for the servo drive controller, which must al-ways be observed.
Warning
DANGER!
The general installation and safety regulations for working on high-current systems (e.g. DIN, VDE, EN, IEC or other national and inter-national regulations) must be observed here.
Failure to observe these regulations can lead to bodily injury, death or considerable damage to property.
The following precautionary measures also apply without claim to completeness:
VDE 0100 Regulations for setting up high-voltage systems up
to 1,000 volts
EN 60204-1 Electrical equipment for machines
EN 50178 Equipping high-voltage systems with electronic devices

2. Safety instructions for electric drives and controllers
18 Festo P-BE-CMMP-AS-…-11A 0708NH
EN ISO 12100 Machine safety – definitions, general design guide-
lines
EN 1050 Machine safety – risk evaluation guidelines
EN 1037 Machine safety – preventing unexpected starts
EN 954-1 Safety related control system parts
2.4.2 Safety instructions for assembly and maintenance
For assembling and maintaining the system, the relevant DIN, VDE, EN and IEC regulations, as well as all national and local safety and accident prevention regulations must always be observed. The system manufacturer or the user is responsible for ensuring that these regu-
lations are observed:
Warning
The servo drive controller may only be operated, maintained and/or serviced by persons qualified and trained to work on or with elec-trical devices.
Avoiding accidents, bodily injury and/or material damage:
Warning
Secure vertical axes to prevent them falling or lowering after the motor is switched off using methods such as:
- mechanical locking of the vertical axis, - external brake / arrester / clamp or - sufficient counterweight of the axis.
Warning
The series-supplied motor holding brake or an external motor-holding brake controlled by the drive controller alone is only suitable for protecting human beings!
Warning
DANGER!
Disconnect the electrical equipment from the power supply using the main switch and secure it to prevent it being switched on again. Wait until the intermediate circuit has discharged before: - Maintenance and servicing work - Cleaning - Extended downtime

2. Safety instructions for electric drives and controllers
Festo P-BE-CMMP-AS-…-11A 0708NH 19
Warning
DANGER!
Before carrying out maintenance work, make sure that the power supply is switched off and locked and that the intermediate circuit is discharged.
Warning
The external or internal braking resistance is live and can carry a dangerous intermediate circuit voltage for up to approx. 5 minutes after the servo drivecontroller has been switched off. This can cause serious bodily injury or even death if it is touched.
Warning
Proceed carefully with mounting. Ensure that no drilling shav-ings, metal dust or mounting material (screws, nuts, wire cut-tings) fall into the servo drive controller during mounting work and subsequent operation.
Make sure also that the external voltage supply of the controller (24 V) is switched off.
The intermediate circuit or the mains voltage must always be switched off before the 24 V controller supply is switched off.
Warning
Other work in the vicinity of the machine must only be carried out when the AC or DC supply is switched off and locked.
Switched-off final stage or switched-off controller enable are not suitable locking conditions. In the event of a fault, this could lead to unintentional movement of the drive.
Exceptions to this are drives with the "Safe standstill" safety fea-ture as per EN 954-1 CAT 3.
Warning
Carry out commissioning with a free-running motor, in order to avoid mechanical damage, e.g. due to incorrect direction of rotation.

2. Safety instructions for electric drives and controllers
20 Festo P-BE-CMMP-AS-…-11A 0708NH
Warning
Electronic devices are never fail-proof.
The user is responsible for ensuring that his system is brought into a safe state if the electric device fails.
Warning
DANGER!
The servo drive controller and in particular the braking resistance, external or internal, can become very hot. This can cause serious burning if the devices are touched.
2.4.3 Protection against touching electric components
This section concerns only devices and drive components with voltages over 50 V. It is dangerous to touch components with voltages of more than 50 V, as this can cause an electric shock. When electric devices are operated, certain components in these devices
are always under dangerous tension.
Warning
Dangerous voltage!
High electric voltage!
Danger of death or serious bodily injury due to electric shock!
For operation the relevant DIN, VDE, EN and IEC regulations, as well as all national and local safety and accident prevention regulations must always be observed. The system manufacturer or the user is responsible for ensuring that these regulations are observed:
Warning
Before switching the device on, fit the covers and protective screens so that the device cannot be touched.
For devices which are to be fitted in a control cabinet, make sure that a housing is fitted so that the electric components cannot be touched.
Warning
Always connect the protective earth conductor of the electrical equipment and the devices firmly to the supply network.
Due to the integrated network filter, the leakage current is greater than 3.5 mA!

2. Safety instructions for electric drives and controllers
Festo P-BE-CMMP-AS-…-11A 0708NH 21
Warning
Before commissioning, and also for brief measuring and test purposes, always connect the protective earth to all electric de-vices or connect an earth cable in accordance with the connec-tion diagram.
Otherwise, high voltages may occur on the housing. These could cause an electric shock.
Warning
Do not touch the electrical connection points of the components when the device is switched on.
Warning
Before touching electric components with voltages over 50 V, disconnect the device from the mains or voltage source.
Protect the device against being switched on again.
Warning
During installation note the amount of intermediate circuit voltage, especially with regard to insulation and protective measures.
Make sure that the earthing, the cross section size of the conductor and the corresponding short-circuit protection are correct.
Warning
The device has an intermediate fast discharge circuit in accordance with EN 60204-1. However, in certain device constellations, particu-larly where several servo drive controllers are connected in parallel to the intermediate circuit or when a braking resistance is not con-nected, the fast discharge may not work. The servo drive controllers can then contain dangerous voltages for up to 5 minutes after being switched off (capacitor residual charge).
2.4.4 Protection by low voltage (PELV) against electric shock
All connections and terminals with voltages from 5 to 50 volts on the servo drive controller are PELVs designed to be safe to touch in accordance with the following standards:
Standards - International: IEC 60364-4-41
- European: EN 50178 and EN 60204-1

2. Safety instructions for electric drives and controllers
22 Festo P-BE-CMMP-AS-…-11A 0708NH
Warning
DANGER!
High electric voltage due to incorrect connection!
Danger of bodily injury or death due to electric shock!
Devices, electrical components and cables may only be connected to connections and terminals from 0 to 50 V, providing they have a protective low voltage (PELV = Protective Extra Low Voltage).
Connect only voltages and current circuits which have reliable separation of dangerous voltages. Safe isolation is achieved via isolating transformers, secure optocouplers or non-mains connected battery-powered operation.
2.4.5 Protection from dangerous movements
Dangerous movements can be caused by incorrect control of connected motors. There are various causes:
Causes - Unsafe or faulty circuitry or cabling
- Faults in operating the components
- Faults in the measured value and signal generators
- Defective or non-EMC valid components
- Faults in the software in the higher-order control system
These faults can occur immediately after the device is switched on or after a certain period
of operation.
The monitoring functions in the drive components exclude to a large extent the possibility of incorrect operation of the connected drives. With regard to the protection of human beings, especially the danger of bodily injury and/or material damage, one must not rely on these circumstances alone. Until the fitted monitoring functions become effective, you must reckon with at least one incorrect drive movement, the extent of which depends on the type of control and on the operating state.
Warning
DANGER!
Dangerous movements!
Danger of injury or death, serious bodily injury or material damage!
For the above-mentioned reasons, the protection of human beings must be ensured with the aid of monitoring systems or by measures which are of higher order than the system. These measures are foreseen depending on the specific features of a danger and fault analysis by the system manufacturer. The safety regulations applicable to the system must be observed here as well. Undesired movements of the machine or other incorrect func-tions can occur as a result of switching off, avoiding or failing to activate safety devices.

2. Safety instructions for electric drives and controllers
Festo P-BE-CMMP-AS-…-11A 0708NH 23
2.4.6 Protection against touching hot components
Warning
DANGER!
Surfaces of the device housing may be hot!
Danger of injury! Danger of burning!
Warning
Danger of burning!
Do not touch the surface of the housing in the vicinity of hot sources!
After switching devices off, leave them for 10 minutes to cool down before touching them.
If you touch hot parts of the device such as the housing which con-tains the heat sink and resistors, you may burn yourself!
2.4.7 Protection when handling and assembling
Handling and assembling certain components in an unsuitable manner can under circum-stances cause injury.
Warning
DANGER!
Danger of injury as a result of incorrect handling!
Bodily injury due to squashing, shearing, cutting, pushing!
The following safety measures apply here:
Warning
Observe the general regulations on setting up and safety when handling and assembling.
Use suitable assembly and transport devices. Prevent clamping and squashing (of fingers). Use only suitable tools. If specified, use special tools.
Use lifting devices and tools in a correct manner. If necessary, use suitable protective equipment (e.g. protective
glasses, safety shoes, safety gloves). Do not stand under hanging loads. Wipe up spilt liquids on the floor to avoid slipping.

3. Product description
24 Festo P-BE-CMMP-AS-…-11A 0708NH
3. Product description
3.1 General data
The CMMP-AS series (2nd generation servo series) of servo positioning controllers are intel-ligent AC servo converters with extensive parameterisation possibilities and expansion options. This allows flexible use in a wide range of different applications.
The servo positioning controller family includes devices for single-phase and three-phase supplies.
Type codes:
Example:
CMMP-AS-C10-11A-3P
Premium series of servo controllers for AC synchronous motors, 10 A nominal current, 3 x 230…480 V input voltage, three-phase
CMM
– P
– AS
– C10
– 11A _ 3P
Series
CMM Motor controller
Version
P Premium
Motor technology
AS AC synchronous
Rated motor current
C10 10 A
Input voltage
11A 3 x 230…480 VAC
Phases
3P Three-phase
The types with three-phase mains feed are intended for connection to the 3 x 400 VAC mains grid.
All servo positioning controllers in the CMMP-AS family have the following performance characteristics:
- Space-saving, compact book-style construction, side-by-side mountable

3. Product description
Festo P-BE-CMMP-AS-…-11A 0708NH 25
- High regulation quality through very high quality sensor technology, vastly superior to
the usual market standards.
- Full integration of all controller and power components, including an RS232 interface for PC communication and a CANopen interface for integration into automation systems
- Integrated universal encoder analysis for the following encoders:
- Resolver
- Incremental encoder with/without commutator signals
- High-resolution Stegmann incremental encoder, absolute encoder with HIPERFACE
- High-resolution Heidenhain incremental encoder, absolute encoder
with EnDat
- Conformance to the current CE and EN standards without additional external measures
- Device design as per UL standards, UL certification
- Fully enclosed, EMC-optimised metal housing for installation on standard switching cabinet mounting panels. The devices have protection class IP20.
- Integration of all filters required to fulfil the EMC regulations during operation (1st in-dustrial area with restricted availability as per EN 61800-3) in the device, e.g. mains fil-ter, motor output filter, filter for 24 V power supply and for the inputs and outputs. The filters are designed for motor cable lengths of up to 25 m. External filters must be used with cables from 25 m to 50 m.
- Integrated braking resistor. External resistors can be connected for large braking ener-gies.
- Full electrical isolation of the controller part and power end stages as per EN 50178. Electrical isolation of the 24 V potential area with the digital inputs and outputs and the analogue and regulation electronics.
- Can be operated as a torque controller, speed controller or position controller
- Integrated positioning control with comprehensive functionality as per CAN in Automa-tion (CiA) DSP402 and numerous additional application-specific functions
- Jerk-free or time-optimised, relative or absolute positioning to a reference point
- Point-to-point positioning with and without smooth transitions
- Speed and angle synchronous travel with electronic gearboxes via incremental en-coder input or Fieldbus
- Comprehensive operating modes for synchronisation
- A wide range of homing methods
- Inching mode
- Teaching mode
- Short cycle times, power control loop bandwidth of approx. 2 kHz, speed control loop bandwidth of approx. 500 Hz

3. Product description
26 Festo P-BE-CMMP-AS-…-11A 0708NH
- Switchable end-stage cycle frequency
- Freely programmable I/Os
- User-friendly parameterising using the Festo parameterising software
- Menu-driven commissioning
- Automatic motor identification
- Simple connection to a higher-level controller, e.g. a PLC via the I/O level or Fieldbus
- High-resolution 16-bit analogue input
- Expansion slots for
- I/O expansion module,
- Profibus interface,
- DeviceNet,
- Ethernet,
- SERCOS.
- "Safe standstill" option as per EN 954-1, safety category 3 (integrated into device)

3. Product description
Festo P-BE-CMMP-AS-…-11A 0708NH 27
3.1.1 Switch-on sequence
Power On
Initalisation phase
Controller enable (DIN5)
End stage is on
Holding brake is released
Speed setpoint value
Actual speed value
t1
t2
t3
t5
t7
DOUT0: READYt6
t4
a b
Time Action
t1 3500 ms Execution of boot program and application start
t2 > 500 µs (tcycP)
t3 30 ms Depends on the operating mode and the state of the drive
t4a = N x 10 ms Parameterisable (Travel start delay tF braking parameter)
t4b > 100 ms Optional for motors with angular encoders without commutator signals:
Time for determination of commutator position
t5 < 10 ms
t6 = K x 250 µs (tcycN) Depending on the quick stop deceleration ramp
t7 = M x 10 ms Parameterisable (Switch-off delay tA braking parameter)
Table 3.1 Switch-on sequence timing

3. Product description
28 Festo P-BE-CMMP-AS-…-11A 0708NH
3.2 Power supply
3.2.1 Three-phase AC supply
The CMMP-AS servo positioning controller satisfies the following requirements for a servo drive controller
- Nominal frequency range of 50 … 60 Hz 10%
- Electrical impulse resistance allowing combination with servo converters. The CMMP-AS servo positioning controller allows dynamic changing between motor and generator operation in both directions without dead times.
- No end-user parameterising required
Switch-on behaviour:
- As soon as the CMMP-AS is provided with mains voltage, the intermediate circuit is charged (< 1 s) via the braking resistor, with the intermediate circuit relay deactivated.
- After the intermediate circuit has been successfully pre-charged, the relay engages and the intermediate circuit is "hard" connected to the mains supply.
3.2.2 Intermediate circuit coupling, DC power supply
Intermediate circuit coupling:
- It is possible to connect CMMP-AS series servo positioning con-trollers with each other at the same nominal intermediate circuit
voltage.
DC power supply:
- Direct DC power supply via the intermediate circuit terminals, without a mains grid connection, is possible with voltages
60 VDC.
The digital motor temperature monitoring only begins functioning at an intermediate circuit voltage of 230 VDC. Below this voltage, the digital motor temperature sensor is always recognised as open.
3.2.3 Mains fuse
The mains supply cable must contain a three-phase automatic circuit breaker
- for the CMMP-AS-C5-11A 16 A with slow-blow characteristics (B16) and
- for the CMMP-AS-C10-11A a 25 A three-phase slow-blow automatic circuit breaker (B50).

3. Product description
Festo P-BE-CMMP-AS-…-11A 0708NH 29
If CE certification is required, the following specifications for mains fusing must be observed: Listed Circuit Breaker as per UL 489, rated 480Y/277 Vac, 16 A, SCR 10 kA.
3.3 Brake chopper
A brake chopper with a braking resistor is integrated in the power output stage. If the per-mitted load capacity of the intermediate circuit is exceeded during the energy recovery, the braking energy may be converted to heat by the internal braking resistor. The brake chop-per is actuated with software control. The internal braking resistor is protected against overloading via software and hardware.
If the rating of the internal braking resistor is inadequate for certain applications, then this
can be switched off by removing the jumpers between pins BR-CH and BR-INT of plug [X9]. An external braking resistor must then be connected between pins BR-CH and ZK+. This braking resistor must not be rated lower than the specified minimum value (see Table A.10 page 101). The output is fused against a short-circuit in the braking resistor or the braking resistor wiring.
Warning
DANGER!
The pin BR-CH is at the positive intermediate circuit potential and is thus not protected from an earth fault, short-circuit to mains voltage, or a negative intermediate circuit voltage.
Warning
High electric voltage!
Simultaneous use of internal and external braking resistors is not possible. The device does not automatically protect external brak-ing resistors from overloads.
3.4 Communication interfaces
The CMMP-AS servo positioning controller has several communication interfaces. The servo positioning controller has an RS232 interface, which is of central importance for
connecting a PC and for using the Festo Configuration Tool parameterisation software.
The basic version of the CMMP-AS servo positioning controller also has a CANopen inter-face.
Pluggable expansion options include
- PROFIBUS DP
- SERCOS
- Ethernet
- DeviceNet.

3. Product description
30 Festo P-BE-CMMP-AS-…-11A 0708NH
In the version described here, the servo positioning controller always operates as a Field-
bus slave.
The FHPP Fieldbus protocol (see the FHPP manual P.BE-CMM-FHPP-SW) can be used for unified control:
3.4.1 Festo profile for handling and positioning (FHPP)
Festo has developed an optimised data profile, the "Festo Handling and Positioning Profile (FHPP)", tailored to target applications for handling and positioning tasks.
The FHPP enables uniform control and programming for the various field bus systems and controllers from Festo.
In addition it defines the following for the user
Operating modes, The I/O data structure, The parameter objects, The sequence control.
Fieldbus communication
Record selection Direct mode Parameter channels
1
2
…
n
Torque Position Speed Free access to all
parameters
Reading and writ-
ing
Table 3.2 The FHPP principle
3.4.2 RS232 interface
The RS232 protocol is primarily intended as a parameterisation interface, but it can also be used for controlling the CMMP-AS servo positioning controller in test situations.
3. Product description
Festo P-BE-CMMP-AS-…-11A 0708NH 31
3.4.3 CAN bus
The following profiles are available for communication via the CAN bus: CANopen protocol in accordance with DS301 with application profile DSP402 or The Festo FHPP positioning profile
The CMMP-AS series no longer supports the specific Festo-CAN protocol of the previous SEC-AC family of devices.
3.4.4 PROFIBUS
Support of PROFIBUS communication according to DP-V0. For drive technology applications,
the functions as per Profidrive Version 3.0 are available. The scope of functions covers functions as per Application Class 1 (speed and torque control) and Application Class 3 (point-to-point positioning). Further Profidrive functions are in preparation.
The device can also be integrated into control systems via a Profibus I/O map. This option provides advanced functions for the control system, like a standard PLC connection, via parallel wiring with the digital I/Os of the device.
A specific Festo telegram allows access to all device-specific functions, beyond the scope of the functions defined in Profidrive.
PROFIBUS profiles as used in the previous SEC-AC family of devices are no longer supported.
3.4.5 DeviceNET
P.BE-CMMP-FHPP-DN-SW DeviceNet manual describes the implemented DeviceNet protocol.
Festo has developed an optimised data profile, the "Festo Handling and Positioning Profile FHPP", tailored to target applications for handling and positioning tasks.
The FHPP enables uniform control and programming for the various field bus systems and controllers from Festo.
To do this, it defines largely unified operating modes, I/O data structures, parameter ob-
jects and process control sequences for the user.
DeviceNet is a machine-orientated network which enables connections between simple industrial devices (sensors, actuators) and higher-order devices (controllers). DeviceNet is based on the CIP protocol (Common Industrial Protocol) and shares all common aspects of CIP with adaptations enabling the frame size of messages to be adapted to that of DeviceNet.

3. Product description
32 Festo P-BE-CMMP-AS-…-11A 0708NH
In order to make commissioning fast and simple, the abilities of the DeviceNet interface of
the motor controller are described in an EDS file. By using a suitable configuration tool you can configure a device within a network. The EDS for DeviceNet is contained on the CD supplied with the product. The latest version can be downloaded from our homepage.
3.4.6 SERCOS
The SERCOS module allows the servo positioning controller to be connected to a SERCOS-compatible CNC controller. Communication via the SERCOS bus occurs over a ring-connected fibre-optic cable (FOC) at a transfer rate of up to 16 MBaud. The nominal and actual values (position, speed or torque values) for up to six connected servo positioning controllers can be exchanged with the CNC controller every 500 μs.
A special feature when using the SERCOS bus is the synchronisation of all participants with
each other. With several servo positioning controllers within a given bus, the internal con-trollers and end-stages of all servo positioning controllers are phase-locked to each other.
The SERCOS module can only be operated in slot Ext 2.
3.4.7 I/O functions and device control
The basic control functions are provided by ten digital inputs (see chapter A.5.3 I/O inter-face [X1], page 105):
To allow positioning targets to be saved, the CMMP-AS servo positioning controller has a target table, in which positioning targets can be saved and called up later. At least four digital inputs are used to select the targets, a single input is used as the start input.
The proximity switches serve to limit the range of motion for safety reasons. During hom-ing, one of the two proximity switches can serve as reference points for positioning control.
Two inputs are used to enable the hardware-side output stage and the regulator.
High-speed sample inputs are available for use in time-critical applications (homing runs, special applications, ...).
The CMMP-AS servo positioning controller has three analogue inputs for input levels rang-ing from +10 V to -10 V. One input is a differential input (16 bit), ensuring a high degree of protection against interference. Two inputs (10 Bit) are single-ended. The analogue signals are quantified and digitalised by the analogue-digital converter at a resolution of 16 bits or 10 bits. These analogue signals serve to specify setpoints (speed or torque) for the control.
The existing digital inputs are already allocated to the basic functions in standard applica-tions. For further functions such as teaching, a separate "Start homing run" input or a Stop output, the analogue inputs AIN1 and AIN2 (also usable as digital inputs DIN12 and DIN13) and the digital DOUT2 and DOUT3 are optionally available.

3. Product description
Festo P-BE-CMMP-AS-…-11A 0708NH 33
If the digital inputs AIN1 and ANI2 are to be used as digital inputs, then a ground reference from AGND to GND24 at plug X1 pins 14 and 6 must be established.
Note
Connecting AGND to GND24 renders the electronics overvoltage protection inoperable.
Limit switch
Limit switch active
Actual speed value(1)
Actual speed value(2)
t1
t2
t3
t4
Time Action
t1 < 250 µs (tcycN)
t2 = N x 250 µs (tcycN) Depending on the quick stop deceleration ramp
t3 < 10 ms
t4 = M x 250 µs (tcycN) Depending on the speed ramp
Table 3.3 Switch-on sequence timing
Actual speed value(1): Permanent blocking of the direction of rotation by the end switch.
Actual speed value(2): No permanent blocking of the direction of rotation by the end switch.

4. Function overview
34 Festo P-BE-CMMP-AS-…-11A 0708NH
4. Function overview
4.1 Motors
4.1.1 Synchronous servo motors
In a typical application, permanently excited synchronous machines with sinewave EMC sequences are used. The CMMP-AS servo positioning controller is a universal servo drive controller that can be operated with standard servo motors. The motor data is determined and parameterised via automatic motor identification.
4.1.2 Linear motors
In addition to rotary applications, the CMMP-AS servo positioning controller is also suit-able for use with linear motors. Permanently excited synchronous linear motors are sup-ported. The high quality signal processing, especially of the encoder signals, and the high clock frequency make the CMMP-AS family of servo positioning controllers suitable for controlling non-ferrous and iron-core synchronous motors with low motor inductance (2 … 4 mH).
4.2 Functions of the CMMP-AS servo positioning controller
4.2.1 Compatibility
From the user point of view, for reasons of compatibility the control structure of the CMMP-AS servo positioning controller has largely the same properties, interfaces and parameters as the previous SEC-AC family.
PWM M
Position
controller
Speed
controller
Current
controller
Power
stage Motor
Angle encoder
1 and 2
Actual value management
X2A
X2B
X10
Set point management:
- Analogue inputs
- Fixed values
- Synchronization
- Ramp generator
Position control and
Interpolation
Trajectories calculation:
- Reference position
- Motorspeed precontrol
- Motorcurrent precontrol E1 E2
Fig. 4.1 Control structure of the CMMP-AS

4. Function overview
Festo P-BE-CMMP-AS-…-11A 0708NH 35
Fig. 4.1 shows the basic control structure of the CMMP-AS. The current controller, speed
controller and charge controller are arranged as cascaded controllers. Due to the rotor-oriented control principle, the current can be separately specified as an active current portion (iq) and an idle current portion (id). For this reason there are two current regula-
tors, each of which is configured as a PI regulator. For reasons of clarity, in Fig. 4.1 the id
controller is not shown.
The basic operating modes are torque control with speed limiting, speed control with torque limiting, and positioning. Functions such as synchronisation and "Flying saw" are variants of these basic operating modes.
4.2.2 Pulse width modulation (PWM)
With the CMMP-AS servo positioning controller, the current regulator clock frequency is set to a cycle time of 125 µs. To minimise switching losses, the pulse width modulation clock frequency can be set to half that of the current regulator clock frequency.
The CMMP-AS servo positioning controller also has a sinewave modulation or, alternatively, third harmonic sinewave modulation. This increases the effective converter output voltage. The modulation type can be selected using the parameterising software. The default set-ting is third-harmonic sinewave modulation.
Converter output voltage Output voltage at the motor terminals
VA,(sin) VLL,Motor = approx. 320 Veff
VA,(sin+sin3x) VLL,Motor = approx. 360 Veff
Table 4.1 Output voltage at the motor terminals with VZK = 560 V
4.2.3 Setpoint management
In the torque and speed control operating modes, the setpoint can be specified using set-point management.
The following values can be selected as setpoint sources:
3 analogue inputs: AIN 0, AIN 1 and AIN 2
3 fixed values: 1st value: Setting dependent on the controller enable logic:
- A fixed value of 1 or
- RS232 interface or
- CANopen-Bus interface or
- PROFIBUS-DP interface or
- DeviceNet interface
- SERCOS
2nd and 3rd values: Setting of fixed values 2 and 3
Process controller SYNC input Additional incremental encoder input [X10]

4. Function overview
36 Festo P-BE-CMMP-AS-…-11A 0708NH
Information
If no setpoint source is activated, then the setpoint is zero.
A ramp generator with an upstream adder is available in the setpoint management. Appro-priate selectors can be used to select any of the abovementioned setpoint sources and use them via the ramp generator. Two further selectors allow the selection of additional set-point sources that are not used via the ramp generator. The final setpoint results from the summation of all values. The ramp acceleration and braking times can be separately pa-rameterised depending on the direction.
4.2.4 Controlled torque mode
In controlled torque mode, a particular setpoint torque, which the servo controller is to generate in the motor, is specified. In this case, only the current regulator is activated since the torque is proportional to the motor current.
4.2.5 Controlled speed mode
This operating mode is used when the motor speed is to be kept constant, regardless of the effective load. The motor speed is exactly the speed specified in the setpoint management.
The speed regulation circuit cycle time of the CMMP-AS servo positioning controller is 250 µs.
The speed controller is designed as a PI controller with an internal resolution of 12 bits per revolution/min. To suppress "wind-up effects", the integrator function is stopped when subordinate limits are reached.
In the controlled speed mode, the current regulator and the speed regulator are active. Analogue setpoint inputs can optionally be used to define a "reliable zero". If the ana-logue setpoint lies within this range, then the setpoint is set to zero ("dead zone"). This can be used to suppress malfunctions or offset drift. The dead zone can be activated/de-activated and the width can be adjusted.
The actual values of speed and position are determined from the internal motor encoder system, which is also used for commutation. An encoder interface can be selected for pro-viding the actual values used for speed regulation (e.g. reference encoder or an appropri-
ate system at the external incremental encoder input). The actual speed value for speed regulation is then obtained from (e.g.) the external incremental encoder input.
The speed setpoints can be internally specified or also derived from the data of an external encoder system (speed synchronisation via [X10] for the speed regulator).

4. Function overview
Festo P-BE-CMMP-AS-…-11A 0708NH 37
Speed message
Speed setpointActual speed
DOUT:Setpoint speed
reached
t1 t1
t2 t2
- t1 < 500 µs (tcycP)
- t2 < 500 µs (tcycP)
4.2.6 Torque-limited speed control
The CMMP-AS servo positioning controllers support torque limited, speed regulated opera-tion with the following characteristics:
- Rapid updating of limit values, e.g. at 200 µs intervals
- Addition of two limit value sources (e.g. for pilot control values)
4.2.7 Synchronisation to external clock sources
The controllers work with sinewave current pulses. The cycle time is always permanently bound to the PWM frequency. The device has a PLL to allow synchronisation of the device regulation with external clock sources (e.g. DeviceNet, PROFIBUS MC). In these cases the cycle time is variable within certain limits to allow synchronisation with the external clock signal.
4.2.8 Load torque compensation for vertical axes
For vertical axis applications the holding torque at standstill can be acquired and stored. It is then used as a switching signal in the torque control circuit and improves the starting behaviour of the axis after the holding brake has been released.
4.2.9 Positioning and position control
In positioning mode, in addition to operation with speed control, a higher-level position controller is active that measures deviations between setpoint position and current posi-tion and uses this to define setpoint values for the speed controller.

4. Function overview
38 Festo P-BE-CMMP-AS-…-11A 0708NH
The position controller is a proportional controller. The cycle time of the positioning control
loop is twice that of the speed control cycle time. However, it can be parameterised as whole multiples of the speed control cycle time.
When the position controller is switched in, then it receives setpoint values from the posi-tioning or synchronisation control system. The internal resolution if up to 32 bits per motor revolution (depending on the encoder used).
Position / Target reached
Start positioning
Positioning running
DOUT1: MC
Target position
Actual position
t1 t4
t2
t3
DIN0 - DIN3 +DIN10 & DIN11
t5
Time Action
t1 > 500 µs (tcycP) Impulse length of the START signal
t2 < 1 ms (tcycIPO) Delay before the drive starts
t3 = N x 1 ms (tcycIPO) Target window reached + response delay
t4 > 500 µs (tcycP) Setup time for position selection
t5 > 1 ms (tcycIPO) Holding time for position selection
Table 4.2 Timing positioning
4.2.10 Synchronisation, electrical gearboxes
The CMMP-AS servo positioning controller allows master-slave mode, which shall be re-ferred to as synchronisation from now on. The controller can function either as a master or slave.
When the CMMP-AS servo positioning controller operates as a master then it can provide a slave with the current rotor position at the incremental encoder input [X11]. If the CMMP-AS

4. Function overview
Festo P-BE-CMMP-AS-…-11A 0708NH 39
servo positioning controller has a communication interface then, as a master, it can trans-
fer its current position, speed, or both values as required.
When the CMMP-AS servo positioning controller is to operate as a slave, various inputs are available for synchronisation. An incremental encoder (position synchronisation via [X10] with speed pre-control for the speed controller) or the communication interface can be used as inputs. The CMMP-AS servo positioning controller can calculate the speed pre-control values itself. All inputs can be activated/deactivated. The internal encoder can be switched off if desired, when another input is used as the current value encoder. This also applies to the speed control operating mode. The external inputs can be weighted with gearing factors. The various inputs can be used individually and also simultaneously.
4.2.11 Brake management
The CMMP-AS servo positioning controller can directly control a holding brake. The holding brake is operated with programmable delay times. In the positioning mode, an additional automatic braking function can be activated that switches off the end stage of the CMMP-AS servo positioning controller after a parameterisable idle period and engages the brake. The mode of operation is compatible with the functions of the previous SEC-AC device family.
4.3 Positioning control
4.3.1 Overview
In the positioning mode, a certain position is specified to which the motor must move. The
current position is obtained by analyzing the internal encoder information. The deviation of the position is processed in the position controller and passed on to the speed regulator.
The integrated positioning control allows jerk-limited or time-optimised positioning, either relative to the current position or absolute with respect to a reference point. It provides setpoint values to the position controller and, to improve the dynamic behaviour, also to the speed controller.
With absolute positioning, travel occurs directly to a defined target position. With relative
positioning, travel occurs around a parameterised path. The positioning range of 232
full rotations ensures that relative positioning can occur as often as desired in a given direction.
The positioning controller is parameterised via a target table. This contains entries for parameterising a target via a communication interface and also target positions that can
be access via the digital inputs. The positioning method, travel profile, acceleration and braking times, and maximum speed can be specified for every entry. All targets can be pre-parameterised. Positioning then only requires an entry to be selected and a start command to be issued. The target parameters can also be changed online via the communication interface.
The number of positioning records that can be stored by the CMMP-AS servo positioning controller is 250 via Fieldbus and 255 via I/O.

4. Function overview
40 Festo P-BE-CMMP-AS-…-11A 0708NH
All position records have the following possible settings:
Target position Positioning speed Final speed Acceleration Brake acceleration Torque pilot control Remaining path message The following additional flags:
- Relative/Relative to last target/Absolute
- Wait for end/Cancel/Ignore start
- Synchronised
- Round axis: Permanently specified direction of movement
- Option: Automatic braking when subsequent positioning is missing
- Option: Travel speed continuously adjustable via analogue input during travel
- Various options for creating motion programs
The positioning records can be accessed via all bus systems or the parameterising soft-ware. The positioning sequence can be controlled via digital inputs.
4.3.2 Relative positioning
With relative positioning, the target position is obtained by adding a value to the current
position. Since a fixed zero point is not required, homing is not absolutely necessary. However, this is often useful in order to bring the drive to a defined position.
Concatenation of relative positioning can be used to continuously position in the same direction (e.g.) for a trimming unit or conveyor (incremental dimensions).
4.3.3 Absolute positioning
Here, the positioning target is moved to regardless of the current position. To be able to execute absolute positioning we recommend first referencing the drive. With absolute positioning the target position is a fixed (absolute) position relative to the zero point or reference point.
4.3.4 Motion profile generator
With travel profiles, a distinction is made between time-optimised and jerk-limited posi-tioning. With time-optimised positioning, motion occurs with the maximum specified ac-celeration and braking. The drive moves to the target in the shortest possible time, the speed sequence is trapezoidal and the acceleration sequence square. With jerk-limited positioning, the acceleration is trapezoidal and the speed sequence is third-order. Since the acceleration constantly changes, the drive moves in a manner that is especially gentle to the mechanics.

4. Function overview
Festo P-BE-CMMP-AS-…-11A 0708NH 41
a(t) a(t) a(t)
t tt
v(t)
t
v(t)
t
v(t)
t
at time optimal jerk limit jerk limit
Fig. 4.2 CMMP-AS servo positioning controller travel profile; t1<t2<t3,when a max 1, a max 2, and a max 3 are the same
4.3.5 Homing run
Every positioning controller requires a defined zero point at the start of operation, which is determined by a homing run. The CMMP-AS servo positioning controller can independently perform this homing run. It analyses various inputs for the reference signal, e.g. the limit switch inputs.
A homing run can be started via a command over the communication interface or automa-tically when the controller is enabled. The start can also optionally occur via a digital input
configured using the parameterising software, in order to perform a targeted homing run independently of the controller enable. The controller enable acknowledges error messages and can be switched off on an application-dependent basis without requiring a new hom-ing run when it is enabled once more. Since the existing digital inputs are usually occupied in normal applications, the analogue inputs AIN1 and AIN2 can optionally be used as digi-tal inputs DIN AIN1 and DIN AIN2 and the digital outputs DOUT2 and DOUT3 can also be used as digital inputs DIN10 and DIN11.
Multiple methods based on the DSP 402 CANopen protocol are implemented for the hom-ing run. With most methods, a switch is searched for at searching speed. Further motion depends on the method used and the type of communication. If a homing run is activated via the Fieldbus then no subsequent positioning to a zero position is performed. This is
optionally performed at Start via the controller enable or RS232. An optional subsequent positioning is always possible. The default setting is "No subsequent positioning".
The ramps and speeds of the homing run can be parameterised. The homing run can also be done time-optimised or jerk-free.
4.3.6 Positioning sequences
Positioning sequences are a number of sequentially organised positioning records. These are travelled to one after another. A positioning record can be made part of a path program via its path program options. This results in a linked list of positions:

4. Function overview
42 Festo P-BE-CMMP-AS-…-11A 0708NH
POS1
POS13
POS19
START
END
POS5 POS6
POS7 POS8
Fig. 4.3 Route program
The user defines the positioning sequence to travel by specifying the start position of the path program. Linear or cyclic sequences are possible. The end of a positioning sequence is indicated by setting the respective subsequent position to an "impossible" value (e.g. -1).
The start position of the path program can be defined:
Starting position - Via Fieldbus
- Via digital inputs
The number of positions in each positioning sequence is only limited by the total number of available positions.
Every position record can be used in the path program. All position records have the fol-lowing possible settings for this:
Settingpossibilities - Subsequent position numbers for two subsequent positions (multiple subsequent positions are possible using continuation via the digital inputs)
- Positioning travel delay time
- Wait for continuation via the digital inputs at the end of the po-sitioning
- Flag: Never stop at this position if the path program is canceled
- Set digital output when position has been reached / positioning started
Further information is provided in the software manual "Servo positioning controller ARS Optional Stop input CMMP-AS".
4.3.7 Stop input in positioning mode
The Stop input can interrupt the running positioning by setting the specified digital input. When the digital input is reset, positioning continues to the original target position. Since the existing digital inputs are normally occupied in normal applications, the analogue in-puts AIN1, AIN2 or the digital outputs DOUT2 and DOUT3, which can also be used as inputs, can be used for this.

4. Function overview
Festo P-BE-CMMP-AS-…-11A 0708NH 43
4.3.8 Contour control with linear interpolation (in preparation)
The implementation of "interpolated position mode" allows the specification of position setpoints in multi-axis controller applications. For this, position setpoints are specified by a higher-order control system in a fixed time slot pattern (synchronisation interval). If the interval is larger than a positioning control cycle, the controller independently interpolates the data values between two specified position values, as shown in the following graphic. The servo positioning controller also calculates a corresponding speed pilot control.

4. Function overview
44 Festo P-BE-CMMP-AS-…-11A 0708NH
y
t
t : synchronisation intervals y n c
tP
tP
: Setposition, intern interpolated
: Interpolation data
: Cycle time position control / positioning
: Interpolated (reference value)characteristic of the position
: Driven characteristic of the position (actual value)
tp
Fig. 4.4 Linear interpolation between two data values
4.3.9 Time-synchronised multi-axis positioning
In multi-axis applications using the "interpolated position mode", clock synchronisation allows simultaneous motions. All the CMMP-AS servo positioning controllers, i.e. the entire controller cascade, are synchronised to the external "clock" signal. Positioning values for multiple axes are read and executed without jitter at the same time. For example, the Sync message of a CAN bus system can be used as the "clock" signal.
This allows (e.g.) multiple axes with different path lengths and travel speeds to be moved to their targets at the same time.

5. Functional safety engineering
Festo P-BE-CMMP-AS-…-11A 0708NH 45
5. Functional safety engineering
5.1 General information and intended use
The CMMP-AS family of servo positioning controllers support the "Safe standstill" safety function, providing protection against unexpected motion as per the requirements of the EN 954-1, Category 3 standard.
Bringing the machine to a standstill must be carried out and ensured by the machine con-trol system. This especially applies to vertical axes without self-limiting mechanics or counterbalancing.
Based on a danger/risk analysis, as per the machine directives 98/37/EG or EN ISO 12100, EN 954-1 and EN 1050, the machine manufacturer must plan a safety system for the entire
machine, including all integrated components. This also included the electric drives.
The EN 954-1 standard defines the controller requirements in five different categories based on the level of risk (see Table 5.1).
Category 1) Summary of requirements System behaviour 2) Principles for achieving
safety
B The safety-relevant components and/or
protection mechanisms, and your own
components, must be designed, built,
selected, assembled and combined in
such a way as to conform with the
relevant standards so that they can
withstand the expected influences.
The occurrence of a fault
can lead to a loss of the
safety function.
Primarily characterised
by the selection of com-
ponents
1 The requirements of category B must be
satisfied.
Proven components and safety principles
must be used.
The occurrence of a fault
can lead to a loss of the
safety function, but the
probability of a fault
occurring is less than for
category B.
2 The category B requirements have to be
fulfilled and proven safety principles
must be used. The safety function must
be checked by the machine controller at
suitable intervals.
The occurrence of a fault
between such checks can
lead to a loss of the safety
function.
The loss of the safety
function will be detected
by the next check.
Primarily characterised
by the structure

5. Functional safety engineering
46 Festo P-BE-CMMP-AS-…-11A 0708NH
Category 1) Summary of requirements System behaviour 2) Principles for achieving safety
3 The category B requirements have to
be fulfilled and proven safety principles
must be used. Safety-relevant parts
must be equipped as follows:
A single fault in any component
must not lead to a loss of the
safety function.
Single faults must be recog-
nised as soon as this is reason-
able possible.
When this one fault oc-
curs, the safety function is
still preserved.
Some, but not all faults
will be detected.
The occurrence of a num-
ber of undetected faults
together can lead to a loss
of the safety function.
4 The category B requirements have to
be fulfilled and proven safety principles
must be used. Safety-related compo-
nents must be constructed as two-
channel systems with constant self-
monitoring and full error recognition!
When faults occur, the
safety function must al-
ways be preserved.
The faults must be de-
tected early enough to
prevent a loss of the
safety function.
1) The category is not intended to define any sort sequence or hierarchical arrangement of safety-related
requirements.
2) Risk analysis is used to determine whether a complete or partial loss of safety function(s) due to faults is
acceptable.
Table 5.1 Description of the category requirements as per EN 954-1
The EN 60204-1 standard deals with the handling of emergencies and defines the terms EMERGENCY-OFF and EMERGENCY-STOP (see Table 5.2).
Handling Definition (EN 60204-1) Danger case
EMERGENCY-
OFF
Electrical safety in case of emergency by
switching off the electrical energy to all or
part of the installation.
EMERGENCY-OFF is to be used where a
risk of electric shock or other electrical
risk exists.
EMERGENCY-
STOP
Functional safety in case of emergency by
bringing a machine or movable parts to a
standstill.
EMERGENCY-STOP is used to stop a process
or a motion if this represents a danger.
Table 5.2 EMERGENCY-OFF and EMERGENCY-STOP as per EN 60204-1
Electrical isolation does not occur with the "Safe standstill" function. This does not pro-vide protection from an electric shock. In the sense of the standards, an EMERGENCY-OFF system cannot be implemented via "Safe standstill" because this requires the complete plant to be switched off via a mains power isolator of some kind (main power switch or mains circuit breaker).
The EN 60204-1 standard describes three stop categories that can be used for shutdowns, depending on the results of a risk analysis. (see Table 5.3).

5. Functional safety engineering
Festo P-BE-CMMP-AS-…-11A 0708NH 47
Stop category Type Handling
0 Uncontrolled shutdown through
immediate switching off of the energy.
EMERGENCY-OFF or
EMERGENCY-STOP
1 Controlled shutdown through switching
off of the energy when a standstill has
been reached.
EMERGENCY-STOP
2 Controlled standstill without switching
off of the energy.
Not suitable for EMERGENCY-OFF or
EMERGENCY-STOP
Table 5.3 Stop categories
5.2 Integrated "Safe standstill" function
Warning
The "Safe standstill" function does not provide protection against electric shock but rather only against dangerous mechanical motion!
5.2.1 General information / description of "Safe standstill"
With "Safe standstill" the energy supply to the device is reliable interrupted. The drive may not generate torque and thus cannot make any dangerous rotations. With suspended loads, additional measures must be taken to ensure that the load does not fall (e.g. mechanical holding brake). Monitoring of the standstill position must not be performed in the "Safe standstill" state.
There are basically three suitable measures for implementing "Safe standstill":
Measures - Circuit breaker between the mains grid and the drive system
(mains breaker)
- Circuit breaker between the power unit and the drive motor (motor breaker)
- Secure pulse blocker (blocking of impulses to the power semi-conductors, integrated into the CMMP-AS)
The use of the integrated solution (secure pulse blocker) offers several advantages:
Advantages - Fewer external components, e.g. circuit breakers
- Less cabling effort and less space required in the switching cabinet
- Lower cost
Another advantage is the availability of the system. The integrated solution allows the intermediate circuit of the servo controller to remain charged. This means no waiting time when the system is restarted.

5. Functional safety engineering
48 Festo P-BE-CMMP-AS-…-11A 0708NH
µP SM
X3
monitoring
of the
driver supply
X1
6 6 6 3
Holding brake (optional)
1
2
6
5
4
3
24V internal 15V IGTB driver supply
Triggering of driver supply relay
(driver supply switch off)
High = driver supply voltage
"ON"Low = "pulse inhibitor" active
"Locking" of holding brake in case of
triggeringDriver supply relay = low
IGBT output stage
Output stage driver
PWM signal inhibition
Co
ntr
olle
r e
na
blin
g D
IN5
Ou
tpu
t sta
ge
en
ab
ling
DIN
4
Internal output
stage enabling
Triggering of holding brake
High = lift brake (active)
Low = apply brake
9
21
1. shut-down path
2. shut-down pathFloating feedback
contact for driver
supply
X6
1
2
7,8,9
+24V-IO
Fig. 5.1 "Safe standstill" block schematic as per EN 954-1 Category 3
Caution
If the "Safe standstill" function is not required, then pins 1 and 2 of [X3] must be bridged.
For "Safe standstill" as per EN 954-1 Category 3, a second channel is required, i.e. motion must be reliably prevented via two separate, completely independent paths. These two paths for interrupting the energy supply to the drive with the reliable impulse block, are called switch-off paths:
1st switch-off path: End stage enable via [X1] (blocking of the PWM signals; the IGBT drivers no longer receive pulse patterns).
2nd switch-off path: Interruption of the supply for the six end stage IGBTs via [X3] using a relay (the IGBT optocoupler drivers are removed from the power supply via a relay, thus preventing the PWM signals from reaching the IGBTs).
A plausibility check between the relay control for the end stage driver supply and the monitoring of the driver supply is performed by the microprocessor. This is used for error recognition of the im-pulse blocker and also for suppressing error messages in normal operation
E 05-2 ("Driver supply undervoltage").

5. Functional safety engineering
Festo P-BE-CMMP-AS-…-11A 0708NH 49
3rd potential-free
feedback contact:
The integrated "Safe standstill" circuitry also has a potential-free
feedback contact ([X3] Pins 5 and 6) for the existence of the driver supply. This is an NC contact. It must be connected to (e.g.) the higher level control system. At suitable intervals (e.g. PLC cycle time or on every "Safe standstill" request), the PLC must perform a plau-sibility check between the relay control for the driver supply and the feedback contact (contact open = driver supply present).
If an error occurs in the plausibility check, the control system must prevent further operation by (e.g.) removing the controller enable or switching off the mains circuit breaker.
5.2.2 Secure stopping brake control
When "Safe standstill" is activated, power is removed from the holding brake via two channels (brake engaged); (see block schematic).
1st channel: The holding brake is controlled by DIN5 (controller enable) in nor-mal operation (see following timing diagram). The 1st "end stage enable" switch-off path affects the brake driver via the microproc-essor and removes power from the holding brake (brake applied).
2nd channel: The 2nd "Relay control for driver supply" switch-off path directly controls a MOSFET that activates the holding brake (brake applied).
Caution
The user is responsible for the dimensioning and the reliable func-tioning of the holding brake. The functioning of the brake must be ensured via a suitable braking test.

5. Functional safety engineering
50 Festo P-BE-CMMP-AS-…-11A 0708NH
5.2.3 Functional method / Timing
The following timing diagram illustrates the functional method of "Safe standstill" to-gether with controller enabling and the stopping brake:
t
1
t
2
t
3
t
5
t
6
t
7
t
8
t1
0
t1
1
t1
2
t1
3
t
9
t
4
t
t
t
t
t
t
t
t
t
Triggering of pulse amplifier supply relay (optocoupler driver)
X3.2 (24V)
X3.2 (0V)
Supply of pulse amplifiers (optocoupler driver)
“ON“ (15V)
“OFF”
Floating feedback contact for driver supply
(X3.5/6)open
closed
Output stage enabling (X1, DIN4)“ON”
Timing of output
stage enabling
variable
Controller enabling (X1, DIN5)
Holding brake control (X6.1/2)Released
(24V)
Fixed
(0V)
Internal output stage enabling
(controlled by µP)
Set speed "n"
n=0
n
“H”
“H
”
“H”
Seven-segment
display
Delay until brake is
released!
Delay until brake is
applied!
Timing of "safe stop"
activation variable.
To be determined by user,
e.g. by means of safety
switching devices, depending
on application.
2. shut-down path
1. shut-down path
Discharge curve of
electrolytic capacitors for the
supply of the pulse amplifiers
"safe stop""safe stop"
“OFF”
“ON”
“OFF”
Can be set via FCT
Both ramps ca be set
separately via FCT
Fig. 5.2 "Safe standstill" timing as per EN 954-1 Category 3

5. Functional safety engineering
Festo P-BE-CMMP-AS-…-11A 0708NH 51
Description of the timing diagram:
This timing diagram is based on the example of speed regulation using the controller enable DIN 5 at [X1]. For Fieldbus applications, the controller enable is additionally controlled via the respective Fieldbus. Depending on the application, the operating mode is also parame-terisable via the parameterising software.
Note
The "Safe standstill" state is shown dotted compared to the func-tional operation!
Starting state: - The 24 V supply is switched on and the intermediate circuit is charged.
- The servo controlled is in the "Safe standstill" state. This state
is indicated by a flashing "H" on the 7-segment display.
In order to switch the servo controller end stage active once more, and thus operate the connected motor, the following steps must occur:
1. The relay control for switching the end stage driver power supply (2nd switch-off path) must be supplied with 24 V between pin 2 and pin 3 of [X3] at time t1.
2. The driver supply is then charged.
3. The potential-free feedback contact ([X3] Pins 5 and 6) for plausibility checking of the driver supply relay control opens a maximum of 20 ms after t1 (t2-t1) and the driver
supply is switched off.
4. Approx 10 ms after the feedback contact opens, the "H" on the display goes out at time t3.
5. The time for the end stage enable ([X1], DIN4) is largely freely selectable (t4-t1). The enable may occur at the same time as the relay is controlled, but it must occur approx.10 µs (t5-t4) before the rising edge of the controller enable ([X1], DIN5), depending on the application.
6. The rising edge of the controller enable at time t5 releases the motor holding brake (if present) and the end stage enable occurs. The brake can only be released when the re-lay for switching the driver supply is engaged, since this controls a MOSFET in the holding brake circuit. A travel start delay time (t6-t5) can be set using the parameteris-
ing software, that regulates the drive at a speed of "0" for the specified time, before moving at the defined speed after this delay, at time t6. The travel start delay time is set to ensure that the brake has actually released before motion begins. For motors without a holding brake, this time can be set to 0.
7. At time t7 the drive has reached the set speed. The required ramp settings can be pa-rameterised using the parameterising software.

5. Functional safety engineering
52 Festo P-BE-CMMP-AS-…-11A 0708NH
The following steps show how you can bring a rotating drive into the "Safe standstill"
state:
1. Before "Safe standstill" is activated (i.e. the driver supply relay "OFF" and the end stage enable "OFF"; both switch-off paths block the PWM signals), the drive should be brought to a standstill be removing the controller enable. Depending on the applica-tion, the braking ramp (t9-t8) is parameterisable using the parameterising software ("Emergency stop brake acceleration").
Warning
DANGER!
Activating "Safe standstill" during operation causes the drive to slowly come to a stop. For drives with a holding brakes, this is ap-plied. It is essential to ensure that the motor brake can stop the drive motion.
2. After reaching a speed of 0, the drive is controlled at this setpoint for a parameterisable switch-off delay time (t10-t9). This adjustable time is the delay required to apply the motor holding brake. This time depends on the holding brake used and must be pa-rameterised by the user. For applications without a holding brake, this time can be set to 0.
3. After this time, the internal end stage enable is switched off by the microprocessor (t10).
The holding brake is always applied when the "braking ramp time + set switch-off delay" has expired, even when the drive has not come to a stop within this time!
4. From time t10 the "Safe standstill" can be activated (driver supply relay and end stage enable switched off at the same time). Time (t11-t10) depends on the application and must be defined by the user.
5. At time t13, an "H" is displayed on the 7-segment display of the servo controller to indicate a "Safe standstill". This occurs at least 30 ms after the potential-free feed-back contact closes (t13-t12).
6. when the driver supply relay control signal is removed (t11) the capacitors in this cir-
cuit area discharge. Approx 80 ms (t12-t11) after removing the driver supply relay con-trol signal the feedback contact closes ([X3], Pin 5 and 6).

5. Functional safety engineering
Festo P-BE-CMMP-AS-…-11A 0708NH 53
5.2.4 Typical applications
Emergency stop circuit
Inputs Outputs
PLC
+24V+24V
+24V
+24V
0V
0V
Driver supply of
output stage
0V
[X3] SAFE STANDSTILL / SUPPLY 24V
[X1] I/O communication
Mains input
24V Input CMMP-AS-11A
24V-Input
µP
1
2
3
4
5
6
Triggering of relay
Error
NC1
NC2
Co
ntr
olle
r e
na
blin
g
Ou
tpu
t sta
ge
dri
ve
r su
pp
ly
Power
contactor
L1
L2
DIN5: Controller enabling
DIN4: Output stage enabling
CMMP-AS-11A...
EMERGENCY
STOP
switching
device
EN954-1 KAT3
with delay
K1
EMERGENCY
STOP request
EMERGENCY STOP
requested
21
9
1
2
10
11Drawn contact
position:
EMERGENCY
STOP requested
or supply voltage
switched off
Fe
ed
ba
ck d
rive
r su
pp
ly
Ou
tpu
t sta
ge
en
ab
ling
[X9.] Power supply
L3 3
Fig. 5.3 Emergency stop circuit as per EN 954-1 Category 3 and Stop Category 0 as per EN 60204-1
Mode of operation:
The EMERGENCY-STOP request causes the EMERGENCY-STOP switching device to block the end stage enable and the relay control for the IGBT end stage driver supply. The drive runs to a standstill and, if present, the motor holding brake is engaged. The drive is in the "Safe standstill" state.
The EMERGENCY-STOP switching device is approved for safety category 3 as per EN954-1.

5. Functional safety engineering
54 Festo P-BE-CMMP-AS-…-11A 0708NH
A higher-level control system monitors the "EMERGENCY-STOP request" and "Driver sup-
ply feedback" signals and checks them for plausibility. If an error occurs the mains circuit breaker is switched off.
The intermediate circuit voltage is maintained and is immediately available for the drive after the EMERGENCY-STOP switching device is deactivated and the controller is enabled once more.
Connection of the motor and the optional holding brake is not shown here and can be found in chapter 7 "Electrical installation".
Warning
DANGER!
The motor brake must be designed to be capable of stopping the drive motion.

5. Functional safety engineering
Festo P-BE-CMMP-AS-…-11A 0708NH 55
Protective door monitoring
Inputs Outputs
PLC
+24V+24V
+24V
0V
0V
L1
L2
Safety door
switch
EN954-1 KAT3
with delay
K1Safety door open
Request for standstill as per EN 60204-1 (stop category 1)
open
closed
Safety door monitor
Drawn contact
position: Safety
door open or
supply voltage
switched
off
Driver supply of
output stage
0V
[X3] SAFE STANDSTILL / SUPPLY 24V
[X1] I/O communication
Mains input
24V Input
24V-Input
µP
1
2
3
4
5
6
Triggering of relay
Error
NC1
NC2
DIN5: Controller enabling
DIN4: Output stage enabling
CMMP-AS-11A...
21
9
1
2
10
11
[X9.] Power supply
Power
contactor
Co
ntr
olle
r e
na
blin
g
Ou
tpu
t sta
ge
dri
ve
r su
pp
ly
Ou
tpu
t sta
ge
en
ab
ling
Fe
ed
ba
ck d
rive
r su
pp
ly
3L3
Fig. 5.4 Protective door monitoring as per EN 954-1 Category 3 and Stop Category 1 as per
EN 60204-1
Mode of operation:
The request to bring the motor to standstill sets the controller enable to low.
The drive slows to a speed of 0 using the defined braking ramp (parameterisable using the parameterising software). After the ramp time has expired (including the switch-off delay for the holding brake if present), the control signal for the driver supply relay and the end stage enable are removed by the higher-level control system.

5. Functional safety engineering
56 Festo P-BE-CMMP-AS-…-11A 0708NH
The higher-level control system monitors the "Protective door open", "End stage drive
supply output" and "Driver supply feedback" signals and checks them for plausibility. If an error occurs the mains circuit breaker is switched off.
Opening the protective door also interrupts the end stage enable and the control signal for the driver supply relay. The driver is in the "Safe standstill" state and is protected against restarting.
The protective door switching device is approved for safety category 3 as per EN 954-1.
The intermediate circuit voltage is maintained and is immediately available for the drive after the protective door is closed.
If the protective door is opened without s standstill request, the drive runs to a stop as per EN 60204-1 stop category 0 and, if present, the motor holding brake is engaged. The driver
is then in the "Safe standstill" state and is protected against restarting.
A door position switch can also be used that keeps the protective door closed until the drive has stopped or the "Driver supply feedback" signal indicates a safe state and the plausibility check is successful. However, the "Safe standstill" state, providing protection
from restarting, is only reached when the protective door is actually opened (not shown).
Another possibility is to use a protective door switching device with delayed contacts. Opening the protective door directly affects the controller enable, whose falling edge causes a controlled standstill using a defined braking ramp. The "End stage enable" and "End stage driver supply" signals are then switched off after a delay by the safety compo-nent. The switch-off delay must match the braking ramp time (not shown)
Warning
DANGER!
The motor brake must be designed to be capable of stopping the drive motion.

6. Mechanical installation
Festo P-BE-CMMP-AS-…-11A 0708NH 57
6. Mechanical installation
6.1 Important instructions
Note
The CMMP-AS-C5-11A-3P and CMMP-AS-C10-11A-3P servo position-ing controllers
May only be used as integrated devices for control cabinet as-sembly
The mounting position is vertical with the power supply lines [X9] leading upwards
Mount with the clip to the control cabinet plate Mounting clearance:
For sufficient ventilation, 100 mm of clearance to other assem-blies is required above and below the device.
A mounting clearance of 150 mm underneath the device is rec-ommended for optimum cabling of the motor and angle encoder cables!
The servo positioning controllers of the CMMP-AS family are designed to be mounted side-by-side on a heat-dissipating mounting panel if used as intended and installed correctly. We wish to point out that excessive heating can lead to premature aging and/or damage to the device. With high thermal loads
on the CMMP-AS servo positioning controller, a mounting clear-ance of 87 mm is recommended!

6. Mechanical installation
58 Festo P-BE-CMMP-AS-…-11A 0708NH
Fig. 6.1 CMMP-AS servo positioning controller: Installation clearance

6. Mechanical installation
Festo P-BE-CMMP-AS-…-11A 0708NH 59
6.2 Device view
1 Reset button
2 Bus switched on
3 [X3]: Control connection
for driver supply relay (Safe standstill)
4 EXT 1 and EXT2 slots for
technology modules
5 Motor shield connection
6 [X4]: Connection for the
CANopen interface
7 [X5]: Connection for the
RS232 serial interface
8 Status display
9 Ready LED
aJ PE connection
Fig. 6.2 CMMP- servo positioning controller: Front view
9
1
2
3
8
7
6
4
5
aJ

6. Mechanical installation
60 Festo P-BE-CMMP-AS-…-11A 0708NH
1 PE connection
2 [X9]: Voltage supply
3 [X11]:Incremental
encoder output
4 [X10]:Incremental
encoder input
5 [X1]: I/O
communication
Fig. 6.3 CMMP-AS-11A servo positioning controller: Top view
1
2
3
4
5

6. Mechanical installation
Festo P-BE-CMMP-AS-…-11A 0708NH 61
1 Spring terminal
connection for the outer shield of the motor cable
2 Motor connection
[X6]
3 [X2A] : Resolver
connection
4 [X2B]: Encoder
connection
Fig. 6.4 CMMP-AS-11A servo positioning controller: Lower view
1
2
1
3
4

6. Mechanical installation
62 Festo P-BE-CMMP-AS-…-11A 0708NH
6.2.1 Assembly
There are mounting clips at the top and bottom of the CMMP-AS servo positioning control-ler. They are used to attach the servo positioning controller vertically to a control cabinet mounting plate. The clips are part of the radiator profile, ensuring an optimal heat transfer to the control cabinet plate.
Please use size M5 screws to attach the servo positioning con-troller.
Fig. 6.5 CMMP-AS servo positioning controller: Mounting plate

7. Electrical installation
Festo P-BE-CMMP-AS-…-11A 0708NH 63
7. Electrical installation
7.1 Connector pin assignments
Connection of the CMMP-AS servo positioning controller to the power supply, motor, brak-ing resistor and holding brake is done as per Fig. 7.1.
Fig. 7.1 Connection to the power supply voltage and the motor

7. Electrical installation
64 Festo P-BE-CMMP-AS-…-11A 0708NH
For operating the CMMP-AS servo positioning controller a 24 V power supply for the elec-
tronics must be connected to the +24 V and GND24V terminals.
The power end stage supply is connected to either terminals L1, L2, L3 for AC supplies or to ZK+ and ZK- for DC supplies.
The motor is connected to terminals U, V, W. The motor temperature switch (PTC or NC contact) is connected to the +Mtdig and –Mtdig terminals, if this uses the same cable as the motor phases. If an analogue temperature sensor (e.g. KTY81) is used in the motor, then this is connected to [X2A] or [X2B] via the encoder cable.
The connection of the shaft encoder via the D-SUB plug to [X2A] / [X2B] is diagrammatically shown in Fig. 7.1.
The PE connection of the CMMP-AS servo positioning controller must be connected to the
operational earth.
The CMMP-AS servo positioning controller must first be fully wired. Only then can the operating voltages be activated for the intermediate circuit and the power supply. If the polarity of the operating voltage connections is reversed, or if the operating voltage is
too high or the operating voltage and motor connections are incorrectly connected, the CMMP-AS servo positioning controller will be damaged.
7.2 Entire CMMP-AS system
An entire CMMP-AS servo positioning controller system is shown in fig. Fig. 7.2. The follow-ing components are required to operate the servo positioning controller:
Components - Main power switch
- Fault-current circuit breaker (RCD), all-current sensitive 300 mA
- Circuit breaker
- Power supply 24 V DC
- CMMP-AS servo positioning controller
- Motor with motor cable
A PC with a serial connection cable is required for parameterising.
A three-phase 16 A slow-blow (B16) circuit breaker must be installed in the mains power supply cable.
If CE certification is required, the following specifications for mains fusing must be observed: Listed Circuit Breaker as per UL 489, rated 480Y/277 Vac, 16 A, SCR 10 kA

7. Electrical installation
Festo P-BE-CMMP-AS-…-11A 0708NH 65
1 Main switch
2 Circuit breaker
3 Power supply
24 V DC
4 External braking
resistor
5 PC
6 EMMS-AS motor
with encoder
7 CMMP-AS
Fig. 7.2 Complete structure of CMMP-AS with motor and PC
7.3 Connection: Power supply [X9]
The CMMP-AS servo positioning controller also receives its 24 VDC power supply for the control electronics via connector [X9].
1
2
3
4
5
6
7

7. Electrical installation
66 Festo P-BE-CMMP-AS-…-11A 0708NH
The mains power supply is three-phase. A direct DC power supply can be used for the
intermediate circuit, as an alternative to AC power or for achieving intermediate circuit coupling.
7.3.1 Layout on device [X9]
- PHOENIX Power-Combicon PC 4/11-G-7,62
7.3.2 Counterplug [X9]
- PHOENIX Power-Combicon PC 4 HV/11-ST-7,62
- Coding on PIN12 (GND24V)
7.3.3 Pin assignments [X9]
Pin no. Description Value Specification
1 L1 230...480 VAC ±10%
50...60 Hz
Mains phase 1
2 L2 Mains phase 2
3 L3 Mains phase 3
4 ZK+ < 700 VDC Alternative supply: Positive intermediate circuit
voltage
5 ZK- < 700 VDC Alternative supply: Negative intermediate circuit
voltage
6 BR-EXT < 800 VDC Connection of the external braking resistor
7 BR-CH < 800 VDC Brake chopper connection for
- internal barking resistor with respect to BR-INT
- external barking resistor with respect to BR-EXT
8 BR-INT < 800 VDC Internal braking resistor connection (bridge to BR-CH
when using the internal resistor)
9 PE PE Mains grid protective earth connection
10 +24 V +24 VDC / max. 3 A Supply for control unit (1 A) and holding brake (2 A)
11 GND24 V GND24 VDC Supply reference potential
Table 7.1 Pin assignments [X9]

7. Electrical installation
Festo P-BE-CMMP-AS-…-11A 0708NH 67
If an external braking resistor is not used, then PIN7 and PIN8 must be bridged in order for the intermediate circuit quick discharge to function!
For larger braking power an external braking resistor must be con-nected [X9].
7.4 Connection: Motor [X6]
7.4.1 Layout on device [X6] at the CMMP-AS
- PHOENIX Power-Combicon PC 4/9-G-7,62
7.4.2 Counterplug [X6]
- PHOENIX Power-Combicon PC 4 HV/9-ST-7,62
- Coding on PIN1 (BR-)
7.4.3 Pin assignments [X6]
Pin no. Description Value Specification
1 BR- 0 V brake Holding brake (Motor), signal level depends on
switching state, High side / Low side switch 2 BR+ 24 V brake
3 PE PE Cable shield for holding brake and temperature
sensor (with Festo cables: not connected)
4 -MTdig GND Motor temperature sensor, NC, NO, PTC, KTY...
5 +Mtdig +3.3 V / 5 mA
6 PE PE Protective conductor from motor
7 W 0...360 Veff
0...5 Aeff (CMMP-AS-C5-11A-P3)
0...10 Aeff (CMMP-AS-C10-11A-P3)
0...1000 Hz
Connection for the three motor phases 8 V
9 U
Table 7.2 Pin assignments [X6] Connection: Motor
The cable shield of the motor cable must also be connected to the controller housing (spring terminal: Fig. 6.4).

7. Electrical installation
68 Festo P-BE-CMMP-AS-…-11A 0708NH
The intermediate circuits of several CMMP-AS servo positioning controllers can be con-
nected via the ZK+ and ZK- terminals at connector X9. Coupling of the intermediate circuits is useful in applications where high braking energies occur or where motion must still be performed when the power supply fails.
A motor holding brake can be connected to terminals BR+ and BR-. The locking brake is fed from the servo positioning controller power supply. The maximum output current provided by the CMMP-AS servo positioning controller must be noted.
To release the holding brake, the voltage tolerances at the holding brake connection terminals must be maintained.
Observe the specifications in table A8 for this.
It may be necessary to insert a relay between the device and the locking brake, as shown in Fig 7.3:
Br+
Br-
ARS 2100
Motor
+24 V power supply
GND power supply
+24 V brake
GND brakefree-wheeling diode
Resistor andcapacitor for spark extinguishing
CMMP-AS
Fig. 7.3 Connecting a high-current (> 2 A) locking brake to the device
Switching inductive DC currents via relays cause heavy currents and sparks. For interference suppression, we recommend inte-grated RC interference suppressors, e.g. from Evox RIFA, part num-ber: PMR205AC6470M022 (RC suppressor with 22 Ω in series with 0.47 uF).

7. Electrical installation
Festo P-BE-CMMP-AS-…-11A 0708NH 69
To release the holding brake, the voltage tolerances at the holding brake connection terminals must be maintained.
Observe the specifications in table A8 for this.
7.5 Connection: I/O communication [X1]
Fig. 7.4 Basic circuit diagram of connection [X1] shows the main functions of the digital and analogue inputs and outputs. The CMMP-AS servo positioning controller is shown to the right and the controlled connections to the left. The cable layout can also be seen.
Two potential areas are defined in the CMMP-AS servo positioning controller:
Analogue inputs and outputs:
All analogue inputs and outputs are referenced to AGND. AGND is internally connected to GND, the reference potential for the control unit with C and AD converters in the servo positioning controller.
This potential area is electrically isolated from the 24 V area and the intermediate circuit.
24 V inputs and outputs:
These signals are relative to the CMMP-AS servo positioning con-troller 24 V supply voltage via [X9] and are isolated by optocouplers from the control unit reference potential.
The CMMP-AS servo positioning controller has one differential (AIN0) and two single-ended analogue inputs, designed for input voltages 10 V. The AIN0 and #AIN0 are con-
nected to the control system using twisted-pair cables. If the control system has single-
ended outputs then the output is connected to AIN0 and #AIN0 is connected to the control system reference potential. If the control system has differential outputs then these are to be connected 1:1 to the differential inputs of the CMMP-AS servo positioning controller.
The AGND reference potential is connected to the control system reference potential. This
is necessary to ensure the the differential input of the CMMP-AS servo positioning control-ler cannot be overloaded by "common-mode interference".
There are two analogue monitor outputs with output voltages 10 V and a reference volt-
age output of +10 V. These outputs can be connected to the higher-level control system and the AGND reference potential must also be connected. If the control system has differ-ential inputs then the "+" input of the control system must be connected to the CMMP-AS servo positioning controller output and the "-" input of the control system must be con-nected to AGND.
7.5.1 Layout on device [X1]
- D-SUB connector, 25-pin, female
7.5.2 Counterplug [X1]
- D-SUB connector, 25-pin, male
- Housing for 25-pin D-SUB connector with 4/40 UNC locking screws

7. Electrical installation
70 Festo P-BE-CMMP-AS-…-11A 0708NH
7.5.3 Pin assignments [X1]
Pin no. Description Value Specification
1 AGND 0 V Shield for analogue signals, AGND
14 AGND 0 V Reference potential for analogue signals
2 AIN0 VOn = 10 V
RI 30 kΩ
Setpoint input 0, differential,
maximum 30 V input voltage 15 #AIN0
3 AIN1 VOn = 10 V
RI 30 kΩ
Setpoint inputs 1 and 2, single ended,
maximum 30 V input voltage 16 AIN2
4 +VREF +10 V Reference output for setpoint potentiometer
17 AMON0 10 V Analogue monitor output 0
5 AMON1 10 V Analogue monitor output 1
18 +24 V 24 V / 100 mA 24V feed-in feed-out
6 GND24 access GND Reference potential for digital I/Os
19 DIN0 POS Bit0 Target selection positioning Bit0
7 DIN1 POS Bit1 Target selection positioning Bit1
20 DIN2 POS Bit2 Target selection positioning Bit2
8 DIN3 POS Bit3 Target selection positioning Bit3
21 DIN4 FG_E Output stage enable
9 DIN5 FG_R Controller enable input
22 DIN6 END0 Limit switch 0 input (blocks n > 0)
10 DIN7 END1 Limit switch 1 input (blocks n < 0)
23 DIN8 START Start positioning task input
11 DIN9 SAMP High-speed input
24 DOUT0 / READY 24 V / 100 mA Ready for operation output
12 DOUT1 24 V / 100 mA Output freely programmable
25 DOUT2 24 V / 100 mA Output freely programmable
13 DOUT3 24 V / 100 mA Output freely programmable
Table 7.3 Connector pin assignments: I/O communication [X1]
7.5.4 Type and layout of cable [X1]
Fig. 7.4 shows the cable [X1] between the CMMP-AS servo positioning controller and the control system. The cable shown has two cable shields.
Both ends of the outer cable shield are connected to PE. In the CMMP-AS servo positioning controller the D-SUB connector housing is connected to PE. When using metallic D-SUB plug housings, the cable shield is simply clamped under the strain relief.

7. Electrical installation
Festo P-BE-CMMP-AS-…-11A 0708NH 71
An unshielded cable is often sufficient for the 24 V signals. In environments with heavy
interference and with long cables (l > 2 m) between the control system and the CMMP-AS servo positioning controller, Festo recommends using shielded control cables.
Despite the differential nature of the CMMP-AS servo positioning controller analogue in-puts, unshielded cables are not recommended for the analogue signals because the inter-ference, e.g. from switching breakers or the converter end stages, can reach high levels. They influence the analogue signals and cause common-mode interference, which can result in deviations in the analogue measurements.
With short cables (l < 2 m, cabling inside the switching cabinet) the outer PE shield at both ends is sufficient to provide interference-free operation.
For the best possible interference suppression of the analogue signals, the individual ana-logue signal conductors should be shielded. One end of the inner cable shied is connected
to AGND (Pin 1 or 14) of the CMMP-AS servo positioning controller. It can also be con-nected at both ends in order to achieve a connection between the control system and CMMP-AS servo positioning controller reference potentials. Pins 1 and 14 are directly con-nected to each other in the controller.
7.5.5 Connection notes [X1]
The digital inputs are designed for 24 V control voltages. The high signal level already offers a high degree of interference immunity for these inputs. The CMMP-AS servo posi-tioning controller provides a 24 V auxiliary supply, which can be loaded to a maximum of 100 mA. The inputs can thus be directly controlled via switches. They can, of course, also be controlled using 24 V PLC outputs.
The digital outputs are implemented as so-called "high side switches". This means the 24 V supply of the CMMP-AS servo positioning controller can be directly switched to the outputs. Loads such as lamps, relays etc. are switched to GND24 by the output. The four outputs DOUT0 to DOUT3 can each supply a maximum load of 100 mA. The outputs can also be directly connected to 24 V PLC inputs.

7. Electrical installation
72 Festo P-BE-CMMP-AS-…-11A 0708NH
24
11
19
6
18
14
1
5
14
17
4
16
3
15
2
13DOUT3
DIN9
DOUT0
DIN0
GND24
+24VDC
+VREF
AMON0
AIN1
AIN0
Pin No.X1
AMON1
AIN2
#AIN0
AGND
AGND
DOUTx
GND24
+24VDC
+24VDC
GND
GND24
PEPE
100 mAmax !
100 mAmax !
Connector
housing
+VREF
AIN0
#AIN0
AGND
AIN1 / AIN2
AGND
+15V
AGND
AGND
AMONx
AGND
GND AGND
DINx
GND24
GND
Control system CMMP-AS
Fig. 7.4 Basic circuit diagram of connection [X1]

7. Electrical installation
Festo P-BE-CMMP-AS-…-11A 0708NH 73
7.6 Connection: Safe Standstill [X3]
The "Safe standstill" safety function is described in chapter 5.2 Integrated "Safe stand-still" function.
7.6.1 Layout on device [X3]
- PHOENIX Mini-Combicon MC 1,5/6-STF-3,81
7.6.2 Counterplug [X3]
- PHOENIX Mini-Combicon MC 1,5/ 6-GF-3,81
7.6.3 Pin assignments [X3]
Pin no.
Description Value Specification
1 24 V 24 VDC 24 VDC feed-in feed-out
(without Category 3 safety equipment: bridge Pin 1 and 2)
2 REL 0 V / 24 VDC Setting and resetting the relay for interrupting the driver supply
3 0 V 0 V Reference potential for PLC
4 ERR 0 V / 24 VDC Signal contact "Error in safety module"
5 Max. 250 VAC
switching voltage
Potential-free feedback contact for driver supply,
NC contact 6
Table 7.4 Pin assignments [X3]
7.7 Connection: Resolver [X2A]
7.7.1 Layout on device [X2A]
- D-SUB connector, 9-pin, female
7.7.2 Counterplug [X2A]
- D-SUB connector, 9-pin, male
7.7.3 Pin assignments [X2A]
Pin no. Description Value Specification
1 S2 3.5 Veff /5-10 kHz
Ri > 5 k
SINE tracking signal, differential
6 S4

7. Electrical installation
74 Festo P-BE-CMMP-AS-…-11A 0708NH
Pin no. Description Value Specification
2 S1 3.5 Veff /5-10 kHz
Ri > 5 k
COSINE tracking signal, differential
7 S3
3 AGND 0 V Shield for signal pair (inner shield)
8 MT- GND Reference potential for temperature sensor
4 R1 7 Veff /5-10 kHz
IA 150 mAeff
Carrier signal for resolver
9 R2 GND
5 MT+ +3.3 V / Ri=2 k Motor temperature sensor, NC, PTC, KTY...
Table 7.5 Pin assignments [X2A]
- The outer shield must always be connected to PE (plug housing) at the controller.
- One end of the inner shield must always be connected to PIN3 of X2A at the CMMP-AS servo positioning controller.
7.8 Connection: Encoder [X2B]
7.8.1 Layout on device [X2B]
- D-SUB connector, 15-pin, female
7.8.2 Counterplug [X2B]
- D-SUB connector, 15-pin, male
Pin no. Description Value Specification
1 MT+ +3.3 V / Ri=2 k Motor temperature sensor, NC, PTC, KTY... **)
9 U_SENS+ 5 V...12 V /
RI 1 k
Sensor cable for the encoder supply
2 U_SENS-
10 US 5 V / 12 V/ 10%
Imax = 300 mA
Operating voltage for high-resolution incremental
encoder
3 GND 0 V Reference potential for encoder supply and motor
temperature sensor
11 R 0.2 VSS
.. 0.8 VSS
RI
120 Ω
Zero impulse tracking signal (differential) from high-
resolution incremental encoder 4 #R
12 DATA 5 VSS RI 120
Bidirectional RS485 data cable (differential)
5 #DATA
13 SCLK 5 VSS R
I 120
RS485 clock output (differential)
6 #SCLK
14 COS_Z0 *) 1 VSS
±10%
RI 120 Ω
COSINE tracking signal (differential) from high-resolution
incremental encoder 7 #COS_Z0 *)

7. Electrical installation
Festo P-BE-CMMP-AS-…-11A 0708NH 75
Pin no. Description Value Specification
15 SIN_Z0 *) 1 VSS
±10%
RI 120 Ω
SINE tracking signal (differential) from high-resolution
incremental encoder 8 #SIN_Z0 *)
*) Heidenhain encoder: A=SIN_Z0; B=COS_Z0
**) The outer cable shield must always be connected to PE (plug housing) at the controller.
Table 7.6 Connector pin assignments: Incremental encoder with serial interface, e.g. EnDat
The outer cable shield must always be connected to PE (plug hous-ing) at the controller (assured with NEBM-M12).
7.9 Connection: Increment encoder input [X10]
7.9.1 Layout on device [X10]
- D-SUB connector, 9-pin, female
7.9.2 Counterplug [X10]
- D-SUB connector, 9-pin, male
7.9.3 Pin assignments [X10]
Pin no. Description Value Specification
1 A/CLK 5 V / RI 120 Incremental encoder signal A /
stepper motor signal CLK
positive polarity as per RS422
6 A# / CLK# 5 V / RI 120 Incremental encoder signal A /
stepper motor signal CLK
negative polarity as per RS422
2 B/DIR 5 V / RI 120 Incremental encoder signal B /
stepper motor signal CLK
positive polarity as per RS422
7 B# / DIR# 5 V / RI 120 Incremental encoder signal B /
stepper motor signal CLK
negative polarity as per RS422
3 N 5 V / RI 120 Incremental encoder zero pulse N
positive polarity as per RS422
8 N# 5 V / RI 120 Incremental encoder zero pulse N
negative polarity as per RS422
4 GND - Reference GND for encoder
9 GND - Screen for the connecting cable

7. Electrical installation
76 Festo P-BE-CMMP-AS-…-11A 0708NH
Pin no. Description Value Specification
5 VCC +5 V 5% 100 mA Auxiliary supply, max. load 100 mA,
but short-circuit protected!
Table 7.7 Pin assignments X10: Incremental encoder input
7.9.4 Type and layout of cable [X10]
We recommend using encoder connection cables where the incremental encoder signal is transmitted via twisted pairs, with each pair being individually shielded.
7.9.5 Connection notes [X10]
Input [X10] can be used for processing incremental encoder signals and also for pulse di-
rection signals as generated by stepper motor controller cards.
The input amplifier at the signal input is designed for differential signals as per the RS422 interface standard. Other signals and levels (e.g. 5 V single-ended or 24 VHTL from a PLC) can also be processed. Please contact your sales partner.
7.10 Connection: Incremental encoder output [X11]
7.10.1 Layout on device [X11]
- D-SUB connector, 9-pin, female
7.10.2 Counterplug [X11]
- D-SUB connector, 9-pin, male
7.10.3 Pin assignments [X11]
Pin no. Description Value Specification
1 O 5 V / RA 66 *) Incremental encoder signal A
6 A# 5 V / RA 66 *) Incremental encoder signal A#
2 B 5 V / RA 66 *) Incremental encoder signal B
7 B# 5 V / RA 66 *) Incremental encoder signal B#
3 N 5 V / RA 66 *) Incremental encoder zero pulse N
8 N# 5 V / RA 66 *) Incremental encoder zero pulse N#
4 GND - Reference GND for encoder
9 GND - Screen for the connecting cable
5 VCC +5 V 5% 100 mA Auxiliary supply, max. load 100 mA, short-circuit
proof!

7. Electrical installation
Festo P-BE-CMMP-AS-…-11A 0708NH 77
Pin no. Description Value Specification
*) The values for RA designate the differential output resistance.
Table 7.8 Pin assignments [X11]: Incremental encoder output
The output driver at the signal output provides differential signals (5 V) as per the RS422 interface standard.
Up to 32 other controllers can be addressed by one device.
7.11 Connection: CAN bus [X4]
7.11.1 Layout on device [X4]
- D-SUB connector, 9-pin, male
7.11.2 Counterplug [X4]
- D-SUB connector, 9-pin, female
7.11.3 Pin assignments [X4]
Pin no. Description Value Specification
1 - - not assigned
6 GND 0 V CAN-GND, electrically connected to GND in the
controller
2 CANL *) CAN-low signal line
7 CANH *) CAN-high signal line
3 GND 0 V See pin no. 6
8 - - not assigned
4 - - not assigned
9 - - not assigned
5 Screening PE Connection for cable shield
*) External 120 termination resistor required at both ends of the bus. We recommend using metal film
resistors with a 5% tolerance and a size of 0207, e.g. from BCC, part no.: 232215621201.
Table 7.9 Pin assignments for CAN bus [X4]

7. Electrical installation
78 Festo P-BE-CMMP-AS-…-11A 0708NH
7.11.4 Connection notes [X4]
Note
When cabling the controller via the CAN bus, you should always observe the following information and instructions to ensure that you end up with a stable, interference-free system. Incorrect ca-bling can cause faults on the CAN bus during operation, which may cause the controller to switch off with an error.
The CAN bus offers a simple, interference resistant method of networking all the compo-nents of a system together. However, this requires that all the following notes on cabling are observed.
Fig. 7.5 CAN bus cabling example
1. The individual network nodes are basically connected in series, so that the CAN cable passes from controller to controller (see Fig. 7.5).
2. A termination resistor of exactly 120 +/- 5% must be connected at both ends of the
CAN bus. This is often already installed in CAN cards or PLCs and, if so, this must be taken into account.
3. Shielded cables with exactly two twisted conductor pairs must be used.
4. One twisted pair is used for connecting CAN-H and CAN-L.
5. The conductors of the other pair are used together for CAN-GND.
6. The cable shield is connected to the CAN shield connection at all nodes.
7. The use of intermediate plugs is not recommended for CAN bus cabling. If this is un-avoidable, then metallic plug housings should be used to connect the cable shields.
8. In order to reduce the transmission of interference as much as possible, always
- Do not lay motor cables parallel to signal cables.
- The motor cables must conform to the Festo specifications.
- The motor cables must be correctly shielded and earthed.
9. For more information on constructing interference-free CAN bus cabling, refer to the Controller Area Network protocol specification, Version 2.0 from Robert Bosch GmbH, 1991.
2

7. Electrical installation
Festo P-BE-CMMP-AS-…-11A 0708NH 79
7.12 Connection: RS232/COM [X5]
7.12.1 Layout on device [X5]
- D-SUB connector, 9-pin, female
7.12.2 Counterplug [X5]
- D-SUB connector, 9-pin, female
- Housing for 9-pin D-SUB connector with 4/40 UNC locking screws
7.12.3 Pin assignments [X5]
Pin no. Description Value Specification
1 - - Not assigned
6 - - Not assigned
2 RxD 10 V / RI > 2 k Receive conductor, as per RS232 specification
7 - - Not assigned
3 TxD 10 V / RA < 2 k Transmit conductor, as per RS232 specification
8 - - Not assigned
4 +RS485 - Reserved for optional RS485 operation
9 -RS485 - Reserved for optional RS485 operation
5 GND PE Interface GND, electrically connected to GND of the
digital unit
Table 7.10 Pin assignments of RS232 interface [X5]
7.13 Instructions on safe and EMC-compliant installation
7.13.1 Explanations and terms
Electromagnetic compatibility (EMC) or electromagnetic interference (EMI) involves the following requirements:
Interference immunity
Sufficient interference immunity of an electrical system or electrical device against external electrical, magnetic or electromagnetic noise via lines or space.
7. Electrical installation
80 Festo P-BE-CMMP-AS-…-11A 0708NH
Interference
emission
Sufficiently low interference emission of electrical, magnetic or
electromagnetic interference of an electrical system or an electrical device on other devices in the environment via conductors and through the air.
7.13.2 Connection instructions
The motor cable shield and the internal PE conductor of the motor cable are both connected to the central PE connection of the CMMP-AS. The mains grid PE connection and the resolver and, if present, encoder cable shields must also be connected to this star point. This star point must be connected to the central mass of the entire switching cabinet (short cable to mounting panel) using a cable with a large conductive area (copper strap). This connection strap is already included at the end of the Festo motor cable.
With greater lengths, special EMC protective measures must be taken.
Warning
For reasons of safety, all PE cables must always be connected be-fore commissioning.
The mains PE connection is connected to the central PE connection point of the CMMP-AS.
Make sure that the earth connections between devices and the mounting plate are of sufficiently large dimensions to conduct away HF interference.
7.13.3 General information on EMC
Interference emission and resistance to interference of a servo drive controller always de-pend on the complete design of the drive, which consists of the following components:
Components - Voltage supply
- Servo drive controller
- Motor
- The electromechanics
- The design and type of wiring
- Higher-order control system
In order to increase the interference immunity and decrease the interference emission, the CMMP-AS servo positioning controller already has integrated motor chokes and mains filters, which means that the CMMP-AS servo positioning controller can be operated with-out additional shielding and filters in most applications.

7. Electrical installation
Festo P-BE-CMMP-AS-…-11A 0708NH 81
The CMMP-AS servo positioning controllers have been approved in accordance with the product standard EN 61800-3 applying to electrical drives
In the majority of cases, no external filter measures are required (see below).
The EMC guidelines Declaration of Conformity is available from Festo.
7.13.4 EMC areas: First and second environments
When suitably installed, and with suitable cabling for all connections, the CMMP-AS servo positioning controller conforms to the requirements of the corresponding EN 61800-3 product standard. This standard no longer refers to "limit value classes" but rather to so-
called "environments".
Note
The "first" environment includes electricity grids connected to residential housing. The "second" environment includes grids con-nected only to industrial plants.
For the CMMP-AS servo positioning controller, the following applies:
EMC class Range Compliance with EMC requirements
Interference emission Second environment (industrial) Motor cable lengths of up to 25 m without
external filtering measures
A suitable mains filter must be installed when
longer cables of 25-50 m are used.
Interference immunity Second environment (industrial) Regardless of motor cable length
Table 7.11 EMC requirements: First and second environments
7.13.5 EMC-compliant wiring
The following must be observed for EMC-compliant installation of the drive system (see also Chapter 7 "Electrical installation", page 63):
1. In order to minimise current leakage and losses in the motor connection cable, the CMMP-AS servo positioning controller should be installed as close as possible to the
motor (see also chapter 7.13.6 "Operation with long motor cables", page 82).
2. The motor and angle generator cables must be screened.
3. The shield of the motor cable is fitted to the housing of the CMMP-AS servo position-ing controller (shield connection terminals, spring terminals). The cable shield is also always fitted to the corresponding servo positioning controller to allow leakage cur-rent to flow back to the controller that caused it.
4. The mains grid PE connection is connected to the PE connection point of the power connection [X9].

7. Electrical installation
82 Festo P-BE-CMMP-AS-…-11A 0708NH
5. The internal PE conductor of the motor cable is connected to the PE connection point
of the motor connection [X6].
6. Signal lines must be separated as far as possible from the power cables. They should not be routed parallel to one another. If crossovers cannot be avoided, they should be made as close to vertical (i.e. at a 90° angle) as possible.
7. Unscreened signal and control lines should not be used. If they must be used, they should at least be twisted.
8. Even screened lines always have short unscreened parts at either end (unless a screened plug housing is used).
In general: - Connect the inner screens to the pins of the plug connector pro-
vided for the purpose; length max. 40 mm.
- Max. length of unscreened wires: 35 mm.
- Connect entire shield flat to the PE terminal; maximum length of 40 mm.
- Connect total shield flat at the motor to the plug or motor hous-ing; length max. 40 mm ensured with the NEBM-M23 T1.
Warning
DANGER!
All PE cables must be connected before commissioning for reasons of safety.
The protective earth regulations in EN 50178 and EN 60204-1 must always be observed in the installation!
7.13.6 Operation with long motor cables
For applications with long motor cables and/or if the wrong motor cables are selected with excessive cable capacity, the filters may be subjected to thermal overload. In order to avoid such problems, we strongly recommend the following procedure for applications in which long motor cables are required:
- From a cable length of over 25 m, use only cables with a capacitance between the motor phase and screen of less than 200 pF/m, or, if possible less than 150 pF/m
and also use a mains filter!
Longer cable lengths result in deviations to the current regulator amplification (cable resistance).

7. Electrical installation
Festo P-BE-CMMP-AS-…-11A 0708NH 83
7.13.7 ESD protection
Caution
Unused D-SUB connector pins present a danger of damage to the device or to other parts of the system as a result of ESD (electro-static discharge).
In the design of the CMMP-AS servo positioning controller, great importance has been placed on high resistance to interference. For this reason individual function blocks are electrically isolated from each other. Signal transmission within the device is performed via an optocoupler.
The following separate areas exist:
Separate areas: - Power stage with intermediate circuit and mains input
- Control electronics with analogue signal processing
- 24 V supply and digital inputs and outputs

8. Startup
84 Festo P-BE-CMMP-AS-…-11A 0708NH
8. Startup
8.1 General connection instructions
As the routing of the connecting cables is critical for EMC, it is essential that you read chapter 7.13.5 "EMC-compliant wiring" (page 81)!
Warning
DANGER!
Failure to follow the instructions in chapter 2 "Safety instructions for electric drives and controllers" (page 13) can result in material damage, injury, electric shock, or in extreme cases, even to fatali-ties.
8.2 Tools / material
Tool - Screwdriver size 1
- Serial interface cable
- Angle encoder cable
- Motor cable
- Power supply cable
- Controller enable cable
8.3 Connecting the motor
Connecting the motor
1. Insert the motor cable plug in the corresponding socket on the motor and secure it.
2. Insert the PHOENIX plug into the socket [X6] on the device.
3. Clamp the cable shields to the shield terminals (not suitable as strain-relief).
4. Insert the motor cable plug in the corresponding socket on the motor and secure it.
5. Insert the D-SUB plug into socket [X2A] resolver or [X2B] en-coder of the device and secure the locking screws.
6. Check all plug connectors once again.

8. Startup
Festo P-BE-CMMP-AS-…-11A 0708NH 85
8.4 Connect the CMMP-AS servo positioning controller to the power supply
Connect the servo positioning controller
1. Make sure that the power supply is switched off.
2. Insert the PHOENIX plug into the socket [X9] on the device.
3. Connect the PE cable of the mains supply to the PE earth socket.
4. Connect the 24 V connection to a suitable power pack.
5. Connect the power supply unit.
6. Check all plug connectors once again.
8.5 Connecting a PC
Connecting a PC 1. Insert the D-SUB plug of the serial interface cable into the socket for the serial interface of the PC and secure the locking screws.
2. Insert the D-SUB plug of the serial interface cable into socket [X5] RS232/COM for the CMMP-AS servo positioning controller and secure the locking screws.
3. Check all plug connectors once again.
8.6 Checking readiness for operation
Checking readiness to operate
1. Make sure that the controller enable is switched off (controller enable: DIN 5 at X1).
2. Switch on the power supply of all equipment. The READY LED on
the front of the equipment should light up.
If the READY LED does not light up, there is a fault. If the seven segment display shows a number sequence, this is an error mes-sage. You must rectify the cause of the message. If this is the case, see chapter 9.2 "Error messages" (page 90). If no display lights up on the device, proceed as follows:

8. Startup
86 Festo P-BE-CMMP-AS-…-11A 0708NH
No display lights up 1. Switch of the power supply.
2. Wait 5 minutes to allow the intermediate circuit to discharge.
3. Check all connecting cables.
4. Check that the 24 V control voltage is functional.
5. Switch on the supply voltage again.

9. Service functions and error messages
Festo P-BE-CMMP-AS-…-11A 0708NH 87
9. Service functions and error messages
9.1 Protective and service functions
9.1.1 Overview
The CMMP-AS servo positioning controller has a comprehensive array of sensors that monitor the controller section, power output stage, motor and external communication to ensure that they function perfectly. All errors which occur are saved in the internal error memory. Most errors cause the controller section to deactivate the servo positioning con-troller and the power output stage to switch off. The servo positioning controller can only be switched on again when the error memory has been cleared by acknowledging the er-
rors, and the errors have been rectified or are no longer present.
A comprehensive system of sensors and monitoring functions ensure operational reliability:
- Measurement of the motor temperature
- Measurement of the power output stage temperature
- Earth fault detection (PE)
- Detection of short-circuits between two motor phases
- Detection of overvoltages in the intermediate circuit
- Detection of faults in the internal voltage supply
- Power supply collapse
If the 24 VDC supply voltage fails, approximately 20 ms remain to (e.g.) save parameters and shut down the controller in a defined manner.
9.1.2 Phases and mains failure recognition
In three-phase operation, the CMMP-AS servo positioning controller recognises the failure of a single phase (phase dropout recognition) or the failure of a multiple phases (mains dropout recognition) in the device power supply.
9.1.3 Overload current and short-circuit monitoring
The overload current and short-circuit monitoring is triggered as soon as the current in the
intermediate circuit exceeds twice the maximum current of the controller. It detects short circuits between two motor phases and short circuits at the motor output terminals against the positive and negative reference potential of the intermediate circuit and against PE. If the error monitor detects overload current, the power output stage shuts down immedi-ately, guaranteeing that the system is short-circuit proof.

9. Service functions and error messages
88 Festo P-BE-CMMP-AS-…-11A 0708NH
9.1.4 Overvoltage monitoring for the intermediate circuit
The overvoltage monitoring for the intermediate circuit takes effect as soon as the inter-mediate circuit voltage exceeds the operating voltage range. The power output stage is then deactivated.
9.1.5 Temperature monitoring for the heat sink
The heat sink temperature of the power output stage is measured with a linear tempera-ture sensor. The temperature limit varies from device to device. A temperature warning is triggered at 5°C below the limit value.
9.1.6 Motor monitoring
The CMMP-AS servo positioning controller has the following protective functions to moni-tor the motor and the connected shaft encoder:
Shaft encoder monitoring:
Faults in the shaft encoder causes the power output stage to be switched off. For the resolver (e.g.) the tracking signal is monitored. For incremental encoders, the commutator signal is checked. Other "intelligent" encoders have additional error detection.
Measurement and monitoring of the motor temperature:
The CMMP-AS servo positioning controller has a digital and an ana-logue input for recording and monitoring the motor temperature. Analogue signal recording means that non-linear sensors are also supported. The following temperature sensors can be selected:
At [X6]: Digital input for PTCs, N/C contacts and N/O contacts
At [X2A] and [X2B]: NC contact and KTY series analogue sensors. Other sensors (NTC, PTC) may require corresponding SW adjustments.
9.1.7 I²t monitoring
The CMMP-AS servo positioning controller has l²t monitoring to restrict the average power loss in the power output stage and in the motor. As the power loss which occurs in the power electronics and in the motor increases by its square as the current flow increases in a worst case scenario, the square of the current value is usually assumed for the power loss.
9.1.8 Power monitoring for the brake chopper
There is a power monitoring system for the internal braking resistor in the operating soft-ware.
9.1.9 Commissioning status
Servo positioning controllers sent to Festo for servicing have other firmware and parame-ters loaded for testing purposes.

9. Service functions and error messages
Festo P-BE-CMMP-AS-…-11A 0708NH 89
The CMMP-AS servo positioning controller must be parameterised before it is commis-
sioned again at the customer's premises. The Festo Configuration Tool parameterising software queries the commissioning status and prompts the user to configure the servo positioning controller. At the same time, the device indicates that it is ready for operation but has not yet been configured by displaying 'A' on the seven segment display.
9.1.10 Quick discharge of the intermediate circuit
When a mains supply dropout is recognised, the intermediate circuit is quickly discharged within the safety time specified in EN 60204-1.
Delayed switching of the brake chopper by power class, when a mains dropout occurs in parallel operation, ensures that the main energy is dissipated by the higher power braking resistor when the intermediate circuit is quickly discharged.
9.2 Operating mode and error messages
9.2.1 Operating mode and error display
A seven segment display is supported. The display and the meaning of the symbols shown are illustrated in the following table:
Display Meaning
The outer segments "rotate" on the display in this operating mode. The display
depends on the current actual position or speed.
The central bar is also active when the controller release is active.
The CMMP-AS servo positioning controller still needs to be parameterised.
(seven-segment display = "A")
Controlled torque mode.
(seven-segment display = "I")
P xx Positioning ("xx" represents the position number)
The digits are sequentially displayed
PH x Reference travel "x" represents the respective phase of the homing run:
0 : Search phase
1 : Slow moving phase
2 : Travel to zero position
The digits are sequentially displayed
E xx Error message with index "xx" and sub-index "y"
-xxy- Warning message with main index "xx" and sub-index "y". Warnings are shown
at least twice on the seven segment display

9. Service functions and error messages
90 Festo P-BE-CMMP-AS-…-11A 0708NH
Display Meaning
The "Safe standstill" option is active for devices in the CMMP-AS family.
(seven-segment display ="H", flashing at 2 Hz)
Table 9.1 Operating mode and error display
9.2.2 Error messages
When a fault occurs, the CMMP-AS servo positioning controller displays an error message cyclically in the seven segment display. The error message consists of an E (for Error), a main index and sub-index, e.g.: E 0 1 0.
Warnings have the same number as an error message. The difference is that a warning is displayed with a prefixed and suffixed hyphen, e.g. - 1 7 0 -.
The meanings and the measures for the error messages are summarised in the following Table 9.2:
Error messages with a main index of 00 indicate information and not a run-time error. User measures are not usually necessary. They only appear in the error buffer and are not shown on the seven-segment display.
Fault message Meaning of error message Measures
Main index
Main index
Sub-index
00 0 Invalid error Information: An invalid error entry (corrupted)
was found in the error buffer marked with this error
number.
No measures required
1 Invalid error discovered and
corrected
Information: An invalid error entry (corrupted) was
found in the error buffer and corrected. The debug
information contains the original error number.
No measures required
2 Error deleted Information: Active errors were quit
No measures required
4 Serial number / Device type
(module exchange)
Information: An exchangeable error store (service
module) was plugged into another device.
No measures required
01 0 Stack overflow Wrong firmware?
Reload standard firmware if necessary.
Contact Technical Support.
02 0 Undervoltage at intermediate
circuit
Error priority set too high?
Check the intermediate circuit voltage (measure)
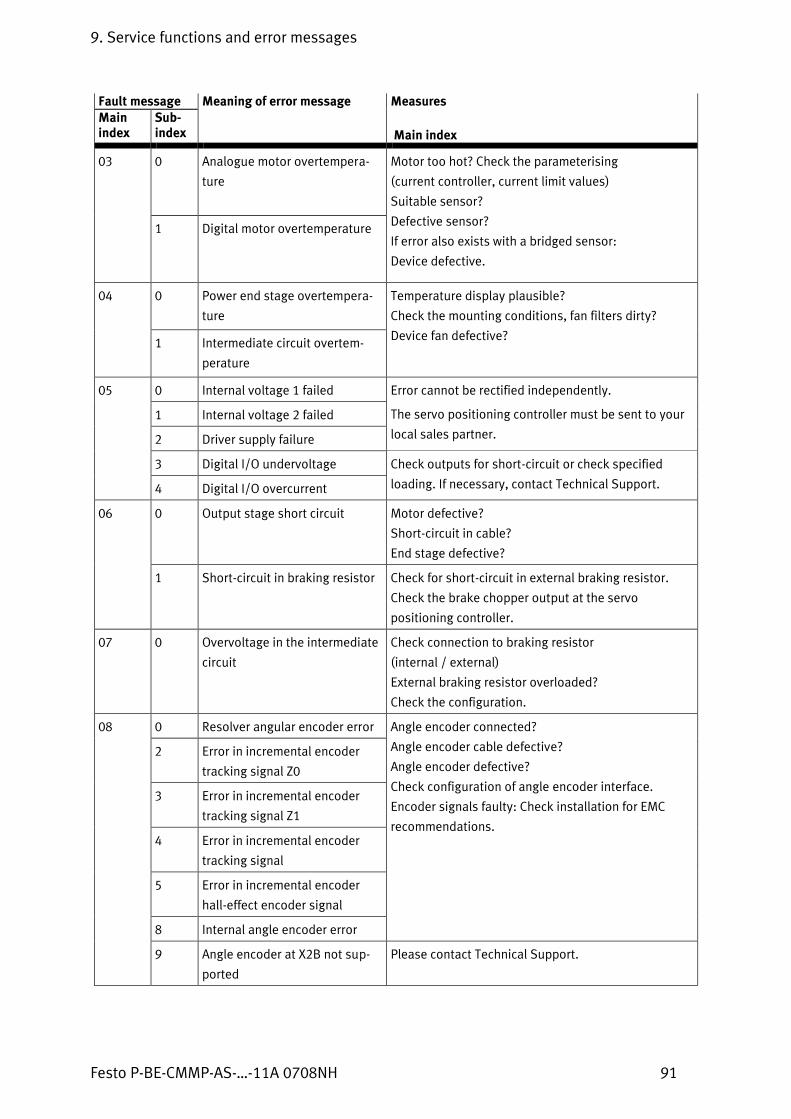
9. Service functions and error messages
Festo P-BE-CMMP-AS-…-11A 0708NH 91
Fault message Meaning of error message Measures
Main index
Main index
Sub-index
03 0 Analogue motor overtempera-
ture
Motor too hot? Check the parameterising
(current controller, current limit values)
Suitable sensor?
Defective sensor?
If error also exists with a bridged sensor:
Device defective.
1 Digital motor overtemperature
04 0 Power end stage overtempera-
ture
Temperature display plausible?
Check the mounting conditions, fan filters dirty?
Device fan defective? 1 Intermediate circuit overtem-
perature
05
0 Internal voltage 1 failed Error cannot be rectified independently.
The servo positioning controller must be sent to your
local sales partner.
1 Internal voltage 2 failed
2 Driver supply failure
3 Digital I/O undervoltage Check outputs for short-circuit or check specified
loading. If necessary, contact Technical Support. 4 Digital I/O overcurrent
06 0 Output stage short circuit Motor defective?
Short-circuit in cable?
End stage defective?
1 Short-circuit in braking resistor Check for short-circuit in external braking resistor.
Check the brake chopper output at the servo
positioning controller.
07 0 Overvoltage in the intermediate
circuit
Check connection to braking resistor
(internal / external)
External braking resistor overloaded?
Check the configuration.
08 0 Resolver angular encoder error Angle encoder connected?
Angle encoder cable defective?
Angle encoder defective?
Check configuration of angle encoder interface.
Encoder signals faulty: Check installation for EMC
recommendations.
2 Error in incremental encoder
tracking signal Z0
3 Error in incremental encoder
tracking signal Z1
4 Error in incremental encoder
tracking signal
5 Error in incremental encoder
hall-effect encoder signal
8 Internal angle encoder error
9 Angle encoder at X2B not sup-
ported
Please contact Technical Support.

9. Service functions and error messages
92 Festo P-BE-CMMP-AS-…-11A 0708NH
Fault message Meaning of error message Measures
Main index
Main index
Sub-index
09 0 Old angle encoder parameter
record (type CMMP-AS)
Please contact Technical Support.
1 Angle encoder parameter record
cannot be decoded
2 Unknown version of angle en-
coder parameter record
3 Defective data structure in an-
gle encoder parameter record
7 Write-protected angle encoder
EEPROM
9 Angle generator EEPROM too
small
10 0 Overspeed (spin protection) Check parameterising of limit values.
Wrong offset angle?
11 0 Error when starting the homing
run
Controller enable missing
1 Error during homing Homing interrupted, e.g. by withdrawal of controller
release.
2 Homing run:
No valid zero impulse
Required zero impulse missing
3 Homing:
Timeout
The parameterised maximum time for the homing run
was exceeded before the homing run was completed.
4 Homing run:
Wrong / Invalid limit switch
Associated limit switch not connected.
Limit switches swapped?
5 Homing:
I²t / Contouring error
Acceleration ramps not suitable parameterised.
Invalid stop reached, e.g. because a reference switch
is not connected.
Contact Technical Support
6 Homing:
End of search path reached
The maximum permissible path for the homing run
has been traveled without reaching the reference
point or the homing run target.
12
0 CAN:
Duplicate node number
Check the configuration of the CAN bus stations
1 CAN:
Communication error, Bus OFF
The CAN chip has switched off communication due to
communication errors (BUS OFF).
2 CAN: CAN communication
transmit error
The signals are interrupted when messages are sent.
3 CAN: CAN communication re-
ceive error
The signals are interrupted when messages are re-
ceived.

9. Service functions and error messages
Festo P-BE-CMMP-AS-…-11A 0708NH 93
Fault message Meaning of error message Measures
Main index
Main index
Sub-index
4 Node Guarding telegram not
received with the parameterised
time
Compare the cycle time of the remote frames with that
of the controller, or controller failure.
Faulty signals?
9 CAN: Protocol error Please contact Technical Support.
13 0 CAN bus timeout Check the CAN parameterisation
14 0 Insufficient power supply for
identification
The available intermediate circuit voltage is too low
for measurement.
1 Current regulator identification:
Measurement cycle insufficient
Automatic determination of parameters has supplied
a time constant outside the parameterisable value
range. The parameter must be manually optimised.
2 End stage enable could not be
issued
End stage enable was not issued, check the DIN4
connection.
3 End stage was prematurely
switched off
The end stage enable was switched off during identifi-
cation.
4 Identification does not support
the configured device type
Identification using the parameterised angle encoder
settings could not be performed.
Check the angle encoder configuration and, if neces-
sary, contact Technical Support.
5 Zero impulse not found The zero impulse was not found after the maximum
permissible number of electrical rotations.
Check the zero impulse signal.
6 Hall-effect signal invalid The impulse sequence or segmentation of the hall-
effect signal is unsuitable.
Check the connection and, if necessary, contact Tech-
nical Support.
7 Identification not possible Ensure adequate intermediate circuit voltage.
Rotor blocked?
8 Invalid number of pole pairs The calculated number of pole pairs lies outside the
parameterisable range. Check the motor technical
data and, if necessary, contact Technical Support.
9 Automatic parameter identifica-
tion
General error
Obtain additional information from the additional
error data. Please contact Technical Support.
15 0 Division by 0 Please contact Technical Support.
1 Range exceeded
2 Mathematical underrun

9. Service functions and error messages
94 Festo P-BE-CMMP-AS-…-11A 0708NH
Fault message Meaning of error message Measures
Main index
Main index
Sub-index
16 0 Error in program execution Please contact Technical Support.
1 Illegal interrupt
2 Initialisation error
3 Unexpected status
17 0 Contouring error limit exceeded Increase error window.
Acceleration parameter too large.
1 Encoder difference monitoring External angle encoder not connected or defective?
Deviation fluctuates, e.g. due gear backlash, if neces-
sary, increase cut-off threshold.
21 0 Error 1 current measurement U Error cannot be self-corrected.
Send the servo positioning controller to your sales
partner.
1 Error 1 current measurement V
2 Error 2 current measurement U
3 Error 2 current measurement V
22 0 PROFIBUS:
Error on initialisation
Defective technology module?
Please contact Technical Support.
1 PROFIBUS: Reserved
2 PROFIBUS communication error Check the configured slave address
Check the bus termination
Check cabling
3 PROFIBUS:
Invalid slave address
Communication was started with slave address 126.
Select a different slave address.
4 PROFIBUS:
Value range error
Mathematical error when converting physical units.
Value range of the data and the physical units do not
match. Contact Technical Support
25 0 Invalid device type Error cannot be self-corrected.
Send the servo controller to your sales partner. 1 Unsupported device type
2 Unsupported HW version Check the firmware version, if necessary,
request an update from Technical Support.
3 Device functionality limited! Device is not enabled for the desired functionality and
may need to be enabled by Festo. The device must be
sent to Festo for this.
26 0 Missing user parameter record Load the default parameter record.
If the error persists, send the servo positioning control-
ler to your sales partner.
1 Checksum error Error cannot be rectified independently.
Please contact Technical Support. 2 Flash: Write error
3 Flash: Deletion error
4 Flash: Internal Flash error
5 Missing calibration data

9. Service functions and error messages
Festo P-BE-CMMP-AS-…-11A 0708NH 95
Fault message Meaning of error message Measures
Main index
Main index
Sub-index
6 Missing user position data
record
Set the position and save it in the servo positioning
controller.
7 Error in the data tables (CAM) Load the default parameter record, if necessary, reload
the parameter record.
If the error persists, contact Technical Support.
27 0 Contouring error danger
threshold
Check the contouring error parameterising.
Motor blocked?
28 0 Missing hours-run meter Acknowledge the error.
If the error persists, contact Technical Support. 1 Hours-run meter: Write error
2 Hours-run meter corrected
3 Hours-run meter converted
30 0 Internal conversion error Please contact Technical Support.
31 0 I²t motor Motor blocked?
1 I²t servo positioning controller Check power dimensioning of drive package.
2 I²t PFC Check power dimensioning of drive. Select operation
without PFC?
3 I²t braking resistor Braking resistor overloaded.
Use external braking resistor?
32 0 Intermediate circuit charging
time exceeded
Please contact Technical Support
.
1 Undervoltage for active PFC
5 Brake chopper overload.
Intermediate circuit could not be
discharged.
6 Intermediate circuit discharge
time exceeded
7 Power supply missing for
controller enable
Intermediate circuit voltage missing.
Angle encoder not yet ready.
8 Power supply failure on
controller enable
Interruption / Mains failure of the power supply
Check the power supply.
9 Phase failure Failure in one or more phases.
Check the power supply.
33 0 Contouring error encoder
emulation
Please contact Technical Support.
34 0 No synchronisation via Fieldbus Synchronisation messages from master failed?
1 Fieldbus synchronisation error Synchronisation messages from master failed?
Synchronisation interval parameterised too small?

9. Service functions and error messages
96 Festo P-BE-CMMP-AS-…-11A 0708NH
Fault message Meaning of error message Measures
Main index
Main index
Sub-index
35 0 Linear motor spin protection Encoder signals are faulty. Check installation for
EMC recommendations.
5 Error in determination of
commutator position
An unsuitable process was selected for the motor.
Please contact Technical Support.
36 0 Parameter was limited Check the user parameter record
1 Parameter was not accepted
37 0 ... 9 SERCOS Fieldbus Please contact Technical Support if necessary.
38 0 ... 9 SERCOS Fieldbus Please contact Technical Support if necessary.
39 0…6 SERCOS Fieldbus Please contact Technical Support if necessary.
40 0 Negative SW limit switch reached The positioning setpoint has reached or exceeded the
respective software limit switch.
Check the target data.
Check the positioning range. 1 Positive SW limit switch reached
2 Target position behind the
negative limit switch
Start of positioning was suppressed because the tar-
get lies behind the respective software limit switch.
Check the target data.
Check the positioning range. 3 Target position behind the
positive limit switch
42 0 Positioning: Missing subsequent
positioning:
Stop
The positioning target cannot be reached due to the
positioning options or the parameters.
Check the parameterisation of the affected positioning
record. 1 Positioning: Reversal of direction
of rotation not permitted: Stop
2 Positioning: Reversal of direction
of rotation after stop not permit-
ted
3 Start positioning discarded. Switching of the operating mode by the positioning
record was not possible.
The calculated direction of rotation is not permitted for
the round axis in the set mode.
Check the selected mode.
5 Round axis. Rotation direction
not permitted
43 0 Limit switch: Negative setpoint
blocked
The drive has left the intended range of motion.
Technical defect in the system?
1 Limit switch: Positive setpoint
blocked
2 Limit switch: Positioning sup-
pressed

9. Service functions and error messages
Festo P-BE-CMMP-AS-…-11A 0708NH 97
Fault message Meaning of error message Measures
Main index
Main index
Sub-index
45 0 Driver supply cannot be
switched off
Please contact Technical Support.
1 Driver supply cannot be
activated
2 Driver supply was activated
47 0 Timeout (setting-up) The speed required for setting-up was not low enough
in time. Check the processing of the control-side re-
quirements.
50 0 CAN:
Too many synchronous PDOs
Please contact Technical Support.
60 0 Ethernet: User-specific (1) Please contact Technical Support.
61 0 Ethernet: User-specific (2) Please contact Technical Support.
64 0…6 DeviceNet Fieldbus Please contact Technical Support.
65 0…1 DeviceNet Fieldbus Please contact Technical Support.
70 1 FHPP: Overrun/underrun or divi-
sion by zero during calculation of
cyclic data.
Please contact Technical Support.
Check the cyclic data and/or check the factor group.
70 2 FHPP: Calculation of the factor
group leads to invalid internal
values.
Check the factor group.
70 3 FHPP: Changing from the current
to the desired operating mode is
not permitted.
Check your application. It may be that not every
change is permitted.
80 0 Current regulator IRQ overflow Please contact Technical Support.
1 Speed regulator IRQ overflow
2 Position controller IRQ overflow
3 Interpolator IRQ overflow
81 4 Low-Level IRQ overflow Please contact Technical Support.
5 MDC IRQ overflow
82 0 Sequence control Internal sequence control: Process was cancelled.
Information only - no measures required.
83 0 Invalid technology module Wrong slot / Wrong HW version. Check the technology
module and, if necessary, contact Technical Support.
1 Unsupported technology module Load the correct firmware?
If necessary, contact Technical Support.
2 Technology module: HW version
not supported
Load the correct firmware?
If necessary, contact Technical Support.
3 Technology module: Write error Please contact Technical Support.

9. Service functions and error messages
98 Festo P-BE-CMMP-AS-…-11A 0708NH
Fault message Meaning of error message Measures
Main index
Main index
Sub-index
90 0 Missing hardware component
(SRAM)
Please contact Technical Support.
1 Missing hardware component
(FLASH)
2 FPGA boot error
3 SD-ADUs start error
4 SD-ADU synchronisation error
after start
5 SD-ADU not synchronous
6 Trigger error
9 DEBUG firmware loaded
91 0 Internal initialisation error Please contact Technical Support.
Table 9.2 Error messages

A. Technical specifications
Festo P-BE-CMMP-AS-…-11A 0708NH 99
A. Technical specifications
Range Values
Permitted temperature ranges Storage
temperature:
-25°C to +70°C
Operating
temperature:
0°C to +40°C
+40°C to +50°C with power reduction
2.5% / K
Permissible installation height Up to 1,000 m above sea level
1,000 to 4,000 m above sea level with power reduction
Air humidity Relative humidity up to 90%, non-condensing
Protection class IP20
Contamination class 1
CE conformity: low voltage directive:
EMC law: Current harmonic oscillation:
EN 50 178
EN 61 800 - 3
EN 61 000 - 3 - 2
Further certifications UL
Table A.3 Technical data: Ambient conditions and qualification
Dimensions and weight Type CMMP-AS-C5-11A Type CMMP-AS-C10-11A
Dimensions of the servo positioning
controller (H*W*D)
(without counterplugs, shield screws
and screw heads)
251 x 81 x 251 mm
Mounting plate dimensions 293 x 76 mm
Weights approx. 3.7 kg
Table A.4 Technical data: Dimensions and weight
Area Type CMMP-AS-C5-11A Type CMMP-AS-C10-11A
Maximum motor cable length for interference emissions as per
EN 61800-3 (conforms to EN 55011, EN 55022)
Second environment
(Industrial)
l 25 m (without filter)
Cable capacitance of one phase against
screen or between two lines
C‘ 200 pF/m
Table A.5 Technical data: Cable data

A. Technical specifications
100 Festo P-BE-CMMP-AS-…-11A 0708NH
Motor temperature monitoring Values
Digital sensor N/C contact: Rcold < 500 Rhot > 100 k
Analogue sensor Silicon temperature sensor, e.g. KTY81, 82 or similar.
R25 2,000
R100 3,400
Table A.6 Technical data: Motor temperature monitoring
A.1 Operation and display components
The CMMP-AS servo positioning controller has two LEDs on the front and one seven seg-ment display for showing the operating status.
Component Function
Seven segment display Displays the operating mode and an error code should an error occur
LED1 Ready status
LED2 CAN bus status display
RESET button Hardware reset for the processor
Table A.7 Display elements and RESET button
A.2 Power supply [X9] Type CMMP-AS –C5-11A-P3 Type CMMP-AS-C10-11A-P3
Supply voltage 3 x 230…480 VAC [± 10%] 50…60 Hz
Alternative DC supply 60 … 700 VDC
24 V supply 24 VDC [+6% -10%] (current consumption 5.5 A) *)
*) additional current consumption from holding brake and IOs, if present
Table A.8 Technical data: Power data [X9]
Note
With a warm motor and a supply voltage that is too low (outside tolerance), the motor brake cannot open 100%, which can lead to premature wearing of the brake.
Internal braking resistor Type CMMP-AS-C5-11A-P3 Type CMMP-AS-C10-11A-P3
Internal braking resistor 68
8.5 kW
110 W
760 V
Pulse power
Continuous power
Response threshold
Table A.9 Technical data: Internal braking resistor [X9]

A. Technical specifications
Festo P-BE-CMMP-AS-…-11A 0708NH 101
External braking resistor Type CMMP-AS-C5-11A-P3 Type CMMP-AS-C10-11A-P3
External braking resistor 60
5,000 W
800 V
Continuous power
Operating voltage
Table A.10 Technical data: External braking resistor [X9]
A.3 Motor connection [X6]
Type CMMP-AS-C5-11A-P3 Type CMMP-AS-C10-11A-P3
Data for operating with 3 x 400 VAC [± 10%], 50 Hz at 5 kHz end stage frequency
Output power 3 kVA 6 kVA
Output voltage 3 x 0…360 V AC
Max. output power for 5 s 6 kVA 12 kVA
Output current 5 Aeff 10 Aeff
Max. output current for 5 x 15 Aeff 20 Aeff
Clock frequency max. 12.5 kHz max. 12.5 kHz
Output frequency 0…1,000 Hz
Max. mains current in continuous
operation 1)
5 Aeff 9 Aeff
1) for a cos of 0.7 in the motor circuit
Table A.11 Technical data: Motor connection data [X6]
Current derating with the CMMP-AS-C5-11A-P3
In contrast to the technical specifications in the motor data, the CMMP-AS-C5-11A and CMMP-AS-C10-11A servo positioning controllers have current derating in rated operation.
The following formula can be used to calculate the end stage output current depending on the end stage frequency for values > 5 kHz:
P3 : I(FPWM)= - 5 A
x fPWM + 13.125 A 8 kHz
The following derating curve applies to the permissible measured current depending on the set pulse frequency:

A. Technical specifications
102 Festo P-BE-CMMP-AS-…-11A 0708NH
Fig. 9.1 Current derating diagram for the CMMP-AS-C10-11A-P3
A.4 Angle encoder connections [X2A] and [X2B]
Various feedback systems can be connected to the CMMP-AS servo positioning controller via the universal encoder interface:
- Resolver (interface [X2A])
- Encoder (interface [X2B])
- Incremental encoder with analogue and digital tracking signals
- SinCos encoder (single/multi-turn) with HIPERFACE
- Multi-turn absolute value encoder with EnDat
The shaft encoder type is then defined using the parameterising software.
The feedback signal is available for subsequent drives via the incremental encoder output [X11].
It is possible to analyze two encoder systems in parallel. When doing this, the resolver for the current regulation is usually connected to [X2A], e.g. an absolute value encoder to [X2B] as a feedback signal for the position controller.
A.4.1 Resolver connection [X2A]
Commonly available resolvers are connected to the 9-pin D-SUB connection [X2A]. Single and multi-pole resolvers are supported. The number of pole pairs in the resolver must be specified by the user via appropriate parameterising software so that the CMMP-AS can correctly determine the speed. The pole pair number of the motor (P0Motor) is always a

A. Technical specifications
Festo P-BE-CMMP-AS-…-11A 0708NH 103
whole multiple of the pole pair number of the resolver (P0Resolver). Incorrect combinations
generate an error message during motor identification, e.g. P0Resolver = 2 and P0Motor = 5.
The resolver offset angle, which is automatically determined during identification, can be read and written for servicing purposes.
Parameter Values
Transmission ratio 0.5
Carrier frequency 5 to 10 kHz
Exciter voltage 7 Veff, short-circuit protected
Exciter impedance (at 10 kHz) (20 + j20)
Stator impedance (500 + j1000)
Table A.12 Technical data: Resolver [X2A]
Parameter Value
Resolution 16 bit
Signal acquisition time delay < 200 µs
Speed resolution approx. 4 min-1
Absolute accuracy of angle acquisition < 5´
Max. speed 16,000 min-1
Table A.13 Technical data: Resolver interface [X2A]
A.4.2 Encoder connection [X2B]
Motors with encoders can be fed back via the 15-pin D-SUB connection [X2B]. The possible incremental encoders for the encoder connection are divided into several groups. If in doubt when using other encoder types, contact your sales partner.
Standard incremental encoder without commutation signals:
These encoders are used in low-cost linear motors to reduce the cost of producing the commutation signal (hall-effect encoder). With these encoders, an automatic pole position determination is performed by the CMMP-AS servo positioning controller at power on.
Standard incremental encoder with commutation signals:
In this variant, standard incremental encoders with three additional hall-effect encoder
signals are used. The number of lines in the encoder can be freely parameterised (1 – 16384 lines/rotation).
An additional offset angle applies to hall-effect encoder signals. This is determined during motor identification or can be defined using the parameterising software. The hall-effect encoder offset angle is usually zero.

A. Technical specifications
104 Festo P-BE-CMMP-AS-…-11A 0708NH
Stegmann encoder :
Encoders with HIPERFACE from the Stegmann company are supported in single-turn and multi-turn. The following encoder series (e.g.) can be connected:
- Single-turn SinCos encoders: SCS 60, SCS 70, SKS 36, SR 50, SR 60
- Multi-turn SinCos encoders: SRM 50, SRM 60, SKM 36, SCM 60, SCM 70
- SinCos encoder for hollow shaft drives: SCS-Kit 101, SCM-Kit 101, SHS 170
Heidenhain encoders:
Incremental and absolute shaft encoders from the Heidenhain company are supported. The following frequently used encoder series (e.g.) can be connected:
- Heidenhain ERN1085, ERN 1387, ECN1313, RCN220, RCN 723, RON786, ERO1285, etc.
- Encoders with an EnDat interface.
Parameter Value
Parameterisable encoder line count 1 – 262144 lines/rotation
Angular resolution / Interpolation 10 Bit / period
Track signals A, B 1 VSS differential
Track signal N 0.2 to 1 VSS differential
Commutator tracks A1, B1 (optional) 1 VSS differential
Track signal input impedance Differential input 120
Limit frequency fLimit > 300 kHz (high resolution track)
fLimit approx. 10 kHz (commutator track)
Additional communication interfaces EnDat (Heidenhain) and HIPERFACE (Stegmann)
Output supply 5 V or 12 V; max. 300 mA; current limited,
controlled via sensor cables,
setpoints switchable via SW
Table A.14 Technical data: Encoder analysis [X2B]

A. Technical specifications
Festo P-BE-CMMP-AS-…-11A 0708NH 105
A.5 Communication interfaces
A.5.1 RS232 [X5]
Communication interface Values
RS232 As per RS232 specification, 9600 Baud to 115.2 k Baud
Table A.15 Technical data: RS232 [X5]
A.5.2 CAN bus [X4]
Communication interface Values
CANopen controller ISODIS 11898, Full CAN controller, max. 1M Baud
CANopen protocol As per DS301 and DSP402
Table A.16 Technical data: CAN bus [X4]
A.5.3 I/O interface [X1]
Digital inputs/outputs Values
Signal level 24V (8V...30V) active high, conforms to EN 1131-2
General logic inputs
DIN0
DIN1
DIN2
DIN3
Bit 0 \
Bit 1, \ Target selection for positioning
Bit 2, / 16 targets selectable from target table
Bit 3 /
DIN4 End stage enable control input high
DIN5 Controller free at high, acknowledge error at low
DIN6 End stage input 0
DIN7 End stage input 1
DIN8 Start positioning control signal
DIN9 Reference switch for homing run or storing of positions
General logic outputs Electrically isolated, 24 V (8 V...30 V) active high
DOUT0 Ready to operate 24 V, max. 100 mA
DOUT1 Freely configurable 24 V, max. 100 mA
DOUT2 Freely configurable, optionally usable as input DIN10 24 V, max. 100 mA
DOUT3 Freely configurable, optionally usable as input DIN11 24 V, max. 100 mA
DOUT4 [X6] Holding brake 24 V, max. 1 A
Table A.17 Technical data: Digital inputs and outputs [X1]

A. Technical specifications
106 Festo P-BE-CMMP-AS-…-11A 0708NH
Analogue inputs/outputs Values
High-resolution analogue
input:
AIN0
10 V input section, 16 bit, differential,
< 250 µs delay time
Analogue input:
AIN1
This input can be optionally parameter-
ised as digital input DIN AIN1 with an
8 V switching threshold
10 V, 10 bit, single-ended,
< 250 µs delay time
Analogue input:
AIN2
This input can be optionally parameter-
ised as digital input DIN AIN2 with an
8 V switching threshold
10 V, 10 bit, single-ended,
< 250 µs delay time
Analogue outputs:
AOUT0 and AOUT1
10 V output range, 9 bit resolution, flimit > 1 kHz
Table A.18 Technical data: Analogue inputs and outputs [X1]
A.5.4 Incremental encoder input [X10]
The input supports all commonly available incremental encoders.
For example, Heidenhain encoders conforming to the ROD426 industrial standard, or encoders with "Single-Ended" TTL or "Open collector" outputs.
Alternatively, the A and B track signals from the device are interpreted as pulse direction signals, allowing the controller to be controlled from stepper motor controller cards.
Parameter Value
Parameterisable line count 1 – 228 lines / rotation
Tracking signals: A, #A, B, #B, N, #N According to RS422 specification
Max. input frequency 1000 kHz
Pulse direction interface: CLK, #CLK, DIR, #DIR, RESET,
#RESET
According to RS422 specification
Output supply 5 V, max. 100 mA
Table A.19 Technical data: Increment encoder input [X10]
A.5.5 Incremental encoder output [X11]
The output provides incremental encoder signals for processing in higher-level control
systems.
The signals are generated with a freely programmable number of lines from the rotation angle of the encoder.
In addition to the A and B tracking signals, the emulation also provides a zero impulse, which goes high for ¼ of a signal period once per rotation (while the A and B tracking signals are high).

A. Technical specifications
Festo P-BE-CMMP-AS-…-11A 0708NH 107
Parameter Value
Number of output lines Programmable 1 –16384 lines/rotation
Connection level Differential / RS422 specification
Tracking signals A, B, N According to RS422 specification
Special feature N track can be switched off
Output impedance Ra,diff = 66
Limit frequency fLimit > 1.8 MHz (lines/s)
Edge sequence Can be limited using parameters
Output supply 5 V, max. 100 mA
Table A.20 Technical data: Incremental encoder output [X11]

A. Technical specifications
108 Festo P-BE-CMMP-AS-…-11A 0708NH

B. Glossary
Festo P-BE-CMMP-AS-…-11A 0708NH 109
B. Glossary
EMC
Electromagnetic compatibility (EMC) or electromagnetic interference (EMI) involves the following requirements:
Interference immunity
Sufficient interference immunity of an electrical system or electrical device against external electrical, magnetic or electromagnetic noise via lines or space.
Interference
emission
Sufficiently low interference emission of electrical, magnetic or
electromagnetic interference of an electrical system or an electrical device on other devices in the environment via conductors and through the air.

110 Festo P-BE-CMMP-AS-…-11A 0708NH
A
AC servo converter ............................... 24 Angle encoder connections [X2A] and
[X2B] .............................................. 102
B
Brake management ............................. 39
C
CAN bus ............................................... 31 CAN bus [X4] ...................................... 105
Checking readiness for operation ........ 85 Commissioning sequence .................... 84 Communication interfaces ................. 105 Connect the power supply ................... 85
Connecting a PC ................................... 85 Connection: CAN bus [X4] .................... 77 Connection: Encoder [X2B] ................... 74 Connection: I/O communication [X1] .... 69 Connection: Increment encoder input
[X10] ................................................. 75 Connection: Incremental encoder output
[X11] ................................................. 76
Connection: Motor [X6] ........................ 67 Connection: Power supply [X9] ............ 65 Connection: Resolver [X2A] .................. 73 Connection: RS232/COM [X5] .............. 79 Connection: Safe Standstill [X3] ........... 73 Connector pin assignments ................. 63 Contour control with linear interpolation
......................................................... 43 Controlled RPM mode .......................... 36 Controlled torque mode ....................... 36 Counterplug [X9] .................................. 66
D
Description of the timing diagram: ....... 51 Device view ......................................... 59 Documentation .................................... 11
E
Electrical installation ........................... 63 EMC ................................................... 109 Emergency stop circuit ........................ 53 Encoder connection [X2B] .................. 103 Entire CMMP-AS system....................... 64
ESD protection .................................... 83
F
Function overview ............................... 34 Functional method / Timing ................ 50 Functional safety engineering ............. 45
G
General information and intended use 45 General information on EMC ................ 80 Glossary ............................................ 109
EMC Interference emission ................. 109
Interference immunity ................. 109 EMC ............................................... 109
H
Homing run ......................................... 41
I
I/O functions and device control ......... 32 I/O interface [X1] ............................... 105 Incremental encoder signal ............... 106 Inhalt .................................................... 5 Instructions on safe and EMC-compliant
installation ....................................... 79
L
Load torque compensation for vertical axes ................................................. 37
M
Mechanical installation ....................... 57
N
Notes General information ......................... 14 Security ........................................... 13
O
Operation and display components ... 100 Optional Stop input ............................. 42 Overload current and short-circuit
monitoring ....................................... 87
P
Positioning and position control .......... 37 Positioning control .............................. 39 Positioning sequences ........................ 41

Festo P-BE-CMMP-AS-…-11A 0708NH 111
Power supply [X9] .............................. 100
Profibus ............................................... 31 Protective door monitoring .................. 55 Pulse width modulation (PWM) ............ 35
R
Resolver connection [X2A] ................. 102 RS232 [X5] ......................................... 105 RS232 interface ................................... 30
S
Safety instructions ......................... 13, 16 Scope of delivery ................................. 12
Secure stopping brake control ............. 49
Service functions and error messages . 87
Servo positioning controller ................ 24 Setpoint management ......................... 35 Setpoint sources ................................. 35 Synchronisation to external clock sources . 37 Synchronisation, electrical gearboxes . 38 Synchronous servo motors .................. 34
T
Technical specifications ...................... 99 Time-synchronised multi-axis positioning
........................................................ 44 Torque-limited speed control .............. 37