design and build a solar house with energy3d software · 1 possible to keep it design and build a...
TRANSCRIPT
1
Design and Build a Solar House with
Energy3D Software IntroductionThe goal of this engineering project is to construct and test the energy efficiency and solar heat gain of a model house. You will be working with a model rather than a full-sized house, but the principles are the same.
This project uses a standard procedure for measuring the thermal per-formance of a house. For the house to lose heat, there must be a temper-ature difference. The interior must be warmer than the outside. Since you can’t cool down your classroom to 0 °C, you will warm up your house to 10 °C above room temperature. This is done with a heater light bulb inside the house.
As with a real house, what matters is how much of the time the furnace must be on to keep the house warm. The more it’s on, the more energy is used per day and the greater your heating bill. To imitate this situa-tion, you will record what percentage of time the heater light bulb must be on to keep the house at 10° C above room temperature.
Finally, you will perform the same test, but with a bright light shin-ing on the house, imitating sunshine. You can then tell how much your energy bill is reduced by “solar heating.”
The setting is the temperate climate of the northern United States: hot summers and cold winters, with moderate spring and fall seasons. There is a fair amount of sunshine all year, but of course the angle of the sun and the length of the day change significantly from season to season.
You have two basic strategies are to cut down on heat loss and to gain some heating from the sun during cold months. You are limited to pas-sive solar strategies. Designs that depend on collectors, pumps, and fans are called active solar collectors and they are not available in this project.
The initial materials will be cardstock, clear acetate, and tape. You must write down a design rationale before you start building and testing. Af-ter you test it, you can start trying other materials and modifications to make it perform better. (See “Modify Solar House.”)
Design a model house that uses as little energy as possible to keep it warm.
Note: This is one chapter of a longer engineering project which includes modifying and retesting this house as well as explorations of the various mechanisms of heat transfer—conduction, con-vection, radiation, and heat capacity—with hands-on or model-based experiments. See: http://concord.org/ engineering
Copyright © 2013 The Concord Consortium This work is licensed under a Creative Commons Attribution-NonCommercial 3.0
United States License (CC BY-NC 3.0 US).
To download Energy2D
software, go to
http://energy.concord.org/
energy2d/
To run the models in this
chapter, go to
http://energy.concord.org/htb
Note the video tutorial.

2
You will be using a computer program, Energy3D, to design and build your house. The process has three steps:
1. Design the house on the computer, using Energy3D. Make three different designs.
2. Review the three designs and choose the best one for building and testing.
3. Print the chosen design and assemble the house.
4. Test the house for energy efficiency.
All of the tools and materials required for this project are described in the “Tools and Materials” Appendix.
Note: This is one chapter of a longer engineering project which includes modifying and retesting this house as well as explorations of the various mechanisms of heat transfer—conduction, convection, radiation, and heat capacity—with hands-on or model-based experiments. See: http://concord.org/engineering
Copyright © 2013 The Concord Consortium This work is licensed under a Creative Commons Attribution-NonCommercial 3.0 United States License (CC BY-NC 3.0 US).
Students design and build their
own house, based on what they
have learned about heat
transfer. They use Energy3D
to both design and print their
finished house. They are asked
to come up with three distinct
designs and choose the best
one.
For each of the three designs,
have teams switch who has
control of the computer. If a
computer lab is available, each
student could work individually
on a separate design.
Learning goals:
• Explain material and design
choices based on
constraints or stated goals.
• Justify a design using
scientific content
knowledge and principles.
• Justify results using
scientific content
knowledge.

3
The design of the house is up to you, but there are specific goals that you should address:
• Thehousehasfeaturesthatyouthinkwillmakeitenergyefficient.• Theinteriorwouldbecomfortabletobeinonasunnydayoracold
night.• Thehouseshouldbeattractiveandhave“curbappeal.”
In addition there are geometric limitations:
• Thehouseshouldnotbelargerthanthe28x36cmplatformprovidedin the software.
• Tomakeroomfortheheaterlightbulb,thewallsmustbeatleast20cm high and there must be room to cut a 12 cm diameter hole (the size of a CD) in the center of the floor.
• Thehousemustbebuildable–thatis,nottoocomplexandnottoomany pieces.
• Theminimumwindowareais50cm2.
Note: In your initial design, you are limited to cardstock and clear acetate as basic building materials.
Design goals
Copyright © 2013 The Concord Consortium This work is licensed under a Creative Commons Attribution-NonCommercial 3.0
United States License (CC BY-NC 3.0 US).

4
Before you begin designing your house on the computer, brainstorm with your team about the goals and how you will address each one. Then answer the following questions.
What shape and size of the building will contribute to the house’s energy efficiency?
Whatroofshapewillcontributetothehouse’senergyefficiency?
Howwillyouorientthebuildingtotakeadvantageofsunlight?What windowsizesandplacementwillbegoodforsolargain?
Describe the other features that you would like your house to have in order to meet the design goals.
Design rationale
Copyright © 2013 The Concord Consortium This work is licensed under a Creative Commons Attribution-NonCommercial 3.0 United States License (CC BY-NC 3.0 US).
Be sure students write out a
serious design rationale before
they start designing.

5
Design procedure
1. Watch the Energy3D movie (Getting Started with Energy3D) at: http://energy.concord.org/energy3d/
2. Construct your house on the computer. Pay attention to the directions, especially which way is south. This should affect many of your decisions.
3. Your house may not look like the example, but it shows a proce-dure you can follow. It’s OK to experiment with different shapes and start over several times if you want to. Keep the house rela-tively simple. Remember, what you design you must build out of paper!
4. Theprogramwillopenwitha28x36cmplatform.Youhousemust fit within this.
Design instructions
Copyright © 2013 The Concord Consortium This work is licensed under a Creative Commons Attribution-NonCommercial 3.0
United States License (CC BY-NC 3.0 US).
Be sure the teams switch who
has control of the computer.
Encourage them to come up
with a variety of designs.
6
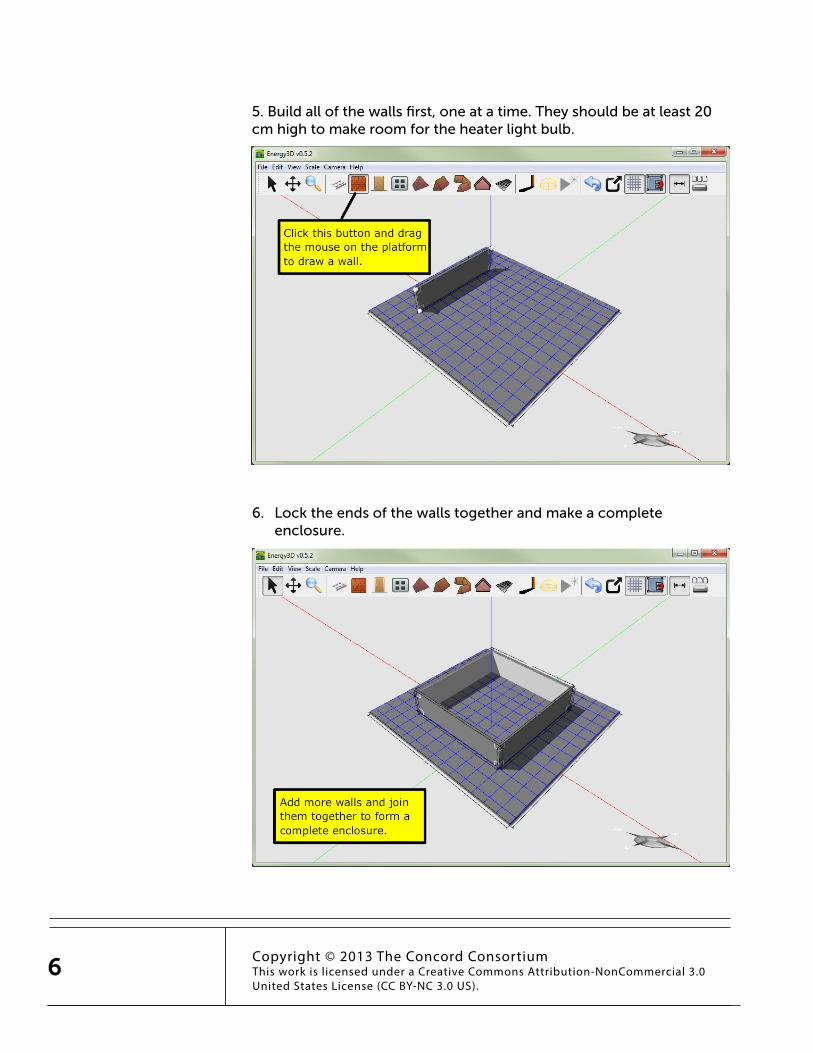
5.Buildallofthewallsfirst,oneatatime.Theyshouldbeatleast20cm high to make room for the heater light bulb.
6. Locktheendsofthewallstogetherandmakeacomplete enclosure.
Copyright © 2013 The Concord Consortium This work is licensed under a Creative Commons Attribution-NonCommercial 3.0 United States License (CC BY-NC 3.0 US).
7
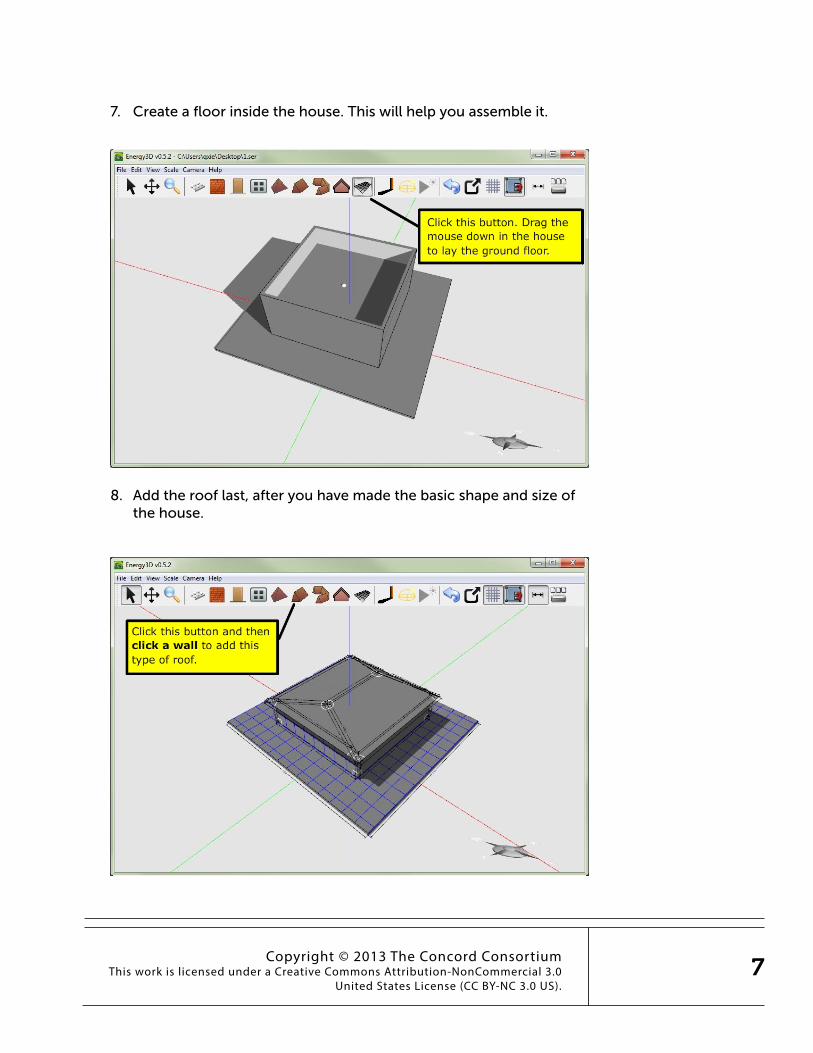
7. Create a floor inside the house. This will help you assemble it.
8. Addtherooflast,afteryouhavemadethebasicshapeandsizeofthe house.
Copyright © 2013 The Concord Consortium This work is licensed under a Creative Commons Attribution-NonCommercial 3.0
United States License (CC BY-NC 3.0 US).
8
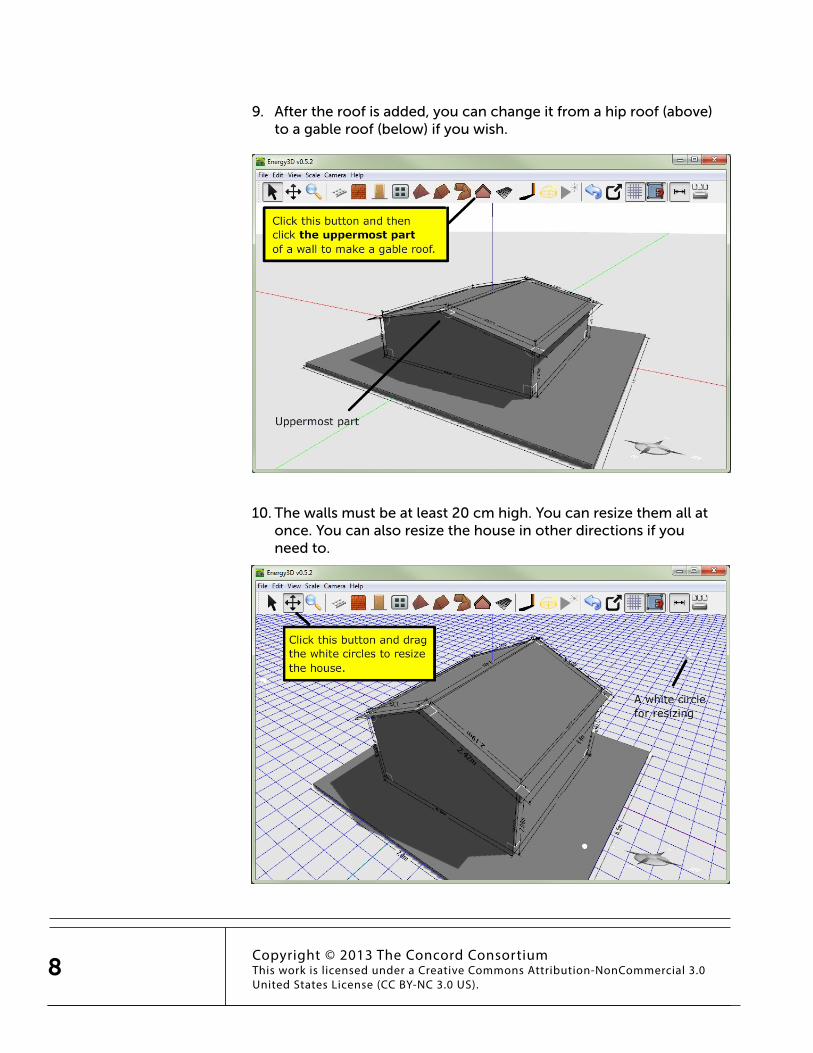
9. Aftertheroofisadded,youcanchangeitfromahiproof(above)to a gable roof (below) if you wish.
10.Thewallsmustbeatleast20cmhigh.Youcanresizethemallatonce. You can also resize the house in other directions if you need to.
Copyright © 2013 The Concord Consortium This work is licensed under a Creative Commons Attribution-NonCommercial 3.0 United States License (CC BY-NC 3.0 US).
9
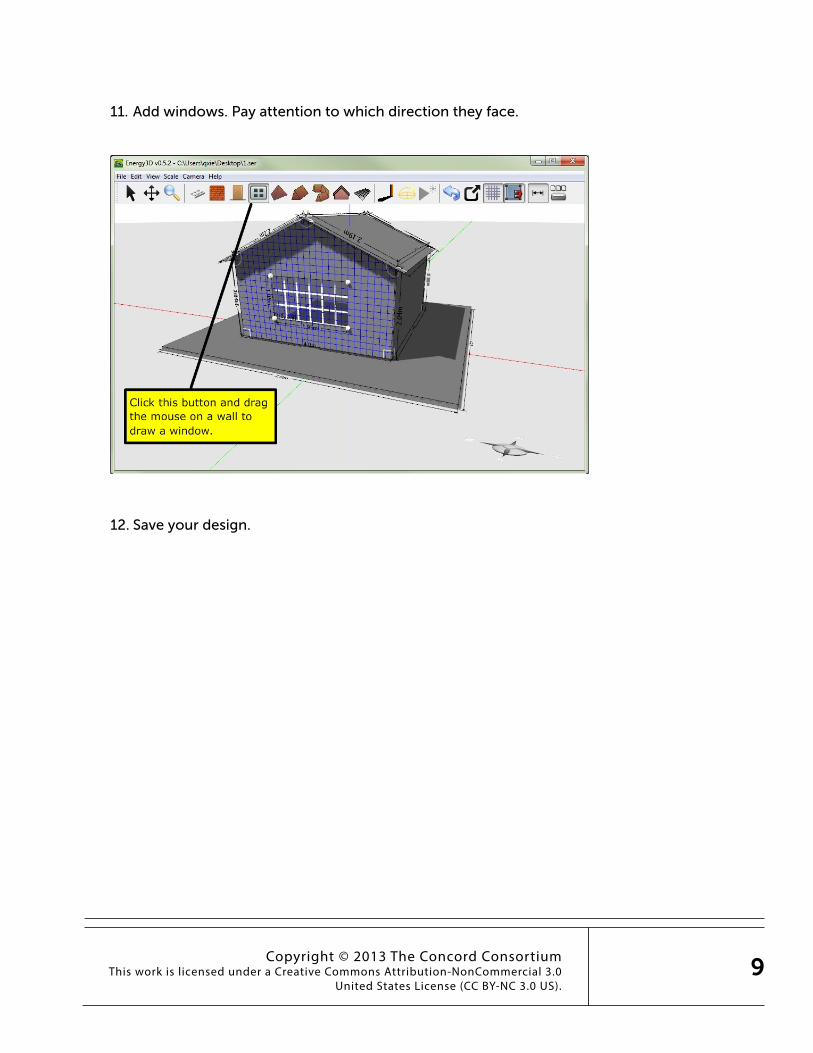
11.Addwindows.Payattentiontowhichdirectiontheyface.
12. Save your design.
Copyright © 2013 The Concord Consortium This work is licensed under a Creative Commons Attribution-NonCommercial 3.0
United States License (CC BY-NC 3.0 US).

10
1. Open the Heliodon tool. Set it to your latitude. Turn on the Shadows tool right next to it.
2. Study how sunlight enters your house at different times of day and different times of year. Do you think your windows are effective passive solarcollectors?Explain.
3. Zoom inside your house. Study the path of sunlight from your various windows. Do you think this would be a comfortable room on a sunny day?Explain.
Evaluation of Design #1
Copyright © 2013 The Concord Consortium This work is licensed under a Creative Commons Attribution-NonCommercial 3.0 United States License (CC BY-NC 3.0 US).

11
4. Now step back and consider as a team how well Design #1 meets your goals. Here is a checklist, but add other goals if you have any.
• Energyefficiency• Ease of building• Attractiveness• Shape• Simplicity• Size• Comfort
Describe how Design #1 successfully met these goals.
Describe how Design #1 was not successful.
5.Basedonyourreview,modifyyourdesignandsaveitagainasanewfile.
Copyright © 2013 The Concord Consortium This work is licensed under a Creative Commons Attribution-NonCommercial 3.0
United States License (CC BY-NC 3.0 US).

12
1. Now that you have some experience with Energy3D, try another altogether different design. Don’t be satisfied with your first attempt!
2. Close and re-open Energy3D. Design a new house from scratch.
3. Save your design.
Design #2
Copyright © 2013 The Concord Consortium This work is licensed under a Creative Commons Attribution-NonCommercial 3.0 United States License (CC BY-NC 3.0 US).
13
1. Open the Heliodon tool. Set it to your latitude. Turn on the Shadows tool.
2. Study how sunlight enters your house at different times of day and different times of year. Examine the house both from the outside and the inside.
3. Step back and consider how well Design #2 meets your goals. Refer back to your checklist.
Describe how Design #2 successfully met these goals.
Describe how Design #2 was not successful.
4. Based on your review, modify your design and save it again as a new file.
Evaluation of Design #2
Copyright © 2013 The Concord Consortium This work is licensed under a Creative Commons Attribution-NonCommercial 3.0
United States License (CC BY-NC 3.0 US).

14
1. Try to come up with one more altogether different design.
2. Close and re-open Energy3D. Design a new house from scratch.
3. Save your design.
Design #3
Copyright © 2013 The Concord Consortium This work is licensed under a Creative Commons Attribution-NonCommercial 3.0 United States License (CC BY-NC 3.0 US).
15
1. Open the Heliodon tool. Set it to your latitude. Turn on the Shadows tool.
2. Study how sunlight enters your house at different times of day and dif-ferent times of year. Examine the house both from the outside and the inside.
3. Step back and consider how well Design #3 meets your goals. Refer back to your checklist.
Describe how Design #3 successfully met these goals.
Describe how Design #3 was not successful.
4. Based on your review, modify your design and save it again as a new file.
Evaluation of Design #3
Copyright © 2013 The Concord Consortium This work is licensed under a Creative Commons Attribution-NonCommercial 3.0
United States License (CC BY-NC 3.0 US).

16
You now have three designs to choose from. Each one may have features that you like or dislike. Review the design goals and select one of them for building and testing. To help you choose, fill out the rating chart below. 3=excellent,2=good,1=fair,0=bad
Whichdesignwillyouselect?
Explain why you selected the design that you did.
Select your best design
Results
Goal House #1 House #2 House #3
Energy efficiency
Ease of building
Attractiveness
Shape
Simplicity
Size
Comfort
Copyright © 2013 The Concord Consortium This work is licensed under a Creative Commons Attribution-NonCommercial 3.0 United States License (CC BY-NC 3.0 US).
Aftereachteamselectstheir
preferred design, have them
present it to the whole class
and explain the virtues and
drawbacks of their design
choices.
17
Print your design
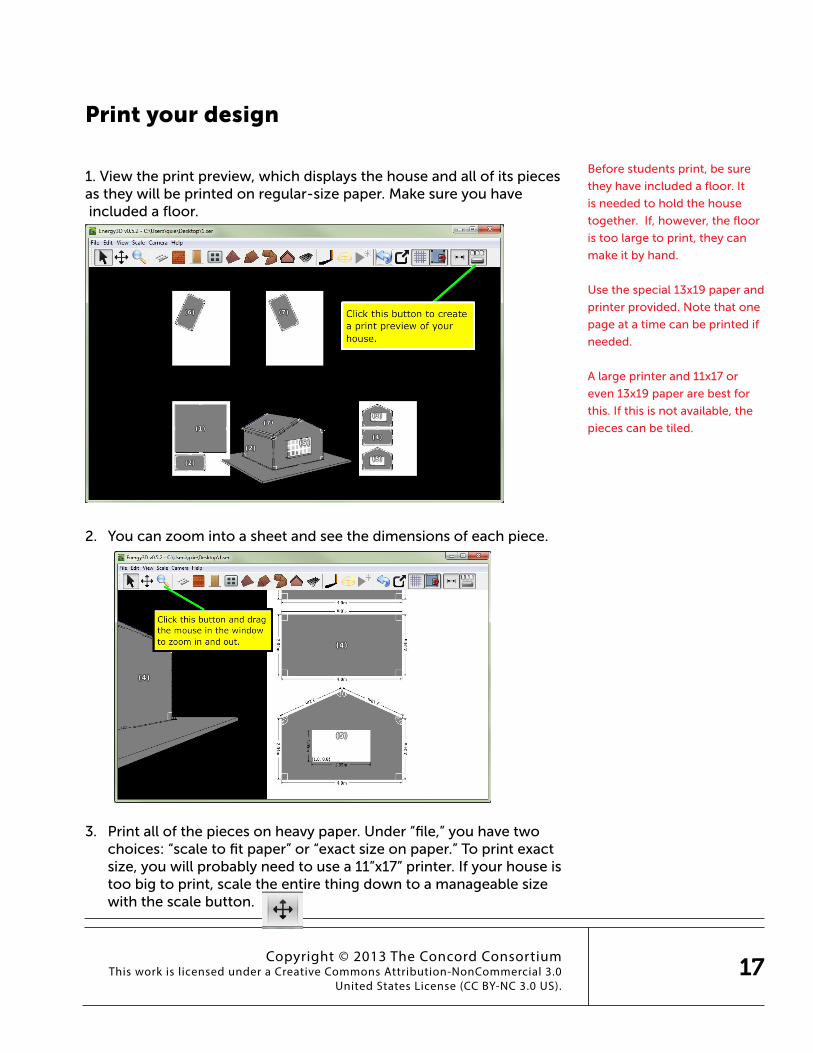
1. View the print preview, which displays the house and all of its pieces as they will be printed on regular-size paper. Make sure you have included a floor.
2. You can zoom into a sheet and see the dimensions of each piece.
3. Printallofthepiecesonheavypaper.Under“file,”youhavetwochoices:“scaletofitpaper”or“exactsizeonpaper.”Toprintexactsize,youwillprobablyneedtousea11”x17”printer.Ifyourhouseistoo big to print, scale the entire thing down to a manageable size with the scale button.
Results
Goal House #1 House #2 House #3
Energy efficiency
Ease of building
Attractiveness
Shape
Simplicity
Size
Comfort
Copyright © 2013 The Concord Consortium This work is licensed under a Creative Commons Attribution-NonCommercial 3.0
United States License (CC BY-NC 3.0 US).
Before students print, be sure
they have included a floor. It
is needed to hold the house
together. If, however, the floor
is too large to print, they can
make it by hand.
Use the special 13x19 paper and
printer provided. Note that one
page at a time can be printed if
needed.
Alargeprinterand11x17or
even 13x19 paper are best for
this. If this is not available, the
pieces can be tiled.

18
Construction
1. Cut out the pieces with scissors.
2. Cut out the window openings with scissors or a utility knife and tape pieces of acetate over them on the inside.
3. Cut a circle in the floor (12 cm diameter, the size of a CD) for the heater light bulb.
4.Tapethehousepiecestogether.Usethe3Dhouseviewin“printview”as a guide. Note that the pieces are numbered. It works well to follow these steps:
a) tape the wall pieces together
b) tape the roof pieces together
c) tape the roof to walls
d) tape the floor to walls
5.Makeaholeinonewallforthetemperaturesensor10cmabovethefloor. Pick the wall that is farthest from the heater light bulb. The sensor willgo3cmintothehouseanditmustbeatleast5cmfromtheheaterlight bulb.
6.Calculatethetotalfloorareaandwindowareaofyourhouse.Alsocalculate the window area that faces south. Your measurements can be rounded to the nearest centimeter. Fill out the table below.
Your house
Floor area (cm2)
Window area (cm2)
Window/floor ratio
South-facing window area (cm2)
South window/floor ratio
Tools & materials
• Scissors
• Pencils
• Metalruler(cm)
• Protractor
• Safetyutilitycutter
• Cardstockthatmatchesyour printer size
• Acetatesheets(8.5x11in)for windows
• Maskingtapeand/orcleartape
Copyright © 2013 The Concord Consortium This work is licensed under a Creative Commons Attribution-NonCommercial 3.0 United States License (CC BY-NC 3.0 US).

19
Your goal in testing your house is to measure how much power it takestokeepyourhouse10°Cwarmerthantheairaroundit.
House heating test
Collect data
1. Connect the temperature sensor to your computer. Use one temperature sensor.
2. Measure the room temperature. We will assume it stays reason-ably constant throughout the experiment. Record temperature in the table below.
3. Calculateyourtargettemperature:10°Caboveroomtempera-ture. Record your room and target temperature in the table below.
4. Insert the temperature sensor in the hole you made in the house. It must be pushed through the wall, so that it is 3 cm from the wall.
5. Turntheheateron.
6. Startcollectingdatawhenthesensorisafewdegreesbelowthe target temperature.
7. Whenthesensorreaches0.2°Cabovethetargettemperature,switch the heater OFF and record the time in the table below (A).
8. Whenthesensordropsto0.2°Cbelowthetargettemperature,switch the heater ON and record the time in the table below (B).
9. Whenthesensoragainreaches0.2°Cabovethetarget temperature, switch the heater OFF and record the time in the table below (C).
10.Stopcollectingdata.
11.Clickthe“scale”icontofitthegraphtoyourdata.
12. Save the data file.
13. Calculate the average power requirement to keep the house warm by filling out the rest of the table below.
Tools & materials
•Onefast-responsetempera-ture sensor (for example, the Vernier surface temperature sensor STS-BTA)
•Computerorothergraphinginterface for temperature sensor
• One40Wlightbulbheater(see “Light bulb heater” in Appendix) in a socket with an inline switch, covered with foil
Note: If your house is large or has lots of window area, you mayneedtochangethe40Wheaterbulbto75W.Besuretouse75Winsteadof40Wwhen you calculate the average power requirement on the next page.
Copyright © 2013 The Concord Consortium This work is licensed under a Creative Commons Attribution-NonCommercial 3.0
United States License (CC BY-NC 3.0 US).
This is the basic house heating
test. Point out that the
students are acting as a
“humanthermostat.”Review
how it is analogous to a real
house furnace, which turns on
and off to keep the house at
a constant temperature. The
furnace output (power) multi-
plied by the percentage of time
it is on (percent) is the average
power requirement to keep the
house warm.

20
House heating test
Room temperature: _____°C
Target temperature: _____°C
Upper limit (target temperature + 0.2): _____°C
Lower limit (target temperature – 0.2): _____°C
Event Time (from data table)
A. Turn heater OFF at upper limit
B. Turn heater ON at lower limit
C. Turn heater OFF at upper limit
D. Total cycle time (C - A)
E. Total time ON (C - B)
F. proportion of time the heater is on(C - B) / (C - A)
G. Average power requirement(40 watts * the proportion of time the heater is on)
_______W
Copyright © 2013 The Concord Consortium This work is licensed under a Creative Commons Attribution-NonCommercial 3.0 United States License (CC BY-NC 3.0 US).
Note: the house does not need
to cool down between this and
the next experiment (page 22)
so students can save time by
doing them both together.
Make a table of everyone’s
results so that they can be
compared and discussed.
Include the floor and window
areas, which may help explain
some of the differences.
Once the room temperature
has been measured,
the whole class can use the
same value throughout the
project unless a large change
(morethan2-3°C)isnoticed.
Then students don’t need to
wait for their house to cool
down between experiments.
This will save considerable time.
21
What specific features of your design contributed to or detracted from theenergyperformanceofthehouse?
Based on your results what design changes would you propose to improvetheperformanceofthesedesignfeatures?
Results
Copyright © 2013 The Concord Consortium This work is licensed under a Creative Commons Attribution-NonCommercial 3.0
United States License (CC BY-NC 3.0 US).
Collect data
1. Connect the temperature sensor to your computer.
2. Assumethatroomtemperaturehasnotchanged.Calculatethetargettemperature(roomtemp+10°C)andenteritinthetable below.
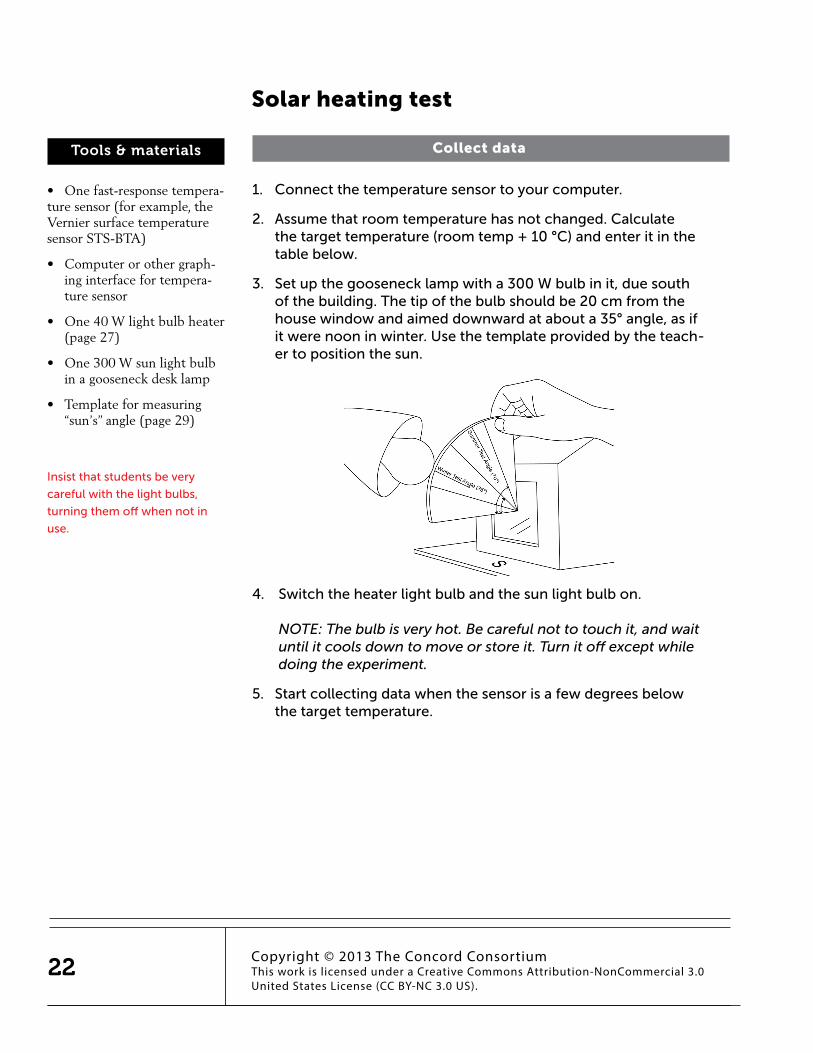
3. Setupthegoosenecklampwitha300Wbulbinit,duesouthofthebuilding.Thetipofthebulbshouldbe20cmfromthehousewindowandaimeddownwardatabouta35°angle,asifit were noon in winter. Use the template provided by the teach-er to position the sun.
4. Switch the heater light bulb and the sun light bulb on. NOTE: The bulb is very hot. Be careful not to touch it, and wait until it cools down to move or store it. Turn it off except while doing the experiment.
5. Start collecting data when the sensor is a few degrees below the target temperature.
Solar heating test
Tools & materials
• Onefast-responsetempera-ture sensor (for example, the Vernier surface temperature sensor STS-BTA)
• Computerorothergraph-ing interface for tempera-ture sensor
• One40Wlightbulbheater(page 27)
• One300Wsunlightbulbin a gooseneck desk lamp
• Templateformeasuring“sun’s” angle (page 29)
22 Copyright © 2013 The Concord Consortium This work is licensed under a Creative Commons Attribution-NonCommercial 3.0 United States License (CC BY-NC 3.0 US).
Insist that students be very
careful with the light bulbs,
turning them off when not in
use.

23
6. Whentheuppersensorreaches0.2°Cabovethetarget temperature, switch the heater OFF and record the time in the tablebelow(A).Leavethesunon.
7. Whentheuppersensorreaches0.2°Cbelowthetarget temperature, turn the heater ON. Record the time in the table below (B).
8. Whenthesensoragainreaches0.2°Cabovethetarget temperature, switch the heater OFF and record the time in the table below (C).
9. Stop collecting data.
10.Clickthe“scale”icontofitthegraphtoyourdata.
11. Save the data file.
12. Calculate the average power requirement to keep the house warm by filling out the rest of the table.
Copyright © 2013 The Concord Consortium This work is licensed under a Creative Commons Attribution-NonCommercial 3.0
United States License (CC BY-NC 3.0 US).

Solar heating test
Room temperature: _____°C
Target temperature: _____°C
Upper limit (target temperature + 0.2): _____°C
Lower limit (target temperature – 0.2): _____°C
Event Time (from data table)
A. Turn heater OFF at upper limit
B. Turn heater ON at lower limit
C. Turn heater OFF at upper limit
D. Total cycle time (C - A)
E. Total time ON (C - B)
F. Proportion of time the heater is on(C - B) / (C - A)
G. Average power requirement (40 watts * proportion of time heater is on) _______W
H. Power requirement without sun _______W
I. Solar contribution _______W
24 Copyright © 2013 The Concord Consortium This work is licensed under a Creative Commons Attribution-NonCommercial 3.0 United States License (CC BY-NC 3.0 US).
Addtheseresultstotheshared
table for discussion.
25
Results
How did this solar-heated house perform compared to the house with-outsunlight?
What specific features of your design contributed to or detracted from itsperformanceasapassivesolarhouse?Includetheevidencefromyour tests that support your claims.
Copyright © 2013 The Concord Consortium This work is licensed under a Creative Commons Attribution-NonCommercial 3.0
United States License (CC BY-NC 3.0 US).

26
Based on your results what design changes would you make to improve its performance?
What are the advantages and disadvantages of having large south-facing windows?
Copyright © 2013 The Concord Consortium This work is licensed under a Creative Commons Attribution-NonCommercial 3.0 United States License (CC BY-NC 3.0 US).
Advantages:moresolargaininwinter,lessinsummer.Coldsurfaceinwinter.
Disadvantages: large conductive loss in winter, conductive gain in summer.
27
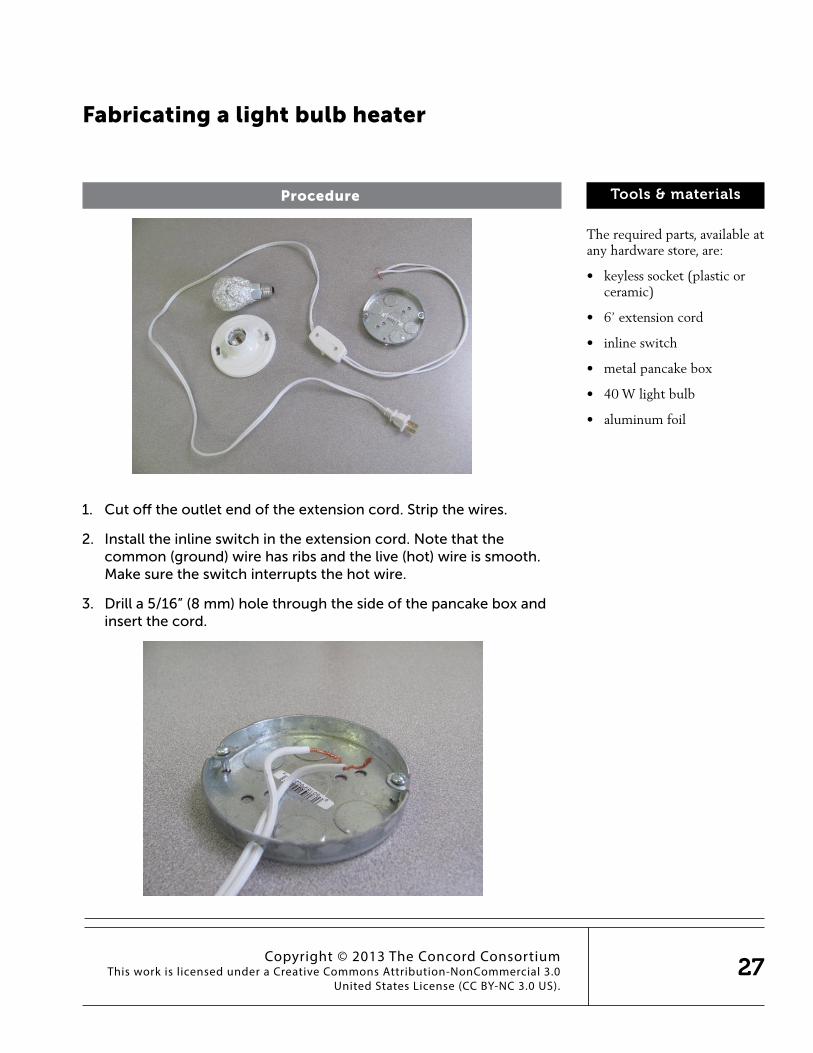
Procedure
1. Cut off the outlet end of the extension cord. Strip the wires.
2. Install the inline switch in the extension cord. Note that the common (ground) wire has ribs and the live (hot) wire is smooth. Make sure the switch interrupts the hot wire.
3. Drilla5/16”(8mm)holethroughthesideofthepancakeboxandinsert the cord.
Fabricating a light bulb heater
Tools & materials
The required parts, available at any hardware store, are:
• keylesssocket(plasticorceramic)
• 6’extensioncord
• inlineswitch
• metalpancakebox
• 40Wlightbulb
• aluminumfoil
Copyright © 2013 The Concord Consortium This work is licensed under a Creative Commons Attribution-NonCommercial 3.0
United States License (CC BY-NC 3.0 US).
28
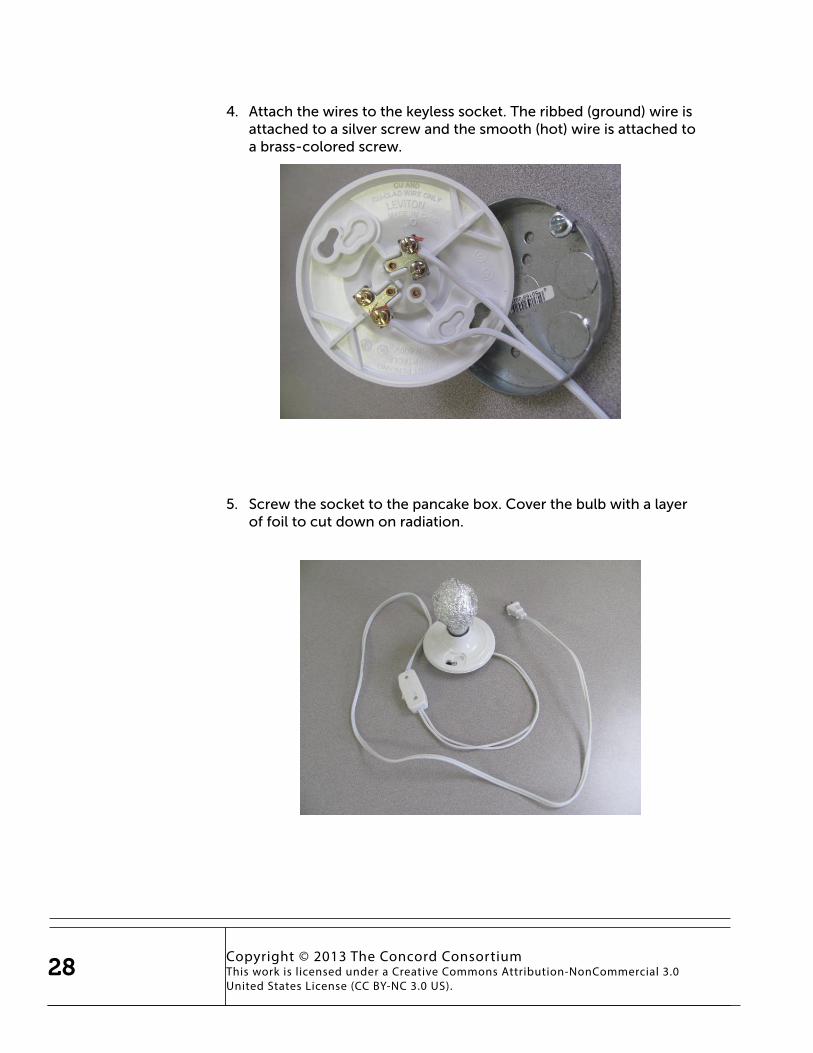
4. Attachthewirestothekeylesssocket.Theribbed(ground)wireisattached to a silver screw and the smooth (hot) wire is attached to a brass-colored screw.
5. Screwthesockettothepancakebox.Coverthebulbwithalayerof foil to cut down on radiation.
Copyright © 2013 The Concord Consortium This work is licensed under a Creative Commons Attribution-NonCommercial 3.0 United States License (CC BY-NC 3.0 US).

29