design guidance: learning environments · design guidance: learning environments table of contents...
TRANSCRIPT
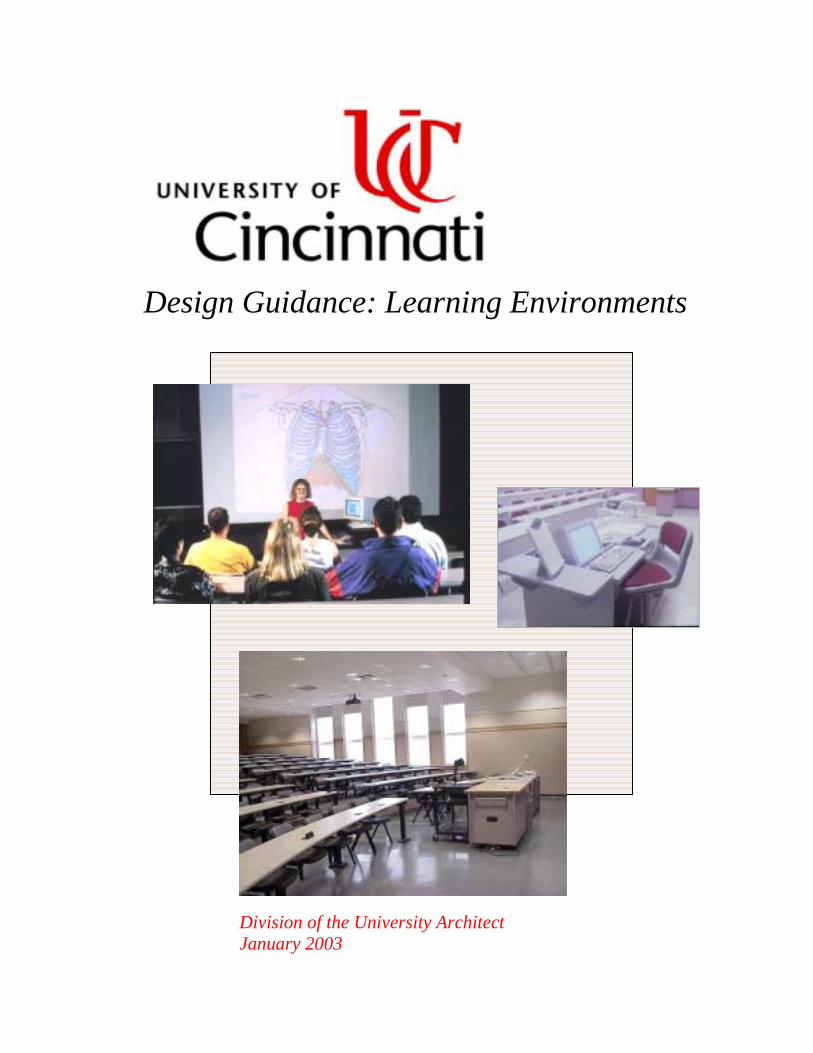
Design Guidance: Learning Environments
Division of the University Architect January 2003

Design Guidance: Learning Environments Table of Contents January 2003
University of Cincinnati i Division of the University Architect
Table of Contents
Acknowledgements iii Introduction 2 Scope, Update and Approval Process 3 Compliance Issues and Special Requirements 3 Code Compliance and Room Capacities 3 Americans with Disabilities Act (ADA) 3 Special Requirements for Design Submissions 3 Room Type Definitions 5 Auditorium 5 Classroom 5 Seminar Room 5 Distance Learning Room 6 Classroom Service 6 Scheduled Instruction Laboratory 6 Room Design, Furnishings, and Equipment 7 Room Location 7 Room Size and Proportion 7 Acoustics 12
Corridors, Entrances/Exits, and Access Aisles 13 Surface Treatments and Colors 15 Furnishings Types and Layouts 17 Student Seating and Work Surfaces 17 Classrooms (21-48 students) 17 Classrooms over 48 students and Auditoriums 17 Interactive Classroom 19 Typical Large Classroom 20 Typical Seminar Rooms 22 Work Surfaces and Seats 24 Recommended Seat Spacing 26 Instructor Workstations 28 Design Flexibility and Computers 31 Tables for References and Guest Speakers 36 Handout Racks 36 Overhead Projectors and Carts 36 Slide Projector Carts and Enclosures 37 Movable Carts for Other A/V System Components 37
Design Guidance: Learning Environments Table of Contents January 2003
University of Cincinnati ii Division of the University Architect
Audio-Visual Systems 38 Marker Boards 38 Display (Tack Boards) 39 Projection Screens 40 Ceiling Mounted Projectors 42 Computer System 43 Audio Systems 43 Document Camera 43 Video-Cassette Recorder with link to Cable TV 43
Slide Projectors 44 Overhead (Transparency) Projectors 45
Control Systems 45 Security for Audio-Visual System Components 45 Telephones and Data Connections 46 Special Equipment for Music Instruction 46 Distance Learning Classrooms 47 Lighting and Electrical Power 51 Heating, Ventilating, and Air Conditioning (HVAC) Systems 58 Room Signage 59 Trash & Recycling Containers 59 Coat Racks 59 Clocks 59 Pencil Sharpeners 59 Conclusion 60 Appendices
1. Typical Audio-Visual Components A-1
Design Guidance: Learning Environments Acknowledgements January 2003
University of Cincinnati iii Division of the University Architect
Acknowledgements
The following members of the University of Cincinnati Classroom Design Guidance work team together dedicated several thousand hours of time to create this document: Michael Burrill AIA AICP, Senior Planner, Campus Planning & Design Michael Hicks, AIA NCARB, Senior Architect, Construction Management Peter Snyder, RA, Senior Architect, Renovations Malcolm Montgomery, Learning Systems Technologist, UCit Joseph Scanio, PhD, Associate Dean, College of Arts & Sciences Gloria Henderson, Undergraduate Student, Campus Planning & Design Chandan Jaykumar, Graduate Student, Campus Planning & Design Mukesh Kumar, Graduate Student, Campus Planning & Design Siddhartha Majumdar, Graduate Student, Campus Planning & Design Milind Surve, Graduate Student, Campus Planning & Design Josh Robinette, Undergraduate Student, Campus Planning & Design Other members of the University of Cincinnati faculty, staff, and student body, as well as design consultants from many different firms, provided valuable inputs to the team. To all of them I would like to express my sincere appreciation. Annmarie Thurnquist Director, Department of Renovations Classroom Design Guidance Work Team

Design Guidance: Learning Environments Introduction January 2003
University of Cincinnati 1 Division of the University Architect
Introduction
This guidance for the design of learning environments at the University of Cincinnati was developed by a multi-disciplinary team. The team included campus planners, architects, an audio-visual system expert, and a senior faculty member who have extensive experience in the design of many different kinds of rooms where learning takes place. The team solicited inputs from faculty, staff, and students in all of the University’s colleges, mechanical and electrical engineers, and consultants involved with design of hundreds of classrooms. The team also obtained valuable information from visits to other campuses and presentations made at several professional conferences. Our primary reason for asking you to read this guidance is to convey the lessons learned and help you avoid “reinventing the wheel” as design of future projects proceeds. We are confident this will expedite the design process and create better learning environments. Objectives Our program to upgrade learning environments has the following objectives: • Encourage interactive learning • Provide comfortable seating with larger work surfaces • Add multi-media audio-visual systems with good sight lines • Provide a link to the Internet from every learning room • Improve access for all persons • Improve functional relationships • Increase flexibility to respond to future needs • Increase classroom use rates This campus-wide program represents an investment of millions of dollars to upgrade our learning environments. Please help us achieve these goals.
Design Guidance: Learning Environments Scope, Update and January 2003 Approval Process
University of Cincinnati 2 Division of the University Architect
Scope, Update and Approval Process
This guidance will be used for the design of learning environments at the University of Cincinnati. It applies to new construction as well as building rehabilitation and renovation projects at the Central Campus, Raymond Walters College, Clermont College, and the College of Applied Science. It applies to the following types of learning environments: Seminar Rooms Classrooms Auditoriums Scheduled Instruction Labs This guidance should be used in conjunction with the current editions of other University Design Guidelines and Standards, which address areas such as Sustainable Design, interior colors, signage and graphics, room numbering, communications, and product selections (when applicable). A complete list of these documents is included in the University Design Guidelines and Standards Manual. The University recognizes that design is a dynamic process and that guidance can quickly become obsolete as changes in teaching concepts, technology, building components, and furnishings design occur. Innovative design solutions not anticipated by this guidance will always be considered as part of the design review process for specific projects. Deviations from the guidance, however, must be clearly identified and submitted in writing for approval through the Project Manager to the University Architect. Questions, comments, and suggested changes to this guidance are also always welcome and will be considered in future updates. Please direct these to the work team that prepared this guidance as follows: Original to: Annmarie Thurnquist, Director, Department of Renovations University of Cincinnati PO Box 210181 Cincinnati, OH 45221-0181 Copy to: Ron Kull, Associate VP and University Architect
University of Cincinnati PO Box 210186 Cincinnati, OH 45221-0186 The University makes every effort to insure that this guidance document is both internally consistent and consistent with other UC design guidance documents. In the event you discover conflicting information, either within this document or with other University documents, please bring this to the attention of the work team as described above.
Design Guidance: Learning Environments Compliance Issues and January 2003 Special Requirements
University of Cincinnati 3 Division of the University Architect
Compliance Issues and Special Requirements
Code Compliance and Room Capacities Achieving full compliance with building and fire codes is a University requirement. Designs shall provide more comfortable seating with easier access than seating layouts that simply meet minimum requirements specified in codes. One of our goals in building new learning spaces and upgrading older ones is to eliminate overcrowding. Deviations from the space standards in this guidance must be fully justified by the designer and approved by the University Architect. NOTE: The criteria contained in this Guidance meets or exceeds Americans with Disabilities Act Accessibility Guidelines (ADAAG), fire, life safety, and other related building codes as of January 2003. Designers shall incorporate subsequent changes if they are more stringent. Americans with Disabilities Act (ADA) The University places a very high priority on full compliance with the ADA. Our goal is simply to make it as easy as possible for instructors, guest speakers, and students with special needs to teach or learn in all learning environments, and to accommodate them discreetly. This suggests design solutions that go well beyond the minimum. For example: • Instructor and student work stations designed to accommodate persons with disabilities
but which are similar in function, appearance, and cost to conventional workstations. • Adjustable-height marker boards that can be raised so they can be easily seen from the
rear of the room. • Projectors and screens designed to allow computer-generated media to be easily seen. • Audio systems that allow both the presented material and student responses to be clearly
understood in all parts of the room, supplemented by portable amplifiers for students with unusual hearing problems.
Guidance intended to achieve full ADA compliance appears throughout this document and should be carefully reviewed by everyone involved with the design of learning rooms, furnishings, and audio-visual systems.
Design Guidance: Learning Environments Compliance Issues and January 2003 Special Requirements
University of Cincinnati 4 Division of the University Architect
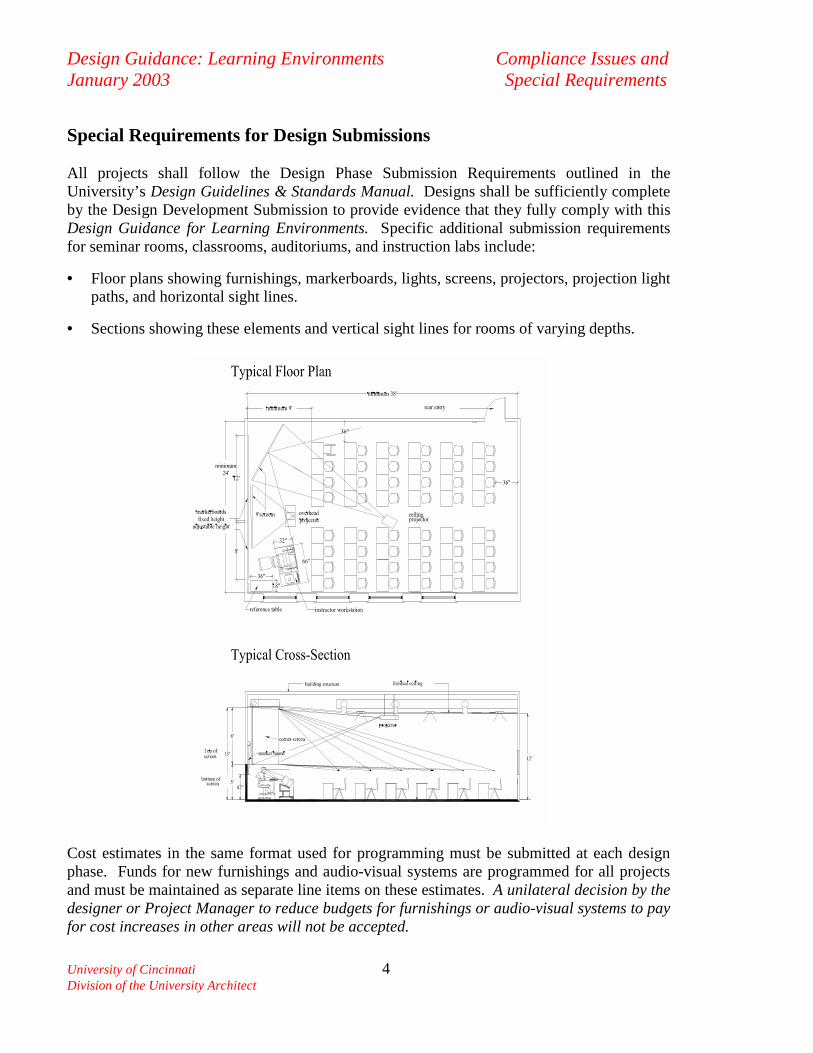
Special Requirements for Design Submissions All projects shall follow the Design Phase Submission Requirements outlined in the University’s Design Guidelines & Standards Manual. Designs shall be sufficiently complete by the Design Development Submission to provide evidence that they fully comply with this Design Guidance for Learning Environments. Specific additional submission requirements for seminar rooms, classrooms, auditoriums, and instruction labs include:
• Floor plans showing furnishings, markerboards, lights, screens, projectors, projection light paths, and horizontal sight lines.
• Sections showing these elements and vertical sight lines for rooms of varying depths.
Cost estimates in the same format used for programming must be submitted at each design phase. Funds for new furnishings and audio-visual systems are programmed for all projects and must be maintained as separate line items on these estimates. A unilateral decision by the designer or Project Manager to reduce budgets for furnishings or audio-visual systems to pay for cost increases in other areas will not be accepted.
Design Guidance: Learning Environments Room Design, Furnishings, January 2003 and Equipment
University of Cincinnati 5 Division of the University Architect
Room Type Definitions The University recognizes that learning can occur anywhere. The UC Master Plan includes several indoor and outdoor public spaces designed to encourage faculty-student interaction. Corridors near teaching spaces and student housing are being designed or redesigned to provide study alcoves with Internet access. Many of these learning environments have now been built. The primary focus of this design guidance, however, is on the types of learning rooms identified below using the definitions and room type numbers developed for the UC Space Management System. Auditorium (Room Type 110-03): A large room used primarily for scheduled classes of multiple academic disciplines with a seating capacity of 200 or more. Auditoriums may also serve non-instructional purposes, but only to a minor or incidental extent. Description: Rooms typically have a multi-media audio-visual system, with seats oriented towards the front of the room, and writing surfaces for each student. They do not have special-purpose equipment for student use (such as that found in a scheduled instruction laboratory) that would make the room unusable for multiple academic disciplines. Limitations: Excluded are theaters, concert halls, and places of assembly, which are not used primarily for instructional purposes and typically do not have writing surfaces near each seat.
Classroom (Room Type 110-01): A room used primarily for scheduled classes of multiple academic disciplines with a seating capacity of 21 to 199 students. Classrooms may also serve non-instructional purposes, but only to a minor or incidental extent. Description: Rooms typically have a multi-media audio-visual system, with seats oriented towards the front of the room, and writing surfaces for each student. They do not have special-purpose equipment for student use (such as that found in a scheduled instruction laboratory) that would make the room unusable for multiple disciplines.
Seminar Room (Room Type 110-02): A room used primarily for scheduled classes of multiple academic disciplines with a seating capacity of about 10 to 22 students. Seminar rooms may also serve non-instructional purposes, but only to a minor or incidental extent. Description: Rooms typically have a multi-media audio-visual system, with seats and tables oriented so that students and instructors can easily interact with each other. They do not have special-purpose equipment for student use (such as that found in a scheduled instruction laboratory) that would make the room unusable for multiple disciplines. Limitation: Excludes conference rooms, which may have similar design features but are primarily used for faculty and staff meetings.
Design Guidance: Learning Environments Room Design, Furnishings, January 2003 and Equipment
University of Cincinnati 6 Division of the University Architect
Distance Learning (Room Type 110-04): A distance learning room is a classroom, seminar room, or auditorium with special audio-visual and communications equipment that allows the instructor to communicate visually and orally with persons located outside of the room. Description: Includes cameras, microphones, and visual display devices such as large screens or monitors to facilitate communication with students and other instructors located outside the room. Most distance-learning classrooms are designed to send and receive communications and accommodate students to provide optimum flexibility and increase use rates. Varied technologies are used. Limitations: Rooms that are used typically to broadcast to other locations and have no students are considered Media Rooms. Classroom Service (Room Type 115): A room that directly serves one or more auditoriums, classrooms, or seminar rooms as an extension of the activities in those rooms. Description: Includes projection rooms, control booths, preparation rooms, coatrooms, closets, or storage areas, etc. Scheduled Instruction Laboratory (Room Type Series 210): A room used primarily by regularly scheduled classes with University course numbers that requires special-purpose equipment for student participation, experimentation, observation, or practice in a field of study. Description: An Instructional Laboratory is specially equipped to serve the needs of a particular discipline for group instruction in regularly scheduled classes. The design of such a room and/or the equipment in it normally limits or precludes its use by other disciplines. Examples would be rooms in which a lab section of a course is held. Included in this category are the following room types (See “UC Room Type Definitions” for details): Art Instruction Lab (210-01) Language Instruction Lab (210-05) Computer Instruction Lab (210-02) Other Instruction Lab (210-06) Design Instruction Lab (210-03) Performance Instruction Lab (210-07) Instrument Instruction Lab (210-04) Wet Instruction Lab (210-08) The size, shape, and other design features of instruction labs varies widely. During the programming phase of a project, the design capacity, furnishings, and equipment planned for these room types must be clearly identified. If an instruction lab requires a multi-media audio-visual system, the guidance for design of these systems may require modification to be compatible with specialized lab equipment or custom-designed furnishings, but basic concepts such as providing good sight lines for all students will still apply. Similar judgement must be used in adapting other applicable guidance to the design of instruction labs.

Design Guidance: Learning Environments Room Design, Furnishings, January 2003 and Equipment
University of Cincinnati 7 Division of the University Architect
Room Design, Furnishings, and Equipment
Room Location Learning rooms shall be located as close to building entrance levels as possible to improve access and reduce noise levels in other parts of the building. Large learning rooms shall be located close to primary building entrances and circulation spaces that are large enough to accommodate students waiting for the next class. Where existing learning spaces do not meet these goals, rehabilitation projects should relocate them, add entrances, or create more spacious circulation elements with places for students to sit while waiting for the next class. The location of learning rooms in relation to natural light should also be considered. Rooms with windows facing north can be more easily designed to provide adequate blackout capability and energy-efficiency than rooms with windows facing other directions. Passive solar design features should be considered for rooms where windows face the sun. Room Size and Proportion Learning spaces need to be large enough to comfortably accommodate the number of students planned for each type of room using the types and sizes of furnishings anticipated for instructors, students, and audio-visual components. Campus Planning shall be involved in any discussions that arise in design that could potentially change functions or seating capacities. The following space standards and furnishings types shall be used to estimate the total usable floor area of learning rooms during the programming phase of a project: SF Per Student Capacity Room Type Furnishings Anticipated 27 20 Seminar Rooms Movable tables & chairs 22 20 21 20 19
32 40 or 48 60-99 100-119 120-199
Classrooms Movable tables & chairs Movable tables & chairs Fixed writing surfaces & movable chairs Fixed writing surfaces & movable chairs Fixed writing surfaces & movable chairs
18 16 14
200-299 300-399 400-650
Auditoriums Fixed writing surfaces & movable chairs Fixed writing surfaces & movable chairs Auditorium seats with tablet arms
40 35
25-40 Computer Instruction Labs
Computer stations/conventional monitors Computer stations/thin-profile monitors
35-60 varies Other Instruction Labs
Furnishings and space needs depend on function and discipline
Design Guidance: Learning Environments Room Design, Furnishings, January 2003 and Equipment
University of Cincinnati 8 Division of the University Architect
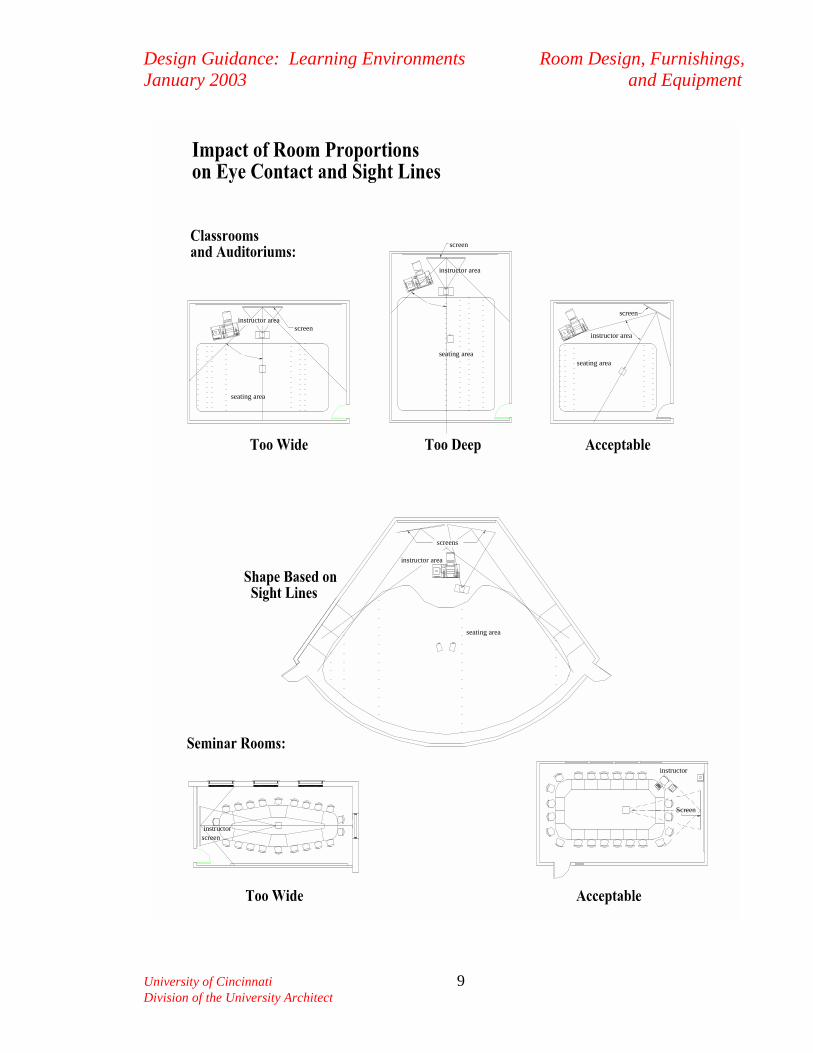
Furnishings layouts shall be developed during schematic design to insure that the room sizes and shapes proposed comfortably accommodate the number of students programmed for each room. The shape of the room, size and types of furnishings proposed, and other design features may increase or decrease the amount of space required per student. Room proportions also have a significant impact on seating capacity, sight lines, and the ability of instructors and students to interact with each other, even in small rooms:
• Classrooms and auditoriums that are too wide make it hard for instructors to maintain eye contact and typically have poor sightlines (especially from seats in the front corners). Instructor areas often provide more space than needed.
• Classrooms and auditoriums that are too deep make it hard for students in rear rows to interact with instructors and other students, hear what is said, and see projected images or marker boards. Instructor areas may be too narrow for screens and marker boards.
• Seminar rooms with rectangular shapes and long, narrow tables make it hard for students and instructors to see each other, projected images, or writing on markerboards. When instructors sit at the head of the table to improve eye contact, this makes it more difficult for them to encourage students to actively participate in the discussion.
To encourage interactive discussion while providing good sight lines, rooms that are nearly square or have a shape based on “viewing angles” from projection screens almost always work out best. To develop learning rooms with good sight lines and efficient seating layouts, design professionals should design from the “inside out”, not from the “outside in”: • Determine number of screens based on seating capacity, room type, and teaching goals • Determine the general location, size, and orientation of each screen and the seating area • Insure the instructor area meets the minimum dimensions in this guidance • Draw “viewing angles” from each screen and insure all seats are within them • Determine optimum width and depth of the seating area based on seat spacing guidance • Determine the location and size of access aisles • Then decide where the walls of the learning room should be located. The conventional design approach - designing the room first, and then trying to see what fits inside it – almost always leads to inefficient seating layouts, poor sight lines, overcrowded instructor areas, or reduced seating capacity.
Design Guidance: Learning Environments Room Design, Furnishings, January 2003 and Equipment
University of Cincinnati 9 Division of the University Architect
screens
seating area
screen
instructor area
45°
seating area
instructor area
screen
seating area
screen
seating area
45°
45°
instructor
Screen
instructor
instructor area
instructor area
screen
Design Guidance: Learning Environments Room Design, Furnishings, January 2003 and Equipment
University of Cincinnati 10 Division of the University Architect
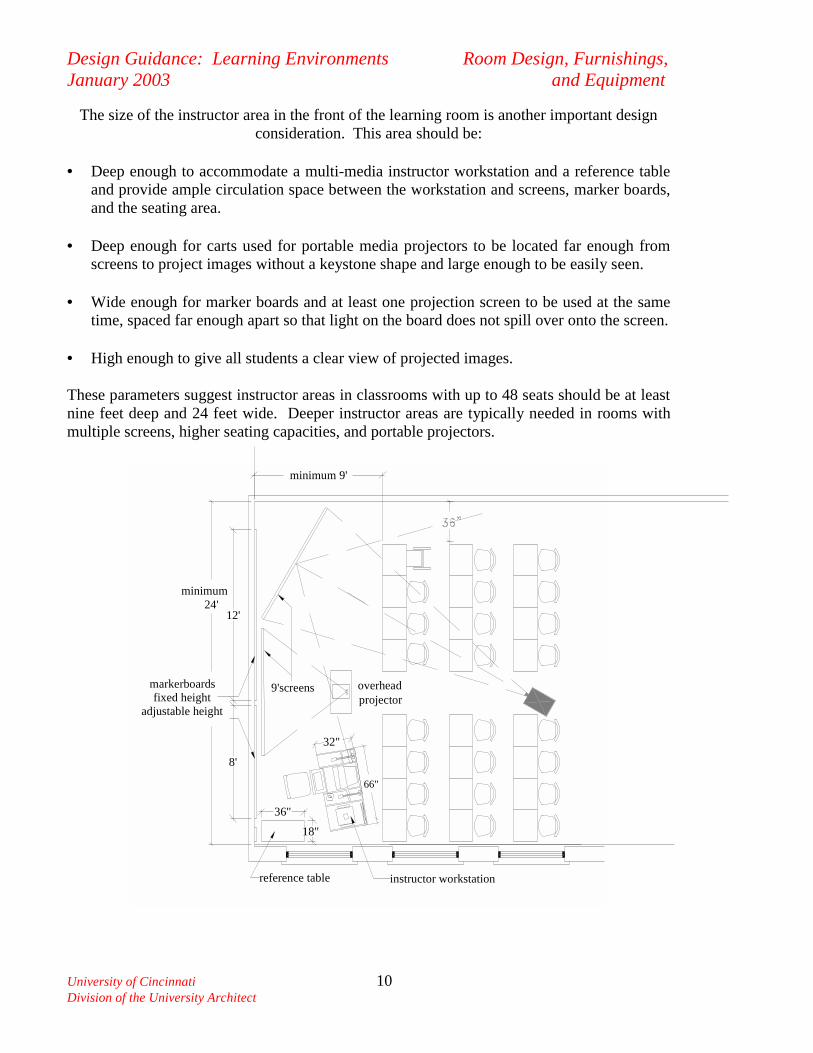
The size of the instructor area in the front of the learning room is another important design consideration. This area should be:
• Deep enough to accommodate a multi-media instructor workstation and a reference table
and provide ample circulation space between the workstation and screens, marker boards, and the seating area.
• Deep enough for carts used for portable media projectors to be located far enough from
screens to project images without a keystone shape and large enough to be easily seen. • Wide enough for marker boards and at least one projection screen to be used at the same
time, spaced far enough apart so that light on the board does not spill over onto the screen. • High enough to give all students a clear view of projected images. These parameters suggest instructor areas in classrooms with up to 48 seats should be at least nine feet deep and 24 feet wide. Deeper instructor areas are typically needed in rooms with multiple screens, higher seating capacities, and portable projectors.
minimum24'
36"
66"
minimum 9'
8'
18"
12'
32"
overhead projector
9'screens
reference table instructor workstation
markerboardsfixed height
adjustable height
Design Guidance: Learning Environments Room Design, Furnishings, January 2003 and Equipment
University of Cincinnati 11 Division of the University Architect
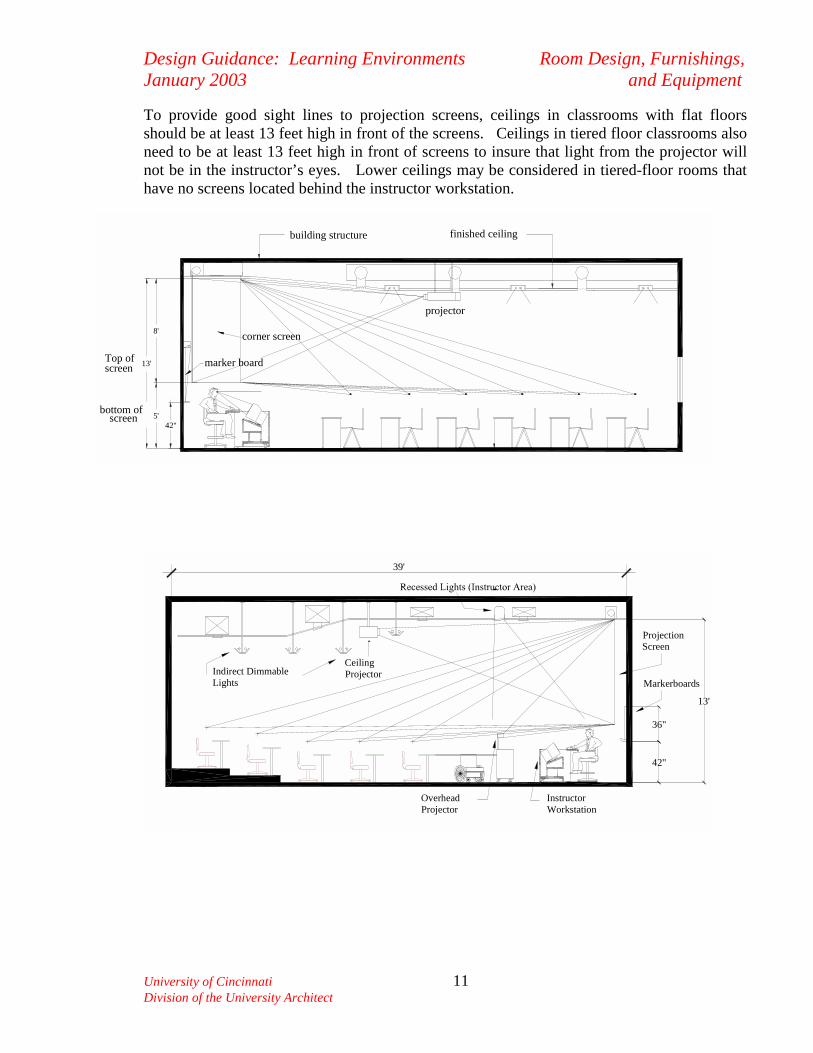
To provide good sight lines to projection screens, ceilings in classrooms with flat floors should be at least 13 feet high in front of the screens. Ceilings in tiered floor classrooms also need to be at least 13 feet high in front of screens to insure that light from the projector will not be in the instructor’s eyes. Lower ceilings may be considered in tiered-floor rooms that have no screens located behind the instructor workstation.
8'
screen
bottom of
13'
5'screen
building structure finished ceiling
corner screen
projector
marker boardTop of
42"
Indirect Dimmable Lights
Ceiling Projector
Markerboards
Projection Screen
42"
36"
39'
Overhead Projector
Instructor Workstation
13'
Design Guidance: Learning Environments Room Design, Furnishings, January 2003 and Equipment
University of Cincinnati 12 Division of the University Architect
Acoustics One of the simplest ways to avoid creating noisy learning rooms is to locate them far enough away from high noise sources such as mechanical equipment, heavy vehicle traffic, music practice rooms, stadiums, or other outdoor spaces that frequently used for noisy activities. Learning rooms shall be designed to provide adequate acoustical separation from all other interior and exterior noise sources. Meet or exceed the following requirements:
• 50 STC Walls, ceilings, floors, movable or folding partitions • 40 STC Doors and windows near high noise areas • 28 STC Doors and windows near low noise areas
The use of movable or folding interior partitions should be avoided because it adds significant cost to meet the 50 STC requirement. Regardless of room size, location, or construction, provide:
• An overall noise level in empty rooms under NC 35 Insure this noise level will be met with the heating and air conditioning system operating. Wall, ceiling, and floor surfaces shall provide good acoustics. The design of large classrooms (over 50 seats), auditoriums, and distance-learning rooms requires special attention and the services of an acoustical engineer. Provide:
• High-reflectance materials near the instructor that project sound to the back of the room.
• Sound-absorbing materials on ceilings and on the upper levels of walls in the rear.
• Target 0.75 reverberation time (acceptable range, 0.6 to 1.2) Special design features such as angled walls and ceilings may be required to insure sounds can be clearly heard without distortion in all parts of the room. The acoustical engineer’s report shall be included in the design development and construction document submittals. The report shall include sound-transmission, noise level, and reverberation time calculations and recommendations to improve acoustic performance.

Design Guidance: Learning Environments Room Design, Furnishings, January 2003 and Equipment
University of Cincinnati 13 Division of the University Architect
Corridors, Entrances/Exits, and Access Aisles The movement of students and the noise they generate should be a major consideration in determining the width of corridors and the location, number, and size of entrance/exit doors in corridors, stairwells, and learning rooms. Building codes are not the only criteria to consider. Corridors should not be designed only for pedestrian circulation. Provide comfortable places for students to sit while waiting for class, with lights above the seats and data outlets nearby for laptop use. Alcoves along corridors that facilitate casual social encounters, study, and provide visual interest or space to wait for elevators are strongly encouraged.
If it is impossible to locate classrooms on an entrance level of the facility, the width of stairs, depth of stair landings, and width of doors leading to stairwells must also be considered to give students enough room to transition easily from one space to another. Entrance/Exit doors to learning rooms should open out but be located so that they do not block corridor traffic. • In smaller rooms, a recessed entrance that allows doors to open out without protruding
into the corridor may suffice. • For larger rooms, it may be necessary to create an entrance alcove large enough for
students to gather while waiting for the next class. Alcoves should be designed to reduce noise levels and prevent light from entering classrooms (interrupting a media presentation). However, the design should avoid two sets of doors.
Design Guidance: Learning Environments Room Design, Furnishings, January 2003 and Equipment
University of Cincinnati 14 Division of the University Architect
Doors should be located so students who arrive late can find seats without disrupting class. Typical solutions: • Locate at least one door near the rear of the seating area. • Provide access aisles that allow easy access to all seats. • It is acceptable to locate a door closer to the instructor area if required to meet fire code
door separation criteria. Existing classrooms with only one door near the front of the room shall be modified during renovation to move the door, move the instruction area, or add a second door. Design of the room and doors shall provide easy access. Minimum criteria: • Minimum 32” clear width with door open
• Door opener meets ADA criteria
• Lever handle with approach area at least 18 inches wide, or • Electric-powered door operator meeting ADA criteria
• Main aisle(s) connecting doors to instructor area and seats are at least 36 inches wide
• Aisles behind seats in use are at least 15 inches wide Refer to Design Guidelines and Standards Manual for door hardware specifications. Provide vision panels in doors or glass sidelights alongside doors to allow people in corridors to see if the room is in use without disturbing classes: • Provide at least two SF of glass area at eye level.
• Sidelights that are full height or begin about three feet above floor level are preferred because they function as well for wheelchair users as for people who are standing.
• Vision panels and sidelights should be located so that corridor light will not affect
projection screens (example: in or near doors in the rear of rooms, but not in the front of rooms).
Design Guidance: Learning Environments Room Design, Furnishings, January 2003 and Equipment
University of Cincinnati 15 Division of the University Architect
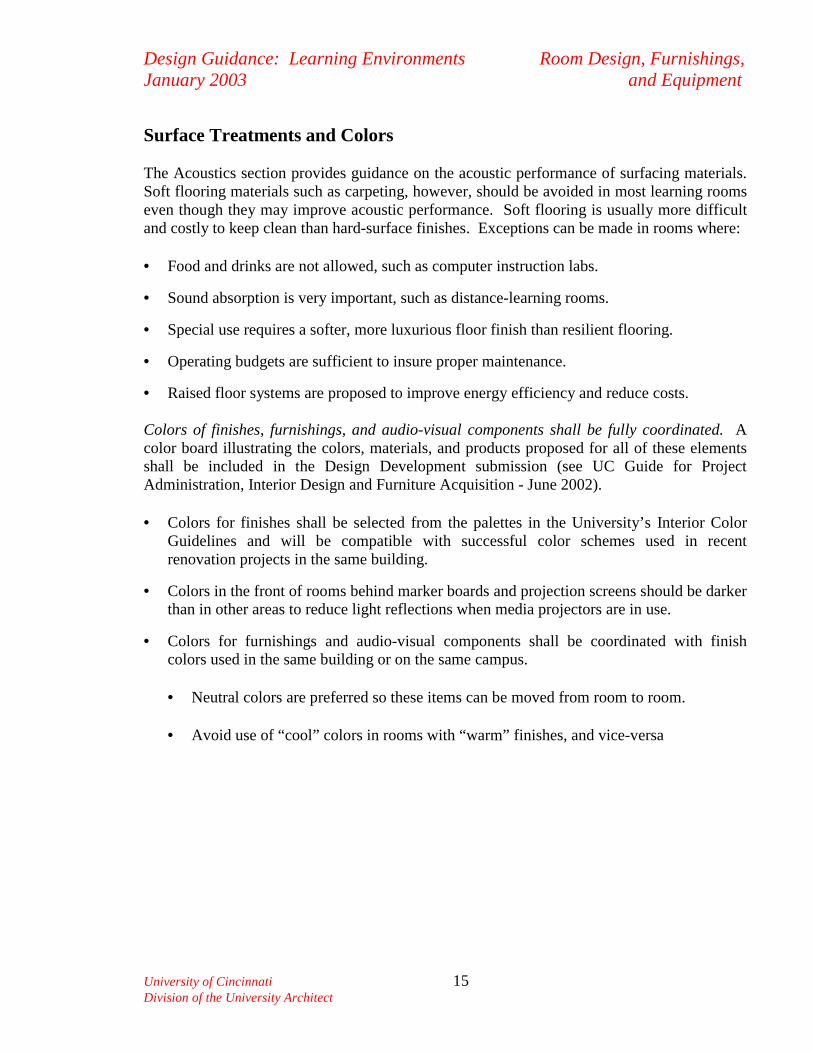
Surface Treatments and Colors The Acoustics section provides guidance on the acoustic performance of surfacing materials. Soft flooring materials such as carpeting, however, should be avoided in most learning rooms even though they may improve acoustic performance. Soft flooring is usually more difficult and costly to keep clean than hard-surface finishes. Exceptions can be made in rooms where: • Food and drinks are not allowed, such as computer instruction labs.
• Sound absorption is very important, such as distance-learning rooms.
• Special use requires a softer, more luxurious floor finish than resilient flooring.
• Operating budgets are sufficient to insure proper maintenance.
• Raised floor systems are proposed to improve energy efficiency and reduce costs. Colors of finishes, furnishings, and audio-visual components shall be fully coordinated. A color board illustrating the colors, materials, and products proposed for all of these elements shall be included in the Design Development submission (see UC Guide for Project Administration, Interior Design and Furniture Acquisition - June 2002). • Colors for finishes shall be selected from the palettes in the University’s Interior Color
Guidelines and will be compatible with successful color schemes used in recent renovation projects in the same building.
• Colors in the front of rooms behind marker boards and projection screens should be darker than in other areas to reduce light reflections when media projectors are in use.
• Colors for furnishings and audio-visual components shall be coordinated with finish colors used in the same building or on the same campus.
• Neutral colors are preferred so these items can be moved from room to room.
• Avoid use of “cool” colors in rooms with “warm” finishes, and vice-versa
Design Guidance: Learning Environments Room Design, Furnishings, January 2003 and Equipment
University of Cincinnati 16 Division of the University Architect
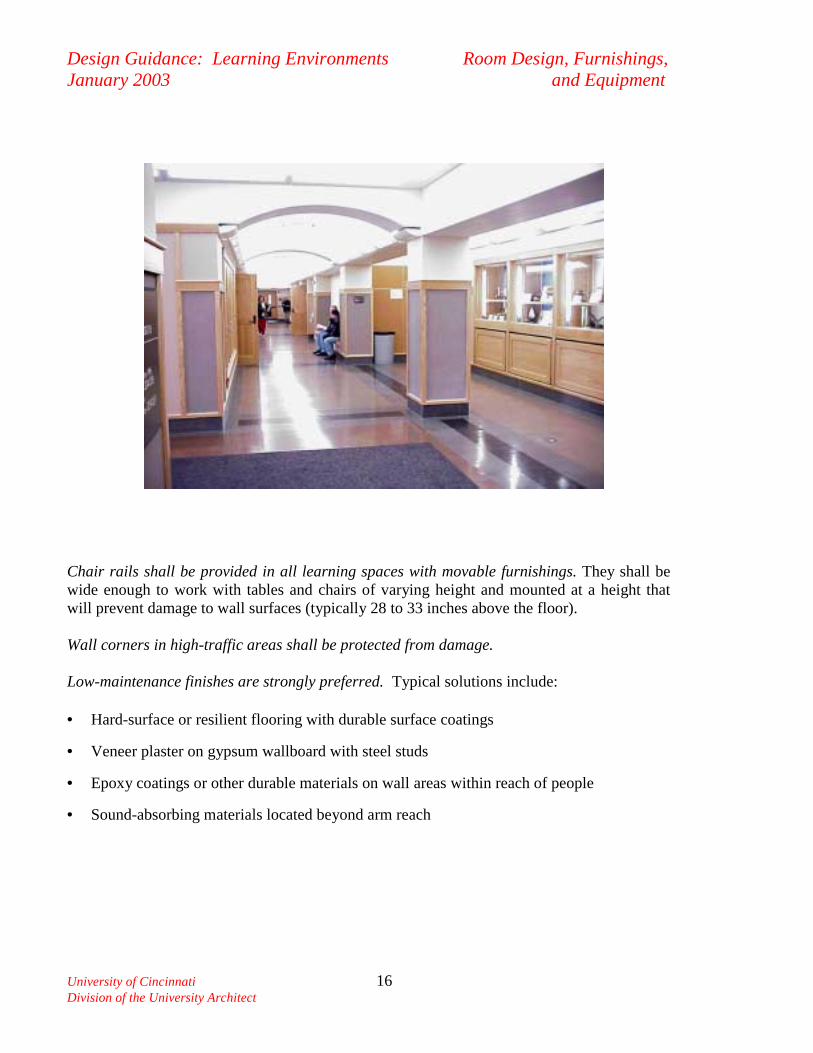
Chair rails shall be provided in all learning spaces with movable furnishings. They shall be wide enough to work with tables and chairs of varying height and mounted at a height that will prevent damage to wall surfaces (typically 28 to 33 inches above the floor). Wall corners in high-traffic areas shall be protected from damage. Low-maintenance finishes are strongly preferred. Typical solutions include: • Hard-surface or resilient flooring with durable surface coatings
• Veneer plaster on gypsum wallboard with steel studs
• Epoxy coatings or other durable materials on wall areas within reach of people
• Sound-absorbing materials located beyond arm reach
Design Guidance: Learning Environments Room Design, Furnishings, January 2003 and Equipment
University of Cincinnati 17 Division of the University Architect
Furnishings Types and Layouts Successful learning rooms require careful study of: • The type, size, and location of furnishings planned for each type of room • Aisle widths and seat spacing • Flexibility to accommodate people of different sizes and needs • How computers and audio-visual components will be accommodated The type, size, and arrangement of furnishings determines how large each learning room must be to accommodate the number of students programmed and where different types of lights, diffusers, and power/data outlets need to be located. Furnishings layouts drawn to scale must therefore be included beginning with the earliest schematic design submission (see UC Guide for Project Administration, Interior Design and Furniture Acquisition - June 2002). They will be carefully reviewed. Architects will adjust room floor areas after furnishings layouts are developed to insure seating capacities: • Meet programmed capacities in rooms with 48 seats or less • Are within 10% of programmed capacities in rooms with more than 48 seats
This iterative approach contrasts sharply with the design process used by some architects and interior designers, who design rooms to meet estimated space targets in the program, and then adjust seating capacities to fit. Designs where seating capacities are reduced because rooms are too small, have inefficient shapes, have obstructions or narrow aisles, have work surfaces that are too small, or have seats spaced too close together for comfort will not be accepted. Student Seating and Work Surfaces The University has conducted several surveys of students, faculty, and staff to determine what types of seating and work surfaces are preferred. Hundreds of furnishings samples have been evaluated in meetings with students and other clients, designers, facilities maintenance staff, and other interested groups. While opinions vary on the merits of specific models, wide consensus has been reached on the following major design decisions:
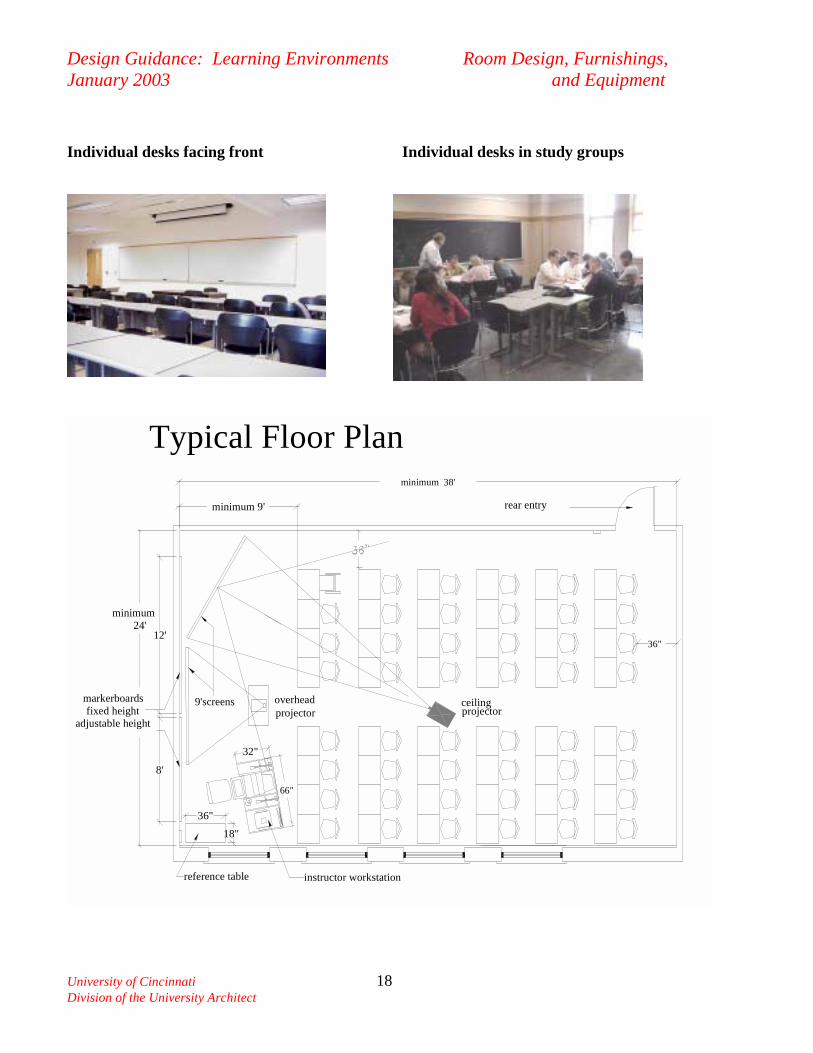
• Classrooms seating up to 48 students shall be designed with individual desks or tables and movable chairs for each student. This gives instructors the flexibility to break classes down into small groups and then quickly move furnishings back into a traditional layout that faces markerboards and screens.
• Classrooms seating more than 48 students and auditoriums with 200-399 seats shall be designed with continuous fixed work surfaces, tiered floors, and upholstered movable chairs with adjustable-height seats and backs. Comfortable auditorium-style seats with tablet-arms can be used in larger auditoriums to reduce room depth and costs.
Design Guidance: Learning Environments Room Design, Furnishings, January 2003 and Equipment
University of Cincinnati 18 Division of the University Architect
Individual desks facing front Individual desks in study groups
ceiling projector
overhead projector
9'screens
reference table instructor workstation
markerboardsfixed height
adjustable height
minimum24'
Typical Floor Plan
36"
66"
rear entry
minimum 38'
minimum 9'
8'
18"
36"12'
32"

Design Guidance: Learning Environments Room Design, Furnishings, January 2003 and Equipment
University of Cincinnati 19 Division of the University Architect
In larger classrooms, fixed work surfaces can be arranged to allow students to more easily communicate with each other and the instructor. This is encouraged as long as good sight lines to screens and markerboards are provided. Insure all students can see all screens.
42'
+0"
+7"
+14"
+21"
3'
39'
3'
8 Seats
13 Seats
17 Seats
20 Seats
19 Seats
6 Seats
Instructor Workstation
Three Screens (11' wide)
Adjustable Height Markerboards
Min
18"
Indirect Dimmable Lights
Ceiling Projector
Markerboards
Projection Screen
42"
36"
39'
Overhead Projector
Instructor Workstation
+14" +14"
Table for References & Panel Discussions
Overhead Projector
Fixed Height Markerboards
Fixed Height Markerboards
2 Ceiling Projectors
Third Projector (Optional)
28"O.C.
Min
36" M
in
36"36"
36"36"
36"
10' M
in
Interactive Classroom
83 Seats 1700 SF (21 SF/Student)
13'
12' M
in
Design Guidance: Learning Environments Room Design, Furnishings, January 2003 and Equipment
University of Cincinnati 20 Division of the University Architect
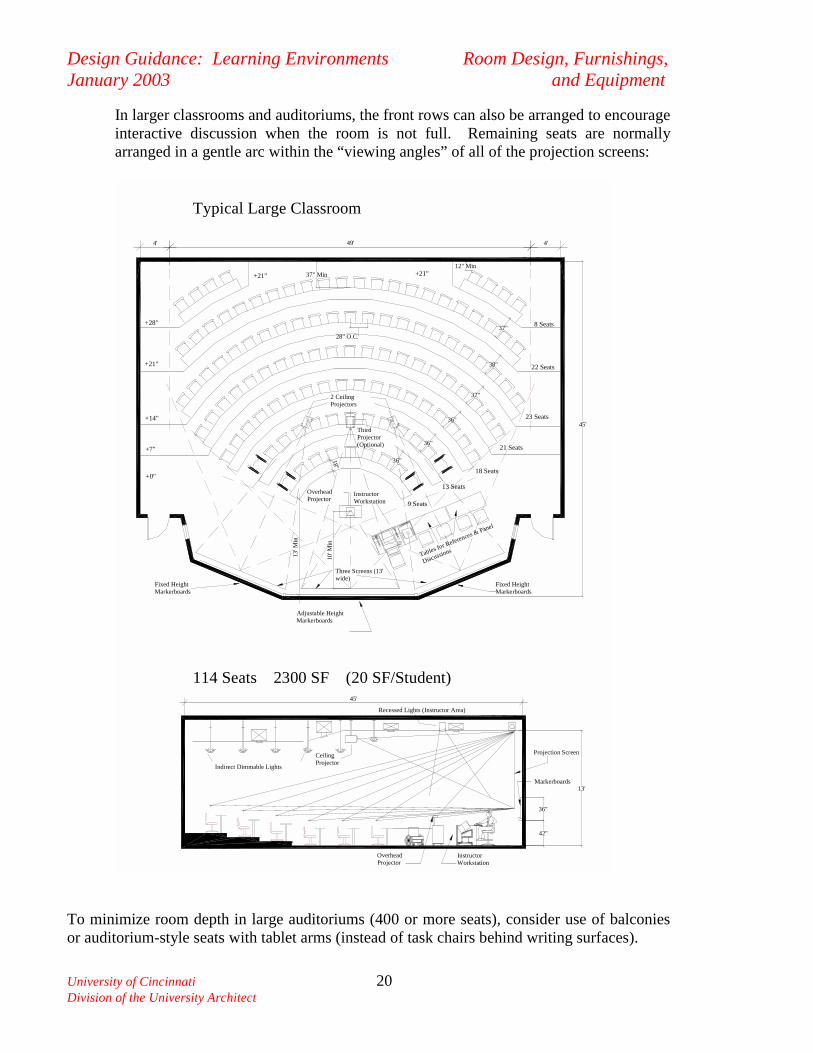
In larger classrooms and auditoriums, the front rows can also be arranged to encourage interactive discussion when the room is not full. Remaining seats are normally arranged in a gentle arc within the “viewing angles” of all of the projection screens:
13'
10' M
in28" O.C.
45'
13 Seats
9 Seats
18 Seats
21 Seats
22 Seats
23 Seats
4'
8 Seats+28"
+21" +21"
Instructor Workstation
Three Screens (13' wide)
Overhead Projector
Adjustable Height Markerboards
Fixed Height Markerboards
Fixed Height Markerboards
18"
36"
36"
36"
37"
38"
37"
Typical Large Classroom
114 Seats 2300 SF (20 SF/Student)
13' M
in
37" Min12" Min
45'
Indirect Dimmable Lights
Ceiling Projector
Markerboards
Projection Screen
Overhead Projector
Instructor Workstation
Third Projector (Optional)
Recessed Lights (Instructor Area)
Tables for References & Panel
Discussions
2 Ceiling Projectors
42"
36"
49'
+14"
+7"
+0"
4'
+21"
To minimize room depth in large auditoriums (400 or more seats), consider use of balconies or auditorium-style seats with tablet arms (instead of task chairs behind writing surfaces).
Design Guidance: Learning Environments Room Design, Furnishings, January 2003 and Equipment
University of Cincinnati 21 Division of the University Architect
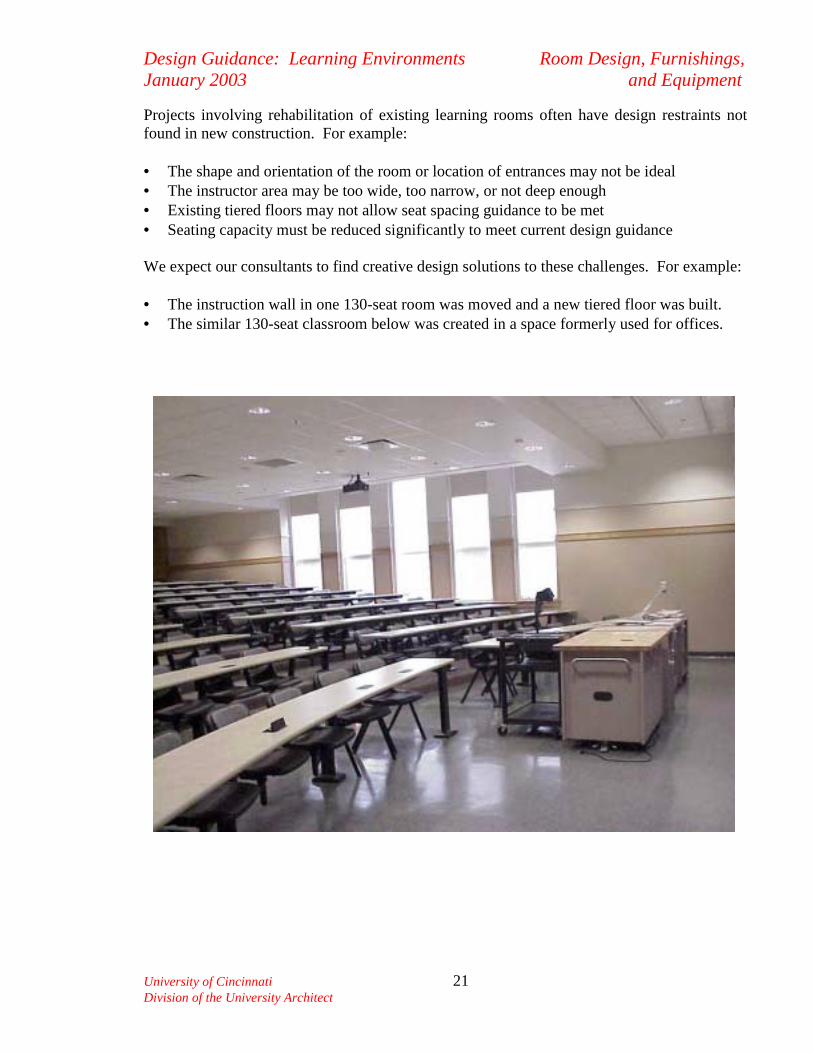
Projects involving rehabilitation of existing learning rooms often have design restraints not found in new construction. For example: • The shape and orientation of the room or location of entrances may not be ideal • The instructor area may be too wide, too narrow, or not deep enough • Existing tiered floors may not allow seat spacing guidance to be met • Seating capacity must be reduced significantly to meet current design guidance We expect our consultants to find creative design solutions to these challenges. For example: • The instruction wall in one 130-seat room was moved and a new tiered floor was built. • The similar 130-seat classroom below was created in a space formerly used for offices.
Design Guidance: Learning Environments Room Design, Furnishings, January 2003 and Equipment
University of Cincinnati 22 Division of the University Architect
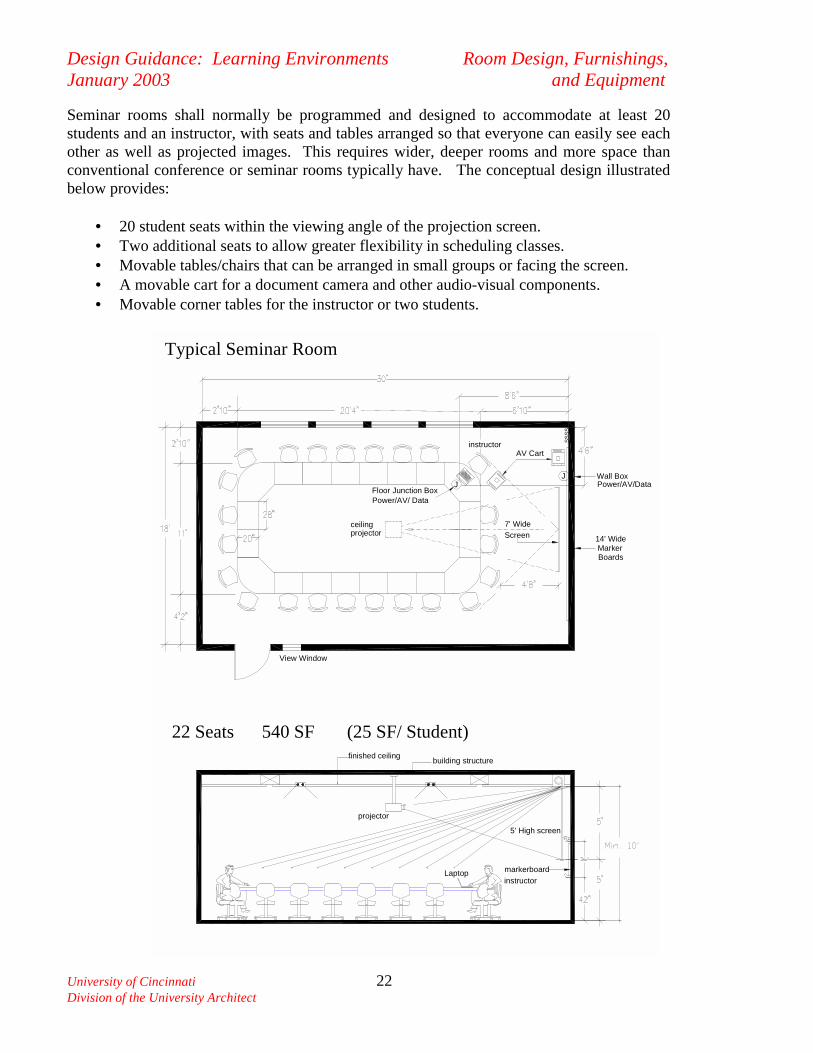
Seminar rooms shall normally be programmed and designed to accommodate at least 20 students and an instructor, with seats and tables arranged so that everyone can easily see each other as well as projected images. This requires wider, deeper rooms and more space than conventional conference or seminar rooms typically have. The conceptual design illustrated below provides:
• 20 student seats within the viewing angle of the projection screen. • Two additional seats to allow greater flexibility in scheduling classes. • Movable tables/chairs that can be arranged in small groups or facing the screen. • A movable cart for a document camera and other audio-visual components. • Movable corner tables for the instructor or two students.
projector
finished ceiling building structure
projectorceiling
instructor
5' High screen
markerboard
SSSS
instructor
Marker14' Wide
View Window
Power/AV/ Data
7' Wide
Wall BoxJ
Laptop
J Floor Junction Box
Power/AV/Data
Boards
Screen
AV Cart
Typical Seminar Room
22 Seats 540 SF (25 SF/ Student)
Design Guidance: Learning Environments Room Design, Furnishings, January 2003 and Equipment
University of Cincinnati 23 Division of the University Architect
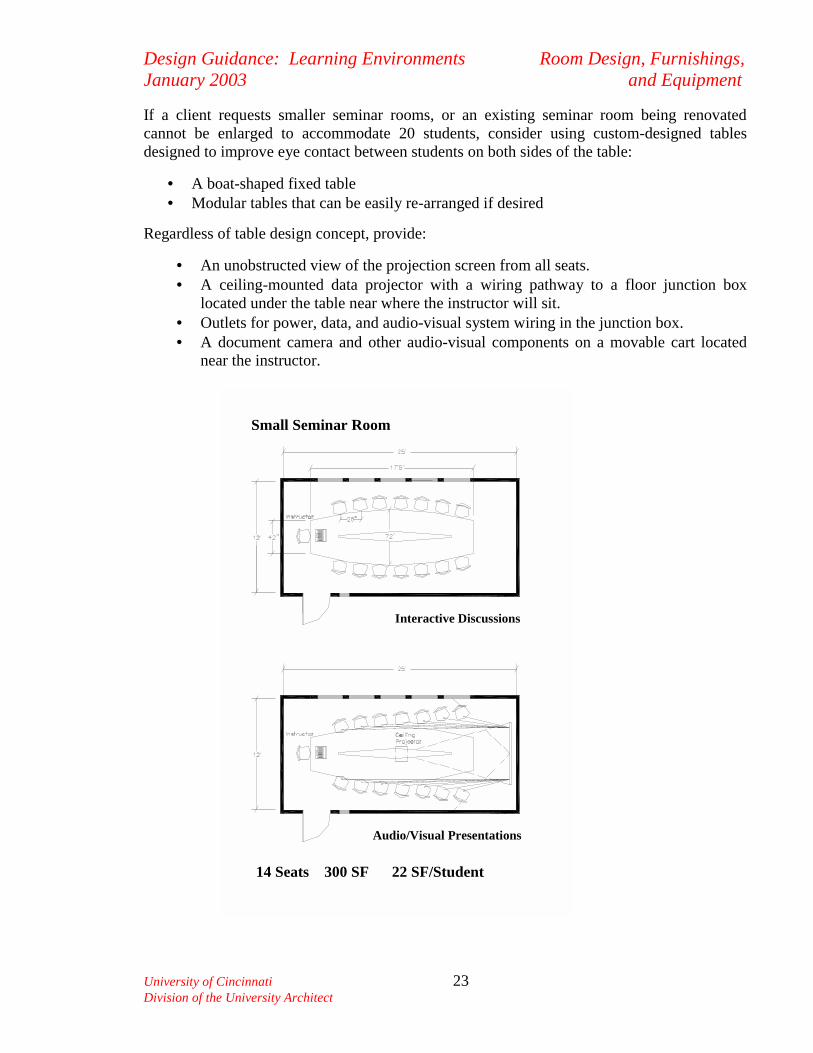
If a client requests smaller seminar rooms, or an existing seminar room being renovated cannot be enlarged to accommodate 20 students, consider using custom-designed tables designed to improve eye contact between students on both sides of the table:
• A boat-shaped fixed table • Modular tables that can be easily re-arranged if desired
Regardless of table design concept, provide:
• An unobstructed view of the projection screen from all seats. • A ceiling-mounted data projector with a wiring pathway to a floor junction box
located under the table near where the instructor will sit. • Outlets for power, data, and audio-visual system wiring in the junction box. • A document camera and other audio-visual components on a movable cart located
near the instructor. Small Seminar Room
14 Seats 300 SF 22 SF/Student
Audio/Visual Presentations
Interactive Discussions
Design Guidance: Learning Environments Room Design, Furnishings, January 2003 and Equipment
University of Cincinnati 24 Division of the University Architect
Work surfaces shall provide about four square feet of usable space for each student in one unobstructed area, excluding space used for computer monitors, keyboards, mouse pads, microphones, or other types of equipment. Typical solutions:
• Student desks with work surfaces 20 inches deep and 28 inches wide. • Continuous work surfaces 18 inches deep and 28 to 30 inches wide. • Seminar tables with similar space for each student (avoid corner seats sharing space). • Computer workstations with comparable amounts of usable work space.
Larger work surfaces will only be considered based on academic needs - such as the use of large drawings or maps in class. Smaller work surfaces shall be considered only for large auditoriums (over 300 seats) with auditorium-style seats that have tablet arms. Student desks, continuous work surfaces, seminar tables, and computer workstations shall be designed to accommodate right and left-handed students as well as students in wheelchairs. This requires careful consideration of work surface height and where they are located in the room. Provide unobstructed knee clearance space underneath work surfaces that is at least:
• 22 inches wide • 27 inches high.
In large rooms with built-in seats (such as auditorium-style seats with tablet arms), provide 36-inch wide accessible workstations for students in wheelchairs as follows:
• 4 workstations Rooms with 49 to 300 seats • 6 workstations Rooms with 301 to 500 seats
For each accessible workstation, provide the same number of movable task chairs with the design features described below to accommodate students who are very large or small. Student seats shall be comfortable and provide good ergonomics, with seats and backrests that have an articulating movement. • Armrests are not desired in most learning rooms because they increase costs, make access
more difficult, and are often hard or impossible to adjust to student size variations. However, they are preferred in rooms used by professional-level non-traditional students.
• In seminar rooms, classrooms and auditoriums with continuous work surfaces, and
computer instruction labs, provide armless task chairs for students with adjustable cushioned and upholstered seats and backs, back tension that adjusts automatically to weight, and casters (or steel glides). Select fabric that is easily cleaned and provides good abrasion resistance (minimum 200,000 double rubs).
Design Guidance: Learning Environments Room Design, Furnishings, January 2003 and Equipment
University of Cincinnati 25 Division of the University Architect
• In classrooms and instruction labs where chemicals or art supplies are used, provide movable chairs or stools that do not need foam pads and upholstery to provide adequate comfort. However, chairs should have adjustable-height seats and backs, back tension that adjusts automatically to weight, and casters (or steel glides).
The specific furnishings models and colors selected for each project shall be consistent with earlier selections on each campus to the maximum extent feasible. This will reduce both initial and maintenance costs. It will also allow furnishings to be moved from room to room or even between buildings as needs change or rooms are renovated, without adversely impacting the appearance of the campus. The following seating types do not meet this guidance and should not be considered:
• Movable chairs with tablet-arms • Pivot-arm seats without adjustable-height seats and backs • Pivot-arm seats that do not comfortably accommodate large/small students • Pedestal seats bolted to the floor • Movable student desks with seats attached • Custom-designs that cannot be used by all students, such as:
• Oversize tables and chairs • Adjustable-height tables
Design Guidance: Learning Environments Room Design, Furnishings, January 2003 and Equipment
University of Cincinnati 26 Division of the University Architect
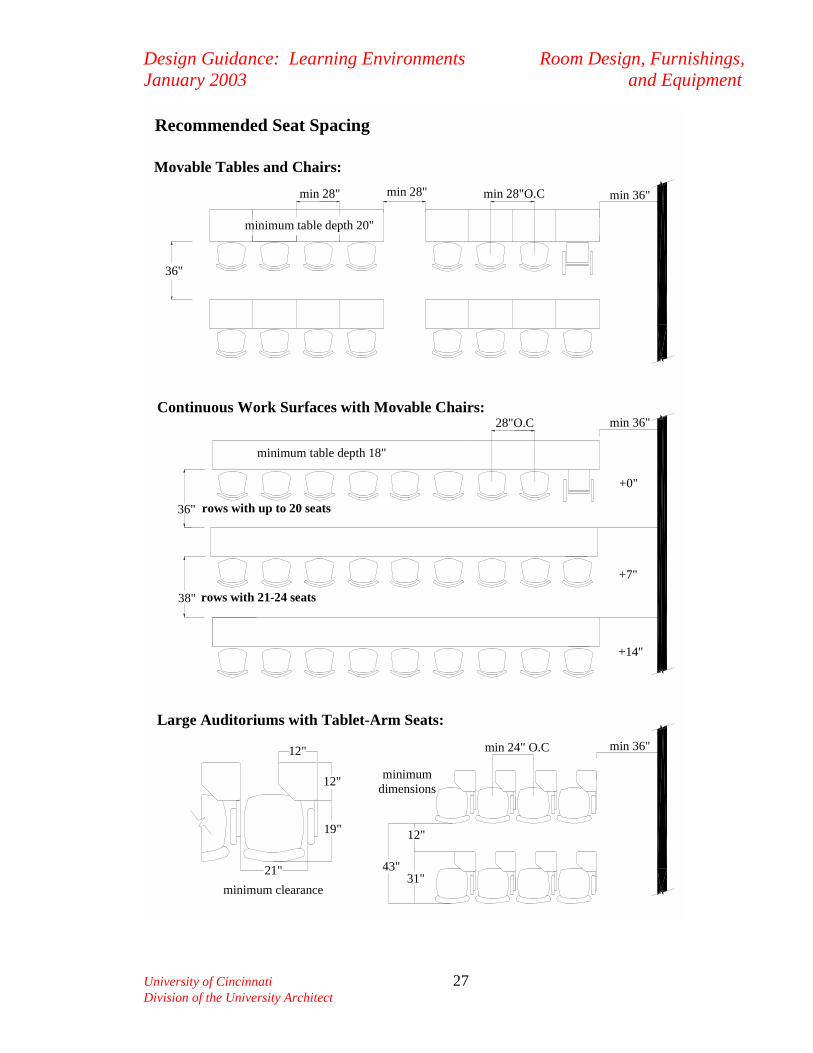
Recommended Seat Spacing Recommended seat spacing for classrooms/auditoriums is as follows:
• Movable seats spaced minimum 28” on center Continuous work surfaces with movable chairs:
• 36 inches apart - rows with up to 20 seats • 38 inches apart - rows with 21-24 seats
Large auditoriums with tablet-arm seats:
• Seats spaced minimum 24 inches on center • Minimum 21 inches clearance between tablet-arm supports • Minimum 12 inches clearance between tablet-arms in use and seat backs (with seats
fully reclined). Access aisles:
• Minimum 36 inch-wide aisle leading to front of room. • Minimum 28-inch-wide aisles in other locations (if provided).
Rationale: Following this seat spacing guidance will provide adequate spatial comfort and:
• Allow students who arrive late to find seats easily with minimum disruption.
• Insures wheelchair users can reach their workstations and the front of the room. The recommended spacing between workstations in computer instruction labs, science labs, and design studios varies because teaching methods and workstation designs vary widely. In these room types, provide: • Minimum 36-inch-wide aisles in rooms where students work primarily in small groups or
bulky equipment must be moved frequently from one workstation to another. • Minimum 28-inch-wide internal aisles in computer instruction and study labs where
students usually work independently or with only one other student.
Design Guidance: Learning Environments Room Design, Furnishings, January 2003 and Equipment
University of Cincinnati 27 Division of the University Architect
Recommended Seat Spacing
min 28" min 28"
minimum table depth 20"
36"
Movable Tables and Chairs:
min 36"
36"
Continuous Work Surfaces with Movable Chairs:
rows with up to 20 seats
min 36"
minimum table depth 18"
min 28"O.C
28"O.C
Large Auditoriums with Tablet-Arm Seats:
rows with 21-24 seats38"
min 36"12"
12"
19"
21"
min 24" O.C
minimum clearance
43"
12"
31"
minimum dimensions
+0"
+7"
+14"
Design Guidance: Learning Environments Room Design, Furnishings, January 2003 and Equipment
University of Cincinnati 28 Division of the University Architect
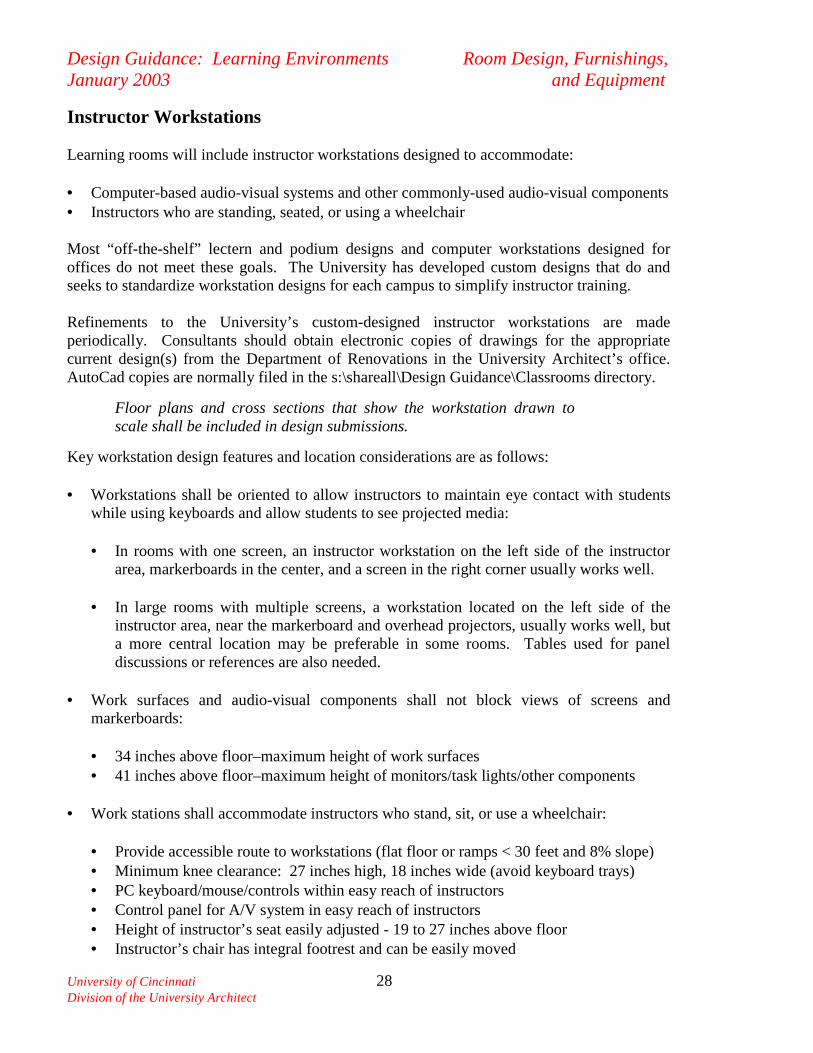
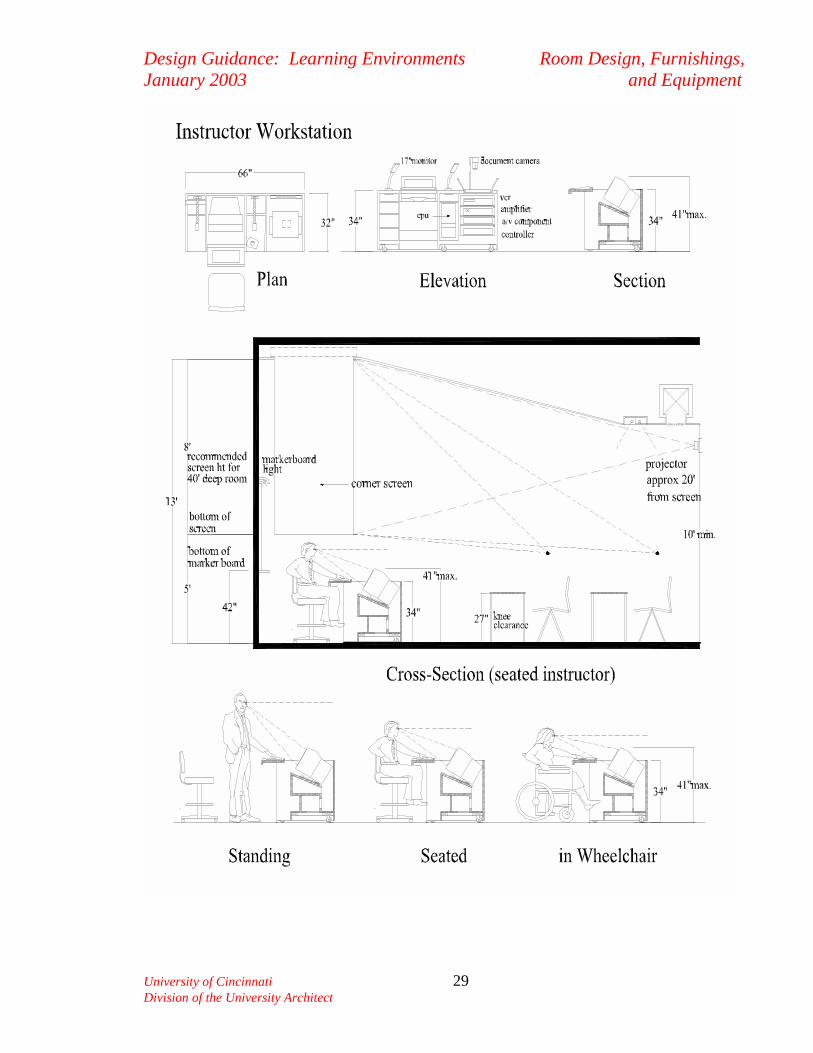
Instructor Workstations Learning rooms will include instructor workstations designed to accommodate: • Computer-based audio-visual systems and other commonly-used audio-visual components • Instructors who are standing, seated, or using a wheelchair Most “off-the-shelf” lectern and podium designs and computer workstations designed for offices do not meet these goals. The University has developed custom designs that do and seeks to standardize workstation designs for each campus to simplify instructor training. Refinements to the University’s custom-designed instructor workstations are made periodically. Consultants should obtain electronic copies of drawings for the appropriate current design(s) from the Department of Renovations in the University Architect’s office. AutoCad copies are normally filed in the s:\shareall\Design Guidance\Classrooms directory.
Floor plans and cross sections that show the workstation drawn to scale shall be included in design submissions.
Key workstation design features and location considerations are as follows: • Workstations shall be oriented to allow instructors to maintain eye contact with students
while using keyboards and allow students to see projected media:
• In rooms with one screen, an instructor workstation on the left side of the instructor area, markerboards in the center, and a screen in the right corner usually works well.
• In large rooms with multiple screens, a workstation located on the left side of the
instructor area, near the markerboard and overhead projectors, usually works well, but a more central location may be preferable in some rooms. Tables used for panel discussions or references are also needed.
• Work surfaces and audio-visual components shall not block views of screens and
markerboards:
• 34 inches above floor–maximum height of work surfaces • 41 inches above floor–maximum height of monitors/task lights/other components
• Work stations shall accommodate instructors who stand, sit, or use a wheelchair:
• Provide accessible route to workstations (flat floor or ramps < 30 feet and 8% slope) • Minimum knee clearance: 27 inches high, 18 inches wide (avoid keyboard trays) • PC keyboard/mouse/controls within easy reach of instructors • Control panel for A/V system in easy reach of instructors • Height of instructor’s seat easily adjusted - 19 to 27 inches above floor • Instructor’s chair has integral footrest and can be easily moved
Design Guidance: Learning Environments Room Design, Furnishings, January 2003 and Equipment
University of Cincinnati 29 Division of the University Architect
Design Guidance: Learning Environments Room Design, Furnishings, January 2003 and Equipment
University of Cincinnati 30 Division of the University Architect
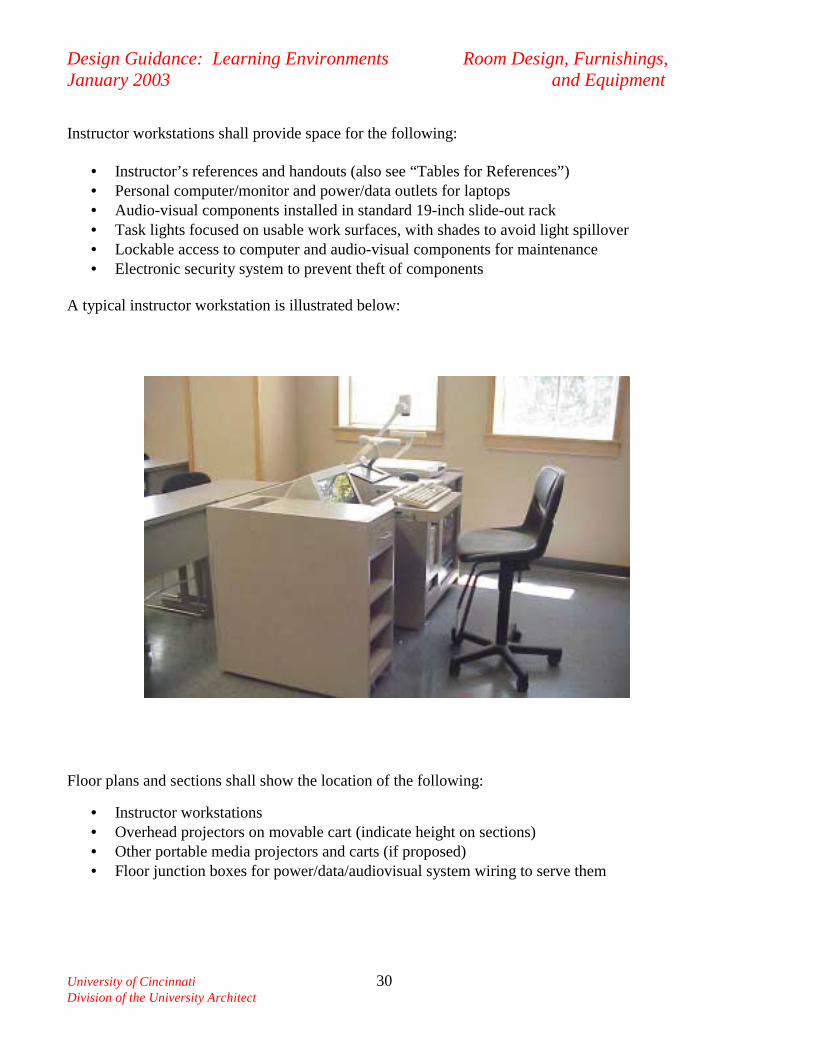
Instructor workstations shall provide space for the following:
• Instructor’s references and handouts (also see “Tables for References”) • Personal computer/monitor and power/data outlets for laptops • Audio-visual components installed in standard 19-inch slide-out rack • Task lights focused on usable work surfaces, with shades to avoid light spillover • Lockable access to computer and audio-visual components for maintenance • Electronic security system to prevent theft of components
A typical instructor workstation is illustrated below:
Floor plans and sections shall show the location of the following:
• Instructor workstations • Overhead projectors on movable cart (indicate height on sections) • Other portable media projectors and carts (if proposed) • Floor junction boxes for power/data/audiovisual system wiring to serve them
Design Guidance: Learning Environments Room Design, Furnishings, January 2003 and Equipment
University of Cincinnati 31 Division of the University Architect
Design Flexibility and Computers Movable tables and chairs (or student desks) give instructors the flexibility to rearrange seating into smaller groups during class. This level of flexibility is much harder to achieve in computer instruction labs or other rooms with equipment that requires power, data, and utility connections. If an academic program requires this level of flexibility, consider: • Use of wireless components • Raised floor systems with flush floor outlets and quick-disconnect power/data wiring Avoid the following: • Power poles or other features that block views of instructors, markerboards, screens • Plastic floor outlets/covers that break easily • Raised floor outlets that present a trip hazard • Plastic raised floor systems that present fire/smoke hazards Computer Instruction Labs shall have furnishings designed to: • Allow students to easily see instructors, markerboards, screens, and computer monitors • Allow students assigned group projects to see monitors of other students in their group • Accommodate large monitors (17 to 19 inch thin-profile monitors are now common) • Allow instructors to easily walk around the room to check student progress • Provide ample space for student references, notebooks, and laptops. • Accommodate right and left-handed students and students using wheelchairs
After evaluating several “off-the-shelf” workstation designs in campus-wide meetings, the University decided to develop custom-designed computer workstations that would better achieve these goals within a space range of 30-40 SF per student. The three designs considered most promising shared the following design features: • Tower-type computers under a primary work surface 29 inches above the floor • Monitors located in the corner on a work surface five inches lower to improve sight lines • No keyboard trays to reduce costs and provide more knee clearance Design variations studied: • Conventional monitor Work surface on right or left • Thin-profile monitor Work surface on right or left • Conventional monitor at an angle Work surfaces on both sides
Design Guidance: Learning Environments Room Design, Furnishings, January 2003 and Equipment
University of Cincinnati 32 Division of the University Architect
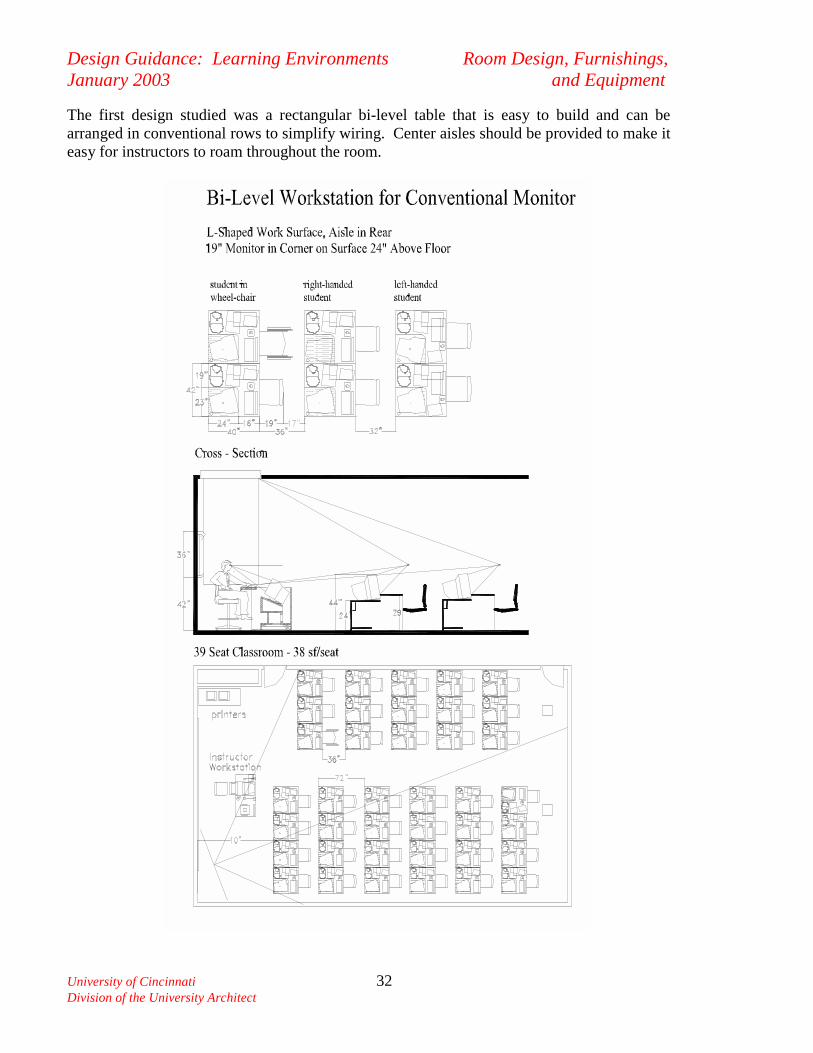
The first design studied was a rectangular bi-level table that is easy to build and can be arranged in conventional rows to simplify wiring. Center aisles should be provided to make it easy for instructors to roam throughout the room.
Design Guidance: Learning Environments Room Design, Furnishings, January 2003 and Equipment
University of Cincinnati 33 Division of the University Architect
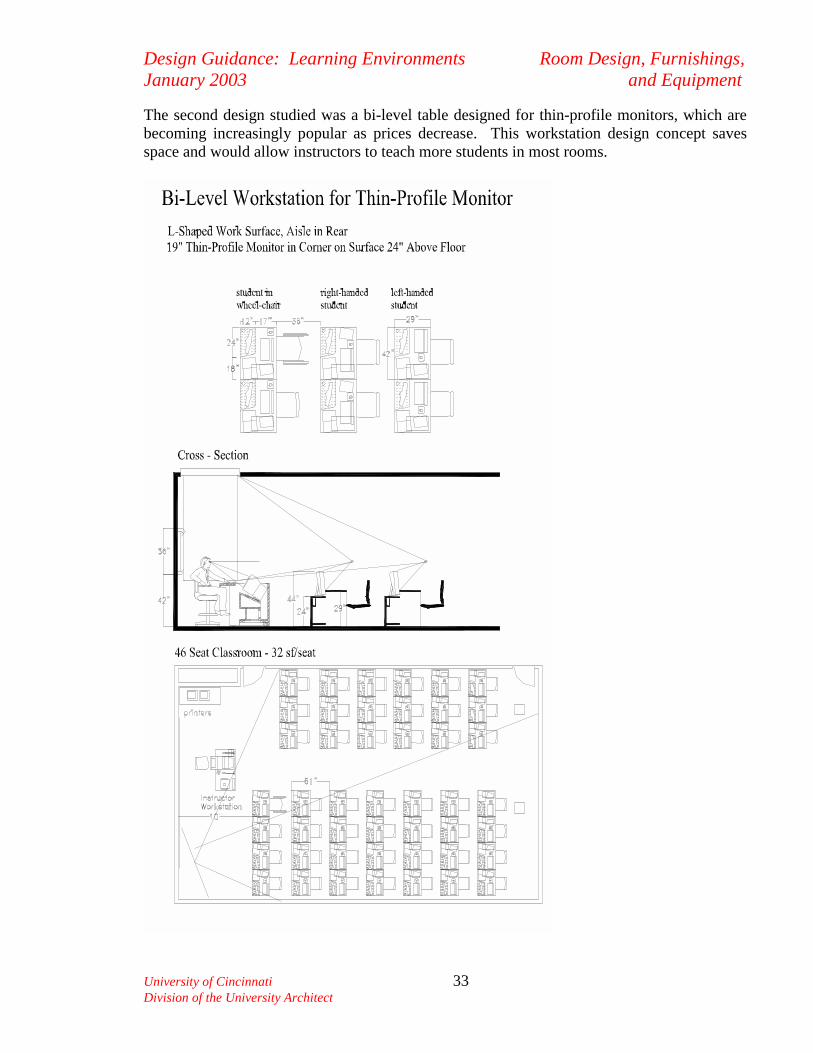
The second design studied was a bi-level table designed for thin-profile monitors, which are becoming increasingly popular as prices decrease. This workstation design concept saves space and would allow instructors to teach more students in most rooms.
Design Guidance: Learning Environments Room Design, Furnishings, January 2003 and Equipment
University of Cincinnati 34 Division of the University Architect
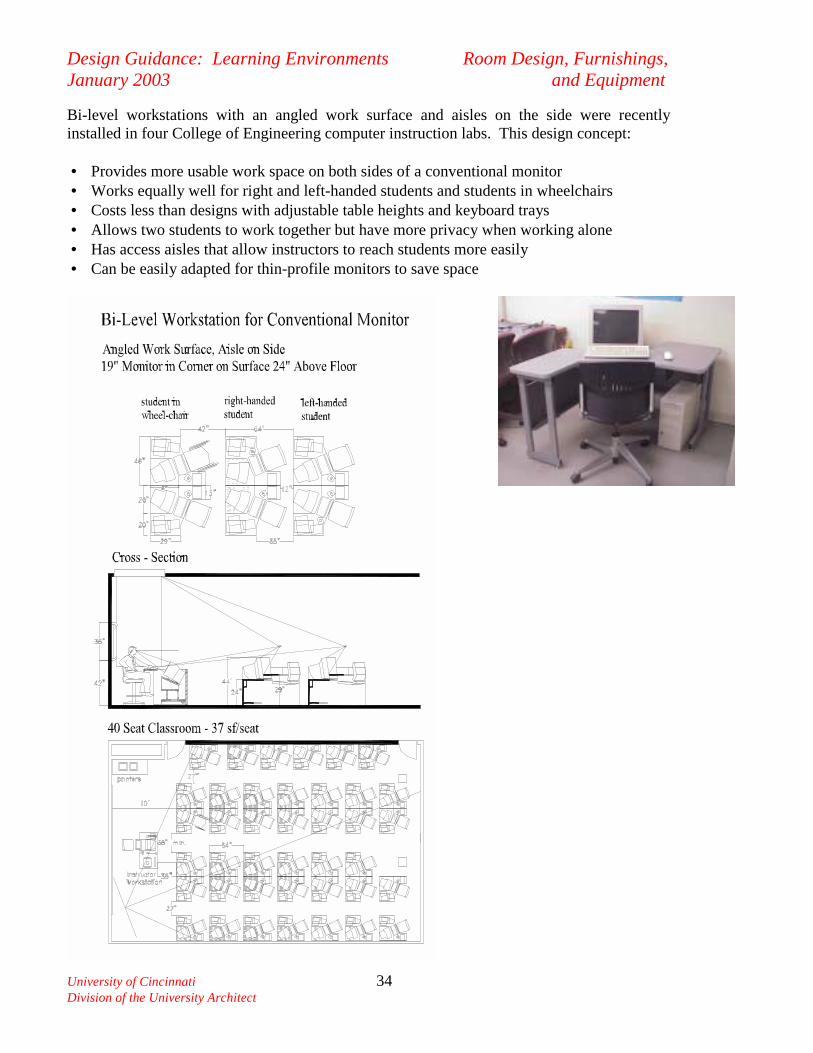
Bi-level workstations with an angled work surface and aisles on the side were recently installed in four College of Engineering computer instruction labs. This design concept: • Provides more usable work space on both sides of a conventional monitor • Works equally well for right and left-handed students and students in wheelchairs • Costs less than designs with adjustable table heights and keyboard trays • Allows two students to work together but have more privacy when working alone • Has access aisles that allow instructors to reach students more easily • Can be easily adapted for thin-profile monitors to save space
Design Guidance: Learning Environments Room Design, Furnishings, January 2003 and Equipment
University of Cincinnati 35 Division of the University Architect
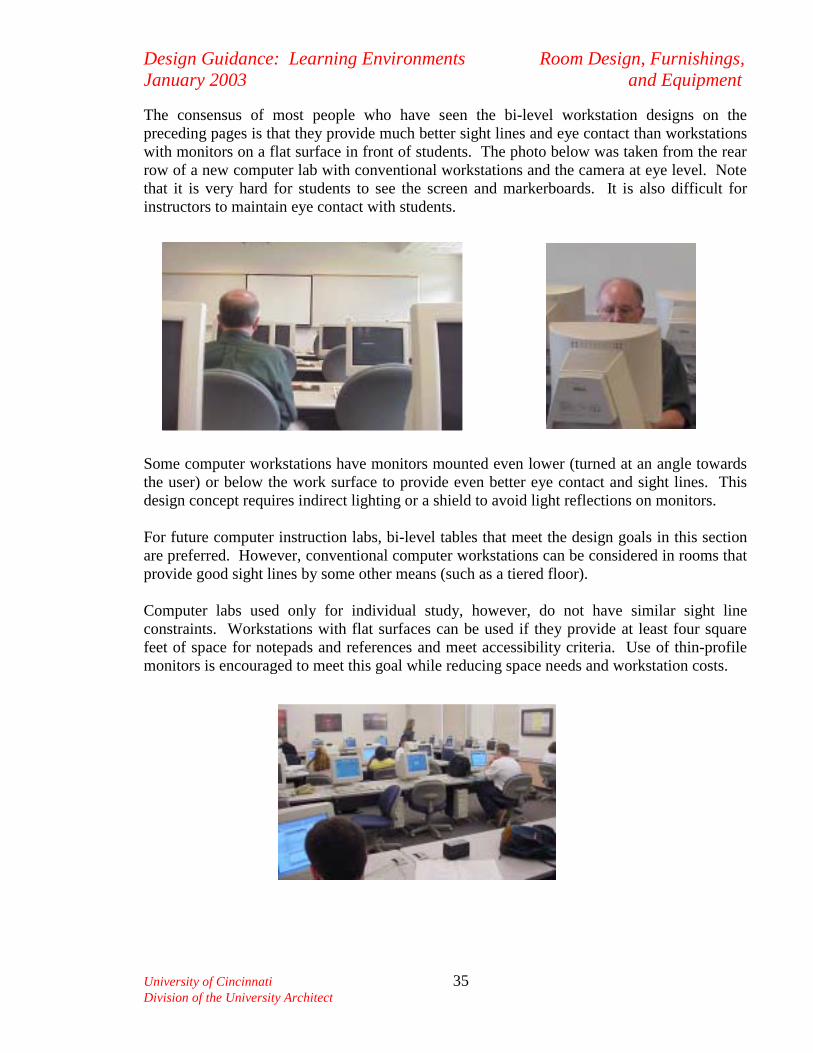
The consensus of most people who have seen the bi-level workstation designs on the preceding pages is that they provide much better sight lines and eye contact than workstations with monitors on a flat surface in front of students. The photo below was taken from the rear row of a new computer lab with conventional workstations and the camera at eye level. Note that it is very hard for students to see the screen and markerboards. It is also difficult for instructors to maintain eye contact with students. Some computer workstations have monitors mounted even lower (turned at an angle towards the user) or below the work surface to provide even better eye contact and sight lines. This design concept requires indirect lighting or a shield to avoid light reflections on monitors. For future computer instruction labs, bi-level tables that meet the design goals in this section are preferred. However, conventional computer workstations can be considered in rooms that provide good sight lines by some other means (such as a tiered floor). Computer labs used only for individual study, however, do not have similar sight line constraints. Workstations with flat surfaces can be used if they provide at least four square feet of space for notepads and references and meet accessibility criteria. Use of thin-profile monitors is encouraged to meet this goal while reducing space needs and workstation costs.

Design Guidance: Learning Environments Room Design, Furnishings, January 2003 and Equipment
University of Cincinnati 36 Division of the University Architect
Tables for References and Guest Speakers In classrooms and instruction labs seating up to 48 students, provide a table near the instructor workstation for the instructor’s references or handouts:
• Work surface 18 inches deep and 36 inches wide • Colors and style compatible with other classroom furnishings Larger classrooms and auditoriums are often used for panel discussions or other events where more than one person makes a presentation. Provide tables and comfortable upholstered chairs to accommodate the instructor’s references, handouts, and other speakers as follows:
Room Capacity # of Tables # of chairs Table Dimensions 50-79 seats 1 2 24” deep, 60” wide 80-119 seats 2 4 24” deep, 60” wide 120 seats or more 3 6 24” deep, 60” wide
Handout Racks Wall-mounted racks for handouts may also be provided if desired by the user group. Select sturdy racks without sharp edges that provide at least three slots that are at least one inch deep and long enough to accommodate legal-size handouts. Overhead (Transparency) Projectors and Carts Show the location of overhead projectors in all rooms. Projector lens shall be located:
• Minimum 6 feet from the screen (seminar rooms/classrooms seating 21-48-students) • Minimum 10 feet from the screen (larger classrooms and auditoriums)
Provide a power outlet nearby (in the floor, on a riser, or in a built-in work surface). If projectors will be located on seminar tables, provide a floor power outlet under the table. In classrooms and auditoriums, provide overhead projector carts that have:
• Work surface height about 34 inches above the floor • Space for transparencies on both sides of the projector’s glass surface • A recess so the glass surface is at the same height as the work surface • Nominal dimensions: 18 inches deep, 36 inches wide
Rationale: This conventional medium is still frequently used. A 34-inch work surface height is convenient for instructors who are standing or seated. Taller carts with projectors mounted on top block views of marker boards and screens. Wall outlets with long extension cords to projectors are unattractive and create a trip hazard that can be avoided.

Design Guidance: Learning Environments Room Design, Furnishings, January 2003 and Equipment
University of Cincinnati 37 Division of the University Architect
Slide Projector Carts and Enclosures In seminar rooms and classrooms with movable furnishings, portable slide projectors will continue to be used. Projectors will be stored in faculty or Media Services offices and brought to the room only when needed. Floor plans will show the location proposed for the projector and power outlet (and projector cart, if applicable). Acceptable solutions vary: • Locate projector on seminar table if table width, location, and sight lines permit.
Projection light path must be in line with center of screen. Provide outlet under table.
• Locate projector on portable cart, on a shelf, or in a wall recess with an unobstructed projection light path in line with center of screen. Provide outlet adjacent to projector.
If portable projector carts are proposed, submit catalog cut for the model proposed (or design details for custom designs). Carts shall be designed to:
• Reduce noise levels while providing adequate ventilation • Allow easy access to slide trays and controls • Provide adequate space for projectors: minimum 17 inches wide, 23 inches deep
In classrooms with three screens (seating capacity 75-199) and auditoriums, provide built-in dual-screen slide projection capability as outlined on page 44. Rationale: Conventional slides will continue to be used despite the advent of scanners and digital cameras. Rather than eliminate this technology entirely, the University will provide built-in projection systems only in large classrooms and auditoriums. • Slide projectors that use a camera to project digital images cost more than conventional
projectors, but they operate quietly, have good image quality, and do not have to be on-line with screens. Instructors can easily correct slides that are not loaded properly or become jammed. Booths for conventional slide projectors waste space and cost more.
• Conventional slide projectors can be set up quickly in seminar rooms and smaller
classrooms if a suitable location is provided near a power outlet. Movable Carts for Other Audio-Visual System Components: Carts for other portable media components are not acceptable in classrooms but are the preferred solution for seminar rooms (and conference rooms). Rationale: Movable projectors and carts in classrooms usually require cables across the floor, which are hazardous and unattractive. They cannot project high-quality images unless they are in the middle of seating areas. This blocks aisles, views of marker boards and instructors, and reduces capacity. Few instructors know how to set up portable projectors quickly, and security is a major problem. In seminar rooms, movable carts can accommodate audio-visual components securely in less space, and floor junction boxes under seminar tables can accommodate A/V wiring.
Design Guidance: Learning Environments Room Design, Furnishings, January 2003 and Equipment
University of Cincinnati 38 Division of the University Architect
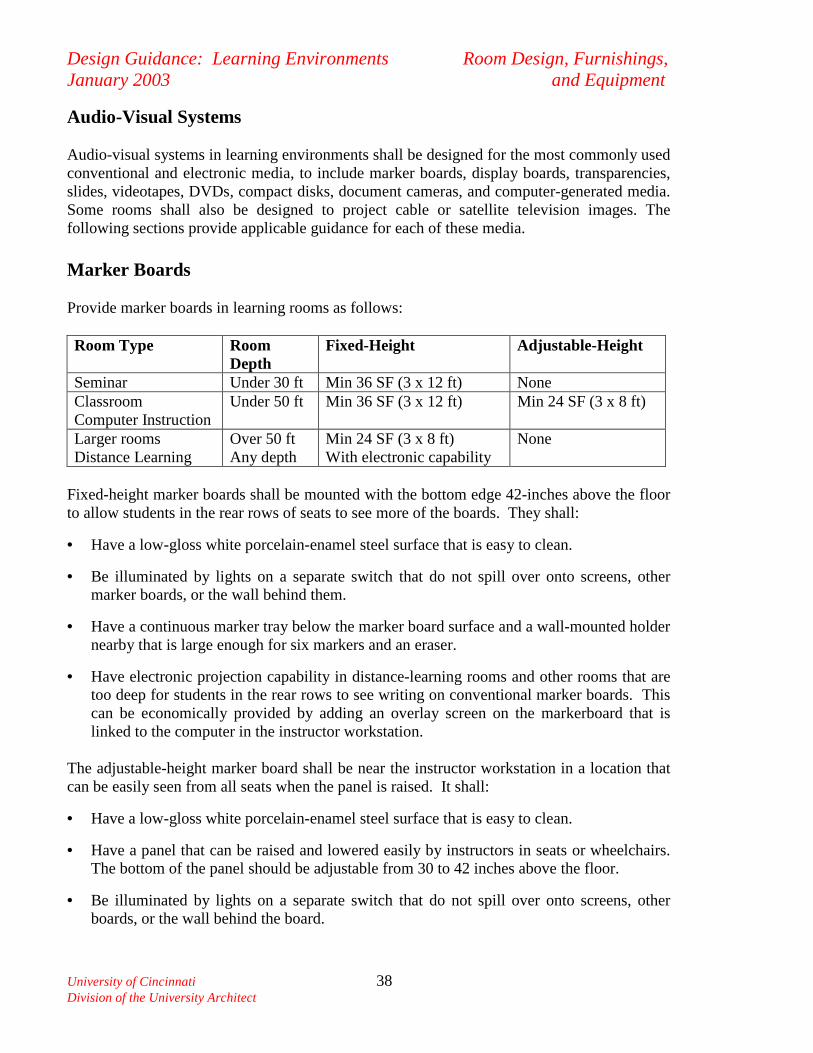
Audio-Visual Systems Audio-visual systems in learning environments shall be designed for the most commonly used conventional and electronic media, to include marker boards, display boards, transparencies, slides, videotapes, DVDs, compact disks, document cameras, and computer-generated media. Some rooms shall also be designed to project cable or satellite television images. The following sections provide applicable guidance for each of these media. Marker Boards Provide marker boards in learning rooms as follows: Room Type Room
Depth Fixed-Height Adjustable-Height
Seminar Under 30 ft Min 36 SF (3 x 12 ft) None Classroom Computer Instruction
Under 50 ft Min 36 SF (3 x 12 ft) Min 24 SF (3 x 8 ft)
Larger rooms Distance Learning
Over 50 ft Any depth
Min 24 SF (3 x 8 ft) With electronic capability
None
Fixed-height marker boards shall be mounted with the bottom edge 42-inches above the floor to allow students in the rear rows of seats to see more of the boards. They shall:
• Have a low-gloss white porcelain-enamel steel surface that is easy to clean.
• Be illuminated by lights on a separate switch that do not spill over onto screens, other marker boards, or the wall behind them.
• Have a continuous marker tray below the marker board surface and a wall-mounted holder nearby that is large enough for six markers and an eraser.
• Have electronic projection capability in distance-learning rooms and other rooms that are too deep for students in the rear rows to see writing on conventional marker boards. This can be economically provided by adding an overlay screen on the markerboard that is linked to the computer in the instructor workstation.
The adjustable-height marker board shall be near the instructor workstation in a location that can be easily seen from all seats when the panel is raised. It shall:
• Have a low-gloss white porcelain-enamel steel surface that is easy to clean.
• Have a panel that can be raised and lowered easily by instructors in seats or wheelchairs. The bottom of the panel should be adjustable from 30 to 42 inches above the floor.
• Be illuminated by lights on a separate switch that do not spill over onto screens, other boards, or the wall behind the board.
Design Guidance: Learning Environments Room Design, Furnishings, January 2003 and Equipment
University of Cincinnati 39 Division of the University Architect
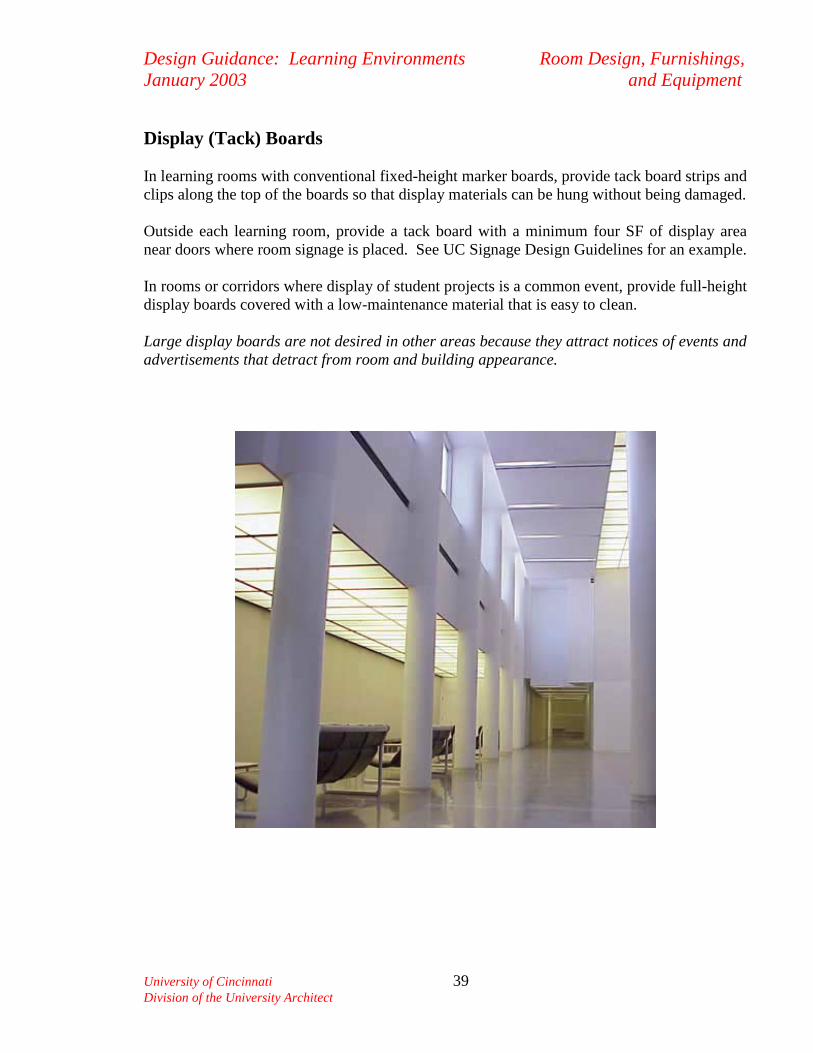
Display (Tack) Boards In learning rooms with conventional fixed-height marker boards, provide tack board strips and clips along the top of the boards so that display materials can be hung without being damaged. Outside each learning room, provide a tack board with a minimum four SF of display area near doors where room signage is placed. See UC Signage Design Guidelines for an example. In rooms or corridors where display of student projects is a common event, provide full-height display boards covered with a low-maintenance material that is easy to clean. Large display boards are not desired in other areas because they attract notices of events and advertisements that detract from room and building appearance.
Design Guidance: Learning Environments Room Design, Furnishings, January 2003 and Equipment
University of Cincinnati 40 Division of the University Architect
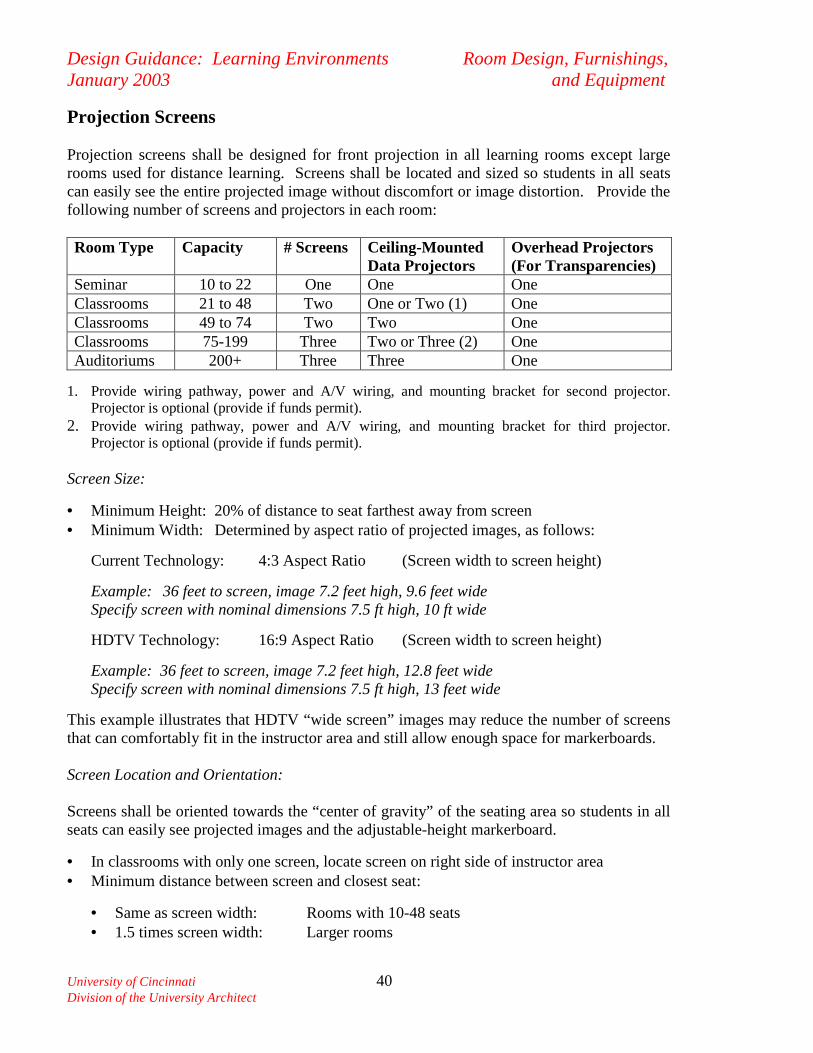
Projection Screens Projection screens shall be designed for front projection in all learning rooms except large rooms used for distance learning. Screens shall be located and sized so students in all seats can easily see the entire projected image without discomfort or image distortion. Provide the following number of screens and projectors in each room: Room Type Capacity # Screens
Ceiling-Mounted Data Projectors
Overhead Projectors (For Transparencies)
Seminar 10 to 22 One One One Classrooms 21 to 48 Two One or Two (1) One Classrooms 49 to 74 Two Two One Classrooms 75-199 Three Two or Three (2) One Auditoriums 200+ Three Three One
1. Provide wiring pathway, power and A/V wiring, and mounting bracket for second projector.
Projector is optional (provide if funds permit). 2. Provide wiring pathway, power and A/V wiring, and mounting bracket for third projector.
Projector is optional (provide if funds permit). Screen Size: • Minimum Height: 20% of distance to seat farthest away from screen • Minimum Width: Determined by aspect ratio of projected images, as follows:
Current Technology: 4:3 Aspect Ratio (Screen width to screen height) Example: 36 feet to screen, image 7.2 feet high, 9.6 feet wide Specify screen with nominal dimensions 7.5 ft high, 10 ft wide HDTV Technology: 16:9 Aspect Ratio (Screen width to screen height)
Example: 36 feet to screen, image 7.2 feet high, 12.8 feet wide Specify screen with nominal dimensions 7.5 ft high, 13 feet wide
This example illustrates that HDTV “wide screen” images may reduce the number of screens that can comfortably fit in the instructor area and still allow enough space for markerboards. Screen Location and Orientation: Screens shall be oriented towards the “center of gravity” of the seating area so students in all seats can easily see projected images and the adjustable-height markerboard.
• In classrooms with only one screen, locate screen on right side of instructor area • Minimum distance between screen and closest seat:
• Same as screen width: Rooms with 10-48 seats • 1.5 times screen width: Larger rooms
Design Guidance: Learning Environments Room Design, Furnishings, January 2003 and Equipment
University of Cincinnati 41 Division of the University Architect
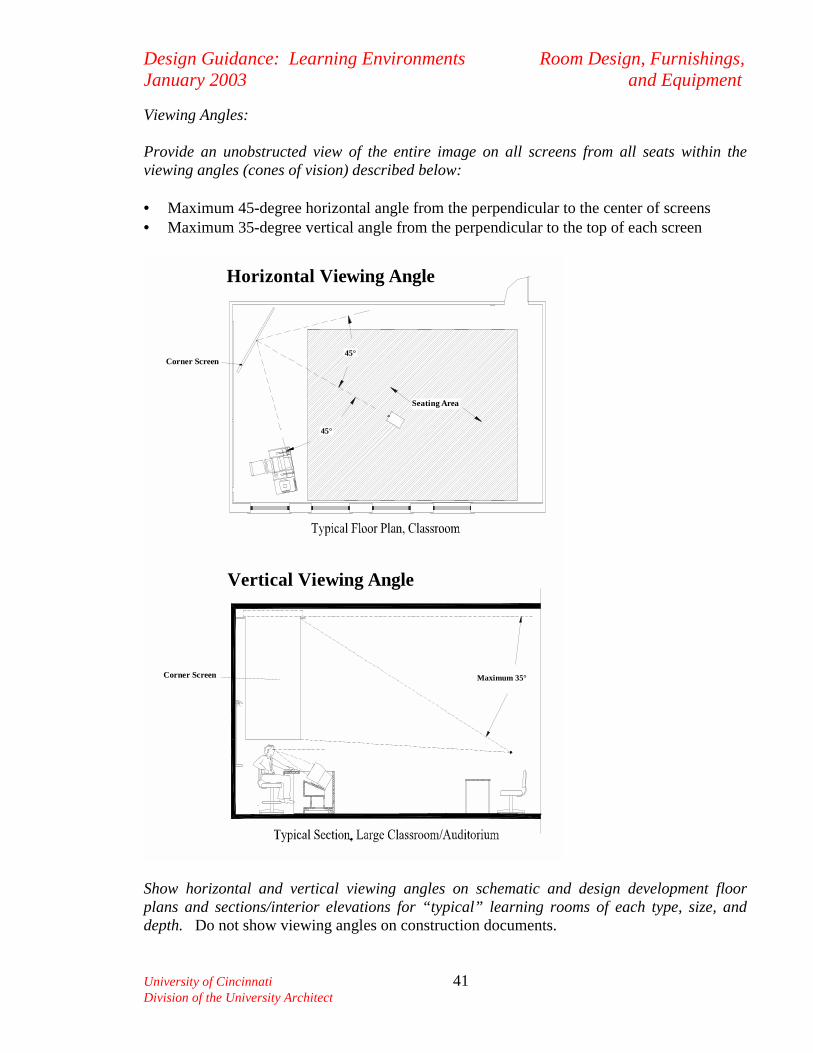
Viewing Angles: Provide an unobstructed view of the entire image on all screens from all seats within the viewing angles (cones of vision) described below: • Maximum 45-degree horizontal angle from the perpendicular to the center of screens • Maximum 35-degree vertical angle from the perpendicular to the top of each screen
Maximum 35°
Corner Screen
Horizontal Viewing Angle
Seating Area
Vertical Viewing Angle
45°
45°
Corner Screen
Show horizontal and vertical viewing angles on schematic and design development floor plans and sections/interior elevations for “typical” learning rooms of each type, size, and depth. Do not show viewing angles on construction documents.
Design Guidance: Learning Environments Room Design, Furnishings, January 2003 and Equipment
University of Cincinnati 42 Division of the University Architect
Screen Surface:
• Matt white with gain of about 1.0 (30 Lamberts per square foot of screen area) • Black border Screen Type:
• Electrically-operated with edge stiffeners • Mounted above the suspended ceiling with opening in ceiling • Stop point five feet above the floor Manual screens will be considered only in rooms designed primarily for interactive discussion and the project budget precludes the use of ceiling-mounted data projectors and other audio-visual components that are installed permanently.
• Manual screens shall be recess-mounted above the suspended ceiling. • Not acceptable: Screens mounted below the ceiling with exposed brackets. Rationale: Screens operated by electric motors represent less than 10% of the cost of an electronic audio-visual system. Installing them after rooms are built can be very costly if ductwork or lights must be moved and new wiring circuits added.
• Most manual screens are not very flat, distort projected images, are hard to raise and lower, and can be easily damaged.
• Students in rear rows cannot see the bottom half of projected images if manual screens are mounted just above the markerboard.
Manual screens should therefore be considered only as a last resort in rooms where projected images are only needed infrequently. Ceiling-Mounted Projectors All learning rooms shall have ceiling-mounted projectors, regardless of room size. To keep pace with current technology, audio-visual consultants shall specify projectors that meet current criteria established by UC audio-visual technology specialists responsible for each campus: Central Campus West and the College of Applied Science, Central Campus East, Raymond Walters College, and Clermont College. Consider projector performance and cost in relation to room size. Performance goals include:
• Low noise level • Uniformly bright, clear images with good resolution and excellent color rendition • Compatibility with other audio-visual components • Reliability; availability and cost of replacement parts • Compact size to avoid blocking views of screens and markerboards
Design Guidance: Learning Environments Room Design, Furnishings, January 2003 and Equipment
University of Cincinnati 43 Division of the University Architect
Computer System All learning rooms accommodating at least 15 students shall have a personal computer at the instructor’s workstation that is connected to the UC network, the room’s projection system, and audio components. Computer systems shall meet current UCit standards; contact UC audio-visual technology specialists before specifying.
• Instructor workstations are designed for tower-type computers but also provide wiring connections for laptops. Conventional 17 to 19-inch monitors have been used in most rooms, but thin-profile monitors have also been used to reduce workstation depth.
• Seminar rooms with seating capacities under 20 students are no longer programmed because of scheduling restraints. If existing small seminar rooms are renovated, they shall have data/power outlets linked to the ceiling projector for use with laptops.
Audio Systems All learning rooms accommodating at least 15 students shall contain an audio amplification system and speakers. Contact UC audio-visual technology specialist for specifications. The instructor workstation is designed to accommodate an amplifier in a standard component rack. Document Camera Provide a document camera in all classrooms, auditoriums, and seminar rooms. Contact UC audio-visual technology specialist for specifications. Video-Cassette Recorder/DVD player with link to Cable TV Learning rooms accommodating at least 15 students shall contain a combination videocassette recorder (VCR) and DVD player. The VCR is designed primarily for playing VHS tapes; features such as recording capability are not required. • The VCR’s tuner also provides access to cable TV channels • The ceiling-mounted projector is used to display images on screens • This eliminates the need for TV monitors Contact UC audio-visual technology specialist for specifications. The instructor workstation is designed to accommodate a VCR/DVD player in a standard component rack. Movable carts used in seminar rooms shall have the same design features.
Design Guidance: Learning Environments Room Design, Furnishings, January 2003 and Equipment
University of Cincinnati 44 Division of the University Architect
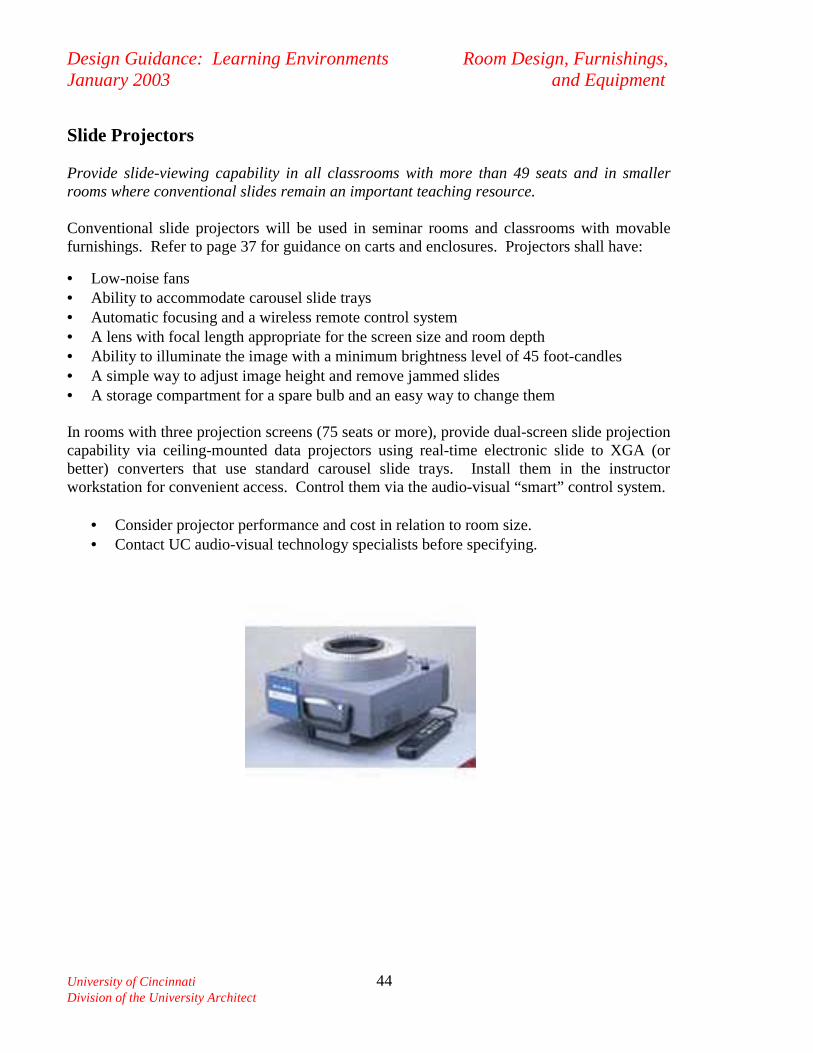
Slide Projectors Provide slide-viewing capability in all classrooms with more than 49 seats and in smaller rooms where conventional slides remain an important teaching resource. Conventional slide projectors will be used in seminar rooms and classrooms with movable furnishings. Refer to page 37 for guidance on carts and enclosures. Projectors shall have:
• Low-noise fans
• Ability to accommodate carousel slide trays • Automatic focusing and a wireless remote control system • A lens with focal length appropriate for the screen size and room depth • Ability to illuminate the image with a minimum brightness level of 45 foot-candles • A simple way to adjust image height and remove jammed slides • A storage compartment for a spare bulb and an easy way to change them In rooms with three projection screens (75 seats or more), provide dual-screen slide projection capability via ceiling-mounted data projectors using real-time electronic slide to XGA (or better) converters that use standard carousel slide trays. Install them in the instructor workstation for convenient access. Control them via the audio-visual “smart” control system.
• Consider projector performance and cost in relation to room size. • Contact UC audio-visual technology specialists before specifying.
Design Guidance: Learning Environments Room Design, Furnishings, January 2003 and Equipment
University of Cincinnati 45 Division of the University Architect
Overhead (Transparency) Projectors Provide an overhead (transparency) projector in all learning rooms. Projectors shall:
• Have a compact wide-angle lens that projects an image with a six-foot diagonal from a distance of six feet.
• Have an installed spare bulb that the user can activate by a lever or switch.
• Be designed to fit inside the recess of the projector cart with the glass surface at the same height as the work surfaces of the cart. Insure switch is easily reached.
• Have a warm neutral color (example: charcoal gray) Control Systems Control systems for electronic components shall have the capability of controlling all of the components identified above as well as projection screens, room lights, and shades operated by electric motors. Contact UC audio-visual technology specialist for detailed specifications. Systems shall:
• Be programmable and capable of being re-programmed • Interface properly with controls for screens, lights, and shades • Have a touch panel on the instructor workstation with easy-to-read, simple menu choices All source codes, compiled codes, and access passwords shall be provided to the University at acceptance and become University property. Security for Audio-Visual System Components Provide a security alarm system on the instructor workstation (and movable carts in seminar rooms) to prevent theft of audio-visual system components. Contact the Renovations Department for typical drawings and specifications (normally filed in the s:shareall\Design Guidance\Classrooms electronic file directory). The typical system includes:
• Locks and alarms for components located on the instructor workstation • A tamper loop that sounds an alarm if a ceiling projector is removed from its brackets • Low-voltage wiring that connects the workstation alarms to the communications room • Radio transmitters in the communications room linked to the campus security system • A keypad inside the workstation to disarm the system for maintenance
Design Guidance: Learning Environments Room Design, Furnishings, January 2003 and Equipment
University of Cincinnati 46 Division of the University Architect
Telephones and Data Connections Provide an analog wall-mounted telephone near the instructor workstation in all learning rooms. Phones are used to obtain technical support and enhance security. Insure phone cord is long enough to reach all areas of the instructor workstation. Contact UCit for specifications. Project Administrators shall make arrangements to activate phone and data service. Special Equipment for Music Instruction Music Instruction labs shall have high-quality stereo components in addition to the audio-visual components typically provided in classrooms. Contact UC audio-visual technology specialist for specifications. Components shall: • Be designed to play vinyl records, audiocassette tapes, and compact disks • Be installed on standard racks to facilitate updates as recording technology changes • Be located on portable carts or in wall-mounted racks • Have a security alarm system linked to the central control panel

Design Guidance: Learning Environments Room Design, Furnishings, January 2003 and Equipment
University of Cincinnati 47 Division of the University Architect
Distance Learning Classrooms The definition of “distance learning” is very broad. Distance learning is in a state of continuous change due to advances in the technology used to transmit information. This guidance focuses specifically on the design of facilities used for transmitting and receiving real-time interactions and the exchange of information to and from remote sites. The design goal is to make the technology invisible and the sharing of images and information between sites as seamless as possible. A classroom, seminar room or auditorium may serve as a distance learning room. Distance learning classrooms have the same purpose as video-conferencing rooms and use similar technologies. The infrastructure required to transmit video images and audio signals shall be evaluated early in the design process to determine its adequacy and the ramifications it will have on room design and the technology used. It is important to determine the type of media that instructors plan to use and what their expectations are for the students at the remote site. Technologies currently used that make this room type unique are:
• Multiple remote controlled cameras focused on the person(s) speaking • Multiple “push to talk” microphones located near a student’s seat • Electronic marker-boards • Compressed digital transmission of low, medium, or high bandwidth video from point
to point or between multiple points. • Streaming video on the data network • Full motion satellite or cable video or television transmission
Most of the criteria used in the design of other types of learning rooms apply to the design of distance learning classrooms. Specific criteria for distance learning includes:
• Entry from the rear or side of the room is strongly recommended so that people arriving late can find a seat with minimum disruption.
• Work surfaces shall be at least 18 inches deep, but 21 to 24 inches is preferable. Provide directional microphones between every pair of seats. Power and data outlets for laptop use at each student workstation may also be requested or required.
• An interactive seating layout that encourages students to communicate with each other as well as the instructor, while maintaining good sight lines to projected images, is essential. Layouts with a gentle arc, semi-circular or U-shape oriented towards screens tend to work best.
• Two rear-projection screens are recommended. One screen would display images of instructors and students located in other distance-learning rooms. The other screen would simultaneously display other digital images. Contact UC audio-visual technology specialist for detailed specifications.
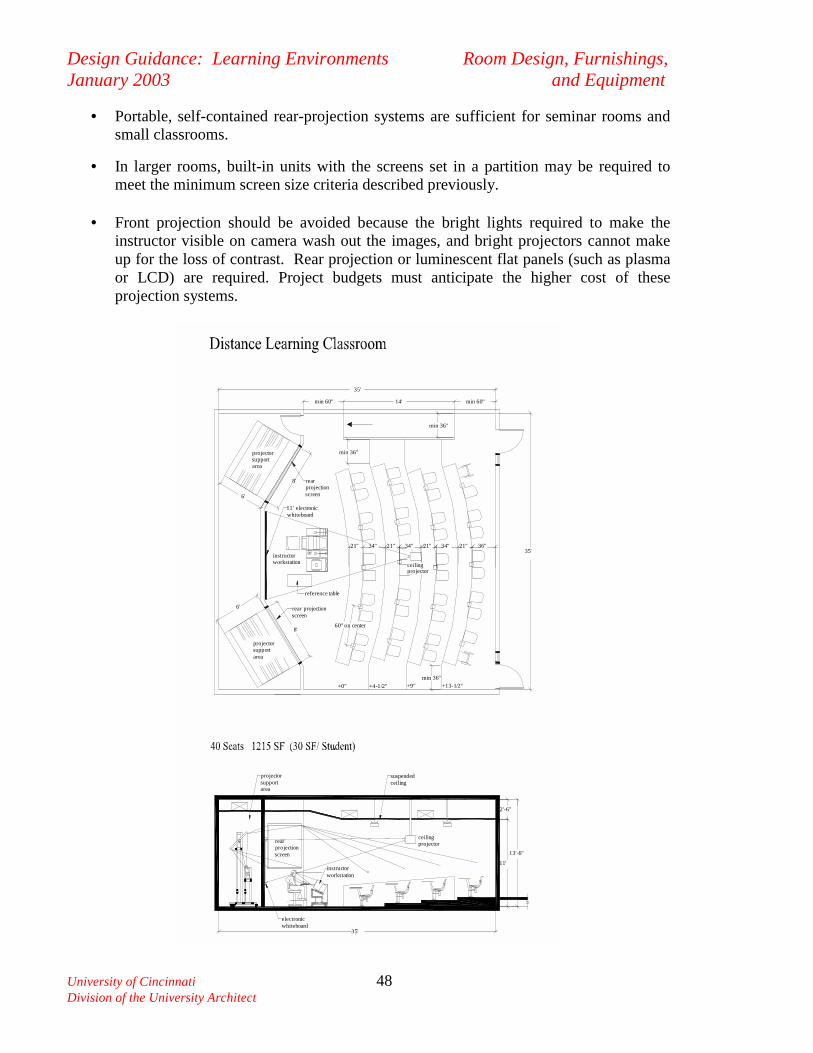
Design Guidance: Learning Environments Room Design, Furnishings, January 2003 and Equipment
University of Cincinnati 48 Division of the University Architect
• Portable, self-contained rear-projection systems are sufficient for seminar rooms and small classrooms.
• In larger rooms, built-in units with the screens set in a partition may be required to meet the minimum screen size criteria described previously.
• Front projection should be avoided because the bright lights required to make the
instructor visible on camera wash out the images, and bright projectors cannot make up for the loss of contrast. Rear projection or luminescent flat panels (such as plasma or LCD) are required. Project budgets must anticipate the higher cost of these projection systems.
+0" +4-1/2" +9" +13-1/2"
ceilingprojector
11' electronicwhiteboard
rear projectionscreen
rearprojectionscreen
projectorsupportarea
projectorsupportarea
reference table
8'
instructorworkstation
6'
6'
8' 60" on center
21" 34" 21" 34" 21" 36"35'
min 36"
min 36"
35'
min 60" 14' min 60"
35'
13'-6"
11'
2'-6"
min 36"
projector supportarea
suspendedceiling
rearprojectionscreen
ceilingprojector
electronic whiteboard
instructorworkstation
21"34"
Design Guidance: Learning Environments Room Design, Furnishings, January 2003 and Equipment
University of Cincinnati 49 Division of the University Architect
An instructor workstation with a full range of media components, a “Smart” control system, and lighting controls at the fingertips of the discussion leader should be provided near the front of the room.
• A tiered floor is recommended to make it easier to see the bottom of screens and electronic or conventional markerboards.
• An electronic whiteboard may be preferred to a conventional white markerboard:
• A ceiling-mounted media projector would allow instructors to project images on the electronic whiteboard at the same time images from other distance learning rooms are displayed on the rear-projection screens.
• A third screen in the center of the room could also be used to display images, but it could not be used to transmit writing or sketches to other rooms.
• Cameras that focus automatically on projected images and persons speaking are required at the transmitting site.
• One camera shall be directed at the instruction area and be capable of following the movement of the instructor.
• The second camera shall be directed toward the audience to focus automatically on an individual who is speaking.
• Lighting must be carefully controlled to avoid shadows, glare, and reflections. Avoid
natural lighting. Provide minimum light levels as follows:
• 50 foot-candles on horizontal surfaces • 35 foot-candles on vertical surfaces
• Minimize noise levels from mechanical systems or other outside noise sources and design room surfaces to eliminate resonance and echoes. Specific criteria:
• Overall noise level in empty rooms shall be NC 20 to NC 25 • Reverberation time 0.60 (equal to or less than 0.3 seconds)
• At least two monitors are required for use by the instructor.
• One monitor shall be used to display images of the audience at the remote site. • The other monitor displays images being viewed by that audience.
• Video-conferencing cameras and compression systems produce best quality and
realism when backgrounds are simple, without discernable visual patterns, and blue or gray in tone. Avoid heavily saturated colors. Full white or black areas (whiteboards, signage and logos, etc.) should be modified to 10% gray and 80% gray respectively.
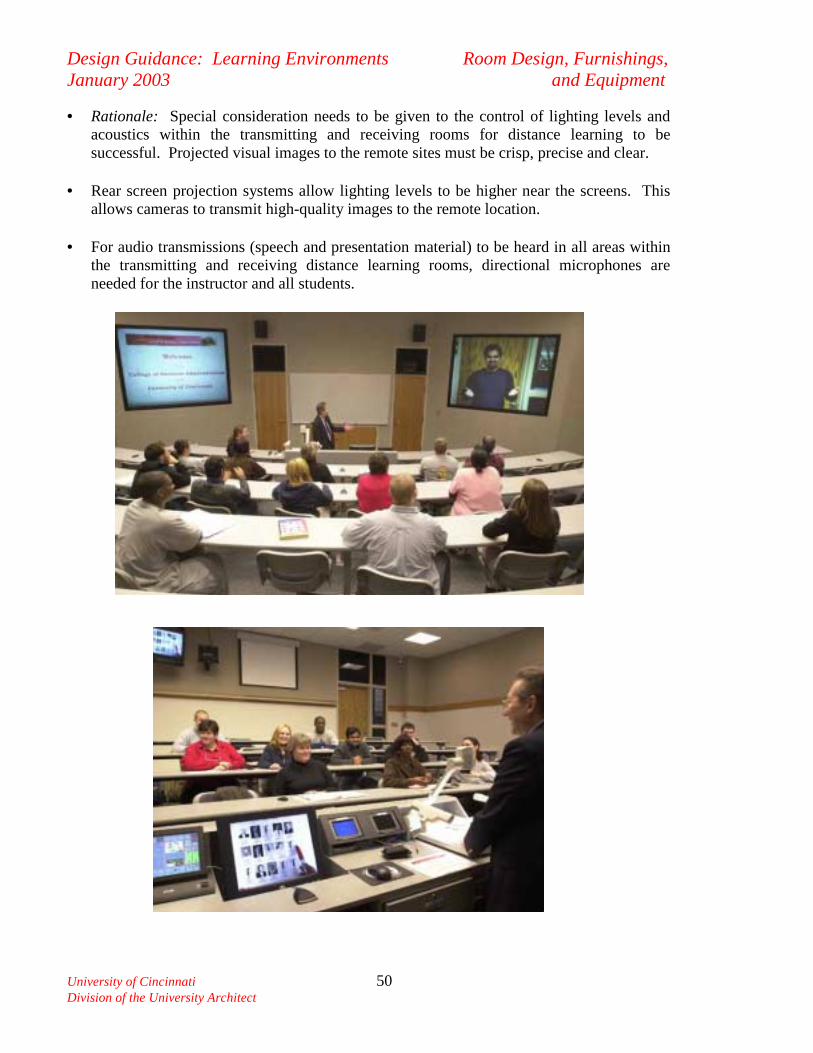
Design Guidance: Learning Environments Room Design, Furnishings, January 2003 and Equipment
University of Cincinnati 50 Division of the University Architect
• Rationale: Special consideration needs to be given to the control of lighting levels and acoustics within the transmitting and receiving rooms for distance learning to be successful. Projected visual images to the remote sites must be crisp, precise and clear.
• Rear screen projection systems allow lighting levels to be higher near the screens. This
allows cameras to transmit high-quality images to the remote location. • For audio transmissions (speech and presentation material) to be heard in all areas within
the transmitting and receiving distance learning rooms, directional microphones are needed for the instructor and all students.

Design Guidance: Learning Environments Room Design, Furnishings, January 2003 and Equipment
University of Cincinnati 51 Division of the University Architect
Lighting and Electrical Power Lighting and electrical power systems shall:
• Be energy-efficient • Be easy to maintain and modify • Provide appropriate lighting levels for all room activities that are easy to control
Consider using low-voltage (analog and digital) and RF control systems for lighting and screens or window shades operated by electric motors. Rationale: Low voltage and RF controls are generally easier to interface to “Smart” control systems used for audio-visual systems and energy management. This is especially true when the “Smart” controls are not installed originally and are added later. Most lighting and electrical power systems lack flexibility and can only be modified at high cost. Systems with conventional outlets, conduit, and hard-wired connections are simply not as easy to modify as systems with accessible raceways and quick-disconnect wiring. Provide natural lighting and window coverings as follows:
• Natural light is available (not excessive) in all learning rooms except distance learning
• Locate windows away from projected images; avoid skylights and clerestory windows
• Window coverings that reduce light intensity and glare when full darkening is not required
• Opaque window coverings that reduce light levels to 2 foot-candles
• Window coverings that are easy to open and close and do not jam:
• Provide electrically-operated shades when budgets permit • Provide manually-operated shades in rooms with only one or two windows • Avoid use of mini-blinds
Rationale: Instructors and students have consistently expressed a strong preference for windows to be included in all learning rooms. Mini-blinds are difficult to clean and maintain, frequently jam, and allow too much light into rooms. Avoid light that creates glare or reflections on computer screens:
• Use indirect natural and artificial lighting in computer instruction and study labs
• Use indirect or parabolic fluorescent lights in other learning rooms
• Avoid placing lights behind instructor workstations
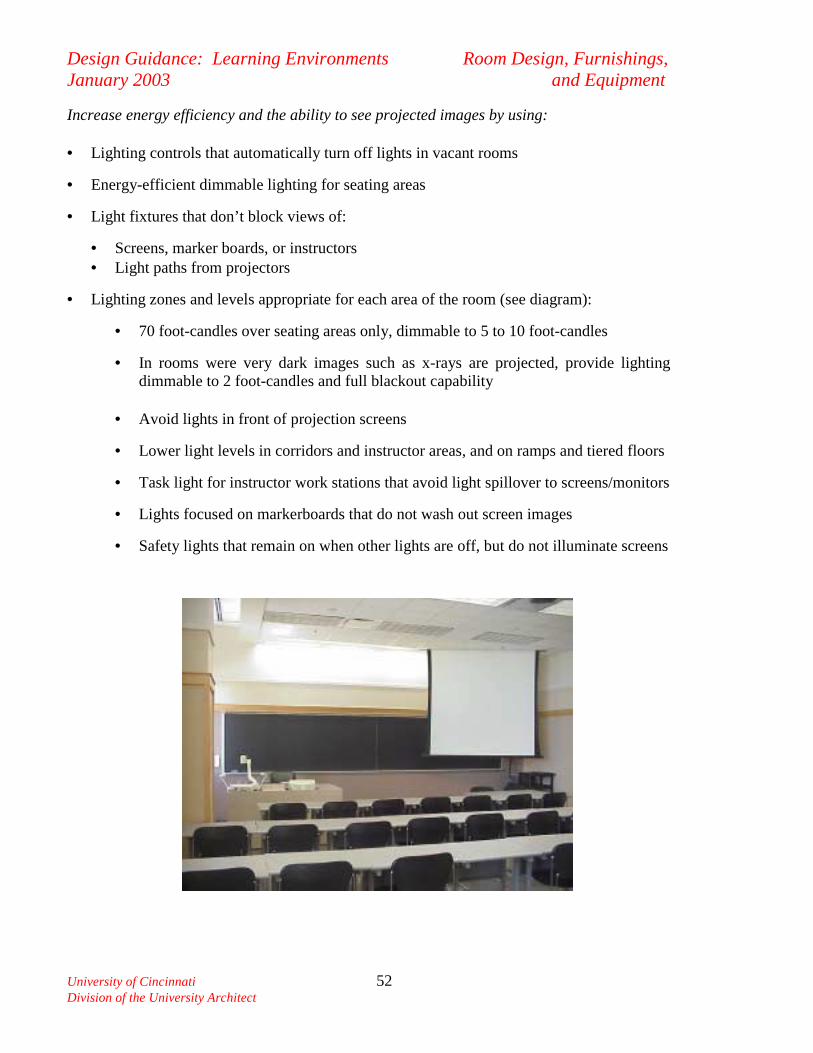
Design Guidance: Learning Environments Room Design, Furnishings, January 2003 and Equipment
University of Cincinnati 52 Division of the University Architect
Increase energy efficiency and the ability to see projected images by using: • Lighting controls that automatically turn off lights in vacant rooms
• Energy-efficient dimmable lighting for seating areas
• Light fixtures that don’t block views of:
• Screens, marker boards, or instructors • Light paths from projectors
• Lighting zones and levels appropriate for each area of the room (see diagram):
• 70 foot-candles over seating areas only, dimmable to 5 to 10 foot-candles
• In rooms were very dark images such as x-rays are projected, provide lighting dimmable to 2 foot-candles and full blackout capability
• Avoid lights in front of projection screens
• Lower light levels in corridors and instructor areas, and on ramps and tiered floors
• Task light for instructor work stations that avoid light spillover to screens/monitors
• Lights focused on markerboards that do not wash out screen images
• Safety lights that remain on when other lights are off, but do not illuminate screens
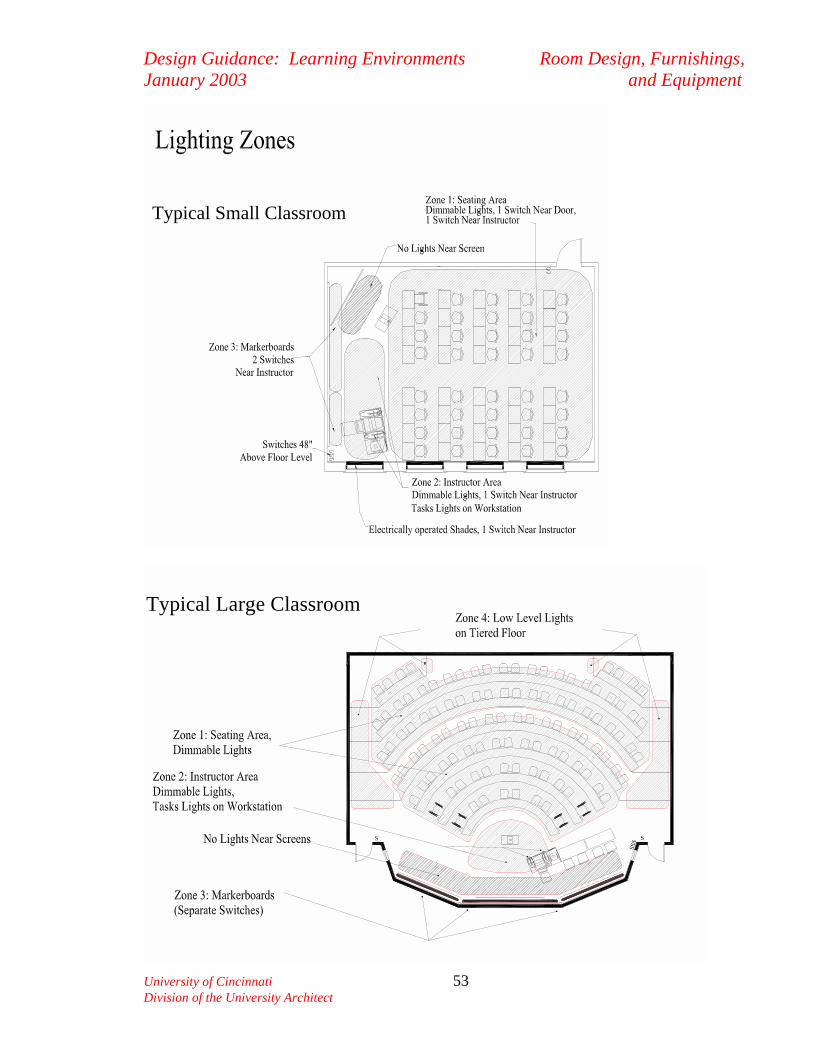
Design Guidance: Learning Environments Room Design, Furnishings, January 2003 and Equipment
University of Cincinnati 53 Division of the University Architect
Typical Small Classroom
Typical Large Classroom
S SSSS
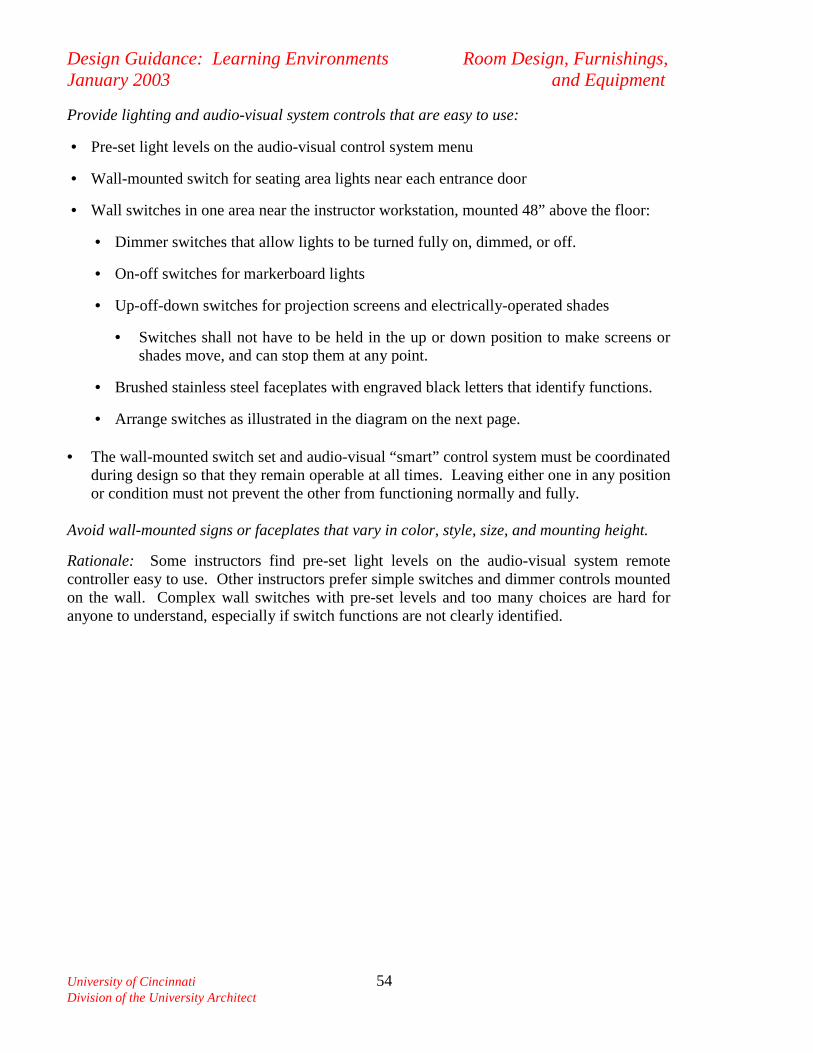
Design Guidance: Learning Environments Room Design, Furnishings, January 2003 and Equipment
University of Cincinnati 54 Division of the University Architect
Provide lighting and audio-visual system controls that are easy to use:
• Pre-set light levels on the audio-visual control system menu
• Wall-mounted switch for seating area lights near each entrance door
• Wall switches in one area near the instructor workstation, mounted 48” above the floor:
• Dimmer switches that allow lights to be turned fully on, dimmed, or off.
• On-off switches for markerboard lights
• Up-off-down switches for projection screens and electrically-operated shades
• Switches shall not have to be held in the up or down position to make screens or shades move, and can stop them at any point.
• Brushed stainless steel faceplates with engraved black letters that identify functions.
• Arrange switches as illustrated in the diagram on the next page. • The wall-mounted switch set and audio-visual “smart” control system must be coordinated
during design so that they remain operable at all times. Leaving either one in any position or condition must not prevent the other from functioning normally and fully.
Avoid wall-mounted signs or faceplates that vary in color, style, size, and mounting height. Rationale: Some instructors find pre-set light levels on the audio-visual system remote controller easy to use. Other instructors prefer simple switches and dimmer controls mounted on the wall. Complex wall switches with pre-set levels and too many choices are hard for anyone to understand, especially if switch functions are not clearly identified.
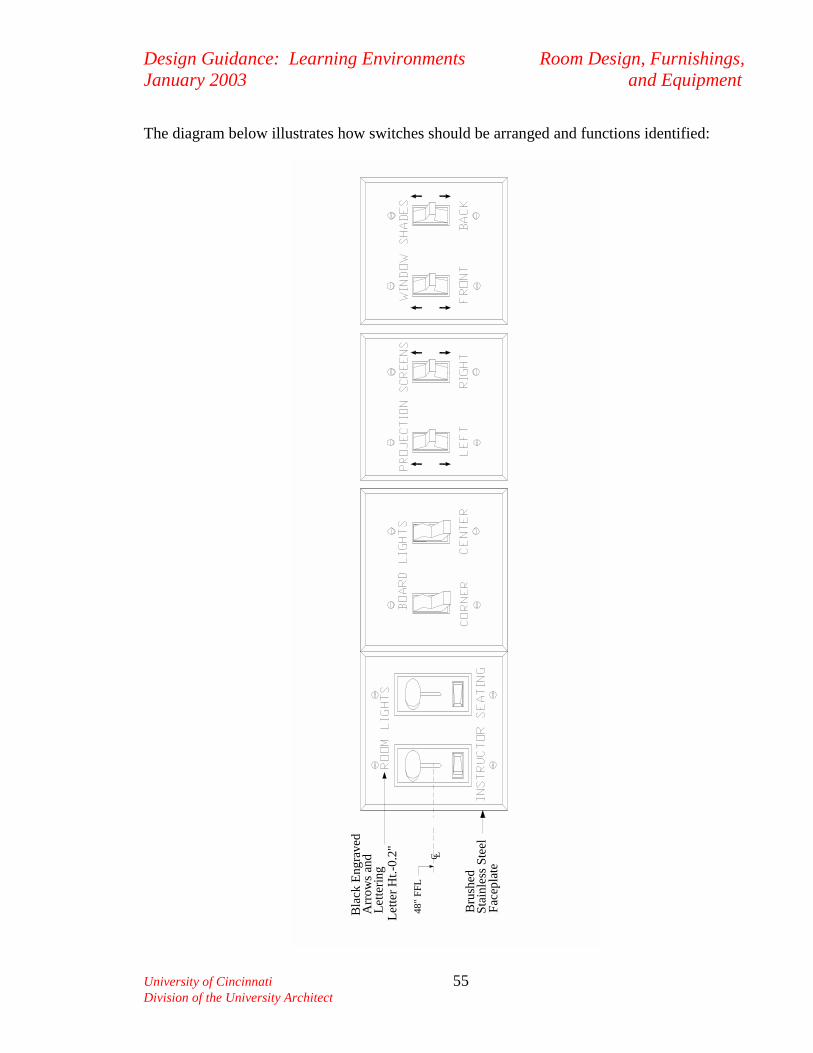
Design Guidance: Learning Environments Room Design, Furnishings, January 2003 and Equipment
University of Cincinnati 55 Division of the University Architect
The diagram below illustrates how switches should be arranged and functions identified:
LC
Lette
r Ht.-
0.2"
Bla
ck E
ngra
ved
Lette
ring
Arr
ows a
nd
Bru
shed
Face
plat
e
48"
FFL
Stai
nles
s Ste
el

Design Guidance: Learning Environments Room Design, Furnishings, January 2003 and Equipment
University of Cincinnati 56 Division of the University Architect
The diagram below illustrates typical locations and sizes of conduit and wiring for electronic classrooms with a full complement of audio-visual components. In large classrooms and auditoriums, provide floor junction boxes, wiring pathways, and wiring to serve all potential locations of the instructor workstation:
J
5
J
3
4 7
$$$$
6
1
$
10
JJ J
9
2
8
2
CODED NOTES:
1. MAIN TERMINAL ENCLOSURE DEMARCATION BOX MOUNTED IN WALL OR A FLOOR-TO-CEILING GYP BOARD WALL CHASE. ONE 2" CONDUIT TO CEILING JUNCTION BOX, ONE 2" CONDUIT TO FLOOR MOUNTED JUNCTIONBOX, FOUR 1" CONDUITS TO CABLE TRAY IN ADJACENT CORRIDOR. INSTALL PHONE/DATA JACK INSIDE DEMARC BOX WITH ONE 1" CONDUIT TO JUNCTION BOX FOR WALL-MOUNTED PHONE NEARBY. DUPLEX RECEPTACLE MOUNTED INSIDE MAIN TERMINAL ENCLOSURE. 2. FLUSH WALL MOUNTED JUNCTION BOX WITH 1" CONDUIT TO ABOVE CEILING FOR WALL MOUNTED SPEAKERS MOUNTED 12" BELOW CEILING.
3. CEILING MOUNTED JUNCTION BOX FOR DATA CONNECTION TO CEILING PROJECTOR.
4. CEILING MOUNTED DUPLEX RECEPTACLE FOR POWER CONNECTION TO CEILING PROJECTOR. 5. FLUSH FLOOR MOUNTED JUNCTION BOX MOUNTED BELOW INSTRUCTOR WORK STATION.
6. 2" CONDUIT FROM MAIN TERMINAL ENCLOSURE TO FLOOR BOX.
7. 2" CONDUIT FROM MAIN TERMINAL ENCLOSURE TO CEILING JUNCTION BOX.
8. JUNCTION BOX ABOVE CEILING FOR POWER CONNECTION TO MOTORIZED SCREENS.
9. DUPLEX RECEPTACLE FOR OVERHEAD PROJECTOR IN TEACHING WALL (OR TIERED FLOOR RISER).
10. WALL-MOUNTED SWITCH FOR SEATING AREA LIGHTS MOUNTED 48" ABOVE FLOOR.
11. SWITCHES NEAR INSTRUCTOR WORK STATION FOR SEATING AREA, INSTRUCTOR AREA, MARKERBOARDLIGHTS, SCREENS, AND ELECTRICALLY OPERATED WINDOW SHADES. MOUNT SWITCHES 48" ABOVE FLOOR.IDENTIFY FUNCTION OF EACH SWITCH ON BRUSHED STAINLESS STEEL FACEPLATE.
11
Design Guidance: Learning Environments Room Design, Furnishings, January 2003 and Equipment
University of Cincinnati 57 Division of the University Architect
Guidance on the types of electrical equipment to be used in University buildings is provided in the Design Guidelines and Standards Manual.
• Low-voltage cables such as those used for audio, video, and control systems shall be run in conduit or raceways separate from electrical power wiring. These circuits must also be separated from high inductive loads.
• There shall be no elevator motors, compressor motors, blower motors, or similar loads on the side of the power transformer that feeds computer or media equipment.
• Consider using open raceways, quick-disconnect outlets, and raised floors with durable floor outlets in computer instruction and study labs.
• Creative solutions to the design of wiring networks that will allow instructor and computer workstations to be more easily moved and upgraded as new components are introduced are encouraged.
Design Guidance: Learning Environments Room Design, Furnishings, January 2003 and Equipment
University of Cincinnati 58 Division of the University Architect
Heating, Ventilating, and Air Conditioning (HVAC) Systems HVAC systems shall be designed to provide a comfortable environment for learning without creating too much noise or wasting energy. The following criteria applies in addition to the criteria in ASHRAE Standards: Indoor air conditions:
The HVAC system shall be designed to maintain 72 degrees Fahrenheit year-round with a humidity range of 35-50% relative humidity. On small renovation projects where it is not possible to maintain these conditions due to existing building or mechanical system design restraints, consult with the Project Administrator to determine acceptable ranges of temperature and humidity.
Outdoor air temperatures: The winter outdoor air temperature used to determine the heating load shall be the ASHRAE 99.6% heating design temperature. To increase energy efficiency and reduce noise levels: • Use equipment with a minimum 10.0 Energy Efficiency Rating (EER)
• Noise levels produced shall not exceed NC-30
• Fans, ductwork, and diffuser noise ratings shall not exceed NC-25 • Provide balancing dampers in supply ductwork to serve all diffusers. Locate dampers far
enough upstream (minimum 2.5 equivalent duct diameters) to provide uniform airflow at the inlet to the diffuser:
• Use opposed-blade dampers in rectangular ductwork. • Use butterfly dampers in round ductwork. • If there isn’t enough space to provide a long-enough straight duct into the diffuser
neck, use other means to reduce noise (equalizing grid, opposed-blade dampers, etc.).
• Provide tamper-proof covers for thermostats Do not locate ductwork or air diffusers near projection screens or the instructor workstation. Rationale: This brings noise into the instructor area and causes screens to undulate, distorting projected images.
Design Guidance: Learning Environments Room Design, Furnishings, January 2003 and Equipment
University of Cincinnati 59 Division of the University Architect
Room Signage Refer to the University’s Signage and Graphics Design Guidelines. Refer to page 55 for guidance on lettering to be used on switches. Trash and Recycling Containers Provide an attractive trash receptacle near exit doors in a location that does not interfere with other room functions. Use designs with neutral colors that use as little floor space as possible. The University encourages recycling as part of its Sustainable Design guidance. This guidance requires recycling containers to be conveniently located to serve building occupants (typically on each floor in locations where recyclable items are generated). Rather than including recycling containers inside learning rooms, provide them: • In lobbies, lunch rooms, or along corridor walls near learning room doors. • Near water fountains or sinks so they can be rinsed out before being discarded.
Rationale: Recycling will succeed only if containers are conveniently located for both users and facility maintenance staff. Coat Racks Coat racks are not required in learning rooms. However, they can be provided if the users request them and space permits. Provide:
• A permanent coat rack with strong hooks, preferably within sight of the seating area • Enough hooks for about 25% of the students in each room.
Rationale: Many students prefer to keep coats at their seats. A location in sight helps prevent theft and encourages students to use the racks. Clocks Provide a large clock that is easy to read and can be seen by instructors and students. Clocks shall be designed so that times are automatically re-set when power outages occur or times are changed in Spring and Fall. Consider radio-controlled clocks. A hard-wired centrally-controlled system is not acceptable. Pencil Sharpeners Provide a manually-operated pencil sharpener in the instructor area in a location that does not block traffic flow (example: attached to a chair rail in the instructor area).
Design Guidance: Learning Environments Room Design, Furnishings, January 2003 and Equipment
University of Cincinnati 60 Division of the University Architect
Conclusion This Design Guidance for Learning Environments is intended to answer the questions our design consultants ask most frequently. It is intended to be performance-oriented, not prescriptive, so that creative design solutions can be developed within the general guidelines presented as long as performance goals are met. Autocad drawings for the typical seminar rooms, classrooms, and computer instruction labs of various sizes and for current designs for instructor workstations are available upon request. In most cases, the design consultant must adapt these to accommodate specific user needs, but many firms have found them to be a useful starting point. Visits to recently-built rooms are also recommended. Design guidance is of little value if it is not read, understood, or followed. We welcome suggestions to improve it, and we actively solicit opinions from faculty, students, and staff after new rooms are brought on-line. We’re counting on you to help us improve the learning process at UC!

Design Guidance: Learning Environments Appendix 1: Typical Audio-Visual System Components
January 2003
Item Notes Seminar Room (20 seats) Classrooms (2 screens) Classrooms (3 screens)Qty Unit $ Total $ Qty Unit $ Total $ Qty Unit $ Total $
Items in Construction Budget (FLCC): Projection Screens (electrically-operated) 1 1 $1,800 $1,800 2 $2,000 $4,000 3 $3,000 $9,000Adjustable-Height Markerboard 1 1 $800 $800 1 $800 $800 1 $1,000 $1,000Fixed-Height Markerboards 1 1 $300 $300 1 $300 $300 2 $400 $800Ceiling Projector Mount 1 $120 $120 2 $120 $240 3 $120 $360Conduit, raceways, power & phone wiring 1 LS $7,000 $7,000 LS $8,000 $8,000 LS $10,000 $10,000Room lighting (artificial) 1 520 $10 $5,200 800 $10 $8,000 1700 $10 $17,000Electrically-operated window shades 1 2 $800 $1,600 2 $800 $1,600 2 $800 $1,600Total $16,820 $22,940 $39,760
Other A/V Components & Alarms (FFE):Ceiling Projectors 1 1 $5,400 $5,400 2 $5,400 $10,800 3 $7,500 $22,500Loudspeakers 4 $85 $340 8 $85 $680 12 $85 $1,020Instructor Workstation (cabinet work only) 2 1 $1,500 $1,500 1 $3,600 $3,600 1 $3,600 $3,600Task Lights on Instructor Workstation $0 $0 2 $40 $80 2 $40 $80Document Camera 1 $2,500 $2,500 1 $3,500 $3,500 1 $3,500 $3,500Computer, monitor, peripherals 1 $3,000 $3,000 1 $3,000 $3,000 1 $3,000 $3,000AV component rack, mounting kit, shelf 1 $350 $350 1 $350 $350 1 $350 $350Amplifier 1 $400 $400 1 $400 $400 1 $400 $400Combination VCR/DVD Player 1 $175 $175 1 $175 $175 1 $175 $175Slide Projection System (slide converter) 3 0 $0 $0 0 $0 $0 1 $4,000 $4,000Matrix Switcher 1 $2,115 $2,115 1 $2,115 $2,115 1 $2,500 $2,500Video Touch Panel 1 $4,100 $4,100 1 $4,100 $4,100 1 $4,100 $4,100Installation of electronic components LS $3,500 $3,500 LS $3,500 $3,500 LS $3,500 $3,500AMX Control System, cue amp/speaker 1 $2,900 $2,900 1 $2,900 $2,900 1 $3,500 $3,500Loading software program 4 1 $400 $400 1 $400 $400 1 $400 $400Audio-Visual/Data Wiring & Connectors LS $1,000 $1,000 LS $1,000 $1,000 LS $1,500 $1,500Extended equipment warranty 5 LS $1,800 $1,800 LS $1,800 $1,800 LS $1,800 $1,800Overhead (Transparency) Projector 1 $300 $300 1 $300 $300 1 $300 $300Overhead (Transparency ) Projector Cart 1 $200 $200 1 $200 $200 1 $200 $200Tuff-nut security locks LS $200 $200 LS $200 $200 LS $200 $200Electronic security alarm system 6 LS $3,000 $3,000 LS $3,000 $3,000 LS $3,000 $3,000Total, AV Components (FFE) - 2002 7 $33,180 $42,100 $59,625
Audio-Visual System Design 8, 4 $1,991 $2,526 $4,770
NOTES:1. Costs are estimates for capacities and number of screens shown. Actual costs vary based on room size, other design features. 2. Seminar rooms and conference rooms usually have a movable cart for audio-visual components, instead of an instructor workstati3. Portable slide projectors/carts are used in rooms seating less than 50 students. Number required varies by project (contact media services representative).4. In addition, allow $1200 to develop AMX software control system program for each room type as part of design fee. 5. See Audio-Visual System Term Contract (T-904) for details.6. Cost of prototype system for 16 McMicken rooms was about $3,000 per room. Lower-cost solutions under study7. Add estimate for inflation to these figures when project schedule is known. Add 10% for FFE contingency also.8. Allow 6-8% of A/V component costs for design services for all three design phases, depending on project complexity Reduce fee if A/V consultant is not involved in early design phases, but include software programming costs (Note 4) Figures used above: 6% for rooms with 1 or 2 screens; 8% for rooms with 3 screens
s:\shareall\Design Guidance\Classrooms\Design Guidance Learning Environments Appendix 1 Typical Audio Visual System Components.xls