design guide - xpo.center · design guide. 2. foreword every day, with the help of the xpo.center...
TRANSCRIPT

DESIGN GUIDE

2.Foreword
Every day, with the help of the xpo.center portal, our team inspects hundreds of files which then become large format prints.
We have created this guide to share our experience with you and ensure peace of mind as you prepare and send us your files.
We ask that you read this carefully before you start to work with our products.
Respecting these guidelines will guarantee that you get perfect graphics. In most cases, turnaround times for creating files are very short, which makes it essential to avoid technical errors.
Do not hesitate to contact us if you have any questions as you read this guide. We are passionate about what we do and would be thrilled to swap notes with you.
Any failure to comply with these points, requiring our team to intervene and modify any files initially submitted to us, may result in additional fees (estimate provided).
The xpo.center team
Always Contact us if you have any questions before you start your stand project.The Xpo team is at your service!
[email protected] +33 (0)4 99 63 68 75 chat xpo.center
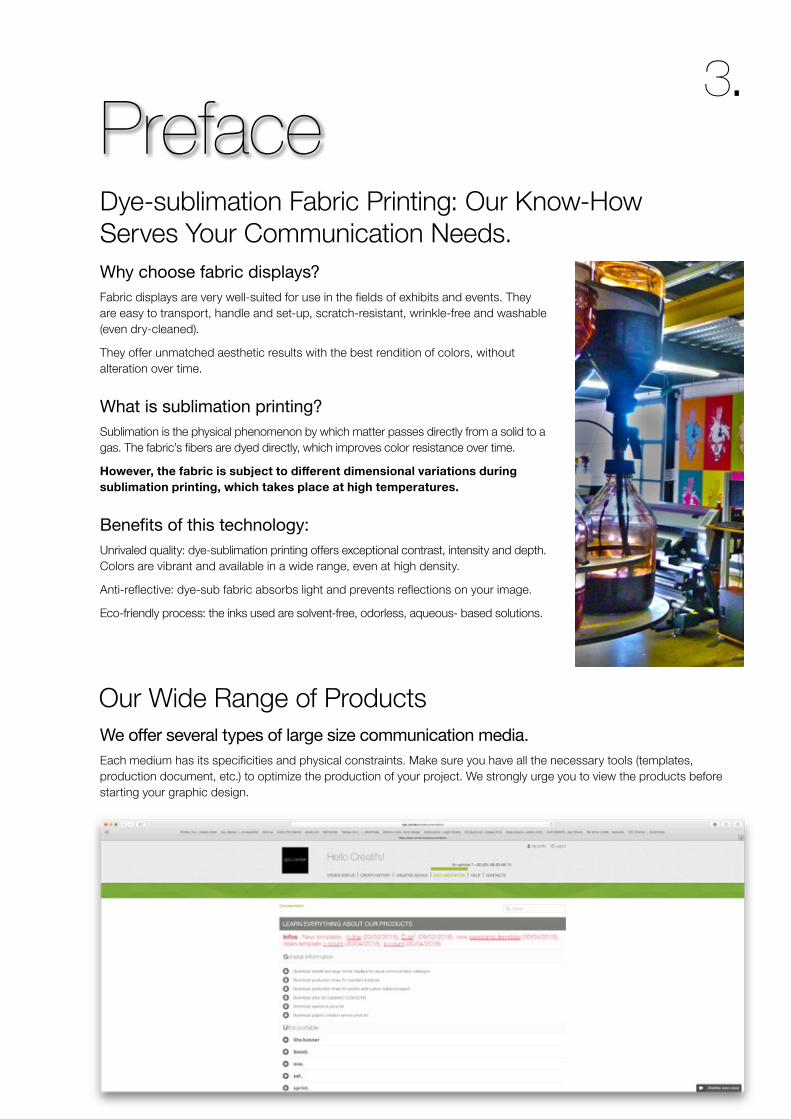
3.PrefaceDye-sublimation Fabric Printing: Our Know-How Serves Your Communication Needs.
Our Wide Range of Products
Why choose fabric displays?Fabric displays are very well-suited for use in the fields of exhibits and events. They are easy to transport, handle and set-up, scratch-resistant, wrinkle-free and washable (even dry-cleaned).
They offer unmatched aesthetic results with the best rendition of colors, without alteration over time.
What is sublimation printing?Sublimation is the physical phenomenon by which matter passes directly from a solid to a gas. The fabric’s fibers are dyed directly, which improves color resistance over time.
However, the fabric is subject to different dimensional variations during sublimation printing, which takes place at high temperatures.
Benefits of this technology:Unrivaled quality: dye-sublimation printing offers exceptional contrast, intensity and depth. Colors are vibrant and available in a wide range, even at high density.
Anti-reflective: dye-sub fabric absorbs light and prevents reflections on your image.
Eco-friendly process: the inks used are solvent-free, odorless, aqueous- based solutions.
We offer several types of large size communication media.Each medium has its specificities and physical constraints. Make sure you have all the necessary tools (templates, production document, etc.) to optimize the production of your project. We strongly urge you to view the products before starting your graphic design.

4.
xpo.center (page 6.)For any large-scale projects or tiled images, do not hesitate to contact us before creating the files.
Confirmed orders cannot be modified.
If your graphics are ready, don't wait until the end of the day to load them, as you'll risk running into site traffic, which will slow down the upload.
Templates (page 15.)Using templates One for each new order
No important objects in the sensitive area or in the accessory space
No objects on CROP MARKS or TEMPLATE layers
Formats Follow size and bleed requirements
Bleed The bleed must contain your image/ not white space
Programs Illustrator ™ and Photoshop ™ Programs - Indesign ™ Not Recommended
Impeccable Graphics (page 19.)Resolution EQUIVALENT OF 100 DPI AT FULL-SCALE
Image Mode & Profile CMYK & Fogra39 (installed with the job option)
File Type PDF/X - 1a: 2003
Saving Include linked images
Flattening Flatten files in Photoshop™ (exported from Indesign™) or rasterize files in Illustrator™
Name files According to production guide
Printer's Marks Neither trim marks, nor registration marks
Color Management (page 21.)Overprinting Do not use overprinting
Reprinting Graphics for Panoramic Booths (page 24.)For Panoramic stands, we ensure reprints of complete artboards only.
Creative Advice (page 25.)Fonts Vectorizing Text
Be careful with borders Do not add a border too close to the bleed. The broader the border, the less the fabric deformation will be seen.
Seams Watch the tutorials
Here is a list of essential items to take into consideration when creating your files.
Summary
[email protected] +33 (0)4 99 63 68 75 chat xpo.center
5.
xpo.center 6 .Portal Overview 6 .Current Orders 6 .Artwork Upload 7 .Eproof 7 .Receive and Approve eProof 8 .
File inspection and quality control 10 .Everything you need to know about the eProof! 10 .What does xpo.center check automatically? 13 .What isn’t checked automatically on the Portal? 14 .
Templates 15 .The template shows various work areas 15 .Pack Contents 16 .Adobe Illustrator™ Template 17 .Adobe Photoshop™ Template 17 .Specs 18 .
Impeccable Graphics 19 .Resolution 19 .Image Mode 19 .Linked images 19 .File format and job.option 20 .Flatten your files: Advantages 20 .Name your files 20 .
Color Management 21 .Colors & Production Method 21 .Choose Rich/Packed black 22 .Successful Gradients 22 .Be Careful with Overprinting 22 .
Reprinting Graphics for Panoramic stands 24 .
Creative Advice 25 .Fonts 25 .Stock Photography 25 .Pay Attention to Borders 25 .
Contents

6.xpo.center Download, verify and manage all your files easily!
After logging in, you land on the home page which summarizes pending orders and their status. Shipped orders are archived in the Order History.
Your Personal Account
By Reference
By Date
Login!
Check out the tutorial!
By Description
By Status
Order Status
Portal Overview#1
VIDEO
ondemand_video

7.Select your order to see the order details page. All artwork appears under each order summary. You can download the template for each graphic. Click on “Upload your file(s) to print” to browse and select your personal files to print. For the same line item, you can select several files at once.
If there are multiple copies, fill in the number of copies per file.
Once the file quantity corresponds to the quantity expected for each line item, you can click “ Generate eProof ”.
Uploading Artwork
Generating an eProof
#2
#3
#1. Download your Template
Project Name
Project
Description of Graphic
DimensionsDeadline for approving eProofs
Project Status
Quantity
#2 Upload your graphic
#2. Generate eProofs
#1. Adjust quantity for each file
Your file name
Your project status

8.
EProofs are provided as PDF files. Please download for verification, before approving or rejecting them.
Receiving and Verifying eProofs#4
#1. Download your eProofs
#2. Approve or Reject eProof
Uploaded file
IF THE PREFLIGHT IS INVALID, THE PORTAL WILL NOT ISSUE AN EPROOF
We invite you to download this preflight, which will explain the reasons for nonconformity. You can then upload a new file.
#1. Upload a new file
Invalid Error Report
#2. Be sure to consult the error report

9.Once all of the eProofs for your order have been confirmed, the files will be manually inspected by our pre-press team.
After our pre-press team has verified the files, they will be launched into production.
Status: “Quality control in progress”
Production Launch
#5
#6
Your project status
Your project status
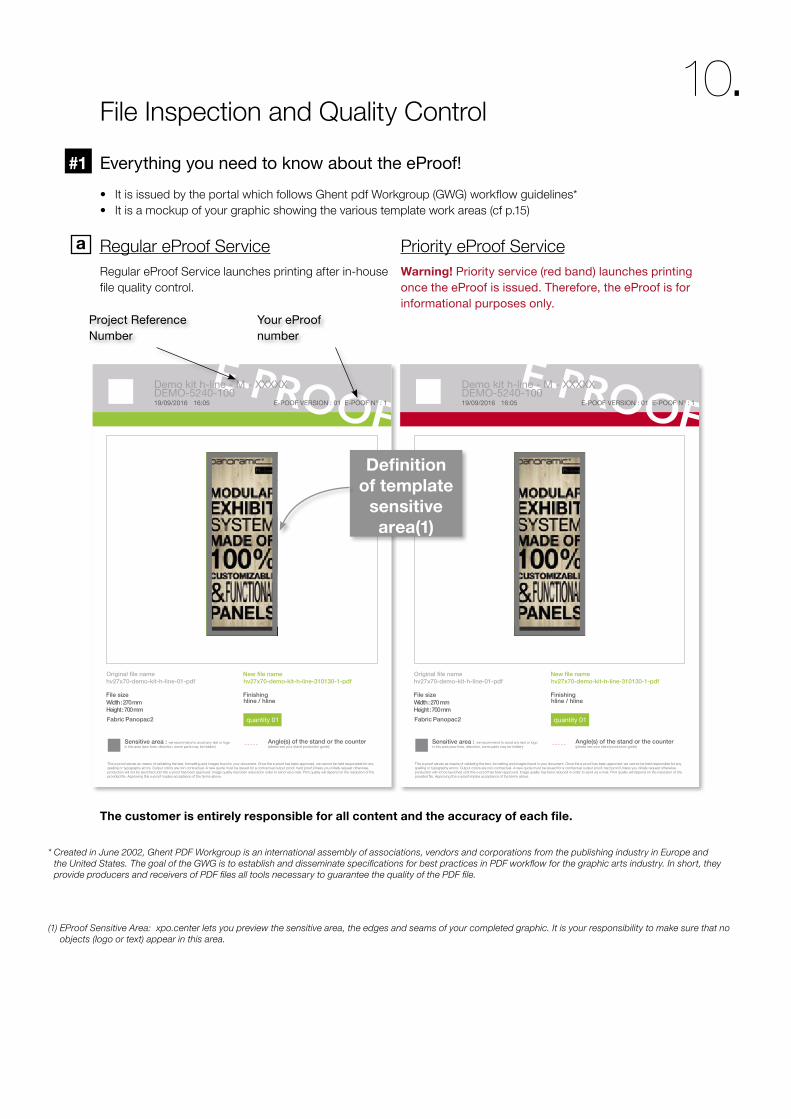
10.Everything you need to know about the eProof!#1
a
* Created in June 2002, Ghent PDF Workgroup is an international assembly of associations, vendors and corporations from the publishing industry in Europe and the United States. The goal of the GWG is to establish and disseminate specifications for best practices in PDF workflow for the graphic arts industry. In short, they provide producers and receivers of PDF files all tools necessary to guarantee the quality of the PDF file.
(1) EProof Sensitive Area: xpo.center lets you preview the sensitive area, the edges and seams of your completed graphic. It is your responsibility to make sure that no objects (logo or text) appear in this area.
Regular eProof ServiceRegular eProof Service launches printing after in-house file quality control.
The customer is entirely responsible for all content and the accuracy of each file.
Priority eProof ServiceWarning! Priority service (red band) launches printing once the eProof is issued. Therefore, the eProof is for informational purposes only.
BÀT
File size Finishing
Original file name New file name
Fabric
BÀT
This e-proof serves as means of validating the text, formatting and images found in your document. Once the e-proof has been approved, we cannot be held responsible for any spelling or typography errors. Output colors are non-contractual. A new quote must be issued for a contractual output proof; hard proof.Unless you initially request otherwise, production will not be launched until this e-proof has been approved. Image quality has been reduced in order to send via e-mail. Print quality will depend on the resolution of the provided file. Approving this e-proof implies acceptance of the terms above.
E-PROOF
Angle(s) of the stand or the counter (please see your stand production guide)
Sensitive area : we recommend to avoid any text or logo in this area (sew lines, distortion, some parts may be hidden)
Demo kit h-line - M - XXXXXDEMO-5240-10019/09/2016 16:05
hv27x70-demo-kit-h-line-01-pdf hv27x70-demo-kit-h-line-310130-1-pdf
hline / hlineWidth : 270 mmHeight : 700 mm
Panopac2 quantity 01
E-POOF VERSION : 01 E-POOF N° : 1 E-PROOF
File size Finishing
Original file name New file name
Fabric
BÀT
This e-proof serves as means of validating the text, formatting and images found in your document. Once the e-proof has been approved, we cannot be held responsible for any spelling or typography errors. Output colors are non-contractual. A new quote must be issued for a contractual output proof; hard proof.Unless you initially request otherwise, production will not be launched until this e-proof has been approved. Image quality has been reduced in order to send via e-mail. Print quality will depend on the resolution of the provided file. Approving this e-proof implies acceptance of the terms above.
E-PROOF
Angle(s) of the stand or the counter (please see your stand production guide)
Sensitive area : we recommend to avoid any text or logo in this area (sew lines, distortion, some parts may be hidden)
Demo kit h-line - M - XXXXXDEMO-5240-10019/09/2016 16:05
hv27x70-demo-kit-h-line-01-pdf hv27x70-demo-kit-h-line-310130-1-pdf
hline / hlineWidth : 270 mmHeight : 700 mm
Panopac2 quantity 01
E-POOF VERSION : 01 E-POOF N° : 1
Your eProof number
Definition of template
sensitive area(1)
Project Reference Number
• It is issued by the portal which follows Ghent pdf Workgroup (GWG) workflow guidelines* • It is a mockup of your graphic showing the various template work areas (cf p.15)
File Inspection and Quality Control

11.
RESOLUTION CHECKING
You have just provided us with a PDF file with some areas under 72 dpi.Therefore, some elements of your artwork may appear pixelated and might affect the quality of your graphic. In the thumbnails below, you will find actual-sized samples that will allow you to verify these elements.
SHIPPING DATE
Demo kit h-line - M - XXXXXDEMO-5240-10019/09/2016 16:05
1
1
2
2
3
3
E-POOF VERSION : 01 E-POOF N° : 1
Valid eProof with WarningThis means that the dimensions are correct but the Portal has detected a resolution below 72 DPI. Actual size screenshots are provided by the Portal on page 2 of the eProof.
b
zoom at 100%

12.Invalid PreflightIf a sizing problem is detected, an error report is automatically generated.
As explained above, you cannot access the eProof for your graphic unless its dimensions have been approved. So, you must upload the graphic again, with the appropriate dimensions in order to obtain the corresponding eProof.
c
The file you have sent us has the following error:
Please upload a new, updated file or contact your customer service representative.
The width and/or height do not comply with the product you have ordered.
dimension
FAQ
ERROR REPORTERROR REPORT
Demo kit h-line - M - XXXXXDEMO-5240-10019/09/2016 16:05
Expected size : 270 mm x 700 mmRecorded size : 297 mm x 210 mmMaximum ratio permitted : 0,1Recorded ratio : 1,1 x 0,3
Upload a new file and request eProof
Or contact us

13.The xpo.center Portal automatically checks your PDF’s technical data, the dimensions of your graphic and the resolution of each image or integrated object.
All processed files will result in an eProof which will be transmitted to you to be verified before printing. With regards to resolution, there is a 100% zoom on areas lower than 72dpi available on the second page of your eProof.
A separate email will be sent for each size/resolution problem detected that does not provide the necessary data for optimal results. A Preflight is then generated instead of an eProof. You will receive an eProof only when the sizes of your graphics are approved.
What does xpo.center check automatically?#2
FILE VERIFICATION xpo.center operator
L X H Dimensions
C
M
J
CM
MJ
CJ
CMJ
N
if_sign-check_299110.pdf 1 09/04/2018 10:01
C
M
J
CM
MJ
CJ
CMJ
N
if_sign-check_299110.pdf 1 09/04/2018 10:09
Crop marks
Resolution
ScalingBÀT
File size Finishing
Original file name New file name
Fabric
BÀT
This e-proof serves as means of validating the text, formatting and images found in your document. Once the e-proof has been approved, we cannot be held responsible for any spelling or typography errors. Output colors are non-contractual. A new quote must be issued for a contractual output proof; hard proof.Unless you initially request otherwise, production will not be launched until this e-proof has been approved. Image quality has been reduced in order to send via e-mail. Print quality will depend on the resolution of the provided file. Approving this e-proof implies acceptance of the terms above.
E-PROOF
Angle(s) of the stand or the counter (please see your stand production guide)
Sensitive area : we recommend to avoid any text or logo in this area (sew lines, distortion, some parts may be hidden)
Demo kit h-line - M - XXXXXDEMO-5240-10019/09/2016 16:05
hv27x70-demo-kit-h-line-01-pdf hv27x70-demo-kit-h-line-310130-1-pdf
hline / hlineWidth : 270 mmHeight : 700 mm
Panopac2 quantity 01
E-POOF VERSION : 01 E-POOF N° : 1
Sensitive area on eProof
Réf : MKG_EUR_Template_HV96X250_V1_20150724
VELUM - RECOUVREMENT DU VISUEL 40MM / 80 MMCANOPY POSITION – GRAPHIC COVERED 40MM / 80MM
ZONE DE FOND PERDUBLEED AREA
ZONE TRANQUILLESAFE AREA
ZONE VISIBLEVISIBLE AREA
ZONE SENSIBLESENSITIVE AREA
Merci de vous référer au Design Guide xpo.centerpour la création de vos visuels. Before creating your graphic files, please consult our xpo.center Design Guide.
POSITION DES ACCESSOIRES - VELUMACCESSORIES POSITION - CANOPY
HV96X250
les lignes de coupedoivent être superposées
RACCORDS
xpo.center
RACC
FR_0
7062
016_
PAO_M
V.
Graphic connection between 2 panels
except with breakdown service and no production
guide
Design defects
Frame
Multiple PDFs
Color

14.What does the Portal NOT automatically check and what is manually inspected by our in-house professionals?
#3
Trim marks: Trim marks are color elements and not automatically detectable. We could automatically erase them but that would also erase all CMJN values identical to the trim marks.
Failure to comply with any of the guidelines below, requiring our team to intervene, may be subject to additional fees (estimate provided).
Frames: During the dye sublimation printing, the fabric is subject to dimensional variations, which take place at high temperatures.
Therefore, for graphic elements located at the edge of your file (frames for example), we cannot guarantee desired rendering.
Forced resolution : It is possible of resample the image in order to obtain a resolution higher than 72dpi, but that means greatly damaging the quality of the image and the overall quality of the file. A visual inspection is essential.
File Creation Issues: Even if it is not included in our guarantee, our operators may detect potential file creation errors (e.g. color differences, issues with transparency flatness, floats, spelling), so we will contact you in this case.

15.TemplatesWe provide templates to help make graphic design easier. These templates were created according to our production methods. They show the different AREAS that are gauged in order to optimize the production of your graphics. Remember that the image you create will wrap a structure that has its own physical constraints. Therefore, be sure to work directly in the templates and respect the indicated areas.
All our templates are full scale and have been designed for graphic arts professionals, they work with Adobe Illustrator™ and Photoshop™ softwares.
The use of InDesign™ is not recommended for large scale graphics, therefore we do not provide those templates.
The template shows various work areas.
VISIBLE AREA: Includes the sensitive area and safe area.
VELUM: Area concealed by a frame in velum (in particular for panoramic h-line).
SAFE AREA: Put your images and logos in this area.
ACCESSORIES POSITION: Space hidden by an accessory (shelves, consoles, brochure stand, etc.).
BLEED AREA: To avoid any problems during the cutting process, it is essential to leave a bleed.
Do not include crop marks, the bleed must consist of your image and not white space.
SENSITIVE AREA: It is not recommended to put any text or logos in this zone. Area in which the image may disappear or be deformed during fabrication.
ASSEMBLY: Finishing touches such as seams, which generally represents a corner of the structure to be wrapped.
The templates are subject to change. Therefore, it is necessary to always refer to the latest version of the document (downloadable on the order details page).
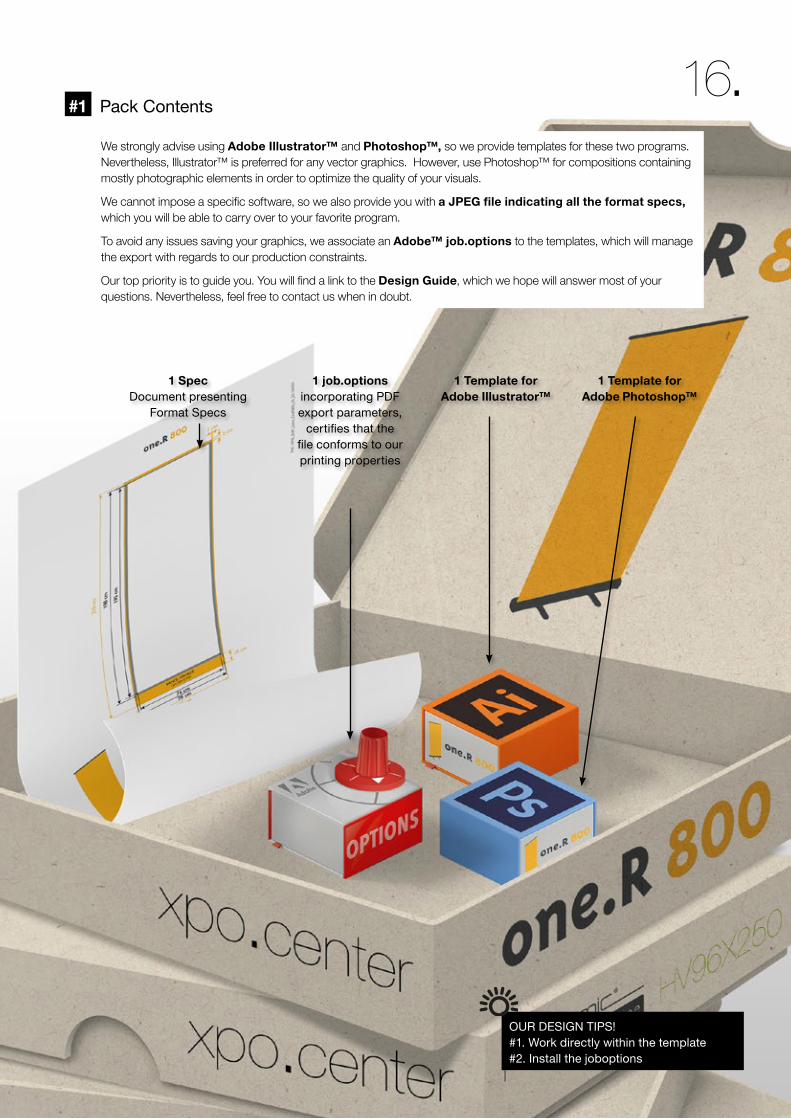
16.We strongly advise using Adobe Illustrator™ and Photoshop™, so we provide templates for these two programs. Nevertheless, Illustrator™ is preferred for any vector graphics. However, use Photoshop™ for compositions containing mostly photographic elements in order to optimize the quality of your visuals.
We cannot impose a specific software, so we also provide you with a JPEG file indicating all the format specs, which you will be able to carry over to your favorite program.
To avoid any issues saving your graphics, we associate an Adobe™ job.options to the templates, which will manage the export with regards to our production constraints.
Our top priority is to guide you. You will find a link to the Design Guide, which we hope will answer most of your questions. Nevertheless, feel free to contact us when in doubt.
1 Spec Document presenting
Format Specs
1 Template for Adobe Illustrator™
1 Template for Adobe Photoshop™
1 job.options incorporating PDF export parameters,
certifies that the file conforms to our printing properties
Pack Contents#1
OUR DESIGN TIPS! #1. Work directly within the template #2. Install the joboptions
17.
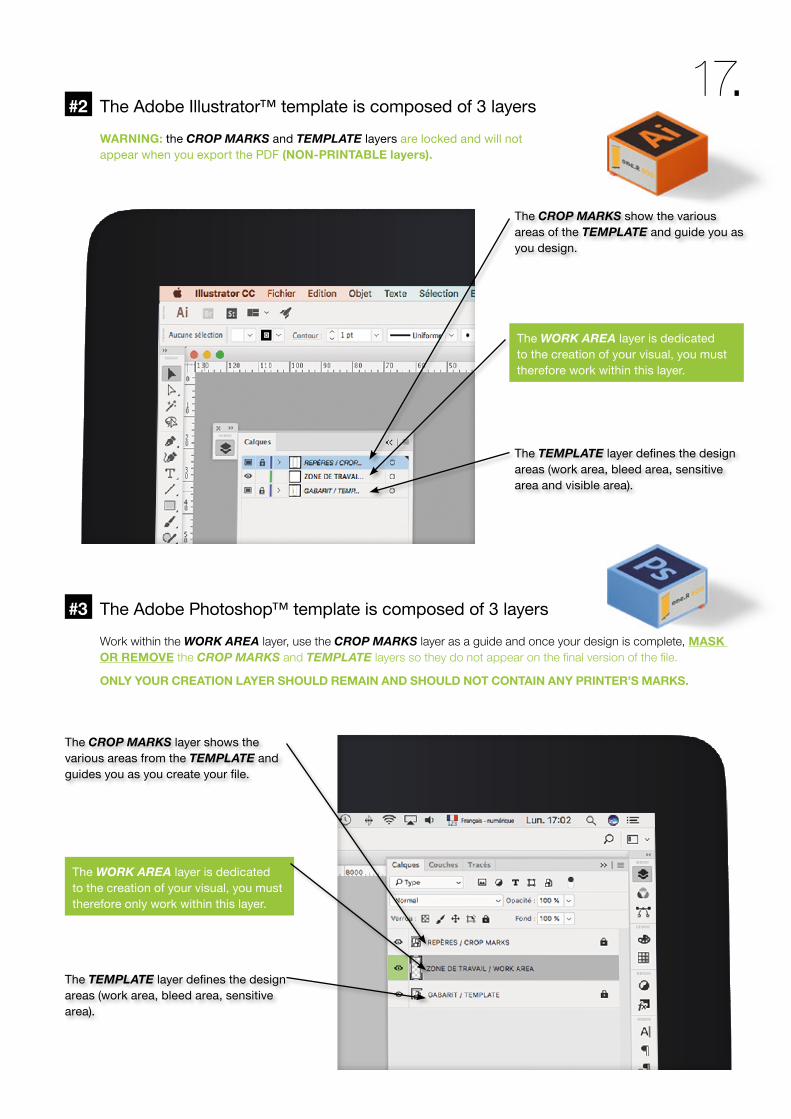
The WORK AREA layer is dedicated to the creation of your visual, you must therefore work within this layer.
The Adobe Illustrator™ template is composed of 3 layers
The Adobe Photoshop™ template is composed of 3 layers
#2
#3
The WORK AREA layer is dedicated to the creation of your visual, you must therefore only work within this layer.
The TEMPLATE layer defines the design areas (work area, bleed area, sensitive area and visible area).
The TEMPLATE layer defines the design areas (work area, bleed area, sensitive area).
The CROP MARKS show the various areas of the TEMPLATE and guide you as you design.
The CROP MARKS layer shows the various areas from the TEMPLATE and guides you as you create your file.
WARNING: the CROP MARKS and TEMPLATE layers are locked and will not appear when you export the PDF (NON-PRINTABLE layers).
Work within the WORK AREA layer, use the CROP MARKS layer as a guide and once your design is complete, MASK OR REMOVE the CROP MARKS and TEMPLATE layers so they do not appear on the final version of the file.
ONLY YOUR CREATION LAYER SHOULD REMAIN AND SHOULD NOT CONTAIN ANY PRINTER’S MARKS.

18.Spec#4As with the Illustrator™ and Photoshop™ templates, you will find different AREAS and their description. The difference lies in the way the dimensions are shown, which you will have to carry over to your own graphics program.
WARNING: each product has its own specificities. Therefore, do not take the characteristics presented on one format and apply them to another, as each product is different.
The different AREAS
Carry-over dimensions

19.ImpeccableGraphicsIn order to enhance your project, here are some tips on resolution, image mode and format in relation to our production methods.
Resolution
Image Mode
Linked images
#1
#2
#3
As with our templates, we strongly advise a resolution of 100 dpi on the final full-scale format (minimum 72 dpi). A lower resolution can result in visual artifacts. A higher resolution, often useless, can weigh down your file and delay its processing by the portal.
You can create your documents in the colorimetric mode of your choice. It is however compulsory to convert the print file to CMYK (Cyan, Magenta, Yellow, Key/Black, aka CMYK) before saving it. If you create your PDF files using our job.options, the conversion will happen automatically at this time. Failure to follow these instructions will systematically generate color problems.
The portal does not block RGB or LAB files, it converts them into CMYK. However, the automatic conversion in our workflow may generate discrepancies or cause damage to the graphics.
When saving the file, you must “include linked images”. If the images are not included in the PDF, they become ghost images. They appear in the PDF but can disappear during the file processing or printing.
It is preferred that you use the “Convert to profile” function on Photoshop™ Adobe (“Edit” menu).

20.File format and job options#4
WARNING! If you do not use the job options: All fonts must be vectorized. All images must be imbedded if you use Illustrator™.
Your file must not contain trim marks or printer's marks.
Be sure to NOT use overprint mode.
The xpo.center portal only accepts PDF files (1 Graphic = 1 PDF).
We provide job options to help make saving your files easier. They include PDF export parameters which certify that a file is compliant with our printing properties. By installing the job options, the quality of your prints will be enhanced (the final results will be truer to your desired rendering).
What does a job option do? It incorporates fonts and converts into CMJN (except Pantone® colors), while complying with the COATED FOGRA39 (ISO 12647-2: 2004) color standard.
1 - Install by double-clicking it. 2 - Select the job option when exporting your graphics to PDF format. 3 - In one click, your PDFs will be ready to upload to the portal.
Benefits of flattening your files
Naming your files
#5
#6
Flattening files helps:
• prevent issues with flattening transparencies (white lines which primarily occur on files exported from Indesign™ and Illustrator™);
• vector images go through the portal without the risk of being refused;
• process files more quickly, since they're not as heavy;
• reduce file upload time.
Please adopt the following rule when naming your files:
ClientName-OrderNumber-ProductName-ProjectName-Letter or Line number
Example: StandFrance-150465-Xtension3x3-LaPoste Or StandFrance-150465-Xpressions3x3-LaPoste-A
WARNING!
If you save your files in a program other than Adobe Photoshop™, be sure to re-open the files in this software in order to FLATTEN them.
We advise you to rasterize for Illustrator™.
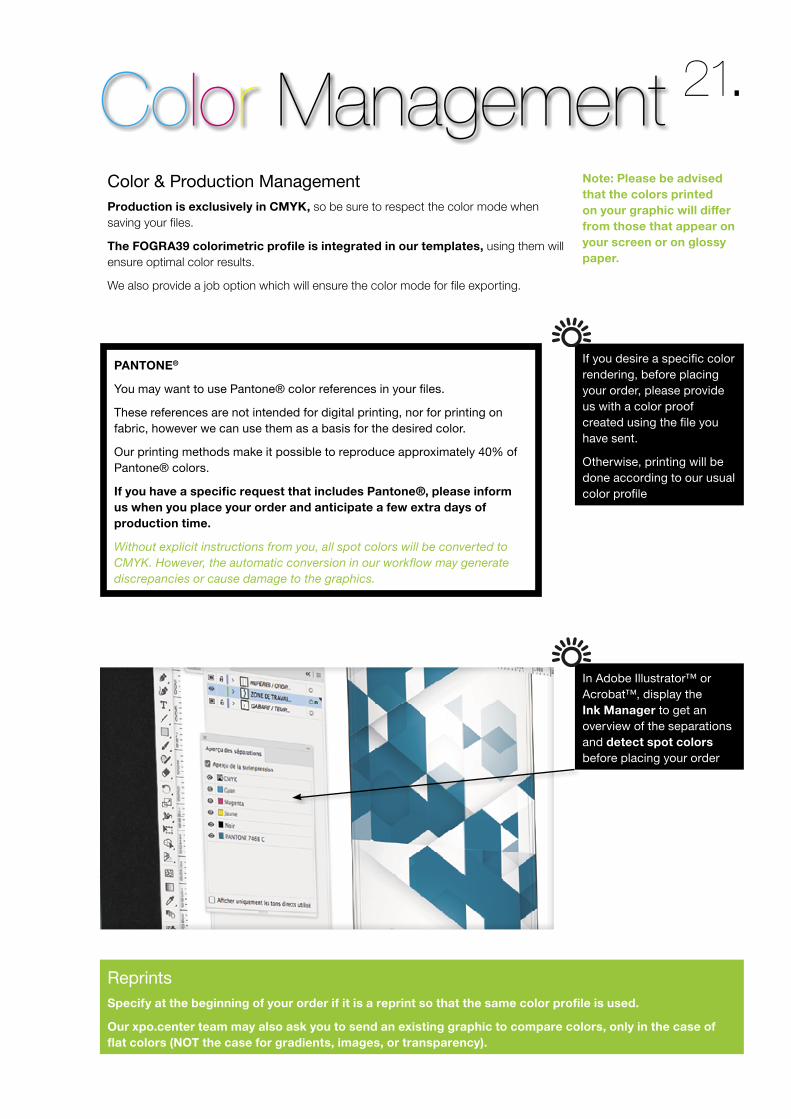
21.Color ManagementColor & Production ManagementProduction is exclusively in CMYK, so be sure to respect the color mode when saving your files.
The FOGRA39 colorimetric profile is integrated in our templates, using them will ensure optimal color results.
We also provide a job option which will ensure the color mode for file exporting.
Note: Please be advised that the colors printed on your graphic will differ from those that appear on your screen or on glossy paper.
If you desire a specific color rendering, before placing your order, please provide us with a color proof created using the file you have sent.
Otherwise, printing will be done according to our usual color profile
PANTONE®
You may want to use Pantone® color references in your files.
These references are not intended for digital printing, nor for printing on fabric, however we can use them as a basis for the desired color.
Our printing methods make it possible to reproduce approximately 40% of Pantone® colors.
If you have a specific request that includes Pantone®, please inform us when you place your order and anticipate a few extra days of production time.
Without explicit instructions from you, all spot colors will be converted to CMYK. However, the automatic conversion in our workflow may generate discrepancies or cause damage to the graphics.
In Adobe Illustrator™ or Acrobat™, display the Ink Manager to get an overview of the separations and detect spot colors before placing your order
ReprintsSpecify at the beginning of your order if it is a reprint so that the same color profile is used.
Our xpo.center team may also ask you to send an existing graphic to compare colors, only in the case of flat colors (NOT the case for gradients, images, or transparency).

22.Choose Rich Black#1For solid black areas (large size), we recommend reinforcing black by 100% with three other colours (C 75 M 75 Y 75 K 100).
Successful Gradients#2Note that sometimes gradients may show bands or streaks. This undesired effect is simply the result of miscalculations within your file. We are not to be held accountable for this sort of gradient flaw.
When values within a gradient get pushed so much that there is no color/value in the file to actually represent the mathematical change that's been applied you get bands of color, which is called banding.
How to reduce the effects? On the large size prints, there is no miraculous formula, but we can provide a few useful hints:
In general, gradients in Photoshop™ are superior to those in Illustrator™..
When you use a black-to-color gradient, it's important to use rich black, enriching both ends of the gradient with the same primary color.
When you create a gradient, be sure to maintain at least a 20% variation between the two colors you’re using.
The shape gradient in Illustrator™ functions more effectively than the gradient tool.
You can add noise (1 to 2%) or blur to your gradient in order to reduce the effect.
Do not use JPEG format to make gradients.
You can create your gradient in 16 bits, then convert the document to 8 bits. The number of colors is significantly higher in 16 bits.

23.Beware of overprinting#3It is essential to verify your document by viewing the overprint preview. This will show a real view of your file before printing.
It is very easy to unintentionally attribute overprint to an object, so remember to activate the overprint preview in Acrobat™or your DTP software before placing your order.
To check for overprinting when you work on Illustrator™, go in the View tab and click on Overprint Preview.
If no objects load on the screen that means that there will not be this type of issue.
Warning: white becomes transparent in overprint
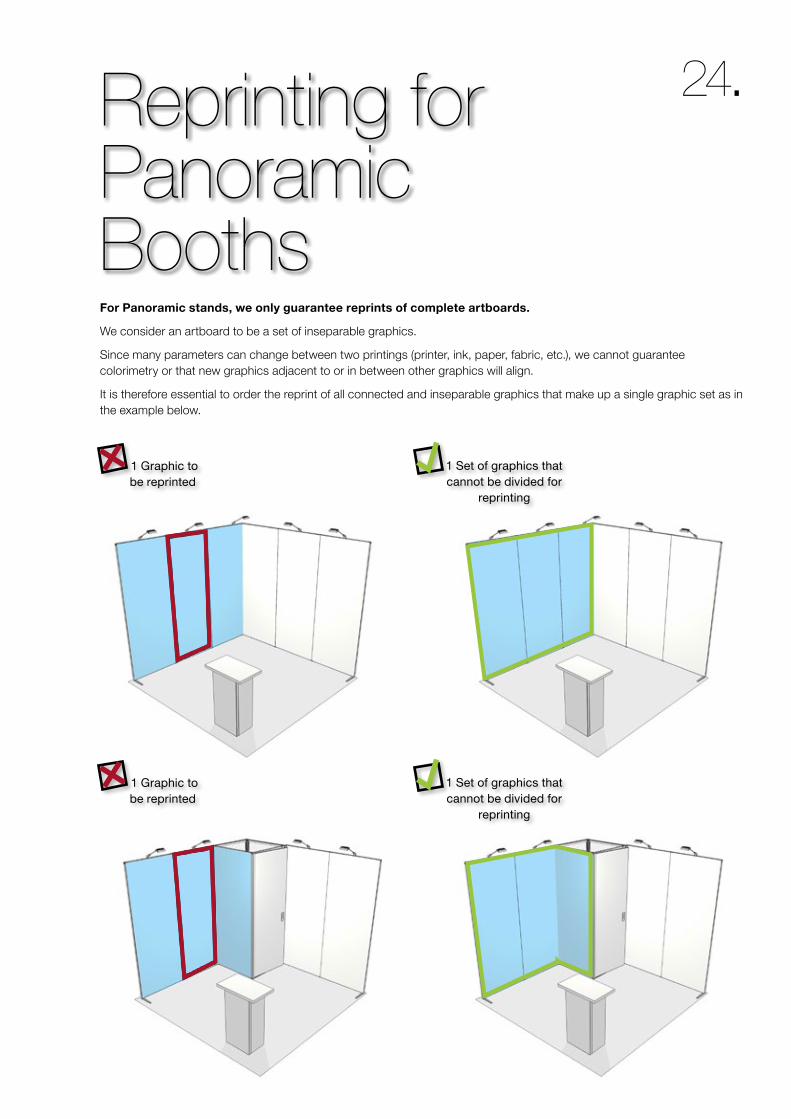
24.Reprinting forPanoramicBoothsFor Panoramic stands, we only guarantee reprints of complete artboards.
We consider an artboard to be a set of inseparable graphics.
Since many parameters can change between two printings (printer, ink, paper, fabric, etc.), we cannot guarantee colorimetry or that new graphics adjacent to or in between other graphics will align.
It is therefore essential to order the reprint of all connected and inseparable graphics that make up a single graphic set as in the example below.
1 Set of graphics that cannot be divided for
reprinting
1 Graphic to be reprinted
1 Set of graphics that cannot be divided for
reprinting
1 Graphic to be reprinted
25.Fonts: Vectorize your TextBy vectorizing your texts, you can avoid any problems interpreting fonts when the file is ripped, like issues incorporating licensed fonts.
Furthermore, the intervention on your files will be simplified by avoiding any issues with missing fonts.
In Illustrator™, select your text, then in the Text menu, choose vectorize.
#1
Text FontsDo not use thin or ultra-thin typeface, as there is a high risk of color migration.
We advise you to use body text with characters at least 7 mm high. You're working on VERY large size prints in comparison with traditional printing formats (A4, A3, brochures, flyers, etc.), as a consequence, be sure to adapt your typographic features to optimize legibility.
Creative Advice
Stock PhotographyWhen choosing to use stock images, be sure to verify the format and the resolution of the images purchased. Both must be adapted to the dimensions of your file.
Files purchased from image databases are in RGB. Make sure you modify the color mode of those images before integrating them into your compositions.
Along the same lines, and to be sure that the purchased file is adapted to the format of your graphic in terms of resolution, you should resample them at 100 dpi.
Finally, and generally speaking, always remember to verify the rendering of your graphics in their final full-scale format.
#2
For more information, read about Impeccable graphics on page 19.
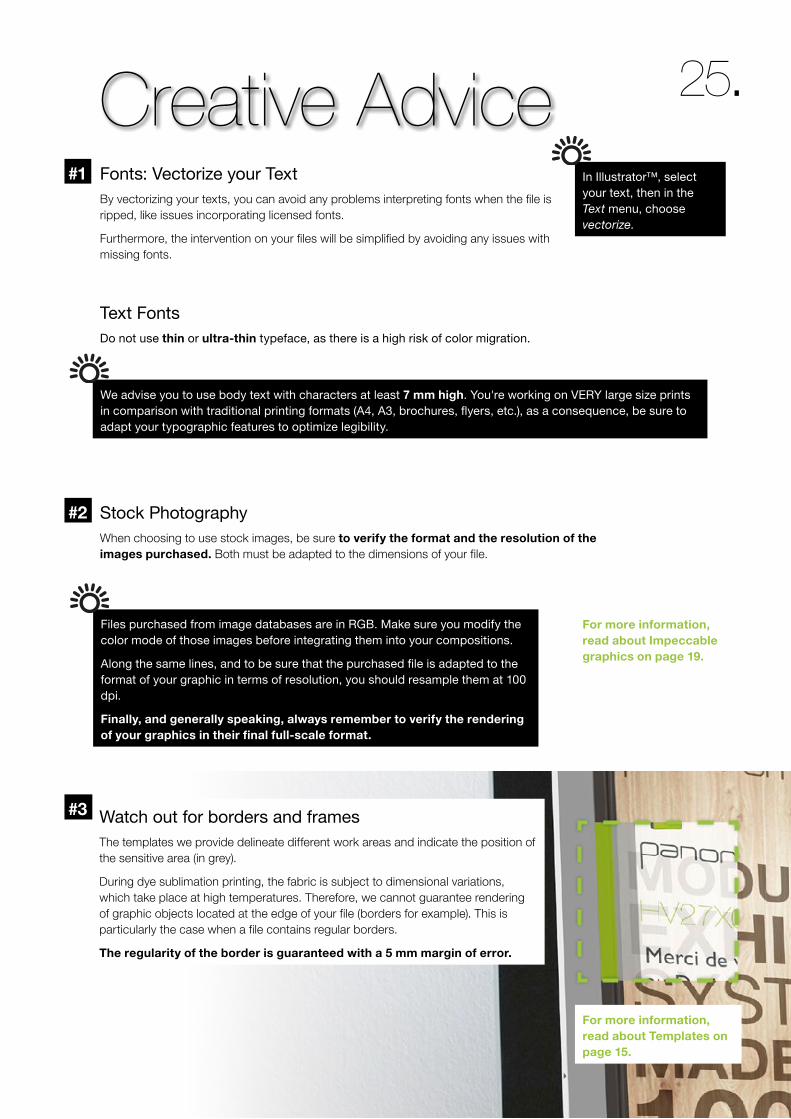
Watch out for borders and framesThe templates we provide delineate different work areas and indicate the position of the sensitive area (in grey).
During dye sublimation printing, the fabric is subject to dimensional variations, which take place at high temperatures. Therefore, we cannot guarantee rendering of graphic objects located at the edge of your file (borders for example). This is particularly the case when a file contains regular borders.
The regularity of the border is guaranteed with a 5 mm margin of error.
#3
For more information, read about Templates on page 15.

mkg
_en_
desig
n-gu
ide_w
eb_v
3_20
19
DESIGN GUIDE
Always Contact us if you have any questions before you start your stand project.The Xpo team is at your service!
[email protected] +33 (0)4 99 63 68 75 chat xpo.center