designing with tables in netobjects fusion 7 · pdf filedesigning with tables in netobjects...
TRANSCRIPT

Designing With Tables in NetObjects Fusion 7 A gotFusion™ Workbook
Karl Strieby, Team gotFusion
©2003 GotFusion, LLC


Designing With Tables in NetObjects Fusion 7
Karl Strieby, Team gotFusion
© 2003 GotFusion, LLC

Designing With Tables in NetObjects Fusion 7
©2003 GotFusion, LLC ii Karl Strieby
This page intentionally blank

Designing With Tables in NetObjects Fusion 7
©2003 GotFusion, LLC iii Karl Strieby
Table of Contents
Introduction ................................ ................................ .............. 1
Caution .....................................................................................................1
Why Read This Document?.........................................................................1
What Do You Need?...................................................................................2
How Do You Get More Information?............................................................3
How Do You Provide Feedback?..................................................................3
Making a Complex Table................................ ............................ 4
Requirements for Complex Tables ...............................................................4
Producing the complex table.......................................................................4
Making room for a chart graphic. ....................................................................... 5
Making room for a chart graphic. ....................................................................... 6
Adding a secondary heading and some news items. ...................................... 7
Decorating the news stories................................................................................. 8
Comparing the finished complex table.............................................................. 9
Making Rounded Corners ................................ ........................ 10
Producing the rounded table.....................................................................10
Setting up the rounded table page ............................................................10
Adding the graphics .................................................................................11
Design Variations to Try ...........................................................................13
Adding more cells to the table .......................................................................... 13
Experiment! .......................................................................................................... 13
Wrapping to the Browser................................ ......................... 14
Setting up the wrapping page...................................................................14
Adding the NavBar............................................................................................. 15
Pasting the rounded table .................................................................................. 15
Modifying the wrapping page and table .....................................................16
Adding the banner .............................................................................................. 16

Designing With Tables in NetObjects Fusion 7
©2003 GotFusion, LLC iv Karl Strieby
Adding the text NavBar ..................................................................................... 17
Comparing the finished wrapping page product .......................................... 17
Using a Master Layout ................................ ............................. 18
Making CSS Coloured Table Borders................................ ........ 19
Requirements for Coloured Borders...........................................................19
Setting Up Coloured Borders.....................................................................19
Making the Practice Table.........................................................................20
Turning On CSS Formatting.............................................................................. 20
Setting the Correct Borders on the Correct Cells............................................ 20
Glossary .......................................................................................................24
Index ...........................................................................................................26

Designing With Tables in NetObjects Fusion 7
©2003 GotFusion, LLC v Karl Strieby
This page intentionally blank


Designing With Tables in NetObjects Fusion 7
©2003 GotFusion, LLC 1 Karl Strieby
Introduction
Caution
Before attempting the exercises in this document, back up your existing Fusion sites. Even if you “just did that last week,” do it now.
You can’t have too many backups.
I can personally attest that it’s easy - and devastating - to have too few.
To learn how to back up Fusion site files, see http://www.gotfusion.com/tutsTD/template.cfm.
Why Read This Document?
You have a good basic understanding of NetObjects Fusion, and you have encountered some common page design problems. For example,
Do you struggle to make NetObjects Fusion's "pixel perfect positioning" designs work well in various web browsers?
Do you want to prevent users from wrecking your design by changing their browser font size?
Do you want to learn a more reliable web page design method?
Do you want your web pages to fill the browser window at various widths?
Do you want some design ideas that you won't find in any other NetObjects Fusion documentation?

Designing With Tables in NetObjects Fusion 7
©2003 GotFusion, LLC 2 Karl Strieby
Table layouts in Fusion are as versatile as your creative imagination. Once you learn the required skills, you will use tables all the time.
To become familiar with Fusion’s table formatting tools, work through the exercises in this document, then experiment on your own.
If you have good backups, you can’t break anything.
You can always hit Undo (CTRL+Z).
What Do You Need?
You need to do the minimum required reading shown below, or have equivalent Fusion experience.
1. c:\NetObjects Fusion 7 \Docs\GettingStarted.pdf.
2. Chapter 15, Adding Tables, from c:\NetObjects Fusion 7 \Docs\UserGuide.pdf.
To complete the exercises in this document, you need
NetObjects Fusion version 7. If you don't own a copy, download the free “30-day demo” version from http://www.netobjects.com/products/html/download.html.
The sample project files located in http://gotfusion.com/tutsks/TableProjectFiles.zip Extract the contents of the zip file to c:\TableProjects.
A Windows personal computer configured as shown here: http://www.netobjects.com/products/html/nf7sysreq.html, and
The mouse and keyboarding skills to run a standard Windows application.

Designing With Tables in NetObjects Fusion 7
©2003 GotFusion, LLC 3 Karl Strieby
How Do You Get More Information?
Copy USERGUIDE.PDF onto two-sided three-hole paper. Stick it in a binder, and read it all. It’s one of the best software manuals I have ever seen.
Participate in the public gotFusion newsgroups. To set up Outlook Express to access the newsgroups, see http://www.gotfusion.com/tutsTD/oexgf.cfm
How Do You Provide Feedback?
Do you have questions or concerns about this manual? Do the steps in the exercises work for you?
Tell me! [email protected].
Don’t worry, I rarely bite.

Designing With Tables in NetObjects Fusion 7
©2003 GotFusion, LLC 4 Karl Strieby
Making a Complex Table
To get some practice with a complex table, work through the steps in this section.
Requirements for Complex Tables
You need
C:\TableProject\Graphics\Chart.gif., and
Your copy of NetObjects Fusion up and running.
Tips
Print this document.
Make a check mark next to each step you complete.
Producing the complex table
1. Select File, New Site, Blank Site.
2. Name the site Learning Tables.
3. Click OK. Fusion takes you to Site View.
4. Select the Home Page.
5. Press CTRL+N to create a new page.
6. Name the new page Sales.
7. Double-click the Sales page icon to open Page View.
Congratulations, you’re ready to start building our table!

Designing With Tables in NetObjects Fusion 7
©2003 GotFusion, LLC 5 Karl Strieby
1. Click the Table Tool
(Figure 1).
2. Click and drag to draw a table in the Layout.
3. Set the table to 4 columns, 7 rows.
4. Set the table border to 0 (Figure 2).
5. Click and drag the first column right border to 80 px. from the left table edge.
6. Merge all first row cells.
7. In the merged cell, enter Our Sales by Region.
8. Use Cell Properties, Text tab to set Style H1.
How are we doing so far? Your table should look like Figure 3.
Figure 1 Table Tool
Figure 2 Table Border
Figure 3 Table with H1 Row

Designing With Tables in NetObjects Fusion 7
©2003 GotFusion, LLC 6 Karl Strieby
Making room for a chart graphic.
1. Select all cells in columns 2-4, rows 2-5 (Figure 4).
2. Right-click a selected cell.
3. Select Merge Cells.
4. Click the Picture tool.
5. Click in the big merged cell.
6. Browse to locate the chart graphic.
7. Click OK.
Did the chart show up? Good job!
Let’s add some captions for the chart.
1. Double-click the cell at column 1, row 2.
2. Enter “North.”
3. Use Cell Properties, Cell Tab to set cell background colour Purple (#9999FF) (Figure 5).
4. In column 1, row 3, enter “South”.
5. Set cell background colour Yellow (#FFFF00).
6. In column 1, row 4, enter “East”.
7. Set cell background colour Maroon (#990000).
Figure 4 Select Cells
Figure 5 Cell Properties, Background Colour

Designing With Tables in NetObjects Fusion 7
©2003 GotFusion, LLC 7 Karl Strieby
8. Select East.
9. Set text colour White (#000000) (Figure 6).
10. In column 1, row 5, enter West.
11. Set cell background colour Orange (#FF9933).
Your page should look like Figure 7.
Adding a secondary heading and some news items.
1. Merge all cells in row 6.
2. Enter Annual Meeting Excitement!
3. Set Annual Meeting Excitement! to H2.
4. In row 7, cell 2, enter The CEO’s Speech.
5. Press Enter to start a new paragraph.
6. Enter Blah blah blah blather blah blah blather blah blah blather.
7. Set The CEO’s Speech to H3.
8. In row 7, cell 3, enter The President’s Speech.
9. Press Enter to start a new paragraph.
10. Enter Blah blah blah blather.
11. Set The President’s Speech to H3.
Figure 6 Text Colour
Figure 7 Page with chart and coloured captions

Designing With Tables in NetObjects Fusion 7
©2003 GotFusion, LLC 8 Karl Strieby
12. In row 7, cell 4, enter The Shareholder Revolt!
13. Press Enter to start a new paragraph.
14. Enter Blah blah blah blah blather blah blah blah blah blather.
15. Set The Shareholder Revolt to H3.
Decorating the news stories
For a finishing touch, let’s decorate those three “news stories” a bit.
1. Select the CEO’s Speech cell.
2. On Cell Properties, Cell Tab, click Format.
3. Use Object Format, Borders Tab to set a Border, Double, 3 px, Purple (#9999FF) with all Padding set to 3 px (Figure 8).
4. Select the President’s Speech cell.
5. Set a Border, Outset, 5 px, Maroon (#990000), all Padding 3 px.
6. Select the Shareholder Revolt cell.
7. Set a Border, Dashed, 5 px, Dark Blue (#003366), all Padding 3 px.
8. Click Preview to examine the page.
Figure 8 Object Format

Designing With Tables in NetObjects Fusion 7
©2003 GotFusion, LLC 9 Karl Strieby
Comparing the finished complex table
If your page looks like Figure 9, congratulations, we’re done! (Don’t worry about minor variations in text wrap or colour.)
Did you notice how you can change Borders and Padding for cells independently of the Table Properties? You can manipulate those settings (and more) on the Object Format dialog (Figure 8).
Beware – many of the settings on the Object Format dialog
Require CSS to render in the browser, and
Could be ignored or mangled by older browsers like Netscape 4.x.
Figure 9 Finished Sales Table

Designing With Tables in NetObjects Fusion 7
©2003 GotFusion, LLC 10 Karl Strieby
Making Rounded Corners
This exercise uses graphics to “fool the eye” into thinking that a table does not have square corners. Use tables designed like this for a whole page, or just to accent an area of a page.
This exercise requires
The graphics in C:\TableProject\Graphics\RedRoundedRectangle\.
Your copy of NetObjects Fusion up and running your Learning Tables.NOD file from the previous exercise.
Producing the rounded table
Create a new page in Site View. Name your new page Rounded Table.
Setting up the rounded table page
1. Switch to Page View.
2. Press F10 to open MasterBorder Properties.
3. Select ZeroMargins (Figure 10).
4. Press F9 to open Layout Properties.
5. Click the Text Tool.
6. Click and drag to draw a box about 500 px by 300 px on the layout.
7. Release the mouse button.
Figure 10 Set ZeroMargins MasterBorder
Designing With Tables in NetObjects Fusion 7
©2003 GotFusion, LLC 11 Karl Strieby
8. Click the Table Tool.
9. Draw a table inside the text box a bit narrower than the text box.
10. Set 3 columns, 3 rows.
11. Click OK.
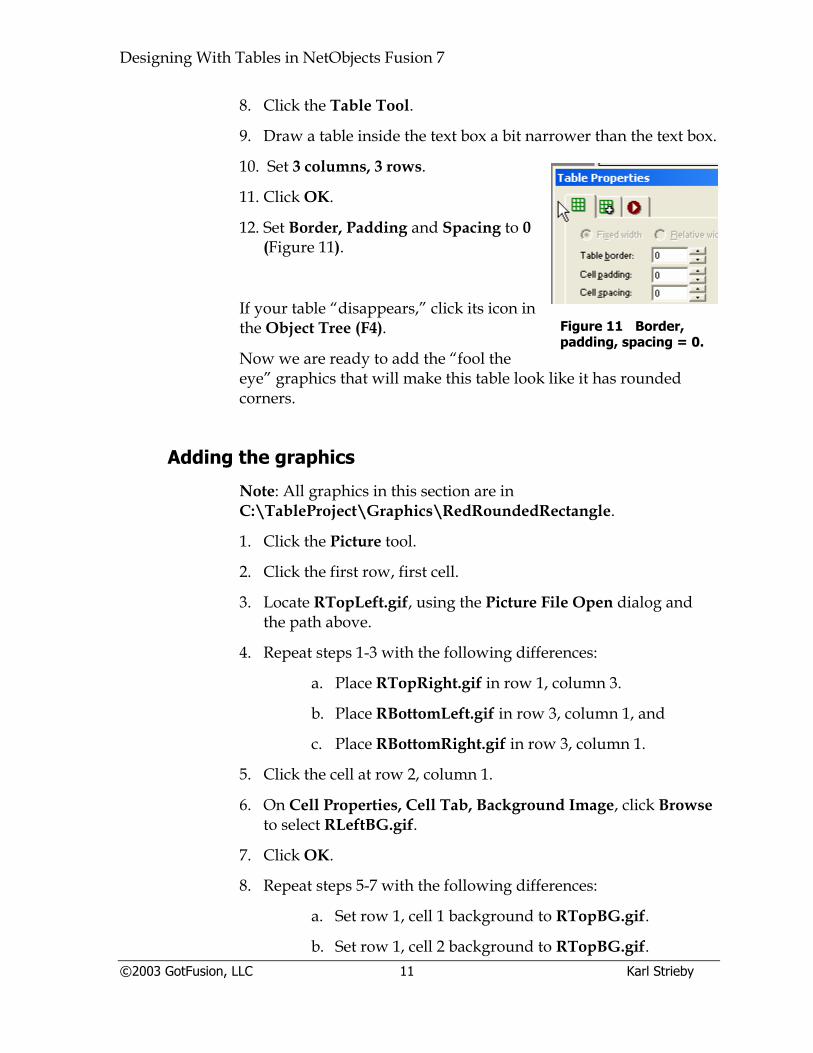
12. Set Border, Padding and Spacing to 0 (Figure 11).
If your table “disappears,” click its icon in the Object Tree (F4).
Now we are ready to add the “fool the eye” graphics that will make this table look like it has rounded corners.
Adding the graphics
Note: All graphics in this section are in C:\TableProject\Graphics\RedRoundedRectangle.
1. Click the Picture tool.
2. Click the first row, first cell.
3. Locate RTopLeft.gif, using the Picture File Open dialog and the path above.
4. Repeat steps 1-3 with the following differences:
a. Place RTopRight.gif in row 1, column 3.
b. Place RBottomLeft.gif in row 3, column 1, and
c. Place RBottomRight.gif in row 3, column 1.
5. Click the cell at row 2, column 1.
6. On Cell Properties, Cell Tab, Background Image, click Browse to select RLeftBG.gif.
7. Click OK.
8. Repeat steps 5-7 with the following differences:
a. Set row 1, cell 1 background to RTopBG.gif.
b. Set row 1, cell 2 background to RTopBG.gif.
Figure 11 Border, padding, spacing = 0.

Designing With Tables in NetObjects Fusion 7
©2003 GotFusion, LLC 12 Karl Strieby
c. Set row 2, cell 3 background to RRightBG.gif.
d. Set row 3, cell 1 background to RBottomBG.gif.
e. Set row 3, cell 2 background to RBottomBG.gif.
That wasn’t so bad, was it? Don’t worry if the table looks a little strange - we’ll tighten it up.
1. Select column 1.
2. Click Fit to Content on Cell Properties, Column Width.
3. Select column 2.
4. Set 200 in Cell Properties, Column Width.
5. Select column 3.
6. Click Fit to Content.
Our table is all set. Let’s add some text in the cell at row 2, column 2.
1. Double-click the cell.
2. Type whatever content you want.
Notice that as you add more content, the table stretches vertically. Now try this:
1. Delete the text from the center cell.
2. Use the Picture Tool to put the chart graphic from the last exercise into the center cell.
Notice how the red rectangle becomes a frame around the chart?

Designing With Tables in NetObjects Fusion 7
©2003 GotFusion, LLC 13 Karl Strieby
Design Variations to Try
Do you want two columns of text? How about a more complex layout with text and graphics?
Adding more cells to the table
Delete the graphic.
Split the center cell.
Merge some of those new cells.
Press CTRL+Z (undo) if you wreck something.
Experiment!
Use your imagination!
Have fun!

Designing With Tables in NetObjects Fusion 7
©2003 GotFusion, LLC 14 Karl Strieby
Wrapping to the Browser
In this section, we’ll build a page with content inside the red rounded rectangle we created in the last chapter. Our page will wrap to the browser window, and have standard Fusion NavBars and a banner.
This exercise requires
Your copy of NetObjects Fusion up and running your Learning Tables.NOD project file from the previous exercise.
Setting up the wrapping page
1. Go to Site View.
2. Press CTRL+N to create a new page.
3. Name the copied page Rounded Table Wrapper.
4. Double-click its name (UntitledNN).
5. Enter Rounded Table Wrapper.
6. Press Enter.
7. Double-click the page icon to open it in Page View.
8. Place a Text Box on the Layout.
9. Double-click the Text Box.
10. Press Enter three times to place empty paragraphs in the text box.
11. Set Size Layout to Text and Contents Wrap to Browser Width in Text Properties.

Designing With Tables in NetObjects Fusion 7
©2003 GotFusion, LLC 15 Karl Strieby
Our new page has all the settings required to make it “wrap” to browser windows of different widths. We’re ready to add the NavBar.
Tip: To access the NavBar, Text NavBar and Banner tools, click and hold the toolbar icon to reveal “fly-out” tools (Figure 12). For details of all the toolbars in Fusion, see http://gotfusion.com/tutsAS/tools.cfm.
Adding the NavBar
1. Place a 100-pixel wide, 1-column, 2-row table on the page.
2. Set the table properties Fixed Width, Border, 0 Cell Padding, 0 Cell Spacing 0.
3. Set the table's alignment Left Wrap.
4. Click the top table cell.
5. Set Row Height to Specified, 45.
6. Click the NavBar Tool.
7. Draw a narrow vertical box on the page.
8. Click and drag the NavBar from the page into the second table cell (Figure 13).
Our page is now ready for the red rounded rectangle table. To save time, use copy-paste instead of rebuilding the table from scratch.
Pasting the rounded table
1. If the Site Navigation panel is not visible, press F2.
2. Double-click the Rounded Table page icon in Site Navigation.
3. If the Object Tree is not visible, press F4.
4. In the Object Tree, select the Table icon.
5. Press CTRL+C.
Figure 12 Fly-out NavBar Menu
Figure 13 NavBar in second Cell

Designing With Tables in NetObjects Fusion 7
©2003 GotFusion, LLC 16 Karl Strieby
6. In Site Navigation, double-click the Round Table Wrapper icon.
7. Double-click next to the NavBar.
8. Press CTRL+V.
9. Set the pasted table to Left Wrap alignment.
Now we’re ready to modify the table and add some content.
Modifying the wrapping page and table
In this section, we'll add the finishing touches to this page design. We need to
Add a Banner and a Text NavBar to the table, and
Set the page size to exactly fit the table.
Let’s get started.
Adding the banner
1. Open the Object Tree if it’s not visible.
2. Click all the + icons in the Object Tree to reveal all the objects.
3. In the Object Tree, select Row 1 of the rounded table.
4. Right-click Row 1 in the table.
5. Choose Insert Row.
6. Merge all the cells in the new row.
7. Click the Banner tool.
8. Click in the new row.
Now we're ready to add a Text NavBar to the bottom of the page and test our layout.

Designing With Tables in NetObjects Fusion 7
©2003 GotFusion, LLC 17 Karl Strieby
Adding the text NavBar
1. In the Object Tree, select Row 3.
2. Right-click Row 3 in the table.
3. Choose Append Row.
4. Merge cells 2 and 3 in the new row.
5. Click the Text NavBar tool.
6. Draw a box in Row 4, Cell 2 to place the Text NavBar.
7. Double-click in Row 2, Cell 4.
8. Enter some sample page content.
9. Click Publish Site, Local Publish, Selected Page Only.
Comparing the finished wrapping page product
Compare your results with Figure 14. (Don’t worry if your Banner and NavBar buttons look different.)
Figure 14 Our page in Internet Explorer.

Designing With Tables in NetObjects Fusion 7
©2003 GotFusion, LLC 18 Karl Strieby
Using a Master Layout
If you like the wrapping layout style of the last page we created, you can use it as a Master Layout for new pages. You can do this with just a few clicks and keystrokes.
1. Switch to Site View.
2. Rename the Rounded Table Wrapper page to Master Layout.
3. On Page Properties' 2nd tab, set Don't publish.
4. Press CTRL+C.
5. Click your home page to select it.
6. Press CTRL+V. A copy of the Master Layout page appears with the other pages in the site.
7. Rename the copied Master Layout to whatever new page name you need.
If you open the new page, you will see that it is identical to the original, but that a navigation bar button and banner contain the new page name. It’s almost like a Fusion MasterBorder – thus the term Master Layout.
Now that you know how to use a Master Layout, you can build entire sites with pages that wrap to the browser width. Create several different Master Layouts for use in different sections of your site project. Try different table arrangements and cell combinations.
Have fun with this design method - experiment!

Designing With Tables in NetObjects Fusion 7
©2003 GotFusion, LLC 19 Karl Strieby
Making CSS Coloured Table Borders
If you want your tables to have coloured borders in NOF, you can do that. As you will learn in this exercise, you can also do a lot more – it just takes a bit of extra fiddling around to do it.
Requirements for Coloured Borders
Traditionally, NOF has always treated Tables as standard HTML objects. NOF’s Table Properties palette lets you set and alter cell borders, but you may need to think a little harder than usual to get good results.
To get this to work, you must –
Turn on CSS formatting
Select the right cells to format
Apply formatting with the Cell Properties Format button, Borders tab.
None of this is as complicated to do as it sounds.
Setting Up Coloured Borders
CAUTION Don’t try this on an existing table in a production site until you are sure you know what you’re doing.
Always make a template backup before you alter a production site.
The steps here may sound complex, but they will get easy with time (like riding a bicycle). Let’s walk through this with a practice table.

Designing With Tables in NetObjects Fusion 7
©2003 GotFusion, LLC 20 Karl Strieby
Making the Practice Table
To practice the skills we’re looking at here, create a new page in a new site file. For our purposes, you don’t care what to name the new site or what to name the new page.
On your practice page,
1. Select the table tool, and drag to draw a table
2. When the Create Table dialog opens, set 5 columns, 5 rows.
3. On the Table Properties dialog, set Table border, Cell Padding and Cell Spacing, to 0 (Zero)
Be sure not to disable the Generate non-breaking spaces option. If you do, the table will collapse, and be very difficult to work with, even using the Object Tree.
Turning On CSS Formatting
Fancy table borders require CSS Formatting. To turn on CSS formatting, do the following:
1. Select Tools, Options, Current Site
2. In the Text formatting section, select, Cascading Style Sheets (CSS).
Setting the Correct Borders on the Correct Cells
Let’s assume you want a Navy Blue border, three pixels wide, around all the table cells. Try this and see what happens:
1. Select all the cells in the table
2. On the third tab of the Cell Properties dialog, click the Format button.
3. On the Object Format dialog, select the Borders tab.
4. Under Border Settings, set Border, Style Solid, Width 3 px, Color #0000CC.
5. Click OK.
Preview or Local Publish the page.

Designing With Tables in NetObjects Fusion 7
©2003 GotFusion, LLC 21 Karl Strieby
You might think that by following the above steps that the table would get borders 3 px wide everywhere. And you would be almost right.
Unfortunately, you get a weird-looking table, with 3px outside borders, and 6px inside borders.
Identifying the problem
The cells that intersect with other cells get inside borders of 3+3 px = 6 px.
The outside borders of the table are OK at 3 px.
NOF produced exactly what you told it to do. Just like Word Perfect for DOS used to do in the old days…but I digress.
Solving the problem
We don’t want the table to get double-width inside borders. To achieve this, set the correct borders on the correct cells.
Setting Properties. all cells All cells have a top and left border.
1. Select all the cells in the table.
2. On Cell Properties, third tab, click Format.
3. Set our blue border, 3px width on with top and left borders only as in Figure 15.
4. Set 3px Padding on all sides.
5. Click OK.
6. Preview the page.
The table should look like Figure 16. Notice that most of the cells look fine, with a 3px border on all sides.
Figure 15 – Setting top and left border only

Designing With Tables in NetObjects Fusion 7
©2003 GotFusion, LLC 22 Karl Strieby
Now we need to fix the last column and the last row.
Setting Properties, last column To set the required properties for the last column,
1. Select the last column
2. On Cell Properties, second tab, click Format.
3. On Object Format, third tab, add the blue border, on the right , leaving the top and left borders alone, as in Figure 17.
4. Click OK.
The table should now have 3px borders everywhere except at the bottom of the last row.
Setting Properties, last row Here’s how to set the last row.
1. Select the last row.
2. On Cell Properties, second tab, click Format.
3. On Object Format, third tab, enable the Bottom border, leaving the Top, Left and Right borders alone.
4. Click OK.
The table should now have 3px borders everywhere except for the right border of the right bottom corner cell.
Figure 16 – Our table so far
Figure 17– Adding the right border

Designing With Tables in NetObjects Fusion 7
©2003 GotFusion, LLC 23 Karl Strieby
Setting Properties, right bottom corner cell We’re almost done. Let’s fix that right bottom corner.
1. Select the right bottom corner cell.
2. On Cell Properties, second tab, click Format.
3. On Object Format, third tab, enable the Right border, leaving the other borders alone.
4. Click OK.
Now the table has a 3px border all around.
A final Caution
Be careful with CSS colours and graphics. If you use a CSS colour in one part of a table structure (border or background) and a graphic in another, the colours may not match.
This problem is especially noticeable on Macintosh systems. Due to technical differences between the way Macs and Windows systems render image gamma values, Windows-generated images often appear “washed out” when viewed on Macs.
Even on Windows systems, differences such as browsers and video drivers can make colour rendering highly unreliable.
For best results –
Don’t mix and match CSS Colours with Graphics in your designs, or
If you must, limit your CSS colours to ones that contrast with your graphics.
Otherwise, feel free to experiment, and have fun! (That’s the best way to learn…)

Designing With Tables in NetObjects Fusion 7
©2003 GotFusion, LLC 24 Karl Strieby
Glossary
Term Definition
Cell The intersection of a row and a column, or the smallest unit in a table.
Column The vertical structure of a table. For example, the Terms in this Glossary are in one column, the Definitions in another.
CSS Cascading Stylesheets - see http://www.w3c.org for more information.
fixed-width table
A table with its width set to a fixed number of pixels.
Fusion NetObjects Fusion, the web design package by WebSite Pros.
gotFusion The NetObjects Fusion users' resource web site, managed by GotFusion, LLC at http://www.gotfusion.com/.
HTML Hyper Text Markup Language: see http://www.w3c.org for more information.
layout The centre area in a Fusion page where you add content unique to each page.

Designing With Tables in NetObjects Fusion 7
©2003 GotFusion, LLC 25 Karl Strieby
MasterBorder (one word, as seen in the application)
The area surrounding the layout on a Fusion page, where you put content that is the same for every page using that MasterBorder.
Master Layout A term I coined to describe a special page that you use to clone new pages.
NavBar (one word)
Fusion’s automatically managed site navigation buttons or text.
Nft The file extension used by NetObjects Fusion template files (NetObjects Fusion Template).
Nod The file extension used by NetObjects Fusion project files (NetObjects Database).
pixels (abbr. px) The 72 dots/inch that make up a typical computer display.
relative-width table
A table with its width set to a percentage of the browser window.
Row The horizontal structure in a table. In this table, each term and its definition are in a row.
SGML Standard Generalized Markup Language. SGML was/is a precursor of both HTML (HyperText Markup Language) and XML (eXtensible Markup Language). For some reason, it never caught on in a big way.
Table Rows and columns of cells.
W3C The World Wide Web Consortium standards organization. See http://www.w3c.org/.

Designing With Tables in NetObjects Fusion 7
©2003 GotFusion, LLC 26 Karl Strieby
Index
Backing up, 1
Complex Table
Captions, adding, 6
Chart, adding, 6
Finished product, comparing, 9
News Items, adding, 7
News Items, decorating, 8
Producing, 4
Requirements, 3
Feedback, Providing, 3
Fusion Toolbar flyouts, 15
Master Layout
Cloning, 18
Setting up, 18
NetObjects Fusion, Obtaining, 2
Newsgroups, Accessing, 3
Required reading
Adding Tables, 2
Getting Started guide, 2
Rounded Table
Content, adding, 12
Graphics, Adding, 11
Requirements, 10
Setting Up, 10
Tightening Up, 12
Sample Graphics, Obtaining, 2
Table Borders, Coloured, 19
Practicing the skills, 20
Setting properties for all cells, 21
Setting Properties for the last column, 22
Setting Properties, last row, 22
Setting Properties, right bottom corner, 23
Setting up, 19
Wrapping page
Banner, adding, 16
Finished Product, comparing, 17
NavBar, adding, 15
Requirements, 14
Rounded Table, adding, 15
Setup, 14
Text NavBar, adding, 16