designsync for simulink connector
TRANSCRIPT

DesignSync for Simulink Connector DesignSync for Simulink User’s Guide 3DEXPERIENCE R2018x
1
Overview
3DEXPERIENCE Platform is based on the V6 Architecture © 2007-2017 Dassault Systèmes.
The 3DEXPERIENCE Platform for 2018x is protected by certain patents, trademarks, and copyrights, the full list of which is available at the 3DS support site: http://help.3ds.com/ .
You will require an account with support in order to view this page. From the support page, select your desired product version and language to launch the appropriate help. Select Legal Notices from the left frame. This displays the full list of patents, trademarks and copyrights for this product.
Any copyrights not listed belong to their respective copyrights owners.
2
Table of Contents
Overview ......................................................................................................................... 1
Using the DesignSync Simulink Integrated Functionality ............................................. 1
DesignSync Simulink Integration Functionality ............................................................ 1
Important Notes ........................................................................................................... 2
Setting up Your Projects .................................................................................................. 3
Adding a Project to Source Control.............................................................................. 3
Field Descriptions ..................................................................................................... 4
Adding a Project From Source Control ........................................................................ 5
Field Descriptions ..................................................................................................... 6
Browsing for DesignSync Objects on the Server ......................................................... 7
Configuring the DesignSync Simulink Interface ........................................................... 7
Using the DesignSync Simulink Integration ..................................................................... 9
Update From DesignSync ............................................................................................ 9
See Also ................................................................................................................... 9
Commit to DesignSync Repository ............................................................................ 10
See Also ................................................................................................................. 10
Show Revisions ......................................................................................................... 10
See Also ................................................................................................................. 11
Compare to Revision ................................................................................................. 11
See Also ................................................................................................................. 11
Compare to Ancestor ................................................................................................. 12
See Also ................................................................................................................. 12
i

Table of Contents
Remove from Project ................................................................................................. 12
See Also ................................................................................................................. 13
Add to Project ............................................................................................................ 13
See Also ................................................................................................................. 13
Revert Using DesignSync .......................................................................................... 13
See Also ................................................................................................................. 14
Extract Conflict Markers to File / View Conflicts ........................................................ 14
See Also ................................................................................................................. 15
Set Selector ............................................................................................................... 15
See Also ................................................................................................................. 15
Tag ............................................................................................................................ 15
See Also ................................................................................................................. 16
Show Status .............................................................................................................. 16
Authenticating as a DesignSync User ........................................................................ 16
Reference ...................................................................................................................... 19
User Interface ............................................................................................................ 19
Understanding the Source Control Window ........................................................... 19
Understanding the Context Menu........................................................................... 20
Viewing Status of DesignSync Objects in Simulink ................................................ 21
Index ............................................................................................................................. 23
ii

Overview The DesignSync Simulink integration provides an interface within MATLAB to manage your files in source control. The DS Simlulink interface requires storing your projects in modules. You can create the module in DesignSync as you create new Simulink projects or connect new Simulink projects to existing modules or existing Simulink projects to new modules.
Any DesignSync functionality not available through the Simulink integration can be performed with one of the DesignSync clients (GUI or command line). The defaults for DesignSync Simulink commands are set with registry keys. For more information on using the DesignSync clients, see The DesignSync Data Manager User's Guide. For more information on configuring DesignSync Simulink, see the DesignSync Data Manager Administrator's Guide. The DesignSync and SyncAdmin GUI interfaces can be launched from within the Simulink client.
Using the DesignSync Simulink Integrated Functionality Once your workspaces have been set up, either by checking in new or existing projects to DesignSync or by populating an existing project into your workspace, you can perform basic revision control tasks within Simulink by selecting the project or object and launching the context menu (pressing the secondary mouse button, usually the right mouse button). In the context menu, you will see Source Control as an option. Within that menu, you can launch all the integrated DesignSync operations.
You can also run key DesignSync module-based operations from the ENOVIA Synchronicity DesignSync Source Control window using provided buttons. For more information on the Source Control Window, see Understanding the Source Control Window.
DesignSync Simulink Integration Functionality The DesignSync Simulink Integration provides the following integrated DesignSync functionality.
• Update From DesignSync (Populating your workspace) • Commit to DesignSync Repository (Checking in your design data) • Adding an Object to DesignSync • Removing a Module Member • Show Status of Objects Checked into DesignSync • Tag DesignSync module versions. • Show Revisions on the server. • Compare to Revision/Compare to Ancestor • Extract Conflict Markers to File / View Conflicts
1

Overview
• Launch the DesignSync GUI to perform any tasks that cannot be performed from within Simulink.
• Launch the SyncAdmin interface to configure DesignSync
Important Notes When you add a project to source control, you must create a new module. Do not add a project to an existing module.
The Delete command available from the context menu should never be used to remove items from source control. You must use Remove from Project or Remove from DesignSync Repository. Afterwards use Delete to complete the removal of the object from the workspace.
The Refresh command does not update DesignSync status. To refresh DesignSync Status, use the Refresh DesignSync Status command in the Source Control context menu. For more information on the Source Control context menu, see Understanding the Context Menu.
2

Setting up Your Projects
Adding a Project to Source Control When you create a project, you can immediately place it under DesignSync source control.
Important: After you've placed the project into DesignSync, you should primarily use the DSSimulink integration to manage source control. If you are using the DesignSync GUI or other DesignSync clients, do not use these clients to change the module root directory or vault association for the project workspace or the workspace selector.
DesignSync allows you to customize the options for this operation, which includes mkmod and optionally tag, using registry keys. For more information on the DesignSync registry keys for Simulink, see the DesignSync Data Manager Administrator's Guide: Simulink Registry Keys Overview.
To place a MATLAB project in DesignSync Source Control:
1. Create or open a new project as you would normally and open the Properties for the project. Source control information is displayed on the bottom of the project properties page.
Select Add project to source control to launch the Add Project to Source Control dialog.
2. Select the ENOVIA Synchronicity DesignSync® Integration and enter the sync URL for the desired module. If you want to apply a tag to the module branch, append @<tagname> to the sync URL. For example: sync://serv1.ABCo.com/Modules/Simulink/XLP-12Pro@Gold
3

Setting up Your Projects
3. Press Convert to add to DesignSync or Cancel to terminate the operation. Click on the image for more information about each field.
4. When the project is added to DesignSync, you see a confirmation page as the
module files are added to the module.
5. Select the Modified Files entry in the Project tree and click the Commit
Modified Files button to check in the files to the server.
Field Descriptions
This section explains the fields used by DesignSync Simulink integration.
Source Code Integration
4

DesignSync for Simulink User's Guide
Select the appropriate ENOVIA Synchronicity DesignSync® Integration from the drop-down list of source control plug-ins.
Repository location
Type the syncURL, including the DesignSync module name for the new module for the project. The module is created by this operation. To Browse for DesignSync Objects on the Server, select the Change button.
Project root
The location on the client machine of the Simulink project.
Source control information
A brief description of the source control integration.
SyncAdmin
This button launches the SyncAdmin GUI in user mode which allows you to modify DesignSync client and server settings.
DesignSync
This button launches the DesignSync GUI which allows you to perform DesignSync operations and view the structure of your DesignSync workspaces and modules.
Show Status
This button launches the showstatus command which displays the status of the module in the Command output window.
Set Selector
This button launches the setselector command which allows you to change the workspace module selector.
Tag
This button launches the tag command which allows you to tag a module version.
Adding a Project From Source Control If this is the first time you are working on a project that is already in development, you need to populate that project from source control onto your system.
5

Setting up Your Projects
DesignSync allows you to customize the options for this operation, which uses the initial populate command, using registry keys. For more information on the DesignSync registry keys for Simulink, see the DesignSync Data Manager Administrator's Guide: Simulink Registry Keys Overview.
To populate a project from DesignSync Source Control:
1. From Simulink, select New | Simulink Project | From Source Control. This launches the Project Retrieval dialog. Click on the image for more information about each field.
2. Enter the fields and press the Retrieve button to populate the module into the
workspace or the Cancel button to cancel the operation.
Field Descriptions
This section explains the fields used by DesignSync Simulink integration.
Source Code Integration
Select the appropriate ENOVIA Synchronicity DesignSync® Integration from the drop-down list of source control plug-ins.
Repository path
6

DesignSync for Simulink User's Guide
Type the syncURL, including the DesignSync module name for the existing module for the new Simulink project. To Browse for DesignSync Objects on the Server, select the Change button.
Sandbox
Local directory path for the workspace. Repository data and metadata is stored in this path. If there is no existing module root directory, DesignSync will create one.
Source control information
A brief description of the source control integration.
SyncAdmin
This button launches the SyncAdmin GUI in user mode which allows you to modify DesignSync client and server settings.
DesignSync
This button launches the DesignSync GUI which allows you to perform DesignSync operations and view the structure of your DesignSync workspaces and modules.
Browsing for DesignSync Objects on the Server Some operations require you to specify a DesignSync module. When you have the option to select a module, you may either type in the module location or click the Change button to launch the Repository Module dialog which allows you browse servers in your defined servers list.
From the defined servers list, you can browse the servers for modules or module branches. If you have selected a module branch, the drop-down Selector list, will auto-fill with the applicable selectors for the selected module branch.
Configuring the DesignSync Simulink Interface Since most of the operations performed in the DesignSync Simulink interface do not permit configurable options, DesignSync has provided a series of customizations in the form of DesignSync registry keys that control how the Simulink interface operates. For more information, see the DesignSync Data Manager Administrator's Guide: Simulink Registry Keys Overview.
7


Using the DesignSync Simulink Integration
Update From DesignSync When working in source control, other users can modify and checkin (or commit) their changes to DesignSync, so you might not always have the latest files present in your workspace. Periodically, particularly when returning to a project after a break, you should update the files from DesignSync to insure you are working from the latest version. This operation is typically referred to as a populate operation.
If you are not sure whether you have the latest versions, you can check the DesignSync status or check the server for modifications with the Check for Modifications command. For more information on how to perform these actions, see .Understanding the Context Menu.
The Simulink integration supports the "get" and "lock" fetch states. This means that in all cases, you will store a physical copy of the project and the files you populate locally. Whether you use the "get" (or merge) model or "lock" model depends on your typical usage. For information on understanding the difference between populate working methodologies, see DesignSync Data Manager User's Guide: Locking and Merging Work Styles.
Different versions of the Update from DesignSync command may show up in the context menu depending upon what objects are (or are not) selected when the context menu is launched. The underlying DesignSync command, can function differently depending on the settings you choose with the DesignSync registry key for the command. DesignSync features multiple Populate registry keys, allowing you to fine tune Update, Revert, Cancel, and initial populate operations. For more information on the DesignSync registry keys for Simulink, see the DesignSync Data Manager Administrator's Guide: Simulink Registry Keys Overview.
Updating From DesignSync:
The object being updated from DesignSync depends on the object selected when the Update (all) from DesignSync option is selected from the context menu.
Select Update from DesignSync. If individual objects are selected, DesignSync updates the selected objects. If no objects are selected, DesignSync updates the entire module..
See Also
Understanding the Context Menu
Revert Using DesignSync
9

Using the DesignSync Simulink Integration
Commit to DesignSync Repository Committing changes to the DesignSync Repository allows you to check in Design data to the DesignSync server. This includes Added or Moved (renamed) files as well as file modifications.
Note: Added and Moved files are considered modified and are checked in to the server when the Commit Modified Files command is used.
You can use the Commit command to commit specific files or the entire module. DesignSync allows you to customize how these two separate Checkin operations act. For more information on the DesignSync registry keys for Simulink, see the DesignSync Data Manager Administrator's Guide: Simulink Registry Keys Overview.
Commit to DesignSync:
1. Select Modified Files from the Project area to check in the entire module, or specific files, to check in only those files.
2. Select the files you wish to check in to DesignSync and chose the Commit to DesignSync Repository from the context menu or use the Commit Modified Files button to check in the entire module.
See Also
Understanding the Context Menu
Add to DesignSync
Remove from Project
Show Revisions Show revisions displays a list of versions for a specified file. The list includes all branches and is provided only for information purposes. The File Revisions list shows the file version, the module version containing the file version, and the reason the file version changed (Changed/Added/Removed, etc.)
Note: The same revisions may appear on several branches
10

DesignSync for Simulink User's Guide
See Also
Compare to Revision
Compare to Ancestor
Understanding the Context Menu
Compare to Revision Compare to Revision allows you to select a version from a list of versions for a specified file. Like the Show Revisions list, it shows the file version, the module version containing the file version, and the reason the file version changed (Changed/Added/Removed, etc.) From the list, you can select a version to compare against the version in your workspace.
Once you have selected the desired version, press the Compare button to launch the appropriate diff tool. If the file object is text based, Simulink launches the text compare window. If the file object is binary, Simulink launches a binary diff tool.
See Also
Show Revisions
11

Using the DesignSync Simulink Integration
Compare to Ancestor
Compare to Ancestor Compare to Ancestor compares the workspace version to the checked out version from the server, effectively showing you only the local modifications you have made in your workspace. If the file object is text based, Simulink launches the text compare window. If the file object is binary, Simulink launches a binary diff tool.
See Also
Show Revisions
Compare to Revision
Understanding the Context Menu
Extract Conflict Markers to File / View Conflicts
Remove from Project Remove from Project and Remove from DesignSync Repository provide the interface to remove project files from DesignSync. After the files have been removed from source control, you can use the Simulink Delete command to remove the physical files from the workspace.
DesignSync allows you to customize the options for this operation using registry keys. For more information on the DesignSync registry keys for Simulink, see the DesignSync Data Manager Administrator's Guide: Simulink Registry Keys Overview.
IMPORTANT: Do not use Delete to remove files that are managed in DesignSync source control. This includes files that have been Added to DesignSync, even if they have not been checked in. This operation is an irreversible operation that removes the DesignSync metadata that allows for proper workspace functionality. After members have been Removed from the project, you may delete them. You may also safely Delete any objects that are in the workspace but are not managed in DesignSync.
Remove from DesignSync Repository:
1. Select the object(s) to remove from DesignSync. 2. Launch the context menu and select the Remove from Project or Remove from
DesignSync Repository. DesignSync removes the files from source control. If the files being removed were in the Added state, the remove is not immediate,
12

DesignSync for Simulink User's Guide
but the files will be listed as removed in the workspace until the next Commit operation.
3. You may then delete the physical copies from the workspace using the Delete command. If you do not use Delete, the files become unmanaged objects in the workspace.
See Also
Understanding the Context Menu
Commit to DesignSync Repository (Check in)
Add to DesignSync
Add to Project Add to Project allows you to add new or additional files from the project into DesignSync revision control.
Add marks the file to be checked in during the next Commit operation. This is an operation that does not take place immediately, but waits for the Commit. This allows you to make multiple structural changes and optionally additional content changes in a single operation, rather than creating multiple module versions.
DesignSync allows you to customize the options for this operation using registry keys. For more information on the DesignSync registry keys for Simulink, see the DesignSync Data Manager Administrator's Guide: Simulink Registry Keys Overview.
Add to Project:
1. Select the object(s) to Add to DesignSync. 2. Launch the context menu and select the Add to Project. DesignSync marks the
objects to Add. You will see this reflected in the object's status. These changes are committed to the server during the next Commit to DesignSync Repository operation.
See Also
Understanding the Context Menu
Commit to DesignSync Repository (Check in)
Remove from Project
Revert Using DesignSync
13

Using the DesignSync Simulink Integration
Revert Using DesignSync populates a specified version of a selected object. When the command is launched, it displays a list of versions for a specified file. The list shows the file versions, the module versions containing the file versions, and the reason the file version changed (Changed/Added/Removed, etc.)
Once you have selected the desired version, press the Revert button to replace the workspace version with the desired server version.
Note: This version is not intended to be edited and checked in. To switch back to an editable version, use Update From DesignSync (Populate) on the object.
DesignSync allows you to customize the options for this operation using registry keys. For more information on the DesignSync registry keys for Simulink, see the DesignSync Data Manager Administrator's Guide: Simulink Registry Keys Overview.
See Also
Understanding the Context Menu
Update From DesignSync (Populate)
Show Revisions
Extract Conflict Markers to File / View Conflicts These commands perform essentially the same function; to resolve conflicts in a file. A conflict occurs when local modifications clash with changes that have been checked into the server since the local version was populated.
If you attempt to Commit to DesignSync Repository (Check in) a file that has conflicts to the server, the operation fails, and the file status is updated to show that the file has local changes that conflict with the version on the server. If you are not sure whether your files conflicts with modifications made on the server, you can Update From DesignSync (Populate), which will merge the changes on the server, if there are any, with your version and let you know if there are conflicts.
When you launch either command, the user can choose to:
• Create two local files, one a copy of the original workspace version, the other a copy of the server version, while the original file retains its conflict markers
• Replace the workspace version with either the workspace or server version and create a local copy of whichever version did not replace the workspace version.
14

DesignSync for Simulink User's Guide
Using the multiple versions, you can compare the files to determine which changes are the correct ones. If you chose to create two local files, you must make your changes to the workspace file version, and remove the conflict markers. If you chose to replace the workspace version, make your changes to the workspace file version, if needed, but there are no conflict markers to remove.
See Also
Understanding the Context Menu
Show Revisions
Compare to Revision
Compare to Ancestor
Set Selector Set Selector allows you to change the workspace selector. This may be necessary if you stop working on a particular release and need to change to working on a new release which was created on a different branch.
Changing the Selector:
1. Press the Set Selector button in the Source Control Window, or select the Set Selector option from the context menu.
2. Specify the Selector name in the type-in field. 3. Click Ok to tag the module version or Cancel to exit without changing the
selector. 4. Update From DesignSync (Populate) to update the files in your workspace to use
latest version on the new selector.
See Also
Understanding the Source Control Window
Understanding the Context Menul
Tag Tag allows you to tag a module version. A tag allows you to provide a named string for the module version that easily allows you to identify important versions, such as your Alpha, Beta, or Gold, or numbered release version.
15

Using the DesignSync Simulink Integration
DesignSync allows you to customize the options for this operation using registry keys. For more information on the DesignSync registry keys for Simulink, see the DesignSync Data Manager Administrator's Guide: Simulink Registry Keys Overview.
Note: You can tag a module branch when you add a new project to source control. For more information, see Adding a Project to Source Control.
Important: Simulink does not support individual member tagging. All tag operations within Simulink are on the module. For module member tagging, see the DesignSync Data Manager User's Guide: Module Member Tags.
Tagging a module version:
1. Press the Tag button in the Source Control Window, or select the Tag option from the context menu.
2. Specify a Tag name in the type-in field. 3. Click Ok to tag the module version or Cancel to exit without tagging.
See Also
Understanding the Source Control Window
Understanding the Context Menu
Adding a Project to Source Control
Show Status The Show Status command can be launched from the Source Control Window or the context menu. The command runs the DesignSync showstatus command. The status information is displayed in the Command Output window.
DesignSync allows you to customize the options for this operation using registry keys.
For more information on the DesignSync registry keys for Simulink, see the DesignSync Data Manager Administrator's Guide: Simulink Registry Keys Overview.
Authenticating as a DesignSync User Your project leader may have configured your enterprise system or DesignSync server to require username and password authentication when accessing vault data on a SyncServer (client vaults never require authentication).
16

DesignSync for Simulink User's Guide
If the 3DPassport Central Authentication Server (CAS) is enabled at your site, then DesignSync supports a single-sign on model that allows you to sign in once and use all the Enterprise tools available to you including all the DesignSync graphical and command-line clients, the DesignSync Web Interface, ProjectSync, and all your other 3DEXPERIENCE tools.
The first time you log into the server, DesignSync requests your username and password. The Simulink interface presents a dialog box where you must supply your username and password.
The username and password must correspond to the desired login. Options include:
• 3DPassport Central Authentication Service username and password • DesignSync user profile • DesignSync-compatible LDAP profile, if the SyncServer is configured to use LDAP
(Lightweight Directory Access Protocol),
See DesignSync Data Manager Administrator's Guide: What Are User Profiles? for more details. If you do not know your username or password, contact your project leader.
For 3DPassort login, authentication takes place the first time you log in to any server using 3DPassport from any client on your system and persists until it expires as defined by the 3DPassport system administrator.
For other types of logins, the authentication takes place each time you start a new DesignSync session or access a different server. If you select Save password, DesignSync stores your password, so in subsequent accesses to the server, you will not have to enter your username and password. Note that the username and password must correspond to your DesignSync user profile for that server. If you do not have a DesignSync user profile, contact your project leader.
17

Reference
User Interface
Understanding the Source Control Window
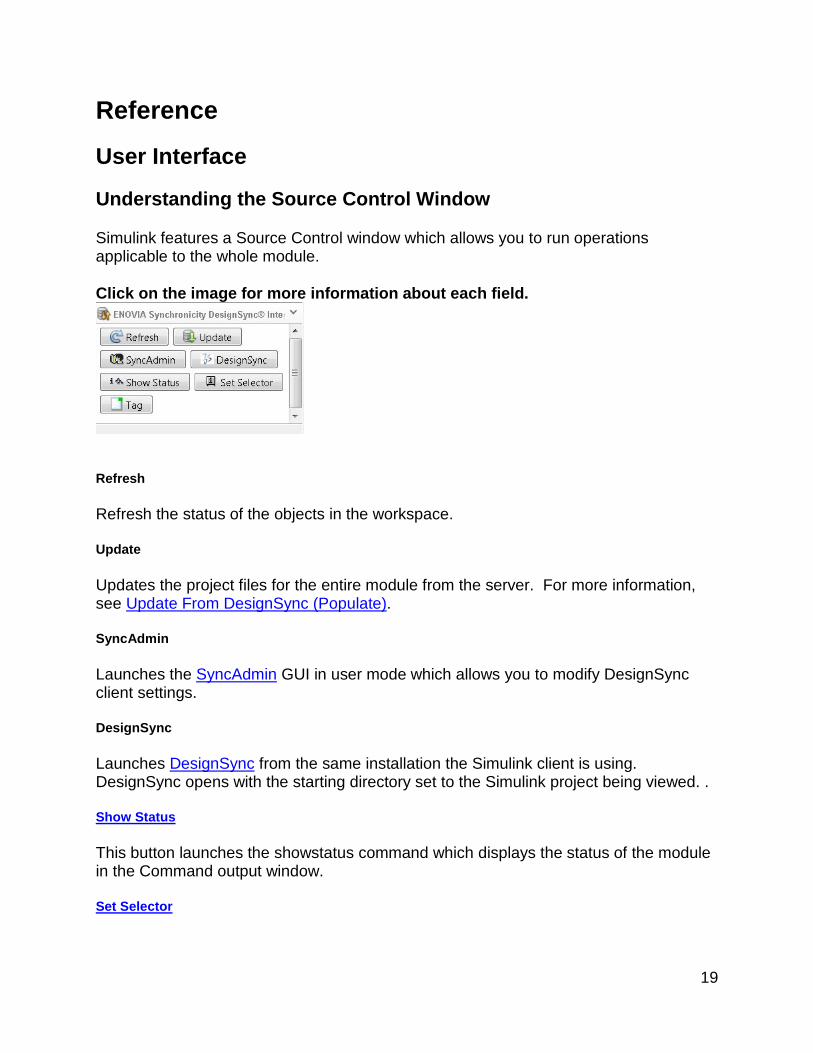
Simulink features a Source Control window which allows you to run operations applicable to the whole module.
Click on the image for more information about each field.
Refresh
Refresh the status of the objects in the workspace.
Update
Updates the project files for the entire module from the server. For more information, see Update From DesignSync (Populate).
SyncAdmin
Launches the SyncAdmin GUI in user mode which allows you to modify DesignSync client settings.
DesignSync
Launches DesignSync from the same installation the Simulink client is using. DesignSync opens with the starting directory set to the Simulink project being viewed. .
Show Status
This button launches the showstatus command which displays the status of the module in the Command output window.
Set Selector
19

Reference
This button launches the setselector command which allows you to change the workspace module selector.
Tag
This button launches the tag command which allows you to tag a module version.
Understanding the Context Menu
The context menu for objects contains DesignSync actions. If those actions are applicable to the selected object (s), it is active. Otherwise it is greyed out (unselectable.).
Note: Not all options appear in the Source Control menu at all times..
The context menu includes the following actions:
• View Details - Shows the details of the source control in the product including the Sandbox (workspace) information, type of source control in use, and server location.
• Commit to DesignSync Repository - Commit the select object(s) or module to the DesignSync repository.
• Commit All to DesignSync Repository - Commit the module to the DesignSync repository. For more information, see Commit to DesignSync Repository (Check in)
• Commit Selection to DesignSync Respository- Commit the select object(s) or module to the DesignSync repository. For more information, see Commit to DesignSync Repository (Check in)
• Commit Modified Files - Commit all modified files to DesignSync. For more information, see Commit to DesignSync Repository (Check in)
• Check for Modifications - Refreshes the selected object(s) against the server version(s) to see if the server version has changed. If the server version has changed, the Revision attribute for the selected object(s) is updated with (not latest).
• SyncAdmin - Launches the SyncAdmin GUI in user mode which allows you to modify DesignSync client and server settings.
• DesignSync - Launches DesignSync from the same installation the Simulink client is using. DesignSync opens with the starting directory set to the Simulink project being viewed. .
• Show Status - launches the showstatus command which displays the status of the module in the Command output window.
• Set Selector - Launches the choose selector dialog. • Tag - launches the tag dialog.
20
DesignSync for Simulink User's Guide
• Update From DesignSync/Update All from DesignSync - Launches a populate to update the module or selected objects. .
• Refresh DesignSync Status - Refresh the status of the objects in the workspace. • Add to DesignSync/Add to Project/Add Folder to Project - Add selected objects to
DesignSync. The objects will be committed to the server during the next Commit to DesignSync Repository (Check in) operation.
• Update Selection from DesignSync - Updates the specific files from DesignSync. For more infomation, see Update From DesignSync (Populate)
• Get File Lock - Checked out the selected object(s) with a lock. • Revert Local Changes and Release Locks/Reverse Local Changes - removes
local modifications for the selected object(s), including removing added files from the project, and unremoving removed but not committed objects and releasing any locks. Note: You cannot release the lock on a modified object without removing local modifications.
• Extract Conflict Markers to File - resolve conflicts in a file. • Remove from Project/Remove from DesignSync Repository - removes selected
object(s) from the project and the DesignSync. repository. • Show Revisions - allows you to view a list of revisions for the selected object. • Compare to Ancestor - show local modifications made in the workspace. • Compare to Revision - compares file to a selected revision. • Revert Using DesignSync -allows you to select a version of the object to populate
in the workspace for viewing.
Viewing Status of DesignSync Objects in Simulink
Status icons in the Simulink project display show the status of the DesignSync objects in the workspace. To refresh the status, run Check for Modifications from the context menu. For more information about the context menu, see Understanding the Context Menu..
Click on the image for more information about the DesignSync status.
21

Reference
Up-to-Date/Unmodified/Up-to-Data (Locked)
An up-to-date status (workspace version is unmodified and server version is the same as the workspace version) is indicated by a green circle. If there is a lock icon after the green circle, the unmodified object is locked.
Modified/Modified (Locked)
A modified status, where the object is modified in the workspace, is indicated by a blue square. If there is a lock icon after the blue square, the modified object is locked.
In Conflict
An In Conflict status, which indicates that both the workspace version and the server version have changed, is indicated by a red circle with an exclamation point inside it. The conflict must be resolved before the object can be checked in.
Unmanaged
An unmanaged status, which indicates that the object has not yet been checked in to DesignSync, is indicated by an empty (white) circle.
Removed
A removed status, which indicates that the object has been marked for removal from source control, is indicated by a dash (-). This only appears in situations where an object was Added, but not commited to source control and then removed. To commit the remove to DesignSync, run Commit to DesignSync Repository.
22

Index A
Add
add to project 13
Add from source control 5
Add to source control 3
C
Cancel
cancel lock 13
Checkin
simulink 10
ci
simulink 10
Commit to repository 10
Compare to ancestor 12
Compare to revision 11
O
Overview
Simulink context window 20
Source Control Window 19
P
Populate
update from DesignSync 9
R
Remove
remove from project 12
Revert
revert using DesignSync 13
S
Simulink
compare to revision 11
T
Tag
module version 15
U
Update from repository 9
V
Viiew conflicts 14
23