desire2learn digital media services kaltura plugin · desire2learn digital media services –...
TRANSCRIPT
Desire2Learn Digital Media Services - Kaltura User Manual
Version: Digital Media Services - Kaltura 3.0

Kaltura Business Headquarters
5 Union Square West, Suite 602, New York, NY, 10003, USA
Tel.: +1 800 871 5224
Copyright © 2013 Kaltura Inc. All Rights Reserved. Designated trademarks and brands are the property of their respective owners.
Use of this document constitutes acceptance of the Kaltura Terms of Use and Privacy Policy.
Desire2Learn Digital Media Services – Kaltura v3.0 User Manual 3
Contents Preface .......................................................................................................................................................... 4
About this Manual ................................................................................................................................... 4 Audience ................................................................................................................................................. 4 Document Conventions ........................................................................................................................... 4 About the Screenshots ............................................................................................................................ 5
Section 1 Overview of the Kaltura D2L DMS 3.0 Plugin ............................................................................... 6 Main Features and Tools ........................................................................................................................ 6
Section 2 Interacting with Media ................................................................................................................... 8 Displaying and Viewing Content ............................................................................................................. 8 Commenting on Media .......................................................................................................................... 10 Searching Media and Captions ............................................................................................................. 11
Searching for Strings in Captions in a single video ........................................................................ 12
Section 3 Creating New Media ................................................................................................................... 14 Uploading Media ................................................................................................................................... 14
Section 4 Recording from Webcam ............................................................................................................ 17
Section 5 Recording Your Screen ............................................................................................................... 19
Section 6 Managing Your Media ................................................................................................................. 22 Editing Media ........................................................................................................................................ 22
Selecting a Frame to Use as a Thumbnail ..................................................................................... 23 Uploading and Managing Captions ....................................................................................................... 24
Uploading Captions ........................................................................................................................ 24 Managing Captions ......................................................................................................................... 25
Publishing Media ................................................................................................................................... 26 Disabling and Closing Comments ......................................................................................................... 26
Section 7 Managing a Media Gallery .......................................................................................................... 29 Adding Media to a Media Gallery .................................................................................................... 30 Moderating Channel Content (available to Course Instructors) ..................................................... 32
Desire2Learn Digital Media Services – Kaltura v3.0 User Manual 4
Preface
This preface contains the following topics: • About this Manual • Audience • Document Conventions
About this Manual This manual describes how to use Desire2Learn Digital Media Services v 3.0 – Kaltura plugin (also referred to as “D2L DMS – Kaltura 3.0”).
NOTE: Please refer to the official and latest product release notes for last-minute updates. Technical support may be obtained directly from: Kaltura Support.
Contact Us:
Please send your documentation-related comments and feedback or report mistakes to [email protected].
We are committed to improving our documentation and your feedback is important to us.
Audience This manual is intended for users of Desire2Learn Digital Media Services – Kaltura version 3.0. The manual assumes familiarity with Desire2Learn concepts and flows and focuses on the DMS – Kaltura 3.0 flows and functionality.
Document Conventions Kaltura uses the following admonitions:
• Note • Workflow
NOTE: Identifies important information that contains helpful suggestions.
Preface
Desire2Learn Digital Media Services – Kaltura v3.0 User Manual 5
Workflow: Provides workflow information.
1. Step 1
2. Step 2
About the Screenshots D2L DMS - Kaltura 3.0 implements a responsive web design for optimal user experience across all devices. The user interface displays differently on different devices and available screen sizes.
The screenshots in this guide were taken on a desktop computer, and on widgets that use the entire available screen width, the user interface may differ somewhat on different devices or for different widget sizes. The functionality remains the same.
Desire2Learn Digital Media Services – Kaltura v3.0 User Manual 6
SECTION 1
Overview of the Kaltura D2L DMS 3.0 Plugin Kaltura has partnered with Desire2Learn to offer an out-of-the-box extension that enables you to record, upload, publish, search, and share video directly from your Desire2Learn environment. This translates into time and money saved for your organization, improved student engagement, creativity and learning results, as well as ease of use for students, faculty and teaching assistants.
Main Features and Tools Upload and Record
• Easy Video Uploading - Upload any type of media (video, audio, images) using a simple interface.
• Create webcam videos - Welcome messages, introductions, assignment instructions, simple demonstrations, and other webcam media.
• Screen Recording – Easily record the screen, along with audio and webcam feeds, to create and publish screencasts. Instructors and students can record and share lectures, presentations, software tutorials, and additional screencasts.
Organize and Share • My Media – Upload, manage, assign, and share content (based on permissions) with a private
media library for each D2L user. • Course Gallery – Search or view rich media assigned to a course if you are a member. Media
can be added by instructors or students, with an option for student contributions moderation by instructors.
• Insert Stuff integration: Intuitively use rich media without time-consuming training, simply click on the “My media” link from within “Insert stuff”.
View and Interact • The Kaltura Player:
o Customize the player - Functionality, features and display
o Configure once use everywhere - Mobile, tablet, PC , TV
o Open Standards , Open Source
o Files are transcoded for Web, HD, or Mobile Delivery across various devices and platforms. Player auto detects device and platform and adjusts the playback using adaptive bitrate technology
o Playback supporting both Flash and HTML5 for mobile, with automated fall back
o Accessibility - Supports playback with ADA/508 compliant player
• Responsive Design: Automatically adjusts site layout to the screen size and device to provide optimal mobile device support
• Captions - Upload multi-lingual captions to reach international, multi-lingual, and hearing-impaired audiences while also enabling in-video search within the captions.
• Comments - Boost online conversations and user engagement by allowing users to comment on
Overview of the Kaltura D2L DMS 3.0 Plugin
Desire2Learn Digital Media Services – Kaltura v3.0 User Manual 7
videos • Search - Quickly find videos based on metadata (name, description, tags, categories) • In-video search – Upload captions and then search for every spoken word. Search results allow
skipping directly to the relevant part in the video. In-video search available within an entry or across videos in the course gallery/my media gallery

Desire2Learn Digital Media Services – Kaltura v3.0 User Manual 8
SECTION 2
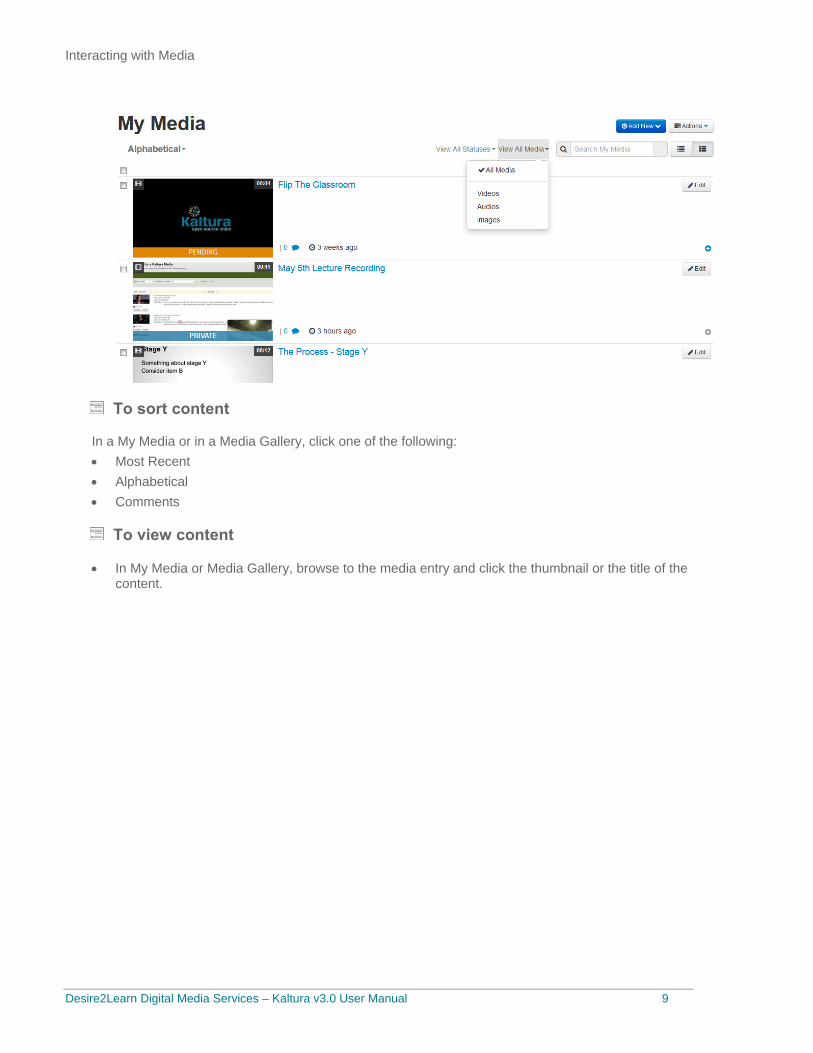
Interacting with Media In My Media and in Media Galleries, you can do the following:
• Filter the content. • Sort the content. • Select a video to play. • View media. • Comment on media. • Search media and captions.
Displaying and Viewing Content To filter content
In My Media and in a Media Gallery, select an option from the View All Media drop down menu: • All Media types (videos, audio, and images) • Videos • Audios • Images
Interacting with Media
Desire2Learn Digital Media Services – Kaltura v3.0 User Manual 9
To sort content
In a My Media or in a Media Gallery, click one of the following: • Most Recent • Alphabetical • Comments
To view content
• In My Media or Media Gallery, browse to the media entry and click the thumbnail or the title of the content.
Interacting with Media
Desire2Learn Digital Media Services – Kaltura v3.0 User Manual 10
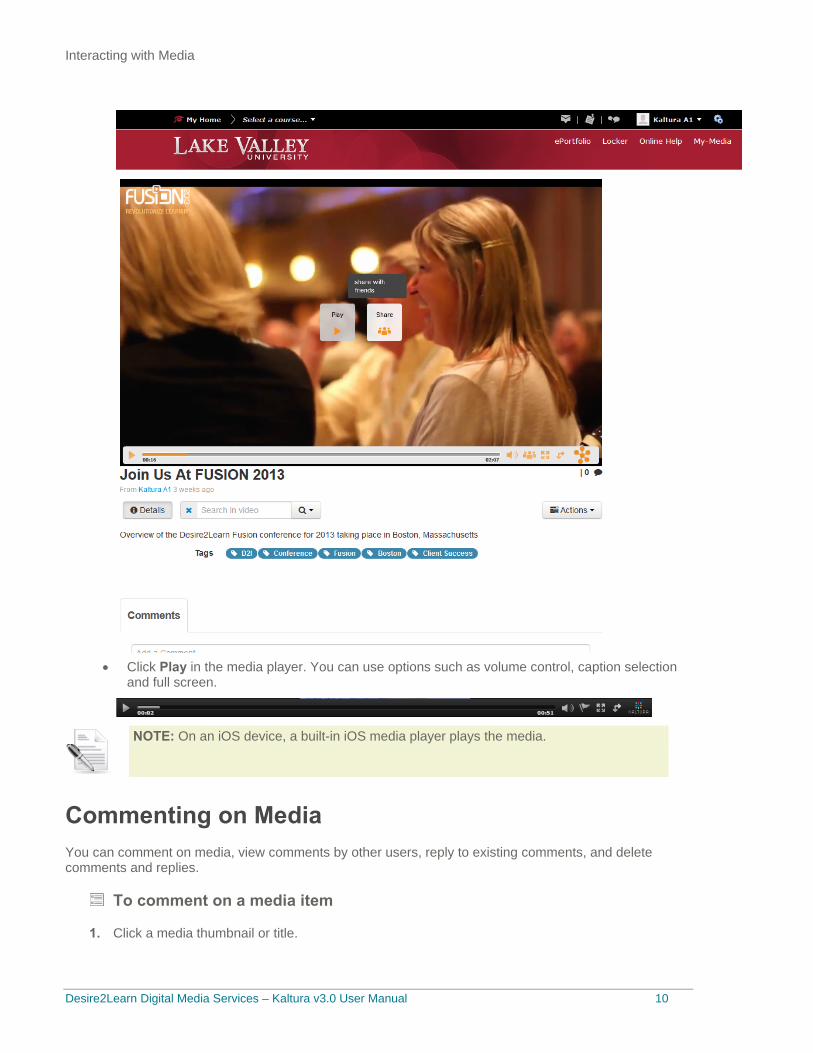
• Click Play in the media player. You can use options such as volume control, caption selection
and full screen.
NOTE: On an iOS device, a built-in iOS media player plays the media.
Commenting on Media You can comment on media, view comments by other users, reply to existing comments, and delete comments and replies.
To comment on a media item
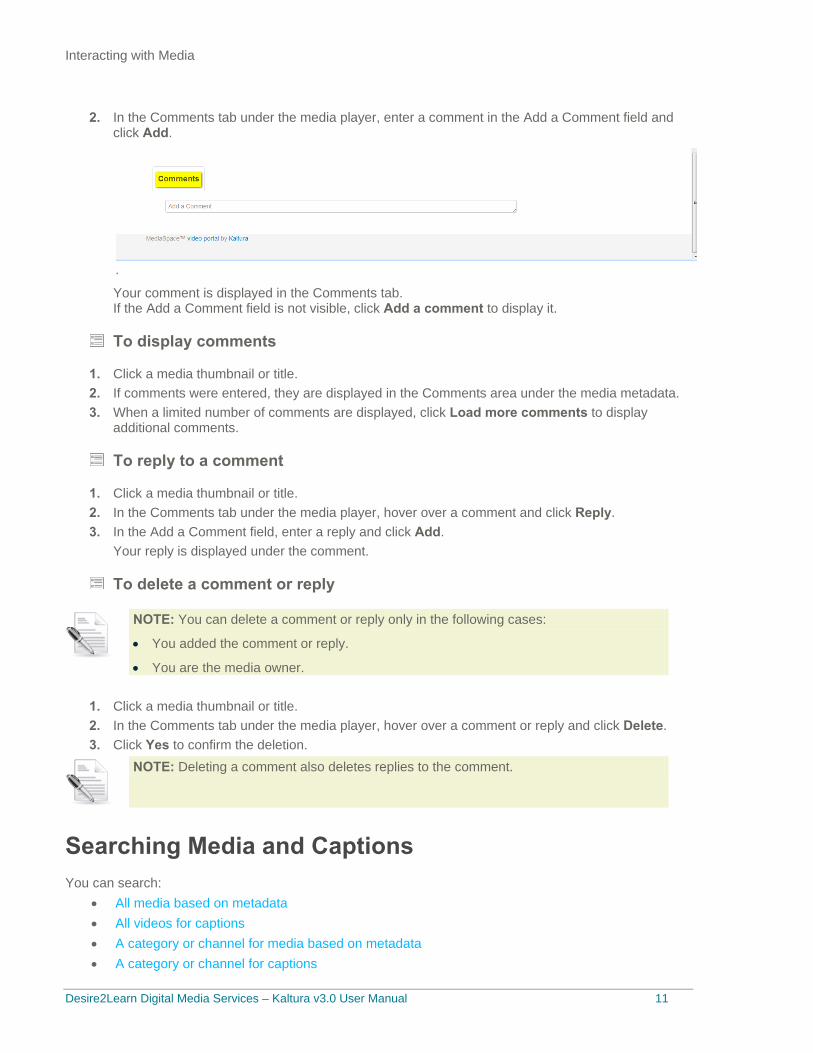
Click a media thumbnail or title. 1.
Interacting with Media
Desire2Learn Digital Media Services – Kaltura v3.0 User Manual 11
In the Comments tab under the media player, enter a comment in the Add a Comment field and 2.click Add.
.
Your comment is displayed in the Comments tab. If the Add a Comment field is not visible, click Add a comment to display it.
To display comments
Click a media thumbnail or title. 1. If comments were entered, they are displayed in the Comments area under the media metadata. 2. When a limited number of comments are displayed, click Load more comments to display 3.
additional comments.
To reply to a comment
Click a media thumbnail or title. 1. In the Comments tab under the media player, hover over a comment and click Reply. 2. In the Add a Comment field, enter a reply and click Add. 3.
Your reply is displayed under the comment.
To delete a comment or reply
NOTE: You can delete a comment or reply only in the following cases:
• You added the comment or reply.
• You are the media owner.
Click a media thumbnail or title. 1. In the Comments tab under the media player, hover over a comment or reply and click Delete. 2. Click Yes to confirm the deletion. 3.
NOTE: Deleting a comment also deletes replies to the comment.
Searching Media and Captions You can search:
• All media based on metadata • All videos for captions • A category or channel for media based on metadata • A category or channel for captions
Interacting with Media
Desire2Learn Digital Media Services – Kaltura v3.0 User Manual 12
• Captions in a single video • For media associated with a user, tag, or category
Searching for Media
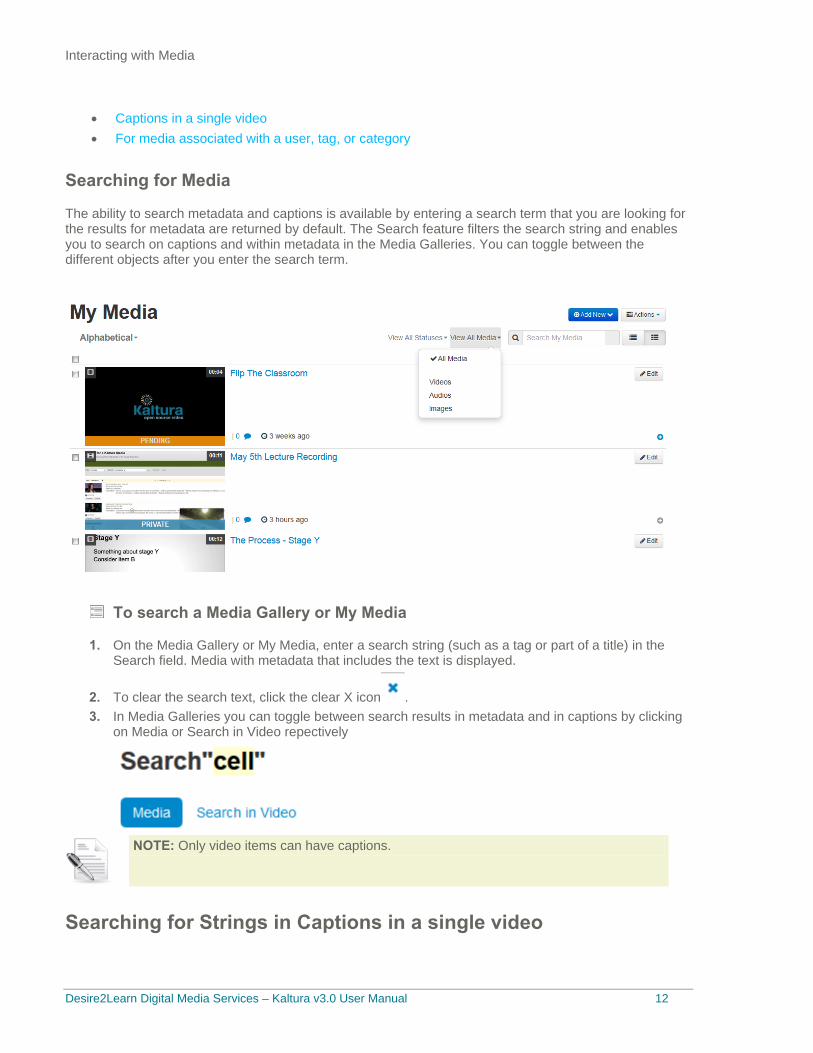
The ability to search metadata and captions is available by entering a search term that you are looking for the results for metadata are returned by default. The Search feature filters the search string and enables you to search on captions and within metadata in the Media Galleries. You can toggle between the different objects after you enter the search term.
To search a Media Gallery or My Media
On the Media Gallery or My Media, enter a search string (such as a tag or part of a title) in the 1.Search field. Media with metadata that includes the text is displayed.
To clear the search text, click the clear X icon . 2. In Media Galleries you can toggle between search results in metadata and in captions by clicking 3.
on Media or Search in Video repectively
NOTE: Only video items can have captions.
Searching for Strings in Captions in a single video
Interacting with Media
Desire2Learn Digital Media Services – Kaltura v3.0 User Manual 13
NOTE: Only video items can have captions.
To search for strings in captions in a single video
From My Media or Media Gallery, click a video thumbnail or title. 1. Enter a search term in the Search in Video search box under the media player. 2.
NOTE: A Search in Video search box is displayed only when the video includes captions.
A result is displayed for each point in the video where the caption text appears. In the results, click a caption to play the video from the point where the text appears. 3. To clear the search text, click the clear icon. 4.

Desire2Learn Digital Media Services – Kaltura v3.0 User Manual 14
SECTION 3
Creating New Media You can create new media from My Media and in Media Galleries. You can:
• Upload media
• Record from webcam
• Record your screen
Uploading Media You can upload media from the My Media or Media Gallery interface via the Add New menu.
To upload media from your desktop
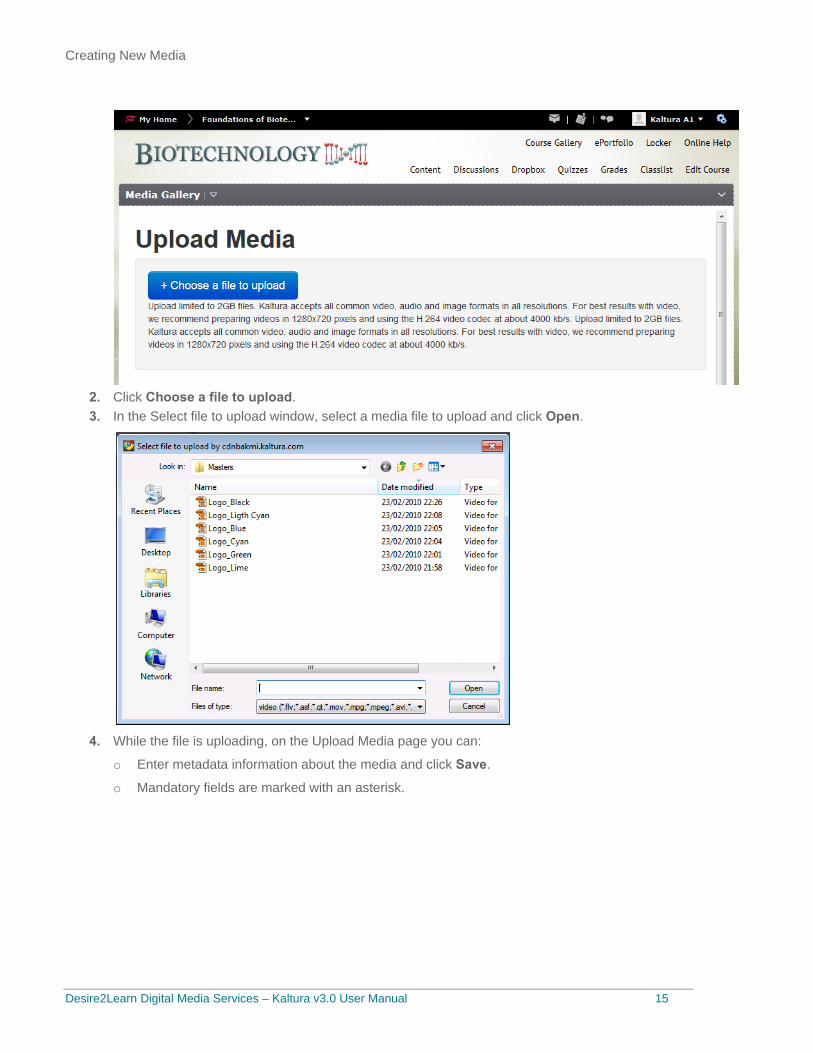
Select Media Upload from the Add New dropdown menu. 1.
The Upload Media page is displayed.
Creating New Media
Desire2Learn Digital Media Services – Kaltura v3.0 User Manual 15
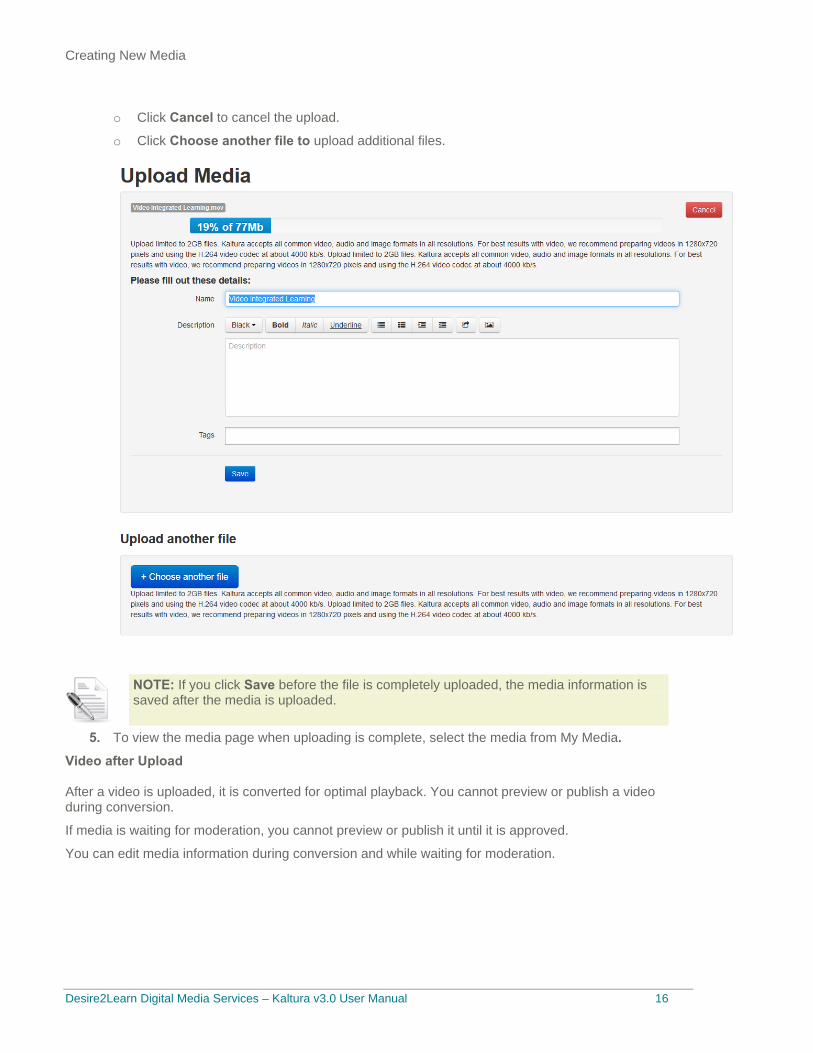
Click Choose a file to upload. 2. In the Select file to upload window, select a media file to upload and click Open. 3.
While the file is uploading, on the Upload Media page you can: 4.
o Enter metadata information about the media and click Save.
o Mandatory fields are marked with an asterisk.
Creating New Media
Desire2Learn Digital Media Services – Kaltura v3.0 User Manual 16
o Click Cancel to cancel the upload.
o Click Choose another file to upload additional files.
NOTE: If you click Save before the file is completely uploaded, the media information is saved after the media is uploaded.
To view the media page when uploading is complete, select the media from My Media. 5.
Video after Upload
After a video is uploaded, it is converted for optimal playback. You cannot preview or publish a video during conversion.
If media is waiting for moderation, you cannot preview or publish it until it is approved.
You can edit media information during conversion and while waiting for moderation.
Desire2Learn Digital Media Services – Kaltura v3.0 User Manual 17
SECTION 4
Recording from Webcam
To record from a webcam
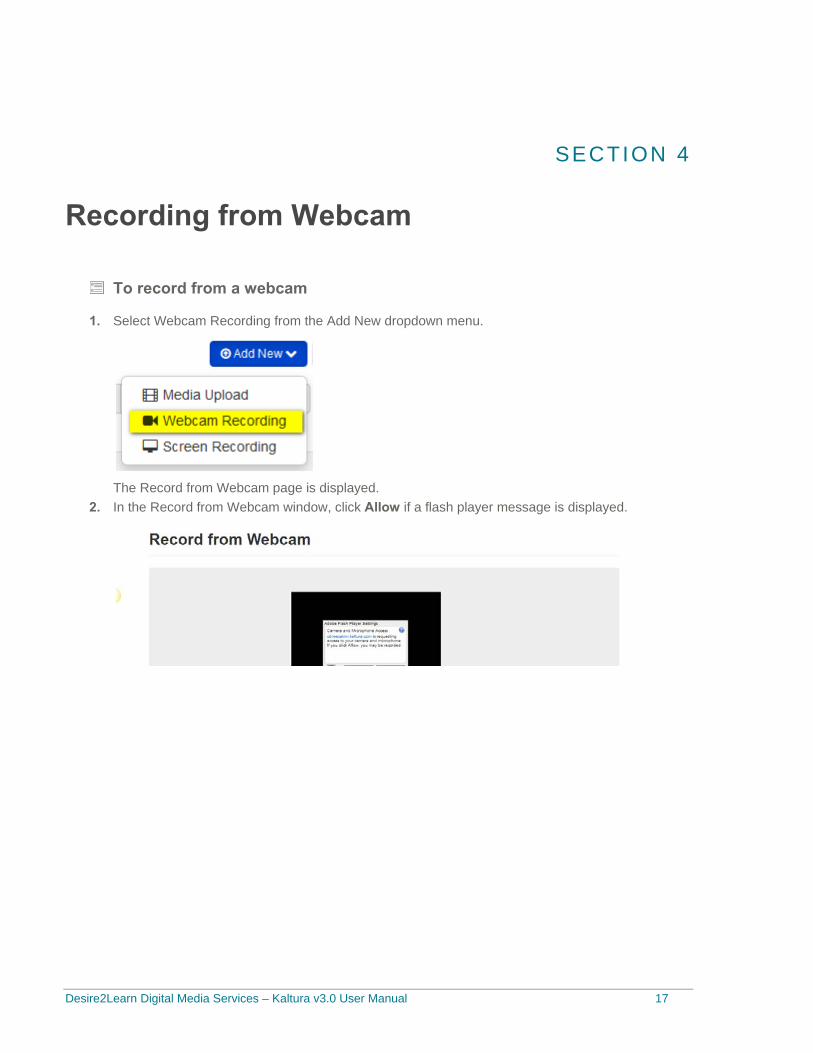
Select Webcam Recording from the Add New dropdown menu. 1.
The Record from Webcam page is displayed.
In the Record from Webcam window, click Allow if a flash player message is displayed. 2.
Recording from Webcam
Desire2Learn Digital Media Services – Kaltura v3.0 User Manual 18
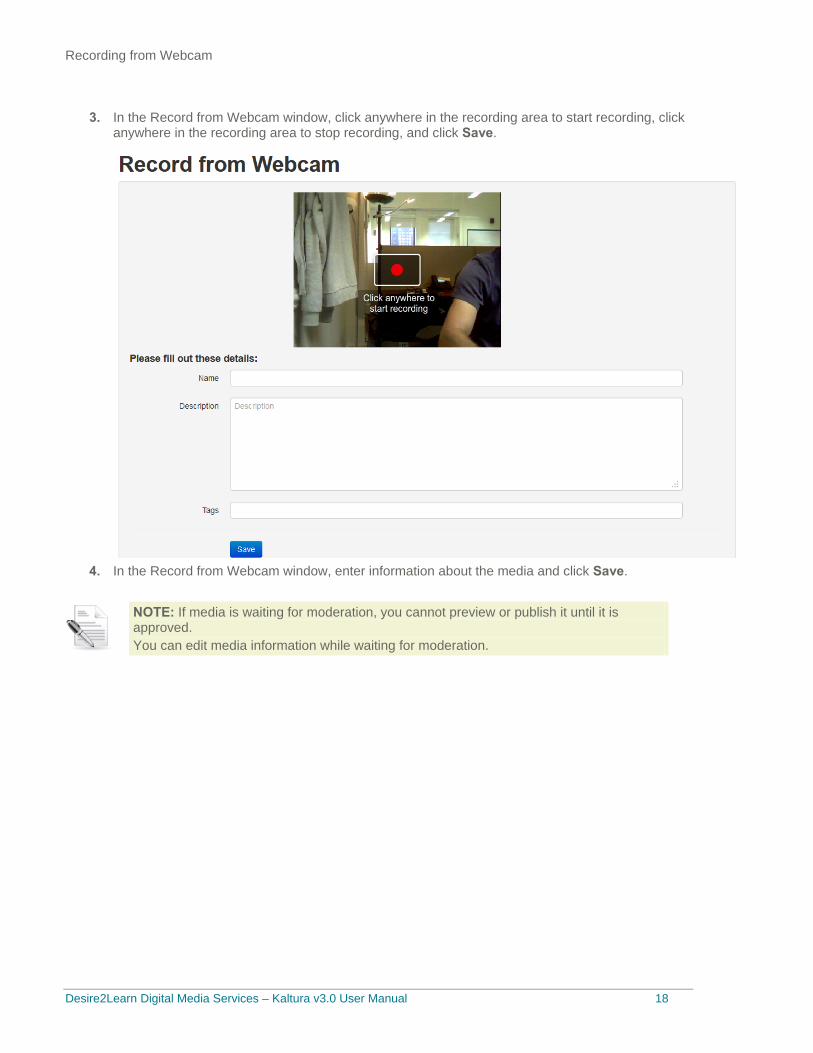
In the Record from Webcam window, click anywhere in the recording area to start recording, click 3.anywhere in the recording area to stop recording, and click Save.
In the Record from Webcam window, enter information about the media and click Save. 4.
NOTE: If media is waiting for moderation, you cannot preview or publish it until it is approved. You can edit media information while waiting for moderation.
Desire2Learn Digital Media Services – Kaltura v3.0 User Manual 19
SECTION 5
Recording Your Screen The following lists the basic workflow of how to record your screen:
Workflow: 1. Select the Screen Recording option.
2. Launch the Screen Recorder.
3. Select the options and area to capture, and start recording.
4. After recording, review the results and upload.
5. After uploading, enter metadata.
To record your screen
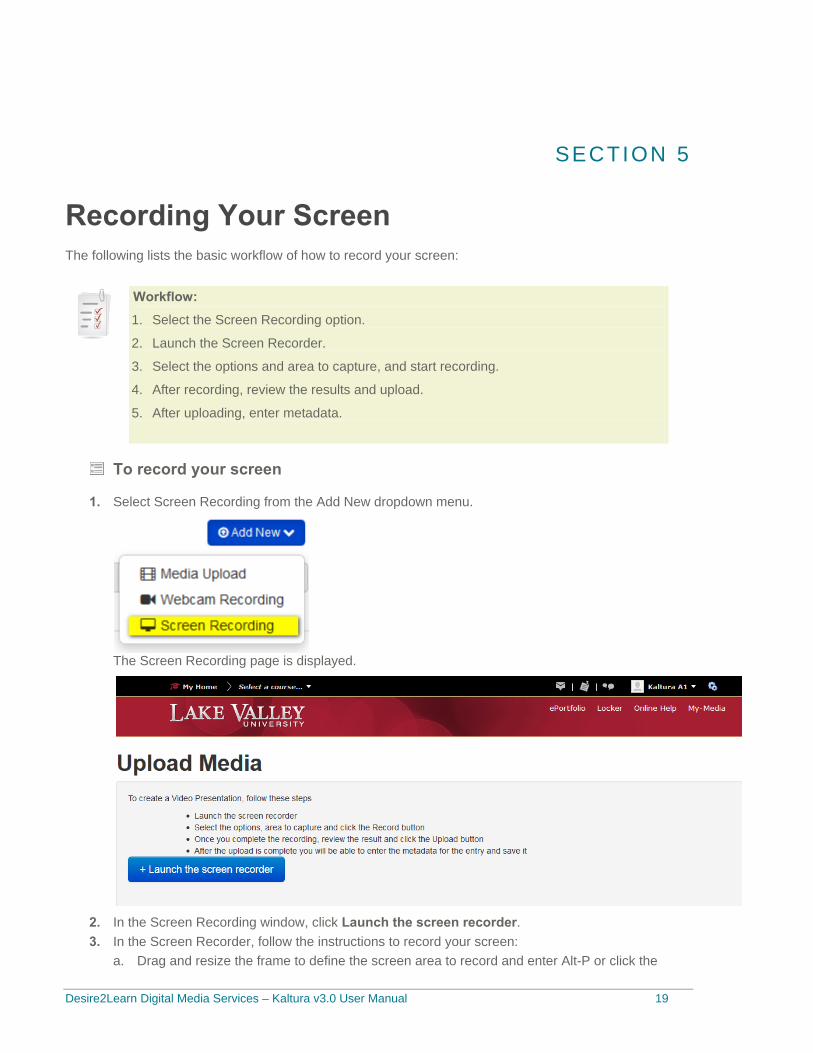
Select Screen Recording from the Add New dropdown menu. 1.
The Screen Recording page is displayed.
In the Screen Recording window, click Launch the screen recorder. 2. In the Screen Recorder, follow the instructions to record your screen: 3.
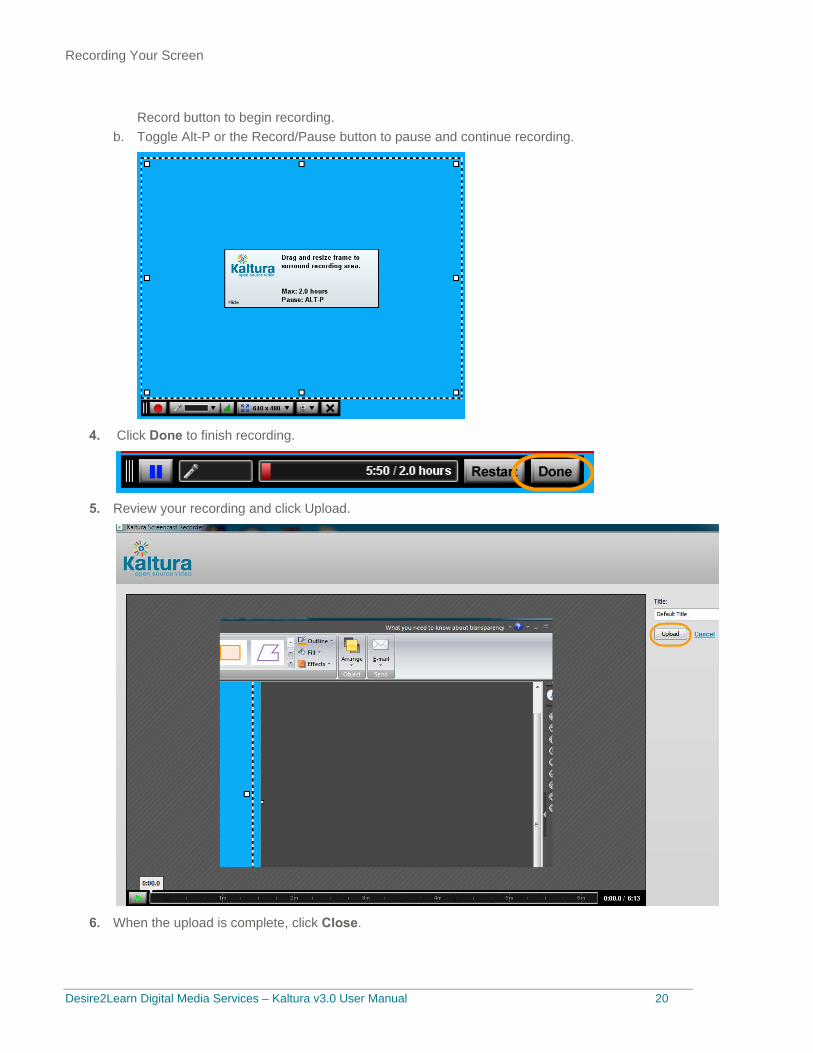
a. Drag and resize the frame to define the screen area to record and enter Alt-P or click the
Recording Your Screen
Desire2Learn Digital Media Services – Kaltura v3.0 User Manual 20
Record button to begin recording. b. Toggle Alt-P or the Record/Pause button to pause and continue recording.
Click Done to finish recording. 4.
Review your recording and click Upload. 5.
When the upload is complete, click Close. 6.

Recording Your Screen
Desire2Learn Digital Media Services – Kaltura v3.0 User Manual 21
Desire2Learn Digital Media Services – Kaltura v3.0 User Manual 22
SECTION 6
Managing Your Media Your My Media page lists the media that you created. In addition to all normal interactions with media as described in Interacting with Media when you open a media page, you can:
• Edit metadata. • Select a thumbnail. • Upload and manage captions. • Publish a media item.to Media Galleries • Publish multiple media items • Disable or close comments
Editing Media To edit media
Managing Your Media
Desire2Learn Digital Media Services – Kaltura v3.0 User Manual 23
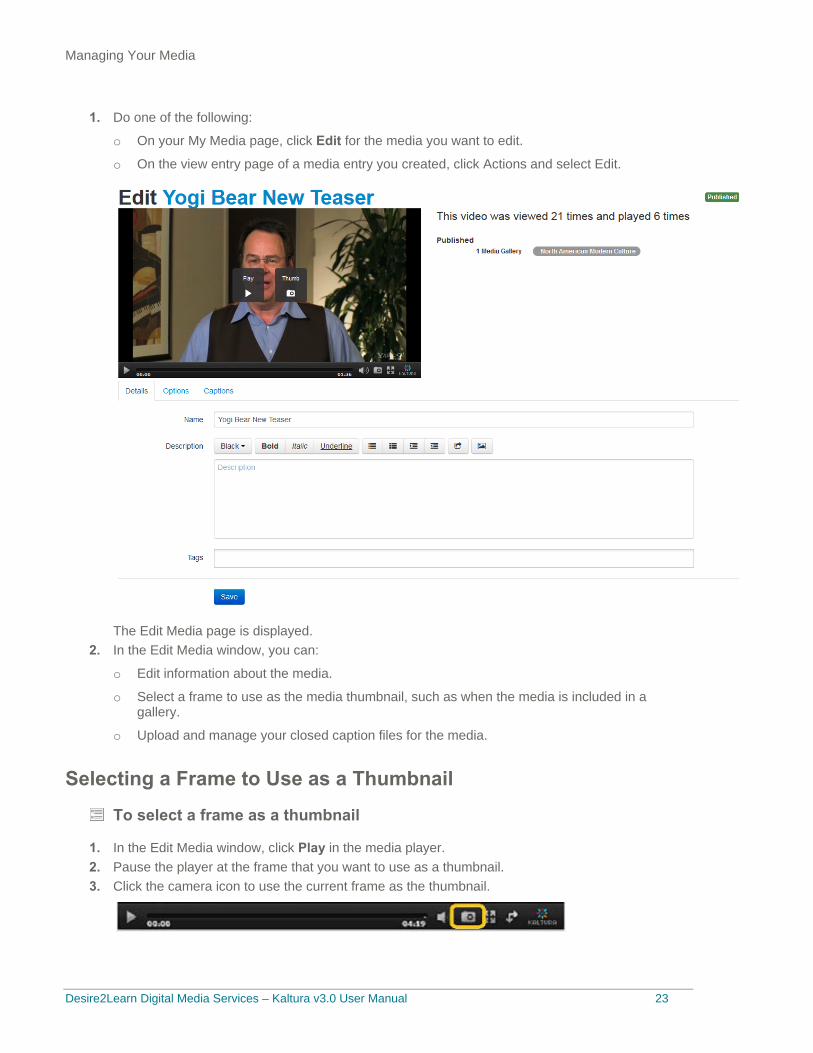
Do one of the following: 1.
o On your My Media page, click Edit for the media you want to edit.
o On the view entry page of a media entry you created, click Actions and select Edit.
The Edit Media page is displayed.
In the Edit Media window, you can: 2.
o Edit information about the media.
o Select a frame to use as the media thumbnail, such as when the media is included in a gallery.
o Upload and manage your closed caption files for the media.
Selecting a Frame to Use as a Thumbnail
To select a frame as a thumbnail
In the Edit Media window, click Play in the media player. 1. Pause the player at the frame that you want to use as a thumbnail. 2. Click the camera icon to use the current frame as the thumbnail. 3.
Managing Your Media
Desire2Learn Digital Media Services – Kaltura v3.0 User Manual 24
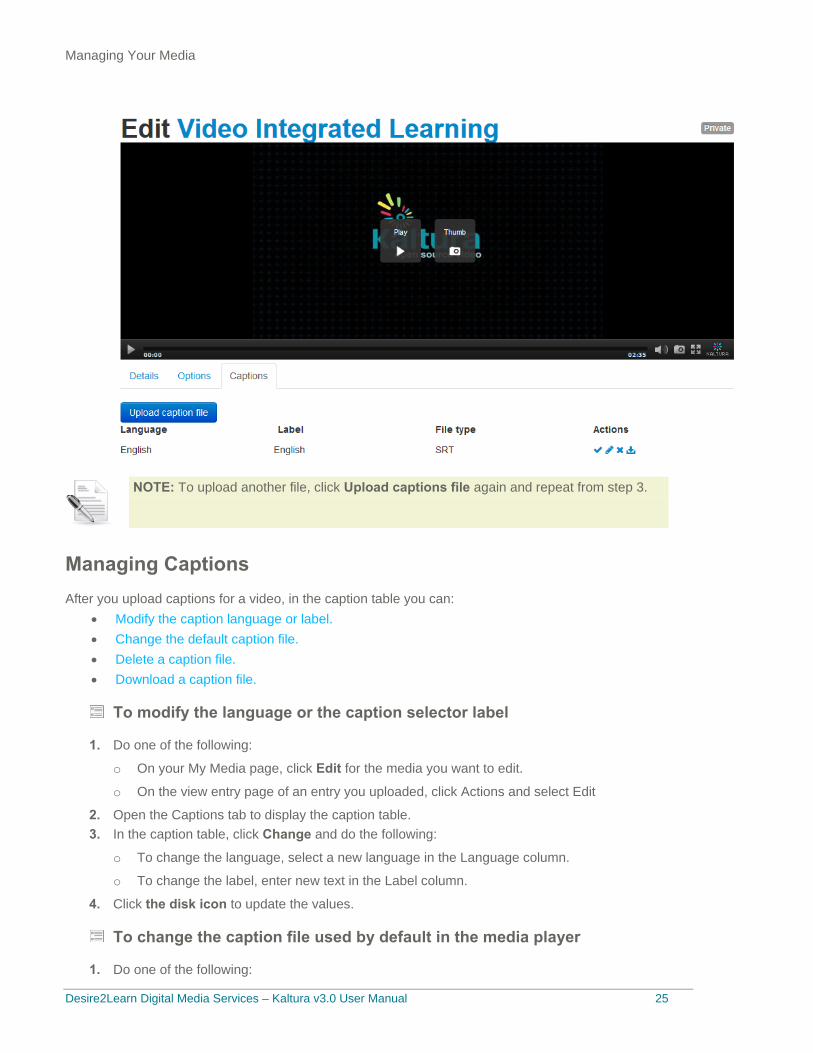
Uploading and Managing Captions You can upload caption files for your media items and manage the captions. Users can search the caption texts.
NOTE: Only video items can have captions.
Uploading Captions
To upload captions
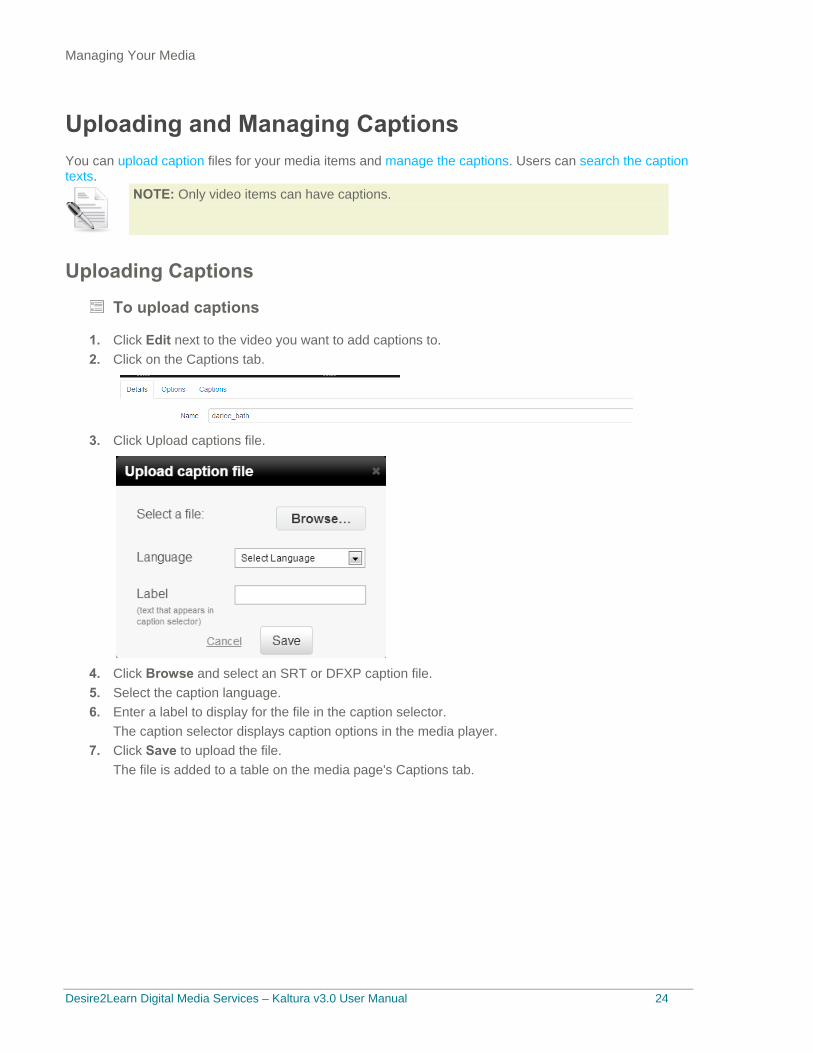
Click Edit next to the video you want to add captions to. 1. Click on the Captions tab. 2.
Click Upload captions file. 3.
Click Browse and select an SRT or DFXP caption file. 4. Select the caption language. 5. Enter a label to display for the file in the caption selector. 6.
The caption selector displays caption options in the media player. Click Save to upload the file. 7.
The file is added to a table on the media page's Captions tab.
Managing Your Media
Desire2Learn Digital Media Services – Kaltura v3.0 User Manual 25
NOTE: To upload another file, click Upload captions file again and repeat from step 3.
Managing Captions After you upload captions for a video, in the caption table you can:
• Modify the caption language or label. • Change the default caption file. • Delete a caption file. • Download a caption file.
To modify the language or the caption selector label
Do one of the following: 1.
o On your My Media page, click Edit for the media you want to edit.
o On the view entry page of an entry you uploaded, click Actions and select Edit
Open the Captions tab to display the caption table. 2. In the caption table, click Change and do the following: 3.
o To change the language, select a new language in the Language column.
o To change the label, enter new text in the Label column.
Click the disk icon to update the values. 4.
To change the caption file used by default in the media player
Do one of the following: 1.
Managing Your Media
Desire2Learn Digital Media Services – Kaltura v3.0 User Manual 26
o On your My Media page, click Edit for the media you want to edit.
o On the view entry page of an entry you uploaded, click Actions and select Edit
Open the Captions tab to display the caption table. 2. In the caption table, click on the checkmark icon in the right column of a caption row to Set as 3.
default.
To delete a caption file
Do one of the following: 1.
o On your My Media page, click Edit for the media you want to edit.
o On the view entry page of an entry you uploaded, click Actions and select Edit
Open the Captions tab to display the caption table. 2. In the caption table, click on the “x” icon to Delete. 3. In the Confirm Remove window, click Yes to remove the caption file. 4.
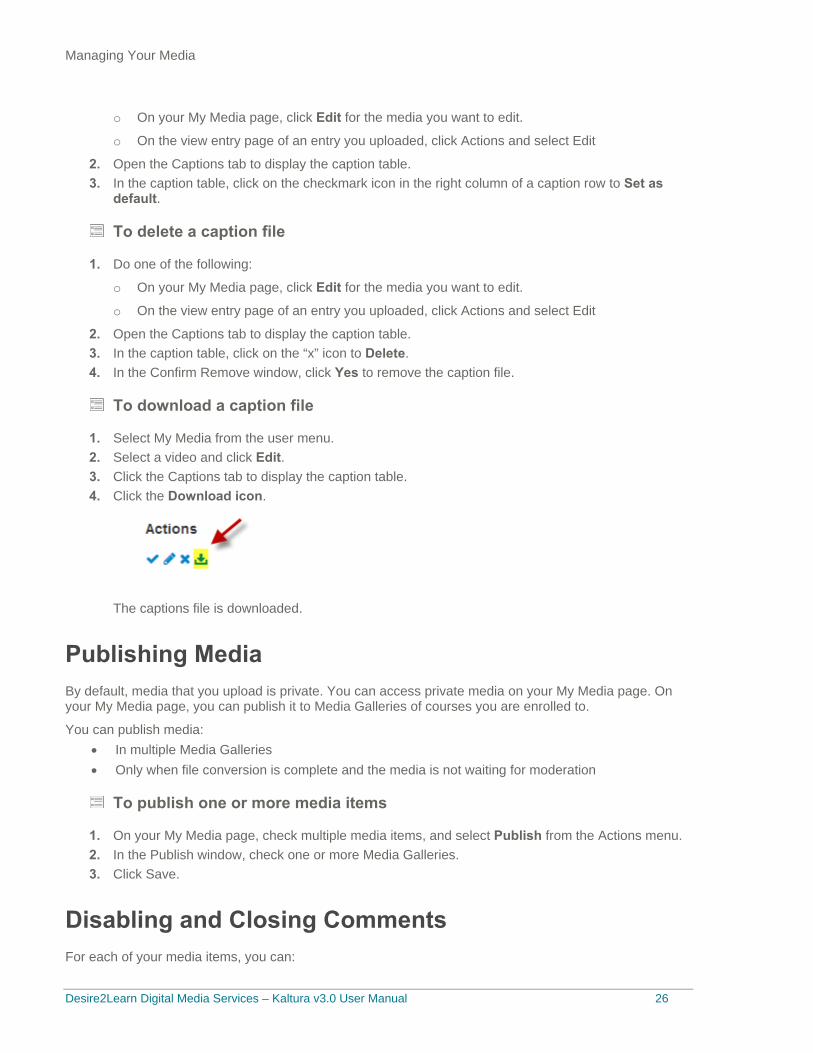
To download a caption file
Select My Media from the user menu. 1. Select a video and click Edit. 2. Click the Captions tab to display the caption table. 3. Click the Download icon. 4.
The captions file is downloaded.
Publishing Media By default, media that you upload is private. You can access private media on your My Media page. On your My Media page, you can publish it to Media Galleries of courses you are enrolled to.
You can publish media: • In multiple Media Galleries • Only when file conversion is complete and the media is not waiting for moderation
To publish one or more media items
On your My Media page, check multiple media items, and select Publish from the Actions menu. 1. In the Publish window, check one or more Media Galleries. 2. Click Save. 3.
Disabling and Closing Comments For each of your media items, you can:
Managing Your Media
Desire2Learn Digital Media Services – Kaltura v3.0 User Manual 27
• Disable the comment feature. • Prevent additional comments.
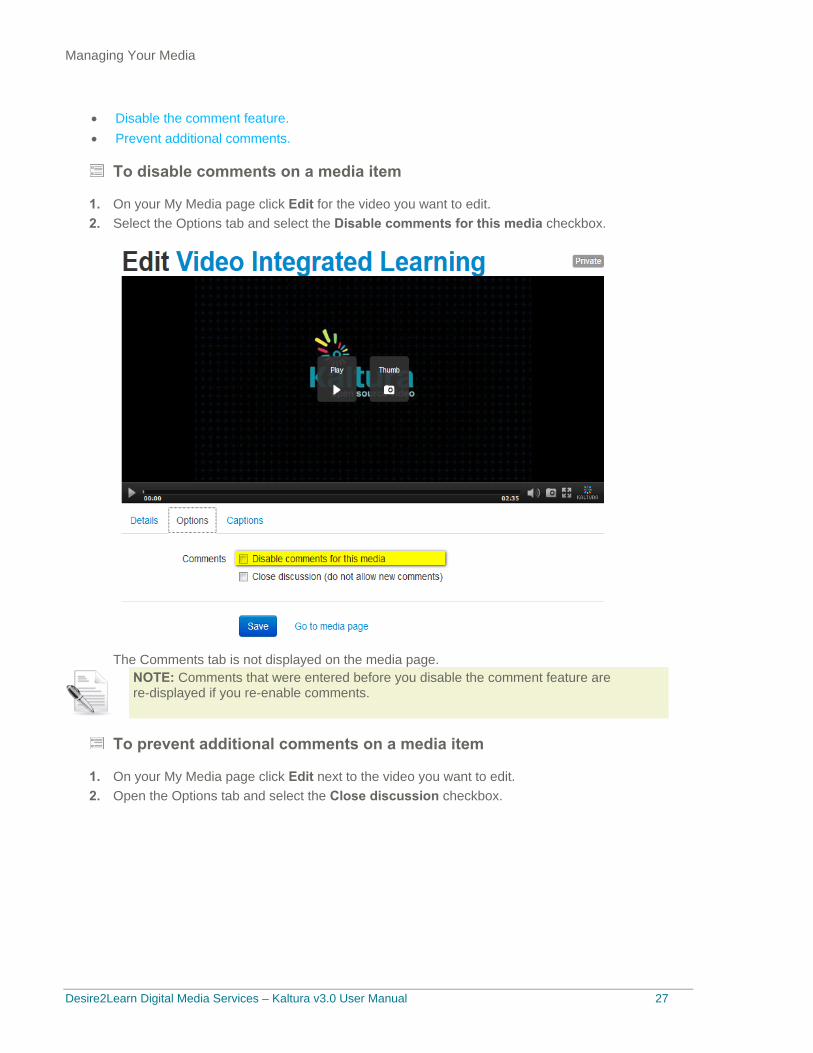
To disable comments on a media item
On your My Media page click Edit for the video you want to edit. 1. Select the Options tab and select the Disable comments for this media checkbox. 2.
The Comments tab is not displayed on the media page.
NOTE: Comments that were entered before you disable the comment feature are re-displayed if you re-enable comments.
To prevent additional comments on a media item
On your My Media page click Edit next to the video you want to edit. 1. Open the Options tab and select the Close discussion checkbox. 2.

Managing Your Media
Desire2Learn Digital Media Services – Kaltura v3.0 User Manual 28
On the Comments tab of the media page, Comments closed is displayed and the Add a Comment field is not displayed.
Desire2Learn Digital Media Services – Kaltura v3.0 User Manual 29
SECTION 7
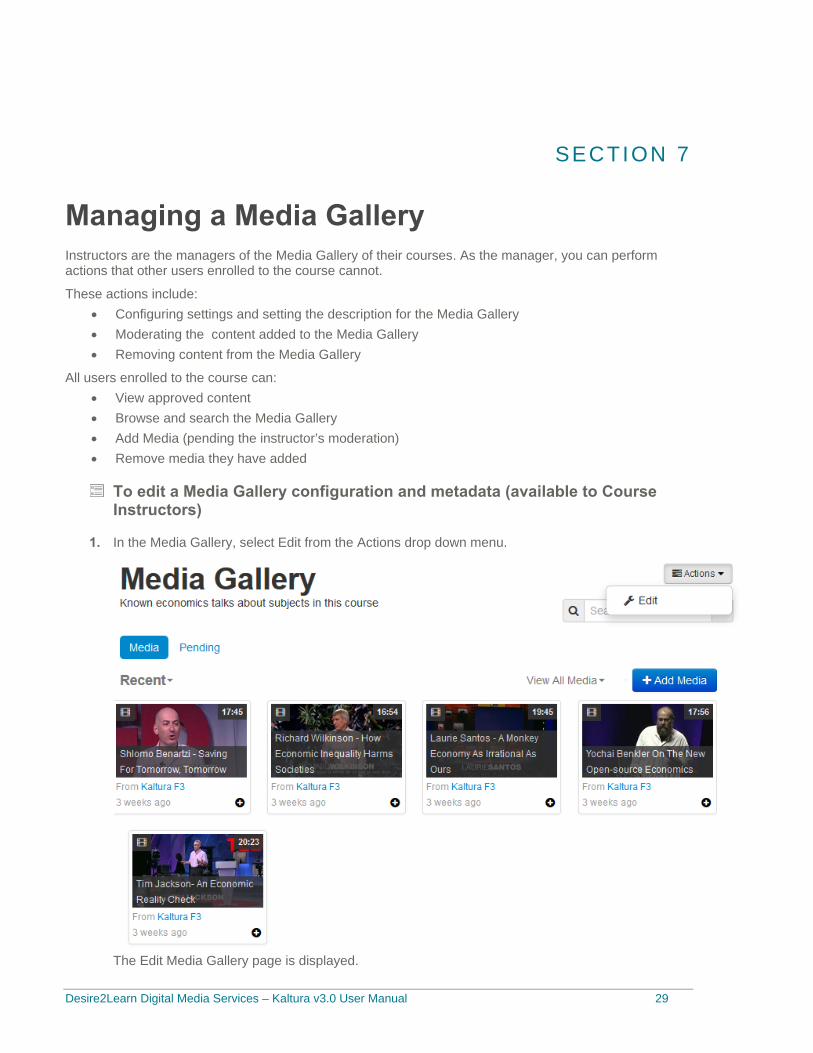
Managing a Media Gallery Instructors are the managers of the Media Gallery of their courses. As the manager, you can perform actions that other users enrolled to the course cannot.
These actions include: • Configuring settings and setting the description for the Media Gallery • Moderating the content added to the Media Gallery • Removing content from the Media Gallery
All users enrolled to the course can: • View approved content • Browse and search the Media Gallery • Add Media (pending the instructor’s moderation) • Remove media they have added
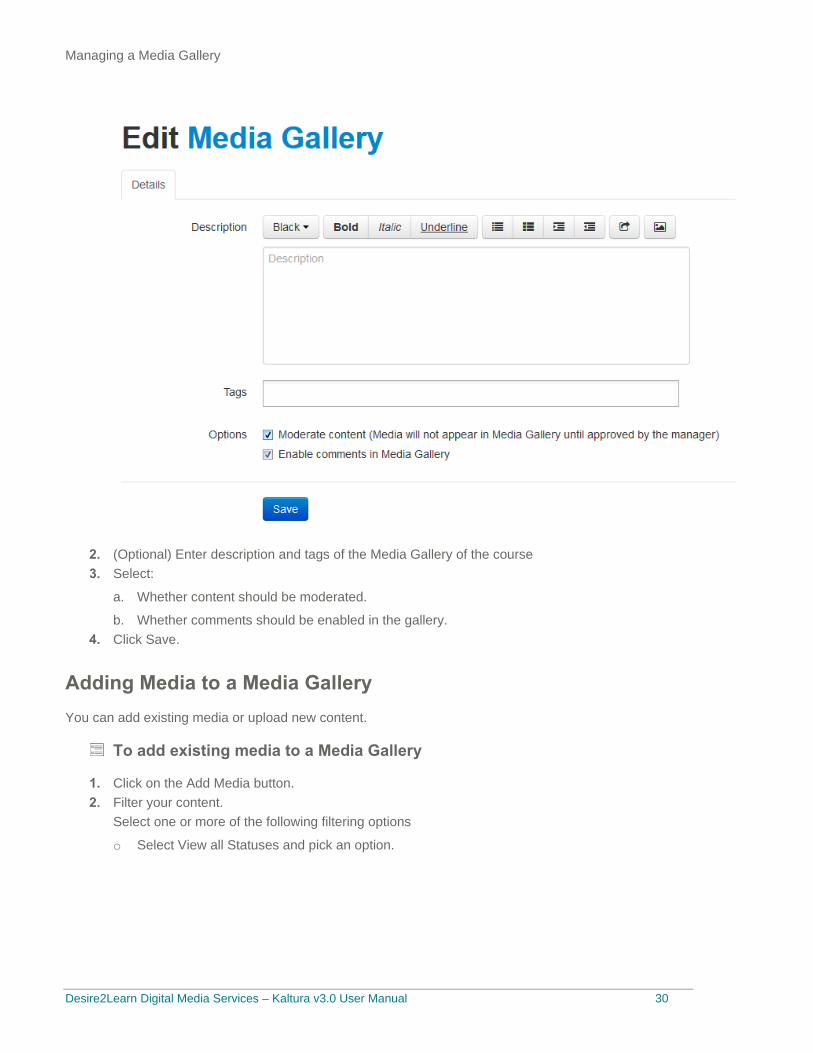
To edit a Media Gallery configuration and metadata (available to Course Instructors)
In the Media Gallery, select Edit from the Actions drop down menu. 1.
The Edit Media Gallery page is displayed.
Managing a Media Gallery
Desire2Learn Digital Media Services – Kaltura v3.0 User Manual 30
(Optional) Enter description and tags of the Media Gallery of the course 2. Select: 3.
a. Whether content should be moderated.
b. Whether comments should be enabled in the gallery. Click Save. 4.
Adding Media to a Media Gallery You can add existing media or upload new content.
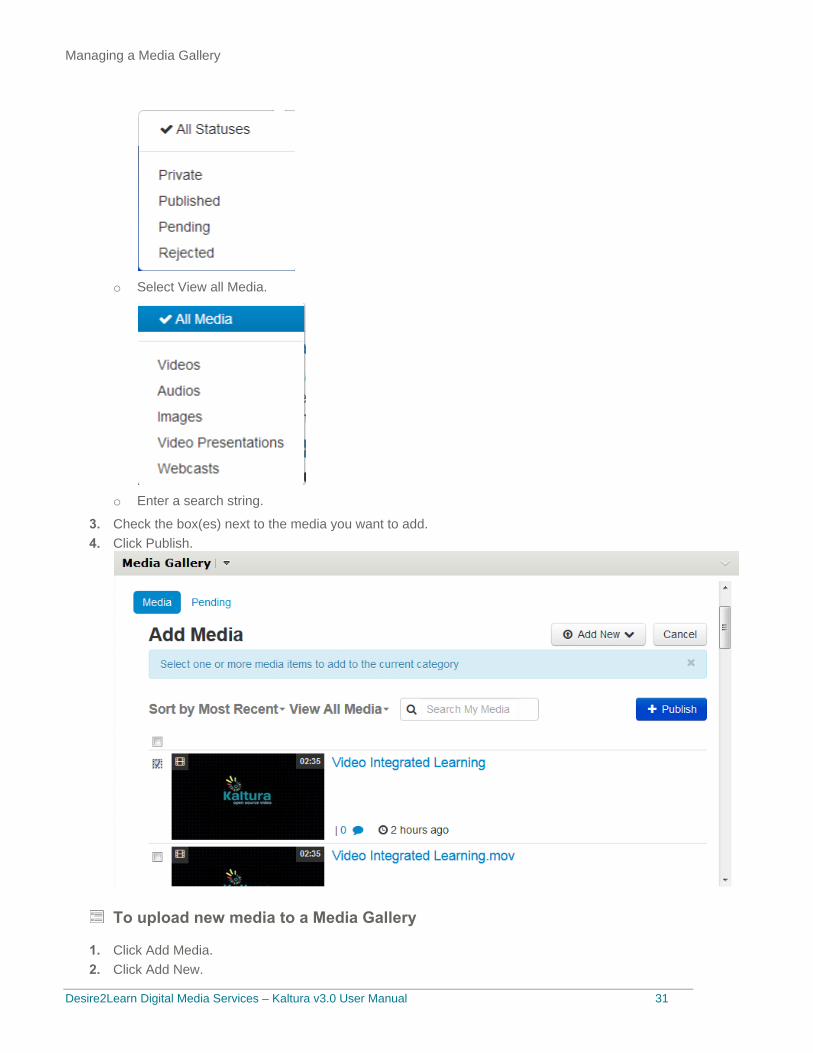
To add existing media to a Media Gallery
Click on the Add Media button. 1. Filter your content. 2.
Select one or more of the following filtering options
o Select View all Statuses and pick an option.
Managing a Media Gallery
Desire2Learn Digital Media Services – Kaltura v3.0 User Manual 31
o Select View all Media.
o Enter a search string.
Check the box(es) next to the media you want to add. 3. Click Publish. 4.
To upload new media to a Media Gallery
Click Add Media. 1. Click Add New. 2.
Managing a Media Gallery
Desire2Learn Digital Media Services – Kaltura v3.0 User Manual 32
Select the desired authoring method. 3. Continue as described in Creating New Media. 4.
The new media item/s will automatically be published to the Media Gallery it was initiated from.
Moderating Channel Content (available to Course Instructors) Course instructors may approve or reject content from the Media Gallery.
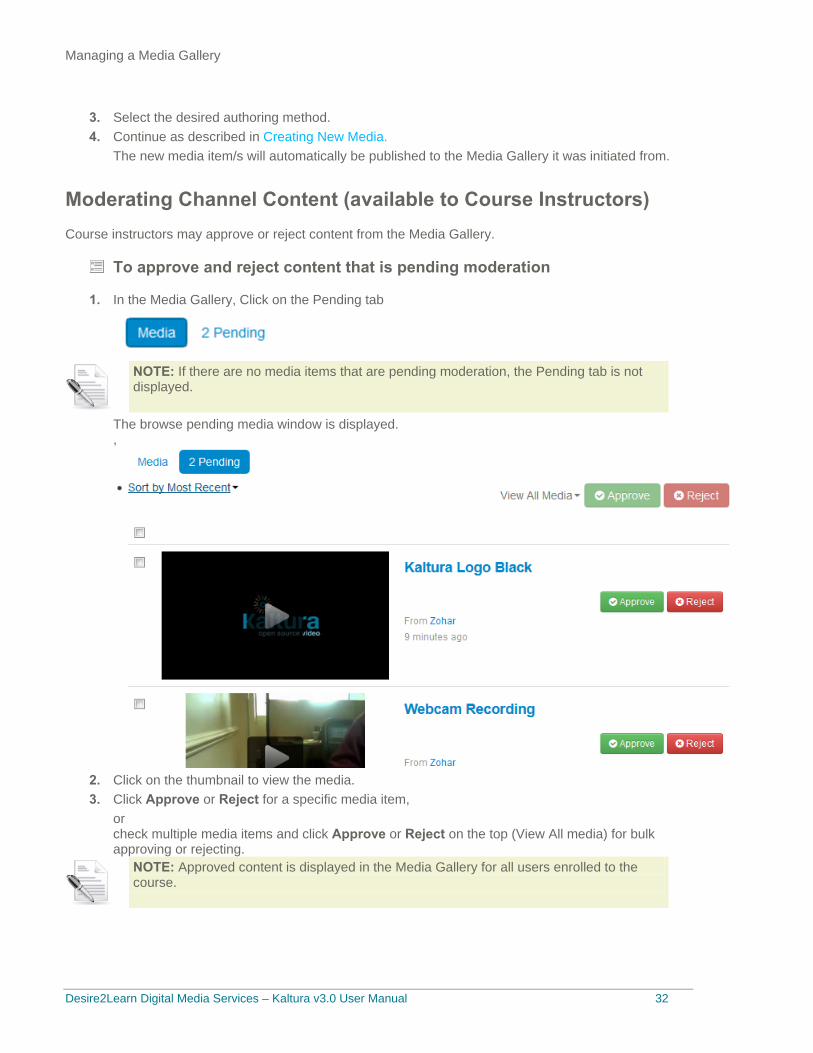
To approve and reject content that is pending moderation
In the Media Gallery, Click on the Pending tab 1.
NOTE: If there are no media items that are pending moderation, the Pending tab is not displayed.
The browse pending media window is displayed. ,
Click on the thumbnail to view the media. 2. Click Approve or Reject for a specific media item, 3.
or check multiple media items and click Approve or Reject on the top (View All media) for bulk approving or rejecting.
NOTE: Approved content is displayed in the Media Gallery for all users enrolled to the course.

Desire2Learn Digital Media Services – Kaltura v3.0 User Manual 33
SECTION 8
Adding Media in Other Tools with the HTML Editor The HTML editor is present in many tools throughout the LMS, such as Content and Discussions.
Use the Insert Stuff button, to add media to any tool that you can use. You can select to use existing media or create new media.
For detailed instructions, please refer to Desire2Learn’s Digital Media Services 3.0 User Guide on the Desire2Learn Community (Account Required).