desktop publishing terms overviedesktop publishing desktop publishing terms overview 16 introductory...
TRANSCRIPT
Desktop Publishing Desktop Publishing Terms Overview 16
INTRODUCTORY CONCEPTS Desktop Publishing Terms
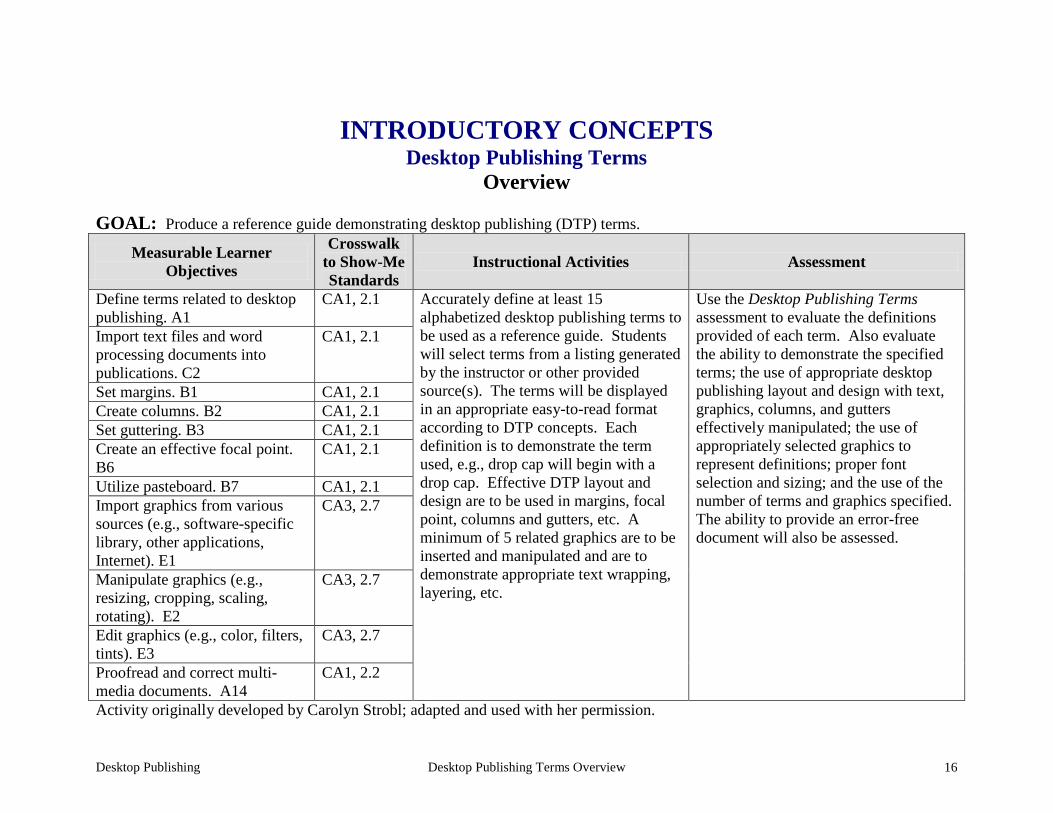
Overview GOAL: Produce a reference guide demonstrating desktop publishing (DTP) terms.
Measurable Learner Objectives
Crosswalk to Show-Me Standards
Instructional Activities Assessment
Define terms related to desktop publishing. A1
CA1, 2.1 Accurately define at least 15 alphabetized desktop publishing terms to be used as a reference guide. Students will select terms from a listing generated by the instructor or other provided source(s). The terms will be displayed in an appropriate easy-to-read format according to DTP concepts. Each definition is to demonstrate the term used, e.g., drop cap will begin with a drop cap. Effective DTP layout and design are to be used in margins, focal point, columns and gutters, etc. A minimum of 5 related graphics are to be inserted and manipulated and are to demonstrate appropriate text wrapping, layering, etc.
Use the Desktop Publishing Terms assessment to evaluate the definitions provided of each term. Also evaluate the ability to demonstrate the specified terms; the use of appropriate desktop publishing layout and design with text, graphics, columns, and gutters effectively manipulated; the use of appropriately selected graphics to represent definitions; proper font selection and sizing; and the use of the number of terms and graphics specified. The ability to provide an error-free document will also be assessed.
Import text files and word processing documents into publications. C2
CA1, 2.1
Set margins. B1 CA1, 2.1 Create columns. B2 CA1, 2.1 Set guttering. B3 CA1, 2.1 Create an effective focal point. B6
CA1, 2.1
Utilize pasteboard. B7 CA1, 2.1 Import graphics from various sources (e.g., software-specific library, other applications, Internet). E1
CA3, 2.7
Manipulate graphics (e.g., resizing, cropping, scaling, rotating). E2
CA3, 2.7
Edit graphics (e.g., color, filters, tints). E3
CA3, 2.7
Proofread and correct multi-media documents. A14
CA1, 2.2
Activity originally developed by Carolyn Strobl; adapted and used with her permission.
Desktop Publishing Desktop Publishing Terms Teaching Points 17
INTRODUCTORY CONCEPTS Desktop Publishing Terms
Teaching Points
Overview Desktop publishing (DTP) has become a viable occupation for many creative people. While the software has evolved over the years, the terminology has remained consistent. This assignment will allow students to demonstrate their understanding of selected DTP terms used throughout the semester and to use their creativity in producing a reference guide of terms. The instructor will provide a list from which students can select 15 terms for the reference guide. Content Review Review and/or teach the following with students:
1. DTP layout and design 2. Working with tables and columns 3. Importing word processing documents into a DTP program 4. Using graphics and images with text Activity Preparation Brainstorm with students the terms that have been used in DTP. Provide a list of DTP terms and check it against those brainstormed. Demonstrate the desktop publishing concepts of focal point, inserting and manipulating graphics, setting margins, using tables, textboxes, text wrapping, layering, balancing white space, and others as appropriate for the DTP software used. Discuss layout, design, and creativity in DTP. Select and demonstrate several terms that could be used by students. If a sample of the project is available, it could be provided for review. Resources Supplies needed for the activity: Computer Paper Printer DTP software
Desktop Publishing Desktop Publishing Terms Teaching Points 18
DTP dictionary Internet connection Websites (and/or key words to be used for search): http://desktoppub.about.com Information about many desktop publishing topics http://ict.cas.psu.edu/training/howto/pagemaker/ManipulatingGraphics.html Using graphics in PageMaker http://www.ettc.net/desktoppublishing/textbox.htm Using textboxes Key words: desktop publishing terms, DTP terms, graphics, manipulating graphics, DTP layout and design Books, articles, and other resources: Adobe Press. (2002). Adobe PageMaker 7.0. Upper Saddle River, NJ: Adobe Press (Prentice
Hall). Braveheart, R. (2003). Adobe PageMaker 7.0 basics. Boston, MA: Thomson Course
Technology. Lee, L. (2002). Introducing Adobe Photoshop elements. Upper Saddle River, NJ: Que/Sams
(Prentice Hall). Proot, K. (2003). Adobe PageMaker 7.0 – Illustrated. Boston, MA: Thomson Course
Technology. Reding, E. (2004). QuarkXPress 5 – Design professional. Boston, MA: Course Technology.
Romano, F. (1997). Delmar’s dictionary of digital printing & publishing. Albany, NY: Delmar Publishers (Thomson).
Weinmann, E., & Lourekas, P. (2003). Illustrator 10 for Windows and Macintosh: Visual
quickstart guide, student edition. Berkeley, CA: Peachpit Press (Pearson Education). Obtain books, videos, and other materials from Resources@MCCE http://www.resources.mcce.org.
Desktop Publishing Desktop Publishing Terms Teaching Points 19
Design Principles for Desktop Publishers Lichty, Tom Book – [4675—BE 11.0101 P L618] CA, WADSWORTH, 1994. Desktop Publishing: Getting the Message Out Video – This program introduces the key components of a basic DTP system including: a fast microprocessor, large hard drive storage capacity, CD-ROM drive, large-screen monitor, b/w-color printer and flatbed scanner and more. Learn about software, page layout programs, drawing programs, editing, clip art and lots more! [10547 – BE VIDEO 40] MERIDIAN, 2000. How To Create High Impact Designs; Over 90 Examples Of What Works And What Doesn’t For Creating Brochures, Newsletters, Ads, Reports, etc. Cleland, Jane K. Book – Examples of designs for printed materials [4336 – BE 50.0401 C589b] CO, CAREER TRACK, 1995.
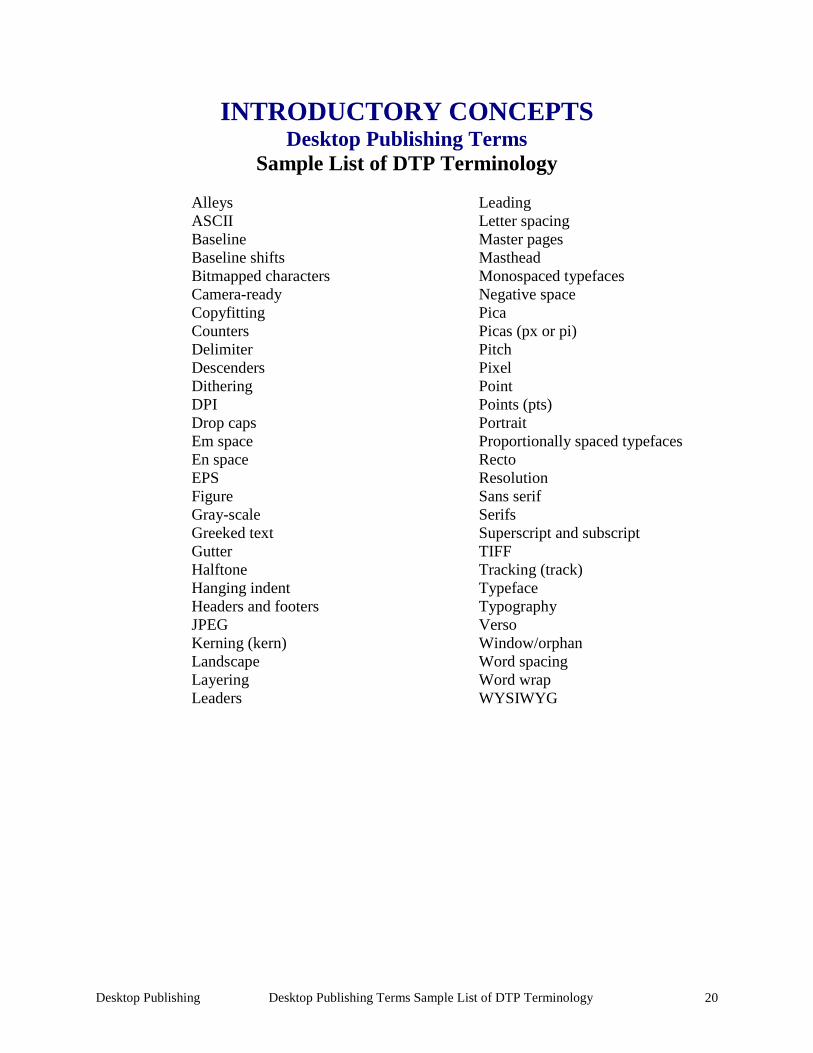
Desktop Publishing Desktop Publishing Terms Sample List of DTP Terminology 20
INTRODUCTORY CONCEPTS Desktop Publishing Terms
Sample List of DTP Terminology
Alleys ASCII Baseline Baseline shifts Bitmapped characters Camera-ready Copyfitting Counters Delimiter Descenders Dithering DPI Drop caps Em space En space EPS Figure Gray-scale Greeked text Gutter Halftone Hanging indent Headers and footers JPEG Kerning (kern) Landscape Layering Leaders
Leading Letter spacing Master pages Masthead Monospaced typefaces Negative space Pica Picas (px or pi) Pitch Pixel Point Points (pts) Portrait Proportionally spaced typefaces Recto Resolution Sans serif Serifs Superscript and subscript TIFF Tracking (track) Typeface Typography Verso Window/orphan Word spacing Word wrap WYSIWYG
Desktop Publishing Desktop Publishing Terms Assignment 21
INTRODUCTORY CONCEPTS Desktop Publishing Terms
Assignment
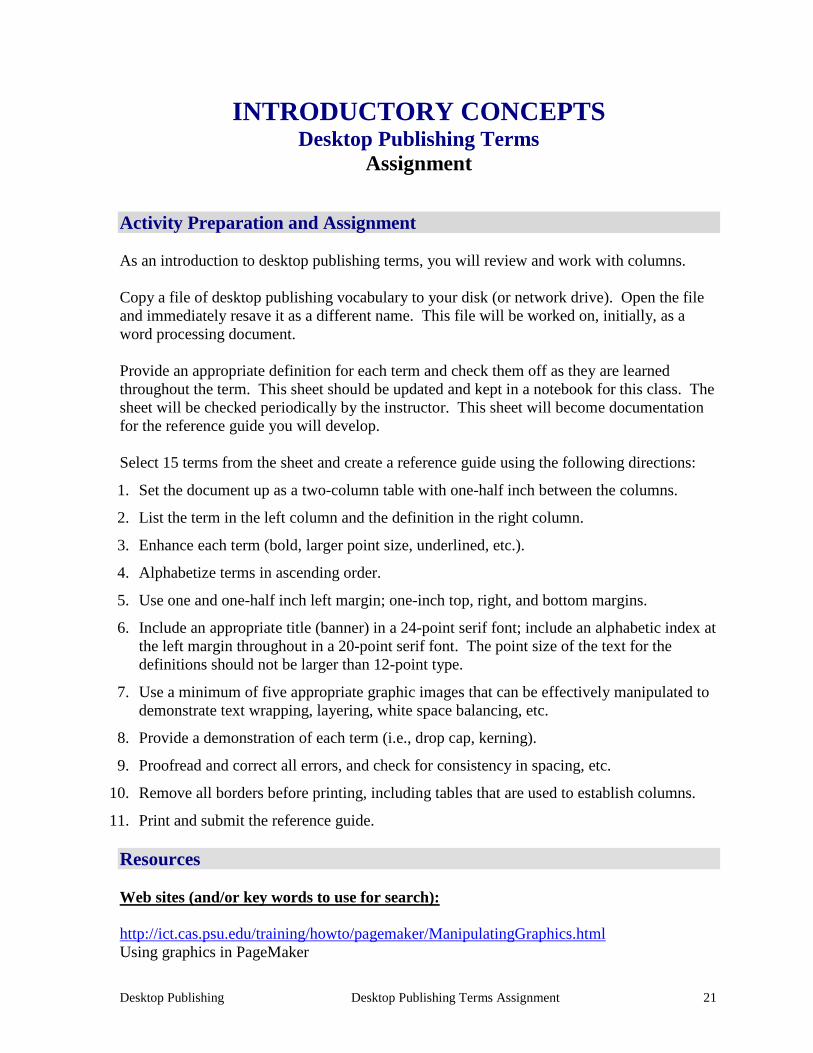
Activity Preparation and Assignment As an introduction to desktop publishing terms, you will review and work with columns. Copy a file of desktop publishing vocabulary to your disk (or network drive). Open the file and immediately resave it as a different name. This file will be worked on, initially, as a word processing document. Provide an appropriate definition for each term and check them off as they are learned throughout the term. This sheet should be updated and kept in a notebook for this class. The sheet will be checked periodically by the instructor. This sheet will become documentation for the reference guide you will develop. Select 15 terms from the sheet and create a reference guide using the following directions:
1. Set the document up as a two-column table with one-half inch between the columns.
2. List the term in the left column and the definition in the right column.
3. Enhance each term (bold, larger point size, underlined, etc.).
4. Alphabetize terms in ascending order.
5. Use one and one-half inch left margin; one-inch top, right, and bottom margins.
6. Include an appropriate title (banner) in a 24-point serif font; include an alphabetic index at the left margin throughout in a 20-point serif font. The point size of the text for the definitions should not be larger than 12-point type.
7. Use a minimum of five appropriate graphic images that can be effectively manipulated to demonstrate text wrapping, layering, white space balancing, etc.
8. Provide a demonstration of each term (i.e., drop cap, kerning).
9. Proofread and correct all errors, and check for consistency in spacing, etc.
10. Remove all borders before printing, including tables that are used to establish columns.
11. Print and submit the reference guide. Resources Web sites (and/or key words to use for search): http://ict.cas.psu.edu/training/howto/pagemaker/ManipulatingGraphics.html Using graphics in PageMaker
Desktop Publishing Desktop Publishing Terms Assignment 22
http://www.ettc.net/desktoppublishing/textbox.htm Using textboxes Key words: desktop publishing terms, DTP terms, graphics, manipulating graphics, DTP layout and design
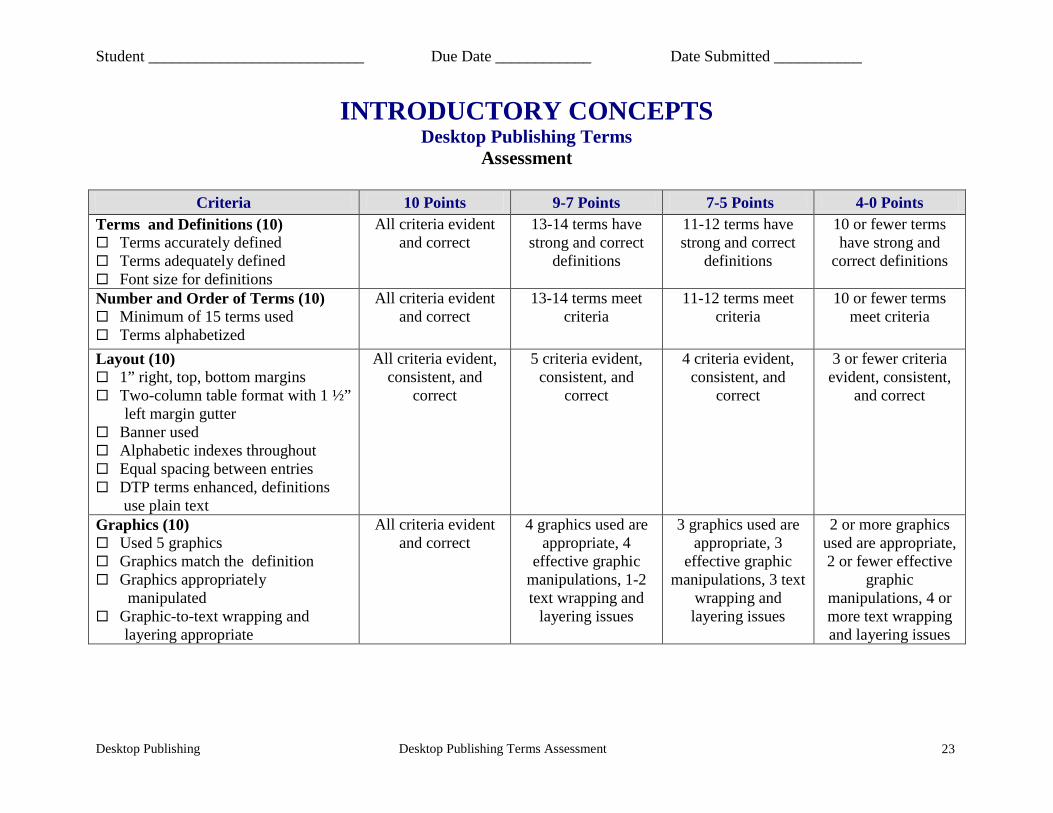
Student ___________________________ Due Date ____________ Date Submitted ___________
Desktop Publishing Desktop Publishing Terms Assessment 23
INTRODUCTORY CONCEPTS Desktop Publishing Terms
Assessment
Criteria 10 Points 9-7 Points 7-5 Points 4-0 Points Terms and Definitions (10) Terms accurately defined Terms adequately defined Font size for definitions
All criteria evident and correct
13-14 terms have strong and correct
definitions
11-12 terms have strong and correct
definitions
10 or fewer terms have strong and
correct definitions
Number and Order of Terms (10) Minimum of 15 terms used Terms alphabetized
All criteria evident and correct
13-14 terms meet criteria
11-12 terms meet criteria
10 or fewer terms meet criteria
Layout (10) 1” right, top, bottom margins Two-column table format with 1 ½”
left margin gutter Banner used Alphabetic indexes throughout Equal spacing between entries DTP terms enhanced, definitions use plain text
All criteria evident, consistent, and
correct
5 criteria evident, consistent, and
correct
4 criteria evident, consistent, and
correct
3 or fewer criteria evident, consistent,
and correct
Graphics (10) Used 5 graphics Graphics match the definition Graphics appropriately manipulated Graphic-to-text wrapping and
layering appropriate
All criteria evident and correct
4 graphics used are appropriate, 4
effective graphic manipulations, 1-2 text wrapping and
layering issues
3 graphics used are appropriate, 3
effective graphic manipulations, 3 text
wrapping and layering issues
2 or more graphics used are appropriate, 2 or fewer effective
graphic manipulations, 4 or more text wrapping and layering issues
Student ___________________________ Due Date ____________ Date Submitted ___________
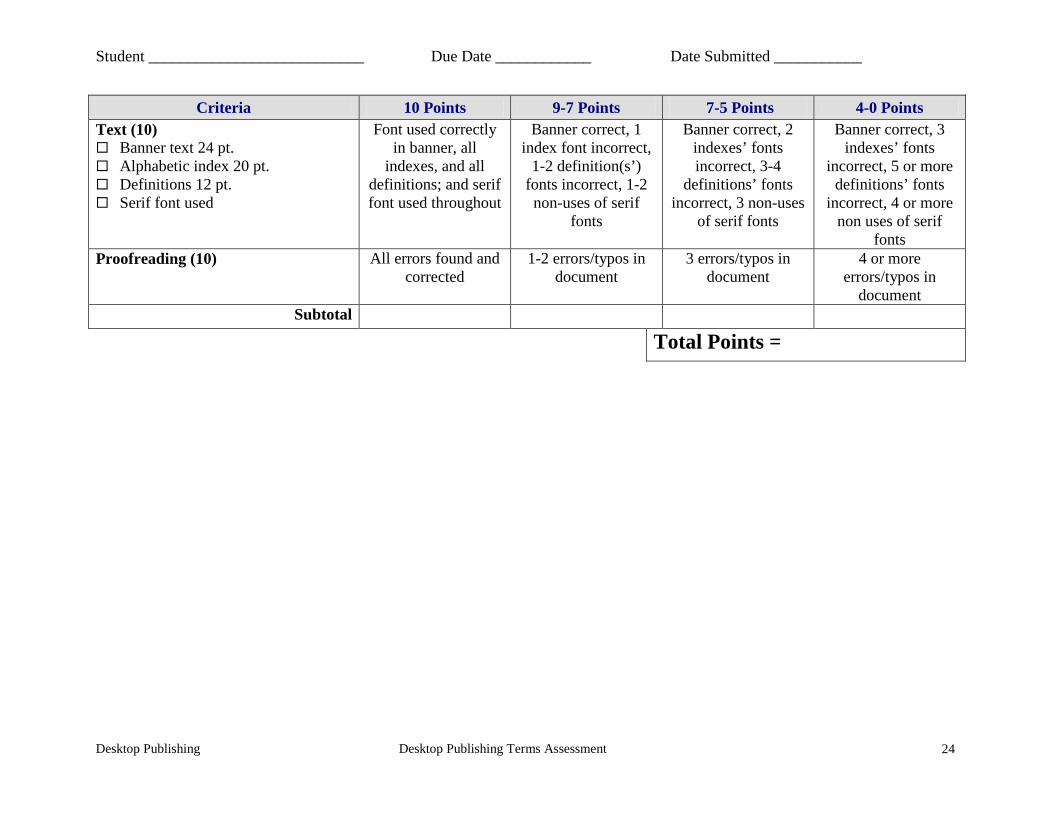
Desktop Publishing Desktop Publishing Terms Assessment 24
Criteria 10 Points 9-7 Points 7-5 Points 4-0 Points Text (10) Banner text 24 pt. Alphabetic index 20 pt. Definitions 12 pt. Serif font used
Font used correctly in banner, all
indexes, and all definitions; and serif font used throughout
Banner correct, 1 index font incorrect,
1-2 definition(s’) fonts incorrect, 1-2 non-uses of serif
fonts
Banner correct, 2 indexes’ fonts incorrect, 3-4
definitions’ fonts incorrect, 3 non-uses
of serif fonts
Banner correct, 3 indexes’ fonts
incorrect, 5 or more definitions’ fonts
incorrect, 4 or more non uses of serif
fonts Proofreading (10) All errors found and
corrected 1-2 errors/typos in
document 3 errors/typos in
document 4 or more
errors/typos in document
Subtotal
Total Points =

Desktop Publishing Bookmarks Overview 25
DEVELOP A PORTFOLIO Bookmarks Overview
GOAL: Develop a two-sided bookmark to be used as door prizes for meetings and/or gifts for teachers, advisory board members, or family members.
Measurable Learner Objectives
Crosswalk to Show-Me Standards
Instructional Activities Assessment
Create multi-page, multicolumn documents (single or multiple pages). G7
CA4, 2.1 Create two-sided bookmarks to be used for personal distribution. The bookmarks will be positioned using a layout represented by four columns of an 8 ½ x 11 sheet in landscape orientation. Information will be printed on both sides (front and back) of the bookmark. A ribbon will be later attached to a hole placed in the bookmark. Decide on the page layout (four columns) and determine what will appear on each column and on each side of the sheet. Use appropriate margins and gutters for effective column width and position. Adjust the paragraph attributes, tabs, and indentations by considering the width of each column, overall layout requirements, and text objects. Compose suitable headlines and captions. Use appropriate graphics
Use the Bookmarks assessment to evaluate the two-sided bookmarks. Evaluate the bookmarks for effective use of margins, gutters, columns, text, text objects and associated features, headlines, captions, paragraph attributes, tabs, and indents. Evaluate the appropriateness and appropriate use of graphics and images in the bookmarks. Also evaluate the attractiveness of the bookmark for alignment (front with back and hole for attached ribbon).
Manage electronic files. A9
CA3, 1.8
Set margins. B1 CA1, 2.1 Create columns. B2 CA1, 2.1 Set guttering. B3 CA1, 2.1 Use text objects and associated features (e.g., word wrapping, drop caps, initial caps, sizing, color, linkage, frames). C3
CA1, 2.1
Adjust paragraphs attributes. C3
CA1, 2.1
Apply tabs and indents in text blocks. C5
CA1, 2.1
Compose headlines and captions. C7
CA1, 2.1
Desktop Publishing Bookmarks Overview 26
Measurable Learner Objectives
Crosswalk to Show-Me Standards
Instructional Activities Assessment
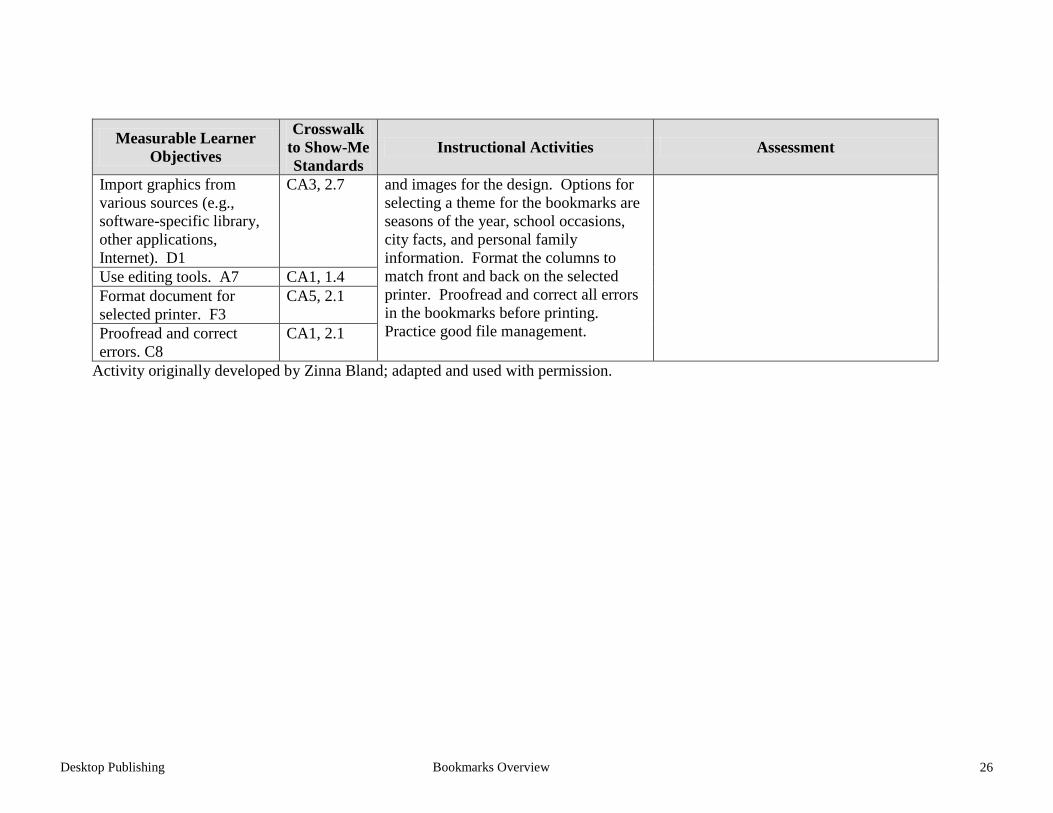
Import graphics from various sources (e.g., software-specific library, other applications, Internet). D1
CA3, 2.7 and images for the design. Options for selecting a theme for the bookmarks are seasons of the year, school occasions, city facts, and personal family information. Format the columns to match front and back on the selected printer. Proofread and correct all errors in the bookmarks before printing. Practice good file management.
Use editing tools. A7 CA1, 1.4 Format document for selected printer. F3
CA5, 2.1
Proofread and correct errors. C8
CA1, 2.1
Activity originally developed by Zinna Bland; adapted and used with permission.
Desktop Publishing Bookmarks Teaching Points 27
DEVELOP A PORTFOLIO
Bookmarks Teaching Points
Overview Bookmarks are used as place holders for readers. The designs on bookmarks are creative, seasonal, personal, and sometimes thought provoking. Some bookmarks have accessories, such as ribbons, pins, embossed items, flowers, or other items to draw attention or create an atmosphere of relevance. This assignment will allow students to create two-sided bookmarks from a selected theme to be used for personal distribution. Content Review Review and/or demonstrate the following as needed: 1. Basic desktop publishing layout and design 2. Four column, front-and-back, bookmark layout and design 3. Tabs and indentations for smaller spaces 4. Using text objects, headlines, and captions 5. Using and manipulating graphics and other objects in layouts 6. Lamination process 7. Duplex printing or printing on both sides 8. Match front and back without overlap from the grab area of the printer Activity Preparation Have students collect bookmarks (or have a portfolio of examples available) for students to review and discuss. Brainstorm with students the information to be included on each side of a two-sided bookmark (front and back). Discuss and demonstrate the use of columns, gutters, and margins in the layout and design. Discuss paragraph attributes, tabs, and indentations within smaller spaces. Newspapers are good examples for many of these concepts. Brainstorm possible themes for bookmarks. Discuss appropriateness of content for the assignment. Discuss the use of headlines and captions, graphics, images, and real objects to represent the theme. Discuss and demonstrate printer options for printing a two-sided, bookmark (front and back). Discuss when and how to apply decorative objects.
Desktop Publishing Bookmarks Teaching Points 28
Demonstrate the lamination process, with and without decorative objects attached. Review methods of proofreading. Review file management procedures. Resources Supplies needed for the activity: Computer Desktop publishing software or advanced features of a word processing package Internet connection Paper Printer (preferably color, duplex capabilities) Lamination sheet and laminating machine Paper cutter Portfolio of bookmarks Ribbons of varying colors Scissors Hole punch Other (determined by bookmark design) Websites (and/or key words to use for search): http://atto.buffalo.edu/registered/Tutorials/msword/MS%20Designing%20Bookmarks.doc Designing bookmarks in Word http://familycrafts.about.com/gi/dynamic/offsite.htm?site=http%3A%2F%2Fwww.kidprintables.com%2Fbookmarks%2F Some samples/examples of printable bookmarks http://www.bookpool.com/.x/4j2dy338d0/b4/ Adobe bookmark design contest http://www.idreamofscrapping.com/Default.asp?ID=1437 How to make bookmarks http://desktoppub.about.com/?once=true& Article on desktop publishing Key words: bookmarks, desktop publishing Books, articles, and other resources: Braveheart, R. (2003). Adobe PageMaker 7.0 basics. Boston, MA: Thomson Course
Technology. Counts, E. L. (2004). Multimedia design and production for students and teachers. Boston,
MA: Allyn and Bacon (Pearson Education).
Desktop Publishing Bookmarks Teaching Points 29
Lee, L. (2002). Introducing Adobe Photoshop elements. Upper Saddle River, NJ: Que/Sams
(Prentice Hall). Proot, K. (2003). Adobe PageMaker 7.0 – Illustrated. Boston, MA: Thomson Course
Technology. Reding, E. (2004). QuarkXPress 5 – Design professional. Boston, MA: Thomson Course
Technology. Solomon, A.W. (2004). Introduction to multimedia. Columbus, OH: Glencoe (McGraw-
Hill). Obtain books, videos, and other materials from Resources@MCCE http://www.resources.mcce.org. Design Principles for Desktop Publishers Lichty, Tom Book – [4675—BE 11.0101 P L618] CA, WADSWORTH, 1994. Desktop Publishing: Getting the Message Out Video – This program introduces the key components of a basic DTP system including: a fast microprocessor, large hard drive storage capacity, CD-ROM drive, large-screen monitor, b/w-color printer and flatbed scanner and more. Learn about software, page layout programs, drawing programs, editing, clip art and lots more! [10547 – BE VIDEO 40] MERIDIAN, 2000. How To Create High Impact Designs; Over 90 Examples Of What Works And What Doesn’t For Creating Brochures, Newsletters, Ads, Reports, etc. Cleland, Jane K. Book – Examples of designs for printed materials [4336—BE 50.0401 C589b] CO, CAREER TRACK, 1995.
Desktop Publishing Bookmarks Assignment 30
DEVELOP A PORTFOLIO Bookmarks Assignment
Activity Preparation and Assignment
In this assignment you will develop a theme then create two-sided bookmarks to be used for personal distributions.
Use the following guidelines to create your bookmarks:
1. Develop a theme for two-side bookmarks. Have the theme approved by the instructor.
2. Collect images, graphics, pictures, and/or objects that can be used to represent the theme for your bookmarks.
3. Sketch the layout for each side of the two-sided bookmarks (front and back) to
represent the theme.
4. Preview collected bookmarks and/or newspapers and magazines for ideas on columns, guttering, and margins for paragraph attributes, tabs, and indentations. Also review text objects and associated features before starting to key your bookmarks. Observe the use and placement of graphics and the use of text around each graphic. Notice the use of objects, if used, on any bookmarks. Watch for good and poor usage of these concepts.
5. Set the layout and text attributes for your bookmark according to the sketched copy.
Considering the observation of good practices to be emulated in your design, input your text and graphics. Observe good text to graphic placement. Remember to leave space if an object will be used.
6. The set up should be on an 8 ½ x 11 sheet in landscape orientation with four columns.
7. Use appropriate headliners and captions.
8. Proofread each page (front and back) and print a black-and-white copy.
9. Proofread the black-and-white copy, observe the layout and design requirements and
mark any errors or elements that will need to be changed.
10. Make all corrections and double check for errors. Print a color copy (front and back).
11. Laminate the color copy and cut along column gutters to make four bookmarks. Punch a hole in an appropriate spacing at the top, bottom or top corner and tie a piece of appropriately cut and suitable color ribbon in the hole.
12. Submit the bookmarks and sketch for evaluation and grading.
13. Obtain a print screen of the folder in Details view and submit it with the project.
Desktop Publishing Bookmarks Assignment 31
Resources Web sites (and/or key words to use for search): http://atto.buffalo.edu/registered/Tutorials/msword/MS%20Designing%20Bookmarks.doc Designing bookmarks in Word http://familycrafts.about.com/gi/dynamic/offsite.htm?site=http%3A%2F%2Fwww.kidprintables.com%2Fbookmarks%2F Some samples/examples of printable bookmarks http://www.bookpool.com/.x/4j2dy338d0/b4/ Adobe bookmark design contest http://www.idreamofscrapping.com/Default.asp?ID=1437 How to make bookmarks Key words: bookmarks, desktop publishing
Student _________________________________ Due Date _______________ Date Submitted ______________
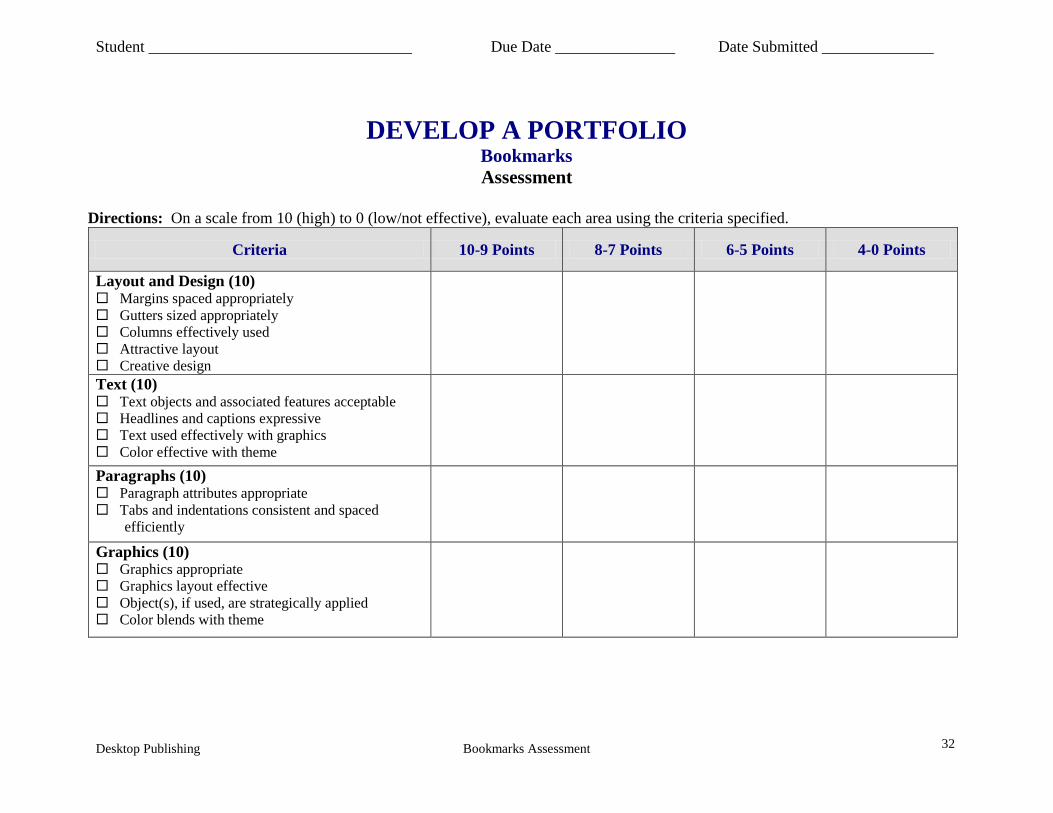
Desktop Publishing Bookmarks Assessment 32
DEVELOP A PORTFOLIO Bookmarks Assessment
Directions: On a scale from 10 (high) to 0 (low/not effective), evaluate each area using the criteria specified.
Criteria 10-9 Points 8-7 Points 6-5 Points 4-0 Points
Layout and Design (10) Margins spaced appropriately Gutters sized appropriately Columns effectively used Attractive layout Creative design
Text (10) Text objects and associated features acceptable Headlines and captions expressive Text used effectively with graphics Color effective with theme
Paragraphs (10) Paragraph attributes appropriate Tabs and indentations consistent and spaced
efficiently
Graphics (10) Graphics appropriate Graphics layout effective Object(s), if used, are strategically applied Color blends with theme
Student _________________________________ Due Date _______________ Date Submitted ______________
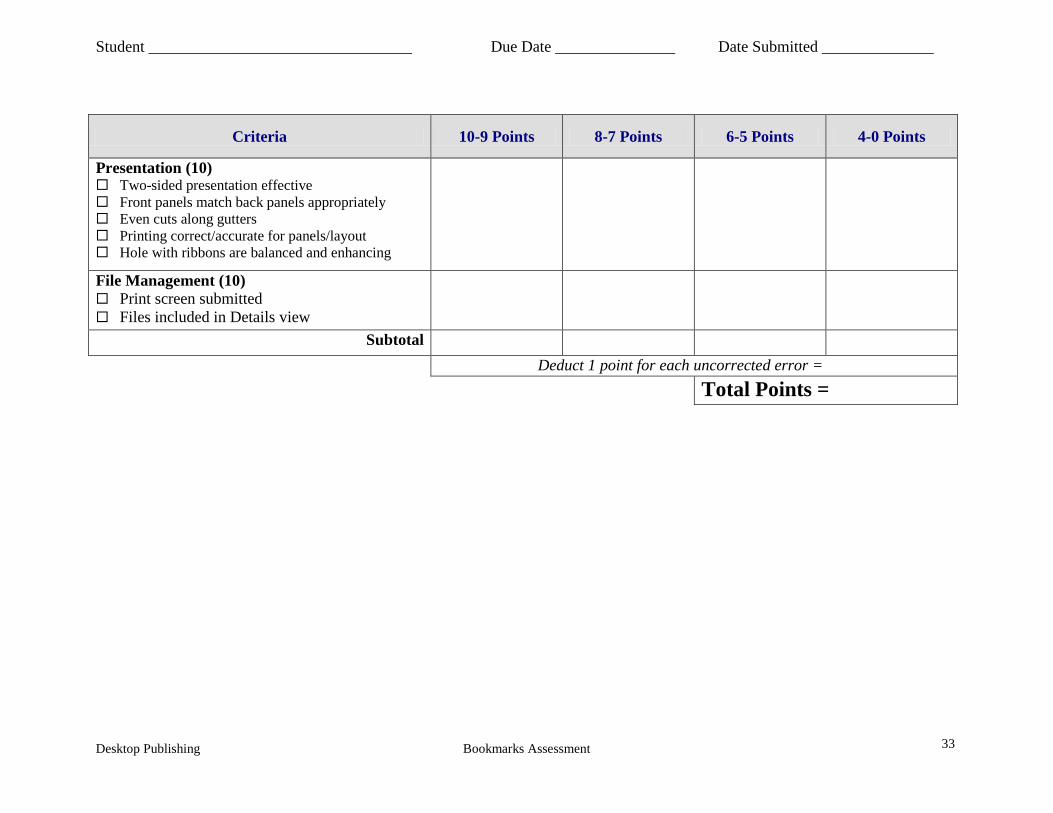
Desktop Publishing Bookmarks Assessment 33
Criteria 10-9 Points 8-7 Points 6-5 Points 4-0 Points
Presentation (10) Two-sided presentation effective Front panels match back panels appropriately Even cuts along gutters Printing correct/accurate for panels/layout Hole with ribbons are balanced and enhancing
File Management (10) Print screen submitted Files included in Details view
Subtotal Deduct 1 point for each uncorrected error =
Total Points =
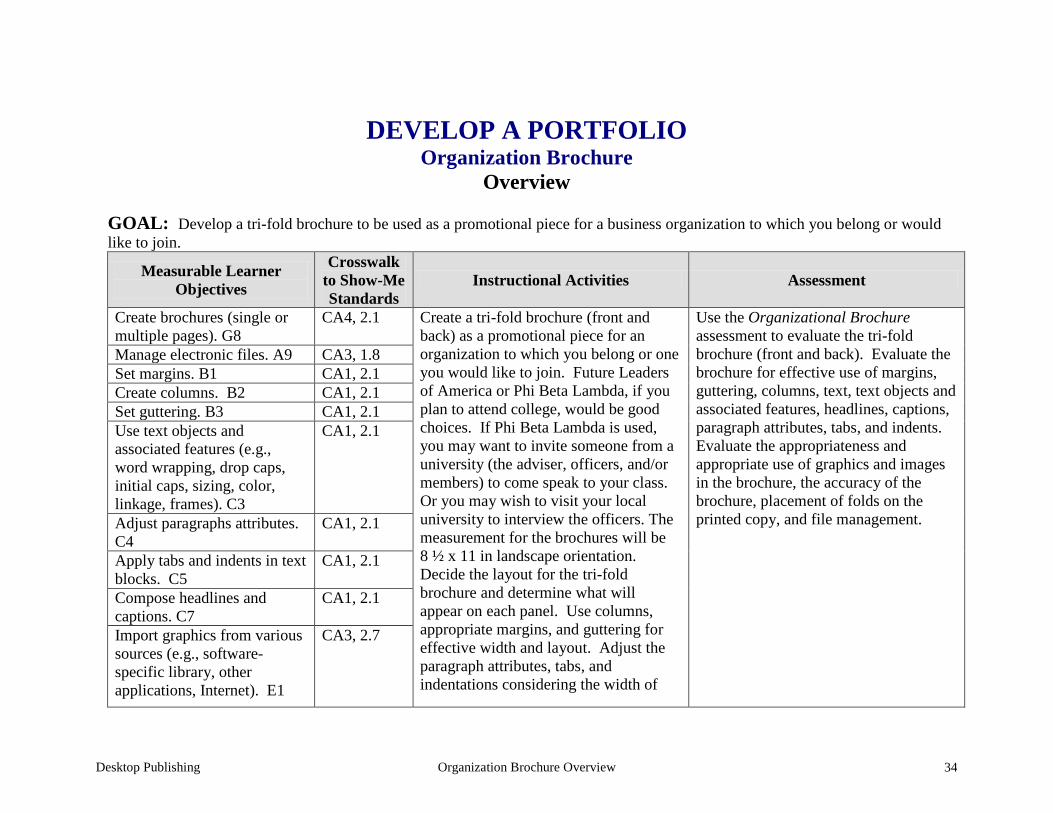
Desktop Publishing Organization Brochure Overview 34
DEVELOP A PORTFOLIO Organization Brochure
Overview
GOAL: Develop a tri-fold brochure to be used as a promotional piece for a business organization to which you belong or would like to join.
Measurable Learner Objectives
Crosswalk to Show-Me Standards
Instructional Activities Assessment
Create brochures (single or multiple pages). G8
CA4, 2.1 Create a tri-fold brochure (front and back) as a promotional piece for an organization to which you belong or one you would like to join. Future Leaders of America or Phi Beta Lambda, if you plan to attend college, would be good choices. If Phi Beta Lambda is used, you may want to invite someone from a university (the adviser, officers, and/or members) to come speak to your class. Or you may wish to visit your local university to interview the officers. The measurement for the brochures will be 8 ½ x 11 in landscape orientation. Decide the layout for the tri-fold brochure and determine what will appear on each panel. Use columns, appropriate margins, and guttering for effective width and layout. Adjust the paragraph attributes, tabs, and indentations considering the width of
Use the Organizational Brochure assessment to evaluate the tri-fold brochure (front and back). Evaluate the brochure for effective use of margins, guttering, columns, text, text objects and associated features, headlines, captions, paragraph attributes, tabs, and indents. Evaluate the appropriateness and appropriate use of graphics and images in the brochure, the accuracy of the brochure, placement of folds on the printed copy, and file management.
Manage electronic files. A9 CA3, 1.8 Set margins. B1 CA1, 2.1 Create columns. B2 CA1, 2.1 Set guttering. B3 CA1, 2.1 Use text objects and associated features (e.g., word wrapping, drop caps, initial caps, sizing, color, linkage, frames). C3
CA1, 2.1
Adjust paragraphs attributes. C4
CA1, 2.1
Apply tabs and indents in text blocks. C5
CA1, 2.1
Compose headlines and captions. C7
CA1, 2.1
Import graphics from various sources (e.g., software-specific library, other applications, Internet). E1
CA3, 2.7
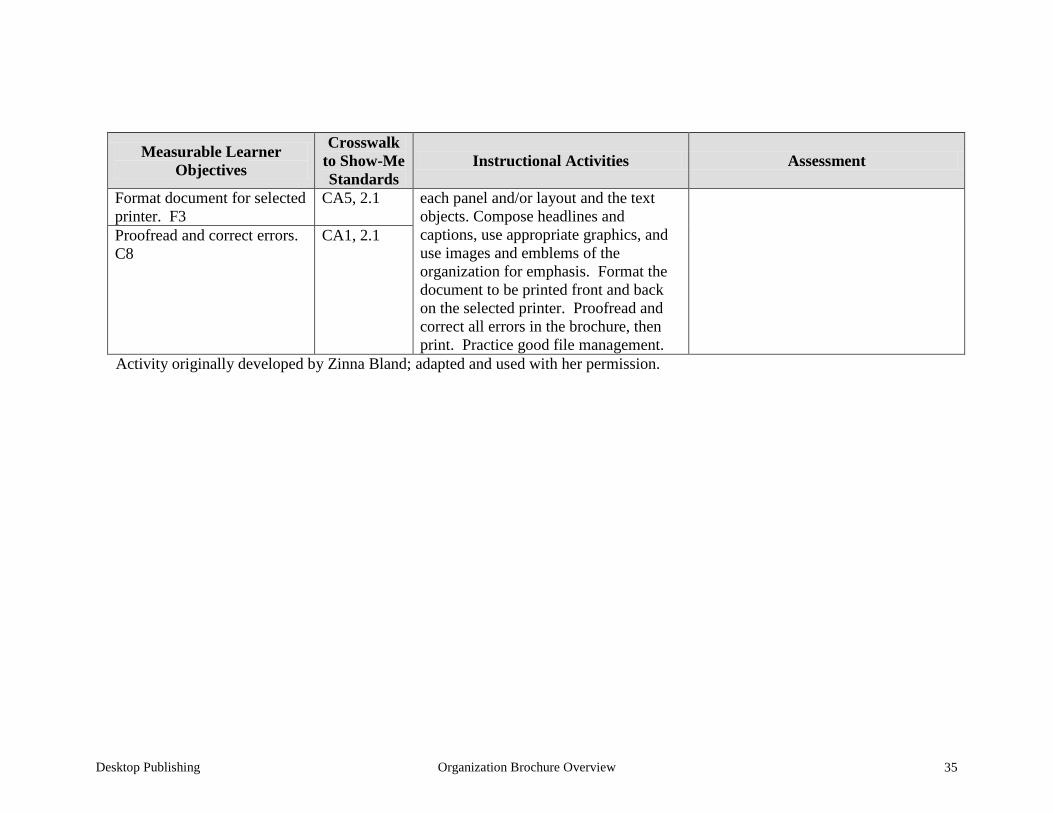
Desktop Publishing Organization Brochure Overview 35
Measurable Learner Objectives
Crosswalk to Show-Me Standards
Instructional Activities Assessment
Format document for selected printer. F3
CA5, 2.1 each panel and/or layout and the text objects. Compose headlines and captions, use appropriate graphics, and use images and emblems of the organization for emphasis. Format the document to be printed front and back on the selected printer. Proofread and correct all errors in the brochure, then print. Practice good file management.
Proofread and correct errors. C8
CA1, 2.1
Activity originally developed by Zinna Bland; adapted and used with her permission.
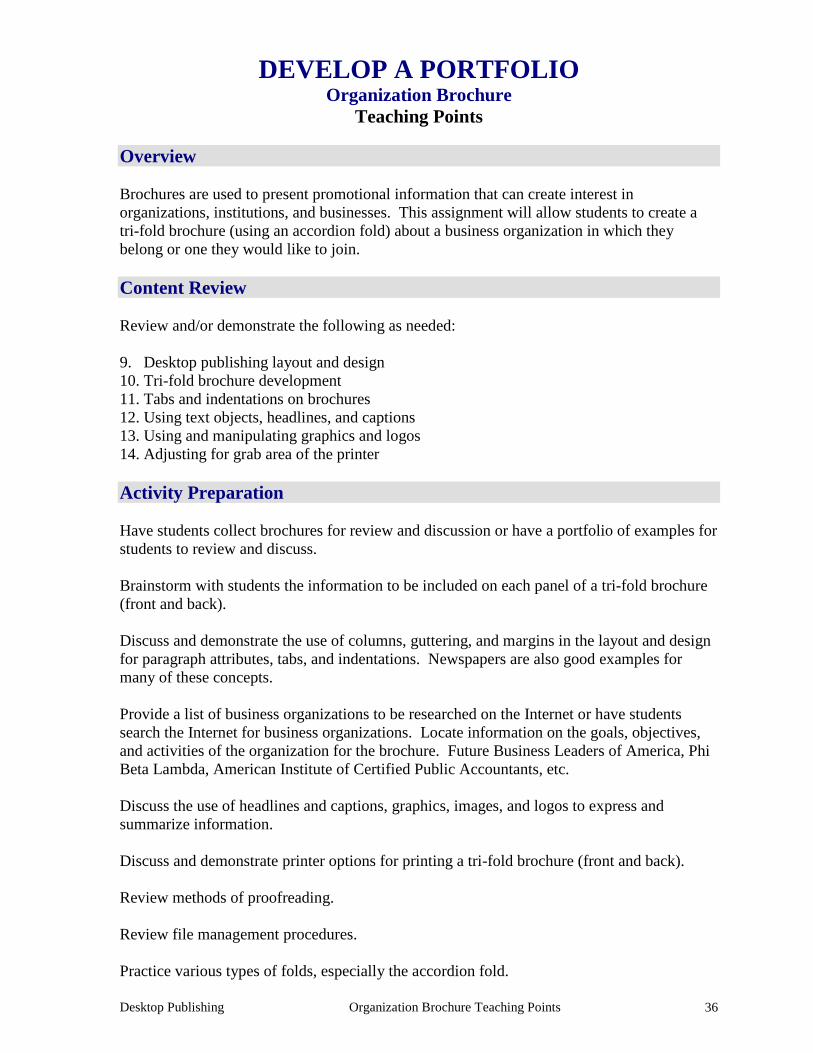
Desktop Publishing Organization Brochure Teaching Points 36
DEVELOP A PORTFOLIO Organization Brochure
Teaching Points Overview Brochures are used to present promotional information that can create interest in organizations, institutions, and businesses. This assignment will allow students to create a tri-fold brochure (using an accordion fold) about a business organization in which they belong or one they would like to join. Content Review Review and/or demonstrate the following as needed: 9. Desktop publishing layout and design 10. Tri-fold brochure development 11. Tabs and indentations on brochures 12. Using text objects, headlines, and captions 13. Using and manipulating graphics and logos 14. Adjusting for grab area of the printer Activity Preparation Have students collect brochures for review and discussion or have a portfolio of examples for students to review and discuss. Brainstorm with students the information to be included on each panel of a tri-fold brochure (front and back). Discuss and demonstrate the use of columns, guttering, and margins in the layout and design for paragraph attributes, tabs, and indentations. Newspapers are also good examples for many of these concepts. Provide a list of business organizations to be researched on the Internet or have students search the Internet for business organizations. Locate information on the goals, objectives, and activities of the organization for the brochure. Future Business Leaders of America, Phi Beta Lambda, American Institute of Certified Public Accountants, etc. Discuss the use of headlines and captions, graphics, images, and logos to express and summarize information. Discuss and demonstrate printer options for printing a tri-fold brochure (front and back). Review methods of proofreading. Review file management procedures. Practice various types of folds, especially the accordion fold.
Desktop Publishing Organization Brochure Teaching Points 37
Resources Supplies needed for the activity: Computer Desktop publishing software or advanced features of a word processing package Internet connection Paper Printer (preferably color, duplex capabilities) Listing of professional organizations Websites (and/or key words to use for search): http://www4.district125.k12.il.us/Faculty/mfinlay/DTP/Proj/brochure.html Steps involved in making a tri-fold brochure, an assignment http://www.computorcompanion.com/LPMArticle.asp?ID=143 Steps on how to create a tri-fold brochure using Word http://www.valdosta.edu/~jlcampbe/3020-5.html Article on “how to” with information on purpose, audience, etc. http://www.desktoppublishing.com/open.html A site with many informative links for desktop publishing http://desktoppub.about.com/?once=true& Article on Desktop Publishing Key words: tri-fold brochure, desktop publishing Books, articles, and other resources: Braveheart, R. (2003). Adobe PageMaker 7.0 basics. Boston, MA: Thomson Course
Technology. Counts, E. L. (2004). Multimedia design and production for students and teachers. Boston,
MA: Allyn and Bacon (Pearson Education). Lee, L. (2002). Introducing Adobe Photoshop elements. Upper Saddle River, NJ: Que/Sams
(Prentice Hall). Proot, K. (2003). Adobe PageMaker 7.0 – Illustrated. Boston, MA: Thomson Course
Technology. Reding, E. (2004). QuarkXPress 5 – Design professional. Boston, MA: Course Technology. Solomon, A.W. (2004). Introduction to multimedia. Columbus, OH: Glencoe (McGraw-
Hill).
Desktop Publishing Organization Brochure Teaching Points 38
Obtain books, videos, and other materials from Resources@MCCE http://www.resources.mcce.org. Design Principles for Desktop Publishers Lichty, Tom Book – [4675—BE 11.0101 P L618] CA, WADSWORTH, 1994. Desktop Publishing: Getting the Message Out Video – This program introduces the key components of a basic DTP system including: a fast microprocessor, large hard drive storage capacity, CD-ROM drive, large-screen monitor, b/w-color printer and flatbed scanner and more. Learn about software, page layout programs, drawing programs, editing, clip art and lots more! [10547 – BE VIDEO 40] MERIDIAN, 2000. How To Create High Impact Designs; Over 90 Examples Of What Works And What Doesn’t For Creating Brochures, Newsletters, Ads, Reports, etc. Cleland, Jane K. Book – Examples of designs for printed materials [4336—BE 50.0401 C589b] CO, CAREER TRACK, 1995.
Desktop Publishing Organization Brochure Assignment 39
DEVELOP A PORTFOLIO Organization Brochure
Assignment Activity Preparation and Assignment
In this assignment you will collect information about a professional organization to which you belong or one you would like to join and create a tri-fold brochure.
Use the following guidelines to create your brochure:
1. Research a professional business organization to which you belong or one you would like to join and gather information to use in a promotional brochure (goals, objectives, events, etc.).
2. Collect images, logos, graphics, and pictures that can be used to express the content of
the information. 3. Sketch the layout for each panel for the tri-fold brochure (front and back presentation)
for an accordion-style fold. 4. Preview collected brochures and/or newspapers and magazines for ideas on columns,
guttering, and margins for paragraph attributes, tabs, and indentations. Also review text objects and associated features before starting the keying of your brochure. Observe the use and placement of graphics and the way the text wraps around the graphics. Watch for good and poor usage of these concepts.
5. Set your layout and input your text, graphics, and text attributes for your brochure
according to the sketched copy. Apply good layout and design practices to your brochure. Observe good text-to-graphic placement and usage. Make sure the graphic remains proportionally shaped.
6. The set up should be on an 8 ½ x 11 sheet in landscape orientation. 7. Use appropriate headliners and captions. 8. Proofread each page (front and back) and print a black-and-white copy. 9. Proofread the black-and-white copy, observe the layout and design elements, and mark
any errors or elements that will need to be changed. 10. Make all corrections and double check. Print a color copy, front and back, and fold it
accordion style. 11. Submit the brochure and sketch for evaluation and grading. 12. Obtain a print screen of the folder in Details view and submit it with the project.
Desktop Publishing Organization Brochure Assignment 40
Resources Websites (and/or key words to use for search): http://www4.district125.k12.il.us/Faculty/mfinlay/DTP/Proj/brochure.html Steps involved in making a tri-fold brochure, an assignment http://www.computorcompanion.com/LPMArticle.asp?ID=143 Steps on how to create a tri-fold brochure using Word http://www.valdosta.edu/~jlcampbe/3020-5.html Article with “how to” information on purpose, audience, etc. Key words: tri-fold brochure, desktop publishing
Student _________________________________ Due Date _______________ Date Submitted ______________
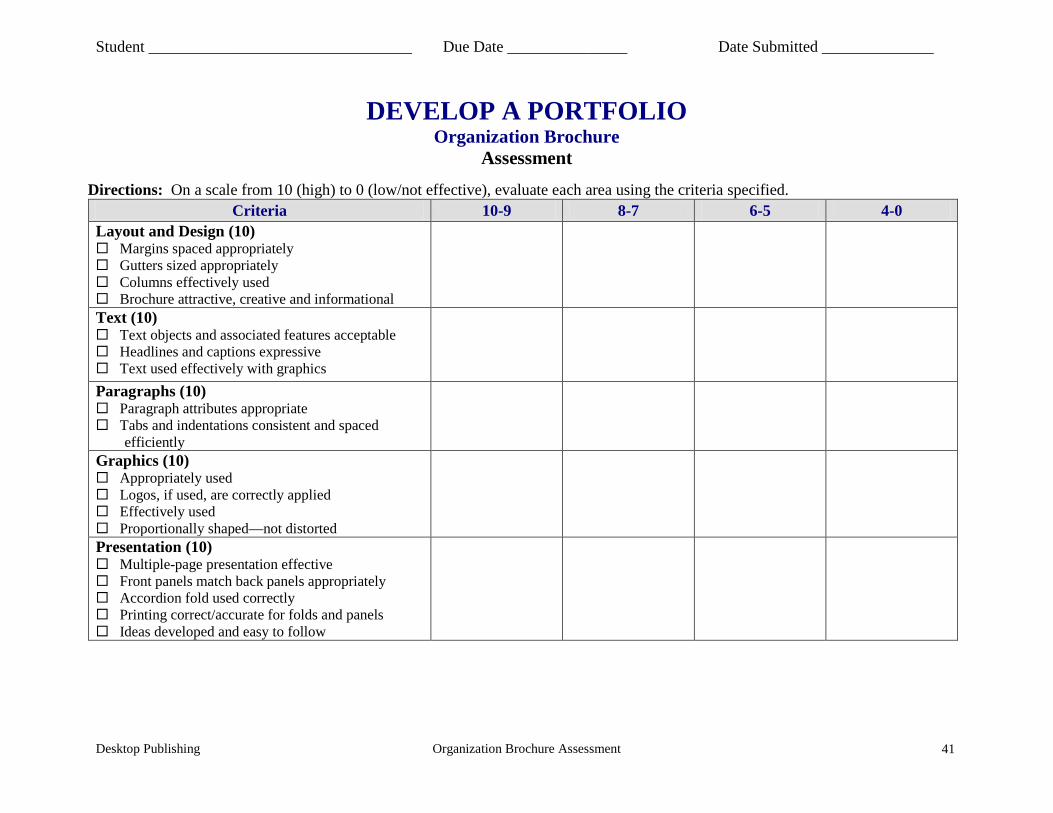
Desktop Publishing Organization Brochure Assessment 41
DEVELOP A PORTFOLIO Organization Brochure
Assessment
Directions: On a scale from 10 (high) to 0 (low/not effective), evaluate each area using the criteria specified. Criteria 10-9 8-7 6-5 4-0
Layout and Design (10) Margins spaced appropriately Gutters sized appropriately Columns effectively used Brochure attractive, creative and informational
Text (10) Text objects and associated features acceptable Headlines and captions expressive Text used effectively with graphics
Paragraphs (10) Paragraph attributes appropriate Tabs and indentations consistent and spaced
efficiently
Graphics (10) Appropriately used Logos, if used, are correctly applied Effectively used Proportionally shaped—not distorted
Presentation (10) Multiple-page presentation effective Front panels match back panels appropriately Accordion fold used correctly Printing correct/accurate for folds and panels Ideas developed and easy to follow
Student _________________________________ Due Date _______________ Date Submitted ______________
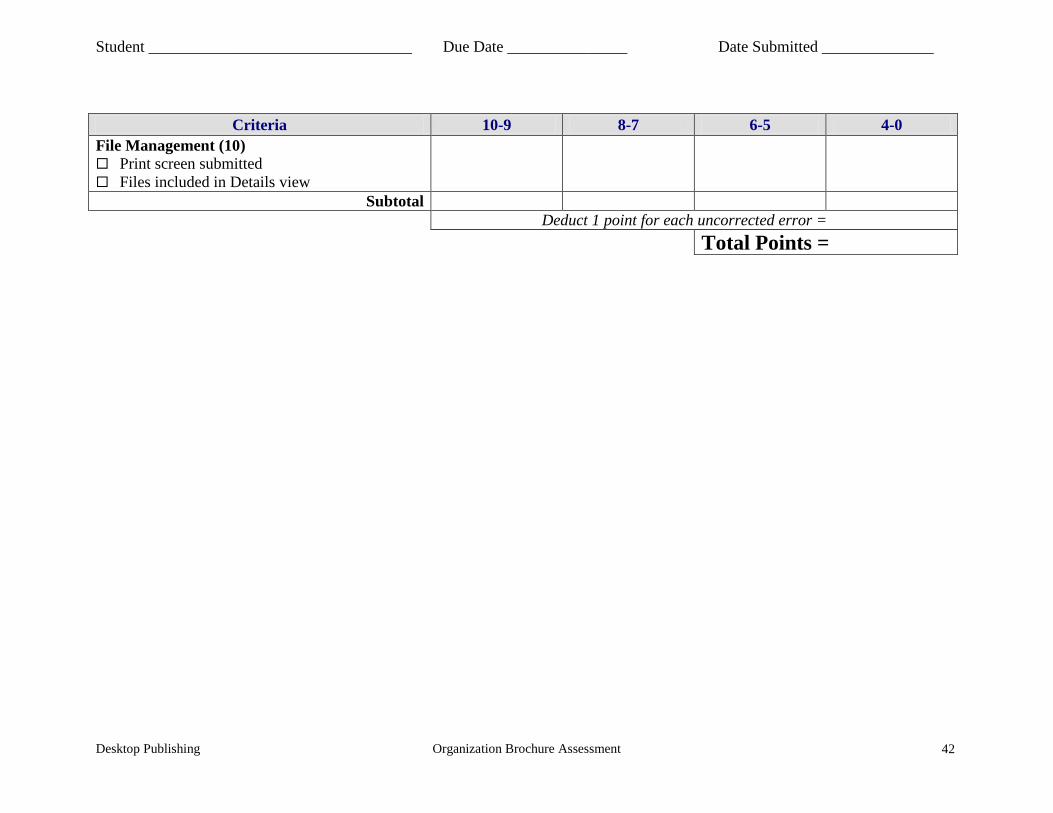
Desktop Publishing Organization Brochure Assessment 42
Criteria 10-9 8-7 6-5 4-0
File Management (10) Print screen submitted Files included in Details view
Subtotal Deduct 1 point for each uncorrected error = Total Points =
Desktop Publishing Real World Examples Overview 43
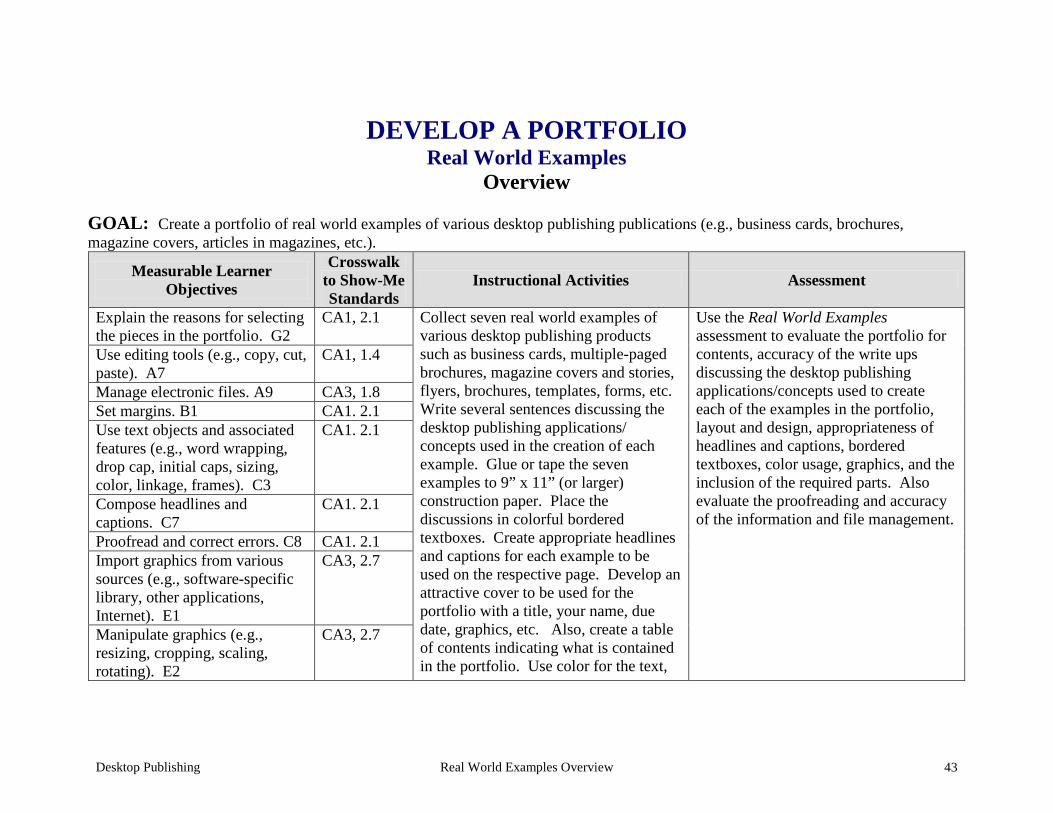
DEVELOP A PORTFOLIO Real World Examples
Overview
GOAL: Create a portfolio of real world examples of various desktop publishing publications (e.g., business cards, brochures, magazine covers, articles in magazines, etc.).
Measurable Learner Objectives
Crosswalk to Show-Me Standards
Instructional Activities Assessment
Explain the reasons for selecting the pieces in the portfolio. G2
CA1, 2.1 Collect seven real world examples of various desktop publishing products such as business cards, multiple-paged brochures, magazine covers and stories, flyers, brochures, templates, forms, etc. Write several sentences discussing the desktop publishing applications/ concepts used in the creation of each example. Glue or tape the seven examples to 9” x 11” (or larger) construction paper. Place the discussions in colorful bordered textboxes. Create appropriate headlines and captions for each example to be used on the respective page. Develop an attractive cover to be used for the portfolio with a title, your name, due date, graphics, etc. Also, create a table of contents indicating what is contained in the portfolio. Use color for the text,
Use the Real World Examples assessment to evaluate the portfolio for contents, accuracy of the write ups discussing the desktop publishing applications/concepts used to create each of the examples in the portfolio, layout and design, appropriateness of headlines and captions, bordered textboxes, color usage, graphics, and the inclusion of the required parts. Also evaluate the proofreading and accuracy of the information and file management.
Use editing tools (e.g., copy, cut, paste). A7
CA1, 1.4
Manage electronic files. A9 CA3, 1.8 Set margins. B1 CA1. 2.1 Use text objects and associated features (e.g., word wrapping, drop cap, initial caps, sizing, color, linkage, frames). C3
CA1. 2.1
Compose headlines and captions. C7
CA1. 2.1
Proofread and correct errors. C8 CA1. 2.1 Import graphics from various sources (e.g., software-specific library, other applications, Internet). E1
CA3, 2.7
Manipulate graphics (e.g., resizing, cropping, scaling, rotating). E2
CA3, 2.7
Desktop Publishing Real World Examples Overview 44
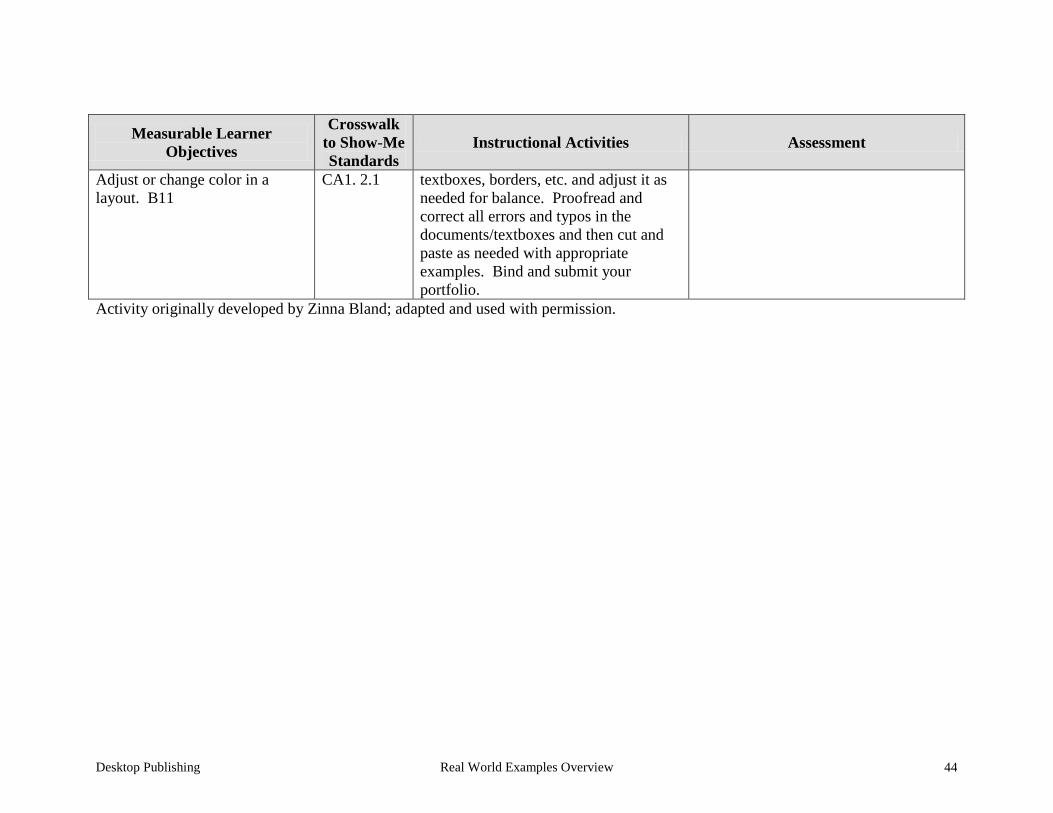
Measurable Learner Objectives
Crosswalk to Show-Me Standards
Instructional Activities Assessment
Adjust or change color in a layout. B11
CA1. 2.1 textboxes, borders, etc. and adjust it as needed for balance. Proofread and correct all errors and typos in the documents/textboxes and then cut and paste as needed with appropriate examples. Bind and submit your portfolio.
Activity originally developed by Zinna Bland; adapted and used with permission.
Desktop Publishing Real World Examples Teaching Points 45
DEVELOP A PORTFOLIO Real World Examples
Teaching Points Overview Portfolios are used to display examples of a person’s work. But because the word portfolio implies a collection of items, it can also be samples of works, pictures, documents, fabrics, or almost anything a person may want to display. This assignment will allow students to collect examples of real world desktop publishing publications and explain the concepts and/or processes used to create each. Content Review Review and/or demonstrate the following as needed: 1. Portfolio development 2. Title pages and project covers 3. Table of contents 4. Textboxes with borders 5. Color usage throughout a project Activity Preparation Provide samples of various portfolios and previous samples of students’ work if available. Discuss how a portfolio is used in general and how it will be used for the Real World Examples project. Brainstorm at least 15 items that could be included in a desktop publishing portfolio. Discuss how many examples can be used from any category in the Real World Examples project. Discuss assembly methods for the portfolio, materials to be used in the project’s construction, pages to be included in the portfolio, and binding of the portfolio. Brainstorm what information could be used in write ups about the examples in the portfolio. Discuss the creation of headlines and captions for the examples included in the portfolio. Discuss and demonstrate text objects, textboxes, borders, etc. and their use in the portfolio.
Desktop Publishing Real World Examples Teaching Points 46
Discuss and demonstrate the use of color throughout a project. Discuss layout for card stock and layout for construction paper. Explain why Web sites of organizations are used to provide examples. Discuss proofreading methods. Resources Supplies needed for the activity: Computer Paper Construction paper or colored card stock Internet connection Printer (color preferred) Glue or other methods for binding and attaching examples Web sites (and/or key words to use for search: Portfolio Web sites: These sites contains example of companies portfolios. http://desktoppub.about.com/cs/freelance/a/portfolio.htm Even though this is about a portfolio of original work, it may provide some hints http://www.scarecrow.ca/portfolio/desktop.asp A company’s portfolio http://www.odanieldesigns.com/portfolio/desktoppublishing/default.cfm A company’s portfolio with explanations of products created http://www.conwaycreations.com/conwaycreations/desktop.htm A company’s portfolio Key words: portfolio, desktop publishing samples, and any word for the types of examples that will be included in the portfolio e.g., magazine covers, business card, etc. Books, articles, and other resources: Braveheart, R. (2003). Adobe PageMaker 7.0 basics. Boston, MA: Thomson Course
Technology. Lee, L. (2002). Introducing Adobe Photoshop elements. Upper Saddle River, NJ:
Que/Sams (Prentice Hall).
Desktop Publishing Real World Examples Teaching Points 47
Proot, K. (2003). Adobe PageMaker 7.0 – Illustrated. Boston, MA: Thomson Course Technology.
Reding, E. (2004). QuarkXPress 5 – Design professional. Boston, MA: Thomson Course
Technology. Obtain books, videos, and other materials from Resources@MCCE http://www.resources.mcce.org. Design Principles for Desktop Publishers Lichty, Tom Book – [4675—BE 11.0101 P L618] CA, WADSWORTH, 1994. Desktop Publishing: Getting the Message Out Video – This program introduces the key components of a basic DTP system including: a fast microprocessor, large hard drive storage capacity, CD-ROM drive, large-screen monitor, b/w-color printer and flatbed scanner and more. Learn about software, page layout programs, drawing programs, editing, clip art and lots more! [10547 – BE VIDEO 40] MERIDIAN, 2000. How To Create High Impact Designs; Over 90 Examples Of What Works And What Doesn’t For Creating Brochures, Newsletters, Ads, Reports, etc. Cleland, Jane K. Book – Examples of designs for printed materials [4336—BE 50.0401 C589b] CO, CAREER TRACK, 1995.
Desktop Publishing Real World Examples Assignment 48
DEVELOP A PORTFOLIO Real World Examples
Assignment
Activity Preparation and Assignment
You will create a portfolio of examples of desktop publishing productions. Follow the steps below to complete the project.
1. Create a folder entitled [insert your name] Real Examples to hold your files.
2. Decide on seven examples from the class brainstorming session on possible desktop publishing examples or other examples that you would like to collect for your portfolio.
3. Write several sentences in textboxes with borders discussing the desktop publishing
concepts used for each of the examples. Use text objects and associated features in the write ups. Use a color theme for effect on borders, text, text objects, and associated features.
4. Create appropriate headlines and captions to be used on each page to accompany the
examples. Appropriate color can also be used on these.
5. Review all samples of the work for color adjustments (if needed).
6. Proofread and correct all errors before printing the items.
7. Attach the examples to construction paper (9” x 11” or larger, if needed) or print on card stock.
8. Attach the headlines, captions, and bordered textboxes to the respective examples.
9. Place the pages of the portfolio in order.
10. Prepare a table of contents to be used with the portfolio.
11. Create an attractive cover to be used for the portfolio. Include your name, a portfolio
title, due date, graphics, etc. Print on card stock if available.
12. Bind the portfolio using the suggestions of the instructor.
13. Print a screen shot of your project folder in Details view.
14. Submit your portfolio and the screen shot.
Desktop Publishing Real World Examples Assignment 49
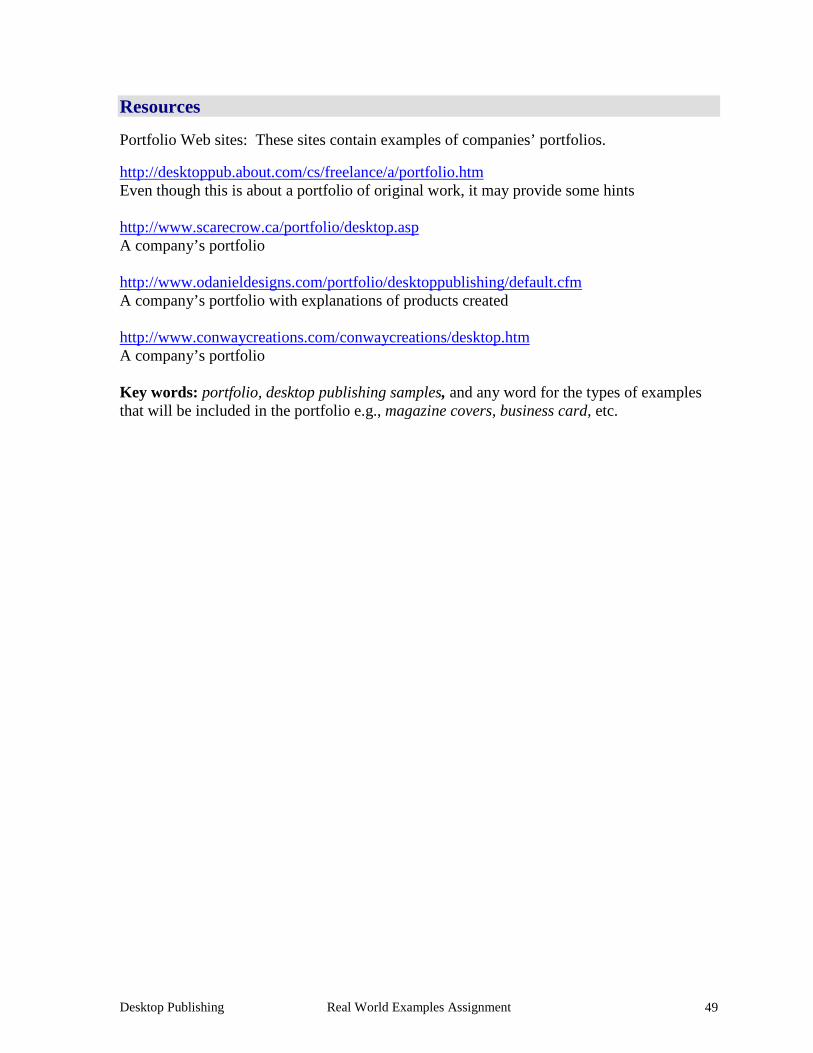
Resources Portfolio Web sites: These sites contain examples of companies’ portfolios. http://desktoppub.about.com/cs/freelance/a/portfolio.htm Even though this is about a portfolio of original work, it may provide some hints http://www.scarecrow.ca/portfolio/desktop.asp A company’s portfolio http://www.odanieldesigns.com/portfolio/desktoppublishing/default.cfm A company’s portfolio with explanations of products created http://www.conwaycreations.com/conwaycreations/desktop.htm A company’s portfolio Key words: portfolio, desktop publishing samples, and any word for the types of examples that will be included in the portfolio e.g., magazine covers, business card, etc.
Student _________________________________ Due Date __________________ Date Submitted ______________
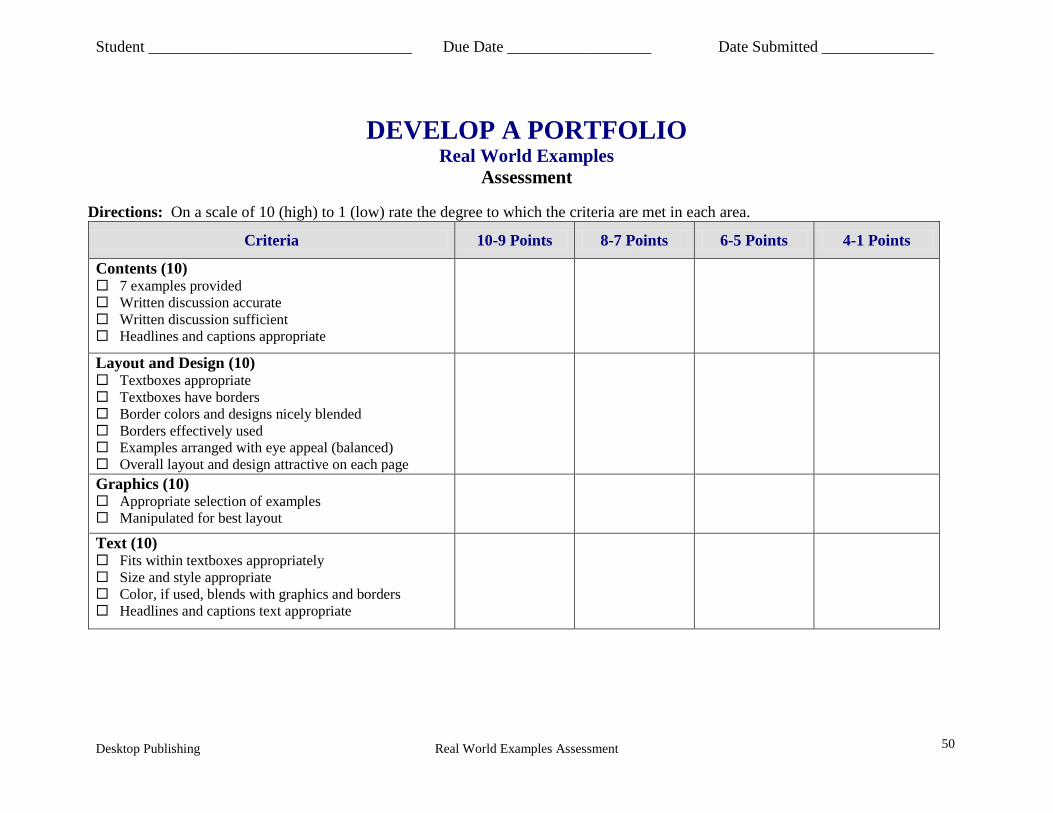
Desktop Publishing Real World Examples Assessment 50
DEVELOP A PORTFOLIO Real World Examples
Assessment
Directions: On a scale of 10 (high) to 1 (low) rate the degree to which the criteria are met in each area.
Criteria 10-9 Points 8-7 Points 6-5 Points 4-1 Points
Contents (10) 7 examples provided Written discussion accurate Written discussion sufficient Headlines and captions appropriate
Layout and Design (10) Textboxes appropriate Textboxes have borders Border colors and designs nicely blended Borders effectively used Examples arranged with eye appeal (balanced) Overall layout and design attractive on each page
Graphics (10) Appropriate selection of examples Manipulated for best layout
Text (10) Fits within textboxes appropriately Size and style appropriate Color, if used, blends with graphics and borders Headlines and captions text appropriate
Student _________________________________ Due Date __________________ Date Submitted ______________
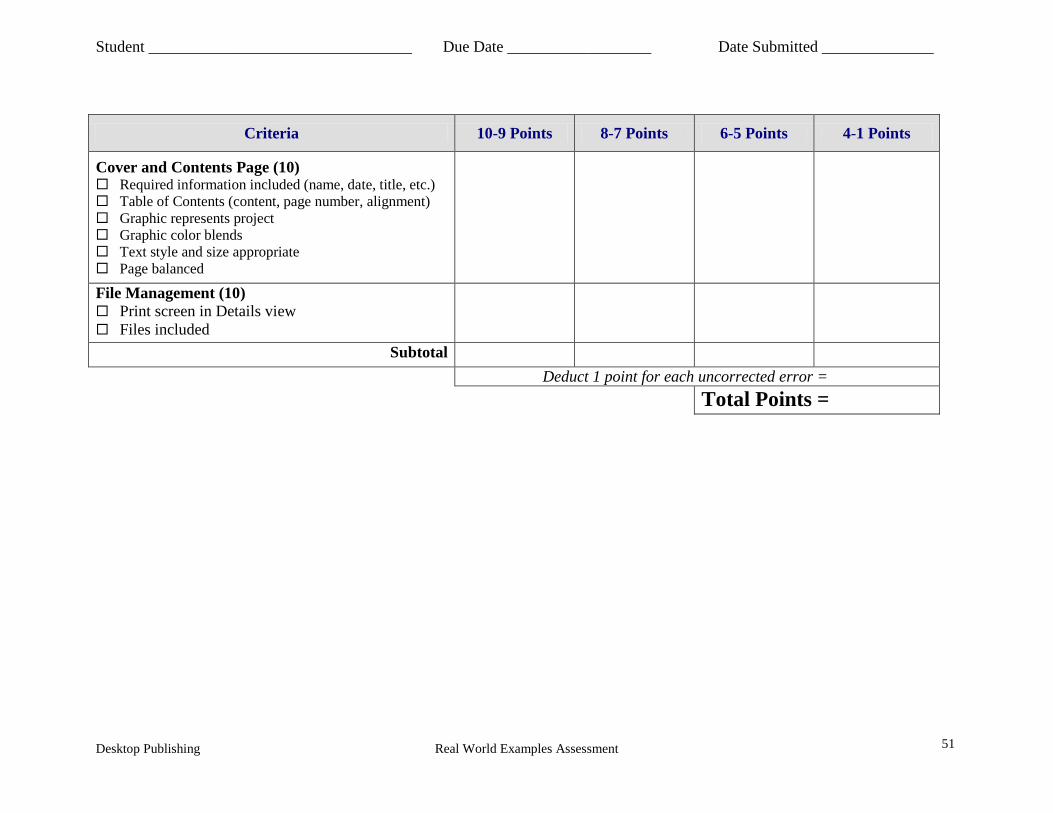
Desktop Publishing Real World Examples Assessment 51
Criteria 10-9 Points 8-7 Points 6-5 Points 4-1 Points
Cover and Contents Page (10) Required information included (name, date, title, etc.) Table of Contents (content, page number, alignment) Graphic represents project Graphic color blends Text style and size appropriate Page balanced
File Management (10) Print screen in Details view Files included
Subtotal Deduct 1 point for each uncorrected error =
Total Points =
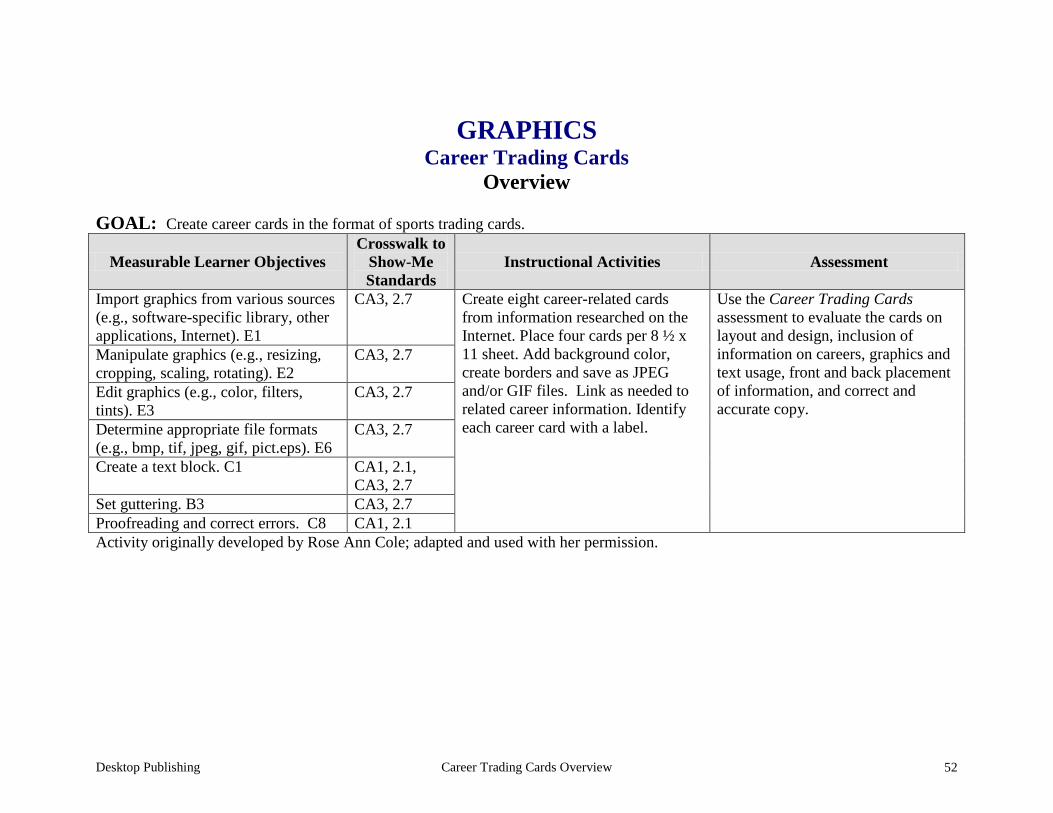
Desktop Publishing Career Trading Cards Overview 52
GRAPHICS Career Trading Cards
Overview GOAL: Create career cards in the format of sports trading cards.
Measurable Learner Objectives Crosswalk to
Show-Me Standards
Instructional Activities Assessment
Import graphics from various sources (e.g., software-specific library, other applications, Internet). E1
CA3, 2.7 Create eight career-related cards from information researched on the Internet. Place four cards per 8 ½ x 11 sheet. Add background color, create borders and save as JPEG and/or GIF files. Link as needed to related career information. Identify each career card with a label.
Use the Career Trading Cards assessment to evaluate the cards on layout and design, inclusion of information on careers, graphics and text usage, front and back placement of information, and correct and accurate copy.
Manipulate graphics (e.g., resizing, cropping, scaling, rotating). E2
CA3, 2.7
Edit graphics (e.g., color, filters, tints). E3
CA3, 2.7
Determine appropriate file formats (e.g., bmp, tif, jpeg, gif, pict.eps). E6
CA3, 2.7
Create a text block. C1
CA1, 2.1, CA3, 2.7
Set guttering. B3 CA3, 2.7 Proofreading and correct errors. C8 CA1, 2.1 Activity originally developed by Rose Ann Cole; adapted and used with her permission.
Desktop Publishing Career Trading Cards Teaching Points 53
GRAPHICS Career Trading Cards
Teaching Points Overview
Many options are available to investigate career choices that match a person’s skills, potential, and personality. This assignment allows students to investigate career choices and use desktop publishing and multimedia skills to show how creatively the information can be displayed.
Content Review Review the following with students: 1. Career choices in business and related fields 2. Layout and design for sports trading cards 3. The Internet as a research tool 4. Grab area for printing/printer Activity Preparation Demonstrate importing graphics from various locations, creating graphics from scratch, and modifying existing graphics. Have students locate sports trading cards or the teacher can provide a set to use for display. Review with students how to use the Internet/Web and/or other sources to research careers. Practice layout and design of desktop publishing projects, especially using various sized papers, gutters, headings and subheadings for categories of information, and placement when using columns. Review procedures for placement of information to match front with back, especially during printing process. Allow for grab space of printer when printing on box and sides. Resources Supplies needed for the activity: Desktop publishing software Printer (color printer preferred) Paper Scissors or paper cutter Laminating materials Internet connection
Desktop Publishing Career Trading Cards Teaching Points 54
Web sites (and/or key words to use for search): www.careers.com www.monster.com http://stats.bls.gov/oco/ Bureau of Labor Statistics: The Occupational Outlook Handbook (OOH) should also be available in the library http://www.works.state.mo.us Missouri Works, an employment database http://www.acinet.org/acinet/ America's Career InfoNet Key words: careers, personality inventory, trading cards, Occupational Outlook Handbook Books, articles, and other resources: Braveheart, R. (2003). Adobe PageMaker 7.0 basics. Boston, MA: Thomson Course
Technology. Lee, L. (2002). Introducing Adobe Photoshop elements. Upper Saddle River, NJ: Que/Sams
(Prentice Hall). Proot, K. (2003). Adobe PageMaker 7.0 – Illustrated. Boston, MA: Thomson Course
Technology. Reding, E. (2004). QuarkXPress 5 – Design professional. Boston, MA: Course Technology. Obtain the following books, videos, and other materials from Resources@MCCE http://www.resources.mcce.org. Career Path Planner for Secondary Students; Missouri's Career Path Series Desborough, Kristin Book – 1. Explore career paths and your personality, and identify a career focus. 2. Develop skills to reach your career goals. 3. Make plans to pursue your career path interests [7015—C&E 11.0000 CE17] COLUMBIA, MO, INSTITUTE FOR WORKFORCE EDUCATION, 1998.
Desktop Publishing Career Trading Cards Assignment 55
GRAPHICS Career Trading Cards
Assignment Activity Preparation and Assignment 1. Use the Web to research information for eight business careers or related fields for career
cards. Prepare cards similar to sports trading cards with imported graphics and pictures on one side and information about the eight careers/positions selected on the other. Document “credits” on each card for graphics and career information in a smaller font.
2. Use either a digital camera or scanner or capture an image for each career trading card.
The career card presentation should also contain correct labels – name/title of career. Some categories of information to include are salary, salary range, and other pertinent salary information; entry-level positions, positions available, and outlook (positions forecasted); education requirements; skills; etc.
3. Use proportional text-to-graphics layout and design by resizing graphics as needed and
using an appropriate type face and font size for headings (positions), subheadings (categories of information), and paragraph information.
4. Print the cards front and back on 8 ½ x 11 inch paper (4 cards per sheet) and laminate.
Cut the cards if directed by the instructor. Submit for evaluation. Resources Web sites (and/or key words to use for search): www.careers.com www.monster.com http://stats.bls.gov/oco/ Bureau of Labor Statistics: The Occupational Outlook Handbook (OOH) or hard copy from the library http://www.works.state.mo.us Missouri Works, an employment database Key words: Use key words associated with careers in the search box on Web engines or Web sites where career information can be located.
Student _________________________________ Due Date __________________ Date Submitted ______________
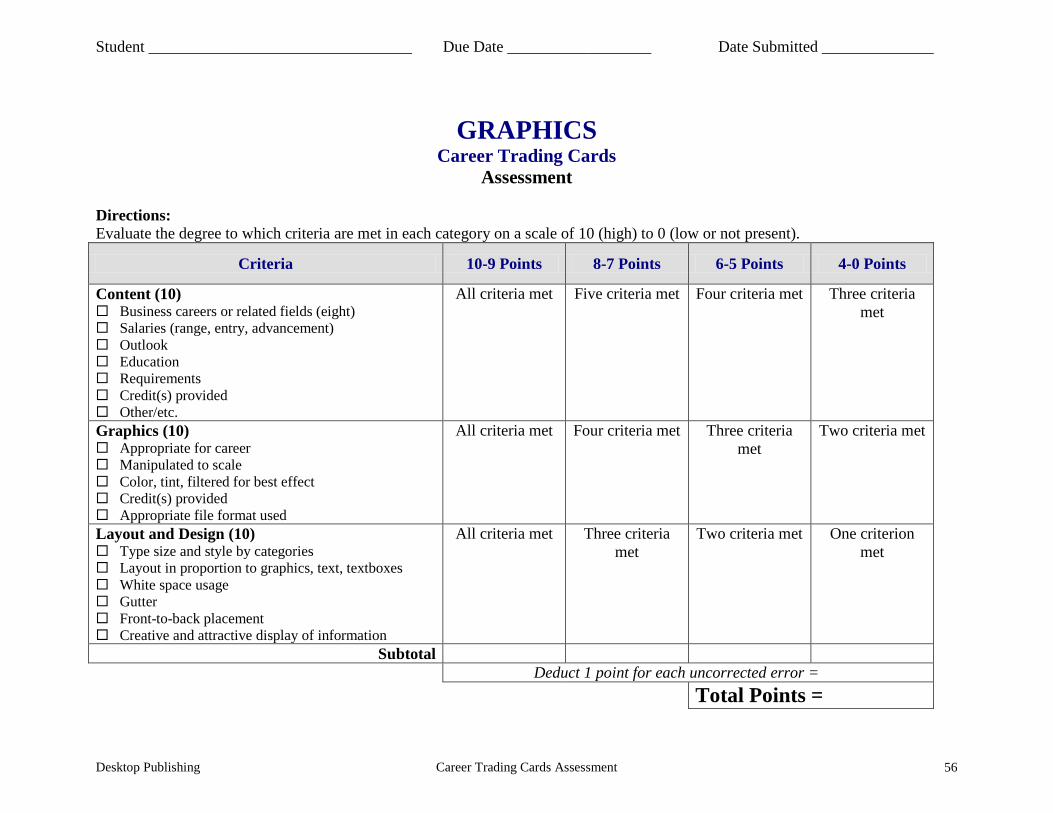
Desktop Publishing Career Trading Cards Assessment 56
GRAPHICS Career Trading Cards
Assessment
Directions: Evaluate the degree to which criteria are met in each category on a scale of 10 (high) to 0 (low or not present).
Criteria 10-9 Points 8-7 Points 6-5 Points 4-0 Points
Content (10) Business careers or related fields (eight) Salaries (range, entry, advancement) Outlook Education Requirements Credit(s) provided Other/etc.
All criteria met Five criteria met Four criteria met Three criteria met
Graphics (10) Appropriate for career Manipulated to scale Color, tint, filtered for best effect Credit(s) provided Appropriate file format used
All criteria met Four criteria met Three criteria met
Two criteria met
Layout and Design (10) Type size and style by categories Layout in proportion to graphics, text, textboxes White space usage Gutter Front-to-back placement Creative and attractive display of information
All criteria met Three criteria met
Two criteria met One criterion met
Subtotal Deduct 1 point for each uncorrected error = Total Points =
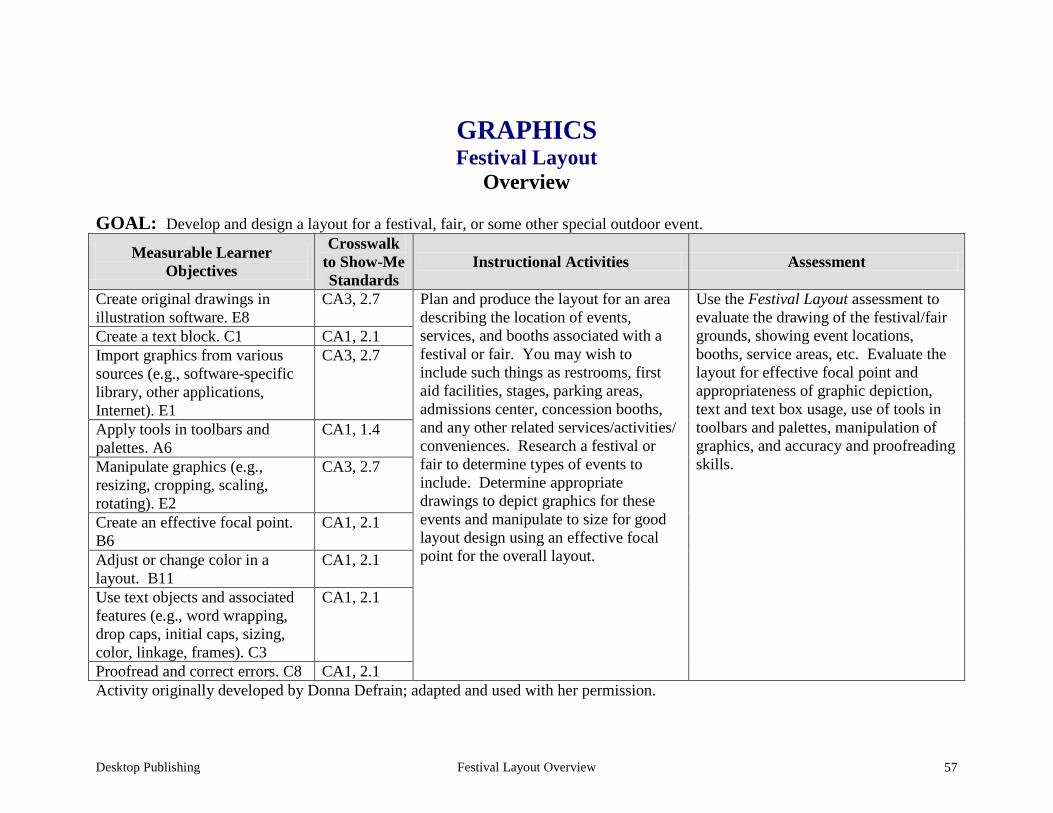
Desktop Publishing Festival Layout Overview 57
GRAPHICS Festival Layout
Overview GOAL: Develop and design a layout for a festival, fair, or some other special outdoor event.
Measurable Learner Objectives
Crosswalk to Show-Me Standards
Instructional Activities Assessment
Create original drawings in illustration software. E8
CA3, 2.7 Plan and produce the layout for an area describing the location of events, services, and booths associated with a festival or fair. You may wish to include such things as restrooms, first aid facilities, stages, parking areas, admissions center, concession booths, and any other related services/activities/ conveniences. Research a festival or fair to determine types of events to include. Determine appropriate drawings to depict graphics for these events and manipulate to size for good layout design using an effective focal point for the overall layout.
Use the Festival Layout assessment to evaluate the drawing of the festival/fair grounds, showing event locations, booths, service areas, etc. Evaluate the layout for effective focal point and appropriateness of graphic depiction, text and text box usage, use of tools in toolbars and palettes, manipulation of graphics, and accuracy and proofreading skills.
Create a text block. C1 CA1, 2.1 Import graphics from various sources (e.g., software-specific library, other applications, Internet). E1
CA3, 2.7
Apply tools in toolbars and palettes. A6
CA1, 1.4
Manipulate graphics (e.g., resizing, cropping, scaling, rotating). E2
CA3, 2.7
Create an effective focal point. B6
CA1, 2.1
Adjust or change color in a layout. B11
CA1, 2.1
Use text objects and associated features (e.g., word wrapping, drop caps, initial caps, sizing, color, linkage, frames). C3
CA1, 2.1
Proofread and correct errors. C8 CA1, 2.1 Activity originally developed by Donna Defrain; adapted and used with her permission.
Desktop Publishing Festival Layout Teaching Points 58
GRAPHICS Festival Layout Teaching Points
Overview
The physical layout of surroundings in graphical depictions is completed for maps, conferences, festivals, buildings, and many other purposes. This assignment will allow students to research festivals and other outdoor events; then develop and design the layout for a selected outdoor event with appropriate amenities.
Content Review Review and/or demonstrate the following as needed: 1. Using the Internet to locate information 2. Applying layout and design principles in layout software 3. Manipulating graphics and images 4. Using toolbars and palettes 5. Creating drawings in layout software 6. Creating a focal point in layout and design Activity Preparation Brainstorm with students the activities, events, and amenities that were at festivals, theme parks, and other events they have attended. Demonstrate the use of software applications appropriate for creation of the assignment. Discuss seasonal needs for events. Demonstrate scaling to size for drawings depicting graphics of buildings, landmarks, parking, etc. Review and/or teach drawing and connecting lines for objects, white space in layout and design for objects and text, and other design features. Review and/or brainstorm common and universal symbols used to depict events. Have students practice text objects and other features of various software applications for the assignment.
Desktop Publishing Festival Layout Teaching Points 59
Resources Supplies needed for the activity: Internet access Drawing software Desktop publishing software Paper Printer (color preferably) Web sites (and/or key words to use for search): http://www.showmensleague.org/festival_planning.html http://www.jhuccp.org/africa/tools/activity/ac28.shtml http://www.sitesalive.com/bl/tg/private/bltgfestival.pdf http://www.l2ed.com/new/ft_e/feste/ft_e_03.htm http://desktoppub.about.com Key words: festival maps, fair layouts Books, articles, and other resources: Adobe Press. (2002). Adobe PageMaker 7.0. Upper Saddle River, NJ: Adobe Press (Prentice
Hall). Adobe Press. (2000). Adobe InDesign 1.5. Upper Saddle River, NJ: Adobe Press (Prentice
Hall). Lee, L. (2002). Introducing Adobe Photoshop elements. Upper Saddle River, NJ: Que/Sams
(Prentice Hall). Reding, E. (2004). QuarkXPress 5 – Design professional. Boston, MA: Course Technology. Obtain the following books, videos, and other materials from Resources@MCCE http://www.resources.mcce.org. Design Principles for Desktop Publishers Lichty, Tom Book – [4675—BE 11.0101 P L618] CA, WADSWORTH, 1994.
Desktop Publishing Festival Layout Teaching Points 60
How To Create High Impact Designs; Over 90 Examples Of What Works And What Doesn’t For Creating Brochures, Newsletters, Ads, Reports, etc. Cleland, Jane K. Book – Examples of designs for printed materials [4336—BE 50.0401 C589b] CO, CAREER TRACK, 1995. Desktop Publishing: Getting the Message Out Video – This program introduces the key components of a basic DTP system including: a fast microprocessor, large hard drive storage capacity, CD-ROM drive, large-screen monitor, b/w-color printer and flatbed scanner and more. Learn about software, page layout programs, drawing programs, editing, clip art and lots more! [10547 – BE VIDEO 40] MERIDIAN, 2000.
Desktop Publishing Festival Layout Assignment 61
GRAPHICS Festival Layout
Assignment
Activity Preparation and Assignment
Design a layout on one sheet of paper (8 ½ x 11) for an event so people will know the location for stages (for events), parking, restrooms, eating, misting areas (in case of heat), first aid, etc.
1. This is to be the first City Spirit Fest (or other event).
2. Choose any Friday, Saturday, and Sunday in the summer months.
3. Decide where the event will be held (local park, field, other).
4. Determine the schedule of activities.
5. Determine the number of bands playing and include descriptions and other events requiring a stage.
6. What food booths will be offered and where will they be located?
7. How many restroom facilities will be needed and where will they be located?
8. What other activities are planned that will not require a stage?
9. Try to use image editing with the letters (e.g., letter stretching, shaky letters, letter
stacking, etc.)
10. You may scan photos, clip art, etc. to use to depict events, locations, and other layout features.
11. Graphics and images should be proportionally sized to fit page layout.
12. Submit a keyed one-page handout outlining the details of all events and times of operation. The handout should coincide with the activities, facilities, etc. on the layout for the festival or fair.
13. Proofread and correct errors in all documents.
14. Submit the printed Festival Layout.
Planning suggestion: Consider mapping the layout with paper and pencil before attempting the project on the computer.
Desktop Publishing Festival Layout Assignment 62
Resources Web sites (and/or keywords for search): http://www.sitesalive.com/bl/tg/private/bltgfestival.pdf http://www.showmensleague.org/festival_planning.html Key words: festival maps, fair layout
Student _______________________________ Due Date ________________ Date Submitted _______________
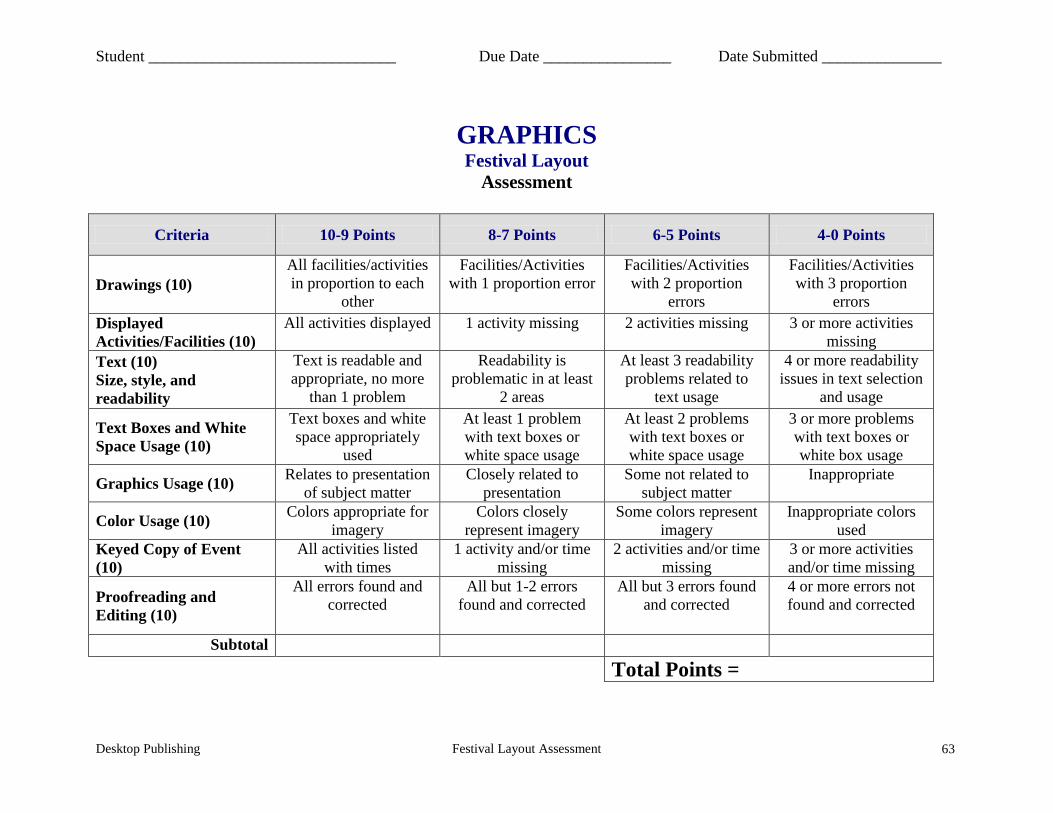
Desktop Publishing Festival Layout Assessment 63
GRAPHICS Festival Layout
Assessment
Criteria 10-9 Points 8-7 Points 6-5 Points 4-0 Points
Drawings (10) All facilities/activities in proportion to each
other
Facilities/Activities with 1 proportion error
Facilities/Activities with 2 proportion
errors
Facilities/Activities with 3 proportion
errors Displayed Activities/Facilities (10)
All activities displayed 1 activity missing 2 activities missing 3 or more activities missing
Text (10) Size, style, and readability
Text is readable and appropriate, no more
than 1 problem
Readability is problematic in at least
2 areas
At least 3 readability problems related to
text usage
4 or more readability issues in text selection
and usage
Text Boxes and White Space Usage (10)
Text boxes and white space appropriately
used
At least 1 problem with text boxes or white space usage
At least 2 problems with text boxes or white space usage
3 or more problems with text boxes or white box usage
Graphics Usage (10) Relates to presentation of subject matter
Closely related to presentation
Some not related to subject matter
Inappropriate
Color Usage (10) Colors appropriate for imagery
Colors closely represent imagery
Some colors represent imagery
Inappropriate colors used
Keyed Copy of Event (10)
All activities listed with times
1 activity and/or time missing
2 activities and/or time missing
3 or more activities and/or time missing
Proofreading and Editing (10)
All errors found and corrected
All but 1-2 errors found and corrected
All but 3 errors found and corrected
4 or more errors not found and corrected
Subtotal Total Points =
Desktop Publishing Original Clipart Overview 64
GRAPHICS Original Clipart
Overview GOAL: Design and draw your own clipart.
Measurable Learner Objectives
Crosswalk to Show-Me Standards
Instructional Activities Assessment
Create original drawings in illustration software. E8
CA3, 2.7 Think of a theme and develop at least 5 suitable illustrations that could be used as clipart for desktop publishing products, Web pages, or other productions requiring graphic images. In creating your illustrations, apply color, tints, filters, and other effects as deemed appropriate. Edit and manipulate the various graphic objects (shapes and drawings) to create proportional sizing and correct aspect ratios. Name each completed illustration with an appropriate title. Proofread and correct all errors. Practice good file management in the project.
Use the Original Clipart assessment to evaluate the originality of the illustration; appropriateness of the items developed; the fit of the various illustrations with the theme; the number of illustrations produced; and the quality of the artwork relative to shape, size, and color. Evaluate the accuracy of the keyed information that describes the theme, file name for each illustration and file management.
Manipulate graphics (e.g., resizing, cropping, scaling, rotating). E2
CA3, 2.7
Edit graphics (e.g., color, filters, tints). E3
CA3, 2.7
Use editing tools (e.g., copy, cut, paste). A7
CA1, 1.4
Proofread and correct errors. C8 CA1, 2.1 Manage electronic files. A9 CA3, 1.8
Desktop Publishing Original Clipart Teaching Points 65
GRAPHICS Original Clipart Teaching Points
Overview Many books, Web sites, and CDs contain illustrations. Desktop publishing and multimedia specialists may rely on clipart as a substitute for original artwork. This assignment will allow students to develop five original illustrations with a common theme that could be used by others as clipart in desktop publishing and multimedia projects. Content Review Review and/or demonstrate the following as needed: 1. Clipart development 2. Cut, paste, copy 3. Coloring clipart 4. Editing graphics—tints, filters, effects 5. Editing tools—cut, copy, paste 6. Grouping and order of objects Activity Preparation Use prepared clipart and demonstrate ungrouping and separating the pieces that make up the total piece. Review clipart development with students. Demonstrate editing concepts (adding tints, filters, and effects) in the creation of clipart. Discuss and demonstrate the grouping and order of objects to create clipart. Discuss and demonstrate the use of editing tools in the creation of clipart. Brainstorm ideas for themes and pieces of clipart that could be developed around the theme. Resources Supplies needed for the activity: Computer Illustrator software
Desktop Publishing Original Clipart Teaching Points 66
Graphic software Paper Printer (color preferred) Web sites (and/or key words to use for search: http://graphicdesign.about.com/library/weekly/aa080797.htm Information on clipart http://graphicdesign.about.com/gi/dynamic/offsite.htm?site=http://www.ideabook.com/logo.htm Directions on how to create some clipart http://graphicdesign.about.com/library/weekly/aa102298.htm Examples illustrating how Halloween clipart was created http://desktoppub.about.com/library/weekly/aa042497.htm Ideas on how to create and modify clipart Key words: clipart, graphics Books, articles, and other resources: Botello, C. (2003). Adobe Illustrator 10—Design professional. Boston, MA: Thomson
Course Technology. Braveheart, R. (2003). Adobe PageMaker 7.0 basics. Boston, MA: Thomson Course
Technology. Lee, L. (2002). Introducing Adobe Photoshop elements. Upper Saddle River, NJ:
Que/Sams (Prentice Hall). Proot, K. (2003). Adobe PageMaker 7.0 – Illustrated. Boston, MA: Thomson Course
Technology. Reding, E. (2004). QuarkXPress 5 – Design professional. Boston, MA: Thomson Course
Technology. Solomon, A.W. (2004). Introduction to multimedia. Columbus, OH: Glencoe (McGraw-
Hill).
Desktop Publishing Original Clipart Assignment 67
GRAPHICS Original Clipart
Assignment
Activity Preparation and Assignment
You will create five original illustrations centered on a particular theme that will be suitable to use as clipart. Use the following directions in creating your clipart files:
1. Create a folder entitled [insert your name] Clipart to hold the files for your project.
2. Review clipart categories on the Web, CDs, and other sources. Ungroup and change the order of several pieces to determine how they were created.
3. Submit the theme, the names of five illustrations to be created for the theme, and a
description of each illustration for your instructor’s approval. Proofread this and all documents as they are created and before they are submitted.
4. Sketch the illustrations to be developed.
5. Edit and manipulate graphics and/or shapes and drawings in the creation of the
illustrations. Cut, copy, and paste objects as needed when creating proportional sizing.
6. Use grouping and order of objects as well as color, tints, filters, and other effects in the
creation of the illustrations.
7. Name each piece of clipart in the collection of your theme.
8. Practice good file management and consider the file size of each illustration being developed and the storage medium during the project.
9. Submit the sketches and instructor approval slip.
10. Submit a screen shot of the project directory in Details view.
11. Submit the project on CD or another medium as instructed by the instructor. Resources Web sites (and/or key words to be used for search): http://graphicdesign.about.com/library/weekly/aa080797.htm Information on clipart

Desktop Publishing Original Clipart Assignment 68
http://graphicdesign.about.com/gi/dynamic/offsite.htm?site=http://www.ideabook.com/logo.htm Directions on how to create some clipart http://graphicdesign.about.com/library/weekly/aa102298.htm Example illustrating how Halloween clipart was created http://desktoppub.about.com/library/weekly/aa042497.htm Ideas on how to create and modify clipart Key words: clipart, graphics
Student _________________________________ Due Date _______________ Date Submitted ______________
Desktop Publishing Original Clipart Assessment 69
GRAPHICS Original Clipart
Assessment
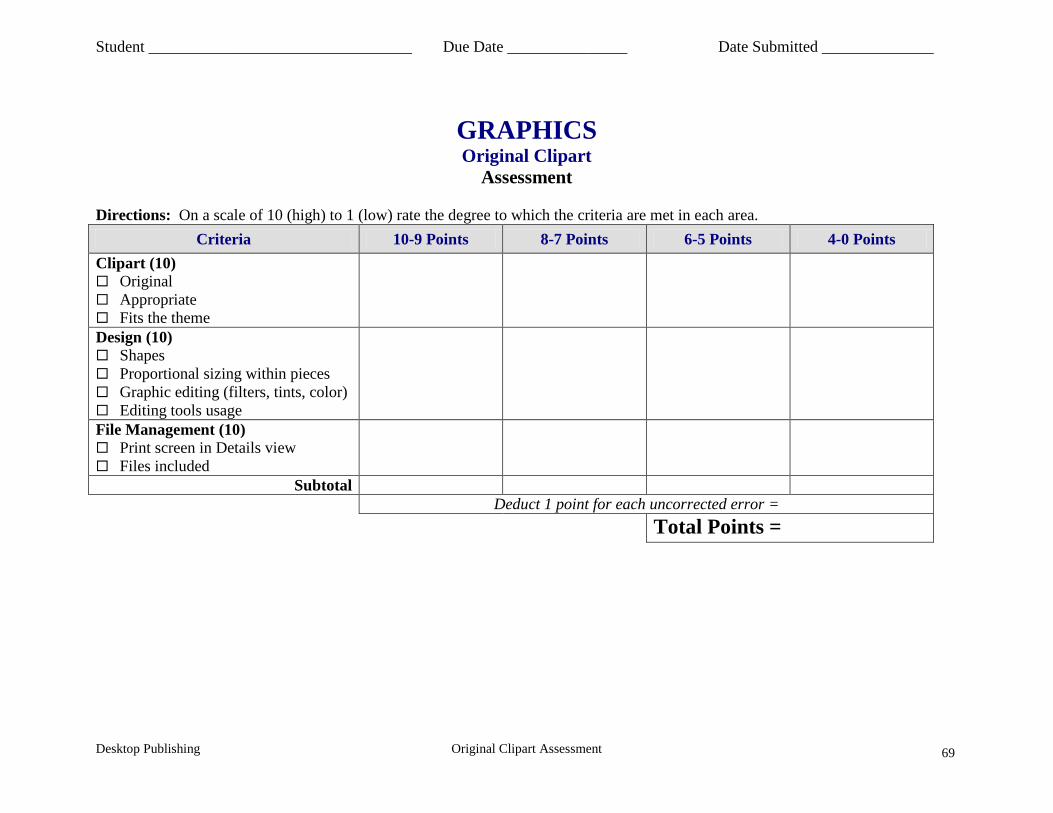
Directions: On a scale of 10 (high) to 1 (low) rate the degree to which the criteria are met in each area. Criteria 10-9 Points 8-7 Points 6-5 Points 4-0 Points
Clipart (10) Original Appropriate Fits the theme
Design (10) Shapes Proportional sizing within pieces Graphic editing (filters, tints, color) Editing tools usage
File Management (10) Print screen in Details view Files included
Subtotal Deduct 1 point for each uncorrected error = Total Points =
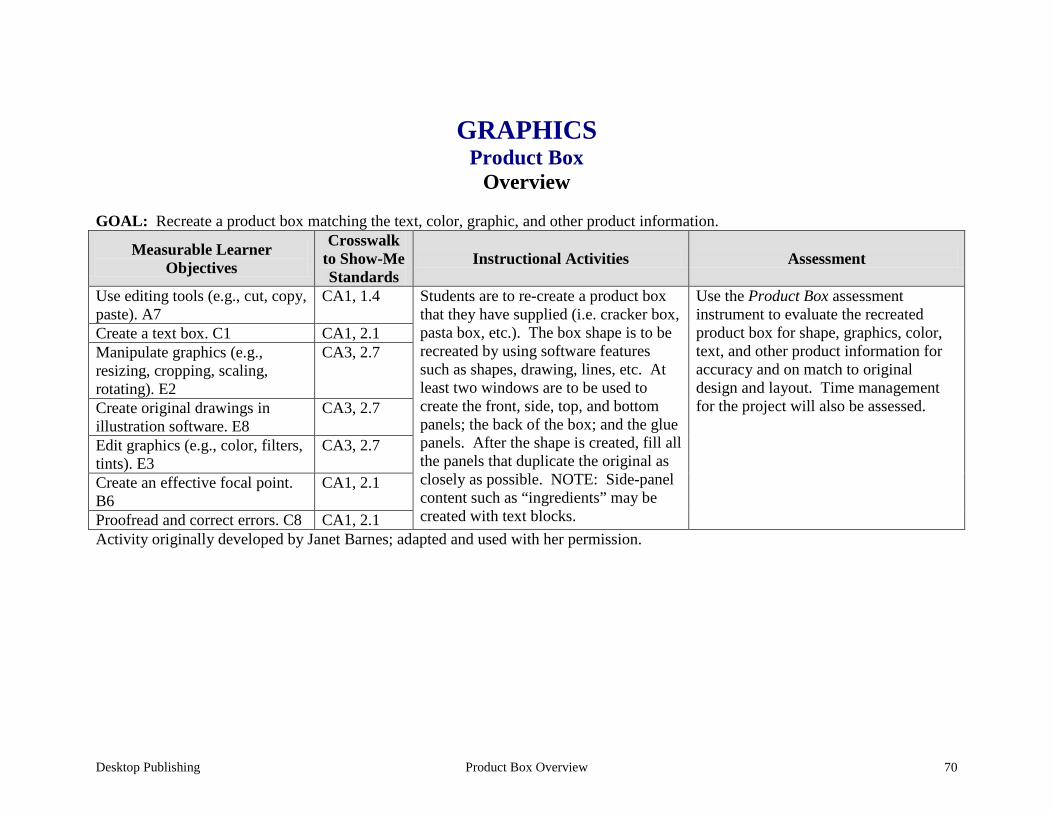
Desktop Publishing Product Box Overview 70
GRAPHICS Product Box
Overview GOAL: Recreate a product box matching the text, color, graphic, and other product information.
Measurable Learner Objectives
Crosswalk to Show-Me Standards
Instructional Activities Assessment
Use editing tools (e.g., cut, copy, paste). A7
CA1, 1.4 Students are to re-create a product box that they have supplied (i.e. cracker box, pasta box, etc.). The box shape is to be recreated by using software features such as shapes, drawing, lines, etc. At least two windows are to be used to create the front, side, top, and bottom panels; the back of the box; and the glue panels. After the shape is created, fill all the panels that duplicate the original as closely as possible. NOTE: Side-panel content such as “ingredients” may be created with text blocks.
Use the Product Box assessment instrument to evaluate the recreated product box for shape, graphics, color, text, and other product information for accuracy and on match to original design and layout. Time management for the project will also be assessed.
Create a text box. C1 CA1, 2.1 Manipulate graphics (e.g., resizing, cropping, scaling, rotating). E2
CA3, 2.7
Create original drawings in illustration software. E8
CA3, 2.7
Edit graphics (e.g., color, filters, tints). E3
CA3, 2.7
Create an effective focal point. B6
CA1, 2.1
Proofread and correct errors. C8 CA1, 2.1 Activity originally developed by Janet Barnes; adapted and used with her permission.
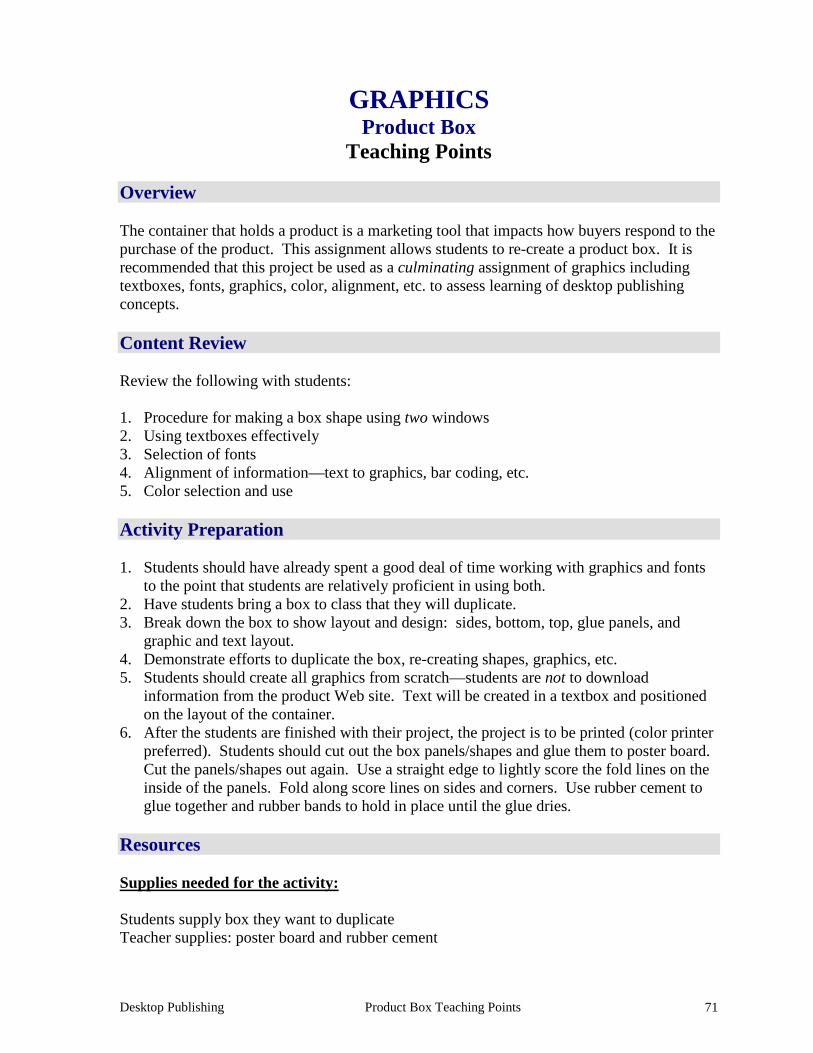
Desktop Publishing Product Box Teaching Points 71
GRAPHICS Product Box
Teaching Points Overview
The container that holds a product is a marketing tool that impacts how buyers respond to the purchase of the product. This assignment allows students to re-create a product box. It is recommended that this project be used as a culminating assignment of graphics including textboxes, fonts, graphics, color, alignment, etc. to assess learning of desktop publishing concepts.
Content Review Review the following with students: 1. Procedure for making a box shape using two windows 2. Using textboxes effectively 3. Selection of fonts 4. Alignment of information—text to graphics, bar coding, etc. 5. Color selection and use Activity Preparation 1. Students should have already spent a good deal of time working with graphics and fonts
to the point that students are relatively proficient in using both. 2. Have students bring a box to class that they will duplicate. 3. Break down the box to show layout and design: sides, bottom, top, glue panels, and
graphic and text layout. 4. Demonstrate efforts to duplicate the box, re-creating shapes, graphics, etc. 5. Students should create all graphics from scratch—students are not to download
information from the product Web site. Text will be created in a textbox and positioned on the layout of the container.
6. After the students are finished with their project, the project is to be printed (color printer preferred). Students should cut out the box panels/shapes and glue them to poster board. Cut the panels/shapes out again. Use a straight edge to lightly score the fold lines on the inside of the panels. Fold along score lines on sides and corners. Use rubber cement to glue together and rubber bands to hold in place until the glue dries.
Resources Supplies needed for the activity: Students supply box they want to duplicate Teacher supplies: poster board and rubber cement
Desktop Publishing Product Box Teaching Points 72
Printer (color preferred) Paper Appropriate software Computer Rubberbands Web sites (and/or key words to use for search): http://stunzkonstantin.com/pack.html Sample package/container layouts http://www.math.nmsu.edu/breakingaway/Lessons/boxes1/boxes.html Making boxes without the computer http://www.ee0r.com/boxes/ Making boxes from drawings Key words: containers, labels, textbox(es), desktop publishing, manipulating graphics Books, articles, and other resources: Adobe Press. (2002). Adobe PageMaker 7.0. Upper Saddle River, NJ: Adobe Press (Prentice
Hall). Adobe Press. (2000). Adobe InDesign 1.5. Upper Saddle River, NJ: Adobe Press (Prentice
Hall). Braveheart, R. (2003). Adobe PageMaker 7.0 basics. Boston, MA: Thomson Course
Technology. Lee, L. (2002). Introducing Adobe Photoshop elements. Upper Saddle River, NJ:
Que/Sams (Prentice Hall). Proot, K. (2003). Adobe PageMaker 7.0 – Illustrated. Boston, MA: Thomson Course
Technology. Reding, E. (2004). QuarkXPress 5 – Design professional. Boston, MA: Thomson Course
Technology. Obtain the following books, videos, and other materials from Resources@MCCE http://www.resources.mcce.org.
Desktop Publishing Product Box Teaching Points 73
Design Principles for Desktop Publishers Lichty, Tom Book – [4675—BE 11.0101 P L618] CA, WADSWORTH, 1994. How To Create High Impact Designs; Over 90 Examples Of What Works And What Doesn’t For Creating Brochures, Newsletters, Ads, Reports, etc. Cleland, Jane K. Book – Contains examples of designs for printed materials [4336—BE 50.0401 C589b] CO, CAREER TRACK, 1995. Desktop Publishing: Getting the Message Out Video – This program introduces the key components of a basic DTP system including: a fast microprocessor, large hard drive storage capacity, CD-ROM drive, large-screen monitor, b/w-color printer and flatbed scanner and more. Learn about software, page layout programs, drawing programs, editing, clip art and lots more! [10547 – BE VIDEO 49] MERIDIAN, 2000.
Desktop Publishing Product Box Assignment 74
GRAPHICS Product Box Assignment
Activity Preparation and Assignment
Product containers are selling points for businesses. It is the first image people get of a product. You are going to re-create a product box that you supply from home.
1. Work on two windows at the same time to make the basic shape of the container. Start by drawing out the basic shape of the box. You can use the drawing tools for the basic shape and copy and paste to duplicate panels. Decide on the window that will contain the front and selected panels, and the window that will have the back and the remaining panels.
2. Be sure to recreate and cover all panels duplicating them with textboxes, text, and/or
graphics. 3. Proofread material and make corrections. 4. Print on color printer, and cut out the box shapes. 5. Glue cut-out shapes on poster board and cut them out again. 6. Fold on edges and glue the panels together. Use rubber bands to hold the panels together
until the glue dries.
NOTE: The maximum paper size is 8 1/2 x 11.
Resources Web sites (and/or key words to use for search): http://desktoppub.about.com Key words: packages, boxes, textbox(es), desktop publishing, manipulating graphics, package design, and adding creating or making with to key words
Student ______________________________ Due Date _______________ Date Submitted ________________
Desktop Publishing Product Box Assessment 75
GRAPHICS Product Box Assessment
Criteria Excellent Good Average Poor
Shape of Box (20)
20-18 Perfectly shaped – all
sides are equal and container folds
properly
17-14 Not exactly shaped,
may be off on one side
13-10 Uneven on two sides/corners
9-0 Off on 3 or more
sides/corners; shape poorly formed
Graphics (40) Match to originals
40-36 Graphics match
originals; all panels covered well; very
creative and similar to original
35-32 Most panels covered
and resemble original; good effort to re-create
graphics and text
31-20 Some attempt to re-create graphics and
text boxes, but some items not closely
matched to original
19-0 Panels not covered, box not completed; attempt to re-create
graphics inappropriate and/or incomplete
Subtotal Deduct 1 point for each uncorrected error = Total Points =
Desktop Publishing Create a Template/Form Overview 76
LAYOUT Create a Template/Form
Overview GOAL: Create templates of customer-supplied materials.
Measurable Learner Objectives
Crosswalk to Show-Me Standards
Instructional Activities Assessment
Complete a project using customer-supplied instructions and/or materials. A13
CA4, 2.1 Collect two business forms from an organization (or school office). Determine if the organization would like to update any information in these forms. Recreate the forms, with any updates and appropriate underlines and/or check boxes, so information can be keyed without changing the appearance of the form. Proofread and correct all errors. Have the form approved by the organization representative. Submit the form on a disk or via e-mail attachment to the organization. Practice good file management.
Use the Create a Template assessment to evaluate the recreation of the two business forms obtained from an organization, in respect to the updates/modifications indicated (if any), underlines and/or check boxes that won’t change when information is keyed, accuracy and proofreading skills, and file management.
Create templates. B8 CA1, 2.1 Set margins. B1 CA1, 2.1 Manage electronic files. A9 CA3, 1.8 Proofread and correct errors. C8 CA1, 2.1
Activity originally developed by Zinna Bland; adapted and used with her permission.
Desktop Publishing Create a Template/Form Teaching Points 77
LAYOUT Create a Template/Form
Teaching Points Overview With the demise of the typewriter, electronic templates and forms are created and completed on the computer, which make information and data gathering easier, quicker, and neater. This assignment allows students to create two templates and/or forms from an organization or their school with lines and/or check boxes. Content Review Review and/or demonstrate the following as needed: Form and template creations Lines and checkboxes Activity Preparation Discuss and brainstorm with students the information to be included in forms and ways decisions are made about the information to be included. Review and/or discuss the steps in designing forms from sketches. Review and/or demonstrate the creation of forms with lines or no lines, check boxes, and drop-down lists. Review why a form/template should be secured and demonstrate how to secure a form/template. Discuss the project and ways the students are to interact with the organizations from which templates/forms are obtained. Resources Supplies needed for the activity: Computer Paper Printer Sample business forms
Desktop Publishing Create a Template/Form Teaching Points 78
Web sites (and/or key words to use for search: How to create a template and a form http://support.microsoft.com/default.aspx?scid=kb;en-us;q141990 http://www.apu.edu/imt/training/word/creating_forms.php http://www.rdg.ac.uk/ITS/Topic/WordProc/WoP2Kfrm01/ http://www.its.queensu.ca/educ/handout/tempform.html http://www.glencoe.com/ps/computered/pas/article.php4?articleId=365 http://www.freedomscientific.com/fs_support/BulletinView.cfm?QC=449 http://www.columbia.edu/cu/libraries/inside/forms/formtips.html http://zircon.mcli.dist.maricopa.edu/mlx/warehouse/00301-00400/00383/making_word_forms.doc Key words: templates, forms, or add Word to any of the key words Books, articles, and other resources: Hinkle, D. (2000). Word 2000 level one: Core. Peoria, IL: Glencoe (McGraw Hill). Pasewark, W., Pasewark, S. G., and Morrison, C. (2002). Microsoft Word 2002 –
Complete tutorial. Boston, MA: Thomson Course Technology. Rutkosky, Nita. (2002). Microsoft Word 2002: Signature series. St. Paul, MN: EMC
Paradigm. Rutkosky, Nita. (2002). Microsoft Word 2002: Core and Expert Certification. St. Paul,
MN: EMC Paradigm.
Desktop Publishing Create a Template/Form Assignment 79
LAYOUT Create a Template/Form
Assignment Activity Preparation and Assignment
Follow the directions below to recreate a form/template which may have modifications.
1. Create a project folder entitled [insert your name] Form Template.
2. Determine which office or organization will be used to obtain two business forms for recreation and have it approved by the instructor.
3. Contact the organization or office and collect two forms. Determine from the office
professional or organization representative what, if any, corrections and/or updating are needed on the form. You want a form/template that has lines, check boxes, and other similar items that will be good as an electronic means to collect data.
4. Recreate the form/template with any modifications and/or corrections needed. Be sure
to use lines, check boxes, etc.
5. Lock the form and make sure it works.
6. Proofread and correct any errors. Remember to unlock the form to make corrections and relock it afterwards.
7. Print a copy and have it evaluated and approved by the organization representative and
your instructor (Submission 1). Submit a copy of the original with any modifications with this submission.
8. Make any corrections noted.
9. Submit the form by e-mail or on a floppy disk to the organization and the instructor
for evaluation (Submission 2). Submit a copy of the original and/or a copy of the first submission evaluated template/form.
10. Submit a print screen of the project folder. Resources Web sites (and/or key words to use for search): http://www.freedomscientific.com/fs_support/BulletinView.cfm?QC=449 How to create forms/templates
Desktop Publishing Create a Template/Form Assignment 80
http://www.columbia.edu/cu/libraries/inside/forms/formtips.html Tips for creating forms using MS Word http://zircon.mcli.dist.maricopa.edu/mlx/warehouse/00301-00400/00383/making_word_forms.doc Good link with screen shots of how to create forms http://familycrafts.about.com/gi/dynamic/offsite.htm?site=http%3A%2F%2Fwww.kidprintables.com%2Fbookmarks%2F Some samples/examples of printable bookmarks
Student _________________________________ Due Date _______________ Date Submitted ______________
Desktop Publishing Create a Template/Form Assessment 81
LAYOUT Create a Template/Form
Assessment
Directions: Rate on a scale of 10 (high) to 1 (low) the criteria for each category. Criteria 10-9 Points 8-7 Points 6-5 Points 4-1 Points
Layout (10) Looks like original Modifications made Lines and/or checkboxes
Submission (10) Template/form submitted Original with modifications Submission 1 Submission 2
File Management (10) Print screen Files included
Accuracy (10) Submission 1 Submission 2 Works correctly with input
Subtotal Total Points =
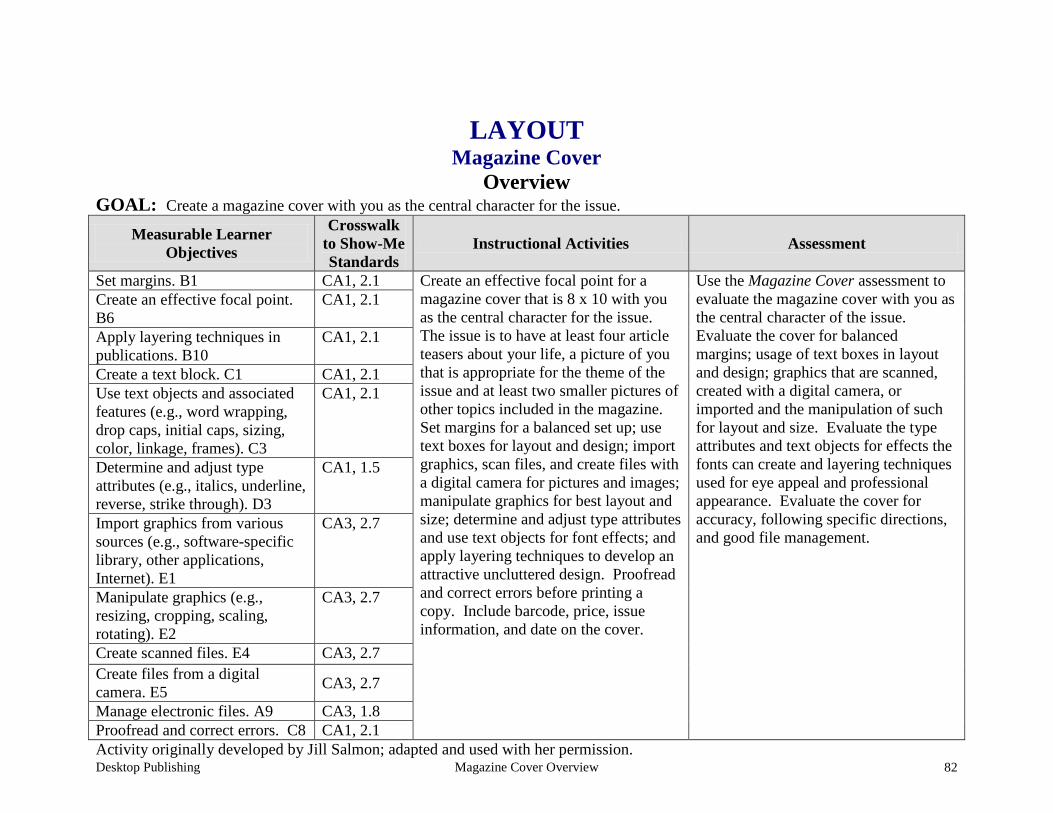
Desktop Publishing Magazine Cover Overview 82
LAYOUT Magazine Cover
Overview GOAL: Create a magazine cover with you as the central character for the issue.
Measurable Learner Objectives
Crosswalk to Show-Me Standards
Instructional Activities Assessment
Set margins. B1 CA1, 2.1 Create an effective focal point for a magazine cover that is 8 x 10 with you as the central character for the issue. The issue is to have at least four article teasers about your life, a picture of you that is appropriate for the theme of the issue and at least two smaller pictures of other topics included in the magazine. Set margins for a balanced set up; use text boxes for layout and design; import graphics, scan files, and create files with a digital camera for pictures and images; manipulate graphics for best layout and size; determine and adjust type attributes and use text objects for font effects; and apply layering techniques to develop an attractive uncluttered design. Proofread and correct errors before printing a copy. Include barcode, price, issue information, and date on the cover.
Use the Magazine Cover assessment to evaluate the magazine cover with you as the central character of the issue. Evaluate the cover for balanced margins; usage of text boxes in layout and design; graphics that are scanned, created with a digital camera, or imported and the manipulation of such for layout and size. Evaluate the type attributes and text objects for effects the fonts can create and layering techniques used for eye appeal and professional appearance. Evaluate the cover for accuracy, following specific directions, and good file management.
Create an effective focal point. B6
CA1, 2.1
Apply layering techniques in publications. B10
CA1, 2.1
Create a text block. C1 CA1, 2.1 Use text objects and associated features (e.g., word wrapping, drop caps, initial caps, sizing, color, linkage, frames). C3
CA1, 2.1
Determine and adjust type attributes (e.g., italics, underline, reverse, strike through). D3
CA1, 1.5
Import graphics from various sources (e.g., software-specific library, other applications, Internet). E1
CA3, 2.7
Manipulate graphics (e.g., resizing, cropping, scaling, rotating). E2
CA3, 2.7
Create scanned files. E4 CA3, 2.7 Create files from a digital camera. E5 CA3, 2.7
Manage electronic files. A9 CA3, 1.8 Proofread and correct errors. C8 CA1, 2.1 Activity originally developed by Jill Salmon; adapted and used with her permission.
Desktop Publishing Magazine Cover Teaching Points 83
LAYOUT Magazine Cover Teaching Points
Overview Magazine covers are created for eye appeal. Interesting topics on the cover capture persons’ attention so they will purchase the magazine. This assignment allows a student to create a magazine cover with the student as the central character. Content Review Review and/or demonstrate the following as needed: 1. Desktop publishing layout and design 2. Techniques in using text including reversals 3. Manipulation and sizing graphics 4. Text objects for effect and appeal 5. Techniques used in creating publications—layering and focal point Activity Preparation Brainstorm with students ideas for magazine covers with them as the central cover character. View previous students’ work and/or have students bring copies of magazines or covers for preview. Demonstrate desktop publishing concepts of focal point, inserting and manipulating graphics, setting margins, textboxes, text wrapping, layering, balancing white space, and others as appropriate for the assignment and the DTP software. Discuss and demonstrate use of the rulers and guides. Discuss resolution, color modes, and width and height of a page. Discuss and demonstrate font styles, font effects, and font measurements. Allow students to use scanners and digital cameras and to import graphics from various sources.
Desktop Publishing Magazine Cover Teaching Points 84
Resources Supplies needed for the activities: Computer Internet connection Paper Printer (preferably color) DTP software Scanner Digital camera Card stock paper Laminator and lamination sheets Websites (and/or key words to be used for search): http://desktoppub.about.com/library/weekly/bl11_publicationart.htm Good site overall on DTP http://www4.district125.k12.il.us/Faculty/mfinlay/DTP/Proj/magazinecover.html Steps involved in making a magazine cover http://www.desktoppublishing.com/open.html A site with lots of informative links for desktop publishing http://www.tiemdesign.com/HOWTO/2002/Feb/IllMCD/default.htm Illustrator 10 magazine cover steps Books, articles, and other resources: Botello, C. (2003). Adobe Illustrator 10 – Design professional. Boston, MA: Thomson
Course Technology. Braveheart, R. (2003). Adobe PageMaker 7.0 basics. Boston, MA: Thomson Course
Technology. Lee, L. (2002). Introducing Adobe Photoshop elements. Upper Saddle River, NJ:
Que/Sams (Prentice Hall). Proot, K. (2003). Adobe PageMaker 7.0 – Illustrated. Boston, MA: Thomson Course
Technology. Reding, E. (2004). QuarkXPress 5 – Design professional. Boston, MA: Course
Technology.
Desktop Publishing Magazine Cover Teaching Points 85
Solomon, A. W. (2004). Introduction to multimedia. Columbus, OH: Glencoe (McGraw-Hill).
Weinmann, E., & Lourekas, P. (2003). Illustrator 10 for Windows and Macintosh: Visual
quickstart guide, student edition. Berkeley, CA: Peachpit Press (Pearson Education).
Obtain books, videos, and other materials from Resources@MCCE http://www.resources.mcce.org. Design Principles for Desktop Publishers Lichty, Tom Book – [4675—BE 11.0101 P L618] CA, WADSWORTH, 1994. Desktop Publishing: Getting the Message Out Video – This program introduces the key components of a basic DTP system including: a fast microprocessor, large hard drive storage capacity, CD-ROM drive, large-screen monitor, b/w-color printer and flatbed scanner and more. Learn about software, page layout programs, drawing programs, editing, clip art and lots more! [10547 – BE VIDEO 40] MERIDIAN, 2000. How To Create High Impact Designs; Over 90 Examples Of What Works And What Doesn’t For Creating Brochures, Newsletters, Ads, Reports, etc. Cleland, Jane K. Book – Examples of designs for printed materials [4336—BE 50.0401 C589b] CO, CAREER TRACK, 1995.
Desktop Publishing Magazine Cover Assignment 86
LAYOUT Magazine Cover
Assignment Activity Preparation and Assignment As an advanced assignment in desktop publishing, you will create a magazine cover with you as the principal character. Create a magazine cover with the title of the publication containing words that are descriptive of you. Be creative and make the finished product look as professional as possible. Use the following requirements to complete your magazine cover:
1. Sketch your magazine cover and get a peer evaluation with at least two positive comments and at least two suggestions for improvement.
2. Submit the sketch with the peer evaluation for the instructor to show approval by initialing and dating.
3. Create a project folder entitled [insert your name] Magazine Cover to hold all files.
4. Create an effective focal point for the magazine cover with a layout that is 8 x 10 (width x length), 200 ppi resolution, RGB color mode, and transparent background.
5. Show rules and drag guides to 1/8 inch inside all borders. Use these guides as the edge of your image area. Use appropriate margins and balance white space.
6. Place the title in an attractive location. The title should be readable, as well as display character and pizzazz.
7. Use a picture of yourself that is appropriate for the theme in an appropriate size, neatly cropped, scaled, and rotated for best effect.
8. Use at least two small pictures of other topics to be included in the magazine on the cover. Pictures can be scanned, taken with a digital camera, or captured from the Internet. All images are to be appropriately sized, neatly cropped, scaled, and rotated for best effect.
9. Use at least four article teasers about your life.
10. Use text boxes, text objects, and associated features to create an effective layout. Use appropriate font and font measurements.
11. Apply appropriate layering techniques.
12. Include barcode, price, issue information, and date on the cover.
13. Proofread and correct all errors. Review the cover and evaluate its professional look and appeal.
14. Have a peer evaluate the copy using the evaluation form. Edit as needed considering the peer’s suggestions and comments.
Desktop Publishing Magazine Cover Assignment 87
15. Print a color copy of your finished magazine cover on card stock. Laminate the printed copy and trim as needed.
16. Submit the cover, sketch, peer evaluation with comments and suggestions, and instructor’s approval (initials and date).
17. Submit a print screen of folder in Details view with all files showing.
Resources Web sites (and/or key words to use for search): www.netmagazines.com www.discount-magazine-subscriptions-online.com Examples of magazine covers
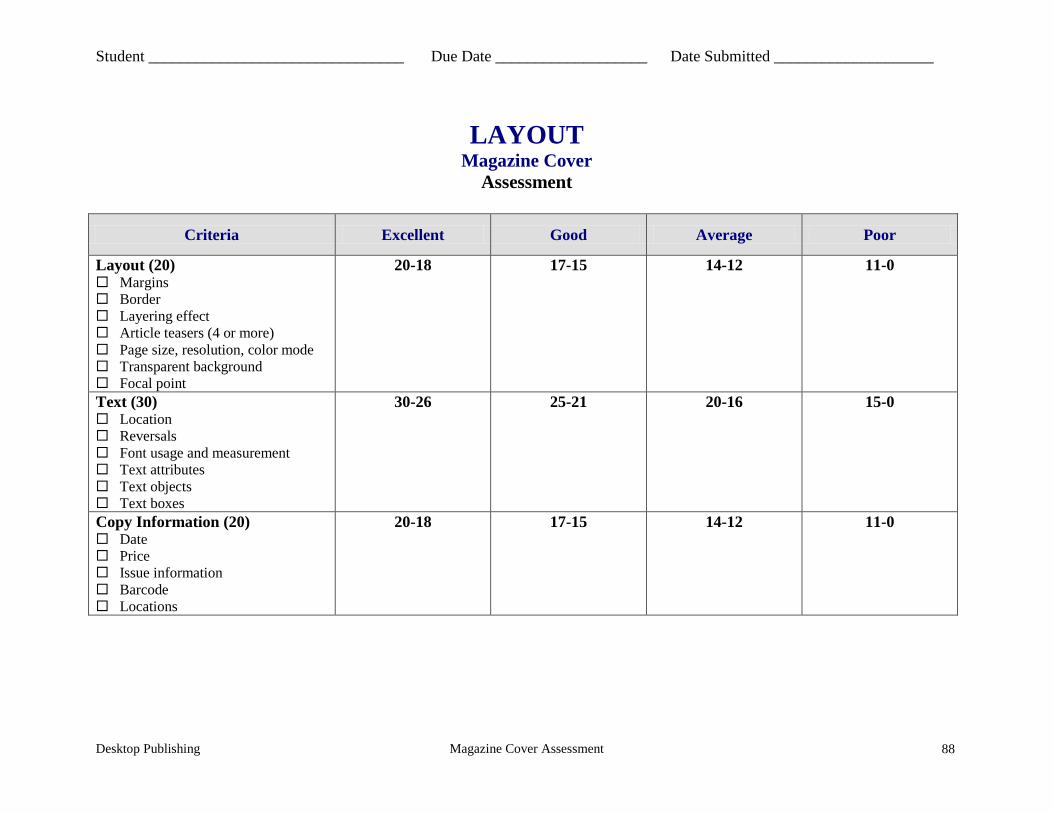
Student ________________________________ Due Date ___________________ Date Submitted ____________________
Desktop Publishing Magazine Cover Assessment 88
LAYOUT Magazine Cover
Assessment
Criteria Excellent Good Average Poor
Layout (20) Margins Border Layering effect Article teasers (4 or more) Page size, resolution, color mode Transparent background Focal point
20-18 17-15 14-12 11-0
Text (30) Location Reversals Font usage and measurement Text attributes Text objects Text boxes
30-26 25-21 20-16 15-0
Copy Information (20) Date Price Issue information Barcode Locations
20-18
17-15
14-12
11-0
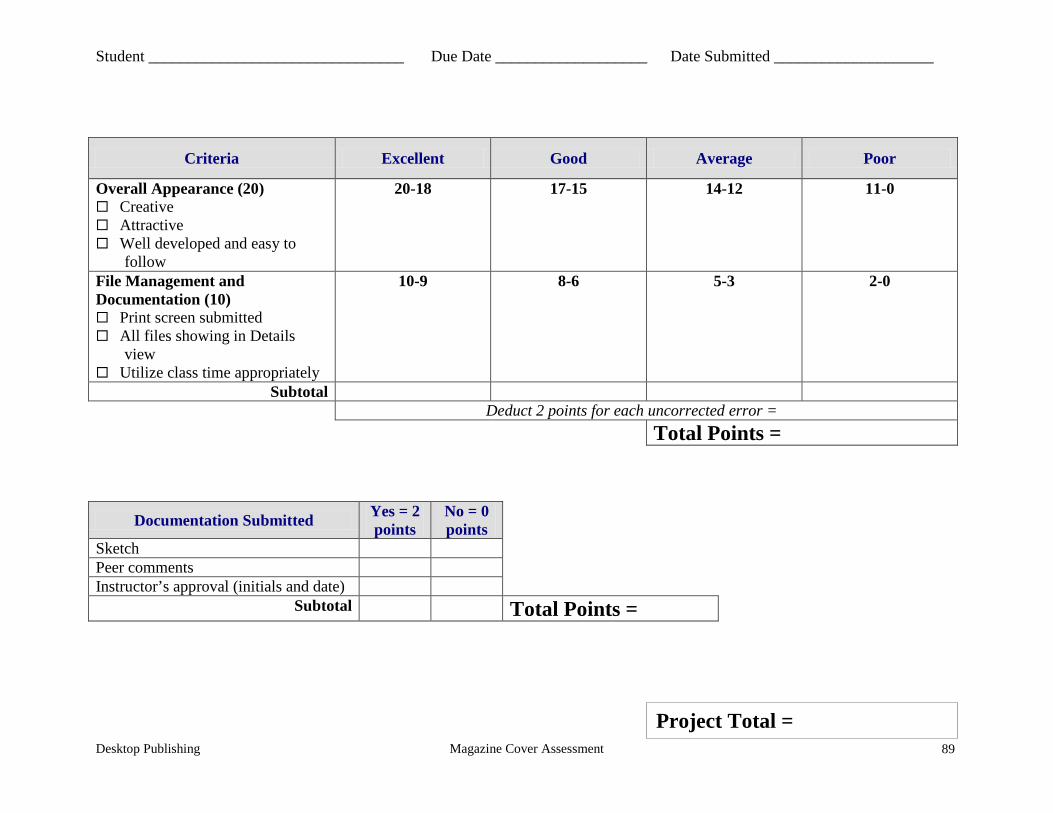
Student ________________________________ Due Date ___________________ Date Submitted ____________________
Desktop Publishing Magazine Cover Assessment 89
Criteria Excellent Good Average Poor
Overall Appearance (20) Creative Attractive Well developed and easy to
follow
20-18
17-15
14-12
11-0
File Management and Documentation (10) Print screen submitted All files showing in Details
view Utilize class time appropriately
10-9 8-6 5-3 2-0
Subtotal Deduct 2 points for each uncorrected error =
Total Points =
Documentation Submitted Yes = 2 points
No = 0 points
Sketch Peer comments Instructor’s approval (initials and date)
Subtotal Total Points =
Project Total =
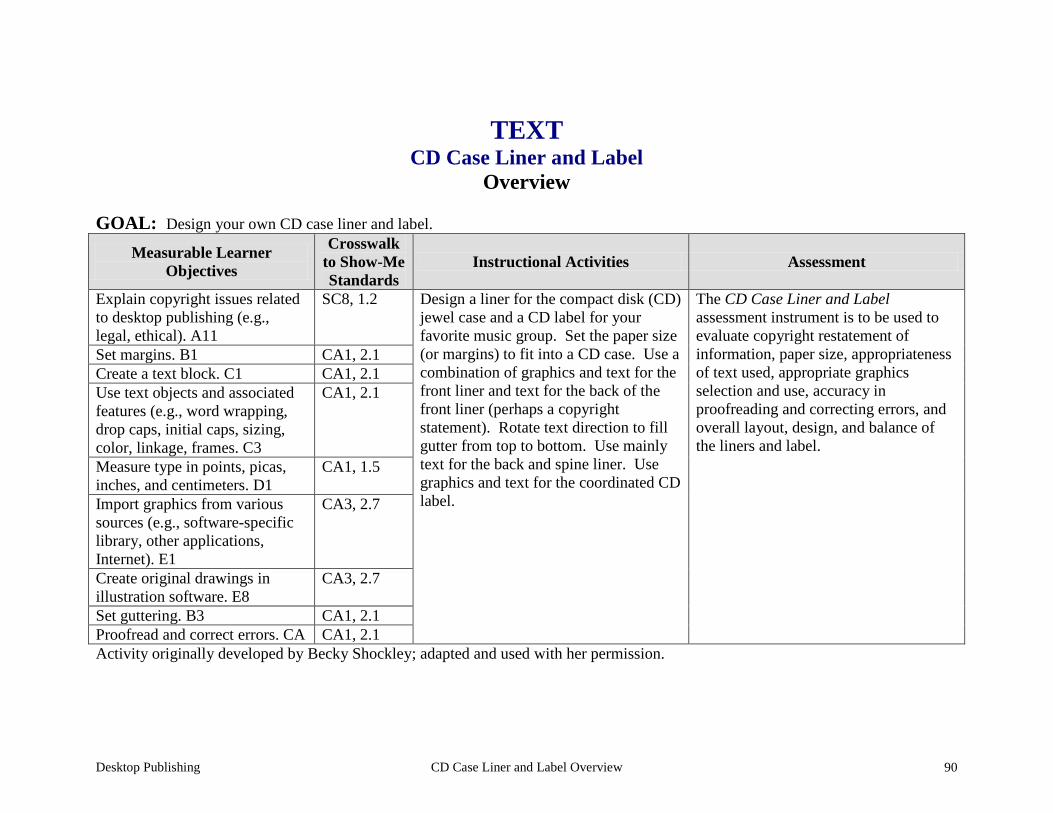
Desktop Publishing CD Case Liner and Label Overview 90
TEXT CD Case Liner and Label
Overview GOAL: Design your own CD case liner and label.
Measurable Learner Objectives
Crosswalk to Show-Me Standards
Instructional Activities Assessment
Explain copyright issues related to desktop publishing (e.g., legal, ethical). A11
SC8, 1.2 Design a liner for the compact disk (CD) jewel case and a CD label for your favorite music group. Set the paper size (or margins) to fit into a CD case. Use a combination of graphics and text for the front liner and text for the back of the front liner (perhaps a copyright statement). Rotate text direction to fill gutter from top to bottom. Use mainly text for the back and spine liner. Use graphics and text for the coordinated CD label.
The CD Case Liner and Label assessment instrument is to be used to evaluate copyright restatement of information, paper size, appropriateness of text used, appropriate graphics selection and use, accuracy in proofreading and correcting errors, and overall layout, design, and balance of the liners and label.
Set margins. B1 CA1, 2.1 Create a text block. C1 CA1, 2.1 Use text objects and associated features (e.g., word wrapping, drop caps, initial caps, sizing, color, linkage, frames. C3
CA1, 2.1
Measure type in points, picas, inches, and centimeters. D1
CA1, 1.5
Import graphics from various sources (e.g., software-specific library, other applications, Internet). E1
CA3, 2.7
Create original drawings in illustration software. E8
CA3, 2.7
Set guttering. B3 CA1, 2.1 Proofread and correct errors. CA CA1, 2.1 Activity originally developed by Becky Shockley; adapted and used with her permission.
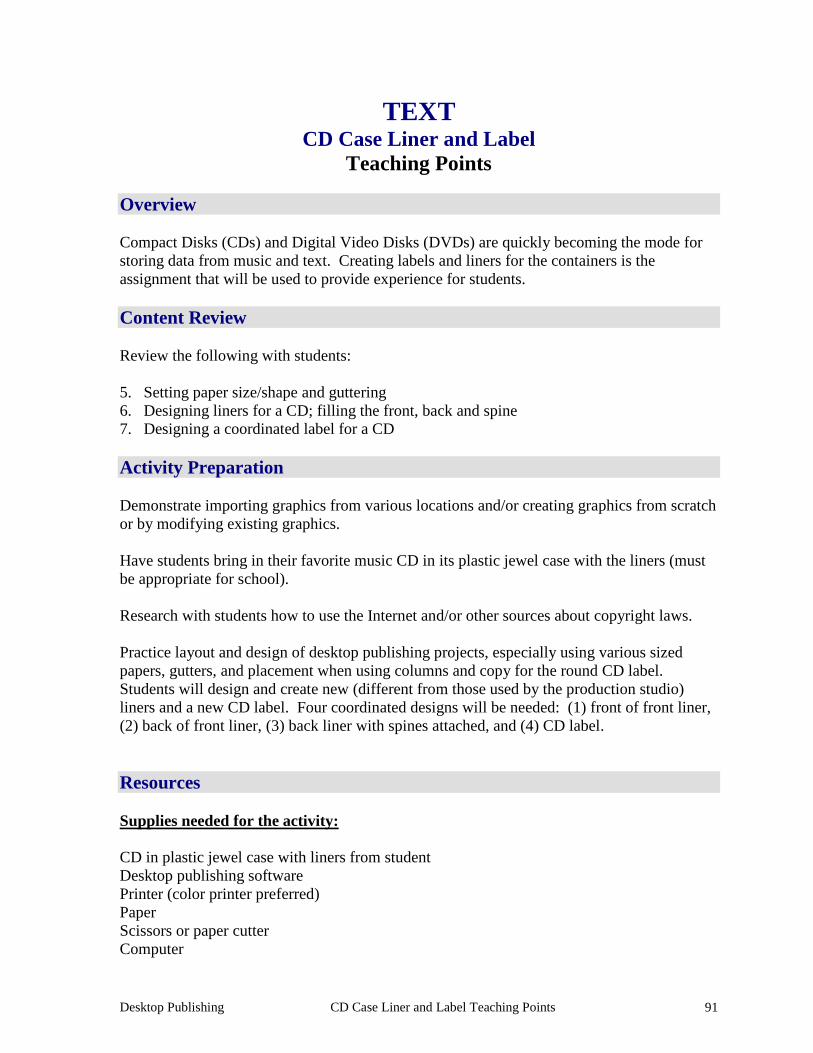
Desktop Publishing CD Case Liner and Label Teaching Points 91
TEXT CD Case Liner and Label
Teaching Points Overview Compact Disks (CDs) and Digital Video Disks (DVDs) are quickly becoming the mode for storing data from music and text. Creating labels and liners for the containers is the assignment that will be used to provide experience for students. Content Review Review the following with students: 5. Setting paper size/shape and guttering 6. Designing liners for a CD; filling the front, back and spine 7. Designing a coordinated label for a CD Activity Preparation Demonstrate importing graphics from various locations and/or creating graphics from scratch or by modifying existing graphics. Have students bring in their favorite music CD in its plastic jewel case with the liners (must be appropriate for school). Research with students how to use the Internet and/or other sources about copyright laws. Practice layout and design of desktop publishing projects, especially using various sized papers, gutters, and placement when using columns and copy for the round CD label. Students will design and create new (different from those used by the production studio) liners and a new CD label. Four coordinated designs will be needed: (1) front of front liner, (2) back of front liner, (3) back liner with spines attached, and (4) CD label. Resources Supplies needed for the activity: CD in plastic jewel case with liners from student Desktop publishing software Printer (color printer preferred) Paper Scissors or paper cutter Computer

Desktop Publishing CD Case Liner and Label Teaching Points 92
Web sites (and/or key words to use for search): Some CD design and packaging web sites: http://desktoppub.about.com/cs/cddesign/ Ideas on CD packaging http://www.musicbizacademy.com/directory/cdgraphicdesign.htm Ideas on designs http://www.artlex.com/graphic.design/assignments/cds&cdpackaging.html CD packaging and design Some copyright Web sites: http://www.utsystem.edu/ogc/intellectualproperty/copypol2.htm#test Fair use of copyrighted materials http://www.mediafestival.org/downloads.html Hall Davidson also has several copyright quizzes http://www.benedict.com/ Copyright Web site on court cases http://www.cyberbee.com/cb_copyright.htm Copyright with Cyberbee—an interactive quiz site with answers Key words: CD labels, CD liners, preparing CD graphics, CD packaging Books, articles, and other resources: Botello, C. (2003). Adobe Illustrator 10—Design professional. Boston, MA: Thomson
Course Technology. Braveheart, R. (2003). Adobe PageMaker 7.0 basics. Boston, MA: Thomson Course
Technology. Lee, L. (2002). Introducing Adobe Photoshop elements. Upper Saddle River, NJ:
Que/Sams (Prentice Hall). Proot, K. (2003). Adobe PageMaker 7.0 – Illustrated. Boston, MA: Thomson Course
Technology. Reding, E. (2004). QuarkXPress 5 – Design professional. Boston, MA: Thomson Course
Technology. Obtain the following books, videos, and other materials from Resources@MCCE http://www.resources.mcce.org.
Desktop Publishing CD Case Liner and Label Teaching Points 93
Design Principles for Desktop Publishers Lichty, Tom Book – [4675 — BE 11.0101 P L618] CA, WADSWORTH, 1994. Desktop Publishing: Getting the Message Out Video – This program introduces the key components of a basic DTP system including: a fast microprocessor, large hard drive storage capacity, CD-ROM drive, large-screen monitor, b/w-color printer and flatbed scanner and more. Learn about software, page layout programs, drawing programs, editing, clip art and lots more! [10547— BE VIDEO 49] MERIDIAN, 2000.
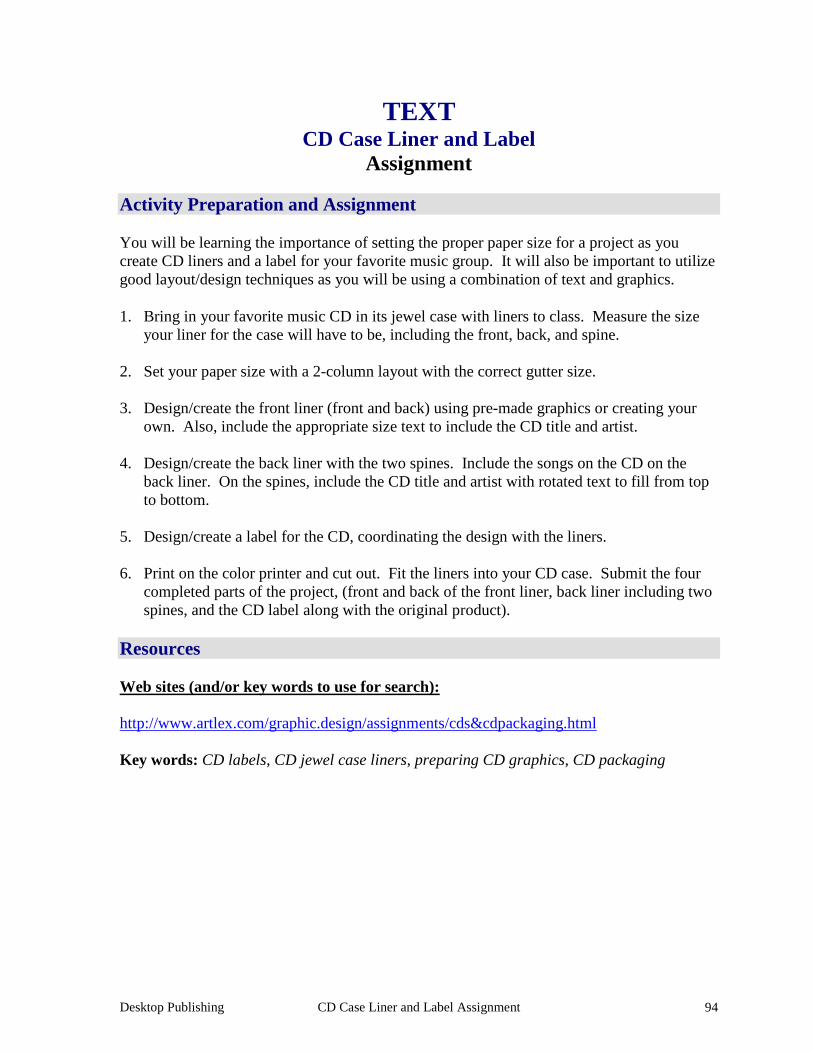
Desktop Publishing CD Case Liner and Label Assignment 94
TEXT CD Case Liner and Label
Assignment Activity Preparation and Assignment
You will be learning the importance of setting the proper paper size for a project as you create CD liners and a label for your favorite music group. It will also be important to utilize good layout/design techniques as you will be using a combination of text and graphics.
1. Bring in your favorite music CD in its jewel case with liners to class. Measure the size your liner for the case will have to be, including the front, back, and spine.
2. Set your paper size with a 2-column layout with the correct gutter size. 3. Design/create the front liner (front and back) using pre-made graphics or creating your
own. Also, include the appropriate size text to include the CD title and artist. 4. Design/create the back liner with the two spines. Include the songs on the CD on the
back liner. On the spines, include the CD title and artist with rotated text to fill from top to bottom.
5. Design/create a label for the CD, coordinating the design with the liners. 6. Print on the color printer and cut out. Fit the liners into your CD case. Submit the four
completed parts of the project, (front and back of the front liner, back liner including two spines, and the CD label along with the original product).
Resources Web sites (and/or key words to use for search): http://www.artlex.com/graphic.design/assignments/cds&cdpackaging.html Key words: CD labels, CD jewel case liners, preparing CD graphics, CD packaging
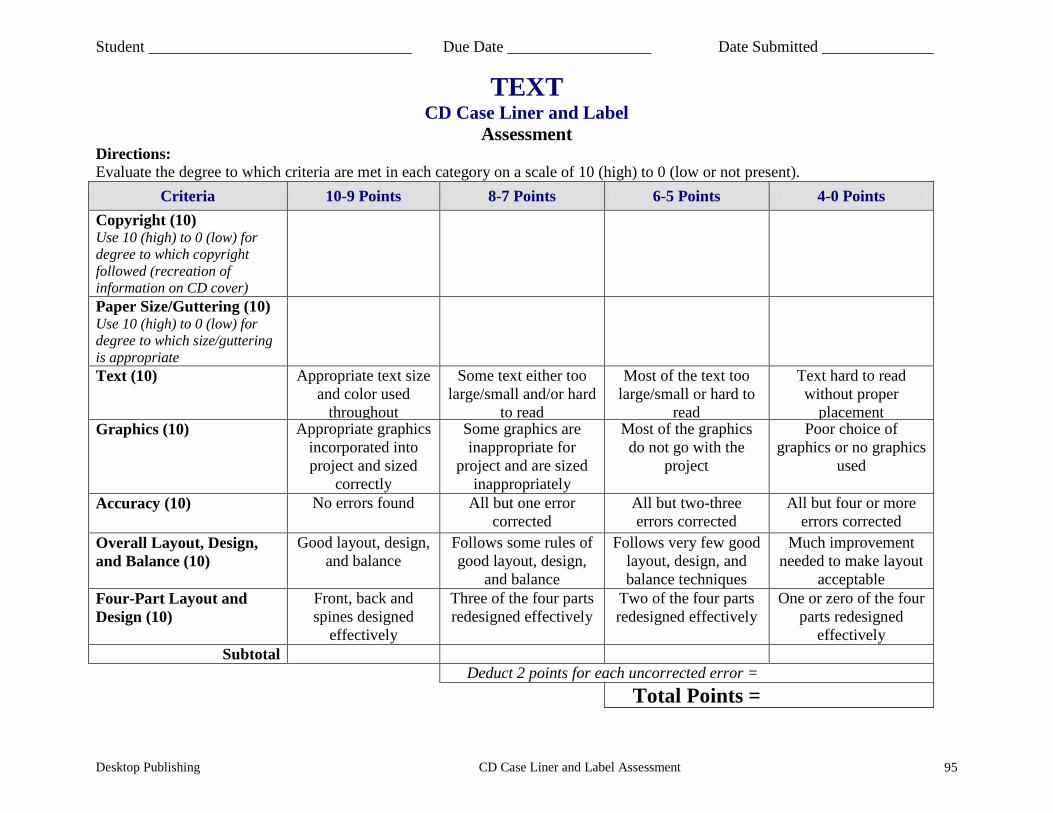
Student _________________________________ Due Date __________________ Date Submitted ______________
Desktop Publishing CD Case Liner and Label Assessment 95
TEXT CD Case Liner and Label
Assessment Directions: Evaluate the degree to which criteria are met in each category on a scale of 10 (high) to 0 (low or not present).
Criteria 10-9 Points 8-7 Points 6-5 Points 4-0 Points Copyright (10) Use 10 (high) to 0 (low) for degree to which copyright followed (recreation of information on CD cover)
Paper Size/Guttering (10) Use 10 (high) to 0 (low) for degree to which size/guttering is appropriate
Text (10) Appropriate text size and color used
throughout
Some text either too large/small and/or hard
to read
Most of the text too large/small or hard to
read
Text hard to read without proper
placement Graphics (10) Appropriate graphics
incorporated into project and sized
correctly
Some graphics are inappropriate for
project and are sized inappropriately
Most of the graphics do not go with the
project
Poor choice of graphics or no graphics
used
Accuracy (10) No errors found All but one error corrected
All but two-three errors corrected
All but four or more errors corrected
Overall Layout, Design, and Balance (10)
Good layout, design, and balance
Follows some rules of good layout, design,
and balance
Follows very few good layout, design, and balance techniques
Much improvement needed to make layout
acceptable Four-Part Layout and Design (10)
Front, back and spines designed
effectively
Three of the four parts redesigned effectively
Two of the four parts redesigned effectively
One or zero of the four parts redesigned
effectively Subtotal
Deduct 2 points for each uncorrected error = Total Points =
Student _________________________________ Due Date __________________ Date Submitted ______________
Desktop Publishing Newsletter Overview 96
TEXT Newsletter Overview
GOAL: Create a newsletter about software and equipment needed for desktop publishing.
Measurable Learner Objectives
Crosswalk to Show-Me Standards
Instructional Activities Assessment
Create multipage, multicolumn documents (e.g., newsletters, magazines). G7
CA4, 2.1 Create a 4-page newsletter discussing and comparing desktop publishing software and equipment. Apply appropriate margins, gutters, columns, character and word spacing, and tabs and indents in text blocks in the newsletter layout and design. Use appropriate graphics, text, headlines and captions in the newsletter. Manipulate graphics, apply type attributes for emphasis, and compose attention-getting headlines and captions. Use 1/3 of a page for mailing information. Provide reference(s) for information and graphics used in the newsletter. Proofread and correct all errors. Practice good file management. Print the four pages of the newsletter on 8 ½ x 11 paper.
Use the Newsletter assessment to evaluate information presented on desktop publishing software and equipment. Evaluate the layout and design of the newsletter on margins, gutters, columns, tabs and indents in text blocks, graphics, type attributes, character and word spacing, and headlines and captions; the content and referencing according to copyright guidelines; the printing of the newsletter for correct page layout and order. Also, evaluate the newsletter for accuracy, proofreading, and for meeting the requirements of the project for file management.
Describe the functions of hardware components required for desktop publishing. A2
CA1, 1.2
Compare functions and features of software used for desktop publishing. A3
CA1, 1.2
Import text files and word processing documents into publication. C2
CA1, 2.1
Use text objects and associated features (e.g., word wrapping, drop caps, initial cap, sizing, color, linkage, frames). C3
CA1, 2.1
Compose headlines and captions. C7
CA1, 2.1
Import graphics from various sources (e.g., software-specific library, other applications, Internet). E1
CA3, 2.7
Student _________________________________ Due Date __________________ Date Submitted ______________
Desktop Publishing Newsletter Overview 97
Measurable Learner Objectives
Crosswalk to Show-Me Standards
Instructional Activities Assessment
Manipulate graphics (e.g., resizing, cropping, scaling, rotating). E2
CA3, 2.7
Adjust or change color in a layout. B11
CA1, 2.1
Create mailing pieces (e.g., product labels, business reply cards). G8
CA4, 2.1
*Explain copyright issues related to desktop publishing (e.g., legal, ethical). A11
SC8, 1.2
Manage electronic files. A9 CA3, 1.8 Proofread and correct errors. C8 CA1, 2.1 Activity originally developed by Lynn Coffey; adapted and used with permission. *Students are to apply copyright guidelines.
Desktop Publishing Newsletter Teaching Points 98
TEXT Newsletter
Teaching Points Overview Newsletter development is a common use of desktop publishing and word processing equipment. While word processing software can be used to create newsletters, the greatest efficiency and effectiveness can be achieved with desktop publishing software. Knowing what software is available and the equipment needed for optimal operation of the software is very important. This project will allow students to create a newsletter to discuss software and equipment possibilities for desktop publishing. Content Review Review the following with students: 1. Internet research of software and equipment for desktop publishing 2. Layout and design for a 4-page newsletter Discuss concepts for layout and design for newsletters: setting tabs and indents in text blocks, determining gutters, setting margins, creating columns, importing text files, using text objects and associated features, adjusting paragraphs attributes, composing attention-getting headlines and captions, importing graphics from various sources, manipulating graphics, adjusting and balancing color throughout the layout, determining and adjusting type attributes for effect, determining and applying character and word spacing, and creating a mailing section on the layout. Activity Preparation Brainstorm layout and design for a 4-page newsletter with a mailing section. Provide examples of newsletter and newspapers for review of the layout and design. Review and discuss the video from Resources@MCCE. A good idea is to review the film and write questions to use for the discussion. Discuss and provide examples of handling and documenting copyrighted materials. Demonstrate methods of proofreading. Discuss and demonstrate printer use for a multiple-page newsletter. Determine and discuss specific requirements for the newsletter, i.e., index, sidebar, types of columns, masthead design, etc.
Desktop Publishing Newsletter Teaching Points 99
Resources Supplies needed for the activity: Computer Internet access Desktop publishing software Printer, preferably color Web sites (and/or key words to use for search: http://desktoppub.about.com/cs/supplies/ Article on hardware and software requirements for DTP http://www.tpub.com/content/photography/14130/css/14130_119.htm DTP software http://www.microsoftfrontpage.com/usingfp/newsletters/#Make%20a%20Sketch%20and%20Write%20the%20Copy Newsletters, some basic information Key words: desktop publishing, software, ergonomic(s), newsletter(s), newsletter design, and any piece of equipment you are researching e.g., scanner, computer, digital camera, printer, etc. Books, articles, and other resources: Braveheart, R. (2003). Adobe PageMaker 7.0 basics. Boston, MA: Thomson Course
Technology. Lee, L. (2002). Introducing Adobe Photoshop elements. Upper Saddle River, NJ:
Que/Sams (Prentice Hall). Proot, K. (2003). Adobe PageMaker 7.0 – Illustrated. Boston, MA: Thomson Course
Technology. Reding, E. (2004). QuarkXPress 5 – Design professional. Boston, MA: Course
Technology. Obtain books, videos, and other materials from Resources@MCCE http://www.resources.mcce.org.

Desktop Publishing Newsletter Teaching Points 100
Desktop Publishing: Getting the Message Out Video — This program introduces the key components of a basic DTP system including: a fast microprocessor, large hard drive storage capacity, CD-ROM drive, large-screen monitor, b/w-color printer and flatbed scanner and more. Learn about software, page layout programs, drawing programs, editing, clip art and lots more! [10547 — BE VIDEO 49] MERIDIAN, 2000. Design Principles for Desktop Publishers Lichty, Tom Book – [4675—BE 11.0101 P L618] CA, WADSWORTH, 1994. How To Create High Impact Designs; Over 90 Examples Of What Works And What Doesn’t For Creating Brochures, Newsletters, Ads, Reports, etc. Cleland, Jane K. Book – Examples of designs for printed materials [4336—BE 50.0401 C589b] CO, CAREER TRACK, 1995.
Desktop Publishing Newsletter Assignment 101
TEXT Newsletter Assignment
Activity Preparation and Assignment You will create a newsletter about desktop publishing software and equipment. Use the Internet to research information for the newsletter. The following are the requirements for your newsletter: 1. Create a folder entitled [insert your name] Newsletter to hold the materials for the project.
2. Research a. Software used for desktop publishing, b. Equipment needs for desktop publishing, and c. Layout and design for newsletters.
3. Highlight all information from the research that will be used in the newsletter (or draw a highlighted border around it).
4. Sketch or plan the layout for your newsletter.
5. Apply desktop publishing concepts throughout the 4-page newsletter (see the Newsletter Overview and/or Newsletter Assessment criteria).
6. Use a banner or heading for the newsletter (2 inches in depth), avoid using single column information in the layout, use a directory to indicate the location of information, apply good design and layout concepts throughout the newsletter, and indicate a page- numbering sequence.
7. Use appropriate date, issue, and other pertinent information in applicable positions throughout the newsletter.
8. Determine the graphics that will be used in the newsletter. Select and use appropriate graphics and manipulate graphics for best effect.
9. Use one-third of a page for mailing information. Create and place the return information in its correct position for mailing. Use blank text boxes to approximate the sizes and positions for the mailing label and area for stamp or indicia (postal markings).
10. Proofread and correct all errors. Submit a copy of your printed newsletter.
11. Submit a copy of your directory in Details view.
12. Submit in a 2-pocket folder the highlighted, bordered information used to create the newsletter.
Desktop Publishing Newsletter Assignment 102
Resources Web sites (and/or key words to use for search): http://desktoppub.about.com/cs/supplies/ Article on hardware and software requirements for DTP http://www.tpub.com/content/photography/14130/css/14130_119.htm DTP software http://www.microsoftfrontpage.com/usingfp/newsletters/#Make%20a%20Sketch%20and%20Write%20the%20Copy Newsletters, some basic information Key words: desktop publishing software, newsletter(s), newsletter design, and any piece of equipment you are researching e.g., scanner, computer, digital camera, printer, etc.
Student _________________________________ Due Date _______________ Date Submitted ______________
Desktop Publishing Newsletter Assessment 103
TEXT Newsletter Assessment
Directions: Evaluate the degree to which criteria are met in each category on a scale of 10 (high) to 0 (low or not present).
Criteria 10-9 Points 8-7 Points 6-5 Points 4-0 Points
Layout and Design (10) Category 1 Banner/heading = depth 2” Date information Issue information Directory Pagination throughout Headlines and captions
Layout and Design (10) Category 2 Guttering Tabs and indents Margins Columns Paragraph attributes Font style, size, attributes,
consistency
Content Information (10) Equipment Software Quality of information Quantity of information Referencing Accurate and complete
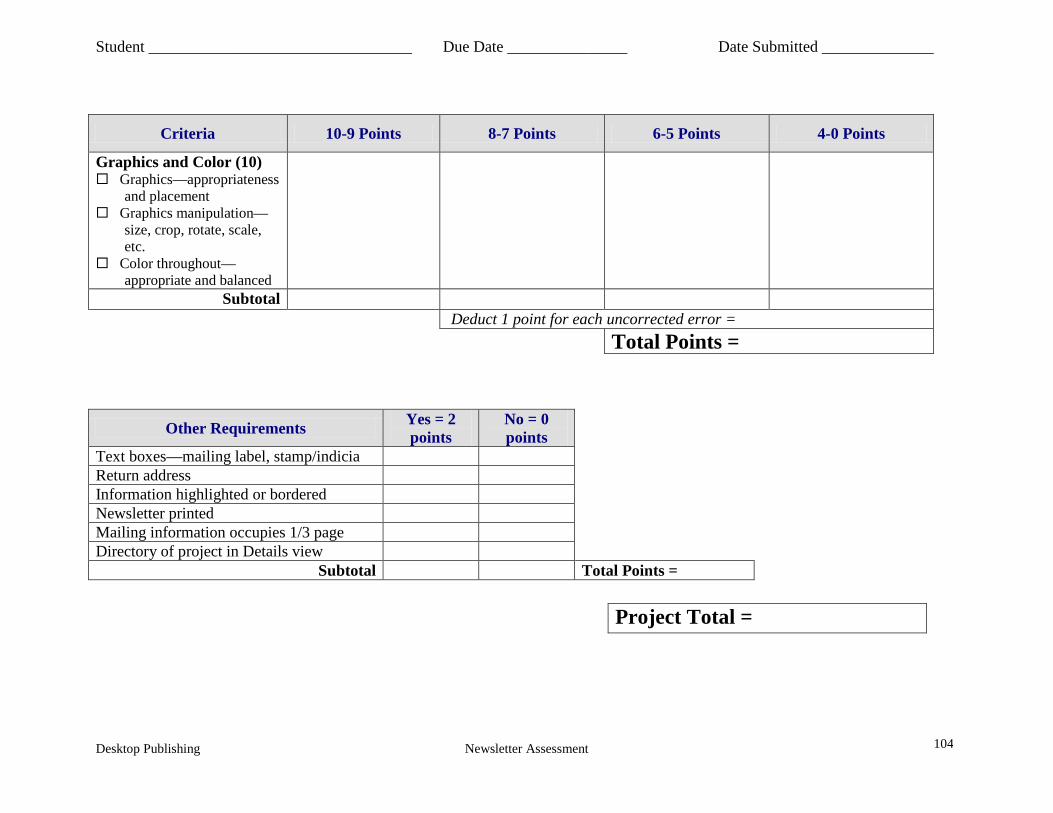
Student _________________________________ Due Date _______________ Date Submitted ______________
Desktop Publishing Newsletter Assessment 104
Criteria 10-9 Points 8-7 Points 6-5 Points 4-0 Points
Graphics and Color (10) Graphics—appropriateness
and placement Graphics manipulation—
size, crop, rotate, scale, etc.
Color throughout—appropriate and balanced
Subtotal Deduct 1 point for each uncorrected error = Total Points =
Other Requirements Yes = 2 points
No = 0 points
Text boxes—mailing label, stamp/indicia Return address Information highlighted or bordered Newsletter printed Mailing information occupies 1/3 page Directory of project in Details view
Subtotal Total Points =
Project Total =
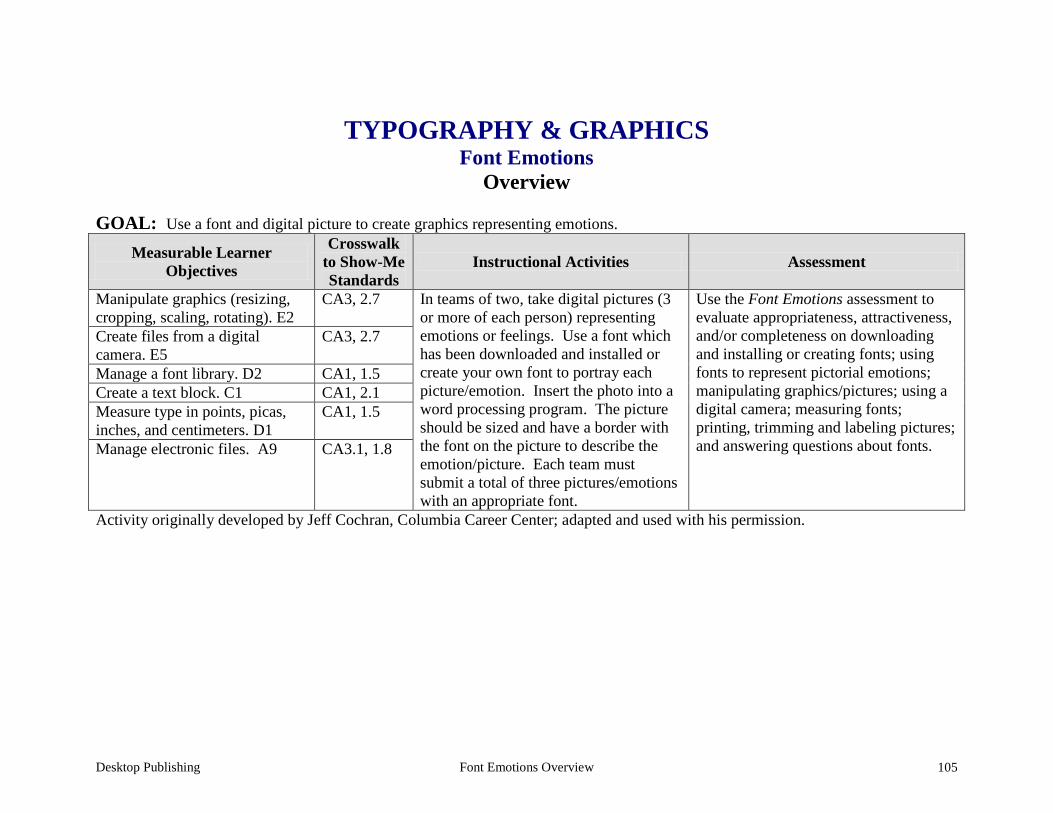
Desktop Publishing Font Emotions Overview 105
TYPOGRAPHY & GRAPHICS Font Emotions
Overview GOAL: Use a font and digital picture to create graphics representing emotions.
Measurable Learner Objectives
Crosswalk to Show-Me Standards
Instructional Activities Assessment
Manipulate graphics (resizing, cropping, scaling, rotating). E2
CA3, 2.7 In teams of two, take digital pictures (3 or more of each person) representing emotions or feelings. Use a font which has been downloaded and installed or create your own font to portray each picture/emotion. Insert the photo into a word processing program. The picture should be sized and have a border with the font on the picture to describe the emotion/picture. Each team must submit a total of three pictures/emotions with an appropriate font.
Use the Font Emotions assessment to evaluate appropriateness, attractiveness, and/or completeness on downloading and installing or creating fonts; using fonts to represent pictorial emotions; manipulating graphics/pictures; using a digital camera; measuring fonts; printing, trimming and labeling pictures; and answering questions about fonts.
Create files from a digital camera. E5
CA3, 2.7
Manage a font library. D2 CA1, 1.5 Create a text block. C1 CA1, 2.1 Measure type in points, picas, inches, and centimeters. D1
CA1, 1.5
Manage electronic files. A9 CA3.1, 1.8
Activity originally developed by Jeff Cochran, Columbia Career Center; adapted and used with his permission.
Desktop Publishing Font Emotions Teaching Points 106
TYPOGRAPHY & GRAPHICS Font Emotions
Teaching Points Overview
Fonts convey meaning in the business world; and they have personalities by the size, face, and style that may be used. They are often used by designers to communicate feelings, ideas, and concepts. This assignment is to combine the use of digital photography and an appropriate font to display emotions or feelings.
Content Review Review and/or demonstrate the following as needed: 1. Representing emotions with font styles, faces, sizes, etc. 2. Measuring fonts (e.g., 72 points = 1”, 36 points = ½ “, 18 points = ¼”, etc.) 3. Using the digital camera and using pictures 4. Inserting and using graphics in a word processing document 5. Maneuvering text
Activity Preparation Brainstorm various emotions that persons show on their faces. Discuss fonts and how they make persons feel and/or think and how fonts show emotions. Match fonts to expressions and/or emotions. Demonstrate how fonts can be created and downloaded. Discuss copyright issues and uses of fonts that are free versus those that have a fee. Discuss and/or demonstrate the measurement of fonts and related terminology e.g., points, serif, sans serif, x-height, etc. Demonstrate the manipulation of graphics in a word processing document: sizing, alignment, cropping, etc. Practice the use of digital cameras and photo manipulation. Resources Supplies needed for the activity: Digital camera Internet access
Desktop Publishing Font Emotions Teaching Points 107
Word processing software Paper Computer Printer Web sites (and/or key words to use for search): Font sites: http://www.fontsnthings.com http://www.acidfonts.com http://www.fontfreak.com http://www.fonts.com http://www.fonts.ontheweb.com Key words: free fonts, emotions, font Books, articles, and other resources: Botello, C. (2004). Adobe Premiere 6.5 – Design professional. Boston, MA: Thomson
Course Technology. Botello, C. (2004). Adobe InDesign 2. Boston, MA: Thomson Course Technology. Botello, C. (2003). Adobe Illustrator 10 – Design professional. Boston, MA: Thomson
Course Technology. Proot, K. (2003). Adobe PageMaker 7.0 – Illustrated. Boston, MA: Thomson Course
Technology. Solomon, A. W. (2004). Introduction to multimedia. Columbus, OH: Glencoe (McGraw-
Hill). Weinmann, E., & Lourekas, P. (2003). Illustrator 10 for Windows and Macintosh: Visual
quickstart guide, student edition. Berkeley, CA: Peachpit Press (Pearson Education). Weixel, S., Weixel, F., Morse, C., & Morse, B. (2004). Graphics and animation basics.
Boston, MA: Thomson Course Technology.
Student ______________________________ Date Due ___________ Date Submitted ___________
Desktop Publishing Font Emotions Questions 108
TYPOGRAPHY & GRAPHICS Font Emotions
Questions
Answer the following questions about fonts from http://www.fontsnthings.com/faq.html.
1. Does http://www.fontsnthings.com have a single downloadable file containing every font on the site?
2. What is wrong when you install the font? When you type, do you see “boxes” or nothing?
3. How can you make your own fonts?
Student ______________________________ Date Due ___________ Date Submitted ___________
Desktop Publishing Font Emotions Assignment 109
TYPOGRAPHY & GRAPHICS Font Emotions
Assignment
Activity Preparation and Assignment
Use a digital camera and take three or more pictures of each person in the team of various emotions. Select or create fonts that represent each emotional expression. Create a folder named Type and Camera for all your files.
1. In teams of two, use a digital camera to take at least three pictures of each team member demonstrating different emotions/feelings.
2. Download and install or create fonts to be used to name each of the photos or each
emotion being portrayed. 3. Insert the photos into a word processing program and manipulate each picture using the
following directions: a. Proportionately size each photo to approximately 3 x 3 inches. b. Put a 6 point border around each picture. c. Use a text box with no fill and no border. d. The font size should be about ¾ inch, which should be placed attractively on the
corresponding emotional photo. e. Adjust the top and bottom margins so that all photos fit and are balanced on one
page. 4. Submit a total of three photos/emotions. Each person on the team must be in at least one
photo. Print to black-and-white printer and trim photos. 5. On the back of each photo, write the names of the team members and the name of the
font used. 6. Submit a print screen of the folder Type and Camera showing all files. 7. Key your answers to the three questions and submit them to your teacher. Resources Web sites (and/or key words to use for search): http://www.fontsnthings.com http://www.acidfonts.com http://www.fonts.ontheweb.com http://www.fontfreak.com Key words: font, emotions, free fonts
Student _________________________________ Due Date _______________ Date Submitted ______________
Desktop Publishing Font Emotions Assessment 110
TYPOGRAPHY & GRAPHICS Font Emotions
Assessment Directions: Evaluate each on a scale of 4 (high) to 0 (low or not completed) on how successful, attractive, and/or appropriate each was completed.
Criteria 4 3 2 1 0
Downloading/Installing or Creating Fonts (4)
Font (4) Resized to ¾ inch
Pictures (4) Inserted into word processor
Pictures (4) Resized 3 x 3
Borders (4) Changed on pictures
Textbox (4) Used, no fill or line
Font (4) Used to portray emotion
Digital Camera (4) Used properly
Printed, Trimmed, and Labeled (4)
Documents (4) Submitted print screen and other documents
Question Responses (4 points each) 1 2 3
Subtotal Total Points =